AHOKU ELECTRONIC OCAMM1 WiFi Video Camera User Manual
AHOKU ELECTRONIC COMPANY WiFi Video Camera Users Manual
Contents
- 1. Users Manual
- 2. User Manual
Users Manual

OCam-M1
WiFi Video Camera
1
User's
manual
2
Directory
DirectoryDirectory
Directory
1. Download APP “Yes iCam…… …….3
2. Power-on …………..…………….…….3
3. First WIFI setup………….…………....4
4. View real time video…………….……..6
5. Restore camera factory setting ……..10
6. Living view instruction……………..…11
7. Camera setting…………………..……12
8. FAQ……………………………………...19
9. Care and maintenance………………..19
3
Before use, please prepare:
Smart phone / Tablet
Smart phone / Tablet Smart phone / Tablet
Smart phone / Tablet Camera
CameraCamera
Camera R
RR
Router
outerouter
outer
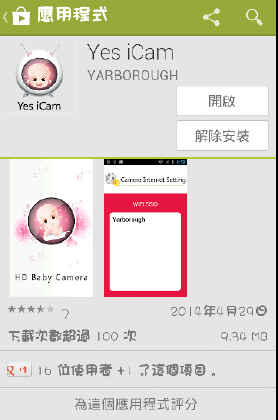
1. Download APP “Yes iCam”:
Download "Yes iCAM" Application software from “Google Play” / ”
Apple Store”. Search keywords “Yes iCam”, download and install it
on your Smartphone/Pad.
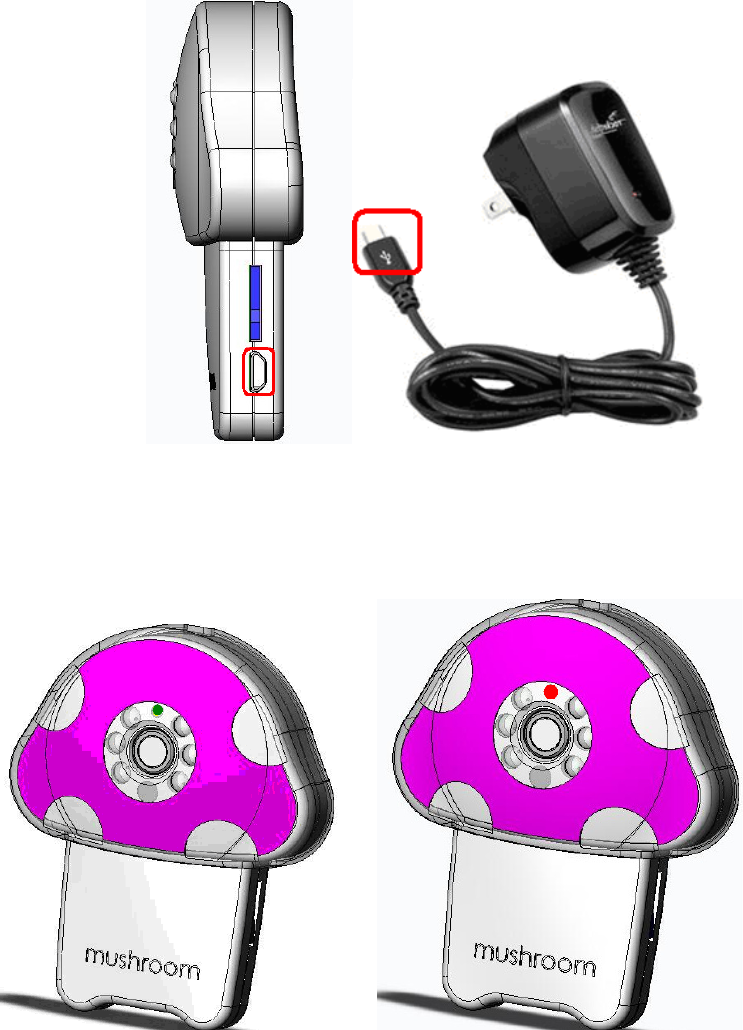
2. Power on
1. The power supply is connected to the power outlet (1) and power
supply DC-side connected to camera power connector. Then Led
on camera will be red color.
4
3. First Wi
First WiFirst Wi
First Wi-
--
-Fi Setup
Fi SetupFi Setup
Fi Setup
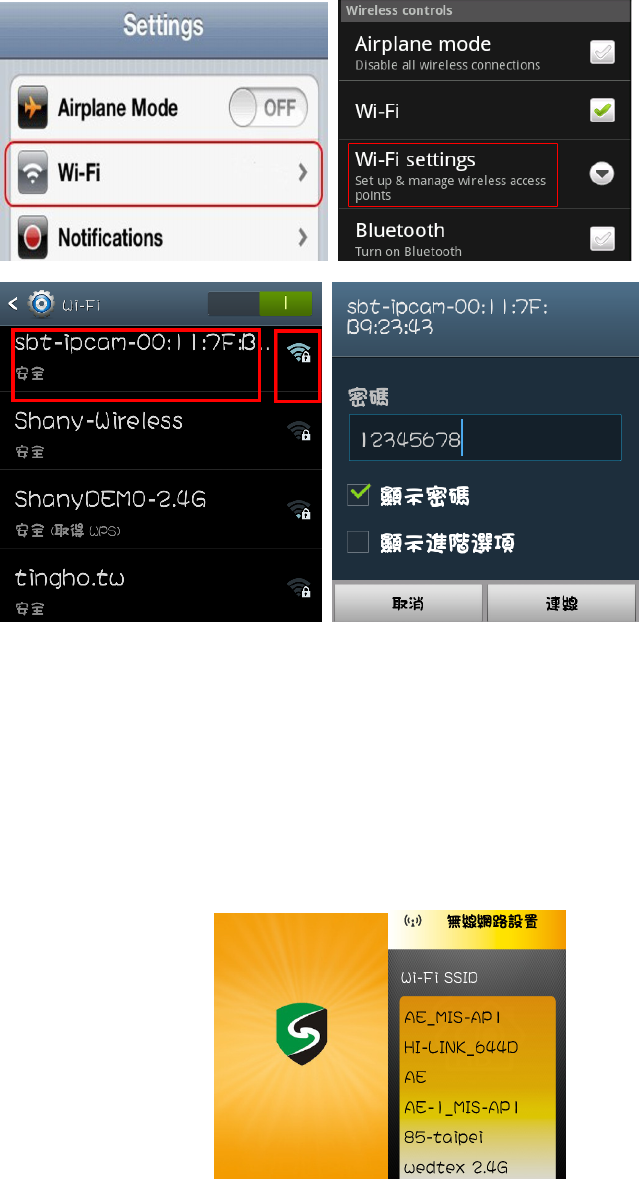
1. The led flashes between red and green color.
2. Open Mobile phone / Tablet setting in the WiFi option to find and
even "sbt-ipcam-XX:XX:XX:XX:XX:XX" , default factory password "
12345678".
5
3. Run APP "Yes iCam" . APP will go into "Wireless Configuration",
Choice the WiFi APP name to connect to router, and enter the
router's password, and complete the connection.
Welcome surface choose WiFi SSID
Notice:
6
1: WiFi SSID is the wireless network AP name.
2: If you can't find what you want to connect your camcorder WiFi
Network , Make sure that the camera WiFi within the range of the
router.
3: If you enter the wrong SSID Password according to camera
“Beep beep " Rang three times. Please close the application
software and reconnect again.
4: Make sure your Smartphone or Tablet PC with camera is
connected to the same WiFi Router.
Connected
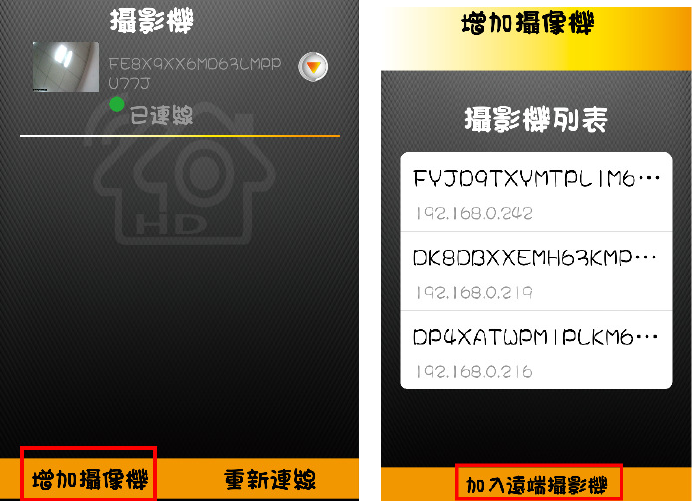
4. View real time video
1. In Camera list, please click on the camera icon to view a live
video camera.
7
2. Add a camera in the sa
Add a camera in the saAdd a camera in the sa
Add a camera in the same WiFi Router.
me WiFi Router.me WiFi Router.
me WiFi Router.
Run “Yes iCam” APP. Please choice “Add New Camera” under
Camera List page. Then APP will scan the nework to find the
available camera and display all APP could find
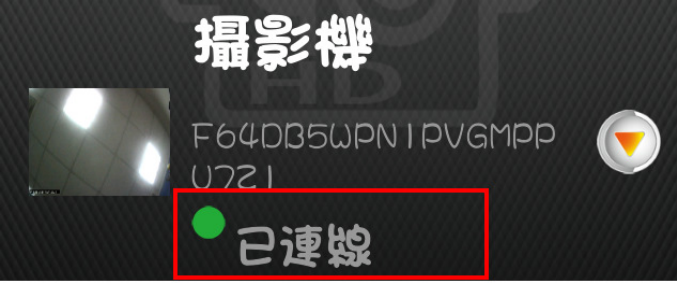
Please choice the camera list APP found.
Then, please input password. And press “confirm” or “V”. APP will
add this camera.
<** Default password is “admin”. Please always change your
password.**>
a. click ”add camera”
8
b. choose the camera
c. key-in password “admin”
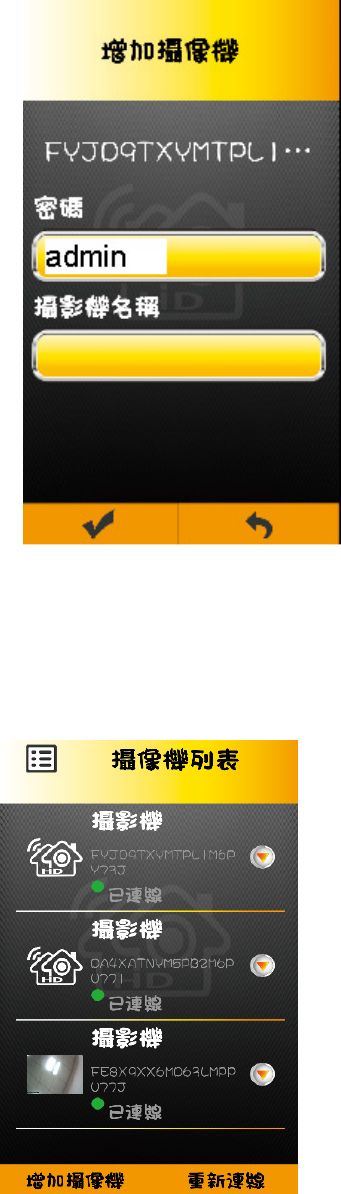
9
d. connected
N
NN
Notice
oticeotice
otice :
If you input the wrong
If you input the wrong If you input the wrong
If you input the wrong password. Please click this camera. Then, APP
password. Please click this camera. Then, APP password. Please click this camera. Then, APP
password. Please click this camera. Then, APP
10
will
willwill
will
ask to input password again.
ask to input password again.ask to input password again.
ask to input password again.
3
33
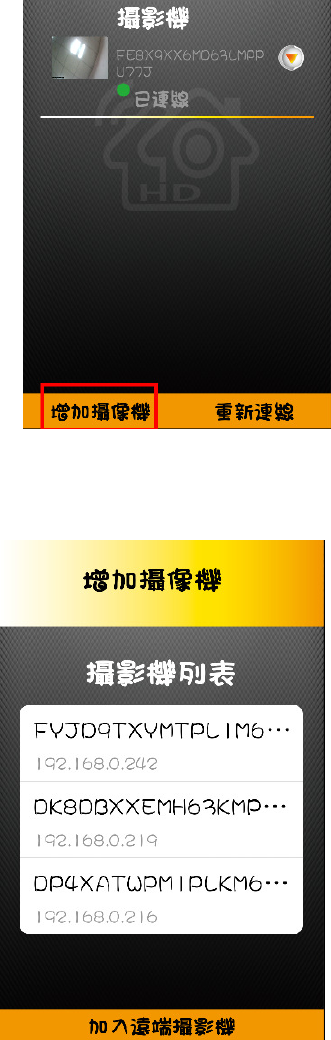
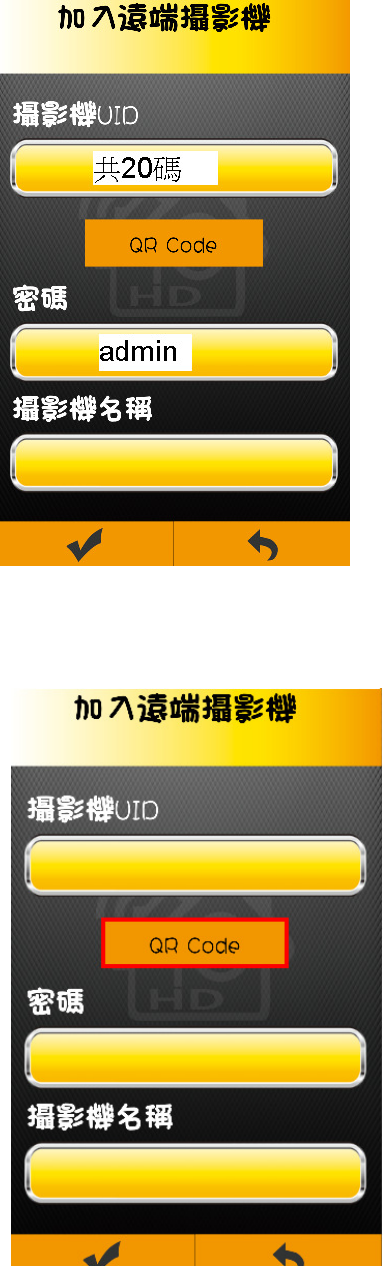
3. Add a remote camera
Add a remote cameraAdd a remote camera
Add a remote camera
Click on the camera list interface " Add cameras ", then click on the
" join the remote cameras " . In "adding remote cameras” ,Please
fill 20 characters and password into " camera UID" , “password”.
(First-time installation is all lower case Admin).
a.
a.a.
a.
click
click click
click “add
addadd
add a remote camera
a remote camera a remote camera
a remote camera”
b. fill
fill fill
fill UID(
UID(UID(
UID(20 character
20 character20 character
20 characters
ss
s),
), ),
), 及
及及
及 password
password password
password ”admin
adminadmin
admin”
11
c.
QR Code to add remote camera
QR Code to add remote cameraQR Code to add remote camera
QR Code to add remote camera
12
d. connected
connectedconnected
connected
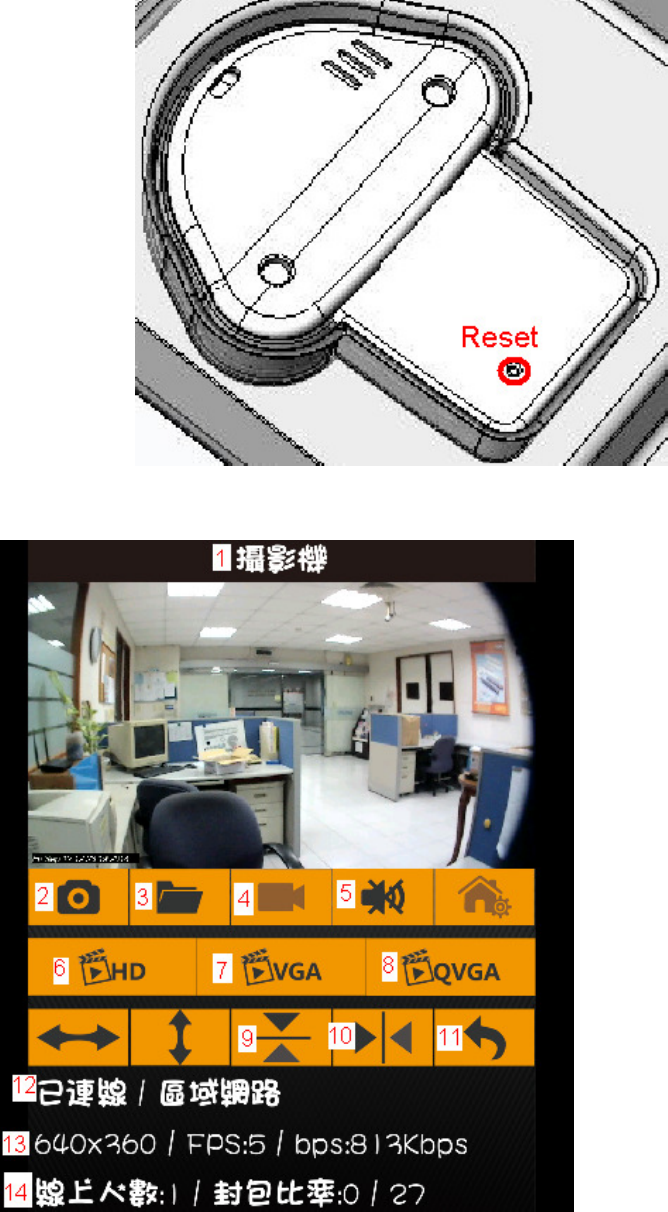
5.
Restore camera factory setting
Restore camera factory settingRestore camera factory setting
Restore camera factory setting
If you forget the camera password, it will take you about 1 minute to reset to
factory setting.
Please follow the procedure:
1. Turn on camera power by plugging power cable.
2. After 20 seconds, please press 5 seconds “reset to default button”. And,
Hear 3 Beep sound,
3. Then, the system will reboot and back to factory setting.\
Notice: if you didn’t hear the “beep sound”, please restart it and do again.
13
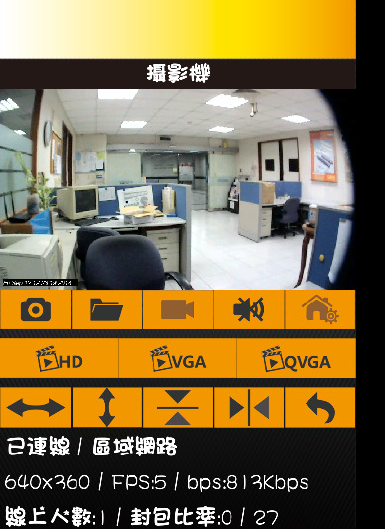
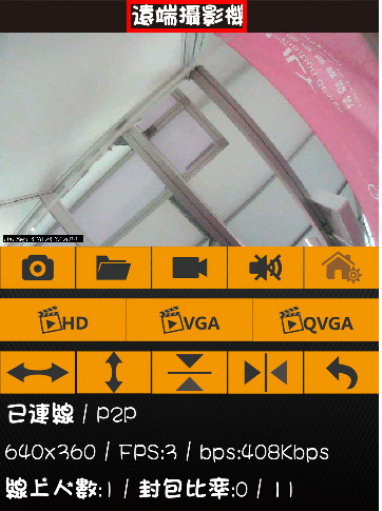
6. Living View Instruction:
1. Camera Name
2. Snapshot:Press this button to capture a snapshot from living view.
14
3. Snapshot folder: You could get all snapshot pictures from this folder.
4. Video Record ON/OFF (Need to have TF card. And plug in TF card into camera TF
card slot.)
5. Two way audio switch: Listen, mute or speak.
6. Switch to 1280*720 resolution living view.
7. Switch to 640*360 resolution living view.
8. Switch to 320*180 resolution living view.
9. Flip for living view.
10. Mirror for living view.
11. Return:Return to camera list
12. Camera status: Online/Offline, P2P/Relay/LAN
13. Message for resolution, frame rate, and video bit rate.
14. Online number to watch living view.
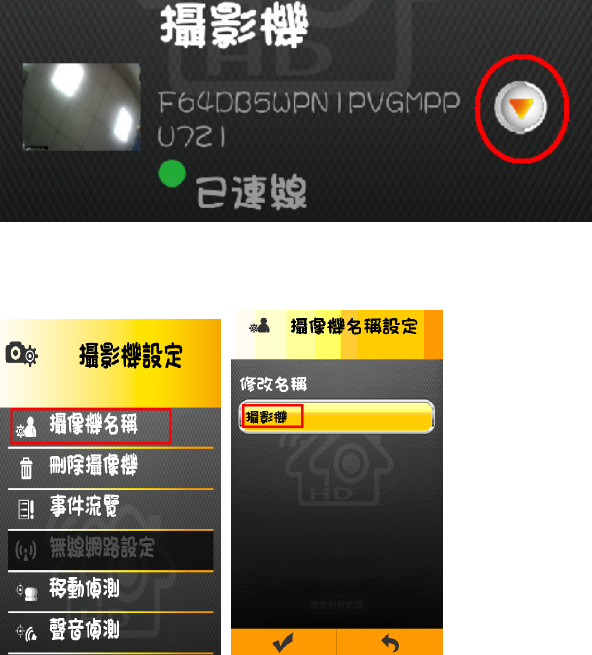
7. Camera setting:
In Camera list, please click symbol to into camera setting.
1. camera name
Modify the camera name
15
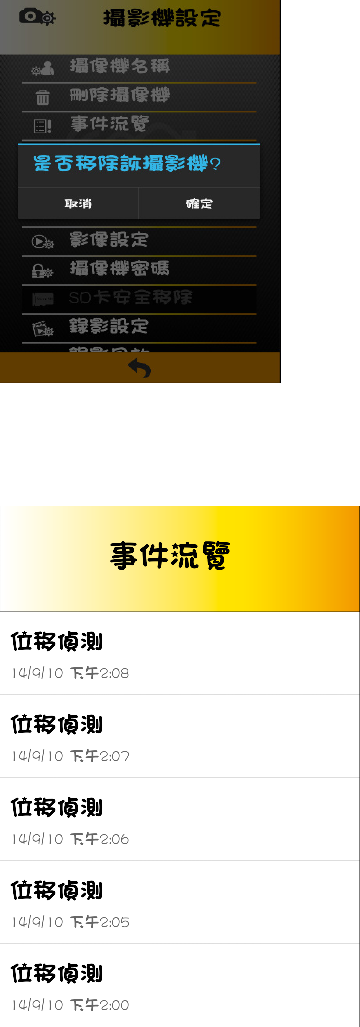
2. Delete camera
Confirm delete this camera
3. Event review
Check all events from motion detection and voice detection.
4. Motion Detection
When motion detection was happened, camera will get snapshot to send to
your email or send out push message into your smartphone/Pad. Please
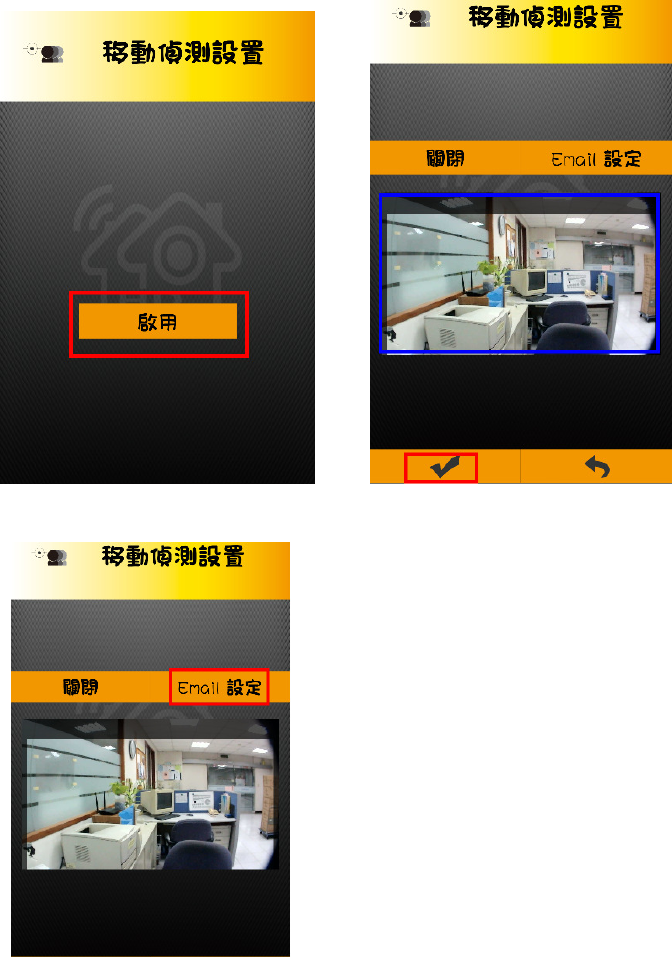
16
configure motion detection. Then, you could turn on all features.
1. Turn on motion detection。
2. Using your figure to set the area of motion detection.。
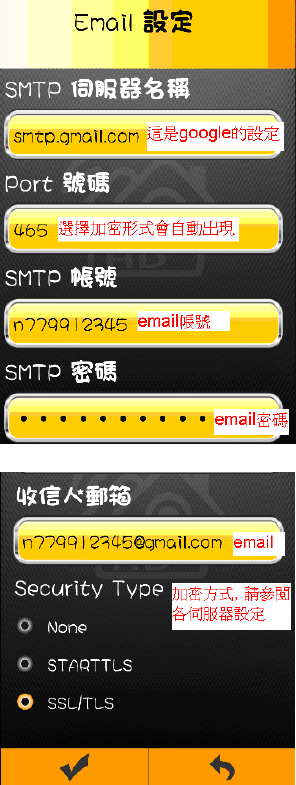
3. configure email。 <Please check your email setting in SMTP function.>
Click “Email setup”
SMTP setup instruction:
17
notice : put in the memory card before setup motion detection。
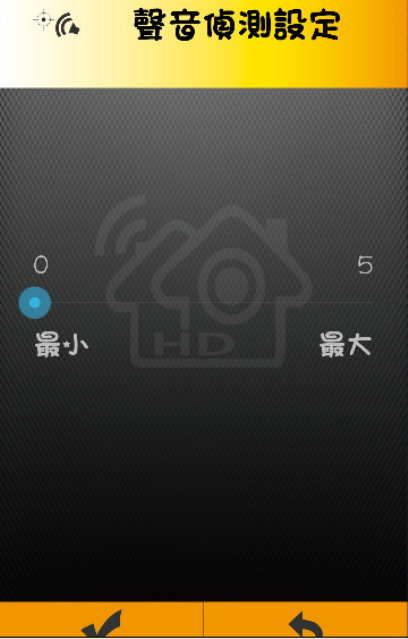
6. Voice detection
When camera microphone receive all sound, the system will check whether
the sound level to be reached.
Then, camera will send out voice and push message and start to video for 5
minutes.
18
Modify sensitivity
7. Video Configuration
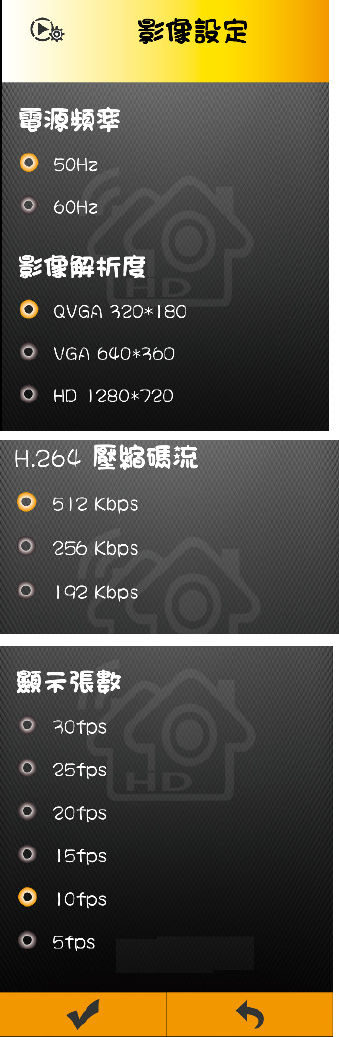
Power frequency:50Hz、60Hz。 <Please check your country to know 50 or 60Hz.>
Resolution:QVGA(320X180)、VGA(640X360)、HD (1280X720)。
Video bit rate:512Kbps、256 Kbps、192 Kbps。
Video frame rate:30fps、25fps、20fps、15fps、10fps、5fps
19
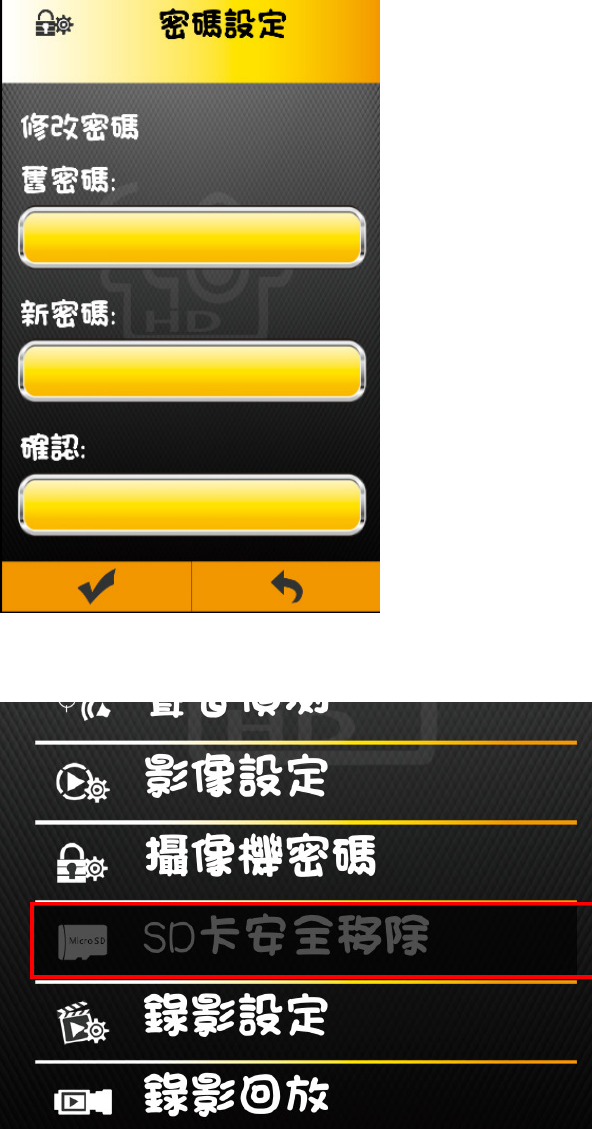
8. Password Configuration
Modify/Change password.
Key-in the old password before key-in the new password.
20
9. SD Card safety remove
Please turn off video recording. Then, press this function to protect SD card data.
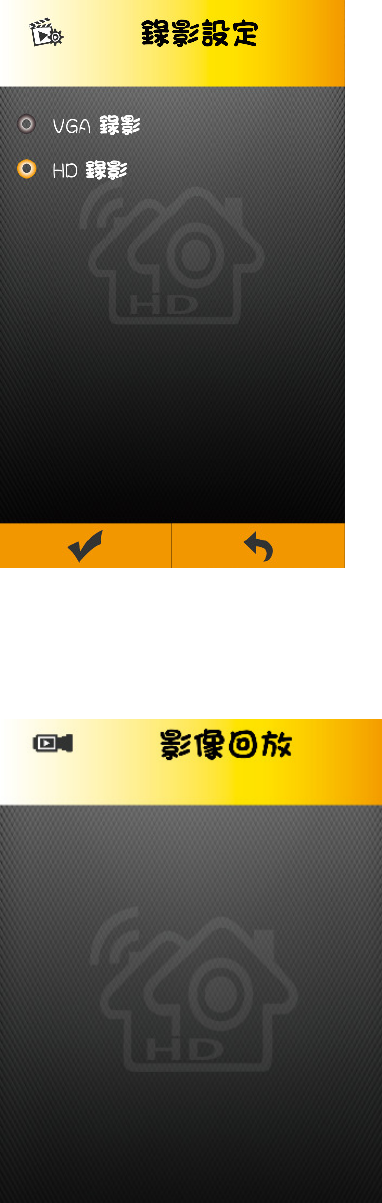
10. Video recording configuration
Configuration video recording file
item:VGA(640*480)、HD(1280*720)
21
11. Video Playback
You could playback the video on SD card.
22
8. FAQ
FAQFAQ
FAQ
APP
APPAPP
APP could not link to camera
could not link to camera could not link to camera
could not link to camera,
, ,
, I
II
I’m sure the WiFi is on
m sure the WiFi is on m sure the WiFi is on
m sure the WiFi is on connected
connectedconnected
connected.
..
.
●make sure power on camera by plugging power cable。
●make sure you see Camera LED as green color always。
●make sure your smartphone/Pad connect to internet or home WiFi router。
●restart the camera,please push the restart bottom by needle。
9.
Care and maintenance
●Please allow children far from all parts and accessories
●Fingerprints or dirt on the surface of the lens have adverse effects on cam work, avoid
touching the lens surface using a mobile phone.
●If the lens appears dirty, wipe the lens with a soft cloth.
●Keep the camera dry, precipitation, humidity, and other circuit containing liquid
minerals will erode.
●Please do not use or store in dusty, dirty areas.。
●. Do not store in high temperature areas, high temperatures can shorten the life of
electronic components and lead to deformation or melt certain plastic parts
●. Do not store in ultra low temperature region. System warming unit (back to normal
temperature), moisture is formed inside the enclosure, and may cause damage to the circuit
board.。
●Do not attempt to open the casing. If by non-professional devices, which can lead to
system compromise.
●. Avoid fall or impact.
●Accompanying or in the form of accessories only supply the power supply to operate the
machine。
●Do not overload the power outlets or extension cords, otherwise fire or electric shock.
25
Federal Communications Commission (FCC) Interference Statement
This equipment has been tested and found to comply with the limits for a Class B digital device,
pursuant to Part 15 of the FCC Rules.
These limits are designed to provide reasonable protection against harmful interference in a
residential installation. This equipment generate, uses and can radiate radio frequency energy and,
if not installed and used in accordance with the instructions, may cause harmful interference to
radio communications.
However, there is no guarantee that interference will not occur in a particular installation. If this
equipment does cause harmful interference to radio or television reception, which can be
determined by turning the equipment off and on, the user is encouraged to try to correct the
interference by one of the following measures:
Reorient or relocate the receiving antenna.
Increase the separation between the equipment and receiver.
Connect the equipment into an outlet on a circuit different from that to which the receiver
is connected.
Consult the dealer or an experienced radio/TV technician for help.
This device complies with Part 15 of the FCC Rules. Operation is subject to the following two
conditions:
(1) This device may not cause harmful interference, and (2) this device must accept any
interference received, including interference that may cause undesired operation.
FCC Caution: Any changes or modifications not expressly approved by the party responsible for
compliance could void the user’s authority to operate this equipment.
RF exposure warning
This equipment complies with FCC radiation exposure limits set forth for an uncontrolled
environment.
This equipment must be installed and operated in accordance with provided instructions and the
antenna(s) used for this transmitter must be installed to provide a separation distance of at least 20
cm from all persons and must not be collocated or operating in conjunction with any other antenna
or transmitter.