AJA Video Systems KIPRO2400 Digital Transmission System User Manual AJA Borg
AJA Video Systems Inc. Digital Transmission System AJA Borg
Contents
- 1. Users Manual Part 1
- 2. Users Manual Part 2
Users Manual Part 1
www.aja.com
Installation and Operation
Guide
Because it matters.
Ki PRO
Published: 6/12/09
ii
Trademarks
AJA
®
, KONA
®
, and XENA
®
are registered trademarks of AJA Video, Inc. Ki Pro™, Io HD
™
and
Io
™
are trademarks of AJA Video, Inc. Apple, the Apple logo, AppleShare, AppleTalk,
FireWire and Macintosh are registered trademarks of Apple Computer, Inc. Final Cut Pro,
QuickTime and the QuickTime Logo are trademarks of Apple Computer, Inc.
All other trademarks are the property of their respective holders.
Notice
Copyright © 2009 AJA Video, Inc. All rights reserved. All information in this manual is subject
to change without notice. No part of the document may be reproduced or transmitted in
any form, or by any means, electronic or mechanical, including photocopying or recording,
without the express written permission of AJA Inc.
Contacting Support
To contact AJA Video for sales or support, use any of the following methods:
443 Crown Point Circle, Grass Valley, CA. 95945 USA
Telephone: 800.251.4224 or 530.274.2048
Fax: 530.274.9442
Web: http://www.aja.com
Support Email: support@aja.com
Sales Email: sales@aja.com
When calling for support, first read the Chapter on
Troubleshooting
at the back of this
manual. You can often save time and effort by looking there first for simple remedies and
information on how to get support from AJA and Apple Computer Inc.
Limited Warranty
AJA Video warrants that this product will be free from defects in materials and
workmanship for a period of three years from the date of purchase. If a product proves to be
defective during this warranty period, AJA Video, at its option, will either repair the
defective product without charge for parts and labor, or will provide a replacement in
exchange for the defective product.
In order to obtain service under this warranty, you the Customer, must notify AJA Video of
the defect before the expiration of the warranty period and make suitable arrangements for
the performance of service. The Customer shall be responsible for packaging and shipping
the defective product to a designated service center nominated by AJA Video, with
shipping charges prepaid. AJA Video shall pay for the return of the product to the Customer
if the shipment is to a location within the country in which the AJA Video service center is
located. Customer shall be responsible for paying all shipping charges, insurance, duties,
taxes, and any other charges for products returned to any other locations.
This warranty shall not apply to any defect, failure or damage caused by improper use or
improper or inadequate maintenance and care. AJA Video shall not be obligated to furnish
service under this warranty a) to repair damage resulting from attempts by personnel other
than AJA Video representatives to install, repair or service the product, b) to repair damage
resulting from improper use or connection to incompatible equipment, c) to repair any
damage or malfunction caused by the use of non-AJA Video parts or supplies, or d) to
service a product that has been modified or integrated with other products when the effect
of such a modification or integration increases the time or difficulty of servicing the
product.
THIS WARRANTY IS GIVEN BY AJA VIDEO IN LIEU OF ANY OTHER WARRANTIES, EXPRESS OR
IMPLIED. AJA VIDEO AND ITS VENDORS DISCLAIM ANY IMPLIED WARRANTIES OF
MERCHANTABILITY OR FITNESS FOR A PARTICULAR PURPOSE. AJA VIDEO’S RESPONSIBILITY
TO REPAIR OR REPLACE DEFECTIVE PRODUCTS IS THE WHOLE AND EXCLUSIVE REMEDY
PROVIDED TO THE CUSTOMER FOR ANY INDIRECT, SPECIAL, INCIDENTAL OR
CONSEQUENTIAL DAMAGES IRRESPECTIVE OF WHETHER AJA VIDEO OR THE VENDOR HAS
ADVANCE NOTICE OF THE POSSIBILITY OF SUCH DAMAGES.

4
1
1
Chapter 1: Introduction
1
Edge Shot Photo Here
Overview
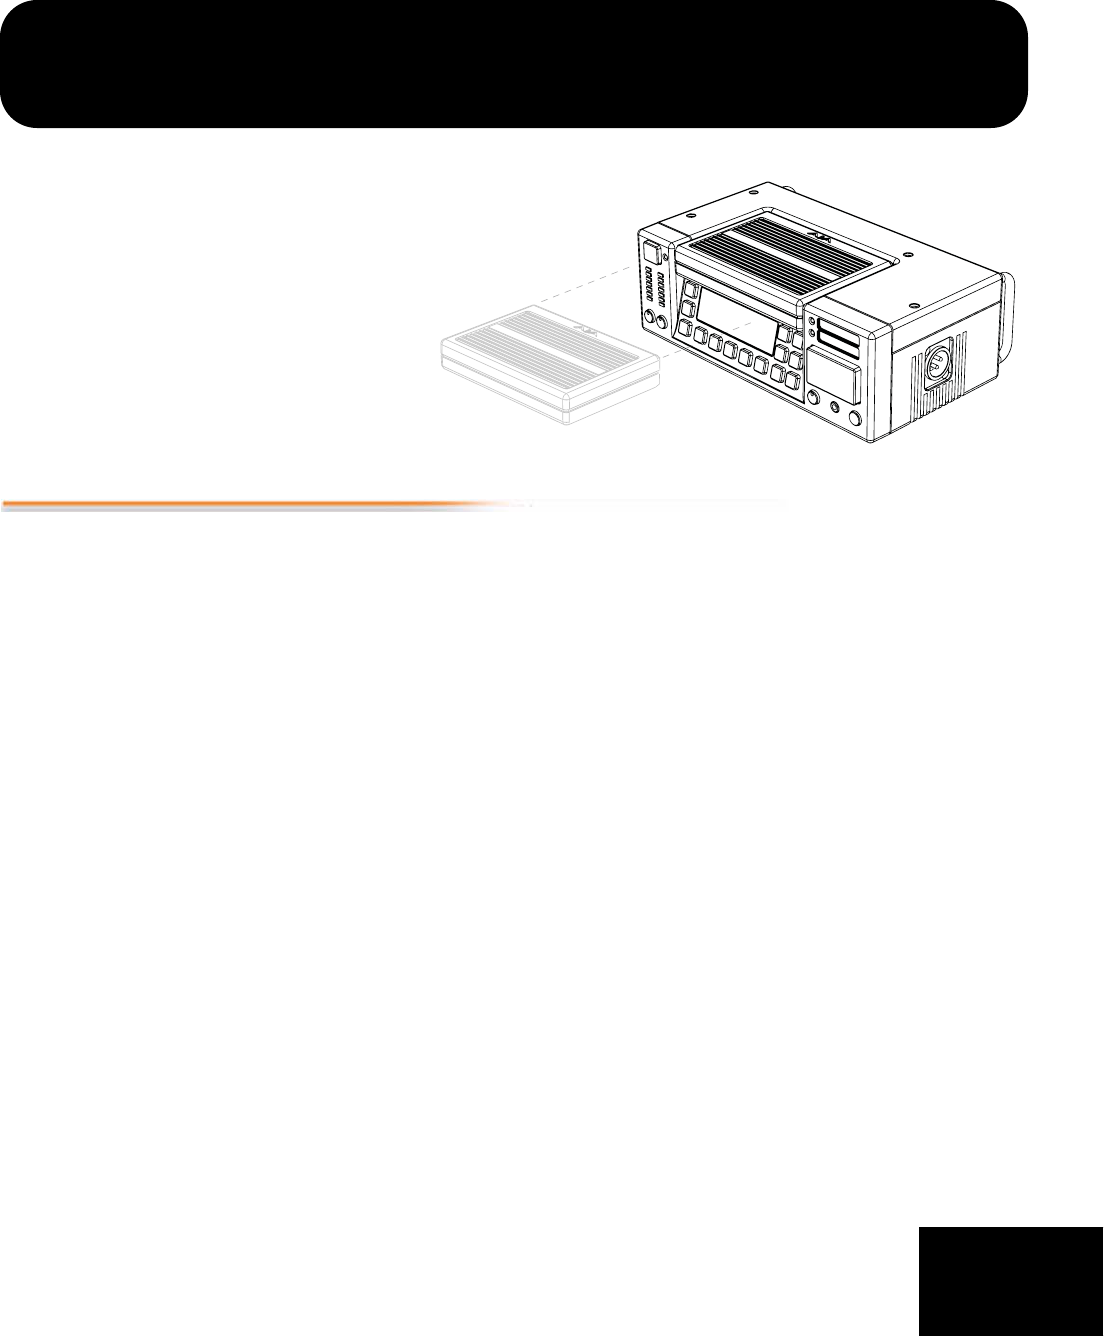
Ki Pro is an all new way of connecting production and post. With it, you can now
shoot on the same codec as you edit with—Apple ProRes 422—built natively into
Ki Pro's stand-alone, portable hardware. Ki Pro simplifies the link between production
and post by acquiring on the best codec for use with Apple Final Cut Studio, from
virtually any camera, regardless of format. With its massive analog and digital
connectivity, virtually any video and audio source can be fed into Ki Pro. Also
included is AJA's powerful 10-bit realtime up/down/cross conversion, enabling
instantaneous recording of SD or HD from any camera format.
Small and portable, you can use AJA’s Ki Pro as a field recorder for creating “ready-to-
edit” professional digital video. Ki Pro supports an Apple “file-based” workflow by
recording standard Apple ProRes 422 QuickTime files on industry standard media. Ki
Pro supports analog and digital audio/video I/O and records on either removable
34mm ExpressCards (up to two can be mounted) or a removable storage module.
Two types of storage modules are also available for Ki Pro: a 2.5” SATA hard drive
(supplied with the base system), or a Solid-State-Drive (SSD) module you can
optionally purchase. When removed, either module functions as a standard FireWire
800 drive when connected to a Mac.
Ki Pro's multi-purpose mechanical design and small form factor allow both “stand-
alone” and camera configurations. In standalone mode, it can connect to a camera
while sitting on a desk or flat surface. Ki Pro can be used by itself to record and
playback media or it can be connected to a Mac Pro or MacBook Pro via FireWire for
transferring media. In a camera configuration it mounts between the camera and a
tripod using an optional adjustable “exoskeleton” frame. The frame option allows for
flexible positioning of the camera head and accessories and attachment to a
professional tripod.

2
Internally, Ki Pro natively supports the amazing Apple ProRes 422 Codecs in
hardware, allowing realtime capture directly to ProRes. In fact, while the Camera is
recording to its own tape or file-based memory, Ki Pro can simultaneously capture
the media as ProRes so it’s instantly ready to edit when connected to a Mac, or
when the removable storage module or an Expresscard is connected to a Mac. With
this kind of flexibility, you can save time, steps, and get your project done quicker
and with the highest quality.
Ki Pro is the only recording device in the world that supports Apple’s ProRes 422 in
hardware—allowing realtime recording of full-raster I-frame media at 4:2:2 quality.
Ki Pro also includes AJA’s realtime hardware 10-bit up/down/cross conversion for
realtime on the fly recording to alternate formats.
Like AJA’s famous KONA and Io HD desktop products, Ki Pro offers unparalleled
connectivity. Within its portable and rugged form factor, Ki Pro offers SD/HD analog
I/O, SD/HD digital I/O including SDI, HD-SDI and HDMI, two channels of balanced
and unbalanced analog audio with switch selectable line levels, plus RS-422, LTC
timecode in/out, and LANC (plus loop through).
Control options are also varied and flexible. Ethernet 10/100/1000 connection is
possible via an RJ45 for remote control from a Mac/PC, and a FireWire 400 (1394a)
connector allows you to pass control and timecode from the camera. A special “AJA
Lens Tap” connector provides a unique ability of Ki Pro to intercept lens control
data for use in stop/start and automated recording control. For wireless control,
Ki Pro features an internal WiFi antenna and radio for connection to wireless
devices such as iPhone, iTouch, or 802.11 equipped computers. A FireWire 800
connector allows a Mac to mount Ki Pro’s storage devices (SSD, HD, and
ExpressCards)—and as mentioned earlier you can also simply remove any of the
storage devices by themselves for mounting on a Mac via FireWire 800 connectors
on them. (For detailed illustrations and discussions of Ki Pro connectors and control
features, see Chapter 2.)
This manual covers the installation and operation of Ki Pro and its optional
accessories.
Features
Ki Pro offers a large number of unique features for optimum quality, ease of use,
and support for a wide variety of workflows and environments. Ki Pro provides
flexible standard and high definition recording, with hardware up/down/cross-
conversion for versatile operation in a mixed SD/HD environment, plus a wide
variety of control methods and storage options.
Hardware
•
Apple ProRes 422 and Apple ProRes 422 HQ Codec—SD, HD 720/1080, full-
raster 10 bit 4:2:2, realtime, implemented in hardware
•
Up/down/cross-conversion, 10-bit, realtime, implemented in hardware
•
Component HD/SD analog video I/O (6 BNC)
•
Composite video output (1 BNC)
•
HD/SD SDI I/O (2 BNC)
•
HDMI I/O (2 HDMI)
•
2 channel balanced and unbalanced analog audio I/O (4 XLR, 4 RCA)
•
LTC I/O (2 BNC)
•
1394a FireWire port (connection to camera for timecode and control)

1
3
Ki Pro Installation and Operation Manual — Features
•
1394b FireWire (connection to host Mac)
•
RS-422 Machine Control—9 pin DE-9 serial port
•
IEEE 802.11 wireless
•
10/100/1000 Ethernet LAN
•
VFD display (2 line x 20), with 18- button front panel controls
•
Front Panel LED Status Indicators: Power On/Off, FireWire (active/inactive),
Ref (Genlock), Video (detected at selected input).
•
Aspect ratio conversion
•
Expressbus storage (cards are user-supplied)
•
Storage Module (HD) with FireWire 800 port for use with Mac computers
(HFS+ file system)
•
12 Vdc AC adapter with industry standard 4-pin XLR battery-style connector
•
3-year warranty
Software
•
Remote Browser control software. When a Mac, PC, or WiFi enabled device
such as an iPhone are connected via the Ki Pro Ethernet port or its WiFi
connection, the device can control the Ki Pro via a web browser.
•
Embedded Linux OS with internal web server for remote control via WiFi or
LAN
•
HFS+ file system support—Ki Pro can be mounted via its FireWire 800
connector, just like a hard drive.
AJA’s Ki Pro software and hardware were developed for use in recording direct to
Apple ProRes media for the simplest possible end-to-end file-based Final Cut Pro
environment—bridging Camera to Post, using Ki Pro as the interconnecting path.
With a camera, an Apple Mac Pro or MacBook Pro, FCP, and Ki Pro, you have an
ideal high-quality cost-effective system for onset acquisition, conversion,
transport, and post-production workflow.
Options
AJA’s Ki Pro can be enhanced by purchasing several options:
•
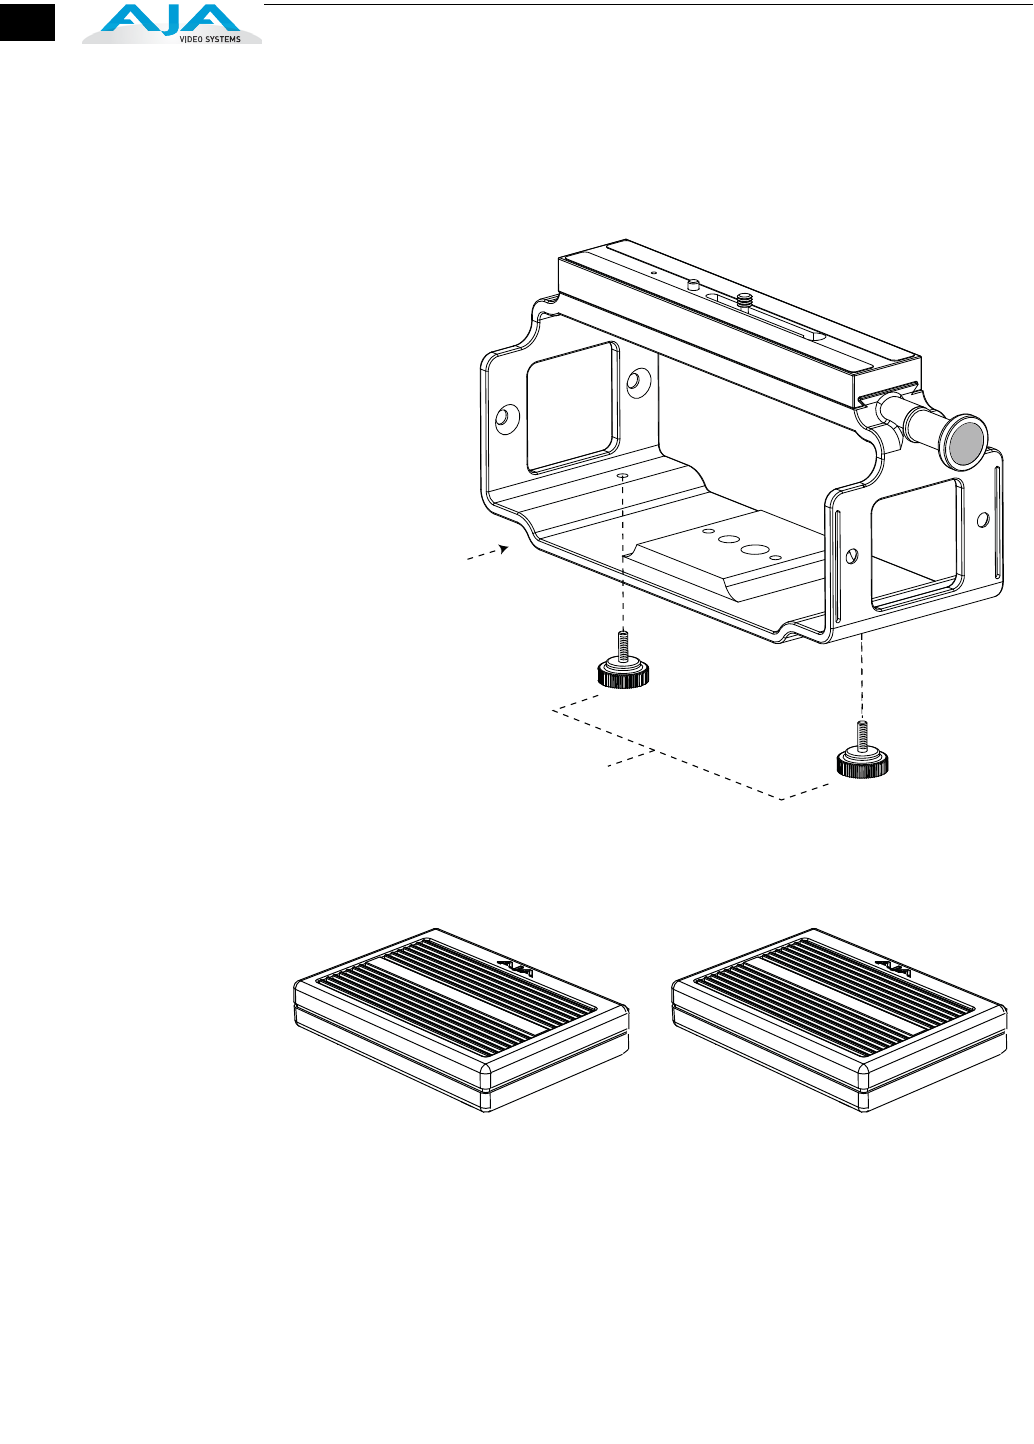
Ki Box Exo-skeleton—provides a surrounding chassis for the Ki Pro that can
both mount to a tripod and provide a mount for camera on top; this
combination allows convenient access to controls.
4
•
Ki Box Exo-skeleton Option
Storage Module Options: SSD or Hard Drive
•
Ki Pro SSD Storage Module—although the Ki Pro comes standard with a
removable HDD Storage Module, an optional SDD Storage Module is also
available. The Ki Pro Solid State Storage Module (SSD) is recommended for
mobile environments where shock-proof sturdiness may be needed. The Ki
Pro SSD Storage Module offers the ultimate in media reliability.
•
Ki Pro Hard Drive Storage Module—although Ki Pro comes with one
removable HDD Storage Module standard, you can buy extras and simply
swap them as needed.
Base Ki Pro Exoskeleton
chassis with camera mount
Knurled thumbscrews
secure Ki Pro chassis
to Exoskeleton
1
5
Ki Pro Installation and Operation Manual — What’s In The Box?
•
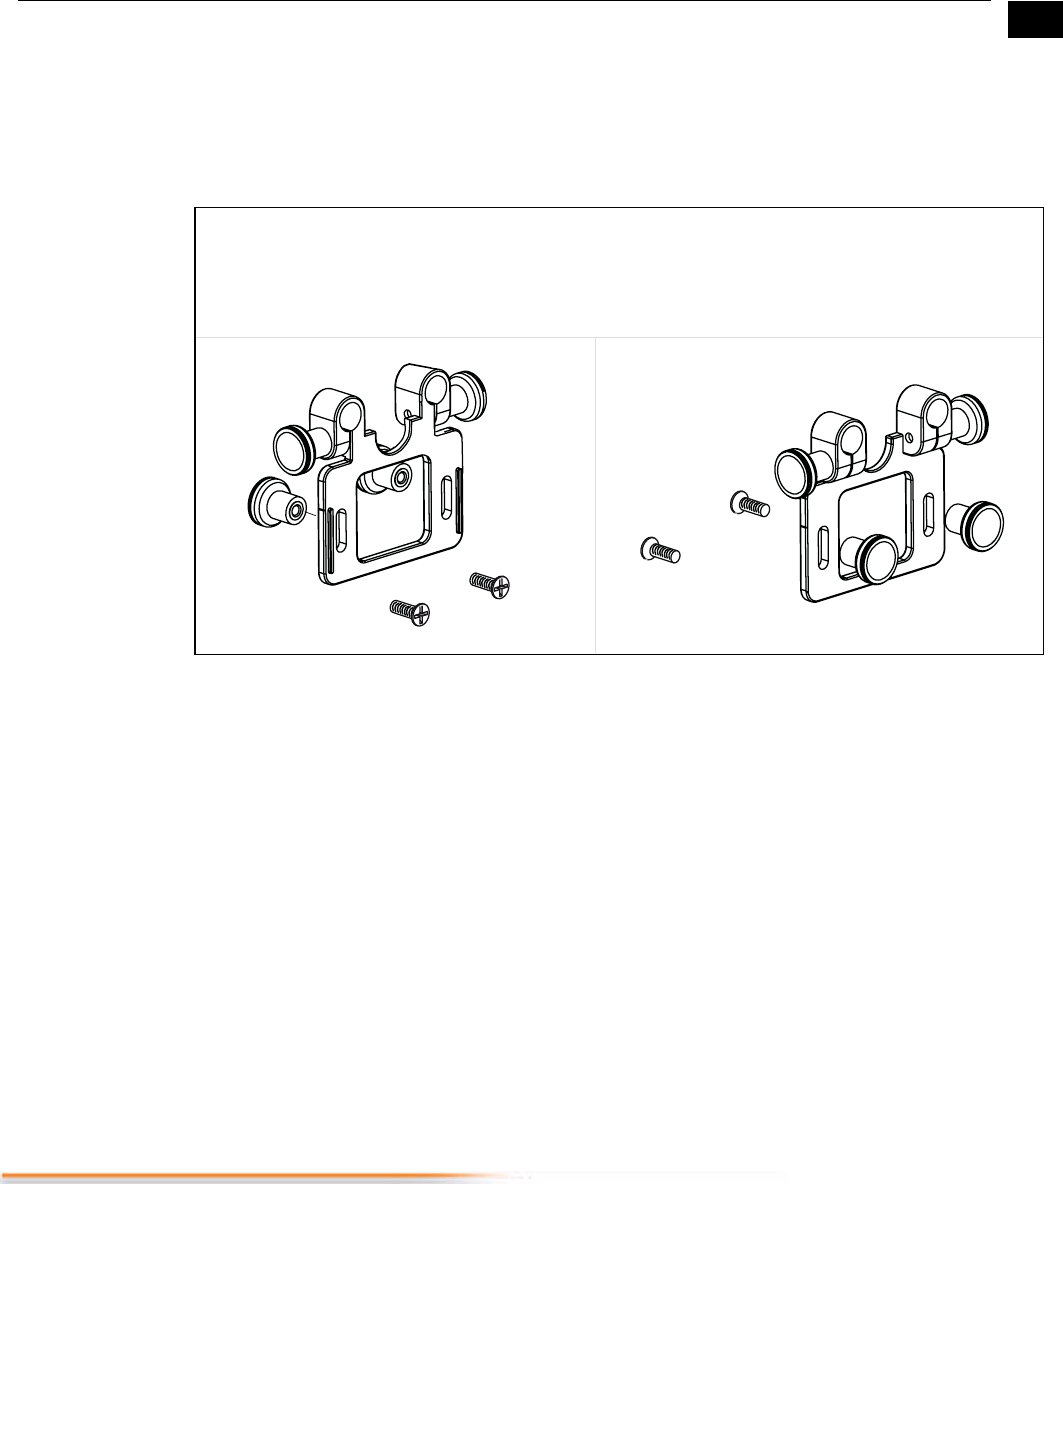
Ki Pro Rod Accessory Kit—this kit adds endplates to the Exo-skeleton so you can
attach two user-supplied 15mm camera accessory rods. The endplates have knobs
for adjusting the height of the rod brackets relative to the camera, as well as a set
of knobs for securing the rods in the brackets.
Rod Accessory Kit Option
•
AJA Lens Tap Cable Accessory—this AJA proprietary cable allows Ki Pro to connect
between the lens tap control connector on a lens and camera body, thereby
intercepting the lens control signals for use in simple start/stop Ki Pro recording
operations.
•
Io Express—a simple low-cost output interface box for CPU-decoding of
compressed formats and playout. It provides uncompressed HD-SDI and SD-SDI
output for formats such as Apple ProRes, XDCAM, and DVCPROHD. Io Express also
includes and HD-SDI/SD-SDI input for video/audio capture into Final Cut Pro. Io
Express attaches to Macs having a free PCIe or ExpressCard slot. The box tethers to
the Mac using a small PCIe header card and cable, making it suitable for both
laptop and desktop computers—and it will even work with PCs. By having Ki Pro
and Io Express, you have a complete Final Cut Pro post-production system for
editing, color correcting and playout.
What’s In The Box?
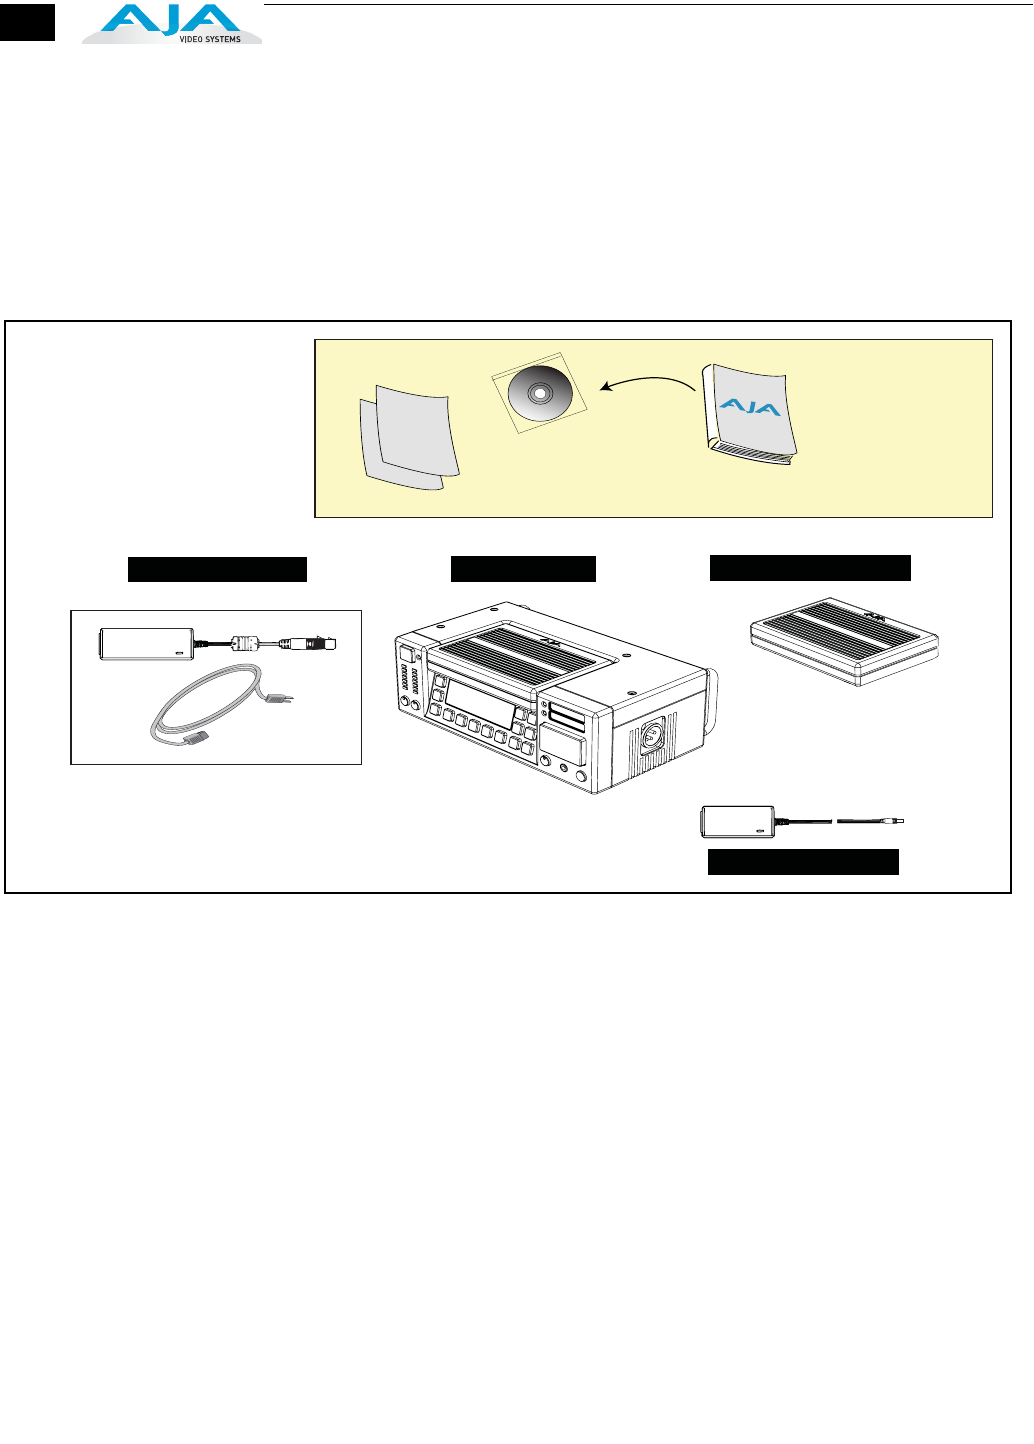
When you unpack your Ki Pro, you’ll find the following components:
•
Ki Pro CD-ROM—this CD contains software and documentation—including this
manual you’re reading (PDF format).
•
Ki Pro Recorder
•
Ki Pro 250GB Hard Drive Storage Module and AC Adaptor
•
AC Adapter 110/220 with industry standard 4-pin XLR connector for supplying
power to the Ki Pro.
Optional Rod Accessory Kit Assembly
Kit components:
2 endplates
4 screws with matching Knobs
(Note: 15mm rods to be supplied by customer)
6
•
FireWire 800 cable
•
Read Me First Notice—Contains late-breaking news and/or errata related to
Ki Pro.
•
Registration Sheet—allows you to register your card by mail or online (details
provided).
Please save all packaging for shipping the Ki Pro should you wish to do so when
moving or sending it in for service.
Ki Pro Shipping Box Contents
Installation Software CD
Read Me First Notice
and Registration Sheets
Ki Pro Recorder
AC Adaptor and Line Cord
Storage Module AC Adaptor
HDD Storage Module
Ki Pro
Installation and Operation
Manual
in PDF format on CD

1
7
Ki Pro Installation and Operation Manual — System Requirements
System Requirements
AJA Video recommends that the Mac Pro or MacBook Pro used with the Ki Pro offer a
FireWire 800 port and support Apple ProRes 422 with a satisfactory level of
performance. Consult Final Cut Pro documentation when setting up and configuring
your system for editing; ensure you have an adequate storage system (RAID array) and
any needed video/audio interfaces.
Apple ProRes 422 Advantages
Data rate:
145 MB/second ProRes 422, 220 MB/second ProRes 422 HQ—supported by
internal system drive or attached storage
Quality:
Excellent, broadcast quality
Captured media is virtually indistinguishable from pristine uncompressed sources.
Better yet, ProRes maintains the quality during editing, surviving multiple encoding/
decoding generations without degradation. It was designed by Apple for editing,
rather than as a transmission/distribution codec as are most popular codecs. Some of
the advantages include:
•
Full-size 1920-by-1080 and 1280-by-720 HD resolutions.
•
Full-size 720-by-486 and 720-by-576 SD resolutions.
•
4:2:2 chroma sampling. Provides precise compositing and blending at sharp
saturated-color boundaries.
•
10-bit sample depth. Preserves subtle gradients of 10-bit sources (perfect for
green-screen compositing, graphics or color correction) with no visible banding
artifacts.
•
I frame-only encoding. Ensures consistent quality in every frame and no artifacts
from complex motion.
•
Variable bit-rate (VBR) encoding. “Smart” encoding analyzes the image and
allocates more bits to complex frames.
•
Low data rate requirements make for more storage options and require less drive
space to store high quality video.
In This Manual
Chapter 1 is the introduction you’re reading, listing features, box contents, and system
requirements.
Chapter 2 gets you started with Ki Pro, introducing the front and rear panel features,
connections and indicators, and all the options available.
Chapter 3 provides complete instructions for operating the Ki Pro from the front panel.
Chapter 4 discusses remote web browser control of Ki Pro via Ethernet or WiFi.

8

1
1
Chapter 2: Getting Started
2
Overview
When using Ki Pro, you’ll make media cable connections to a variety of equipment
based on how it’s being used. Onset, it can be connected direct to a camera; at other
times, you may want to connect it to a Mac Pro or MacBook Pro for accessing stored
media you’ve shot. Chapters 2 and 3 discuss how to operate and use the Ki Pro in its
many configurations—this chapter introduces the operating configurations, power
supply options, plus all indicators, controls, and connections so you’ll have a working
knowledge of how it can be used to tie together the worlds of acquiring media
(production) and post-production. For ease of explanation, we’ll talk about these two
ways of using the Ki Pro:
•
Stand-alone—in standalone use for
acquiring media
, the Ki Pro unit is placed on
a desktop or surface and connected by cable to video/audio sources, usually a
camera or camcorder. After acquiring media, you can use the media on a Mac,
by removing the Ki Pro storage module and directly connecting it to the Mac via
FireWire 800, or alternatively, the whole Ki Pro unit can be connected to a Mac
via a FireWire 800 cable.
•
Camera Mount with Exo-skeleton—for the optimum in onset flexibility, an
optional Ki Pro Exo-skeleton camera mount can be attached to a tripod, the Ki
Pro mounted within it, and the camera mounted on top of the Exo-skeleton. This
creates a complete self contained acquisition system for acquiring Apple ProRes
422 media in realtime as the camera is shooting. As in the standalone mode, the
storage media can be easily inserted or removed for shooting and shuttling to
your editing system—without having to remove Ki Pro from the tripod. The exo-
skeleton offers many adjustments and an optional rod accessory kit is available
for vertical/horizontal camera adjustment with respect to the rod and
accessories.
Learning about the front panel indicators will be useful in selecting operational
modes and monitoring what is happening on Ki Pro as well as troubleshooting
problems that can occur. Becoming familiar with the Ki Pro front and rear panels will
simplify installation, setup, and operation of the system.
On the following pages are front and rear panel illustrations with notations that
summarize all of the connectors and indicators. Detailed descriptions of each of the
connectors and indicators follow afterward.
10
Operator Side—Buttons and Display
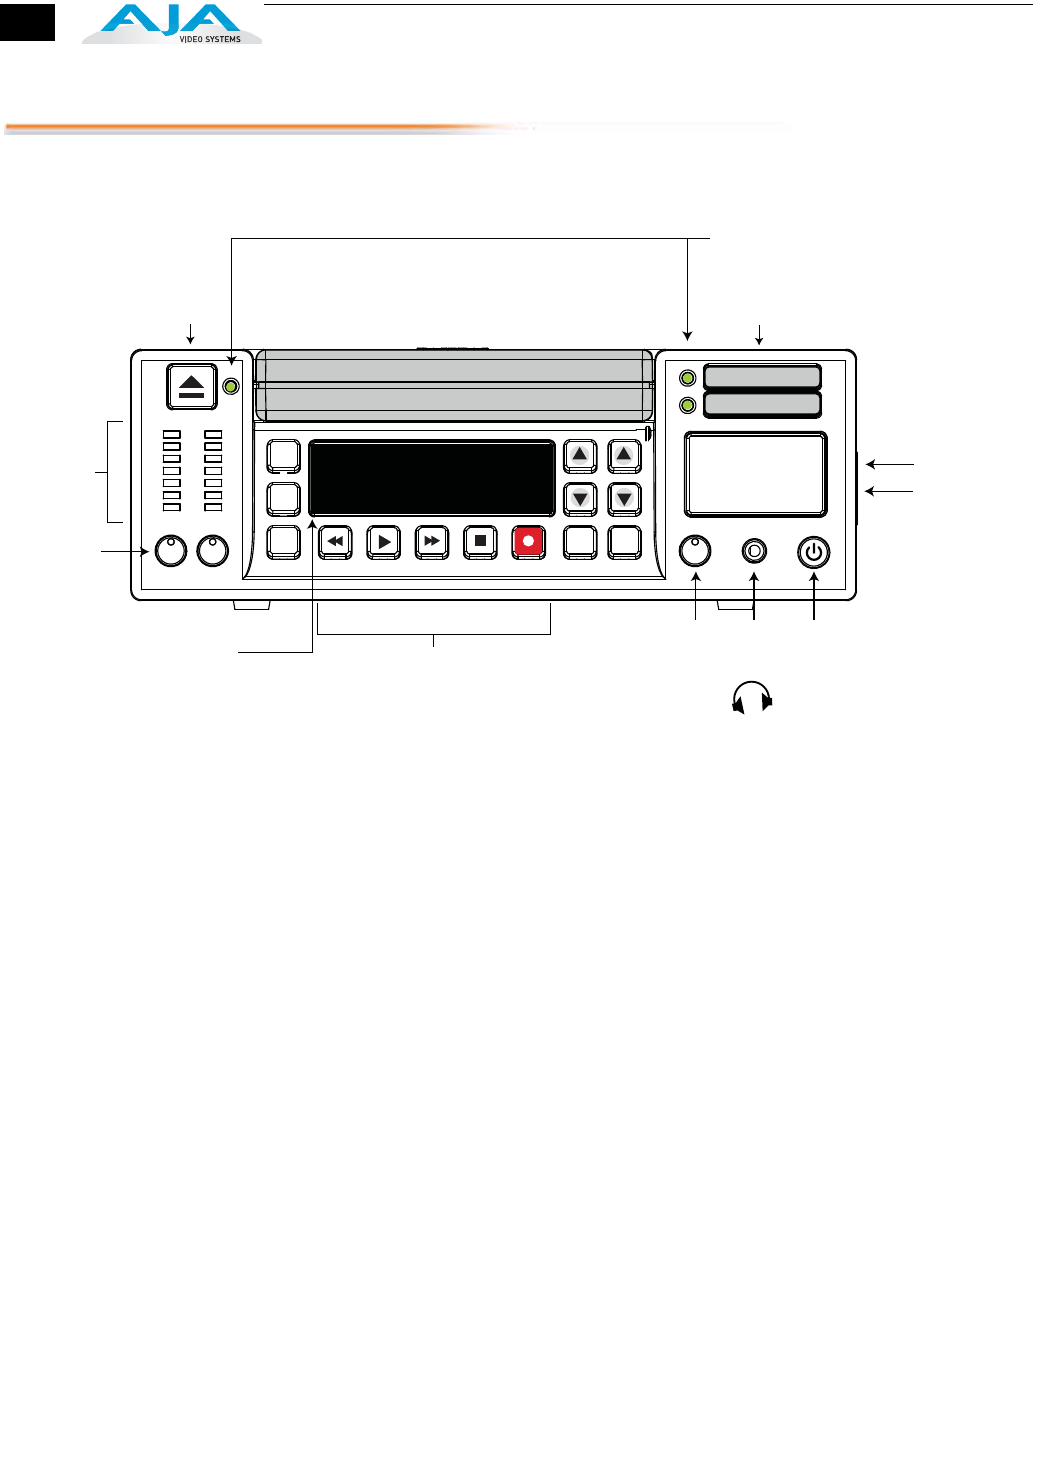
Ki Pro Operator Side (front panel)
Controls and
Displays
The Operator Side of Ki Pro features a variety of buttons, knobs, jacks, and
indicators for operating Ki Pro directly. Each of the items found on the “Operator
Side” are described here and on the following pages. This side is referred to as the
“Operator Side” because when mounted in the exoskeleton, it matches the
operator side of the camera. When controlling camera features, you’ll also be
looking at all the Ki Pro control features for ease of use.
Buttons
Power
ON/OFF Button—Controls system power on/off and shows whether power
is ON (when illuminated) or OFF. To turn power on, press the button once.It
isn’t necessary to press hard or depress the button—it’s a “soft” button sensed
by the processor inside. When OFF, and the button is touched, it will begin
powering up and display start-up progress on the alphanumeric display.
To power down, you must press and hold the power button down for 3
seconds. This action prevents accidental power-off during normal operation.
When the unit is powering down you can abort the power-down process by
simply removing your finger from the power button before 2 seconds have
elapsed.
STATUS
Button—Pressing the STATUS button, when not lit, enters the I/O Status
menu. Repeatedly pressing the STATUS button will cycle through I/O Status,
Alarms, and Off (returning to the TRANSPORT menu). STATUS menus can be
accessed at any time—including when the machine is in an active transport
mode (PLAY, RECORD, FF, REV). The ALARM state displayed on the display
STATUS
DELETE
CLIP SLOT
ADJUSTSELECT
CONFIG
MEDIA
CLIP xxxxxxxx
REEL xxx
1 4% S
00:01:21:13
Storage Module (slides into slot)
Slot LED Status Indicators show:
Media Selected—Green
Not-Selected—not illuminated
Recording—flashes Green, On and Off
Expresscard Memory Slots (2) — 34mm 1-lane PCIe
(press card in to mount; press again to eject)
4-pin XLR
Battery Power
Connector
(on side)
VU
Meters
(2 Channel)
Audio
Input
Level
Adjust
Head
Phone
Jack
Head
Phone
Volume
(Press in and
volume adjust
knob will pop out
for easy adjustment)
Storage Module
Release
Button
(press and hold button down
while removing Disk Storage
Cartridge)
140 x 16 pixel
Alphanumeric
and Graphics Display
(typically 2 x 20 characters)
Transport Control Buttons
(Reverse/Stop/Play/Record/Fast Forward)
Power
ON/OFF
(Press to power up,
press and hold for 5 seconds to
power-down; abort power-down
by removing finger before 5 seconds)
Cover Plate
over WiFi
Antenna

1
11
Ki Pro Installation and Operation Manual — Operator Side—Buttons and
shares functionality with STATUS. The STATUS button can be used to toggle
through alarms. All menus and front panel operations are described in
Chapter 3.
CONFIG
Button—Pressing CONFIG when not lit, enters the CONFIG menu.
Pressing CONFIG when it is lit turns Off the CONFIG menu (returning you to
the default TRANSPORT menu). The CONFIG menu can only be entered from
the STOP mode. The CONFIG menu remembers which parameter it is set to
when exited, and will return to that same parameter when the menu is re-
entered.
MEDIA
Button—Pressing MEDIA when not lit, enters the MEDIA menu. Pressing
MEDIA when it is lit will turn Off the MEDIA menu (returning to the default
TRANSPORT menu). The MEDIA menu can only be entered from the STOP
mode. The MEDIA menu remembers which parameter it is set to when
exited, and will return to that same parameter when the menu is re-entered.
Transport Control Buttons—The transport buttons are always active—except
during CONFIG and MEDIA menu operations where they are locked out.
STOP
: Press STOP to end playback or a media operation (PLAY, FF, REV,
or RECORD). When stopped, DDX displays the current point in the stopped
clip. STOP can also be considered a “pause” button. If the PASSTHROUGH
parameter is set to ON, then stopping playback returns the device to E-to-
E. If the PASSTHROUGH parameter is set to OFF, then the last recorded
frame is displayed as output. If the PASSTHROUGH parameter is set to
AUTO, then the last recorded frame is displayed until a double a
depression of the STOP button is performed.
PLAY
: Press PLAY to begin forward playback of the current clip at
normal speed.
RECORD
: Press the red button to begin recording. Once in RECORD
mode, all other transport buttons are locked-out except the STOP button.
FFWD
: Press button to begin fast playback of the current clip at 2x
speed. Successive pushes increase the speed to 4x, 8x, and 16x. (Pushing
the button after 16x speed is reached has no further effect.) When fast-
forwarding, audio is muted.
REV
: Pressing REV when not lit, begins playback of the current clip in
reverse at 1x speed. Successive pushes increase the speed to 2x, 4x, 8x, and
16x. (Pushing the button after 16x speed is reached has no further effect.)
When playing in reverse, audio is muted for all speeds above 1x.
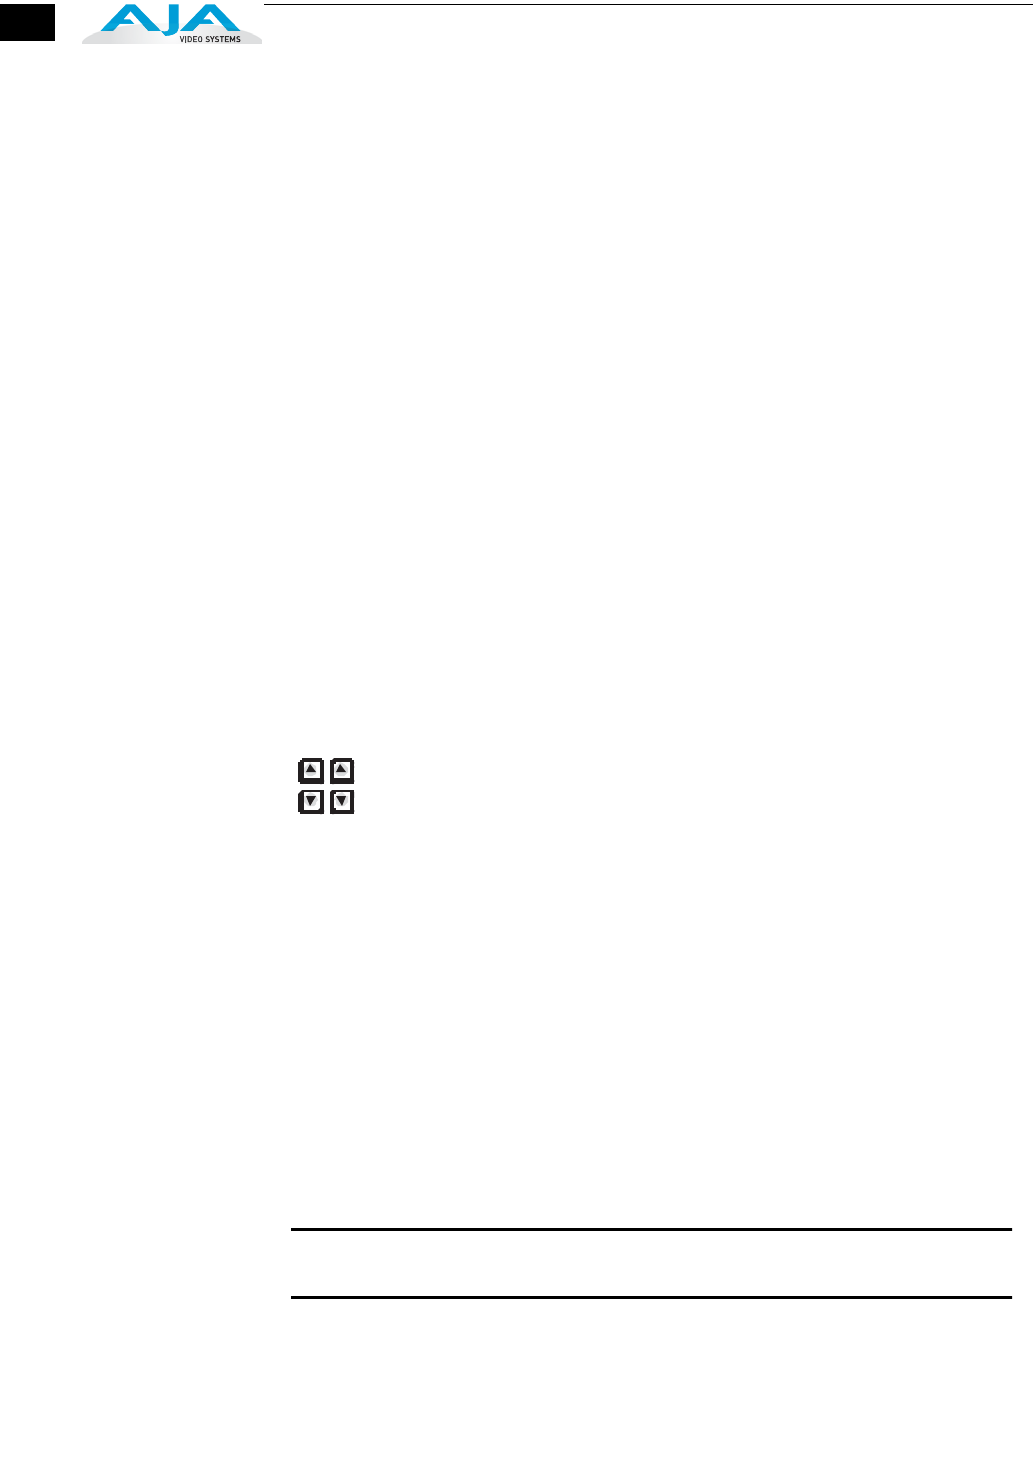
SELECT (up/down): while in the TRANSPORT menu, the SELECT buttons
select clips and operate like “previous” and “next” keys. When a clip is
selected it is “cued” to the beginning of the clip. Note that ordering and
playback of clips is based on timestamp order, not clip name.
ADJUST (up/down): while in the TRANSPORT menu, and in the “STOP”
mode, the ADJUST buttons will “single step” the current clip at a rate of
one frame per button push (up=forward, down=reverse).
DELETE CLIP
Button—Dedicated button that when pressed, deletes the currently
selected clip. When pressed, the system displays a precautionary “ARE YOU
SURE?” prompt. Press the up-arrow ADJUST button to say “Yes” and delete
the clip, or the down-arrow ADJUST button to abort the deletion. When a clip
is deleted, the next clip is then cued for deletion. Pressing DELETE CLIP, STOP
or any other button—while the “ARE YOU SURE” prompt is displayed—
cancels the delete operation. Pressing any button other than up-arrow
ADJUST always aborts deletion.
12
DELETE CLIP can be used in either the TRANSPORT menu or the MEDIA menu.
When pressed in the TRANSPORT menu with a current clip active (PLAY, REV,
FF, RECORD), the active mode will continue until the DELETE CLIP is confirmed.
DELETE CLIP works on both un-tagged clips and on tagged-for-deletion clips.
Within the MEDIA menu, clips can be tagged for deletion (TAG FOR DELETE)
and then DELETE CLIP used to delete all tagged clips. A rapid double-pressing
of DELETE CLIP results in display prompt of “DELETE TAGGED CLIPS?” and “ADJ
UP=YES, DOWN=NO”; if you then press ADJUST up-arrow, all tagged clips will
be deleted.
SLOT Button—Selects which storage is accessed by the system—either the storage
module slot or one of the Expresscard slots. Push SLOT repeatedly to cycle
through the 3 possible slots. This function is only active when in the “STOP”
mode and requires a “PRESS STOP TO CONFIRM” if not stopped. After you
select a slot, the system returns to the last selected clip and timecode for that
slot. If the media has been changed since the slot was last selected (physically
removed/media replaced), then the “first” clip will be “cued” to its start point. If
no media is present in the selected slot, the system will display “WARNING NO
MEDIA.” To clear the warning, either select another slot by pressing the SLOT
button again or insert media into the selected slot. If inserted media has any
issues, additional prompts may be displayed as appropriate such as:
“WARNING FRMT MEDIA” or “WARNING MEDIA LOW.”
Note: On power up, the storage module is the initial storage system selected and accessed
by Ki Pro.
SELECT Buttons—
In the CONFIG and MEDIA menus the SELECT buttons cycle through
parameters in the menus. In the STATUS menu(s) the SELECT buttons
have no function. In the TRANSPORT menu, the SELECT buttons select
clips and operate like “previous” and “next” buttons. When a clip is
selected it is cued to the beginning of the clip. Ordering and playback of clips is
based on timestamp order—not clip name.
ADJUST Buttons—In the CONFIG and MEDIA menus, the ADJUST buttons alter the
value of the parameter chosen by the SELECT buttons. In the STATUS menu(s)
the ADJUST buttons have no function. In the TRANSPORT menu, and in the
“STOP” mode, the ADJUST buttons single-step the current clip at a rate of one
frame per button-push (up=forward, down=reverse).
Disk Storage Module Release Button—Press and hold to physically release a
storage module from the unit; you must pull out the storage module while
pressing the button. This action prevents a storage module from accidental
removal while recording/playing. For safe removal of any media, either storage
module or Expresscards, the corresponding slot LED must be unlit. Note: the
ExpressCard/34 media is push-to-eject media and does not require this release
button to be pressed for removal.
Caution: removing any media with the slot LED lit, or while flashing, can result in
corrupted media or potential damage to the SSD, hard drive or ExpressCard/34 media.
Audio Input Level Adjust Knobs—Knobs underneath the VU meters allow you to
adjust the input levels for each of the two audio channels. To adjust a level,
press the knob inward and the knob will then pop out for easy adjustment. This
feature allows knobs to be recessed, preventing accidental changes in a
production environment.
ADJUSTSELECT

1
13
Ki Pro Installation and Operation Manual — Operator Side—Buttons and
Head Phone Volume Knob—To adjust headphone listening level, press the knob
inward and the knob will then pop out for easy adjustment—just like the audio
input level knobs.
Displays and Indicators
Alphanumeric and Graphics Display—Display details: The display is a 140x16 Graphics
display. Normally, it will be configured in a 2x20 character format. All menus are
designed to fit into this format.
Operational note: The display power consumption is directly related to the number
of pixels that are turned on and the intensity. Therefore, the default brightness is
an intensity value of 6 (on a scale of 1-8) and users will be able to diminish this
value as they see fit in order to conserve as much as 22% power consumption for
the VFD. The intensity setting of the VFD also correlates to the backlit buttons on
the unit (play, select up, select down, etc.)
During a period of 3 minutes of inactivity, the VFD will go to a screensaver mode
and the buttons backlights will turn off.
VU Meters—7-segment LEDs show audio input levels for the 2 audio channels
(respectively). Knobs underneath the VU meters allow you to adjust the input
levels independently to prevent clipping and ensure proper signal amplitude.
Green—audio source signal level is in the “safe” area (no clipping). Vertically, the
green LEDs also show the signal strength, so you can see if the signal level is low.
Generally, it’s preferred to have the signal near the top of the green or even
occasionally peaking into the yellow LEDs.
Yellow—audio source signal levels are at the peak edge of the safe area before
clipping will occur.
Red—audio source amplitude is too hot and the signal is clipping at it’s signal
peaks. You should reduce the input gain at its source (camera, mixer or source
equipment supplying the signal).
ExpressCard Slot LED Status Indicators—Each of the 3 media slots (S1, S2, D1) have an
associated LED status indicator. The following states for the LED indicator denote
the status of the media:
LED lit/on: selected media
LED unlit/off: inactive media, okay to eject or no media inserted
LED flashing: recording in progress
Disk Storage Module LED Status Indicator—The following states for the LED indicator
denote the status of the media:
LED lit/on: selected media
LED unlit/off: inactive media, okay to eject or no media inserted
LED flashing: recording in progress
14
Other Front Panel Features
ExpressCard Memory Slots (2)—Both of these slots support ExpressCard/34 (34 mm
wide) memory cards (not ExpressCard/54). Cards must be very fast to be used
with Ki Pro. Visit the Ki Pro support page on our website for a list of AJA-qualified
cards:
http://www.aja.com/support/ki-pro/ki-pro.php
Head Phone Jack—1/8" (3.5mm) miniature stereo TRS connection for standard stereo
headphones.
Connector Side
Connect any camcorder, camera, or audio source—digital or audio—regardless of
brand or format, to Ki Pro’s many connectors. The Connector side of Ki Pro contains
almost all of the available connections, protected by handles that extend out for easy
grip while protecting the connectors when out of the exoskeleton. On the Back Side
of the unit is a single power connector for supplying the 12-Volt DC operating
voltage (see installation later in this chapter).
The function of Ki Pro’s inputs and outputs depend on the operational mode. Ki Pro’s
active input (the one to be recorded) is selected by front panel, web browser, or WiFi
browser action. Ki Pro’s outputs are active all the time. In other words, the same
output video appears simultaneously on the HDMI, SDI, component, and composite
outputs. (Note: composite is an SD only format, so it will not output HD material.) This
method of operation allows simultaneous connection to source devices, onset
monitoring displays, and audio equipment.
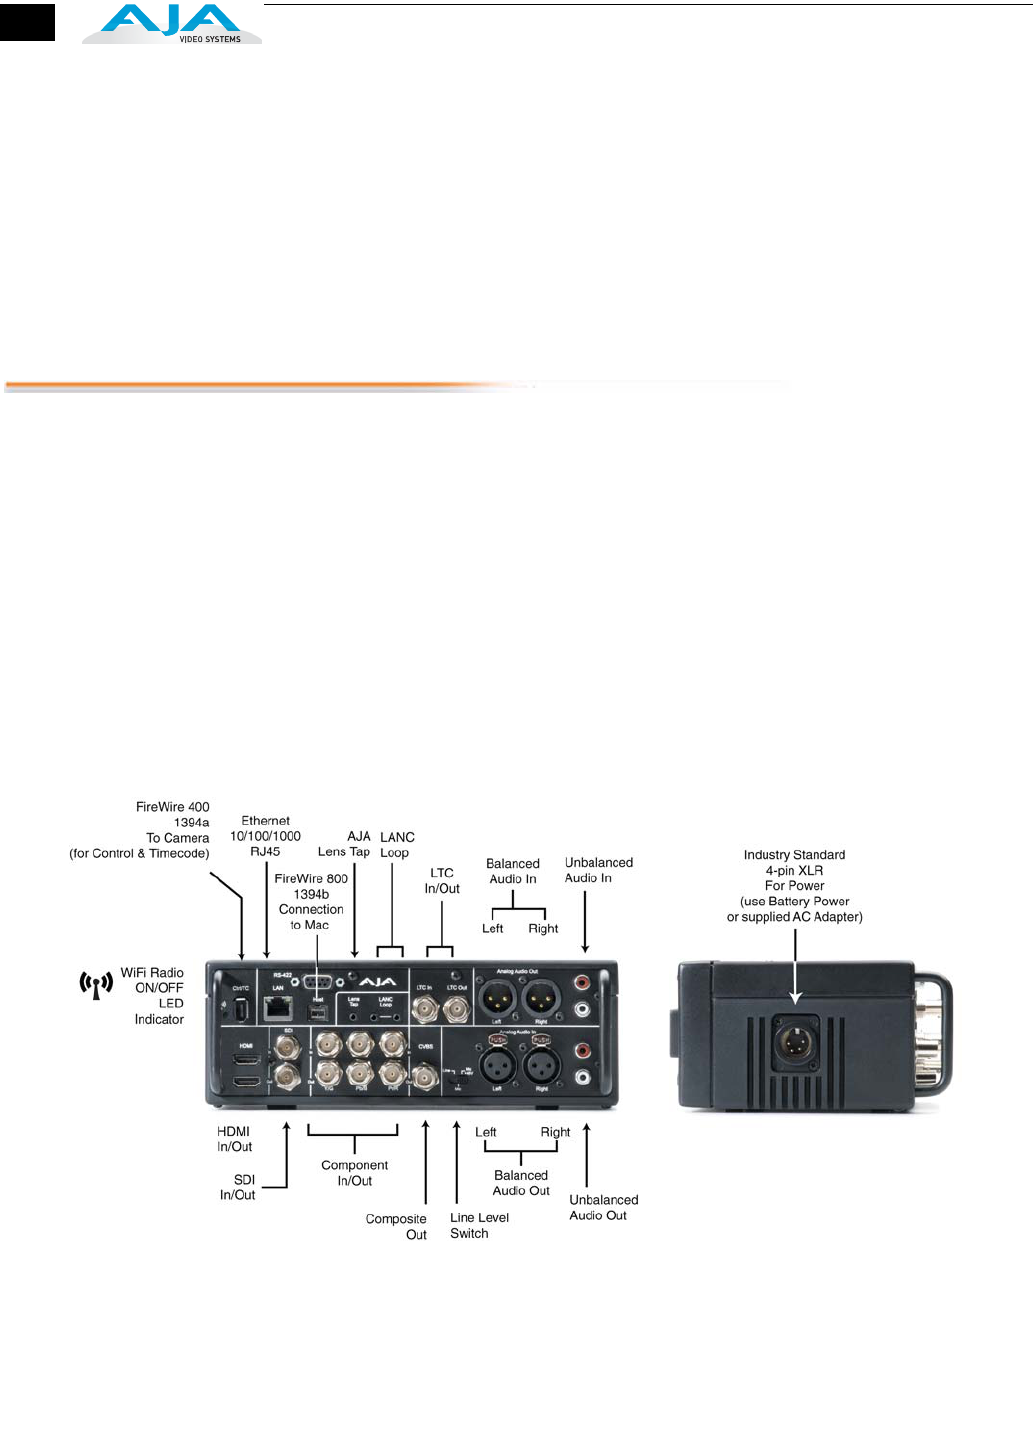
Ki Pro Connector Side and Back Side
Connections • HDMI—v1.1 video with embedded audio (2 channels input, 8 channels output),
1x connector for input and 1x connector for output.
1
15
Ki Pro Installation and Operation Manual — Connector Side
• HD/SD-SDI Input and Output, with 8 channel embedded audio (2x BNC)
• HD/SD Component YPbPr/RGB Video, 3x BNCs for input, and 3x BNCs for output.
• Composite video output (CVBS, 1x BNC)
• 2 channel balanced analog audio Input and Output (4x XLR RCA)
• 2 channel unbalanced analog audio Input and Output (4x RCA)
• Line Level Switch (analog audio input level)
• LTC Input and Output (2x BNC)
• Lens Tap
• LANC
• 1394a FireWire port (connection to camera for timecode and control)
• 1394b FireWire port (connection to host computer)
• LED Indicator for IEEE 802.11 Radio ON/OFF
• 10/100/1000 Ethernet LAN
• 9 pin serial port (for future use)
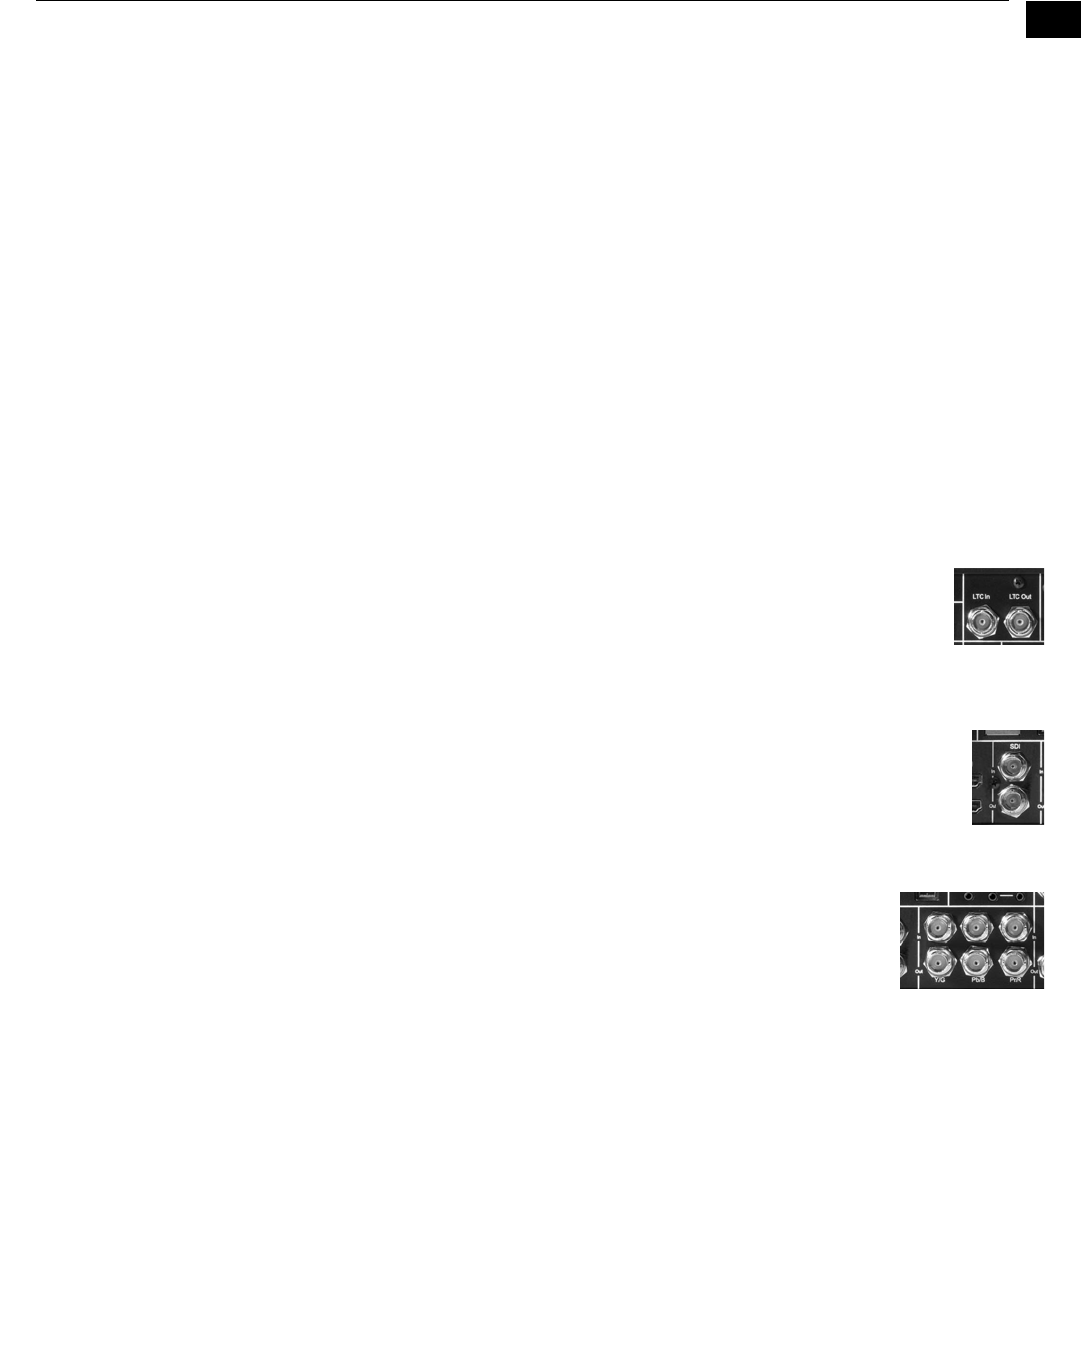
LTC Timecode Input And Output
Two BNCs provide connections to the house LTC timecode generator or
source. Connections are high impedance. One BNC is for input and the
other for output.
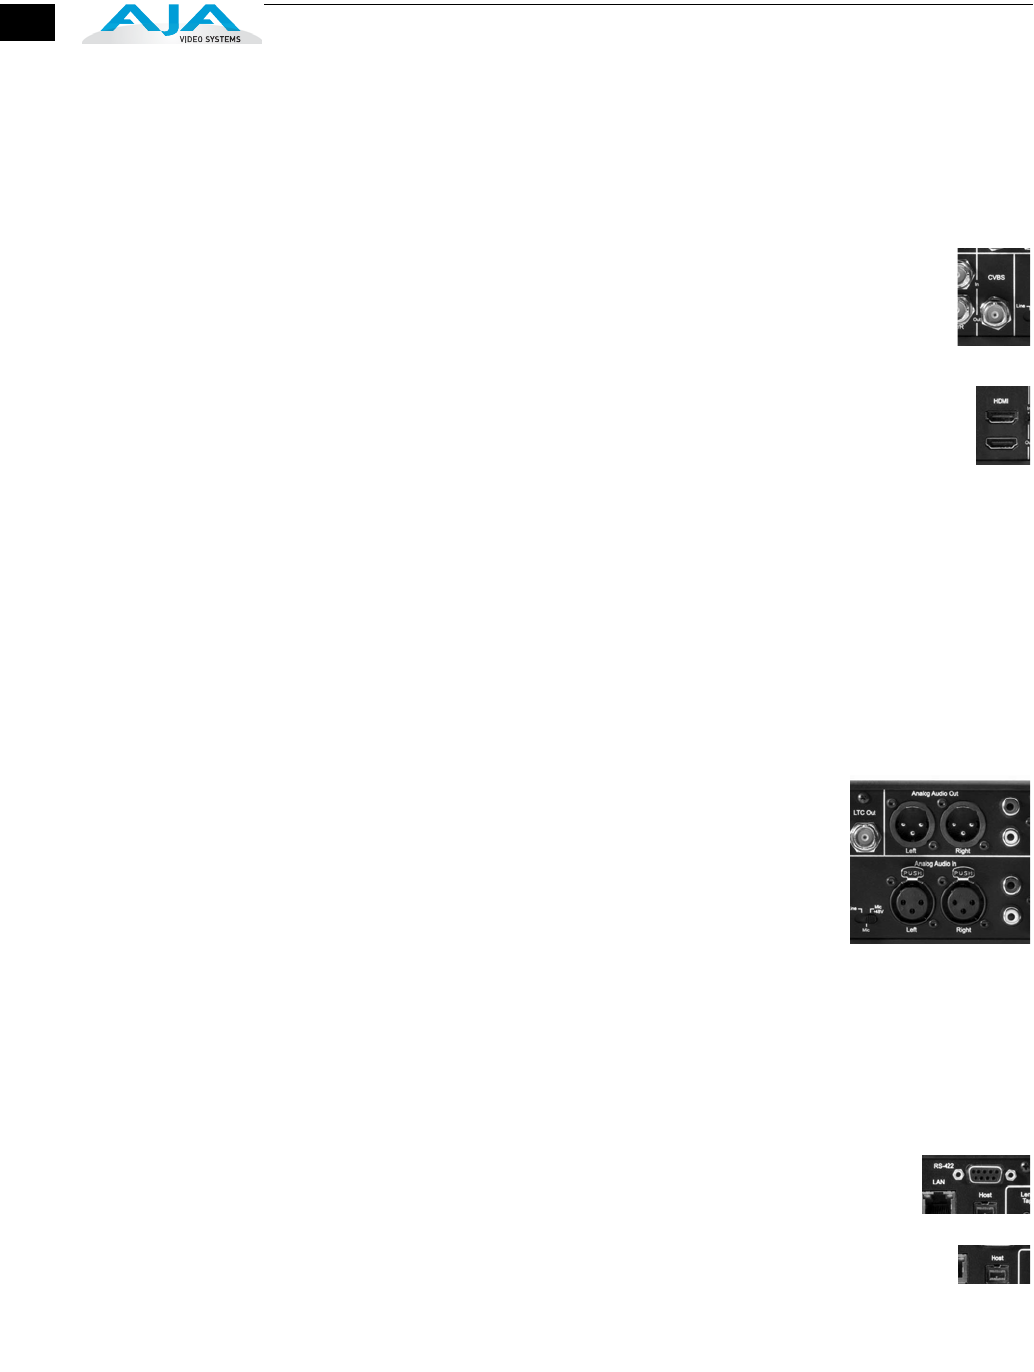
SDI Input and Outputs
Two BNC connectors are provided for SDI input and output. SDI input and
output supports SD-SDI and HD-SDI video and embedded 24-bit digital
audio. If your camera has multiple outputs, look to see if it has SDI I/O, and use
it where possible for the highest quality.
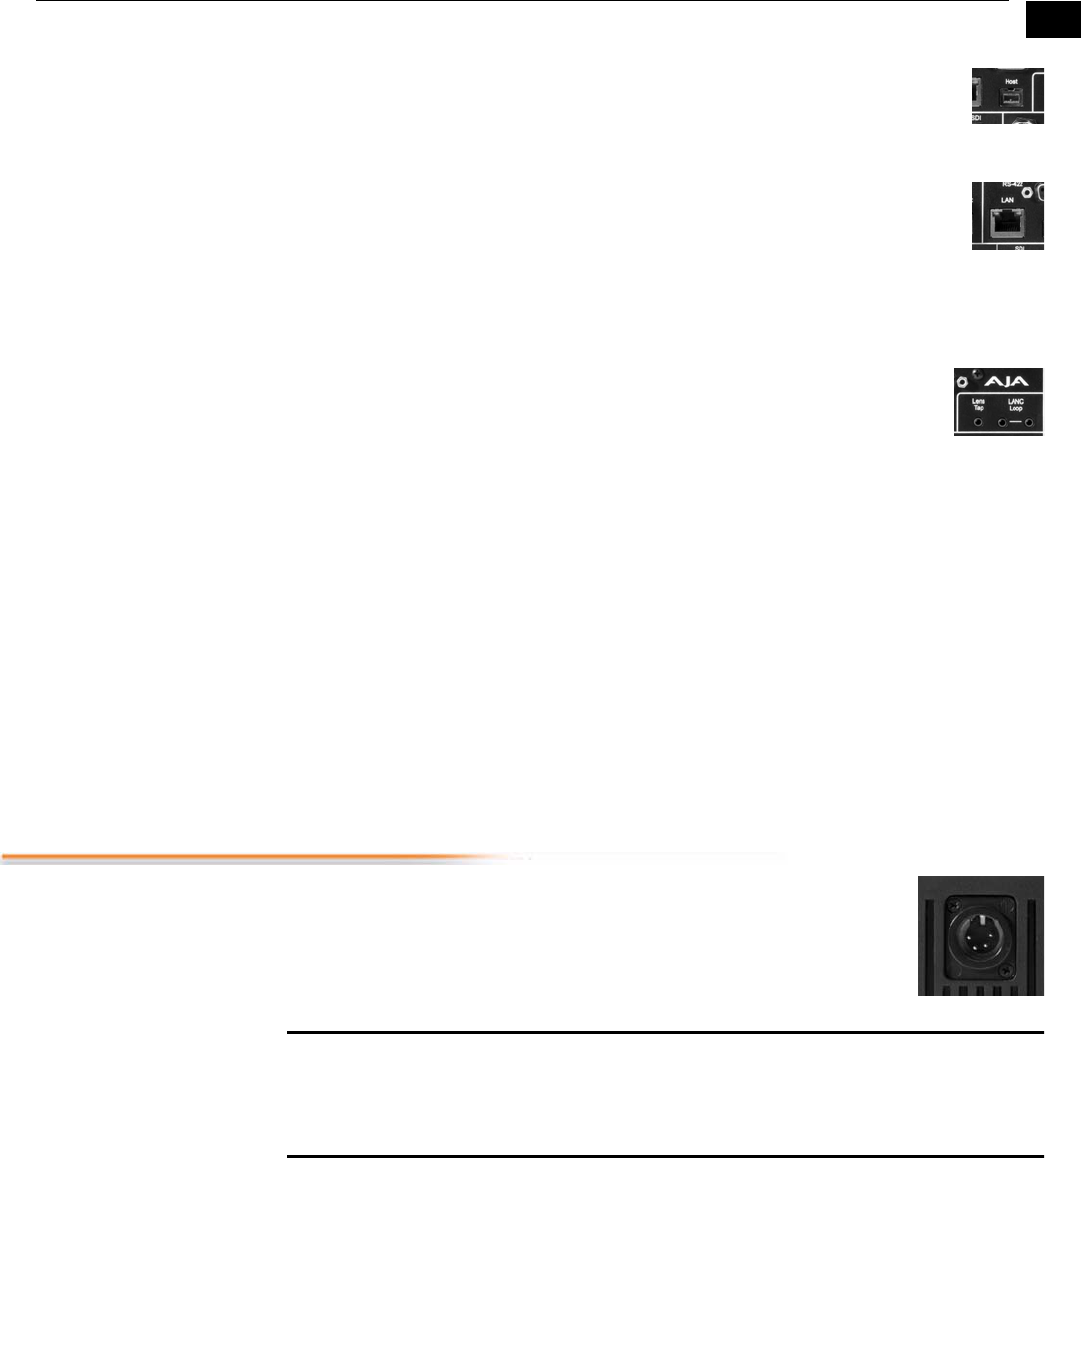
Component YPbPr
Connect component YPbPr video cables from a VTR, Camera, or other
source to the three YPbPr input BNCs: Y/G, Pr/R, and Pb/B. Then
connect the YPbPr Out BNCs to a monitor, or other component
device. Component input video signals are A/D (input) converted (10-
bit). Similarly, component output video signals are D/A converted (10-bit). Component
video signals are higher quality than composite.
A Note About RGB—Although RGB is used less in today’s video systems, Ki Pro
supports it at both input and output. Because Ki Pro’s (and SMPTE SDI) native
format is YPbPr, AJA recommends the use of YPbPr whenever possible. Although
component video monitors often have RGB inputs, it’s better to use YPbPr when
the monitor supports it. The YPbPr format provides “headroom” for “superwhite”
and “superblack”—and these video levels will be clipped when transcoding to RGB.
Also, the RGB/YPbPr transcoding involves a level translation that results in
mathematical round-off error.
16
A Note About YPbPr—Component Video, or YPbPr, has been given several names
over time. YUV, Y/R-Y/B-Y, and YCbCr, are just some examples. Although these
various formats have some differences in levels, they are all basically the same. Ki
Pro supports three different types of YPbPr: SMPTE/EBU N10, Betacam (NTSC),
and Betacam (NTSC Japan). These three formats differ in level only.
CVBS Composite NTSC/PAL Output
One BNC connector supplies composite NTSC or PAL output. Connect the
CVBS Out BNC to a monitor, or other Composite video device. Composite
video signals are D/A (output) converted (10-bit).
HDMI
Two HDMI connectors provide for input and output of HDMI compatible
video (version 1.1) and multi-channel embedded audio (2 input/8 output).
HDCP is not supported on either input or output. The HDMI input is designed
to support long cable runs: up to 100 ft when using 22 or 24AWG HDMI cable, or up
to 50 ft using 28 or 30AWG HDMI cable. The HDMI output supports standard HDMI
cables only.
Formats supported (video only):
525i, 625i, 720p 50/59.94/60, and 1080i 50/59.94/60 are supported on input
and output.
1080p23.98, 1080p24, 1080p25, 1080p29.97, and 1080p30 are supported for
output only.
Analog 2 Channel Balanced Audio Input and Output
Four XLRs, 2 female for input and 2 male for output, provide 2
channels of balanced audio. Audio is high-quality 24-bit A/D
input and D/A output at 48kHz. Level adjustments are made via
software or a switch for line-level, microphone with phantom
power (condenser mic), or microphone without phantom
power (dynamic mic).
Analog 2 Channel Unbalanced Audio Input and Output
Two RCA connectors provide an unbalanced stereo audio input pair for use with
consumer camcorders, VTR/VCRs and other A/V devices. For output, two RCA
connectors provide an unbalanced stereo audio output pair for driving inexpensive
audio monitoring systems.
9-pin DE9 Connector
Reserved for future use.
Host (FireWire 800)
IEEE 1394b FireWire™ connector for connecting to the 800 Mb/s FireWire
connector on an Apple Mac Pro or MacBook Pro for passing data. This connector does
not support connection to any other FireWire devices such as cameras or hard drives.
1
17
Ki Pro Installation and Operation Manual — Power Connector (back of unit)
CTRL/TC (FireWire 400)
IEEE 1394a FireWire™ connector for connecting Ki Pro to a camera for
timecode control. This connector does not support connection to hard drives.
Ethernet
An RJ45 connector provides a 10/100/1000 Ethernet port for connecting Ki
Pro directly to a computer or Ethernet hub or switch for connecting to a LAN.
Ki Pro is compatible with CAT-5 straight-through or cross-over Ethernet cables,
automatically detecting which is used. Once connected and properly configured, Ki Pro
can then be controlled by a web browser on the LAN.
LANC Loop
This connector accepts a LANC plug (2.5mm 3-conductor TRS jack) and then
loops it through to a second connector (loop). LANC or Local Application
Control Bus System (sometimes called Control-L) is a Sony protocol for synchronizing
cameras. Available on many brands of cameras, LANC enables accessories like Tripods
with a control handle to control camera and Ki Pro record/stop.
Lens Tap
This connector supports an optional “Lens Tap” kit AJA offers for controlling Ki Pro. A
proprietary AJA cable connects between the camera body and the lens, intercepting
the camera’s own interconnecting cable. This allows the Ki Pro transport control
(record/stop) to happen by simply operating the shutter/record button on the camera.
LED Indicator for IEEE 802.11 Radio
This LED shows the status of the internal 802.11 radio used to transmit and receive WiFi
data. When illuminated, the LED shows the radio is ON.
Power Connector (back of unit)
On the back of Ki Pro is a standard 4-pin male XLR connector for
supplying 12-Volt DC power to the unit. You can use either the supplied
AC Adapter or furnish your own battery source. Since the connector is
an industry standard pinout, choices are varied and flexible. Many 3rd-
party vendors offer products using this standardized power connector.
Warning: Ki Pro has no user-serviceable parts. An internal fuse protects the circuitry;
however, it can only be replaced by AJA service centers or AJA dealers. To remove power
from the unit, remove power from the 4-pin XLR power connector to ensure
disconnection.
18
Storage
Record hours of media to a portable removable hard-drive storage module with
built-in FireWire 800, or to flash-based ExpressCard/34 cards, that both instantly
mount on your OSX desktop for immediate editing and file access. Ki Pro ships with a
250GB hard disk that can store up to 2 hours of Apple Pro Res media. For additional
storage you can buy a variety of storage types.
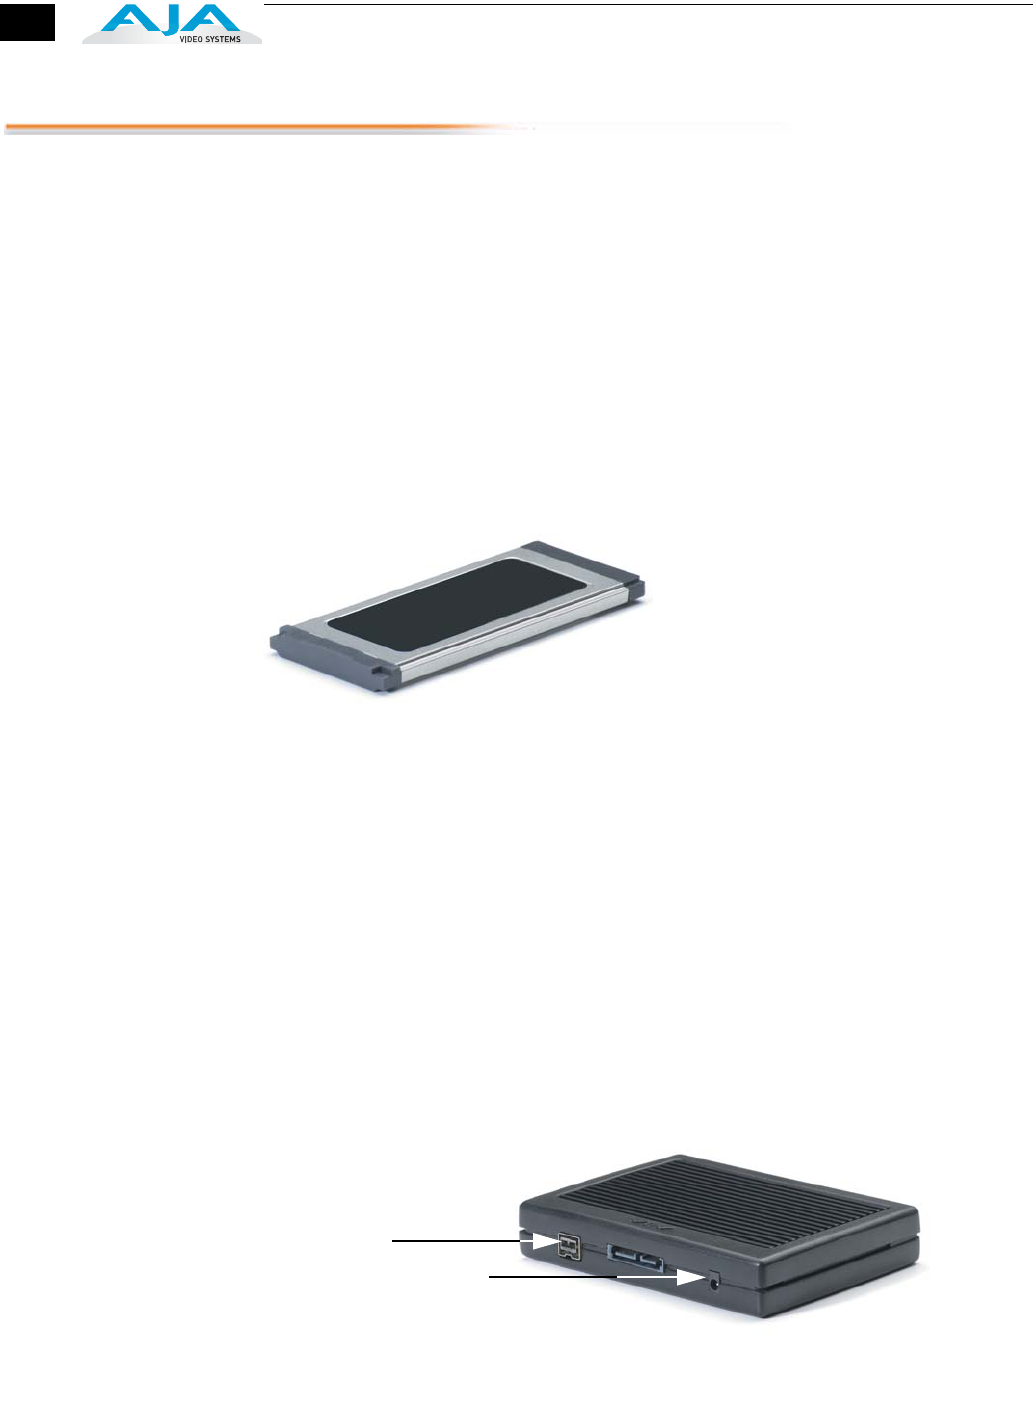
ExpressCard/34
Memory Cards
Although AJA doesn’t make or sell ExpressCard/34 memory cards, Ki Pro provides
two slots where they can be used. With the rapid industry development of these
cards and many manufacturers providing them, brands and models will change
often. AJA will post on the Ki Pro support web page which brands AJA has tested and
found to work acceptably. Since cards have to be fast enough to sustain throughput
without dropping frames, not all ExpressCard/34 cards will qualify for Ki Pro usage.
Search here to find list of qualified cards:
http://www.aja.com/support/ki-pro/ki-pro.php
ExpressCard/34 Memory Card
Removable Storage
Modules (HDD or
SSD)
Although the Ki Pro comes standard with a removable 250GB SATA HDD Storage
Module, an optional SDD Storage Module is also available. The Ki Pro Solid State
Storage Module (SSD) is recommended for mobile environments where shock-proof
sturdiness may be needed. The Ki Pro SSD Storage Module offers the ultimate in
media reliability.
You may also choose to purchase extra HDD or SSD Storage Modules so you can
quickly load and unload media from the Ki Pro unit while onset.
Storage Modules can be powered via the FireWire 800 cable, or via an AC adapter
(supplied).
Check with your AJA dealer or the AJA website for Storage Module offerings as
capacities and models may change.
Storage Module (HDD and SSD look identical)
Firewire 800
Connector
Power connector
(AC Adapter)

1
19
Ki Pro Installation and Operation Manual — Installation
Selecting Media To select which storage device is used for media recording and playback, press the
SLOT button on the bottom right side of Ki Pro (operator side). The currently selected
storage device will have a lit green LED. Pressing the SLOT button switches to the next
available device from the possible three (storage module, ExpressCard 1 and
ExpressCard 2).
This function is only active when in “STOP” mode and requires a “PRESS STOP TO
CONFIRM” if not stopped. After you select a slot, the system returns to the last selected
clip and timecode for that slot. If the media has been changed since the slot was last
selected (physically removed/media replaced), then the “first” clip will be “cued” to its
start point. If no media is present in the selected slot, the system will display “WARNING
NO MEDIA.” To clear the warning, either select another slot by pressing the SLOT button
again or insert media into the selected slot. If inserted media has any issues, additional
prompts may be displayed as appropriate such as: “WARNING FRMT MEDIA” or
“WARNING MEDIA LOW.”
Note: On power up, the storage module is the initial storage system selected and accessed by
Ki Pro.
Formatting Media To reformat storage media, it must first be selected using the SLOT button (see
previous topic). Once selected, follow these steps:
1. Press the STOP button
2. Press the MEDIA button
3. Press SELECT (up or down) repeatedly until you see the menu 16.1 Format Media.
4. Press ADJUST up arrow. Ki Pro will display “ERASE MEDIA nn? (where “nn” is the
storage device D1 for storage module or S1 for the top ExpressCard, or S2 for the
bottom ExpressCard). Press the ADJUST up arrow button. Ki Pro will display
“CONFIRM ERASE”—press and hold the ADJUST up arrow button for 2 seconds or
longer and then formatting will begin. Ki Pro will display progress and when
done, you’ll see the 16.1 Format Media menu once again.
Installation
The following topic details set up and installation of Ki Pro. Their are two different ways
to set up and use the Ki Pro portable recorder:
• Stand-alone use
• Camera and mounting with optional Exoskeleton (with or without a tripod)
Software setup is the same for both uses. Choices you will make include how Ki Pro will
be controlled (front panel, 802.11 wireless, or Ethernet & web-browser) and the
physical system requirements for your application (camera mount or not, video and
audio monitoring choices, and media workflows). First we’ll discuss mounting methods
and then follow up with software configuration and setup.
20
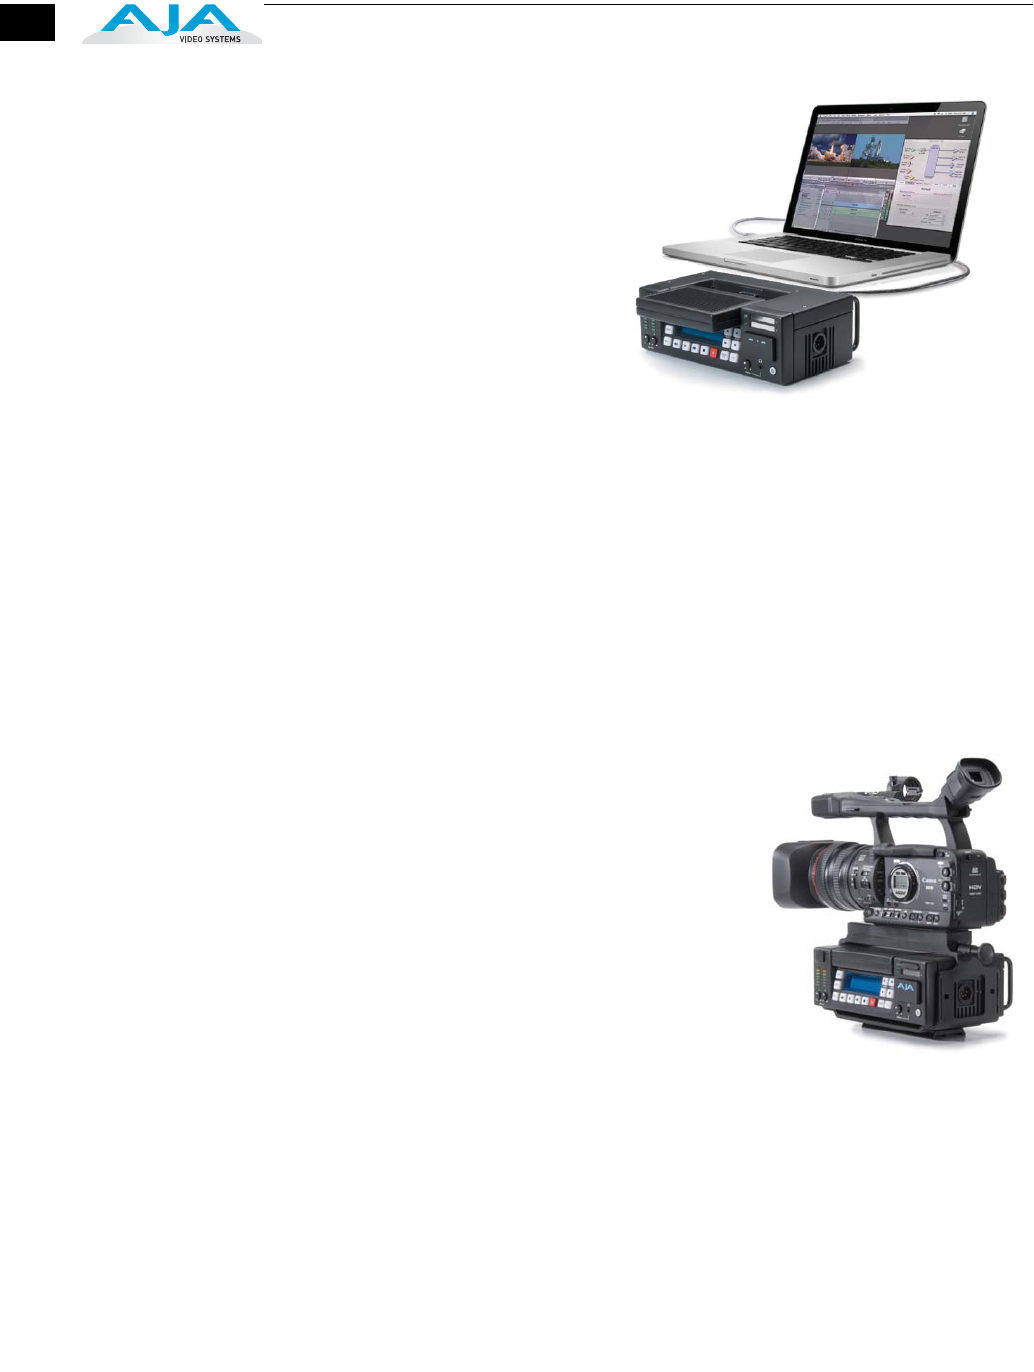
Stand-alone Usage In stand-alone use, Ki Pro is simply a
box that connects to the video and
audio output connector(s) from a
camera or camcorder, recording
whatever media is output. Here are
some typical workflows and
applications:
• Recording a live video feed from
a security camera; Ki Pro is
rackmounted, receiving
component video input.
• Recording a corporate video live
from a camera; Ki Pro sits on a
computer work desk receiving component video input and audio from a mixer.
• Recording on location, Ki Pro is truck-mounted, powered off 12 volt battery.
• Desk mounted in an AV media library, recording legacy material from a variety of
decks, formats and sources, converting dissimilar media to standardized Apple
Pro Res for archival.
• Recording live house-of-worship services, Ki Pro sits on a shelf receiving a feed
from a wall mounted remote camera and audio feed from house mixer.
• Recording live music at a remote location, Ki Pro receives video feed from event
producer’s switcher and picks up audio from a stereo pair of phantom-powered
condenser microphones.
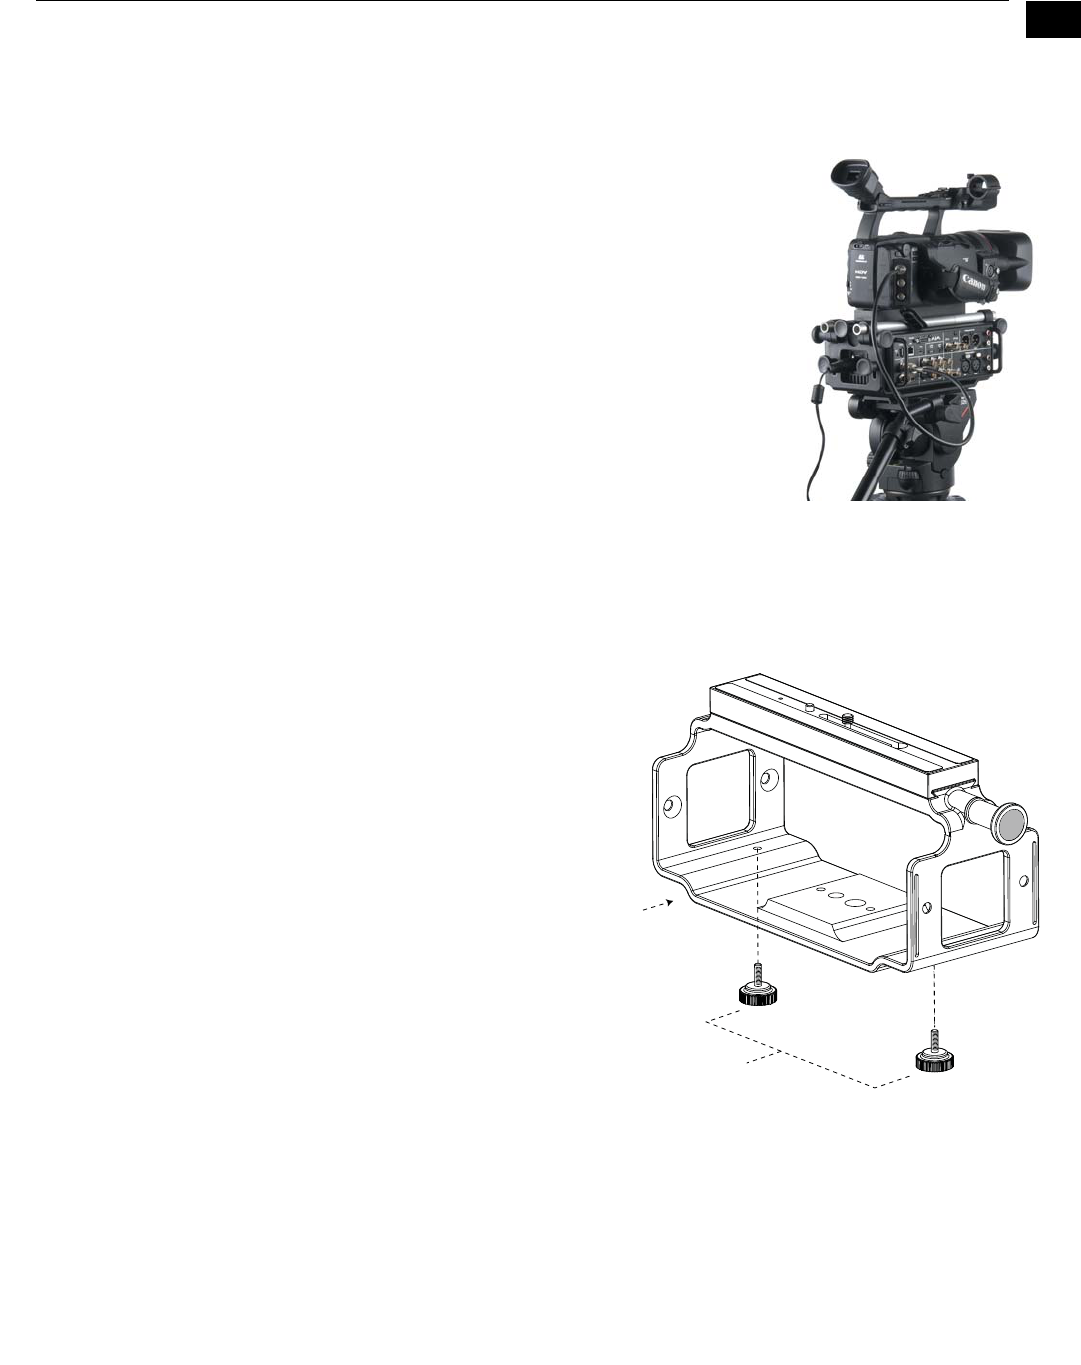
Camera Mounting
with Exoskeleton
Ki Pro’s applications become even wider,
when you add in the optional Exoskeleton
that provides for mounting of both a
camera and/or a tripod. Here are some
typical workflows and applications:
• Handheld camcorder with Ki Pro
mounted underneath and a battery
pack used for live sports—recorded
media is ready to edit immediately.
• Broadcast usage with Ki Pro’s
hardware-based conversion
capability to take camera’s (1080 or
720) input and realtime convert to
another format.
Ki Pro with Exoskeleton and
camera on mount
1
21
Ki Pro Installation and Operation Manual — Installation
• Onset application: camera operator controls
shooting via optional AJA lens tap—
whenever shutter is pressed, recording/stop
occurs. An assistant remotely names clips
and content using an iPhone communicating
with Ki Pro wirelessly.
• Multi-camera shoot, with different brands of
cameras, different internal camera codecs, all
mounted with Ki Pros and delivering the
same format of media: Apple Pro Res 422,
ready to edit immediately after filming. No
log and capture necessary.
When mounting a camera inside the Exoskeleton
frame, all Ki Pro controls will face the same
direction as the camera controls, so the camera
operator can easily make adjustments. Power to Ki Pro exits on the same side as the
back of the camera so cables don’t clutter the lens side of the setup.
Exoskeleton Setup and Adjustment
The Exoskeleton option
has two configurations.
As it comes out of the
box, it contains an
adjustable camera
mount on top, a plate
on the bottom for
tripod mounting, and
two thumbscrews for
securing the Ki Pro unit
to the Exoskeleton.
An option that can be
added is an accessory
rod kit that adds plates
to each side of the
Exoskeleton frame so
that 15mm user-
supplied rods can be
used with the camera.
Rods are handy for
mounting battery
packs, matte boxes, and a wide variety of other options.
Ki Pro with Exoskeleton and
optional endplates with
user-supplied accessory rods
Base Ki Pro Exoskeleton
chassis with camera mount
Knurled thumbscrews
secure Ki Pro chassis
to Exoskeleton
22
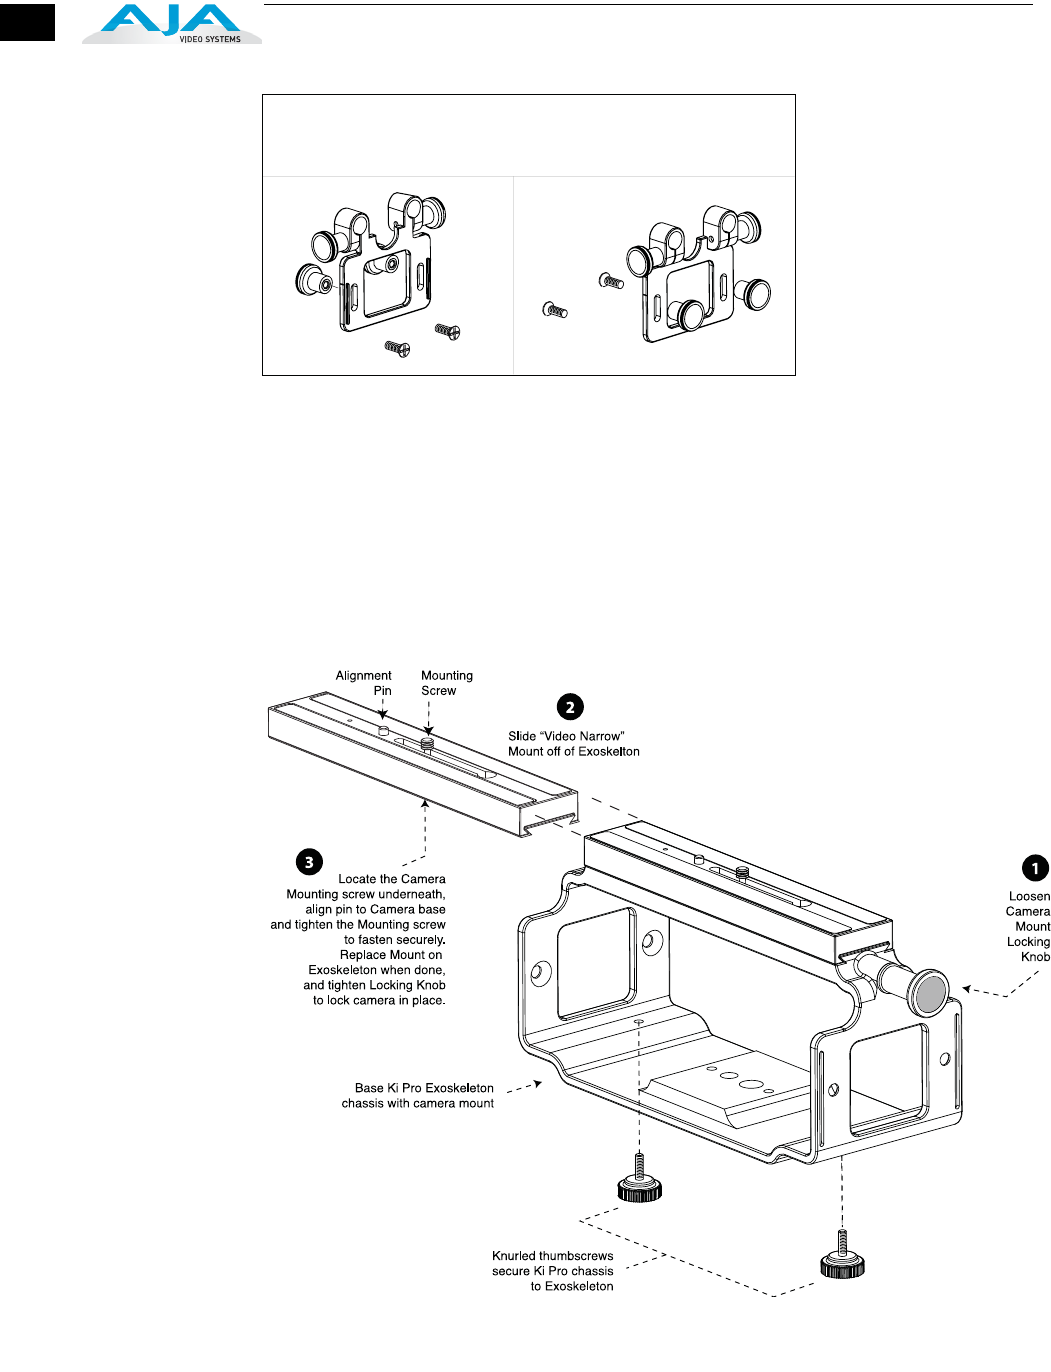
For most uses with an Exoskeleton, you’ll want to first mount the camera or
camcorder to the adjustable mount on top, before sliding in the Ki Pro unit and
locking it. To mount a camera, follow these steps:
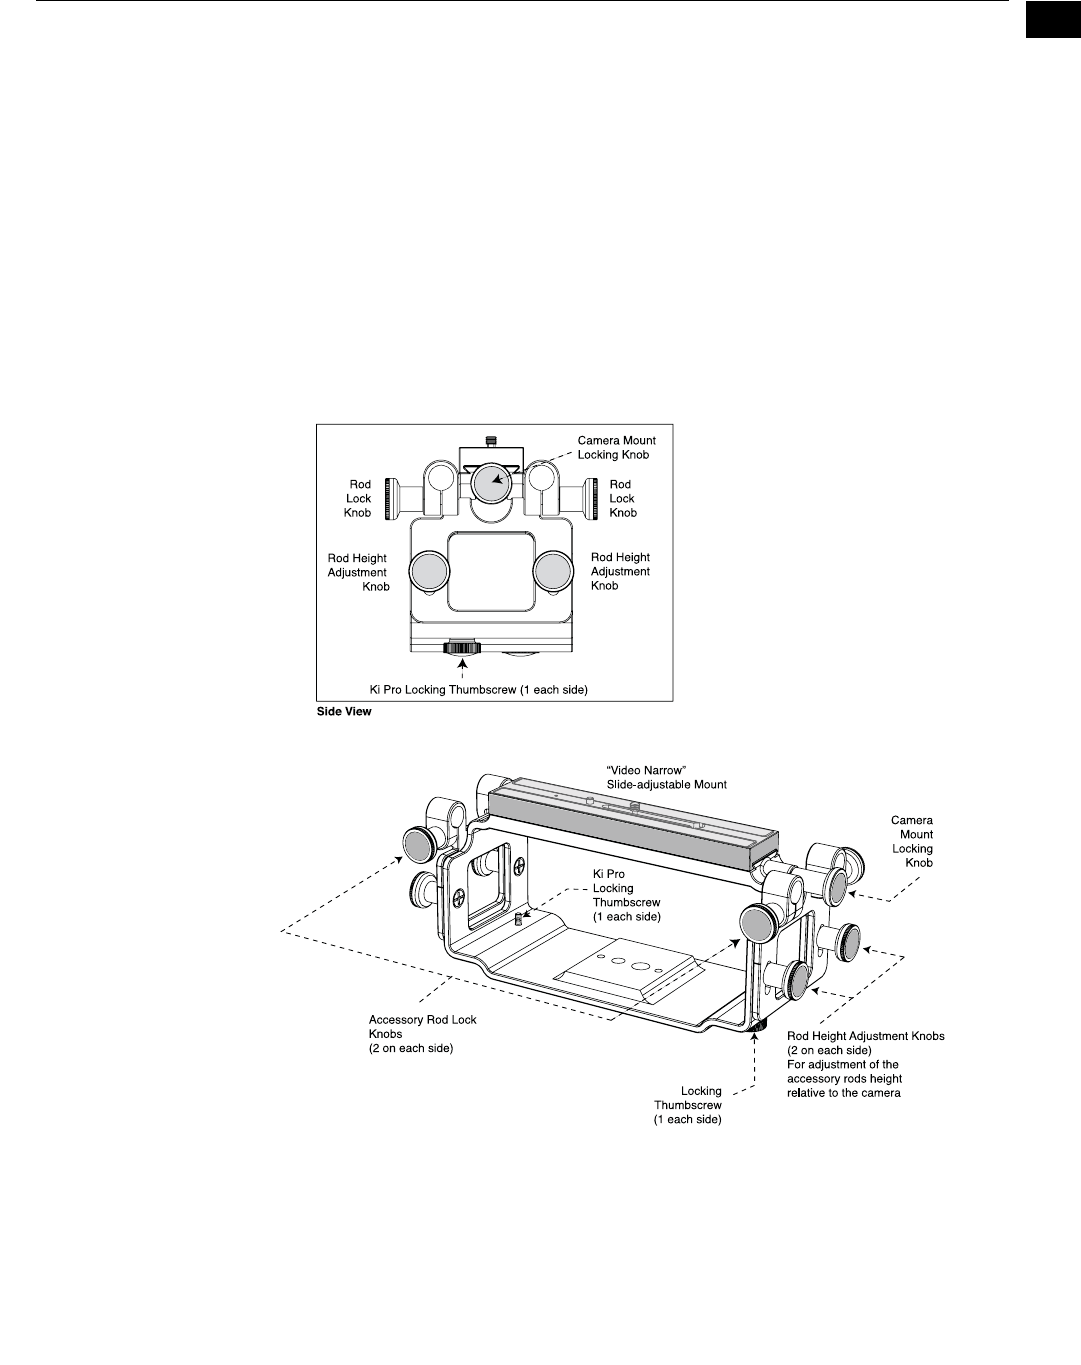
1. Locate the camera mount locking knob on the Exoskeleton and loosen it.
2. Slide the camera mount off of the mounting rail.
3. Place the camera on the mount, orienting the mount’s alignment pin to
camera’s corresponding pin socket. Once aligned, tighten the mounting screw
to secure the camera.
4. Slide the camera and mount back on the rail and tighten the locking knob.
Exoskeleton Camera Mounting
Optional Rod Accessory Kit Assembly
Kit components:
2 endplates
4 screws with matching Knobs
(Note: 15mm rods to be supplied by customer)
1
23
Ki Pro Installation and Operation Manual — Installation
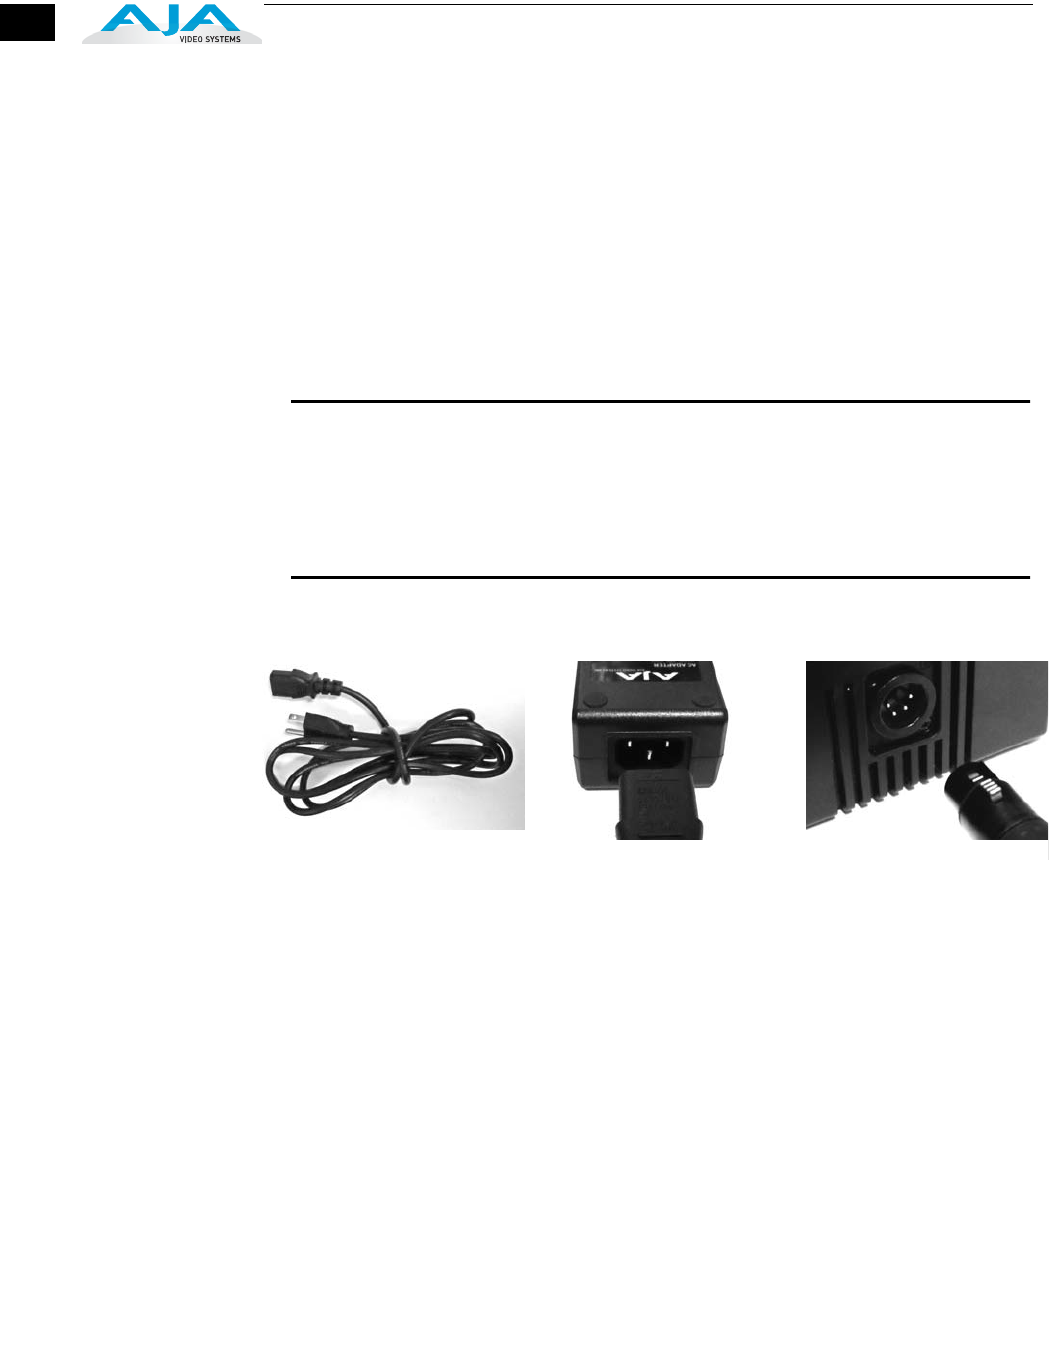
Attaching the rod accessory kit is simple:
1. Place an endplate from the kit on the outside of the Exoskeleton frame, aligning
it’s two screw slots with the two screw holes in the frame.
2. Insert one of the supplied screws from the inside of the frame through the frame
hole and slot. While holding the screw from the inside, screw one of the supplied
knobs on the threaded end of the screw.
3. Repeat step 2 for each of the 4 knobs and screws.
Once the kit is installed, you can then loosen the rod lock knobs, insert user-supplied
15mm accessory rods, and then mount any desired accessories.
To raise or lower the rods, simply loosen the rod height adjustment knobs (the ones
you installed in step 2), lift the rods to the desired height, and then tighten the knobs
once complete.
Exoskeleton Endplates and Rod Height Adjustment
24
Applying Power The installation and set up of a Ki Pro is straight-forward. If you’ll be controlling the
unit from the front panel buttons and display, it’s ready right out of the box. Just
cable the system’s audio and video sources, VTR(s), monitors, and audio equipment,
mount the Ki Pro unit as desired, and begin recording. However, if you wish to control
Ki Pro from a web browser or 802.11 device (iPhone etc.), then there are additional
configuration steps necessary.
Using AC Power
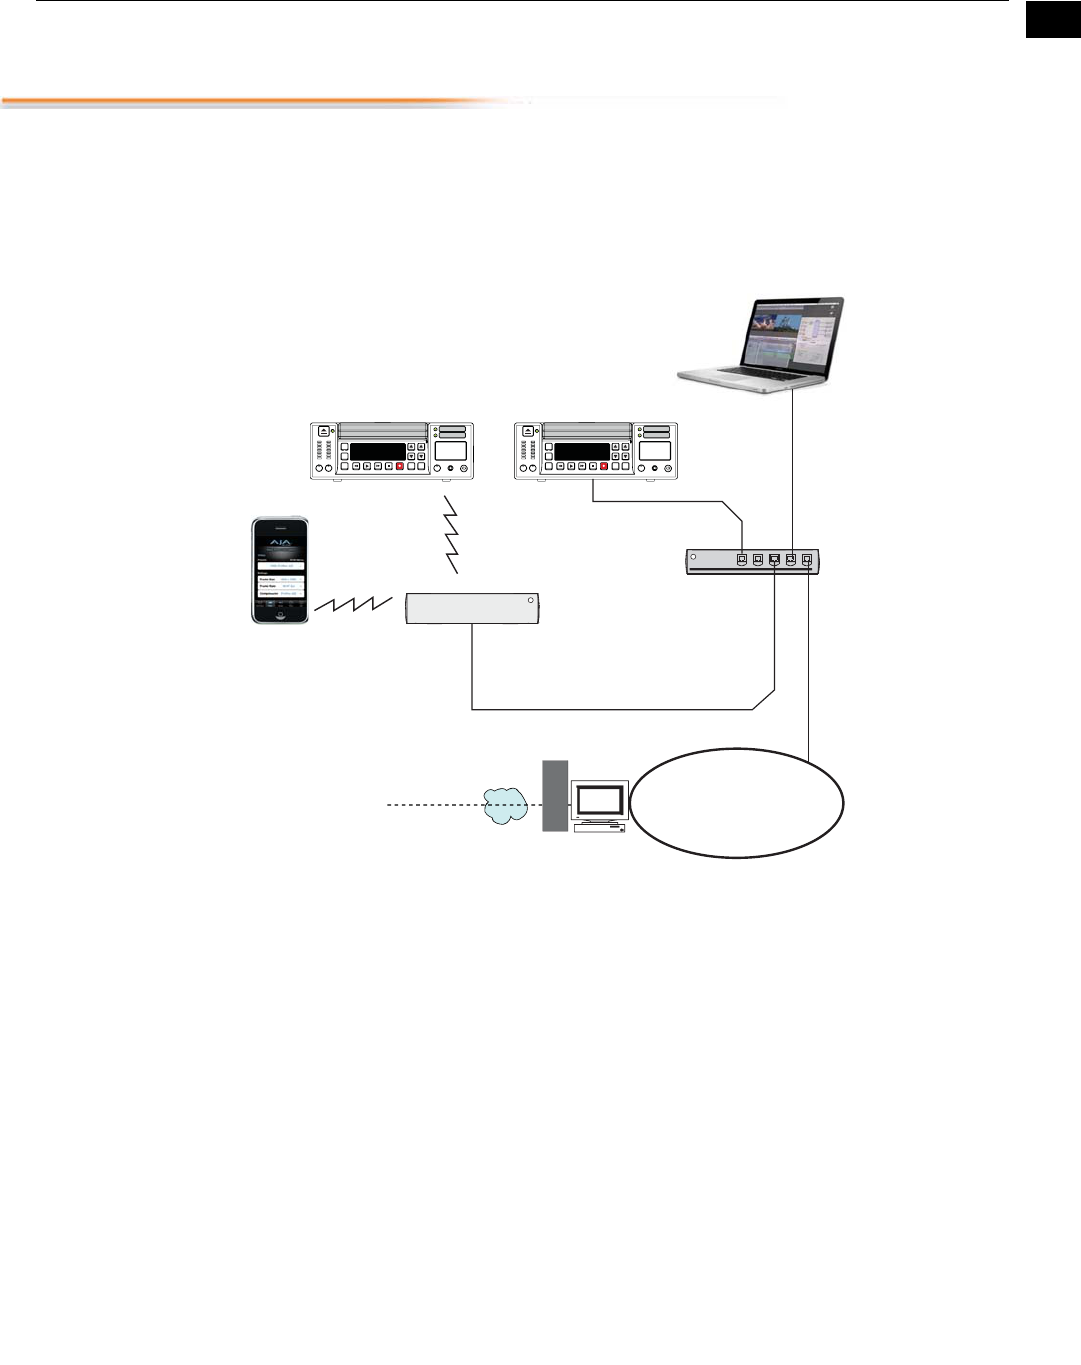
To begin using Ki Pro, plug the 4-pin XLR on the supplied AC adapter into the XLR
power socket on the back of Ki Pro. Then plug the AC adapters line cord into 110 VAC
or 220 VAC (the supply is autosensing).
Warning: Do not open the chassis. There are no user-serviceable parts inside.
Hazardous voltage is present inside the unit, presenting a risk of electric shock or
serious personal injury. Opening the chassis will void the warranty unless performed
by an AJA service center or licensed facility. Remove the supplied AC line cord from
mains power when moving the unit. Do not defeat the safety purpose of the
grounding-type plug.
Using DC Power
1. Locate Line Cord 2. Insert into DC supply 3. Insert 4-pin XLR into
12Vdc Ki Pro power socke
t
1
25
Ki Pro Installation and Operation Manual — Remote Network Control
Remote Network Control
Topics Here TBD.
WiFi versus wired-Ethernet
.
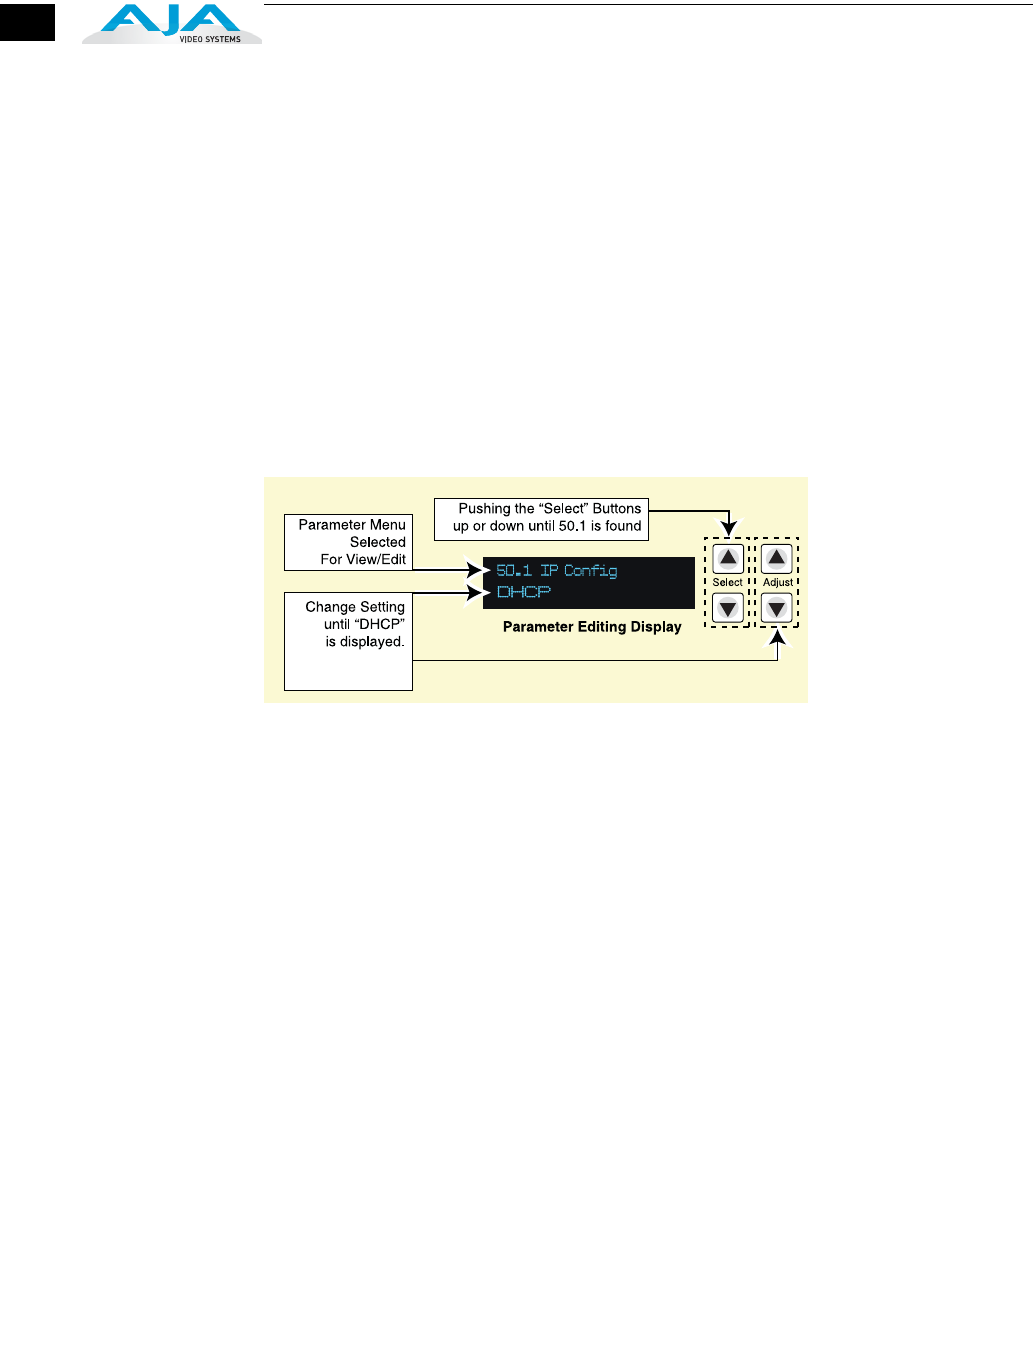
Ki Pro Networking Example
Network
Connections
Ki Pro can be networked directly to a MacBook Pro or Mac using a single Ethernet cable
(straight or cross-over)—or it can be connected to a local area network (LAN). If
wireless networking is desired, Ki Pro can also be controlled via an iPhone or laptop
browser using 802.11 and communicating through a wireless access point (Airport).
In hard-wired configurations, Ki Pro connects via its 10/100/100 Base-TX Ethernet
connector. In a direct connection, you simply connect the Ki Pro to an Ethernet-
equipped computer having a browser using a Cat-5 cable. If connecting via a LAN, you
then connect the Ki Pro’s Ethernet connector to a hub or switch on the LAN. A LAN is a
shared network that includes other Ethernet devices all attached via a hub or digital
switch. LANs may be divided into zones separated by software or hardware routers.
Devices on a LAN have IP addresses which may be fixed and permanent, or dynamically
assigned by the network (DHCP). When attaching Ki Pro to a LAN, you should first talk
to your network administrator and find out how they want it connected (static IP or
DHCP). Your IT department will be able to supply the information you need to install Ki
Pro on a LAN.
10/100/1000 Base-T
Firewall
& Router
WAN/ISP
Hub
Airport
Wireless
Router
iPhone
Ki Pro Wireless Connection Ki Pro Wired Connectionion
802.11
wireless
10/100 Base-T
LAN
STATUS
DELETE
CLIP SLOT
ADJUSTSELECT
CONFIG
MEDIA
CLIP xxxxxxxx
REEL xxx
1 4% S
00:01:21:13
STATUS
DELETE
CLIP SLOT
ADJUSTSELECT
CONFIG
MEDIA
CLIP xxxxxxxx
REEL xxx
1 4% S
00:01:21:13
io
n
Laptop
w/Web Browser
for Remote
Control
26
TCP/IP Information
You’ll Need
If your LAN has a DHCP server that assigns IP addresses dynamically, then you don’t
have to configure anything (Ki Pro defaults to DHCP). If for some reason your IT
administrator prefers an assigned IP address that is fixed (called a “static IP), then get
the IP address—you’ll be entering it in the “IP CONFIG parameter.” If your LAN
requires static IP addresses, then also ask your IT administrator for the Subnet Mask
and default gateway IP address (your LAN’s internet router). The following two topics
discuss two different ways to set up Ki Pro: via DHCP or via a static IP address.
Networking via
DHCP
The default configuration (from the factory) automatically looks for a DHCP server to
issue an IP address. So, as long as your network has a DHCP server (usually part of
your router—e.g. an Airport base station wireless router), then you need to do
nothing other than plugging the Ki Pro into the net. To manually select DHCP: use the
Select buttons to navigate to the parameter “50.1 IP CONFIG”, and then use the Adjust
buttons to select “DHCP”. That’s it!
Here are the steps to communicate with Ki Pro after choosing the DHCP selection:
1. Use the Select buttons to navigate to parameter 50.2. Note on a piece of paper
the DHCP supplied IP address shown.
2. With your laptop or desktop computer connected to the same LAN and DHCP
enabled, type the IP address you noted in step 1 into the browser address bar.
You should now see Ki Pro’s browser status screen.
If Ki Pro cannot get an address from the DHCP server on the LAN while Ki Pro is set to
DHCP via parameter 50.1, it will then automatically drop back to a preset factory IP
address of 192.168.0.2. In this instance you can follow these alternate steps to
communicate with Ki Pro:
1. Set the computer’s Ethernet IP address to 192.168.0.n (where n is not 2).
2. Set the computer’s Subnet mask to 255.255.255.0 (most computers default to
the proper netmask when the address is set).
3. Run a browser on the computer and type “192.168.0.2” (the factory fallback IP
address). You should now see Ki Pro’s browser status screen.
Note: (If Ki Pro fails to find a DHCP server via it’s network connection, it will fall back to using
the factory default static IP of 192.168.0.2—or whatever IP address you’ve previously
defined. AJA recommends you define a Static IP address with parameter 50.2 so you’ll be
prepared in the event your DHCP server fails.)
Networking Ki Pro
using a Static IP
Address
To set a static IP address for Ki Pro, you’ll have to make some simple Parameter menu
selections. The illustration below shows the four menu selections you need to make,
while entering the information provided to you by your IT administrator (as discussed
earlier).
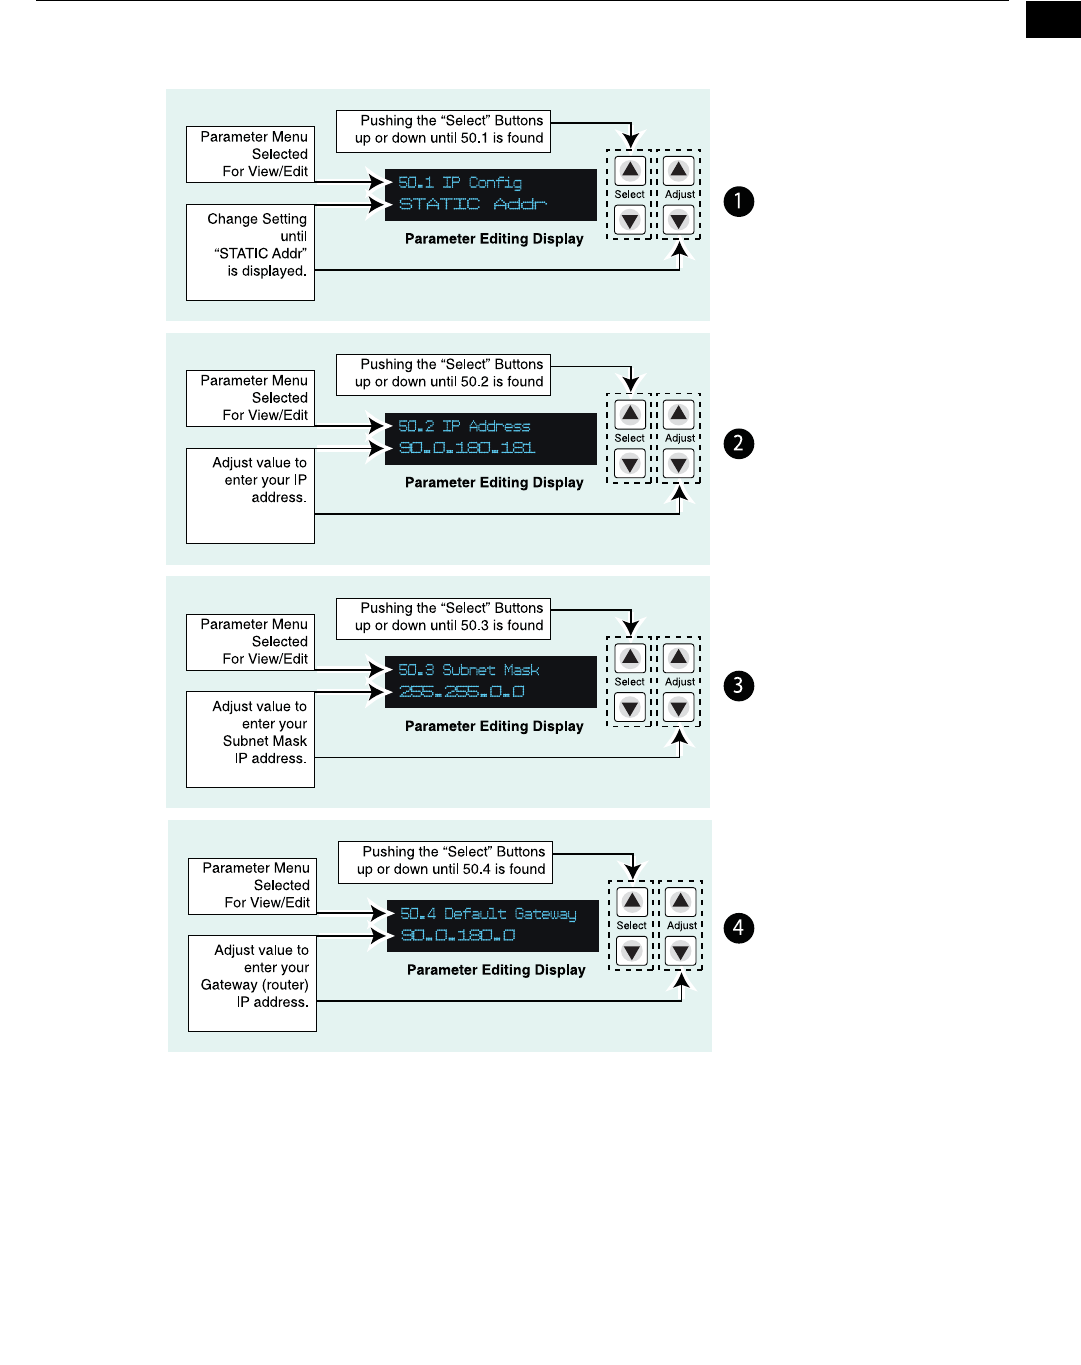
1
27
Ki Pro Installation and Operation Manual — Remote Network Control
Configuring Ki Pro with a Static IP Address
Networking Ki Pro
using the Factory
Default IP
If you don’t want to use DHCP to network Ki Pro and also don’t want to set your own
static IP address, you can simply use a Default setting to use a factory setting of
10.65.74.65. This might be useful for an application where you directly connect a laptop
or computer to Ki Pro and want to get networking quickly. Here are the steps to set up
this method of communication:
1. Use the Select buttons to navigate to parameter “50.1 IP CONFIG”, and then use
the Adjust buttons to select “Default”.
Note: for parameters 50.2,
50.3, and 50.4, you will be
setting IP addresses that
consist of “octets” separated
by a period (i.e., 90.0.180.0).
For these parameters, the
Select
button selects the
octet and then the
Adjust
buttons select the desired
number. Pressing Select
again advances to the next
octet. At the final octet, the
address will flash—pressing
Select at that point confirms
the setting.

28
2. Set your laptop or desktop computer Ethernet IP address to 10.m.n.m (where
m is not 65 and n is not 74).
3. Also on the computer, set the Subnet mask to 255.0.0.0 (most PCs default to
the proper netmask when the address is set—so you may not have to do
anything here).
4. Run a browser on the computer and type “10.65.74.65” (the Default factory IP
address). You should now see the FS1’s browser status screen.
Test Ki Pro’s
Network
Connection with
“Ping”
After setting the IP address and other TCP/IP settings and connecting Ki Pro’s
Ethernet connection to a LAN or directly to a computer, ensure that you have a valid
connection by “Pinging” the Ki Pro. Pinging ensures that other devices on the
network, or a computer directly attached to it, can see it. Simply run the Ping utility
from a computer on the same LAN as Ki Pro, or one attached directly to Ki Pro. Here’s
how to Ping a Ki Pro from a Mac OSX computer or Windows PC:
Mac Ping Procedure
1. Find the Applications Folder, and then find the Utilities Folder inside of the
Applications Folder.
2. Locate the “Terminal” utility application and double-click it.
3. On the Ki Pro, go to parameter menu 50.2 and read the IP address.
4. At the Terminal prompt, enter the IP address noted in step 3. For example: ping
192.168.0.2
5. If successful, the ping utility will respond that packets were sent, received and
how long it took. For example:
64 bytes from 192.168.0.2: icmp_seq=0 ttl=64 time=0.590 ms
6. If unsuccessful, check Ki Pro’s network settings and resolve the problem with
your IT administrator.
Controlling Ki Pro
from a web-browser
To control Ki Pro from a web-browser on a network attached computer, you must
enter Ki Pro’s IP address as a URL in the browser. For example, if Ki Pro’s IP address
were “90.0.6.31”, you would then type into the web browser: http://90.0.6.31
This topic is explained in greater detail in Chapter 4: Browser Remote Control.
Controlling Ki Pro
via WiFi
Another option for remote control is Ki Pro’s built-in 802.11 wireless transceiver
which can communicate with properly configured 802.11 wireless access points such
as an Airport Basestation or 802.11 wireless router (linksys etc.).
You can enable or disable WiFi control of Ki Pro for security. Further, you can select a
type of wireless security to match other devices; popular methods such as WEP, WPA
and WPA2 are supported. To use wireless control you’ll follow this basic process:
• Enable wireless control of Ki Pro
• Select a wireless network to connect to (as set on the access point you’ll
communicate with).
• Select the type of security, if any, to be used. If there is security, you’ll also enter
its password.
• Lastly, you’ll select from two choices the type of location and 802.11 radio
environment where Ki Pro will reside—indoor or outdoor.

1
29
Ki Pro Installation and Operation Manual — Using Ki Pro as a FireWire 800
• Once configured, you can control Ki Pro from an iPhone or other 802.11 wireless
device that supports browser control (iTouch et al).
Wireless control of Ki Pro is managed using menus 53.1 through 53.5 as listed in
Chapter 3, under Config Menu Parameters. The steps of setting up and using Wireless
control are then discussed later in Chapter 4 under Browser Remote Control.
Using Ki Pro as a FireWire 800 Hard Drive
We’ve already discussed how Ki Pro’s storage module can be used as a stand-alone hard
drive to immediately edit data recorded—you simply remove it and connect it to a Mac
via a FireWire 800 cable. Similarly, you can also connect the whole Ki Pro unit (with
Storage Module and any desired ExpressCard/34 cards installed) also via a FireWire 800
cable to a Mac. When a Ki Pro is connected, all available storage media installed in that
Ki Pro will mount on the Mac’s desktop. For example, if you have a 250GB HDD storage
module and an ExpressCard/34 8GB card installed, then you’ll see those two volumes
mount on the desktop with their HFS file systems, ready for editing.
This feature may not be enabled in Version 1.0 Ki Pro software.