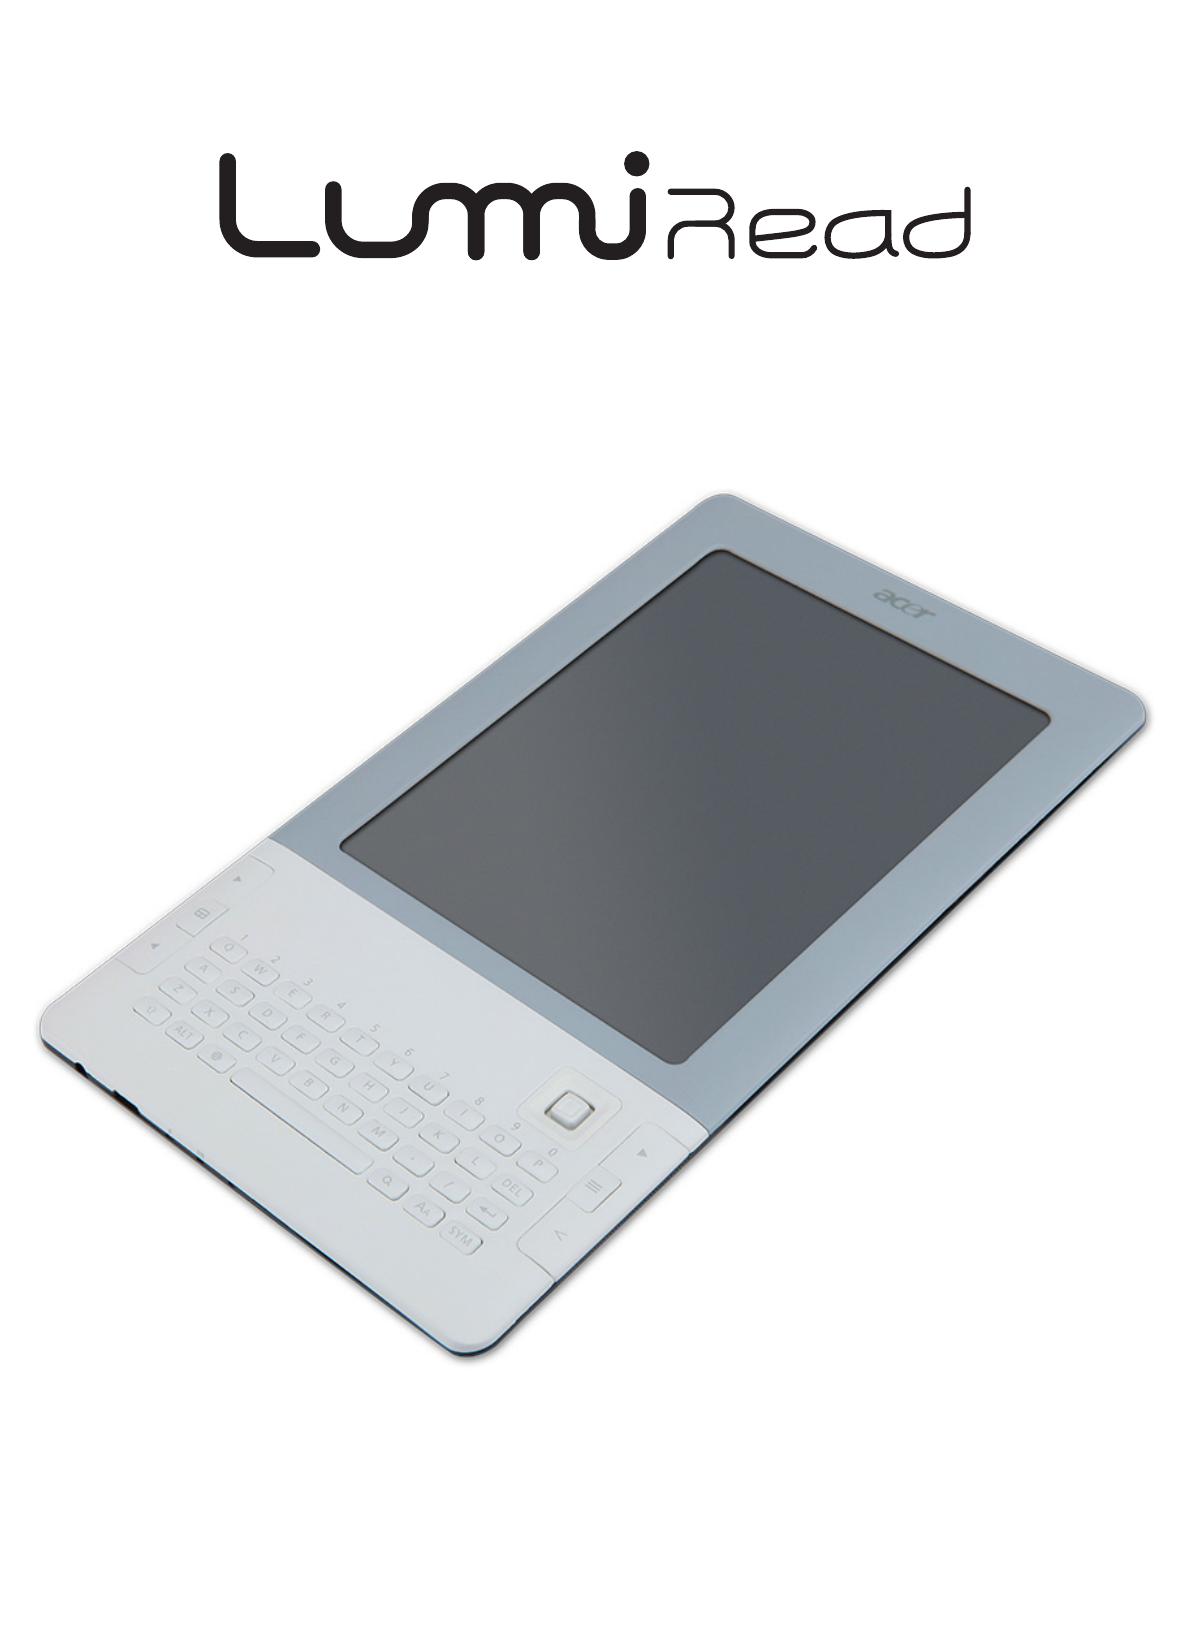
Acer orporated HEB00 LUMIREAD User Manual User Guide
Acer Incorporated LUMIREAD User Guide
Contents
- 1. Users Manual 1
- 2. Users Manual 2
Users Manual 1
1
Acer LumiRead 600 User Guide
Press the Next page button
on your reader to see more. ►

2
Table of Contents
Tip: Press the MENU button on your reader, and then select
Table of Contents to jump to a section.
Press the Search key to search for a specific term.
Getting to know your reader
Features and functions . . . . . . . . . . . . . . . . . . . . . . . . . . . . . . . . .4
Setting up
Unpacking your reader . . . . . . . . . . . . . . . . . . . . . . . . . . . . . . . . .5
Getting to know your reader . . . . . . . . . . . . . . . . . . . . . . . . . . . .6
Charging your reader . . . . . . . . . . . . . . . . . . . . . . . . . . . . . . . . . .9
Installing a microSD card . . . . . . . . . . . . . . . . . . . . . . . . . . . . . . .9
Installing a SIM card (depends on model) . . . . . . . . . . . . . . . . .10
Using your reader
Turning on for the first time . . . . . . . . . . . . . . . . . . . . . . . . . . .11
Turning your reader off . . . . . . . . . . . . . . . . . . . . . . . . . . . . . . .11
The Home screen . . . . . . . . . . . . . . . . . . . . . . . . . . . . . . . . . . . . .12
Navigation . . . . . . . . . . . . . . . . . . . . . . . . . . . . . . . . . . . . . . . . . .17
The keyboard . . . . . . . . . . . . . . . . . . . . . . . . . . . . . . . . . . . . . . . .18
Getting books onto your reader
Wi-Fi connections . . . . . . . . . . . . . . . . . . . . . . . . . . . . . . . . . . . . .20
Transferring files
Connecting to a PC with USB . . . . . . . . . . . . . . . . . . . . . . . . . . .22
Copying files to a microSD Card . . . . . . . . . . . . . . . . . . . . . . . . .23
Downloading a book . . . . . . . . . . . . . . . . . . . . . . . . . . . . . . . . .23
Sharing a book . . . . . . . . . . . . . . . . . . . . . . . . . . . . . . . . . . . . . .24
Reading eBooks on your reader
Opening a book . . . . . . . . . . . . . . . . . . . . . . . . . . . . . . . . . . . . . .26
Navigating in a book . . . . . . . . . . . . . . . . . . . . . . . . . . . . . . . . . .28
Viewing options . . . . . . . . . . . . . . . . . . . . . . . . . . . . . . . . . . . . .31
Adding notes to a book . . . . . . . . . . . . . . . . . . . . . . . . . . . . . . .32
Highlighting text . . . . . . . . . . . . . . . . . . . . . . . . . . . . . . . . . . . . .32

3
Adding a bookmark . . . . . . . . . . . . . . . . . . . . . . . . . . . . . . . . . .32
Searching for annotations . . . . . . . . . . . . . . . . . . . . . . . . . . . . .33
Shopping at Barnes&Noble
Creating a Barnes & Noble account . . . . . . . . . . . . . . . . . . . . . .34
Using the Wish List
Opening your Wish list . . . . . . . . . . . . . . . . . . . . . . . . . . . . . . . .37
Typing an ISBN . . . . . . . . . . . . . . . . . . . . . . . . . . . . . . . . . . . . . . .37
Using the ISBN scanner . . . . . . . . . . . . . . . . . . . . . . . . . . . . . . . .38
Purchasing a book . . . . . . . . . . . . . . . . . . . . . . . . . . . . . . . . . . . .39
Internet Browsing
Internet Search . . . . . . . . . . . . . . . . . . . . . . . . . . . . . . . . . . . . . .40
My Favorites . . . . . . . . . . . . . . . . . . . . . . . . . . . . . . . . . . . . . . . . .41
Navigating in a web page . . . . . . . . . . . . . . . . . . . . . . . . . . . . . .41
Using eRead mode . . . . . . . . . . . . . . . . . . . . . . . . . . . . . . . . . . .44
Using Smart download . . . . . . . . . . . . . . . . . . . . . . . . . . . . . . . .45
Using the RSS Reader . . . . . . . . . . . . . . . . . . . . . . . . . . . . . . . . .46
Specifications . . . . . . . . . . . . . . . . . . . . . . . . . . . . . . . . . . . . . . . .48
End User Licence Agreement
Regulatory information . . . . . . . . . . . . . . . . . . . . . . . . . . . . . . .53
© 2010. Acer Incorporated.
All rights reserved.
Acer LumiRead 600 User Guide
Original issue: 06/2010
This reader contains Adobe® Reader® Mobile software under license from Adobe
Systems Incorporated, Copyright © 1995-2009 Adobe Systems Incorporated. All
rights reserved.
Adobe and Reader are trademarks of Adobe Systems Incorporated.

4
Getting to know your reader
Features and functions
Your new reader offers a portable text reader that can carry
your entire library. You can:
• Access your eBooks while on the move.
• Read books in many open file formats: TXT, ePub, PDF,
HTML, DOC, RTF, MOBI/PRC, CHM.
• Browse thousands of books ready for purchase.
• Easily read the energy-saving and eye-friendly screen, even
in full sunlight.
• Connect to the Internet and download books or read news
with RSS feeds.

5
Setting up
Unpacking your reader
Your new reader comes packed in a protective box. Carefully
unpack the box and remove the contents. If any of the
following items is missing or damaged, contact your dealer
immediately:
• Acer LumiRead Quick Guide
• Companion CD
• USB cable
• AC adapter
6
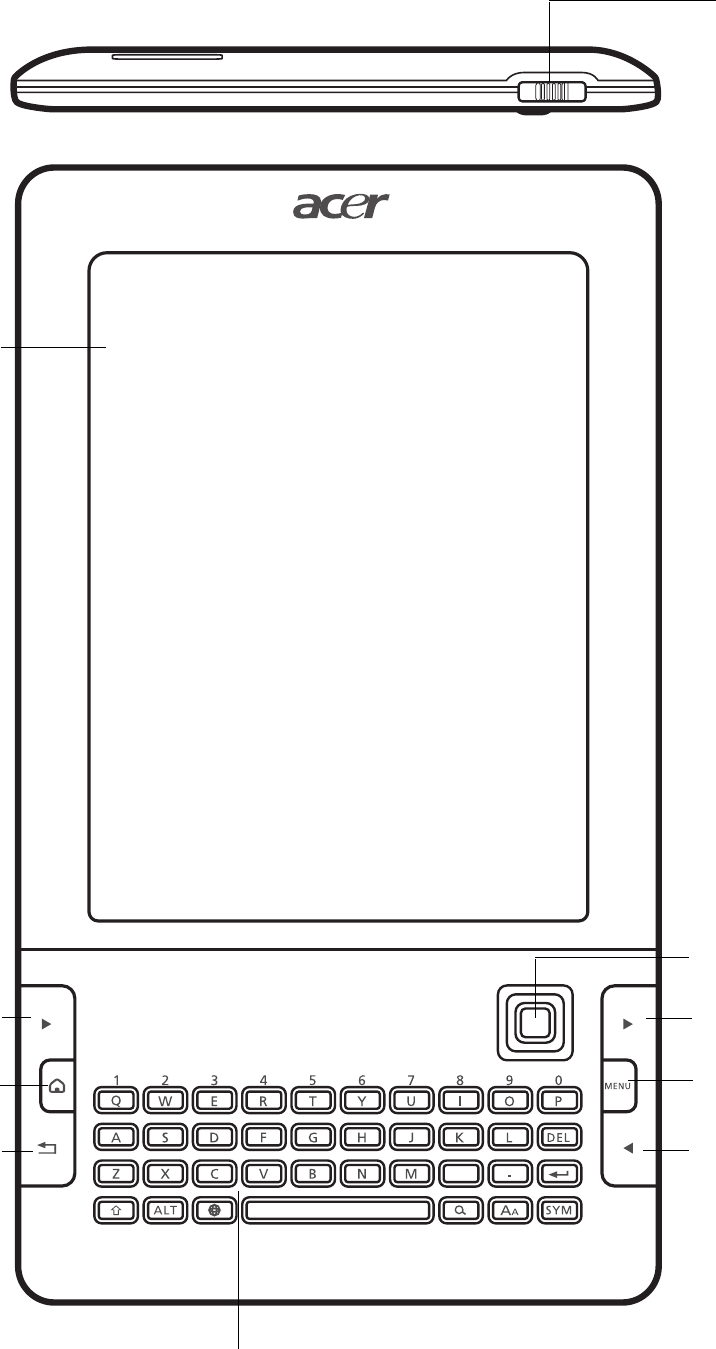
Getting to know your reader
Views (top/front)
,
2
7
6
3
5
48
9
10
1

7
Top/front features (image on previous page):
Back/bottom features (image on next page):
* SIM card slot is only available on 3G-enabled readers.
No. Item Description
1 Power button Slide to turn the reader on or off:
• Power on, or to enter/resume from Sleep
mode: briefly slide the power key.
• Power off: slide and hold for more than five
seconds.
2 Screen High-resolution, high-contrast screen to display
text.
3 Next page button Press to move to the next page of a book, search
results or the bookshelf.
4 Home button Return to the Home screen.
5 Back and exit
button
Press to move back one step in menus, or exit a
book.
6 Keyboard For text entry, with special keys to browse the
Internet or search for books on your reader.
7 Previous page
button
Press to move to the previous page in a book,
search results or the bookshelf.
8 Menu button Open the option menu.
9 Next page button Press to move to the next page of a book, search
results or the bookshelf.
10 4-way navigation
dial / Confirm
Use this joystick to navigate on the screen or a
page. Press to confirm a selection.
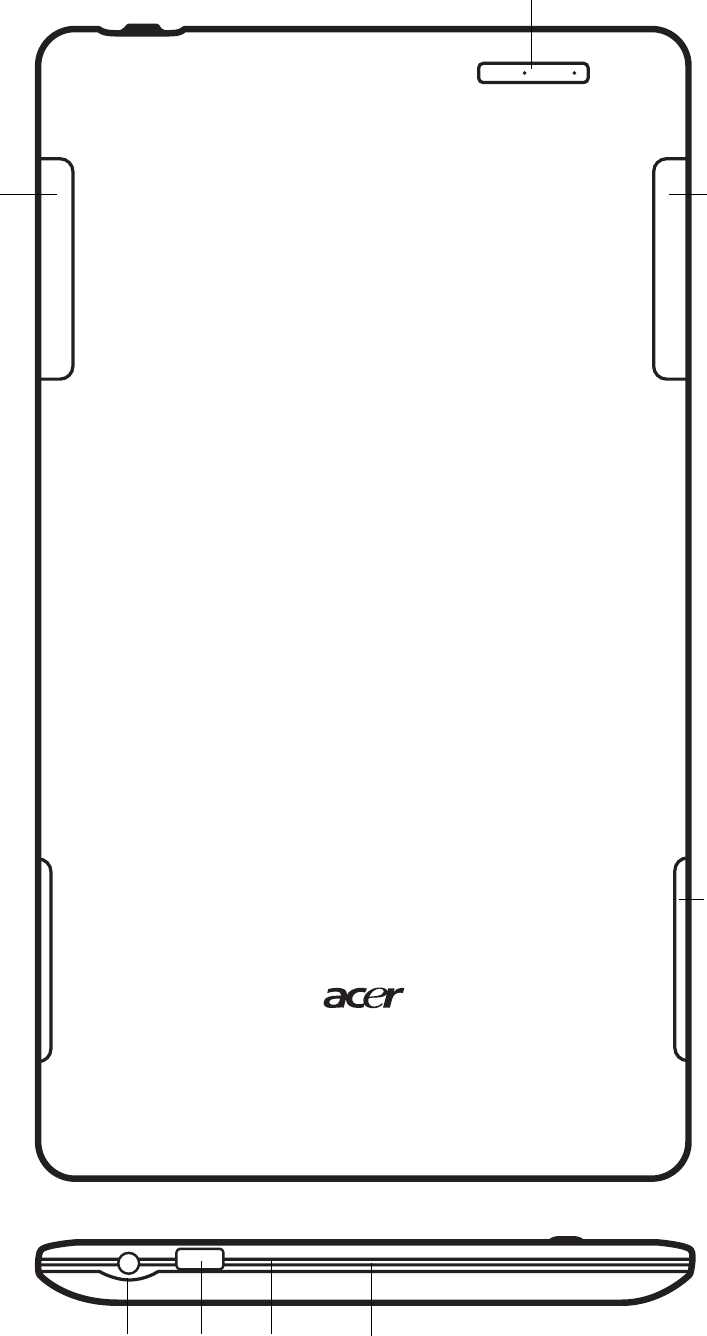
No. Item Description
11 ISBN barcode
scanner
Use to scan ISBN barcode from a book cover.
12 Volume control
buttons
Increase or decrease audio volume.
13 Speakers Listen to music or an audio book.
14 MicroSD card / SIM
card cover*
Insert a microSD card and SIM card here.*
15 3.5 mm headphone
jack
Connect to headphones.
16 Micro USB
connector
Connect to a USB cable/charger.
17 Battery charge
indicator
Lights to indicate battery charging status.
Red when charging, green when fully charged.
18 Reset button Use to reset your reader.
8
Views (back/bottom)
11
12
13
14
151617 18
Description on previous page.
9
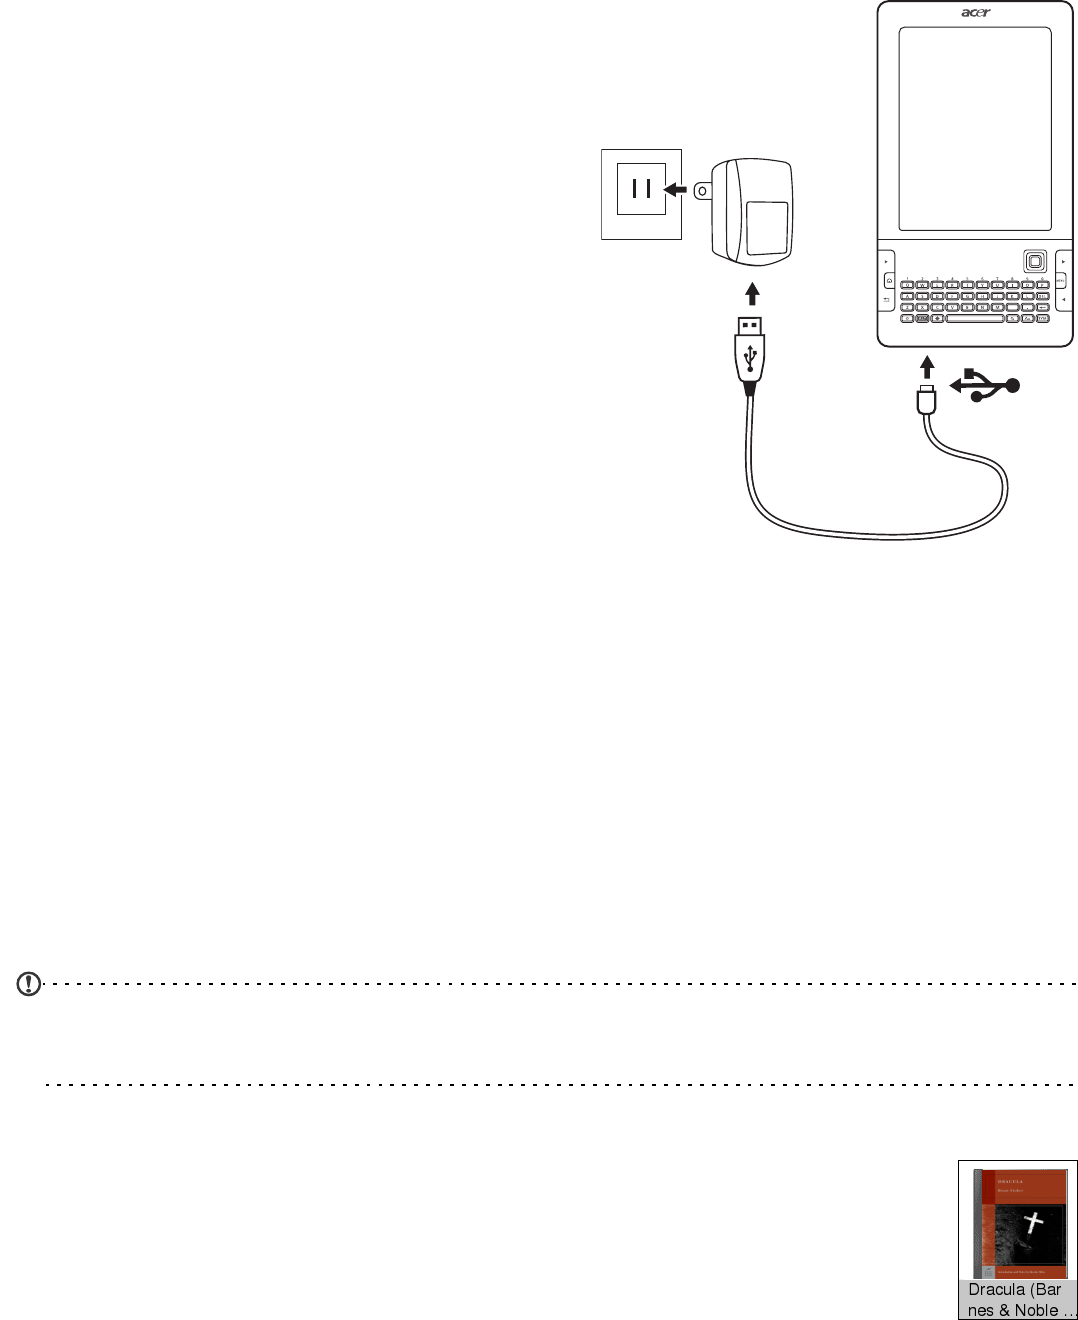
Charging your reader
,
Before using your reader, you
must charge it for at least 30
minutes. After initial use you can
charge as needed.
Connect the USB cable to the
micro USB connector on your
reader, and then connect the USB
connector to the AC adapter. Plug
the AC adapter into an AC outlet
and charge the device.
It is normal for the reader to heat
up when charging or during long
periods of use. All Acer readers
are factory tested before release.
Installing a microSD card
To take expand your reader’s capabilities, you may install a
microSD card. The card slot is located under a cover on the back
of the reader.
1. Open the card slot cover.
2. Orient the microSD card correctly and insert it into the slot.
Note: Ensure that the card is inserted all the way into the
card slot.
3. Close the card slot cover.
4. A micro SD icon will be displayed on the bookshelves.
See “The bookshelves” on page 13. Select and open
the icon to see the contents of the micro SD card.

11
Using your reader
Turning on for the first time
To turn on your reader for the first time, slide and hold the
power button until the screen turns on. You will then be asked
to assign a name to your reader. Type your choice, select
Confirm by moving the navigation dial down and finally press
the dial.
After a short configuration period, you will see the Home
screen.
The screen
The screen provides a high-resolution, high-contrast surface
that may display text and gray-scale graphics. The passive
screen reflects ambient light; there is no glow to create
eyestrain.
The screen is extremely power-efficient, only requiring power
when changing the display. The battery can function for weeks
without being recharged.
Turning your reader off
If you will not use your reader for a while, slide and release the
power button to put the reader in sleep mode. This saves
power and ensures that your reader does not unintentionally
use any services such as wireless . An image will be
displayed on the screen while the reader is in sleep mode; this
does not use any power.
To turn off your reader completely, slide and hold the power
button for at least five seconds.
12
Turning on your reader
If the screen is off and the reader does not react to the front
panel buttons, it may have been locked and is in sleep mode.
Slide and release the power button to wake up your reader.
The Home screen
After the first start process is completed, your reader will
display the Home screen. This screen gives you quick access to
the frequently-used features of your reader.
Notification area
The Notification area is at the top of the screen.
This area displays icons and text to inform you about your
reader, including activity and battery status.
13
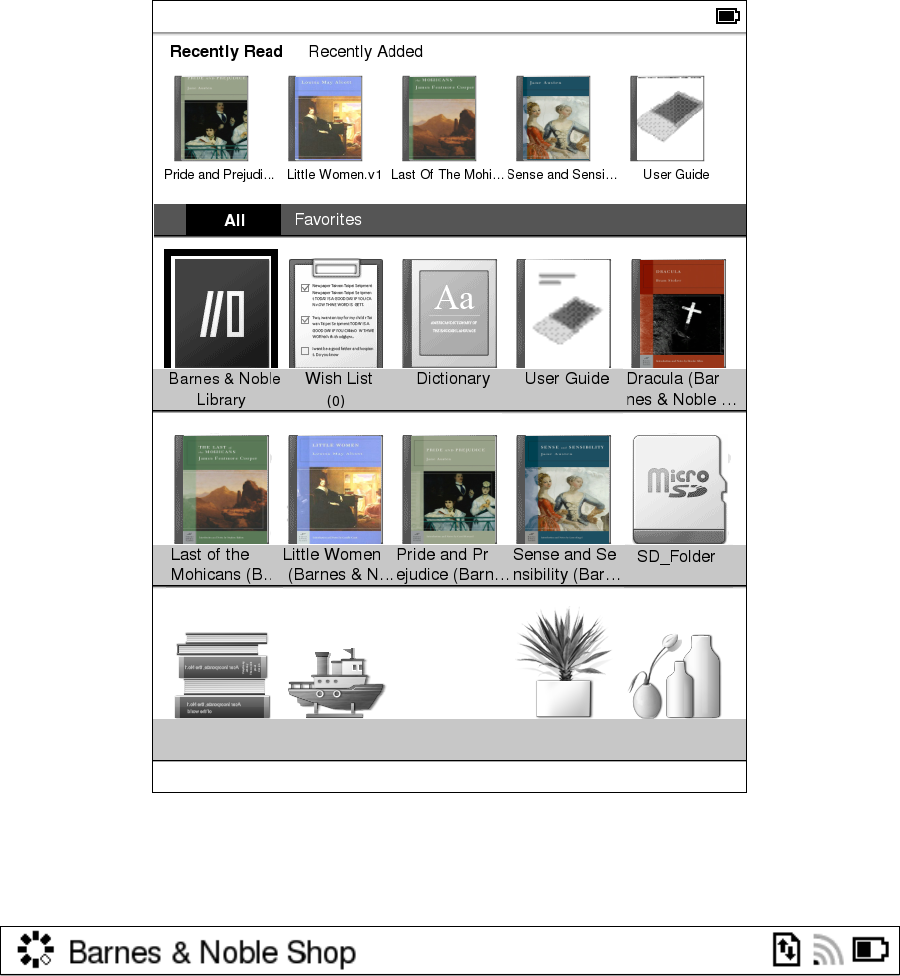
The bookshelves
The contents of your reader are shown on the Home screen as a
series of bookshelves. Each book or function is shown as an
image with a name; this image is either a generic book cover,
or you may customize the book with your own cover image.
Icon Item Description
Activity dial The activity dial is shown when the reader is
busy.
Transfer The transfer icon is shown when your reader
is using the network connection.
Wireless
The wireless icon is shown when your reader
is connected to a wireless network.
Battery status The battery status indicates current battery
charge. In this case the battery is about half
charged.
14
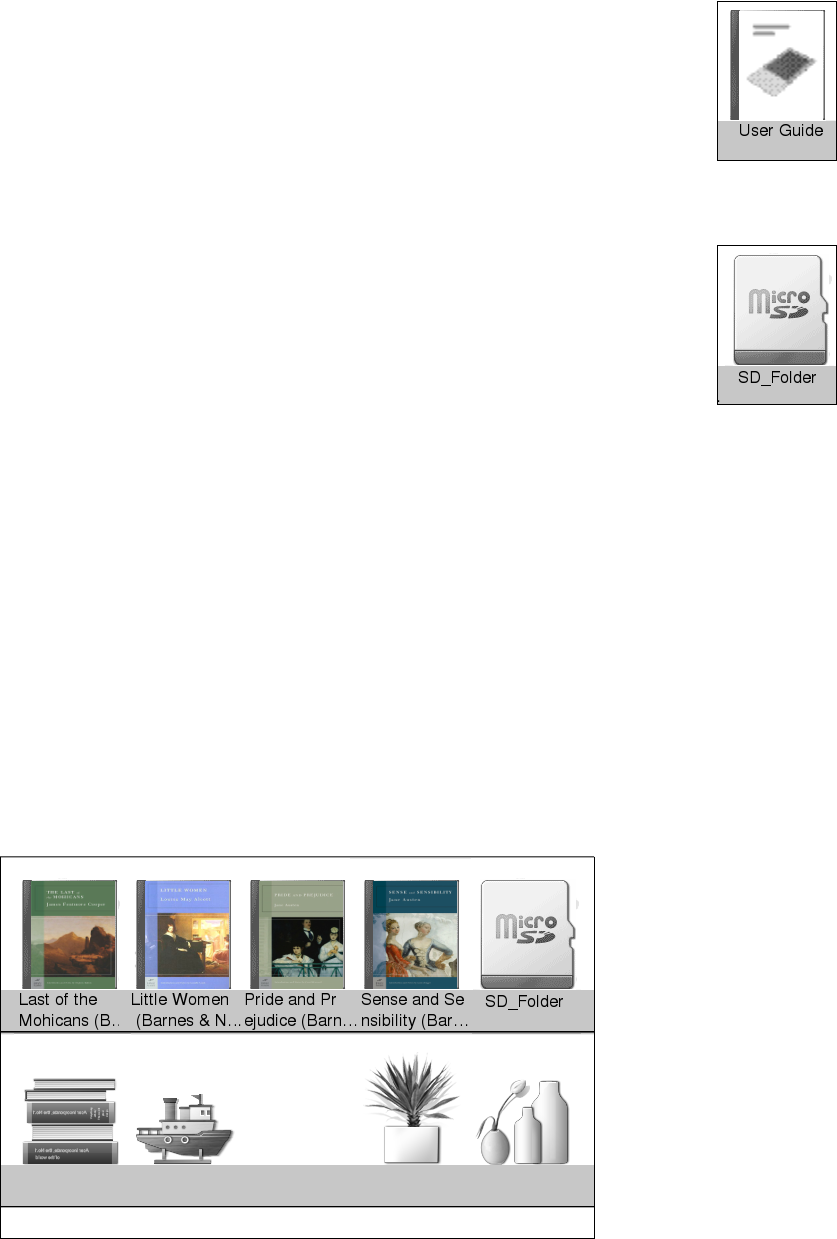
Note: When you first turn on your reader, the shelves include
some decorations to fill the space. These decorations are
ornamental and cannot be selected. If you add a book or
microSD card they are removed.
A box or highlighted area shows the current selection; use the
navigation pad to move the selection. Press the navigation pad
to confirm a selection (open a book or start a tool).
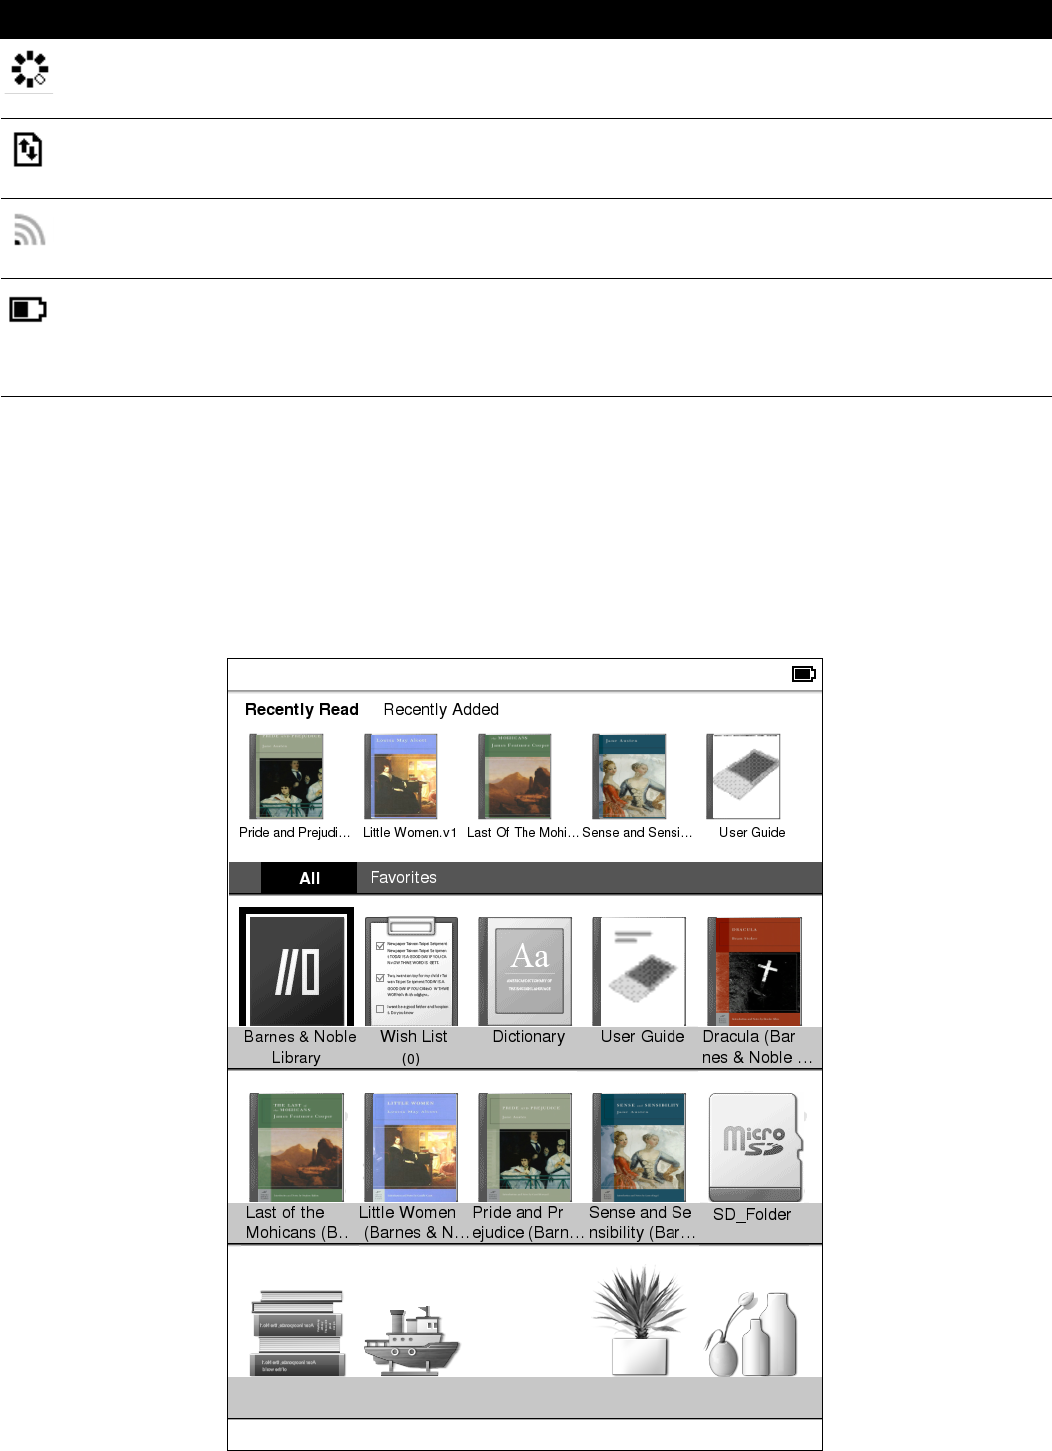
Recently read and recently added
The first shelf (at the top) displays books you have recently
read, or recently added items. This list will change to reflect
your activity.
Favorites/tags
As you add books to your reader, you may find it difficult to
find the book you need. You may either search for a specific
title or author (“Searching” on page 19), add books to your
Favorites, or choose only to display books with a certain tag, to
reduce the number of books displayed at one time.
Normally All books are displayed, but you can select the bar
and move the highlight to the right until the appropriate tag is
selected. Press the navigation dial to confirm your choice.
Available tags are: All, Favorites, Fiction, Romance, Fantasy,
Crime, Historical, Horror, Business, Life, Outdoor, Science.
Note: Tags are hidden if the reader contains no books with
that genre tag.

15
If a tag has been selected, only books with that tag will be
displayed.
Bookshelves
Barnes & Noble Bookstore
The Barnes & Noble bookstore allows you to purchase
and download eBooks for your reader. With Internet
access you can browse and purchase items on your
reader, or you may use your computer and then
transfer the books over USB or microSD card.
Note: You must create a Barnes & Noble account before
browsing the bookstore. See “Shopping at Barnes&Noble”
on page 34.
Wish list
The Wish List allows you to keep a record of interesting
books you would like to purchase. You may enter a
book’s ISBN (International Standard Book Number) and
an Internet search will complete the rest of the
information. See “Using the Wish List” on page 37.
Your reader includes an ISBN barcode scanner that can scan the
ISBN barcode and automatically add the book to your wish list.
See “Using the ISBN scanner” on page 38.
Dictionary
The Dictionary allows you to check the definitions of
words. Open the dictionary and type the word you
want to check, then select Search Dictionary. A
definition of the word is displayed at the top of the
screen.
16
User Guide
This guide provides information on how to get the best
from your reader. Learn how to navigate, read an
eBook, enter text and use the many additional
functions of your reader.
microSD card (if inserted)
If you have inserted a microSD card (“Installing a
microSD card” on page 9) select this icon to see the
contents of the card. However, the contents of the
microSD card must be organized in specific folders to
be seen. See “Copying files to a microSD Card” on page 23.
Book Covers
The Book Covers folder exists if you’ve added books to your
reader. Cover art for your books is stored in this area.
Books
The lower half of the screen displays two shelves. Any books
you have purchased can be seen here. If you have many books,
you can use the Next Page and Previous page buttons to display
more titles.
17
Navigation
There are two ways to navigate using your reader. You may use
the 4-way navigation dial to change the highlighted item or
move around a page, or use the navigation keys (on either side
of the keyboard) to page through menus or a book.
Navigation dial and confirm button
The 4-way navigation dial allows you to change the
highlighted item on the screen, indicated by a box
around the item.
Move the dial up, down, left or right to change which item is
selected. Press the dial to confirm the selection.
Note: There may be a short delay after making a selection, as
your reader updates the display.
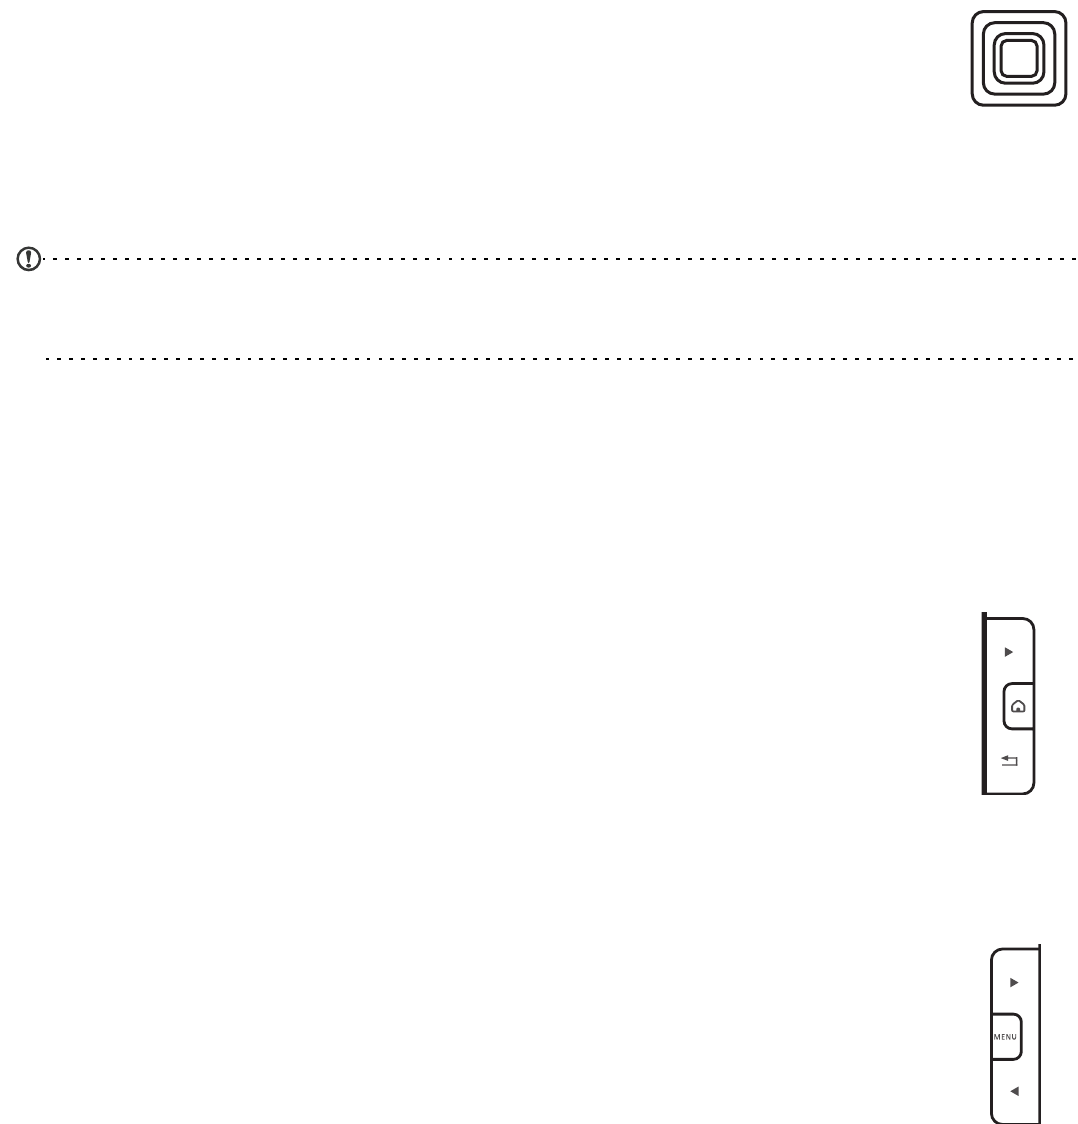
Navigation keys
The navigation keys are on either side of the keyboard. they
allow you to page through menus or a book.
To the left of the keyboard there are three keys are available:
•The top key ► takes you forward one page.
• The middle key takes you directly to your reader’s
Home screen.
• The last key exits an option or moves you back one
level in a menu; for example, when reading a book,
this button will close the book.
To the right of the keyboard there are three more keys:
•The top key ► takes you forward one page or level in
a menu (this is the same as the top key on the left).
•The MENU key opens the option menu.
• The last key ◄ moves you back one page or level in a
menu.
18
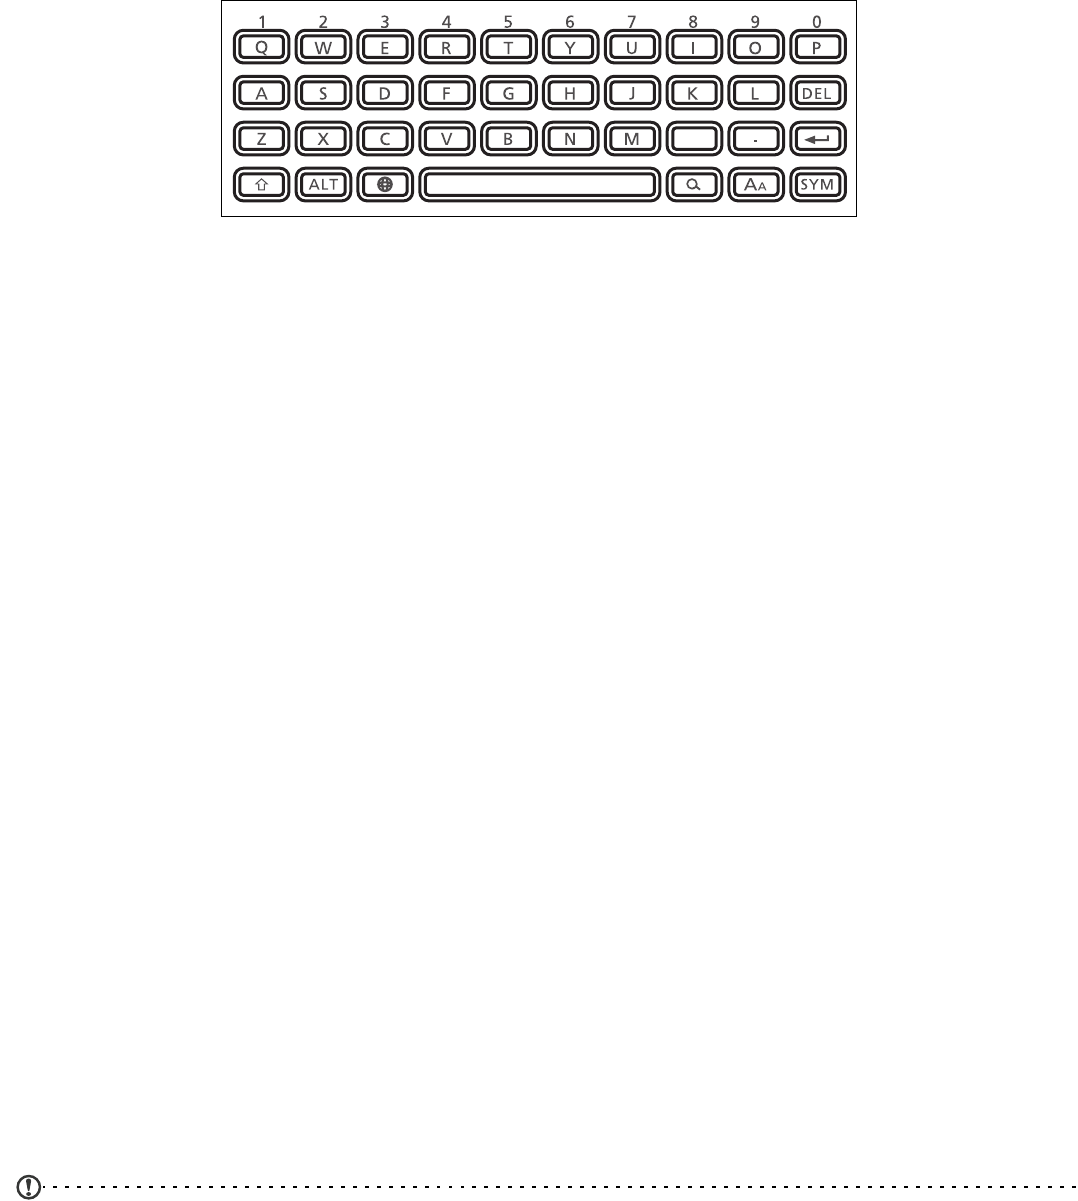
The keyboard
Use the mini keyboard to enter notes and type text for book
and Internet searches. Simply select a text box and tap keys to
enter text.
,
Entering numbers
Press and hold the ALT key and then press the keys in the top
row to type the associated number. To enter a series of
numbers, quickly press the ALT key twice to lock the keyboard
in number mode; press the ALT key once to return the
keyboard to text entry.
Entering symbols
Press the SYM key to display a set of symbols and special
characters you can use. Use the navigation dial to select a
symbol and then press the dial to confirm and enter it into a
text box.
Changing the Input language
Press the Shift key to change the input language. An icon in the
notification bar shows the current language.
Internet
Press the Internet key to open the Internet browser. If you have
access to a Wi-Fi network, you can enter a search term, or
an Internet address.
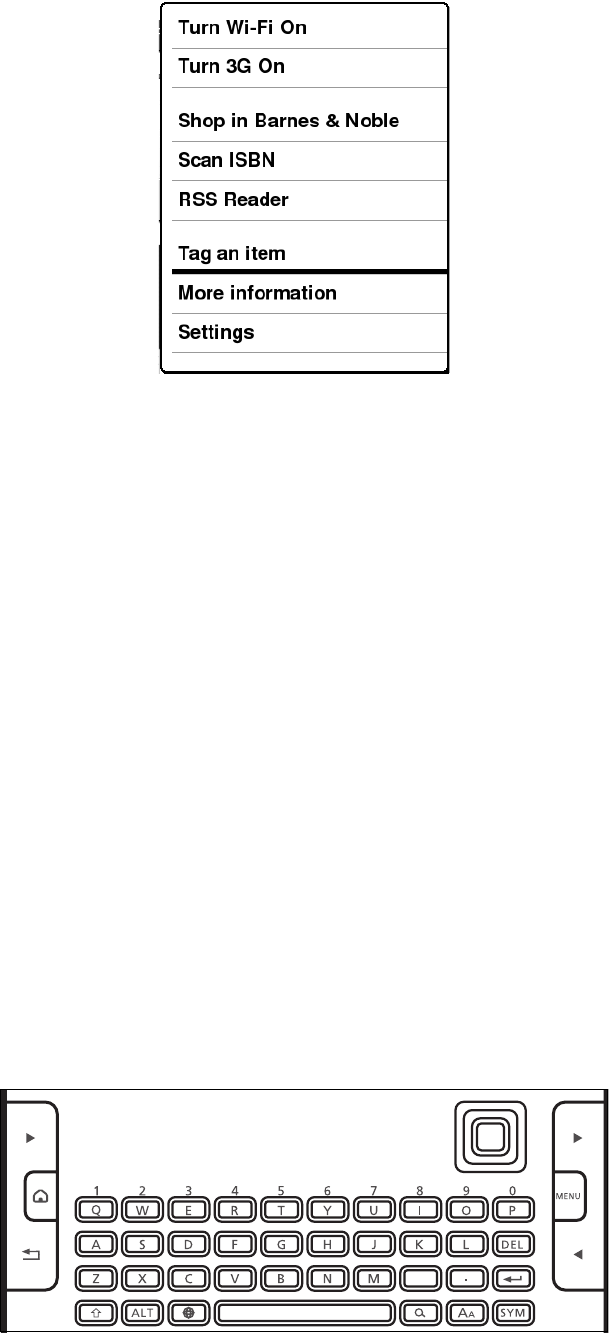
Note: To turn on wireless access, press the MENU button,
then select Turn Wi-Fi On; select a network and follow the
instructions. To turn on 3G access, press the MENU button,
then select Turn 3G On.
19
After your reader has connected, press the Internet button
to open the browser.
Searching
Press the search key to search the items on your reader. The
type of search depends on the item that is open. You can
search for the title of a book or an annotation from the Home
screen.
You can also search for text in a book or the Internet. See
“Search this book” on page 30 or “Internet Search” on
page 40.
20
Getting books onto your reader
There are several ways to get books onto your reader. The Wi-Fi
functions allow you to download books directly from
online sources, a microSD slot allows you to store and transfer
books from a computer or device with an memory card reader,
and the USB connection allows you to transfer books from a
USB-equipped computer.
Wi-Fi connections
Your reader’s Wi-Fi connection enables many tasks that require
the Internet. The built-in browser can perform searches, sign in
to accounts with online booksellers, and browse the majority of
web sites.
Note: The browser works best with sites adapted for mobile
devices, such as smartphones or tablet computers.
Wi-Fi access
Access to Wi-Fi gives you a fast, reliable connection, but is only
available in limited areas.
Wi-Fi requirements
You must be near a wireless router or hotspot to gain access to
a Wi-Fi signal. You must also have any security key or login
information required by the provider of the wireless network.
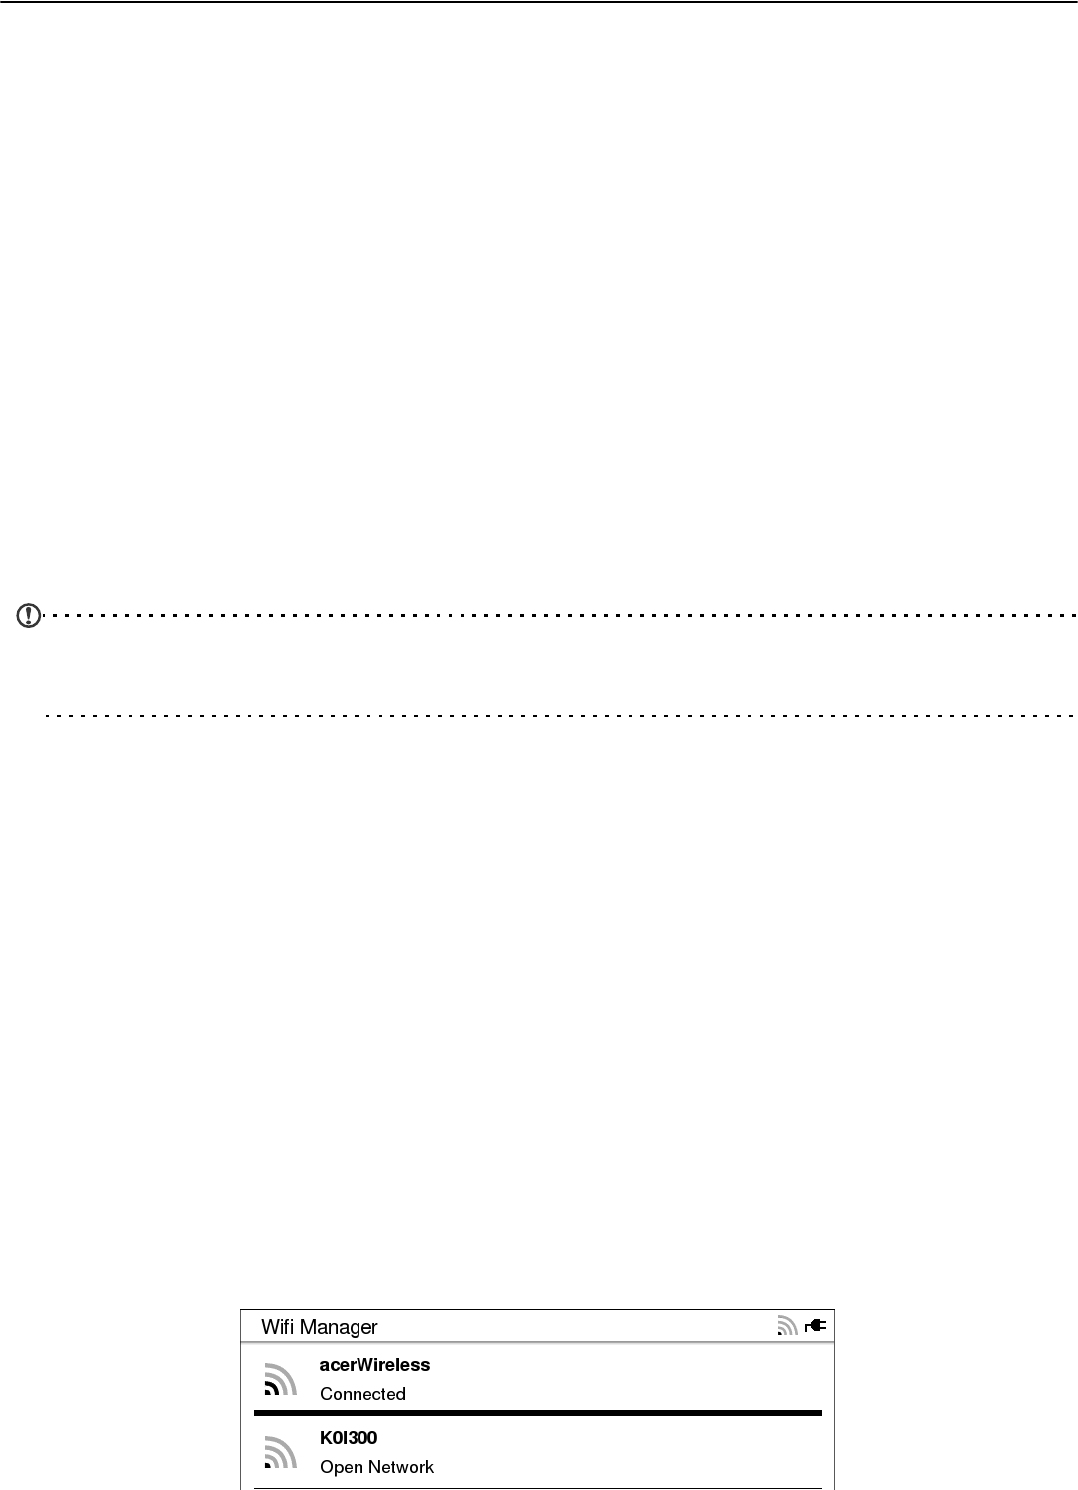
Procedure
To turn on wireless access, press the MENU button, then select
Turn Wi-Fi On. A list of nearby access points will be displayed;
select your network and wait until a connection is established.

21
The network may use extra security options, follow any further
onscreen instructions to complete the connection.
After your reader has connected to the network, press the
Internet key to open the browser, or select the Barnes &
Noble Library from the Home screen.
3G access
Access to a 3G network gives you convenient access to the
Internet almost anywhere you can receive a phone signal.
3G requirements
3G access requires an active 3G SIM card inserted in the reader’s
SIM card slot. A data plan is required to gain Internet access.
Procedure
To turn on wireless access, press the MENU button, then select
Turn 3G On. Enter your PIN and wait until a connection is
established.
After your reader has connected to the network, press the
Internet button to open the browser, or select the Barnes &
Noble Library from the Home screen.
Downloading books
You can download books from the provided Barnes & Noble
library, or through Internet sites of your choice with the
Internet browser. Several sites are suggested on the first page
of the browser.
See “Shopping at Barnes&Noble” on page 34.
22
Transferring files
You can transfer books to your reader with several methods.
Connecting to a PC with USB
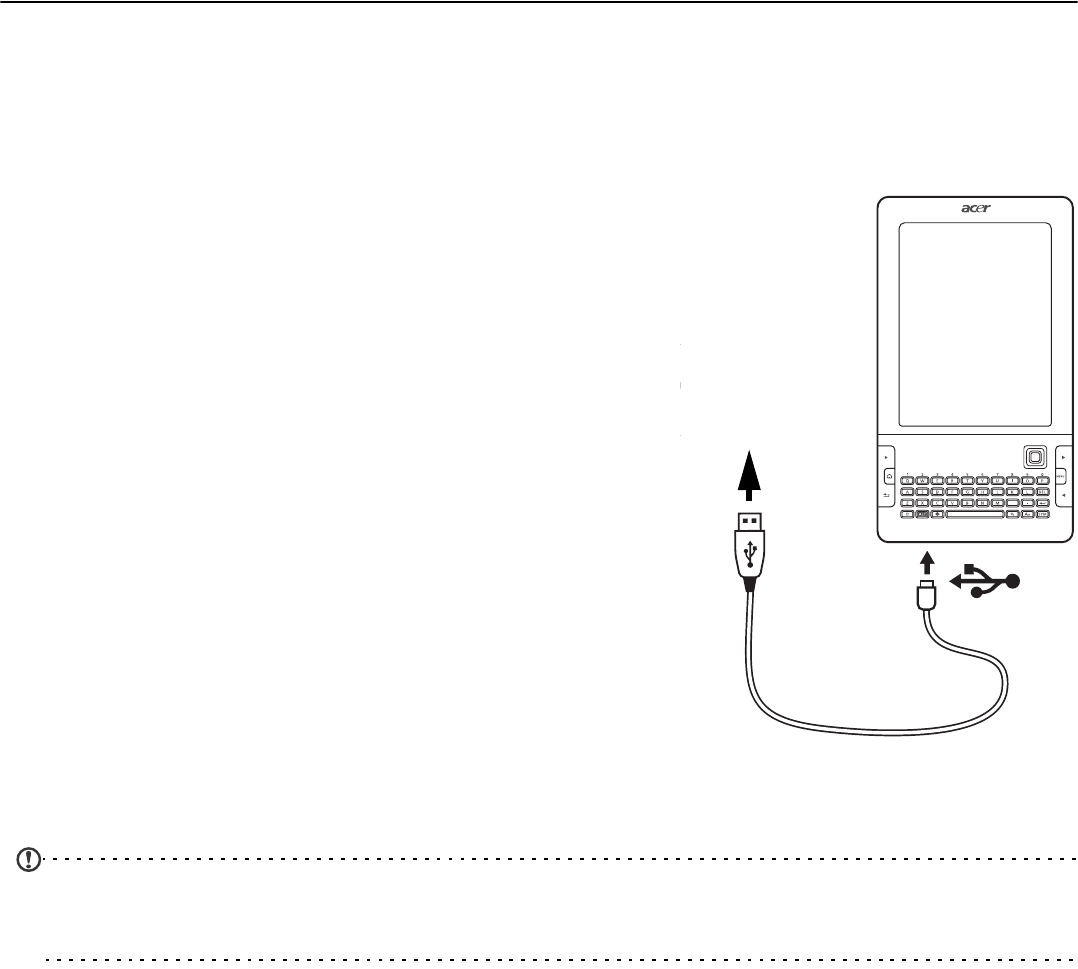
,
To computer
Connect the USB cable to the micro
USB connector on your reader, and
then connect the USB cable to a USB
port on your computer.
The reader will be detected as a USB
external storage device; you can access
your reader with the normal tools
provided by your computer (e.g. the
Library folder, opening the My
Computer folder, etc.).
If a Micro SD card is installed in your
reader, it will appear as a second
storage device, and you can also access
this in the same manner.
Note: Your reader’s battery will charge while it is connected
to your computer.
You should follow your computer’s instructions for removing a
USB storage device from the computer.
Organizing files on your reader
When transferring files to your reader, files must be placed in
specific folders to be seen on the bookshelves.
• All books, audio books and images for viewing (i.e.
anything to be added to your reader’s bookshelves) must
be placed in the books folder.
• Images for book covers must be placed in the covers
folder.

23
• You may organise your books into folders on your reader,
simply use your PC to create additional folders in the
books folder. These folders will be added to your reader’s
bookshelves.
Copying files to a microSD Card
Your reader features a memory expansion slot that accepts a
microSD card to expand memory and storage capacity.
You may use the reader as an external memory card reader,
simply by connecting the reader to your computer. But first
refer to “Installing a microSD card“ on page 9 for instructions
on installing a microSD card in your reader.
Tip: If your PC is able to read a microSD card, you can use the
PC to copy files to the microSD card directly. See “Organizing
files on the microSD card” on page 23.
Organizing files on the microSD card
You must copy files to specific folders on the microSD
cards so that they may be found by your reader.
Books and covers must use the same folder names as
files stored on the reader’s internal memory. See
“Organizing files on your reader” on page 22.
Downloading a book
You may connect to the Internet with your reader and a
wireless network, or simply use your computer, and download
books from any number of online bookstores, sites that provide
free downloads, or sometimes directly from authors.
The browser on your reader provides links to many sites that
allow downloads. See “Internet Browsing” on page 40.
Reputable bookstores, such as Barnes & Noble, provide secure
sites that provide books while assuring quality and legality.
Your reader includes many convenient options that allows you
24
to use these bookstores. See “Shopping at Barnes&Noble” on
page 34.
Note: Please check that the author and publisher allow you
to download their books from a given site. While some
welcome the readership and publicity from free downloads,
others wish to be duly rewarded for their work and
creativity.
Always respect copyright laws and contracts.
Warning: Books or other files that use DRM (Digital Rights
Management) technology cannot be viewed on your reader,
unless purchased from Barnes & Noble.
Sharing a book
Share via email with LendMe™
You can share a book from the Barnes & Noble Library with a
friend. You need to have Internet access for your reader and
your friend’s email address.
Note: You may share a single book for a duration of two
weeks. You may not read the book during this time, but will
automatically get it ‘back’ after this period has finished.
Select and open your Barnes & Noble Library. Select the
book you want to lend. Press the MENU button and
select Lend.
Enter the email address of your friend and type a short
message. Select Send to send the message.
Share via wireless with another reader
You can share a book with a friend who also owns an Acer
reader. To do this you must create an ‘ad-hoc’ (device-to-
device) network.
25
Creating an ad-hoc network
Press the MENU button, then select Turn Wi-Fi On. From the
Wi-Fi Manager screen, press MENU, the select Add Wi-Fi
network. Make sure that the ad-hoc option is selected and
select OK.
Type a name for your ad-hoc network, then select a security
option. If you wish to use a password to control access to your
network, select WEP then carefully type the password that your
friends will need.
Your friend should now turn on their reader’s Wi-Fi, and
connect to your ad-hoc network.
You may now send your book.
Sending your book
Select the book you wish to share, press the MENU button and
select More Information. Select Share this book and press the
confirm button (navigation dial).
Available ‘ad-hoc’ (device-to-device) networks will be shown;
select your friends device and select Yes to send the book.
Wait for your friend to accept the transfer on their reader, then
wait the transfer to finish. If you have finished sharing books,
turn off your Wi-Fi connection; open the Wi-Fi Manager, press
MENU and select Disconnect.

26
Reading eBooks on your reader
Your reader is able to read a multitude of file types. These files
can be downloaded or transferred from a TXT, ePub, PDF,
HTML, DOC, RTF, MOBI/PRC, CHM. Most eBook sites provide
files in one of these formats.
Warning: Copyright protection systems may be used by
certain vendors. These files cannot be read on your reader.
Opening a book
All books stored on your reader, or the microSD card, may be
seen on the shelves on the Home screen.
If the book you want is displayed, use the navigation dial to
select the book, then press the confirm button (navigation dial)
to open it.
If more than one page of books are available (see the page
total in the bottom-left corner), use the Next Page and Previous
Page buttons to switch between pages.
Searching for a book
If you have many books on your reader, it may be difficult to
find a specific title. You may search for keywords (i.e., a specific
author or word from the title).
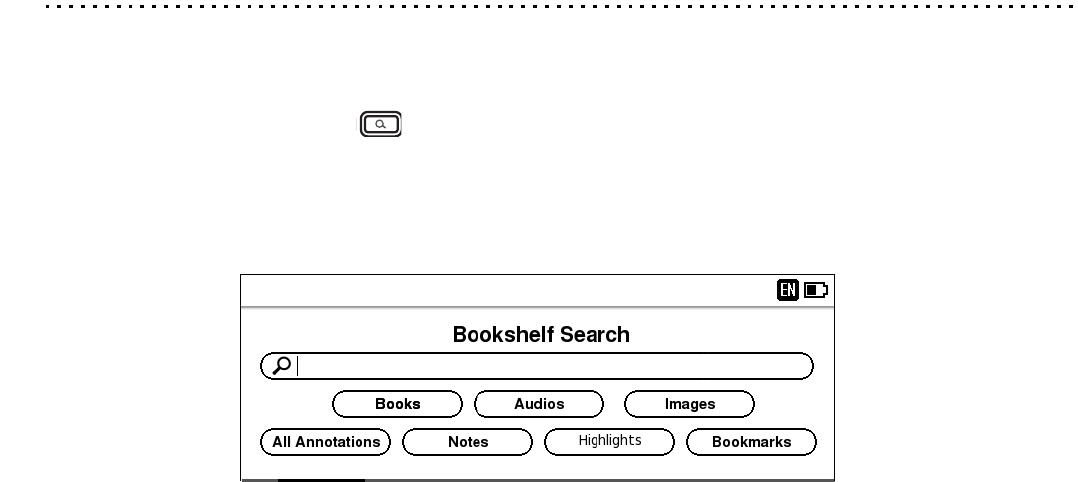
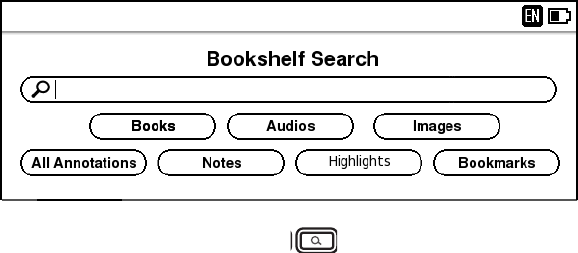
Press the Search key on the keyboard to open Bookshelf
search. Type the word to search, then use the navigation dial to
select what kind of text will be searched. You may choose from:
Books (the title of the book), Audio, Images, All Annotations,
Notes, Highlights, Bookmarks.

27
Press the confirm button (navigation dial), and a list of books
that match the search term will be displayed.
If the book you want is displayed, use the navigation dial to
select the book, then press the confirm button (navigation dial)
to open it.
If more than one page of results are available, use the Next
Page and Previous Page buttons to switch between pages.
Press the Search key again to close Bookshelf search.
Filtering by favorites or tags
You may reduce the number of books shown on the Home
screen by using the Favorite or tags.
Setting a favorite
Use the navigation dial to select a favorite book, then press the
MENU key.
28
Select the Tag an item entry, and then select the Favorites entry
from the list.
Once a book has been set as a Favorite, a star will be displayed
on the lower-right corner of the cover, and it can be found in
the Favorites section of the Favorites/tags bar.
Setting a tag
Some books may already be tagged with a genre when you put
them on your reader. If you want to add one or more tags to an
eBook, follow the procedure for setting a Favorite, above, but
select one of the tags from the list.
Any tags defined for a book will be visible in the favorites/tags
bar on the Home screen.
Navigating in a book
While you are reading a book, you may simply page through
the book with the Next page and Previous page buttons on the
lower-right side of the reader.
,
A second Next page button is on the left for convenience.
If you want to exit from a book, either press the Back or Home
button (both on the lower-left).
29
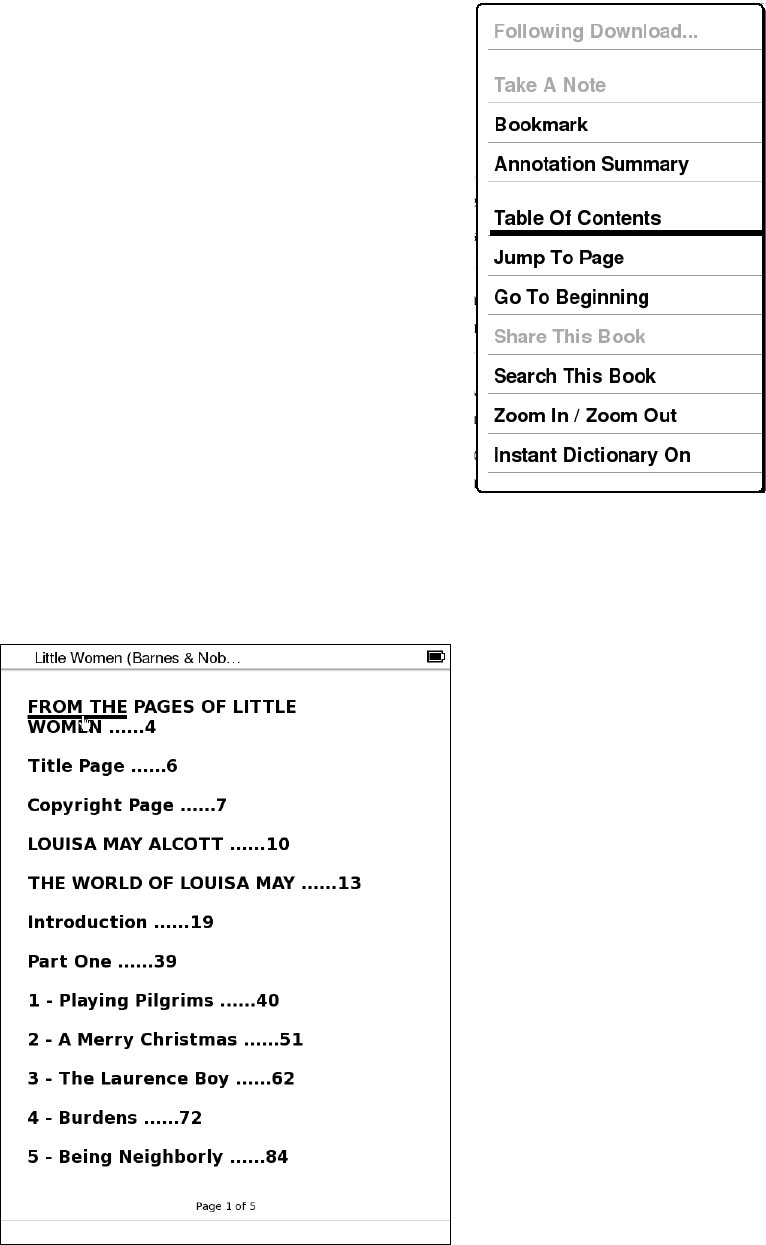
Table of contents
While many eBooks include a table of
contents at the beginning, it is usually not
possible to use this to jump to specific
chapters. You can instead use a table of
contents generated by your reader to quickly
navigate to major sections.
Press the MENU button, then select Table of
Contents. You will then see a list of major
sections and headings. Use the navigation
dial to select an entry from the list and press
the confirm button (navigation dial) to jump
to that section.
If more than one page is available, use the Next Page and
Previous Page buttons to switch between pages.
Press the Back button to return to the book without making a
selection.
30
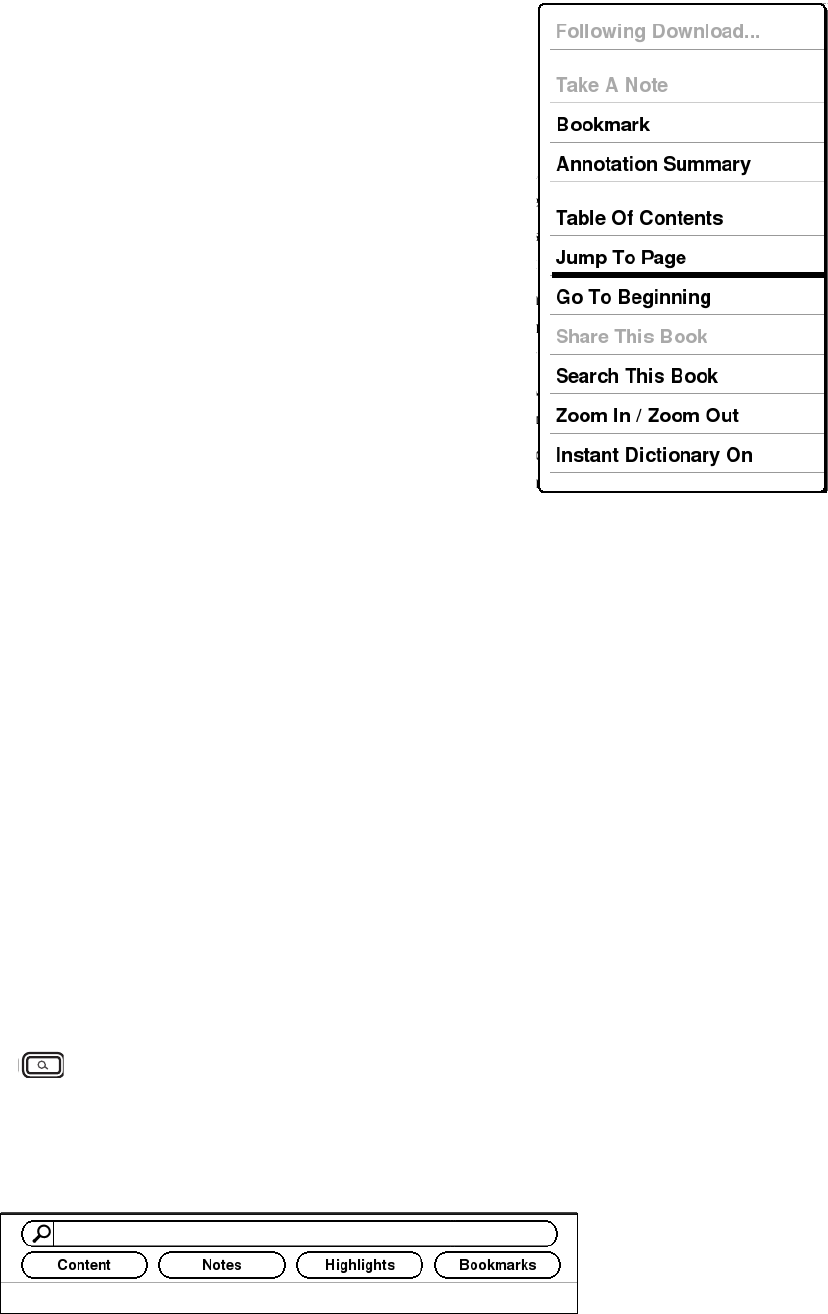
Jump to page
If you know a specific page reference, or
want to skip forward in a book, you can
enter a page reference.
Press the MENU button, then select Jump to
Page. Enter the page that you want to view
(press and hold the ALT key to enter
numbers), highlight Go on the screen, and
press the confirm button (navigation dial) to
jump to that section.
If more than one page is available, use the
Next Page and Previous Page buttons to
switch between pages.
Press the Back button or select Cancel to return to the book
without changing the page.
Go to beginning
You can quickly return to the first page of a book: Press the
MENU button, then select Go To Beginning.
Search this book
If you want to find a specific word, either in the main text or in
annotations or notes, you can search the book contents.
Press the MENU button, then select Search this Book or press
the Search key . Enter the text that you want to find,
highlight the type of content you want to search (Content,
Notes, Highlights or Bookmarks), and press the confirm button
(navigation dial).
A list of sections that match the search term will be displayed. If
the section you want is displayed, use the navigation dial to
select it, then press the confirm button (navigation dial) to
open it.
31
If more than one page of search results are available, use the
Next Page and Previous Page buttons to switch between pages.
Press the Back button to return to the book without changing
the page.
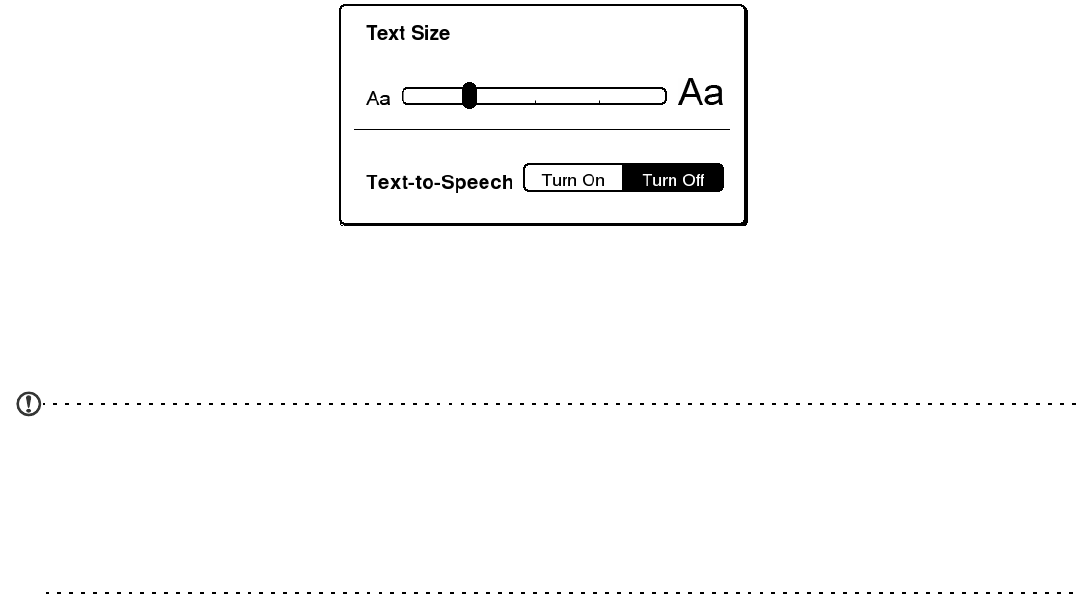
Viewing options
In most books it is possible to change viewing options, such as
the size of the text. Some options can be used by pressing a
key, while others can be found in the Menu settings.
Text size
Press the text size key (‘AA’) on the keyboard to see text size
options. Use the navigation dial to increase (press the dial to
the right) or decrease (press the dial to the left) the text size.
This will change the number of words visible on the screen.
The text size will change as you move the selection left or right.
When the text is at an appropriate size, press the confirm
button (navigation dial) and continue reading the book.
Note: Certain files provide a fixed layout; the option will
change the size of the page. For better control over the size
of a page, press the MENU button, then select Zoom In /
Zoom Out.
Text-to-speech
Press the text size key (‘AA’) on the keyboard to see text size
options. Press the confirm button (navigation dial) to select the
Text-to-Speech options.
32
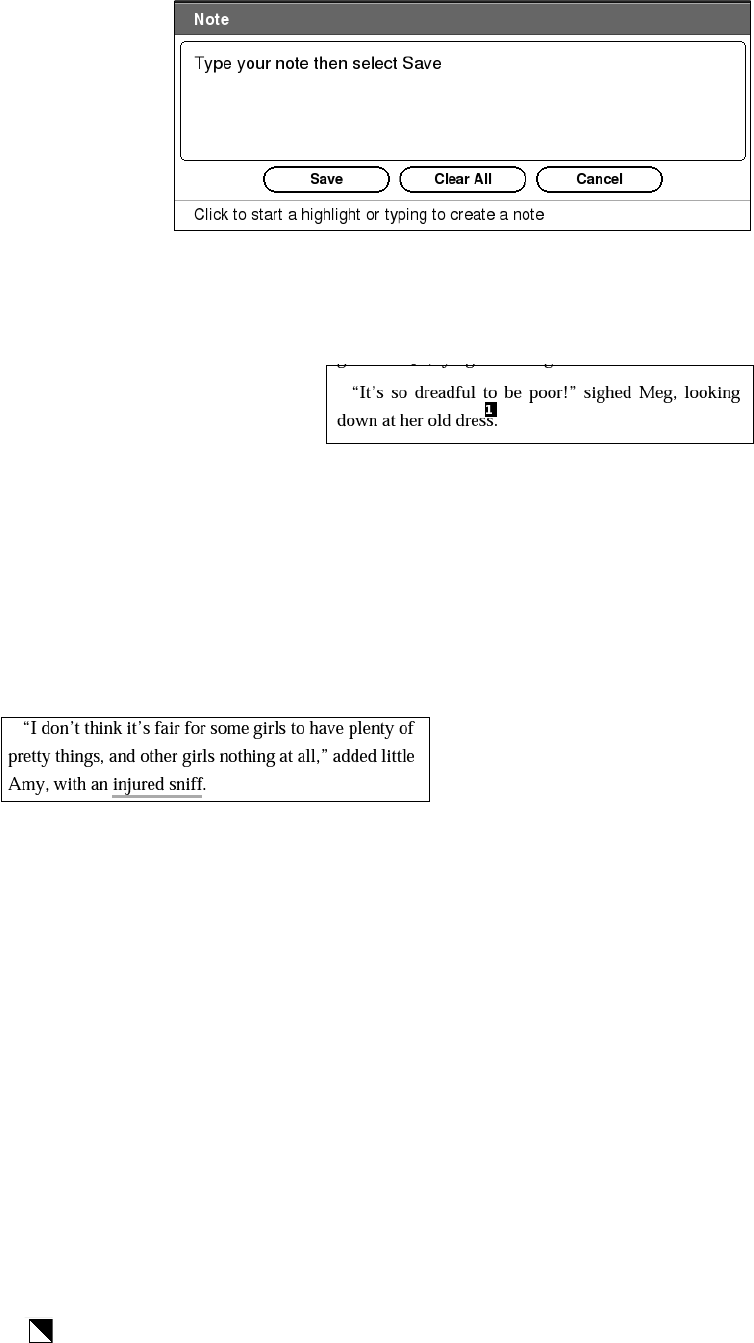
Adding notes to a book
If you need to add notes or comments to a book for future
reference, you can add up to 9 notes to any page in a book,
and each note can be up to 255 characters long.
While viewing the page,
move the navigation dial to
show the cursor (a straight
line | in the text). Use the
navigation dial to move the
cursor to the beginning of
any word on the page, and start typing to enter the text for the
note.
After typing your text, select Save
and press the navigation dial to add
the note. A numbered marker shows
the position of any notes.
Highlighting text
You can highlight one or more words on a page. Highlighted
text will be underlined for future reference.
While viewing the page, move the navigation dial to show the
cursor (a straight line | in the text). Use the navigation dial to
move the cursor to the beginning of any word on the page,
press the navigation dial to start the highlight, then move the
cursor to indicate the stretch of text to be highlighted. Press
the navigation dial again to set the highlighted text.
Adding a bookmark
A page can be bookmarked so you can find it easily. While
viewing the page, press the MENU button, and select
Bookmark page. A small dog-ear will be added to the top
corner of the page.
33
Searching for annotations
All annotations can be found easily; notes, highlights and
bookmarked pages can be searched from the Home screen.
Simply press the Search button and enter the search text.

34
Shopping at Barnes&Noble
Your reader includes quick access to the Barnes & Noble eBook
store.
However, you will need to create a Barnes & Noble account
before you can access the store from your reader.
Creating a Barnes & Noble account
Before browsing the Barnes & Noble store with your reader,
you must apply for a Barnes & Noble account from a PC with
Internet access.
Create a Barnes & Noble account
Follow these steps on a PC:
1. Open the browser and go to www.bn.com/account
2. Select Create an Account (if you do not see this, first select
My Account).
3. Enter the information requested to create login information
for your account (including your email address and name).
Note down this information, as you will need it when
accessing Barnes & Noble from your reader.
4. Select Create Account & Continue.
5. You will be asked for further information that will allow you
to purchase and download eBooks.
Note: You need to provide credit card and billing address
information to purchase books from Barnes & Noble.
35
Access Barnes & Noble from your reader
1. Turn on your reader.
2. Turn on your reader’s network access (either Wi-Fi ).
Note: Press the MENU button, then select Turn on Wi-Fi or
Turn on 3G. See “Wi-Fi and 3G connections” on page 20.
3. Select the Barnes & Noble Library from the Home
screen.
4. Enter the email address and password you used
when you created your Barnes & Noble account.
Tip: To enter the @, or any other symbol, press SYM, then use
the navigation dial to select the symbol you need. Press the
confirm button (navigation dial) to enter the symbol in the
text.
Starting with Barnes & Noble
There are several ways to access Barnes & Noble services from
your reader.
Note: These services require an Internet connection.
The Barnes & Noble Library provides access to daily
recommendations and news.
You can also press the MENU button and select Shop in
Barnes & Noble to see a list of books you can download

36
and purchase. These are conveniently organized into categories
and the list can be searched; press the Search button .
You can search for wish list items on the Barnes &
Noble store. Open the Wish List from the Home screen,
and select Find eBook on B&N. A list of matches will be
displayed and you can purchase or download an eBook
directly from the list.
See “Purchasing a book” on page 39.
37
Using the Wish List
The Wish list allows you to store information about books and
other publications so you may look for them later, or even buy
them online. You can add information about a book quickly by
using the ISBN (International Standard Book Number) code that
is used worldwide to identify and classify books; it is visible on
the cover of all books, and nearly all stores will quote this code.
You can add this information either by typing the ISBN into the
Wish list, or by scanning the cover of a book with the ISBN
scanner.
Opening your Wish list
Select the Wish List icon on the Home screen and press
the confirm button (navigation dial) to open your Wish
list.
To add an item, press the MENU button. If you have a copy of
the book select Scan ISBN, otherwise select Add ISBN to Wish
List to type the code.
Typing an ISBN
Select Add ISBN to Wish List and simply type the number (hold
the ALT key to activate the numbers on the top-row). Select
Add to Wish List and press the selection button.
The book will be added to your Wish list. If you are connected
to the Internet the Wish list will check for more information
about the book (title, author, cover) and add this information
to the list.
38
Using the ISBN scanner
Your reader can quickly scan the
ISBN code from any book and store
the code for later use. Add the
book to your wish list so you can
search for it later, including the
book’s author and title.
From the Home screen, or the Wish
list, press MENU and select Scan
ISBN. Press the confirm button
(navigation dial) to start the scan.
Find the ISBN on the cover of the book, and
position the scanner over the ISBN.
Use the ISBN barcode focus target to help find
the barcode.
An image on the screen allows you to position the book and
reader correctly. Aim the scanner so that you can see the entire
code in the image.
39
Tip: The scanner needs a clear image to register a code. If the
scanner is unable to register the code, improve the lighting
and hold the book and reader as steady as possible.
Your reader will automatically register the code when the
scanner is in the correct position.
Select Add to Wish List to store the code in the Wish list.
If you are connected to the Internet the Wish list will check for
more information about the book (title, author, cover) and add
this information to the list.
Purchasing a book
If you are connected to the Internet you can purchase a book
directly from the Barnes & Noble bookstore.
Select the book on your Wish list, then select Find eBook on
B&N. If the book is available in the store, you will be taken
directly to a page with purchase and download information.
Simply follow the instructions on the page.
Note: This requires an account with the Barnes & Noble
online store. See “Shopping at Barnes&Noble” on page 34.

40
Internet Browsing
Your reader includes an optimized browser so you may
download and read a wide variety of content directly on your
reader.
Activate a wireless network (Wi-Fi if available) and press
the Browser key on the keyboard.
Note: The browser is optimized for mobile devices and may
not display all Internet sites. The browser works best with
sites adapted for mobile devices, such as smartphones or
tablet computers.
The first page shows Internet Search and the My Favorites list.
Internet Search
You can type a search term,
or an Internet address.
When you have finished
select one of the buttons
below the search box and
press the confirm button
(navigation dial) to access
the Internet.
Google
The Google button will
search for the text using
Google search.
Go to URL
If you have typed an
Internet address, select Go
to URL to go directly to that
page.

41
Current Page
Instead of starting an Internet search, Current Page will search
the text in the displayed page for the search term.
Wikipedia
The Wikipedia button will search for the text in the Wikipedia
encyclopedia.
When viewing an Internet page, press Search key to type a
new search term.
My Favorites
The My Favorites section provides direct links to your favorite
sites; to start you off the list is filled with eBook-related sites.
Simply select one of the favorite icons and press the confirm
button (navigation dial). If more than one page of favorites are
available, use the Next Page and Previous Page buttons to
switch between pages.
Note: After a site has been accessed, the initial favorite icon
will be replaced with an image of the site.
Add or remove favorites
You may add or remove sites to the My Favorites list.
To add a page you are viewing to the My Favorites list, press
the MENU button and select Add to My Favorites. It will be
added to the top of the list.
To remove a favorite, first select it, then press the MENU button
and select Remove from My Favorites.
Navigating in a web page
Your reader allows you to navigate through an Internet page:
• Use the Next Page and Previous page buttons to step up or
down through a long page.
42
• Press the ALT key and then move the navigation dial left
or right to step left or right on a page that is wider than
the screen.
• Move the navigation dial in any direction to move towards
and select the next link in that direction.
•Press the ALT key and then move the
navigation dial up or down to display a sub-
screen panel. This displays a small thumbnail
of the entire page, with a small rectangle
that shows the viewing area. Move the
viewing area with the navigation dial, then
press the navigation dial to close the sub-
screen and see the selected area on the entire screen.
• Press the Back button to move back one page.
Landscape mode
Many Internet sites are best viewed on wider screens. You may
make full use your reader’s screen by switching to landscape
mode. This rotates the display so that you may hold the reader
with the keyboard on the right. Press the MENU button and
select Landscape mode.
,
,
Portrait mode
Landscape mode
Read Text
here
Read Text here
Note: The navigation dial also changes orientation to match
the screen.
43
You may return to the normal orientation; press the MENU
button and select Portrait mode.
Browser settings
While the browser is open, press the MENU button to see
additional options:
Refresh
Refresh the current page to see recent changes.
Add to My Favorites
This option allows you to add a page to the My Favorites list.
See “My Favorites” on page 41.
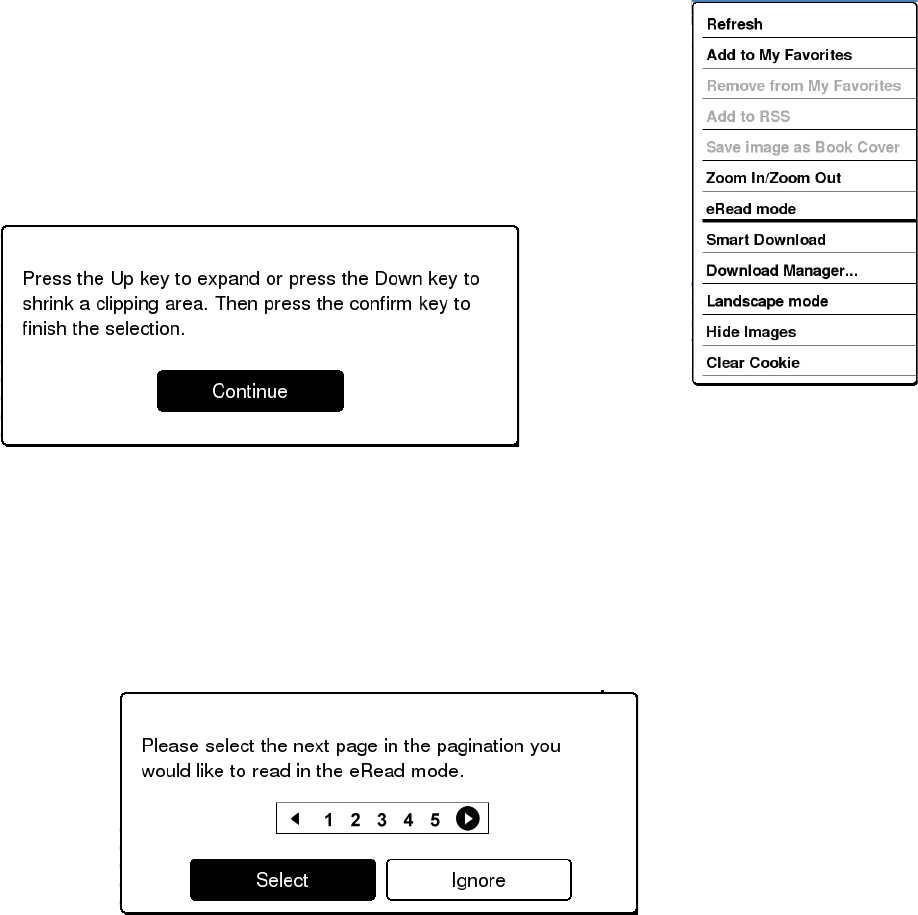
Add to RSS
You can use this option when on a page with an RSS feed to
add the feed to the built-in RSS reader. See “Using the RSS
Reader” on page 46.
Save Image as book cover
You can download an image from the Internet and use it as a
book cover for any book in your library. This option will
download the image and place it in the ‘covers’ directory of
your reader.
Zoom in/ Zoom Out
You may zoom in or out of a page to aid legibility. This will
change the size of the entire page, so may not be ideal for all
web pages.
eRead Mode
This option allows you to select an area of the page that will be
reformatted to improve the display in your reader. This is best
used on long sections of text, and certain pages are not
appropriate for eRead mode. See “Using eRead mode” on
page 44.

44
Smart download
This option allows you to select and download an area of the
page for later viewing. The area will be saved as a book in the
reader’s library. This is best used on long sections of text, and
certain pages are not appropriate for Smart download. See
“Using Smart download” on page 45.
Landscape/Portrait mode
See “Landscape mode” on page 42.
Download Manager...
The Download manager tracks all downloads from the
browser, you can check the progress of downloads and restart
failed downloads from this section.
Hide images
You can instruct the browser to ignore all images for faster
browsing or improved legibility.
Clear cookie
Cookies are used by some Internet sites to store information,
such as when you last visited or any personal preferences on
that site. This option will clear this information so it is not
available to other people using the reader.
Using eRead mode
If you are reading a web page, you can adapt the page so it is
better adapted to your reader. You may select an area to
format into pages and then view them with the Next page/
previous page buttons.
Note: This is best used on long sections of text. Certain pages
are not appropriate for eRead mode.
45
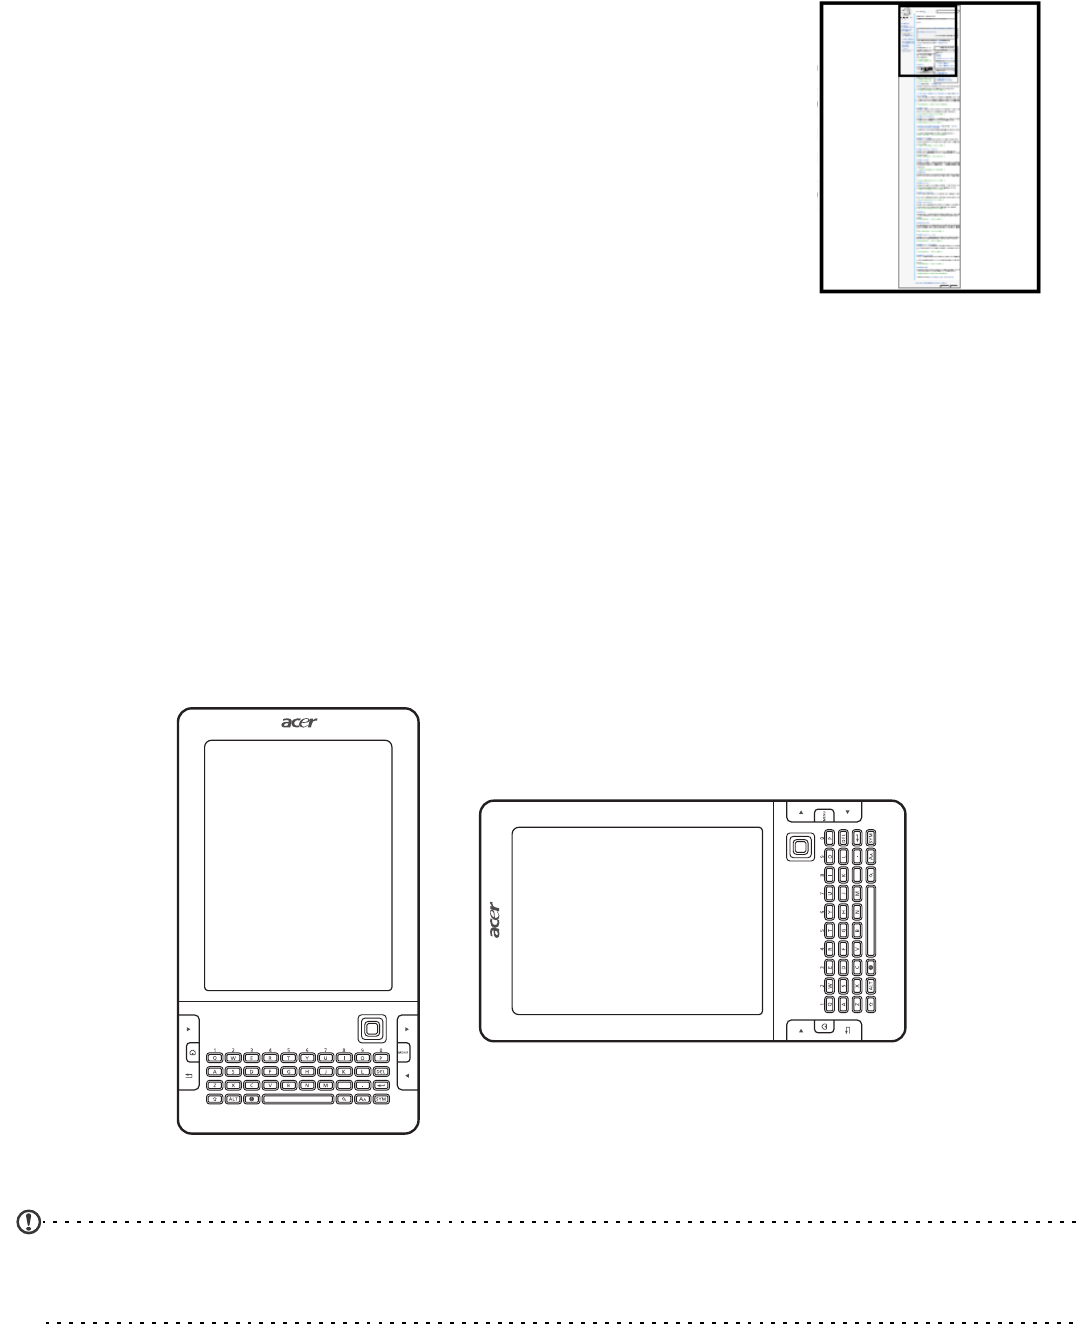
To start eRead mode, open the web page, press
the MENU button and select eRead mode.
Use the navigation dial to move the selected area
to the starting point of the text you want to
reformat.
Press the navigation dial to confirm and move the end of the
selection so that all the text you want to read is in the selection
box. Press the navigation dial again to confirm the selection.
The selection will be divided into pages, select the first page
you want to view.
You may now navigate the pages using the Next page/Previous
page buttons on your reader. Press the Back button to leave
eRead mode.
Using Smart download
This option allows you to select and download an area of the
page for later viewing. The area will be saved as a book in the
reader’s library, so it can be accessed even when you do not
have an Internet connection.
To use Smart download to create a book, open the web page,
press the MENU button and select Smart Download.

46
Use the navigation dial to create a selection as you would for
eRead mode. See “Using eRead mode” on page 44.
After you have created your selection, select Download and
confirm with the navigation dial.
Note: If a microSD memory card is installed in your reader,
you can choose to save the book either to your reader or to
the microSD card.
Normally the book will use the name of the selected page, but
you can change this. After typing any changes to the title of
the book, select Yes to create the book.
A message will tell you how long it will take a while to
download and create the book. Do not turn off the Internet
connection during this time.
After the book has been created, you can open and read it like
any other eBook. See “Opening a book” on page 26.
Using the RSS Reader
Subscribing to RSS feeds provides an easy method to keep up
with sites and subjects that interest you. Your reader can
connect to the Internet and download RSS ‘feeds’: news
headlines, blogs, articles and audiocasts from sites that use this
service. Every time an article is added, the feed provides a
summary of the content. No personal information is required to
subscribe, you just need to know the address of the feed.
To open the RSS reader, open the Home
screen, press the MENU button and select RSS
Reader.
If you have not subscribed to an RSS feed, or
want to add another feed, press the MENU
button and select Add RSS Feed.
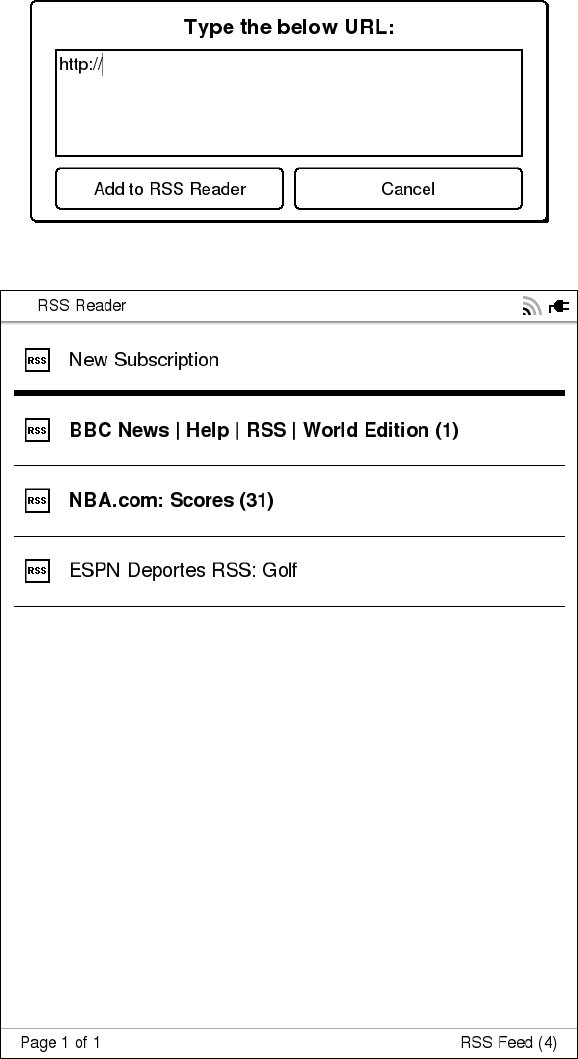
47
Enter the full Internet address of the feed and select Add to RSS
Reader. The address will be added to your list of RSS feeds.
The RSS reader will show a list of the feeds you have entered.
Use the navigation dial to select a feed, then press the confirm
button (navigation dial) to see the individual entries from a
feed. Select an item and press the navigation dial to read an
item.
Deleting an RSS feed
If you no longer want to receive updates from a feed you can
delete it. Select the feed from the list of feeds, and press the
DEL key.
48
Specifications
Performance
• ARM11, 532 MHz
• System memory:
• 128 MB LPDDR
• 2 GB moviNAND
• Linux 2.6.28+
Display
• 6” e-Paper
• 600 x 800 resolution (168 ppi)
•Grayscale
Multimedia
• Reader support: TXT, ePub, PDF, HTML, DOC, RTF, MOBI/
PRC, CHM
• RSS reader
•Browser
• Two speakers
USB connector
• Micro USB connector
• USB Client
• DC power-in (5 V, 1 A)
Connectivity
• IEEE Wi-Fi 802.11b/g WLAN
• Optional 3G modem (data only)
Camera
• 0.3 megapixel camera for barcode scanner
Expansion
• microSD memory card slot (up to 32 GB)
• SIM card slot (3G-enabled models only)

49
Battery
• High-density, rechargeable 1530 mAh Li-Ion Polymer / Li-
Ion battery (non-replaceable)
Note: Length of battery operation will depend on power
consumption, which is based on system resource use. For
example, constantly using the wireless network or using
power-demanding applications will shorten battery life
between charges.
Dimensions
Height 209.5 mm
Width 118 mm
Thickness 10.3 mm
Weight <285 g

50
End User Licence Agreement
IMPORTANT-READ CAREFULLY: THIS END USER LICENSE AGREEMENT ("AGREEMENT") IS A
LEGAL AGREEMENT BETWEEN YOU (EITHER AN INDIVIDUAL OR A SINGLE ENTITY), AND ACER
INC. INCLUDING ITS SUBSIDIARIES ("ACER") FOR THE SOFTWARE (WHETHER PROVIDED BY ACER
OR BY ACER'S LICENSORS OR SUPPLIERS) THAT ACCOMPANIES THIS AGREEMENT, INCLUDING
ANY ASSOCIATED MEDIA, PRINTED MATERIALS AND RELATED USER ELECTRONIC
DOCUMENTATION WHICH MAY BE BRANDED "ACER" ("SOFTWARE"). AGREEMENTS RELATING
TO ANY OTHER PRODUCT OR TOPIC ARE NEITHER INTENDED NOR SHOULD THEY BE IMPLIED.
BY INSTALLING THE ACCOMPANYING SOFTWARE OR ANY PORTION THEREOF, YOU AGREE TO
BE BOUND BY THE TERMS AND CONDITIONS OF THIS AGREEMENT. IF YOU DO NOT AGREE TO
ALL OF THE TERMS AND CONDITIONS OF THIS AGREEMENT, DO NOT CONTINUE THE
INSTALLATION PROCESS AND IMMEDIATELY DELETE ALL INSTALLED FILES, IF ANY, OF THE
ACCOMPANYING SOFTWARE FROM YOUR PHONE.
IF YOU DO NOT HAVE A VALIDLY-LICENSED COPY OF THE APPLICABLE SOFTWARE, YOU ARE
NOT AUTHORIZED TO INSTALL, COPY OR OTHERWISE USE THE SOFTWARE, AND HAVE NO
RIGHTS UNDER THIS AGREEMENT.
The Software is protected by U.S. and international copyright laws and conventions as well as
other intellectual property laws and treaties. The Software is licensed, not sold.
GRANT OF LICENSE
Acer grants to you the following non-exclusive and non-transferable rights with respect to the
Software. Under this Agreement, you may:
1. Install and use the Software only on a single designated phone. A separate license is
required for each phone on which the Software will be used;
2. Make one copy of the Software solely for backup or archival purposes;
3. Make one hardcopy of any electronic documents included in the Software, provided that
you receive the documents electronically.
RESTRICTIONS
You may NOT:
1. Use or copy the Software except as provided in this Agreement;
2. Rent or lease the Software to any third party;
3. Modify, adapt, or translate the Software in whole or in part;
4. Reverse engineer, decompile, or disassemble the Software or create derivative works based
upon the Software;
5. Merge the Software with any other program or modify the Software, except for your
personal use; and
6. Sublicense or otherwise make the Software available to third parties, except that you may,
after prior written notification to Acer, transfer the Software as a whole to a third party so
long as you do not retain any copies of the Software and such third party accepts the terms
of this Agreement.
7. Transfer your rights under this Agreement to any third parties.
8. Export the Software in contravention of applicable export laws and regulations, or (i) sell,
export, re-export, transfer, divert, disclose technical data, or dispose of, any Software to any
prohibited person, entity, or destination including, without limitation, Cuba, Iran, North
Korea, Sudan and Syria; or (ii) use any Software for any use prohibited by the laws or
regulations of the United States.
SUPPORT SERVICES
Acer is not obligated to provide technical or other support for the Software.
ACER LIVE UPDATE
Certain of the software contains elements that enable the use of the Acer Live Update service,
which allows for updates for such software to be automatically downloaded and installed on
51
your phone. By installing the software, you hereby agree and consent that Acer (or its licensors)
may automatically check the version of such software that you are using on your phone and may
provide upgrades to such software that may be automatically downloaded on to your phone.
OWNERSHIP AND COPYRIGHT
Title, ownership rights and intellectual property rights in and to the Software and all copies
thereof shall remain with Acer or Acer's licensors or suppliers (as applicable). You do not have or
shall not gain any proprietary interest in the Software (including any modifications or copies
made by or for you) or any related intellectual property rights. Title and related rights in the
content accessed through the Software is the property of the applicable content owner and may
be protected by applicable law. This license gives you no rights to such contents. You hereby
agree
1. Not to remove any copyright or other proprietary notices from the Software;
2. To reproduce all such notices on any authorized copies you make; and
3. To use best efforts to prevent any unauthorized copying of the Software.
TRADEMARKS
This Agreement does not grant to you any rights in connection with any trademarks or service
marks of Acer or of Acer's licensors or suppliers.
DISCLAIMER OF WARRANTIES
TO THE MAXIMUM EXTENT PERMITTED BY APPLICABLE LAW, ACER, ITS SUPPLIERS, AND ITS
LICENSORS, PROVIDE THE SOFTWARE "AS IS" AND WITH ALL FAULTS, AND HEREBY DISCLAIM
ALL OTHER WARRANTIES AND CONDITIONS, EITHER EXPRESS, IMPLIED OR STATUTORY,
INCLUDING, BUT NOT LIMITED TO, ANY IMPLIED WARRANTIES, DUTIES OR CONDITIONS OF
MERCHANTABILITY, OF FITNESS FOR A PARTICULAR PURPOSE, OF ACCURACY OR
COMPLETENESS OF RESPONSES, OF RESULTS, OF WORKMANLIKE EFFORT, OF LACK OF VIRUSES,
AND OF LACK OF NEGLIGENCE, ALL WITH REGARD TO THE SOFTWARE AND THE PROVISION OF
OR FAILURE TO PROVIDE SUPPORT SERVICES. ALSO, THERE IS NO WARRANTY OR CONDITION OF
TITLE, QUIET ENJOYMENT, QUIET POSSESSION, CORRESPONDENCE TO DESCRIPTION OR NON-
INFRINGEMENT WITH REGARD TO THE SOFTWARE.
EXCLUSION OF INCIDENTAL, CONSEQUENTIAL AND CERTAIN OTHER DAMAGES
TO THE MAXIMUM EXTENT PERMITTED BY APPLICABLE LAW, IN NO EVENT SHALL ACER, ACER'S
SUPPLIERS, OR ACER'S LICENSORS, BE LIABLE FOR ANY SPECIAL, INCIDENTAL, INDIRECT,
PUNITIVE, OR CONSEQUENTIAL DAMAGES WHATSOEVER (INCLUDING, BUT NOT LIMITED TO,
DAMAGES FOR LOSS OF PROFITS OR CONFIDENTIAL OR OTHER INFORMATION, FOR BUSINESS
INTERRUPTION, FOR PERSONAL INJURY, FOR LOSS OF PRIVACY, FOR FAILURE TO MEET ANY
DUTY INCLUDING OF GOOD FAITH OR OF REASONABLE CARE, FOR NEGLIGENCE, AND FOR ANY
OTHER PECUNIARY OR OTHER LOSS WHATSOEVER) ARISING OUT OF OR IN ANY WAY RELATED
TO THE USE OF OR INABILITY TO USE THE SOFTWARE, THE PROVISION OF OR FAILURE TO
PROVIDE SUPPORT SERVICES, OR OTHERWISE UNDER OR IN CONNECTION WITH ANY PROVISION
OF THIS AGREEMENT, EVEN IN THE EVENT OF THE FAULT, TORT (INCLUDING NEGLIGENCE),
STRICT LIABILITY, BREACH OF CONTRACT OR BREACH OF WARRANTY OF ACER OR ITS SUPPLIERS
OR LICENSORS, AND EVEN IF ACER AND ITS SUPPLIERS AND LICENSORS HAVE BEEN ADVISED OF
THE POSSIBILITY OF SUCH DAMAGES.
LIMITATION OF LIABILITY AND REMEDIES
NOTWITHSTANDING ANY DAMAGES THAT YOU MIGHT INCUR FOR ANY REASON WHATSOEVER
(INCLUDING, WITHOUT LIMITATION, ALL DAMAGES REFERENCED ABOVE AND ALL DIRECT OR
GENERAL DAMAGES), THE ENTIRE LIABILITY OF ACER, ITS SUPPLIERS, AND ITS LICENSORS,
UNDER ANY PROVISION OF THIS AGREEMENT, AND YOUR EXCLUSIVE REMEDY FOR ALL OF THE
FOREGOING, SHALL BE LIMITED TO THE AGGREGATE AMOUNT PAID BY YOU FOR THE
SOFTWARE. THE FOREGOING LIMITATIONS, EXCLUSIONS AND DISCLAIMERS (INCLUDING
DISCLAIMER OF WARRANTIES AND EXCLUSION OF INCIDENTAL, CONSEQUENTIAL AND CERTAIN
OTHER DAMAGES ABOVE) SHALL APPLY TO THE MAXIMUM EXTENT PERMITTED BY APPLICABLE
LAW, EVEN IF ANY REMEDY FAILS ITS ESSENTIAL PURPOSE; PROVIDED, HOWEVER, THAT
BECAUSE SOME JURISDICTIONS DO NOT ALLOW THE EXCLUSION OR LIMITATION OR LIABILITY
52
FOR CONSEQUENTIAL OR INCIDENTAL DAMAGES, THE ABOVE LIMITATION MAY NOT APPLY TO
YOU.
TERMINATION
Without prejudice to any other rights, Acer may immediately terminate this Agreement without
notice if you fail to comply with any terms and conditions of this Agreement.
In such event, you must:
1. Cease all use of the Software;
2. Destroy or return to Acer the original and all copies of the Software; and
3. Delete the Software from all phones on which it was resident.
All disclaimers of warranties and limitation of liability set forth in this Agreement shall survive
termination of this Agreement.
GENERAL
This Agreement represents the complete agreement between you and Acer relating to this
license for the Software and supersedes all prior agreements, communications, proposals and
representations between the parties and prevails over any conflicting or additional terms of any
quote, order, acknowledgement or similar communication. This Agreement may only be
modified by a written document signed by both parties. If any provision of this Agreement is
held by a court of competent jurisdiction to be contrary to law that provision will be enforced to
the maximum extent permissible and the remaining provisions of this Agreement will remain in
full force and effect.
ADDITIONAL PROVISIONS APPLICABLE TO THIRD PARTY SOFTWARE AND SERVICES
Software provided hereunder by Acer's licensors or suppliers ("Third Party Software") is made
available to you for your personal, non-commercial use only. You may not use the Third Party
Software in any manner that could damage, disable, overburden, or impair the services provided
by Acer's licensors or suppliers hereunder ("Third Party Services"). Furthermore, you may not use
the Third Party Software in any manner that could interfere with any other party's use and
enjoyment of the Third Party Services, or the services and products of Acer's licensors' or
suppliers' third party licensors. Your use of the Third Party Software and Third Party Services is
also subject to additional terms and conditions and policies which can be accessed through our
global website.
Privacy policy
During registration you will be asked to submit some information to Acer. Please refer to Acer’s
privacy policy at www.acer.com or your local Acer website.
53
Regulatory information
Safety Information
• Use only the batteries and power adapter provided by the
manufacturer. The use of unauthorized accessories may
void your warranty.
• Unplug the power adapter from the wall outlet during
lightning storms to avoid electric shock or fire.
• Do not expose the reader to direct sunlight.
• Do not store your reader in temperatures higher than 60ºC
or 140ºF.
• Do not use harsh chemicals or detergents to clean your
reader.
• Do not handle the reader with wet hands while it is being
charged. This may cause an electric shock or serious
damage to the reader.
Make sure that the device:
• Is away from magnetic fields or any device generating
static electricity.
• Is kept at least 30 centimeters (one foot) away from a
mobile phone.
• Is not in a dusty or damp environment.
• Is not used near water. Never spill liquids of any kind on or
into your computer.
• Cables are not strained and that there is no risk of people
walking or tripping over them.
• Other devices do not crush the cables.
• Always unplug your computer from the power outlet
before cleaning it.
• Do not use liquid or aerosol cleaners, use a damp cloth
instead.
• Never spray cleaning product directly on the screen.
• If you spill liquid on your computer, switch it off
immediately, unplug the AC adapter, remove the battery

54
and make sure it is completely dry before switching it on
again. Wait overnight if necessary.
Do not attempt to service your reader yourself, as opening
or removing covers may expose you to dangerous voltage or
other risks. Refer all servicing to qualified service personnel.
Unplug your computer from the wall outlet and refer servicing
to qualified service personnel when:
• the power cord or plug is damaged, cut or frayed,
• liquid was spilled into the product,
• the product was exposed to rain or water,
• the product has been dropped or the case has been
damaged
• the product exhibits a distinct change in performance,
indicating a need for service
Note: Adjust only those controls that are covered by the
operating instructions, since improper adjustment of other
controls may result in damage and will often require
extensive work by a qualified technician to restore the
product to normal condition.
Warning: Battery cannot be removed and replaced, contact
your reseller if battery performance needs to be checked. Do
not pierce, open or disassemble the battery. Failure to follow
this guideline may cause the battery to leak acid, become
hot, explode or ignite and cause injury and/or damage.
Safety in aircraft
Warning: Using wireless devices while flying in aircraft is
prohibited. Switch off all devices (Wi-Fi options)
before boarding an aircraft; they may be dangerous to the
operation of the aircraft, disrupt communications, and even
be illegal.

55
Health Precautions
Warning: To protect your hearing, when using
speakers or headphones, increase volume
gradually until you can hear clearly and
comfortably; do not increase the volume level
after your ears have adjusted. Do not listen to high volumes
for extended periods. Do not increase the volume to block
out noisy surroundings; decrease the volume if you cannot
hear people speaking near you
• The reader and accessories may contain small parts. Keep
them out of the reach of small children.
• If you work or play for hours at a time, then make sure you
take regular breaks. Look away from the computer's
screen once in a while. Do not use your computer if you
are tired.
• Arrange your reader so that you can work in a natural and
relaxed position. Place items that you use frequently
within easy reach.
• We advise that parents monitor the use of games by their
children. If you or your child experience any of the
following symptoms: dizziness, blurred vision, eye or
muscle twitches, loss of consciousness, disorientation, any
involuntary movement or convulsion, IMMEDIATELY
discontinue use and consult your doctor. This may happen
even if the person has no medical history of epilepsy.
NCC warning
警語
經型式認證合格之低功率射頻電機,非經許可,公司、商號或使用
者均不得擅自變更頻率、加大功率或變更原設計之特性及功能。
低功率射頻電機之使用不得影響飛航安全及干擾合法通信;經發現
有干擾現象時,應立即停用,並改善至無干擾時方得繼續使用。
前項合法通信,指依電信法規定作業之無線電通信。
56
低功率射頻電機須忍受合法通信或工業、科學及醫療用電波輻射性
電機設備之干擾。