Actiontec Electronics M6240V GbE 11AC Fiber Gateway User Manual Manual
Actiontec Electronics Inc GbE 11AC Fiber Gateway Manual
Contents
- 1. Manual
- 2. Manual r1
Manual

User Guide
GbE 11ac Fiber Gateway
Model # M6240V
0535-0021-000 rev. 1

i
Table of Contents
Introduction 1
Getting to Know the Gateway 1
Connecting the Gateway 4
Setting Up the Gateway 4
Computer Network Conguration 7
Home Page 9
Specifications 12
General 12
LED Indicators 12
Environmental 13
Notices 14
Warranty 14
Important Safety Instructions 14
FCC Class B Equipment 16
Contact Info 16

1
Introduction
Thank you for purchasing the GbE 11ac Fiber Gateway. The Gateway features four
Ethernet ports, making it one of the most versatile Gateways available. If you want
to take your home or office networking to the next level, the Actiontec Broadband
Gateway is sure to be one of the keys to your success.
Getting to Know the Gateway
This section contains a quick description of the Gateway’s LEDs, ports, etc.
The Gateway features several indicator lights on its front panel, and a series of
ports and switches on its rear panel.
Front Panel
The front panel of the Gateway features 3 indicator LEDs: Internet, Wireless, and
WPS.
Internet LED
The Internet LED is illuminated when the Gateway is connected to the Internet.
WIreless LED
The Wireless LED illuminates when the Gateway is broadcasting a wireless sig-
nal. If the LED blinks, a wireless device is connected to the Gateway’s wireless
network.
1

2
GbE 11ac Fiber Gateway
WPS Button/LED
The WPS button is used to connect other wireless devices to the Gateway’s wire-
less network via WPS. When the LED ring around the button is illuminated, it is
in operation.
Rear Panel
LAN Ethernet Ports (4)
The Ethernet ports connect devices to the Gateway via Ethernet cables to create
a local area network (LAN). The Ethernet ports are 100/1000 Mbps auto-sens-
ing ports, and are equipped with two LEDs. If one LED is illuminated, the port
is operating at 100 Mbps; if both are illuminated, the port is operating at 1000
Mbps.
WAN Ethernet Port
The WAN Ethernet port connects the Gateway via Ethernet cable to the
Internet. It is a 100/1000 Mbps auto-sensing port, and equipped with two LEDs.
If one LED is illuminated, the port is operating at 100 Mbps; if both are illumi-
nated, the port is operating at 1000 Mbps.
SFP Port
The SFP port connects the Gateway via SFP cable to the Internet. It is equipped
with one LEDs which, if illuminated, denotes that the port is operational.
MoCA Port
The MoCA port connects the Gateway via coaxial cable to the Internet. It is
equipped with two LEDs: a WAN LED (signifying the MoCA port is operating
as a WAN port), and a LAN LED (signifying the MoCA port is operating as a
LAN port).

3
Introduction
Reset Button
To restore the Gateway’s factory default settings, press and hold the Reset button
for approximately ten seconds. The reset process will start about ten seconds
after releasing the button. When the Gateway resets, all the lights on the front
panel turn off, and then the lights start flashing. The Gateway has completed its
reset process when the Power light glows steadily green.
M Caution: Do not unplug the Power cord from the Gateway
during the reset process. Doing so may result in the loss of the
Gateway’s configuration information. If this occurs, reset the
Gateway again.
Power Switch
The Power switch powers the Gateway on and off.
Power Port
The Power port connects the Gateway to an electrical wall outlet via the
Power cord.
M Caution: Do not unplug the Power cord from the Gateway
during the reset process. Doing so may result in the loss of the
Gateway’s configuration information. If this occurs, reset the
Gateway again.

4
Connecting the
Gateway
Connecting a computer or local network to the Gateway is a simple procedure,
varying slightly depending on the computer’s operating system, and designed to
seamlessly integrate the Gateway with the computer or local network. Moreover,
zero-configuration is attained when taking advantage of Universal Plug-and-Play
support in Windows XP.
The Windows default network settings dictate that in most cases, the setup pro-
cedure described in the “Computer Network Configuration” will be unnecessary.
For example, the default DHCP setting in Windows 2000 is “client,” requiring no
further modification.
However, Actiontec advises following the setup procedure described below to verify all
communication parameters are valid and the physical cable connections are correct.
Setting Up the Gateway
There are three parts to setting up the Gateway: Connecting the Cables,
Configuring the Gateway, and Connecting Other Computers/Set Top Boxes.
Connecting the Cables
☞ Note: If a different Gateway was being used, disconnect it.
Remove all Gateway components, including power supplies and
cables, since they will not work with the Gateway.
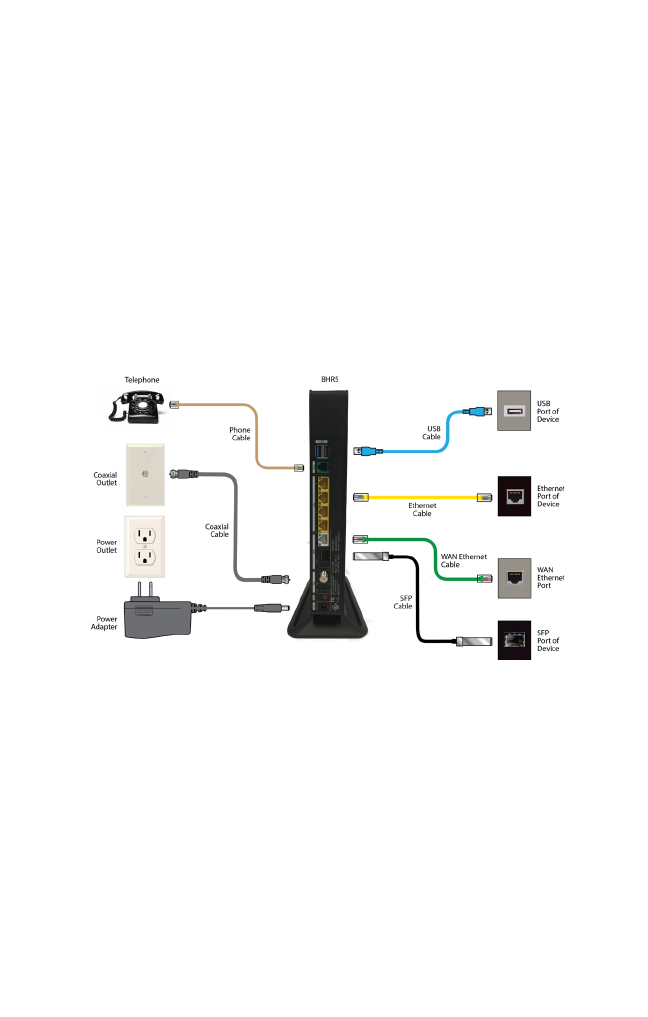
1. Get the Gateway and its black Power cord (external, 12V DC, 3.5A, model #
NBS40C120350VU, manufactured by Actiontec) from the box.
2. Plug the black Power cord in the black port on the back of the Gateway and
then into a power outlet.
3. Turn the Gateway on.
4. Plug the yellow Ethernet cable from the box into one of the four yellow
Ethernet ports on the back of the Gateway.
5. 6Make sure the computer is powered on, then plug the other end of the yellow
Ethernet cable into an Ethernet port on the computer.
2

5
Connecting the Gateway
6. Make sure at least one of the Ethernet LAN lights on the front of the Gateway
glows steadily green. This may take a few moments.
7. The phone company previously installed a high-speed Ethernet wall jack
somewhere in the house. Locate it and plug one end of the white Ethernet
cable in the wall jack.
8. Plug the other end of the white Ethernet cable in the white port on the back of
the Gateway.
9. Make sure the Ethernet WAN light on the front of the Gateway glows
steadily green.
☞ Note: If the Ethernet WAN light does not illuminate, make sure
the Ethernet cable is connected properly at both ends.

6
GbE 11ac Fiber Gateway
Configuring the Gateway
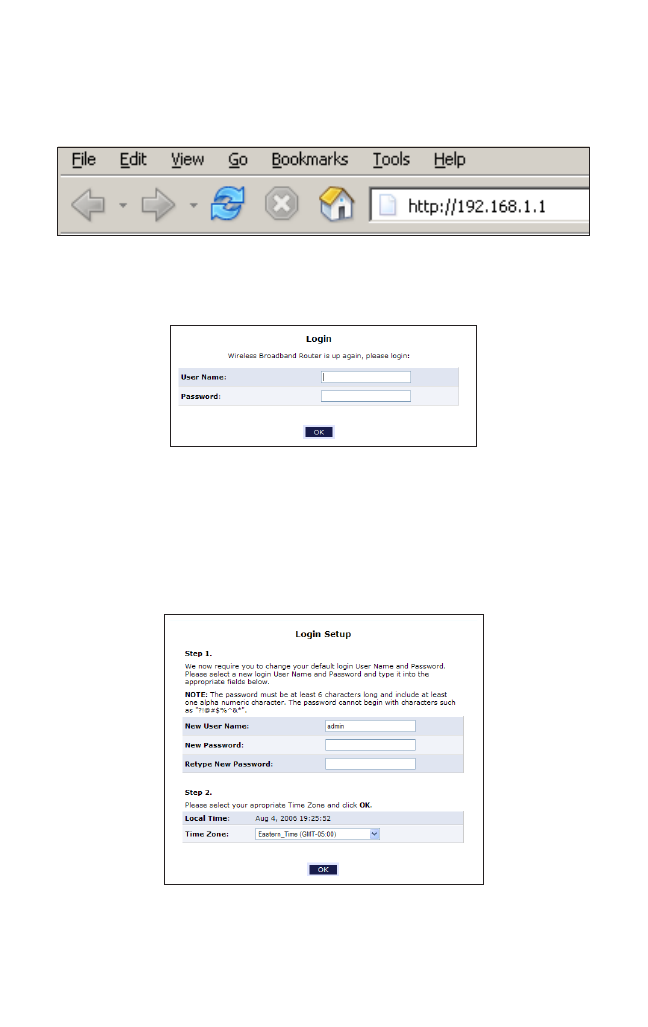
1. Open a web browser on the computer connected to the Gateway. In the
“Address” text box, type:
http://192.168.1.1
then press Enter on the keyboard.
2. The “Login” screen appears. Enter the default user name (admin) and pass-
word (password) in the appropriate text boxes, then click OK.
3. The “Login Setup” screen appears. Select a new user name and password and
enter them in the appropriate text boxes (the password must be entered twice,
for validation purposes). Write the new user name and password down on a
piece of paper and keep it in a safe place, since they will be needed to access
the Gateway’s MegaControl Panel™ in the future.

7
Connecting the Gateway
4. In the bottom part of the screen, select the correct time zone from the “Time
Zone” drop-down list, then click OK at the bottom of the screen.
5. The Gateway is now configured.
Connecting Other Computers/Set Top Boxes
To connect the Gateway to other computers or set top boxes:
1. Get an Ethernet cable and plug one end into one of the open yellow
Ethernet ports on the back of the Gateway.
2. Plug the other end of the Ethernet cable into an Ethernet port on the computer.
3. Make sure the corresponding Ethernet LAN light on the front of the
Gateway glows steadily green.
4. Repeat these steps for each computer to be connected to the Gateway.
Computer Network Conguration
Each network interface on the computer should either be configured with a stati-
cally defined IP address and DNS address, or instructed to automatically obtain an
IP address using the Network DHCP server. The Gateway is set up, by default, with
an active DHCP server, and Actiontec recommends leaving this setting as is.
Configuring a Computer to Use Dynamic IP Addressing
To configure a computer to use dynamic IP addressing:
Windows XP
1. Select Network Connections in the Control Panel.
2. Right-click Ethernet Local Area Connection, then click Properties.
3. In the “General” tab, select Internet Protocol (TCP/IP), then click
Properties.
4. The “Internet Protocol (TCP/IP) Properties” window appears.

8
GbE 11ac Fiber Gateway
5. Click the “Obtain an IP address automatically” radio button.
6. Click the “Obtain DNS server address automatically” radio button.
7. Click OK to save the settings.
Windows 2000/98/Me
1. Select Network and Dialing Connections in the Control Panel.
2. Right-click on the Ethernet connection’s icon, then click Properties.
3. Select Internet Protocol (TCP/IP) component, then click Properties.
4. The “Internet Protocol (TCP/IP) Properties” window appears.
5. Click the “Obtain an IP address automatically” radio button.
6. Click the “Obtain DNS server address automatically” radio button.
Windows NT
1. Click Network in the Control Panel. The “Network” window appears.
2. In the “Protocol” tab, select Internet Protocol (TCP/IP) then click
Properties.
3. In the “IP Address” tab, click the “Obtain an IP address automatically” radio
button.
4. In the “DNS” tab, verify no DNS server is defined in the “DNS Service Search
Order” text box and no suffix is defined in the “Domain Suffix Search
Order” text box.
Linux
1. Login into the system as a super-user, by entering “su” at the prompt.
2. Type “ifconfig” to display the network devices and allocated IPs.
3. Type “pump -i <dev>,” where <dev> is the network device name.

9
Connecting the Gateway
4. Type “ifconfig” again to view the newly allocated IP address.
5. Make sure no firewall is active on device <dev>.
Home Page
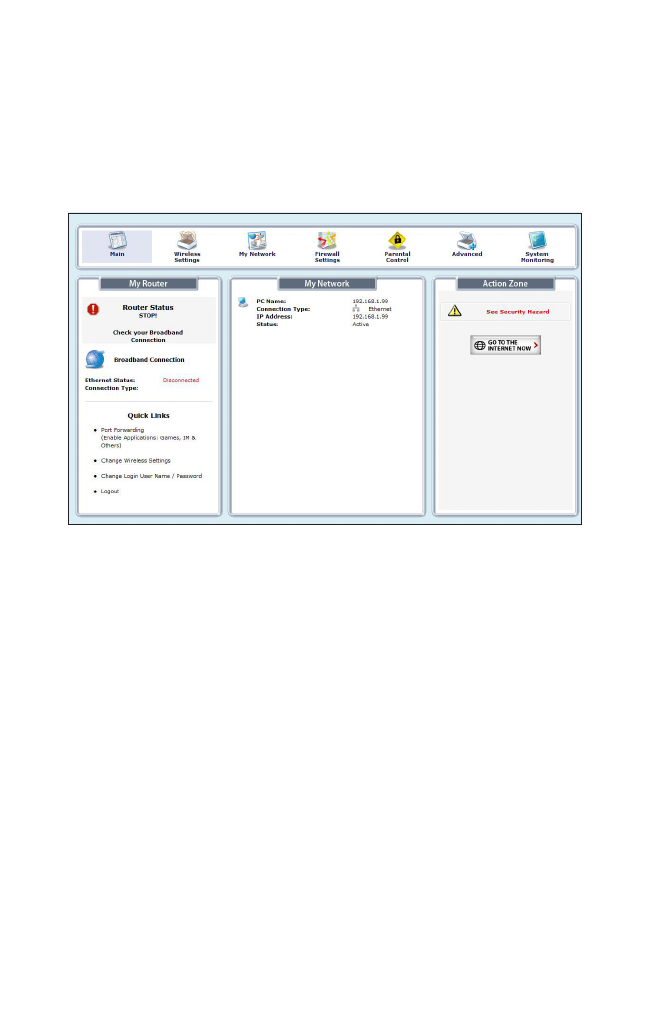
After logging into the Gateway’s GUI, (see “Configuring the Gateway” at the
beginning of this chapter), the Home screen appears.
The Home screen has a menu that occupies the top of the screen. Below that, the
screen is divided into three columns: “My Router,” “My Network,” and “Action
Zone.” A brief description of each continues below.
Main Menu
The “Main Menu” contains links to all of the configuration options of the
Gateway: My Network (explained in chapter 3 of this manual), Firewall Settings
(chapter 5), Parental Controls (chapter 6), Advanced (chapter 7), and System
Monitoring (chapter 8).

10
GbE 11ac Fiber Gateway
My Router
This section displays the status of the Gateway’s network and Internet connection.
A green light signifies the Gateway is connected; a yellow light means the Gateway
is attempting to connect; and a red light signifies the Gateway’s connection is
down.
Broadband Connection
The “Broadband Connection” section of My Gateway displays the state of the
Gateway’s broadband connection (“Connected” or “Disconnected”) for the con-
nection option (“Ethernet Status”).
Quick Links
The “Quick Links” section of My Gateway contains a list of frequently accessed
settings, including “Change Login User Name & Password,” “Enable Gaming,”
and “Logout.”
My Network
The “My Network” section of the Home screen displays the connection type, name,
IP address, and MAC (Media Access Control) address of all devices connected to
the Gateway’s network. The icon associated with the device will be displayed nor-
mally (signifying an active device) or shaded (signifying the device has not been
active for at least 60 seconds). The user can also configure the basic settings of each
device by clicking on its icon. These settings are described in more detail in chapter
3, “Configuring My Network Settings.”

11
Connecting the Gateway
Action Zone
This section contains links to various Verizon Web sites, and other informational
links. Clicking on the flashing icon above “Go to Internet Now” connects the user
to the home page configured on the user’s web browser.

12
Specifications
General
Model Number
M6240V (GbE 11ac Fiber Router)
Standards
Wireless IEEE 802.11ac
Wireless IEEE 802.11n
Wireless IEEE 802.11a/b/g
Ethernet IEEE 802.3/802.3u/802.3ab 10/100/1000 Base-T
IP
IPv6 Dual Stack
DHCPv6 with PD on WAN
Stateful or Stateless on LAN
Speed
LAN Ethernet: 10/100/1000 Mbps auto-sensing
Cabling Type
Ethernet 10BaseT: UTP/STP Category 3 or 5
Ethernet100BaseTX: UTP/STP Category 5
LED Indicators
Internet, Wirless, WPS, LAN (8), WAN (2), SFP, MoCA (2)
B

13
GbE 11ac Fiber Router
Environmental
Power
External, 12V DC, 3.5A
Model # NBS40C 120350VU
Manufactured by Actiontec
Certifications
FCC Part 15B, 15C
UL
WiFi
WPS
Operating Temperature
0º C to 40º C (32º F to 104º F)
Storage Temperature
-20º C to 70º C (-4º F to 158º F)
Operating Humidity
8% to 93% (non-condensing)
Storage Humidity
5% to 100% (non-condensing)
☞ Note: Specifications are subject to change without notice.

14
Notices
Warranty
This product has a one-year Limited Hardware Warranty and 90-day free software
updates from date of purchase.
Local Law
This Limited Warranty Statement gives the customer specific legal rights. The
customer may also have other rights, which vary from state to state in the United
States, and from country to country elsewhere in the world.
To the extent that this Limited Warranty Statement is inconsistent with local
law, this Statement shall be deemed modified to be consistent with such local
law. Under such local law, certain disclaimers and limitations of this Warranty
Statement may not apply to the customer.
Go to http://www.actiontec.com/products/warranty.php for more information.
Important Safety Instructions
Basic safety precautions should always be followed to reduce the risk of fire, electri-
cal shock, and personal injury, including the following:
Do not use this product near water – for example, near a bathtub, kitchen sink,
laundry tub, or swimming pool, or in a wet basement; only clean with dry cloth.
Do not block any ventilation openings. Install in accordance with the manufactur-
er’s instructions. Do not install near any heat sources such as radiators, heat regis-
ters, stoves, or other apparatus including amplifiers that produce heat.
Do not use the telephone to report a gas leak in the vicinity of the leak;
Use only the power cord and batteries indicated in this manual if applicable. Note:
you may need to reword for batteries or adapters.
Do not dispose of batteries in fire, as they may explode – check with local codes for
possible special disposal instructions if applicable.

15
GbE 11ac Fiber Router
15
Telephone Line Cord Caution
To reduce the risk of fire, use only No. 26 AWG or larger (e.g., 24 AWG) UL Listed
or CSA Certified Telecommunication Line Cord.
Coaxial Cable
If applicable, the coaxial cable screen shield needs to be connected to the Earth at
the building entrance per ANSI/NFPA 70, the National Electrical Code (NEC),
in particular Section 820.93, “Grounding of Outer Conductive Shield of a Coaxial
Cable,” or in accordance with local regulation.
For Audio/Video Apparatus
This reminder is provided to call the CATV system installer’s attention to Section
820.93 of the National Electric Code (NEC), which provides guidelines for proper
grounding and, in particular, specifies that the coaxial cable shield shall be connect-
ed to the grounding system of the building, as close to the point of cable entry as
practical.
TV Interface Device
If a transfer switch is not required for a TV interface device, including system ter-
minal devices, the following label shall be used in addition to the label shown in §
15.19(a):
This device is intended to be attached to a receiver that is not used to receive over-
the-air broadcast signals. Connection of this device in any other fashion may cause
harmful interference to radio communications and is in violation of the FCC Rules,
part 15.
This device is verified to comply with part 15 of the FCC Rules for use with cable
television service.

16
Notices
FCC Class B Equipment
This equipment has been tested and found to comply with the limits for a Class B
digital device, pursuant to Part 15 of the FCC Rules. These limits are designed to
provide reasonable protection against harmful interference in a residential installa-
tion. This equipment generates, uses and can radiate radio frequency energy and,
if not installed and used in accordance with the instructions, may cause harmful
interference to radio communications. However, there is no guarantee that inter-
ference will not occur in a particular installation. If this equipment does cause
harmful interference to radio or television reception, which can be determined by
turning the equipment off and on, the user is encouraged to try and correct the
interference by implementing one or more of the following measures:
Reorient or relocate the device;
Increase the separation between the equipment and receiver;
Connect the equipment to an outlet on a circuit different from that to which the
receiver is connected; (applicable only to powerline products)
Consult the dealer or an experience radio or television technician for help.
Declaration of Conformity
This device complies with Part 15 of the FCC Rules. Operation is subject to the
following two conditions:
1. This device may not cause harmful interference;
2. This device must accept any interference received, including interference that
may cause undesired operation of the device.

17
Notices
Modifications
The FCC requires the user to be notified that any changes or modifications made
to this device that are not expressly approved by Actiontec Electronics, Inc, may
void the user’s authority to operate the equipment.
Important Note on WiFi
If applicable, this equipment complies with FCC radiation exposure limits set forth
for an uncontrolled environment.
The radio has been found to be compliant to the requirements set forth in CFR 47
Sections 2.1091, 15.247 (b) (4),15.407 addressing RF Exposure from radio frequen-
cy devices as defined in Evaluating Compliance with FCC Guidelines for Human
Exposure to Radio Frequency Electromagnetic Fields. The equipment should be
installed more than 30 cm (~12 in.) from your body or nearby persons.
Only channel 1~11 can be operated for the 2.4 GHz ISM band and channels 36 to
48 and 149-165 for the UNII and ISM Bands. (Channels 52-64 and 100-144 are
available if the device is enabled for DFS Band) Channels 124-128 are currently
permanently disabled for weather radar. Selection of other channels is not possible.
Contact Info
For questions regarding your product or the FCC declaration, contact:
Actiontec Electronics, Inc
760 North Mary Avenue, Sunnyvale, CA 94085, United States
Tel: (408) 752-7700
Fax: (408) 541-9003