Advantech Co M31R01 Industrial Tablet PC User Manual MARS 3100R S
Advantech Co Ltd Industrial Tablet PC MARS 3100R S
Contents
- 1. Manual part 1
- 2. Manual part 2
- 3. Manual BT
- 4. Users manual part 1
- 5. Users manual part 2
Users manual part 2
37 MARS-3100R/S User Manual
Chapter 3 Advantech Central Manager
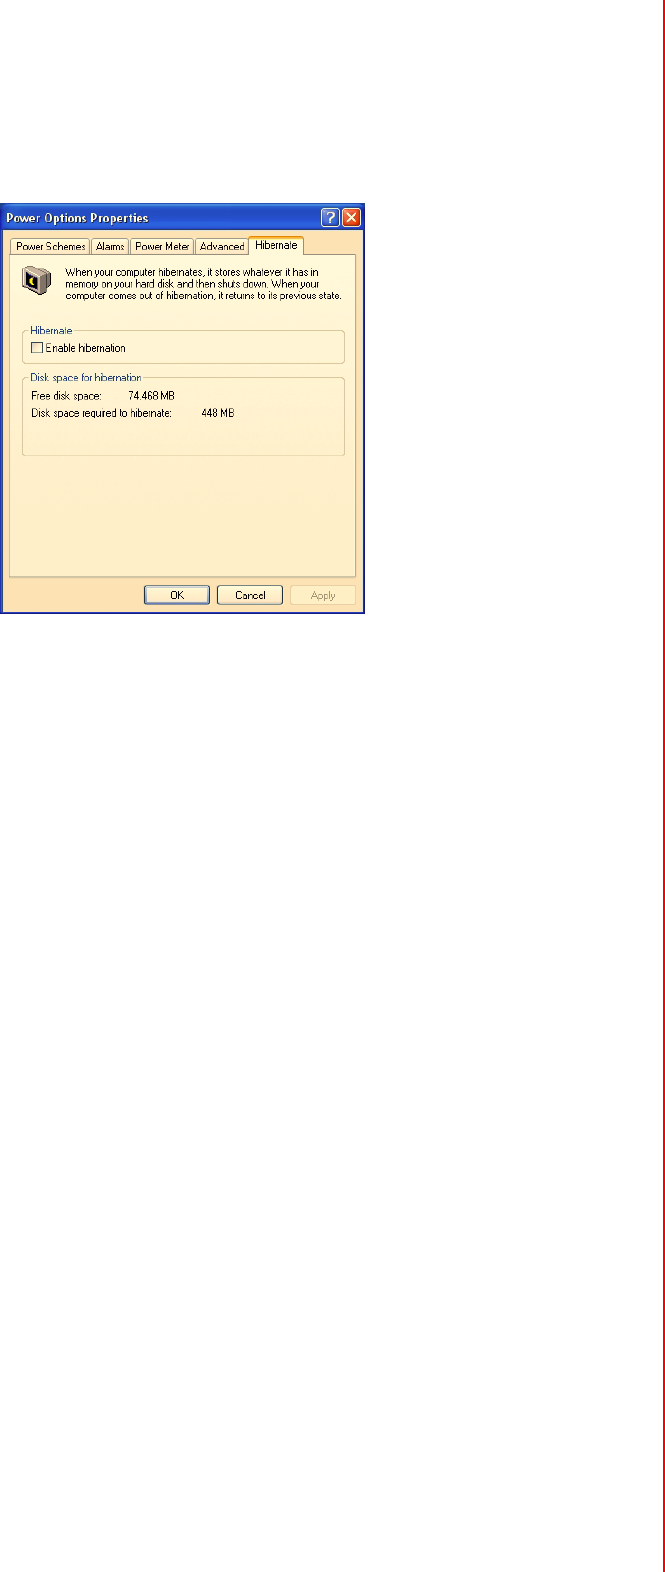
3.4.2.5 Hibernate
The fifth tab on the Power Options Properties menu displays the Hibernate menu,
which provides the option to Enable hibernation.
Figure 3.20 Hibernate
3.4.2.5.1 Hibernate check box
Selecting the Enable hibernation check box activates the hibernation function. It is
intended to preserve data that is currently active in the SDRAM memory, by saving it
to the hard disk drive before placing the computer into hibernation. Whenever the
computer is brought out of hibernation, it restores the data to its previous locations,
and the whole computer resumes its previous state of activity.
3.4.2.5.2 Disk space for hibernation
This box displays the Free disk space presently available on the computer and the
amount of minimum disk space required to activate the Hibernate function.
MARS-3100R/S User Manual 38
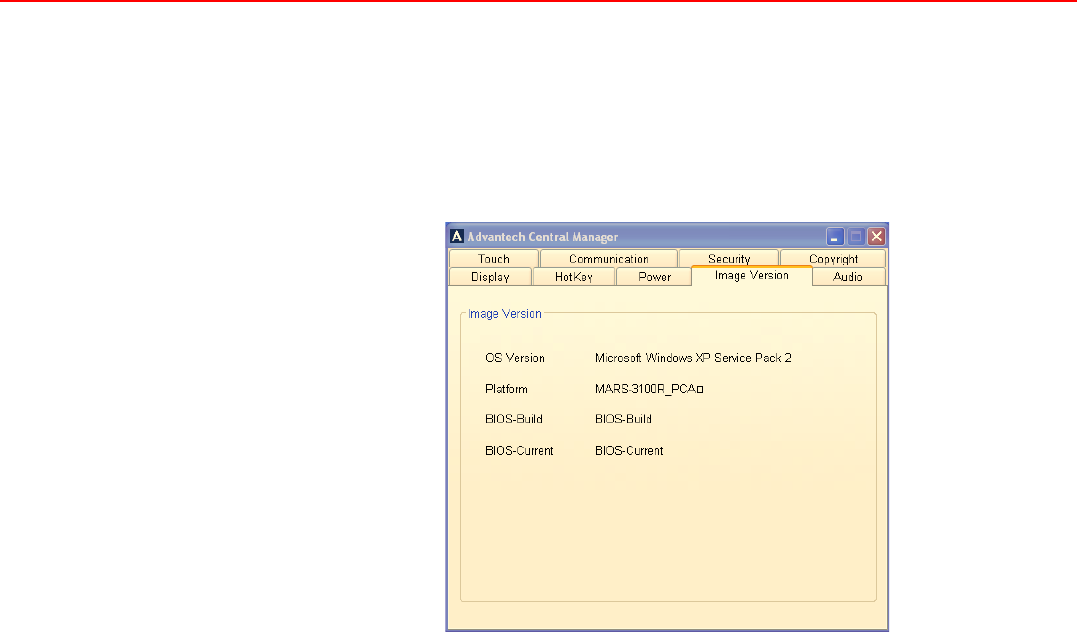
3.5 Image Version
The Image version menu displays information about the status of the OS that is cur-
rently installed on the MARS-3100R/S. Normally, the OS is Microsoft Windows XP
Embedded Service Pack 2. The data displayed here also details the current version
of BIOS installed in the system, and its build date.
Figure 3.21 Image version
39 MARS-3100R/S User Manual
Chapter 3 Advantech Central Manager
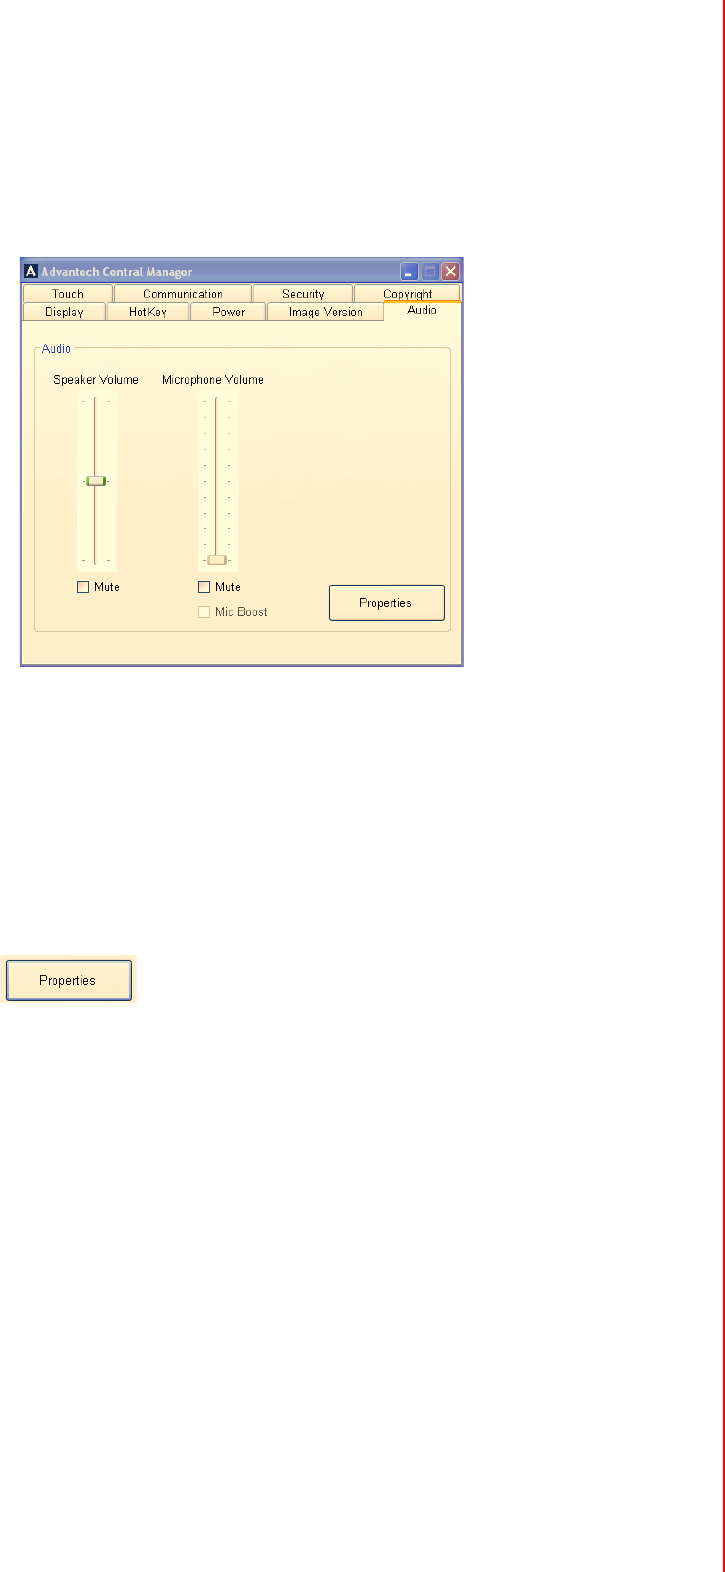
3.6 Audio
The Audio menu displays two slider controls to adjust the volume of the speaker and
the microphone. To make basic adjustments, place the pen on the slider button and
move it up or down.
Figure 3.22 Main audio menu
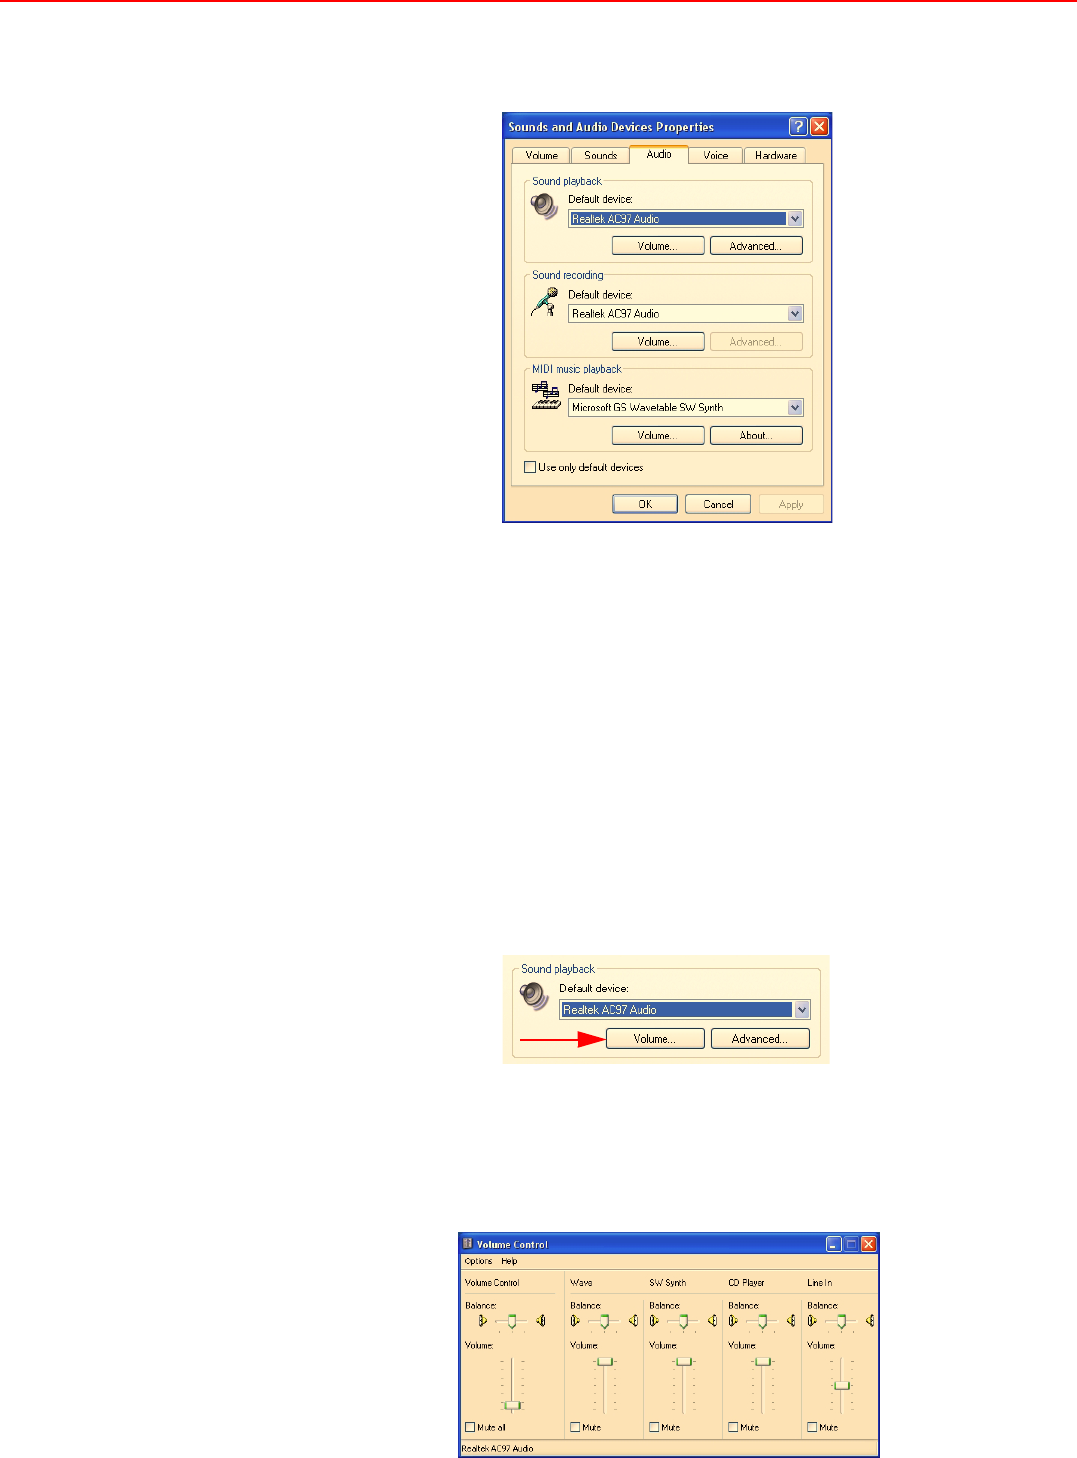
3.6.1 Sounds and Audio Devices Properties
The MARS-3100R/S supports a variety of precise audio settings.
!Audio devices
!Volume
!Sounds
!Voice
!Hardware
Click Properties on the main Audio menu of the Central Manager to
open the Sounds and Audio Devices Properties menu.
MARS-3100R/S User Manual 40
3.6.1.1 Audio devices
The third tab on Sounds and Audio Device Properties displays the Audio menu,
Figure 3.23 Audio menu
Three Audio Device settings are displayed on the menu.
!Sound playback
!Sound recording
!MIDI music playback
3.6.1.1.1 Sound playback
The Sound playback control sets the hardware device that controls audio signal pro-
cessing. By default, the system is set to use the Realtek AC97 Audio chipset built into
the motherboard. However, if any external audio device or card is added to drive
audio processing, then it is possible to select the device from this menu.
Sound playback displays two important controls for fine-tuning the hardware audio
device controller.
!Volume
!Advanced audio settings
Figure 3.24 Volume and advanced buttons
3.6.1.1.2 Volume
Click the Volume button to access the Volume Control sub-menu. Five settings may
be adjusted for the sound playback device. The volume and balance of software and
external devices is controlled with sliders using the pen.
Figure 3.25 Playback volume control
41 MARS-3100R/S User Manual
Chapter 3 Advantech Central Manager
3.6.1.1.3 Advanced audio properties
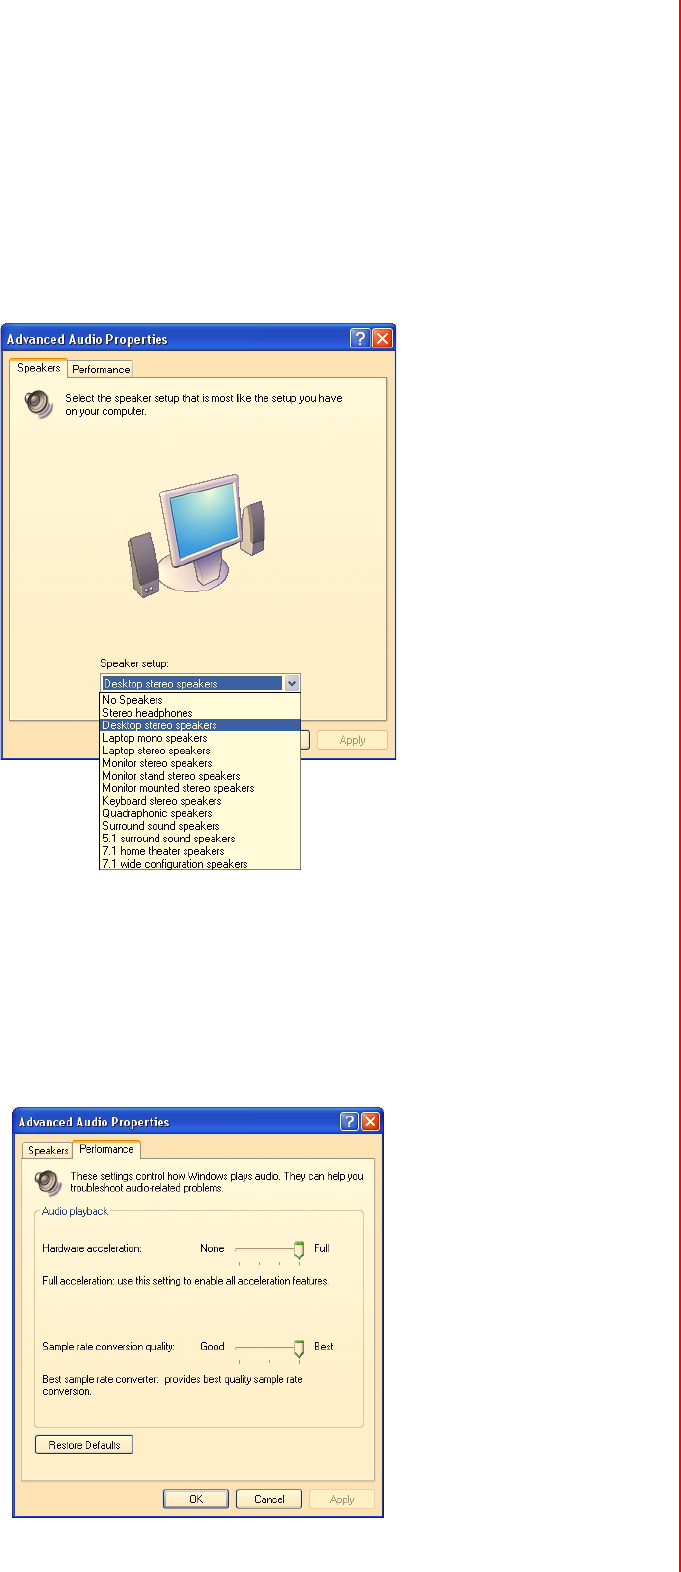
Two properties are controlled from the Advanced audio properties sub-menu.
!Speakers
–The Speakers menu permits quick configuration of speakers, according to
the number and type of speakers connected to the computer.
–The drop-down list for Speaker setup control displays a variety of options;
select the arrangement most suited to the type of speakers already installed.
Figure 3.26 Speaker properties
!Performance
–The Performance menu displays Audio playback controls for adjusting the
Hardware acceleration and the Sample rate. By default, both are set to the
maximum possible allowance. This setting devotes more system resources
to the quality of audio playback. Normally, it will not be necessary to adjust
these features unless the system has trouble playing back audio. Click
Restore defaults to reset the system defaults to maximum.
Figure 3.27 Performance properties
MARS-3100R/S User Manual 42
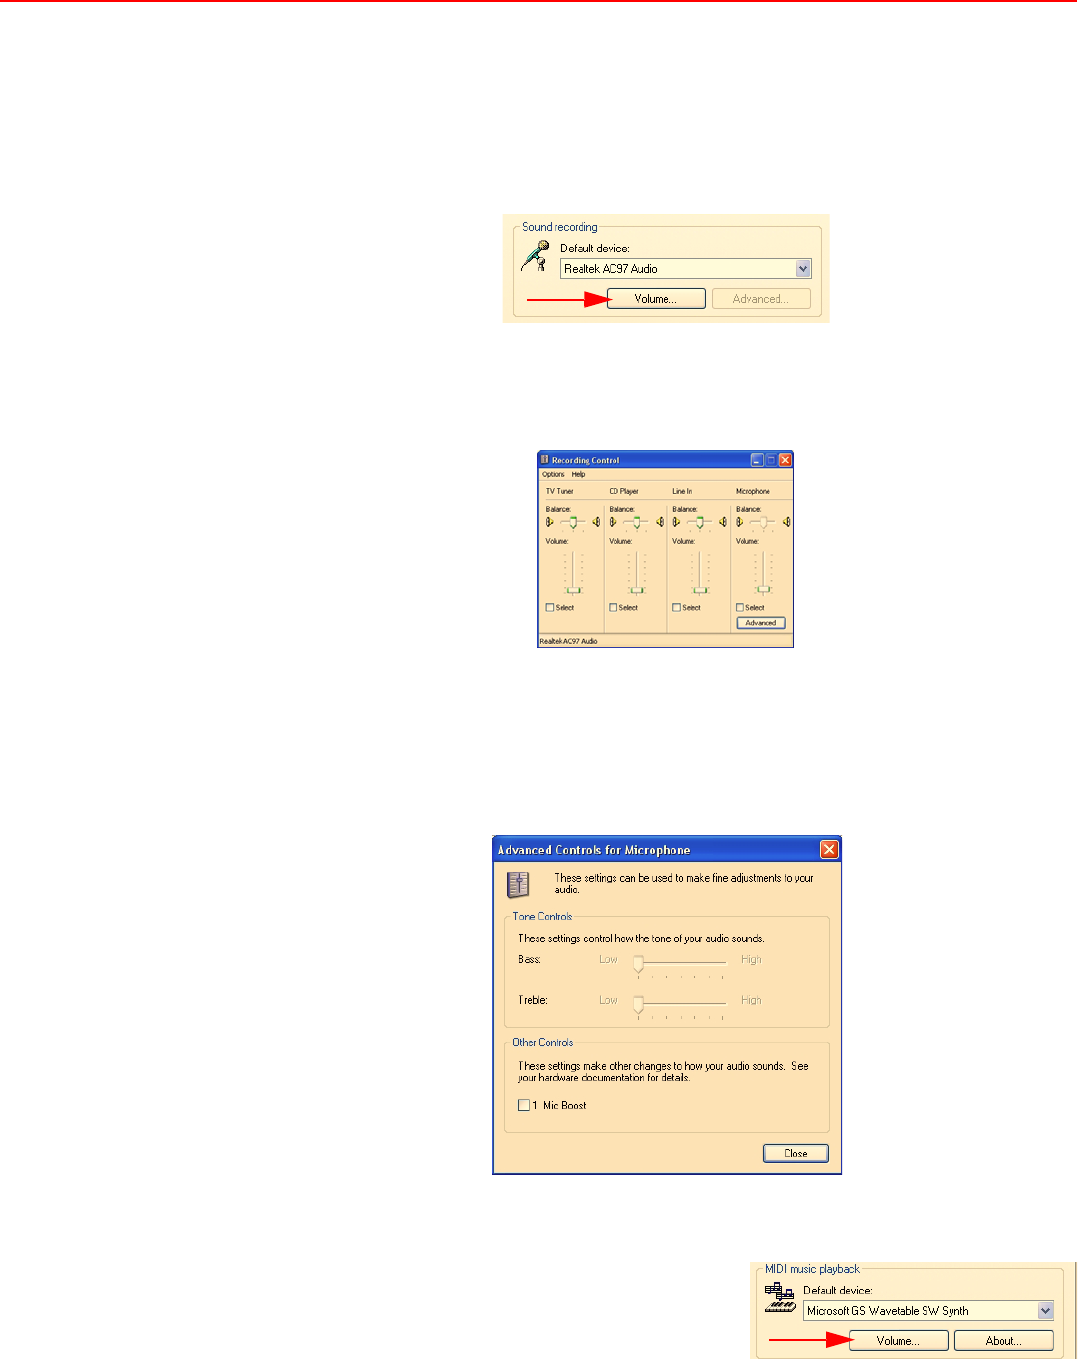
3.6.1.1.4 Sound recording
The Sound recording control on the Audio menu control permits fine-tuning of the
recording device. By default, the system device is the onboard Realtek AC97 chipset.
Sound recording also displays an important control for fine-tuning hardware devices
that may be connected via the device controller.
!Volume
Figure 3.28 Sound recording menu
–Click the Volume button to access the Recording controls sub-menu. Four
types of volume settings may be adjusted for sound recording devices, TV
Tuner, CD Player, Line In and Microphone.
Figure 3.29 Recording controls
–Click Advanced on the Recording Control sub-menu to access the
Advanced Controls for Microphone sub-menu.
•Tone Controls: Adjust the bass and treble sensitivity of the microphones.
•Other Controls: The audio device supports 1 Mic Boost. Select the
check box to activate this effect.
Figure 3.30 Advanced controls for microphone
3.6.1.1.5 MIDI music playback
The MIDI music playback control permits selec-
tion of the hardware device that controls MIDI sig-
nal processing. By default, the system is set to
use the Microsoft GS Wavetable SW Synth.
Figure 3.31 MIDI music playback
MIDI music playback also displays a volume control sub-menu that is identical to
the Playback volume control; (See Figure 3.25) for fine-tuning MIDI devices.
43 MARS-3100R/S User Manual
Chapter 3 Advantech Central Manager
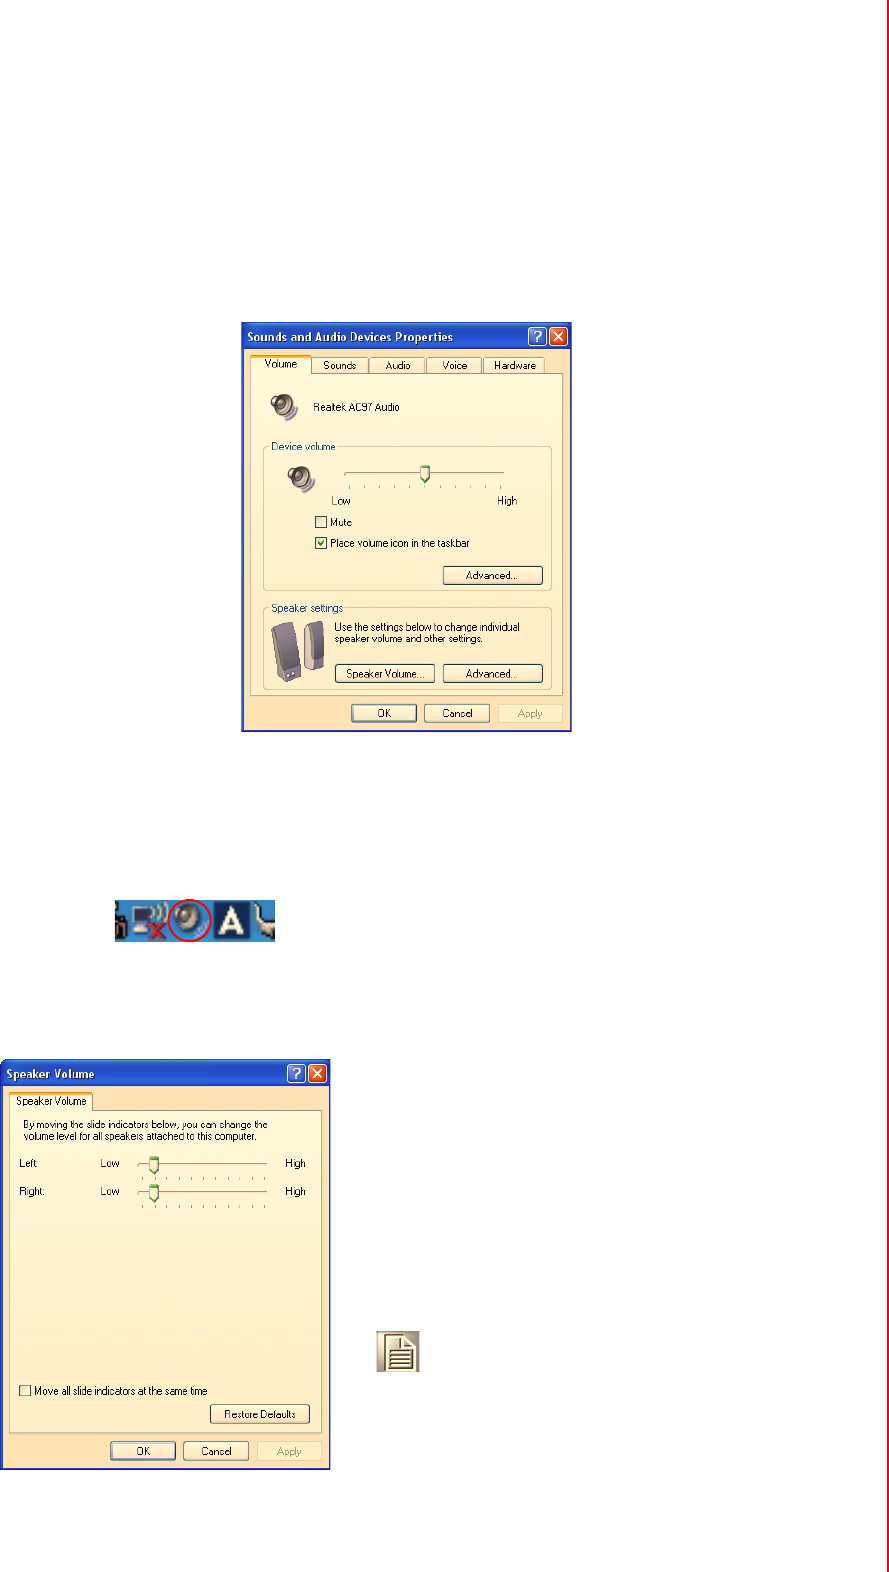
3.6.1.2 Volume
The first tab on Sounds and Audio Device Properties menu displays the Volume
menu for the current audio controller. By default, this device is a Realtek AC97 Audio
chipset.
Two Volume settings are displayed on the menu.
!Device volume
!Speaker settings
Figure 3.32 Volume menu
3.6.1.2.1 Device volume
The Device volume adjusts audio outputs and associated optional features. Use the
pen and slider to set the device output volume of the AC97 controller. Click the Mute
check box to silence all audio outputs. By default, the Volume icon is displayed on
the taskbar.
Click Advanced to access the volume control sub-menu. (See figure 3.25).
3.6.1.2.2 Speaker settings
From the Volume menu, click Speaker Volume
to open the sub-menu. The Speaker settings
control makes precise adjustments to the
speaker volume. Slider buttons are available to
adjust the speakers individually; if the Move all
slide indicators check box is selected, the slid-
ers move in unison.
Click Restore Default on the Speaker Volume
menu to reset the volume to normal setting.
Figure 3.33 Speaker volume
Note! Clicking Advanced in Speaker set-
tings on the main Volume menu
opens the Advanced Audio Prop-
erties sub-menu, as described in
section 3.6.1.1.3, Advanced audio
properties. (See page 38 above.)
MARS-3100R/S User Manual 44
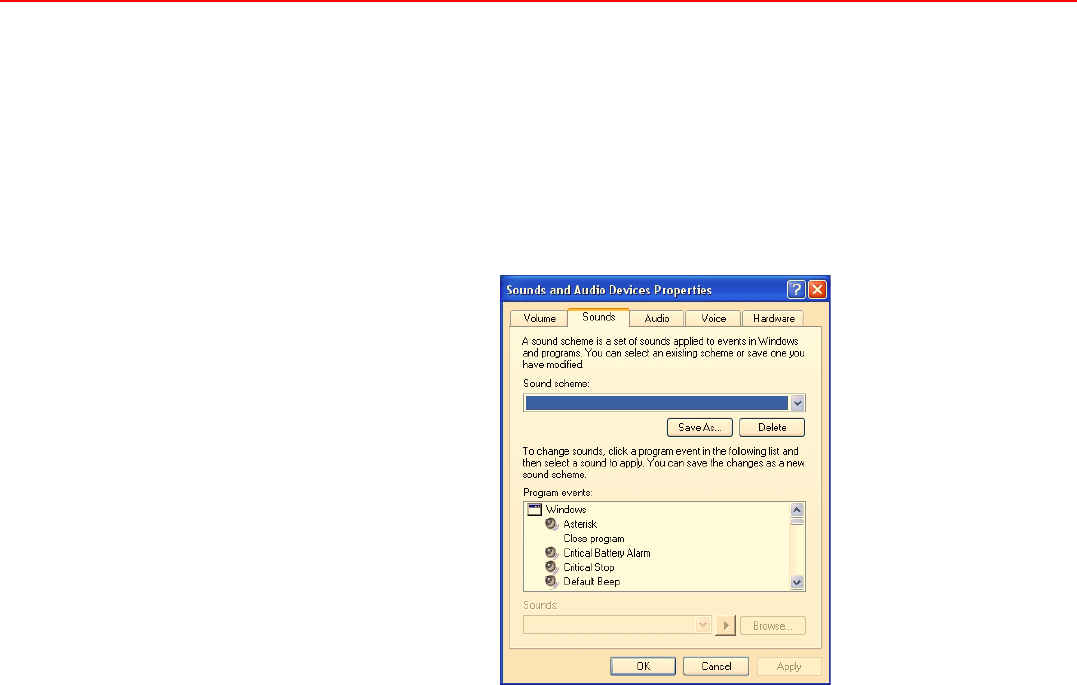
3.6.1.3 Sounds
The second tab on the Sounds and Audio Device Properties menu displays the
Sounds menu. The sound scheme is set to the Windows default. However, it is pos-
sible to customize the sounds produced by the computer during events; and custom
sound assignments may be saved as a new Sound scheme.
The Sounds menu also displays a scrolling list of all events to which sounds may be
assigned. Use the pen to select Program events and assign a sound (wav) file to
each event from selections on the Sounds drop-down list.
Figure 3.34 Sounds menu
45 MARS-3100R/S User Manual
Chapter 3 Advantech Central Manager
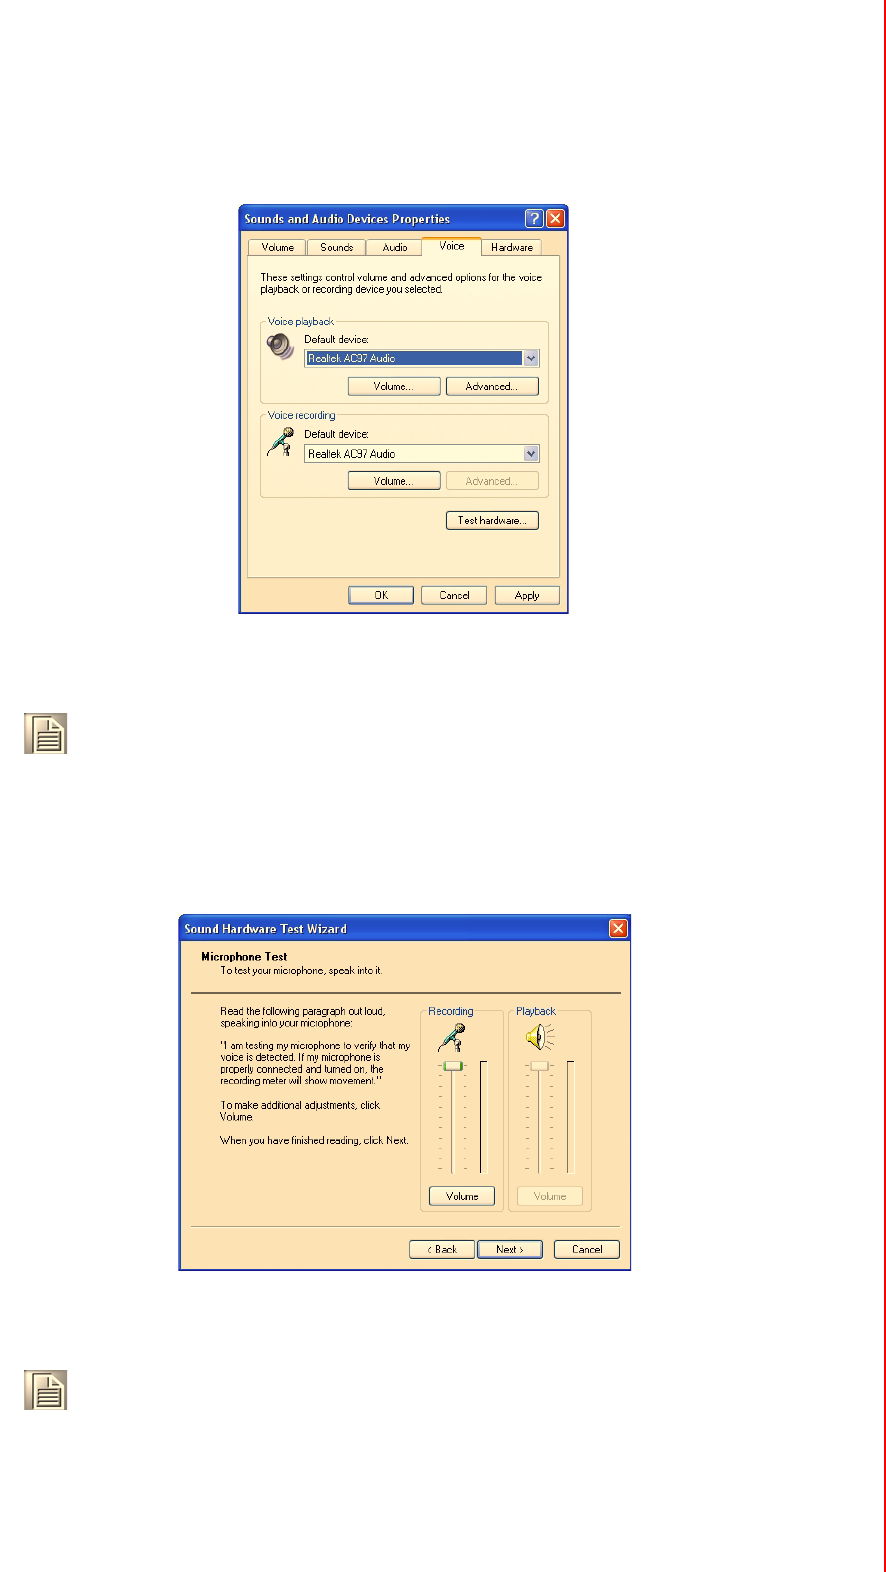
3.6.1.4 Voice
The fourth tab on Sounds and Audio Device Properties displays the Voice menu
for adjusting audio inputs and outputs when a microphone is connected to the PC.
Figure 3.35 Voice menu
3.6.1.4.1 Test hardware
Click Test hardware to initiate a microphone test that will calibrate the audio levels
from the microphone to the system, so that peak audio performance is attained.
Follow the onscreen instructions to calibrate the microphone.
Figure 3.36 Hardware test for microphone level
Note! The control settings on the Voice sub-menus, Volume and Advanced,
are identical to those found in the Audio devices, section 3.6.1.1. on
pages 37, 38 and 39.
Note! A microphone must be connected to the computer, or the internal micro-
phone must be activated. (See Chapter 2.8, Connecting Peripherals.)
MARS-3100R/S User Manual 46
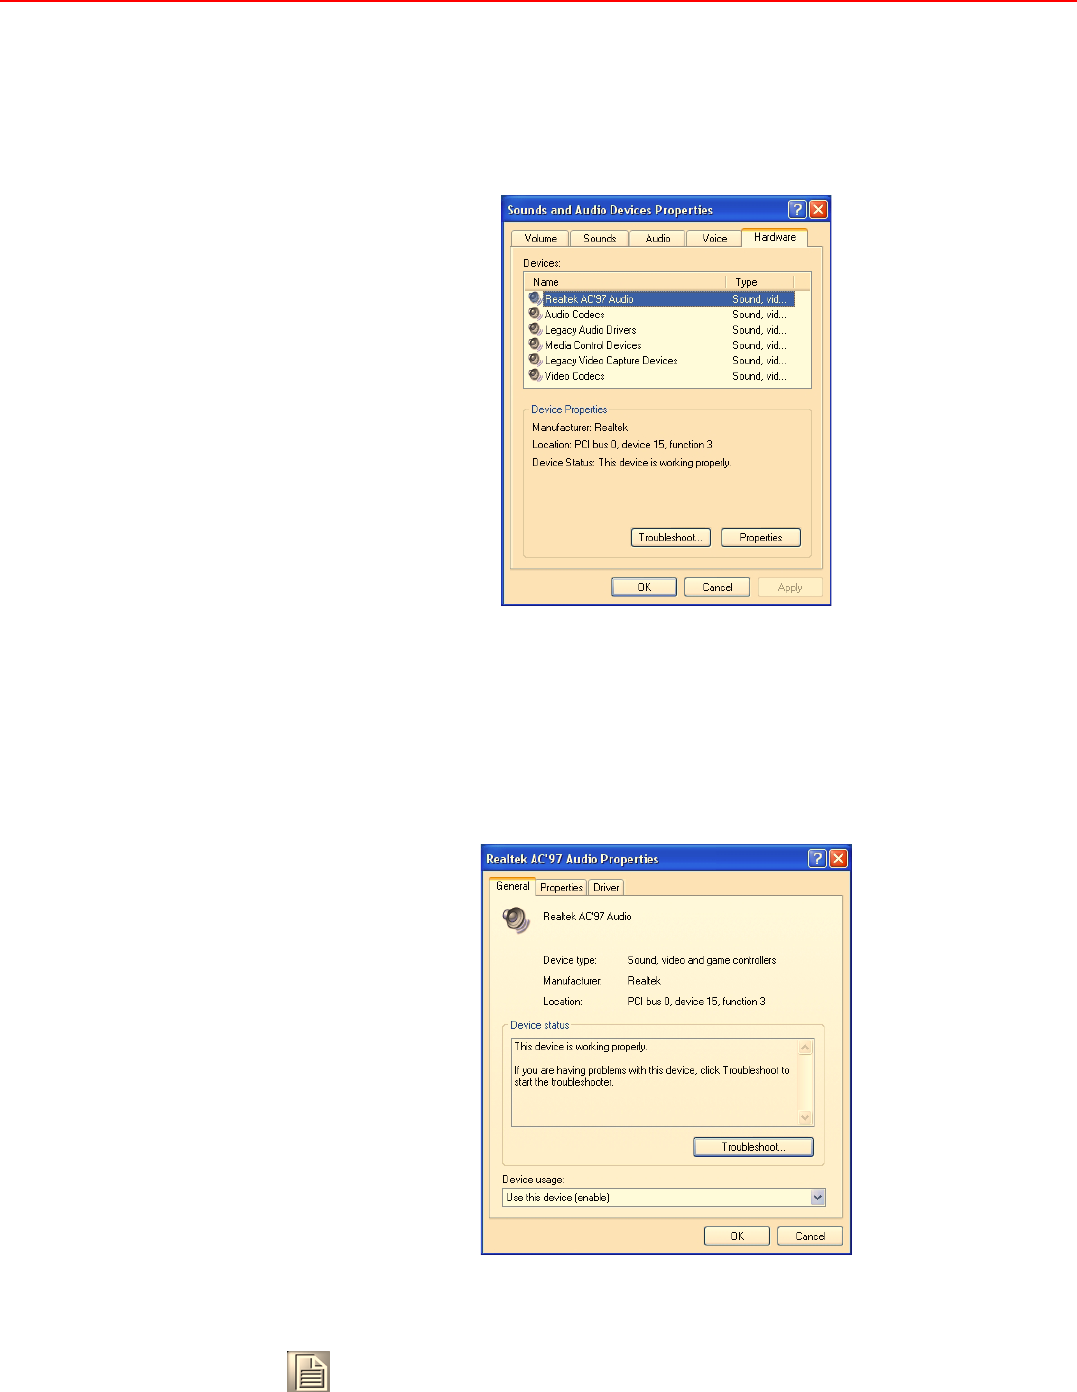
3.6.1.5 Hardware
The fifth tab on Sounds and Audio Device Properties displays the Hardware
menu. Several hardware devices and drivers are listed. It is possible to check the sta-
tus of each device and driver from this menu. Click Troubleshoot if device drivers
are not functioning correctly.
Figure 3.37 Hardware menu
3.6.1.5.1 Properties
The properties of each device or driver may be displayed, checked and modified. To
display device or driver properties, double-click on an item in the list, or select an
item and then click Properties.
!The General menu displays details about the manufacturer, date and functional
status of the selected item.
Figure 3.38 General menu
Note! To access the Troubleshooting help from the Hardware menu, or any
sub-menu, the MARS-3100R/S must be connected to the Internet.
47 MARS-3100R/S User Manual
Chapter 3 Advantech Central Manager
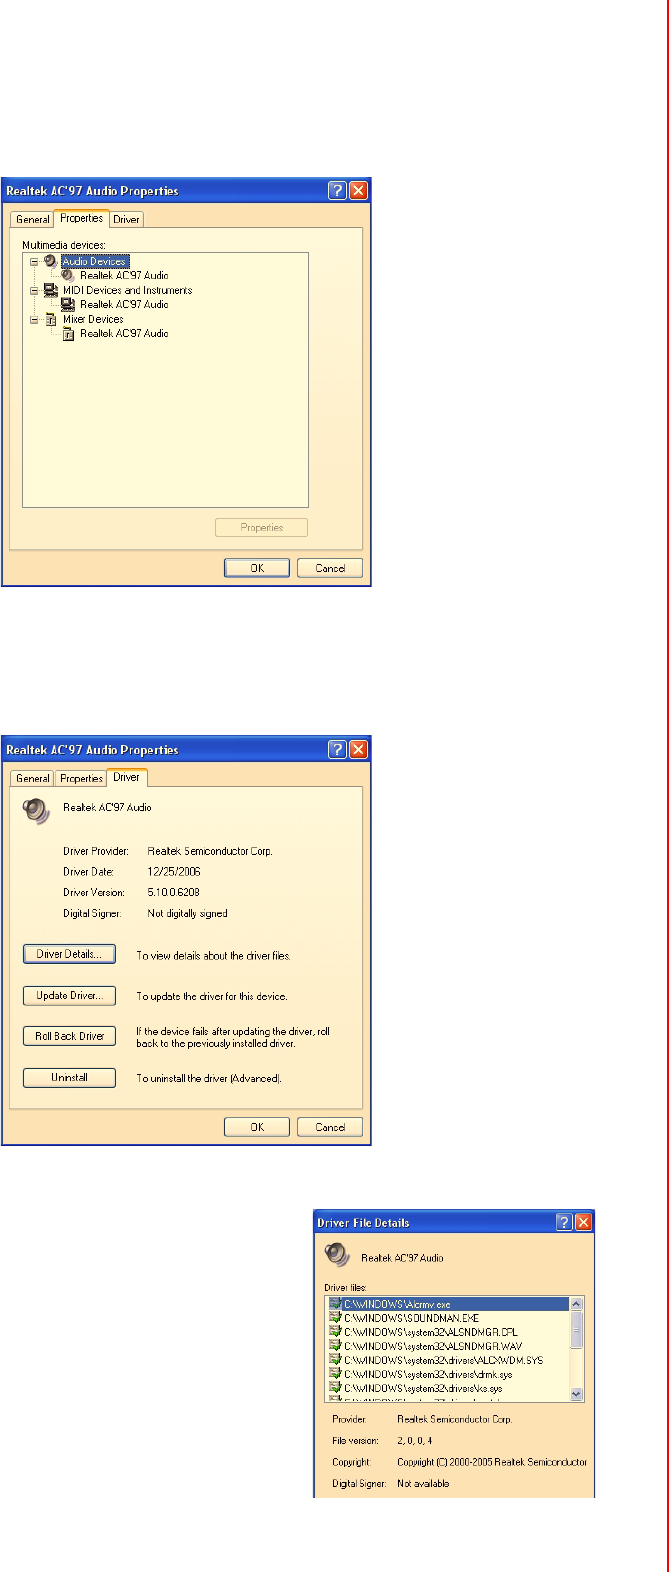
!The Properties menu displays a comprehensive list of all the hardware and
software devices on the system.
Figure 3.39 Properties menu
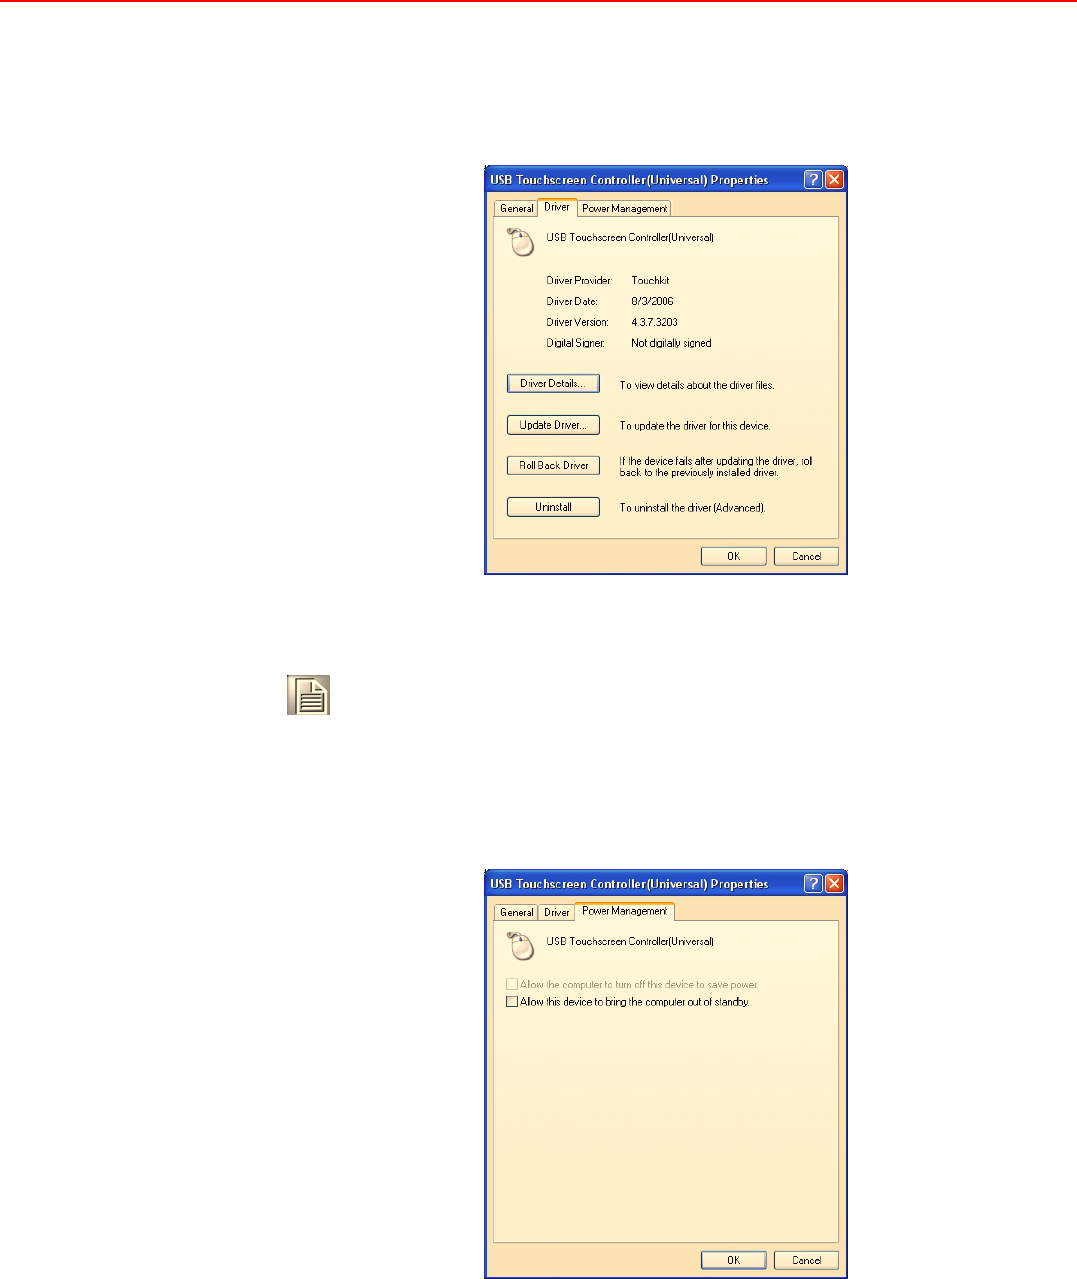
!The Driver menu displays a description of the manufacturer, date, version and
signification of the selected device driver. The menu permits updates, rollbacks
and uninstalling of drivers.
Figure 3.40 Driver menu
–Click Driver Details to view a full list of all
active drivers.
Figure 3.41 Driver details
MARS-3100R/S User Manual 48
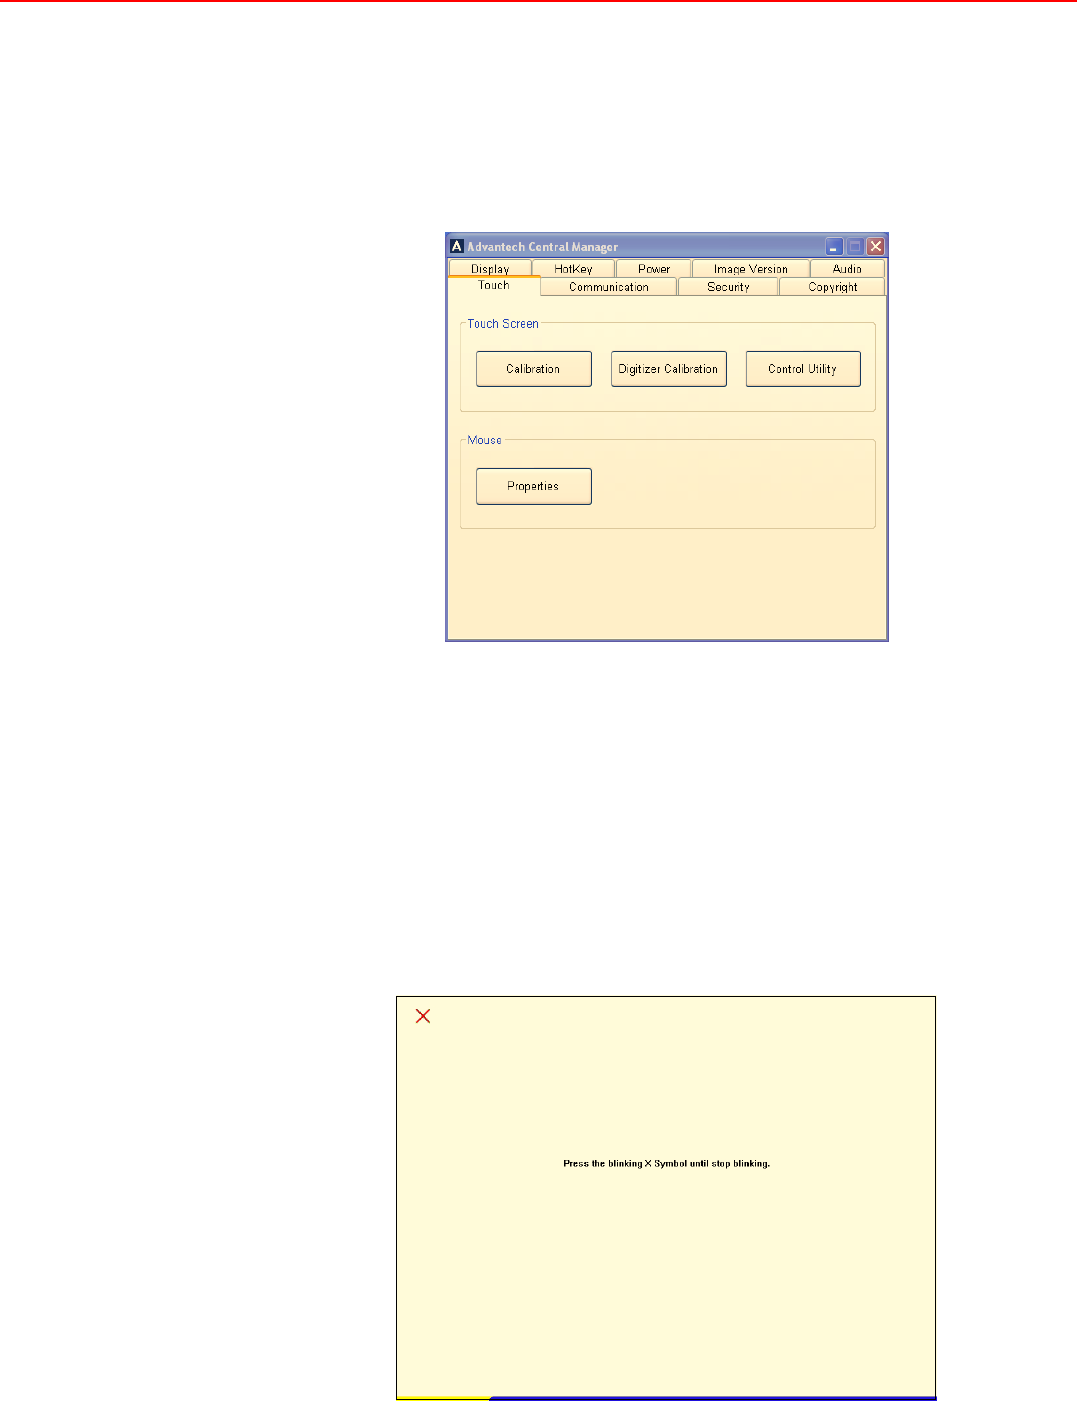
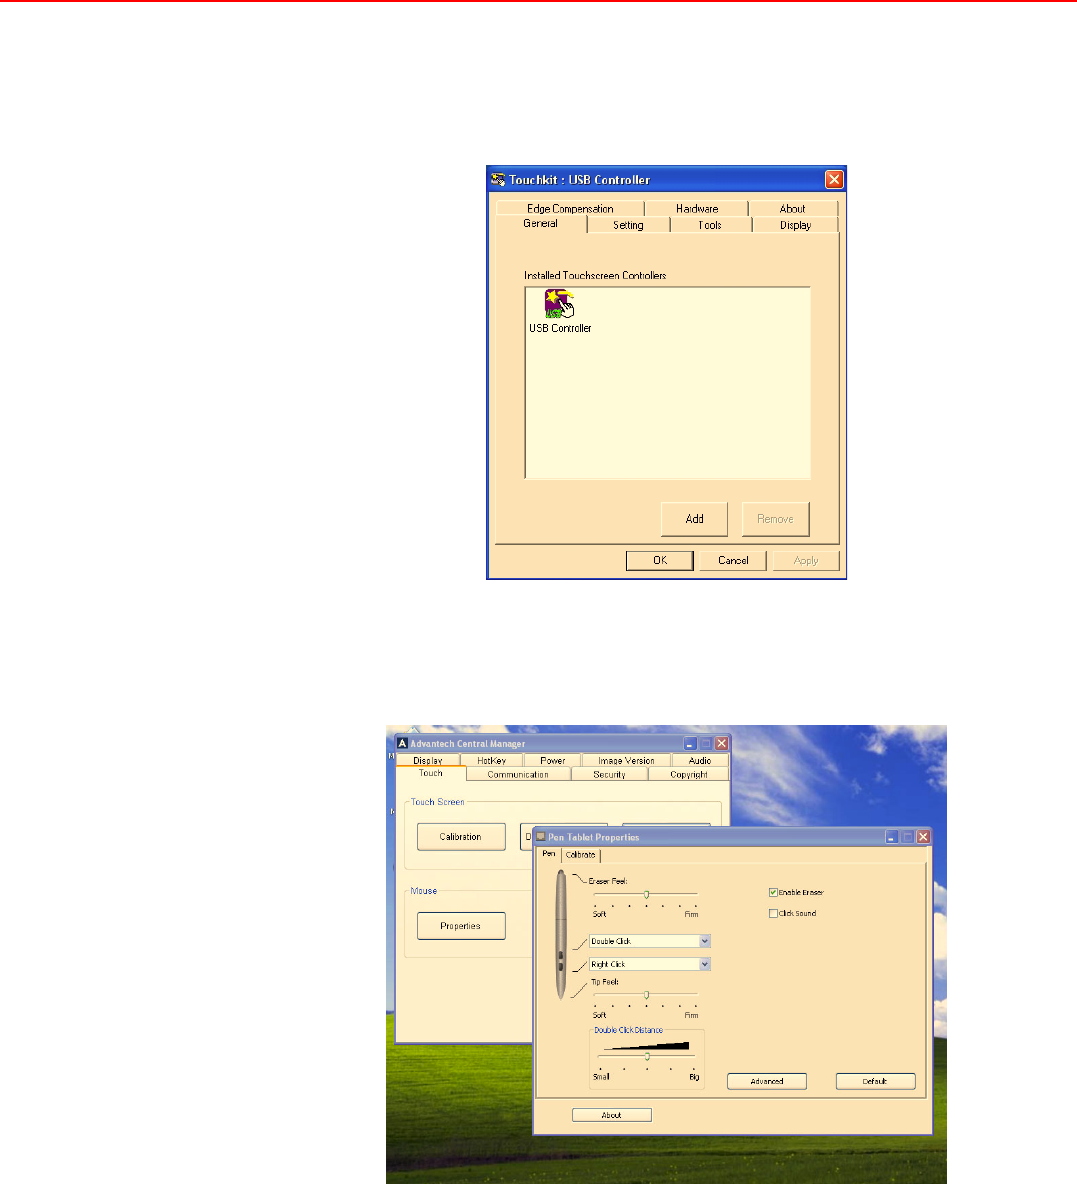
3.7 Touch
The Touch menu displays two fields.
!Touchscreen: for Calibration of pen sensitivities and access to the Control
utility, (Touchkit).
!Mouse: for accessing, testing and modifying properties.
Figure 3.42 Touch menu
3.7.1 Touchscreen
The Touchscreen field accesses a Calibration tool for adjusting the sensitivity of the
screen to the position of the pen on the screen; a Digitizer Calibration for calibrating
the sensitivity of the pen as it touches the surface of the screen; and the Control Util-
ity, which opens a link to the Touchkit USB Controller.
3.7.1.1 Calibration
Click Calibration to activate the resistive touchscreen calibration tool.
!Follow the onscreen instructions to calibrate the touchscreen. Press the pen
onto the middle of each X until it stops flashing and another one appears.l
Figure 3.43 Touchscreen calibration
49 MARS-3100R/S User Manual
Chapter 3 Advantech Central Manager
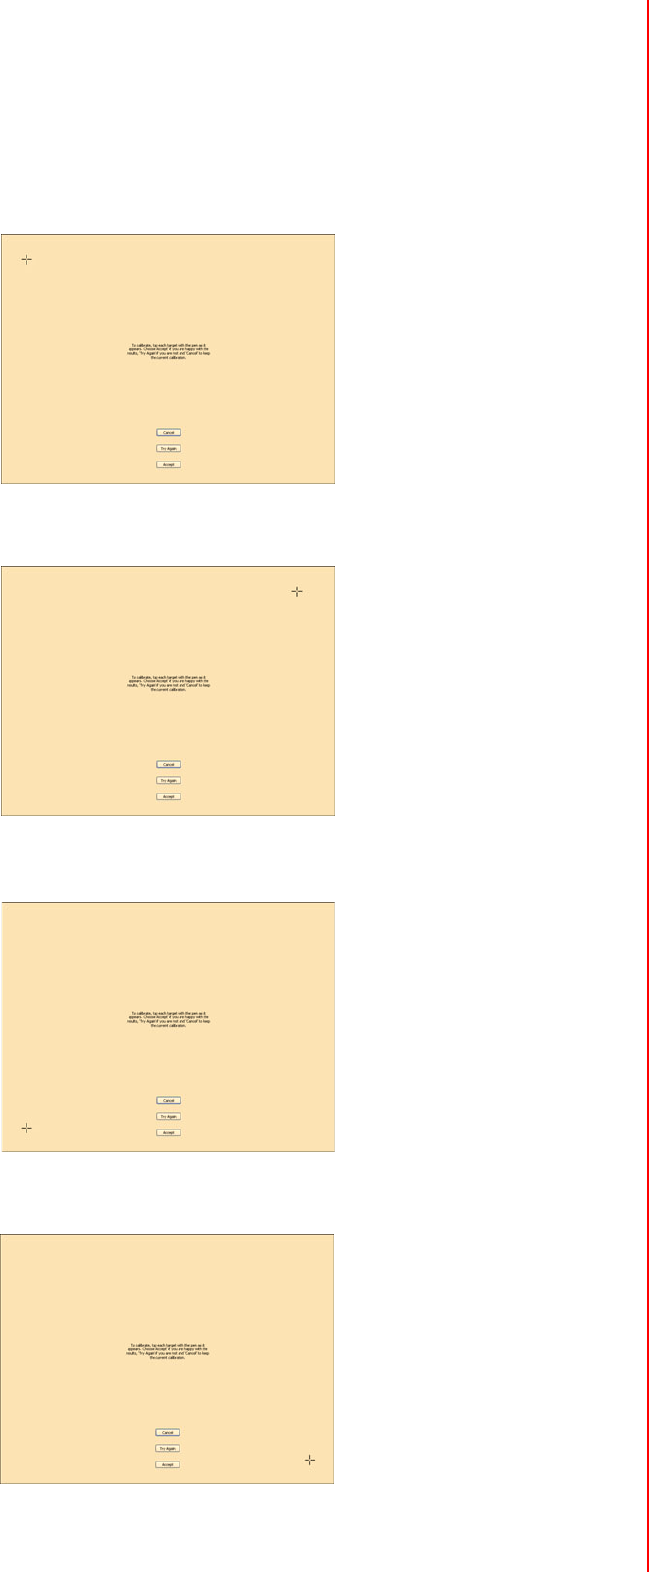
3.7.1.2 Digitizer Calibration
Click Digitizer Calibration to active the pen / digitizer calibration tool. Use the Digi-
tizer pen to click the cross on the screen step by step until the calibration process is
completed.
Figure 3.44 Digitizer Calibration Step 1
Figure 3.45 Digitizer Calibration Step 2
Figure 3.46 Digitizer Calibration Step 3
Figure 3.47 Digitizer Calibration Step 4
MARS-3100R/S User Manual 50
3.7.1.3 Control Utility for MARS-3100S
Click Control Utility to open the Touchkit USB Controller utility. (See Chapter 2,
Section 2.6 and the Help files available on the MARS-3100S; or, refer to the Support
CD-ROM for printable versions of Touchkit instructions.)
Figure 3.48 Touchkit USB controller
3.7.1.4 Control Utility for MARS-3100R
Click Control Utility to open the Pen Tablet Properties tool to modify the sensitivity
of the pen / digitizer settings, and to calibrate the pen for the MARS-3100R.
Figure 3.49 Pen tablet properties menu

51 MARS-3100R/S User Manual
Chapter 3 Advantech Central Manager
3.7.2 Mouse
The MARS-3100R/S supports a variety of precise Mouse settings.
!Buttons
!Pointers
!Pointer Options
!Hardware
Click Mouse Properties to access the sub-menus.
3.7.2.1 Buttons
The first tab on Mouse Properties is the Buttons menu.
Figure 3.50 Buttons menu
Three Button fields are displayed on the menu.
!Button configuration
!Double-click speed
!ClickLock
3.7.2.1.1 Button configuration
Select the check box to switch the priority of the right mouse button for functions like
selecting items and dragging them, instead of the left mouse button. The left mouse
button also performs the same actions normally assigned to the right button if the
check box is selected.
3.7.2.1.2 Double-click speed
To increase the responsiveness of the mouse button whenever it is double-clicked,
slide the button to the right. Then, test the response: double-click slowly and then
faster; in this way it is possible to set a double-click that opens the folder displayed on
the right side of the field. If the double-click speed required to open the folder is too
slow or too fast, repeat the slider button adjustments until a satisfactory double-click
speed is attained.
3.7.2.1.3 ClickLock
Select the checkbox to enable ClickLock. To set the mouse to drag and drop items
with a single click, and without having to hold down the mouse button while dragging,
click the mouse button once after enabling ClickLock from this menu.
MARS-3100R/S User Manual 52
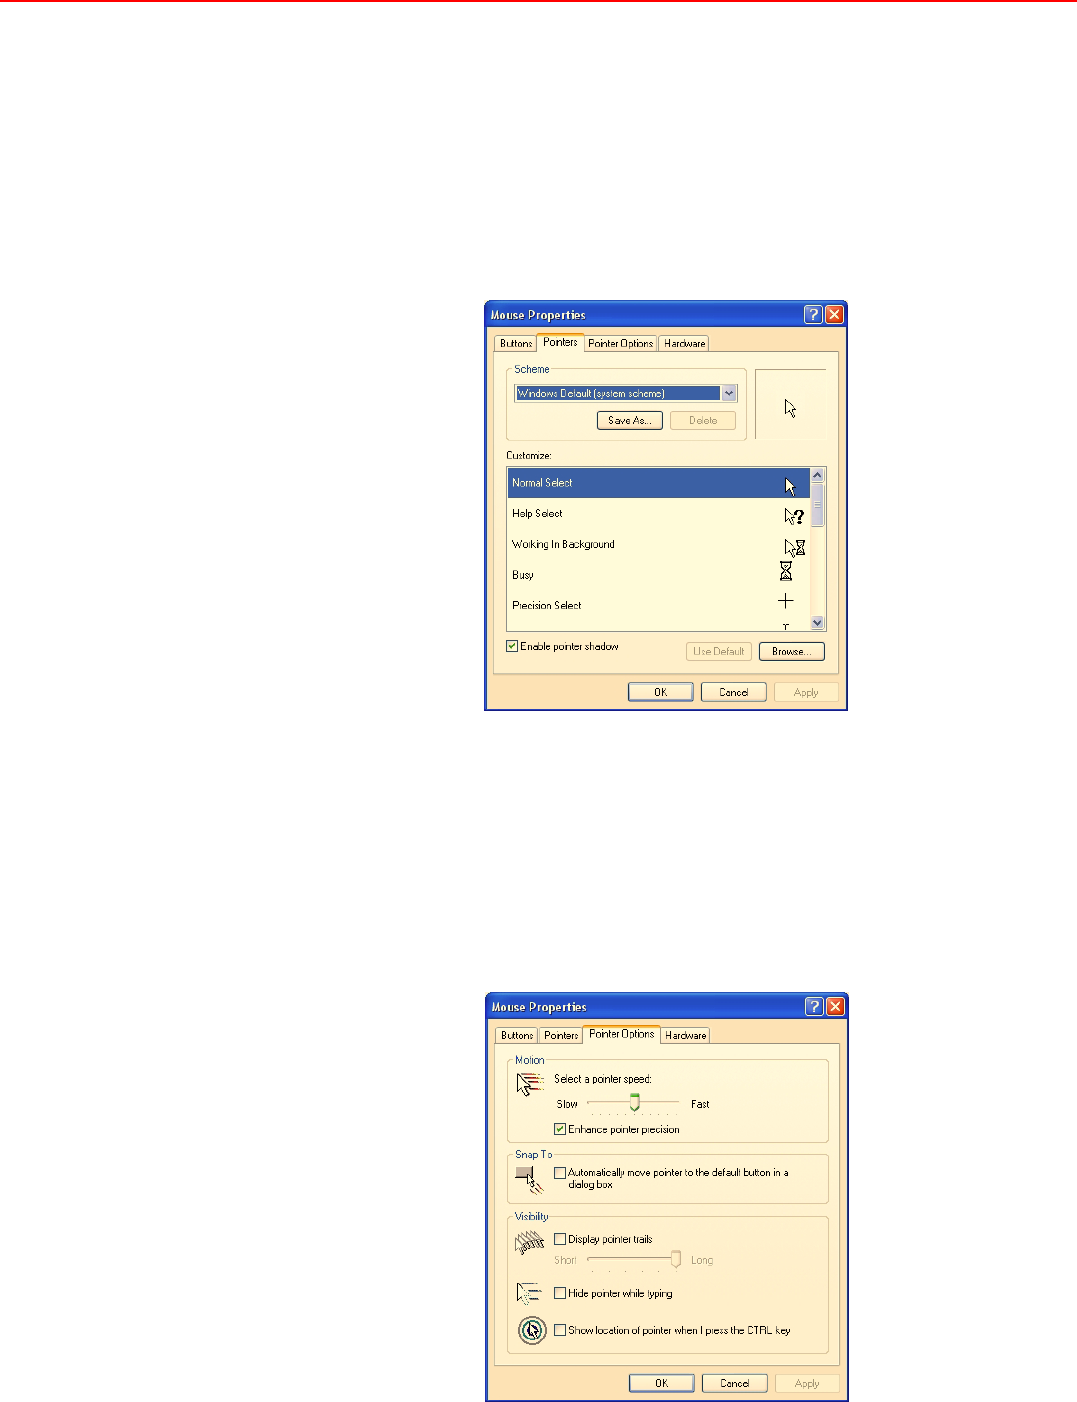
3.7.2.2 Pointers
The pointers menu displays a selection of options, and offers an exceptionally wide
variety of customized cursors.
3.7.2.2.1 Scheme
The Scheme field displays a range of custom pointer styles. Select one scheme.
Then go to the Customize field and select one pointer. It is also possible to select
custom cursors from files by clicking the Browse button. Click Apply.
To enable a Pointer shadow, click the Enable pointer shadow check box.
Figure 3.51 Pointers menu
3.7.2.3 Pointer options
Further adjustments to the performance of the pointer may be made on the Pointer
Options menu. Three fields are available.
3.7.2.3.1 Motion
Move the slider to control the distance that the cursor travels relative to the amount of
mouse movement required. To enhance the sensitivity of the pointer for precise work,
select the Enhance pointer precision check box.
Figure 3.52 Pointer options menu
53 MARS-3100R/S User Manual
Chapter 3 Advantech Central Manager
3.7.2.3.2 Snap To
To make the pointer immediately snap to the buttons in menus or dialog boxes, select
the Snap to check box.
3.7.2.3.3 Visibility
To enhance the visibility of the mouse pointer, select the Display pointer trails
check box. If selected, the cursor displays trails as it moves.
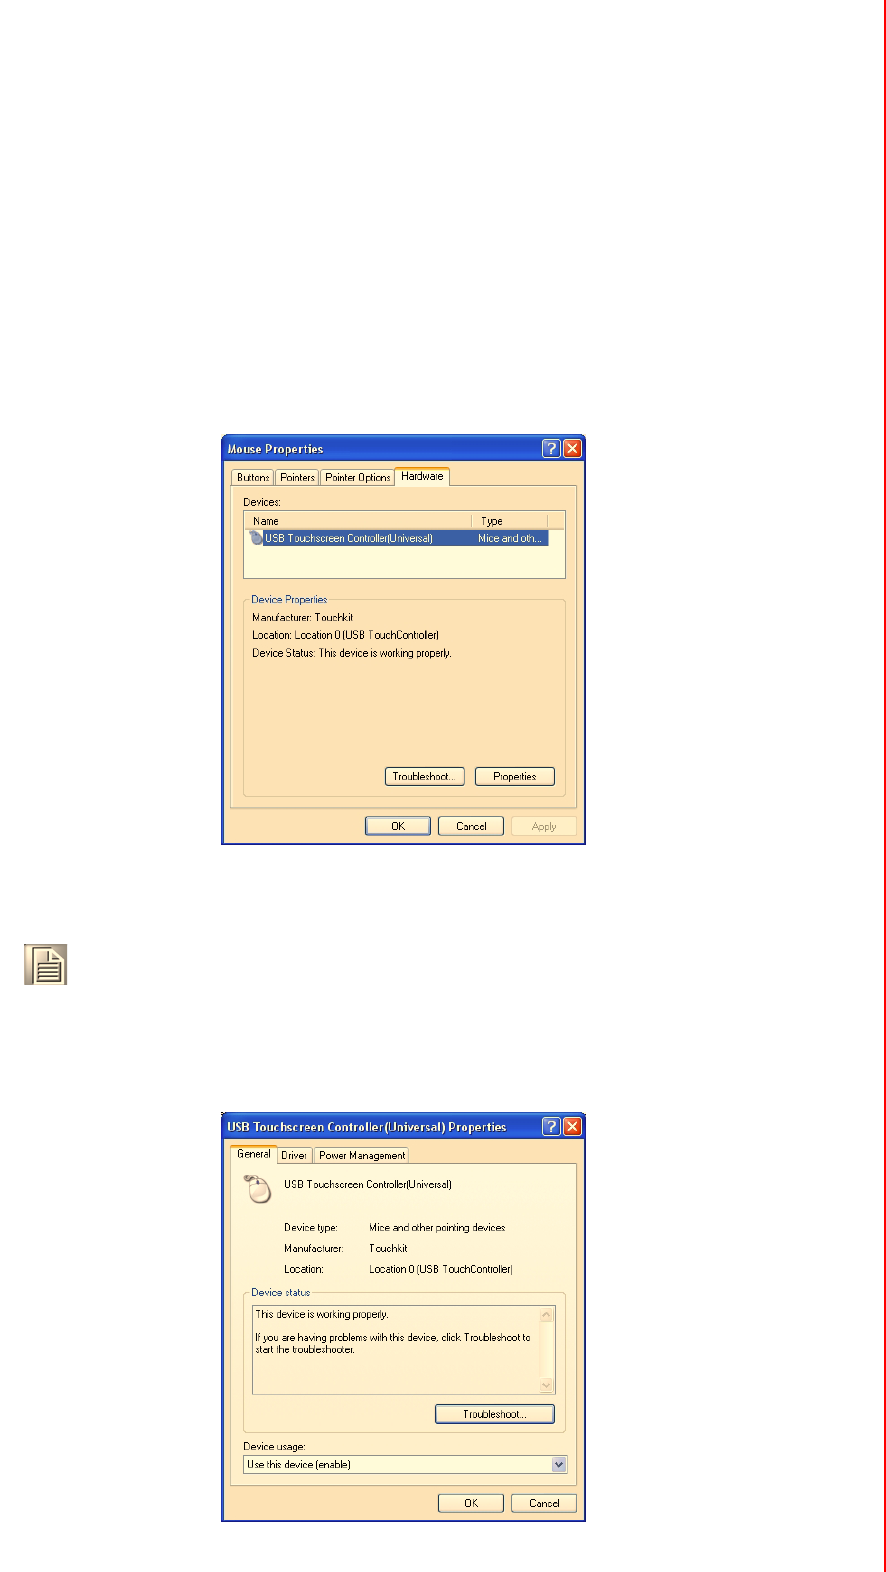
3.7.2.4 Hardware
The Hardware menu details the manufacturer and type of USB mouse controller that
is installed on the computer. Click Properties to access sub-menus for adjustment of
the mouse.
Figure 3.53 Mouse hardware menu
3.7.2.4.1 General USB properties
The General sub-menu describes the type of touchscreen controller hardware that is
installed on the system. If the device is not working properly, click Troubleshooting.
Figure 3.54 General USB properties
Note! To access the Troubleshooting help from the Hardware menu, or any
of the sub-menus, the MARS-3100R/S must be connected to the Inter-
net.
MARS-3100R/S User Manual 54
3.7.2.4.2 USB driver properties
The Driver sub-menu describes the type of touchscreen control driver. Click Driver
Details to display the name and precise location of the driver on the C:\ drive. Click
Update Driver to engage the Welcome to the Hardware Update Wizard.
Figure 3.55 USB driver properties
3.7.2.4.3 USB power management
The Power Management sub-menu displays two options. Select the first check box
to turn off power to the mouse whenever it is idle. Select the second check box to use
the mouse to turn the computer on, and bring it out of standby mode.
Figure 3.56 USB power management
Note! Click Roll Back Driver only if the system does not function properly
after attempting to update the driver. Click Uninstall only if planning to
install a new USB controller device that requires a new driver.
55 MARS-3100R/S User Manual
Chapter 3 Advantech Central Manager
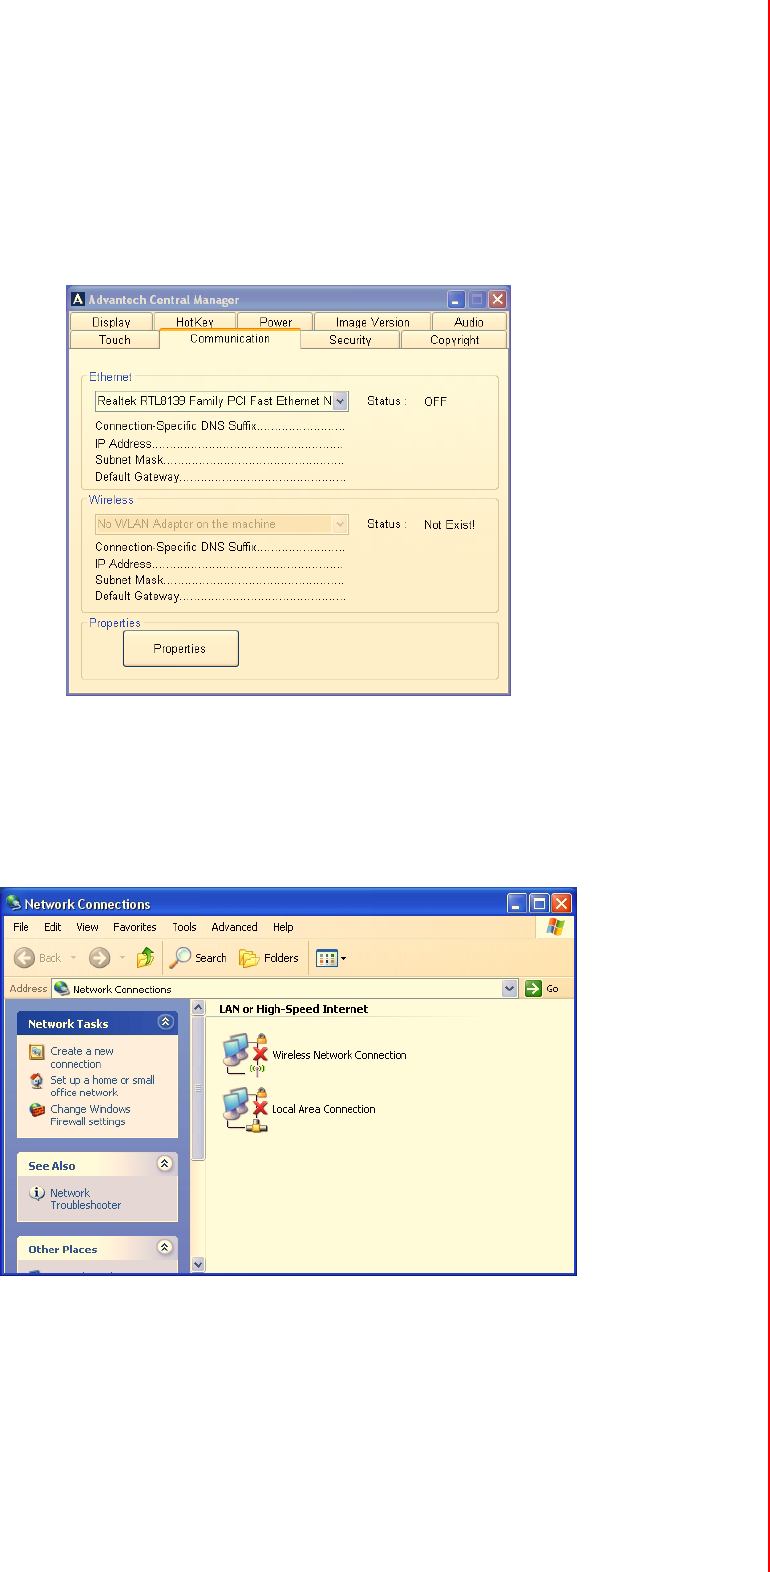
3.8 LAN
The LAN menu displays the status of the Ethernet hardware device installed on the
MARS-3100R/S, including its name and connection addresses. The status of the
Ethernet or Wireless will turn “ON” once the MARS-3100 is already connected. An
“OFF” message indicates that the computer is not connected.
3.8.1 Properties
Click Properties to open Network Connections in an Explorer window. To configure
a new connection for the first time, click Create a new connection and follow the
onscreen instructions. Make sure that the addresses for network servers are handy,
otherwise, making a connection will be impossible.
Figure 3.57 Network connections
MARS-3100R/S User Manual 56
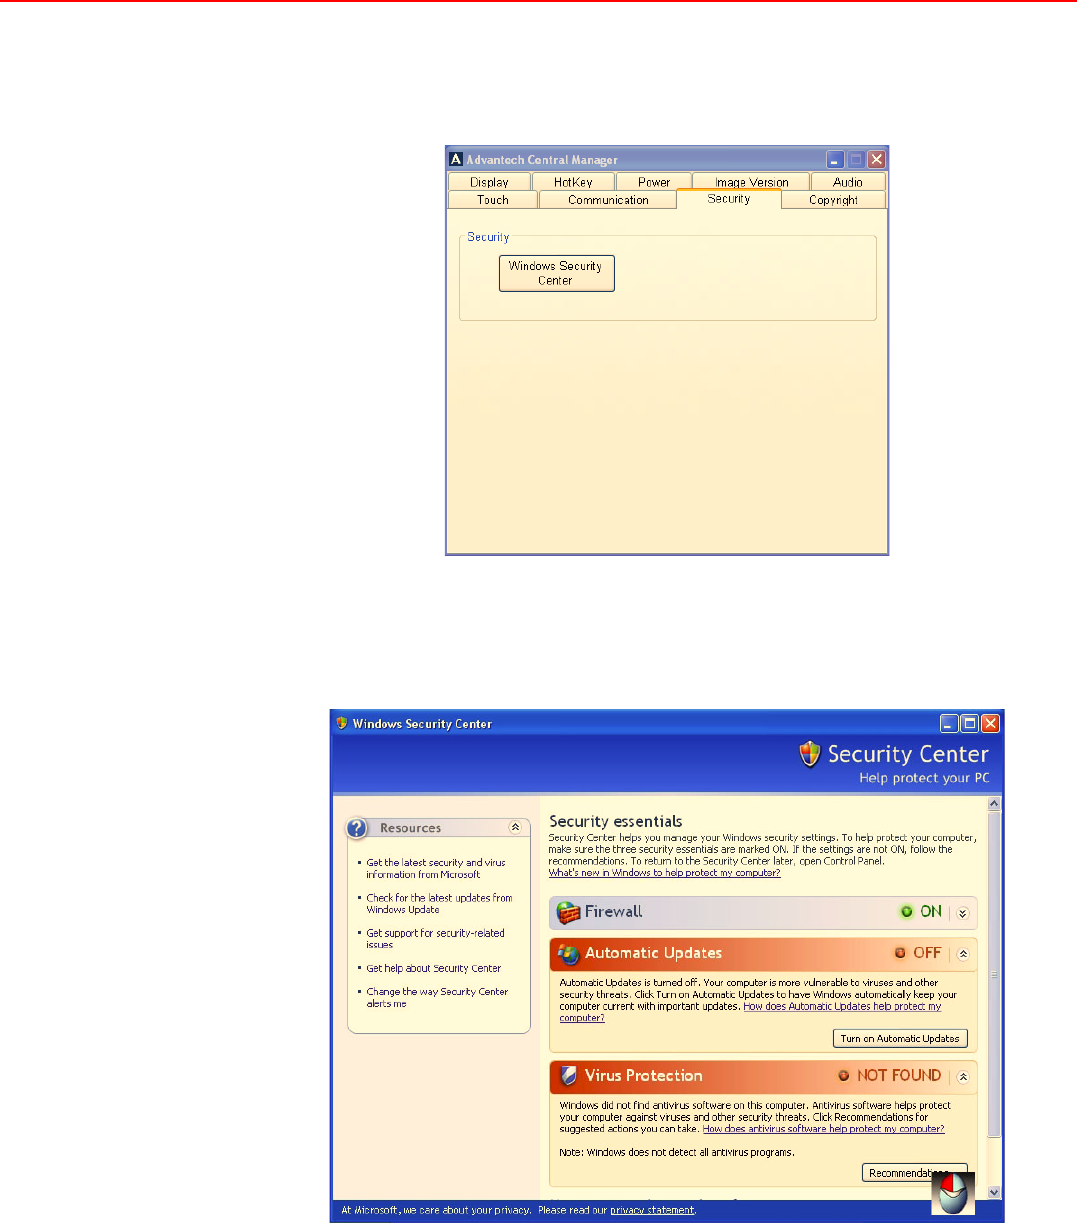
3.9 Security
The Security menu displays access to the Windows Security center.
Figure 3.58 Security menu
Click Windows Security Center to set the degree of network security. The Center
offers precise control over firewalls and antivirus applications. If the computer is con-
nected to a network, it may receive automatic updates and access antivirus software.
Figure 3.59 Security center

Chapter 4
4Maintenance and
Troubleshooting
This chapter explains how to care
for and maintain the Tablet PC
along with a troubleshooting FAQ.
Sections include:
!Care, Storage and Cleaning
!Replacing Components
!Troubleshooting
!OS Maintenance and Re-Instal-
lation

MARS-3100R/S User Manual 58
4.1 Care, Storage and Cleaning
4.1.1 Protect the computer from damage
The MARS-3100R/S is built to withstand extreme conditions of high and low temper-
ature and physical shock when dropped from any side. However, the utmost care
should be exercised to ensure that the computer is operated within its specific opera-
tional limits. (See section 1.4 for more information.)
4.1.2 Maintain good connections
Periodic maintenance of all electrical connections is essential to maintain stable
operation of the computer and an adequate supply of electrical current to the battery.
4.1.3 Prevent thermal stress
The computer is designed to operate within a wide temperature range. However, if
conditions exceed these limitations, it is advisable to stop using the computer or per-
manent damage may result.
4.1.4 Storing the computer
The computer may be stored in the “off” state with a fully charged battery for up to 30
days. It will continue to power up and be usable.
4.1.5 Caring for the touchscreen display
Use only a soft, clean cloth or lens cleaning paper to wipe the touchscreen. Wipe the
screen when the power is off.
Note! !Do not place heavy objects on the computer and do not subject it to
undo shock or vibrations. Severe shocks can render it inoperable.
!Do not disassemble the computer; doing so may damage the unit
and void the warranty.
Note! !Keep connectors away from sources of dust or wetness.
!Check AC connections and make sure the adapter cord is firmly
inserted.
!Replace any damaged power cords, broken connectors immedi-
ately if they are broken.
Note! !The computer is not warranted for repair if it becomes inoperable
after being subjected to extreme thermal conditions.
Note! !It is advisable to remove the battery and store it in a plastic bag if
the computer will remain unused for periods in excess of 30 days.

59 MARS-3100R/S User Manual
Chapter 4 Maintenance and Troubleshooting
4.1.6 Cleaning the computer
Use a soft, clean cloth. Dampen the cloth with water and household dish detergent
then wipe the housing without applying too much pressure.
Note! !Do not use alcohol or abrasive cleansers to clean either the touch-
screen or the computer.
!Use only mild, detergent-based (household) degreasers to remove
oil or tar.
MARS-3100R/S User Manual 60
4.2 Replacing Components
After long periods of use certain components may wear out. It is always possible to
replace old components. Follow these instructions to make changes. To replace
other components besides the battery and the HDD, like the touchscreen, please
contact technical support.
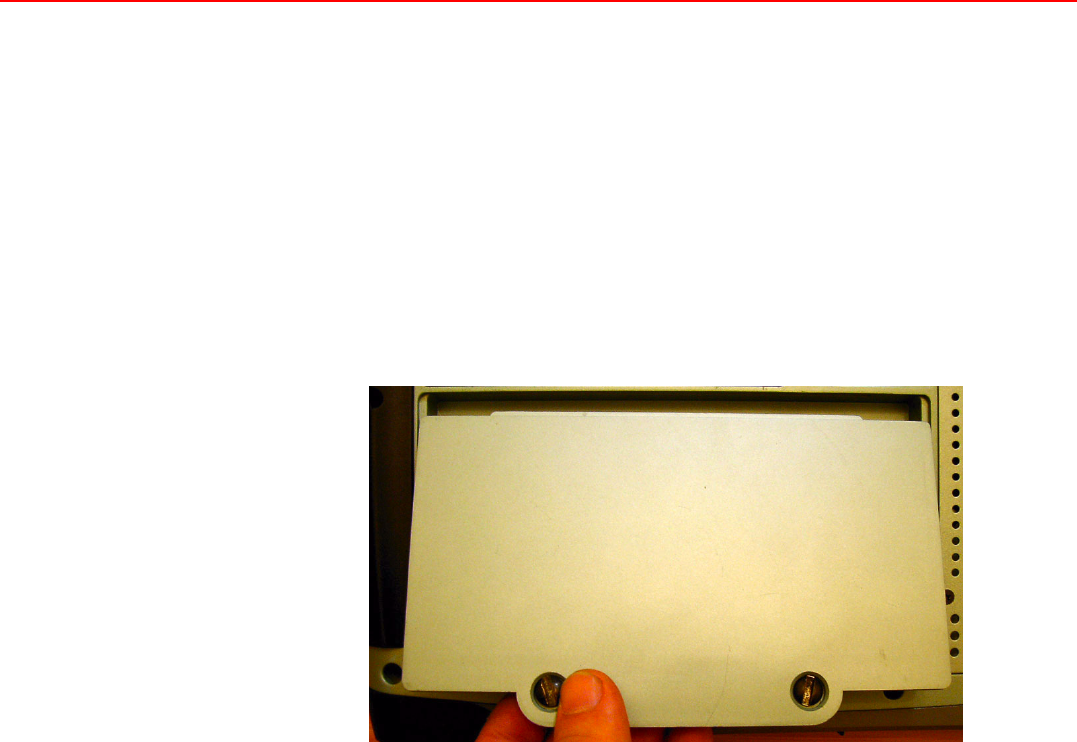
4.2.1 Battery
1. Turn off the MARS-3100R/S
2. Disconnect any peripheral devices from the MARS-3100R/S.
3. Unfasten the two large flathead screws and remove the old battery.
Figure 4.1 Removing the battery pack
4. Insert the new battery pack.
5. Fasten the two flathead battery cover screws.
61 MARS-3100R/S User Manual
Chapter 4 Maintenance and Troubleshooting
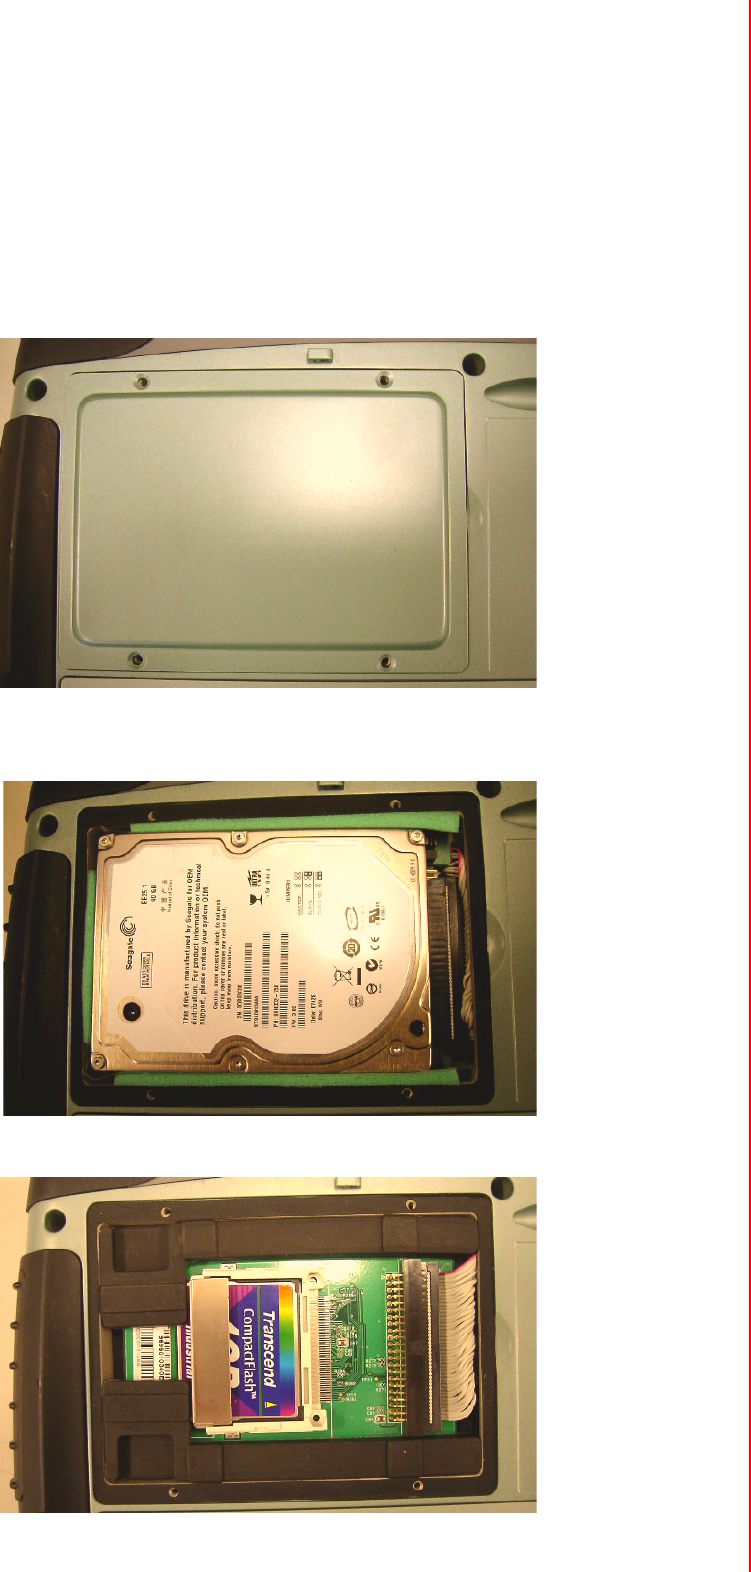
4.2.2 HDD (or CF card)
The hard disk drive (or optional CF card) is accessed behind the port on the backside
of the computer.
1. Turn off the MARS-3100R/S.
2. Remove the DC adapter and Battery pack from MARS-3100R/S.
3. Disconnect any peripheral devices from the MARS-3100R/S.
4. Unfasten the four small screws and remove the cover.
Figure 4.2 HD / CF Card Port
5. The HDD (or CF card) is visible after removing the cover.
Figure 4.3 Hard Disk Drive
Figure 4.4 CF card
MARS-3100R/S User Manual 62
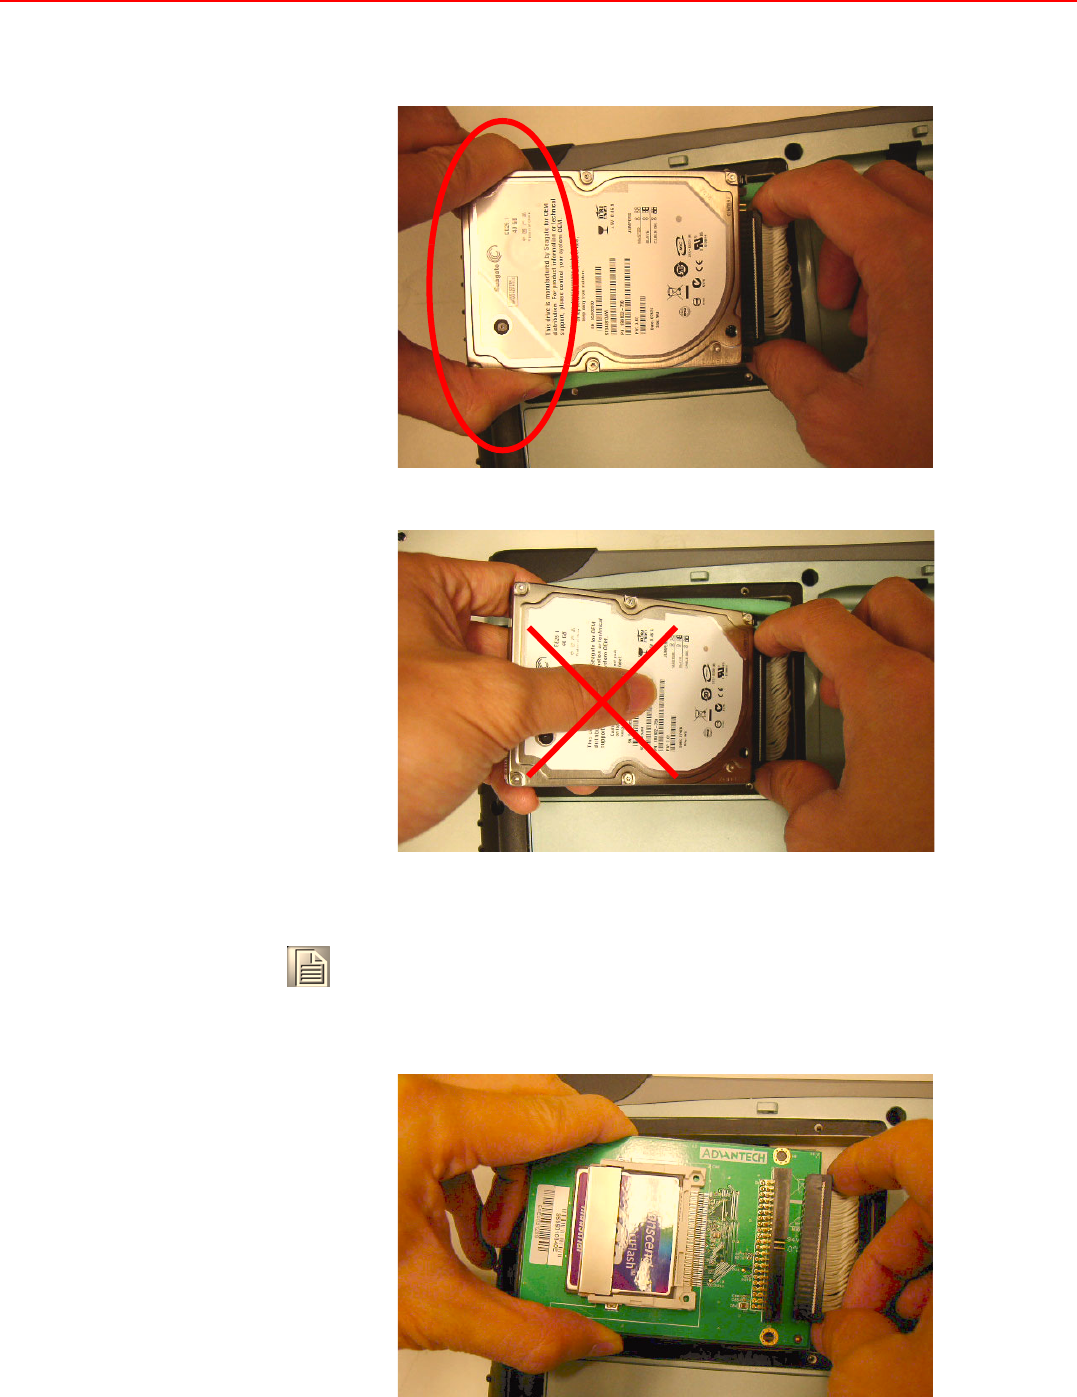
6. Grasp the HDD or CF card firmly. Use two fingers on both sides on the end. Lift
up.
Figure 4.5 Correct Removal of the HDD
Figure 4.6 Incorrect removal of the HDD
7. Grasp the cable connector firmly. Unplug the connector, pulling it straight out.
Figure 4.7 Unplugging the cable connector
Note! !Do not grasp the HD with the thumb in the middle of the housing.
!Do not twist or bend either the HD or the CF card during removal.

63 MARS-3100R/S User Manual
Chapter 4 Maintenance and Troubleshooting
8. Remove the CF card from the slot.
Figure 4.8 Removing the CF card

MARS-3100R/S User Manual 64
4.3 Troubleshooting
Follow the instructions below if any problems occur with basic operation of the
MARS-3100R/S. If problems cannot be resolved using these instructions, please
consult technical support.
4.3.1 Computer will not start
!Connect the AC adapter and/or charge the battery.
!Check to see a new battery is inserted and connected.
!Remove the battery and the AC adapter and reinstall both.
!Under conditions of extremely high or low temperature, it is possible that the
computer may not function. Use the MARS-3100R/S only within its recom-
mended operational parameters.
4.3.2 Computer does not resume operation after suspension
!Check to see if the AC adapter or any peripherals have been connected or dis-
connected prior to suspension. Reconnect the AC or remove the peripherals; it
may be necessary to restart the computer.
4.3.3 Computer will not enter into suspension mode
!Check to see that the computer is not connected to an active network.
!Shut off any applications that regularly access the hard drive.
4.3.4 Computer will not shut down
!Remove any peripheral devices, and try again.
4.3.5 Display remains off, or is not bright
!Make sure that the computer is turned on.
!The brightness display setting may be too low. (See section 3.2.4)
!The computer may be stuck in suspension mode.
– Check AC, restart or remove peripheral devices.
!An external monitor may be installed. Disconnect it and restart.
4.3.6 Computer touchscreen does not respond to the pen
!The touchscreen may not be calibrated. (See sections: 2.5 to 2.7)
!Attach a USB device to the system, like a keyboard. If it also fails to respond,
then the system may need to be reconfigured or reinstalled.
!Try restarting the computer and retest the pen before making major system
changes.
4.3.7 Headphones do not emit, or volume is too low
!The volume control may be set to mute. (See section: 3.6)
4.3.8 Peripherals do not respond
!Check to see if the device is enabled or turned on.
!Check the device drivers are installed and selected in BIOS.
!Shut down the computer. Unplug the devices. Restart the computer. Plug in the
devices to see if they are detected; if they are detected, they are “live.”

65 MARS-3100R/S User Manual
Chapter 4 Maintenance and Troubleshooting
–If the device still does not respond, the devices, or their drives may be out of
date or incorrectly installed; or, the OS/drivers/hardware may not support this
particular type of peripheral device.
4.3.9 The amber battery status LED is always on
!Battery capacity is below the "Low Battery Alarm."
!Charge the battery; replace the battery if it is spent.
4.3.10 The amber battery status LED is blinking
!Battery is critically low.
!Charge the battery; replace the battery if it is spent.
4.3.11 The amber battery status LED is blinking quickly
!Battery error. Replace the battery.

MARS-3100R/S User Manual 66
4.4 OS System Maintenance and Re-Installation
4.4.1 MARS-3100S
The MARS-3100S is supplied with a pre-loaded OS: Microsoft Windows XP Embed-
ded, which is specially configured for MARS-3100S by Advantech programmers. If
the OS on the MARS-3100S becomes damaged or crashes, please contact technical
support.
4.4.2 MARS-3100R
The MARS-3100R is supplied with a pre-loaded OS: Windows XP Professional. If the
OS on the MARS-3100R becomes damaged or crashes, it may be necessary to re-
install Microsoft Windows XP Professional using the Recovery Media CD. The
Recovery Media CD is contained in the standard MARS-3100R package.
1. Connect one CD/DVD-ROM drive to the MARS-3100R.
2. Insert the Recovery Media CD into the CD/DVD-ROM.
3. The CD/DVD-ROM autoplays the CD and pops up this window:
Figure 4.9 Welcome to Windows XP
Note! !Recommended drive: USB external CD/DVD-ROM.
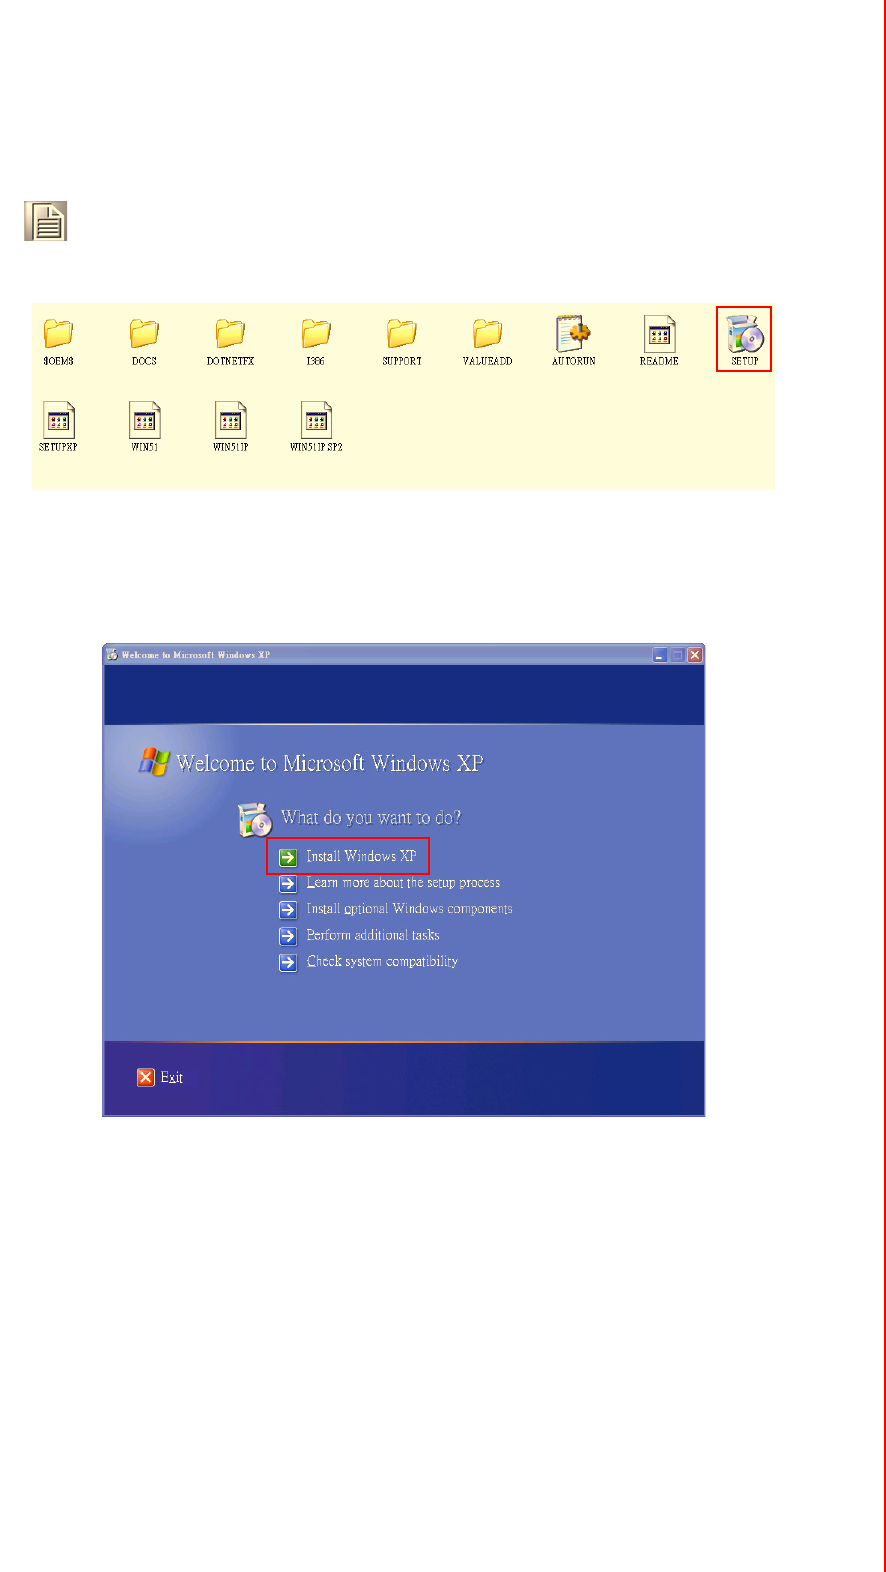
67 MARS-3100R/S User Manual
Chapter 4 Maintenance and Troubleshooting
Figure 4.10 XP setup icon
4. Click Install Windows XP and follow the instructions to perform a full Windows
XP Professional OS installation.
Figure 4.11 Install Windows XP
Note! !If this window fails to pop up automatically, execute “Setup.exe”
manually.

INDEX 1
5-way navigation button 11
A
About this Manual 2
AC adapter 14
Accessories 6
Alarms 33
Ask me what to do 30
Audio
Advanced audio properties sub-menu 41
Performance 41
Speakers 41
Devices 40
Hardware menu 46
Properties 46
Jacks 19
Menu 39
MIDI music playback 42
Sound playback 40
Sound recording 42
Sounds 44
Sounds and Audio Devices Properties
menu 39
Speaker settings 43
Test hardware 45
Voice 45
Volume 40, 43
B
Battery 12
Charging 13
Critical battery alarm 34
Disposal 13
Installing 12
Low battery alarm 33
Swapping 13
Brightness 27
Buttons 11
Hotkey 28
Key 30
Power 29
C
Calibration 14, 15, 48
4 points 15
Caring for
Computer 58
CE iii
Central Manager 24
CF card
Installation and removal 61
COM ports 18
Components
Replacing 60
Configuration utility 15
Copyright ii
D
Disk space 37
Display 25
Menu 25
Properties 26
Properties menu 26
Rotation 25
Button 26
Display rotation button 11
Do nothing 29
Draw test 16
E
Environmental Standards 4
F
FCC iii
Features 2
H
HDD
Installation and removal 61
Hotkey
Buttons 11, 28
Hotkeys
Menu 28
I
Image version
Menu 38
Internet Connection
Setting Up 74
K
Key button 11, 30
L
LAN
Menu 55
Properties 55
LAN port 20
LED Signals 9
Battery status 9
HDD status 10
Power ON/OFF 9
Wireless LAN ON/OFF 10
LEDs 9
M
Maintenance
Cleaning 59
Connections 58
Storage 58
Thermal stress 58
Touchscreen 58
MIDI music playback 42
Mouse
Buttons 51
General USB properties 53
Hardware 53
Pointer Options 52
Pointers 52
Scheme 52
USB driver properties 54
USB power management 54
Mouse settings 51
O
OS
MARS-3100R 66
MARS-3100S 66
P
Package 6
Package contents 6
Packing List v
Pen 17
Peripherals
Connecting 18
Power
Advanced menu 36
Advanced settings 31
Alarms 33
Button 14, 29
Configuration 36
Hibernate menu 37
Menu 29
Options Properties menu 31, 33, 35, 36,
37
Power Meter menu 35
Schemes menu 31
Power Management
Suspend-to-Disk 21
Suspend-to-RAM 20
Product Labelling vii
R
Replacing
Battery 60
Resuming 21
S
Safety Instructions v
Security
Menu 56
Shut down 29
Sound recording 42
Specifications 3
Standby 30
Static Electricity vii
System defaults
Resetting 66
T
Technical Support iv
Time and date 20
Touch
Menu 48
Mouse settings 51
Touchkit USB Controller utility 50
Touchscreen
Calibration 15, 48
Troubleshooting 64
Forgotten password 65
No audio 64
No display 64
No peripheral response 64
No resumption 64
No shutdown 64
No start up 64
No suspension mode 64
Status LEDS 65
U
USB ports 18
Using Hotkey Buttons 28
V
VGA port 19
Views 7
Back 7
Back edge 8
Front 7
Front edge 8
Left edge 8
Right edge 8
W
Warranty ii
Welcome 2

www.advantech.com
Please verify specifications before quoting. This guide is intended for reference
purposes only.
All product specifications are subject to change without notice.
No part of this publication may be reproduced in any form or by any means,
electronic, photocopying, recording or otherwise, without prior written permis-
sion of the publisher.
All brand and product names are trademarks or registered trademarks of their
respective companies.
© Advantech Co., Ltd. 2007