Armatix SMARTIP1 iP1 SmartSystem sporting gun User Manual armatix iP1 SmartSystem Operating Manual
Armatix GmbH iP1 SmartSystem sporting gun armatix iP1 SmartSystem Operating Manual
Armatix >
Contents
- 1. User Manual I
- 2. User Manual II
User Manual I
iP1 SmartSystem
Operating Manual EN
Pistol iP1
Calibre .22lr

2
iP1 SmartSystem
Masthead
Should you require further information on our products or technical support, please do not hesitate
to contact us.
Armatix GmbH
Feringastraße 4
85774 Unterföhring
Germany
Tel.: +49 89 / 4 27 29 79 - 0
Fax: +49 89 / 4 27 29 79 - 79
info@armatix.de
Managing directors: Bernd Dietel, Ernst Mauch
Company registered offices: Petersberg
Jena County Court
HRB 501907
VAT ID: DE 235056291
Legal disclaimer:
Despite the greatest care taken in the compilation of this document, data can change even at short
notice. We can therefore give no guarantee or assume any liability for the up-to-dateness, correct-
ness and completeness of the information contained. Content and layout of the operating manual
are protected by copyright. Duplication of the pages or their contents shall require the prior written
approval of ARMATIX GmbH, insofar as the duplication is not permitted by law.
Copyrights 2010:
Armatix GmbH, Unterföhring.
All rights reserved. Text, illustrations and diagrams and their layout in this operating manual are
protected by copyright laws and other intellectual property rights. The content of this operating
manual must not be copied, distributed, modified or made accessible to third parties for commer-
cial purposes.

3
iP1 SmartSystem
Contents
1 Introduction 6
2 Safety Precautions 7
2.1 About this operating manual 7
2.1.1 Conventions and symbols 8
2.2 Safety Precautions 9
2.2.1 General safety precautions 9
2.2.2 Observe the following when handling the weapon 10
2.2.3 Note when firing 11
2.2.4 Note after firing 11
2.2.5 Shipping and / or handing over the weapon 11
2.3 Intended use 11
2.4 Liability and warranty 12
3 Description 13
3.1 The iP1 SmartSystem 13
3.2 The SmartGun 15
3.2.1 Design and operating elements 15
3.2.2 Functions 15
3.3 The wrist watch 17
3.3.1 Design and operating elements 17
3.3.2 Functions 18
3.4 The accessories 19
3.4.1 Scope of supply 19
3.4.2 Additional accessories / equipment required 19
4 Handling 20
4.1 Checking the weapon system (weapon and wrist watch) 20
4.1.1 Carry out safety check 20
4.1.2 Carry out function test 21
4.2 Adapting the weapon to the user 21
4.2.1 Grip 21
4.2.2 The gun sight (aiming device) 22

4
iP1 SmartSystem
4.3 Inserting the batteries 23
4.3.1 Weapon 23
4.3.2 Wrist watch 23
4.4 The wrist watch functions 24
4.4.1 Standard display (time and date) 27
4.4.1.1 Weapon symbol 27
4.4.1.2 Set time and date 28
4.4.2 Weapon menu 29
4.4.2.1 Input of the PIN 29
4.4.2.2 PIN OK, set remaining time 30
4.4.2.3 PIN entered incorrectly 31
4.4.2.4 PIN entered incorrectly three times 32
4.4.2.5 Deactivate weapon function of the wrist watch prematurely 32
4.4.3 Alarm clock 33
4.4.3.1 Set the alarm clock 33
4.4.4 Stopwatch 34
4.4.5 Extended SmartSystem safety functions 35
4.4.5.1 System time synchronisation 35
4.4.5.2 The SuperPIN 36
4.4.5.3 Reset weapon 37
4.4.5.4 Referencing the weapon 39
4.4.6 Firmware update 40
4.5 Preparing the weapon for use 41
4.5.1 Clean the barrel of the weapon 41
4.5.2 Filling the magazine 41
4.5.3 Prepare the weapon for firing (load the weapon) 42
4.6 Aiming and firing 43
4.6.1 The stance 43
4.6.2 Aiming 43
4.6.2.1 Aiming errors 43
4.6.3 Firing 44
4.6.4 Uncock the weapon 44
4.6.5 Reloading the weapon 45
4.6.6 Unloading remaining ammunition from weapon 46

5
iP1 SmartSystem
5 Cleaning 47
5.1 General notes on cleaning 47
5.2 Dismantling the weapon 47
5.2.1 Safety check 47
5.2.2 Release the slide (pull off the cover) 48
5.2.3 Remove slide 48
5.3 Cleaning the weapon 49
5.4 Assembling the weapon 50
6 Malfunctions and Remedies 51
6.1 Mechanical faults 51
6.2 Change shot pattern 53
6.2.1 Replacing the front sight (change shot pattern vertically) 53
6.2.2 Adjusting the front sight laterally (change shot pattern horizontally) 53
6.3 Electronic malfunctions 54
7 Storage 55
7.1 Corrosion protection of the weapon 55
7.2 Packing the weapon 56
7.3 Storage of the weapon 56
8 Transport / Shipment 57
8.1 Preparing the weapon for transport 57
8.2 Shipping the weapon 57
9 Disposal 58
10 Spare Parts and Repairs 59

6
iP1 SmartSystemiP1 SmartSystem
1 Introduction
Dear Customer,
You have chosen the iP1 SmartSystem from Armatix. We wish to thank you for your choice. Not only
because you have thereby confirmed to us that we are on the right path with our idea of a "safe
weapon", but more importantly because with your decision you are making a crucial contribution to
fighting misuse of firearms.
Only an intrinsically safe weapon is effectively protected against misuse. In this respect, the Smart-
System from Armatix represents a trendsetting innovation. No-one other than the identified user of
the weapon who has the matching lock (the wrist watch) and key (the PIN) can use the weapon.
But it is more than this revolutionary safety concept that makes the SmartSystem a real innovation.
The SmartGun belonging to the system is a modern, high-precision handgun developed in accord-
ance with the latest weapon technology and ergonomic principles and guidelines.
This weapon system is not futuristic – it is the future. We are convinced of that.
We wish you a great deal of enjoyment with the Armatix SmartSystem.
Your Armatix Team

7
iP1 SmartSystemiP1 SmartSystem
2 Safety Precautions
2.1 About this operating manual
This operating manual describes the design, functions and handling of the iP1 SmartSystem from
Armatix. It contains additional information on troubleshooting, storage, transport and disposal, as
well as on the ordering of spare parts.
The operating manual forms part of the weapon and of the operating concept. It must therefore
always be stored with the weapon in order to be available for consultation at any time before using
the weapon.
This operating manual is intended for persons authorised to own and handle handguns such as the
SmartGun.
In addition to this operating manual, a quick-start guide is also included with the SmartSystem. It
describes the fundamental steps for using the SmartSystem. It is intended only as a brief overview
and is no substitute for thorough reading and understanding of this operating manual.
8
iP1 SmartSystemiP1 SmartSystem
2.1.1 Conventions and symbols
Dangers are associated with the handling of any weapon; particular attention is drawn to these in
this operating manual. The hazard warnings are depicted as follows:
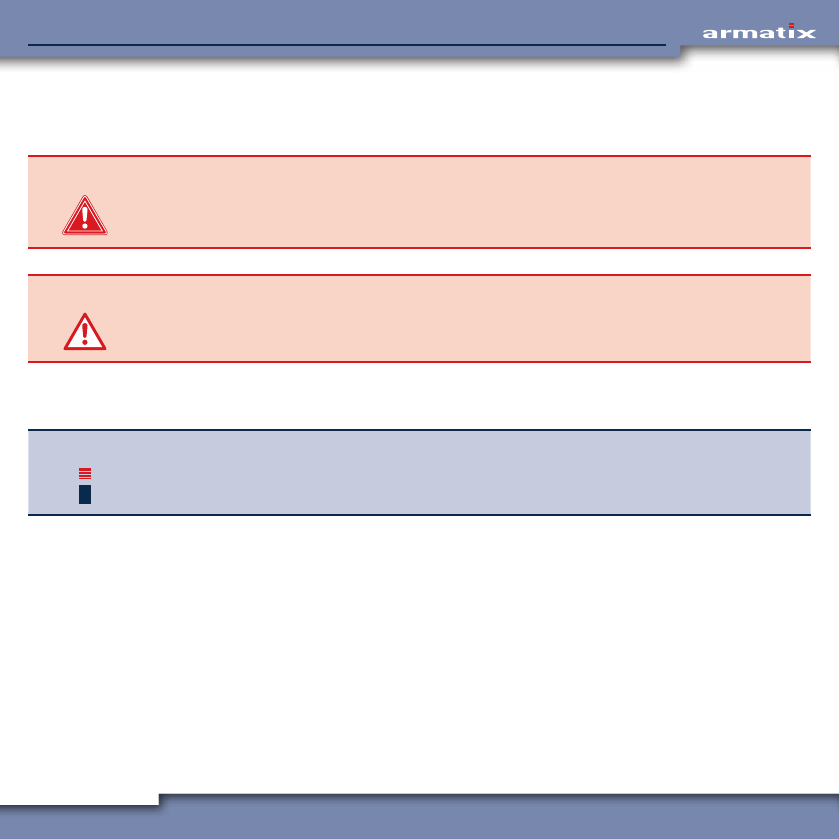
DANGER! This symbol with the word "DANGER!" draws attention to an imminent hazard that can result
in immediate death or serious injury if not avoided.
¾This arrow directs you to the appropriate measure for avoiding this imminent hazard.
CAUTION! This symbol with the word "CAUTION!" draws attention to an imminent hazard that can
result in minor or moderate injury or material damage if not avoided.
¾This arrow directs you to the appropriate measure for avoiding this imminent hazard.
Information of particular importance at specific points or which simplifies the handling steps de-
scribed for the user of the weapon are highlighted as follows:
INFO This symbol "INFO" gives you tips and recommendations for the use and handling of the
SmartSystem.
9
iP1 SmartSystemiP1 SmartSystem
2.2 Safety Precautions
The Armatix SmartSystem has been developed in accordance with the latest standards of weapons
technology and with the recognised guidelines for safety and protection of the user.
Furthermore, the system sets new standards in protection against misuse of the weapon.
Nevertheless the SmartGun is a weapon, and for this reason may only be used by authorised
persons who have read and understood this operating manual completely, with the due care and
attention and in observance of the safety precautions described in this operating manual.
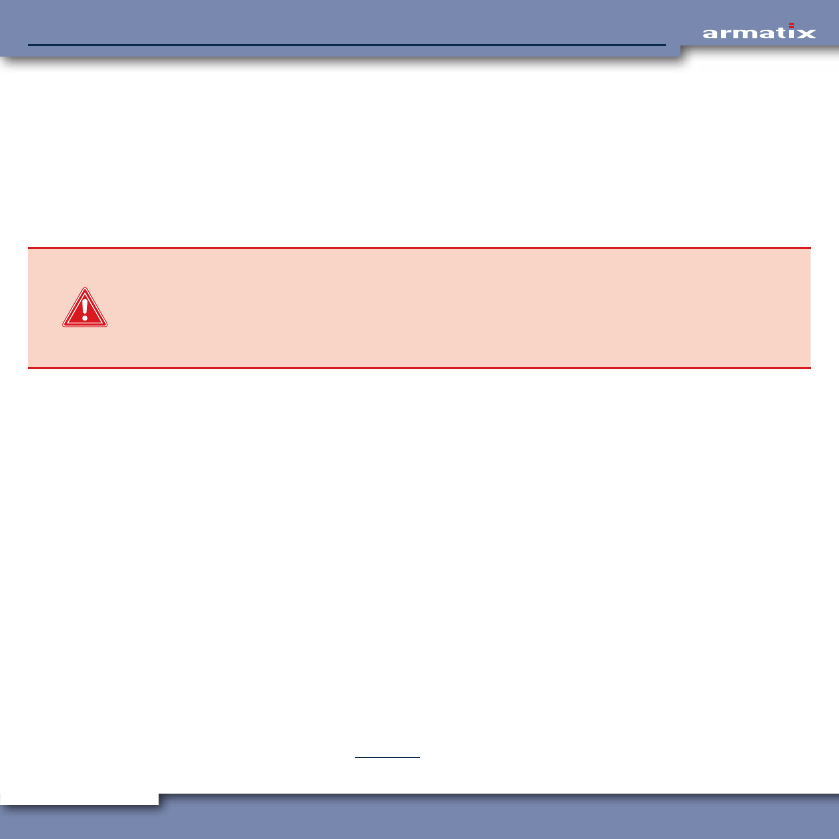
DANGER! Mortal danger!
The use of the weapon can create acute dangers for the life and limb of the user, and for
third persons and the immediate surroundings.
¾In order to avoid these dangers, please read the following precautions carefully and
observe them when handling the SmartGun system.
2.2.1 General safety precautions
• Do not use the weapon before you have read and understood this operating manual completely.
• Store this operating manual together with the weapon at all times.
• Also keep any supplements or additions to this operating manual together with the weapon.
• The operating manual must always be handed over when giving the weapon to another user or
owner.
• Only allow persons access to the weapon who have read and understood this operating manual
completely.
• The batteries included with the system are not rechargeable. Never try to recharge non-recharge-
able batteries. They may explode or catch fire.
• Never try to dismantle batteries. Battery fluids can cause serious injuries.
• Never expose batteries to high temperatures (direct sunlight, heaters or fire). They may explode.
• Never use mixed batteries in the weapon. Type, manufacturer and residual capacity must be
identical.
• Observe the instructions in Chapter 9 when disposing of the batteries.

10
iP1 SmartSystemiP1 SmartSystem
2.2.2 Observe the following when handling the weapon
• The handling of a handgun demands a great deal of attention, as direction and position of the
weapon can change very easily and quickly.
• Always regard the weapon as loaded until such time as you have ascertained the real load condition.
• Use the weapon only when you have assured yourself of its safe technical condition.
• Ensure that the weapon is unloaded during any handling of the weapon not related to loading or
firing of the weapon.
• Use the weapon only in accordance with its intended use (see Chapter 2.3), never as a cutting
weapon, striking tool, breaking tool, etc. Use of the weapon for other than its intended purpose
can lead to unintentional firing or to damage to the weapon.
• A weapon is not a toy! Playing with the weapon is therefore inappropriate and should be avoided.
• Never point the weapon towards persons or animals during loading, cleaning, dismantling or
practice.
• Do not touch the trigger during loading or unloading of the weapon, during aiming or other
operations with the weapon. Always place your trigger finger on the outside of the trigger guard
and move it onto the trigger only immediately before firing.
• Do not exert force during handling, cleaning or dismantling of the weapon.
• Frequent hammer strikes with the weapon empty will result in premature wear. Therefore avoid
unnecessary striking of the hammer with the weapon empty.
• Weapon and ammunition must be stored separately and protected from access by unauthorised
persons, in particular children (see Chapter 7).
• Faults that may impair the functional safety of the weapon must be addressed and remedied
immediately (see Chapter 6).
• Exceptional loads on the weapon such as hard impacts or dropping can impair its functional
safety. Following exceptional loads, the weapon must be inspected by the manufacturer or an
authorised dealer before use.
• Never rely completely on the safety devices. They are in no way a substitute for careful and cor-
rect handling of the weapon.
• The manufacturers' specifications for accessories and ammunition must be observed during their
use.

11
iP1 SmartSystemiP1 SmartSystem
2.2.3 Note when firing
• Remove the oil from the weapon before firing.
• Load the weapon only with properly machined, undamaged ammunition of the specified calibre.
• Wear safety goggles when firing.
• Wear ear protectors when firing.
• Keep your hands out of the way of the slide when firing.
• Keep the muzzle area of the weapon free when firing.
• Do not fire at flat surfaces such as stones, concrete, walls, doors, windows or even water. The
projectile can pass through these or be deflected in an unpredictable direction.
• Press the trigger only when the weapon is aimed at the target and there are no endangered
objects or persons behind or around the area of the target.
2.2.4 Note after firing
• After firing, uncock and unload the weapon as described in Chapter 4.6.6.
• Weapon and ammunition must be stored in accordance with the specifications in Chapter 7.
2.2.5 Shipping and / or handing over the weapon
• Hand over the weapon only in unloaded condition and with the slide open (visual inspection of
the unloaded condition).
• The specifications for transport and shipment in Chapter 8 must be observed.
2.3 Intended use
The Armatix SmartSystem contains a calibre .22lr handgun protected by special measures against
misuse and a wrist watch into which the function for unlocking the weapon is integrated. It is de-
signed for accurate firing at targets at ranges of up to 25 m.
The danger range of the weapon is 1800 m!
Criminal activities using the gun do not constitute an intended use!

12
iP1 SmartSystemiP1 SmartSystem
2.4 Liability and warranty
This device complies with Part 15 of the FCC Rules. Operation is subject to the following two condi-
tions:
1. This device may not cause harmful interference, and
2. this device must accept any interference received, including interference that may cause unde-
sired operation.
Changes or modifications not expressly approved by the party responsible for compliance could void
the user’s authority to operate the equipment.
Armatix GmbH assumes no liability or warranty for incidents arising due to:
• Failure to observe this operating manual,
• Incorrect use of the SmartSystem,
• Improper handling,
• Negligence,
• Use of accessories and spare parts from other manufacturers without the express written ap-
proval of Armatix GmbH, or
• Modifications or conversions to the weapon without the express written approval of Armatix
GmbH.

13
iP1 SmartSystemiP1 SmartSystem
3 Description
3.1 The iP1 SmartSystem
The concept of the Armatix SmartSystem is based on the splitting of weapon and access control into
two separate components that together form the weapon system.
The SmartGun
The calibre .22lr pistol is a modern precision handgun with an integrated mechatronic safety device.
This safety device is normally active and can only be deactivated using the wrist watch so that the
weapon can be used.
The wrist watch
In its normal condition, the weapon is locked and must be unlocked for firing. This is effected with
the wrist watch when the following conditions have been satisfied:
• System times of wrist watch and weapon are synchronised.
• The valid PIN has been entered on the wrist watch.
• Wrist watch and weapon have a common "code" for the communication.
• Wrist watch and weapon are within the communication radius (normally wristwatch on wrist of
firing hand, weapon in the firing hand).
• Weapon with correctly inserted magazine in the hand (backstrap switch on the weapon is actu-
ated (see Chapter 3.2)).
The enabled status of the weapon is signalled by the LED on the backstrap lighting up green.
Enabling of the weapon by the wrist watch after entering the PIN ends
• When the weapon is no longer held in the hand (backstrap switch no longer actuated (see Chap-
ter 3.2)),
• When the magazine is removed,
• On expiry of the set remaining time (see Chapter 4.4.2.2),
• By manual deactivation of the wrist watch (see Chapter 4.4.2.5).

14
iP1 SmartSystemiP1 SmartSystem
Operating states of the system
• Weapon function of the wrist watch activated
After input of the correct PIN at the wrist watch, the receiver in the wrist watch is active and
waits for a signal from the weapon.
– The large weapon symbol appears on the display of the wrist watch.
• Weapon activated
Actuation of the backstrap switch when the weapon is picked up activates its transmitter and the
weapon waits for an enable signal from the wrist watch.
– The LED lights up red.
The wrist watch checks the signal from the weapon; if the check is successful, the wrist watch
enables the weapon for firing.
• Magazine safety device tripped
If the magazine is not correctly inserted, the integral magazine safety device prevents the weapon
from being enabled.
– The LED lights up blue.
• Weapon enabled
If the check of the signal by the wrist watch and of the magazine safety device was successful, the
unlocking mechanism is activated and the weapon enabled for firing.
– The LED lights up green.

15
iP1 SmartSystemiP1 SmartSystem
3.2 The SmartGun
3.2.1 Design and operating elements
The SmartGun is a calibre .22lr handgun. It has been developed in accordance with the latest
ergonomic principles and criteria. The parts and operating elements of the SmartGun are identified
in the figure below.
1
2
3
4
5
6
7
8
9
10
11
1 Front sight
2 Rear sight
3 Hammer
4 Slide
5 LED
6 Slide release lever
7 Backstrap with backstrap switch
8 Trigger
9 Cover
10 Magazine release lever
11 Magazine
3.2.2 Functions
The components shown in Chapter 3.2.1 have the following functions:
• Slide
When the slide is pulled back and moves forward again, a cartridge is transported from the mag-
azine into the chamber. This is only necessary when there is no cartridge in the chamber before
firing (e.g. when a magazine has been emptied and a newly filled magazine has been inserted).
When the pistol is fired, the slide automatically moves back and ejects the empty cartridge case.
As the slide moves forward again, a new cartridge is transported from the magazine into the
chamber.

16
iP1 SmartSystemiP1 SmartSystem
• LED
The LED on the backstrap signals the operating condition of the weapon by lighting up in differ-
ent colours:
–Red
The red LED that lights up when the weapon is picked up signals that the weapon is not
enabled for firing.
–Blue
The blue LED that lights up when the weapon is picked up signals that the magazine has not
been inserted or has not been inserted correctly.
–Green
The green LED that lights up when the weapon is picked up signals that the weapon is enabled
for firing.
• Slide release lever
The slide release lever holds the slide in the rear position when the magazine is empty. This sig-
nals to the user that the magazine is empty.
For handling over the weapon with open slide and without the magazine inserted, the slide re-
lease lever can be pushed up manually with the slide pulled back and the slide is held open when
the arresting lever is released.
After inserting a newly filled magazine and pressing the slide release lever, the slide moves for-
ward. A new cartridge is then transported automatically into the chamber.
• Magazine release lever
The lever that can be actuated on both sides underneath the trigger releases the magazine so
that it can be removed.
• Trigger
Depending on the hammer position, the following occurs when the trigger is pulled completely:
– When the hammer is cocked, it is immediately uncocked and transmits its energy via the firing
pin to the ignition charge in the cartridge (Single Action / SA).
– When the hammer is uncocked, it is first cocked to a given point and then immediately
uncocked. It transmits its energy via the firing pin to the ignition charge in the cartridge
(Double Action / DA).
17
iP1 SmartSystemiP1 SmartSystem
• Backstrap with backstrap switch
Three backstraps of different sizes are available for the SmartGun to allow a better ergonomic
adaption of the pistol to the user. On delivery, the smallest backstrap (size "S") is fitted.
The backstrap switch linked to the backstrap is actuated when the weapon is picked up and
activates the communication with the wrist watch.
3.3 The wrist watch
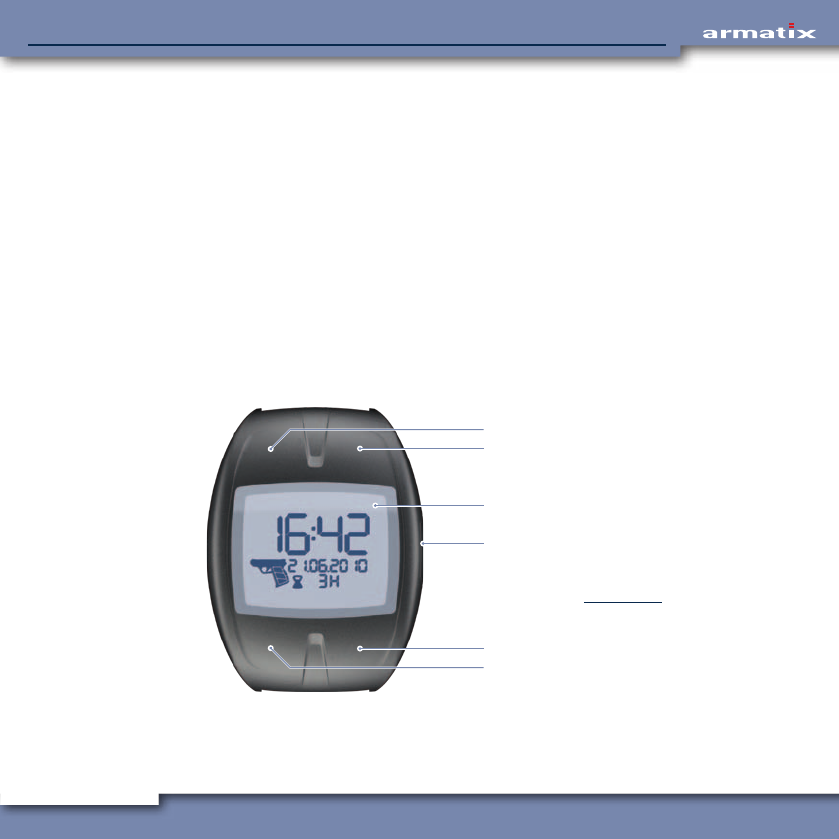
3.3.1 Design and operating elements
The wrist watch belonging to the SmartSystem contains not only a precise timer and associated
auxiliary functions but more importantly the enable control of the weapon. Without the input of the
correct PIN at the wrist watch, the weapon cannot be used.
The buttons on the upper side of the wrist watch are integrated into the housing and are actuated
by deformation when the surface is pressed.
1
2
3
4
5
6
1 Button top left (TL)
2 Button top right (TR)
3 Display*
4 Button middle right (MR)
5 Button bottom right (BR)
6 Button bottom left (BL)
* The meaning and functions of the
displayed elements is described in
Chapter 4.4.

18
iP1 SmartSystemiP1 SmartSystem
3.3.2 Functions
The wrist watch has both the functions of a modern timer, but also a number of auxiliary functions
relevant to the SmartSystem.
Timer functions
• Time and date display
• Alarm clock
• Stopwatch
SmartSystem functions
• Input of the PIN
• Setting and display of the remaining time (time until the wrist watch is automatically deactivated)
• Display of the SmartSystem activation status (large weapon symbol)
• Display of the weapon battery status (grip of the large weapon symbol)
• Time synchronisation between wrist watch and weapon
• Input of the SuperPIN
General functions
• Indication of low capacity of the wrist watch battery
• Background lighting (see Chapter 4.4)

19
iP1 SmartSystemiP1 SmartSystem
3.4 The accessories
3.4.1 Scope of supply
• Lockable transport case
• Weapon with magazine
• Second magazine (optional)
• Wrist watch (referenced to the weapon)
• Data medium with operating manual
• Quick Start Guide
• Batteries for weapon (2 × AAA / Micro), supplied loose
• Battery for wrist watch (CR2032), installed in the wrist watch
• 2.8 mm diameter punch
3.4.2 Additional accessories / equipment required
• Weapon oil
• Cleaning set
• Lint-free cleaning cloths
20
iP1 SmartSystemiP1 SmartSystem
4 Handling
4.1 Checking the weapon system (weapon and wrist watch)
Before using the SmartSystem, the checks described here must be carried out to ensure that the
individual components are in good condition and can be used safely.
4.1.1 Carry out safety check
The safety check serves to ensure that there is no ammunition in the weapon. This check is neces-
sary when taking over the weapon from another user or if you are uncertain about the load state of
the weapon for other reasons.
CAUTION! Risk of damage!
Dropping the magazine can cause damage to the cartridge guides that may result in mal-
functions.
¾Do not allow the magazine to fall on the floor when releasing; catch it in your hand.
• Release and remove the magazine.
• Hold the weapon firmly in your hand.
• Grip the slide, pull it back as far as it will go and lock it by pushing up the slide release lever.
• Check by looking into the chamber that there is no cartridge in the weapon.
– If there is a cartridge in the chamber, read and follow the steps described in Chapter 6.
CAUTION! Risk of injury!
The spring-loaded slide moves forward when the slide release lever is pressed.
¾Keep your hands out of the way of the slide.
• Press the slide release lever down. The slide moves forward.
21
iP1 SmartSystemiP1 SmartSystem
4.1.2 Carry out function test
INFO The function test serves to check that the weapon is in a technically good condition. This test
is particularly necessary after assembling the weapon or after remedying a malfunction.
• Insert an empty magazine into the weapon. The magazine must engage noticeably.
• Pull the slide back as far as it will go. It is held in this position by the slide release lever.
CAUTION! Risk of injury!
The spring-loaded slide moves forward when the slide release lever is pressed.
¾Keep your hands out of the way of the slide.
• Press the slide release lever down. The slide moves forward.
• Release and remove the magazine.
• Pull the trigger quickly as far as it will go – the hammer is uncocked.
• Move your finger away from the trigger and rest it on the side of the trigger guard.
• Move the slide back and forth several times to check its free movement.
4.2 Adapting the weapon to the user
4.2.1 Grip
In order to be able to adapt the weapon to different hand sizes, different backstrap housings are
available for the SmartSystem. On delivery, the smallest backstrap (size "S") is fitted.
INFO In order to avoid damage to the weapon housing when pressing out the pin, use the punch
provided (2.8 mm diameter).
22
iP1 SmartSystemiP1 SmartSystem
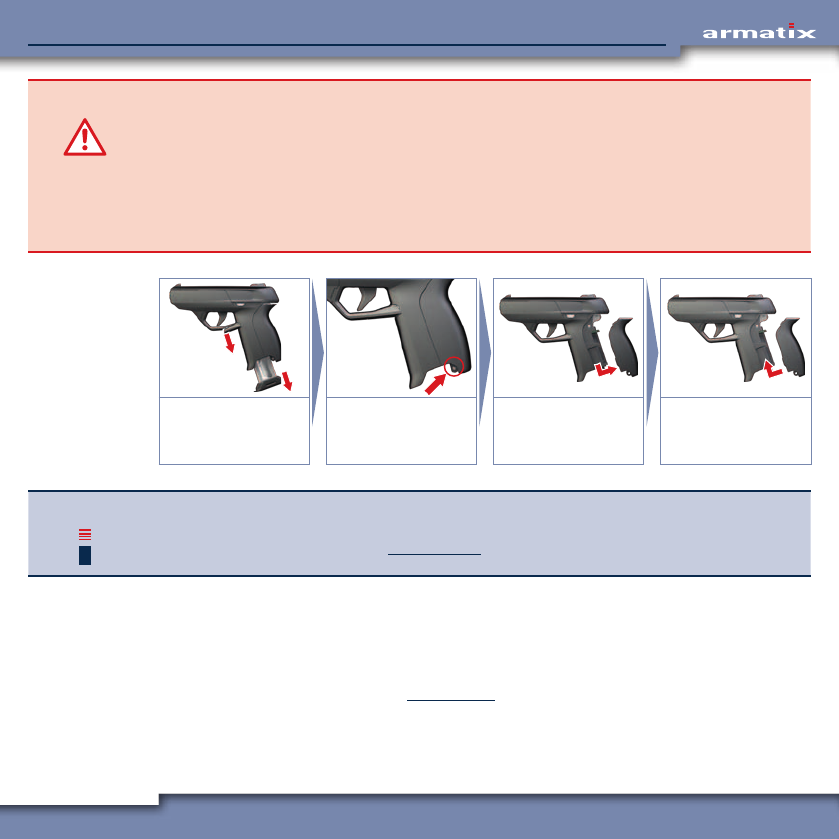
CAUTION! Risk of damage!
Dropping the magazine can cause damage to the cartridge guides that may result in mal-
functions.
¾Do not allow the magazine to fall on the floor when releasing.
If the hammer is cocked with the backstrap removed, the hammer spring can be over-
stretched due to the lack of a stop.
¾Do not cock the hammer when the backstrap is removed.
1.
2.
Release and remove
the magazine.
Press out the pin using
a punch (2.8 mm
diameter).
Pull the backstrap
down and to the rear.
Fit the desired back-
strap and assemble
the weapon.
INFO The compartment for the weapon batteries is located under the backstrap. If the batteries
have not yet been inserted into the weapon, you can do it at this point. Information on insert-
ing the batteries can be found in Chapter 4.3.1.
The weapon is assembled again in the reverse order.
4.2.2 The gun sight (aiming device)
Various sights are available for the SmartSystem to allow the accuracy of the weapon to be opti-
mised according to your own aiming habits.
Changing of the sights is described in Chapter 6.2.1.
23
iP1 SmartSystemiP1 SmartSystem
4.3 Inserting the batteries
4.3.1 Weapon
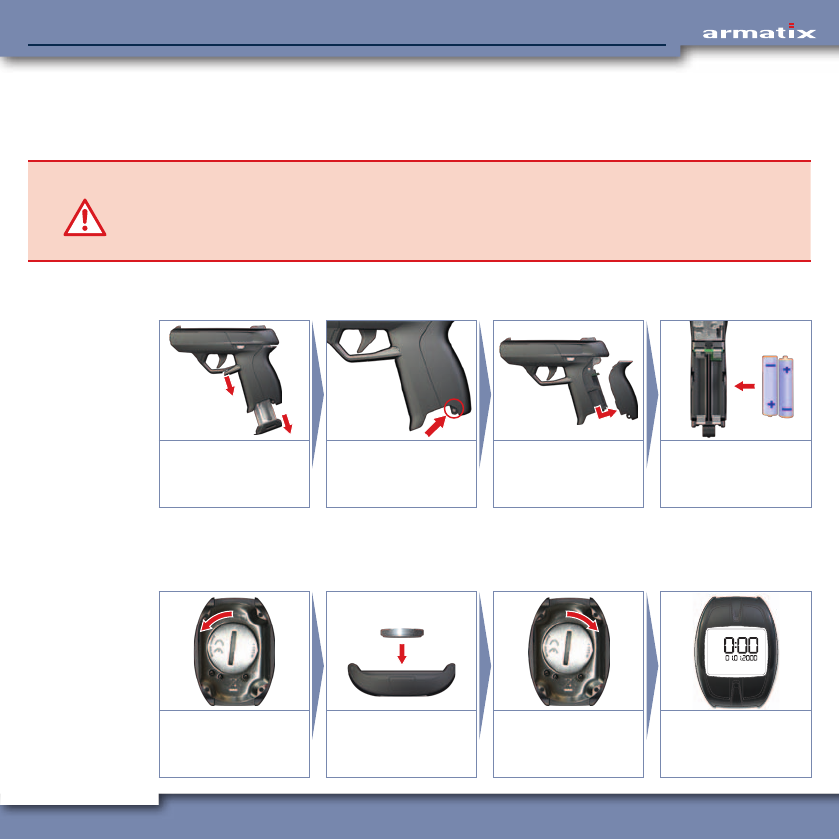
CAUTION! Risk of damage!
Dropping the magazine can cause damage to the cartridge guides that may result in mal-
functions.
¾Do not allow the magazine to fall on the floor when releasing; catch it in your hand.
The weapon batteries (2 x AAA / Micro) are located under the backstrap. Proceed as follows to insert
the batteries (reassemble in the reverse order).
1.
2.
Release and remove
the magazine.
Press out the pin using
a punch (2.8 mm
diameter).
Pull the backstrap
down and to the rear.
Insert the batteries as
shown.
4.3.2 Wrist watch
The wrist watch battery (CR2032) is located under the battery compartment cover on the rear side.
Proceed as follows to insert the battery:
–
+
Release and remove
the battery compart-
ment cover.
Insert the battery as
shown.
Replace and lock the
battery compartment
cover.
The wrist watch is now
ready for use.
24
iP1 SmartSystemiP1 SmartSystem
4.4 The wrist watch functions
The wrist watch of the SmartSystem has a large number of functions. Certain of these correspond to
the functions of a commercially available digital wrist watch.
Furthermore, the wrist watch has numerous possibilities for controlling the functions of the
SmartSystem.
This chapter explains both the wrist watch functions and the SmartSystem-related functions. The
functions are described in the same order in which they can be called up on the wrist watch.
Background lighting
The background lighting of the wrist watch display is activated by holding the button BL pressed for
3 seconds and goes out again automatically after a short time.
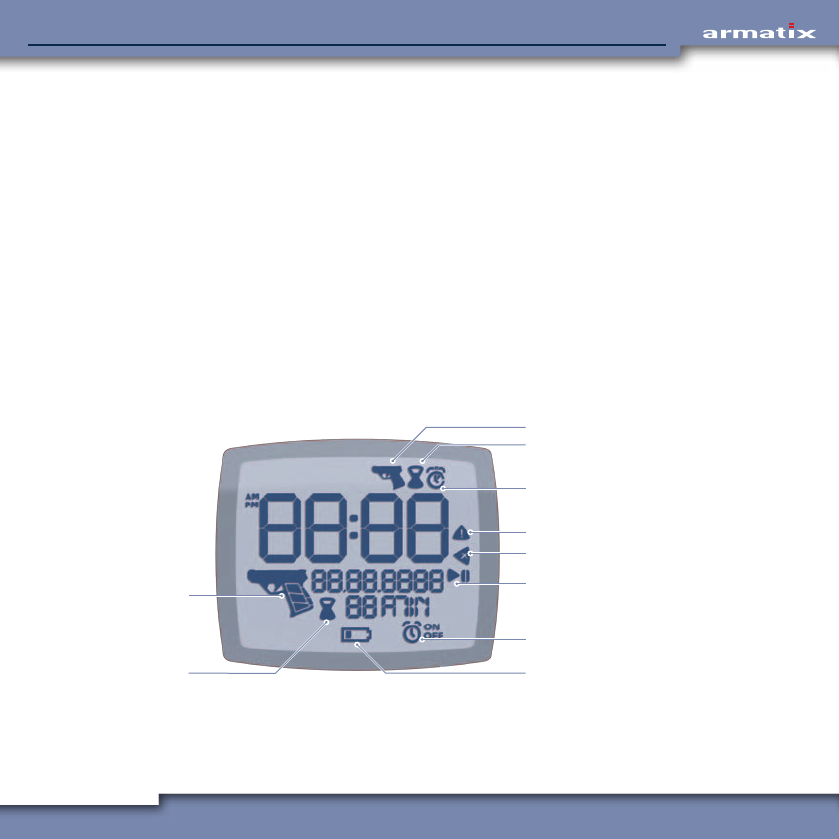
Display elements
In addition to the time and date, the respective active functions of the wrist watch are indicated by
various symbols on the display.
2
1
3
9
10
5
6
4
7
8
1 Weapon menu
2 Setting of remaining time
3 Alarm clock / stopwatch
4 Warning
5 Delete
6 Stopwatch start / stop
7 Alarm clock On / Off
8 Wrist watch battery
9 Display of remaining time
10 Weapon function of the wrist
watch / weapon battery

25
iP1 SmartSystemiP1 SmartSystem
Symbol Meaning
Weapon menu
The small weapon symbol appears in the top right-hand corner when the weapon menu is
called up. Settings related directly to the weapon can be carried out here (see Chapter 4.4.2).
Remaining time
The symbol appears during setting of the remaining time (see Chapter 4.4.2.2).
In the lower half of the display it indicates the remaining time displayed alongside for
which the wrist watch is activated.
Alarm clock
The symbol appears during setting of the alarm time (see Chapter 4.4.3).
After setting the alarm time, the alarm clock can be switched on ( ) or off ( ).
When the alarm clock is switched on, the symbol indicates that the alarm clock
is switched on.
Stopwatch
The stopwatch symbol appears in the top right-hand corner of the display when the
stopwatch is active (see Chapter 4.4.4).
The start-stop symbol appears when the stopwatch is called up and indicates that the
stopwatch can be started, stopped and reset with the button MR.
Delete
The 'Delete' symbol indicates that the last input (e.g. the last digit entered during
input of the PIN) can be deleted with the button MR.
Warning
This symbol appear to indicate a fault.
Wrist watch battery
This symbol appears when the battery of the wrist watch needs to be replaced (see
Chapter 4.3.2).
Weapon function of the wrist watch / weapon battery
The large weapon symbol appears in every menu when the weapon function of the
wrist watch is activated.
The three bars in the grip indicate the charge state of the battery in the weapon (see
Chapter 4.4.1.1). They only appear when communication has been established with
the weapon.
26
iP1 SmartSystemiP1 SmartSystem
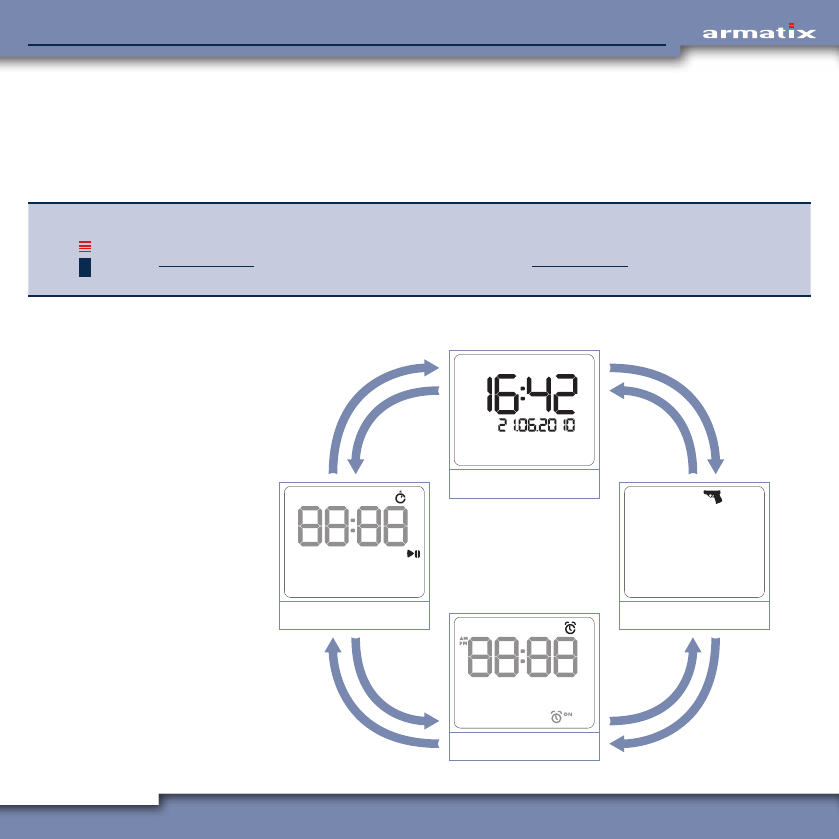
Scrolling through the individual function menus of the wrist watch
The basic functions of the wrist watch can be scrolled through with the buttons BR and TR in the
recurring sequence illustrated below.
• Holding button TR depressed (3 seconds) calls up the respective submenu of the selected function
menu.
INFO If no button on the wrist watch is pressed in a menu for at least 20 seconds, the wrist watch
returns automatically to the display of the time and date. Exceptions are the stopwatch (see
Chapter 4.4.4) and the firmware update function (see Chapter 4.4.6). Here the wrist watch
does not return automatically to the standard display.
Menu sequence when scrolling through with button BR or TR
BRBR
TR
TR
TR
TR
BRBR
Time / date
Weapon menu
Alarm clock
Stopwatch
27
iP1 SmartSystemiP1 SmartSystem
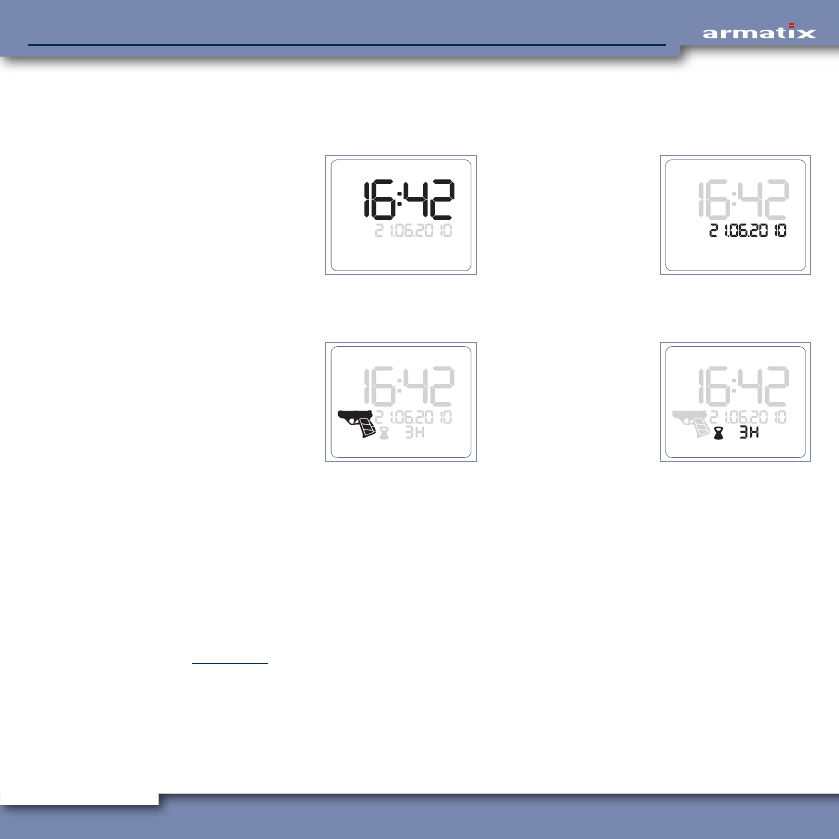
4.4.1 Standard display (time and date)
As standard, i.e. when no other function of the wrist watch has been called up, the display shows
the following information:
• Current time. • Current date.
When the weapon function of the wrist watch is activated, at least the following information is also
displayed:
• Activation status
of the wrist watch
(contour) and status
of the weapon
battery (bars in the
grip).
• Remaining time
until automatic
deactivation of the
weapon function of
the wrist watch.
4.4.1.1 Weapon symbol
The weapon symbol in the bottom left-hand corner of the display provides several items of information:
• Weapon function of the wrist watch activated
The display of the weapon symbol signals that the weapon function of the wrist watch is activated.
• Communication with weapon established
The display of the battery bars signals that the communication between wrist watch and weapon
has been established and is functional. A precondition for this is that the preconditions described
in Chapter 3.1 are satisfied.
28
iP1 SmartSystemiP1 SmartSystem
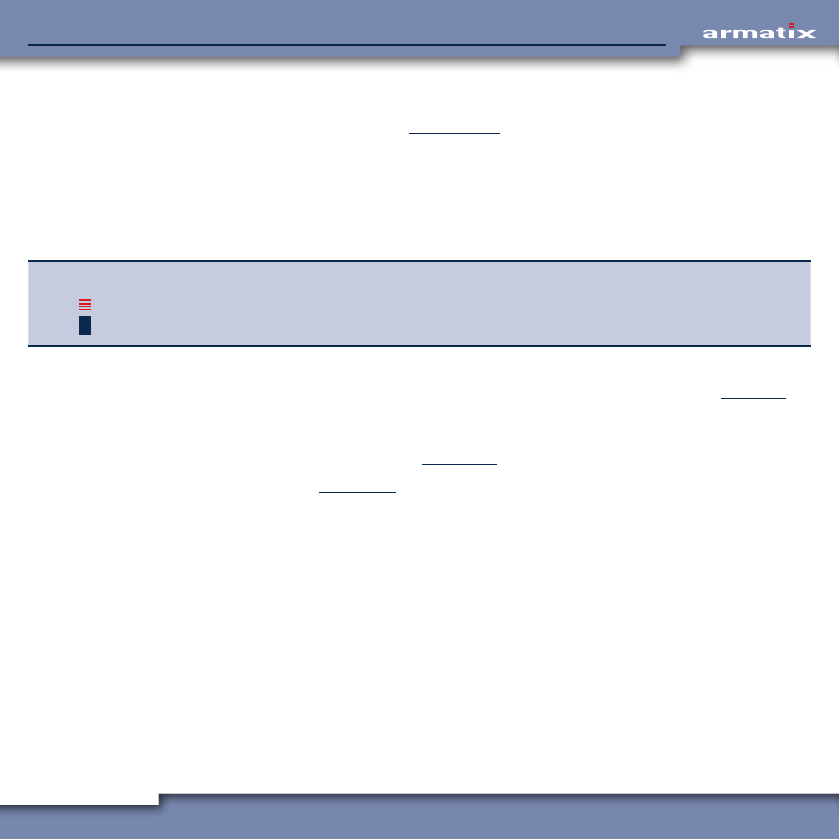
• Status of the weapon battery
The three battery bars in the grip area of the weapon symbol indicate the charge state of the
weapon batteries:
Battery capacity 100% Battery capacity approx. 66%
Battery capacity approx. 33% (Bar flashes) Battery empty
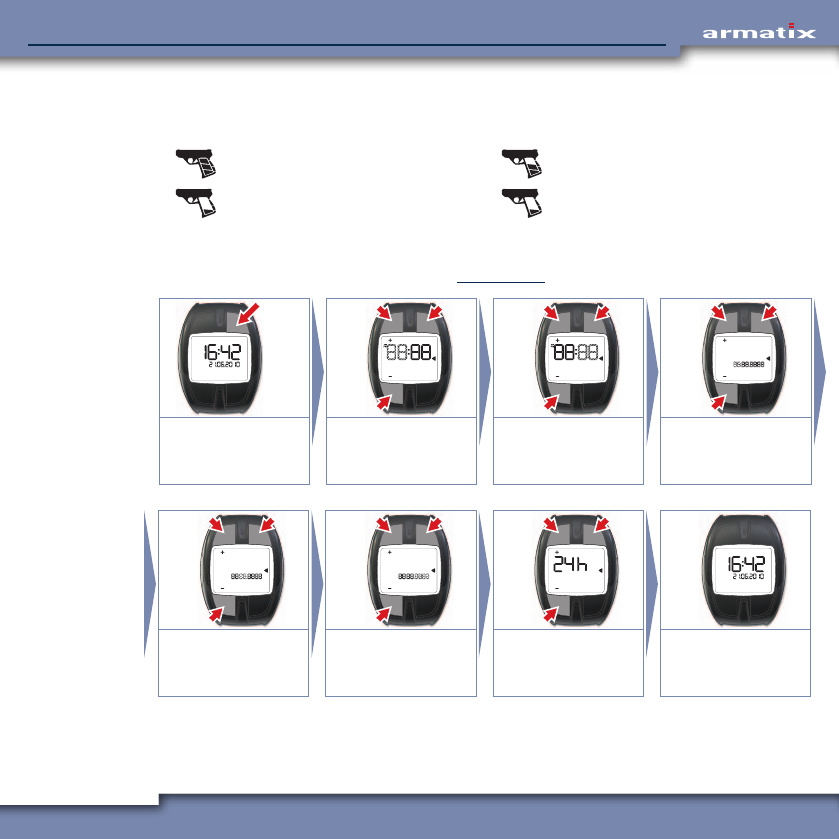
4.4.1.2 Set time and date
Starting situation is the standard display (see Chapter 4.4.1).
3 sec.
OK
–
+
OK
–
+
OK
–
+
Call up setting:
Hold TR pressed for 3
seconds.
Hours:
Set (TL, BL)
and confirm (TR).
Minutes:
Set (TL, BL)
and confirm (TR).
Day:
Set (TL, BL)
and confirm (TR).
OK
–
+
OK
–
+
OK
12h
24h
Month:
Set (TL, BL)
and confirm (TR).
Year:
Set (TL, BL)
and confirm (TR).
12h / 24h mode:
Select (TL, BL)
and confirm (TR).
Standard display
appears.
29
iP1 SmartSystemiP1 SmartSystem
INFO The display of the date also changed, depending on the 12h / 24h setting:
12h mode: <Month>.<Day>.<Year>
24h mode: <Day>.<Month>.<Year>
The illustrations in this chapter show the setting of the date in 24h mode.
4.4.2 Weapon menu
The weapon menu contains the functions for activation (PIN input) and deactivation of the weapon
function, and for setting the remaining time for which the weapon function is to remain activated.
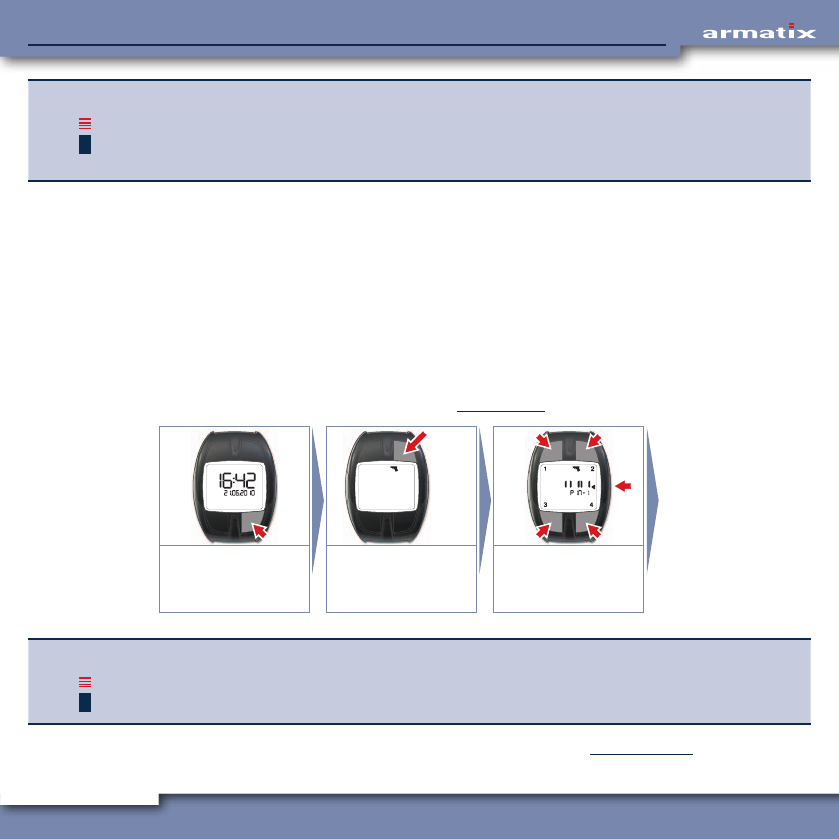
4.4.2.1 Input of the PIN
The input of the PIN supplied activates the weapon function of the wrist watch.
The PIN supplied consists of 5 digits from 1 to 4 that can be entered via the buttons TL, TR, BL and
BR. When the 5th digit is entered, the input is automatically accepted.
Example: PIN 41324 Button BR (4), button TL (1), button BL (3), button TR (2), button BR (4).
Starting situation is the standard display (see Chapter 4.4.1).
1x
3 sec. 2
43
1
Weapon menu:
Press BR 1x
Submenu:
Hold TR pressed for 3
seconds.
Enter PIN.
Correction: MR.
INFO The PIN input can also be called up directly from the standard display (time and date). Hold
button BR depressed for 3 seconds.
If the PIN is entered incorrectly, "FAIL" appears on the display. See Chapter 4.4.2.3.
30
iP1 SmartSystemiP1 SmartSystem
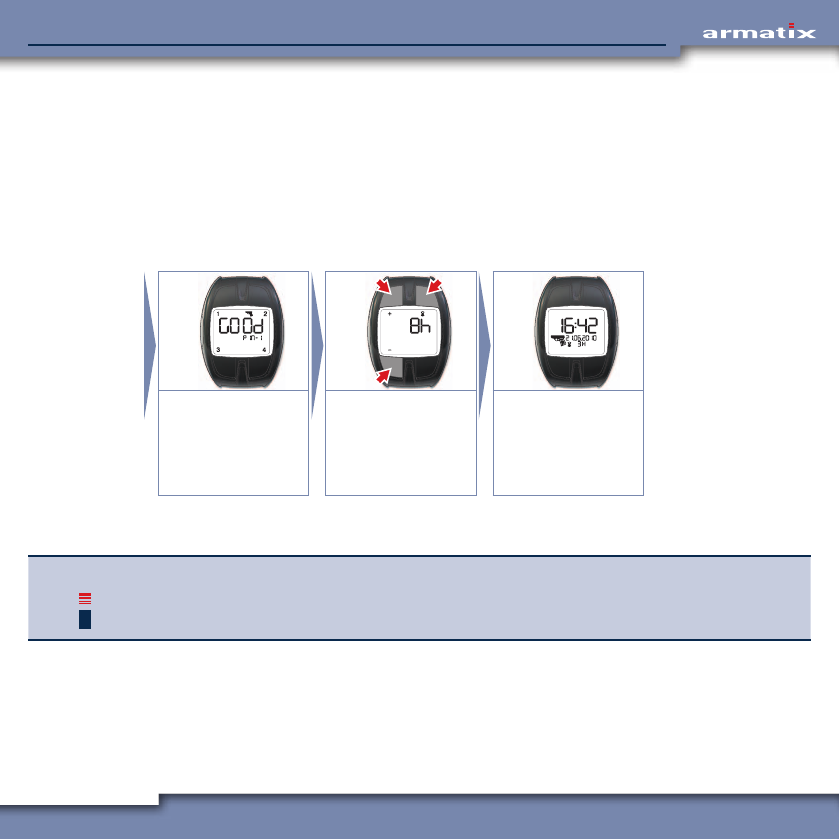
4.4.2.2 PIN OK, set remaining time
After correct input of the PIN and confirmation by the display "GOOD", the remaining time menu
is displayed. Here you can enter the time with the buttons + (TL) and – (BL) on expiry of which the
weapon function of the wrist watch is automatically deactivated. The deactivation is indicated to the
user by an acoustic signal.
• Maximum settable time: 8 hours.
• Minimum settable time: 1 hour.
The setting is confirmed and saved by pressing the button at top right (TR).
OK
–
+
Display "GOOD" for 2
seconds.
Remaining time:
Set (TL, BL)
and confirm (TR).
Time, date and
remaining time are
displayed. Weapon
and wrist watch are
activated.
After setting the remaining time, the weapon menu is automatically terminated and the standard
display appears. The weapon function of the wrist watch is now activated.
INFO The set remaining time is displayed as standard at the next PIN input in the remaining time
menu and can be either accepted directly or changed.
31
iP1 SmartSystemiP1 SmartSystem
Check communication between wrist watch and weapon
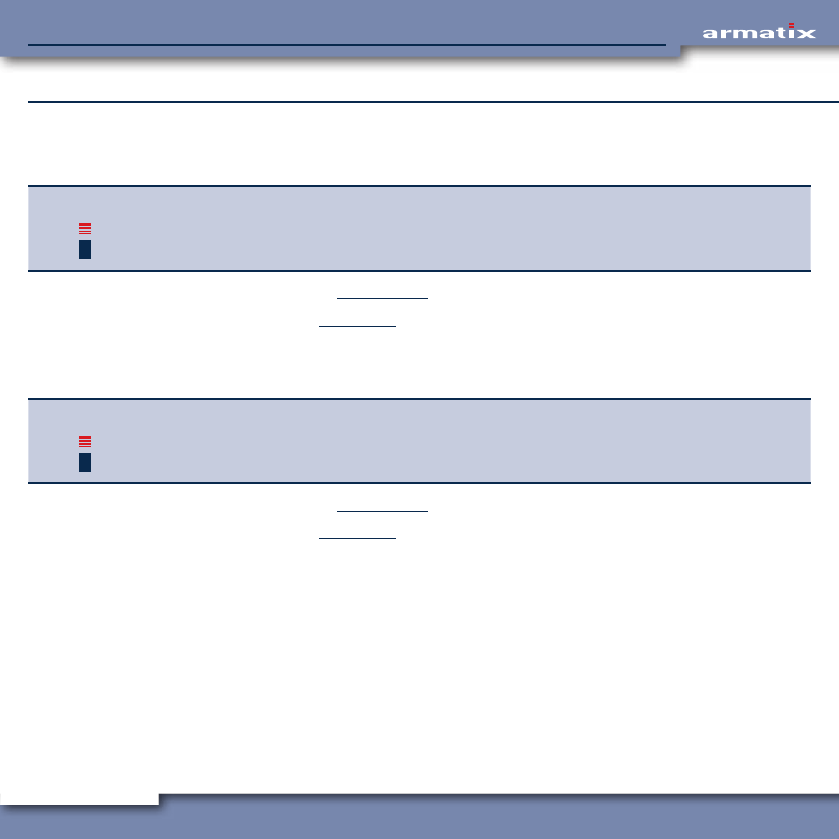
To check the communication between wrist watch and weapon, hold the weapon in your hand (full
batteries must be inserted) so that the backstrap switch is actuated. The LED display will indicate
one of the following statuses:
• LED display lights up blue: No magazine inserted.
• LED display lights up red: Weapon not ready for firing.
• LED display lights up green: The wrist watch detects the signal from the weapon.
The weapon is ready for firing!
If this is not the case, remedy the problem following the troubleshooting guide in Chapter 6.
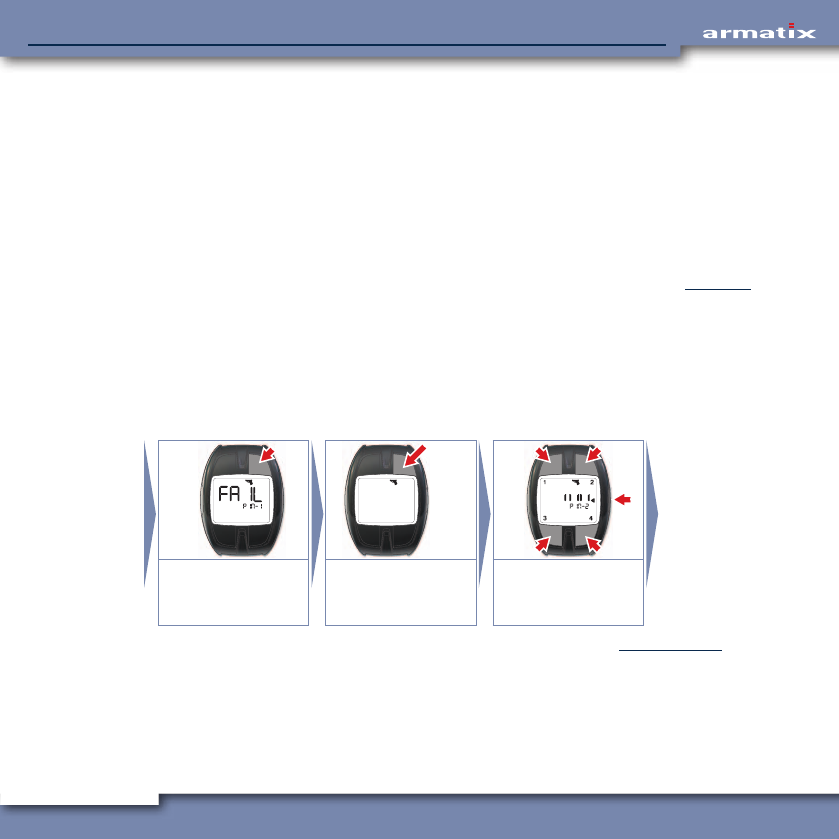
4.4.2.3 PIN entered incorrectly
If the PIN is entered incorrectly, "FAIL" appears on the display. After confirming this message with
button TR, the system returns to the weapon menu. From here the submenu for the input of the PIN
can be called up again by holding button TR depressed for 3 seconds.
In the second line of the display, a message now appears indicating that this is the second attempt
to enter the PIN.
OK
3 sec. 2
43
1
Display "FAIL"
Confirm with TR, to
the weapon menu.
Submenu:
Hold TR pressed for 3
seconds.
Enter PIN.
Correction: MR.
If the entered PIN was correct, the remaining time can now be set (see Chapter 4.4.2.2).
32
iP1 SmartSystemiP1 SmartSystem
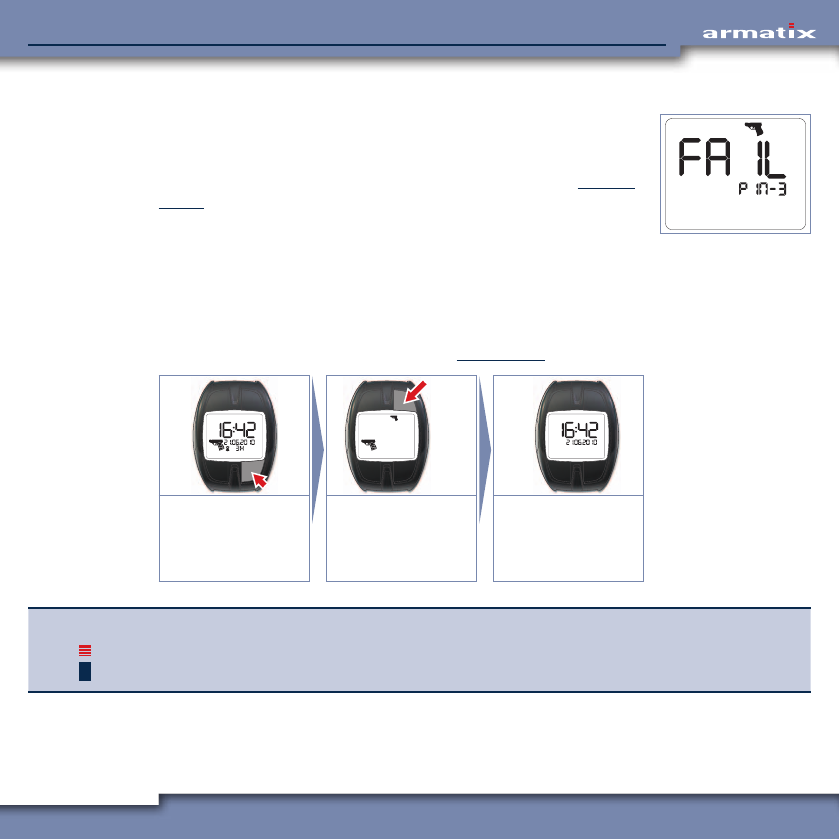
4.4.2.4 PIN entered incorrectly three times
If the PIN is entered incorrectly three times, the weapon function of the
wrist watch is permanently barred. The message shown opposite appears
on the display at every further attempt to enter the PIN.
The SuperPIN has to be entered to enable the system again. See Chapter
4.4.5.2.
4.4.2.5 Deactivate weapon function of the wrist watch prematurely
If necessary, the weapon function of the wrist watch can be terminated even before expiry of the set
remaining time. For this the button at top right (TR) on the wrist watch must be held depressed in
the weapon menu for at least 3 seconds.
Starting situation is the standard display (see Chapter 4.4.1).
1x
3 sec.
Weapon menu:
Press BR 1x
Deactivate weapon
function prematurely:
Hold TR pressed for 3
seconds.
Standard display
appears.
INFO The weapon function of the wrist watch can also be deactivated directly from the standard
display (time and date). Hold button BR depressed for 3 seconds.
33
iP1 SmartSystemiP1 SmartSystem
4.4.3 Alarm clock
The setting of the alarm clock function can be displayed and changed in the menu item "Alarm
clock". When the alarm clock function is activated, an alarm sounds for 20 seconds when the set
time is reached.
The alarm can be switched off by pressing any button on the wrist watch, but sounds again after 24
hours (set time is reached again). To switch off the alarm permanently, the alarm clock function has
to be deactivated.
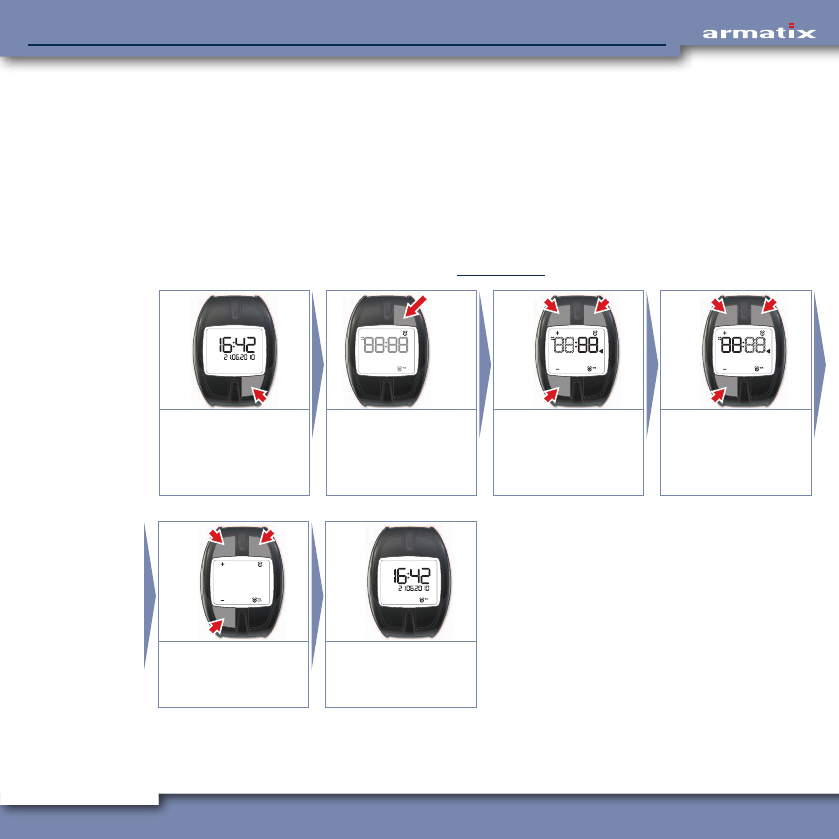
4.4.3.1 Set the alarm clock
Starting situation is the standard display (see Chapter 4.4.1).
2x
3 sec.
OK
–
+
OK
–
+
"Alarm clock" menu:
Press BR 2x.
Display last alarm
time. To set:
Hold TR pressed for 3
seconds.
Hours:
Set (TL, BL)
and confirm (TR).
Minutes:
Set (TL, BL)
and confirm (TR).
OK
–
+
Alarm clock on / off:
Set (TL, BL)
and confirm (TR).
Standard display
appears.
34
iP1 SmartSystemiP1 SmartSystem
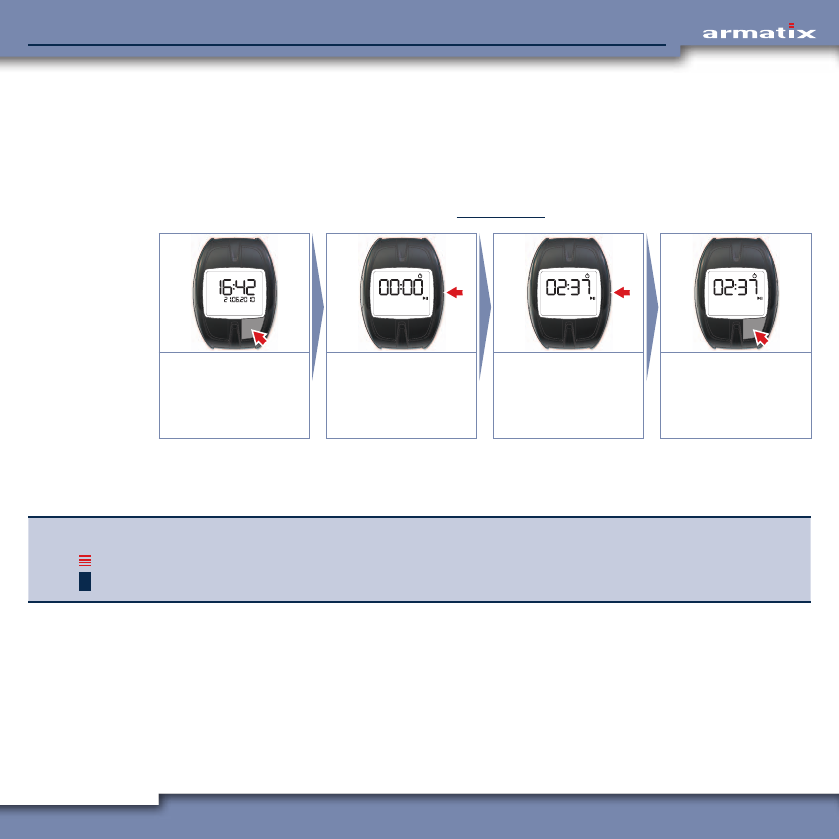
4.4.4 Stopwatch
The stopwatch offers the possibility for measuring and displaying a given period of time.
The maximum accuracy is 1 second.
If 59 minutes and 59 seconds is exceeded, only hours and minutes are displayed.
Press button MR to start, stop and reset the timing.
Starting situation is the standard display (see Chapter 4.4.1).
3x 1x
"Stopwatch" menu:
Press BR 3x.
Start timing:
Button MR
Stop timing:
Button MR
Reset: Hold MR
pressed for 3 seconds.
Back to standard
display:
Press BR 1x.
The timing continues to run until it is stopped again by the user. It is also possible to return to the
standard display without stopping the timing. The stopwatch then continues to run "in the back-
ground".
INFO A maximum of 99 hours and 59 minutes can be displayed. After that the stopwatch starts
again at 00 hours and 00 minutes.
35
iP1 SmartSystemiP1 SmartSystem
4.4.5 Extended SmartSystem safety functions
The input of the PIN activates the weapon function of the wrist watch. In order that the weapon
can be enabled by the wrist watch, the following criteria must be satisfied in addition to the correct
input of the PIN:
• A magazine inserted into the weapon,
• System times of wrist watch and weapon are synchronised,
• Wrist watch and weapon have a common "code" for their communication.
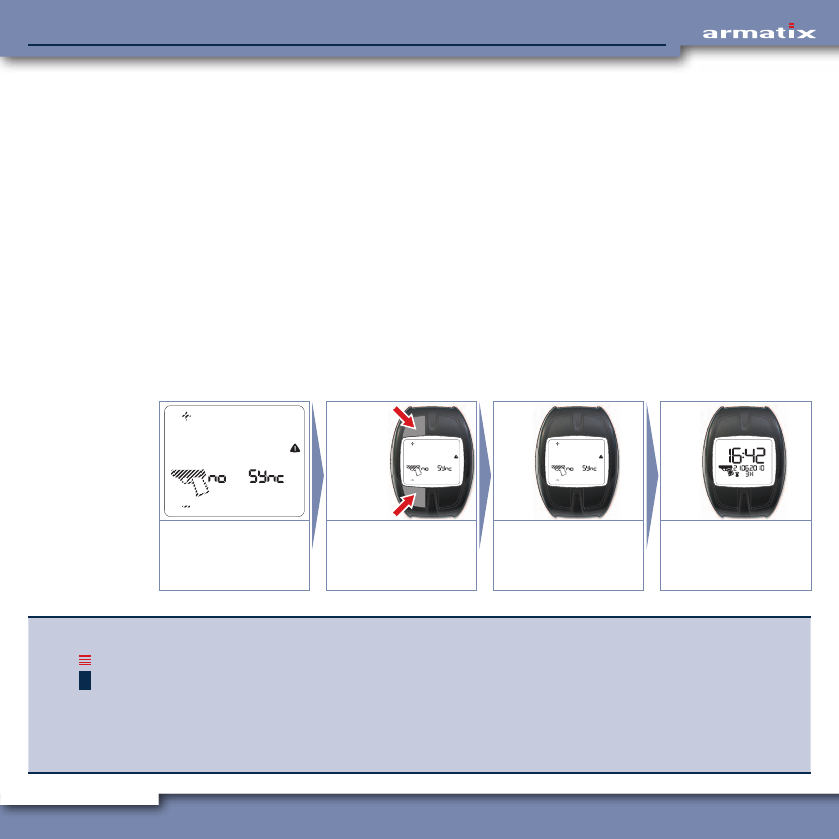
4.4.5.1 System time synchronisation
If the system times of the wrist watch and weapon are not synchronised (for example, after chang-
ing the batteries in the weapon), the message "no Sync" appears on the display of the wrist watch
when the backstrap switch is actuated. In addition, the LED on the weapon flashes red. Wrist watch
and weapon have to be synchronised.
Starting situation is the message "no Sync" on the display.
3 sec.
3 sec.
Display: "no Sync"
Weapon symbol,
+ and – flash.
Hold TL and BL de-
pressed for 3 seconds.
Weapon and wrist
watch are synchro-
nised.
Standard display
appears.
INFO If after the attempted synchronisation only a flashing weapon symbol appears instead of the
standard display, the synchronisation was not successful.
If you have access to several SmartSystem weapons, check whether the weapon belongs to
the wrist watch being used.
If the weapon is to be used for self-defence purposes, we recommend that it is activated at
regular intervals (enter the PIN and activate the weapon function of the wrist watch) and
that the charge state of the batteries is regularly checked.

36
iP1 SmartSystemiP1 SmartSystem
4.4.5.2 The SuperPIN
If the PIN of the wrist watch is to be deleted (for example, because the PIN was entered incorrectly
three times, loss of the PIN or passing on of the weapon), this can be done with the SuperPIN sup-
plied. It consists of 12 digits from 1 to 4.
Starting situation is the standard display (see Chapter 4.4.1).
3 sec.
3 sec.
2
43
1
Hold TL, TR, BL and
BR depressed for 3
seconds.
MR: Cancel.
Press any other
button:
To the input.
Enter SuperPIN.
MR: Correction.
SuperPIN input correct
After input of the correct SuperPIN, the input
mask for the new PIN is automatically displayed.
The new PIN (5 digits from 1 to 4) has to be en-
tered here. This is followed by the mask with the
footer "PIN 2" again to confirm the previously
entered PIN by entering again.
After successful confirmation, the standard
display appears again.
2
43
1 2
43
1
Enter new PIN. Repeat new PIN.
If the second PIN entered does not match the first, the procedure has to be carried out again. This is
repeated until "PIN 1" and "PIN 2" match.
SuperPIN input incorrect
After input of an incorrect SuperPIN, the standard display appears. To enter the SuperPIN again,
proceed as described in Chapter 4.4.5.2. "PIN 2" is shown in the second line of the display.
If the SuperPIN is entered incorrectly three times, no further input of the SuperPIN is possible for 10
minutes. Then you can try three times again to enter the SuperPIN.
37
iP1 SmartSystemiP1 SmartSystem
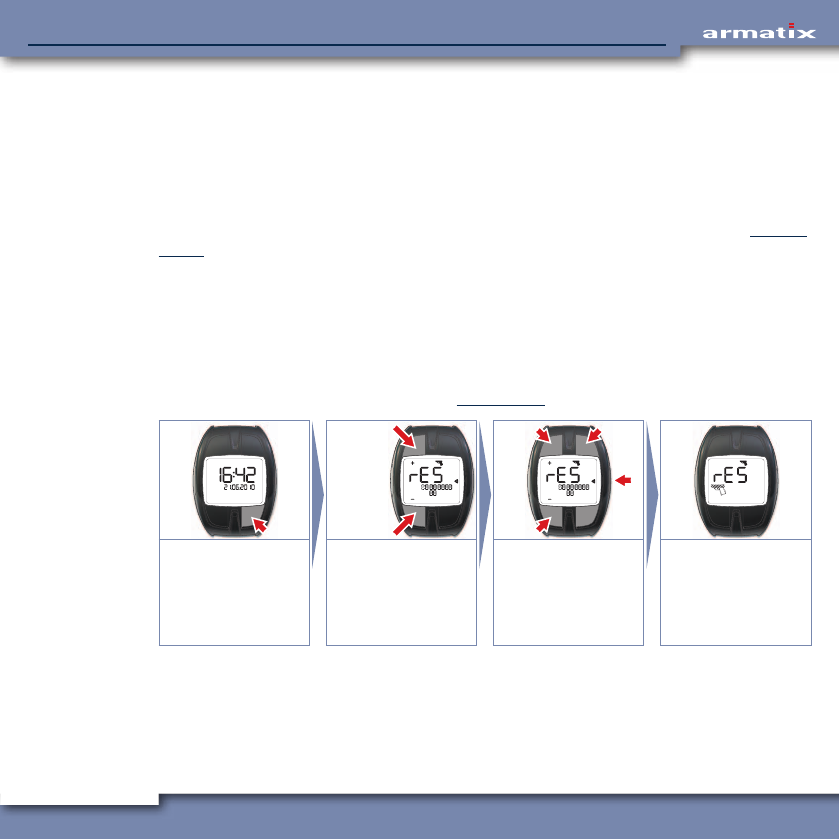
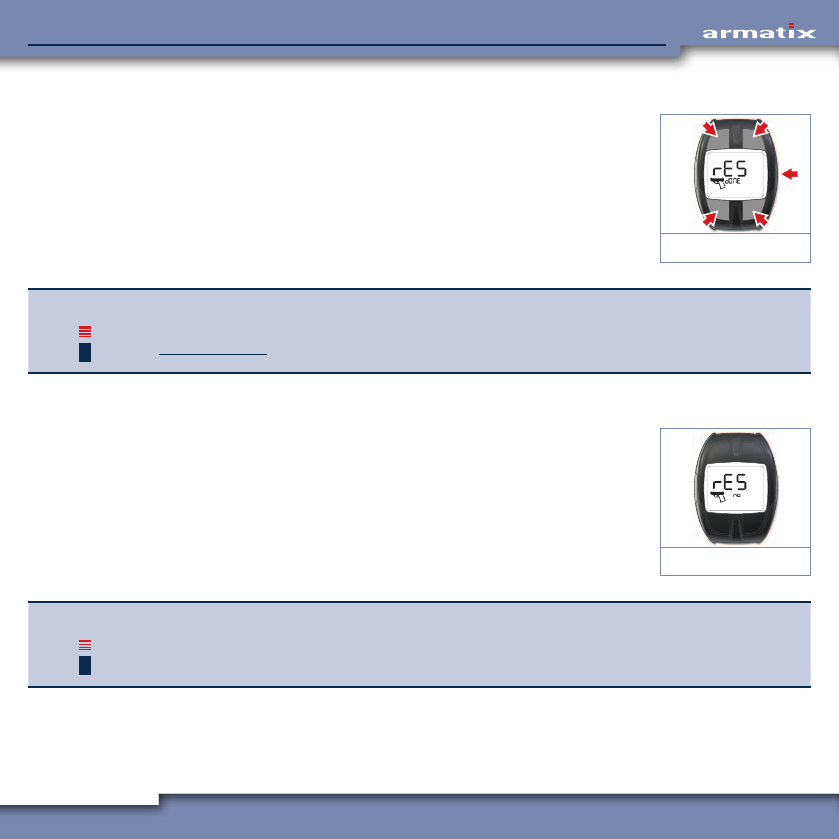
4.4.5.3 Reset weapon
By resetting the weapon, the ID of the wrist watch and the code for the communication in the
weapon are deleted. Resetting is performed in the following steps:
• Enter the weapon PIN,
• Check of the weapon PIN by the weapon (weapon held in the hand, backstrap switch actuated,
empty magazine inserted).
After resetting the weapon, it has to be referenced again before it can be used further (see Chapter
4.4.5.4).
Enter weapon PIN
The function for entering the weapon PIN is called up via the weapon menu by holding the buttons
TL and BL depressed for 3 seconds. To enter the input mode, you then have to press button TR once.
The weapon PIN consists of 10 digits from 0 to 9 and is entered digit by digit by changing the dis-
played numbers with the buttons TL (+) and BL (-). Each digit has to be confirmed with button TR.
Starting situation is the standard display (see Chapter 4.4.1).
1x
3 sec.
3 sec.
OK
–
+
Weapon menu:
Press BR 1x
Function "Reset
weapon". Hold TL and
BL depressed for 3
seconds.
Input: TR 1x
Enter digits individu-
ally (TL and BL) and
confirm (TR).
Correction: MR
After last digit:
Weapon symbol
flashes, receiver ready.
After confirmation of the last digit, the receiver in the wrist watch is activated – the weapon symbol
flashes. The weapon must not be held in the hand (backstrap switch actuated) for communication
with the wrist watch. After detection of the weapon, the wrist watch transmits the weapon PIN to
the weapon.
38
iP1 SmartSystemiP1 SmartSystem
Weapon PIN entered correctly
On input of the correct weapon PIN and successful transmission, the
code and the ID of the wrist watch are deleted in the weapon. The symbol
shown on the right appears on the display. The weapon must now be
placed out of your hand (backstrap switch not actuated).
Pressing any button of the wrist watch now returns you to the standard
display.
Weapon PIN OK
INFO As the weapon now has no wrist watch ID and no code, it cannot be used.
In order to be able to use the weapon again, it must be referenced to a wrist watch. See
Chapter 4.4.5.4.
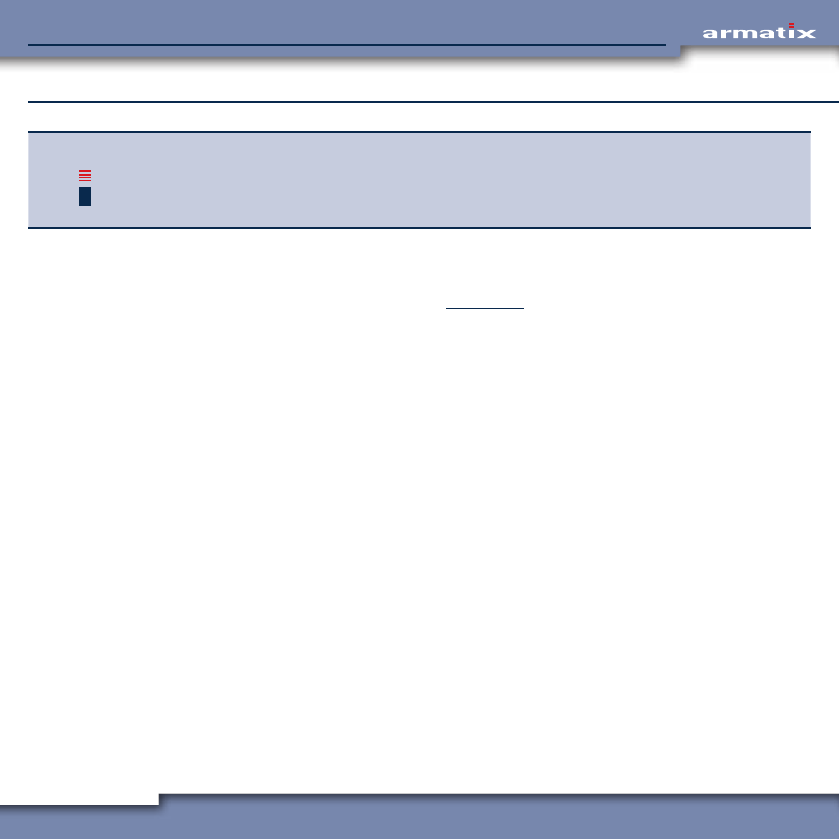
Weapon PIN entered incorrectly
If the weapon PIN is entered incorrectly, the symbol shown on the right
appears on the display. In addition, the renewed input of the weapon PIN
is barred for 10 minutes.
The weapon PIN can then be entered again.
Weapon PIN incorrect
INFO The ten minute input lockout is a safety function and cannot be bypassed, for example by
removing and reinstalling the battery. If the battery is removed during the 10 minutes, the
timer starts again at 10 minutes when the battery is inserted.,

39
iP1 SmartSystemiP1 SmartSystem
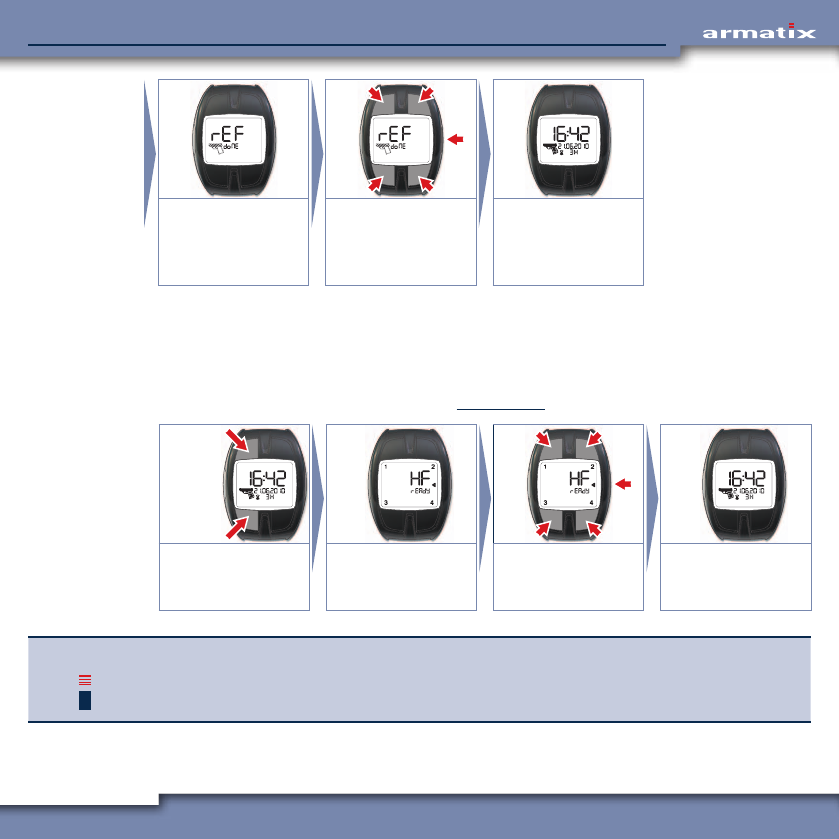
4.4.5.4 Referencing the weapon
During referencing of the weapon, the ID of the wrist watch and the code are transmitted to the
weapon and stored there. Referencing is necessary when the weapon has no stored wrist watch ID
or code. This is the case, for example, after resetting the weapon.
Before delivery by the manufacturer, the weapon is referenced to the wrist watch supplied so that
referencing is not necessary with a newly acquired weapon.
A precondition for referencing the weapon is that the weapon function of the wrist watch has been
activated, i.e. the PIN of the wrist watch has been entered.
The function for referencing the weapon is called up via the weapon menu by holding the buttons TR
and BR depressed for 3 seconds.
The weapon must then be held in your hand (backstrap switch actuated) in order to able to receive
and save the ID and the code from the wrist watch.
DANGER! Mortal danger!
As the PIN has already been entered beforehand, the weapon is immediately ready for use
and firing after saving of the wrist watch ID and code!
¾Observe the corresponding safety precautions for the handling of the armed weapon.
Starting situation: Wrist watch is activated (PIN entered), weapon is reset.
1x
3 sec.
3 sec.
Weapon menu:
Press BR 1x
Function "Reference
weapon": Hold TR and
BR depressed for 3
seconds.
Wrist watch is ready
to transmit.
Hold the weapon in
your hand (backstrap
switch actuated).
40
iP1 SmartSystemiP1 SmartSystem
Wrist watch ID and
code are transmitted
to the weapon and
stored.
Back to standard
display:
Press any button.
Standard display
appears.
4.4.6 Firmware update
The firmware of wrist watch and weapon can be updated using the USB tool available as an option.
For the communication with the USB tool, the receiver in the wrist watch is activated manually.
This menu is not terminated automatically. Press any button to return to the standard display.
Starting situation is the standard display (see Chapter 4.4.1).
3 sec.
3 sec.
Activate receiver: Hold
TL and BL depressed
for 3 seconds.
Receiver ready. Terminate waiting:
Press any button.
Standard display
appears.
INFO Further information on the use of the USB tool and the procedure for the firmware update
can be found in the documentation on the USB tool.

41
iP1 SmartSystemiP1 SmartSystem
4.5 Preparing the weapon for use
4.5.1 Clean the barrel of the weapon
Before firing, the barrel must be cleaned to remove dirt, oil and residues. The slide of the weapon
can be removed for cleaning (see Chapter 5.2).
Use commercially available cleansing agents for cleaning the barrel.
If necessary, install the slide again and carry out a function test as described in Chapter 4.1.2.
INFO At very low temperatures, condensation can freeze on the weapon and impair the function.
¾Do not expose the weapon to warm and cold air in quick succession to avoid the forma-
tion of condensation.
4.5.2 Filling the magazine
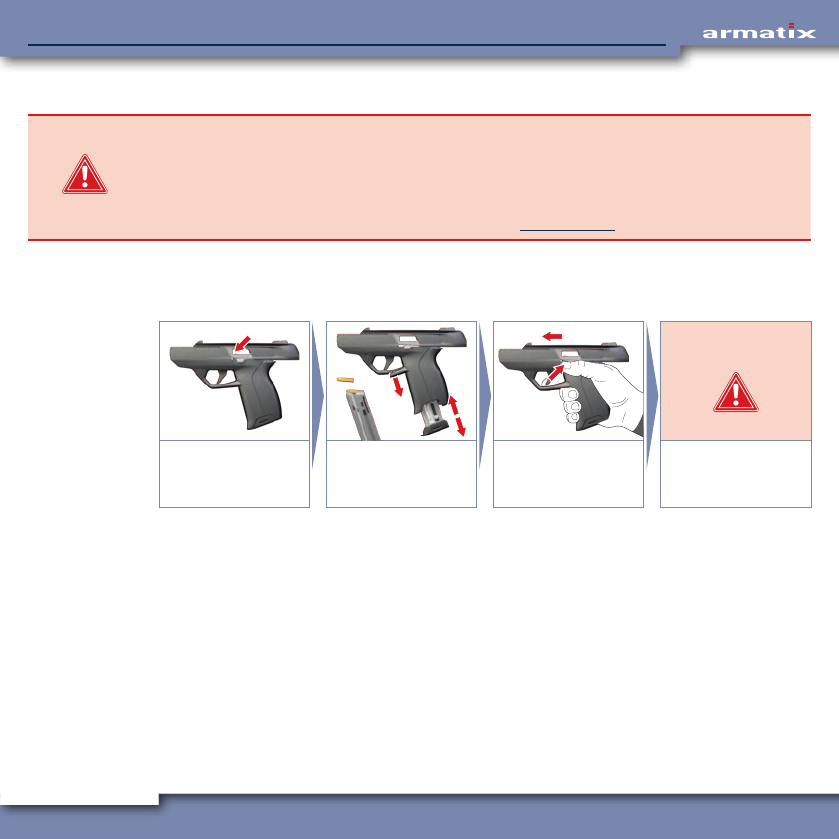
DANGER! Risk of injury!
If incorrectly handled, cartridges can pose serious hazards for the health of the user and for
the proper function of the weapon.
¾Observe the safety precautions for the handling of ammunition. See Chapter 2.2.
The magazine is design to hold max. 10 cartridges of calibre .22lr.
Loading of the magazine can be simplified by also pulling back the slide.
1.
2. CLICK
Release and remove
the magazine.
Grip the magazine,
pull the slide at the
same time when
filling.
Insert the ammunition
as shown, max. 10x
calibre .22lr.
Push in the magazine
completely.
42
iP1 SmartSystemiP1 SmartSystem
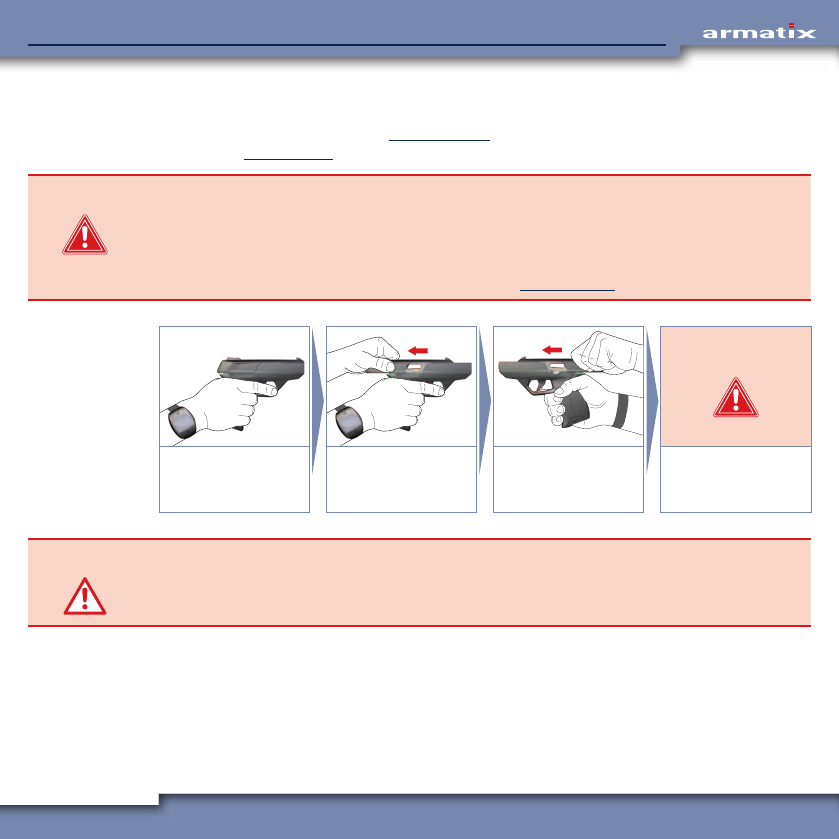
4.5.3 Prepare the weapon for firing (load the weapon)
A precondition for the readiness for firing of the weapon is the correctly entered PIN in the wrist
watch worn on the firing hand (see Chapter 4.4.2.1), and fully charged batteries installed in the
weapon (see Chapter 4.3.1).
DANGER! Mortal danger!
A weapon ready for firing represents a potential hazard to life and limb.
¾Observe the corresponding safety precautions for the handling of the armed weapon.
¾Load the weapon only immediately before firing.
¾Unload the weapon immediately after firing (see Chapter 4.6.6).
DANGER!
Hold the weapon with
your firing hand, finger
not on the trigger.
Grip the slide, pull
back completely, ...
… release the slide,
the slide moves
forwards.
Mortal danger!
Weapon is loaded
and cocked!
CAUTION! Risk of injury!
During firing without cover, the slide is not fixed. This can result in damage to the weapon.
¾Use the weapon only with fitted and locked cover (must engage noticeably when fitted).

43
iP1 SmartSystemiP1 SmartSystem
4.6 Aiming and firing
4.6.1 The stance
CAUTION! Risk of injury!
During firing, the slide moves back very quickly and can cause serious injuries to your hands.
¾Keep your hands out of the way of the slide.
We recommend two-handed firing for maximum accuracy.
Hold the weapon with your firing hand and support it with your other hand.
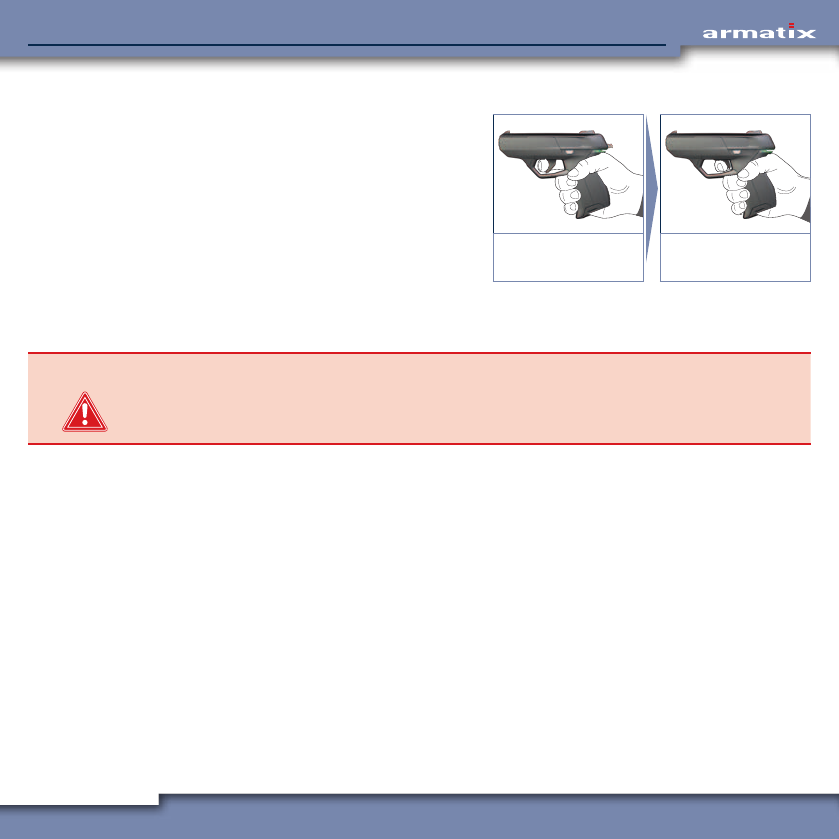
4.6.2 Aiming
The weapon has an ergonomically optimised gun sight based on "rear
sight and front sight". The recess in the rear sight is trapezoidal to simplify
centering of the front sight.
Focus the weapon over rear sight and front sight and aim along the mid-
dle of the upper edge of the front sight.
Hold the weapon
firmly and aim at the
target.
4.6.2.1 Aiming errors
Too far left Too far right Too high Too low
44
iP1 SmartSystemiP1 SmartSystem
4.6.3 Firing
Place your finger on the trigger only when
you have aimed at the target!
Pull the trigger quickly (within 10 seconds) as far
as it will go. The cartridge is ignited, the slide
moves back, ejects the empty cartridge case
and cocks the hammer. The slide moves forward
again, transporting a new cartridge from the
magazine into the chamber. The weapon is im-
mediately ready for firing again.
Place your finger on
the trigger.
Pull the trigger swiftly
as far as it will go.
4.6.4 Uncock the weapon
DANGER! Mortal danger!
A shot may be fired unintentionally during uncocking of the weapon.
¾Always point the weapon towards a free area during uncocking.
Point the weapon towards a free area and hold the hammer with your thumb. Press the trigger and
allow the hammer to move forwards slowly.
Before the next shot, either the hammer has to be cocked again by hand or you have to fire in DA
mode. (When the trigger is pressed, the hammer is first cocked and then immediately uncocked.)
The force needed to press the trigger increases in this case.
45
iP1 SmartSystemiP1 SmartSystem
4.6.5 Reloading the weapon
DANGER! Mortal danger!
The weapon is ready for firing after reloading.
¾Observe the corresponding safety precautions for the handling of the armed weapon.
¾Load the weapon only immediately before firing.
¾Unload the weapon immediately after firing (see Chapter 4.6.6).
When the last cartridge in the magazine is fired, the slide moves back and remains in the rear posi-
tion. The weapon is now free of ammunition.
The magazine can now be removed, reloaded and installed again as illustrated.
1.
2.
4.
3.
2.
1.
DANGER!
After the last shot:
Slide remains back,
chamber is empty.
Remove the magazine,
reload and install.
Press the slide release
lever, the slide moves
forwards.
Mortal danger!
Weapon is loaded
and cocked!
46
iP1 SmartSystemiP1 SmartSystem
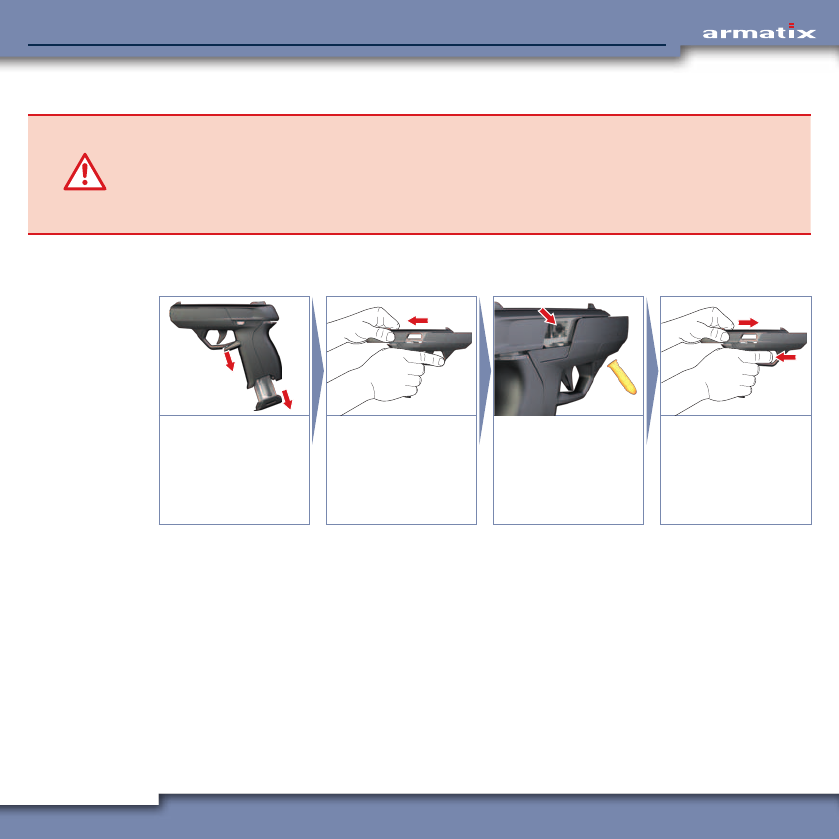
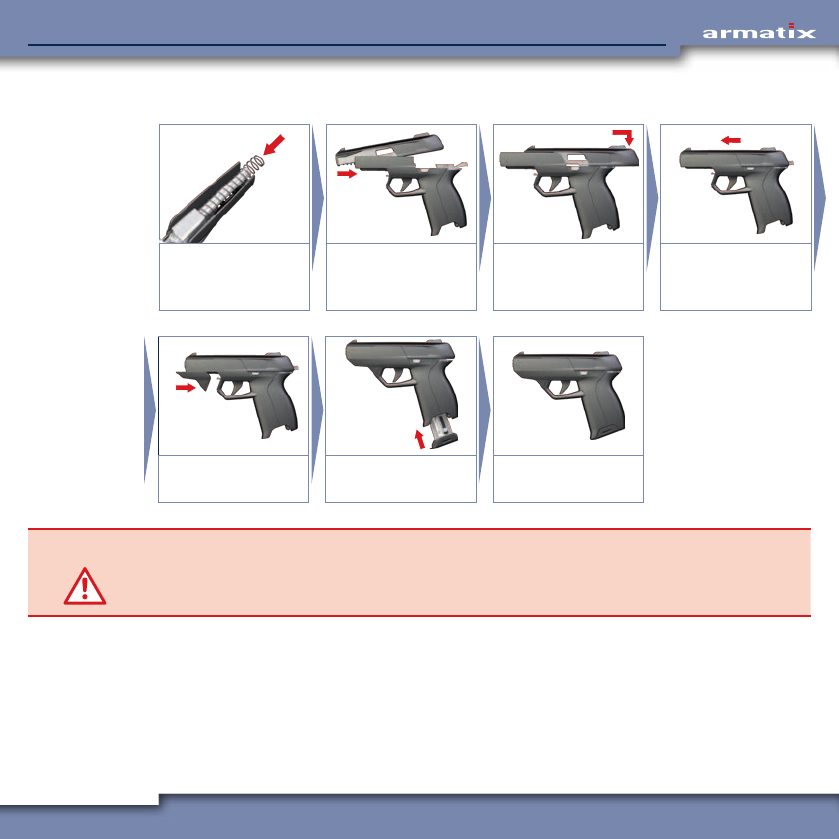
4.6.6 Unloading remaining ammunition from weapon
CAUTION! Risk of damage!
Dropped cartridges may be deformed and could jam in the barrel. Mechanical loading of the
ignition charge can cause the cartridge to fire.
¾Catch the cartridges in your hand during emptying of the magazine, do not allow them to
drop onto the floor.
If there is still ammunition in the weapon after firing, the weapon has to be unloaded as illustrated.
Empty the magazine before inserting again.
1.
2.
1.
2.
Release and remove
the magazine.
Grip the slide, pull
back completely, ...
… eject and collect the
cartridge(s).
Inspect the cartridge
chamber - it must be
empty!
Release the slide,
press the trigger
(uncock the weapon)
and insert an empty
magazine.
47
iP1 SmartSystemiP1 SmartSystem
5 Cleaning
5.1 General notes on cleaning
Regular cleaning and care of the weapon enhances not only the appearance of the weapon, but
also and more importantly the safety of the user.
• The service life is prolonged due to the reduced wear.
• The functional safety is assured.
• Hazards and accidents are avoided.
Therefore clean the weapon after every firing session and at intervals of 500 shots as described in
the following chapters.
5.2 Dismantling the weapon
CAUTION! Risk of damage and injury!
Improper handling during dismantling and assembly of the weapon can result in malfunc-
tions and possibly even unserviceability of the weapon.
¾Strictly observe the instructions given during dismantling and assembly of the weapon.
¾Dismantling of the weapon beyond the extent described here may only be carried out by
authorised personnel.
5.2.1 Safety check
Before dismantling the weapon, carry out a safety check as described in Chapter 4.1.1. During the
safety check, the magazine is released and removed.
48
iP1 SmartSystemiP1 SmartSystem
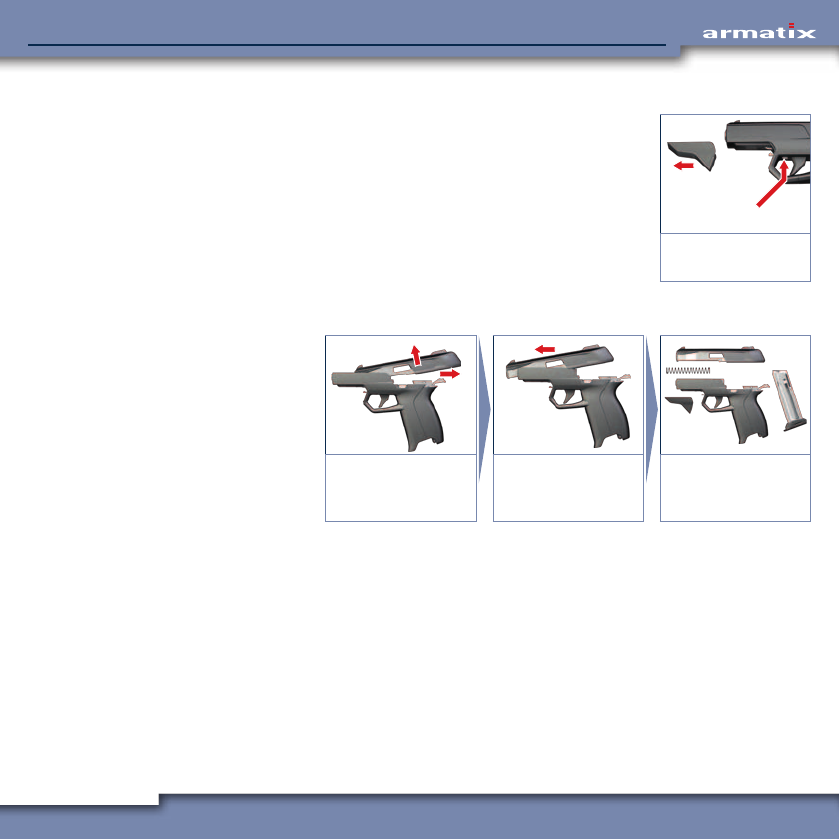
5.2.2 Release the slide (pull off the cover)
In order to be able to remove the slide, the cover must first be released
and pulled off.
To release the cover, press the metal strip under the barrel in front of the
trigger upwards and pull the cover off the weapon from the front.
1.
PRESS
2.
Release and pull off
cover.
5.2.3 Remove slide
After pulling off the
cover, the slide can
now be removed as
illustrated:
2.
1.
Pull the slide com-
pletely to the rear and
lift out.
Remove the slide to
the front over the
barrel.
The weapon is
dismantled.
49
iP1 SmartSystemiP1 SmartSystem
5.3 Cleaning the weapon
CAUTION! Risk of damage!
Use of the wrong cleaning agents and other materials can result in damage to the weapon.
¾Use only weapon oil, commercially available cleaning agents and lint-free cleaning cloths
without additives for cleaning the weapon.
¾Avoid the use of corrosive and aggressive media.
• Inspect the weapon first visually for damage.
• Clean soiled parts and surfaces of the weapon.
• Clean the inside of the barrel using suitable cleaning agents.
• Before storage only:
Oil the outside and inside of the barrel lightly with weapon oil.
• Oil the inside, in particular the running surfaces, of the slide lightly with weapon oil.
• Oil the cleaned parts lightly with weapon oil.
50
iP1 SmartSystemiP1 SmartSystem
5.4 Assembling the weapon
Push the recoil spring
onto the barrel.
Push the slide over the
spring and pull back
over the barrel.
Pull the slide back as
far as it will go and
place onto the guide.
Push the slide forward
in the guide.
CLICK
CLICK
Push on the cover until
it engages.
Push in the magazine
completely.
The weapon is
assembled.
CAUTION! Risk of injury!
During firing without cover, the slide is not fixed. This can result in damage to the weapon.
¾Use the weapon only with fitted and locked cover (must engage noticeably when fitted).
51
iP1 SmartSystemiP1 SmartSystem
6 Malfunctions and Remedies
This chapter describes possible malfunctions that may occur and corresponding remedial measures
that the user can carry out himself.
If the malfunction cannot be remedied with the measures described here, please consult your dealer.
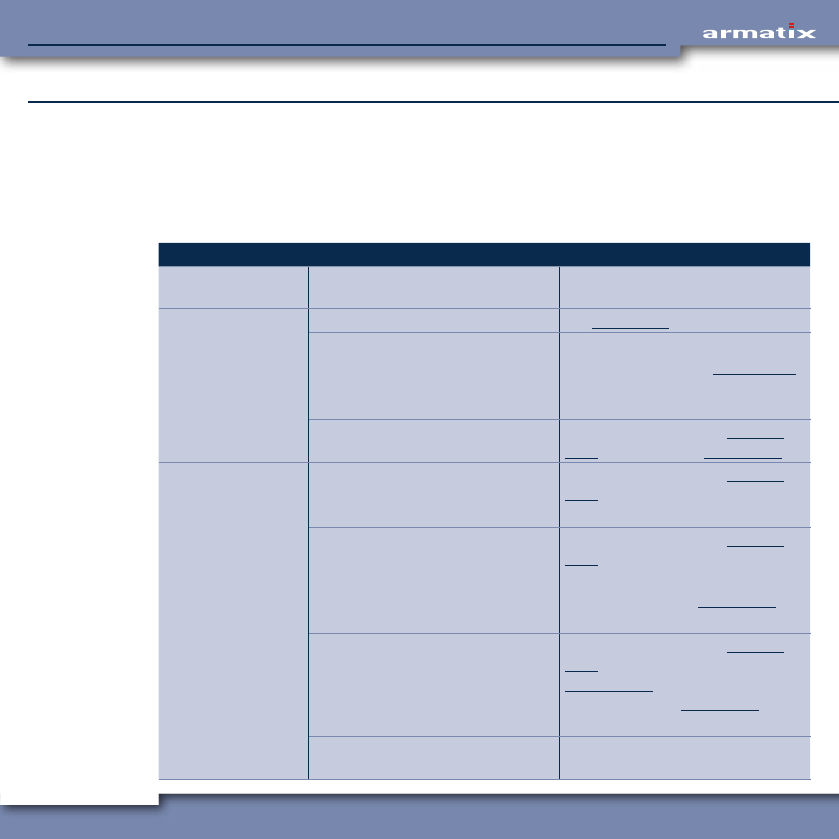
6.1 Mechanical faults
Malfunction Cause Remedial measure
The cartridge jams in
the barrel.
Faulty ammunition. Have the weapon repaired by a
specialist.
Cartridge does not
ignite.
Communication error. See Chapter 6.3.
Faulty ammunition. Wait at least one minute!
Unload the weapon (see Chapter 4.6.6).
Do not use the cartridge with
the failed ignition charge again!
Weapon is heavily soiled. Unload the weapon (see Chapter
4.6.6) and clean (see Chapter 5.3).
Cartridge case is not
ejected.
Faulty ammunition. Unload the weapon (see Chapter
4.6.6).
Use other ammunition.
Cartridge case jams in the chamber.
Reason: Cartridge case deformed or
chamber soiled.
Unload the weapon (see Chapter
4.6.6), push the cartridge case out
through the barrel.
Clean chamber (see Chapter 5.3).
Use other ammunition.
Slide does not return far enough. Unload the weapon (see Chapter
4.6.6), carry out a function test (see
Chapter 4.1.2), if necessary clean
the chamber (see Chapter 5.3).
Use other ammunition.
Ejection mechanism damaged. Have the weapon repaired by a
specialist.

52
iP1 SmartSystemiP1 SmartSystem
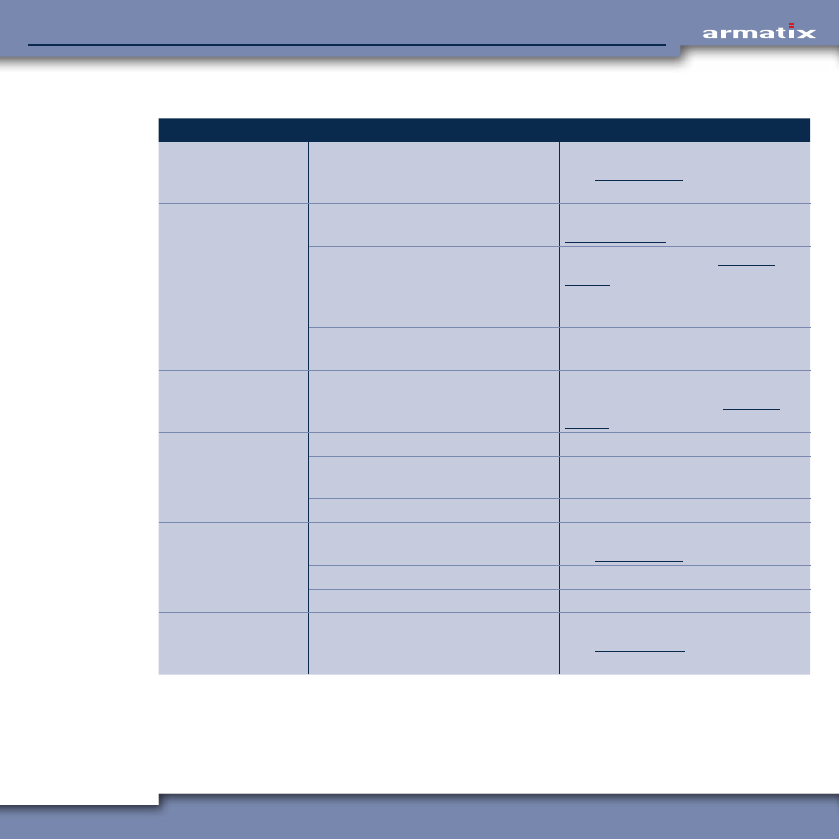
Malfunction Cause Remedial measure
Cartridge is not
transported into the
chamber.
Faulty ammunition. Use other ammunition.
Chamber soiled. Unload the weapon (see Chapter
4.6.6), clean the chamber (see
Chapter 5.3).
Recoil spring defective. Replace recoil spring.
Magazine not inserted correctly. Push in the magazine completely
(must engage noticeably).
Magazine damaged. Replace magazine.
(Last) cartridge is
not delivered from
the magazine.
Magazine spring defective. Have magazine repaired.
Magazine damaged. Replace magazine.
Slide does not re-
main back after the
last shot.
Faulty ammunition. Use other ammunition.
Magazine spring defective. Have magazine repaired.
Slide return too short. Carry out function test (see Chapter
4.1.2) and clean chamber, if neces-
sary (see Chapter 5.3).
Use other ammunition.
Slide release lever defective. Have weapon repaired.
Slide does not close
completely.
Faulty ammunition. Use other ammunition.
Weapon is heavily soiled. Unload the weapon (see Chapter
4.6.6) and clean (see Chapter 5.3).
Recoil spring defective. Replace recoil spring.
Projectile strikes
to the side of the
target.
Faulty ammunition. Use other ammunition.
Gun sight maladjusted. Adjust gun sight correctly (see
Chapter 6.2).
Projectile strikes
above or below the
target.
Faulty ammunition. Use other ammunition.
Gun sight (front sight) damaged. Replace front sight (see Chapter
6.2).

53
iP1 SmartSystemiP1 SmartSystem
6.2 Change shot pattern
The shot pattern of the weapon can be changed both vertically (by using a different front sight size)
and horizontally (by lateral adjustment of the front sight).
The front sight is held in the front sight mounting and can be moved sideways in the mounting to
change the shot pattern horizontally.
After replacing the front sight, the horizontal shot pattern must always be readjusted.
6.2.1 Replacing the front sight (change shot pattern vertically)
• Unload the weapon (see Chapter 4.6.6).
• Remove the slide from the weapon (see Chapter 5.2).
• Remove the front sight mounting with front sight from the seat from the inside using the punch
supplied.
• Push the front sight to the side out of the mounting.
• Push the new front sight into the mounting from the side.
• Press the front sight mounting with front sight into the seat from above until it noticeably
engages.
• Install the slide on the weapon again (see Chapter 5.4).
6.2.2 Adjusting the front sight laterally (change shot pattern horizontally)
• Move the front sight using suitable tools to adjust the shot pattern.
• Check the shot pattern by aiming and firing as described in Chapter 4.6.
54
iP1 SmartSystemiP1 SmartSystem
6.3 Electronic malfunctions
Malfunction Cause Remedial measure
LED display does not
light up (backstrap
switch actuated).
No or empty batteries in the
weapon.
Install full batteries in the weapon
(see Chapter 4.3.1).
LED display lights
up red.
Weapon function of the wrist watch
not activated.
Enter PIN at the wrist watch (see
Chapter 4.4.2.1).
Weapon is not synchronised with
the wrist watch (the weapon symbol
flashes after synchronisation).
Reference weapon (see Chapter
4.4.5.4), possibly test a different
weapon (if you have access to sev-
eral weapons).
Wrist watch is not within range of
the weapon.
Bring wrist watch and weapon into
communication range.
LED display flashes
red.
System times of wrist watch and
weapon not synchronised (symbol
"no Sync" on display).
Synchronise system times of wrist
watch and weapon (see Chapter
4.4.5.1).
LED display lights
up blue.
No magazine inserted. Insert magazine.
Magazine not inserted correctly. Push in the magazine completely
(must engage noticeably).
Magazine damaged. Replace magazine.
LED display lights up
weakly.
Weapon battery is empty. Install full batteries in the weapon
(see Chapter 4.3.1).
Backstrap / optical waveguide soiled. Clean backstrap / optical waveguide.
Optical waveguide defective. Replace optical waveguide.
No message on
display of the wrist
watch.
No battery inserted or battery
empty.
Install full battery in the wrist watch
(see Chapter 4.3.2).
55
iP1 SmartSystemiP1 SmartSystem
7 Storage
7.1 Corrosion protection of the weapon
Corrosion protection of the weapon is only necessary if storage for at least 6 months is planned.
The corrosion protection guards the weapon against external influences and its functional safety is
maintained.
If the weapon is not to be stored for longer than 6 months, cleaning as described in Chapter 5 is
sufficient.
CAUTION! Risk of damage!
Use of the wrong cleaning agents and other materials can result in damage to the weapon.
¾Use only weapon oil, commercially available cleaning agents and lint-free cleaning cloths
without additives for cleaning the weapon.
¾Avoid the use of corrosive and aggressive media.
• Carry out a safety check as described in Chapter 4.1.1.
• Inspect the weapon first visually for damage.
• Dismantle the weapon as described in Chapter 5.2.
• Clean soiled parts and surfaces of the weapon using a cleaning cloth.
• Remove the batteries.
• Oil the cleaned parts lightly with weapon oil.
• Clean the barrel of the weapon.
• Then grease the inside of the barrel.
• Close off both ends of the barrel.
• Oil the outside of the barrel lightly with weapon oil.
• Oil the inside, in particular the running surfaces, of the slide lightly with weapon oil.
• Oil the cleaned parts lightly with weapon oil.
• Clean the magazine and feeder with a cleaning cloth and oil the outside of the magazine lightly.
56
iP1 SmartSystemiP1 SmartSystem
7.2 Packing the weapon
• Unload the weapon as described in Chapter 4.6.6.
• Empty the magazine.
• Pack the weapon in the corresponding transport container.
7.3 Storage of the weapon
INFO The national regulations on the storage of weapons and ammunition must be observed and
obeyed.
• Remove the batteries.
• If the weapon is not to be stored for longer than 6 months, cleaning as described in Chapter 5
must be carried out.
• If the weapon is expected to be stored for longer than 6 months, the weapon must be protected
against corrosion before storage (see Chapter 7.1).
• Pack the weapon (see Chapter 7.2).
• Always store the unloaded weapon and the ammunition separately from one another in closed
rooms where they are protected against the influence of the weather, burglary and fire.
• During storage of more than 1 year: Check the grease packing of the barrel once a year.
57
iP1 SmartSystemiP1 SmartSystem
8 Transport / Shipment
8.1 Preparing the weapon for transport
INFO The national regulations on the transport of weapons and ammunition must be observed
and obeyed.
• Unload the weapon (see Chapter 4.6.6).
• Pack the weapon (see Chapter 7.2).
8.2 Shipping the weapon
INFO The national regulations on the shipment of weapons and ammunition must be observed
and obeyed.
• Unload the weapon (see Chapter 4.6.6).
• Pack the weapon (see Chapter 7.2).
58
iP1 SmartSystemiP1 SmartSystem
9 Disposal
INFO The national regulations on the disposal of weapons, ammunition and batteries must be
observed and obeyed.
The batteries, in particular, contain hazardous substances and must not be disposed of in
the domestic refuse.
The weapon must be disposed of via the weapon dealer or the manufacturer.
For disposal by the manufacturer, please proceed as follows:
• Pack the weapon ready for shipment (see Chapter 8.2).
• Send the weapon with the following information to Armatix GmbH (address, see rear cover of this
operating manual):
– Your name
– Your address
– Your telephone number
– Product designation and weapon number
– Order to the manufacturer to dispose of the weapon.
59
iP1 SmartSystemiP1 SmartSystem
10 Spare Parts and Repairs
DANGER! Risk of injury!
The iP1 SmartSystem from Armatix is a high-tech product and is manufactured with the high-
est precision. Errors during repair can lead to serious injury to persons and serious damage
to the weapon and to dangerous malfunctions.
¾For repairs going beyond the replacement of the parts to be removed for cleaning, the
weapon must be placed in the hands of a dealer or sent to the manufacturer.
The following spare parts can be sourced from the dealer and replaced independently by the user:
• Backstraps in the sizes S, M and L
• Front sights in four different sizes
• Front sight mounting
• Magazine
• Cover
• Batteries
• Wrist watch

Armatix GmbH
Eichenweg 6
07616 Petersberg
Germany
Armatix GmbH
Feringastraße 4
85774 Unterföhring
Germany
Tel.: +49 89 / 4 27 29 79 - 0
Fax: +49 89 / 4 27 29 79 - 79
E-Mail: info@armatix.de
www.armatix.com