Audiovox aar Systems D189070 Rear Seat Entertainment System - BCU User Manual rse
Audiovox Incaar Systems GmbH Rear Seat Entertainment System - BCU rse
Contents
User Manual 1
TSD B08001 1
RSE – Overview
The Rear Seat Entertainment system (RSE) allows passengers in
the rear compartment to access multimedia content and basic
Infotainment functions using the Touch Screen Remote (TSR) or
a suitable device running the Bentley Flying Spur RSE app.
Dependent upon specification, the RSE system may consist of the
following items:
• Display screens >
• Multimedia interface >
• Media loaders >
• Left and right headphone sockets >
• Wireless headphones >
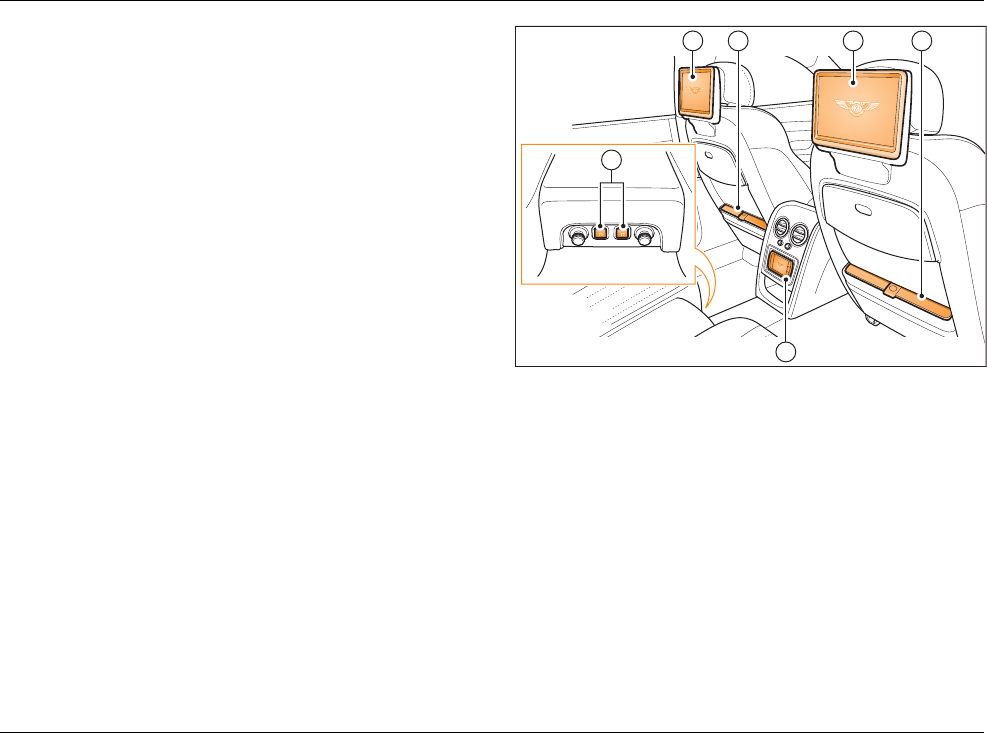
Fig. 1 RSE features (5 seat vehicle shown)
1 Display screen >
2 Media loader >
3 Touch screen remote (TSR) >
4 Headphone connections >
Multimedia interface
Media loaders
Touch screen remote (TSR)
Using the RSE
Settings
Headphones
1 2 1
3
2
4
B0918
2TSD B08001
Multimedia interface
Fig. 2 Multimedia interface
1 RSE SIM card reader
2 Multimedia interface
The multimedia interface (located in the glovebox), contains the
following:
• Jukebox - 64GB memory capacity for storing media files.
• Multimedia interface - Enables connection of a compatible
media device to the Infotainment system.
• RSE SIM card reader - Enables access to the internet when a
suitable SIM card is present.
The SIM card should be inserted into the card slot with the
‘chip’ facing upwards and the ‘cut-off’ corner pointing towards the
right.
Note
• Very high or very low temperatures (a common occurrence in a car's
interior) can cause damage to a portable player and/or impair its
performance. Please do not leave your portable player in the car in
case of extreme temperatures.
• Handle the adapter cable with care. Make sure the cable does not
become pinched or trapped.
Media loaders
Touch screen remote (TSR)
Using the RSE
Settings
Headphones
B0922.LH
1 2

TSD B08001 3
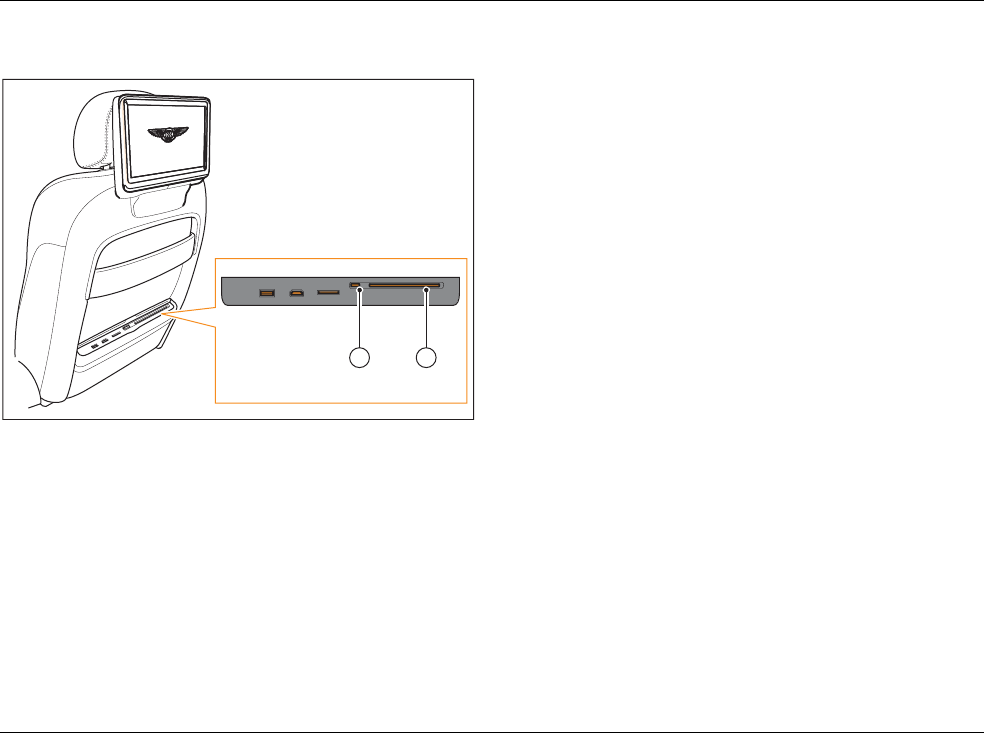
Media loaders
Raise the front of the cover to access the features of the media
loader.
Fig. 3 Seatback features
1Display screen>
2 CD/DVD disc slot >
3 CD/DVD Eject button >
4 SD memory card slot >
5HDMI input>
6 USB connector >
Multimedia interface
Touch screen remote (TSR)
Using the RSE
Settings
Headphones
B0920
1
USB HDMI SD
23456
4TSD B08001
Touch screen remote (TSR)
When controlling the RSE system, the TSR works like a track pad,
where the movement of a finger on the central area of the TSR
touch screen is used to highlight an option on the display screen.
The highlighted option can then be selected by tapping the screen.
It is possible to scroll through lists by ‘swiping’ a finger on the
touch screen in the direction desired. To quickly scroll through a
list, hold a finger on the edge of the touch screen at the end of
the swipe gesture. The scrolling action will stop when the end of
the list is reached or when the finger is removed from the screen.
For general information on using the TSR, refer to the ‘Touch
screen remote’ heading in the Infotainment chapter of the Owner’s
Handbook.
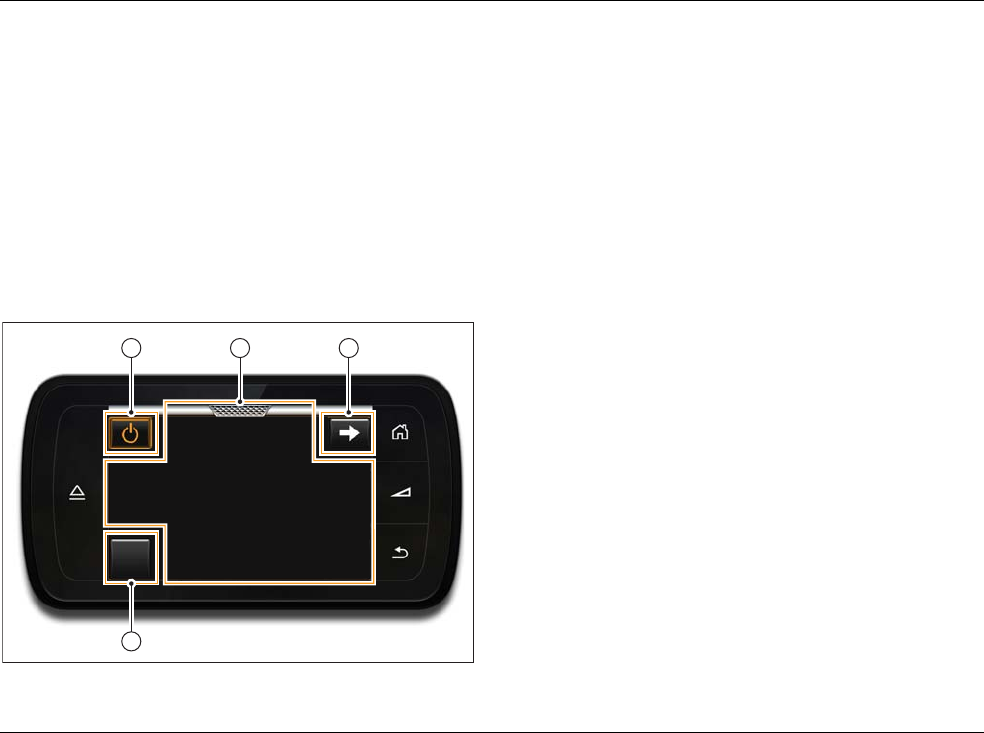
Fig. 4 TSR in gesture mode (left-hand RSE system
selected)
1 On/off function button >
2 Touch screen
3 Select right-hand RSE system function button >
4 RSE main menu function button >
Multimedia interface
Media loaders
Using the RSE
Settings
Headphones
B0935.EN
1 2 3
4
Menu
TSD B08001 5
TSR function buttons
Dependent upon the currently selected menu, the following
function buttons may appear on the TSR or the RSE display screen:
- Press to turn the currently selected RSE system on or off.
- Press to return to the previous menu screen.
- Press to return to the RSE system main menu.
- Displays the currently playing media.
Switching the RSE system on and off
Switching between RSE screens
Adjusting the volume
Switching the RSE system on and off
To switch on the RSE system using the TSR, select the RSE app
from the app selector screen.
The TSR will prompt the user to select from the following options:
- Left-hand RSE system and display monitor on.
- Right-hand RSE system and display monitor on.
- Both RSE systems and display monitors on.
When both sides of the RSE system are switched on together, the
TSR control will default to the left-hand RSE system.
TSR function buttons
Switching between RSE screens
Adjusting the volume
Menu
6TSD B08001
Switching between RSE screens
To switch off the RSE system, proceed as follows:
1. Use the or function button to select the desired side
of the RSE system.
2. Press the function button. A pop-up window displaying the
following options will open (the left-hand RSE system has been
selected for this example):
Switch off left display or Switch on left display -
Switches on or off the left-hand display only. When the display
is switched off, the audio for the currently playing media will
continue to be output through the currently selected source.
Switch off left system - Switches off the left-hand RSE
system.
Cancel - Closes the pop-up window and returns to the
previous TSR screen.
3. Select the desired option.
To switch on the RSE system after it has been switched off via the
TSR, or if only one side had been switched on at initial start-up,
press the function button.
TSR function buttons
Switching the RSE system on and off
Adjusting the volume
Adjusting the volume
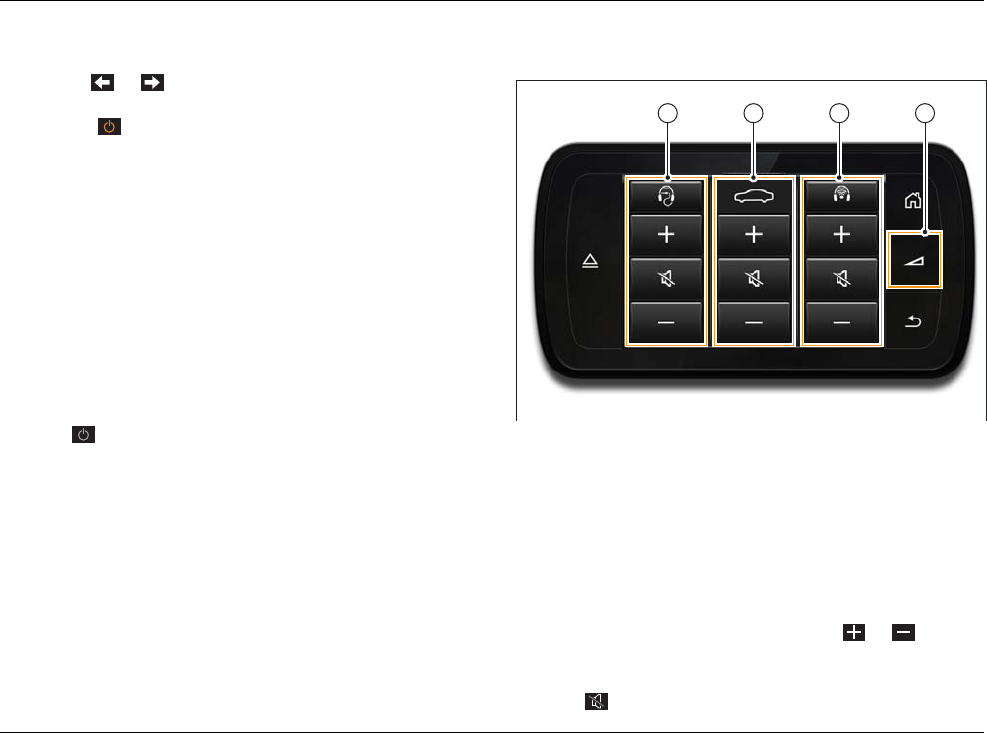
Fig. 5 Volume controls
1 Left-hand RSE volume controls
2 Infotainment system volume controls
3 Right-hand RSE volume controls
4 Volume control button
Pressing the volume control button (4) opens the volume control
pop-up window.
It is possible to control the volume settings for the Infotainment
system or any wired or wireless headphones that may be
connected to the RSE system. Press the or function
buttons for the desired device to increase or decrease the volume
of the desired output.
Press the function button to mute the desired output.
B0934
1 2 3 4

TSD B08001 7
If wired and wireless headphones are connected to the same side
of the RSE system, it is possible to toggle between adjustment for
each pair of headphones by pressing the or function button
at the top of the pop-up window.
Note
The volume control pop-up window will close after approximately
5 seconds of inactivity.
TSR function buttons
Switching the RSE system on and off
Switching between RSE screens
Using the RSE
Fig. 6 Main menu
There are 6 possible media sources that can be accessed using the
RSE system.
The Jukebox is available individually to both sides of the RSE
system. >
The TV source is a shared source, available to each user. >
Each media loader supports the following sources:
• CDs and DVDs >
• USB devices >
•SD cards>
•HDMI>
Multimedia interface
Media loaders
Touch screen remote (TSR)
Settings
B0991.EN

8TSD B08001
Headphones Selecting a media source
All media sources will be shown on the display screen. Any sources
which are currently unavailable will be displayed in grey.
Select the desired source by highlighting and tapping to select. The
media will start playing automatically.
Dependent upon the currently selected source, the following
function buttons may appear on the toolbar at the bottom of the
display screen:
- Displays the currently playing media and, dependent upon
the current media playing, toggles between ‘picture-in-picture’ and
full screen mode.
- Plays the currently selected or paused media.
- Pauses the currently playing media.
- Skips to the previous track or chapter.
- Skips to the next track or chapter.
Selection - Opens the Selection menu.
Extras - Opens the Extras menu.
Dependent upon the currently selected source, the Extras menu
may contain the following options:
Repeat - Repeats the currently selected file. An icon will be
displayed on the upper toolbar.
Repeat Track - Repeats the currently selected track. An icon
will be displayed on the upper toolbar.
Repeat Folder - Repeat the contents of the currently selected
folder. An icon will be displayed on the upper toolbar.
Mix - Plays the content of the selected folder or device in a
random order. An icon will be displayed on the upper toolbar.

TSD B08001 9
Picture format - Enables the aspect ratio of the display screen
to be adjusted.
Brightness - Enables the brightness of the display screen to be
adjusted using a slider.
Copy all device content to Jukebox - Copies all content from
the currently selected device to the Jukebox.
Title menu - Displays the Title menu of a DVD.
Title / Chapter List - Displays the Title/Chapter list of a DVD.
Subtitles - Displays subtitles on a DVD.
Information - Displays information about the selected content,
such as file size, genre, artist, etc.
Playing media
Supported media files
Media restrictions and notes
Playing media
Selecting a media source
Supported media files
Media restrictions and notes

10 TSD B08001
Jukebox
The Jukebox uses the storage provided in the multimedia interface
to create a media library which remains available to the RSE and
Infotainment systems even after the original media has been
removed from the system. Compatible files can be copied from
an SD card or USB memory stick onto the Jukebox.
Supported media files
TV
CDs and DVDs
SD cards
HDMI
USB devices
Viewing the Jukebox content
It is possible to display the library contents in different formats.
To select a different format (dependent upon the current library
selected), proceed as follows:
1. Use the TSR to highlight and select Selection on the toolbar
at the bottom of the display screen.
2. Highlight and select the desired view:
Now Playing - Displays the currently playing media source.
Album List - Displays available audio media in list form, grouped
by album title.
Album Browser - Displays available audio media art, grouped by
album title.
Artists - Displays available audio media, grouped by artist name.
Songs - Displays available audio media, grouped by track name.
Playlists - Displays available playlists.
Video List - Displays available video media in list form.
Video Browser - Displays available video media art, grouped by
video title.
Search - Enables available media to be searched by title.
To copy an individual item to the Jukebox, proceed as follows:
1. Highlight the item to be copied to the Jukebox.
2. Tap and hold the touch screen for approximately 1 second. A
pop-up window will open.
3. Select Copy to Jukebox. The copying process will begin. A
progress bar will be displayed on the upper toolbar.
To copy the complete contents of a connected media device to
the Jukebox, proceed as follows:
1. Select the device from the main menu.

TSD B08001 11
2. Highlight and select the Extras menu.
3. Highlight and select Copy all device content to Jukebox.
The copying process will begin. A progress bar will be displayed
on the upper toolbar.
To delete an individual item from the Jukebox, proceed as follows:
1. Navigate to the item in the Jukebox.
2. Tap and hold the touch screen for approximately 1 second. A
pop-up window will open.
3. Select Delete from Jukebox. The selected item will be
deleted.
Media stored on the Jukebox can also be accessed via the
Infotainment system and output through the Infotainment system
speakers, whilst either of the RSE systems plays media
independently.
To play media stored on the Jukebox via the Infotainment system,
proceed as follows:
1. Press the Media control button on the Infotainment system.
2. Press the MDI function button on the Infotainment system.
3. Press the Play function button. It is now possible to navigate
to the root folder and select Jukebox. Select the desired
content to play.
Note
• If the copying process is cancelled (for example, the RSE system is
switched off) the copying process will stop after the last completely
copied track.
• For details of supported media types, please refer to Supported media
files. >
TV
(when fitted)
The TV source utilises the Infotainment system TV tuner and
cannot be controlled directly from the RSE app.
Control of the TV source can be made using the Infotainment
system controls or the TSR in Front control mode. For further
information, please refer to the Audio chapter of the Owner’s
Handbook.
Note
The TV source is not available in all markets.
Settings - Select Settings from the main menu to alter the
settings of the RSE system. >
Supported media files
Jukebox
CDs and DVDs
SD cards
HDMI
USB devices
12 TSD B08001
CDs and DVDs
To insert a disc into the RSE system, proceed as follows:
1. Hold the disc vertically, with the printed side facing towards
the front of the car.
2. Insert the disc into the disc slot (1) on the desired seatback
until it is drawn in automatically. Do not push any further.
To remove a disc from the RSE system, proceed as follows:
1. Press the eject button (2) on the desired seatback to move
the disc into the eject position. The disc will now be partially
ejected.
2. Once the disc is in the eject position, remove it from the disc
slot. If the disc is not removed after approximately ten seconds,
the disc will be drawn back in and the process will need to be
repeated.
Supported media files
Jukebox
TV
SD cards
HDMI
USB devices
B0920_DVD
USB HDMI SD
12
TSD B08001 13
SD cards
To insert an SD memory card into the RSE system, proceed as
follows:
1. Hold the memory card with the cut-off corner facing
downwards and to the left-hand side.
2. Insert the memory card into the memory card slot (1) on the
desired seatback, until the card clicks into place.
To remove a memory card from the RSE system, proceed as
follows:
1. Press the inserted memory card. The memory card will spring
back and will now be partially ejected.
2. Remove the memory card from the memory card slot.
If the inserted memory card cannot be read by the RSE system,
the SD card function button will remain disabled and the function
cannot be selected.
Supported media files
Jukebox
TV
CDs and DVDs
HDMI
USB devices
B0920_SD
USB HDMI SD
1

14 TSD B08001
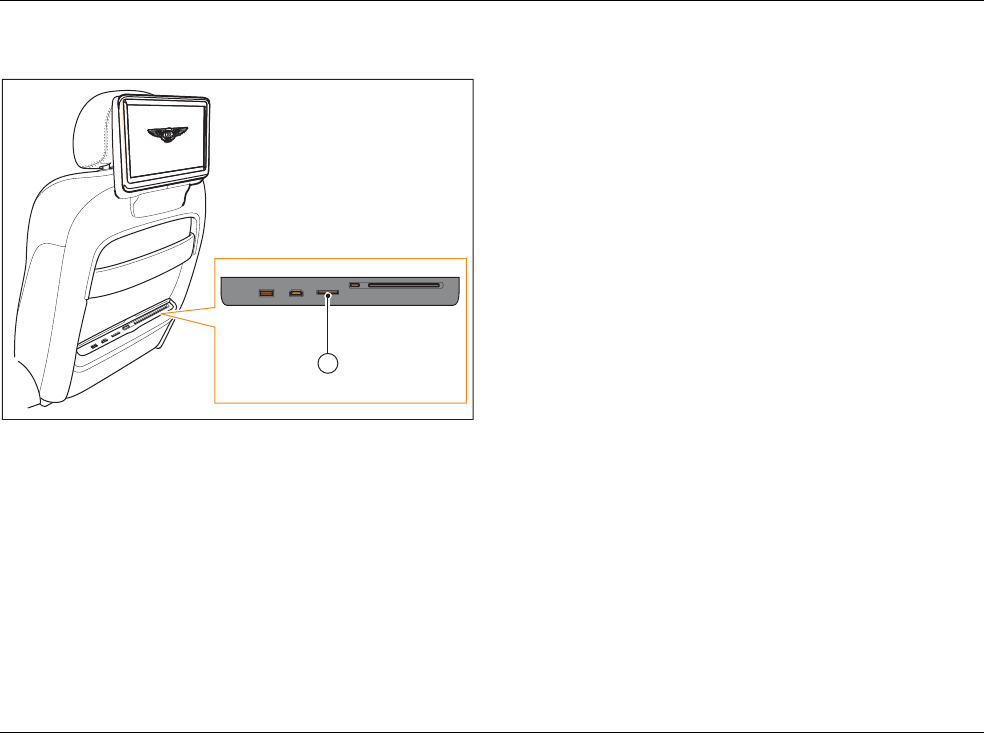
HDMI
The screen will display the HDMI output of your connected device.
HDMI cables should only be inserted in the correct orientation.
The HDMI inputs support the following standards:
• 576p (720x576p @ 50Hz, 16:9)
• 480p (720x480p @ 59.94/60Hz, 16:9)
• DMT0659 (640x480p @ 59.94/60Hz, 4:3)
Supported media files
Jukebox
TV
CDs and DVDs
SD cards
USB devices
B0920_HDMI
USB HDMI SD
1

TSD B08001 15
USB devices
USB devices should be inserted with the icon facing towards
the rear of the car.
USB devices should only be inserted in the correct orientation.
If the connected USB device cannot be read by the RSE system,
the USB function button will remain disabled and the function
cannot be selected.
Supported media files
Jukebox
TV
CDs and DVDs
SD cards
HDMI
B0920_USB
USB HDMI SD
1
16 TSD B08001
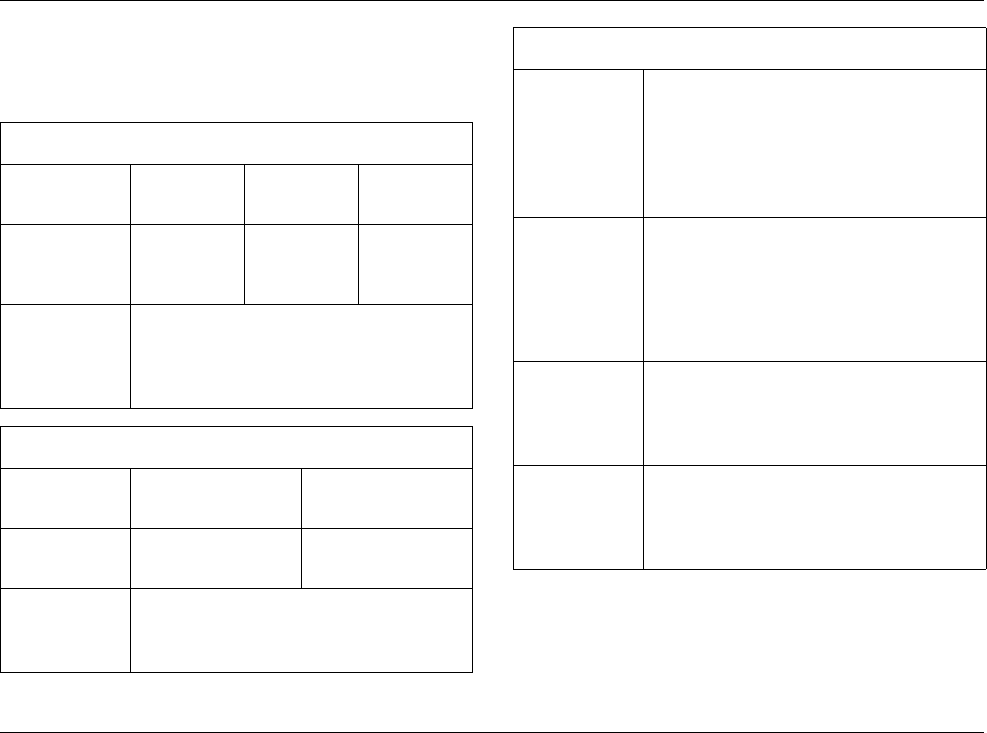
Supported media files
The following file specifications are supported by the RSE system,
the Jukebox, the memory card readers and the connection for the
USB mass storage device:
Selecting a media source
Playing media
Media restrictions and notes
Audio files
File extension .mp3 .wma
.asf
.m4a
.mp4
Format MPEG-1/-2
Layer 3
Windows
Media
Audio 8 and 9
MPEG-4
Specifications
Up to max. 320 kbit/sec and 48 kHz sampling
frequency
Specifications quoted depend on codec used.
Not all codecs support the quoted values.
Video files
File extension .mp4
.m4v
.wmv
.asf
Format H,264 Windows media video
9
Specifications
Up to max. 2000 kbit/sec and 1920x1080px
Specifications quoted depend on codec used.
Not all codecs support the quoted values.
Media limitations
File system
SD/SDHC/Memory cards
Mass storage device: FAT or FAT32 file system,
max 1 partition
DVD drive: joliet (CDs: single session and
multi-session, DVDs: single session only, DVD
films), UDF
No. of files
DVD drive: max. 512 files per folder, max. 255
folders plus root directory Jukebox: max. 3000
files can be copied
USB mass storage device and memory cards:
max. 70,000 files in total and max. 1000 files
per directory
Supported
media
Memory cards: with a capacity of up to 32 GB
DVD drive: audio CDs (up to 80 minutes),
standard DVD-video and DVD-audio
compatible with DVD-video
Metadata
(Audio files
only)
Album, track, artist, year, genre and comments
for MP3/WMA/M4A files
Embedded album covers with up to
800x800px (GIF, JPEG, PNG)

TSD B08001 17
Media restrictions and notes
• Only use 12 cm standard CDs/DVDs and memory card with
the dimensions 32 mm x 24 mm x 2.1 mm or 1.2 mm.
• Variations in the quality of data media produced by different
manufacturers may lead to problems during playback.
• The unit may be unable to read individual tracks or the entire
data medium due to the data medium configuration or the
devices and/or programs used for recording. Information can
be found on the internet regarding the best ways to create
audio files and data media (compression rate, ID3 tag, etc.).
• Due to the larger quantity of data, it takes longer to read a
data medium containing compressed audio files (.mp3, .wma)
than a normal audio CD. Complex folder structures can also
slow down the reading of a data medium.
• Playlists only determine a certain playing order. There are no
files stored on a playlist. The Infotainment system will not play
a playlist if the files are not on the data medium at the locations
referred to by the playlist.
• Only supported media files are displayed and played. All other
files are ignored.
• Audio files cannot be copied onto the memory card from the
Infotainment system or the RSE system.
Selecting a media source
Playing media
Supported media files
Settings
Multimedia interface
Media loaders
Touch screen remote (TSR)
Using the RSE
Headphones
18 TSD B08001
Wireless and networking
The following options are available:
Display
Jukebox status
System information
Menu overview
Wi-Fi
hotspot Press this button to enable the Wi-Fi hotspot. A
tick will be placed in the check-box.
Wi-Fi
hotspot
settings
Network
SSID
Displays the RSE network name. Select
to enter a new name for the RSE
network. The default name is ‘Bentley-
RSE’.
Security Select from the available security
protocols.
Password Select to change the Wi-Fi password.
The default password is ‘bentley!’.
Show
password
Displays the characters of the
password.
Save Saves any changes made to the Wi-Fi
settings.
Cancel Cancels any changes and returns to the
previous menu.
Data
networks
Data
roaming
Press this button to enable data
roaming. A tick will be placed in the
check-box. Activating this feature may
incur additional data charges.
Access
point
names
Lists available access point
names. Highlight and select the
desired APN.
To edit an APN, highlight the desired
APN and hold for approximately
1 second. Use the on-screen keyboard
to enter the APN details.
New APN
Enables data for a new APN to be
entered. APN data can be requested
from your mobile network provider.
Restore
default
APN
settings?
Restores the default settings for the
data network.
Menu overview

TSD B08001 19
Display
Enables the brightness of the display screen to be adjusted using
a slider.
Wireless and networking
Jukebox status
System information
Jukebox status
The Jukebox status displays data showing the amount of available
space on the Jukebox. It is also possible to format the Jukebox
from this menu.
To format the Jukebox, proceed as follows:
1. Select the Format function button.
2. Select Ok on the pop-up window.
The Jukebox will be formatted and all data stored on it will be
erased.
Wireless and networking
Display
System information

20 TSD B08001
System information
Displays system information, such as software level and system
serial numbers.
Wireless and networking
Display
Jukebox status
Headphones
Connections for two pairs of wired headphones are provided, and
dependent upon specification, a pair of wireless headphones are
located in each rear door pocket.
Multimedia interface
Media loaders
Touch screen remote (TSR)
Using the RSE
Settings
Menu overview
Reset your system
to the factory
settings?
Resets the RSE system to the original
settings. The option of formatting the
Jukebox is offered during the reset process.
Legal information Displays legal information relating to the
RSE system.
System version
information
Displays information relating to the RSE
system hardware and software.
TSD B08001 21
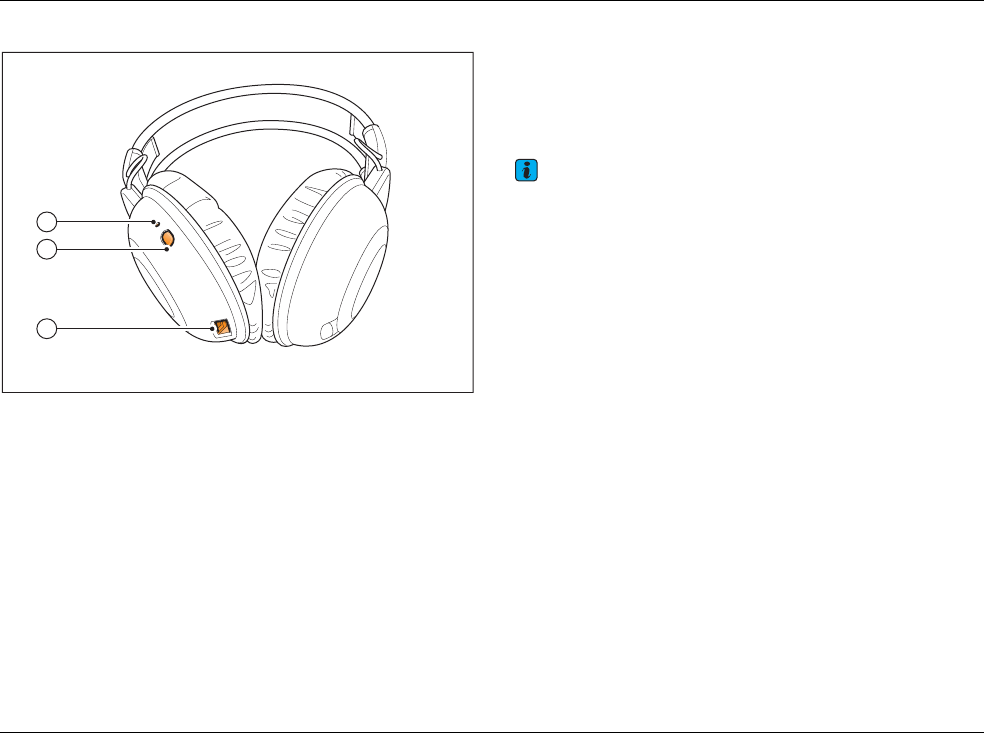
Wireless headphones
Fig. 7 Wireless headphones
1 Status display
2 Power button
3 Charging cable connection
Wired headphones
Switching wireless headphones on and off
To switch on the wireless headphones, briefly press the power
button on the left-hand earpiece. The status display will flash
slowly.
To switch off the wireless headphones, briefly press the power
button until the status display goes out.
Note
When the RSE system has been switched off, the wireless headphones
will switch off automatically after approximately five minutes.
Pairing wireless headphones
Charging wireless headphones
B0919
1
2
3
22 TSD B08001
Pairing wireless headphones
The procedure to pair each set of wireless headphones must be
started separately. The wireless headphones will be paired to the
side of the RSE system from which the pairing procedure is started.
To pair the wireless headphones, proceed as follows:
1. With the wireless headphones turned on, press and hold the
power button on the left-hand earpiece until the status display
starts flashing rapidly.
2. Using the TSR, select Settings from the main Menu screen.
3. Select Headphones, followed by Find headphones. The
RSE system will search and connect to available wireless
headphones.
An on screen message will be displayed at the end of this
process.
Note
The wireless headphones must be paired with the RSE system the first
time that they are used. After this initial pairing, the connection will be
re-established automatically when the wireless headphones and the RSE
system are switched on.
Switching wireless headphones on and off
Charging wireless headphones
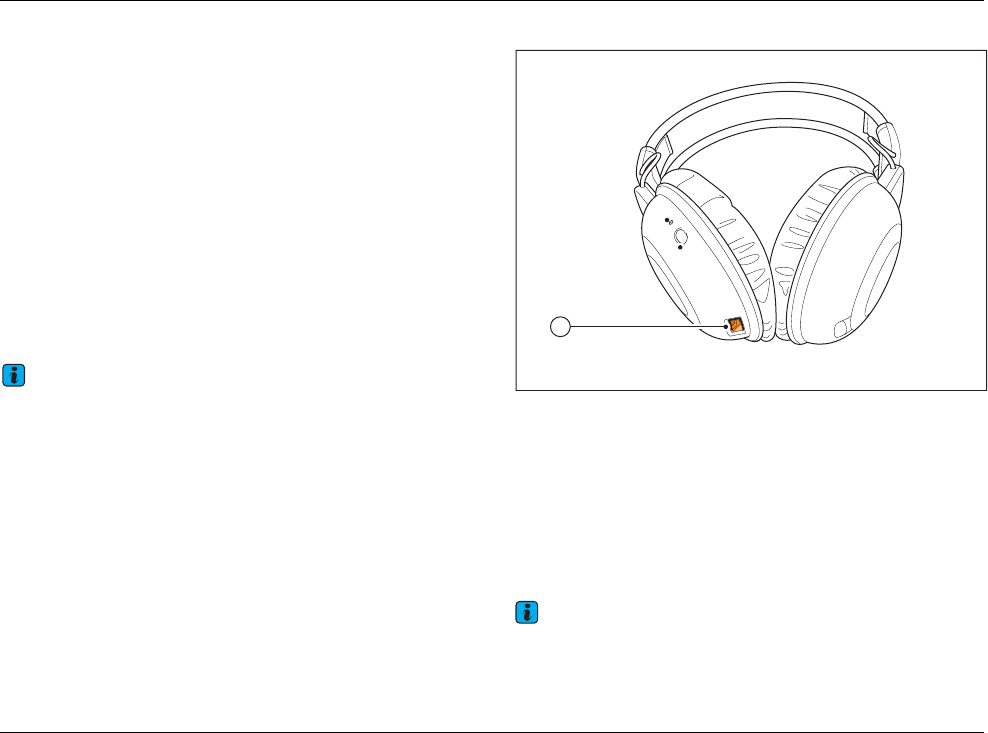
Charging wireless headphones
1 Charging cable connection
When the status display on the wireless headphones repeatedly
flashes twice, followed by a longer pause, the batteries require
charging.
To charge the wireless headphones, proceed as follows:
1. Plug the charging cable into the connection on the bottom of
the left headphone (1).
2. Connect the charging cable to a USB connector on either of
the Media loaders. >
Note
The wireless headphones will only be charged when the ignition and
RSE system are switched on.
B0919-1
1
TSD B08001 23
Switching wireless headphones on and off
Pairing wireless headphones
Wired headphones
On cars fitted with two rear seats, the headphone sockets are located
in the rear console storage compartment. On cars fitted with three
rear seats, the headphone sockets are located on the front face of
the rear centre seat position.
These connections are designed to accept stereo jack plugs with
a 3.5 mm diameter.
To connect the wired headphones, flip down the cover over the
desired connection (left/right) and insert the jack plug.
Note
When headphones are connected to the RSE system, very high/very low
volume levels are automatically reduced/increased to a preset level.
Wireless headphones
Take special care when charging the headphones as they could
become hot.
WARNING

24 TSD B08001