Avante Technology VT-EVC308-FF Vote-Trakkar(TM) Electronic Voting Machine User Manual
Avante International Technology, Inc. Vote-Trakkar(TM) Electronic Voting Machine
User Manual

Full-face Polling Official’s Manual Version 1.1.2 December 28, 2005 0
©2001-2005 Avante International Technology, Inc.
Polling Official’s
Manual
Avante International Technology, Inc.
VOTE-TRAKKER™ Full-Face Voting Unit
Version 1.1.2
December 28, 2005
© 2001-2005 Avante International Technology, Inc.

Full-face Polling Official’s Manual Version 1.1.2 December 28, 2005 1
©2001-2005 Avante International Technology, Inc.
Table of Contents
1 ABOUT THIS MANUAL.................................................................................................................. 3
2 BASIC KNOWLEDGE ABOUT THE VOTING MACHINE ...................................................... 3
3 SET UP THE VOTING UNIT..........................................................................................................4
3.1 GET FAMILIAR WITH THE VOTING UNIT ................................................................................... 4
3.2 TURN ON THE VOTE-TRAKKER™ ........................................................................................ 8
4 OPEN POLL..................................................................................................................................... 14
5 ENCODE SMART CARD .............................................................................................................. 16
5.1 CARD ENCODING UNIT ............................................................................................................... 16
5.2 ENCODE A SMART CARD ........................................................................................................... 19
5.2.1 TWO TYPES OF TEST CARD ............................................................................................................. 19
5.2.2 ISSUE A VOTING SMART CARD........................................................................................................ 20
5.3 EMERGENCY UPDATE ............................................................................................................... 21
6 ASSIST VOTERS DURING VOTING.......................................................................................... 22
6.1 ACTIVATE A BALLOT................................................................................................................. 22
6.2 VOTE VIA THE TOUCHSCREEN.................................................................................................. 23
6.2.1 WRITE-IN A CANDIDATE ................................................................................................................ 25
6.2.2 SKIP CHOICE(S) ............................................................................................................................. 25
6.2.3 CHANGE YOUR CHOICES ................................................................................................................ 26
6.2.4 BIGGER FONT DISPLAY .................................................................................................................. 26
6.2.5 VOTE FOR REFERENDUM/INITIATIVE............................................................................................ 27
6.3 CAST YOUR BALLOT AND REVIEW THE VVPAT ...................................................................... 28
6.3.1 DO NOT PRINT VVPAT .................................................................................................................. 29
6.3.2 PRINT A FINAL VVPAT ONLY ........................................................................................................ 30
6.3.3 ALLOW REJECTING VVPAT........................................................................................................... 31
6.4 VOICE-ASSISTED VOTING .......................................................................................................... 32
6.5 PROVISIONAL VOTING .............................................................................................................. 34
6.6 TURN OFF PRINTER TEMPORARILY........................................................................................... 34
Full-face Polling Official’s Manual Version 1.1.2 December 28, 2005
©2001-2005 Avante International Technology, Inc.
2
6.7 UNLOCK A FLEEING VOTER SCREEN........................................................................................ 35
7 CLOSE POLL .................................................................................................................................. 37
7.1 EXIT THE VOTING SCREEN ........................................................................................................ 37
7.2 CLOSE POLL ON EACH VOTING UNIT ........................................................................................ 38
7.3 CONSOLIDATE POLLING PLACE TOTAL .................................................................................... 40
7.4 SHUT DOWN THE SYSTEM ......................................................................................................... 42
7.5 DELIVER THE TALLY RESULT ................................................................................................... 42
8 OTHER DUTIES ............................................................................................................................. 44
8.1 VOTING DEMONSTRATION (TEST-VOTING MODE) .................................................................. 44
8.2 CHANGE PAPER ROLL ............................................................................................................... 45

Full-face Polling Official’s Manual Version 1.1.2 December 28, 2005
©2001-2005 Avante International Technology, Inc.
i
IMPORTANT SAFETY INSTRUCTIONS
THIS IS THE ELECTRICAL HAZARD SYMBOL. IT INDICATES THAT THERE ARE
DANGEROUS HIGH VOLTAGES PRESENT INSIDE THE VOTE TRAKKER. TO
REDUCE THE RISK OF FIRE OR ELECTRIC SHOCK, DO NOT ATTEMPT TO OPEN
THE ENCLOSURE OR GAIN ACCESS TO AREAS WHERE YOU ARE NOT
INSTRUCTED TO DO SO. REFER SERVICING TO QUALIFIED SERVICE
PERSONNEL ONLY.
THIS IS THE USER CAUTION SYMBOL. IT INDICATES A CONDITION WHERE
DAMAGE TO THE EQUIPMENT OR INJURY TO THE OPERATOR COULD OCCUR
IF OPERATIONAL PROCEDURES ARE NOT FOLLOWED. TO REDUCE THE RISK
OF DAMAGE OR INJURY, FOLLOW ALL STEPS OR PROCEDURES AS
INSTRUCTED.
THIS DEVICE COMPLIES WITH PART 15 OF THE FCC RULES.
OPERATION IS SUBJECT TO THE FOLLOWING TWO CONDITIONS:
(1) THIS DEVICE MAY NOT CAUSE HARMFUL INTERFERENCE,
AND (2) THIS DEVICE MUST ACCEPT ANY INTERFERENCE THAT
MAY CAUSE UNDESIRED OPERATION.
FCC ID:
Q
JZVT-EVC308-FF

Full-face Polling Official’s Manual Version 1.1.2 December 28, 2005
©2001-2005 Avante International Technology, Inc.
ii
IMPORTANT SAFETY INSTRUCTIONS
READ USER’S GUIDE – After installation, read the User’s Guide carefully before
operating. Follow all instructions carefully.
POWER SOURCES – This product should be operated only from the type of source
indicated on the manufacturer’s ID label. Installation should be in compliance with
applicable sections of the National Electric Code. Consult your local building code
before installing.
VENTILATION – Slots and openings in the cabinet are provided for ventilation and
to ensure reliable operation of the product. To protect the unit from overheating, those
openings must not be blocked or covered. This product should not be placed in a
built-in installation, such as a wall cutout unless proper ventilation is provided.
WATER AND MOISTURE – Do not place containers with liquids such as coffee,
water, sodas, etc. on this unit. Do not operate this machine in a wet environment.
CLEANING – If it should become necessary to clean this equipment, disconnect the
unit from its power source first. Do not use liquid cleaners, aerosols, abrasive pads,
scouring powders or solvents, such as benzene or alcohol. Use a soft cloth lightly
moistened with a mild detergent solution. Ensure that the surface is fully dry before
reconnecting power.
HEATING – Do not install this product near heat sources such as radiators, air ducts,
areas subject to direct intense sunlight, or other products that produce heat.

Full-face Polling Official’s Manual Version 1.1.2 December 28, 2005
©2001-2005 Avante International Technology, Inc.
iii
POWER CORD PROTECTION – The power supply cord for this product should be
routed or installed in such a manner to protect it from being walked on or pinched.
The unit should be powered down completely before connecting or disconnecting the
power cable. The power cord should be removed before moving the unit. The power
cord must be placed near an easily accessible unobstructed socket outlet.
SERVICING – Do not attempt to service this unit unless specifically instructed to do
so. Do not attempt to gain access to areas of the unit where dangerous voltages are
present. Refer servicing to qualified service personnel.
DAMAGE REQUIRING SERVICE – Unplug this product from the wall outlet and
refer servicing to qualified service personnel under the following conditions:
• When the power supply cord is damaged.
• If liquid has been spilled into the enclosure of the unit.
• If the product does not function normally by following the instructions in this guide. Adjust
only those controls that are covered by the operating instructions. Improper adjustment of
other controls may result in damage and will often require rework by a qualified technician to
restore the product to its normal operation.
• If the product has been damaged in any way.
• When the unit displays a negative distinct change in performance.
Battery Replacement Warning – CAUTION! Danger of explosion if battery is
incorrectly replaced. Replace only with same or equivalent type recommended
by the manufacturer. Dispose of used batteries according to the manufacturer’s
instructions and regards to local law.
Full-face Polling Official’s Manual Version 1.1.2 December 28, 2005
©2001-2005 Avante International Technology, Inc.
3
ABOUT THIS MANUAL
This manual contains the instruction for polling officials on how to operate the VOTE-
TRAKKER™ full-face touchscreen voting machine at a polling place. You may find detailed
information about the following operations:
• Set up the voting machine and confirm the proper operation
• Open Poll
• Issue Voting Smart Card
• Monitor the voting process
• Close Poll
BASIC KNOWLEDGE ABOUT THE VOTING MACHINE
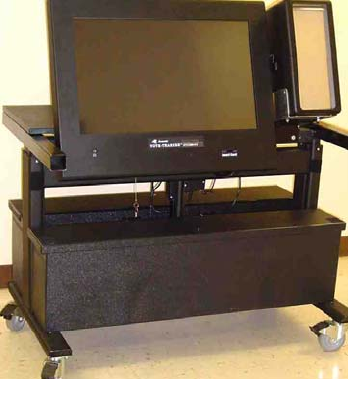
A VOTE-TRAKKER™ full-face touchscreen voting machine contains three major parts -- a 30-
inch LCD monitor with integrated processing unit, a printer unit, and a height-adjustable table
with optional battery backup– that are situated on a height-adjustable cart. The 30-inch LCD
monitor, which has an embedded touchscreen and processing components, displays the ballot to
the voter and reacts to screen-touching as the voter makes a selection. The printer unit prints the
data sent by the main processing unit, such as a Voter Verifiable Paper Audit Trail (VVPAT) and
the “Open Poll” or “Close Poll” tally report.
Each VOTE-TRAKKER™ unit works independently. They are not networked to each other.
Every voting unit contains a smart card reader that controls access to use the voting machine.
Polling officials need to have their own smart cards for authorized use of the machine, while a
voter will be issued a voting smart card to get the proper ballot on the voting unit.
This height-adjustable voting machine is user-friendly for handicapped voters. The touchscreen
reacts to the touch by any object. This helps voters with limited dexterity to use any stylus to
vote. Each main processing unit can provide audio assistance for visually impaired or illiterate
voters to vote independently via a modified QWERTY keyboard (provided by Avante).
Full-face Polling Official’s Manual Version 1.1.2 December 28, 2005
©2001-2005 Avante International Technology, Inc.
4
SET UP THE VOTING UNIT
1.1 GET FAMILIAR WITH THE VOTING UNIT
Figure 3.1A shows the front view of a full-face voting unit.
The voting unit is attached to an electric-powered height-adjustable table with four articulating
wheels (omni-directional). A compartment that contains power-control components and batteries
sits at the rear bottom of the table. The power cord of the entire voting unit is stored inside this
compartment. You need to plug the power cord into the power outlet before operating the voting
machine. Depending on the required duration of power backup, an additional battery
compartment may be mounted at the front bottom of the table.
The front side of the voting machine contains the monitor, and the printer unit that is mounted to
the right of the monitor. A smart card reader slot is located at the lower right corner of the
monitor unit, and a headphone jack is located at the lower left corner of the monitor. The printer
unit is used to print all the reports (including the Voter-Verifiable Paper Audit Trail) that are
required during the voting session. The power and data wiring for the printer has been pre-
installed so that you do not need to plug in anything to the printer.
Figure 3.1A
Full-face Polling Official’s Manual Version 1.1.2 December 28, 2005
©2001-2005 Avante International Technology, Inc.
5
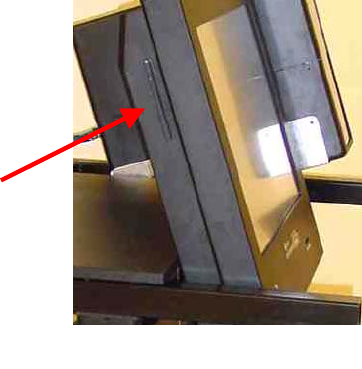
The left side panel of the monitor has the CD drive. A voting machine that has been delivered to
the polling place should already have a CD-R inside the CD writer. The CD will be ejected
automatically after the “Close Poll” procedure is completed. Polling officials are required to
remove the CD-R that records election information. The headphone jack provides a standard 1/8
inch connector for any voter who needs voice-assisted voting.
At the rear side of the voting unit, the table height adjustment switch is located. The table keeps
moving upward as long as you hold down the “↑” arrow and stops automatically when it reaches
the maximum height. Press and hold down the “↓” button to lower the table to its minimum
height or release the button at any desirable height to stop the movement.
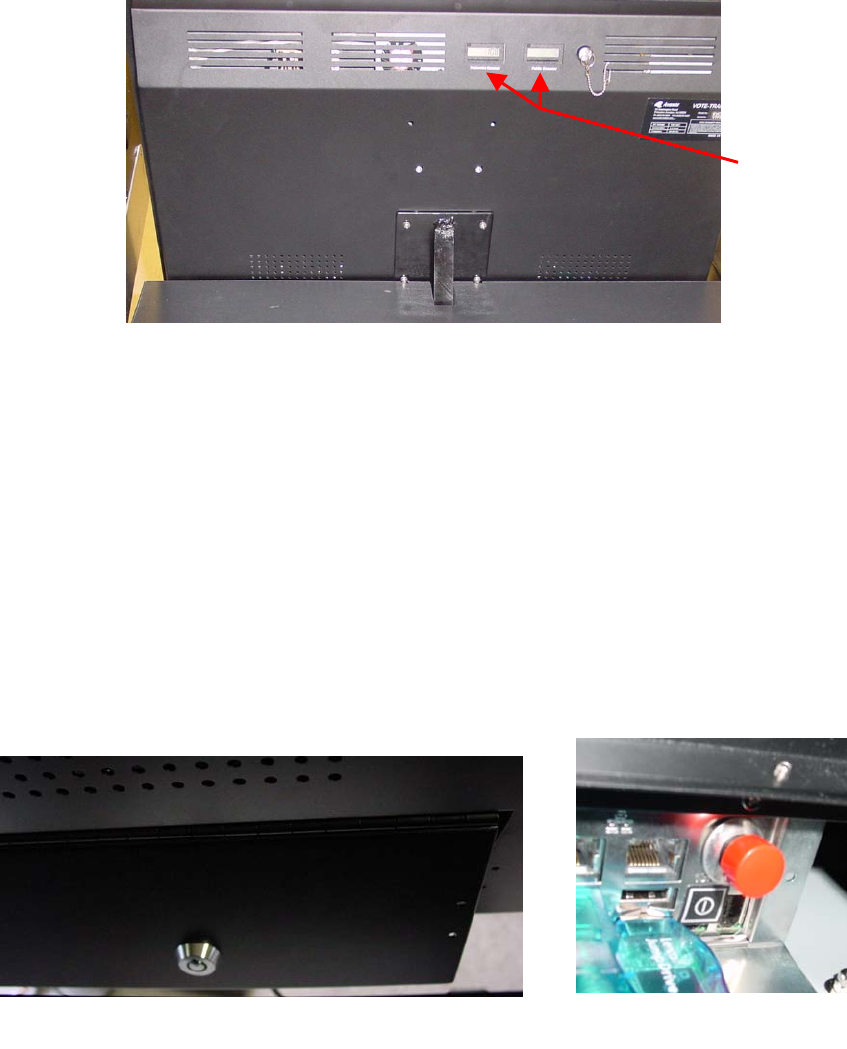
At the top center of the back of the monitor, you may see two counters: a non-resettable
“Protective Counter” and a resettable “Public Counter”. The “Protective Counter” shows how
many ballots have been cast since the machine was built, while the “Public Counter” tells you
how many voters have cast ballot during this election. Insert the counter-reset key into the
keyhole beside the “Public Counter” and turn it clockwise to reset the counter to zero count.
Please keep in mind that the counter can only be reset when the computer is turned on.
(Depending on your state’s election law requirement, these two counters may be
substituted by software counters that are displayed on the monitor. If that is the case, you
will not need to use the physical counter on the voting unit.)
Figure 3.1B
Full-face Polling Official’s Manual Version 1.1.2 December 28, 2005
©2001-2005 Avante International Technology, Inc.
6
Here is a picture of the counters.
At the lower right of the monitor’s rear panel you can find a metal cover with a lock on it.
Behind this cover are some critical components and parts that must be secured during the voting
session. The power switch button is a red button, located at the right corner behind the cover. All
connection ports for the computer are also located behind the cover, including USB ports, serial
ports, and so on. The flash drive and the accessible keyboard are plugged into the computer via
the USB ports. The flash drive, which should have already been plugged into the computer
before the voting unit is delivered to the polling place, is a mandatory storage media that ensures
data-redundancy. It retains a mirror copy of the election data that is identical to what is retained
by the computer’s hard drive.
There is a hole at the bottom of the metal cover. The accessible keyboard cord should be inserted
through that hole and be plugged into a USB port. Do not unplug any other components.
Figure 3.1C
Figure 3.1D
Full-face Polling Official’s Manual Version 1.1.2 December 28, 2005
©2001-2005 Avante International Technology, Inc.
7
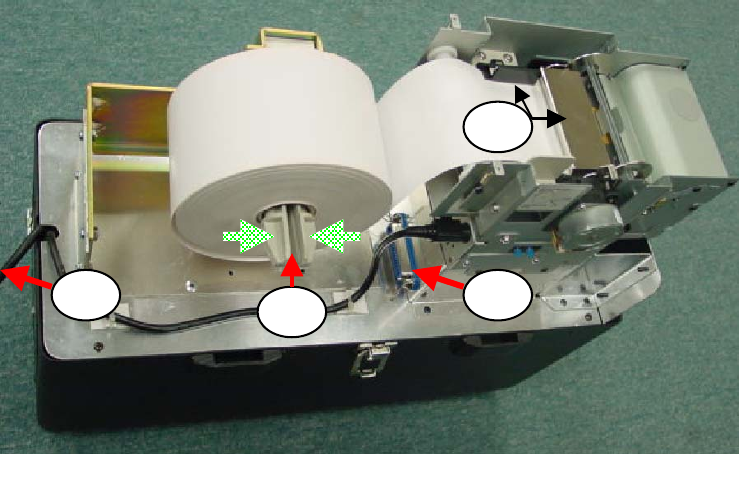
Now let’s look at the printer unit. Open the latch at each side of the printer unit and remove the
top cover. Figure 3.1E shows you the inside of the printer unit.
Item 1: The printer’s data port that the printer cable from the computer should be plugged into.
Item 2: The black wire is the printer’s power cable that plugs into the battery compartment.
Item 3: This is the paper roll holder. The two opposite arrows show you the direction to squeeze
the holder to remove the paper roll when needed.
Item 4: You can see a piece of black plastic guider and a shiny metal cover. In case the paper
runs out during an election, it needs to be changed. To remove the paper, find the lever
that is connected to the metal cover and pull it to open the cover. To load the paper, press
down the metal cover to close it. Load the paper underneath the black plastic and insert
the paper below the metal cover until the printer takes the paper in automatically.
The printer is a thermal printer that does not use ink. Instead, it prints by heating up thermal
paper to make it black. Please note that only one side of the paper is good for printing. Therefore,
when you load the paper, pay attention to the instruction panel on the printer to avoid loading the
paper in the wrong direction.
Figure 3.1E
12 3
4
Full-face Polling Official’s Manual Version 1.1.2 December 28, 2005
©2001-2005 Avante International Technology, Inc.
8
1.2 TURN ON THE VOTE-TRAKKER™
If the voting machines have been kept in a freezing environment, you MUST let the system
warm up to room temperature before turning it on. Open the battery compartment cover at the
rear bottom of the table, take out the power cord and plug it into a power outlet. You can have up
to three Full-Face VOTE-TRAKKER™ machines connected for each 110V circuit. Use the table
height adjustment switch at the rear of the voting unit to raise the table to a desirable height. If
this machine is used for handicapped voters, you need to plug in the accessible keyboard.
If you are sure that the above requirements are met, open the metal cover at the lower right
corner of the rear panel of the monitor, press and release the red On/Off switch button to turn on
the system. Please allow up to 2 minutes for the system to boot up. Wait until you see the
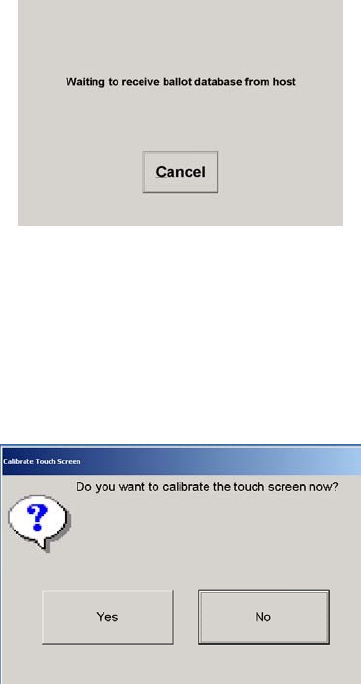
following screen shown in Figure 3.2A.
Since the ballot database should have been loaded and tested on the voting machine, please
ignore this screen and select the “Cancel” button to continue. Figure 3.2B asks you to check
whether the touch-screen is working properly. If it is not, you can access the calibration program
from this screen.
Figure 3.2A
Figure 3.2B
Full-face Polling Official’s Manual Version 1.1.2 December 28, 2005
©2001-2005 Avante International Technology, Inc.
9
The touchscreen calibration should have been tested at your jurisdiction’s warehouse. If you
want to verify the accuracy of calibration, use your finger to touch the screen and see whether the
arrow moves exactly to where you touch the screen. If you see any problem with the calibration,
contact your supervisor immediately. Only a service technician should be allowed to calibrate the
touch screen.
If the touchscreen works properly, press the “No” button to move on. Wait until you see Figure
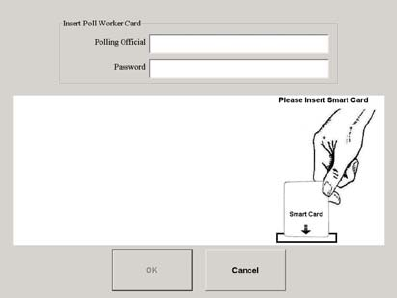
3.2C appear, asking for login information.
Insert your polling official’s login smart card. If more than one official is required to operate the
voting unit, the system will ask for the next login entry after the first login entry is accepted.
Warning: For security protection, three consecutive failed login attempts will lead the system to
shut down.
When the login entries are accepted, the system will perform hardware component tests. Your
jurisdiction may choose to skip certain tests in order to reduce polling officials’ workload. If this
is the case, you can skip the following instructions and continue with the text after Figure 3.2H.
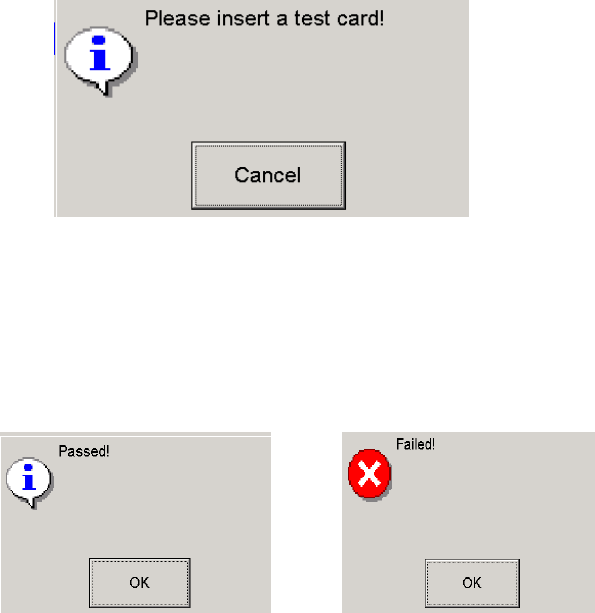
The first hardware component to be tested is the card reader. If polling officials logged in with
smart cards, this test will be skipped because the reader has already been tested functionally.
Figure 3.2C
Full-face Polling Official’s Manual Version 1.1.2 December 28, 2005
©2001-2005 Avante International Technology, Inc.
10
You will see Figure 3.2D for testing the smart card reader. Insert the Smart Card Reader test
card. This card has been specially encoded to test the functionality of the smart card reader.
If you see Figure 3.2E, the test is passed. If you see Figure 3.2F, this indicates that the card
reader works but detected that you inserted a card other than the smart card reader test card.
Unless you are positive that you used the right card, you do not have to test the reader again.
The bad thing is that there is no response after you inserted a reader test card. If this happens,
you need to make sure that the test card is not a blank card (you can try that card on other voting
units or use any VID card to test the reader). If you are sure that the card is not a blank one, there
is some problem with the smart card reader. Notify a supervisor immediately. The reader is a
critical component of the system whose failure will render the system unusable.
Fi
g
ure 3.2D
Figure 3.2F
Figure 3.2E
Full-face Polling Official’s Manual Version 1.1.2 December 28, 2005
©2001-2005 Avante International Technology, Inc.
11
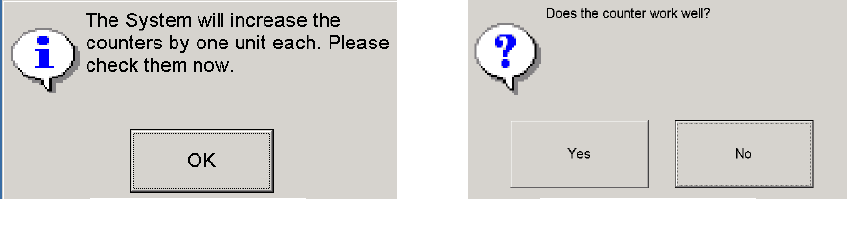
The next component to be tested is the two counters (Public and Protective). The reading of each
counter will be increased by one count during the test.
Record the initial reading of each counter before testing the counters. Press the “OK” button in
Figure 3.2G. Visually check to see if both counters have increased one count. In Figure 3.2H,
choose “Yes” or “No” depending on the test result.
A voting unit with malfunctioning counters should not be used in an election until the counter is
repaired. Therefore, if you choose “NO” in Figure 3.2H, the system will shut down.
If the hardware test passes, the computer will check each storage media to make sure that the
minimum memory capacity requirement is met. An error message will appear on the screen
showing which media did not pass the test and the system will shut down if such a failure is
detected. Since every voting unit should have been tested before being delivered to the polling
place, the error message about the storage media is rarely seen at the polling place. If it does
happen, inform your supervisor immediately. The flagged memory media should be replaced or
checked by a service technician.
If the memory test passes, the computer will send a test report to the printer unit to be printed. If
the printer unit is not functioning properly, you will see a “No Printer!” error message on the
screen and the system will shut down. You need to solve the printer’s problem before running
the voting program. If everything works, you will see a report similar to the one shown in Figure
3.2I.
Figure 3.2G Figure 3.2H

Full-face Polling Official’s Manual Version 1.1.2 December 28, 2005
©2001-2005 Avante International Technology, Inc.
12
Figure 3.2I
Election Type: General Election
Test Time: 2005-5-18 17:01:41
VOTE-TRAKKER™: VTE0200107
Software Version 1.1.0
Hardware Version 1.4.0
-----------------------------------------------------------------------------
Machine ID: 2
Machine Code: 02
Allocated Name: VTE0200107
Machine Status: Begin
Paper Record: On Line
-----------------------------------------------------------------------------
Raw Data File is OK!
18-5-2005 06:45:58
Open Poll by Polling Official 11,22
18-5-2005 06:46:09
First Ballot Cast
18-5-2005 15:24:25
Last Ballot Cast
18-5-2005 16:00:03
Close Poll by Polling Official 11,22
-----------------------------------------------------------------------------
Device Test Status
Battery: PASSED! 100.00%
Counter: PASSED!
Printer: PASSED!
Smart Card: PASSED!
Sound: PASSED!
-----------------------------------------------------------------------------
Store Media Size(Available) Test
A:\Floppy 1344.2K AVAILABLE
C:\Hard Drive 16499342.5K AVAILABLE
D:\CD-ROM 681080 K AVAILABLE
E:\Flash Mem 31202 K AVAILABLE
Beginning Public Counter Number
-------------------------------------------
Ending Public Counter Number
-------------------------------------------
Beginning Protective Counter Number
-------------------------------------------
Ending Protective Counter Number
Polling Officials Signature
X_-------------------------------------------------
_
______________________________________
X -------------------------------------------------
_
________________________________________
Observers:
Description of Test Report:
- Election Type: Based on description assigned
during ballot generation.
- Test Time: Time the report was printed.
- VOTE-TRAKKER™: The network identification
of the computer in the VOTE-TRAKKER™.
- Software Version: The version of the Voting
module.
- Hardware Version: The version number of the
VOTE-TRAKKER™ hardware.
- Machine ID: Assigned during ballot generation. A
unique number.
- Machine Code: Used for the voter record.
- Allocated Name: The name assigned in ballot
generation for this particular VOTE-TRAKKER™.
- Machine Status: Begin (prior to opening poll),
Open or Closed.
- Paper Record: Online or Offline for printing.
- Raw Data File: Checks raw data file(s) for
availability and to make sure they are the same.
- Times are listed for opening, closing, first and last
cast of votes.
- Each major device is checked for operational
status.
- Each storage media is checked for available
memory size. If the storage media is missing, (e.g.
no floppy in drive) the system will not run as all 3
storage media are required for redundancy and tally.
All of the media storage should also be totally
empty.
On the printout shown in Figure 3.2I, spaces are
provided for signatures and countersignatures for all
parties to agree that they observed the testing of the
voting machine.
Full-face Polling Official’s Manual Version 1.1.2 December 28, 2005
©2001-2005 Avante International Technology, Inc.
13
Open the printer’s front plastic cover to remove the report and save it for audit purpose. After
you remove the printout, you should see Figure 3.2J. VOTE-TRAKKER™ is now ready to be
activated for voting.
If the following situations do not apply, you can go directly to Section 4 to start the “Open Poll”
procedure.
• If polling officials are required to test-run the voting machine and preview the actual
ballot, follow the instructions in Section 8.1 to conduct the test voting. After the test is
completed, go to Section 4 for the “Open Poll” procedure.
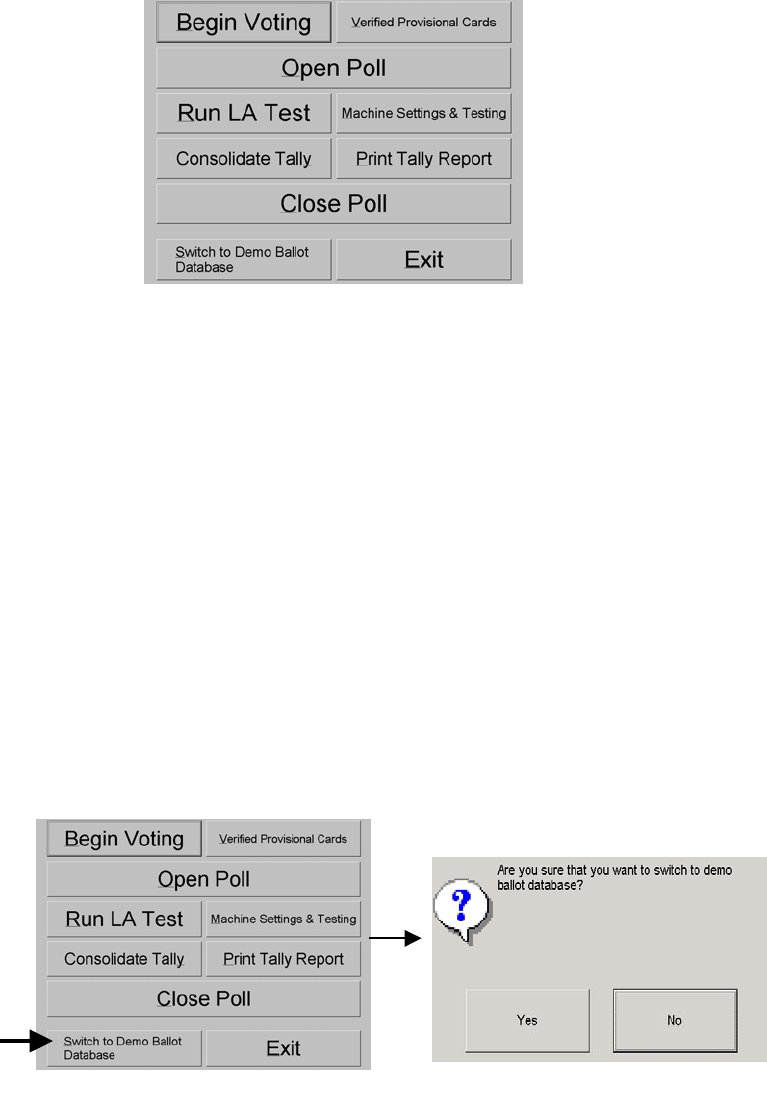
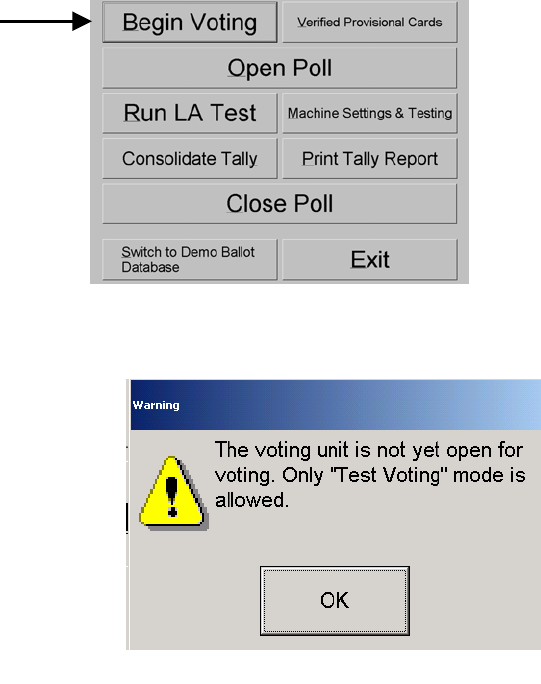
• If this voting machine is designated as a demo unit to train voters, simply press the
“Begin Voting” button to start the test-voting mode. Do not perform the “Open Poll”
procedure (See Section 4) unless you want to turn this demo unit into an actual voting
machine. If your jurisdiction has loaded a simple demo ballot on this demo unit, you can
press the “Switch to Demo Ballot Database”. After you confirm to switch, the computer
will reboot and load the demo ballot as the current database.
Fi
g
ure 3.2K
Figure 3.2J

Full-face Polling Official’s Manual Version 1.1.2 December 28, 2005
©2001-2005 Avante International Technology, Inc.
14
OPEN POLL
Before a voting machine is ready for public voting, you must complete the “Open Poll”
procedure. The “Open Poll” procedure is required only once during the entire election process.
Press the “Open Poll” button.
Figure 4B will appear requesting you to reset the public counter back to zero. The counter reset
key is on the back of the machine. Turn it clockwise and return the key to its original position.
Check the zero reading of the public counter and press “Yes” to confirm.
The printer will print a zero-count verification report. Do not pull the paper when it comes out
from the printer. Remove each page when it is fully presented. Normally you will have one set of
zero reports for “Regular Voting”. If you find out that there are addition reports for “Provisional”
and “After-hour Provisional”, that’s fine. When the printer finishes printing the zero report, you
will see a “Done!” confirmation screen shown in Figure 4C.
Figure 4B
Figure 4A

Full-face Polling Official’s Manual Version 1.1.2 December 28, 2005
©2001-2005 Avante International Technology, Inc.
15
If more than one page is printed, staple the reports together for this voting machine. Follow your
procedure requirement to sign and maintain this zero report. Press the “OK” button in Figure 4C.
This will bring you back to Figure 4A. Press the “Begin Voting” button. The voting unit is now
ready for real voting. From this point until the poll is closed, the two counters will increase their
readings only by a ballot cast. After every voting unit finishes printing the zero report, you need
to complete the following final checklist to finish the “Open Poll” process.
1. You should check that a keyboard is properly connected to each voting unit that may be
used by handicapped voters. Close the metal cover above the power on/off switch and
lock it. If you are required to seal the cover, record the seal number on your polling place
administrative document. Insert a headphone into the headphone jack for each voting unit
that has been connected with a keyboard.
2. Close the top cover of the printer unit and lock the latch at each side. Use a numbered
security seal to lock the printer unit’s rear door to prevent access to the VVPAT. The
number on the seal should also be documented.
3. The zero-count verification report for each machine is fully collected and properly
stapled. The current reading of the public counter for each voting unit stays at zero and
the current reading for the protective counter is documented accordingly.
If you can answer “Yes” to the above checklist, your machines are ready for public voting. Once
you have the voting smart cards ready for voters, they can vote on these machines.
Fi
g
ure 4C
Full-face Polling Official’s Manual Version 1.1.2 December 28, 2005
©2001-2005 Avante International Technology, Inc.
16
ENCODE SMART CARD
Every voter needs a smart card to obtain the correct ballot on the voting machine. Unless your
jurisdiction has decided to encode all smart cards in advance at a central location (this may be a
good option for a less-populated jurisdiction), polling officials will be responsible for encoding
the smart card for each eligible voter.
1.3 CARD ENCODING UNIT
A normal card-encoding unit consists of a notebook computer and a smart card encoder.
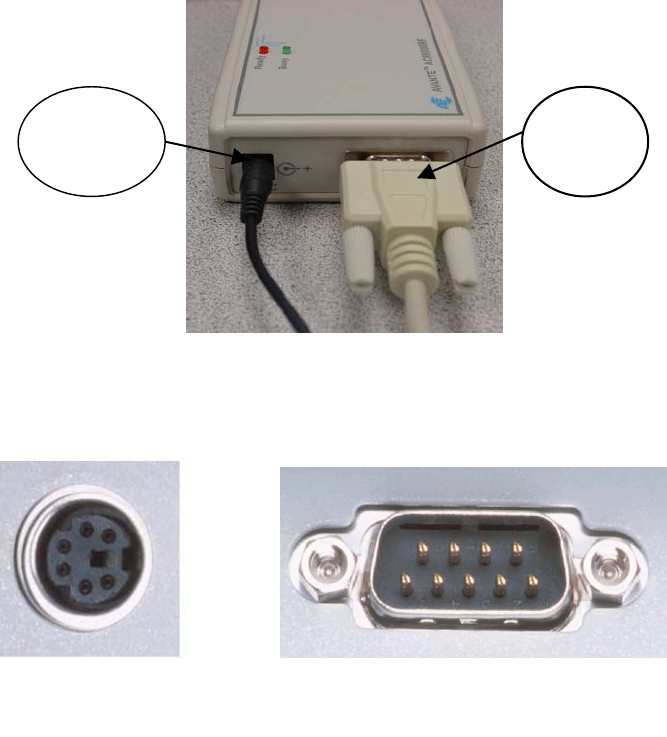
The smart card encoder has a power cord and a data cord. Figure 5.1A shows the data and power
cord that connect to the card encoder.
Depending on the model of computer that will be used for issuing smart card, the other end of
the power cord and data cord may look different.
Figure 5.1A
Power
Cord
Data
Cord
PS/2 Port Serial Port
Figure 5.1B
Full-face Polling Official’s Manual Version 1.1.2 December 28, 2005
©2001-2005 Avante International Technology, Inc.
17
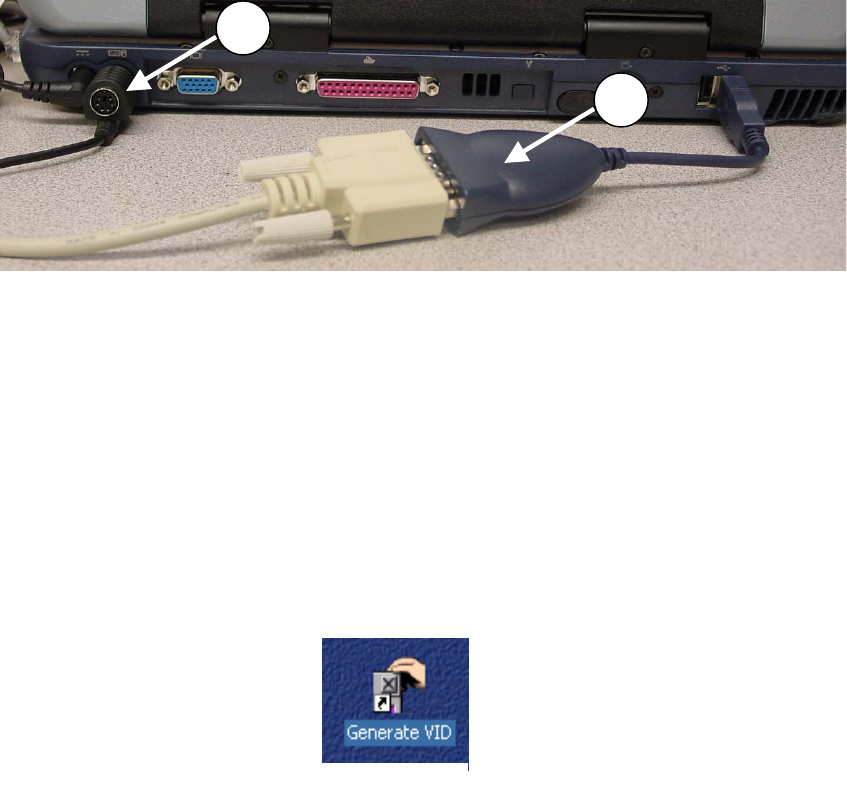
If your computer has a PS/2 port (a port available on most PC that can be used to plug in a
mouse or keyboard. It has a socket for a 6-pin mini-DIN plug), you can plug in the other end of
the power cord to the PS/2 port to supply power for the encoder. If you cannot find a PS/2 port
on the computer, the other end of the power cord should have a power adapter that you need to
plug into a wall outlet to get power supply.
If you can locate a serial port on your computer, this is where you should plug in the other end of
the data cord. Otherwise, a Serial-to-USB converter should come with the data cord to connect
with the computer. Figure 5.1C shows the rear view of a computer that has the power cord
plugged into the PS/2 port and the data cord connected with a Serial-to-USB converter.
After you have connected the encoder, turn on your computer. When power is supplied to the
encoder, you should hear a beep and the red LED on the top panel of the encoder is on (see
Figure 5.1A).
Your computer may have been programmed to run the “Generate VID” module automatically
when it is turned on (you will see Figure 5.1E displayed on the computer screen). Otherwise,
find the “Generate VID” shortcut icon on the Windows desktop screen and double-click it to run
the program.
1
2
Figure 5.1C
Figure 5.1D
PS/2
Mouse
Port
Serial-to-USB
Ada
p
ter
Full-face Polling Official’s Manual Version 1.1.2 December 28, 2005
©2001-2005 Avante International Technology, Inc.
18
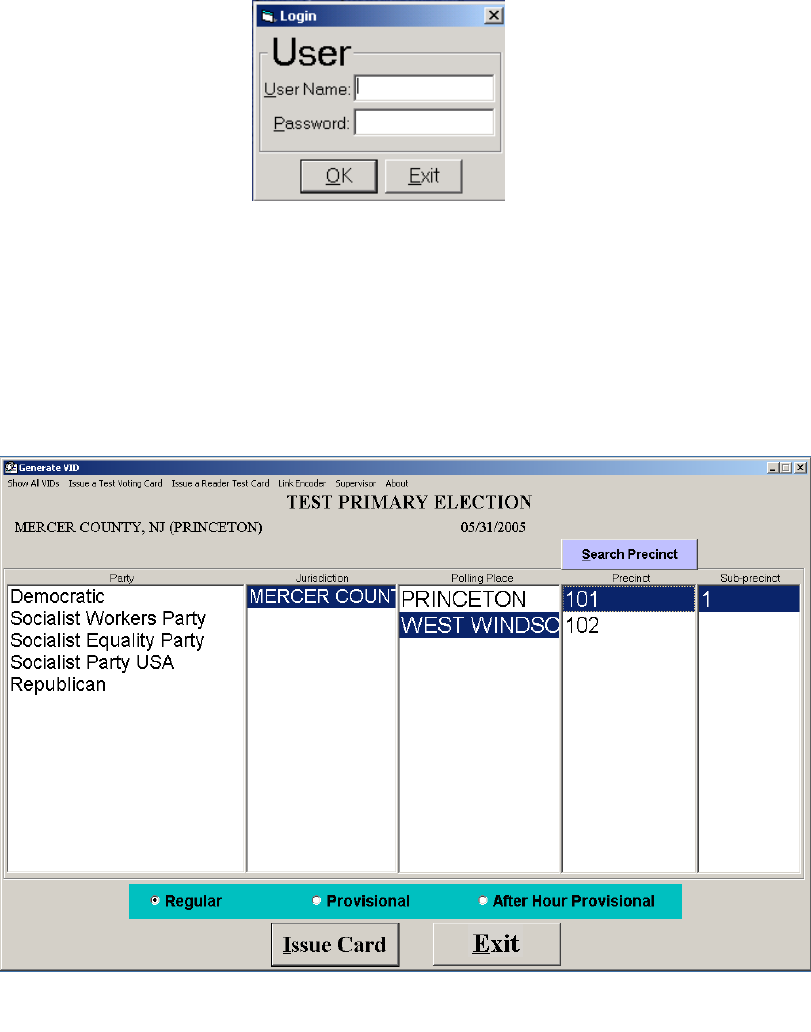
Enter a valid set of polling-official-level username and password in Figure 5.1E. Click OK to
proceed or Exit to cancel the operation.
After the correct login username and password are entered, you will see Figure 5.1F. The “Issue
Card” button will be grayed out if the computer cannot detect a functioning smart card encoder.
If so, you cannot encode any smart cards until you fix the connection error and reload the
“Generate VID” program.
Figure 5.1E
Figure 5.1F

Full-face Polling Official’s Manual Version 1.1.2 December 28, 2005
©2001-2005 Avante International Technology, Inc.
19
1.4 ENCODE A SMART CARD
To issue any smart card, a card encoder must be connected to the computer before the “Generate
VID” program runs. If the “Issue Card” button in Figure 5.2A is grayed out, the card encoder is
not properly connected with the computer. You may use the “Link Encoder” button in the top
menu bar to reset the encoder connection after you connect a smart card encoder to the computer.
Figure 5.2A shows a sample interface screen.
1.4.1 TWO TYPES OF TEST CARD
Item No. ①: A “Reader Test Card” is used to test whether the smart card reader on a voting
machine is working properly. This card may be rarely used if polling officials are required to use
smart card to login and operate the voting unit because this has proven that the reader is
functional. The reader test card may be valuable only when polling officials are required to
manually enter the login username and password via the touchscreen. To issue a reader test card,
simply put one smart card on the encoder (see Figure 5.2.1A) and click the “Issue a Reader Test
Card” button in the top menu bar.
Figure 5.2A
1 2
3
4
Full-face Polling Official’s Manual Version 1.1.2 December 28, 2005
©2001-2005 Avante International Technology, Inc.
20
Item No. ②: A “Test Voting Card” is used to cast a selected type of ballot when the voting
machine is not opened for actual voting. This card is frequently used during pre-election logic
and accuracy testing or educating the voters about how to use the voting machine. To issue a test
voting card, choose from Item No. ③ for the desired ballot that you want to vote (political party
selection is required for Primary Election only), place a smart card on the card encoder, and click
the “ Issue a Test Voting Card” menu. Once encoded, this card is reusable until the voting
machine is loaded with a new ballot database in which the layout of Item No. ③ has changed.
Item ① and ② are for polling officials to conduct functioning test only. They will not be used
for real voting by any voter. Figure 5.2.1A shows that a smart card is placed on top of the
encoder to get encoded.
1.4.2 ISSUE A VOTING SMART CARD
After a voter checks in at the poll book desk, you will know the proper ballot for that voter. In
Item ③, select the correct location (from Jurisdiction down to Sub-precinct) and choose a
political party (primary election only) that is applicable to the voter. The “Search Precinct”
button on top of the “Precinct” column allows you to find a certain precinct from a large number
of available precincts.
In Item No.④, select the proper type of smart card to be issued. Below is the definition for the
three types of voting card:
Figure 5.2.1A
Full-face Polling Official’s Manual Version 1.1.2 December 28, 2005
©2001-2005 Avante International Technology, Inc.
21
Regular: for properly registered voters. This is the most commonly used option.
Provisional: for a voter whose registration cannot be verified at the polling place;
After Hour Provisional: for properly registered voters who have to cast their ballots after the
official time of poll-closing, because a court judge or other officials have demanded that the poll
hour be extended due to an occurrence of unexpected disaster.
After you have chosen the correct settings in Item No. ③ and ④ for the voter, place a smart card
on the encoder, and click the “Issue Card” button. You will see a “Done” screen when the card is
successfully encoded. You can give the encoded smart card to the voter.
Since provisional and after hour provisional ballots cast will be decided later whether being
counted or not, the VID number will be used as a tracking number that may be used when
counting the ballot. When a provisional card is issued, the VID number will be shown on the
screen. You need to record the number onto the voter’s provisional ballot envelope. You may
also need to tell the provisional voter to seal the smart card into the envelope after he/she casts
the ballot in order to get counted during the canvassing process (check with your election
administrator whether this step is required).
1.5 EMERGENCY UPDATE
If the smart card issuing computer breaks down during an election day, you can use another
computer loaded with the database for the current election to continue issuing cards. To prevent
the new computer from issuing those voting authorization codes that have been used by the
previous computer, you need to update the database to exclude those used numbers. To update,
choose the “Supervisor” button in the top menu bar in Figure 5.2A and login as a supervisor. Ask
your election administrator for the supervisor login code. After successful login, choose the
“Update” sub-menu. Find out how many cards have been issued (from your poll book checklist)
and enter the number accordingly in the update screen. Confirm to update the database after you
entered the correct number.

Full-face Polling Official’s Manual Version 1.1.2 December 28, 2005
©2001-2005 Avante International Technology, Inc.
22
ASSIST VOTERS DURING VOTING
As a polling official, you may need to assist voters who have various questions about how to use
the voting machine. Therefore, you need to get familiar with how to vote on the voting unit.
1.6 ACTIVATE A BALLOT
Each voter needs a smart card to vote. When you get your smart card, go to any voting unit that
has completed the “Open Poll” procedure.
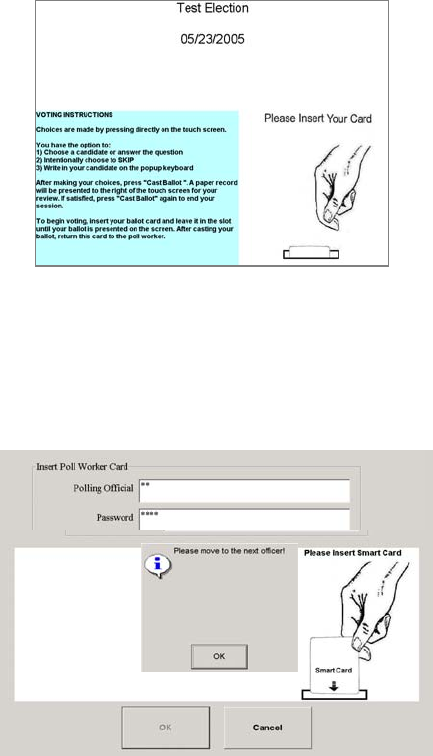
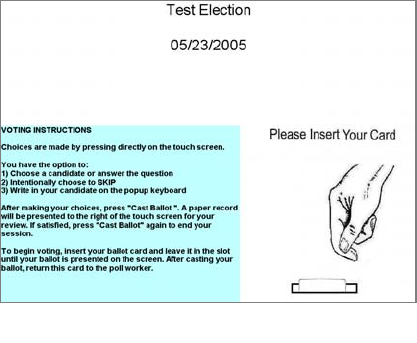
Figure 6.1A shows the first screen that a voter will see. This screen provides voting instructions
and asks the voter to insert his/her voting smart card into the card slot on the voting unit.
Insert the smart card and leave the card in the card slot and wait to see your ballot on the screen.
If the election provides multiple language ballots, you need to choose your voting language from
the next screen, as shown in Figure 6.1B.
Fi
g
ure 6.1A
Figure 6.1B
Full-face Polling Official’s Manual Version 1.1.2 December 28, 2005
©2001-2005 Avante International Technology, Inc.
23
Press on your desired language and wait for the ballot to be presented on the screen. Your voting
card has been erased and become a blank card. Remove the card after you cast your ballot.
1.7 VOTE VIA THE TOUCHSCREEN
For voters who have no problem seeing the ballot screen and using their hands or any stylus to
press the touchscreen, voting via the touchscreen is quite easy and fast. Simply press your choice
on the screen and follow the onscreen instruction, and you will be done with your voting in a
breeze.
After the voter’s smart card is accepted and language is chosen, the voter will see the ballot
displayed on the touchscreen. In some states that adopt Open (or Modified) Primary election, the
voter will be allowed to choose a party’s ballot from a list of political parties available.
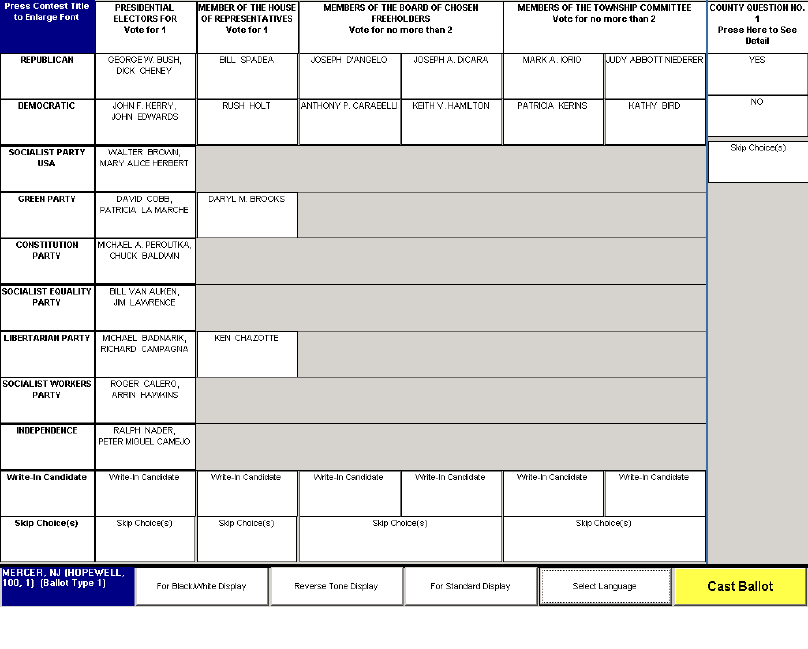
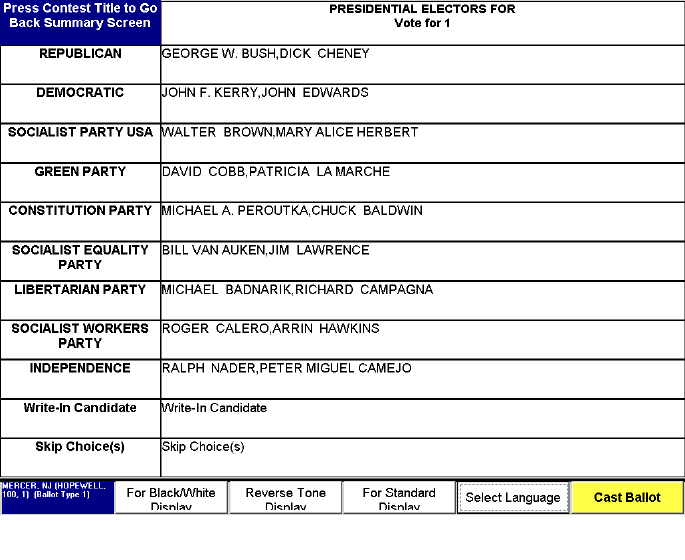
Figure 6.2A is a sample screen of the full-face ballot.
Figure 6.2A

Full-face Polling Official’s Manual Version 1.1.2 December 28, 2005
©2001-2005 Avante International Technology, Inc.
24
Press anywhere inside a box to select that choice. The selection will be highlighted to
differentiate it from others. See Figure 6.2B.
To help those voters who are color-blindness or have similar vision difficulties, the system
provides two color/contrast options, in addition to the “Standard Display” as shown in Figure
6.2B. Press the “For Black/White Display”, “Reverse Tone Display” or “For Standard Display”
bar at the bottom of the screen to choose the display option that is most comfortable.
Figure 6.2B
Black/White Display Reverse Tone Display
Figure 6.2C
Full-face Polling Official’s Manual Version 1.1.2 December 28, 2005
©2001-2005 Avante International Technology, Inc.
25
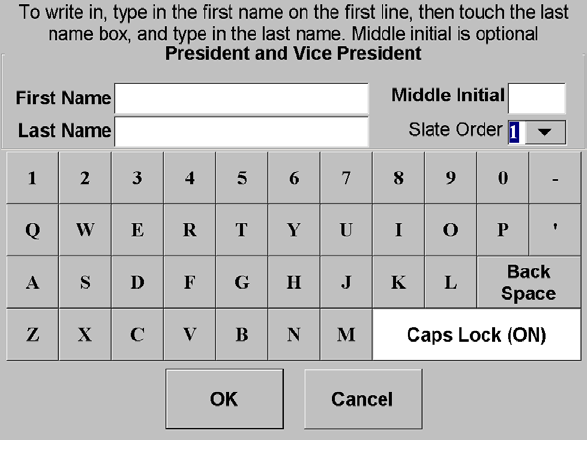
1.7.1 WRITE-IN A CANDIDATE
If you want to enter a write-in, press the “Write-in Candidate” button for that contest. Figure
6.2.1A will appear, allowing you to do a write-in.
Press the box next to the “First Name” heading, and enter the candidate’s first name. Press the
“Last Name” box and “Middle Initial” (optional) box and complete your entry. Press the “OK”
button to record your write-in. Space is not permitted in any name entry.
The “Slate Order” box appears only if the write-in is for a “Slate” contest (i.e. President and Vice
President). When you finish entering the first set of names, you will be asked to write-in the
“Vice Candidate”. Press the “OK” button after you complete your entry for the vice candidate.
You should now see your write-in displayed in the full-face screen. You may press the write-in
box again to cancel that write-in.
1.7.2 SKIP CHOICE(S)
If you decide to undervote in a contest, use the “Skip Choice(s)”. For example, if you only want
to select one candidate in a “Vote for 3” contest, you may select your candidate and then press
Figure 6.2.1A
Full-face Polling Official’s Manual Version 1.1.2 December 28, 2005
©2001-2005 Avante International Technology, Inc.
26
the “Skip Choice(s)” button. The machine will retain every candidate that you have selected for
this contest and fill in the rest as “Skip Choice(s)”. You can move on to vote the next contest.
1.7.3 CHANGE YOUR CHOICES
If you want to change your choice at any time during the voting process, press on your new
choice in a “Vote For One” contest, and you will see that the new choice is highlighted to replace
the existing one for this contest. If the contest requires more than one choice, you need to de-
select an existing choice before a new choice can be registered because the voting machine does
not know which existing choice you want to replace. To de-select an existing choice, press that
choice again so that the highlight is removed.
1.7.4 BIGGER FONT DISPLAY
If the voter has problem seeing the ballot in full-face display because the font is too small, press
the office title to use the entire screen to display that contest in larger font size. See Figure
6.2.4A as a sample.
After the voter makes the required number of selections in Figure 6.2.4A, the screen will
automatically return to the full-face display
Figure 6.2.4A

Full-face Polling Official’s Manual Version 1.1.2 December 28, 2005
©2001-2005 Avante International Technology, Inc.
27
1.7.5 VOTE FOR REFERENDUM/INITIATIVE
All referenda/initiatives are grouped together and separated from other office contests. You may
choose “Yes”, “No” or “Skip Choice(s)” for the question. To see the details about a referendum
or initiative, press the question title and the details will be shown in the entire screen. After you
make a selection, the screen will return to the full-face mode automatically.
Figure 6.2.5A
Figure 6.2.5B
Full-face Polling Official’s Manual Version 1.1.2 December 28, 2005
©2001-2005 Avante International Technology, Inc.
28
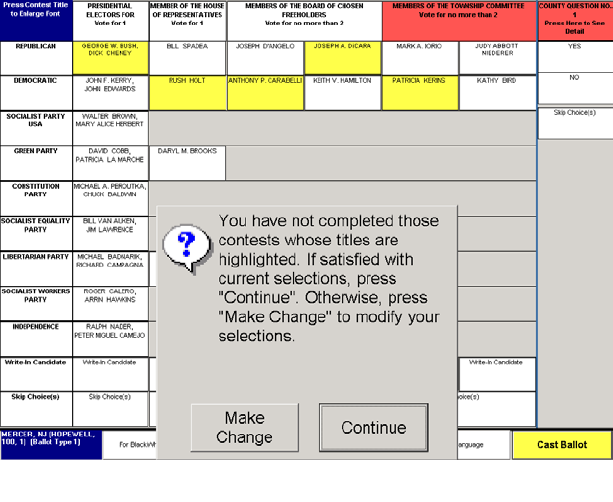
1.8 CAST YOUR BALLOT AND REVIEW THE VVPAT
When you have made all selections, press the “Cast Ballot” button to cast your ballot. If you do
not vote for the required number of selections in any contest or referendum, you will see the title
of such contest/referendum highlighted with an undervote alert message.
You can press the “Make Change” button and modify your selections. When you make the
required number of choices for each highlighted contest/referendum, the highlight of the title will
be removed automatically.
If you do not want to make any changes to your selections, press the “Continue” button to
proceed with casting your ballot.
Depending on your jurisdiction’s choice to print the Voter Verified Paper Audit Trail (VVPAT)
for the voter to verify and how to control the process of verifying the VVPAT, there are three
possible scenarios for completing your voting process. Check with your election administrator to
see which scenario applies to your polling place.
Section 6.3.1, 6.3.2 and 6.3.3 will show you three possible scenarios.
Figure 6.3A
Full-face Polling Official’s Manual Version 1.1.2 December 28, 2005
©2001-2005 Avante International Technology, Inc.
29
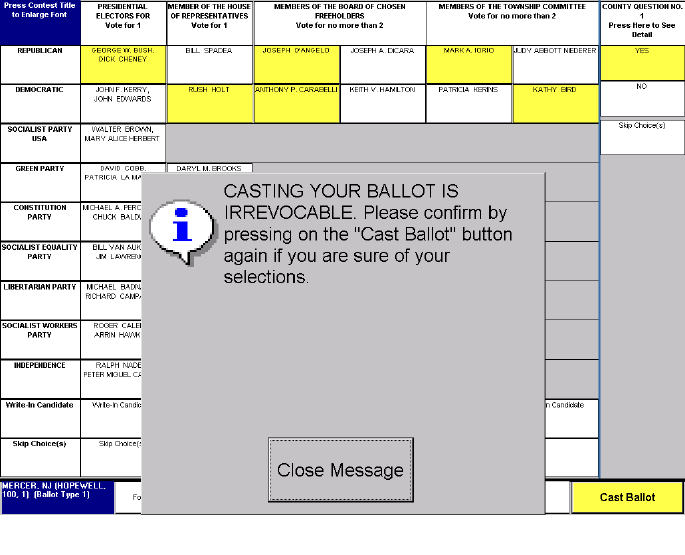
1.8.1 DO NOT PRINT VVPAT
If your jurisdiction has chosen not to print the VVPAT for every voter, or if the printer has been
turned off temporarily to conserve power consumption during an electric blackout, you will see
Figure 6.3.1A after the first time that you press the “Cast Ballot” button.
This is the last chance if you want to change your selection. You can still press the “Close
Message” button and change any selection you want. If you press the “Cast Ballot” button again
in Figure 6.3.1A, your voting session will be completed. You may see a “Thank you for voting!”
message briskly displayed before the screen returns to Figure 6.1A, ready for the next voter.
Figure 6.3.1A
Full-face Polling Official’s Manual Version 1.1.2 December 28, 2005
©2001-2005 Avante International Technology, Inc.
30
1.8.2 PRINT A FINAL VVPAT ONLY
If your jurisdiction has chosen to print a final VVPAT after the voter has cast his/her ballot, you
will see the same screen as shown in Figure 6.3.1A after you press the “Cast Ballot” button the
first time. If you press this button again to confirm casting the ballot, you will see Figure 6.3.2A
shown on the screen. Meanwhile, the printer will print the VVPAT and present it for the voter to
review, as shown in Figure 6.3.2B.
The VVPAT is presented behind the printer’s plastic cover to prevent the voter from taking it
away. The voter can check that each selection is correctly listed on the VVPAT. The voter
cannot change or reject this final VVPAT. If the voter does not press the “Retract Paper Record”
button to deposit the VVPAT within the preset time limit, the screen will change to Figure
6.3.2C to ask the voter whether he/she needs more time to review the VVPAT.
If the voter chooses to continue reviewing, the screen will change back to Figure 6.3.2A and the
VVPAT will remain at display. If the voter choose to deposit the VVPAT or does not make any
Figure 6.3.2A Fi
g
ure 6.3.2B
Figure 6.3.2C
Full-face Polling Official’s Manual Version 1.1.2 December 28, 2005
©2001-2005 Avante International Technology, Inc.
31
selection within a preset time limit, the printer will withdraw the VVPAT and deposit it into the
VVPAT compartment at the bottom of the printer unit.
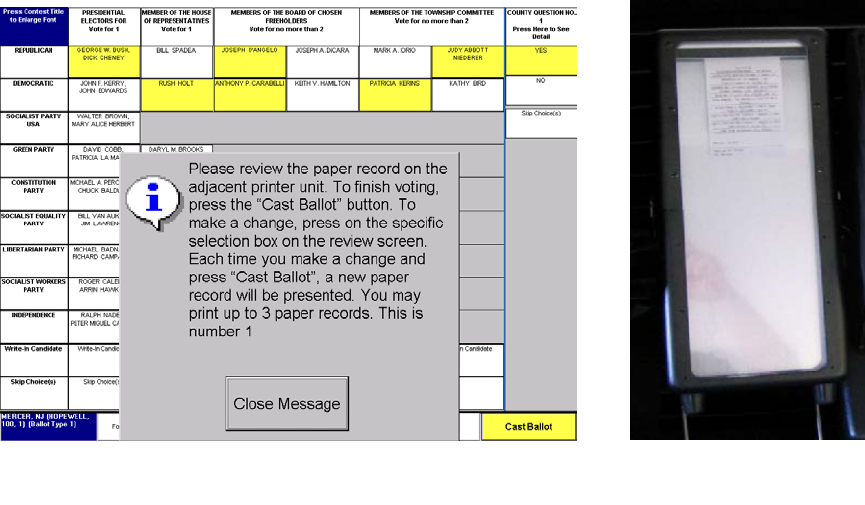
1.8.3 ALLOW REJECTING VVPAT
If your jurisdiction has chosen to print VVPAT and to allow a voter to reject a VVPAT, Figure
6.3.3A will appear after you press the “Cast Ballot” button the first time. Meanwhile, the
VVPAT is presented by the printer, as shown in Figure 6.3.3B.
After reviewing the VVPAT, if you press the “Cast Ballot” again, the VVPAT will be withdrawn
and deposited into the printer unit. You have finished voting and you can leave the voting booth.
If you decide to change your selection after reviewing the VVPAT, you can change the selection
on the touchscreen. When you press the “Cast Ballot” button after you make the change, the
current VVPAT will be withdrawn and another VVPAT will be printed to reflect the new change
and be presented for your review. Your voting session is completed when you press the “Cast
Ballot” button to accept the VVPAT or when you have reached the maximum number of
VVPAT limited by your jurisdiction.
Figure 6.3.3B
Figure 6.3.3A
Full-face Polling Official’s Manual Version 1.1.2 December 28, 2005
©2001-2005 Avante International Technology, Inc.
32
1.9 VOICE-ASSISTED VOTING
If a voter cannot vote via the touchscreen or cannot read, he/she can vote independently with
voice-assisted voting. As a polling official, you may help a visually impaired voter get to the
voting booth, find a chair for him/her to sit down if possible, hand over the keyboard and the
headphone, select his/her desired language if multiple language ballots are available, and insert
the voting smart card to activate the ballot. Once the smart card is accepted and the ballot is
presented on the screen, you need to press the “F9” key on the keyboard to start the voice-
assisted voting feature. If the headphone has a built-in volume control, you may tell the voter to
adjust the volume. Now you can step away from the voting machine and come back only if the
voter needs any help.
The voter will hear the voting instruction through the headphone. First, the voter will get
familiarized with the keyboard. There are four special shape buttons on the keyboard, one at each
corner of the entire keyboard unit.
Lower Right Corner Button: Press this button when you hear your candidate’s name to select it;
Upper Right Corner Button: To repeat the reading of the current contest from the beginning;
Lower Left Corner Button: This is the last button to press when you are ready to cast your ballot.
Upper Left Corner Button: This button will allow you to skip the current candidate or instruction.
The voter will be asked to press on each button. The function of each button will be explained
after the correct button is pressed. Besides these four basic buttons, several option keys will be
introduced for advanced voters who are familiar with the layout of a keyboard.
If the voter wants to listen to the instruction again, press the long narrow “Space Bar” at the
bottom row of the keyboard.
For each contest, the system will read the first candidate’s name, wait for the voter’s response,
and move on to the next candidate if the voter did not select the previous one, until all candidates
Full-face Polling Official’s Manual Version 1.1.2 December 28, 2005
©2001-2005 Avante International Technology, Inc.
33
are read. If write-in option is allowed, this option will be read after all candidates are read. “Skip
Contest” will be the last choice provided for each contest.
The voter simply presses the “Lower Right Corner Button” when the desired candidate’s name is
read. The system will immediately confirm that the voter has selected this candidate for the
current contest. The voter will be directed to vote for the next choice or contest.
If the voter knows how to type on a keyboard, he/she can write-in by typing directly from the
QWERTY keyboard. If the voter does not know how to type, he/she can press the “Upper Right
Corner Button” to scroll through the alphabet list and press the key below the “Upper Right
Corner Button” to select one letter at a time.
For public questions, the voter will hear the options “Yes”, “No” or “Skip Choices” after the
question has been read.
When the voter has made choices for every contest/question on the ballot, the system will read
back every selection, one by one, for the voter to review or change. To change a selection, press
the “Lower Right Corner Button” after you hear that selection. You will be brought back to that
contest to make another choice.
If you are satisfied after you heard every selection, press the “Lower Left Corner Button” twice
to confirm casting your ballot. If printing the VVPAT is required by your jurisdiction, after the
voter casts the ballot successfully, a VVPAT will be printed and withdrawn immediately if the
voter used the Voice-assisted voting because the system assumes that the voter is not able to
visually review the VVPAT. Instead, the system will read what has been printed on the VVPAT
back to the voter giving a chance to “review” it.
The voice-assisted voting program is designed to be self-explanatory and intuitive. From our
experience, the voter has little problem in using this feature after getting familiar with the four
basic buttons.
Full-face Polling Official’s Manual Version 1.1.2 December 28, 2005
©2001-2005 Avante International Technology, Inc.
34
1.10 PROVISIONAL VOTING
When a voter needs to vote a provisional ballot, a polling official needs to issue a provisional
smart card. After the card is encoded, the polling official records the VID number shown on the
computer screen onto the voter’s provisional envelope. After receiving the provisional voting
smart card from the polling official, the voter can insert the smart card into any voting unit. A
message will appear on the touchscreen notifying the voter that he/she will be voting a
provisional ballot. The provisional voter can vote on the touchscreen voting unit in exactly the
same way as would a registered voter. When the ballot is cast, the voting unit will encode the
result back onto the smart card and store the result in the computer. Check with your election
administrator about whether you need to tell the voter to seal the smart card inside the envelope
after the ballot is cast.
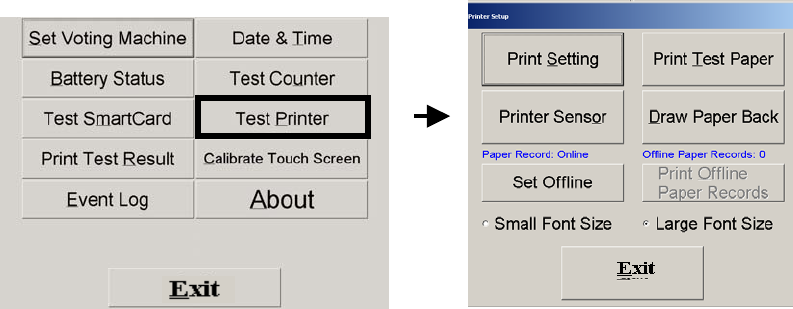
1.11 TURN OFF PRINTER TEMPORARILY
If the external power supply goes out during the Election Day, you may need to turn off the
printer temporarily to conserve power retained by the UPS. To do so, choose “Machine Setting
and Testing” from the administrative screen (Figure 3.2J). (To find out how to get to this
administrative screen from the voting screen, follow the instruction in Section 7.)
In Figure 6.6A, choose “Test Printer”. Next, in Figure 6.6B, choose “Set Offline”.
Figure 6.6A Figure 6.6B
Full-face Polling Official’s Manual Version 1.1.2 December 28, 2005
©2001-2005 Avante International Technology, Inc.
35
After you confirm to set the printer “Offline”, the VVPAT will not be printed when a voter casts
the ballot. Instead, the computer will retain the record electronically. The number shown in the
“Offline Paper Records” area in Figure 6.6B will increase to tell you how many ballots have
been cast during the temporary shutoff of the printer. Once the printer is turned off, the “Set
Offline” button in Figure 6.6B will become “Set Online”. You may press this button to turn on
the printer unit when the external power supply is back. Once the printer is turned online, you
may print those paper records that have been retained electronically by the computer by pressing
the “Print Offline Paper Records” button shown in Figure 6.6B.
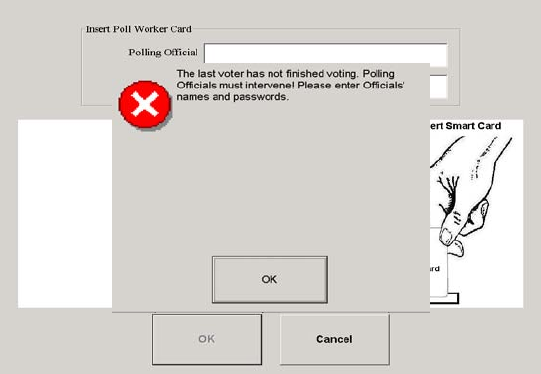
1.12 UNLOCK A FLEEING VOTER SCREEN
A fleeing voter refers to a voter who has left the polling place without casting the activated ballot
on the touchscreen voting unit. The voting system has a built-in feature to protect the privacy of
such a voter and reset the machine to be ready for the next voter.
After a ballot has been activated and presented on the touchscreen, a warning message will
appear if no one touches the screen within the preset time limit (adjustable by your election
administrator), asking the voter to touch anywhere on the touchscreen to turn off the warning
message. If there is still no response within the next 10 seconds, Figure 6.7A will appear to lock
down the system.
Figure 6.7A
Full-face Polling Official’s Manual Version 1.1.2 December 28, 2005
©2001-2005 Avante International Technology, Inc.
36
Insert the polling official smart cards (or enter your login information manually through the
touchscreen if applicable). Once the required number of polling official login has been entered,
you will have the chance to unlock the screen.
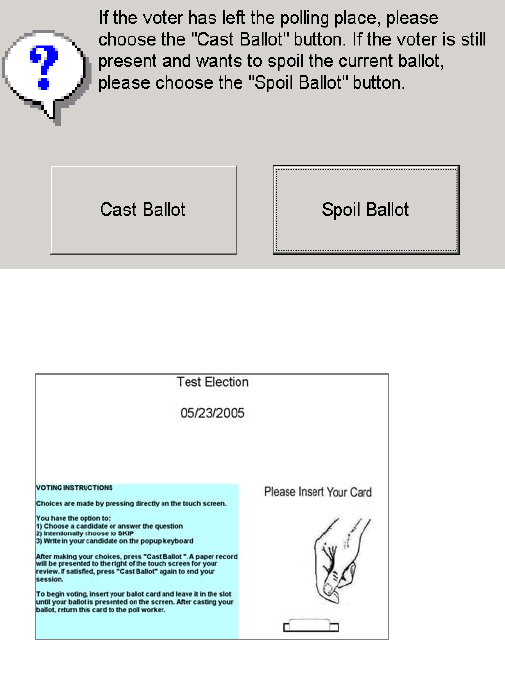
• If your state law stipulates that a fleeing voter’s ballot should not be counted, you should
see Figure 6.7C displayed on the screen, meaning the previous ballot has been spoiled
automatically and the machine is ready for the next voter.
• If your state law requires that a fleeing voter’s ballot be counted, you should see Figure
6.7B after the polling official login has been accepted. Please check around to see
whether the voter is still present and make your selection in Figure 6.7B accordingly.
You will be asked to confirm your choice. If you confirm to cast the ballot, both counters
will increase their reading by one count and the computer will record the ballot “As Is”.
If you confirm to spoil the ballot, the current ballot will be deleted from the computer’s
database and the counter reading will not change.
Once you see the screen return to Figure 6.7C, the machine is ready for the next voter.
Figure 6.7B
Fi
g
ure 6.7C
Full-face Polling Official’s Manual Version 1.1.2 December 28, 2005
©2001-2005 Avante International Technology, Inc.
37
CLOSE POLL
The “Close Poll” procedure is the last step that you need to complete at the polling place. After
this step, all voting machines will stop further voting and generate the tally result in the format of
paper report and electronic copy. The tally result from each voting machine may be consolidated
at the polling place to form a polling place total tally. Polling officials will shut down each
voting unit and transport the tally result to the tabulation center.
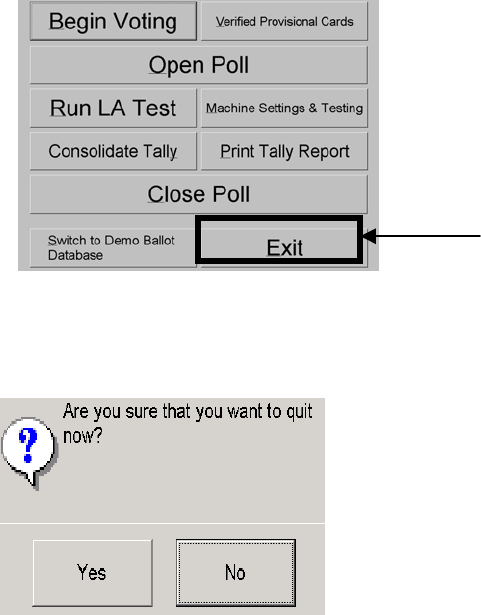
1.13 EXIT THE VOTING SCREEN
After the last voter has finished voting, Figure 7.1A should be displayed on the touchscreen.
To exit Figure 7.1A and go back to the administrative screen where you can perform the “Close
Poll” function, insert your polling official’s smart card. Figure 7.1C will appear on the screen,
asking for additional polling official’s login information if necessary.
Figure 7.1B
Fi
g
ure 7.1A
Full-face Polling Official’s Manual Version 1.1.2 December 28, 2005
©2001-2005 Avante International Technology, Inc.
38
Figure 7.1C will appear when the required number of polling official login has been met.
1.14 CLOSE POLL ON EACH VOTING UNIT
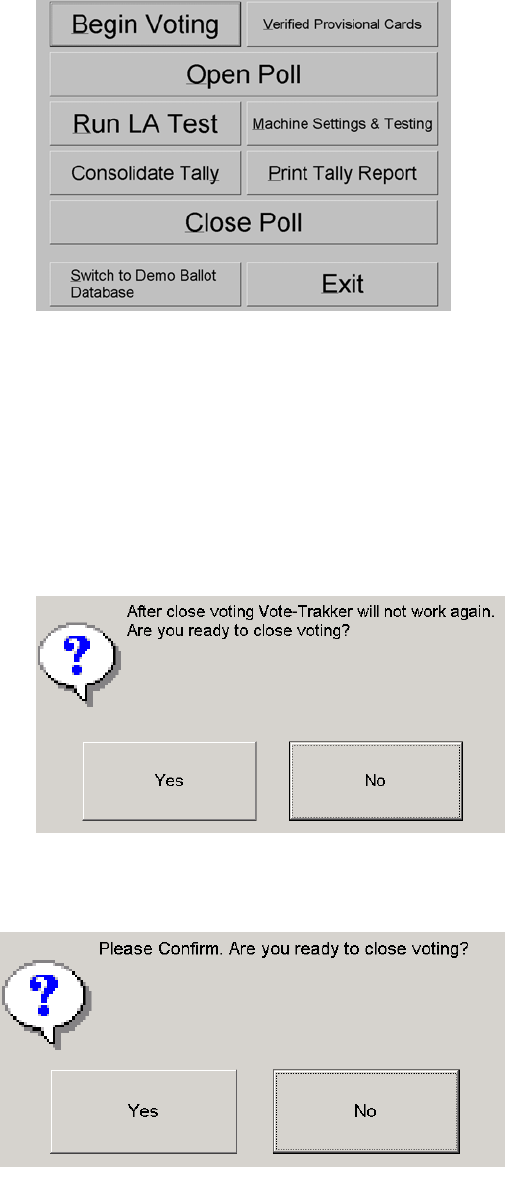
Since every voting unit runs independently, you need to close each machine individually.
Remove the top cover of the printer unit. Choose the “Close Poll” button from Figure 7.1C.
Figure 7.2A will appear asking you whether you are ready to close the poll.
If you choose the “Yes” button, Figure 7.2B will appear asking you to confirm closing the poll.
Fi
gu
r
e
7.
2A
Figure 7.2B
Fi
g
ure 7.1C
Full-face Polling Official’s Manual Version 1.1.2 December 28, 2005
©2001-2005 Avante International Technology, Inc.
39
Press the “Yes” button in Figure 7.2B to continue. If the computer’s internal clock detects that
you are closing the polling prior to the official poll-closing time, you will see a message warning
that you are closing the poll earlier than the official time. You can override the warning message
and continue with closing the poll.
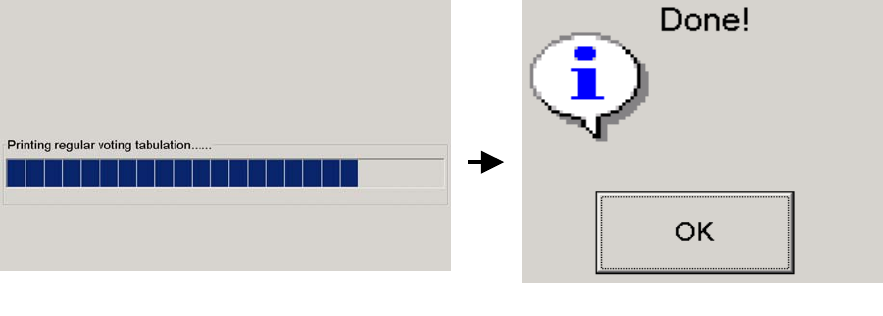
When the computer starts to close the poll, there will be a status bar informing you the current
task being processed. Wait for the printer to start printing. If the voting unit has any fleeing
voter’s ballot casts or any offline paper records, the printer will print and withdraw such records,
one by one. After that, the system will begin generating and printing the tally report. Do not pull
the paper before it is fully presented at the printer’s presenter. Remove the paper tally report.
Staple the report together for one voting unit if there are multiple pages printed. The computer
will complete copying data onto the CD-R. You will see a “Done!” message when the computer
has successfully completed the “Close Poll” procedure.
The CD disc should have been ejected automatically. Remove the CD-R from the CD drive. If
the CD-R has not been properly labeled to identify the source (at least showing the serial number
of the voting unit), please do so immediately after you get hold of the CD disc.
Press the “OK” button shown in Figure 7.2C. The computer screen will return to Figure 7.1C. If
you need additional copies of the tally report, you can press the “Print Tally Report” button to
print additional copies of the tally report. Please note that a “Test Voting” tally report will be
printed in addition to those reports printed during the “Close Poll” procedure.
Figure 7.2C
Full-face Polling Official’s Manual Version 1.1.2 December 28, 2005
©2001-2005 Avante International Technology, Inc.
40
1.15 CONSOLIDATE POLLING PLACE TOTAL
After every voting unit in your polling place has completed the “Close Poll” procedure, you can
select one voting unit as the host to consolidate the tally from each voting unit to give you a
polling place total tally. This host machine will print out a polling place consolidated tally report
and record the total tally onto a CD-R for your record.
You need the CD-R from every voting unit that has been used in your polling place, including
the host machine’s own CD-R. Insert the first CD-R into the CD drive of the selected host
machine and wait for about 10 seconds for the CD disc to be recognized by the computer. Press
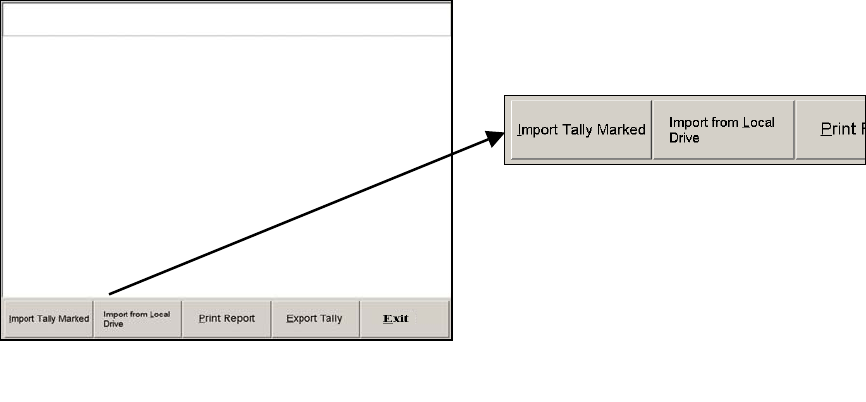
the “Consolidate Tally” option from the administrative screen (Figure 7.1D).
In Figure 7.3A, press the “Import from Local Drive” button.
The system will import the tally data from the CD disc for consolidation. You will see a status
bar showing the progress of the consolidation process. If the computer finds out that the CD disc
contains the tally from a voting machine that does not belong to the list of voting units that have
been assigned to this polling place by your election administrator, you will see a message
reminding you so. You can choose to proceed or cancel the consolidation of that voting machine.
After the tally from the CD disc has been successfully consolidated, you will see a confirmation
message shown on the screen. Meanwhile, the CD will be ejected automatically. Remove the
Figure 7.3A
Full-face Polling Official’s Manual Version 1.1.2 December 28, 2005
©2001-2005 Avante International Technology, Inc.
41
first CD disc and insert the next one. Wait for about 10 seconds, and press the “Import from
Local Drive” button. Repeat these steps until you have consolidated every CD-R.
The CD disc that has been consolidated should be put aside and well packaged to keep it from
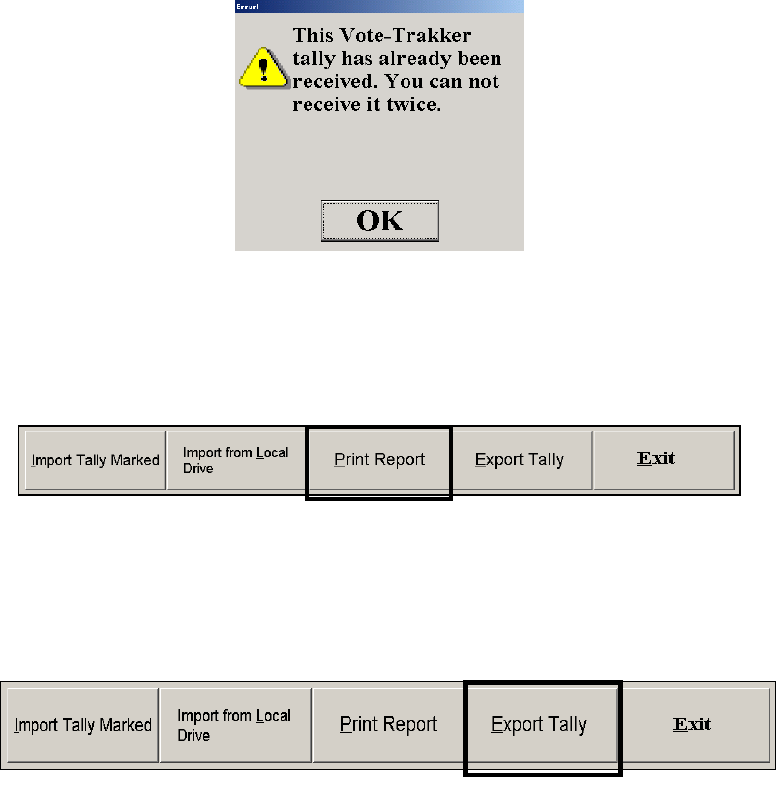
physical damage. In case you mistakenly insert the same CD into the CD drive more than once,
the computer will flag the message (figure 7.3B) showing you that the tally from this CD disc
has already been consolidated.
After consolidating the tally data from every CD disc, you can print out the consolidated tally
report. Press the “Print Report” button shown in Figure 7.3C. If you need additional copies of the
consolidated tally report, press the “Print Report” button again for one more copy.
You can transfer the consolidated tally electronically onto the polling place total tally CD disc
provided in your precinct supply kit. Find this specially marked CD and insert it into the host
machine’s CD drive. Wait for about 10 seconds. Press the “Export Tally” button.
You will see a status bar showing you the progress of the export. Once you see a “Done!”
confirmation screen, remove the CD disc and bag it properly. This will complete your tally
consolidation process. Press the “Exit” button in Figure 7.3D to exit the “Consolidation” screen.
Figure 7.3B
Figure 7.3C
Fi
g
ure 7.3D
Full-face Polling Official’s Manual Version 1.1.2 December 28, 2005
©2001-2005 Avante International Technology, Inc.
42
1.16 SHUT DOWN THE SYSTEM
When you want to shut down the system, press the “Exit” button shown in Figure 7.4A
You need to confirm in Figure 7.4B to shut down the system
After you press the “Yes” button in Figure 7.4B, the system will start to shut down. When you
see the computer screen turn black, you may unplug the power cord from the power outlet.
You may leave the seal of the VVPAT compartment door intact. The seal will be broken later if
a manual recount is required. Lower the height-adjustable table to its minimum height. Unplug
the power cord and put it back to the battery compartment.
1.17 DELIVER THE TALLY RESULT
After the poll is closed, polling officials are responsible for delivering the tally result to the
tabulation center. Make sure that you have the CD-R from every voting unit, the “total” CD-R if
Figure 7.4B
Figure 7.4A
Full-face Polling Official’s Manual Version 1.1.2 December 28, 2005
©2001-2005 Avante International Technology, Inc.
43
you have consolidated your polling place total tally, and the paper tally report for every voting
unit and the polling place total tally as well. Each CD-R should be properly labeled to identify
the source of tally result, and be well packaged to keep it from physical damages. The tally
report from each voting unit should be stapled separately. Follow your election procedure and
bring all of the required items with you for delivery.
Full-face Polling Official’s Manual Version 1.1.2 December 28, 2005
©2001-2005 Avante International Technology, Inc.
44
OTHER DUTIES
Besides the regular polling official duties explained in the previous sections, there may be other
responsibilities as explained below.
1.18 VOTING DEMONSTRATION (TEST-VOTING MODE)
Any voting unit can be used as a demo machine to train voters on how to vote on the touchscreen
system. You must NOT perform the “Open Poll” procedure on the demo-voting unit unless you
want to turn this demo unit into a real voting unit.
To set up a demo machine, follow the instructions in Section 3. Once you get to the
administrative screen as shown in Figure 8.1A, press the “Begin Voting” button.
You will see Figure 8.1B appear confirming that you are running the “Test Voting” mode.
Fi
g
ure 8.1B
Figure 8.1A
Full-face Polling Official’s Manual Version 1.1.2 December 28, 2005
©2001-2005 Avante International Technology, Inc.
45
Press the “OK” button in Figure 8.1B. You will see Figure 8.1C appear ready for you to use the
test voting feature. Please refer to Section 6 for how to vote on the voting unit.
To get a “test voting” ballot, you need a “test voting” smart card. Please refer to Section 5.2.1 for
how to get a test voting smart card. This card is reusable for repetitive test voting.
To exit the test-voting mode and return to the administrative screen (Figure 8.1A), insert your
polling official’s login smart card and log out of the voting screen.
1.19 CHANGE PAPER ROLL
This task should rarely be needed at a polling place. Each printer should have been installed with
a new roll of paper with up to 1200 ft. length of paper (or a used roll with sufficient amount of
paper left) during the pre-election testing at your jurisdiction’s warehouse. In case the paper does
run out during an election, please refer to Figure 3.1D for the instructions on how to change the
paper roll.
Figure 8.1C

G
G
G
G
G
G
G
G
G
G
G