BIXOLON SPP-R200II Mobile Printer User Manual Manual
BIXOLON Co.,Ltd. Mobile Printer Manual
BIXOLON >
Contents
- 1. Manual
- 2. Users Manual
Manual
User's Manual
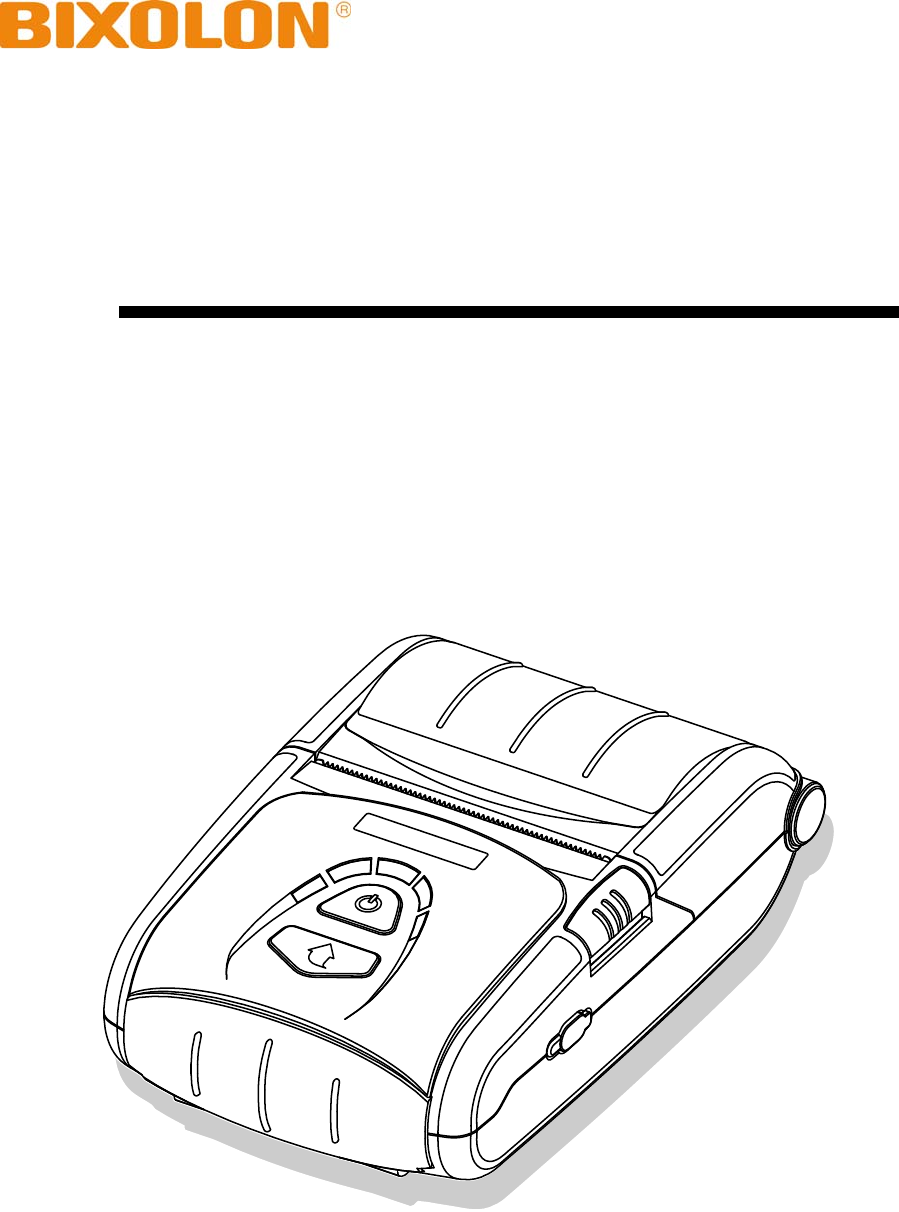
SPP-R200II
Mobile Printer
Rev. 1.00
http://www.bixolon.com

Rev. 1.00 - 2 -
SPP-R200II
■ Table of Contents
※ Manual Information & Usage Precautions············································· 3
1. Content Confirmation············································································· 10
2. Product Part Names·················································································11
3. Installation & Usage················································································ 12
3-1 Battery Installation··········································································· 12
3-2 Battery Charging ············································································· 12
3-3 Paper Installation ············································································ 15
3-4 Using Belt Clip················································································· 16
3-5 Using Belt Strap (Optional) ····························································· 17
3-6 Using Case (Optional)····································································· 18
3-7 Protective Case (Optional) Usage··················································· 19
3-8 Control Panel Usage······································································· 20
3-9 MSR Usage····················································································· 21
4. Self-Test··································································································· 21
5. Label Printing Function·········································································· 24
5-1 Label Function Setting ···································································· 24
5-2 Auto Calibration Function································································ 24
6. Peripherals Connection·········································································· 25
6-1 Bluetooth Connection······································································ 25
6-2 Interface Cable Connection····························································· 25
7. Printer Cleaning ······················································································ 26
8. Appendix·································································································· 27
8-1 Specifications·················································································· 27
8-2 Certification ····················································································· 28
8-3 Label Types····················································································· 29

Rev. 1.00 - 3 -
SPP-R200II
■ Manual Information
※ Manual Information & Usage Precautions
This user’s manual contains basic information for product usage as well as for emergency
measures that may be required.
※ The following separate manuals provide more detailed content on various technological
issues and areas.
1. Windows CE Module Program Manual
This manual provides information on the dll files required for Windows CE application
program development.
2. Windows Driver Manual
This manual provides information on installation and main functions of the Windows
Driver for this product.
3. Unified Utility Manual
This manual provides information on the software used to select functions of this
product, modify operation conditions, etc.
• VMSM (Virtual Memory Switch Manager)
: As a function that sets the basic operation conditions of the product, the use o
f
non-hardware control, software-based virtual switches is explained.
• NV Image Download Manager
: The downloading of image files, such as logos, intended for repetitive printing is
explained.
• Firmware Download Manager
: The downloading and installation of the latest Firmware, which is subject to
ongoing modification for the enhancement of product performance, are explained.
4. Bluetooth Connection Manual
This manual provides information on the connection of this product with devices
equipped with Bluetooth functionality (PDAs, PCs, etc.). The devices included are
as follows.
• PDAs:
- Intermec PDA (Device: CN2B, OS: Pocket PC 4.20.0)
- SYMBOL PDA (Device: SYMBOL MC70, OS: Windows Mobile 5.0)
- HP PDA (Device: iPAQ hx2700, OS: Windows Mobile 5.1.1702)
- Mobile Compia PDA (Device: M3, OS: WinCE 5.0)
- InnoTeletek PDA (Device: MC3000, OS: WinCE 4.2)
- Widefly PDA (Device: WF35, OS: WinCE 5.0)
• Bluetooth:
- Dongle (BlueSoleil IVT Stack)
- Dongle (Widcomm Stack)
5. Commands Manual
This manual provides information on the protocol and functions of the control
commands that can be used with this product.
6. Code Pages Manual
This manual provides information on each character code page that can be used
with this product.
We at BIXOLON maintain ongoing efforts to enhance and upgrade the functions and
quality of all our products. In following, product specifications and/or user manual content
may be changed without prior notice.
Rev. 1.00 - 4 -
SPP-R200II
■ Safety Precautions
In using the present appliance, please keep the following safety regulations in order to
prevent any hazard or material damage.
WARNING
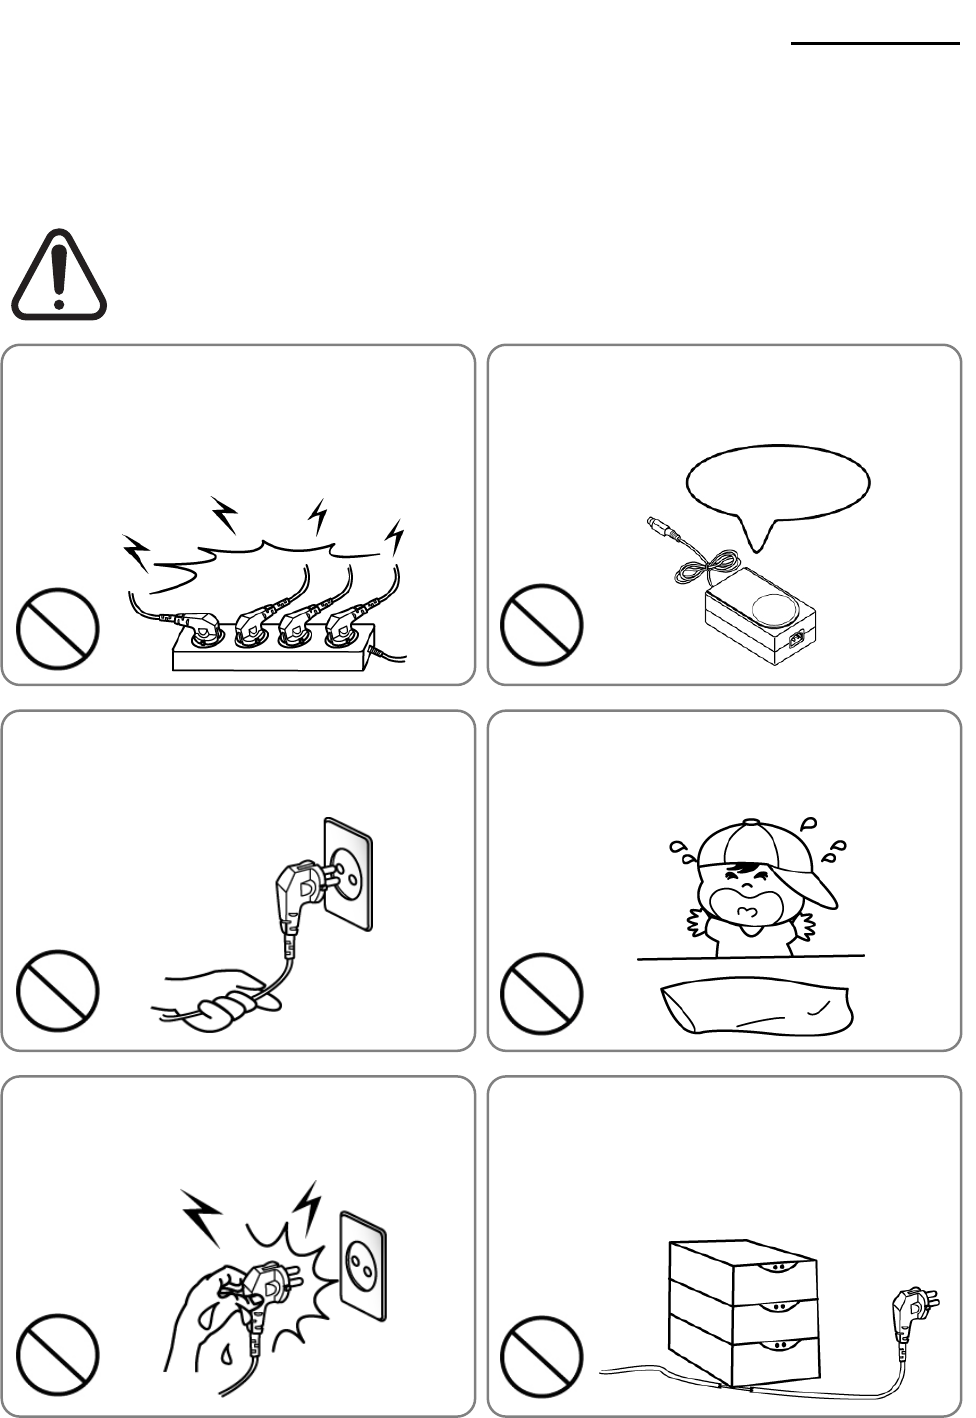
Violating following instructions can cause serious injury or death.
Do not bend the cable by force or leave it under any
heavy object.
• A damaged cable can cause a fire.
Do not plug in or unplug with your hands wet.
• You can be electrocuted.
Keep the plastic bag out of children’s reach.
• If not, a child may put the bag on his head.
Do not pull the cable to unplug.
• This can damage the cable, which is the origin of a fire or a
breakdown of the printer.
You must use only the supplied adapter.
• It is dangerous to use other adapters.
Do not plug several products in one multi-outlet.
• This can provoke over-heating and a fire.
• If the plug is wet or dirty, dry or wipe it before usage.
• If the plug does not fit perfectly with the outlet, do not plug in.
• Be sure to use only standardized multi-outlets.
PROHIBIT
PROHIBIT PROHIBIT
PROHIBIT PROHIBIT
ONLY SUPPLIED ADAPTER
PROHIBIT
Rev. 1.00 - 5 -
SPP-R200II
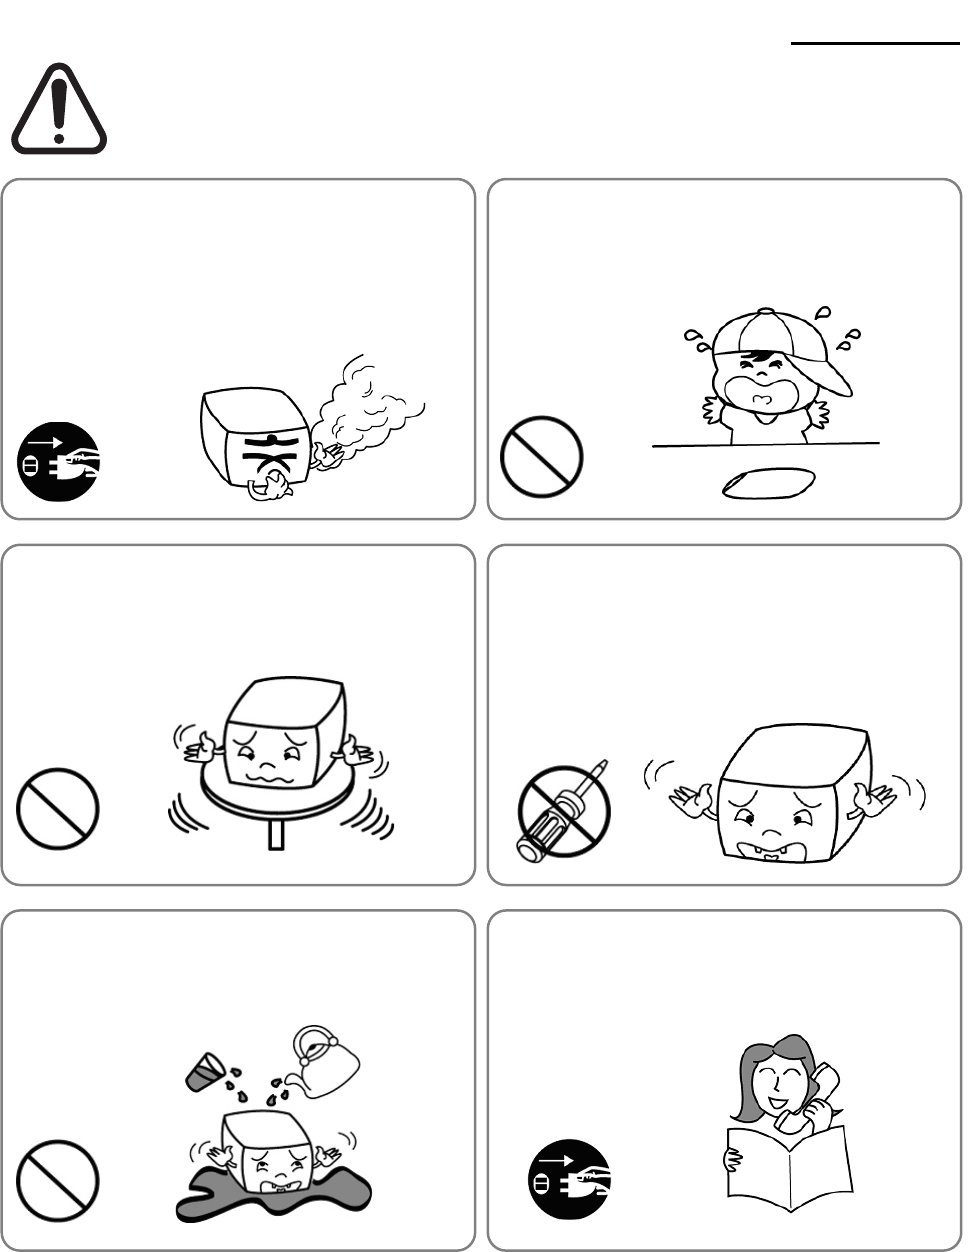
CAUTION
Violating following instructions can cause slight wound or damage the appliance
.
Do not use the printer when it is out of order. This
can cause a fire or an electrocution.
• Switch off and unplug the printer before calling your dealer.
Do not let water or other foreign objects in the
printer.
• If this happened, switch off and unplug the printer before
calling your dealer.
Use only approved accessories and do not try to
disassemble, repair or remodel it for yourself.
• Call your dealer when you need these services.
• Do not touch the blade of auto cutter.
Install the printer on the stable surface.
• If the printer falls down, it can be broken and you can hurt
yourself.
Keep the desiccant out of children’s reach.
• If not, they may eat it.
If you observe a strange smoke, odor or noise from
the printer, unplug it before taking following
measures.
• Switch off the printer and unplug the set from the mains.
• After the disappearance of the smoke, call your dealer to
repair it.
TO UNPLUG
PROHIBIT
DISASSEMBLING
PROHIBITED
PROHIBIT
PROHIBIT
TO UNPLUG
PRINTER
PRINTER
PRINTER
PRINTER
DEALER
PRINTER

Rev. 1.00 - 6 -
SPP-R200II
■ Battery Safety Precautions
Make sure to review the user manual carefully prior to product use.
Neglecting to heed the following instructions can result in battery overheating, combustion,
explosion, damage and/or decline in performance and product life.
Danger
1. Do not allow water, seawater or moisture to enter or leak into the battery. If the safety
mechanism within the battery becomes oxidized, the battery may overcharge with
abnormal electrical current and/or voltage so that it may overheat, ignite and/or explode.
2. Do not place the battery near open flames or heating devices, such as stoves.
Exposure to excessive heat may cause damage to the resin case and/or insulating
materials, thus causing a short circuit within the battery that may result in battery
overheating, combustion, and/or explosion.
3. Charge the battery only with the exclusive charger specified (optionally provided) by
BIXOLON. The use of an incorrect charger may result in overheating, combustion
and/or explosion of the battery.
4. Charging the battery with a modified charger may result in overheating, combustion
and/or explosion of the battery by abnormal chemical reaction caused by incorrect
polarity.
5. Do not directly connect the battery to an electrical power outlet not specified by
BIXOLON. Doing so may result in overheating, combustion and/or explosion of the
battery by over-current and/or over-voltage.
6. Do not heat the battery or place it near a fire. Doing so may melt insulation materials,
damage the safety mechanism/equipment, and/or ignite the electrolytic solution. There
is a potential risk of battery overheating, combustion, and/or explosion.
7. Do not reverse the connection of (+) and (-) electrodes of the battery. Charging the
battery in reverse polarity may produce an undesired chemical reaction inside the
battery cell, causing unexpected behavior during discharging such as overheating,
explosion, or fire.
8. Do not allow the battery’s (+) or (-) pole to come into contact with any metal. In addition,
do not carry or store the battery with metallic items, such as necklaces and hairpins.
Doing so may cause a short circuit of the battery generating an over-current. There is
the potential risk to overheat, ignite and/or explode the battery or overheat the metallic
items, such as necklaces, hair pins etc.
9. Do not throw the battery or subject it to strong shock. If the safety mechanism in the
battery is damaged, the battery may be overcharged and, consequently, an adverse
chemical reaction may be generated in the battery. There is a potential risk of battery
overheating, combustion, and/or explosion.

Rev. 1.00 - 7 -
SPP-R200II
10. Do not pierce the battery with a pointed object, such as nail or awl, or strike with a
heavy object, such as a hammer, and take care not to step on the battery. There is a
potential risk of battery overheating, combustion, and/or explosion caused by an
internal short circuit.
11. Do not solder the battery directly. Doing so may melt the insulating materials and/or
damage the safety mechanism or safety equipment, resulting in battery overheating,
combustion, and/or explosion.
12. Do not disassemble and/or modify the battery. The battery contains safety equipment
and a safety mechanism to prevent danger. There is a potential risk of overheating,
combustion, and/or explosion caused by disassembly.
13. Do not charge the battery near open flames and/or under direct sunlight. Because
exposure to high temperatures triggers the operation of the safety mechanism, the
battery may not charge or may overcharge due to destruction of the safety mechanism.
There is a potential risk of overheating, combustion, and/or explosion.
14. Do not expose the battery to high temperatures over 60 oC, and do not use or store it
in a hot or humid place.
15. Do not use the battery if it is damaged or the exterior is deformed due to external
shock or if it is swollen.
Warning
1. Do not place the battery within the reach of small children to prevent any swallowing
accidents. If a small child has swallowed the battery, consult a physician immediately.
2. Do not place the battery in a microwave oven and/or high voltage appliance. Doing so
can cause rapid overheating and/or destruction of the sealing, resulting in battery
overheating, combustion, and/or explosion.
3. Do not combine and use any battery of different capacity and/or type with the primary
battery. Doing so can cause excessive electrical discharge during use or excessive
charging during charging, resulting in an abnormal chemical reaction within the battery
that can cause battery overheating, combustion, and/or explosion.
4. If during battery usage, storage, or charging, a strange odor or conditions differing from
the normal, such as overheating, color changes, warping, etc., are detected, remove
the battery from the product or charger and discontinue use. Continued use may
cause battery overheating, combustion, and/or explosion.
5. When recharging, if the battery is not charged after the normal fixed charging time,
discontinue charging. Continued charging can result in battery overheating,
combustion, and/or explosion.
6. If the battery appears to be coated with condensation or emits a strange odor,
immediately place it far away from any heat source. The condensation may be
caused by a leak of electrolytic solution that can ignite to cause battery combustion
and/or explosion.

Rev. 1.00 - 8 -
SPP-R200II
7. If the battery is leaking electrolytic solution and any of the solution enters the eyes,
immediately wash out with clean water, and then consult a physician to receive
treatment. Neglecting to do so can cause permanent eye injuries.
Caution
1. Do not use or leave the battery in a location exposed to high temperatures or intense
direct sunlight, such as within an automobile. Doing so can cause battery overheating
and/or combustion. In addition, battery performance and product life may be reduced.
2. The battery contains a safety mechanism to prevent danger. Do not use the battery in
a location that is prone to static electricity (above the amount covered by the
manufacturer’s product warranty) that can cause damage to this safety mechanism.
Damage to the safety mechanism can result in battery overheating, combustion, and/or
explosion.
3. The temperature ranges for battery usage are as follows. Any usage outside of these
ranges can result in battery overheating and/or damage. In addition, battery
performance and product life may be reduced.
- Charging: 0 ~ 40 oC
- Product Usage: -20 ~ 60 oC
- Storage: -20 ~ 60 oC (30 days)
- Long-Term Storage: -20 ~ 40 oC (90 days)
4. Please review the exclusive charger manual carefully for charging instructions.
5. If you observe any abnormal symptom, such as strange smell and overheating, on first
use after purchasing the product, contact your local dealer immediately.
6. If a child must use the battery, the child’s parent or legal guardian should clearly explain
the instructions from the user manual prior to use. In addition, the parent or legal
guardian should periodically confirm that usage is being conducted in accordance with
user manual instruction during use.
7. Store the battery in a location that is out of the reach of small children. During usage,
make sure to also place the charger and/or product out of the reach of small children.
8. If the battery is leaking electrolytic solution, and the solution comes in contact with the
skin or clothing, immediately wash thoroughly with clean water. Contact with skin can
result in skin disorders.
9. Make sure to review the user manual and precautions carefully prior to use.
In addition, after carefully reviewing the user manual and precautions, place them in a
secure location for future reference when needed.
10. There is a risk of explosion when replacing with an incorrect battery. Only exchange it
for another one of the same or equivalent model specified by BIXOLON. Insulate the
used battery by attaching insulation tape to its port, and then dispose of the battery
according to local regulations.
11. If using the printed side of preprinted paper, this may cause malfunction.

Rev. 1.00 - 9 -
SPP-R200II
Recommended
1. Review the user manual for instructions concerning insertion/removal of batteries
into/from the product.
2. The battery shipped with the product is partially charged, and it is good for checking the
operation of the equipment. Charge the battery first with the supplied charger if the
equipment does not work or long hours of operation are required.
3. To avoid improper use of the battery, review the product user manual carefully.
4. Do not charge the battery for long times in excess of the normal charging time indicated
in the user manual.
5. If the battery is not to be used for a long period of time, remove it from the product and
store in a location with low humidity. If the battery is stored while still inserted in the
product in a highly humid location, oxidization may occur along with a decline in battery
performance.
6. Turn off the power after using the equipment. Otherwise the performance of the battery
will be degraded over time.
7. The battery may fail to charge if it is not used for a long period of time. Charge the
battery with the supplied charger at least once every six months if the equipment is not
used for a long time. Leaving the battery for a long time without charging may degrade
the performance of the battery or cause system trouble.
8. If the battery terminal is contaminated, clean the contact with a dry cloth before using it.
Using the battery with contaminated contacts may cause problems when supplying
power to the equipment or charging due to irregular electric contact.
9. Each battery has a life cycle. If the usage time of the produce is shortened, replace with
a new battery. Insulate the used battery by attaching insulation tape to its port, and
then dispose of the battery according to local regulations.
■ Other Precautions
The copyright for this user manual and various other manuals is property of the BIXOLON
Co., Ltd. Any copying or conversion into electronic firm and saving of this material
without the express written permission of BIXOLON Co., Ltd. is strictly prohibited.
Use of the information contained in this manual is not subject to any patent liability. This
manual has been prepared with utmost care and attention to detail but may contain certain
errors and/or omissions.
BIXOLON Co., Ltd. is not legally liable for any damages resulting from the use of the
information in this manual.
BIXOLON Co., Ltd. and its affiliates are not legally liable (United States excluded) for any
damages, loss, costs, and/or expenses that result from the breakdown, malfunction, and/or
misuse of the product due to violation or neglect of the operation and maintenance
information and instructions provided by the BIXOLON Co., Ltd., as well as from the
unauthorized alteration, repair, and/or modification of the product by the user and/or third
party.
BIXOLON Co., Ltd. is not legally liable for any damages and/or issues resulting from the
use of options and/or parts that are not authentic BIXOLON products or authorized
products.
Rev. 1.00 - 10 -
SPP-R200II
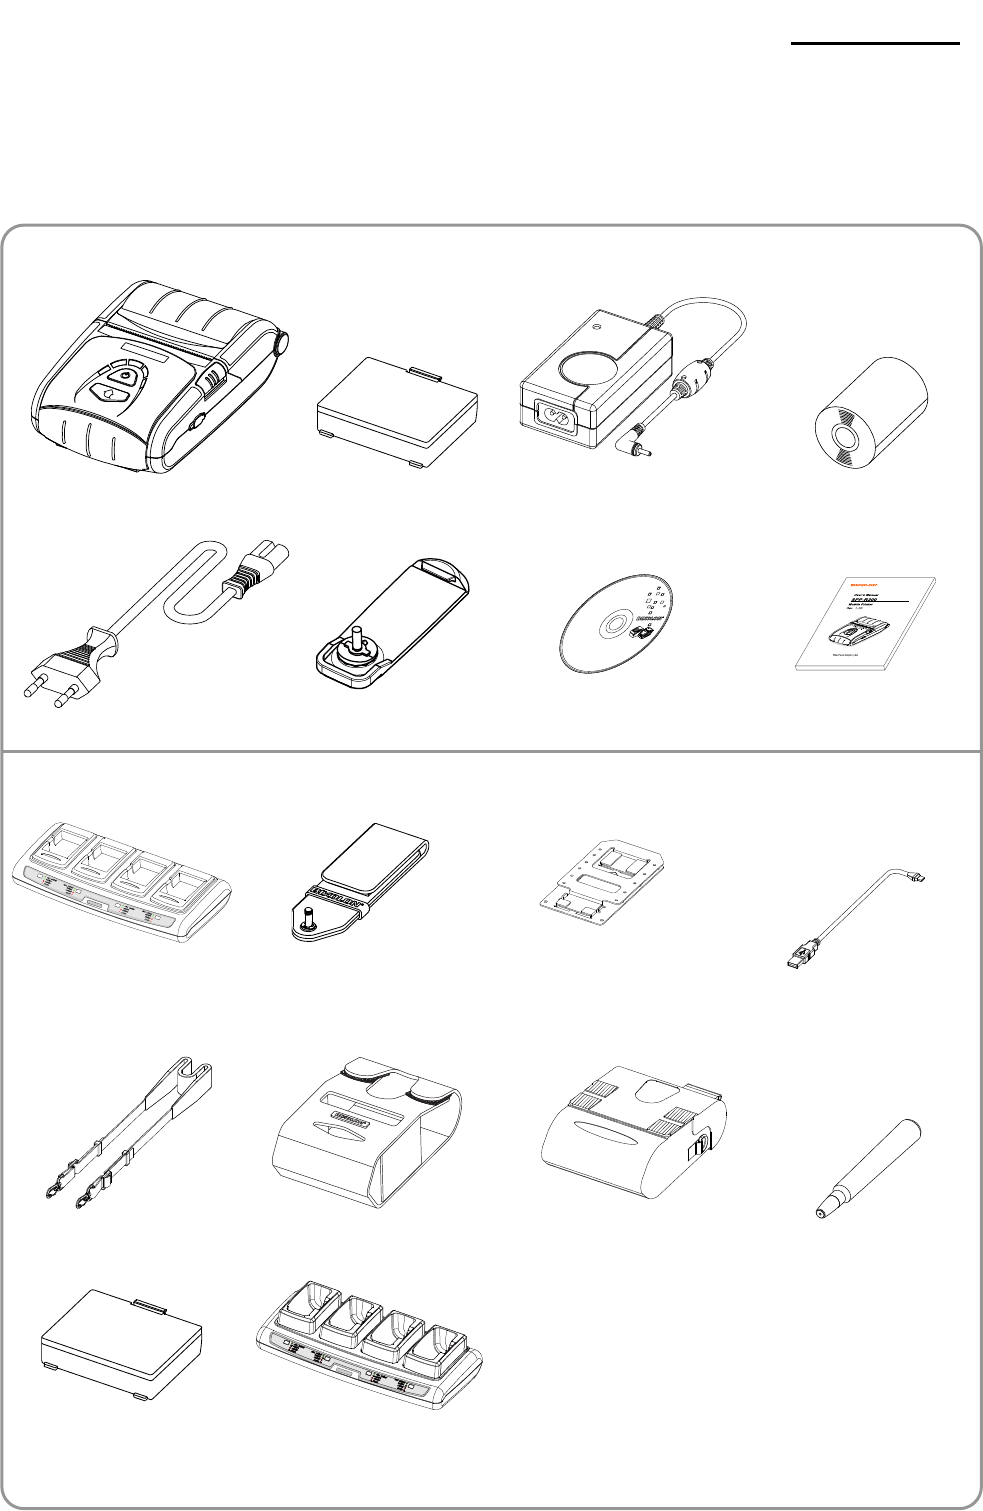
1. Content Confirmation
The following items should all be contained in the printer package.
Contact the dealer from which the purchase was made if any item is damaged and/or
missing.
※ Basic items
SPP-R200II Battery Battery Charger Paper
Power Cord Belt Clip CD User Manual
※ Optional items
Quad Charger Belt Strap
Wall mount forQuad
Charger(RWM-350) Interface Cable
Shoulder Strap Case Protection Case Cleaning Pen
Battery Quad Cradle
Rev. 1.00 - 11 -
SPP-R200II
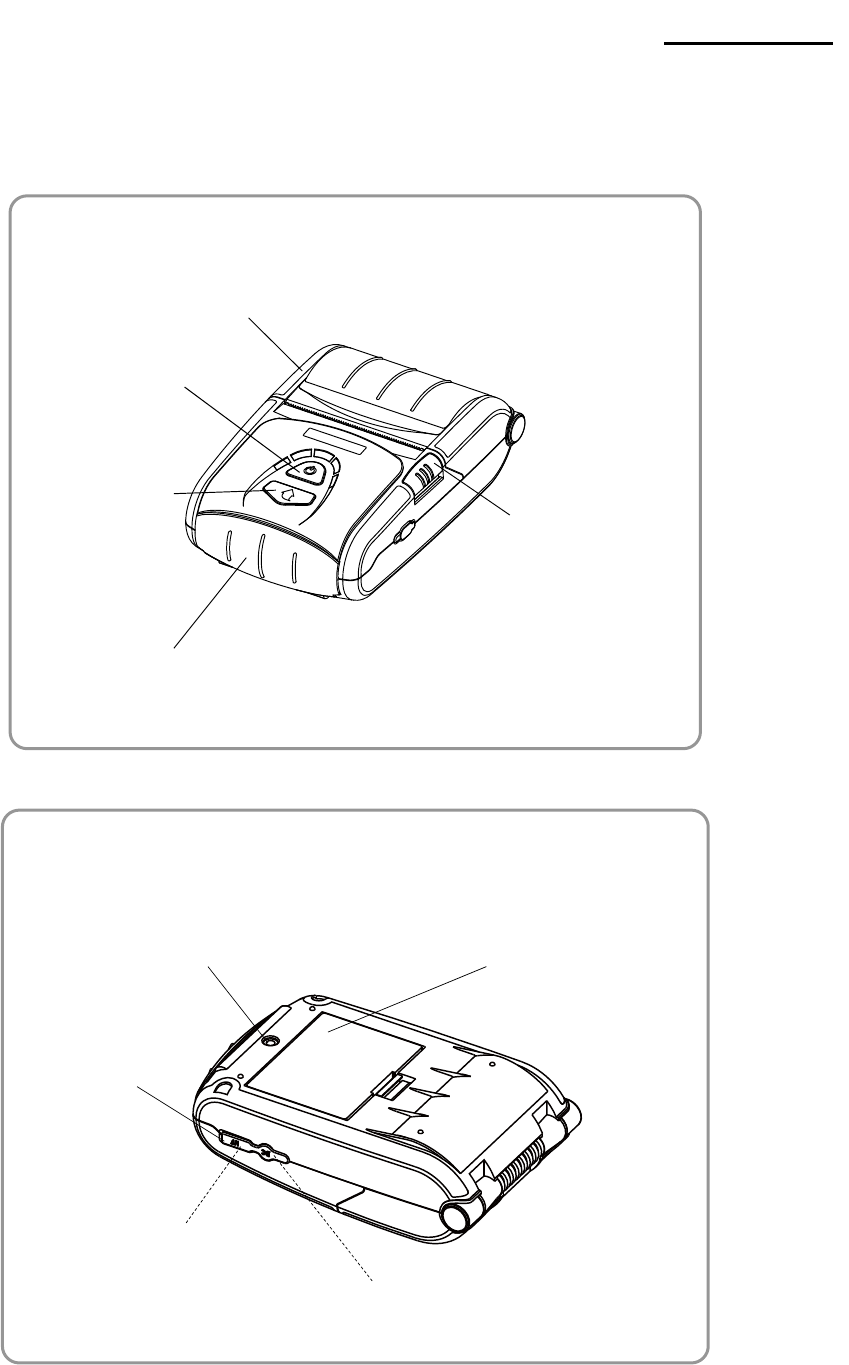
2. Product Part Names
• Front
• Rear
Cable Connection
Power Connection
Battery
Hole for mounting belt strap / belt clip
Interface Cap
Paper Cover
Power Button
MSR Cover
Open Button
Paper Feed
Button
Rev. 1.00 - 12 -
SPP-R200II
3. Installation & Usage
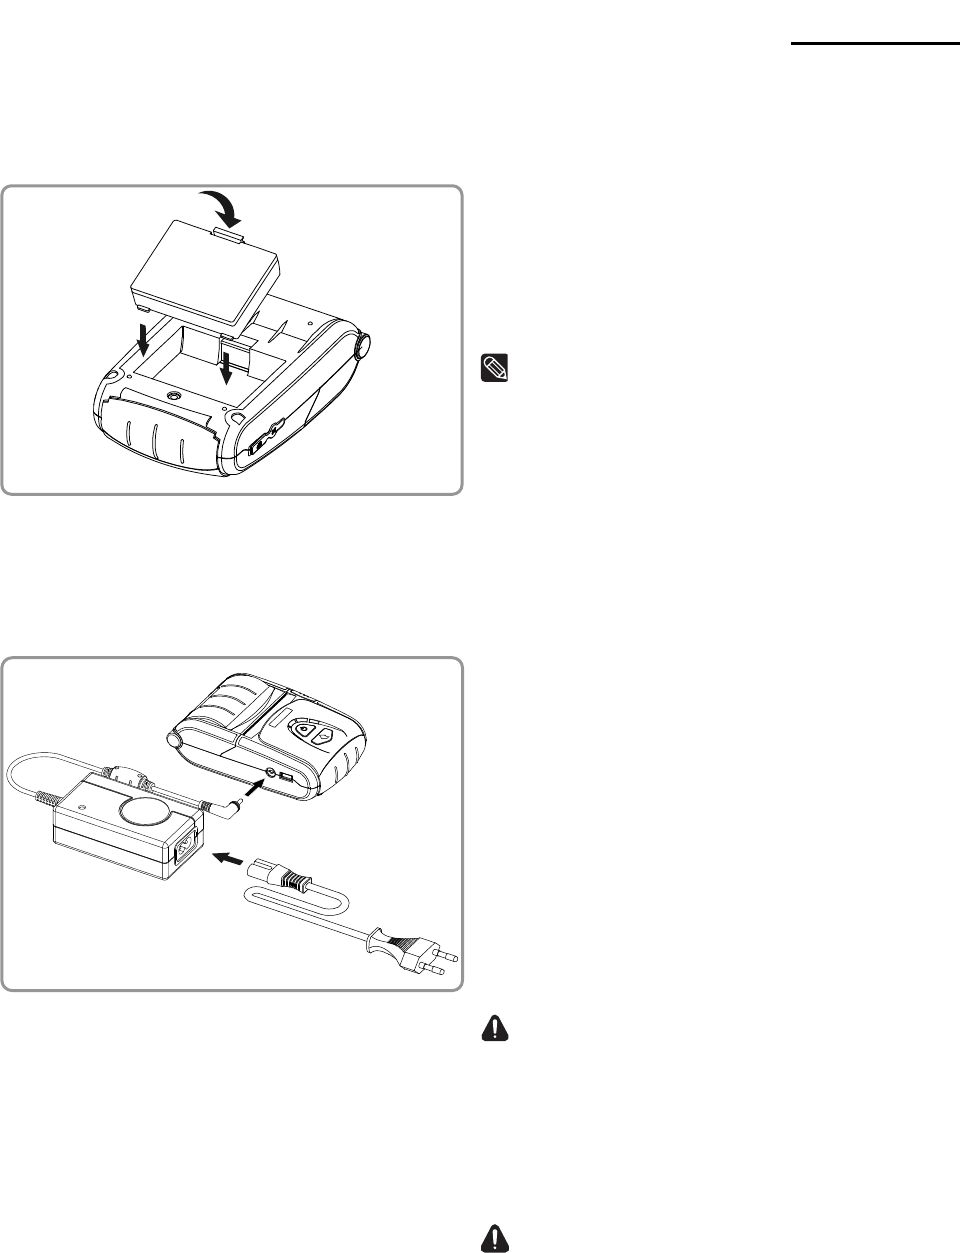
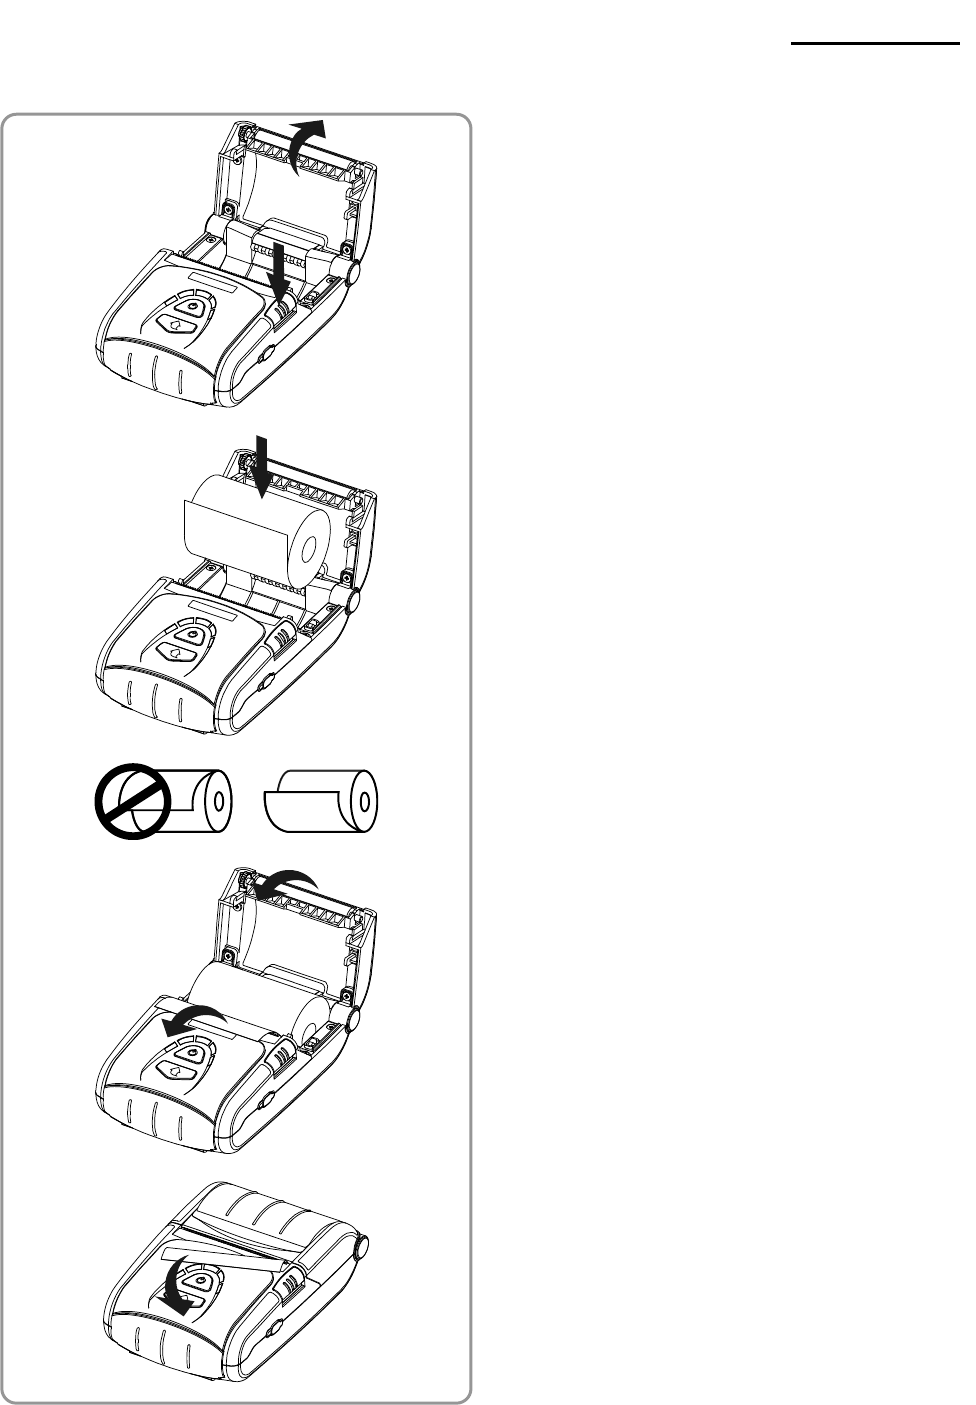
3-1 Battery Installation
1) Insert the battery on the rear side of the
printer, aligning the battery hook properly.
2) Push the battery into the slot until a
snapping sound is heard.
NOTE
As the battery is not charged at the time of
purchase, charge the battery prior to product use.
(Use the battery charger)
3-2 Battery Charging
3-2-1 Battery Charging Usage
1) Turn off the printer power.
2) Connect the power cord ② to the battery
charger ①, and then connect AC power.
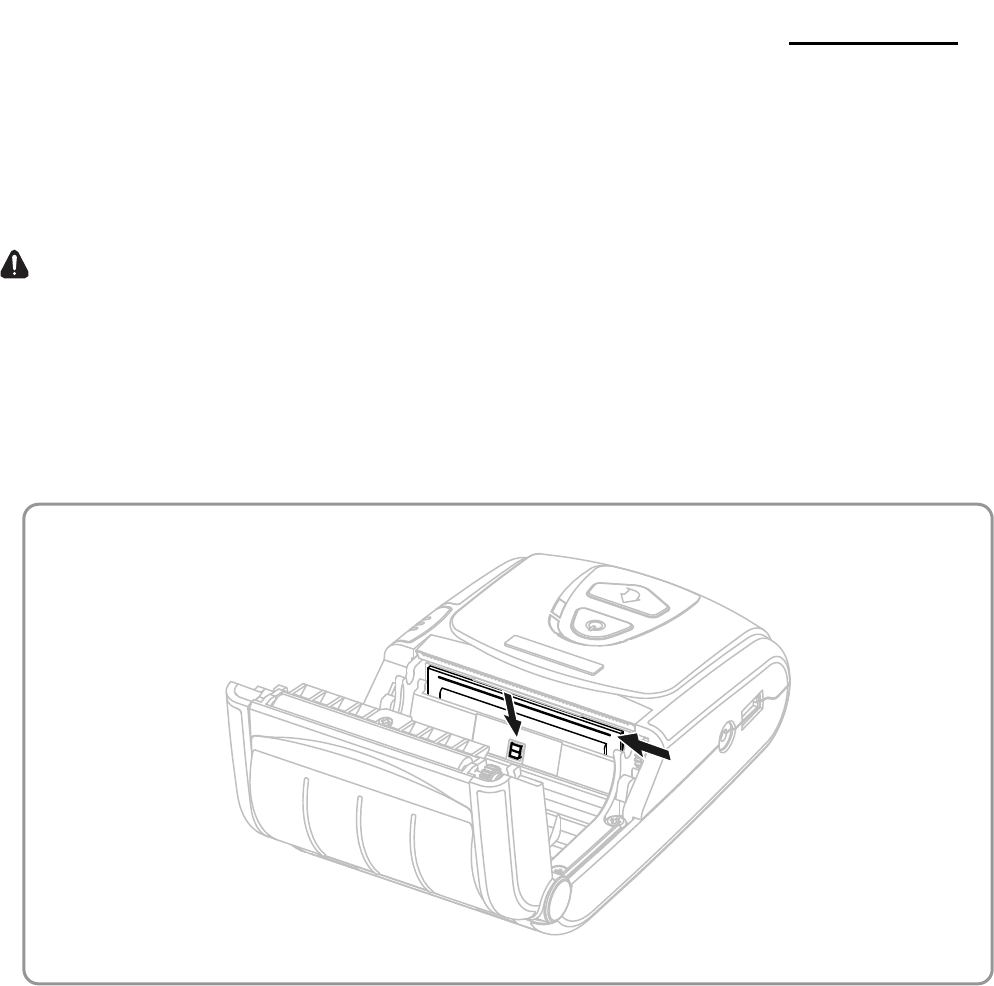
3) Open the external interface cap in the
direction of ③.
4) Connect the battery charger to the power
connector.
CAUTION
The printer may incur serious damage if the
battery charger provided by BIXOLON is not
used. BIXOLON is not legally liable for any such
damages. (The voltage and electrical current
specifications of the printer and battery charger
must match.)
WARNING
Turn off the power before charging the battery
for the printer.
① ②
③
Rev. 1.00 - 13 -
SPP-R200II
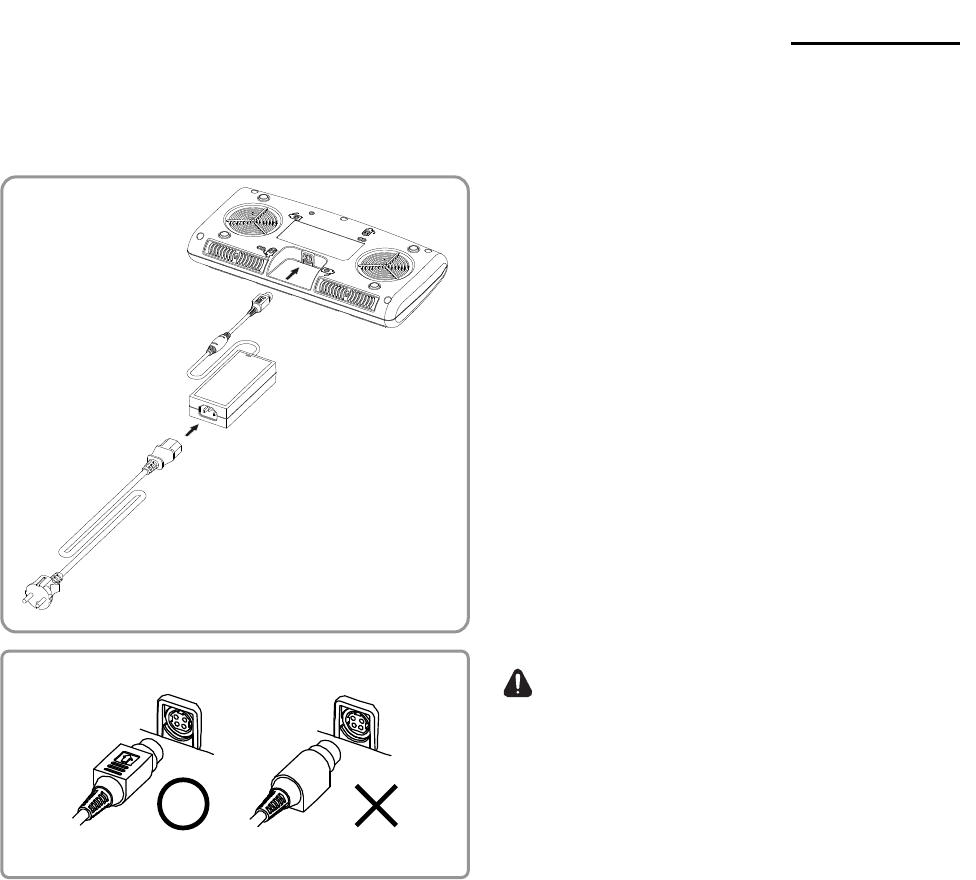
3-2-2 Using Quad Charger/Quad Cradle (Optional)
3-2-2-1 Connecting the cables
1) Connect the power cord to the adaptor,
and Connect the adaptor to the power
connector of the Quad Charger.
2) Plug the power cord into a power Outlet.
Input power is 100 ~ 240VAC, 50/60Hz,
1.4A.
3) When power is supplied, the amber and
green Lamp turn on for two seconds.
WARNING
Use only designated AC/DC adaptor.
(12VDC, 5A)
Rev. 1.00 - 14 -
SPP-R200II
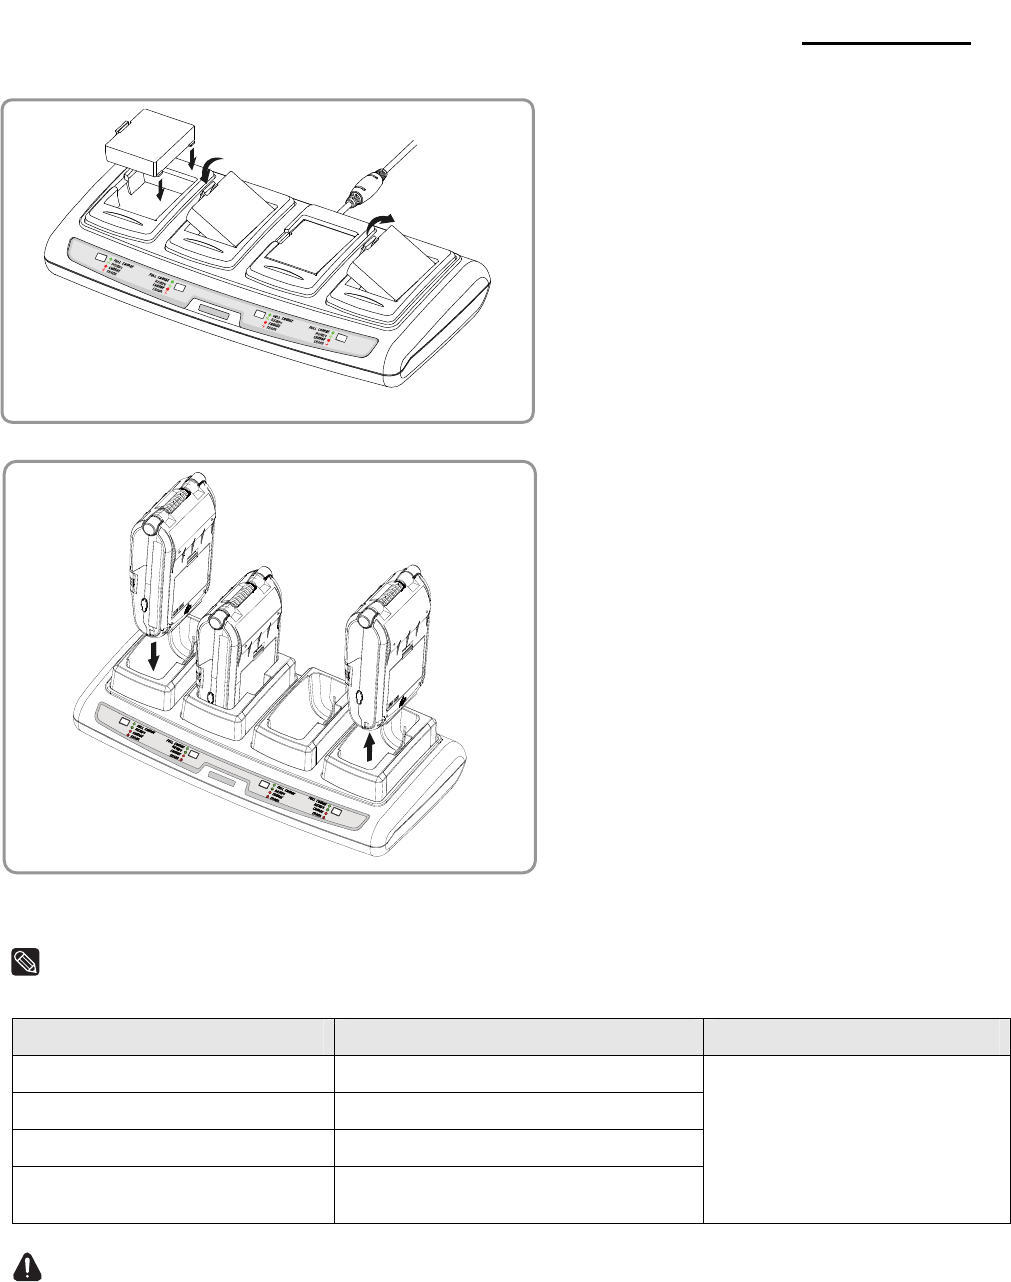
3-2-2-2 Charging Battery (Printer)
1) Fasten batteries via the battery
hooks into the Quad Charger as
shown above.
2) Push the battery in until a snapping
sound is emitted.
3) Charging begins as soon as the
battery is completely inserted.
Batteries are charged to 8.4VDC, 0.8A.
4) Push the hook and pull up to extract
the battery.
1) Turn the printer off.
2) Slide the printer in the Quad Cradle
as shown in the picture.
3) Push the printer in until a clicking
sound is heard.
4) Charging will begin when the printer
is installed.
5) Pull out the printer to separate it.
NOTE
Battery charging status descriptions are as follows.
Lamp Charge Status Charge Time
Red Lamp On Charging
Green Lamp Blinking Over 80% Charged
Green Lamp On Fully Charged
Red Lamp Blinking Error
Replace or Reinstall Battery
2.5 hours
CAUTION
1. If the red lamp of the charger blinks, install the battery again.
2. If the red lamp continues to blink despite several attempts (4 ~ 5 times) to
install the battery, contact your local dealer.
3. The charging time may vary depending on the type of the charger or ambient temperature.
Rev. 1.00 - 15 -
SPP-R200II
3-3 Paper Installation
1) Press the Open button to open the paper
cover.
2) Insert the paper as shown in the image.
(Remove any remaining core of a fully
used paper roll.)
3) Take care to align the paper correctly.
4) Pull the paper out as shown in the image
and close the paper cover.
5) Tear off any excess paper in the direction
of the side of the printer.
Rev. 1.00 - 16 -
SPP-R200II
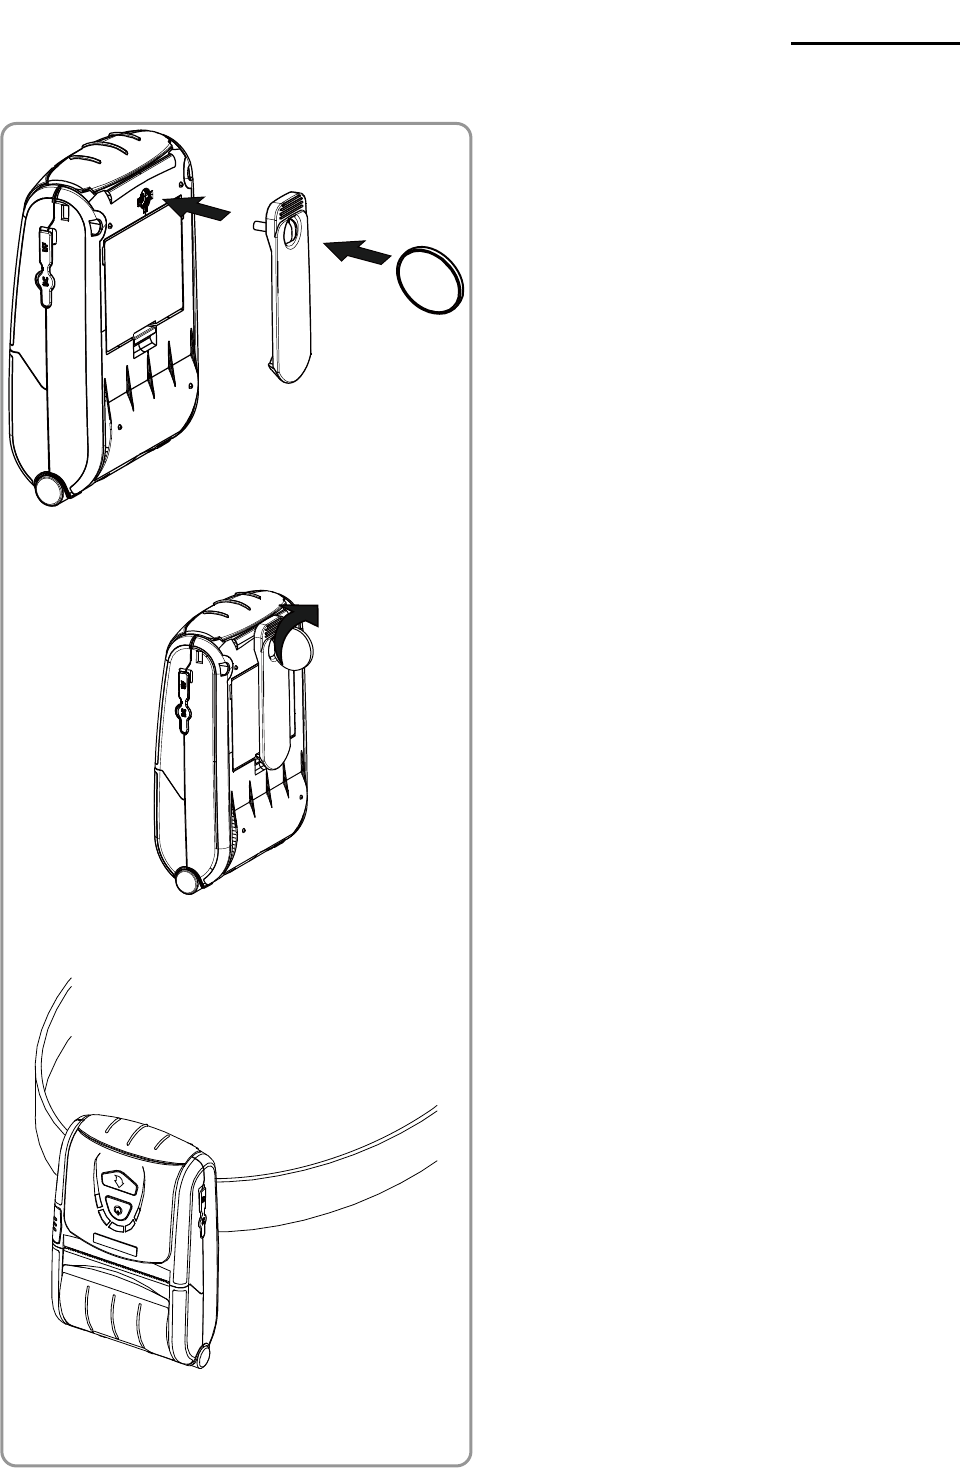
3-4 Using Belt Clip
1) Insert the screw of the belt clip to the belt
clip mounting hole.
2) Fasten the screw of the belt clip with an
object like a coin as shown in the picture.
(Be careful to fasten in the correct
direction.)
3) Insert the clip to the belt.
Belt Clip
Coin
Belt
Rev. 1.00 - 17 -
SPP-R200II
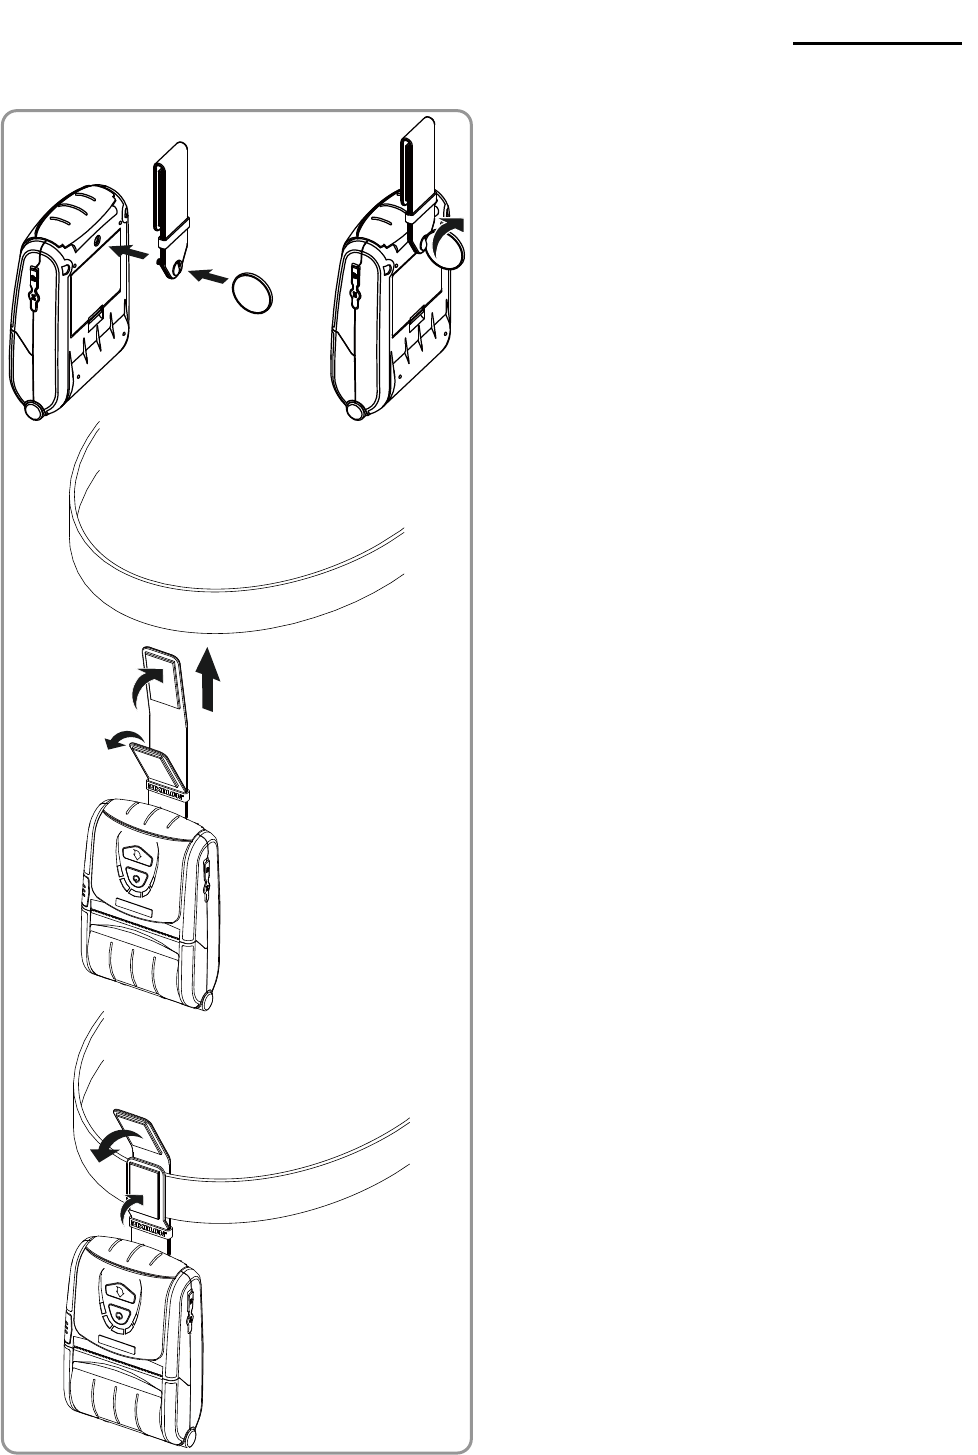
3-5 Using Belt Strap (Optional)
1) Insert the belt strap screw into the belt
strap hole.
2) Use a coin to tighten the belt strap screw
as shown in the image.
3) Undo the belt strap Velcro.
4) Fasten the belt strap to a belt.
5) Close the Velcro as shown in the image.
Belt
Belt Strap
Coin
Belt
Rev. 1.00 - 18 -
SPP-R200II
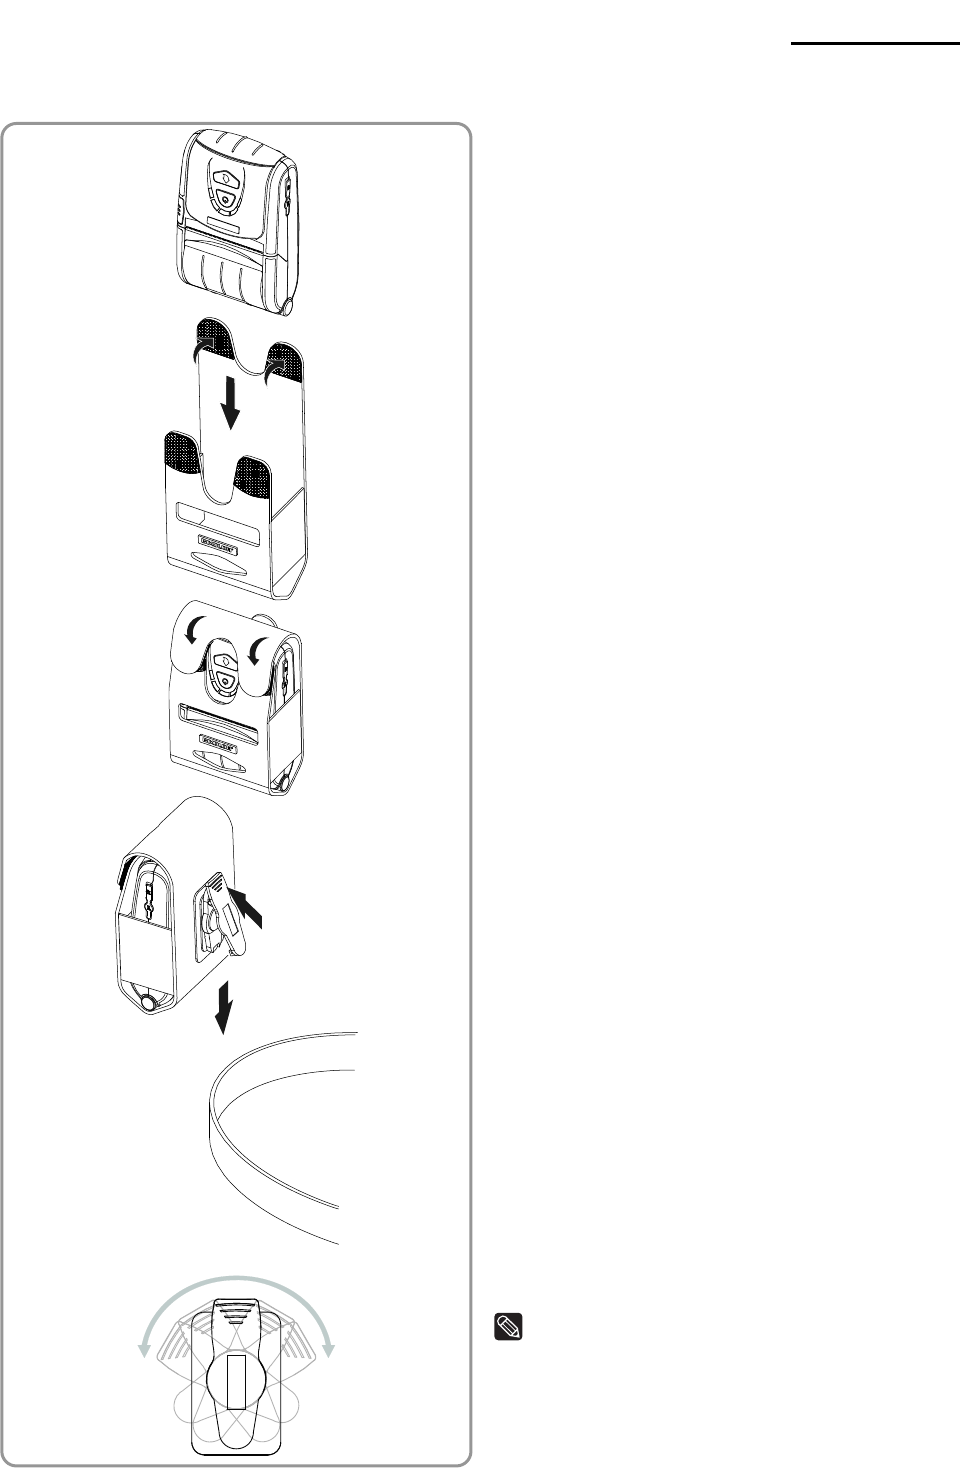
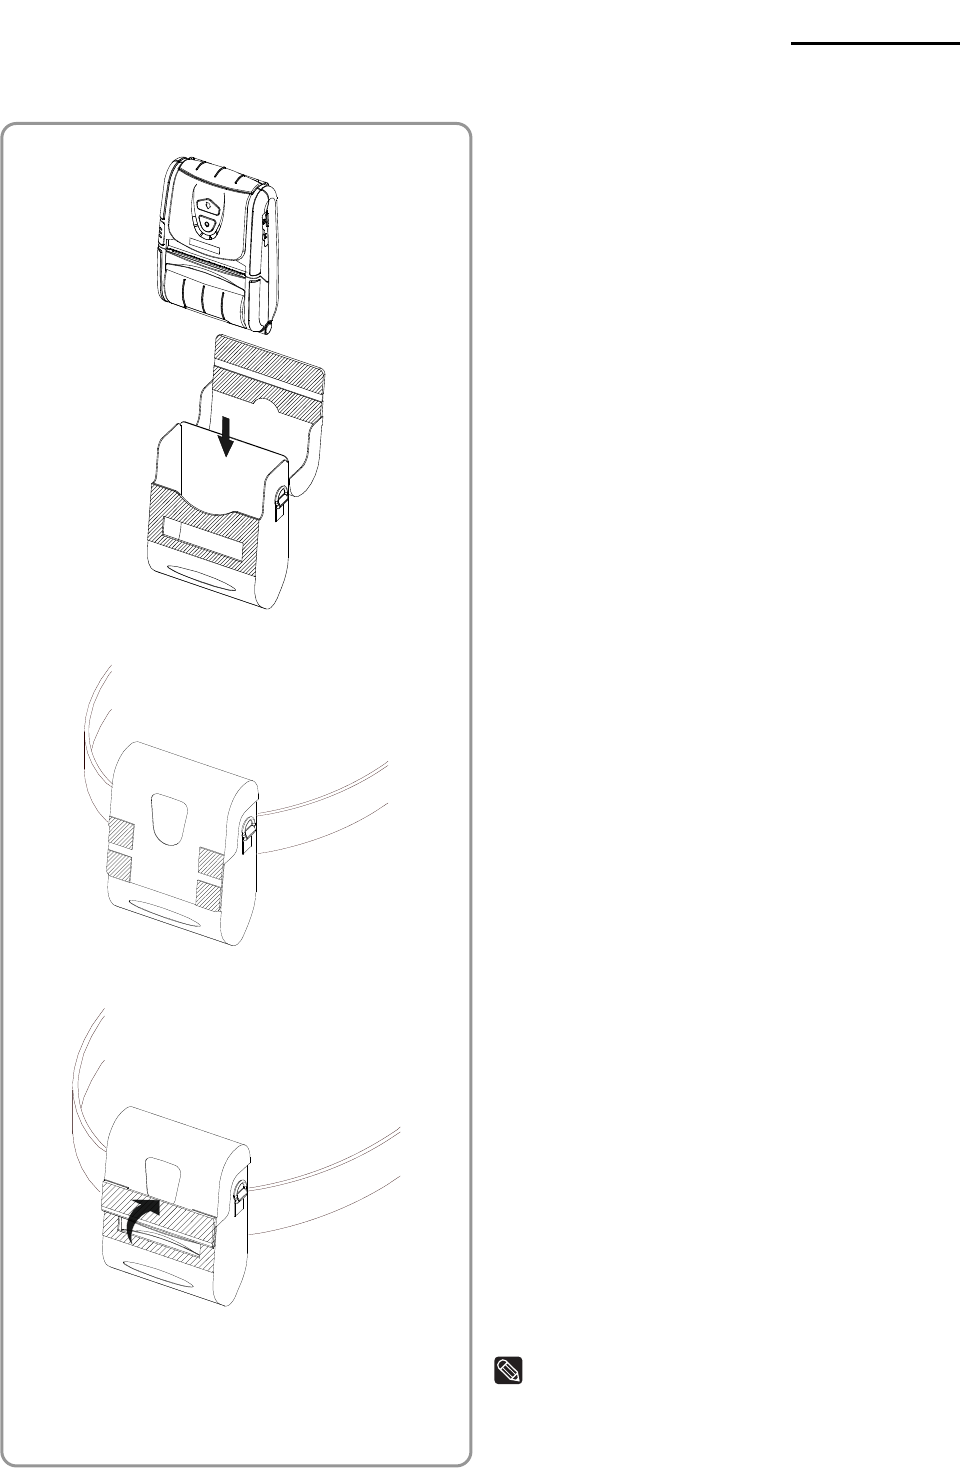
3-6 Using Case (Optional)
1) Open its top cover
2) Insert the printer in the case in the
direction shown in the picture.
3) Close the Velcro.
4) Attach it to the belt using the clip on the
back of the case.
Note
Clip of the case can be rotated in two steps of
30° for each step (up to 60°)
Belt
Rev. 1.00 - 19 -
SPP-R200II
3-7 Protective Case (Optional) Usage
1) Open its top cover.
2) Insert your printer into the protective case
as shown in the figure on the left.
3) Close the Velcro.
4) Attach it to the belt using the clip on the
back of the protection case.
5) Open the paper discharger when using
the printer as shown in the figure.
Note
The clip of the protection case can be rotated
in two steps of 30° for each step (up to 60°)
Belt
Belt
Rev. 1.00 - 20 -
SPP-R200II
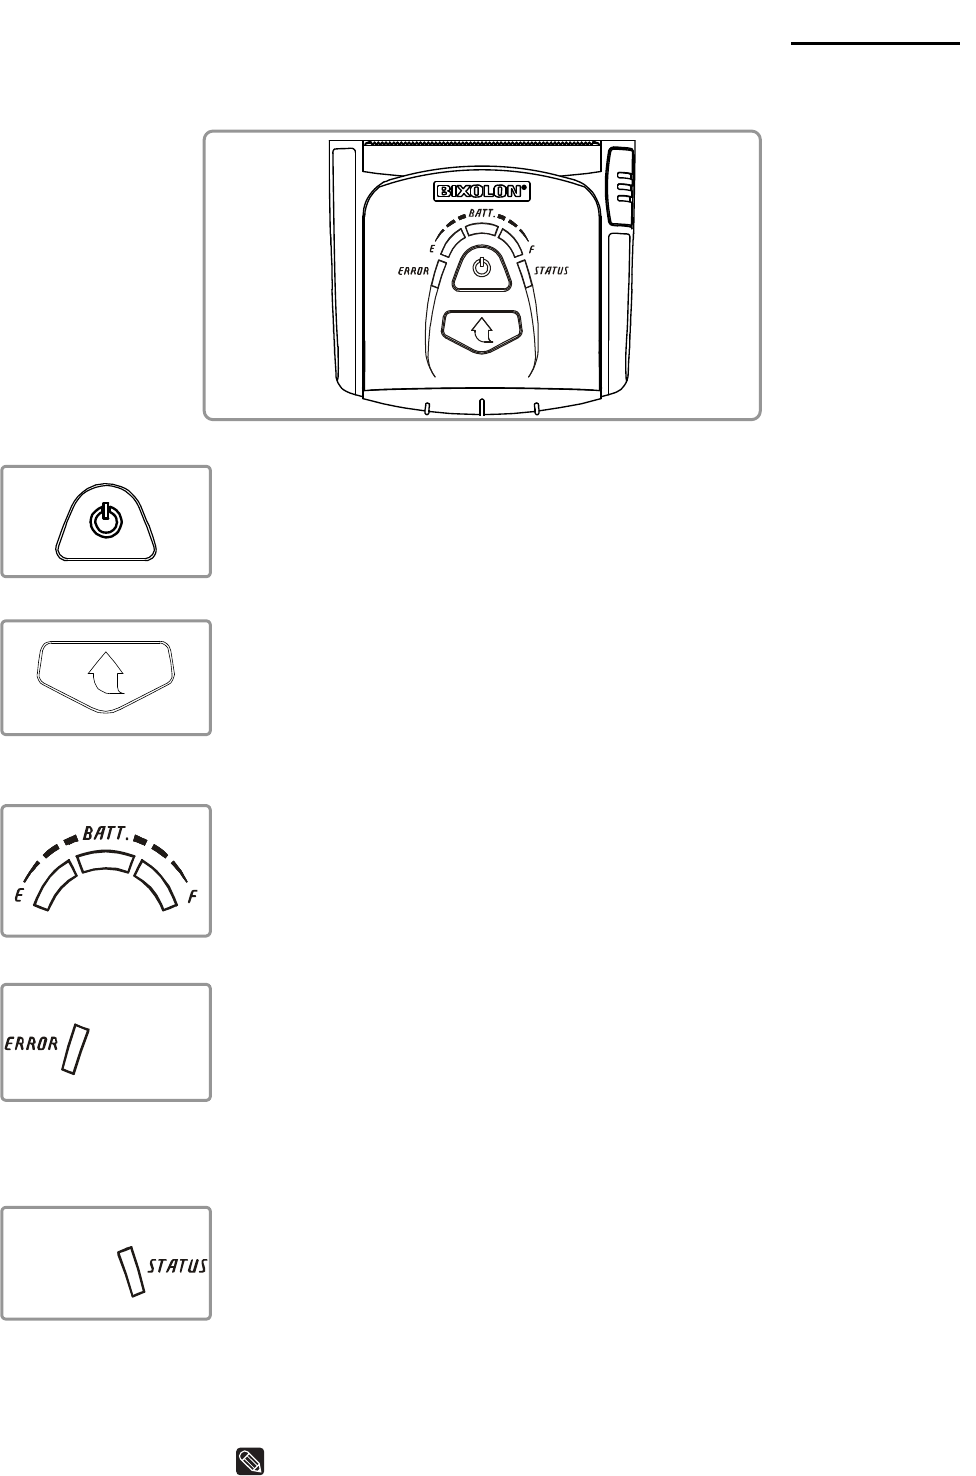
3-8 Control Panel Usage
• Power Button
This button is used to turn the printer on and off.
When the printer is off, pressing this button for approximately 2
seconds will turn the power on. When the printer is on, pressing
this button for approximately 2 seconds will turn the power off.
• Paper Feed Button
This button is used to feed paper manually, take the self-set and
dump hexadecimals.
1) To feed paper manually, press this button.
2) For information on the self-test, refer to “4. Self-Test”.
3) For information on the dump of hexadecimals, refer to “Service
Manual”.
• Battery Status Lamp (Blue or Red)
1) If three blue lamps are lit, the battery is fully charged.
2) If two blue lamps are lit, the battery is half charged.
3) If one blue lamp is lit, the battery is at the lowest charge level.
4) If the red lamp is lit, the battery must be charged or replaced.
• Error Lamp (Left-sided)
1) If the red lamp is lit, the paper cover is open.
2) If the red lamp is blinking, either the paper has been fully used or
the print head is overheated.
(Fill with paper or turn the printer off for at least 10 minutes.)
3) If the red lamp continues to blink, it may indicate a more serious
problem with the product, and thus an authorized service dealer
should be consulted.
• Bluetooth Lamp (Green)
1) When using Bluetooth
If the printer is ready for wireless communication with any
Bluetooth, the green lamp as well as the battery status lamp is
turned on.
2) When using wireless LAN
The right indicator shows the signal strength from wireless LAN.
The green lamp blinks for acceptable signal strength while the red
lamp blinks for weak signal strength.
In power save mode, only the Status lamp is lit.
NOTE
The power saving mode is activated after the first communication, with the
Rev. 1.00 - 21 -
SPP-R200II
default time interval being 10 seconds.
3-9 MSR Usage
1) Press the MSR cover to open.
2) Insert the card as shown in the image
and swipe in the direction of the arrow.
(can be done in both directions)
3) When finished using, press the MSR
cover to close it.
NOTE
If the card does not register, first check to see if
it is properly aligned. When swiping the card,
the recommended swiping speed is
100 ~ 1200 mm/sec.
4. Self-Test
Run the self-test when first setting the printer or when encountering a problem, and check
the following.
- Control Circuit, Mechanisms, Print Quality, ROM Version, and Memory Switch Settings
If no issue is found with the printer after running the self-test, examine the other devices or
peripherals and software. This function is independent of such other devices and software.
• Self-Test Instructions
1) Turn the printer power off and close the printer paper cover.
2) Pressing the paper feed button and power button simultaneously turns the printer on.
3) The printout is produced after releasing the two buttons.
4) To add a printout of the ASCII pattern, press the paper feed button once more.
5) After the ASCII pattern is printed out, the self-test is automatically terminated.

Rev. 1.00 - 22 -
SPP-R200II
• Self-Test Sample (For Bluetooth)
Firmware version :
V01.00 STOB 050412
Butter Capacity : 128K Bytes
Print Density : 100%
Serial Interface
- Baud rate : 115200 bps
Data bits : 8 bits
Parity : None
Stop bit : 1 bit or more
Handshaking : DTR/DSR
Default Codepage : PC437
Print Speed : Max. 80mm/s
Double byte character mode:On
Font : 12 x 24
Paper out Bell : Off
Low Battery Buzzer : On
Power off time : 15 Min
Idle mode time : 10 Sec
MSR data including sentinel
Character mode : None
MSR read mode : Auto TRACK1/2/3
BATT NTC : OK
Memory switch setup status
Memory S/W1 Memory S/W2
1 2 3 4 5 6 7 8 1 2 3 4 5 6 7 8
ON █ █ ON
OFF █ █ █ █ █ █ OFF █ █ █ █ █ █ █ █
Memory S/W3 Memory S/W4
1 2 3 4 5 6 7 8 1 2 3 4 5 6 7 8
ON █ █ █ █ ON
OFF █ █ █ █ OFF █ █ █ █ █ █ █ █
Memory S/W5 Memory S/W6
1 2 3 4 5 6 7 8 1 2 3 4 5 6 7 8
ON █ █ █ █ ON █ █
OFF █ █ █ █ OFF█ █ █ █ █ █
Memory S/W7 Memory S/W8
1 2 3 4 5 6 7 8 1 2 3 4 5 6 7 8
ON █ █ █ ON
OFF █ █ █ █ █ OFF █ █ █ █ █ █ █ █
RF Interface
Bluetooth Firmware version :
4.0.0
Bluetooth BD address :
001901223194
- Auth. & Encry. are enable
- Connection Mode = 2
Not available WLAN
If you want to continue
SELF-TEST printing,
Please press FEED button.
ASCII
!”#$%&’()*+,-./0123456789:;<=>?@
”#$%&’()*+,-./0123456789:;<=>?@A
#$%&’()*+,-./0123456789:;<=>?@AB
$%&’()*+,-./0123456789:;<=>?@ABC
%&’()*+,-./0123456789:;<=>?@ABCD
&’()*+,-./0123456789:;<=>?@ABCDE
’()*+,-./0123456789:;<=>?@ABCDEF
()*+,-./0123456789:;<=>?@ABCDEFG
)*+,-./0123456789:;<=>?@ABCDEFGH
*+,-./0123456789:;<=>?@ABCDEFGHI
+,-./0123456789:;<=>?@ABCDEFGHIJ
,-./0123456789:;<=>?@ABCDEFGHIJK
-./0123456789:;<=>?@ABCDEFGHIJKL
./0123456789:;<=>?@ABCDEFGHIJKLM
/0123456789:;<=>?@ABCDEFGHIJKLMN
0123456789:;<=>?@ABCDEFGHIJKLMNO
123456789:;<=>?@ABCDEFGHIJKLMNOP
23456789:;<=>?@ABCDEFGHIJKLMNOPQ
3456789:;<=>?@ABCDEFGHIJKLMNOPQR
456789:;<=>?@ABCDEFGHIJKLMNOPQRS
56789:;<=>?@ABCDEFGHIJKLMNOPQRST
6789:;<=>?@ABCDEFGHIJKLMNOPQRSTU
789:;<=>?@ABCDEFGHIJKLMNOPQRSTUV
89:;<=>?@ABCDEFGHIJKLMNOPQRSTUVW
9:;<=>?@ABCDEFGHIJKLMNOPQRSTUVWX
PC437
Ç
üéâäàåçêëèïîìÄÅÉæÆôöòûùÿÖÜ¢£¥
Pt
ƒ
ü
éâäàåçêëèïîìÄÅ
É
æÆôöòûùÿÖÜ¢£¥
Pt
ƒ
á
é
âäàåçêëèïîìÄÅ
É
æÆôöòûùÿÖÜ¢£¥
Pt
ć
â
äàåçêëèïîìÄÅ
É
æÆôöòûùÿÖÜ¢£¥
Pt
ƒáí
ó
ä
àåçêëèïîìÄÅ
É
æÆôöòûùÿÖÜ¢£¥
Pt
ƒáíó
ú
à
åçêëèïîìÄÅ
É
æÆôöòûùÿÖÜ¢£¥
Pt
ƒáíóú
ñ
å
çêëèïîìÄÅ
É
æÆôöòûùÿÖÜ¢£¥
Pt
ƒáíóúñ
Ñ
ç
êëèïîìÄÅ
É
æÆôöòûùÿÖÜ¢£¥
Pt
ƒáíóúñÑ
ª
ê
ëèïîìÄÅ
É
æÆôöòûùÿÖÜ¢£¥
Pt
ƒáíóúñѪ
º
ë
èïîìÄÅ
É
æÆôöòûùÿÖÜ¢£¥
Pt
ƒáíóúñѪº
¿
è
ïîìÄÅ
É
æÆôöòûùÿÖÜ¢£¥
Pt
ƒáíóúñѪº¿
┌
ï
îìÄÅ
É
æÆôöòûùÿÖÜ¢£¥
Pt
ƒáíóúñѪº¿┌
┐
î
ìÄÅ
É
æÆôöòûùÿÖÜ¢£¥
Pt
ƒáíóúñѪº¿
┌
┐½
ì
ÄÅ
É
æÆôöòûùÿÖÜ¢£¥
Pt
ƒáíóúñѪº¿┌
┐
½
¼
Ä
Å
É
æÆôöòûùÿÖÜ¢£¥
Pt
ƒáíóúñѪº¿┌
┐
½¼
ÅÉ
æÆôöòûùÿÖÜ¢£¥
Pt
ƒáíóúñѪº¿┌
┐
½¼¡
«
É
æÆôöòûùÿÖÜ¢£¥
Pt
ƒáíóúñѪº¿┌
┐
½¼¡«
»
æ
ÆôöòûùÿÖÜ¢£¥
Pt
ƒáíóúñѪº¿┌
┐
½¼¡«»
▓
Æ
ôöòûùÿÖÜ¢£¥
Pt
ƒáíóúñѪº¿
┌
┐
½¼¡«»
▓▒
ô
öòûùÿÖÜ¢£¥
Pt
ƒáíóúñѪº¿
┌
┐
½¼¡«»
▓▒░
ö
òûùÿÖÜ¢£¥
Pt
ƒáíóúñѪº¿┌ ┐½¼¡«»▓▒░
┃
ò
ûùÿÖÜ¢£¥
Pt
ƒáíóúñѪº¿┌ ┐½¼¡«»▓▒░┃
┤
û
ùÿÖÜ¢£¥
Pt
ƒáíóúñѪº¿┌ ┐½¼¡«»▓▒░┃
┤╡
ù
ÿÖÜ¢£¥
Pt
ƒáíóúñѪº¿┌ ┐½¼¡«»▓▒░┃
┤╡╢
ÿ
ÖÜ¢£¥
Pt
ƒáíóúñѪº¿┌┐½¼¡«»▓▒░┃
┤╡╢╖
*** Completed ***

Rev. 1.00 - 23 -
SPP-R200II
• Self-Test Sample (For Wireless LAN)
Firmware version :
V01.00 STOB 050412
Butter Capacity : 128K Bytes
Print Density : 100%
Serial Interface
- Baud rate : 115200 bps
Data bits : 8 bits
Parity : None
Stop bit : 1 bit or more
Handshaking : DTR/DSR
Default Codepage : PC437
Print Speed : Max. 80mm/s
Double byte character mode:On
Font : 12 x 24
Paper out Bell : Off
Low Battery Buzzer : On
Power off time : 15 Min
Idle mode time : 10 Sec
MSR data including sentinel
Character mode : None
MSR read mode : Auto TRACK1/2/3
BATT NTC : OK
Memory switch setup status
Memory S/W1 Memory S/W2
1 2 3 4 5 6 7 8 1 2 3 4 5 6 7 8
ON █ █ ON
OFF █ █ █ █ █ █ OFF █ █ █ █ █ █ █ █
Memory S/W3 Memory S/W4
1 2 3 4 5 6 7 8 1 2 3 4 5 6 7 8
ON █ █ █ █ ON
OFF █ █ █ █ OFF █ █ █ █ █ █ █ █
Memory S/W5 Memory S/W6
1 2 3 4 5 6 7 8 1 2 3 4 5 6 7 8
ON █ █ █ █ ON █ █
OFF █ █ █ █ OFF█ █ █ █ █ █
Memory S/W7 Memory S/W8
1 2 3 4 5 6 7 8 1 2 3 4 5 6 7 8
ON █ █ █ ON
OFF █ █ █ █ █ OFF █ █ █ █ █ █ █ █
RF Interface
Not available Bluetooth
WLAN firmware version :
Ver 1.2
WLAN MAC address :
cc7a30020517
- System Name : SPP-R200II
- Network Mode : Adhoc
- Authentication : Open
- Encryption : None
- ESSID : BIXOLON_adhoc
- DHCP : Disabled
- IP : 192.168.1.1
- Netmask : 255.255.255.0
- Gateway : 192.168.1.2
- Port : 9100
- HTTPS : Disabled
- Telnet : Disabled
- FTP : Disabled
- SNMP : Disabled
If you want to continue
SELF-TEST printing,
Please press FEED button.
ASCII
!”#$%&’()*+,-./0123456789:;<=>?@
”#$%&’()*+,-./0123456789:;<=>?@A
#$%&’()*+,-./0123456789:;<=>?@AB
$%&’()*+,-./0123456789:;<=>?@ABC
%&’()*+,-./0123456789:;<=>?@ABCD
&’()*+,-./0123456789:;<=>?@ABCDE
’()*+,-./0123456789:;<=>?@ABCDEF
()*+,-./0123456789:;<=>?@ABCDEFG
)*+,-./0123456789:;<=>?@ABCDEFGH
*+,-./0123456789:;<=>?@ABCDEFGHI
+,-./0123456789:;<=>?@ABCDEFGHIJ
,-./0123456789:;<=>?@ABCDEFGHIJK
-./0123456789:;<=>?@ABCDEFGHIJKL
./0123456789:;<=>?@ABCDEFGHIJKLM
/0123456789:;<=>?@ABCDEFGHIJKLMN
0123456789:;<=>?@ABCDEFGHIJKLMNO
123456789:;<=>?@ABCDEFGHIJKLMNOP
23456789:;<=>?@ABCDEFGHIJKLMNOPQ
3456789:;<=>?@ABCDEFGHIJKLMNOPQR
456789:;<=>?@ABCDEFGHIJKLMNOPQRS
56789:;<=>?@ABCDEFGHIJKLMNOPQRST
6789:;<=>?@ABCDEFGHIJKLMNOPQRSTU
789:;<=>?@ABCDEFGHIJKLMNOPQRSTUV
89:;<=>?@ABCDEFGHIJKLMNOPQRSTUVW
9:;<=>?@ABCDEFGHIJKLMNOPQRSTUVWX
PC437
Ç
üéâäàåçêëèïîìÄÅÉæÆôöòûùÿÖÜ¢£¥
Pt
ƒ
ü
éâäàåçêëèïîìÄÅ
É
æÆôöòûùÿÖÜ¢£¥
Pt
ƒ
á
é
âäàåçêëèïîìÄÅ
É
æÆôöòûùÿÖÜ¢£¥
Pt
ć
â
äàåçêëèïîìÄÅ
É
æÆôöòûùÿÖÜ¢£¥
Pt
ƒáí
ó
ä
àåçêëèïîìÄÅ
É
æÆôöòûùÿÖÜ¢£¥
Pt
ƒáíó
ú
à
åçêëèïîìÄÅ
É
æÆôöòûùÿÖÜ¢£¥
Pt
ƒáíóú
ñ
å
çêëèïîìÄÅ
É
æÆôöòûùÿÖÜ¢£¥
Pt
ƒáíóúñ
Ñ
ç
êëèïîìÄÅ
É
æÆôöòûùÿÖÜ¢£¥
Pt
ƒáíóúñÑ
ª
ê
ëèïîìÄÅ
É
æÆôöòûùÿÖÜ¢£¥
Pt
ƒáíóúñѪ
º
ë
èïîìÄÅ
É
æÆôöòûùÿÖÜ¢£¥
Pt
ƒáíóúñѪº
¿
è
ïîìÄÅ
É
æÆôöòûùÿÖÜ¢£¥
Pt
ƒáíóúñѪº¿
┌
ï
îìÄÅ
É
æÆôöòûùÿÖÜ¢£¥
Pt
ƒáíóúñѪº¿┌
┐
î
ìÄÅ
É
æÆôöòûùÿÖÜ¢£¥
Pt
ƒáíóúñѪº¿
┌
┐½
ì
ÄÅ
É
æÆôöòûùÿÖÜ¢£¥
Pt
ƒáíóúñѪº¿┌
┐
½
¼
Ä
Å
É
æÆôöòûùÿÖÜ¢£¥
Pt
ƒáíóúñѪº¿┌
┐
½¼
ÅÉ
æÆôöòûùÿÖÜ¢£¥
Pt
ƒáíóúñѪº¿┌
┐
½¼¡
«
É
æÆôöòûùÿÖÜ¢£¥
Pt
ƒáíóúñѪº¿┌
┐
½¼¡«
»
æ
ÆôöòûùÿÖÜ¢£¥
Pt
ƒáíóúñѪº¿┌
┐
½¼¡«»
▓
Æ
ôöòûùÿÖÜ¢£¥
Pt
ƒáíóúñѪº¿
┌
┐
½¼¡«»
▓▒
ô
öòûùÿÖÜ¢£¥
Pt
ƒáíóúñѪº¿
┌
┐
½¼¡«»
▓▒░
ö
òûùÿÖÜ¢£¥
Pt
ƒáíóúñѪº¿┌ ┐½¼¡«»▓▒░
┃
ò
ûùÿÖÜ¢£¥
Pt
ƒáíóúñѪº¿┌ ┐½¼¡«»▓▒░┃
┤
û
ùÿÖÜ¢£¥
Pt
ƒáíóúñѪº¿┌ ┐½¼¡«»▓▒░┃
┤╡
ù
ÿÖÜ¢£¥
Pt
ƒáíóúñѪº¿┌ ┐½¼¡«»▓▒░┃
┤╡╢
ÿ
ÖÜ¢£¥
Pt
ƒáíóúñѪº¿┌┐½¼¡«»▓▒░┃
┤╡╢╖
*** Completed ***

Rev. 1.00 - 24 -
SPP-R200II
5. Label Printing Function
5-1 Label Function Setting
Label paper and black mark paper available at the label mode.
• Setting Operations
1) Turn on the printer power.
2) Open the paper cover and press and hold down the paper feed button for longer than
two seconds.
3) After the buzzer tone is emitted, insert paper and close the cover.
4) Repeat the steps above to return to receipt mode.
• Setting Via Memory Switch
- Please refer to the memory switch changing section of the Commands Manual.
5-2 Auto Calibration Function
The label printing function requires the recognition of label paper gaps and black mark
paper black bar in order to print.
If label paper gaps are not properly recognized, use the auto calibration function.
• Auto Calibration Instructions
1) Turn the printer power off while in label print mode.
2) Press and hold down the paper feed button and then press the power button.
3) After the following printout is outputted, press the power button to perform auto
calibration.
Select the mode
Auto Calibration: Power Button
Self Test: Feed Button
4) Three pages of label paper are outputted when performing auto calibration.
Rev. 1.00 - 25 -
SPP-R200II
6. Peripherals Connection
This product can communicate with other devices via Bluetooth communication and cable.
6-1 Bluetooth Connection
1) The printer can be connected to devices
equipped with Bluetooth communication
capacity (PDAs, PCs, etc.).
2) Use the Bluetooth connection function
supported by the device to connect to the
printer.
3) The printer can be connected to other
stations, such as PDAs and PCs
supporting wireless LAN communication
in Ad-hoc mode and AP in Infrastructure
mode.
NOTE
Refer to the Bluetooth Wireless LAN Manual
for detailed information on its connection.
You can check the bluetooth environment
(authentication, encryption, connection mode)
and the wireless LAN environment (IP, SSID,
authentication, encryption) via the self-test
page.
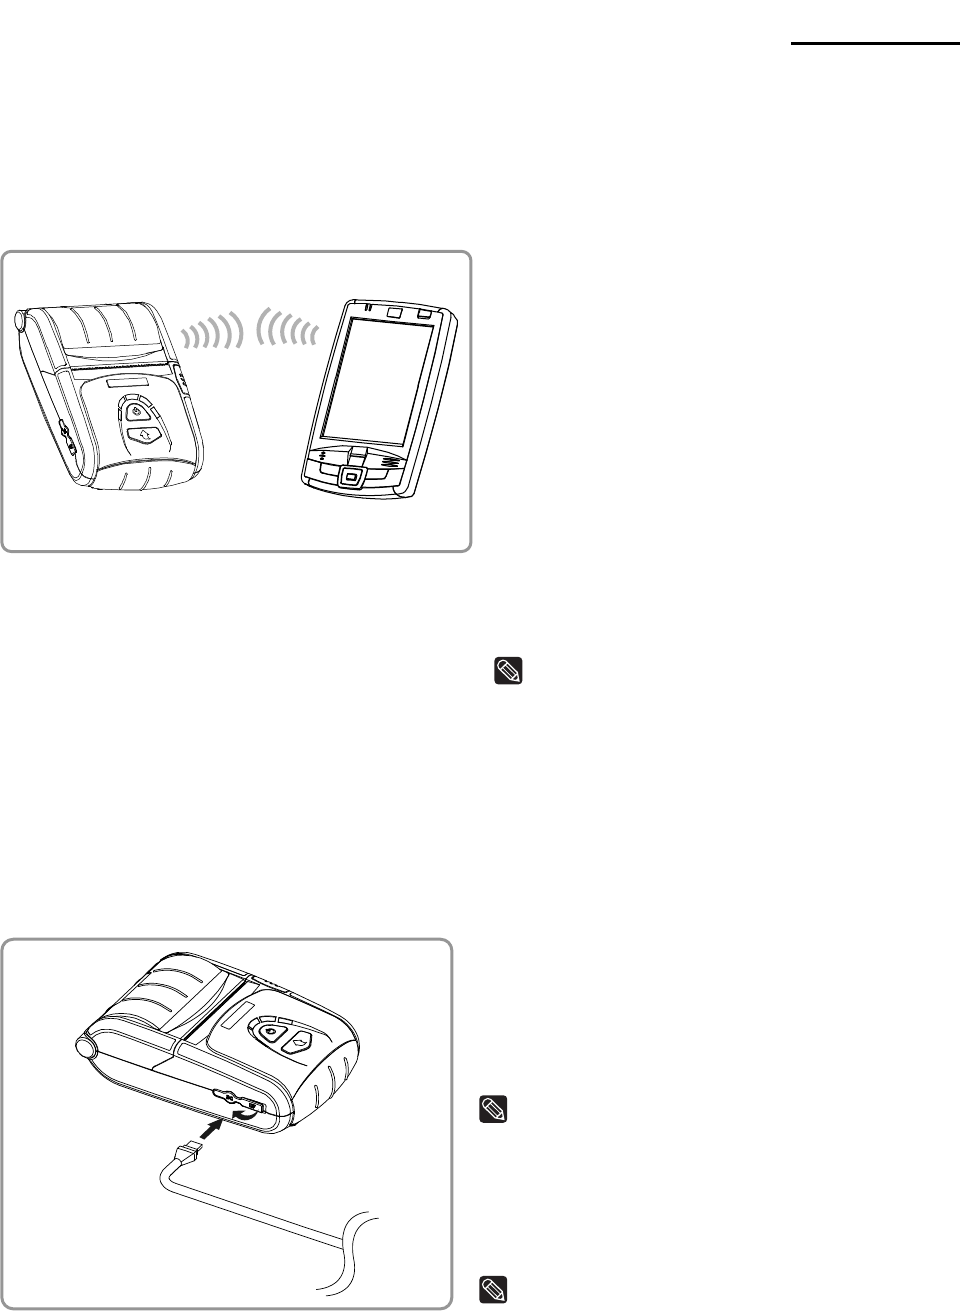
6-2 Interface Cable Connection
1) Open the Interface Cap ①.
2) Connect the interface cable (optional) ② to
the cable connector of the printer.
NOTE
Use only cables (optional) provided by BIXOLON
(USB, Serial).
3) Connect the interface cable to the USB
port of the device (PDAs, PCs, etc.).
NOTE
The interface cable that can be connected with
the printer is available in both USB and Serial
type.
Refer to the service manual for detailed interface
cable specifications.
①
②
Rev. 1.00 - 26 -
SPP-R200II
7. Printer Cleaning
If the interior of the printer is dusty, print quality can decline.
In such a case, follow the instructions below to clean the printer.
CAUTION
• Make sure to turn the printer power off prior to cleaning.
• As the print head gets very hot during printing, if intending to clean the print head, turn
the printer power off and wait approximately 10 minute before commencement.
• When cleaning the print head, take care not to touch the heated portion of the print head.
→ The print head is susceptible to damage from static electricity, etc.
• Take care not to allow the print head to become scratched and/or damaged in any way.
1) Open the paper cover and remove any paper that may be present.
2) Wipe the print head with a cleaning pen.
3) Use a cloth moistened with an alcohol solution to clean the paper sensor are and
remove any paper remnants and/or dust.
4) Insert paper into the printer 1~2 minutes after completing the cleaning process and
close the printer cover.

Rev. 1.00 - 27 -
SPP-R200II
8. Appendix
8-1 Specifications
Item Description
Printing Method Thermal printing
Printing Speed 90 mm/sec (Receipt Paper)
Resolution 203 DPI
Paper Supply
Mode Easy paper loading
Character Size Font A: 12 × 24 Font B: 9 × 17 Font C: 9 × 24
Characters
Per Line Font A: 32 Font B/C: 42
Character Set
English: 95
Expanded Graphics: Standard(ENG) -128 × 30 pages
Others(KOR,CHN,JPN) - 128 × 20 pages
International: 32
Barcode 1 Dimension: UPC A, UPC E, CODE 39, CODE 93, Code
128, EAN 8, EAN 13, ITF, Codabar
2 Dimension: PDF417, DATAMATRIX, MAXI, QR
Emulation BXL/POS
Driver Windows XP(32bit) / WEPOS / 2003 Server(32bit) /
VISTA(32bit) / 2008 Server(32bit) / 7 (32bit)
SDK Windows XP / WEPOS / 2003 Server /
VISTA / 2008 Server / 7 / CE 3.0 and later
Sensor Paper End, Paper Cover Open
Cutter Type Tear-Bar
Printing
Language User language supported
Paper Type Thermal paper
Width 58 ± 0.5 mm (2.28” ± 0.2”)
Diameter Max. ø40 mm (1.57”)
Paper
Thickness 0.07 ± 0.003 mm
TPH 50 km
Reliability Battery Rechargeable up to 500 times
Communications Interface
Serial/USB, Bluetooth Class2 V3.0
Wireless Lan 802.11 b/g
* Communication is enabled only for devices with Bluetooth
or Wireless LAN function.
Input Voltage: 100 ~ 250 VAC
Current: 0.5A (Max. at 110VA)
Battery
Charger Output Voltage: 8.4 VDC Current: 0.8A
* Charging current and charging time may depend on the type
(option) of the charger.
Type Lithium-ion
Output Voltage: 7.4 VDC (Available 8.4 ~ 6.8VDC)
Capacity: 1200 mAh
Battery
Charging Time 2.5 hours
Temperature Printer: -10~50 (14~122 )℃℉
Battery: 0~40 (32~104 )℃℉
Usage
Conditions Humidity Printer: 10~80% RH (No condensation)
Battery: 20~70% RH(Non-condensing, refer to the tempera
ture conditions on page 8)
Dimensions Printer 79.5mm × 126.7mm × 43.6mm
(3.13″ × 4.99″ × 1.72″)
Weight Printer
Printer : 186g (0.42lbs)
Printer + Battery : 239g (0.53lbs)
Printer + Battery + Paper : 296g (0.66lbs)
Package: approx. 1000g (2.2lbs)
Basic Package Battery, Battery Charger, Belt Clip, Paper
Accessories Sold Separately Battery, Case, Protection Case, Belt Strap, Cleaning Pen,
Interface Cable, Shoulder Strap, Quad Cradle, Quad
Charger, Wall mount for QuadCharger(RWM-350)
* This equipment is indooruse and all the communication hiring are limited to inside of the building.
* The switch is the disconnecting device. Turn off switch from any hazard.

Rev. 1.00 - 28 -
SPP-R200II
8-2 Certification
1) WEEE (Waste Electrical and Electric Equipment)
This mark shown on the product or its literature indicates that the
corresponding item should not be discarded at the end of its working life with
other household waste. To prevent possible harm to the environment or
human health from uncontrolled waste disposal, please separate marked
items from other types of waste and recycle them responsibly to promote the
sustained reuse of material resources. Household users should contact either the
retailer where they purchased this product, or their local government office for details
of where and how they can conduct environmentally safe recycling of such items.
Commercial users should contact their suppliers and check the terms and conditions of
purchase contracts. This product should not be combined with other commercial
waste for disposal.
2) This equipment is indoor use and all the communication hiring are limited to
inside of the building.
3) The switch is the disconnecting device. Turn off switch from any hazard.
Warning
Lithium-lon Battery pack
<Warning> The battery has the potential risk of overheating, fire and/or explosion. To avoid
such risks, observe the following instructions:
• A visibly swollen battery may be dangerous. Contact BIXOLON or your local dealer.
• Only use an eligible charger.
• Keep away from open flames. (Do not place in a microwave.)
• Do not leave the battery pack inside a vehicle in summertime.
• Do not store or use in a hot and humid place like a sauna with sleeping rooms.
• Do not place the battery pack on a quilt, an electric blanket or a carpet for a long time.
• Do not store the battery pack switched on in an enclosed place for a long time.
• Do not allow the battery port to touch metal items, such as necklace, coin, key or clock etc.
• Use the lithium secondary cell guaranteed by mobile phone manufacturer or BIXOLON.
• Do not disassemble, compress or pierce the battery pack.
• Do not drop the battery pack from a high place or subject it to strong shock.
• Do not expose the battery to high temperatures over 60oC.
• Do not expose to humidity.
Disposal Directions
• Do not dispose of waste battery packs recklessly.
• Do not burn or throw in fire to dispose of the battery pack.
There is a risk of fire and/or explosion.
• How to dispose of battery packs may vary depending on countries or regions.
Dispose of it in the correct method.
Recommendation for Charging
• Do not charge your battery pack in a way not mentioned in the instruction manual.
Doing so may result in fire or explosion.

Rev. 1.00 - 29 -
SPP-R200II
8-3 Label Types
The labels used on this product are composed of the following materials;
• BIXOLON logo label: PC
• Rating Label: PP
• Other labels: PET
FCC compliance Information
This device complies with part 15 of FCC Rules. Operation is subject to the following two
conditions: (1) This device may not cause harmful interference, and (2) This device must
accept any interference received, including interference that may cause undesired
operation.
Information to the user
NOTE: This equipment has been tested and found to comply with the limits for a Class B
digital device, pursuant to part 15 of the FCC Rules.
These limits are designed to provide reasonable protection against harmful interference in
a residential installation.
This equipment generates, uses and can radiate radio frequency energy and, if not
installed and used in accordance with the instructions, may cause harmful interference to
radio communications. However, there is no guarantee that interference will not occur in a
particular installation. If this equipment does cause harmful interference to radio or
television reception, which can be determined by turning the equipment off and on, the
user is encouraged to try to correct the interference by one or more of the following
measures:
- Reorient or relocate the receiving antenna.
- Increase the separation between the equipment and receiver.
- Connect the equipment into an outlet on a circuit different from that to which the
receiver is connected.
- Consult the dealer or an experienced radio/TV technician for help.
CAUTION: Any changes or modifications not expressly approved by the party responsible for compliance could
void the user's authority to operate this equipment.