BIXOLON SPP-R400 Mobile printer User Manual
BIXOLON Co.,Ltd. Mobile printer
UserManual.wiki
>
BIXOLON
>
SPP-R400 User Manual
>
User manual
Contents
1.
User manual
2.
User Manual
User manual
Navigation menu
Upload a User Manual
Namespaces
Wiki Guide
HTML
PDF
Info
Views
User Manual
Discussion / Help
Navigation
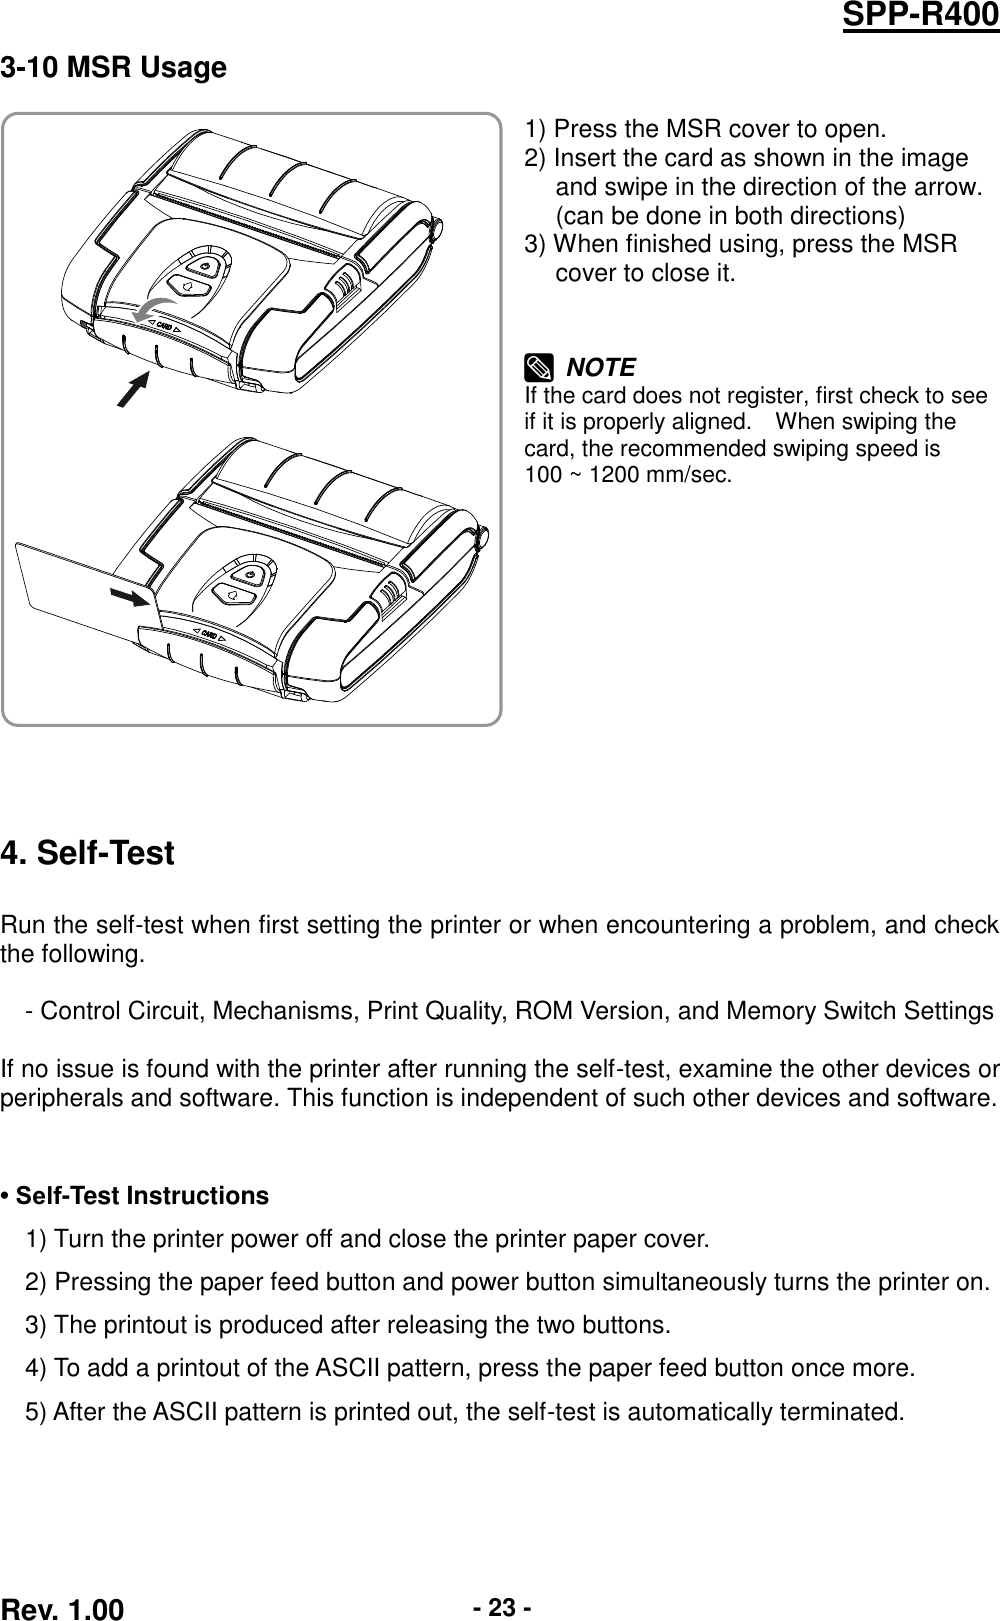
![Rev. 1.00 - 24 - SPP-R400 • Self-Test Sample (For Bluetooth) Firmware version : V01.00 STOB 050812 Butter Capacity : 128K Bytes Print Density : 100% Bluetooth Interface - Baud rate : 115200 bps Serial Interface - Baud rate : 115200 bps Data bits : 8 bits Parity : None Stop bit : 1 bit or more Handshaking : DTR/DSR Default Codepage : PC437 Print Speed : 80mm/s Double byte character mode:Off Font : 12 x 24 Paper out Bell : Off Low Battery Buzzer : On Power off time : 15 Min Idle mode time : 10 Sec Black Mark sensor : Front side of paper MSR data including sentinel Character mode : None MSR read mode : Auto TRACK1/2/3 Memory switch setup status Memory S/W1 Memory S/W2 1 2 3 4 5 6 7 8 1 2 3 4 5 6 7 8 ON █ █ ON OFF █ █ █ █ █ █ OFF █ █ █ █ █ █ █ █ Memory S/W3 Memory S/W4 1 2 3 4 5 6 7 8 1 2 3 4 5 6 7 8 ON █ █ █ █ ON OFF █ █ █ █ OFF █ █ █ █ █ █ █ █ Memory S/W5 Memory S/W6 1 2 3 4 5 6 7 8 1 2 3 4 5 6 7 8 ON █ █ █ █ ON █ █ OFF █ █ █ █ OFF █ █ █ █ █ █ Memory S/W7 Memory S/W8 1 2 3 4 5 6 7 8 1 2 3 4 5 6 7 8 ON █ █ █ ON OFF █ █ █ █ █ OFF █ █ █ █ █ █ █ █ RF Interface BT embedded Bluetooth firmware version : 4.0.0 Bluetooth BD address : 74F07DB00162 - Auth. & Encry. are enable - Connection Mode = 2 Not available WLAN If you want to continue SELF-TEST printing, please press FEED button. ASCII !"#$%&'()*+,-./0123456789:;<=>?@ABCDEFGHIJKLMNOP "#$%&'()*+,-./0123456789:;<=>?@ABCDEFGHIJKLMNOPQ #$%&'()*+,-./0123456789:;<=>?@ABCDEFGHIJKLMNOPQR $%&'()*+,-./0123456789:;<=>?@ABCDEFGHIJKLMNOPQRS %&'()*+,-./0123456789:;<=>?@ABCDEFGHIJKLMNOPQRST &'()*+,-./0123456789:;<=>?@ABCDEFGHIJKLMNOPQRSTU '()*+,-./0123456789:;<=>?@ABCDEFGHIJKLMNOPQRSTUV ()*+,-./0123456789:;<=>?@ABCDEFGHIJKLMNOPQRSTUVW )*+,-./0123456789:;<=>?@ABCDEFGHIJKLMNOPQRSTUVWX *+,-./0123456789:;<=>?@ABCDEFGHIJKLMNOPQRSTUVWXY +,-./0123456789:;<=>?@ABCDEFGHIJKLMNOPQRSTUVWXYZ ,-./0123456789:;<=>?@ABCDEFGHIJKLMNOPQRSTUVWXYZ[ -./0123456789:;<=>?@ABCDEFGHIJKLMNOPQRSTUVWXYZ[\ ./0123456789:;<=>?@ABCDEFGHIJKLMNOPQRSTUVWXYZ[\] /0123456789:;<=>?@ABCDEFGHIJKLMNOPQRSTUVWXYZ[\]^ 0123456789:;<=>?@ABCDEFGHIJKLMNOPQRSTUVWXYZ[\]^_ 123456789:;<=>?@ABCDEFGHIJKLMNOPQRSTUVWXYZ[\]^_` 23456789:;<=>?@ABCDEFGHIJKLMNOPQRSTUVWXYZ[\]^_`a 3456789:;<=>?@ABCDEFGHIJKLMNOPQRSTUVWXYZ[\]^_`ab 456789:;<=>?@ABCDEFGHIJKLMNOPQRSTUVWXYZ[\]^_`abc 56789:;<=>?@ABCDEFGHIJKLMNOPQRSTUVWXYZ[\]^_`abcd 6789:;<=>?@ABCDEFGHIJKLMNOPQRSTUVWXYZ[\]^_`abcde 789:;<=>?@ABCDEFGHIJKLMNOPQRSTUVWXYZ[\]^_`abcdef 89:;<=>?@ABCDEFGHIJKLMNOPQRSTUVWXYZ[\]^_`abcdefg 9:;<=>?@ABCDEFGHIJKLMNOPQRSTUVWXYZ[\]^_`abcdefgh :;<=>?@ABCDEFGHIJKLMNOPQRSTUVWXYZ[\]^_`abcdefgh PC437 Ç ü é â ä à å ç ê ë è ïîìÄ Å É æ Æ ô ö ò û ù ÿÖ Ü ¢ £ ¥Ptƒ ü é â ä à å ç ê ë è ïîìÄ Å É æ Æ ô ö ò û ù ÿÖ Ü ¢ £ ¥Ptƒá é â ä à å ç ê ë è ïîìÄ Å É æ Æ ô ö ò û ù ÿÖ Ü ¢ £ ¥Ptƒáí â ä à å ç ê ë è ïîìÄ Å É æ Æ ô ö ò û ù ÿÖ Ü ¢ £¥Ptƒ á í ó ä à å ç ê ë è ïîìÄ Å É æ Æ ô ö ò û ù ÿÖ Ü ¢ £ ¥Ptƒáíóú à å ç ê ë è ïîìÄ Å É æ Æ ô ö ò û ù ÿÖ Ü ¢ £ ¥Ptƒáíóúñ å ç ê ë è ïîìÄ Å É æ Æ ô ö ò û ù ÿÖ Ü ¢ £ ¥PtƒáíóúñÑ ç ê ë è ïîìÄ Å É æ Æ ô ö ò û ù ÿÖ Ü ¢ £ ¥Ptƒ á í ó ú ñ Ñ ª ê ë è ïîìÄ Å É æ Æ ô ö ò û ù ÿÖ Ü ¢ £ ¥Ptƒ á í ó ú ñ Ñ ª º ë è ïîìÄ Å É æ Æ ô ö ò û ù ÿÖ Ü ¢ £ ¥Ptƒ á í ó ú ñ Ñ ª º ¿ è ïîìÄ Å É æ Æ ô ö ò û ù ÿÖ Ü ¢ £ ¥Ptƒ á í ó ú ñ Ñ ª º ¿ ┌ ïîìÄ Å É æ Æ ô ö ò û ù ÿÖ Ü ¢ £ ¥Ptƒ á í ó ú ñ Ñ ª º ¿ ┌ ┐ îìÄ Å É æ Æ ô ö ò û ù ÿÖ Ü ¢ £ ¥Ptƒ á í ó ú ñ Ñ ª º ¿ ┌ ┐ ½ ìÄ Å É æ Æ ô ö ò û ù ÿÖ Ü ¢ £ ¥Ptƒá í ó úñ Ѫ º ¿ ┌ ┐ ½ ¼ Ä Å É æ Æ ô ö ò û ù ÿÖ Ü ¢ £ ¥Ptƒá í ó úñÑ ªº ¿ ┌ ┐ ½ ¼ ¡ Å É æ Æ ô ö ò û ù ÿÖ Ü ¢ £ ¥Ptƒ á í ó ú ñ Ñ ª º ¿ ┌ ┐ ½ ¼ ¡« É æ Æ ô ö ò û ù ÿÖ Ü ¢ £ ¥Ptƒ á í ó ú ñÑ ª º ¿ ┌ ┐½ ¼ ¡ « » æ Æ ô ö ò û ù ÿÖ Ü ¢ £ ¥Ptƒ á í ó ú ñ Ñ ª º ¿ ┌ ┐½ ¼ ¡« » ▓ Æ ô ö ò û ù ÿÖ Ü ¢ £ ¥PtƒáíóúñÑ ªº¿ ┌ ┐ ½ ¼ ¡ « » ▓ ▒ ô ö ò û ù ÿÖ Ü ¢ £ ¥Ptƒ á í óú ñ Ñ ª º ¿ ┌ ┐ ½ ¼ ¡« » ▓ ▒ ░ ö ò û ù ÿÖ Ü ¢ £ ¥Ptƒ á í ó ú ñ Ñ ª º ¿ ┌ ┐½ ¼ ¡ « »▓ ▒░ ┃ ò û ù ÿÖ Ü ¢ £ ¥Ptƒ á í ó ú ñ Ѫ º ¿ ┌ ┐ ½¼ ¡« » ▓▒ ░ ┃┤ û ù ÿÖ Ü ¢ £ ¥Ptƒá í óú ñ Ѫ º¿┌ ┐½ ¼ ¡« »▓▒ ░ ┃┤╡ ù ÿÖ Ü ¢ £ ¥Ptƒ á í óú ñ Ñ ªº¿ ┌ ┐½ ¼ ¡«»▓ ▒ ░ ┃┤╡╢ ÿÖ Ü ¢ £ ¥Ptƒ á í ó ú ñ Ñ ª º ¿┌ ┐ ½ ¼ ¡ « » ▓ ▒ ░ ┃┤╡╢╖ *** Completed ***](https://usermanual.wiki/BIXOLON/SPP-R400.User-manual/User-Guide-1905071-Page-24.png)
![Rev. 1.00 - 25 - SPP-R400 • Self-Test Sample (For Wireless LAN) Firmware version : V01.00 STOB 050812 Butter Capacity : 128K Bytes Print Density : 100% Bluetooth Interface - Baud rate : 115200 bps Serial Interface - Baud rate : 115200 bps Data bits : 8 bits Parity : None Stop bit : 1 bit or more Handshaking : DTR/DSR Default Codepage : PC437 Print Speed : 80mm/s Double byte character mode:Off Font : 12 x 24 Paper out Bell : Off Low Battery Buzzer : On Power off time : 15 Min Idle mode time : 10 Sec Black Mark sensor : Front side of paper MSR data including sentinel Character mode : None MSR read mode : Auto TRACK1/2/3 Memory switch setup status Memory S/W1 Memory S/W2 1 2 3 4 5 6 7 8 1 2 3 4 5 6 7 8 ON █ █ ON OFF █ █ █ █ █ █ OFF █ █ █ █ █ █ █ █ Memory S/W3 Memory S/W4 1 2 3 4 5 6 7 8 1 2 3 4 5 6 7 8 ON █ █ █ █ ON OFF █ █ █ █ OFF █ █ █ █ █ █ █ █ Memory S/W5 Memory S/W6 1 2 3 4 5 6 7 8 1 2 3 4 5 6 7 8 ON █ █ █ █ ON █ █ OFF █ █ █ █ OFF █ █ █ █ █ █ Memory S/W7 Memory S/W8 1 2 3 4 5 6 7 8 1 2 3 4 5 6 7 8 ON █ █ █ ON OFF █ █ █ █ █ OFF █ █ █ █ █ █ █ █ RF Interface Not available bluetooth WLAN firmware version : Ver 0.1 WLAN MAC address : CC7A00010877 - System Name : SPP-R400 - Network Mode : Adhoc - Encryption : None - ESSID : BIXOLON_adhoc - DHCP : Disabled - IP : 192.168.1.1 - Netmask : 255.255.255.0 - Gateway : 192.168.1.2 - Port : 9100 - HTTPS : Disabled - Telnet : Disabled - FTP : Disabled - SNMP : Disabled If you want to continue SELF-TEST printing, please press FEED button. ASCII !"#$%&'()*+,-./0123456789:;<=>?@ABCDEFGHIJKLMNOP "#$%&'()*+,-./0123456789:;<=>?@ABCDEFGHIJKLMNOPQ #$%&'()*+,-./0123456789:;<=>?@ABCDEFGHIJKLMNOPQR $%&'()*+,-./0123456789:;<=>?@ABCDEFGHIJKLMNOPQRS %&'()*+,-./0123456789:;<=>?@ABCDEFGHIJKLMNOPQRST &'()*+,-./0123456789:;<=>?@ABCDEFGHIJKLMNOPQRSTU '()*+,-./0123456789:;<=>?@ABCDEFGHIJKLMNOPQRSTUV ()*+,-./0123456789:;<=>?@ABCDEFGHIJKLMNOPQRSTUVW )*+,-./0123456789:;<=>?@ABCDEFGHIJKLMNOPQRSTUVWX *+,-./0123456789:;<=>?@ABCDEFGHIJKLMNOPQRSTUVWXY +,-./0123456789:;<=>?@ABCDEFGHIJKLMNOPQRSTUVWXYZ ,-./0123456789:;<=>?@ABCDEFGHIJKLMNOPQRSTUVWXYZ[ -./0123456789:;<=>?@ABCDEFGHIJKLMNOPQRSTUVWXYZ[\ ./0123456789:;<=>?@ABCDEFGHIJKLMNOPQRSTUVWXYZ[\] /0123456789:;<=>?@ABCDEFGHIJKLMNOPQRSTUVWXYZ[\]^ 0123456789:;<=>?@ABCDEFGHIJKLMNOPQRSTUVWXYZ[\]^_ 123456789:;<=>?@ABCDEFGHIJKLMNOPQRSTUVWXYZ[\]^_` 23456789:;<=>?@ABCDEFGHIJKLMNOPQRSTUVWXYZ[\]^_`a 3456789:;<=>?@ABCDEFGHIJKLMNOPQRSTUVWXYZ[\]^_`ab 456789:;<=>?@ABCDEFGHIJKLMNOPQRSTUVWXYZ[\]^_`abc 56789:;<=>?@ABCDEFGHIJKLMNOPQRSTUVWXYZ[\]^_`abcd 6789:;<=>?@ABCDEFGHIJKLMNOPQRSTUVWXYZ[\]^_`abcde 789:;<=>?@ABCDEFGHIJKLMNOPQRSTUVWXYZ[\]^_`abcdef 89:;<=>?@ABCDEFGHIJKLMNOPQRSTUVWXYZ[\]^_`abcdefg 9:;<=>?@ABCDEFGHIJKLMNOPQRSTUVWXYZ[\]^_`abcdefgh :;<=>?@ABCDEFGHIJKLMNOPQRSTUVWXYZ[\]^_`abcdefgh PC437 Ç ü é â ä à å ç ê ë è ïîìÄ Å É æ Æ ô ö ò û ù ÿÖ Ü ¢ £ ¥Ptƒ ü é â ä à å ç ê ë è ïîìÄ Å É æ Æ ô ö ò û ù ÿÖ Ü ¢ £ ¥Ptƒá é â ä à å ç ê ë è ïîìÄ Å É æ Æ ô ö ò û ù ÿÖ Ü ¢ £ ¥Ptƒáí â ä à å ç ê ë è ïîìÄ Å É æ Æ ô ö ò û ù ÿÖ Ü ¢ £ ¥Ptƒ á í ó ä à å ç ê ë è ïîìÄ Å É æ Æ ô ö ò û ù ÿÖ Ü ¢ £ ¥Ptƒáíóú à å ç ê ë è ïîìÄ Å É æ Æ ô ö ò û ù ÿÖ Ü ¢ £ ¥Ptƒáíóúñ å ç ê ë è ïîìÄ Å É æ Æ ô ö ò û ù ÿÖ Ü ¢ £ ¥PtƒáíóúñÑ ç ê ë è ïîìÄ Å É æ Æ ô ö ò û ù ÿÖ Ü ¢ £ ¥Ptƒ á í ó ú ñ Ñ ª ê ë è ïîìÄ Å É æ Æ ô ö ò û ù ÿÖ Ü ¢ £ ¥Ptƒ á í ó ú ñ Ñ ª º ë è ïîìÄ Å É æ Æ ô ö ò û ù ÿÖ Ü ¢ £ ¥Ptƒ á í ó ú ñ Ñ ª º ¿ è ïîìÄ Å É æ Æ ô ö ò û ù ÿÖ Ü ¢ £ ¥Ptƒ á í ó ú ñ Ñ ª º ¿ ┌ ïîìÄ Å É æ Æ ô ö ò û ù ÿÖ Ü ¢ £ ¥Ptƒ á í ó ú ñ Ñ ª º ¿ ┌ ┐ îìÄ Å É æ Æ ô ö ò û ù ÿÖ Ü ¢ £ ¥Ptƒ á í ó ú ñ Ñ ª º ¿ ┌ ┐ ½ ìÄ Å É æ Æ ô ö ò û ù ÿÖ Ü ¢ £ ¥Ptƒá í ó úñ Ѫ º ¿ ┌ ┐ ½ ¼ Ä Å É æ Æ ô ö ò û ù ÿÖ Ü ¢ £ ¥Ptƒá í ó úñÑ ªº ¿ ┌ ┐ ½ ¼ ¡ Å É æ Æ ô ö ò û ù ÿÖ Ü ¢ £ ¥Ptƒ á í ó ú ñ Ñ ª º ¿ ┌ ┐ ½ ¼ ¡« É æ Æ ô ö ò û ù ÿÖ Ü ¢ £¥Ptƒ á í ó ú ñÑ ª º ¿ ┌ ┐½ ¼ ¡ « » æ Æ ô ö ò û ù ÿÖ Ü ¢ £ ¥Ptƒ á í ó ú ñ Ñ ª º ¿ ┌ ┐½ ¼ ¡« » ▓ Æ ô ö ò û ù ÿÖ Ü ¢ £ ¥Ptƒ á í ó ú ñ Ñ ª º ¿ ┌ ┐½ ¼ ¡« » ▓ ▒ ô ö ò û ù ÿÖ Ü ¢ £ ¥Ptƒ á í óú ñ Ñ ª º ¿ ┌ ┐ ½ ¼ ¡« » ▓ ▒ ░ ö ò û ù ÿÖ Ü ¢ £ ¥Ptƒ á í ó ú ñ Ñ ª º ¿ ┌ ┐½ ¼ ¡ « »▓ ▒░ ┃ ò û ù ÿÖ Ü ¢ £ ¥Ptƒ á í ó ú ñ Ѫ º ¿ ┌ ┐ ½¼ ¡« » ▓▒ ░ ┃┤ û ù ÿÖ Ü ¢ £ ¥Ptƒá í óú ñ Ѫ º¿┌ ┐½ ¼ ¡« »▓▒ ░ ┃┤╡ ù ÿÖ Ü ¢ £ ¥Ptƒ á í óú ñ Ñ ªº¿ ┌ ┐½ ¼ ¡«» ▓ ▒░ ┃┤╡╢ ÿÖ Ü ¢ £ ¥Ptƒ á í ó ú ñ Ñ ª º ¿┌ ┐ ½ ¼ ¡ « » ▓ ▒ ░ ┃┤╡╢╖ *** Completed ***](https://usermanual.wiki/BIXOLON/SPP-R400.User-manual/User-Guide-1905071-Page-25.png)