Binatone Electronics 80-7472-01 1.9GHz CORDLESS PHONE User Manual Quick Start Guide
Binatone Electronics International Ltd. 1.9GHz CORDLESS PHONE Quick Start Guide
Contents
- 1. Users Manual
- 2. User Manual
Users Manual
User’s Guide
DECT 6.0 Cordless Answering System with Bluetooth® Wireless
Technology
L501BT / L502BT / L503BT / L504BT / L505BT
1 Getting started
2 Getting to know your phone
3 Using the phone
4 Help
5 General Information
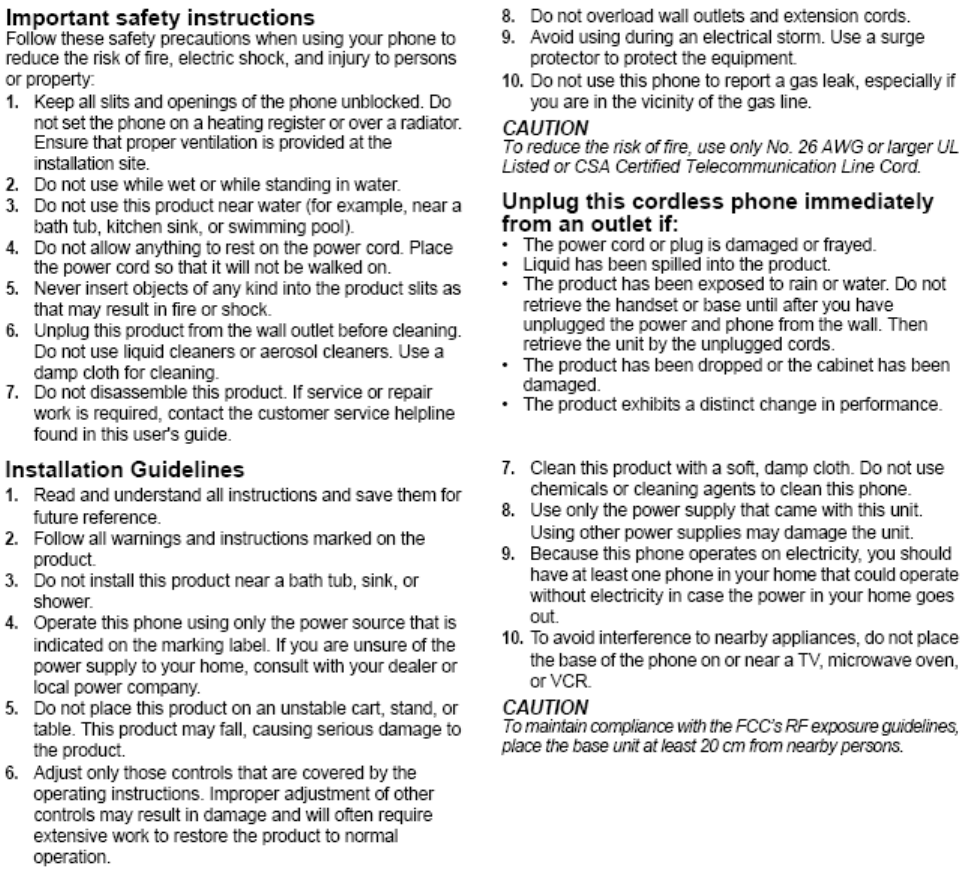
Warning
Use only the power adapters and telephone line cord
provided in the box.

Box Contents
Handset
Base
Battery door
NiMH rechargeable battery pack
Power adapter
Telephone line cord
User’s guide
In multi-handset packs, you will find one or more additional handsets, chargers with power adapter units,
additional rechargeable battery packs and battery doors.
IMPORTANT
Only use the telephone line cord supplied.
This equipment is not designed for making emergency telephone calls when the power fails. Alternative
arrangements should be made for access to emergency services.
This ENERGY STAR® program (www.energystar.gov) recognizes and encourages the use of
products that save energy and help protect our environment. We are proud to mark this product
with the ENERGY STAR® label indicating it meets the latest energy efficiency guidelines.
1 Getting started
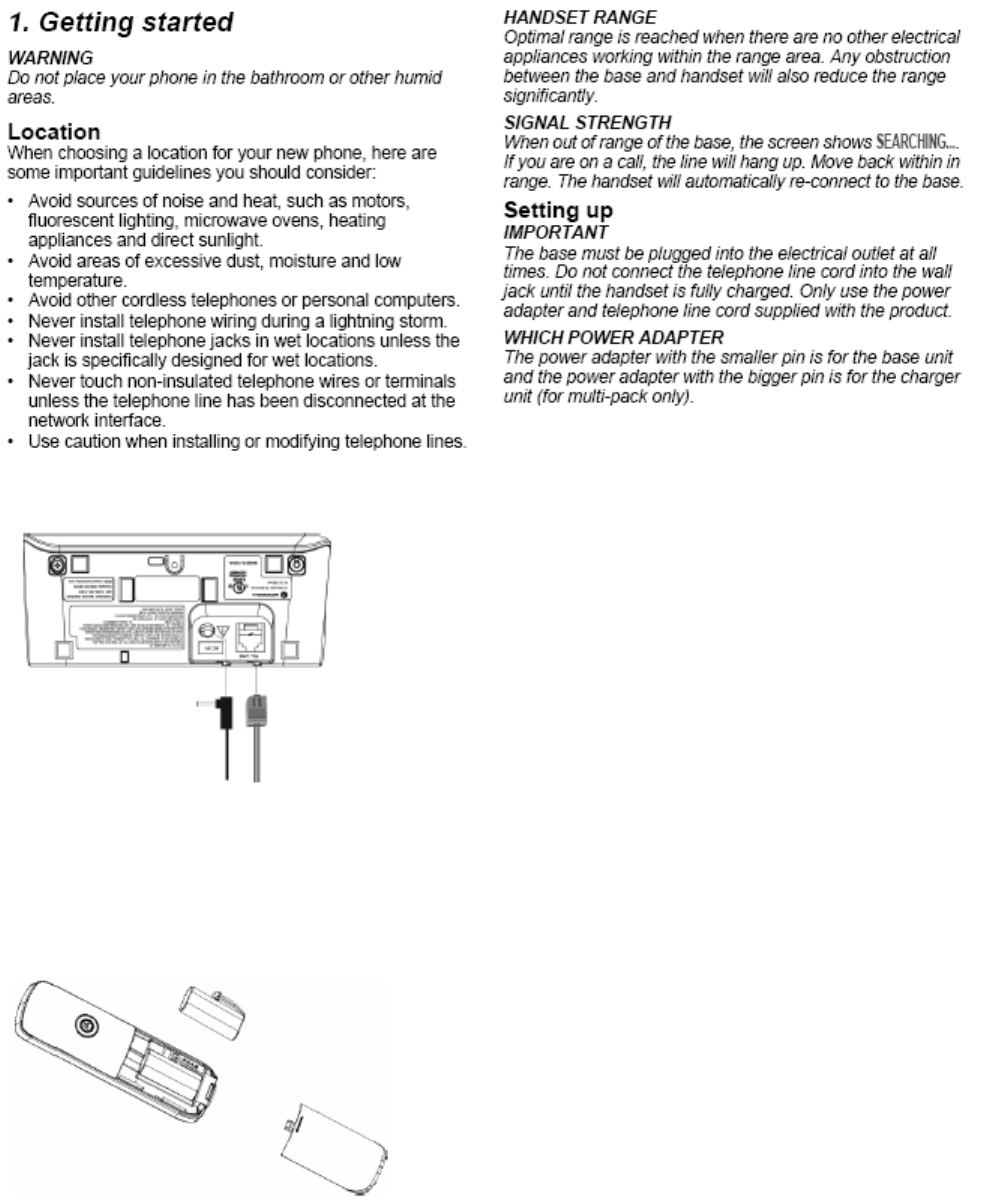
Step 1. Connect the base
- Plug the power adapter with smaller round pin plug and telephone line cord into the base. Power adapter
with bigger round pin plug is for charger (for multi-handset pack only).
- Plug the other end of the power adapter and telephone line cord into the wall jack.
- Use only the provided power adapter.
Step 2. Install and charge the handset battery pack
- Slide out the battery compartment cover. Place the supplied rechargeable battery pack in the battery
compartment, with the battery connector plugged in, as shown.
- Slide the battery compartment cover back.
- Put the handset on the main pack base to charge for at least 24 hours. When the handset if fully charged,
the <Batter full icon> will indicate that it is fully charged.
IMPORTANT
Use only the rechargeable battery pack provided with the product.
Step 3. Set the display language
- Press <Menu> and <Up/Down> to select SETUP HS.
- Press <Menu> and <Up/Down> to select LANGUAGE.
- Press <Menu> and <Up/Down> to select the language.
- Press <Menu> to save.
Step 4. Set date and time
- Press <Menu> to select DATE & TIME.
- Press <Menu> and edit the year and date.
TIPS
You can press <Up/Down> to move between the input fields YEAR and DATE.
- Press <Menu> and edit the time in 12hr format. Press <Up/Down> to toggle AM/PM settings.
- Press <Menu> to save the settings.
NOTE
If you have subscribed to your network’s Caller ID service, the date and time is set automatically for the
handset every time a call is received.
Step 5. Your phone is now ready for use.
2 Getting to know your phone
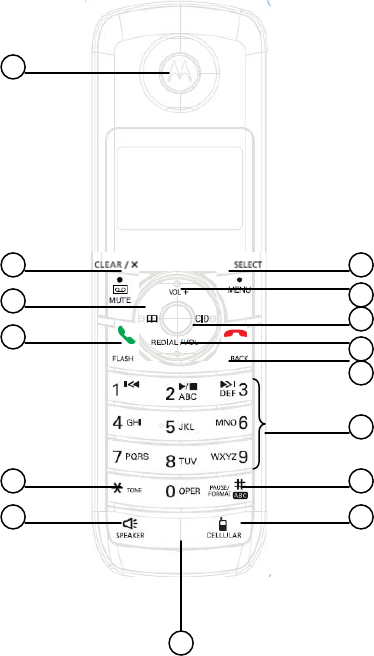
Overview of your handset
15
1
2
3
4
5
6
7
8
14
13
12
11
10
9

1 Menu/ Select
In idle mode: press to access menu list.
In menu/editing mode: press to confirm and save the settings.
During a call: press to hold a call.
In calls list entry: press to save the entry to the phonebook.
In phonebook entry: press to go to phonebook editing mode.
2 Scroll up/ Volume up
In menu mode: press to scroll up.
In editing mode: press to move cursor to the left.
During a call: press to increase volume.
Calls list/phonebook/redial list entry: press to scroll up the list.
In answering machine mode: press to increase volume.
3 Right/ Calls list
In idle mode/during a call: press to access calls list.
In editing mode: press to move the cursor to the right.
4 Scroll down/ Volume down/ Redial list
In idle/pre-dial mode: press to access redial list.
In menu mode: press to scroll down.
In editing mode: press to move cursor to the right.
During a call: press to decrease volume.
Calls list/phonebook/redial list entry: press to scroll down the list.
In answering machine mode: press to decrease volume.
5 Talk off/ Back
In menu/editing mode/phonebook entry: press to exit to previous level.
In pre-dial mode/calls list/redial list entry/answering machine mode: press to exit to idle.
During a call: press to end a call.
6 Alphanumeric keypad
In idle/pre-dial/editing mode/during a call: press to enter characters/numbers. Long press to activate
speed dial.
7 #/ Pause/ ABC/ Format
In idle/pre-dial/number editing mode/during a call: press to insert a "#", press and hold to insert a pause.
In name editing mode: toggle ABC/Abc/abc.
In calls list entry: press to toggle the Caller ID display format between 7, 8, 10 and 11 digits.
8 Cellular
In idle mode: press to make a cellular call.
During an incoming cellular call: press to answer the cellular call.
9 Microphone
10 Speaker
In idle/menu/pre-dial mode/during a call: press to turn on/off the speakerphone.
Call List/phonebook/redial list entry: press to make a call with speakerphone.
During ringing: press to answer a call with speakerphone.
In answering machine mode: press to toggle the message playback via earpiece/speakerphone
11 11 */ Tone
In idle/pre-dial/editing mode: press to insert a "*".
During a call: press to switch from pulse to tone dialing temporarily if pulse mode was selected before.
After the call has ended, the dial mode will change back to pulse.
12 Talk on/ Flash
In idle/menu/pre-dial mode: press to make a call.
Call List/phonebook/redial list entry: press to make a call to the selected entry.
During a call: press to make a flash.
During ringing: press to answer a call.
13 Left/ Phonebook
In idle mode/during a call: press to access the phonebook.
In editing mode: press to move the cursor to the left.
14 Answering Machine/ Mute/ Clear/ X
In idle mode: press to play the voice prompt of answering machine main menu.
In pre-dial/editing mode: press to delete one character/digit. Long press to delete all characters/digits.
During a call: press to mute/unmute the call.
In calls list/phonebook entry: press to delete the entry.
In answering machine mode: press to delete the current message playback.
15 Earpiece
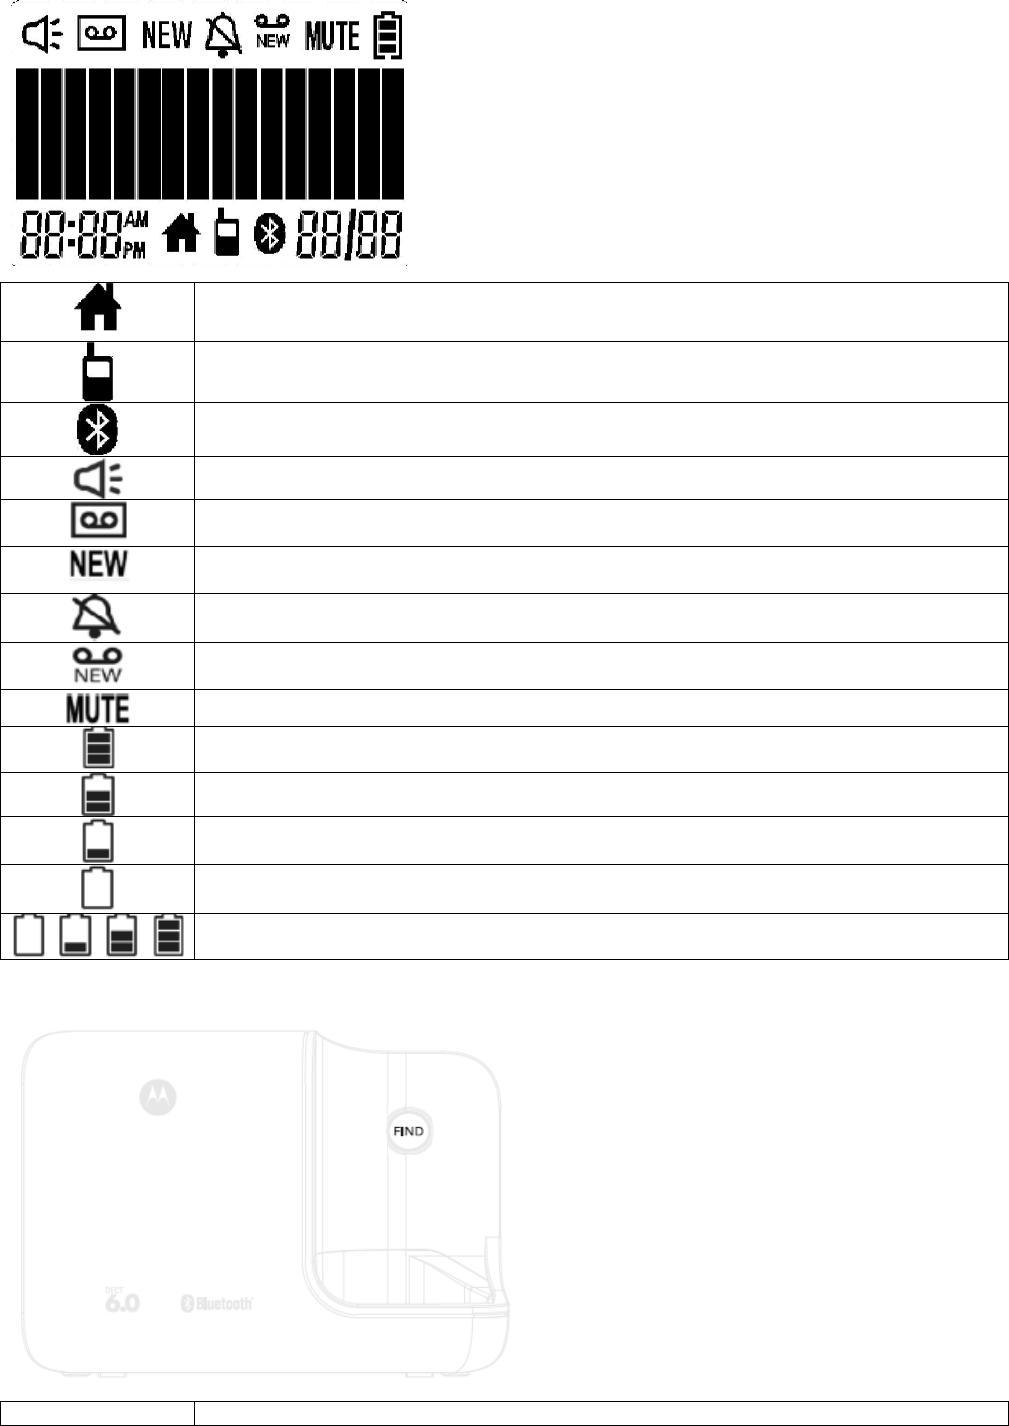
Handset LCD display
Overview of the base
On steadily when the Home line is in use.
Off when the Home line is on-hook.
On steadily when the Cellular line is in use.
Off when the Cellular line is on-hook.
On steadily when there is Bluetooth device connected with the telephone base.
Off when Bluetooth feature is disabled.
On when speakerphone is turned on.
On when answering machine is turned on.
Flashes when new answering machine message is received.
Indicates when new call is received.
Off when new call has been viewed.
On when ringer volume is turned off.
On when there is new voice mail not yet listened to.
Off when new voice mail has been listened to.
On when a call is muted.
Full battery power level.
2/3 battery power level.
1/3 battery power level.
Flashes when low battery level is detected, needs charging.
Animation in cycle. Battery is charging.
FIND Press to find/page all registered handsets.
3 Using the phone
Introducing Bluetooth
Your new telephone system with Bluetooth wireless technology has the following features:
- Pair one Bluetooth enabled mobile phone with the telephone base.
- Connect a Bluetooth enabled mobile phone to make and receive CELLULAR calls.
- Make and receive calls using your Bluetooth enabled mobile phone plan while benefiting from the ease and
comfort of your home telephone system.
Glossary of terms
Below are some terms used in this user’s guide to help you become familiar with using your Bluetooth devices
and your new telephone system.
Bluetooth mobile phone - Refers to a Bluetooth enabled mobile telephone.
CELLULAR line - The communications service provided through your Bluetooth enabled mobile telephone.
HOME line - Your conventional telephone land line.
Bluetooth Setup
To pair and connect a Bluetooth enabled mobile phone:
- Press <Menu> and <Up/Down> to select SETUP CELLULAR.
- Press <Menu> twice to enter discoverable mode. The Bluetooth feature will be activated.
- Using your Bluetooth enabled mobile phone, turn on the Bluetooth feature and search for a new device.
- Once your Bluetooth enabled mobile phone has found the Motorola
L501BT/L502BT/L503BT/L504BT/L505BT telephone base, select it.
- Using your Bluetooth enabled mobile phone, enter the PIN code of the telephone base (the default PIN
code is 0000) to continue the pairing process.
Refer to the user’s manual of your Bluetooth enabled mobile phone to learn how to search for or add new
Bluetooth devices.
To replace or delete a Bluetooth enabled mobile phone:
- Press <Menu> and <Up/Down> to select SETUP CELLULAR.
- Paired cellular device name will be displayed.
And then
- Press <Clear/Mute> to delete the connected device.
- Press <Menu> to confirm.
Or
- Press <Menu> to replace the currently connected cellular device.
- Press <Menu> to start the pairing process as above.
NOTE
- Refer to your mobile phone user’s guide for more information about its Bluetooth function.
- Make sure that your Bluetooth enabled mobile phone is between one to twelve feet away from the
telephone base in order to maintain a clear and consistent connection between your Bluetooth mobile
phone, telephone base and cell tower.
- Make sure that your Bluetooth enabled mobile phone has sufficient signal strength. You may need to move
the Bluetooth enabled mobile phone and telephone base to a location where the cellular signal may be
stronger.
- Charge your Bluetooth mobile phone while it is connected to the telephone base because your mobile
phone’s battery will discharge faster while it is connected wirelessly to the telephone base.
- Monitor your mobile phone’s usage because airtime is deducted from your cellular plan for the duration of
the CELLULAR calls.
Make a home call
Enter the phone number and press <Talk on> or <Speaker> to dial the phone number.
Make a cellular call
Enter the phone number, and then press <Cellular> twice to dial out.
Dial one touch number
Press and hold a key from <1> to <9> until the number is displayed and dialed.
Answer a home call
Press <Talk on> or <Speaker> to answer the incoming home call.

Answer a cellular call
Press <Cellular> or <Speaker> to answer the incoming cellular call.
End a call
During a call, either home or cellular call, press <Talk off> or put the handset on the base cradle.
Adjust volume
During a call, press <Up/Down> to adjust the volume.
Mute
- During a call, press <Mute/Clear> to mute the microphone, so that you can talk to someone else in the
room without your caller hearing you.
- Press <Mute/Clear> again to resume the microphone.
Dial from the redial list
- Press <Down/Redial> and then scroll <Up/Down> to the entry you want to redial.
- Press <Talk on> or <Speaker> to dial the number from home line.
OR
- Press <Cellular> to dial the number from cellular line.
Dial from the calls list
- Press <Right/CID> and then scroll <Up/Down> to the entry you want to dial.
- Press <Talk on> or <Speaker> to dial the number from home line.
OR
- Press <Cellular> to dial the number from cellular line.
Add entry to phonebook
- Press <Left/PB> and press <Menu> to select ADD.
- Press <Menu> and enter the name.
- Press <Menu> and enter the number.
- Press <Menu> to save.
Dial from the phonebook
- Press <Left/PB> and then scroll <Up/Down> to select the entry you want to dial.
- Press <Talk on> or <Speaker> to dial the number from home line.
OR
- Press <Cellular> to dial the number from cellular line.
Personal Settings
Menu Map
Main
Menu DATE
& TIME PHONEBOO
K INTERCOM SETUP HS SETUP BS SETUP
CELLULAR ANSWER
MACHINE RESET
SETTINGS
Sub
Menu DATE
TIME VIEW
ADD
EDIT
DELETE
DELETE ALL
PB CAPACITY
SPEED DIAL
RINGER TONE
RINGER VOLUME
KEY TONE
LOW BATT TONE
OUT RANGE TONE
HANDSET NAME
LANGUAGE
LCD CONTRAST
AUTO TALK
REGISTRATION
DIAL MODE
FLASH TIME
AREA CODE
ANSWER MODE
MESSAGE ALERT
NUMBER OF
RINGS
ANNOUNCEMENT
RECORD MEMO
CALL SCREENING
REMOTE ACCESS
SECURITY CODE
CLR VOICE MAIL
ALL SETTINGS
1. Press <Menu>.
2. Press <Up/Down> to scroll through the menu.
3. Press <Menu> to open a sub-menu or validate an option.
Press <Talk off/Back> to go back to previous menu level or cancel an action.
If you do not press any button on the handset for 30 seconds, the display will automatically return to standby. It
will also return to standby when the handset is placed on the base or charger.
Registration
Up to 5 handsets can be registered to one base. The original handset is pre-registered to use. Additional
handsets must be registered to the base before you can use them.
To register an additional handset,
- Press <Menu> and <Up/Down> to select SETUP HS.
- Press <Menu> and <Up/Down> to select REGISTRATION.
- Press <Menu> and <Up/Down> to select YES or NO.
- Select YES and press <Menu> to enter the registration procedure as below:
1. Place the unregistered cordless handset on the charger.
2. Press and hold <FIND> for 4 seconds on base.
3. Release <FIND> once the IN USE LED is flashing.
4. A confirmation tone is generated if registration is successful. Handset X is displayed where X
denotes the number of handsets and the phone goes back to idle.
Reset all settings
- Press <Menu> and <Up/Down> to select RESET SETTINGS.
- Press <Menu> and <Up/Down> to select ALL SETTINGS.
- Press <Menu> to select YES. Then all the personalized settings will be reset to default.
NOTE
Phonebook entries, calls list and redial list will remain unchanged.
Paging/Find handset
Press <FIND> on the base. All handsets registered to the base will ring.
To stop the paging, press <FIND> again, or press <TALK ON>/<TALK OFF>/<SPEAKER> on the handset, or
place the handset on the cradle.
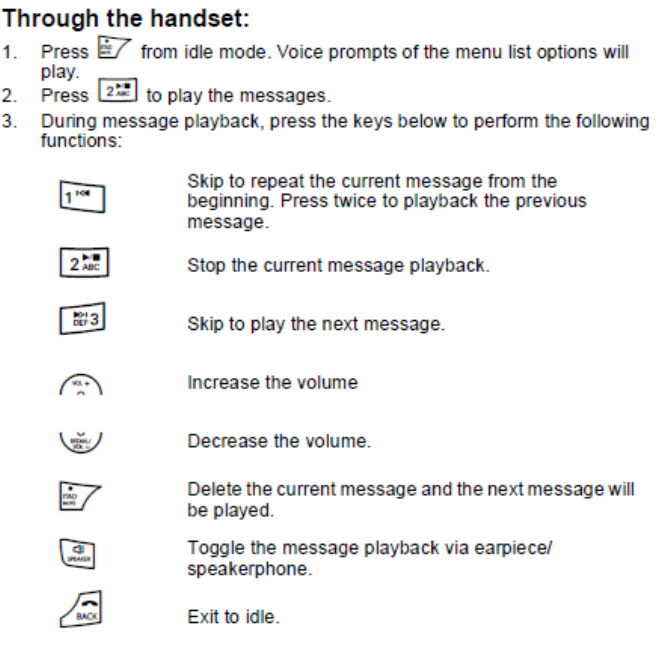
Using your answering machine
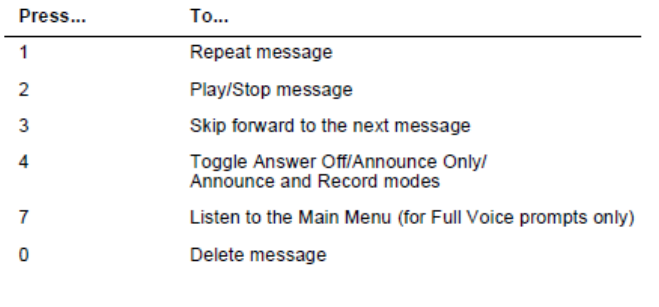
Remote access
Remote access allows you to operate your answering machine and listen to your messages by calling your
phone from another phone.
The correct sequence of the 3 security PIN digits needs to be detected before entering remote access mode.
Random digits detected prior to the correct 3 digits sequence are ignored, and answering machine recording
continues until the complete PIN is detected. There is no system prompt to enter the remote access code.
Press the following keys on your handset to carry out your desired function after entering remote access mode.
4 Help
I cannot pair my mobile phone to the telephone base
- Make sure the Bluetooth function of your Bluetooth enabled mobile phone is turned on. See your mobile
phone user’s manual for more information.
- Remove the Motorola L501BT/L502BT/L503BT/L504BT/L505BT from your mobile phone’s Bluetooth
device history list (see your mobile phone user’s manual for more information).
- Carefully follow the pairing instructions in the user’s guide, making sure that your mobile phone is not
connected to any other Bluetooth device(s).
- Turn off your mobile phone, and then turn it on again.
- Reset the telephone base. Unplug the unit’s electrical power. Wait for approximately 15 seconds, and then
plug it back in. Repeat the above suggestions.
The <Battery> icon is not scrolling when the handset is placed on the base
- Bad battery contact – move the handset slightly.
- Dirty contact – clean the battery contact with a cloth moistened with alcohol.
- Battery is full – no need to charge.
No dial tone
- No base power – check the connections. Reset the phone: unplug and plug back in the electrical outlet.
- Handset batteries are empty – charge the battery pack for at least 24 hours.
- Handset may be too far from the base – move closer to the base.
- Wrong telephone line cord – use the telephone line cord provided.
Poor audio quality
- The base is too close to electrical appliances, reinforced concrete walls or metal doorframes – move the
base away from any electrical appliances.
No ring tone
- The ring tone is deactivated.
- Increase the volume.
Caller ID does not work
- Check your subscription with your network operator.
- If you subscribe to high-speed internet service (Digital Subscriber Line – DSL) through your telephone lines,
you must install a DSL filter between the telephone base and the telephone wall jack. The filter will prevent
noise and caller ID problems caused by DSL interference. Please contact your DSL service provider for
more information about DSL filters.
A phonebook entry cannot be stored
- The phonebook is full. Delete an entry to free memory.
No display
- Try recharging or replacing the rechargeable battery pack.
- Reset the base. Unplug the unit’s electrical, then plug it back in.
- If LED is not lit up, then try to unplug the unit’s electrical power, and then plug it back in.
When the handset lost its link with the base during a call
- Check if the power cord is connected properly into the base.
- Check if the power adapter is connected properly into the wall socket.
- Move the handset closer to the base. It may be out of range.
- Reset the base by unplugging the unit’s electrical power. Wait for around 15 seconds and re-plug the
power again. Allow up to one minute for the handset to synchronize with the registered base again.
Noise interference on your radio or television
- Your base or charger may be too close. Move it as far away as possible.
5 General information
If your product is not working properly…
1. Read this User’s Guide.
2. Visit our website: www.motorola.com
3. Contact Customer Service in the US and Canada at 1-888-331-3383.
To order a replacement battery pack contact customer service or visit our website.
Technical Specifications
RF frequency band 1921.536 MHz – 1928.448 MHz
Channels 5
Operating temperature 5°C to 45°C
Telephone base voltage
(AC voltage, 60Hz) 96 – 130 Vms
Telephone base voltage
(Adapter output) 6V DC, 400mA
Handset voltage 2.4V 550mAh Ni-MH battery pack
Charger voltage
(Adapter output) 6VAC, 300mA
