Bioinsec BKS-4800HP FINGERPRINT ACCESS CONTROLLER User Manual User Guide
Bioinsec Co.,Ltd FINGERPRINT ACCESS CONTROLLER User Guide
Bioinsec >
USERS MANUAL
Console Manager
- 1 -
User Manual
27, Sep, 2007

Console Manager
- 2 -
Table of Contents
1 About BKS-4800 Series -------------------------------------------------------------------------- 4 -
2 Setup Console Manager-------------------------------------------------------------------------- 4 -
2.1 Installation - 4 -
2.1.1 Installation PC Capacity - 4 -
2.1.2 Console Manger total diagram - 5 -
2.1.3 How to install Console Manager on PC - 5 -
2.1.4 How to uninstall Console Manager on PC - 8 -
2.2 How to setup Console Manager - 9 -
2.2.1 Enter Console Manager - 9 -
2.2.2 Main window and basic word - 12 -
2.3 How to use Console Tele Manager - 16 -
3 How to connect between Terminal & Server---------------------------------------------- 17 -
3.1 Select portHow to register - 17 -
3.2 Setup terminal - 18 -
3.3 Connection of terminal -25-
4 How to enroll User--------------------------------------------------------------------------------- 37 -
4.1 Enroll company - 37 -
4.2 Enroll Group(Department or Branch) - 38 -
4.3 Enroll position - 39 -
4.4 Enroll Userr - 40 -
5 Set schedule & Role -------------------------------------------------------------------------------- 45 -
5.1 Set schedule - 55 -
5.1.1 Set Holiday - 55 -
5.1.2 Set Time Zone - 57 -
5.1.3 Set Time schedule - 58 -
5.2 Transmit Schedule to terminal - 59 -
5.3 Role - 60 -
5.4 Schedule control layout -- 58
6 Transmit------------------------------------------------------------------------------------------------- 63 -
6.1 Download & Upload - 63 -
6.1.1 Download User - 64 -
6.1.2 Delete User - 64 -

Console Manager
- 3 -
6.1.3 Download All user - 65 -
6.1.4 Delete All user - 65 -
6.1.5 Upload FP and EM TYPE - 65 -
6.1.6 Download and delete schedule - 66 -
6.1.7 Download terminal status - 66 -
6.1.8 Firmware update - 66 -
7 Monitoring----------------------------------------------------------------------------------------------- 66 -
8 Report---------------------------------------------------------------------------------------------------- 67 -
8.1 User log data view - 69 -
8.2 All log data view - 65
9 Time & Attendance----------------------------------------------------------------------------------- 72 -
9.1 Enter T&A - 72 -
9.2 Set T&A condition - 78 -
9.2.1 Data path - 82 -
9.2.2 Standard time - 83 -
9.2.3 Holiday - 87 -
9.2.4 Enroll others - 88 -
9.3 Trans T&A data - 90 -
9.4 Query T&A - 90 -
9.4.1 Daily - 91 -
9.4.2 Personal - 92 -
9.4.3 Period - 92 -
10 Other function---------------------------------------------------------------------------------------- 93 -
10.1 Check enrolled user of terminal - 93 -
10.2 Data Utility - 94 -
10.3 Door Open - 94 -
10.4 Change window structure - 95 -
10.5 Sliding message on LCD - 95 -

Console Manager
- 4 -
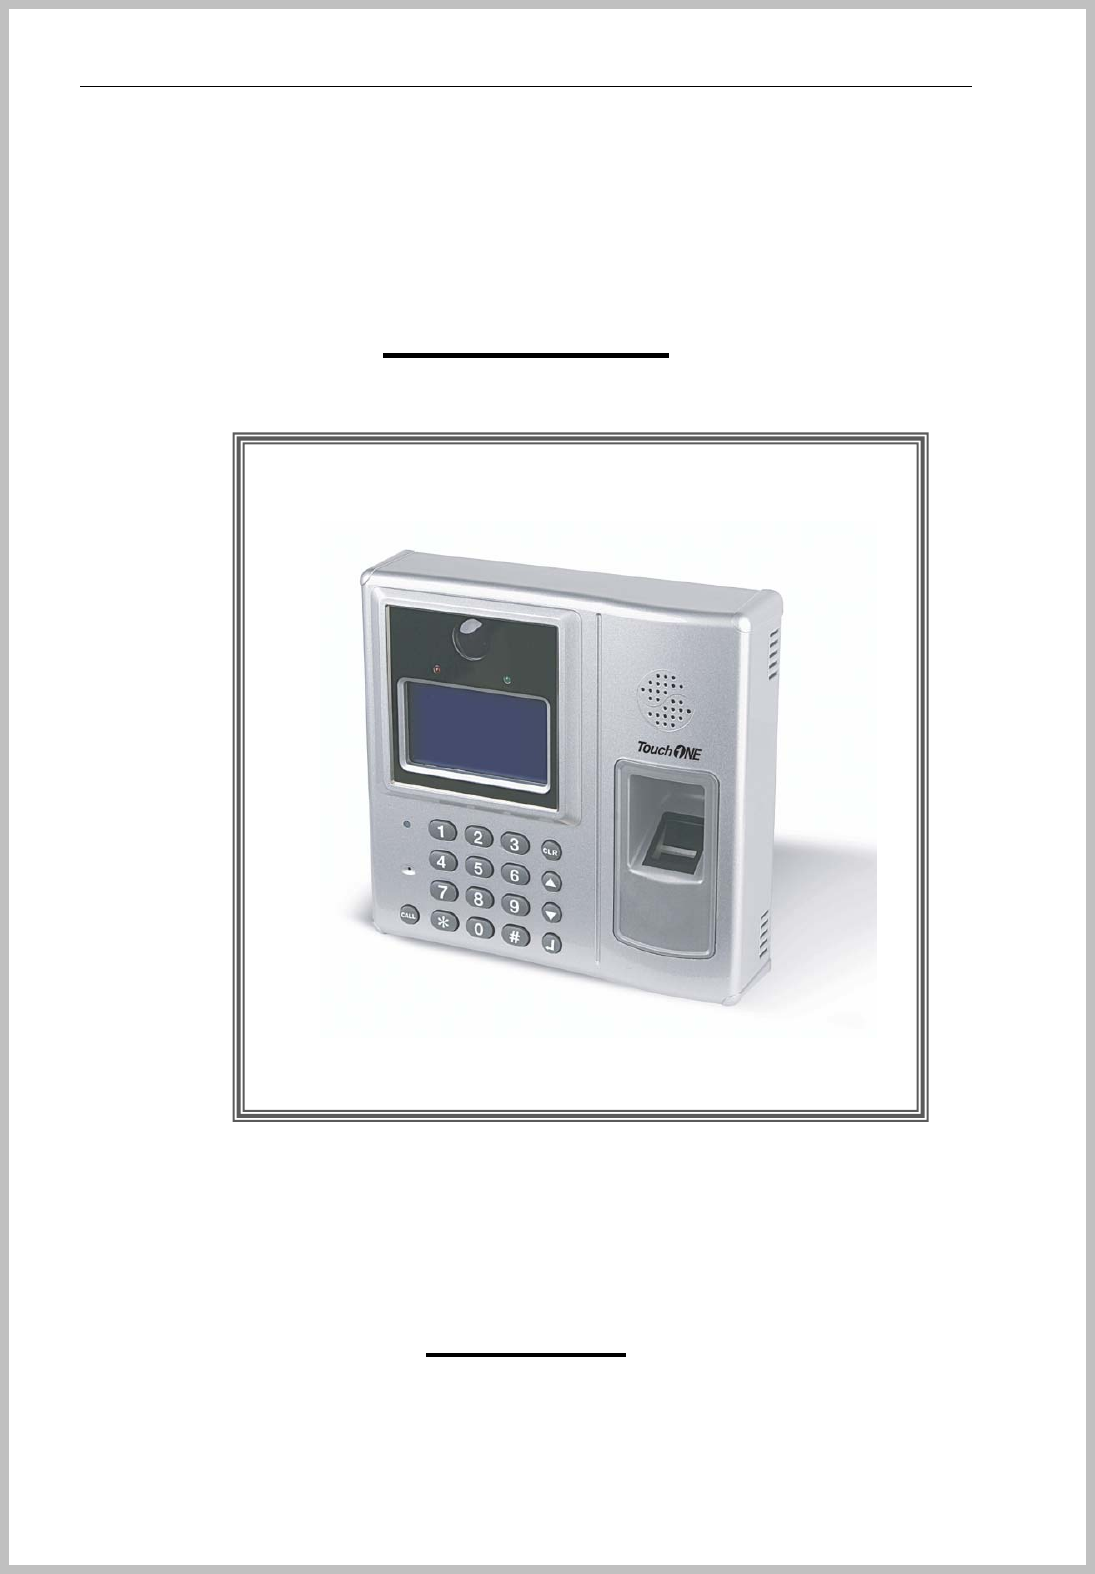
1. About BKS-4800 Series
BKS-4800 security, work place time and attendance, and over-time work verification and other
situations requiring the presence of the authorized personnel. Fingerprint identification technology
bypasses problems of existing security solutions such as EM TYPEcards and keypad locks. These
are prone to security breach from card duplication and misplacement or improper disclosure of
password. These accidents allow for proxy authorization and breach of security.
Fingerprints have constancy and uniqueness and its pattern can be easily and cheaply recorded,
thus making it the most desirable form of biometric recognition system. The new sensor now enables
us to cut costs as well as to miniaturize, both of which will make the technology more practical and
more easily mass marketed.
BKS-4800 supports various I/O protocols and is an optimal solution for managing access-controlled
points. With 128 X 64 pixels blue LCD screen, 12 regular keys and 5 special function keys, make
BKS-4800 user-friendly. Communication is based on TCP/IP is also easy with the included 1 RS232
port, 1 RS485 port, 1 relay signal and 1 external sensor inputs.
2. Setup Console Manager
Installation
Installation PC Capacity
BKS-4800 Manager system : suggested PC application
CPU Pentium 4 1.7 GHz over
RAM 256MB over (512MB suggest to be over)
OS Windows 2000 / XP
HDD 40GB over
Network LAN
THE MANUFACTURER IS NOT RESPONSIBLE FOR ANY RADIO OR TV
INTERFERENCE CAUSED BY UNAUTHORIZED MODIFICATIONS TO THIS
EQUIPMENT. SUCH MODIFICATIONS COULD VOID THE USER’S AUTHORITY TO
OPERATE THE EQUIPMENT.
Console Manager
- 5 -
BKS-4800 Manager system : minimum capacity
CPU Pentium 3 1.0 GHz over
RAM 128MB over
OS Windows NT / 2000 / XP
HDD 20GB over
Network LAN
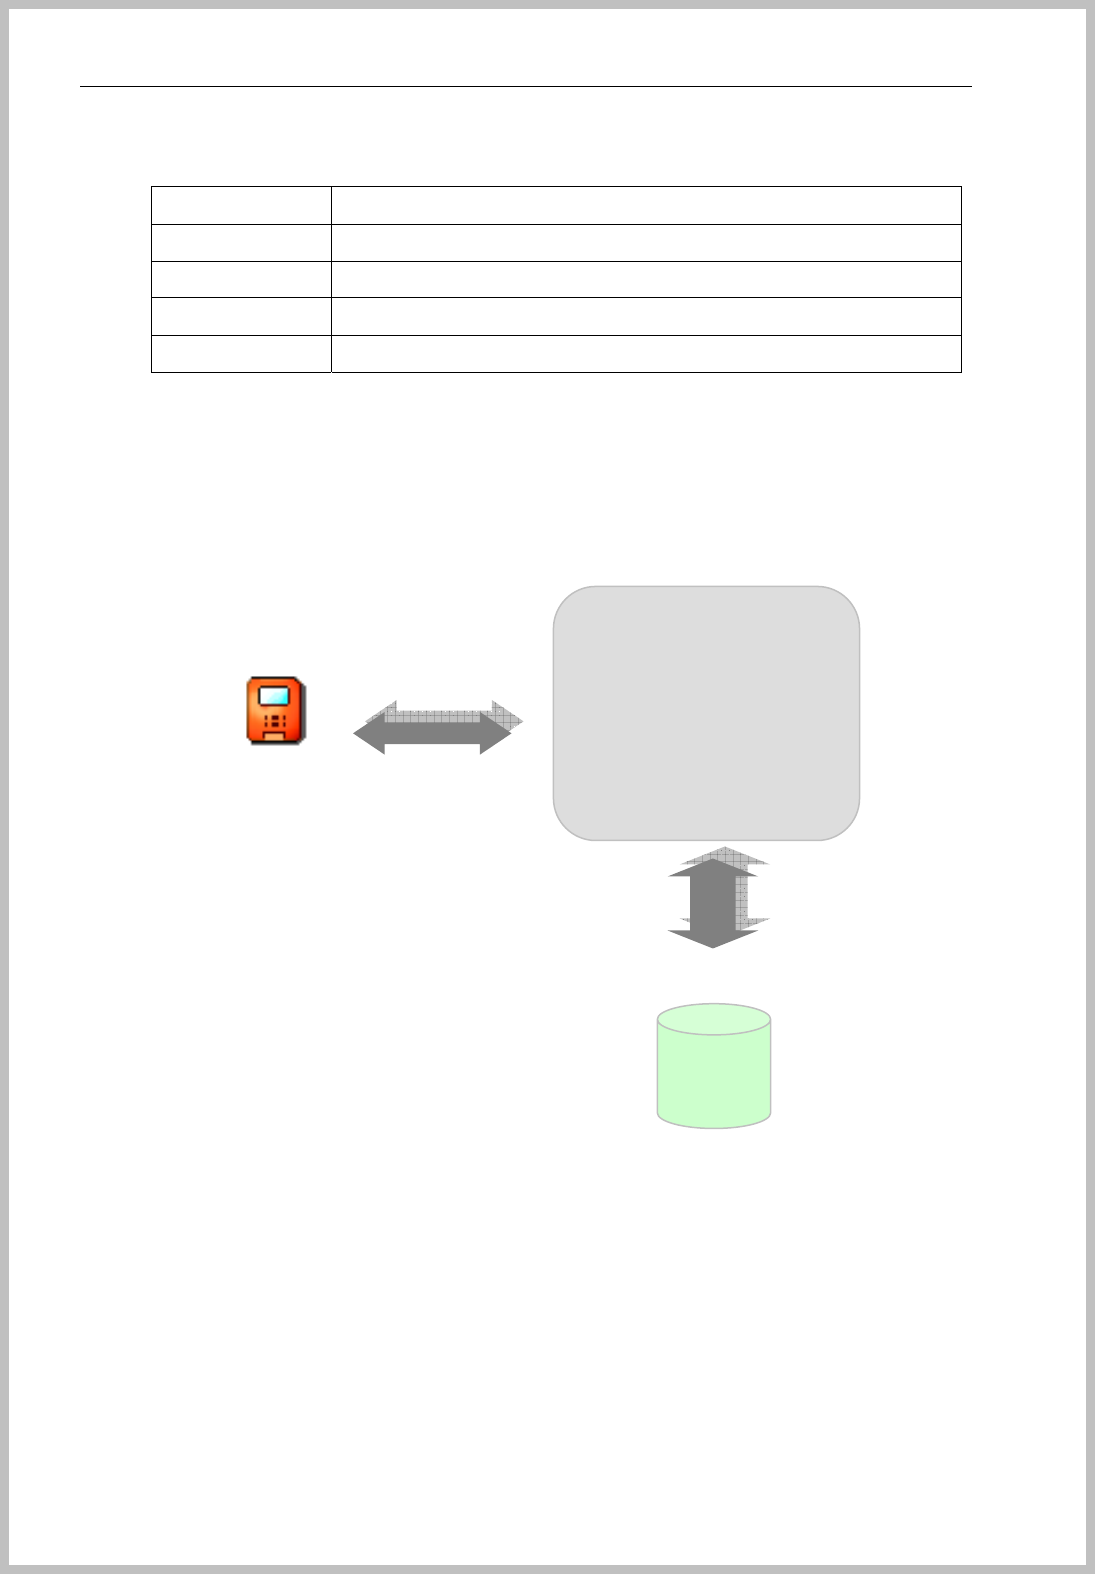
Console Manager total diagram
How to install Console Manager on PC
Content of installation
① Choose the administration PC.
② Check the computer installed Window system. (Windows 2000 / XP)
③ To install Console Manager as to click “Setup.exe”.
④ After installation of Console Manager, input BKS-2600 to USB port.
⑤ Install BKS-2600 driver.
E
En
nr
ro
ol
ll
l
b
ba
as
si
ic
c
d
da
at
ta
a
C
Co
on
nn
ne
ec
ct
ti
io
on
n
c
co
on
nd
di
it
ti
io
on
n
M
Mo
on
ni
it
to
or
ri
in
ng
g
T
T
&
&
A
At
tt
te
en
nd
da
an
nc
ce
e
D
DB
B
Console Manager
Terminal
Console Manager
- 6 -
Set Console Manager
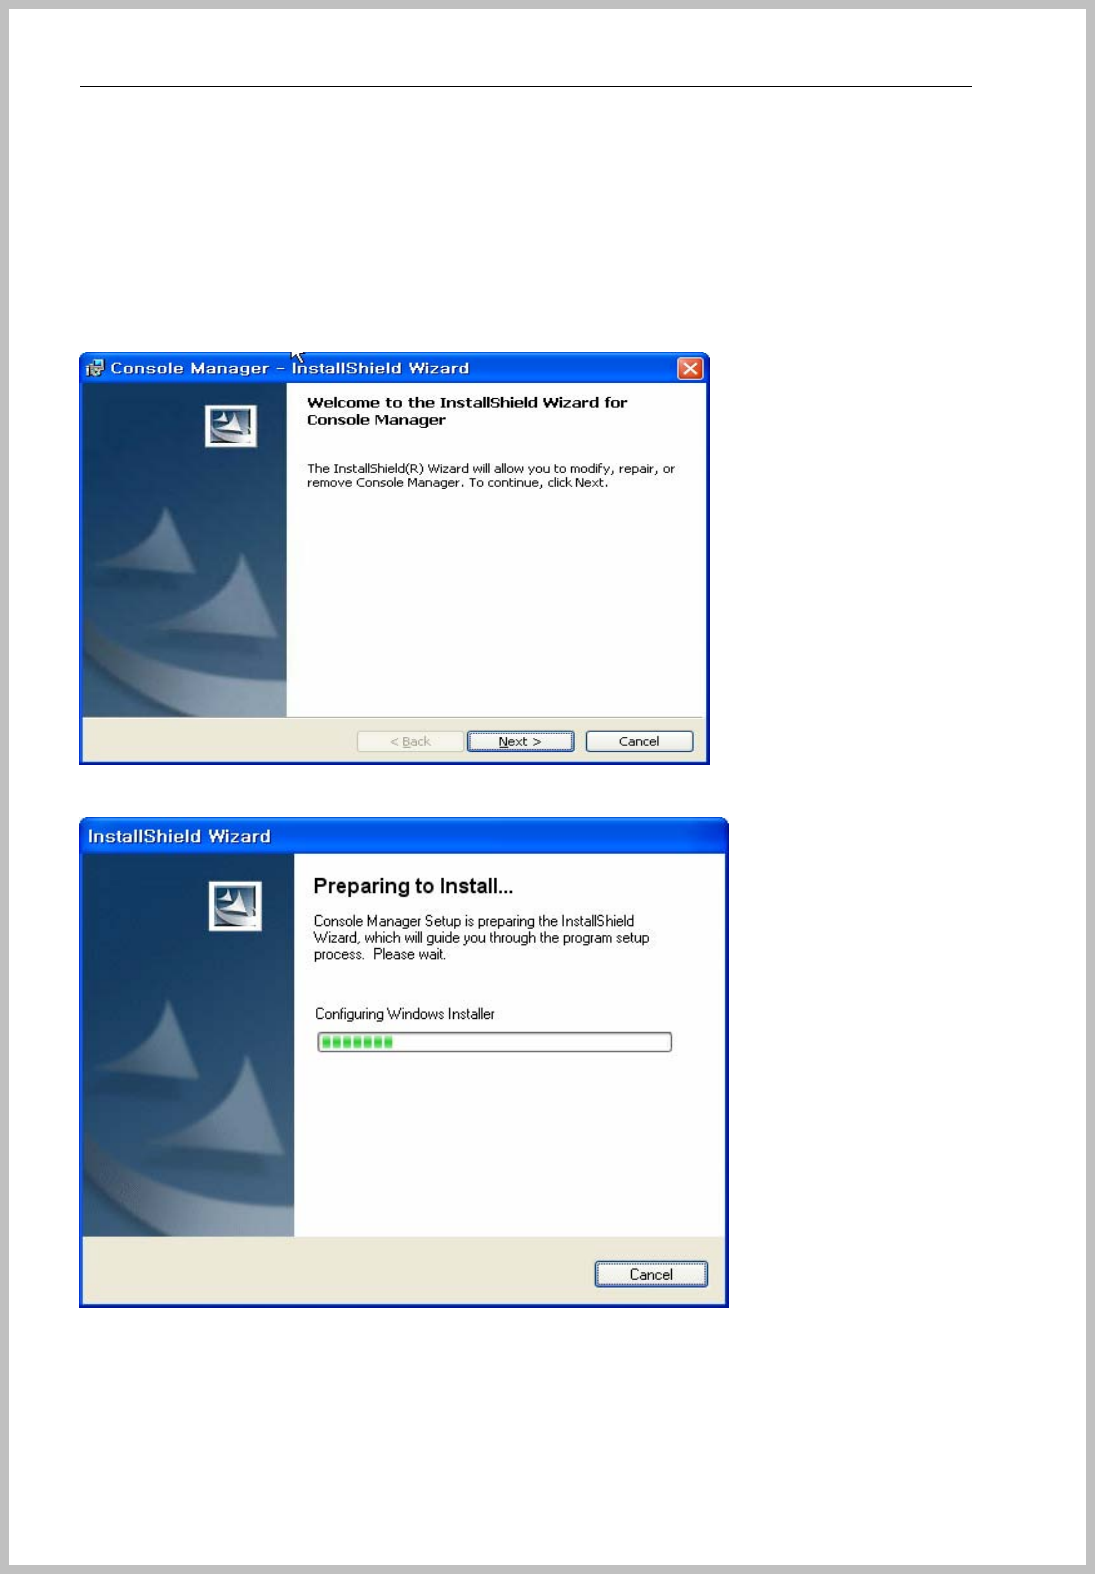
Double click the “setup.exe” file and then the below installation window will be shown.
Caution: The Console manager should be set at only C drive.
Please click the Next button.
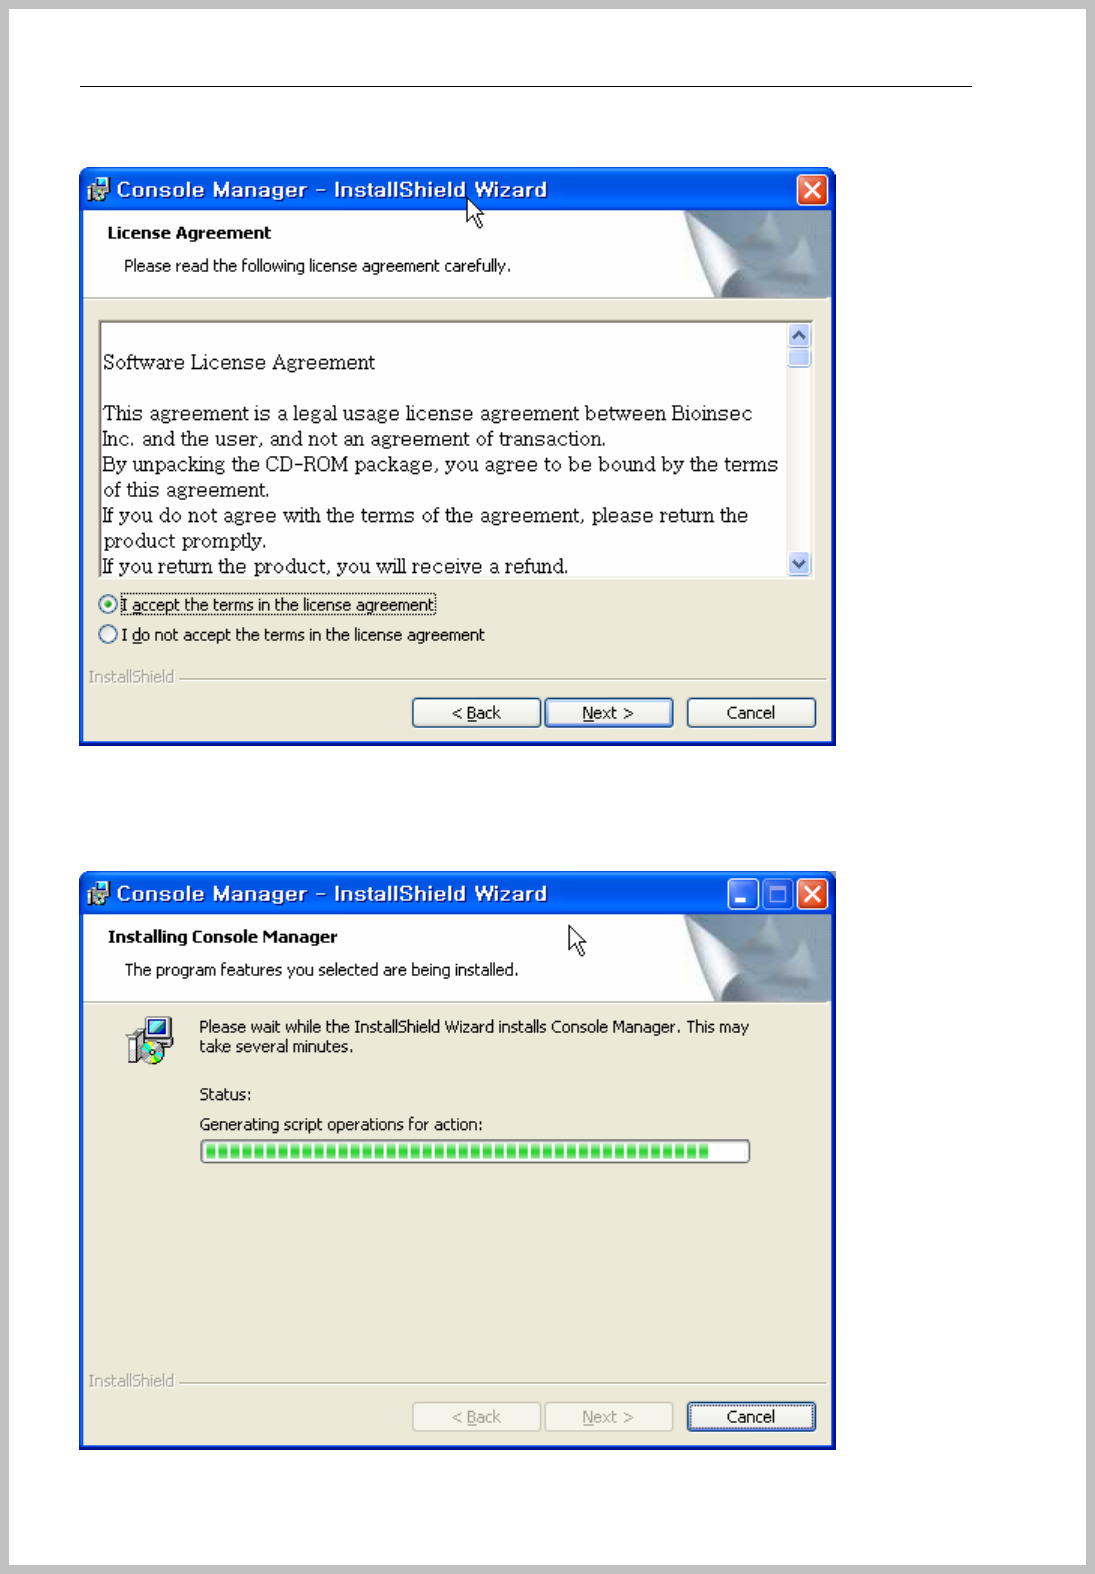
Click the next button after confirm License Agreement.
Console Manager
- 7 -
Click Next button.
Console Manager
- 8 -
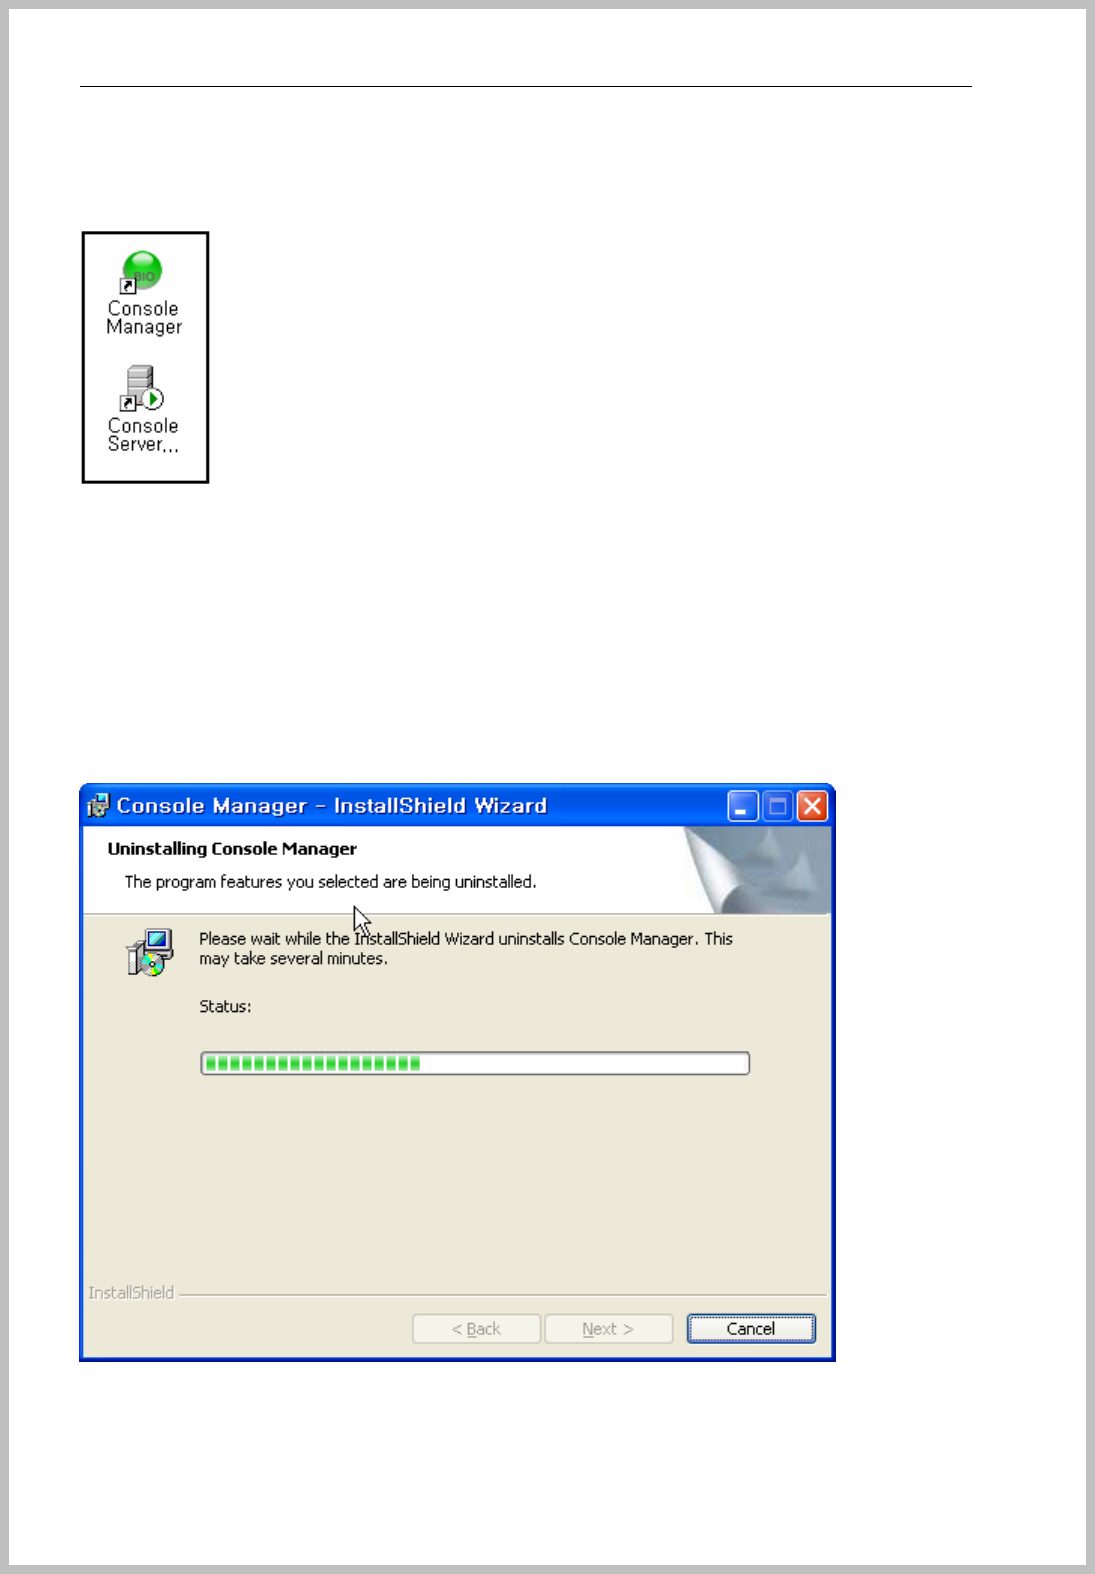
“Console Manager” & “Console Service” Icon created on the desktop.
How to uninstall Console Manager on PC
Uninstall Console Manager
Start – control – Program add/delete – Select Console Manager .
Click the delete button and Console Manager will be removed.
Console Manager
- 9 -
How to setup Console Manager
Console Manager is main control program networked several BIOINSEC terminals on network.
It’s shown all records of communication between terminal and server, that is the reason can
control all LOG related of BKS-4800 terminals.
Enter Console Manager
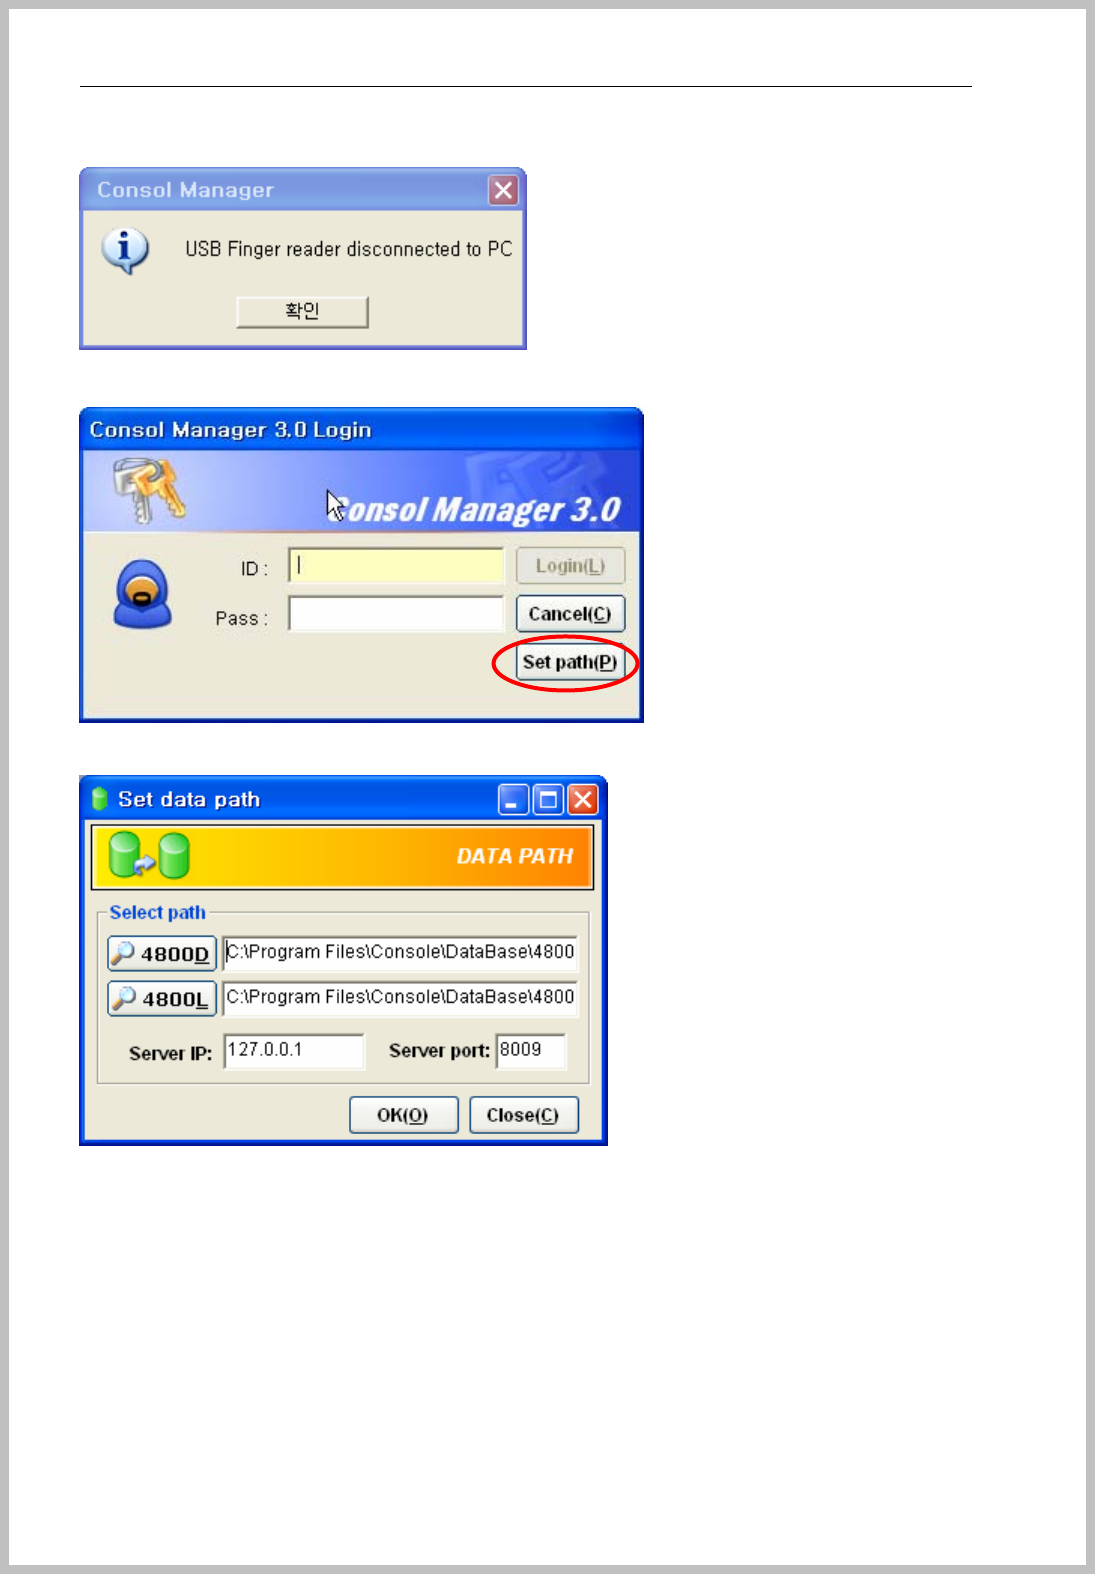
Main long-in window appears after click Console Manager icon on the desktop, Click the
Icon and above window appears.
Initial set value is “ ID : 1 Pass : 1 “, please give new Password for reduction of security
risk.
If the administrator enrolled “Admin Fingerprint,” please click the blue man Icon pointing to
finger icon and place your finger on BKS-2600 scanner.
Console Manager
- 10 -
< When USB Scanner doesn’t be connected to PC, this message appears >
Setup path : Please click “Set path” and then the below window appears.
4800D : C:\Program Files\Console\DataBase\4800D.mdb
4800L : C:\Program Files\Console\DataBase\4800D.mdb
Server IP : Computer IP address or input 127.0.0.1
Server Port : 8009
Setting values are automatically set like above menu.
TCP Application Port and TCP/Terminal Port are automatically opened.
Console Manager
- 11 -
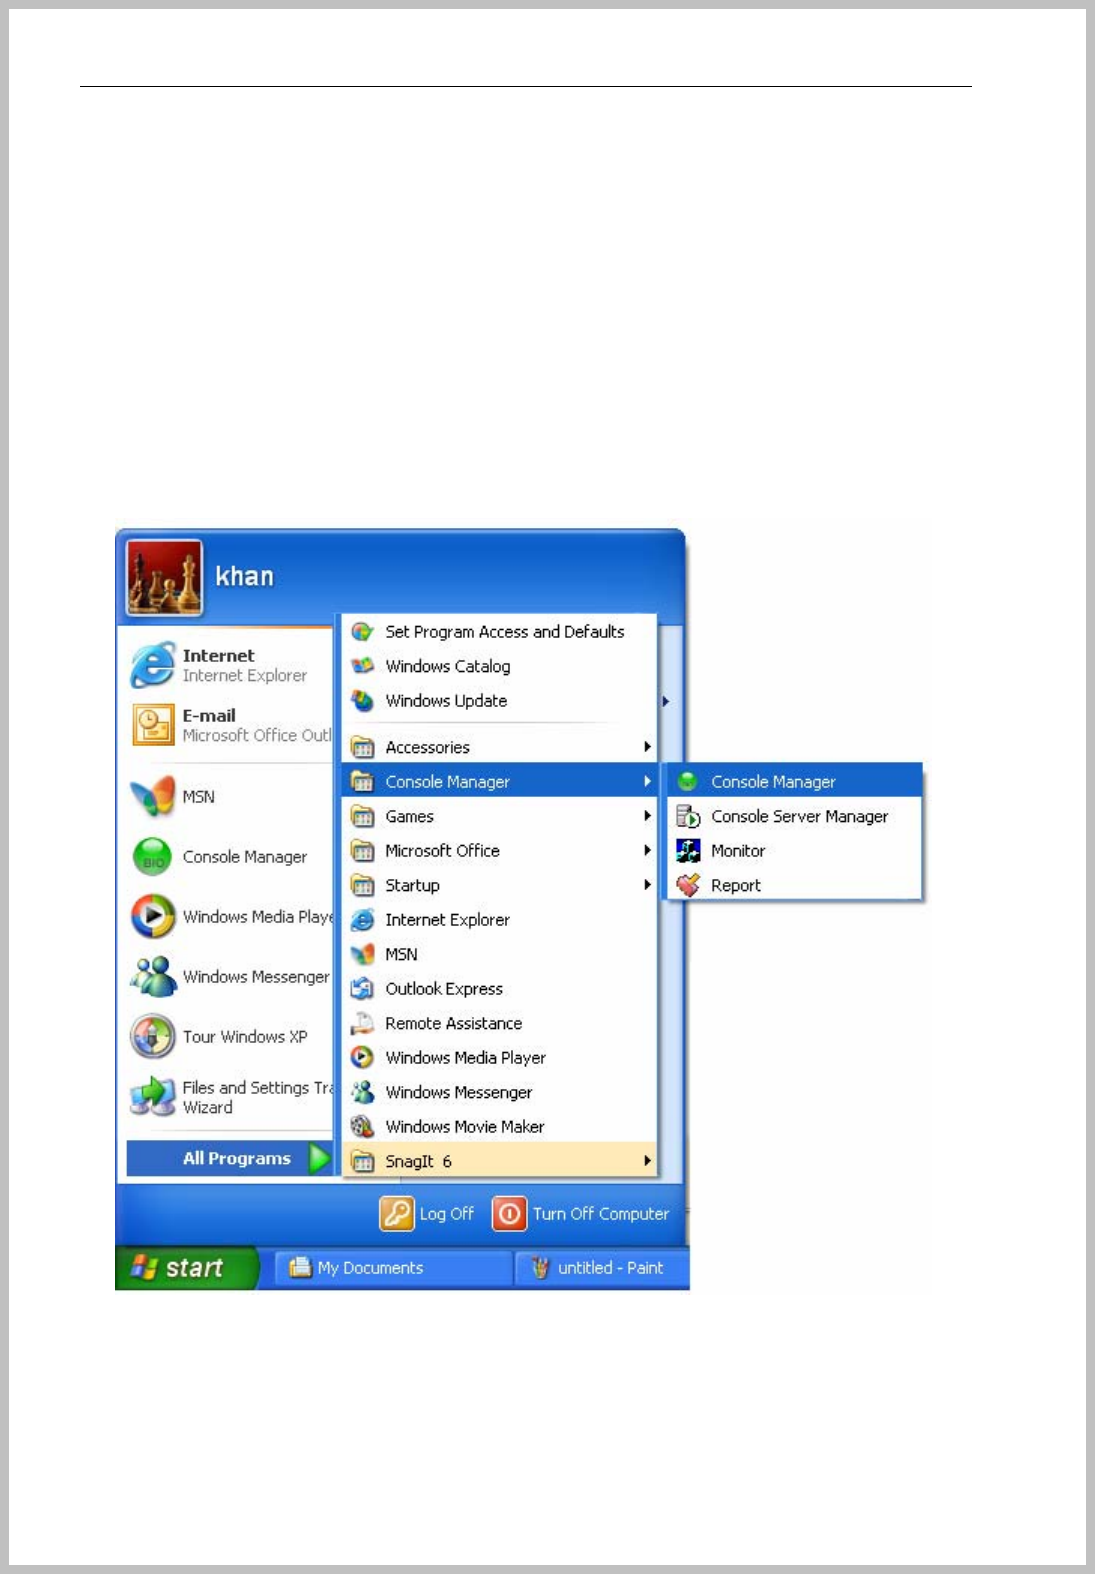
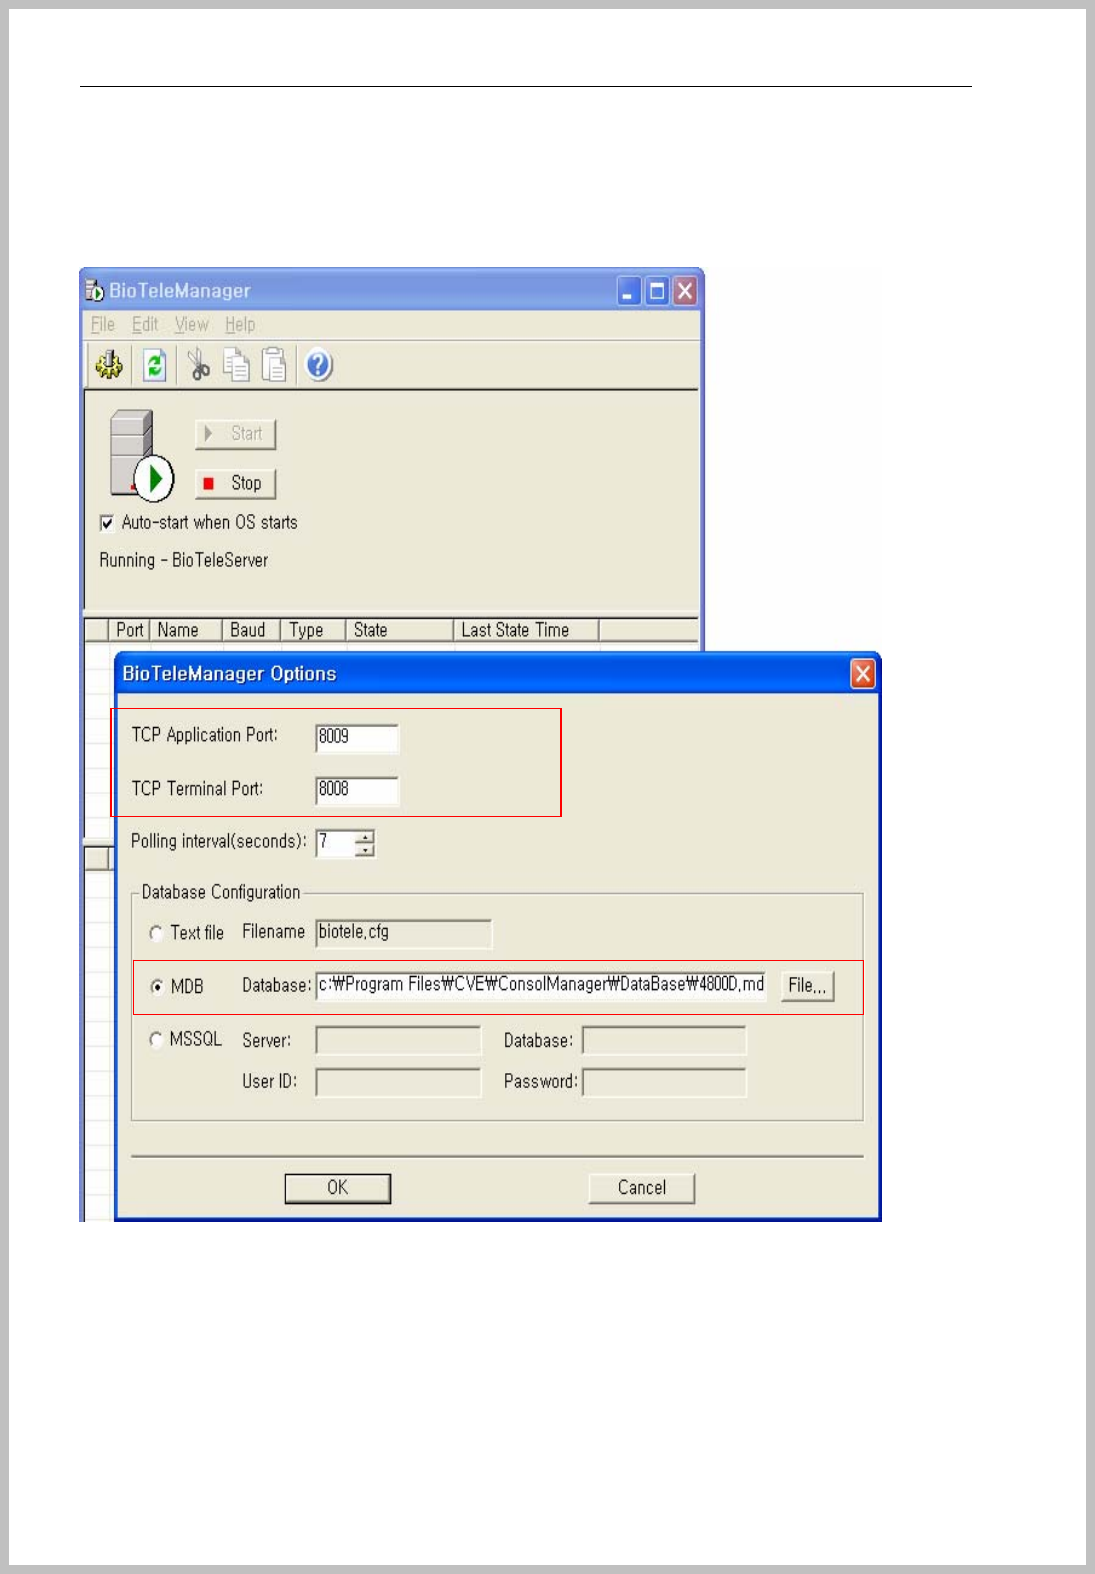
Console Manager & Console Server Manager icon displays on the desktop and “Start => Program
=> Console Manager => Console Server Manager”.
Double click the “Console Server Manager” menu
TCP Application Port and Console Manager Server port is automatically set 8009.
TCP/Terminal Port, 8008 also is automatically set as Terminal Port 8008.
After checking all data path clearly, click “OK” button for saving. And then main window appears.
Console Manager
- 12 -
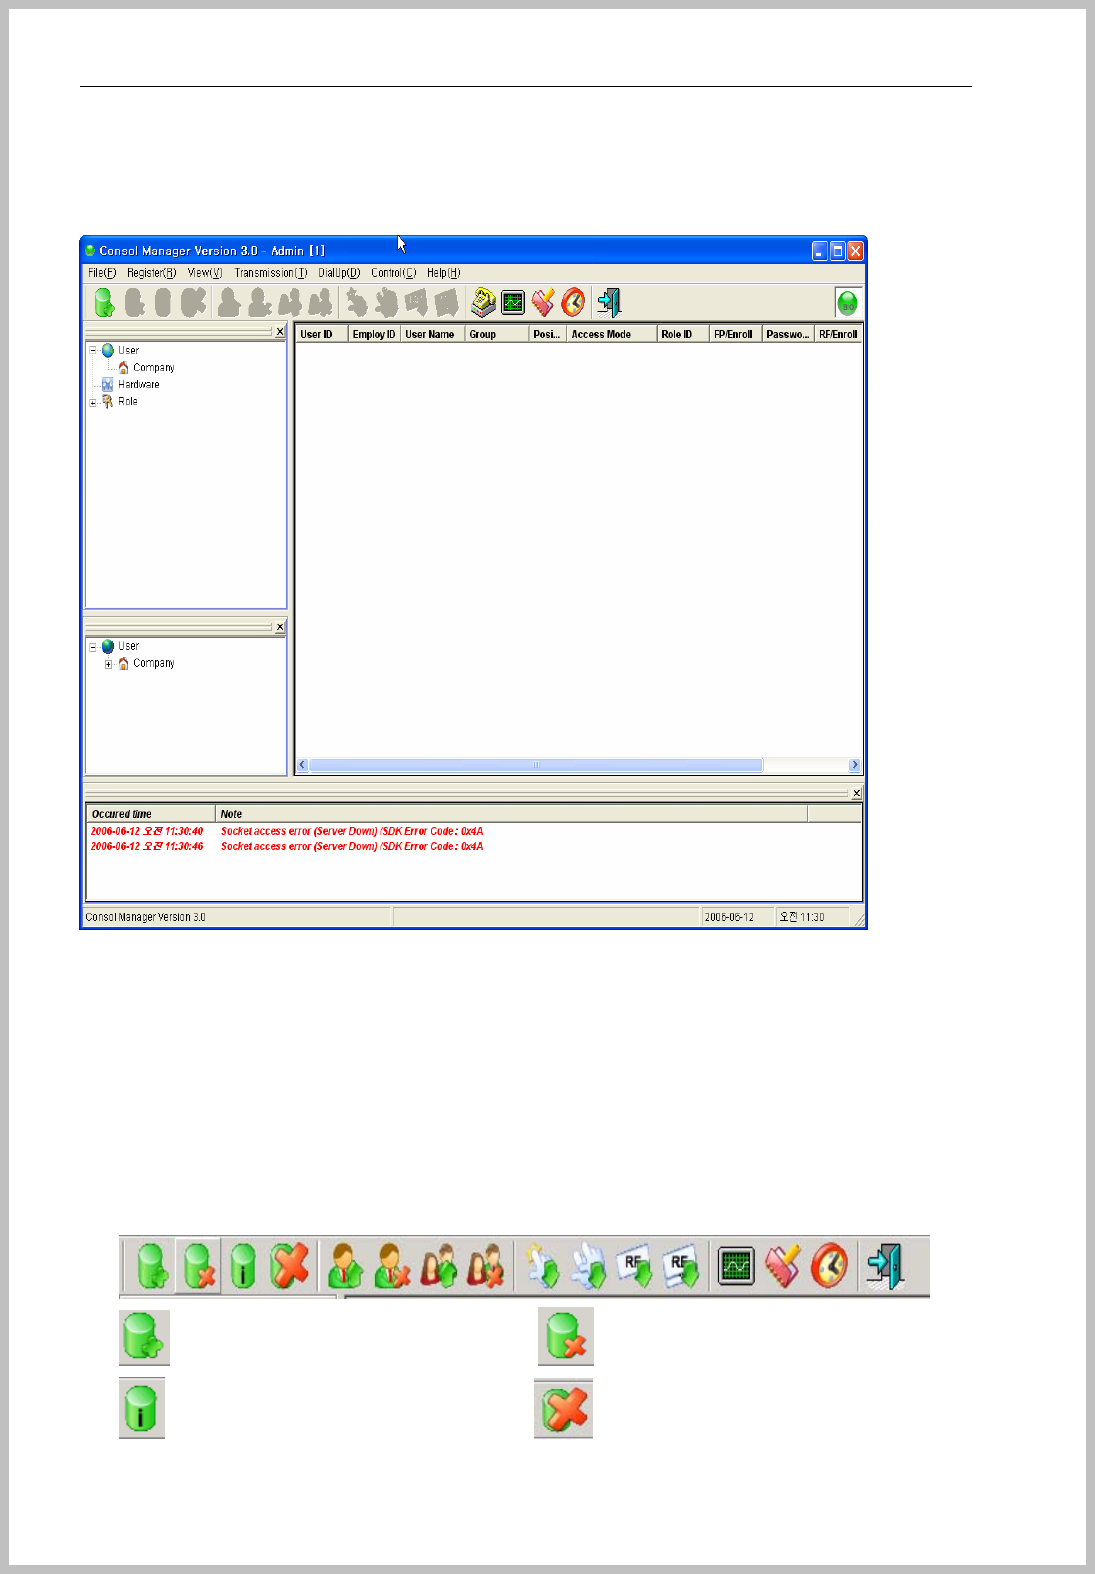
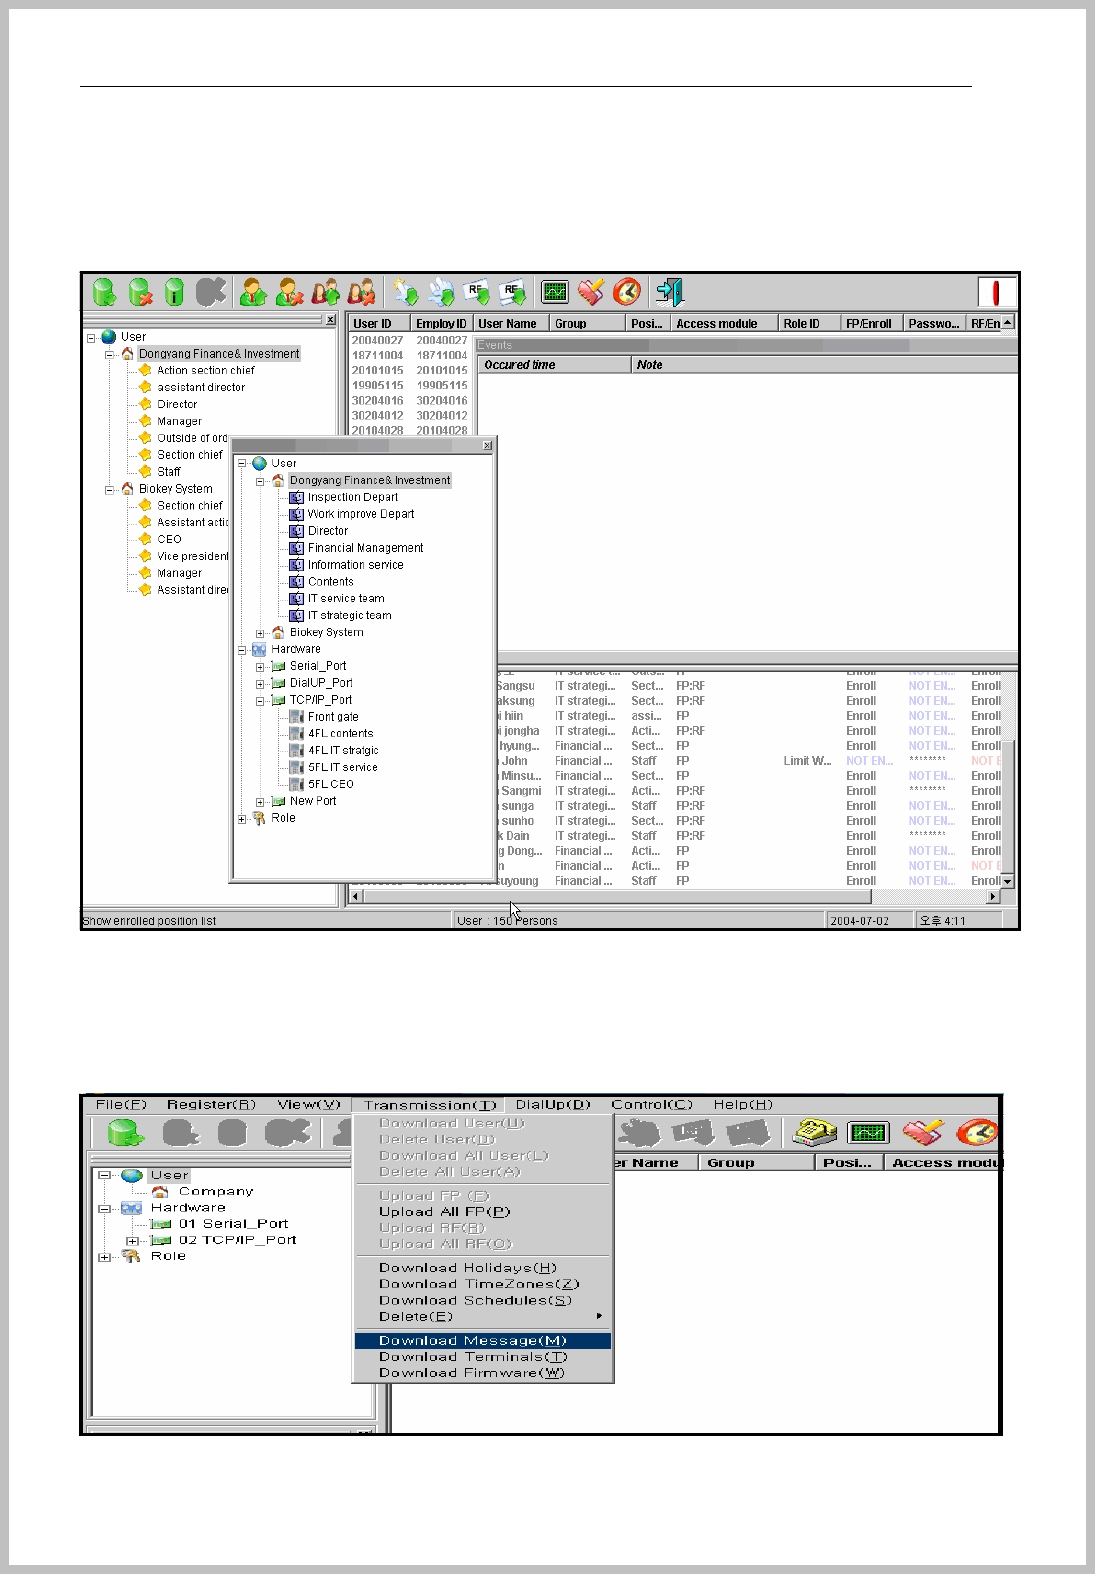
Main window and basic word
Main window is composed to Menu Bar, Tool, Tree View, Icon .
① Menu bar : file, enroll, Setup, View, Transmission, Control, Window, Help.
② Tool : New enroll, delete, Information, Delete all, Transform data, Delete terminal user data,
Transmit all user data, Delete all user data of system, Get FP data from Terminal, Get all FP
data, Get all EM TYPEdata, Monitoring, Report, Time & Attendance, Close etc…
③ Position View : Show the position tree view of user and terminal data.
④ Event view: Show terminal status and event
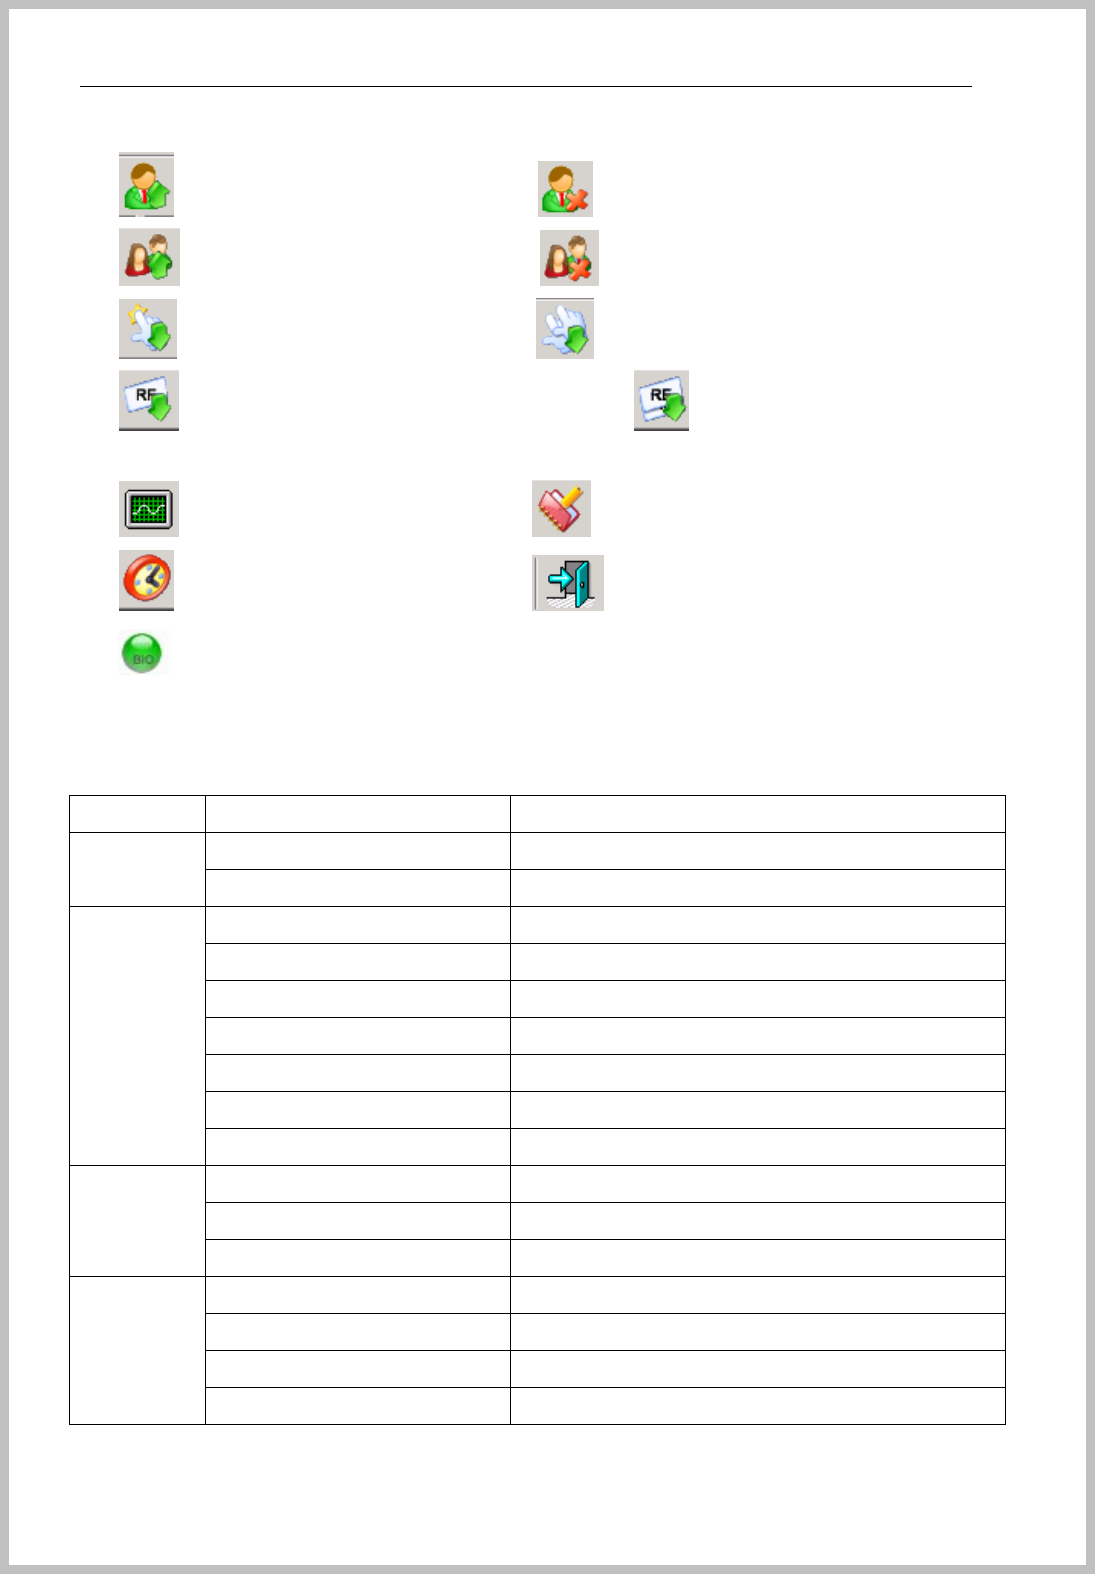
⑤ Menu bar detail description
: Enroll new user : Delete user ,
: Show user information : Delete event window message
Console Manager
- 13 -
: Transmit user data to terminal : Delete user data of terminal
: Transmit all user data to terminal : Delete all user data of terminal
: Get FP data from terminal : Get all FP data from terminal
: Get EM TYPEdata from terminal : Get all EM TYPEdata from
terminal
: Monitoring : Report
: Time & Attendance : Exit
: When service system works well, Console log is turning.
Menu Sub menu contents
Set admin Set administrator file
Close Finish Console Manager
Company Enroll Company
Group Enroll department
Position Enroll position
Set port Enroll terminal port
Terminal Add/delete terminal
Role Setup user access role
Enroll
User Enroll user
Set FP enrollment Set Fingerprint enrollment.
Set data path Set DB path
Setup
Check Com Check the communication with terminal
Admin window Appear administrator window
Position window Appear position window
Event window Appear event window
View
Document window Appear document window

Console Manager
- 14 -
Menu Sub menu contents
Transmit personal data Transmit personal data to terminal
Delete personal data Delete personal data of terminal
Transmit all data Transmit all user data to terminal
Delete all user data Delete all user data from terminal
Get FP data by personal Get fingerprint data from terminal by personal
Get all user FP data Get all fingerprint data from terminal
Get all user EM TYPEdata Get all user EM TYPEdata from terminal
Get EM TYPEdata by personal Ger EM TYPEdata from terminal by personal
Transmission
Check user enroll Check the enrollment.
Download Terminals Download terminal data
Download Schedules Download schedule data
Download Holidays Download Holiday data to terminal
Download Time Zones Download time zone to terminal
Door open Door open
Set door Set door condition
Control
Update Firmware Terminal Firmware
Horizontally Sort horizontal style
Vertically Sort Vertical style
Icon sorting Icon sorting
Cascade Sort cascade
Window
Window List
Help Help Help
Console Manager
- 15 -
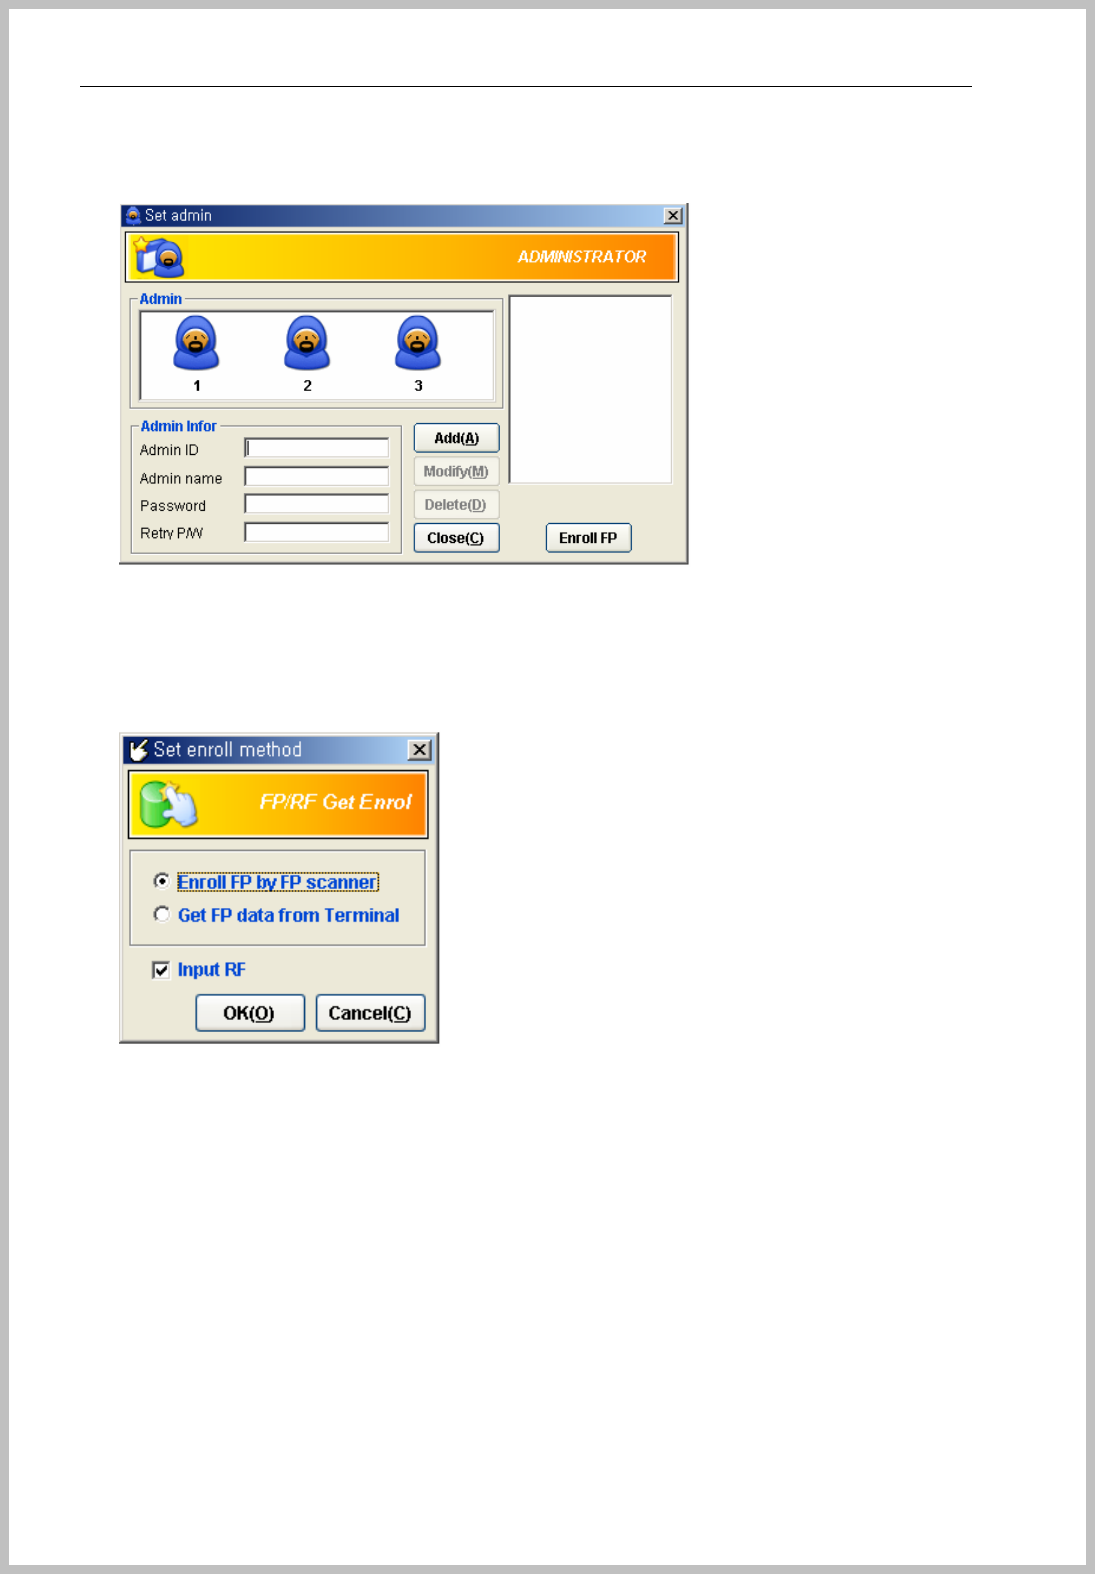
Set administrator
Initial admin is set as “Admin ID 1”, you can add new administrators as push “Add” button after
enrolled new ID and Password. If you want to use fingerprint, please enroll fingerprint as push
“ Enroll FP” button and place your finger on the sensor of BKS-2600 scanner connected to PC.
Set enroll method
Select enrollment method between “Enroll by fingerprint scanner” and “Get Fingerprint data from
terminal”
Please make sure that “Enroll by FP scanner” should connect of BKS-2600 scanner on PC.
And push “OK” button for saving.
Useful description of word
① Download : Send data to terminal
② Upload : Get data from terminal
③ FP : Fingerprint
Console Manager
- 16 -
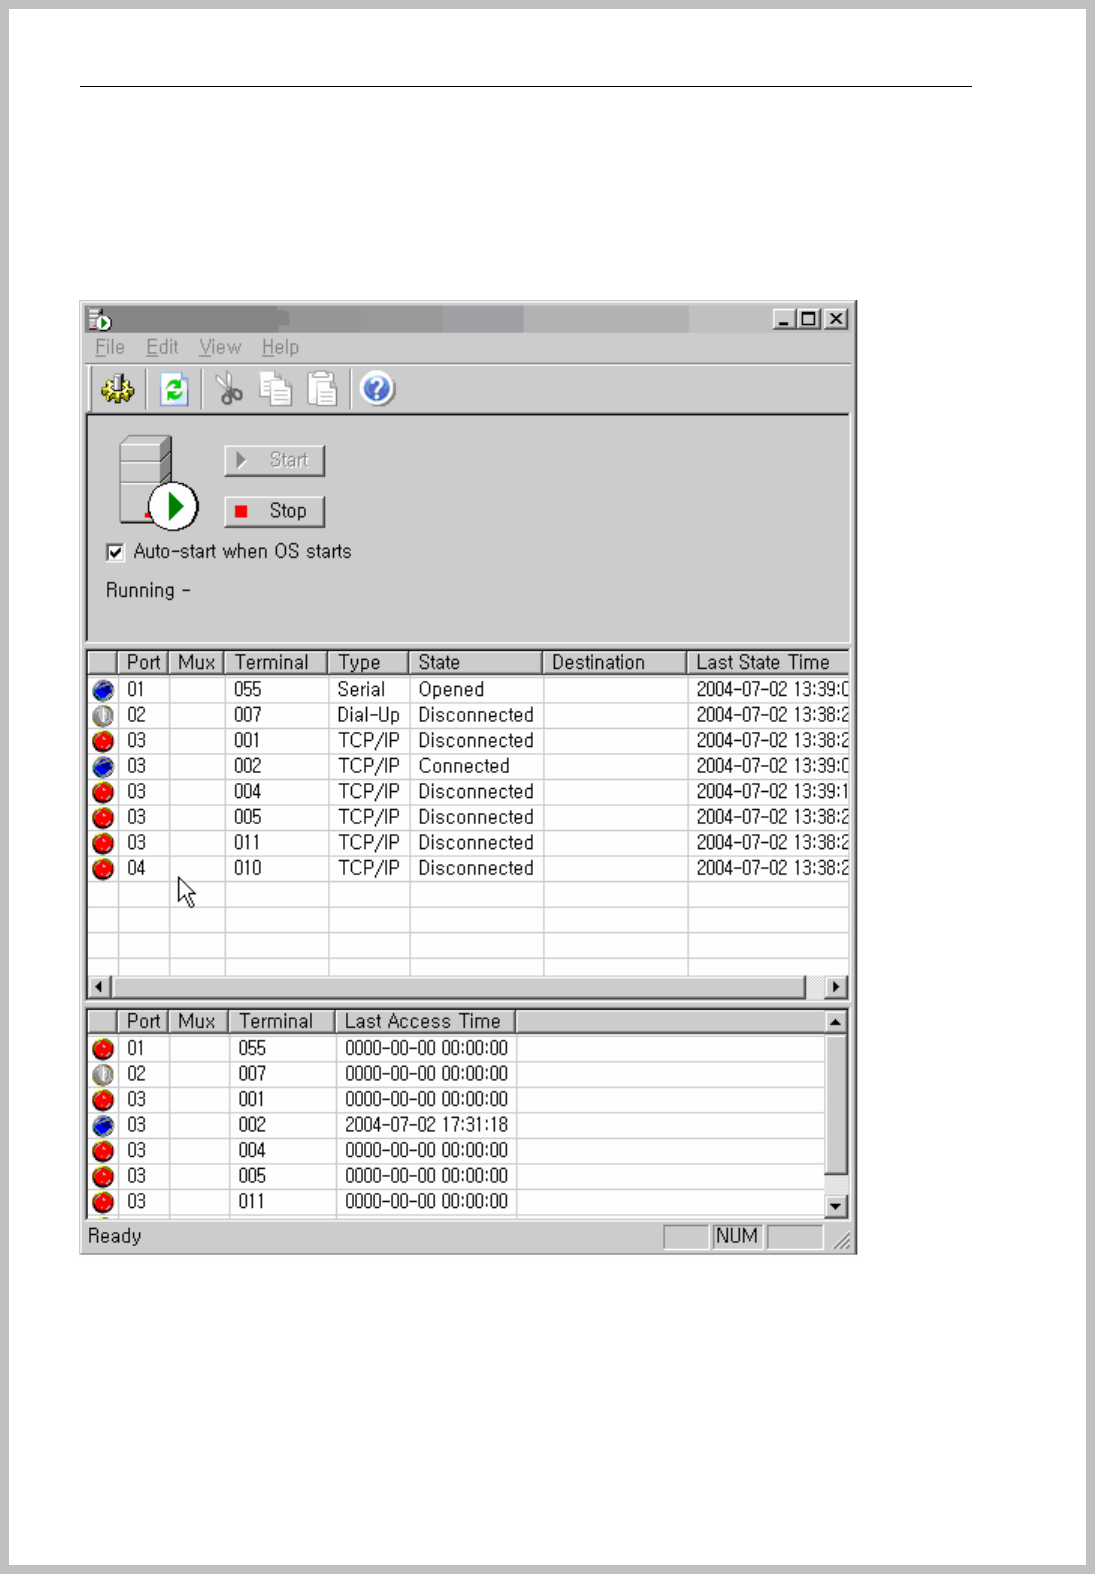
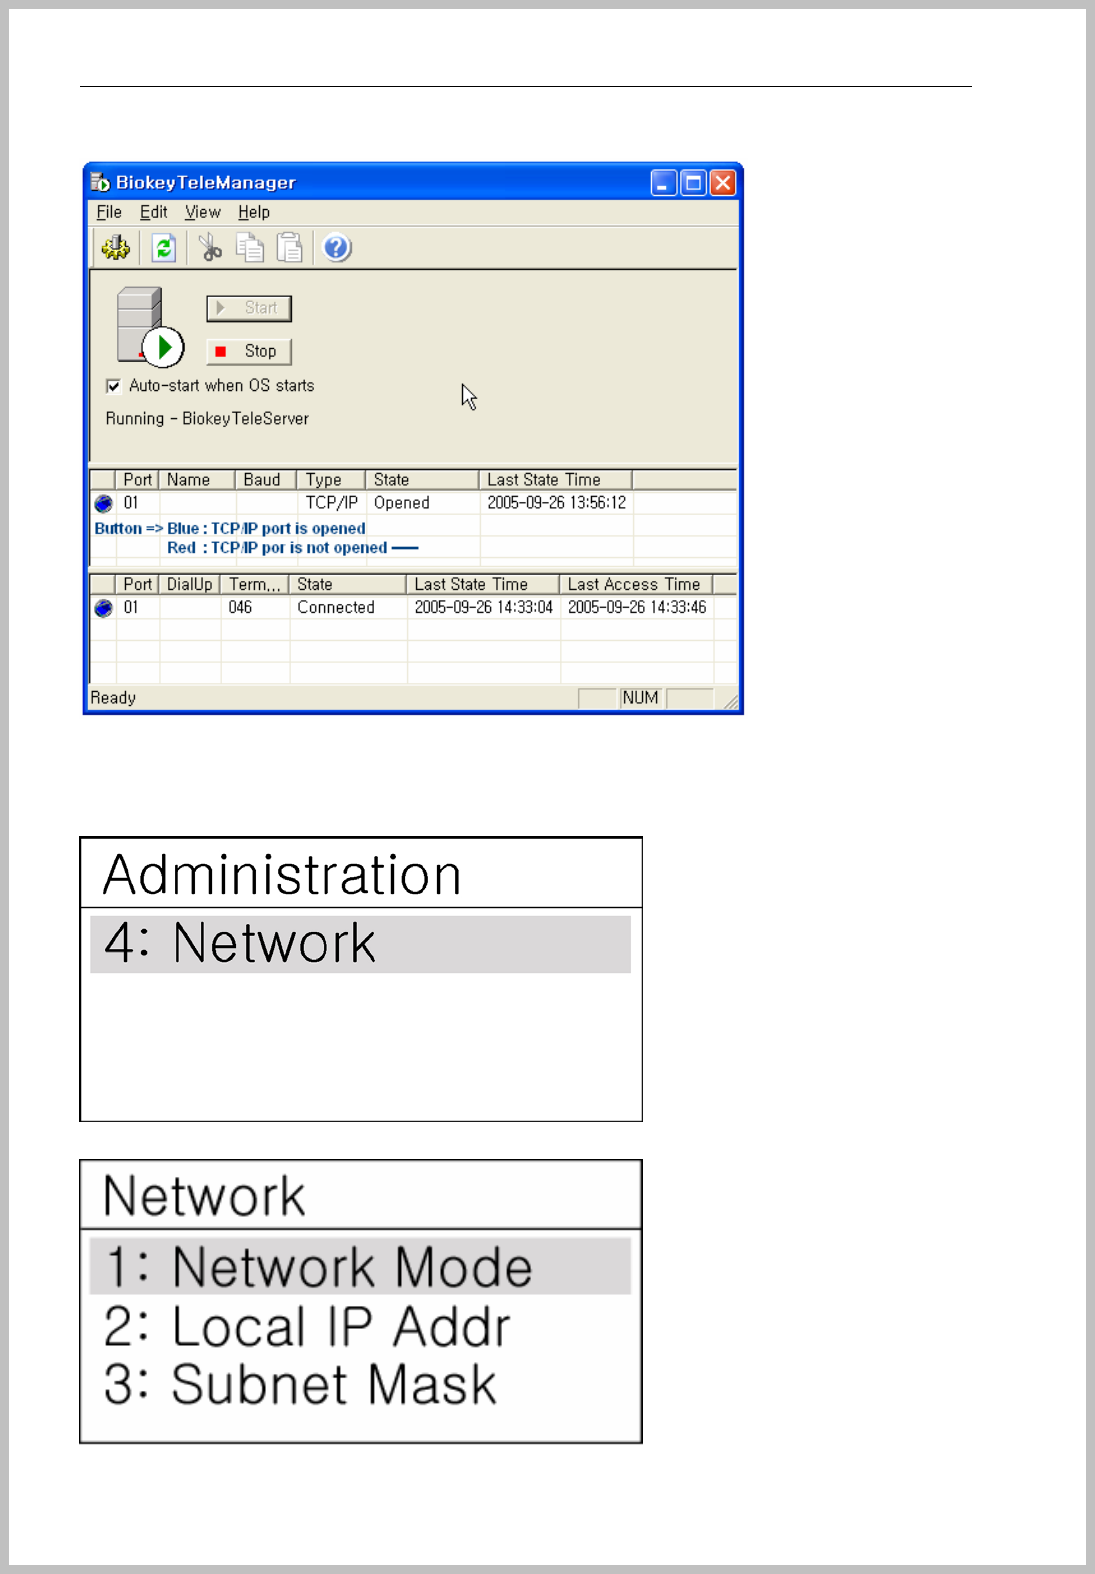
How to use Console Service
For communication with terminal and Console Manager Software, Window service system should be
started.
Click “Bio Tele Manager” Icon on desktop and appears the below window.
Click “Start” button and appears all status of enrolled terminal. Connected state is correct
communication with server and terminal. If the state marked to disconnected, please check all
condition of terminal set value and terminal set value.
Console Manager
- 17 -
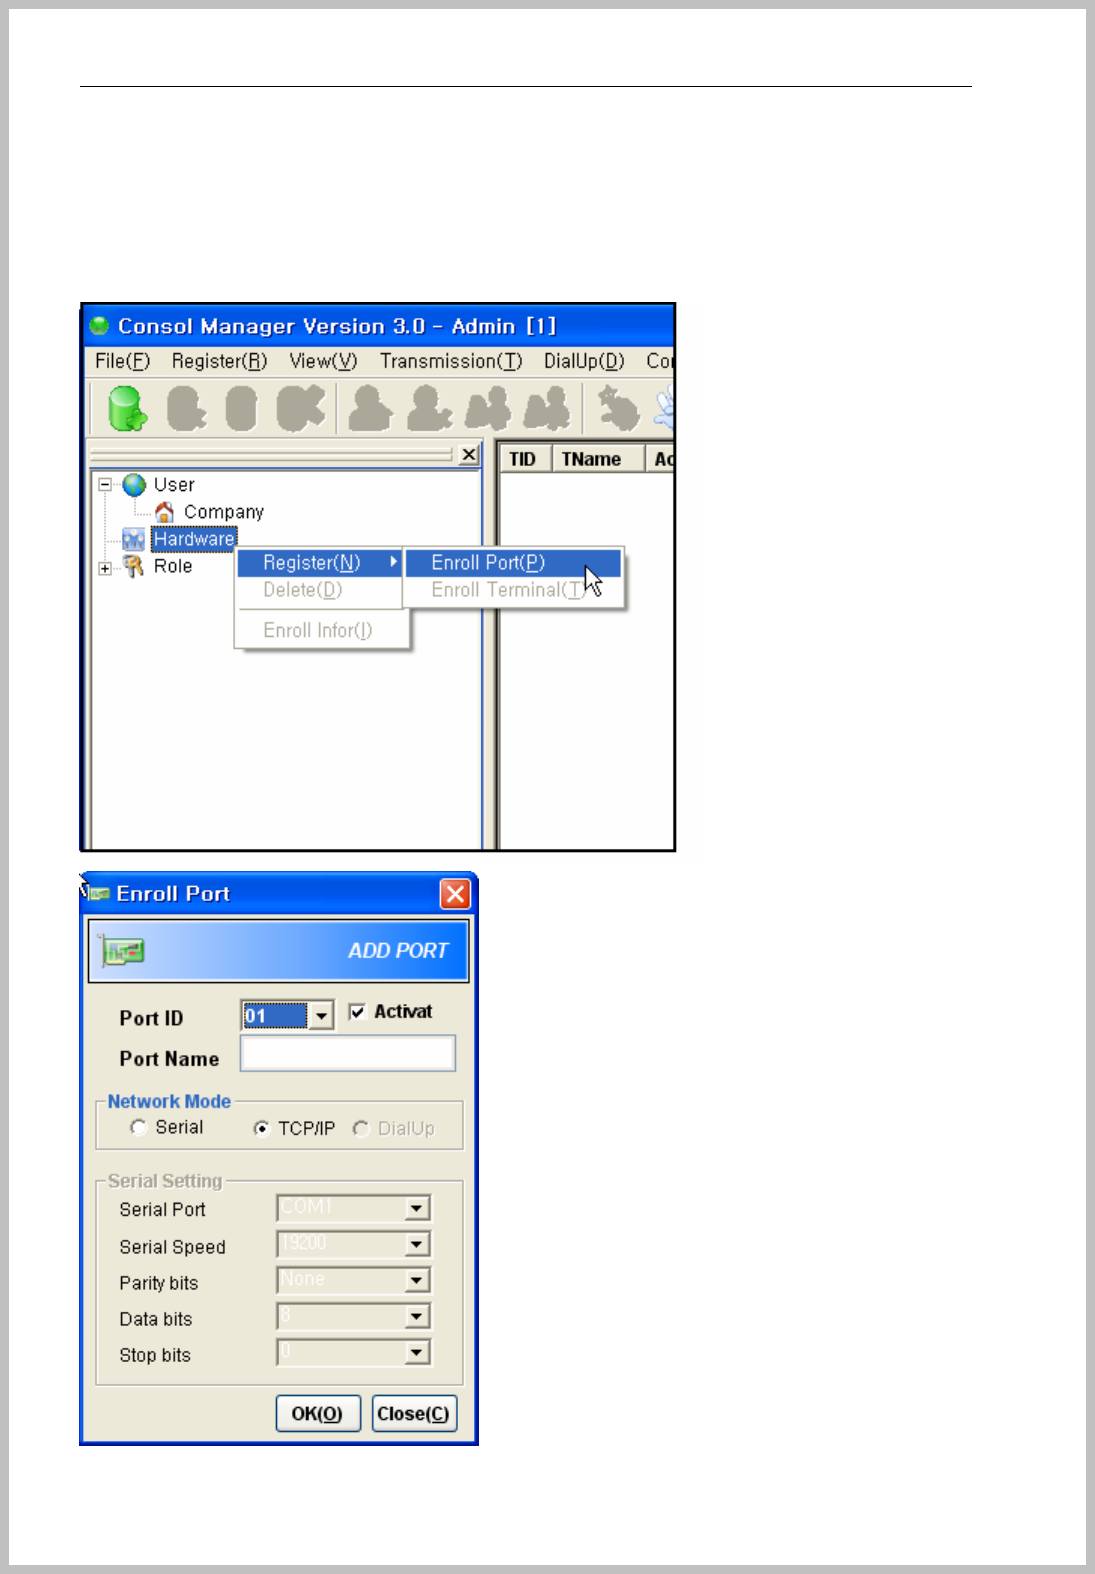
3. How to connect between Terminal and Server
Select port
It initially input 3 kind of terminal port as Dial-up, Serial and TCP/IP.
First choose correct port type and enroll terminal as below.
Console Manager
- 18 -
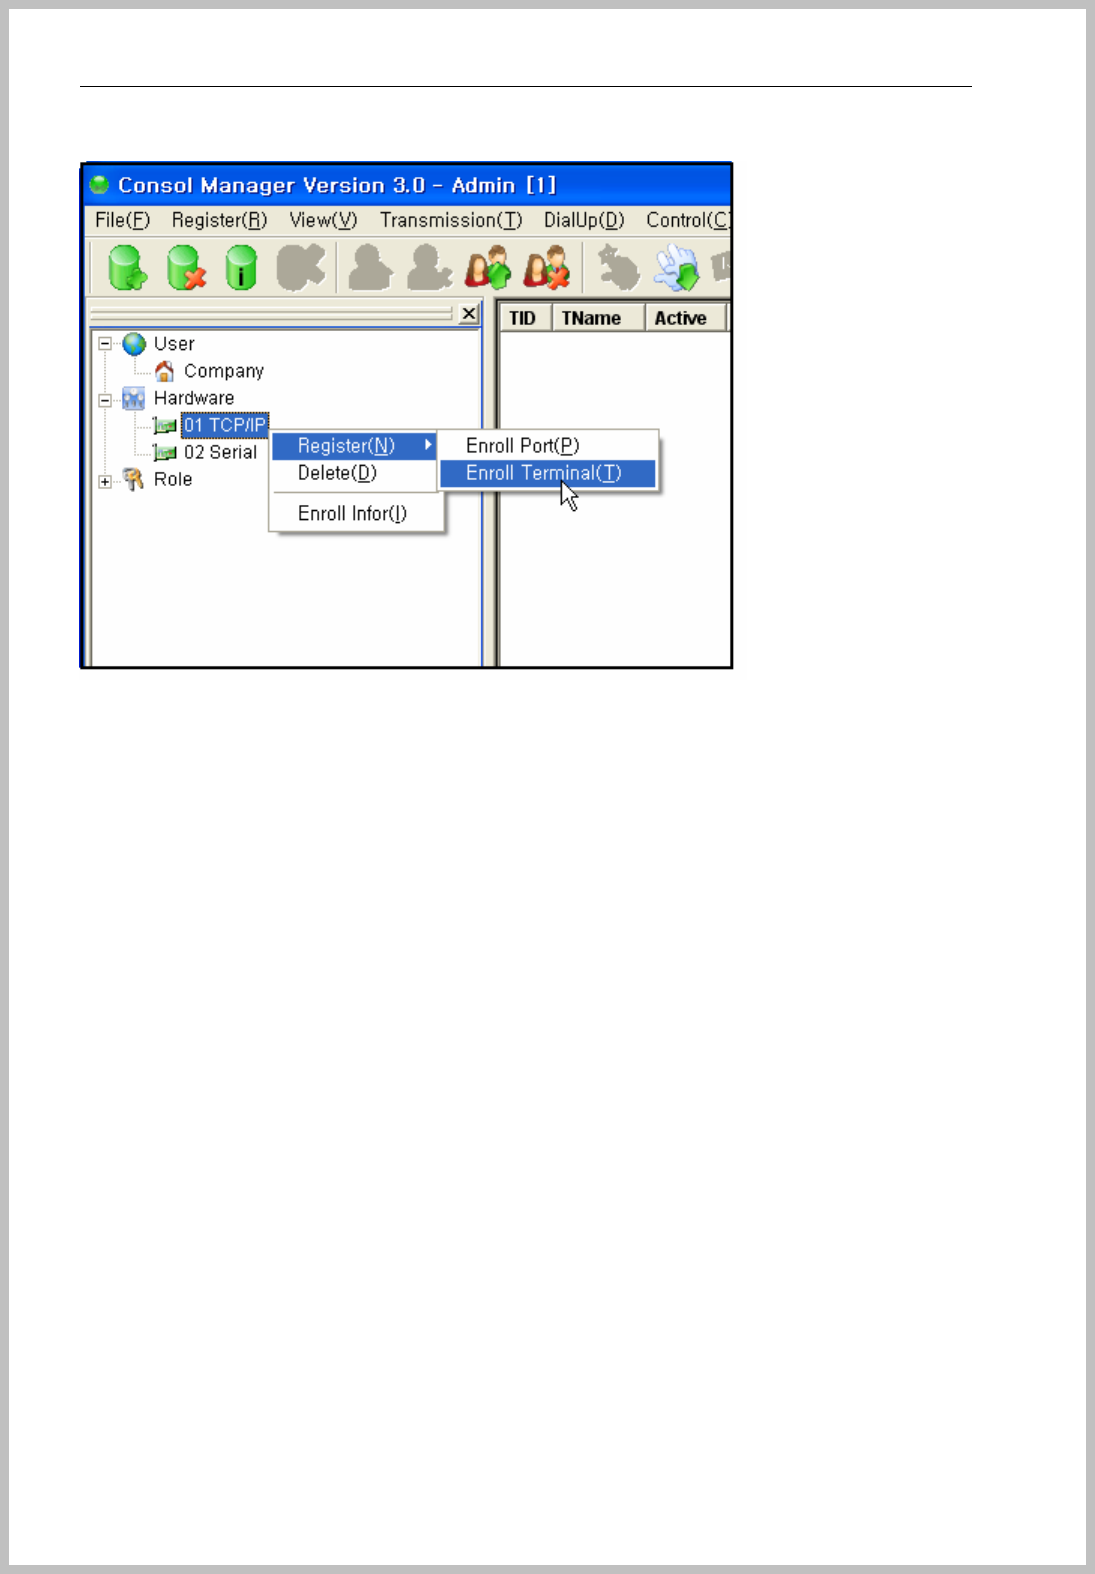
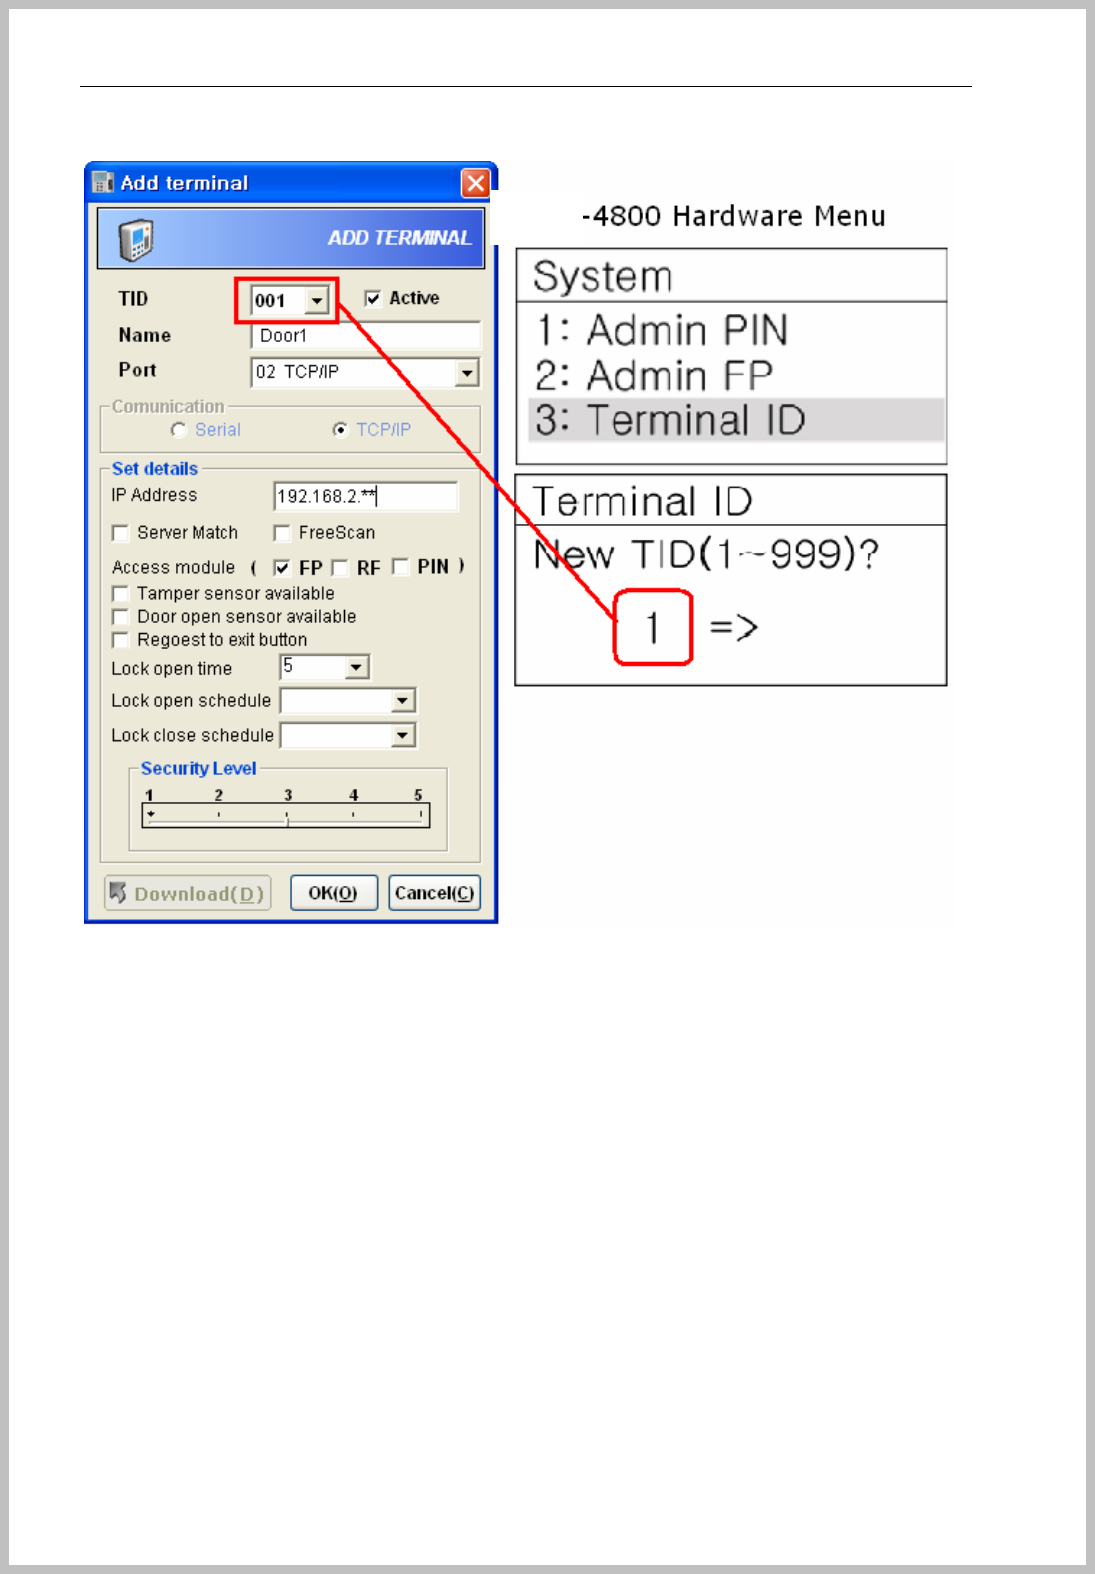
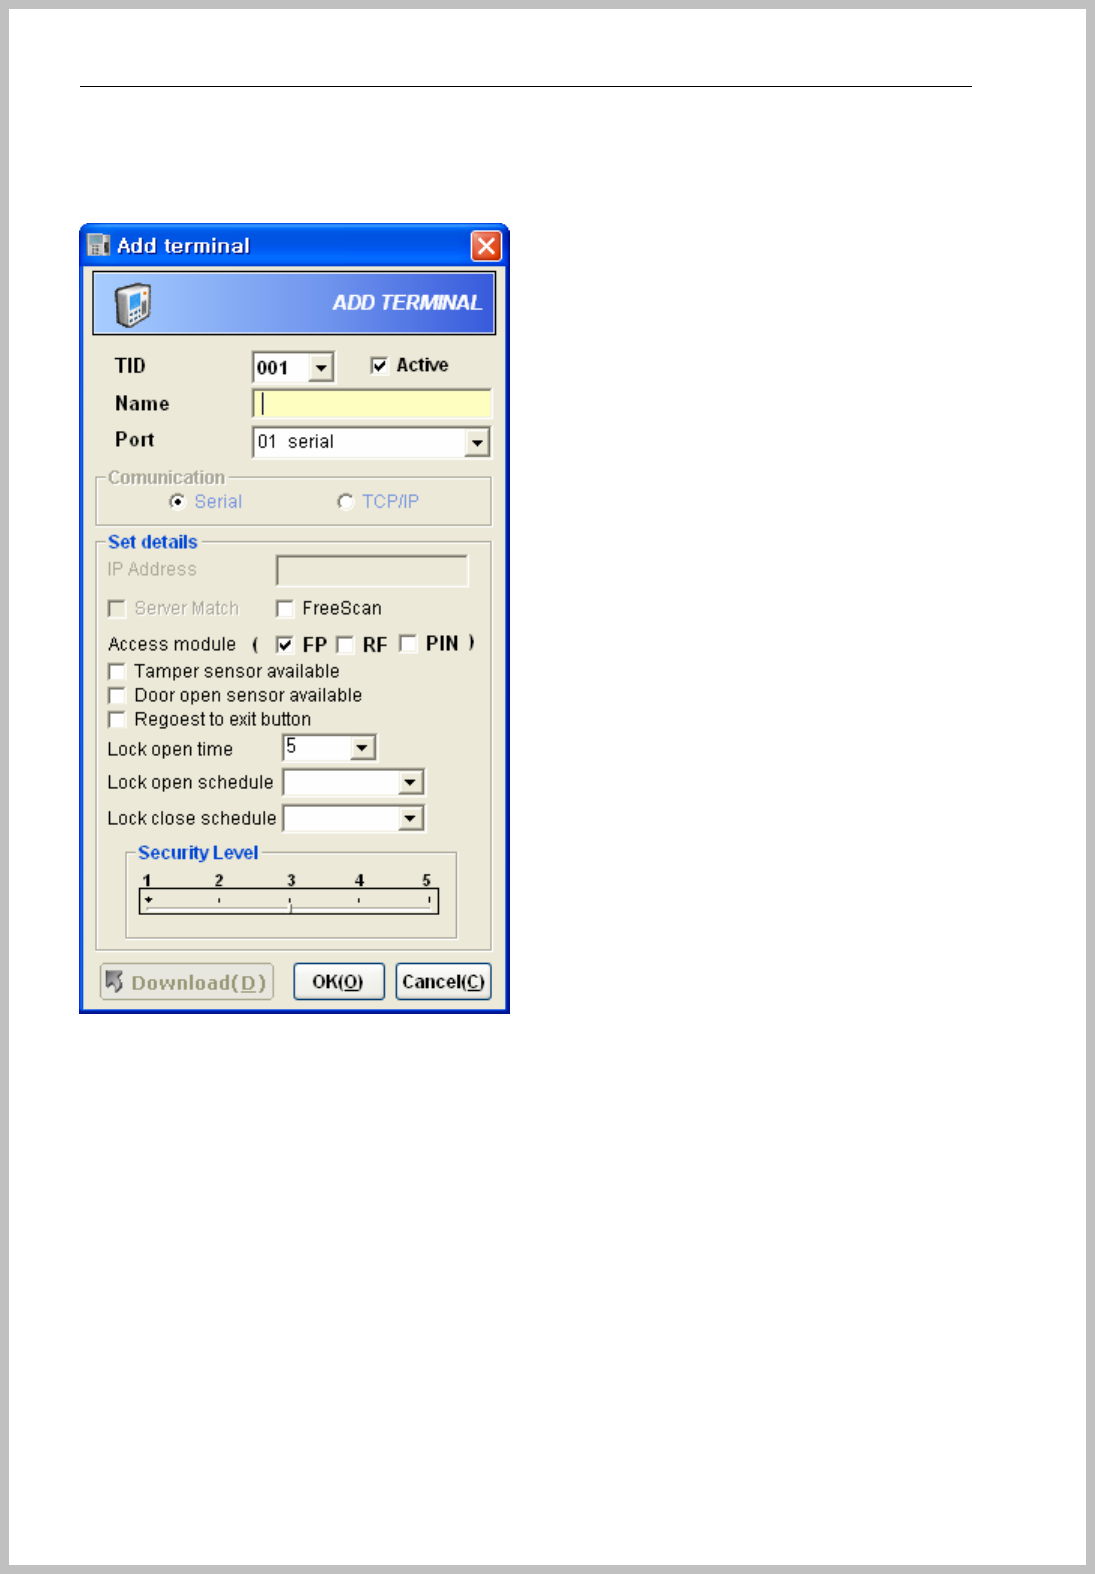
Setup TCP/IP Connection
Enroll Terminal by tree menu or menu bar to TCP/IP port
TID : Terminal ID should match as terminal enrolled terminal ID the stage of
“3.System=>3.Terminal ID => Shown number”
Name : Input terminal name
Select port
Server Match is not available now
Check Free scan mode if you want to use
TCP/IP port should input server PC IP address.
Select Access module
Check Temper sensor, Door open sensor, exit button if it’s available.
Select Security level applied to terminal.
Push “OK” button for saving.
After registration, Stop Console Server Manager and restart and then you can see the
terminal
Console Manager
- 19 -
‘
BKS
Console Manager
- 20 -
z CAUTION : IF YOU SEE RED COLOR BUTTON AND CLOSE STATE, PLEASE
GO TO “4. OPEN PORT FOR THE USER OF WINDOW XP SERVICE PACK2”
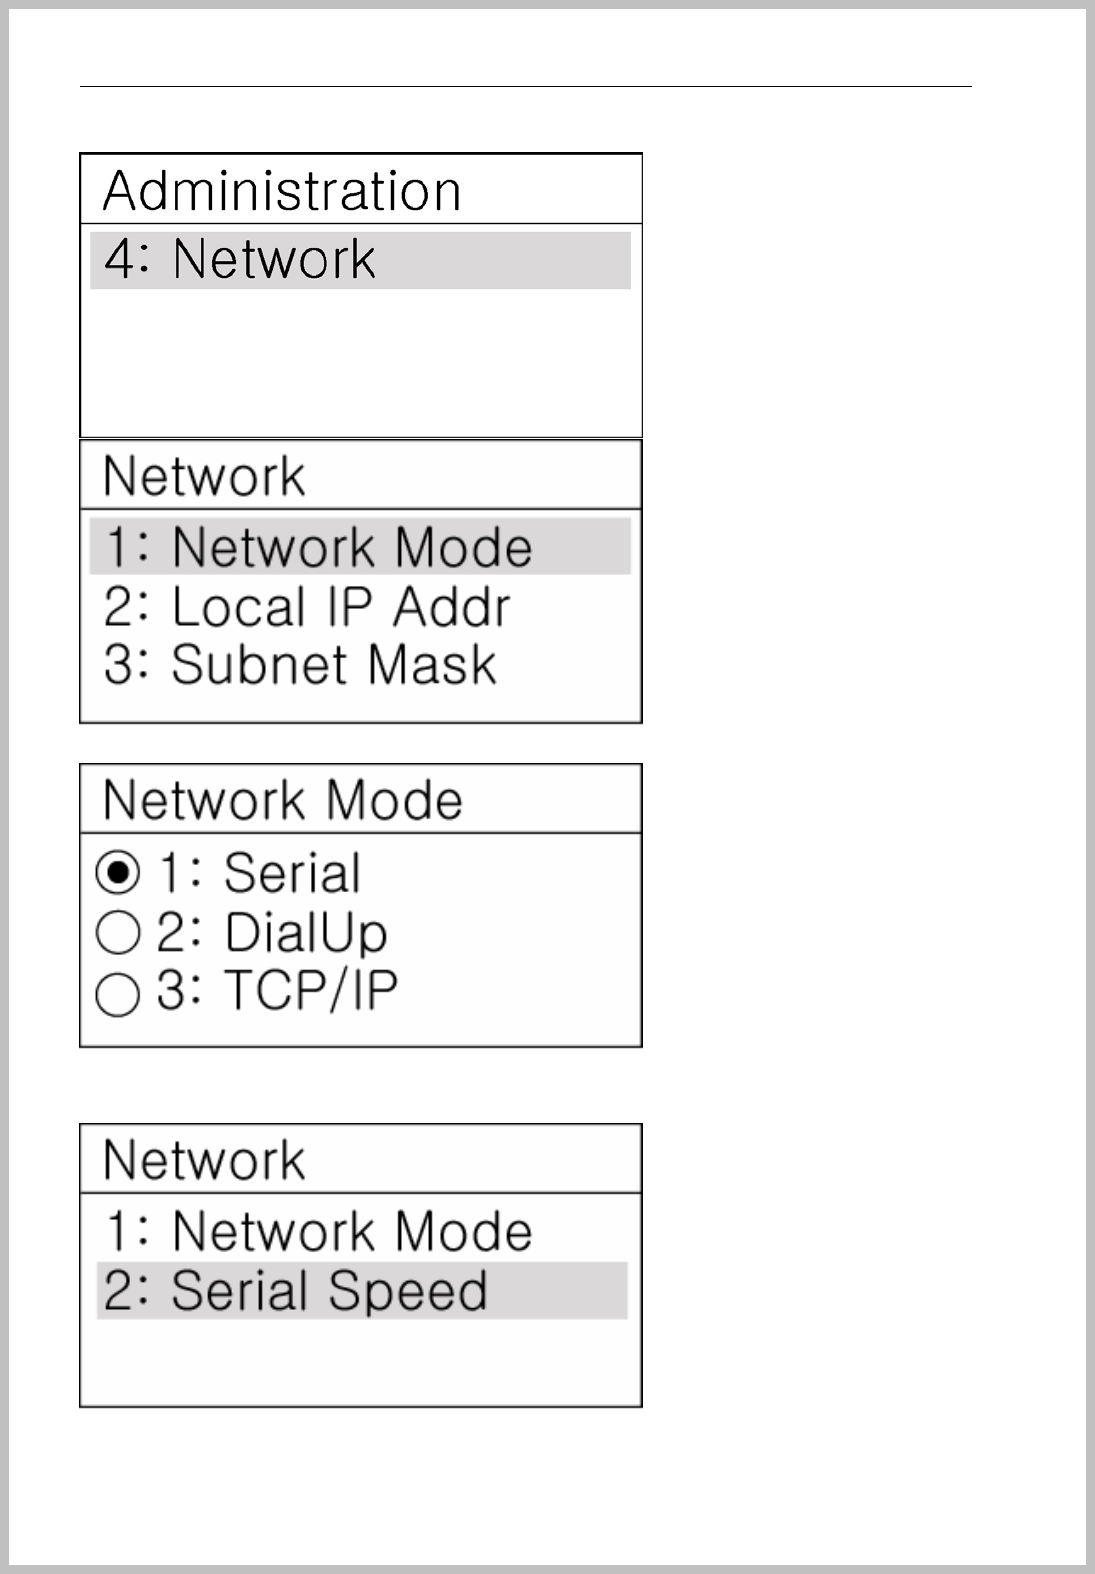
Go to “ 4. Network Mode => 3. TCP/IP => Select TCP/IP network”
Console Manager
- 21 -
Input TCP/IP value
1. Local IP Address : Input Terminal IP address
2. Subnet Mask : Input Subnet Mask address
3. Gateway : Input Gateway address
4. Server Host : Input Server PC’s IP address
5. Server Port : Input port number of PC server. It is set, as 8008 initially, please do not
change without special cause.
Console Manager
- 22 -
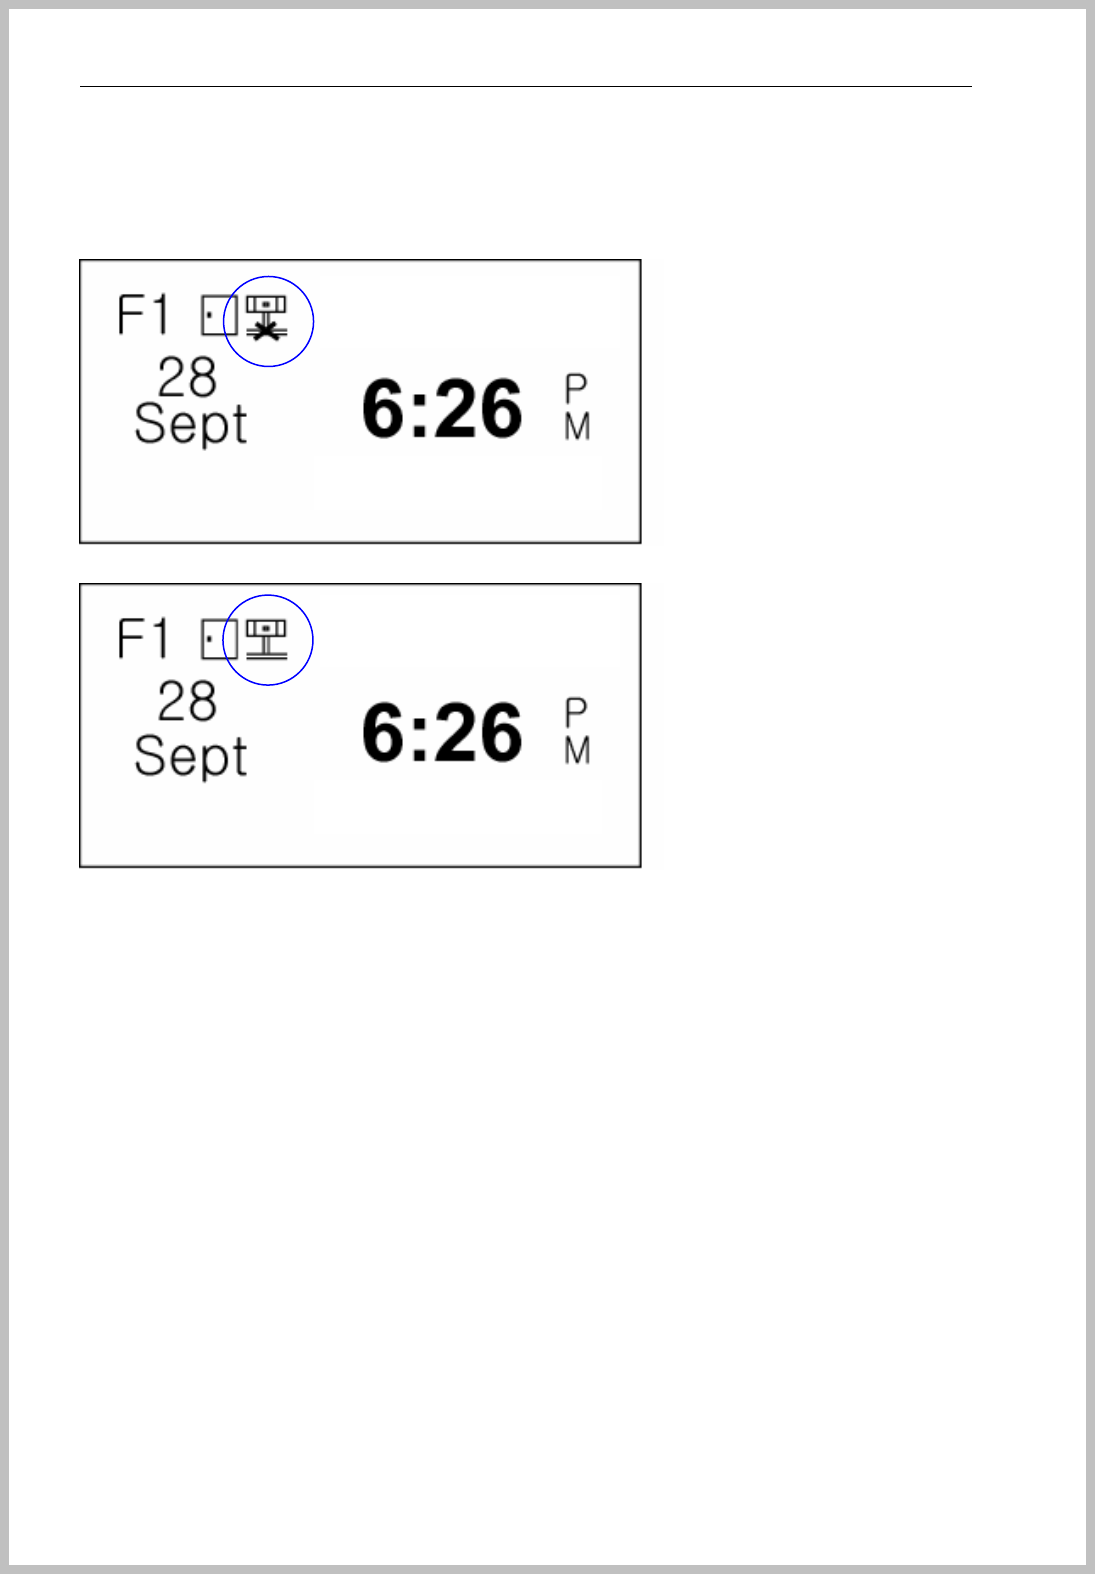
LCD Icon change and network connection state
When you see the TCP/IP network Icon and “ X” means Network disconnected.
All setting value is correct and TCP/IP icon disappears “X” mark.
BKS-4800
BKS-4800
Console Manager
- 23 -
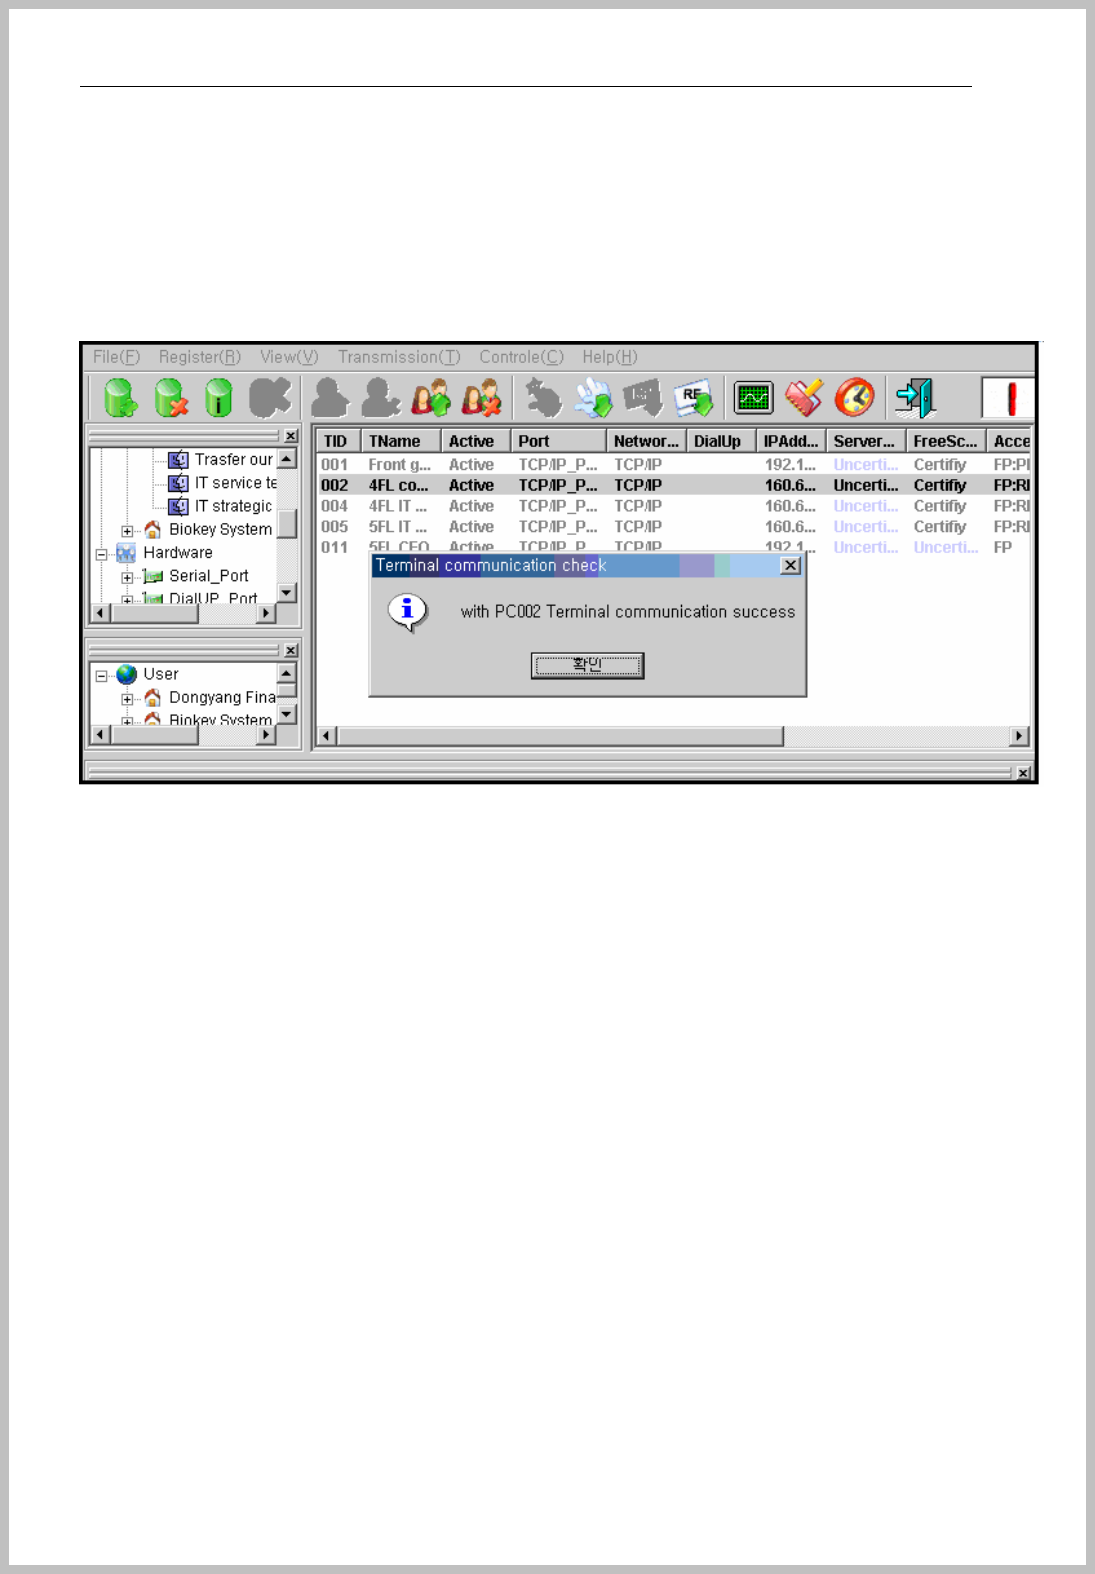
Console Manager connecting states
When you double click terminal on Console Manager, you can see the rotating icon as
follows.
NOTE: If the terminal is disconnected statues with the red cross button, please try the
following steps.

Console Manager
- 24 -
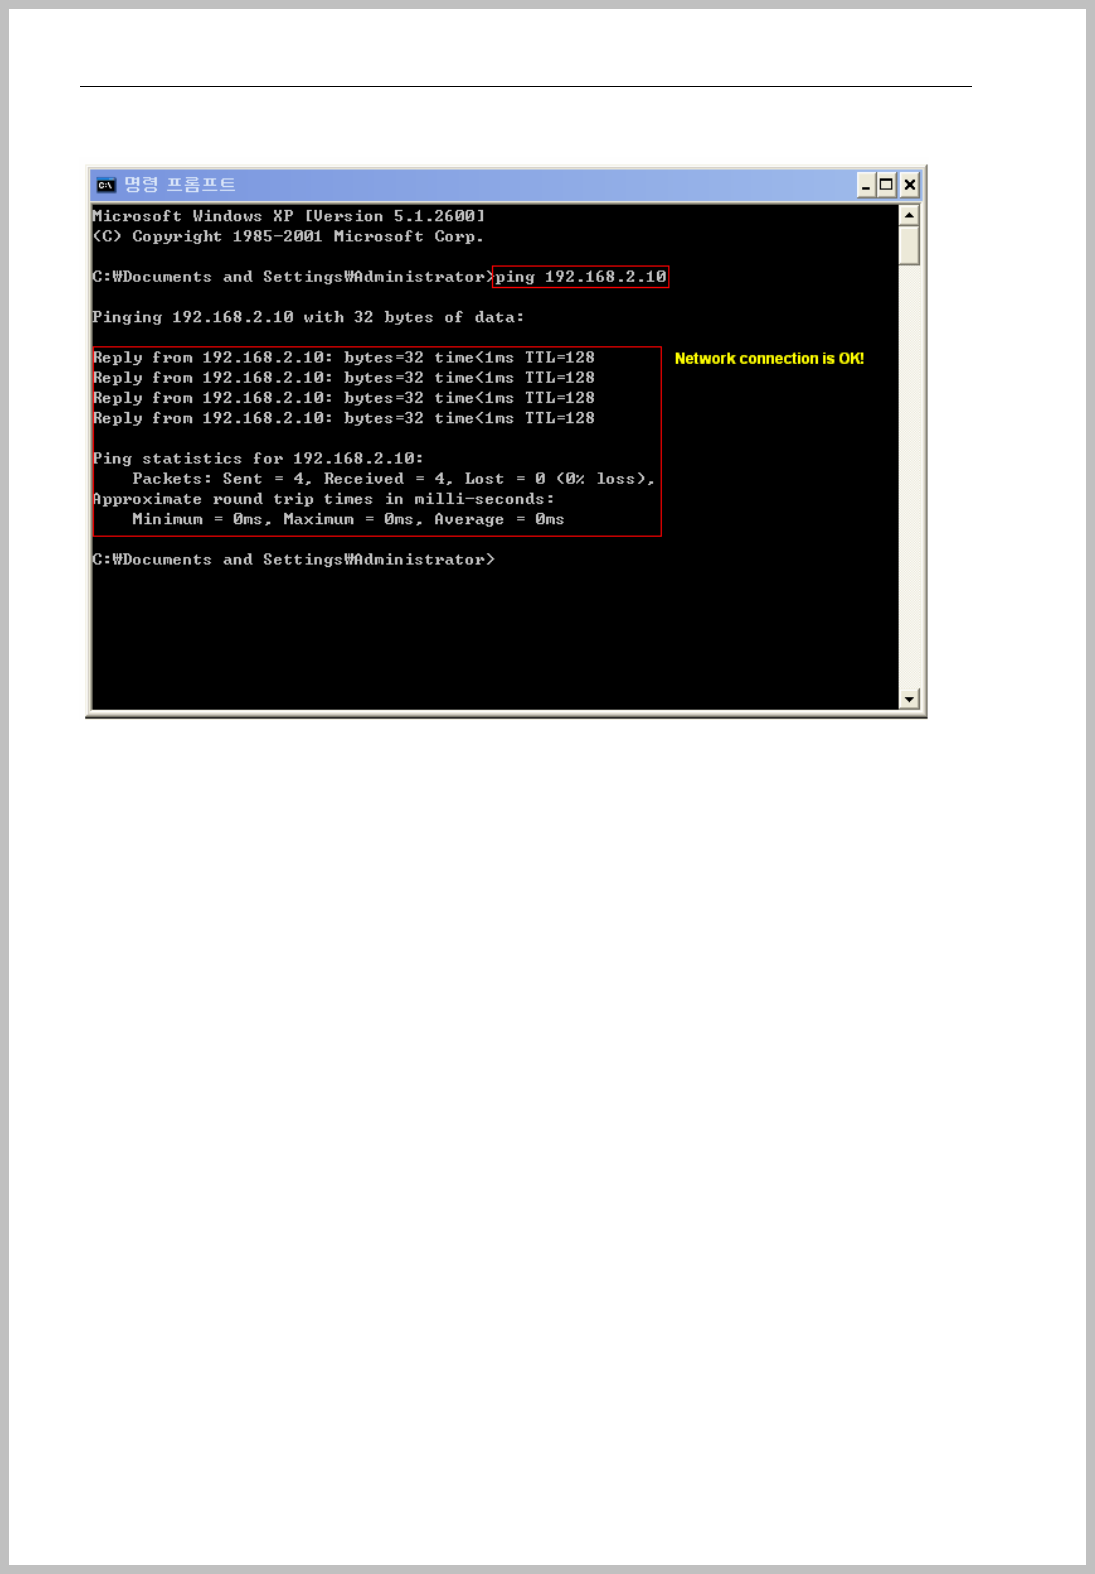
< Terminal IP Address >
Open “command prompt” program on the server PC, write ping + Terminal IP address,
if you got “Request timed out” message, it is the incorrect IP address.
Console Manager
- 25 -
When you receive the above message, it’s the correct IP address for terminal.
< Server IP address >
Open “command prompt” program on the server PC, write “ipconfig” and push “Enter”
key on the keyboard.
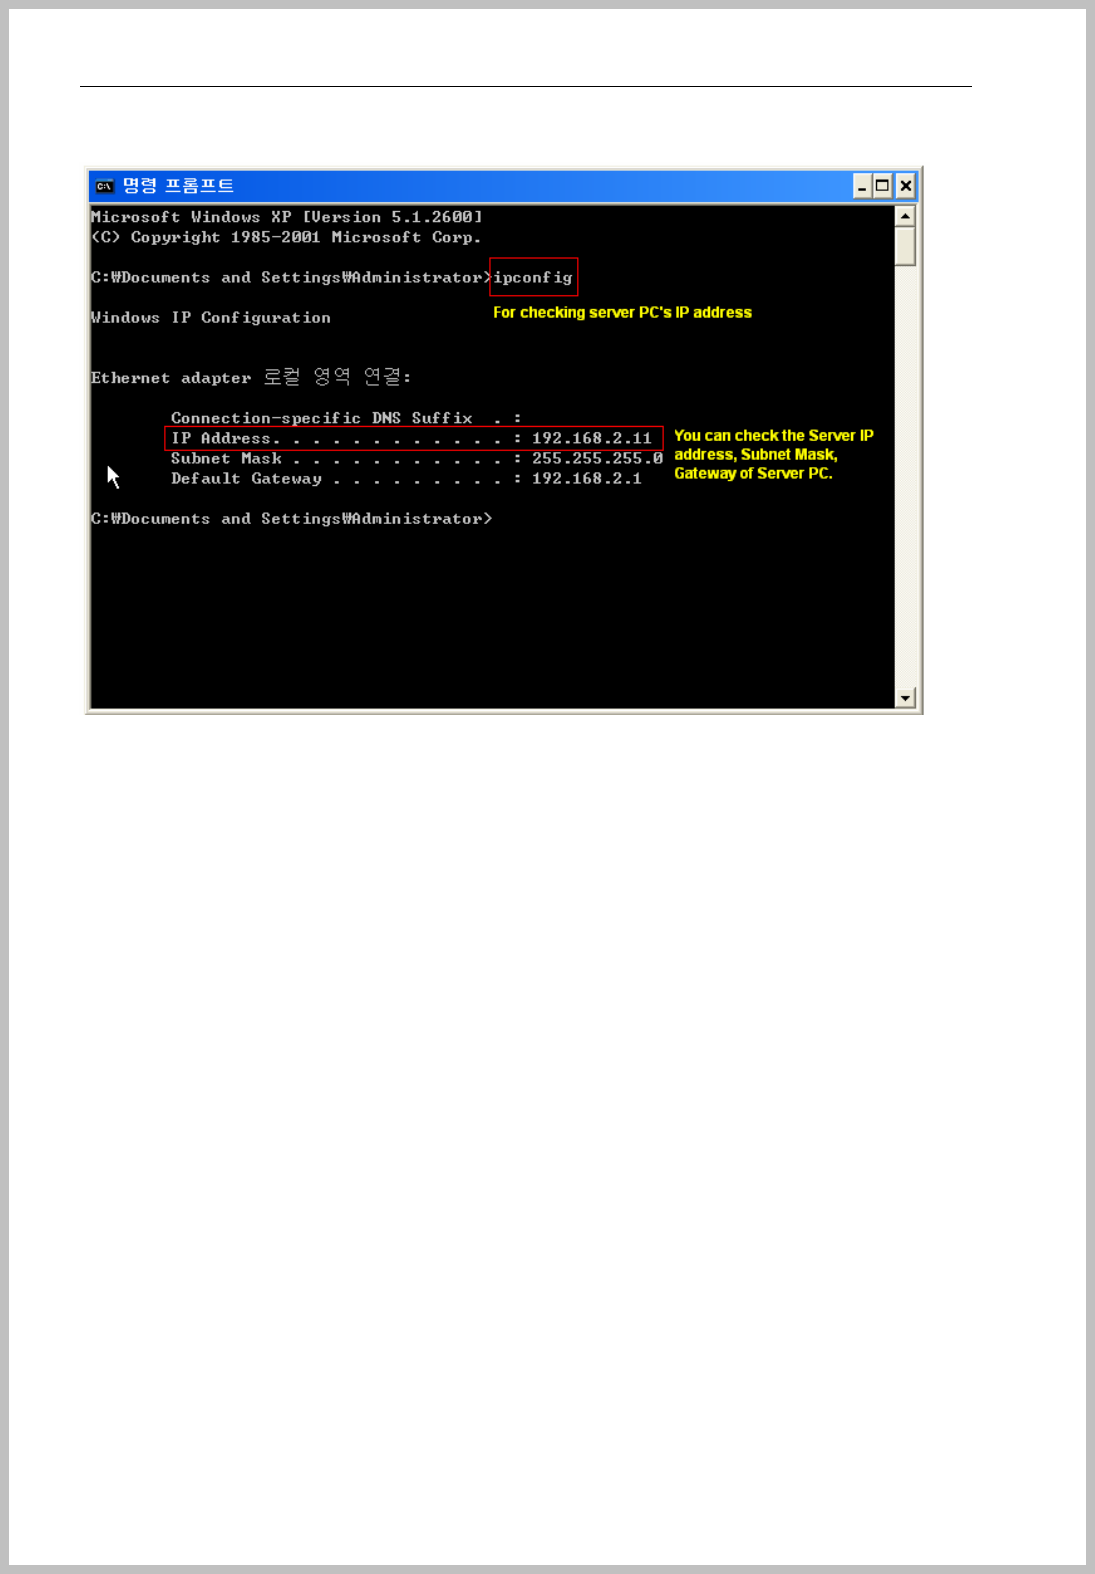
Console Manager
- 26 -
The server PC’s network value is appeared.
Change the correct IP setting value, it should restart “Console Server Manager” to be
recognized changed value.
Console Manager
- 27 -
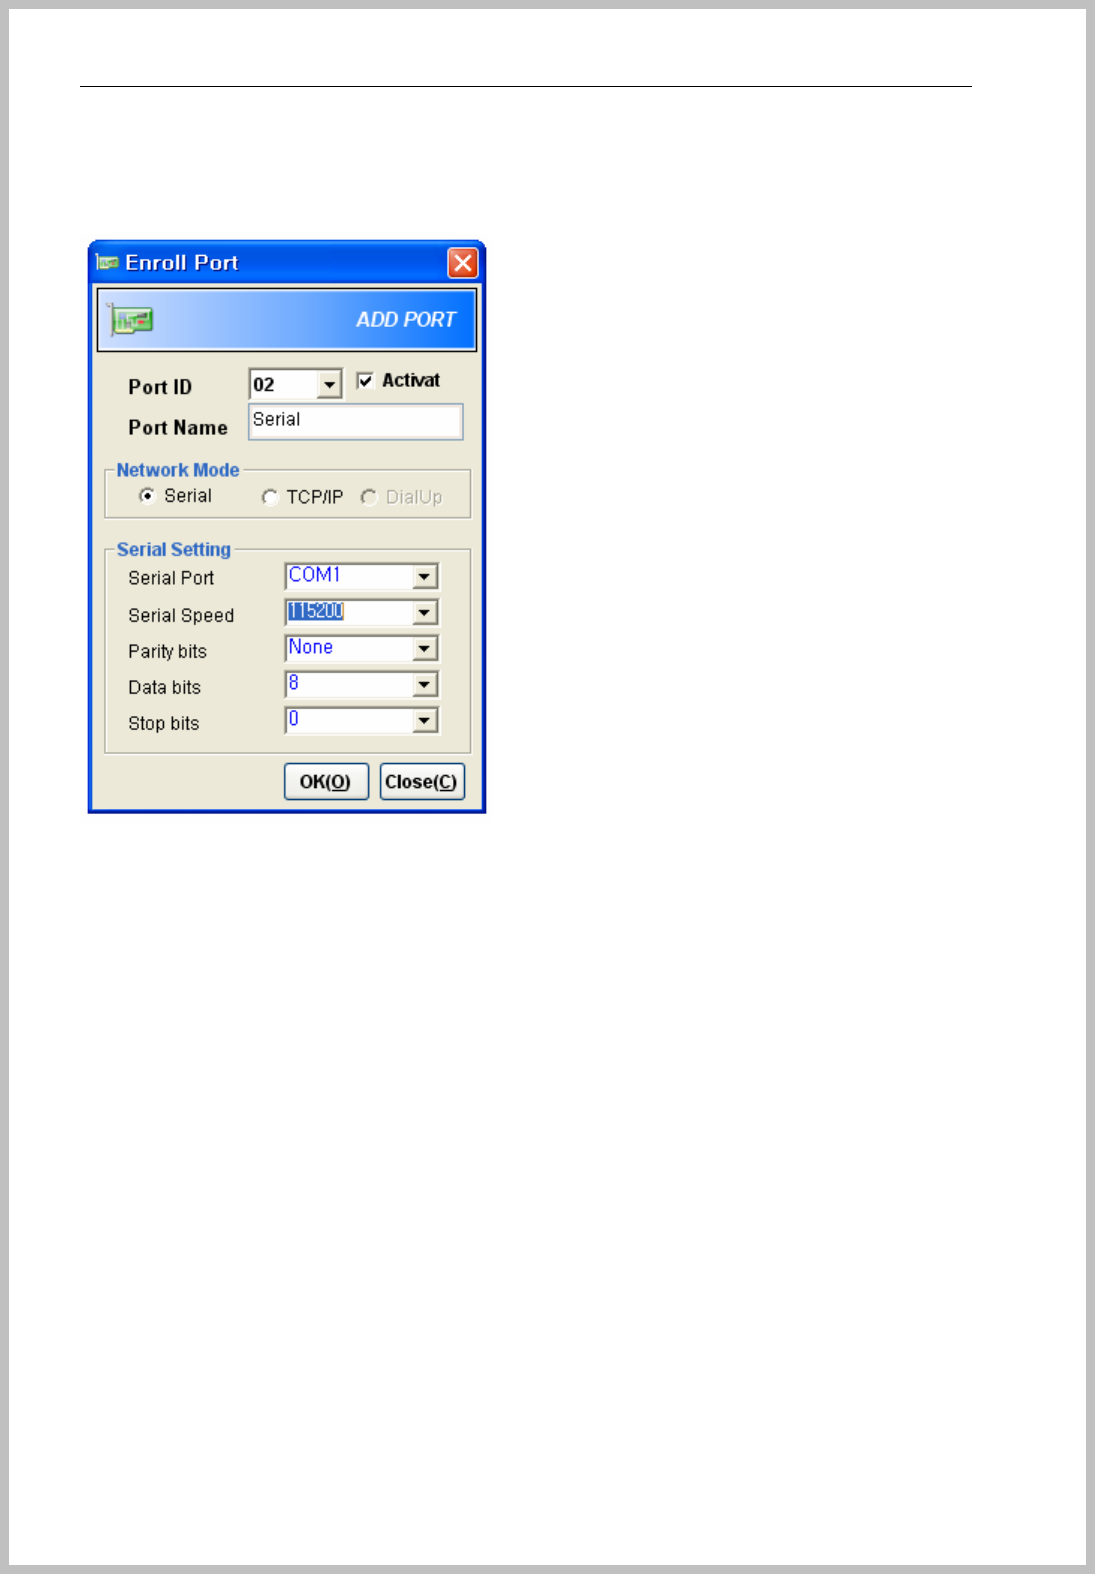
Setup Serial Connection
Enroll Terminal by tree menu or menu bar to Serial port
TID : Terminal ID should match as terminal enrolled terminal ID the stage of
“3.System=>3.Terminal ID => Shown number”( Refer to page 26)
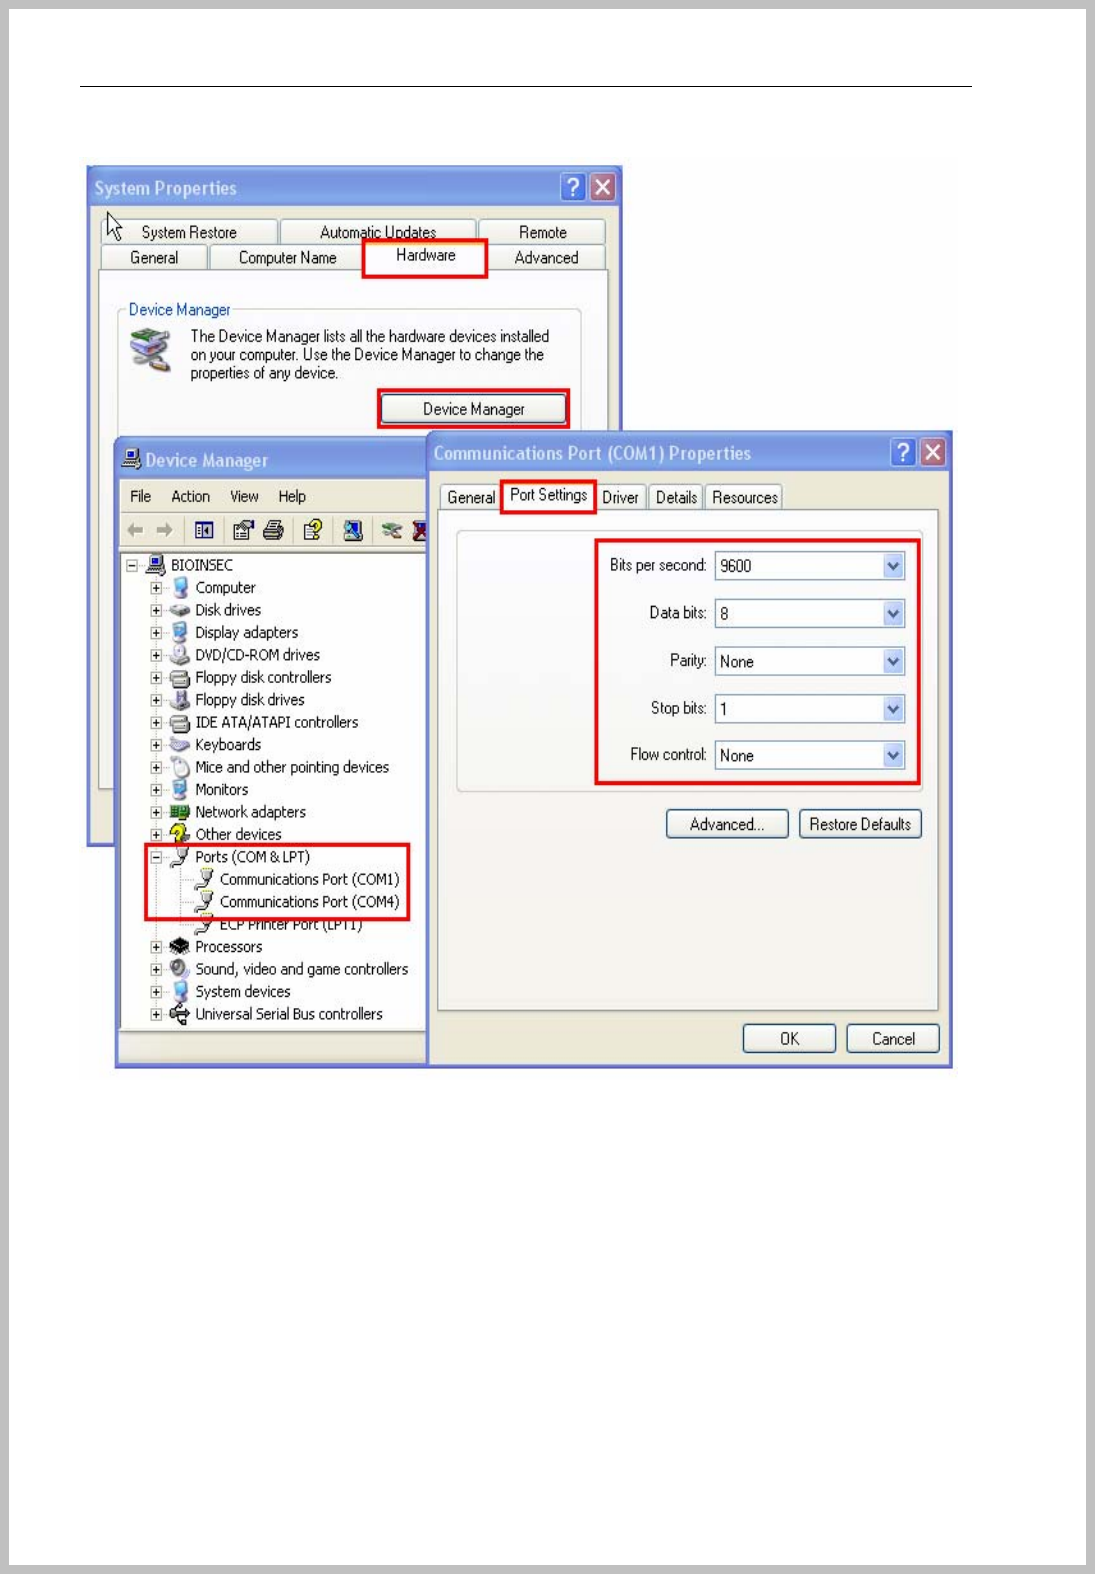
Set Serial Port, Serial Speed and others at the same value of Window setting.
( System Properties=> Hardware tab =>Device Manager => Ports => Double click
“Communication Port” => Communications Port Properties => Port Settings Tab )
Console Manager
- 28 -
Console Manager
- 29 -
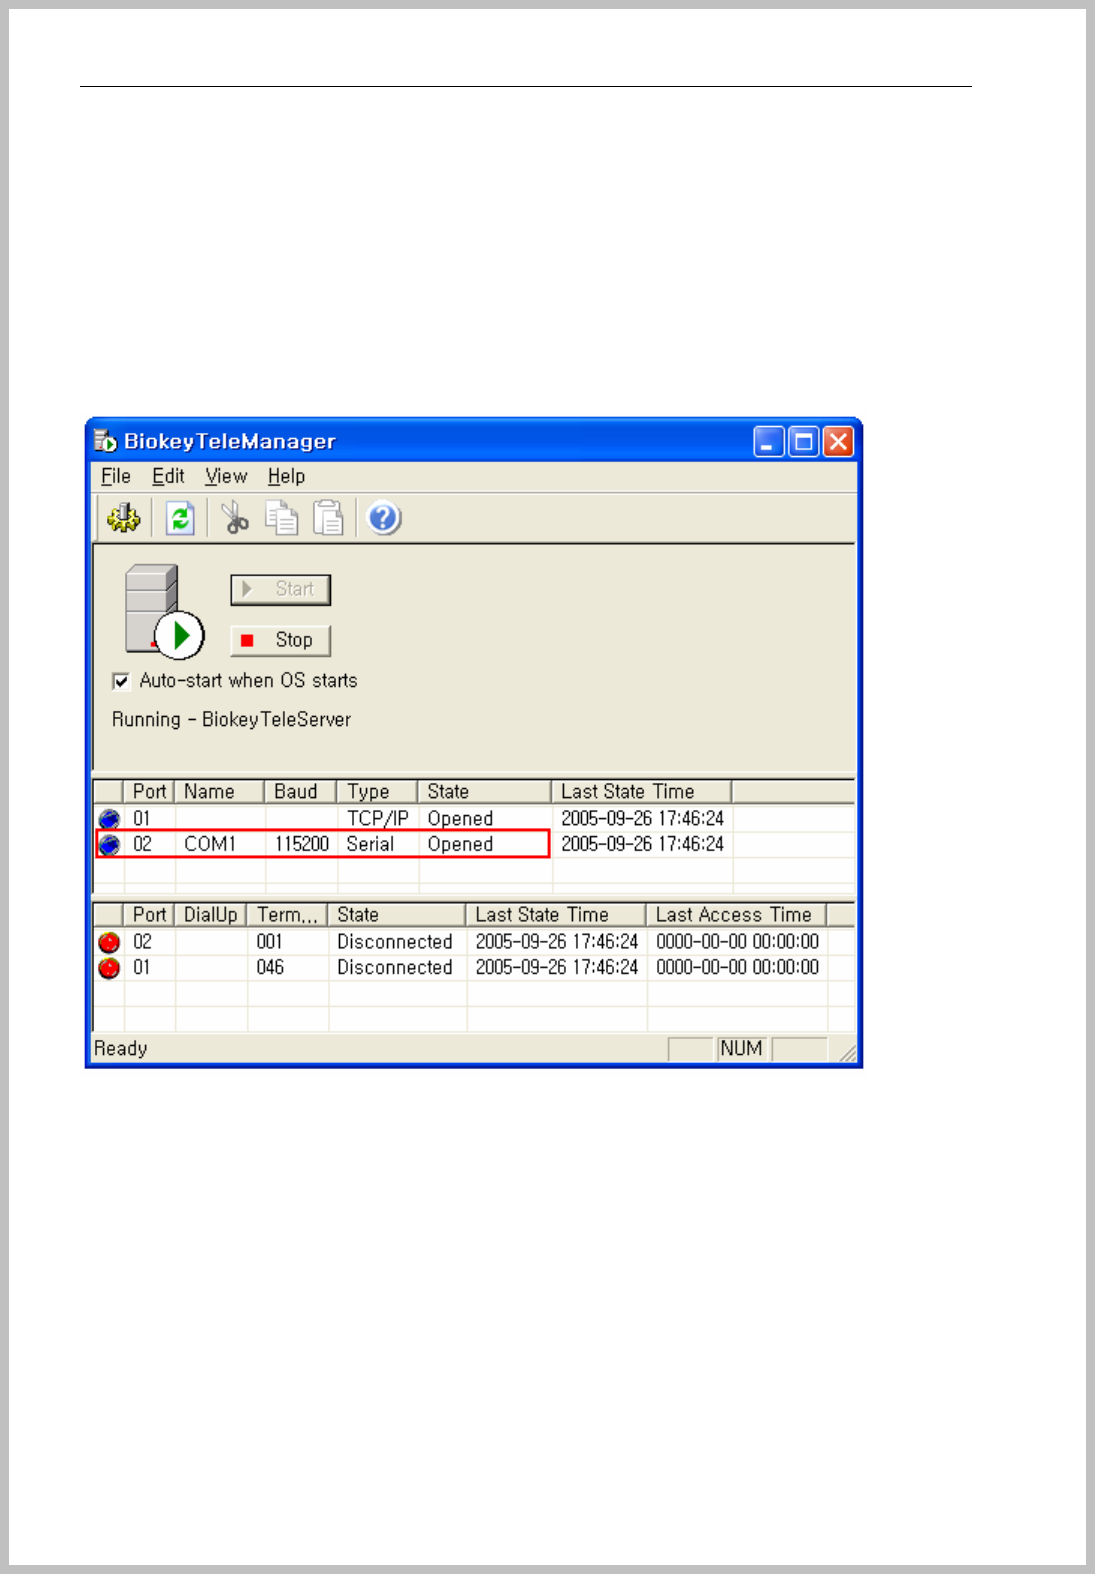
Restart “Console Server Manager” and then changed Opened state of port.
When you push “Start” button on Console Manager, you can see the red box displays
blue button, COM1, 115200, Serial Opened states.
If the COM1 port is not connected with terminals, you occur from the incorrect COM Port
or different Baud rates.
And go to Console Manager and push “Start” button, you can see the blue button and
Serial Opened status.
The first box is for the Port state between terminal and server PC. So it shows blue
button of the opened state.
NOTE: If the port is not opened statues with the red button, please check your computer is
installed SP2. If yes, please refers to page 12~14.
Console Manager
- 30 -
Add Serial terminal
Enroll Terminal by tree menu or menu bar to Serial port
TID : Terminal ID should match as terminal enrolled terminal ID the stage of
“3.System=>3.Terminal ID => Shown number” ( refer to 26 page )
Set the hardware setting of serial communication
Go into the menu of terminal( CFR-3000 : 0 + <┘ ) as to input “1111” as initial
password.
Go to “4. Network Mode => 1. Network Mode => 1.Serial mode”
Console Manager
- 31 -
Input Serial Speed as same as Console Manager setting value( Refer to page 34 ).
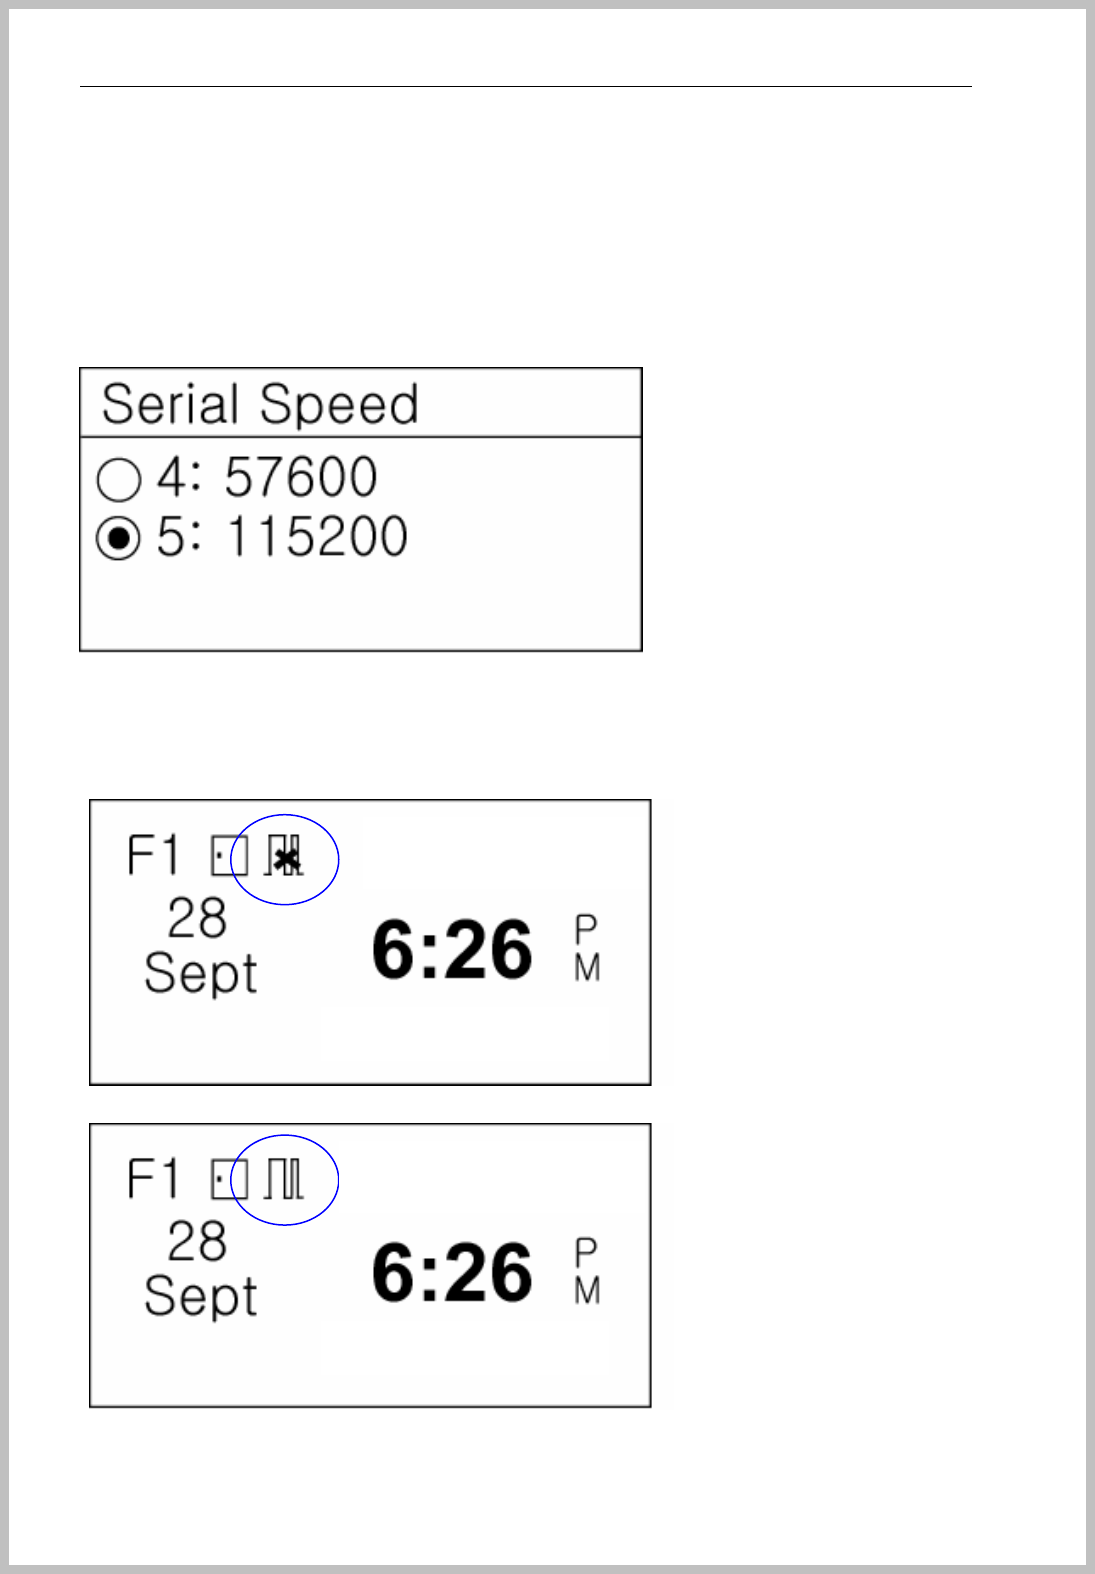
Console Manager
- 32 -
Select one value as same as Console Manager setting value. ( Refer to page 33~34 )
1. 9600
2. 19200
3. 38400
4. 57600
5. 115200
LCD Icon change and network connection state.
When you see the Serial network Icon and “X” means Network disconnected.
All setting value is correct and Serial icon disappears “X” mark.
BKS-4800
BKS-4800
Console Manager
- 33 -
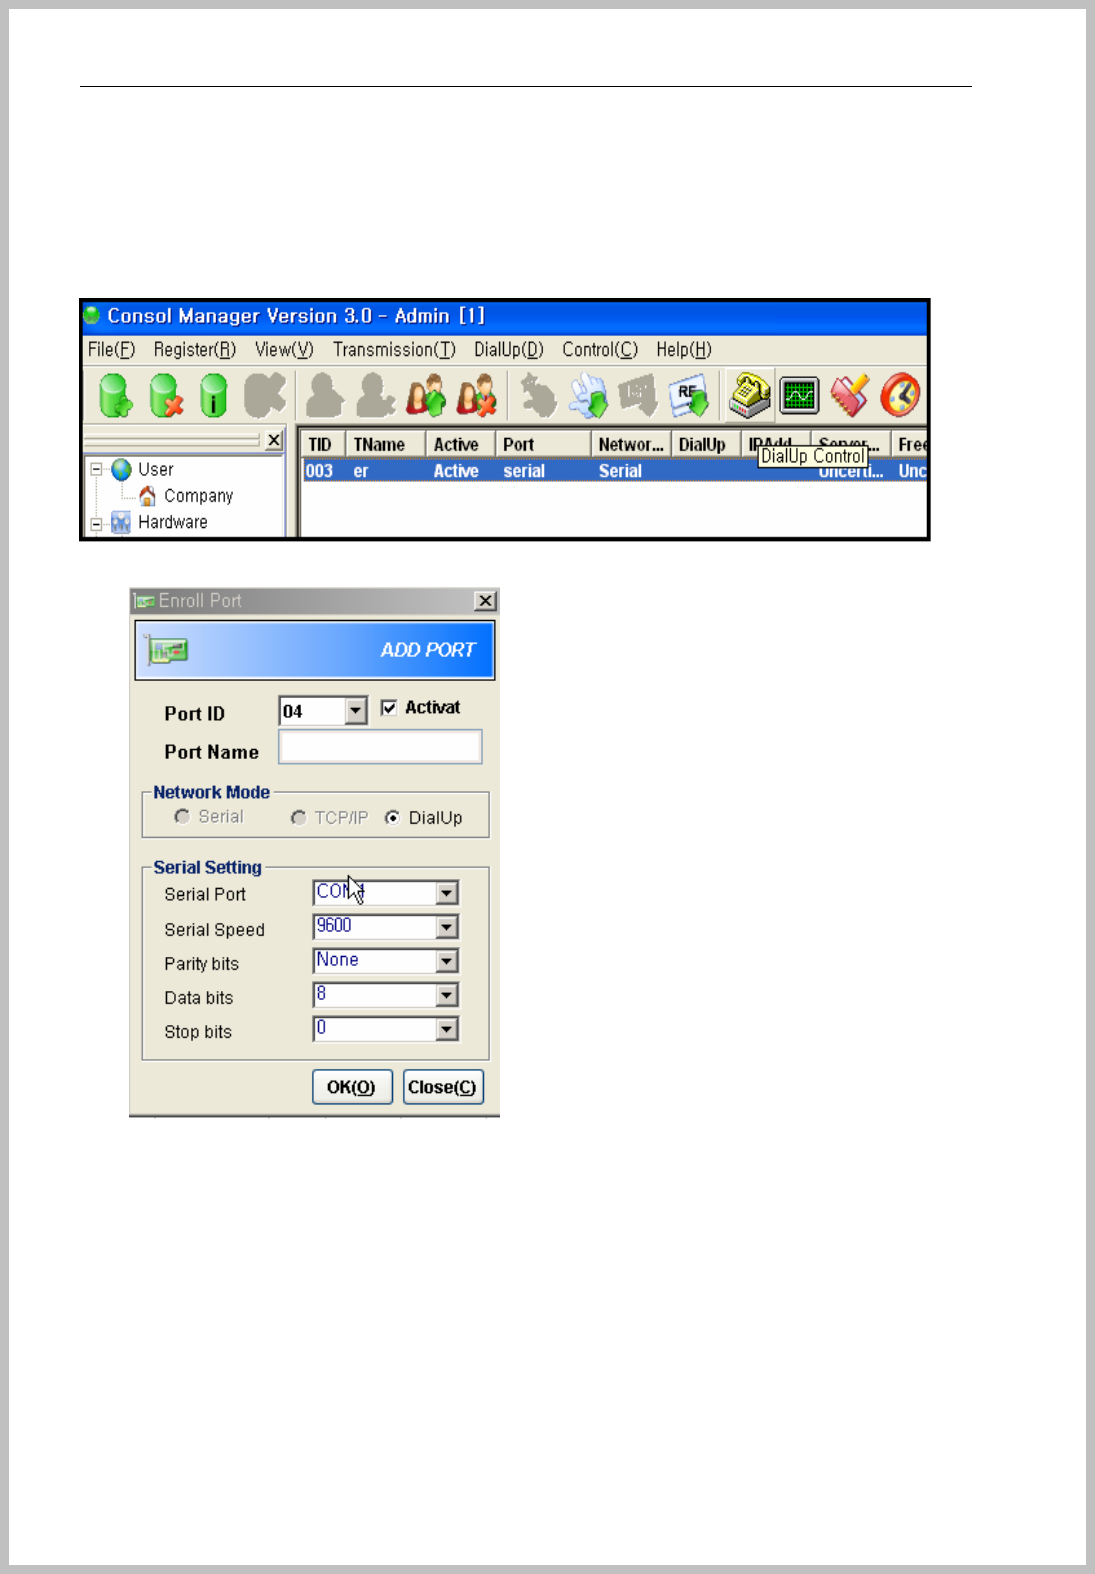
Setup Dial-Up Connection
Go to “DialUp(D) => DialUp Control” of Menu bar and the above Dial-up setting window appears.
Click “ADD” button when cursor is on DialUp (telephone image).
Add port window appears
Input port name first. Set Serial port and serial speed.(Refer to page 34)
Click “ADD” button when cursor is on enrolled Port.
ADD Terminal window appears
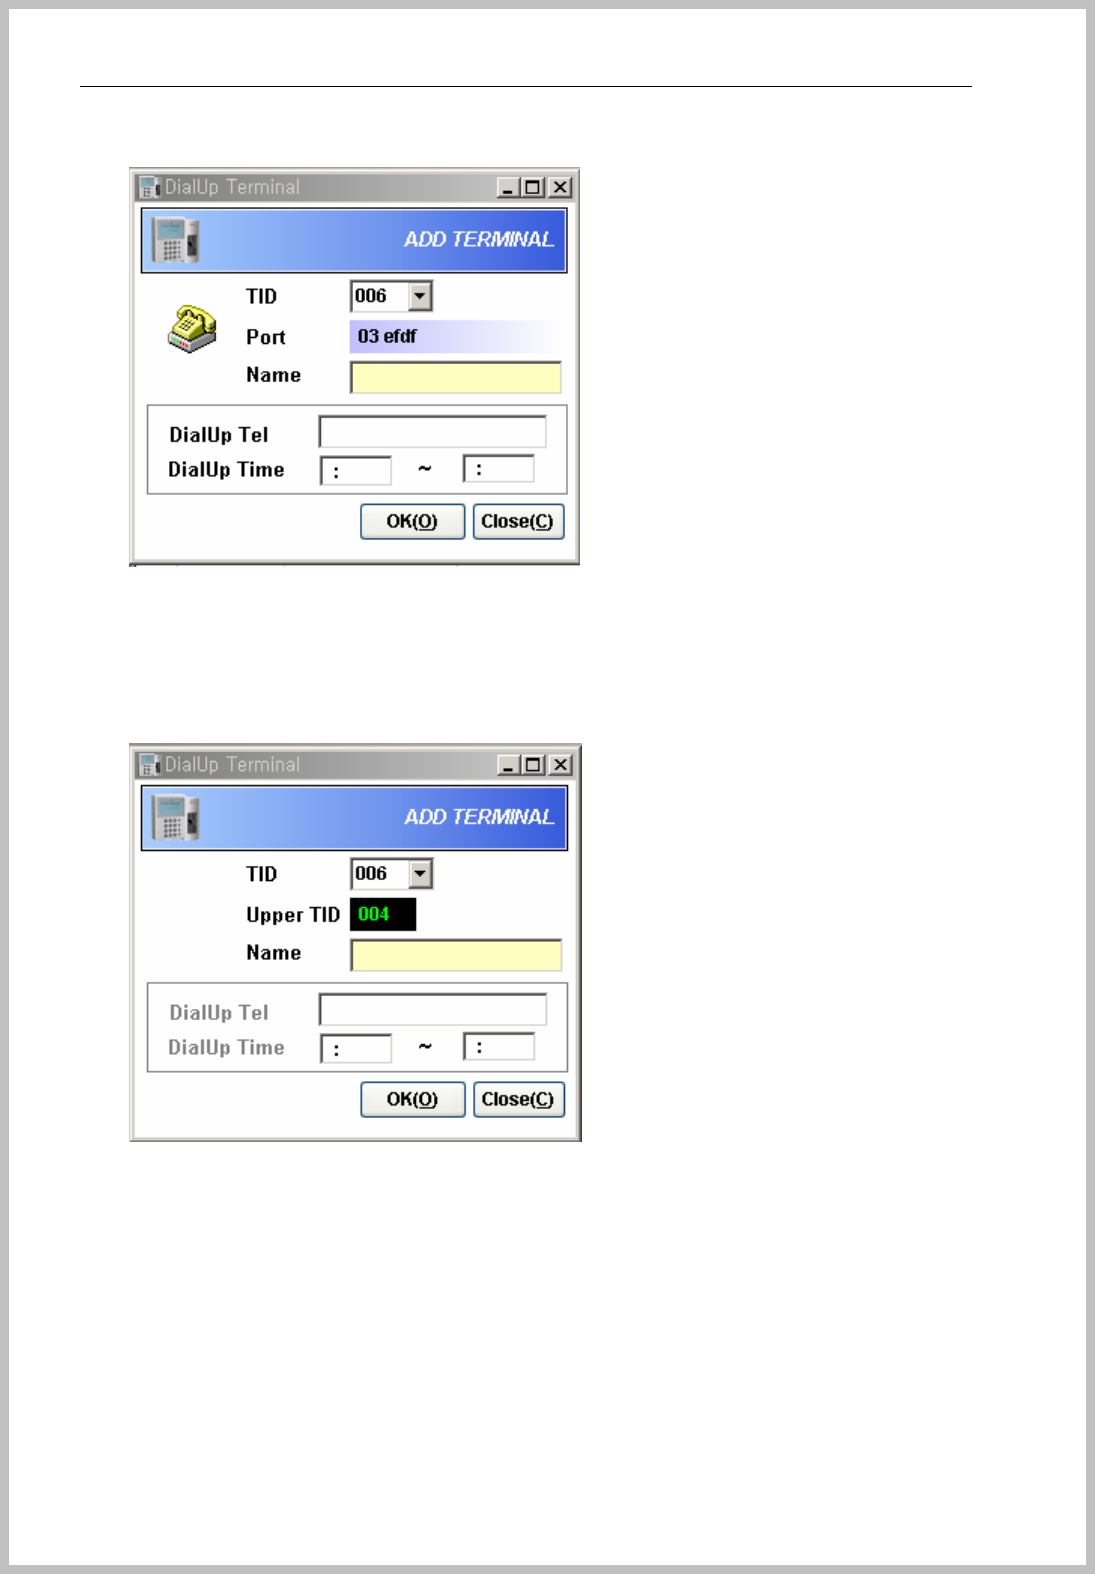
Console Manager
- 34 -
Input “Name” DialUp setting. It should be direct telephone No. extension No is not available.
If the modem is connected to 485 serial connection, give telephone No and Dial-up time to
one terminal only. For enrollment of rest of terminals, Click “ADD” button when cursor is on
enrolled Terminal. The below window appears.
It couldn’t input Tel number and time so just input correct TID & Name.
After set, click DialUp on the menu bar and the below window appears.
The right section is shown enrolled dial-up terminal. For calling to terminal, select terminal
and push “ Connect(D)” button. All modem connection status is shown in “MODEM” and
“SERIAL” section.
For checking dialing status, please check tick mark of Checking Dialing.
10 seconds mean, when terminal doesn’t send data to server for 10 seconds, modem
disconnected. This setting value can’t change in automatic connection, but manual
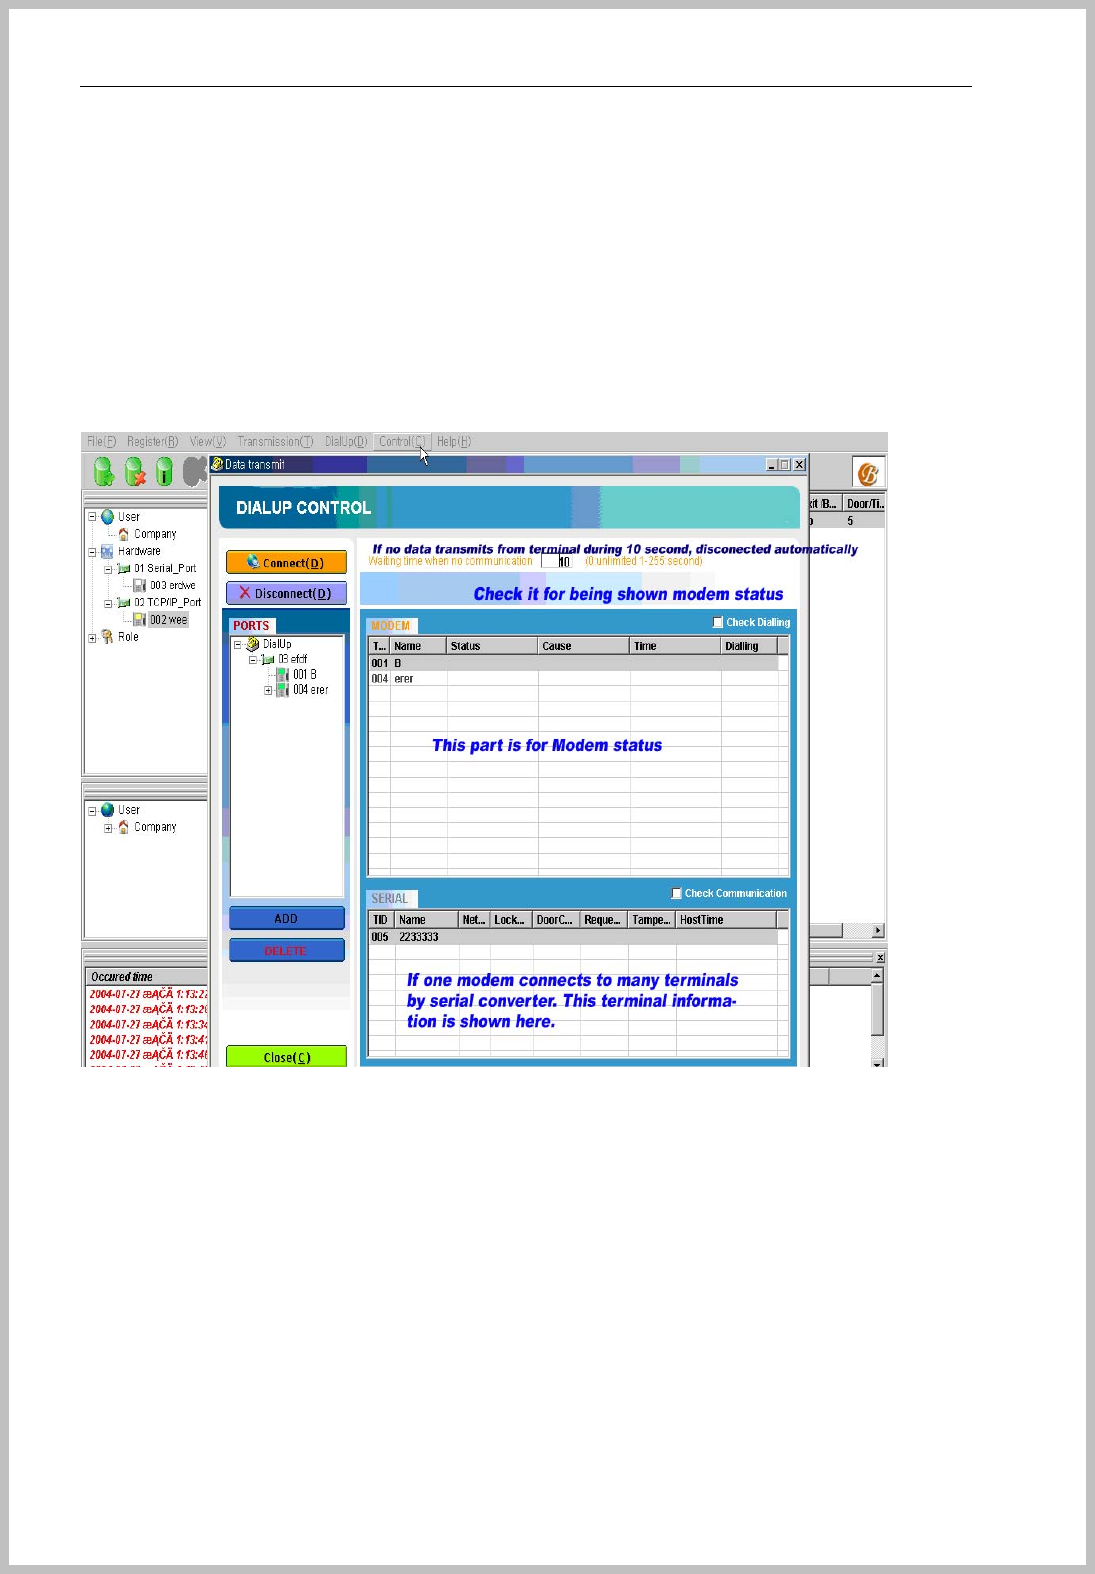
Console Manager
- 35 -
connection as to click Connect button can give new value 0~ 255 seconds. 0 is continually
connection(unlimited connect time) 1 is disconnect after no data for 1 second. 255 is
disconnect after no data for 255 seconds.
If modem connects to several terminals by serial converter, SERIAL section shows all sub
terminals of modem.
After terminal registration, Stop service and restart.
Console Manager
- 36 -
Connection of terminal
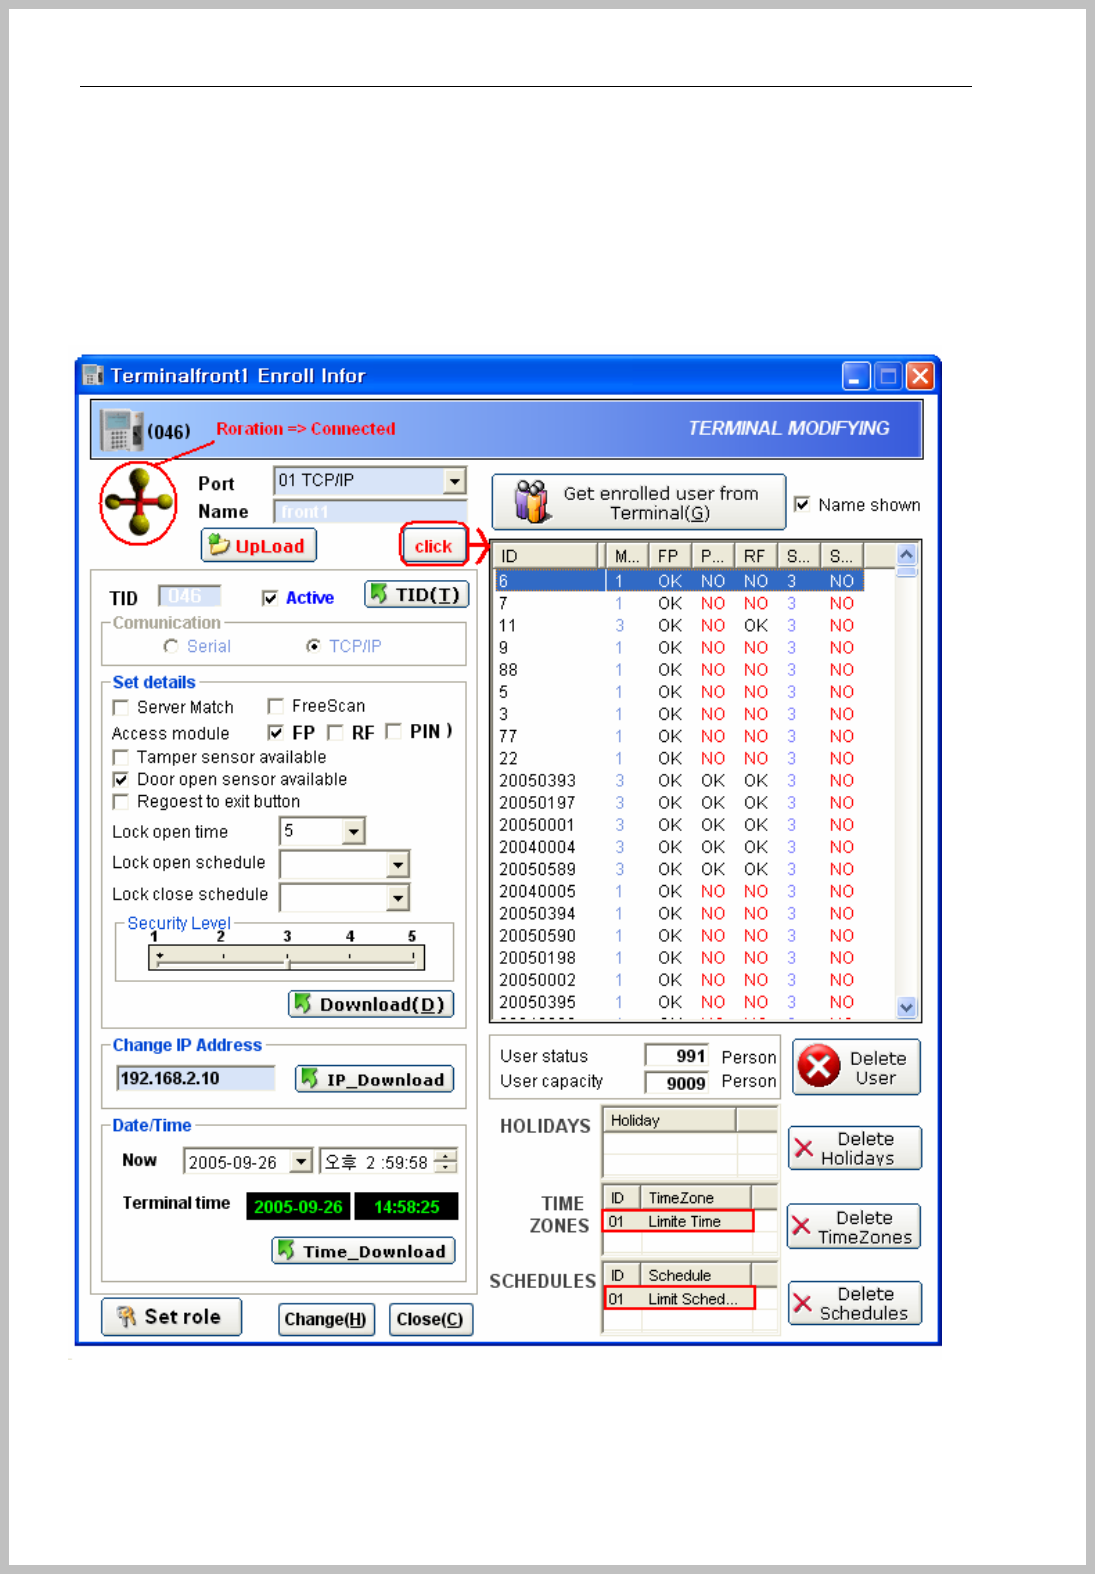
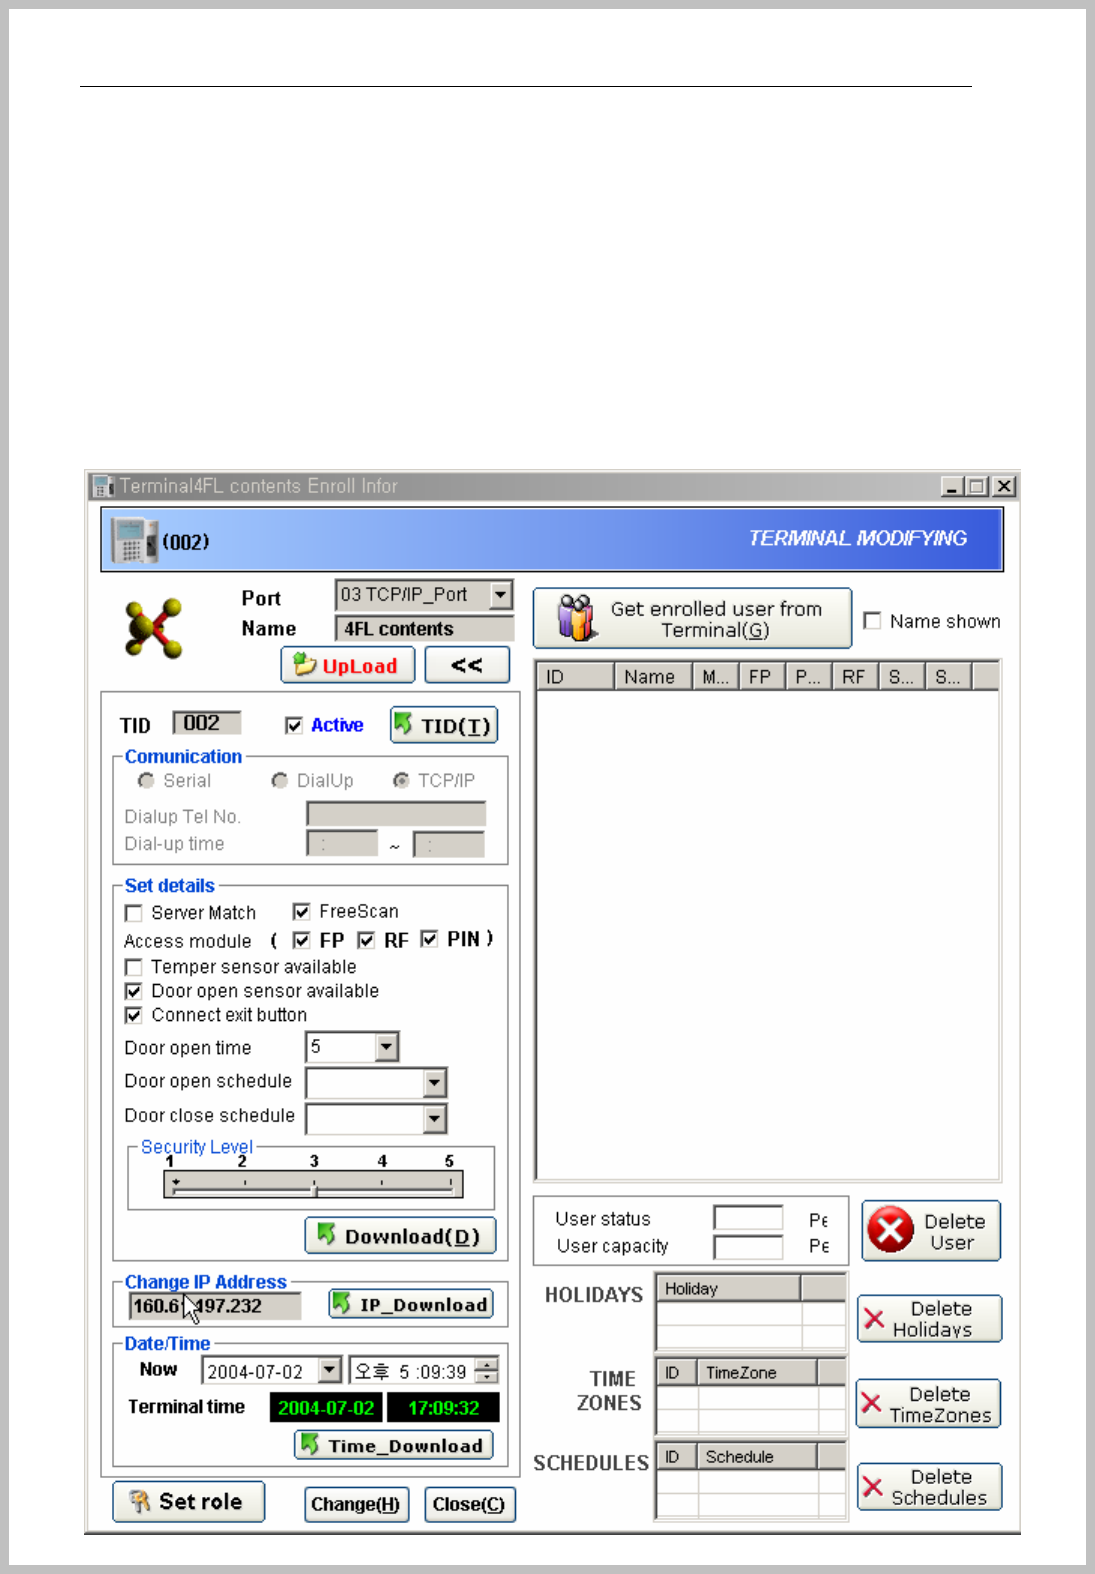
Click to enrolled terminal and appears the below window.
When server connection is well, the mark will be turning, if not, red X mark will be displayed.
If user wants to change setting value, change and click download button for changing terminal
setting value.
All enrolled terminal status appears, and modification and deletion is possible by download and
upload button.

Console Manager
- 37 -
Set details :
Server Match is not available( plan to update this function),
Free scan mode can set here and terminal
Access module : possible to check here and terminal.
Door open time : Door close after 5 seconds.
Door open schedule : If user wants to keep opening door within given schedule time.
Door close schedule : If user wants to keep closing door within given schedule time.
Download : if you change any value, click Download button for applying.
Holiday, TimeZone, Schedule is shown registered value of terminal, so if you want to apply
schedule to user and terminal, it must have schedule value on terminal.
4. How to enroll User
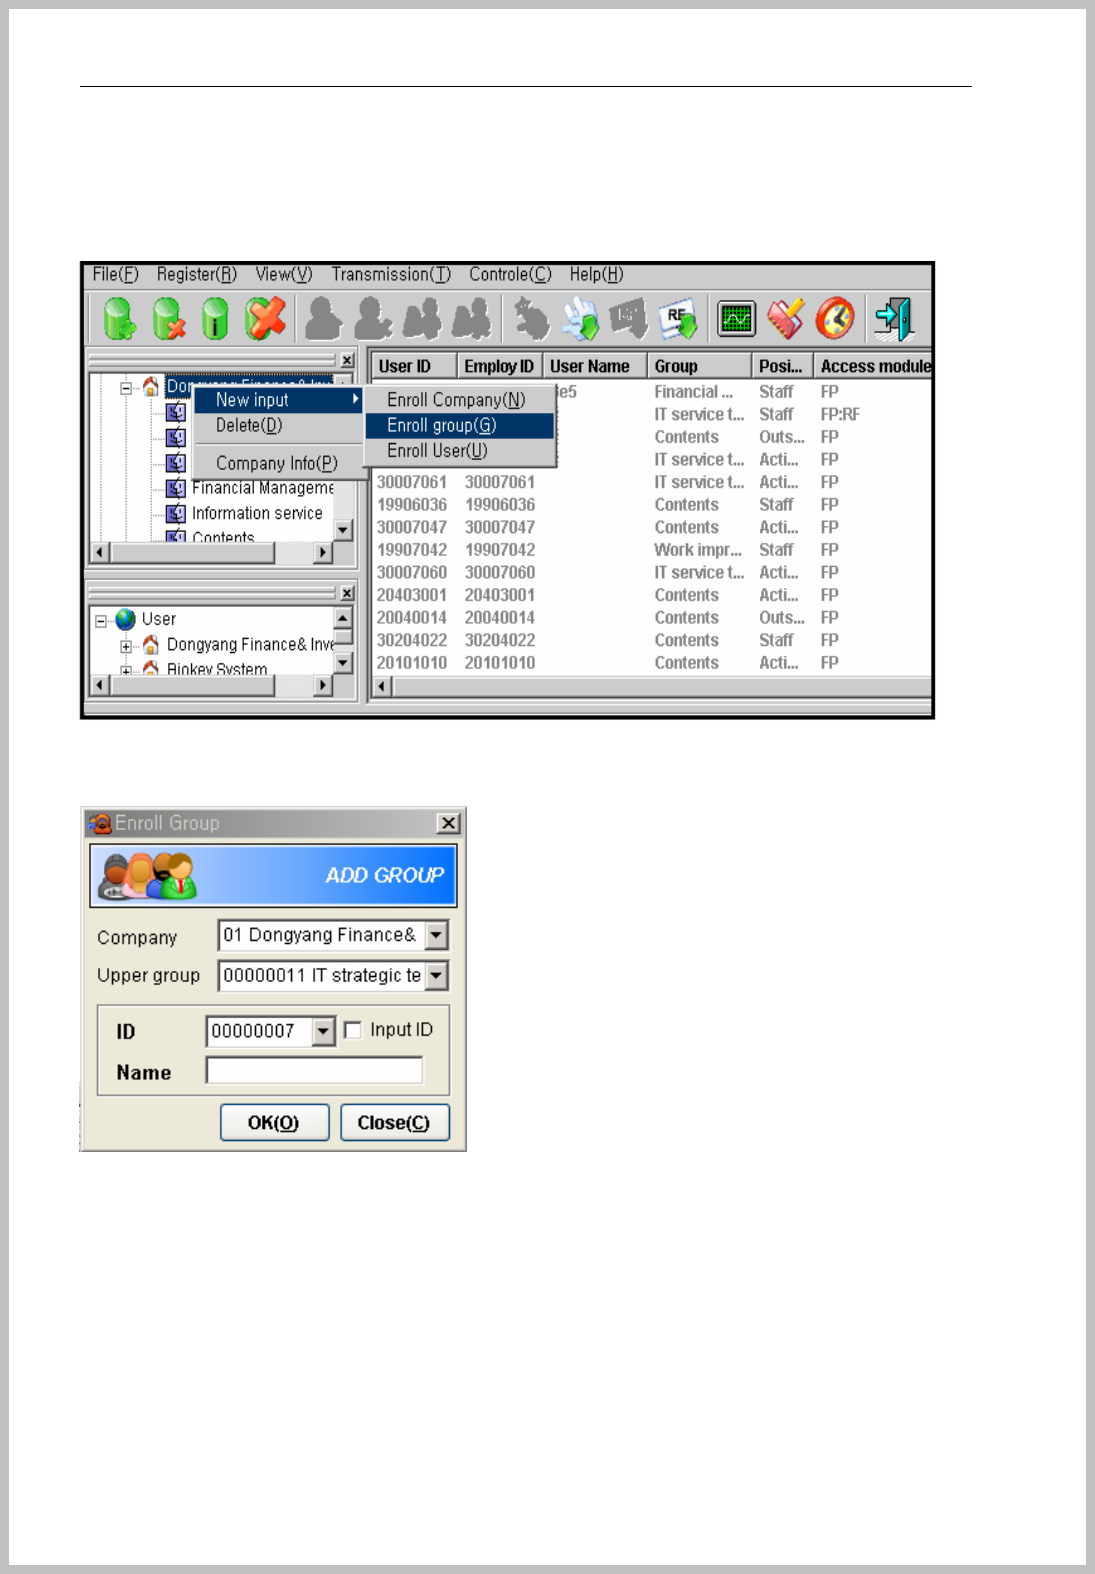
Enroll company
Select User and click the right button of mouse as the below picture or go to menu bar of stage
(Register=> Company=>New).
Console Manager
- 38 -
Enroll Group ( Department or Branch )
After enrolled company, enroll group(Company department or branch) as sub menu of enrolled
company.
Sub group can be made under upper group.
Console Manager
- 39 -
Enroll position
Select User and click the right button of mouse as the below picture or go to menu bar of stage
(Register=> Position=>New)
Console Manager
- 40 -
When click enroll position, this window appears. It can be enrolled by company.
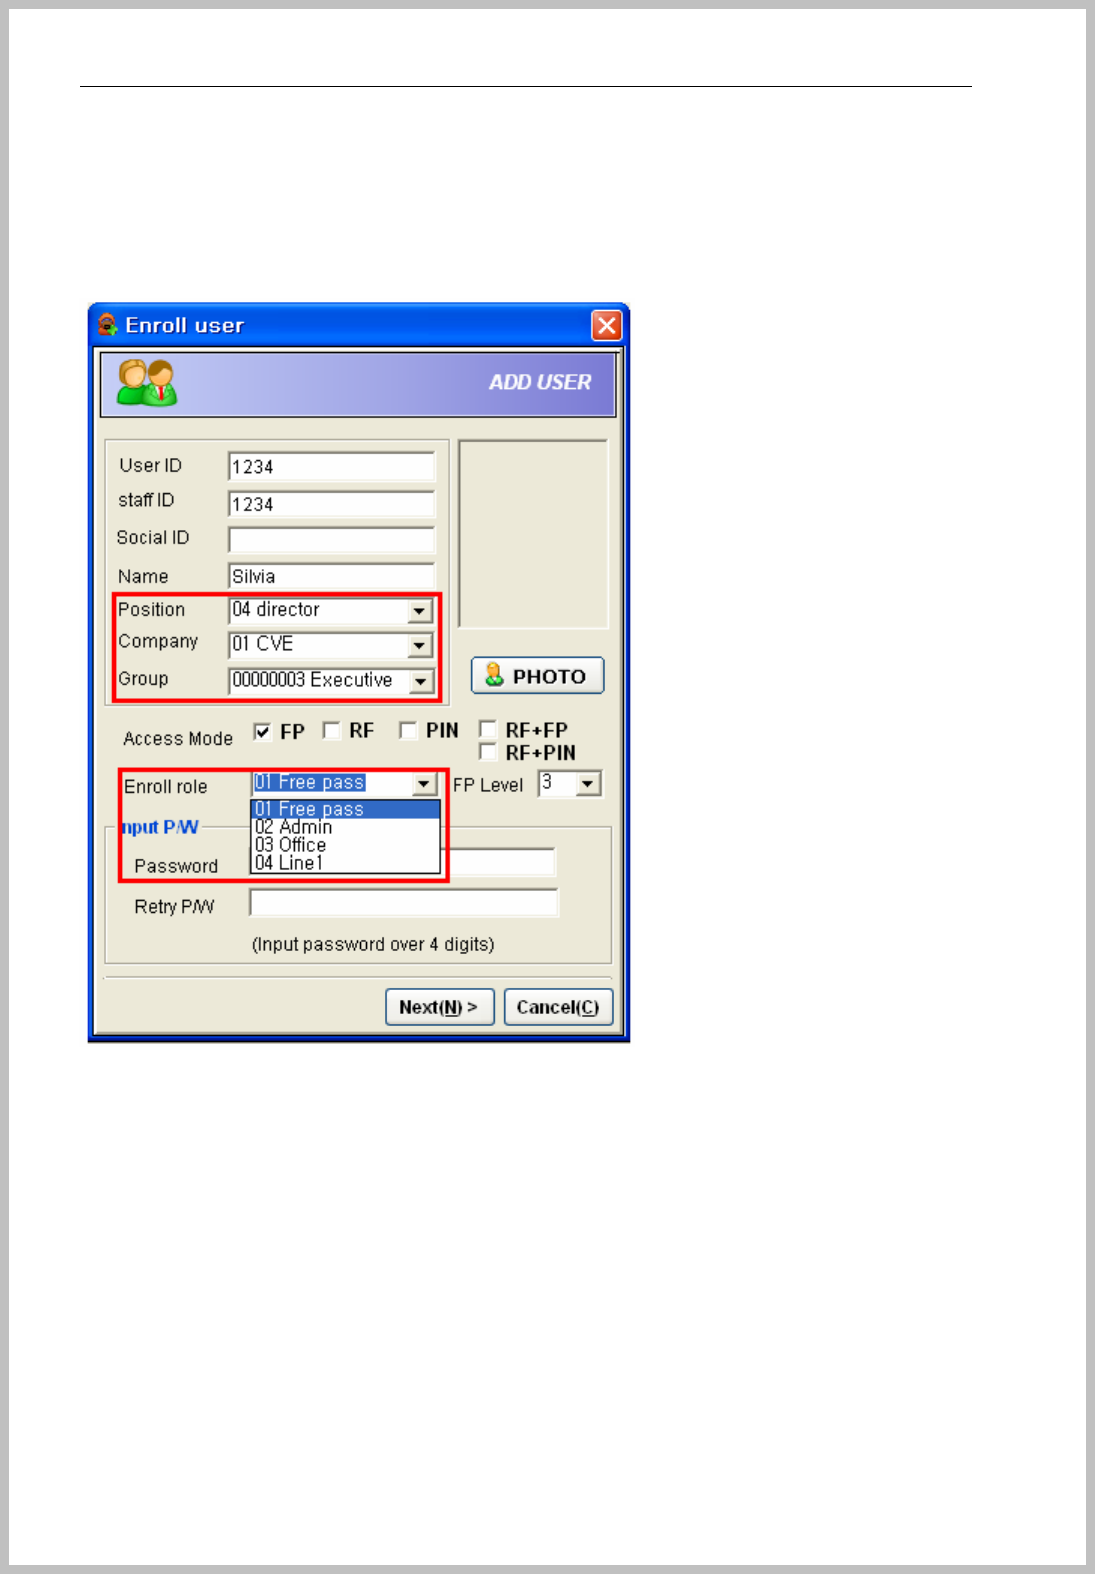
Enroll User
Click the right button of mouse at selected Group or go to menu bar of stage (Register=>
User=>New)
If you want to use Time & Attendance software, should select position, company and group
correctly. BMP file is only available for photo upload.

Console Manager
- 41 -
When BKS-2600 scanner is connected, click “First FP enroll” button for fingerprint enrollment.
input description
*User ID Input User ID the range of 1~8 digit(0~99999999)
*com-ID Company ID or employee No, 1~8(0~99999999) digit.
*User Name Input user name
*Social No Input user social No.
*Position Select user position.
*Depart Select user department
*Access mode Select FR, RF, PIN, RF+FP, RF+PIN
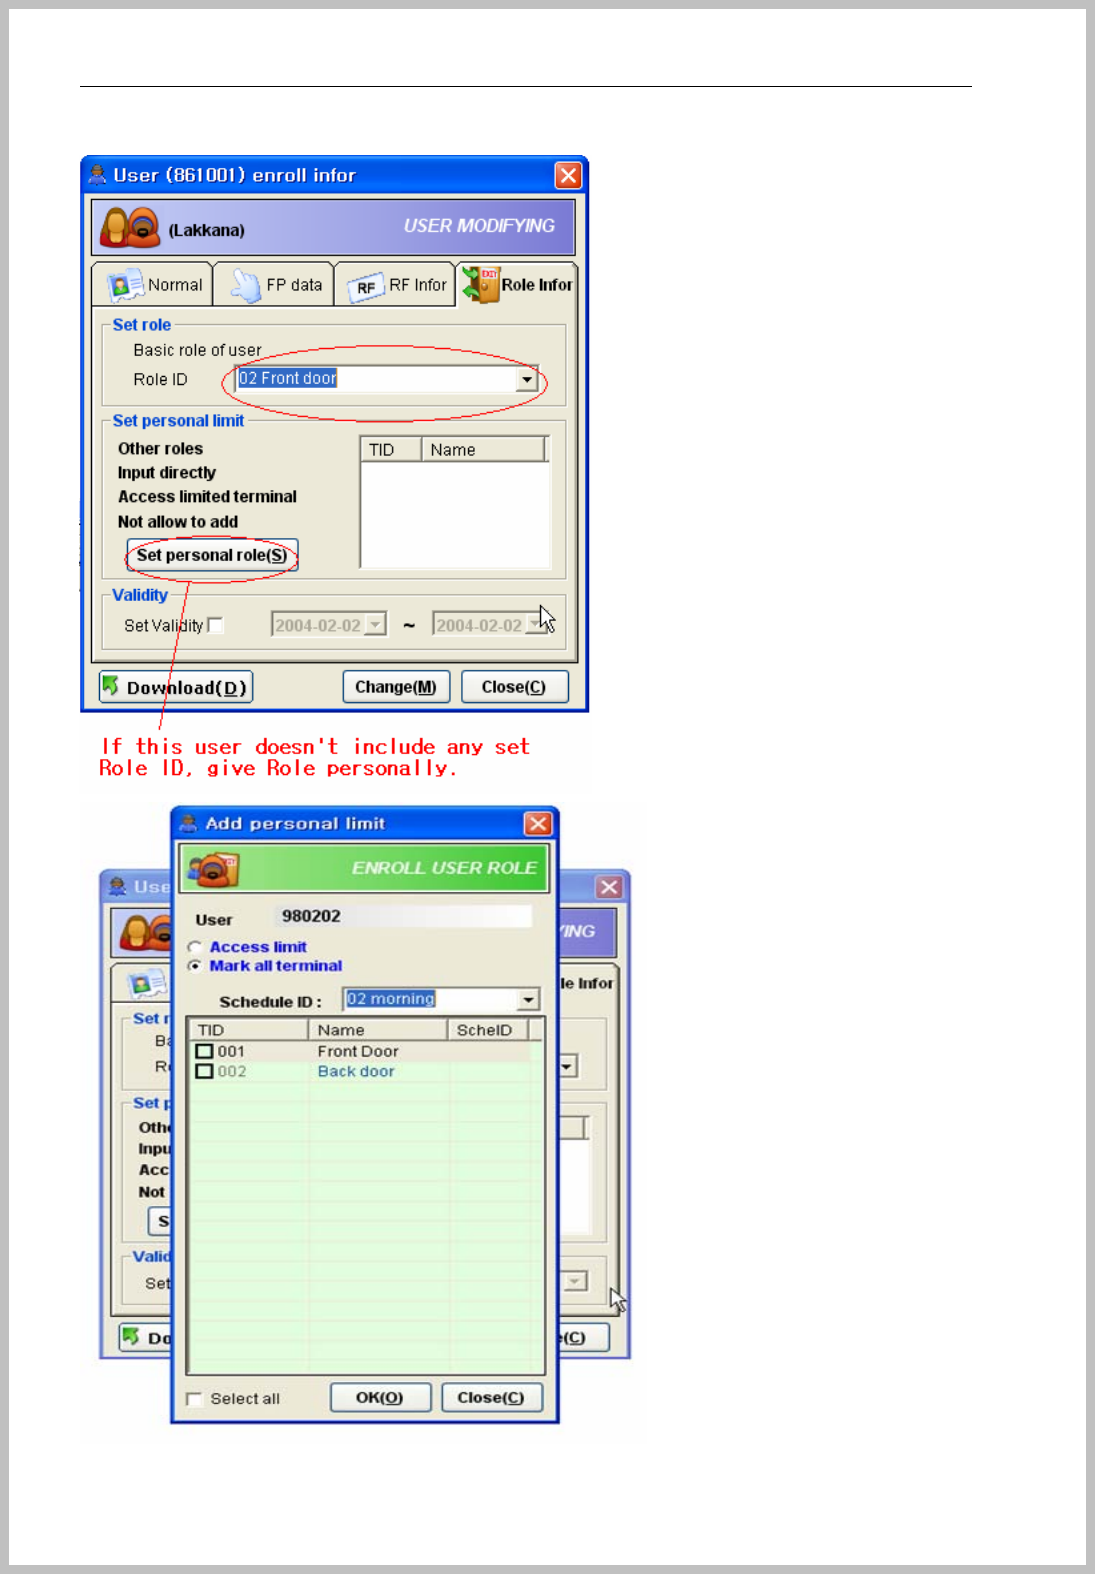
*Set role Set role by personal
Security level Set security level by personal
Password Input 1~8 digit(0~99999999).
Retry Password Retry password for confirmation
z Security level
FP level description
0 Same security level as terminal’s setting level
1 Very low
2 Low
3 Normal
4 High
5 Very high
Console Manager
- 42 -
If not, enroll in Terminal and use “Get FP data” function. Please push “Next” button after enrollment
done.
z Manually : Select manually the most optimum image as to click “OK” button.
z Automatically : Select automatically the most optimum image.
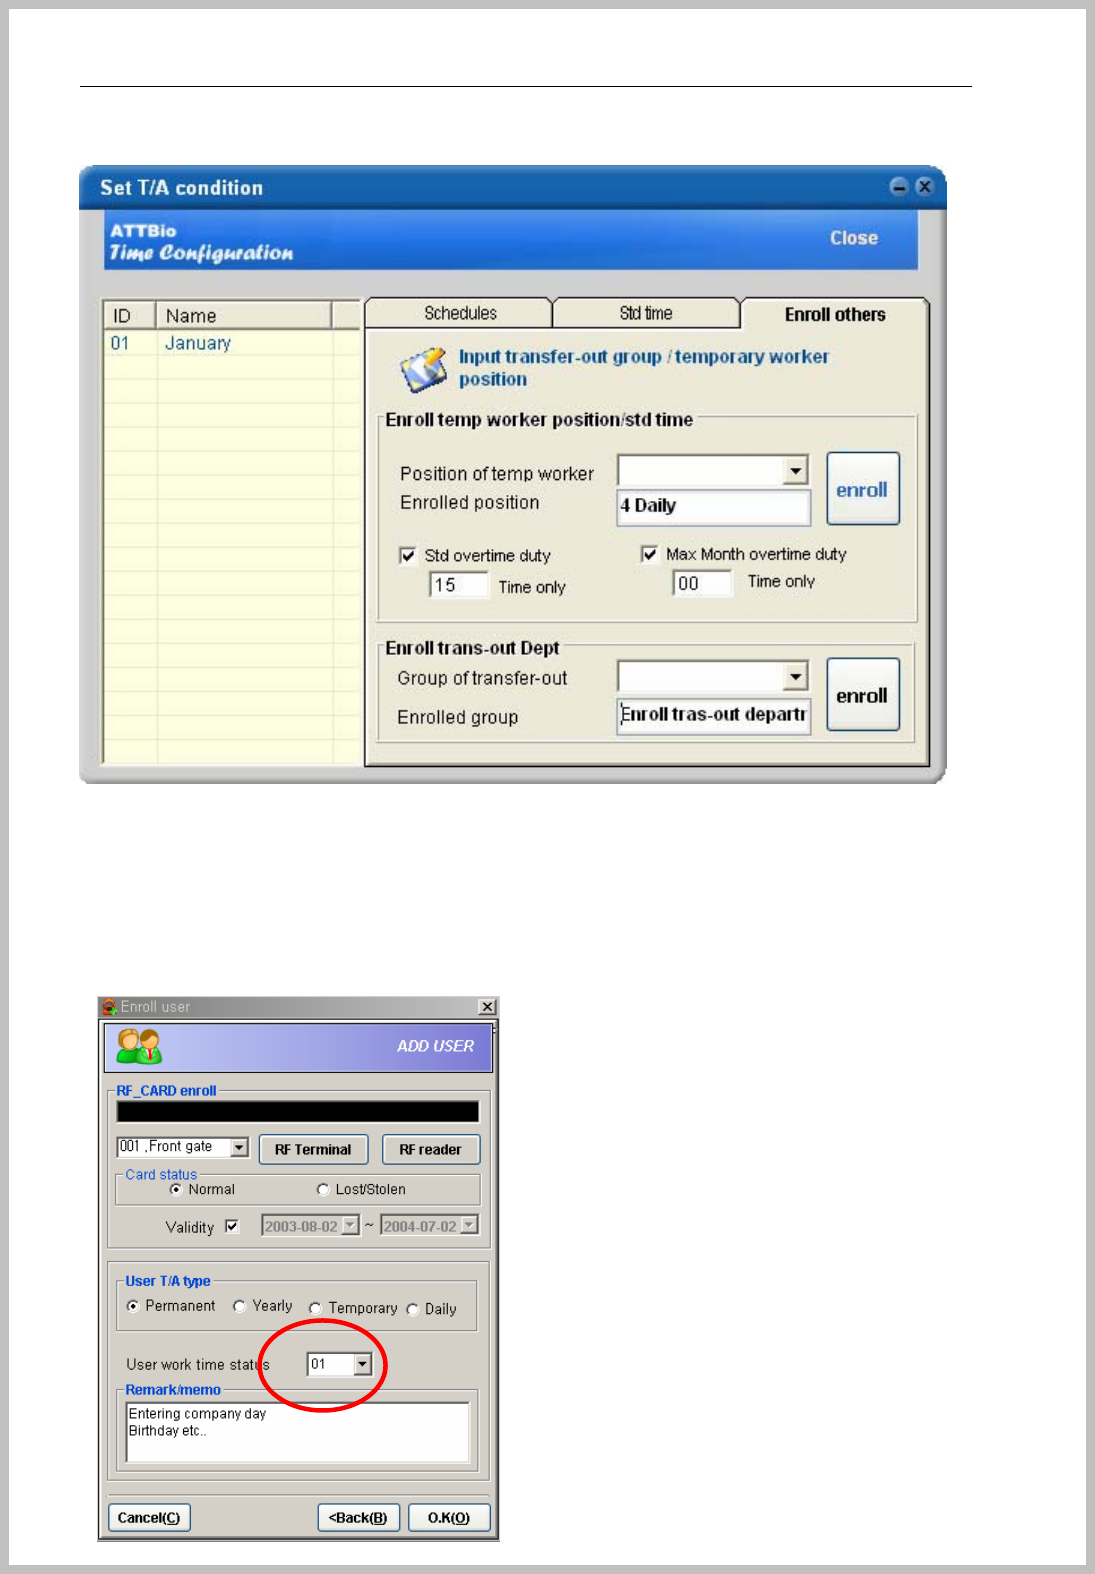
This is for EM TYPEenrollment and work type for Time & Attendance. Push “OK” button after input
done. Please select “User work time status” if you want to Time & Attendance software and detail
information is in Time & Attendance chapter.
Console Manager
- 43 -
Input Description
RF-CARD enroll Enroll RF-CARD by EM TYPEcard reader.
Card status Normal, stolen or lost
*Validity User validity period
User type Permanent, yearly contact, temporally, daily
User work time
status
Set user work time.
Remark/memo Record meno
Validity mean is the user usage period by set value.
This function is for transmit enrolled user data to terminal, and push “Download” button for saving on
terminal.
All enrolled process is done but for using Access limit or Time & Attendance software, please see the
corresponding chapter before user enrollment.
Console Manager
- 44 -
Green color : Dial-up terminal
Black color : TCP/IP, Serial

Console Manager
- 45 -
5. Set Schedule & Role
< Example of How to use >
*Group
A Group : CEO & Executive
B Group : Administrator
C Group : Office Worker
D Group : Factory Worker- Line1
*Access permitted Area
A Group : 1~10 (Terminal ID)
B Group : 4~10 (Terminal ID)
C Group : 4~10 (Terminal ID)
D Group : 7~10 (Terminal ID)
Group Holiday Working time Access time Access Area
A : CEO SUN
SAT
09:00~18:00 All day
with Holiday
All terminals
B : Admin NONE 09:00~18:00 06:00~22:00 TID :4~10
C : Office SUN
2&4th of SAT
1 day of 15th
09:00~18:00
SAT : 09:00~13:00
08:00~19:00
SAT: 08:00~14:00
TID:4~10
D : Line1 SUN
3days of 10,20,30th
09:00~15:00
16:00~19:00
08:00~15:15
16:15~20:00
TID:7~10
Other conditions: National Holiday 19th , All Groups are applied to holiday
Step1
Holiday Setting
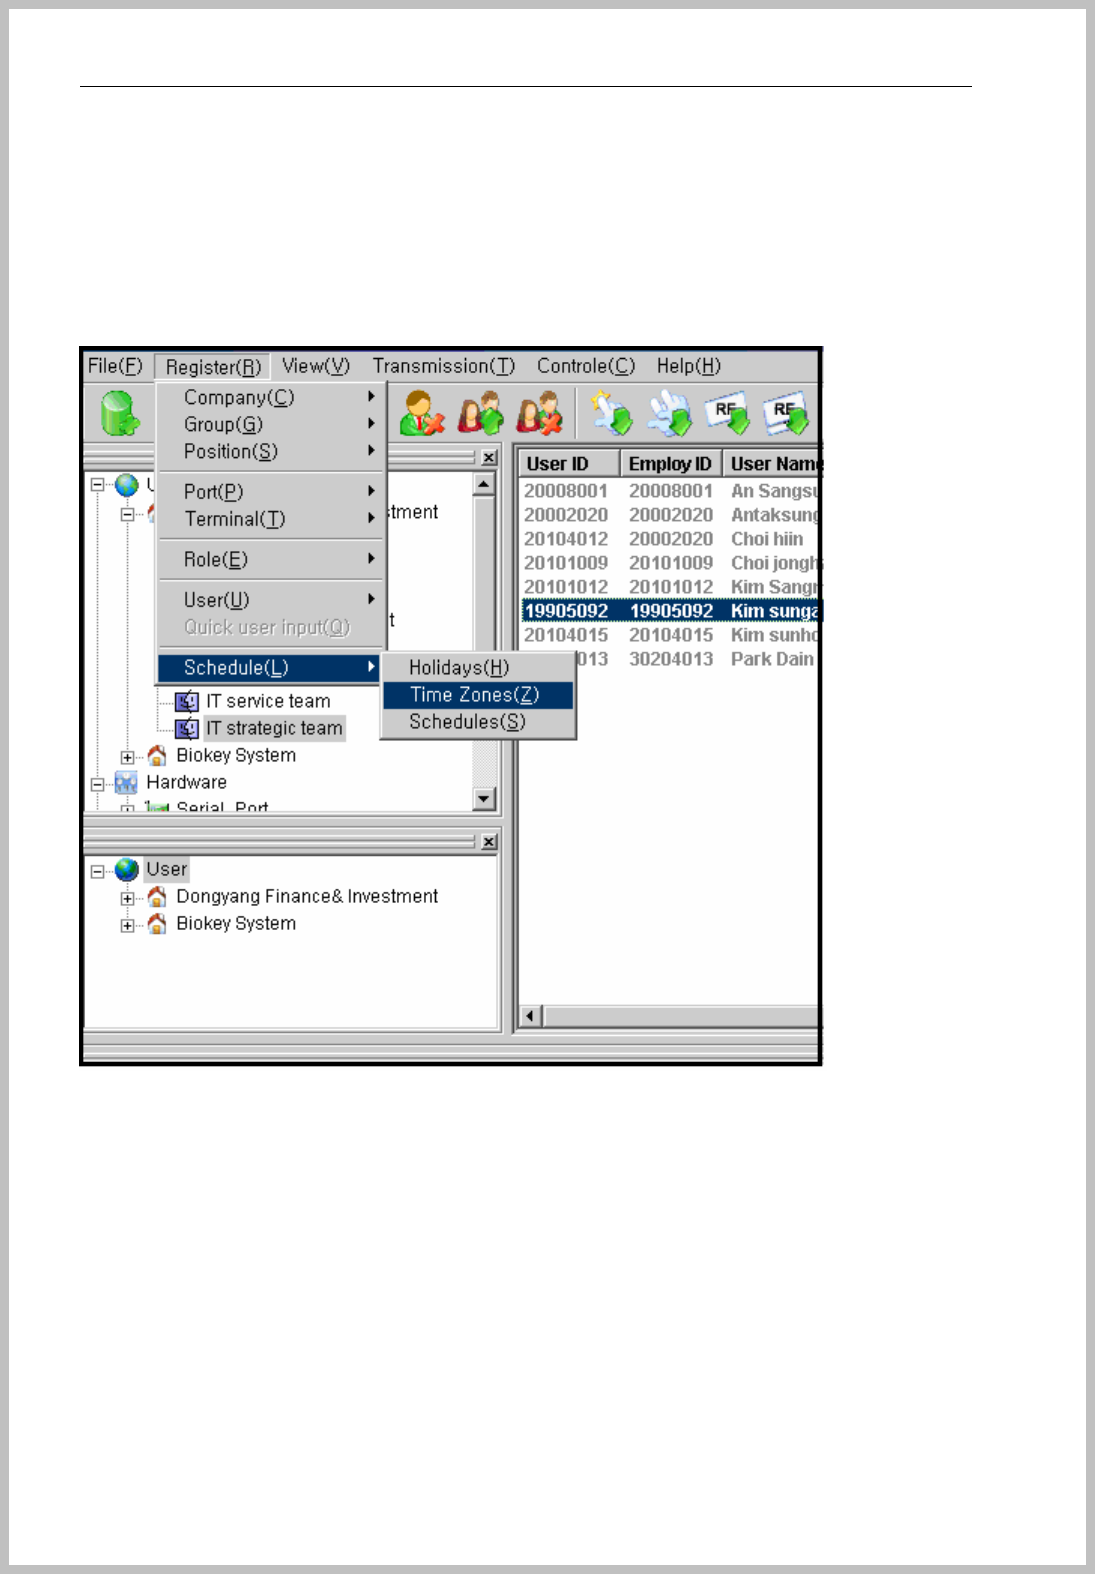
Go to the stage of “menu => Register => Schedule => Holidays”.
You can select a repeated common holiday on the schedule table.
What is repeated common holiday?
Console Manager
- 46 -
Every Sunday, Saturday
Rotating day of week like every 2nd & 4th of Saturday or every 1st of Monday
etc…
You don’t have to enroll on holiday list all these days.
It can be made the 3 holiday table
1. 19th => A,B Group
2. 15th , 19th => C Group
3. 10th , 19th , 20th , 30th => D Group
Select date => Choose Holiday Table => Enroll
Console Manager
- 47 -
Step 2
Time zone setting
Go to the stage of “menu => Register => Schedule => Time Zones.”
Note: You don’t need to register No entry (All day limited to enter) time zone
for default value.
If the working time is 00:09~20:00, you can give one or half hours more time than
working hour for early attend and late leave workers.
01 Limit Time : 00:00~00:00 => Access granted for all day
02 Admin : 06:00~22:00 => This is for B group of 09:00~18:00 working time.
03 Office : 08:00~20:00 => This is for ABC Group of 09:00~18:00 working
time.
04 SAT : 0800~14:00 => This is for C Group of Saturday 09:00~13:00 working
time.
Console Manager
- 48 -
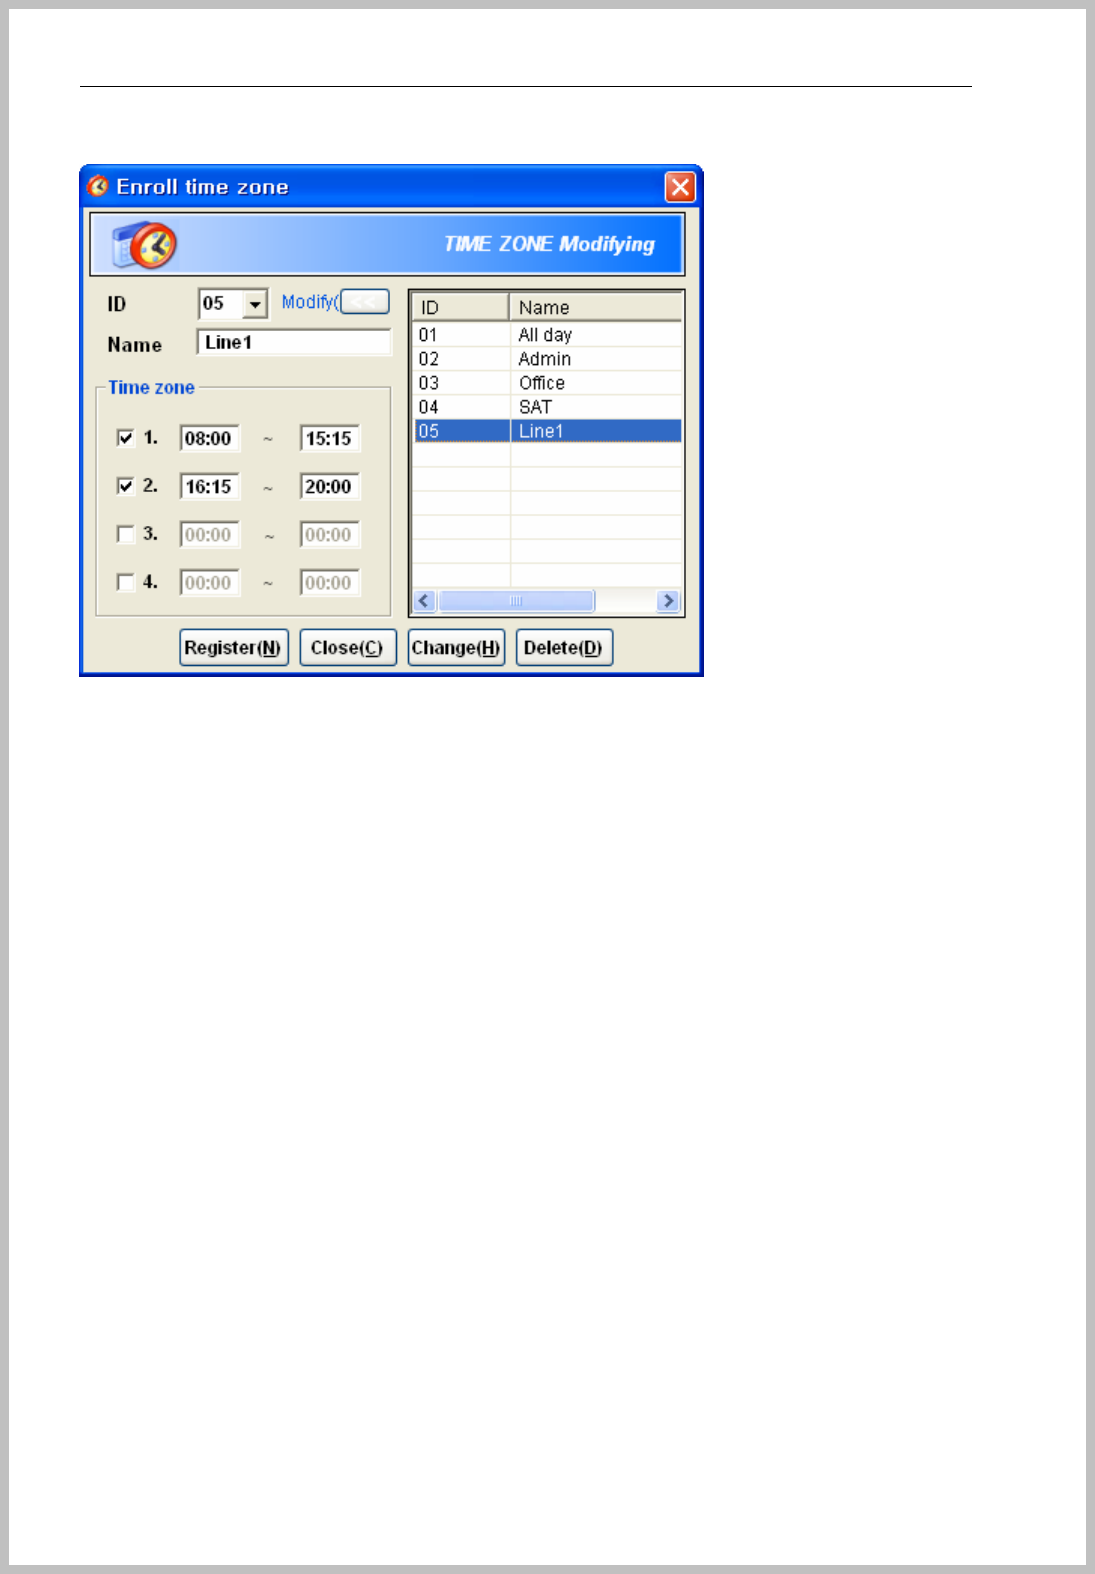
05 Line : 08:00~15:15, 16:15~20:00 => This is for D group of 09:00~19:00 and
15:00~16:30 Break time.
Totally 5 different time zones are required for it.
Step 3
Schedule
Go to the stage of “menu => Register => Schedule => Schedules”.
A Group setting => Access All day
Select “01 All day” for every setting.
Please be careful of “Enroll Holiday” should be set “Holiday1” and select “01 All day”
Console Manager
- 49 -
C Group setting
Please be careful of 2nd and 4th Saturday holiday setting and select “32 No Entry”
for Sunday.
Week : 03 Office time zone
Set every other week : check 2nd &4th of Saturday and select “32 No Entry”
Enroll Holiday : Select “Holiday02” and “32 No Entry”
Console Manager
- 50 -
D Group setting
Holiday : Select “Holiday3” and “32 No Entry”
Sunday : Select “32 No Entry”.
Console Manager
- 51 -
All schedules are set as 4 different schedule ID using by time zone and holiday.
Console Manager
- 52 -
Step 3
Role setting
Go to the stage of “menu => Register => Role => New”.
The role setting makes easy access control for several terminals together.
A CEO can pass any door so first you select “01 A CEO” schedule and then add
applied terminals. CEO group can pass any door so select all terminals.
Console Manager
- 53 -
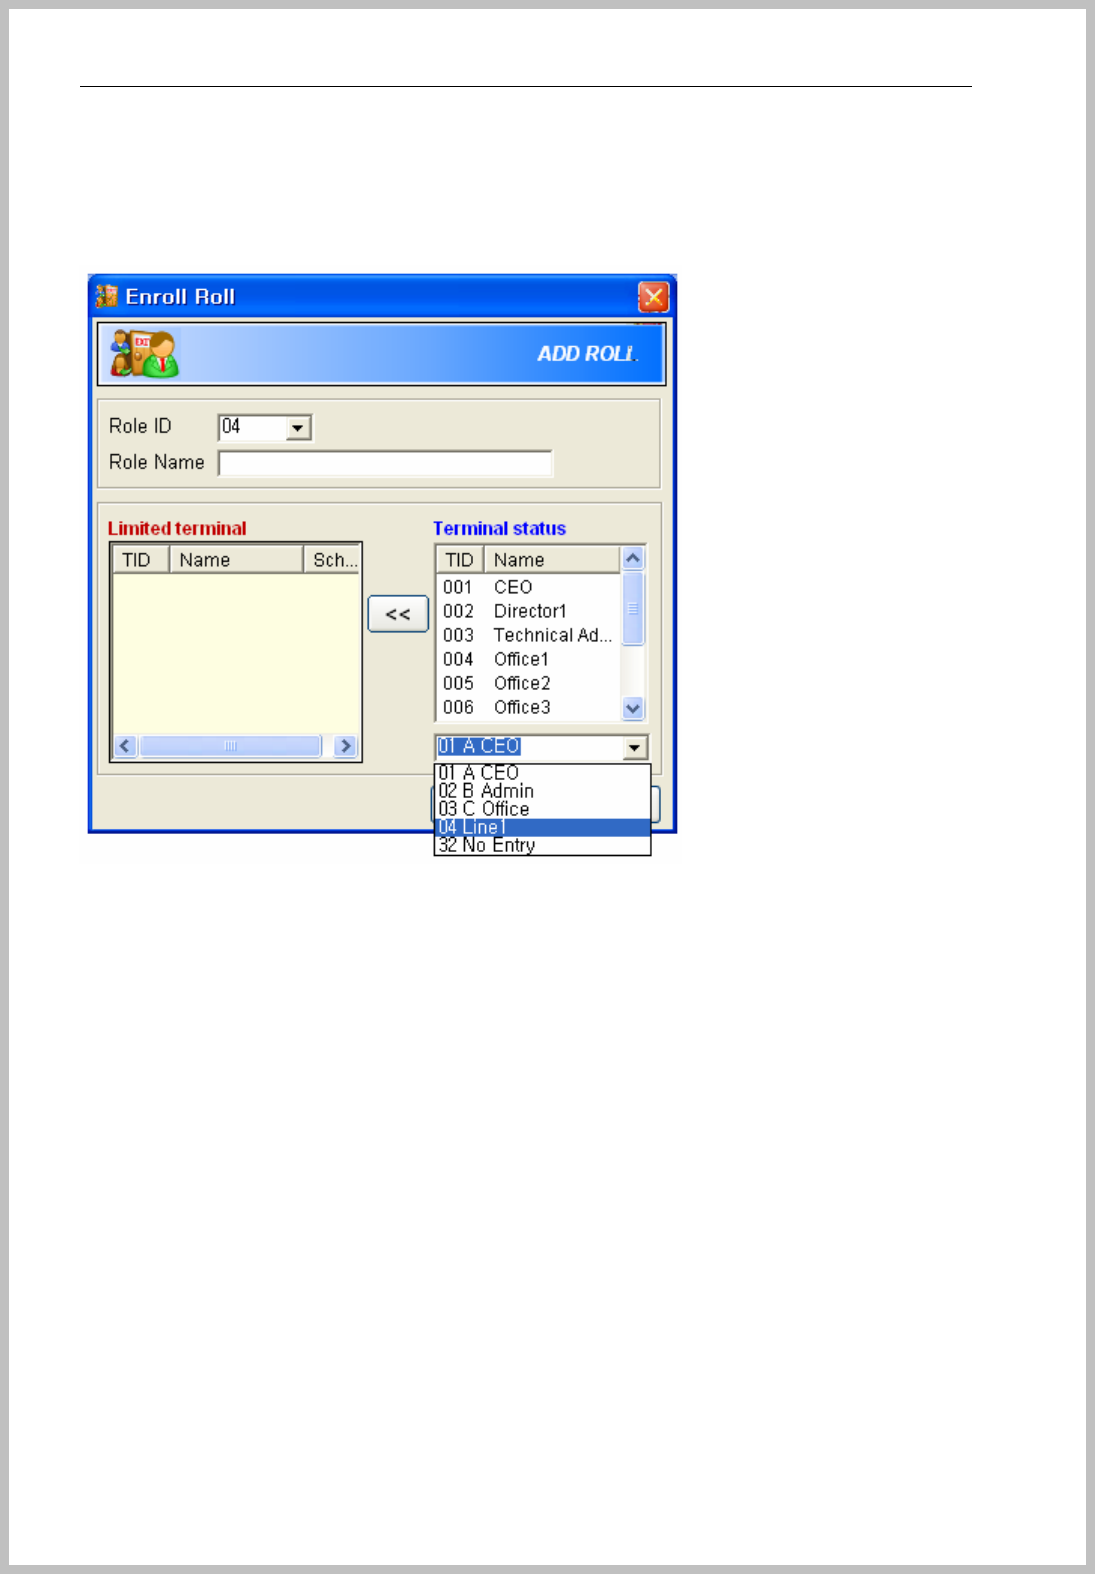
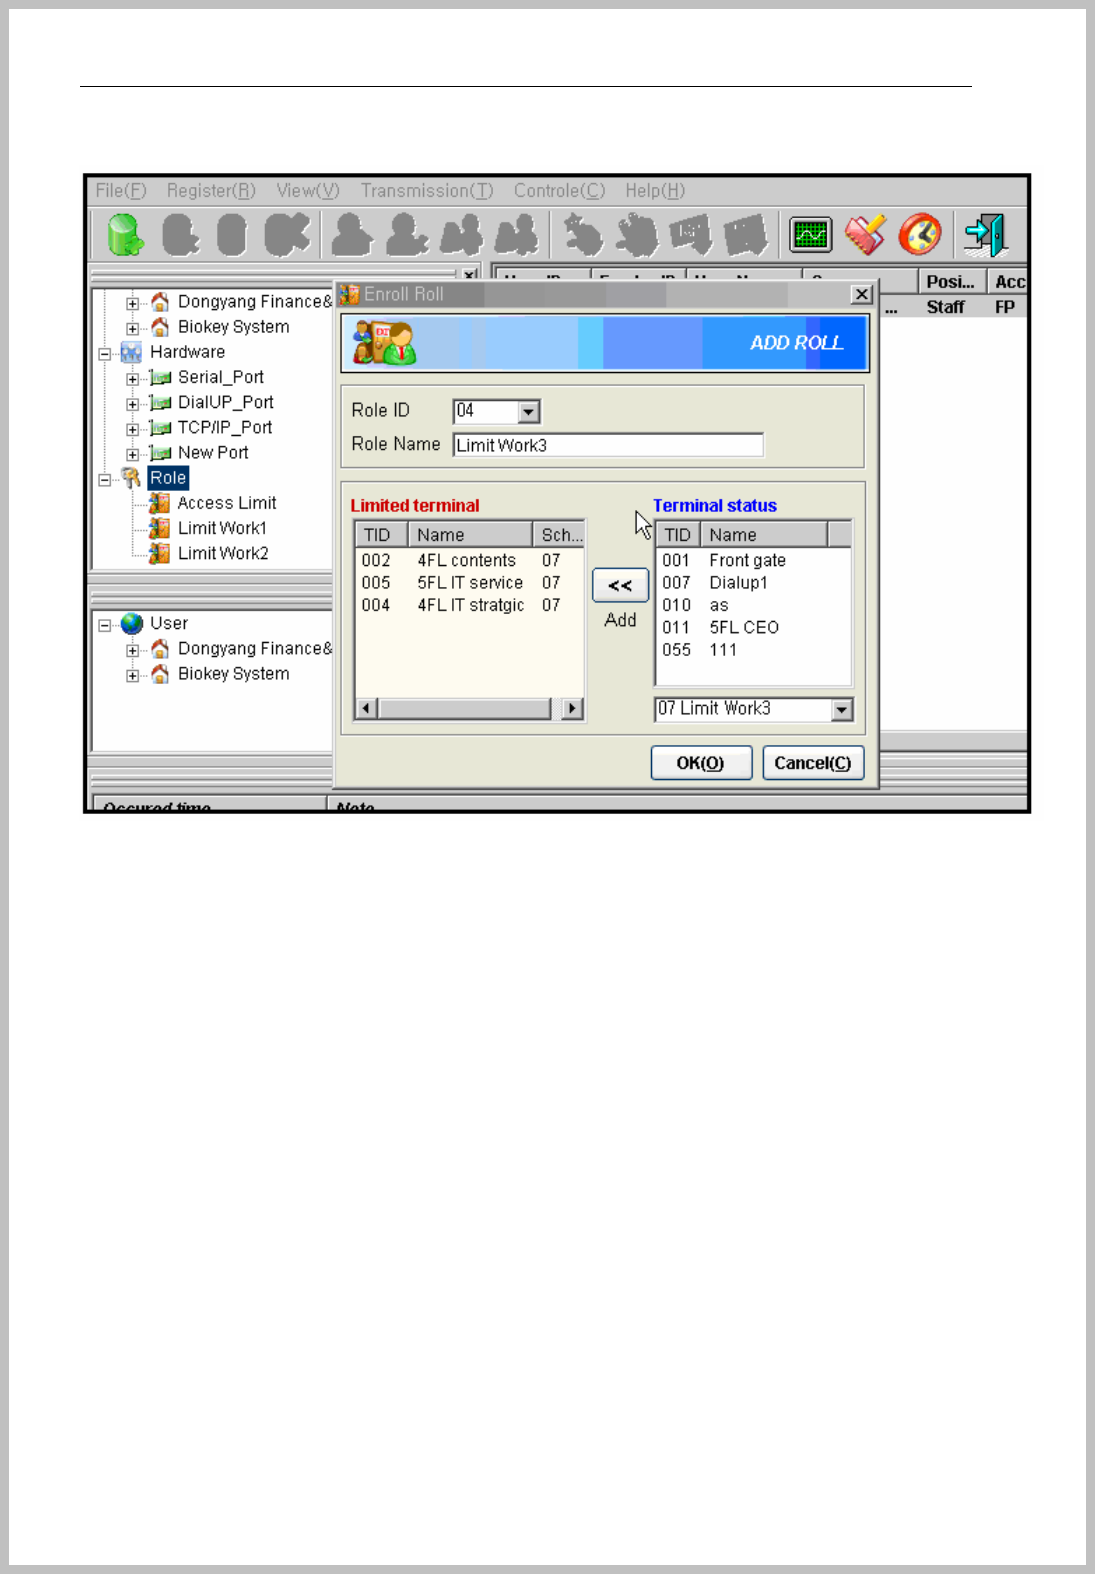
D Line1 group can pass 7~10 terminals only, first select “04 Line1” and add
007~010 TID to Limited terminal field.
001~006 terminals: Select “32 No Entry” and then add to limited terminal field.
Console Manager
- 54 -
Step 4
Apply to user registration
Position : Director applies for“01 Free pass” role
Console Manager
- 55 -
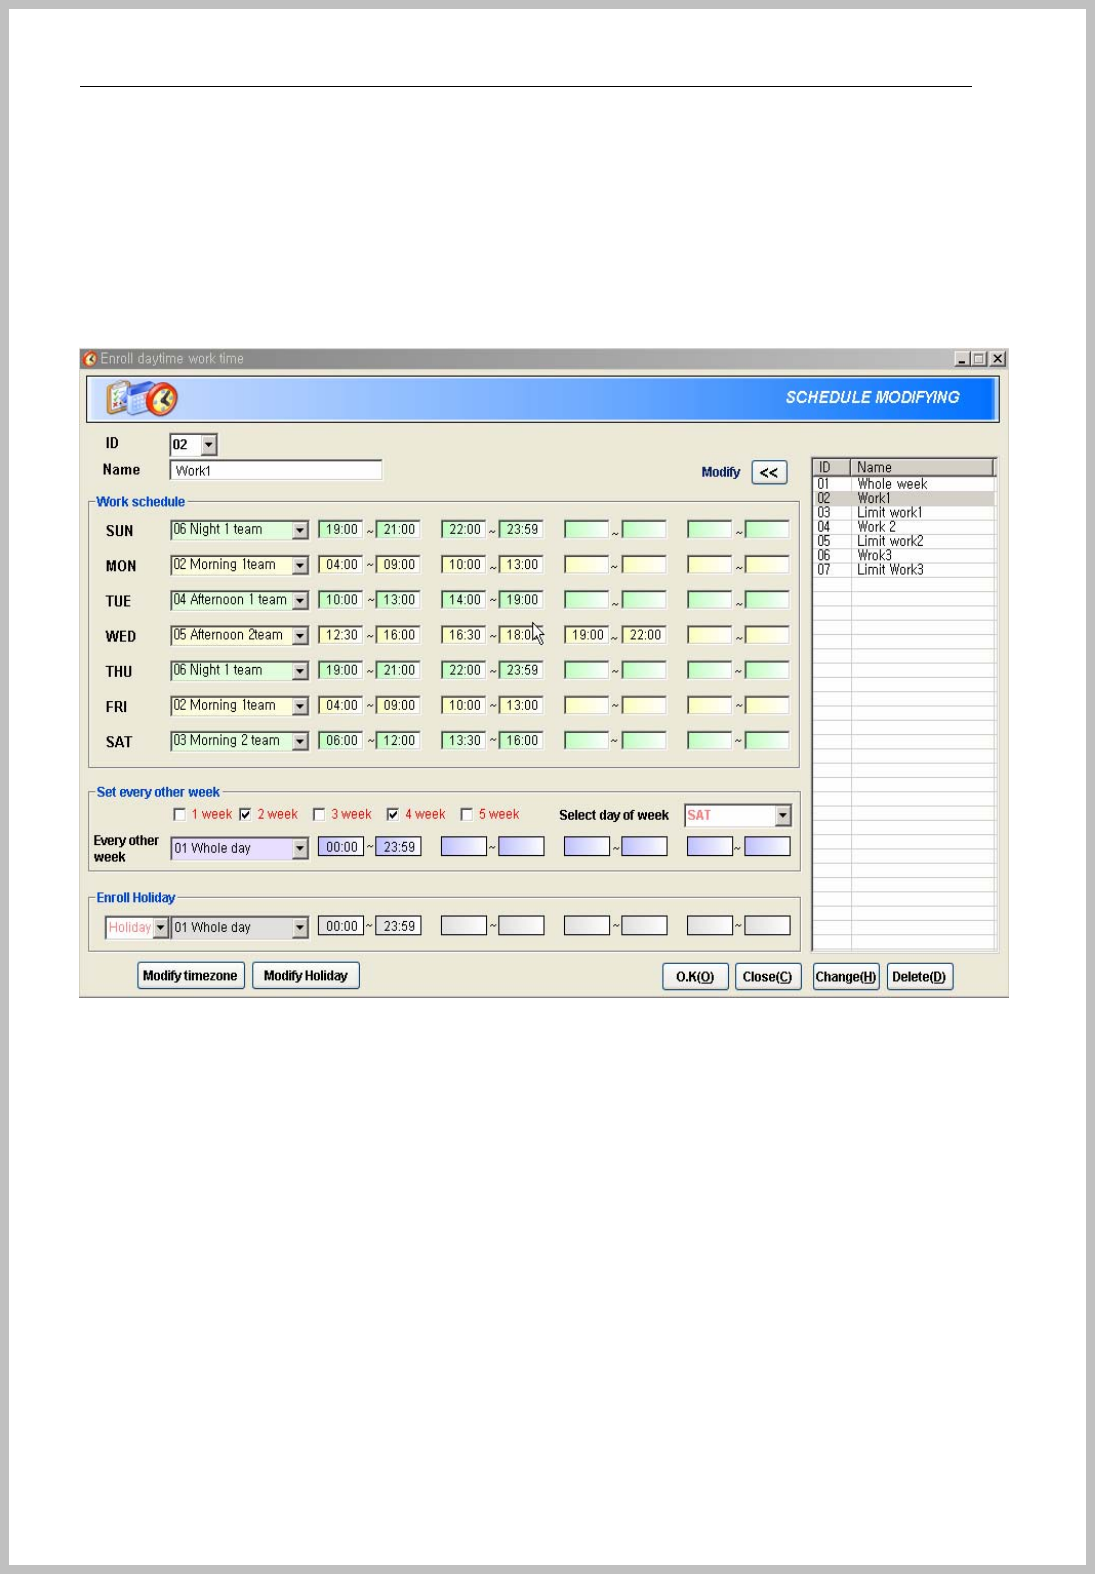
5.1Set Schedule
If terminal uses for Access control, it should be set correctly.
This software makes you manage the weekly schedule and base of Role function together.
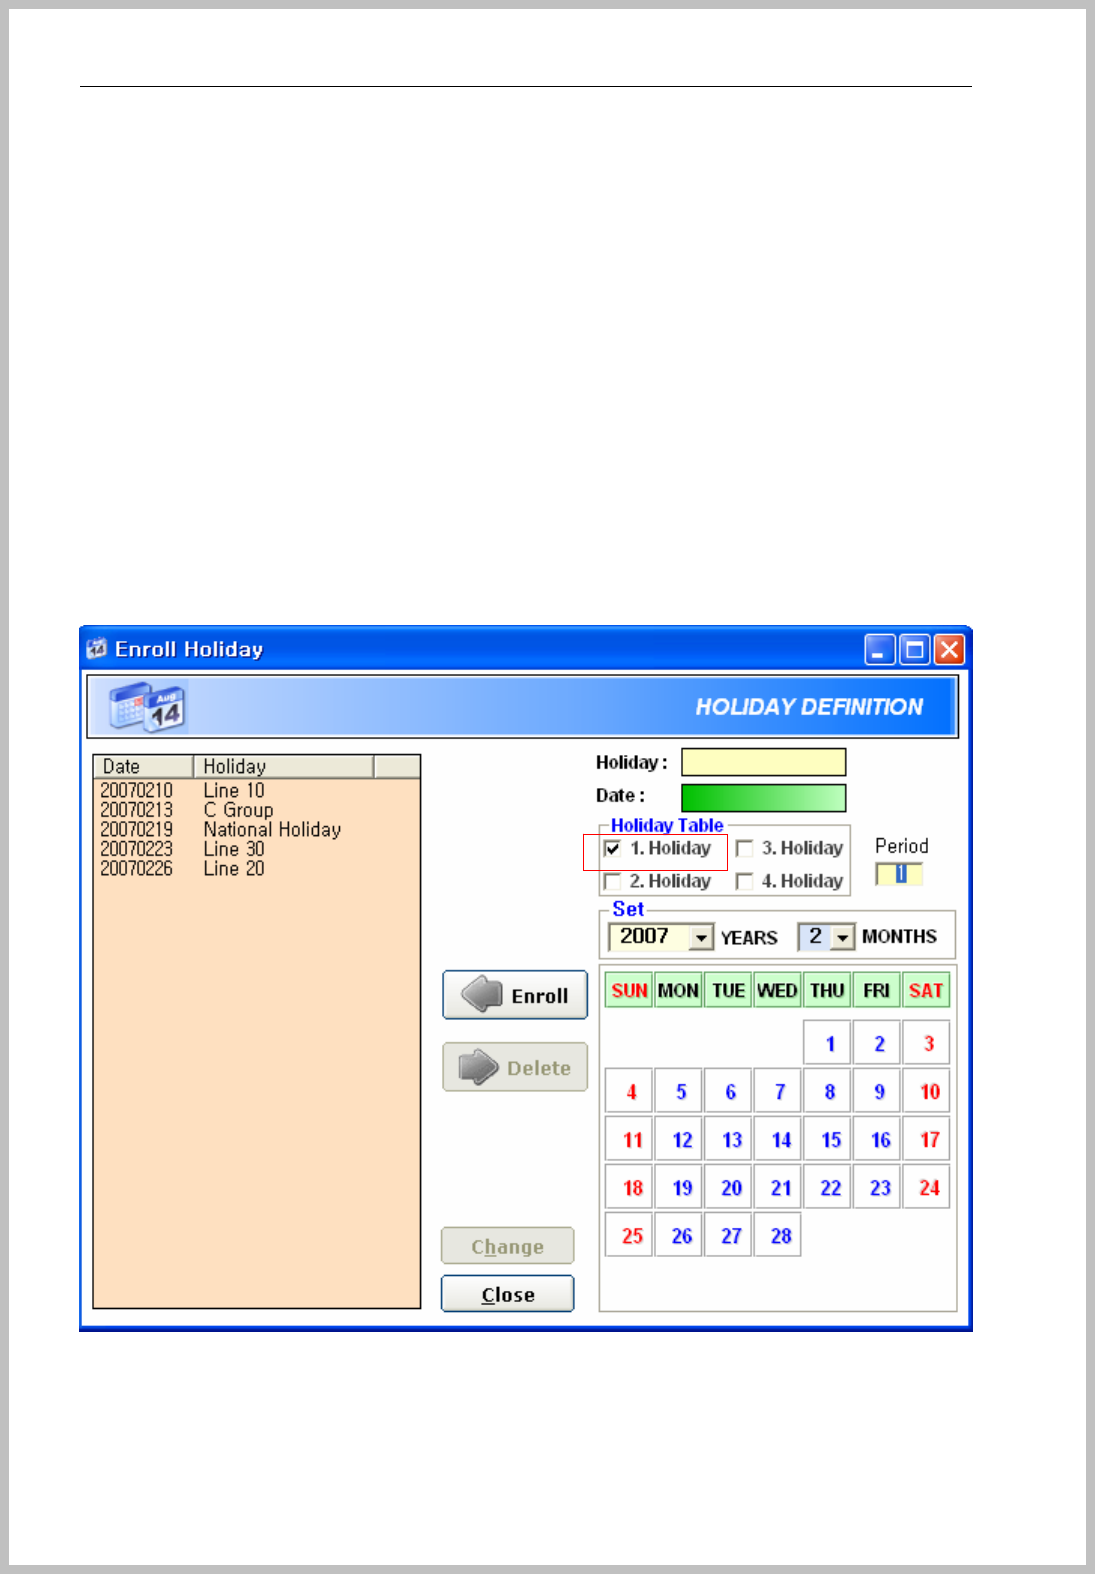
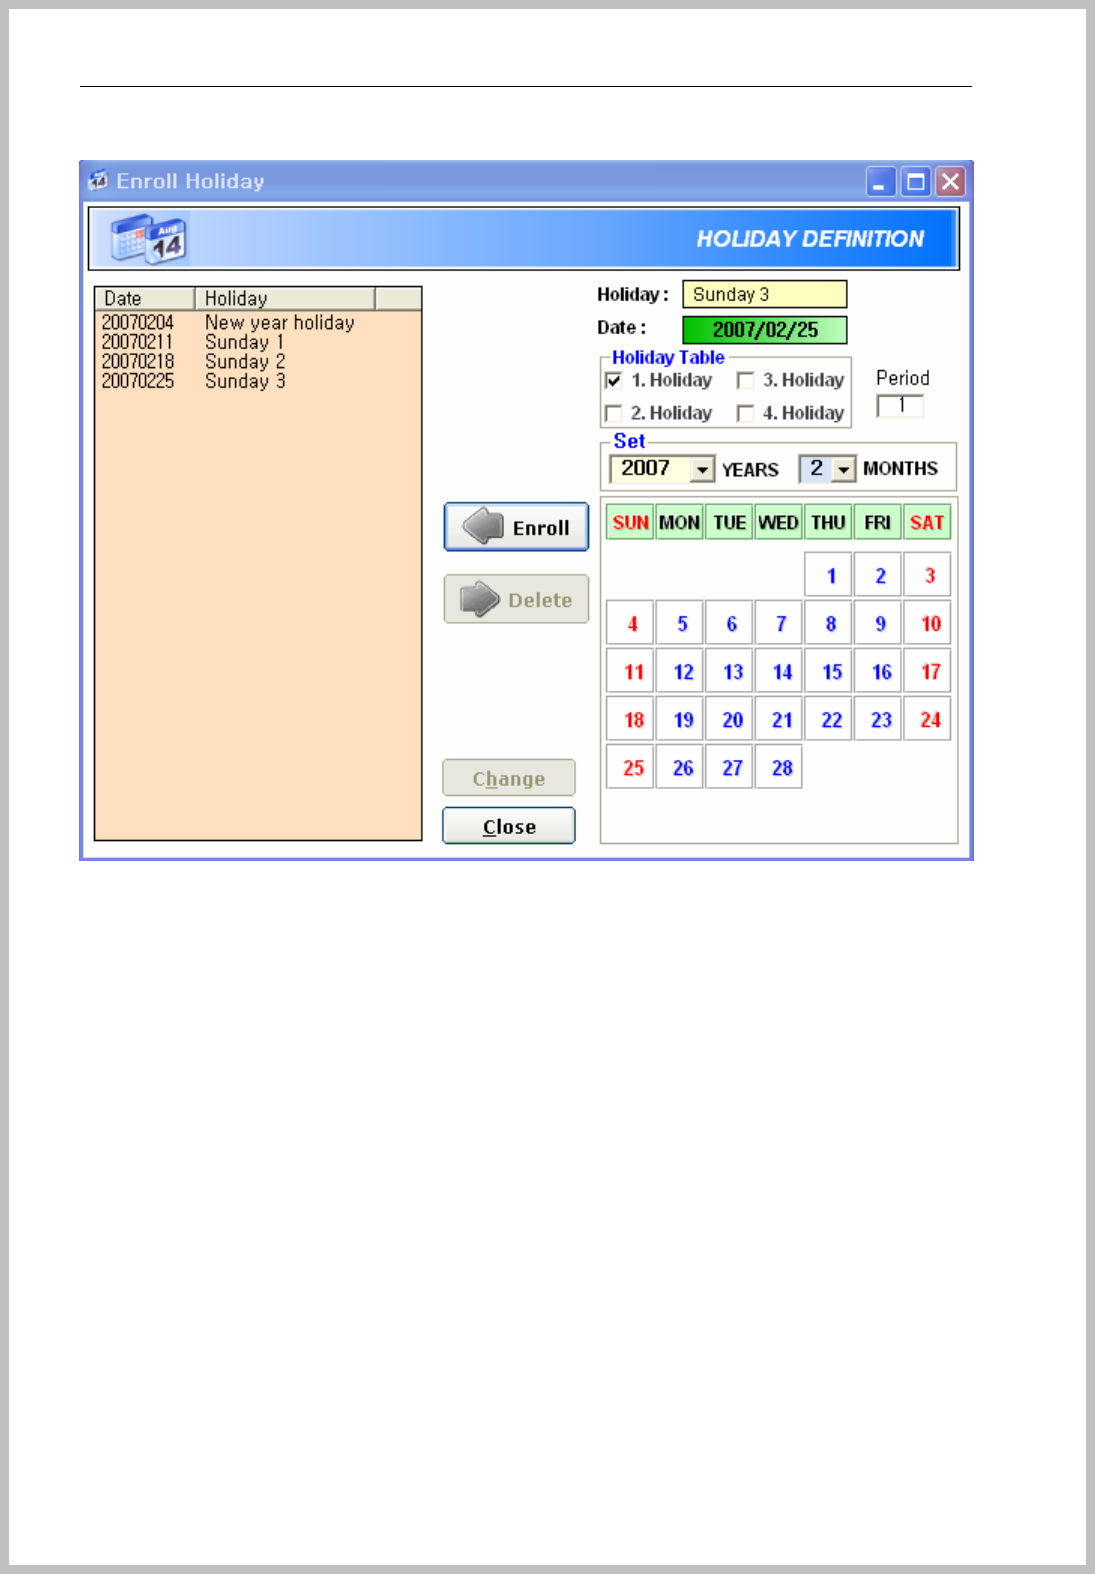
5.1.1Set Holiday
Go to the stage of ( Register=> Schedule=> Holiday)
The below window appears when push “Holiday” of menu
Holiday table is initially set as “1 Holiday” is for dividing holiday type.
For example, Type 1 is for Sunday, Type 2 is for National Holiday, Type 3 is for Company day off and
if 4th of July is including Sunday and National Holiday, please check “1 Holiday” & “2 Holiday”.
Console Manager
- 56 -
Holiday Table section
(EXAMPLE)
“A” group holiday => All Sunday and Saturday
“B” group holiday => All Sunday
“C” group holiday => All Sunday and 3 days of 10, 20 and 30th
EX) “A” group is day off all Sunday and National Holiday
“B” group is day off all Saturday and National Holiday.
“C” group is day off 10,15,20,15,30.
So you can make Holiday 1,2,3 by worker schedule.
For falling on day, check included schedule. For example “A” &”B” group has same holiday as
National Holiday. If it is 6th of July, click and select “1,Holiday” & “2.Holiday” together.

Console Manager
- 57 -
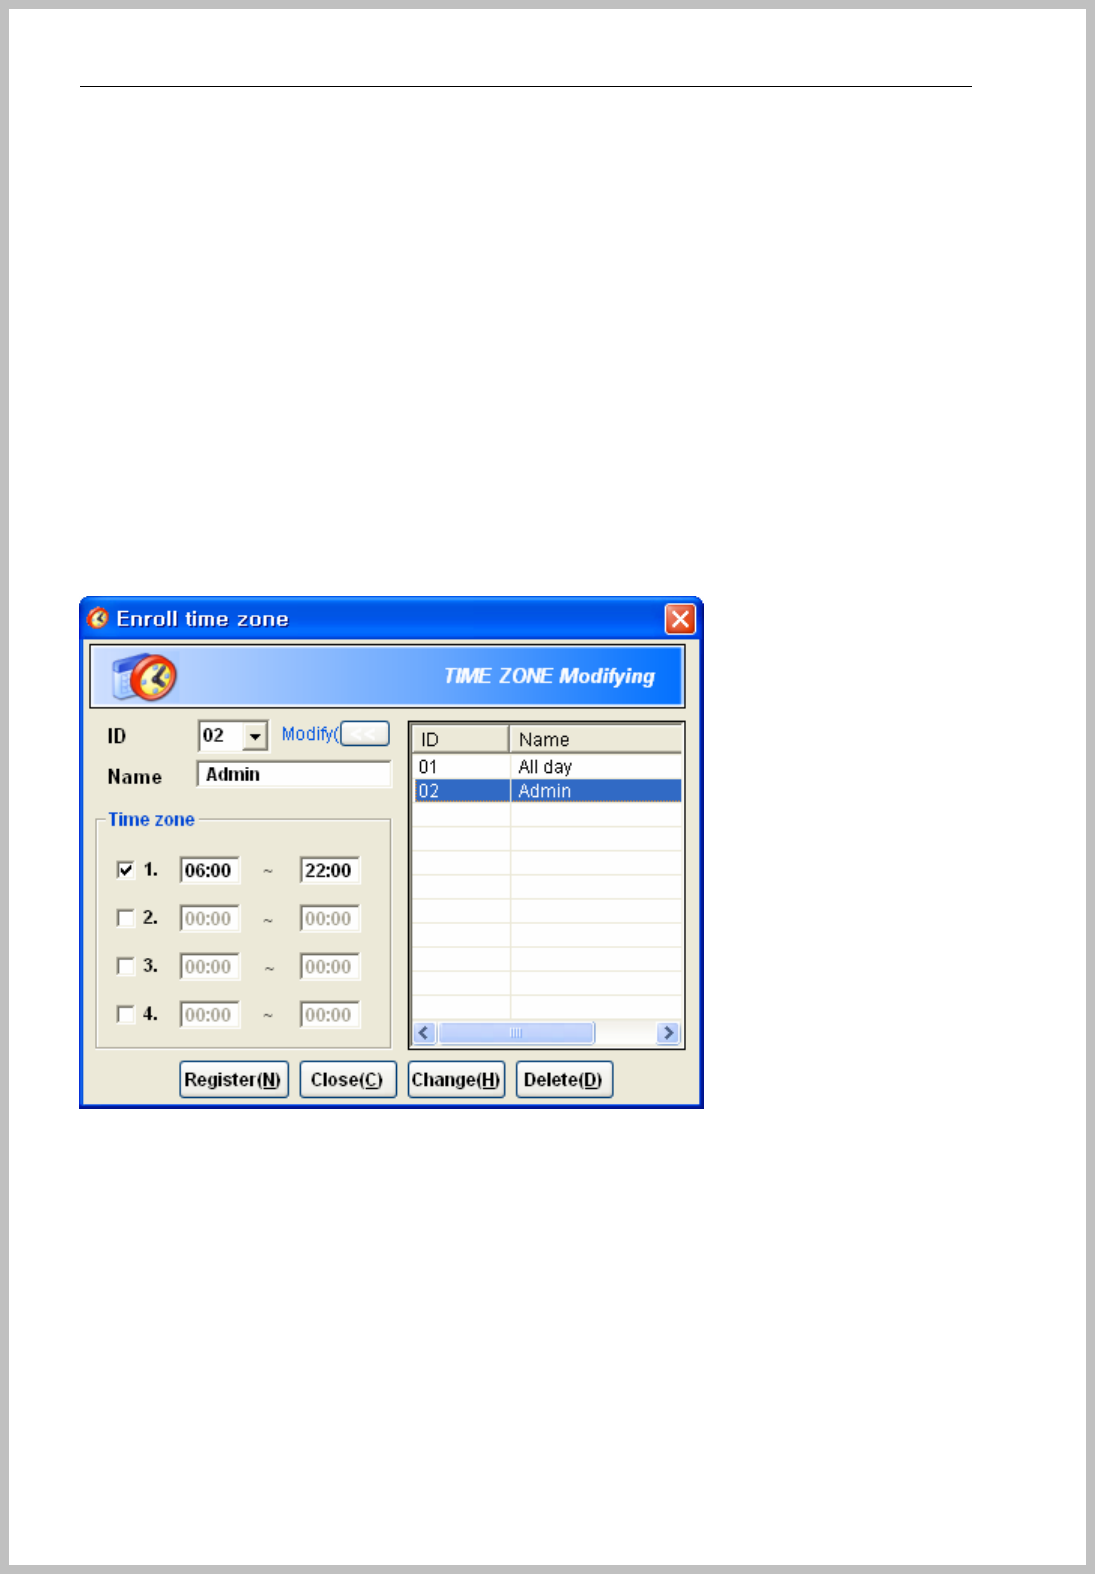
5.1.2Set Time Zone
Go to the stage of (Register=> Schedule=> Time Zones). And the below window appears.
.Input Name and Time Zone. It can be input 4 times a day ( 0 ~ 23:59 ).
For easy comprehension, time zone is divided by working group time as like Morning 1 team & 2
team, Afternoon 1 team & 2 team and Night 1 team.
EX) Whole day : 00:00~24:59
Morning 1team working time : 06:00~ 16:00
Morning 2 team working time : 07:00~10:00, 13:00~19:00
For setting value of time zone.
Morning 1 team : 05:00~17:00
Morning 2 team : 06:00~11:00, 12:00~20:00
You should consider of time gap for enter company and leave company around 30 min~1 hour.
Console Manager
- 58 -
5.1.3Set Time Schedule
After set time zone, set weekly time schedule.
“Set every other week” is for fixed day off, it gets an advantage over the Holiday.
”Enroll “Holiday” should be sleeted of Holiday type and time set by time zone.
Access control time : Please see the above picture. Sunday Night 1 team only can enter the
door during set time(19:00~21:00, 22:00~23:59). When worker try to enter except set
time(00:00~18:59, 21:01~21:59), access denied with authentication failed message
appears
Set every other week : This function is for company extra settled day off every other week.
For example, “A” company is day off 2,4 Saturday. If you want to give value whole day close
door, give time value to 00:00~00:01 or 23:58~23:59.
Enroll Holiday : Please remember Holiday setting and give holiday value. And select one
time zone. For example, you want to open only day time during Holiday, set as 10:00~16:00
or just close whole day set as 00:00~00:01 or 10:00~10:01 (Minimum time gap is 1 min)

Console Manager
- 59 -
5.2Transmit Schedule to terminal
For use of Schedule & Role function, all record should be sent to selected terminal as to click the
“Download” button of the window to be shown after saving.
The below window automatically appears when all process finished.
Without transmit to terminal, schedule and role functions can’t apply.

Console Manager
- 60 -
* Green Color is DialUp connection terminal.
* Black Color is TCP/IP and Serial terminal.
5.3Role
Select Role and click the right button of mouse as the below picture or go to menu bar of stage
(Register=> Role=>New).
First, give Role Name and select on enrolled Schedules of above “OK” button.
Second, Select terminals to be applied.
Third, push “OK” button for saving.
Apply for each user, please select “Enroll role” on process of “Enroll User”
Console Manager
- 61 -
Console Manager
- 62 -
Console Manager
- 63 -
Check TID and click ”OK” button set personal limit.
5.4 Schedule control layout
Holiday : 4 different holiday setting
Time Zone : 4 different time zone a day
Time Zone enrolled ID : 32 time zones are possible
Schedule enrolled ID : 32 schedules are possible
You can management various schedule of access control.
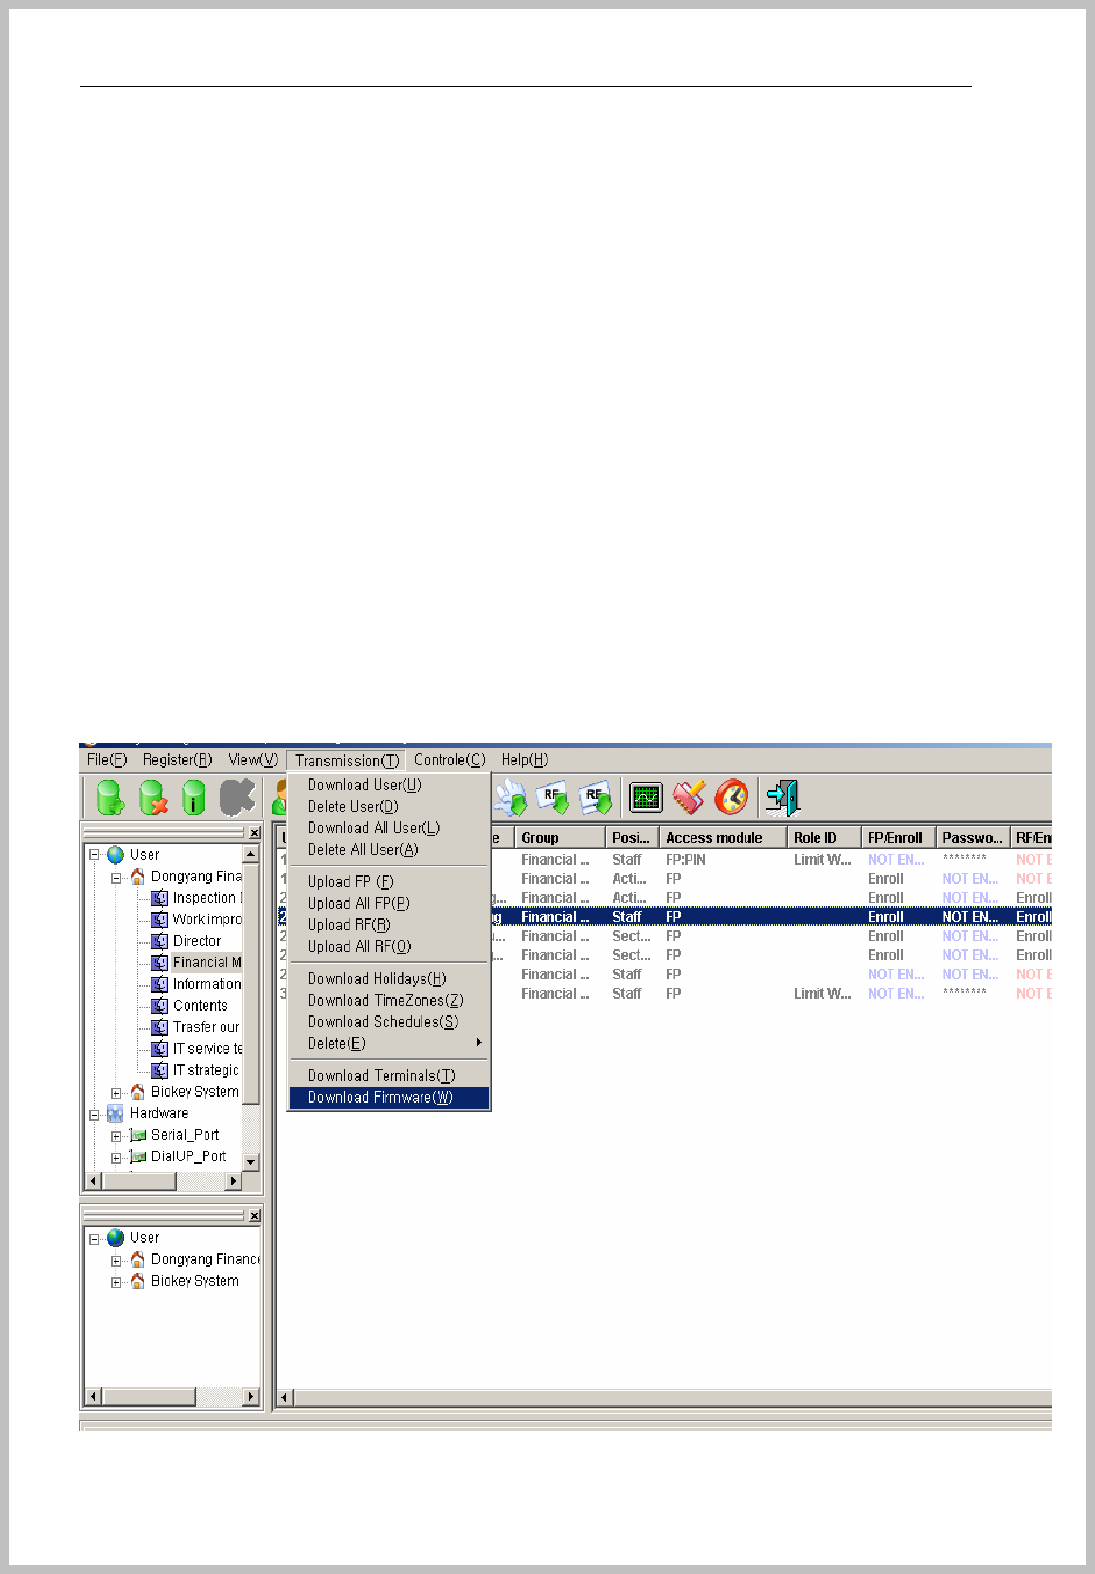
6. Transmit
6.1 Download & Upload
Go to the process of “Transmission” of menu bar. “Download” means “ sending data to terminal” and
“Upload” means “ Get data from terminal”.

Console Manager
- 64 -
6.1.1 Download User
This is for transmit selected user data to terminal. First, it should select one user to be transmitted.
6.1.2 Delete User
This is for deletion of selected user data from terminal. First, it should select one user to be deleted.

Console Manager
- 65 -
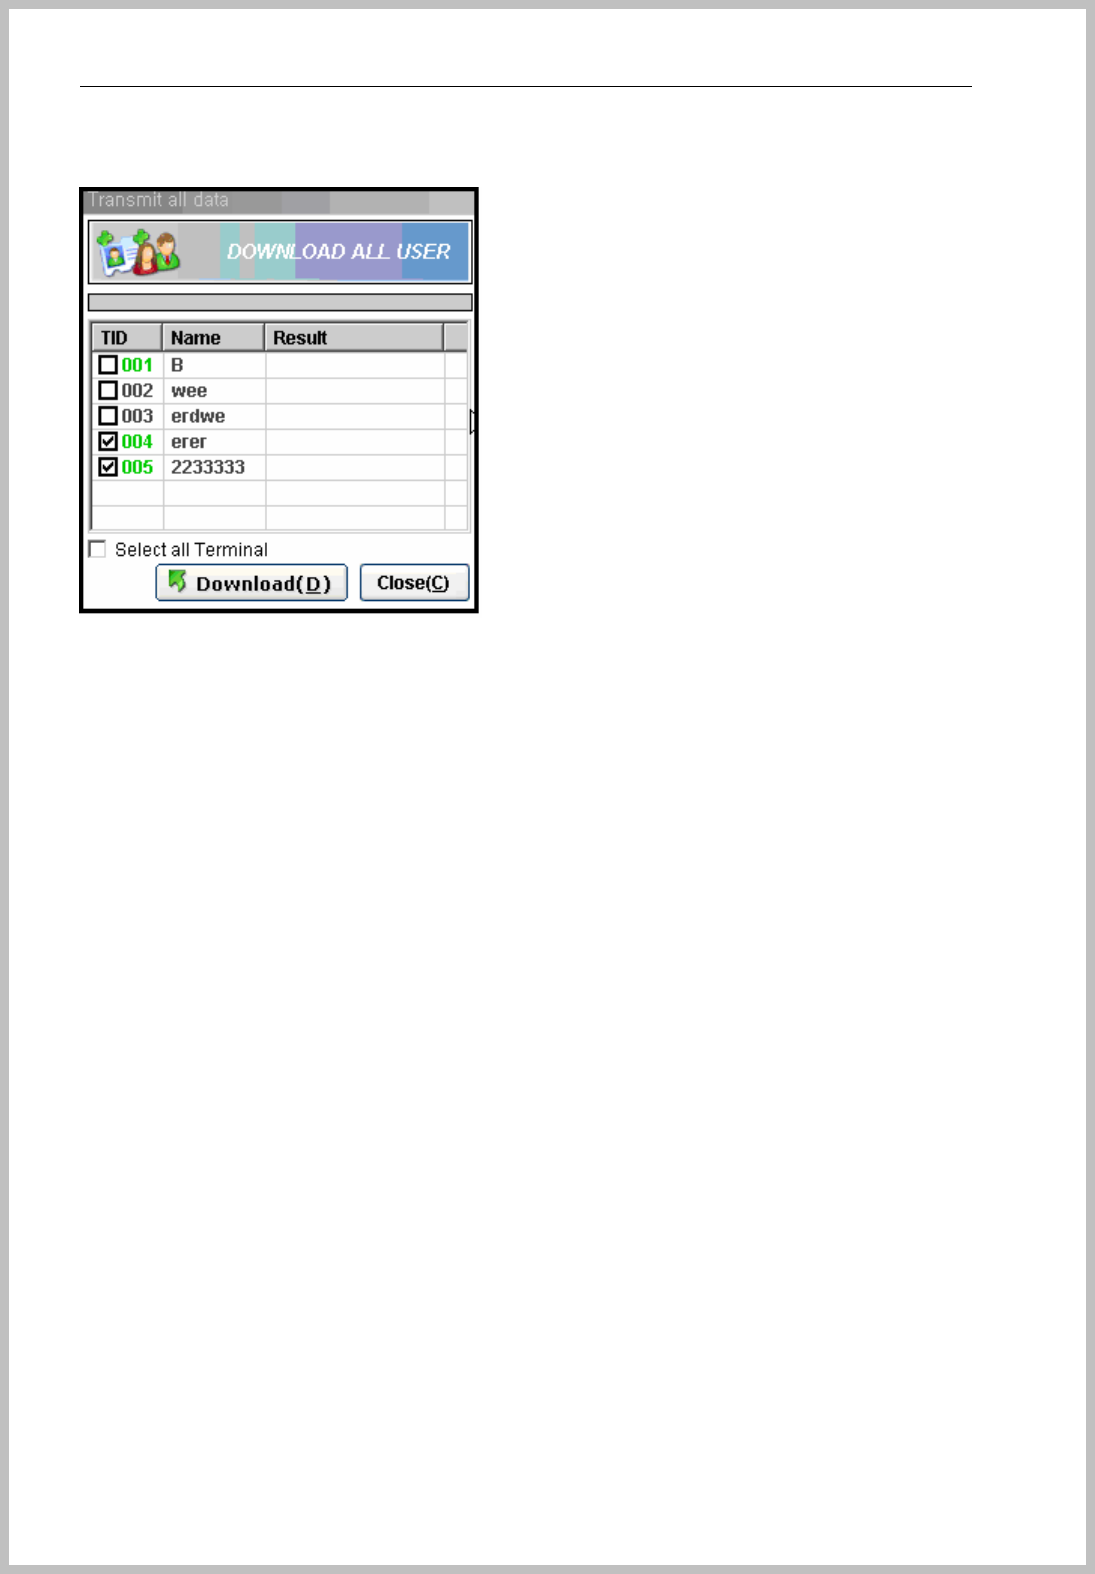
6.1.3 Download All user
This is for transmit all user data of selected group or company to terminal. First, it should select one
group or company to be transmitted.
6.1.4 Delete All user
This is for deletion of all user data from terminal.
6.1.5 Upload FP and RF
This is for get Fingerprint & EM TYPEdata stored in Terminal.
The data modify by User ID.
Console Manager
- 66 -
6.1.6 Download and delete Schedule
Enrolled schedule should transmit to terminal, if not, schedule function not works.
6.1.7 Download terminal
This is for checking terminal status.
6.1.8 Firmware update
z Supported binary file named “***.bin” by Console System, input to “C:/program/Console”
folder and run Console Manager. Select “Control-> Update firmware” of tool bar.
z As to show of patch by Console, click it and wait till small window appears.
z Click the message and close the window.
z Please reset the terminal.
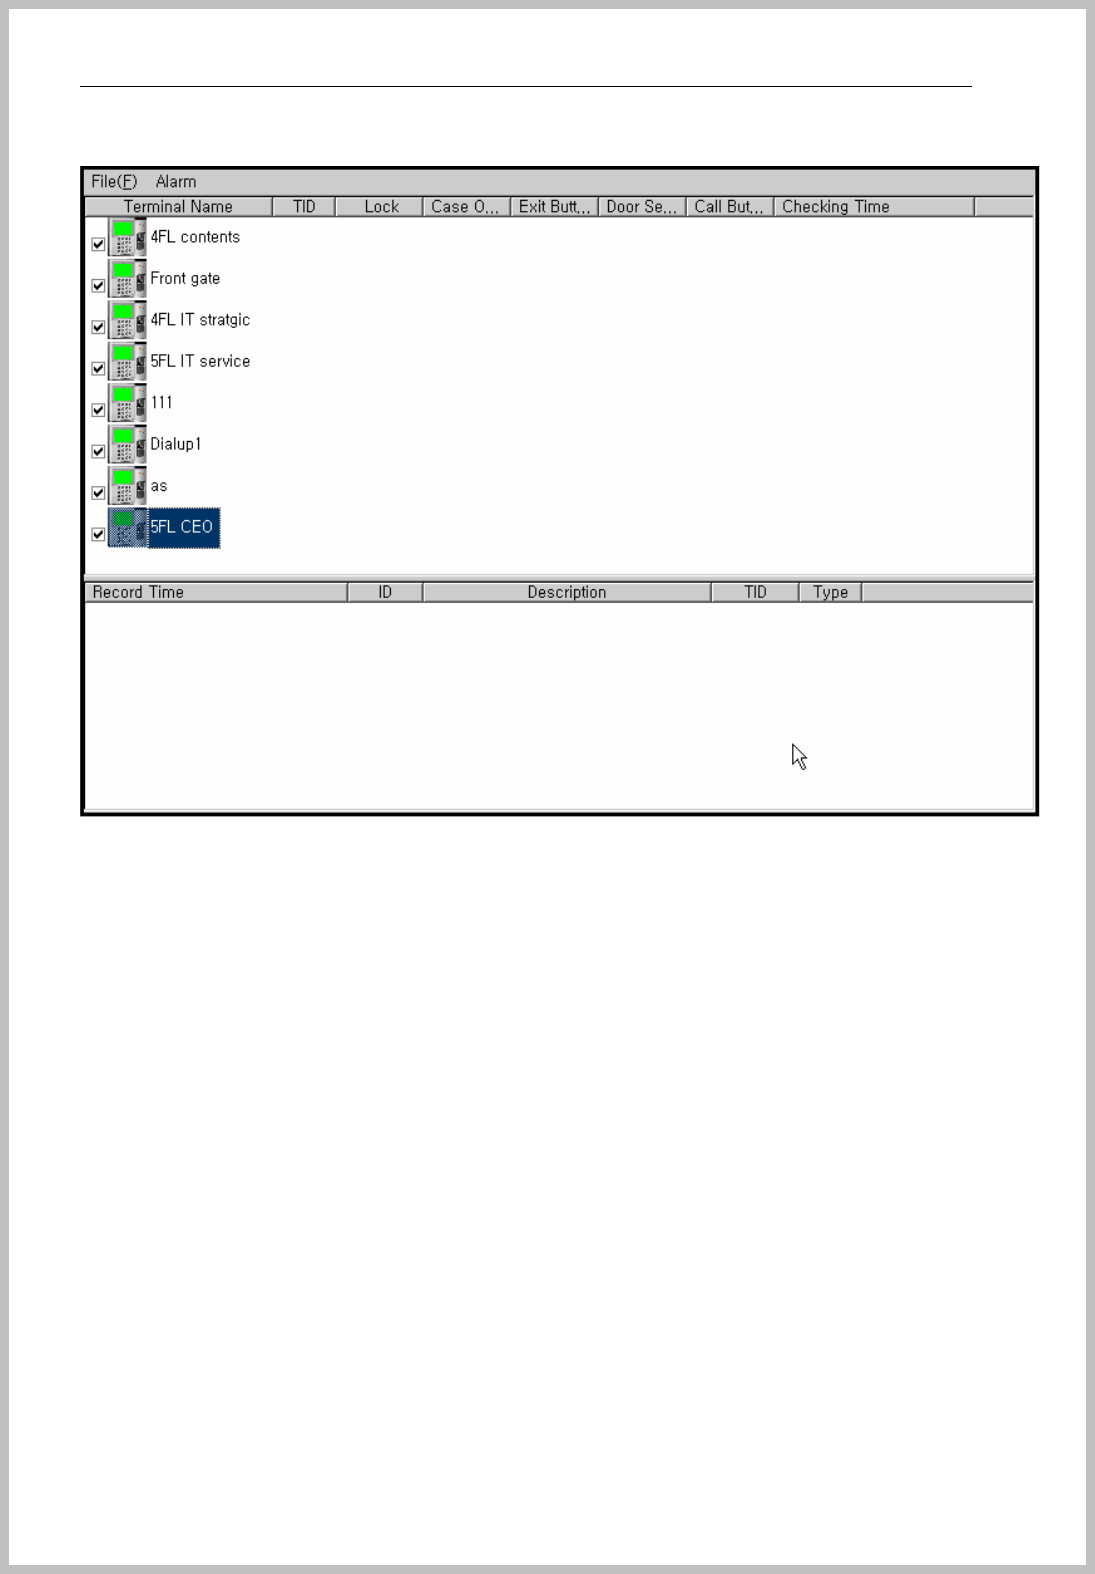
7 Monitoring
After install Console Manager, run as to click icon ‘Monitoring’.
It can real-time monitoring of Lock, case open, exit button door sensor and call button.
The below part is shown the terminal and log record at real-time.
When administrator wants to be off the alarm sound, select ‘Alarm’ of menu bar.
Console Manager
- 67 -
8 Report
<How to use Report>
Search a person the following conditions
Name : John Smith
Group : Line 1
Date : 6/1/2006 ~ 6/31/2006
Time : AM11:00~ PM02:00
Terminal : Terminal 004
Purpose : John Smith tried to access the terminal 4 for the above time, even though
he doesn’t be allowed to enter this time by schedule.
Console Manager
- 68 -
After choose Access Denied of Event section, it is listed many event ID.
137 Access Denied : Access Control => Denied by schedule and role function
146 Access Denied : Lost Card => Denied by lost and stolen card on user
information.
Console Manager
- 69 -
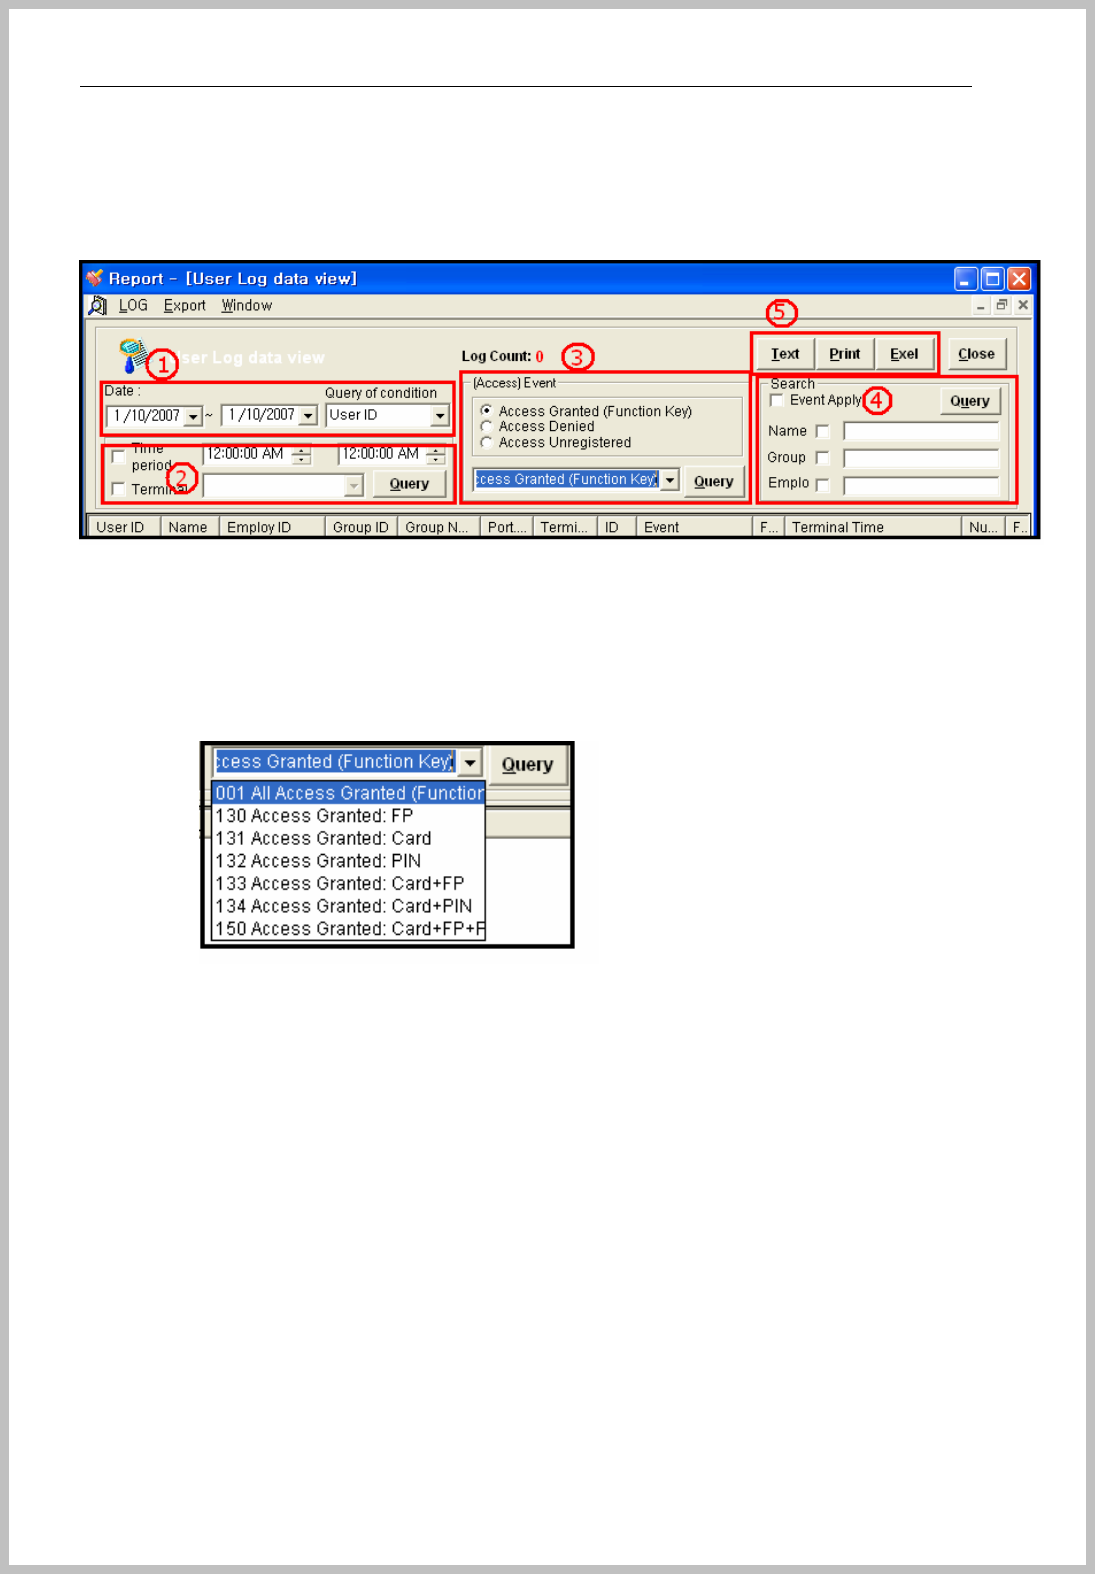
8.1 User log data view
User log data view is set as default window.
This is for user event log record by set period as to push “Query” button.
1. Date : Select the period of date and choose the priority query condition on the scroll
list.
2. Time period and Terminal : it can make more details of searching under result of ①.
3. Access Event : It can be searched by log event type as Access Granted, Access
Denied, Access Unregistered. After done it, select details by granted method.
4. Search : Check the box required conditions of Name, Group and, Employee ID and
then input character or number.
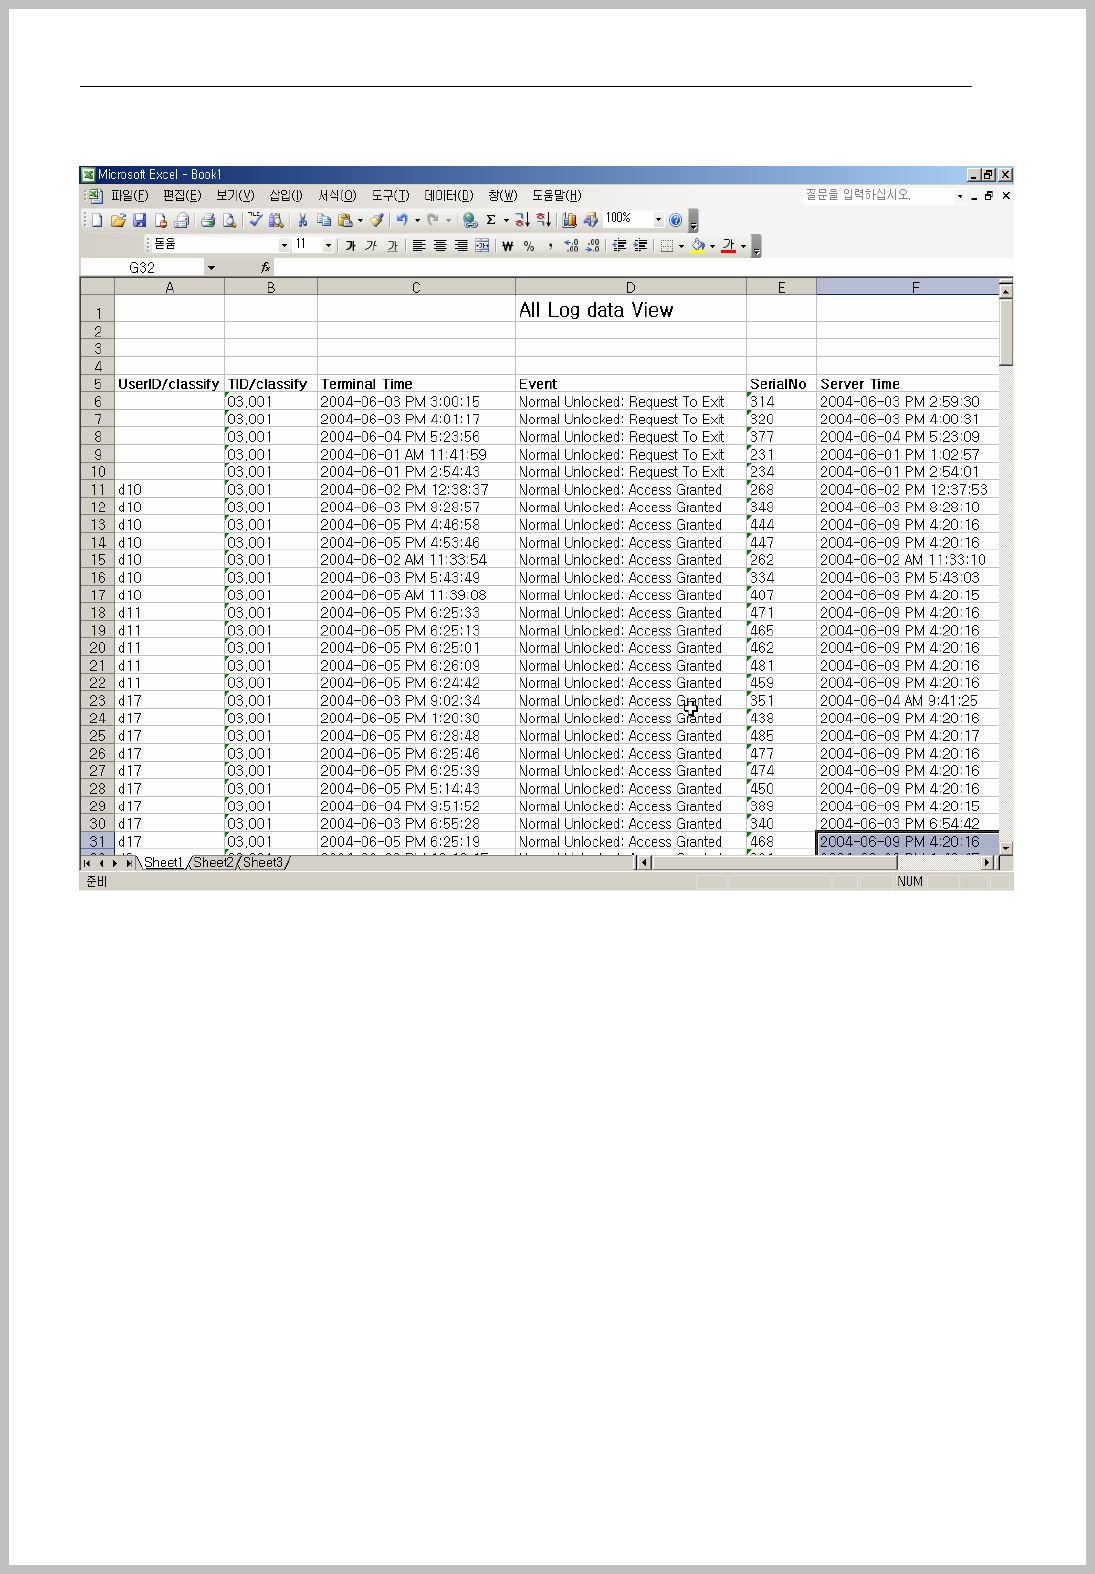
5. Data output by Text, Print, Excel : save by text or excel file and print out.
Console Manager
- 70 -
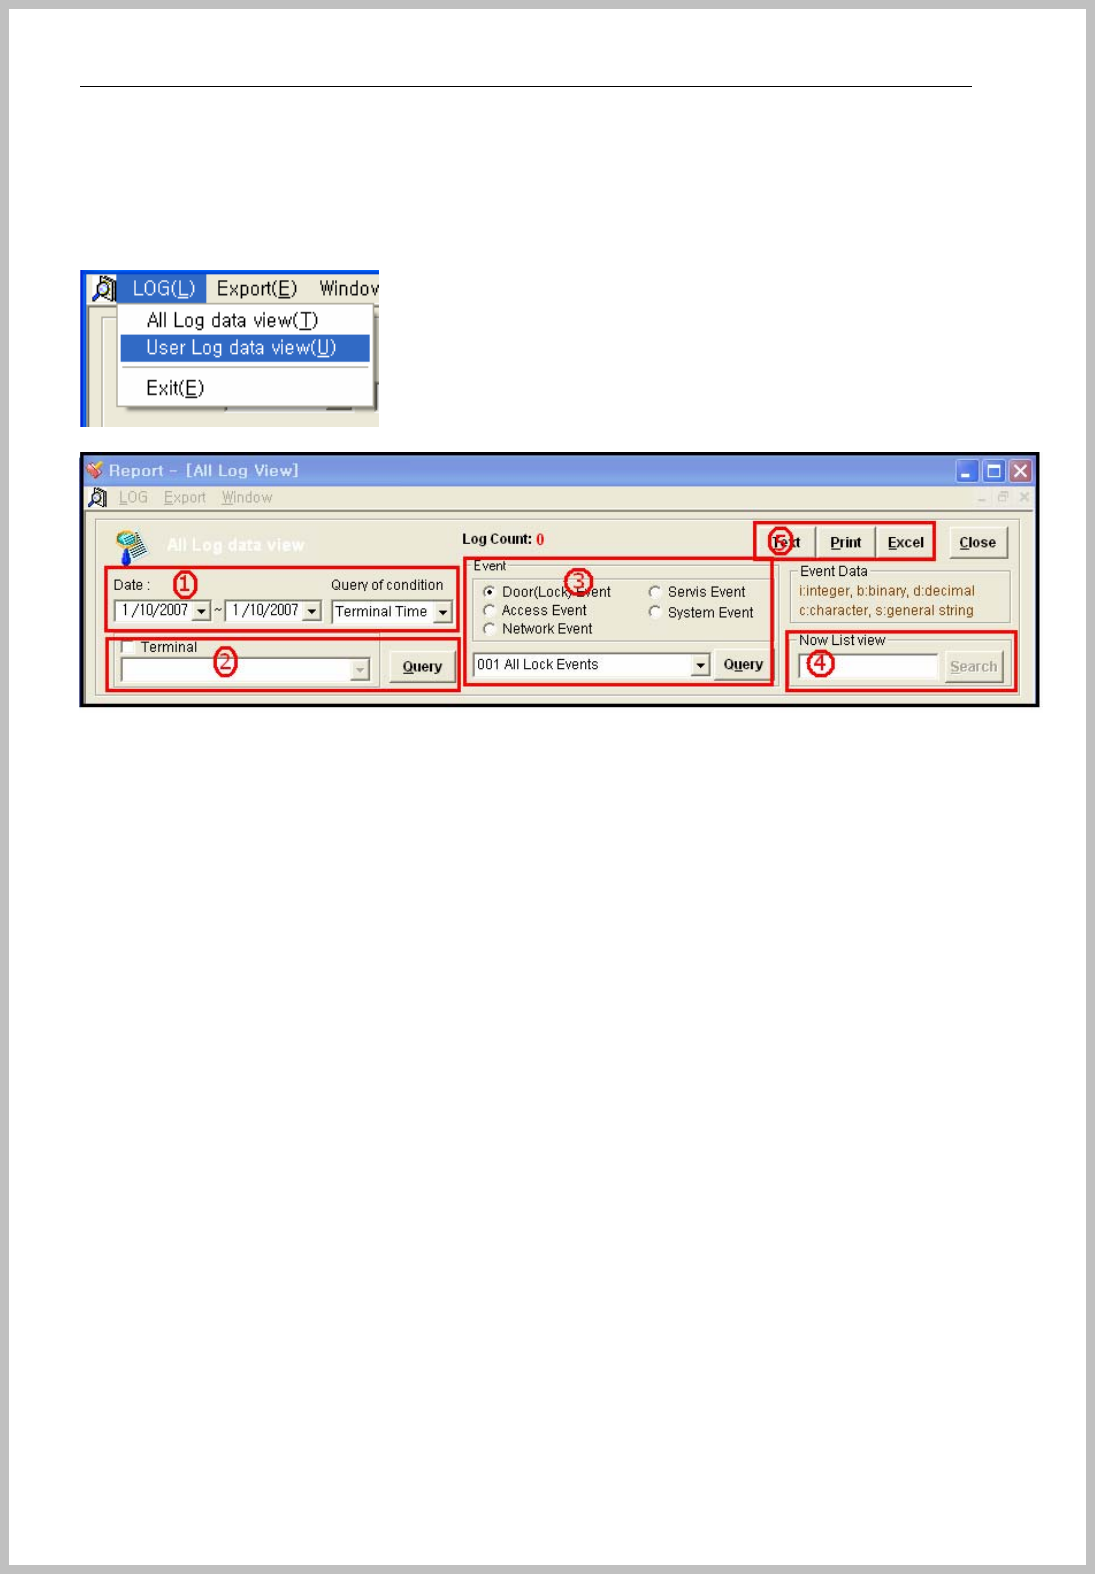
8.2 All log data view
If you need the details of records, not only user data, please select “menu=> Log=> All Log
data view”
1. Date : Select the period of date and choose the priority query condition on the
scroll list.
2. Terminal : Select terminal ID and then click the “Query” button.
3. Event : Door Event – Please choose one main event and you can see the change
of scroll menu by your selection. Select sub query condition of scroll bar.
4. Search : input a words or number for searching on the listed data.
5. Data output by Text, Print, Excel : save by text or excel file and print out.
Console Manager
- 71 -
Console Manager
- 72 -
9. Time & Attendance
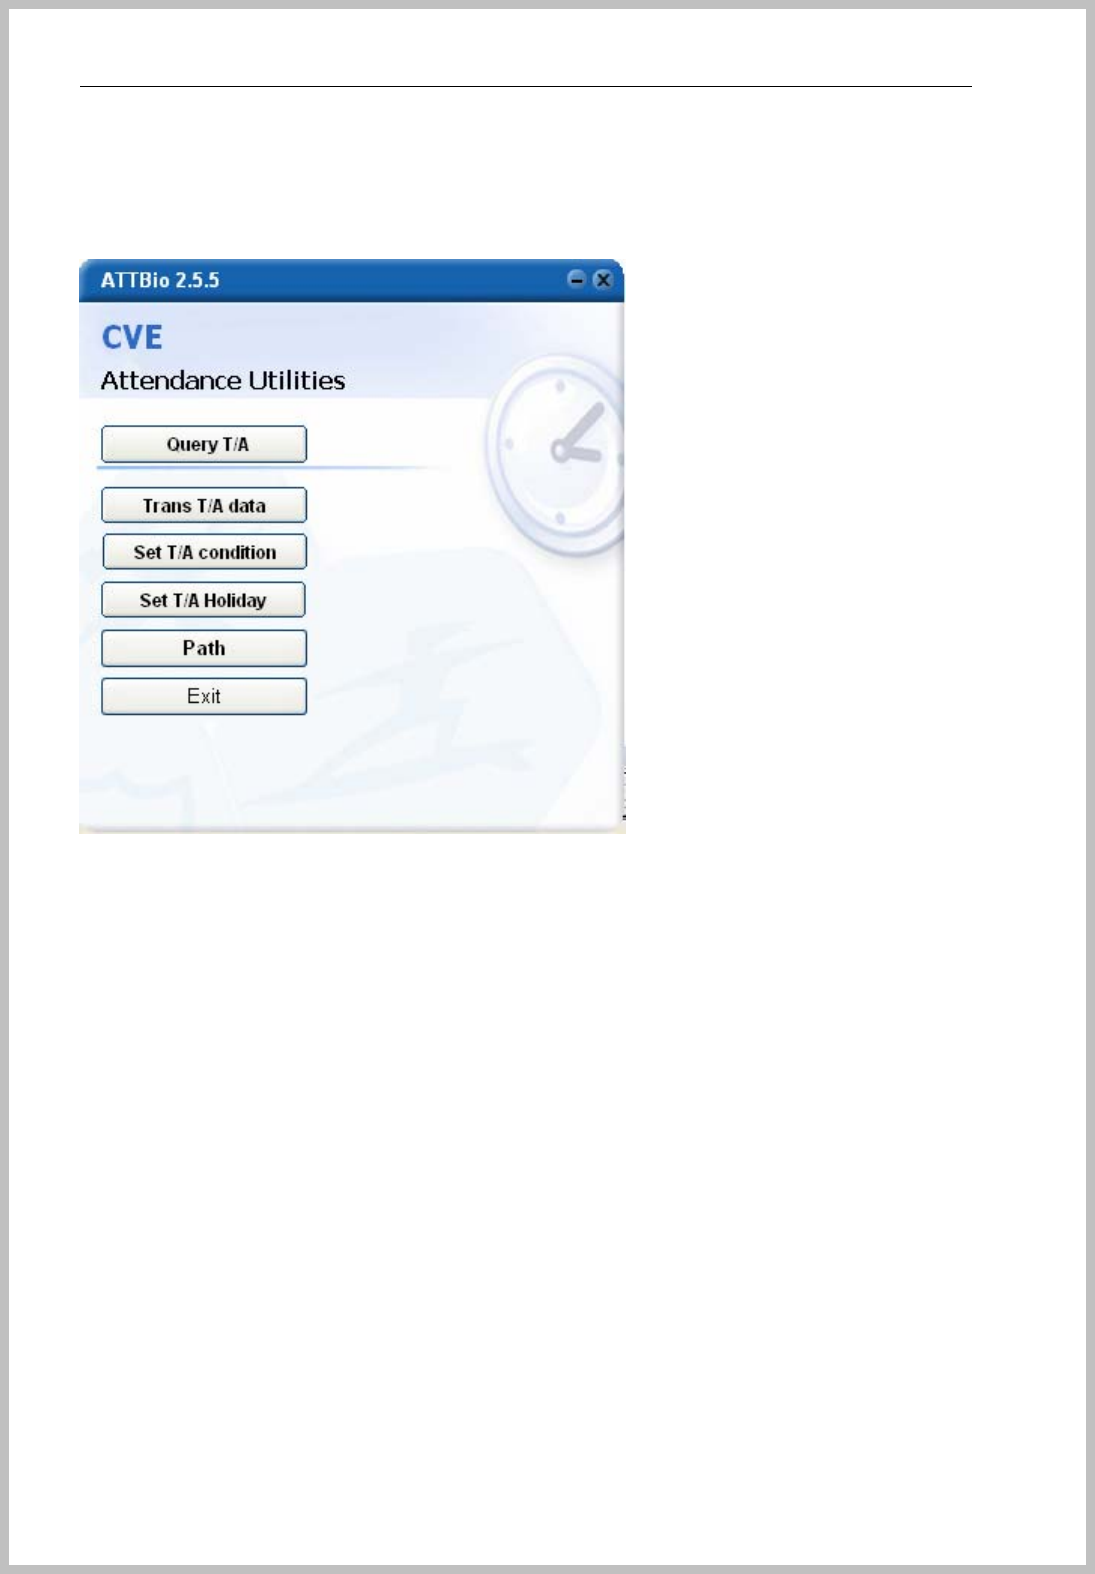
9.1Enter T&A
After push T&A icon on the menu bar, the below window appears.
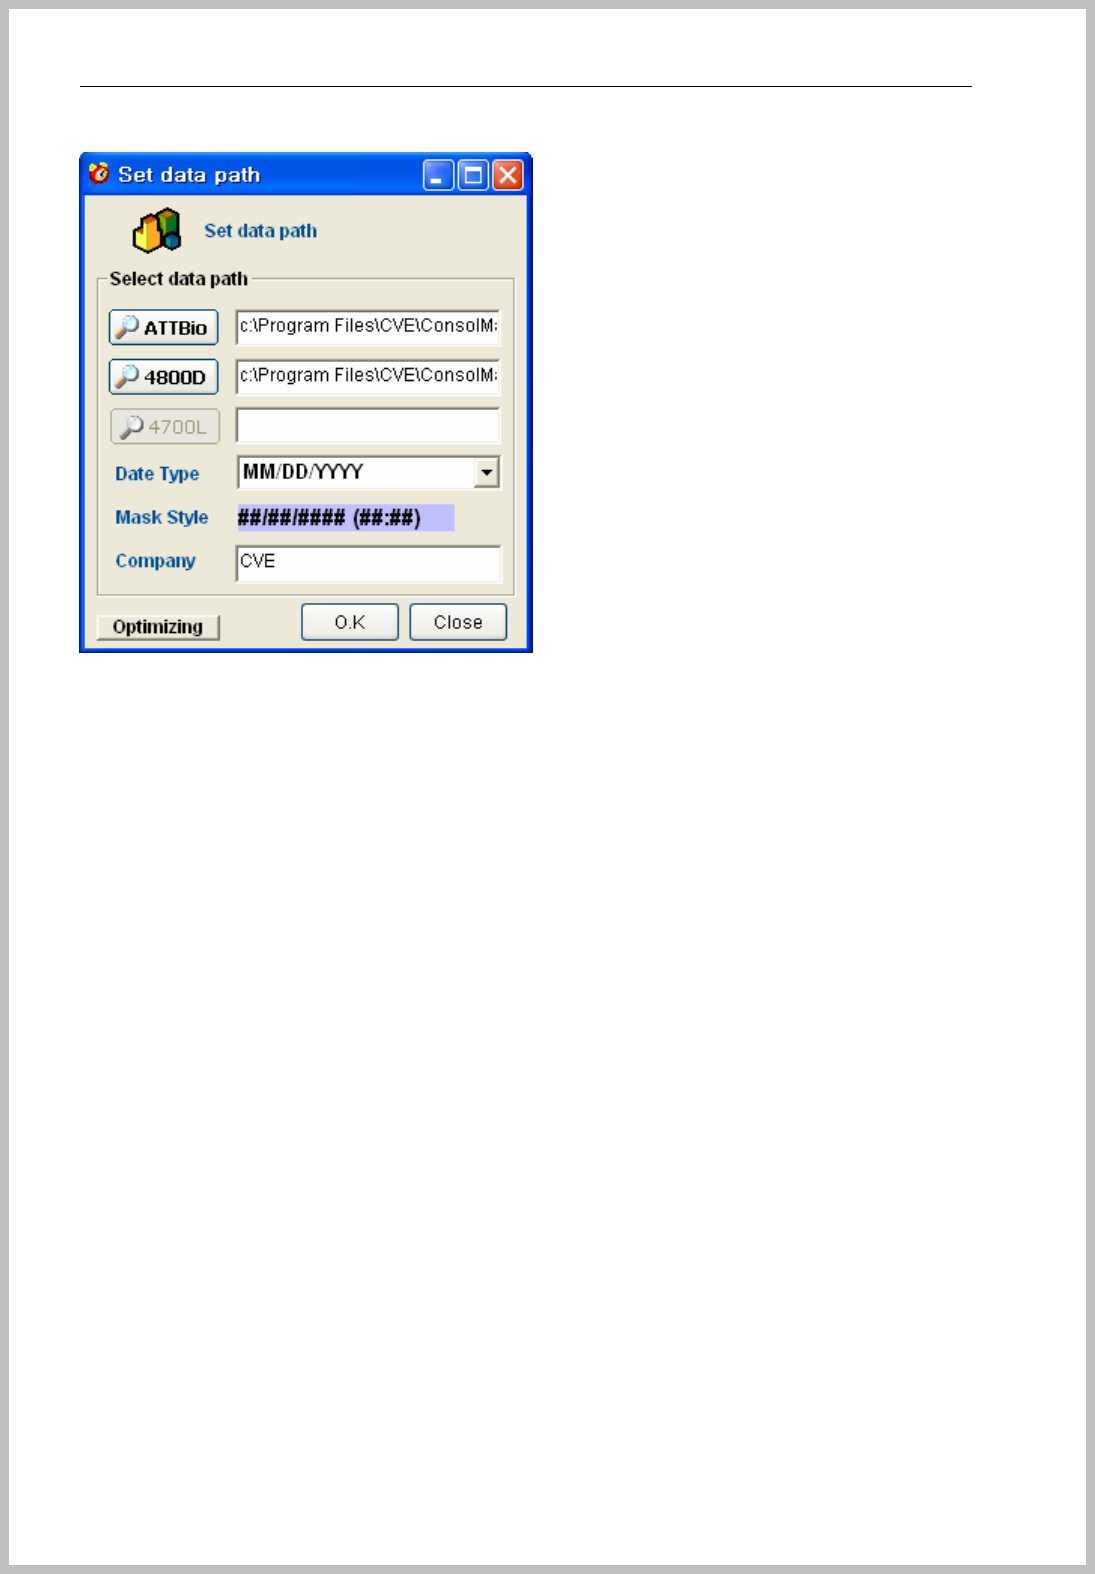
When “Attendance Utilities” is shown, click the Path icon of window. And set the data path as like
below
ATTBio =>C:\Program Files\Console\DataBase\ATTDB.mdb
4800D =>C:\Program Files\Console\DataBase\4800D.mdb
You can see that both ATTBio and 4800D paths are automatically set like below.
Console Manager
- 73 -
Input Company name and click “OK” button and close the window.
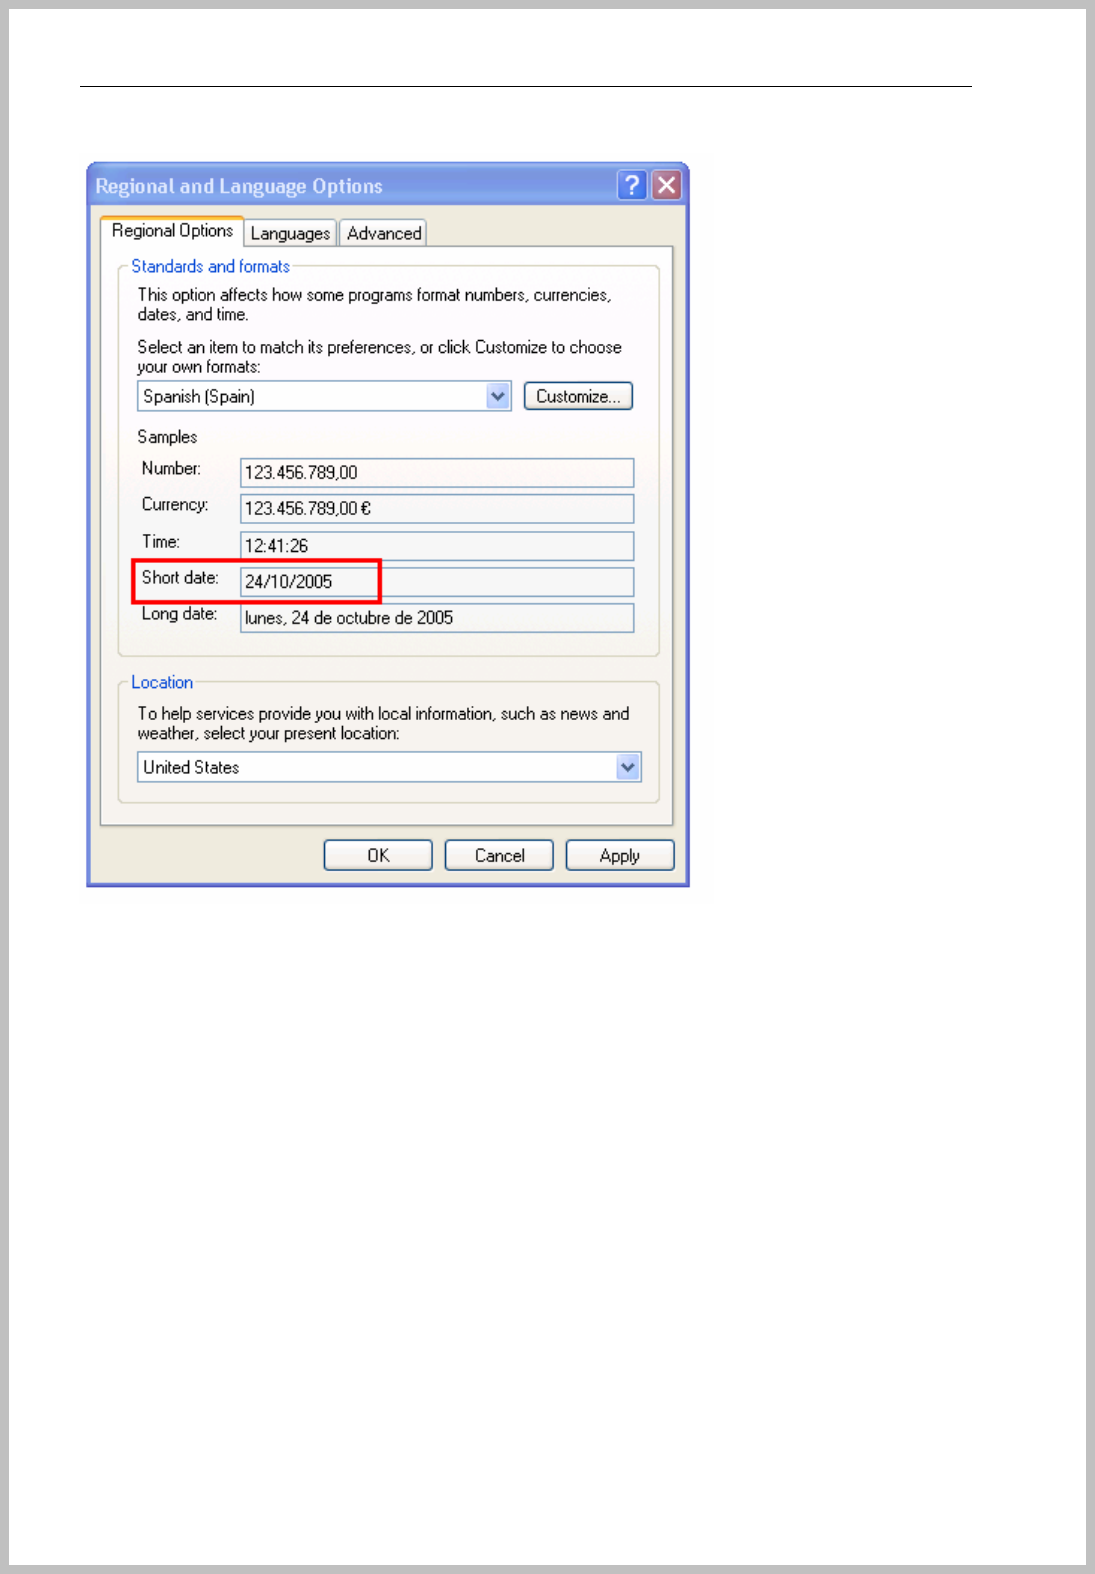
Set “Date Type”
It should be set the same as the window date format on the control panel of Window system as
below.
Go to control panel => Regional and Language

Console Manager
- 74 -
Go to Regional Option => Short date
Short Date : 24/10/2005
Date type : DD/MM/YYYY
Console Manager
- 75 -
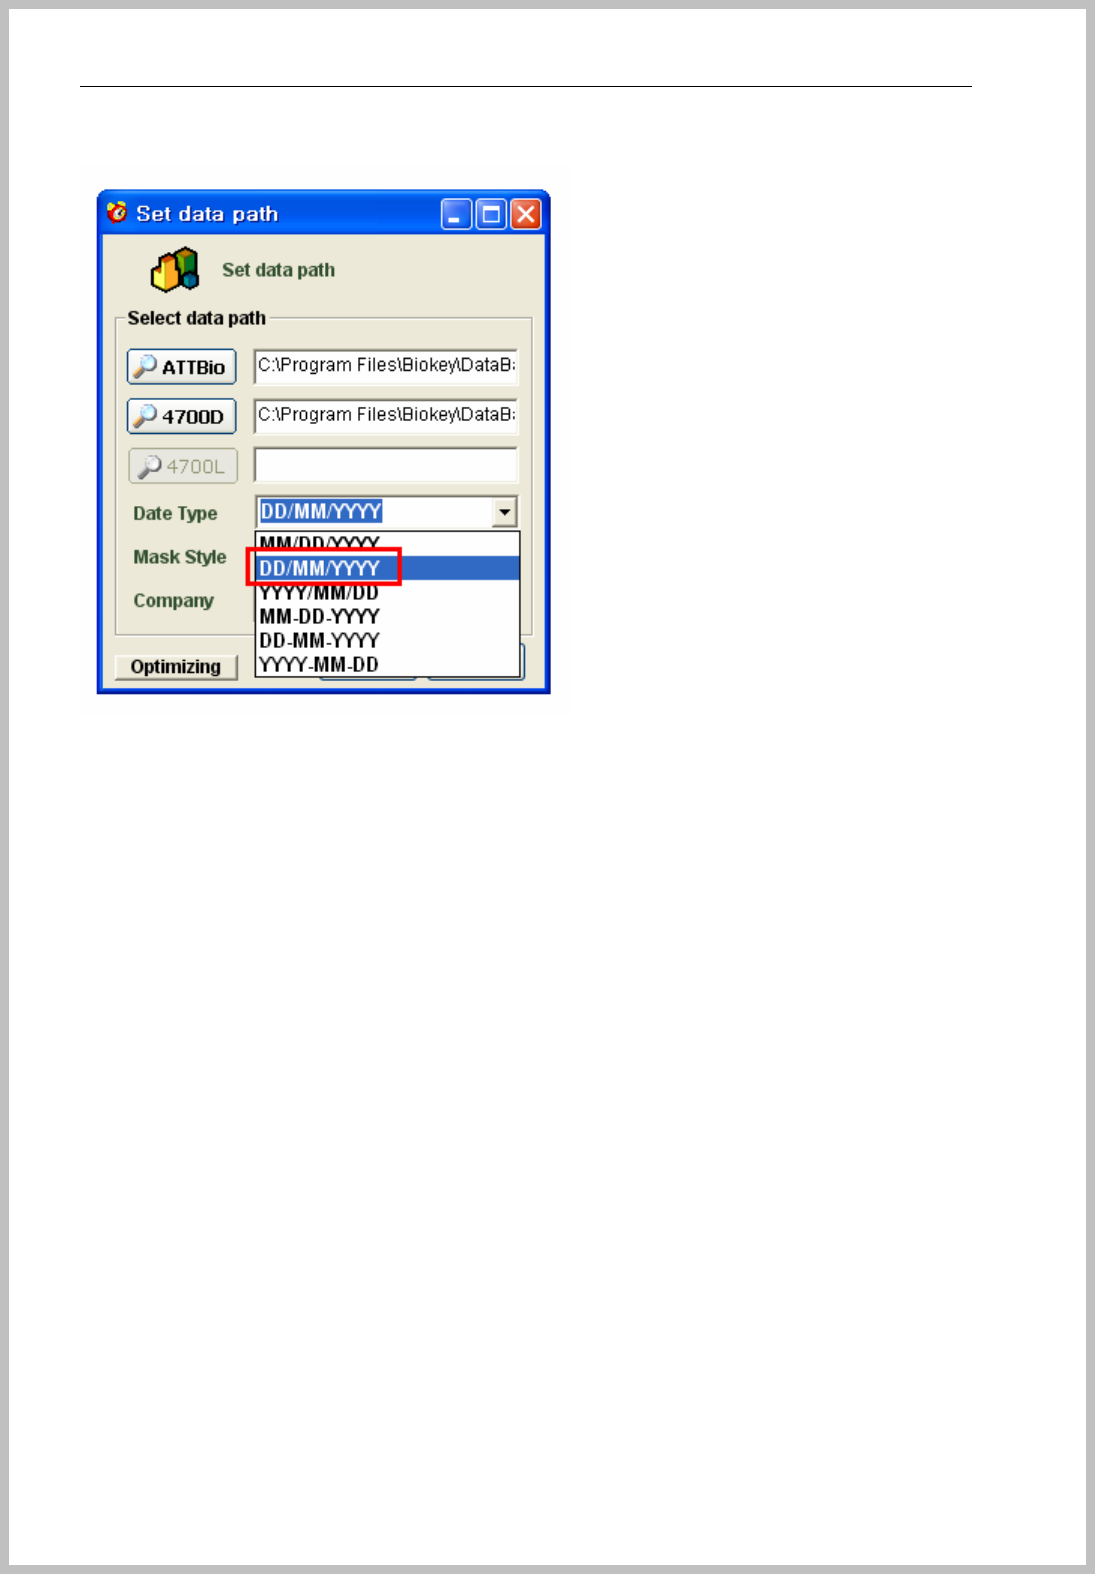
It should be selected the same date format as the window system and then click “OK” button.
Console Manager
- 76 -
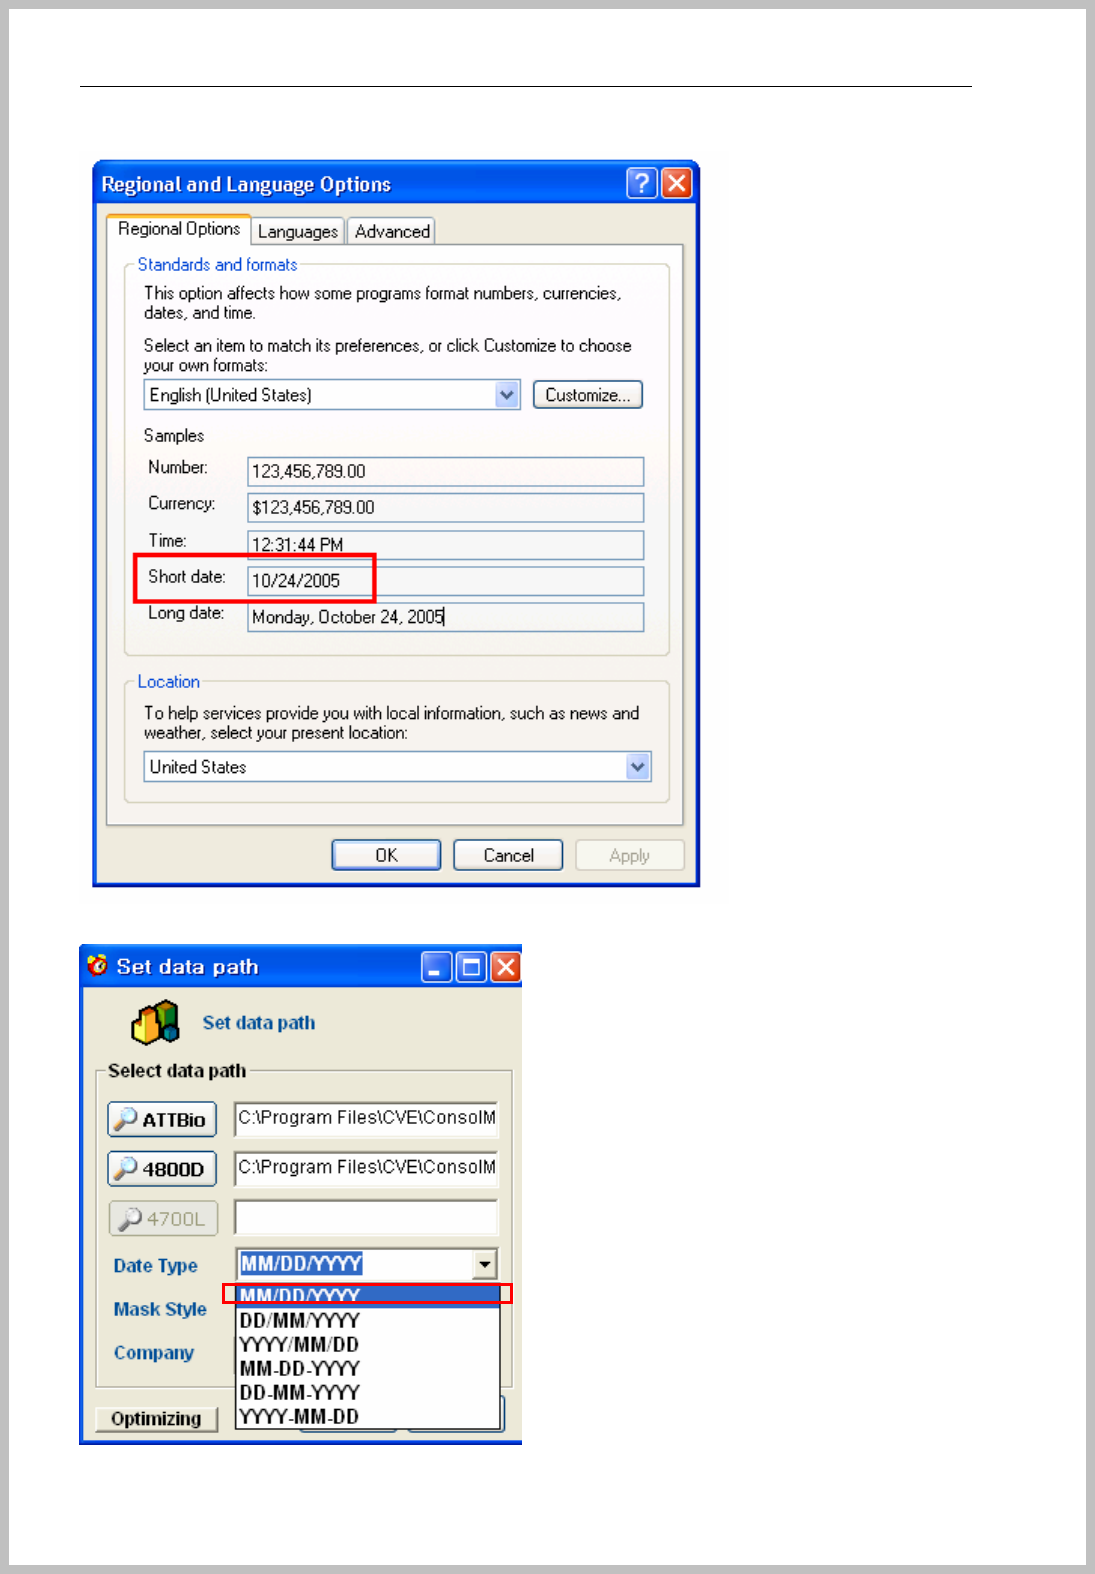
Short Date : 10/24/2005
Date type : MM/DD/YYYY
Console Manager
- 77 -
Console Manager
- 78 -
After All value is set correctly, click “OK” button for saving this setting value.
9.2Set T&A condition
< How to set Time and Attendance condition >
*Name : John Smith
*Work Type
z 1st & 3rd week : Day work(09:00~18:00)
Saturday (09:00~14:00)
z 2nd & 4th week : Night work(14:00~23:00)
*Over time : Allowed over one hour than working time zone
Not allowed over 3 hours a day
*Deduction : Being late than working time zone
Minus 30 minutes(Break time) a day
*Holiday : All Sunday
Go to the “std time” tab for setting working time.
< Day work >
Console Manager
- 79 -
<Night Work>
Please do not use 24:00 or 00:00 behind mis-calculation of working period of time.
For correct calculation, must be checked at “Apply night time” for over 24 hour time
line.
Go to the “enroll day off” tab for holiday enrollment.
<Holiday>
Click each Sunday and click the “enroll” button.
Console Manager
- 80 -
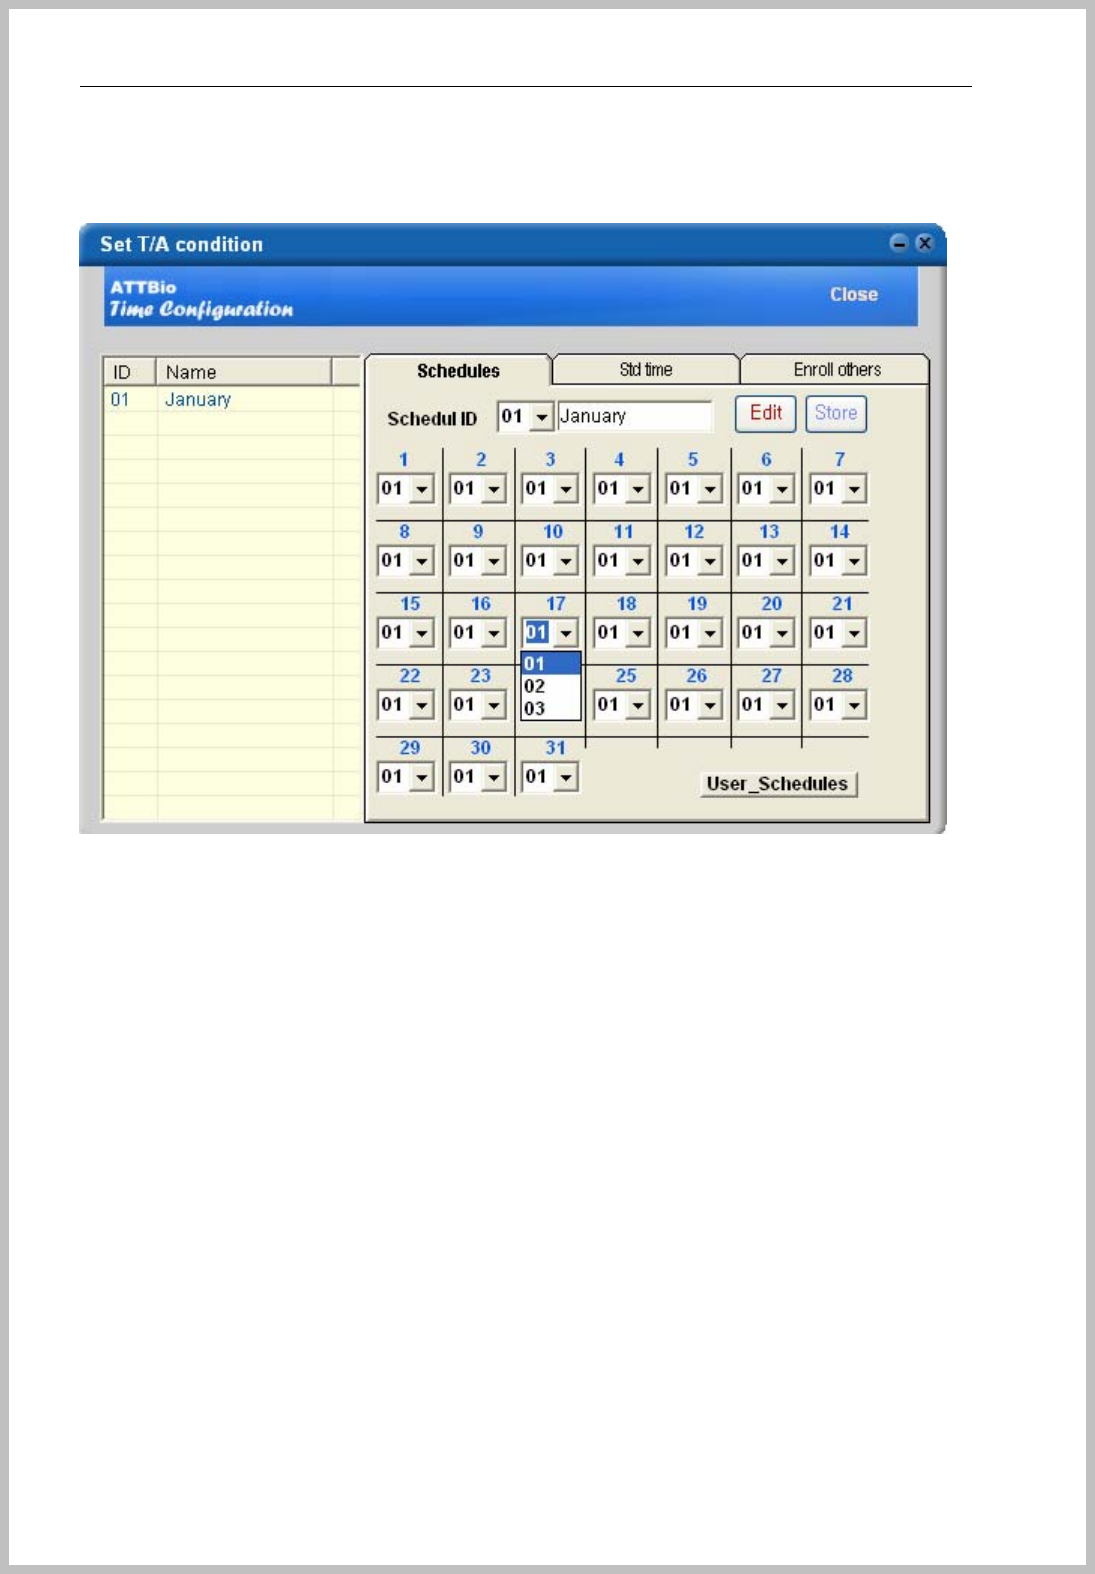
Go to the “Schedules” tab for making monthly schedule.
Make schedules 1&3rd week is applied to “01” and 2&3rd week is applied to “02” and
then click “Store” button.
Console Manager
- 81 -
Applies to “User information => EM TYPEinfo tab => T/A Work type => Select T&A
Schedule ID”.
Console Manager
- 82 -
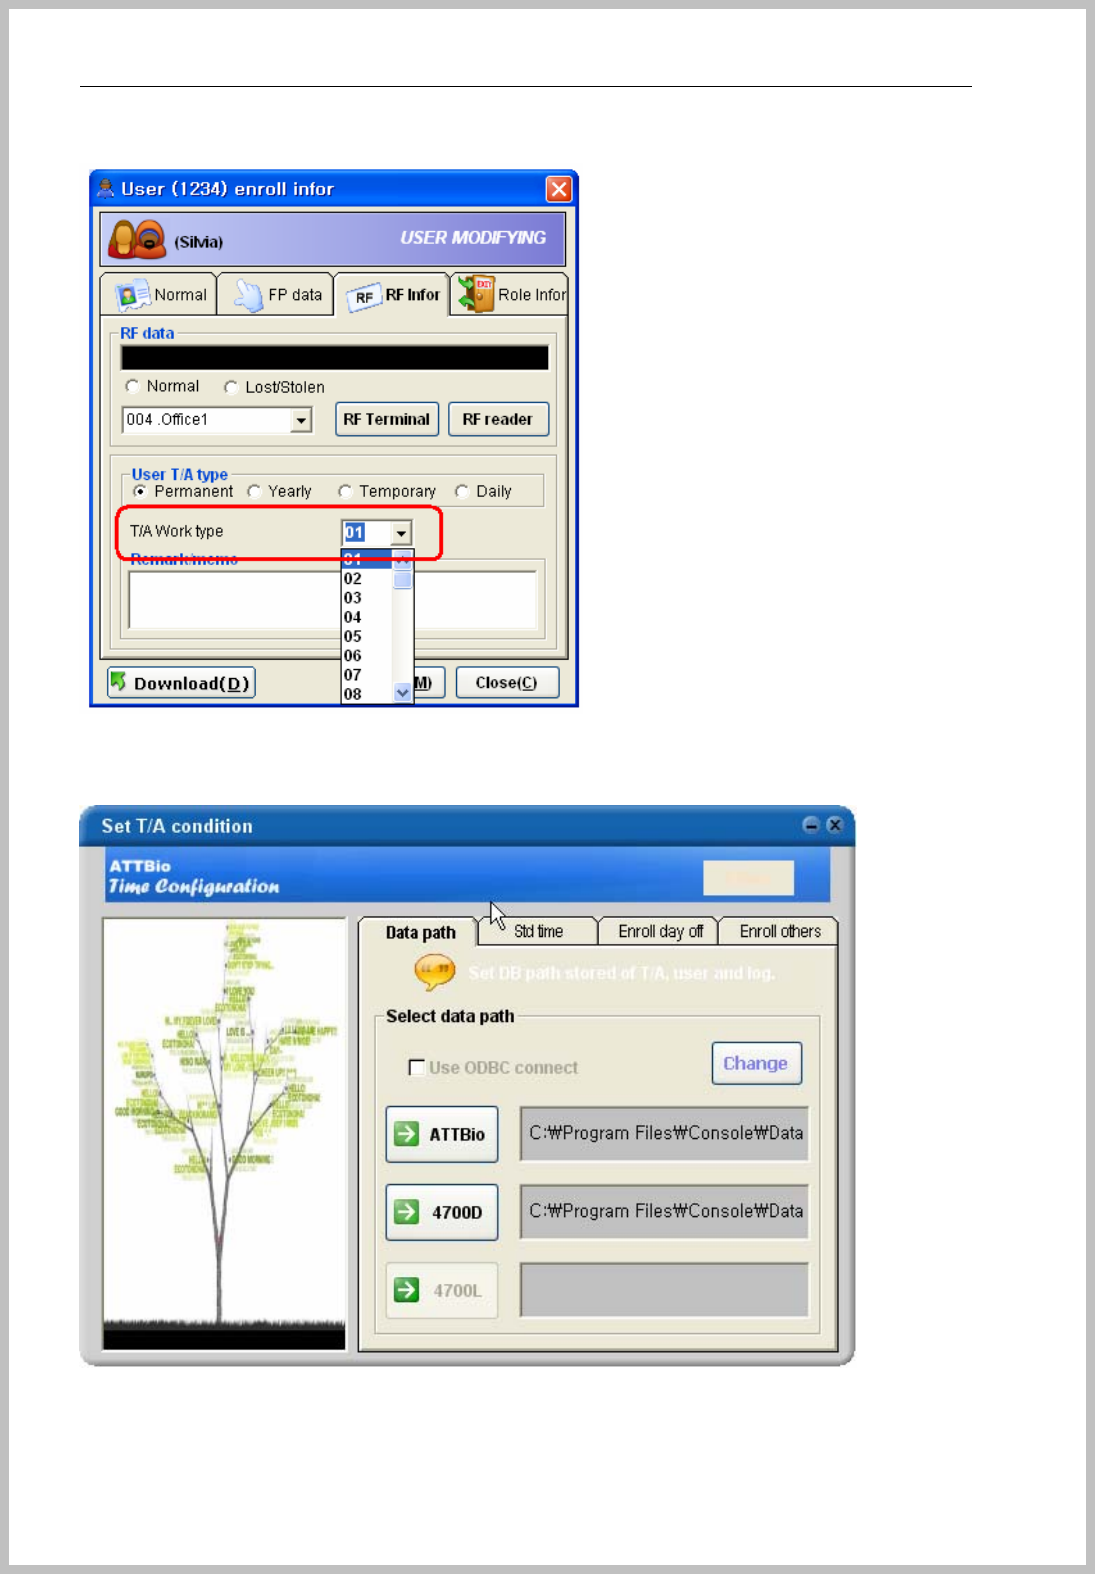
8.2.1 Data path
Select data path for Time & Attendance data.
z ATTBio : DB for T&A data
z 4800D : Log record DB. This data transforms to T&A data.
Console Manager
- 83 -
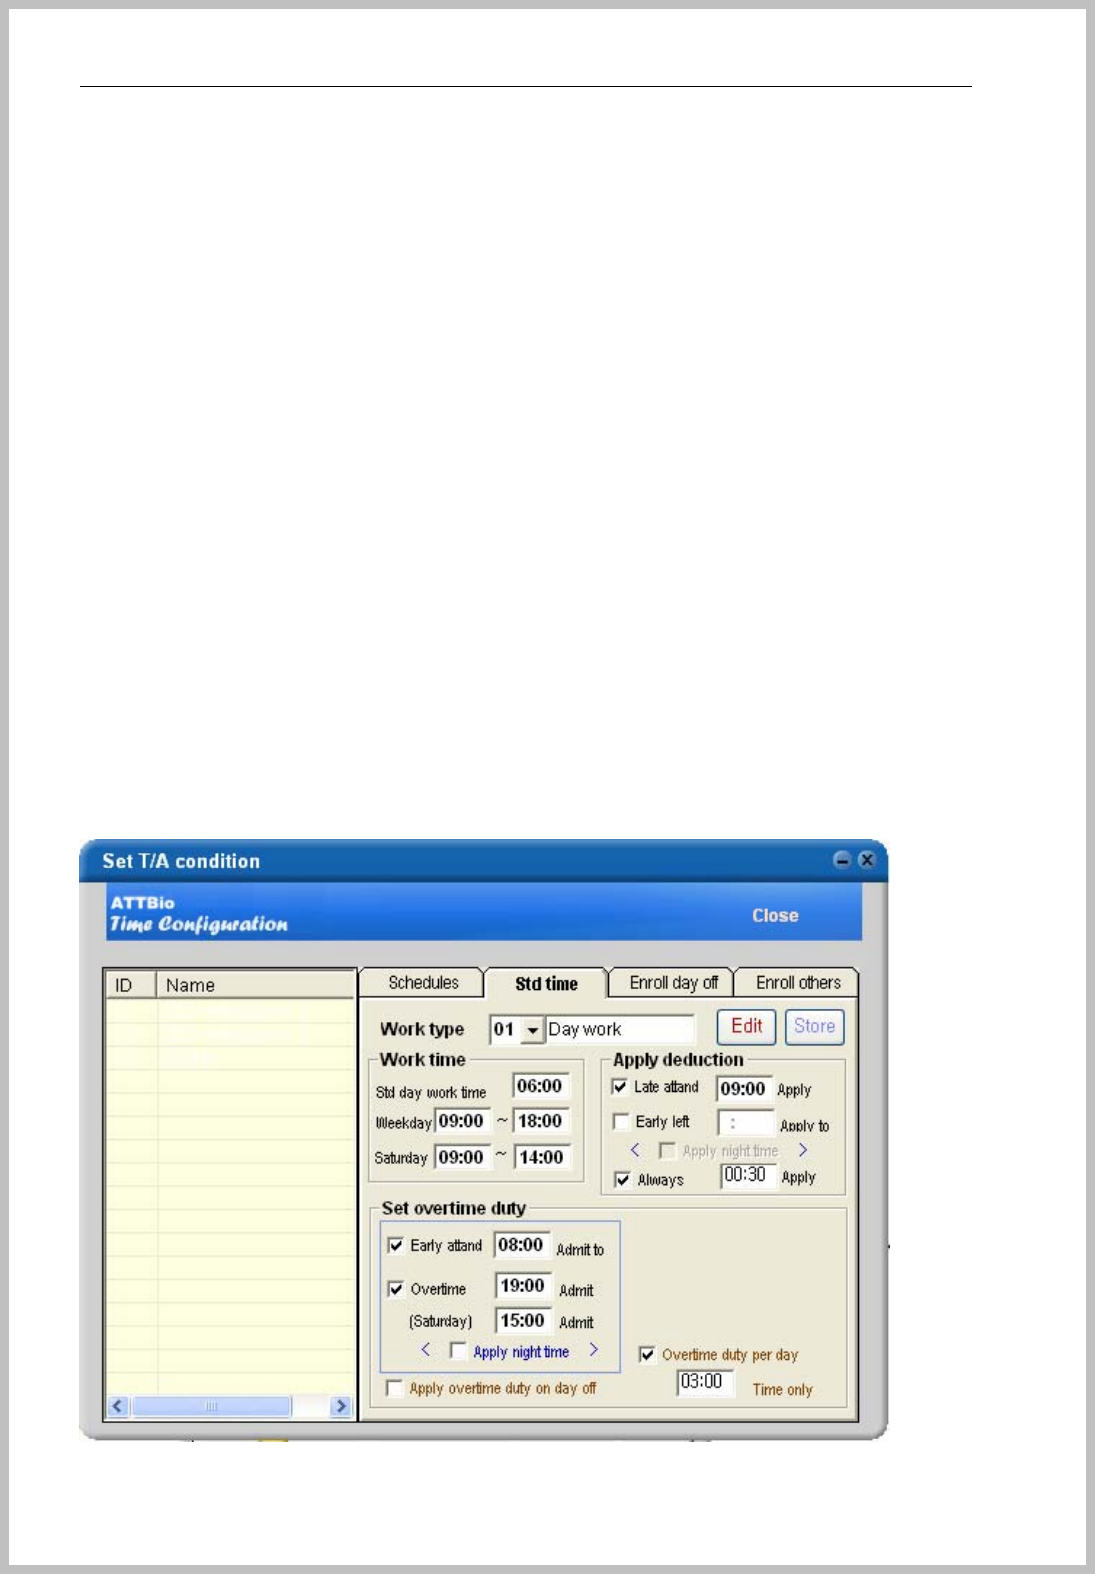
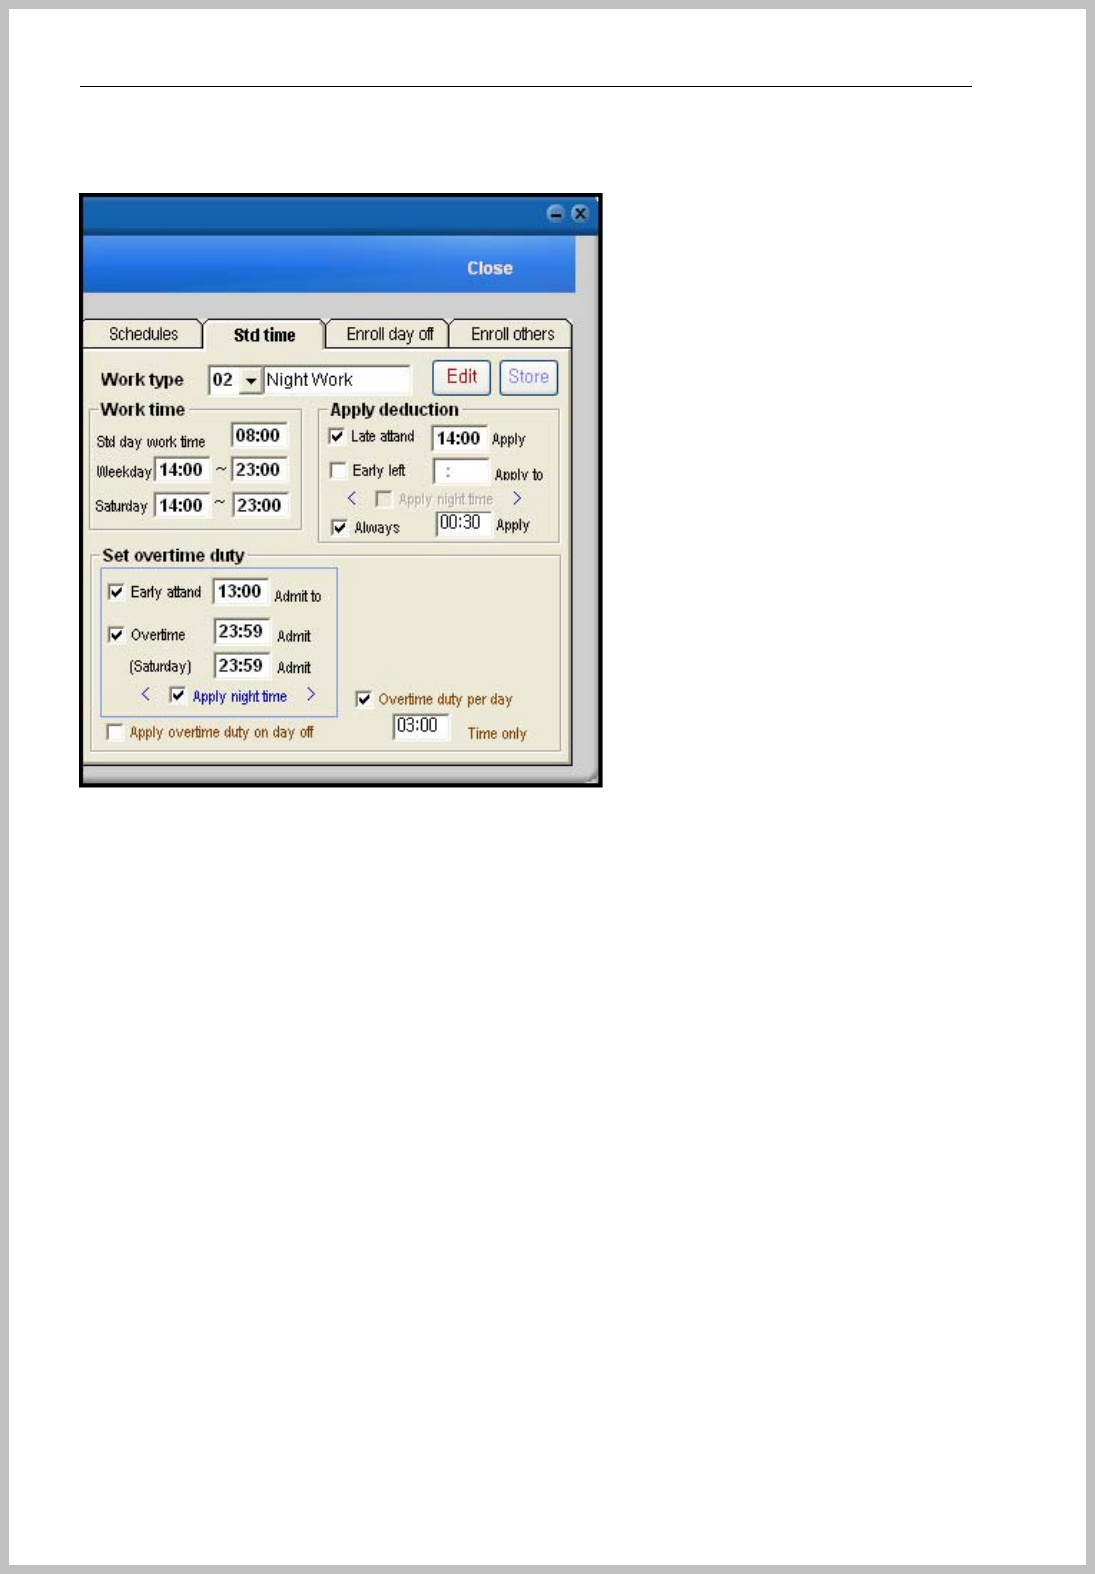
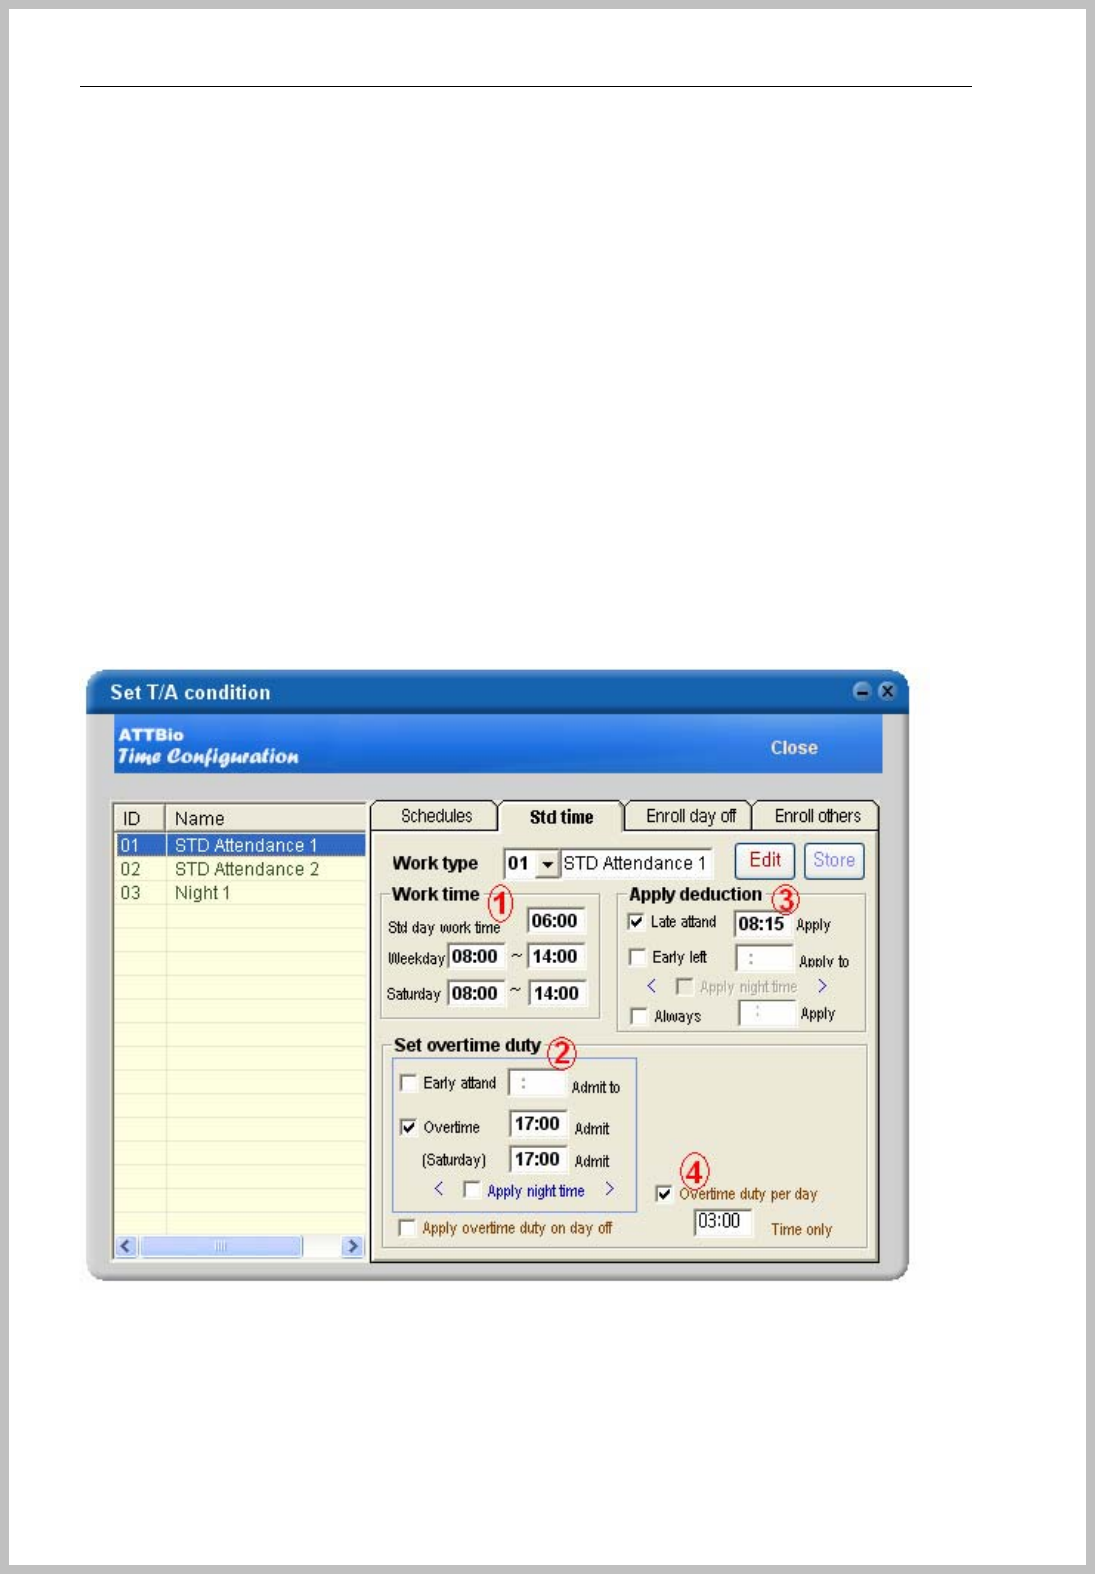
9.2.2Standard time
Standard time is set 24 hours from input time. For example, when input 20:00, it calculates
20:00~19:59(Next day) is one day for night workers.
z Input name of work type
z Input standard time and settled work time.
z Set overtime duty and if work time is belong 2 days, please check “Apply night time”.
z Apply overtime duty on day off : if works on Holiday, it becomes same as overtime duty.
z Overtime duty per day : if company policy has limited overtime a day, only input time can be
calculated for authorized overtime.
z Apply deduction : input late attend and Early left for minus of working time. If work time is
belong 2 days, please check “Apply night time”.
z If company policy has settled deduction time for purpose of lunch time, rest time etc.., input
time for minus.

Console Manager
- 84 -
Work type : Divide working group by different time schedule.
① Work time
z Std day work time – for example, working time is 20:00 ~ next day 05:00, normally it
divided 2 days. But when Std day work time is set as 19:00, one day is from 19:00~18:59.
This is for normally use for night worker over two days.
z Weekday – this is for working time
z Saturday – this is for working time on Saturday only.
② Set overtime duty
z Early attend – For example, working time starts 08:00 and set Early attend 07:00. if
worker starts work from 06:00, company accept overtime. If worker starts work from 20:10,
company don’t accept overtime as the applied over time is earlier than 20:00.
z Overtime – For example, working time finishes 06:00 and set Over time 07:00. If worker
does till 08:00, company accepts the overtime for two hours. If worker finishes at 06:30,
company don’t accept overtime as the applied over time is later than 07:00.
z Apply night time – Do not check it for normal working time, Please check the next page for
the detail description.
z Apply overtime duty on day off : If company applies overtime for work on Holiday, check
it.
③ Apply deduction
z Apply deduction : this is minus of working time.
z Late attend – For example, work starts 21:00, and set late attend as 21:30. A worker starts
work from 21:45, it marks to late attendance and minus from work time
z Early left –For example, work finish 07:00, and set Early left as 06:30, A worker leaves
earlier than 06:30, it marks to early left and minus from work time
z Apply night time – it must check for over two days night time working type. If not, it doesn’t
apply to one day.
z Always – If company wants to minus appointed time, ( this is special function and normally
use for government employee ) check and input time to be deduction. For example,
company input 01:00 Applied and the total working time is 10 hours. T&A data calculates
working time is 9 hours for the deduction function.

Console Manager
- 85 -
④ Apply deduction
z Overtime duty per day : If company has a rule of the limited overtime, please check it. For
example A company only accept 4 hours overtime per day Even though A worker did 5
hours overtime, the T&A data is calculated only 4 hours overtime.
Console Manager
- 86 -
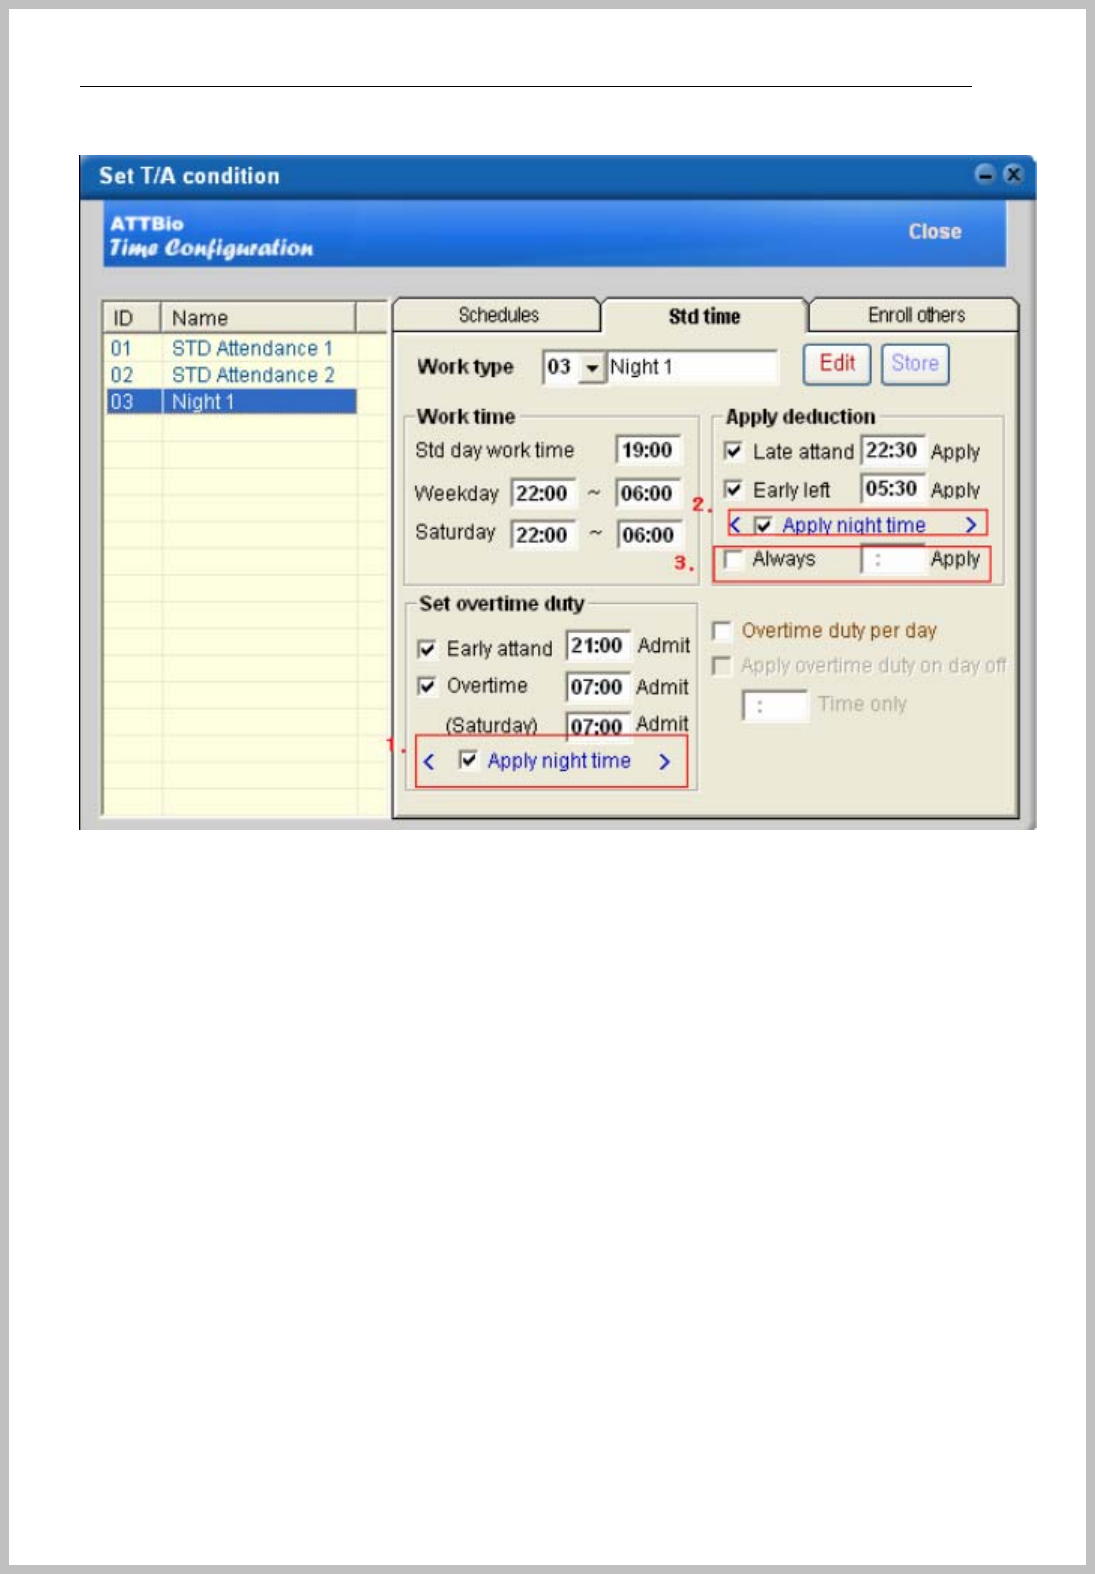
1. Apply night time
Working time : 22:00 ~ 06:00
Over time : From 07:00
When working time over the 24 hours like above time setting, Check “Apply night time”.
2. Apply night time
Working time : 22:00 ~ 06:00
Over time : From 07:00
When working time over the 24 hours like above time setting, Check “Apply night time”.
3. Always
If the company has special deduction time on working time like lunch time, break time etc.,
Check it and input the deduction time from the total working time.

Console Manager
- 87 -
For example
Always : 00:30
Total working time ( including overtime ) : 09:00
Calculated working time : 08:30
So this function is used for special company payment policy.
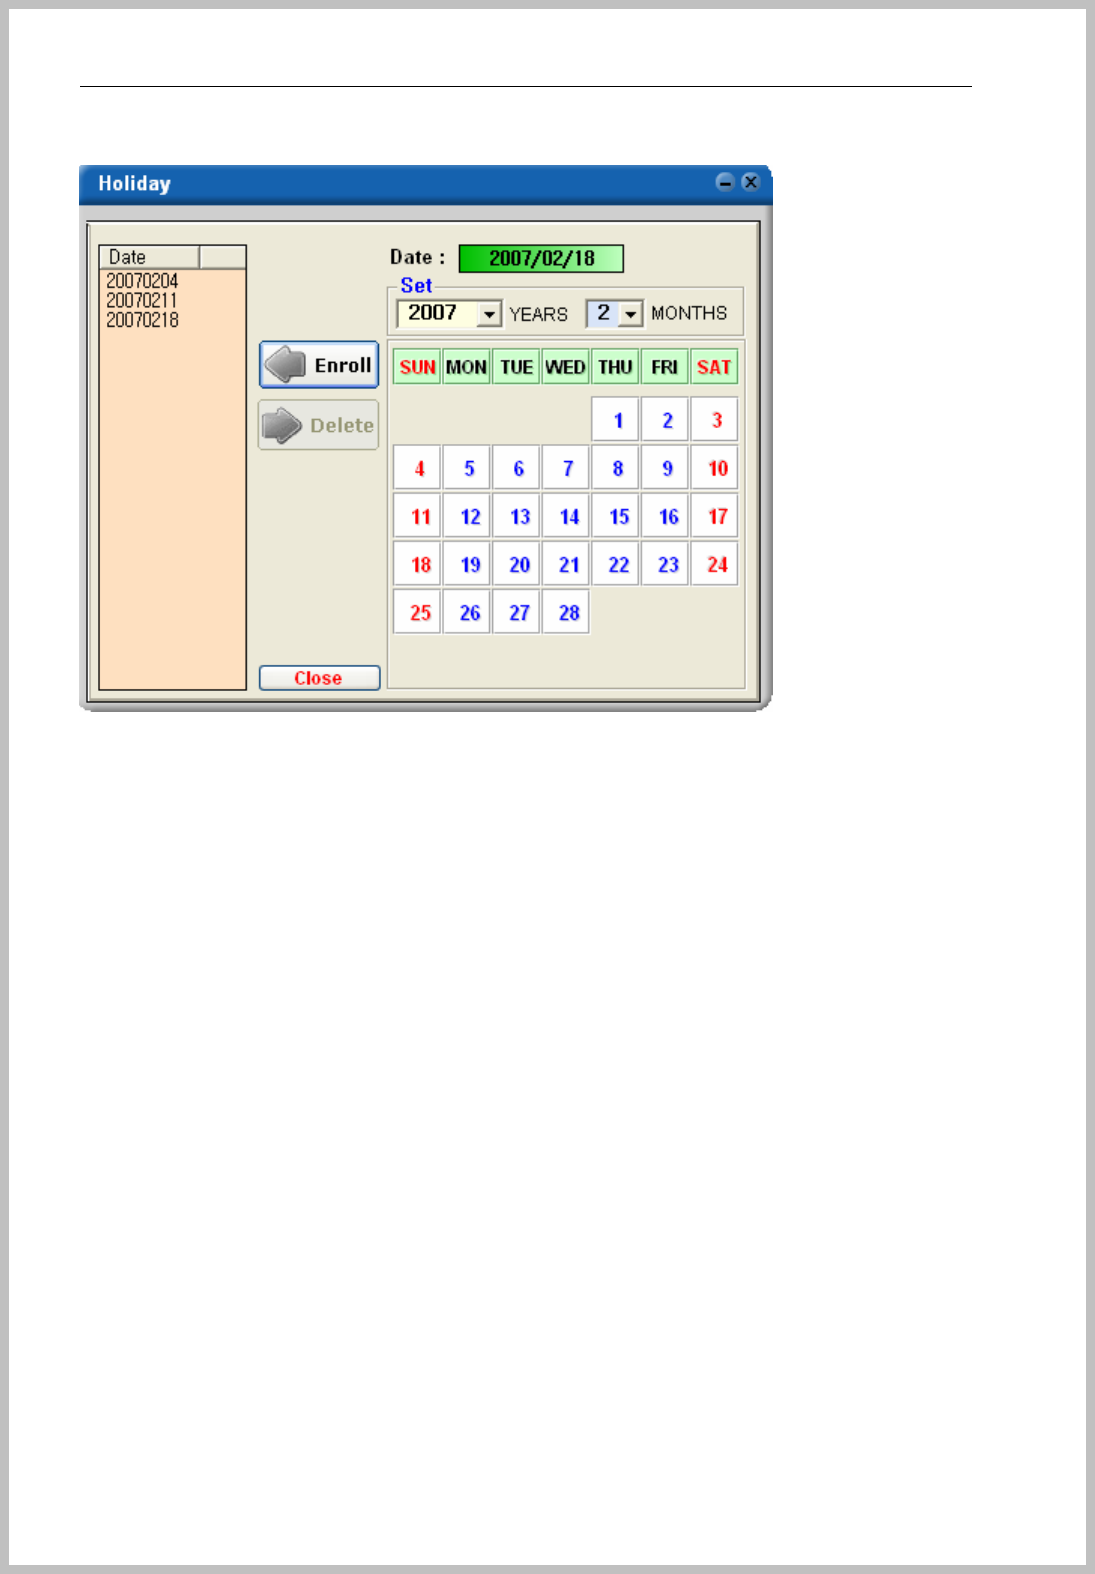
9.2.3 Holiday
Please enroll Holiday separately to Schedule Holiday.
Schedule Holiday and T&A Holiday have no connection, please enroll it by purpose.
Console Manager
- 88 -
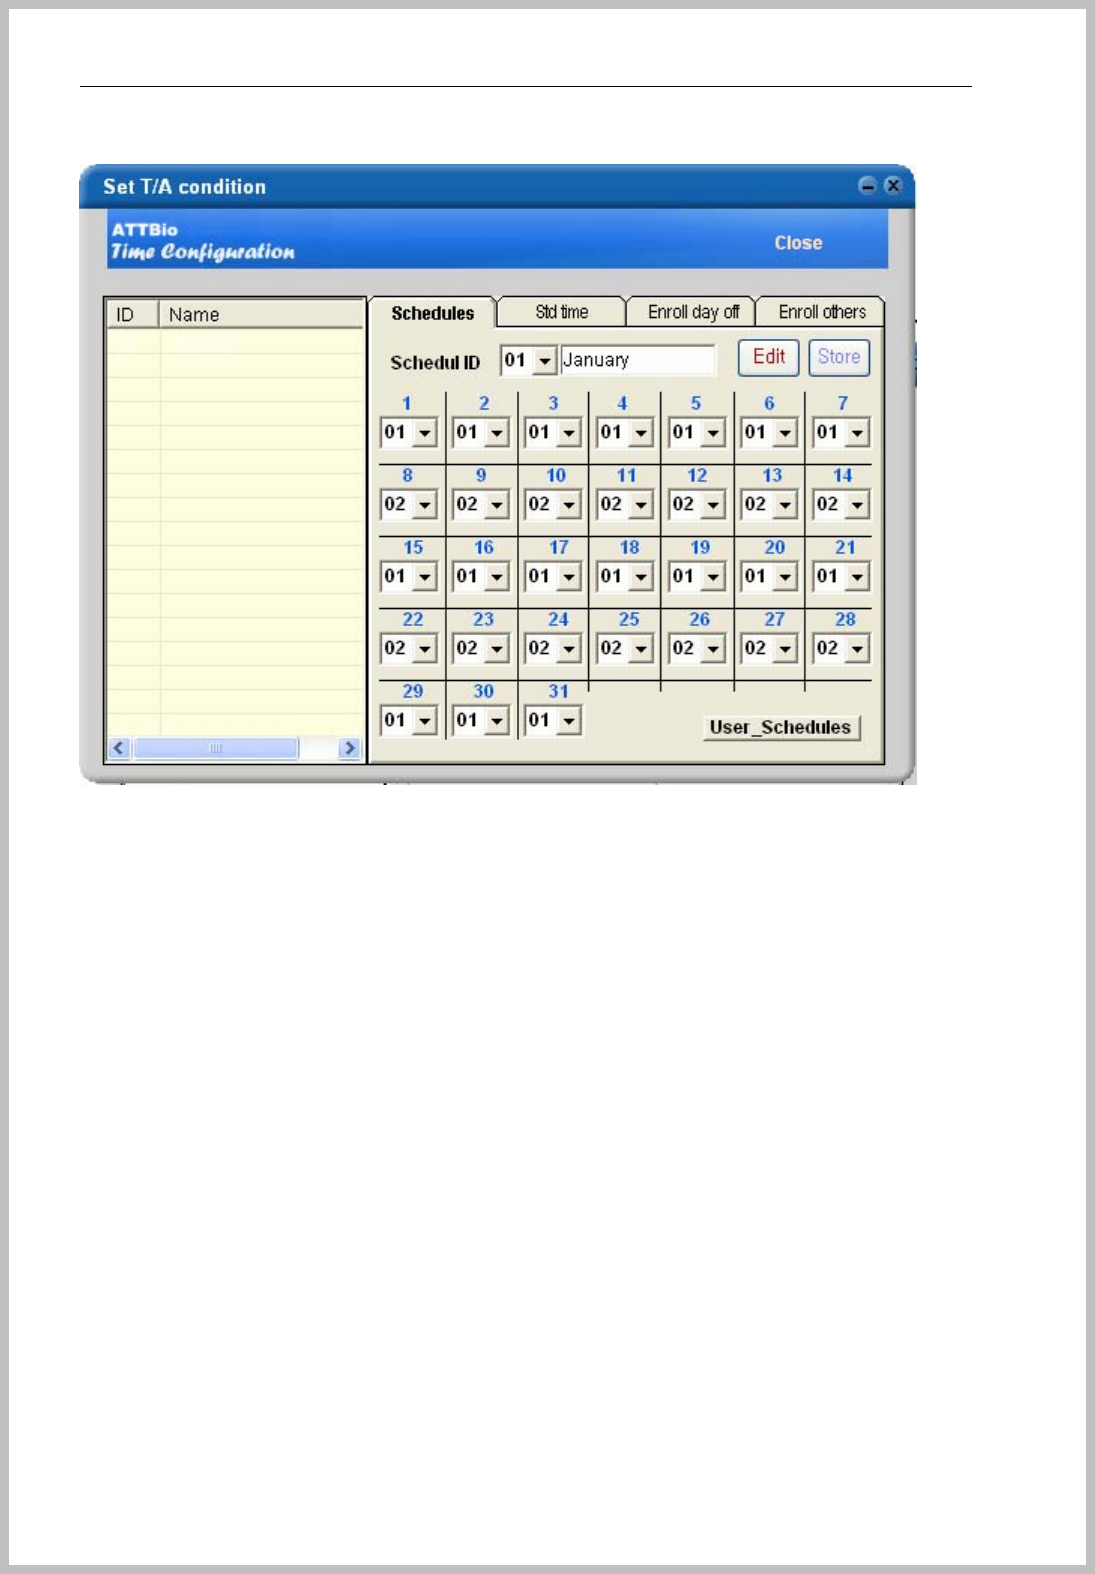
9.2.3Schedule
Manage monthly T&A schedule selected by “Work Type” ID listed on scroll menu.
9.2.4Enroll others
Temporary worker position and set trans-out depart.
Temporary worker : If company policy has special condition for temporary workers as limit overtime,
please input the condition.
Transferred to other department : It should set Trans-out Department for keeping previous record.
Without it, previous record before moving out will be deleted.
When department movement happens, please give another User ID for preventing from confusion.
For making this group, please see the 4.2 Enroll group (P17).
* All time is set as “ yyyy-MM-dd “. For using T&A software, you must change the
date type on PC and then operate transform data in next step.
Console Manager
- 89 -
Enrolled Work type Number can apply when user enrollment to select suitable Work type No.
When transform to T/A data, the user is calculated automatically by condition of Work type
you set. If it’s not selected, T&A data can’t be applied.
Console Manager
- 90 -
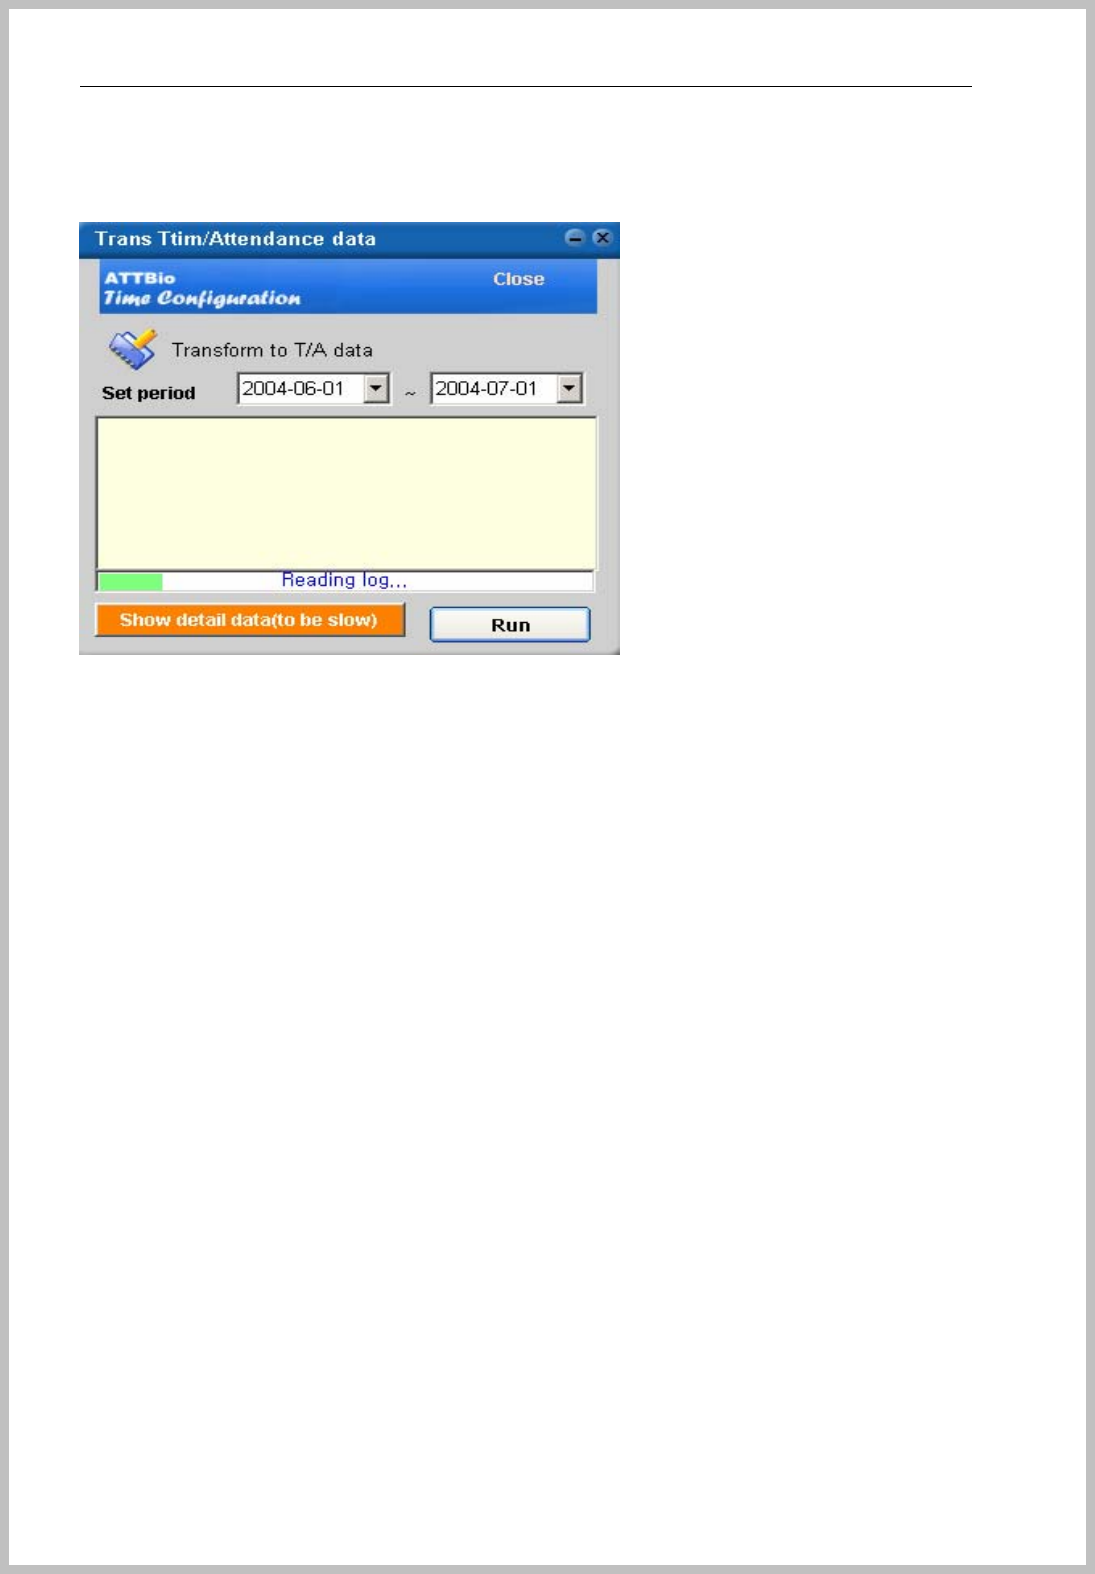
9.3Trans T&A data
After saving all T&A condition, push “Trans T/A data”. Select period and push “ Run” button.
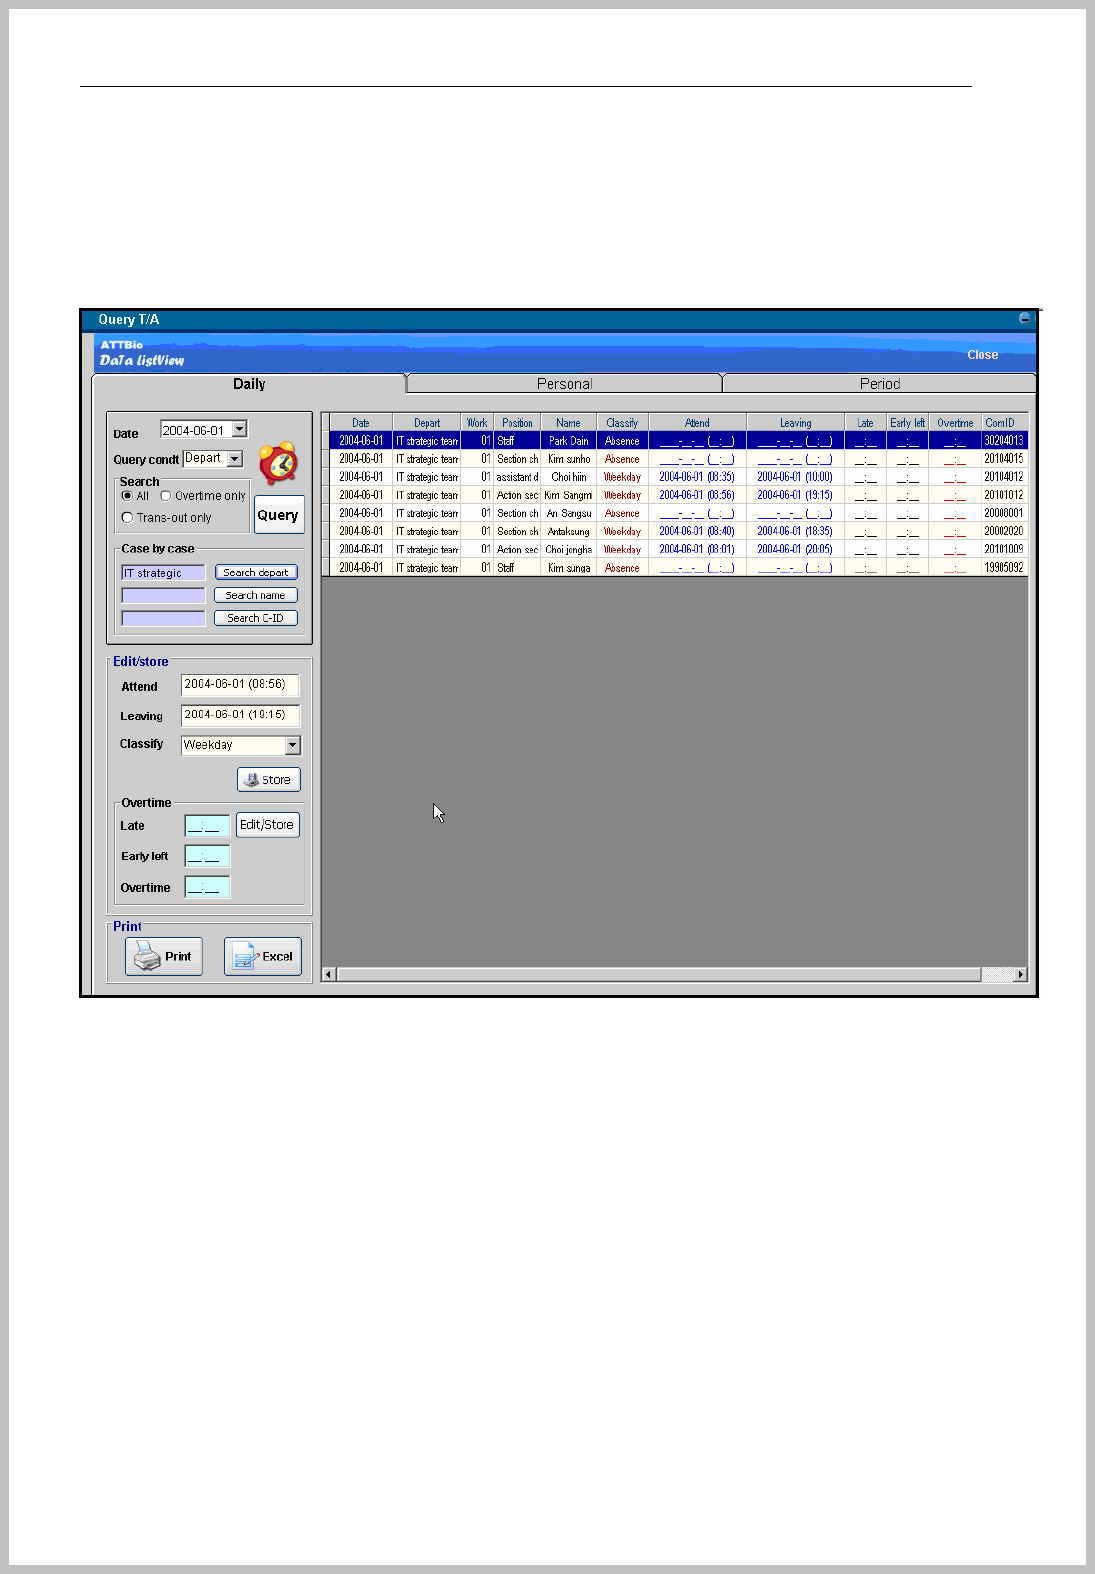
9.4Query T&A
It can be shown by Daily, personal and Period condition.
Console Manager
- 91 -
9.4.1Daily
After input query date and sub conditions, queried data appears.
It’s possible to Edit, transform to Excel and Print out.
* Edit/Store section
Administrator can be edited the data by “Edit/Store section” and then click the ”Store” button for
saving.
Console Manager
- 92 -
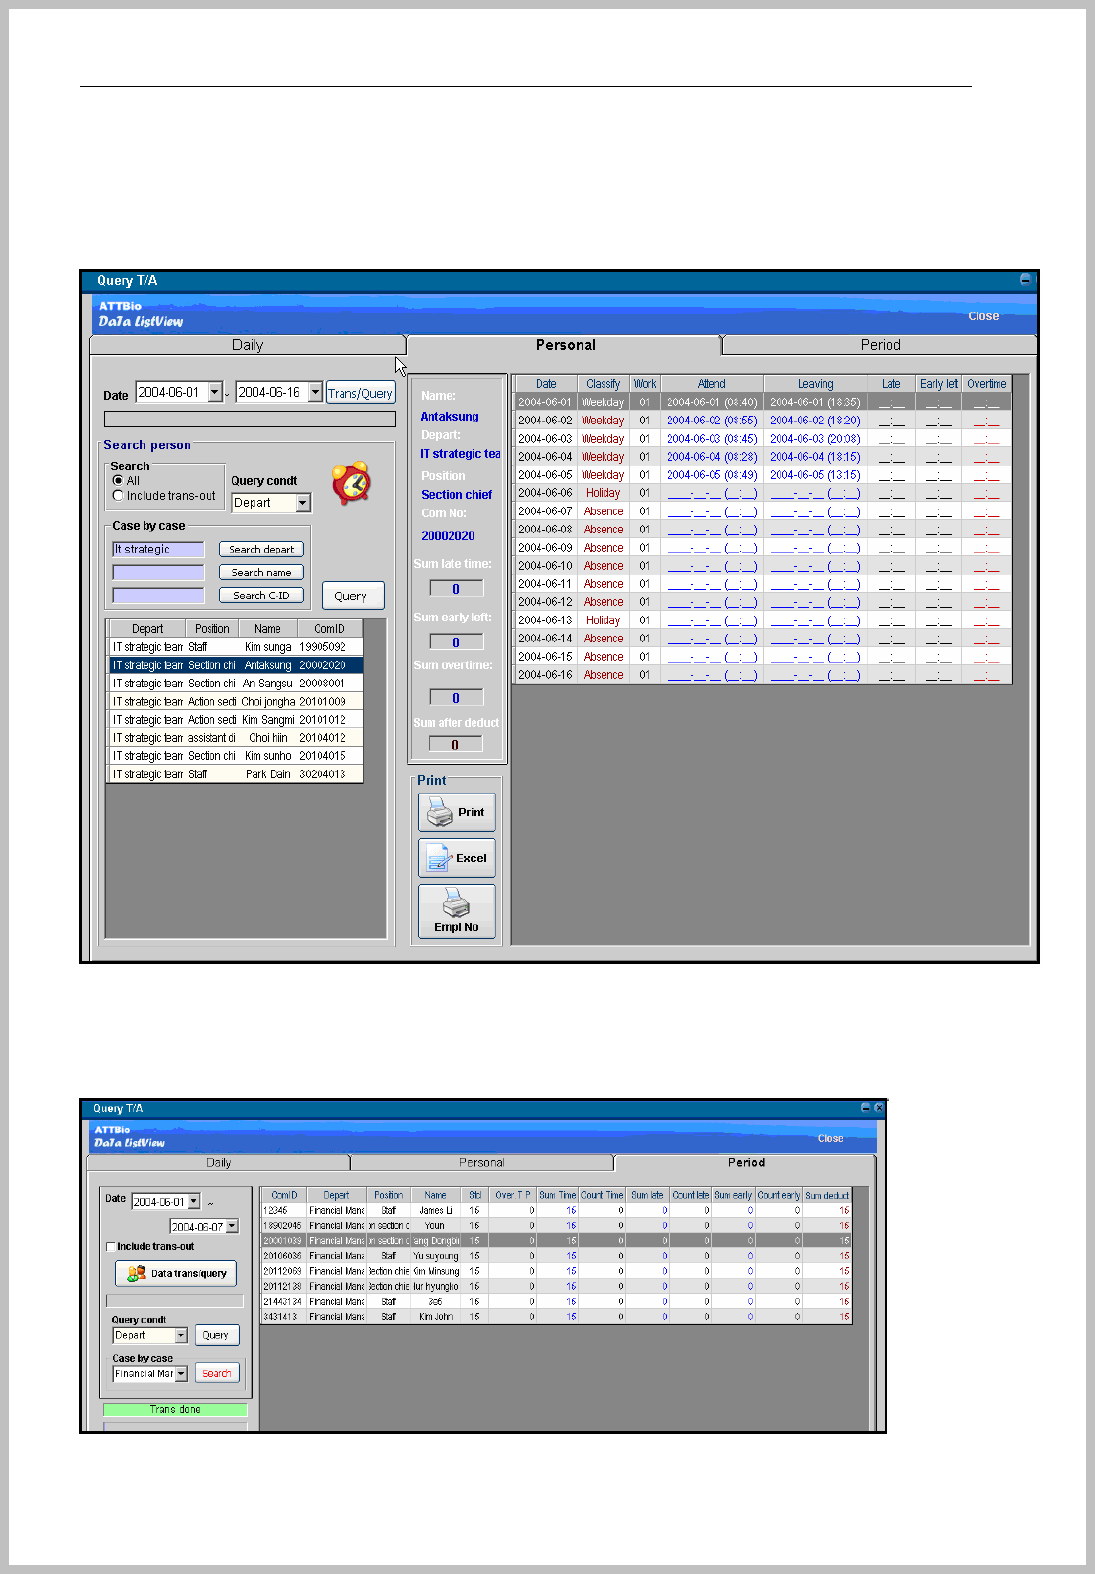
9.4.2Personal
After input query date and sub conditions, personal queried data appears.
It’s possible to Edit, transform to Excel and Print out.
9.4.3Period
After input query date and sub conditions, queried data appears.
It’s possible to Edit, transform to Excel and Print out.
Console Manager
- 93 -
10. Other function
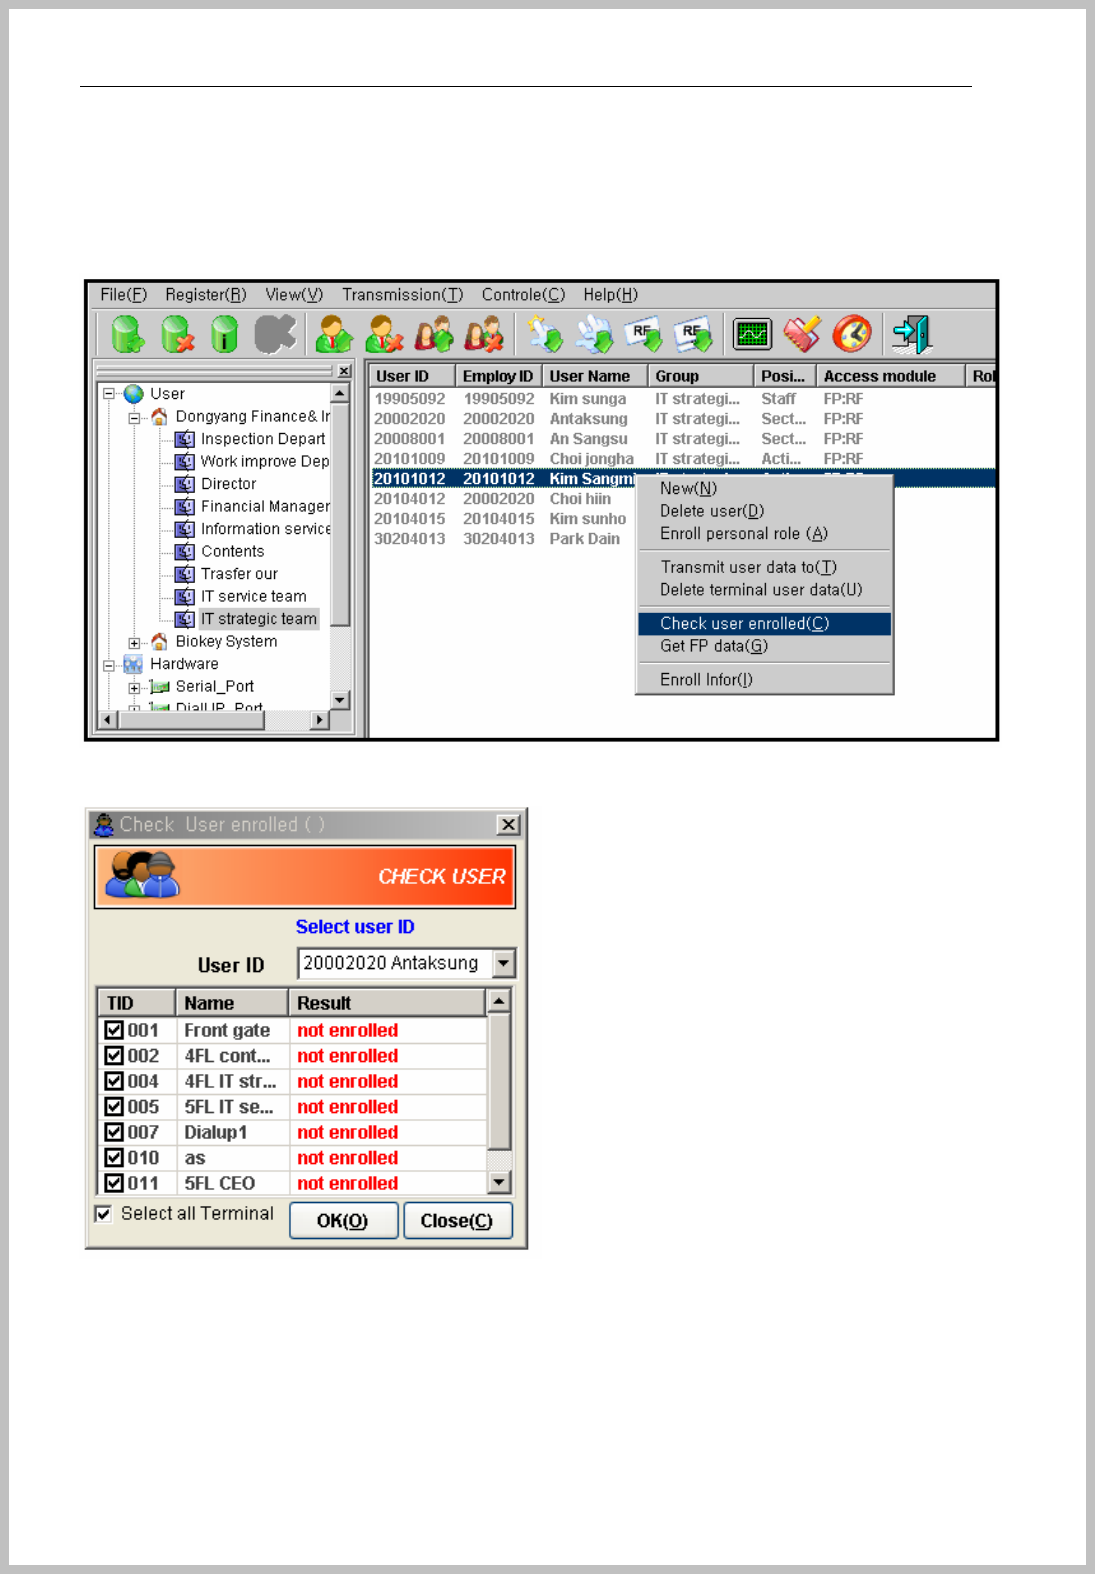
10.1Check enrolled user of terminal
Click the mouse of right button at the position of below image.
After select terminal, push “OK” button and enrollment status appears.
Console Manager
- 94 -
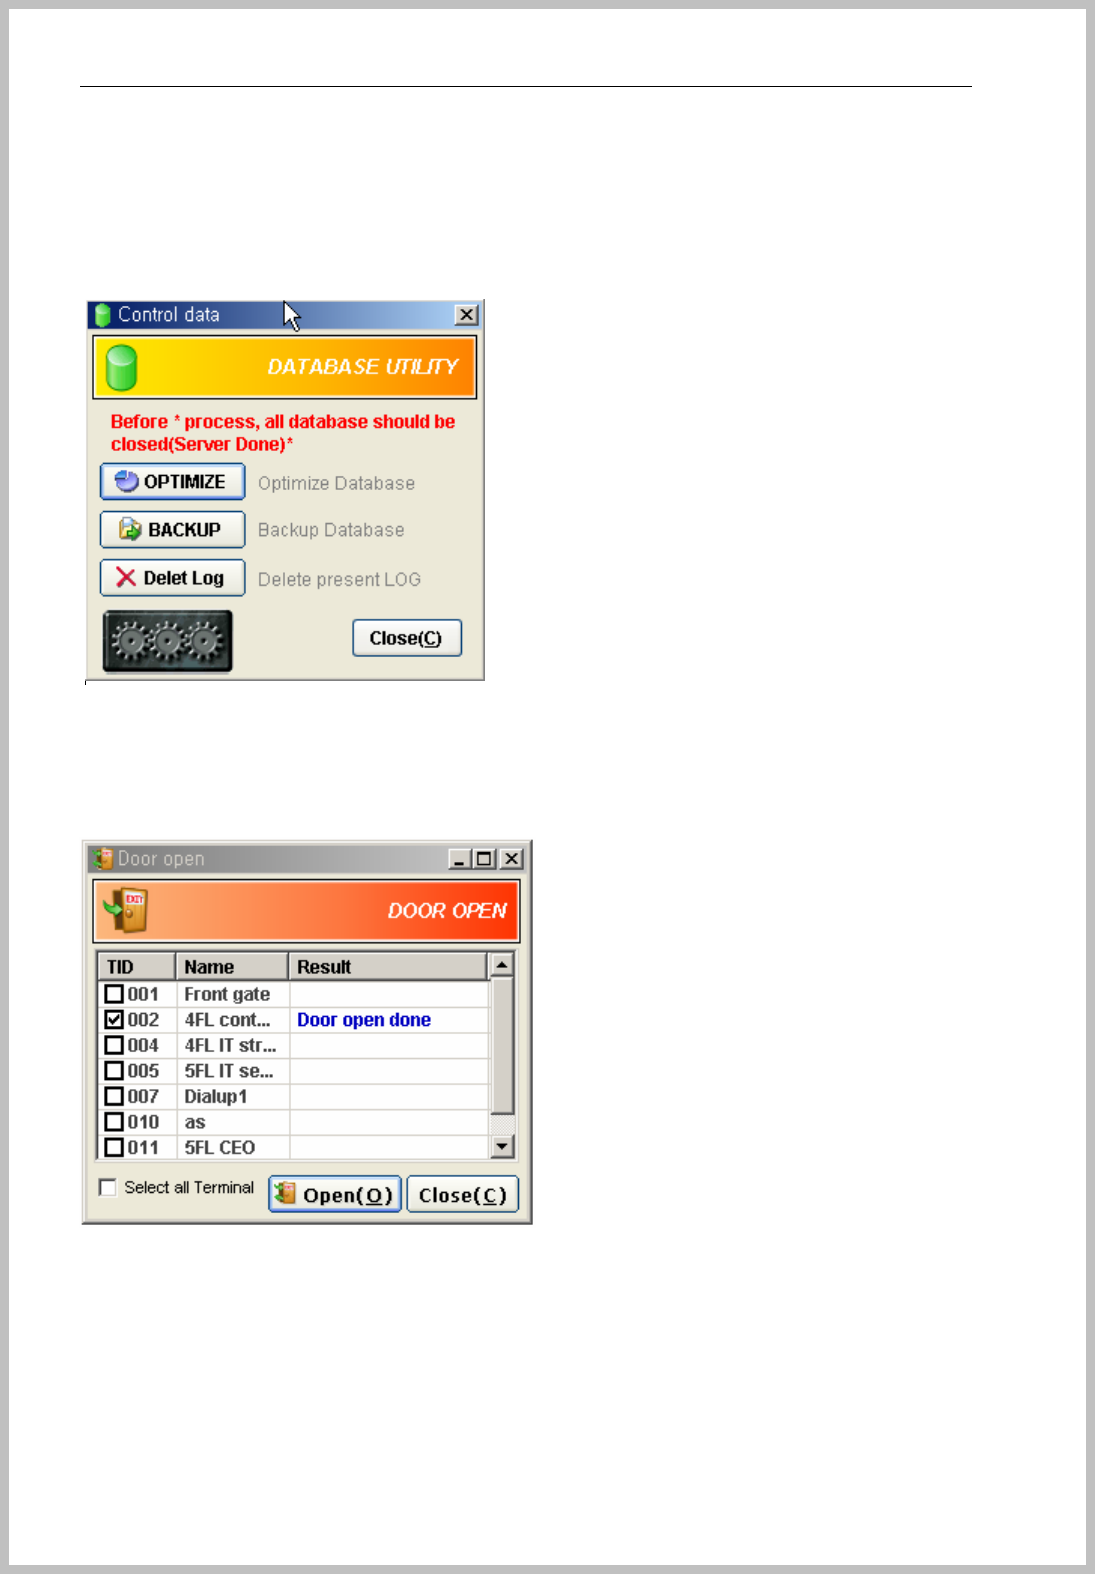
10.2 Database Utility
This is for optimize database or backup when database files up.
Go to at stage of (Menu bar=> File=> Database=> Data utility).
Before process, all run operation should be closed.
.
10.3 Door open
When visitor call, select the terminal to be opened and push “Open” button.
Go to the stage of (Menu bar=> Control=> Door open)
Console Manager
- 95 -
10.4 Change window structure
For change main window structure of Console Manager, double click the outline of window and it
separated.
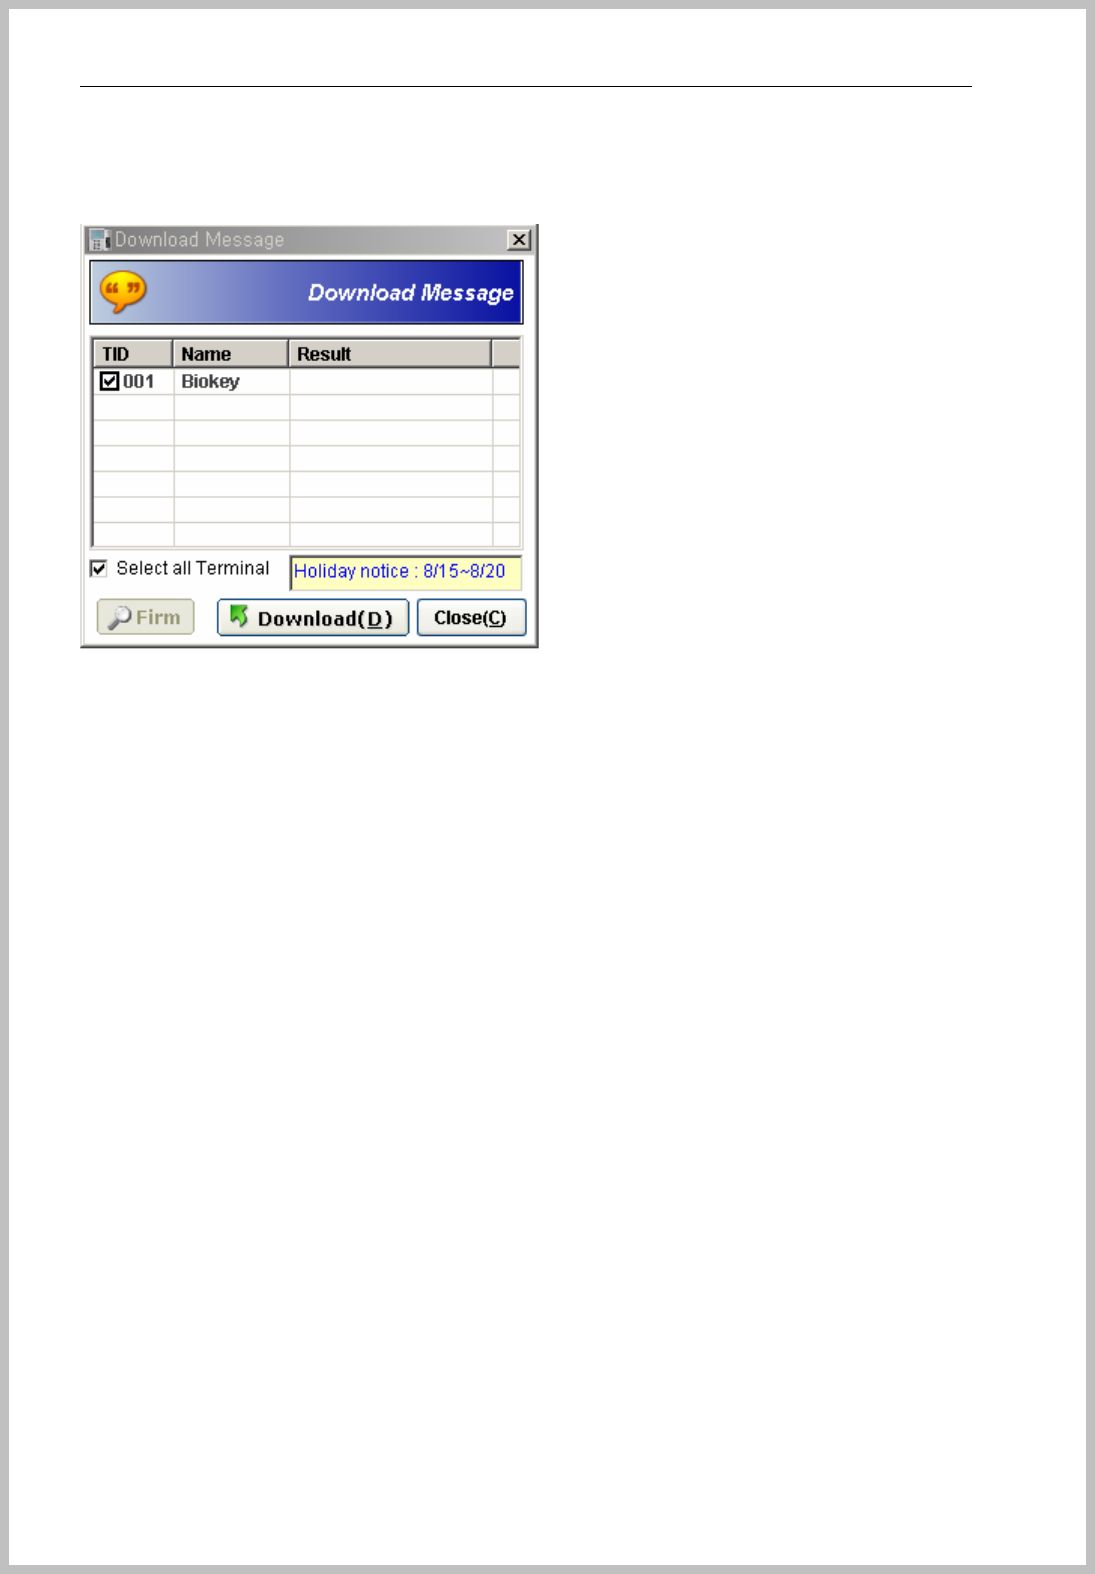
10.5 Sliding Message on LCD
This method is for input sliding message as you want to display. It can input to 150 characters only.
Go to Transmission => Download Message => New window appears.
Console Manager
- 96 -
Input message in yellow table within 150 letters. Select terminal and click Download button.
When you reset or power off of terminal, the message is deleted.

Console Manager
- 97 -
Nov. - 2007

Console Manager
- 98 -
Table of Contents
5 Introduction--------------------------------------------------------------------------------------------------
4 -
6 Feature-------------------------------------------------------------------------------------------------------
-- 4 -
6.4 Characteristics - 4 -
2.1.5 Level up the security reliability - 4 -
2.1.6 Reliable and stable algorithm - 5 -
2.1.7 Entrance security - 5 -
2.1.8 Function keys and log records - 8 -
2.1.9 Low system maintenance cost - 102 -
2.1.10 Control the large number of terminal by one system - 102 -
6.5 Support functions - 9 -
6.6 Specification - 16 -
6.6.1 LCD Display - 104 -
6.6.2 Keypad Instruction - 105 -
7 Registration, Edition, Deletion-----------------------------------------------------------------------
-- 17 -
3.2 How to register - 17 -
3.3.1 Fingerprint registration - 106 -
3.3.2 EM TYPECard registration - 106 -
3.3.3 Password registration - 107 -
3.3.4 EM TYPECard + Fingerprint - 108 -
3.3.5 EM TYPEcard + Password - 108 -
3.3.6 Selective authentication method - 109 -
3.3.7 Set personal security level - 109 -
3.4 How to edit - 18 -
3.4.1 Search for editorial ID - 109 -
3.4.2 Change to authentication method - 110 -
3.5 How to delete - 36 -
3.5.1 Delete user - 110 -
3.5.2 Delete All - 111 -
8 Use & Authentication method--------------------------------------------------------------------------

Console Manager
- 99 -
37 -
5.5 Fingerprint user - 37 -
5.6 EM TYPEcard user - 38 -
5.7 Password user - 39 -
5.8 EM TYPEcard + Fingerprint, EM TYPEcard + Password user - 40 -
5.9 Selectable authentication method user - 113 -
6 Free scan and Grouping --------------------------------------------------------------------------------
45 -
6.5 Free scan authentication - 55 -
6.6 Grouping - 59 -
7 Terminal registration--------------------------------------------------------------------------------------
63 -
7.2 Setting the terminal ID - 63 -
7.3 Setting network mode upon transmission methods- 114 -
7.3.1 Serial, Dial-Up - 114 -
7.3.2 Dial-Up - 115 -
7.3.3 TCP/IP - 115 -
7.4 Setting date and time - 3 -
8 The other functions----------------------------------------------------------------------------------------
66 -
7.1 setting security level - 117 -
7.2 Tunes locking time of door - 117 -
7.3 Checks all registered user - 118 -
7.4 Checks all registered ID - 118 -
7.5 Change administrator password - 118 -
7.6 Change administrator fingerprint - 118 -
7.7 Description of button - 119 -
7.8 Change operations of authentication methods - 119 -
7.9 Set LCD Back light time - 119 -
7.10 Exposure - 120 -
7.11 LCD contrast - 121 -
7.12 LCD brightness - 121 -
7.13 Time & Attendance setting - 122 -
7.14 Mask Event & Delete Event - 124 -
8 Tips on cautions use------------------------------------------------------------------------- 67 -
8.1 First setting in initial use - 69 -

Console Manager
- 100 -
8.2 Incase of fingerprint hard to be processed - 70 -
8.3 Reset BKS-4800 and back to setting status before latest trial - 125 -
8.4 Right fingerprint registration position - 125 -
9 Specifications-----------------------------------------------------------------------------------------------
- 72 -
8.3 Configuration - 72 -
8.4 Power - 78 -
8.5 Environment - 90 -
8.6 Communication Interface - 90 -
8.7 Relay - 126 -
8.8 Fingerprint storage - 127 -
8.9 Log records - 127 -
8.10 Dimension - 127 -
8.11 Weight - 127 -
8.12 Authentication speed - 127 -
8.13 FRR(fault rejection rate) - 127 -
8.14 FAR(fault acceptance rate) - 127 -
8.15 Fingerprint data - 127 -
8.16 Sensor resolution - 127 -
10 Hardware(main board)------------------------------------------------------------------------------------
93 -
9.5 Connector description - 93 -
11 Application example--------------------------------------------------------------------------------------
131 -
10.6 Standalone - 131 -
10.7 PC-RS232 - 134 -
10.8 PC-TCP/IP - 137 -
10.9 PC-RS485 140
10.10
PC-Modem 144
10.11
EM TYPEModule connection 144

Console Manager
- 101 -
About BKS-4800 Series
Creative Vision Electronics’ 3rd generation biometric Access control system, the BKS-4800, offers
superior technology with a competitive price point. The BKS-4800 can be installed as pure
standalone or IP integrated system. The simplicity of working inside today’s standards of IP
connectivity and Microsoft Access as the database give you and your installation an advanced
security product that is easy to manage.
BKS-4800 provides an ultimate biometric access control solution for an employer, whose main
concern is to controlling of any unauthorized personnel’s entry to a secured area and to
automatically manage employees’ access activities (ins & outs of certain premises) as well as other
payroll-related information for any hourly employee (absences, late for work, lunch hour, holidays,
overtime, special holidays work, etc.). BKS-4800, the fingerprint solution, can eliminate the current
problems of EM TYPEcards and keypad access control systems, which are prone to a several
security breaches (card duplication, loss of card, sharing of card or password).
BKS-4800 relies on a new optical sensor which enables us to decrease the cost of BKS-4800 as well
as to allow the unit to be more accurate and reliable. BKS-4800 supports various I/O protocols and is
an optimal solution for managing access-controlled points. With 128 X 64 pixels blue LCD screen, 12
regular keys and 5 special function keys, make BKS-4800 more user-friendly than our competitors’
products. Communication are based on TCP/IP, RS232, RS485, 1 relay signal and 1 external sensor
inputs.
5. Features
Characteristics
Level up the security reliability
Existing security measures such as security card systems and keypad systems are prone to breach
by unauthorized persons through card-duplication or disclosure of set security code. Fingerprint ID
system can truly restrict security access only to those authorized persons.
Reliable and stable algorithm
BIOINSEC utilizes its own proprietary algorithm with an outstanding match process and security.

Console Manager
- 102 -
Entrance security : Access control, time & attendance, over-time management and other
applications
Fingerprint ID system allows for management of entrance security, work place time and attendance,
and over-time work. Also, situations that require the presence of the authorized persons at a secured
point can take advantage of our fingerprint ID system.
Function keys and log records.
Four programmable function keys may be used to manage time and attendance. A single terminal
can be adapted to manage many different kinds of work involving site security control and time and
attendance.
Low system maintenance cost
Existing ID cards require new issuance of cards with addition of new users and loss of cards. This
becomes unnecessary with fingerprint ID system. System maintenance cost can be lowered to
negligible levels when compared to other solutions.
Control the large number of terminal by one system.
Our fingerprint ID system module may be used as stand-alone units to control entrance traffic or in
multiple module configurations utilizing TCP/IP/RS232/RS485/Modem protocol to connect with
server. Also, direct connection to program wants to use through bundled SDK. Because BKS-4800
module contain RTC and log management capabilities (up to 10,000 records), entrance security and
other event management are possible without an ACU.
Support functions
- User management
Register a user(RF, fingerprint, password)
Delete a user or all users
Query about registered user number( Console Manager )
Query about maximum registerable user number
Query about ID allocation( Console Manager )
Set a user’s time zone
View or receive registered ID list( Console Manager )

Console Manager
- 103 -
Transmit user’s data in the terminal( Console Manager )
- System management
Configure and read terminal’s time and date
Change and read security level
Change Terminal ID
Configure communication mode(TCP/IP, Serial, Dial-up)
Serial - Change communication speed
Receive firmware version( Console Manager )
Change lock operating time
Disable/enable free scan mode
- Door mode
Configure and read door mode (normal/ forced open/ forced close) and time( Console
Manager )
- Log
Transmit the log record to server in real-time ( Console Manager )
Log data contains the function key, entrance time, user ID( Console Manager )
Query log count( Console Manager )
Delete all log( Console Manager )
- Authentication
Authentication at the terminal( 1 : 1, 1 : N )
Various authentication methods(RF, Password, Fingerprint, RF+FP, RF+PIN)
- Auxiliary function
Exit button
Relay out(Lock driver)
Transmit the case status
Support voice message
Transmit door switch status
Visible a condition of relay icon
Visible a condition of Network icon
Console Manager
- 104 -
Specification
Model number
Model Description
BKS-4800 Fingerprint Access Control and Time/Attendance Management
Terminal
BKS-4800M Fingerprint Access Control with Mifare card(13.56Mhz) and
Time/Attendance Management Terminal
BKS-4800E Fingerprint Access Control with EM card(125Khz) and
Time/Attendance Management Terminal
Common Specification
Features Specification
CPU Samsung ARM9 32bit Micro processor
Memory SDROM 128Mb, NAND FROM 64Mb
LCD 128 x 64 pixels, Blue LED 4lines
Sensor Optic, 500 DPI
1:1 matching Speed: Less than 1 sec
Storage : 5,000 User (Finger+RF+PW)
1:N
matching(freescan)
Speed : Less than 2.5 sec
Storage : 1,000 User (Finger+RF+PW)
Size (H)95mm X (L)300mm X (D)35mm
Fingerprint Data Size
512 Byte
Power DC 12V (provided)
IN/OUT Port Exit S/W, Door open sensor, Lock controller
Protocol TCP/IP(10/100BT), Serial (RS232, RS485), Dial-Up
Language/Voice English
Option Mifare Card, EM Card
LCD display
●Function Key : F1, F2, F3, F4
●Door Status : =>Door closed =>Door opened
●Network Connection :
Console Manager
- 105 -
- TCP/IP : =>Connected =>Disconnected
- Serial : =>Connected =>Disconnected
- Dial-Up : =>Modem connected(ready to call)
=>Modem connection failed, Check the connection of the modem and
BKS-4800
=>calling
=>line is connected, Data transmission
Keypad Instruction
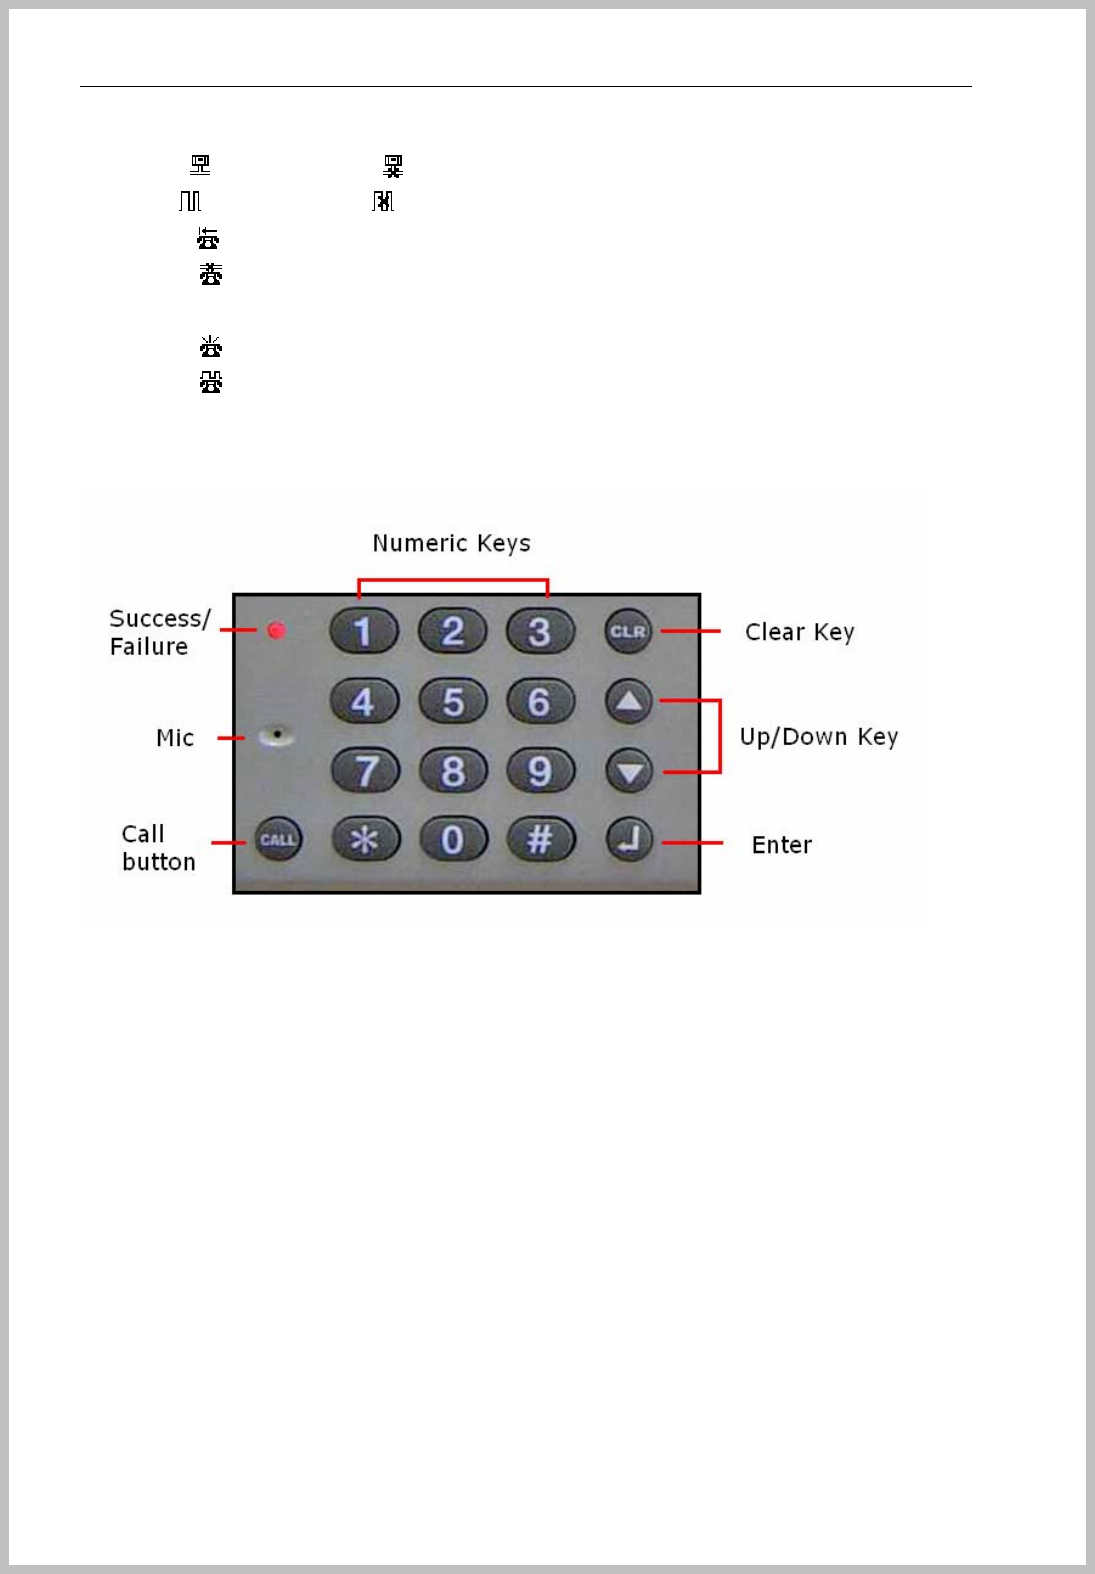
● Enter to Admin menu : 0 + <┘
Hardware Instruction
6. Registration, Edition, Deletion
How to register
Administrator menu allows new user registration, edition, deletion and system setup.
Press “Menu” button enters the administrator mode and press ‘1111’.
The initial system password is set as ‘1111’.
<Useful description of button>
Arrow key (▲ ▼) : curser scroll down or up
“<┘” button: confirm the selection mode and get into the lower menu stage and saved.
Console Manager
- 106 -
“CLR” button: move to the upper menu stage without saving.
“ * “ button : 1) in grouping mode to mark all figures in the other place of ID number, 2) browse all
user list 3) mark & delete check (√) and “.” When input IP address at network mode.
< How to enter Menu >
Push “0 ” and “<┘” button and input ‘1111’ as the initial set value.
First, follow the process “ 1.User => 1.New User ” and “Enter User ID:” message appears.
If entered ID is in use already, “User ID Overlapped” message appears.
Fingerprint registration
Fingerprint registration
For registering a fingerprint, place the finger on the red lighting sensor after push “3.FP1”.
The registration can be completely done as to press “1.Save & Exit” to save and back to upper menu
stage automatically.
If you want to improve the authentication rate or register another finger for convenience, push
“2.FP2” and keep the same process as “1.FP” registration.
EM TYPECard Registration (Optional function.)
First, select “5. Card” for EM TYPECard registration and “Touch Your Card” message appears.
After close EM TYPECard registered, disclose EM TYPECard after “buzzer” sound.
When “One More Time Please!” message appears, repeat again with same EM TYPEcard.
Enter Password :
****
Administration
1:User
2:Service
3:System
Place
Your Finger One More Time,
Please
1. Save & Exit
2. Access Mode
3. FP1*
4. FP2
5. Card
.▣Asterisk (‘*’) appears in the right of menu by saving.
1:New User
2:Edit User
3:Delete User
New User
ID : No. ID : No. ID : No.

Console Manager
- 107 -
Second, For run EM TYPEcard authentication, follow the process “ 2.Access Mode=>2.Card” with
tick mark(√) by pushing “*” button or corresponding number.
Back to upper menu stage for saving by pushing “1.Save & Exit”.
Password registration
First, select “3. PIN” for password registration and “Enter Password:” message appears.
Enter the 4~8 digit password to be registered.
When “One More Time Please!” message appears, repeat again with same password.
When the two entered passwords do not match, “Sorry! Data Mismatched” message is displayed.
After confirming the password, select “1.Save & Exit” to be successfully registered.
Second, For run the password authentication, follow the process “ 2.Access Mode=>3.PIN” with tick
mark(√) by pushing “*” button or number “3”.
Back to upper menu stage for saving by pushing “1.Save & Exit”.
□ 1. FP
▣ 2. Card
□ 3. PIN
□ 4. Card+FP
□ 5. Card+PIN
1. Save & Exit
2. Access Mode
3. FP1
4. FP2
5. Card
6. PIN
1. Save & Exit
2. Access Mode
3. FP1
4. FP2
5. Card*
6. PIN
Touch
Your Card
One More Time
Please!
1. Save & Exit
2. Access Mode
3. FP1
1. Save & Exit
2. Access Mode
3. FP1
4. FP2
5. Card
6. PIN*
Verify Password:
Enter Password :
ID : No. ID : No. ID : No.
ID : No. ID : No. ID : No.
ID : No. ID : No. ID : No.

Console Manager
- 108 -
Card +FP
It’s applied for the user wants to use EM TYPEcard instead of ID or the high security level as it must
be matched EM TYPEcard and Fingerprint together.
First, for registering a fingerprint and EM TYPEcard, select and register “3.FP1” and “5.Card” as the
same process of “3-1-1” “3-1-2”.
Second, For run the this authentication method, follow the process “ 2.Access Mode=>4.Card +FP”
with tick mark(√) by pushing “*” button or number “4”.
Back to upper menu stage for saving by pushing “1.Save & Exit”.
Card + Password
It’s applied for the user wants to use “EM TYPEcard instead of ID+ Password” or the high security
level as it must be matched EM TYPEcard and Password together.
First, for registering a fingerprint and Password, select and register “5.Card” and “6.PIN” as the same
process of “3-1-2” “3-1-3”.
Second, For run the this authentication method, follow the process “ 2.Access Mode=>5.Card +PIN”
with tick mark(√) by pushing “*” button or number “5”.
Back to upper menu stage for saving by pushing “1.Save & Exit”.
1 Save & Exit
2. Access Mode
3. FP1
4. FP2
5. Card
6. PIN
1. Save & Exit
2. Access Mode
3. FP1
4. FP2
5. Card
6. PIN*
1 Save & Exit
2. Access Mode
3. FP1
4. FP2
5. Card
6. PIN
1. Save & Exit
2. Access Mode
3. FP1*
4. FP2
5. Card*
6. PIN
□ 1. FP
□ 2. Card
▣ 3. PIN
□ 4. Card+FP
□ 5. Card+PIN
ID : No. ID : No. ID : No.
ID : No. ID : No. ID : No.
□ 1. FP
□ 2. Card
▣ 3. PIN
□ 4. Card+FP
□ 5. Card+PIN

Console Manager
- 109 -
Selective authentication method
If you want to choose one authentication method of all registered methods.
First, register all methods want to be used, and then
Select “2.Accss mode” and then choose required numbers with the tick mark(√).
Back to upper menu stage for saving by pushing “1.Save & Exit”.
Set Personal Security Level
If you want to set the security level by personal, please select level and then click “<┘” button
and “1.Save & Exit”
How to change authentication methods.
Search for ID of being amended.
For changing the authentication method, follow the process “ 1.User=>2.Edit User” and “Enter User
ID:” message appears. Please enter ID of being amended.
If user needs to search ID list, push “*” button for a while as for displaying all ID list and then choose
1 Save & Exit
2. Access Mode
3. FP1
4. FP2
5. Card
6. PIN
1. Save & Exit
2. Access Mode
3. FP1
4. FP2
5. Card*
6. PIN*
1. Save & Exit
2. Access Mode
3. FP1*
4. FP2*
5. Card*
6. PIN*
ID : No. ID : No. ID : No.
□ 1. FP
□ 2. Card
□ 3. PIN
□ 4. Card+FP
▣ 5. Card+PIN
ID : No. ID : No.
▣ 1. FP
□ 2. Card
▣ 3. PIN
□ 4. Card+FP
□ 5. Card+PIN
3 FP1
4 FP2
5 Card
6 PIN
7 Securi Level
Securi Level
ID : No.
⊙ 1. Normal
○ 2. High
○ 3. Very High
ID : No.
Securi Level

Console Manager
- 110 -
required ID. Please move curser by “ARROW” button for ID selecting, push “<┘” button to go edition
mode.
Change authentication methods
For change the authentication method, select “2.Edit” user of system initiates the edition process. If it
has additional methods, display check(√), otherwise, for not required method any longer, delete
check(√).
save and back to upper menu stage by pushing “<┘” button and select “1.Save & Exit” for saving.
User Deletion
Delete user
When enter ID required to delete, “Enter User ID:” message appears at the stage of “1.User =>
3.Delete User).
Enter User ID :
1. Save & Exit
2. Access Mode
3. FP1
4. FP2
.▣Tick mark (√) appears as to push “*” button or corresponding number.
1. Save & Exit
2. Access Mode
3. FP1
4. FP2
Administration
1:User
2:Service
3:System
1:New User
2:Edit User
3:Delete User
Edit User
Edit User
ID : No. ID : No. ID : No.
▣ 1. FP
□ 2. Card
▣ 3. PIN
□ 4. Card+FP
□ 5. Card+PIN
Enter User ID :
Administration
1:User
2:Service
3:System
1:New User
2:Edit User
3:Delete User
Delete User
Delete User

Console Manager
- 111 -
When “Verify User ID” message appears, input the same ID again to completely delete.
It’s matched, “OK! User deleted” message is displayed.
Delete all
For delete all input users, follow the process “1.User=>3.Delete User” and “ Enter User ID:” message
appears, push “*” button for a while till “All ** Users” message appears.
For completely deleting all registered users, select “1.Yes” and then “OK! All User Deleted” message
is displayed.
7. Use & Authentication method
Fingerprint User
Light on the sensor by pushing “<┘” button or keeping on the last ID number for a while after input
the user ID.
Place your finger on the finger sensor.
Success
Failure
OK!
User Deleted
Enter User ID :
3
Verify User ID:
3
OK!
All User Deleted
Enter User ID :
* All 50 Users
1.Yes 2.No
OK!
Access Granted
Enter User ID :
** Place Your
Finger
Delete User
Delete User
Delete User
Delete User Delete User Delete User
BKS-4800 BKS-4800 BKS-4800
Console Manager
- 112 -
When fail authentication, repeat one more time automatically.
Please try again with second failure message.
EM TYPECard User ( Do not need to input ID )
Close EM TYPEcard to the below of the fingerprint sensor.
Success
Failure
Password User
After input User ID, press “<┘” button or keep on the last number for a while.
Push password when “Enter Password:” message appears.
Success
Failure
Sorry!
Access Denied
Touch
Your Card
OK!
Access Granted
Sorry!
Access Denied
Enter Password:
Enter User ID :
** Place Your
Finger
Touch
Your Card
OK!
Access Granted
BKS-4800 BKS-4800 BKS-4800
BKS-4800 BKS-4800
BKS-4800
BKS-4800
BKS-4800
BKS-4800

Console Manager
- 113 -
When fail authentication, repeat one more time automatically.
Please try again with second failure message.
EM TYPECard + Fingerprint, EM TYPECard + Password User( Do not need to
input ID )
Apply for the place needs high security level.
Authenticate as the fingerprint and password is completely matched.
Selectable authentication method user
Select one authentication method of all registered methods. When one selected method is matched,
“OK! Access Granted” message” appears.
Ex) in case of Fingerprint & Password register
1. Input User ID
2. Apply fingerprint or Password
8. Free scan and Grouping
Free scan authentication
If number of user is less than 50 people, free scan authentication will be helpful to reduce one step of
ID input. Follow the process “ 2.service =>3.Free Scan” and select “ 1.Enable ” and save it by “<┘”
button.
For use of free scan, keep push “ * “ button for seconds until sensor emit light or push twice of “*
“ button and place your finger on sensor for authentication.
Grouping
Sorry!
Access Denied
1:User
2:Service
3:System
1. Unlock Time
2. Security Leve
3. Free Scan
4. Time & Attend
▣ 1. Enable
Service Free Scan Administration
Enter Password:
BKS-4800 BKS-4800

Console Manager
- 114 -
If number of user is more than 50 people, free scan authentication with grouping ID input will be
helpful to reduce touching time of long ID and can speed up system processing time effectively.
For use of free scan with grouping ID, input first figure number of user ID and keep push “ * “ button
for seconds until sensor emit light and place your finger on sensor for authentication.
User ID grouping process is as follows;
- If user has 12345678 ID with more than 50 people, when try “1” and “*” twice
- Basically processor count only all ID having “1” at first figure place among registered users.
- It means data loading burden on processor will be reduced to one tenth other than free scan.
- As like above wise, user can shorten a long ID number and a number of target user group ID as
trying “12” and “*” or “1” and “*” and “8” or “*” and “ 8” and so on.
9. Terminal registration
Setting the terminal ID
To operate terminals in network must set terminal ID. Follow the process “3.System=>2.Terminal
ID=> new TID “ up to 999 terminals and touch “ <┘ “ button for storage.
Setting network mode upon transmission methods
Serial, Dial-Up
Select this methods when try to connect server PC to terminal by serial line.
First, follow the process “ 4.Network=>1.Network Mode=>1. Serial “ and confirm it by touching “ <┘”
button or “ number “ button and then it’s saved.
1. Admin PIN
2. Admin FP
3. Terminal ID
New TID(1-999)?
1=>
1. Network Mode
2. Local IP Addr
3. Subnet Mask
⊙1. Serial
○2. Dial-Up
○3. TCP/IP
Administration
1:User
2:Service
3:System
System Terminal ID
Administration
1.User
2.Service
3.System
4.Network
Network Network Mode

Console Manager
- 115 -
Second, back to upper menu stage by “<┘” button and set transmission speed by following this
process “4.Network =>2.Serial Speed ” and then it’s saved by “ <┘” button.
Dial-Up
To be updated within June 2004.
TCP/IP
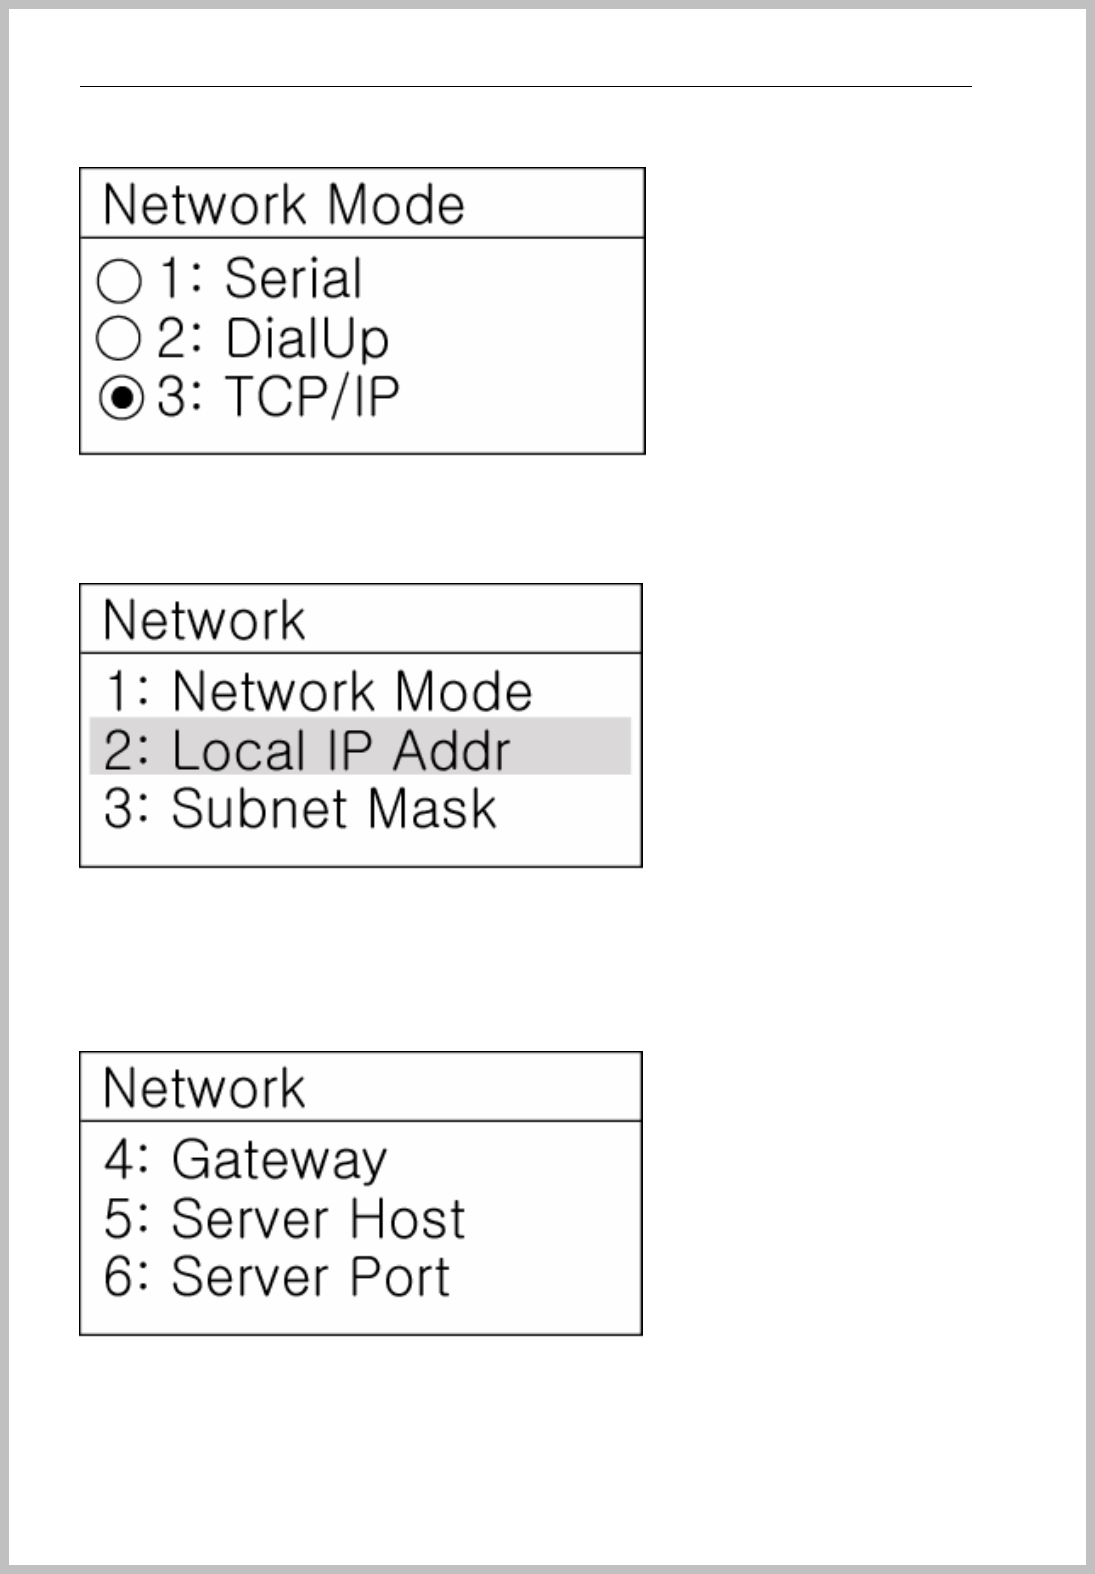
Select this methods when make terminal operation over Internet. First, follow this process
“ 4.Network =>1.Network Mode=>3. TCP/IP “, check 3. TCP/IP and then press “ <┘” button for
storage or push “ number” button.
Second, go to the upper menu and set the five options;
a. Local IP Address (terminal IP)
1. Network Mode
2. Serial Speed
○1:9600
○2:19200
⊙3:38400
Local IP Addr:
255 .255.255.0
Network Serial Speed
1. Network Mode
2. Local IP Addr
3. Subnet Mask
○1. Serial
○2. Dial-Up
⊙3. TCP/IP
Administration
1.User
2.Service
3.System
4.Network
Network Network Mode
1. Network Mode
2. Local IP Addr
3. Subnet Mask
Network Local IP Addr

Console Manager
- 116 -
Input IP address by use of “number” button, “#” button for deletion and “*” button for “.” And
it’s saved by “<┘” button.
b. Subnet Mask
Input Subnet Mask address
c. Gateway
Input Gateway address
d. Server Host
Input PC server IP address
e. Server Port
Input port number of PC server. It is set, as 8008 initially, please do not change without
special cause.
Setting date and time
Date and time keep even though power is off. It also can be changed at Console Manager program.
For date setting, follow this process “ 3.System=>5.Set Date” and input current date and save it “<┘”
button. For the change, please move curser by “ARROW” button and delete it by “#”and input new
date and save it.
i.e.) if date is April 23, 2004, input 040423.
For time setting, follow this process “ 3.System=>6.Set Time “ and input current time and save it “<┘”
button. For the change, please move curser by “ARROW” button and delete it by “#”and input new
1. Network Mode
2. Local IP Addr
3. Subnet Mask
4. Gateway
5. Server Host
6. Server Port
YY/MM/DD
Server Port :
8008 =>
Server Port Network
1. Admin PIN
2. Admin FP
3. Terminal ID
4. Access Module
5. Set Date
Administration
1:User
2:Service
3:System
System Set Date

Console Manager
- 117 -
time and save it.
i.e.) if time is PM one thirty and five seconds, input 133005.
10. The other functions
Setting security level
Tune security level from ‘Very Low(1)’ to ‘Very High(5)’ level. ‘3. Normal’ is set in default.
The higher security level is the lower FAR (fault acceptance rate). Reversibly the lower security level
is the higher FAR.
There is an inverse proportion between FAR and FRR (fault rejection rate).
Tunes locking time of door
It can control locking speed of door operation. Five (5) seconds is set in default.
HH:MM:SS
1. Unlock Time
2. Security Level
3. Free Scan
○ 1. Very Low
○ 2. Low
⊙ 3. Normal
○ 4. High
○
5. Very High
New Time (1-999)?
5=>
Administration
1:User
2:Service
3:System
Service Securi Level
1. Unlock Time
2. Security Level
3. Free Scan
Administration
1:User
2:Service
3:System
Service
Unlock Time
3. Terminal ID
4. Access Module
5. Set Date
6. Set Time
Administration
1:User
2:Service
3:System
System Set Time

Console Manager
- 118 -
Checks all registered user
At the stage of (1.User=>3.Delete User=> Enter User ID) keep push (*) button for seconds, it shows
all number of registered users. And for escape input “NO” or touch “CLR” button.
Checks all registered ID
At the stage of (1.User=>2.Edit User=> Enter User ID) keep push (*) button for seconds, it shows all
ID list in BKS-4800.
If you want to change authentication method on target ID, scroll down to the target ID by “ARROW
“ button and touch “<┘” button and it is ready to change.
Change administrator password
The initial password number was set as 1111. Please must change it to your own password number.
Type your new code twice as same number.
Follow this process as “ 2.System=>1.AdminPIN=>Enter New P/W=> Verify New P/W=>OK! Data
Saved “
Change administrator Fingerprint
Enter Password:
****
Enter User ID :
*
Administration
1:User
2:Service
3:System
1:New User
2:Edit User
3:Delete User
Delete User Delete User
Enter User ID :
*
Administration
1:User
2:Service
3:System
1:New User
2:Edit User
3:Delete User
Edit User
Edit User
1. Admin PIN
2. Admin FP
3. Terminal ID
4. Access Module
Administration
1:User
2:Service
3:System
System Admin P/W

Console Manager
- 119 -
After registered Administrator fingerprint, this function can be used instead of P/W.
Process is same as user FP registration..
Follow this process as “ 3.System=>2.Admin FP=>Place finger on the sensor=> OK! Data Saved “
Description of button
- Arrow key (▲ ▼) : curser scroll down or up
- <┘ button: confirm the selection mode and get into the lower menu stage and saved.
- CLR button: move to the upper menu stage without saving.
- “ * “ button : 1) in grouping mode to mark all figures in the other place of ID number, 2)
browse all user list 3) mark & delete check (√) and “·” When input IP address at
network mode.
- ‘ # ’ Button: to cancel input number as like back space key in PC keyboard.
Change operations of authentication methods
Initially all authentication methods “Fingerprint, RF-card, Password (PIN)” was set for operation. If
you want to delete any method from them, just touch “*” to delete check (√) and save it by “<┘”
button.
Follow the process “ 3.System=>4.Access Module=>FP, Card, Key “ and select your choice.
Set LCD Back Light time
If you want to control LCD back light time how long it’s on, input the time from 0 to 255 second.
For light on all the time, select “ 0 “, for power saving, you can select the back light off time.
If 200 second input, back light will be off after 200 second of last push button.
⊙ 1: FP Sensor
⊙ 2: Card Reader
⊙3: PIN ke
yp
ad
1. Admin PIN
2. Admin FP
3. Terminal ID
4. Access Module
Administration
1:User
2:Service
3:System
System Access Module
New Time(0-255)
0 =>
5 Card Reader
6 Set Date
7 Set Time
8 Options
Administration
1:User
2:Service
3:System
System BackLight Time
1. BackLight Time
2. Exposure
3. LCD Contrast
4. LCD Brightness
Options
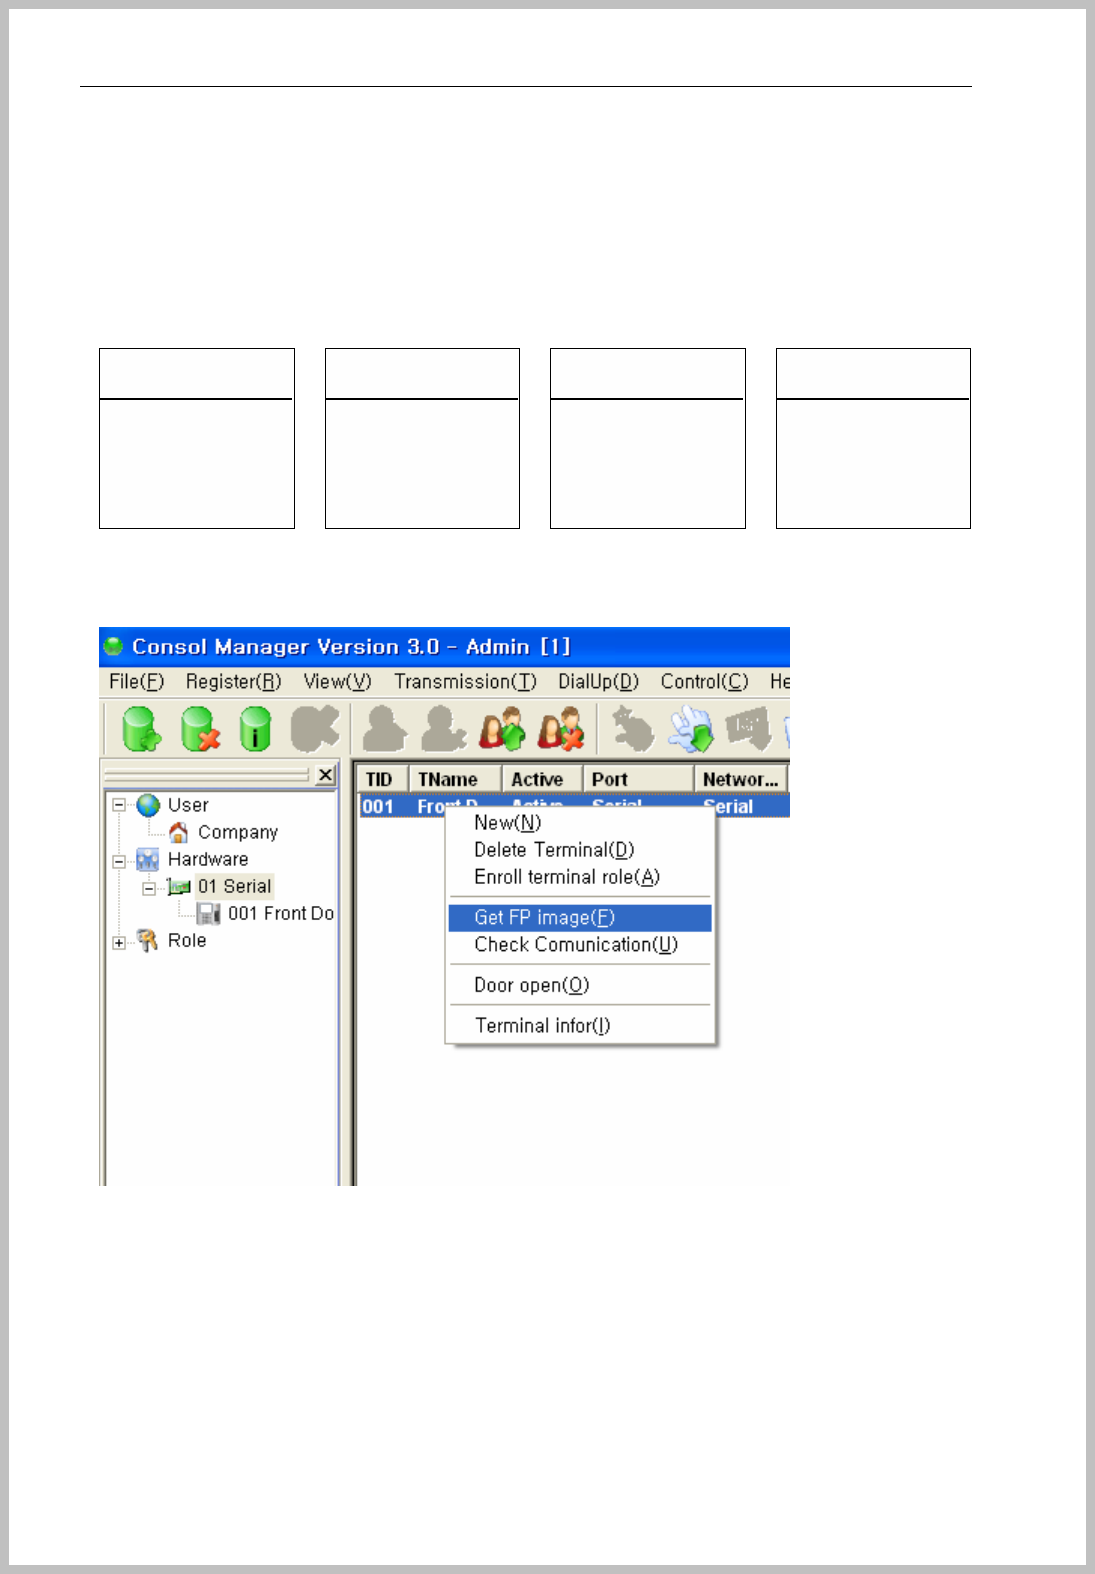
Console Manager
- 120 -
Exposure
It can control the sensor exposure time to get more high quality image.
Follow the process “ 3.System=>8. Options=> 2.Exposure=> Select suitable Exposure of 3 levels
and save it by “<┘” button.
You can check the fingerprint image from Console Manager.
Exposure
○ 1: Very Low
○ 2: Low
⊙ 3: Normal
1. BackLight Time
2. Exposure
3. LCD Contrast
4. LCD Brightness
5 Card Reader
6 Set Date
7 Set Time
8 Options
Administration
1:User
2:Service
3:System
System Options
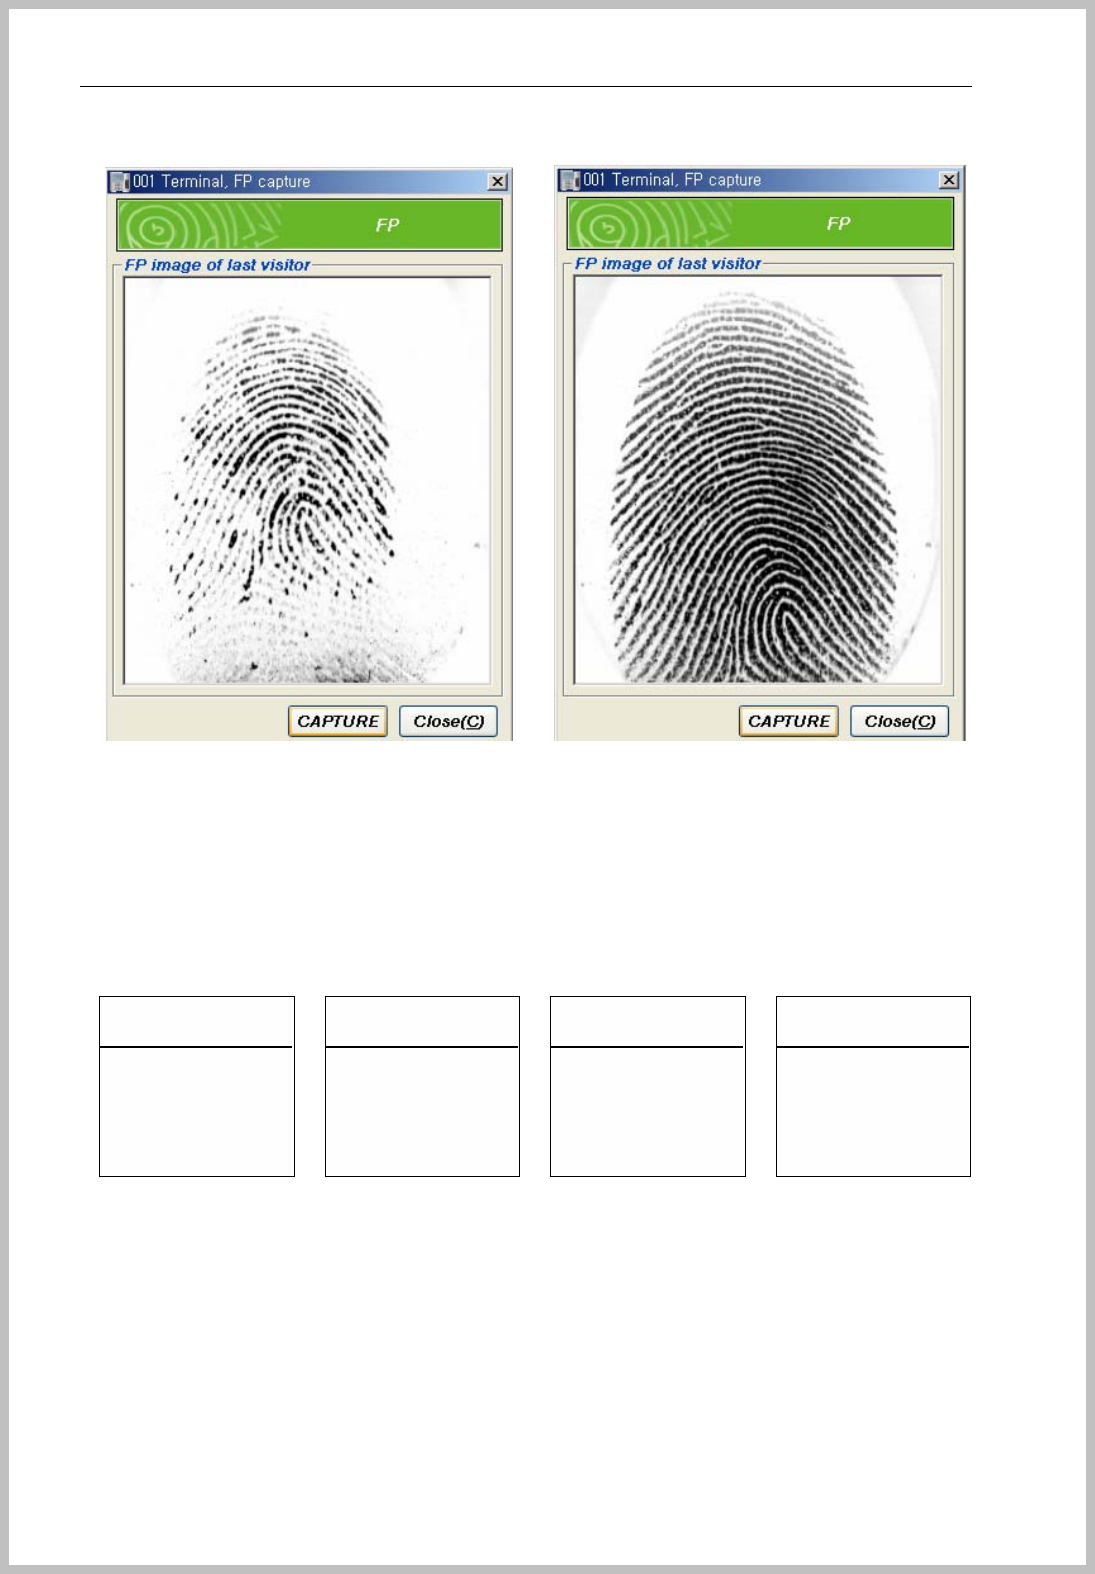
Console Manager
- 121 -
=>
First, check the image remained on terminal and you select the most clear image level.
LCD Contrast
It can control LCD contrast. To become big number, the background color is dark.
Follow the process “ 3.System=>8.Options=>3.LCDContrast =>Select suitable contrast of “0~63
“ and save it by “<┘” button.
LCD Brightness
It’s set to 5 levels in initial stage.
Follow the process “ 3.System=>8.Options=>4.LCD Brightness=>Select suitable Brightness level
and save it by “<┘” button.
△
5
▽
5 Card Reader
6 Set Date
7 Set Time
8 Options
Administration
1:User
2:Service
3:System
System LCD Contrast
1. BackLight Time
2. Exposure
3. LCD Contrast
4. LCD Brightness
Options

Console Manager
- 122 -
Time & Attendance setting
For being shown Time & Attendance function on LC window, go to the stage (2.Service=>4.
Time&Attend) and set details.
1. Key
It’s set the function key among the 1.Up/Down Arrow Key, 2. NO-F1,F2,F3,F4 and 3.
F1,F2,F3,F4,NO
1. Up/Down Arrow Key : Select function by Up&Down arrow key
2. NO-F1,F2,F3,F4 : NO – CLR, F1 - △, F2 - ▽, F3 - <┘, F4 - #
3. F1,F2,F3,F4,NO : F1 – CLR, F2 - △, F3 - ▽, F4 - <┘, NO - #
It’s set the function key between 1.Up/Down Arrow Key and 2. or 3( 4 buttons of vertically forth line
Arrow, CLR, <┘)
If you use over 4 functions, please select to 1.Up/Down Arrow key as to push number “1” or “*”
button
2. Display
When you don’t want to use T&A function, just check “1.Disable”.
2. Text : display message as IN, OUT, ABSENCE, Break In, Break Out.
3. Icon : display icon as same step as text.
1. Unlock Time
2. Security Level
3. Free Scan
4. Time&Attend
Administration
1:User
2:Service
3:System
Service Time&Attend
1. Key
2. Display
3. Item
Time & Attend
1. Key
2. Display
3. Item
Key
○1. Up/down Key
○2. NO-F1-…-F4
⊙3. F1-…-F4-NO
△
5
▽
5 Card Reader
6 Set Date
7 Set Time
8 Options
Administration
1:User
2:Service
3:System
System LCD Brightness
1. BackLight Time
2. Exposure
3. LCD Contrast
4. LCD Brightness
Options

Console Manager
- 123 -
3. Message select
After selecting text or icon, set function key message.
4. No display T&A message
For no display T&A message, go to 2.Service => 4.Time & Attend => 2> Display => Select 1.Disable.
And save as click to ‘<┘’ button
5. No display function key.
If you want to set ‘F1’ key is no display, go to 2.Service => 4.Time & Attend => 3.Item => Select no
operating button =>1.Enable => remove tick mark.
Time & Attend
1. Key
2. Display
3. Item
Display
1. Disable
2. Text
3. Icon
Time & Attend
1. Key
2. Display
3. Item
Items
1. No
2. F1 √ IN
3. F2 √ OUT
4. F3
Time & Attend
1. Key
2. Display
3. Item
F1
1. Enable
2. Text
3. Icon
F1 : Text
○ 1:
⊙ 2: IN
○ 3: OUT
○ 4: ABSENCE
○
5: Break In
Time & Attend
1. Key
2. Display
3. Item
Display
⊙1. Disable
○2. Text
○3. Icon
Time & Attend
1. Key
2. Display
3. Item

Console Manager
- 124 -
Event setting
For being shown Mast Event & Delete Event function on LCD window, go to the stage
(2.Service=>5.Event) and set details.
z Delete Event : Delete all event on the memory of BKS-4800
z Output Type : Network – Standard type data is directly sent to PC
26 Wiegand, 34 Wiegand – Directly connect to ACU(Access Control Unit)
without PC interface
z Mask Event : Lock Event – Normal Locked, Normal Unlocked etc
Access Event – Access Granted, ID etc main event
Other Event – Network Status, System Information
□ 1.Enable : Send the Event to PC
▣ 1.Enable : Do not stored on Memory and not sent to PC
BKS-4800 store many event log records included the lock event ( door open/close ), Access Event
and Other Event. If you don’t want to store “Lock Event” data, disable it.
When BKS-4800 use for standalone mode and no need the Log record, sometimes push “6.Delete
Event” stored Event or disables all Events. It helps the fast operation speed to prevent from full
memory data.
Time & Attend
1. Key
2. Display
3. Item
Items
1. No
2. F1 √ IN
3. F2 √ OUT
4. F3
Time & Attend
1. Key
2. Display
3. Item
F1
1. Enable
2. Text
3. Icon
F1 : Enable
□ 1.Enable
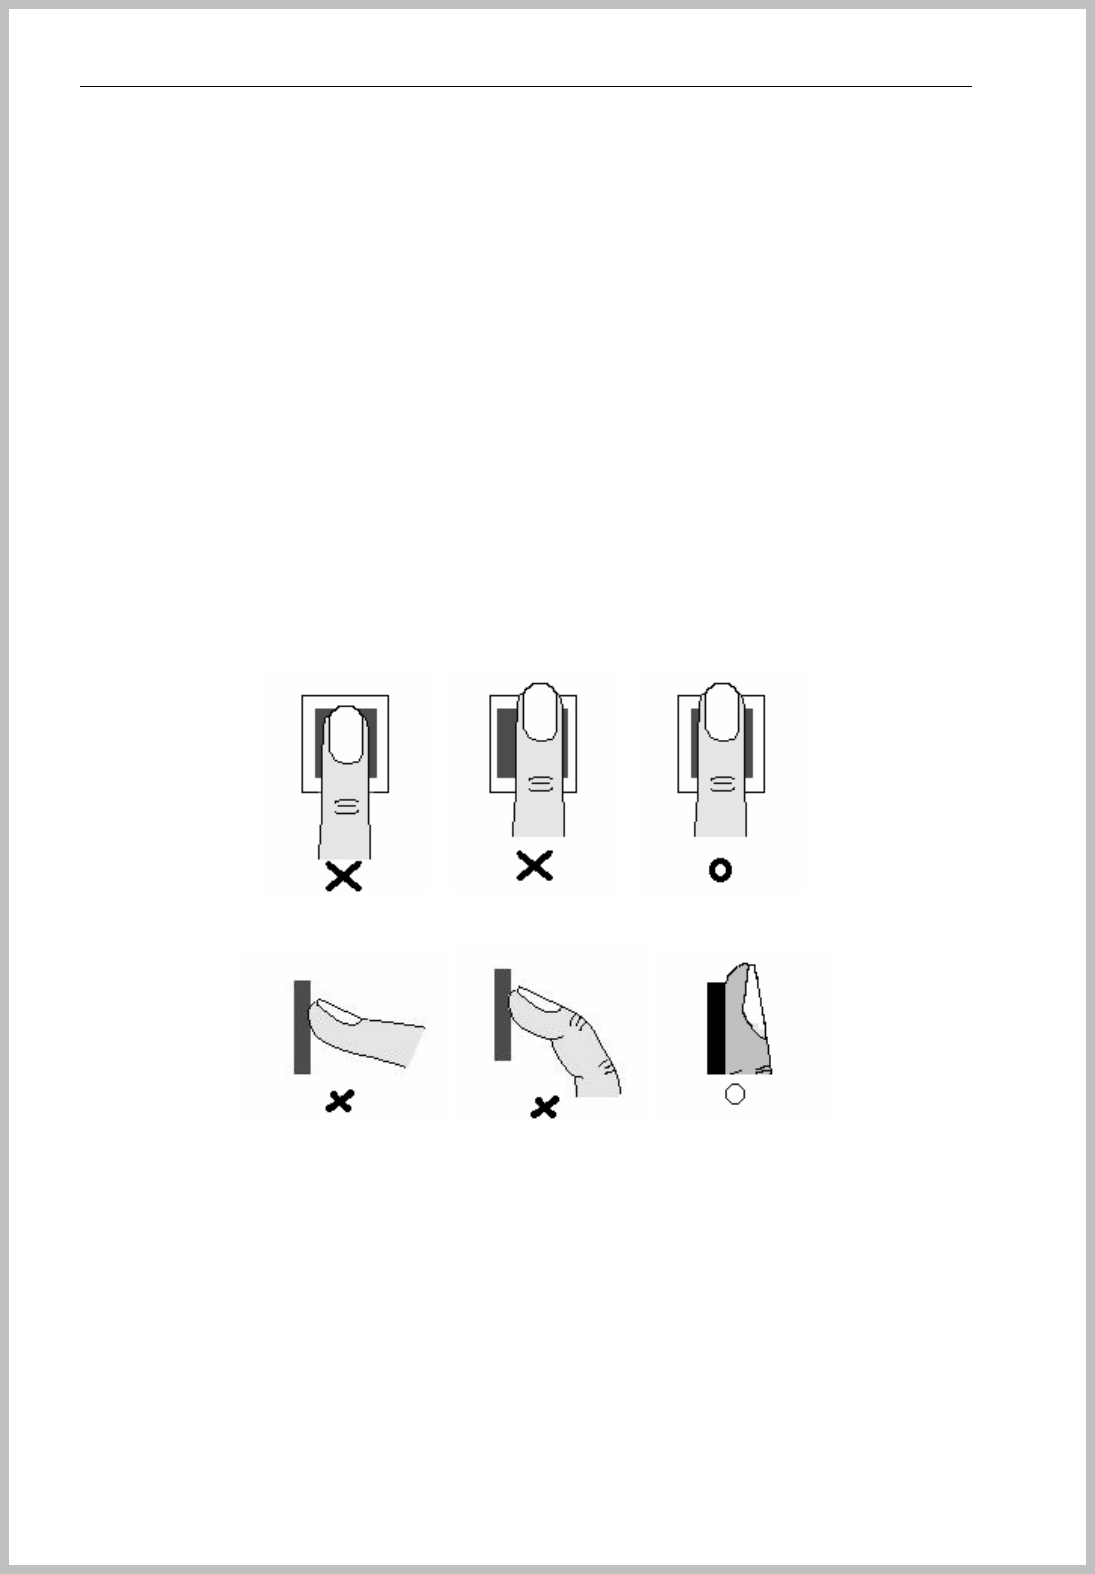
Console Manager
- 125 -
11. Tips on cautions use
First setting in initial use
- Change system password for your security.
- Default setting password at manufacturing site: 1111
- Power should be supplied after all cablings are completed.
In case of fingerprint hard to be processed
¾ Try again, after removing some dirties and water on fingerprint
¾ Stay more than 1.0 seconds on capture area and don’t move your finger during touch.
Reset BKS-4800 and back to setting status before latest trial
¾ When BKS-4800 is in disorder without special problem, Just push Reset switch, then it‘s
back to setting status before latest trial.
¾ You can call anytime to customer support center for your trouble.
Right fingerprint registration position
¾ Registration position
¾ Right finger touching

Console Manager
- 126 -
12. Specification
Configuration
- Main board
- LCD module
- Fingerprint sensor
Power
- Voltage
¾ +12V DC with ±30% tolerance, less than 150mVp-p ripple voltage
- Power consumption
¾ Stand by: average 300mA
¾ Maximum on working: average 600mA
Environment
- Temperature & humidity
¾ Operation temperature : -15℃ to 60℃
¾ Operation humidity: 0% to 90%
- Static electricity
¾ 0~4KV contact discharge: No unrecoverable error
¾ 0~8KV air discharge: No user detectable error
Communication Interface
- 1 RS232 port/RS485/Dial-UP
¾ Speed: select one among 9600, 19200, 38400 bps
¾ Default speed: 19200bps
¾ Interface valuable: no flow control, 1 stop bit, 8 data bits
¾ Maximum interface span is up to RS232, RS485 specification.
¾ Maximum transmission span: 150m
- 1 TCP/IP
- 1 Wigand
Relay
- 1 Relay Out (COM, NO, NC)
Rated 1A@24VDC
Rated 1A@120VAC

Console Manager
- 127 -
Fingerprint storage
- 1:1 : up to 5,000 user (two templates per user)
- 1:N matching : up to 1,000 user (two templates per user)
Log records
- Up to 10,000 events
Dimension
- Device: 155 mm (W) X 35 mm (D) X 155 mm (H)
- LCD module: 75 mm (H) X 52 mm (W)
- Fingerprint capture area in Sensor: 18 mm (H) X 16 mm (W)
Weight
- 400g
Authentication speed
- Less than 1.0 seconds
FRR (fault rejection rate)
- 0.01%
FAR (fault acceptance rate)
- 0.001%
Fingerprint data
- 512 bytes
Sensor resolution
- 500DPI

Console Manager
- 128 -
Hardware (main board)
Connector description
- Main board
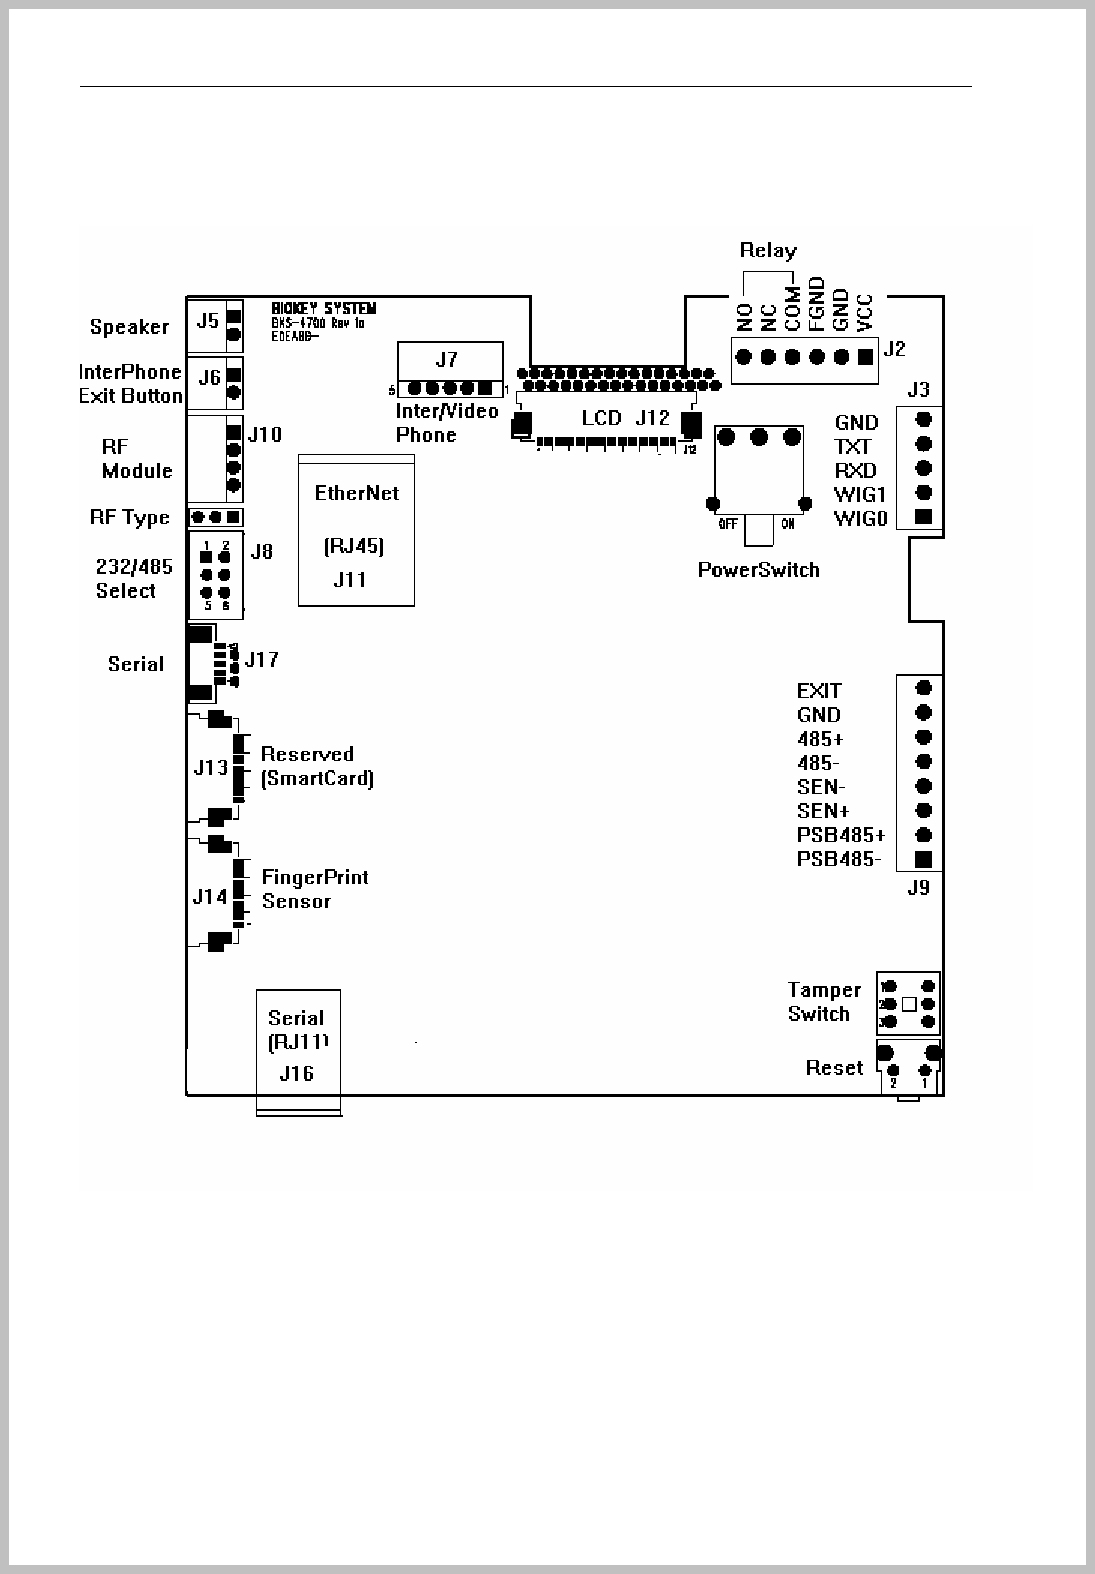
Console Manager
- 129 -
- Details on connectors
* J2
- NO: Normal Open
- NC: Normal Close
- Relay Com: relay common port
- FGND: not used
- GND: ground

Console Manager
- 130 -
- VCC: DC +12V
* J3
- GND: ground
- TXD: RS232C transmit port (Dial-up)
- RXD: RS232C receipt port (Dial-up)
- WIG1: Wiegand connection port
- WIG0: Wiegand connection port
*J9
- EXIT: Exit button port (connect with GND port)
- GND: ground
- 485+: RS485 port
- 485-: RS485 port
- SEN-: connection port for door sensor
- SEN+: connection port for door sensor
- PSB485+: not yet applied
- PSB485-: not yet applied
*J8 (RS232 / 485 Jumper selectable)
- RS232: must jumper with 1-3,2-4 pin for 232 port use of J3
- RS485: must jumper with 3-5,4-6 pin for RXD/TXD port use of J7
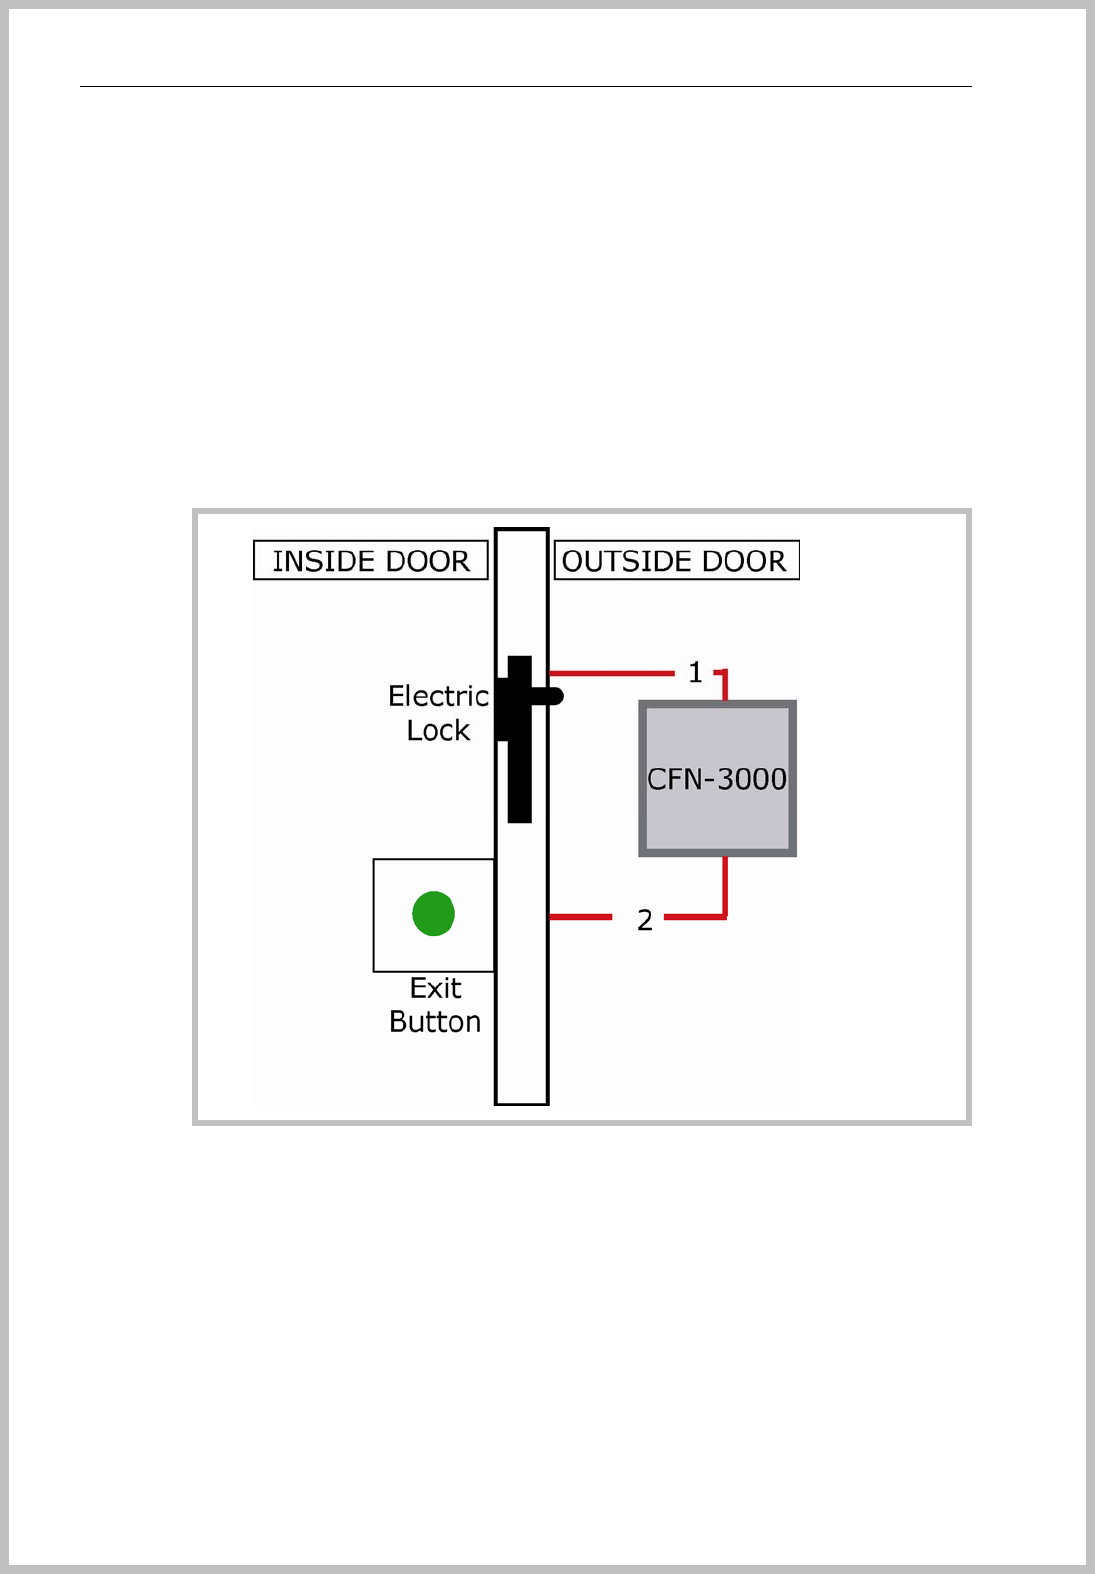
Console Manager
- 131 -
Application example
- Instruction for power line installation is not explained
- In case of Lock, upon door type of installation site Dead bolt, Striker, EM Lock will be used.
Standalone – one(1) device
- Installed one unit for only access control without PC.
* Usage: access control
* Configuration: BKS-4800, Lock, inner exit button, S.M.P.S adapter (DC 12V 2A)
* Block diagram
z The # in the connection line means count # of line
* Connection example of BKS-4800 connector
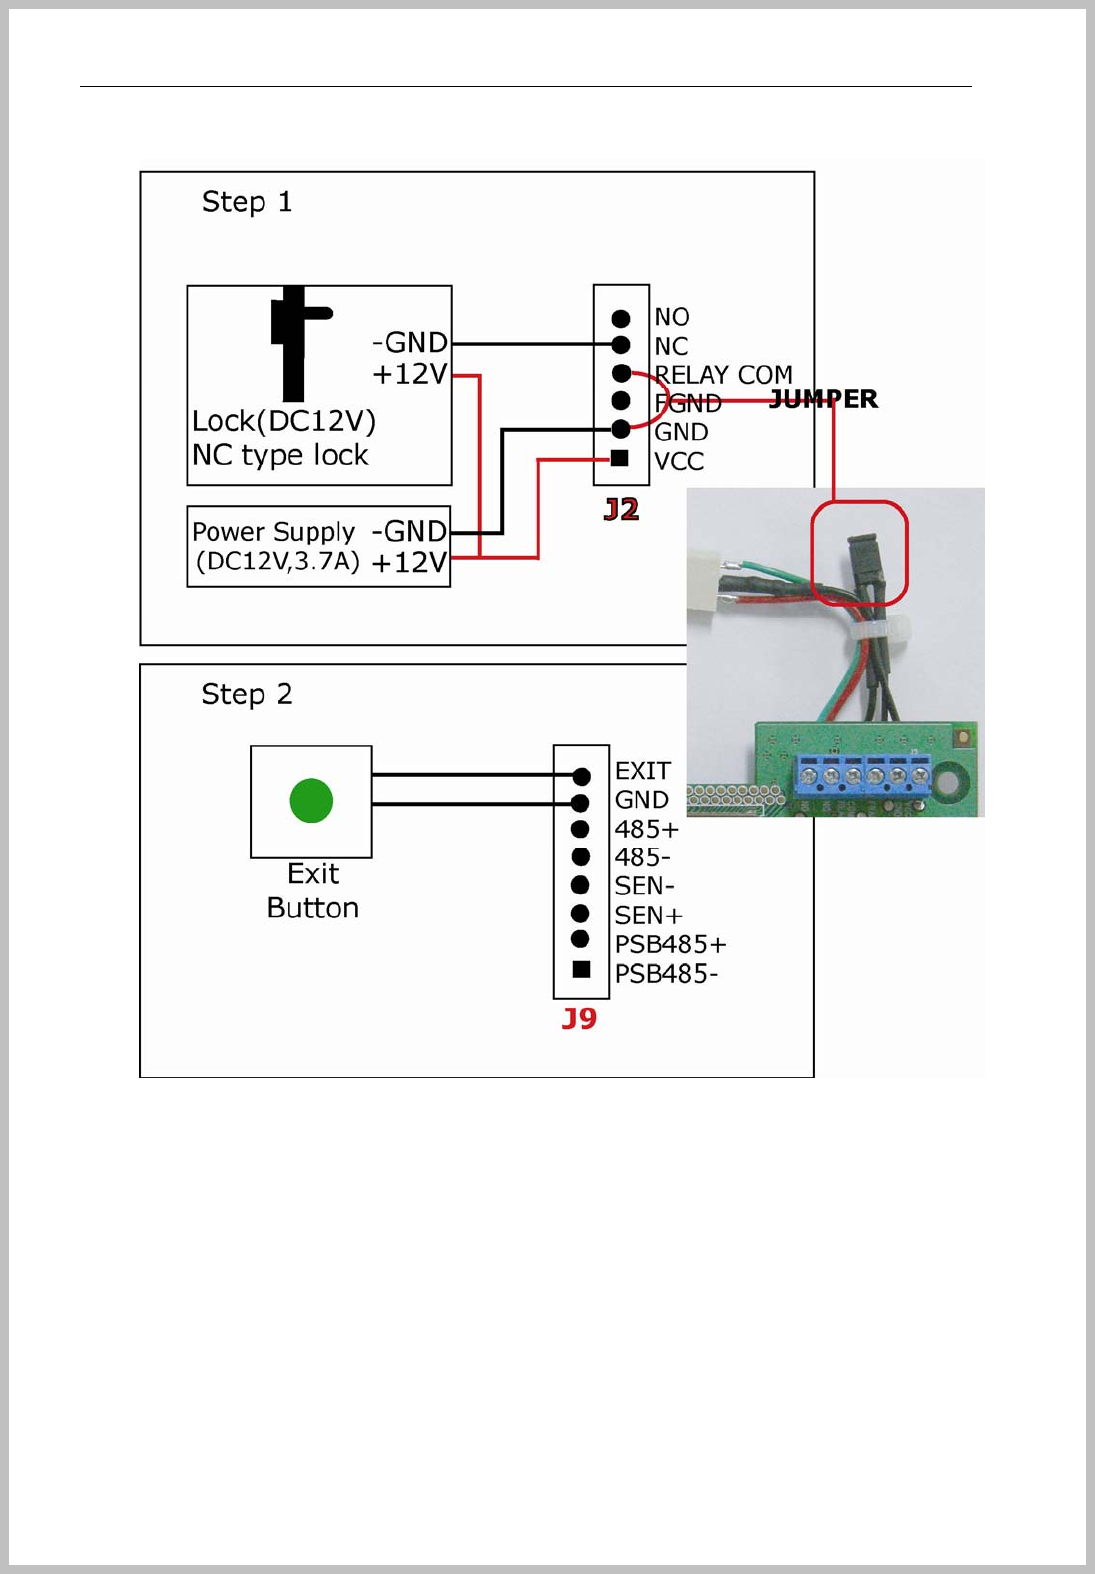
Console Manager
- 132 -
- Initial setting
* Registration must be done at BKS-4800 terminal as manual 5.1 section shows.
Standalone for two(2) terminals between wall
Use both side of wall without exit button.
Please be careful of specific power connection as follows.
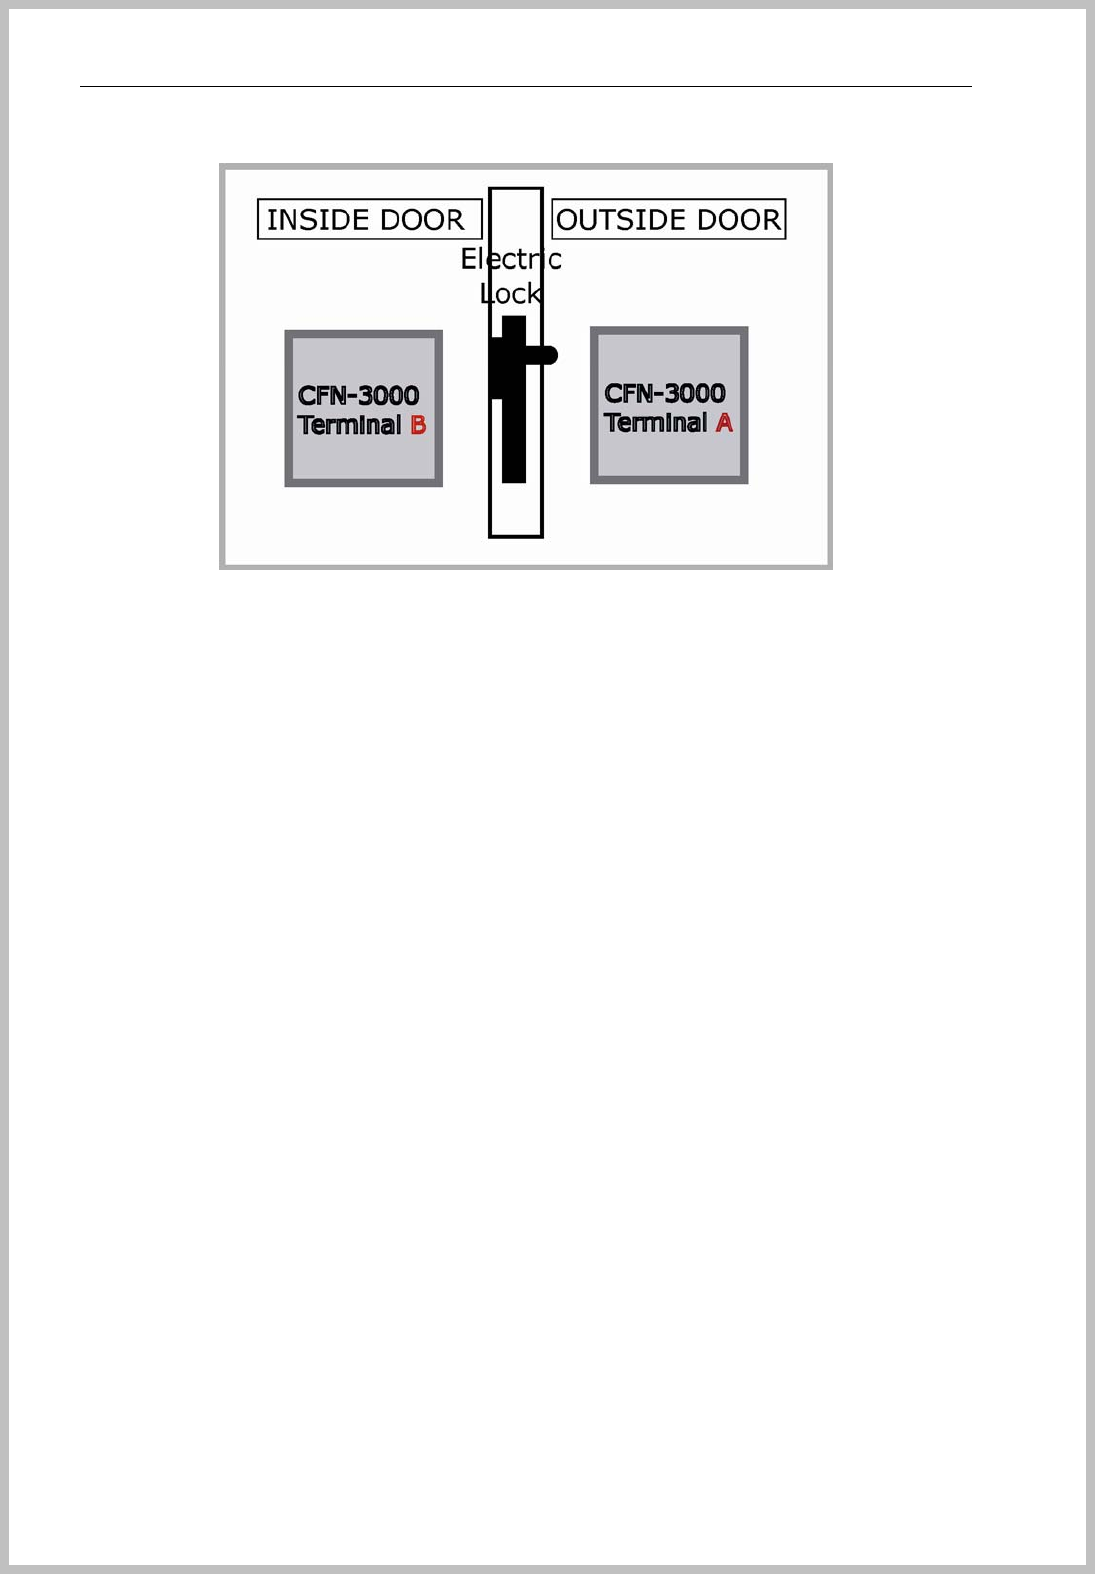
Console Manager
- 133 -
z Connection example of BKS-4800 connector
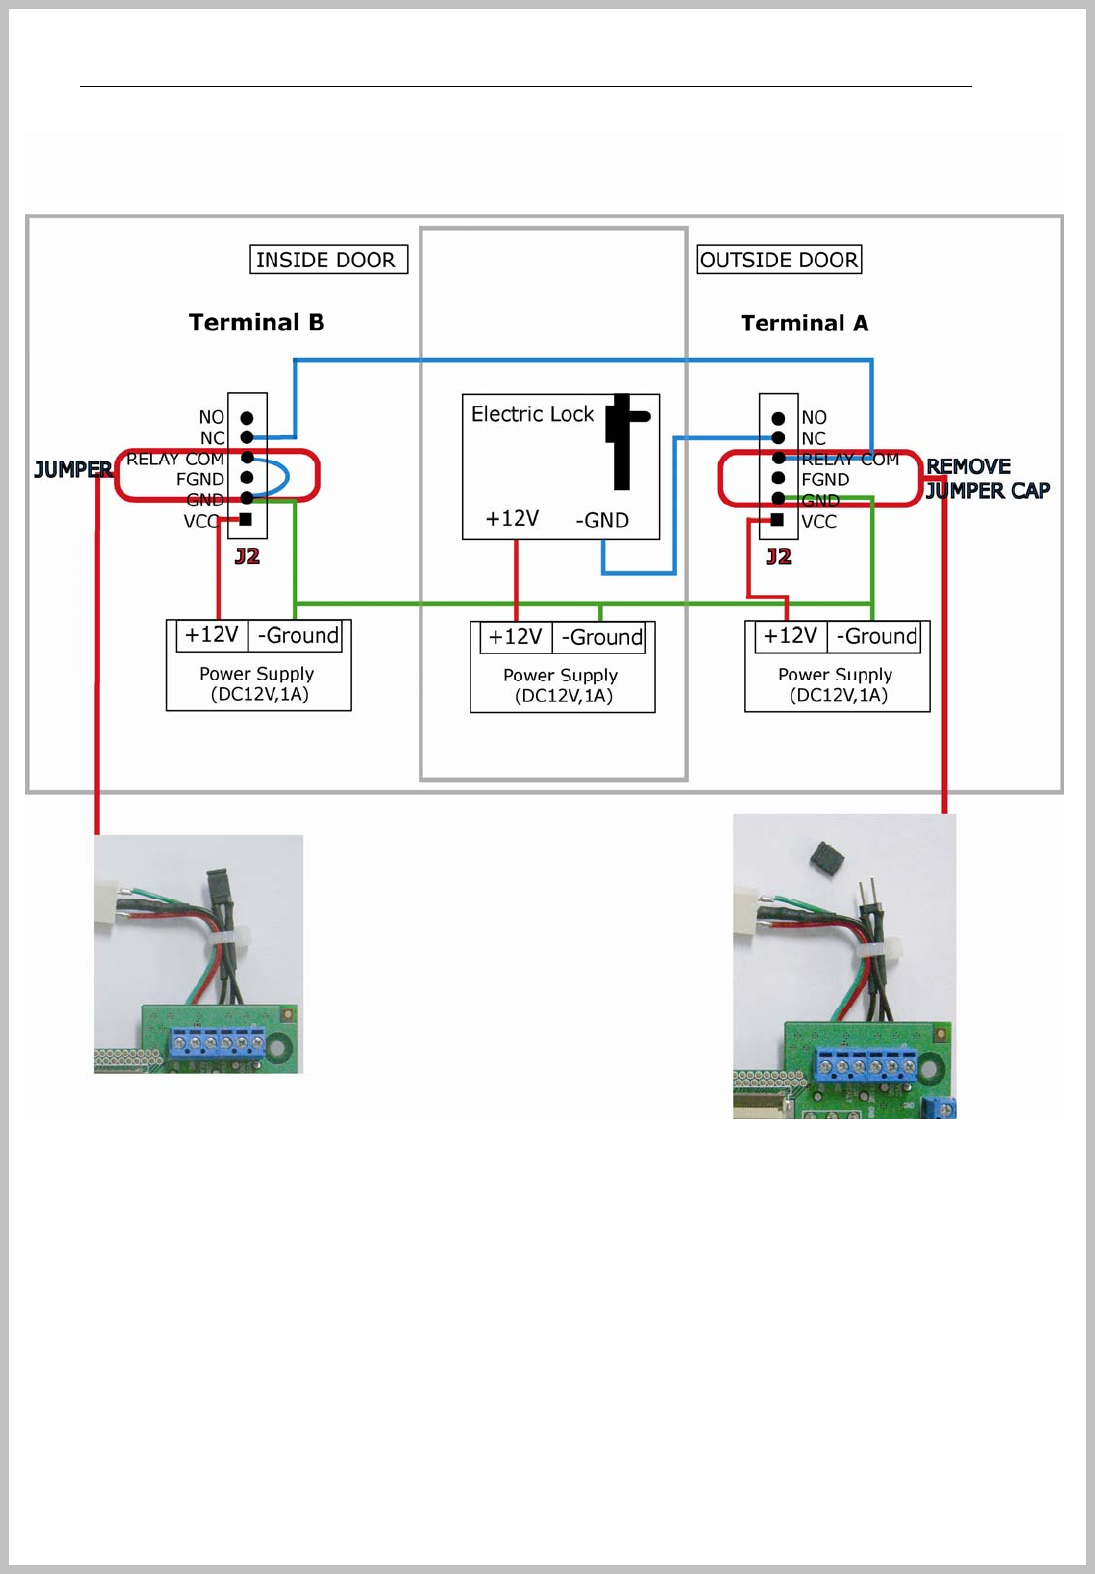
Console Manager
- 134 -
Please be careful of the difference Jumper setting as above picture.
PC - RS232
- Serial network application: more than one BKS-4800 connected with server PC through RS-232
for access control and Time & Attendance.
z Configuration
Access control: BKS-4800, Console-Manager (terminal control & log management),
Lock, inner exit button, S.M.P.S adapter (DC12V 2A), BKS-2600 (fingerprint scanner),
Server PC, door sensor
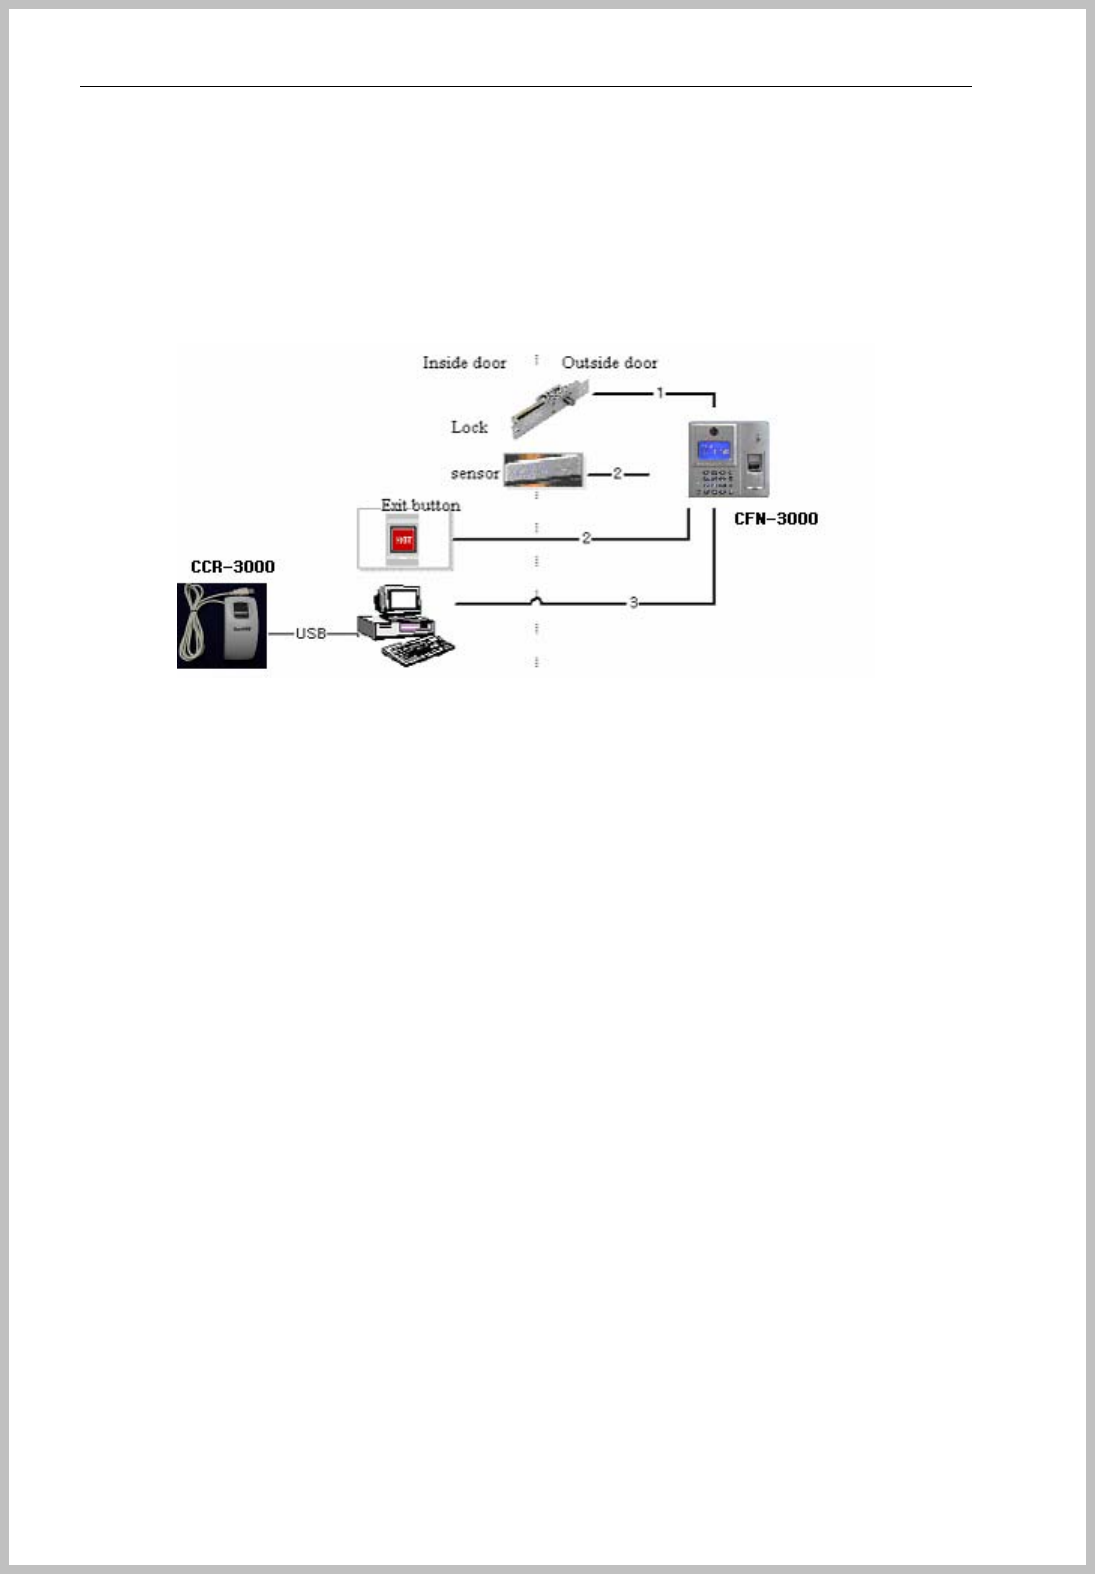
Console Manager
- 135 -
Time & Attendance: BKS-4800, Console-Manager (terminal control & log management),
S.M.P.S adapter (DC 12V, 2A), BKS-2600, Server PC
Door sensor: check on door being open or closed.
Block diagram
Connection example of BKS-4800 connector #2
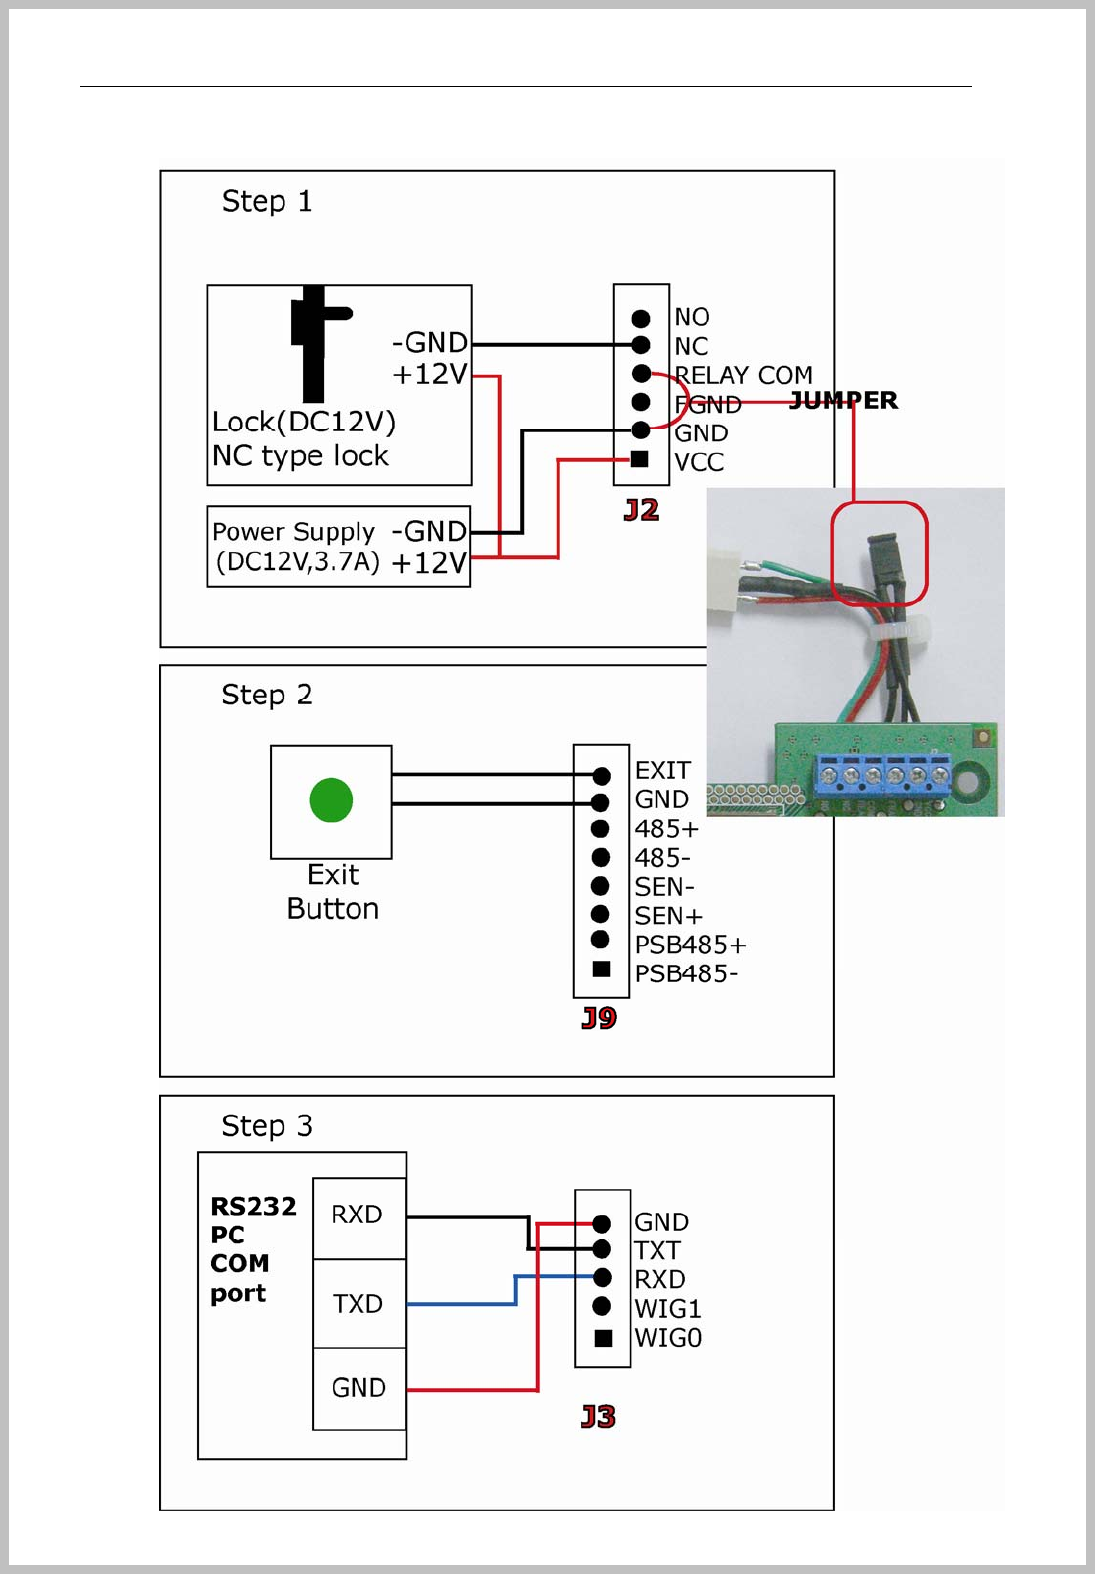
Console Manager
- 136 -

Console Manager
- 137 -
z Initial setting
- All setting’s available on PC and BKS-4800, but we recommend PC processing for your
convenience.
Registration
- In case of BKS-4800 (fingerprint scanner), customer can enroll the user’s fingerprint by Console-
Manger program or server program coded by SDK and transmit it to BKS-4800 terminals.
- Without BKS-4800, directly enroll user’s fingerprint at BKS-4800 and download it to PC server by
Console program.
Time & Attendance
- User’s event records should be kept in BKS-4800 and transmitted to PC server.
- At the PC, Console-Manager or server program coded by SDK will handle it along with
customer’s management format.
Door control
- Regardless of terminal authentication, Door can be controlled by use of compulsory mode in
Console Manager; open, closed, timeframe for open or closed
Restriction on user’s admission
- Each user’s timeframe for admission can be set in Console-Manage. If he tries to admit to door,
LCD window shows “ it is not time to use “ and also door does not operate.
- Initially all user are not set for time restriction.
For more information on Console-Manager, please refer to manual of Console-Manager.
PC – TCP/IP
- BKS-4800 has TCP/IP port. So several terminals can be connected through HUB for PC server
control network.
- In case of network mode, should set TID (terminal ID) in BKS-4800: 1 ~ 255. For the setting of
TID please refer to manual 5.3.2 section.
z Configuration
Access control: BKS-4800, Console-Manager, Lock, inner exit button, S.M.P.S adapter
(DC 12V 2A), BKS-2600, Server PC, door sensor
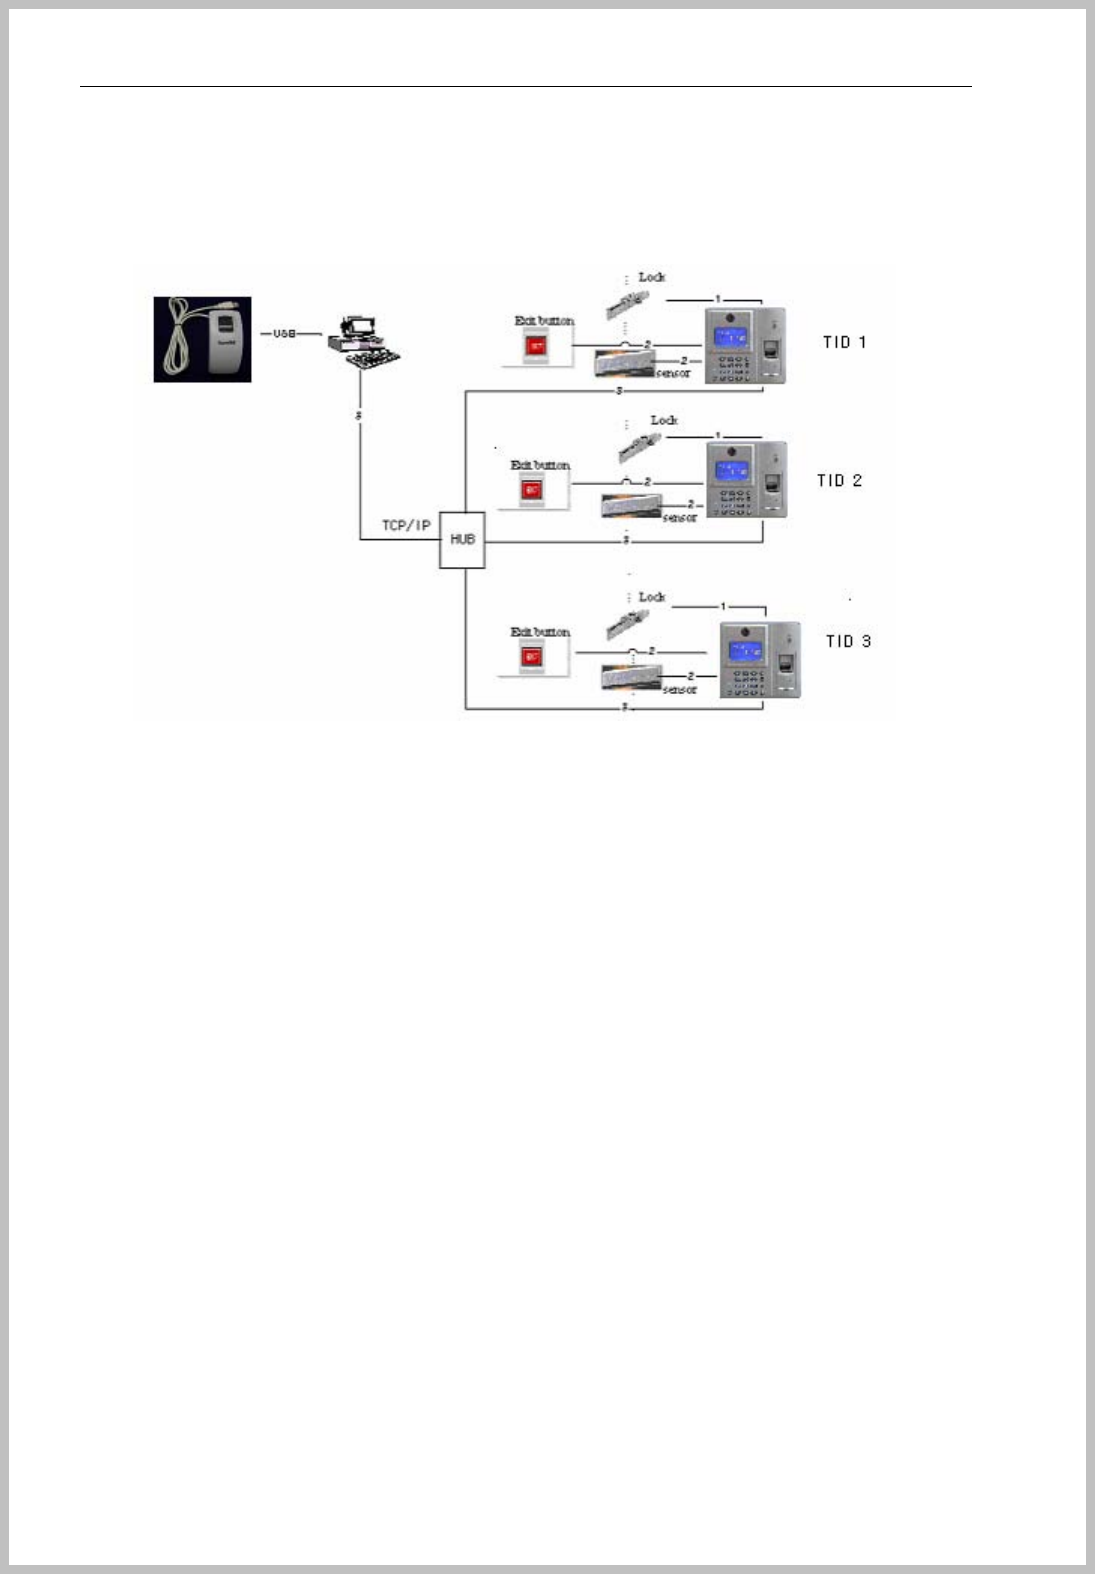
Console Manager
- 138 -
Time & Attendance: BKS-4800, Console Manager, S.M.P.S adapter (DC12V 2A), BKS-
2600, Server PC
Block diagram
Connection example of BKS-4800 connector
BKS-4800
BKS-4800
BKS-4800
BKS-2600

Console Manager
- 139 -
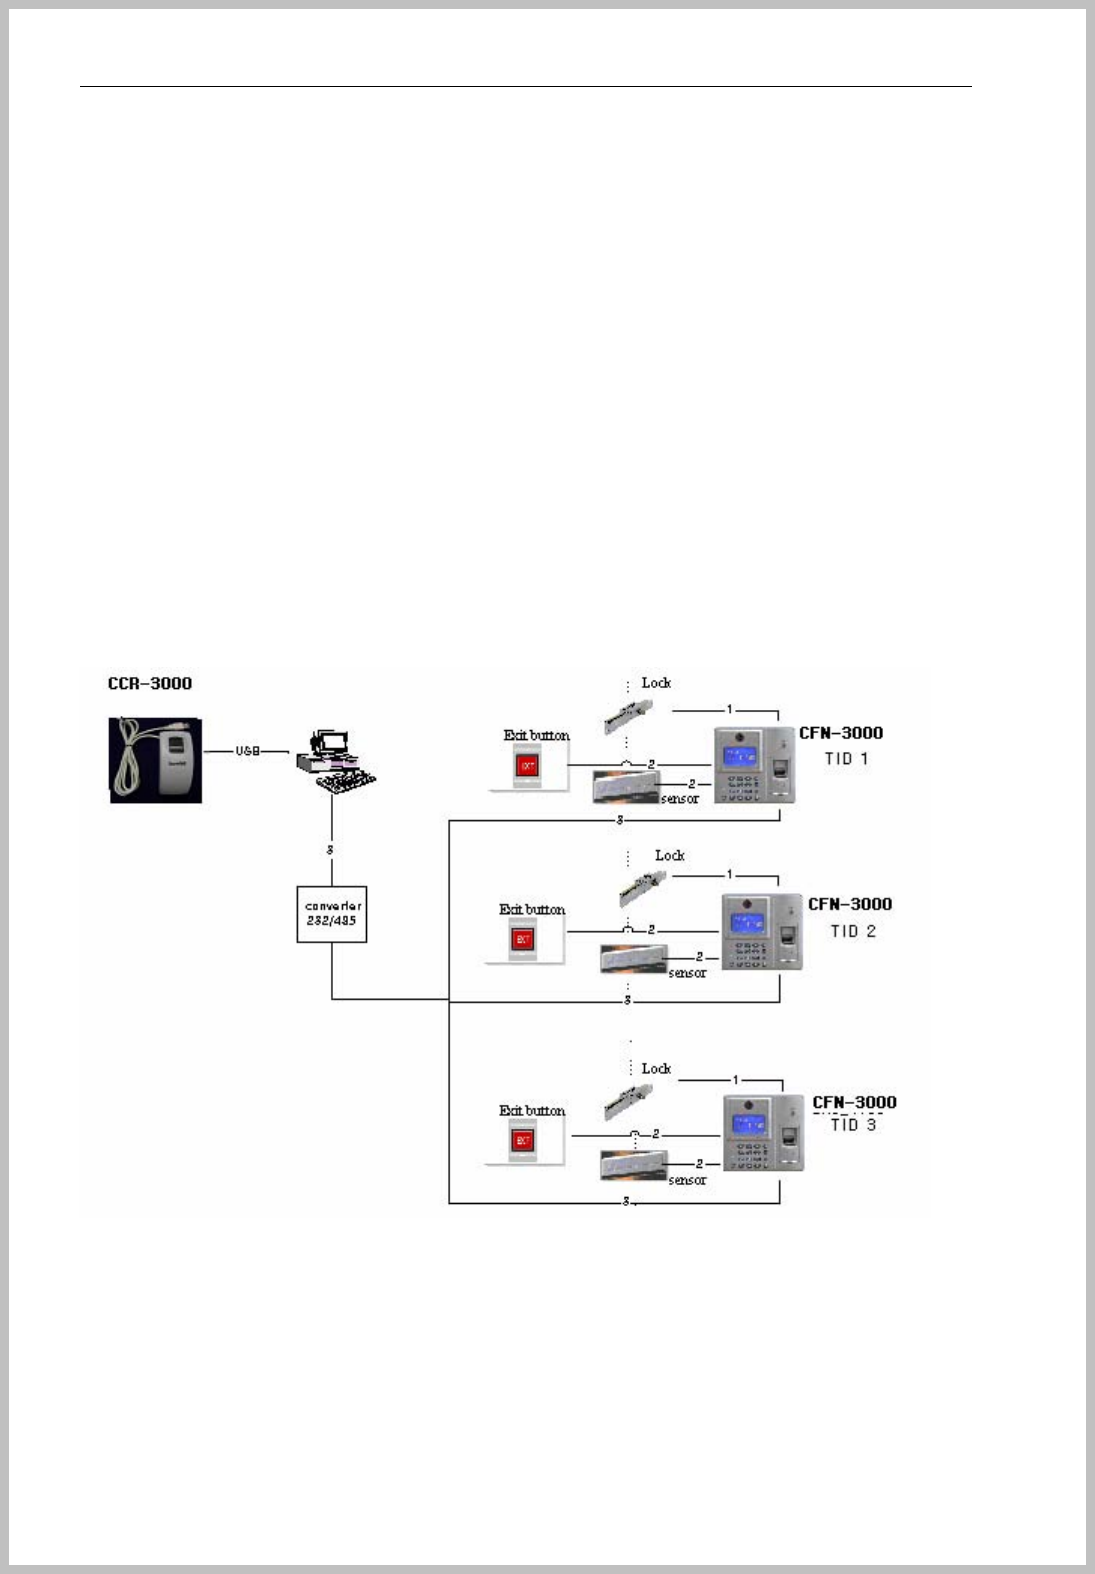
Console Manager
- 140 -
PC – RS 485
You can connect multiple BKS-4800 and PC via RS485. You are required RS232 to RS485 converter
additionally. If you want to install several BKS-4800, you must assign unique TID to each BKS-4800.
TID range is from 1 to 255. For changing method of TID, please refer to chapter 6.1
Configuration
Access control: BKS-4800, RS232 to RS485 converter, Console-Manager(terminal control
& log management), Lock, inner exit button, S.M.P.S adaptor (DC 12V, 2A), BKS-
2600(fingerprint scanner), Server PC, door sensor
Time and attendance: BKS-4800, RS232 to RS485 converter, Console-Manager(terminal
control & log management), S.M.P.S adaptor (DC 12V, 2A), BKS-2600, Server PC
Door sensor : check on door being open or closed
Block diagram
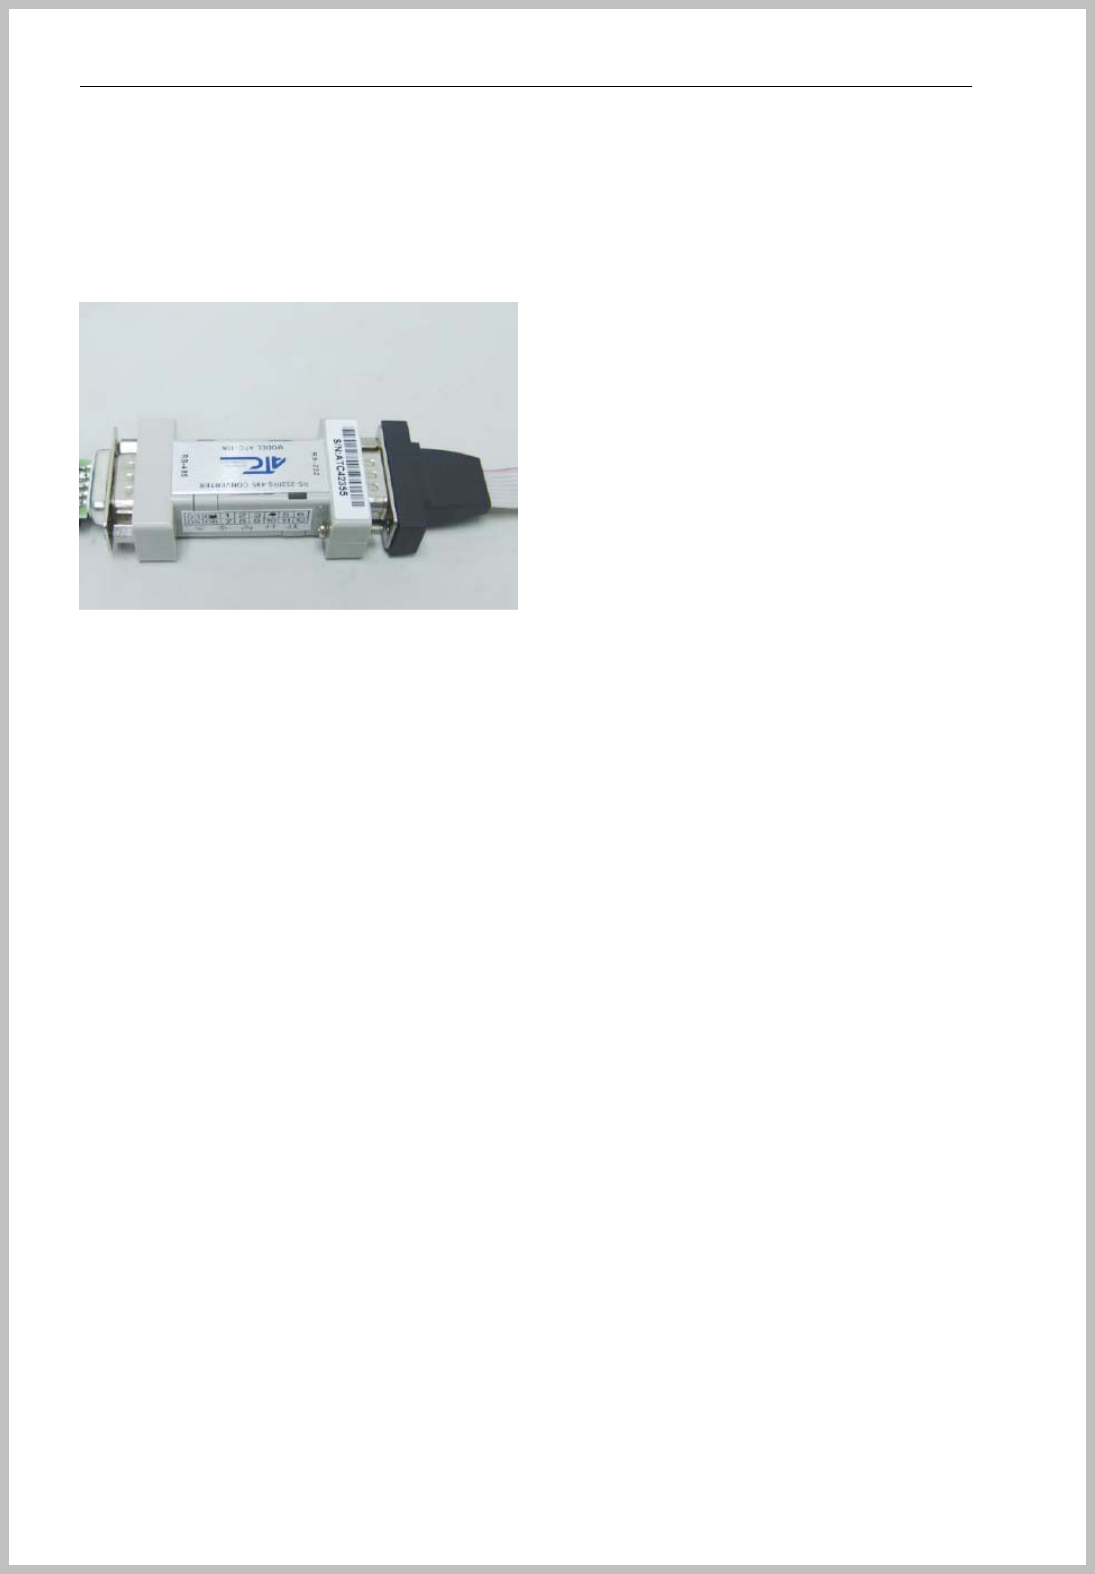
Console Manager
- 141 -
Connection example of BKS-4800 connector
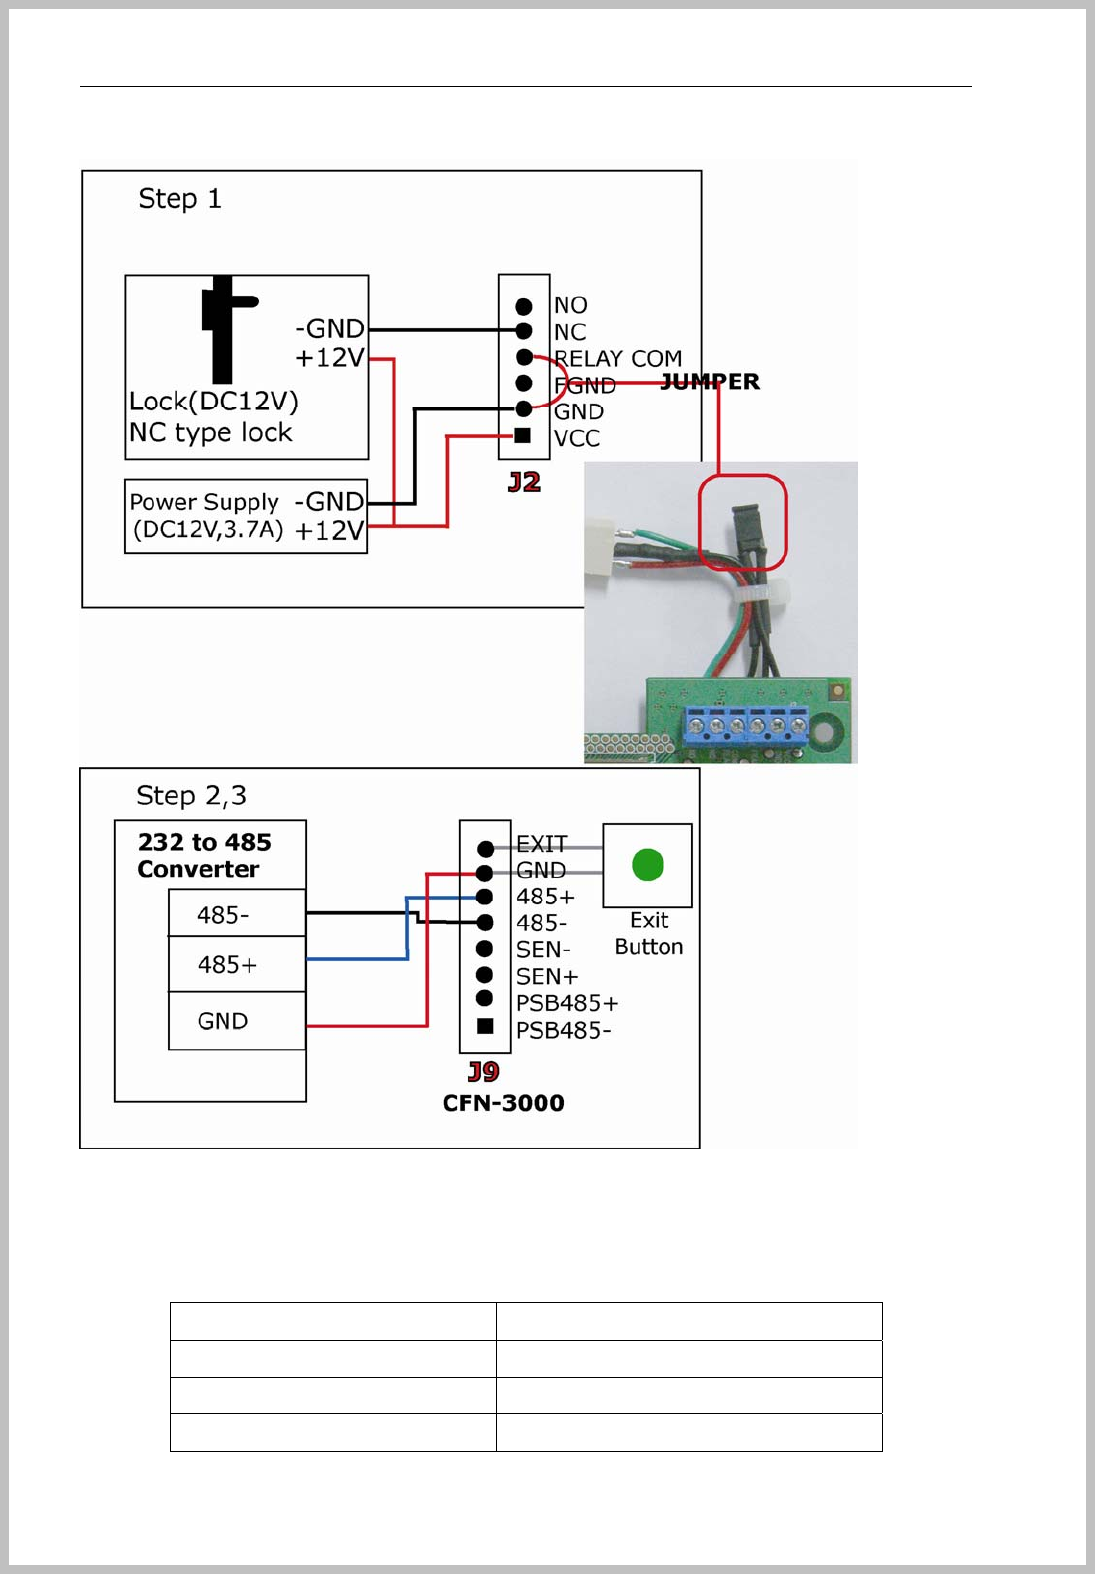
Console Manager
- 142 -
9 Connection example
In this experiment, I use 232/485 converter of ILSHIN Inc.
BKS-4800, converter connection specification
BKS-4800 232 to 485 converter
485+(connector #1,4) 485+(DSUB 25, 4)
485-(connector #1,3) 485-(DSUB 25, 6)
GND(connector #1, 5) GND(DSUB 25, 2)
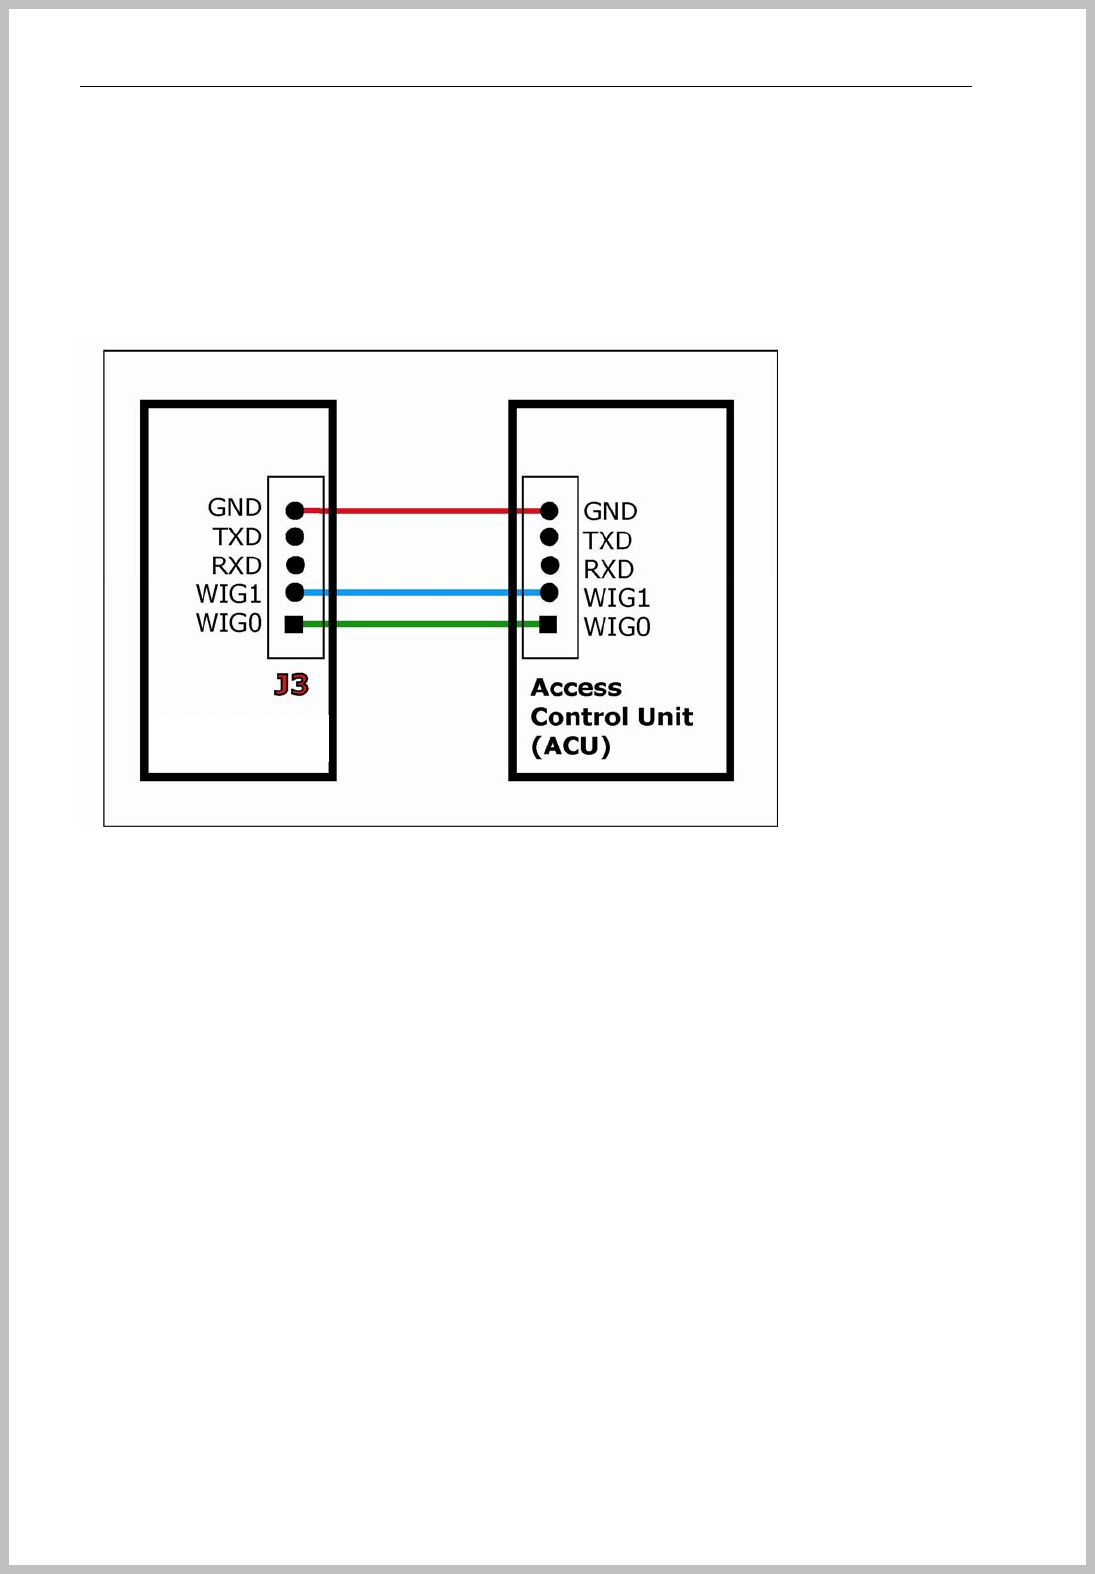
Console Manager
- 143 -
Wiegand communication with Access Control Unit ( ACU )
Connection example of BKS-4800 connector
BKS-4800
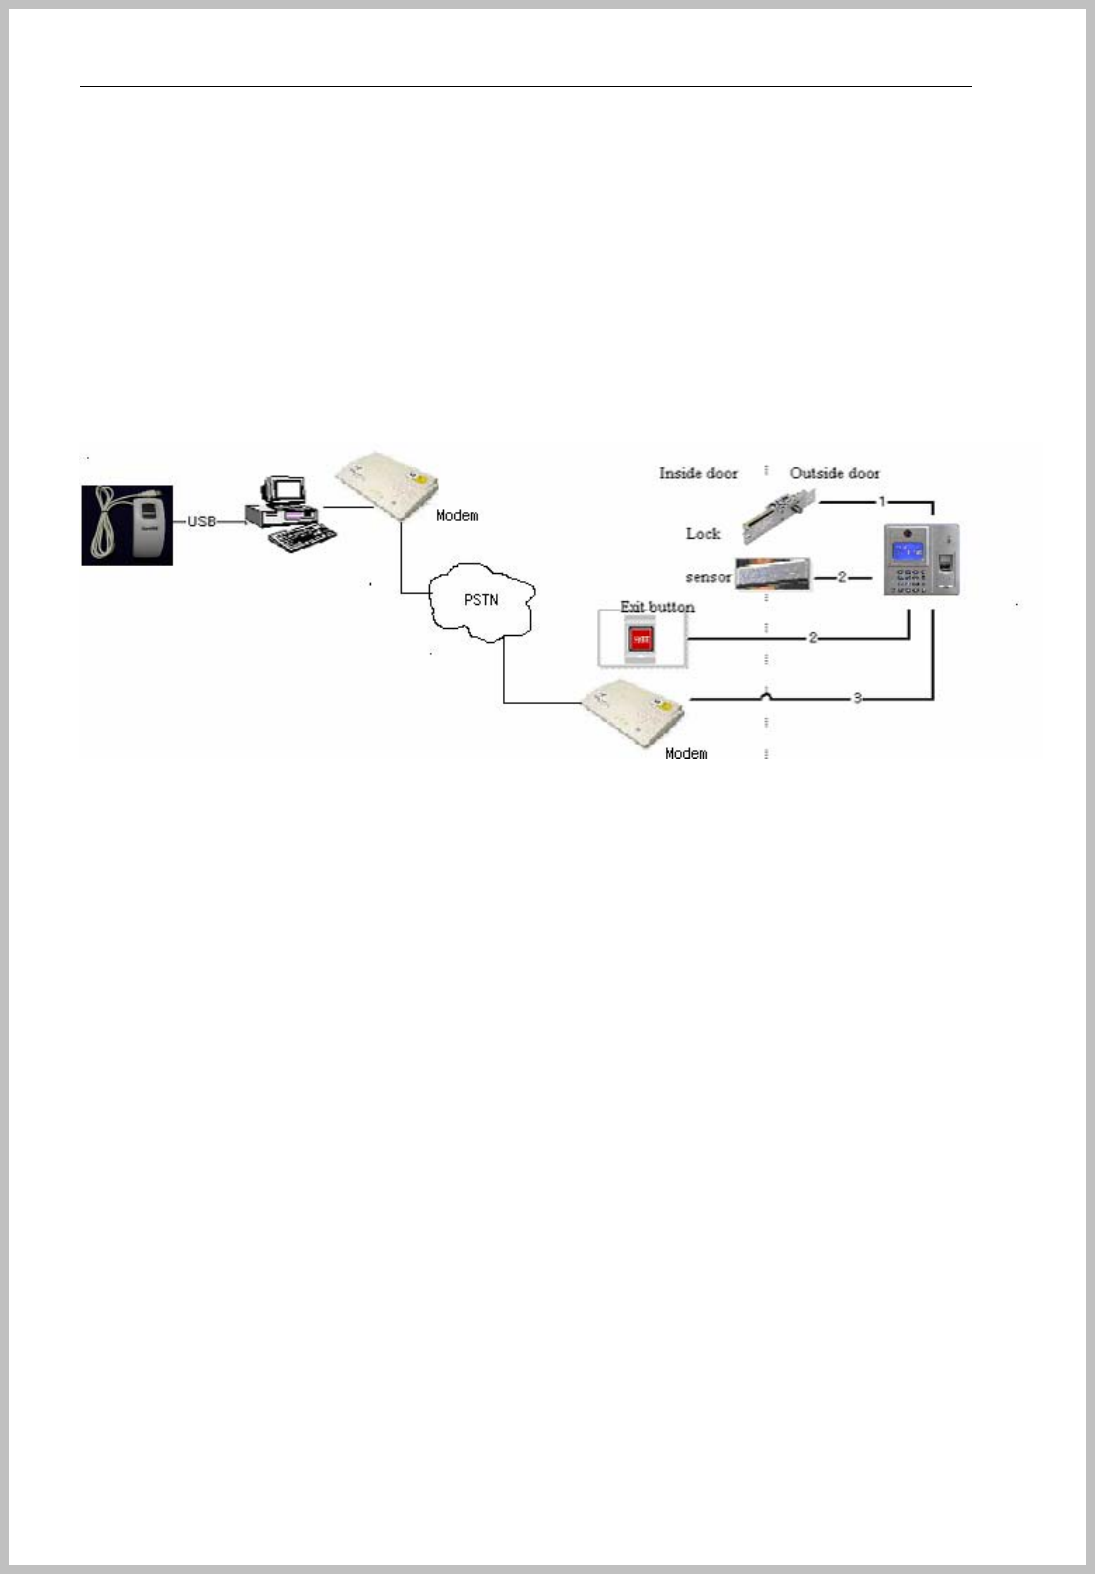
Console Manager
- 144 -
PC – Modem
For modem communication, it needs two modems for sender and receiver with fixed telephone
number.
Connection example of BKS-4800 connector
zsa
EM TYPEmodule connection- Mifare Standard Module
BKS-4800
BKS-2600

Console Manager
- 145 -
1. EM TYPEType
- Voltage TTL (3.3V ~ 5V ) from EM TYPEmodule : TTL RXD type
( 3-2 connect )
- Voltage RS232( +- 15V) from EM TYPEmodule : RS232 RXD type
( 1-2 connect )
2. EM TYPEModule
- 1,2 : Supply VCC 5V to module
- 3 : TTL signal
- 4 : RS232 signal
3. Communication Format
9600, N , 8, 1
4. Data storage
Max 8Byte
*Please inform to BIOINSEC with other type of module.