BridgeWave Communications BW64 BridgeWave BW64 & BW64E User Manual 045 57014 0A
BridgeWave Communications, Inc. BridgeWave BW64 & BW64E 045 57014 0A
Contents
- 1. User Manual pt 1
- 2. User Manual pt 2
- 3. User Manual pt 3
User Manual pt 1

P/N580‐00516
BW64 & BW64E
Configuration Guide
045-57014 Rev A

BW64 & BW64EConfiguration Guide
i 045-57014 Rev A
Copyright Notice & Disclaimer
Copyright © 2004 – 2015 BridgeWave Communications. All rights reserved.
Printed in the USA
No portion of this publication may be reproduced, copied, or distributed without the written consent of
BridgeWave Communications. BridgeWave reserves the right to update or change the material in this
publication at any time without notice. BridgeWave has made every effort to ensure that the information
and the instructions contained in the publication are adequate and is not responsible for any errors or
omissions due to typing, printing, or editing of this document.
Purchasers of BridgeWave products should make their own evaluation to determine the suitability of
each such product for their specific application. BridgeWave’s obligations regarding the use or
application of its products shall be limited to those commitments to the purchaser set forth in its
Standard Terms and Conditions of Sale for a delivered product.
This publication has been prepared for professional and properly trained personnel, and the customer
assumes full responsibility when using the information herein.
Export Control
All BridgeWave radio products are restricted commodities that fall under ECCN 5A002 of the
Department of Commerce. These products are "ENC restricted" under section 740.17(b)(2) of the Export
Administration Regulations (EAR). BridgeWave products may only be exported, re-exported,
transferred, or retransferred in accordance with Export Administration Regulations. Diversion contrary
to U.S. law is expressly prohibited.
Product Compatibility
While every effort has been made to verify operation of this product with many different
communications products and networks, BridgeWave makes no claim of compatibility between its
products and other vendors’ equipment. It is assumed that users have thoroughly evaluated this
product’s performance in the communications environment in which it will be used.

BW64 & BW64EConfiguration Guide
ii 045-57014 Rev A
Safety
CAUTION, WARNING, and DANGER statements have been strategically placed in the text to alert
personnel of possible hazards. These statements must be closely observed.
The following general safety precautions must be observed during all phases of operation and service of
the products covered in this manual. Failure to comply with these precautions or with specific warnings
elsewhere in this manual willfully violates standards of design, manufacture, and intended use of the
product. BridgeWave assumes no liability for the customer’s failure to comply with these requirements.
These BridgeWave radios meet all applicable FCC safety requirements for general population
exposure to radio frequency emissions; however, it is best to avoid prolonged, unnecessary
exposure to the front of the radio while it is operating.
The outdoor equipment must be properly grounded to provide some protection against voltage
surges and built-up static charges. In the event of a short circuit, grounding reduces the risk of
electrical shock.
For installations in the U.S.A., refer to Articles 810830 of the National Electrical Code,
ANSI/NFPA No. 70, for information with respect to proper grounding and applicable lightning
protection for DC cables. The installer must also follow any additional local building and
electrical code regulations.
For installations in all other countries, implement protection in accordance with the safety
standards and regulatory requirements of the country where the equipment is to be installed.
Do not install or operate this equipment in the presence of flammable gases or fumes. Operation
of any electrical instrument in such an environment constitutes a definite safety hazard.
Do not install substitute parts or perform any unauthorized modification to the equipment.
Changes or modifications not expressly approved by BridgeWave can void the user’s authority
to operate the equipment.

BW64 & BW64EConfiguration Guide
iii 045-57014 Rev A
Regulatory Information
This device complies with FCC Part 15.255 and Industry Canada RSS-210.
Operation is subject to the following two conditions:
(1) This device may not cause harmful interference, and,
(2) This device must accept any interference that may cause undesired operation.
French Translation:
Le présent appareil est conforme aux CNR d’Industrie Canada applicables aux appareils radio exempts
de licence. L’exploitation est autorisée aux deux conditions suivantes:
(1) l’appareil ne doit pas produire de brouillage;
(2) l’utilisateur de l’appareil doit accepter tout brouillage radioélectrique subi, même si le
brouillage est susceptible d’en compromettre le fonctionnement.

BW64 & BW64EConfiguration Guide
iv 045-57014 Rev A
Equipment Precautions
Water and Moisture - These BridgeWave radios are designed to withstand weather conditions typically
encountered when installed outdoors.
RF Radiation Safety, Maximum Permissible Exposure (MPE) Limits
Regarding guidelines for Human exposure limits to Radio Frequency (RF) electromagnetic fields, the
BW64E has been evaluated for compliance with FCC OET Bulletin 65 and human exposure limits
recommended by the International Commission on Non-Ionizing Radiation Protection (ICNIRP), IEEE,
and adopted by ANSI.
BW64E devices, utilizing 10inch (25.4cm) integrated antennas and BW64E devices utilizing 2ft(60cm)
diameter antennas, are below the General Population/Uncontrolled Exposure limits of 1 mW/cm2, and
well below the Occupational/Controlled Exposure limit of 5mW/cm2 at any Near-Field, Transition, or
Far-Field distance region including the antenna surface.

BW64 & BW64EConfiguration Guide
v 045-57014 Rev A
Table of Contents
Copyright Notice & Disclaimer .......................... i
Export Control .................................................... i
Product Compatibility ......................................... i
Safety .................................................................. ii
Regulatory Information ..................................... iii
Equipment Precautions ..................................... iv
RF Radiation Safety, Maximum Permissible
Exposure (MPE) Limits .................................... iv
1Introduction .................................................. 3
1.1Purpose.................................................... 3
1.2Prior Knowledge ..................................... 3
1.3Contact Information ................................ 4
2System Overview .......................................... 5
2.1Internal Switch ........................................ 5
3Connecting to the NMS ............................... 7
4Installation Configuration ......................... 10
4.1Auto-Calibration ................................... 10
4.2Rate Setup .............................................. 12
4.3SFP Interface......................................... 13
4.4AdaptPath™ Secondary Path ............... 14
4.5Synchronous LSP Setup ......................... 16
4.6AdaptSwitch™ ....................................... 18
4.7Access Control ....................................... 20
4.8IP Setup ................................................. 24
5Diagnostic Tools ......................................... 26
5.1Status Page Indications ......................... 26
5.2Viewing Statistics .................................. 32
5.3AES Statistics......................................... 35
5.4TX Mute Function .................................. 36
6SNMP .......................................................... 37
6.1Configuring SNMP ................................ 37
6.2SNMP MIB Information ........................ 39
7User Accounts & Passwords ...................... 43
7.1User ....................................................... 44
7.2Administrator ......................................... 44
7.3Factory Access....................................... 45
7.4Communities .......................................... 46
7.5Enhanced Security ................................. 47
7.6Logging Out ........................................... 47
8RADIUS ...................................................... 48
8.1Configuring RADIUS ............................ 48
9Configuration File Management ............... 50
9.1Backing Up a Configuration ................. 50
9.2Editing a Configuration File ................. 50
9.3Restoring a Configuration ..................... 51
10Upgrading Software ................................... 52
10.1Determining Versions ........................ 52
10.2Software Upgrade Procedure ............ 53
11System Restarts .......................................... 56
12Product Upgrades by Request ................... 57
12.1Introduction ....................................... 57
12.2Request License File Procedure ........ 57
13AES Encryption Feature ........................... 59
13.1AES Setup ........................................... 60
14SysLog ......................................................... 63

BW64 & BW64EConfiguration Guide
2 045-57014 Rev A
14.1Syslog Message Format ..................... 63
14.2Local Syslog Message Display .......... 64
14.3Syslog Setup ....................................... 64
14.4NTP Setup for SysLog Time Stamping
65
15Default Recovery (Hard Reset) ................. 67
BW64 & BW64EConfiguration Guide
3 045-57014 Rev A
1 Introduction
1.1 Purpose
The information in this guide is directed to persons who must perform or coordinate the tasks associated
with the process of installing wireless communication devices, and planning communication network
applications.
1.2 Prior Knowledge
This manual assumes the operator has at least basic experience with and an understanding of wireless
technology and some familiarity with configuring and operating networking equipment. Preferably, the
person installing this equipment fully understands the information covered in this manual prior to
attempting these procedures.
DANGER, WARNING and NOTE statements have been placed in various sections throughout this
document to alert personnel of possible traffic affecting issues and to provide additional tips and helpful
information. These statements should be closely observed.
Symbol Description
Indicates that personal injury can result if the user does not
comply with the given instruction.
A DANGER statement will describe the potential hazard, its
possible consequences, and the steps to perform to avoid
personal injury.
Indicates that equipment damage, process failure and/or loss of
data can result if the user does not comply with the given
instructions.
A WARNING statement will describe the potential hazard, its
possible consequences, and the steps to perform to avoid
serious equipment damage.
Provides supplementary information to emphasize a point or
procedure, or provides a tip for easier operation.
BW64 & BW64EConfiguration Guide
4 045-57014 Rev A
1.3 Contact Information
Technical Assistance and Customer Service
BridgeWave distributors and resellers are authorized local service providers and are responsible for
immediate Tier 1 customer support. If a problem cannot be resolved, contact BridgeWave Customer
Service for assistance:
Regional Standard Support
Available Monday through Friday from 8:00 AM to 5:00 PM UTC local time, per region.
NAM (North America) UTC -8
+1 (408) 567-6906
EMEA (Europe, Middle East, and Africa) UTC +0
+1 (408) 457-6658
APAC (Asia Pacific) UTC +8
+1 (408) 457-6659
The UTC coverage times do not reflect daylight saving time
adjustments.
E-mail: support@bridgewave.com
Return Material Authorization (RMA)
Should BridgeWave equipment have to be returned for repair or replacement, an RMA number must be
obtained from BridgeWave. When returning equipment, be sure to write the RMA number on the
outside of the shipping carton, and follow instructions received from support upon approval of the
RMA.
BridgeWave Sales
For questions pertaining to the purchase of equipment, software licenses, warranties, or services please
contact sales at the following:
E-mail:sales@bridgewave.com
Inside Sales: +1.866.577.6908
BW64 & BW64EConfiguration Guide
5 045-57014 Rev A
2 System Overview
This section provides an overview of the system design.
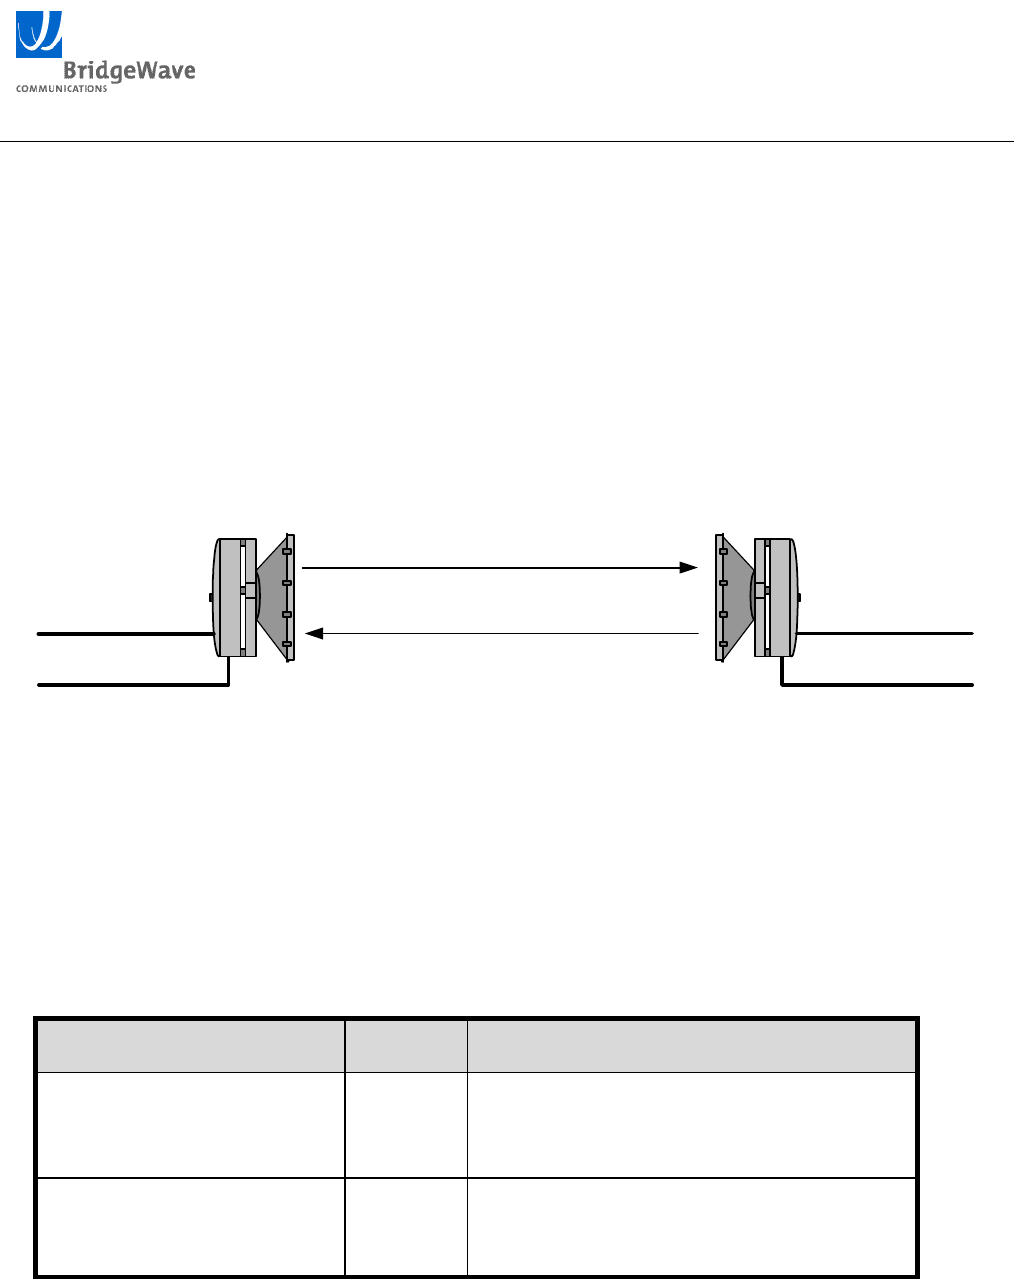
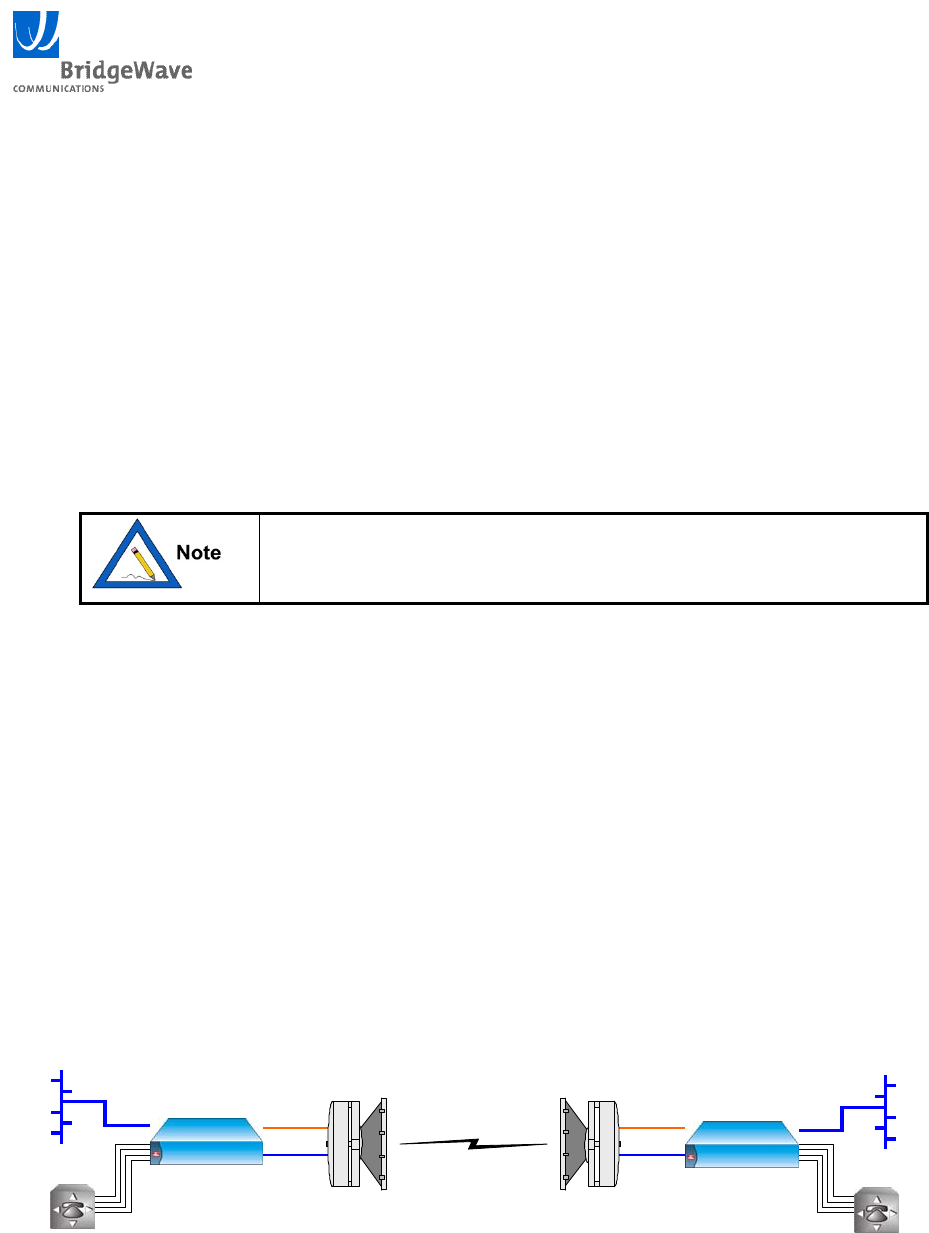
A BridgeWave link consists of two radio terminals that transmit to each other on a full duplex channel
pair, providing point-to-point 100 Mbps or 1000 Mbps Ethernet connectivity between two locations.
The BW64 and BW64E product uses FDD (Frequency Division Duplexing), transmitting on one
frequency and receiving on a separate frequency at the same time. One terminal in each link is
designated the High-Band unit and one is designated the Low-Band unit. The High Band unit transmits
on the higher frequency of the channel pair and receives on the lower frequency, while the Low Band
unit transmits on the lower frequency and receives on the higher frequency. Figure 2-1 provides an
example.
10/100Base-T Copper
1000Base-X Fiber
High-Band Unit Low-Band Unit
Transmits Low Channel Receives Low Channel
Transmits High Channel Receives High Channel
10/100Base-T Copper
1000Base-X Fiber
Figure 2-1 Link Diagram
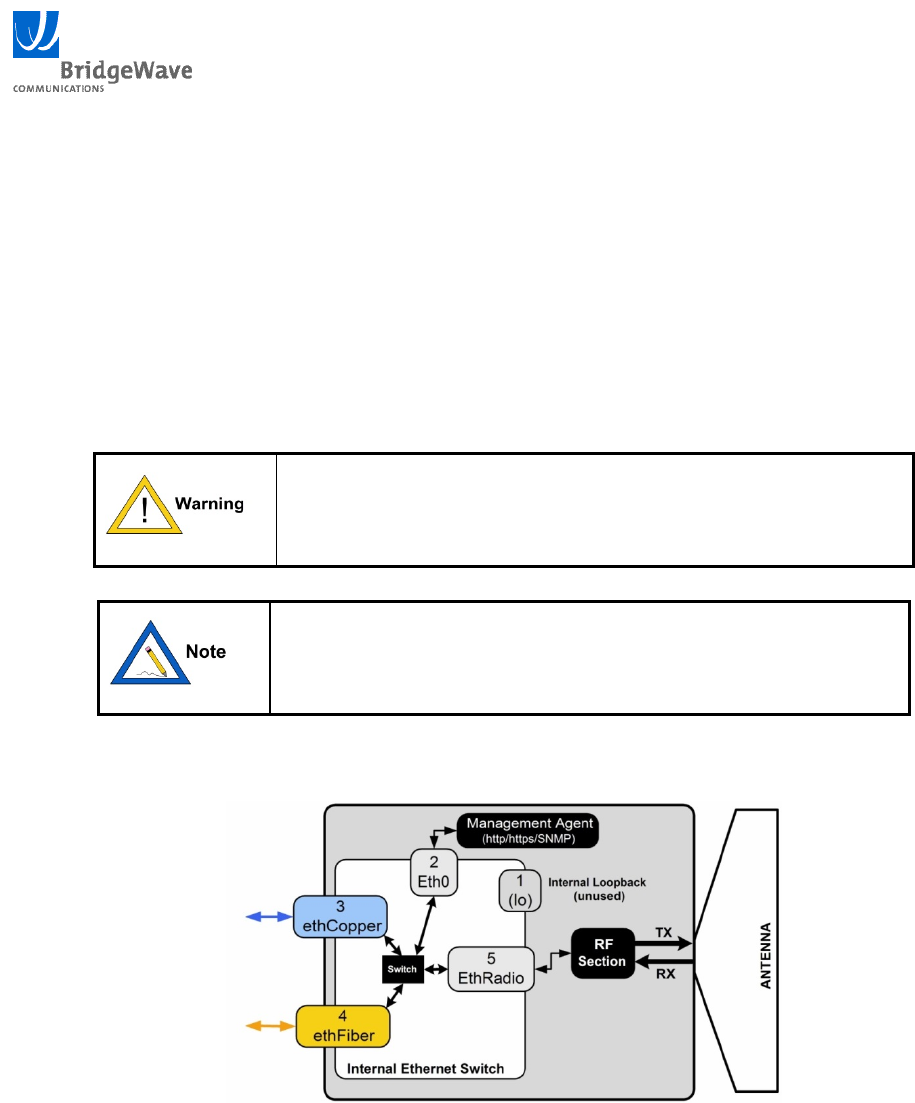
2.1 Internal Switch
Both High-Band and Low-Band units contain an embedded Ethernet switch. The switch has five
interfaces and can be configured to allow both user application and management agent Ethernet packets
to be delivered to/from the fiber, copper, radio, and or management switch port interfaces. Table 2.1-
1provides a list of the interfaces and a description of each followed by a diagram in Figure 2-2.
Table 2.1-1 Internal Switch Interface List
Interface#Description
Loopback
1
(lo)
Internalloopbackinterface.Thisinterfaceappears
asaninterfaceinSNMPbutisnotuseraccessibleor
configurable.
ManagementAgent
2
(eth0)
InternalinterfacethatprovidesaPINGresponder,
anSNMPagentandanHTMLwebserverfor
managingtheunit

BW64 & BW64EConfiguration Guide
6 045-57014 Rev A
Copper3
(ethCopper)
10/100Base‐Tcopperinterfaceusedforoutofband
management,AdaptPathoperationordropand
insertapplications.Configuredforauto‐negotiation
enabledandauto‐cross‐overcabledetection.
Fiber
4
(ethFiber)
1000Base‐SX(Standard) or1000Base‐LX(Optional)
fiberinterface.Configurableforauto‐negotiation
enabledordisabled.
Radio
5
(ethRadio)
Thisinterfaceisinternallyattachedtotheradio
transmitandreceivechannelandprovidesthe
connectionbetweenthelocalandremoteradio
terminals.Theinterfaceoperatesinthefollowing
modesdependingonproduct.
100Mbps(FEProducts)
1000Mbps(GEProducts)
100/1000Mbps(ARProducts)
Figure 2-2 Internal Switch Diagram
BW64 & BW64EConfiguration Guide
7 045-57014 Rev A
3 Connecting to the NMS
By default the units are configured for ‘In-Band’ management and the web interface can be accessed
through the copper, SFP, or over the link via the radio interface.
The units are shipped with the factory default IP address set to 192.168.0.1 for Low-Band units and
192.168.0.2 for High-Band units.
Multiple users may concurrently access the radio management
agent from different browser windows. If multiple users are logged
on as Administrator, they are all permitted to independently
modify the unit’s configuration.
The following steps should be followed to connect to the units when in their default configuration state:
1. Configure your PCs IP Address to one that falls within the (192.168.0.3 – 192.168.0.254, Subnet
Mask 255.255.255.0) range.
2. Open a web browser and enter http://192.168.0.1 for the Low-Band unit or http://192.168.0.2 for
High-Band.
3. Optionally, if the “https” was enabled under the IP Setup page then enter https://192.168.0.1 for
Low-Band units or https://192.168.0.2 for High-Band. The https:// URL is required to establish a
Secure Socket Layer (SSL) connection to the units when https is enabled.
BW64 & BW64EConfiguration Guide
8 045-57014 Rev A
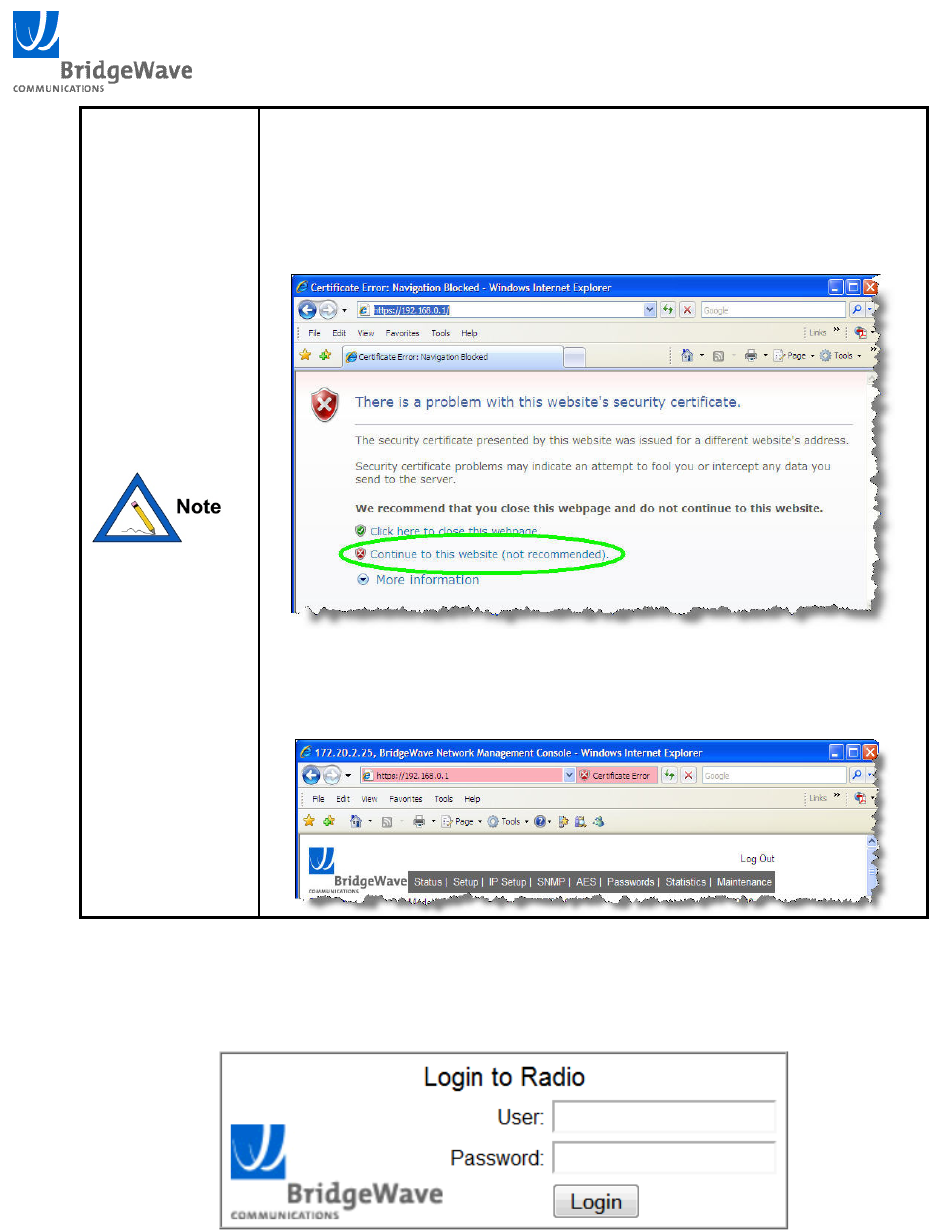
Depending on web browser version used, a certificate acceptance
dialog window may be displayed when logging into an “-AES”
enabled product that requires https:// for establishing an SSL
connection. Select the option that allows you to continue to the
site.
Some web browser versions will continue to highlight the address
bar in red after choosing to continue.
4. After entering the IP address of the radio unit, the browser should display the logon screen; enter
‘admin’ as the user and ‘adminpass’ as the default password.

BW64 & BW64EConfiguration Guide
9 045-57014 Rev A
After logging on, the ‘Status’ screen will be displayed. The navigation bar across the top of the screen
provides links to the following management functions:
Status – Displays status indications and modes of operation for the units’ interfaces.
Setup – Configure physical network interface settings and access options for the management agent.
IP Setup – Configure DHCP or static IP addressing for the management interface.
AES – Configure and activate 256 key, enable/disable AES. Only visible on units with AES license
installed.
SNMP – Configure MIB-2 system group variables and trap settings.
Security – Set/change passwords, enable/disable factory access, and configure SNMP read/write
community strings.
Default username/passwords are:
User Account: user/userpass
Administrator Account: admin/adminpass
RADIUS – Configure RADUIS server IP, shared secret, timeout and authorization.
Statistics – Display Ethernet traffic statistics for physical port interfaces.
Syslog – Display, filter and clear local Syslog events.
Maintenance – Provides an inventory of hardware and software. Perform an auto-calibration and
soft/hard restart. Backup and restore configuration files and update software.
Logout – Terminates the management session from the browser window.

BW64 & BW64EConfiguration Guide
10 045-57014 Rev A
4 Installation Configuration
The initial installation of the units involves configuring fiber interface speed and duplex settings,
selecting In-Band or Out-Band management options and setting IP addresses. The wireless link should
be physically installed following the instructions found in the corresponding installation manual
provided with the link. BridgeWave has verified operation with current versions of Windows Internet
Explorer and Mozilla Firefox.
4.1 Auto-Calibration
The Auto-Calibrate function is an important part of the system installation and is normally performed
during the physical hardware installation, per the procedures outlined in the hardware Installation and
Operations Manual, after the antenna alignment has been completed. While this function is normally
performed as part of the hardware installation, it is also possible to initiate the function through the web
management interface.
The Auto Calibration feature scans the receive signal level across the entire band and flattens the levels,
much like the equalizer on your home or car stereo. The radio system is said to be in “Alignment Mode”
when it is first powered up with no fiber connected. Once the alignment is completed; the Auto
Calibration mode is triggered ON as soon as the fiber cable is connected. You will know the radio
terminal has initialized the Auto Calibration when the Link LED is flashing on/off - this lasts for up to
120 seconds. The fiber interface of the radio terminal needs to detect an optical signal of the appropriate
wavelength. This requires the fiber optic cables be connected to a 1000Base-SX port on an Ethernet
device (switch, router, media converter, etc.) or this can be accomplished with a fiber optic loopback
cable by connecting the fiber output of the radio into the fiber input of the radio. The loopback cable
should only be connected long enough for auto-calibration to start and should be removed immediately.
Auto-calibration is a required step per installation once antenna alignment is completed.
The results are saved to flash for recall upon system hard restart or power-cycle.
Use the following steps to perform an ‘Auto-Cal’ from the web management interface.
1. Connect to the web management interface of the unit, and select the ‘Maintenance’ tab.
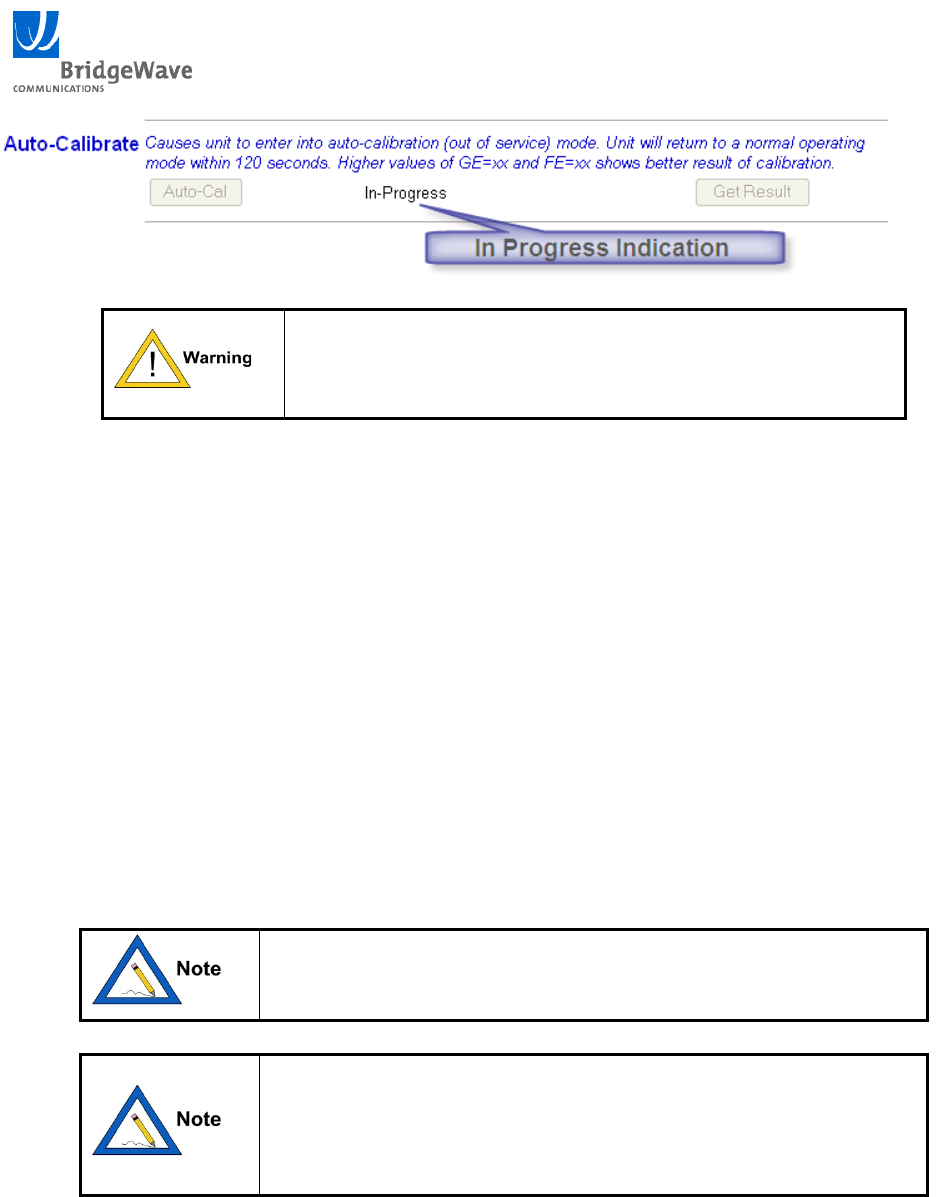
2. Under the ‘Auto-Calibrate’ section click on the ‘Auto-Cal’ button. An ‘In-Progress’ status will
be displayed.
BW64 & BW64EConfiguration Guide
11 045-57014 Rev A
Clicking the ‘Auto-Cal’ option causes the link to enter an out
of service mode and is considered traffic affecting. The link
will return to normal operating mode within 120 seconds.
3. Continue to click the ‘Maintenance’ tab to refresh the page. The calibration results will be
displayed upon completion, and are automatically saved to flash.
The results are a numeric value that is displayed for Gigabit Ethernet (GE), Fast Ethernet (FE), or both
GE and FE are displayed for FE-U and AR products. Listed below is a description of the expected
results for each mode.
FE = This field displays the calibration results for the Fast Ethernet (FE) mode of operation. A good
calibration will result in a value of 10 or higher being displayed. Higher values indicate better
calibration results. As values increase, the incremental benefits diminish.
GE = This field displays the calibration results for the Gigabit Ethernet (GE) mode of operation. A good
calibration will result in a value of 10 or higher being displayed. Higher values indicate better
calibration results. As values increase, the incremental benefits diminish.
Calibration results that display slightly lower than 10 may be
observed on links that are operating near or over the
recommended maximum distance.
Performing a ‘Get Result’ from the ‘Maintenance Page’ will force
the unit to pull the current results and display them on the web
interface screen. It may be necessary to do this if a calibration is
performed using the fiber cable as outlined in the hardware
Installation and Operations Manual.
BW64 & BW64EConfiguration Guide
12 045-57014 Rev A
4.2 Rate Setup
The ‘AdaptRate’ option is available on FE80U or FE60U (using GigE trial mode or upon AR upgrade)
and AR products only. This feature allows for the link to operate in 1000 Mbps (GE) mode and
temporarily switch to 100 Mbps (FE) mode to overcome fading conditions caused by severe rain events.
This parameter can also be used to disable the AdaptRate feature and manually force the link to operate
in FE or GE mode only.
For BW products, the rate is set by license key to 125, 250, 500 or 1000 Mbps.
Use the following steps to configure the radio Interface (FE-U and AR products only):
1. Connect to the web management interface of the ‘High-Band’ unit, and select the ‘Setup’ tab.
The Low band radio will follow the settings of the High band radio
2. Under the ‘AdaptRate Setup’ section select the desired ‘Operation Mode’ from the following
options:
AdapRate (Default) – Allows for automatic switching from 1000 Mbps (GE) mode to 100
Mbps (FE) mode when the Receive Signal Level (RSL) drops to –57dBm or below. The link will
automatically return to GE mode when the RSL has reached –55dBm or higher.
1000 Mbps – Selecting this option fixes the link to operate in Gigabit Ethernet (GE) mode only.
100 Mbps – Selecting this option fixes the link to operate in Fast Ethernet (FE) mode only.
The ‘AdaptRate’ ‘Operation Mode’ parameter is configured on
FE-U and AR High-Band units. The option is a display only
parameter on Low-Band Units. Low-Band units derive the
operational mode from the High-Band units. FE and GE
products are fixed to 100Mbps or 1000 Mbps modes only. This
step can be skipped for fixed mode FE and GE products.
An AR or upgraded FE-U product can be used as a spare for
an FE or GE unit of the same frequency and band. However,
the ‘Operation Mode’ must be manually set to the appropriate
mode when used as a spare. This will prevent the unit from
adaptively changing modes, which will drop the link causing a
network outage.
3. If the calibration procedure was performed during the hardware installation make sure the
‘Installation Auto-Calibration’ option has been disabled. Refer to Section 4.1 to perform a
calibration from the web interface.
BW64 & BW64EConfiguration Guide
13 045-57014 Rev A
4. Select ‘Submit New Values’ at the bottom of the ‘Setup’ page. A red value will be displayed
under the Current Effective Values column. Click the ‘Setup’ tab to refresh the browser window
until the Current Effective Value is no longer displayed in red.
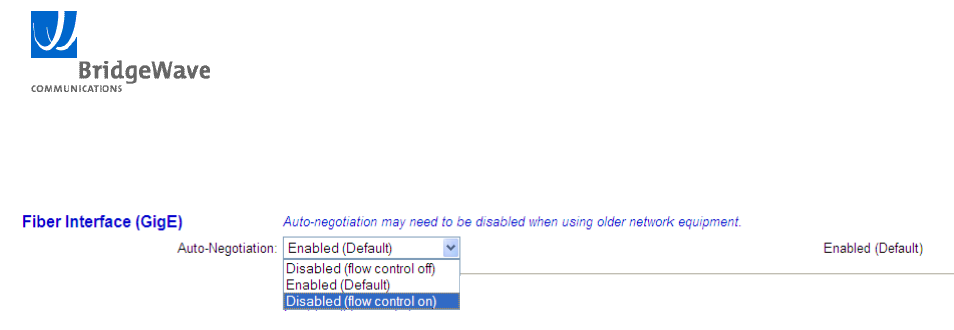
4.3 SFP Interface
All BridgeWave 60GHz and 80GHz radios are fitted with a Gigabit Ethernet fiber interface, regardless
of whether the radio is operating in FE (100 Mbps) or GE (1000 Mbps) mode over the air. Two options
are available for the fiber interface of the radio unit.
1000Base-SX option: Designed for 850nm multi-mode fiber.
1000Base-LX option: Designed for 1310nm single-mode fiber.
For both options, Auto Negotiation (AN) does not negotiate Speed or Duplex, only flow-control. When
auto-negotiation is disabled, Flow-control can also be set to enabled or disabled. The units are set with
auto-negotiation and flow control enabled as the factory default.
When flow control is enabled on the fiber interface and
management access is set to “In-Band”, the copper interface
and the internal management interface will assert Pause frames
towards the fiber when broadcast, multicast, and unknown
unicast traffic reaches more than 100Mbps.
It is important that the BridgeWave radio and the customer network equipment interfaces be configured
identically; both interfaces should be configured to auto-negotiate or else both should be configured to
not auto-negotiate.
For Adapt-Rate (AR) mode, the SFP interface on the radio and
the attached switch should be set with flow-control enabled on
models. This will allow flow control to assert backpressure on
the network, via pause frames, when AR is operating in 100
Mbps Fast Ethernet mode. This will assist with preventing
congestion and provide for higher Quality of Service (QoS)
when stepping from 1000 Mbps down to 100 Mbps mode.
Use the following steps to configure the SFP Interface:
1. Connect to the web management interface of the unit, and select the ‘Setup’ tab.
2. Under the ‘Fiber Interface (GigE)’ section, select ‘Enabled (Default)’, ‘Disabled (flow control
off)’ or ‘Disabled (flow control on)’
BW64 & BW64EConfiguration Guide
14 045-57014 Rev A
3. Select ‘Submit New Values’ at the bottom of the ‘Setup’ page. A red value will be displayed
under the Current Effective Values column. Click the ‘Setup’ tab to refresh the browser window
until the Current Effective Value is no longer displayed in red.
4.4 AdaptPath™ Secondary Path
When an AdaptPath™ link reaches a pre-defined RSL level, the fiber traffic is directed to a secondary
path attached to the copper interface such as a 5.4 or 5.8GHz PTP radio link
The Fiber remains operational and In-Band management will still be available.
The AdaptPath™ capability should remain disabled except in redundant link configurations or if it is
necessary to quickly signal external network equipment when radio link down states are detected.
The AdaptPath™ feature:
Is only available in Adapt-Rate (AR) radios from BridgeWave
RSL activation points are configured from the High band radio in the radio link.
The Low band radio LSP must be configured as enabled.
The AdaptPath™ function can be setup to allow:
GE to FE and then failover by setting the RSL level to the suggested FE default.
GE to failover by setting the RSL level to the suggested GE default.
Flexibility to set any RSL level for the AdaptPath™ failover.
The Copper port on the BridgeWave radios is set to Auto-negotiate (AN). The failover radio must also
be set to AN. The negotiation between the two devices should settle at 100Base-T Full Duplex.
In-Band management is required, Out-Band management is not available with AdaptPath™ links.
Data over the secondary path is NOT encrypted on AES equipped systems
BW64 & BW64EConfiguration Guide
15 045-57014 Rev A
Fiber TX RX
RX TX
RX TX
TX RX
Fiber
RXTX
TX
RX
Secondary Radio Path
CopperCopper
Figure 4-1 AdaptPath™ Technology
Use the following steps to configure the AdaptPath™ feature:
After the equipment is installed, perform the following suggested steps to setup the LSP function in an
AR system:
1. In the ‘Setup’ page on both Radios, set the Radio LSP to Fiber (Adaptpath) to ‘Enabled’
2. In the High band radio, press the FE Default Switch Points button to set the RSL trigger points to
achieve GE to FE and then to LSP rate switching. The RSL fields will then be filled in with the
default values. (The Low band radio RSL Activation function is grayed out)
3. Set the ‘Access Control’ to ‘In-Band (Default)’ at both High and Low band radios
4. Press the ‘Submit New Values’ button at both radios.
5. When Adaptpath triggers, the High band Radio TX will be muted, the High Band RX will read
green RSL but Red Link. The Low Band RX will read Red RSL and Red Link.

BW64 & BW64EConfiguration Guide
16 045-57014 Rev A
Setting RSL activation point values to zero:
When the RSL Activation point is set to zero, the AdaptPath™ or
LSP function will be continuously forced.
When the RSL Deactivation point is set to zero, the function will
not return after engagement.
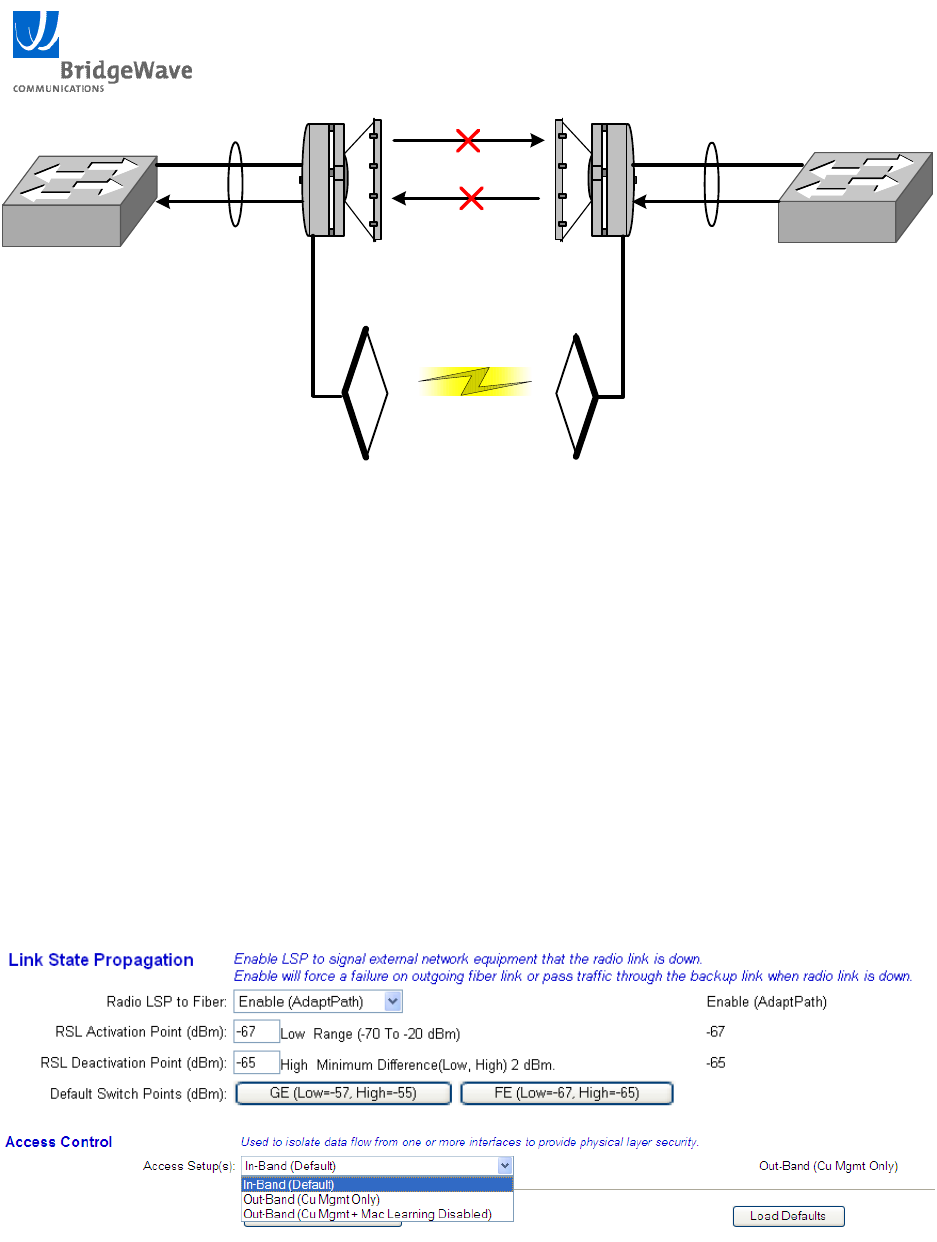
4.5 Synchronous LSP Setup
Link State Propagation (LSP) allows external network equipment to handle redundancy by rapidly
switching the application traffic, synchronously at both ends of the link, to another available
(redundant) interface in the external network. This functionality generally supported on enterprise and
network backbone class switches and routers.
LSP should remain disabled unless it is necessary to quickly signal external network equipment when
radio link down states are detected.
LSP:
Is available in all radios from BridgeWave, AR, GE, FE and FE-U.
The functionality can be tested by using a built in test function.
LSP can be setup to allow:
AR: GE to FE and then LSP by setting the RSL level to the suggested FE default.
GE: GE to LSP by setting the RSL level to the suggested GE default.
FE: FE to LSP by setting the RSL level to the suggested FE default.
Flexibility to set any RSL level for the LSP activation.
In-Band management will be disconnected from Fiber when LSP is activated. In-Band and Out-Band
management will still be available from Copper.
LSP configuration is only performed on the High band radio
On the Low band radio, the grayed out settings are not applicable
to LSP operation
BW64 & BW64EConfiguration Guide
17 045-57014 Rev A
Fiber TX RX
RX TX
RX TX
TX RX
Fiber
RXTX
TX
RX
Core Network Redundant Path
Switch Port Gets
Notified That Link Is Down High-Band
Radio
Low-Band
Radio
Switch Port Gets
Notified That Link Is Down
Copper
(Management)
Copper
(Management)
Figure 4-2 LSP
LSP: Access to the web and SNMP management functionality will
not be possible if the radio is being managed In-band through the
fiber interface and LSP has disabled the fiber interface.
Restoration of the radio link will be required in order to regain
access to the equipment.
If the LSP feature is enabled it is highly recommended to enable
copper Out-Band management. This will allow for access to the
units if the radio link is in a down state.
LSP: LSP recovers faster if auto negotiation is disabled on the
fiber interface of the radio. It is recommended to disable auto
negotiation on the attached network equipment and disable auto
negotiation on the radio’s fiber interface if using the LSP feature
Flow-control can either be disabled or enabled in the radio with
auto-negotiation disabled.
Use the following steps to configure Synchronous LSP:
After the equipment is installed, perform the following suggested steps to setup the function.
1. In the ‘Setup’ page, set both High band and Low band radios Radio LSP to Fiber selection to
‘Enabled’
2. In the High band radio, and for AR, press the FE Default Switch Points button to set the RSL
trigger points to achieve GE to FE and then to LSP rate switching. The RSL fields will then be
filled in with the default values. For GE or FE only systems, only one FE or GE default button
will be available.
3. Custom RSL activation points can be directly entered into the field.
4. Select Access control to either ‘In-Band (Default) or Out-Band (Copper Management Only) at
both Radios
BW64 & BW64EConfiguration Guide
18 045-57014 Rev A
5. Press the ‘Submit New Values’ button at both radios.
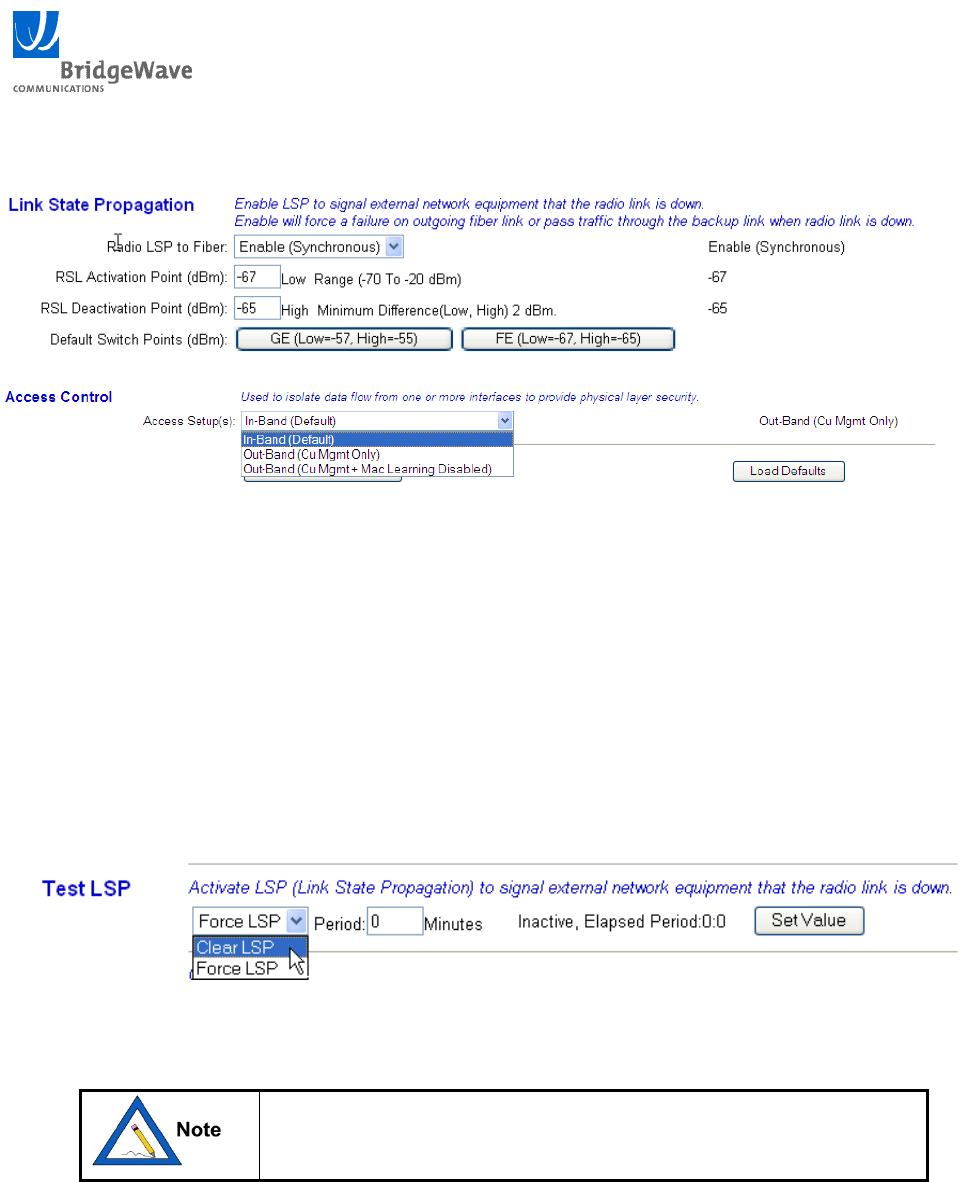
Testing the LSP function(s):
1. Put test apparatus or computers at each end of the link to ping or run traffic across the link
2. In the High band Radio’s ‘Maintenance’ page, set ‘Force LSP” and set the duration of the test to
1-99 minutes. The High band radio activates the function for both ends of the link and the ‘Force
LSP’ control will not be seen on the Low band radio
3. Press the ‘Set Value’ button
4. For an AdaptPath™ link, observe that the traffic is still flowing in the secondary path
5. For a LSP link, verify that both fiber transmitters are down.
6. Return the system to the ‘Clear LSP’ state. (Or wait for the function to timeout)
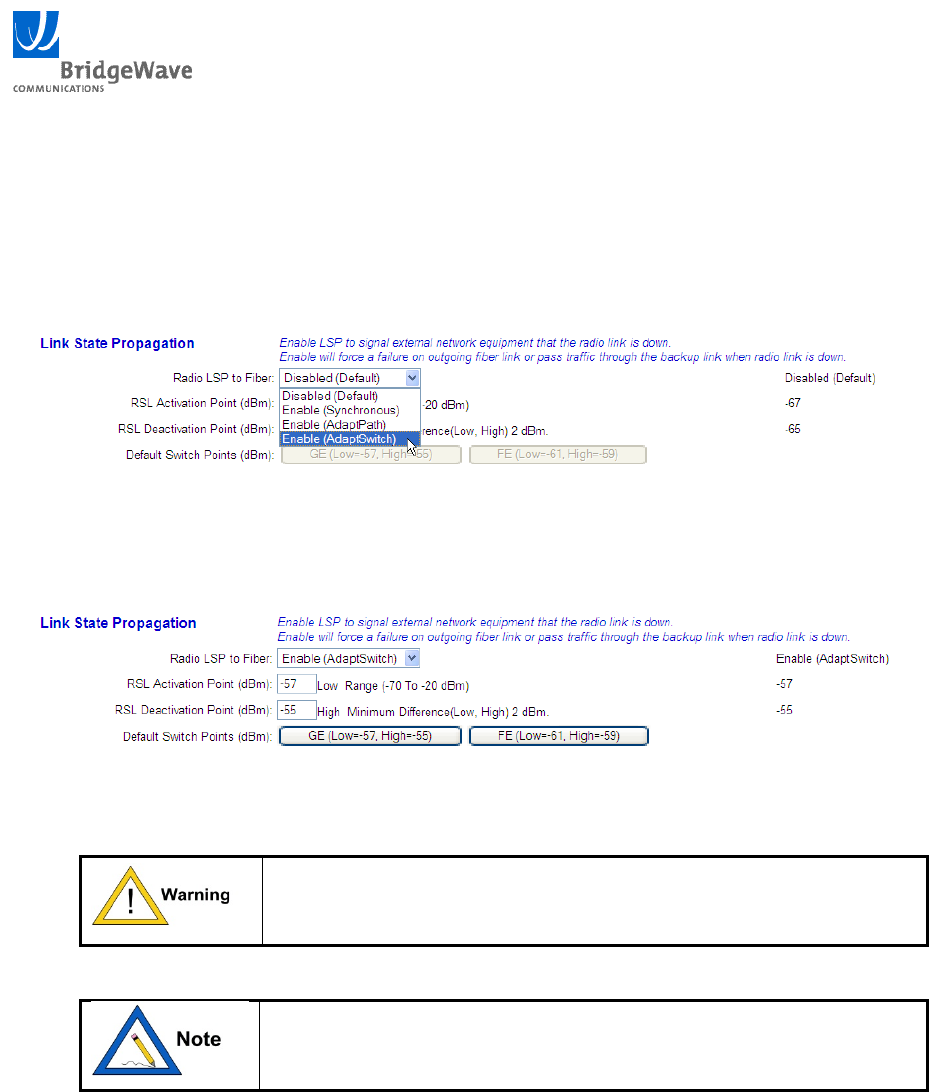
4.6 AdaptSwitch™
AdaptSwitch™ is a license controlled software upgrade. Please
use the ‘Request License’ function on the ‘Maintenance’ page to
obtain the license
BridgeWave’s low-latency radio links operate well with T1, E1, DS3, OC3 and STM-1 external
gateways.
BW64 & BW64EConfiguration Guide
19 045-57014 Rev A
BridgeWave’s AdaptRate™ product solution was developed to increase the Radio link distances and
availability by switching between GE and FE modes based on the fading conditions of the link.
BridgeWave has developed a combined solution of AdaptRate™ and AdaptSwitch™ for use with
external gateways.
Independent Quality of Service (QoS) provisioning can possibly be used in the external gateway for
both GE and FE rates.
Refer to the Manufacturer’s documentation for QoS setup
information in the Gateway device
When the radio link is set to AdaptSwitch™ mode and is connected to an external Gateway, all traffic is
carried over the Fiber interface in GE mode. The NMS management operates “in-band” on the Fiber
port.
When the link switches from GE to FE, the Radio alerts the remote device and both can switch to the
Copper port to carry traffic. The NMS management now operates “in-band” on the Copper port
Depending on the model, the external Gateway QoS settings can automatically switch to re-prioritize the
traffic based on the AdaptRate mode of GE or FE.
Figure 4.6: AdaptSwitch™ Connection Setup
Wireless
GbE
FE
GbE
FE
FE/GbE
FE/GbE FE/GbE
FE/GbE
NxE1/T1
PBX
NxE1/T1
PBX
BW64 & BW64EConfiguration Guide
20 045-57014 Rev A
Use the following steps to configure the AdaptSwitch™ feature:
After the equipment is installed, perform the following suggested steps to setup the AdaptSwitch™
function in an AR system:
1. In the ‘Setup’ page on both AR Radios, set the Radio Link State Propagation selection to ‘Enable
(AdaptSwitch)’:
2. In the High band radio, it is recommended to press the GE Default Switch Points button to set
the RSL trigger points to achieve the factory default AR rate switching between GE and FE. The
RSL fields will then be filled in with the default AR values. However, the activation and
deactivation points are user programmable by simply filling in the switchover numbers.
3. Press the ‘Submit New Values’ button at both radios.
In AdaptSwitch™ mode, the NMS Management will only operate
in-band on the Fiber interface when the link is in GE mode or on
the Copper interface when the link is in FE mode
When in the AdaptSwitch™ mode, a default recovery (hard reset)
will require that the system be operating in FE mode.
If the system is forced to GE mode, hard reset is not possible
4.7 Access Control
The ‘Access Control’ option performs two functions. One is to specify which interfaces will be allowed
access to the internal management agent for web and SNMP access. The second is to specify the
configuration of the internal switch with respect to In-Band or Out-Band management. Detailed
information about the In-Band and Out-Band options are provided in Section 4.7.1and 4.7.2.
BW64 & BW64EConfiguration Guide
21 045-57014 Rev A
4.7.1 In-Band (Default)
This option allows for management of each radio terminal through the copper, fiber, and/or radio
interface. When the ‘Access Control’ parameter on the ‘Setup’ page is configured for In-Band the
internal switch places the copper, fiber and radio interfaces onto the same internal VLAN.
This effectively places the copper port into the same broadcast domain (LAN segment) as the fiber and
radio interfaces. A single MAC learning table is then used for all ports. A user can then select if the
management agent can be accessed from the fiber or radio interfaces in addition to the copper interface.
Connecting both the copper and fiber interfaces to the same
network or switch when ‘In-Band’ is selected can create
network loops, broadcast storms, and other problems that can
bring down the core network.
When ‘In-Band’ is selected, broadcast or multicast traffic
exceeding 10 Mbps can flood the internal management agent
preventing web access to the unit. This does not impact the
availability of the link.
Figure4‐3providesalogicaldiagramoftheinternalswitchwhenCopperIn‐Bandisselected.
Figure 4-3In-Band Management
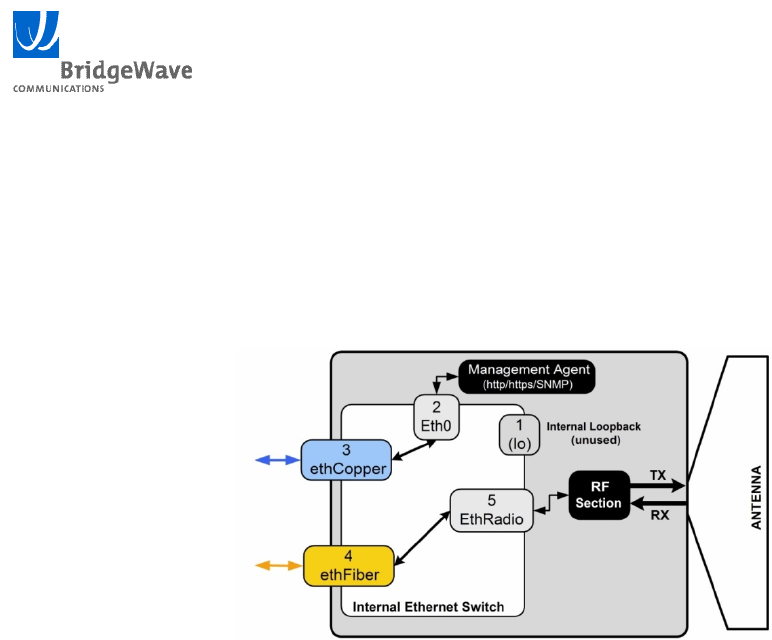
4.7.2 Copper Out-Band
This option allows for management of each radio terminal through the copper interface, while keeping
the management traffic isolated from the core network traffic.
BW64 & BW64EConfiguration Guide
22 045-57014 Rev A
When the ‘Access Control’ parameter on the ‘Setup’ page is configured for Out-Band (Copper
Management Only), the internal switch isolates the copper interface from the fiber and radio interfaces
by placing it into a separate port based VLAN.
This effectively places the copper port into its own broadcast domain (LAN segment). Figure 4-4
provides a logical diagram of the internal switch when Copper Out-Band is selected.
Figure 4-4 Out-Band, Copper Management Only
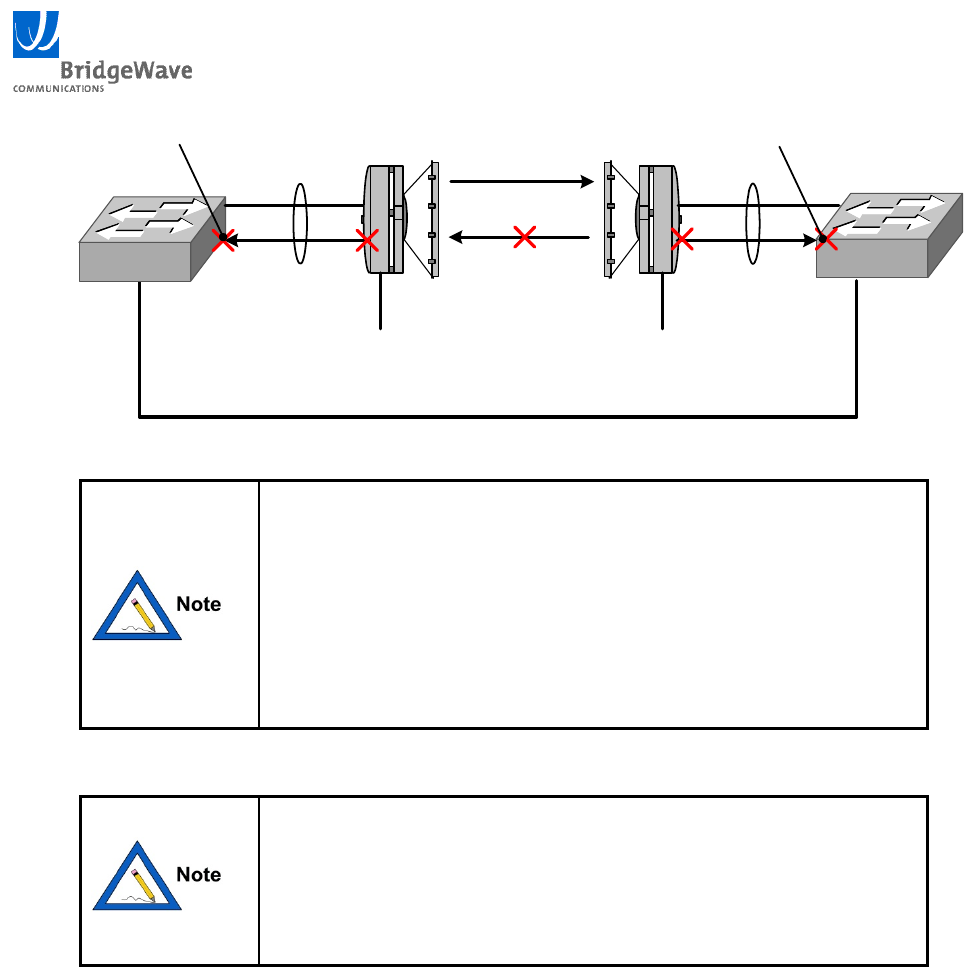
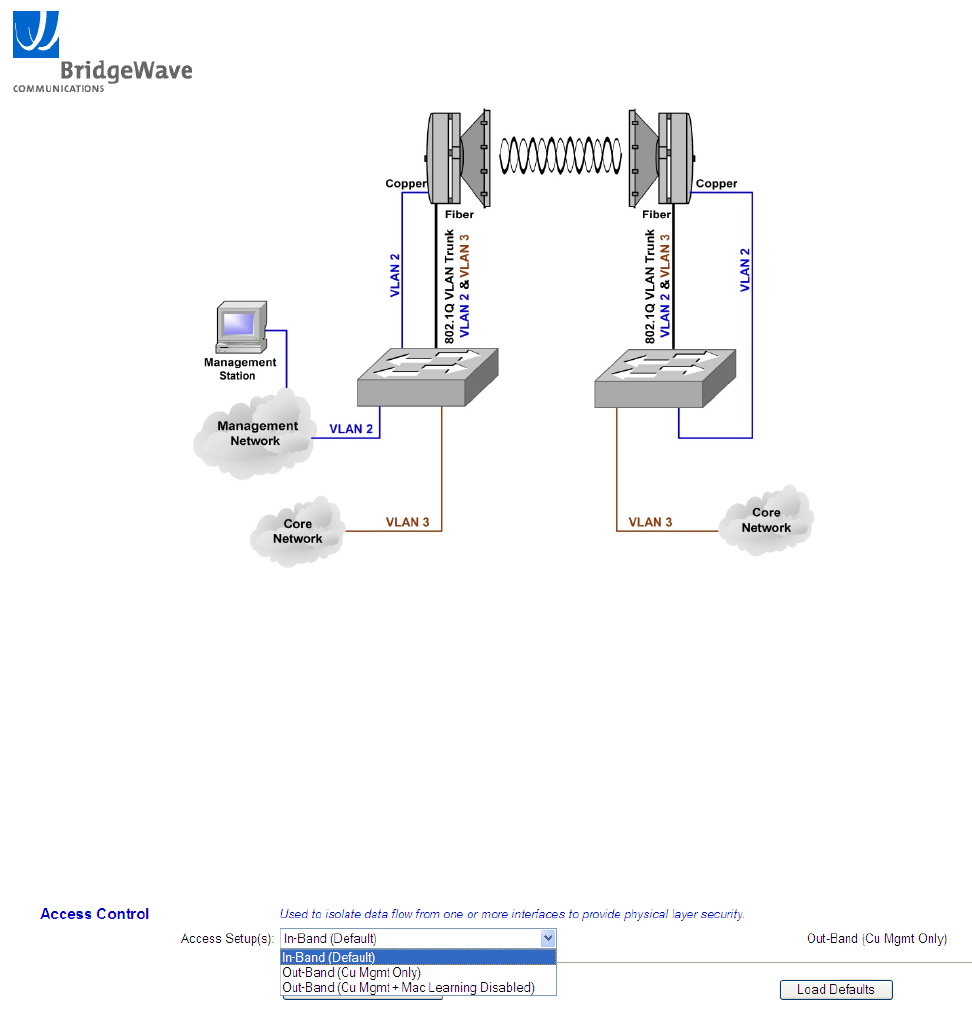
When ‘Out-Band’ is selected, one way to manage the remote radio from the local side is accomplished
through the use of VLAN in the network equipment at both ends of the link.
The management traffic is isolated between the copper and fiber ports by VLAN and then transported
through a connection over the fiber and radio interface.
An example of this is depicted in Figure 4-5 where an 802.1Q VLAN trunk is used to allow the
management station to access the remote radios copper port.
The switches keep the core network traffic and the management network traffic secure and separate
from one another.
BW64 & BW64EConfiguration Guide
23 045-57014 Rev A
Figure 4-5 Out-Band Management Network Deployment Example
4.7.3 Configuring Management Access
Use the following steps to configure the ‘Management Access’ option:
1. Connect to the web management interface of the unit and select the ‘Setup’ tab.
2. Under the ‘Access Control’ section select the desired ‘In-Band (Default)’, or ‘Out-Band (Copper
Management Only)’ option.
When ‘In-Band’ is selected the internal switch is configured so that the copper, fiber, and radio
interfaces are placed onto the same LAN and the option to allow management access on the Fiber
and/or the radio interface becomes available.
When ‘Out-Band (Cu Mgmt Only)’ is selected the Copper interface is placed into a separate LAN on
the internal switch and becomes physically isolated from the fiber and radio interfaces. When this
option is enabled the management interface of the unit can only be accessed through a connection to
the copper port.
When ‘Out-Band (Cu Mgmt + MAC Learning Disabled)’ is selected the Copper interface also
functions as ‘Out-Band (Cu Mgmt Only)’ but the MAC learning function in the switch is disabled.
This allows NAC authentication security appliances to be attached to the network with BridgeWave
BW64 & BW64EConfiguration Guide
24 045-57014 Rev A
radios. If a PC is on one end of the link and the NAC is at the other end then the MAC table in the
BridgeWave radio sees the same packet on both sides of the network.
3. Click the ‘Submit New Values’ button at the bottom of the ‘Setup’ page for the changes to
become active.
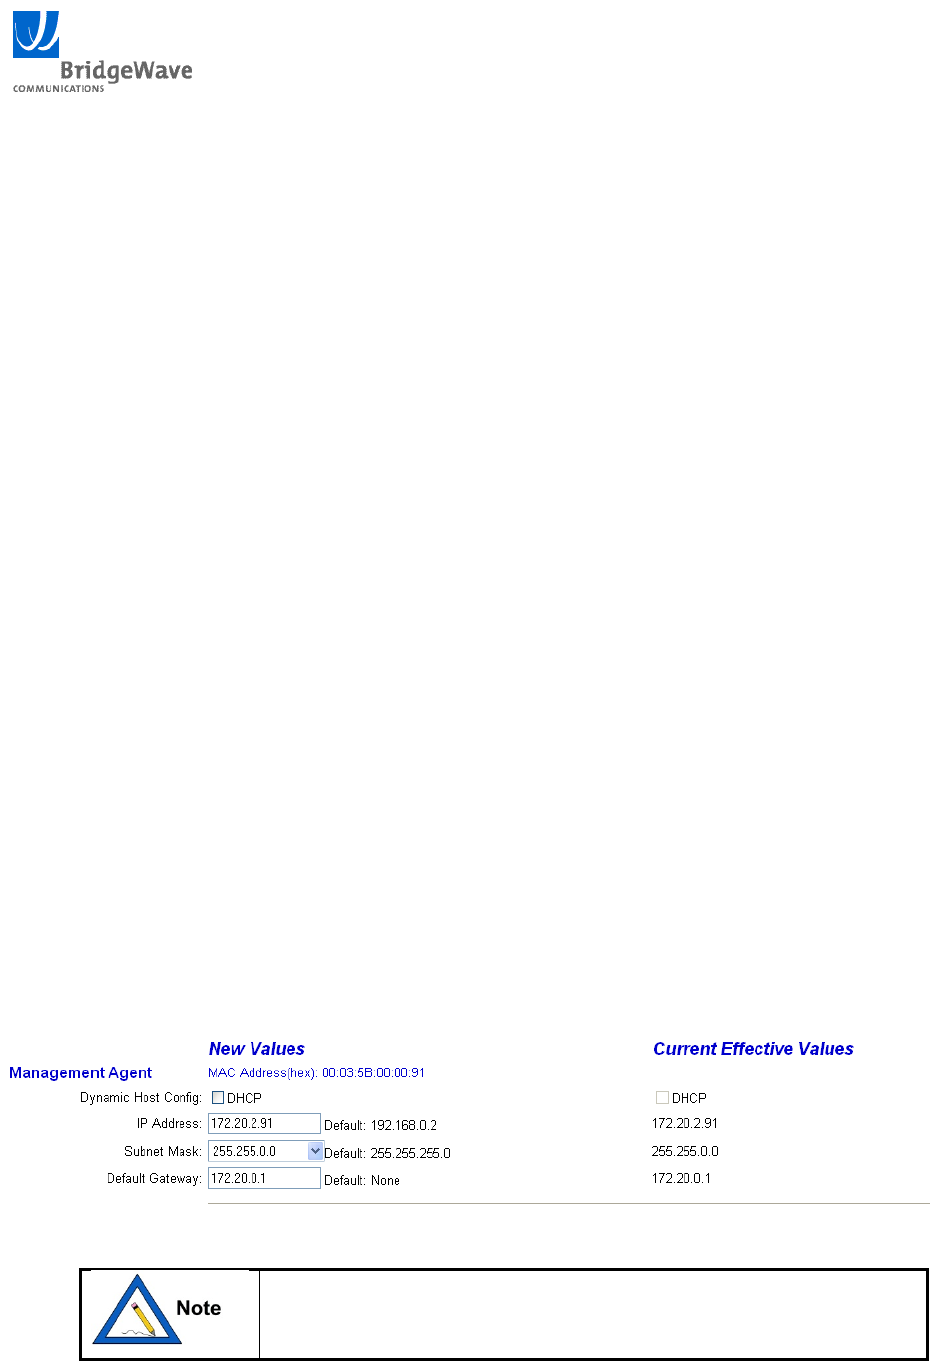
4.8 IP Setup
The network addressing options are configured from the ‘IP Setup’ page of the web management
interface. The network administrator would typically provide these values.
Use the following steps to configure IP Setup parameters:
1. Connect to the web management interface of the unit and select the ‘IP Setup’ tab.
2. Under the ‘Management Agent’ section configure the parameters listed below:
Dynamic Host Config – Checking the DHCP box enables the unit to receive an IP address,
subnet mask and default gateway from the network’s DHCP server. Un-checking the box
disables the DHCP function.
IP address – Allows for static configuration of the IP address for the management agent.
The factory default for the Low-Band radio is 192.168.0.1 and the High-Band radio is
192.168.0.2.
Subnet mask – The subnet mask can be configured by picking the desired value from the
Pull-down menu.
Default Gateway – Sets the default gateway address for this radio. Leave blank if no default
gateway is to be used.
3. Select ‘Submit New Values’ at the bottom of the ‘IP Setup’ page. The current values will be
displayed in Red under the Current Effective Values column, along with a (Soft Restart Pending)
message.
4. Click the ‘Soft Restart’ option at the bottom of the ‘IP Setup’ page to make the New Values active.
A ‘Soft Restart’ is required before a change to the Management Agent
parameters will become active.
BW64 & BW64EConfiguration Guide
25 045-57014 Rev A
After a restart it will take approximately 140 seconds for the web
management interface to become accessible. The soft restart does
not drop the radio link and data traffic will continue to flow.
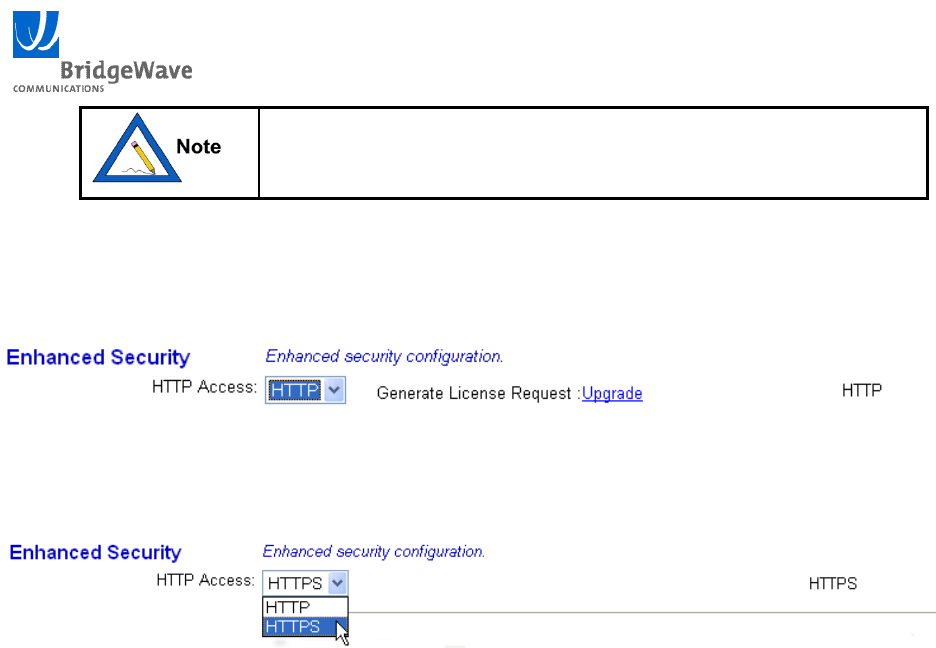
Advanced Security - If secure management is desired for Non-AES units, a license key to upgrade to
HTTPS secure management can be purchased. Contact Sales for more information.
AES and secure management equipped units, have the option of selecting non-secure HTTP rather than
HTTPS in the IP Setup page

BW64 & BW64EConfiguration Guide
26 045-57014 Rev A
5 Diagnostic Tools
The status of a link can be determined by viewing the information contained on the ‘Status’ and
‘Statistics’ pages of the units web interface.
The ‘Status’ page provides a variety of parameters that display Green, Yellow, or Red indications. A
detailed description of the ‘Status’ page parameters are listed in Section 5.1.
The ‘Statistics’ page provides transmit and receive statistics counters for the Copper, Fiber, and Radio
interfaces. Section 5.2 provides a detailed description of the statistics counters.
5.1 Status Page Indications
The Status page shows basic unit information including product model, band of operation, and MAC
address, as well as the current state of the unit and its physical interfaces.
Green, yellow, and red status indicators provide a quick visual summary of the unit’s operating
condition. Under normal operating conditions, all indicators should be green, unless one of the network
interface ports is not in use.
Red indicators signify unit failures, unconnected network interfaces, or abnormal operating conditions.
Yellow indicators signify marginal operating conditions, which may impact unit operation. The
displayed information is updated with every refresh of the Status page and does not automatically
update.
Not all values are updated in real time and may take several seconds to reflect the unit’s true operating
status.
The ‘Automatic Refresh’ checkbox may be enabled to automatically refresh the screen every 10
seconds.
An example of the Status page is shown in Figure 5-1 and a definition of each parameter follows.

BW64 & BW64EConfiguration Guide
27 045-57014 Rev A
Figure 5-1 Status Page
USER: Indicates the currently logged-in username
STATUS
Model: Indicates the type of unit.
High-Band or Low Band: Indicates the frequency band of the radio’s transmitter. A link
consists of one low-band and one high-band radio.
MAC: Displays the MAC address of the management NMS interface.
Note:BWproducts
willshowthelicensed
rateof125,250or
500 h
BW64 & BW64EConfiguration Guide
28 045-57014 Rev A
UNIT
Up time: Time since last unit power cycle, soft restart, or hard restart.
Calibration Results: This parameter displays the results of the calibration performed during
installation or via the ‘Auto-Calibration’ option performed from the maintenance page.
Prior to viewing the calibration results a ‘Get Results’ should
be performed from the Maintenance screen of the web
interface. This ensures that the displayed results are
synchronized with the active values stored in the flash of the
MCU.
The results of the calibration are provided for 100 Mbps (FE), 1000 Mbps (GE), or both FE and
GE modes for FE-U and AR products.
FE = This field displays the calibration results for the Fast Ethernet (FE) mode of
operation. A good calibration will result in a value of 10 or higher being displayed.
Higher values indicate better calibration results.
GE = This field displays the calibration results for the Gigabit Ethernet (GE) mode of
operation. A good calibration will result in a value of 10 or higher being displayed.
Higher values indicate better calibration results.
Calibration results that display slightly lower
than 10 may be observed on links that are
operating near the maximum distance
recommendations.
Input Voltage: Voltage present at unit power input connector
GREEN: ≥ 16 volts
RED: < 16 volts
Temperature: Temperature within unit enclosure
GREEN: Within specification (-20°C to 75°C) (-4°F to 167°F)
YELLOW: At operating limit
Min/Max temperature is also displayed from the last restart of the unit.
BW64 & BW64EConfiguration Guide
29 045-57014 Rev A
RADIO
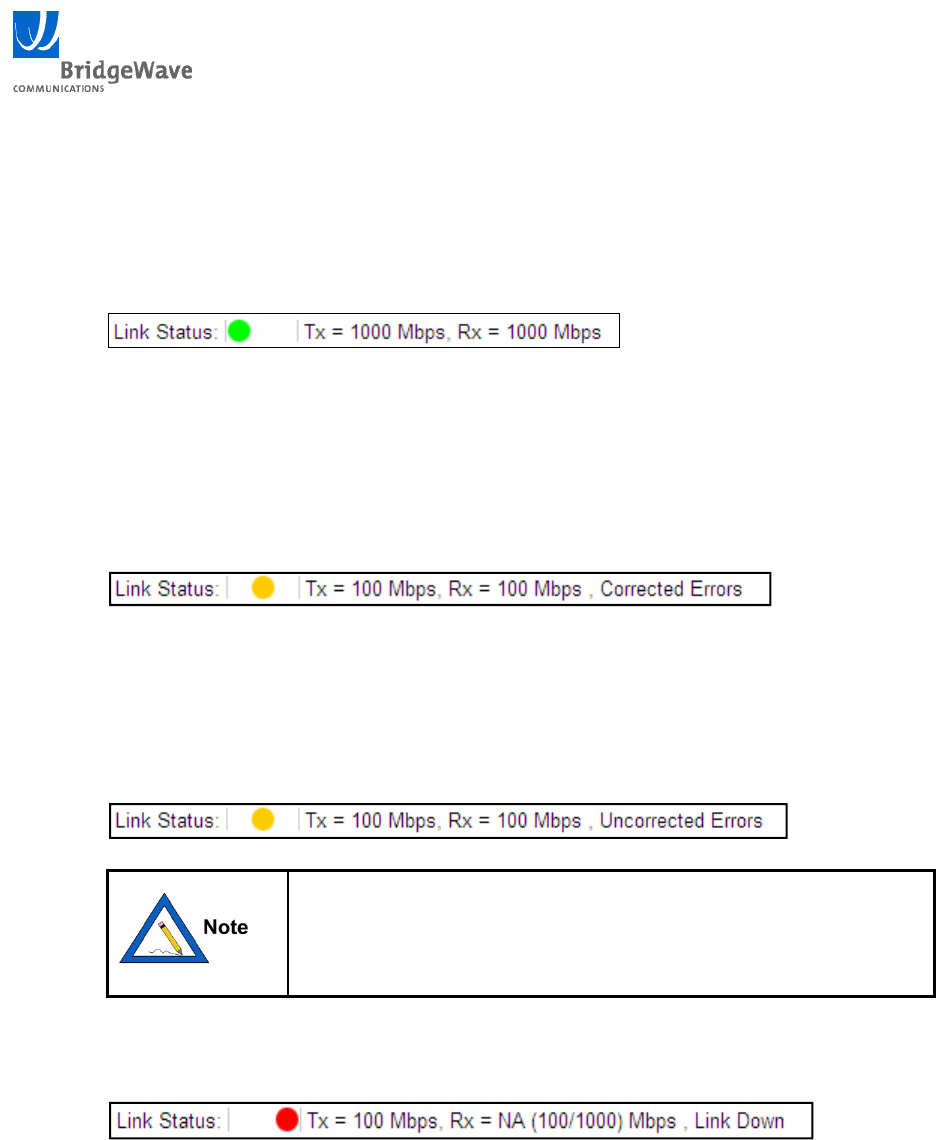
Link Status: Speed and quality status of the radio interface
GREEN: Link is up, error-free
YELLOW: This indicates that errors in the transmission are occurring. The system
contains built in Forward Error Correction (FEC) that will correct most errors that occur near
the receive signal threshold. If ‘Corrected Errors’ is displayed then the FEC is correcting all
errors and the user traffic is unaffected.
If ‘Uncorrected Errors’ is displayed the FEC is no longer able to correct all errors and some
user data packets could be dropped. When ‘Uncorrected Errors’ is displayed, errors may
show up on the receive statistics for the radio interface.
When the received radio signal is attenuated due to rain and the
radio nears its receive threshold the Forward Error Correction
(FEC) starts correcting errors. A ‘Yellow’ indication is normal
under these conditions.
RED: Link is down
Receive Signal Level (RSL): Signal level in dBm and alignment voltage present at unit test
point. This value is not updated in real time and can take 20 seconds to reflect current status.
BW64 & BW64EConfiguration Guide
30 045-57014 Rev A
For 1000 Mbps (GE) link speed:
GREEN: ≥ -55dBm
YELLOW: Between -55 and -59dBm
RED: < -59dBm
For 100 Mbps (FE) link speed:
GREEN: ≥ -65dBm
YELLOW: Between -65 and -69dBm
RED: < -69dBm
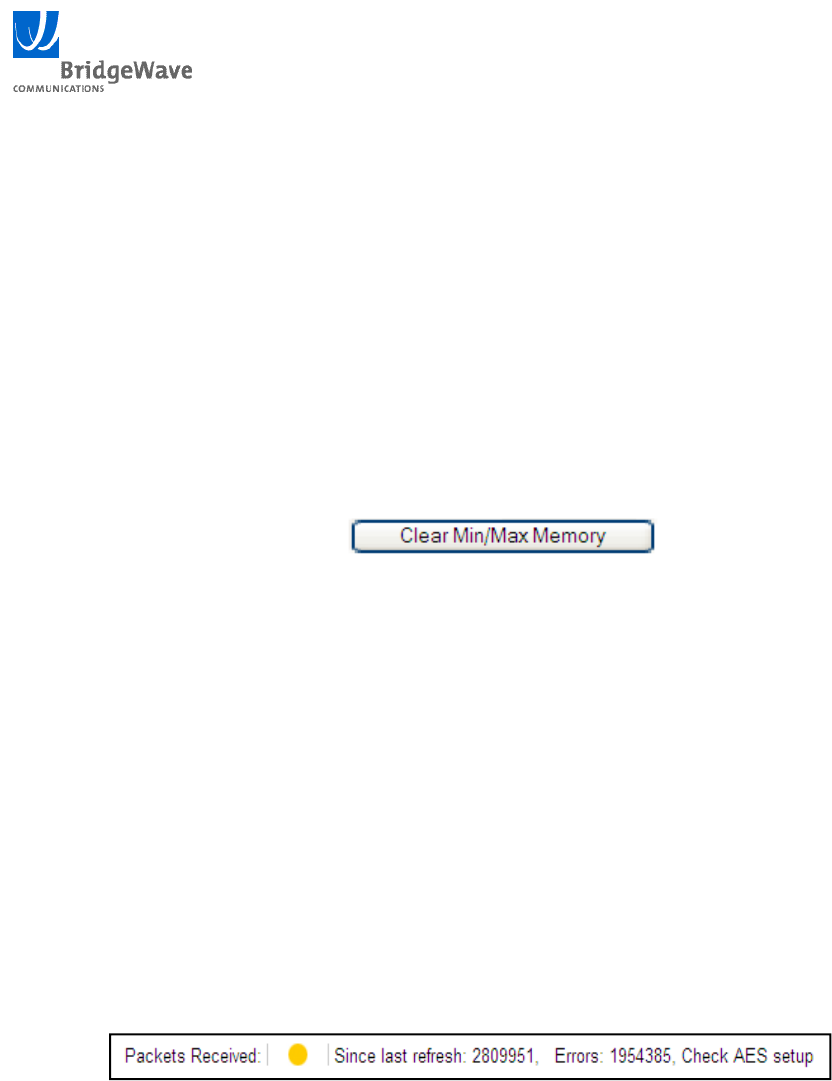
Min/Max RSL is also displayed from the last restart of the unit or from the Clear Min/Max Memory
Button on the Status page:
Transmitter Temp: Internal temperature of the radio transmitter
GREEN: Within specification (-20oC to 75oC) (-4oF to 167oF)
YELLOW: At operating limit
Min/Max transmitter temperature is also displayed from the last restart of the unit.
Packets Received: Number of packets received by the radio interface since last refresh of the
management interface from any active user session.
GREEN: No packet errors (dropped packets) since last refresh
YELLOW: One or more packet errors since last refresh. The ‘Check AES setup’
message is displayed, as shown below, if errors are occurring and AES
encryption is enabled on only one end of the link, or the key does not
match on each end.
Link Utilization: Percentage of total link capacity in use. This value is calculated once every
minute and displayed until the next calculation period.
BW64 & BW64EConfiguration Guide
31 045-57014 Rev A
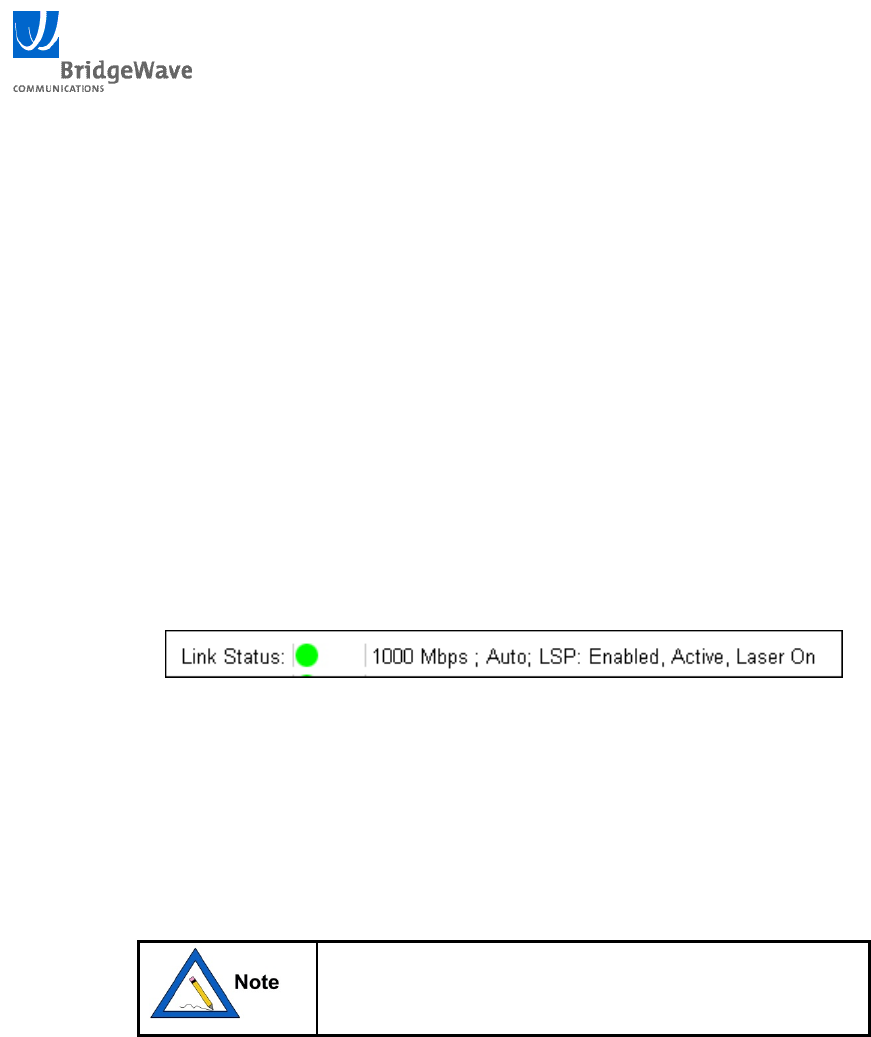
FIBER
Link Status: Speed, auto negotiation setting, LSP and Laser on/off status message of fiber
interface
GREEN: Port is up
RED: Port is down
Packets Received: Number of packets received by the fiber interface since last refresh of the
management interface from any active user session.
GREEN: No packet errors since last refresh
YELLOW: One or more packet errors since last refresh
Link Utilization: Percentage of total link capacity in use. This value is calculated once every
minute and displayed until the next calculation period.
LSP Related Information: This example shows that LSP is enabled and active and the Laser is
on:
COPPER
Link Status: Displays the physical status and copper backup active message for the 10/100Base-
T copper interface.
GREEN: Port is up
RED: Port is down (Normal if copper port is not used)
The Copper interface is set for Auto Negotiation only.
The negotiated speed and duplex are displayed
Packets Received: Number of packets received by the copper interface since
last refresh of the management interface from any active user session.
GREEN: No packet errors since last refresh
YELLOW: One or more packet errors since last refresh
Link Utilization: Percentage of total link capacity in use. This value is calculated once every
minute and displayed until the next calculation period.
BW64 & BW64EConfiguration Guide
32 045-57014 Rev A
Automatic Refresh: The statistics page will automatically update every 10 seconds when this
parameter is enabled.
The web interface will not automatically log off inactive users if
the Automatic Refresh option is enabled and the browser
window is left on the Status page. Select the Log Out option to
prevent un-authorized access to the unit.
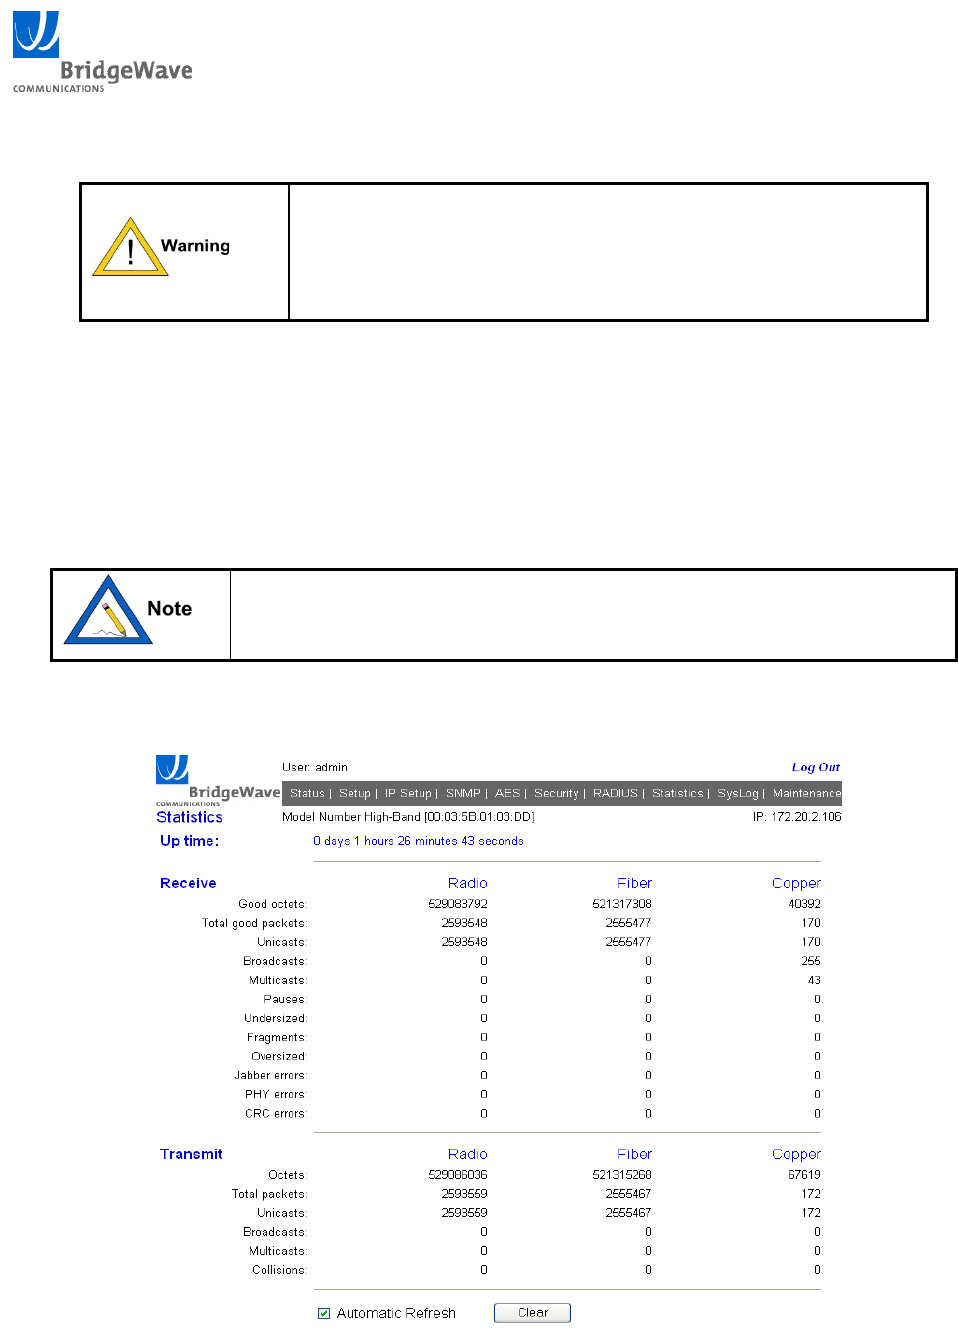
5.2 Viewing Statistics
The ‘Statistics’ page of the web interface displays received and transmitted Ethernet packet statistics for
the copper, fiber, and radio interfaces. These values allow the user to see where packets are dropped due
to corrupted or invalid contents, determine the flow of packets between the interfaces, and determine the
rate that data is moving through the system.
‘Receive’ and ‘Transmit’ are relative to the switch port; e.g., a packet
transmitted on the fiber interface is a packet sent from the fiber interface
of the unit to the user’s network equipment.
An example of the ‘Statistics’ page is shown in Figure 5-2 and a definition of each parameter follows.
Figure 5-2 Statistics Page

BW64 & BW64EConfiguration Guide
33 045-57014 Rev A
5.2.1 Receive and Transmit
Good Octets: An octet is a sequence of eight bits. Since a byte is not eight bits in all
computer systems, octet provides an unambiguous term. . When a packet
is in error, none of the octets are counted as “good”.
Total good packets: Total number of packets without errors received. For the
transmit direction this is expressed as total packets sent, since only good
packets are sent.
Unicast: Total number of frames that have a unicast destination MAC address.
Unicast frames are addressed to a single host on a LAN.
Broadcasts: Total number of good frames that have a broadcast destination MAC
address. Broadcast frames are addressed to all hosts on a LAN.
Multicasts: Total number of good frames that have a multicast destination. Multicast
are frames addressed to a subset of hosts on a LAN.
Pauses: Pause frames are sent if flow control is enabled and a port needs to
temporarily stop the flow of incoming packets.
Undersized: Total number of frames received with a length less than 64 octets but with
a valid FCS.
Fragments: Total number of frames received with a length less than 64 octets and an
invalid FCS.
Oversized: Total number of frames received with a length that exceeds 1632 bytes but
with a valid FCS. These errors are caused either by damaged packets or by
user network equipment being configured to transmit jumbo frames.
Jabber errors: Total number of frames received with a length that exceeds 1632bytes but
with an invalid FCS.
PHY errors: Receive errors on the physical interface.

BW64 & BW64EConfiguration Guide
34 045-57014 Rev A
CRC errors: Short for Cyclic Redundancy Check, CRC is a method of
detecting errors in data transmission. A CRC is control information sent
with a block of data that when received can be used to verify that all data
was received correctly. CRC errors typically indicate physical defects in
fiber or copper cabling, or poor receive signal quality on a radio link. One
or less CRC errors every 16 minutes on a fully-loaded 1000 Mbps link
would equal a bit error rate of under 10-12 and is considered excellent
performance for fiber or radio connections. One CRC error every 90
seconds would equal a bit error rate of 10-10 on a 100 Mbps copper
connection, which complies with 100Base-TX specifications. While
higher error rates should normally only be seen during short periods of
heavy rain downpours, most LAN applications can easily tolerate 10-8 bit
error rates without noticeable degradation.
Collisions: Total number of collisions detected. Collisions indicate that more than one
device is transmitting packets to an Ethernet hub at the same time, and will
normally be detected by the device itself and be re-transmitted. Collisions
should not occur when devices are connected through Ethernet switches in
full duplex mode.
Automatic Refresh: The statistics page will automatically update every 10 seconds when this
parameter is enabled.
The web interface will not automatically log off inactive users if
the Automatic Refresh option is enabled and the browser
window is left on the Statistics page. Select the Log Out option
to prevent un-authorized access to the unit.
Clear: Resets all statistics counters to zero.
BW64 & BW64EConfiguration Guide
35 045-57014 Rev A
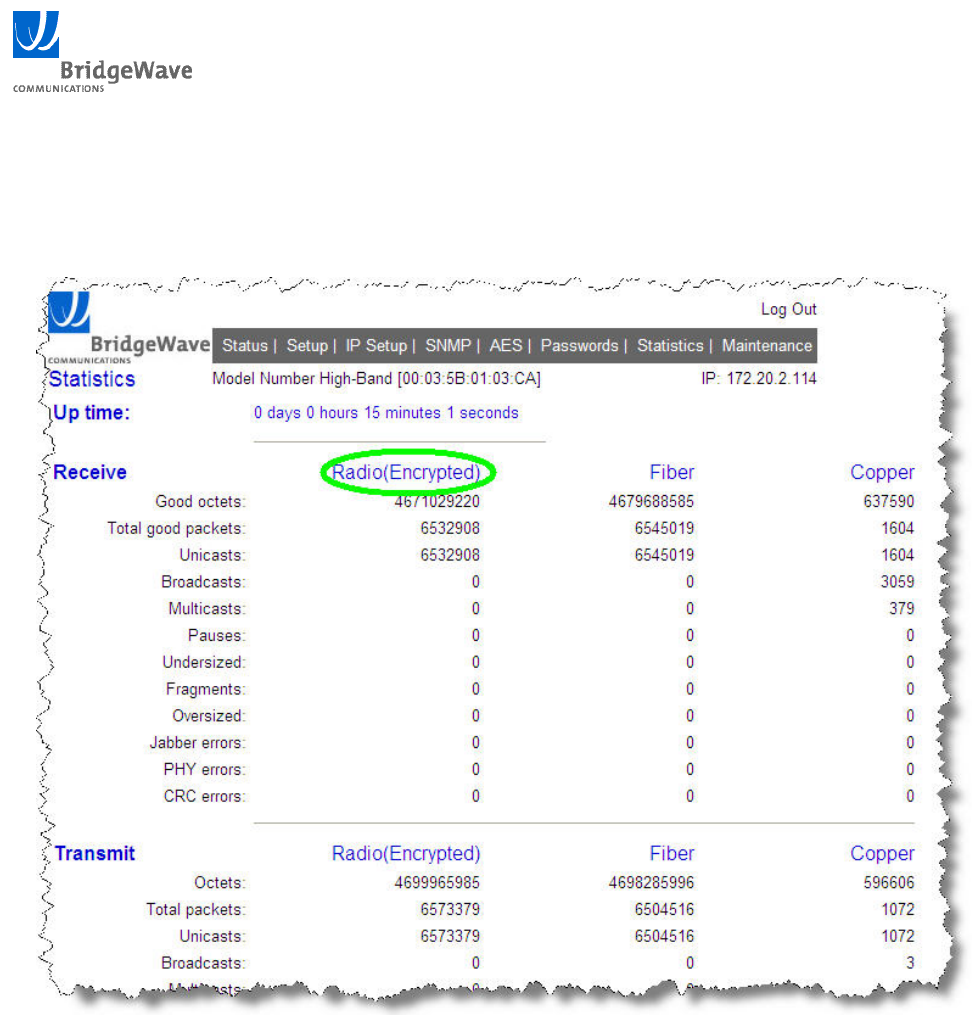
5.3 AES Statistics
In AES systems transmitting encrypted data, the statistics screen will appear slightly different as shown
in Figure 5-3, Statistics screen for AES encrypted traffic, indicating that the Radio traffic is encrypted
Figure 5-3, Statistics screen for AES encrypted traffic
BW64 & BW64EConfiguration Guide
36 045-57014 Rev A
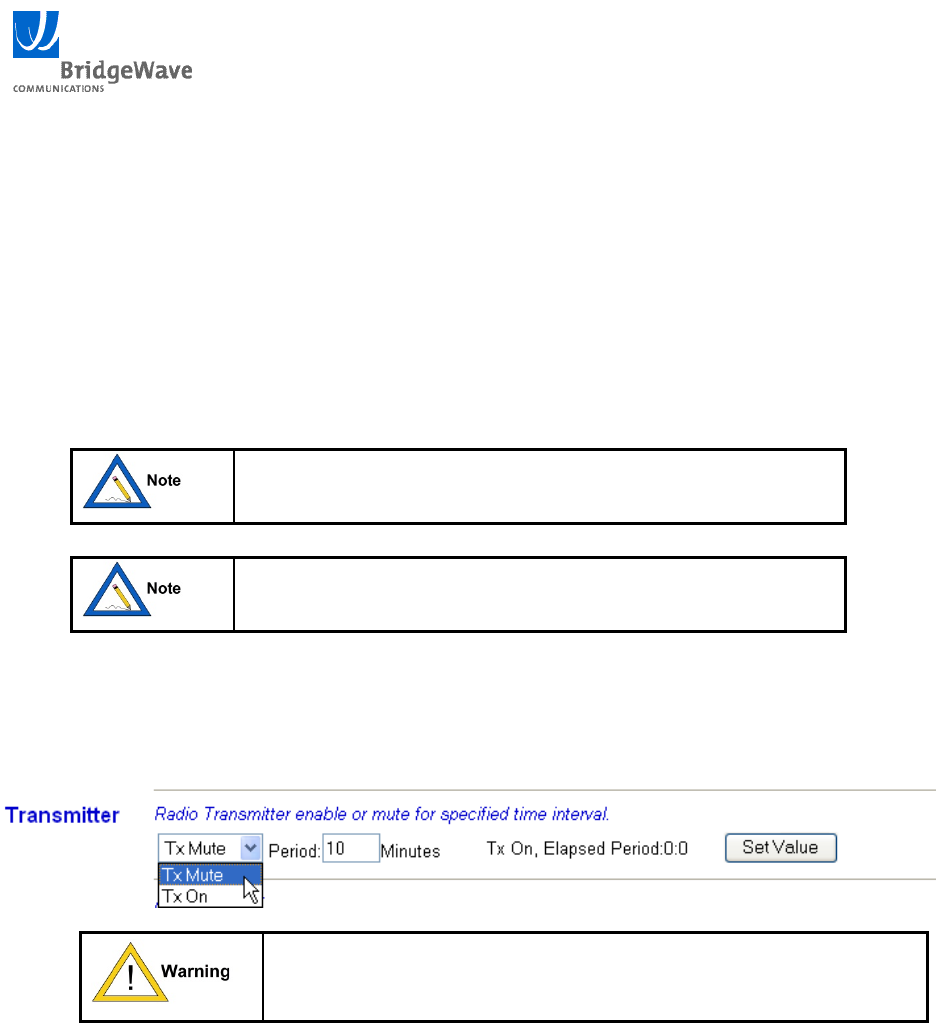
5.4 TX Mute Function
The Transmitter (TX) mute function can be useful for investigating and diagnosing interference related
problems.
Use the following steps to mute the Transmitter
1. Connect to the web management interface of the unit and select the ‘Maintenance’ tab.
2. Under the Transmitter section, select TX Mute.
3. Select the amount of time required for the TX Mute operation. The range is 1-99 minutes.
A value of zero is always applied, no matter what value is
entered for ‘TX ON’ and sets continuous operation.
The value of zero and continuous operation of ‘TX Mute’ is
not allowed.
4. Press the ‘Set Value’ button and OK for the pop-up ‘Confirm Operation’ window.
5. The elapsed time of the operation is shown upon refresh of the browser window
The TX Mute function will not operate until the Fiber or Software
activated ‘Auto-Calibration’ function has been performed
BW64 & BW64EConfiguration Guide
37 045-57014 Rev A
6 SNMP
Simple Network Management Protocol (SNMP) is a standardized protocol used for monitoring and
controlling various elements within a network. All BridgeWave products that are network management
enabled provide SNMP V2 support for GET and SET commands on MIB-2 and BridgeWave enterprise
MIB objects. Traps are sent in SNMP V1 format.
SNMP V1 and V2 MIBS are included in .zip file for each software release. The .zip software release
packages can be downloaded from the BridgeWave Support web site at the following url:
http://www.bridgewave.com/support/downloads.cfm
6.1 Configuring SNMP
A majority of the SNMP related configuration parameters are located on the ‘SNMP’ tab of the web
interface.
Use the following steps to configure SNMP.
1. Select the ‘SNMP’ tab from the web browser interface of the unit.
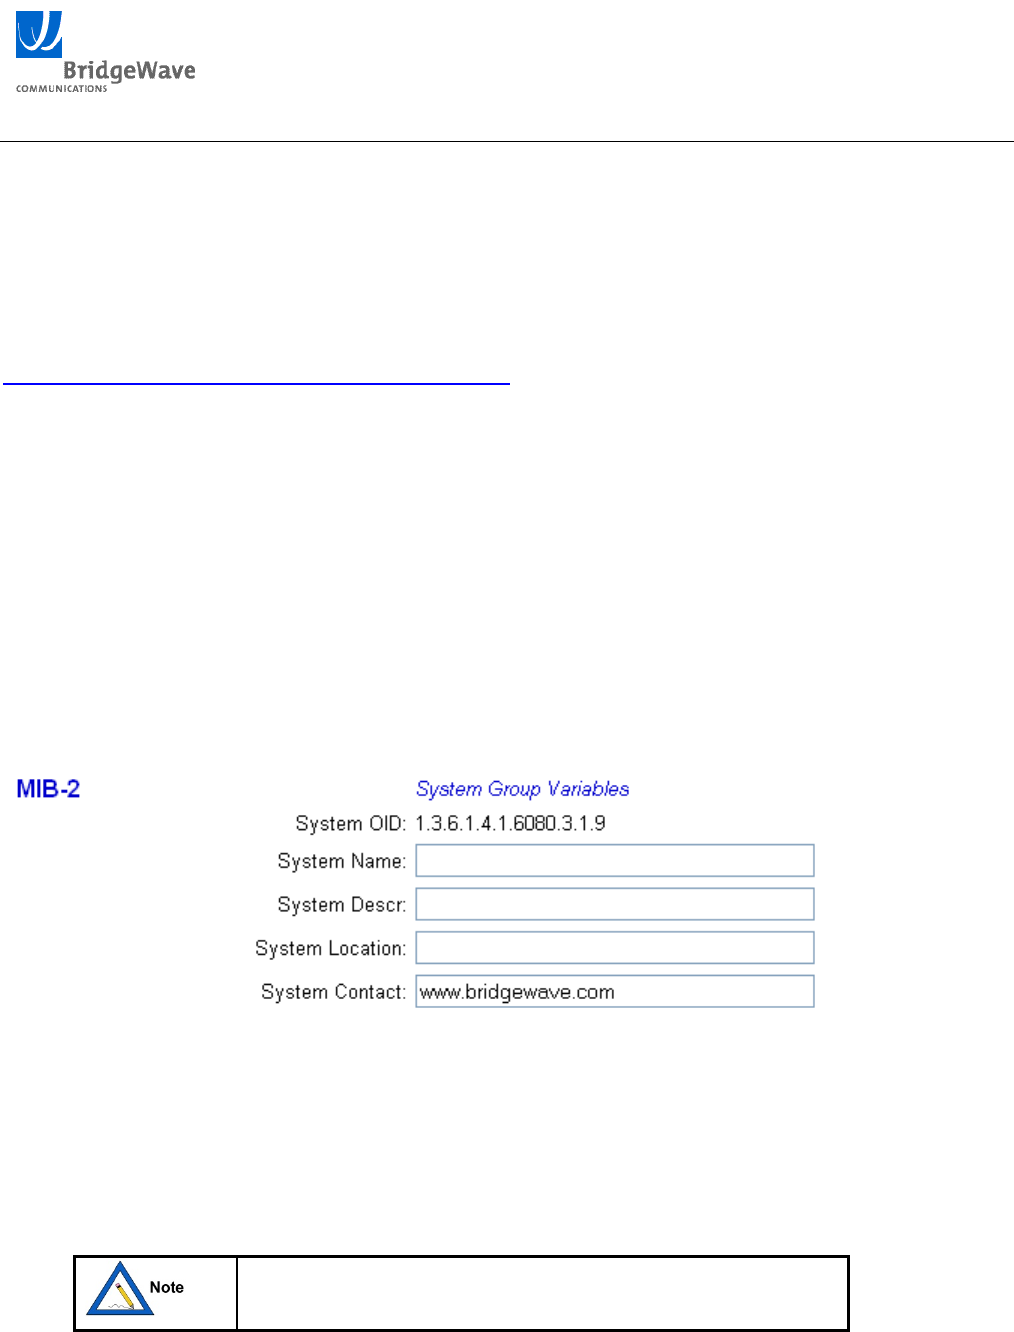
2. Enter the MIB-2 system group variables. These fields may be populated with any desired
name(s), descriptions, locations and appropriate system contact for identification purposes. A
definition of each parameter is listed below:
System OID: 1.3.6.1.4.1.6080.3.1.9 Identification of the network management subsystem
contained in this entity.
System Name: Typically an administratively assigned name for this managed node. By
convention, this is the node's fully qualified domain name.
System Descr: Enter a brief description of the system.
This information will be displayed at the top of all web pages
once filled out.
BW64 & BW64EConfiguration Guide
38 045-57014 Rev A
System Location: Enter a value that describes the physical location of the unit such as address
or building name.
System Contact: Identification of the contact person for this managed node, together with
information on how to contact this person.
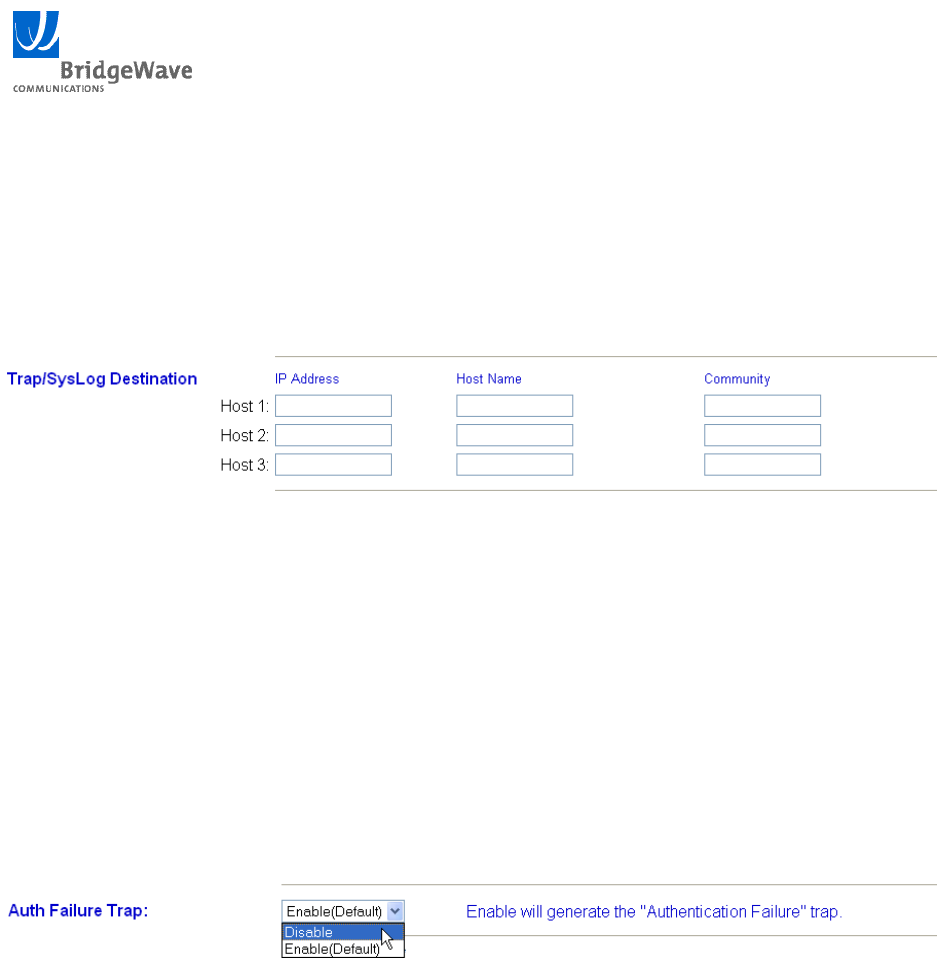
3. Next, enter the ‘IP address’, ‘Host Name’, and trap ‘Community’ of the management station(s)
that will be monitoring this unit. All SNMP alarms (traps) will be sent to the host specified in
this section. A maximum of three trap destinations can be configured.
IP Address: The IP address destination of the host to receive traps
Host Name: The host name assigned to the management station receiving the traps.
Community: Value required by SNMP management station to authenticate incoming traps.
4. Enable or Disable the ‘Auth Failure Trap’. When enabled a trap will be sent to the management
agent if a SNMP read or read/write access to the unit is attempted using an invalid community
string.
5. Select the ‘Passwords’ page from the web interface of the unit.
6. Under the ‘Communities’ section, enter in the ‘Read Only’ and ‘Read Write’ community strings
and ‘SNMP Access’ capabilities. Refer to Section 7.4 for a detailed description of these
parameters.
BW64 & BW64EConfiguration Guide
39 045-57014 Rev A
6.2 SNMP MIB Information
BridgeWave supplies an enterprise MIB file that provides definitions of objects beyond the standard
MIB-2 objects. This MIB file can be found on the CD that is included with the product and on
BridgeWave’s website: http://www.bridgewave.com/support/downloads.cfm. To install the
BridgeWave MIB file on your network management station, follow the instructions provided with
your network management station software.
Standard MIB-2 objects can be accessed without installing the
BridgeWave MIB file.
Supported MIB-2 Groups
Table 6.2-1 MIB-2 Groups
Equipment Interfaces
The MIB-2 interface table is always populated with the following five entries. 1 (Lo) = Loop-back, 2
(eth0) = Management port, 3 (ethCopper) = Copper port, 4 (ethFiber) = Fiber port, and 5 (ethRadio)
= Radio port
BridgeWave Enterprise MIB Objects
Name OID
s
y
ste
m
1.3.6.1.2.1.1
interfaces 1.3.6.1.4.1.2
a
t
1.3.6.1.4.1.3
i
p
1.3.6.1.4.1.4
icm
p
1.3.6.1.4.1.5
tc
p
1.3.6.1.4.1.6
ud
p
1.3.6.1.4.1.7
e
gp
1.3.6.1.4.1.8
transmissio
n
1.3.6.1.4.1.10
snm
p
1.3.6.1.4.1.11

BW64 & BW64EConfiguration Guide
40 045-57014 Rev A
Table 6.2-2 BridgeWave Enterprise MIB Objects
NameOIDDescription
brwaveRadioSn1.3.6.1.4.1.6080.2.1
brwaveCommon1
Unit serial number
brwaveUnitModel1.3.6.1.4.1.6080.2.2
brwaveCommon2
UnitModelNumber
brwaveBbSn1.3.6.1.4.1.6080.2.3
brwaveCommon3
BaseBandhardwareserialnumber
brwaveIfSn1.3.6.1.4.1.6080.2.4
brwaveCommon4
IFhardwareserialnumber
brwaveMmwSn1.3.6.1.4.1.6080.2.5
brwaveCommon5
Millimeterwavehardwareserialnumber
brwaveTrapCount1.3.6.1.4.1.6080.2.6
brwaveCommon6
Numberoftrapsgeneratedbyunitsincestart‐up.
Rollsbacktozerooncereachedtomaximumvalue.
brwaveRadioTxBand1.3.6.1.4.1.6080.3.1.2.1
brwaveFactorySetup1
Radio’stransmittingfrequencyband
brwaveRadioFactoryRate1.3.6.1.4.1.6080.3.1.2.3
brwaveFactorySetup3
Radio’soperatingdatarate
brwaveRadioClearStats1.3.6.1.4.1.6080.3.1.2.4
brwaveFactorySetup4
ClearStatistics,Setvalueof1toclear.Returns
always0whenread
brwaveRadioInVoltage1.3.6.1.4.1.6080.3.1.3.1
brwaveRadioStatus1
Radio’svoltagelevelafterDC‐DCconversionfrom
the48VDCto24VDCinsidetheradio.
brwaveRadioUnitTemperature 1.3.6.1.4.1.6080.3.1.3.2
brwaveRadioStatus2
Radio’sinternalunittemperatureindegreesCx
100.
brRadioTxTemperature1.3.6.1.4.1.6080.3.1.3.3
brwaveRadioStatus3
Radio’stransmittertemperature.Thereadingof
theradiotemperaturesensorindegreesCx100.
BrwaveRadioRSL1.3.6.1.4.1.6080.3.1.3.4
brwaveRadioStatus4
ReceivedSignalLevel(dBm)presentedasa
negativenumericalvalueindBmx100
brwaveRadioRSLVoltage1.3.6.1.4.1.6080.3.1.3.5
brwaveRadioStatus5
ReceivedSignalLevel(Voltage)presentedasa
“String”value.
brwaveRadioAbsRSL1.3.6.1.4.1.6080.3.1.3.6
brwaveRadioStatus6
ReceivedSignalLevel(dBm)presentedasa
positivenumericalvalueindBmx100

BW64 & BW64EConfiguration Guide
41 045-57014 Rev A
BrwaveRadioRSLVoltageInt1.3.6.1.4.1.6080.3.1.3.7
brwaveRadioStatus7
ReceivedSignalLevel(Voltage)presentedasan
Integervalueinvoltsx10.
brwaveCopperUtilization1.3.6.1.4.1.6080.3.1.3.8
brwaveRadioStatus8
Linkutilizationcalculatedeverypollinginterval.
brwaveFiberUtilization1.3.6.1.4.1.6080.3.1.3.9
brwaveRadioStatus8
Linkutilizationcalculatedeverypollinginterval.
brwaveRadioUtilization1.3.6.1.4.1.6080.3.1.3.10
brwaveRadioStatus10
Linkutilizationcalculatedeverypollinginterval.
PercentageisbasedonRadiorate.
brwaveRadioFecError1.3.6.1.4.1.6080.3.1.3.11
brwaveRadioStatus11
PostandPreFECerrorcalculatedeverypolling
interval0‐NoError,1‐PreFEC,2‐PostFECError
brwaveRadioPreFecFlag1.3.6.1.4.1.6080.3.1.3.12
brwaveRadioStatus12
Pre‐FECerrorsflagcountedeverypollinginterval
brwaveRadioPostFecFlag1.3.6.1.4.1.6080.3.1.3.13
brwaveRadioStatus13
Post‐FECerrorsflagcountedeverypollinginterval
brwaveRadioRate1.3.6.1.4.1.6080.3.1.3.14
brwaveRadioStatus14
IndicatorforBWproductrate
BridgeWaveEnterpriseMIBTraps
Table 6.2-3 Bridgewave Enterprise MIB Traps
NameOIDDescription
brwaveErrorsOverThreshold 1.3.6.1.4.1.6080.3.1.9.0.1
brwaveRadioEventsV2 1
Switch port has error rate over threshold
with more than 1000 errors in 4 seconds.
brwaveErrorsUnderThreshold 1.3.6.1.4.1.6080.3.1.9.0.2
brwaveRadioEventsV2 2
Switch port error rate changed from over
to under threshold, an error-free state for
at least 4 seconds.
brwaveUnitTemperatureAbnormal 1.3.6.1.4.1.6080.3.1.9.0.3
brwaveRadioEventsV2 3
Radio unit temperature not in normal
operating range.
Normal range is: -20°C to +80°C
brwaveUnitTemperatureNormal 1.3.6.1.4.1.6080.3.1.9.0.4
brwaveRadioEventsV2 4
Unit temperature restores from abnormal
to normal range
brwaveTxTemperatureAbnormal 1.3.6.1.4.1.6080.3.1.9.0.5
brwaveRadioEventsV2 5
Transmitter temperature is not in normal
operating range.
Normal range is: -20°C to +80°C
brwaveTxTemperatureNormal 1.3.6.1.4.1.6080.3.1.9.0.6
brwaveRadioEventsV2 6
Transmitter temperature is restored to
normal range
brwaveInputVoltageAbnormal 1.3.6.1.4.1.6080.3.1.9.0.7
brwaveRadioEventsV2 7
Unit’s input voltage is not in normal
range.
Normal input voltage > 16 Volts.
BrwaveInputVoltageNormal 1.3.6.1.4.1.6080.3.1.9.0.8
brwaveRadioEventsV2 8
Unit’s input voltage is restored to normal
range

BW64 & BW64EConfiguration Guide
42 045-57014 Rev A
brwaveRslNormal 1.3.6.1.4.1.6080.3.1.9.0.10
brwaveRadioEventsV2 10
Received Signal Level is normal. Normal
signal level
> -55.00 dBm (GE mode) and > -65.00
dBm (FE mode)
brwaveRslMinor 1.3.6.1.4.1.6080.3.1.9.0.11
brwaveRadioEventsV2 11
Received Signal Level dropped to the
level of minor event.
When RSL between -55.00 to -59 dBm
(GE mode)
OR -65.00 to -69.00 dBm (FE mode)
brwaveRslMajor 1.3.6.1.4.1.6080.3.1.9.0.13
brwaveRadioEventsV2 13
RSL dropped to the level of major event.
RSL < -59.00 dBm (GE mode) or RSL <
-69 dBm (FE mode).
brwaveConfigChange1.3.6.1.4.1.6080.3.1.9.0.26
brwaveRadioEventsV226
Whenwebclienthasperformed
configurationchangesorclearingof
statistics.
brwaveLoginSuccessful 1.3.6.1.4.1.6080.3.1.9.0.27
brwaveRadioEventsV2 27
Upon successful user log in to the web
interface. (Obsolete)
brwaveGeToFeSwitch 1.3.6.1.4.1.6080.3.1.9.0.28
brwaveRadioEventsV2 28
AR rate switch from GE to FE mode.
Current RSL value is included
brwaveFeToGeSwitch 1.3.6.1.4.1.6080.3.1.9.0.29
brwaveRadioEventsV2 29
AR rate switch from FE to GE mode.
Current RSL value is included

BW64 & BW64EConfiguration Guide
43 045-57014 Rev A
7 User Accounts & Passwords
The management agent supports two types of users, with varying capabilities. The Administrator
(username=’admin’) may view status and statistics, view/modify unit configuration, and perform
maintenance functions (including software update). The User (username=’user’) may view status,
configuration, and statistics, but is prevented from modifying unit configuration or performing
maintenance functions.
Multiple users may concurrently access the radio management agent from
different browser windows. If multiple users are logged on as
Administrator, they are all permitted to independently modify the unit’s
configuration.
The ‘Security’ page of the web management interface allows the Administrator to set the User,
Administrator and Factory Access passwords and SNMP community names. These changes take effect
immediately upon clicking the Submit buttons. It is important to remember the passwords that have
been assigned to the unit. If a password is forgotten, it cannot be recovered; if this happens please refer
to the Default Recovery (Hard Reset) section of this manual.
Remote Authentication Dial In User Service (RADIUS) may also be used to manage the user access of
BridgeWave radios that are embedded in a network environment.
BW64 & BW64EConfiguration Guide
44 045-57014 Rev A
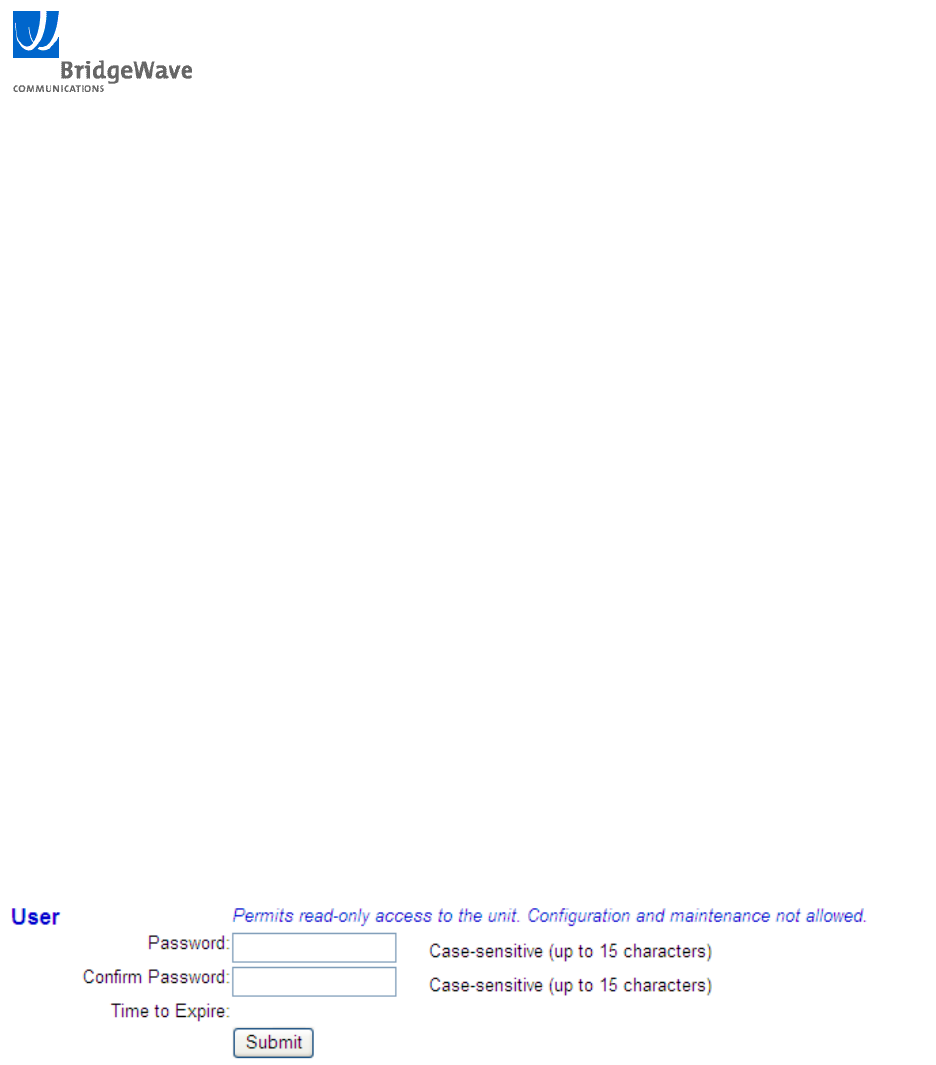
7.1 User
Permits read only capability such as viewing of unit status, configuration parameters and statistics. Does
not permit modification of any parameter, setting passwords or performing maintenance functions. A
history of the last 15 passwords is maintained to prevent password reuse. The user password can be set
or reset by the administrator. The factory default user account name/password combination is:
user/userpass
Password: The password is case-sensitive, may contain letters, numbers, and special
characters, and can have a maximum of 15 alphanumeric characters. If the
‘Minimum Password Length’ option is enabled under the ‘Enhanced
Security’ section then the password must contain 10 or more characters.
Confirm Password: Repeat the same password to validate.
Time to Expire: If a value other than 0 has been set in the ‘Password Expires’ field of the
‘Enhanced Security’ section this field will display the amount of time
remaining until the password expires. If the password has expired, it will
show how long since expiration and will be displayed in red. Only the
‘Admin’ user account has permissions to change the ‘Password Expires’
field.
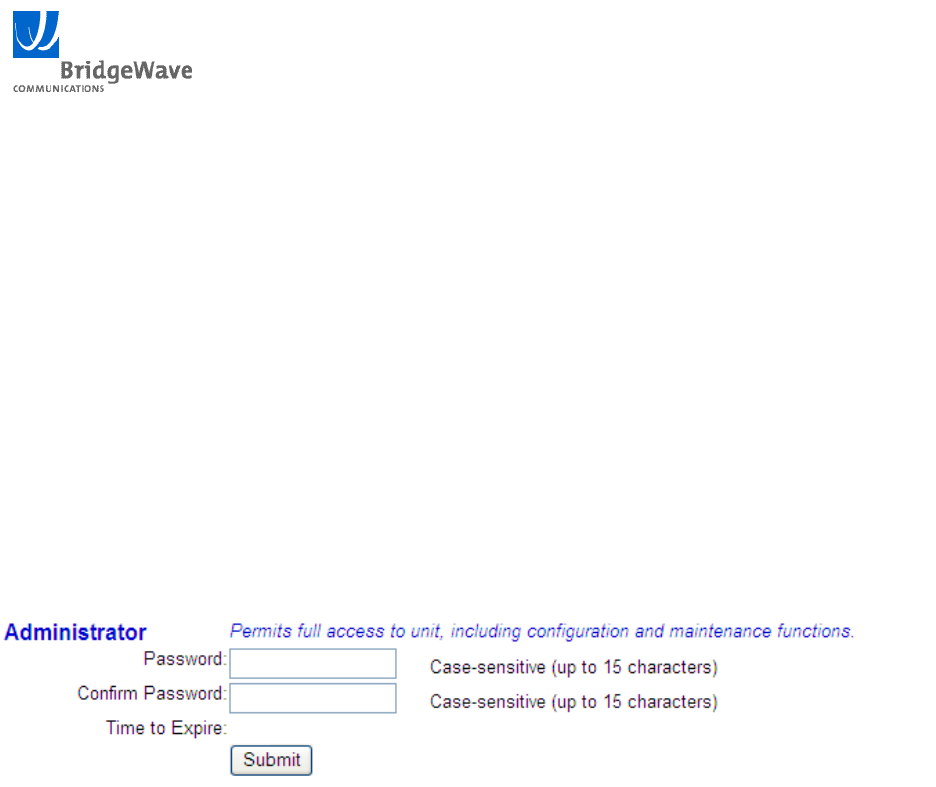
7.2 Administrator
Permits full access to unit, including configuration and maintenance functions. A history of the last 15
passwords is maintained to prevent password reuse. In order to recover a lost administrator password a
hard reset is required. This will reset the unit to factory default values and requires a complete
reconfiguration of the unit. The factory default admin account user name/password combination is:
admin/adminpass
BW64 & BW64EConfiguration Guide
45 045-57014 Rev A
Password: The password is case-sensitive, may contain letters, numbers, and
special characters, and can have a maximum of 15 alphanumeric
characters. If the ‘Minimum Password Length’ option is enabled under
the ‘Enhanced Security’ section then the password must contain 10 or
more characters.
Confirm Password: Repeat the same password to validate.
Time to Expire: If a value other than 0 has been set in the ‘Password Expires’ field of the
‘Enhanced Security’ section this field will display the amount of time
remaining until the password expires. If the password has expired, it
will show how long since expiration and will be displayed in red. Once
the password has expired, the ‘admin’ user will be forced to change the
value of the password at the next login, before any other operations will
be permitted. Only the ‘admin’ user account has permissions to change
the ‘Password Expires’ field.
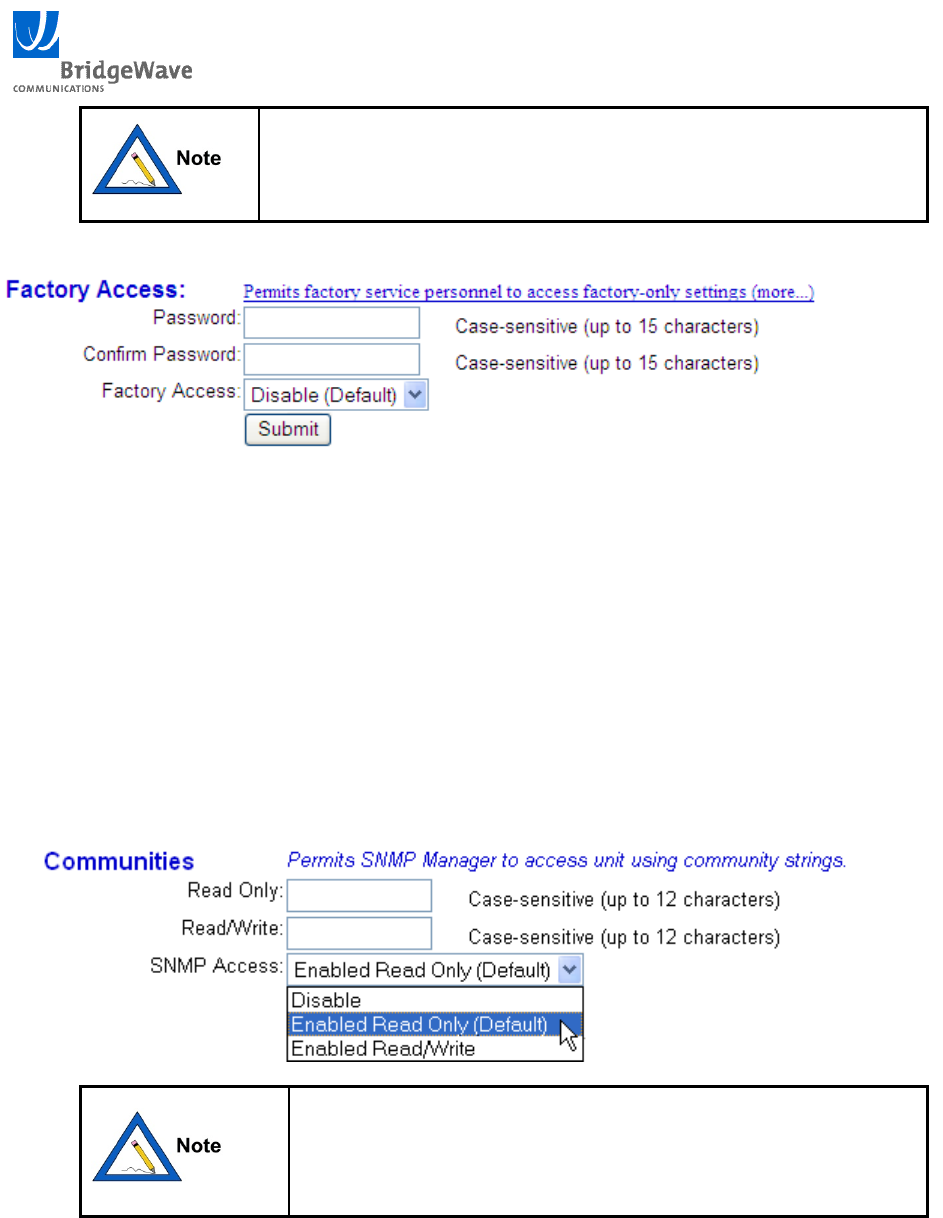
7.3 Factory Access
Permits BridgeWave factory service personnel to access the unit, including factory-only internal
settings. In order for service personnel to access unit, this feature must be enabled and the administrator
needs to set and provide an assigned password.
Password: The password is case-sensitive, may contain letters, numbers, and special
characters, and can have a maximum of 15 alphanumeric characters. If the
‘Minimum Password Length’ option is enabled under the ‘Enhanced
Security’ section then the password must contain 10 or more characters.
Confirm Password: Repeat the same password to validate.
Factory Access: Scroll menu to choose between ‘Enabled and ‘Disabled’. The default is for
the access to be disabled.
BW64 & BW64EConfiguration Guide
46 045-57014 Rev A
For security reasons, the administrator should only enable factory
access for the time of active access by BridgeWave factory service
personnel. A power cycle or ‘Hard Restart’ will automatically
change the factory access to disabled.
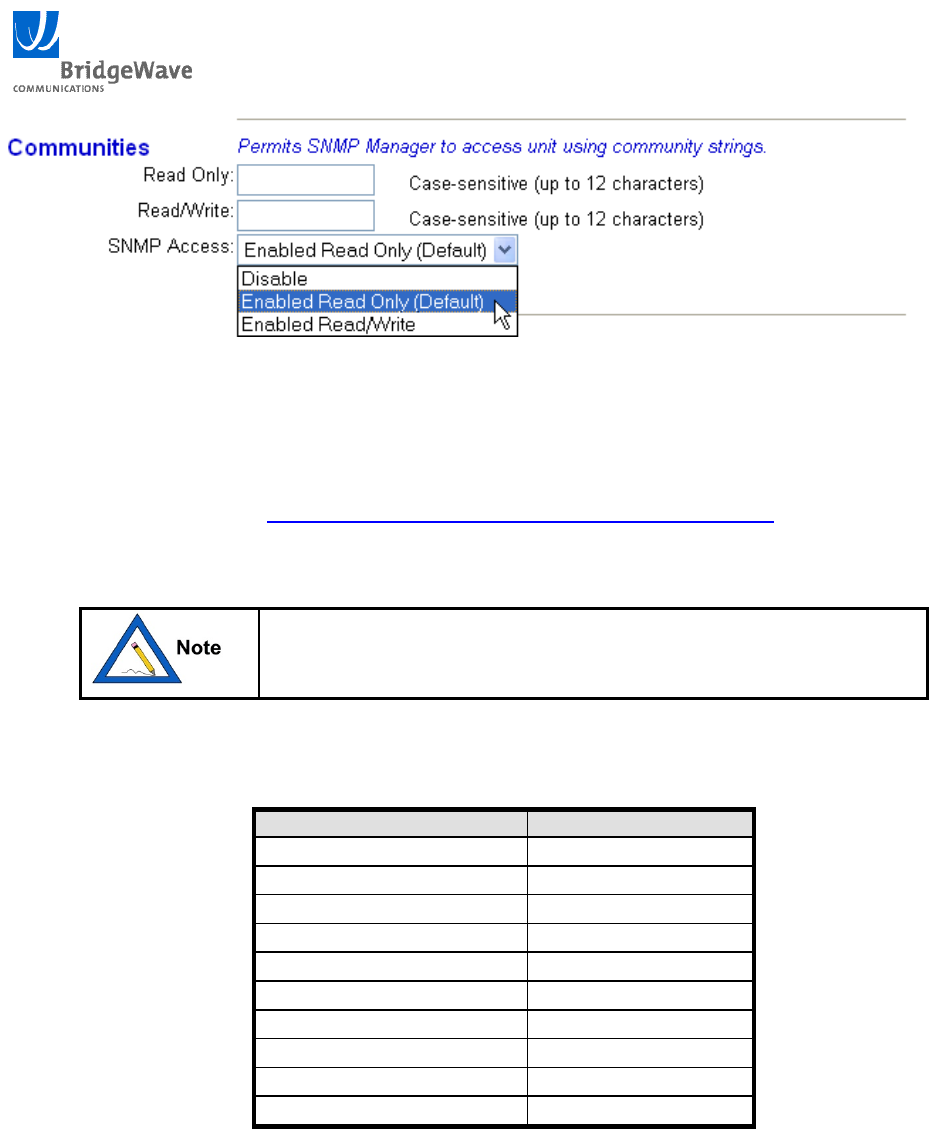
7.4 Communities
Read and write community strings are used for permitting SNMP management access. The Community
strings are case-sensitive and can have 0-12 characters comprised of numbers, letters, or special
characters.
Read Only: Used for authentication of SNMP GET request. Default value is ‘public’.
Read/Write: Used for authentication of SNMP SET request. Default value is ‘private’.
SNMP Access: This parameter allows for SNMP to be ‘Disabled’, ‘Enabled Read/Write’, or
‘Enabled Read Only (Default)’.
As part of the initial setup, if you do not intend to utilize the
SNMP function, it is good practice to change the ‘SNMP
Access’ to ‘Disabled’. This will prevent users from accessing
the SNMP agent.
BW64 & BW64EConfiguration Guide
47 045-57014 Rev A
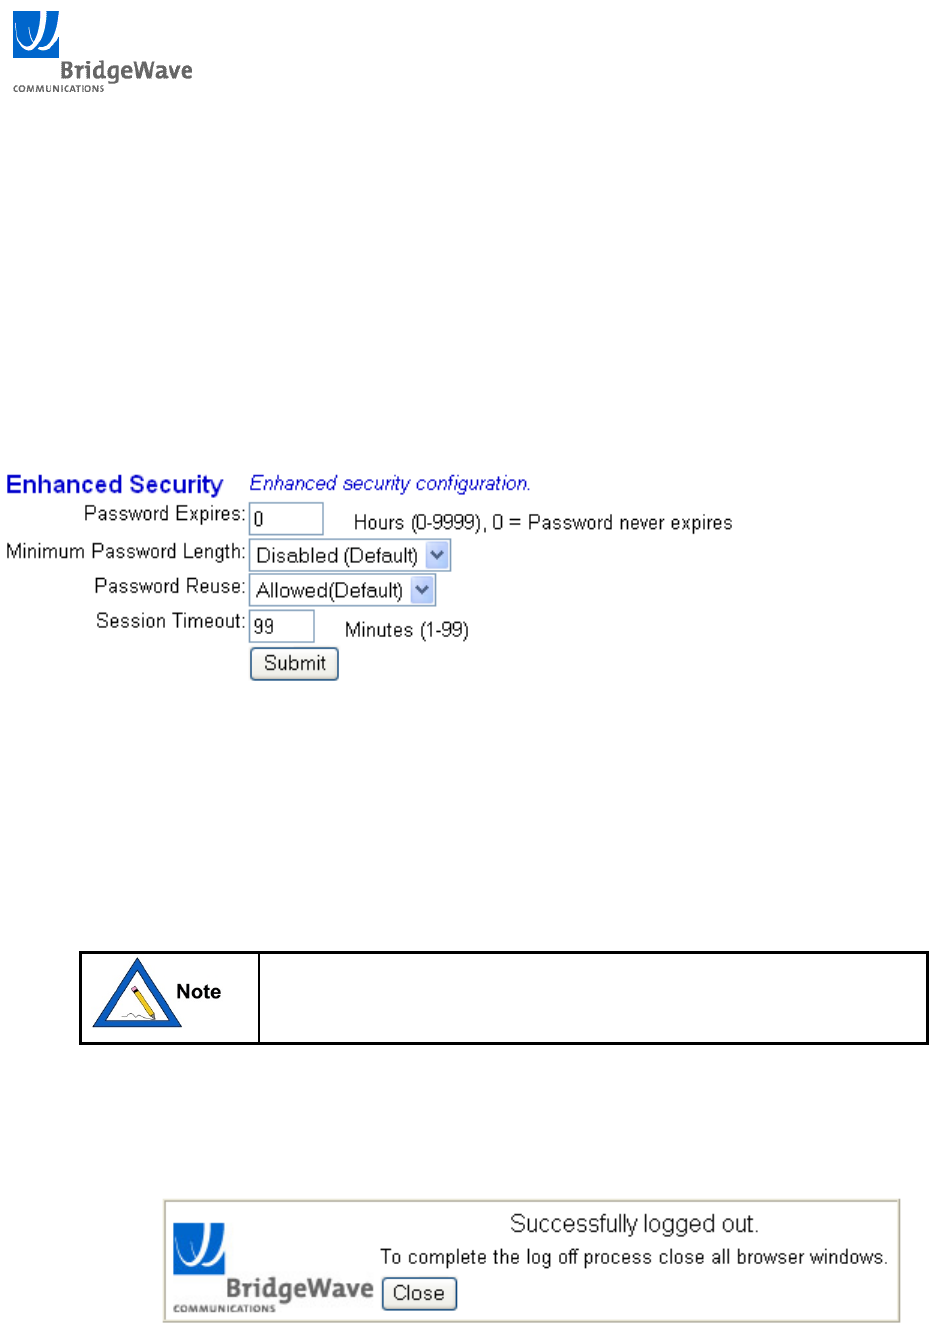
7.5 Enhanced Security
Permits password security configuration option to expire the password in the range of 0-9999 hours. If
the value is set to zero, the password is maintained indefinitely.
Permits password security configuration option to set the minimum password length to 10 characters
minimum. Disabled allows any length password. The maximum password length allowed is 15
characters.
Permits password security configuration option to allow or not allow password reuse.
Permits the extension of the time between automatic session timeouts to a value of 1-99 minutes.
7.6 Logging Out
User connections to the web management agent will automatically log out after 5 minutes (default) of
inactivity unless re-configured in the ‘Enhanced Security’ function. The ‘Log Out’ option can be used to
manually close the User’s connection to the management agent. The user will be required to re-enter
username and password to regain access to the management agent.
The automatic log out function will not log out a user connection
when the ‘Status’ or ‘Statistics’ page is the active page and the
‘Automatic Refresh’ option is enabled.
1. Select the ‘Log Out’ option from the upper right hand corner of the web interface.
2. Select ‘Yes’ when prompted. This will close the browser window for increased security.
Figure 7-1 User Log Out
BW64 & BW64EConfiguration Guide
48 045-57014 Rev A
8 RADIUS
Remote Authentication Dial In User Service (RADIUS) standard (RFC 2865) allows for remote and
centralized user administration, authentication and authorization of the BridgeWave Radio user names
and passwords when the radios are embedded in a network environment.
When RADIUS is enabled in the BridgeWave radio and a user attempts to login to the radio, the radio
will send the authentication request to the specified RADIUS server.
The communication between the radio and the RADIUS server is authenticated and encrypted through
the use of a shared secret. The shared secret is not transmitted over the network.
The radio has three RADIUS configuration options:
Disable (Default)
Enable while allowing locally configured (admin, user) login access
Enable while disallowing locally configured (admin, user) login access
If the RADIUS server is not available and RADIUS is enabled
with local access disallowed, a hard reset will be needed to
regain login access to the radio.
8.1 Configuring RADIUS
The RADIUS related configuration parameters are located in the RADIUS tab of the web interface.
Use the following steps to configure RADIUS
1. Select the ‘RADIUS’ tab from the web browser interface of the unit.
2. Enter the Primary RADIUS server IP address in the field provided. The Secondary server
address is optional.
3. Enter the server port in the field provided
4. Enter the shared secret in the field provided
5. Re-enter the shared secret in the verify field provided
6. Enter the ‘Timeout’ and ‘Retries’ values if other than default is required
7. Select the configuration mode of ‘Disable (Default)’, ‘Enable (allow Local Users)’ or ‘Enable
(Disallow Local Users)’ from the drop down menu
8. Push the ‘Submit’ button
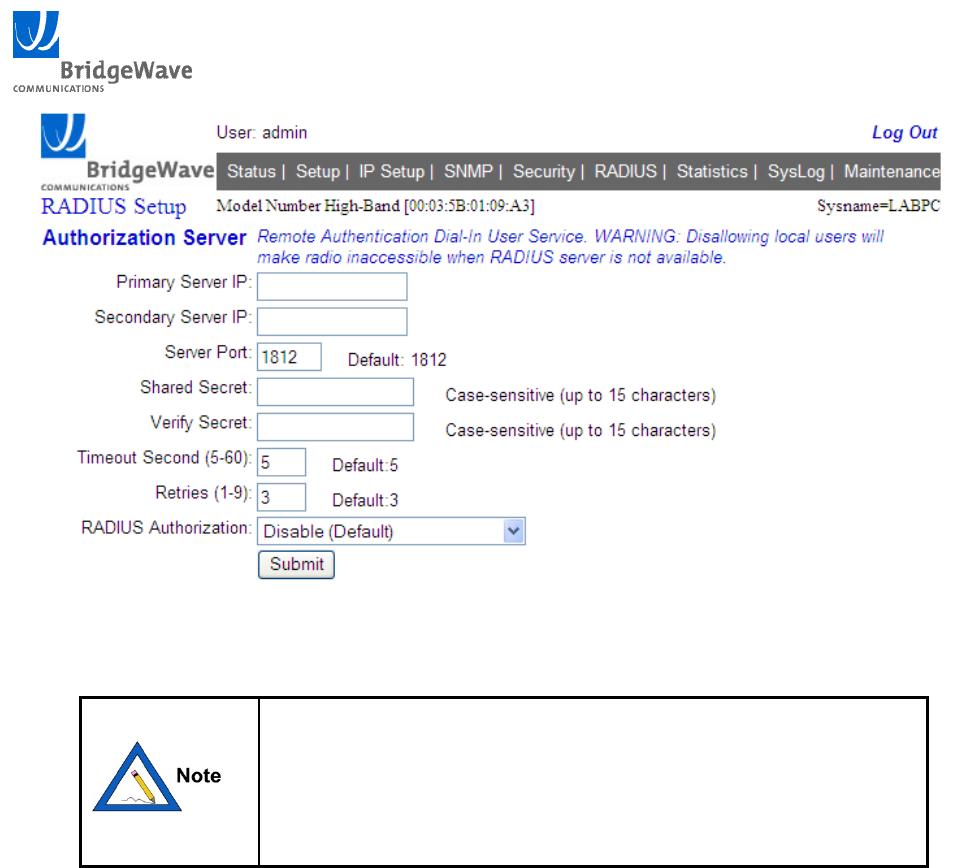
BW64 & BW64EConfiguration Guide
49 045-57014 Rev A
Figure 8-1: RADIUS Setup Page
One possible safe approach to take is to first enable RADIUS and
allow local user login access. Now open a new browser window
and login with a username and password provided by the RADIUS
server. When the login through the RADIUS server is successful, it
is safe to re-enable RADIUS in the radio, disallowing local user
access.
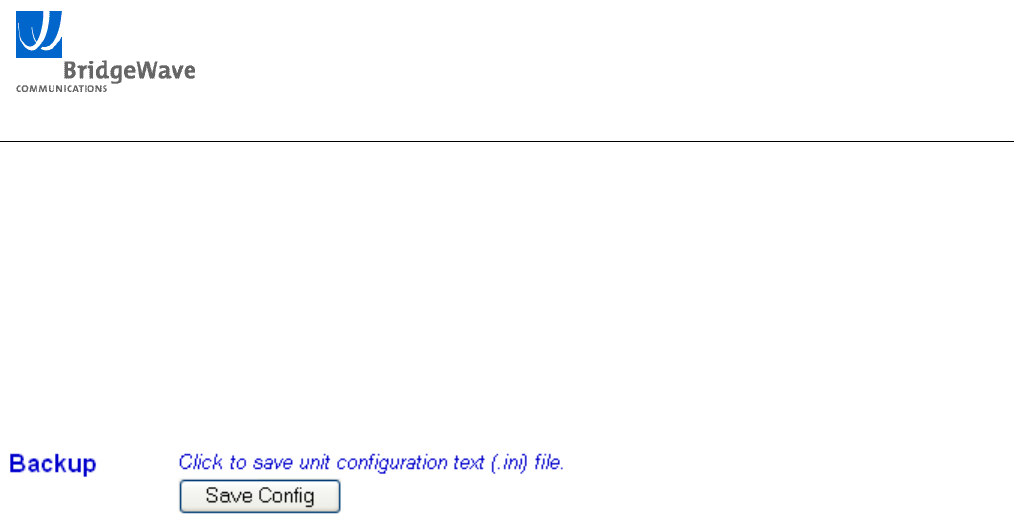
BW64 & BW64EConfiguration Guide
50 045-57014 Rev A
9 Configuration File Management
A copy of the unit’s configuration can be saved to an external file. The file is saved in an .ini format and
can be viewed with a text editor.
9.1 Backing Up a Configuration
Use the following steps to perform a backup of the unit configuration.
1. Select the ‘Maintenance’ tab from the web browser interface of the unit.
2. Select the ‘Backup’ option from the ‘Config’ section of the ‘Maintenance’ screen.
3. A File Download window will be displayed. Select the ‘Save’ option and choose the location
and name for the file and then click the ‘Save’ button. The file will then be stored the chosen
location.
9.2 Editing a Configuration File
The configuration radioconf.ini file is text based and various parameters can be edited by using a basic
text editor such as Notepad on a windows based PC. The editable parameters in the file are enclosed by
quotations “” “”. The filename is editable but must remain an .ini file type.
The file is divided into sections with the sections named as follows:
[Header] Do not edit this value; it is used as a file control parameter
[System] The SNMP system name, system description, system contact, system location, session timeout
(in seconds), password reuse (yes=1/no=0), and authentication trap (yes=1/no=0) can be edited.
[Trap1], [Trap2] and [Trap3] The three Trap/Syslog IP destinations, names and community information
can be edited
[Radauth] The RADIUS Primary and secondary server IP, server port, timeout and retry values can be
edited. RADIUS authorization can be disabled (0, default), Enabled and allow local users (1) or Enabled
and disallow local users (2)
[Management] The IP address, IP Mask, Gateway, Time-zone, Timeserver The LSP RSL value for RSL
activation (lowest RSL) The LSP RSL value for RSL Deactivation (highest RSL), IP address, Access
control: In-band (0), Copper Secondary path (1) Copper Out-band (2), AR alignment mode disable on
reset (Yes=1/No-0), AR operation mode (1), Fiber auto-negotiation (Yes=1/No=0), AdaptPath/LSP
(Enable=1/Disable=0), AES Bypass (1)
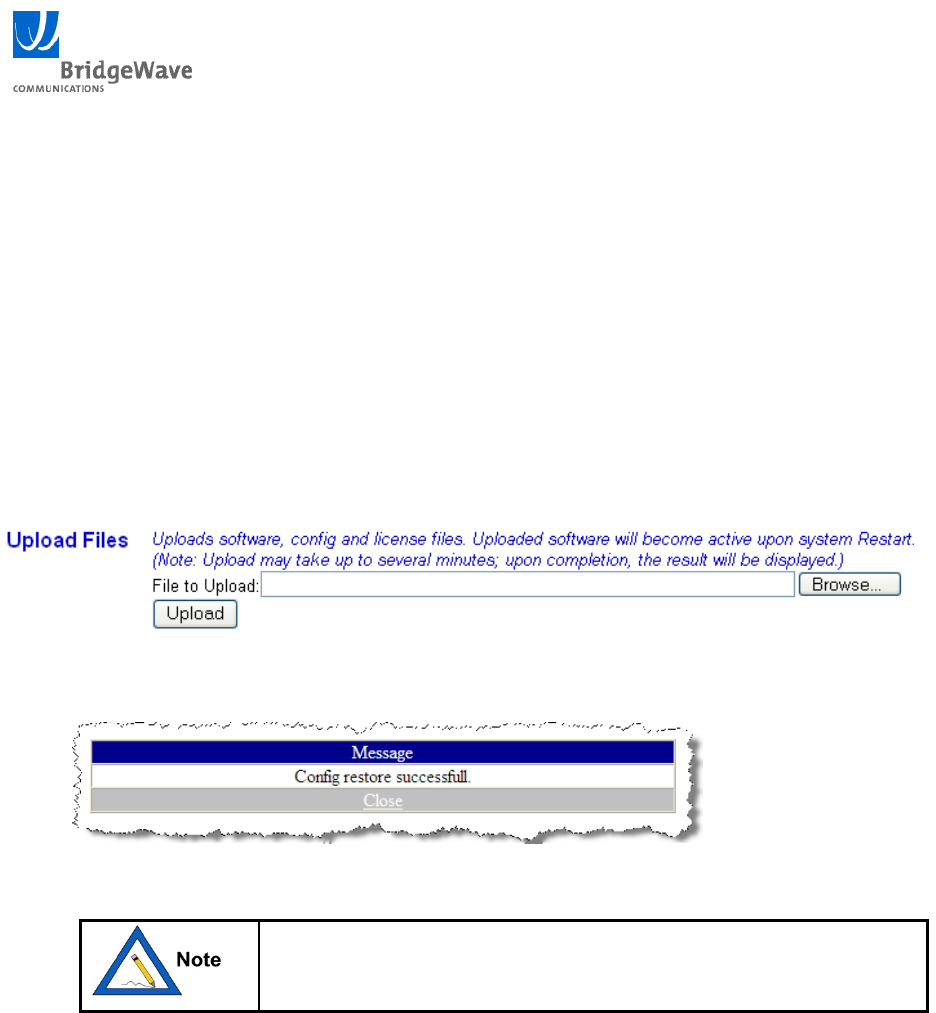
BW64 & BW64EConfiguration Guide
51 045-57014 Rev A
Care should be taken during the editing process to not disturb any other characters other than what is
typed between the quotation marks
Care should also be taken when saving the file to keep the .ini extension intact. This is done by selecting
“all files as the save type and making sure that the filename has .ini at the end of the filename.
9.3 Restoring a Configuration
Use the following steps to restore the unit configuration from a backup .ini file.
1. Select the ‘Maintenance’ tab from the web browser interface of the unit.
2. Select the ‘Browse‘option from the ‘Update Software Restore Config’ section of the
‘Maintenance’ screen and select the file from its saved location, then select ‘Upload’.
The following message will be displayed if successful:
If IP related parameters were modified in the configuration file it
will require a ‘Soft Restart’ before the changes will become active.
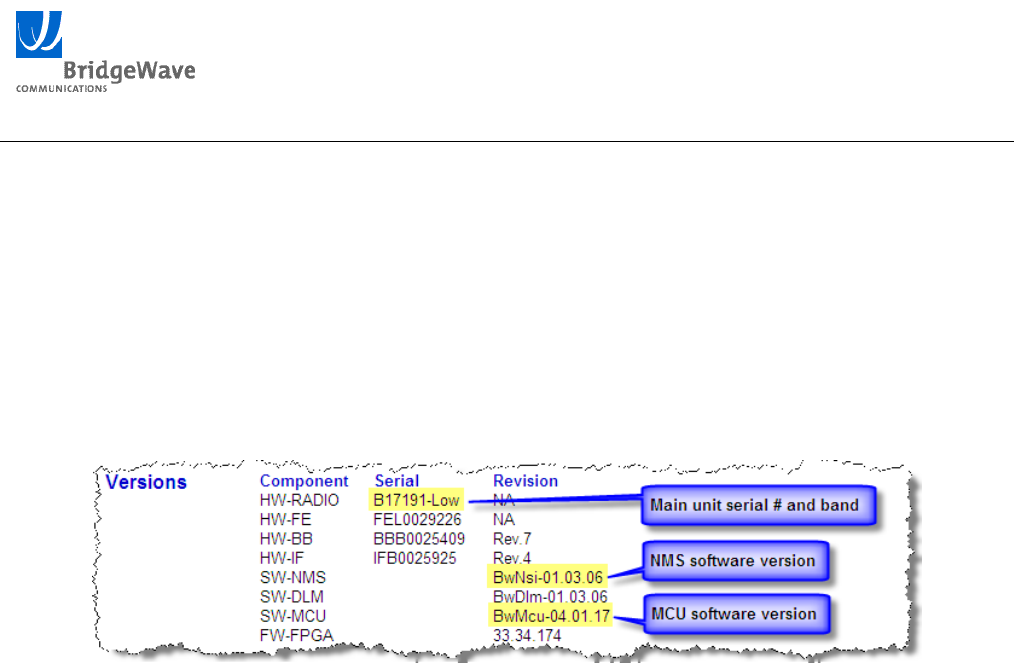
BW64 & BW64EConfiguration Guide
52 045-57014 Rev A
10 Upgrading Software
10.1 Determining Versions
The ‘Versions’ section on the ‘Maintenance’ page of the web interface, shown in Figure 10-1, displays a
detailed inventory of a unit’s hardware and software components. The information may be needed when
contacting factory personnel to help resolve issues or when updating a unit’s software. The HW-
RADIO, SW-NMS, and SW-MCU values can be used to identify the equipment serial number and the
two field-upgradeable software components. Prior to performing a software upgrade these three items
should be confirmed in order to determine compatibility.
Figure 10-1 Hardware and Software Versions
A detailed description of each component is listed below:
HW-Radio: This field displays the serial number of the unit and indicates if it is a High-Band or
Low-Band unit.
HW-FE: Displays the serial number of the internal Front End module. *
HW-BB: Displays the serial number of the internal Base Band module. *
HW-IF: Displays the serial number of the internal IF module. *
SW-NMS: Displays the current NMS software version.
SW-DLM: Displays the current DLMsoftware version. *
SW-MCU: Displays the current MCUsoftware version.
FW-FPGA: Displays the current firmware version of the internal FPGA. *
* Only used by factory personnel
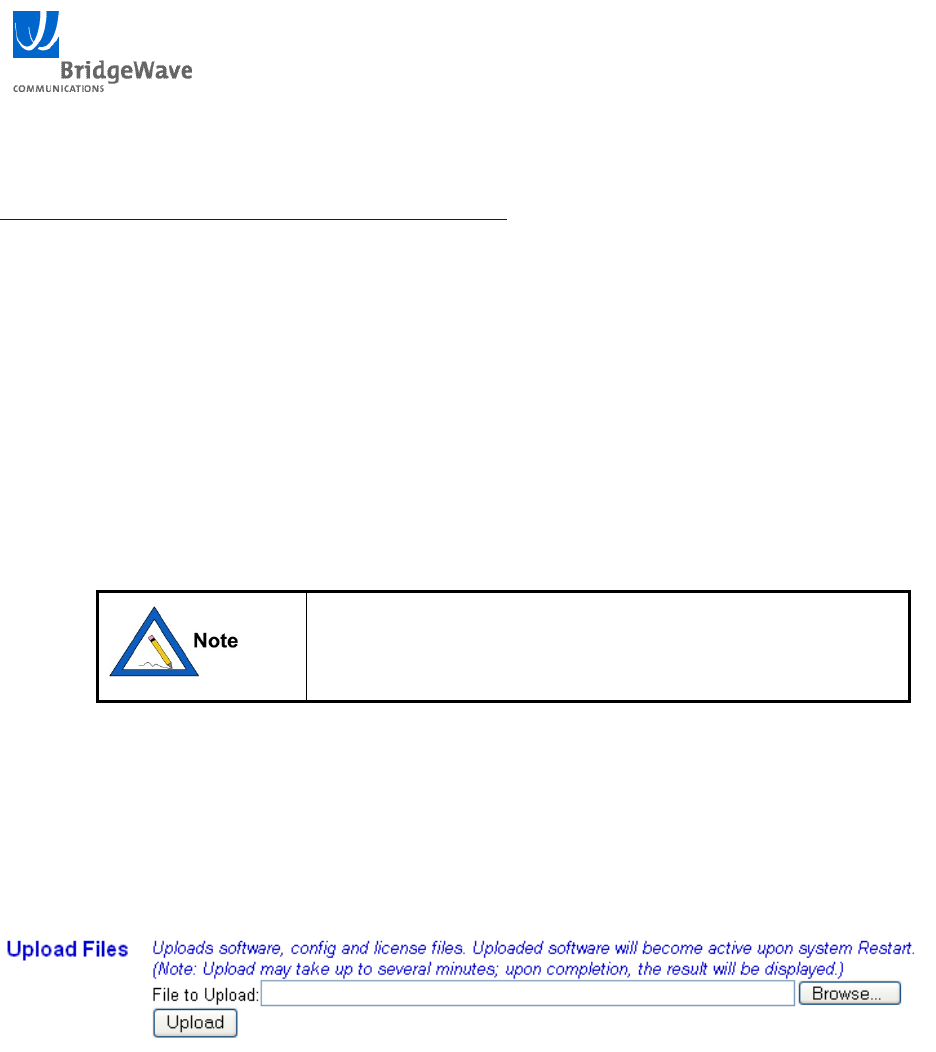
BW64 & BW64EConfiguration Guide
53 045-57014 Rev A
10.2 Software Upgrade Procedure
To obtain the latest version of software, go to the download section of the BridgeWave website at
http://www.bridgewave.com/support/downloads.cfm. You will find a list of software updates available
for your product. The download consists of a dated .zip file that includes the product software, MIB files
and the release notes for the package.
Use the following steps to upgrade a unit’s software:
1. Confirm compatibility of your equipment, and current software releases with the available
software releases listed on the BridgeWave download site.
2. Download the upgrade package and unzip the files to a known location on your hard drive.
Several files will be unzipped into the directory. Some software releases will contain a
‘BwNmsSSL-xx-xx-xx.cat’ file, a ‘MCU_AES-xx-xx-xx.cat’ file, or both files, where xx-xx-xx
is the version number. When both files are present they must both be upgraded independently
starting with the ‘BwNmsSSL-xx-xx-xx.cat’ file.
Do not change the .cat extension name, or use the “.”
character if renaming the file. This will cause the upgrade
process to fail.
3. Next, browse into the unit that is being upgraded and select the ‘Maintenance’ tab from the web
interface.
4. Select the ‘Browse‘option from the ‘Update Software Restore Config’ section and select the new
‘BwNmsSSL-xx-xx-xx.cat’ file software image from the unzipped file location. Then select
‘Upload’.
5. The upload can take several minutes to complete. Upon successful completion a ‘File Upload
Success’ message will be displayed:
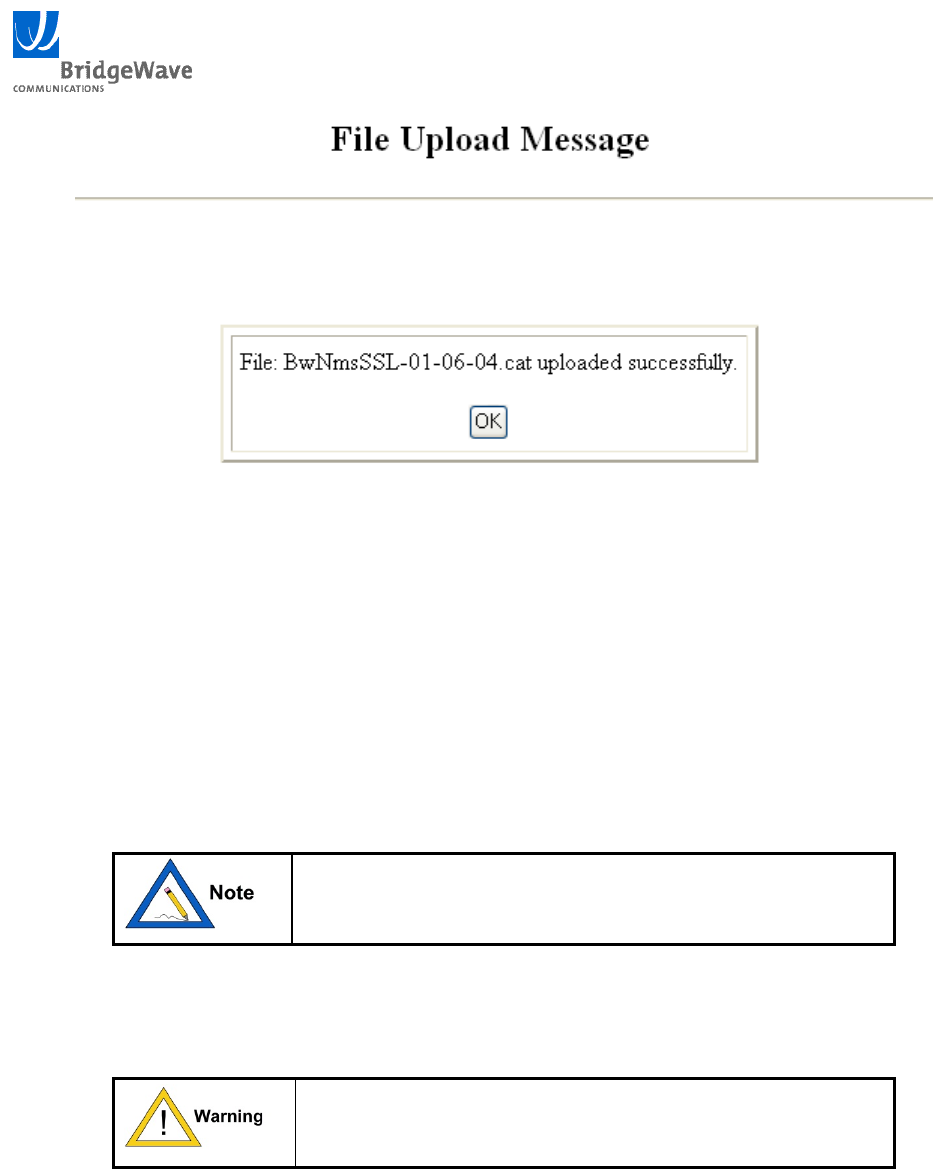
BW64 & BW64EConfiguration Guide
54 045-57014 Rev A
Figure 10-2 File Upload Success Page
If no indication or a failure message is received after ten minutes, please verify the file name and
retry the upload. If the failure repeats, please re-upload the file from the BridgeWave website
and retry. If the failure still repeats, please contact customer service.
6. After receiving a ‘File Upload Success’ perform a ‘Soft Restart’ from the ‘Maintenance’ page of
the web interface.
The management agent will not be accessible for 140 sec
after rebooting or Hard Restarting the unit, even though
data traffic will flow over the link immediately.
7. Repeat Steps 3 – 6 for the ‘MCU_AES-xx-xx-xx.cat’ file if it is contained in the .zip release
package.
Do not interrupt the upload process when upgrading the
‘MCU_AES-xx-xx-xx.cat’ file. An interruption could cause
the unit to become inoperable.

BW64 & BW64EConfiguration Guide
55 045-57014 Rev A
When upgrading the MCU_AES-xx-xx-xx.cat file of a
remote radio over the wireless interface, the link traffic may
drop while the file is being burned to flash. This can cause
the ‘File Upload Success’ message to not be received by the
upgrade PC at the local end. If a success message is not
received after waiting 15 minutes reconnect to the remote
radios web interface and verify the new MCU version is
displayed before proceeding with the remaining steps.
8. After successfully uploading the above file(s) perform a ‘Hard Restart’ from the ‘Maintenance
Page’ of the web interface, or power cycle the unit.
The updated software will become active upon completion of the Hard Restart process.
The management agent will not be accessible for 140 sec
after rebooting or Hard Restarting the unit, even though
data traffic will flow over the link immediately.
9. When the web interface becomes available browse into the unit and select the ‘Maintenance’ tab.
Verify that the xx.xx.xx portion of the SW-NMS, and SW-MCU revisions match the xx-xx-xx
portion of the ‘BwNmsSSL-xx-xx-xx.cat’ and ‘MCU_AES-xx-xx-xx.cat’ files respectively.
10. Next, select the ‘Setup’ tab. Verify all settings on the ‘Setup’ page, and select ‘Submit Changes’,
even if no changes were made. This will bind the configuration settings using the logic and
functionality contained within the new software. The unit should now be operational with the
new software.
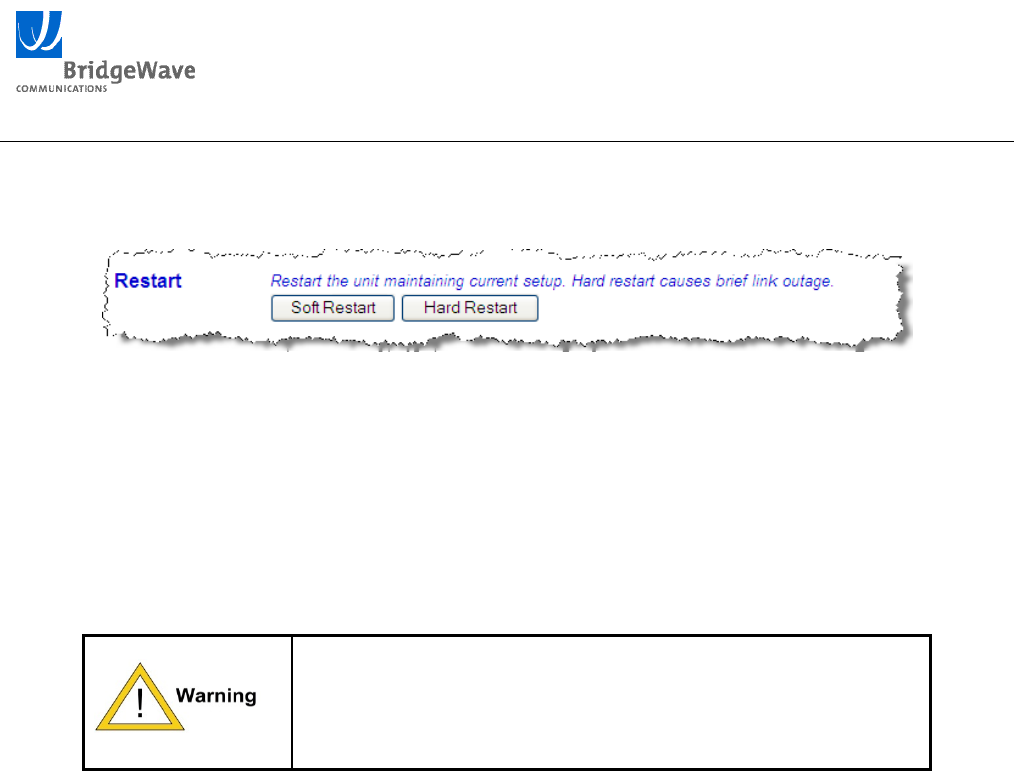
BW64 & BW64EConfiguration Guide
56 045-57014 Rev A
11 System Restarts
The following types of restarts can be performed on the unit from the ‘Maintenance’ page of the web
management interface:
Soft Restart – Performs a soft restart of the unit. This will activate the latest changes submitted from
the Setup page. If no changes have been made it will maintain the current configuration settings. A
restart will not stop data transfer, but will make the management agent inaccessible for
approximately 140 seconds.
Hard Restart – Performs a hard restart of the unit. This will activate the latest changes submitted
from the Setup page. If no changes have been made it will maintain the current configuration
settings.
Performing a ‘Hard Restart’ will momentarily interrupt user
data traffic flow across the link.
‘Soft Restart’ is NOT traffic affecting.

BW64 & BW64EConfiguration Guide
57 045-57014 Rev A
12 Product Upgrades by Request
12.1 Introduction
Currently, end customers may request license upgrades for the following:
- Upgrade the rate in BW systems
- Upgrade FE60U or FE80U to full AR System.
- Upgrade 60 and 80, non-AES version to NMS SSL security.
- Upgrade SLE100 to AES encryption.
- Upgrade AR60 or AR80 to AdaptSwitch functionality.
- Extend the Upgrade/Downgrade time periods
It is highly recommended that the customer upgrade to at least 3.0.2 NMS
(and appropriate MCU) or newer before requesting license upgrades
The customer has the option of generating a request file in the NMS and emailing the file to
BridgeWave or the customer can just supply the following information:
Radio Unit serial number
Radio unit MAC address
NMS software version
License type requested
12.2 Request License File Procedure
The following procedure should be used to request and Install license upgrades to the product.
1. Using a web browser connect to the web management interface of the ‘High-Band’ unit and
click on the ‘Maintenance’ tab. For BW product upgrade/dupgrades and , follow this both
radios must request licenses
2. Under the ‘License’ section push the ‘Request License’ button. A File Download dialog box
will be shown.
3. Select the ‘Save’ option from the File Download dialog box, shown in Figure 12-1 Request
License Upgrade File, and save the .ini file to a known location.
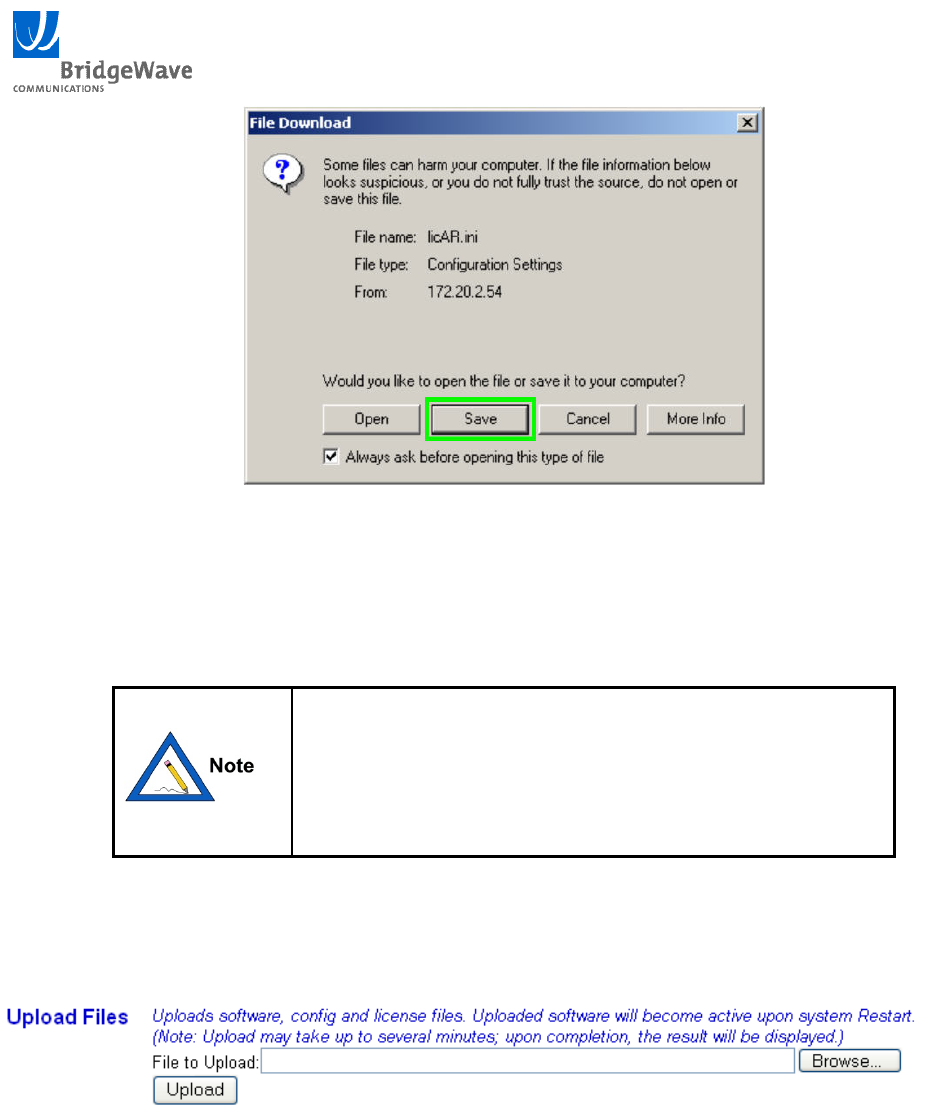
BW64 & BW64EConfiguration Guide
58 045-57014 Rev A
Figure 12-1 Request License Upgrade File
4. This file must then be emailed to BridgeWave after purchasing an upgrade.
5. Once the upgrade has been purchased, BridgeWave will email a license file that must be
uploaded to both radios or just the High-Band unit. Save this file to a known location.
It is highly recommended that the software is upgraded to
the latest version before requesting license upgrades
Otherwise, the unit’s software should not be upgraded until
after the license file has been received and properly
installed.
6. From the web interface of the High-Band or both units, select the ‘Maintenance’ tab. Under
the ‘Update Software Restore Config’ section select ‘Browse’ and locate the license file
received from BridgeWave, then select ‘upload’.
A confirmation message will be displayed upon successful upload and the unit can then be configured to
operate in AR mode from the ‘Setup’ page.
ContactSalesformoreinformationregardingthepurchaseoflicenseupgrades.

BW64 & BW64EConfiguration Guide
59 045-57014 Rev A
13 AES Encryption Feature
The Advanced Encryption Standard (AES) feature provides a method for securing the data traffic
traveling across the radio link by encrypting the information. The AES feature and the associated
procedures in this section only apply to BridgeWave products that include the “-AES” designator in the
model number. Example: AR80X-AES
In cryptography, AES is a block cipher adopted as an encryption standard by the U.S. government. AES
is one of the most popular algorithms used in symmetric key cryptography. The design and strength of
all key lengths of the AES algorithm (i.e., 128, 192 and 256) are sufficient to protect classified
information up to the SECRET level. TOP SECRET information requires use of either the 192 or 256
key lengths. The BridgeWave AES solution uses the 256 key length.
For the 256 Key, 64, 4-bit HEX characters or 32, 8-bit ASCII keyboard text characters are used for the
key.
AES product models also support Secure Socket Layer (SSL) connections for enhanced security when
accessing the web management interface. The SSL feature requires the “https://” designation be placed
in front of the units IP address when trying to access the web management interface.
By default the AES capable units are shipped with AES encryption enabled, with a matching key active
on both ends of the link. When encryption is enabled the key must be identically configured on each unit
for connectivity across the link to be established.
The Link Quality voltage reading, which is used to determine the performance of the link, is fully
functional independent of AES configuration.
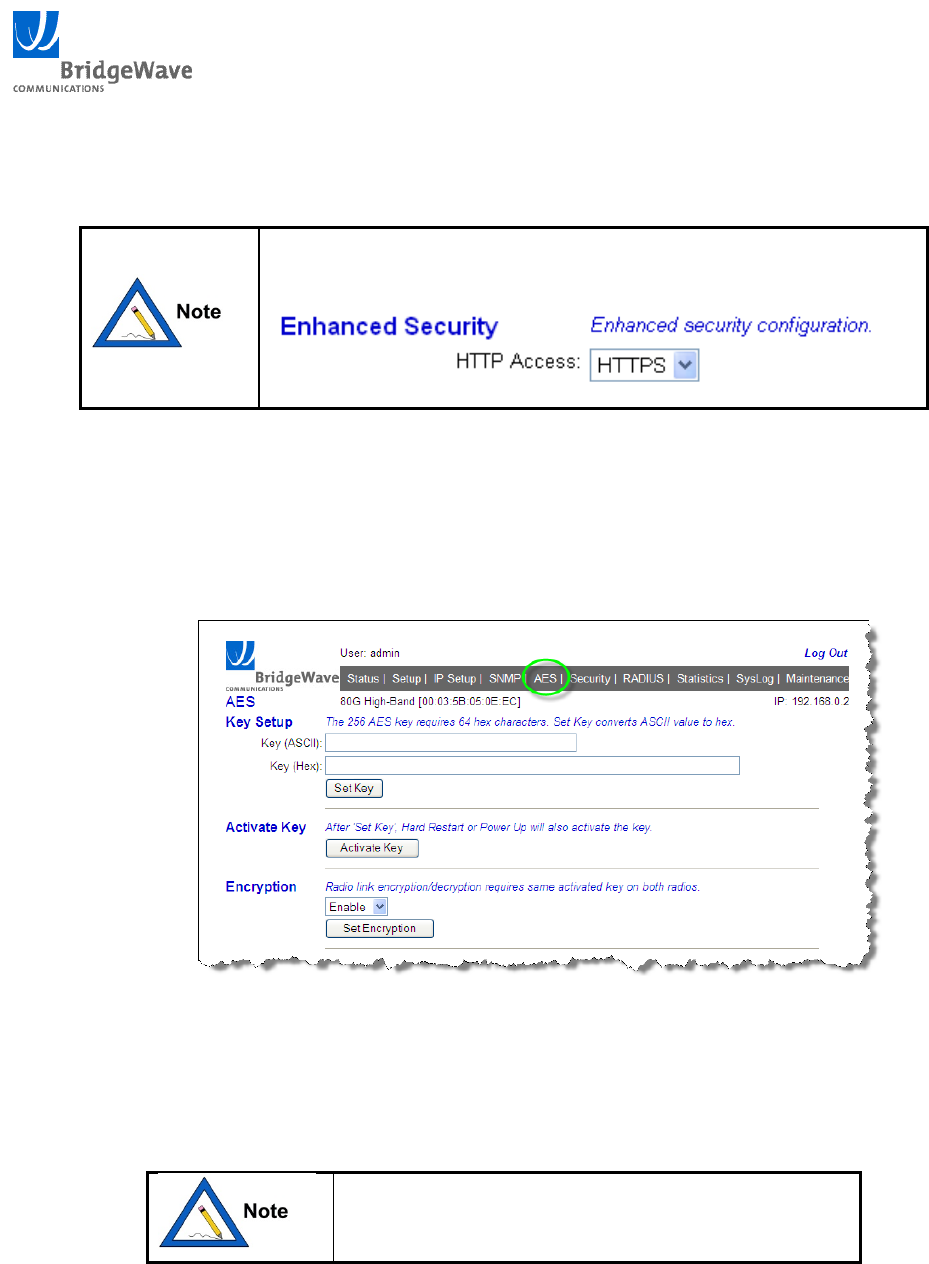
BW64 & BW64EConfiguration Guide
60 045-57014 Rev A
13.1 AES Setup
Use the following procedure to configure and enable AES encryption:
AES setup requires secure management to be enabled. This can be
verified in the ‘IP Setup’ page as shown:
1. AES should only be configured after proper installation has been completed and an
unencrypted link has been established and validated. Confirm you are working with a fully
operational link.
2. Using a web browser connect to the web management interface of the Local (Near End) unit
and click on the ‘AES’ tab. The ‘AES’ configuration page shown below will be displayed:
3. Under the ‘Key Setup’ section enter up to 32 ASCII text characters into the ‘Key (ASCII)’
field, and then select the ‘Set Key’ button. The ASCII characters will automatically be
converted to Hex. Alternatively Hex characters can be entered directly into the ‘Key (Hex)’
field. After ‘Set Key’ the buttons will become grayed out while the key is being saved to
flash. This process can take up to 4 minutes.
Check the key closely before performing the ‘Set
Key’ operation. The key contents will not be
displayed after performing the ‘Set Key’ operation.
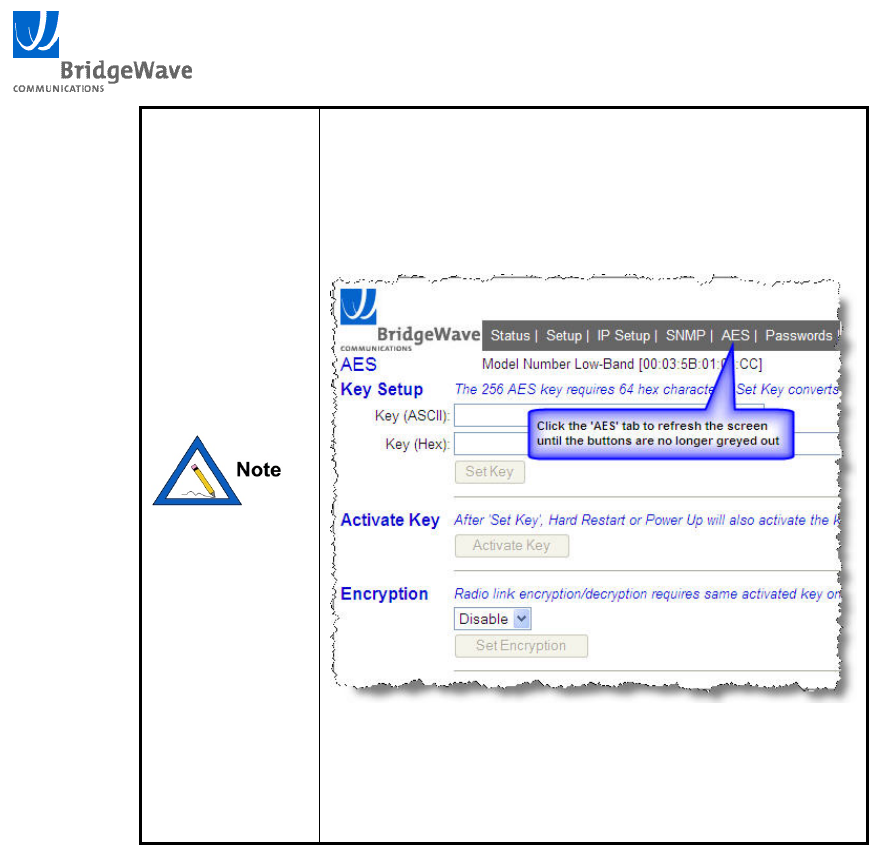
BW64 & BW64EConfiguration Guide
61 045-57014 Rev A
Click on the ‘AES’ tab to refresh the page until the
buttons are no longer grayed out. Do not hit the
browser ‘Refresh’ option to update the page. This will
cause the key to resave and the buttons will continue
to be grayed out.
Please be patient. It may take up to 4 minutes for the
256 key data to be written to the radio memory. The
buttons on the AES page will be grayed out during
this process.
4. Log into the Remote (Far End) unit and perform the ‘Set Key’ operation outlined in Step 3.
Again, it can take up to 4 minutes for the key to be written to the flash memory.
5. Next select the ‘Activate Key’ option on the Remote (Far End) unit first, and then the Local
(Near End) unit. This applies the key to the internal encryption hardware but does not enable
encryption.
6. The ‘Encryption’ field is used to ‘Enable’ or ‘Disable’ encryption and is set to ‘Enable’ by
default. Verify that both the Local (Near End) and Remote (Far End) unit ‘Encryption’ fields
are set to ‘Enable’. If ‘Disable’ is selected, toggle the ‘Encryption’ field of the Remote (Far
end) to ‘Enable’ and then click the ‘Set Encryption’ button, then perform the same on the
Local (Near End) unit.
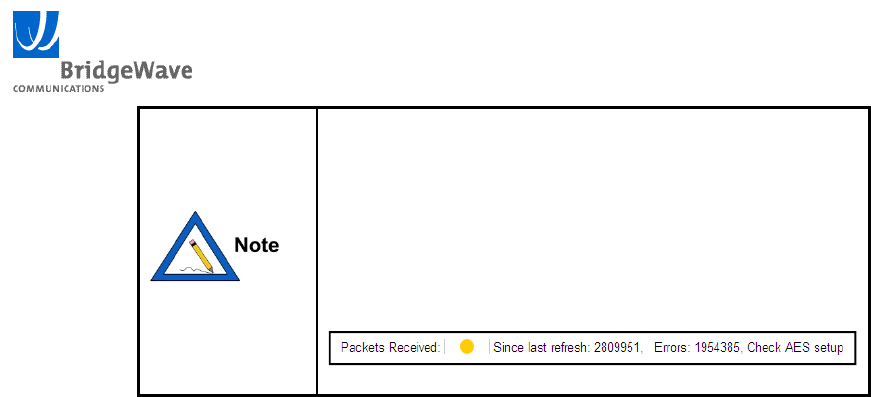
BW64 & BW64EConfiguration Guide
62 045-57014 Rev A
If connectivity across the link cannot be established
after enabling encryption, check the ‘Packets
Received’ field under the ‘Radio Interface’ section of
the ‘Status’ tab. If errors are displayed followed by the
‘Check AES setup’ message, shown below, the keys are
most likely mismatched and should be reentered into
both local and remote units.

BW64 & BW64EConfiguration Guide
63 045-57014 Rev A
14 SysLog
SysLog is a communications protocol as well as program applications used for forwarding,
storing and processing log messages in a heterogeneous IP network
SysLog is based on standards RFC 3164 and RFC 3195
The Syslog protocol is a client-server type protocol. The Syslog sender, in this case, the
BridgeWave radio, may be enabled to send small textual messages to the Syslog server program.
SysLog is supported across multiple platforms and can be used to integrate data from different
types of systems into a central repository.
The BridgeWave radio additionally stores the Syslog messages locally in a circular buffer of up
to 256 messages.
14.1 Syslog Message Format
The messages sent to the Syslog server have two fields known as the TAG field and the
CONTENTS field.
The values of the TAG field describing the event are SOURCE-SEVERITY-MNEMONIC.
The SOURCE field will contain one of the following: Radio, Fiber, Copper, Equipment,
Configuration or Maintenance.
The SEVERITY field will contain one of the following: Emergency (0), Alert (1), Critical (2),
Error (3), Warning, (4), Notice (5), Informational (6) or Debug (7)
The MNEMONICS field will contain one or more of the following: RSL, Temp, Input Voltage,
Error, LSP, TX, Calibration, Upload, Laser, Status or Start
The CONTENT is delimited by a colon and contains the details of the message.
Some sample Syslog messages to the Syslog server are as follows:
FIBER-2-STATUS:Link Down (indicates critical status that fiber link is down)
FIBER-6-STATUS:Link Up (indicates informational status that fiber link is up)
Radio-2-STATUS:Link Down RSL=-46 dBm, TX Temp=39C (Indicates a critical status,
the RF in the link is down, the RSL and transmitter temperature when it went down)
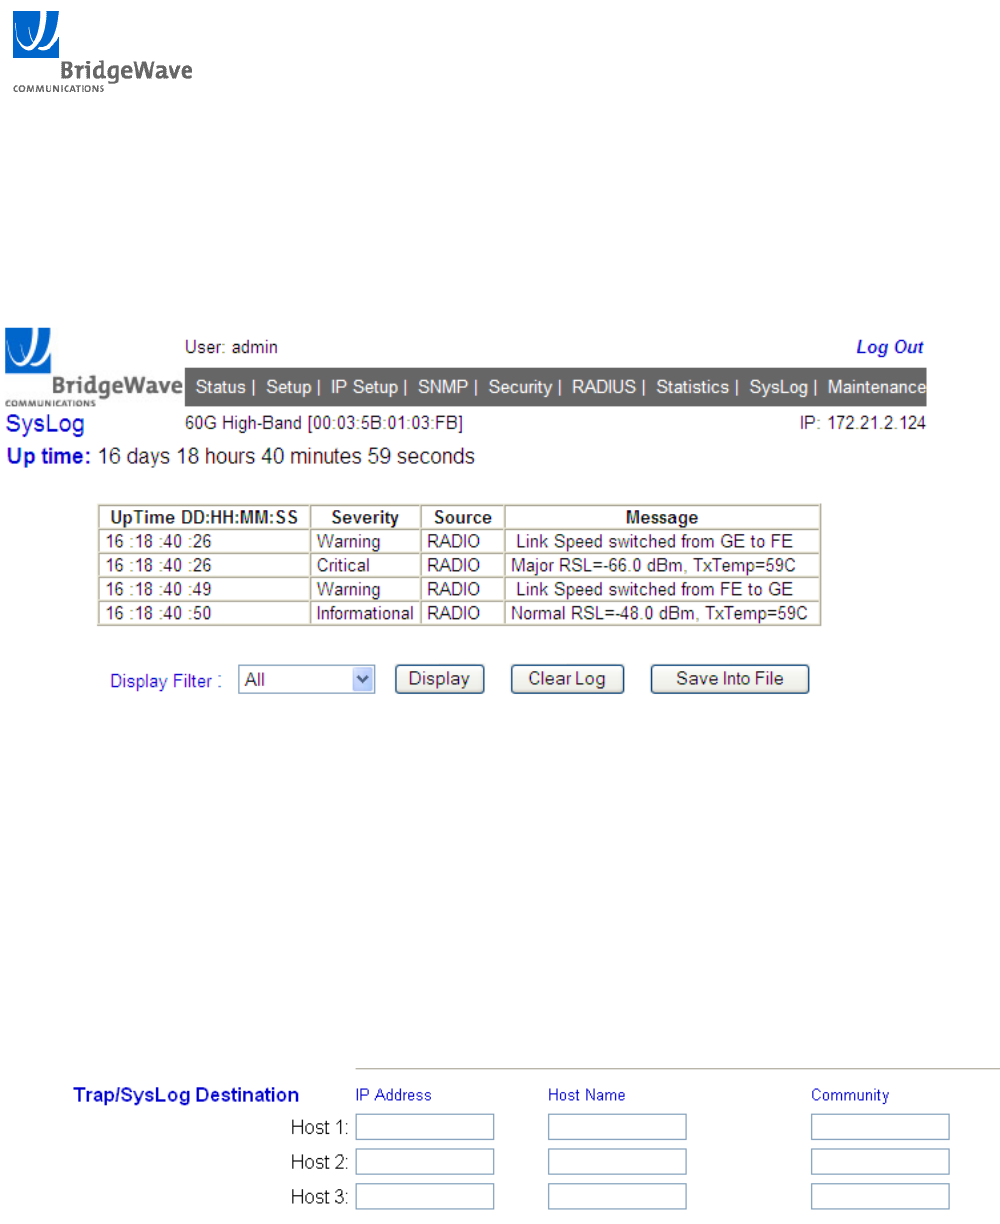
BW64 & BW64EConfiguration Guide
64 045-57014 Rev A
14.2 Local Syslog Message Display
As shown in Figure 14-1, Local Syslog Message display, ‘Up Time, ‘Severity’, ‘Source’ and
‘Message’ information is presented for the operator.
The ‘Save Into File” button transfers the SysLog data to an Excel file
Figure14‐1,LocalSyslogMessagedisplay
14.3 Syslog Setup
The Syslog server destination is setup on the SNMP page as follows:
1. Select the SNMP tab from the web browser interface of the unit
2. Enter the IP address of the Syslog message destination in the IP address field of Host 1,
Host 2 or Host 3 fields. The Host name and Community are not needed.
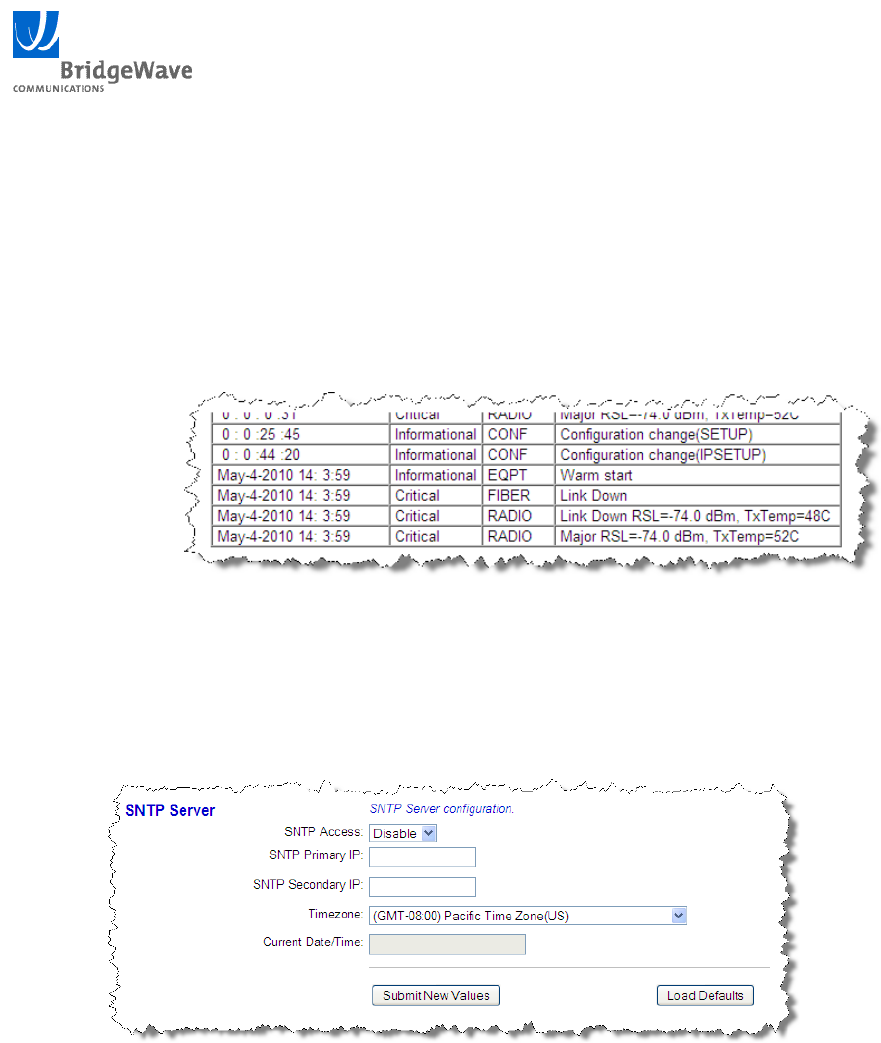
BW64 & BW64EConfiguration Guide
65 045-57014 Rev A
14.4 NTP Setup for SysLog Time Stamping
SNTP stands for Simple Network Time Protocol which is a client/server based protocol that
allows a network device (client) to obtain time and date information from an SNTP server over an
IP based network.
By default the Syslog events are stamped with the system uptime of the unit. To mark the SysLog
events with a time and date value the SNTP capability must be configured and enabled. Figure
14-2 shows the SysLog time stamping before and after configuration of the SNTP functionality.
Figure 14-2 SNTP Event Time Stamping
The steps below outline the process to configure the SNTP functionality:
1. Select the ‘IP Setup’ tab from the web browser interface of the unit.
2. In the ‘SNTP Server’ section of the page set the ‘SNTP Access’ parameter to ‘Enable’.
3. Enter a valid IP address of the primary SNTP time server into the ‘SNTP Primary IP’
field.
4. Optionally, a secondary SNTP IP server can be entered. This is recommended for
redundancy purposes but is not required.
5. Select the desired ‘Timezone’ from the drop down menu.
6. Press the ‘Submit New Values’ button at the bottom of the screen.
7. Press the ‘Soft Restart’ button for the new values to become active.
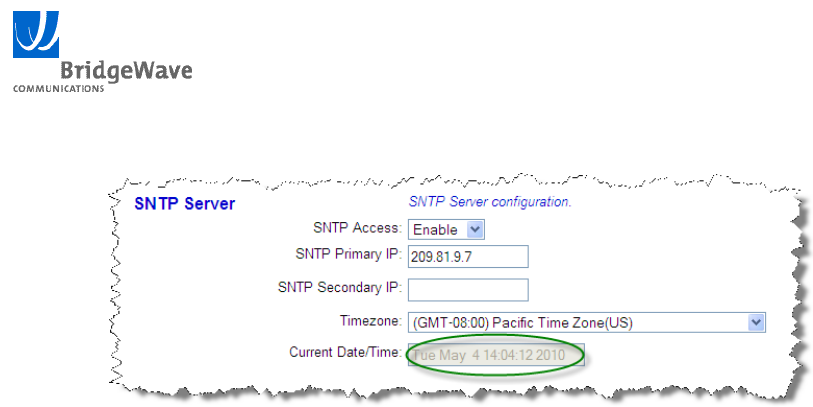
BW64 & BW64EConfiguration Guide
66 045-57014 Rev A
8. The management access will be lost for approximately 3 minutes. Upon regaining access,
confirm that the ‘Current Date/Time’ parameter is reading the correct value.
BW64 & BW64EConfiguration Guide
67 045-57014 Rev A
15 Default Recovery (Hard Reset)
If the unit’s Administrator password or IP configuration is forgotten, it will be necessary to perform a
hard reset to return these parameters to the factory default values. Only the Administrator/User/Factory
passwords, IP configuration, and Management Access parameters will be reset to default values. All
other parameters will remain in their currently configured state.
Each BridgeWave unit is shipped with a hard reset box that can be used to return the unit to its default
factory configuration.
In order to reset the Administrator password and IP configuration, it is required to have physical access
to the unit’s copper data port (RJ-45 jack) or cable and the unit’s power cable.
User data traversing the radio link will be briefly interrupted
during the hard restart process.
Procedure
1. First power down the unit,
2. Connect the hard reset box via a straight-through (standard) Ethernet cable at least 3 meters
long to the copper (RJ45) port on the unit. If a cable is already running to the RJ-45 port of
the unit, the reset box can simply be connected to the other end of this cable.
3. Reconnect power to the unit and wait a minimum of 90 seconds, before disconnecting the
hard reset box. The unit will then begin its normal restart cycle, and the management agent
will normally become accessible within approximately 3 minutes using the default IP
configuration, usernames, passwords and community strings.
This may take longer than the normal 140 seconds for the restart
operation to complete and the management agent to become
available.
Making your own hard reset cable:
If you do not have access to the hard reset box supplied with the unit, you can create your own “hard
reset cable” using the following procedure:
1. Obtain a standard Ethernet patch cable at least 3m in length.
BW64 & BW64EConfiguration Guide
68
045-57014 Rev A
2. Cut off one end of the Ethernet patch cable and then strip the jacket from the two wires that
belong to pins 3 and 6. These are typically the wires from either the orange/white-orange or
green/white-green pairs, but this is not guaranteed to be the case.
3. Connect the two wires from pins 3 and 6 together to make a short. All other wires must be left
un-terminated.
4. Use this hard reset cable as a substitute for the hard reset box and Ethernet cable. Instead of
disconnecting the hard reset box (as in the previous procedure), disconnect the wires going to
pins 3 and 6 from each other and leave the cable in place for the additional 2 minutes; it is
important not to remove the cable from the unit until the process is complete.

BW64 & BW64EConfiguration Guide
69 045-57014 Rev A
(End of NMS manual, this page intentionally left blank)