Brother 8V9404 Mobile Printer User Manual Short Term Confidential UserGuide RJ 3150
Brother Industries, Ltd. Mobile Printer Short Term Confidential UserGuide RJ 3150
Brother >
Contents
- 1. (Short-Term Confidential) User Manual-Product Safety Guide_RJ-3050_3150
- 2. (Short-Term Confidential) User Manual-UserGuide_RJ-3050
- 3. (Short-Term Confidential) User Manual-UserGuide_RJ-3150
(Short-Term Confidential) User Manual-UserGuide_RJ-3150
Check that the package contains the following before using the printer.
Installing the Rechargeable Li-ion Battery
1
1.
Make sure that the cover latch is lifted up, and then insert the battery
into the battery compartment with the battery cover attached to the
battery. Make sure that the terminal end of the battery is facing inward.
2.
With the battery inserted and while pushing the battery lightly, lower the
cover latch until it clicks locking the battery in place.
Removing the Rechargeable Li-ion Battery
While pushing the battery lightly, lift the cover latch to unlock the battery, and
then remove the battery.
1.
Make sure that the printer is turned off. If the printer is turned on, press
and hold the (Power) button to turn it off.
2.
Make sure that the rechargeable Li-ion battery is installed in the printer.
3.
Use the AC adapter and AC power cord to connect the printer to an AC
power outlet (see Connecting to an AC Power Outlet (Optional)), or use
the car adapter to connect the printer to a DC power outlet (see
Connecting to a DC Power Outlet (Optional)).
4.
The battery indicator light is orange when the battery is charging.
When the rechargeable Li-ion battery is fully charged, the battery
indicator light turns off. Disconnect the AC adapter or car adapter from
the battery’s AC/DC connector.
For details, see the Online User’s Guide.
Connecting to an AC Power Outlet (Optional)
Connect the printer to a nearby AC power outlet to charge the rechargeable
battery.
1.
Connect the AC adapter to the printer.
2.
Connect the AC power cord to the AC adapter.
3.
Connect the AC power cord to a nearby AC power outlet (100 -
240 VAC, 50 - 60 Hz).
Unpacking the RJ-3150
Printer Rechargeable Li-ion
Battery
Belt clip
User’s Guide Product Safety Guide Clock battery
General Description
1 Battery compartment
2 Battery cover latch
3 USB host port
4 Mini-USB port
5 AC/DC connector
6 Cover open lever
7 Peeler latch
8 RD Roll compartment cover
9 Paper outlet
10 Label peeler
11 LCD
12 BATT (Battery) indicator
13 (Power) button
(To turn the printer on/off)
14 CANCEL button
15 Cursor button (UP/DOWN)
16 OK button
17 Menu button
18 (Feed) button
(To feed the paper or print the
printer settings)
English
Español
Thank you for purchasing the Brother RuggedJet RJ-3150 mobile printer.
Read the included User’s Guide and Product Safety Guide, before using the
printer. For detailed operation instructions, see the Online User's Guide (Brother
Solutions Center at http://support.brother.com/). We suggest that you keep
these documents in a handy place for future reference. To download the latest
manuals, please visit the Brother Solutions Center (http://support.brother.com/),
where you can also download the latest drivers and utilities for your printer, read
FAQs and troubleshooting tips or learn about special printing solutions.
Printed in China
LBD532001
RJ-3150
User’s Guide
1
3
2
45
67
8
9
10
11
13
14
15
17
12
18
16
Using the Rechargeable Li-ion
Battery
Charging the Rechargeable Li-ion
Battery
1 AC adapter
2 AC power cord
1
2
Connecting to a DC Power Outlet (Optional)
Connect the printer to your vehicle’s 12 V DC power outlet (cigarette lighter,
etc.) to charge the rechargeable battery.
1
1.
Connect the car adapter to the vehicle’s 12 V DC power outlet.
2.
Connect the car adapter to the printer.
1.
Open the battery cover using a cross point screwdriver.
2.
Insert the supplied battery into the space for the battery, making sure
that the battery is level and its positive side is facing up.
3.
Close the battery cover using a cross point screwdriver.
1.
Install the printer driver and software downloaded from the web page.
(See Installing the Drivers section.)
2.
Make sure that the printer is powered using a charged battery.
3.
Turn the printer on. The POWER indicator should be green.
4.
Connect the printer to a computer or handheld device using either a
USB cable, Bluetooth, or Wi-Fi.
5.
Insert the RD Roll.
6.
Print receipts or labels.
For details, see the Online User’s Guide.
When Not Using the Label Peeler
1.
Push the cover open lever to open the RD Roll compartment cover.
2.
Open the roll guides by lifting up the roll guide adjustment lever (1) and
pulling the roll guide outwards.
Insert an RD Roll into the RD Roll compartment with the labels feeding
from the bottom as shown.
3.
While lifting up the roll guide adjustment lever (1), push in both roll
guides (2) to the roll width. Insert the RD Roll so that it is positioned
straight in the RD Roll compartment.
4.
Close the RD Roll compartment by pressing down on the center of the
cover until it latches.
When Using the Label Peeler
1.
Push the cover open lever to open the RD Roll compartment cover.
2.
Push both sides of the label peeler towards the rear of the printer.The
peeler will spring up and away from the printer.
Then, pull the peeler out fully away from the printer until the a mark is
visible as shown.
1Car adapter
NOTE
A battery charger (option) and cradle (option) can also be used for
charging.
Setting the Clock Battery
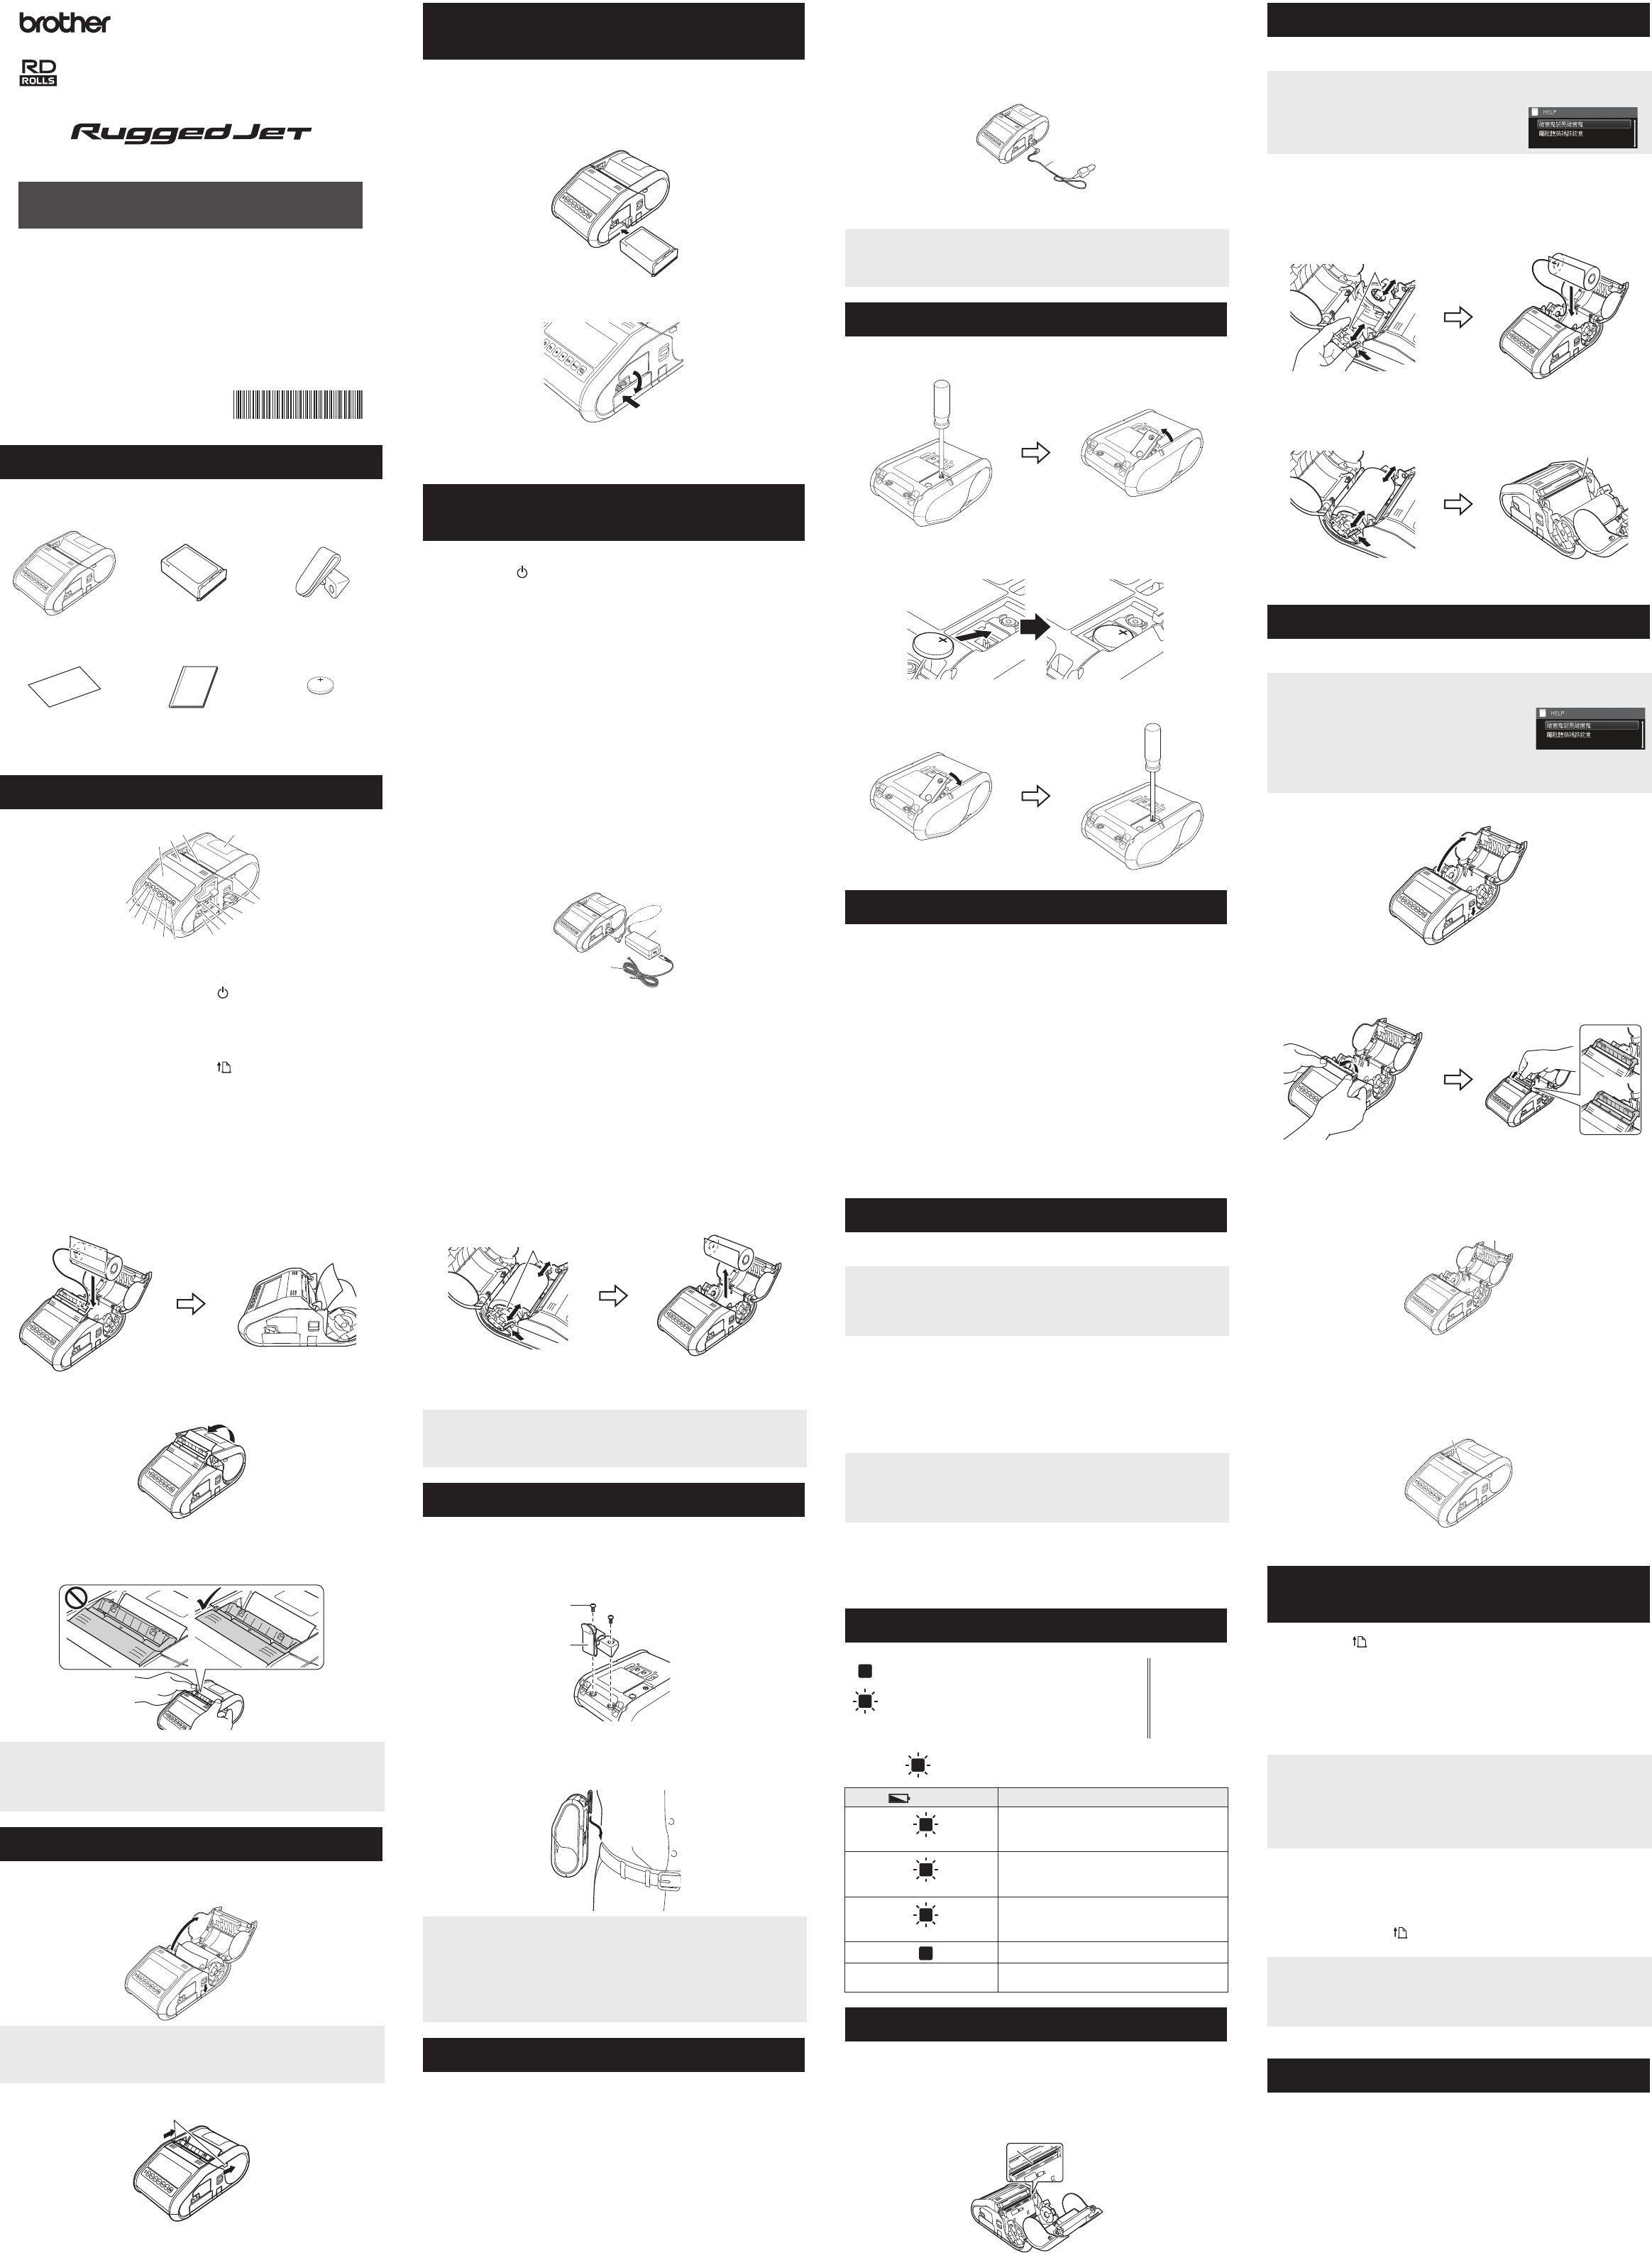
Printing Receipts or Labels
1
Inserting the RD Roll
NOTE
You can also view information about loading
paper in Help.
Open the RD Roll compartment cover, and press
the Menu button on the printer.
Inserting the RD Roll (cont’d)
NOTE
• You can also view information about setting
the label peeler and loading paper in Help.
Open the RD Roll compartment cover, and
press the Menu button on the printer.
• A video on setting up the label peeler is
available at the following address.
http://solutions.brother.com/movie/d532/
2
1
3
1
2
3
3.
Peel off one label from the end of the RD Roll, and then insert the RD
Roll so that it is positioned straight in the RD Roll compartment.
4.
Close the RD Roll compartment cover. Make sure that the paper outlet
is on top of the cover.
5.
In order to remove any slack in the roll, lightly pull on the paper fed out
of the paper outlet until no more can be pulled out.
6.
Push both sides of the paper outlet until it clicks into place.
1.
Push the cover open lever, and then open the RD Roll compartment
cover.
2.
Open the roll guides by lifting up the roll guide adjustment lever (1) and
pulling the roll guide (2) outwards. Remove the RD Roll.
When using the printer outside the office, you can attach the included belt clip
to the printer and secure the belt clip to your belt.
1.
Secure the Phillips-head screws to the rear of the printer as shown.
2.
Attach the clip to your belt.
Please install the printer driver and P-touch Editor software before using the
printer.
1.
Download the installer from the following web page.
www.brother.com/inst/
2.
Double-click the downloaded file to start the installation. Follow the on-
screen instructions to complete the installation.
NOTE
To open the RD Roll compartment cover when the label peeler is set up,
first release the peeler latches on both sides of the printer before pushing
the cover open lever.
Removing the RD Roll
NOTE
When you use the label peeler, first release the peeler latches on both
sides of the printer before pushing the cover open lever.
1 Peeler latch
1
1 Roll guide adjustment lever
2 Roll guide
NOTE
When you use the label peeler, make sure that the backing paper does
not become caught when removing the RD roll.
Attaching the Belt Clip
1Belt clip
2 Phillips screw
IMPORTANT
• Make sure that the belt clip is attached securely to the printer. There
is a risk of injury if the belt clip is not attached securely and the printer
falls.
• Make sure that the belt clip is attached securely to the wearer's belt.
There is a risk of injury if the belt clip is not attached securely and the
printer falls.
Installing the Drivers
2
1
2
1
Bluetooth Connection
1
1.
Press the [Menu] button, use [a] or [b] to select the [Bluetooth] menu,
and then press the [OK] button.
Set [Bluetooth (On/OFF)] to [On].
2.
Use your Bluetooth management software to discover the printer.
Bluetooth communication is now available.
Wi-Fi Connection
1.
Press the [Menu] button, use [a] or [b] to select the [WLAN] menu, and
then press the [OK] button.
Set [WLAN (On/OFF)] to [On]. Wi-Fi communication is now available.
For details, see the Online User’s Guide.
Example: O = Indicator is blinking in orange
Maintenance of the printer may be carried out as required. However, some
environments may require that maintenance must be done more frequently
(e.g. in dusty conditions).
Print Head Maintenance
Use a dry cotton swab to wipe the print head.
Roller Maintenance
Use a piece of cellophane tape to remove dirt from the roller.
Paper Outlet Maintenance
If adhesive accumulates at the paper outlet and media becomes
jammed,clean the paper outlet with a cloth slightly moistened with isopropyl
alcohol.
You can use the (Feed) button to print a report that lists the following
printer settings:
Program version
Printer usage history
Missing dot test pattern
Printer setting information
List of transferred data
Network setting information
1.
Make sure that a roll of 3" (76.2 mm) receipt paper has been loaded and
the RD Roll compartment cover is closed.
2.
Turn on the printer.
3.
Press and hold the (Feed) button until the POWER indicator starts
blinking in green. The settings will print.
For details, see the Online User’s Guide.
Brother Global Web Site: http://www.brother.com
Brother Developer Center: http://www.brother.com/product/dev/
For Frequently Asked Questions (FAQs), Product Support and Technical
Questions, and Driver Updates and Utilities: http://support.brother.com/
Wireless Network Connections
IMPORTANT
In order for the printer and your Bluetooth-equipped computer or adapter
to communicate, you must first pair the printer with the computer or
handheld device using the Bluetooth management software.
IMPORTANT
In order for the printer and your network access point or router to
communicate, you must first install the printer driver and Printer Setting
Tool.
Battey Indicators
= Indicator is lit
O = Orange
= Indicator is blinking
(off) = Indicator is off
(Battery) Description
O
(Once every second)
Battery needs recharging
O
(Twice every 4 seconds)
Rechargeable battery power: low
O
(Once every 4 seconds)
Rechargeable battery power: half
OCharging
(off) Rechargeable battery power: full
Charging complete
Maintaining the Printer
1 Print head
1
2Roller
3 Paper outlet
Printing the Printer Set-up
Information
NOTE
• You can use the Printer Setting Tool to set in advance which items will
be printed.
• The node name appears in the Printer Settings. The default node
name is “BRWxxxxxxxxxxxx”. (“xxxxxxxxxxxx” is based on your
printer’s MAC Address / Ethernet Address.)
NOTE
• To print the Printer Set-up Information, we recommend to use 3" (76.2
mm) receipt paper.
• This operation can also be performed using the Printer Setting Tool.
Internet Addresses
2
3