Capital Prospect MM318 Remote Transmitter User Manual MM 318
Capital Prospect Ltd Remote Transmitter MM 318
Contents
- 1. User Manual
- 2. Users Manual
User Manual
3-Button Remote MODEL: MM-318 Preliminary Copy
1. INTRODUCTION
Thank you for your purchase of
Skylink® remote transmitter, Model MM-
318.
The following items are included in this package:
-
One of MM-318 Remote
-
Lithium Battery CR-2032 (Installed)
-
Mounting accessories
-
User’s Instructions
Follow one or more instructions below to program transmitter MM-318 to the Skylink® receiver
or Skylink® garage door opener you want to control.
2. PROGRAMMING
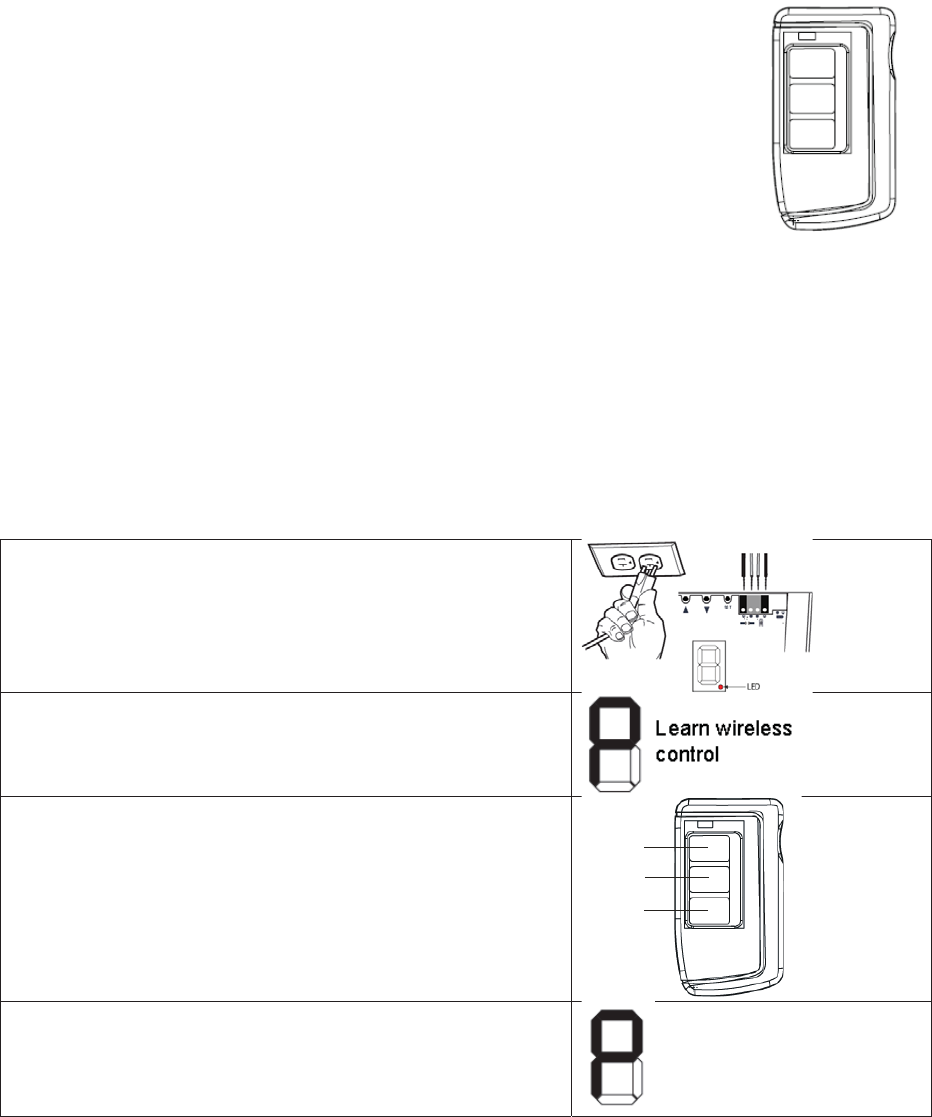
2a. PROGRAMMING A REMOTE TRANSMITTER TO THE SKYLINK® GARAGE DOOR
OPENER – ATOMS™ SERIES
1. Connect the opener to an approved power source.
The dot in the LED display stays on.
2. Press the [Set] button for one second, and release the
button until the LED Display shows the letter “P”.
3. Within 30 seconds, press any button on the remote
that you would like to program to the opener.
N
ote:
[.
] = Button 1, [
..
] = Button 2, [
…
] = B
utton 3
Button [2]
Button [3]
Button [1]
4. Once the button on the remote is programmed. The
LED segment will off and emits one beep indicating
the programming successfully
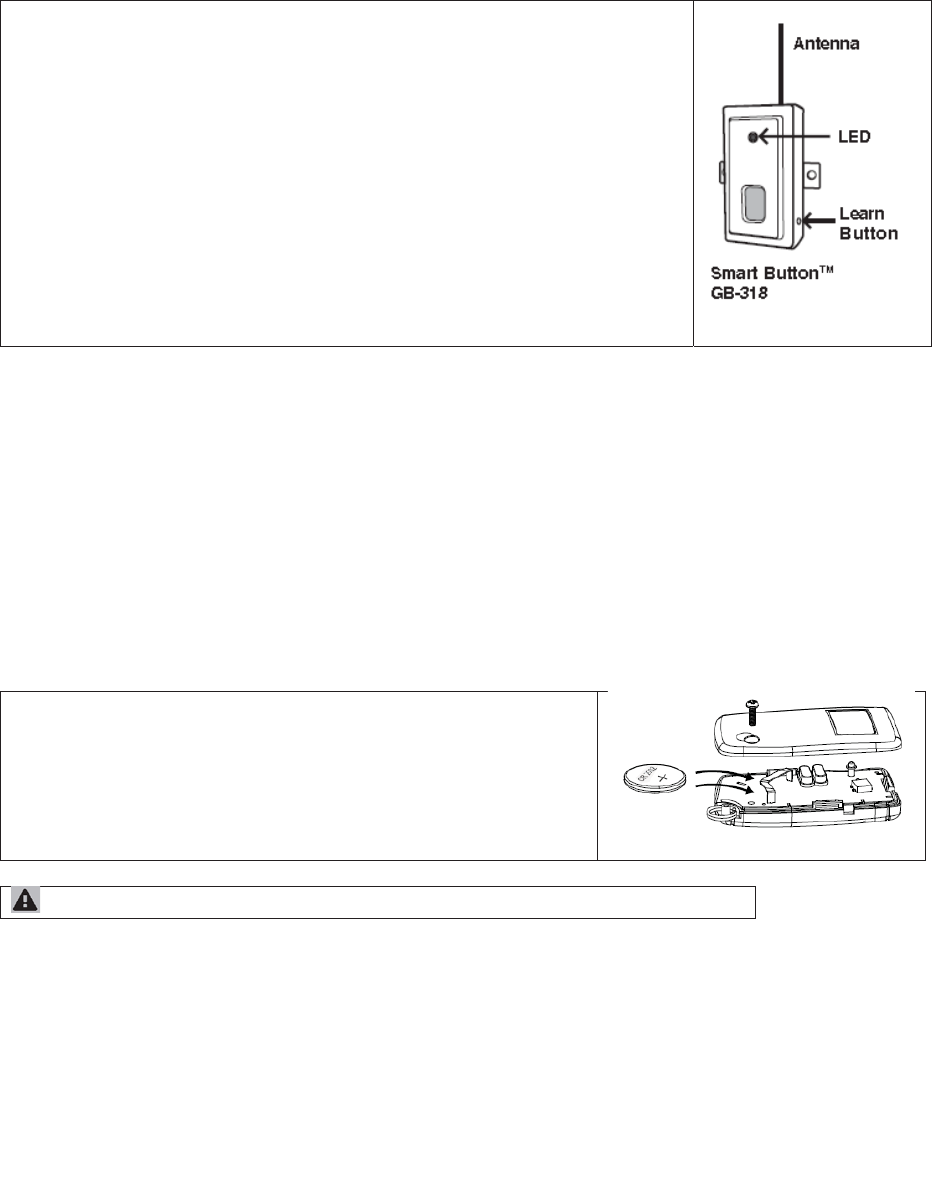
2b. PROGRAMMING A REMOTE TRANSMITTER TO THE SKYLINK® RECEIVER – GB-318
Refer to the receiver Smart ButtonTM GB-318 user’s instruction to set
up the unit.
1. Press the learn button on the side of the Smart Button
TM GB-
318.
2. Once the learn button is pressed, the LED will
flash quickly. Release
the learn button.
3. Within 30
seconds, press any one of the 3 buttons
on the transmitter
that you want to program to the
receiver.
4. Once the remote control is programmed, the LED
will flash slowly, in
the same way as it flashes
in standby mode.
5. You may now operate the garage door
opener
with this new remote
control.
6. To program this transmitter to control another
receiver, repeat
process (1) to (4) to program another button on the remote transmitter.
3. OPERATION
Press the programmed button to open/close the garage door or receiver.
4. BATTERY REPLACEMENT
The remote come with a 3 Volt lithium battery (CR 2032) installed. It is time to change the
battery when the red LED on the transmitter does not turn on when either button is pressed.
To replace the battery:
1. Undo the screw on the back of the remote.
2. Pry out the back cover from the remote
3. Take out the old battery.
4.
Place the new battery in position. Be sure the polarity
is correct.
5. Close the back cover with the screw.
Battery Disposal - Dispose used battery according to local regulation.
5. FCC
This device complies with Part 15 of the FCC Rules and Industry Canada licence-exempt RSS
standard(s). Operation is subject to the following two conditions: (1) this device may not cause harmful
interference, and (2) this device must accept any interference received, including interference that may
cause undesired operation.
WARNING
This device complies with Part 15 of the FCC rules. Operation is subject to the following two conditions:
1) this device may not cause harmful interference, and
2) this device must accept any interference received, including interference that may cause undesired
operation.
changes or modifications not expressly approved by the party responsible for compliance could void
your authority to operate the equipment.

Le présent appareil est conforme aux Partie 15 des règlements de la FCC et CNR d'Industrie Canada
applicables aux appareils radio exempts de licence. L'exploitation est autorisée aux deux conditions
suivantes :
(1) l'appareil ne doit pas produire de brouillage, et
(2) l'utilisateur de l'appareil doit accepter tout brouillage radioélectrique subi, même si le brouillage est
susceptible d'en compromettre le fonctionnement.
WARNING:
Changes or modifications to this unit not expressly approved by the party responsible for
compliance could void the user’s authority to operate the equipment.
6. WARRANTY
If, within one year from date of purchase, this product should become defective (except battery),
due to faulty workmanship or materials, it will be repaired or replaced, without charge. Proof of
purchase and a Return Authorization are required.
7. CUSTOMER SERVICE
If you would like to
- find out the up-to-date specifications
- know more about features and applications
- download documents, i.e. user’s instructions
- order Skylink products
or if you have difficulty getting products to work, please:
1. visit our FAQ section at www.skylinkhome.com, or
2. email us at support@skylinkhome.com, or
3. call our toll free at 1-800-304-1187 from Monday to Friday, 9 am to 5 pm EST. Fax (800) 286-
1320
CUSTOMER SERVICE
17 Sheard Avenue, Brampton, Ontario, Canada L6Y 1J3
Email:support@skylinkhome.com
http://www.skylinkhome.com
©2016 SKYLINK GROUP
This device complies with Industry Canada's licence-exempt RSSs. Operation is subject to the following two
conditions:
(1) This device may not cause interference; and
(2) This device must accept any interference, including interference that may cause undesired operation of the
device.
Cet appareil est conforme aux CNR exempts de licence d'Industrie Canada. Le fonctionnement est soumis aux
deux conditions suivantes:
(1) Ce dispositif ne peut causer des interférences; et
(2) Cet appareil doit accepter toute interférence, y compris les interférences qui peuvent causer un mauvais
fonctionnement de l'appareil.