Collage Investments LK-500 Mobile phone User Manual E188
Collage Investments LLC. Mobile phone E188
UserManual.wiki
>
Collage Investments
>
LK-500 User Manual
>
User Manual
Contents
1.
User Manual
2.
User manual
User Manual
Navigation menu
Upload a User Manual
Namespaces
Wiki Guide
HTML
PDF
Info
Views
User Manual
Discussion / Help
Navigation
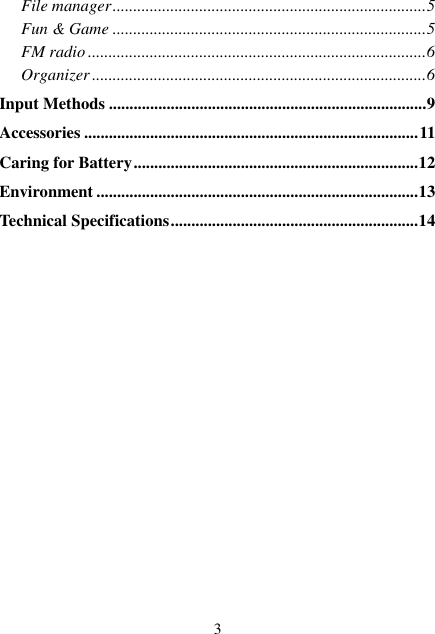


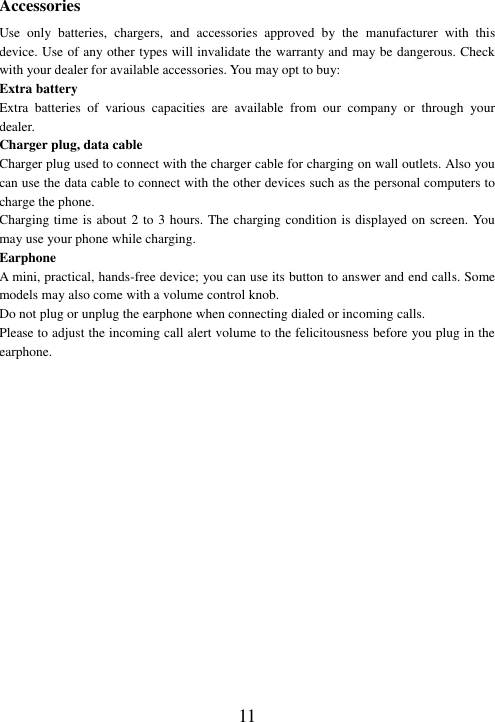
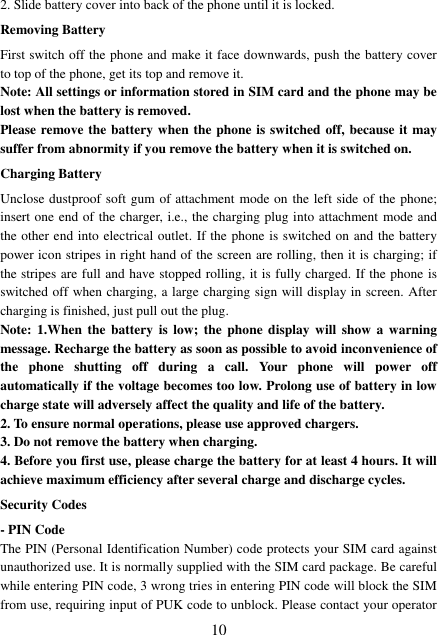
![8 Knowing the Keys 1. Left soft key/Right soft key: Implement the functions shown in the lower left/right hand corner. 2. Call/Answer key (Green key): Press after dialing to connect by SIM Card. Press if there is an incoming call to answer. Press from standby to go to call records list. 3. End/Power key (Red key): Long press to switch phone on/off; Press to end, reject call; or to exit a menu. 4. OK key: Confirm or accept selection in menu access. Press from standby to enter the selected shortcuts list function. 5. Navigator Keys: Press the up/down/left/right direction in menu to scroll, browse or in edit page to move cursor. In idle mode, press the left/right direction keys to select the shortcut function showed on the bottom of the screen, and then press the OK key to confirm. 6. 0-9 alphanumeric keys: Press corresponding keys to input numbers when dialing or numbers and characters when editing. From Standby: Long press “2” to “9” key to dial speed dial numbers (as defined in the menu [Contacts/Speed dial]). Press the alphanumeric key [O] to input “+” symbol for international access in the dialing interface. Press the alphanumeric key [P] to input “p” symbol for the fixed extension number. 7.*(Star) Key: Press in standby to input “*” character. 8.#(Pound) Key Press in standby to input “#” character.Press to change input method when editing.](https://usermanual.wiki/Collage-Investments/LK-500.User-Manual/User-Guide-1767287-Page-8.png)
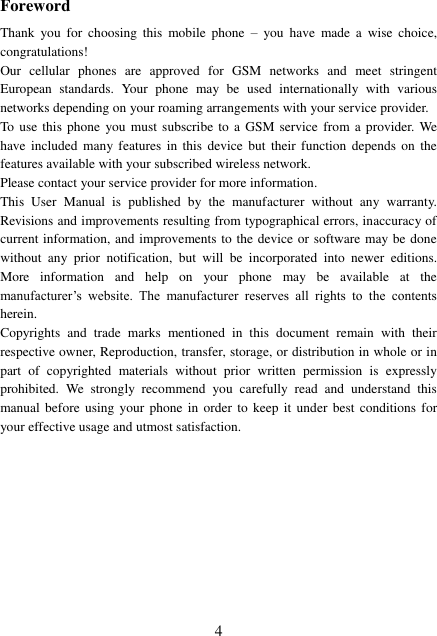
![12 Using Your Phone Powering on/off Press and hold the Red key to switch your phone on or off. 1. If there is no SIM card, SIM card is defective, or SIM card contact is loose, you will be prompted with a warning after powering on, Shut down and check your SIM and its installation. 2. If inserted SIM card into the phone, meanwhile phone code and PIN code is turned on. When switched on, after entering the phone code and PIN code, the phone enter the standby mode by the current SIM. After switched on, the phone will automatically search the network. If the phone detected authorized network, the screen will display the network name and signal strength;If no authorized network is found,the phone can only make emergency calls or use non-communications features. Making a Call In standby mode, press the corresponding numeric keys to enter the phone number that you want to dial, including necessary area codes. Press C key to delete erroneous inputs; press the Call/Answer key to make a call when done to connect. 1. Dialing Fixed/Land Line Extensions: You cannot directly get through some fixed line extensions, and need to dial the telephone exchange or trunk line first and then press [P] key to switch until “P” appears on the screen. And then dial the extension. 2. Making an International Call: To make an international call, press [*] key to switch until the prefix symbol "+" of inter-national call displays in screen. 3. Dialing from Phonebook: Enter the Phonebook via the menu to enter the phonebook list, use the Up/Down Navigator keys to scroll to the desired contact, or press the first letter of the name of the desired contact as saved in your phonebook for quick access to names beginning with the letter then scroll to the desired one. 4. Dialing from Call history: Enter the Call center (press the Call/Answer key from standby or via the menu), use the Up/Down navigator keys to scroll to the](https://usermanual.wiki/Collage-Investments/LK-500.User-Manual/User-Guide-1767287-Page-12.png)
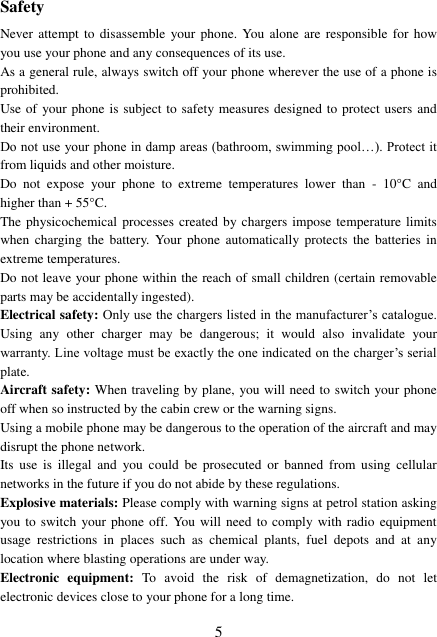
![13 desired contact. Receiving a Call When there is an incoming call, the phone will give corresponding alert, if your network supports caller ID, the screen will display caller’s name or number (depending on whether there is information about the caller in your phonebook). 1. Press the Call/Answer key or press the Left soft key and confirm [Answer] to answer the incoming call. 2. If function of [Call settings] is selected as [Any key], press the any key to answer the incoming call except the Right soft key or the Red key. 3. If you do not want to answer an incoming call, press the Red key to reject it. You can also press the Red key to end a call. 4. During a call, you can press the up/down navigator keys to adjust receiver volume. 5. You can contact emergency service numbers without the need of SIM card. Different networks uses different emergency numbers, please contact your network operator for details. Emergency Service You can directly dial the emergency service number without SIM card. Different networks use different urgency service numbers, so for details please inquire the network operation company. Using the In-Call Menu The feature provides some operations and features while you are in active call with a party or several parties. Some of which are network dependent, please inquire with your network operator or service provider of their availability. Press the Right soft key [H-Free/H-Held] to activate the loudspeaker function while on an activate call; following the same procedure can deactivate the function.](https://usermanual.wiki/Collage-Investments/LK-500.User-Manual/User-Guide-1767287-Page-13.png)
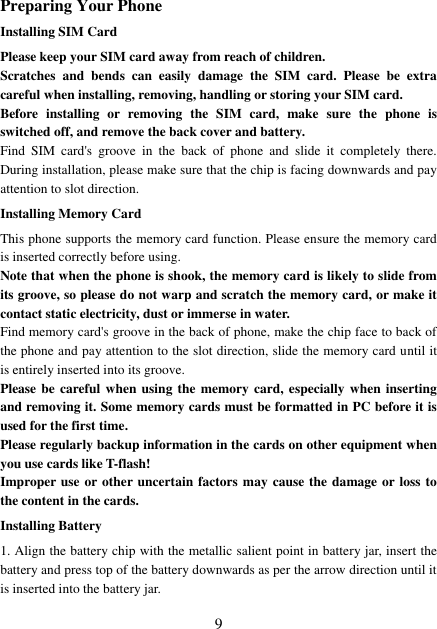
![14 U-disk-Movable Storage This phone supports movable storage, i.e., the U-disk function, when the phone is switched off, it can be used as U-disk when connected with PC by data line. When the phone is switch on, it will give alert and show “Mass storage” when connected with PC by data line, and then you can take the memory card as a U-disk when you select [OK] option, or select [Back] to return to continue using the phone functions and charging it. 1. If you select [Mass Storage] mode, please disconnect the data line after downloading, otherwise you can not operate the functions related to U-disk like multimedia, and the user set content (wallpaper and ring tone etc) with original documents stored in memory card will automatically retrieve the default setting and the user setting after quitting the U disk function. 2. When you disconnect the data line, please make the operation of "Unplug or eject hardware" until you can safely disconnect the data line, otherwise you may damage the U-disk.](https://usermanual.wiki/Collage-Investments/LK-500.User-Manual/User-Guide-1767287-Page-14.png)
![Menu functions Services Internet surfing using the phone is based on Wireless Application Protocol (WAP). WAP translates the internet language into WML and HTML languages understandable by your phone. It requires only the phone and a WAP server support to surf the net. Your network will need to support this feature for you to surf the internet using your phone. Phonebook Select contacts option to browse the phone book list Press the Left soft key [Options] to access the menu options: • View: Display details of currently contact. • Call: Dial the selected phone number. • Add new contact: This menu allows you to add the new record to the SIM card or the Phone. • Send message: Send message to this number. ·IP dial: If set and activated IP number, you can dial the currently selected phone number that adds IP number. • Edit: Modify the currently selected contactor record. • Delete: Delete the currently selected record • Copy: Copy the selected records to SIM card if it is saved in phone and vice versa. You can select ‘from SIM to phone, from phone to SIM’ option to copy the phonebook you want. Note: Copy the record from the phone to SIM card, only the name and number of record can be transferred. ·Move: Move this record to SIM card if it is saved in phone and vice versa. Note: Copy or move the record from the phone to SIM card, only the name and number of record can be transferred. ·Add to Speed dial: Add the currently number to speed dial list. • Mark several: Mark one or several phonebook record and make the options Messages Message service is a network dependent function, which allows you to send, receive and](https://usermanual.wiki/Collage-Investments/LK-500.User-Manual/User-Guide-1767287-Page-15.png)
![1 edit all kinds of messages. Please contact the network operator for more details. - Write message Function: Compose a new message, save and/or send it to the recipient. Note: to send SMS, you need to set the correct SMS service center number which can be obtained from network provider. While composing, press the # key to change input method, a text message can be up to 160 characters in length and may contain pictures and ring tones (EMS). Press the Left Soft key [Options] to select options when editing: Note: 1. to send SMS, you need to set the correct SMS service center number which can be obtained from network provider. 2. If [SMS settings/Common settings/Save sent message] is [On], the sent successfully/unsuccessfully SMS will be both saved to Outbox; otherwise the SMS will not be saved. - Inbox Received SMS messages can be stored either in phone or in SIM memory, and are accessed here. If the message memory is full, the indication “Memory full” and the message icon will be shown on the screen and flashed. Before you can receive new messages, delete some of your old messages in the inbox folder. If the capacity of new messages is beyond the capacity of the inbox, the information will be lost and incomplete. In message list, press the OK key or the Left soft key [Ok] to read the selected message, press the OK key or the Left soft key [Options] to make the following menu: - Outbox If [Save and send] option is selected when sending the message, the sent SMS will be saved to Outbox. In sent message list, press the OK key or the Left soft key [Ok] to read the selected message, press the OK key or the Left soft key [Options] to make the operations of [Send](https://usermanual.wiki/Collage-Investments/LK-500.User-Manual/User-Guide-1767287-Page-16.png)
![2 from SIM1/SIM2, Edit, Delete, Copy to phone/SIM, Move to phone/SIM, Delete all, Copy all, Move all, Use number, Use URL]. - Drafts Incompletely composed and saved messages can be organized and accessed here. - Settings Sets and save messages service parameters. -Memory status view the percentage of the messages memory consumption. -Voicemail (supported by the network) Set and call your voice mail number. Your network may provide or support voice mailboxes. It is a service that lets your callers leave a voice message at a voice mailbox assigned to you for your later retrieval. You may have to apply for the service and secure the voice mailbox number from your operator. - Bro. messages(supported by the network) Set and activate receive of local information broadcast from the network. Choose whether you want to receive information broadcast from your network such as weather forecast, traffic update, news, and taxi service info. Please contact your local network operator for more details. Call los This phone can record all received calls, dialed calls and missed calls as well as their call time. Only when related function is supported by network and phone is switched on and in network service area, it can record the answered and missed calls. Dialed/Received/Missed/Allcalls: Display list of dialed /accepted incoming/missed/all calls. Once on the call records list, press the OK key to view the details, press the Left soft key [Options] to make the following options: View, Call, Save, Delete,Edit before call,Send message. Settings Date and time Set the phone’s current time and date and its format, home city. Display Personalize your display according to your preference. -Wallpaper: Select wallpaper for your phone; it is the background image on your standby](https://usermanual.wiki/Collage-Investments/LK-500.User-Manual/User-Guide-1767287-Page-17.png)
![4 receiver does not answer in dialing, the phone will automatically redial the number. The maximum redial times are 10. And during this period, the subscriber cannot dial any other number. Press the End/Power key or the Right soft key [Cancel] to end auto redial. ·Answer mode: use the OK key or the Left soft key to turn any key on or off, if activated, you can answer incoming calls just by any key except the Red key and the Right soft key. Network settings • Network selection: Choose to Automatic or Manual select network. If automatic selection, the phone will select the current network where your SIM is registered to. If manual, your phone will search for and list down available networks for your selection, note that you must select the network where your SIM is registered to. • Preferences networks: Set or modify your preferred network. It will display the network preference list as stored in your SIM. Network status Display the status of network. Security settings You can set security options of the phone under this menu so that the phone or the SIM card cannot be illegally used. • SIM security: Press the OK key to activate or deactivate SIM Lock, the current status is displayed in a dialogue box when you scroll to this option. To activate SIM PIN, you will be asked to enter the PIN code. If activated, you will be required to enter the PIN every time you turn on the phone. Please consult with your service provider for more details. Note: If you key in the incorrect PIN code for three times consecutively, the SIM card will be locked. The PIN code and PUK code may be offered with the SIM card, otherwise contact your service provider. The default PIN code is usually 1234. Please change your initial phone code promptly. • Phone security: Press the OK key to activate or deactivate phone lock, the current status is displayed in a dialogue box when you scroll to this option. To activate phone lock, you will be asked to enter the phone password. If activated, you will be required to enter the phone password every time you turn on the phone. Please consult with your service provider for more details. Note: The default phone lock code is 1122. Please change your initial phone code promptly. The above code should be set in the format, such as 0000~00000000. Restore factory settings](https://usermanual.wiki/Collage-Investments/LK-500.User-Manual/User-Guide-1767287-Page-19.png)
![5 To return your phone’s settings to their original values as when it came out of the factory, enter the phone password, select [Yes] to reset and reboot (power off and on again the phone). File manager The currently available memory locations are shown in the file manager interface, the Total and Free memory are shown on top. Press the Left soft key [Options] for: • Open: enter or open the selected drive. • New folder: create a folder in the currently selected drive. • Format: format the drive, this will erase all current contents. • Details: view the percentage of the memory consumption. Fun & Game - topwatch Use your phone as a stopwatch. Typical stopwatch The Typical Stopwatch has two modes and an option: ·Split timing: record up to 20 split times, press the Left soft key [Start] to start timer, press again to stop, and press the Left soft key to resume. To record another split time, press the Right soft key [Split], the split time is recorded as a split the total time or continuance of the previous split. After recorded all times, stop the time and press the Right soft key and select ‘Yes’ to Save and enter a name for the record. ·Lap timing: similar to the split timer, but instead recording the times as laps (all laps time starts at 00:00:00:00 at the same time but with individual finishing times). nWay stopwatch The nWay Stopwatch allows four different stopwatches to start and stop at individual instance all from 00:00:00:00, only one timer may run at a time, either one may stop and continue timing again from where it stops. The total time is shown on top of the screen.](https://usermanual.wiki/Collage-Investments/LK-500.User-Manual/User-Guide-1767287-Page-20.png)
![6 Use the navigator keys as indicated on screen to control the four timers, press the Left soft key to stop or resume, press and hold the Left soft key to reset the timer. FM radio FM radio is supported by the phone. Access the function only when you plug the earphone. In FM radio interface, press the down navigator key to open/close FM radio function, press the up navigator key to open/close auto search. If activated auto search, press the left/right navigator key to forward/backward the channel auto search, unless a channel is found. You can search the channel by manual, each press left /right navigator key can decrease/ increase by 0.1MHz. Note: 1. when background play function is activate, you can listen the tuner in standby or other menu interface. When loud speaker function is activate, you can listen the tuner loud speaker if plug the earphone. 2. Quality of radio subscription is possibly influenced by environment like indoor or under shield. You can improve this situation as following: stand closer to the window, adjust the position of earphone line or adjust the channel manually. Organizer Calendar Select the calendar menu, and the screen will display the calendar of that month, with date of that day shown by a special color. Press the up/down navigator key to modify date and calendar in screen upside will be correspondingly renewed. Select a date and press the OK key or the Left soft key [Options] and make the following options: View today, View all, Add event, Delete event, Jump to date, Go to weekly/monthly view or Print. To do list With this function you could expediently manage all kinds of missions in work and life as well as arrange and record your future matters. Alarm This phone can set five alarm clocks at most, which still work in phone switched-off status. When the alarm time is reached, press the Left soft key or the Red key to stop; press the Right soft key to snooze, the alarm will remind you again after snooze time if snooze is selected. From alarm clock list displayed in alarm clock menu select an alarm clock and press the Left soft key [Edit] to enter its setting menu, after editing above options, press the Right Soft key [Done] and confirm saving, then alarm clock icon displays in idle mode upside. World clock](https://usermanual.wiki/Collage-Investments/LK-500.User-Manual/User-Guide-1767287-Page-21.png)
![7 View the current time of major world cities. Check the current time and date of different major cities in the world. Enter the function, a world map will be displayed, the current city is indicated by a longitude line on the x-axis and a latitude line on the y-axis, press the left and right navigator key to move between the cities. The city’s current date and time with an icon indicating if it is day time or night are displayed under the map as you scroll to it. Calculator Your phone provides you a calculator with four basic functions, which facilitates simple calculations. Note: The accuracy rate of calculator is 12 effective numbers, and calculations of over nine effective numbers will cause errors. Shortcuts Set eight functions that you often want to use. Profiles Customize alert preferences. You can customize your alert profiles for different events and environments. Follow the above path and scroll to either: General; Meeting; Outdoor; Indoor; Headset,Silent, press [Options] and select ‘Activate’ to use the profile. Select ‘Customize’ to set the following: • Incoming call: scroll to select one ring to set as incoming call ring tone. • Alert type: Set alert type: Ring only; Vibration only; Vibration and ring, Vibration then ring or Silent. • Ringtone volume: Adjust ring tone volumes. • Ring type: Scroll to Single (play ring tone once), Repeat (play ring tone repeatedly until you have acted on the event), Ascending (increasing volume) and press the OK key to set as ring mode. • Message tone: scroll to select one ring to set as message ring tone. • Keypad tone: select Silent, Click, or Tone type keypad tones. • Keypad volume: Adjust Keypad tone volumes. Note: The headset profile will automatically be activated if you plugged in the headset and deactivated and return to default profile when the headset is removed. Multimedia Audio player Play the audio files saved in the phone or memory card.](https://usermanual.wiki/Collage-Investments/LK-500.User-Manual/User-Guide-1767287-Page-22.png)
![8 In playing interface, press Up navigator keys to select / ‘play/pause’, ‘stop’, press Left/right navigator keys to select / ‘previous/next’ ; press the Up/Down navigator keys to adjust player volume. press the Left soft key [Options] to access the operation menu of MP3 player. 1. When play list is empty, it has only [Add] and [Settings] functions ([Settings/List auto gen] is [Off]). 2. When play list is not empty, you can make the following operations for each option: All songs, Settings ,Help, Stop. Camera Your phone is fitted with camera allows you to take photos whenever possible. You can store the pictures in phone or customize the wallpaper. Select this option to enter photo preview interface. In this interface, press the Up/Down Navigator keys to zoom; press the Left/Right Navigator keys to adjust exposure compensation. Press the OK key to take photos which will be stored in [Image viewer] automatically, if [Cont. shot] option is off, you will be notify to save the photo or not after taking a photo, press the Left soft key to save it and press the Right soft key to cancel the photo and back the photo preview interface. In photo preview interface, you can choose the following operations by pressing the Left soft key [Options] in a pop-up menu: ·Camera settings: use the Left/Right navigator keys to adjust Cont. shot, Effect settings, White balance, Scene mode, Anti-flicker,Delay timer, After adjustment, please press the OK key or the Left Soft key to confirm current position. ·Image settings: Select image quality and size. ·Restore default: restore camera parameters to default settings. ·Album: enter the album function. Video recorder Enter video preview interface by selecting this option, press the Left soft key](https://usermanual.wiki/Collage-Investments/LK-500.User-Manual/User-Guide-1767287-Page-23.png)
![9 [Options] to make the correspond operations. Press the OK key to begin video recording, during which press the same keys or to pause or continue; the Right soft key [Stop] to stop video recording, the phone will give alert whether to save the video, press the Left soft key to save the video and return to the preview interface, press the Right soft key not to save and return to the preview interface. Input Methods This phone provides diversified input modes for you to enter letter information when editing SMS and adding phonebook. Use the # key to switch between different input methods and there is corresponding input method icon at the bottom of the screen. 9.1 ABC (abc) input Method General operation methods of English input method: 1. Each key is used to input several characters. Fast and repeatedly press key until your required character appears. 2.When you need to input English punctuation and some special signs, press the [1] numeric key to call out special sign input box in English input status (include English capitalization). 3. Press the # key to switch input methods. 4. In majuscule or minuscule input status, once press the [0] key to input blank. 9.2 The Numeric Input Method To input numerical values, press the respective numeric keys. Long press the [1] numeric key to call out special sign input box and input some special signs.](https://usermanual.wiki/Collage-Investments/LK-500.User-Manual/User-Guide-1767287-Page-24.png)
![10 9.3 Smart English input method Smart English input method is divided into majuscule, minuscule and initial, i.e. smart majuscule ABC, smart minuscule a b c. This input method possesses sort of association function which makes you just need to press every letter once to change the whole word. Every key on keyboard represents characters, and this input method would automatically compare in phone's language database and select correct word, so it requires less time than traditional English input method. Smart English input method has the same specific keyboard definition as English input method. General operation methods of smart English input method: 1. Every key is used to input its corresponding character and automatically change to compose word according to previous key's corresponding character. Fast and repeatedly press the Up/Down Navigator keys until your requisite character or word appear, and you can select it. You can press the Left soft key to select word or characters and press the [0] key to complete word confirmation and input blank. 2. Press the # key to switch input methods.](https://usermanual.wiki/Collage-Investments/LK-500.User-Manual/User-Guide-1767287-Page-25.png)