COMPUTIME 9910 Computime Producer 2002 RF User Manual Producer 2002 RF Mnl
Computime Limited Computime Producer 2002 RF Producer 2002 RF Mnl
UserManual.wiki
>
COMPUTIME
>
9910 User Manual
Users Manual
Navigation menu
Upload a User Manual
Namespaces
Wiki Guide
HTML
PDF
Info
Views
User Manual
Discussion / Help
Navigation

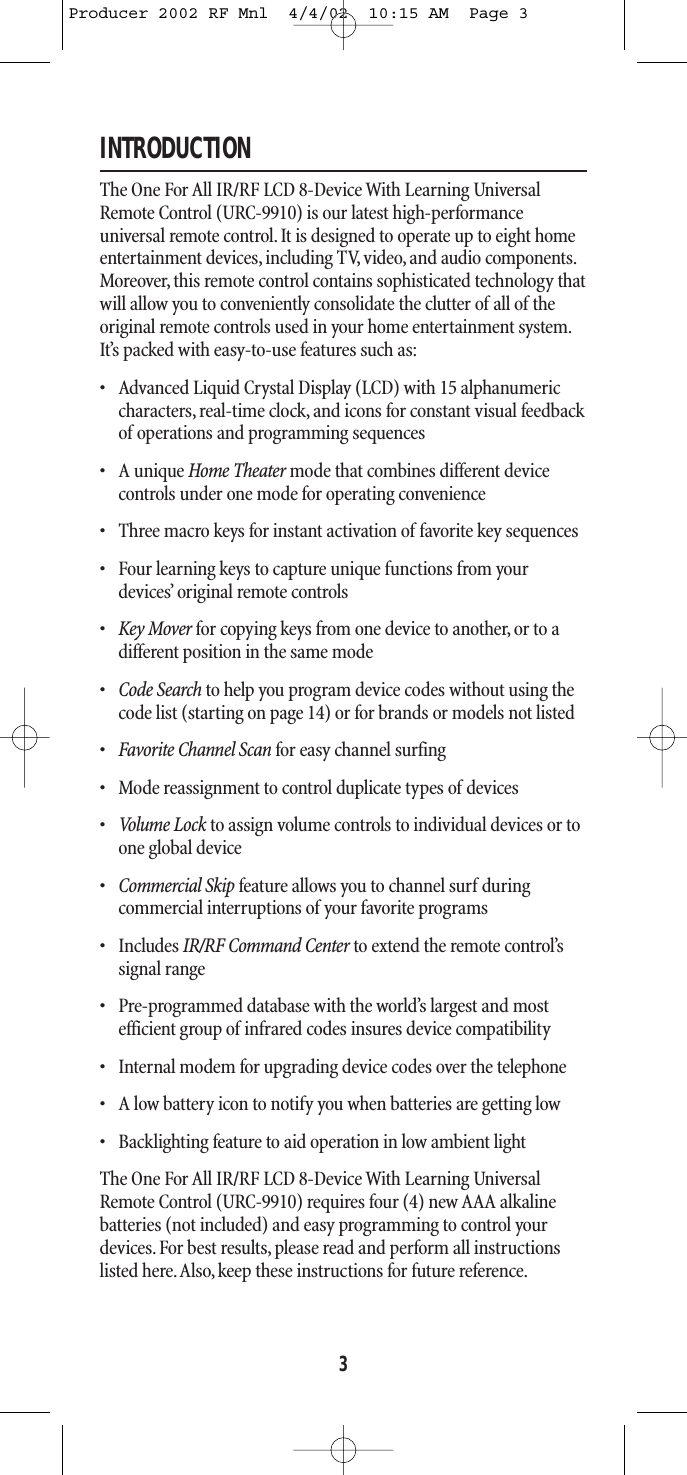
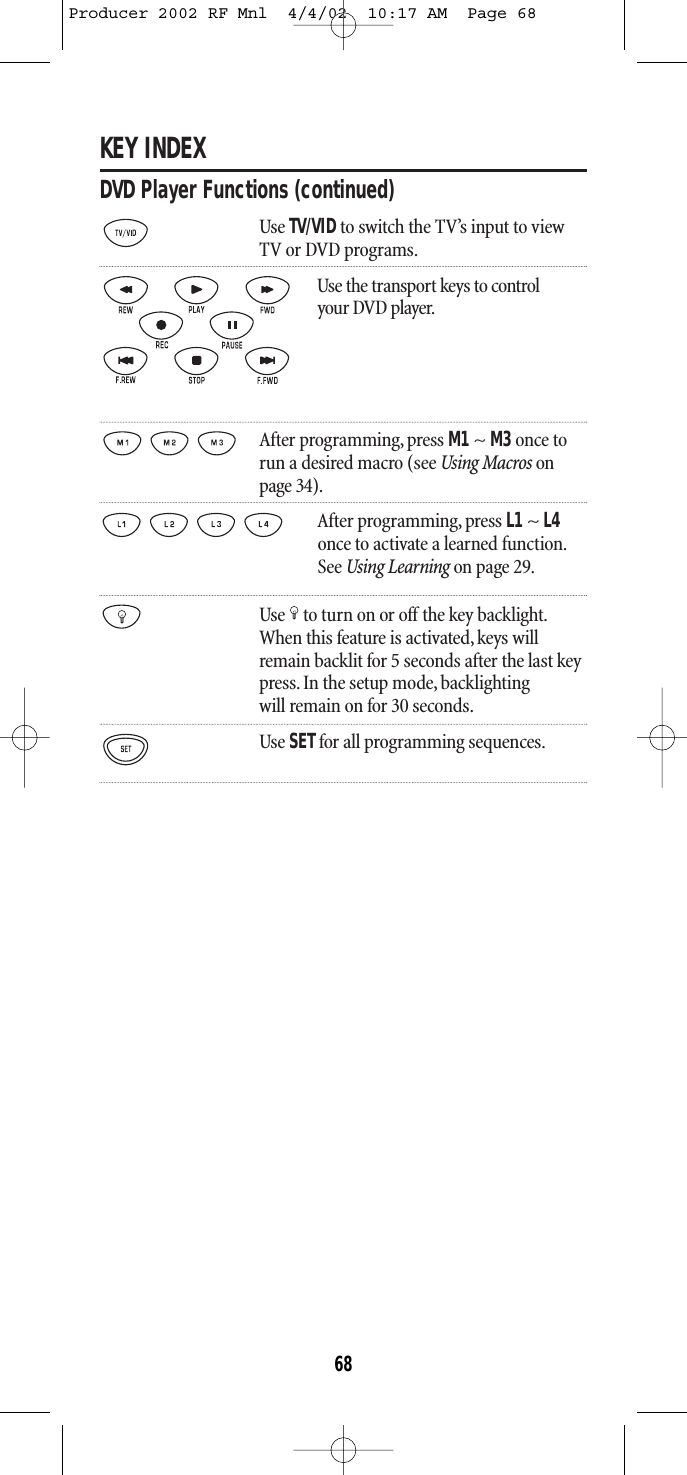
![SETTING THE CLOCK1. On the URC-9910 remote control, press and holdSETuntil you see the display change from the defaultdevice and time to [CODE SET].NOTE: Default values for device, its code, and time areshown above.Your remote control settings may be different.NOTE: If you wish to exit the programming mode at anytime, press EXIT once.You will see an [EXIT] message as theremote control returns to normal operation.NOTE: If you see an [INVALID] message, you have inadver-tently pressed an incorrect key. Simply note your error andcontinue programming.2. (x 5) Press the ▲key five times until you see the displaychange to [CLOCK SET].NOTE: If you go past [CLOCK SET],press the ▼key one ormore times to return to it.3. Press SELECTonce to begin programming.You willsee the display change to the current time.4. Press the ▲key one or more times until you see thedesired hour (a.m. or p.m.).5. Press the ▼key one or more times until you see thedesired minute.6. Once the time is correctly set, press SELECT once toaccept the values. The display will confirm yourentry with [SUCCESS]and then [EXIT SETUP].The URC-9910 remote control will return to normal operation.5Producer 2002 RF Mnl 4/4/02 10:15 AM Page 5](https://usermanual.wiki/COMPUTIME/9910/User-Guide-265047-Page-5.png)
![PROGRAMMING DEVICE CONTROLThe URC-9910 remote control is preprogrammed at the factory tooperate an RCA TV and VCR, a Motorola (GI) cable converter, an RCAsatellite receiver,a Pioneer CD player, a Toshiba DVD player, a Pioneeraudio receiver/ amplifier, and a One For All home automation device.To control devices other than the default brands,perform the follow-ing steps and repeat them as needed for each device to be pro-grammed; otherwise skip this section:NOTE: For TV/VCR Combo control, see “Programming TV/VCR ComboControl”on page 12.1. Turn on a device (e.g.,VCR or DVD player) and, ifapplicable, insert media (e.g.,cassette or disc).NOTE: Please read steps 2 through 8 completely beforeproceeding. Highlight or write down the codes and deviceyou wish to program before starting step 2.2. On the URC-9910 remote control, press and holdSETuntil you see the display change from the cur-rent device and time to [CODE SET].NOTE: The device, its code, and time are examples.Yourremote control settings may be different.NOTE: To exit programming at any time, press EXIT once orallow 30 seconds of inactivity to lapse.You will see [EXITSETUP] as the remote control returns to normal operation.NOTE: [INVALID] means you have inadvertently pressed anincorrect key. Note your error and continue programming.3. Press SELECTonce to begin programming.You willsee the display change to the last-selected deviceand its current code (e.g., TV and 0051).4. Press a desired device key once (e.g., VCR).You willsee the display change to the desired device and itscurrent code (e.g.,VCRand 0035).NOTE: Use the AUX key to program control of homeautomation devices, video accessories, audio services, andother audio or video devices. Alternately, use the AUX key toprogram control of a second device type (e.g., a second VCR;see “Re-assigning Device Keys” on page 37).5. Use the Manufacturer’s Codes (starting on page 14) to locate the type of device and brand name. Thenuse the keypad to enter the first four-digit code foryour device and press SELECTonce.10Producer 2002 RF Mnl 4/4/02 10:15 AM Page 10](https://usermanual.wiki/COMPUTIME/9910/User-Guide-265047-Page-10.png)
![For example, to enter the first GE VCR code (onpage 24), press 0twice, 6 once, 0once, and thenSELECTonce.If the code is entered correctly, you will see the[SUCCESS]message.6. Press EXITto exit the programming mode.You willsee an [EXIT SETUP]message as the URC-9910remote control returns to normal operation.7. To verify the code works, aim the URC-9910 remotecontrol at the desired device, press its device keyonce and then press POWERonce. The device shouldturn off. If it does not respond, repeat steps 2through 6, trying each code for your brand until youfind one that works.If it still does not work,trySearching For Your Code on page 27.NOTE: If the device does not have a POWER key, press the(Play) key.8. Repeat steps 1 through 7 for each device you want to control.For future reference, write down eachworking device code in the boxes below:TVCode:VCRCode:DVDCode:SAT Code:CBLCode:RCVR/AMPCode:CDCode:AUXCode:Aux. DeviceType:________________________________11Producer 2002 RF Mnl 4/4/02 10:15 AM Page 11](https://usermanual.wiki/COMPUTIME/9910/User-Guide-265047-Page-11.png)
![PROGRAMMING TV/VCR COMBO CONTROLPerform the following instructions to control a TV/VCR Combo:1. Turn on the TV/VCR Combo and insert a video cassette.NOTE: Please read steps 2 through 9 completely before pro-ceeding. Highlight or write down the codes and device youwish to program before starting step 2.2. On the URC-9910 remote control, press and holdSETuntil you see the display change from the cur-rent device and time to [CODE SET].NOTE: The device, its code, and time are examples.Yourremote control settings may be different.NOTE: To exit programming at any time, press EXIT once orallow 30 seconds of inactivity to lapse.You will see [EXITSETUP] as the remote control returns to normal operation.NOTE: [INVALID] means you have inadvertently pressed anincorrect key. Note your error and continue programming.3. Press SELECTonce to begin programming.You willsee the display change to the last-selected deviceand its current code (e.g., TV and 0051)4. Press VCRonce.You will see the display change to[VCR]and its current code.5. Use the Setup Codes For TV/VCR Combos (onpage 22) to locate the type of device and brandname. Then use the keypad to enter the first four-digit code for your device and press SELECTonce.For example,to enter the first Sony TV/VCR Combocode on page 23, press 0four times and then SELECTonce.If the code is entered correctly, you will see the[SUCCESS]message.NOTE: If your TV/VCR Combo has a separate TV code, youwill also need to perform step 6.12Producer 2002 RF Mnl 4/4/02 10:16 AM Page 12](https://usermanual.wiki/COMPUTIME/9910/User-Guide-265047-Page-12.png)
![6. (Optional) Skip this step if your TV/VCR Combodoes not have a separate TV code. Otherwise, pressTVonce.You will see the display change to [TV]andits current code.Use the keypad to enter the separate TV code foryour device.7. Press EXITto exit the programming mode.You willsee [EXIT SETUP] as the URC-9910 remote controlreturns to normal operation.8. To verify the code works, aim the URC-9910 remotecontrol at the desired device, press VCRonce and then press POWERonce.The TV/VCR Comboshould turn off. If it does not respond, repeat steps 2through 8, trying each code for your brand until youfind one that works.If it still does not work,trySearching For Your Code on page 27.NOTE: If the device does not have a POWER key, press the(Play) key.NOTE: For VCR/TV Combos programmed with separate TVcodes, TV volume is controlled by pressing VCRfirst andthen TV. After that, use VOL+ (or VOL-) to raise (or lower)the TV volume. For other alternatives on controlling volumekeys, see “Changing Volume Lock” on page 32 or “UsingKeymover” on page 38.9. For future reference,write down the workingTV/VCR combo code in the below boxes:TV/VCRCode:TVCode(if used):13Producer 2002 RF Mnl 4/4/02 10:16 AM Page 13](https://usermanual.wiki/COMPUTIME/9910/User-Guide-265047-Page-13.png)
![SEARCHING FOR YOUR CODEIf your device does not respond to the URC-9910 remote controlafter trying all codes listed for your brand, or if your brand is notlisted at all, try manually searching for your code.For example, to manually search for a code for your TV:1. Turn on the TV.2. On the URC-9910 remote control, press and holdSETuntil you see the display change from the current device and time to [CODE SET].NOTE: The device, its code, and time are examples.Yourremote control settings may be different.NOTE: To exit programming at any time, press EXIT once orallow 30 seconds of inactivity to lapse.You will see [EXITSETUP] as the remote control returns to normal operation.NOTE: [INVALID] means you have inadvertently pressed anincorrect key. Note your error and continue programming.3. Press the ▼key once until you see the displaychange to [MAN SEARCH].NOTE: If you go past [MAN SEARCH],press the ▲key one ormore times to return to it.4. Press SELECTonce to begin programming.You willsee the display change to the last-selected deviceand its code (e.g.,VCRand 0035).5. Press a desired device key once (e.g., TV).You willsee the display change to the desired device and thefirst code in the manual search list (e.g., TVand0047).6. Aim the URC-9910 remote control at the device(e.g., TV)and press SELECT once.You will see theLED(red light) blink and the (IR) icon flashindicating IR codes are being transmitted.continued on next page...27Producer 2002 RF Mnl 4/4/02 10:16 AM Page 27](https://usermanual.wiki/COMPUTIME/9910/User-Guide-265047-Page-27.png)
![SEARCHING FOR YOUR CODE (continued)NOTE: In the manual search mode, the URC-9910 remotecontrol will send IR codes from its library to the selecteddevice, starting with the most popular code first.7. If the device (e.g., TV) turned off, skip to the nextstep. If it did not turn off, aim the URC-9910 remotecontrol at the device (e.g., TV) and press the ▲keyonce to advance the manual search to the next code(e.g., TVand 0054).Again you will see the LED(redlight) blink and the (IR) icon flash.Repeat this step as often as needed until you find acode that turns off the device.8. To save the working code, press SELECT once. Thedisplay will confirm your entry with [SUCCESS]andthen [EXIT SETUP].The URC-9910 remote control will return to normal operation.NOTE: For future reference, write down the working devicecode in the appropriate boxes on page 11.9. To perform a manual code search for anotherdevice, repeat steps 1 through 8, but this time (instep 5) substitute the appropriate device key for thedevice you are searching for.NOTE: If you have not found a working device code after trying the aboveprocedure, please contact our customer service center to upgrade your One For All IR/RF LCD 8-Device With Learning Universal Remote Control(URC-9910). See “About Upgrading”on page 51.28Producer 2002 RF Mnl 4/4/02 10:16 AM Page 28](https://usermanual.wiki/COMPUTIME/9910/User-Guide-265047-Page-28.png)
![USING LEARNINGProgram the learning keys (L1~L4) to add functions that areunique to your home entertainment devices (e.g.,VCR Tracking Upor Down). However, there are some considerations:• Your original remote control must be in working order for thelearning feature to work properly.• Learned keys are mode specific, so each one can store a uniquefunction for each mode.• Learned keys can be used in macros (see Using Macros on page 34).• Although dedicated keys (L1~L4) are provided for storinglearned functions, you can also use any key (except keys fordevices and programming) for learning. However, using them aslearned keys will overwrite their original functions.• For optimum learning, avoid high levels of ambient light such asnatural sunlight or energy-efficient fluorescent lights.NOTE: Please have your original remote controls handy before programminglearning. Be sure to press each key within 5 seconds of the previous entry.If not, the URC-9910 remote control will exit the programming mode.Programming A Learning Key 1. On the URC-9910 remote control, press and holdSETuntil you see the display change from the cur-rent device and time to [CODE SET].NOTE: The device, its code, and time are examples.Yourremote control settings may be different.NOTE: To exit programming at any time, press EXIT once orallow 30 seconds of inactivity to lapse.You will see [EXITSETUP] as the remote control returns to normal operation.NOTE: [INVALID] means you have inadvertently pressed anincorrect key. Note your error and continue programming.2. (x 2) Press the ▼key twice until you see the displaychanges to [IR LEARN].NOTE: If you go past [IR LEARN],press the ▲key one ormore times to return to it.3. Press SELECTonce to begin programming.You willsee the display change to the last-selected device(e.g., TV).continued on next page...29Producer 2002 RF Mnl 4/4/02 10:16 AM Page 29](https://usermanual.wiki/COMPUTIME/9910/User-Guide-265047-Page-29.png)
![USING LEARNINGProgramming A Learning Key (continued) 4. Press a device key once (e.g.,TV) to assign a desiredmode for learning.5. Select an open learning key (e.g.,L1) and press itonce.You will see the display change to [LEARNING]and the LED(red light) will turn on for 5 seconds.6. Place your original remote control (e.g.,TV remotecontrol) head-to-head (about 2" apart) from theURC-9910 remote control.7. On your original remote control, press and hold thekey (i.e., feature) to be learned until until you see[SUCCESS]appear on the URC-9910 remote control.The display will return to device mode you selectedfor learning (e.g., TV).If the key was not learned, you will see an [ERROR]message instead.Repeat steps 5 through 7 as needed to achieve [SUCCESS].8. To learn functions onto other learning keys (e.g., L2~ L4), repeat steps 4 through 7 for each key.9. Press EXITto exit the programming mode.You willsee an [EXIT SETUP]message as the remote controlreturns to normal operation.10. To test a learned feature,aim the URC-9910 remotecontrol at the desired device and press its device keyonce (e.g., TV, where the learning mode wasassigned). Then press the learning key (e.g., L1)2"30Producer 2002 RF Mnl 4/4/02 10:16 AM Page 30](https://usermanual.wiki/COMPUTIME/9910/User-Guide-265047-Page-30.png)
![where the learned feature is stored. The featureshould activate.If not,try the programming thelearning key again, starting with step 1 (on page 29).Deleting A Function From A Learning Key1. On the URC-9910 remote control, press and holdSETuntil you see the display change from the cur-rent device and time to [CODE SET].NOTE: The device, its code, and time are examples.Yourremote control settings may be different.NOTE: To exit programming at any time, press EXIT once orallow 30 seconds of inactivity to lapse.You will see [EXITSETUP] as the remote control returns to normal operation.NOTE: [INVALID] means you have inadvertently pressed anincorrect key. Note your error and continue programming.2. (x 3) Press the ▼key three times until you see the displaychange to [IR DELETE].NOTE: If you go past [IR DELETE],press the ▲key one ormore times to return to it.3. Press SELECTonce to begin programming.You willsee the display change to the last-selected device(e.g., TV).4. Press a device key once (e.g.,TV) for the mode thatcontains the learned function.5. Press learning key once (e.g., L1) where the feature(to be deleted) is stored.You will see the displaychange to [DELETED]and then return to last-selectedmode (e.g., TV).6. If desired, repeat steps 4 and 5 to delete otherlearned functions.7. Press EXITto exit the programming mode.You willsee an [EXIT SETUP]message as the URC-9910remote control returns to normal operation.31Producer 2002 RF Mnl 4/4/02 10:16 AM Page 31](https://usermanual.wiki/COMPUTIME/9910/User-Guide-265047-Page-31.png)
![USING VOLUME LOCKIn its default (unlocked) state,the URC-9910 remote control allowseach device to control its own volume only in its own mode (e.g., TVvolume in the TV mode, VCRvolume in VCRmode, etc.). However,using our Volum e Lock feature, you can lock the volume controls foreach device to all modes (e.g., RCVR/AMPvolume in all modes).Moreover, using the Volume Unlock feature (see the next page),you can further customize the settings so that a device’s volumecontrols are unlocked in one mode, but remain locked in all othermodes (e.g., TVvolume in the TV mode and RCVR/AMP volume inother modes).Programming Volume Lock 1. On the URC-9910 remote control, press and holdSETuntil you see the display change from the cur-rent device and time to [CODE SET].NOTE: The device, its code, and time are examples.Yourremote control settings may be different.NOTE: To exit programming at any time, press EXIT once orallow 30 seconds of inactivity to lapse.You will see [EXITSETUP] as the remote control returns to normal operation.NOTE: [INVALID] means you have inadvertently pressed anincorrect key. Note your error and continue programming.2. (x 4) Press the ▼key four times until you see the displaychange to [VOL LOCK].NOTE: If you go past [VOL LOCK],press the ▲key one ormore times to return to it.3. Press SELECTonce to begin programming.You willsee the display change to [TO MODE].4. Press a mode key (e.g., RCVR/AMP) to lock a device’svolume controls to all modes.You will see the displaychange to [SUCCESS]and then [EXIT SETUP] as theremote control automatically exits the programmingmode and returns to normal operation.5. If desired, repeat steps 1 through 4 as needed to lockvolume controls for other devices to all modes.32Producer 2002 RF Mnl 4/4/02 10:16 AM Page 32](https://usermanual.wiki/COMPUTIME/9910/User-Guide-265047-Page-32.png)
![Programming Volume Unlock 1. On the URC-9910 remote control, press and holdSETuntil you see the display change from the current device and time to [CODE SET].2. (x 5) Press the ▼key five times until you see the displaychange to [VOL UNLOCK].NOTE: If you go past [VOL UNLOCK],press the ▲key one ormore times to return to it.3. Press SELECTonce to begin programming.You willsee the display change to [ALL MODE].To unlock one mode,skip to step 4.Otherwise pressSELECTonce to unlock all modes.You will see the display change to [UNLOCKED]and then [EXIT SETUP]as the remote control automatically exits the pro-gramming mode and returns to normal operation.4. or (Optional) Press ▲(or ▼) once.You will see the display change to [ONE MODE].a. Press SELECTonce.You will see the display changeto [SEL MODE].b. Press a mode key once (e.g., TV) to unlock it.You will see the display change to [UNLOCKED]and return to [SEL MODE].c. If desired,repeat step 4b as needed to unlock volume controls for other devices. Otherwise,press EXIT to exit the programming mode.Youwill see an [EXIT SETUP]message as the remotecontrol returns to normal operation.33Producer 2002 RF Mnl 4/4/02 10:16 AM Page 33](https://usermanual.wiki/COMPUTIME/9910/User-Guide-265047-Page-33.png)
![USING MACROSWith programming, the M1 through M3 keys on your URC-9910remote control can be setup to perform repetitive, time-consumingoperations for easy, convenient access through the press of a singlekey. Macro keys are ideal for home theater operations, setting afavorite channel,guide steps, or other multiple functions you wouldlike to control with one key press.Moreover, each macro key canhold up to15 key presses total.NOTE: Programming a new macro over an existing one will erase the original macro.Programming A Favorite Channel With so many channels available through your cable or satellite system provider, you can program a macro that directly selects afavorite channel with one key press. For example,let’s assume yourfavorite cable programs are on channel 71. Perform the followingsteps to program a macro key for direct access of this channel:NOTE: This example assumes the TV tuner is connected directly to the cableline and not through a cable converter.1. On the URC-9910 remote control, press and holdSETuntil you see the display change from the cur-rent device and time to [CODE SET].NOTE: The device, its code, and time are examples.Yourremote control settings may be different.NOTE: To exit programming at any time, press EXIT once orallow 30 seconds of inactivity to lapse.You will see [EXITSETUP] as the remote control returns to normal operation.NOTE: [INVALID] means you have inadvertently pressed anincorrect key. Note your error and continue programming.2. (x 6) Press the ▼key six times until you see the displaychange to [KEY MACRO].NOTE: If you go past [KEY MACRO],press the ▲key one ormore times to return to it.3. Press SELECTonce to begin programming.You willsee the display change to [SEL MACKEY].4. Select an open macro key (e.g., M1) and press itonce.You will see the display change to [ENTER SEQ].34Producer 2002 RF Mnl 4/4/02 10:16 AM Page 34](https://usermanual.wiki/COMPUTIME/9910/User-Guide-265047-Page-34.png)
![5. Enter a macro sequence of up to 15 keys. For ourexample, press the following keys once in this order:TV- 7-1NOTE: If you have access to over 100 channels, add a 0before the channel numbers (e.g., 0-7-1). If the originalremote control required pressing an Enter key to change thechannel, also press the Enter key after the channel number(e.g., 0-7-1-ENTER).NOTE: An [ERROR] message, followed by [MAX = 15] alertsyou that the macro sequence must be 15 keys or less.After pressing the first key (in the macro sequence),you will see the display change to [SEL TO END].Thismessage acts as a reminder to use SELECTto end thesequence (see next step).6. To end the macro sequence, press and hold SELECTuntil you see [SUCCESS] appear in the display,followed by [EXIT SETUP]. The URC-9910 remotecontrol will automatically exit the programmingmode and return to normal operation.Now when you press M1, you will instantly see cable channel 71 onyour TV set.Programming A Master Power Key With InstantChannel Selection A macro key can be programmed to turn on and off your devices aswell.For example, let’s set up a sequence that will turn on the TVand tune it to channel 3, and then turn on the cable converter andtune it to a premium channel (e.g., 11).NOTE: This example assumes all equipment is turned off and that the TV isconnected through the cable converter with TV tuning set to channel 3.1. Perform steps 1 through 4 of the previous section,Programming A Favorite Channel on page 34.However, this time in step 4, substitute another openmacro key (e.g., M2).2. Enter a macro sequence of up to 15 keys. For ourexample, press the following keys once in this order:CBL- POWER - TV- POWER- 0-3 - CBL- 1-1 NOTE: If you have access to over 100 channels, add an 0before each set of channel numbers (e.g., 0-0-3and 0-1-1).If the original remote control required pressing an Enter keyto change the channel, also press the Enter key after eachchannel number (e.g., 0-0-3-ENTER and 0-1-1-ENTER).continued on next page...35Producer 2002 RF Mnl 4/4/02 10:16 AM Page 35](https://usermanual.wiki/COMPUTIME/9910/User-Guide-265047-Page-35.png)
![USING MACROSProgramming A Master Power Key With InstantChannel Selection (continued)NOTE: An [ERROR] message, followed by [MAX = 15] alertsyou that the macro sequence must be 15 keys or less.3. After pressing the first key (in the macro sequence),you will see the display change to [SEL TO END].This message acts as a reminder to use SELECTtoend the sequence (see next step).4. To end the macro sequence, press and hold SELECTuntil you see [SUCCESS] appear in the display,followed by [EXIT SETUP].The remote control willautomatically exit the programming mode and returnto normal operation.Now when you press M2once, the cable converter and TV will turnon, the TV will tune to channel 03, and then the cable converter willtune to channel 11.Clearing A Macro1. Perform steps 1 through 4 of the earlier section,Programming A Favorite Channel on page 34.However, this time in step 4, select a macro key youwant to be cleared (e.g., M1~ M3).2. Press and hold SELECT to clear the macro key.You will see the display change to [SEL TO END].Thismessage acts as a reminder to use SELECTto end thesequence (see next step).3. Continue pressing SELECT until you see [SUCCESS]appear in the display, followed by [EXIT SETUP].TheURC-9910 remote control will automatically exit theprogramming mode and return to normal operation.36Producer 2002 RF Mnl 4/4/02 10:16 AM Page 36](https://usermanual.wiki/COMPUTIME/9910/User-Guide-265047-Page-36.png)
![RE-ASSIGNING DEVICE KEYSThe URC-9910 remote control can control a second TV,VCR, DVDplayer, or other device by using the Mode Map feature. For example,to control a TV, a cable converter, and two VCRs, you will need to re-assign the unused AUXkey to operate the second VCR as follows:1. On the URC-9910 remote control, press and holdSETuntil you see the display change from the cur-rent device and time to [CODE SET].NOTE: The device, its code, and time are examples.Yourremote control settings may be different.NOTE: To exit programming at any time, press EXIT once orallow 30 seconds of inactivity to lapse.You will see [EXITSETUP] as the remote control returns to normal operation.NOTE: [INVALID] means you have inadvertently pressed anincorrect key. Note your error and continue programming.2. (x 7) Press the ▼key seven times until you see the displaychange to [MODE MAP].NOTE: If you go past [MODE MAP],press the ▲key one ormore times to return to it.3. Press SELECTonce to begin programming.You willsee the display change to [FROM MODE].4. Select a mode to be copied (e.g., VCR) and press itonce.You will see the display change to [TO MODE].5. Select a mode to be re-assigned (e.g., AUX) and press it once.You will see the display change to[SUCCESS],followed by [EXIT SETUP]. The URC-9910remote control will automatically exit the program-ming mode and return to normal operation.6. The AUX key is now ready to be programmed asyour second VCR. See Programming Device Controlon page 10.continued on next page...37Producer 2002 RF Mnl 4/4/02 10:16 AM Page 37](https://usermanual.wiki/COMPUTIME/9910/User-Guide-265047-Page-37.png)
![RE-ASSIGNING DEVICE KEYS (continued)To re-assign other device keys to the AUXkey, repeat steps 1 through6 on the previous page but substitute the key sequence from the below chart:To Re-Assign Device Key Perform SequenceAUX as 2nd TV key: SET*- ▼(x 7) - SELECT - TV - AUXAUX as 2nd DVD key: SET*- ▼(x 7) - SELECT-DVD- AUXAUX as 2nd SAT key: SET*- ▼(x 7) - SELECT-SAT- AUXAUX as 2nd CD key: SET*- ▼(x 7) - SELECT-CD- AUXAUX as 2nd CBL key: SET*- ▼(x 7) - SELECT-CBL- AUXAUX as 2nd RCVR/AMP key: SET*- ▼(x 7) - SELECT - RCVR/AMP - AUX*NOTE: Press and hold SET (see step 1 on previous page).You can also re-assign another unused device key by substituting anopen key for the AUXkey in the above chart and performing thesequence. For example, to re-assign an unused SAT key as a secondCDkey, perform SET*- ▼(x 7) - SELECT - CD - SAT.USING KEYMOVERThe URC-9910 remote control includes a Keymover feature thatallows you to map (or copy) keys from one mode (i.e., source mode)to another mode (i.e., destination mode).NOTE: The following keys cannot be used as a source or destination: TV,VCR,DVD,AUX,SAT,CBL,RCVR/AMP,CD,HOME THEATER,and SET.Programming Keymover For example, if your VCR does not have volume control, try mapping the volume and mute keys from TVmode to VCR mode as follows:1. On the URC-9910 remote control, press and holdSETuntil you see the display change from the cur-rent device and time to [CODE SET].NOTE: The device, its code, and time are examples.Yourremote control settings may be different.NOTE: To exit programming at any time, press EXIT once orallow 30 seconds of inactivity to lapse.You will see [EXITSETUP] as the remote control returns to normal operation.NOTE: [INVALID] means you have inadvertently pressed anincorrect key. Note your error and continue programming.2. (x 8) Press the ▼key eight times until you see the displaychange to [KEYMOVER].38Producer 2002 RF Mnl 4/4/02 10:16 AM Page 38](https://usermanual.wiki/COMPUTIME/9910/User-Guide-265047-Page-38.png)
![NOTE: If you go past [KEYMOVER],press the ▲key one ormore times to return to it.3. Press SELECTonce to begin programming.You willsee the display change to [FROM MODE].4. Select a source mode (e.g., TV) and press it once.Youwill see the display change to [FROM KEY].5. Select a source key (e.g., VOL+) and press it once.You will see the display change to [TO MODE].6. Select a destination mode (e.g., VCR) and press itonce.You will see the display change to [TO KEY].7. Select a destination key (e.g., VOL+) and press itonce.You will see the display change to [SUCCESS],followed by [EXIT SETUP]. The URC-9910 remotecontrol will automatically exit the programmingmode and return to normal operation.8. Repeat steps 1 through 7 twice more, substitutingVOL–and MUTE as source and destination keys insteps 5 and 7.Upon completion of the above procedure, you can now use yourURC-9910 remote control to control the TV’s volume and mute inthe VCR mode, as well as in the TV mode.Restoring Keymoved Keys to Default SettingsRestoring A Single Keymoved Key1. Perform steps 1 through 7 of the previous section,Programming Keymover on the previous page.However, this time in step 6, make the destinationmode the same as the source mode (e.g., TV).Youwill see the display change to [CLR KMVR].continued on next page...39Producer 2002 RF Mnl 4/4/02 10:16 AM Page 39](https://usermanual.wiki/COMPUTIME/9910/User-Guide-265047-Page-39.png)
![USING KEYMOVERRestoring Keymoved Keys to Default SettingsRestoring A Single Keymoved Key (continued)2. Press SELECTonce to clear the keymoved key.Youwill see [DELETED]appear in the display, followed by[EXIT SETUP].The URC-9910 remote control willautomatically exit the programming mode and returnto normal operation.Restoring All Keymoved Keys In A Single Mode1. Perform steps 1 through 4 of the earlier section,Programming Keymover on page 38.However, thistime in steps 3 and 4, make the source mode andsource key the same mode (e.g., TV).You will see thedisplay change to [CLR KMVR].2. Press SELECTonce to clear all keymoved keys fromthis mode.You will see [DELETED]appear in the display, followed by [EXIT SETUP].The remote controlwill automatically exit the programming mode andreturn to normal operation.40Producer 2002 RF Mnl 4/4/02 10:16 AM Page 40](https://usermanual.wiki/COMPUTIME/9910/User-Guide-265047-Page-40.png)
![USING CHANNEL SCANIn the TV,VCR,DVD,SAT,and CBL modes, use the FAV key to start a 3-second scan of all favorite channels (if programmed – seeProgramming Favorite Channel Scan below) and/or all channels forthe selected mode.1. If Favorite Channel Scan has been set up, skip tostep 2.Otherwise,on the URC-9910 remote controlpress TV,VCR,DVD,SAT,or CBLonce.2. Press FAV once.•IfFavorite Channel Scan has been set up, scanningof favorite channels will start and, upon comple-tion, continue to scan all channels upward for thesame device.•IfFavorite Channel Scan has not been set up,scanning will start with the current channel,thenproceed to the next channel up, and continueuntil all channels of the selected device isscanned.You will see the LED (red light) and IRtransmission icon ( ) blink each time a channelis scanned.3. To stop scanning channels at any time, press any keyonce (except the backlight key ).PROGRAMMING FAVORITE CHANNEL SCANIn the TV,VCR,DVD,SAT,or CBL mode, you can store a list of up to10 favorite channels, in any order, that will be immediately scannedwhen FAV is pressed (see Using Channel Scan above).NOTE: Only channels of one mode can be stored for Favorite Channel Scan.1. On the URC-9910 remote control, press and holdSETuntil you see the display change from the cur-rent device and time to [CODE SET].NOTE: The device, its code, and time are examples.Yourremote control settings may be different.NOTE: To exit programming at any time, press EXIT once orallow 30 seconds of inactivity to lapse.You will see [EXITSETUP] as the remote control returns to normal operation.NOTE: [INVALID] means you have inadvertently pressed anincorrect key. Note your error and continue programming.continued on next page...41Producer 2002 RF Mnl 4/4/02 10:16 AM Page 41](https://usermanual.wiki/COMPUTIME/9910/User-Guide-265047-Page-41.png)
![PROGRAMMING FAVORITE CHANNEL SCAN (continued)2. (x 4) Press the ▲key four times until you see the displaychange to [FAV CHAN].NOTE: If you go past [FAV CHAN],press the ▼key one ormore times to return to it.3. Press SELECTonce to begin programming.You willsee the display change to the last-selected device(e.g., [VCR]).4. Select a mode (e.g.,TV) for favorite channel scanning and press it once. Then press Press SELECTonce.You will see the display change to [FAV].5. Use the keypad to enter a favorite channel number(e.g., 031). The display will show your entry.NOTE: If the original remote control required pressing anEnter key to change the channel, also press the ENTER keyafter the channel number (e.g., 0-3-1-ENTER). However, thedisplay will not show the ENTER key.NOTE: If you made a mistake during entry, press any number key one or more times until you see the displayclear out. Then try entering the correct numbers again.Press SELECT once.You will see the display clear out,ready for your next entry.6. If desired, repeat step 5 for each favorite channel tobe stored, up to a total of 10 channels.NOTE: Once the tenth channel is entered, the remote controlwill automatically exit programming.7. (Optional) To exit programming, press and holdSELECT until you see [SUCCESS]appear in the display, followed by [EXIT SETUP].The URC-9910remote control will automatically exit the program-ming mode and return to normal operation.42Producer 2002 RF Mnl 4/4/02 10:16 AM Page 42](https://usermanual.wiki/COMPUTIME/9910/User-Guide-265047-Page-42.png)
![USING THE HOME THEATER MODEControl OrganizationAbout Device Groups (continued)The default Device Group settings from the factory is:(1) Playback Group: VCR(2) Audio Group:TV(3) Channel Group:CBL(4) Menu Group: CBL(5) PIP Group: TVProgramming The Home Theater ModeFor example, let’s assume you have a TV, a cable converter, and a VCRin your home theater system.You can set up the Home Theater modeso that selected controls are assigned to these devices as follows:1. On the URC-9910 remote control, press and holdSETuntil you see the display change from the cur-rent device and time to [CODE SET].NOTE: The device, its code, and time are examples.Yourremote control settings may be different.NOTE: To exit programming at any time, press EXIT once orallow 30 seconds of inactivity to lapse.You will see [EXITSETUP] as the remote control returns to normal operation.NOTE: [INVALID] means you have inadvertently pressed anincorrect key. Note your error and continue programming.2. (x 3) Press the ▲key three times until you see the displaychange to [THEATER].NOTE: If you go past [THEATER] ,press the▼key one ormore times to return to it.3. Press SELECTonce to begin programming.You willsee the display change to [PLAYBACK].NOTE: The program will automatically step through eachControl Group (from Playback to PIP) as you perform steps3 through 7. However, you can use the ▲or ▼keys to navi-gate to a specific group to make further changes.44Producer 2002 RF Mnl 4/4/02 10:16 AM Page 44](https://usermanual.wiki/COMPUTIME/9910/User-Guide-265047-Page-44.png)
![a. Press SELECTonce to enter Playback ControlGroup assignment.You will see the display changeto the last-selected device (e.g., [TV]).b. Select a device for Playback Control Group assign-ment.For this example, press VCRonce.This willassign the entire group of Playback Controls (i.e.,PLAY,STOP,FF,REW,F.FWD,F.REW,PAUSE,andREC) to the VCR.You will see the display changeto your device choice (e.g.,[VCR]).c. Press SELECT once to accept the assignment instep 3b.You will see the display change to the nextControl Group assignment, [AUDIO]).4. Press SELECTonce to enter Audio Control Groupassignment.You will see the display change to thelast-selected device (e.g., [VCR]).a. Select a device for Audio Control Group assign-ment.For this example, press TVonce.This willassign the entire group of Audio Controls (i.e.,VOL+,VOL-,and MUTE) to the TV.You will see thedisplay change to your device choice (e.g., [TV]).b. Press SELECT once to accept the assignment instep 4a.You will see the display change to the nextControl Group assignment, [CHANNEL]).5. Press SELECTonce to enter Channel Control Groupassignment.You will see the display change to thelast-selected device (e.g., [TV]).continued on next page...45Producer 2002 RF Mnl 4/4/02 10:16 AM Page 45](https://usermanual.wiki/COMPUTIME/9910/User-Guide-265047-Page-45.png)
![USING THE HOME THEATER MODEProgramming The Home Theater Mode5. (continued)a. Select a device for Channel Control Group assign-ment.For this example, press CBLonce.This willassign the entire group of Channel Controls (i.e.,CH+,CH-, (Keypad) 0~ 9,ENTER,LAST,SLEEP,INFO,and TV/VID) to the cable converter.You will see the display change to your devicechoice (e.g.,[CBL]).b. Press SELECT once to accept the assignment instep 5b.You will see the display change to the nextControl Group assignment, [MENU]).6. Press SELECTonce to enter Menu Control Groupassignment.You will see the display change to thelast-selected device (e.g., [CBL]).a. Select a device for Menu Control Group assignment.For this example, press CBLonce.This will assignthe entire group of Menu Controls (i.e., MENU,GUIDE, Cursor Controls (▲,▼,,),SELECT,andEXIT) to the cable converter.You will see the displaychange to your device choice (e.g.,[CBL]).b. Press SELECT once to accept the assignment instep 6a.You will see the display change to the nextControl Group assignment, [PIP]).7. Press SELECTonce to enter PIP Control Group assignment.You will see the display change to thelast-selected device (e.g., [CBL]).a. Select a device for PIP Control Group assignment.For this example, press TVonce. This will assignthe entire group of PIP Controls (i.e., PIP,MOVE,and SWAP) to the TV.You will see the displaychange to your device choice (e.g., [TV]).▲▲46Producer 2002 RF Mnl 4/4/02 10:17 AM Page 46](https://usermanual.wiki/COMPUTIME/9910/User-Guide-265047-Page-46.png)
![b. Press SELECT once to accept the assignment instep 7a.You will see the display change to the firstControl Group assignment, [PLAYBACK]).8. or At this point, all Control Groups have been assigned.To change an assignment, use the ▲or ▼keys tonavigate to a specific group and make changes byrepeating the appropriate step (3, 4, 5, 6, or 7).Otherwise, to exit programming, press and holdSELECT until you see [SUCCESS]appear in the dis-play, followed by [EXIT SETUP].The URC-9910remote control will automatically exit the program-ming mode and return to normal operation.Operating The Home Theater ModeAfter programming the Home Theater mode (see the previous section), you simply activate it by pressing HOME THEATERonce.Instantly, groups of URC-9910 remote control keys will be assignedto their programmed devices.For the above example (in the previous section), pressing HOMETHEATER once would assign the following keys to the VCR, TV, andcable converter:VCR:PLAY,STOP,FF,REW,F.FWD,F.REW,PAUSE,and RECTV:VOL+,VOL-,MUTE,PIP,MOVE,and SWAPCable Converter:CH+,CH-, (Keypad) 0~ 9,ENTER,LAST,SLEEP,INFO,TV/VID,MENU,GUIDE, Cursor Controls (▲,▼,,),SELECT,and EXIT▲▲47Producer 2002 RF Mnl 4/4/02 10:17 AM Page 47](https://usermanual.wiki/COMPUTIME/9910/User-Guide-265047-Page-47.png)
![USING COMMERCIAL SKIPThe URC-9910 remote control includes a unique Commercial Skipfeature, once programmed, that will allow you to skip viewing com-mercials by pressing the COM SKIPkey. Then, as you change chan-nels (to view another program without commercials), an internaltimer will count down a preset time interval before returning thedevice to the original channel.Programming Commercial SkipFor example,let’s assume you are watching a national sports eventon channel 2 that consistently breaks for one-minute commercials.Meanwhile, cable channel 26 is showing a favorite action moviewithout commercials. By performing the following steps, you can setCommercial Skip to automatically return the cable converter to thesports event after one minute of viewing the movie:NOTE: Commercial Skip only works in the following modes: TV,VCR,DVD,CBL,and SAT.1. Select the device where channels will be changed(e.g., CBL).2. On the URC-9910 remote control, press and holdCOM SKIPuntil you see the display change from thecurrent device and time to [CHANNEL].NOTE: The device, its code, and time are examples.Yourremote control settings may be different.NOTE: To exit programming at any time, press EXIT once orallow 30 seconds of inactivity to lapse.You will see [EXITSETUP] as the remote control returns to normal operation.NOTE: [INVALID] means you have inadvertently pressed anincorrect key. Note your error and continue programming.3. Use the keypad to enter a favorite channel number(e.g., 002). The display will show your entry.NOTE: If the original remote control required pressing anEnter key to change the channel, also press the ENTER keyafter the channel number (e.g., 0-0-2-ENTER). However, thedisplay will not show the ENTER key.NOTE: If you made a mistake during entry, press EXIT once.You will see [EXIT SETUP] as the remote control returns tonormal operation. Then try programming Commercial Skipagain starting with step 1.4. Press SELECTonce to accept your channel entry.Youwill see the display change to [30 SEC].48Producer 2002 RF Mnl 4/4/02 10:17 AM Page 48](https://usermanual.wiki/COMPUTIME/9910/User-Guide-265047-Page-48.png)
![5. or If desired, press ▲(or ▼) one or times to select adifferent time interval.Your choices are 30 (default),60, 90, 120, 150, or 180 seconds.For this example,select 60 seconds.6. Press SELECTonce to accept the 60-second setting.You will see [SUCCESS] appear in the display,followed by [EXIT SETUP]. The URC-9910 remotecontrol will automatically exit the programmingmode and return to normal operation.Operating Commercial SkipIn our example, let’s assume you are watching a national sportsevent on cable channel 2 and it looks like a commercial is about toappear. Immediately, press COM SKIPonce and then enter channel26 (e.g. 026).The cable converter will switch to channel 26 and, after 1 minute,automatically return to channel 2. The next time a commercialappears, try pressing COM SKIP once, followed by PREV once to activate the same sequence.For a more powerful Commercial Skip technique, try programmingthese steps into an open macro key (see Using Macros on page 34).This way you will be able to press one key to switch channels andreturn after a preset time.49Producer 2002 RF Mnl 4/4/02 10:17 AM Page 49](https://usermanual.wiki/COMPUTIME/9910/User-Guide-265047-Page-49.png)
![RESTORING FACTORY DEFAULT SETTINGSThe URC-9910 remote control includes an Operation Reset programthat you can use to restore the unit to factory default settings.IMPORTANT: Executing this program will erase all custom settings,including Home Theater assignments, Macros, Learned Keys, KeymovedKeys, and all device assignments.1. On the URC-9910 remote control, press and holdSETuntil you see the display change from the cur-rent device and time to [CODE SET].NOTE: The device, its code, and time are examples.Yourremote control settings may be different.NOTE: To exit programming at any time, press EXIT once orallow 30 seconds of inactivity to lapse.You will see [EXITSETUP] as the remote control returns to normal operation.NOTE: [INVALID] means you have inadvertently pressed anincorrect key. Note your error and continue programming.2. (x 2) Press the ▲key twice until you see the displaychange to [OPS RESET].NOTE: If you go past [OPS RESET],press the▼key one ormore times to return to it.3. Press SELECTonce to begin programming.You willsee the display change to [CLR SETUP].4. Press SELECTonce to start the process.You will seethe display change to [RESET RAM]as the activememory is cleared, followed by [RESET E2]as thepreprogrammed memory is restored.Then you will see [EXIT SETUP] as the URC-9910remote control automatically exits the programmingmode and returns to normal operation.50Producer 2002 RF Mnl 4/4/02 10:17 AM Page 50](https://usermanual.wiki/COMPUTIME/9910/User-Guide-265047-Page-50.png)
![TROUBLESHOOTINGPROBLEM: LCD (Liquid Crystal Display) begins to fade, does notappear, or the LOW BATTERY()icon appears.SOLUTION: Replace the batteries with four (4) new AAA alkaline batteries (see page 4).PROBLEM: LED (red light) and IR( ) icon blinks when you press akey, but home entertainment device does not respond.SOLUTION: Be sure to select the correct device key for the device youwant to control.Also, aim the URC-9910 remote control at the device not farther than 15 feet away (if not using theIR/RF Command Center). Or try installing the IR/RF Command Center for greater range (see page 52).PROBLEM: The URC-9910 remote control does not control homeentertainment devices or commands do not work properly.SOLUTION: Try all listed codes for the device brands being set up.Make sure they originally can be operated with an infrared remote control.PROBLEM: TV/VCR combo does not respond properly.SOLUTION: Use the VCR codes for your brand. Some combo units mayrequire both a TV code and a VCR code for full operation.PROBLEM: The URC-9910 remote control does not turn on Sony orSharp TV/VCR Combo.SOLUTION: For Power On,these products require programming TV codes.For Sony, use TV code 0000 and VCR code 0032.For Sharp, use TV code 0093 and VCR code 0048.PROBLEM: Changing channels does not work properly.SOLUTION: If original remote control required pressing ENTER tochange channels, press ENTERon the URC-9910 remote control after entering the channel number.PROBLEM: During learning, the display shows an [ERROR]messageafter pressing and holding a key to be learned.SOLUTION: A bad capture has occurred.Avoid high-ambient light sources,such as direct daylight and fluorescent bulbs.Also, try readjusting positions of remote controls before performing the procedure again. Make sure the key(s) on the original remote control is (are) operating correctly.PROBLEM: CH+ and CH-do not work for your RCA TV.SOLUTION: Due to RCA design (1983-1987), only the original remote control will operate these functions.PROBLEM: No remote control of volume.SOLUTION: See Using Volume Lock on page 32 to lock/unlock the volume controls.PROBLEM: Tried Search For Your Code method and still could not finda working code.SOLUTION: Your device may be newer than the URC-9910 remote control. See About Upgrading on page 51.continued on next page...55Producer 2002 RF Mnl 4/4/02 10:17 AM Page 55](https://usermanual.wiki/COMPUTIME/9910/User-Guide-265047-Page-55.png)