COMPUTIME CTL3082 In Home Display User Manual CTL3082
Computime Limited In Home Display CTL3082
user manual
1
Smart Energy In-Home Display
Instruction Manual
Model No.CTL3082
2
CONTENTS
PRODUCT OVERVIEW..............................................................................................................................................3
SAFETY INSTRUCTIONS.............................................................................................................................................3
INSTALLATION...........................................................................................................................................................4
BACKLIGHT ...............................................................................................................................................................4
NAVIGATION BUTTONS ...........................................................................................................................................4
HOME SCREEN .........................................................................................................................................................5
MENU.........................................................................................................................................................................5
Usage menu.........................................................................................................................................................6
Forecast menu.....................................................................................................................................................6
System menu........................................................................................................................................................7
Settings menu ......................................................................................................................................................7
MESSAGES ................................................................................................................................................................8
PRICE...................................................................................................................................................................... 10
SPECIFICATIONS.................................................................................................................................................... 11
FCC DECLARATION.............................................................................................................................................. 12
ETL ........................................................................................................................................................................... 14
3
PRODUCT OVERVIEW
The In-Home Display unit shows the history of your energy and forecasts your energy usage based on the data
it collects. The smart ZigBee™ technology enables the unit to communicate with your utility company so you
can receive messages about energy saving events and price reductions.
SAFETY INSTRUCTIONS
Purpose and correct use:
• Read these instructions carefully and keep in a safe place for future reference.
• All manual/safety instructions and electricity supplier’s regulations must be adhered to.
• Only connect this unit to a UL/ETL approved 5-volt DC power supply provided by manufacturer.
• Do not install this unit at an altitude of over 2000 meters.
• This standalone electronic unit should only be used in dry, closed living and office spaces. Do not place
the unit in a bathroom or area of excessive moisture. Do not allow the unit to get wet.
• Place the unit in an easy-to-reach position where you can comfortably reach the buttons and view the
screen.
• Do not expose the unit to temperatures below 5°C or above 40°C, humidity above 90% or pollution
above level 2.
• Do not expose the unit to voltage beyond 90V-260V AC.
• Clean the unit with a dry, soft cloth. Do not use solvents or aggressive cleaning agents.
The manufacturer accepts no responsibility for damage caused by non-observance of these instructions.
4
INSTALLATION
1. Plug the power adapter into the adapter socket on the left-hand side of the unit.
2. Pull out the table stand on the back of the unit and place the unit on a firm, flat surface near a power
source.
3. Insert the plug into a 120 or 220 V wall socket.
BACKLIGHT
Press any button to turn on the backlight.
Note: If the backlight has turned off, you need to press any button to turn it on again before you can enter the
menus.
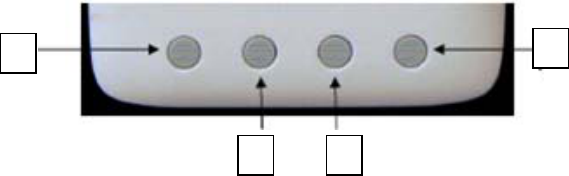
NAVIGATION BUTTONS
The navigation buttons are as follows:
Throughout this manual, the buttons to press in order to access the onscreen commands will be referred to as
(1), (2), (3), (4).
1
2
3
4
5
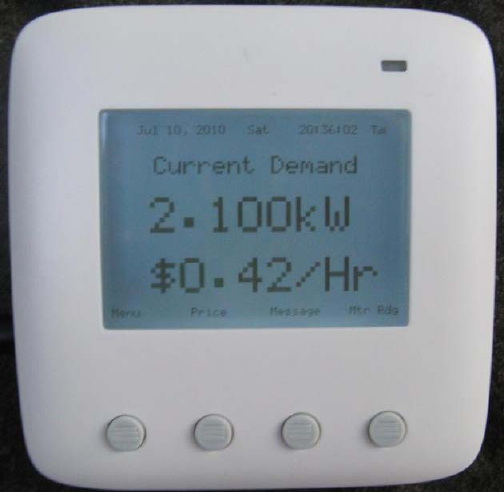
HOME SCREEN
The Home screen is the main display screen. It shows the
current power consumption and the cost per hour.
From the Home screen, you can access the system menu,
current price of your electricity, messages from your utility
company, and your current meter reading.
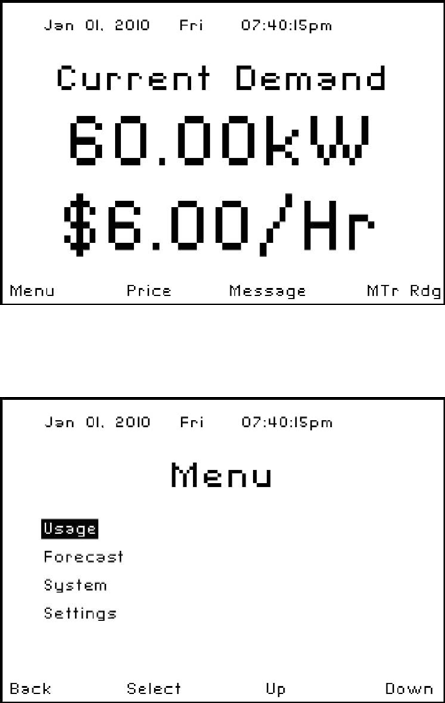
MENU
The Menu page provides navigation to the Usage, Forecast,
System and Settings menu pages. To view one of these
pages, press (3) or (4) to select the desired page and press (2)
to view it. Press (1) to return to the Home Screen.
6
Usage menu
To view your energy usage:
1. Enter the ‘Usage’ menu.
2. Press (3) or (4) to select one of the following options and press (2) to view the data:
• ‘Today’ – Shows your total energy usage and cost for today.
• ‘Last 24 Hours’ – Shows how many hours of energy you have used and the total cost.
• ‘Last 30 Days’ – Shows your energy consumption and the total cost for the last 30 days.
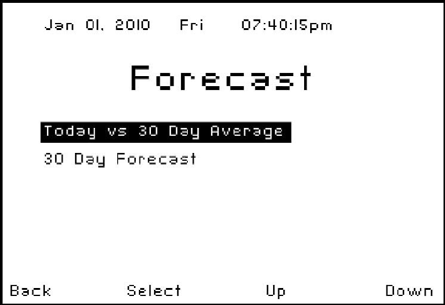
Forecast menu
To view your energy forecast:
1. Enter the ‘Forecast’ menu.
2. Press (3) or (4) to select one of the following options
and press (2) to view the data:
• ‘Today vs 30-Day Average’ – Shows today’s
energy usage/cost and compares it to your
average daily usage and cost for the last 30 days.
• ’30-Day Forecast’ – Forecasts the next month’s
energy usage/cost based on your average daily
usage/cost for the last 30 days.
7
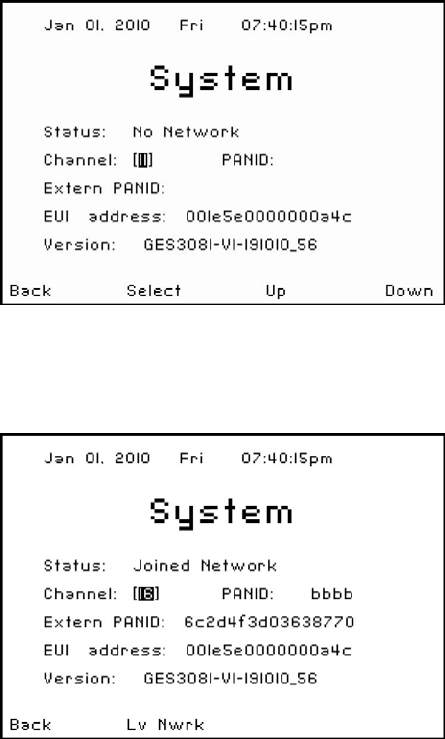
System menu
To join a network and connect to the utility company:
1. Enter the ‘System’ menu.
2. The default status should be “No Network”. The
Channel should display “Auto”.
3. Press (2) to scan and join a network.
4. The status will update and show ‘Joined Network’ if it
successfully connects to your utility meter. It will
display ‘Joined Failed’ if your connection was
unsuccessful. It takes approximately one minute for
the connection process to complete. If you
experience problems connecting to your utility network, please contact your utility company.
To disconnect from a network:
1. Enter the ‘System’ menu.
2. ‘Lv Nwrk’ appears on the screen. Press (2) to exit the
network.
Note: PANID/Extern PANID/E01 Address/VERSION – are all
codes that you may be asked to supply if you phone to the
utility company for technical support.
Settings menu
To change the LCD brightness:
1. Enter the ‘Settings’ menu.
2. Press (2) to select ‘LCD Brightness’. Use (3) or (4) to adjust the brightness of the LCD screen.
8
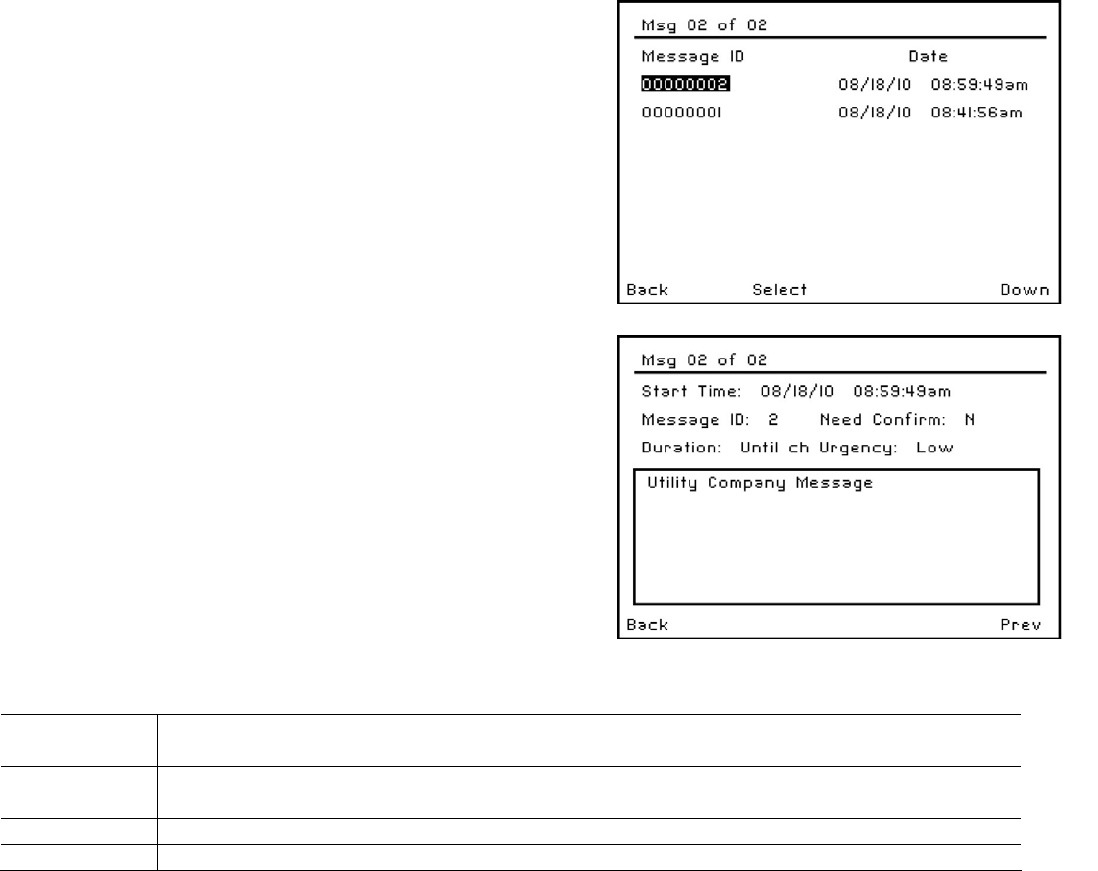
MESSAGES
To view utility messages:
1. Press (3) while on the Home Screen and the following
Message screen is displayed. This screen displays a
history of your last 64 messages. It lists the message ID
and date/time for each message.
2. To view the actual utility message, press the (3) or (4)
buttons to select the desired message. Press (2) to
view.
3. Press (3) or (4) to view additional utility messages.
4. To exit the message screen, press (1) to return to the
list of messages. Press (1) again to return to the Home
Screen.
Understanding the Message screen information:
Screen
Message Description
Msg 33 of 33 The number of the message you are viewing, followed by the number of total messages you
have received.
Publish Time The date and time the message was sent to you.
Message ID The Message ID is a utility company generated identification number.

9
Duration The energy saving event lasts for this period.
Urgency The level of urgency can be ‘Low’, ‘Medium’ or ‘High’.
Message Box Your utility company will send you a wide range of messages that appear in this message box.
The standard energy saving messages as shown above provide the following information:
1. Level 1: This energy saving event is Level 1. There are 9 different event levels:
• Green – Energy saving
• Levels 1-5 – Level of message importance; 1 is low and 5 is high
• Emergency
• Planned outage
• Service Disconnect
2. 16/4: The date.
3. Heat: Advises if your system is currently in Heat or Cool mode.
4. 25°C: The new setpoint temperature level for this event.
• 08:00-10:00: The time the energy saving event will take place.
10
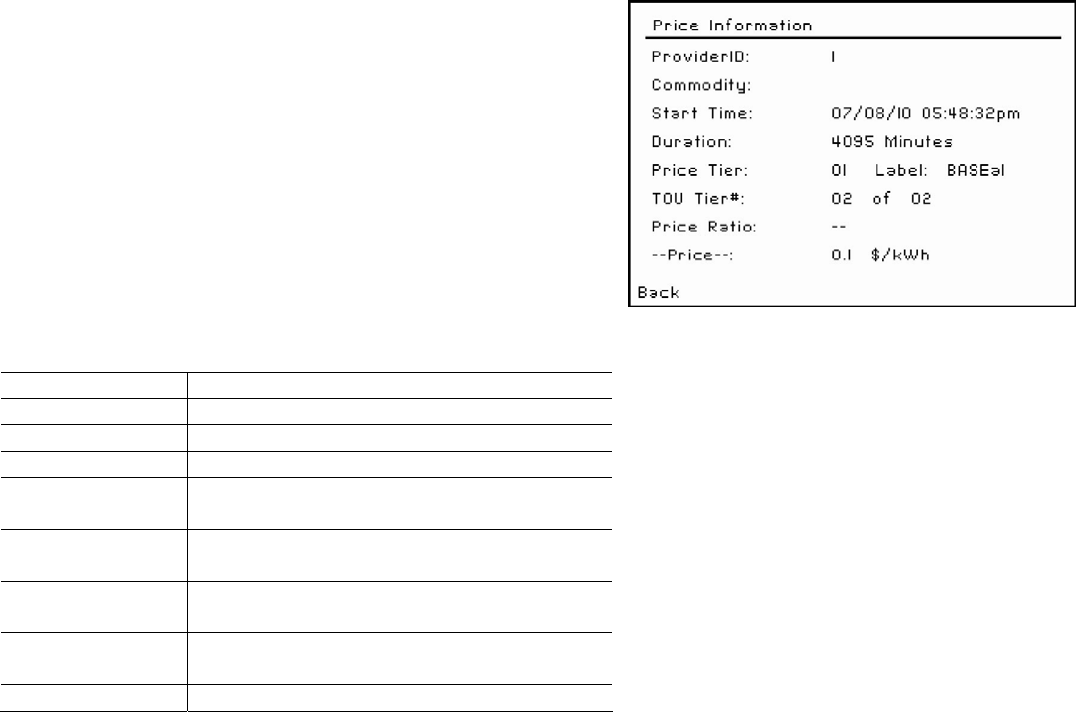
PRICE
To view current price information:
5. Press (2) and the Price screen opposite appears. A
description of the information displayed on this screen
can be found in the below table.
6. Press (1) to return to the Home Screen.
Screen Message Description
Provider ID ID number correlates to the utility company.
Commodity Electricity
Start Time Date and time of the price information.
Duration The length of time the price information
relates to.
Price Tier The Price Tier values range from 1 (the least
expensive tier) to 6 (the most expensive tier).
TOU Tier Identifies the meter register being used for
energy accumulation.
Price Ratio Ratio to the normal price chosen by the
supplier.
--Price--: Price of kilowatt-hour.

11
SPECIFICATIONS
LCD Screen Resolution 240 x 160
Backlight LED
RF Frequency 2405-2480 MHz
RF Range Up to 1300 ft (400 m) line of sight
Device Power Input DC 5V
A/C Adapter Input AC 90V to 260V
Size 4.2” (L) x 4.2” (W) x 1.1” (H)
10.6 (L) x 10.6 (W) x 2.8 (H) cm
Weight 0.63 lb (285 g)
12
FCC DECLARATION
WARNING: Changes or modifications to this unit not expressly approved by the party responsible for
compliance could void the user’s authority to operate the equipment.
This device complies with Part 15 of the FCC Rules. Operation is subject to the following two conditions: (1) this
device may not cause harmful interference, and (2) this device must accept any interference received,
including interference that may cause undesired operation.
NOTE: This equipment has been tested and found to comply with the limits for a Class B digital device,
pursuant to Part 15 of the FCC Rules. These limits are designed to provide reasonable protection against
harmful interference in a residential installation. This equipment generates uses and can radiate radio
frequency energy and, if not installed and used in accordance with the instructions, may cause harmful
interference to radio communications. However, there is no guarantee that interference will not occur in a
particular installation. If this equipment does cause harmful interference to radio or television reception, which
can be determined by turning the equipment off and on, the user is encouraged to try to correct the
interference by one or more of the following measures:
• Reorient or relocate the receiving antenna.
• Increase the separation between the equipment and receiver.
• Connect the equipment into an outlet on a circuit different from that to which the receiver is
connected.
• Consult the dealer or an experienced radio/TV technician for help.
FCC RF Radiation Exposure statement:
This equipment complies with FCC RF radiation exposure limits set forth for an uncontrolled environment. This
equipment should be installed and operated with a minimum distance of 20 centimeters between the radiator
and your body.
13

14
ETL DECLARATION
This device must be connected to an ETL/UL Approved 5V DC adapter provided by manufacturer.
Conditions for operating this device:
Location of Usage Indoor and dry location
Operating Voltage of Adapter 90 V to 260 V AC
Operating Temperature 5 oC to 40 oC
Relative Humidity Max. 90% RH non-condense
Altitude Up to 2000 m
Pollution Degree 2
For installation, please refer to the installation section of this manual.
Place the device on a flat surface without any blockage so power can be easily disconnected.
This product has been tested to the requirements of CAN/CSA-C22.2 No. 61010-1, second edition, Including
Amendment 1, or a later version of the same standard incorporating the same level of testing requirements.
WARNING: If the equipment is used in a manner not specified by manufacturer, the protection provided by
the equipment may be impaired.