Current Cost 2011-ENVIR Envi R Energy Monitor receiver and transmitter User Manual PowerSave Envi R Man indd
Current Cost Ltd., Envi R Energy Monitor receiver and transmitter PowerSave Envi R Man indd
User Manual Aug 05
1
Monitor User Guide
The SmartR Monitor
PowerSave Envi R Man.indd 1 04/08/2011 10:27
2EnviR - The SmartR Monitor
How the EnviR works 3
EnviR Functions and Features Overview 4
Setting up your EnviR 5
Pair Display to the Transmitter 5
Sensable software – Voltage Adjustment 6
Sensable software – Pairing additional C² enabled displays to the transmitter 6
Install Transmitter and CT Clamps 7
Setting the Clock 8
Setting the Base Rate 8
Multiple Rate Tariffs 8
Advanced Features 9
Full System Reset 9
DATA output 9
Troubleshooting 10
Safety and care of your monitor 10
Limited One Year Warranty 11
Specications 11
Contact Us 12
PowerSave Envi R Man.indd 2 04/08/2011 10:27
3
A big thank you for taking the decision to reduce your energy use. The planet
needs more people like you. If we all do our bit to stop wasting electricity we
can signicant reduce our carbon footprint.
The beauty of the EnviR is that it shows you how much energy you are using right now.
It also shows you how much your electricity is costing every day and every month.
The EnviR will allow you to take control of your energy use and SAVE Money while helping
reduce your carbon footprint.
The EnviR uses clamps that detect a tiny magnetic eld that is created as current moves through
power cables. The greater your energy use, the greater the magnetic signature. The clamps are
connected to a transmitter that sends a signal wirelessly to the display every 10.0649 seconds. The
display calculates the data and shows you how much energy you are using in real time. It also stores
your historical energy usage. Data can be exported to your computer and various software programs
can graph your usage various ways.
The EnviR monitor is not a substitute for utility supplied electric meters. The EnviR is an informational
tool only. Utility electric meters monitor usage full time and are therefore more accurate.
We recommend that you install the display in your kitchen or other area where you can check the
display regularly. Over time you will learn more about your energy use pattern and will know when it is
higher than normal. As you leave your home or go to bed, a quick glance will conrm that you are not
wasting energy.
This device is designed to provide years of maintenance free energy usage information. Since the
device monitors whole home energy usage measured through the incoming main electricity feed
cables, the installer must have some knowledge of electricity including working on or around wires
and power panels. The EnviR monitor does not require you to carry out any electrical wiring.
Similarly, if
you notice anything unusual about your electricity supply, such as loose wires, exposed cabling, burn
marks or holes in the insulating materials, damage to your meter, then stop immediately and consult
an electrician or your energy supplier.
PowerSave Envi R Man.indd 3 04/08/2011 10:27
4EnviR - The SmartR Monitor
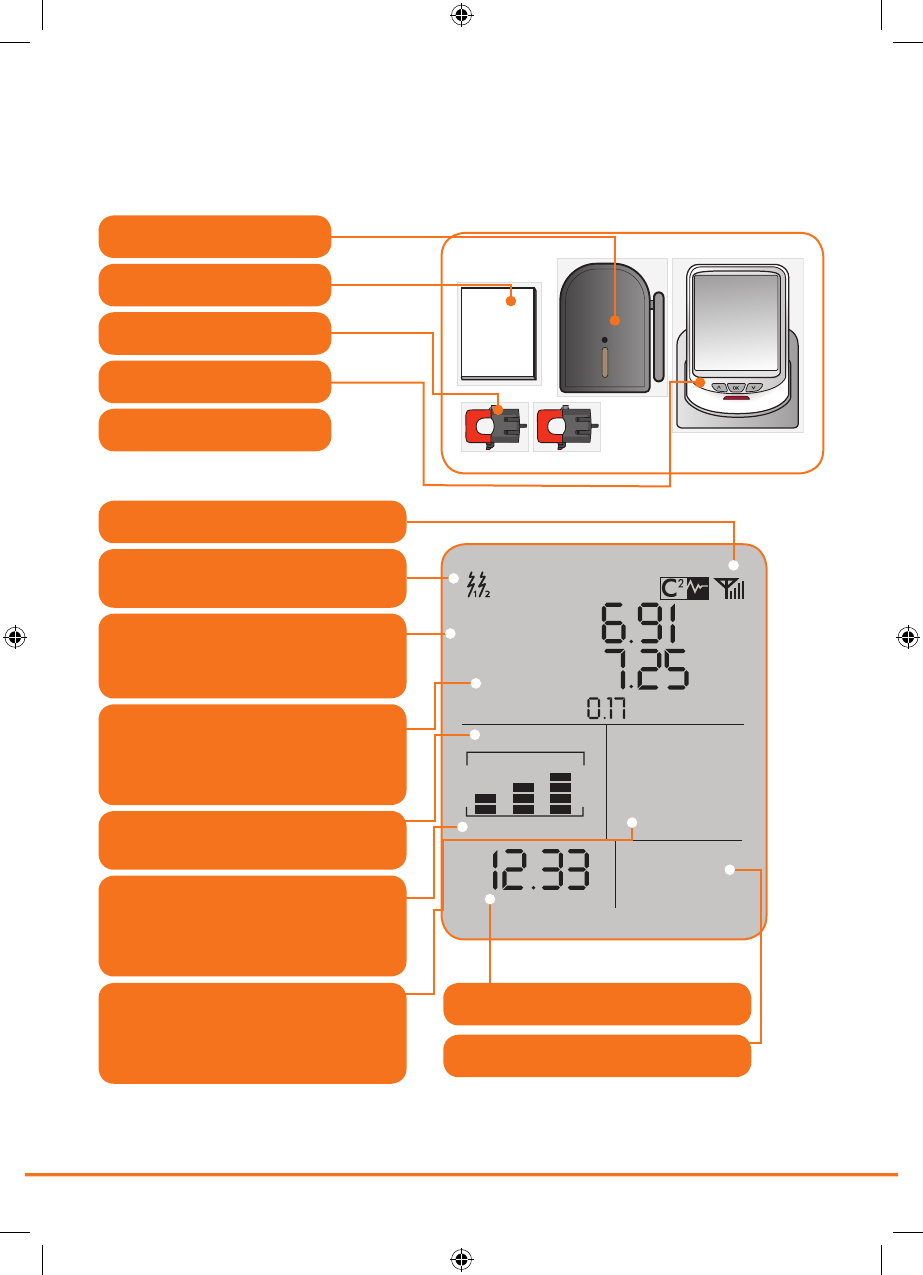
Before commencing installation please take a moment to review the components, buttons and
display functions. Your Standard EnviR Kit includes: One Transmitter
One Transmitter
Two CT Clamps
One Display Power Supply
One Installation Guide
One Display
Antenna Signal
Current Time
Temperature or Device Number
This graph shows relative energy
usage between Day (7AM and 3
PM), Eve (3PM and 11PM) and Night
(11PM-7AM)
Shows how much energy you are
using right now. Test it by turning a light
on or off and watch the number change
Shows how much money you are
spending per day and per month
based on the energy being used
and the cost rate in effect
Indicates number of CT clamps
connected
Accumulated energy usage over
the past day, week and month. Mode
changes every 10 seconds or can be
scrolled using the OK button
Shows cost change based on a
recent change in energy use
Last Days
o
F
Yesterday
kWh
Night
Per
Day
Day Eve
TempTime
30
kW
Energy Now
Electric
Cost $
72
1422
Down
$
Transmitters can send a wireless signal up to 100 feet indoors. You must deduct
10 feet from this range for every wall between the transmitter and the display.
!
PowerSave Envi R Man.indd 4 04/08/2011 10:27
5
• Plug display power supply into back of display.
• Plug display into convenient wall outlet.
• Remove plastic battery tab from transmitter.
• The red LED light on the transmitter should be ashing slowly. If not, check the batteries.
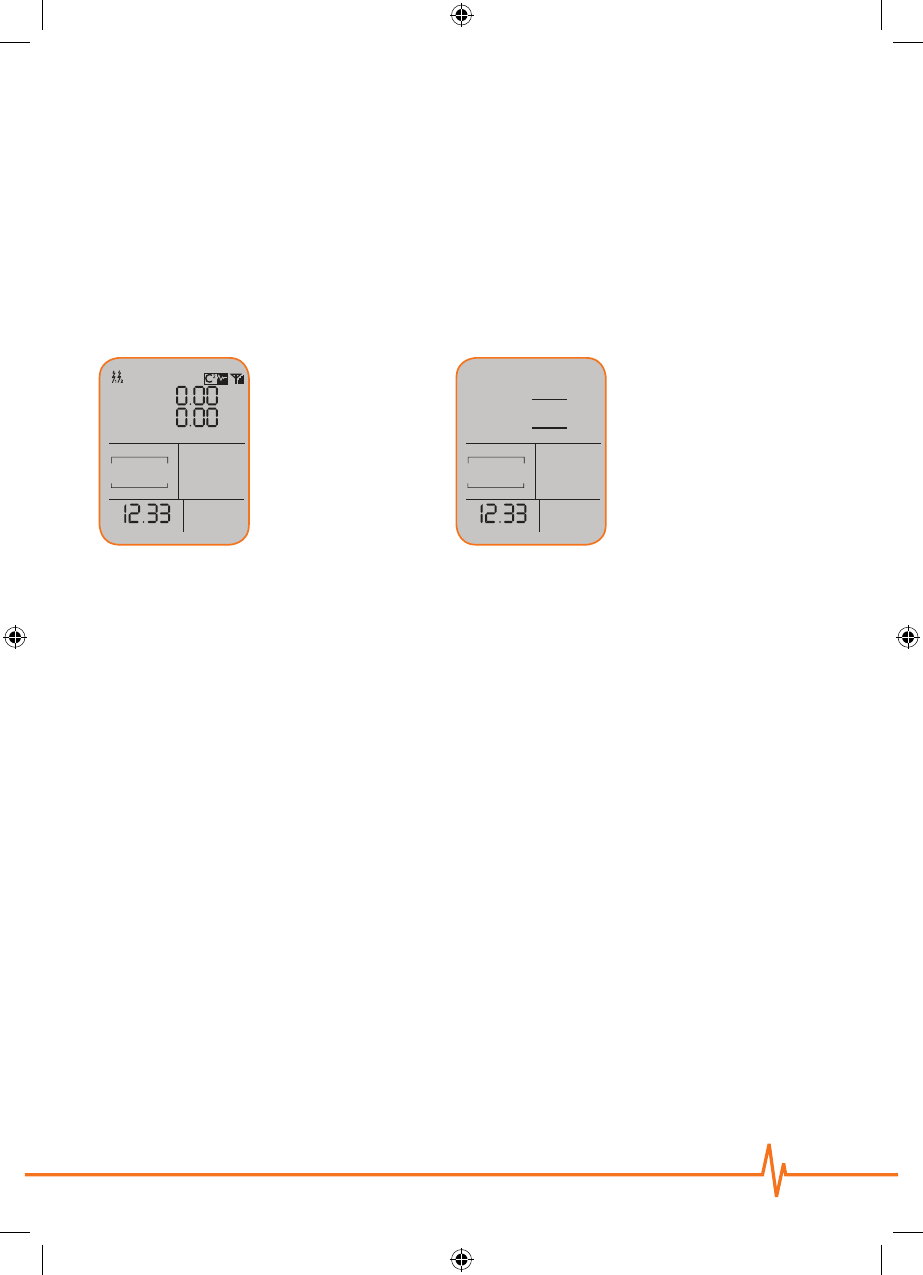
• Check the display and compare it to the two images below to determine if the unit is paired.
Last Days
o
F
Yesterday
kWh
Night
Per
Day
Day Eve
TempTime
30
kW
Energy Now
Electric
Cost $
72
$
Last Days
o
F
Yesterday
kWh
Night
Per
Day
Day Eve
TempTime
30
kW
Energy Now
Cost $
72
Last Days
o
F
Yesterday
kWh
Night
Per
Day
Day Eve
TempTime
30
kW
Energy Now
Electric
Cost $
72
$
Last Days
o
F
Yesterday
kWh
Night
Per
Day
Day Eve
TempTime
30
kW
Energy Now
Cost $
72
If the display looks
like the image to
the left displaying
0.00 and the electric
symbols then a
wireless connection is
made and the system
is paired.
If the display looks
like the image on the
left then it needs to
be paired. Proceed
to pairing instructions
below.
• Place the transmitter and the display in the same room.
• Using the tip of a pen, press the small button found in the front-center of the black transmitter
and hold it for 9 seconds then release.
• The red LED light on the transmitter should be ashing rapidly. If it doesn’t ash rapidly repeat
last step again.
• While the light on the transmitter is ashing rapidly, press and hold the DOWN (V) button
on the display until the red LED light on the display ashes once. Release DOWN (V) button.
• The screen will show a tuning signal pyramid shown on the image on the left and is synchronizing
itself with the transmitter.
• Once synchronization is complete the display will look like paired display image above.
PowerSave Envi R Man.indd 5 04/08/2011 10:27

6
The new Sensable software found in the EnviR transmitter allows you to set your known voltage.
The default value shown on the display of 115. If you wish to change it please follow the instructions
below:
1) Follow the steps for pairing the EnviR display and transmitter.
2) When you release the button the screen will show a tuning signal indicating the display is tuning
to the transmitter. When your monitor and transmitter are tuning, the middle right of the display will
show “115”.
3) At this point if you wish to adjust your voltage setting please undertake the following:
(i) Press and hold the recessed tuning button on the transmitter for 3 seconds and then release.
(ii) The display will now have changed and will indicate “120”.
(iii) Repeat this process to select your known voltage (the range is from 100 to 130V starting at
115V).
(iv) Each press cycles the voltage shown on the display, so press as many times as you need to
reach the voltage value you want to use.
(v) For example if you wished to set 130V you will need to repeat steps (i) and (ii) three times
and the display will show 120, 125 and then 130.
4) Once completed, your display will clear and then “0 watts” will appear. This usually takes 1 to 2
minutes. The aerial icon will appear indicating pairing has been successful.
*Please note that the voltage shown on the display is used for the EnviRs internal calculations, this
has nothing to do with the display power adaptor.
The new Sensable software found in the EnviR transmitter allows you to set up additional C2 enabled
displays within the home. To pair additional displays please undertake the following steps:
1) Place the transmitter and display in the same room.
2) Using a ballpoint pen or similar, push and hold the recessed tuning button, found in the front-centre
of the black transmitter, until the LED on the transmitter has ashed exactly
3) Upon releasing, the red LED on the transmitter will rapidly ash for a minute, indicating that the
transmitter is now ready to pair with any additional C2 enabled displays, at the same time as staying
paired with the existing EnviR display. If it doesn’t, please try again.
4) Whilst the LED on the transmitter is ashing, at the additional display(s) press and hold the DOWN
(V) button on the display until the LED on the display ashes.
5) When you release the button on the additional display(s) the screen will show a tuning signal
indicating the display(s) is tuning to the transmitter.
6) Once tuning is completed, all displays will clear and then “0 watts” will appear. This usually takes 1
to 2 minutes. The aerial icon will appear indicating pairing has been successful.
EnviR - The SmartR Monitor
PowerSave Envi R Man.indd 6 04/08/2011 10:27
7
IMPORTANT: THIS DEVICE MUST BE INSTALLED BY A QUALIFIED/LICENCED ELECTRICIAN,
UNLESS OTHERWISE PERMITTED BY LOCAL REGULATIONS.
• Locate the main breaker panel that disconnects all power to the house. This enclosure is usually
located close to the meter.
If the main breaker panel enclosure or wiring or breakers show any sign of disrepair or damage
or you notice anything unusual about your electricity supply, such as loose wires, exposed
cabling, burn marks or holes in the insulating materials or damage to your meter then stop
immediately and consult a qualied electrician.
• Open the main breaker panel enclosure.
• TURN OFF MAIN BREAKER
• Unscrew and carefully remove the protective cover. This will reveal all wires.
• Check to make sure that there is enough room to t the transmitter in the enclosure so that the
protective cover can be remounted. If there is not enough room seek installation help from a qualied
electrician.
• Place the transmitter as high in the enclosure as possible. A Velcro sticker is used to secure the
transmitter in place.
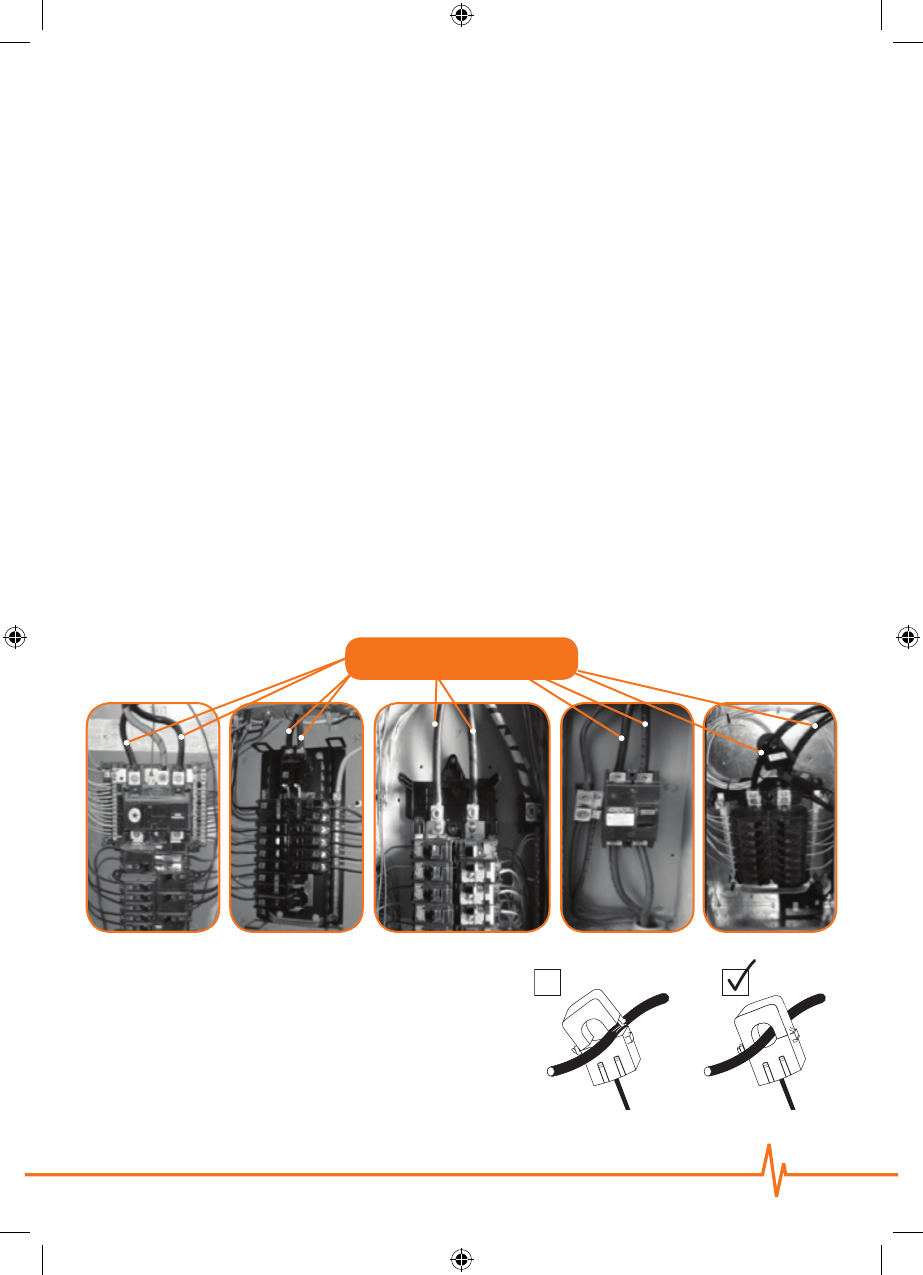
• Locate the two main incoming cables coming from the meter and feeding the main breakers in the
panel. They are usually the 2 thickest cables and are normally black or red. A third cable usually
thinner and marked with green or white labels is the ground and will not be used.
• Clamp one CT clamp around each main cable.
Do not pull or bend the power cables. Make sure
that the clamps can move freely and that they
do not pinch or apply any undue pressure on the cables.
• Connect the clamp leads to the bottom of the transmitter
and make sure that the center input
labeled #1 on the transmitter is always connected.
The second sensor to the left of the center input. The third input is reserved for 3-phase installations.
Examples of main cables
x
!
PowerSave Envi R Man.indd 7 04/08/2011 10:27
8EnviR - The SmartR Monitor
• Check the display to ensure that it is reading the signal and that watts are being displayed.
• Re-attach the protective cover and close the panel.
• Turn On the Main Breaker.
• Press the OK button for three seconds.
• The screen will clear and clock hours will ash.
• Use the UP ( ) or DOWN (V) buttons to adjust the hour.
• Once the correct hour is selected press OK button.
• The minutes will now ash. Use the UP ( ) or DOWN (V) buttons to adjust
the minutes. Once the correct minute has been selected press the OK button.
The unit has been programmed with a default rate of $0.1396 cents per kWh. To nd out your
local rate, contact your local utility or review your last utility bill and divide the total bill amount /
KWhs used. To adjust your rate:
• Push the UP ( ) button and hold for three seconds.
• Press OK. The display will ash normal price.
• Press UP ( ) or DOWN (V) buttons to adjust price on rst 2 digits.
• Press OK. The display will ash last 2 digits.
• Press UP ( ) or DOWN (V) buttons to adjust price on last 2 digits.
• Press OK.
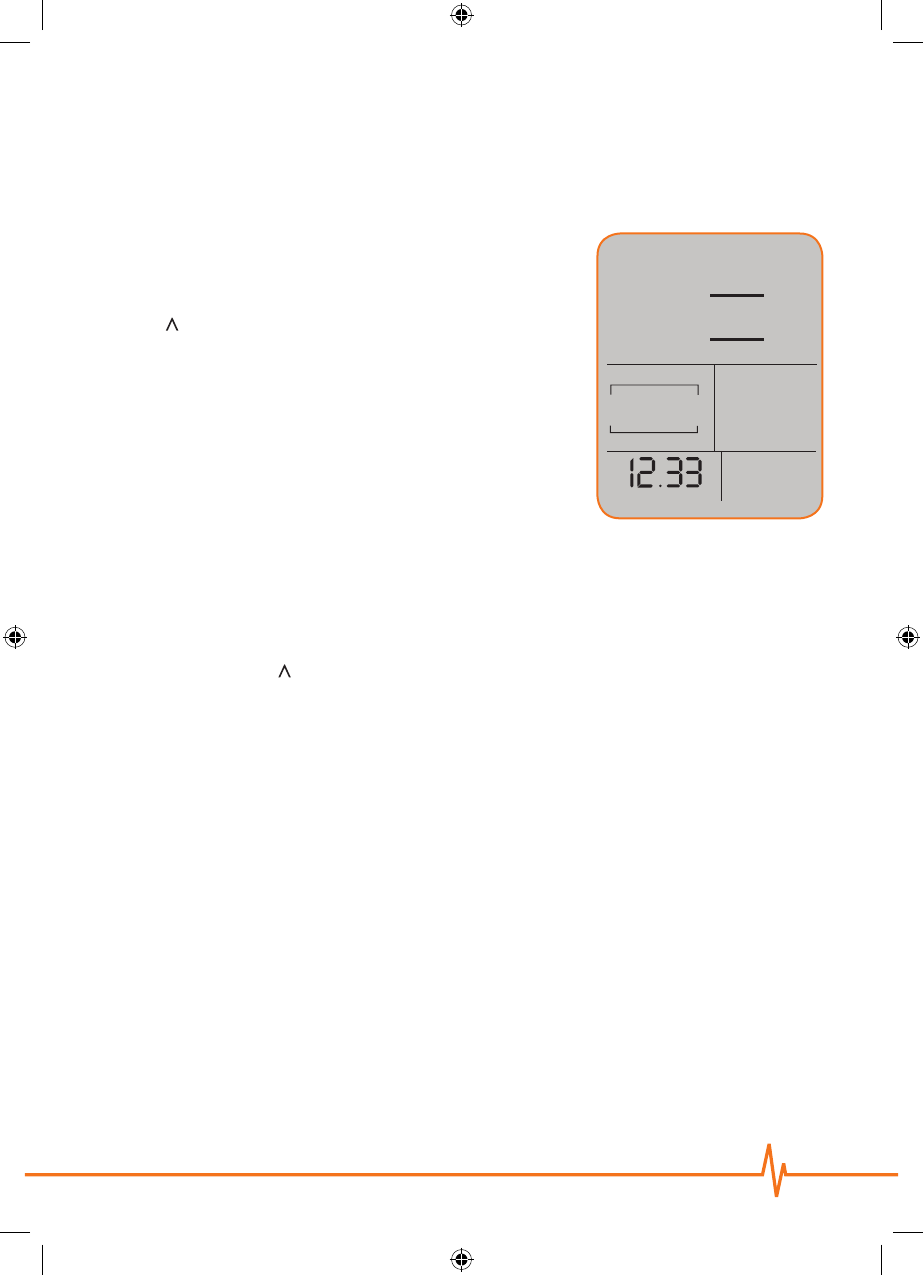
The EnviR can be programmed to calculate different KWh unit rates for electricity consumed at different
times of day. In order to program different rates:
• Press and hold the UP ( ) and DOWN (V) buttons together until the LED ashes. Then release both
buttons.
• Using the UP ( ) and DOWN (V) buttons you can select your low cost rate. Press the OK button to
conrm rate.—If you do not select a different rate, then you will not see the time section.
• You will see the clock ashing. Using the UP ( ) and DOWN (V) buttons you can now set the time that
your low rate starts. Press the OK button to conrm.
• Using the UP ( ) and DOWN (V) buttons you can set the time your normal rate starts.
Press the OK button to conrm.
• The display will resume normal operation.
Time
Last DaysYesterday
kWh
Night
Per
Day
Day Eve
Appliance
Time
30
kW
Energy Now
Cost $
PowerSave Envi R Man.indd 8 04/08/2011 10:27
9
Additional transmitters
The EnviR can be synced with up to nine additional transmitters. Uses include:
• Monitor individual appliances or components.
• Electrical usage of multiple users in apartment settings.
• Solar or other alternative energy sources monitoring.
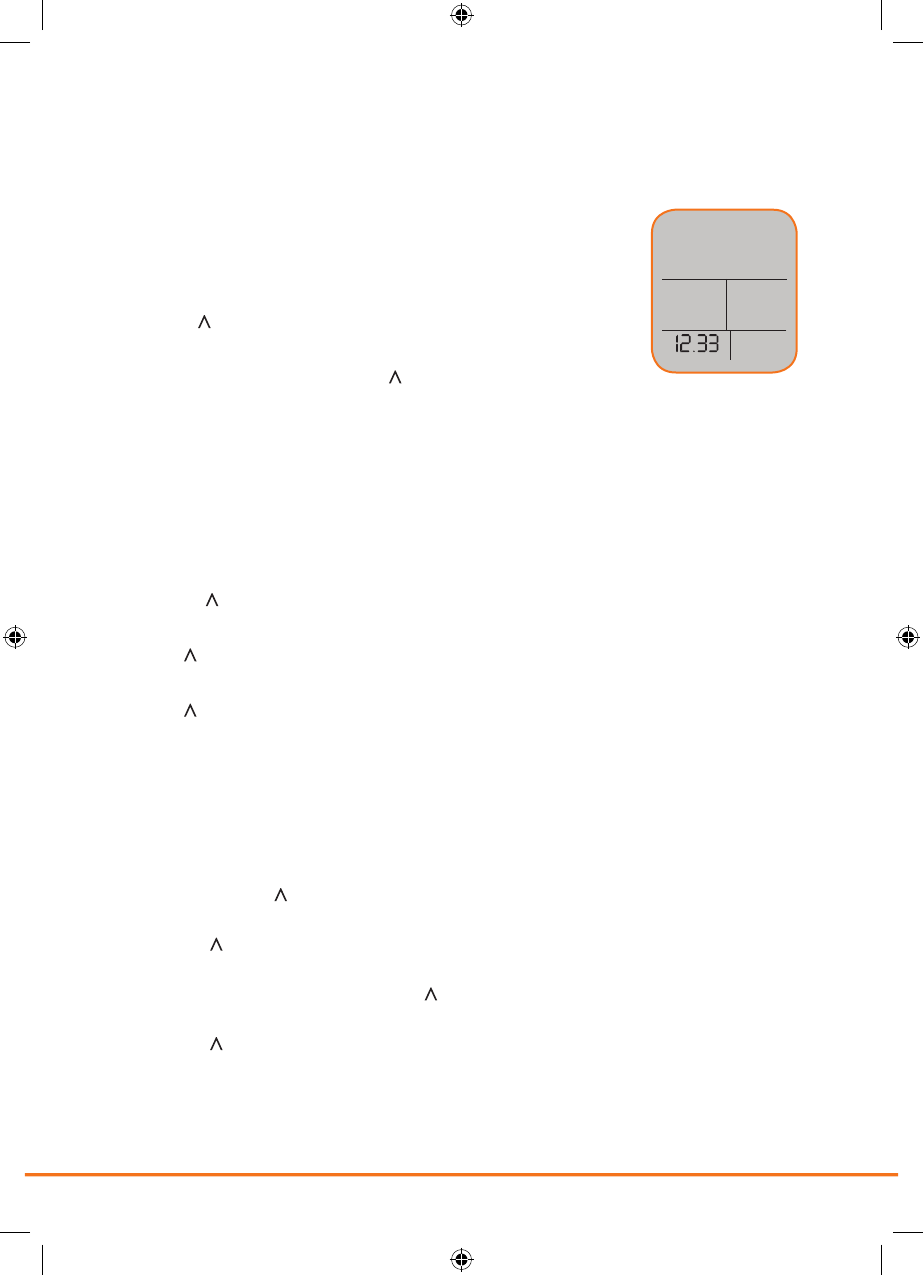
• In order to sync an additional transmitter to the device simply press
the UP ( ) or DOWN (V) buttons on the display and you will see
Appliance number in the bottom right corner. When you reach the
desired Appliance #, then pair the transmitter per the instructions
for pairing the display to the transmitter on page 5.
• PowerSave will introduce IAM (Individual Appliance Monitors)
which will allow you to monitor up to nine individual outlets.
Additional transmitters can be ordered from your supplier or
The EnviR can be fully reset to its factory condition. Resetting the EnviR will wipe out ALL historical
data and pairing information. To fully reset the EnviR:
• Remove the display power lead from the display.
• Press and hold the UP ( ) and DOWN (V) buttons as you push the display power lead into the back
of the display. When RED LED light ashes release the buttons.
• The display will show software version number.
• Remove and reconnect the power lead on the display. This switch-on wipes all history and
pairing ID’s and burn in fresh defaults.
• Display unit will need to be paired again and rates need to be reprogrammed see page 5.
• The EnviR will store up to 7 years of historical data. On the back of the display a USB cable can be
connected to facilitate both historical and real time data transfer to a MAC or PC.
• When installing the USB cable to the computer make sure you download the appropriate USB driver.
Please visit for more information on available software downloads.
• Once the EnviR is connected to a computer the historical data will transfer automatically at 1 minute
past every odd hour, ie 17:01, 19:01 etc. A burst of data is sent once every 10 seconds. History Data
is sent for all 10 sensors regardless if they are now present or not.
Time
Last DaysYesterday
kWh
Night
Per
Day
Day Eve
Appliance
Time
30
kW
Energy Now
Cost $
PowerSave Envi R Man.indd 9 04/08/2011 10:27
10 EnviR - The SmartR Monitor
• A full cycle of history output can be initiated for download on demand by pressing and holding the
DOWN (V) and OK buttons together until the LED ashes. Please note: all processor activity is
halted during this download, even the clock, with a lot of history, the download may take some time!
Self-resets when done.
Your EnviR monitor should reach you in perfect condition. If you have connected it properly but cannot
get it to work, please check the following before contacting us for assistance.
• Do not attempt to repair or service any part of the EnviR equipment. Contact our customer service
department for assistance.
• Do not immerse the product in water, or any other liquids.
• Do not expose the product to heat, ame, steamy conditions or extreme cold.
• Do not open the equipment or touch any of its electronic circuitry.
• Do not hit, strike or drop the equipment—if the display gets broken, take special care not to
touch the liquid crystals.
• Do not use this product for any other purpose for which it was intended.
Changes or modications not expressly approved by the party responsible for Compliance could
void the User’s authority to operate the equipment.
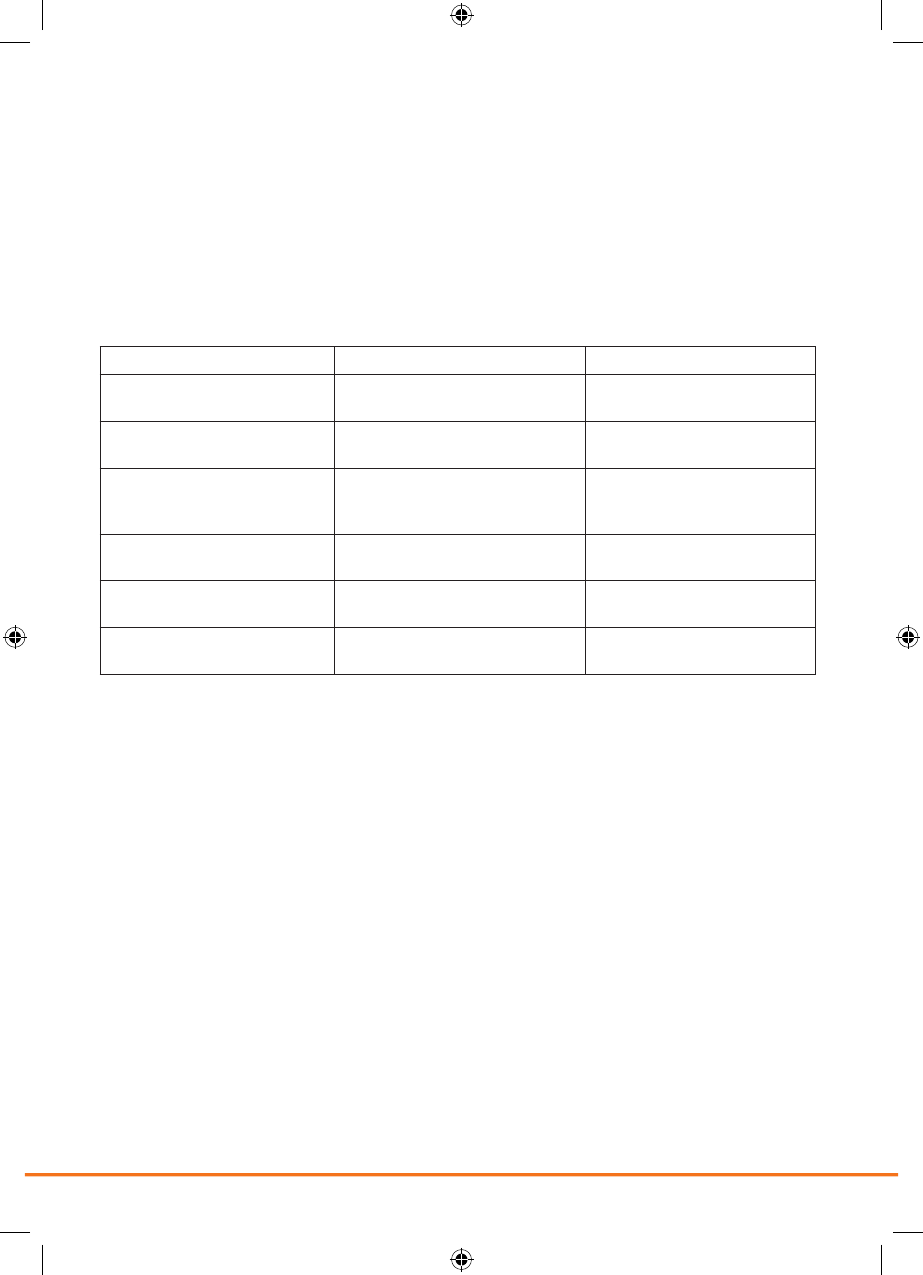
No display Faulty display and/or display
power supply
Contact supplier
Corrupted display
(incomplete data)
Faulty display Contact supplier
Alternating readings Display picking up a signal from
a neighbours’ transmitter
Pair your transmitter and
display again, see page ?
Data does not change Incorrect installation Refer to page?
Costs reading seems
excessively high or low
Correct tariff has not been set Refer to page ? – Adjusting
your electricity price
Temperature gauge
excessively high
Display too close to heat source Choose a different location
PowerSave Envi R Man.indd 10 04/08/2011 10:27

11
PowerSave Inc. warrants this product for a period of one (1) year from date of purchase for all defects
in workmanship or materials to the original user or consumer purchaser. This warranty excludes
and does not cover defects, malfunctions, or failures caused by misuse, unauthorized repairs,
modications or accidental damage. All defective parts will be repaired free of charge or replaced.
Note: This warranty does not apply to batteries. This warranty is only applicable to a product
purchased through a PowerSave Inc. authorized Reseller. In no event shall PowerSave, Inc. be liable
for consequential or incidental damages. This warranty is in lieu of all other expressed warranties. The
duration of any implied warranty is limited to the period of the expressed warranty set forth above.
NOTE: The display format is not suitable for accuracy checking of utility supplied electric meter.
Product Size: 14cm x 17cm (base) x 10.5 cm
Viewable Screen: 7.3cm x 9cm
Retail Package Size: 38.5cm x 18.5cm x 7cm
Internal Power Requirement: Mains block adapter (nominal 1.0 watt)
Display power supply UL listed.
Physical Format: Table-top
Energy Monitored: Electricity (gas, LPG, oil in development)
Receiver: 433MHz SRD band
Communication Platform: C² architecture
Sensor Coding Recognition: 10 channel (each three input potential)
Recognition Method: User Initiated - seeks 4,096 possibilities
Number of Permitted Sensors: Ten (x3 input)
Display: Liquid Crystal segmented display
Backlight: No
LCD mode: Positive reective -12:00 view
Main services: Energy, kWh and Dollars
Subordinate Services: Clock time (12hr), room temperature
24 hour rolling consumption (bar graph) display (social division into 3 x 8hr periods)
PC connection for streaming data for seven years historical data.
Software code: starting Vx.09
Tariff pre-set at prevailing rate (issued by the purchaser). Adjustable to $99.9
Manufactured in China for Current Cost Ltd. North American Master Distributor: PowerSave, Inc.
PowerSave Envi R Man.indd 11 04/08/2011 10:27

enabled
433MHz
enabled
433MHz
ETSI EN 300 220-2 V2.1.1(2006-04), EN 50371 2002, EN 301489-3 v1.4.1 2002-08, EN
60215:1989+A1:1992+A2:1994, IEC 60950-1:2001(1st Edition) and/or EN 60950-
1:2001+A11:2004
This equipment has been tested and found to comply with the limits for a Class B digital
device, pursuant to Part 15 of the FCC Rules. These limits are designed to provide reasonable
protection against harmful interference in a residential installation. This equipment generates,
uses and can radiate radio frequency energy and, if not installed and used in accordance with
the instructions, may cause harmful interference to radio communications. However, there is no guarantee
that interference will not occur in a particular installation.
If this equipment does cause harmful interference to radio or television reception, which can be determined by
turning the equipment off and on, the user is encouraged to try to correct the interference by one or more of
the following measures:
• Reorient or relocate the receiving antenna.
• Increase the separation between the equipment and receiver.
• Connect the equipment into an outlet on a circuit different from that to which the receiver is connected.
• Consult the dealer or an experienced radio/TV technician for help.
Imported and distributed by:
by email: info@powersave.us
by phone: 1(888) 636-0444
PowerSave, Inc. Fort Lauderdale, Florida
Further information is available at
PowerSave Envi R Man.indd 12 04/08/2011 10:27