D Link 20070819 Media Center Extender User Manual revised
D Link Corporation Media Center Extender revised
D Link >
Contents
- 1. User manual part 1 revised
- 2. User manual part 2 revised
User manual part 1 revised


2D-Link DSM-750 User Manual
Table of Contents
Safety Information .......................................................4
Product Overview ........................................................ 7
Package Contents....................................................7
Minimum System Requirements..............................8
Introduction..............................................................9
Features.................................................................10
Hardware Overview ...............................................11
Front Panel....................................................... 11
Back Panel.......................................................12
Using the Remote Control ...............................13
Connecting the DSM-750 ..........................................15
Video Connections...........................................15
Audio Connections........................................... 17
Network Connections.......................................19
Setup...........................................................................20
Wired Setup...........................................................21
Media Center Extender Optional Set Up .........22
Configure Your Network Settings Manually......24
Wireless Setup.......................................................26
Media Center Extender Optional Set Up .........27
Setup Wizard ................................................... 29
Manual Setup ...............................................30
Encryption .................................................... 31
Configure Your Network Settings Manually......33
Completing the Setup Wizard .......................... 35
8-Digit Setup Key...................................................37
Complete Extender Setup......................................37
Windows® Media Player 11 Setup ............................ 38
Using Your DSM-750..................................................47
MediaLounge™ Home Page...................................47
My Media ............................................................... 47
Video................................................................48
Viewing a Video............................................ 49
Subtitles .......................................................50
Music ...............................................................51
Organizing Music Files.................................52
Listening to Music ........................................53
Browsing for Music ....................................... 54
Photo ...............................................................55
Organizing Photo Albums............................. 56
Viewing a Photo ...........................................57
Viewing a Slideshow ....................................58
Search ...................................................................59
USB Direct Menu................................................... 61
Supported Formats.......................................... 62
Table of Contents

3D-Link DSM-750 User Manual
Table of Contents
Windows Media Center Menu................................ 63
TV + Movies..................................................... 64
Music ...............................................................65
Pictures + Videos .............................................66
Online Media....................................................66
Tasks > Settings...............................................67
Settings Menu........................................................68
A/V Output .......................................................68
Aspect Ratio.................................................68
Video Output ................................................69
Display Resolution........................................ 69
S/PDIF Audio Output.................................... 70
Network............................................................71
Wired Connection......................................... 72
Wireless Connection ....................................76
Slideshow.........................................................83
Slideshow Delay........................................... 83
Photo Scaling ...............................................84
Fade In/Fade Out ......................................... 84
Slideshow Sequence.................................... 84
System............................................................. 85
Device Name................................................ 85
Screen Saver Delay......................................85
Browse Display............................................. 86
System Reset...............................................87
Update Device.............................................. 87
About............................................................88
Extender ..........................................................89
Set up Extender ...........................................89
Remove Setup Information........................... 90
Learn More................................................... 90
Automatic Start............................................. 91
Remote Control ............................................91
Launch Extender ..........................................92
Wireless Security.......................................................93
What is WEP?........................................................ 93
What is WPA? ........................................................94
Wireless Installation Considerations....................... 95
Troubleshooting......................................................... 96
Frequently Asked Questions.................................. 101
Wireless Basics .......................................................103
How to Check your Media ....................................... 107
Converting an Earlier WMV File .......................... 108
Audio and Video Cables Guide............................... 114
Networking Basics ..................................................115
Check your IP Address ........................................115
Technical Specifications......................................... 116
Contacting Technical Support................................ 118
Warranty ...................................................................119
Registration..............................................................124
4D-Link DSM-750 User Manual
Table of Contents
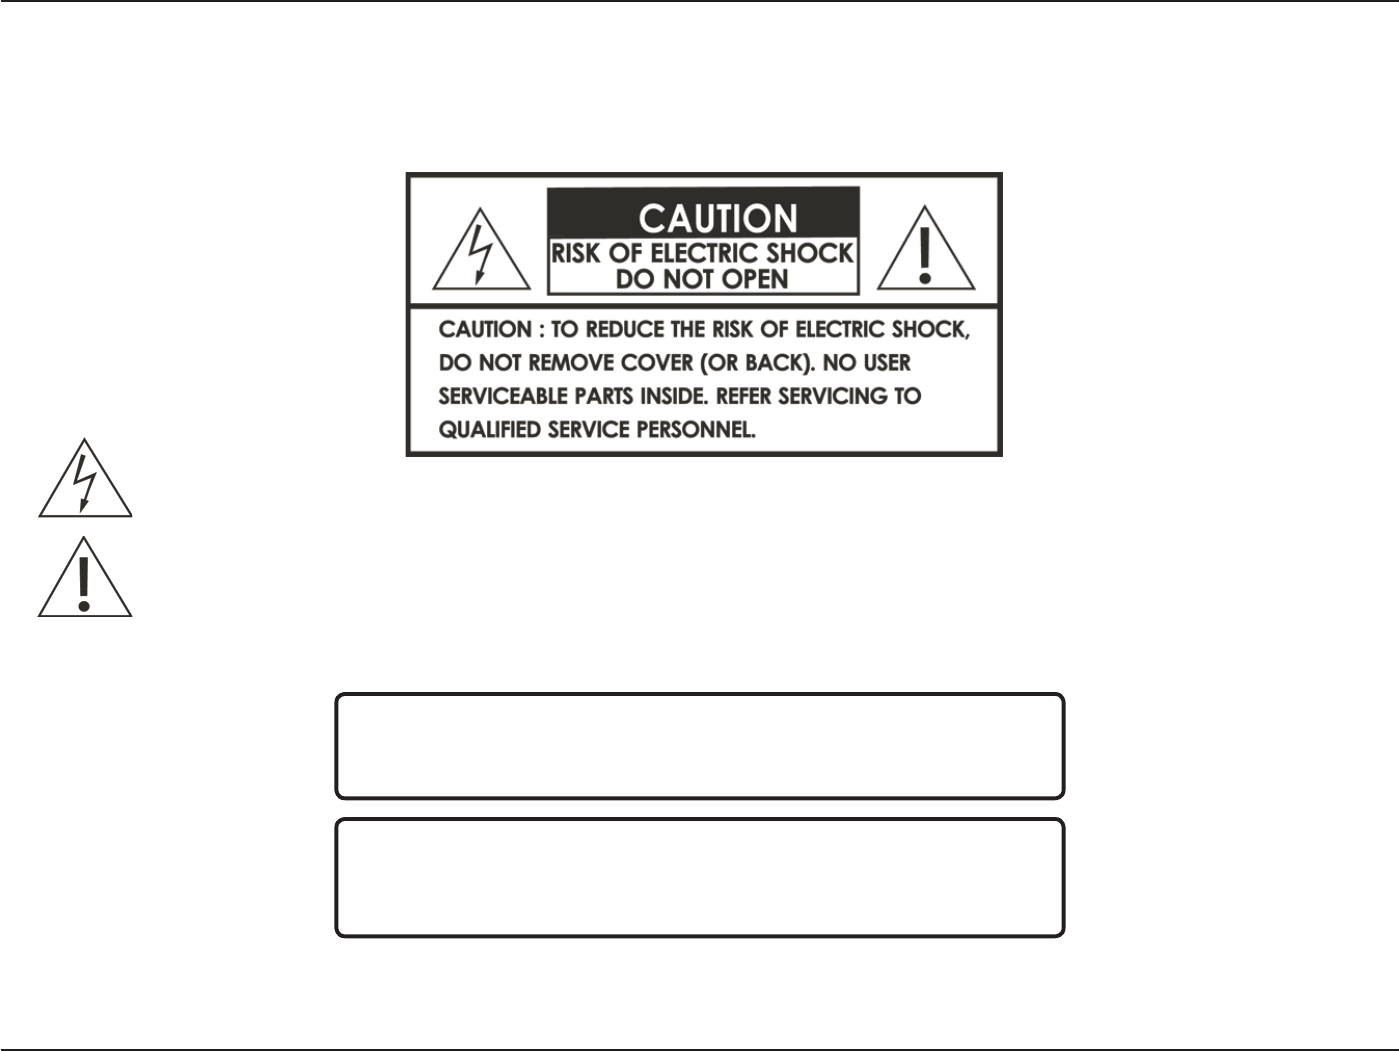
For optimum performance, please read the following information carefully.
Safety Precautions
The lightning flash with arrowhead symbol, within an equilateral triangle, is intended to alert users to the presence of uninsulated “dangerous
voltage” within the product’s enclosure that may be of sufficient magnitude to constitute a risk of electric shock to persons.
The exclamation point within an equilateral triangle is intended to alert the user to the presence of important operating and maintenance (servicing)
instructions in the literature accompanying the appliance.
CAUTION!
THE POWER SUPPLY CORD IS USED AS THE MAIN DISCONNECT DEVICE. ENSURE THAT
THE SOCKET-OUTLET IS LOCATED/INSTALLED NEAR THE EQUIPMENT AND IS EASILY
ACCESSIBLE.
CAUTION!
TO REDUCE THE RISK OF FIRE, ELECTRIC SHOCK, OR PRODUCT DAMAGE, DO NOT EXPOSE
THE UNIT TO RAIN, MOISTURE, DRIPPING, OR SPLASHING. DO NOT PLACE OBJECTS FILLED
WITH LIQUIDS UPON THE UNIT.
Safety Information
5D-Link DSM-750 User Manual
Table of Contents
CAUTION!
• DO NOT INSTALL OR PLACE THIS UNIT IN A BOOKCASE, BUILT-IN CABINET OR IN
ANOTHER CONFINED SPACE. ENSURE THE UNIT IS WELL VENTILATED. TO PREVENT RISK
OF ELECTRIC SHOCK OR FIRE HAZARD DUE TO OVERHEATING, ENSURE THAT CURTAINS
AND ANY OTHER MATERIALS DO NOT OBSTRUCT THE VENTILATION VENTS.
• DO NOT OBSTRUCT THE UNIT’S VENTILATION OPENINGS WITH NEWSPAPERS,
TABLECLOTHS, CURTAINS, AND SIMILAR ITEMS.
• DO NOT PLACE SOURCES OF NAKED FLAMES, SUCH AS LIGHTED CANDLES, ON THE
UNIT.
• DISPOSE OF BATTERIES IN AN ENVIRONMENTALLY-FRIENDLY MANNER.
CAUTION!
TO PREVENT ELECTRIC SHOCK, MATCH THE WIDE BLADE OF THE PLUG TO THE WIDE
SLOT OF THE ELECTRICAL OUTLET AND FULLY INSERT.
This device is designed and manufactured to assure personal safety. Improper use can result in electric shock or fire hazard. The safeguards incorporated
in this unit will protect you if you observe the following procedures for installation, use, and servicing. This device does not contain any user serviceable
parts.
• Carefully read and follow the Manual and Quick Setup Guide.
• Do not place the product near heat sources such as radiators, heat registers, stoves, or other products that produce heat.
• Do not use this product near water.
• Unplug the unit from the wall outlet before cleaning. Do not use liquid cleaners or aerosol cleaners. Use a damp cloth for cleaning.
• Power-supply cords should be routed so that they are not likely to be walked on or pinched by items placed upon or against them.
• Do not overload wall outlets.
• Do not use this product during a storm. Unplug the unit from the wall outlet. If the product is to be left unattended for a long period of time. This will prevent damage to the
product due to lightning and power-line surges.
• Do not attempt to service this product yourself. Opening the cover may expose you to dangerous voltage or other hazards. For service, please contact a qualified service
technician.

6D-Link DSM-750 User Manual
Table of Contents
Radio and TV Interference:
This equipment has been tested and found to comply with the limits for a Class B digital device, pursuant to Part 15 of the FCC Rules. These limits are
designed to provide reasonable protection against harmful interference in a residential installation. This equipment generates, uses and can radiate
radio frequency energy and, if not installed and used in accordance with the instructions, may cause harmful interference to radio communications.
However, there is no guarantee that interference will not occur in a particular installation. If this equipment does cause harmful interference to radio or
television reception, which can be determined by turning the equipment off and on, the user is encouraged to try to correct the interference by one or
more of the following measures:
•Reorient or relocate the receiving antenna.
•Increase the separation between the equipment and receiver.
•Connect the equipment into an outlet on a circuit different from that to which the receiver is connected.
•Consult the dealer or an experienced radio/TV technician for help.
FCC Caution: Any changes or modifications not expressly approved by the party responsible for compliance could void the user’s authority to operate
this equipment.
This device complies with Part 15 of the FCC Rules. Operation is subject to the following two conditions: (1) This device may not cause harmful
interference, and (2) this device must accept any interference received, including interference that may cause undesired operation.
Important Note:
Radiation Exposure Statement:
This equipment complies with FCC radiation exposure limits set forth for an uncontrolled environment. This equipment should be installed and operated with minimum
distance 20cm between the radiator & your body.
This transmitter must not be co-located or operating in conjunction with any other antenna or transmitter.
The availability of some specific channels and/or operational frequency bands are country dependent and are firmware programmed at the factory to match the
intended destination. The firmware setting is not accessible by the end user.
Industry Canada statement:
This device complies with RSS-210 of the Industry Canada Rules. Operation is subject to the following two conditions:
(1) This device may not cause harmful interference, and (2) this device must accept any interference received, including interference that may cause
undesired operation.
Important Note:
Radiation Exposure Statement:
This equipment complies with IC radiation exposure limits set forth for an uncontrolled environment. This equipment should be installed and operated with minimum
distance 20cm between the radiator & your body.
This device has been designed to operate with an antenna having a maximum gain of 2 dB. Antenna having a higher gain is strictly prohibited per regulations of
Industry Canada. The required antenna impedance is 50 ohms.
7D-Link DSM-750 User Manual
Section 1 - Product Overview
OK
ABC DEF
JKL
GHI MNO
TUV
PQRS WXYZ
123
456
78
0
9
CLEAR ENTER
DSM-750
REPEAT SHUFFLE SEARCH
AUDIO
TRACK
Channel Page
Recorded
TV Options
Guide Live TV
Product Overview
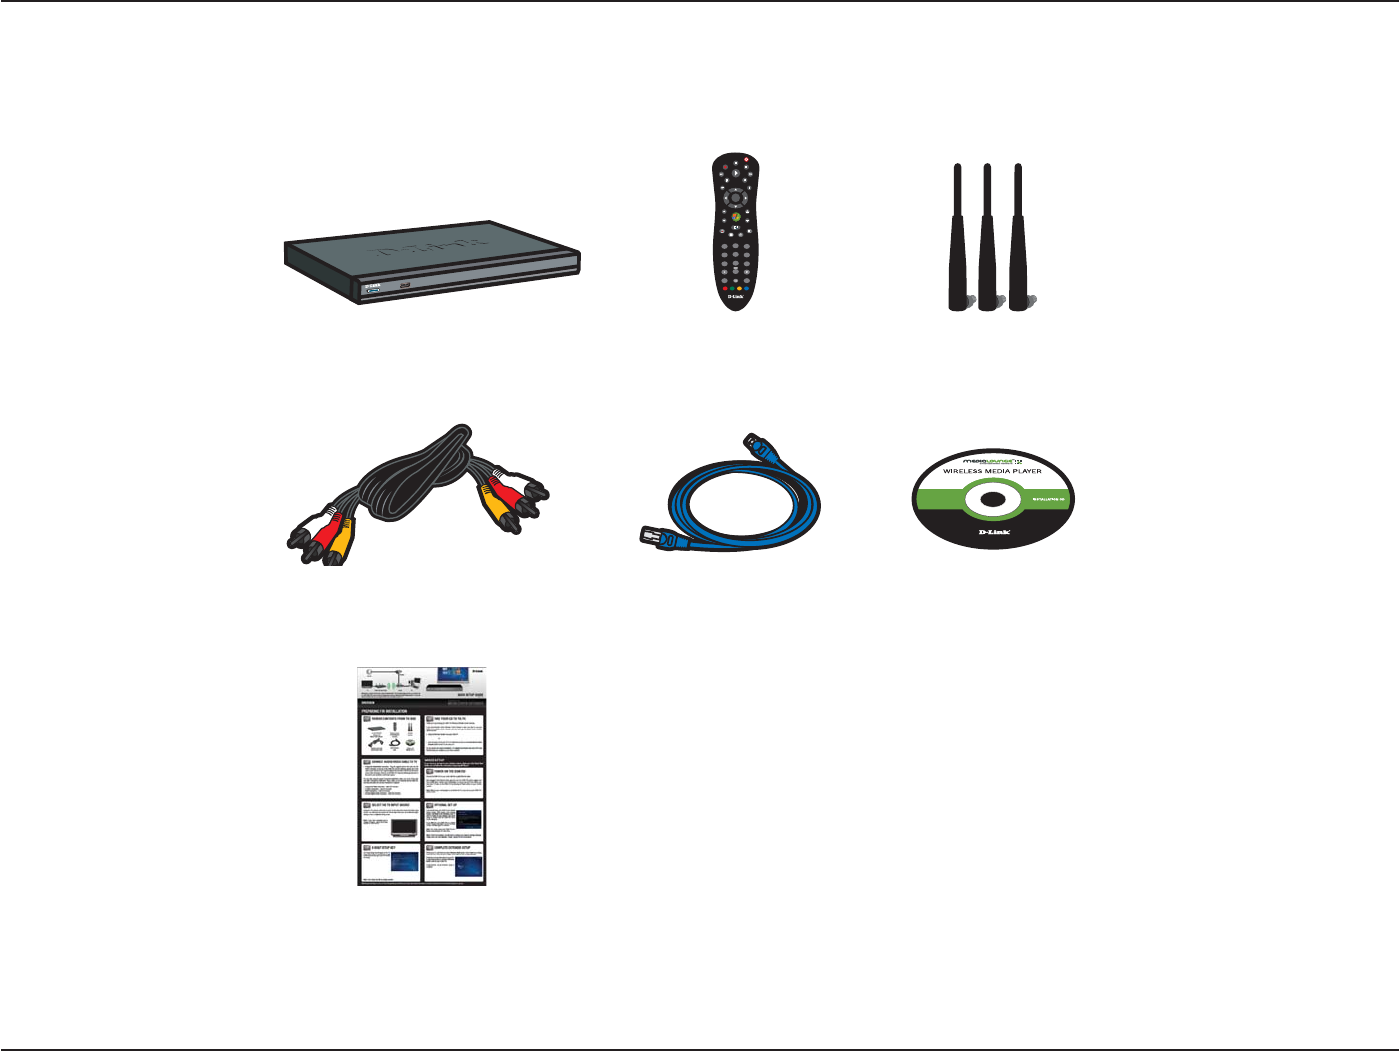
Package Contents
Software, Product
Documentation, and
Warranty on CD
Ethernet Cable
Composite
Audio/Video Cable
D-Link DSM-750
Wireless HD Media Center Extender
Remote Control
(2 AA Batteries
Included)
Wireless
Antennas
Quick Setup Guide

8D-Link DSM-750 User Manual
Section 1 - Product Overview
Minimum System Requirements
• Standard or HD Television with HDMI, Component Video, S-Video, or Composite Video Input
• TV, Stereo, or A/V Receiver with Optical Digital, Coaxial Digital, or Composite Audio Input
• Wired or Wireless Network (100Mbps Ethernet or Wireless Draft 802.11n Network is Recommended for Optimal
Video Streaming)
FOR MEDIA CENTER EXTENDER MODE
PC with:
• 1GHz Processor
• 1GB RAM
• 200MB Hard Drive Space
• CD-ROM Drive
• Windows Vista® Home Premium or Ultimate
• To view live TV, a TV Tuner that supports Windows Vista is required
FOR D-LINK MEDIALOUNGE™ MODE
PC with:
• 500MHz Processor
• 128MB Memory
• 100MB Hard Drive Space
• CD-ROM Drive
• Windows Vista® Home Basic or XP
FOR INTERNET ACCESS
• Broadband Modem
• Router
• Subscription with an Internet Service Provider (ISP)

9D-Link DSM-750 User Manual
Section 1 - Product Overview
Introduction
If you do not have Windows Vista Home Premium or Ultimate yet, you can still use the DSM-750 in MediaLounge mode
to share music, photos, and video files from your Windows Vista Home Basic or XP computer.
Simple to setup with a sleek design that makes it a natural addition to any home entertainment center.The AV connectors
on the back panel of the DSM-750 allow for direct connection to your television or home theater system. Use the
included remote control to access media content stored on your PC. Browse music files, watch videos, and display
photos, all on your television!
USB Direct playback is also available through the DSM-750. The USB connector is located on the front panel, which
allows for easy access to music, photos, and videos stored on removable USB flash drives.
The DSM-750 supports the majority of audio, video, and image file formats by using the Windows Media Center. You
can stream MP3, WMA, WAV, OGG Vorbis, and AIFF files from your computer and enjoy them on your home stereo
system. Watch stored videos in H.264, VC-1, WMV9, MPEG1/2/4, AVI, Xvid, or DVR-MS (recorded TV from Windows
Media Center) on your television. Enjoy slideshows of your favorite photos in JPEG, JPEG2000, TIFF, GIF, BMP or
PNG formats. Better yet, it’s easy to access the files through the television interface using the remote control included
with the DSM-750. Dynamic on-screen menus provide for easy to use navigation.
The DSM-750 is capable of playing back High-Definition video files with support for resolutions up to 1080i and includes
the latest High-Definition Multimedia Interface (HDMI) connection. Connect the DSM-750 to your television using HDMI
and experience the highest quality digital video signal.
D-Link introduces the latest addition to its multimedia family of slave products: the D-Link DSM-750 Wireless
High-Definition (HD) Media Center Extender.Using your home entertainment center from the comfort of the living room,
the DSM-750 includes everything you need to instantly access and play music, videos, and photos. If you have Windows
Vista Home Premium or Ultimate, the Media Center Extender makes it possible to watch recorded and live TV, timeshift
through live TV, and access Online Media on your television.The DSM-750 features 802.11g and draft 802.11n wireless
technology and can also connect to a wired network. These options provide you with the maximum throughput for
sharing and transferring digital media.
®
®

10D-Link DSM-750 User Manual
Section 1 - Product Overview
• Stream media content from a PC or D-Link Network Attached Storage to your entertainment center.
• Stream live TV from a Vista® Home Premium/Ultimate PC that has a TV tuner.
• Experience Windows Media Center on your TV from your Windows Vista Ultimate or Home Premium PC.
• Access Windows Media Center’s Online Media, Video, Photo, Music, Internet TV, and more...
• Supports WMV9 video files, as well as H.264, VC-1, MPEG 1/2/4, XVID, and AVI.
• High-Definition (HD) video files with support for resolution up to 1080i.
• Listen to digital music on your stereo system.
• View digital photos, slideshows, and videos on TV.
• Convenient access to media content stored on a USB drive using the front panel USB connector.
• Connect using an Ethernet network cable at up to 100Mbps.
• Easily connect to your wireless network using 802.11a/b/g/n.
• Dual band 11n wireless works at 2.4GHz, and 5GHz for best possible streaming of HD video.
• UPnP AV compliant to support standard Media Server software.
• Support for most popular digital media formats.
• Remote controlled TV interface for quick access to your media content.
• Sleek design complements your existing audio/video equipment.
• Optical and coaxial digital audio output.
• Component, Composite, S-Video, and HDMI video outputs.
• 64- or 128-bit WEP security, WPA™ PSK support, and WPA2™ PSK support.
• Supports DHCP for easy connection to your home network.
• Dynamic on-screen menus and a built-in screensaver.
• Time-Shift TV - Rewind and pause while watching live TV.
• Record TV up to two weeks in the future.
• Easy setup wizard
Features
11D-Link DSM-750 User Manual
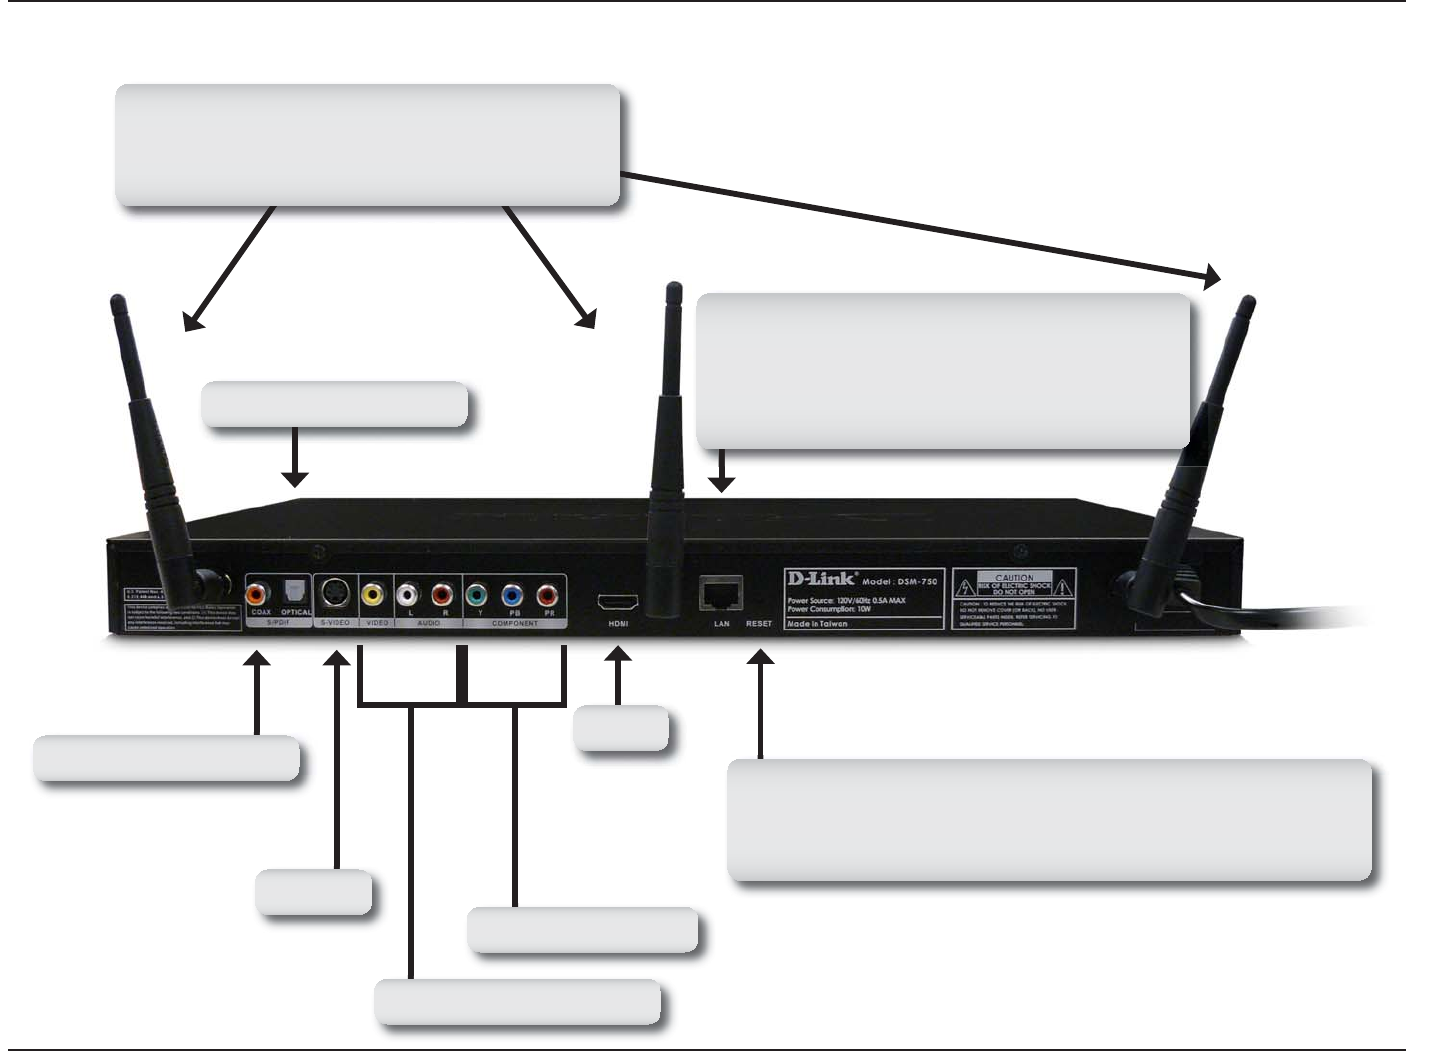
Section 1 - Product Overview
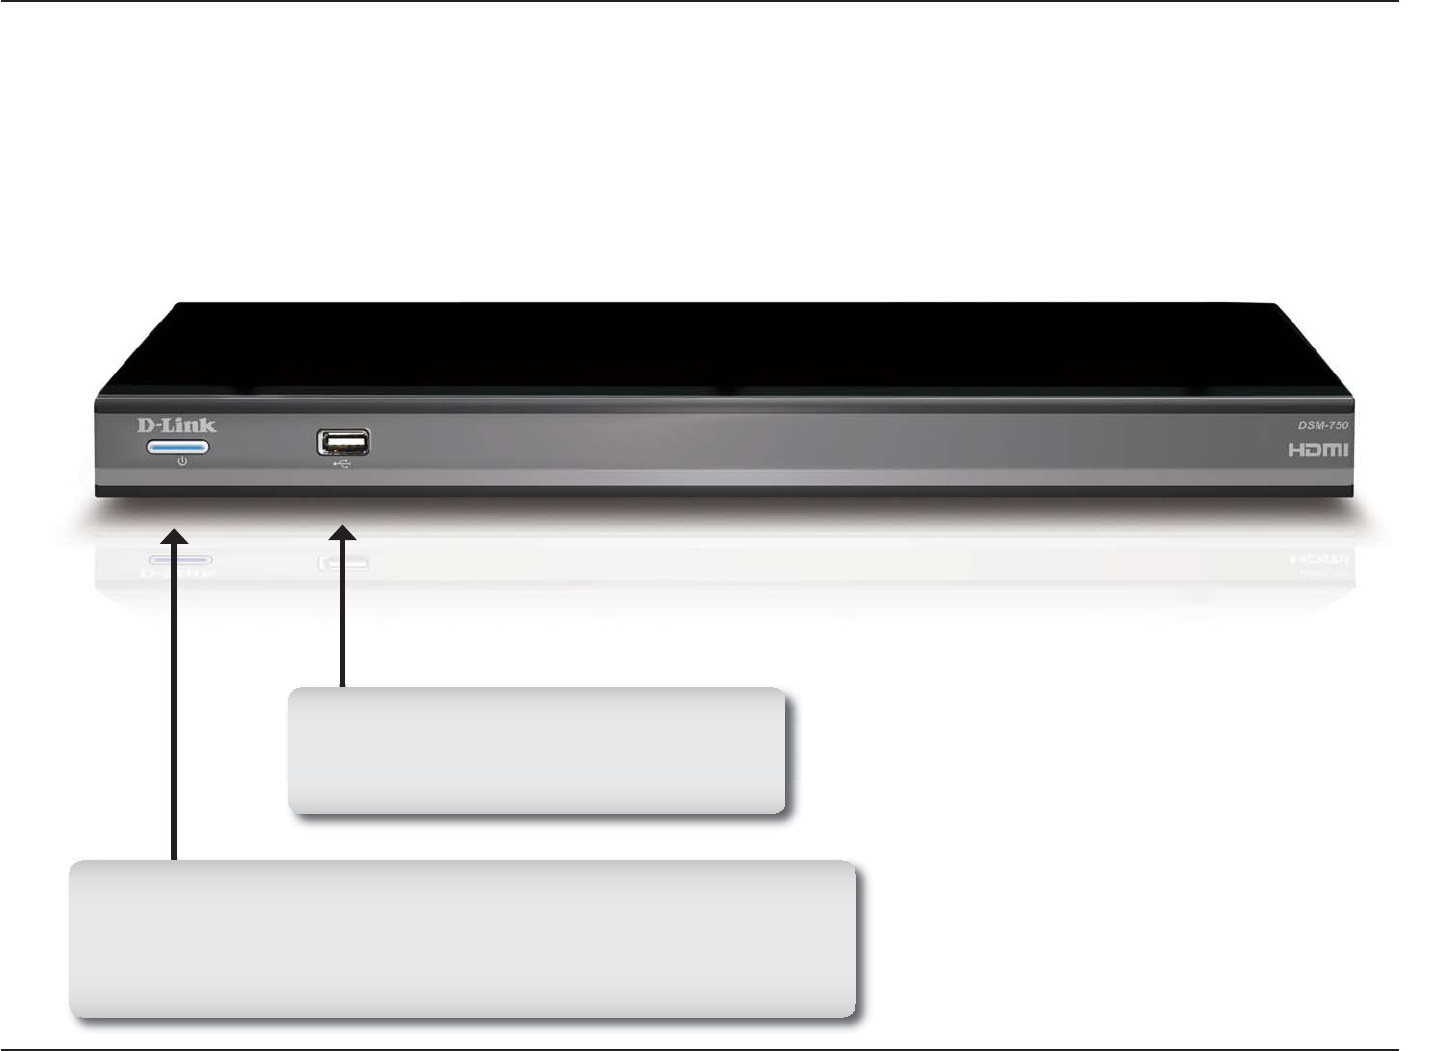
Hardware Overview
Front Panel
Power Button
Press the Power button on your remote control and the device’s power
button will illuminate. You may also press the power button located here on
the DSM-750 front panel.
USB Port
Insert a USB thumb drive to view additional
videos, music, and photos.
12D-Link DSM-750 User Manual
Section 1 - Product Overview
Back Panel
Reset
Using a small pointed object, depress the reset switch for 10
seconds to restore the DSM-750 to factory default settings.
RJ-45 Ethernet Connector
Connect the supplied Ethernet cable to the
network cable connector, and attach the other
end to a router or hub on your network.
Antennas
Attach the three supplied antennas for wireless
communication with your network.
HDMI*
Coaxial Digital Audio
Component Video
Composite Audio/Video
Optical Digital Audio
S-Video
*HDMI outputs both audio and video.

13D-Link DSM-750 User Manual
Section 1 - Product Overview
Turn the DSM-750 ON or OFF.
Plays music, photo slideshows, videos, live TV & recorded TV.
Starts recording Live TV in Extender mode.
Stops playing any media file, live TV or recorded TV.
Rewinds music, video files, live TV and recorded TV.
Fast forwards through music, video files, “timeshifted” live TV and recorded
TV.
Selects previous music track or photo. In Extender mode during “timeshifted”
live TV and recorded TV, this button rewinds back 10 seconds.
Selects the next music track or photo. In Extender mode during “timeshifted”
live TV and recorded TV, this button moves ahead 30 seconds.
Pauses music, photo slideshows, videos, live TV & recorded TV.
Information about the selected media file appears.
Returns to the previously viewed page.
Selects currently highlighted selection and starts playing selected media file.
When in MediaLounge mode, this button starts the Media Center Extender
mode. Jumps to the Media Center home screen when already in Media Center
Extender mode.
Moves up or down a page in a list of media files.
Changes the current Live TV channel being viewed up or down (Extender
mode only).
When in Media Center Extender mode, this button starts the MediaLounge
mode. Jumps to MediaLounge home screen when already in MediaLounge
mode.
(Works in Extender mode only). Jumps to the Recorded TV page of Windows
Media Center.
In MediaLounge mode, displays music, photo, and video shortcuts. In Photos,
a photo toolbar is displayed (rotate, zoom, and pan).
(Works in Extender mode only). Jumps to the television viewing guide.
(Works in Extender mode only). Displays the currently selected television
channel.
Enter alphanumeric characters (alphabet and numeral characters can be
entered).
Using the Remote Control
(1) POWER
(2) Player Functions
Play
Record
Stop
Rewind
Fast Forward
Skip backward
Skip forward
Pause
(3) More Info
(4) Back
(5) OK / Navigation Arrows
(6) Windows Media Center
(7) Page UP / DOWN
(8) Channel UP / DOWN
(9) MediaLounge™ Mode
(10) Recorded TV
(11) Options
(12) Guide
(13) Live TV
(14) Alphanumeric Keypad
1
2
3
4
5
7
8
6
9
10 11
12 13
14
15
16
17
18
20 19
21
14D-Link DSM-750 User Manual
Section 1 - Product Overview
Selects currently highlighted selection. Same as OK button above.
Clears any text that was entered by the On Screen Keyboard or number keys.
(Works in MediaLounge mode only) Jumps to the Search page when in My
Media to search for music, photos or videos.
(Works in MediaLounge mode only) Repeats playback of a single selected
music track or multiple music tracks.
(Works in MediaLounge mode only) Toggles between audio tracks in a
supported video file with multiple tracks.
(Works in MediaLounge mode only) Shuffles the playback order of music tracks
in a folder or playlist.
Toggles between supporting the 4 color-coded Teletext buttons for Europe and
MediaLounge mode buttons below the Teletext button.
(15) ENTER
(16) CLEAR
(17) SEARCH
(18) REPEAT
(19) AUDIO TRACK
(20) SHUFFLE
(21) Teletext Mode
Note: The DSM-750 remote control does not have volume control buttons, nor does it have a mute button. It is
recommended that you use your audio device’s remote control to control the volume.
15D-Link DSM-750 User Manual
Section 3 - Configuration
•
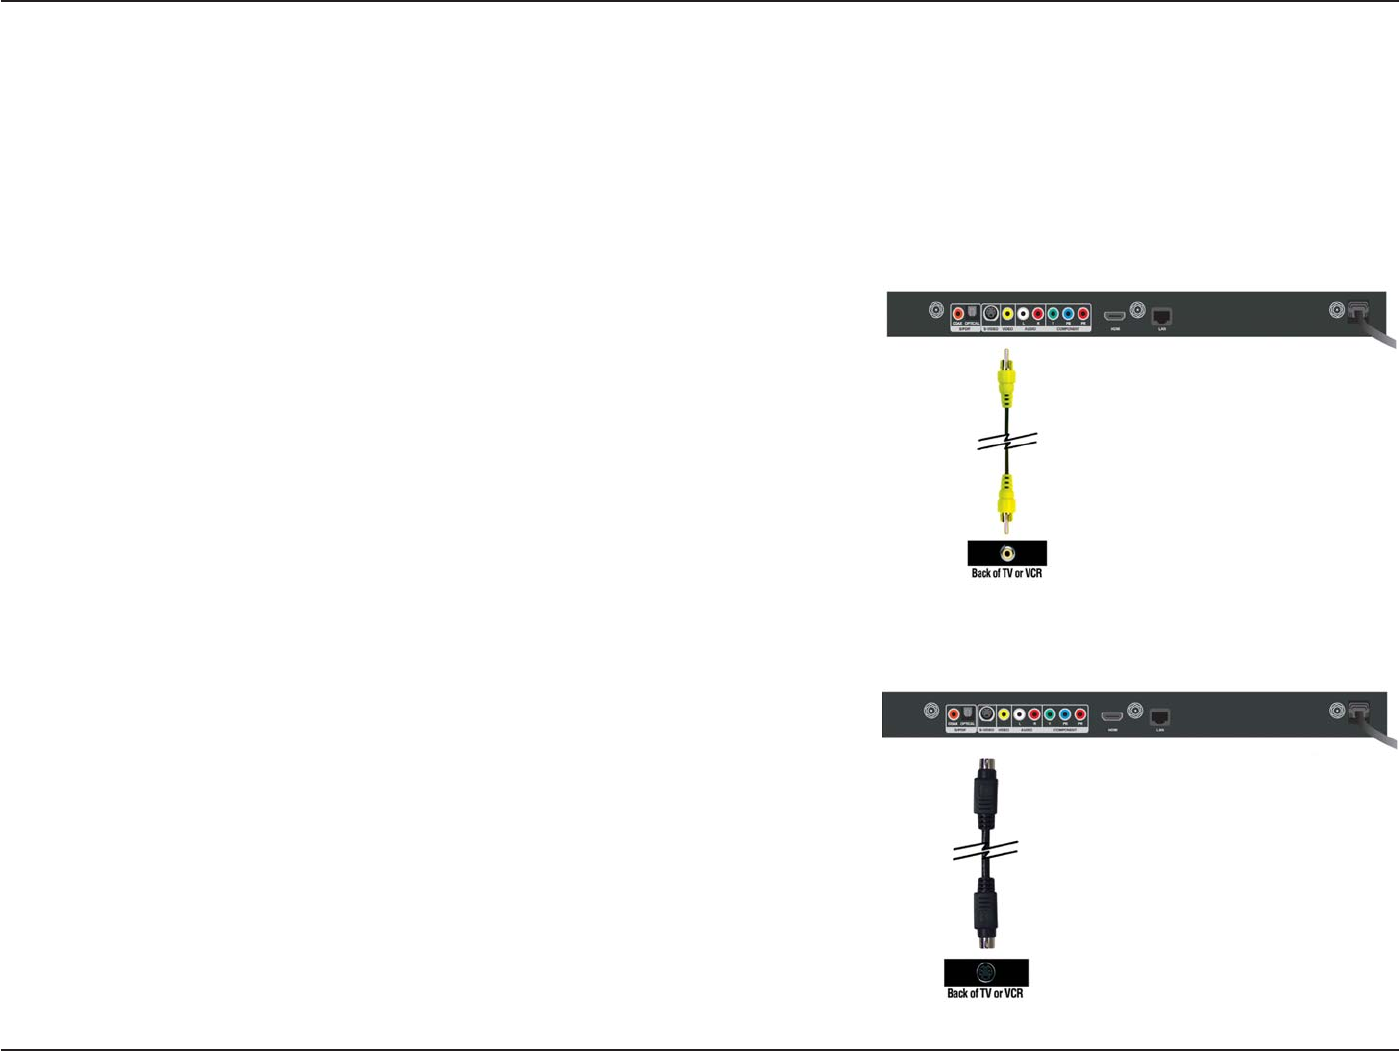
Composite Video Connector
Plug the supplied yellow video cable into the VIDEO connector on the
DSM-750 and the matching opposite end of the cable to your television
input.
•S-Video Connector
Plug the S-Video cable into the S-VIDEO connector on the DSM-750
and the opposite end into the S-Video connector on your television.
Note: This cable is not supplied.
Connecting the DSM-750
All audio, video, and networking connections are located on the rear panel of the DSM-750.
Video Connections
Select one of four ways to connect video to your DSM-750:
16D-Link DSM-750 User Manual
Section 3 - Configuration
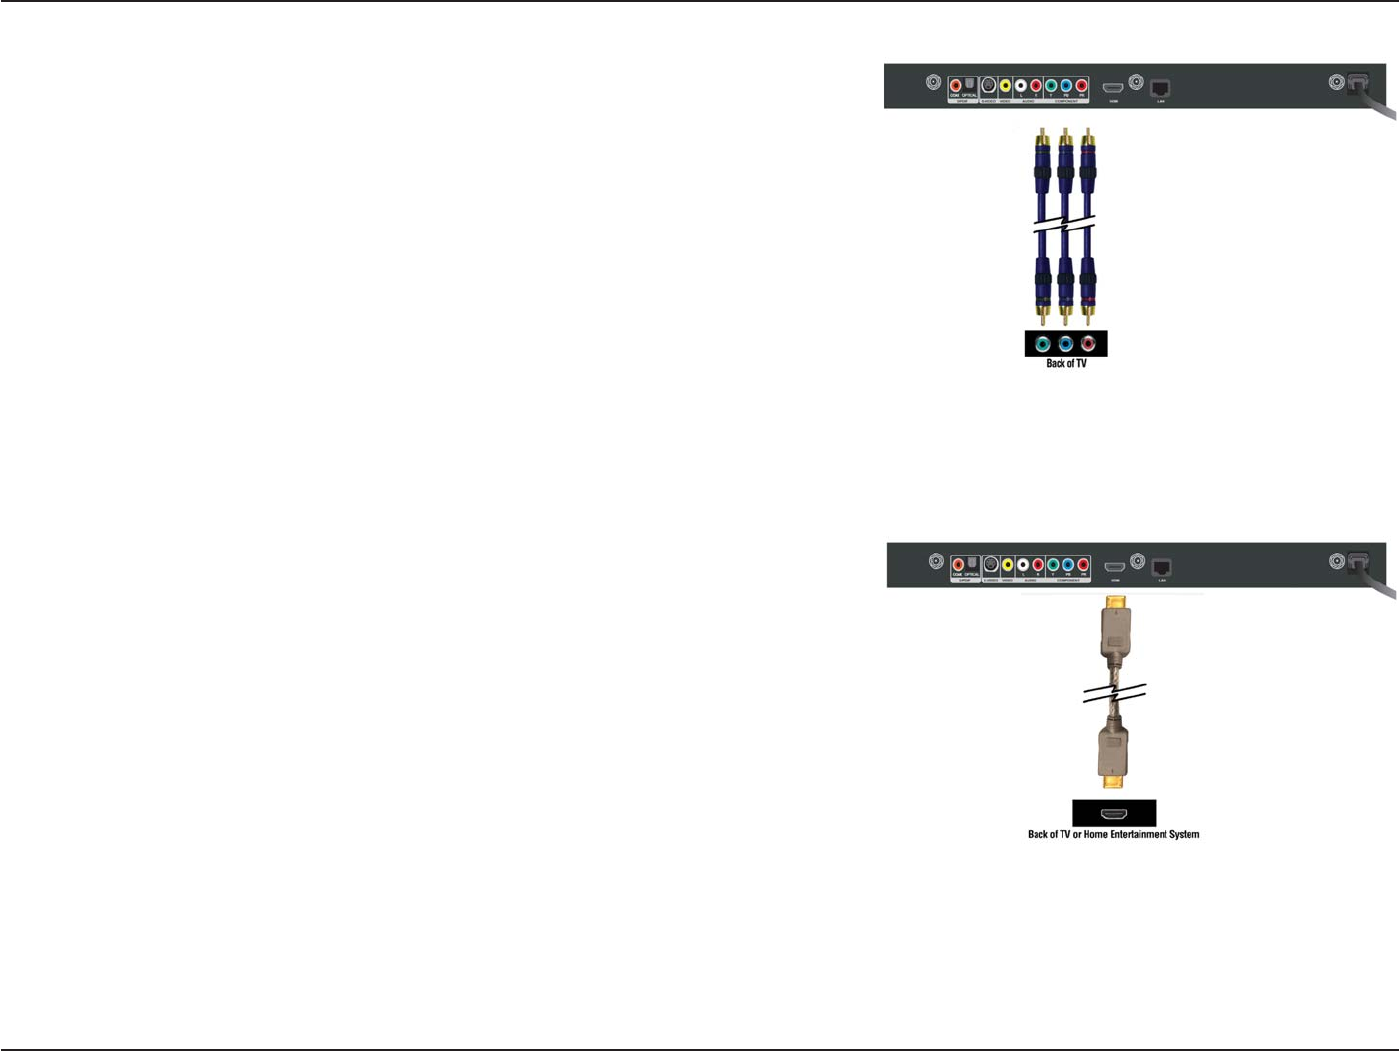
•HDMI
Plug the HDMI cable into the HDMI connector on the back panel of the
DSM-750.
Plug the opposite end to the matching HDMI connector on your television
or audio/video system. HDMI provides the best video quality resolution
up to 1080i, plus audio support.
High-Definition Multimedia Interface (HDMI) supports standard, enhanced, or
high-definition video, plus digital audio on a single cable.
Note: This cable is not supplied.
•Component Video Connectors
Match the color coded cables to the matching COMPONENT connectors
on the DSM-750 and the opposite end into the component video input
of your television. This connection supports HD video resolution up to
1080i.
Note: This cable is not supplied.
17D-Link DSM-750 User Manual
Section 3 - Configuration
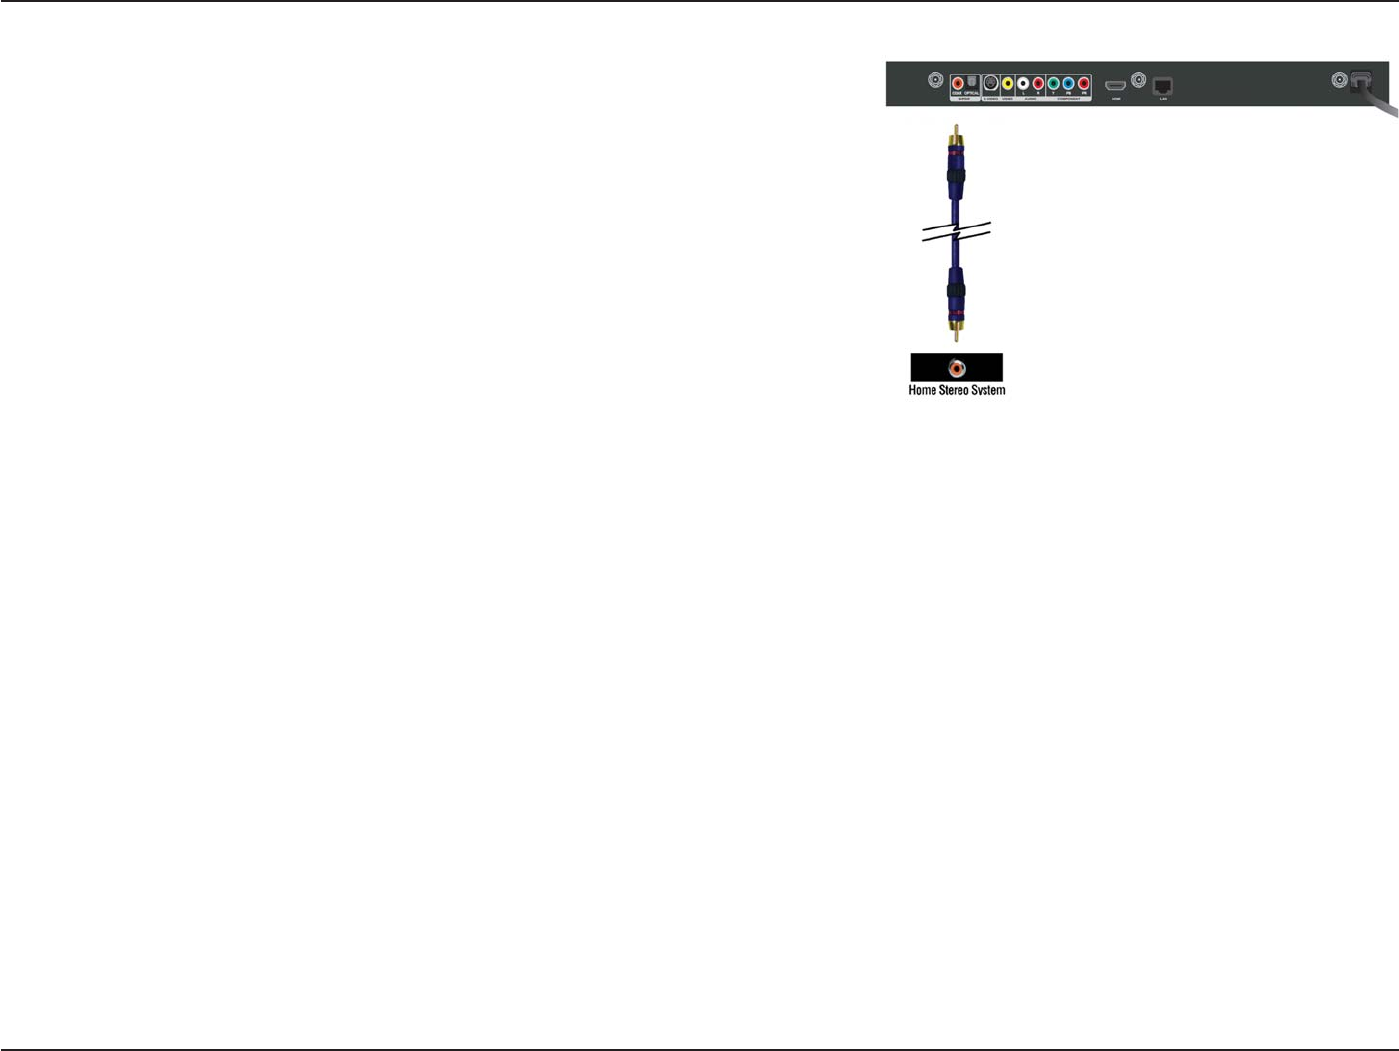
•Optical Digital Audio
Connect an optical audio connector into the OPTICAL connector on the
DSM-750 and the matching opposite end of the cable to the audio input
of your audio system.
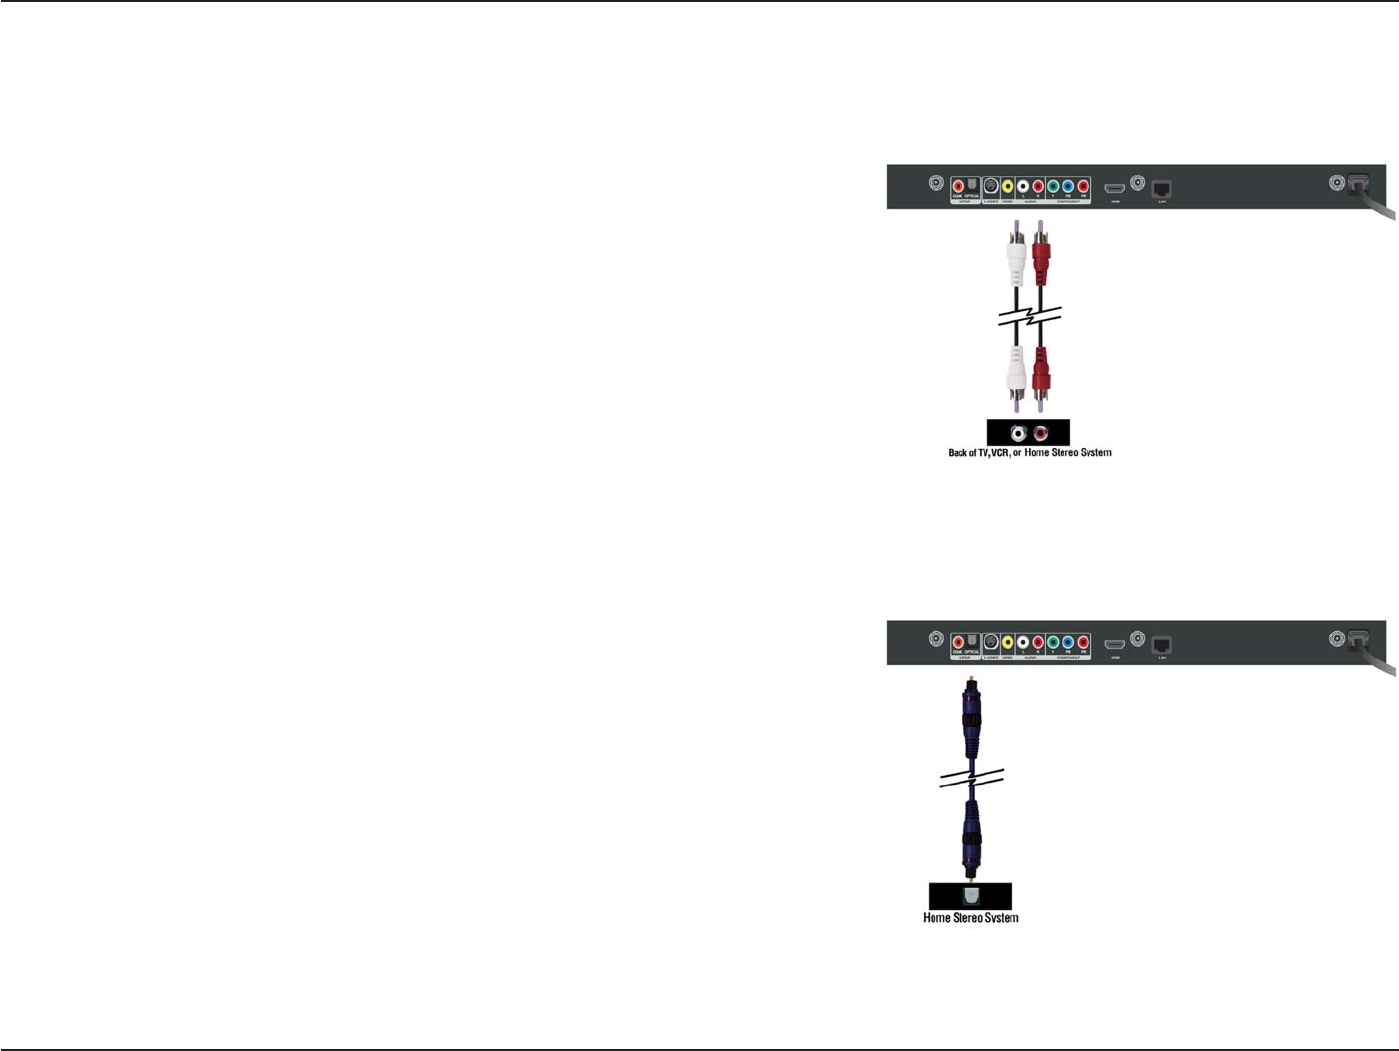
•Composite Audio
Plug the supplied red and white connectors into the AUDIO (color-coded
matching) connectors on the DSM-750.
Plug the opposite ends to the matching connectors on your television or
audio/video system.
Note: This cable is not supplied.
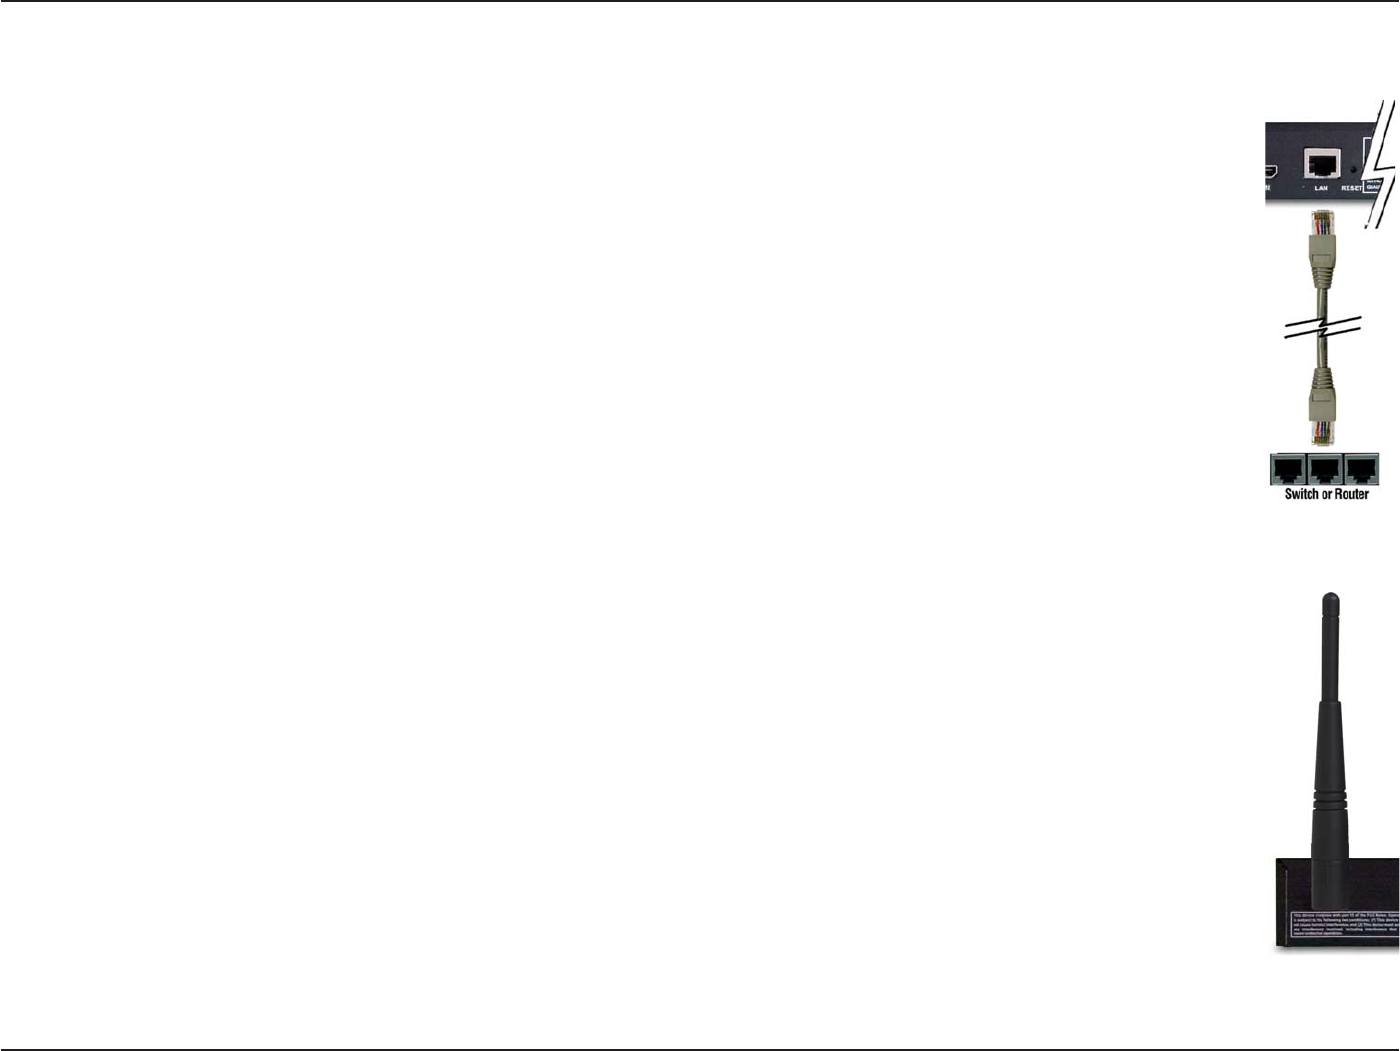
Audio Connections
Select one of three ways to connect audio to your DSM-750:
18D-Link DSM-750 User Manual
Section 3 - Configuration
•Coaxial Digital Audio
Connect a coaxial digital audio connector into the COAX connector on
the DSM-750 and the matching opposite end of the cable to the audio
input of your audio system.
Note: This cable is not supplied.
19D-Link DSM-750 User Manual
Section 3 - Configuration
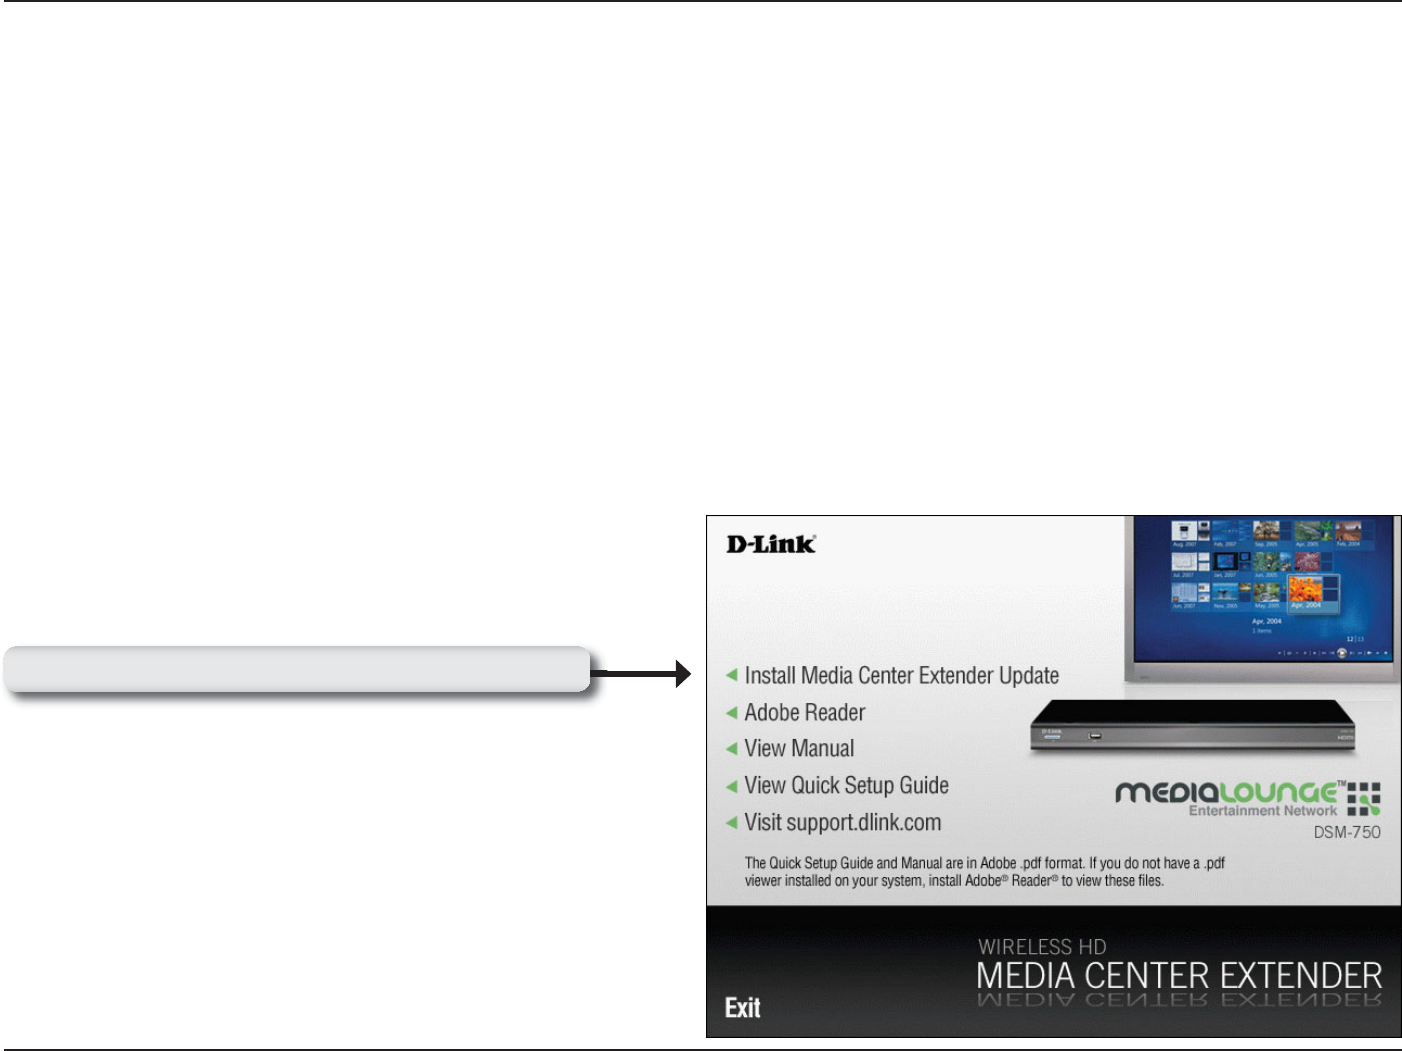
•RJ-45 Ethernet Connector
Connect the supplied Ethernet cable to the network cable connector, and attach the other end to a router
or hub on your network.
•Wireless Antennas
Attach the supplied three antennas by threading them onto the “gold” antenna connectors located on the
back of the DSM-750. Be sure the antennas are secure and in an upright position.
Note: If you place the DSM-750 in an enclosed area (e.g. an entertainment center) you may need to obtain
an extension antenna to provide an optimal wireless signal.
Network Connections
Select one of two ways to connect your DSM-750 to your network:
20D-Link DSM-750 User Manual
Section 3 - Configuration
If you have Windows Vista® Ultimate, Home Premium or later, and want to use your DSM-750 as a Media Center
Extender, you will need to get the Media Center Extender Update for the Windows Vista PC by either:
• Using Windows Update from your Windows Vista PC.
or
• Insert the setup CD into your PC’s CD-ROM drive and click on the Install Media Center Extender Update option
on the setup CD.
Note: Insert the setup CD into your PC’s CD-ROM drive to
access the DSM-750 Manual and Quick Setup Guide.
Setup
Click Install Media Center Extender Update

21D-Link DSM-750 User Manual
Section 3 - Configuration
Wired Setup
Note: If you choose to connect to a wireless network, please skip to the Wireless Setup section on page 26.
For the quickest and easiest installation, it is highly recommended that DHCP is enabled. Most networks have DHCP
enabled to allow new devices on the network to connect automatically.
Make sure the DSM-750 is properly connected to your router with the supplied Ethernet cable.
After plugging in the Ethernet cable, plug the end of the DSM-750 power supply cord into a power outlet. Position your
media player so that you can see it from where you view your TV. Power on the DSM-750 by pressing the Power button
on the included DSM-750 remote control.
Note: Make sure your media player is not behind the TV so you can use your DSM-750 remote control.
Using the TV’s remote control, turn on your TV and select the correct audio/video input source. When the correct audio/
video input source is selected, you will see the MediaLounge™
startup screen or Optional Set Up screen.
Note: If you don’t remember how to change TV inputs, refer to
the TV User Manual for instructions.
22D-Link DSM-750 User Manual
Section 3 - Configuration
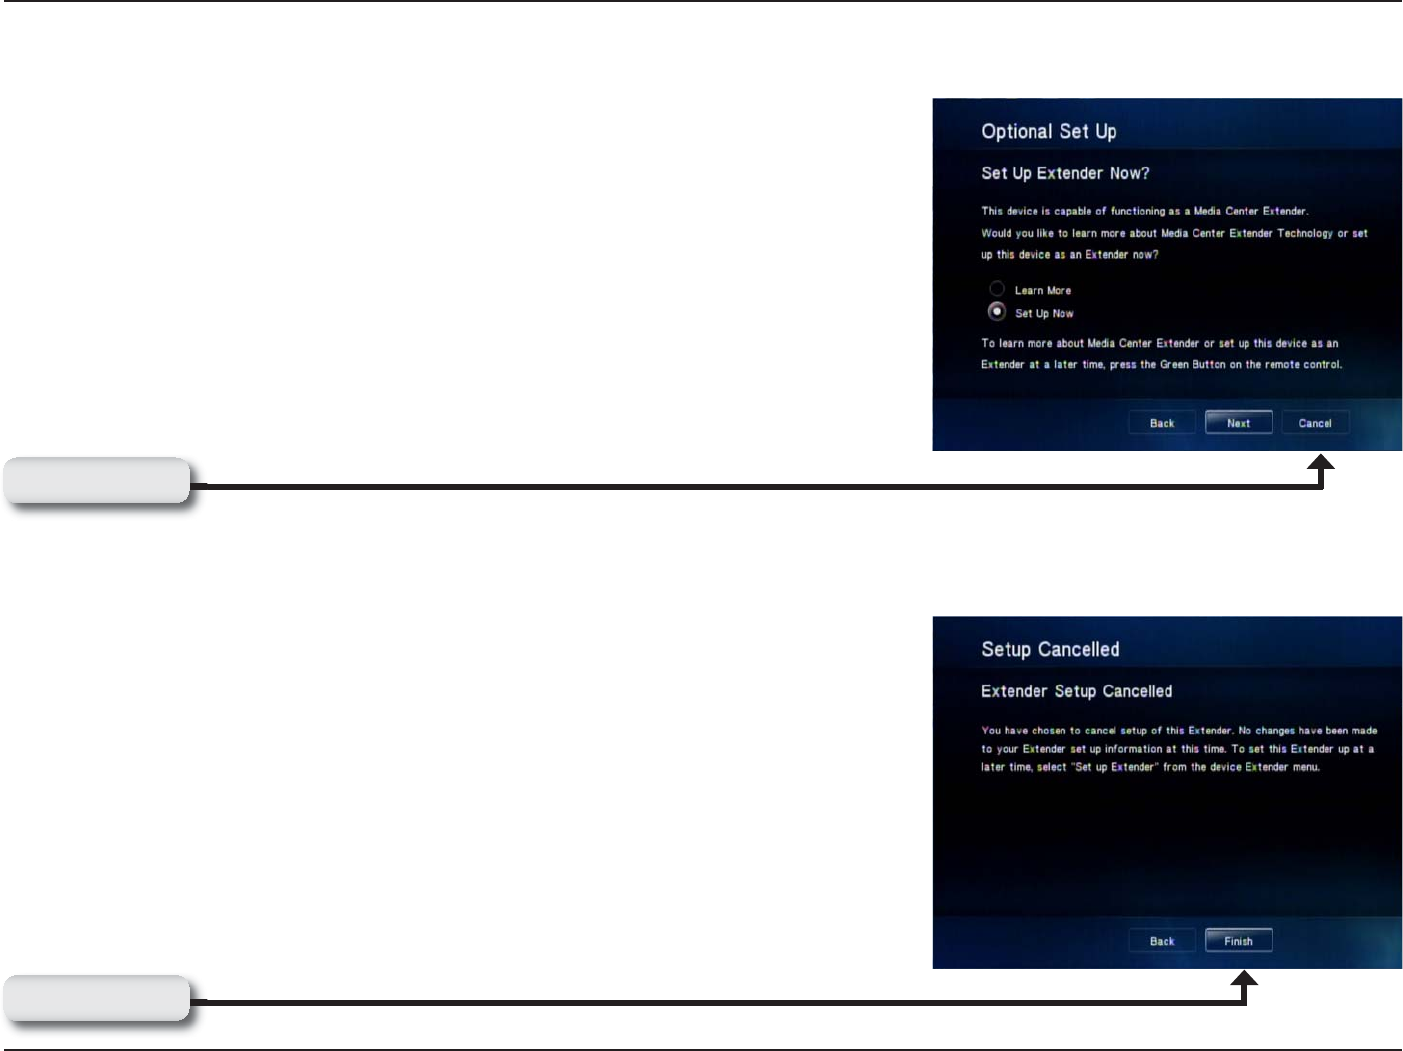
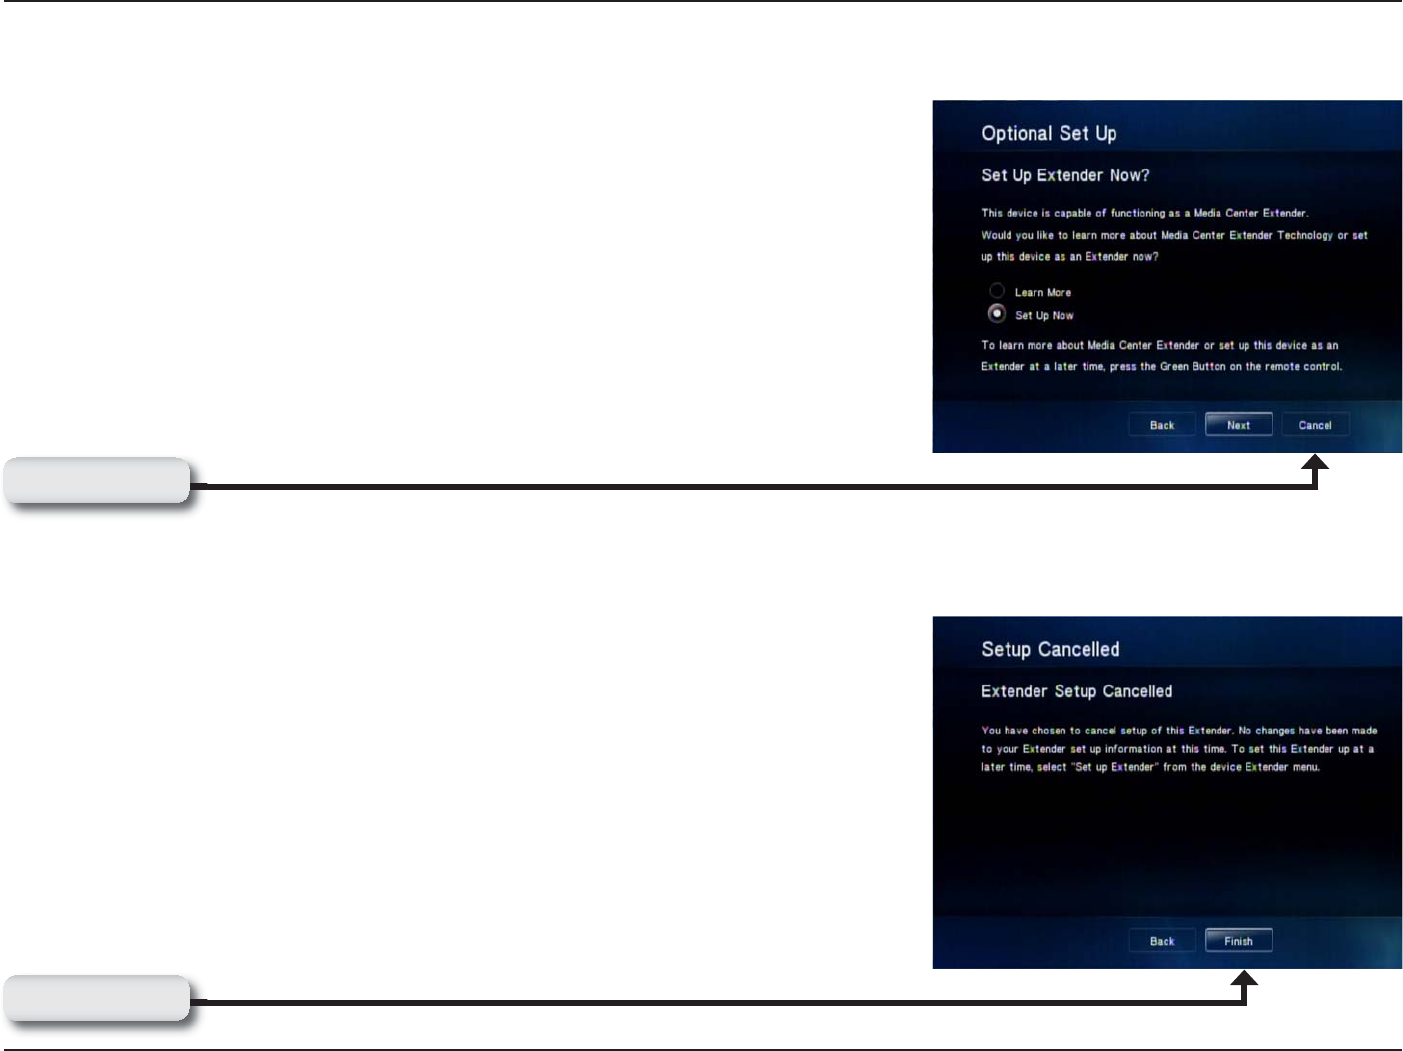
Media Center Extender Optional Set Up
If you are NOT using your DSM-750 as a Media Center Extender, click
Cancel. If you have Windows Vista® Home Premium or Ultimate, and you
want to set up the Extender, skip to the following page. Setting up the DSM-
750 as a Media Center Extender allows a Windows Vista Home Premium or
Ultimate based PC to share the Media Center experience on your TV. If you
only have Windows Vista Home Basic or XP, you will only have access to the
MediaLounge™mode.
After clicking Cancel, click Finish. DHCP (Dynamic Host Configuration
Protocol) allows network settings required by the DSM-750 to be set
automatically. If DHCP is enabled on your network, your wired setup is
complete and the DSM-750 MediaLounge home screen will appear. Please
skip to page 38.
Note: DHCP allows devices to be added to the network with minimal or no
manual configuration.
Click Cancel
Click Finish
23D-Link DSM-750 User Manual
Section 3 - Configuration
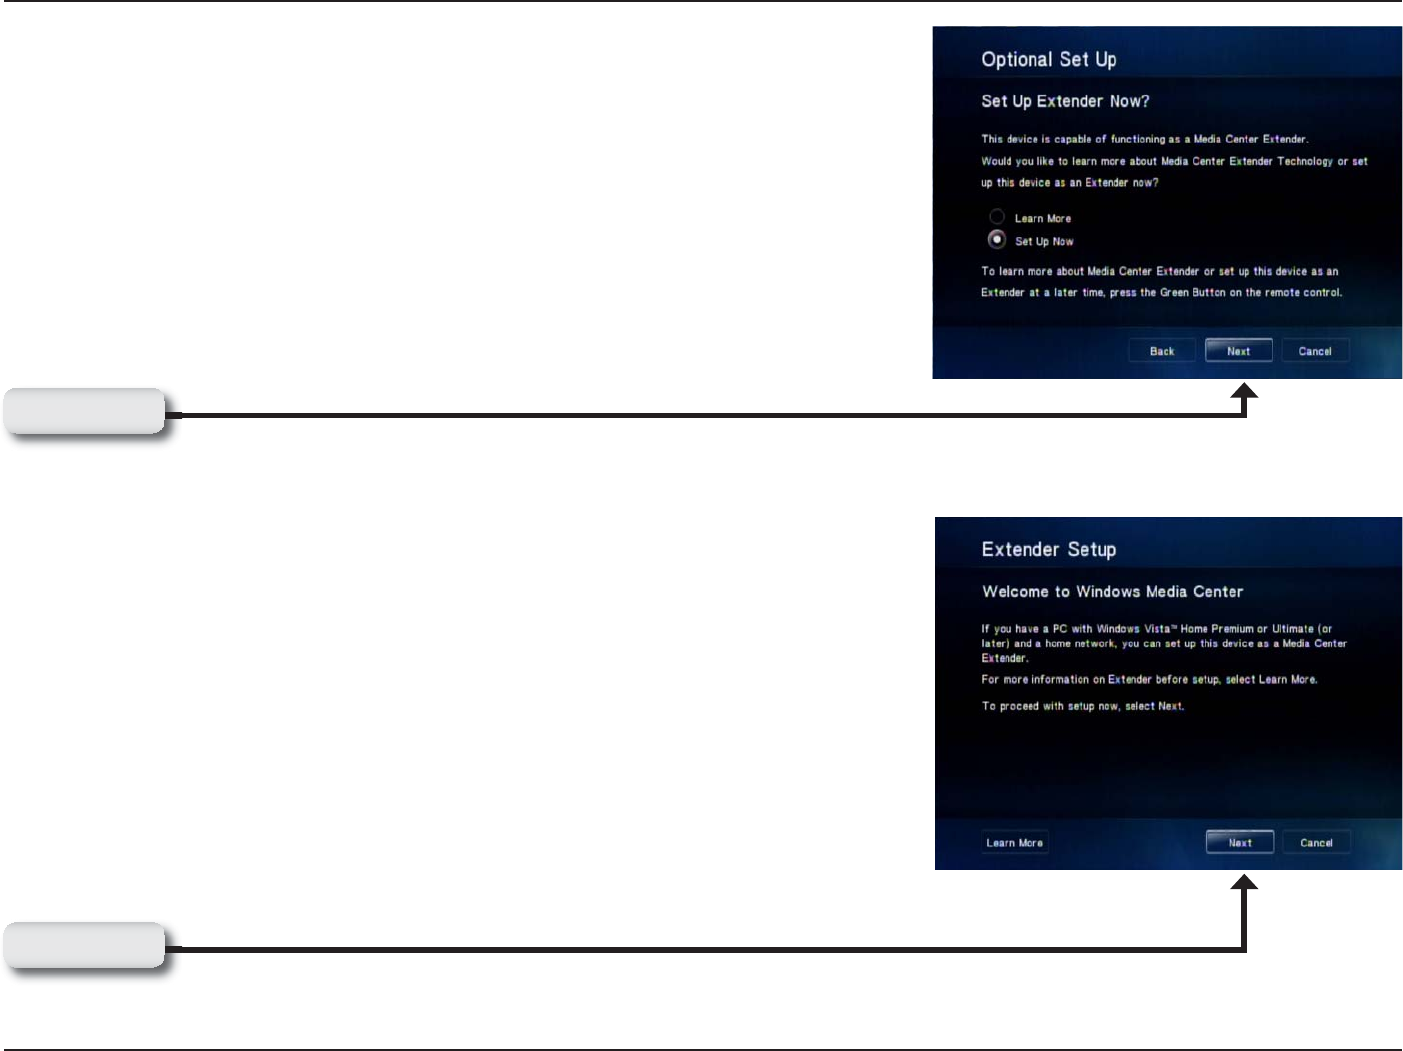
If you ARE using your DSM-750 as a Media Center Extender, click Next.
On the following screen, click Next again to continue.
Note: You can also setup your DSM-750 as a Media Center Extender at a
later time.
Note: If DHCP is enabled, please skip to the “8-Digit Setup Key” section on
page 37. If DHCP is NOT enabled, please continue to the “Configure Your
Network Settings Manually” section on the following page.
DHCP (Dynamic Host Configuration Protocol) allows network settings
required by the DSM-750 to be set automatically.
Click Next
Click Next
24D-Link DSM-750 User Manual
Section 3 - Configuration
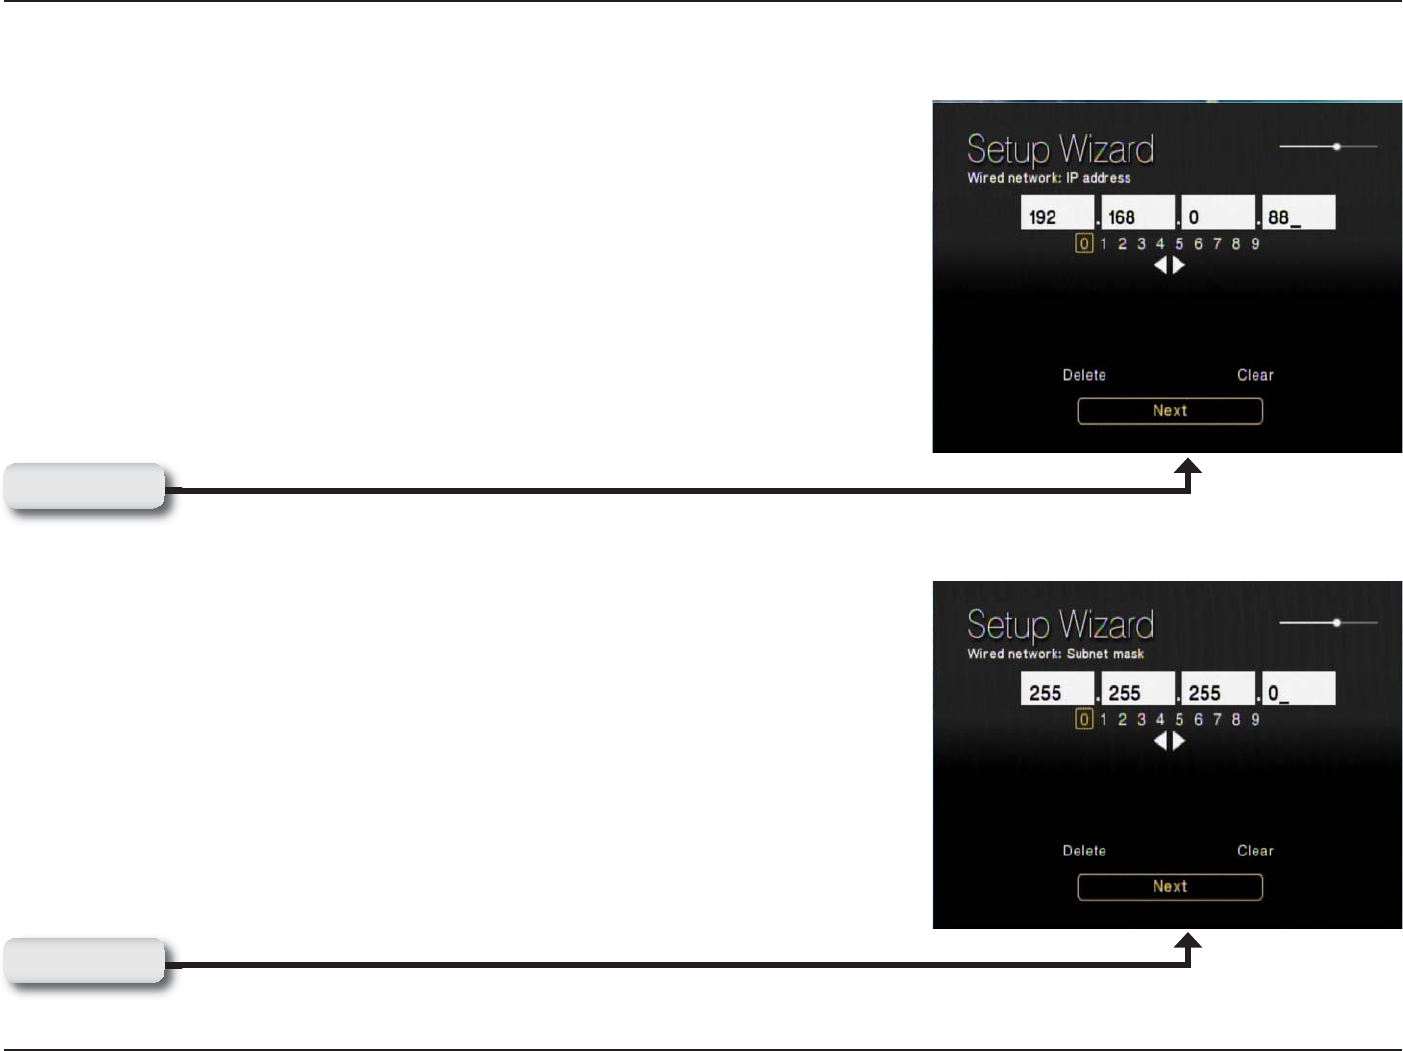
Configure Your Network Settings Manually
Use your remote control number keypad, or select the numbers from the on
screen number pad, to enter your wired network’s IP address.
Once you have entered your IP address, use your remote control to navigate
to the Next option and press OK.
Use your remote control number keypad, or select the numbers from the on
screen number pad, to enter your wired network’s Subnet mask.
Once you have entered your Subnet mask, use your remote control to navigate
to the Next option and press OK.
Click Next
Click Next
25D-Link DSM-750 User Manual
Section 3 - Configuration
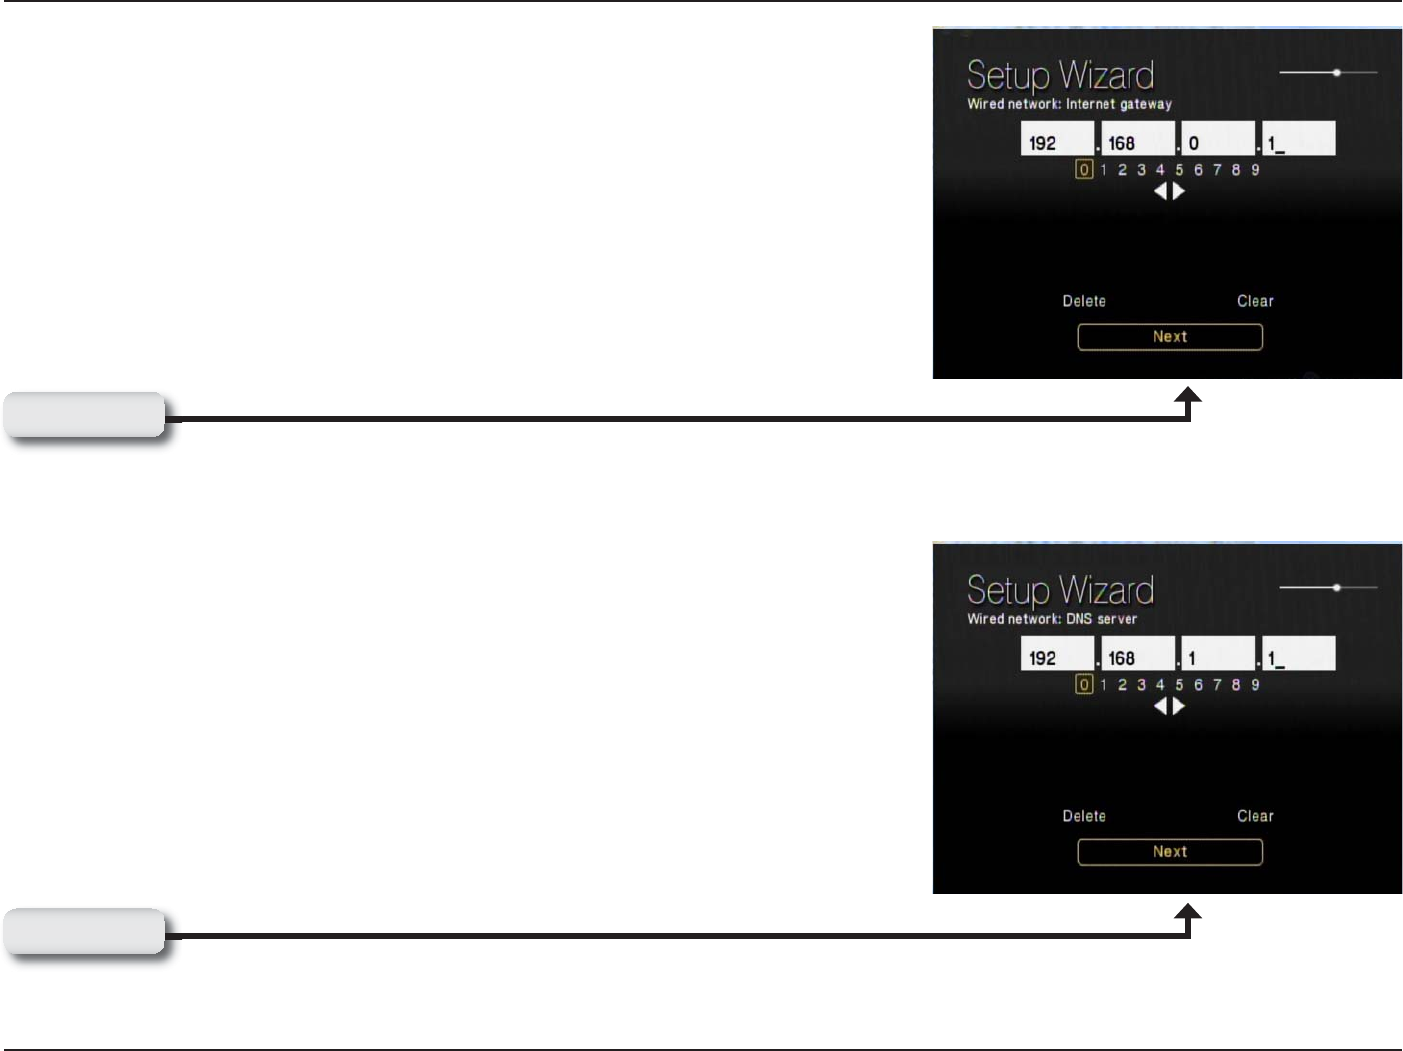
Use your remote control number keypad, or select the numbers from the on
screen number pad, to enter your wired network’s Internet gateway.
Once you have entered your Internet gateway, use your remote control to
navigate to the Next option and press OK.
Use your remote control number keypad, or select the numbers from the on
screen number pad, to enter your wired network’s DNS server.
Once you have entered your DNS server, use your remote control to navigate
to the Next option and press Enter.
Please wait while the DSM-750 connects to your network. After connecting
successfully to the DSM-750, please skip to the “8-Digit Setup Key“ section
on page 37.
Note: If you are unable to connect to your network, please check your network
connections or contact your network administrator.
Click Next
Click Next

26D-Link DSM-750 User Manual
Section 3 - Configuration
Wireless Setup
Make sure the supplied three antennas are properly attached onto the “gold” antenna connectors located on the back
of the DSM-750, and that the antennas are secure and in an upright position.
For the quickest and easiest installation, it is highly recommended that DHCP and SSID broadcast are enabled. Most
networks have DHCP and SSID broadcast enabled to allow new devices to find the wireless network and connect
automatically.
After you’ve connected the antennas, plug the end of the DSM-750 power supply cord into a power outlet. Position
your media player so that you can see it from where you view your TV. Power on the DSM-750 by pressing the Power
button on the included DSM-750 remote control.
Note: Make sure your media player is not behind the TV so you can use your DSM-750 remote control.
Using the TV’s remote control, turn on your TV and select the correct audio/video input source. When the correct audio/
video input source is selected, you will see the MediaLounge™ startup screen or Optional Set Up screen.
Note: If you don’t remember how to change TV inputs, refer to
the TV User Manual for instructions.
27D-Link DSM-750 User Manual
Section 3 - Configuration
Media Center Extender Optional Set Up
If you are NOT using your DSM-750 as a Media Center Extender, click
Cancel. If you have Windows Vista® Home Premium or Ultimate, and you
want to set up the Extender, skip to the following page. Setting up the DSM-
750 as a Media Center Extender allows a Windows Vista Home Premium or
Ultimate based PC to share the Media Center experience on your TV. If you
only have Windows Vista Home Basic or XP, you will only have access to the
MediaLounge™mode.
After clicking Cancel, click Finish. DHCP (Dynamic Host Configuration Protocol)
allows network settings required by the DSM-750 to be set automatically. If
DHCP is enabled on your network, the Setup Wizard screen will appear.
Please skip to page 29 to continue with the Setup Wizard.
Note: DHCP (Dynamic Host Configuration Protocol) allows network settings
required by the DSM-750 to be set automatically.
Click Cancel
Click Finish

28D-Link DSM-750 User Manual
Section 3 - Configuration
If you ARE using your DSM-750 as a Media Center Extender, click Next.
On the following screen, click Next again to continue.
Note: You can also setup your DSM-750 as a Media Center Extender at a
later time.
Note: If DHCP is NOT enabled, you will have to enter your network settings
manually to complete the Setup Wizard.
DHCP (Dynamic Host Configuration Protocol) allows network settings
required by the DSM-750 to be set automatically.
Click Next
Click Next
29D-Link DSM-750 User Manual
Section 3 - Configuration
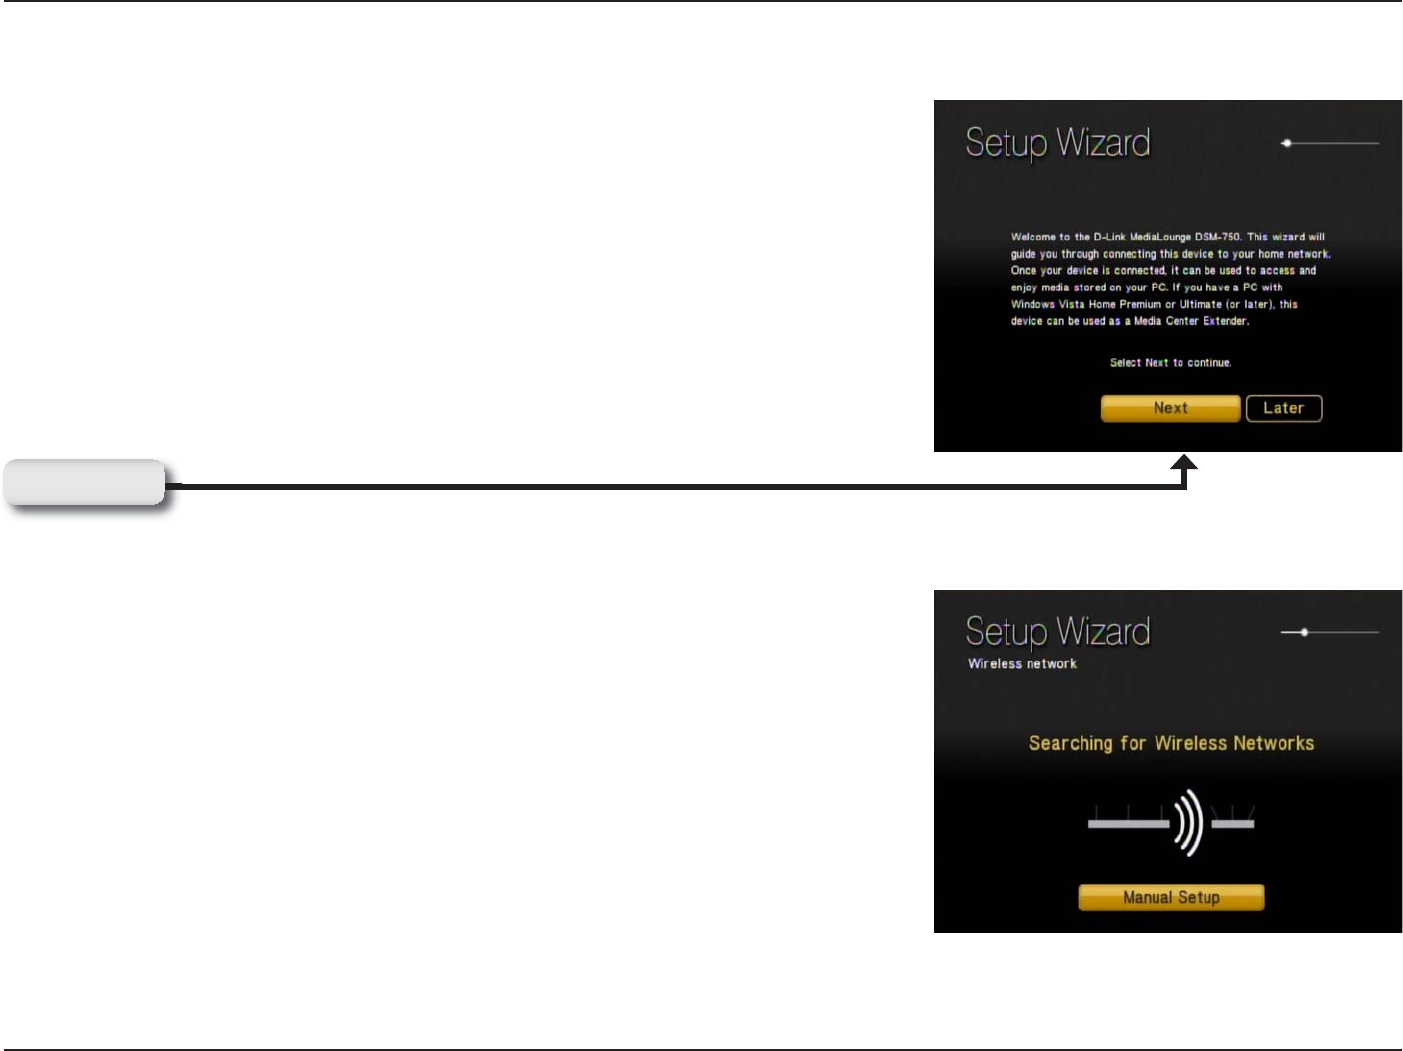
Setup Wizard
Follow the on screen instructions to continue with the wireless network
setup.
Click Next to begin the Wireless Setup Wizard.
Please wait while the DSM-750 searches for available wireless networks.
Note: If your router’s SSID broadcast is turned off, please use your remote control
to select Manual Setup. If you clicked Manual Setup, please continue to the
following page. If you did not click Manual Setup, please skip to page 31.
Click Next
30D-Link DSM-750 User Manual
Section 3 - Configuration
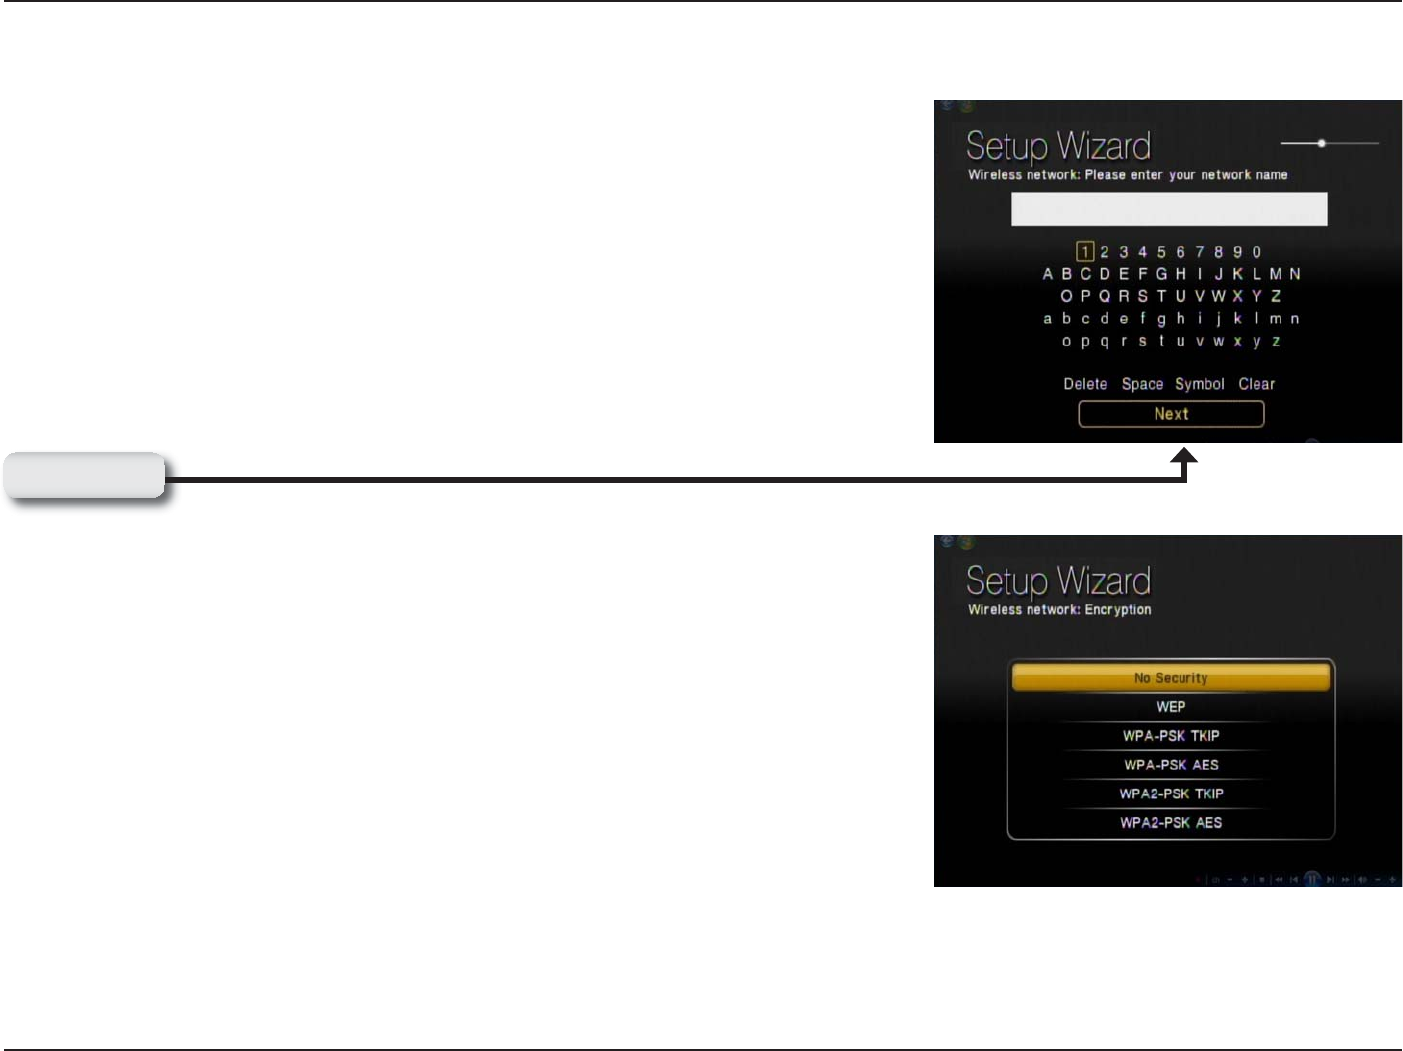
Manual Setup
Note: This page can be skipped by most users if SSID broadcast is
enabled.
By using the remote control’s alphanumeric keypad, or the On Screen
Keyboard, you may enter your wireless network’s name. When you have
completed entering the network name, use the down arrow to select Next.
Note: If your wireless network is not found, refer to the “Wireless Installation
Considerations and Troubleshooting” section starting on page 95 for
information as to why this may have happened.
By using your remote control, navigate through the encryption type list by
either pressing the up or down arrow. Once you find your network’s encryption
type, use your remote control to click it. Please continue to the “Encryption”
section on the following page.
Click Next
31D-Link DSM-750 User Manual
Section 3 - Configuration
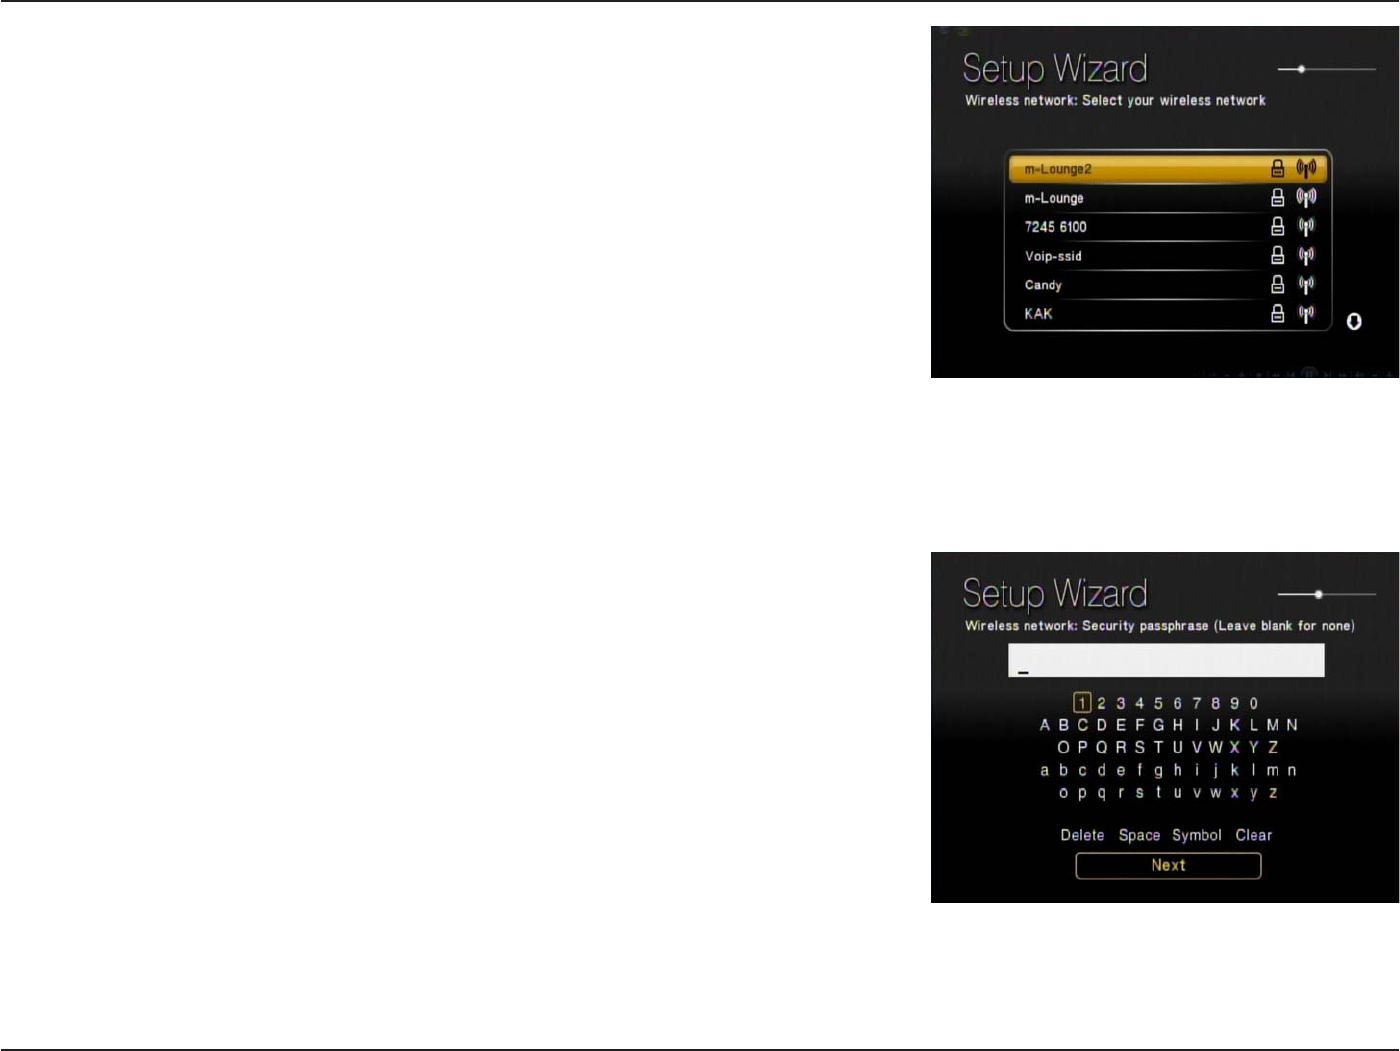
Select your wireless network from the list of networks that appear.
Note: If you do not see your wireless network, refer to the “Wireless
Installation Considerations and Troubleshooting” section starting on page
95 for information as to why this may have happened.
Encryption
If your wireless home network is using wireless encryption, you will need to
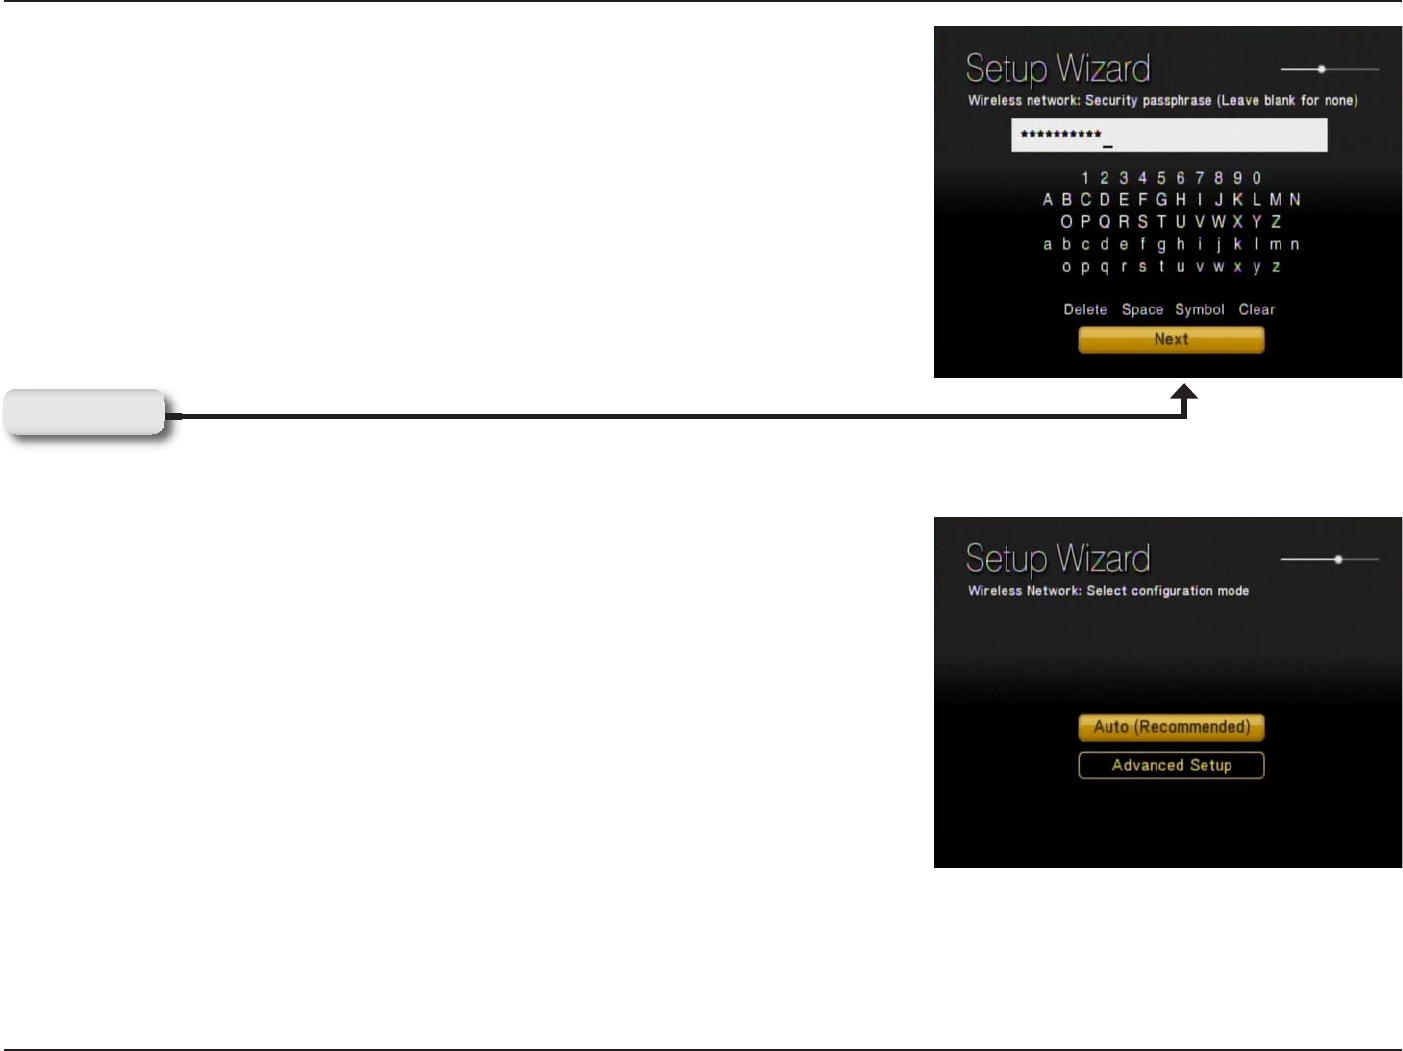
provide the DSM-750 with the network security passphrase. By using the On
Screen Keyboard, you may enter the network security passphrase.
32D-Link DSM-750 User Manual
Section 3 - Configuration
When you have completed entering the network security passphrase, use the
down arrow to select Next.
Note: This passphrase must exactly match the network security passphrase,
consult your network administrator for more information.
If DHCP is enabled on your network, select Auto (Recommended). If DHCP
is not enabled on your network, select Advanced Setup to enter the wireless
network settings manually.
Note: If you selected Advanced Setup, please skip to “Configure Your
Network Settings Manually” on the following page. If you selected Auto
(Recommended), please skip to the “Completing the Setup Wizard“ section
on page 35.
Click Next
33D-Link DSM-750 User Manual
Section 3 - Configuration
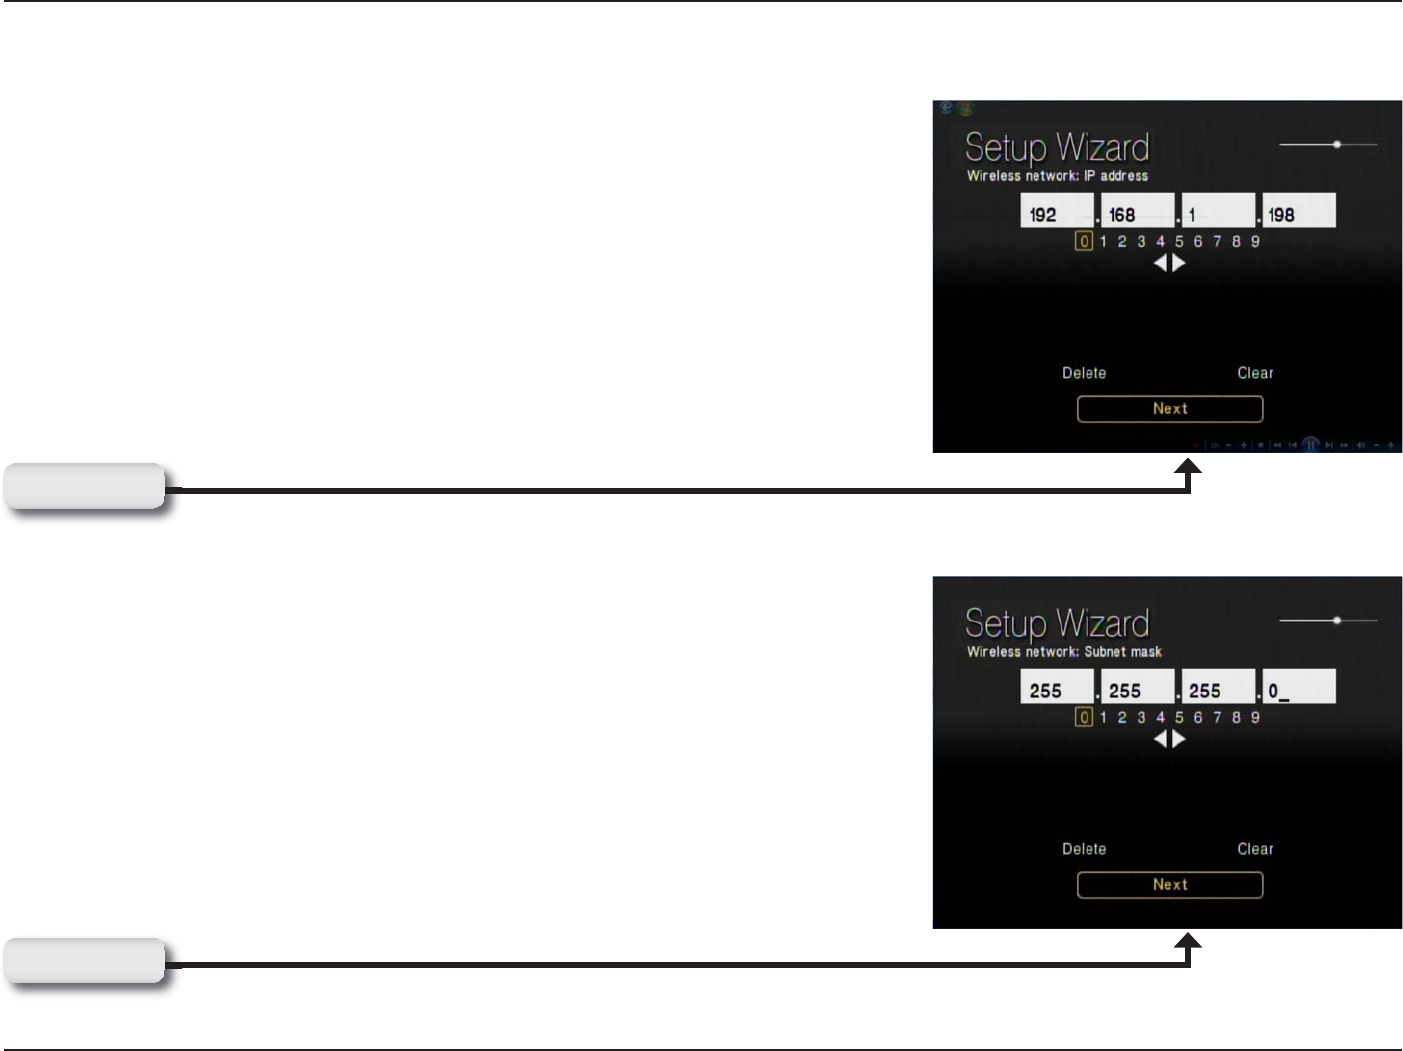
Configure Your Network Settings Manually
Note: Skip this section if DHCP is enabled on your network.
Use your remote control number keypad, or select the numbers from the on
screen number pad, to enter your wireless network’s IP address.
Once you have entered your IP address, use your remote control to navigate
to the Next option and press Enter.
Use your remote control number keypad, or select the numbers from the on
screen number pad, to enter your wireless network’s Subnet mask.
Once you have entered your Subnet mask, use your remote control to navigate
to the Next option and press Enter.
Click Next
Click Next
34D-Link DSM-750 User Manual
Section 3 - Configuration
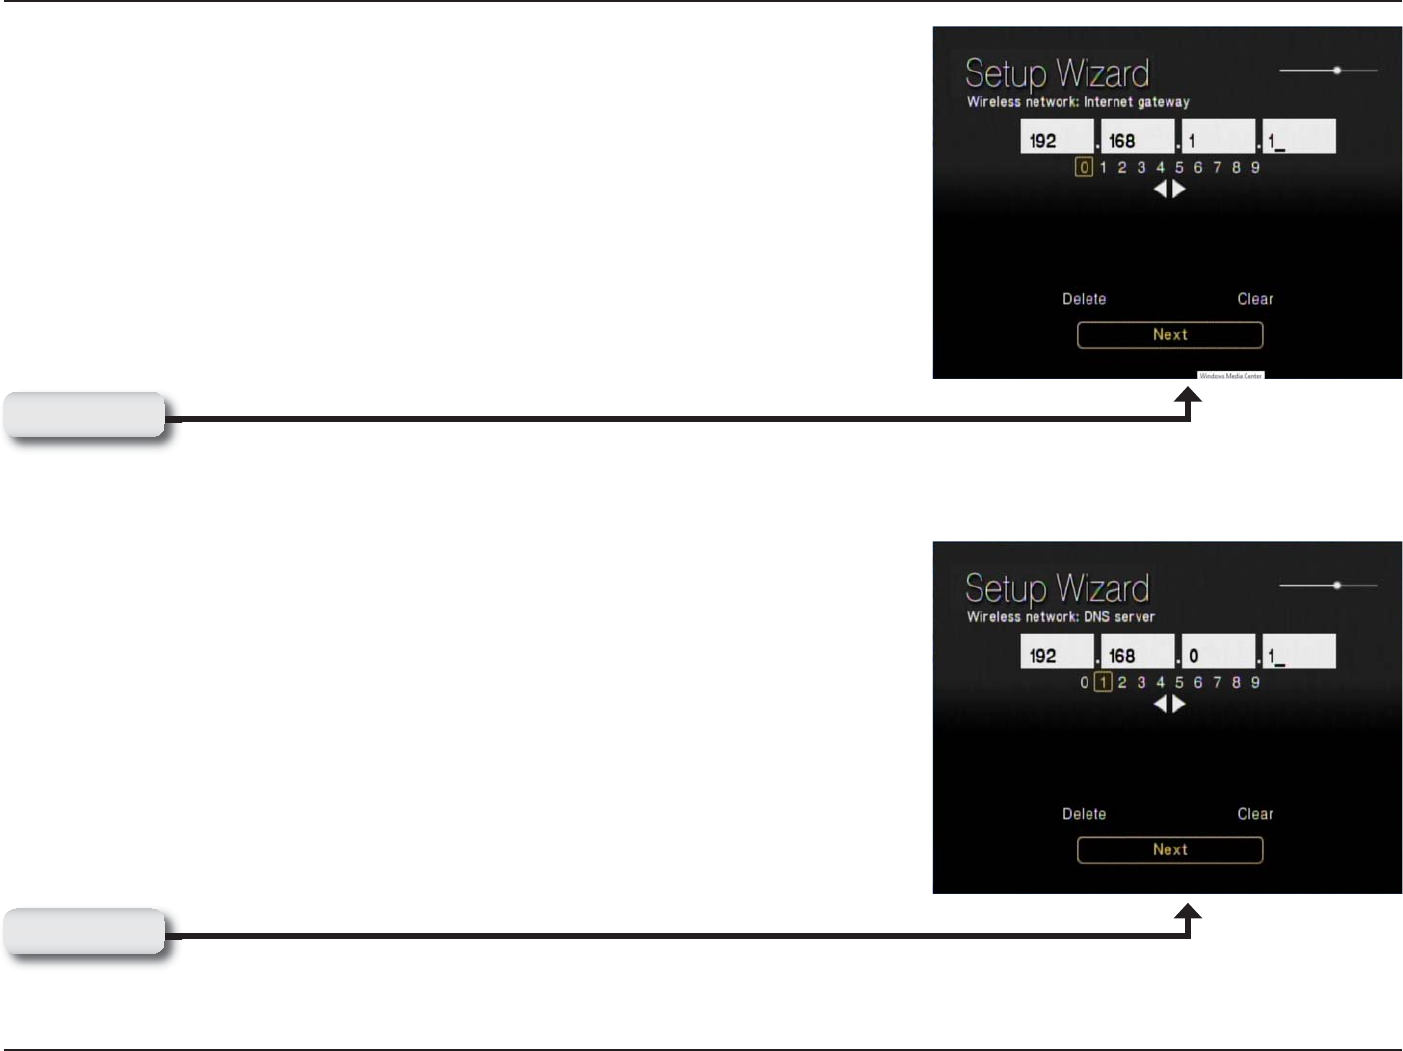
Use your remote control number keypad, or select the numbers from the on
screen number pad, to enter your wireless network’s Internet gateway.
Once you have entered your Internet gateway, use your remote control to
navigate to the Next option and press Enter.
Use your remote control number keypad, or select the numbers from the on
screen number pad, to enter your wireless network’s DNS server.
Once you have entered your DNS server, use your remote control to navigate
to the Next option and press Enter.
Please wait while the DSM-750 connects to your network.
Note: If you are unable to connect to your network, please contact your network
administrator.
Click Next
Click Next
35D-Link DSM-750 User Manual
Section 3 - Configuration
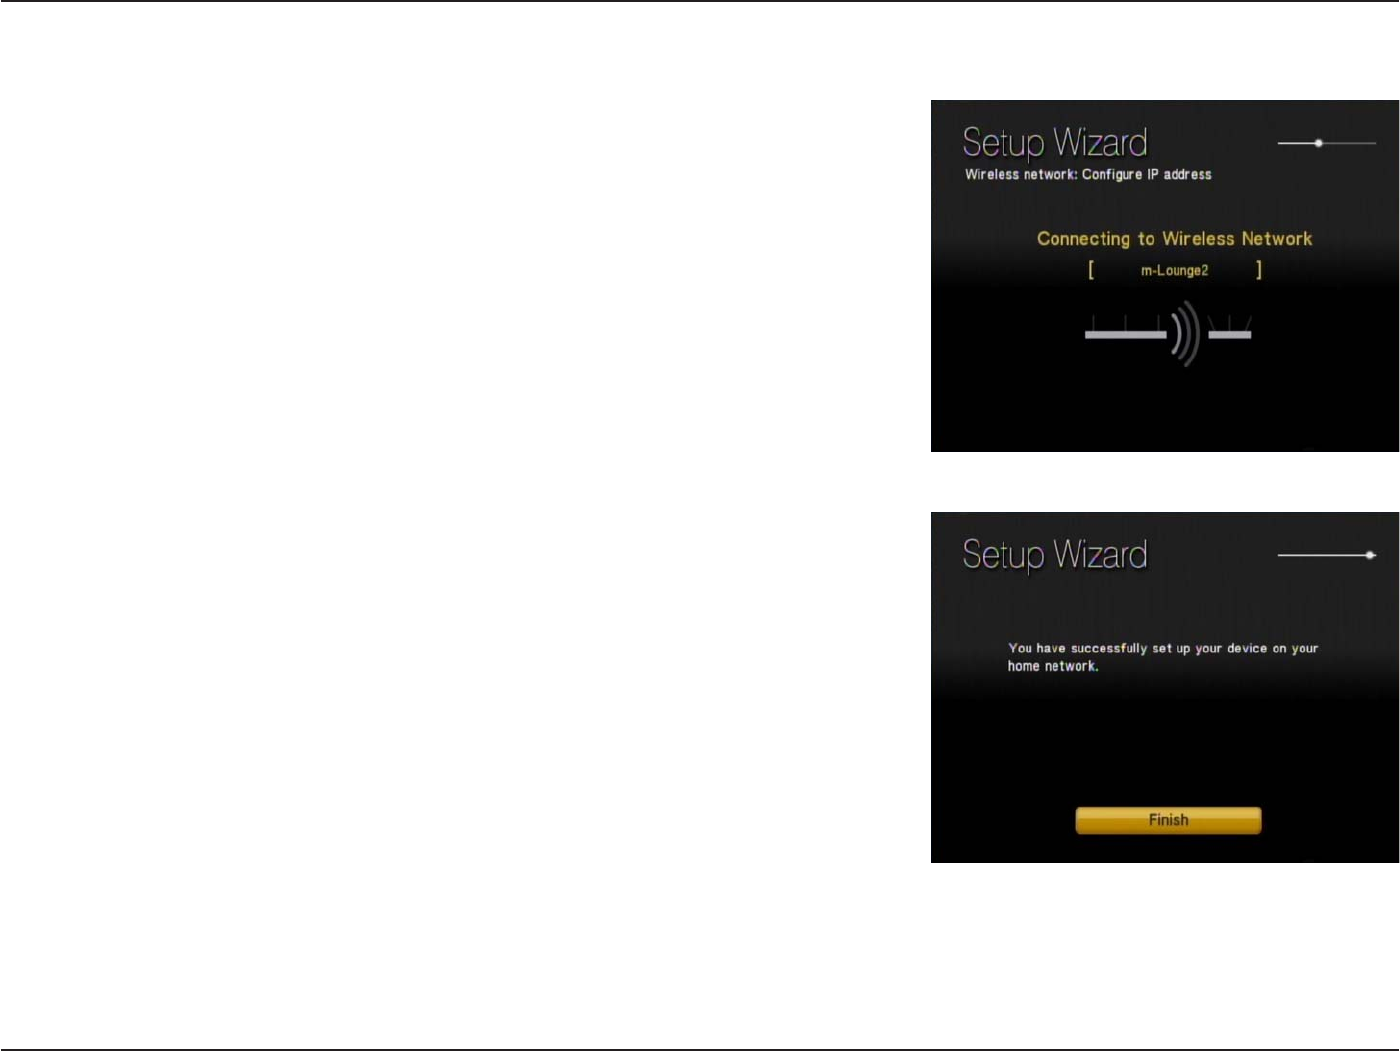
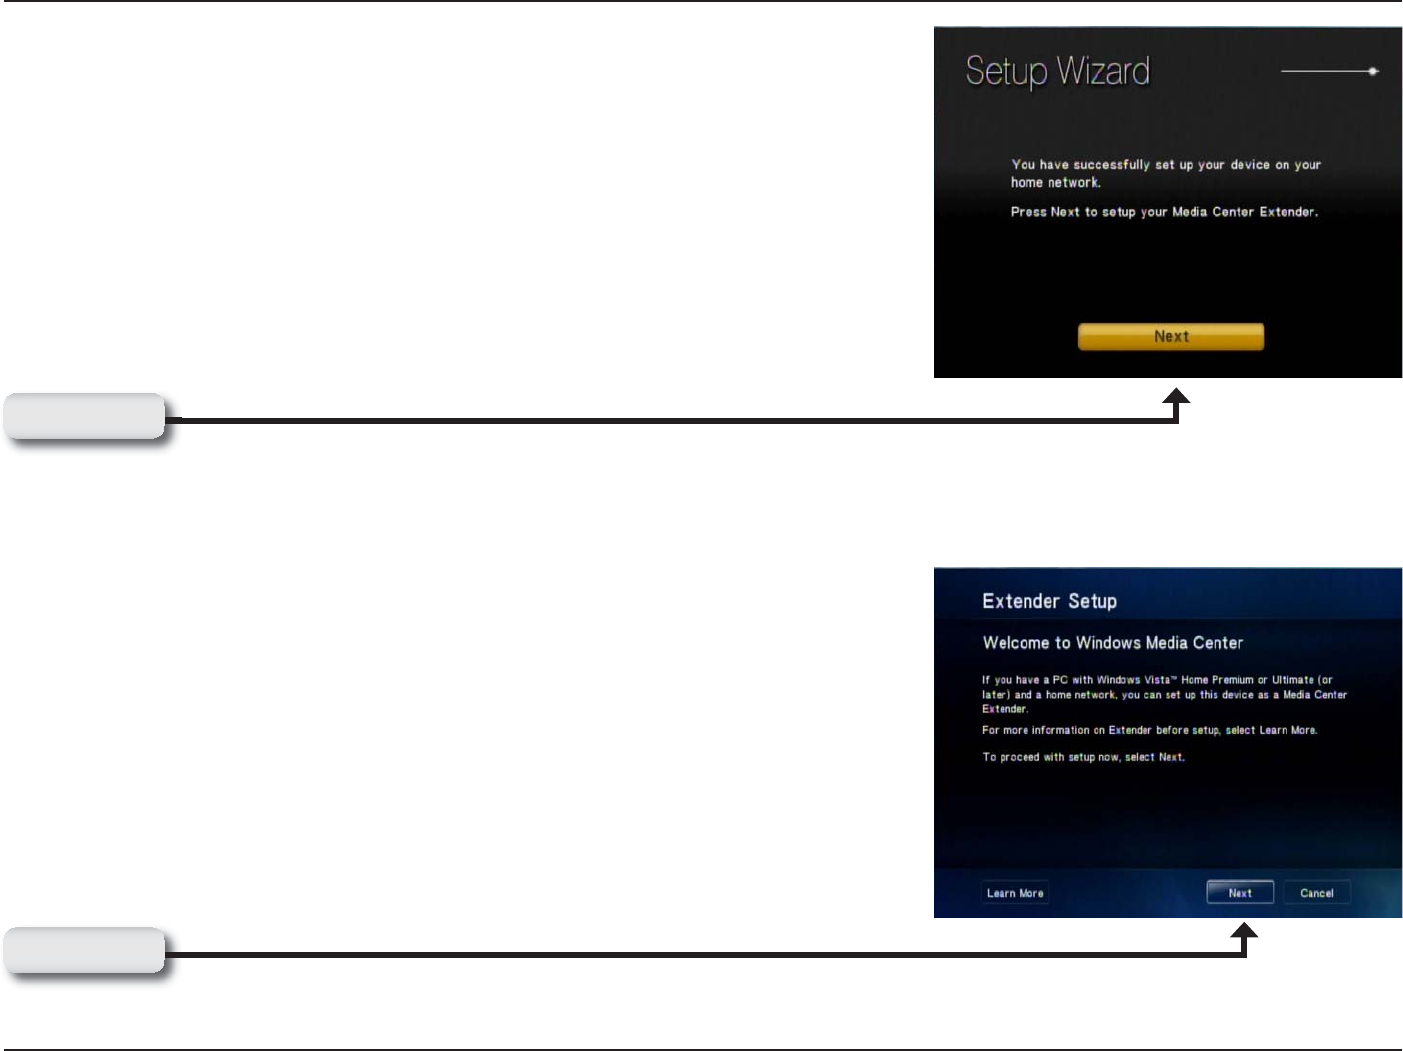
Completing the Setup Wizard
Connecting to the wireless network may take up to a minute.
The “You have successfully set up your device on your home network” message
should appear.
If you chose NOT to setup the DSM-750 as a Windows Media Center Extender,
click Finish. Your wireless setup is complete and the DSM-750 MediaLounge™
home screen will appear. Please skip to page 38.
Note: If you did not receive the “successful” message mentioned here, please
refer to the “Wireless Installation Considerations and Troubleshooting”
section starting on page 95. for more information.
36D-Link DSM-750 User Manual
Section 3 - Configuration
If you ARE using the DSM-750 as a Media Center Extender, click Next to
continue.
On the Extender Setup screen, click Next again.
Click Next
Click Next
37D-Link DSM-750 User Manual
Section 3 - Configuration
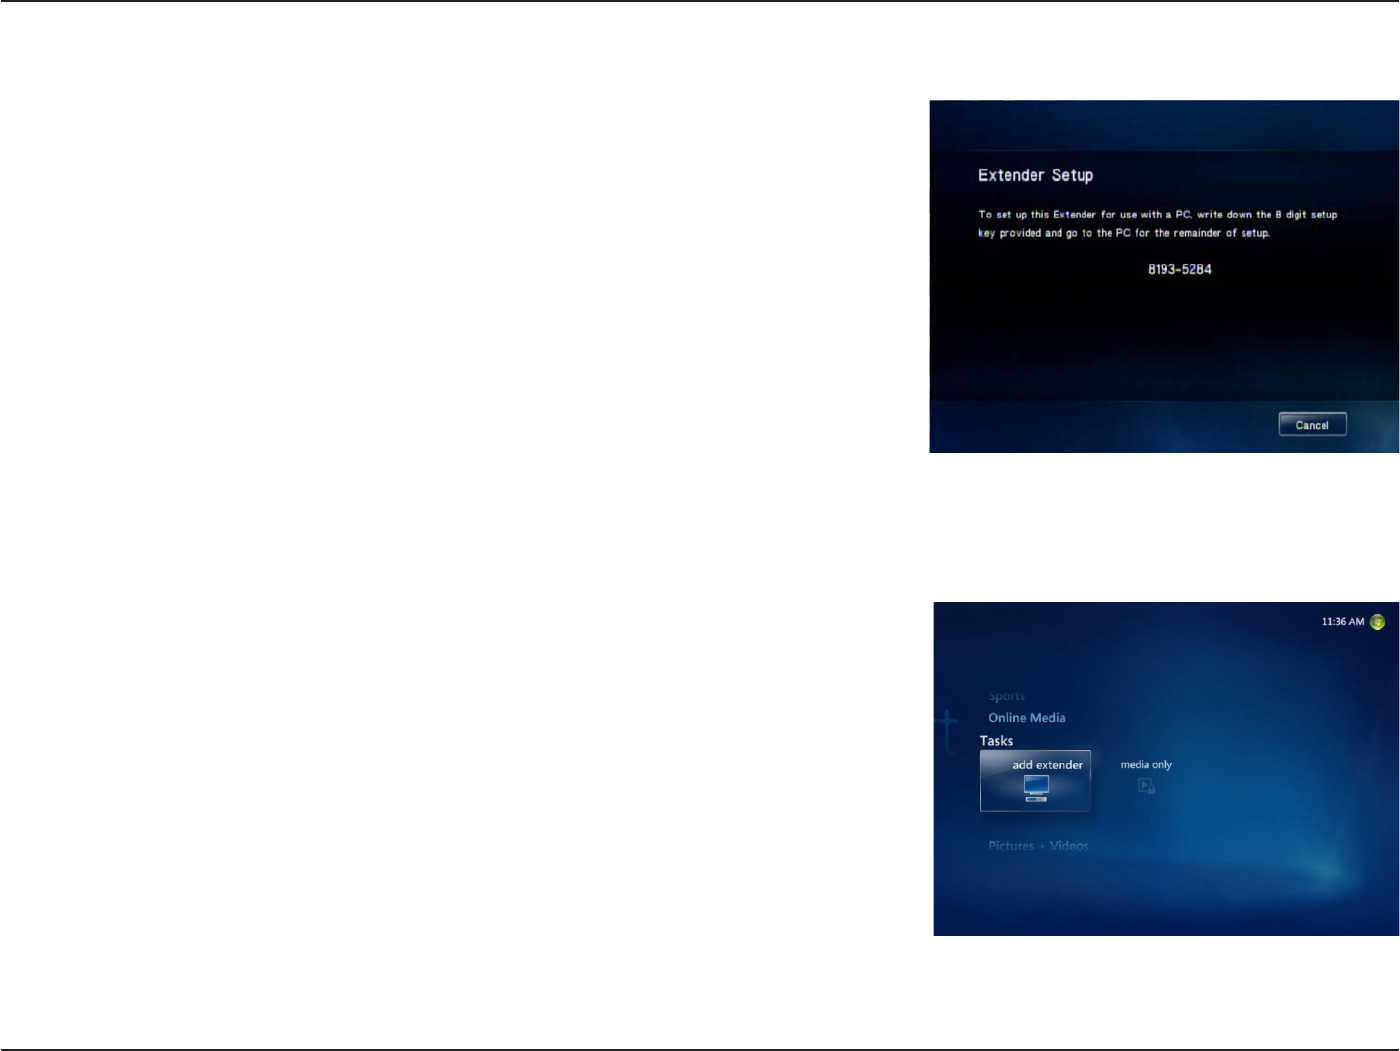
8-Digit Setup Key
An 8-digit Setup Key will appear on the TV. Please write down or remember
this 8-digit Setup Key and then go to your PC to finish the setup.
Complete Extender Setup
While at your PC, click Start and select Windows Media Center. Select Tasks
by scrolling down the menu. Once you are in Tasks, scroll right and click on
Add Extender.
Follow the on screen instructions to enter the 8-digit Setup Key and to
configure Windows® Media Center for your DSM-750.
Congratulations, your Extender setup is complete.

38D-Link DSM-750 User Manual
Section 3 - Configuration
To get the most out of the DSM-750 Media Center Extender, and to enjoy the Windows Media Center experience
on your TV by using the DSM-750, a PC with Windows Vista Home Premium or Ultimate is required. If you are
not yet ready to experience Windows Media Center from your DSM-750, you can still view photos or videos, or
listen to music, from a Windows Vista Basic or Windows XP computer.
To share audio, video, and photo files from your computer, it is necessary to have Windows Media Player 11
or another UPnP™ AV media server software on the PC. Windows Media Player 11 software allows you to share
your PC’s audio, video, and photo files with your media player. Windows® Media Player 11 software then streams the
content to your DSM-750 via your wired/wireless network connection.
If more than one PC contains files you want to share, you can select one of the following options:
1. Copy all of the files to one computer designated to run the Windows Media Player 11 software.
2. Map network drives on the computer with the Windows Media Player 11 software to additional computers that
contain files you want to share. This method also allows you to share files from computers that cannot run the
Windows Media Player 11 software such as Macintosh systems. The computer running the Windows Media
Player 11 software must always be on when streaming content from any computer.
Note: In order to share files from your MAC to your PC you must turn on Windows sharing from Preferences Menu
and select Sharing.
3. Configure the Windows Media Player 11 software on each computer.
4. All versions of Windows Vista include Windows Media Player 11. Windows XP offers Windows Media Player 11 as
a free update from Windows Update, or you can download Windows Media Player 11 by visiting microsoft.com.
Windows® Media Player 11 Setup
39D-Link DSM-750 User Manual
Section 3 - Configuration
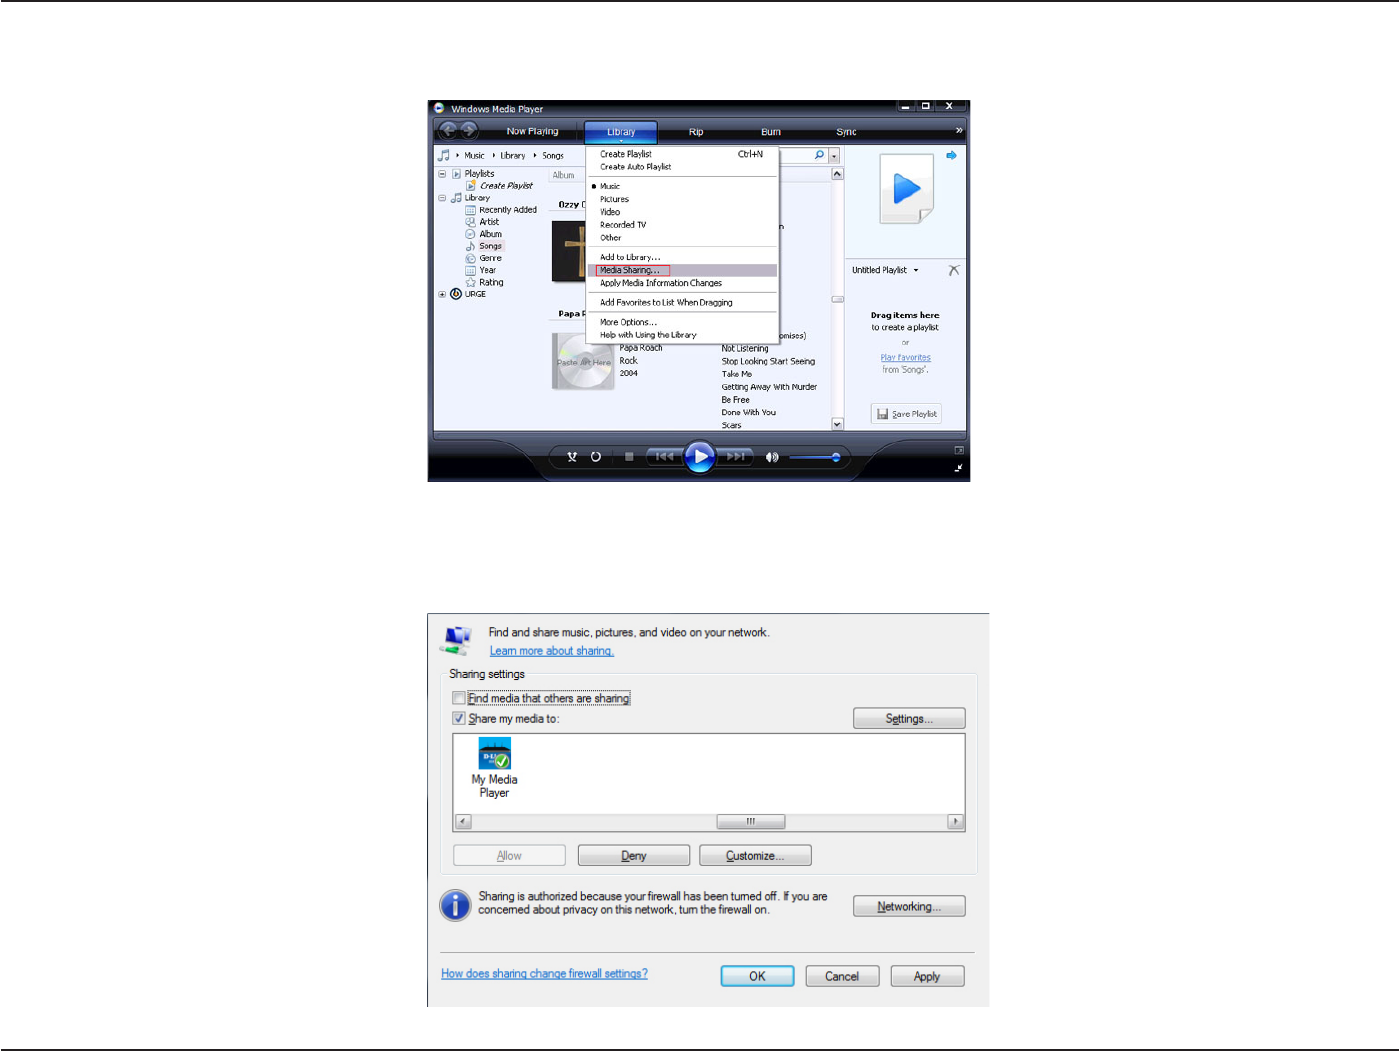
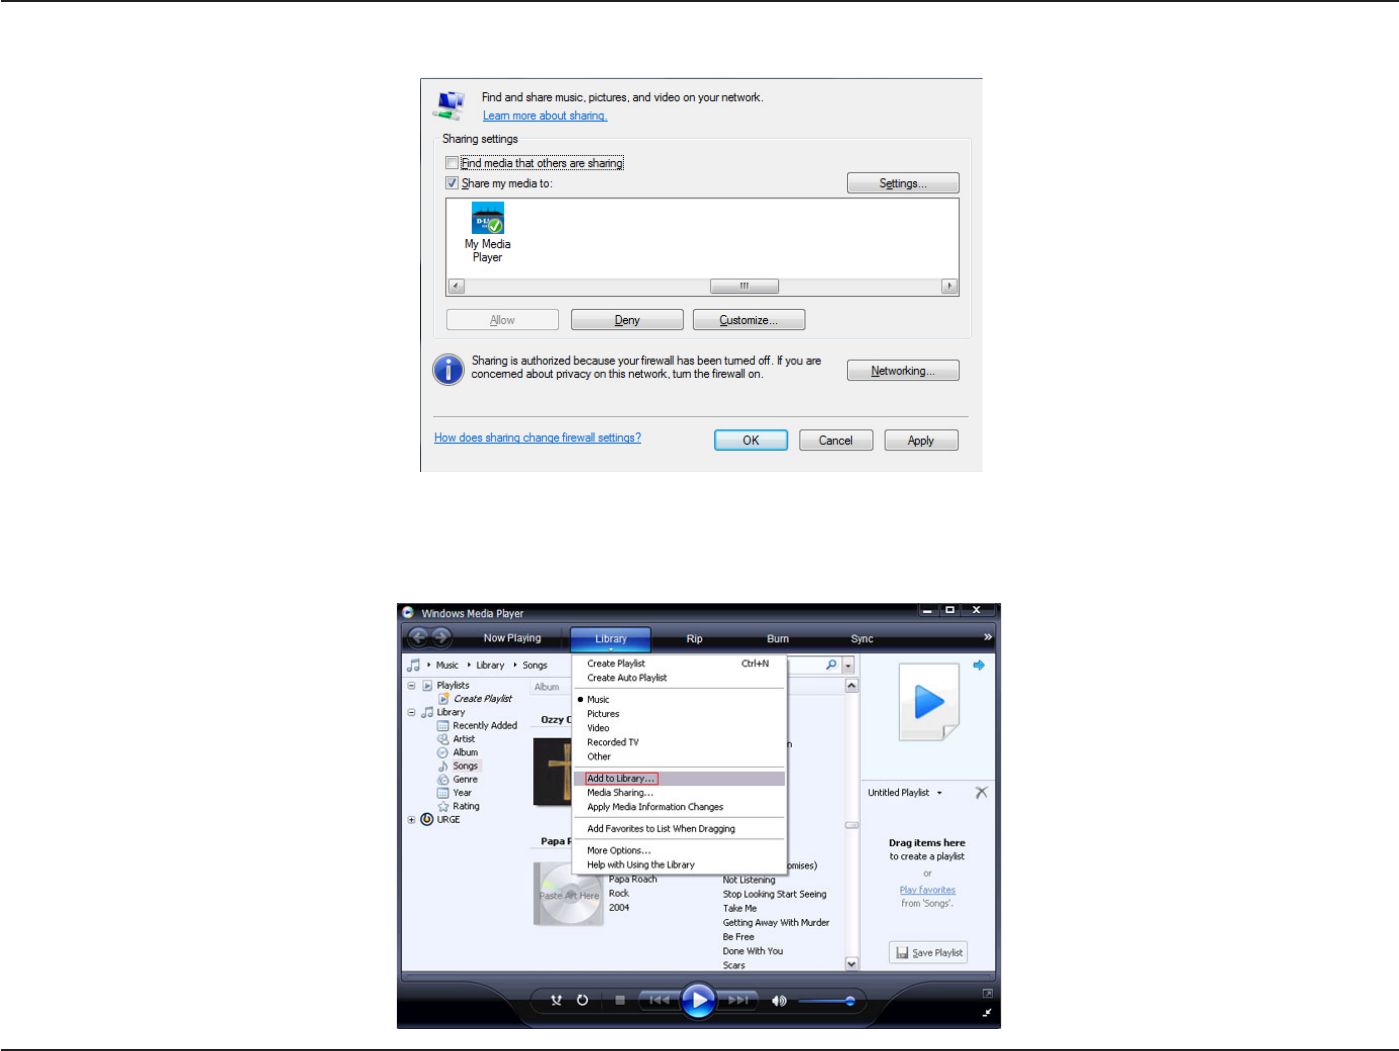
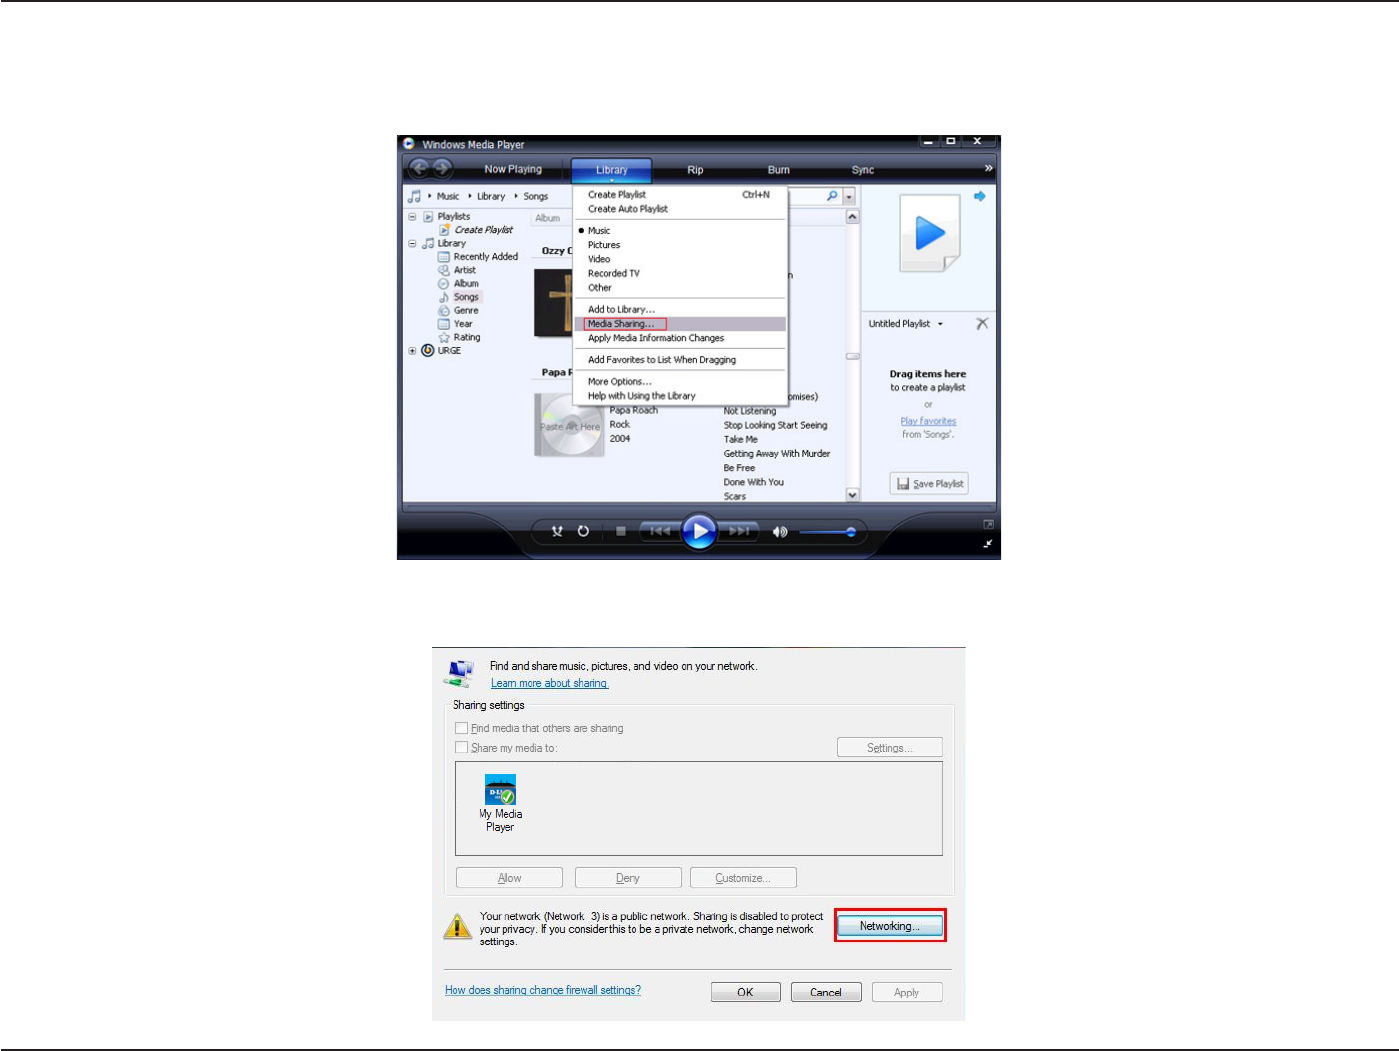
In order to share media to your DSM-750 using Windows® Media Player 11, you must first allow your media player
access in the software. Click the down arrow under Library and select Media Sharing.
Click the Share my media to: check box. Select your D-Link DSM-750 media player from the Media Sharing box
and then click the Allow button.
40D-Link DSM-750 User Manual
Section 3 - Configuration
Your device will now have a green check mark. Click Apply and then click OK.
Now you need to add the folders containing media you want shared with your DSM-750. Click on Library and then
click on Add to Library.
41D-Link DSM-750 User Manual
Section 3 - Configuration
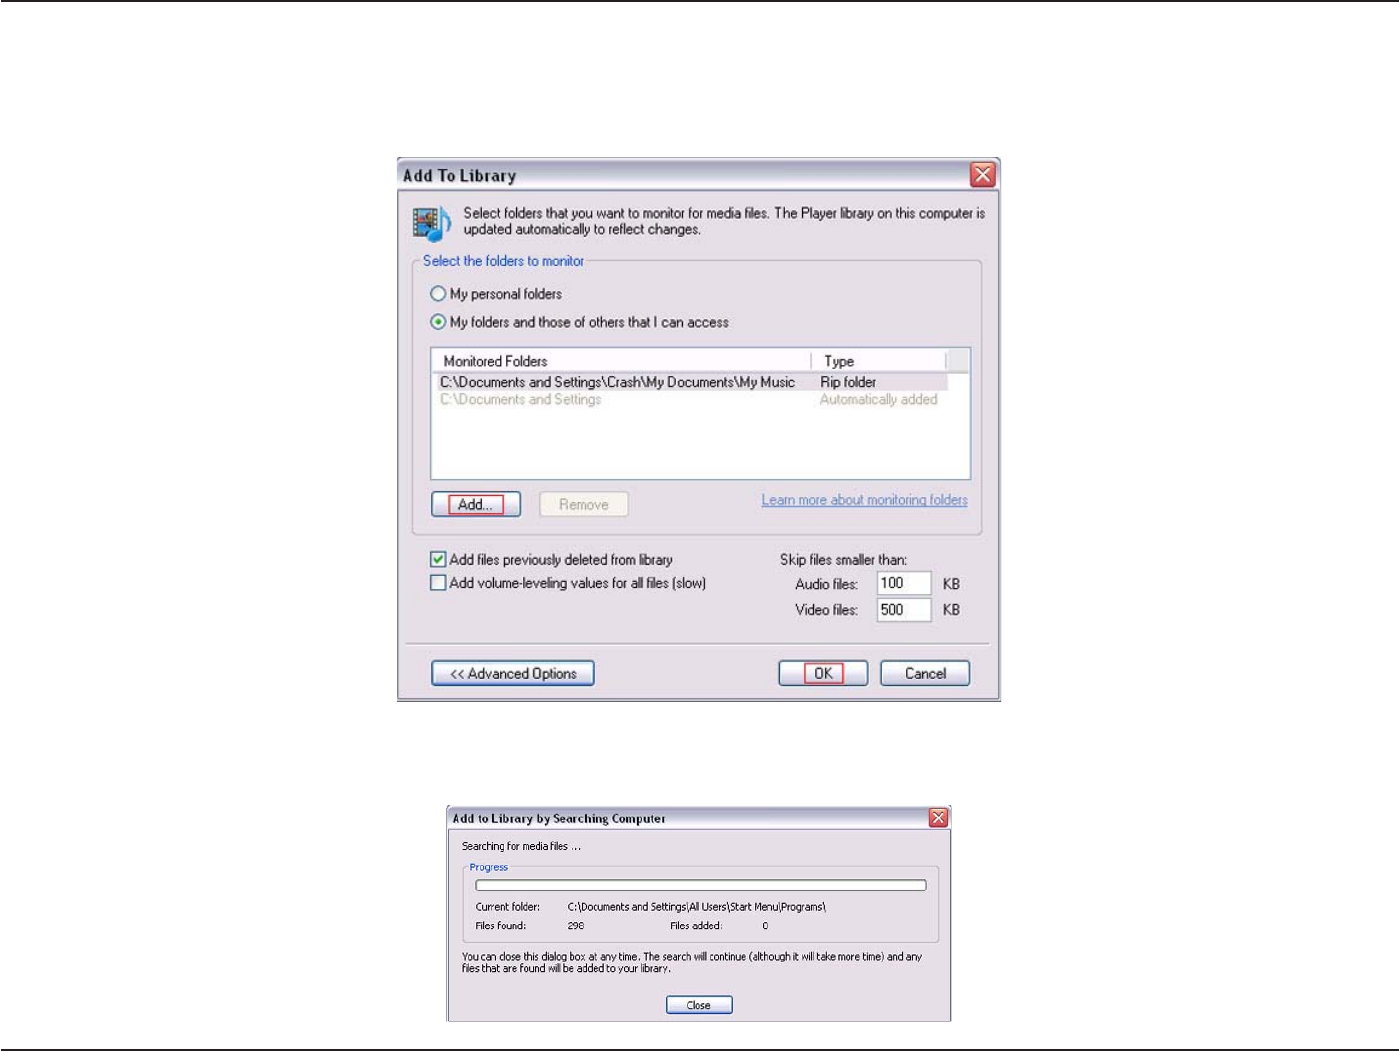
Click the Advanced Options button in the bottom left-hand corner. Click Add and choose the folders with media
you wish to be shared. If you have folders in other areas of your hard drive or on other drives in your PC or network,
you will need to select the Add button and select each folder manually. Once you have added the folder(s) you
want to share click OK.
Windows® Media Player 11 will now search for supported media files in the folders you selected to share.
42D-Link DSM-750 User Manual
Section 3 - Configuration
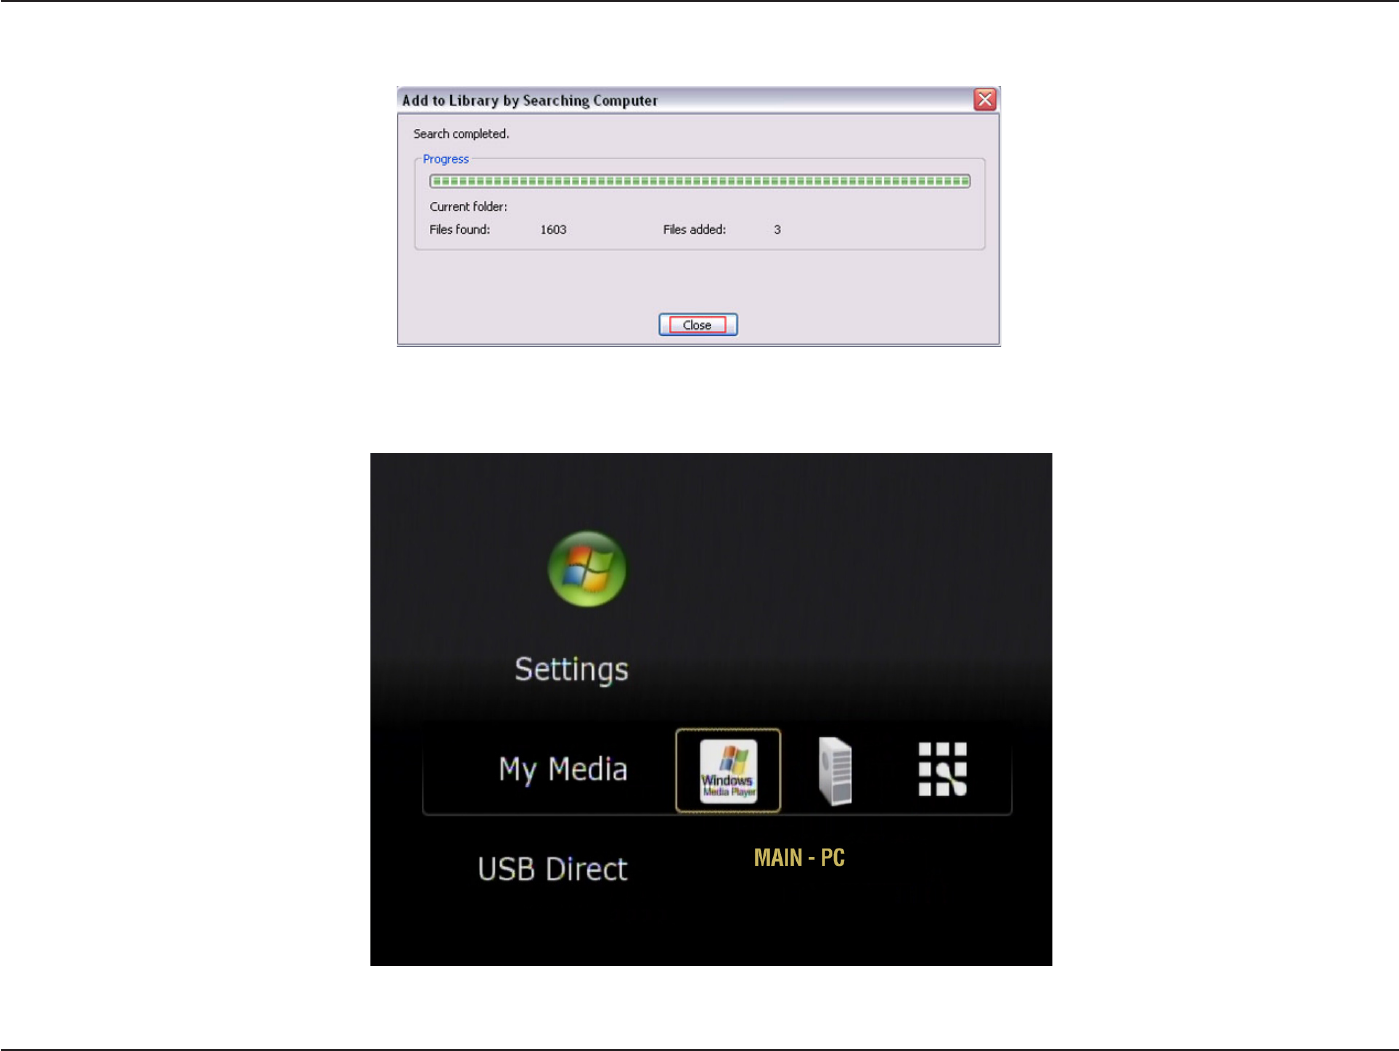
Click Close and you are ready to use Windows® Media Player 11 as your server.
You can now return to your TV and select the Windows Media Server from My Media on the DSM-750 Home Page.
43D-Link DSM-750 User Manual
Section 3 - Configuration
Once you have confirmed that your Windows® Media Player sharing has been enabled and is showing on your D-Link
DSM-750 you can select your Music, Photos or Videos after selecting the Windows Media Player 11 media server.
44D-Link DSM-750 User Manual
Section 3 - Configuration
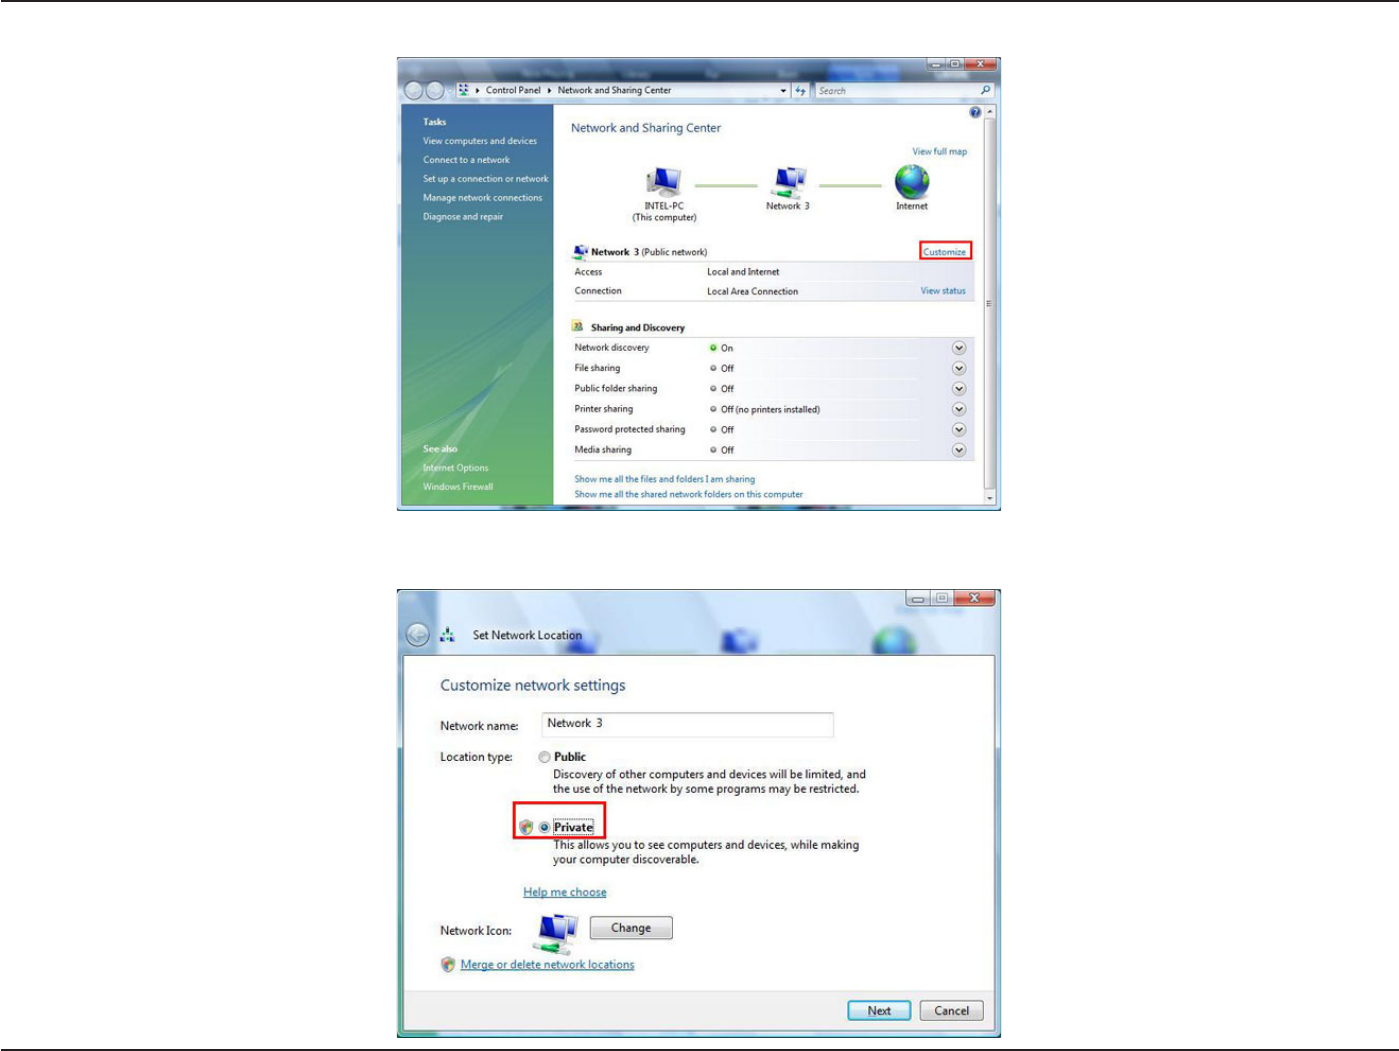
If you are using Windows Vista® and Media Sharing is disabled, follow these steps to enable media sharing:
Open Windows Media Player 11. Click the down arrow under Library and select Media Sharing.
Click the Networking button.
45D-Link DSM-750 User Manual
Section 3 - Configuration
Click the Customize button.
Select Private under Location Type. Click the Next button.

46D-Link DSM-750 User Manual
Section 3 - Configuration
Click the Close button. Media sharing should now be accessible from your Windows Vista® PC.
47D-Link DSM-750 User Manual
Section 3 - Configuration
Using Your DSM-750
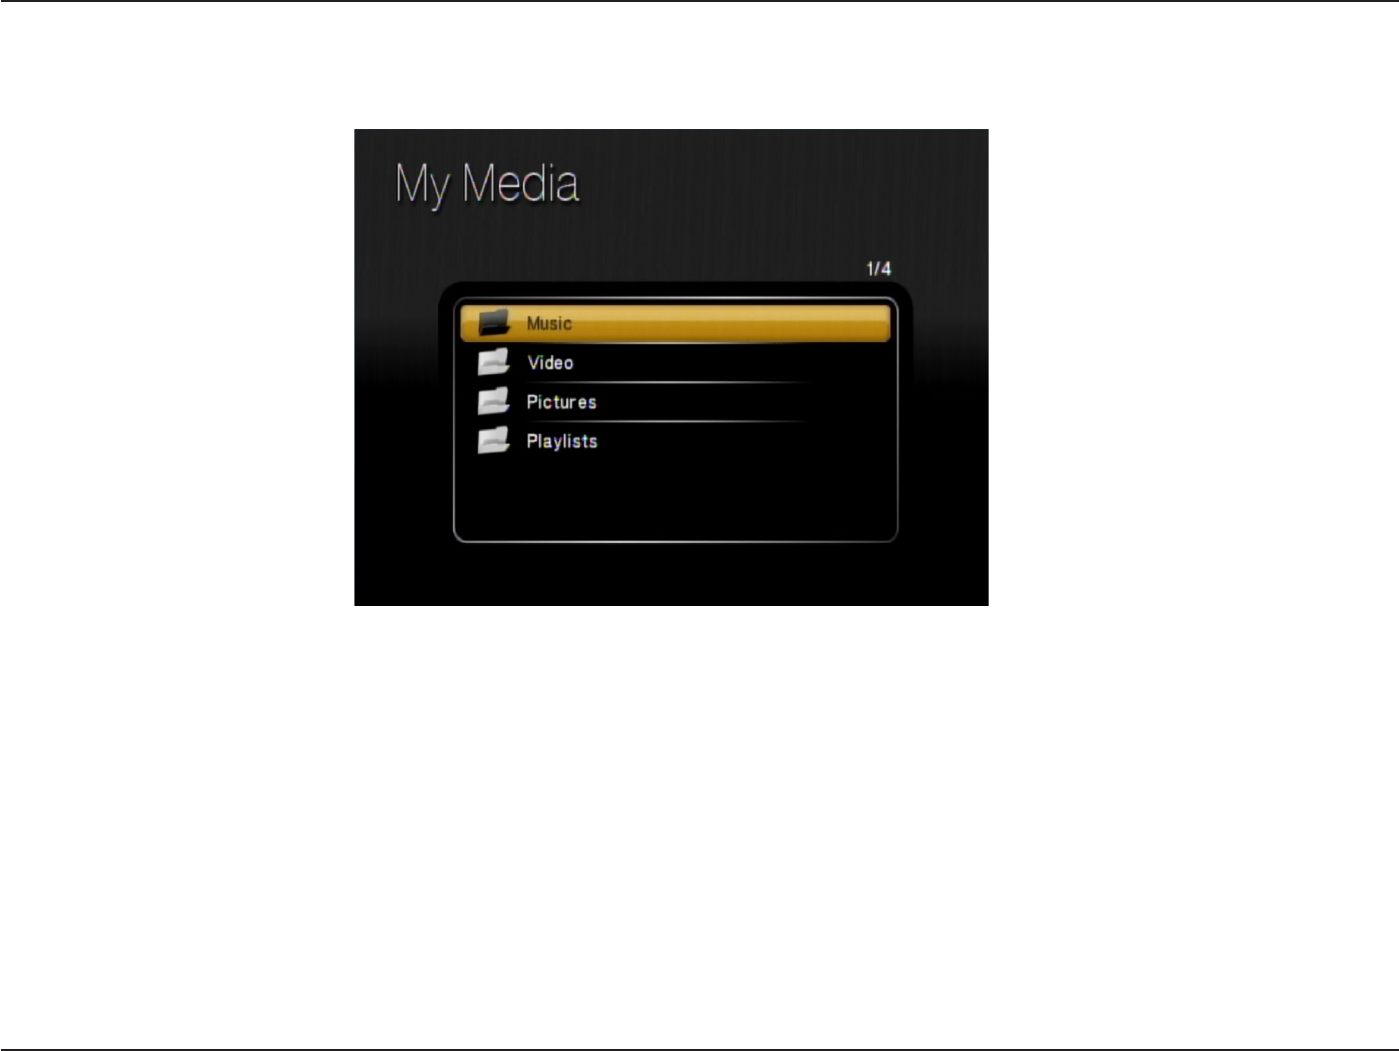
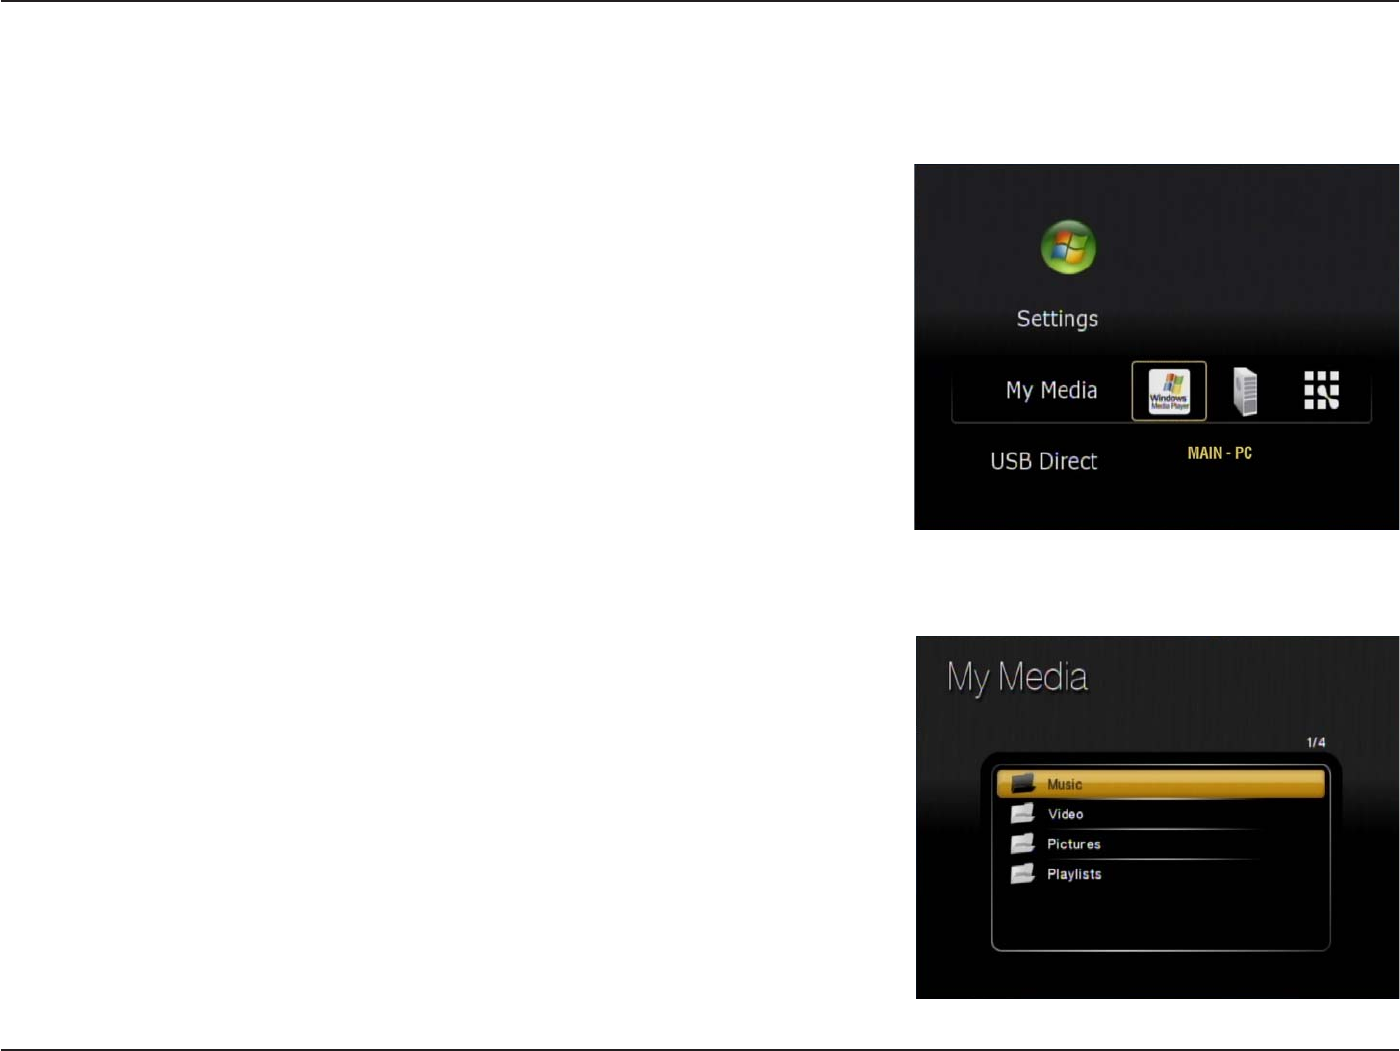
MediaLounge™ Home Page
The MediaLounge Home Page will appear after you have successfully
configured your DSM-750 with your network. The following options are
available:
•My Media
•USB Direct
•Windows Media Center (Operational only if the DSM-750 is setup as an
Extender)
•Settings
The folder names and their order that are displayed in the My Media menu
are dependant on the media server you are connected to. The following
folders may appear:
•Video
•Music
•Photo
•Playlists
Note: The menu interface is initially setup to display in Thumbnail mode,
but you may find it easier to navigate through the menus in List mode. To
change this setting to List mode, access the Settings menu and select
Browse Display. Please see page 86 for more information.
My Media

48D-Link DSM-750 User Manual
Section 3 - Configuration
The following video file formats are supported:
• MPEG-1
• MPEG-2
• MPEG-4 (ASP - Advanced Simple Profile)
• AVI (MPEG4 layer only, does not support uncompressed AVI,
Resolution up to 1080i)
• XVID (with MP3 and PCM)
• WMV9 (Resolution up to 1080i)
• DVR-MS (Record TV from Windows Media Center)
• H.264 (MPEG-4 Part 10)
Video

49D-Link DSM-750 User Manual
Section 3 - Configuration
Viewing a Video
Once you enter the Video menu, you will see a list of video folders and/or video files.
Use the Navigation Arrows on your DSM-750 remote control to navigate to the video file you wish to view. Once you
have made your choice, highlight the video and press OK, or press Play to view the video. If your video is located
within a folder, highlight the folder and press OK. Then highlight the video and press OK again, or press Play to view
the video.
Play - To play video.
Pause - To pause video.
Fast Forward - To fast forward through the
video. Press this button several times to
change the speed.
Rewind - To rewind through the video.
Press this button several times to
change the speed.
Stop - Stops the video.
Skip Forward - Skips forward 30 seconds of
a video. Only for compatible types of video.
Skip Backward - Skips through 10 seconds
of the video in reverse.
Audio Track Button
The Audio Track button on your remote control allows you to toggle through multiple language tracks in a video that
contains multiple audio tracks.
Note: REPEAT and SHUFFLE only work while listening to music.
50D-Link DSM-750 User Manual
Section 3 - Configuration
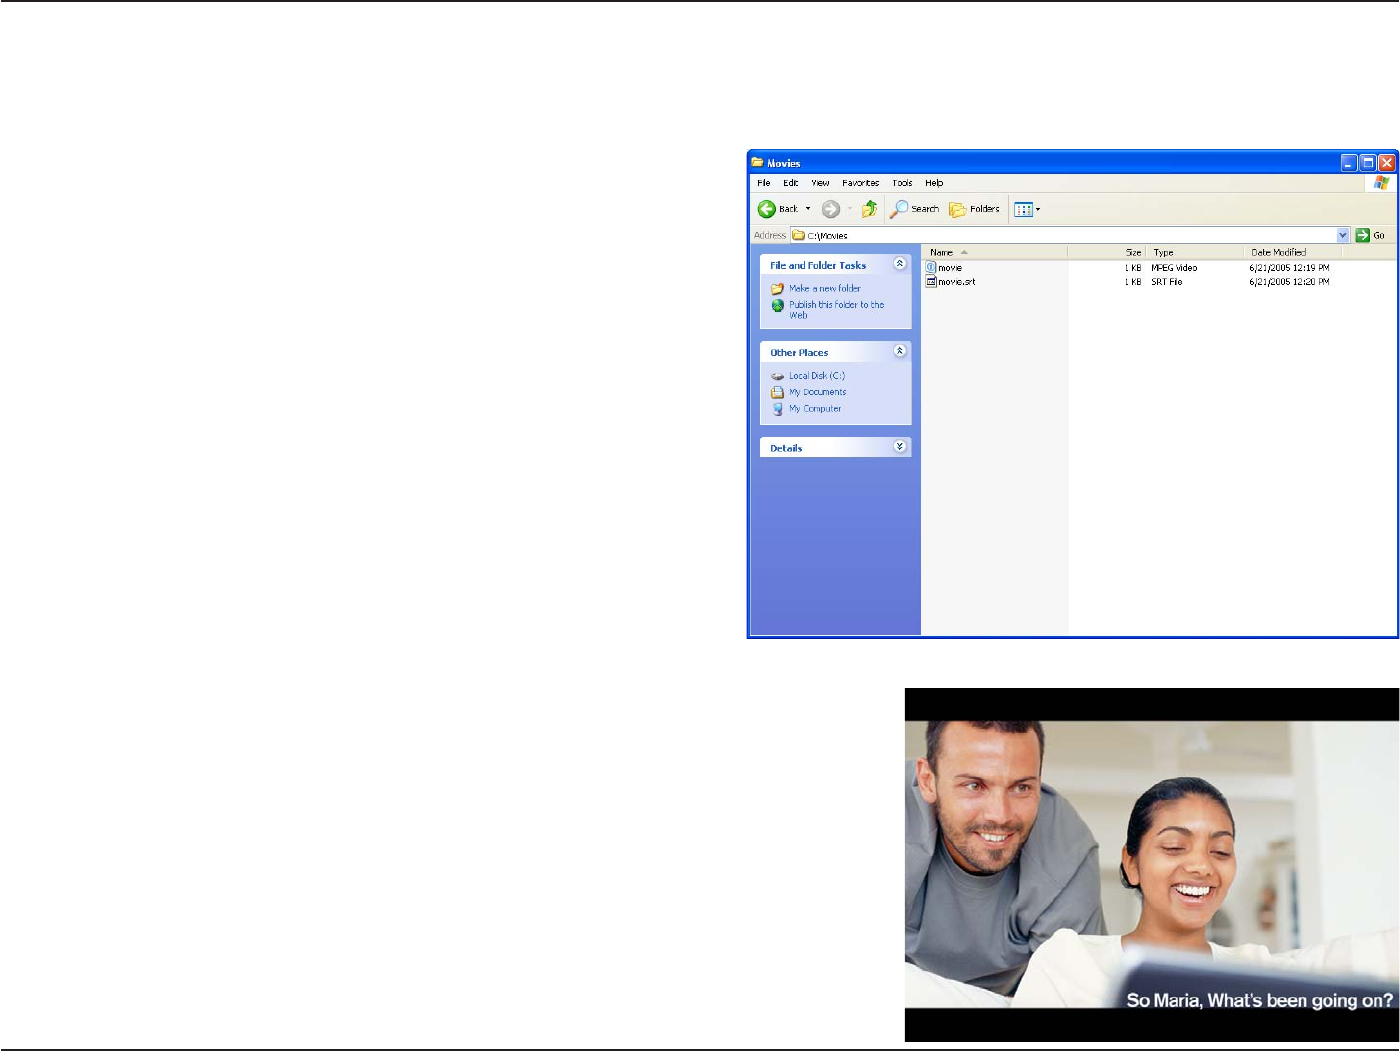
Subtitles
Your media player supports the display of the SRT subtitle file format. To use it, make sure that it is in the same folder
as your movie file and that they are both named exactly the same.
Simply start the video file and the subtitles will show at the bottom of the
screen.
Note: Tools to generate SRT files can be found online.
51D-Link DSM-750 User Manual
Section 3 - Configuration
Your music listening experience on the media player depends upon
the quality of your digital music files on your PC. Avoid quality settings
below 48kbps as they are unsupported. For CD quality music, rip your
MP3s at 128kbps or higher, with a sample rate of 44.1kHz.
The following music file formats are supported:
• MP3 (up to 320 kbps)
MPEG-1, Layer 3 Audio file -The standard Internet music file format.
This is the most commonly used audio format.
• WMA (Does not support WMA lossless)
Windows Media Audio file - Supported by the Microsoft Windows Media
player and some music jukebox programs. Also supports WMDRM
protected WMA files when using Windows Media Player 11.
• WAV
WAV was developed by Microsoft and IBM. WAV sound files end in .wav and are compatible with Windows applications
supporting audio.
• AIFF (AIFF files must be encoded in PCM format only.) AIFF (Audio Interchange File Format) was developed by
Apple Computers and is the standard audio format for Macintosh computers. File extensions are .AIF or .IEF.
• MPEG 1 and MPEG 2
Moving Pictures Experts Group created standards for compressing audio and video. Audio uses the file extension
.mp3.
• OGG Vorbis
Open source audio format. Uses the file extension .ogg.
Note: You are able to play music while viewing a slideshow.
Music
52D-Link DSM-750 User Manual
Section 3 - Configuration
Organizing Music Files
Music files are located on your PC, or on a compatible Network Attached Storage (NAS) drive. They can be contained
in one directory folder, or organized in several subfolders.
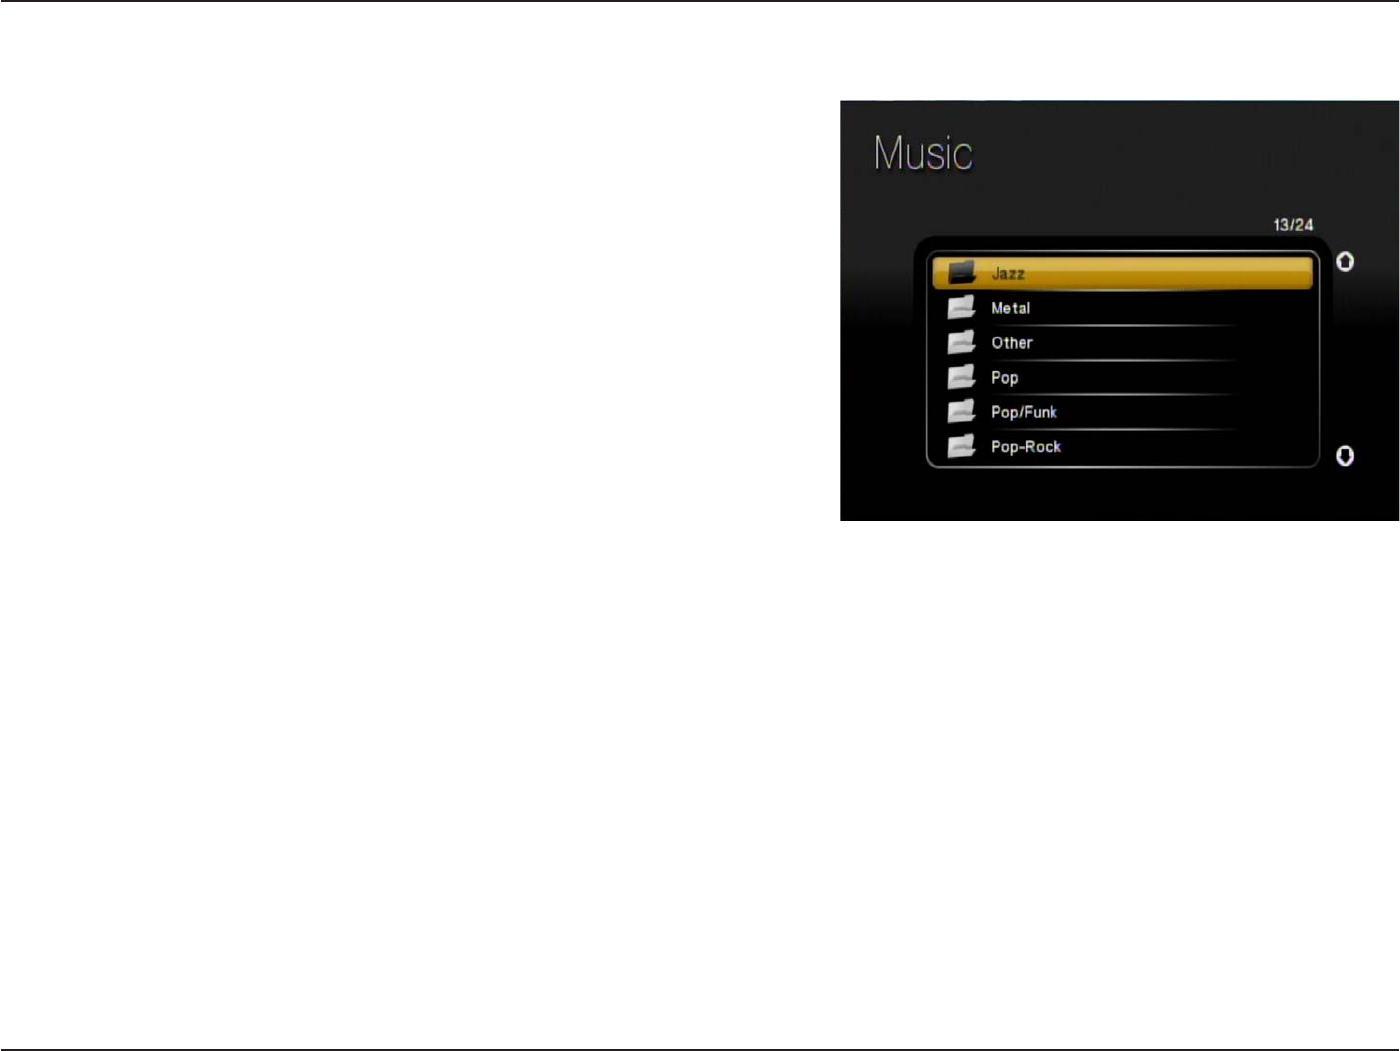
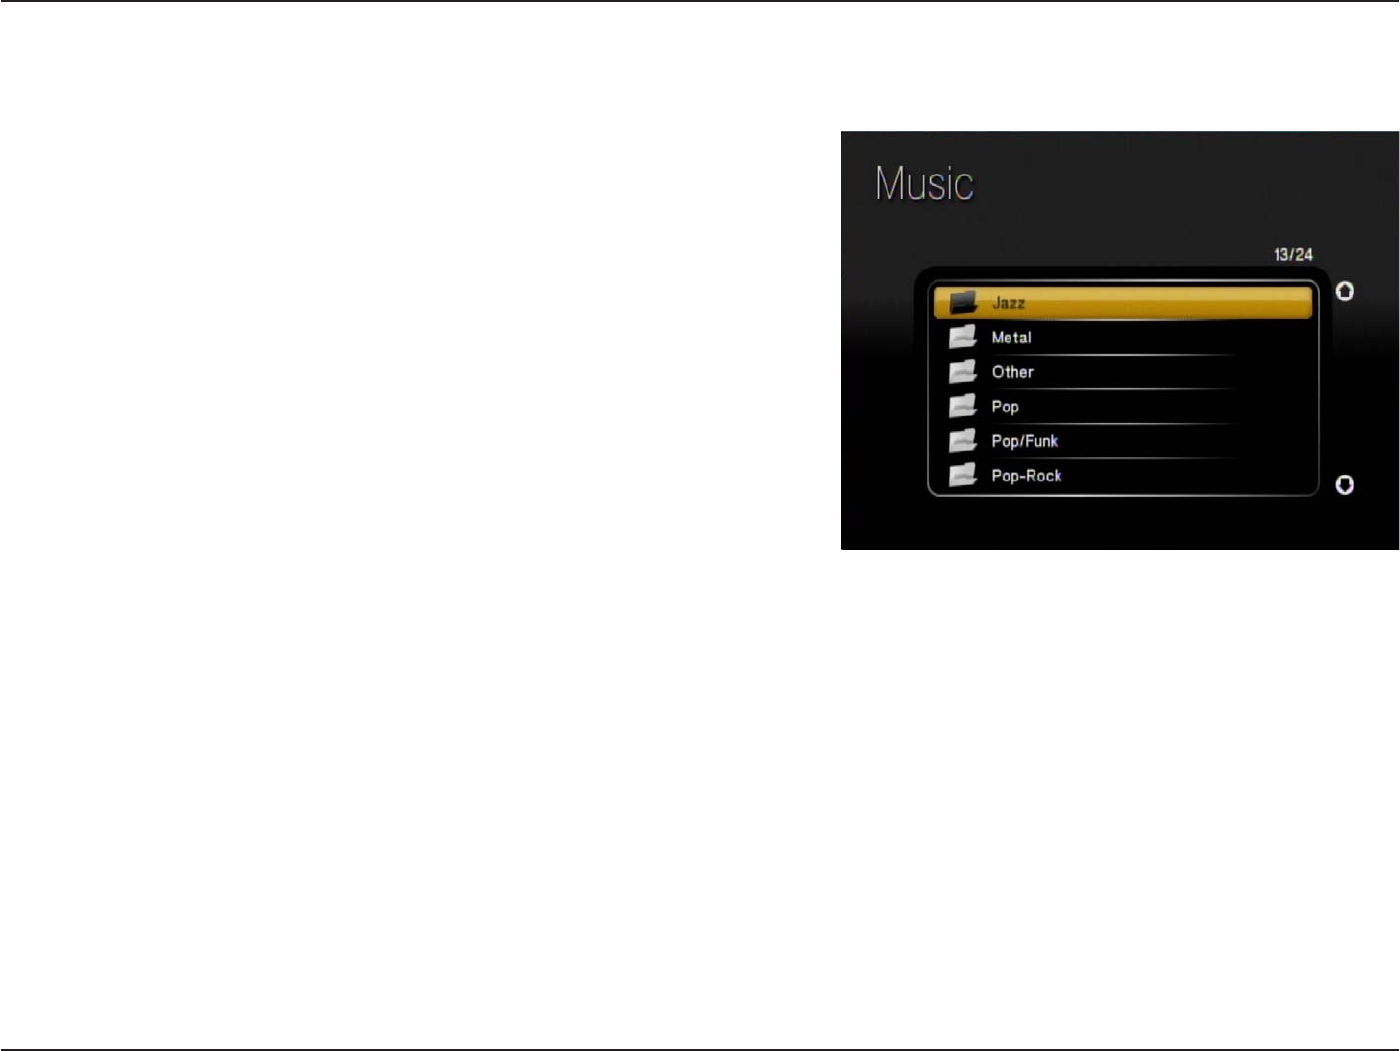
The DSM-750 displays your music files by genres, artists, albums, and tracks. This information is obtained from the
ID3 tags in each of your music files. The ID3 tag is created for you when you rip (copy) your music from your CD.
However, if your music files have incorrect or incomplete tags, the tracks may not appear where they should in your
music categories. The exact order in which your folders and files appear on the DSM-750, are controlled by the media
server software.

53D-Link DSM-750 User Manual
Section 3 - Configuration
Listening to Music
Once you enter the Music menu, you will see a list of your music
folders.
Use the Navigation Arrows on your DSM-750 remote control to
navigate to the music file you wish to listen to. Once you have made
your choice, highlight the music file and press OK, or press Play.
The DSM-750 music player will appear and your song selection
will begin.
Note: The album art will only display if the song you downloaded
or ripped from your CD is from an actual album. The album art is
downloaded from an online media library.
Play - To play music.
Pause - To pause music.
Fast Forward - To fast
forward through the
music.
Rewind - To rewind
through the music.
Stop - Stops the music.
Record - Starts recording
Live TV in Extender mode.
Skip Forward - Skips
through the music at
certain points.
Skip Backward - Skips
through the music in
reverse at certain points.
SHUFFLE - This option is only
available while in MediaLounge™
mode.
REPEAT - This option is only
available while in MediaLounge
mode.
Note: REPEAT and SHUFFLE only
work for music. These buttons are not
supported for video or photos.
54D-Link DSM-750 User Manual
Section 3 - Configuration
There are many ways to browse for a music track. For example, let’s use the following music file located in the
default music folder. (...\Beethoven\Ode to joy.mp3)
Ode to joy.mp3
Artist: Ludwig van Beethoven
Album: Beethoven
Genre: Classical
To browse for this track in the track list:
1. Select All Tracks
2. Highlight Ode to joy
To browse by artist:
1. Select Artists
2. Select Ludwig van Beethoven
3. Select Beethoven
4. Highlight Ode to joy
To browse by album:
1. Select Albums
2. Select Beethoven
3. Highlight Ode to joy
To browse by genre:
1. Select Genres
2. Select Classical
3. Select Ludwig van Beethoven
4. Select Beethoven
5. Highlight Ode to joy
To browse by folder:
1. Select Folders
2. Select My Music
3. Select Beethoven
4. Select Ode to joy
Note: see the SEARCH function on page 59 for
additional search options.
Browsing for Music

55D-Link DSM-750 User Manual
Section 3 - Configuration
Photo
The following photo file formats are supported:
• BMP (non-compressed)
Windows bitmap file. Widely used in Microsoft
Windows for pictures and backgrounds.
• JPEG (grayscale, RGB, YCbCy)
(Does not support CMYK, YCCK.)
The JPEG format is the Internet and digital photo format standard
used by most digital cameras.
• GIF
(Animated GIF’s are not supported)
Older format still widely available on the internet for photos, web
pages, and clip art.
• PNG (Non-alpha channel only)
Portable Network Graphics standard created in response to limitations in the GIF file format.
•TIFF (RGB)
(Does not support CMYK, YMC, YMCK, KCMY)
Tagged Image File Format is a raster file format.
•JPEG2000
JPEG2000 is a new image format based on the latest compression technology.
Note: You are able to play music while viewing a slideshow.

56D-Link DSM-750 User Manual
Section 3 - Configuration
Organizing Photo Albums
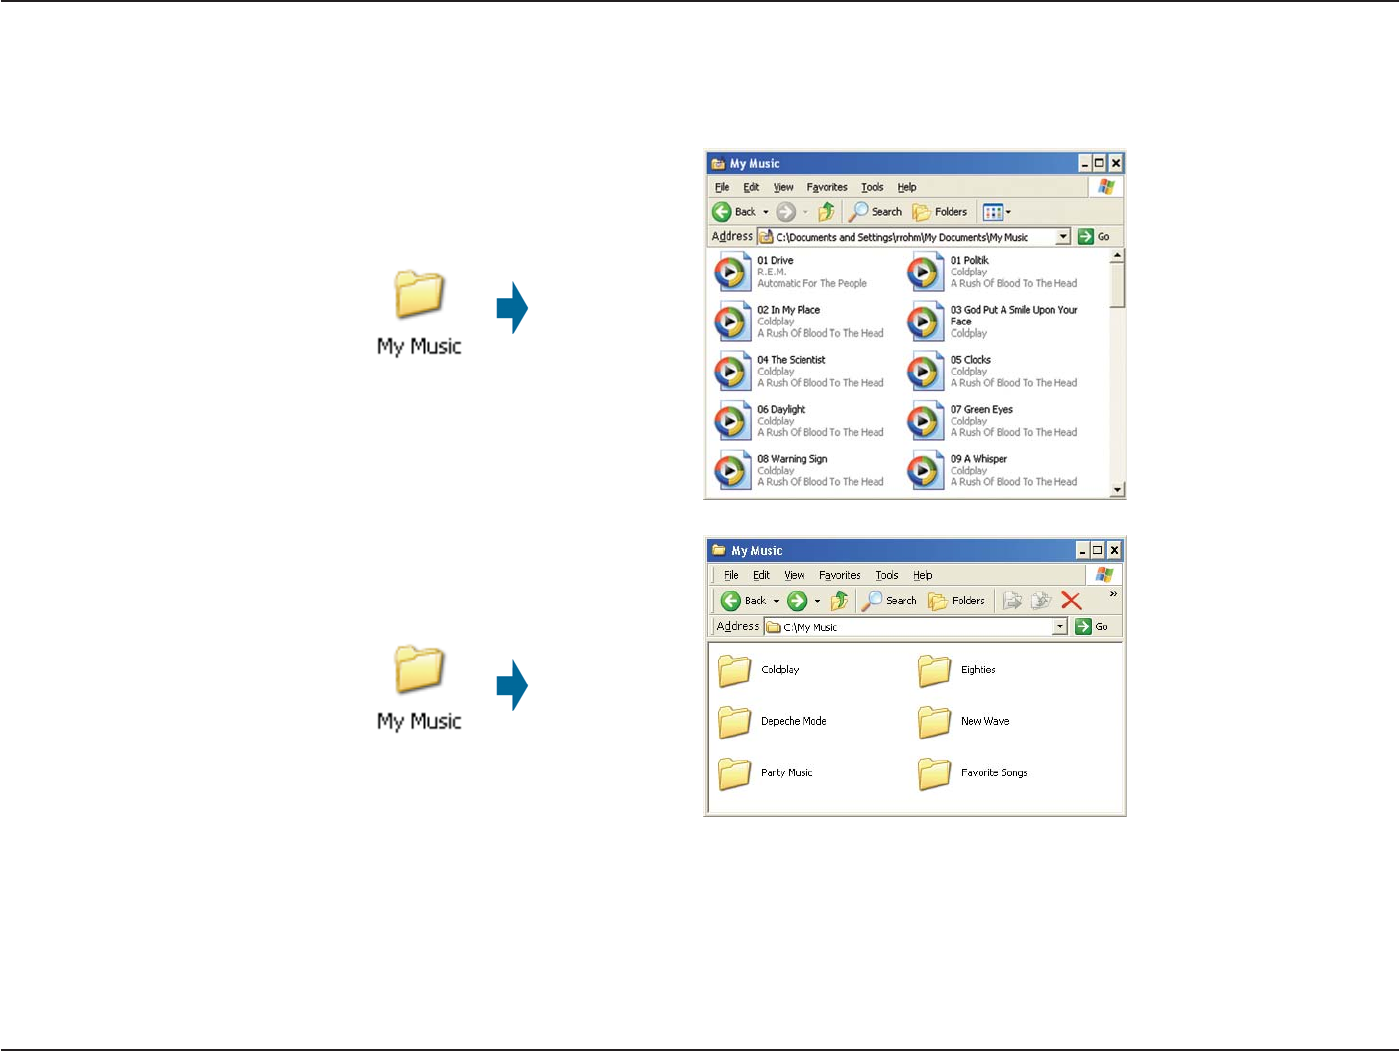
Unlike music files, photos contain little information about their content. Therefore, photos are organized by their filename
and by the folder they are in. Many digital cameras will organize your photos into folders when you connect and unload
them to your PC. Each time you dock or connect, a new folder is created using the current date and time, and all photos
are copied into that folder.
To simplify browsing on your DSM-750, you can create folders on your PC. For instance, create a folder in the My
Pictures directory called Vacation and copy all of your vacation photos into it. Your DSM-750 will show the Vacation
folder. To play a slideshow of the folder, highlight it and press the Play button. To view a list of photos in the folder,
highlight it and press the right arrow button.
You can give your photos meaningful names by renaming the files on the PC. Most digital cameras number photos
sequentially. For example, rename the photo IM001125.jpg to sunset.jpg on your PC. The photo will be displayed as
sunset.jpg on your DSM-750*.
You can create as many folders as you need. Create a folder for the year, then create folders inside for each of the
months, and then folders in each month for special occasions (birthday, vacation, holidays, etc...).
*Folder creation and renaming files must be done on the PC via standard Windows® procedures.
57D-Link DSM-750 User Manual
Section 3 - Configuration
Viewing a Photo
Once you enter the Photo menu, you will see a list of folders and
pictures.
Use the Navigation Arrows on your DSM-750 remote control to
navigate to the photo file you wish to view. Once you have made
your choice, highlight the photo file and press OK.
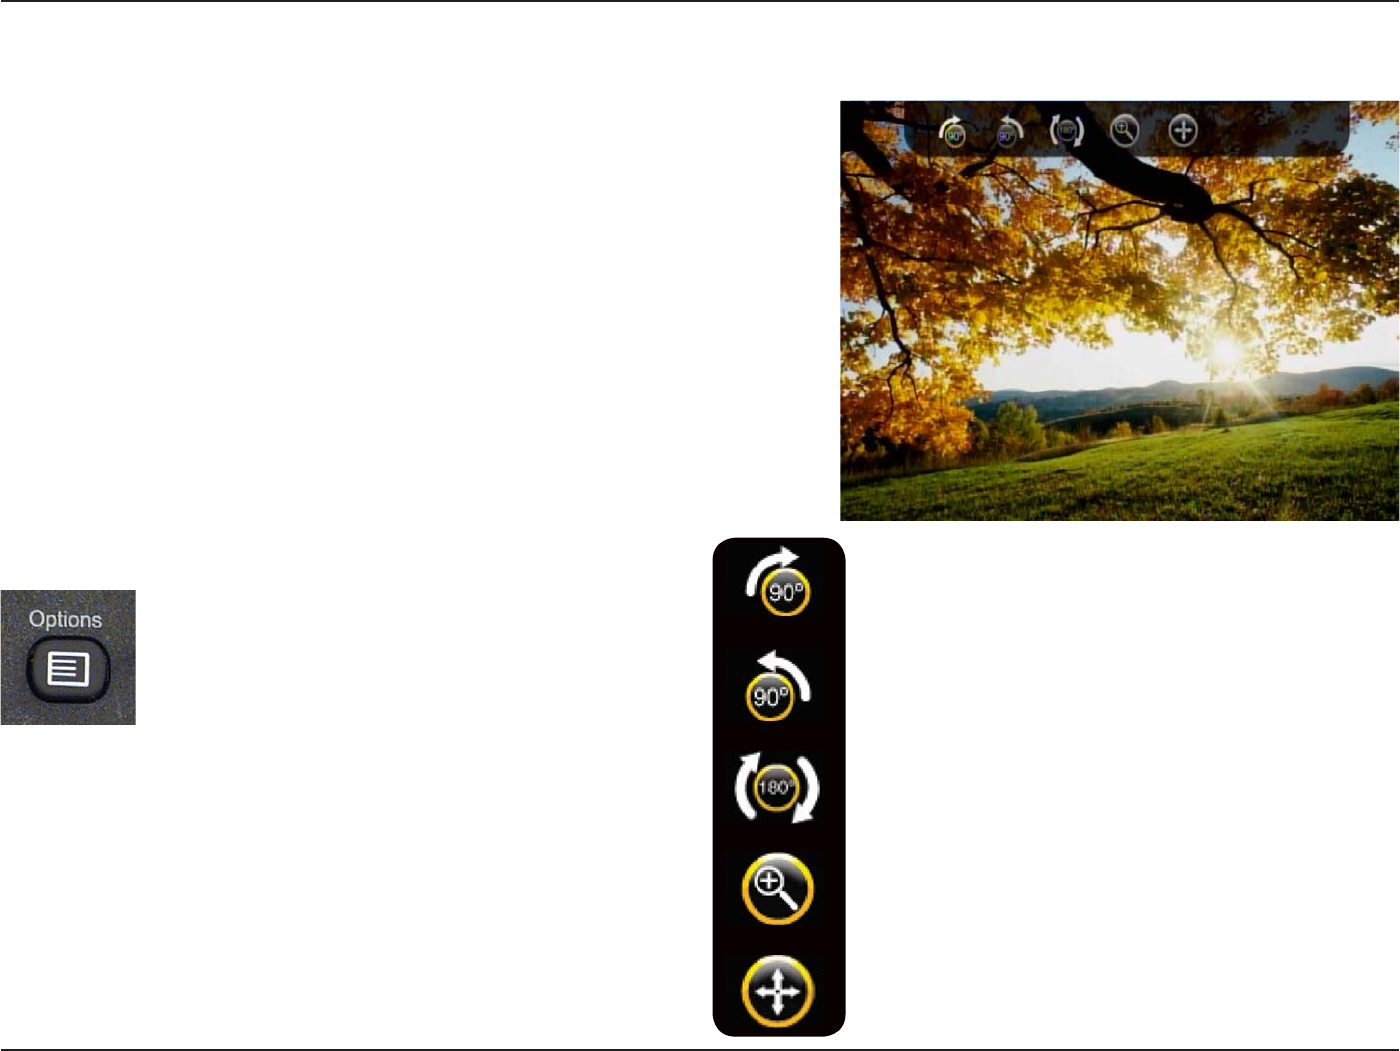
When viewing a photo you can change the on-screen appearance by
applying rotate, pan, and zoom effects. These on-screen effects are
only for enhancing the on-screen view and are not saved to the actual
file. To access the photo viewing effects, press the Options button on
the remote control while viewing the photo that you want to manipulate.
To select an effect, highlight the effect using the Navigation Arrows
on the remote control and press OK to select the effect.
Rotate the photo 90° clockwise
Rotate the photo 90° counter-clockwise
Rotate the photo 180° clockwise
Zoom in on the photo
Pan the Photo
Press the Options button on your DSM-750
remote control to access the options menu
while viewing a photo. Press the Options
button again to exit the options menu.

58D-Link DSM-750 User Manual
Section 3 - Configuration
Viewing a Slideshow
Once you enter the Photo menu, you will see a list of folders and pictures.
To start playing a photo slideshow, highlight a folder and press the Play button. The first photo will be displayed and
then followed by the next photo in the folder. All photos in the folder will be displayed.
Please continue to the Slideshow section on page 83 to setup your slideshow settings. The Slideshow settings are:
•Time Delay
•Photo Scaling
•Fade In/Fade Out
•Slideshow Sequence
Controlling photo playback is very similar to controlling a CD player. Once you have started a photo slideshow, use the
DSM-750 remote to Play,Pause, or Stop the show. Press the Skip Backward and Skip Forward buttons to skip to
the previous or next photo. To set the amount of time before the next photo in a slideshow is displayed, please continue
to the Slideshow section on page 83.
59D-Link DSM-750 User Manual
Section 3 - Configuration
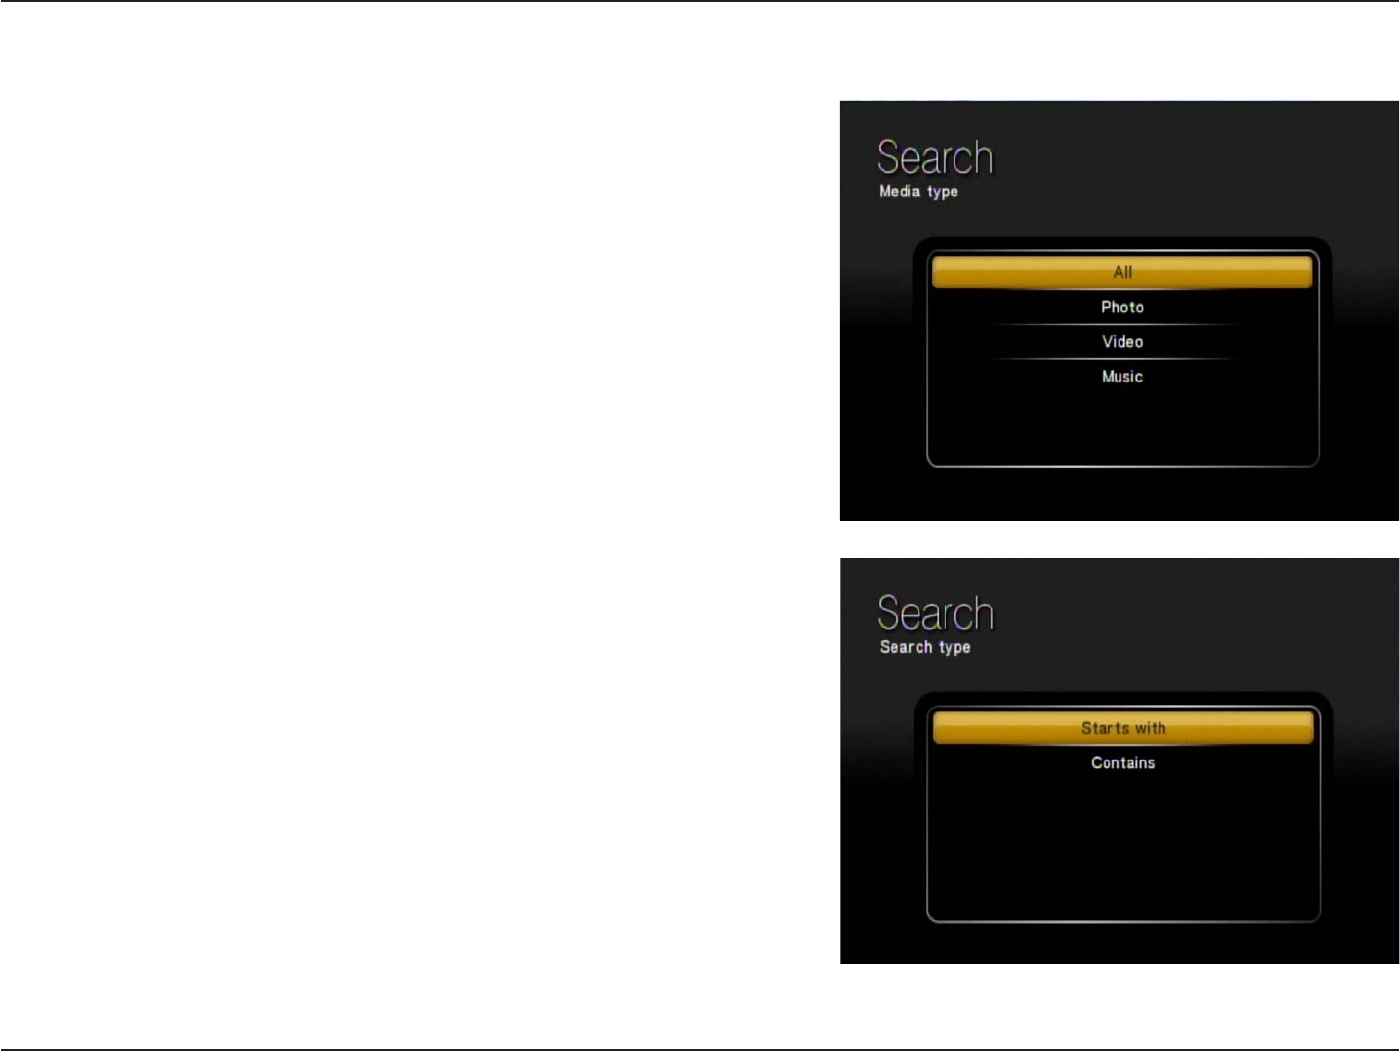
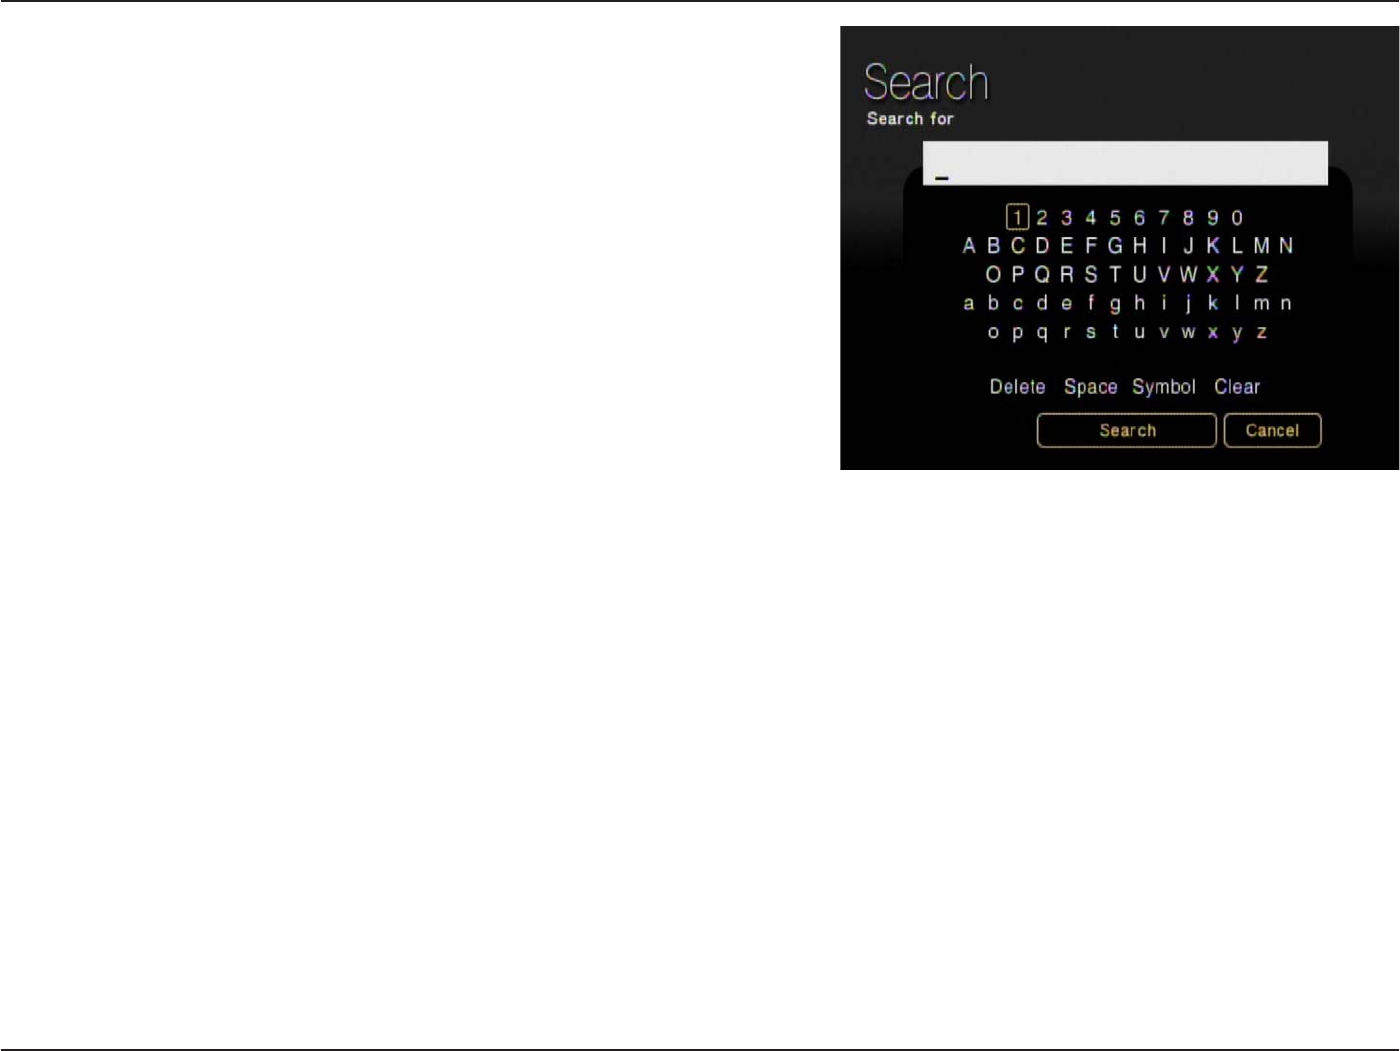
Search
Click the SEARCH button on the DSM-750 remote control and the
following screen will appear. This screen allows you to search for
music tracks, videos, and/or photos. The search function only works
in MediaLounge™ mode, and you must be in the My Media section
before conducting a search. Select between All, Photo, Video,
or Music. After making a selection, click OK on your DSM-750
remote control.
Note: The search function only works for MediaLounge™ mode.
After selecting a media type to search in, you must provide a search
type by either selecting Starts with or Contains.
•Starts with will search for files that begin with characters entered
during your search. Example search of the letters en would be:
Enjoy the Spaghetti
Endless Resolution
Entering San Diego
•Contains will search for files that contain the specified characters
anywhere in the file name. Example search of the letters en would be:
This is the Beginning of the End
The Small Pretender
Entering San Diego
60D-Link DSM-750 User Manual
Section 3 - Configuration
The next screen that follows will have an On Screen Keyboard with
a search box. You MUST use the On Screen Keyboard to enter
alphanumeric characters in the search box. Click Search to begin
your search.
If you want to remove the last character entered, use the DSM-750
remote control’s Navigation Arrows to toggle down and select the
Delete option. While Delete is highlighted, click OK on the remote
control to actually delete the last character. If you want to clear the
entire search box, use the DSM-750 remote control’s Navigation
Arrows to toggle down and select the Clear option. While Clear is
highlighted, click OK on the remote control to actually clear the search
box. You may also press CLEAR on your DSM-750 remote control to
clear the search box.
Note: The alphanumeric keypad on your DSM-750 remote control is unavailable while accessing the Search screen.
You MUST use the On Screen Keyboard to continue with your search.
61D-Link DSM-750 User Manual
Section 3 - Configuration
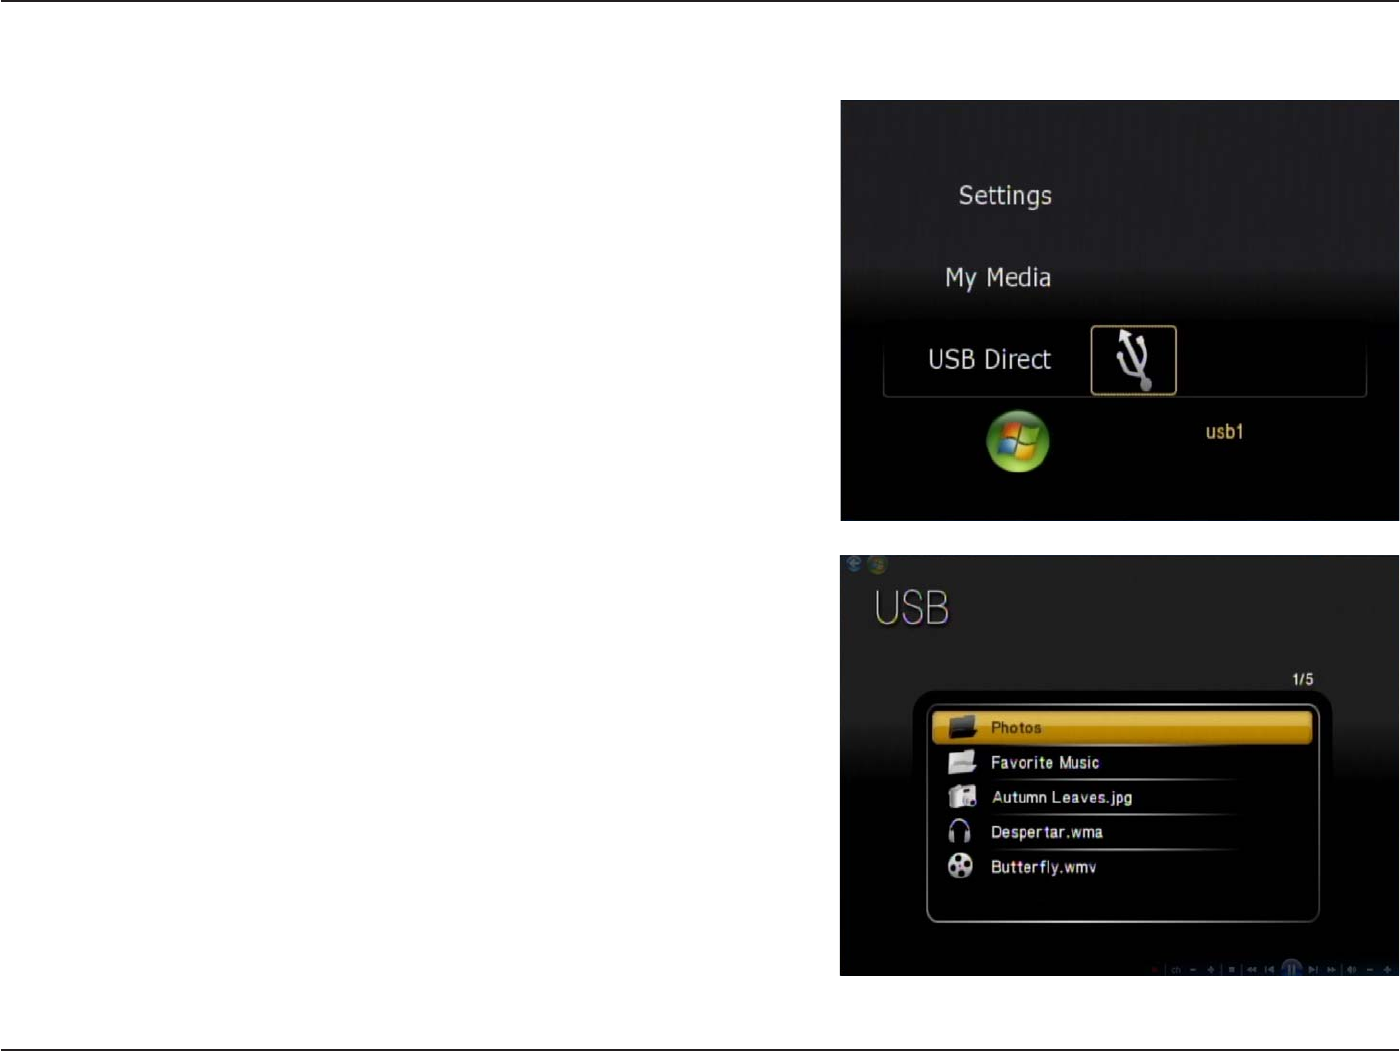
USB Direct Menu
Insert your USB thumb drive into the USB port on the front panel
of the DSM-750. The DSM-750 will automatically detect if there is a
USB drive, and the USB Direct option will be available to you on the
MediaLounge™ menu.
The DSM-750 currently supports NTFS, FAT, and FAT32 formats.
You can play music from your USB drive, and view photos from a listed
server by accessing My Media.
62D-Link DSM-750 User Manual
Section 3 - Configuration
Supported Formats
The following file formats are supported using USB Direct:
• MPEG-1
• MPEG-2
• MP3
• OGG
•WAV
•WMA
•AIF (.aif only)
•AC3
•LPCM (.lpcm only)
• H.264 (.avi)
• WMV9 (up to 720p)
• VC-1
• MPEG-1
•MPEG-2 TS (up to 8Mbps)
•MPEG-2 PS (up to 8Mbps)
•M2V
•MPEG-4 (.mp4)
•XVID
•M4V
• JPEG (.jpg & .jpeg)
• GIF
• PNG
• TIF (.tif & .tiff)
Note: You are able to play music while viewing a slideshow.
MUSIC VIDEO PHOTO