D Link AP1360A1 802.11b/g/n Access Point User Manual Manual 1
D Link Corporation 802.11b/g/n Access Point Manual 1
D Link >
Contents
- 1. Manual 1
- 2. Manual 2
Manual 1

2D-Link DAP-1360 User Manual
Table of Contents
Product Overview ........................................................4
Package Contents ...................................................4
System Requirements .............................................4
Introduction ..............................................................5
Features ..................................................................6
Hardware Overview .................................................7
Connections .......................................................7
LEDs ..................................................................8
Wireless Installation Considerations.........................9
AP/Repeater/Wireless Client Mode ..........................10
Access Point Mode ................................................10
Wireless Client Mode .............................................11
Repeater Mode ......................................................12
Conguration .............................................................13
Web-based Conguration Utility ............................13
Wireless Setup Wizard ..........................................14
Wireless Setup Wizard For AP Mode ....................15
Setup Wizard For Repeater Mode .........................22
Setup Wizard For Wireless Client Mode ................29
Add Wireless Device With WPS ...............................37
Wizard Setup ........................................................39
Access Point ....................................................39
Repeater ..........................................................41
Wireless Client .................................................42
LAN Setup .......................................................43
LAN Settings ....................................................44
Advanced Wireless ..........................................45
Access Control .................................................46
Maintenance ..........................................................47
Device Administration .....................................47
Firmware Update ............................................48
Status..........................................................................49
Device Info .............................................................49
Log .........................................................................50
Statistics ................................................................51
Wireless .................................................................51
Help .......................................................................52
Wireless Security.......................................................53
What is WEP? ...........................................................53
Congure WEP ..........................................................54
What is WPA? ............................................................55
Congure WPA-PSK, WPA2-PSK, and WPA2-Auto-
PSK (Personal) ..........................................................56
Congure WPA-EAP, WPA2-EAP, and WPA2-Auto-
EAP (Enterprise) ........................................................57
Table of Contents

3D-Link DAP-1360 User Manual
Table of Contents
Connect to a Wireless Network Using Windows® XP .......... 57
Congure WEP/WPA-PSK ...............................................59
Using Windows® Vista (Secured Network) ....................60
Using Windows® Vista (Unsecured Network) ........63
Troubleshooting ..............................................................66
Wireless Basics ........................................................68
Wireless Modes .........................................................72
Networking Basics ....................................................73
Technical Specications...........................................75
4D-Link DAP-1360 User Manual
Section 1 - Product Overview
• D-Link DAP-1360 Wireless N Access Point
• Power Supply
• Manual on CD
• Quick Installation Guide
• Ethernet Cable
System Requirements
• Computers with Windows®, Macintosh®, or Linux-based operating systems with an installed Ethernet
Adapter
• Internet Explorer or Netscape Navigator version 6.0 or above, with JavaScript enabled
Product Overview
Package Contents
Note: Using a power supply with a different voltage rating than the one included
with the DAP-1360 will cause damage and void the warranty for this
product.

5D-Link DAP-1360 User Manual
Section 1 - Product Overview
Introduction
D-Link, an industry leader in networking, introduces the new D-Link Wireless N Access Point(DAP-1360). With the
ability to transfer les with a maximum wireless signal rate of up to 300Mbps1, the DAP-1360 gives you high-speed
wireless network access for your home or ofce.
The DAP-1360 is Wi-Fi IEEE 802.11n compliant, meaning that it can connect and interoperate with other 802.11n
compatible wireless client devices. The DAP-1360 is also backwards compatible with 802.11b/g. It can be exibly
congured to operate in 7 different modes Access Point, Wireless Client, Bridge, Bridge with AP, Repeater, WISP
Client Router or WISP Repeater.With its Setup Wizard, the DAP-1360 Access Point ensures that you will be up and
running on a wireless network in just a matter of minutes.
The DAP-1360 Access Point features Wi-Fi Protected Access (WPA-PSK/WPA2-PSK) and 64/128-bit WEP Encryption
to provide an enhanced level of security for wireless data communications. The DAP-1360 also includes additional
security features to keep your wireless connection safe from unauthorized access.
The DAP-1360 supports WPS on three operation modes,with each capable of being conveniently setup by using PIN
method or Push Button.
1 Maximum wireless signal rate based on IEEE Standard 802.11n specications. Actual data throughput will vary. Network conditions and environmental
factors, including volume of network trafc, building materials and construction, and network overhead, lower actual data throughput rate.

6D-Link DAP-1360 User Manual
Section 1 - Product Overview
• Multiple operation modes – Can be exibly congured to operate as an Access Point, Wireless Client, Bridge, Bridge
with AP, Repeater, WISP Client Router or WISP Repeater.
• Total security – Complete set of security features including WEP encryption and WPA/WPA2 to protect network
against outside intruders.
• Supports WPS(WiFi Protected Setup) in seven operation modes.
• Connect home and soho to a wireless network – Create a wireless network for your home and ofce using the
D-Link DAP-1360 as a 802.11n standard Wireless Access Point. Connect this Access Point to a broadband modem
and let others wirelessly access your Internet connection. Enjoy surng the web, checking e-mail, and chatting with
family and friends online.
• Protect wireless network and data – The DAP-1360 provides 64/128-bit WEP encryption and WPA/WPA2 security
to protect your network and wireless data. In addition, it also provides MAC address ltering and the Disable SSID
Broadcast function to limit outsiders’ access to your home and ofce network.
• Flexibly congure your AP for different applications – The DAP-1360 can be congured to operate as (1) an
Access Point to act as a central hub for wireless users, (2) an Wireless Client to connect to another Access Point, (3)
a Repeater to extend the wireless coverage to cover all "dead" spots".
• Easy to install and use – With D-Link's Setup Wizard, you can set up your wireless network in minutes. It congures
your DAP-1360's operation mode, makes it easy to add new wireless devices onto the network, and helps you create
a simple wireless network for your home and ofce.
1 Maximum wireless signal rate based on IEEE Standard 802.11n specications. Actual data throughput will vary. Network conditions and environmental
factors, including volume of network trafc, building materials and construction, and network overhead lower actual data throughput rate.
Features
7D-Link DAP-1360 User Manual
Section 1 - Product Overview
Hardware Overview
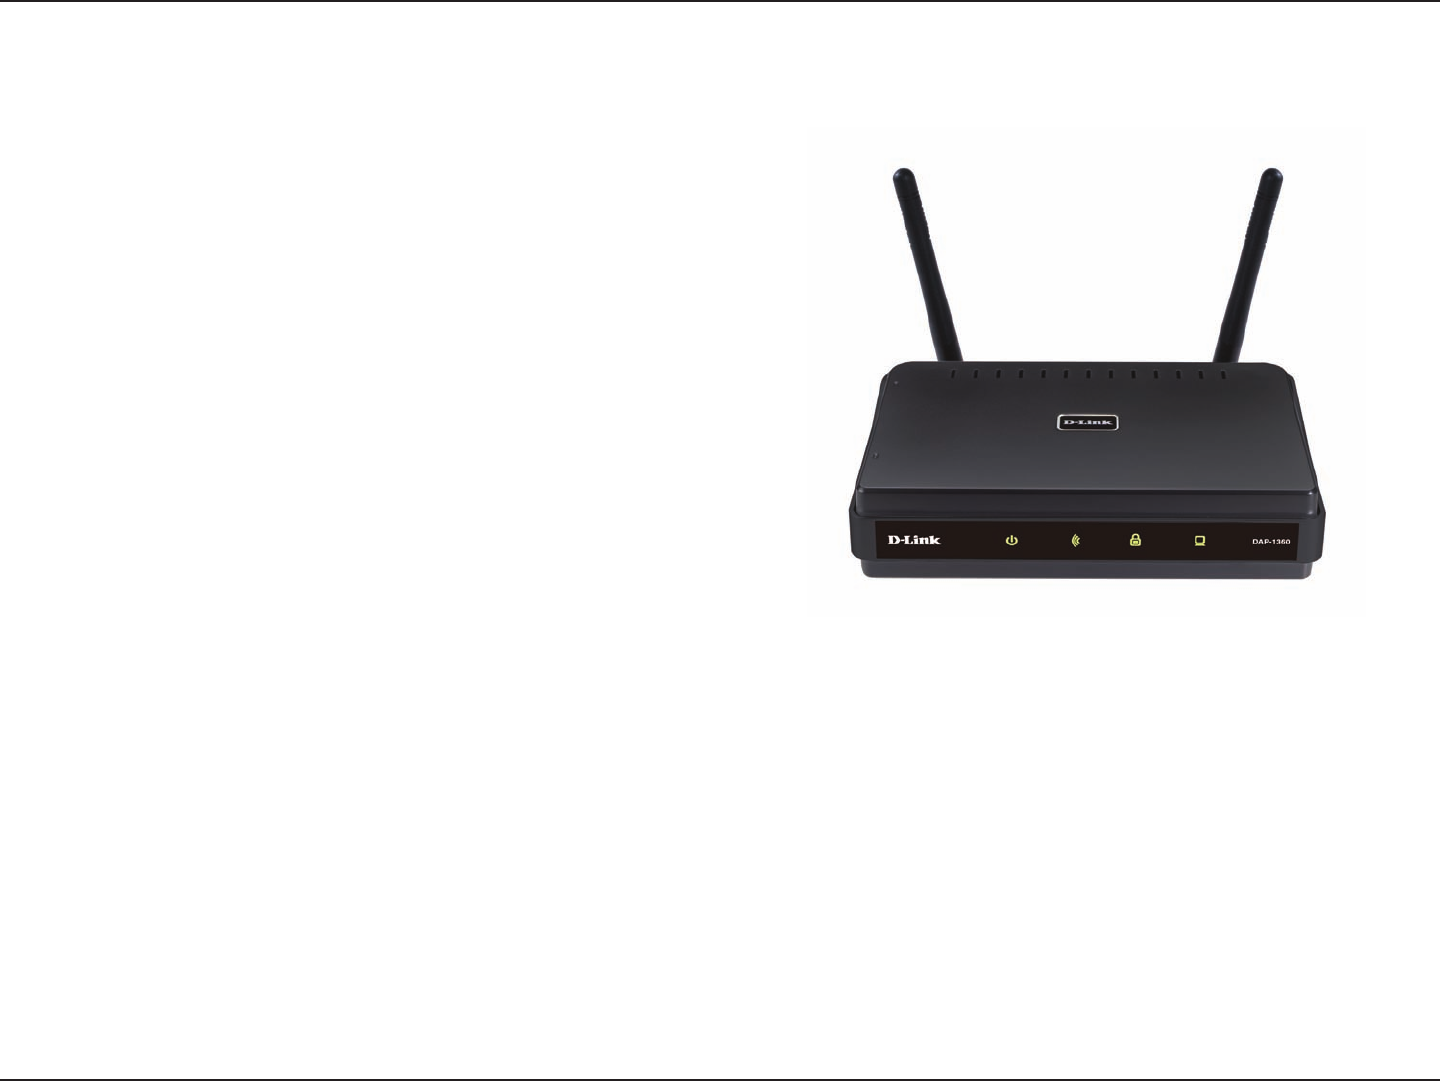
Connections
RESET:
Pressing the Reset Button restores
the access point to its original
factory default settings.
LAN Port:
Connect an Ethernet device such
as a computer, switch or router.
Power Socket:
Connect the power
adapter.
8D-Link DAP-1360 User Manual
Section 1 - Product Overview
Hardware Overview
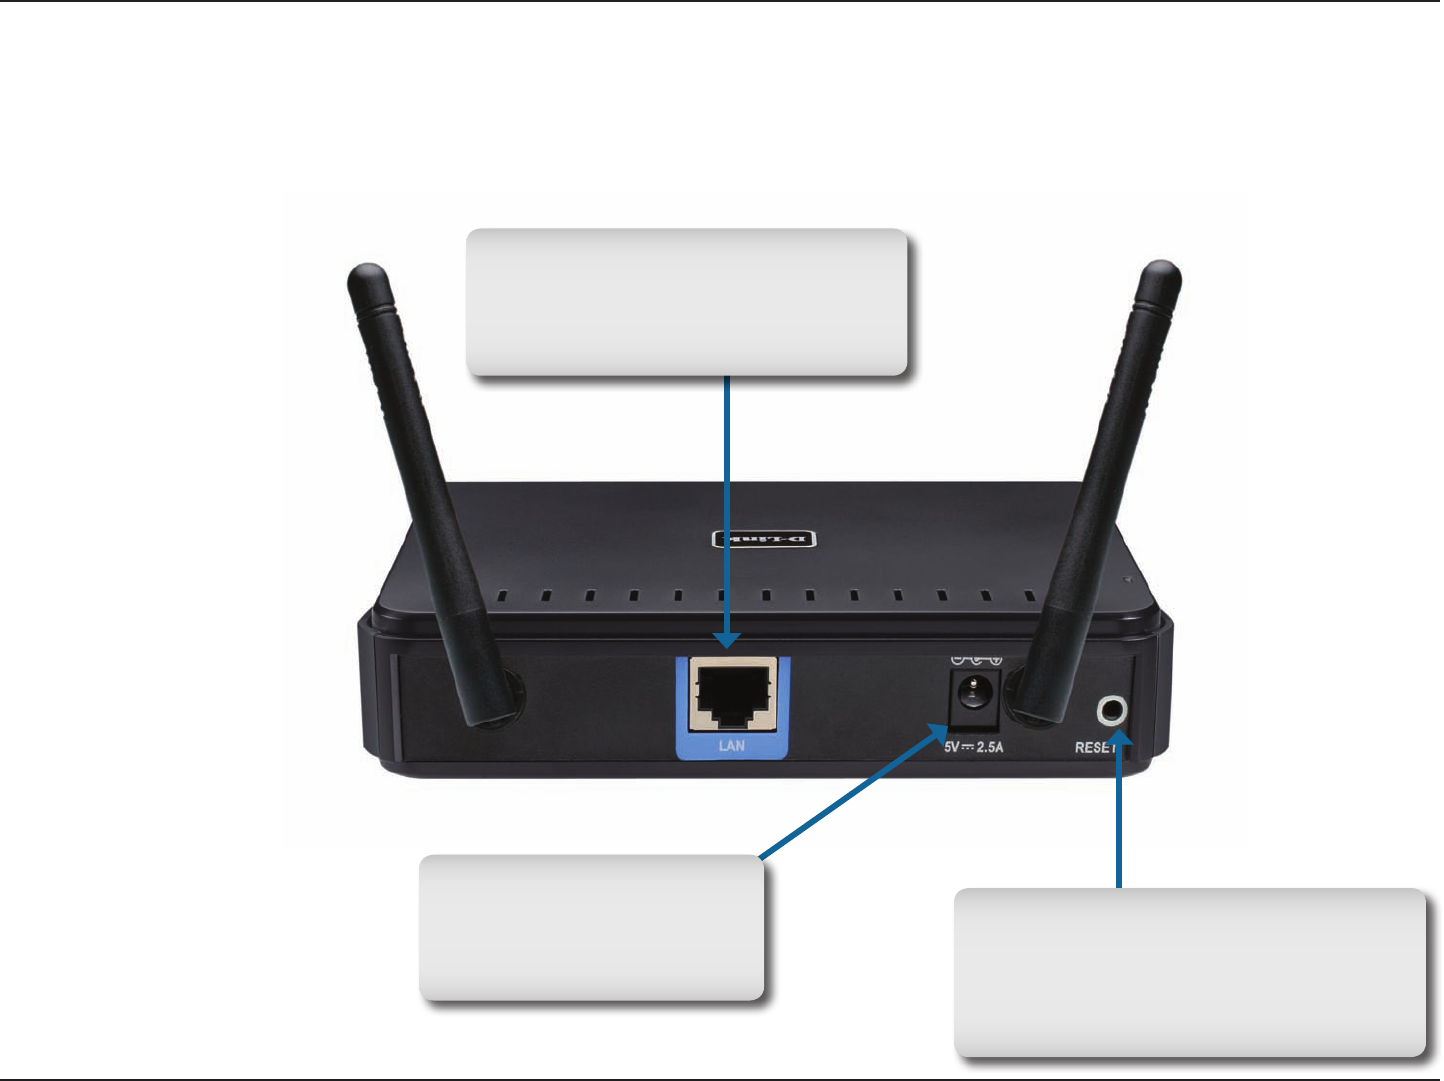
LEDs
Power: Solid green light
indicates connection to a
power source
WLAN: Blinking green light
indicates wireless activity;solid
green light indicates connection
LAN:Blinking green light
indicates activity;Solid green
light indicates connection
Security: A solid green
light indicates when
wireless security is
enabled.

9D-Link DAP-1360 User Manual
The D-Link wireless access point lets you access your network using a wireless connection from virtually anywhere
within the operating range of your wireless network. Keep in mind, however, that the number, thickness and location
of walls, ceilings, or other objects that the wireless signals must pass through, may limit the range. Typical ranges vary
depending on the types of materials and background RF (radio frequency) noise in your home or business. The key
to maximizing wireless range is to follow these basic guidelines:
1. Keep the number of walls and ceilings between the D-Link access point and other network devices to a
minimum - each wall or ceiling can reduce your adapter’s range from 3-90 feet (1-30 meters.) Position your
devices so that the number of walls or ceilings is minimized.
2. Be aware of the direct line between network devices. A wall that is 1.5 feet thick (.5 meters), at a 45-degree
angle appears to be almost 3 feet (1 meter) thick. At a 2-degree angle it looks over 42 feet (14 meters)
thick! Position devices so that the signal will travel straight through a wall or ceiling (instead of at an angle)
for better reception.
3. Building Materials make a difference. A solid metal door or aluminum studs may have a negative effect
on range. Try to position access points, wireless access points, and computers so that the signal passes
through drywall or open doorways. Materials and objects such as glass, steel, metal, walls with insulation,
water (sh tanks), mirrors, le cabinets, brick, and concrete will degrade your wireless signal.
4. Keep your product away (at least 3-6 feet or 1-2 meters) from electrical devices or appliances that generate
RF noise.
5. If you are using 2.4GHz cordless phones or X-10 (wireless products such as ceiling fans, lights, and home
security systems), your wireless connection may degrade dramatically or drop completely. Make sure your
2.4GHz phone base is as far away from your wireless devices as possible. The base transmits a signal
even if the phone in not in use.
Wireless Installation Considerations
10D-Link DAP-1360 User Manual
How you use your DAP-1360 will determine which mode you choose on the DAP-1360. This section will help you gure
out which setting works with your setup.
AP/Repeater/Wireless Client Mode
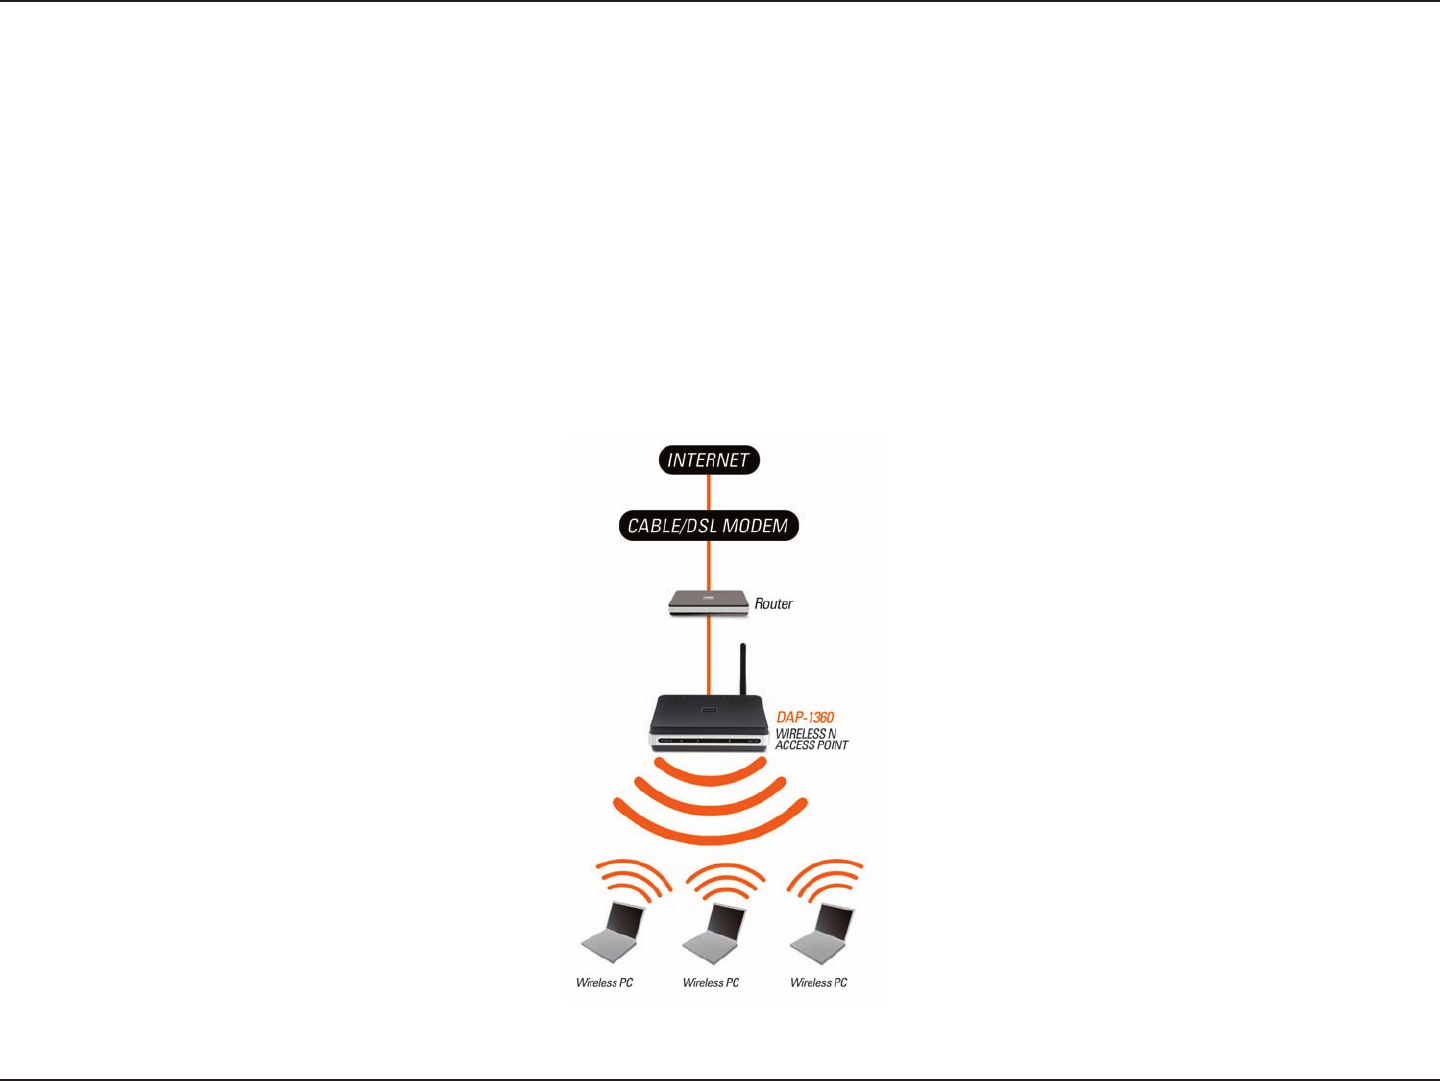
Access Point Mode
In Access Point mode, the DAP-1360 acts as a central connection point for any computer (client) that has a 802.11n
or backward-compatible 802.11b/g wireless network adapter and is within range of the AP. Clients must use the same
SSID (wireless network name) and channel as the AP in order to connect. If wireless security is enabled on the AP,
the client will need to enter a password to connect to the AP. Multiple clients can connect to the AP at the same time
in Access Point mode.
Wireless PCs Using the DAP-1360 as a Central Connection Point

11D-Link DAP-1360 User Manual
Wireless Client Mode
In Wireless Client mode, the DAP-1360 acts as a wireless network adapter for your Ethernet-enabled device (such as
a game console or a TV set-top box). Connect your Ethernet-enabled device to the AP using an Ethernet cable. AP
Client mode can support multiple wired clients.
Ethernet-enabled Gaming Console Using the DAP-1360 as a Wireless Interface to Access the Internet
12D-Link DAP-1360 User Manual
Appendix A - Wireless Modes
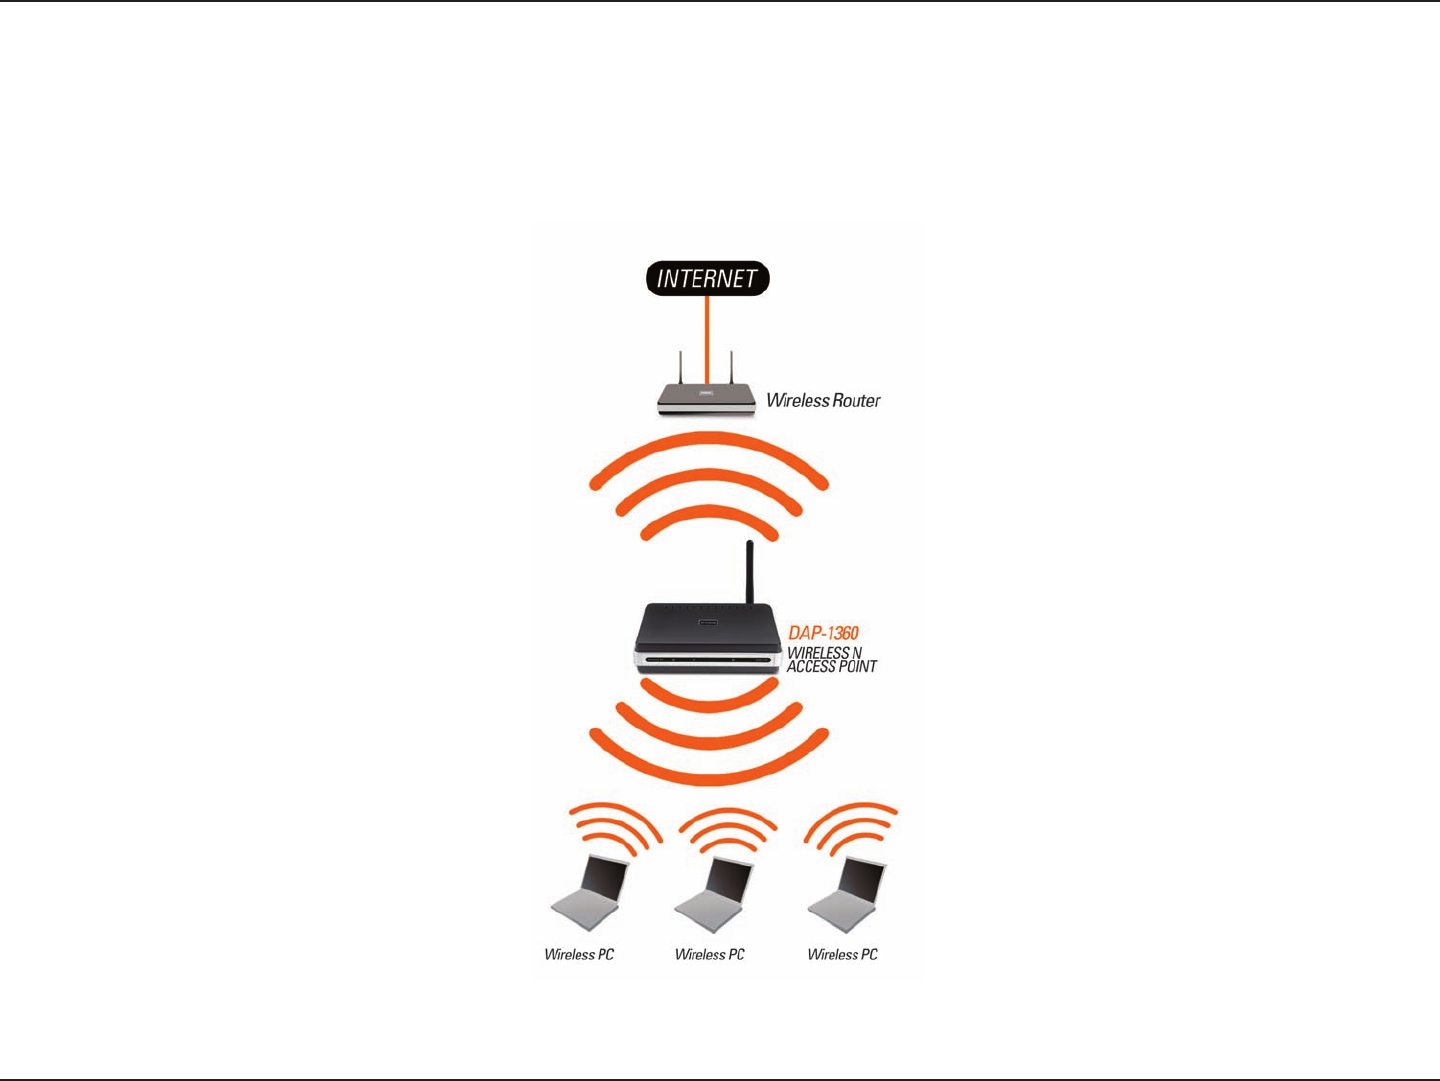
Repeater Mode
Repeater mode increases the range of your wireless network by extending the wireless coverage of another AP or
wireless router. The APs and wireless router (if used) must be within range of each other. Make sure that all clients,
APs, and the wireless router all use the same SSID (wireless network name) and channel.
Extending the Wireless Coverage of a Wireless Router Using the DAP-1360
13D-Link DAP-1360 User Manual
Section 3 - Conguration
Configuration
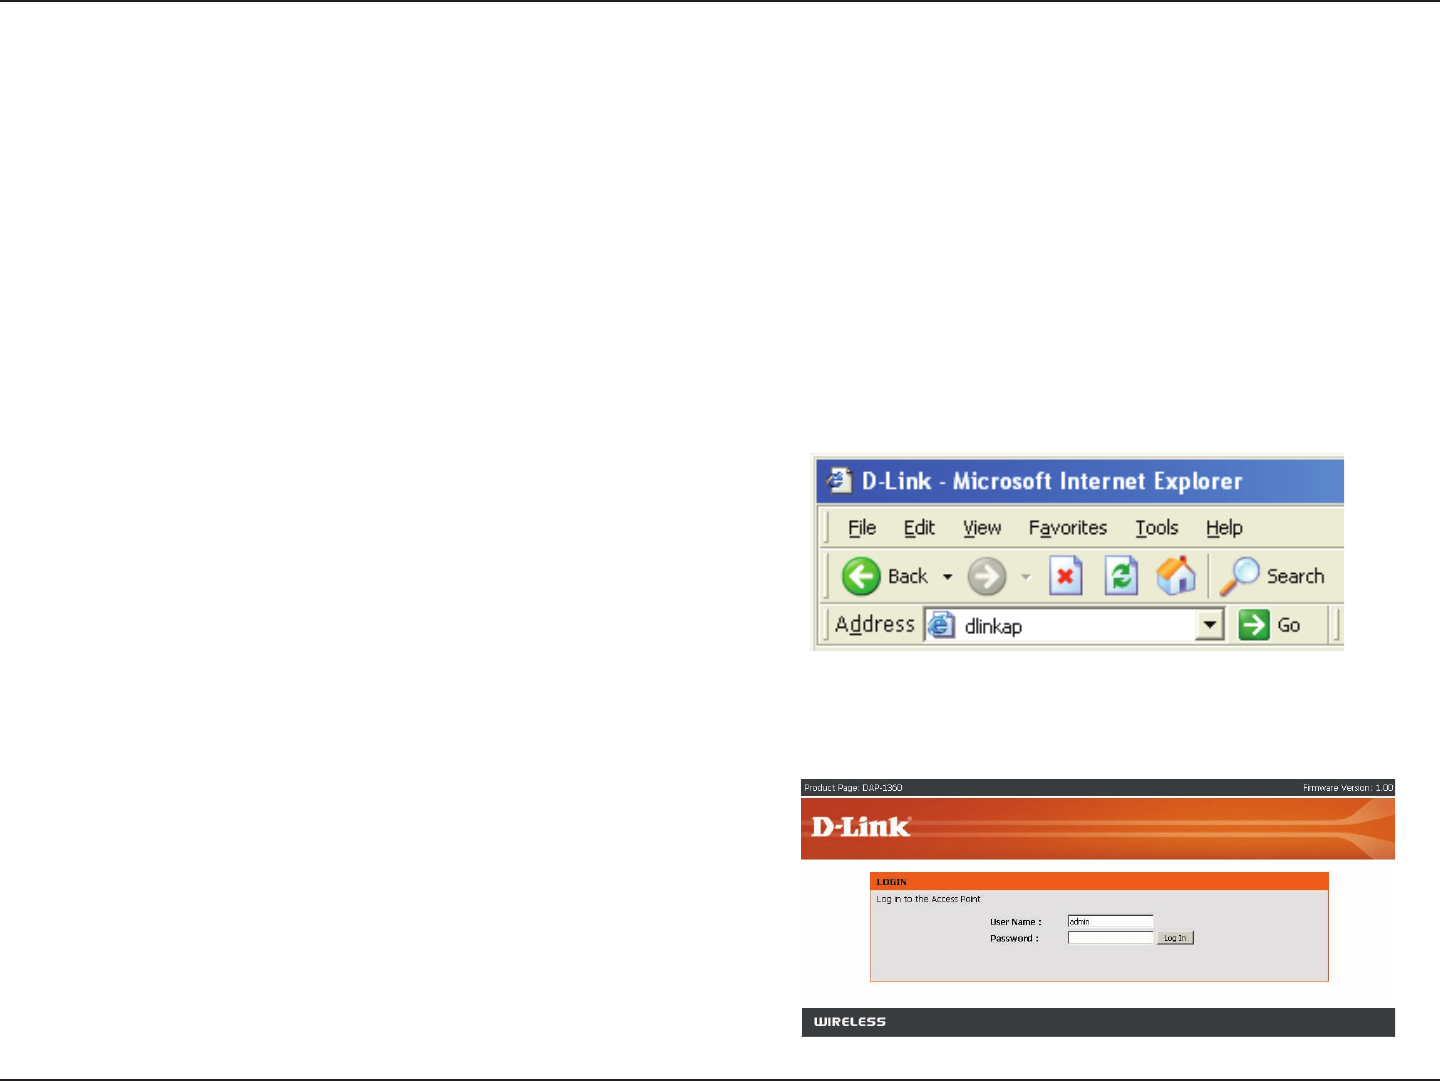
Web-based Configuration Utility
1. Open the web browser
2. Type in the device name of the
DAP-1360.(dlinkap)
If you wish to change the default settings or optimize the performance of the DAP-1360, you may use the configuration
utility that D-Link has included a configuration utility for this purpose.
After you have completed the initial installation, you can access the configuration menu, at any time, by opening the
web-browser and typing in the device name of the DAP-1360. The DAP-1360’s default device name is shown below:
Note: If you have changed the default device name assigned to the DAP-1360, make sure to enter the correct device name.
3. Type admin in the User Name
eld
4. Leave the Password blank
5. Click OK

14D-Link DAP-1360 User Manual
Section 3 - Conguration
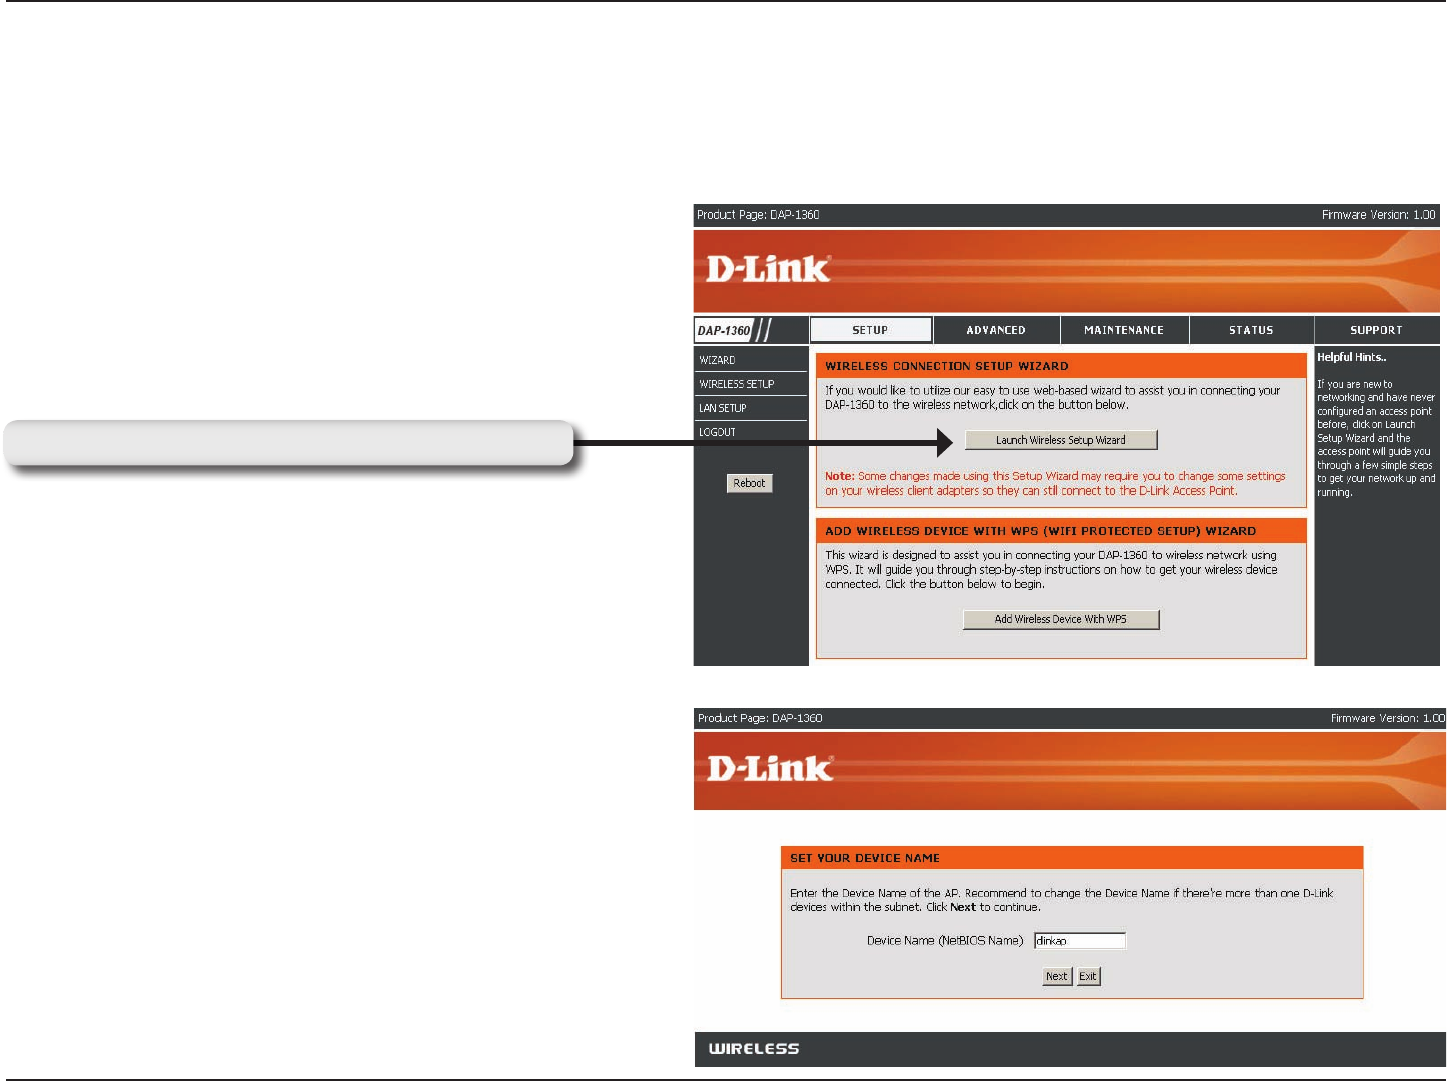
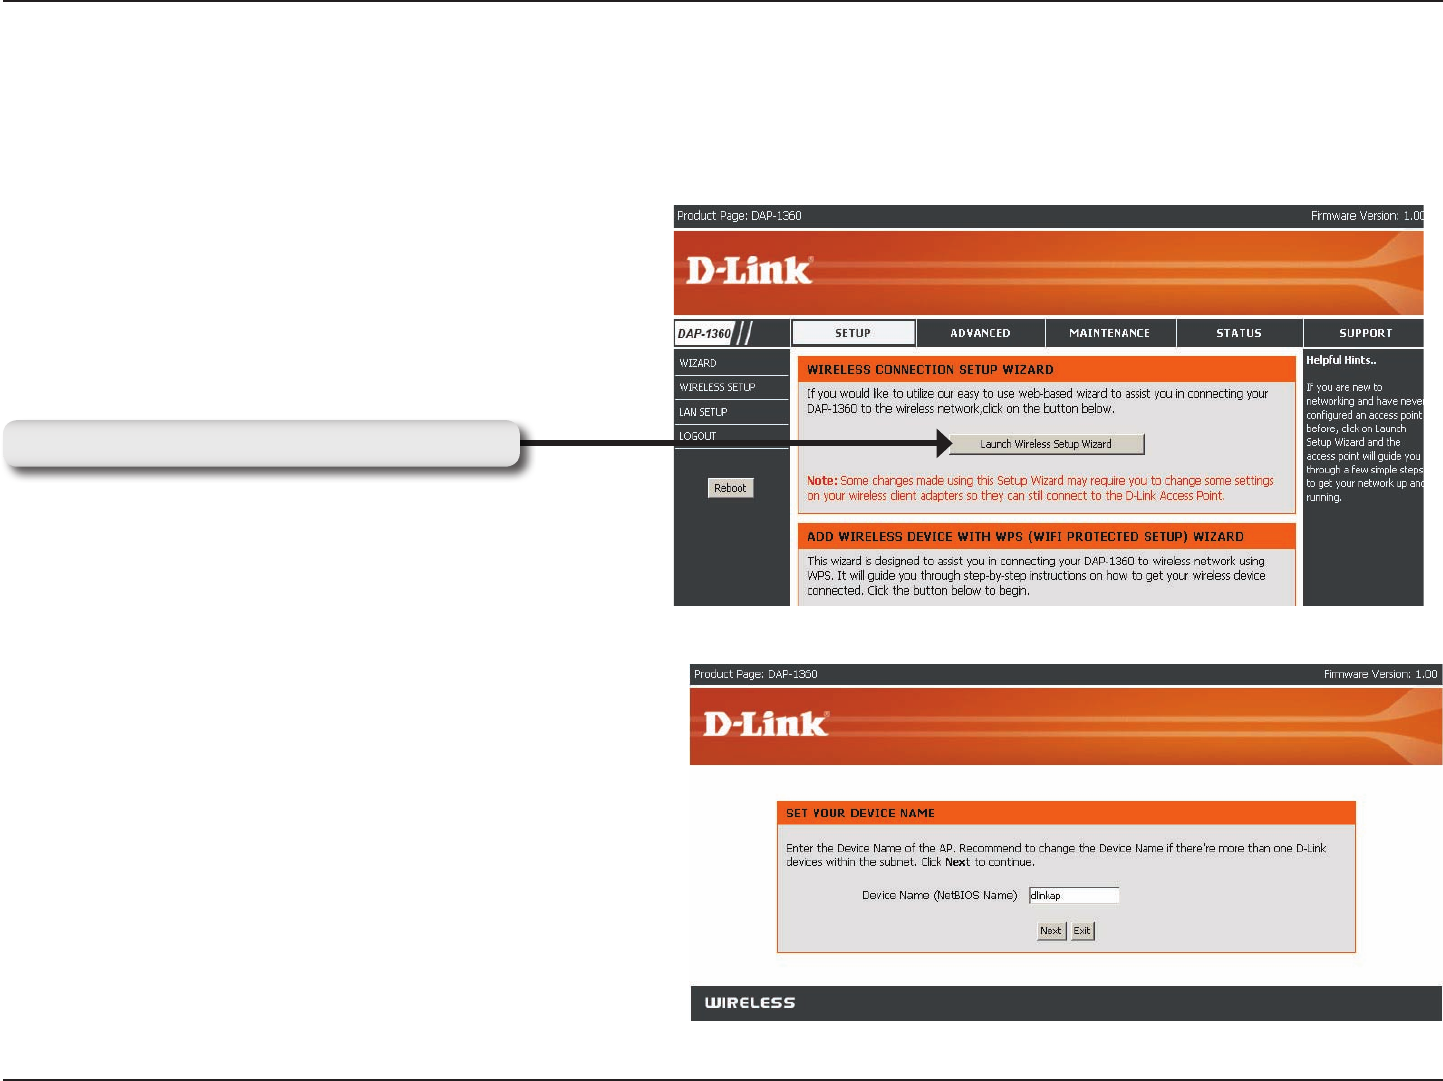
Click Launch Wireless Setup Wizard to quickly
congure your access point.
To setup your wireless network using WPS, you can
click Add Wireless Device With WPS and skip to page
37.
Wireless Setup Wizard
15D-Link DAP-1360 User Manual
Section 3 - Conguration
This Wizard is designed to assist you in connecting you wireless device to your access point. It will guide you through
step-by-step instructions on how to get your wireless device connected.
Wireless Setup Wizard For AP Mode
Enter the Device Name of the AP and click Next to
continue. It is recommended to change the Device
Name if there is more than one D-Link device within
the subnet.
Click Launch Wireless Setup Wizard to begin.
Click Launch Wireless Setup Wizard
Select the wireless mode Access Point.
16D-Link DAP-1360 User Manual
Section 3 - Conguration
Click Save to save your network settings.
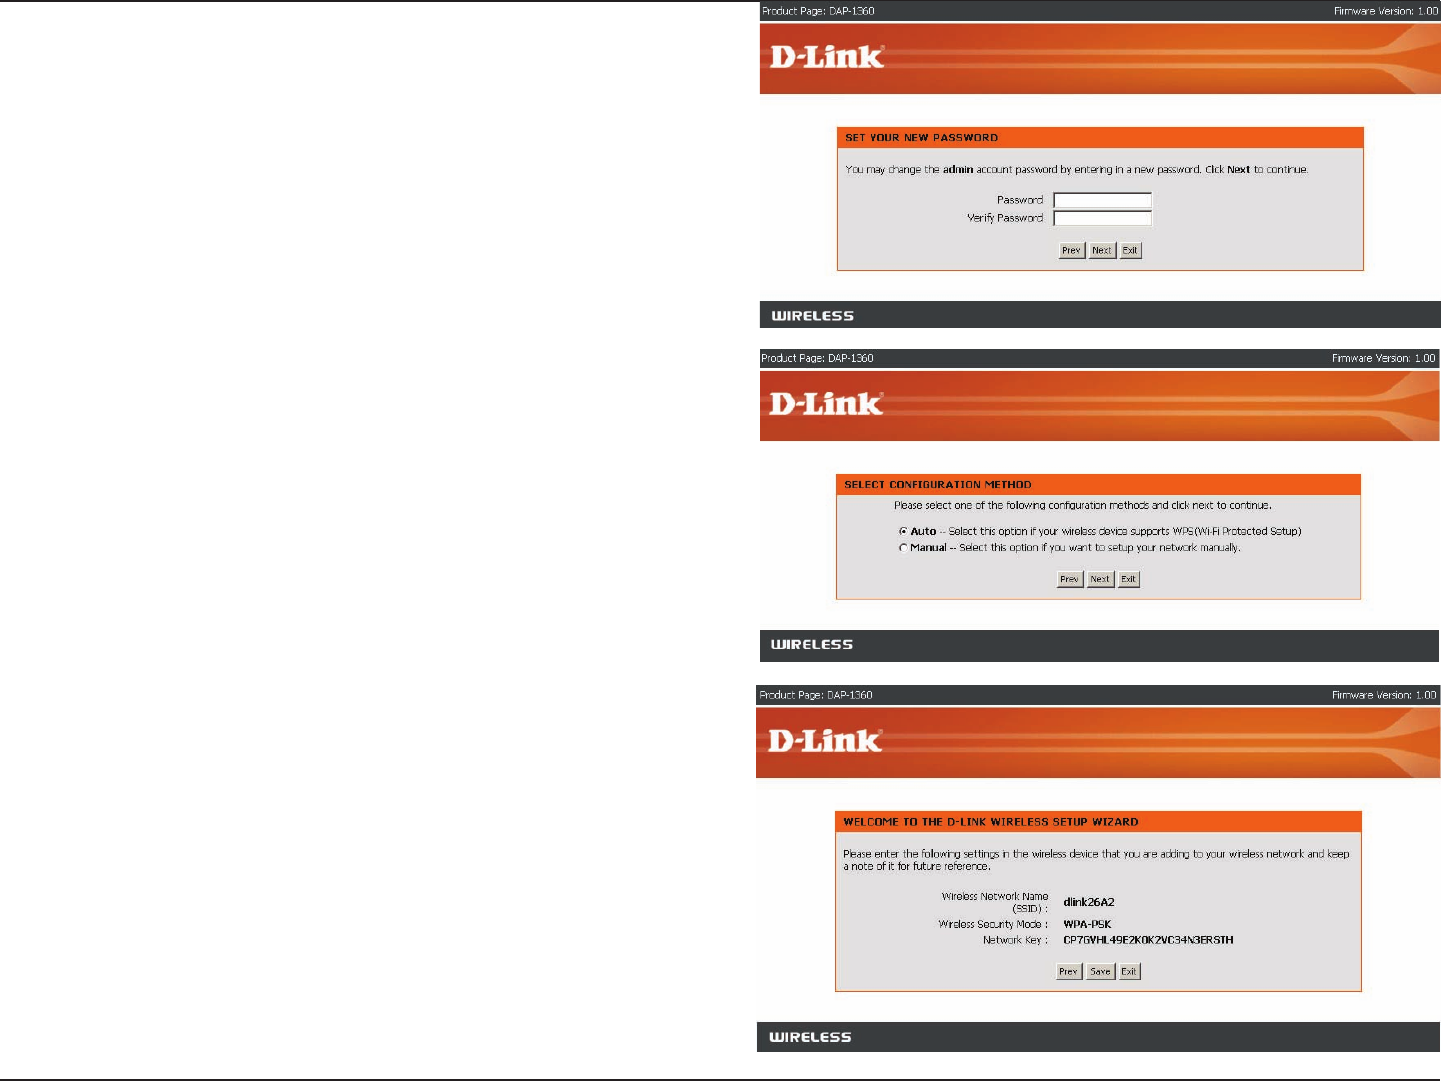
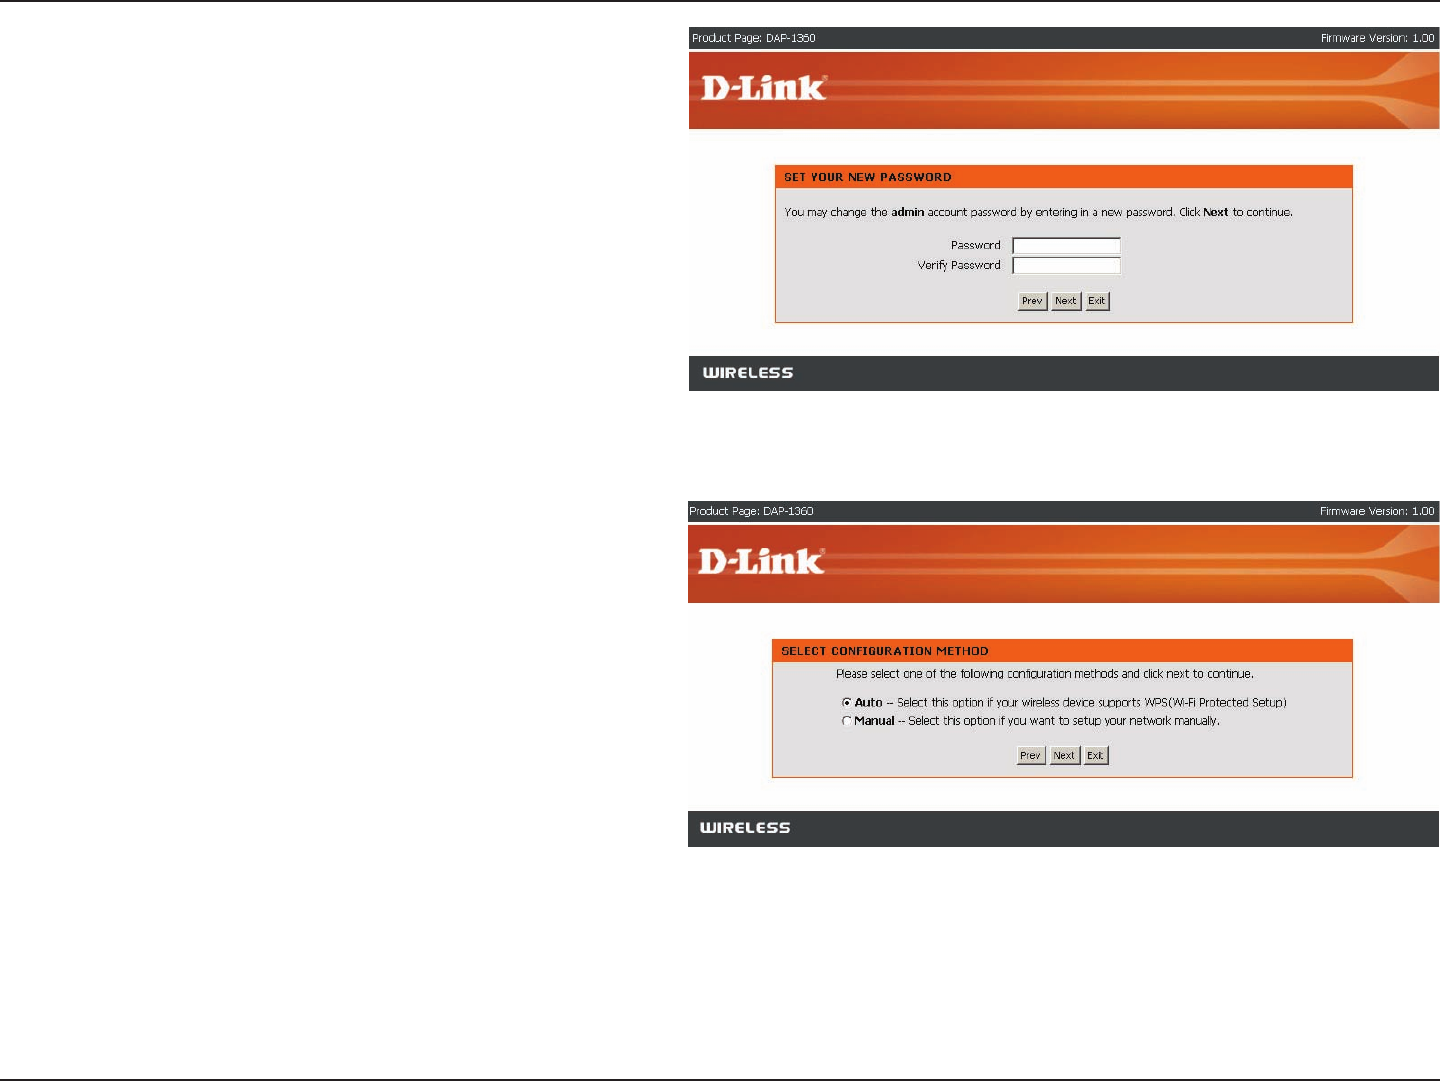
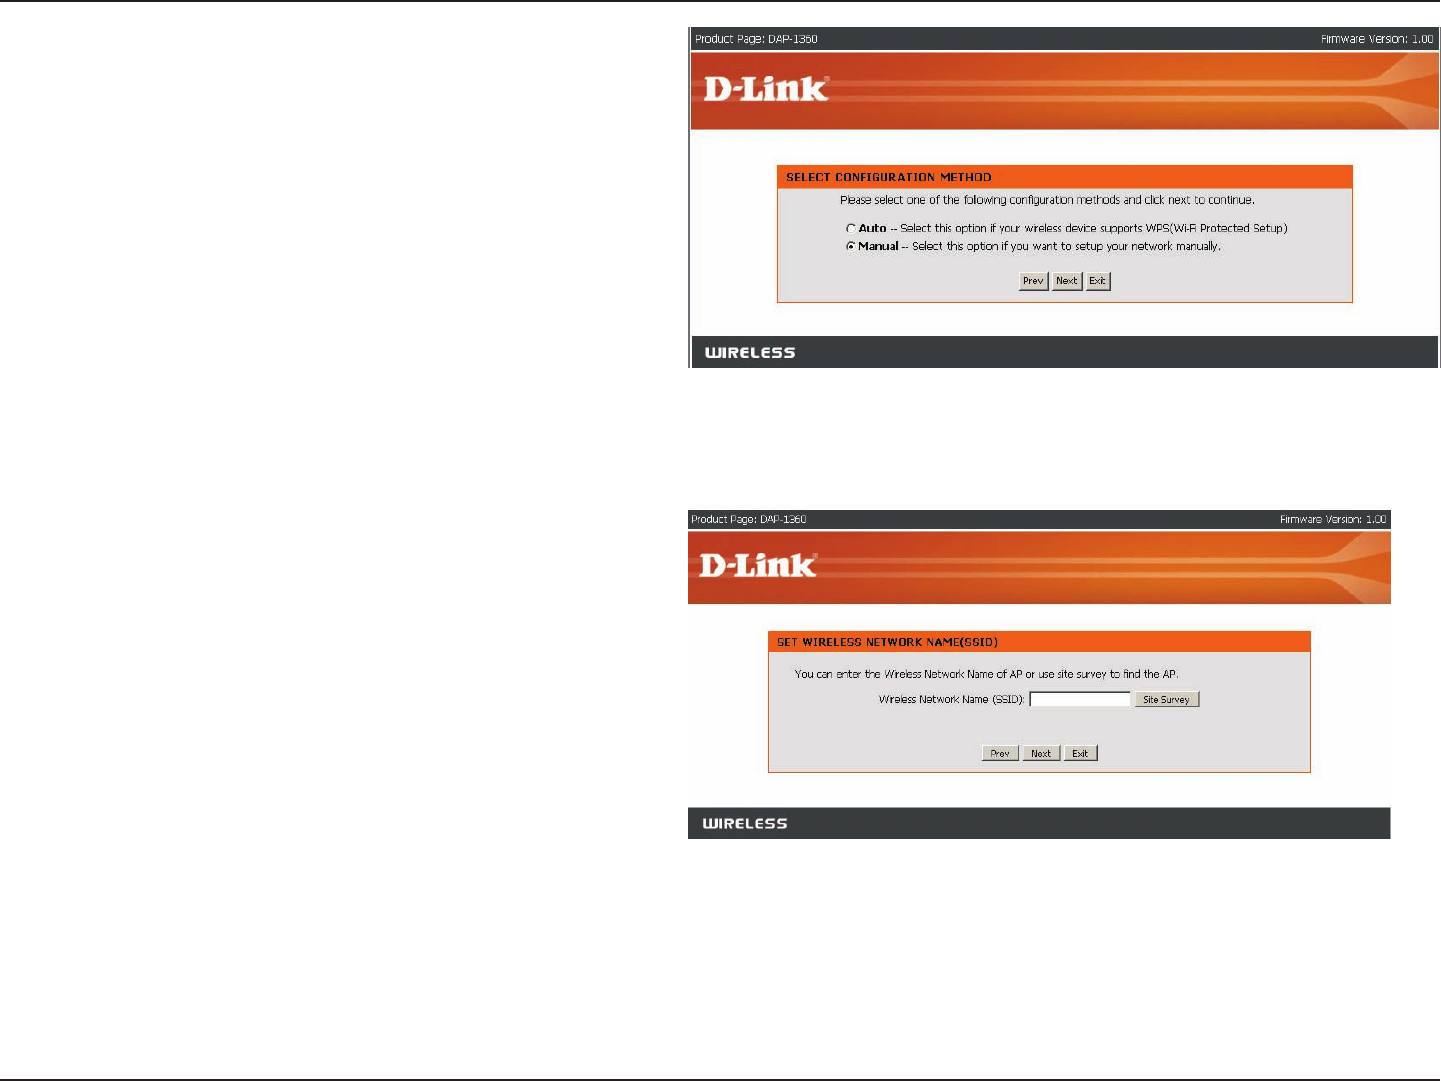
Select Auto as the conguration method only if your
wireless device supports Wi-Fi Protected Setup.
Skip to next page for Manual conguration.
Click Next to continue.
If you want to change the admin account password,
enter a new password and click Next.
17D-Link DAP-1360 User Manual
Section 3 - Conguration
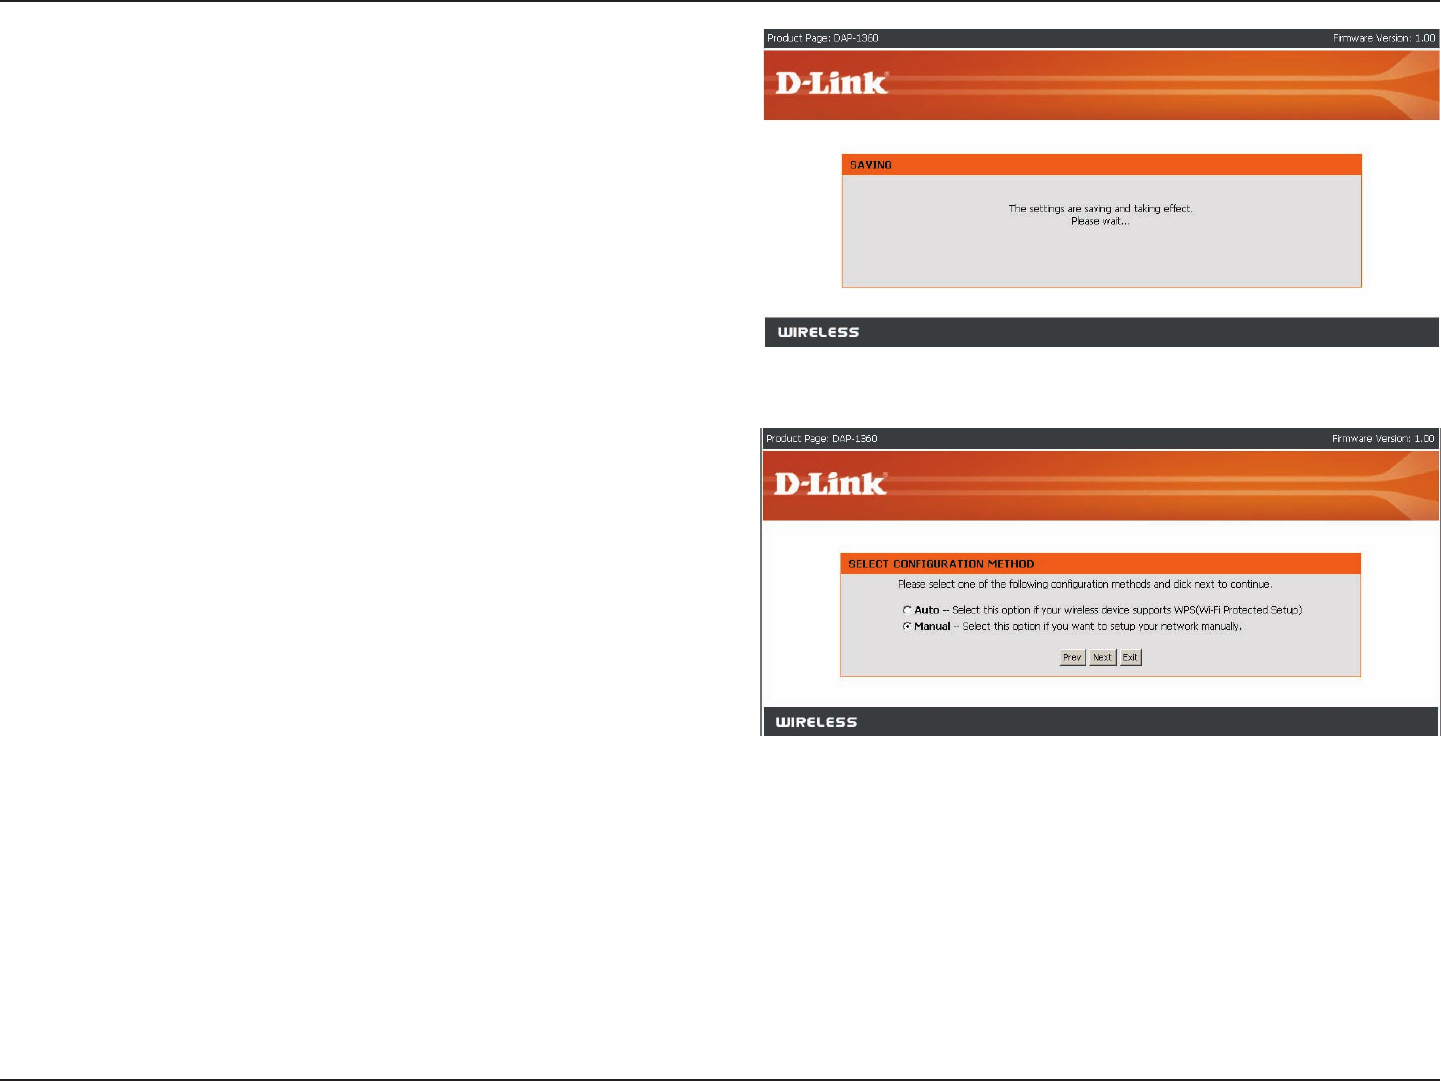
Select Manual as the conguration method to setup
your network manually.
Click Next to continue.
In order for your network settings to take effect AP will
reboot automatically.
When the device has nished rebooting the main screen
will display.
18D-Link DAP-1360 User Manual
Section 3 - Conguration
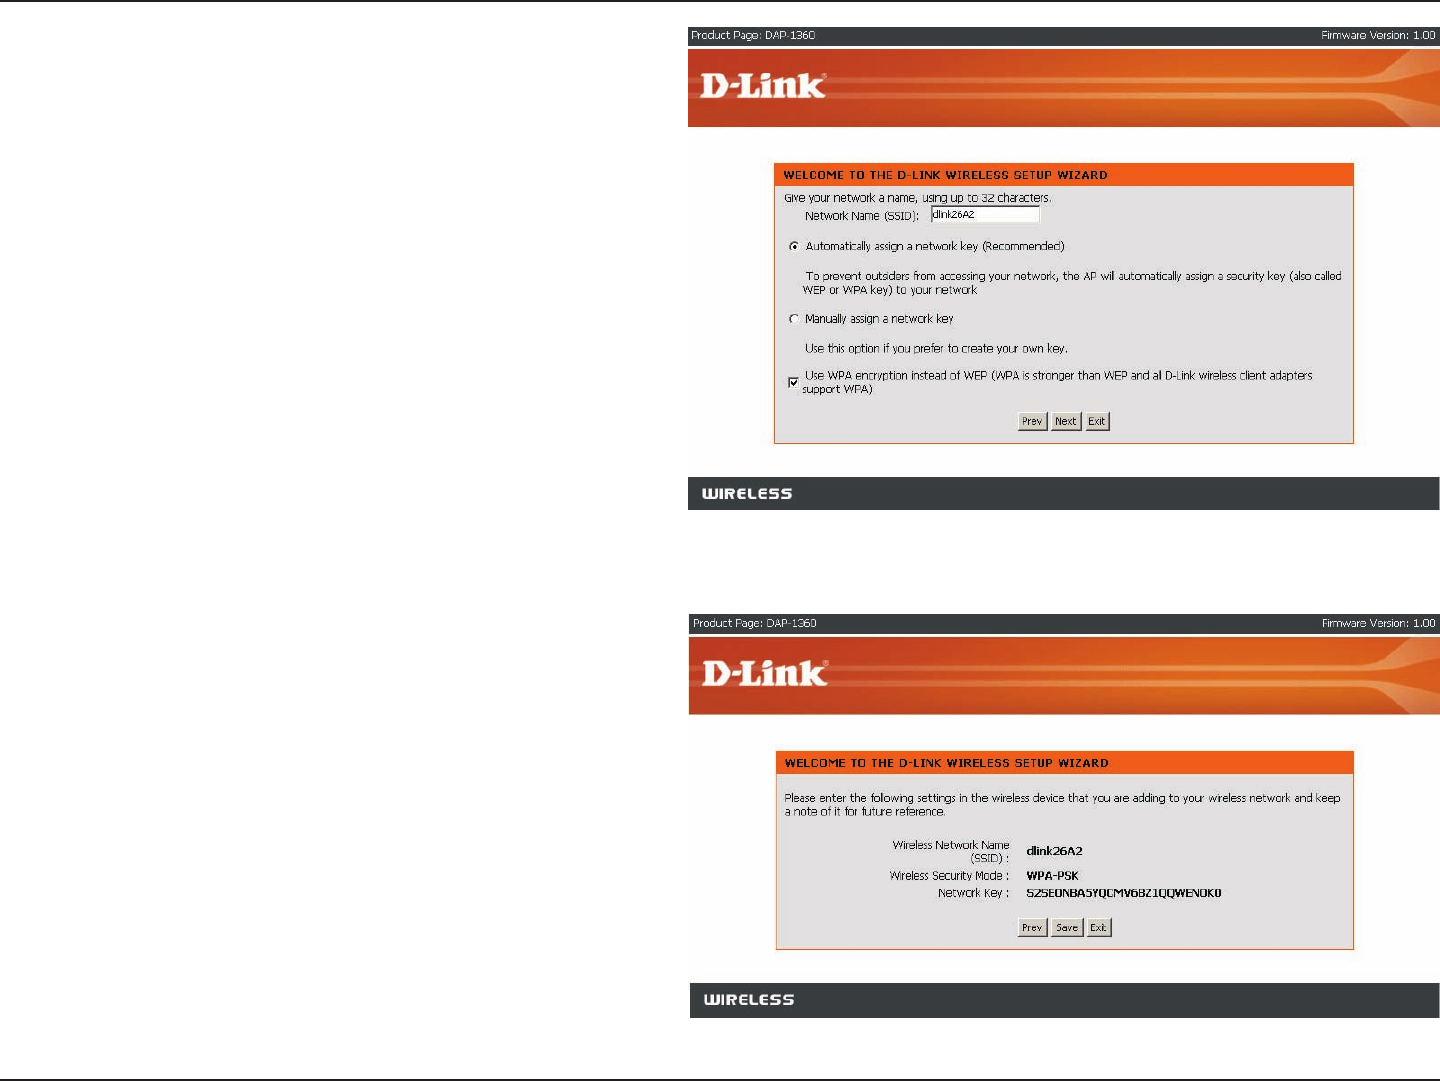
If you choose WPA-PSK encryption, the following
screen will show you your Network Key to enter on your
wireless clients.
Click Save to nish the Setup Wizard.
Enter a network name and choose Automatically
assign a network key.
To Manually assign a network key, skip to page 19.
Click Next to continue.

19D-Link DAP-1360 User Manual
Section 3 - Conguration
Choose Manually assign a network key to create
your own key.
Click Next to continue.
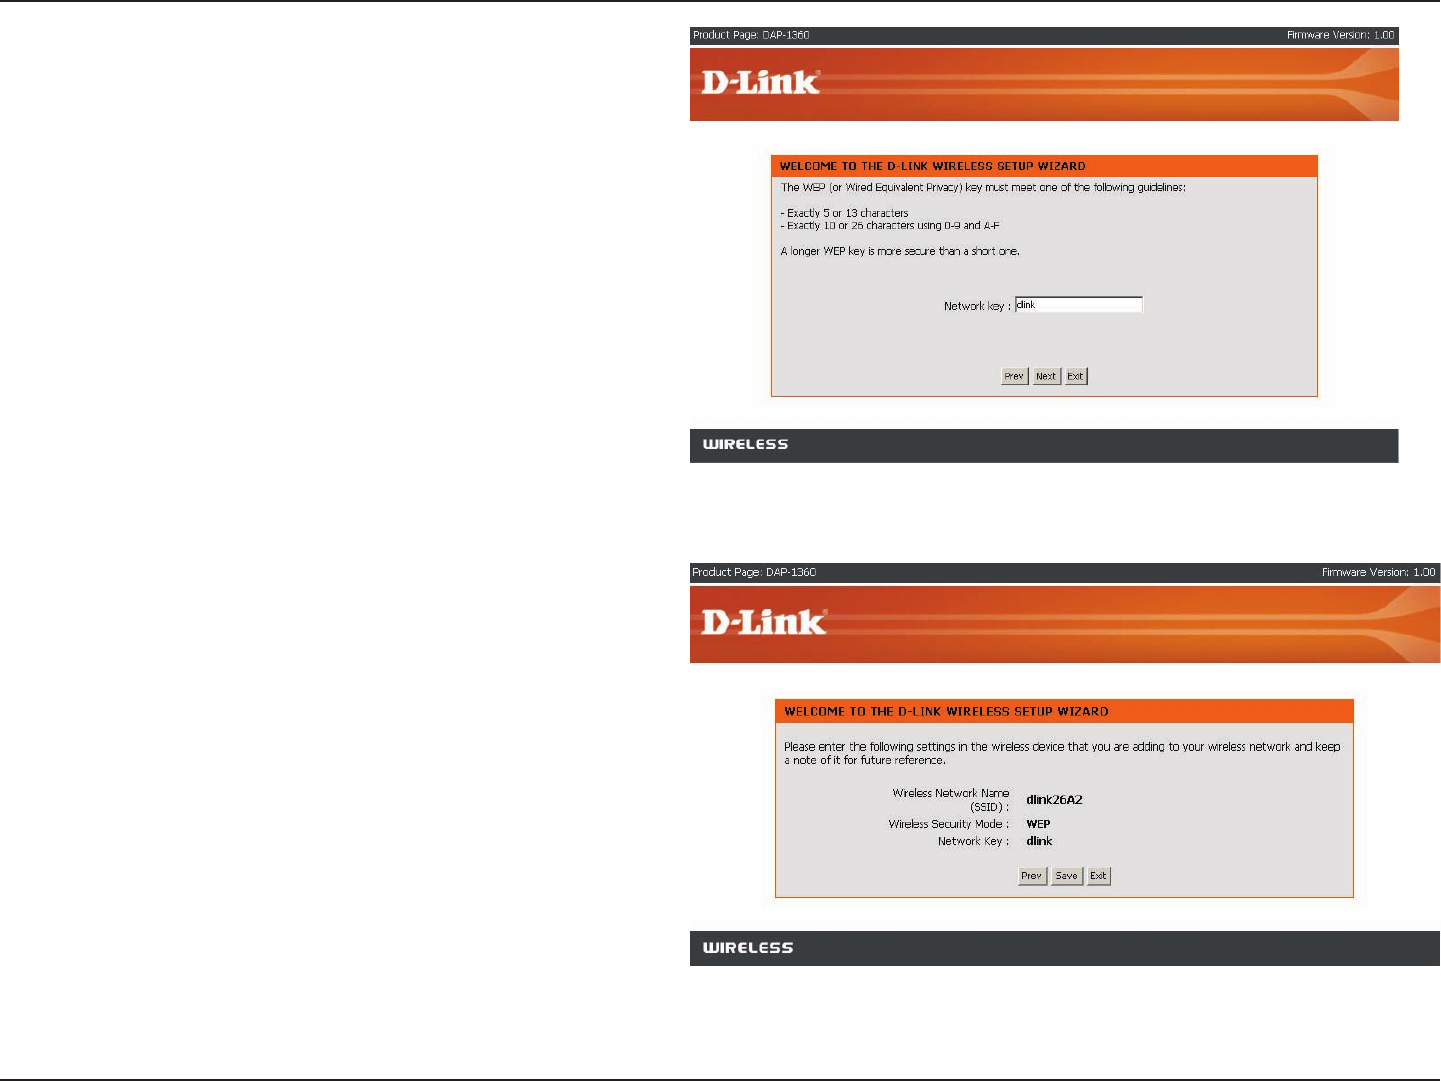
If you choose WEP encryption, the following screen will
show you your Network Key to enter on your wireless
clients.
Click Save to nish the Setup Wizard.
20D-Link DAP-1360 User Manual
Section 3 - Conguration
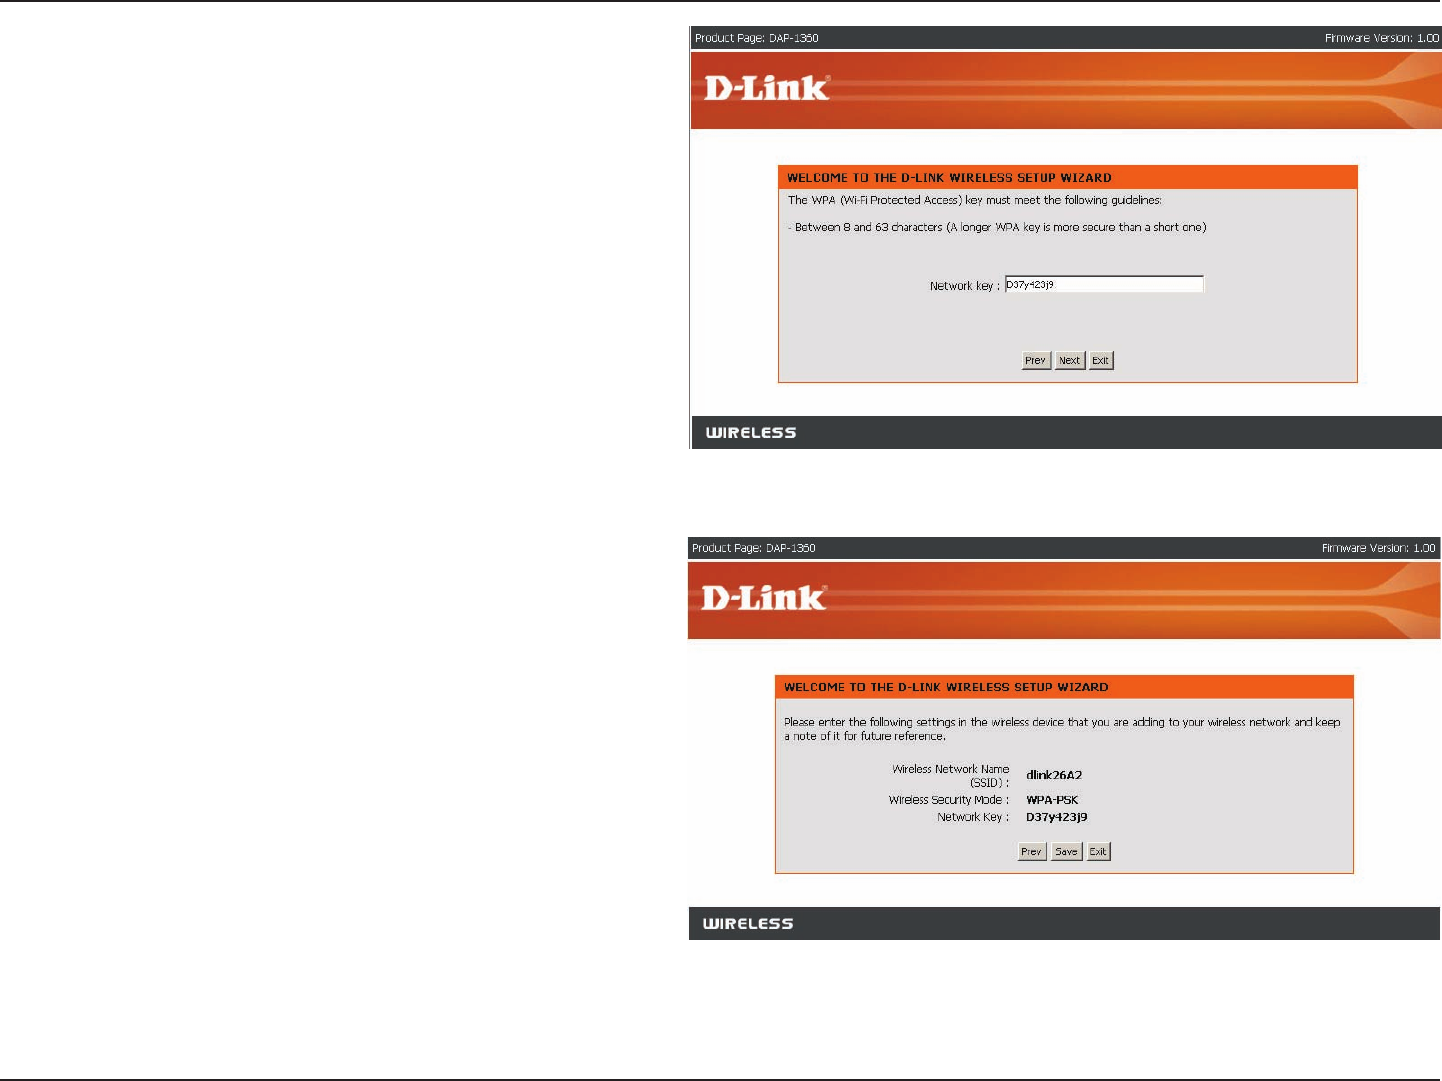
If you select WPA encryption, the following screen will
show you your network key to enter on your wireless
clients.
Click Save to nish the Setup Wizard.
For WPA encryption, enter a Network Key between 8
and 63 characters long or enter exactly 64 characters
using 0-9 and A-F.
Click Next to continue.
21D-Link DAP-1360 User Manual
Section 3 - Conguration
If you select WEP encryption, the following screen will
show you your network key to enter on your wireless
clients.
Click Save to nish the Setup Wizard.
For WEP encryption, enter a Network Key exactly 5 or
13 characters long or exactly 10 or 26 characters using
0-9 and A-F.
Click Next to continue.

22D-Link DAP-1360 User Manual
Section 3 - Conguration
This wizard is designed to assist you in conguring the wireless settings for your DAP-1360 with repeater mode. It
will guide you through step-by-step instructions on how to setup your wireless network. You can click launch wireless
setup wizard to quickly congure your access point. If DAP-1360 successfully connect to the AP or Wireless router
with repeater mode, you can also click add wireless device with WPS to setup your wireless network using WPS.
Click Launch Wireless Setup Wizard to begin.
Click Launch Wireless Setup Wizard
Setup Wizard For Repeater Mode
Enter the Device Name of the AP and click Next to
continue. It is recommended to change the Device
Name if there is more than one D-Link device within
the subnet.
Select the wireless mode Repeater.

23D-Link DAP-1360 User Manual
Section 3 - Conguration
Select Auto configuration if you want to use Wi-Fi
Protected Setup.
If you want to setup your network manually, skip to page
26.
Click Next to continue.
If you want to change the admin account password,
enter a new password and click Next.
24D-Link DAP-1360 User Manual
Section 3 - Conguration
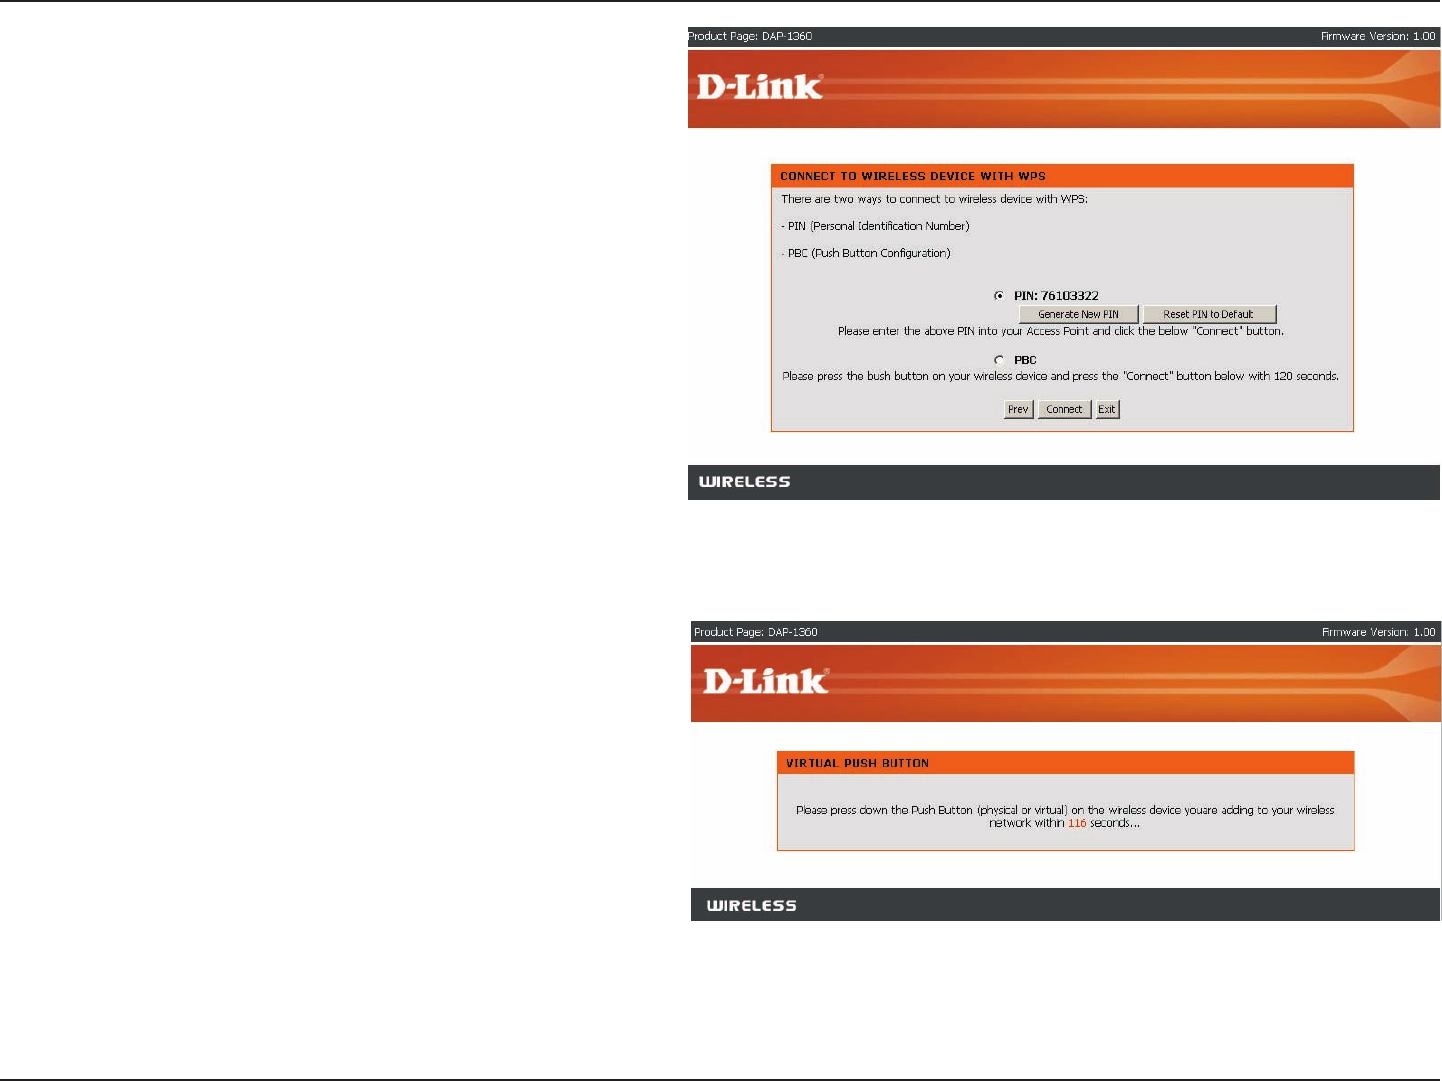
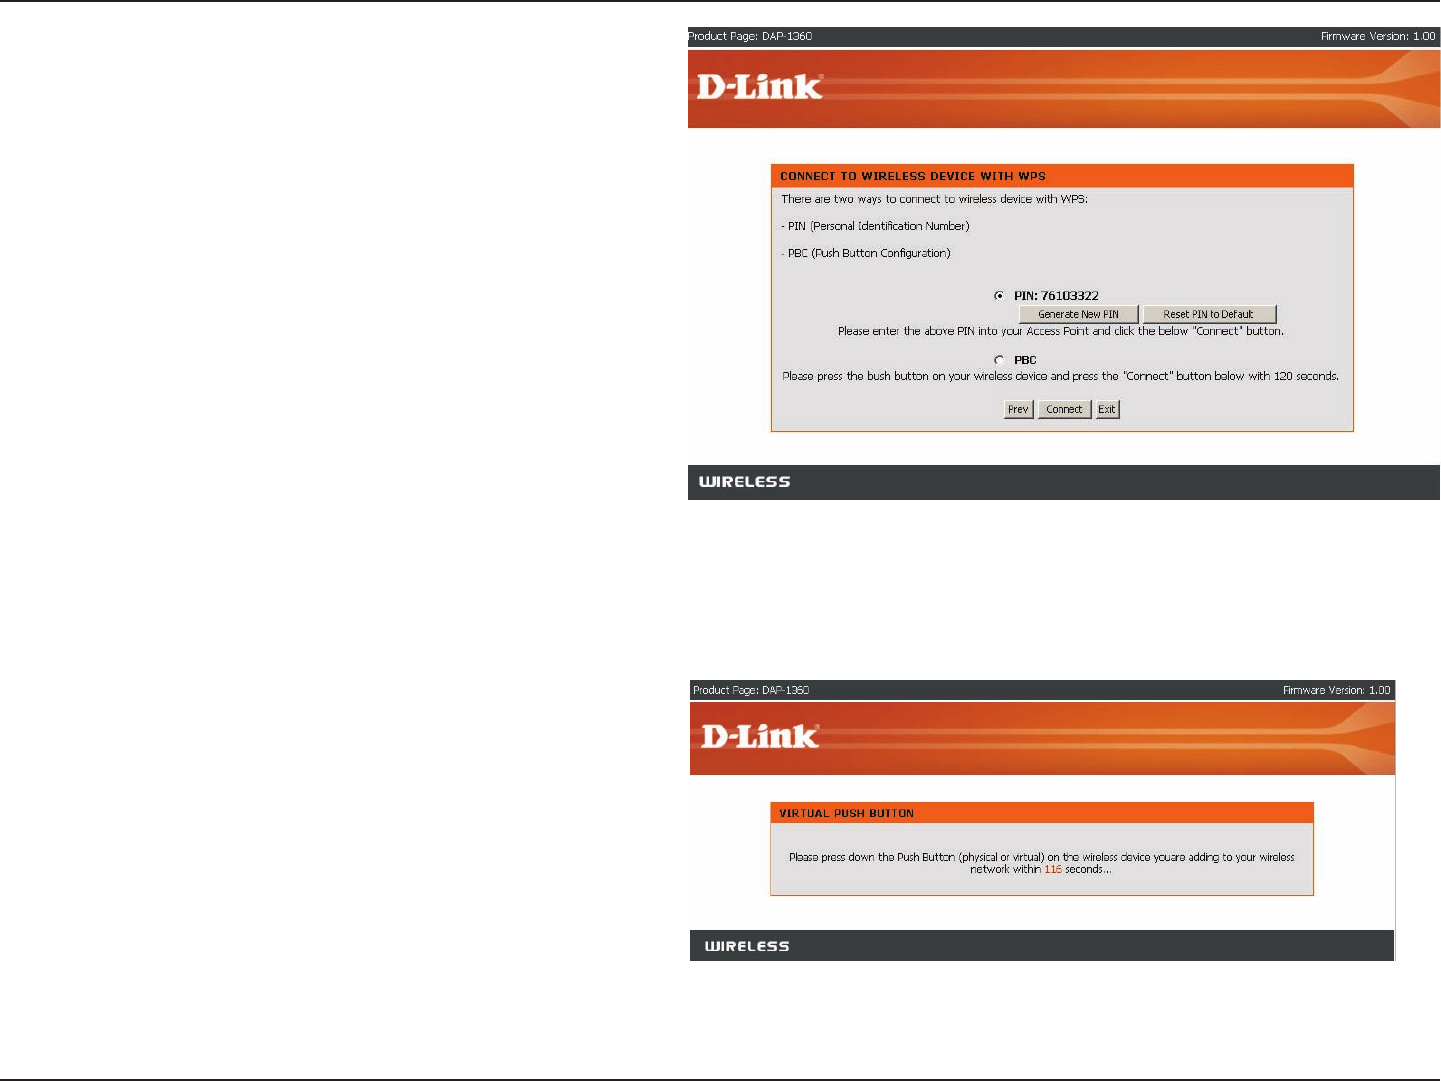
Start WPS on the wireless device you are adding to
your wireless network to complete the setup.
Select PIN to connect your wireless device with WPS.
For PBC conguration, skip to next page.
Enter the PIN number used into your access point and
click Connect.

25D-Link DAP-1360 User Manual
Section 3 - Conguration
Press down the Push Button on the wireless device you
are adding to your network to complete the setup.
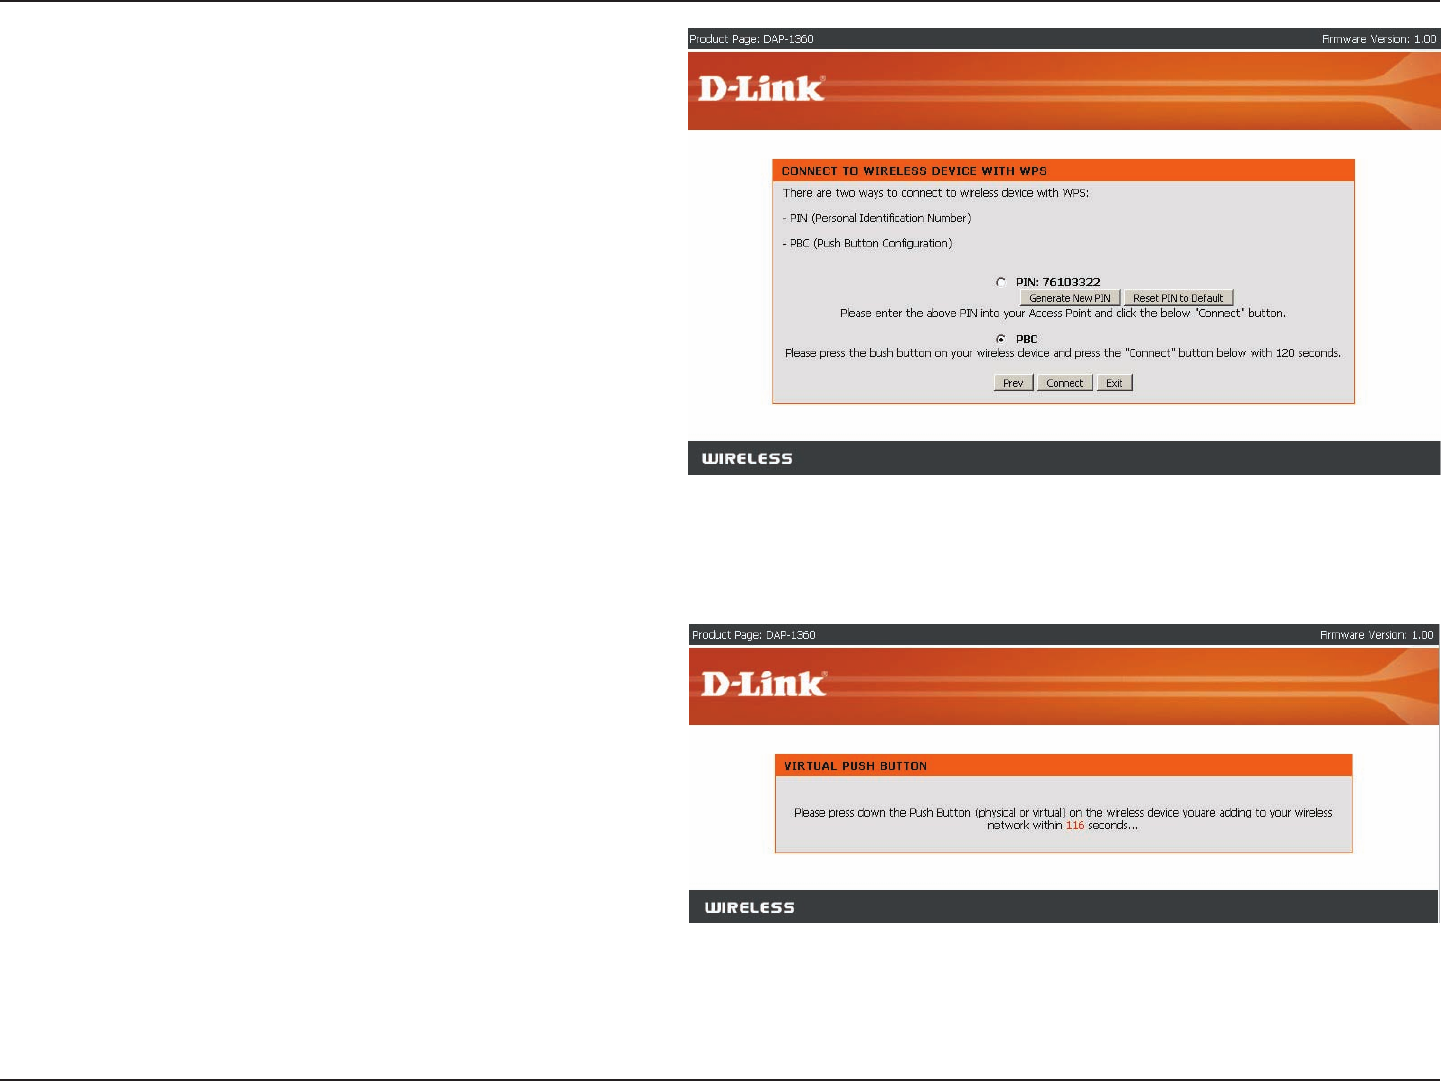
Select PBC to use the Push Button Conguration to
connect to your network.
Click Connect to continue.
26D-Link DAP-1360 User Manual
Section 3 - Conguration
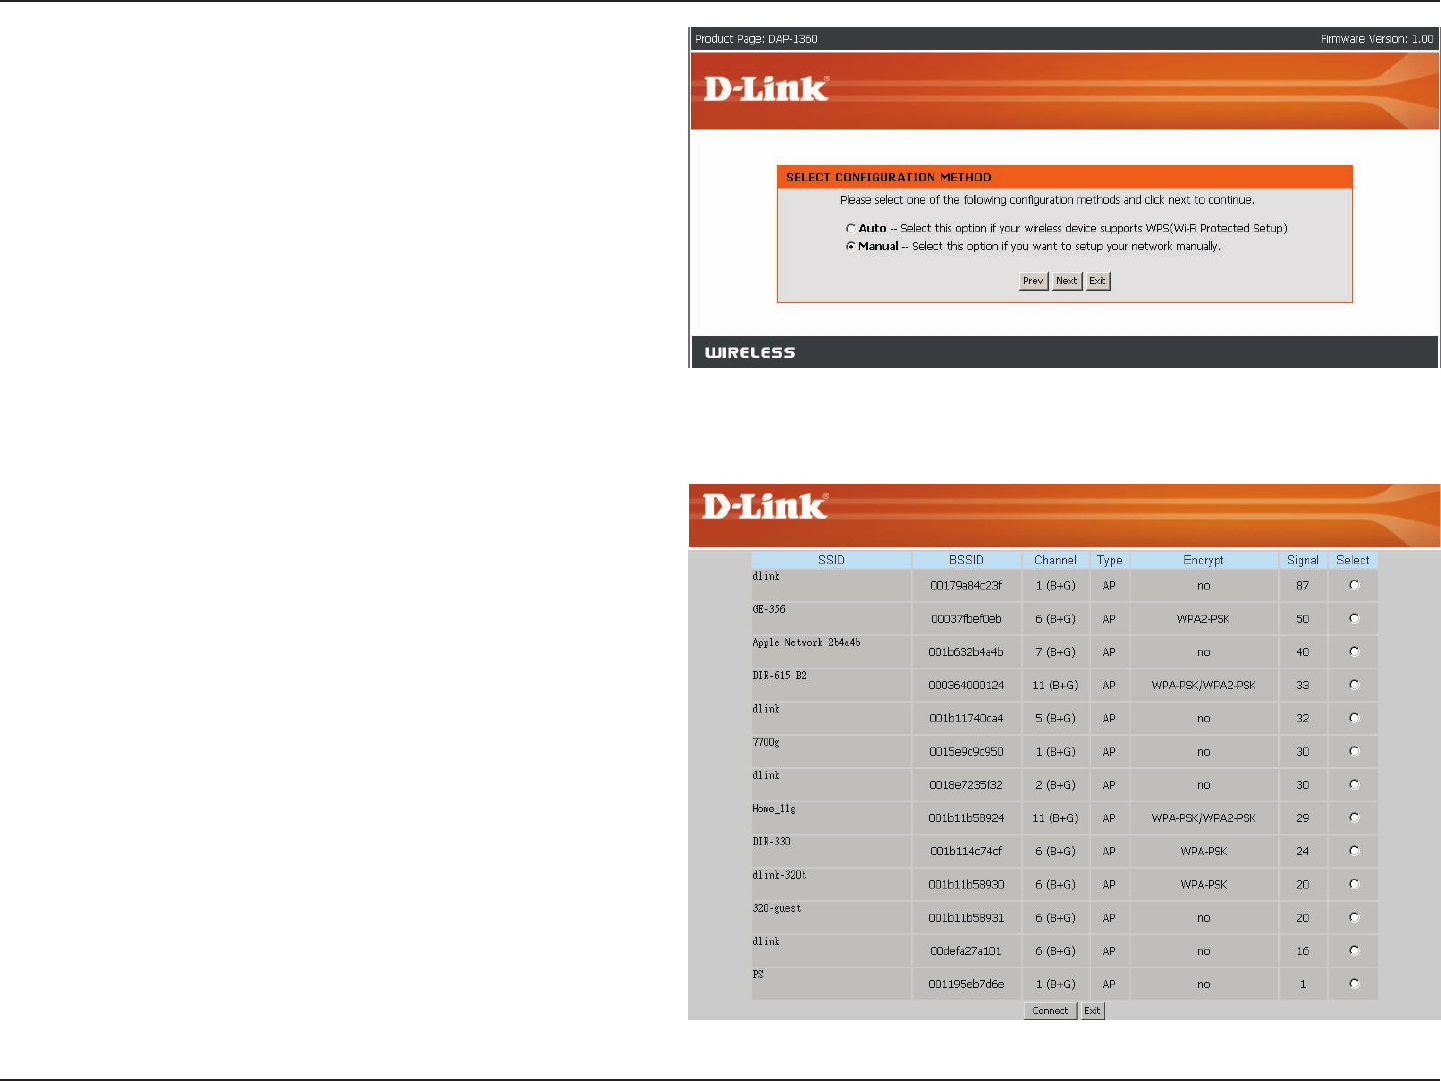
Select Manual conguration to setup your network
manually.
Click Next to continue.
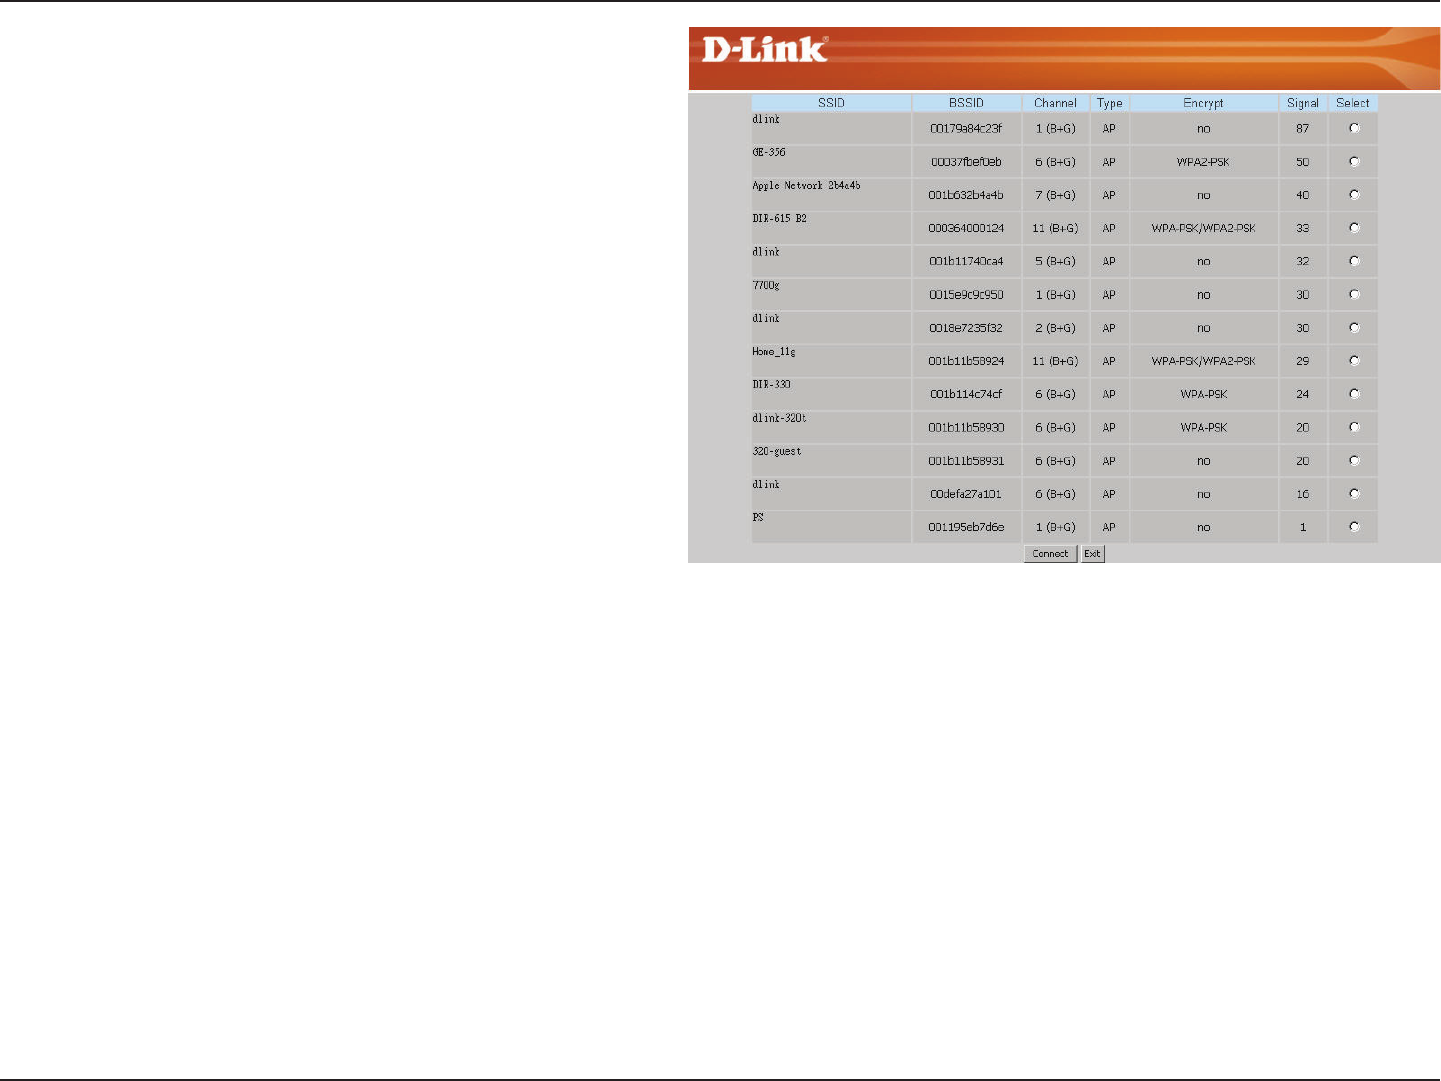
If you clicked on Site Survey to following screen will
be displayed.
Find your access point from the list and click Connect
to complete the Setup Wizard.

27D-Link DAP-1360 User Manual
Section 3 - Conguration
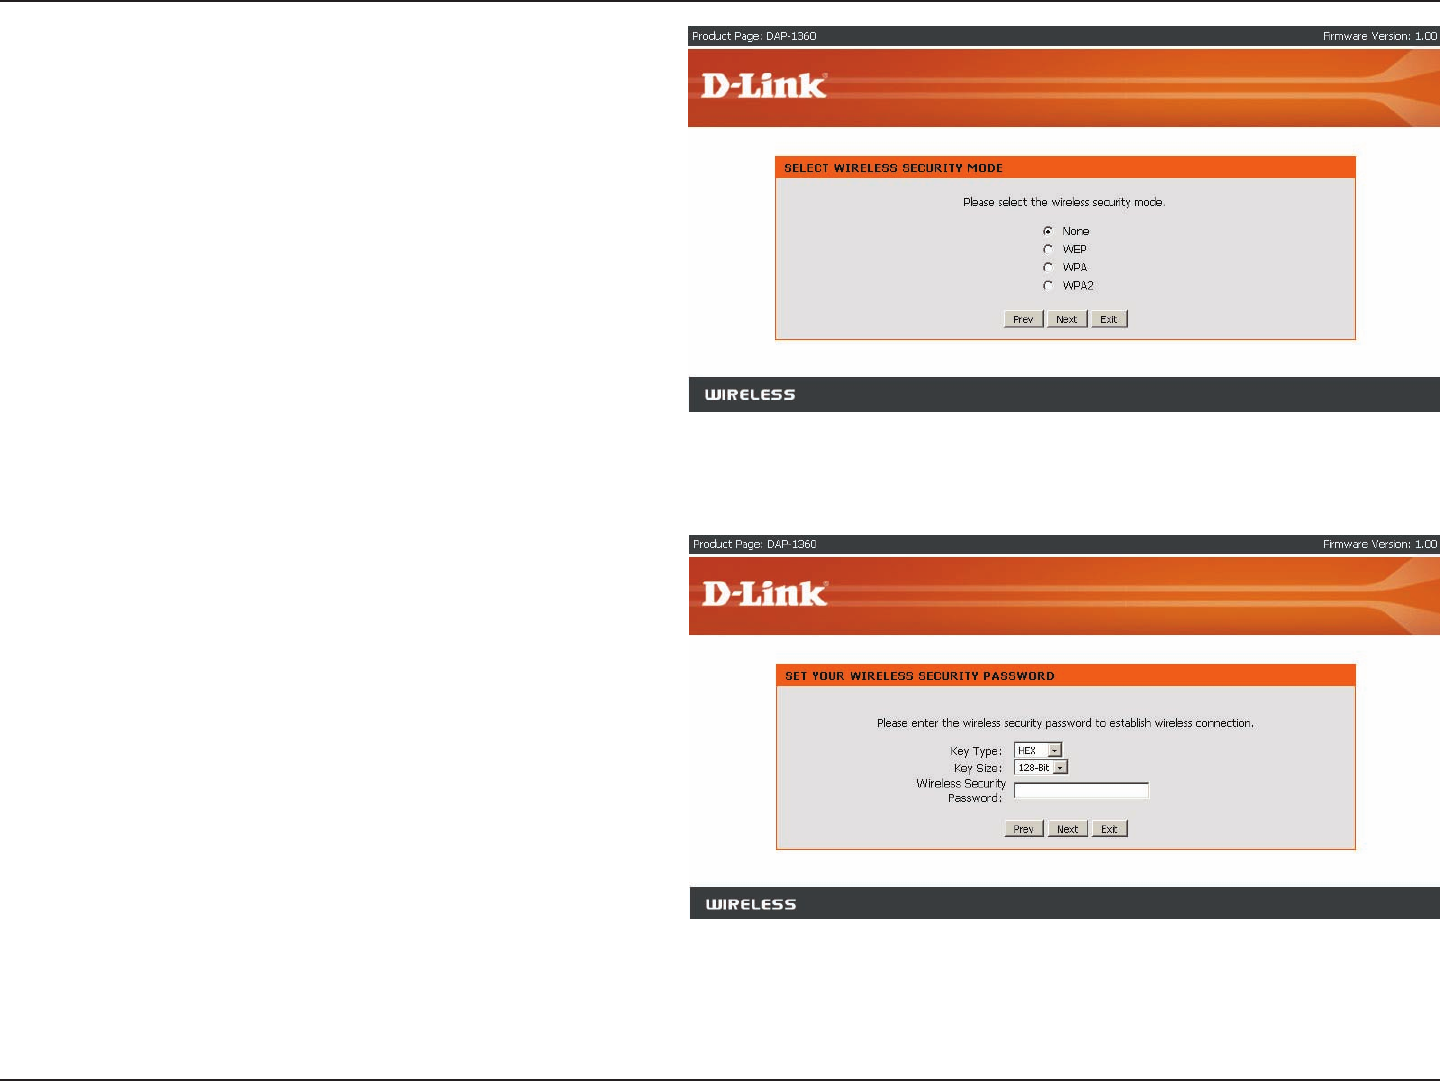
If you choose WEP, enter the wireless security password
and click Next to complete the Setup Wizard.
Choose which Security Mode you want to use and click
Next to continue.
28D-Link DAP-1360 User Manual
Section 3 - Conguration
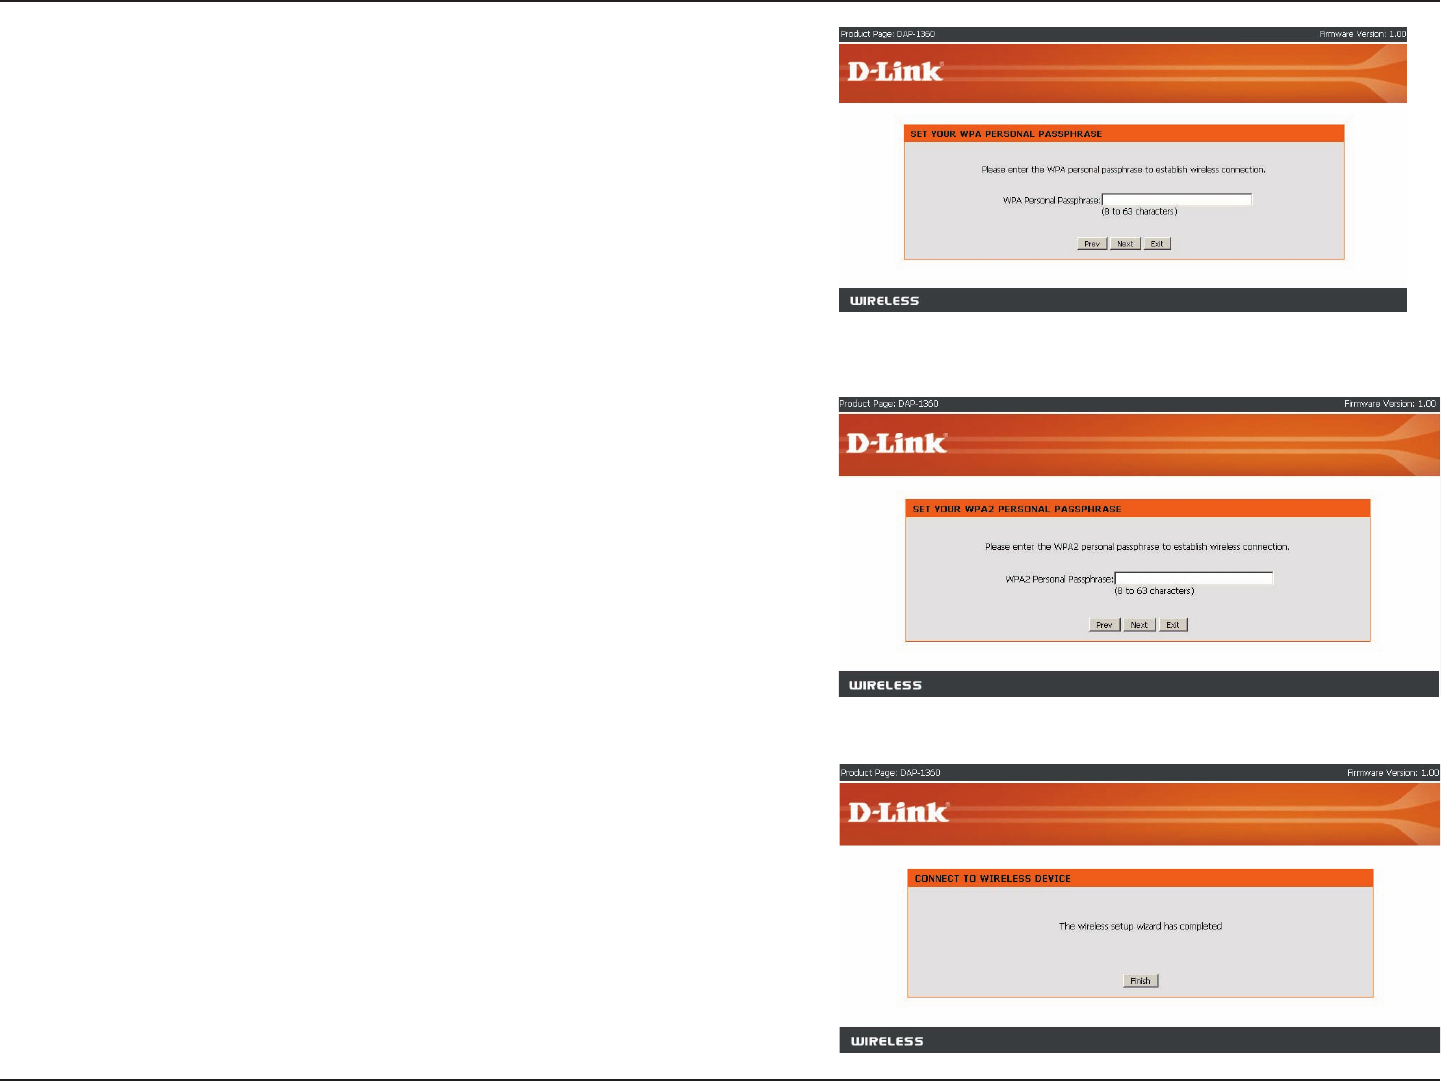
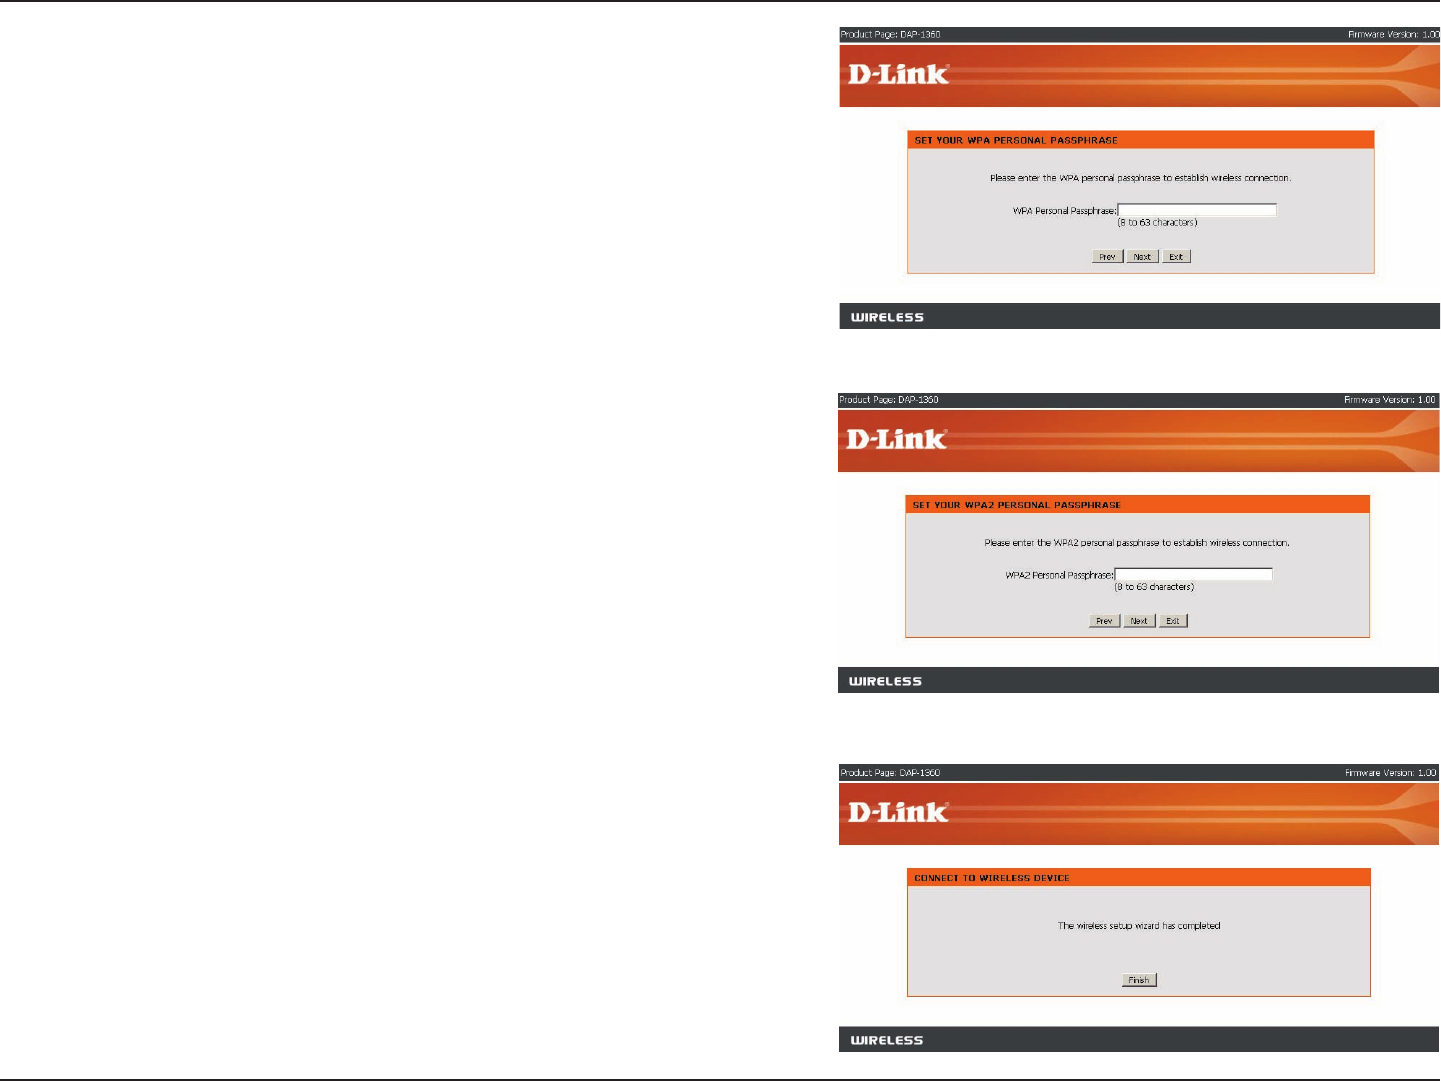
The Wireless Setup Wizard is complete.
Click Finish to reboot the device.
If you choose WPA2, enter the WPA2 Personal Passphrase and
click Next to complete the Setup Wizard.
If you choose WPA, enter the WPA Personal Passphrase and click
Next to complete the Setup Wizard.
29D-Link DAP-1360 User Manual
Section 3 - Conguration
This wizard is designed to assist you in conguring the wireless settings for your AP with wireless client mode. It
will guide you through step-by-step instructions on how to setup your wireless network.
Click Launch Wireless Setup Wizard to begin.
Click Launch Wireless Setup Wizard
Setup Wizard For Wireless Client Mode
Enter the Device Name of the AP and click Next to
continue. It is recommended to change the Device
Name if there is more than one D-Link device within
the subnet.
Select the wireless mode Wireless Client.
30D-Link DAP-1360 User Manual
Section 3 - Conguration
Select Auto configuration if you want to use Wi-Fi
Protected Setup.
If you want to setup your network manually, skip to page
33.
Click Next to continue.
If you want to change the admin account password,
enter a new password and click Next.
31D-Link DAP-1360 User Manual
Section 3 - Conguration
Start WPS on the wireless device you are adding to you
wireless network to complete the setup.
Select PIN to connect your wireless device with WPS.
For PBC conguration, skip to next page.
Enter the PIN number used into you access point and
click Connect.
32D-Link DAP-1360 User Manual
Section 3 - Conguration
Press down the Push Button on the wireless device you
are adding to your network to complete the setup.
Select PBC to use the Push Button Conguration to
connect to your network.
Click Connect to continue.
33D-Link DAP-1360 User Manual
Section 3 - Conguration
Enter the Wireless Network Name of the AP or use site
survey to nd the AP.
Click Next to continue.
Select Manual conguration to setup your network
manually.
Click Next to continue.
34D-Link DAP-1360 User Manual
Section 3 - Conguration
If you clicked on Site Survey to following screen will be
displayed.
Find your access point from the list and click Connect to
complete the Setup Wizard.
35D-Link DAP-1360 User Manual
Section 3 - Conguration
If you choose WEP, enter the wireless security password
and click Next to complete the Setup Wizard.
Choose which Security Mode you want to use and click
Next to continue.
36D-Link DAP-1360 User Manual
Section 3 - Conguration
The Wireless Setup Wizard is complete.
Click Finish to reboot the device.
If you choose WPA2, enter the WPA2 Personal Passphrase and
click Next to complete the Setup Wizard.
If you choose WPA, enter the WPA Personal Passphrase and click
Next to complete the Setup Wizard.
37D-Link DAP-1360 User Manual
Section 3 - Conguration
This Wizard is designed to assist you in your wireless network setup. It will guide you through step-by-step instructions
on how to set up your wireless network and how to make it secure.
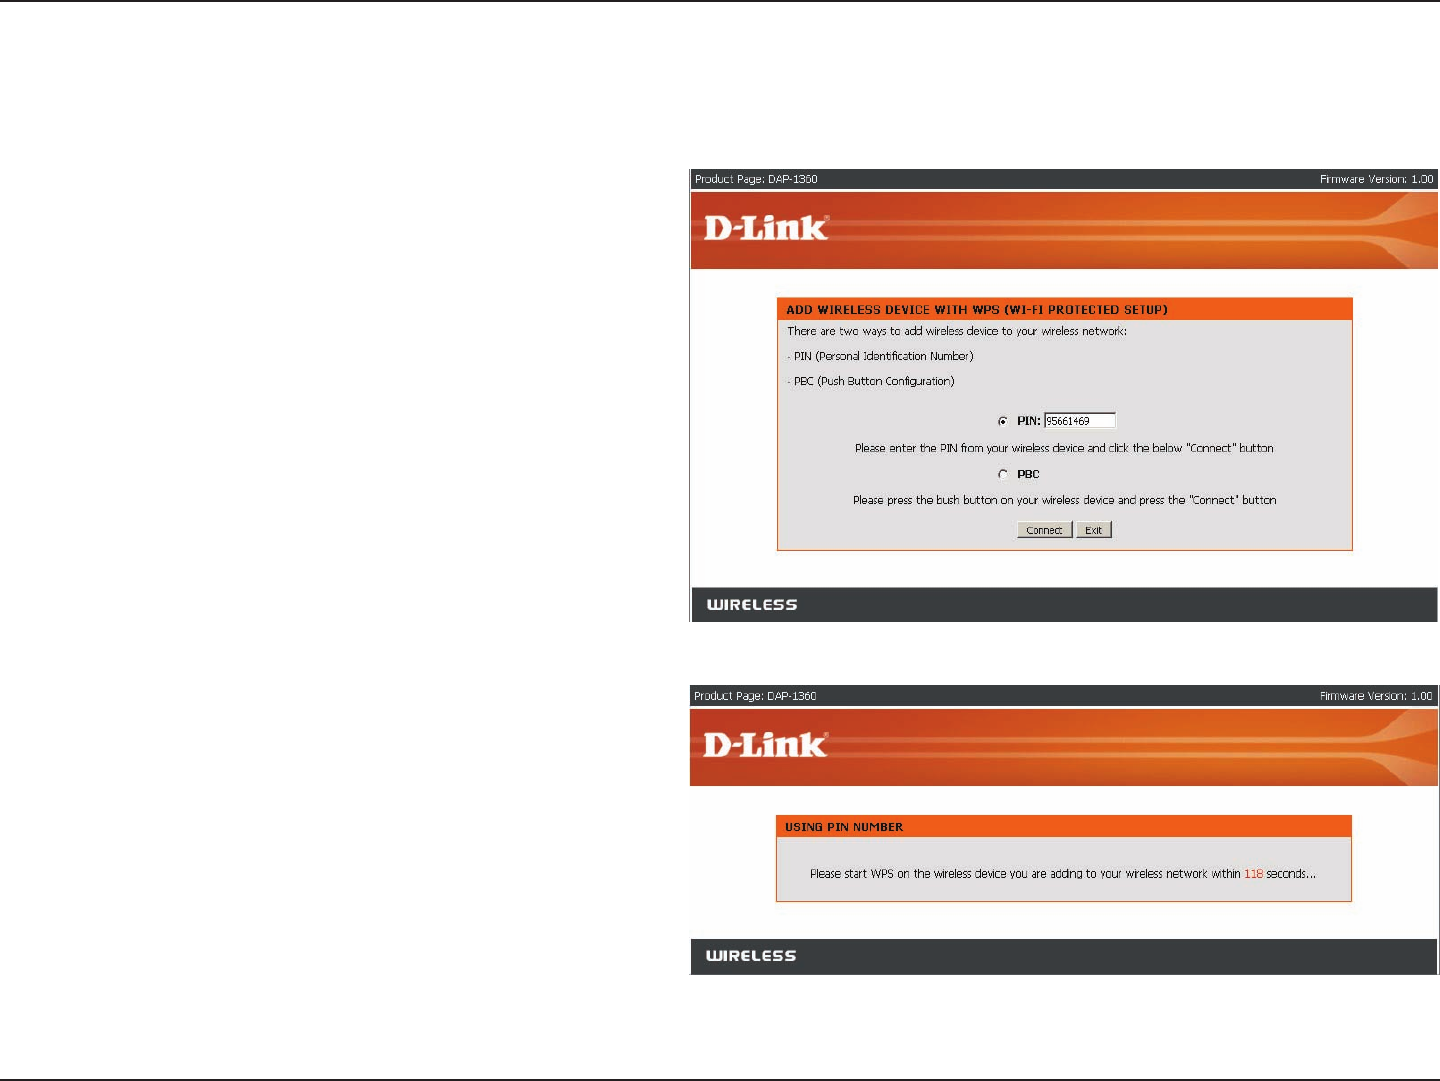
Select PIN to use your PIN number from your wireless
device to connect to your network.
For PBC conguration, skip to next page.
Click Connect to continue.
Start WPS on the wireless device you are adding to you
wireless network to complete the setup.
Add Wireless Device With WPS
38D-Link DAP-1360 User Manual
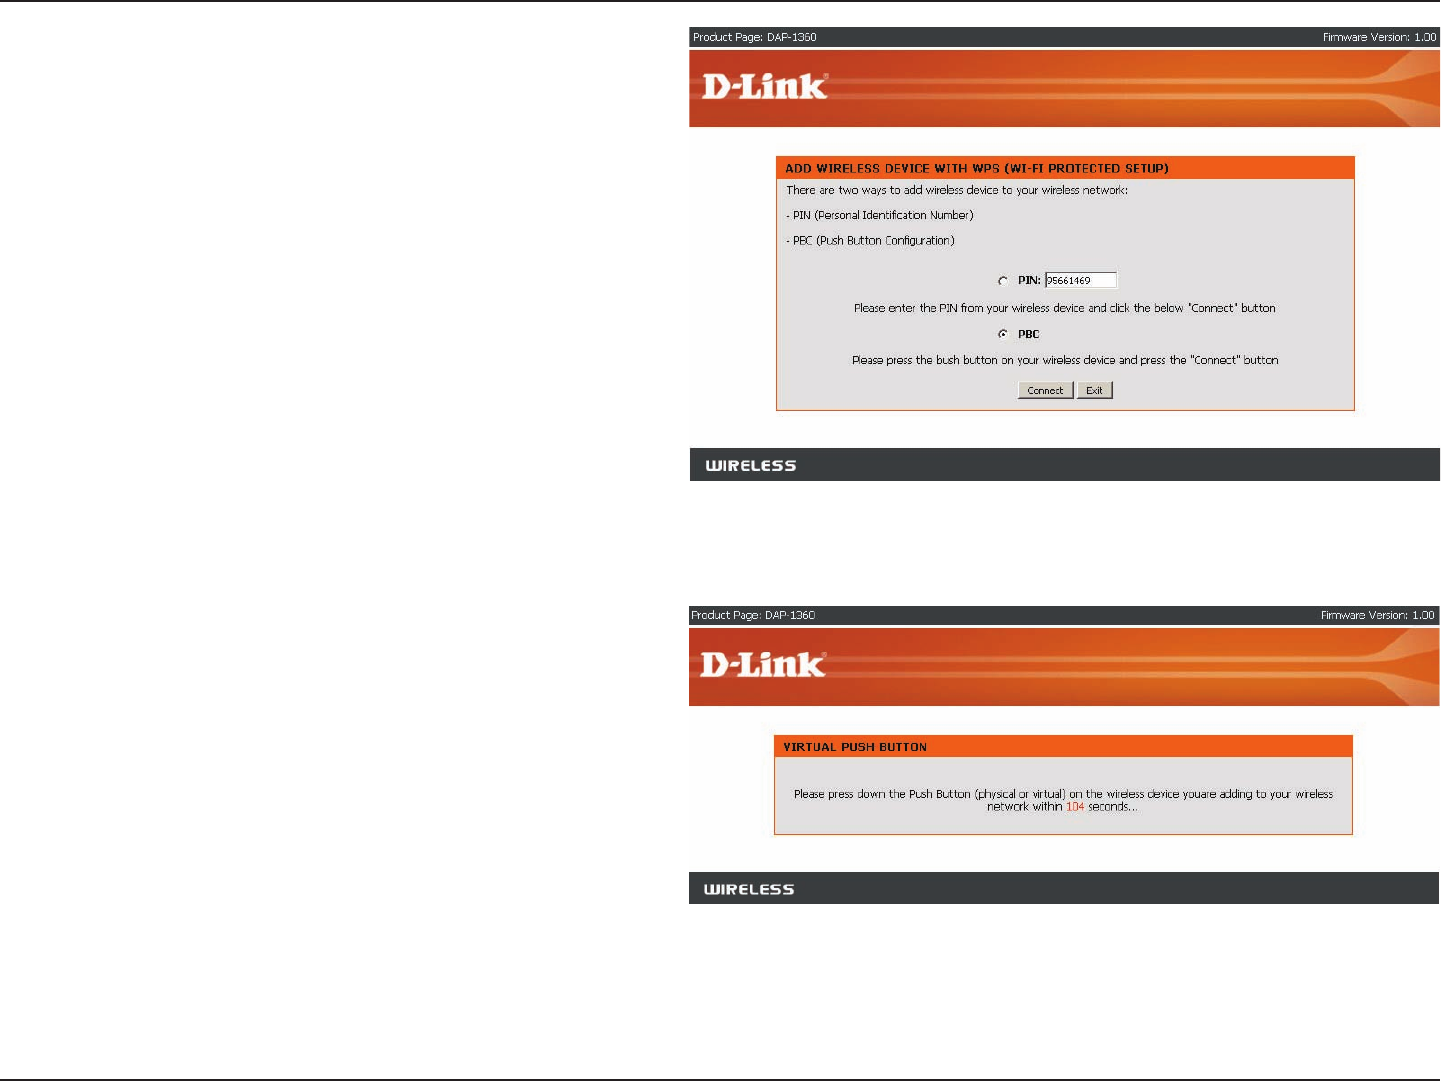
Section 3 - Conguration
Press down the Push Button on the wireless device you
are adding to your network to complete the setup.
Select PBC to use the Push Button Conguration to
connect to your network.
Click Connect to continue.
39D-Link DAP-1360 User Manual
Section 3 - Conguration
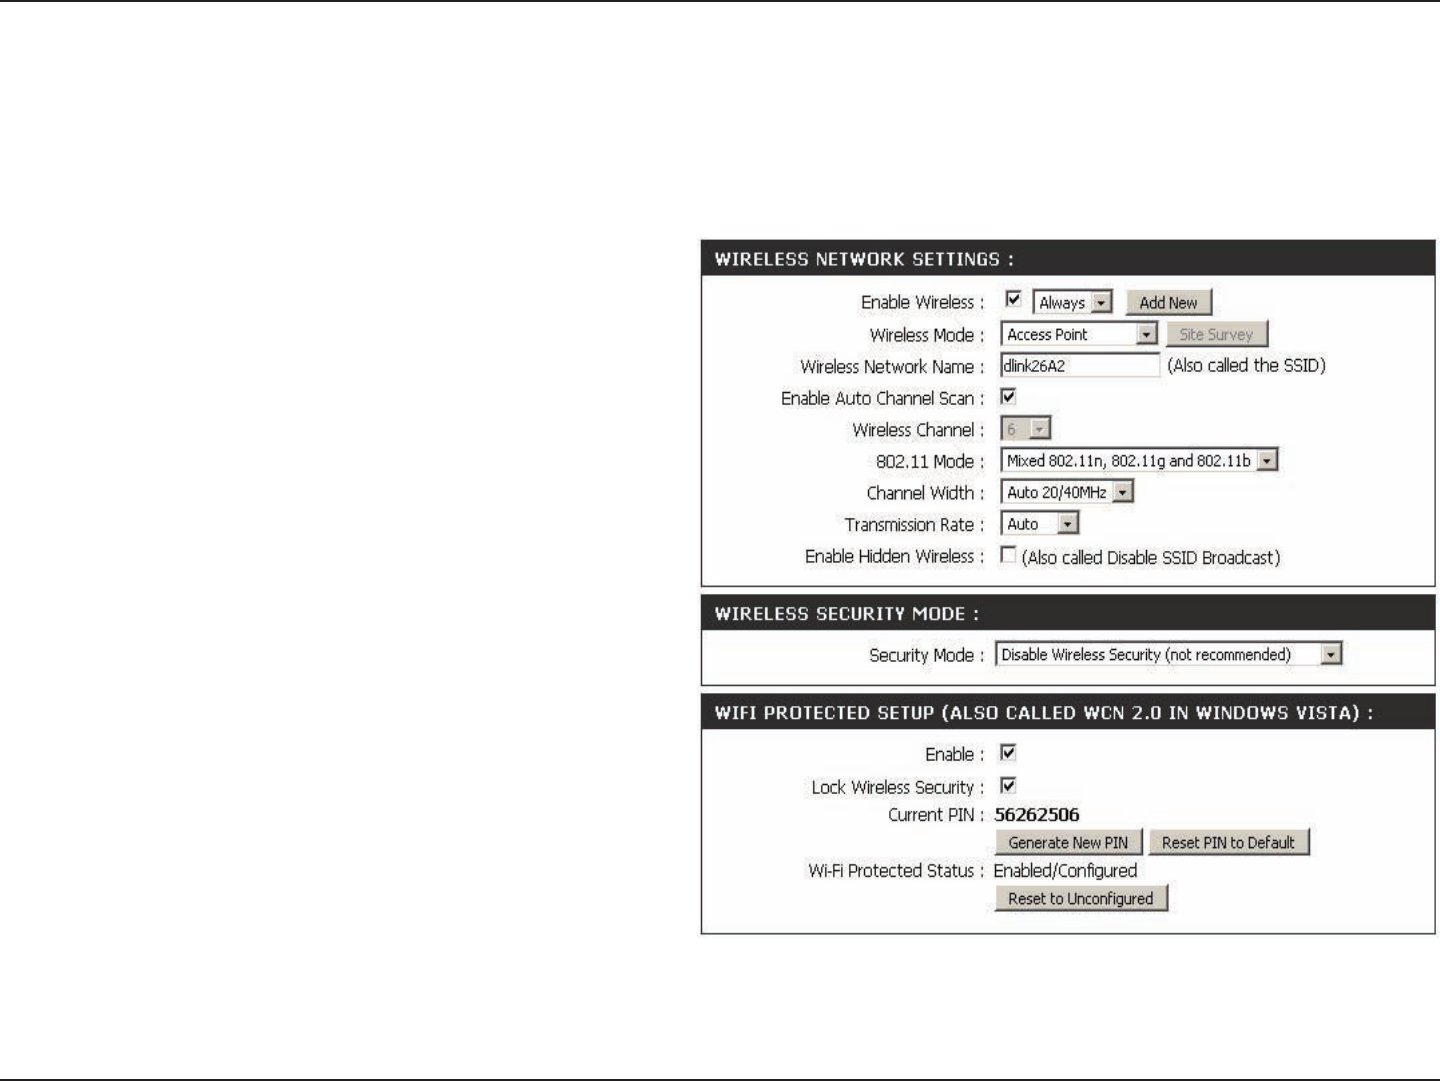
Access Point
Wireless Network
Name (also called
the SSID):
The Wireless Network Name is a unique name
that identies a network. All devices on a network
must share the same wireless network name
in order to communicate on the network. If you
decide to change the wireless network name
from the default setting, enter your new wireless
network name in this eld.
Wireless Channel:
Enable Auto
Channel Scan:
Auto channel selection is the default setting. First
disable Auto Channel Scan (see below) and you
will be able to select a wireless channel.
Check the box to enable Auto Channel Scan.
Enable this feature to auto-select the channel
for the best wireless performance.
In AP mode, the DAP-1360 acts as a central connection point for any computer (client) that has an 802.11n or backward-compatible
802.11b/g wireless network adapter and is within range of the AP.
Wireless Setup
Enable Wireless: Select this to turn Wi-Fi on and off. Use the drop-
down box to select if you want to use a schedule.
Click Add New to add or change a schedule.
Wireless Mode: Select the wireless mode from Access Point,
Wireless Client, Repeater, Bridge, Bridge
with AP mode, WISP Client Router and WISP
Repeater.
802.11 Mode: Select the appropriate 802.11 mode based on the
wireless clients in your network. The drop-down
menu options are 802.11g Only, Mixed 802.11b/g, 802.11b Only, 802.11n Only, or Mixed 802.11b/g/n.

40D-Link DAP-1360 User Manual
Section 3 - Conguration
Enable or disable the Wi-Fi protected setup feature.
Locking the wireless security prevents the settings from being changed by any new external registar using its PIN. Devices
can still be added to the wireless network using Wi-Fi Protected Setup. It is still possible to change wireless network settings
with Manual Wireless Network Setup, Wireless Network Setup Wizard, or an existing external WLAN Manager Registar.
Shows the current value of the access point’s PIN.
Create a random number that is a valid PIN. This becomes the access point’s PIN. You can then copy this PIN to the user
interface of the registrar.
Restore the default PIN of the access point.
Resets Wi-Fi Protected Status to Not Congured. Vista WPS icon will only be displayed when the Wi-Fi Protected Status is
Not Congured.
Wi-Fi Protected
Setup:
Lock Wireless
Security:
Current PIN:
Generate New PIN:
Reset PIN to
Default:
Reset to
Unconfigured:
Wireless Security
Mode:
Select a wireless security setting. Options are None, WEP, WPA, WPA2, or WPA2-Auto. See p.53 of this manual for a
detailed explanation of the wireless security options.
Enable Hidden
Wireless:
Check the box if you do not want the SSID to be broadcast by the DAP-1360. This prevents the SSID from being seen
by site survey utilities, so any wireless clients will have to be pre-congured with the SSID of the DAP-1360 in order to
connect to it.
Channel Width: Select the appropriate channel width between 20MHz or Auto 20/40MHz from the pull-down menu.
Transmission
Rate:
Select the transmission rate. It is strongly suggested to use the Best setting for optimal performance.
41D-Link DAP-1360 User Manual
Section 3 - Conguration
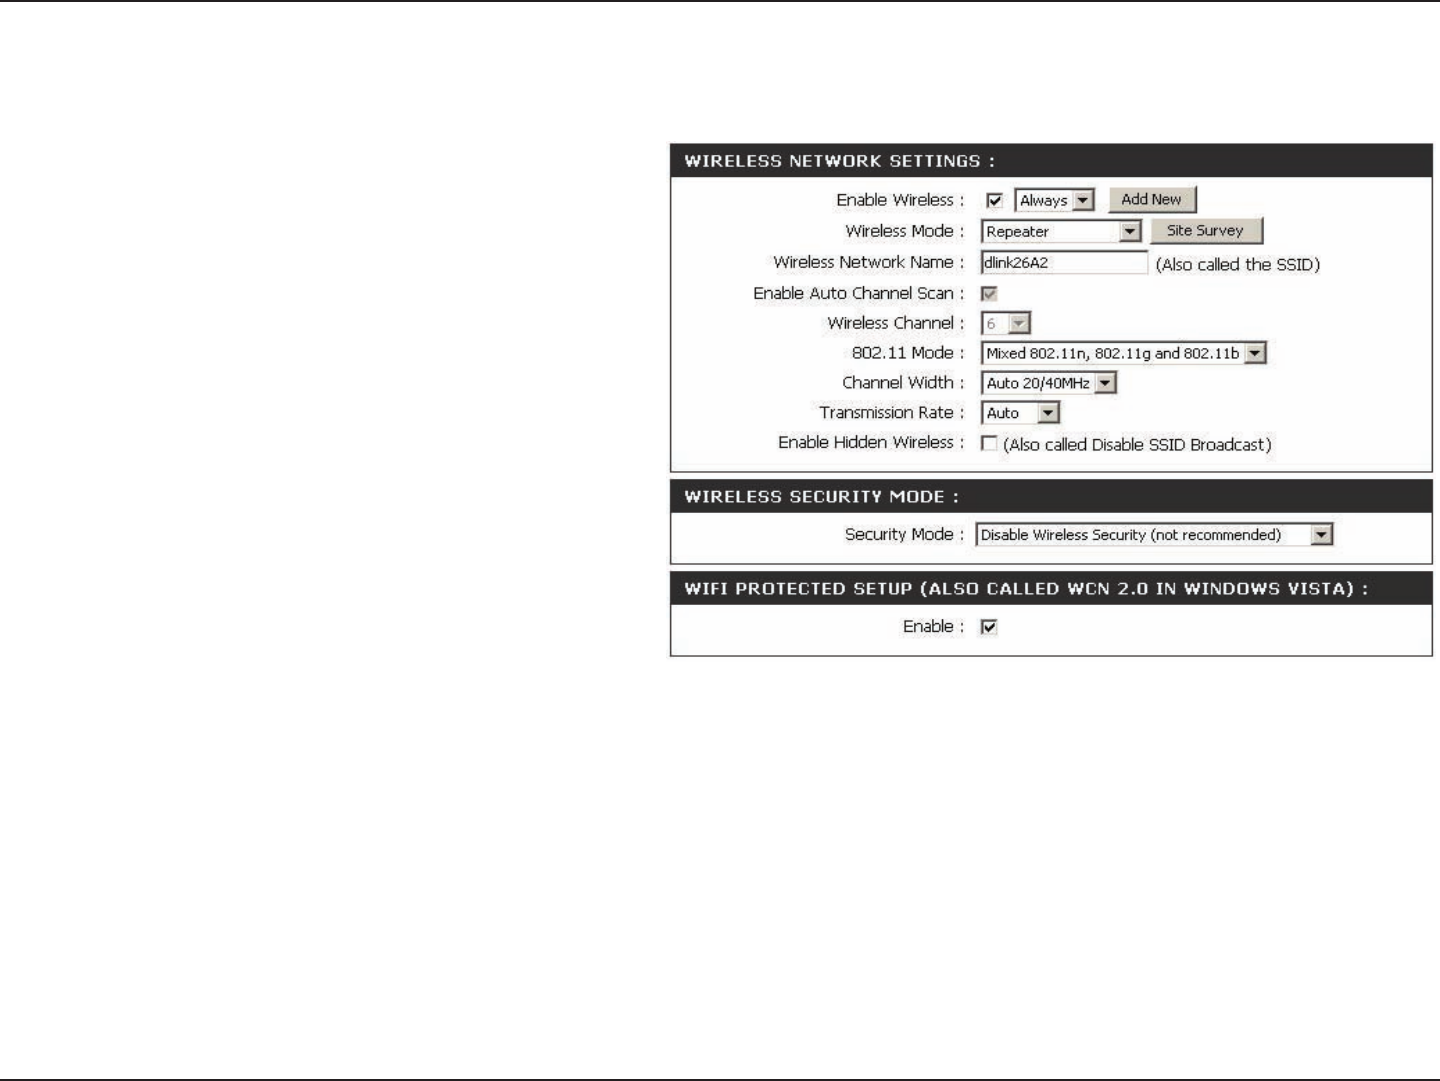
The Wireless Network Name is a unique name
that identies a network. All devices on a
network must share the same wireless network
name in order to communicate on the network.
If you decide to change the wireless network
name from the default setting, enter your new
wireless network name in this eld.
Click this button to choose the root AP from an
available connection list.
This option is unavailable in Repeater mode.
Wireless
Network Name
(also called the
SSID):
Site Survey:
Wireless
Channel:
Enable Hidden
Wireless:
The channel will follow the root AP. The
channel used will be displayed.
Repeater
Wireless repeater mode extends the wireless coverage of another wireless AP or wireless router.
Wireless
Security Mode: Select a wireless security setting. Options are None, WEP, WPA, or WPA2. See p.53 of this manual for a detailed
explanation of the wireless security options.
Wi-Fi Protected
Setup: Select enable if you want to congure 1360 with WPS.
Enable Wireless: Select this to turn Wi-Fi on and off. Use the drop-
down box to select if you want to use a schedule.
Click Add New to add or change a schedule.
Wireless Mode: Select the wireless mode from Access Point,
Wireless Client, Repeater, Bridge, Bridge
with AP mode, WISP Client Router and WISP
Repeater.
802.11 Mode: Select the appropriate 802.11 mode based on the wireless clients in your network. The drop-down menu options are 802.11g
Only, Mixed 802.11b/g, 802.11b Only, 802.11n Only, or Mixed 802.11b/g/n.
42D-Link DAP-1360 User Manual
Section 3 - Conguration
You can input the wireless network
name of the root AP or click the Site
Survey button to nd the root AP.
Click this button to choose the root AP
from an available connection list.
This option is unavailable in AP Client
mode.
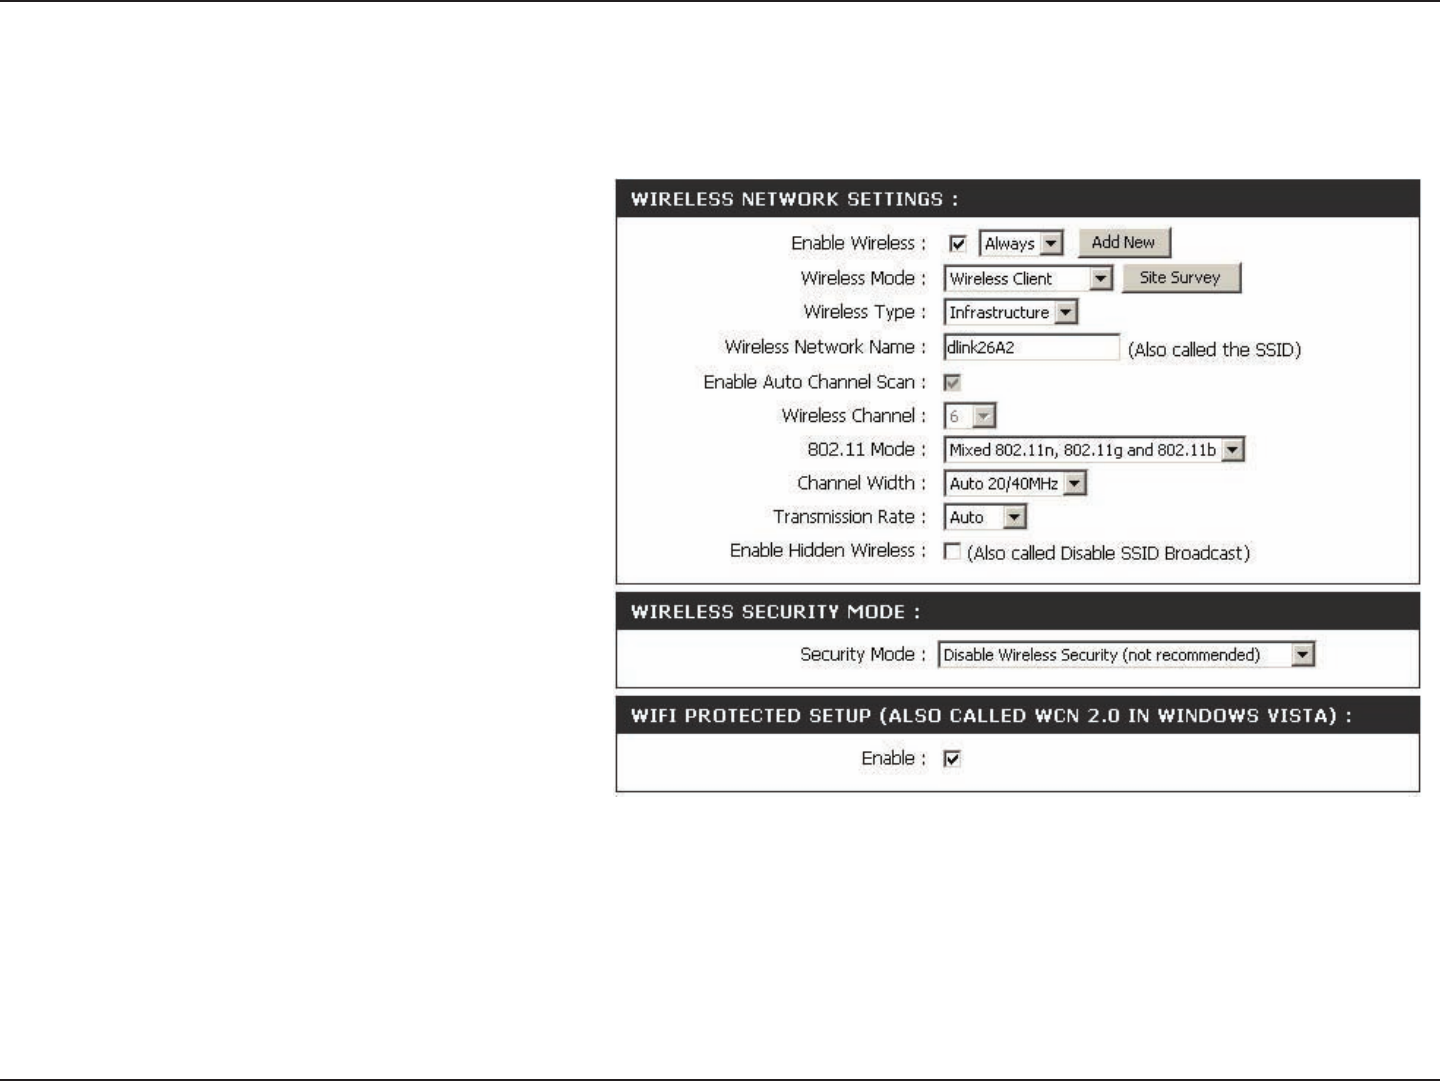
Wireless Client
This option is unavailable in AP Client
mode.
Wireless
Network Name
(also called the
SSID):
Site Survey:
Wireless
Channel:
Enable Auto
Channel scan:
Enable Hidden
Wireless:
The channel used will be displayed.
The channel will follow the root AP.
In wireless client mode, the DAP-1360 acts as a wireless network adapter for your Ethernet-enabled device (such as a game console or
a TV set-top box).
Wireless
Security Mode: Select a wireless security setting. Options
are None, WEP, WPA, or WPA2.
See p.53 of this manual for a detailed
explanation of the wireless security
options.
Wi-Fi Protected
Setup: Select enable if you want to congure 1360 with WPS.
43D-Link DAP-1360 User Manual
Section 3 - Conguration
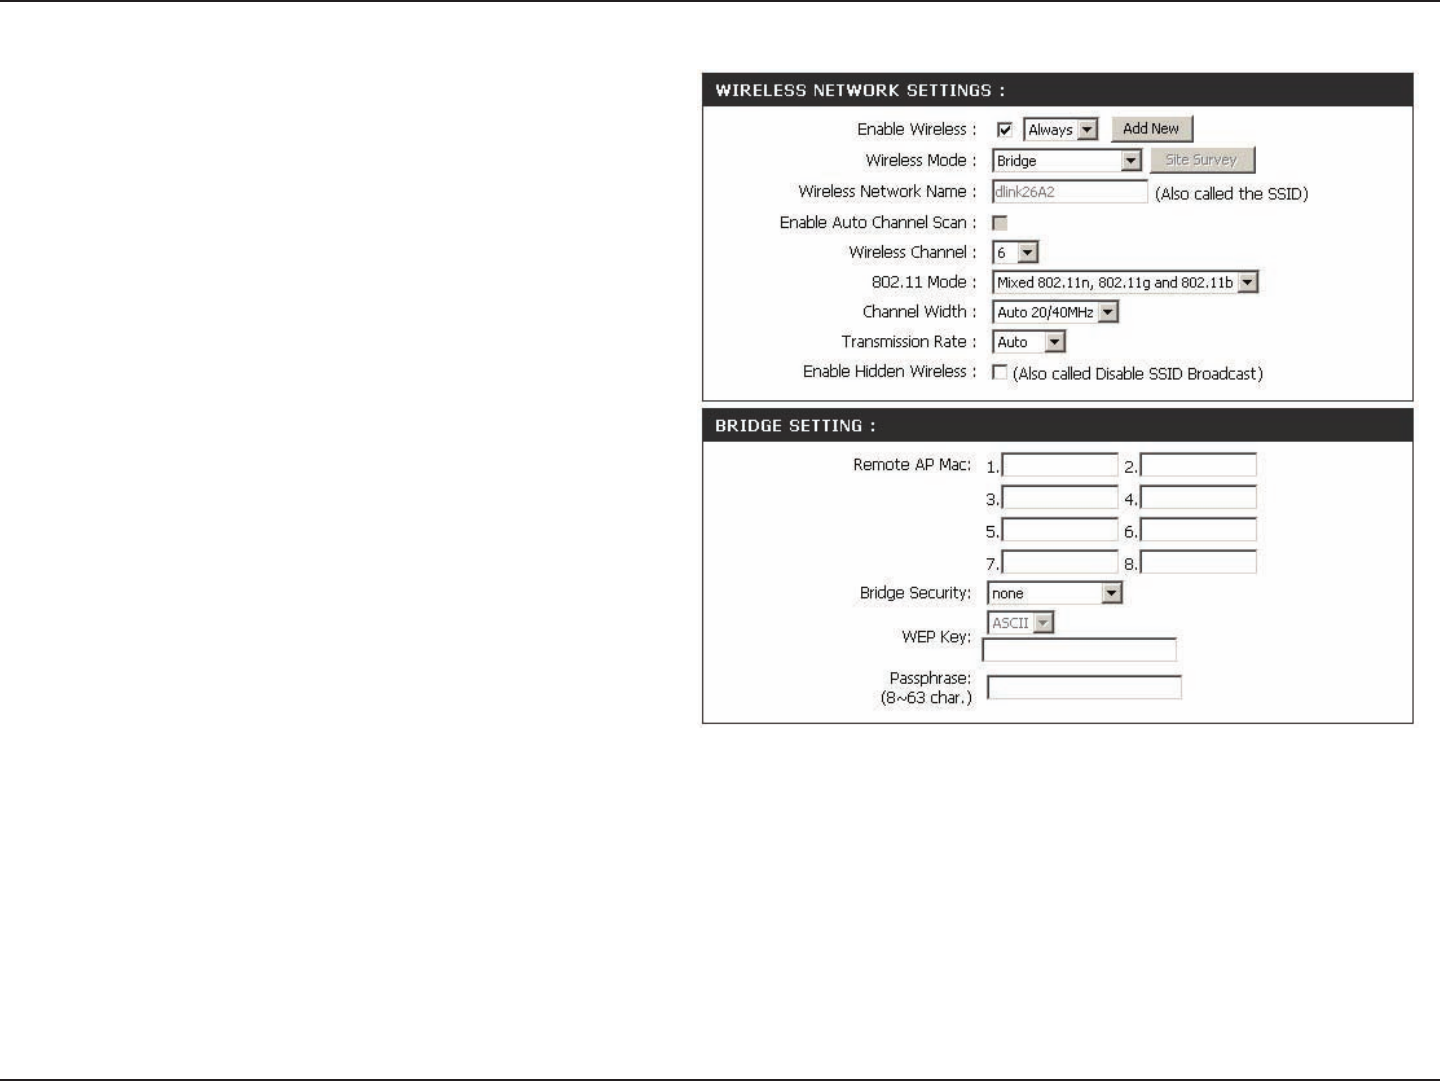
The Wireless Network Name is a unique
name that identies a network. All devices
on a network must share the same wireless
network name in order to communicate on the
network. If you decide to change the wireless
network name from the default setting, enter
your new wireless network name in this
eld.
This button is unavailable in Bridge mode.
This option is unavailable in Bridge mode.
Bridge
This option is unavailable in Bridge mode.
Wireless
Network Name
(also called the
SSID):
Site Survey:
Wireless
Channel:
Enable Auto
Channel scan:
Enable Hidden
Wireless:
All devices on the network must share the
same channel.
Remote AP MAC: Enter the MAC addresses of the APs in your network that will serve as bridges to wirelessly connect multiple networks.
Note: Bridge Mode is not completely specied in WiFi or IEEE standards. It can work with other DAP-1160 units. Communication with other APs (even other D-Link
APs) is not guaranteed.
Bridge wireless mode connects 2 LANs together.
Bridge Security:Select None to disable encryption to across the network. Select WEP 64bits or WEP 128bits to limit communication to
only those devices that share the same WEP settings. Select WPA-PSK or WPA2-PSK to secure your network using a
password and dynamic key changes (No RADIUS server required).
44D-Link DAP-1360 User Manual
Section 3 - Conguration
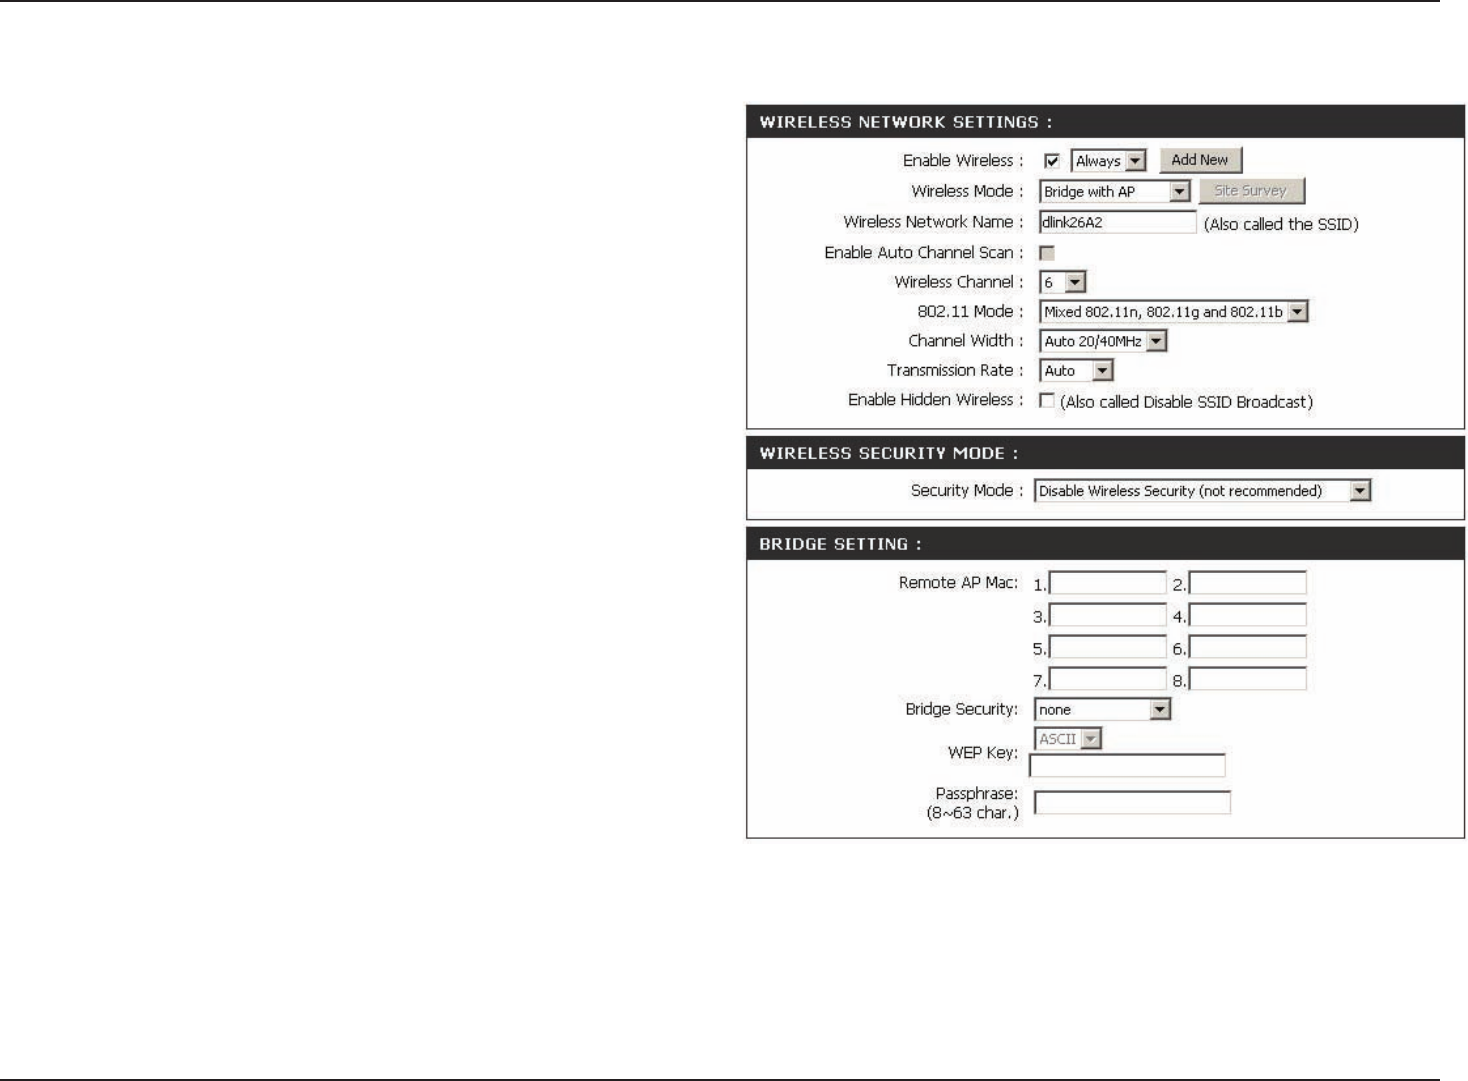
The Wireless Network Name is a unique name that
identies a network. All devices on a network must
share the same wireless network name in order
to communicate on the network. If you decide to
change the wireless network name from the default
setting, enter your new wireless network name in
this eld.
This button is unavailable in Bridge with AP mode.
Bridge with AP
Check the box if you do not want the SSID to be
broadcast by the DAP-1160. This prevents the SSID
from being seen by Site Survey utilities, so any
wireless clients will have to be pre-congured with
the SSID of the DAP-1160 in order to connect to it.
Wireless
Network Name
(also called the
SSID):
Site Survey:
Wireless
Channel:
Enable Hidden
Wireless:
Input a new number if you want to change the default
setting. All devices on the network must be set to the
same channel to communicate on the network.
Bridge with AP wireless mode connects 2 LANs, while still functioning as a wireless AP for local wireless clients.
Wireless
Security Mode:
Bridge Security:Select None to disable encryption to across the network. Select WEP 64bits or WEP 128bits to limit communication to
only those devices that share the same WEP settings. Select WPA-PSK or WPA2-PSK to secure your network using a
password and dynamic key changes (No RADIUS server required).
Enable Auto
Channel scan: This option is unavailable in Bridge mode.
Select a wireless security setting. Options are None,
WEP, WPA, WPA2, or WPA2-Auto. See p.34 of this
manual for a detailed explanation of the wireless
security options.
Remote AP Mac : Enter the MAC addresses of the APs in your network that will serve as bridges to wirelessly connect multiple networks.
Note: Bridge with AP mode is not completely specied in WiFi or IEEE standards. It can work with other DAP-1160 units. Communication with other APs (even
other D-Link APs) is not guaranteed.
45D-Link DAP-1360 User Manual
Section 3 - Conguration
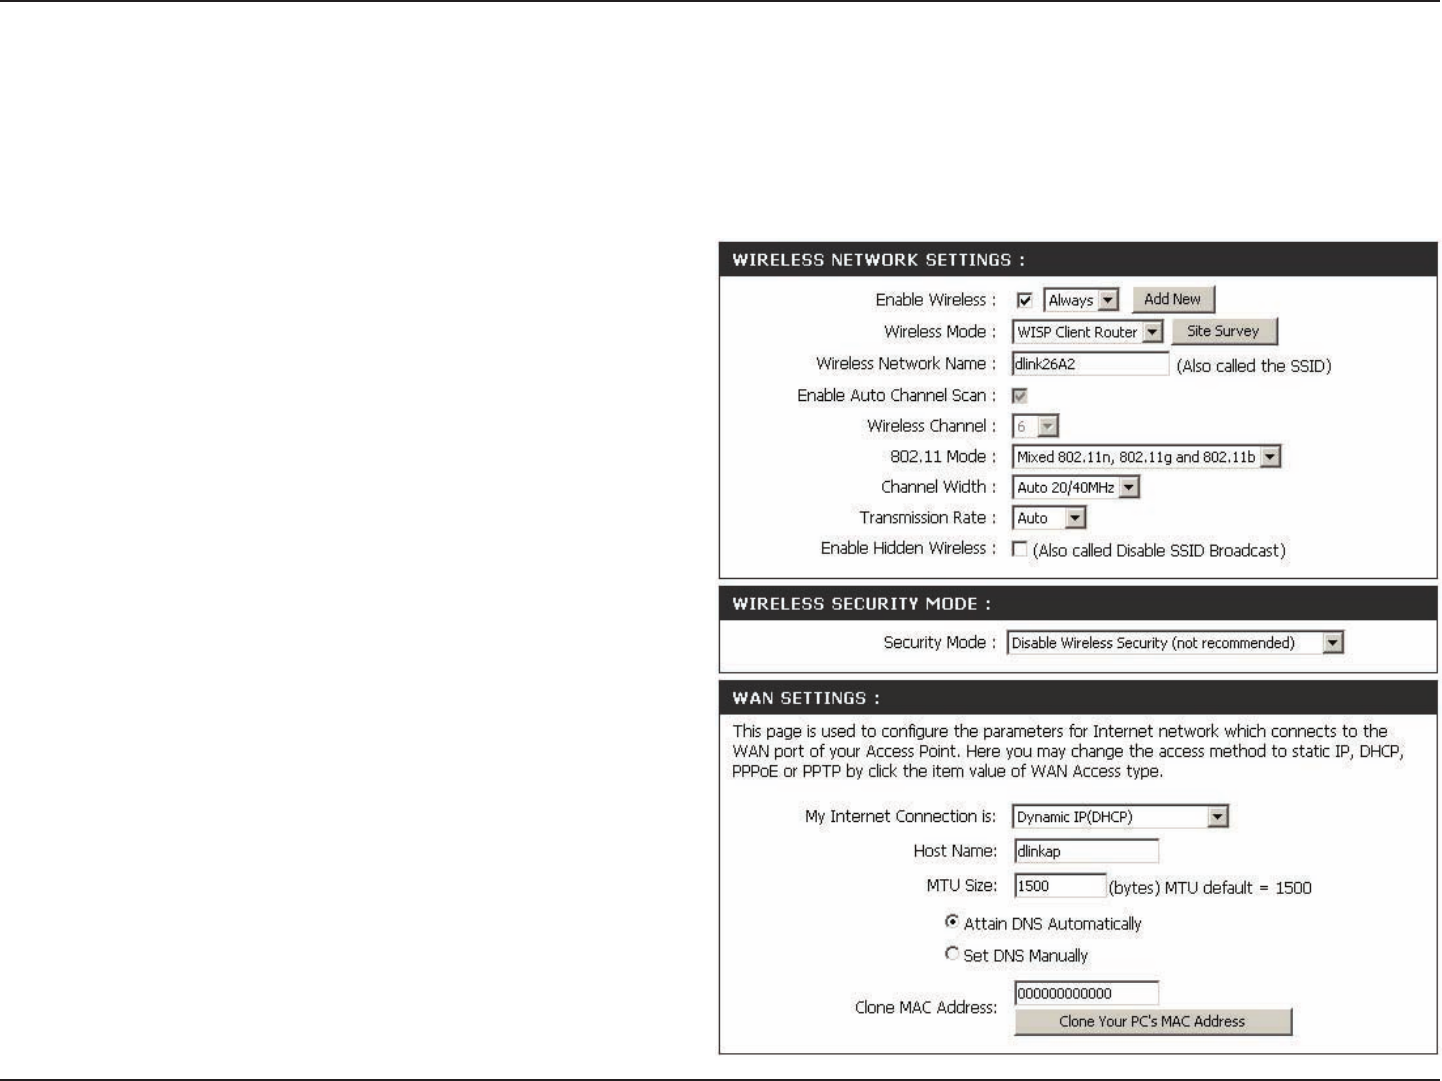
You can input the wireless network name of
the root AP or click the Site Survey button to
nd the root AP.
Click this button to choose the root AP from
an available connection list. If the root AP
has wireless encryption, you have to use the
same wireless security mode to connect the
root AP.
This option is unavailable in WISP Client
Router and WISP Repeater mode.
Wireless Network
Name:
Site Survey:
Wireless
Channel:
Enable Auto
Channel Scan:
The channel used will be displayed. The
channel will follow the root AP.
Enable Hidden
Wireless:
This option is unavailable in WISP Client
Router and WISP Repeater mode.
WISP Client Router and WISP Repeater
In WISP Router Client mode, the DAP-1360 wirelessly connects to a WISP (Wireless Internet Service Provider) AP. In this mode, the DAP-
1360 also acts as a router for wired clients on your LAN and provides NAT (Network Address Translation) and a DHCP server to generate
IP addresses for wired clients. NAT and the DHCP server allow many computers to share the same wireless Internet connection.
WISP Repeater wireless mode acts the same as WISP Client Router wireless mode, with the addition of a wireless signal for any wireless
clients on the LAN.
Wireless
Security Mode: Select a wireless security setting. Options are
None, WEP, WPA, or WPA2. See p.38 of this
manual for a detailed explanation of the wireless
security options.