D Link IR615E3 D-Link DIR-615 Wireless N Router User Manual Manual Part 1
D Link Corporation D-Link DIR-615 Wireless N Router Manual Part 1
D Link >
Contents
- 1. Manual Part 1
- 2. Manual Part 2
- 3. Manual Part 3
Manual Part 1
1D-Link DIR-615 User Manual
Section 1 - Product Overview
Product Overview
Note: Using a power supply with a different voltage rating than the one included with the DIR-615 will cause damage and void the warranty for this
product.
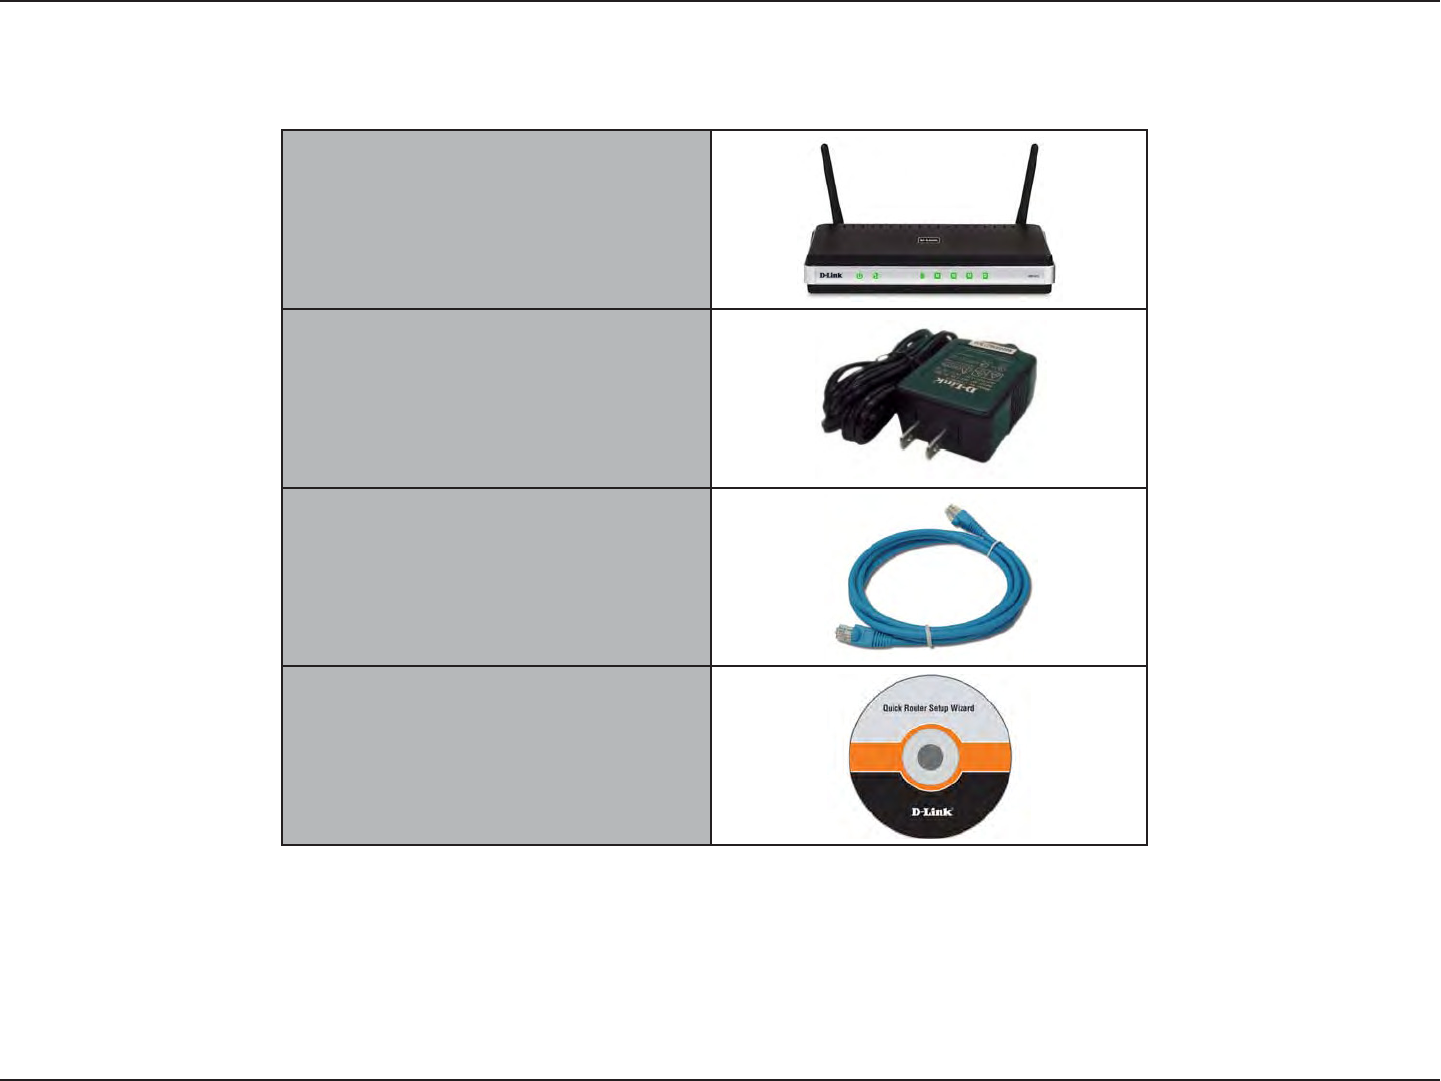
Package Contents
D-Link DIR-615 Wireless N Router
Power Adapter
Ethernet Cable
CD-ROM

2D-Link DIR-615 User Manual
Section 1 - Product Overview
Network Requirements
• An Ethernet-based Cable or DSL modem
• IEEE 802.11n-draft/g wireless clients
• 10/100 Ethernet
Web-based Configuration
Utility Requirements
Computer with the following:
• Windows®, Macintosh, or Linux-based operating
system
• An installed Ethernet adapter
Browser Requirements:
• Internet Explorer 6 or higher
• Mozilla 1.7.12 or higher
• Firefox 3.0 or higher
• Safari 3 or higher
• Flock 0.7.14 or higher
• Opera 6.0 or higher
Windows® Users: Make sure you have the latest version
of Java installed. Visit www.java.com to download the
latest version.
CD Installation Wizard
Requirements
Computer with the following:
• Windows® XP with Service Pack 2 or Vista®
• An installed Ethernet adapter
• CD-ROM drive
System Requirements

3D-Link DIR-615 User Manual
Section 1 - Product Overview
• Faster Wireless Networking - The DIR-615 provides up to 300Mbps* wireless connection with other
802.11n wireless clients. This capability allows users to participate in real-time activities online, such as
video streaming, online gaming, and real-time audio.
• Compatible with 802.11g Devices - The DIR-615 is still fully compatible with the IEEE 802.11g standard,
so it can connect with existing 802.11g PCI, USB and Cardbus adapters.
• Advanced Firewall Features - The Web-based user interface displays a number of advanced network
management features including:
• Content Filtering - Easily applied content filtering based on MAC Address, URL, and/or
Domain Name.
• Filter Scheduling - These filters can be scheduled to be active on certain days or for a
duration of hours or minutes.
• Secure Multiple/Concurrent Sessions - The DIR-615 can pass through VPN sessions. It
supports multiple and concurrent IPSec and PPTP sessions, so users behind the DIR-615
can securely access corporate networks.
• User-friendly Setup Wizard - Through its easy-to-use Web-based user interface, the DIR-615 lets you
control what information is accessible to those on the wireless network, whether from the Internet or from
your company’s server. Configure your router to your specific settings within minutes.
* Maximum wireless signal rate derived from IEEE Standard 802.11g and Draft 802.11n specifications. Actual data throughput will vary. Network conditions and
environmental factors, including volume of network traffic, building materials and construction, and network overhead, lower actual data throughput rate. Environmental
conditions will adversely affect wireless signal range.
Features
4D-Link DIR-615 User Manual
Section 1 - Product Overview
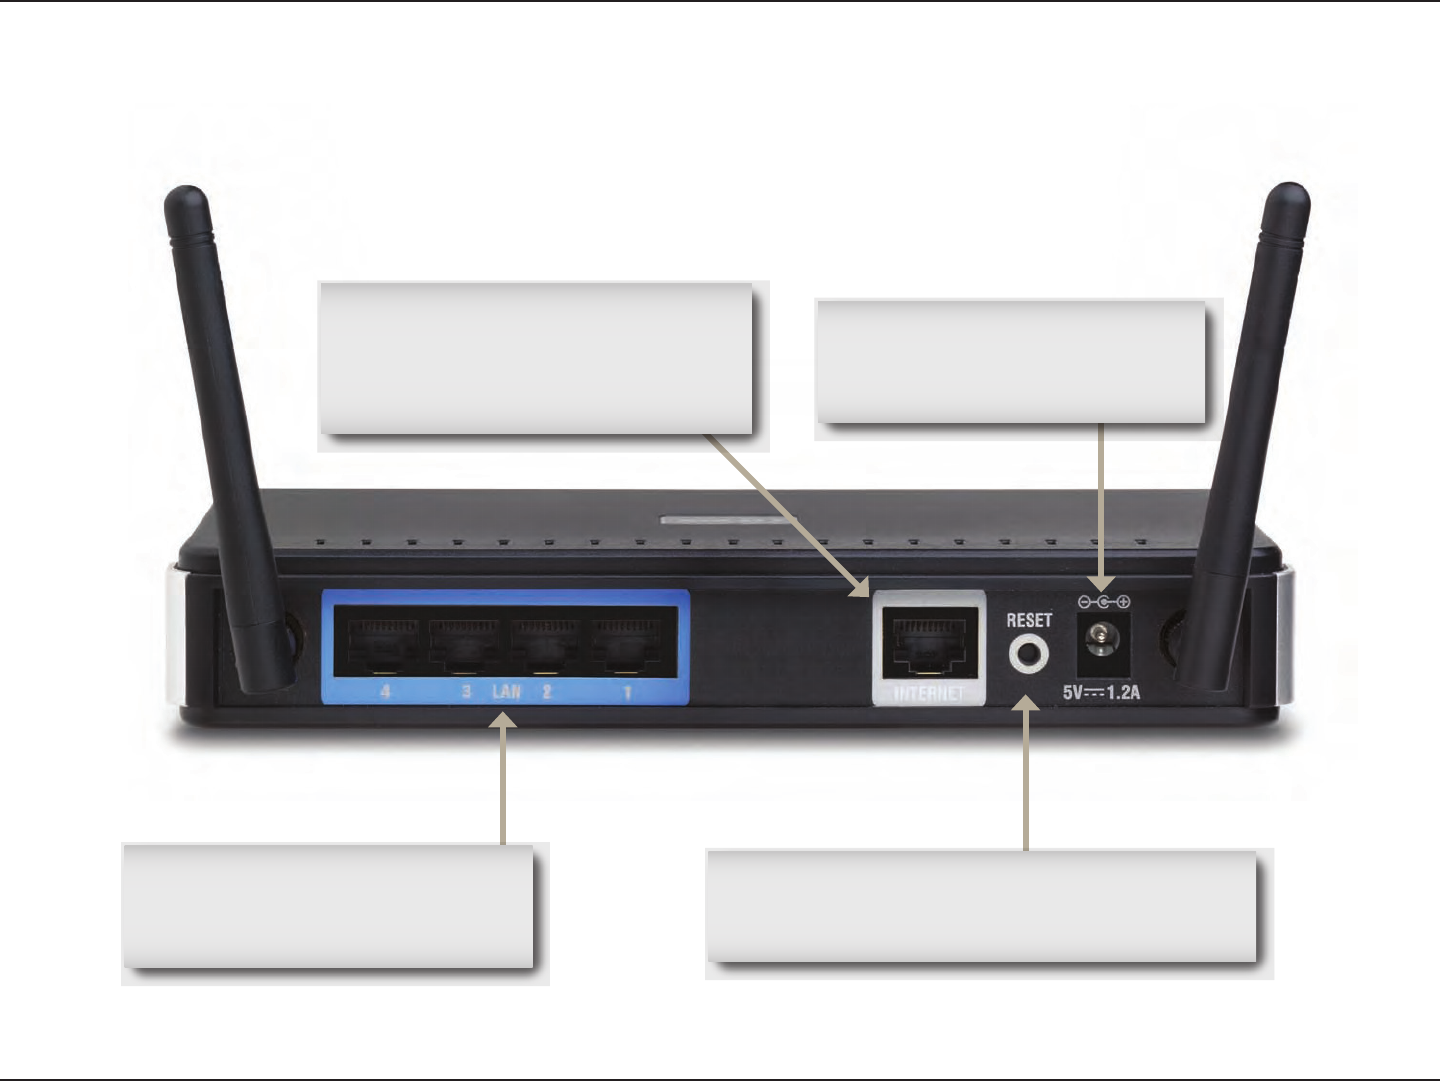
Hardware Overview
Connections
Power Receptor
Receptor for the supplied power
adapter.
LAN Ports (1-4)
Connect Ethernet devices such as
computers, switches, and hubs.
Reset
Pressing the Reset button restores the router to
its original factory default settings.
Internet Port
The auto MDI/MDIX Internet port is
the connection for the Ethernet cable
to the cable or DSL modem.
5D-Link DIR-615 User Manual
Section 1 - Product Overview
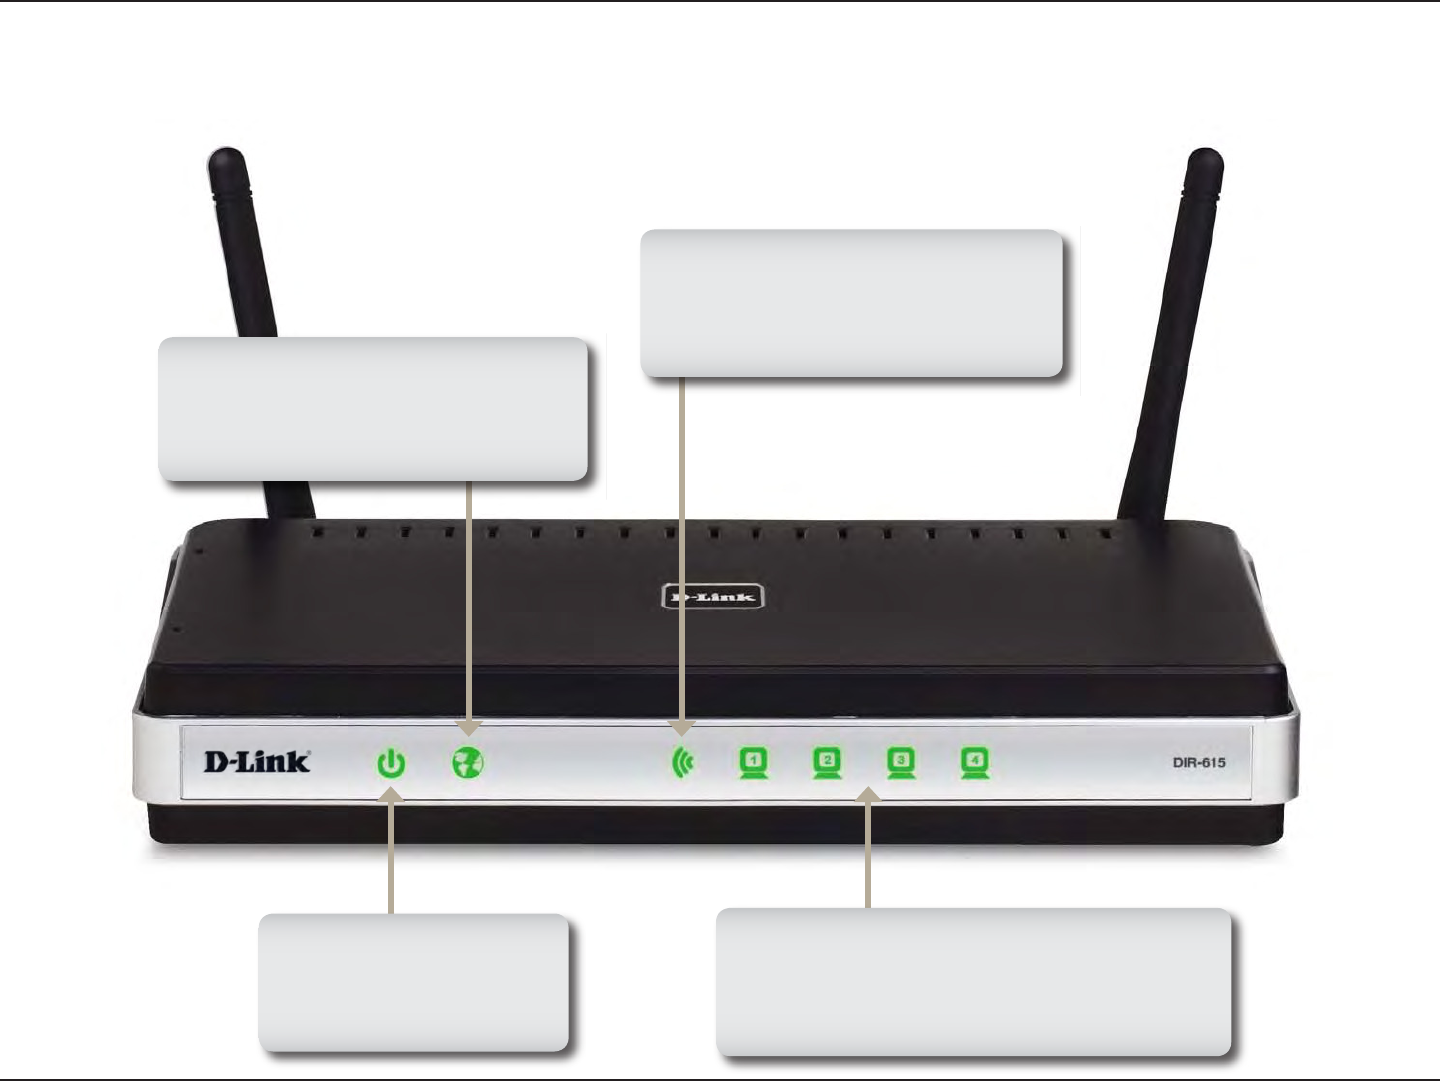
WLAN LED
A solid light indicates that the wireless
segment is ready. This LED blinks
during wireless data transmission.
Internet LED
A solid light indicates connection on
the Internet port. This LED blinks
during data transmission.
Power LED
A solid light indicates a
proper connection to the
power supply.
Local Network LEDs
A solid light indicates a connection to an
Ethernet-enabled computer on ports 1-4.
This LED blinks during data transmission.
Hardware Overview
LEDs

6D-Link DIR-615 User Manual
Section 2 - Installation
Before you Begin
This section will walk you through the installation process. Placement of the router is very important. Do not place the
router in an enclosed area such as a closet, cabinet, or in the attic or garage.
• Please configure the router with the computer that was last connected directly to your modem.
• You can only use the Ethernet port on your modem. If you were using the USB connection before using
the router, then you must turn off your modem, disconnect the USB cable and connect an Ethernet cable
to the Internet port on the router, and then turn the modem back on. In some cases, you may need to call
your ISP to change connection types (USB to Ethernet).
• If you have DSL and are connecting via PPPoE, make sure you disable or uninstall any PPPoE software
such as WinPoet, Broadjump, or Enternet 300 from your computer or you will not be able to connect to
the Internet.
• When running the Setup Wizard from the D-Link CD, make sure the computer you are running the CD
from is connected to the Internet and online or the wizard will not work. If you have disconnected any
hardware, re-connect your computer back to the modem and make sure you are online.
Installation

7D-Link DIR-615 User Manual
Section 2 - Installation
Wireless Installation Considerations
The D-Link wireless router lets you access your network using a wireless connection from virtually anywhere within
the operating range of your wireless network. Keep in mind, however, that the number, thickness and location of walls,
ceilings, or other objects that the wireless signals must pass through, may limit the range. Typical ranges vary depending
on the types of materials and background RF (radio frequency) noise in your home or business. The key to maximizing
wireless range is to follow these basic guidelines:
1. Keep the number of walls and ceilings between the D-Link router and other network devices to a minimum
- each wall or ceiling can reduce your adapter’s range from 3-90 feet (1-30 meters.) Position your devices
so that the number of walls or ceilings is minimized.
2. Be aware of the direct line between network devices. A wall that is 1.5 feet thick (.5 meters), at a
45-degree angle appears to be almost 3 feet (1 meter) thick. At a 2-degree angle it looks over 42 feet
(14 meters) thick! Position devices so that the signal will travel straight through a wall or ceiling (instead
of at an angle) for better reception.
3. Building Materials make a difference. A solid metal door or aluminum studs may have a negative effect on
range. Try to position access points, wireless routers, and computers so that the signal passes through
drywall or open doorways. Materials and objects such as glass, steel, metal, walls with insulation, water
(fish tanks), mirrors, file cabinets, brick, and concrete will degrade your wireless signal.
4. Keep your product away (at least 3-6 feet or 1-2 meters) from electrical devices or appliances that
generate RF noise.
5. If you are using 2.4GHz cordless phones or X-10 (wireless products such as ceiling fans, lights, and
home security systems), your wireless connection may degrade dramatically or drop completely. Make
sure your 2.4GHz phone base is as far away from your wireless devices as possible. The base transmits
a signal even if the phone in not in use.
8D-Link DIR-615 User Manual
Section 2 - Installation
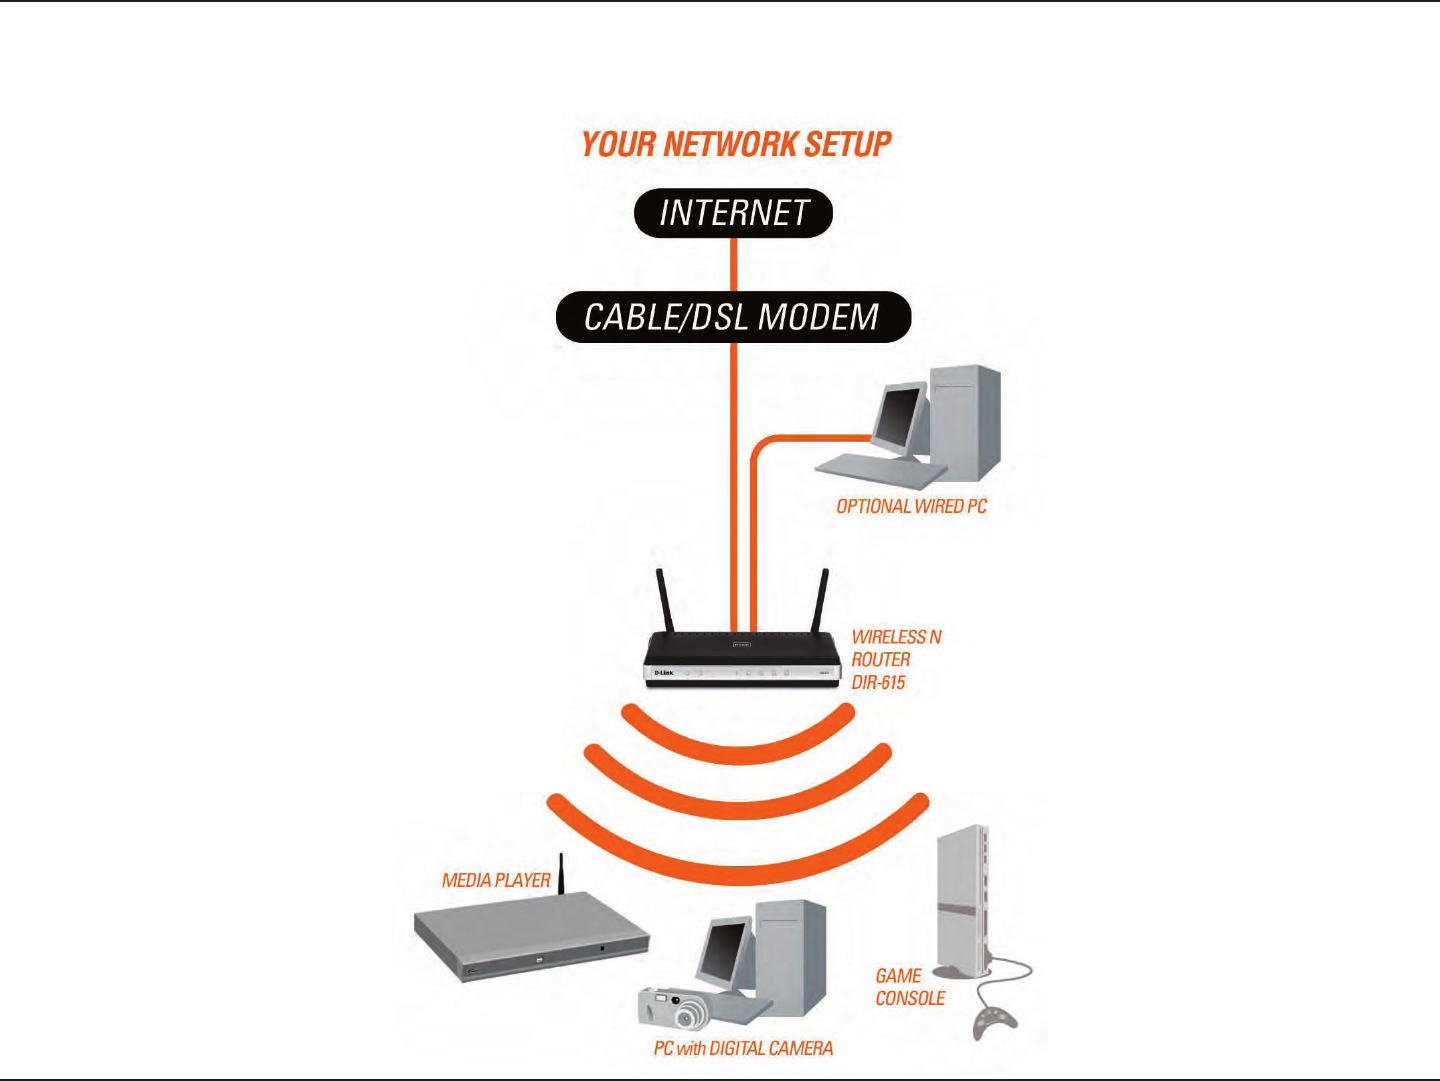
Network Diagram

9D-Link DIR-615 User Manual
Section 2 - Installation
If you are connecting the router to a cable/DSL/satellite modem, please follow the steps below:
1. Place the router in an open and central location. Do not plug the power adapter into the router.
2. Turn the power off on your modem. If there is no on/off switch, then unplug the modem’s power adapter. Shut down
your computer.
3. Unplug the Ethernet cable (that connects your computer to your modem) from your computer and place it into the
Internet port on the router.
4. Plug an Ethernet cable into one of the four LAN ports on the router. Plug the other end into the Ethernet port on your
computer.
5. Turn on or plug in your modem. Wait for the modem to boot (about 30 seconds).
6. Plug the power adapter to the router and connect to an outlet or power strip. Wait about 30 seconds for the router
to boot.
7. Turn on your computer.
8. Verify the link lights on the router. The power light, Internet light, and the LAN light (the port that your computer is
plugged into) should be lit. If not, make sure your computer, modem, and router are powered on and verify the cable
connections are correct.
9. Skip to page 13 to configure your router.
Connect to Cable/DSL/Satellite Modem

10D-Link DIR-615 User Manual
Section 2 - Installation
If you are connecting the D-Link router to another router to use as a wireless access point and/or switch, you will have
to do the following before connecting the router to your network:
• Disable UPnP™
• Disable DHCP
• Change the LAN IP address to an available address on your network. The LAN ports on the router cannot
accept a DHCP address from your other router.
To connect to another router, please follow the steps below:
1. Plug the power into the router. Connect one of your computers to the router (LAN port) using an Ethernet cable.
Make sure your IP address on the computer is 192.168.0.xxx (where xxx is between 2 and 254). Please see the
Networking Basics section for more information. If you need to change the settings, write down your existing settings
before making any changes. In most cases, your computer should be set to receive an IP address automatically in
which case you will not have to do anything to your computer.
2. Open a web browser and enter http://192.168.0.1 and press Enter. When the login window appears, set the user
name to Admin and leave the password box empty. Click Log In to continue.
3. Click on Advanced and then click Advanced Network. Uncheck the Enable UPnP checkbox. Click Save Settings
to continue.
4. Click Setup and then click Network Settings. Uncheck the Enable DHCP Server server checkbox. Click Save
Settings to continue.
5. Under Router Settings, enter an available IP address and the subnet mask of your network. Click Save Settings to
save your settings. Use this new IP address to access the configuration utility of the router in the future. Close the
browser and change your computer’s IP settings back to the original values as in Step 1.
Connect to Another Router

11D-Link DIR-615 User Manual
Section 2 - Installation
6. Disconnect the Ethernet cable from the router and reconnect your computer to your network.
7. Connect an Ethernet cable in one of the LAN ports of the router and connect it to your other router. Do not plug
anything into the Internet port of the D-Link router.
8. You may now use the other 3 LAN ports to connect other Ethernet devices and computers. To configure your wireless
network, open a web browser and enter the IP address you assigned to the router. Refer to the Configuration and
Wireless Security sections for more information on setting up your wireless network.
12D-Link DIR-615 User Manual
Section 2 - Installation
Note: It is recommended to write down the login password on the provided CD holder.
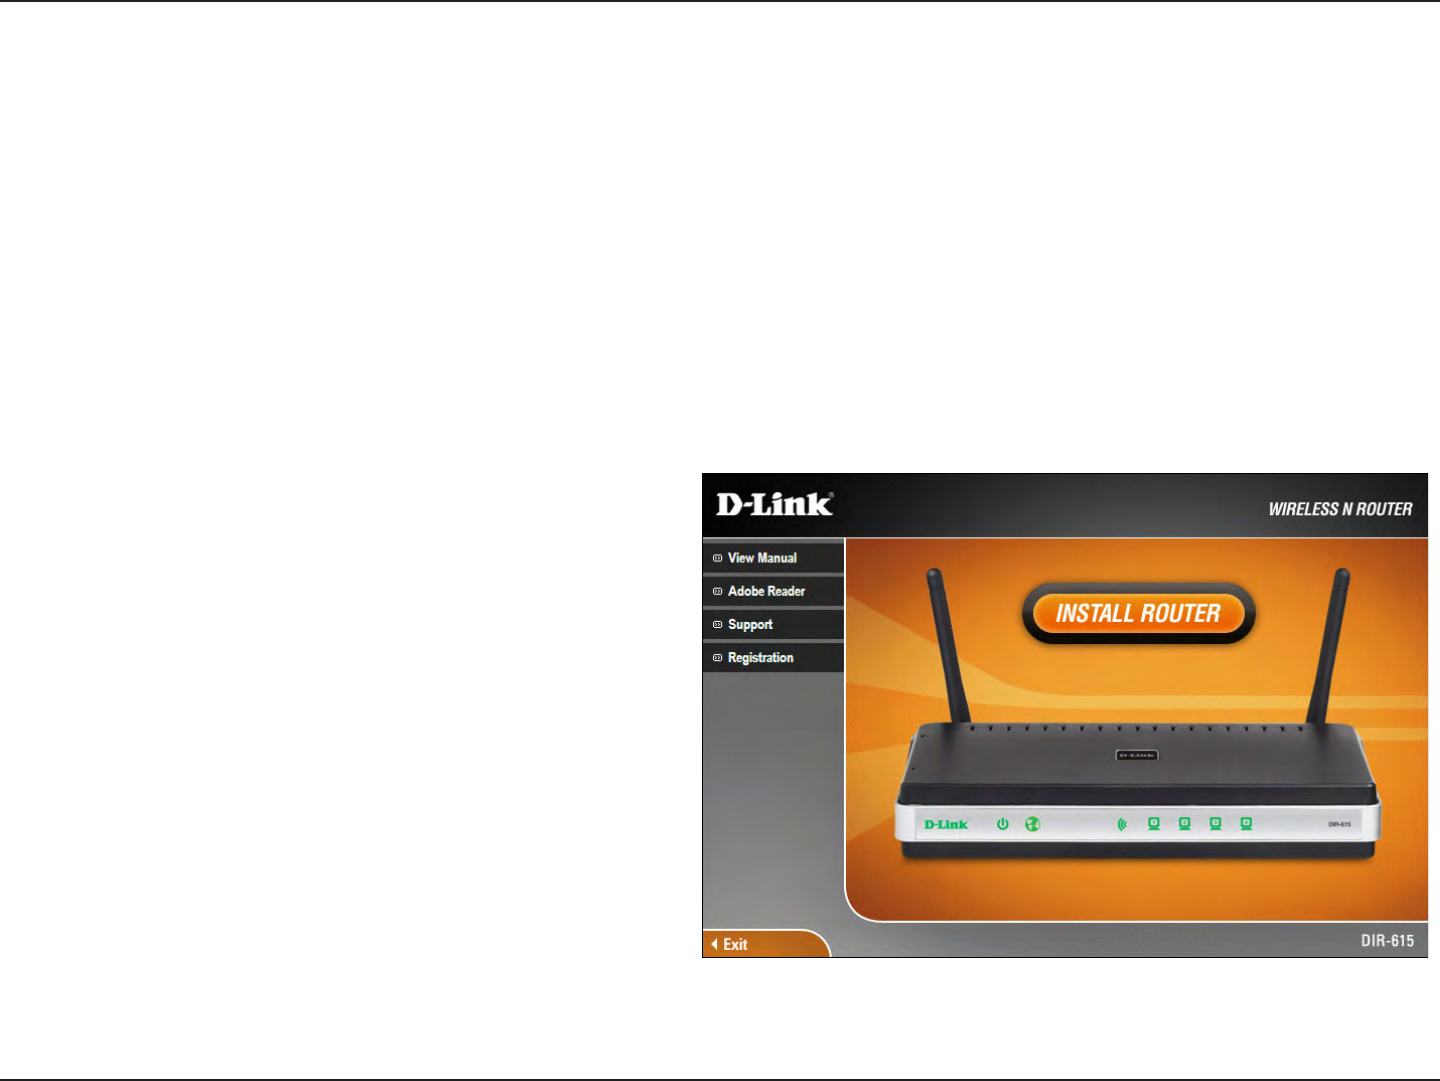
The DIR-615 includes a Quick Router Setup Wizard CD. Follow the simple steps below to run the Setup Wizard to
guide you quickly through the installation process. You may manually configure your router without the wizard. Refer
to the next page to manually setup your router.
Insert the Quick Router Setup Wizard CD in the CD-ROM drive. The step-by-step instructions that follow are shown
in Windows® XP or Vista®. The steps and screens are similar for the other Windows® operating systems.
If the CD autorun function does not automatically start on your computer, go to Start > Run. In the run box type
“D:\DIR615.exe” (where D: represents the drive letter of your CD-ROM drive).
When the autorun screen appears, click Install Router
and follow the on-screen instructions.
Getting Started
13D-Link DIR-615 User Manual
Section 3 - Configuration
Configuration
This section will show you how to configure your new D-Link wireless router using the web-based configuration
utility.
Web-based Configuration Utility
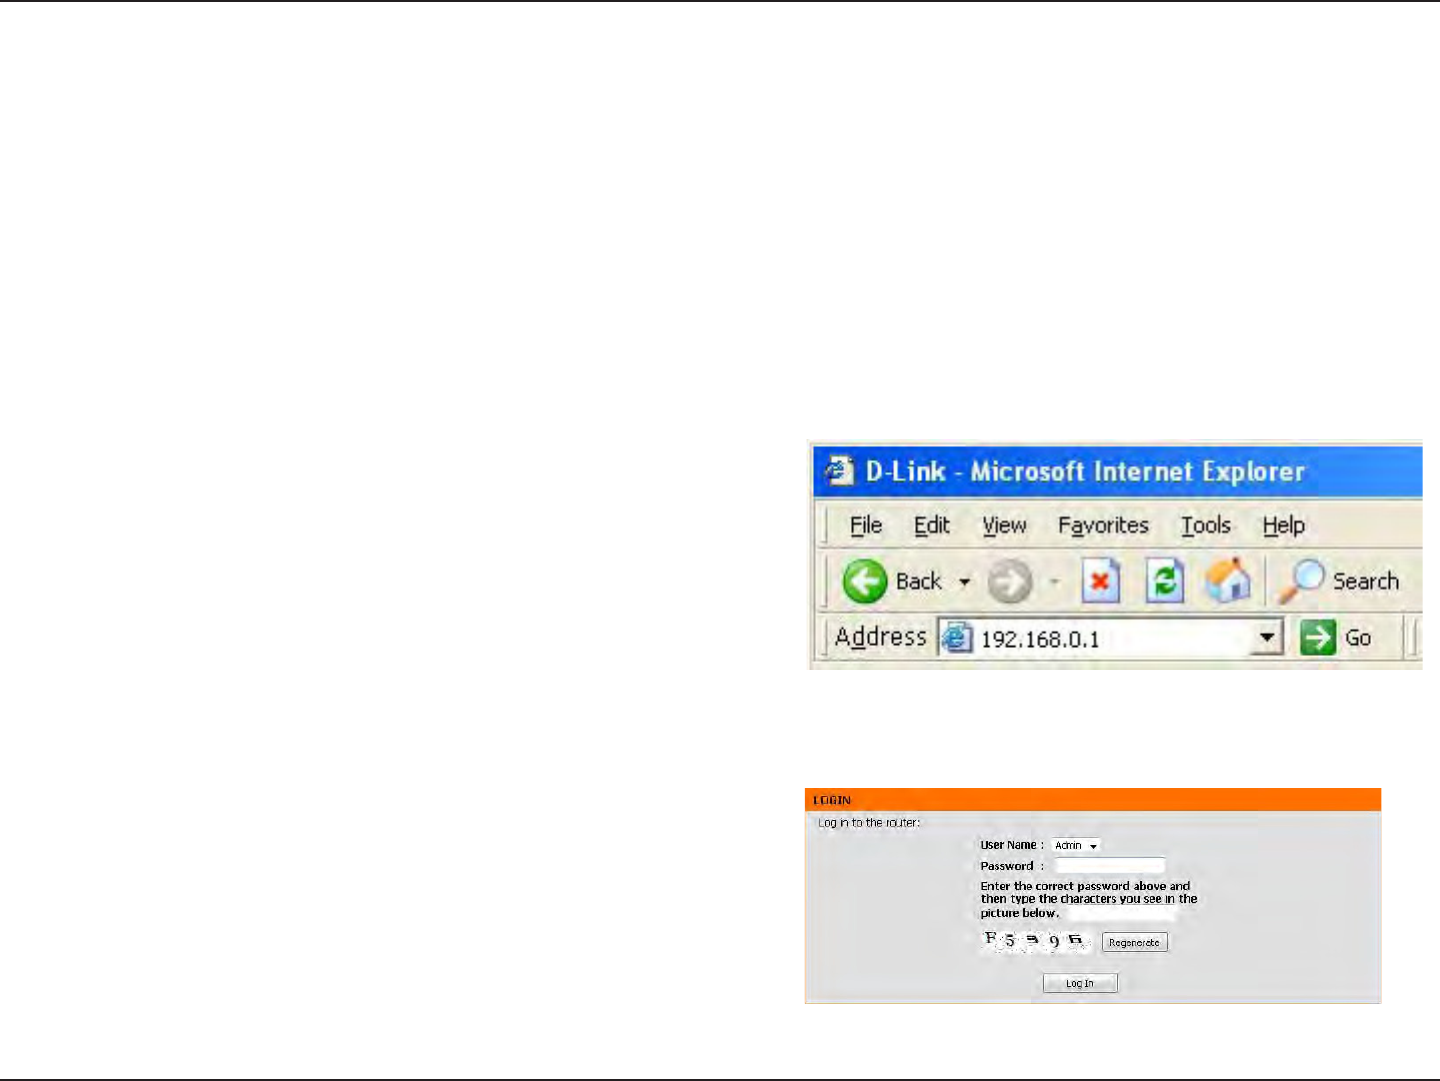
To access the configuration utility, open a web-browser such
as Internet Explorer and enter the IP address of the router
(192.168.0.1).
You may also connect using the NetBIOS name in the address
bar (http://dlinkrouter).
Select Admin from the drop-down menu and then enter your
password. Leave the password blank by default. Type in the
graphical authentication code (if you cannot read it, click
Regenerate). The graphical authentication will be disabled
by default.
If you get a Page Cannot be Displayed error, please refer
to the Troubleshooting section for assistance.
14D-Link DIR-615 User Manual
Section 3 - Configuration
Internet Connection Setup Wizard
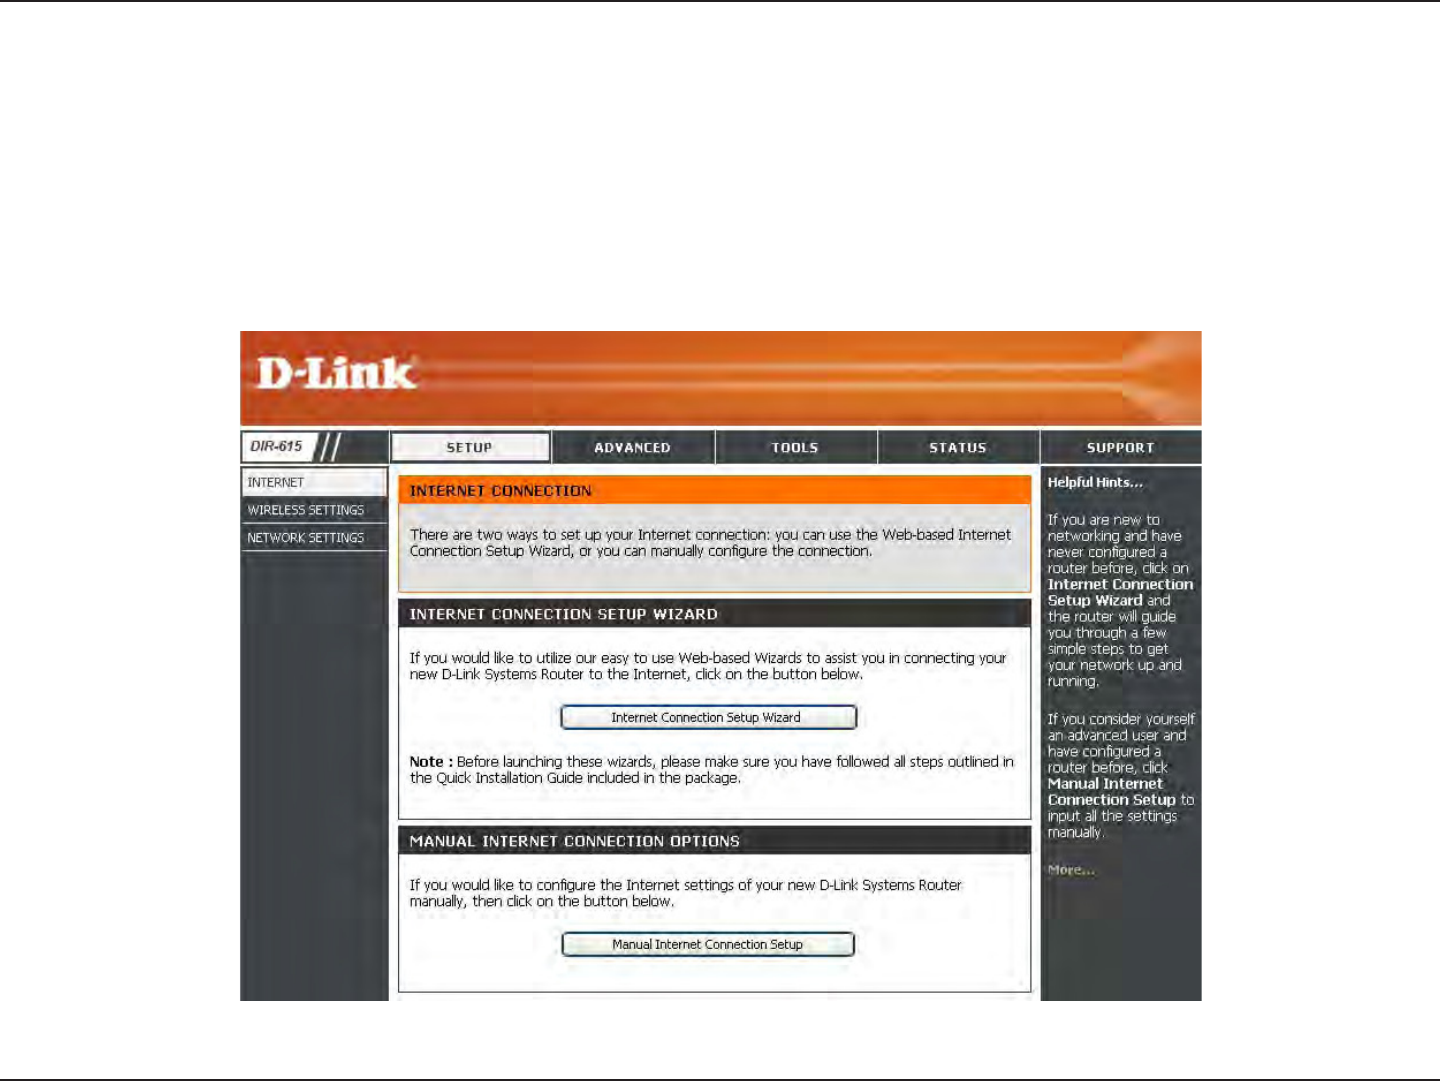
Once logged into the web interface of the router, the Setup > Internet page will appear. Click the Internet Connection
Setup Wizard button to quickly configure your router using the setup wizard.
If you want to enter your settings without running the wizard, click Manual Internet Configuration Wizard and skip
to page 19.
15D-Link DIR-615 User Manual
Section 3 - Configuration
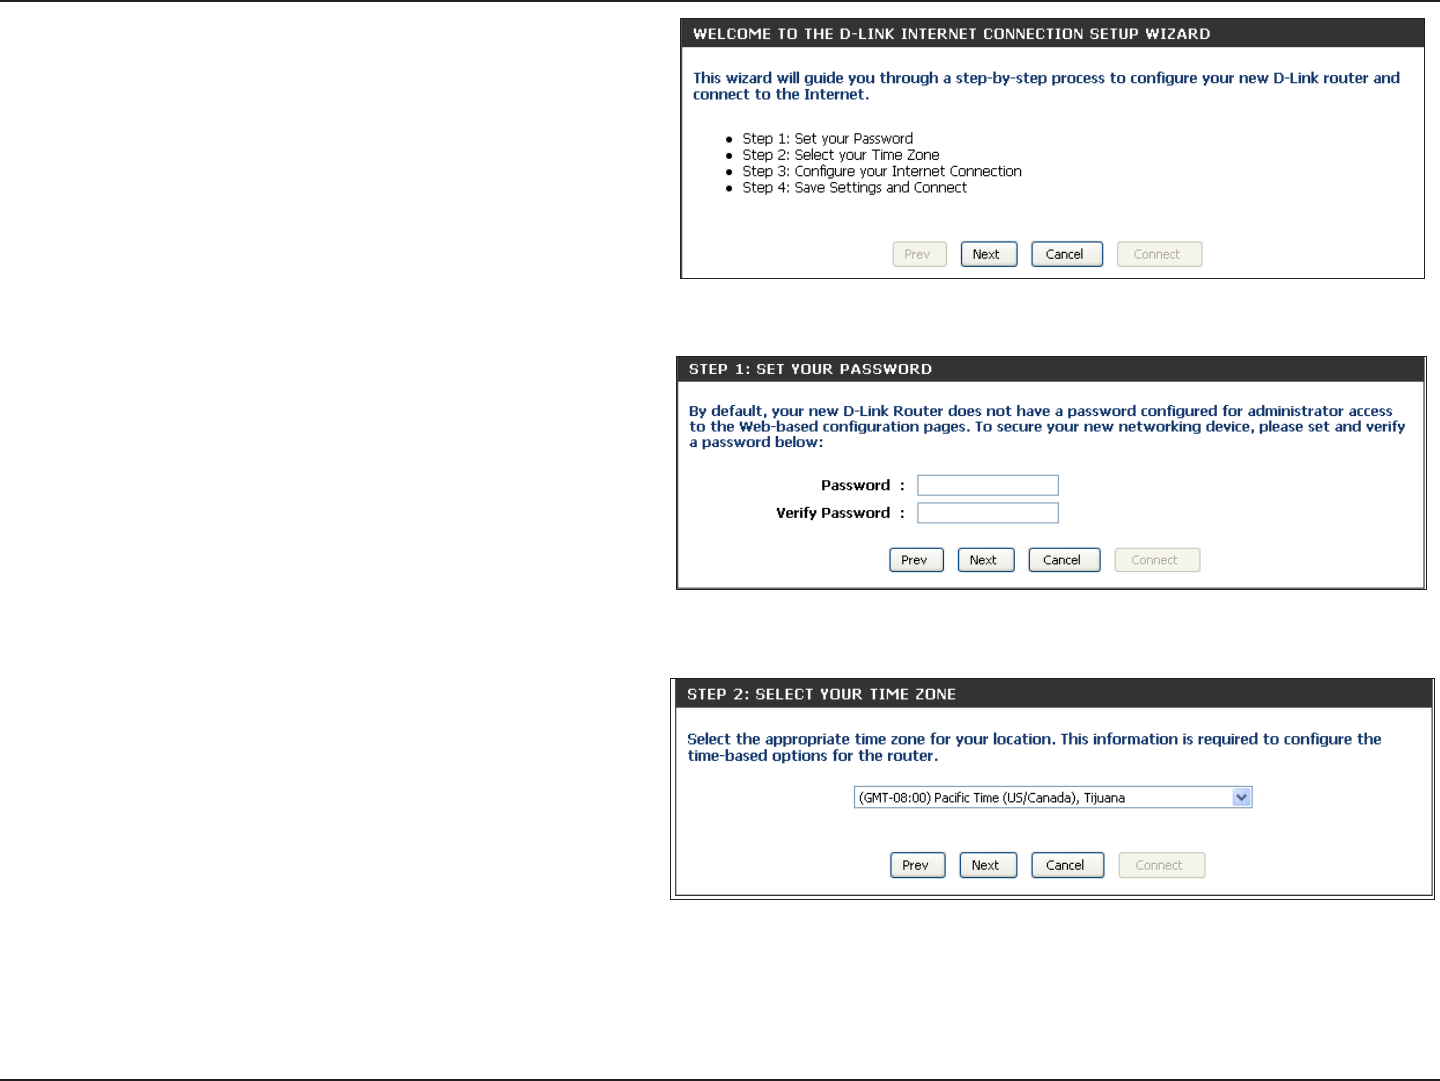
Click Next to continue.
Create a new password and then click Next to
continue.
Select your time zone from the drop-down menu and
then click Next to continue.
16D-Link DIR-615 User Manual
Section 3 - Configuration
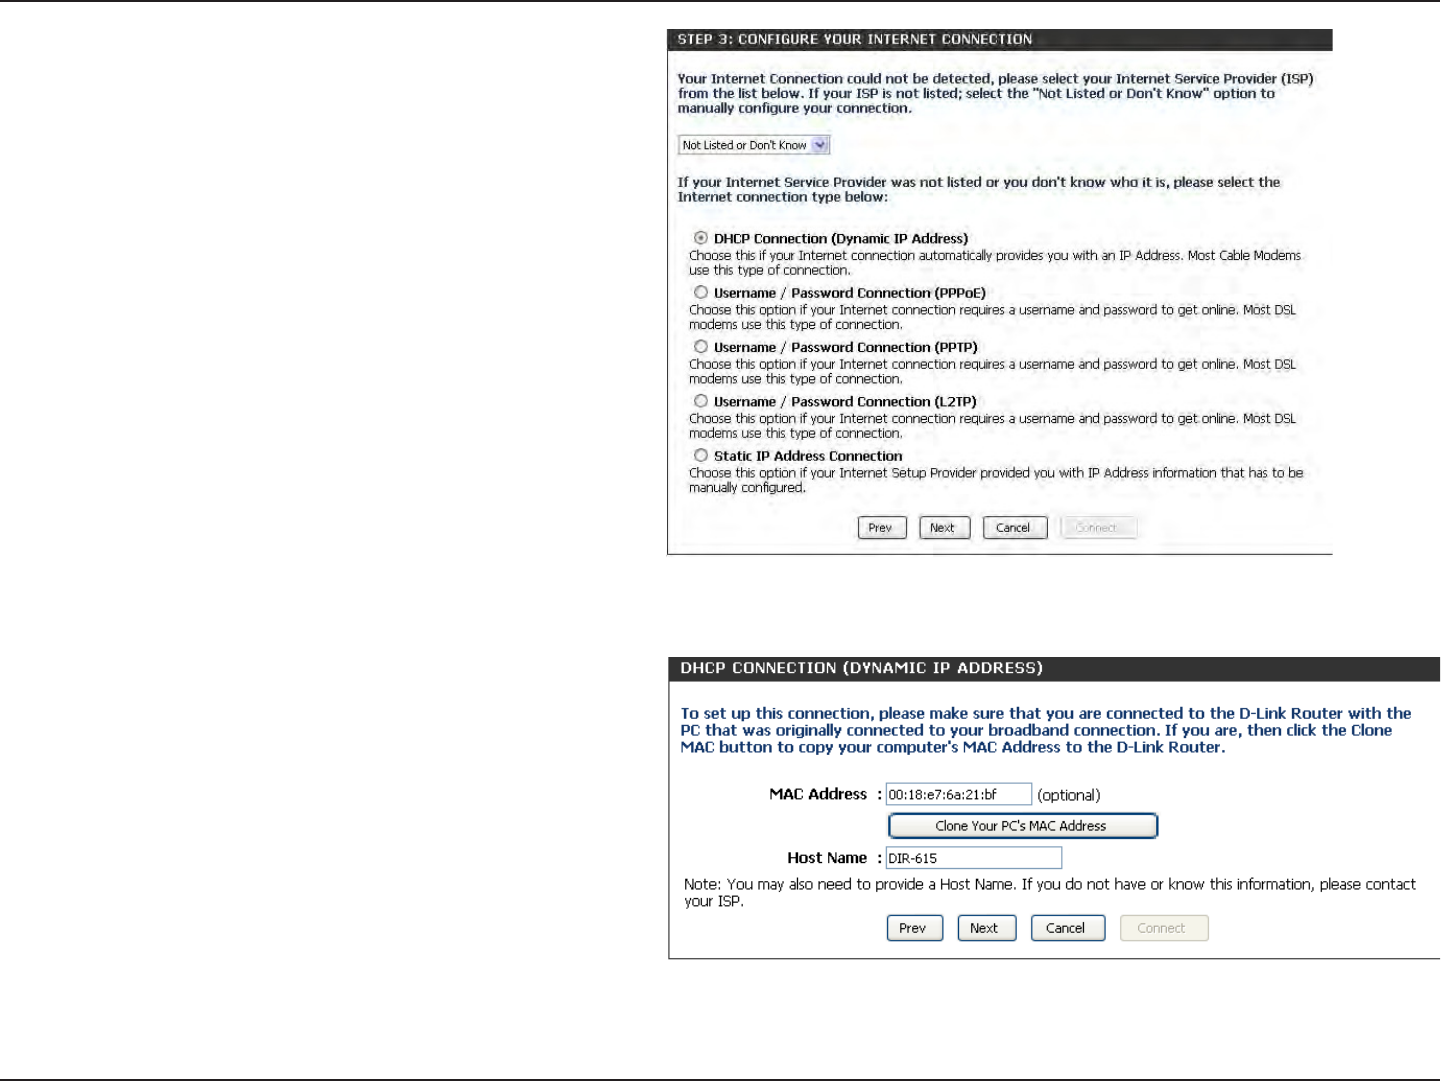
If you selected Dynamic, you may need to enter
the MAC address of the computer that was last
connected directly to your modem. If you are currently
using that computer, click Clone Your PC’s MAC
Address and then click Next to continue.
The Host Name is optional but may be required by
some ISPs. The default host name is the device name
of the Router and may be changed.
Select the type of Internet connection you use and
then click Next to continue.
17D-Link DIR-615 User Manual
Section 3 - Configuration
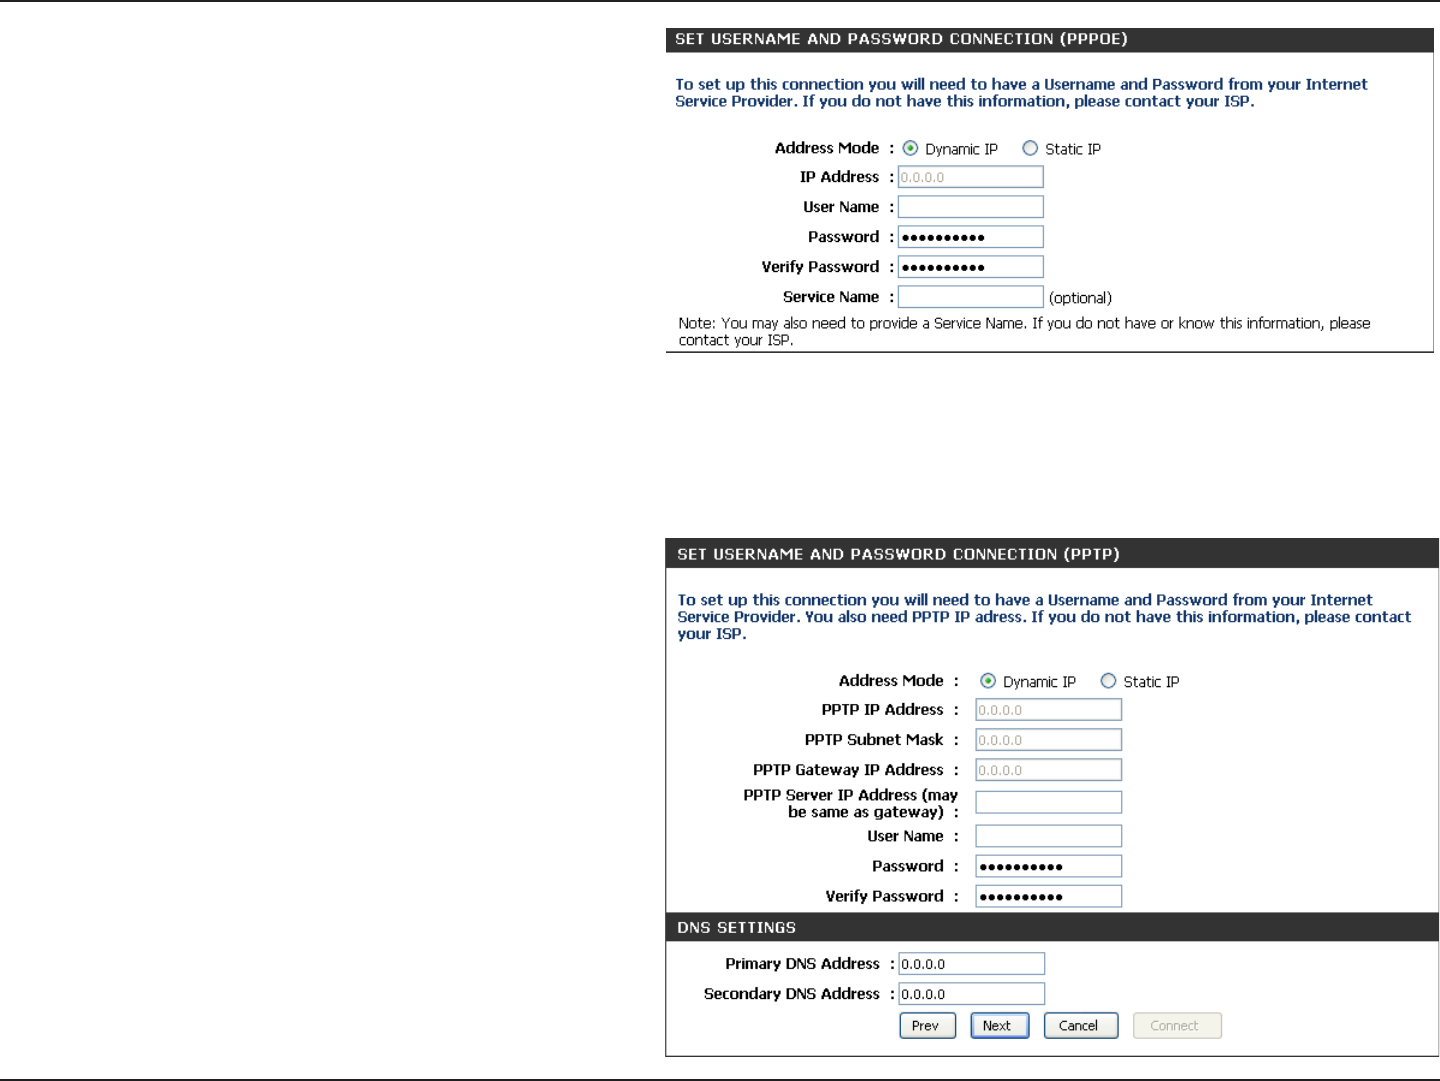
If you selected PPTP, enter your PPTP username
and password. Click Next to continue.
If you selected PPPoE, enter your PPPoE username
and password. Click Next to continue.
Select Static if your ISP assigned you the IP
address, subnet mask, gateway, and DNS server
addresses.
Note: Make sure to remove your PPPoE software
from your computer. The software is no longer
needed and will not work through a router.
18D-Link DIR-615 User Manual
Section 3 - Configuration
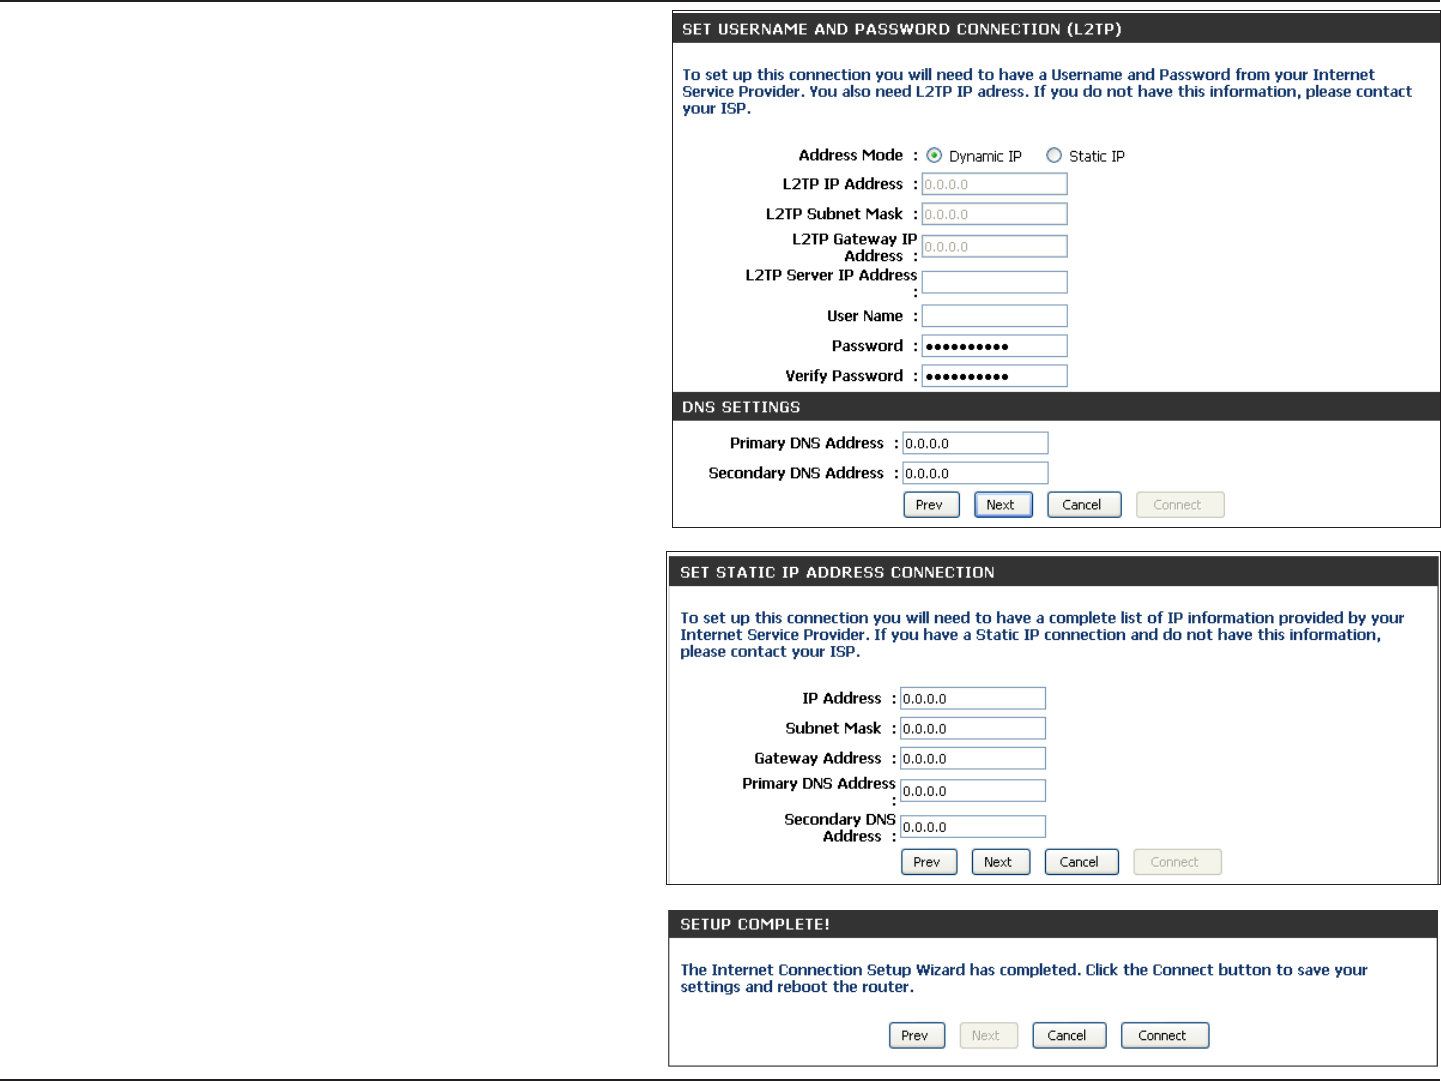
If you selected L2TP, enter your L2TP username and
password. Click Next to continue.
If you selected Static, enter your network settings
supplied by your Internet provider. Click Next to
continue.
The Setup is now complete. Click the Connect to
save your settings. Please allow 1-2 minutes to
connect.

19D-Link DIR-615 User Manual
Section 3 - Configuration
If you opt to set up your Internet connection manually, you will be redirected to a WAN page that allows you to select
your Internet type and enter the correct configuration parameters.
Select your Internet connection type using the “My Internet
Connection is” drop-down menu.
Click the Save Settings button when you have configured the
connection.
Manual Configuration
Dynamic (Cable)
Select Dynamic IP (DHCP) to obtain IP Address information
automatically from your ISP. Select this option if your ISP does not
give you any IP numbers to use. This option is commonly used for
cable modem services such as Comcast and Cox.
Advanced Domain Name System (DNS) services enhances your
Internet performance by getting you the information and web pages
you are looking for faster and more reliably. In addition, it improves your
overall Internet experience by correcting many common typo mistakes
automatically, taking you where you intended to go and saving you
valuable time.
Disclaimer: D-Link makes no warranty as to the availability, reliability,
functionality and operation of the Advanced DNS service or its
features.
My Internet
Connection:
Enable
Advanced
DNS Service:
The Host Name is optional but may be required by some ISPs. Leave blank if you are not sure.
Check the box if you are having problems obtaining an IP address from your ISP.
Enter the Primary and secondary DNS server IP addresses assigned by your ISP. These addresses are usually obtained
automatically from your ISP. Leave at 0.0.0.0 if you did not specifically receive these from your ISP.
Host Name:
Primary/
Secondary
DNS Server:
Use
Unicasting:

20D-Link DIR-615 User Manual
Section 3 - Configuration
MAC Address:
MTU: Maximum Transmission Unit - you may need to change the MTU for optimal performance with your specific ISP. 1500 is the
default MTU.
The default MAC Address is set to the Internet port’s physical interface MAC address on the Broadband Router. It is not
recommended that you change the default MAC address unless required by your ISP. You can use the Clone Your PC’s
MAC Address button to replace the Internet port’s MAC address with the MAC address of your Ethernet card.
21D-Link DIR-615 User Manual
Section 3 - Configuration
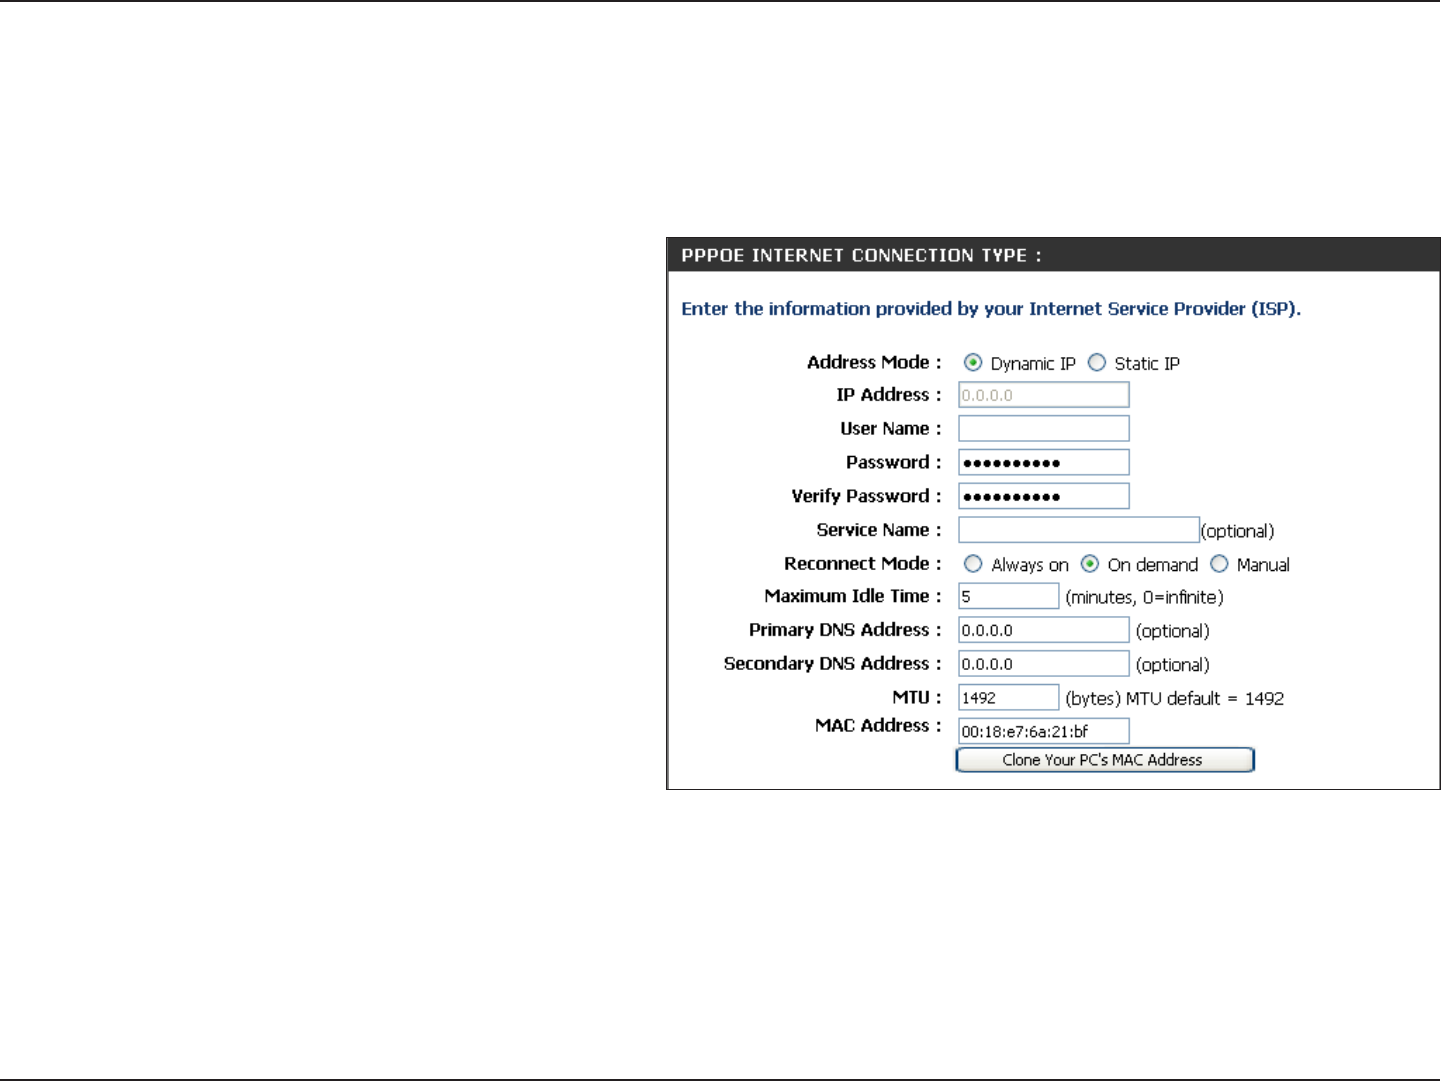
Select PPPoE (Username/Password) from
the drop-down menu.
Select Static if your ISP assigned you the IP
address, subnet mask, gateway, and DNS
server addresses. In most cases, select
Dynamic.
Enter the IP address (Static PPPoE only).
Enter your PPPoE user name.
Enter your PPPoE password and then retype
the password in the next box.
Enter the ISP Service Name (optional).
Select either Always-on, On-Demand, or
Manual.
Enter a maximum idle time during which the Internet connection is maintained during inactivity. To disable this feature,
enable Auto-reconnect.
Enter the Primary and Secondary DNS Server Addresses (Static PPPoE only).
My Internet
Connection:
Address Mode:
IP Address:
User Name:
Password:
Service Name:
Reconnection Mode:
Maximum Idle Time:
DNS Addresses:
PPPoE (DSL)
Choose PPPoE (Point to Point Protocol over Ethernet) if your ISP uses a PPPoE connection. Your ISP will provide
you with a username and password. This option is typically used for DSL services. Make sure to remove your PPPoE
software from your computer. The software is no longer needed and will not work through a router.

22D-Link DIR-615 User Manual
Section 3 - Configuration
MTU:
MAC Address:
Maximum Transmission Unit - you may need to change the MTU for optimal performance with your specific ISP. 1492 is
the default MTU.
The default MAC Address is set to the Internet port’s physical interface MAC address on the Broadband Router. It is not
recommended that you change the default MAC address unless required by your ISP. You can use the Clone Your PC’s
MAC Address button to replace the Internet port’s MAC address with the MAC address of your Ethernet card.
23D-Link DIR-615 User Manual
Section 3 - Configuration
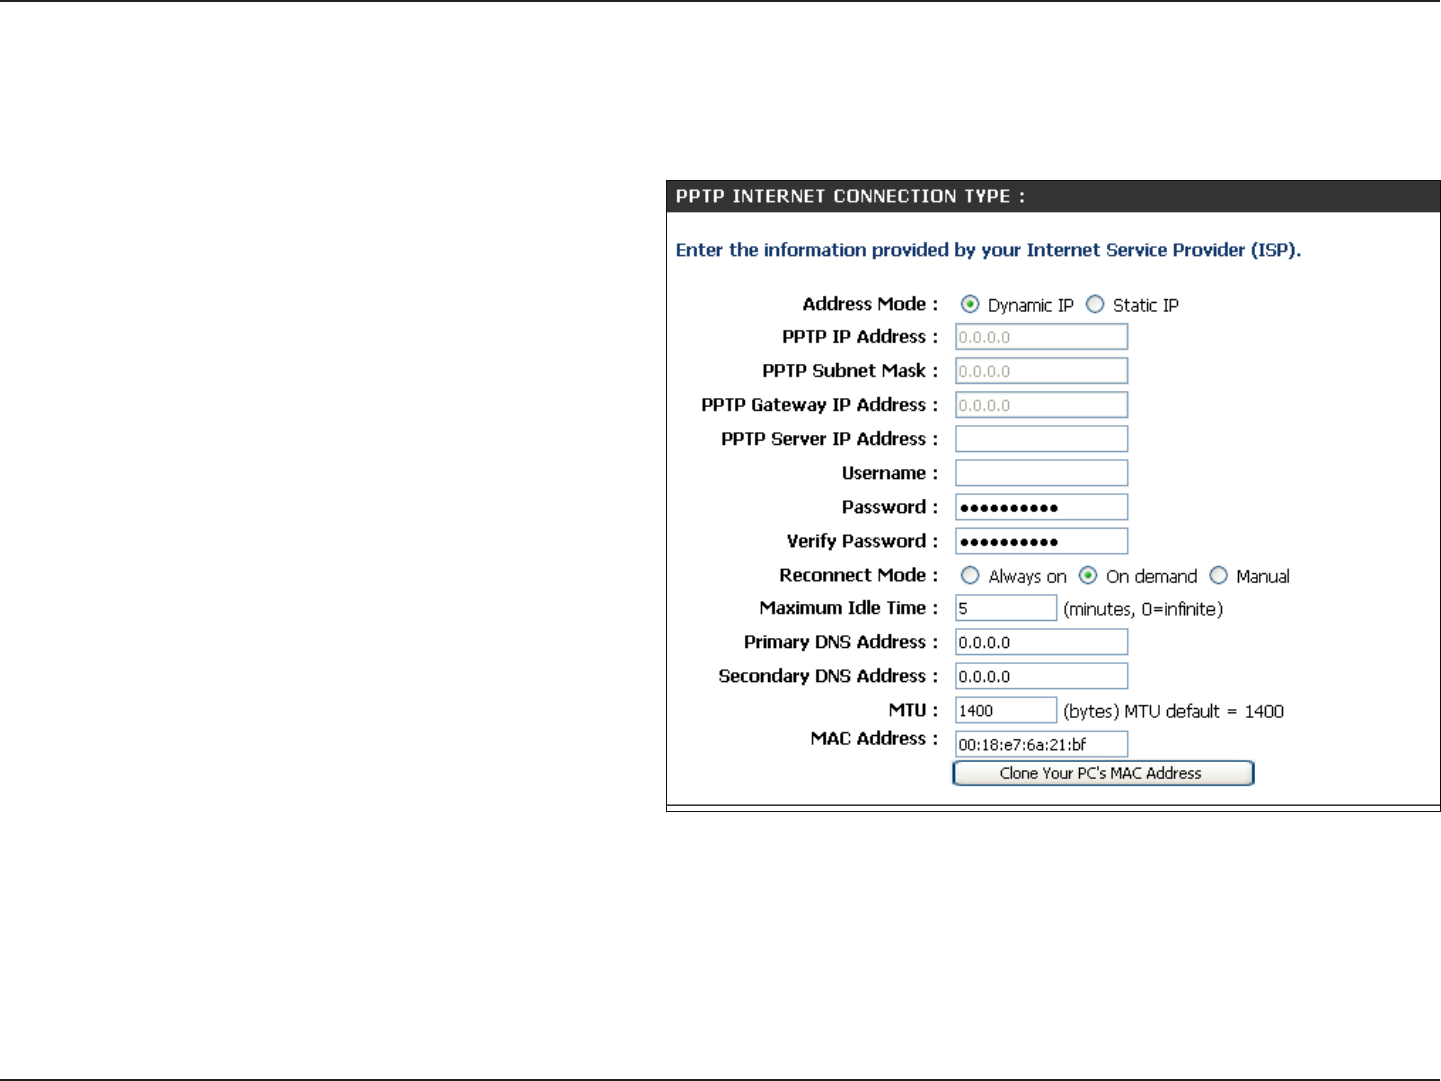
Select Static if your ISP assigned you the IP
address, subnet mask, gateway, and DNS server
addresses. In most cases, select Dynamic.
Enter the IP address (Static PPTP only).
Enter the Primary and Secondary DNS Server
Addresses (Static PPTP only).
Enter the Gateway IP Address provided by your
ISP.
Enter the Server IP provided by your ISP
(optional).
Enter your PPTP username.
Enter your PPTP password and then retype the
password in the next box.
Select either Always-on, On-Demand, or
Manual.
Enter a maximum idle time during which the Internet connection is maintained during inactivity. To disable this feature, enable
Auto-reconnect.
The DNS server information will be supplied by your ISP (Internet Service Provider.)
Maximum Transmission Unit - you may need to change the MTU for optimal performance with your specific ISP. 1400 is the
default MTU.
Address Mode:
PPTP IP Address:
PPTP Subnet
Mask:
PPTP Gateway:
PPTP Server IP:
PPTP
Choose PPTP (Point-to-Point-Tunneling Protocol ) if your ISP uses a PPTP connection. Your ISP will provide you with
a username and password. This option is typically used for DSL services.
Username:
Password:
Reconnect Mode:
Maximum Idle
Time:
DNS Servers:
MTU:

24D-Link DIR-615 User Manual
Section 3 - Configuration
The default MAC Address is set to the Internet port’s physical interface MAC address on the Broadband Router. It is not
recommended that you change the default MAC address unless required by your ISP. You can use the Clone Your PC’s
MAC Address button to replace the Internet port’s MAC address with the MAC address of your Ethernet card.
MAC Address:
25D-Link DIR-615 User Manual
Section 3 - Configuration
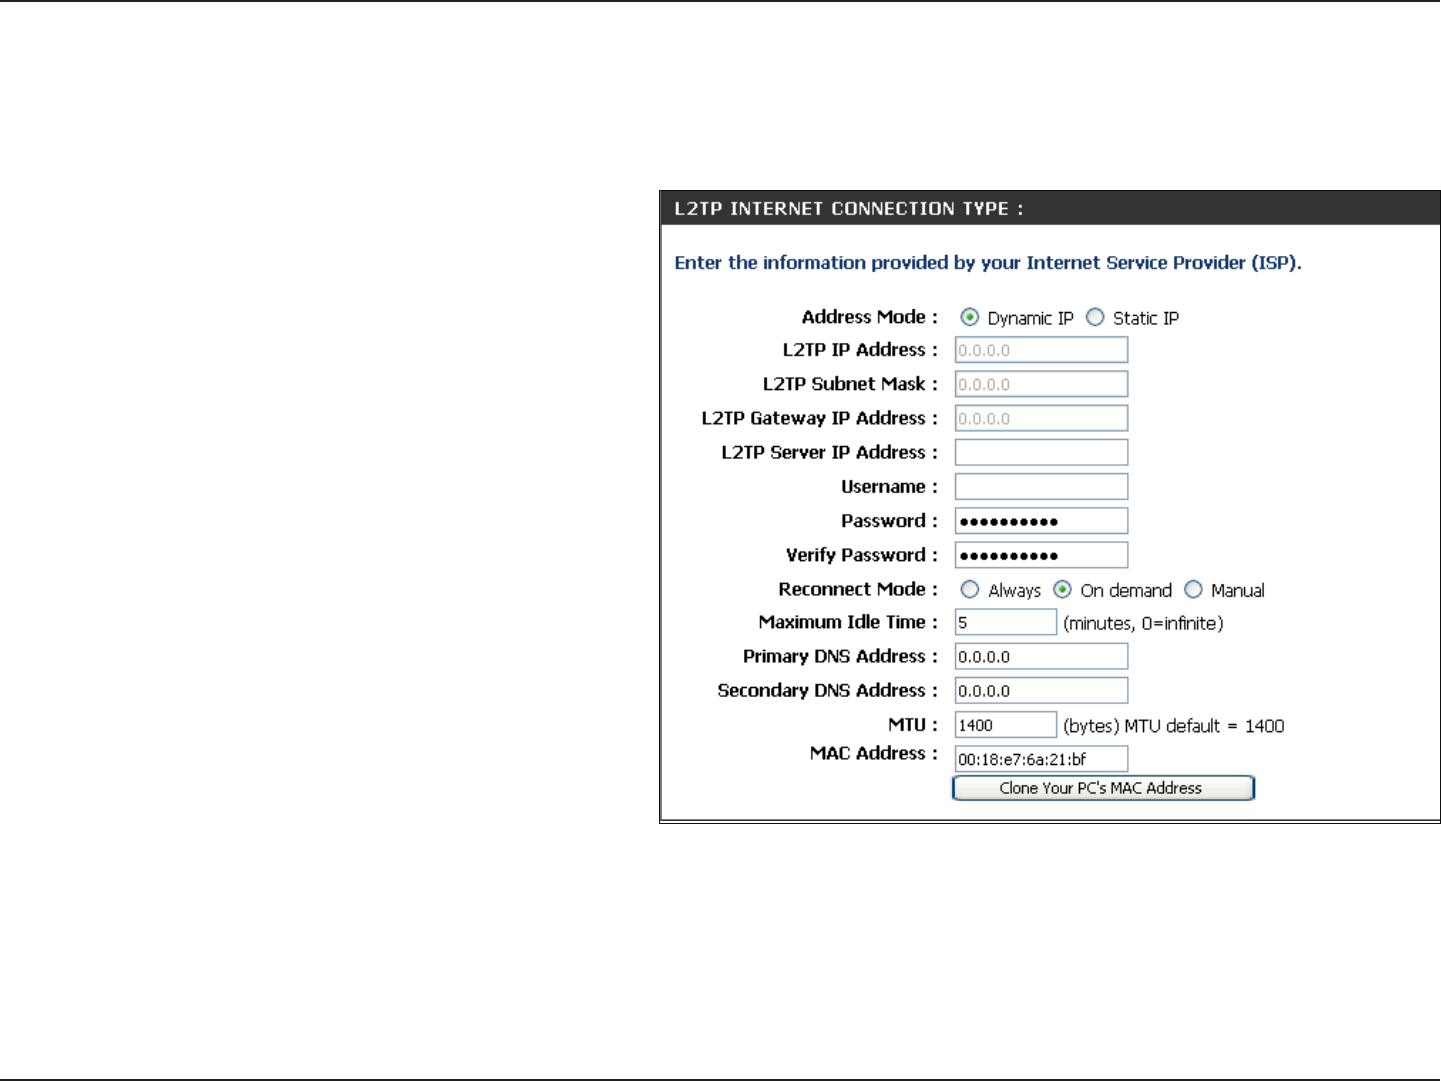
Select Static if your ISP assigned you the IP
address, subnet mask, gateway, and DNS
server addresses. In most cases, select
Dynamic.
Enter the L2TP IP address supplied by your
ISP (Static only).
Enter the Subnet Mask supplied by your ISP
(Static only).
Enter the Gateway IP Address provided by
your ISP.
Enter the Server IP provided by your ISP
(optional).
Enter your L2TP username.
Enter your L2TP password and then retype
the password in the next box.
Select either Always-on, On-Demand, or
Manual.
Enter a maximum idle time during which the Internet connection is maintained during inactivity. To disable this feature,
enable Auto-reconnect.
Enter the Primary and Secondary DNS Server Addresses (Static L2TP only).
Address Mode:
L2TP IP Address:
L2TP Subnet Mask:
L2TP Gateway:
L2TP Server IP:
Username:
Password:
Reconnect Mode:
Maximum Idle Time:
DNS Servers:
L2TP
Choose L2TP (Layer 2 Tunneling Protocol) if your ISP uses a L2TP connection. Your ISP will provide you with a username
and password. This option is typically used for DSL services.

26D-Link DIR-615 User Manual
Section 3 - Configuration
MTU:
Clone MAC
Address:
Maximum Transmission Unit - you may need to change the MTU for optimal performance with your specific ISP. 1400 is the
default MTU.
The default MAC Address is set to the Internet port’s physical interface MAC address on the Broadband Router. It is not
recommended that you change the default MAC address unless required by your ISP. You can use the Clone Your PC’s
MAC Address button to replace the Internet port’s MAC address with the MAC address of your Ethernet card.
27D-Link DIR-615 User Manual
Section 3 - Configuration
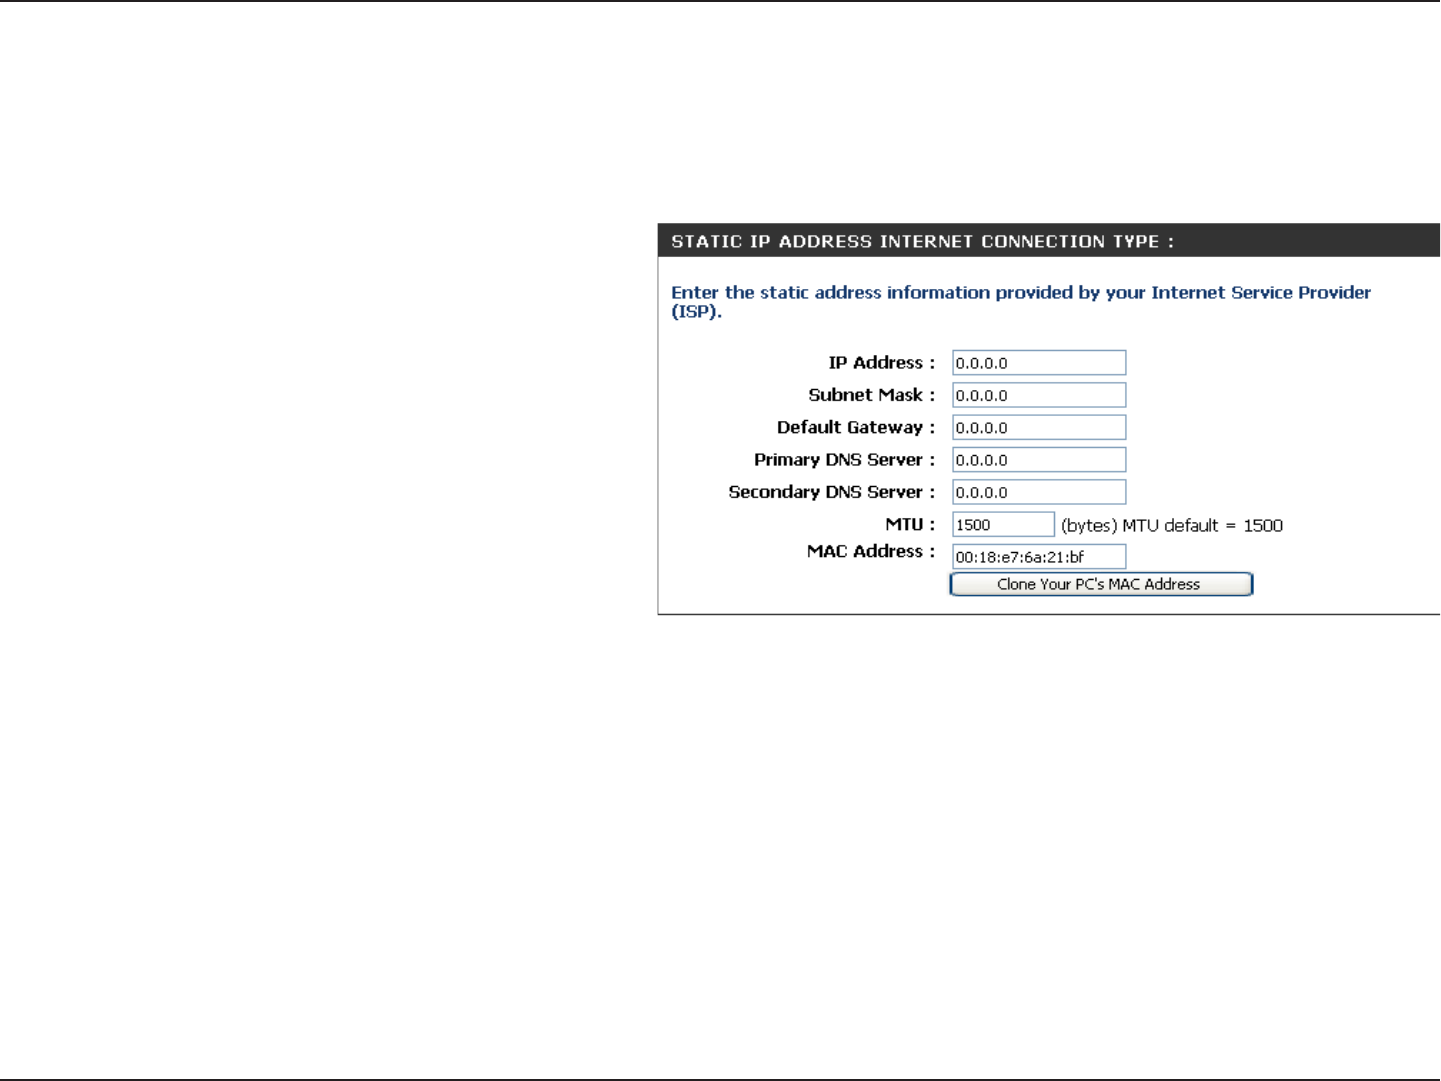
Enter the IP address assigned by your ISP.
Enter the Subnet Mask assigned by your ISP.
Enter the Gateway assigned by your ISP.
The DNS server information will be supplied by
your ISP (Internet Service Provider.)
Maximum Transmission Unit - you may need to
change the MTU for optimal performance with
your specific ISP. 1500 is the default MTU.
The default MAC Address is set to the Internet
port’s physical interface MAC address on the
Broadband Router. It is not recommended that
you change the default MAC address unless
required by your ISP. You can use the Clone
Your PC’s MAC Address button to replace
the Internet port’s MAC address with the MAC
address of your Ethernet card.
IP Address:
Subnet Mask:
Default Gateway:
DNS Servers:
MTU:
MAC Address:
Static IP Address
Select Static IP Address if all the Internet port’s IP information is provided to you by your ISP. You will need to enter in the IP address,
subnet mask, gateway address, and DNS address(es) provided to you by your ISP. Each IP address entered in the fields must be in the
appropriate IP form, which are four octets separated by a dot (x.x.x.x). The Router will not accept the IP address if it is not in this format.
28D-Link DIR-615 User Manual
Section 3 - Configuration
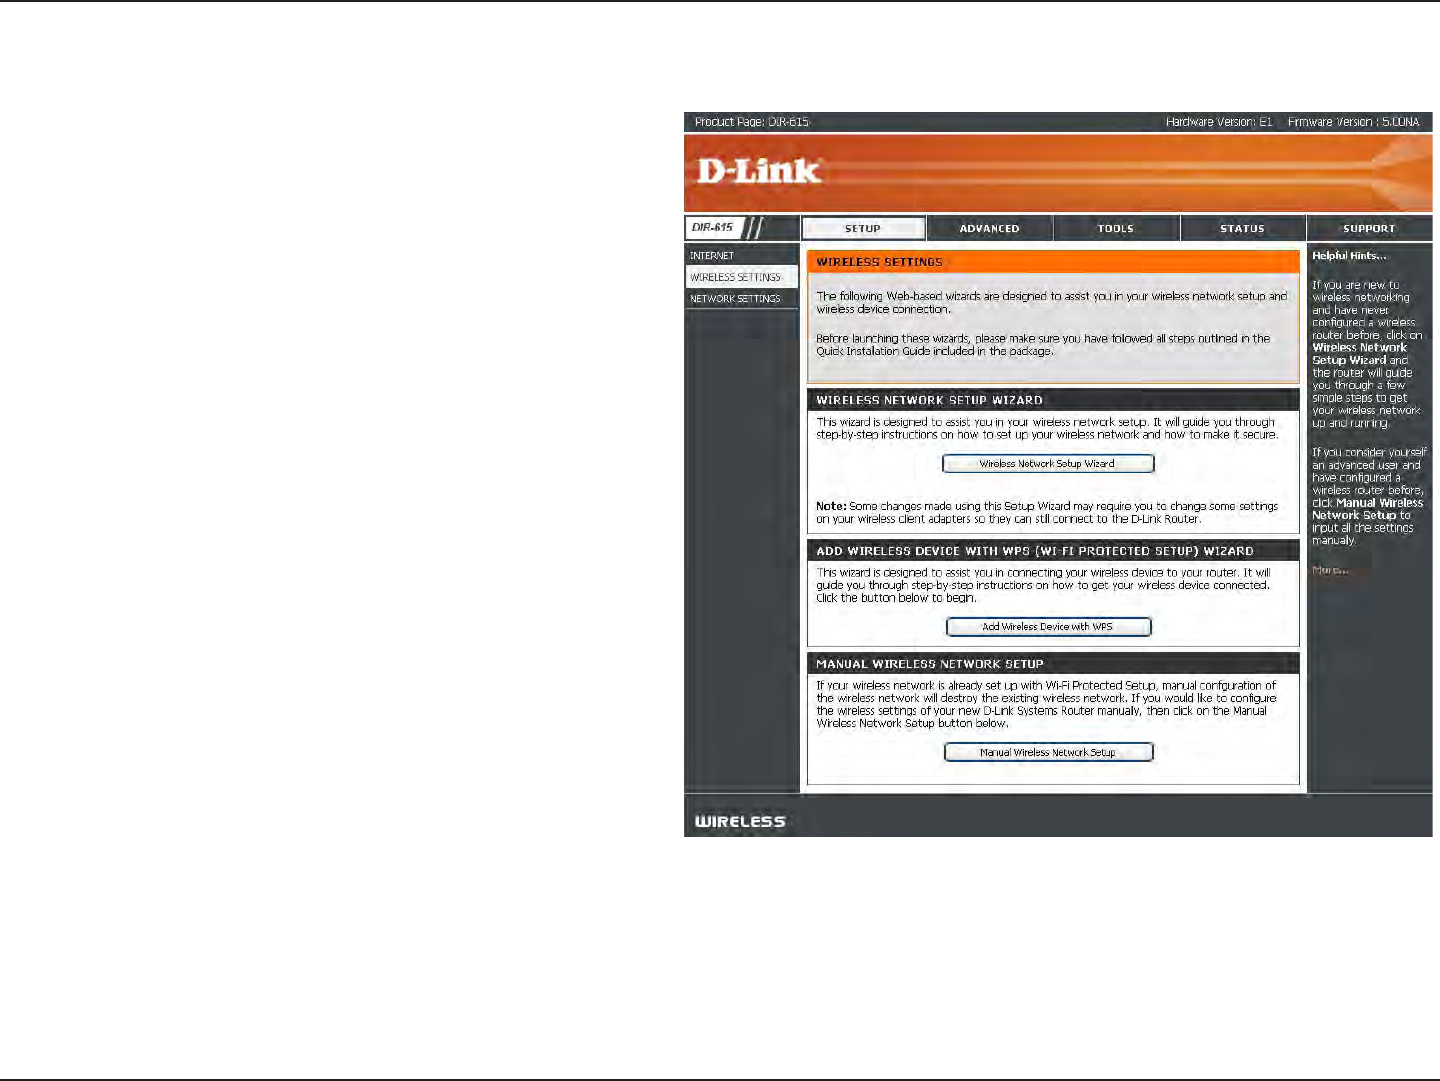
Wireless Settings
If you want to configure the wireless settings on your
router using the wizard, click Wireless Network Setup
Wizard and refer to page 79.
Click Add Wireless Device with WPS if you want to add
a wireless device using Wi-Fi Protected Setup (WPS)
and refer to page 82.
If you want to manually configure the wireless settings
on your router click Manual Wireless Network Setup
and refer to the next page.
29D-Link DIR-615 User Manual
Section 3 - Configuration
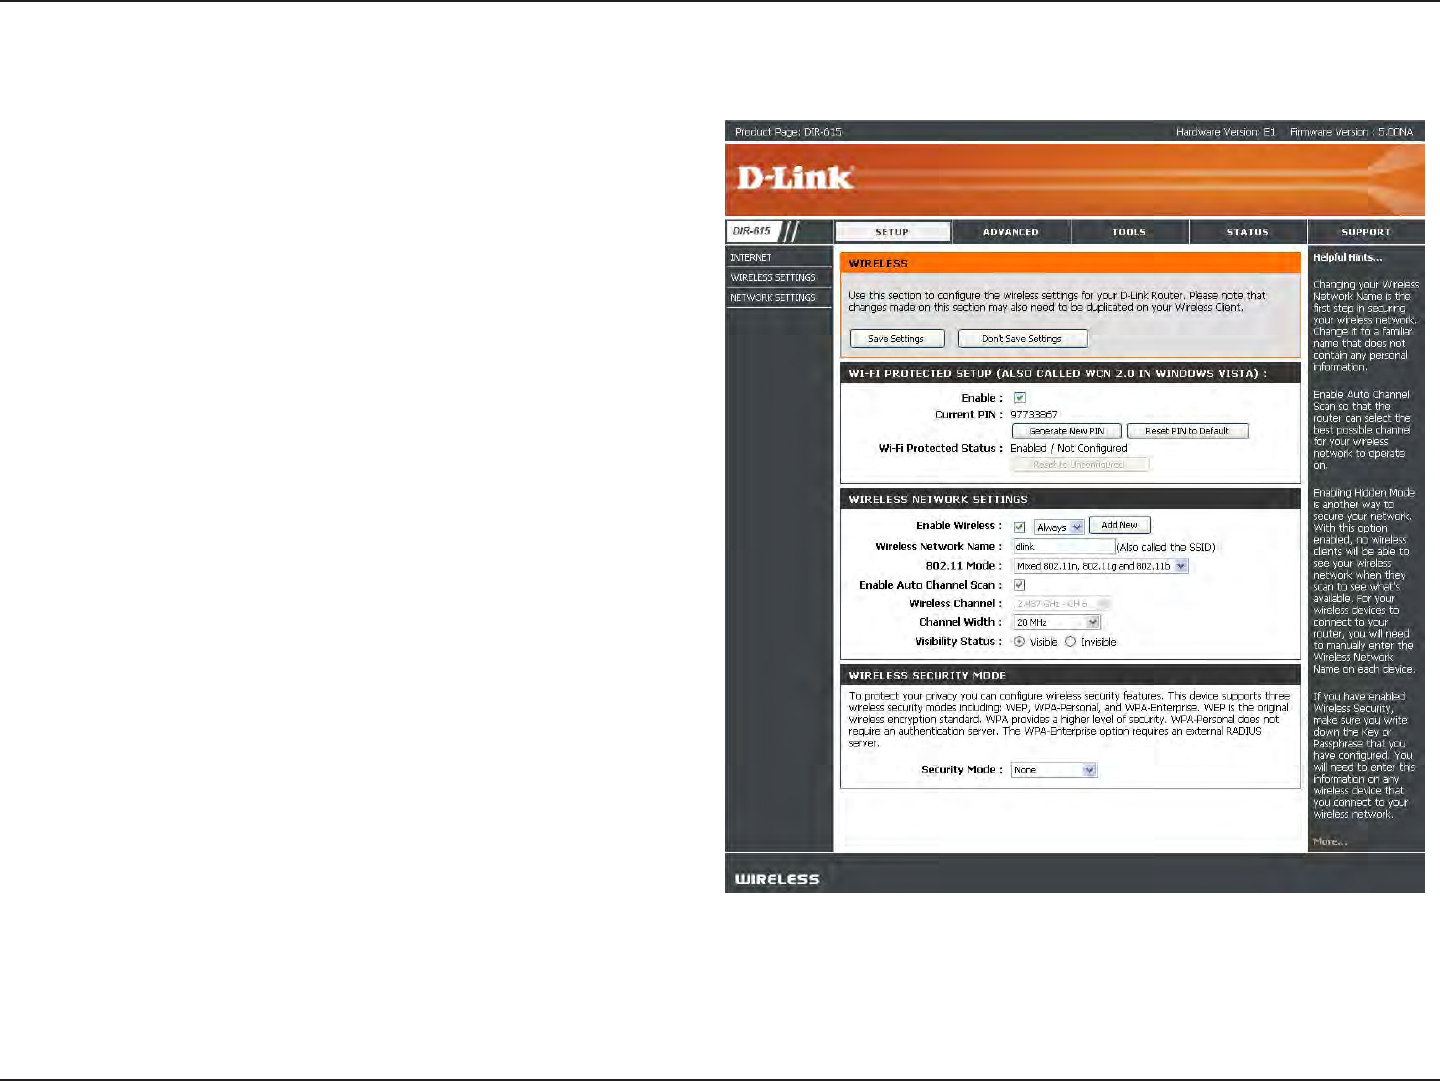
Manual Wireless Network Setup
Check the box to enable the wireless function. If
you do not want to use wireless, uncheck the box
to disable all the wireless functions. Click Add New
to create your own time schedule to enable the
wireless function.
Service Set Identifier (SSID) is the name of your
wireless network. Create a name using up to 32
characters. The SSID is case-sensitive.
Select one of the following:
802.11g Only - Select if all of your wireless clients
are 802.11g.
Mixed 802.11g and 802.11b - Select if you
are using both 802.11b and 802.11g wireless
clients.
802.11b Only - Select if all of your wireless clients
are 802.11b.
802.11n Only - Select only if all of your wireless
clients are 802.11n.
Mixed 802.11n, 802.11b, and 802.11g - Select
if you are using a mix of 802.11n, 11g, and 11b
wireless clients.
Mixed 802.11n and 802.11g - Select if you are
using a mix of 802.11n and 802.11g wireless
clients.
The Auto Channel Scan setting can be selected to
allow the DIR-615 to choose the channel with the least amount of interference.
Indicates the channel setting for the DIR-615. By default the channel is set to 6. The Channel can be changed to fit the
channel setting for an existing wireless network or to customize the wireless network. If you enable Auto Channel Scan,
this option will be greyed out.
Enable Wireless:
Wireless Network
Name:
802.11 Mode:
Enable Auto
Channel Scan:
Wireless Channel:

30D-Link DIR-615 User Manual
Section 3 - Configuration
Select the transmit rate. It is strongly suggested to select Best (Auto) for best performance.
Select the Channel Width:
Auto 20/40 - Select if you are using both 802.11n and non-802.11n wireless devices.
20MHz - Select if you are not using any 802.11n wireless clients. This is the default setting.
Select Invisible if you do not want the SSID of your wireless network to be broadcasted by the DIR-615. If Invisible is selected,
the SSID of the DIR-615 will not be seen by Site Survey utilities so your wireless clients will have to know the SSID of your
DIR-615 in order to connect to it.
Refer to page 79 for more information regarding wireless security.
Visibility Status:
Wireless Security:
Channel Width:
Transmission Rate:
31D-Link DIR-615 User Manual
Section 3 - Configuration
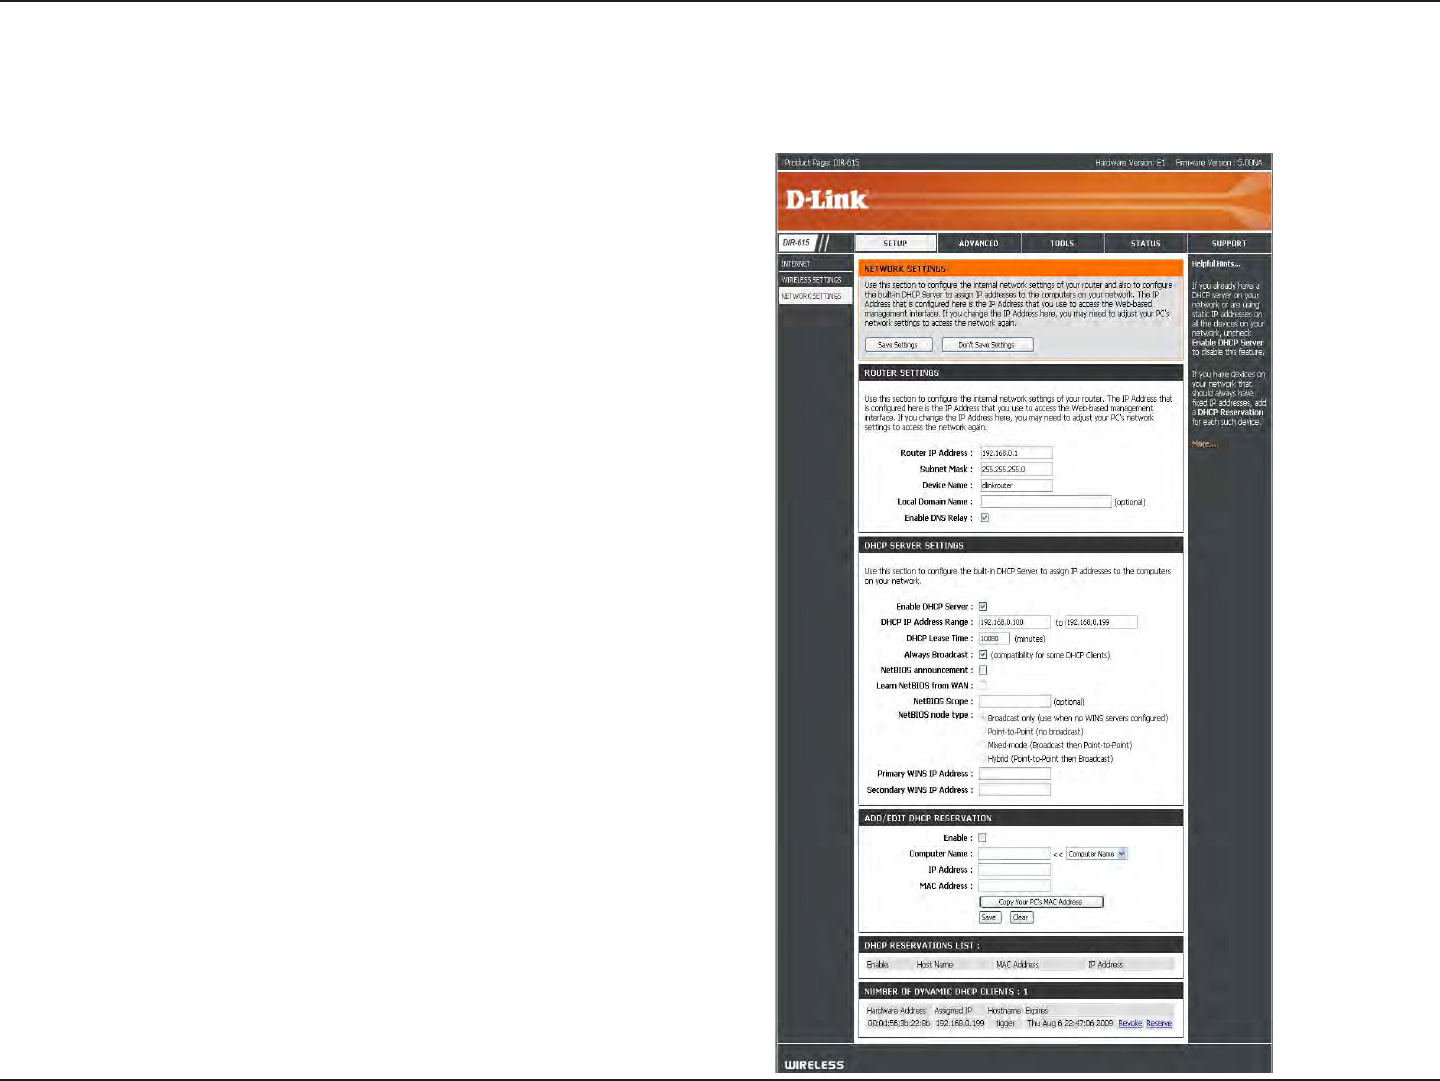
This section will allow you to change the local network settings of the router and to configure the DHCP settings.
Network Settings
Enter the IP address of the router. The default IP
address is 192.168.0.1.
If you change the IP address, once you click Apply, you
will need to enter the new IP address in your browser
to get back into the configuration utility.
Enter the Subnet Mask. The default subnet mask is
255.255.255.0.
Enter the Domain name (Optional).
Uncheck the box to transfer the DNS server information
from your ISP to your computers. If checked, your
computers will use the router for a DNS server.
IP Address:
Subnet Mask:
Local Domain:
Enable DNS Relay:
32D-Link DIR-615 User Manual
Section 3 - Configuration
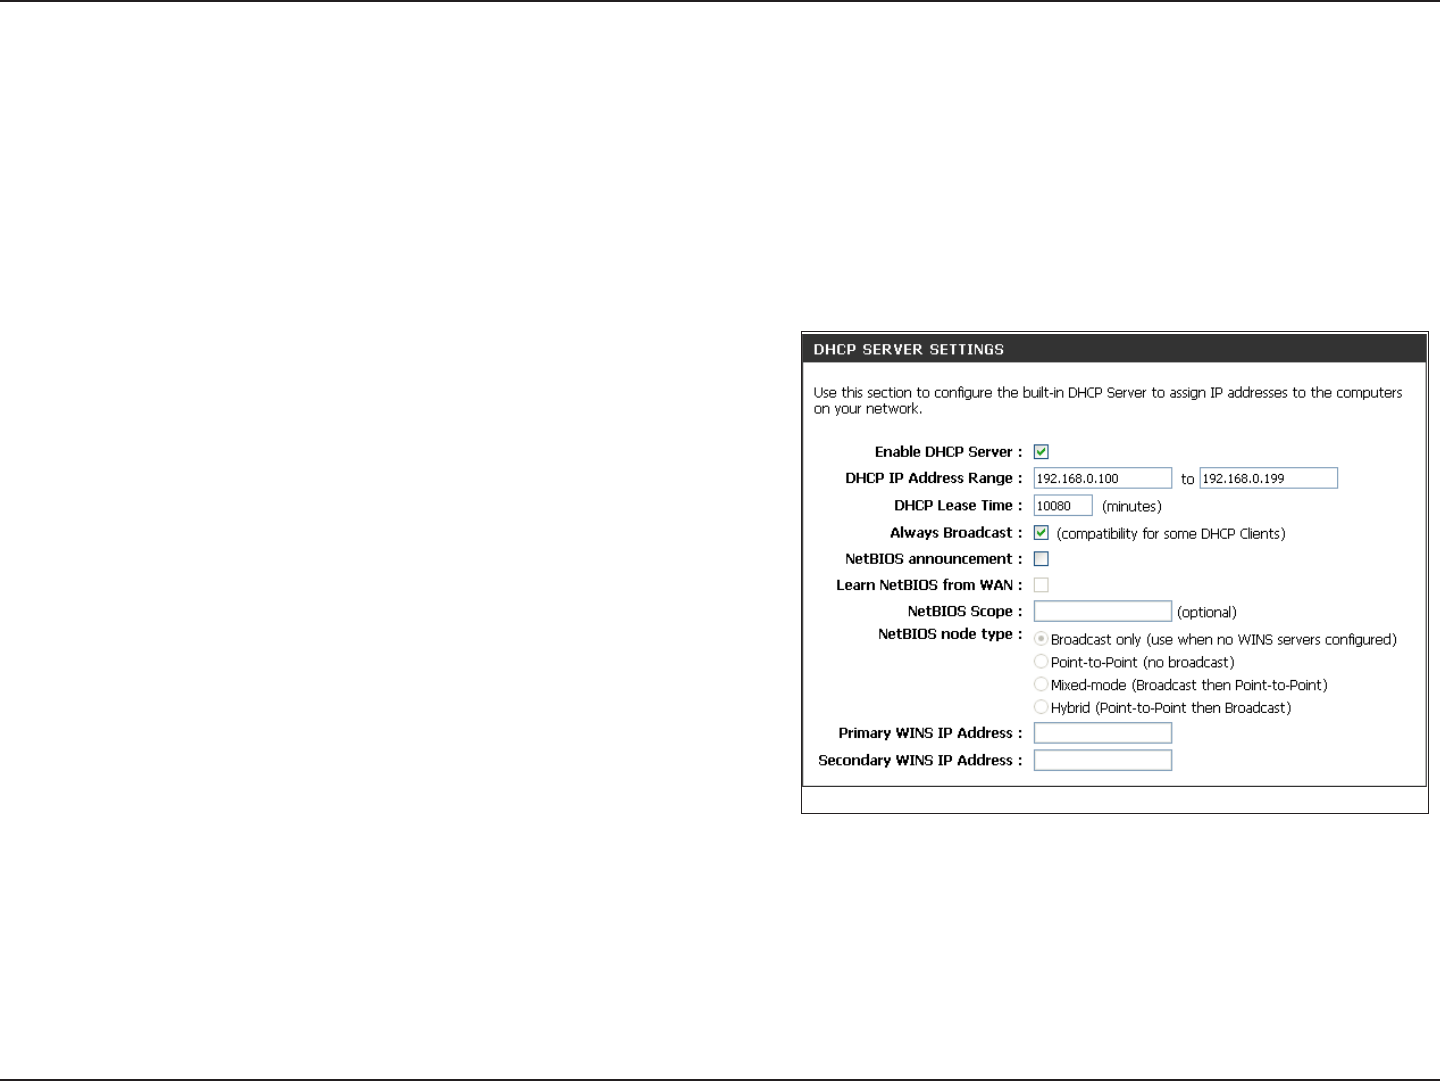
Check this box to enable the DHCP server on your router.
Uncheck to disable this function.
Enter the starting and ending IP addresses for the DHCP
server’s IP assignment.
Note: If you statically (manually) assign IP addresses to your
computers or devices, make sure the IP addresses are outside
of this range or you may have an IP conflict.
The length of time for the IP address lease. Enter the Lease
time in minutes.
Enable this function to ensure compatibility with some DHCP
clients.
If NetBIOS advertisement is switched on, switching this setting
on causes WINS information to be learned from the WAN side, if available. Turn this setting off to configure manually.
This is an advance setting and is normally left blank. This allows the configuration of NetBIOS domain name under which
network hosts operate. This setting has no effect if the “ Learn NetBIOS information form WAN is activated.
Enable DHCP
Server:
DHCP IP Address
Range:
Lease Time:
Always
Broadcast:
Learn NetBIOS
WAN:
Net BIOS scope:
DHCP Server Settings
DHCP stands for Dynamic Host Control Protocol. The DIR-615 has a built-in DHCP server. The DHCP Server will
automatically assign an IP address to the computers on the LAN/private network. Be sure to set your computers to be
DHCP clients by setting their TCP/IP settings to “Obtain an IP Address Automatically.” When you turn your computers
on, they will automatically load the proper TCP/IP settings provided by the DIR-615. The DHCP Server will automatically
allocate an unused IP address from the IP address pool to the requesting computer. You must specify the starting and
ending address of the IP address pool.
33D-Link DIR-615 User Manual
Section 3 - Configuration
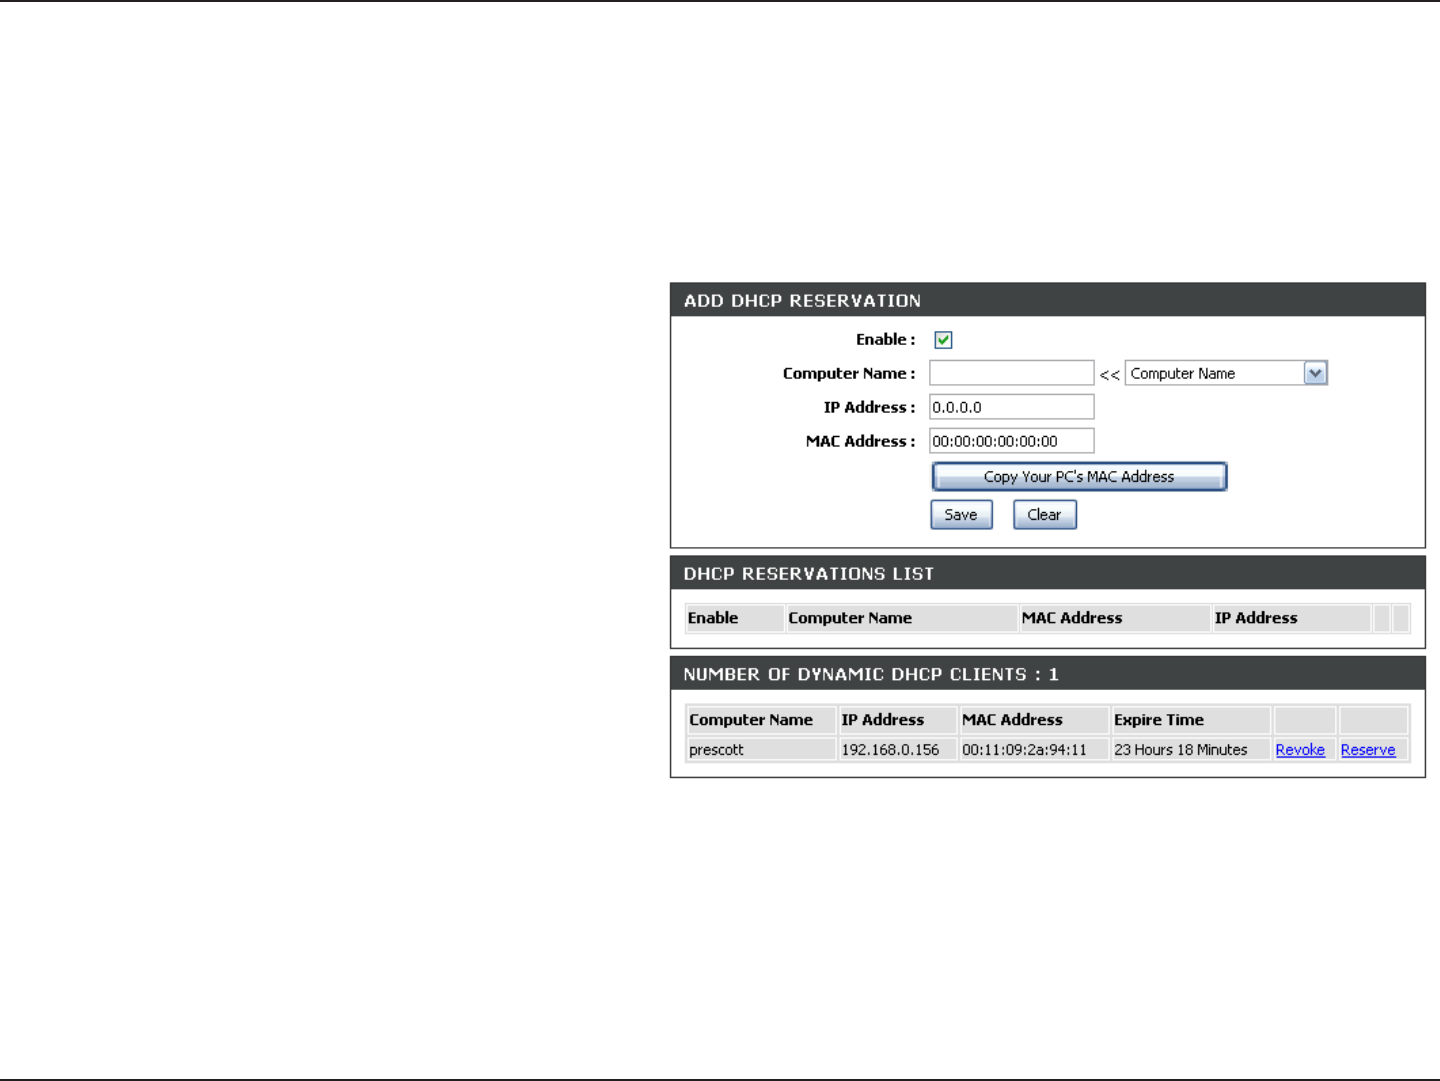
DHCP Reservation
If you want a computer or device to always have the same IP address assigned, you can create a DHCP reservation.
The router will assign the IP address only to that computer or device.
Note: This IP address must be within the DHCP IP Address Range.
Check this box to enable the reservation.
Enter the computer name or select from the drop-
down menu and click <<.
Enter the IP address you want to assign to the
computer or device. This IP Address must be
within the DHCP IP Address Range.
Enter the MAC address of the computer or
device.
If you want to assign an IP address to the
computer you are currently on, click this button
to populate the fields.
Click Save to save your entry. You must click
Save Settings at the top to activate your
reservations.
In this section you can see what LAN devices are currently leasing IP addresses.
Click Revoke to cancel the lease for a specific LAN device and free an entry in the lease table. Do this only if the device no
longer needs the leased IP address, because, for example, it has been removed from the network.
Enable:
Computer Name:
IP Address:
MAC Address:
Copy Your PC’s
MAC Address:
Save:
Number of
Dynamic DHCP
Clients:
Revoke:

34D-Link DIR-615 User Manual
Section 3 - Configuration
Reserve:
Note: The Revoke option will not disconnect a PC with a current network session from the network; you would need to use
MAC Address Filter to do that. Revoke will only free up a DHCP Address for the very next requester. If the previous
owner is still available, those two devices may both receive an IP Address Conflict error, or the second device may
still not receive an IP Address; in that case, you may still need to extend the “DHCP IP Address Range” to address
the issue, it is located in the DHCP Server section.
The Reserve option converts this dynamic IP allocation into a DHCP Reservation and adds the corresponding entry to the
DHCP Reservations List.
35D-Link DIR-615 User Manual
Section 3 - Configuration
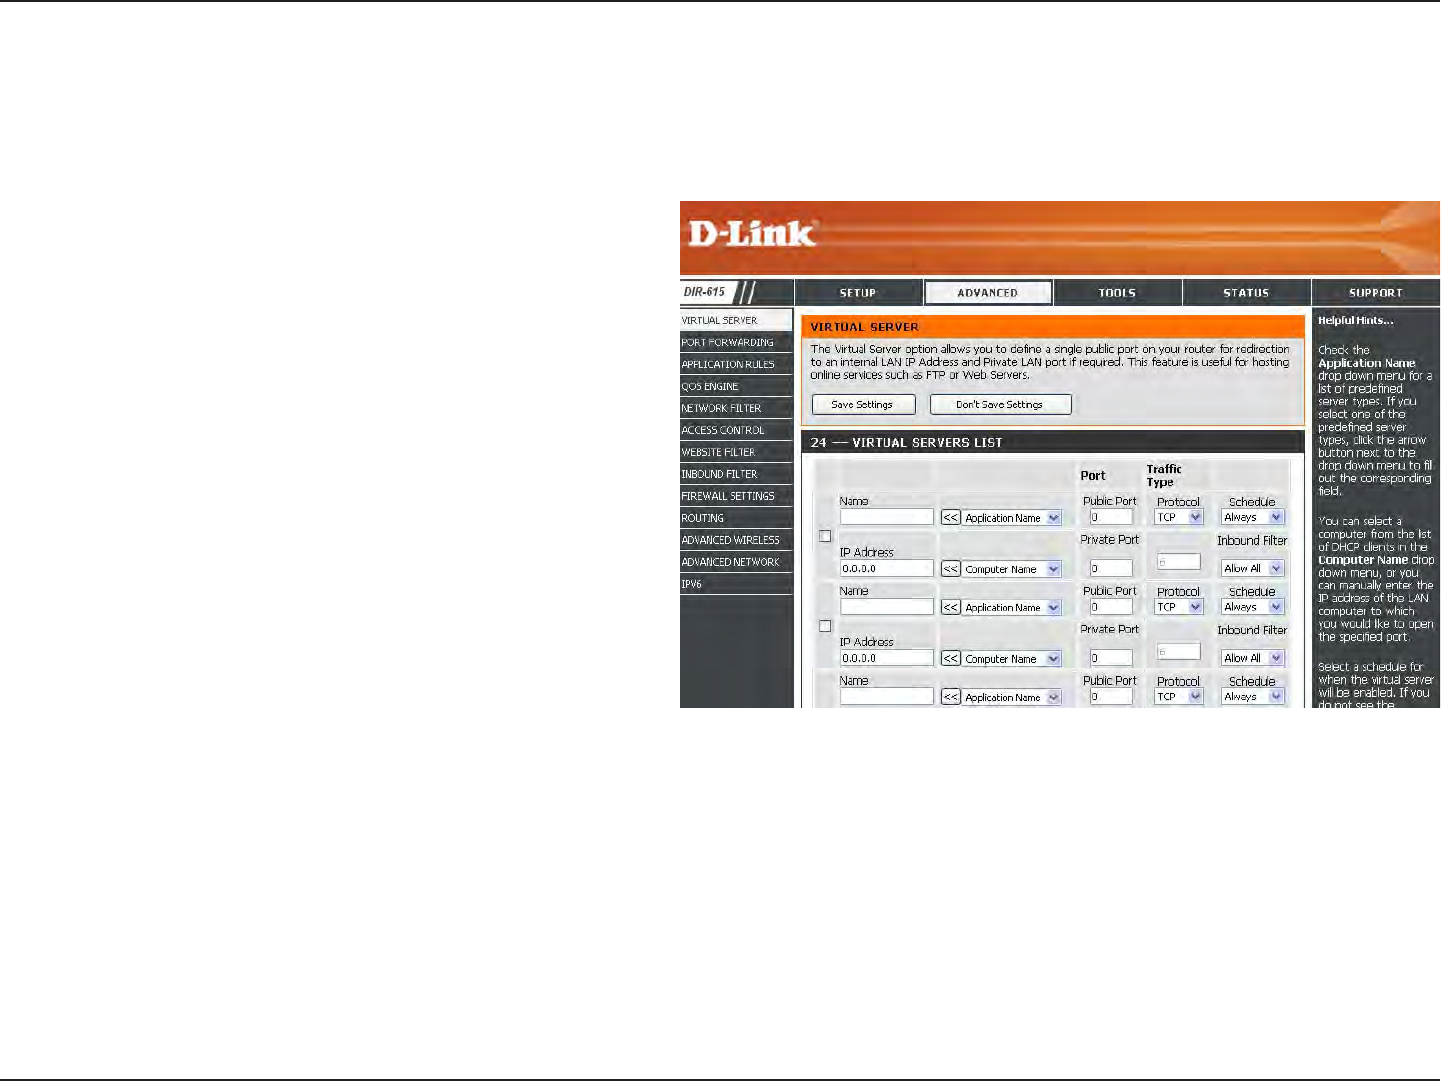
The DIR-615 can be configured as a virtual server so that remote users accessing Web or FTP services via the public
IP address can be automatically redirected to local servers in the LAN (Local Area Network).
The DIR-615 firewall feature filters out unrecognized
packets to protect your LAN network so all computers
networked with the DIR-615 are invisible to the outside
world. If you wish, you can make some of the LAN
computers accessible from the Internet by enabling
Virtual Server. Depending on the requested service,
the DIR-615 redirects the external service request to
the appropriate server within the LAN network.
The DIR-615 is also capable of port-redirection
meaning incoming traffic to a particular port may be
redirected to a different port on the server computer.
Each virtual service that is created will be listed at the
bottom of the screen in the Virtual Servers List. There are
pre-defined virtual services already in the table. You
may use them by enabling them and assigning the server IP to use that particular virtual service.
For a list of ports for common applications, please visit http://support.dlink.com/faq/view.asp?prod_id=1191.
Virtual Server
36D-Link DIR-615 User Manual
Section 3 - Configuration
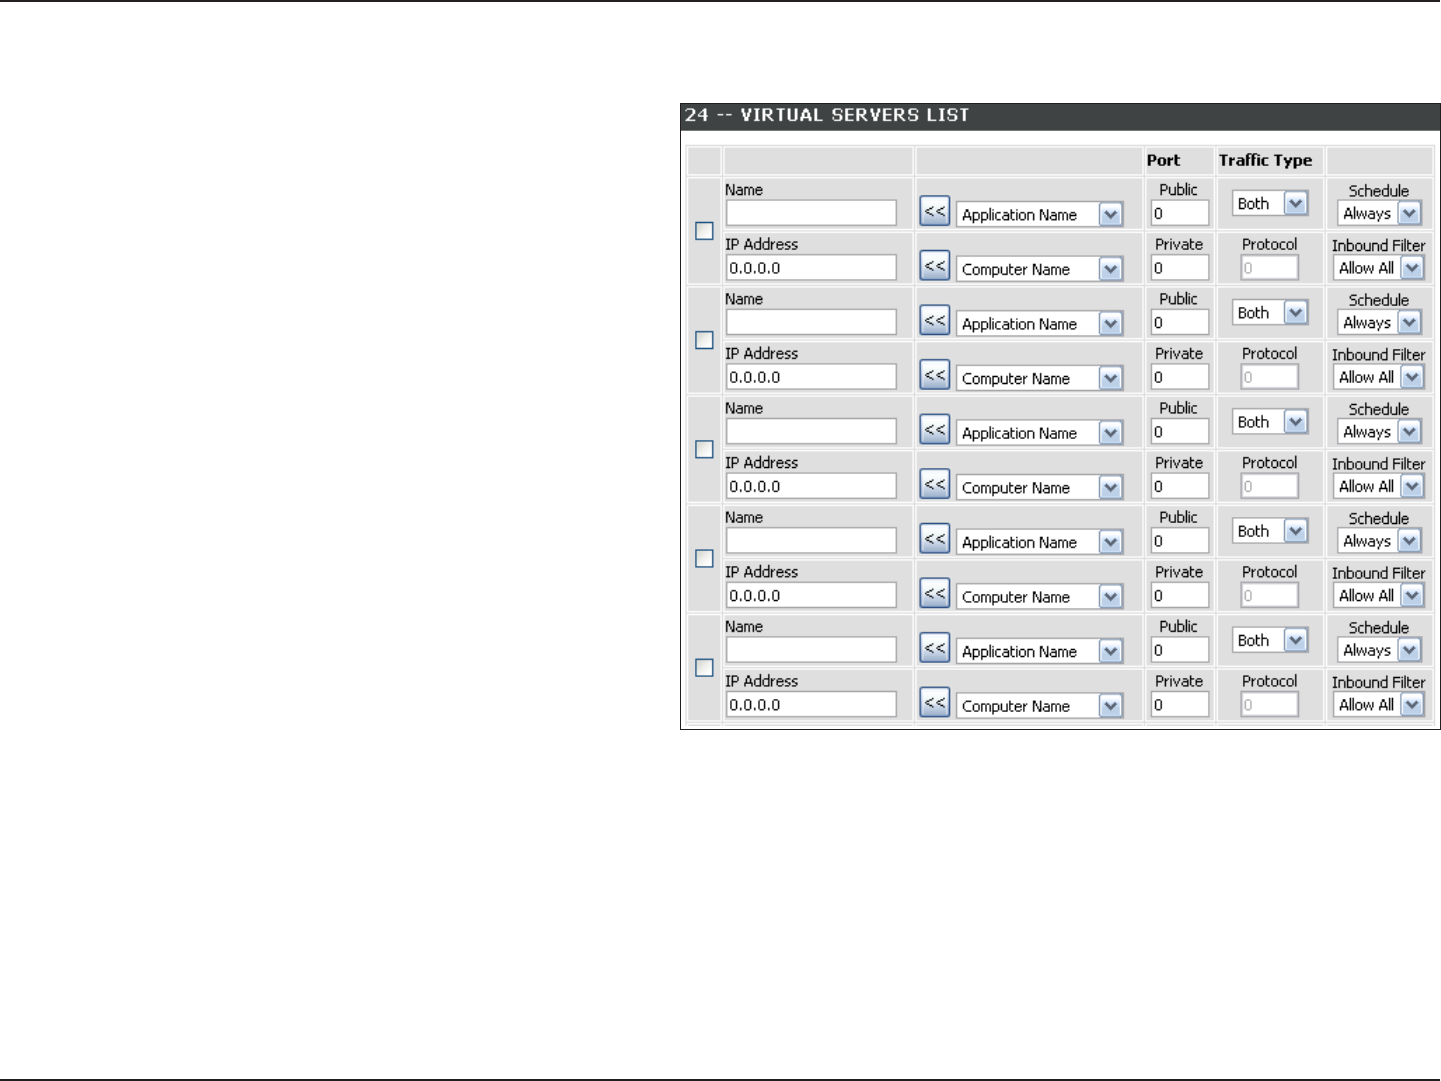
This will allow you to open a single port. If you would like to open a range of ports, refer to the next page.
Enter a name for the rule or select an application
from the drop-down menu. Select an application
and click << to populate the fields.
Enter the IP address of the computer on your
local network that you want to allow the incoming
service to. If your computer is receiving an IP
address automatically from the router (DHCP),
you computer will be listed in the “Computer
Name” drop-down menu. Select your computer
and click <<.
Enter the port that you want to open next to Private
Port and Public Port. The private and public ports
are usually the same. The public port is the port
seen from the Internet side, and the private port
is the port being used by the application on the
computer within your local network.
Select TCP, UDP, or Both from the drop-down
menu.
Select Allow All (most common) or a created
Inbound filter. You may create your own inbound filters in the Advanced > Inbound Filter page.
The schedule of time when the Virtual Server Rule will be enabled. The schedule may be set to Always, which will allow the
particular service to always be enabled. You can create your own times in the Tools > Schedules section.
Name:
IP Address:
Private Port/
Public Port:
Protocol Type:
Inbound Filter:
Schedule:
37D-Link DIR-615 User Manual
Section 3 - Configuration
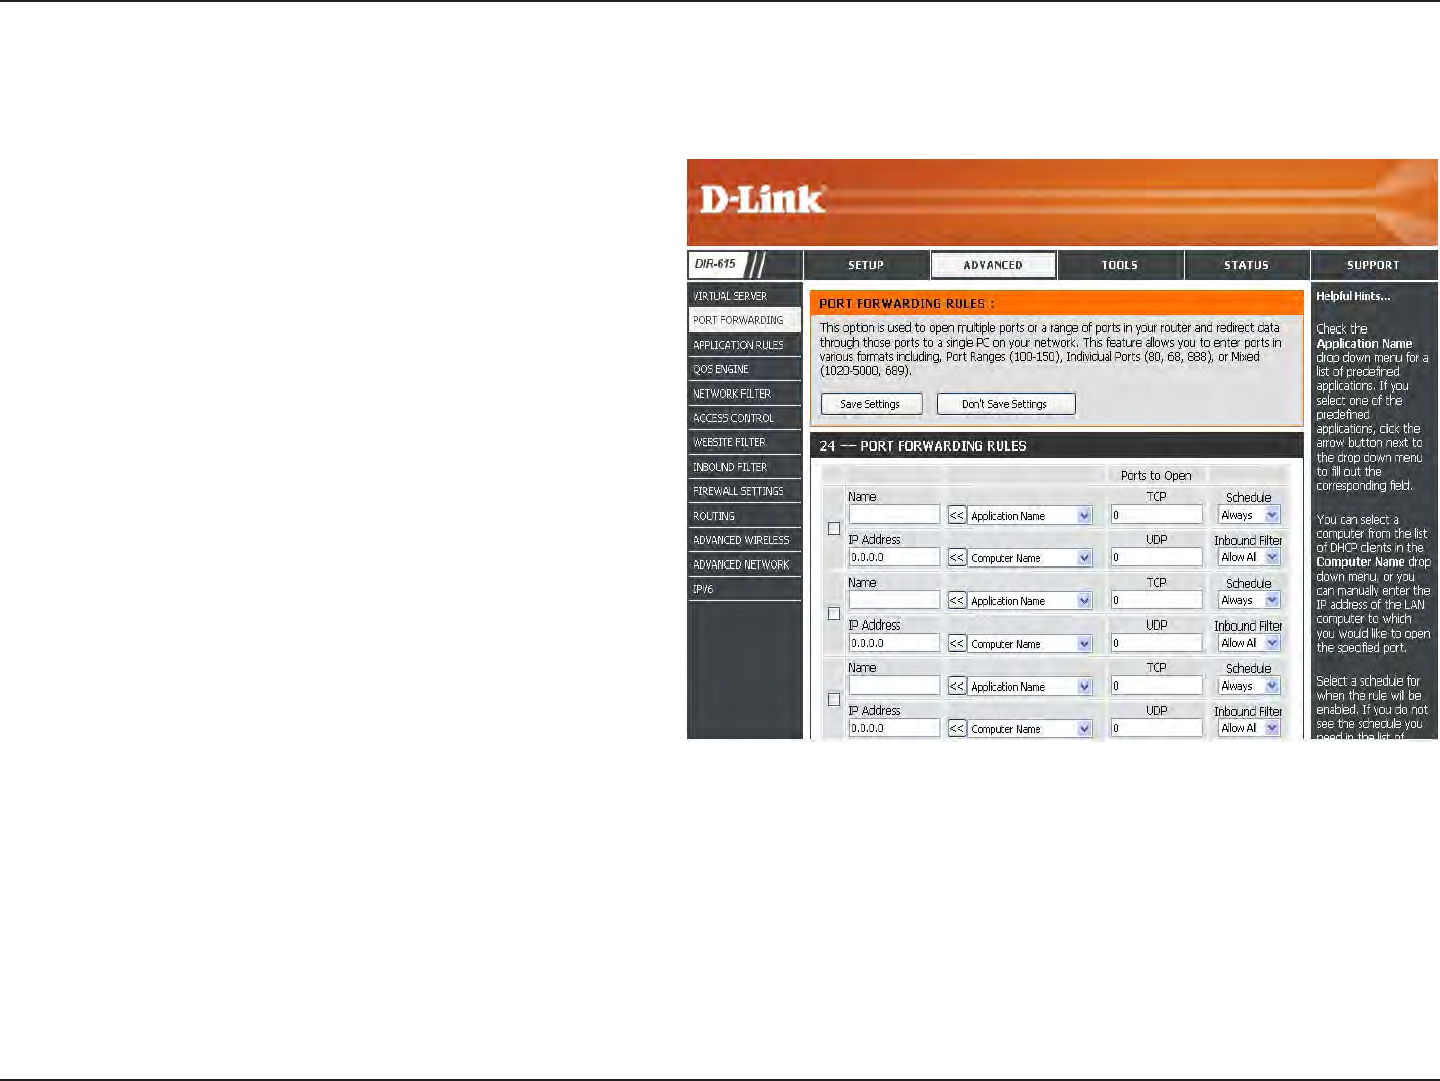
This will allow you to open a single port or a range of ports.
Port Forwarding
Enter a name for the rule or select an application
from the drop-down menu. Select an application
and click << to populate the fields.
Enter the IP address of the computer on your local
network that you want to allow the incoming service
to. If your computer is receiving an IP address
automatically from the router (DHCP), you computer
will be listed in the “Computer Name” drop-down
menu. Select your computer and click <<.
Enter the TCP and/or UDP port or ports that you
want to open. You can enter a single port or a range
of ports. Separate ports with a common.
Example: 24,1009,3000-4000
Select Allow All (most common) or a created
Inbound filter. You may create your own inbound
filters in the Advanced > Inbound Filter page.
The schedule of time when the Virtual Server Rule
will be enabled. The schedule may be set to Always,
which will allow the particular service to always
be enabled. You can create your own times in the
Tools > Schedules section.
Name:
IP Address:
TCP/UDP:
Inbound Filter:
Schedule:
38D-Link DIR-615 User Manual
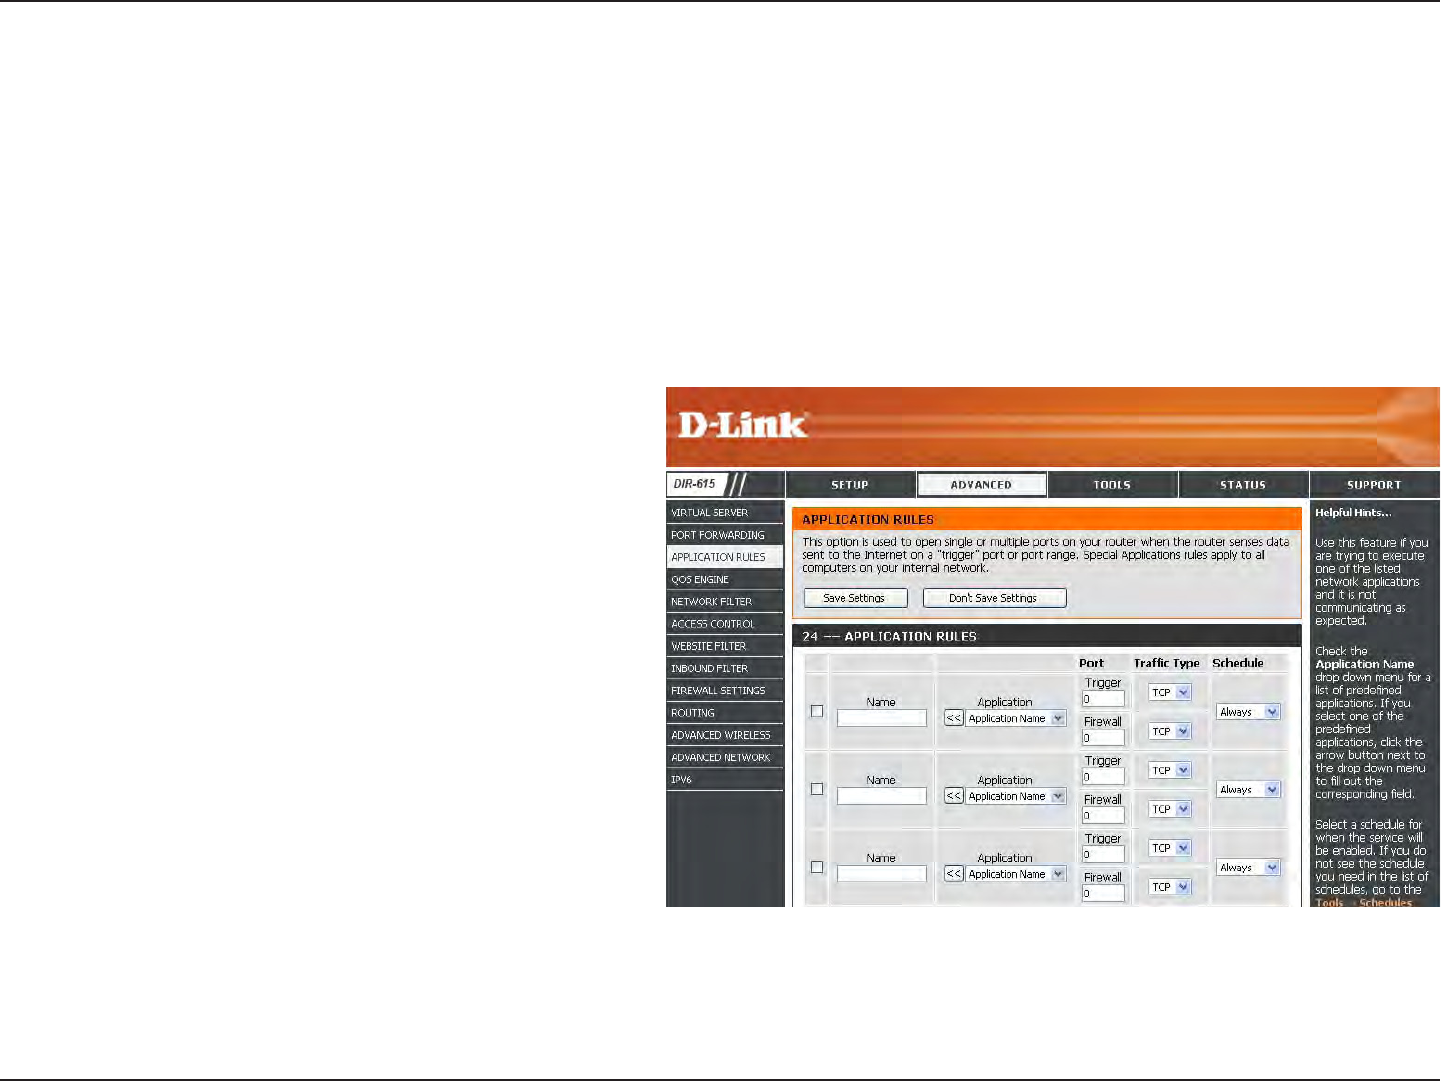
Section 3 - Configuration
Enter a name for the rule. You may select a
pre-defined application from the drop-down
menu and click <<.
This is the port used to trigger the application. It
can be either a single port or a range of ports.
Select the protocol of the trigger port (TCP,
UDP, or Both).
This is the port number on the Internet side
that will be used to access the application. You
may define a single port or a range of ports.
You can use a comma to add multiple ports or
port ranges.
Select the protocol of the firewall port (TCP,
UDP, or Both).
The schedule of time when the Application Rule
will be enabled. The schedule may be set to
Always, which will allow the particular service
to always be enabled. You can create your own
times in the Tools > Schedules section.
Name:
Trigger:
Traffic Type:
Firewall:
Traffic Type:
Schedule:
Application Rules
Some applications require multiple connections, such as Internet gaming, video conferencing, Internet telephony and
others. These applications have difficulties working through NAT (Network Address Translation). Special Applications
makes some of these applications work with the DIR-615. If you need to run applications that require multiple connections,
specify the port normally associated with an application in the “Trigger Port” field, select the protocol type as TCP or
UDP, then enter the firewall (public) ports associated with the trigger port to open them for inbound traffic.
The DIR-615 provides some predefined applications in the table on the bottom of the web page. Select the application
you want to use and enable it.
39D-Link DIR-615 User Manual
Section 3 - Configuration
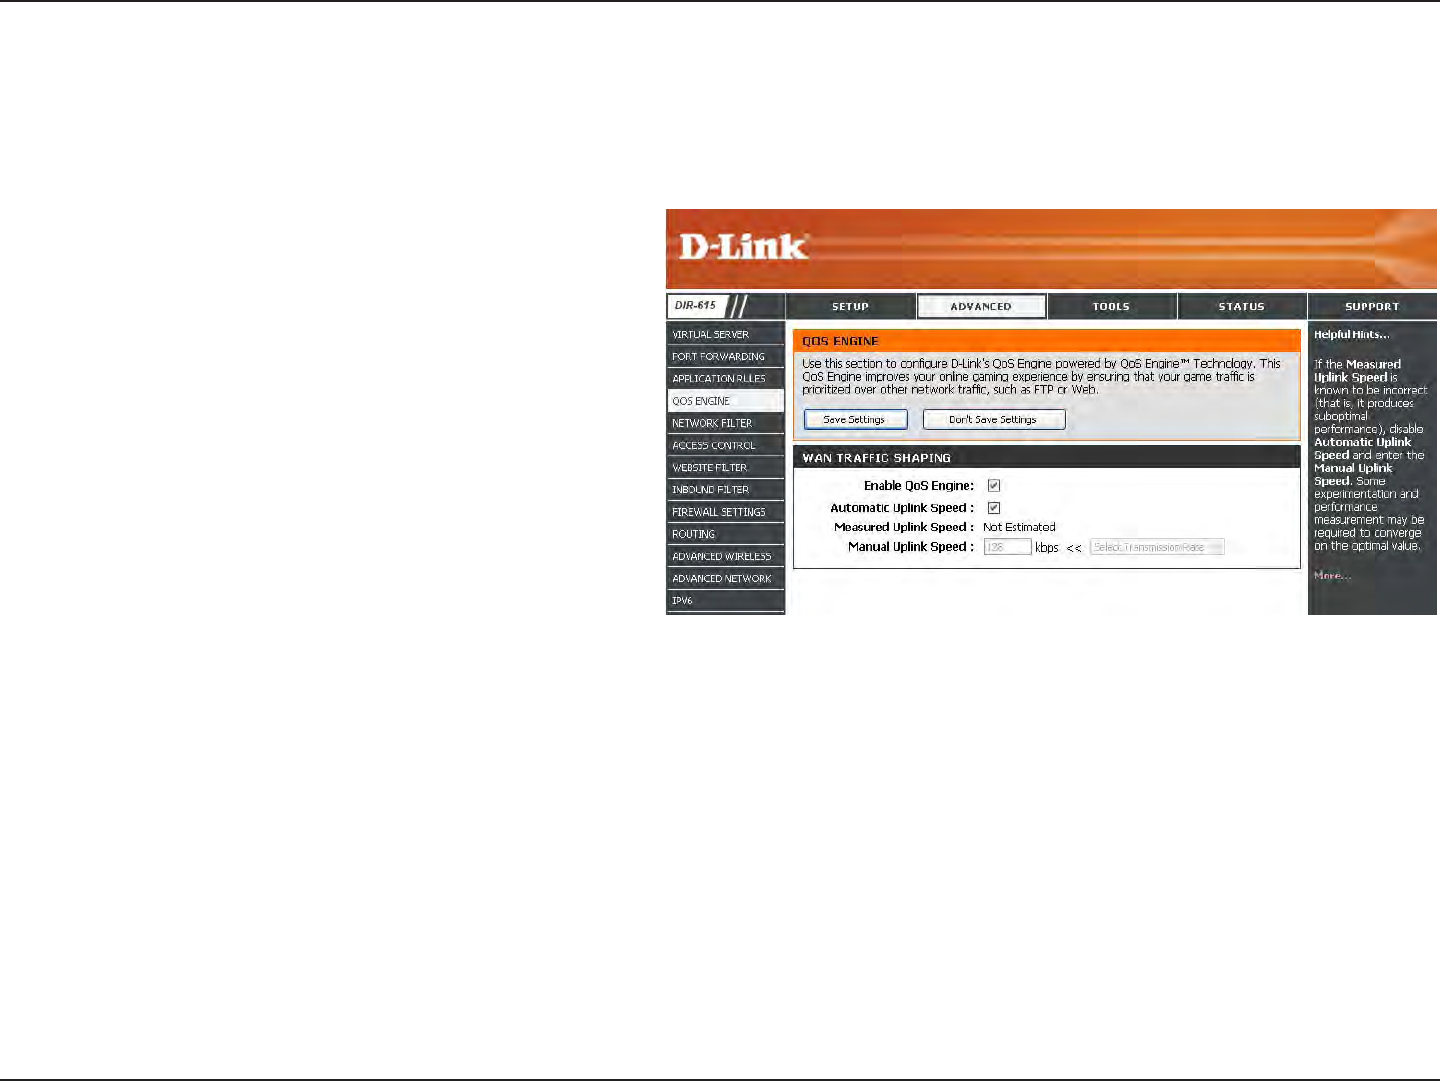
QoS Engine
This option is disabled by default. Enable this
option for better performance and experience
with online games and other interactive
applications, such as VoIP.
This option is enabled by default when the
QoS Engine option is enabled. This option will
allow your router to automatically determine the
uplink speed of your Internet connection.
This displays the detected uplink speed.
The speed at which data can be transferred
from the router to your ISP. This is determined
by your ISP. ISP’s offer speed as a download/
upload pair. For example, 1.5Mbits/284Kbits. Using this example, you would enter 284. Alternatively you can test your uplink
speed with a service such as www.dslreports.com.
Enable QoS Engine:
Automatic Uplink
Speed:
Measured Uplink
Speed:
Manual Uplink
Speed:
The QoS Engine option helps improve your network gaming performance by prioritizing applications. By default the
QoS Engine settings are disabled and application priority is not classified automatically.
40D-Link DIR-615 User Manual
Section 3 - Configuration
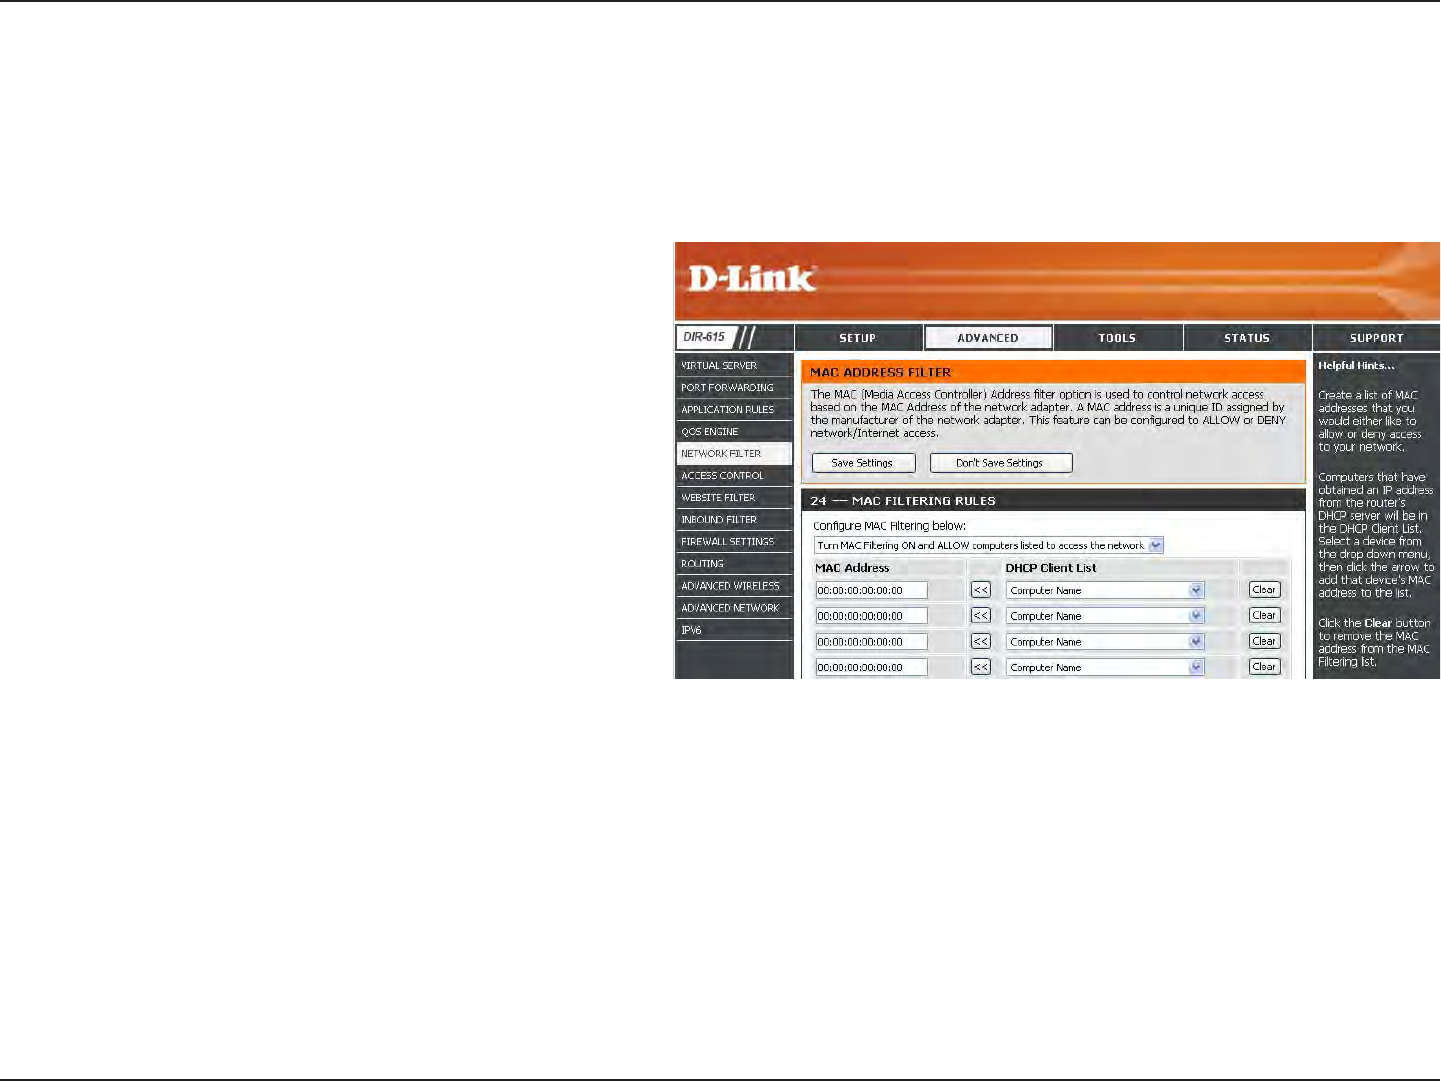
Network Filters
Select Turn MAC Filtering Off, allow MAC
addresses listed below, or deny MAC addresses
listed below from the drop-down menu.
Enter the MAC address you would like to filter.
To find the MAC address on a computer, please
refer to the Networking Basics section in this
manual.
Select a DHCP client from the drop-down menu
and click << to copy that MAC Address.
Configure MAC
Filtering:
MAC Address:
DHCP Client:
Use MAC (Media Access Control) Filters to allow or deny LAN (Local Area Network) computers by their MAC addresses
from accessing the Network. You can either manually add a MAC address or select the MAC address from the list of
clients that are currently connected to the Broadband Router.