DOGCARE INNOVATION and TECHNOLOGY TC01-C1 DOG TRAINING COLLAR User Manual
SHENZHEN DOGCARE INNOVATION & TECHNOLOGY CO., LTD. DOG TRAINING COLLAR Users Manual
Contents
- 1. Users manual
- 2. Users Manual
Users Manual
尺寸:325*200mm
材质:
尺寸:
工艺:
刀模线:
折叠线:
备注:
设计:
128g铜版纸
前后印刷
型号:
审核:
325*200mm
封面
封底
封面
封底
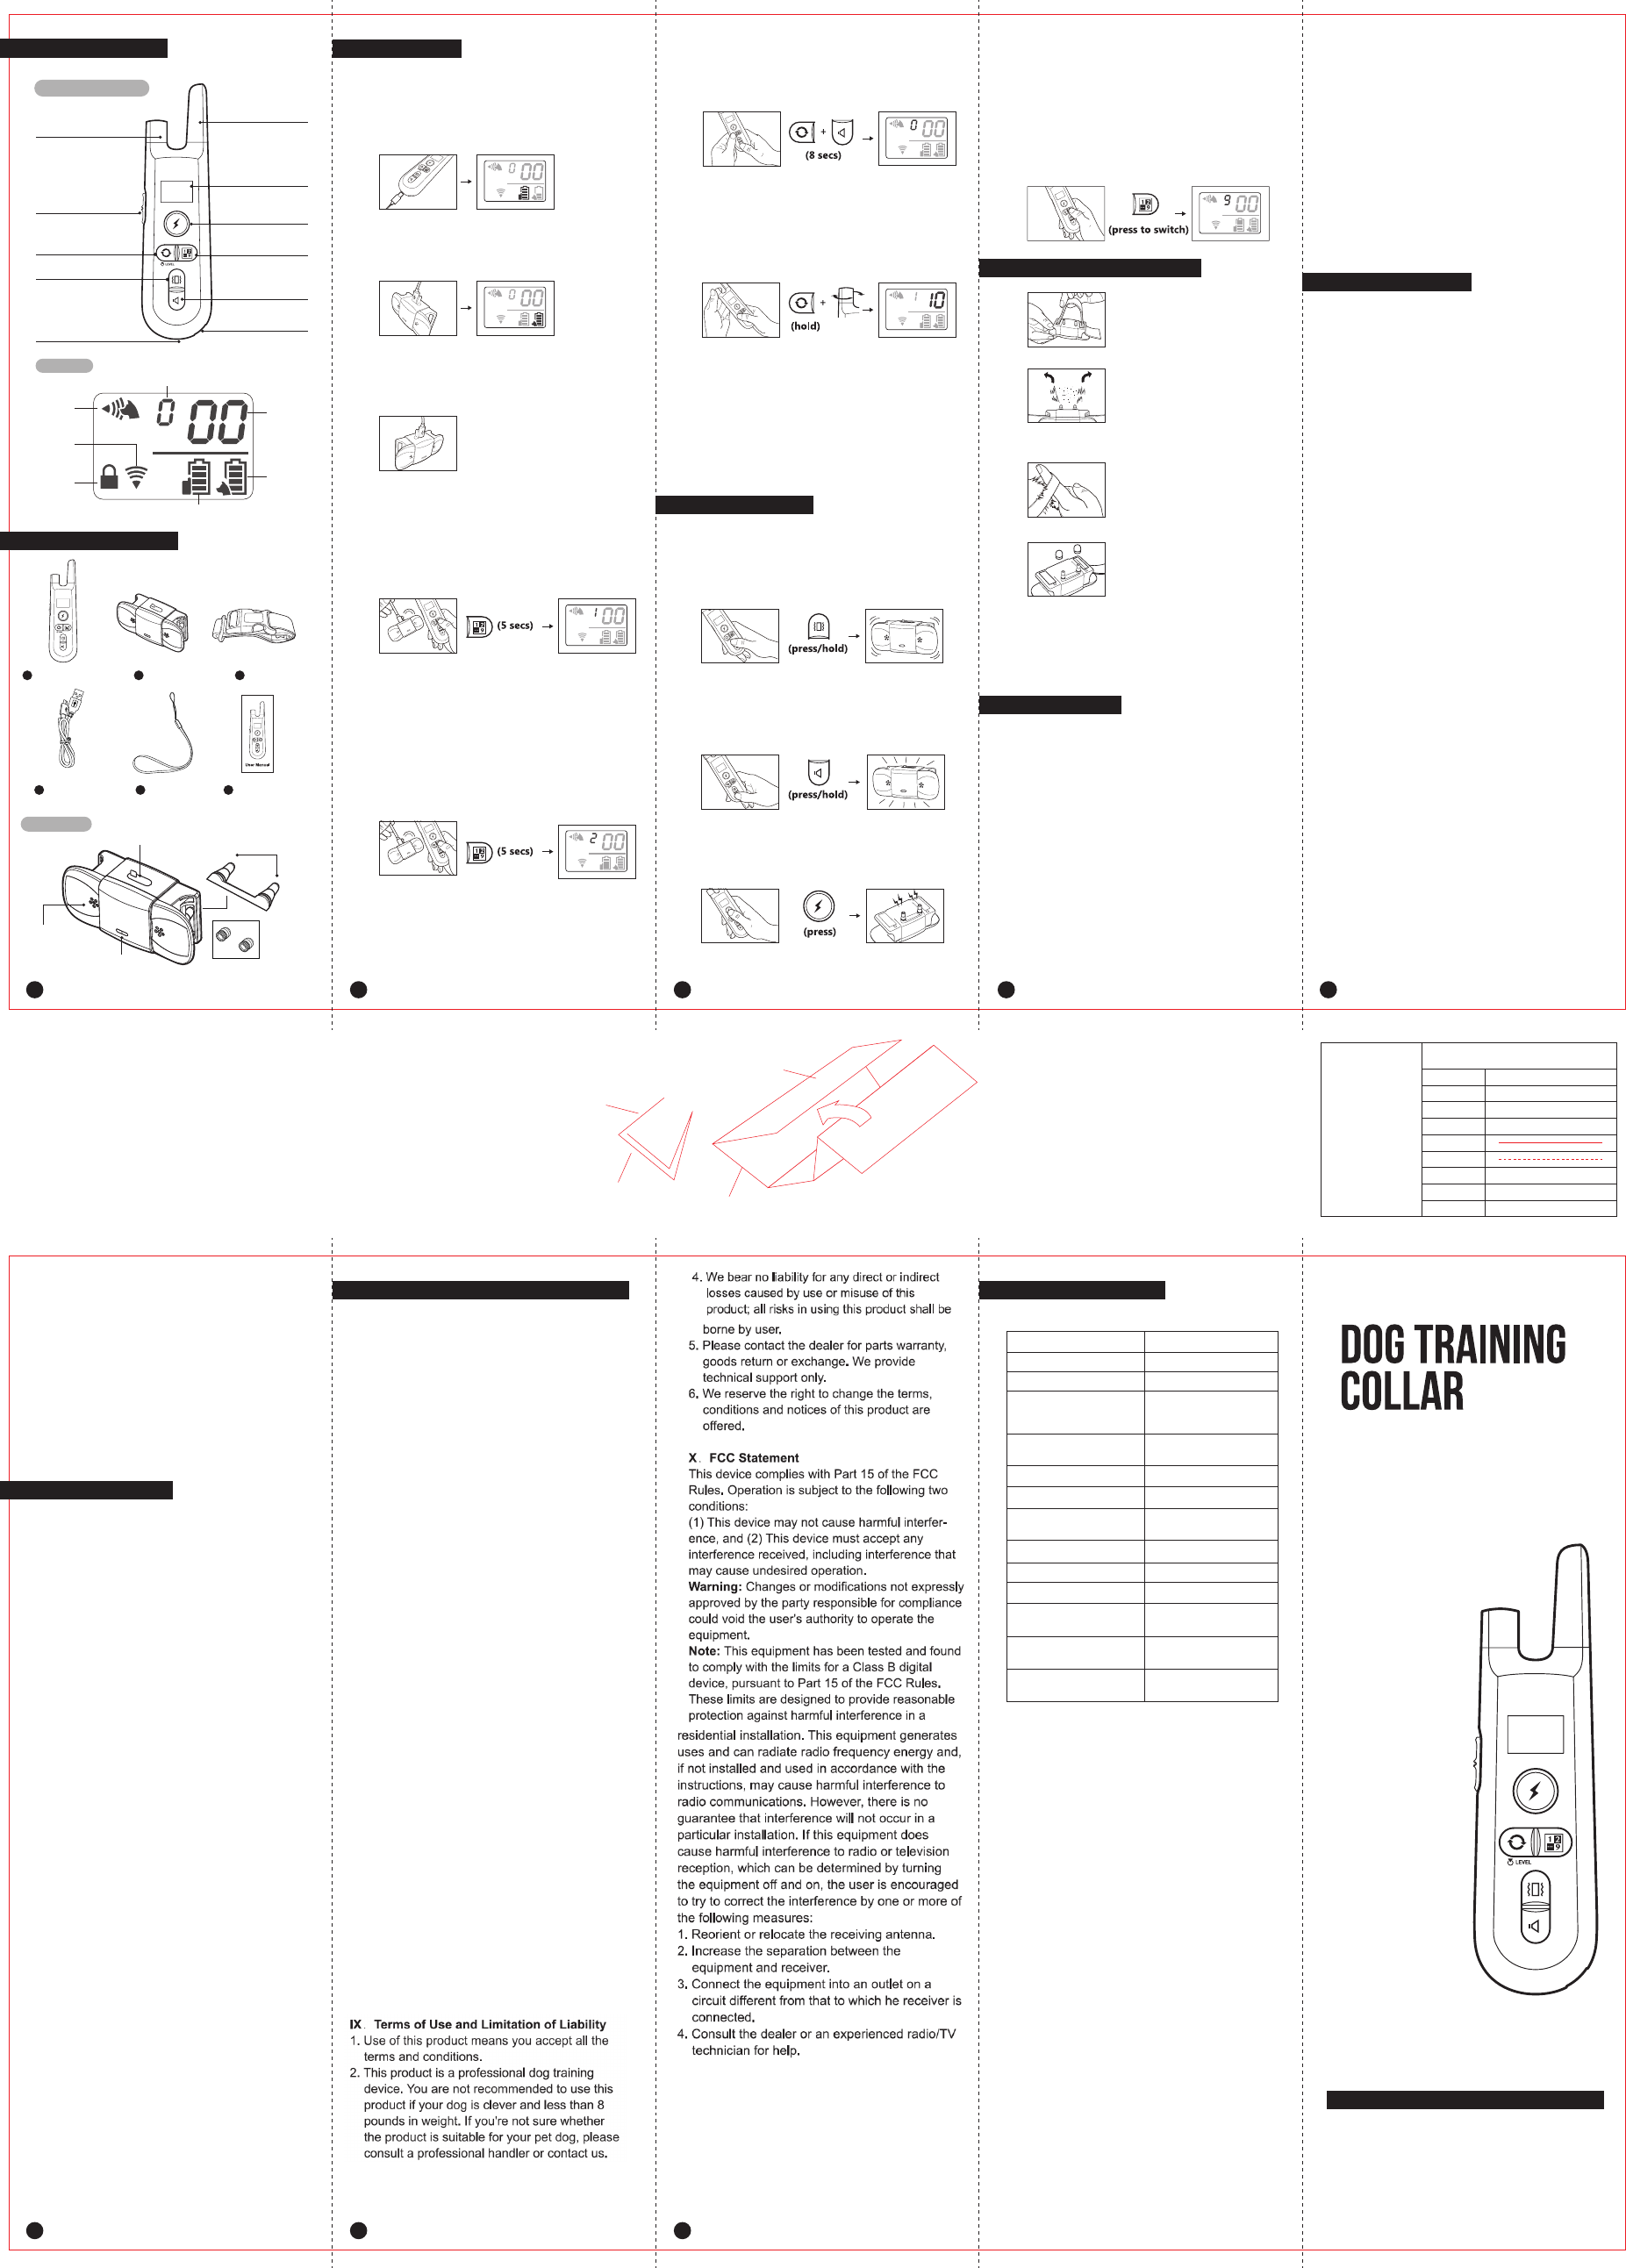
I. Product Overview
II. Package Content
ON & OFF Switch /
Static Level Regulator
Keypad Lock
Static Level Regulator
Activation Button
Vibrate Button
Antenna
Display Screen
Static Button
Channel Switch /
Match Button
Beep Button
Lanyard Holder
Micro USB
Charging Port
Training
Mode
Keypad
Lock
Remote’s
Signal
Battery Status (Remote)
Battery
Status
(Receiver)
Channel Display
(1-9)
Static Level
Display
(01-99)
Screen
Remote Control
III. Setting Up
1.
2.
3.
4.
2.3. Connect your additional Receiver to a
power source. Press and hold Channel Switch
/Match Button for 5 secs (repeat steps 2.1
and 2.2). The Channel Display will show the
subsequent number of the new Receiver.
Note: Connect only 1 Receiver at a time, do
not connect all simultaneously, or the Remote
will match all Receivers into a single channel.
Adding multiple Receivers:
Removing all Matched Receivers:
Press and hold Static Level Regulator
Activation Button and Beep Button
simultaneously for 8 secs. The Channel Display
V. Wearing the Receiver Collar
Thread the collar through
the Receiver.
If your dog has thick fur,
please separate the fur at
the electrodes with a comb
to enable them to reach
the skin.
When wearing the collar,
the tightness is at most
fitting if one finger can be
inserted underneath.
The Silicone Caps can dull
the static sensation, you
should decide if you need
put them on. The soft caps
also protect your dog from
direct contact with metal
electrodes, which in some
cases will cause discomfort
to some dogs.
1.
2.
3.
IV. Training Modes
Vibration Mode:
Press Vibrate Button, and the Receiver will
vibrate once; hold the button and the
vibration persists.
Sound Mode:
Press Beep Button, and the Receiver will give
a “beep” sound; hold the button and the
“beep” sound persists.
Static Stimulation Mode:
Press the Static Button, and the Receiver will
give a Static Stimulation to the wearer.
4.
1.
2.
3.
4.
1.
2.
3.
4.
5.
6.
VI. Training Tips
Reward your dog with food will usually
help to achieve the best result.
Do not use the device on dogs aged below
6-month, old, pregnant, easily frightened,
aggressive, in heat, old, and dogs not in
best of health.
Use verbal commands first, and supple-
ment with a corrective stimulus only as
needed. Be consistent with your verbal
commands, using the same words every
time. Work with your pet on one behavior
at a time to avoid confusion and frustration.
Use as little stimulus as possible and only to
reinforce verbal commands when necessary.
Do not over correct your dog.
For example, use the beeps as warning by
pressing Beep Button. The dog will become
conditioned to the beep preceding the
corrective stimulus and will soon learn to
recognize the beep as a warning along with
your verbal command.
Do not rely on this product solely to train your
dog. Some dogs will not respond to this
product. We cannot guarantee the effective-
ness of this or any trainer on your dog.
If your dog shows signs of growling, snarling,
biting or aggression while using the collar,
discontinue use immediately and contact a
professional trainer for advice.
VII. Important Notice
1.
2.
3.
4.
5.
6.
7.
It is strictly prohibited to open the Receiver
in any situation. Doing so will likely
compromise the waterproof function and
thus voiding the product warranty.
Please use Remote Control and Receivers
from the complete set, do not use other
product to match with the Receiver.
If you want to test the product, please use
professional testing apparatus. Do not test
with hands, so as to avoid accidental injury.
If find water at the charging port, please
wipe it dry before charging.
Beware the interference from the environ-
ment can cause the product not to work
properly. For examples are places with high
voltage facilities, communication towers,
thunderstorm, large buildings, and strong
electromagnetic interference.
Both Remote and Receiver have automatic
power-saving mode. They will enter sleep
mode if idling for 5 mins.
The included collar is a basic accessory and
is not necessarily suitable for all types of
dog breeds. Any collar not wider than 24mm
and not thicker than 5mm, made of soft
material, can be a replacement for the
current collar.
Regarding you and the product:
The Receiver collar is not a regular collar and
not recommended to put on a leash to
walk your dog. (Doing so during pulling may
hurt the dog due to protruding electrodes
on the Receiver.)
Do not put the collar on for over 12 hours,
it may cause rashes or discomfort to your
dog’s skin.
Do not allow children, or anyone who has
little to no experience with training dogs, to
handle this training kit.
Regarding well-being of your dog:
1.
2.
3.
VIII. Troubleshooting
1. Remote/Receiver runs out of power quickly;
not charging
Make sure the charger and Remote/Receiver is
securely connected. Try to use other universal
android USB cable to charge.
2. Static is too weak or even completely no
static; Static Mode has no effect on my dog.
Make sure the receiver has enough
power(when it
is low-battery, shock doesn't work); Only both
electrodes are simultaneously touched by
dog's
skin shock will work; Try to increase the static
level
to more than 45. If dog has long hair, you
need to
separate dog hair to make electrodes touched.
3. Remote/Receiver does not response
Recharge the Remote/Receiver,make sure they
have enough power.
Check the keypad lock(which is on the left side
of
Remote), unlock the Remote. If Remote is
locked,
there will be a lock icon on the display.
If you try methods above but still fail, please
remove all the matching and reconnect
Remote
with Receivers.
4. Receiver is fully charged, but Remote
Display still shows receiver has empty
battery.
Turn off Remote and turn on Remote again.
5. Fail to match Receiver with Remote
Make sure Receiver is connected to a power
source( charging mode can only be activated
while charging).
Must hold Channel Switch more than 5 secs, if
not,
matching will fail.
If you still fail after trying as above, contact us
via
support@dogcareglobal.com to confirm
whether
receiver and remote is of the different version,
we
will solve for you.
6. Training mode fails to sync up even in a very
short distance
Make sure there is no strong signal interfer-
ence in
your surroundings. Remote's range could
IX. Terms of Use & Limitation of Liability
XII. Product Specification
Model
Package Dimension
Collar’s Dimension
Receiver’s Casing
Remote’s Casing
Remote / Receiver’s Battery
Charging Voltage
Remote / Receiver
Charging Time
Charging Port
Operating Environment
Remote / Receiver
Standby Time
Remote to Receiver’s
Signal Range Distance
Receiver’s Battery Sync
Distance
TC01-C1
8.6‘’ x 3‘’x3‘’
27.6‘’ x0.95‘’
IP65 waterproof;
Rain resistant;
Swimming approved
Non-waterproof;
Keep away from water
450mAh
DC 5V/300mA
Full Charge at 2-3 hrs
Micro USB
32°F-104°F, <95% Rh
Remote: 60 days;
Receiver: 40 days
656 Ft
164 Ft
Model: TC01-C1
will default to “0”. Note: Make sure all
Receivers you want to remove have power
and in the effective range, so that Receivers
could receive the remove command.
Configurating Static Levels:
Press and hold Static Level Regulator
Activation Button and simultaneously
slowly rotate Static Level Regulator until
the digit on the screen reaches a suitable
strength.
Recommended Static Level strength starts
from “10”. This is the minimum sensation
your dog can feel. The right static level goes
down to individual basis which you should
find out from your dog’s responses. The
sensitivity to static depends on your dog’s
size and weight, amount of fur, and even
Do not hold the button as it is not recommend-
ed to have prolonged shock to your dog. The
static, however, will cut off in 4 secs automati-
cally to prevent unintentional harm to your pet.
Switching Channel:
Press the Channel Switch Button to choose
which Receiver you want to control if you
matched more than one Receiver.
User Manual
1
1
2
2
3
3
4
4
5
5
6 7 8
Remote Control Receiver Collar
including
Silicone Caps
for electrodes
USB Cable Lanyard User Manual
Receiver
Static Electrodes
USB Charging Port
& Rubber Lid
Sound
Speaker
LED Status
Light
In order to guarantee normal diving function,
please insert the waterproof rubber lid
over the charging port.
Static stimulation is not a pleasant
experience for any dogs. Punishment is
harsh way to train a dog. Always praise and
encourage your dog for good behavior.
Note: With Anti-Misoperation design, Static
function always cut-off after 4 secs, this is a
precaution designed to prevent unintention-
al long-pressed of the button, and potential
animal abuse.
4.
5.
1. Do not operate the devices under temperature
of 104°F and above, doing so in such high
temperature will decrease the performance of
the batteries.
2. Do not use the Remote during snowing, this
could lead to water sipping in causing damage
to the controller.
3. Do not use the set in places with strong
electromagnetic interference. This will greatly
compromise the performance of the product.
4 Avoid dropping the devices on hard surface
inflict excessive force on them.
5. Avoid using the devices in environment
flooded with corrosive chemical, this may lead
to color degrading, deforming, or cracking
of exterior of the devices.
1. When not in use, please wipe clean both
the Remote and Receiver with mild detergent.
Turn off the Remote, lock the keypad, put on
the rubber lid on the Receiver’s charging
port,
and store the set in a cool dry place.
2. During cleaning, wipe with soft cloth and mild
detergent. Do not use hard brushes which
may scratch the surface of the device.
3. If the Receiver has gotten dirty, secure the
charging port rubber lid secured and w
X. Operating Environment & Maintenance
Do not use the product in the circumstances
as follow:
6
Charge the devices respectively for 2 hours
and above.
Remote Control: Charge the device until the
battery icon on the display indicates full bars.
Receiver: Charge the device until the red LED
turns green. The display on the Remote will
indicate full bars as well.
Match the Remote Control to the Receiver:
*You may skip this step because the set is
already paired by factory setting.
2.1. Connect the Receiver to
a power source via the USB
cable, matching mode can
only be activated during
charging.
2.2. Press and hold Channel Switch / Match
Button for 5 secs. The Receiver will vibrate
and beep which indicates the matching is
complete.
You will see “1” (or subsequent number) in
the Channel Display if matching is successful.
‘beeps’
‘vibrates’
‘beeps’
‘vibrates’
If any quality problems or confusion, feel free tocontact us
support@dogcareglobal.com
3. This product is a professional dog training
device and should not be used for other
purposes. Please do not violate local laws in
using this product.