Digital Angel 800100 DTR Series Reader User Manual DTRReaderManual 052606
Digital Angel Corporation DTR Series Reader DTRReaderManual 052606
Contents
- 1. user manual
- 2. manual
user manual

DTR READER
(ISO Compliant)
OPERATING MANUAL
Reads RFID Tags On:
• Livestock
• Pets
• Fish
• Custom Applications
Page 1
Table of Contents
I. Components 2
II. Getting Started 3
III. Operation 5
IV. Installing InfodexM 7
V. Connecting to a Host 8
VI. Using InfodexM 15
VII. Troubleshooting 21
VIII. Proper Use and Care 23
IX. Specifications and Warranty 24
X. FCC Statement 25
Page 2
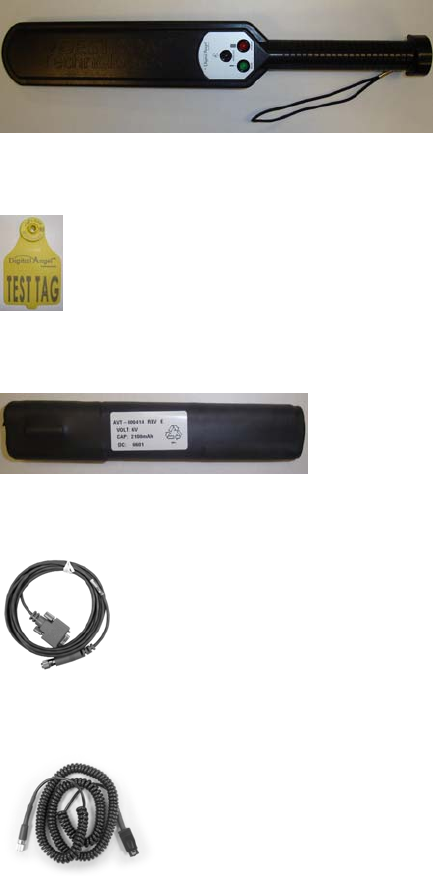
I. Components
The following DTR Reader components are available and can be ordered separately.
800.8001.00
Reader/Standard
802.1312.22
Test Tag
110.0060.00
Battery Pack
228.0230.00
Standard Cable
228.0049.00
Serial Coil Cable
Also available but not pictured: DTR Holster (DTRH-01), IR5760 Charger.
To order additional accessories and for kit information, please contact Digital Angel at
1-800-328-0118.
Page 3
II. Getting Started
Features of the reader
• Can read up to 18,000 tags on a single battery charge
• Wired (serial) or wireless (Bluetooth) operation
• Capable of storing 510 RFID tags (DTR3 only)
• Configurable using either a utility program or a communications program (DTR3 only)
Battery information
Type
The battery in the kit is custom designed for the reader. The use of other commercial
batteries WILL NOT activate the reader and could cause permanent damage.
Installation
To install the battery, remove the thumb screw and slide open the door on the end of the
reader handle. After inserting the battery, close the door and tighten the thumb screw.
Important: Only one end of the battery is designed to enter the chamber. If battery does
not fit easily, turn it over and re-insert. Forcing the incorrect end of the battery into the
chamber could damage the components.
Page 4
Charging
The battery should be fully charged before the first use and should only be charged with
the supplied charger. The battery may be charged either within or outside the battery
chamber. When leaving the battery within the battery chamber, loosen the battery door
thumbscrew one turn and then slide the cover to expose the charging receptacle.
1) Plug the charger into a standard AC outlet.
2) Plug the charger cord into the battery receptacle.
The charger will disconnect power to the reader. The reader cannot be used while the
battery is charging.
3) Periodically monitor the progress.
The Status light on the charger indicates the state of the battery.
• Yellow = the battery needs charging.
• Green = the battery is fully charged.
The battery should fully charge in about two hours. It is not possible to overcharge
the battery.
4) When the battery is charged, remove the charger and close the battery door.
The reader is now ready for operation.
Page 5
III. Operation
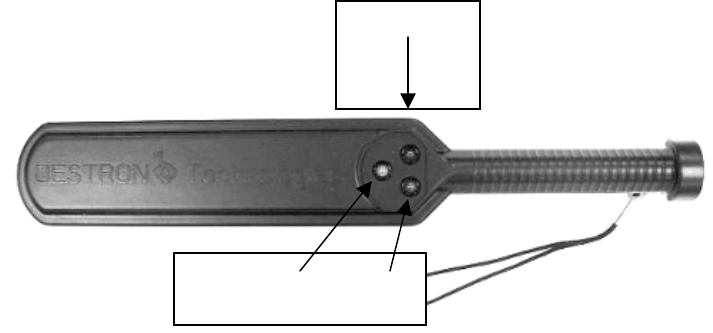
Activate the reader
Push the activation switch on the bottom of the reader to turn power on (allow five
seconds for startup to complete). The red light on the top of the reader will be lit and will
remain on while the reader is active.
The reader will stay active for 60 minutes. After 60 minutes the reader will automatically
shut down.
Steady red: Power is on.
Flashing red: Reader memory is more than 90% full (applies to DTR3 Readers only).
Flashing blue: Reader is searching for wireless connection.
Steady blue: Reader is connected to host.
One green flash: A tag has been read.
Red Light
Blue Light
Green Light
Page 6
Reading tags
Press the scanning switch and hold it until the tag has been successfully scanned. You
must pass the reader within six inches of the ID tag. Be sure to release the switch before
scanning the next tag. This allows the reader to return to scan mode.
DTR3 Reader
On a DTR3 Reader the tags are stored by default in memory on the reader. If a tag is
successfully read and saved, the green indicator light will flash twice and the reader will
beep twice. If the same tag is read twice in a row, the green indicator light will flash once
and the reader will beep once but the tag will not be saved in memory.
The tags are downloaded from the reader using the InfodexM utility. If the memory
function is disabled the DTR3 Reader will operate the same as the DTR1 reader.
DTR1 Reader
The DTR1 reader does not contain any memory and the tags are immediately
downloaded to a host device via either a serial or Bluetooth connection.
Pre-test before scanning animals
A test tag is been provided with the reader. Hold this tag in the palm of your hand and
pass the reader over the tag.
Storage
Be careful that the power switch is not accidentally held in the “on” position during
storage. If it is held on the reader battery will deplete and need to be re-charged.
Page 7
IV. Installing Infodex®M
(DTR3 Readers only)
Infodex®M is a utility that enables you to:
• Configure the reader
• Download tags from the reader to the utility
• Export tag IDs to your computer
Requirements
• Windows 2000 or Windows XP
• .NET Framework 2.0 or later (automatically installed for you during the utility
installation process)
• RS-232 serial port or Bluetooth connectivity
Installation
To install InfodexM:
1) Insert the InfodexM CD into the CD drive.
The Welcome dialog should automatically appear. If it doesn’t, simply double-click
the Setup.exe file on the CD.
2) Click Next.
The Select Installation Folder dialog is displayed.
3) If you accept the default folder and user values, click Next. Otherwise, modify the
values and then click Next.
The Confirm Installation dialog is displayed.
4) To begin the installation process, click Next.
5) When the Installation Complete dialog is displayed, click Close.
Page 8
V. Connecting To A Host
Serial cable connection
1) Turn on the reader and then connect it to your host data collection device (PDA,
computer, etc.) using the serial communication cable provided with the reader.
2) Configure the data collection software.
If using a communications program such as HyperTerminal, use the following
RS232 settings:
• Baud rate: 9600
• Data bits: 8
• Parity: None
• Stop bits: 1
• Flow: None
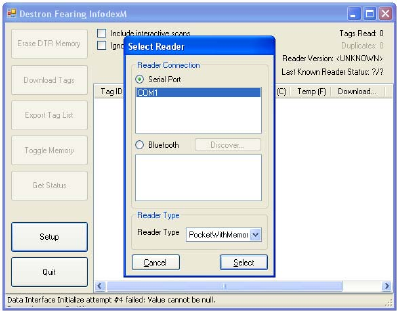
If using InfodexM (DTR3 models only), start the utility by selecting Start > All
Programs > Destron Fearing > InfodexM. The utility should automatically connect
to the reader. If it doesn’t:
a) Click Setup.
b) Enable the Serial Port option, in the Reader Type box select DTR, and then click
Select.
Page 9
Bluetooth connection to a computer
DTR1 Readers (using a comm program)
1) Turn on the reader and wait for the blue light to begin flashing.
2) Open the Bluetooth manager and initiate a communication session with the reader.
Make sure the COM (serial) port service is enabled for the device.
3) When prompted, type the proper passcode.
The passcode is the last five digits of the serial number located on the handle of
the reader.
4) Wait for the flashing blue light to change to a steady blue light (indicating the
connection is made).
5) On your computer, start your communications program and verify its
configuration: 9600 baud, 8 data bits, no parity bits, 1 stop bit, no flow control.
DTR3 Readers (using InfodexM)
1) Turn on the reader and wait for the blue light to begin flashing.
2) On your computer, start the utility by selecting Start > All Programs > Destron
Fearing > InfodexM.
3) Click Setup.
4) Enable the Bluetooth option and select DTR in the Reader Type box.
Note: Your Bluetooth COM port may appear in the Serial Port box. If so, select it
and then click Select (and skip Step 5 and Step 6).
5) Click Discover.
6) Select your reader from the list of discovered devices and then click Select.
Page 10
Bluetooth wireless connection to a PDA
(DTR1 and DTR3 Readers)
There are many different ways to establish a Bluetooth connection. Please consult your
device’s user manual for directions on how to connect to the reader.
A sample PDA connection
If you are using a Windows CE device (Pocket PC 2003), set up the device as follows:
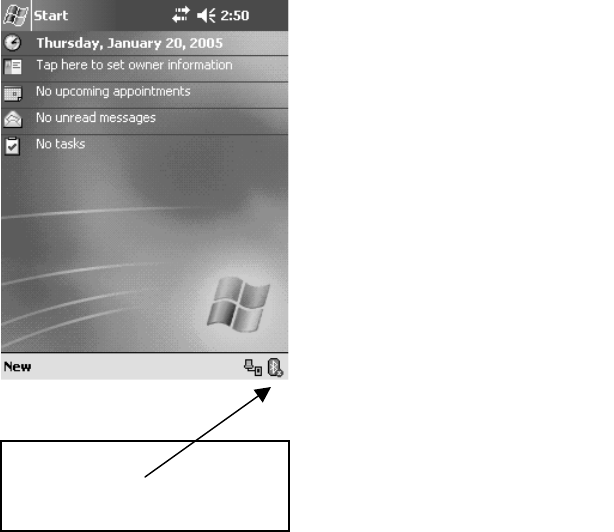
1) Turn on Bluetooth functionality
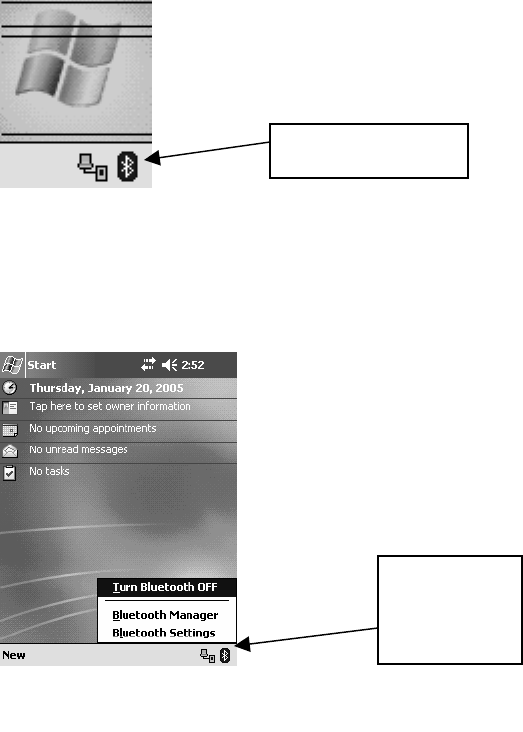
a) Turn on the PDA and allow a few seconds for the device to turn on the Bluetooth
function. A Bluetooth icon should appear in the lower right hand corner of the screen.
If a red circle with a white “x” appears next to the Bluetooth icon, then the Bluetooth
device is sleeping and must be turned on.
Bluetooth OFF
Page 11
b) To turn on the Bluetooth function, tap the Bluetooth icon located in the lower right
corner of the PDA screen and then select Turn Bluetooth ON. This will turn on the
wireless connection and the red circle “X” will disappear.
2) Configure the PDA serial port.
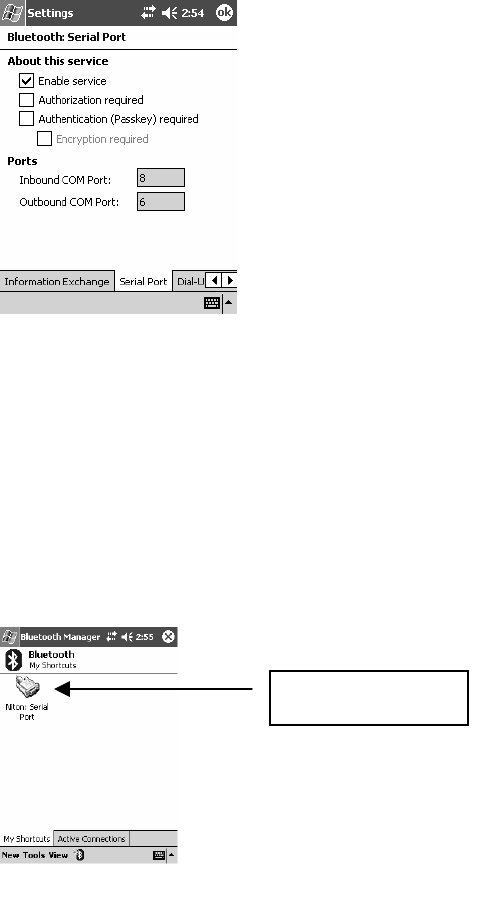
a) To verify the proper setup of the Bluetooth device, tap the Bluetooth icon again to
display the menu. Select “Bluetooth Settings” to display the settings window.
Bluetooth ON
Tap to
access the
menu
Page 12
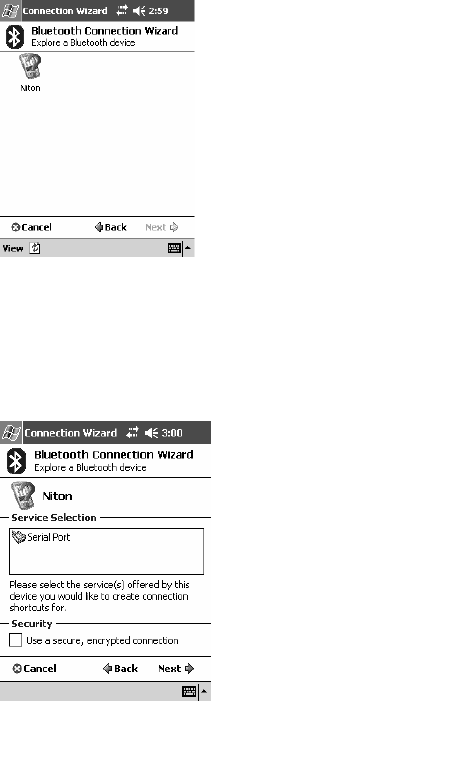
b) On the bottom of the Settings window, tap on the right arrow and scroll until the
Serial Port tab appears.
c) Select the Serial Port tab and verify that the Enable service check box is enabled.
The other check boxes should not be checked. In the top right-hand corner of the
screen click OK.
3) Enable the serial connection.
a) Turn on the DTR Reader.
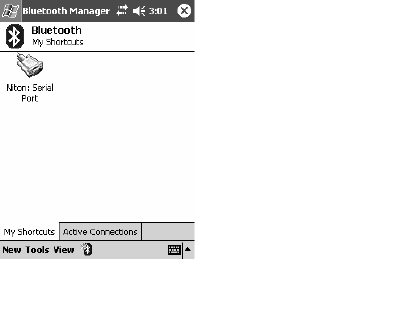
b) On the PDA, tap the Bluetooth icon and select the Bluetooth Manager menu. This
will display a list of all previously configured devices.
c) Double-click the serial port icon to enable the connection to the reader.
Note: If this is your first time in the Bluetooth Manager screen, you must get it to
“discover” the reader. To do this:
• In the lower left corner tap New.
• Tap on Connect and then double-tap Explore a Bluetooth device.
Double-click
Page 13
• Click inside the No device selected box. The Bluetooth Browser will appear while
the PDA is searching for a device.
Important: The DTR Reader must be on when the browser is in a search mode.
• When the browser detects the reader, the Serial Port icon will appear on the PDA.
Tap the reader icon to open the Bluetooth Connection Wizard.
• The available services will be displayed in the Service Selection box. Tap Serial
Port and then in the lower right corner of the PDA tap Next.
• Tap Finish.
Page 14
4) Pair the device.
a) Highlight the serial connection and then tap Tools. At the top of the screen tap
Add. The Bluetooth: Device pairing dialog will appear.
b) Tap the Search icon and the device name will appear with identification
numbers. In the Passkey window, type the last five digits of the device ID number
and then tap OK.
The wireless serial cable icon will remain available in the Bluetooth Manager for
future use.
Page 15
VI. Using InfodexM
(DTR3 Readers Only)
InfodexM is used to:
• Erase tags from the reader’s memory
• Download tags from the reader’s memory
• Export tags to a spreadsheet program
• Enable and disable the reader’s memory
• Establish a serial or a Bluetooth connection with the reader
• Configure how the reader manages interactive scans and duplicate tags.
Note: You can also use a communications program to perform these tasks. See page 20
for details.
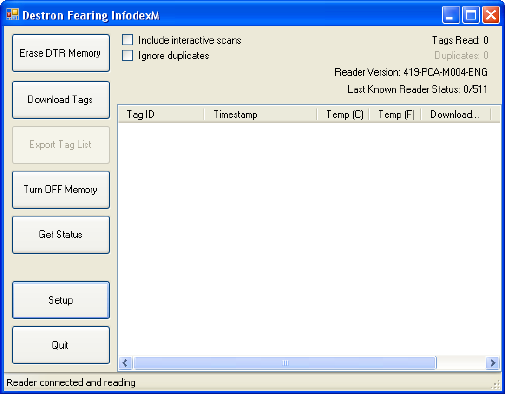
Starting InfodexM
To start the utility you select Start > All Programs > Destron Fearing > InfodexM. The
following window is displayed.

Page 16
Erasing DTR memory
To erase all tags currently in the reader’s memory, click Erase DTR Memory. Erasing
tags from memory does not clear the list of tags currently stored within the utility.
Downloading tags from memory
To download all tags currently stored in the reader’s memory, click Download Tags. The
tags are downloaded to the utility and displayed within the tag list. For example:
Information displayed about each downloaded tag includes:
• Tag ID: The 15 digit code that uniquely identifies each tag.
• Timestamp: The date and time that the tag was downloaded from memory.
• Temp (C) and Temp (F): Reserved for future use.
• Downloaded?: Either Yes or No.
Yes = the tag was downloaded from memory
No = the tag was scanned interactively (directly into the utility’s tag list).
• File Number: Reserved for future use.
Note: Downloading tags from memory does not erase the tags from memory.
Page 17
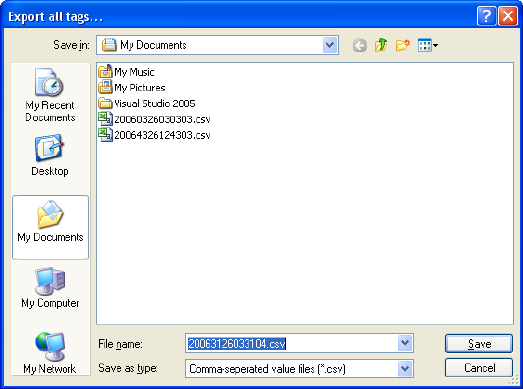
Exporting tags to your computer
Tags that have been downloaded to the utility can be exported and saved to a file on your
computer. This enables you to use a spreadsheet program to evaluate your tag data. To
export the tags:
1) Click Export Tag List.
The Export all tags dialog is displayed.
2) Specify a folder, a file name, and a file type, and then click Save.
There are two possible file types:
• Comma-separated value files: Readable by most popular spreadsheet programs but
some cells may require formatting.
• Excel Comma-separated value files: Designed for use with Microsoft Excel.
Note: Exporting the tag list does not erase the tags from the utility tag list.
Page 18
Enabling and disabling memory
The DTR3 Reader contains internal memory capable of storing up to 510 RFID tags. You
can enable and disable the use of the memory feature using the Turn ON Memory / Turn
OFF Memory button. The name of the button changes depending on whether memory is
currently enabled or disabled.
Note: The utility must be connected to the reader in order to enable or disable memory.
When memory is enabled
Tags scanned by the reader will be stored in memory. To get the tags you must download
them using the Download Tags button.
When memory is disabled
The reader will function exactly like a DTR1 Reader. Tags scanned by the reader will be
sent directly to your computer via a serial or Bluetooth connection.
If there are tags in memory when memory is disabled, those tags are saved, but no
additional tags will be saved.
Page 19
Managing interactive scans and duplicate tags
InfodexM contains two check boxes that enable you to specify how the utility should
manage interactive scans and duplicate tags.
Note: The following two options apply only to the utility. They do not apply to the
reader.
• Include interactive scans: If enabled, scanned tags will be sent directly to the utility’s
tag list. This happens regardless of whether reader memory is enabled or disabled. If this
option and reader memory are both enabled, the tags are sent to both the utility and to
memory.
Note: The tags displayed within the utility are not saved unless they are exported to a
.csv file using the Export Tag List button.
• Ignore duplicates: If enabled, duplicate tags are ignored by the utility. Duplicate tags
will continue to be accepted and stored in reader memory.
Tip: To see how the duplicates are ignored, enable both this option and Include
interactive scans. When a duplicate tag is read the status message in the lower left corner
of the utility will indicate it has been read but the tag ID will not be added to the utility’s
tag list.

Page 20
InfodexM statistics
The following statistics are displayed in the upper-right corner of the utility. To update
this list, click Get Status.
• Total Tags: The total number of tags read by the utility since it was started. This
includes tags read directly to the utility using the Include interactive scans option as well
as those tags downloaded from memory. Downloading the same tags from memory
multiple times will increase the total value.
• Duplicates: The total number of duplicate tags identified by the utility.
• Reader Version: The version of software currently running on the reader.
• Last Known Reader Status: The number of tags currently saved in memory. The
memory can store 510 tags.
Communications program commands
If you prefer, you can use a communications program (such as HyperTerminal) rather
than the utility to manage the DTR3 Reader’s memory and tags. The available commands
are:
• Esc: Enter console mode • D: Download tags
• S: Reader status • M: Enable/disable memory
• V: Reader version # • ?: Display help menu
• E: Erase memory • X: Exit
Page 21
VII. Troubleshooting
PROBLEM
• Reader power light does not come on.
ACTION
• The battery must be fully charged. Charge battery.
• Inspect and clean terminals on the battery if needed.
• Make sure battery is fully inserted and door is closed and sealed.
PROBLEM
• Reader has reduced read range or is not reading the tags.
ACTION
• The battery may be getting low. Recharge the battery.
Important: Metal objects, computer monitors, video screens, or other readers or
microchip tags within 18” of the scanning area (check pockets) may distort the read
range.
• If using a laptop computer, make sure it is properly grounded, using a three-prong plug.
• To see if the host device is the problem, disconnect the reader and scan the test tag.
Page 22
PROBLEM
• Host device will not accept data.
ACTION
• Check cable connections to reader and the host device.
• Verify communications setup on host.
PROBLEM
• Reader’s green light stays on continuously.
ACTION
• Remove the battery and replace or reinstall. Then, re-test the system. If the problem
continues, disconnect the reader from the host device and test. If the reader now works
properly, verify the settings on the host device.
PROBLEM
• Can’t make a serial port connection to the reader using the InfodexM utility.
ACTION
• The COM port may be busy, possibly due to an existing serial port connection. Check
to see if you have an existing serial port connection using a communications program
such as HyperTerminal.
Page 23
VIII. Proper Use and Care
While the reader is designed to perform in harsh conditions, it IS NOT to be used as an
animal paddle, tool, or as an instrument for anything other than scanning animal tags. Use
of the reader for non-scanning functions could permanently damage the components and
replacement/repair WILL NOT be covered under the warranty.
Clean the reader when needed with either soap and water or with a mild cleaning
solution. DO NOT immerse the reader in water or clean with strong chemical solutions.
Page 24
IX. Specifications and Warranty
Weight (with batteries):
• 1.6 lbs.
Length/width:
• 19.5 inches / Length
• 3 inches / Width
Batteries (custom pack provided):
• 2.5 hour fast charge
• 2100mA capacity
• Battery Life – 500 charge/discharge cycles
Charger/Adapter:
• 110/240 volt compatible
Storage Temperature:
• -25 to 45 degrees C
Operating Temperature:
• -25 to 45 degrees C
Operating Frequency:
• 134.2 Khz
Read Range:
• 6 inches
Warranty Information
The Reader is warranted against defects in materials and workmanship, under normal use
and service for One (1) year from date of purchase. This warranty will not apply if
adjustments, repair or parts replacement is required because of accident, neglect, damage
during transportation or by causes other than ordinary use.
Digital Angel Corporation’s sole responsibility under this warranty shall be, at its option,
to either repair or replace any product which fails during the warranty period. In no event
shall Digital Angel Corporation be liable for any indirect or consequential damages or
loss of profit.

Page 25
X. FCC Statement
Digital Angel Corporation
South St. Paul, MN 55075-2443
Phone: 1-800-328-0118
Fax: 1-800-328-4565
FCC ID: P8F800100
This device complies with Part 15 of the FCC rules. Operation is subject to the following
two conditions:
1) This device may not cause harmful interference, and,
2) This device must accept any interference received including interference that may
cause undesired operation.
Caution to the user:
Any changes or modifications to the reader other than specified by this manual or Digital
Angel Corporation could void the user’s authority to operate the reader.
Industry Canada Registration ID
IC: 4284A-800100