Digital Cynos DCM-17WT LCD Monitor User Manual users manual
Digital Cynos Co., Ltd. LCD Monitor users manual
Contents
- 1. users manual
- 2. USERS MANUAL
users manual
17” Wide TFT-LCD TV
User’s Manual
Model : DCM-17WT
Thank you for selecting our 17” TFT-LCD TV monitor. Please take a few minutes
to read this user’s manual for the best performance of this TV.
Please keep this user’s manual for future reference.
The present home appliance is certified and approved by EMC/EMI and can be
used in all places including residency area.
Information in this manual is subject to change without prior notice. Ver1.00E

FCC Information
This equipment has been tested and found to comply with limits for a class B digital device,
pursuant to Part 15 of the FCC Rules. These limits are designed to provide reasonable protection
against harmful interference in a residential installation.
This equipment can generates, uses, and radiate radio frequency energy and, if not installed and
used in accordance with the instructions, may cause harmful inteference to radio
Communications. However, there is no guarantee that interference will not occur in a particular
installation.
If this equipment does cause unacceptable interference to radio and television reception, which
can be determined by turning the equipment off and on, the user is encouraged to try to correct
the interference by one or more of the following measures.
■Reorient or relocate the receiving antenna.
■Increase the separation between the equipment and receiver.
■Connect the equipment into an outlet on a circuit different from that to which the receiver
is connected.
■Consult the dealer or an experienced Radio/ TV technician for help.
3
DCM-17WT
Cation : Any changes or modifications in construction of this
device whice are not expressly approved by the party
responsible for compliance could void the user's authority to
operate the equipment.

<Warning> for Installation
1. Do not put a glass of water, chemical substances or any small metal object
on the TV set.
This may cause damage, electric shock or fire. If a foreign substance gets
into the set, unplug it and contact a service center.
2. Keep your TV set out of humidity and dust.
An electric shock or fire could occur in the TV set.
3. Do not use or store inflammable substances near the set.
This may cause an explosion or fire.
4. Do not place the TV on an unstable cart, stand, tripod, bracket or table.
Otherwise, it can fall.
The set can be damaged seriously if this happens.
Place the TV set on a stable surface.
5. Do not place or use any inflammable spray, materials, etc. near the TV set.
This may cause an explosion or fire.
6. Do not keep the set under feeble and bad ventilation condition such as on
the bookshelf or in the wall closet.
This may cause a fire by increasing internal temperature of the set.
7. Do not place power cord near radiator or heat register.
This may cause an electric shock or fire by melting power cord’s coating.
8. An outdoor antenna system should not be placed near overhead power lines,
other electric lines, power circuits, etc.
This may cause an electric shock or fire.
9. Bend the outdoor antenna cable, which is located in the building. This is to
prevent the rainwater from coming into through the antenna cable.
This may cause an electric shock or fire.
10. Do not place the TV set on an unstable cart, stand, tripod, bracket or table.
Otherwise, it can fall.
This can cause serious injury to a child or adult and serious damage to the
appliance.
11. Do not incline the TV set over 15o.
This may cause serious injure to a child or adult and serious damage to
the appliance.
Safety Instructions
To reduce the risk of fire, electrical shock, and other injuries, keep these safety
precautions in mind when installing, using, and maintaining your machine.
Here is Notice mark with <Warning> & <Caution> and its meanings are
as followed;
<Warning> : If you manipulate against the notice, it may cause serious
injury or death to user.
<Caution> : If you manipulate against the notice, it may cause slight
injury to user or appliance.
<Warning> for Power
1. Do not use damaged or loose plug and receptacle.
This may cause an electric shock or fire.
2. Do not touch the plug with wet hands.
This may cause an electric shock.
3. Do not connect too many extension cords or plugs to a wall outlet.
This may cause a fire.
4. Do not bend the plug and wire excessively or place heavy objects upon
them, which could cause damage.
Failure to do so may cause an electric shock or fire.
5. Plug the power cord perfectly into a wall outlet.
Unstable connection of the power cord may cause a fire.
<Caution> for Power
1. Hold the head part of power cord when you unplug it from the wall outlet.
Its violation may cause unexpected heating or fire by wires damage.
2. Disconnect the plug from the outlet while cleaning the TV.
Its violation may cause an electric shock or fire.
4 5
DCM-17WT

CONTENTS
Main Features
Package Contents
TV Parts
Connection
Remote Control
1. Buttons
2. Installing Batteries in the Remote Control
3. Power On/Off
4. TV mode / Monitor mode
5. Change Input Source
6. How to use MENU
7. Memorizing TV Channel
8. Changing TV Channel
9. Volume Control / MUTE
10. Auto Adjustment of Monitor Display
11. Display Pause
12. Set PIP / Control Screen Size
13. Change PIP Position
14. Control Screen Size
Function Button
TV Menu
PC Monitor Menu
Size
Specification
1. Specification
2. The Standard Signal Mode for PC Monitor
Troubleshooting
A/S (After-Sales Service)
<Caution> for Installation
1.Place the TV at a certain distance from the wall for ventilation.
If not, it may cause a fire by increasing internal temperature of the TV.
2. Do not cover the vents on the monitor cabinet.
Bad ventilation may cause a breakdown or fire.
3. Place the monitor on a flat and stable surface.
4. Lift the monitor using both hands when you move it.
<Warning> for Use
1. Disconnect the plug from the outlet during storms, lightening or your long
absence.
Failure to do so may cause an electric shock or fire.
2. After you removing the batteries from remote control, keep them out of
children’s reach. Children or infants may swallow them.
If it happens, contact your doctor immediately.
3. Never insert any metal object into monitor openings.
This may cause an electric shock, fire or injury.
4. Do not remove its cover (or back). No user serviceable parts inside.
This may cause an electric shock or fire. Refer servicing to qualified
service personnel.
<Caution> for Use
1.
Unplug the TV from the wall outlet when not being used for a long period of
time.
If not, the dust heated in the unit may cause an electric shock or fire.
2. Unplug the TV from the wall outlet and disconnect the antenna or cable
system when moving it to other places.
If not, it may cause damage to cable system and cause an electric shock
or fire.
3. Unplug the power cord from wall outlet if you notice strange smoke, sound
or smell from the TV set, and refer servicing to qualified service personnel.
This may cause an electric shock or fire.
4. Unplug the TV from the wall outlet before cleaning. Use a damp cloth but not
liquid or aerosol cleaners.
If not, an electric shock or fire may be provoked.
6 7
DCM-17WT
5
6
7
8
9
10
15
19
20
21
22
23
10
15
19
20
21
22
23
10
15
19
20
21
22
23
22
23
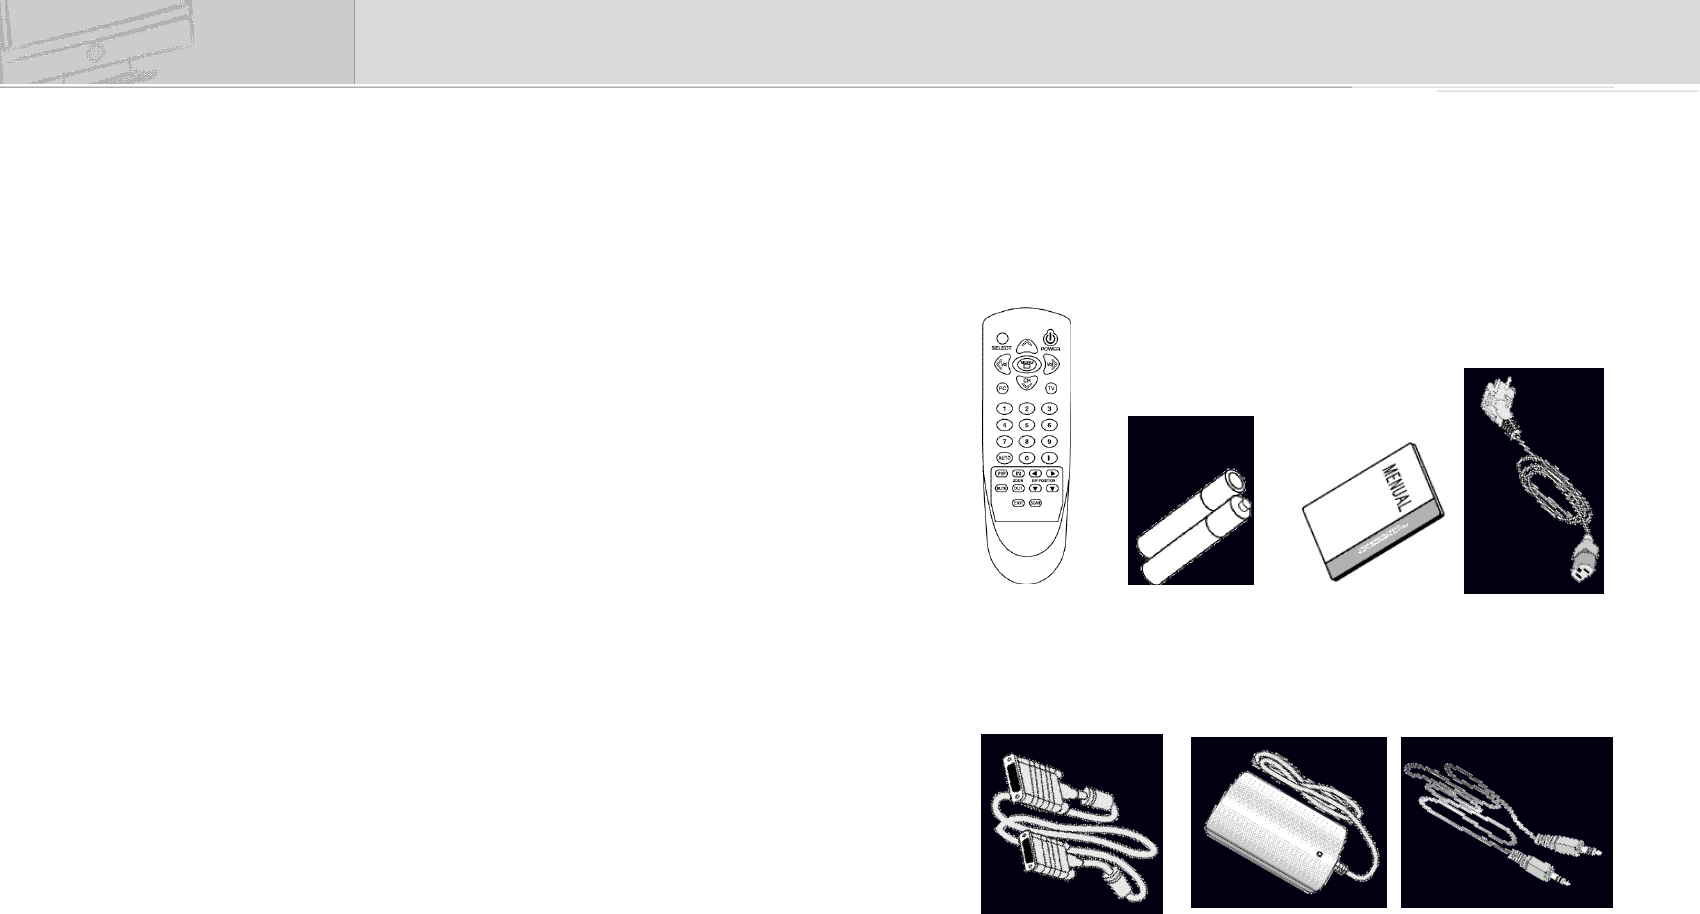
Package Contents
Please make sure the following items are included with your LCD TV. If any
items are missing, contact with your dealer.
Main Features
■Easy & convenient Installation
Unlike conventional CRT TV, its slim size and design allow user to install and
use without much limitation.
■Easy-to-use Function
User can enjoy using the product even more due to its easy-to-use remote
control and rotary function buttons on TV
■Simple installation on the wall
User can install the unit on the wall simply with three screws or nails.
(Attention: The wall should be solid enough to avoid that the unit is crooked or
dropped.)
■Auto Adjustment
You can simply adjust the TV to the best conditions with one button.
■Remarkable Functional Extension
The unit carries out the functions of PC monitor as well as TV and can work in
connection with various products such as DVD, VCR, Camcorder and Audio.
■Perfect Image
The most advanced TFT-LCD panel is adapted to the unit. It removes the
screen flicker effect of Braun tube mode, which relieves eye fatigue to a
considerable point and provides the user perfect images.
■Profound and Rich Sound Effect
User can enjoy profound and rich sound without additional audio player thanks
to the unit’s audio part with its sepecial speakers, which is of the best quality
among the products of the same rank.
8 9
DCM-17WT
Remote Control
15Pin VGA Cable DC 12V Adapter Audio Cable
Batteries(AA
×2
)User’s Manual Power Cord
Connection
1.Power Connection
•
The present unit adjusts the voltage automatically.
If you use 110V power, please connect the adapter convertible to 110V to AC
cord before use.
•
Please check that the AC cord is plugged in correctly when you connect it to
an outlet or DC adapter.
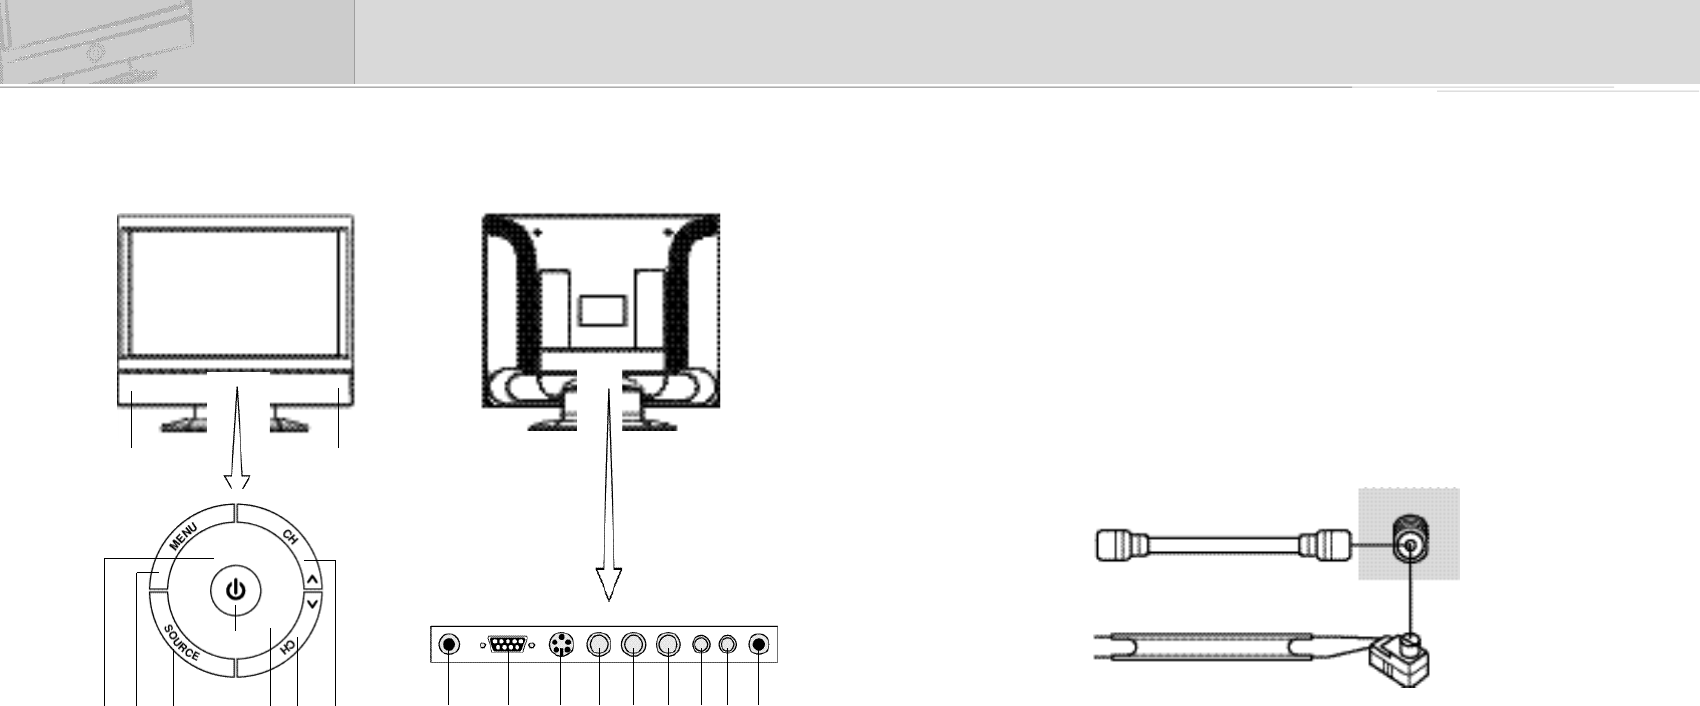
2.Connection of Antennas
•
Make sure that the copper wire does not be bent if you use Round Leads (75-
ohm)
•
Round Leads, Flat Twin Leads and antenna converter are separate purchasing
items.
TV Parts
1. Power 10. S-Video In jack
2. Remote Control Sensor 11. Composite Video In jack
3. Menu 12. Audio (L) In jack
4. Input Mode 13. Audio(R) In jack
5. CH Up/Down 14. Stereo Audio In jack
6. Power indicator 15. Stereo Audio Out jack
7. Speaker 16. TV Antenna
8. Power Input Connector
9. PC Video Input
10 11
DCM-17WT
832 4 6
1
5 5
7 7
91 0 1 1 1 2 1 3 1 4 1 5 1 6
Round Leads
Flat Twin Leads
Antenna Converter
TV Antenna
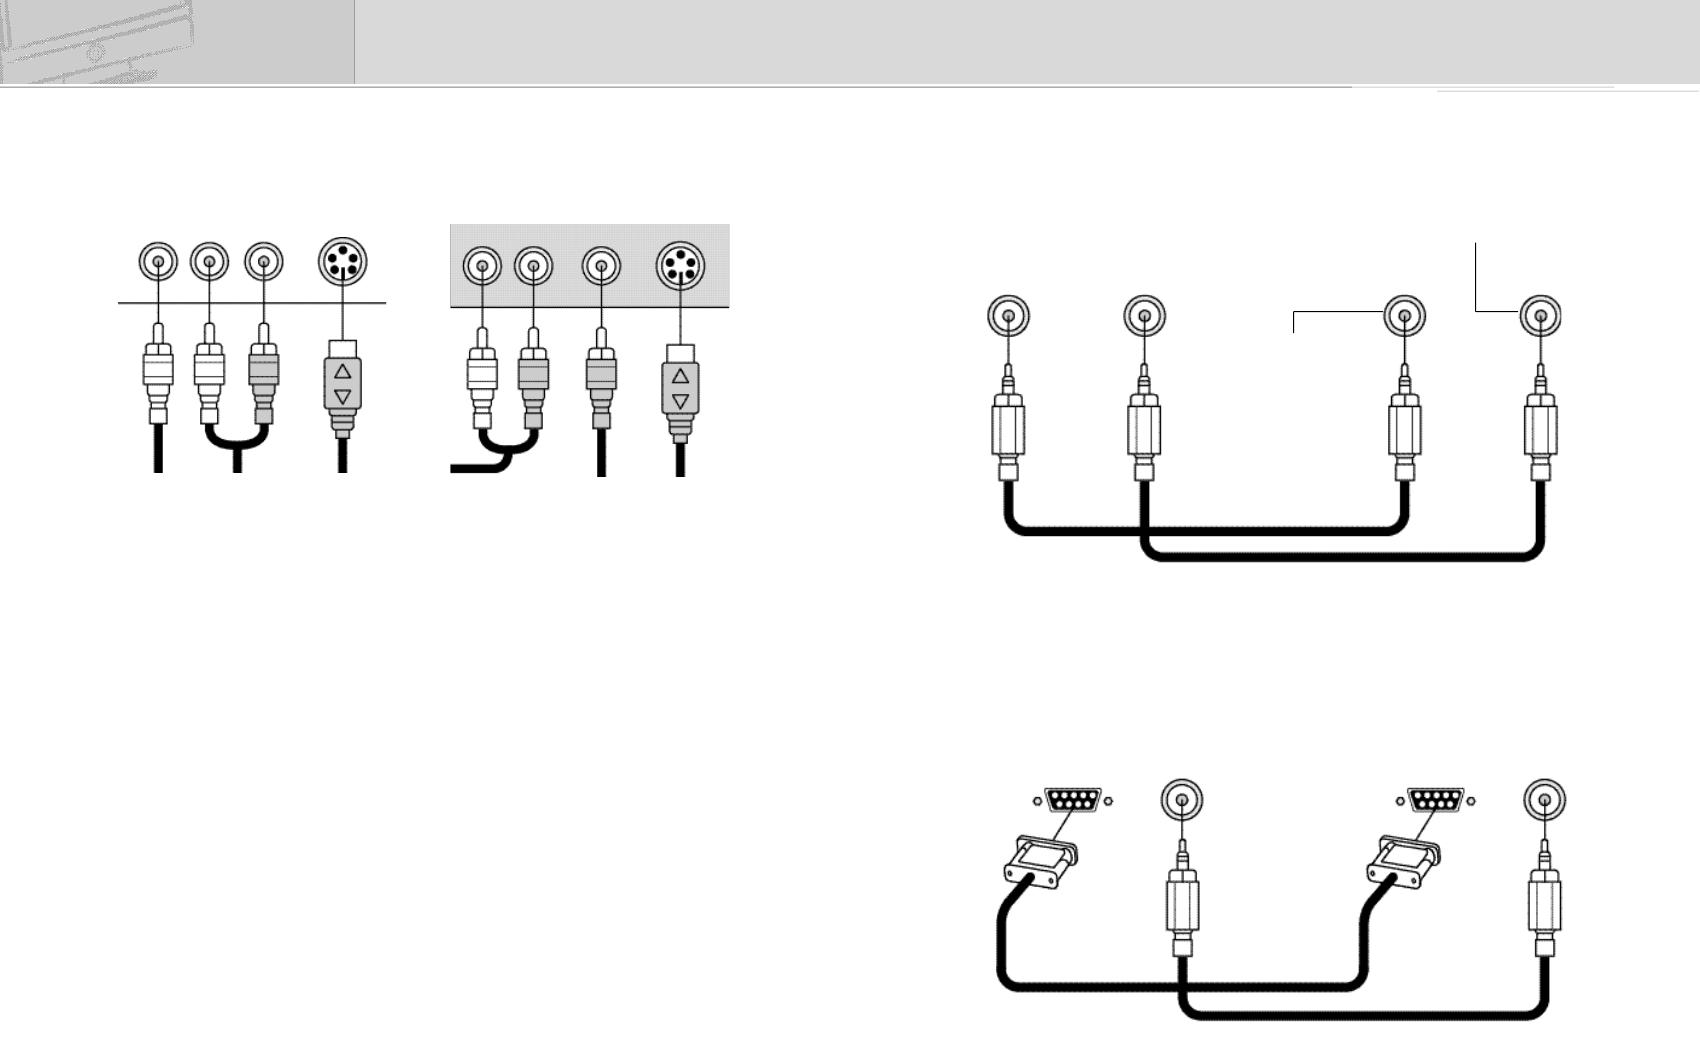
4.Connecting of Audio Line IN / OUT
5.Connecting to PC
3.Connecting of Composite Connector / S-Video connector
•
Connect a set of audio cables between the L, R AUDIO INPUT jacks on the TV
and various players (VTR, DVD, Set Top Box, etc).
•
Make sure that all connectors are connected with same color of input and
output.
•
S-Video outputs give you better images than Composite Video outputs.
12 13
DCM-17WT
V i D E O
LINE IN
RGB
Display Card
Output
AUDIO
Intput
LINE IN
LINE OUT Audio Output Audio Input
A u d i o V i d e o S - V i d e oL - A U D I O - R S - V I D E O
<Rear Connection Parts of the TV>
<Rear Connection Parts>
<PC or External
Equipment>
<Earphone / External Equipment’s>
<Rear Connectors> <PC Connectors>
<External Equipment’s Output>
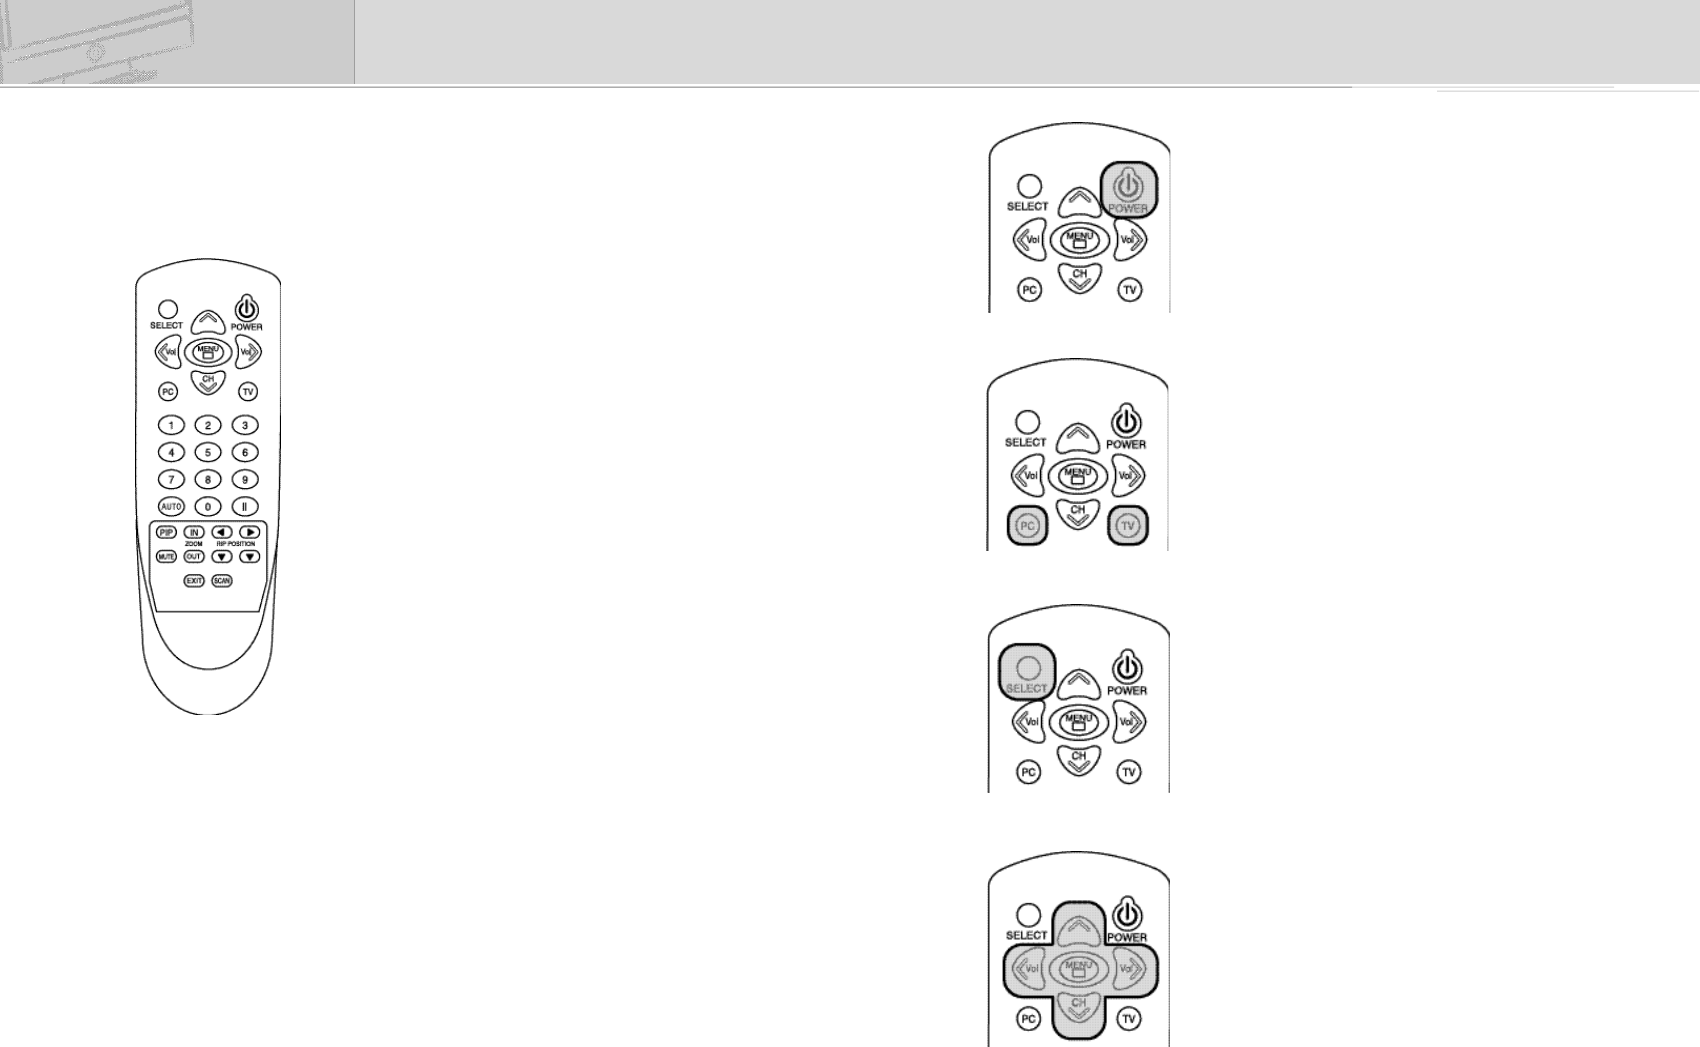
3. Power On/Off
•
Turns the TV on and off
4. TV mode / Monitor mode
•
Power on and press TV button to enter the
TV mode.
•
Power on and press PC button to enter the
PC mode
5. Change Input Source
•
If you want to change external input source
while watching TV, please press the SELECT
button on remote control. At each time you
press it, the signal will change as follows:
PC -> TV -> Composite -> S-Video -> PC.
6. How to use MENU
•
Press <MENU> button to enter main menu.
Use <CH> button to select up and down
menu.
•
To move to sub-menu, press <MENU>
button again or press <VOL> menu of right
side.
Remote Control
1. Buttons
①
POWER : Turns the LCD TV on and off
②
SELECT : Change input source
③
CHANNEL UP / DOWN : Change TV channel
④
MENU : MENU control
⑤
VOLUME UP / DOWN : Volume control
⑥
PC / TV : Change PC / TV signal
⑦
0 ~ 9 : Select TV channels directly
⑧
AUTO : Auto adjustment of PC Mode
⑨ ‖
: Pause
⑩
PIP : PIP select
⑪
MUTE : Silent of sound
⑫
ZOOM IN / OUT : Control screen size
⑬▲▼◀ ▶
: Change PIP position
⑭
SCAN : Auto TV channel selection
⑮
EXIT : Exit menu or function
The remote control can be used up to about
7m, 15o (R/L) from remote control sensor.
2. Installing Batteries in the Remote Control
1) Slide the cover out completely.
2) Make sure to match the “ +/- ” Ends of the batteries with the diagram
inside the compartment and install 2 batteries.
3) Replace the cover.
4) Battery : 2 x DC 1.5V AA type
Be sure to put the battery correctly in order to avoid all dangers including
blowout, water leakage or injury.
For environmental protection, please dispose of dead batteries to their separate
collection can.
14 15
DCM-17WT
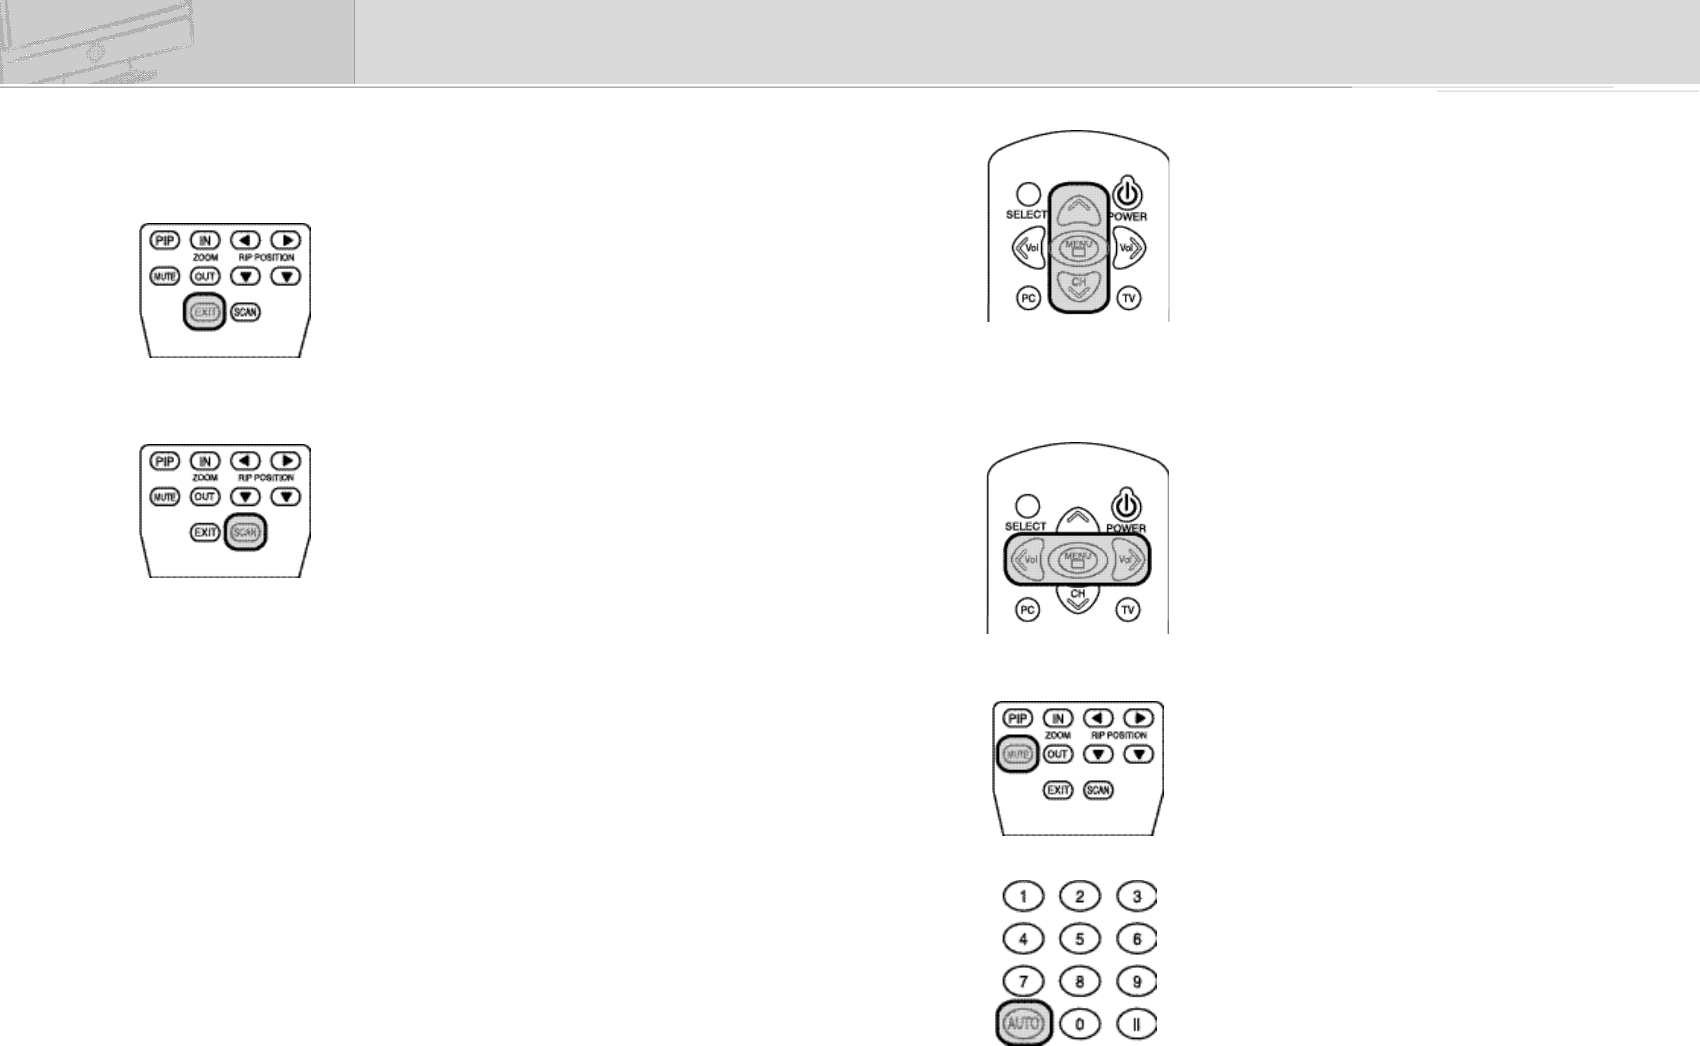
8. Changing TV Channel
•
If some channels are stored, you have only
stored channels to explore by pressing
these buttons. If you have not saved any
channel yet, you go through all the
channels with these buttons. For your
convenience, it is recommended to store
some channels before use.
•
When you press <CH> buttons in TV Mode
(including PIP mode), the TV changes
channels in sequence.
•
You can view any channel directly by using
number buttons on the remote control.
•
You can change TV channel in menu mode, too.
9. Volume Control / MUTE
•
You can control volume when audio signal is
connected such as TV, PC and external
signal.
•
Press to increase or decrease the volume.
•
The system volume can be controlled by
OSD button.
•
Press < MUTE > button to cut off the sound
temporarily and press it again to revive the
sound.
10. Auto Adjustment of PC Mode
•
Press <AUTO> button of remote control to
adjust the size of monitor screen and
resolution to the best conditions
automatically.
•
In sub-menu, use <CH> button to select up
and down menu like main menu operation.
•
To control function of menu, use <VOL>
button.
•
If you finished all controls of menu, press
<MENU> button in sub-menu to enter main
menu and then press <MENU> button again
to exit menu control.
•
Or use <EXIT> button of the bottom of
remote control to finish current controlling
menu.
7. Memorizing TV Channels
•
To search TV channel, press <SCAN>
button in TV mode.
•
TO stop searching TV channel and to store
searched TV channel, press <MENU>
button.
•
TV channel memory function works only
during the airtime. If TV signal is very
weak, it is hard to search signals.
•
When the power is cut off or the unit
system is reinitialized, all the recorded
channel information disappears. In this
case, you need to record the channels
again.
•
To erase searched TV channel, use channel
edit function of menu mode
✽
Channels 2~69 are for “off-air”(antenna)
and channels 1 and 14~69 are for cable
channels. Channels 14~69 are for both
antenna and cable channels. To select one
of them, use source menu of TV menu.
16 17
DCM-17WT
Function Button
Function button work as follows
1. : power and volume adjustment (rotary button)
•
This button turns on and off.
•
You can control the volume by turning this button.
•
You can choose the desired value of selected menu by turning the button.
2. CH
▲ /
CH
▼
: change of channel and menu
•
It changes TV channel.
•
It selects main/sub menu (up and down).
3. MENU : Menu selection
•
You use the button to start or quit the menu mode.
•
You can enter sub-menu or return to main-menu section by this button.
4. SOURCE : Selection among TV, PC monitor and other external inputs
(Composite, S-Video)
•
By pressing the button, you can have PC monitor signal -> TV -> Composite
signal -> S-Video signal -> PC monitor signal in turn.
11. Freezing the Picture
•
Press <II> button to freeze the picture and
press again to continue.
12. PIP function and changing the screen
size
•
Press <PIP> button to create PIP screen.
•
Press < PIP > button to change the screen
size. The size changes as following order
(off->small-> middle->large)
•
PIP is only available in PC monitor mode.
•
PIP is available with TV mode and external
signals (Composite, S-Video).
•
You can adjust PIP input signals in menu
mode.
13. Changing the position of PIP
•
Use <direction-key> of remote control to
change the PIP position.
•
PIP position is also changeable in menu
mode.
14. Changing the Screen Size
•
Use ZOOM <IN> button to magnify the size
of the screen.
•
Use ZOOM <OUT> button to diminish the
size of the screen.
•
Changing screen size is done with the
central part of the screen as base point. You
can not make screen size smaller than
actual size.
•
To finish changing the screen size, press
<EXIT> button.
18 19
DCM-17WT
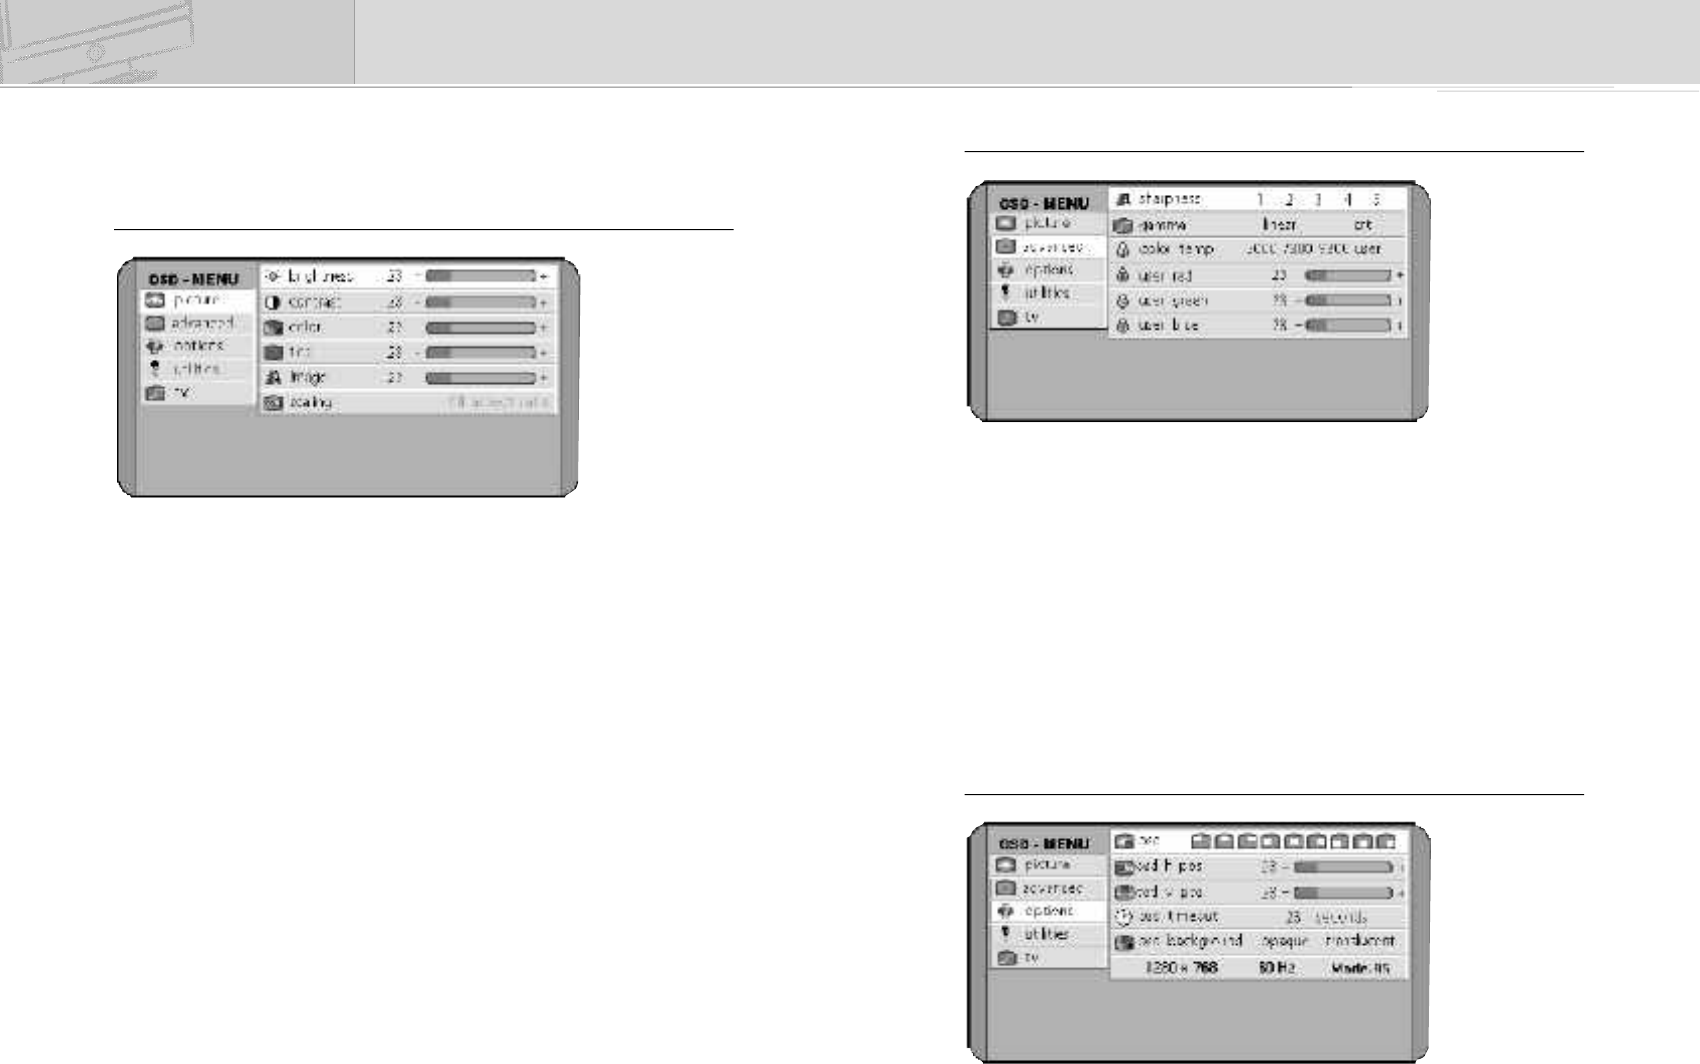
■
Advanced
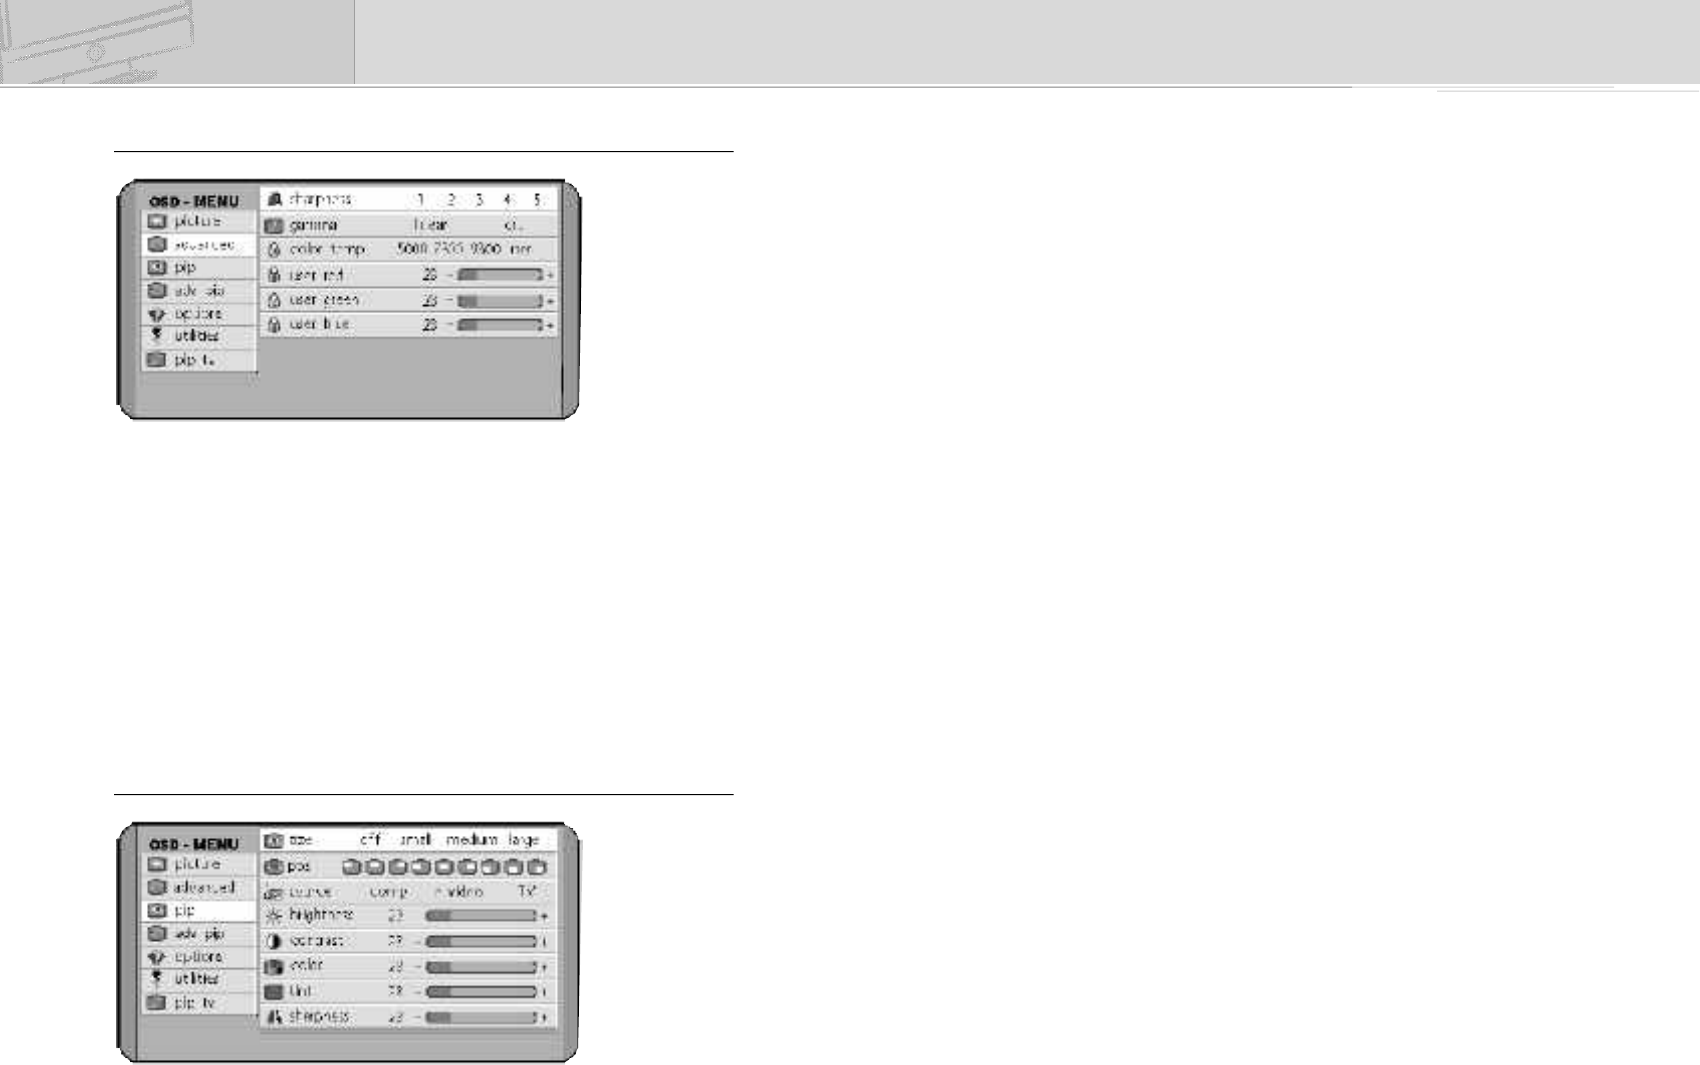
1) Sharpness
This adjusts the clarity and the focus of screen image.
SHARP 1 -> 2 -> 3 -> 4 -> 5 SOFT
2) Gamma
Linear : It shows gamma pattern of LCD TV type.
CRT : It shows gamma pattern of CRT TV type.
3) Color temp
This provides three preset color adjustments.
Warm 5000-> 7300-> 9300 Cool
USER : User can adjust each of R, G, B.
■
Options
TV MENU
■
Picture
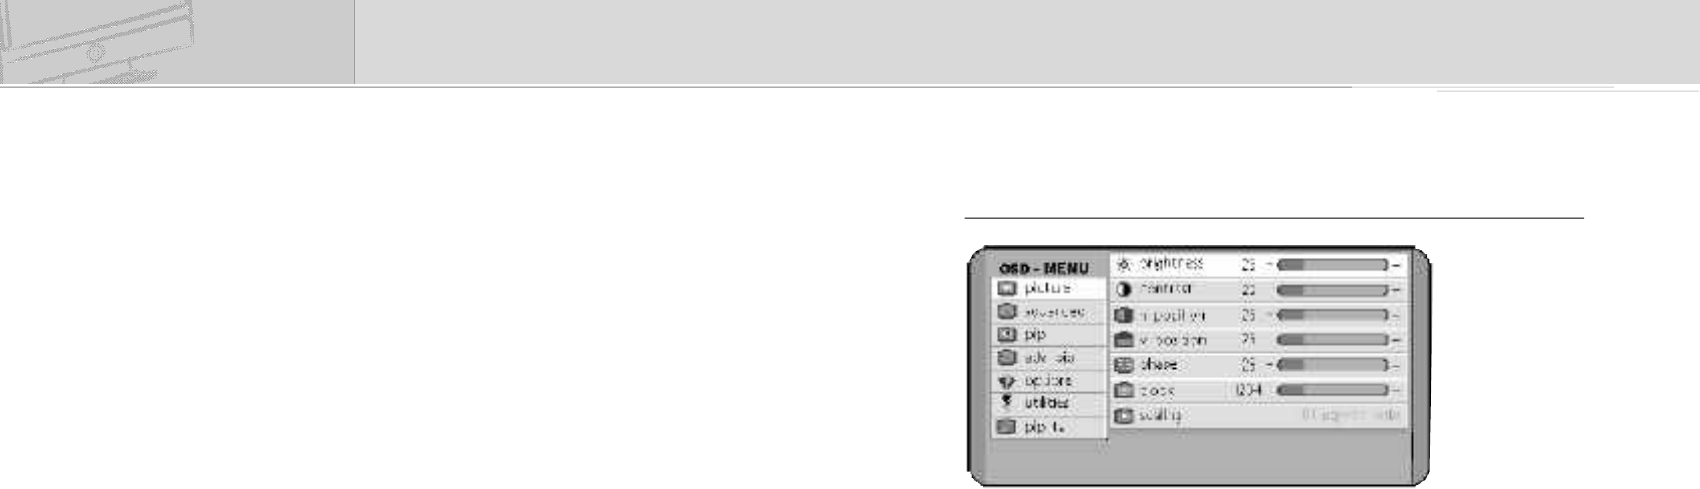
1) Brightness
This controls the brightness of the LCD.
2) Contrast
This controls the contrast of the LCD.
3) Color
This adjusts the depth of TV image color.
4) Tint
This adjusts the tint of TV image color.
5) Image
This adjusts the clarity and the focus of screen image.
6) Scaling
Normal : Image displayed in full screen.
zoom2 : Image enlarged by 200% from the center of the screen.
Anamorphic : Image displayed in panoramic view.
Zoom : Image enlarged by 150% from the center of the screen.
Fill aspect ratio : Image displayed with an aspect ratio 4:3
Wide : lmage displayed with an aspect ratio 4:3 depending on the horizontal
size
20 21
DCM-17WT
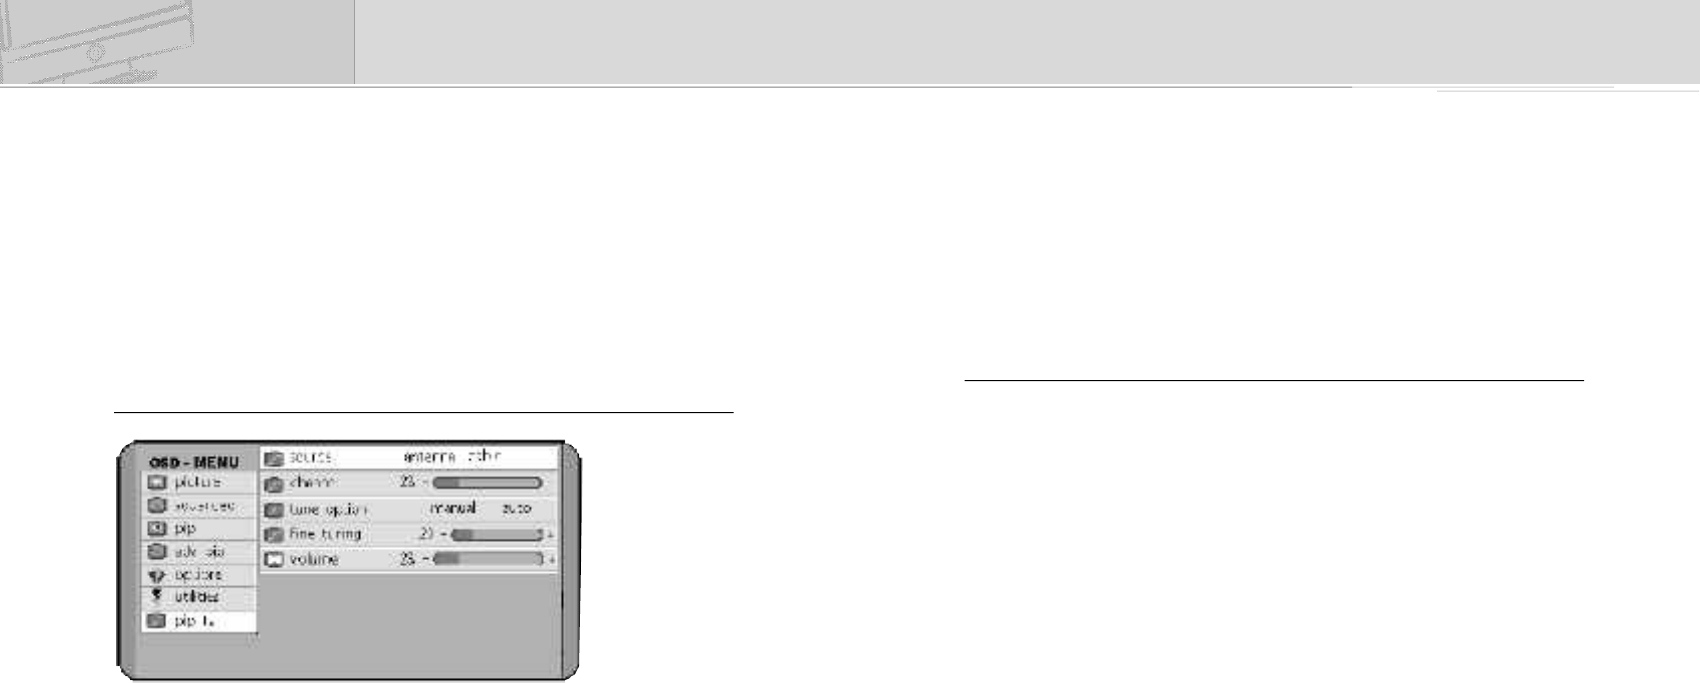
5) Source
You can select a source.
PC -> TV -> Composite -> S-Video
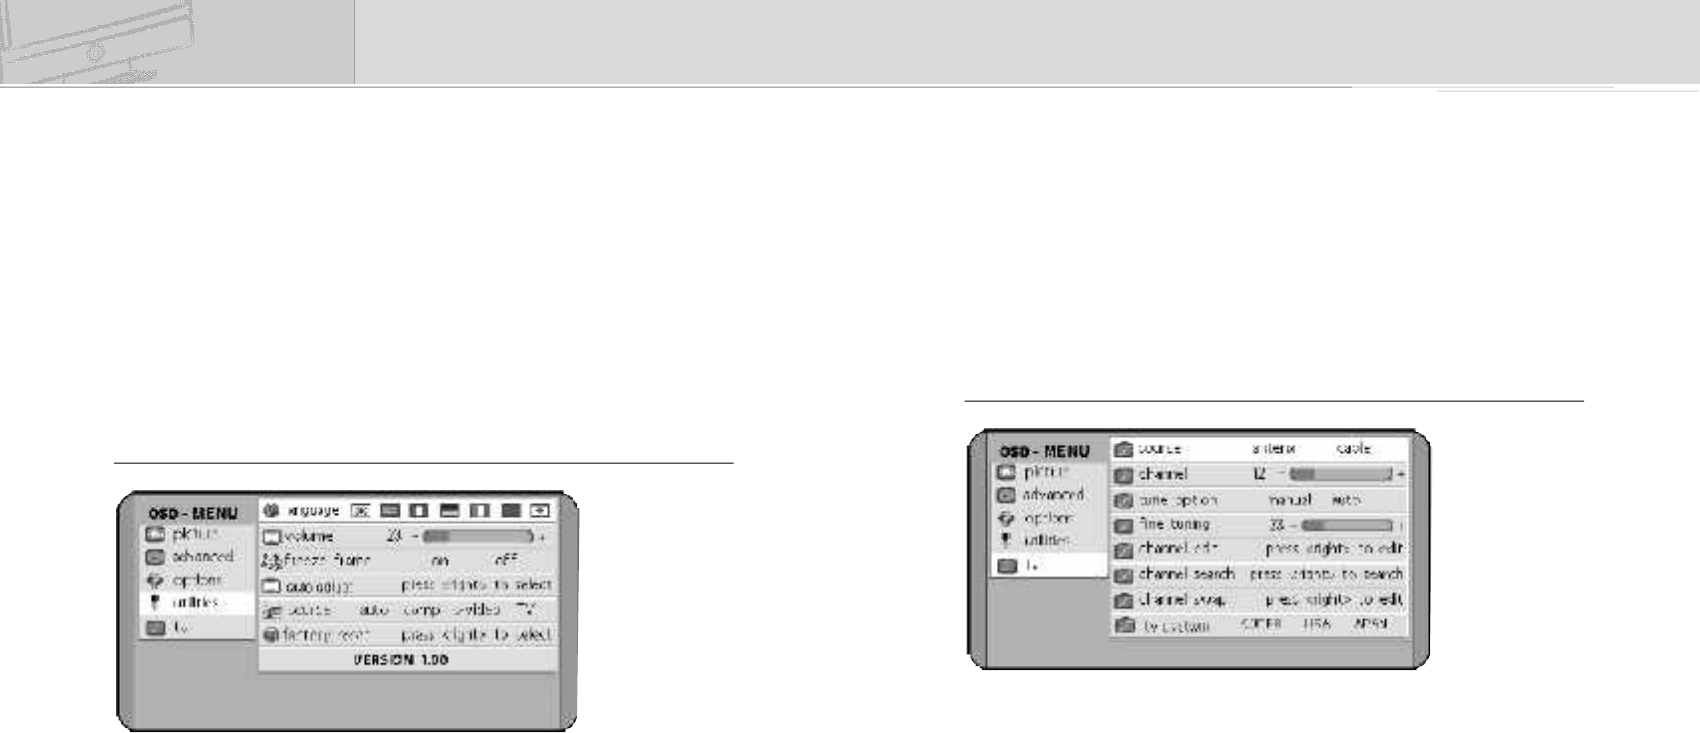
6) Factory reset
This allows you to reset all the OSD control settings back to the factory
settings.
For this, either press the VOL button of remote control or turn the OSD
power button to the right.
■
T V
1) Source
It selects a TV broadcasting signal (antenna / cable).
2) Channel
You can move through TV channels by this.
3) Tune option
It selects channel-tuning mode (manual/auto).
4) Fine tuning
When you chose manual tuning mode, fine tuning function works.
5) Channel edit
It adds new entries or deletes stored channels.
You can edit channels either by pressing VOL button on the remote control or
turning POWER button to the right.
.
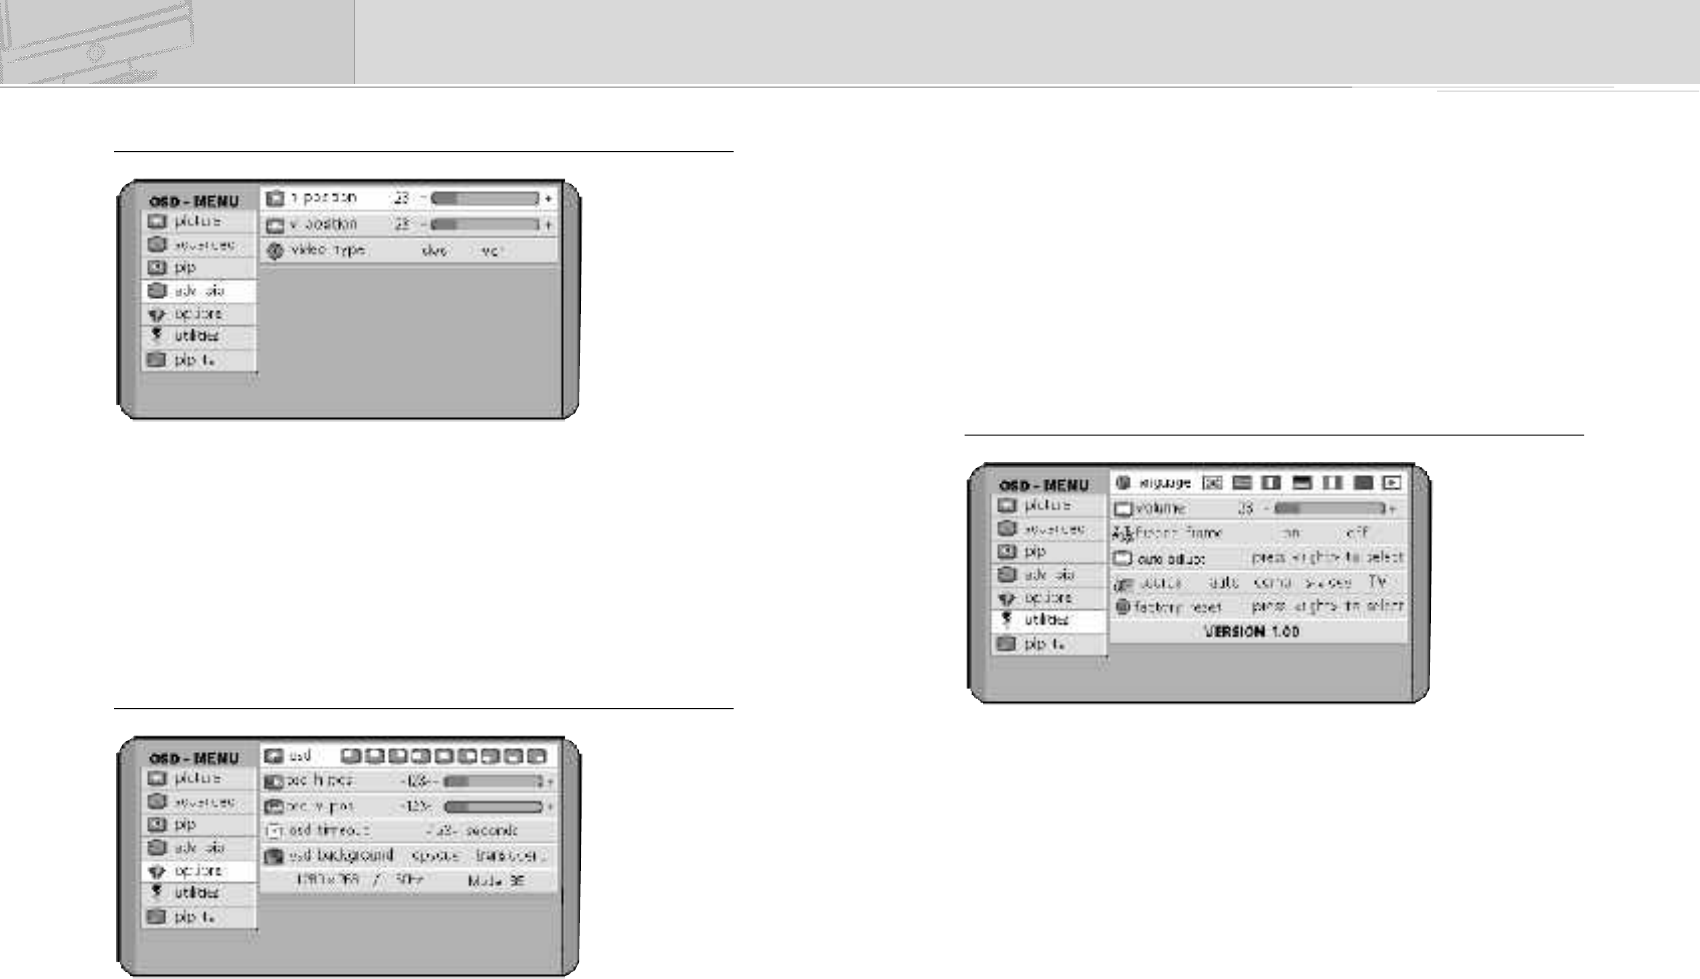
1) osd
It provides nine preset OSD positions.
2) osd h / v pos
It controls OSD position.
3) osd timeout
User can select the time up to 60 seconds.
4) osd background
It controls the color of OSD background.
Opaque (gray), translucent (transparent)
■
Utilities
1) Language
User can select OSD language.
2) Volume
This controls audio volume.
3) Freeze frame
This pauses the image.
4) Auto adjust
This adjusts the screen automatically to the best condition.
You can do this by pressing the VOL button of remote control or by turning
the OSD power button to the right.
22 23
DCM-17WT
PC Monitor Menu
■
Picture
1) Brightness
It controls the LCD brightness.
2) Contrast
It controls the LCD contrast.
3) h position
It controls horizontal image position.
4) v position
It controls vertical image position.
5) phase
It adjusts the focus, clarity and stability of image.
6) clock
It adjusts the horizontal size of display.
7) Scaling
Fill all : Image displayed in full screen regardless the resolution.
Fill aspect ratio : Image displayed in full screen horizontally or vertically.
One to one : Image displayed in original size as received from input.
6) Channel search
This searches and stores channels as remote control (SCAN button function).
To search for channels, either press the < VOL > button on the right side of
the remote control or turn the rotary button to the right.
To stop channel search, press the < MENU > button on the remote control or
on the function button.
✽ 2
Channels 2~69 are for “off-air”(antenna) and channels 1 and 14~69 are
for cable channels.
Channels 14~69 are for both antenna and cable channels. To select one of
them, use source menu of TV menu.
7) Channel swap
It changes stored channel numbers at will.
You can do this by either pressing the < VOL > button on the right side of
the remote control or by turning the rotary button of function button to the
right.
After the Channel Swap window appears on the screen, you can change the
current channel number to a new one you want. You can select new channel
numbers to store by pressing the right < VOL > button on the remote
control. You can restore former state by pressing the left < VOL > button.
8)TV system
It selects TV broadcasting system of the area. KOREA / USA / JAPAN
24 25
DCM-17WT
✽
PIP mode is available only in PC monitor mode.
1) Size
It selects the PIP size.
2) Pos
It selects the PIP position.
3) SOURCE
It selects the source of video signal.
(1) Auto: It searches and selects automatically the signal currently being
inserted among Composite, S-video and TV signals. The priority is
given in the following order: TV, Composite, S-Video.
(2) Comp, S-video, TV : It selects manually Composite, S-Video and TV
signals. If the signal manually selected is feeble or
does not exist, PIP screen cannot be displayed
normally.
✽
Only when the PIP mode is “ON”, you can adjust brightness , contrast ,
color, tint and sharpness.
4) Brightness (of PIP screen)
5) Contrast (of PIP screen)
6) Color (of PIP scre
7) Tint (of PIP screen)
8) Sharpness (PIP screen)
✽
The conditions of PIP screen such as brightness, contrast, color, and clarity
may be somewhat inferior to those of normal screen.
✽
Use PIP TV menu if you need to control TV menu when monitor mode is
PIP TV.
■
Advanced
1) Sharpness
It adjusts the clarity and the focus of screen image.
SHARP 1 -> 2 -> 3 -> 4 -> 5 SOFT
2) Gamma
Linear : It shows gamma pattern of LCD monitor type.
CRT : It shows gamma pattern of CRT monitor type.
3) color temp
It provides three preset color adjustments.
Warm 5000-> 7300-> 9300 Cool
USER : User can adjust each of R,G,B.
■
PIP(Picture in Picture)
26 27
DCM-17WT
2) osd h / v pos
This controls the position of OSD.
3) osd timeout
You can select the time up to 60 seconds.
4) osd background
This controls the color of OSD background.
5) Opaque, translucent
This provides the current PC signal resolution and vertical frequency.
■
Utilities
1) Language
It selects language of OSD menu.
2) Volume
It controls the volume of audio.
3) Freeze frame
It pauses the image by selecting “ON”.
4) Auto adjust
It adjust the screen to the best condition automatically.
For this, press the VOL button of remote control or turn the power button of
OSD to the right.
■
Adv PIP
✽
You can control adv pip menu only when the PIP mode is “ON”.
1) H Position
It controls the horizontal PIP screen position.
2) V Position
It controls the vertical PIP screen position.
3) Video type
It adjusts PIP video input signal type.
■
Options
1) osd
This provides nine preset OSD positions.
28 29
DCM-17WT
4) Fine tuning
Please change to manually to mathch the OSD description.
5) Volume
Control volume of TV signal.
✽
Some points to keep in mind when using Menu
✽
You must check if all menus are adjusted properly before use.
■
Some point to keep in mind when using Menu
You must check if all menus are adjusted properly before use.
1. TV Mode
You should verify :
1) The TV Source (Antenna / Cable).
2) That the TV area (TV system) is set as USA, KOREA or JAPAN.
3) That TV channels are stored normally.
4) That the image signal input is set as TV.
5) Whether the Mute function is set or not.
2. PC Monitor mode
You should verify:
1) Resolution (1280*768 is the best setting).
2) Vertical frequency (60 Hz is the best).
3) That the image signal input is set as PC.
<Note>
✽
If your PC does not support resolution 1280*768, please use it after
upgrading the PC graphic card to the newest driver. If your graphic card
cannot support resolution 1280*768 60Hz, please use your PC in the
resolution 1024*768 or 1280*1024.
5) Source
You can select a source in the following order:
PC -> TV -> Composite -> S-video
6) Factory reset
This allows you to reset all the OSD control settings back to the factory
settings.
For this adjustment, press the VOL button of the right side of remote control
or turn the OSD power button to the right.
■
PIP TV
1) Source
It selects a TV broadcasting signals (antenna / cable).
2) Channel
It allows you to change TV channels.
✽
Channels between 2 and 69 are for “off-air”(antenna) and channel 1 as
well as those between 14~69 are for cable channels.
Channels between 14 and 69 are for both antenna and cable. To select one
of them, use the source menu of TV menu.
3) Tune option
It selects a channel search mode (manual/auto).
30 31
DCM-17WT
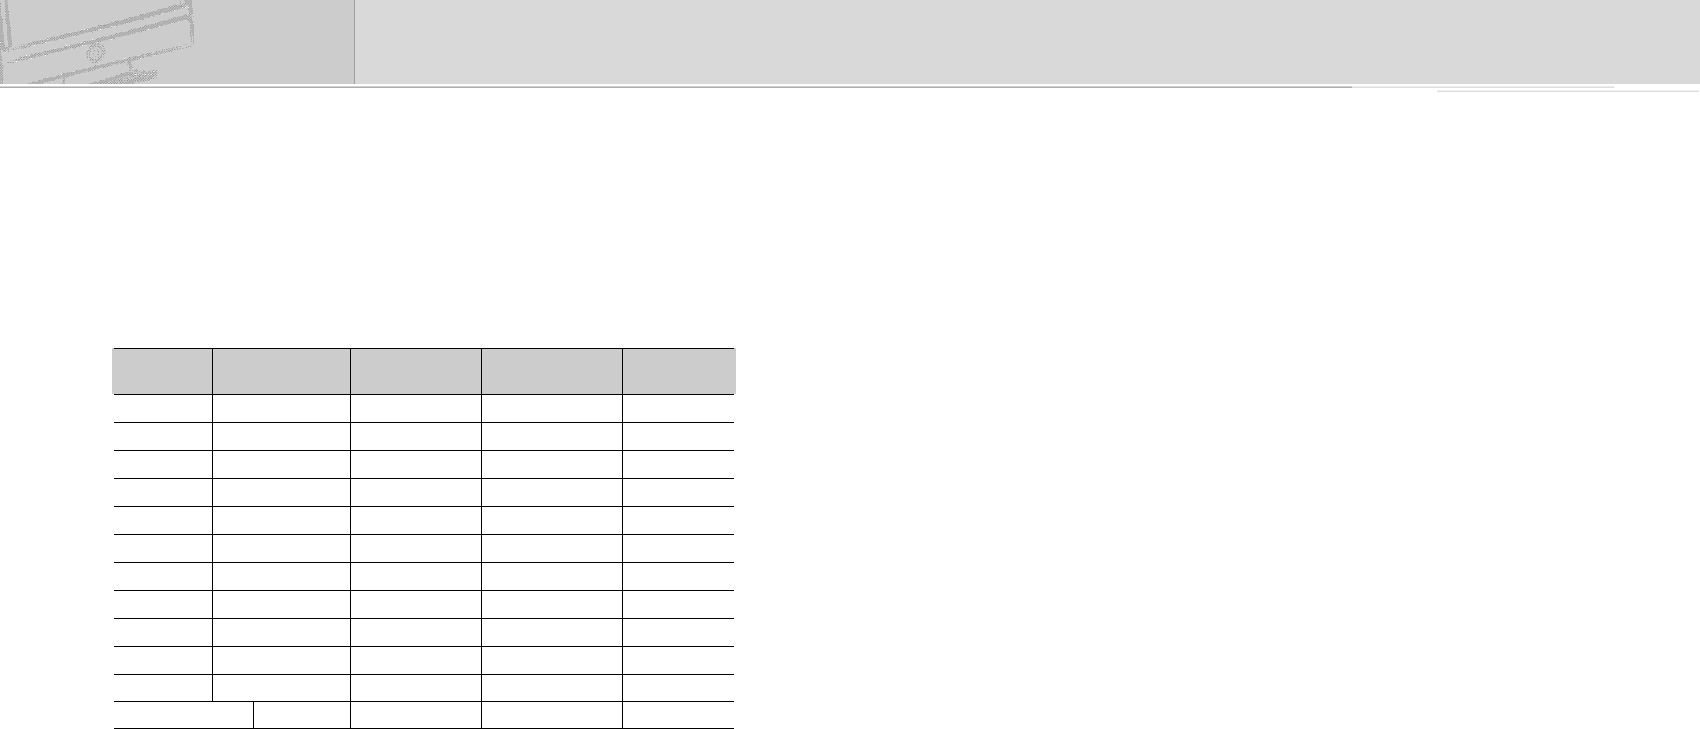
Specification
1.Specification
Design and all specifications are subject to change without notice.
Product Name 17”Wide TFT-LCD TV
LCD Type a-Si TFT-LCD
Screen Size 17” Wide (diagonal length)
Pixel Pitch 0.291mm x 0.291mm
Contrast Ratio 400 : 1(Typ.)
Luminance 450 cd/m2
Active Display Area 372.48 mm (H) x 223.49 mm (V)
Viewing Angle L/R:75°/75°, High/Low:50°/ 70°D
Interface LVDS
TV receiving channels VHF:Channels 2~13 UHF:Channels 14~69
Cable : Channels 1, 14~125
TV broadcasting system
NTSC-M mode
Audio Output MAX 5W x 2 / Stereo
PC Monitor Horizontal Frequency 30 ~ 61 kHz
Vertical Frequency 56~ 85 Hz
Colors 16.2M colors (6bit + FRC 2bit)
Maximum Resolution WXGA : 1280(H) x 768(V)
Other Resolution XGA, SVGA, VGA
Power Supply Adapter Input AC 100V~240V, 50~60Hz
Output DC 12V
Power Consumption Maximum < 40W
Power Saving/OFF < 5W
Power Saving Mode VESA DPMS
✽
The present home appliance is certified and approved by EMC/EMI and can
be used in all places including residency area.
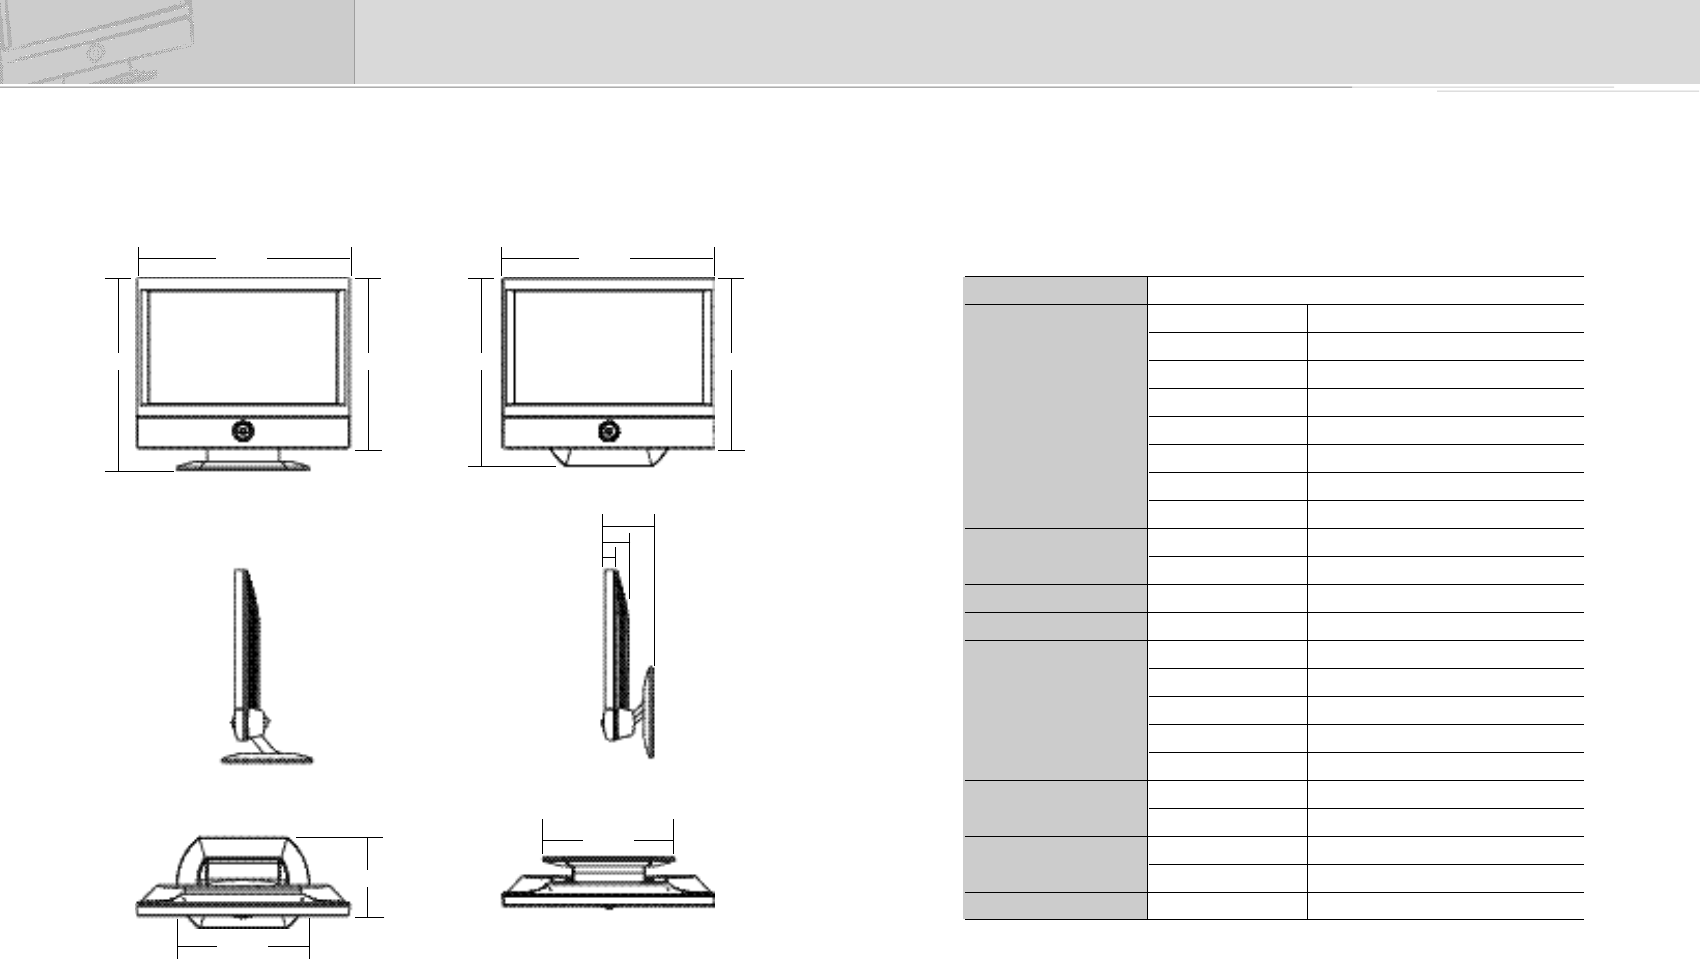
SIZE
✽
Weight : around 5.8kg (Net) / around 7.8kg (Gross)
✽
The present unit can bend backward up to 15 degrees (Tilt Angel)
32 33
DCM-17WT
<With stand> <With the stand folded>
422mm
382mm 338mm
422mm
262mm
262mm
180mm
373mm 338mm
47mm
24mm
96mm
Troubleshooting
If the TV seems to have a problem, follow the list of possible problems and
solutions presented below. If none of these troubleshooting tips applies, call
your nearest service center.
1. TV Troubleshooting
•
Poor picture or sound quality
─
Check all wire connections & adjust the antenna.
─
In the areas of poor TV reception conditions or of long distance from TV
stations, you can have quality problems in the image and sound received.
•
No picture or sound
─
Make sure that the TV is plugged in and check the antenna connections.
─
Check its input source such as PC, TV, Composite, S-Video.
•
Screen with lines or unstable image
─
Check if there is an appliance in use disturbing electric
waves.(radiophone, hair drier, electric drill, etc.)
─
Do fine tuning by manual adjustment.
•
Unable to receive certain channels
─
Check if the channel is set correctly.
─
Redirect the antenna by moving it right and left.
•
Picture without sound
─
Press MUTE button
─
Control the volume
2. PC Monitor Troubleshooting
•
No image on the screen
─
The VGA cable should be connected completely to the TV and computer.
─
The display card should be inserted fully in its slot.
─
Power switch of both PC and TV should be turned on.
─
Make sure that a supported mode has been selected on the display card
or system in use.
─
Modify the graphic card mode properly referring to the table of standard
signal modes presented in the previous page.
─
Check if VGA cable pin is not bent or took off.
2.The Standard Signal Mode for PC Monitor
If the signal from the system corresponds to the standard signal mode, the
screen is adjusted automatically. However, if the signal discords with it, the
screen may go blank with the power LED on or display <Out of Range> error
message.
Refer to the display card manual and adjust the screen as follows.
Resolution Horizontal Vertical Clock Sync Polarity
(H x V) Frequency(KHz) Frequency(Hz) Frequency(MHz) (H/V)
640 x 480 3 1 . 4 6 9 5 9 . 9 4 2 5 . 1 7 5 - / -
640 x 480 3 5 6 6 . 6 6 3 0 . 2 4 - / -
640 x 480 3 7 . 8 6 1 7 2 . 8 0 9 3 1 . 5 - / -
640 x 480 3 7 . 5 7 5 3 1 . 5 - / -
720 x 400 3 1 . 4 6 9 7 0 . 0 8 7 2 8 . 3 2 2 - / +
800 x 600 3 7 . 8 7 9 6 0 . 3 1 7 4 0 + / +
800 x 600 4 8 . 0 7 7 7 2 . 1 8 8 5 0 + / +
800 x 600 4 6 . 8 7 5 7 5 4 9 . 5 + / +
1024 x 768 4 8 . 3 6 3 6 0 . 0 0 4 6 5 - / -
1024 x 768 5 6 . 4 7 6 7 0 . 0 6 9 7 5 - / -
1024 x 768 6 0 . 0 2 3 7 5 . 0 2 9 7 8 . 7 5 + / +
1280 x 768(the best) 4 7 . 7 1 2 6 0 . 0 1 5 8 0 . 1 3 6 - / +
✽
The table of standard signal modes presented above shows only primary mode
suitable for each resolution level concerned. In most of the cases, the
resolution degrees up to WXGA (1280*768), whether they are included in the
table or not, are adjusted automatically to their best suitable signal mode
without additional adjustment by PC graphic card. If the resolution is not
adjusted automatically, please set graphic card’s output mode to signal mode.
✽
If your PC graphic card does not support resolution 1280*768, please reinstall
it by downloading the newest driver from graphic card manufacturer and
setting it to resolution 1280*768, vertical frequency 60Hz, color 16 or 24 bites.
✽
The present unit has Plug and Play function. The computer perceives the
monitors as “Basic Monitor”, “Plug and Play Monitor” or “LCD Monitor”.
34 35
DCM-17WT

Concerning services
For the product’s functional trouble occurred in use, client can benefit from the
warranty during one year from the date of purchase. However, all services for
the troubles caused by client’s erroneous use or by natural calamity will be
charged even during the term of warranty validity.
Situations of charged services (client’s responsibility to pay)
All services will be charged even during the term of warranty validity if
requested in the situations as below
1. The product went out of order because you had put foreign objects (water,
liquor, coffee, etc.).
2. The product is damaged or out of order because you dropped it or the unit
was exposed to a shock.
3. The product’s external cover is harmed or degraded by organic substances
such as thinner or benzene.
4. Some accessories are lost or damaged due to the client’s voluntary
disassembly of the product.
5. The product fell out of order due to the accessories used other than those
supplied by manufacturer. (adapter, etc.)
6. The product fell into trouble due to the wrong voltage applied.
7. The product fell out of order after being serviced by someone other than our
client service staff.
8. Natural calamity (thunderbolt, fire, storm, flood, gas, sea wind, earthquake,
etc.) caused trouble to the product.
9. User did not respect the present instructions manual and caused trouble to
the product.
10. The product has trouble due to client’s other faults.
11. If the purchase date cannot be recognized, we count the quality guarantee
term from the first day of the third month after the date of manufacture.
•
Unable to turn on the equipment
─
Check if the AC cord is plugged in correctly and retry to turn on the unit.
─
Plug the monitor AC cord off the power socket. Connect the AC cord
again in 10~20 minutes.
•
LED on TV is red flickering without image
─
Check if the VGA cable is connected to the TV and computer correctly.
─
Check if the computer is in power-saving mode by touching the keyboard
or mouse.
•
Image is unstable and out of focus
─
Check if the VGA cable is connected to the computer correctly.
─
You need to readjust the image when computer display mode changes.
Please readjust the image by using Auto setting or adjustment menu.
─
Check if the monitor and graphic card are compatible and if they are set
at the proper refresh rate. If the characters appear distorted, please
reset the refresh rate to 60Hz.
•
Image size is strange
─
Please reset the image size using vertical and horizontal positions funtion
of screen adjustment menu.
─
Please try Auto Adjust function.
36 37
DCM-17WT
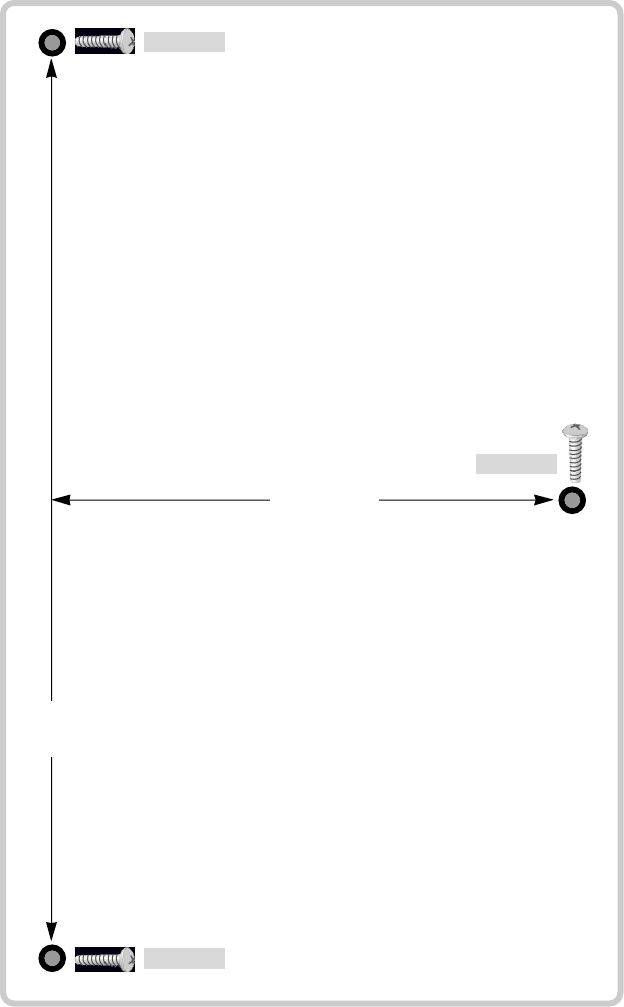
162 mm
92 mm
The places of nails to install the unit on the wall
The head size of nail or screw : 3.7mm ~ 4.5mm
The thickness of nail or screw : less than 2.6mm
Fixing hole
Fixing hole
Fixing hole