Asus Zenfone Live L1 Manual
2018-07-18
: Asus-Zenfone-Live-L1-Manual asus-zenfone-live-l1-manual 4035 manuals phones
Open the PDF directly: View PDF ![]() .
.
Page Count: 86
ZA550KL
User Guide
ZENFONE 5
ZENFONE 5

2
Care and safety
Guidelines
Road safety comes rst. We strongly recommend not to use your device when
driving or operating any type of vehicle.
This device should only be used in environments with ambient temperatures
between 0°C (32°F) and 35°C (95°F).
Turn o your device in restricted areas where the use of mobile devices is prohibited.
Always obey rules and regulations when in restricted areas, such as, in aircraft, movie
theater, in hospitals or near medical equipment, near gas or fuel, construction sites,
blasting sites and other areas.
Use only AC adapters and cables approved by ASUS for use with this device. Refer to
the rating label on the bottom of your device and ensure that your power adapter
complies with this rating.
Do not use damaged power cables, accessories, and other peripherals with your
device.
Keep your device dry. Do not use or expose your device near liquids, rain, or
moisture.
You can put your device through x-ray machines (such as those used in conveyor
belts for airport security), but do not expose the device to magnetic detectors and
wands.
The device screen is made of glass. If the glass gets broken, stop using the device
and do not touch the broken glass parts. Immediately send device for repair to
ASUS-qualied service personnel.
Do not listen at high volume levels for long periods to prevent possible hearing
damage.
Disconnect the AC power before cleaning your device. Use only a clean cellulose
sponge or chamois cloth when cleaning your device screen.
Send device for repair to ASUS-qualied service personnel only.
E13969
May 2018
First Edition
3
Proper disposal
Risk of explosion if battery is replaced by an incorrect type. Dispose of used batteries
according to the instructions.
DO NOT throw the battery in municipal waste. The symbol of the crossed out
wheeled bin indicates that the battery should not be placed in municipal waste.
DO NOT throw this product in municipal waste. This product has been designed to
enable proper reuse of parts and recycling. The symbol of the crossed out wheeled
bin indicates that the product (electrical, electronic equipment and mercury-
containing button cell battery) should not be placed in municipal waste. Check local
regulations for disposal of electronic products.
DO NOT throw this product in re. DO NOT short circuit the contacts. DO NOT
disassemble this product.
ZenTalk Fans Forum
(http://www.asus.com/zentalk/global_forward.php)
WARNING
Cancer and Reproductive Harm-
www.P65Warnings.ca.gov
NOTE: The app descriptions shown in this manual are for reference purposes only, and may not
exactly match what you see on your device.
NOTE: For more legal and e-labelling information, check on your device from Settings > System >
About phone > Legal information / Regulatory labels.
4
1 Basics
Welcome! .................................................................................................................................................. 7
Get your ASUS Phone ready! ............................................................................................................. 8
Starting for the rst time ..................................................................................................................14
Using the touchscreen.......................................................................................................................15
2 There’s no place like Home
Zen Home features .....................................................................................................18
Home screen .........................................................................................................................................18
Quick settings .......................................................................................................................................19
Notications ..........................................................................................................................................20
Personalizing your Home screen ............................................................................... 21
Widgets .................................................................................................................... 21
Wallpapers .............................................................................................................................................22
Easy Mode ..............................................................................................................................................23
Kids Mode ..............................................................................................................................................26
Setting up the date and time ..........................................................................................................28
Setting up your ringtone and alert sounds................................................................................28
Lock Screen .................................................................................................................29
Customizing your lock screen ......................................................................................................... 29
Face Unlock .................................................................................................................30
Setting up face unlock from Settings ........................................................................................... 30
3 Work hard, play harder
Chrome ........................................................................................................................33
Launching Chrome .............................................................................................................................33
Sharing pages .......................................................................................................................................34
Bookmarking pages ...........................................................................................................................34
Clearing the browsing data .............................................................................................................34
Gmail ............................................................................................................................35
Google Calendar .........................................................................................................36
Creating events ....................................................................................................................................36
Editing or removing events .............................................................................................................36
Creating reminders .............................................................................................................................37
Editing or removing reminders ......................................................................................................37
File Manager................................................................................................................38
The Cloud.....................................................................................................................39
ASUS WebStorage ...............................................................................................................................39
ZenUI FAQs ..................................................................................................................40
4 Keeping in touch
Call in style ..................................................................................................................41
Dual SIM feature...................................................................................................................................41
Making calls ...........................................................................................................................................43
Contents
5
Receiving calls ......................................................................................................................................45
Other call options ................................................................................................................................ 46
Managing multiple calls ....................................................................................................................47
Recording calls .....................................................................................................................................47
Managing contacts .....................................................................................................48
Contacts Settings ................................................................................................................................48
Setting up your prole ......................................................................................................................48
Adding contacts ................................................................................................................................... 49
Marking your favorite contacts ......................................................................................................50
Social networking with your contacts .........................................................................................51
Send messages and more ..........................................................................................52
Google Messenger ..............................................................................................................................52
5 Fun and entertainment
Using a headset ...........................................................................................................53
Connecting the audio jack ...............................................................................................................53
Google Play Music ......................................................................................................54
6 Your precious moments
Capture moments .......................................................................................................55
Launching the Camera app .............................................................................................................55
Advanced camera features ..............................................................................................................57
Using the Gallery ........................................................................................................59
Viewing the photo location .............................................................................................................59
Sharing les from the Gallery ..........................................................................................................59
Deleting les from the Gallery ........................................................................................................ 59
Editing images ...................................................................................................................................... 60
7 Staying connected
Mobile network ...........................................................................................................61
Enabling the mobile network .........................................................................................................61
Wi-Fi .............................................................................................................................61
Enabling Wi-Fi .......................................................................................................................................61
Connecting to a Wi-Fi network .......................................................................................................62
Disabling Wi-Fi ...................................................................................................................................... 62
Bluetooth® ......................................................................................................................................................................................................... 62
Enabling Bluetooth® ........................................................................................................................... 62
Pairing your ASUS Phone to a Bluetooth® device ....................................................................63
Unpairing your ASUS Phone from the Bluetooth® device ....................................................63
Tethering .....................................................................................................................64
Wi-Fi
Hotspot .........................................................................................................................................64
Bluetooth Tethering ............................................................................................................................65
8 Travel and Maps
Weather .......................................................................................................................66
Launching the Weather app ............................................................................................................66
Weather home screen ........................................................................................................................ 67
6
Clock ............................................................................................................................68
Alarm clock ............................................................................................................................................68
World clock ............................................................................................................................................69
Stopwatch ..............................................................................................................................................69
Timer ........................................................................................................................................................70
9 Zen Everywhere
Special Zen Tools .........................................................................................................71
Calculator ...............................................................................................................................................71
Sound Recorder ...................................................................................................................................72
Mobile Manager ...................................................................................................................................74
PowerMaster .........................................................................................................................................75
10 Maintain your Zen
Keeping your device up-to-date ................................................................................76
Updating your system .......................................................................................................................76
Storage ....................................................................................................................................................76
Backup and reset .................................................................................................................................76
Reset ......................................................................................................................................................... 76
Securing your ASUS Phone ..............................................................................................................77
Appendix
Safety information ......................................................................................................80
Notices .........................................................................................................................82
Index
7
Chapter 1: Basics
Basics 1
1 Basics
Welcome!
Explore the intuitive simplicity of ASUS ZenUI!
ASUS ZenUI is a charming and intuitive interface exclusively for ASUS Phones. It provides you with
special apps, which are integrated in or with other apps, to t your unique individual needs and
make your life easier while letting you have fun with your ASUS Phone.
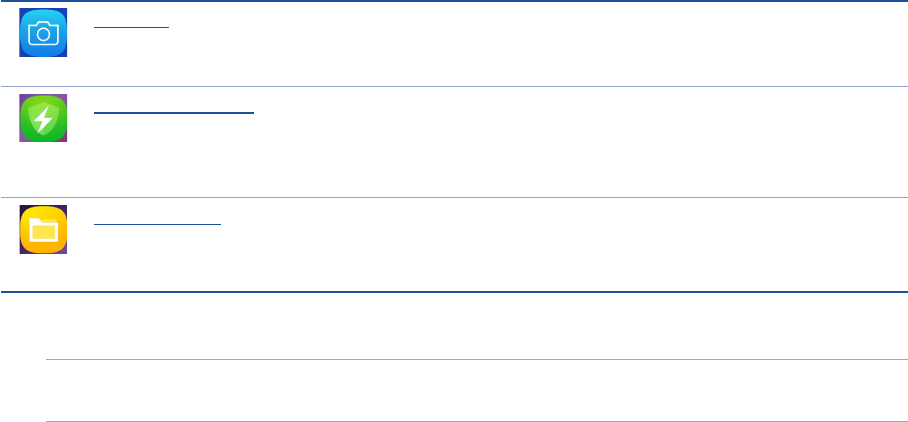
Camera
With PixelMaster technology, capture those precious moments in vivid and high-quality
photos and videos.
Mobile Manager
Mobile Manager provides an integrated interface for several apps that are designed to
optimize device performance, manage the phone power, storage usage and system
notications.
File Manager
File Manager allows you to easily locate and manage your data on the internal storage
of your ASUS Phone and its connected external storage devices.
NOTE: Availability of ASUS ZenUI apps vary per region and ASUS Phone model. Swipe up from the
lower part of your Home screen to check the apps available on your ASUS Phone.
8
Chapter 1: Basics
Get your ASUS Phone ready!
Parts and features
Take a hold of your device and have it running in a jiy.
WARNING!
• Toavoidnetworkconnectionandbatteryissues:
• DONOTplaceametallicstickerontheantennaarea.
• DONOTuseametallicprotectiveframe/caseonyourASUSPhone.
• DONOTcovertheantennaareawithyourhandsorotherobjectswhileusingsomefunctionssuch
as making calls or using the mobile data connection.
• WerecommendthatyouuseASUS-compatiblescreenprotectors.Usingnon-ASUS-compatible
screen protectors may cause your ASUS Phone's sensor to malfunction.
NOTES:
• BothnanoSIMcardslotssupportGSM/GPRS/EDGE,WCDMA/HSPA+/DC-HSPA+,FDD-LTE,andTD-
LTE DSDV network bands. Both nano SIM cards can connect to VoLTE 4G calling service. But only one
can connect to FDD-LTE, and TD-LTE data service at a time.
• ThemicroSDcardslotsupportsmicroSDandmicroSDXCcardformats.
IMPORTANT!
• Wedonotrecommendusingascreenprotectorasitcaninterferewiththeproximitysensor.Ifyou
want to use a screen protector, ensure that it does not block the proximity sensor.
• Keepthedevice,particularlythetouchscreen,dryallthetime.Waterorotherliquidscancausethe
touch screen to malfunction.
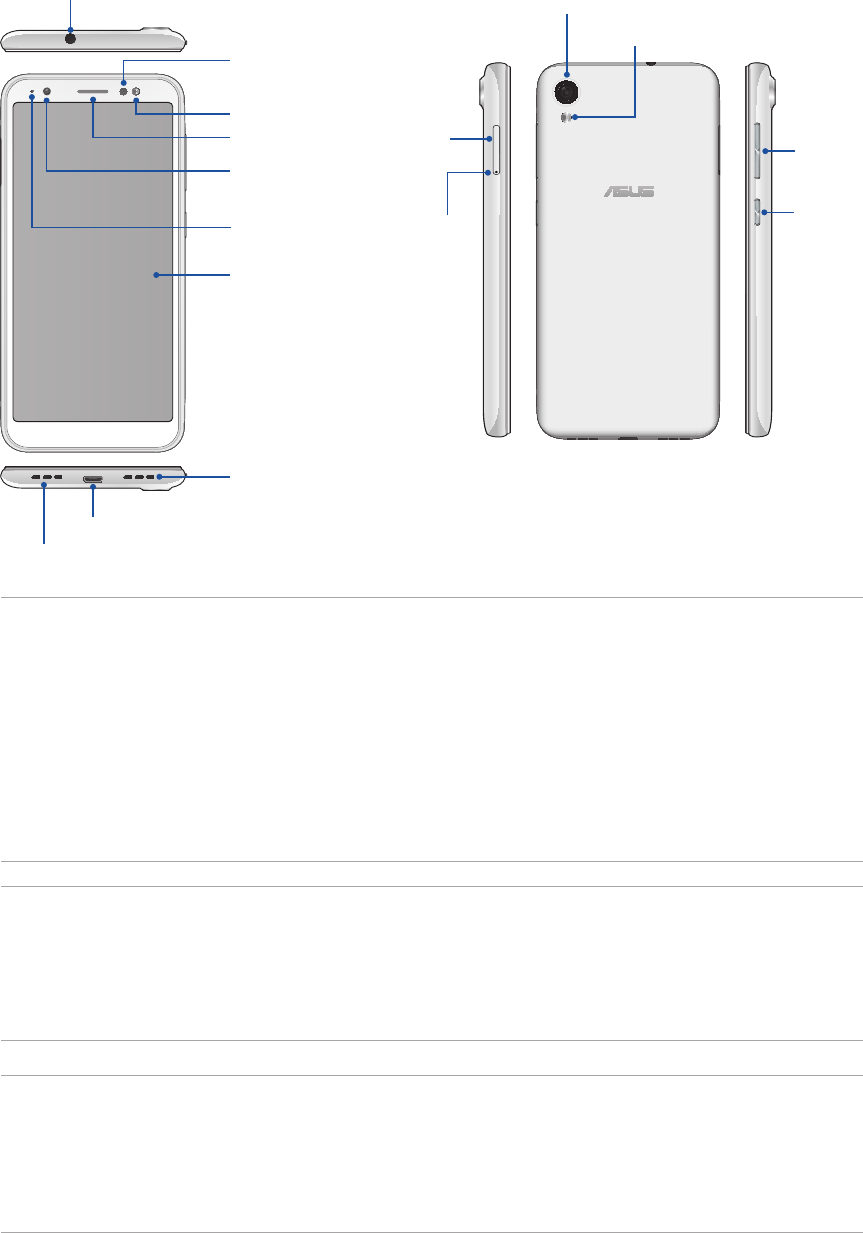
Audio jack
Camera ash
Receiver
Proximity sensor
and light sensor
Touch screen
display
Speaker
Micro USB port
Microphone
Nano SIM /
microSD card
slot
Eject hole
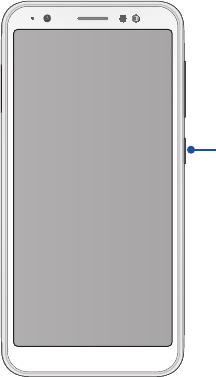
Volume key
Power key
Camera ash
Rear camera
Front camera
LED indicator
9
Chapter 1: Basics
Installing a nano SIM card / memory card
YournanoSIMcardslotssupportGSM/GPRS/EDGE,WCDMA/HSPA+/DC-HSPA+,FDD-LTE,andTD-LTEDSDV
network
bands.
NOTE: To prevent connector damage, ensure to use a standard nano SIM card without a SIM adapter or
the use of a cutter.
Your ASUS Phone supports a microSD,andmicroSDXCmemorycardwithupto2TBcapacity.
NOTES:
• SomememorycardsmaynotbecompatiblewithyourASUSPhone.Ensurethatyouuseonlycompatible
memory cards to prevent loss of data, damage to your device, or memory card, or both.
• ThemicroSDcardissoldseparately.
CAUTION! Be extra careful when handling a
nano SIM card /
memory card. ASUS is not responsible for
any data loss or damage incurred to your
nano SIM cards /
memory card.
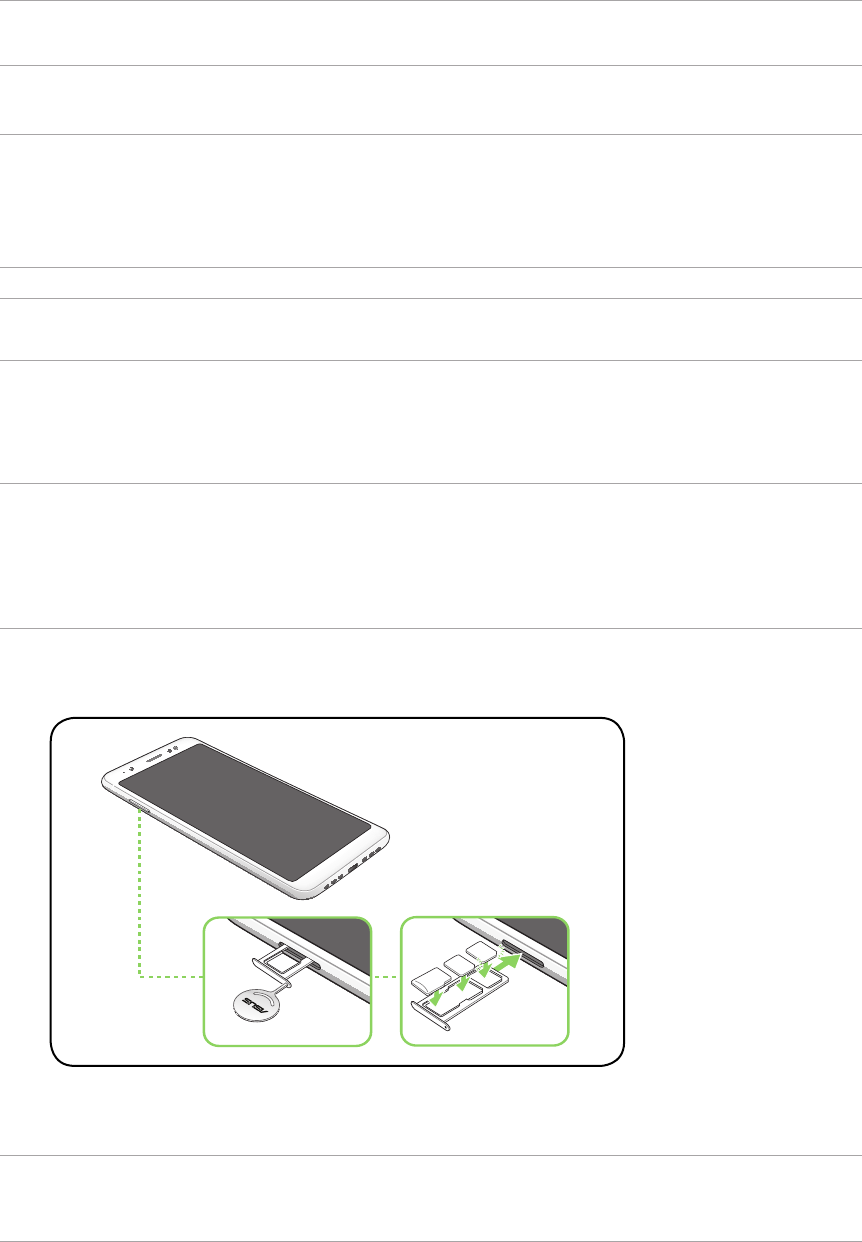
To install a Nano SIM card / memory card:
1. Push the bundled eject pin into the hole on the card slot to eject the tray out.
CAUTION!
• Becarefulnottodamagethecardslotcoverorinjureyourngernailswhenyouremovethecover.
• Donotforciblyremove,shear,ordistortthecard slot cover.
• Donotusesharptoolsorsolventonyourdevicetoavoidscratchesonit.
2. Insert the Nano SIM or microSD card into the appropriate slot.
Nano-SIM1
Nano-SIM2
MicroSD
3. Gently push the tray back in until it’s securely closed.
NOTE:BothnanoSIMcardslotssupportGSM/GPRS/EDGE,WCDMA/HSPA+/DC-HSPA+,FDD-LTE,and
TD-LTE DSDV network bands. Both nano SIM cards can connect to VoLTE 4G calling service. But only one
can connect to FDD-LTE, and TD-LTE data service at a time.
10
Chapter 1: Basics
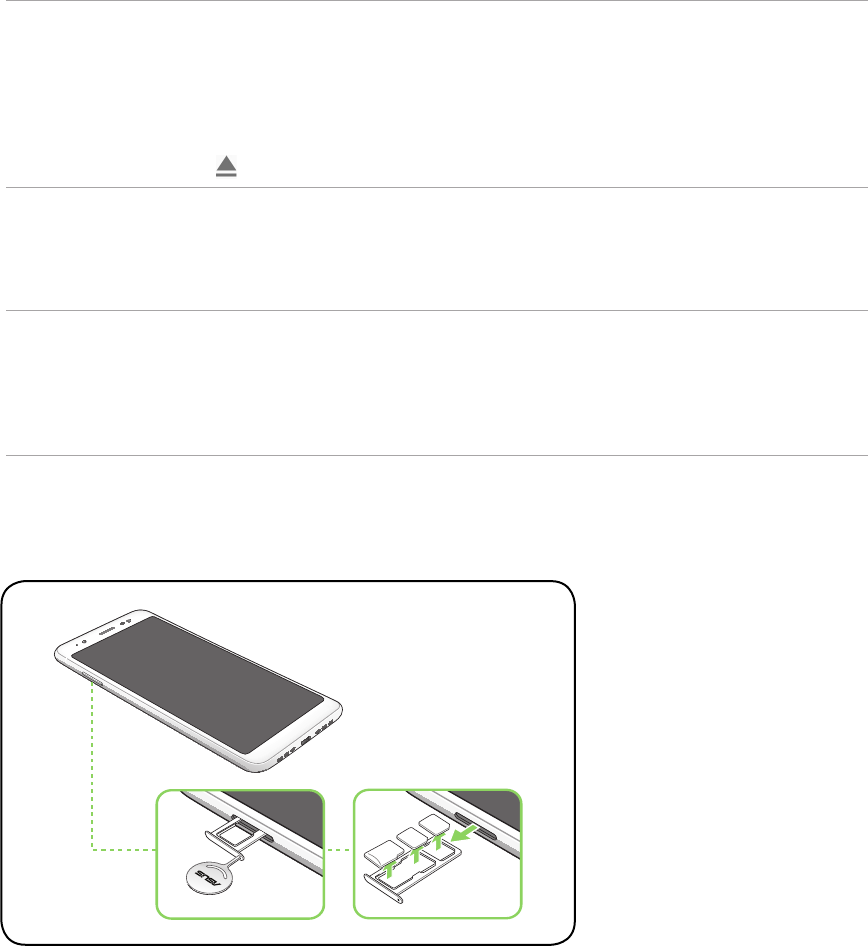
Removing a nano SIM /memory card
CAUTION!
• BeextracarefulwhenhandlingananoSIMcard/memorycard.ASUSisnotresponsibleforanydata
loss or damage incurred to your nano SIM cards / memory card.
• Ejectthememorycardproperlytosafelyremoveitfromdevice.Toejectthememorycard,swipe up
from the lower part of your Home screen and tap Settings > Storage & memory, then under
Portable storage, tap beside SD card.
To remove a nano SIM card / memory card:
1. Push the bundled eject pin into the hole on the card slot to eject the tray out.
CAUTION!
• Becarefulnottodamagethecardslotcoverorinjureyourngernailswhenyouremovethecover.
• Donotforciblyremove,shear,ordistortthecard slot cover.
• Donotusesharptoolsorsolventonyourdevicetoavoidscratchesonit.
2. Remove the nano SIM or MicroSD card from the card slot.
3. Gently push the tray back in until it’s securely closed.
Nano-SIM1
Nano-SIM2
MicroSD
11
Chapter 1: Basics
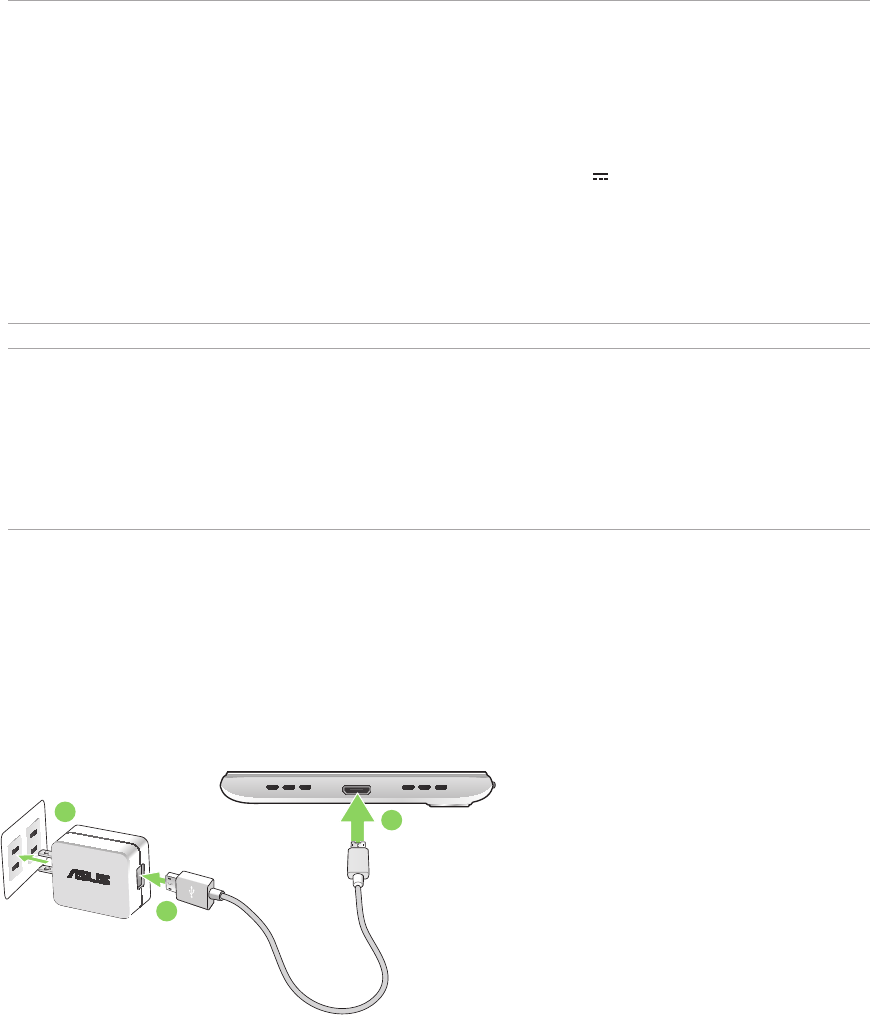
Charging your ASUS Phone
Your ASUS Phone comes partially charged but you must charge it fully before using it for the rst
time. Read the following important notices and cautions before charging your device.
IMPORTANT!
• PeelotheprotectivelmontheACpoweradapterandmicroUSBcablebeforeusingitwithyour
device.
• EnsuretoplugtheACpoweradaptertoacompatiblepoweroutlet.YoucanplugtheACpower
adapter to any compatible 100~240 V outlet.
• TheoutputvoltageoftheACpoweradapterforthisdeviceis+5.2V 1A, 5W.
• WhenusingyourASUSPhonewhileplugged-intoapoweroutlet,thepoweroutletmustbenear
your device and easily accessible.
• Toconserveelectricity,unplugtheACpoweradapterfromthepoweroutletwhennotinuse.
• DonotplaceheavyobjectsontopofyourASUSPhone.
CAUTION!
• Whilecharging,yourASUSPhonecanbecomewarm.Thisisnormal,however,ifyourdevice
becomes unusually hot, disconnect the micro USB cable from your device and send the device,
including the AC power adapter and cable to an ASUS-qualied service personnel.
• TopreventanydamagetoyourASUSPhone,ACadapter,ormicroUSBcable.Ensurethatthemicro
USB cable, AC adapter, and your device are connected properly before charging.
TochargeyourASUSPhone:
1. Connect the micro USB cable to the power adapter.
2. Connect the micro USB cable to your ASUS Phone.
3. Plug the AC power adapter to a grounded power outlet.
3
1
2
12
Chapter 1: Basics
IMPORTANT!
• WhenusingyourASUSPhonewhileitispluggedtoapoweroutlet,thegroundedpoweroutlet
must be near to the unit and easily accessible.
• WhenchargingyourASUSPhonethroughyourcomputer,ensurethatyouplugthemicroUSBcable
to your computer’s USB port.
• AvoidchargingyourASUSPhoneinanenvironmentwithambienttemperatureofabove35oC
(95oF).
• ChargeyourASUSPhoneforeight(8)hoursbeforeusingitinbatterymodeforthersttime.
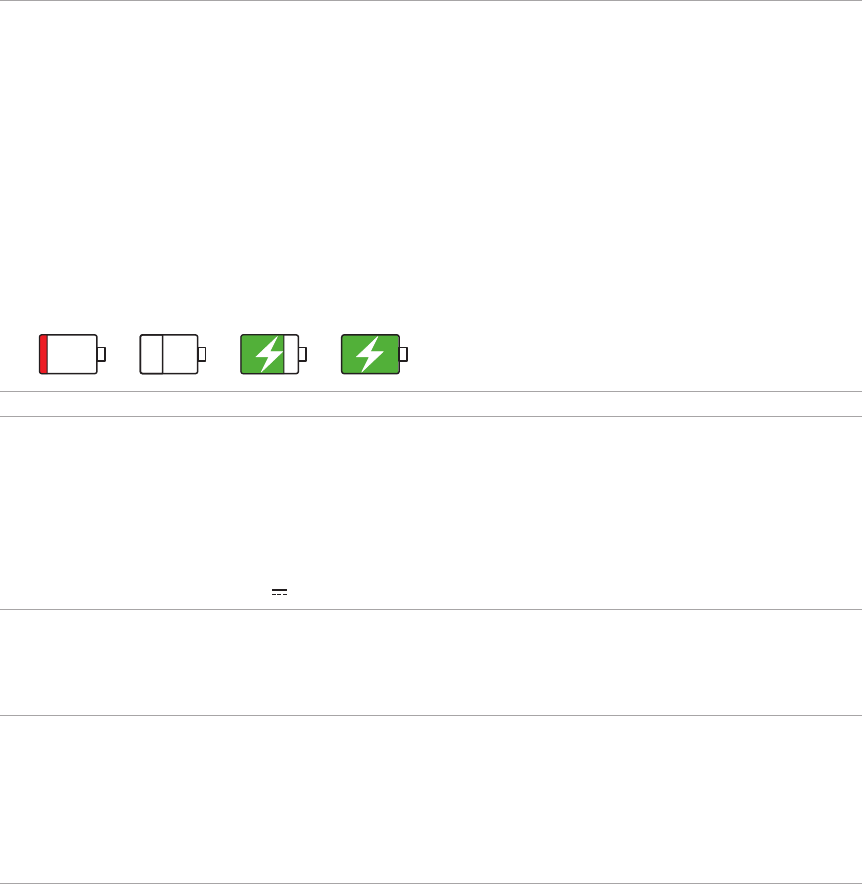
• Thestatusofbatterychargeisindicatedbythefollowingicons:
Low Not Charging Charging Full
NOTES:
• Forsafetypurposes,useONLY the bundled power adapter and cable to avoid damaging your
device and prevent the risk of injury.
• Forsafetypurposes,useONLY the bundled power adapter and cable to charge your ASUS Phone.
• TheinputvoltagerangebetweenthewalloutletandthisadapterisAC100V-240V.Theoutput
voltageofthedeviceis+5.2V 1A, 5W.
4. When fully-charged, disconnect the USB cable from your ASUS Phone rst before unplugging
the AC power adapter from the power outlet.
NOTES:
• Youcanuseyourdevicewhilechargingbutitmaytakelongertofullychargethedevice.
• ChargingyourdeviceviaUSBportofacomputermaytakelongertofullychargethedevice.
• IfyourcomputerdoesnotprovideenoughpowerforchargingviaUSBport,chargeyourASUS
Phone using the AC power adapter plugged to a power outlet instead.
13
Chapter 1: Basics
Turning your ASUS Phone on or o
Turning your device on
To turn your device on, press and hold the power button until your device vibrates and starts up.
Turning your device o
Toturnyourdeviceo:
1. If your screen is turned o, press the power button to turn it on. If your screen is locked, unlock
the device screen.
2. Press and hold the power button, then when prompted, tap Power o then tap OK.
Sleep mode
To put your device in sleep mode, press the power button once until the screen turns o.
Power key
14
Chapter 1: Basics
Starting for the rst time
When you turn your ASUS Phone on for the rst time, Setup Wizard will guide you through the
setup process. Follow the onscreen instructions to select your language, set up your mobile
network, Wi-Fi and security features, and sync accounts.
Use your Google or ASUS account to set up your device, if you do not have a Google or ASUS
account yet, go ahead and create one.
Google Account
UsingaGoogleAccountallowsyoutofullyutilizetheseAndroidOSfeatures:
• Organizeandseeallyourinformationfromanywhere.
• Automaticallybackupallyourdata.
• LeverageGoogleservicesconvenientlyfromanywhere.
ASUS Account
HavinganASUSAccountgetsyoutoenjoythefollowingperks:
• PersonalizedASUSsupportserviceandwarrantyextensionforregisteredproducts.
• Free5GBofCloudstoragespace.
• Receivethelatestdeviceandrmwareupdates.
Battery power conservation tips
The battery charge is the lifeline of your ASUS Phone. Here are some battery power conservation
tips that helps preserve the power of your ASUS Phone battery.
– Close all running apps that are not in use.
– When not in use, press the power button to put the device in sleep mode.
– Decrease brightness of display.
– Keep the speaker volume to a low level.
– Disable Wi-Fi feature.
– Disable Bluetooth feature.
– Disable the screen auto-rotate feature.
– Disable all auto-sync features in your device.
15
Chapter 1: Basics
Using the touchscreen
Use these gestures on the touchscreen to launch apps, access some settings, and navigate your
ASUS Phone.
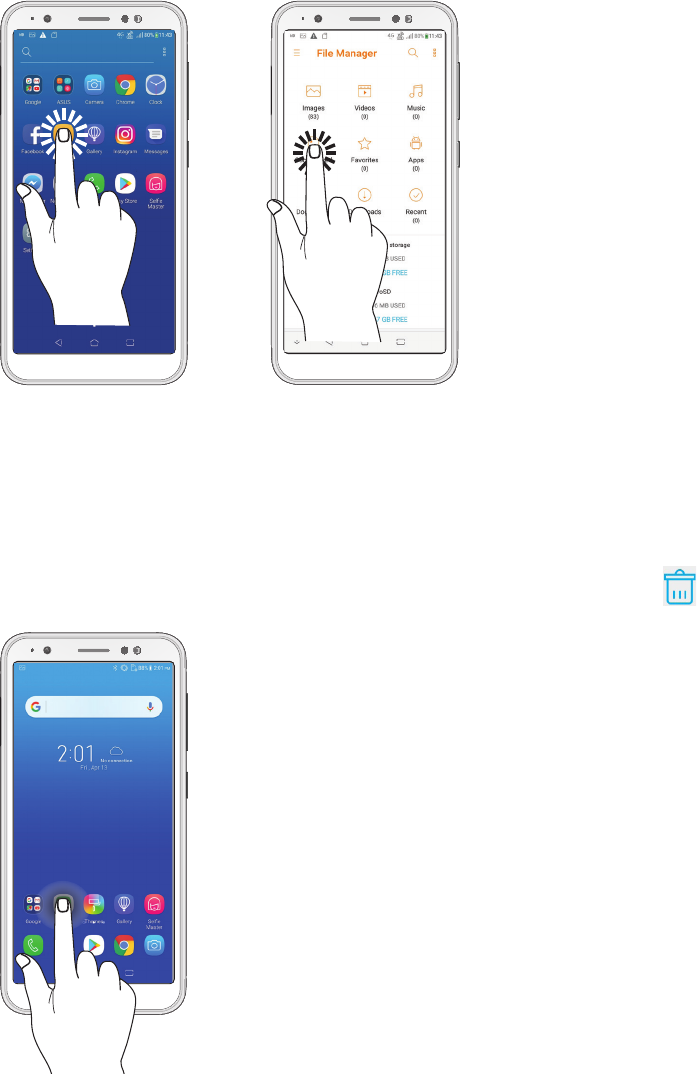
Launching apps or selecting items
Doanyofthefollowing:
• Tolaunchanapp,simplytaponit.
• ToselectanitemsuchasinFileManagerapp,simplytaponit.
Moving or deleting items
Doanyofthefollowing:
• Tomoveanapporwidget,tapandholdthendragittothelocationwhereyouwantittobe.
• TodeleteanapporwidgetfromtheHomescreen,tapandholditthentap .
16
Chapter 1: Basics
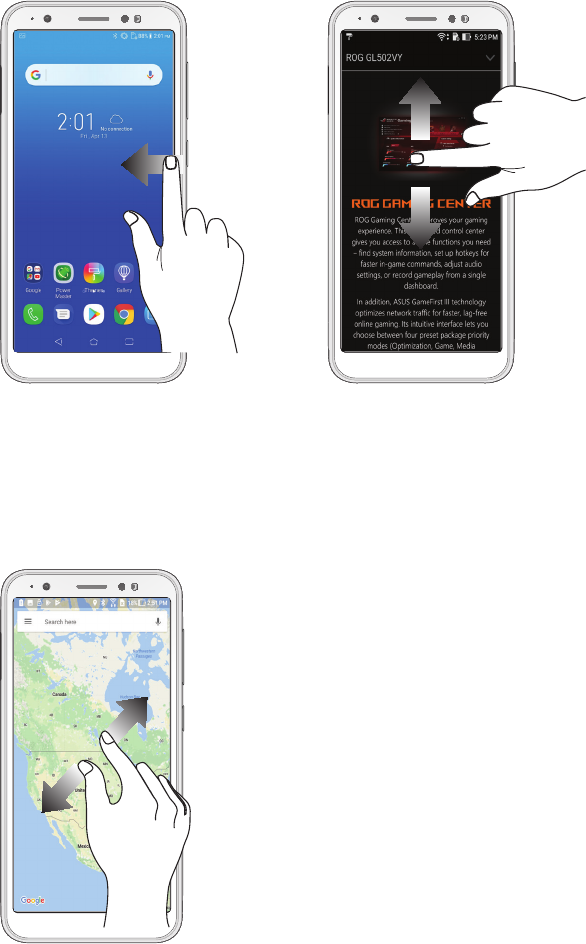
Moving through pages or screens
Doanyofthefollowing:
• SwipeyourngertotheleftortotherighttoswitchbetweenscreensortoopenGoogleSearch
page.
• Scrollyourngerupordowntogothroughwebpagesorlistofitems.
Zooming in
Spread apart your two ngers on the touch panel to zoom in an image in Gallery or Maps, or zoom
in a web page.
17
Chapter 1: Basics
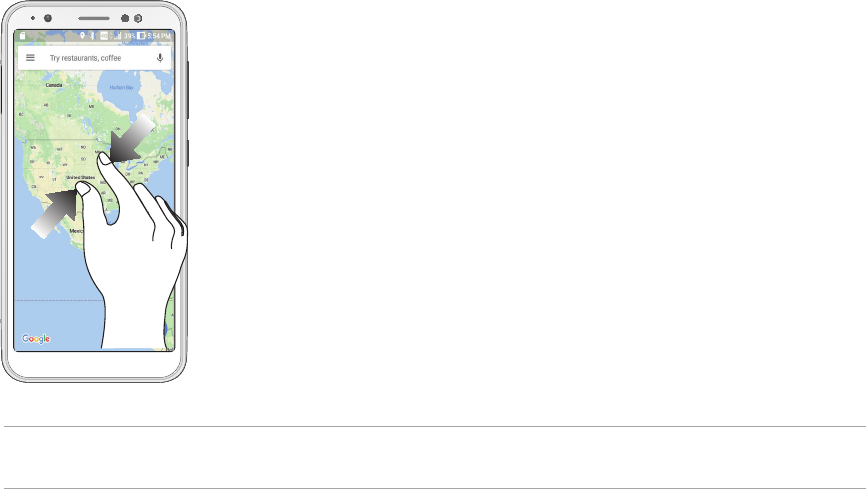
Zooming out
Bring together your two ngers on the touch panel to zoom out an image in Gallery or Maps, or
zoom out of a web page.
NOTE: You may not be able to zoom in/out of some web pages as these pages may have been
designed specically to t your mobile screen.
18
Chapter 2: There’s no place like Home
There’s no place like Home 2
2 There’s no place like Home
Zen Home features
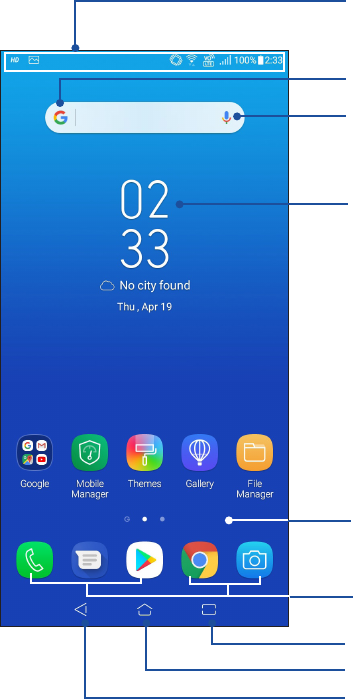
Home screen
Get reminders of important events, app and system updates, weather forecasts, and text messages
from people who really matter to you, right from your Home screen.
Swipe down this area once to display System notications
Swipe down this area twice to display Quick settings
Tap to display Time and Weather settings
Swipe up to open the All Apps screen
Tap to open an app
Tap to open Google Search page
Tap to open Voice Search
Tap to display recent apps
Tap to go back
Tap to go to Home screen
19
Chapter 2: There’s no place like Home
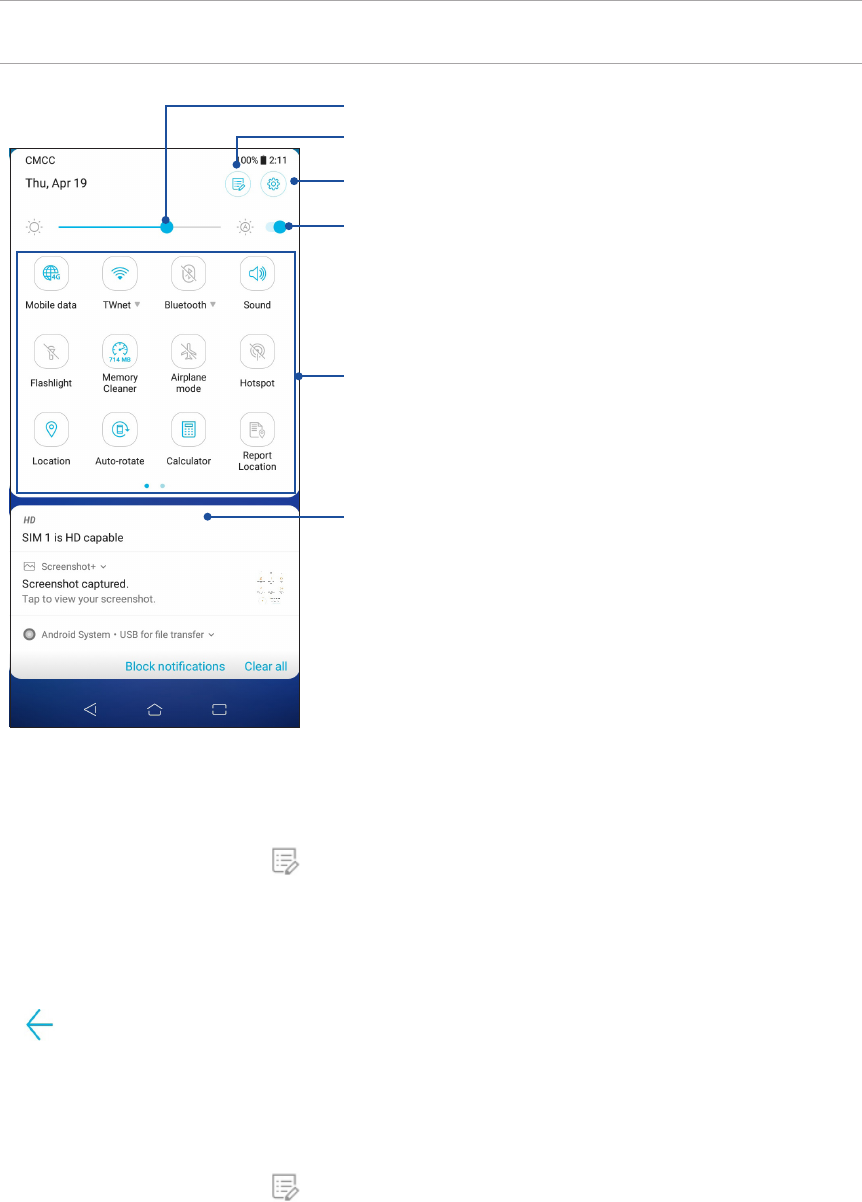
Quick settings
The Quick settings panel provides a one-tap access to some of the wireless features and settings of
your ASUS Phone. Each of these features are represented by an icon.
To launch the Quick settings panel, swipe down twice from the top of your screen.
NOTE: A blue icon indicates that the feature is currently enabled while a gray icon indicates a disabled
feature.
Adding buttons
ToaddbuttonstotheASUSQuickSettingspanel:
1. Launch Quick settings then tap .
2. Swipe up Drag to add tiles.
3. Under Drag to add tiles, tap and drag an icon up to add it to the Quick Settings panel.
4. Tap to go back and view the current Quick Settings panel.
Removing buttons
ToremoveexistingbuttonsfromtheASUSQuickSettingspanel:
1. Launch Quick settings then tap .
2. Tap and drag an icon below Drag to add tiles to remove it from the Quick Settings panel.
Swipe up to switch to System notications panel
Tap these buttons to enable or disable their functions
Slide left or right to adjust the screen’s brightness
Tap to open Settings
Tap to select/deselect items to display in Quick settings
Tap to enable/disable automatic brightness adjustment
20
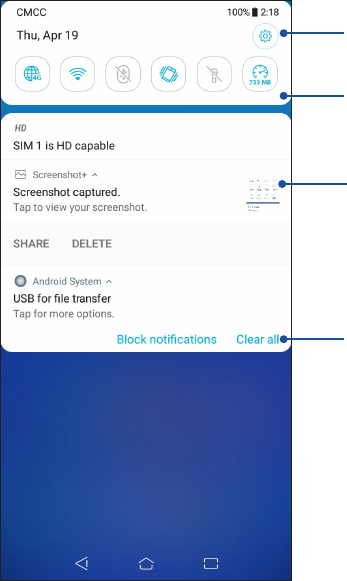
Chapter 2: There’s no place like Home
•Swipethenoticationtotheleftorrightto
remove it from the list
•Taponthenoticationtoviewitsdetails
Swipe down to switch to the Quick Settings panel
Tap to open Settings
Tap this to delete all of the listed notications
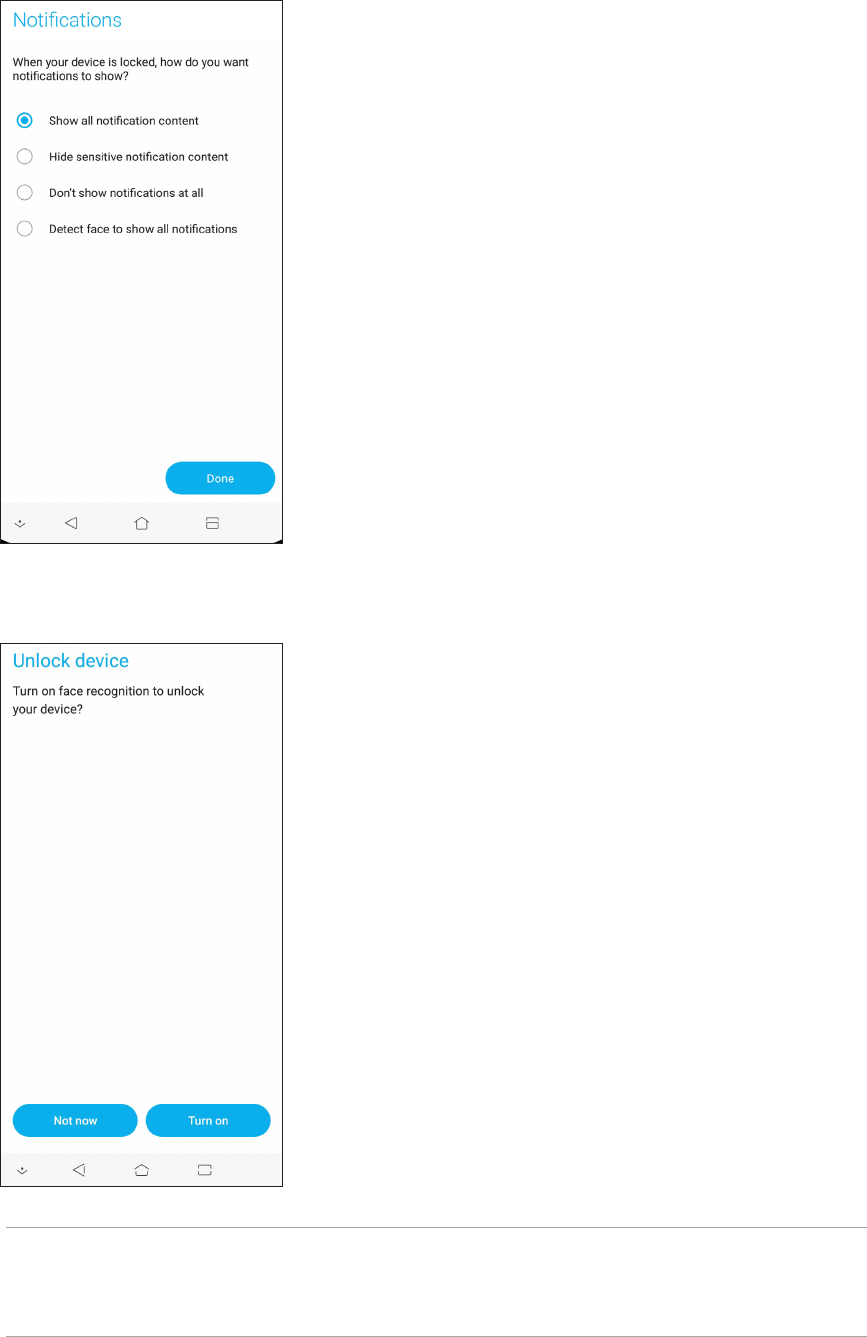
Notications
From Notications, you can see the latest updates done and system changes made on your ASUS
Phone. Most of these changes are data and system-related.
To launch the Notications panel, swipe down from the top of your screen.
21
Chapter 2: There’s no place like Home
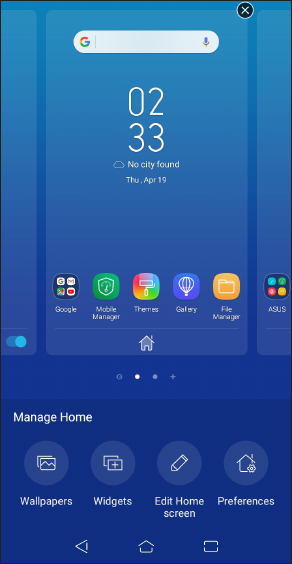
Personalizing your Home screen
Stamp your own personality on your Home screen. Select an attractive design as your wallpaper,
and add widgets for a quick review of important info. You can also add more pages so you can add
and quickly access or view more apps or widgets on your Home screen.
TolaunchtheManageHomescreen:
• TapandholdanemptyareaonyourHomescreen.
Widgets
You can put widgets, which are small dynamic apps, on your Home screen. Widgets provide you
with quick-views of the weather forecast, calendar events information, battery status, and more.
Adding widgets
Toaddawidget:
1. Tap and hold an empty area on your Home screen and select Widgets.
2. From the Widgets screen, tap and hold a widget, then drag it to an empty area on your Home
screen.
Removing widgets
From your Home screen, tap and hold a widget, then drag it to Remove on top of your screen.
22
Chapter 2: There’s no place like Home
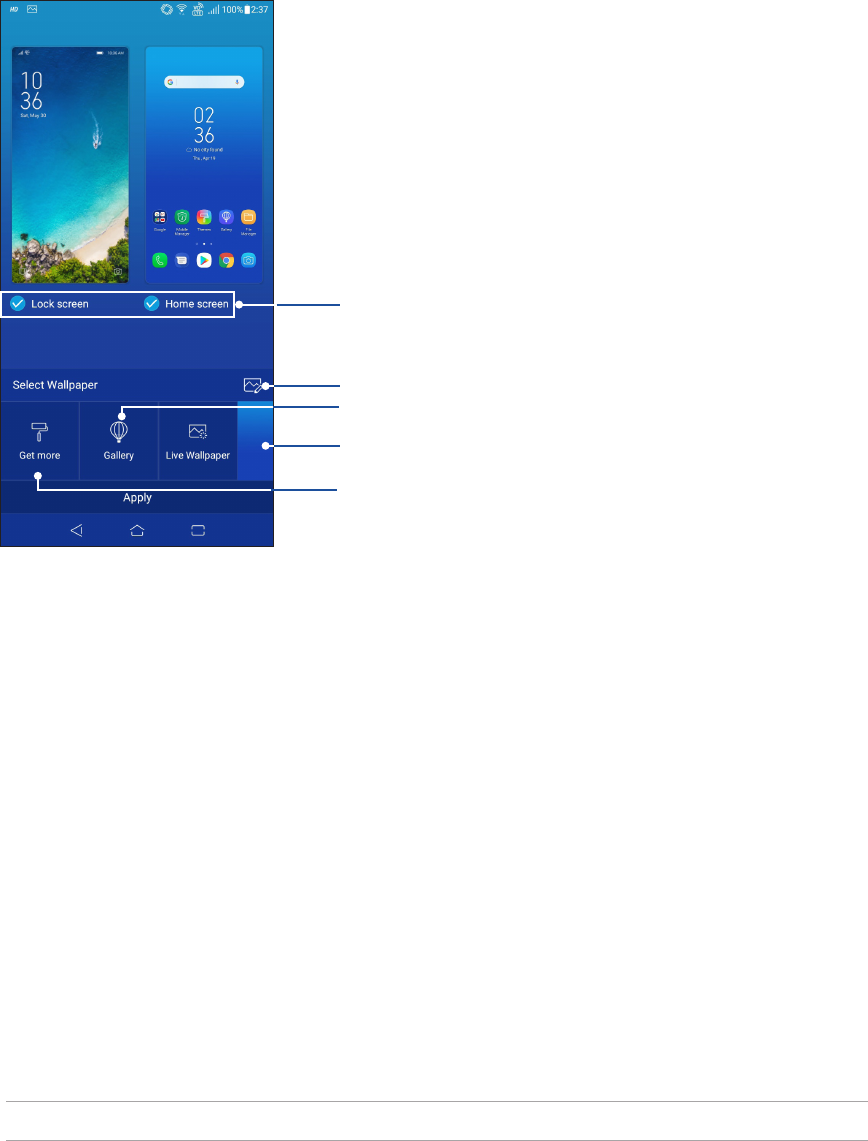
Wallpapers
Let your apps, icons, and other Zen elements sit on an attractively designed wallpaper. You may
add a translucent background tint to your wallpaper for readability and clarity. You can also select
an animated wallpaper to make your screen come alive.
Applying wallpaper
Toapplywallpaper:
1. Tap and hold an empty area on your Home screen and select Wallpapers.
2. Select to set wallpaper to Lock screen or Home screen.
3. Select a wallpaper, then tap Apply.
Applying an animated wallpaper
Toapplyananimatedwallpaper:
1. Tap and hold an empty area on your Home screen and select Wallpapers.
2. Tap Live Wallpaper.
3. Select an animated wallpaper, then tap SET WALLPAPER.
NOTE: YoucanalsosetupyourwallpapersettingsfromSettings > Wallpaper.
Tap to select a wallpaper
Tick to select where you want to apply the wallpaper
Tap to select an image from Gallery
Tap to edit the wallpaper
Tap to view the online wallpapers
23
Chapter 2: There’s no place like Home
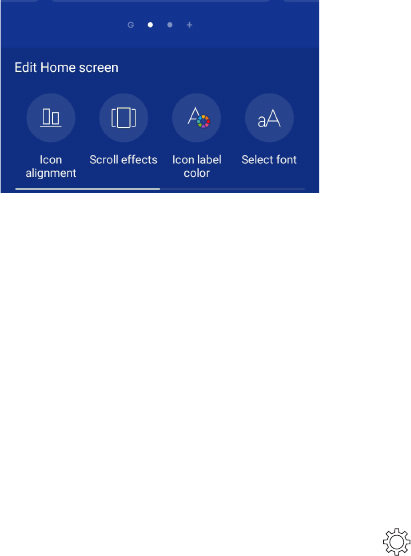
Editing your Home screen
You can extend your Home screen, select a scroll eect, change the icon and font, adjust the size
and color of the icon and font, and align the icons to the top or bottom of your screen.
1. Tap and hold an empty area on your Home screen and select Edit Home screen.
2. Tap a feature to edit your Home screen.
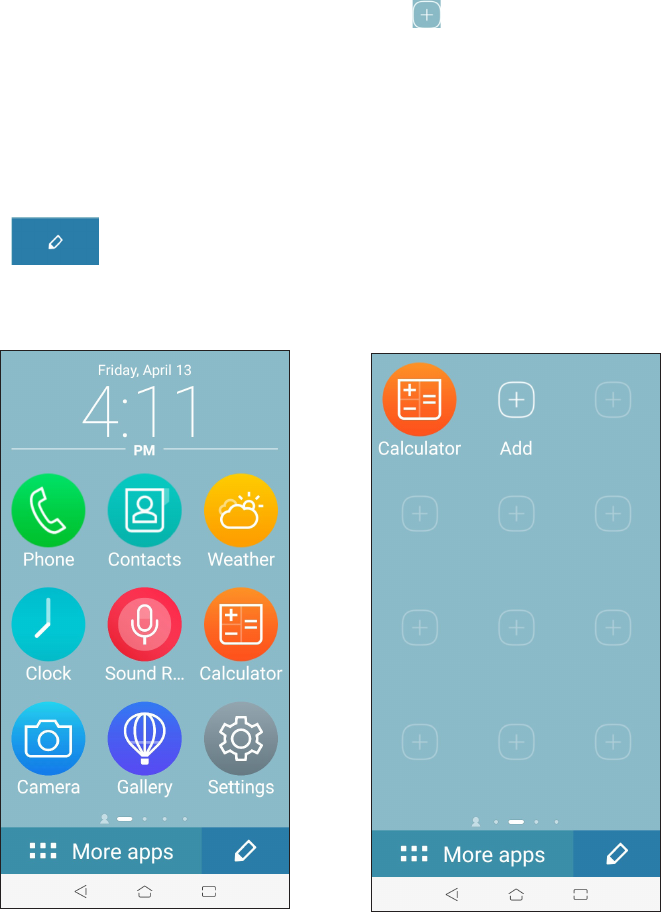
Easy Mode
Navigate your ASUS Phone better with Easy Mode, an intuitive interface with large icons, buttons,
and font size for better readability and easier user experience. You can also quickly do your core
tasks such as making calls, sending messages, and more in Easy Mode.
Enabling Easy Mode
ToenableEasyMode:
1. LaunchtheSettingsscreenbydoinganyofthefollowing:
•Launch Quick Settings then tap .
•Swipe up from the lower part of your Home screen then tap Settings.
2. Tap Advanced.
3. Slide Easy Mode to On.
24
Chapter 2: There’s no place like Home
Adding shortcuts
In Easy mode, you can add up to thirty-six (36) app shortcuts on the Home screen.
1. Swipe to the right of the Home screen, then tap .
2. From the All apps screen, select the app that you want to add to the list.
Removing shortcuts
Dothefollowing:
1. Tap .
2. Select the app or apps that you want to remove from the list, then tap Delete.
25
Chapter 2: There’s no place like Home
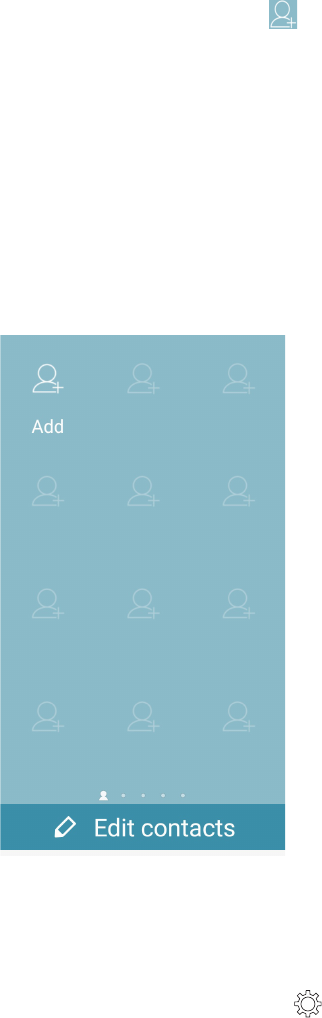
Adding contacts
In Easy Mode, you can add your frequently contacts on the Home screen.
1. Swipe to the right of the Home screen, then tap .
2. From the Contacts screen, select the contact that you want to add to the list.
Removing contacts
Dothefollowing:
1. Swipe to the right of the Home screen, then tap Edit contacts.
2. Select the contact or contacts that you want to remove from the list, then tap Delete.
Disabling Easy mode
TodisableEasymode:
1. Swipe down from the top of your screen then tap .
2. Tap Advanced.
3. Slide Easy mode to OFF.
26
Chapter 2: There’s no place like Home
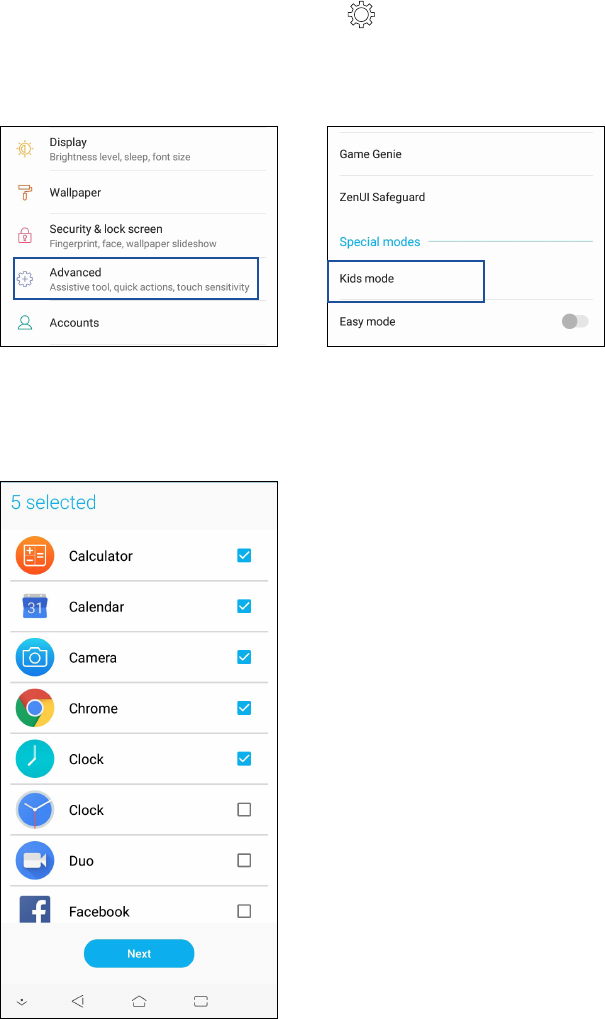
Kids Mode
Kids Mode is a parental control feature, which allows you to limit your children’s use of your phone,
including app access and usage time restrictions and incoming call blocking.
Using Kids Mode
TouseKidsMode:
1. LaunchtheSettingsscreenbydoinganyofthefollowing:
•Launch Quick Settings then tap .
•Swipe up from the lower part of your Home screen and tap Settings.
2. Tap Advanced > Kids mode.
3. Create your PIN, select a security question and key in your answer.
4. Select the apps you want to display under Kids mode then tap Next.

27
Chapter 2: There’s no place like Home
5. Congure the incoming call settings then tap Finish.
6. Tap to congure more settings for Kids mode.
7. Tap to disable Kids mode.

28
Chapter 2: There’s no place like Home
Setting up the date and time
By default, the date and time displayed on your Home screen automatically syncs with your mobile
provider’s settings.
Tochangethedateandtimesettings:
1. LaunchtheSettingsscreenbydoinganyofthefollowing:
•Launch Quick settings then tap .
•Swipe up from the lower part of your Home screen then tap Settings.
2. Scroll down the Settings screen and select System > Date & time.
3. Slide Automatic date & time and Automatic time zone to OFF.
4. Adjust the date and time.
5. Select the time zone.
6. You can opt to use the 24-hour format, if you prefer.
NOTE: See also Clock.
Setting up your ringtone and alert sounds
Set up the sound for your phone ringtone, notications such as text messages, emails, and event
alerts. You can also choose to enable or disable the dial pad touch tones, touch sounds, screen lock
sound, or you can choose to have your ASUS Phone vibrate when you tap on it.
Tosetupthesoundsettings:
1. LaunchtheSettingsscreenbydoinganyofthefollowing:
•Launch Quick settings then tap .
•Swipe up from the lower part of your Home screen then tap Settings.
2. Select Sound & vibration and set up your preferred sound settings.
29
Chapter 2: There’s no place like Home
3. In the next screen, tap Screen lock.
4. Tap the screen lock option you would like to use.
NOTE: For more details, see Securing your ASUS Phone.
Lock Screen
By default, the lock screen appears after turning on your device and while waking it up from sleep
mode. From the lock screen, you can proceed to your device’s Android® system by swiping on your
touch screen panel.
Your device’s lock screen can also be customized to regulate access to your mobile data and apps.
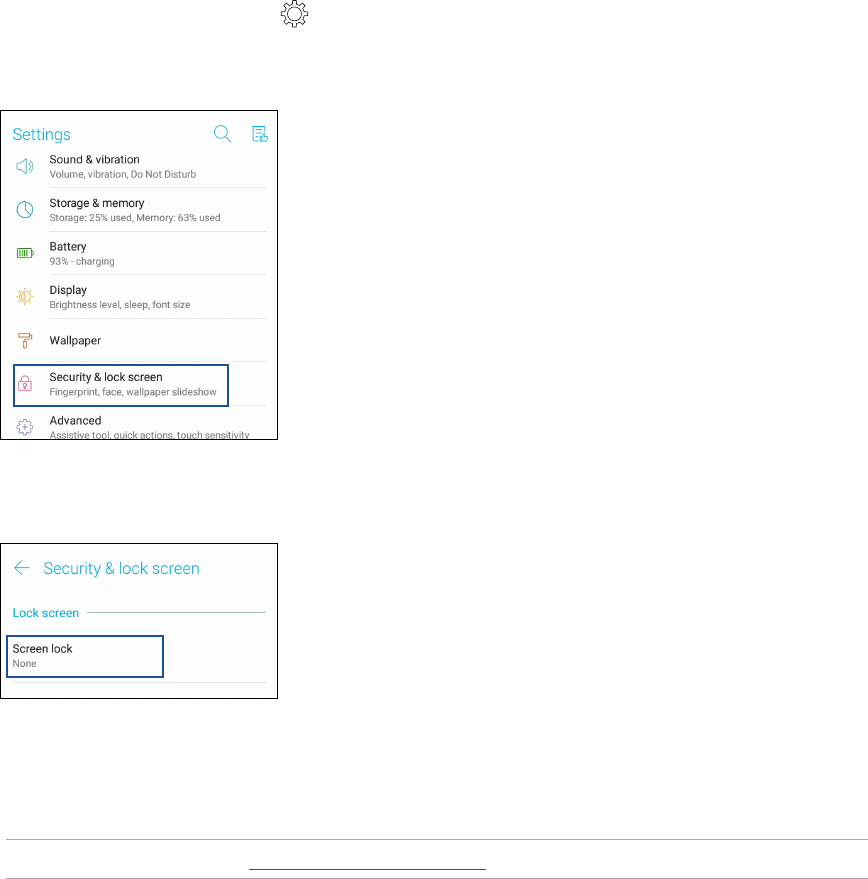
Customizing your lock screen
If you want to change your lock screen settings from the default Swipe option, refer to the
followingsteps:
1. Launch Quick settings then tap .
2. Select Security & lock screen.
30
Chapter 2: There’s no place like Home
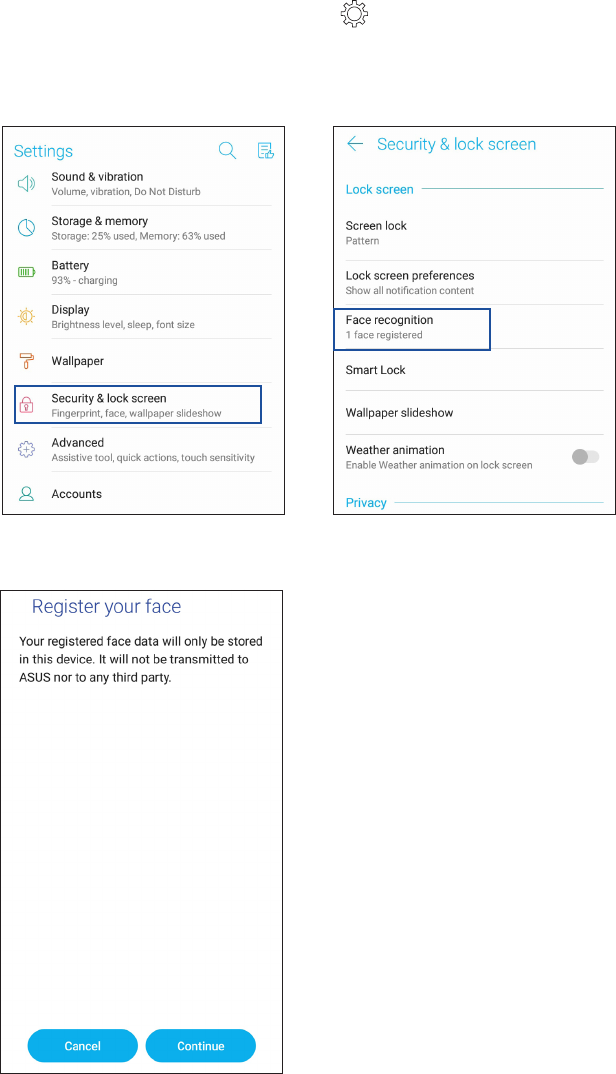
Face Unlock
Face unlock prevents others from using your ASUS phone without your permission eertlessly. You
can light up your ASUS Phone’s screen and look at it to unlock your device, access your phone’s
home screen in one second. When you set up your face unlock, you also need to set up your screen
lock method for device startup.
Setting up face unlock from Settings
To set up face unlock from Settings:
1. LaunchtheSettingsscreenbydoinganyofthefollowing:
•Launch Quick settings then tap .
•Swipe up from the lower part of your Home screen and tap Settings.
2. Scroll down the Settings screen and select Security & lock screen >Face recognition.
3. Tap Continue.
31
Chapter 2: There’s no place like Home
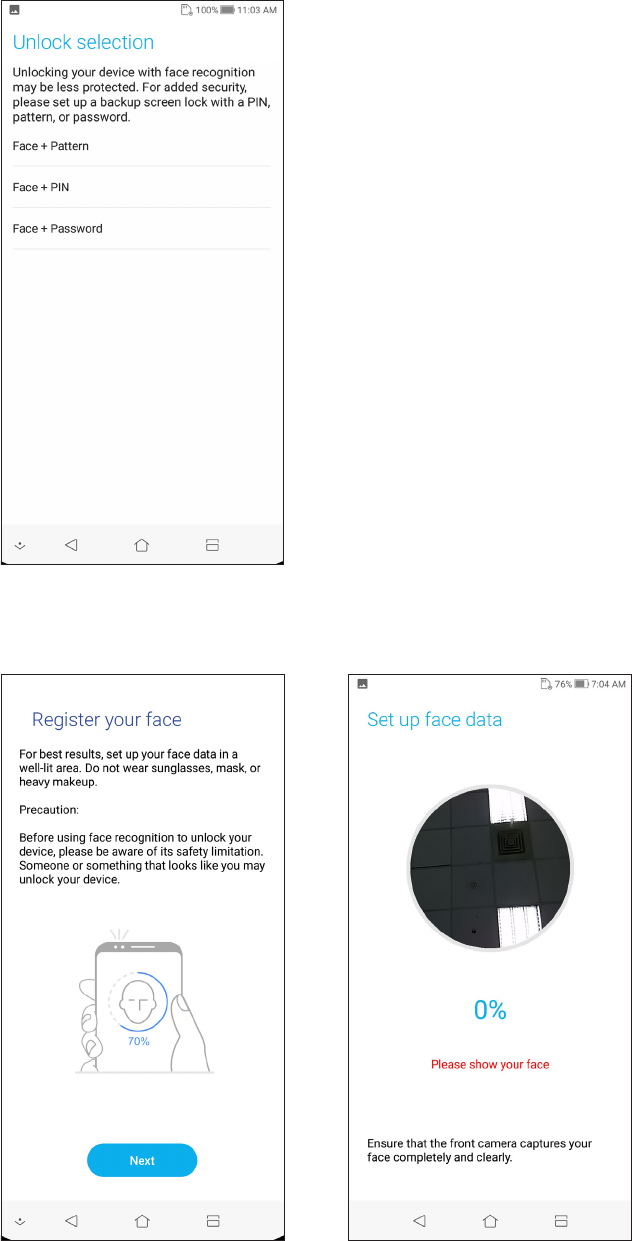
5. Tap NEXT and follow the instructions to register your face.
4. Follow the instructions to set up your backup screen lock method.
32
Chapter 2: There’s no place like Home
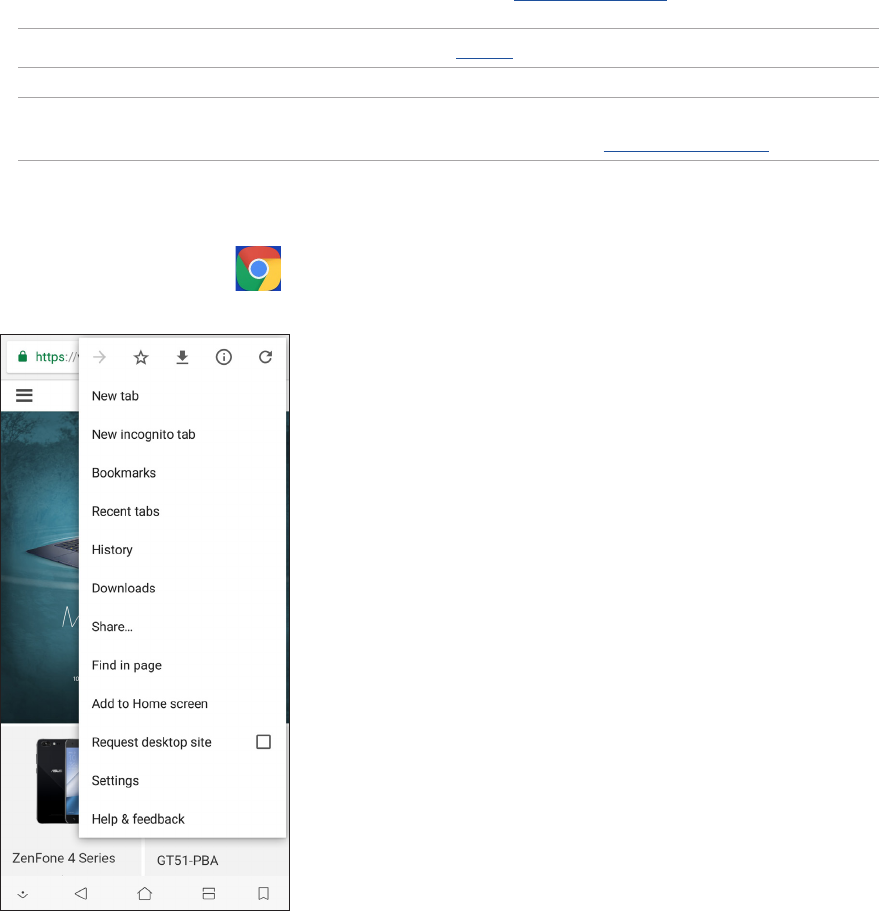
7. When nished, tap Turn on to enable face recognition to unlock your phone.
NOTES:
• Show your mouth, nose and opened eyes while using face unlock feature.
• Wearing sunglasses or insucient light will lead to failure of face unlock.
6. Select how you want to display your notications on the lock screen, then tap Done.
33
Chapter 3: Work hard, play harder
Work hard, play harder 3
3 Work hard, play harder
Chrome
Chrome for Android lets you enjoy the same fast, secure and stable web browsing experience
as that on the desktop Chrome. Sign in to your Google account to sync tabs, bookmarks, and
browsing history across all your devices. If you don’t have a Google account, register for one.
NOTE: For details on creating a Google account, see Gmail.
IMPORTANT! Before doing any Internet surng or Internet-related activities, ensure that your ASUS
Phone is connected to a Wi-Fi or mobile network. For more details, see Staying connected.
Launching Chrome
From your Home screen, tap to launch Chrome.
34
Chapter 3: Work hard, play harder
Sharing pages
Share interesting pages from your ASUS Phone to others via an email account, cloud storage
account, Bluetooth, or other ASUS Phone apps.
1. Launch Chrome.
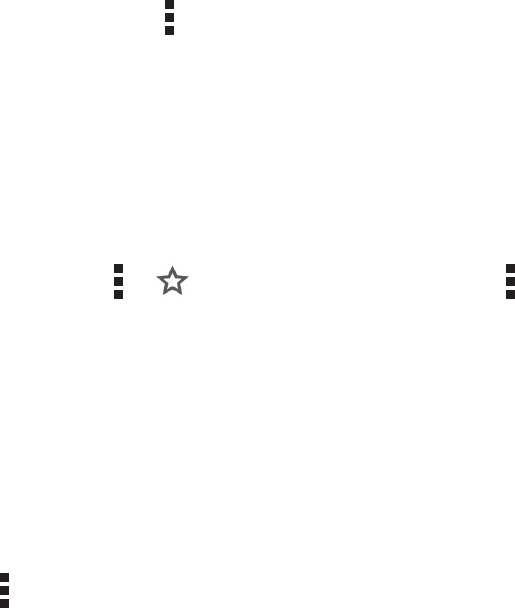
2. From a web page, tap > Share...
3. Tap the account or app that you want to use as medium in sharing the page.
Bookmarking pages
Bookmark your favorite pages or websites so you can go back and browse them again.
Tobookmarkapage:
From the page, tap > . To view your favorite pages, tap > Bookmarks, then select the
page you want to view or access.
Clearing the browsing data
Clear the browsing data that are temporarily stored in your ASUS Phone to improve the loading
performance of your Chrome browser. The browsing data includes browsing history, cache,
cookies/site data, saved passwords, and autoll data.
1. Launch the browser.
2. Tap > Settings > Privacy > Clear browsing data.
3. Select the browsing data that you want to delete.
4. When done, tap CLEAR DATA.

35
Chapter 3: Work hard, play harder
Gmail
Use Gmail to set up your Google account to get into Google-related services and apps as well as
receive, send, and browse emails right from your ASUS Phone. You can also set up other email
accounts such as Yahoo or your work email account via Gmail.
IMPORTANT! Your ASUS Phone must be connected to a Wi-Fi or mobile network so you can add
an email account or send and receive emails from added accounts. For more details, see Staying
connected.
TosetupyourGoogleaccount:
1. FromyourHomescreen,doanyofthefollowingtolaunchGmail:
• TapGoogle > Gmail.
• SwipeupfromthelowerpartofyourHomescreenthentapGoogle > Gmail.
2. Tap Add an email address.
3. Select Google.
4. Enter your email address. To create a new Google account, tap More options > Create account.
5. Follow the next steps to sign in to your Google account.
NOTE: If you want to set up your work account on your ASUS Phone, ask for the email settings from
your network administrator.
36
Chapter 3: Work hard, play harder
Google Calendar
Bring your schedule to life and keep track of all your important events or reminders. Events that you
create or edit will automatically sync with all Google Calendar versions that you’ve logged into.
Creating events
Tocreateanevent:
1. From the Home screen, tap Google > Calendar.
2. Tap then tap Event.
3. Enter your event name, and select the date and time for the event. You may set the event as an
all-day or recurring event.
• All-dayevent:FromtheAll-day eld, move the slider to the right.
• Recurringevent:TapMore options > , then select how often you want the event to
recur or repeat.
4. To set the time zone, tap More options > , then enter the country whose time zone you
want displayed.
5. From the Add location eld, enter the venue or location of the event.
6. Tap , then you may select or set the time or day to get a notication or reminder about the
event.
7. From the Invite people eld, enter the email addresses of your guests to the event.
8. You may also add note or attachment from the Add note or Add attachment eld.
9. Once nished, tap SAVE.
Editing or removing events
Toeditorremoveanevent:
1. From the Home screen, tap Google > Calendar.
2. Tap the event that you want to edit or delete.
3. To edit the event, tap and make the necessary changes. To remove the event, tap >
Delete, then tap DELETE to conrm the deletion.

37
Chapter 3: Work hard, play harder
Creating reminders
Tocreateareminder:
1. From the Home screen, Google > Calendar.
2. Tap then tap Reminder.
3. Enter your reminder name and tap DONE.
4. Set the date and time for the reminder. You may set the reminder as an all-day or recurring
reminder.
• All-dayreminder:FromtheAll day eld, move the slider to the right.
• Recurringreminder:Tap , then select how often you want the reminder to recur or
repeat.
5. Once nished, tap SAVE.
Editing or removing reminders
Toeditorremoveareminder:
1. Tap Google > Calendar.
2. Tap the reminder that you want to edit or delete.
3. To edit the reminder, tap and make the necessary changes. To remove the reminder, tap
> Delete, then tap DELETE to conrm the deletion.
38
Chapter 3: Work hard, play harder
IMPORTANT! Before accessing les saved on the network and cloud storage, ensure that Wi-Fi or
mobile network is enabled on your ASUS Phone. For details, see Staying connected.
File Manager
Using File Manager allows you to easily locate and manage your data on the internal storage of
your ASUS Phone and its connected external storage devices.
To launch File Manager, swipe up from the lower part of your Home screen then tap File Manager.
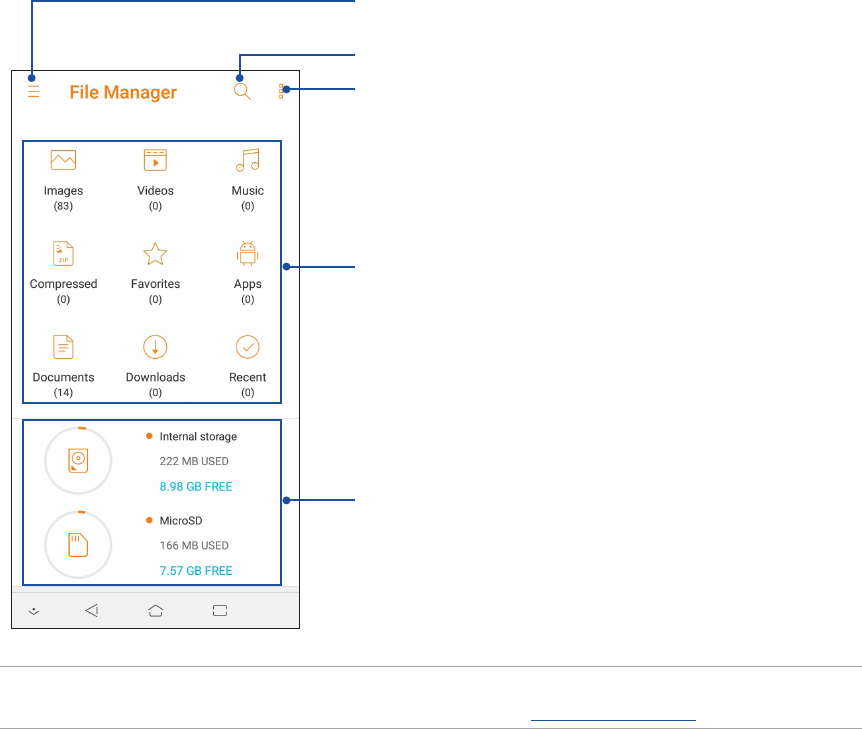
Tap to display the les under the category
Displays the usage of the internal and external storage
Tap to search for a le
Tap to access the internal, external, network,
and cloud storage
Tap to edit the categories, clear search history, view the help le,
and more
39
Chapter 3: Work hard, play harder
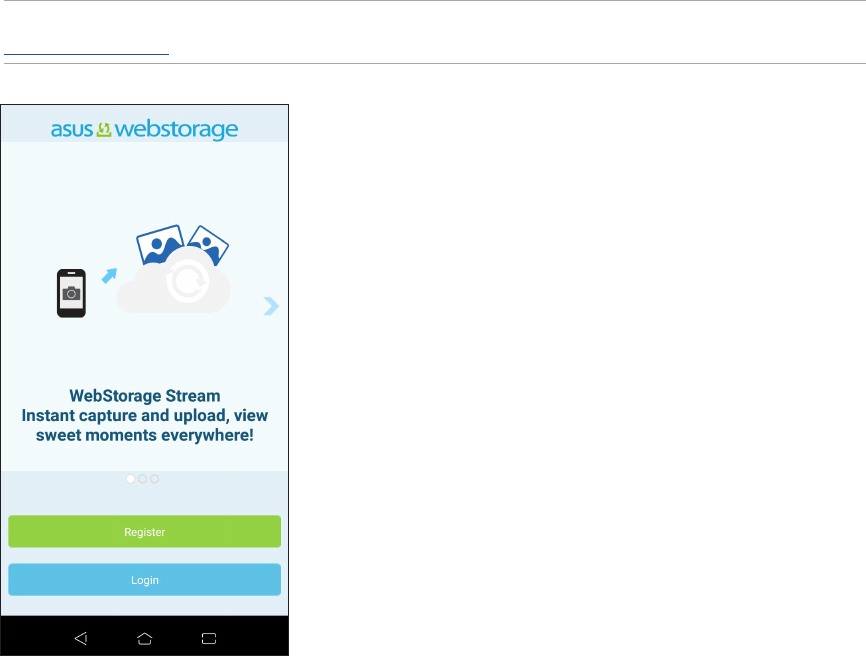
The Cloud
Back up your data, sync les among dierent devices, and share les securely and privately via a
Cloud account such as ASUS WebStorage, Drive, OneDrive, and Dropbox.
ASUS WebStorage
Register for or sign in to ASUS WebStorage and get free cloud storage. Automatically upload newly
captured photos for instant sharing, sync les among dierent devices, or share les via your ASUS
WebStorage account.
IMPORTANT! Ensure that Wi-Fi or mobile network is enabled on your ASUS Phone. For details, see
Staying connected.
40
Chapter 3: Work hard, play harder
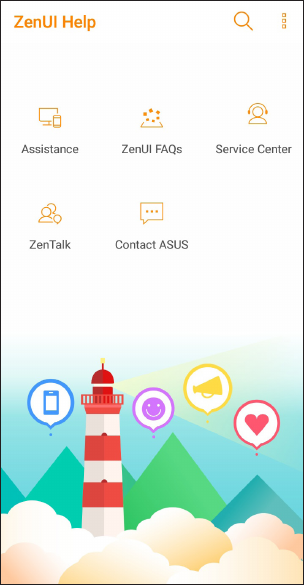
ZenUI FAQs
Find answers from FAQs (Frequently Asked Questions) or directly interact with other ZenUI users to
nd and share solutions about ZenUI apps.
ToaccessZenUIFAQs:
1. Swipe up from the lower part of your Home screen and tap Settings > Support >ZenUI Help.
2. Tap ZenUI FAQs, then select the app that you want to nd answers for.
41
Chapter 4: Keeping in touch
Keeping in touch 4
4 Keeping in touch
Call in style
Dual SIM feature
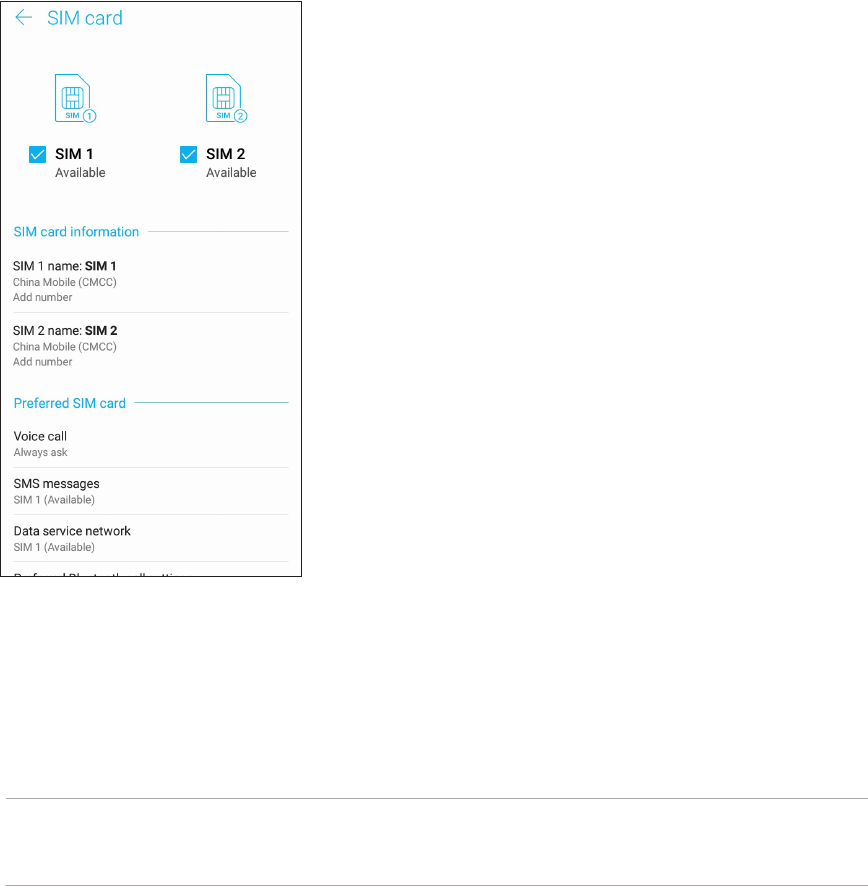
The dual SIM feature of your ASUS Phone lets you manage the settings of the installed Nano SIM
cards. With this feature, you can enable/disable Nano SIM cards, assign SIM names, or set one as a
preferred network.
Renaming your Nano SIM cards
Change the names of your Nano SIM cards on your ASUS Phone so that you can identify them
easily.
To change the names of your Nano SIM cards, tap SIM 1 name: SIM 1 or SIM 2 name: SIM 2 then
key in the names for your Nano SIM cards.
NOTE: If your SIMs have dierent mobile service providers, we recommend you to use the names
of these providers for your SIM names. If both SIMs have the same mobile service provider, we
recommend you to use the mobile numbers for your SIM names.
42
Chapter 4: Keeping in touch
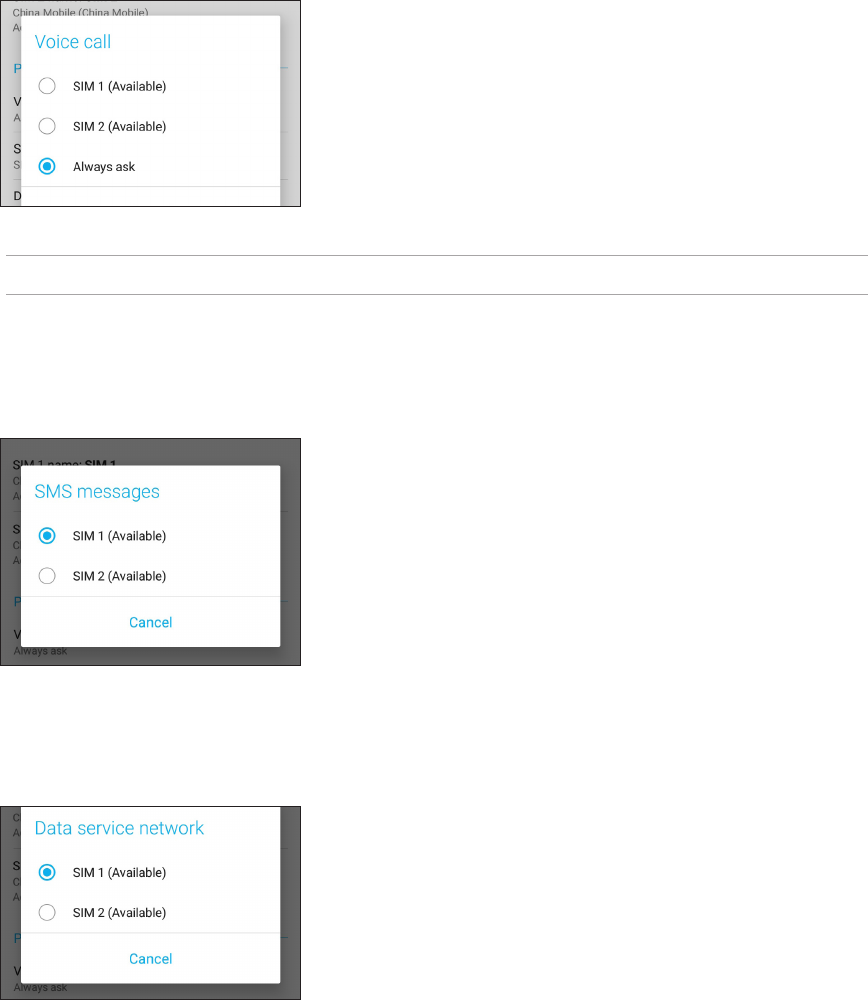
Assigning a preferred SIM card
Assign a SIM card as your preferred SIM for voice calls, SMS messages, and data services.
SIM card for voice calls
When you make a call, your ASUS Phone automatically uses the preferred SIM card to connect the
call.
To assign a SIM card for voice calls, tap Voice call then tap the SIM that you want to use.
IMPORTANT! You can only use this feature if you make a call from your contacts list.
SIM card for SMS messages
To assign a SIM card for SMS messages, tap SMS messages then select from SIM 1 or SIM 2.
SIM card for data service
To assign a SIM card for data service, tap Data service network then select from SIM 1 or SIM 2.
43
Chapter 4: Keeping in touch
Making calls
Your ASUS Phone oers you many ways to make a call. Call your friends from your contacts list,
smart dial to quickly place a call, or enter a speed-dial number to call your frequently-called
contact.
NOTE: Organize your contacts in the Contacts app. For details, see Managing contacts.
Launching the Phone app
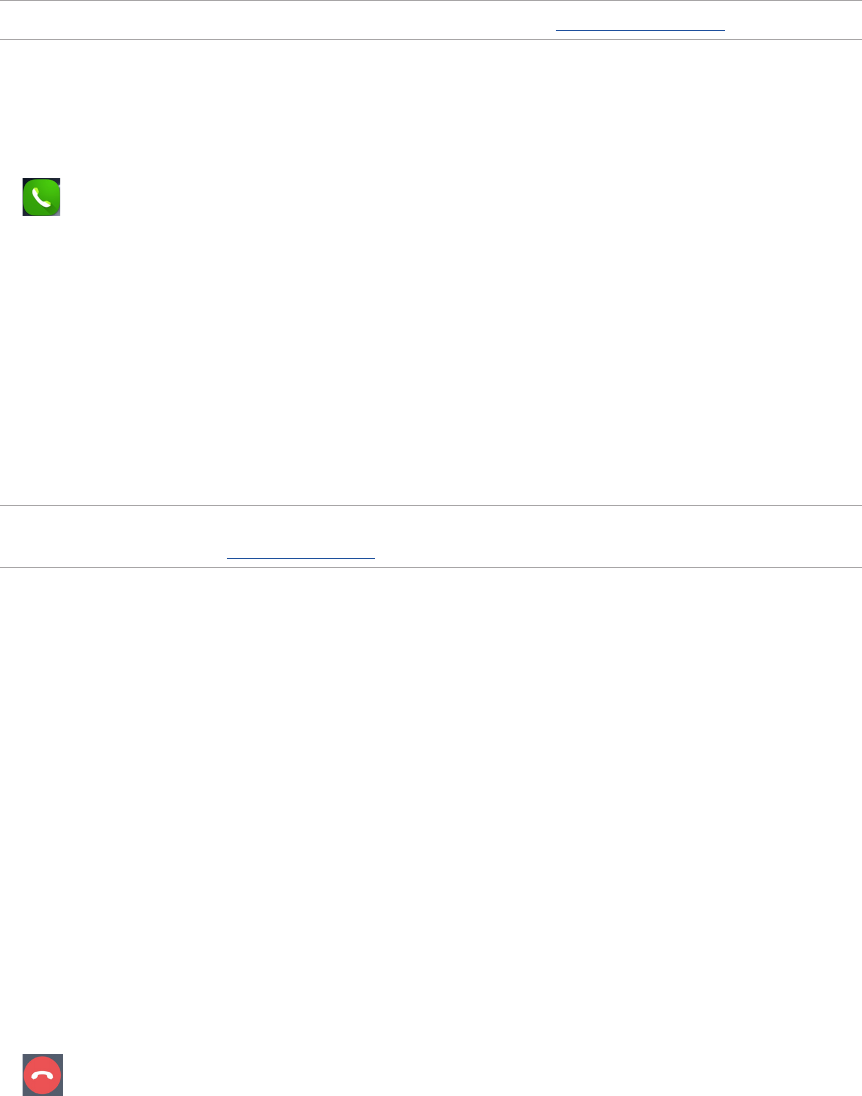
FromyourHomescreen,doanyofthefollowingtolaunchthePhoneapp:
• Tap .
• SwipeupfromthelowerpartofyourHomescreenandtapPhone.
Dialing a phone number
Use the Phone app to directly dial a phone number.
1. From your Home screen, tap Phone then tap the number keys.
2. Select from call buttons SIM 1 or SIM 2 to dial the number.
NOTE: The labels of the call buttons may vary depending on the setting that you made to your SIM
cards. For more details, see Dual SIM feature.
Dialing an extension number
When you need to call an extension number, you can do any of these steps to skip the voice
prompts.
Prompting for conrmation of an extension number
You can insert a conrmation prompt for the extension number after dialing the main number.
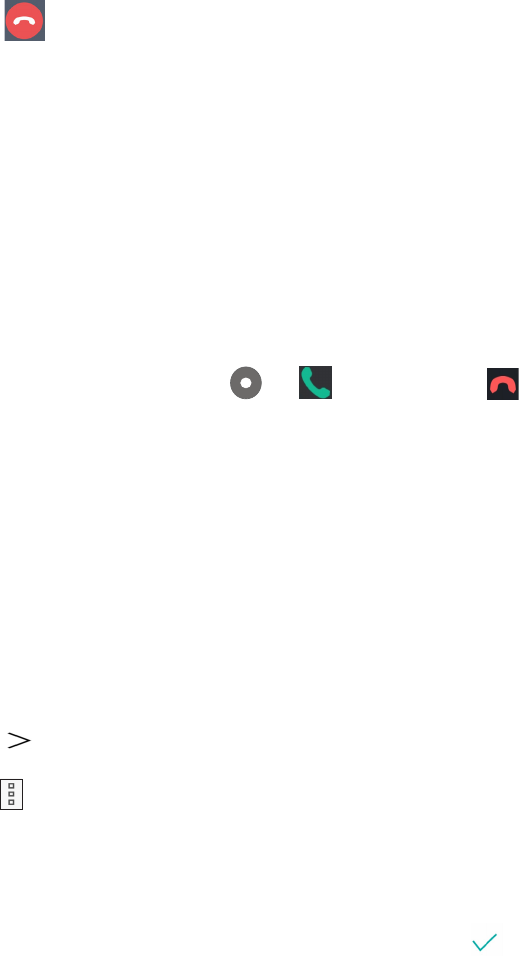
1. From the Phone app, enter the main number.
2. To insert a conrmation prompt, tap and hold # until a semi-colon (;) appears.
3. Select from call buttons SIM 1 or SIM 2 to make the call.
4. When prompted, tap Yes to conrm the extension number.
5. Tap to end the call.

44
Chapter 4: Keeping in touch
Auto-dialing an extension number
You can insert a short or long pause after dialing the main number, then the extension number is
dialed automatically.
1. From the Phone app, enter the main number.
2. To insert a pause, tap and hold * until a comma (,) appears.
3. Enter the extension number.
4. Select from call buttons SIM 1 or SIM 2 to place the call.
5. Tap to end the call.
Smart dialing your contacts
As you enter the rst few numbers or letters of your contact’s name, Smart Dial lters through your
contacts list or call logs and provide you with possible matches. You can check if the contact you’re
trying to reach is on the list of possible matches, then you can quickly place that call.
1. Launch the Phone app then enter the number or name of the contact in the Search eld.
2. From the list of possible matches, tap the contact you wish to call. If the contact is not on list,
enter the complete number or name of the contact.
3. Select from call buttons SIM 1 or SIM 2 to make the call.
NOTE: The labels of the call buttons may vary depending on the setting that you made to your SIM
cards. For more details, see also Dual SIM feature.
Calling from Contacts app
Use the Contacts app to make a call from your contacts list.
1. Launch the Contacts app.
2. Tap the contact name then tap the number that you wish to dial.
3. If there are two SIM cards installed, tap the SIM card from which you want to make the call.
4. Tap to end the call.
NOTE: To view all contacts from all contact accounts, tap Contacts to display dropdown list then tick
all accounts.
45
Chapter 4: Keeping in touch
Calling your favorite contacts
When you add a contact to your Favorites list, you can quickly call the contact from the Phone app.
1. Launch the Contacts app.
2. Tap Groups > Favorites to display your Favorites list, then tap your favorite contact whom you
want to call.
3. Tap to end the call.
Receiving calls
The touch screen of your ASUS Phone lights up when there is an incoming call. The display of the
incoming call also varies, depending on the status of your ASUS Phone.
Answering calls
TherearetwowaystoansweracalldependingonthestatusofyourASUSPhone:
• Ifyourdeviceisactive,tapAnswer or to reject a call, tap Dismiss.
• Ifyourdeviceislocked,drag to to answer or to to reject the call.
Managing your call logs
From your call logs, you can call back your missed calls, save calls to your contacts list, or redial your
recently-called number or contact.
Saving calls to Contacts
You can add a call/number from your call logs to your contacts list.
1. From the Phone app, tap Recents to display your call logs.
2. Tap beside the number that you want to add to your contacts list.
3. Tap at the upper right corner of your screen.
4. Tap Create new contact to add a new entry to your contacts list.
Tap Add to an existing contact, select a contact, choose whether to overwrite the contact’s
number with this new one or add a new entry, then tap .
46
Chapter 4: Keeping in touch
Redialing your last-called number
Toredialyourlast-callednumber:
1. From the Phone app, tap Recents to display your call logs.
2. Tap the call button to display your last-called number, then tap the call button again to redial
the number.
3. Tap to end the call.
Other call options
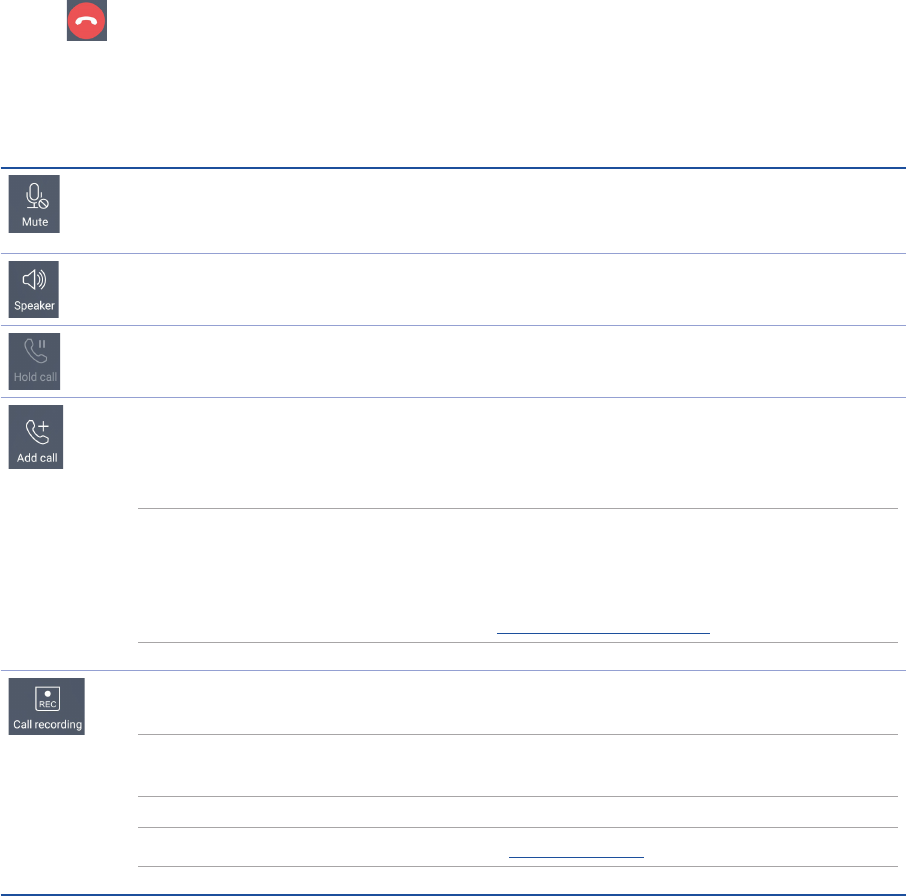
During an active call, tap any of the possible call options for when a call is in progress.
Microphone
Turns the microphone for the active call on or o. When the microphone is o or in
mute mode, you can hear the caller but the caller can’t hear you.
Speakerphone
Turns the speakerphone on or o.
Call on hold
Puts an active call on hold.
Conference call
When you have subscribed to a conference call service with your mobile service
provider, this icon allows you to add a contact or contacts in an active call.
NOTES:
• Thenumberofparticipantsintheconferencecalldependonyourconferencecall
subscription. You can inquire from your mobile service provider about this service.
• Formoredetailsonconferencecall,seeManaging multiple calls.
Record
Records an active call.
IMPORTANT! Before recording an active call, it is dictated by most local laws to ask
permission from the other person or persons on the other line.
NOTE: For more details, refer to the section Recording calls.
47
Chapter 4: Keeping in touch
Managing multiple calls
Your ASUS Phone provides you the convenience of making or taking two calls.
Answering another call
While you are talking on your ASUS Phone, you can hear a beeping sound, indicating of another
incoming call. Tap Answer on the touch screen to receive an incoming call while on an active call.
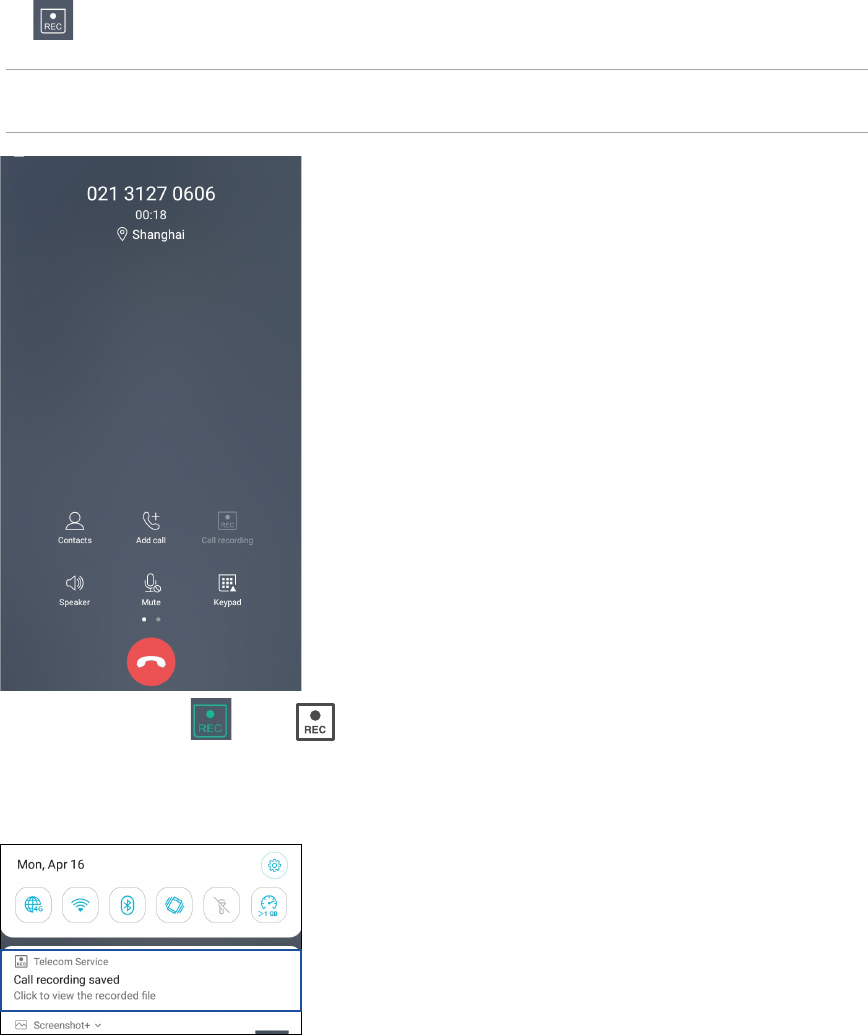
Recording calls
Your ASUS Phone allows you to record a conversation for future reference or information.
1. Call a contact or dial a number.
2. Tap to record the call.
IMPORTANT! Before recording a call, ensure that you ask for permission from the other party or
parties.
3. To stop recording, tap . This icon appears on the system notication bar.
4. Swipe down from the top of the screen, then tap Call recording saved notication to view the
recorded conversation.
48
Chapter 4: Keeping in touch
Managing contacts
Organize your contacts and easily stay in touch with them via calls, SMS messages, emails, or social
networks. Organize your contacts into groups to quickly get in touch with a set of contacts.
You can also sync your contacts with your email or social network accounts, link contacts’ info for
easy access in one place, or lter the contacts you want to keep in touch with.
To launch the Contacts app, swipe up from the lower part of your Home screen and tap ASUS >
Contacts.
Contacts Settings
Select how you would want to display your contacts from the Contacts settings. Such display
options include displaying only those contacts with phones, sorting list by rst/last name, or
viewing contact names as rst/last names rst. To set up your Contacts settings, tap > Settings
from the Contacts app.
Setting up your prole
Make your ASUS Phone truly your own and set up your prole info.
1. Launch the Contacts app then tap Set up my prole or ME.
NOTE: ME appears when you’ve set up your Google account on your ASUS Phone.
2. Fill in your info such as mobile or home number. To add other info, tap Add another eld.
3. When you’ve completed your info, tap .
49
Chapter 4: Keeping in touch
Adding an extension number to a contact number
You can add a contact’s extension number to skip the voice prompts when making a call.
1. In the contact’s information screen, enter the contact’s main number and extension number in
eitherofthesetwoways:
•Insert a comma (,) after the main number, then enter the contact’s extension number.
There’ll be a short pause before the extension number is dialed automatically. To extend
the pause, tap Pause to insert another comma.
•Insert a semi-colon (;) after the main number, then enter the contact’s extension number.
When dialing the contact number, you’ll be prompted to conrm the extension number.
Tap Yes on the conrmation message.
2. When you’ve completed the info, tap .
Adding contacts
Add contacts to your device, corporate, Google, or other email accounts and ll in more important
contact information such as contact numbers, email addresses, special events for VIPs, and more.
1. Launch the Contacts app then tap .
2. Select Device.
NOTES:
• YoucanalsosavethecontacttoyourSIMcardoranemailaccount.
• Ifyoudon'thaveanemailaccount,tapAdd account then create one.
3. Fill in the neccessary information such as mobile or home number, email address, or group
where you want to put the contact in.
4. After lling in the information and you want to add more contact numbers or email addresses,
tap Add new.
5. If you want to add other contact information, tap Add another eld.
6. When you’ve completed the info, tap .
50
Chapter 4: Keeping in touch
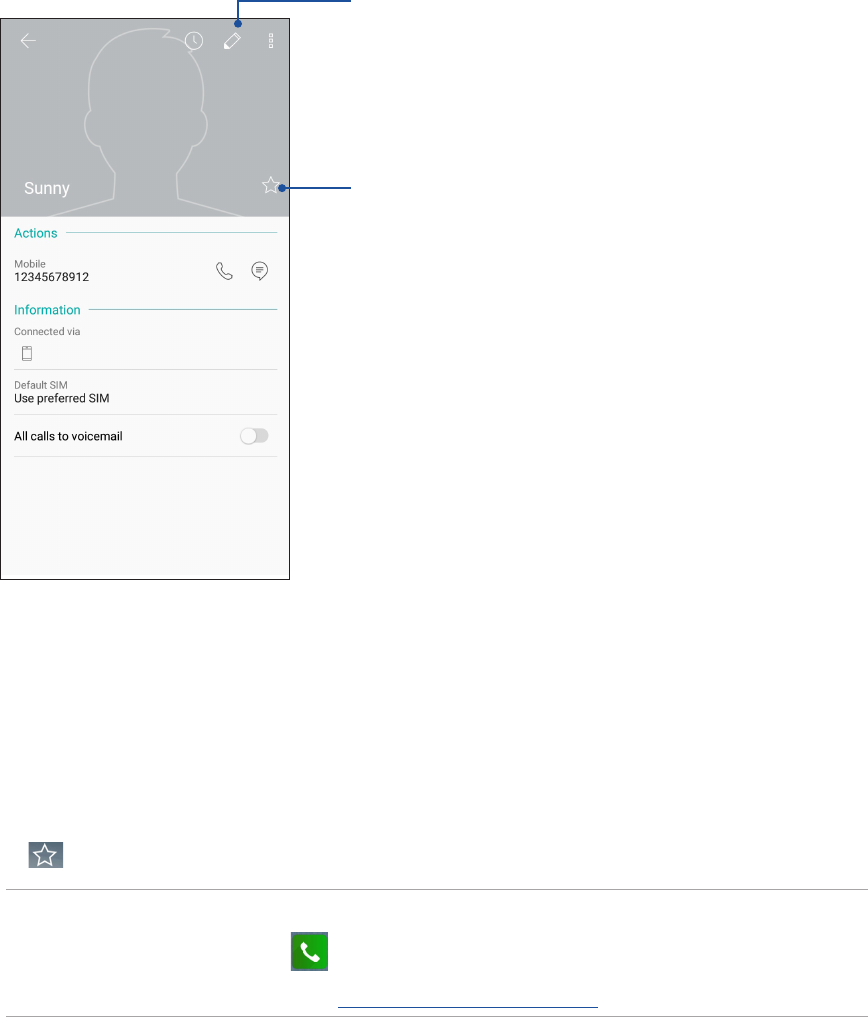
Customizing your contact’s prole
Edit your contact’s info, add a photo, set a ringtone, or take a photo as a cover for your contact’s
prole.
1. Launch the Contacts app then select the contact whose info or prole you want to edit or
customize.
2. Make the changes from the contact’s prole page.
Tap to edit your contact’s info
Marking your favorite contacts
Set your frequently-called contacts as your favorites to be able to call them quickly from the Phone
app.
1. Swipe up from the lower part of your Home screen then tap ASUS > Contacts.
2. Select the contact that you want to mark as a favorite.
3. Tap . The contact is added to your Favorites List in the Phone app.
NOTES:
• ToviewyourFavoriteslist,tap from the Home screen, then tap Groups > Favorites.
• Formoredetails,refertothesectionCalling your favorite contacts.
Tap to add to the Favorites List
51
Chapter 4: Keeping in touch
Managing your block list
Blocking contacts or numbers
Create your list of blocked contacts or numbers to avoid receiving any unwanted calls or messages.
Your blocked calls and messages will be saved to the Block List archive.
1. Swipe up from the lower part of your Home screen and tap ASUS > Contacts then tap >
Settings > Call blocking & block list > Block list.
2. Tap ,thendoanyofthefollowing:
•To block a contact, tap Choose from contacts, then select the contact you want to block
from your contacts list.
•To block a number from the recent call logs, tap Choose from recent call logs, then
select the contact you want to block from your contacts list.
•To block a number, tap Enter a number then enter the number that you want to block.
•To block a SIP number, tap Enter a SIP number then enter the number that you want to
block.
3. When done, tap .
Unblocking contacts or numbers
You may remove a blocked contact or number from your list and receive calls or messages from the
contact or number again.
1. Swipe up from the lower part of your Home screen then tap ASUS > Contacts then tap >
Settings > Call blocking & block list > Block list.
2. Tap the contact or number that you want to unblock then tap Remove from block list.
Social networking with your contacts
Integrating the social network accounts of your contacts makes it easier for you to view their
proles, news, and social feeds. Stay updated with the activities of your contacts in real time.
IMPORTANT! Before you can integrate social network accounts of your contacts, you need to log in to
your social network account and sync its settings.

52
Chapter 4: Keeping in touch
Syncing your social network account
Sync your social network account to add the social network accounts of your contacts to your ASUS
Phone.
1. DoanyofthefollowingtolaunchtheSettingsapp:
•Launch Quick settings then tap .
•Swipe up from the lower part of your Home screen then tap Settings.
2. From the Settings screen, tap your social network account under Accounts section.
3. Slide Automatically sync data to ON to sync the social network accounts of your contacts.
4. Launch the Contacts app to view your contacts list. Tap the contact, you will see which social
network the contact is from.
Send messages and more
Google Messenger
Google Messenger, an intuitive and delightful app, lets you send/receive SMS/MMS messages,
as well as send group texts, photos, or audio messages. You can add emojis or stickers to your
messages, share your location, archive your messages, and easily block SMS senders. You can also
take photos or record videos and easily share these les.
Sending messages
1. From the Home screen, tap .
2. Tap , then select the contact whom you want to send a message to.
3. Start composing your message in the message eld.
4. When you’re done, select the SIM account where you’re going to send your message from.
Replying to messages
1. Tap your message alert from your Home screen or Lock screen.
2. Start composing your reply in the message eld.
3. When you’re done, select the SIM account where you’re going to send your reply from.
53
Chapter 5: Fun and entertainment
Fun and entertainment 5
5 Fun and entertainment
Using a headset
Have the freedom to do other things while you’re in a call or enjoy listening to your favorite music,
using a headset.
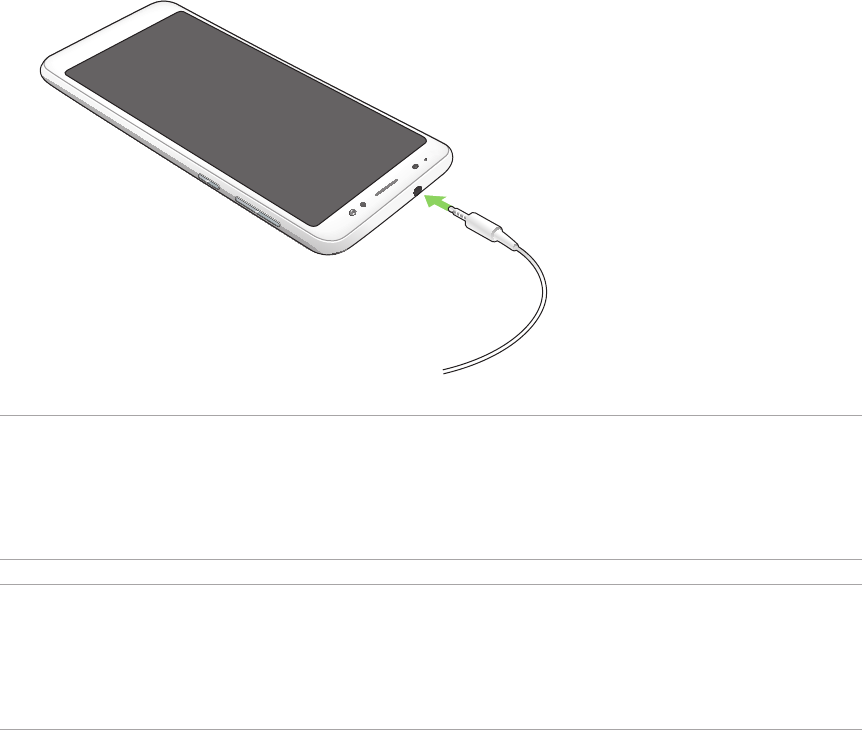
Connecting the audio jack
Insert the 3.5mm headset jack into the audio port of your device.
WARNING!
• Donotinsertotherobjectsintotheaudiojackport.
• Donotinsertacablewithelectricpoweroutputintotheaudiojackport.
• Listeningatahighvolumeforlongperiodscandamageyourhearing.
NOTES:
• Wehighlyrecommendtouseonlycompatibleheadsetsorthebundledheadsetwiththisdevice.
• Unpluggingtheaudiojackwhilelisteningtomusic,automaticallypausesthemusicplayed.
• Unpluggingtheaudiojackwhilewatchingavideo,automaticallypausesthevideoplayback.

54
Chapter 5: Fun and entertainment
Google Play Music
With Google Play Music, you can stream your favorite music, create playlists, or listen to the radio.
You can also store up to 50,000 music les to the cloud for free. You can also subscribe to Google
Play Music for unlimited and ad-free access to millions of music les that you can add to your own
music library.
Setting up your Google Play Music
Sign in to your Google or Gmail account to be able to use Google Play Music. Once you've signed
in to your acccount, all music les on your ASUS Phone, including the uploaded or purchased ones
from Google Play, are added to your library.
TosetupyourGooglePlayMusic:
1. From the Home screen, Google > Play Music.
2. Tap then tap Settings > Tap to choose account.
3. Enter your account, then tap ADD ACCOUNT.
4. Follow the next instructions to sign in to your account.
NOTES:
• GooglePlayMusicsubscriptionisonlyavailableinsomecountriesorregion.
• FormoredetailsonusingGooglePlayMusic,visithttps://support.google.com.

55
Chapter 6: Your precious moments
Your precious moments 6
6 Your precious moments
Capture moments
Launching the Camera app
Capture images and record videos using your ASUS Phone’s Camera app. Refer to any of the steps
below to open the Camera app.
From the home screen
Tap .
Using the volume key
While your ASUS Phone is on sleep mode, double-click the volume key to wake it up and immediately launch
the Camera app.
NOTE: Before using the volume key to launch the Camera app, enable this function from Settings > Advanced,
then slide Instant camera to ON.
56
Chapter 6: Your precious moments
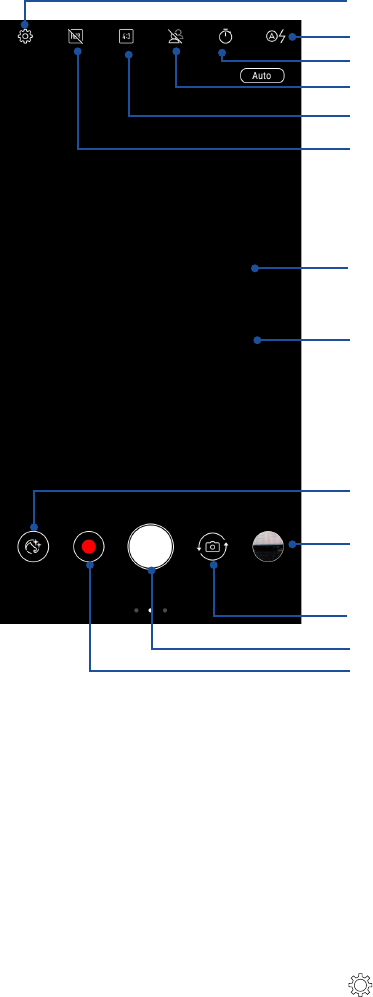
Camera home screen
Your ASUS Phone’s camera is equipped with auto-scene detection and auto-image stabilizer
features. It also features a video stabilization function that helps prevent shakiness while video
recording.
Tap the icons to start using your camera and explore the image and video features of your ASUS
Phone.
Adjust settings
Switch between screen modes
Set the time (in second) delay before capturing photos
See the Gallery
Record videos
Take photos
Swipe to the right to use advanced camera settings
Swipe to the left to use eects
Enable or disable the ash function
Enable or disable HDR
Switch between the front and rear cameras
Touch to switch between Auto mode and Beauty mode
Switch between Normal mode and Portrait mode
Photo Locations
Toenablethelocationtaggingfeature,refertothefollowingsteps:
1. Turn on the location access from Settings > Security & lock screen > Location > App-level
permissions.
2. Ensure that you have shared your location to Google Map.
3. From the Camera app’s home screen, tap > and activate Location services before you take the
photo.
57
Chapter 6: Your precious moments
Advanced camera features
Explore new ways of capturing images or videos and make captured extra special moments using
the advanced camera features of your ASUS Phone.
IMPORTANT! Apply the settings rst before taking images. Available features may vary per model.
Beauty
Have fun during and after taking photos of your family and friends using the Beauty feature of your ASUS
Phone. When enabled, this feature allows you to make live beauty enhancements on your subject’s face before
you press the shutter button.
Capturing Beauty photos
1. From the Camera app’s home screen, swipe to the right then tap Beauty.
2. Tap to adjust the Beauty settings to apply to the photo.
3. Tap to start capturing the photo.
NOTE: Drag towards the center of the screen to set a countdown timer.
Applying Beauty to photos
1. Tap the thumbnail to select the photo.
2. Tap the photo and tap Edit > to select your preferred Beauty feature, then tap SAVE to save the
photo.
Panorama
Capture images from various angles using Panorama. Images captured from a wide angle perspective are
automatically stitched together using this feature.
Capturing panoramic photos
1. From the Camera app’s home screen, swipe to the right then tap Panorama.
2. Tap the shutter button then pan your ASUS Phone horizontally (to the left or right) or vertically (upward
or downward) to capture the scenery.
NOTE:WhilepanningyourASUSPhone,atimelineofthumbnailsappearsonthelowerpartofyourscreenasit
captures the scenery.
3. Tap when nished.

58
Chapter 6: Your precious moments
Time lapse
The time lapse video feature of your ASUS Phone allows you to capture stills for automatic time lapse
playback. In eect, events seem to move in a fast-forward manner though they actually occurred and were
recorded between long intervals.
Recording Time lapse videos
1. From the Camera app’s home screen, swipe to the right then tap Time lapse.
2. Tap then select the time lapse interval.
3. Tap the shutter button to start taking Time lapse videos.

59
Chapter 6: Your precious moments
Using the Gallery
View images and play videos on your ASUS Phone using the Gallery app.
This app also allows you to edit, share, or delete image and video les stored in your ASUS Phone.
From Gallery, you can display images in a slideshow or tap to view the selected image or video le.
To launch Gallery, swipe up from the lower part of your Home screen and tap Gallery.
Viewing the photo location
Enable the location access on your ASUS Phone, and get the location details on your photos. Your
photos’ location details include the area where the photos are taken, as well a map of the location
via Google Map or Baidu (in China only).
Toviewthedetailsofaphoto:
1.
Turn on the location access from Settings > Security & lock screen > Location > App-level permissions.
2. Ensure that you have shared your location to Google Map or Baidu.
3. Launch the Gallery app, and select the photo whose photo details you want to view.
4. Tap the photo then tap Details.
Sharing les from the Gallery
1. From the Gallery screen, tap the folder where the les you want to share are located.
2. After opening the folder, tap > Select to activate le selection.
3. Tap the les you want to share. A check mark appears on top of the image you select.
4. Tap then select from the list where you want to share the images.
Deleting les from the Gallery
1. From the Gallery screen, tap the folder where the les you want to delete are located.
2. After opening the folder, tap > Select to activate le selection.
3. Tap the les you want to delete. A check mark appears on top of the image you select.
4. Tap .
60
Chapter 6: Your precious moments
Editing images
The Gallery also features its own image editing tools that you can use to enhance images saved on
your ASUS Phone.
1. From the Gallery screen, tap the folder where the les are located.
2. After opening the folder, tap the image you want to edit.
3. Once the image is opened, tap it again to show its functions.
4. Tap Edit to open the image editing toolbar.
5. Tap any of the icons on the editing toolbar to apply changes to the image.

61
Chapter 7: Staying connected
Staying connected 7
7 Staying connected
Mobile network
When there’s no available Wi-Fi network that you can connect to, you can enable your mobile
network’s data access for Internet connection.
Enabling the mobile network
1. DoanyofthefollowingtolaunchtheSettingsscreen:
•Launch Quick settings then tap .
•Swipe up from the lower part of your Home screen then tap Settings.
2. Tap Connections > Mobile network.
3. Slide Data enabled to ON, and congure the other mobile network settings, if necessary.
NOTES:
• IfyouaccesstheInternetviayourmobilenetwork,additionalchargeswillbeincurreddependingon
your data plan.
• Formoredetailsonyourmobilenetworkcharges/feesandsetttings,contactyourmobileservice
provider.
Wi-Fi
The Wi-Fi technology of your ASUS Phone gets you connected to the wireless world. Update your
social media accounts, browse the Internet, or exchange data and messages wirelessly from your
ASUS Phone.
Enabling Wi-Fi
1. LaunchtheSettingsscreenbydoinganyofthefollowing:
•Launch Quick settings then tap > Connections.
•Swipe up from the lower part of your Home screen then tap Settings > Connections.
2. Slide the Wi-Fi switch to the right to turn on the Wi-Fi.
NOTE: You can also enable the Wi-Fi from Quick Settings screen. Refer to section Quick Settings on
how to launch Quick Settings screen.

62
Chapter 7: Staying connected
Connecting to a Wi-Fi network
1. On the Settings screen, tap Wi-Fi to display all detected Wi-Fi networks.
2. Tap a network name to connect to it. For a secured network, you may be prompted to key in a
password or other security credentials.
NOTES:
• YourASUSPhoneautomaticallyreconnectstothenetworkthatyouconnectedwithpreviously.
• Turn o the Wi-Fi feature when you're not using it to help save battery power.
Disabling Wi-Fi
TodisableWi-Fi:
1. LaunchtheSettingsscreenbydoinganyofthefollowing:
•Launch Quick settings then tap > Connections.
•Swipe up from the lower part of your Home screen then tap Settings > Connections.
2. Slide the Wi-Fi switch to the left to turn o the Wi-Fi.
NOTE: You can also disable the Wi-Fi from Quick Settings screen. See Quick Settings on how to launch
Quick Settings screen.
Bluetooth®
Use the Bluetooth feature of your ASUS Phone to send or receive les and stream multimedia les
with other smart devices over short distances. With Bluetooth, you can share your media les with
your friends’ smart devices, send data for print with a Bluetooh printer, or play music les with a
Bluetooth speaker.
Enabling Bluetooth®
1. DoanyofthefollowingtolaunchtheSettingsscreen:
•Launch Quick settings then tap > Connections.
•Swipe up from the lower part of your Home screen then tap Settings > Connections.
2. Slide the Bluetooth switch to the right to turn on the Bluetooth.
NOTE: You can also enable the Bluetooth from Quick Settings screen. See Quick Settings on how to
launch Quick Settings screen.

63
Chapter 7: Staying connected
Pairing your ASUS Phone to a Bluetooth® device
Before using the Bluetooth feature of your ASUS Phone in full scale, you have to pair it rst with the
Bluetooth device. The ASUS Phone automatically stores the pairing connection of the Bluetooth
device.
1. On the Settings screen, tap Bluetooth to display all available devices.
IMPORTANT!
• Ifthedevicethatyouwanttopairisnotinthelist,ensuretoenableitsBluetoothfeatureandis
discoverable.
• SeetheuserguidethatcamewithyourdevicetolearnhowtoenableitsBluetoothandandsetitto
discoverable.
2. Tap > Refresh to scan for more Bluetooth devices.
3. In the list of available devices, tap the Bluetooth device that you want to pair with.
4. Ensure that the same passkey show on both devices, then tap Pair.
NOTE: Turn o the Bluetooth feature when you're not using it to help save battery power.
Unpairing your ASUS Phone from the Bluetooth® device
1. On the Settings screen, tap Bluetooth to display all available and paired devices.
2. In the list of paired devices, tap
of Bluetooth device that you want to unpair, then tap Forget.
64
Chapter 7: Staying connected
Tethering
When Wi-Fi service is not available, you can use your ASUS Phone as a modem or turn it into a Wi-Fi
hotspot to get Internet access on your laptop, tablet, and other mobile devices.
IMPORTANT! Most mobile service providers may require a data plan for you to be able to use the
tethering function. Contact your mobile service provider about availing of this data plan.
NOTES:
• Internet access via tethering may be slower than the standard Wi-Fi or mobile connection.
• Only a limited number of mobile devices can tether to your ASUS Phone for Internet access.
• Turn o the tethering feature when you're not using it to help save battery power.
Wi-Fi
Hotspot
Turn your ASUS Phone into a Wi-Fi Hotspot to share Internet connection with other devices.
1. DoanyofthefollowingtolaunchtheSettingsscreen:
•Launch Quick settings then tap > Connections.
•Swipe up from the lower part of your Home screen then tap Settings > Connections.
2. Tap Hotspot & Tethering then slide Portable Wi-Fi hotspot to ON.
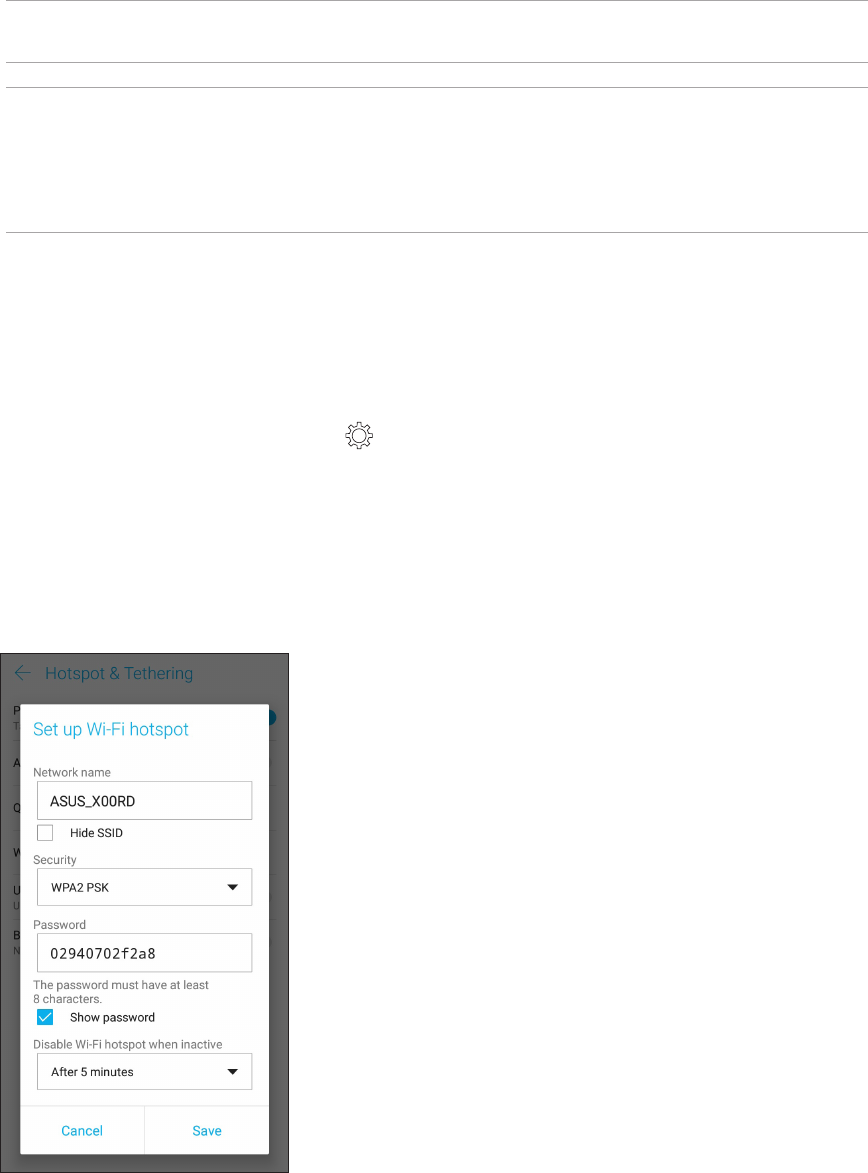
3. Tap Portable Wi-Fi hotspot then assign a unique SSID or network name and a strong
8-character password for your Wi-Fi hotspot. When done, tap Save.
4. Connect other devices to your ASUS Phone’s hotspot connection the same way you connect to a
Wi-Fi network.
65
Chapter 7: Staying connected
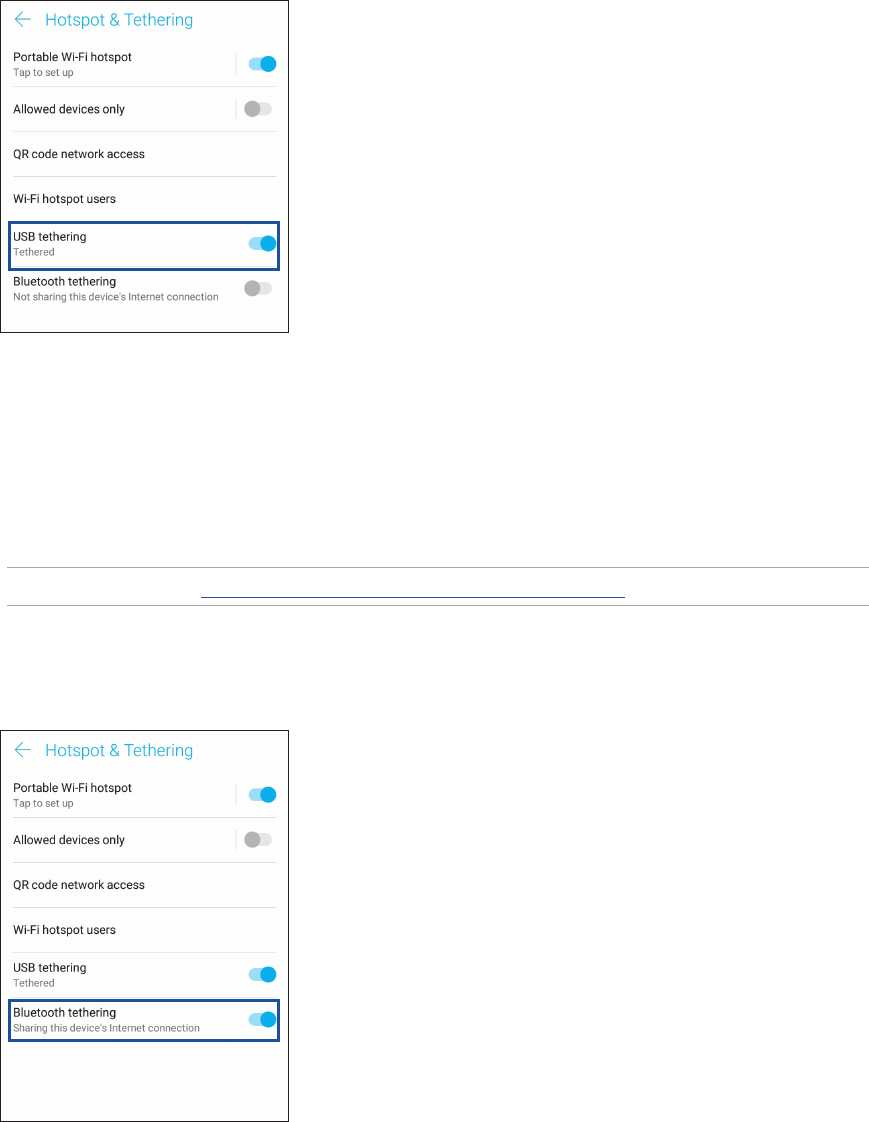
Bluetooth Tethering
Enable Bluetooth tethering on your ASUS Phone to share its Internet connection with other devices.
1. Enable Bluetooth on your ASUS Phone and the other device.
2. Pair both devices.
NOTE: For details, see Pairing your ASUS Phone to a Bluetooth® device.
3. From the Settings screen, tap Connections > Hotspot & Tethering, then silde Bluetooth
tethering to ON.
USB Tethering
Enable USB tethering on your ASUS Phone and share its Internet connection with other devices.
1. Connect your ASUS Phone to another device with a USB cable.
2.
From the Settings screen, tap Connections > Hotspot & Tethering, then silde USB tethering
to ON
to enable tethering.
66
Chapter 8: Travel and Maps
Travel and Maps 8
8 Travel and Maps
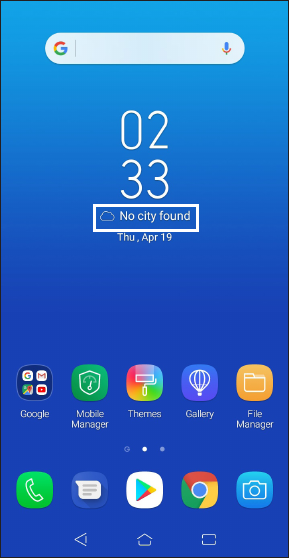
Weather
Get real-time weather updates straight from your ASUS Phone using the weather app. Using
Weather, you can also check other weather details from around the world.
Launching the Weather app
From your Home screen, tap the weather icon to launch the Weather app.
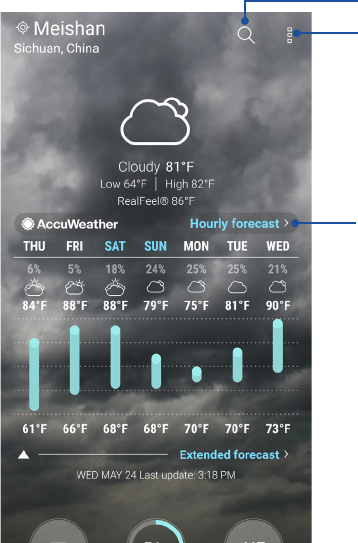
67
Chapter 8: Travel and Maps
Weather home screen
Set up and get your current location’s weather updates as well as other parts of the world.
Tap to search for a city’s weather info
Tap to get the area’s current weather info, refresh the
weather info, edit the location list, or congure the
weather settings
Swipe up to see other weather information
Swipe to the left or right to see the weather information
of other cities in your location list
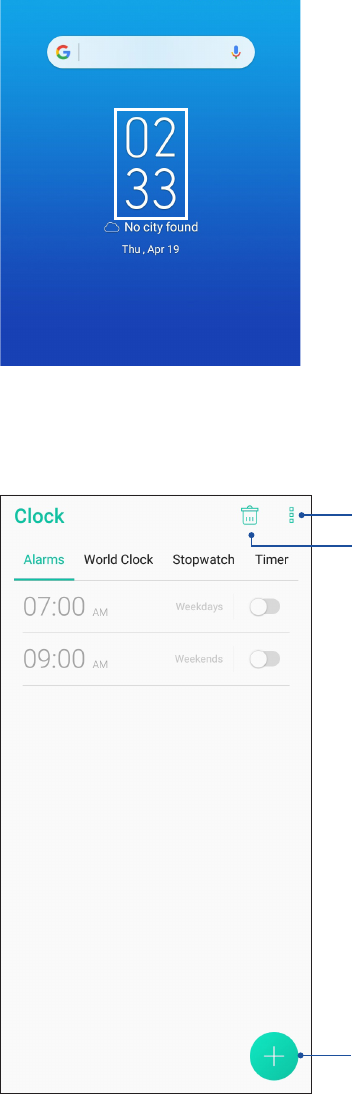
68
Chapter 8: Travel and Maps
Clock
Customize the time zone settings of your ASUS Phone, set alarms, and use your ASUS Phone as a
stop watch using the Clock app.
Launching Clock
LaunchtheClockappusingeitherofthefollowingoptions:
•Swipe up from the lower part of your Home screen then tap Clock.
•From your ASUS Phone’s home screen, tap the digital clock display.
Alarm clock
Tap Alarms to access the alarm clock settings of your ASUS Phone.
Tap this to access the settings of the alarm clock feature
Tap this to delete any of the previously set alarms
Tap this to set a new alarm time
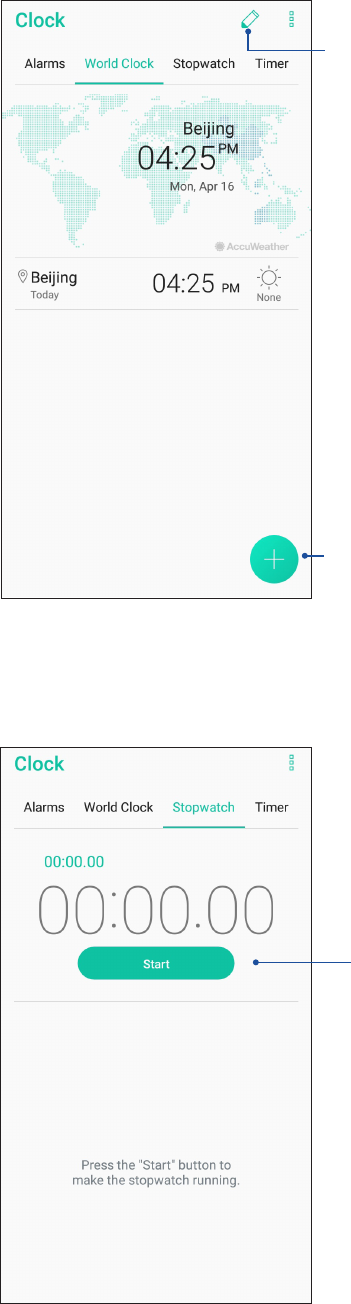
69
Chapter 8: Travel and Maps
World clock
Tap World Clock to access the world clock settings of your ASUS Phone.
Tap this to edit the cities marked on your world clock
Tap this to add a new city to mark on your world clock’s map.
Stopwatch
Tap Stopwatch to use your ASUS Phone as a stopwatch.
Tap this button to start running the stopwatch feature
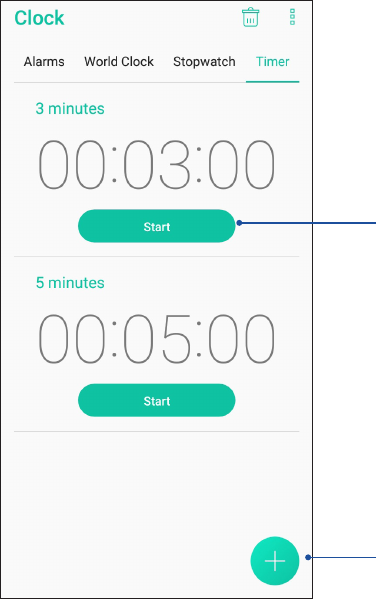
70
Chapter 8: Travel and Maps
Timer
YoumaysetmultipletimeroptionsforyourASUSPhone.Todothis,followthestepsbelow:
Setting the timer
1. Tap Timer to access the timer feature of your ASUS Phone.
Tap this to set a new timer
Tap this button to start running the timer
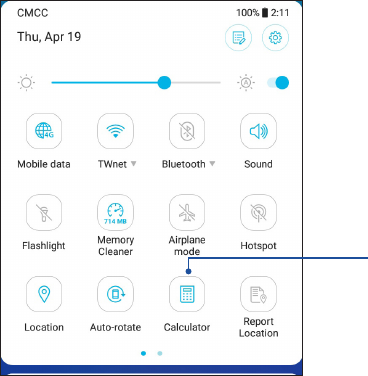
71
Chapter 9: Zen Everywhere
Zen Everywhere 9
9 Zen Everywhere
Special Zen Tools
Calculator
One-swipe and a tap is all it takes to launch your Calculator. When you open the Quick settings
panel, the Calculator icon is there visibly on top of the list. Tap it to get started with your
computations.
Tap this to enable the calculator
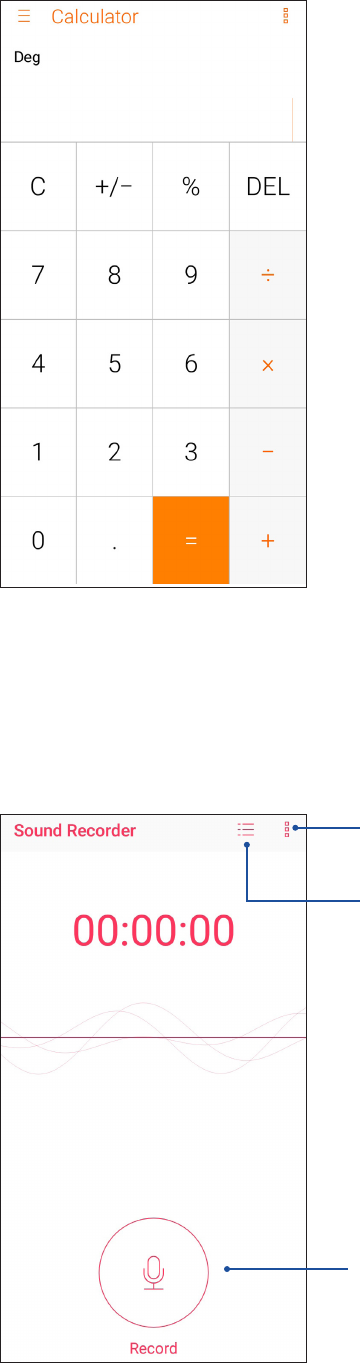
72
Chapter 9: Zen Everywhere
Calculator screen
Sound Recorder
Record audio les using your ASUS Phone by enabling the Sound Recorder app.
Launching Sound Recorder
To launch Sound Recorder, swipe up from the lower part of your Home screen then tap ASUS >
Sound Recorder.
Tap to start audio recording
Tap to customize the Sound Recorder settings
Tap to view the list of saved audio recording les
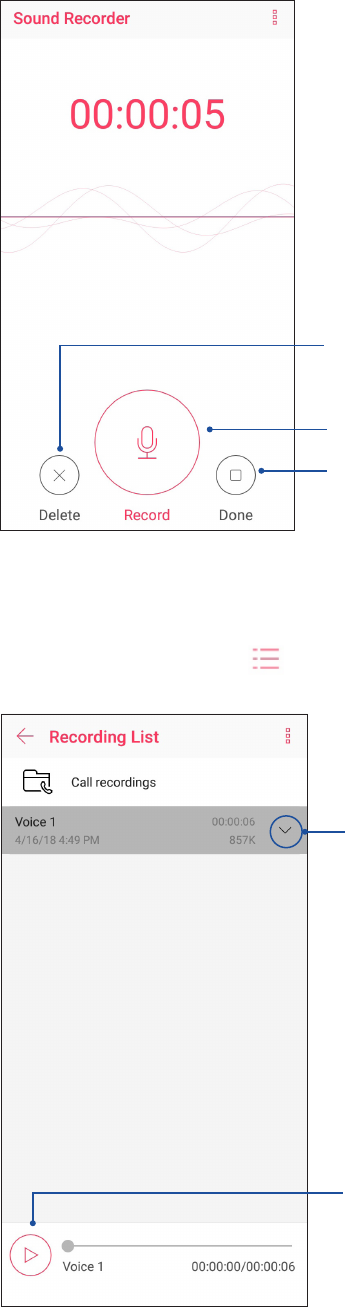
73
Chapter 9: Zen Everywhere
Pausing a recording
During a paused recording, you can choose to resume, delete, or save the recording.
Tap to resume the recording
Tap to save the recording
Tap to delete the recording
Recording List
From the Recording List, you can play, rename, share, or delete a saved audio recording le.
To view your recording list, tap from the Sound Recorder main screen.
Tap to play/pause your selected recording
Tap to share, rename, or delete your selected
recording
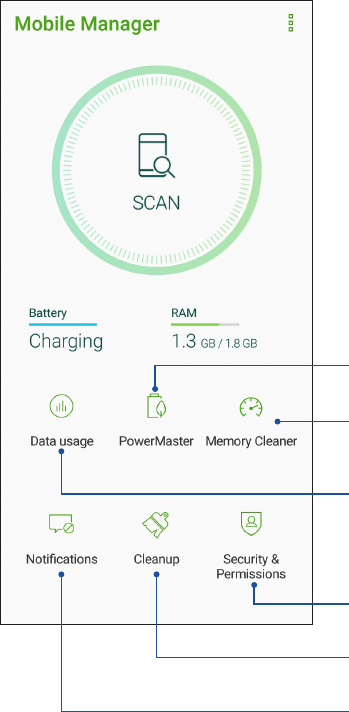
74
Chapter 9: Zen Everywhere
Mobile Manager
Mobile Manager provides an integrated interface for several apps that are designed to optimize
device performance, manage the phone power, storage usage and system notications.
To launch the ASUS Mobile Manager app, tap Mobile Manager from your Home screen.
Tap this to allow or block notications from an individual app
Tap this to launch the PowerMaster app
Tap this to view the mobile data usage, set a monthly limit for
mobile data use, and control apps to access the Internet only
over Wi-Fi, only over mobile network, neither or both
Closes unused processes that are running in the
background to retrieve more system memory
Tap this to run privacy and security scan and prevent apps from
using dangerous permissions and starting automatically
Tap this to uninstall the selected unused apps to free up some
storage
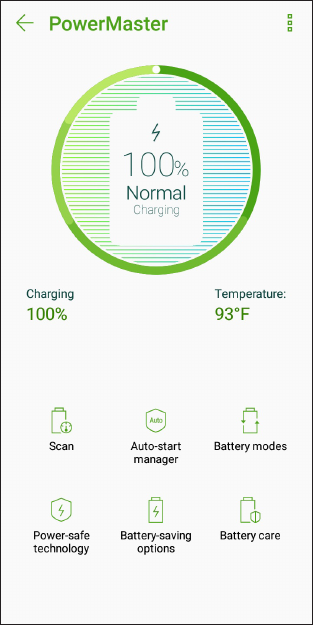
75
Chapter 9: Zen Everywhere
PowerMaster
With an intelligent suite of power management technologies, PowerMaster fully optimizes the
performance of your device, provides an integrated interface for power-related optimization
features and settings, and oers extended protection for your system, battery, adapter, and the
charging function.
To launch PowerMaster, tap Mobile Manager from your Home screen, and then tap PowerMaster.
Taponanyofthesefunctions:
•Scan:Scansforoptimizationstosavepower.
•Auto-start manager:AllowsyoutolaunchAuto-startmanagerapp.
•Battery modes:Allowsyoutoselectyourbatterymodesandcustomizeyourpowersavingsettings
according to your needs.
•Power-safe technology:Provides
extended protection for your system, battery, adapter, and
the charging function.
•Battery-saving options:Allowsyoutodisablesomefeaturesorstopunnecessaryappstosave
power.
•Battery care :Dynamicallyadjuststhechargingratebetween10:00PMand7:00AMandextends
the battery life of your ASUS phone by up to two times.

76
Chapter 10: Maintain your Zen
Keeping your device up-to-date
Keep your ASUS Phone in the loop of Android system updates and upgraded apps and features.
Updating your system
1. Swipe up from the lower part of your Home screen then tap Settings.
2. On the Settings screen, slide down to display other items then tap System > System updates to
check for system updates.
3. Tap on the System updates screen to set up automatic download of system updates.
NOTE: YoucanpreviewthelasttimeyourASUSPhone’ssystemwasupdatedattheLastupdatecheck:
of the System update window.
Storage
You can store data, apps, or les on your ASUS Phone (internal storage), on an external storage,
or on an online storage. You need an internet connection to transfer or download your les on
an online storage. Use the bundled USB cable to copy les to or from the computer to your ASUS
Phone.
Backup and reset
Back up data, Wi-Fi passwords, and other settings to Google servers using your ASUS Phone.
1. Swipe up from the lower part of your Home screen then tap Settings > System > Backup.
2. FromtheBackupwindow,youcan:
•Back up to Google Drive: This feature backs up your data, Wif-Fi passwords, and other
settings to Google Drive when enabled.
•Account: Allows you to specify the account you to be associated when you save your
backup.
Reset
Reset network settings and app preferences, or reset factory defaults.
1. Swipe up from the lower part of your Home screen then tap Settings > System > Reset.
Maintain your Zen 10
10 Maintain your Zen
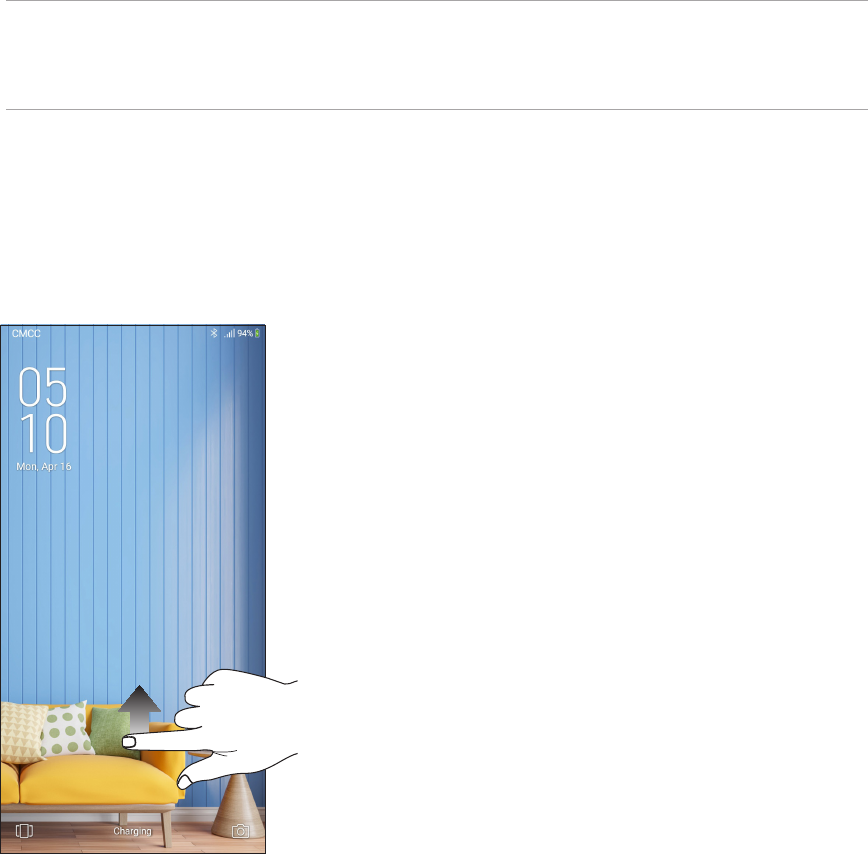
77
Chapter 10: Maintain your Zen
2. FromtheResetwindow,youcan:
•Network settings reset: This feature restores Wi-Fi passwords, and other network
settings.
•Reset app preferences: This feature facilitates restoration of backed up settings and data
when you reinstall an app.
•Factory data reset: Erases all data on phone.
Securing your ASUS Phone
Use the security features of your ASUS Phone to prevent unauthorized calls or access of
information.
Unlocking your screen
When the screen is locked, you can open it with the security unlocking options that the ASUS
Phone oers you.
1. Swipe up from the lower part of your Home screen then tap Settings > Security & lock screen.
2. Tap Screen lock then select an option to unlock your ASUS Phone.
NOTES:
• Refertosection Unlock screen options for more information.
• Todeactivatetheunlockscreenoptionthatyouset,tapNone on Choose screen lock screen.
Unlock screen options
Choose from these options to lock your ASUS Phone.
Swipe
Swipe up to unlock your ASUS Phone.

78
Chapter 10: Maintain your Zen
PIN
Key in at least four numbers to set a PIN.
IMPORTANT! Ensure to remember the PIN that you created to unlock your device.
Pattern
Slide your nger on the dots and create a pattern.
IMPORTANT! You can create a pattern with a minimum of four dots. Ensure to remember the pattern
that you created to unlock your device.
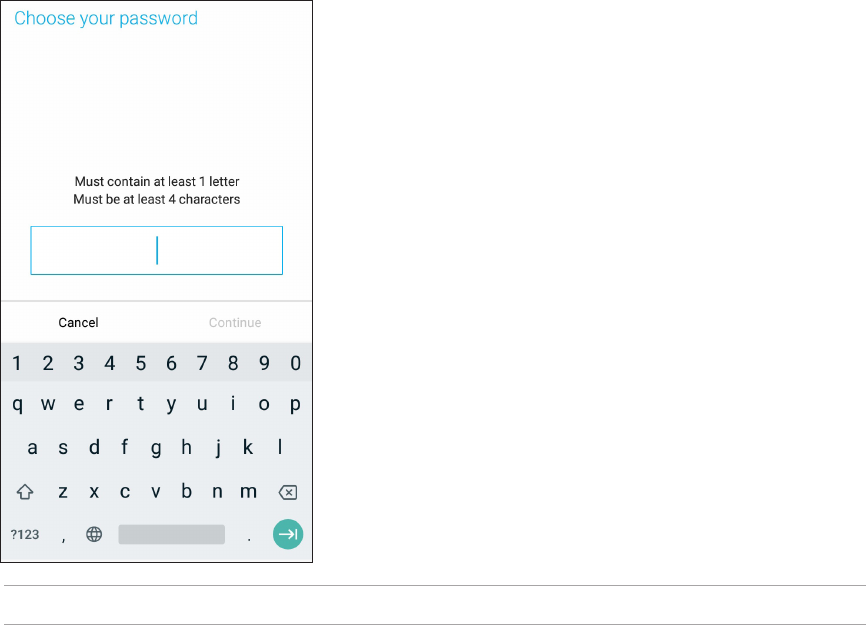
79
Chapter 10: Maintain your Zen
Password
Key in at least four characters to create a password.
IMPORTANT! Ensure to remember the password that you created to unlock your device.
Setting your ASUS Phone identity
Know your ASUS Phone’s identity such as serial number, IMEI (International Mobile Equipment
Identity) number, or model number.
This is important, as when you may lose your ASUS Phone, you can contact your mobile carrier and
provide the information to blacklist the unauthorized use of your ASUS Phone.
TodisplayyourASUSPhone’sidentity:
1. Swipe up from the lower part of your Home screen then tap Settings.
2. On the Settings screen, slide down to display other items then tap System > About phone. The
About screen displays the status, legal information, model number, operating system version,
hardware, and software information of your ASUS Phone.
3. To see the serial number, SIM contact number, and IMEI of your ASUS Phone, tap Status.

80
Appendix
Appendix
Safety information
CAUTION! Use of controls or adjustments or performance of procedures other than those specied
herein may result in hazardous radiation exposure.
ASUS Phone care
• UseyourASUSPhoneinanenvironmentwithambienttemperaturesbetween0°C(32°F)and
35 °C (95 °F).
The battery
WARNING: Disassembling the battery by yourself will void its warranty and may cause serious harm.
Your ASUS Phone is equipped with a high performance non-detachable Li-polymer battery.
Observe the maintenance guidelines for a longer battery life.
• Donotremovethenon-detachableLi-polymerbatteryasthiswillvoidthewarranty.
• Avoidcharginginextremelyhighorlowtemperature.Thebatteryperformsoptimallyinan
ambienttemperatureof+5°Cto+35°C.
• Donotremoveandreplacethebatterywithanon-approvedbattery.
• UseonlyASUSbattery.Usingadierentbatterymaycausephysicalharm/injuryandmay
damage your device.
• Donotremoveandsoakthebatteryinwateroranyotherliquid.
• Nevertrytoopenthebatteryasitcontainssubstancesthatmightbeharmfulifswallowedor
allowed to come into contact with unprotected skin.
• Donotremoveandshort-circuitthebattery,asitmayoverheatandcauseare.Keepitaway
from jewelry or metal objects.
• Donotremoveanddisposeofthebatteryinre.Itcouldexplodeandreleaseharmful
substances into the environment.
• Donotremoveanddisposeofthebatterywithyourregularhouseholdwaste.Takeittoa
hazardous material collection point.
• Donottouchthebatteryterminals.

81
• Toavoidreorburns,donotdisassemble,bend,crush,orpuncturethebattery.
NOTES:
• Riskofexplosionifbatteryisreplacedbyanincorrecttype.
• Disposeofusedbatteryaccordingtotheinstructions.
The charger
• UseonlythechargersuppliedwithyourASUSPhone.
• Neverpullthechargercordtodisconnectitfromthepowersocket.Pullthechargeritself.
Caution
Your ASUS Phone is a high quality piece of equipment. Before operating, read all instructions and
cautionary markings on the (1) AC Adapter.
• DonotusetheASUSPhoneinanextremeenvironmentwherehightemperatureorhigh
humidity exists. The ASUS Phone performs optimally in an ambient temperature between 0 °C
(32 °F) and 35 °C (95 °F).
• DonotdisassembletheASUSPhoneoritsaccessories.Ifserviceorrepairisrequired,returnthe
unit to an authorized service center. If the unit is disassembled, a risk of electric shock or re may
result.
• Donotshort-circuitthebatteryterminalswithmetalitems.
Operator access with a tool
If a TOOL is necessary to gain access to an OPERATOR ACCESS AREA, either all other compartments
within that area containing a hazard shall be inaccessible to the OPERATOR by the use of the same
TOOL, or such compartments shall be marked to discourage OPERATOR access.
82
Notices
EU Radio Equipment Directive Compliance
Simplied EU Declaration of Conformity
Hereby,ASUSTekComputerInc.declaresthattheradioequipmentASUS_X00RDisincompliance
with Directive 2014/53/EU. Full text of EU declaration of conformity is available at https://www.
asus.com/support/. (Search for ZA550KL)
RF Output Table
NOTE: ThisRFoutputpowertableisforEUmemberstates,theEEAStates,theEFTAStatesandTurkey
only. The frequency range and the RF output power may dier from other non-EU countries.
RF Exposure Information
This ASUS product has been tested and meets applicable European SAR limits. The SAR limit is 2.0
W/kg in countries that set the limit averaged over 10 grams of tissue. The specic maximum SAR
valuesforthisdeviceareasfollows:
• Head:0.423W/Kg@10g
• Body:1.454W/Kg@10g
When carrying this device or using it while worn on the body, either use an approved accessory
such as a holster or otherwise maintain a distance of 5 mm from the body to ensure compliance
with RF exposure requirements.
Items Maximum Radio-Frequency Output Power Table
Bluetooth Bluetooth BR/EDR (2402~2480 MHz) 6.68 dBm
Bluetooth LE (2402~2480 MHz) 0.85 dBm
WLAN
2.4GHz 802.11b (2412~2472 MHz) 15.96 dBm
2.4GHz 802.11g (2412~2472 MHz) 13.91 dBm
2.4GHz 802.11n HT20 (2412~2472 MHz) 12.13 dBm
2.4GHz 802.11n HT40 (2422~2462 MHz) 12.05 dBm
GSM GSM 900 Burst (880~915; 925~960 MHz) 32.99 dBm
GSM 1800 Burst (1710~1785; 1805~1880 MHz) 30.35 dBm
WCDMA WCDMA Band I (1920~1980; 2110~2170 MHz) 22.87 dBm
WCDMA Band VIII (880~915; 925~960 MHz) 23.06 dBm
LTE
LTE Band I (1920~1980; 2110~2170 MHz) 23.06 dBm
LTE Band III (1710~1785; 1805~1880 MHz) 23.07 dBm
LTE Band V (824~849; 869~894 MHz) 22.61 dBm
LTE Band VII (2500~2570; 2620~2690 MHz) 23.33 dBm
LTE Band VIII (880~915; 925~960 MHz) 22.75 dBm
LTEBandXX(832~862;791~821MHz) 22.75 dBm
LTEBandXL(2300~2400MHz) 22.70 dBm
83
CE Marking
Using GPS (Global Positioning System) on your ASUS Phone
TousetheGPSpositioningfeatureonyourASUSPhone:
Ensure that your device is connected to the Internet before using Google Map or any GPS-enabled
apps.
For rst-time use of a GPS-enabled app on your device, ensure that you are outdoors to get the
best positioning data.
When using a GPS-enabled app on your device inside a vehicle, the metallic component of the car
window and other electronic devices might aect the GPS performance.
For India only:
This ASUS product has been tested and meets applicable European SAR limits. The SAR limit is 2.0
W/kg in countries that set the limit averaged over 1 grams of tissue. The specic maximum SAR
valuesforthisdeviceareasfollows:
• Head:0.468W/Kg@1g
• Body:0.981W/Kg@1g
When carrying this device or using it while worn on the body, either use an approved accessory
such as a holster or otherwise maintain a distance of 10 mm from the body to ensure compliance
with RF exposure requirements.
Prevention of Hearing Loss
To prevent possible hearing damage, do not listen at high volume levels for long periods.
For France, headphones/earphones for this device are compliant with the sound pressure level
requirementlaiddownintheapplicableEN50332-1:2013and/orEN50332-2:2013standard
required by French Article L.5232-1.
General Usage (typical body-worn) (for Japan)
This device ( (front & rear side) should be operated under a seperation distance of 5 mm from the
human body.
* The other four sides are not in close proximity to the human body at the general use as described
above.
84
Regional notice for Singapore
This ASUS product complies with IMDA Standards.
Coating notice
IMPORTANT! To provide electrical insulation and maintain electrical safety, a coating is applied to
insulate the device except on the areas where the I/O ports are located.
Green ASUS notice
ASUS is devoted to creating environment-friendly products and packaging to safeguard consumers’
health while minimizing the impact on the environment. The reduction of the number of the
manual pages complies with the reduction of carbon emission.
For the detailed user manual and related information, refer to the user manual included in the
ASUS Tablet or visit the ASUS Support Site at http://support.asus.com/.
ASUS Recycling/Takeback Services
ASUS recycling and takeback programs come from our commitment to the highest standards for
protecting our environment. We believe in providing solutions for you to be able to responsibly
recycle our products, batteries, other components as well as the packaging materials. Please go to
http://csr.asus.com/english/Takeback.htm for detailed recycling information in dierent regions.
Manufacturer: ASUSTeK Computer Inc.
Address: 4F, No.150, LI-TE RD., PEITOU, TAIPEI 112, TAIWAN
Authorised representative in Europe: ASUS Computer GmbH
Address: HARKORT STR. 21-23, 40880 RATINGEN, GERMANY
Modelname:ASUS_X00RD(ZA550KL)
India E-waste (Management and handling) Rules 2016
This product complies with the “India E-Waste (Management) Rules, 2016” and prohibits use of lead,
mercury, hexavalent chromium, polybrominated biphenyls (PBBs) and polybrominated diphenyl
ethers (PBDEs) in concentrations exceeding 0.1% by weight in homogenous materials and 0.01 %
by weight in homogenous materials for cadmium, except for the exemptions listed in Schedule II of
the Rule.
India BIS - IS 16333 Notice
LanguageInput:Hindi,English,Tamil
Readability:Assamese,Bangla,Bodo(Boro),Dogri,Gujarati,Hindi,Kannada,Kashmiri,Konkani,
Maithili, Malayalam, Manipuri(Bangla), Manipuri(Meetei Mayek), Marathi, Nepali, Oriya, Panjabi,
Santhali, Sanskrit, Sindhi (Devanagari) ,Tamil, Telugu, Urdu and English
Index
A
Advanced camera features 57
ASUS Phone 8
- charging 11
- Parts and features 8
- turning on/o 13
B
Backup and reset 76
Beauty
- see also Advanced camera features 57
Block list 51
- blocking 51
- unblocking 51
Bluetooth 62
- enabling 62
- pairing 63
- unpairing 63
C
Calculator 71
Call logs 45
- redial your last-called number 46
- saving calls to Contacts 45
Calls 43
- answering 45
- calling from Contacts 44
- calling your favorite contacts 45
- dialing a phone number 43
- launching the Phone app 43
- other call options 46
- receiving 45
- recording 47
- see also Contacts 48
- see Call logs 45
- see Extension number 43
- see Multiple calls 47
- see Smart Dialing 44
Camera 55
- camera home screen 56
- launching 55
- photo Locations 56
- see Advanced camera features 57
Chrome 33
- bookmarking pages 34
- clearing the browser cache 34
- launching 33
- reading the pages later 34
- sharing pages 34
Index
Clock 68
- alarm clock 68
- launching 68
- stopwatch 69
- timer 70
- world clock 69
Cloud 39
- ASUS WebStorage 39
Contacts 48
- adding 49
- adding an extension number 49
- contacts settings 48
- customizing your contact’s prole 50
- see also Social networking 51
- setting up your prole 48
D
Date and time 28
- setting up 28
Dual SIM feature 41
- assigning 42
- renaming 41
- SIM card for data service 42
- SIM card for SMS messages 42
- SIM card for voice calls 42
E
Easy Mode 23
- adding contacts 25
- adding shortcuts 24
- disabling 25
- enabling 23
- removing contacts 25
- removing shortcuts 24
Extension number 43
- auto dialing 44
- conrmation prompt 43
- dialing 43
F
Face Unlock 30
Favorite contacts 45
- calling 45
- marking 50
File Manager 38
First-time startup 14
G
Gallery 59
- deleting les 59
- editing images 60
- sharing les 59
- viewing the photo location 59
Gmail 35
Google Calendar 36
- Creating events 36
- Creating reminders 37
- Editing or removing events 36
- Editing or removing reminders 37
Google Messenger 52
- replying to messages 52
- sending messages 52
Google Play Music 54
- setting up your Google Play Music 54
H
Headset 53
- connecting 53
Home screen 18
- personalizing 21
- see also Easy Mode 23
- see also Wallpapers 22
- see also Widgets 21
K
Kids Mode 26
- using Kids Mode 26
L
Lock screen 29
- customizing 29
M
Managing your call logs 45
- redialing your last-called number 46
- saving to Contacts 45
MicroSD 9
- installing 9
- removing 10
Mobile Manager 74
Mobile network 61
- enabling 61
Multiple calls 47
- answering another call 47
N
Nano SIM card 9
- installing 9
- removing 10
Notications 20
P
Panorama
- see also Advanced camera features 57
PowerMaster 75
Q
Quick settings 19
- adding or removing buttons 19
R
Ringtone 28
- setting up 28
- Sound & Vibration 28
S
Security 77
Smart Dialing 44
Social networking 51
Sound Recorder 72
- pausing a recording 73
- recording list 73
Storage 76
System 76
- updating 76
T
Tethering 64
- Bluetooth Tethering 65
- USB Tethering 65
- Wi-Fi Hotspot 64
Time lapse
- see also Advanced camera features 57
Touchscreen 15
- launching apps or selecting items 15
- moving or deleting items 15
- moving through pages or screens 16
- zooming in 16
- zooming out 17
W
Wallpapers 22
- animated wallpaper 22
Weather 66
- launching 66
- weather home screen 67
WebStorage 39
Widgets 21
Wi-Fi 61
- connecting 62
- disabling 62
- enabling 61
- see also Wi-Fi Hotspot 64
Z
ZenUI 7
ZenUI FAQ 40
