Hyperledger Blockchain Setup Instructions Local Docker
User Manual:
Open the PDF directly: View PDF ![]() .
.
Page Count: 20

!
!
BLOCKCHAIN!ON!LOCAL!SETUP!
INSTRUCTIONS!
!!!!!
!
!!!!!!
!!!!!
Abstract!
This!document!covers!instructions!for!setting!up!Blockchain!network!on!local!Windows!machine
!
Contents'
Introduction!.................................................................................................................................................!3
A.!Install!Docker!Toolbox!on!Windows!Machine!......................................................................................!3
B.!Setup!Blockchain!(Hyperledger)!network!using!docker!images!...........................................................!7
C.!Run!a!Sample!Application!–!Marbles!Application!................................................................................!9
D.!Test!Blockchain!Network!–!If!you!want!to!test!your!chaincode!.........................................................!13
Through!CLI!........................................................................................................................................!13
Through!REST!API!...............................................................................................................................!14
!
'
!
!
'
'
'
'
'
'
'
'
Introduction'
This document covers setting up a Blockchain Network (with one peer + membership service)
on your local machine for various development and testing activities on Windows machine. It will
list the instructions that simply leverages the Docker images that the Hyperledger Fabric project
publishes to DockerHub.
Follow the instructions below to setup Blockchain network locally on Windows machine.
Note : Sections A. B and C are mandatory to setup Blockchain Network and get a sample
application running. Section D can be referred when you want to develop chaincode and
test it on the network
A.'Install'Docker'Toolbox'on'Windows'Machine'
'
1. To run Docker, your machine must have a 64-bit operating system running Windows
7 or higher. Additionally, you must make sure that virtualization is enabled on your
machine.
Follow the steps mentioned on the link
(https://docs.docker.com/toolbox/toolbox_install_windows/) to verify the
requirements.
2. Go to the Docker Toolbox page.
3. Click the installer link to download.
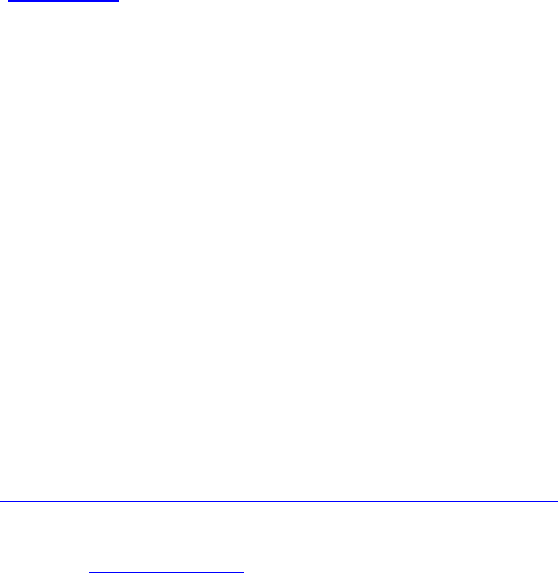
4. Install Docker Toolbox by double-clicking the installer.
The installer launches the “Setup - Docker Toolbox” dialog.
If Windows security dialog prompts you to allow the program to make a change,
choose Yes. The system displays the Setup - Docker Toolbox for Windows
wizard.
5. Press Next to accept all the defaults and then Install.
Accept all the installer defaults. The installer takes a few minutes to install all the
components:
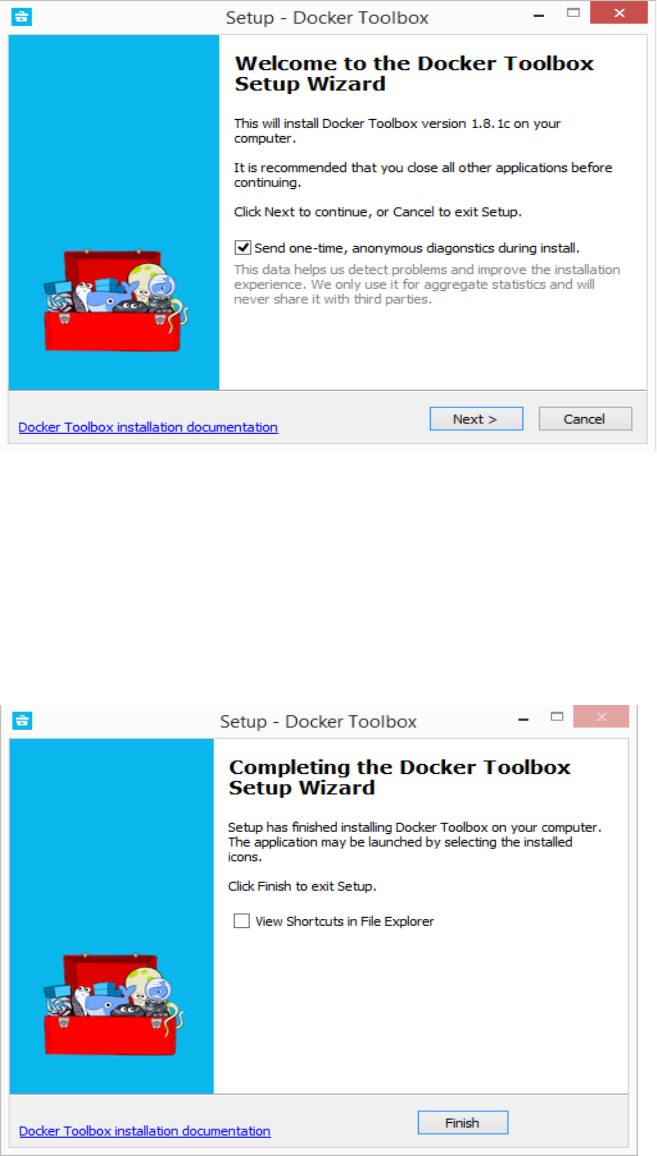
6. When notified by Windows Security the installer will make changes, make sure you
allow the installer to make the necessary changes.
When it completes, the installer reports it was successful:
7. On your Desktop, find the Docker Toolbox icon.
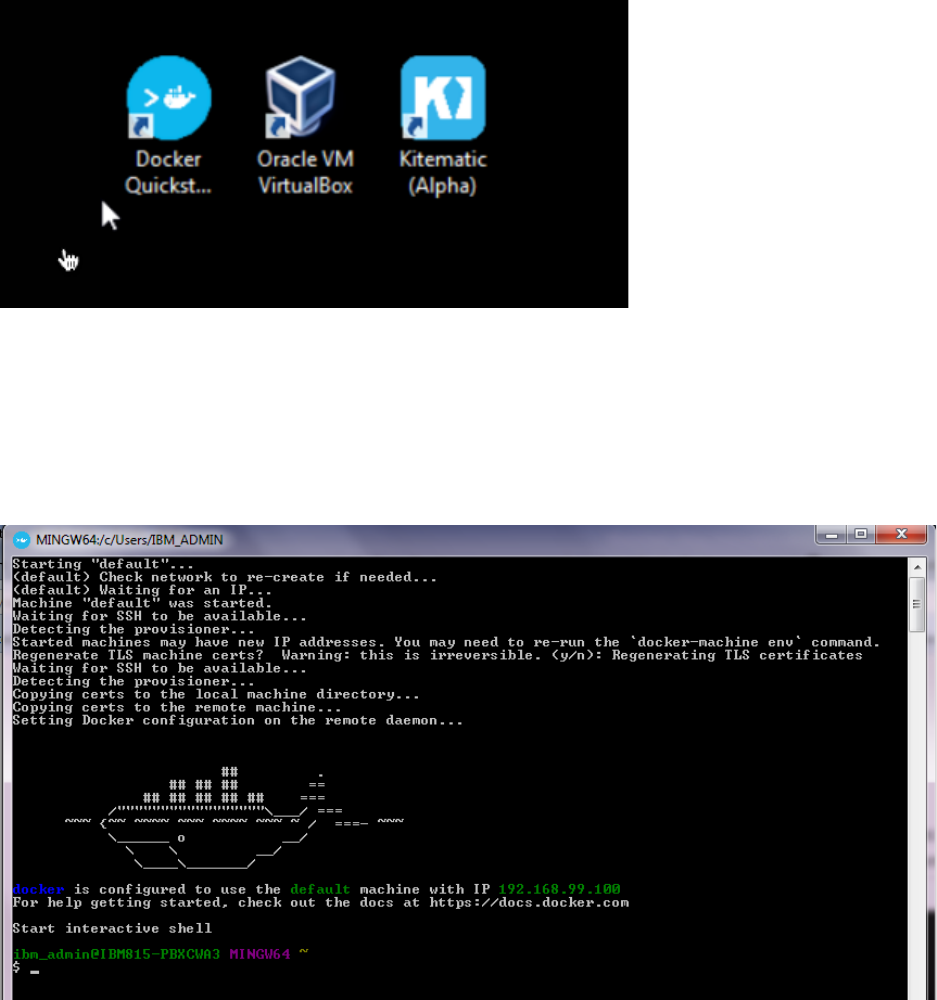
8. Click the icon to launch a Docker Toolbox terminal.
If the system displays a User Account Control prompt to allow VirtualBox to make
changes to your computer. Choose Yes.
The terminal does several things to set up Docker Toolbox for you. When it is done,
the terminal displays the $ prompt.
9. Note down IP address of the docker machine printed in the screen as above.
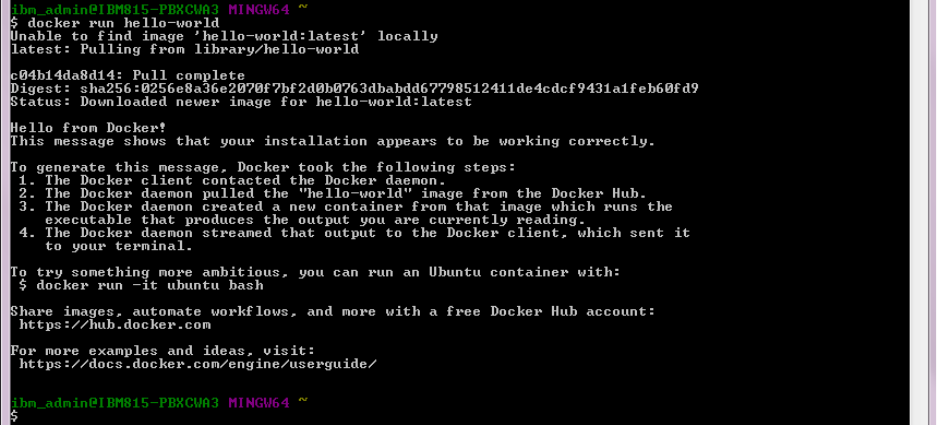
10. Verify docker installation
Type the docker run hello-world command and press RETURN.
The command does some work for you, if everything runs well, the command’s
output looks like this:

B.'Setup'Blockchain'(Hyperledger)'network'using'docker'images'
1. Execute following commands to pull docker images required to run Blockchain locally
docker pull hyperledger/fabric-peer
docker pull hyperledger/fabric-membersrvc
docker pull hyperledger/fabric-baseimage:x86_64-0.2.1
2. Change tag of fabric-baseimage to latest.
This is required due to the issue https://jira.hyperledger.org/browse/FAB-300 as a
workaround
docker tag <image-id> hyperledger/fabric-baseimage:latest
image-id : image id of baseimage can be found by running command “docker
images”
3. Create a directory
e.g mkdir blockchain-compose
cd blockchain-compose
4. Create docker-compose.yml file with the below contents
membersrvc:
image: hyperledger/fabric-membersrvc
ports:
- "7054:7054"
command: membersrvc
vp0:
image: hyperledger/fabric-peer
ports:
- "7050:7050"
- "7051:7051"
- "7053:7053"
environment:
- CORE_PEER_ADDRESSAUTODETECT=true
- CORE_VM_ENDPOINT=unix:///var/run/docker.sock
- CORE_LOGGING_LEVEL=DEBUG
- CORE_PEER_ID=vp0
- CORE_PEER_PKI_ECA_PADDR=membersrvc:7054
- CORE_PEER_PKI_TCA_PADDR=membersrvc:7054
- CORE_PEER_PKI_TLSCA_PADDR=membersrvc:7054
- CORE_SECURITY_ENABLED=true
- CORE_SECURITY_ENROLLID=test_vp0
- CORE_SECURITY_ENROLLSECRET=MwYpmSRjupbT
volumes:
- /var/run/docker.sock:/var/run/docker.sock
links:
- membersrvc
command: sh -c "sleep 5; peer node start"
5. Run following command to start the Blockchain network with the images
(More information about docker compose can be found at :
https://docs.docker.com/compose/ )
Docker-compose up
Make sure that to errors or failed messages displayed on the screen.
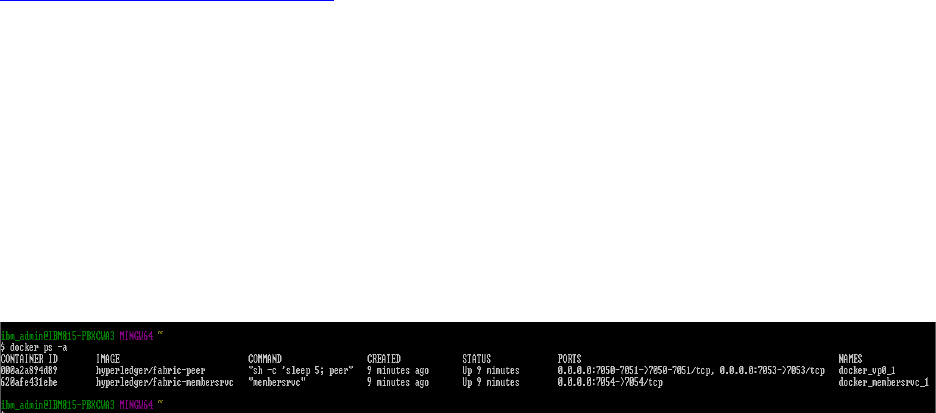
6. You can check running container by executing following command
docker ps -a
Example output :
C.'Run'a'Sample'Application'–'Marbles'Application'
Refer: https://github.com/spansare/marbles
This is a nodejs based application which has been written using Nodejs SDK for
Blockchain. This application demonstrates transferring marbles between two users
leveraging IBM Blockchain
Follow the Steps below to run the application
1. Install Nodejs Runtime
a. Download the Windows installer from the Nodes.js® web site
b. Run the installer (the .msi file you downloaded in the previous step.)
c. Follow the prompts in the installer (Accept the license agreement, click the
NEXT button a bunch of times and accept the default installation settings).
d. Restart your computer. You won’t be able to run Node.js® until you restart
your computer.
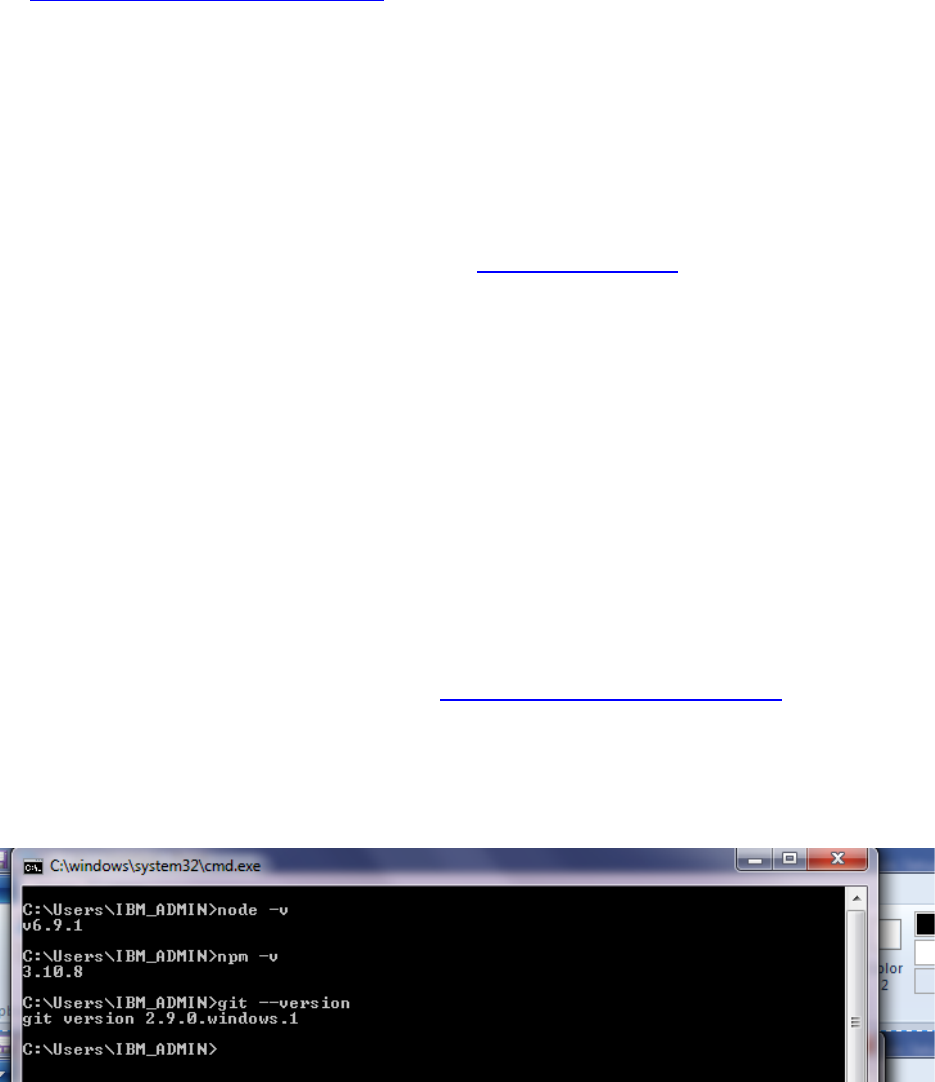
e. Test Node. To see if Node is installed, open the Windows Command Prompt,
Powershell or a similar command line tool, and type node -v
2. Install git for windows
a. Download the Windows installer from https://git-for-windows.github.io/
b. Run the exe
c. Verify the installation
3. Clone the Sample Marbles application on the local Windows machine
a. Open command prompt and create a directory to clone the application

mkdir local-marbles
cd local-marbles
b. Run below command to clone the application code from github
git clone https://github.com/spansare/marbles
4. Run the application – Execute command below
a. Change to marbles directory – cd marbles
b. Open mycreds.json file. This is the file which will contain all the details about
your blockchain network.
Verify the IP Address. It should be the one noted in Section A Step 9.
If not, change it accordingly.
c. npm install gulp -g
d. npm install
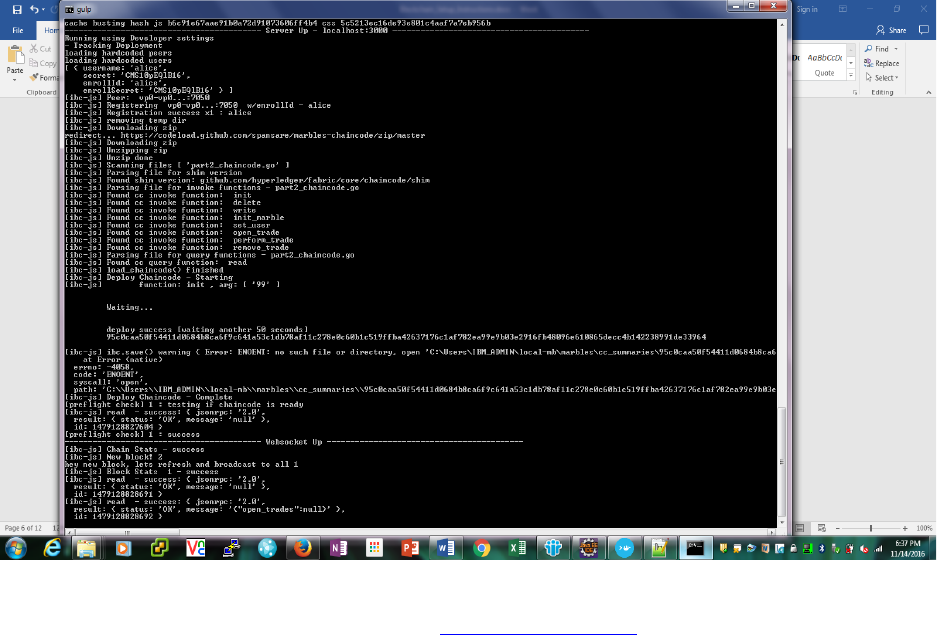
e. gulp
f. If all goes well you should see this message in the console:
-------------------------------- Server Up - localhost:3000 -------------------------------
g. The app is already coded to auto deploy the chaincode. You should see
further message about it deploying. [IMPORTANT] You will need to wait
about 60 seconds for the cc to fully deploy. The SDK will do the waiting for us
by stalling our callback.
h. Once you see this message you are good to go:
[ibc-js] Deploying Chaincode - Complete
----------------------- Websocket Up -----------------------
5. Use the application
a. Open up your browser and browse to http://localhost:3000
b. Click the "Create" link on the top navigation bar
c. Fill out all the fields, then click the "Create" button
d. It should have flipped you back to "Home" and you should see that a new
marble has been created
e. Next let’s trade a marble. Click and drag one marble from one person's list to
another. It should temporary disappear and then auto reload the marbles in
their new state.
f. You can view all the transactions at the bottom of the application page

You have the sample application ready to use.
Note : Next Section is optional. If you have developed your own chaincode and
want to test that on the network, you can refer next section, else it can be
skipped
D.'Test'Blockchain'Network'–'If'you'want'to'test'your'chaincode'
There are 2 ways to test the network as listed below. You can use either of them
Through'CLI'
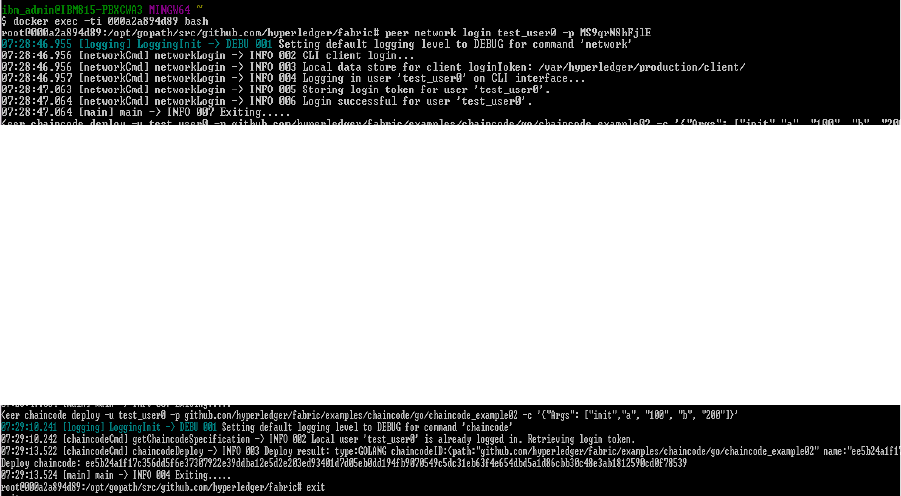
a. Open another Quickstart Docker Terminal.
Login to peer container
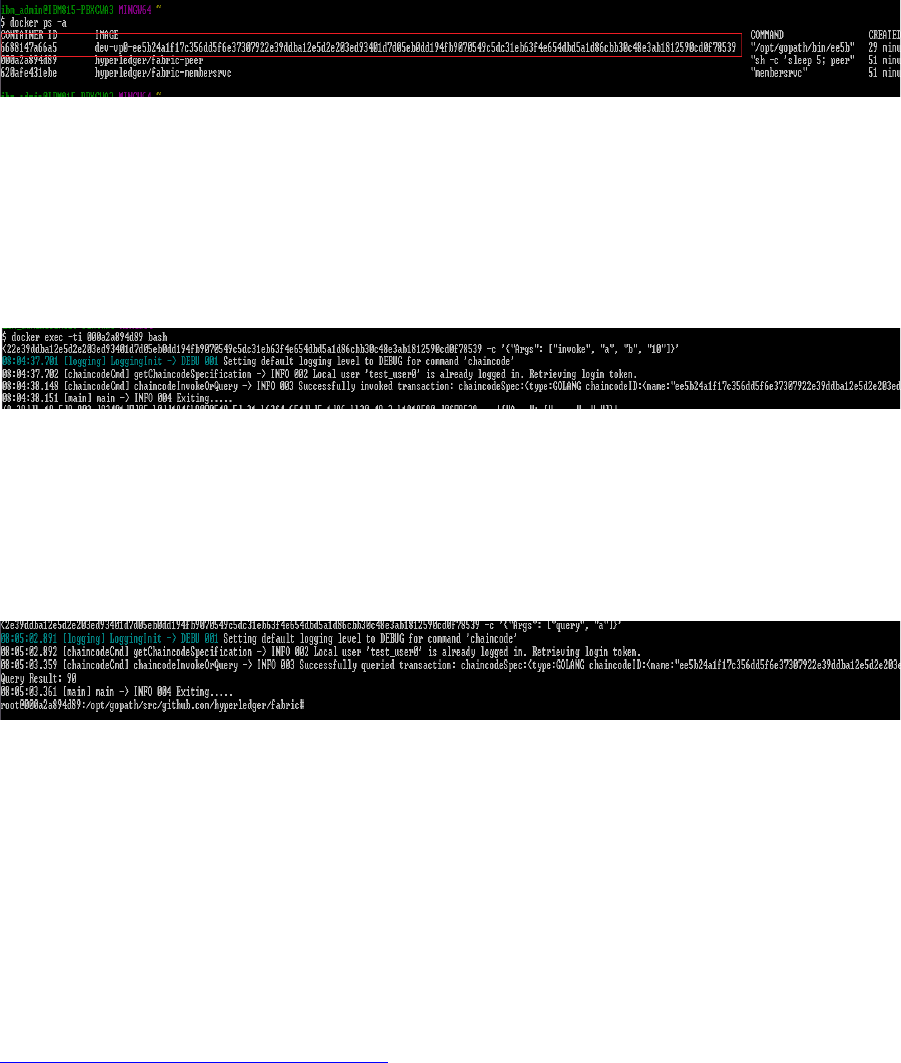
Docker exec -ti <container-id> bash
container-id : container id of the peer can be found by running “docker ps -a”
command.
b. Execute following command to login into the network with user ‘test_user0’
Note : Users are pre-created for the network and their details can be found in file
membersrvc.yaml in membersrvc container.
peer network login test_user0 -p MS9qrN8hFjlE
c. Execute following command to deploy chaincode
peer chaincode deploy -u test_user0 -p
github.com/hyperledger/fabric/examples/chaincode/go/chaincode_example02 -c
'{"Args": ["init","a", "100", "b", "200"]}'
github.com/hyperledger/fabric/examples/chaincode/go/chaincode_example02 :
Sample chaincode which can be used to test the blockchain network
It will return hashcode for the deployed chaicode.
This process takes sometime even though command is completed.
Note : To verify chaincode deploy was successful, execute “docker ps -a”
command (from Quickstart Docker terminal) and check if one more container is
added to the list and is in running state.
Also, make sure there are no errors thrown on the terminal where “docker-
compose up” command was initiated.
d. Execute following command to invoke chaincode
peer chaincode invoke -u test_user0 -n
ee5b24a1f17c356dd5f6e37307922e39ddba12e5d2e203ed93401d7d05eb0dd19
4fb9070549c5dc31eb63f4e654dbd5a1d86cbb30c48e3ab1812590cd0f78539 -c
'{"Args": ["invoke", "a", "b", "10"]}'
e. Execute following command to query chaincode
peer chaincode query -u test_user0 -n
ee5b24a1f17c356dd5f6e37307922e39ddba12e5d2e203ed93401d7d05eb0dd19
4fb9070549c5dc31eb63f4e654dbd5a1d86cbb30c48e3ab1812590cd0f78539 -c
'{"Args": ["query", "a"]}'
Through'REST'API'
a. Use the IP address printed on Quickstart Docker Terminal (as mentioned in
Section A Step 9) as REST API Endpoint for REST API invocation.
b. Use any REST Client (e.g. REST Client for Firefox or Postman for Chrome)
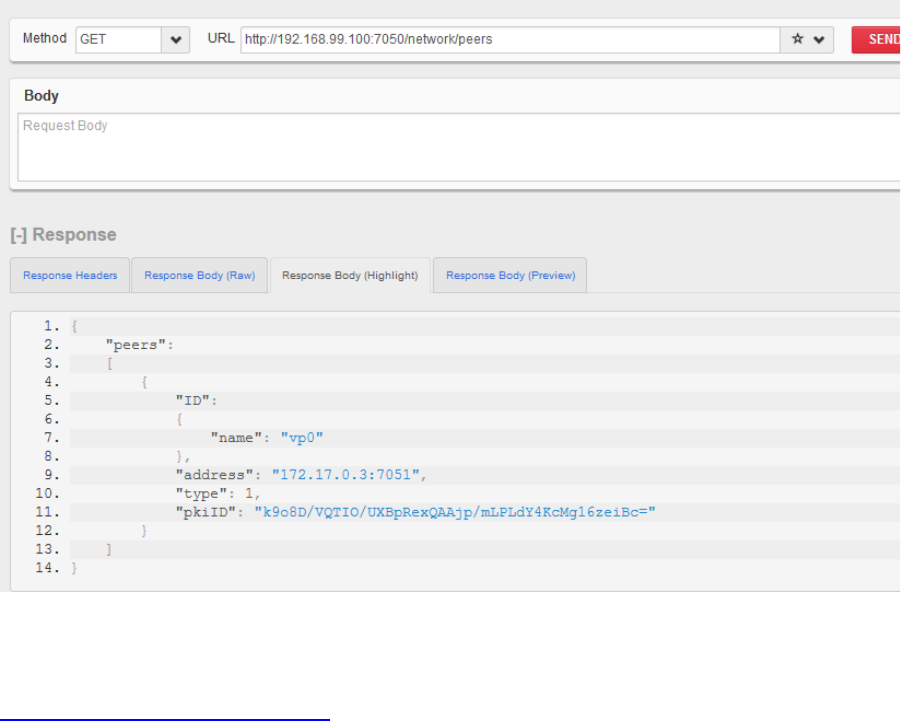
c. Use the GET call below to make sure REST API endpoint is configured correctly.
http://<IP Address>:7050/network/peers
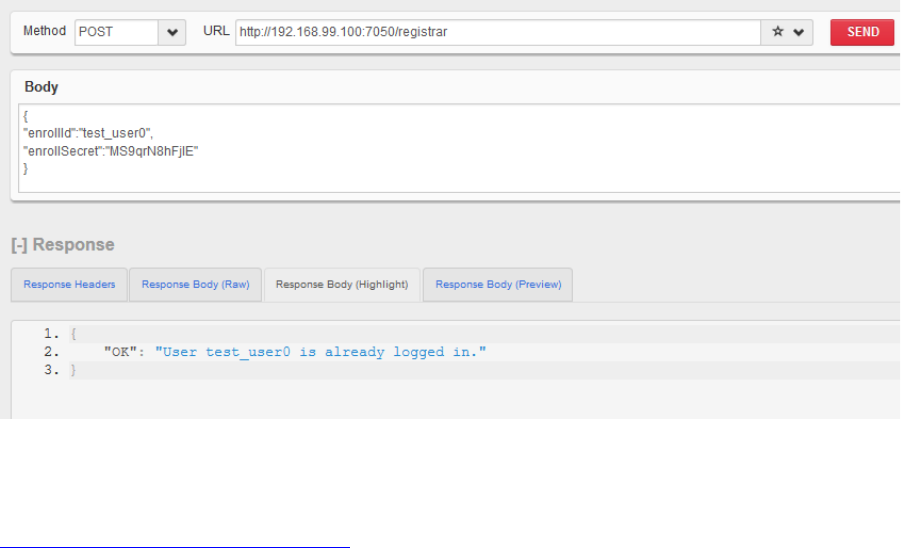
d. Use POST call to register the User
http://<IP Address>:7050/registrar
with Body as:
{
"enrollId":"test_user0",
"enrollSecret":"MS9qrN8hFjlE"
}
e. Deploy Chaincode with REST API
http://<IP Address>:7050/chaincode
With Body as:
{
"jsonrpc": "2.0",
"method": "deploy",
"params": {
"type": 1,
"chaincodeID": {
"path":
"github.com/hyperledger/fabric/examples/chaincode/go/chaincode_example02"
},
"ctorMsg": {
"function": "init",
"args": [
"a",
"100",
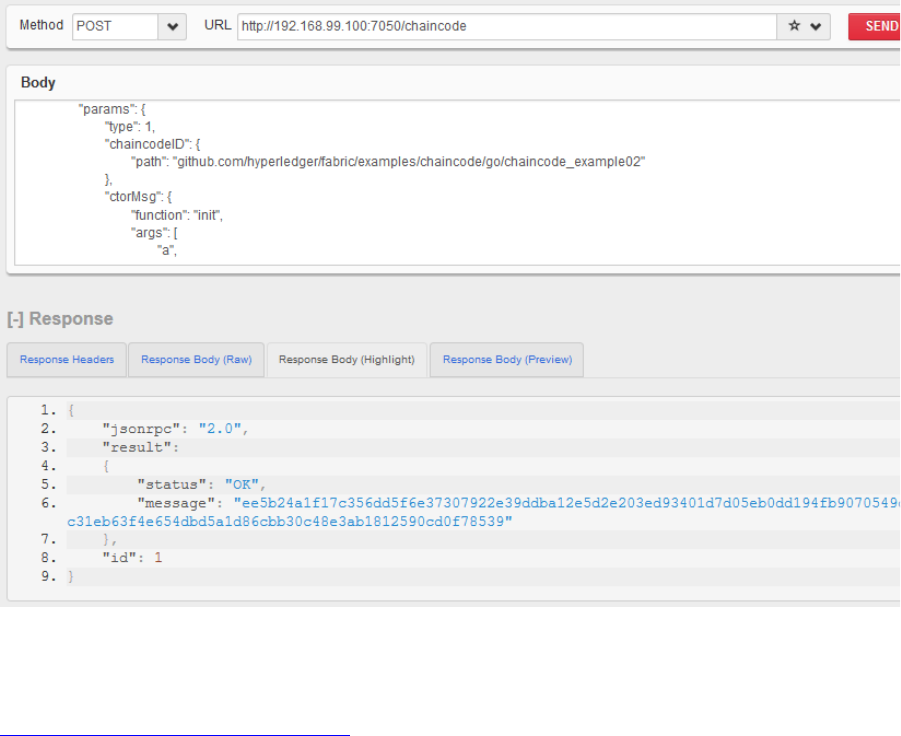
"b",
"200"
]
},
"secureContext": "test_user0"
},
"id": 1
}
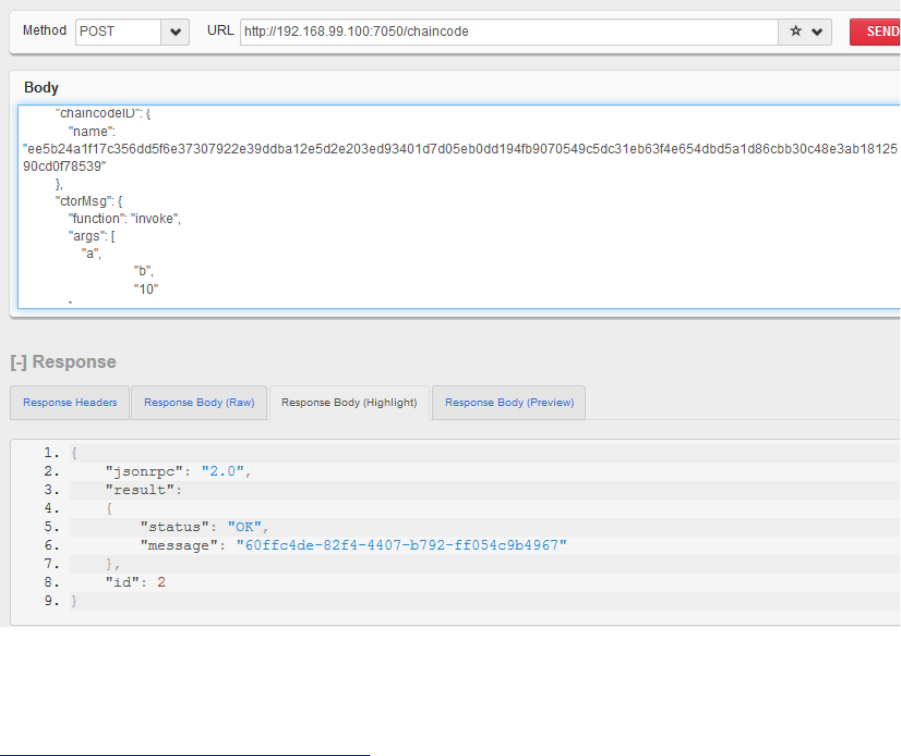
f. Invoke Chaincode with REST API
http://<IP Address>:7050/chaincode
With Body as :
{
"jsonrpc": "2.0",
"method": "invoke",
"params": {
"type": 1,
"chaincodeID": {
"name":
"ee5b24a1f17c356dd5f6e37307922e39ddba12e5d2e203ed93401d7d05eb0dd19
4fb9070549c5dc31eb63f4e654dbd5a1d86cbb30c48e3ab1812590cd0f78539"
},
"ctorMsg": {
"function": "invoke",
"args": [
"a",
"b",
"10"
]
},
"secureContext": "test_user0"
},
"id": 2
}
g. Query Chaincode with REST API
http://192.168.99.100:7050/chaincode
With Body as:
{
"jsonrpc": "2.0",
"method": "query",
"params": {
"type": 1,
"chaincodeID": {
"name":
"ee5b24a1f17c356dd5f6e37307922e39ddba12e5d2e203ed93401d7d05eb0dd19
4fb9070549c5dc31eb63f4e654dbd5a1d86cbb30c48e3ab1812590cd0f78539"
},
"ctorMsg": {
"function": "read",
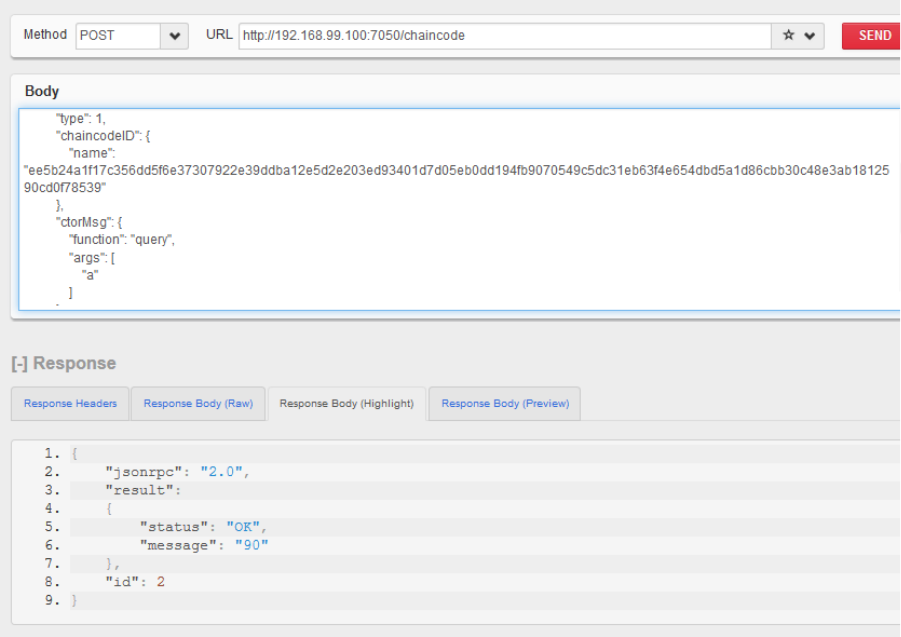
"args": [
"a"
]
},
"secureContext": "test_user0"
},
"id": 2
}
!
