NX870E FIRE SUPERVISION MODULE NX 870E Dual Dialer Installation Manual Rev C
NX-870E Fire Supervision Dual Dialer Installation Manual Rev C NX-870E Fire Supervision Dual Dialer Installation Manual Rev C
User Manual: NX-870E Fire Supervision Dual Dialer Installation Manual Rev C AlarmHow.net Library
Open the PDF directly: View PDF ![]() .
.
Page Count: 8

NetworX™ Series
NX-870E Fire Supervision Module
Installation and Startup

© 2005 GE Security
All rights reserved. Printed in the USA.
NetworX™ is a trademark of GE companies.
These instructions do not purport to cover all details or variations in equipment nor to provide every possible contingency to be met during
installation, operation, and maintenance. If further information is desired or if particular problems arise that are not covered sufficiently for the
purchaser’s purpose, the matter should be referred to GE Security, Gladewater, Texas, USA.
This document contains proprietary information of GE Security, USA and is furnished to its customer solely to assist that customer in the
installation, testing, operations, and/or maintenance of the equipment described. This document shall not be reproduced in whole or in part
nor shall its contents be disclosed to any third party without the written approval of GE Security. Please refer to the current GE Security
product catalog for detailed warranty information.
TABLE OF CONTENTS
I. ORDERING INFORMATION.............................................................................................................................................2
II. GENERAL DESCRIPTION ..................................................................................................................................................3
III. TERMINAL DESCRIPTIONS..............................................................................................................................................3
IV. WIRING THE MODULE......................................................................................................................................................4
V. WIRING TO ALTRONIX POWER SUPPLY....................................................................................................................5
VI. INSTALLING THE MODULE .............................................................................................................................................6
VII. ENROLLING THE MODULE..............................................................................................................................................6
VIII. ENCLOSURE DIAGRAM ....................................................................................................................................................6
IX. UNDERWRITERS LABORATORIES REQUIREMENTS ..............................................................................................7
X. LOCAL TELEPHONE COMPANY INTERFACE.............................................................................................................7
XI. SPECIFICATIONS.................................................................................................................................................................8
I. ORDERING INFORMATION
PART # DESCRIPTION PART # DESCRIPTION
NX-8-CF NX-8 Commercial Fire Control Panel NX-8E-CF NX-8E Commercial Fire Control Panel
NX-8-CF-KIT NX-8 Commercial Fire Control Panel in NX-003-CF
Enclosure, NX-148E-CF LCD keypads (2); NX-870E
Fire Supervision module; 16.5V 50VA Transformer
NX-8E-CF-KIT NX-8E Commercial Fire Control Panel in NX-003-
CF Enclosure, NX-148E-CF LCD keypads (2); NX-
870E Fire Supervision module; 16.5V 50VA
Transformer
NX-148E-CF NX148E LCD Keypad for Commercial Fire panel (Red
plastic)
NX-208E 2 Wire Smoke Loop Expander
NX-148E-CF-W NX148E LCD Keypad for Commercial Fire panel
(White plastic)
NX-320E Remote Power Supply
NX-216E 16 Zone Expander NX-2192E PinPoint ID Module
NX-508E Eight Output Module NX-003-CF Commercial Fire Enclosure (Red)
NX-870E Fire Supervision Module
2 NX-870E Fire Supervision
II. GENERAL DESCRIPTION
The NX-870E Fire Supervision module is a microprocessor-controlled expansion module that provides the features necessary in most
fire system installations. The module facilitates the connection of two (2) phone lines to the NX-8-CF or NX-8E-CF control panel. It
provides the necessary monitoring and switching of these phone lines for a quick and easy addition to those systems that require the
additional security of a second phone line. The fire supervision module also provides a separate fully supervised bell output that can be
used to power fire annunciators separate from burglary annunciators. Additionally, it provides full supervision of the earth ground
connection required by most fire installation standards.
III. TERMINAL DESCRIPTIONS
Terminal
Description
Line 1 R
Ring terminal for the incoming primary phone line.
Line 1 T
Tip terminal for the incoming primary phone line.
Line 1 R1
Ring terminal for the building phones connected to the primary phone line. This terminal, along with T1, feeds
the incoming primary phone line to the building phones.
Line 1 T1
Tip terminal for the building phones on the primary phone line. This terminal, along with R1, feeds the
incoming primary phone line to the building phones.
ª The primary phone line will always be connected to the control when it is available.
Line 2 R
Ring terminal for the incoming secondary phone line.
Line 2 T
Tip terminal for the incoming secondary phone line.
Line 2 R1
Ring terminal for the building phones connected to the secondary phone line. This terminal, along with T1,
feeds the incoming secondary phone line to the building phones.
Line 2 T1
Tip terminal for the building phones on the secondary phone line. This terminal, along with R1, feeds the
incoming secondary phone line to the building phones.
ª The secondary phone line will only be connected to the control if the primary is not available. A failure of
the secondary phone line will be reported to the control even if it is not being used by the control.
POS
Connect to control panel BELL+ terminal. This terminal supplies power to the Fire Supervision board. With the
NX-870E connected, the BELL terminals on the NetworX control panel cannot be used as a speaker or siren
output.
GND
Connect to the control panel COMMON terminal. This terminal supplies the common side of the power to the
Fire Supervision board.
DATA
Connect to the control panel DATA terminal. This terminal is the data-signaling terminal to all the devices on
the buss.
BELL +
Connect the positive side of fire warning devices to this terminal. For full supervision of these devices connect
according to the diagram on page 4.
BELL
Connect the negative side of fire warning devices to this terminal. For full supervision of these devices
connect according to the diagram on page 4.
PIPE
Connect this terminal to the cold water pipe ground. This terminal provides supervision of the earth ground
connection to the system.
Connect to a cold water pipe ground or rod driven into the ground.
EARTH " When using the Fire Supervision module, it is important not to connect a separate earth ground
to the earth ground terminal of the control panel. This will be interpreted by the control as a
ground fault. Ground is provided to the control panel via the GND terminal of the power
connection.
NX-870E Fire Supervision 3
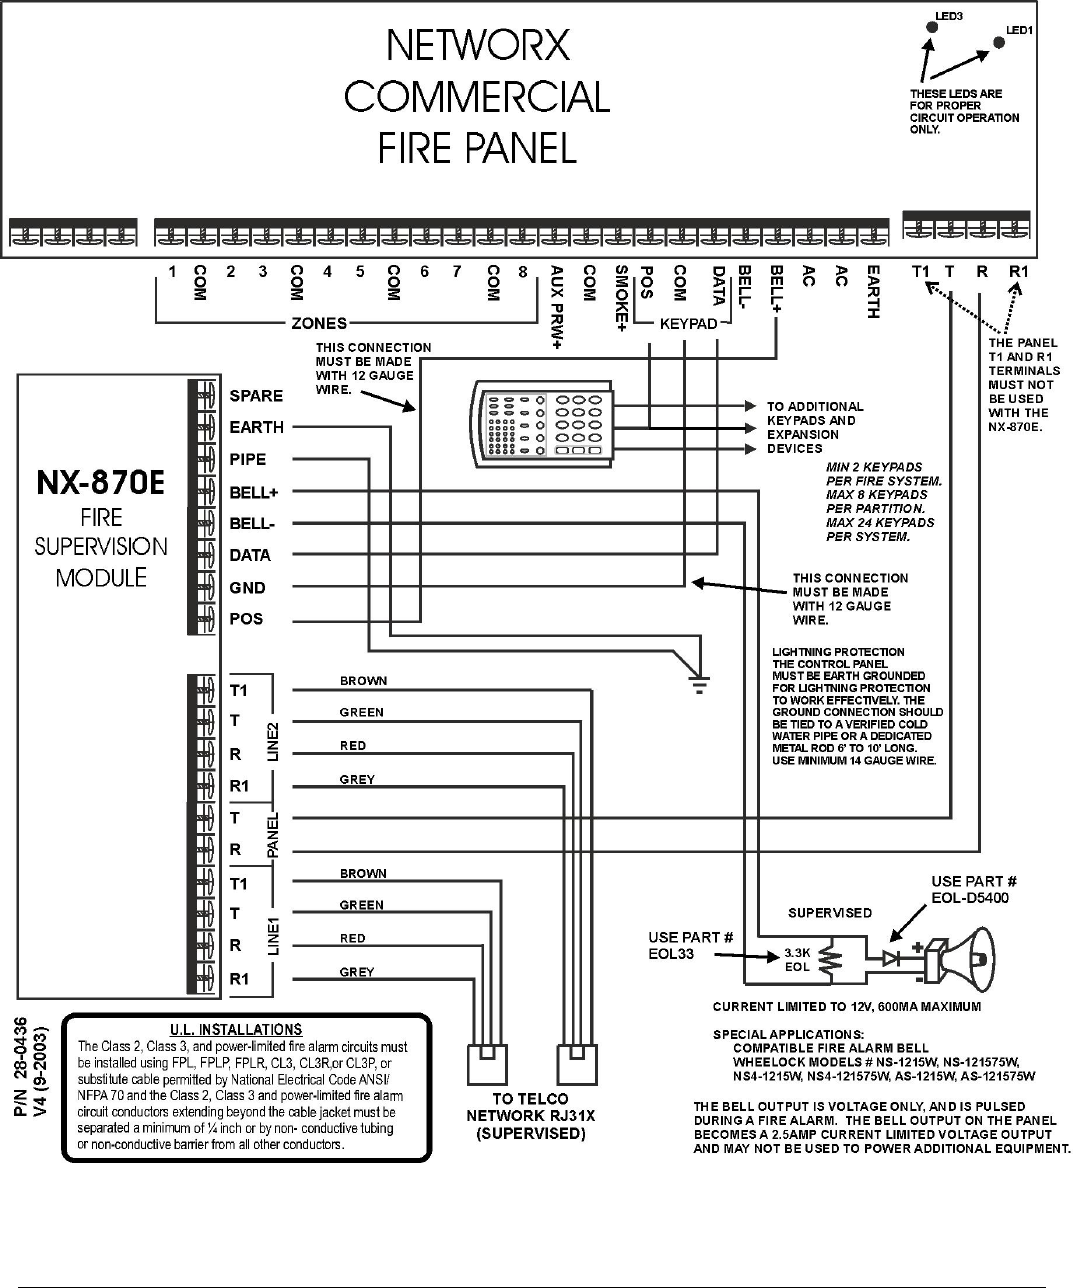
IV. WIRING THE MODULE
4 NX-870E Fire Supervision
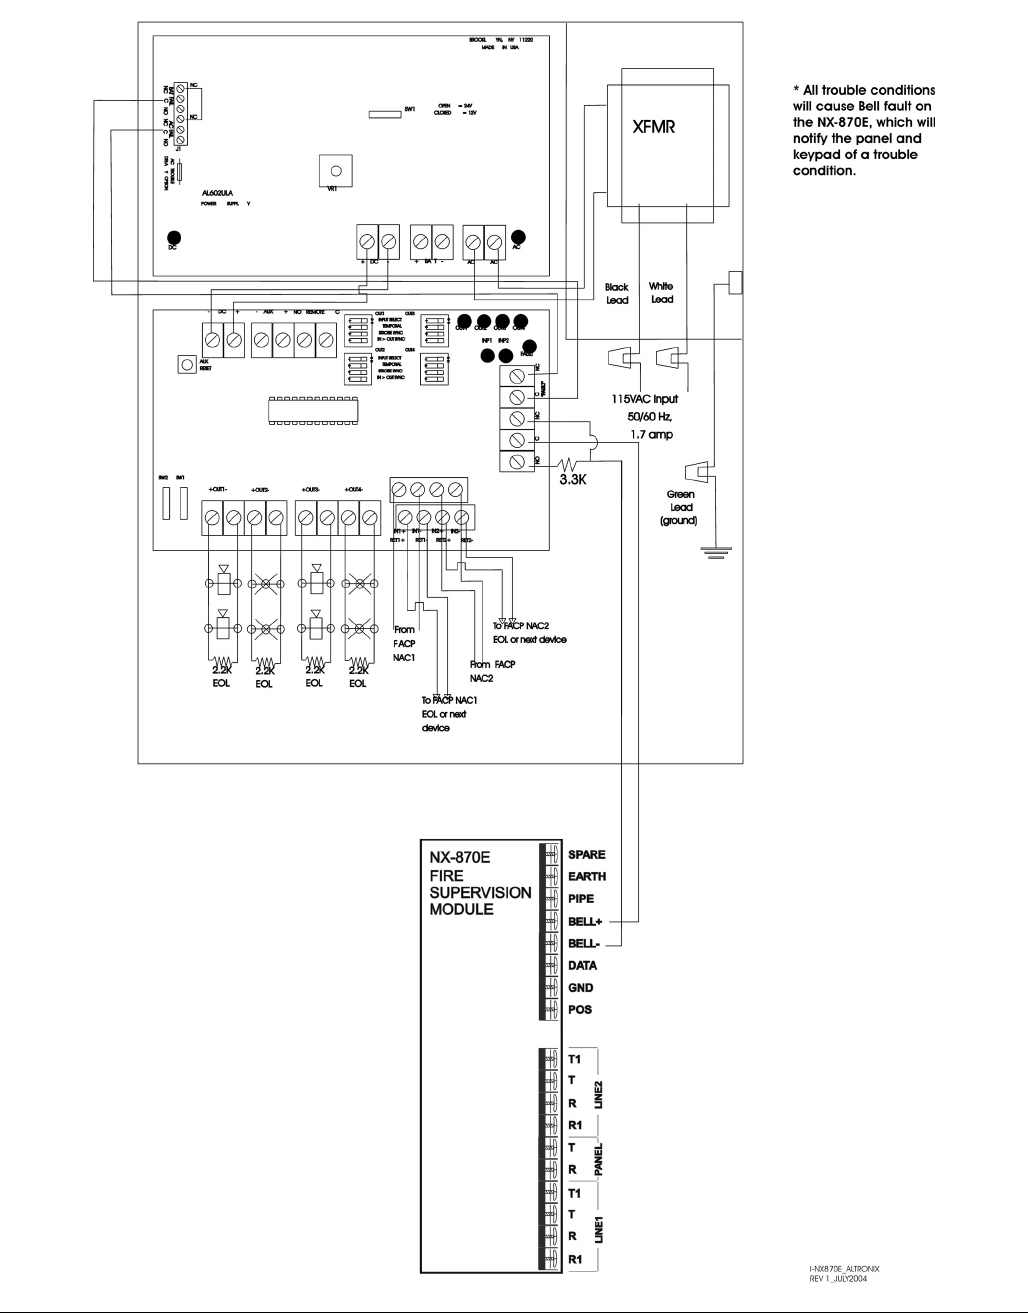
V. WIRING TO ALTRONIX POWER SUPPLY
When used with Altronix Model AL602ULADA Power Supply (12/24VDC 6.5A):
NX-870E Fire Supervision 5
VI. INSTALLING THE MODULE
The Fire Supervision module can be installed in a simple two-step process. First, wire the NX-870E according to the wiring diagram on page
4. Second, use the procedure below to enroll the Fire Supervision module into the NX-8-CF or NX-8E-CF. All functions associated with the
Fire Supervision module will be performed automatically. No programming is required beyond the enrolling process.
VII. ENROLLING THE MODULE
For supervision purposes, the NetworX control panel has the ability to automatically find and store in its memory, the presence of all
keypads, zone expanders, wireless receivers, and any other module connected to the data terminal. This allows these modules to be
supervised by the control panel. To enroll the modules, enter the Program Mode of the NetworX control panel as follows. To enter the
Program Mode, press [r]-[8]. At this time, the five function LEDs (Stay, Chime, Exit, Bypass, & Cancel) will begin to flash. Next, enter the “Go
To Program Code” (FACTORY DEFAULT IS [9]-[7]-[1]-[3]). If the “Go To Program Code” is valid, the “Service” LED will flash and the five function
LEDs will illuminate steady. You are now in the Program Mode. When the Program Mode is exited by pressing the [Exit] key, the control
panel will automatically enroll the devices. The enrolling process takes about 12 seconds, during which time the “Service” LED will illuminate.
User codes will not be accepted during the enrolling process. If a speaker is attached to the control panel, it will click at this time. If a siren
or bell is attached to the control panel, it will sound for about 1 second. Once a module is enrolled, if it is not detected by the control, the
“Service” LED will illuminate. NOTE: In the event of a trouble condition, the address reported for the Fire Supervision module will be “9”.
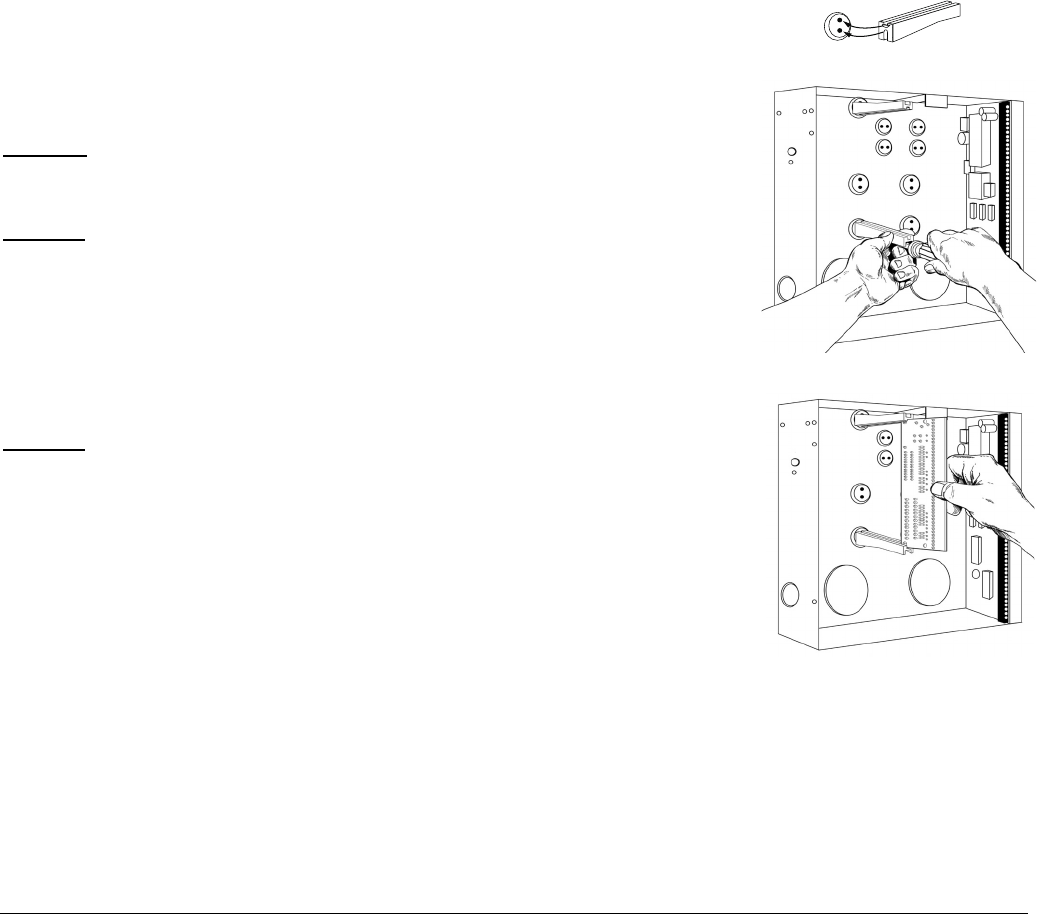
VIII. ENCLOSURE DIAGRAM
Inside the can, several 3-holed insertion points have been constructed. This allows for either vertical
or horizontal placement of the modules. Notice that the insertion points have two sizes of holes –
a larger hole and two smaller holes.
Diagram 1: The black plastic PCB guides are grooved on the top where the PC Board is to be
situated. This grooved side goes into the larger hole, while the other side has a deep notch for the
screw to be secured into on one of the smaller holes.
Diagram 2: Take the black plastic PCB guide, grooved side down, and place it in the top insertion
point. The grooved/notched side will be in the large hole, facing the inside of the can. It should not
require force, and you will detect a slight settling when it is in place. Insert one of the provided
screws into the small hole (from inside the can) to secure it in place. Note: The screw will be in the
small hole on the top or bottom if the board is positioned vertically, or it will be in the right or left
hole if the board is placed horizontally.
The second PCB slide should be positioned upside down from the first (grooved side up) and placed
in the lower insertion point, using the same procedures described above. Once mounted, screw it in
securely.
Diagram 3: The PC board should slide freely in the grooves of both guides.
6 NX-870E Fire Supervision

IX. UNDERWRITERS LABORATORIES REQUIREMENTS
Special Applications: UL Commercial Fire
• Must be used in conjunction with NetworX NX-8-CF or NX-8E-CF Commercial Fire panels.
• Compatible Fire Alarm bell: Wheelock models: NS-1215W, NS-121575W, NS4-1215W, NS4-121575W, AS-
1215W, AS-121575W
X. LOCAL TELEPHONE COMPANY INTERFACE
TELEPHONE CONNECTION REQUIREMENTS
Except for telephone company provided ringers, all connections to the telephone network shall be made through standard plugs and
standard telephone company provided jacks or equivalent in such a manner as to allow for immediate disconnection of the terminal
equipment. Standard jacks shall be so arranged that if the plug connected thereto is withdrawn, no interference to the operation of
the equipment at the customers premises, which remains connected to the telephone network, shall occur by reason of such
withdrawal.
INCIDENCE OF HARM
Should terminal equipment or protective circuitry cause harm to the telephone network, the telephone company shall, where practical,
notify the customer that temporary discontinuance of service may be required. However, where prior notice is not practical, the
telephone company may temporarily discontinue service if such action is deemed reasonable in the circumstances. In the case of such
temporary discontinuance, the telephone company shall promptly notify the customer who will be given the opportunity to correct the
situation. The customer also has the right to bring a complaint to the FCC if he feels the disconnection is not warranted.
This equipment has been tested and found to comply with the limits for a Class B digital device, pursuant to Part 15 of the FCC Rules.
These limits are designed to provide reasonable protection against harmful interference when the equipment is operated in a
residential environment. This equipment generates, uses, and can radiate radio frequency energy and, if not installed and used in
accordance with the instruction manual, may cause harmful interference to radio communications. However, there is no guarantee
that interference will not occur in a particular installation. If this equipment does cause harmful interference to radio or television
reception, which can be determined by turning the equipment off and on, the user is encouraged to try to correct the interference by
one or more of the following measures:
- Reorient or relocate the receiving antenna.
- Increase the separation between the equipment and receiver.
- Connect the equipment into an outlet on a circuit different from that to which the receiver is connected.
- Consult the dealer or an experienced radio/TV technician for help.
CHANGES IN TELEPHONE COMPANY EQUIPMENT OR FACILITIES
The telephone company may make changes in its communications facilities, equipment, operations, or procedures where such action
is reasonably required and proper in its business. Should any such change render the customers terminal equipment incompatible with
the telephone company facilities, the customer shall be given adequate notice to make modifications to maintain uninterrupted
service.
GENERAL
The FCC prohibits customer provided terminal equipment be connected to party lines.
IMPORTANCE OF THE RINGER EQUIVALENCE NUMBER
The Ringer Equivalence Number (REN) of this device is 0.1B. This number is a representation of the electrical load that it applies to your
telephone line.
MALFUNCTION OF THE EQUIPMENT
In the event that the device should fail to operate properly, the customer shall disconnect the equipment from the telephone line to
determine if it is the customer’s equipment that is not functioning properly. If the problem is with the device, the customer shall
discontinue use until it is repaired.
EQUIPMENT INFORMATION
MANUFACTURER OF CONNECTING EQUIPMENT: CADDX CONTROLS, INC.
FCC REGISTRATION NUMBER: GCQAL01BNX-870E; RINGER EQUIVALENCE: 0.1 B

XI. SPECIFICATIONS
OPERATING POWER 12 VDC, Supplied from NX-8-CF or NX-8E-CF
CURRENT DRAW Standby 20 mA
Operating 110 mA
Communicating with
Phone Line 2 Selected
BELL LOAD 600mA Maximum
DIMENSION 6" Wide
3.25" High
1" Deep
SHIPPING WEIGHT 9 lbs.
1420 NORTH MAIN STREET
GLADEWATER, TEXAS 75647
Main Phone 800-727-2339 Technical Support 888-437-3287
Outside the US 903-845-6941 Tech Support Fax 903-845-8409
Main Fax 903-845-6811 Sales & Literature 800-547-2556
Web: www.caddx.com
www.ge-security.com
NX870EIC05 Rev C (Jan 2005)
