Visio HelmFM Page Plan Web VIEW Users Manual
User Manual: WebVIEW Users Manual
Open the PDF directly: View PDF ![]() .
.
Page Count: 21
LOGON
SIGNATURE
CONFIGURE
ALARM HISTORY
SAVE SIGNATURE
RECALL SIGNATURE
OVERLAY SIGNATURE
COMPARE SIGNATURE
PLANT FLOOR
TONNAGE
REPORTS
CHANNEL
SWITCHES
ZOOMING
ZOOMED
CORNER
ZOOMING
ZOOMED
USERS
ACCESS
WebVIEW RLG Site Map
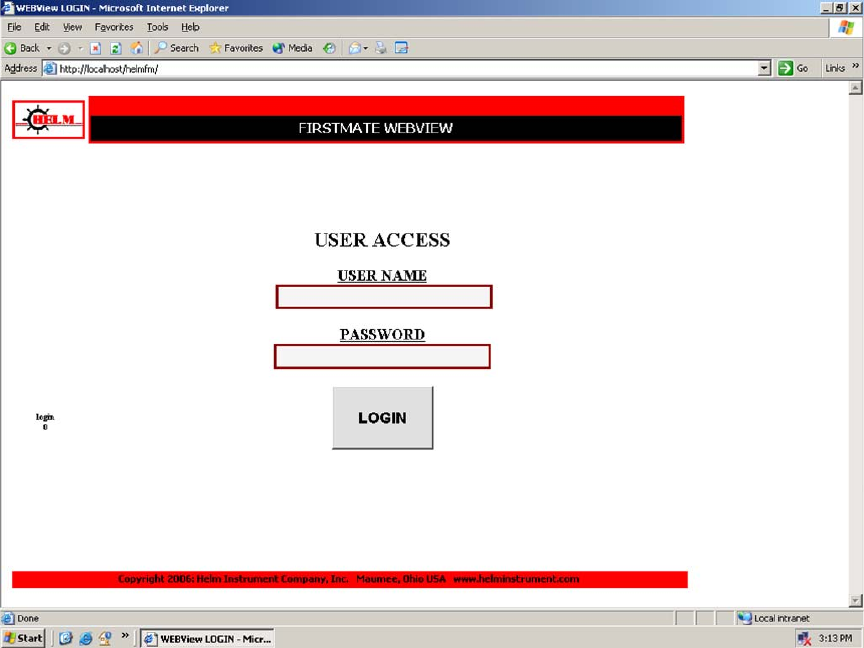
USER LOGON
This is the entry point to WebVIEW.
Open this page using these URL’s:
From the Server: http://localhost/helmfm
From a client computer: http://computer name/helmfm
Enter a USER NAME, the matching PASSWORD, and click the LOGIN button.
WebVIEW comes with a default user name, “demo” and default password
“demo”.
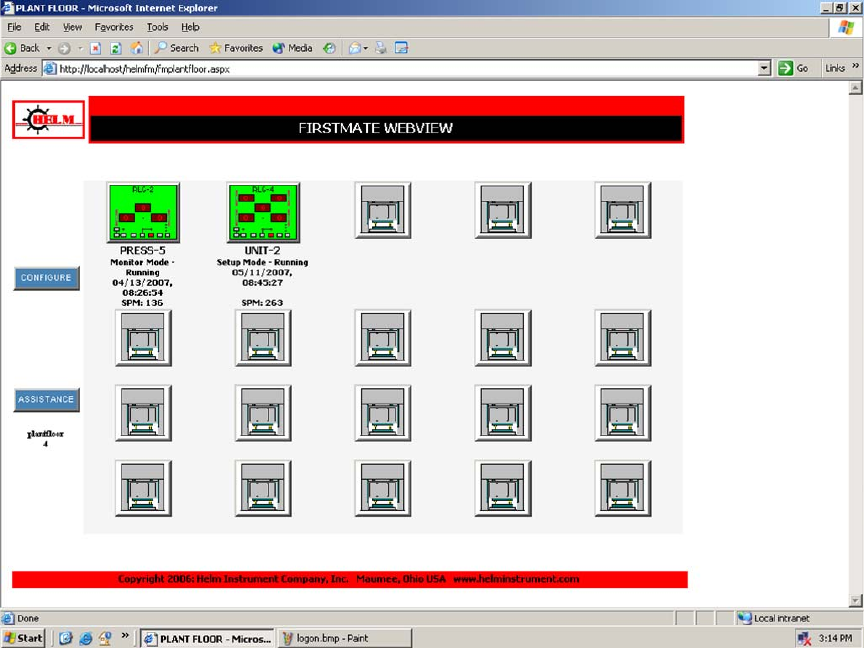
PLANT FLOOR
Plant Floor provides a quick status view of your instruments and equipment,
and is the gateway to all other features in WebVIEW.
Each instrument is described and colored to indicate status. Basic information
such as Parts Counts are supplied and the information is refreshed every ten
seconds.
Click on one instrument’s picture to access additional features.
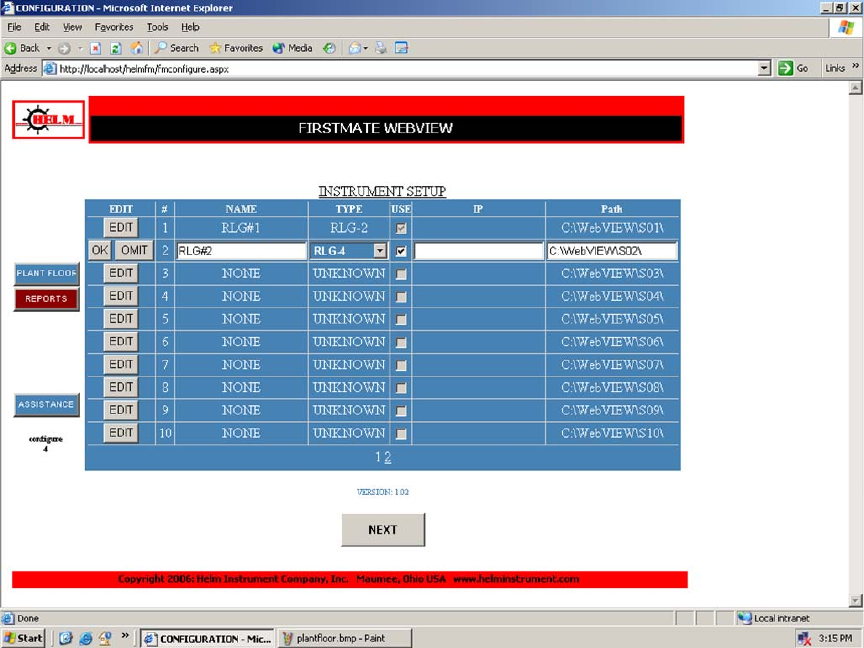
INSTRUMENT SETUP
The INSTRUMENT SETUP screen is opened from PLANT FLOOR.
Each instrument has a unique SEQUENCE NUMBER. Modify the settings for
that number here. You must select a TYPE, check the USE box and verify the
PATH settings for an instrument to be displayed properly. Other fields are for
reference only at this time.
Instrument TYPE is RLG-2 for two-channel and RLG-4 for four-channel units.
Check the USE box to include the unit on the Plant Floor screen.
The default PATH settings will be correct for most installations.

USER PAGE ACCESS
This configuration screen allows you to select access levels for the various
features of WebVIEW. A “1” is the lowest level, allowing users total access and
“4” is the highest.
CONFIGURATION requires a level “4” code.
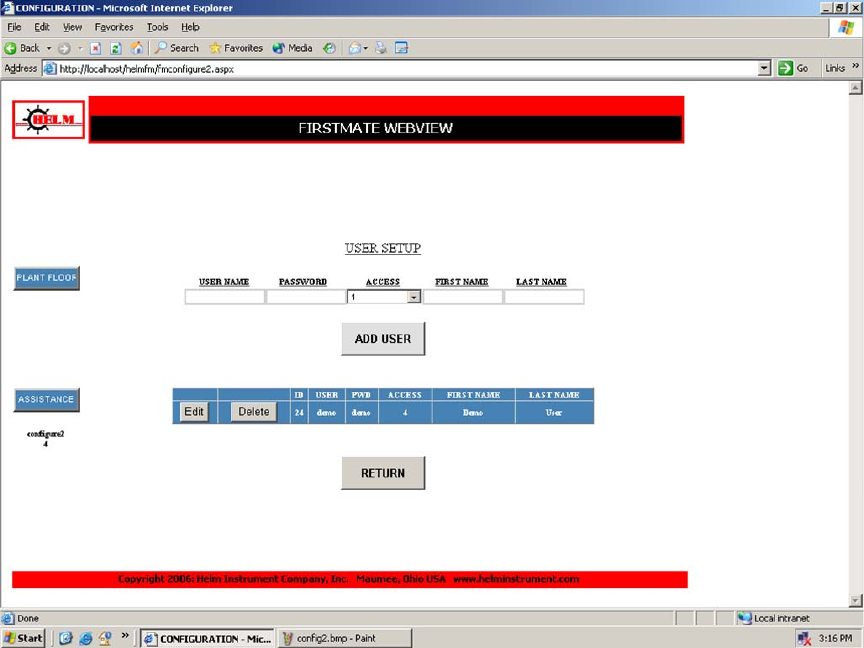
USER SETUP
Setup USERS here. Provide a USER NAME and PASSWORD, and a reference
to the actual person. The ACCESS LEVEL corresponds to the desired webpage
access determined in the previous screen.
ACCESS LEVEL “4” is required to enter these screens. You must have at least
one user set to “4” at all times.
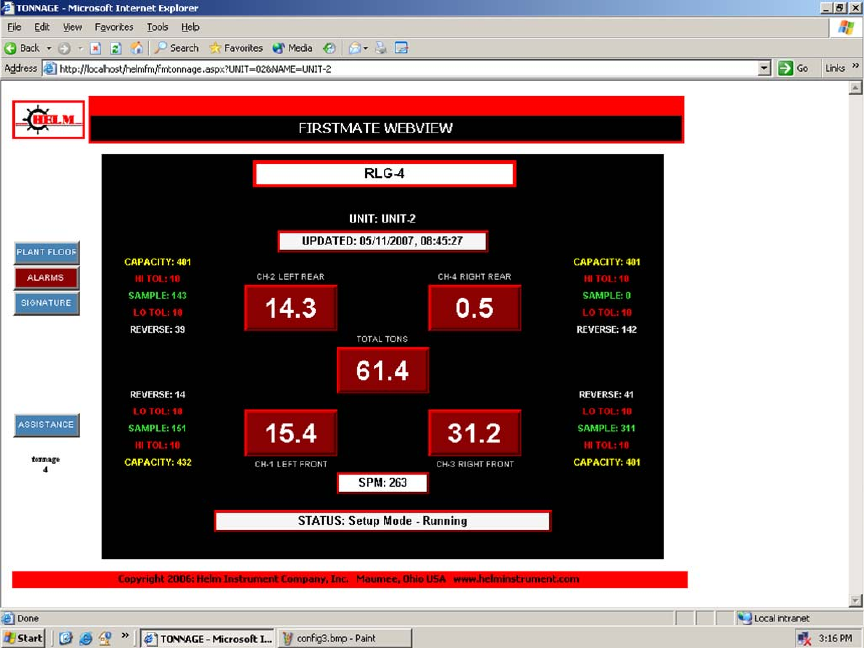
TONNAGE
Clicking on an image on the Plant Floor page opens this TONNAGE page.
This page is refreshed every ten seconds with the information provided by the
instrument assigned to it. Channel tonnage is shown in the four (two) corners,
the total tonnage is at the center and capacity, tolerance, sample and reverse
information is listed beside each channel.
Use the Menu or Click on a tonnage channel display to open the Signature
Page. Use the Menu to reach the Alarms Page.
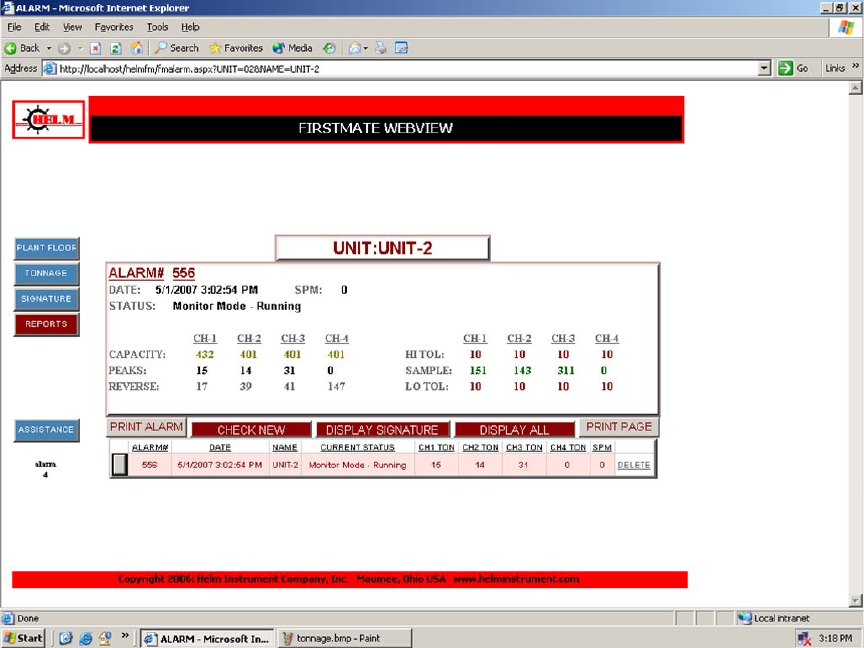
ALARM HISTORY
This is the ALARM HISTORY page, providing a list of all recorded alarms and
access to individual alarms and the corresponding Signature files.
Alarms are listed in the grid display. Click a button at the left to display all data
in the fields above the grid. When a Signature is on file for that alarm, the
DISPLAY SIGNATURE button is visible allowing access to the Signature
Analysis Page.
Alarms are held in a MS Access Database. The Database is loaded with new
alarm transactions whenever you click on the CHECK NEW button. This
process may take some time depending on the backlog of alarm transactions.
Select the DISPLAY ALL button to refresh the page with all alarms for all units.
You can DELETE an alarm record using the button on the grid. IT IS A
PERMANENT DELETE! Use caution.
Use the Menu button, “REPORTS” to open the Alarm Reports Page.
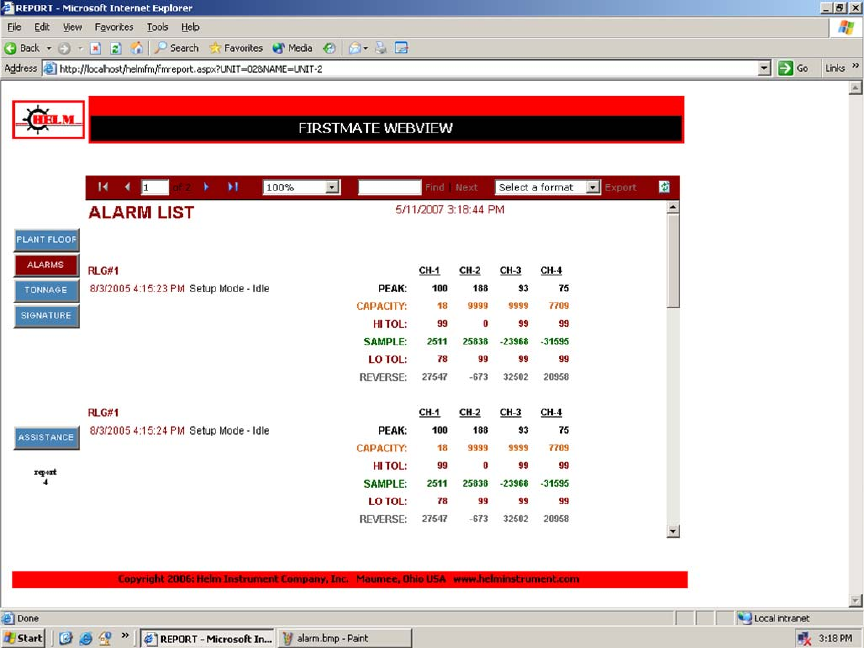
ALARM REPORTING
Selecting REPORTS on the Alarm History Page opens the Alarm History
Reports Page.
This page provides access to the the Alarm History as a scrolling report list.
The information is color-coded to match the Tonnage format. There is a
zooming feature to size the text, a search box for locating a specific alarm, and
an export feature that converts the report to MS Excel or Adobe PDF formats.
Print the report by first exporting it and then printing.
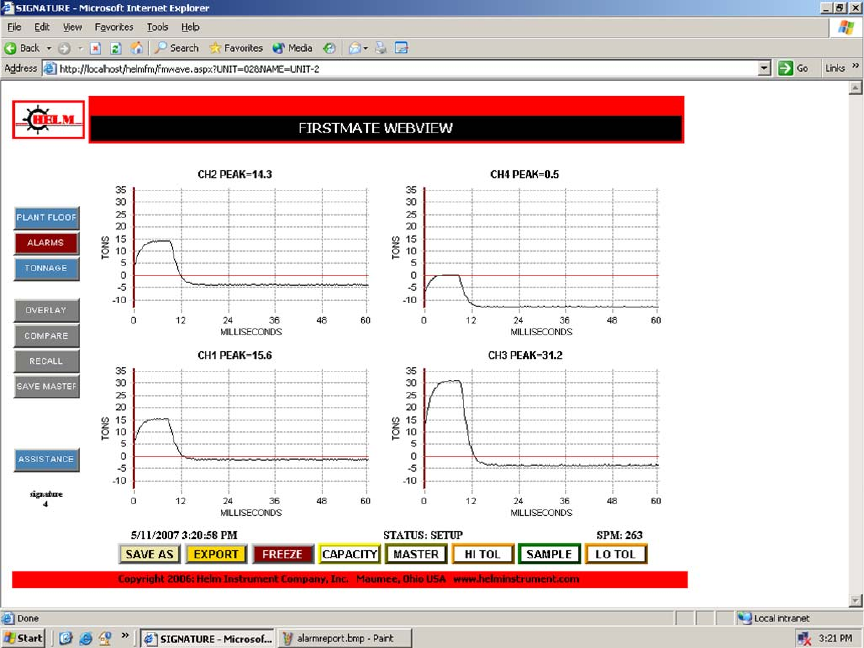
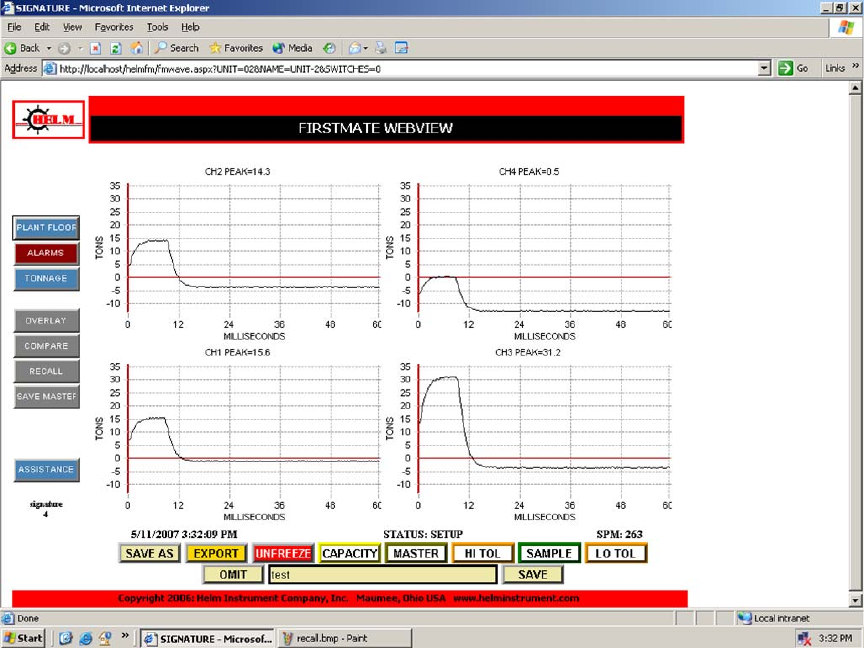
SIGNATURE ANALYSIS
This is the main SIGNATURE ANALYSIS Page, providing access to all signature
functions. Each graph represents the forming force on one channel. the load in tons is
displayed on the left index and the duration of stroke in milliseconds is displayed on the
bottom axis.
Additional signature features are accessed via the gray buttons on the Menu Panel:
OVERLAY – combines all channels on one graph.
COMPARE – combines 1 – 5 signatures on the same screen.
RECALL – recalls a saved Signature file for display.
SAVE MASTER – writes the currently displayed signature to MASTER.BIN
Display features are activated using buttons at the bottom of the screen:
SAVE AS – writes the currently displayed signature to a name you provide.
EXPORT – writes the current signature to CSV format.
FREEZE – starts and stops the ten second automatic refresh
CAPACITY – toggles display of dark yellow lines representing the Capacity Settings.
HI / LO TOL - toggles display of red lines representing high and low Tolerance Settings.
SAMPLE - toggles display of green lines representing the Sample Settings.
Click on any graph to display only that channel.
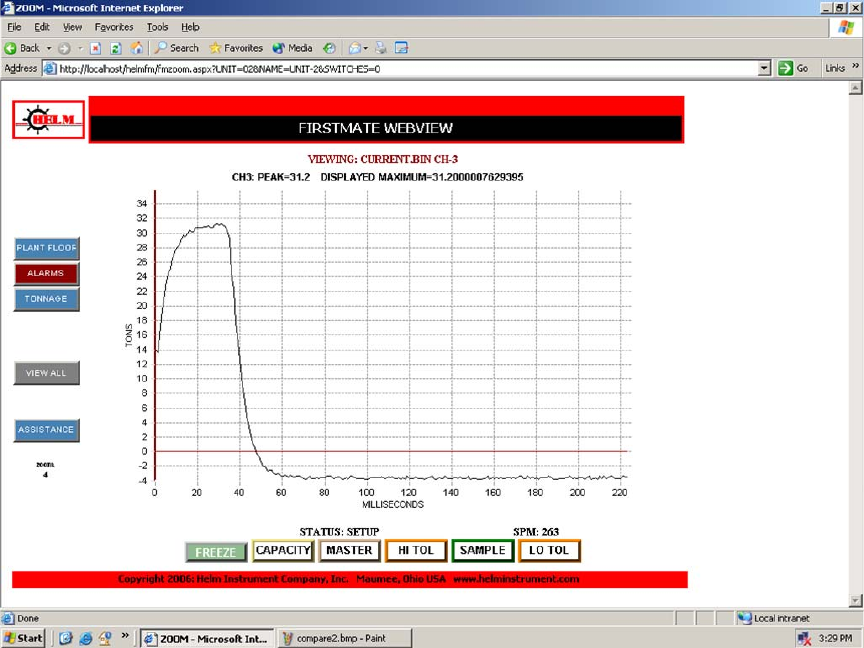
SIGNATURE – SINGLE CHANNEL
When you click on any channel of the Signature Page, that channel is redrawn
to full-page scale. All display features work exactly like the main Signature
Page features.
Select VIEW ALL from the Menu to return to the multiple channel page.

SIGNATURE – SWITCHES
This illustrates the display features for HI TOLERANCE, SAMPLE, and LOW
TOLERANCE. The display is from a two-channel instrument.
Click on a display button and the page is refreshed, drawing the requested line.
The page is rescaled to display the colored line.
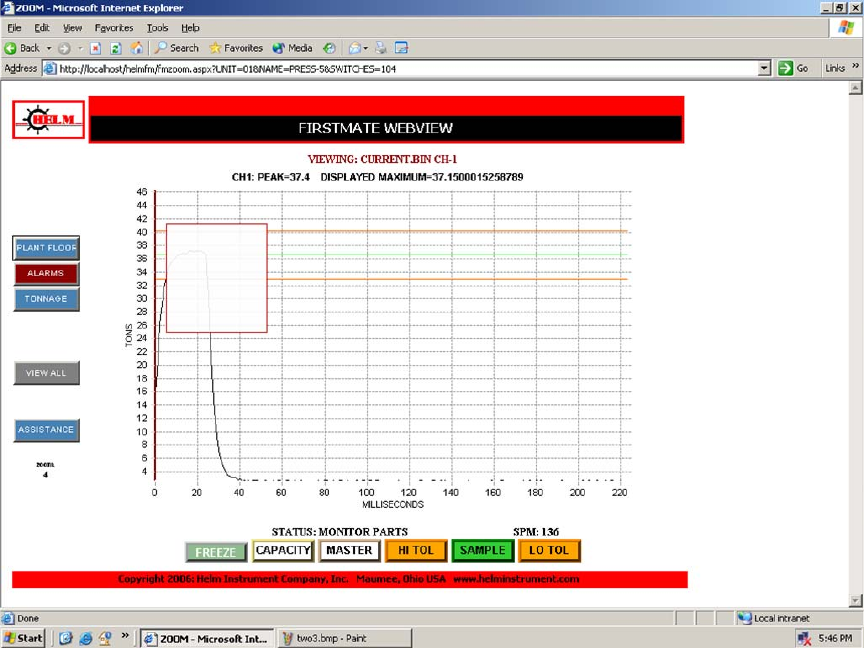
SIGNATURE - ZOOMING
Switching to single-channel view enables the ZOOM feature. This feature
allows you to select a portion of the channel view for magnification.
Click at the upper left to start, drag down to the lower right, and click again to
finish.
You may zoom to any level.
To end the zoom and restore the full channel view, click first at the lower right,
drag up to upper left, clicking again to complete the rectangle.
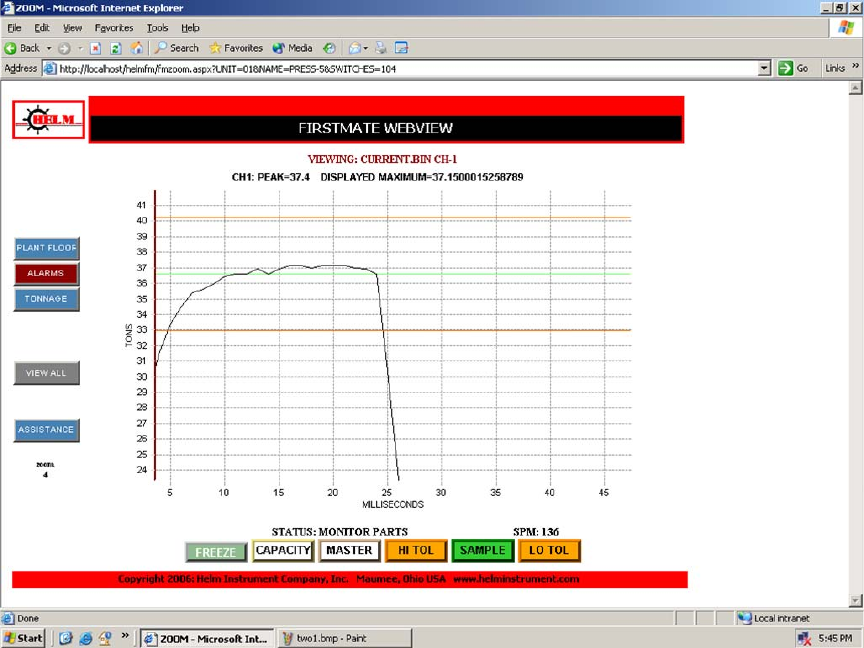
SIGNATURE - ZOOMED
This illustrates the magnified portion selected on the previous page.
SIGNATURE – SAVE CURRENT
The “SAVE AS” feature allows you to save the currently displayed signature to
a file name that you select.
Clicking the SAVE AS button freezes the screen and opens a text entry box
allowing you to type in the file name. You may SAVE the name or click OMIT to
end without saving.
Saved files are stored in the C:\WEBVIEW\Sx directory where x is the
sequence number of this unit. Use RECALL or COMPARE to view a saved
signature.
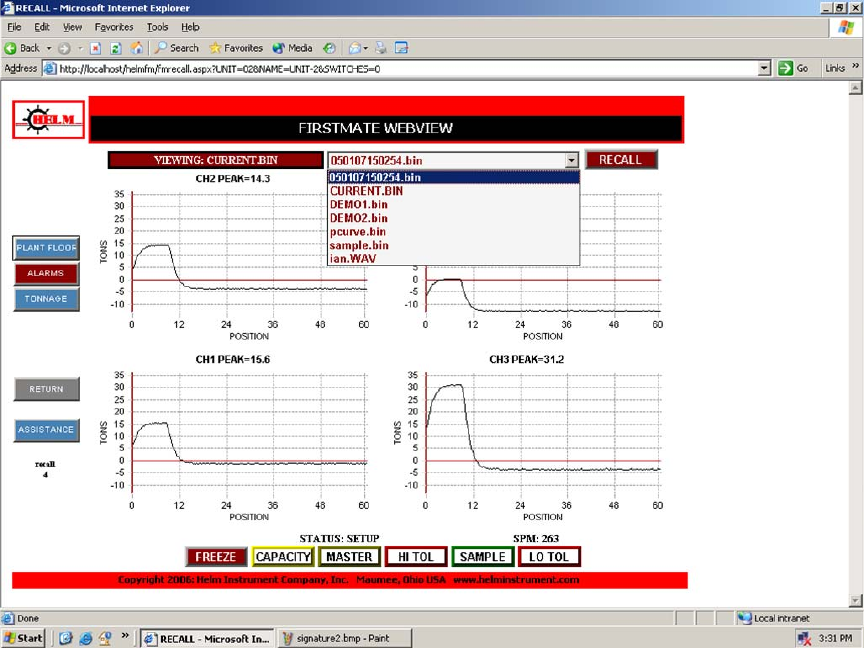
SIGNATURE - RECALL
Selecting RECALL from the Signature Menu opens this page, allowing you to
display saved signatures.
All available signatures for this unit are available in a listbox at the top of the
page. Select the one you want and then click the RECALL button.
Display features function as described on the Signature Page.
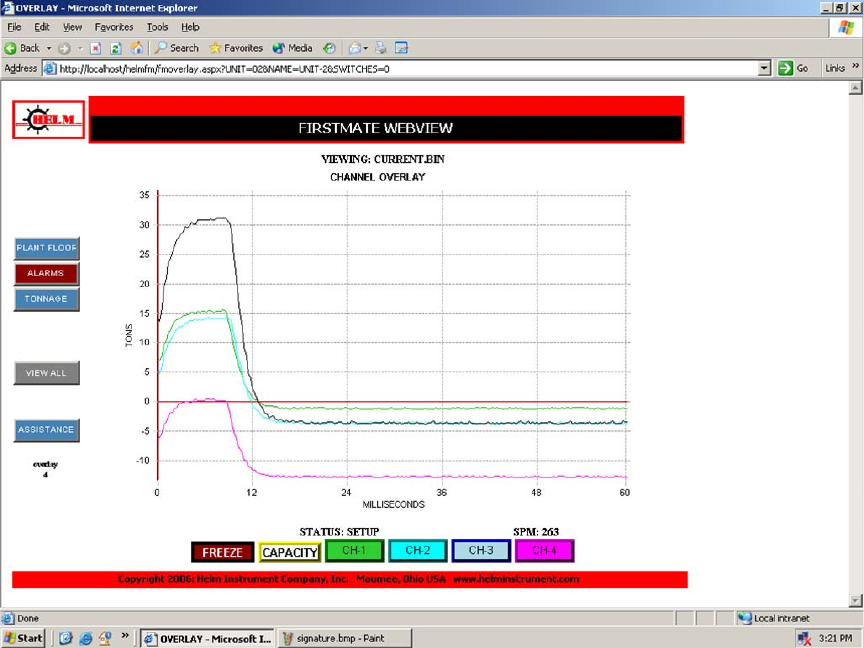
SIGNATURE - OVERLAY
Selecting OVERLAY from the Signature Menu opens this page, combining all
channels of the current signature on one graph.
The channels are color-coded and matched to display buttons along the bottom
that allow you to toggle display of each channel.
Select VIEW ALL from the Menu to return to the Current Signature Page.
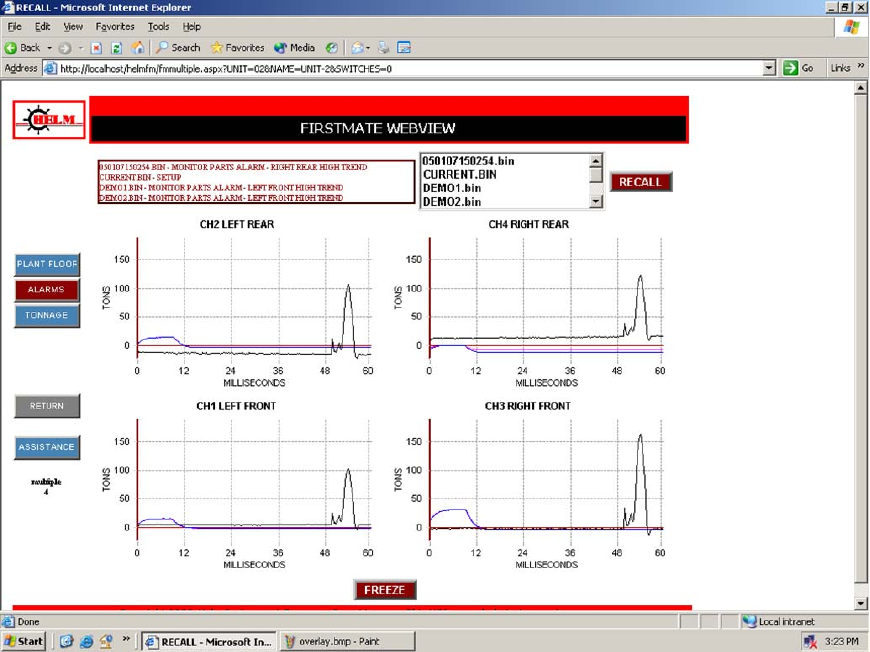
SIGNATURE - COMPARE
The COMPARE menu button opens this page where you can select one to five
stored signature to overlay on the display.
Use the list box to select signatures, holding the “control” key for multiple
selections. Click on RECALL to initiate the display.
The four corners are shown. You can click on a corner to display it on a larger
graph. Use RETURN on the Menu to open the Current Signature Page.
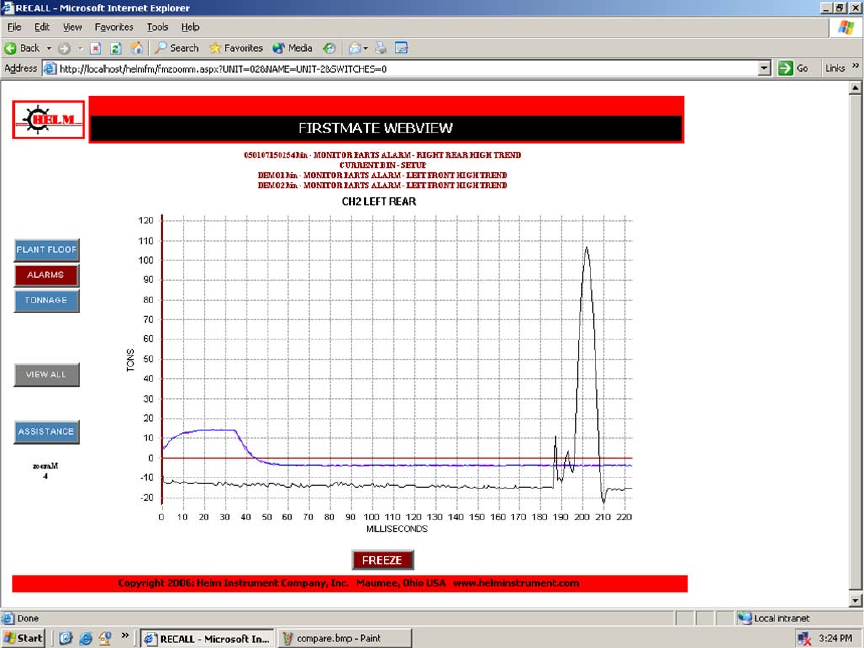
SIGNATURE – COMPARE SINGLE CHANNEL
This illustrates the single-channel display of a Signature Compare.
Use VIEW ALL on the Menu to return to the all-channel Compare page.
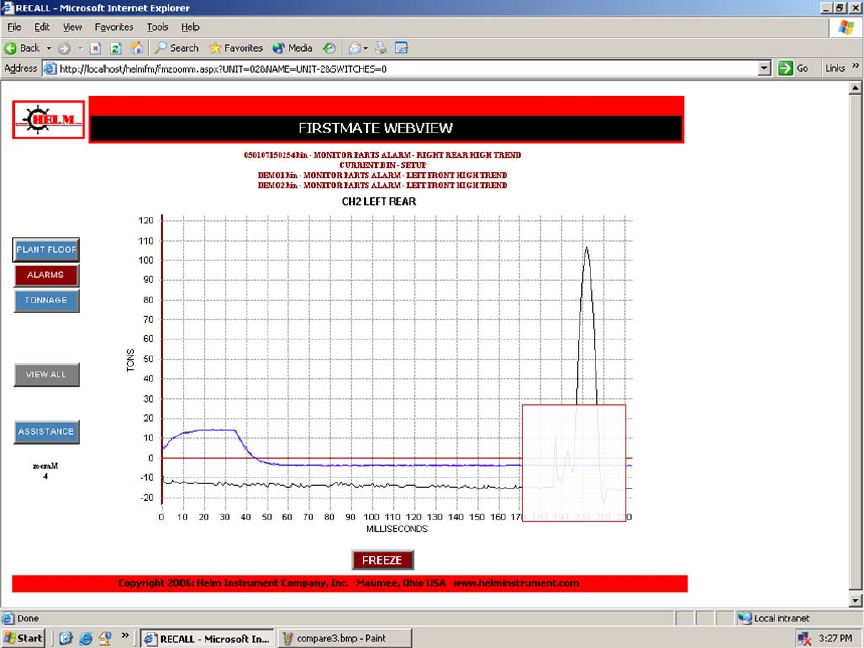
SIGNATURE - ZOOMING
Compared signatures may be ZOOMED by clicking on graph starting in the
upper left, dragging to the lower right, and clicking again.
To UNZOOM, click anywhere, drag to the upper left, and click again.

SIGNATURE - ZOOMED
This shows the magnified selection from the previous page’s ZOOM.
