PGP Universal Server Administrator's Guide 3.2.1 321 Admin En
User Manual: Universal Server - 3.2.1 - Administrator's Guide User Guide for PGP Universal Server Software, Free Instruction Manual
Open the PDF directly: View PDF ![]() .
.
Page Count: 385 [warning: Documents this large are best viewed by clicking the View PDF Link!]
- Introduction
- The Big Picture
- About Open Ports
- About Naming your PGP Universal Server
- Understanding the Administrative Interface
- Licensing Your Software
- Operating in Learn Mode
- Managed Domains
- Understanding Keys
- Managing Organization Keys
- Administering Managed Keys
- Managing Trusted Keys and Certificates
- Managing Group Keys
- Setting Mail Policy
- Overview
- Understanding the Pre-Installed Policy Chains
- How Upgrading and Updating Affect Mail Policy Settings
- Mail Policy Outside the Mailflow
- Using the Rule Interface
- Building Valid Chains and Rules
- Managing Policy Chains
- Managing Rules
- Adding Key Searches
- Choosing Condition Statements, Conditions, and Actions
- Working with Common Access Cards
- Applying Key Not Found Settings to External Users
- Using Dictionaries with Policy
- Keyservers, SMTP Archive Servers, and Mail Policy
- Managing Keys in the Key Cache
- Configuring Mail Proxies
- Email in the Mail Queue
- Specifying Mail Routes
- Customizing System Message Templates
- Managing Groups
- Managing Devices
- Administering Consumer Policy
- Understanding Consumer Policy
- Managing Consumer Policies
- Making Sure Users Create Strong Passphrases
- Enabling or Disabling Encrypted Email
- Using the Windows Preinstallation Environment
- X.509 Certificate Management in Lotus Notes Environments
- Offline Policy
- Using a Policy ADK
- Out of Mail Stream Support
- Enrolling Users through Silent Enrollment
- PGP Whole Disk Encryption Administration
- Setting Policy for Clients
- Using Directory Synchronization to Manage Consumers
- Managing User Accounts
- Recovering Encrypted Data in an Enterprise Environment
- PGP Universal Satellite
- PGP Universal Satellite for Mac OS X
- PGP Universal Satellite for Windows
- Configuring PGP Universal Web Messenger
- Configuring the Integrated Keyserver
- Configuring the PGP Verified Directory
- Managing the Certificate Revocation List Service
- Configuring Universal Services Protocol
- Introducing PGP Remote Disable and Destroy
- System Graphs
- System Logs
- Configuring SNMP Monitoring
- Viewing Server and License Settings and Shutting Down Services
- Managing Administrator Accounts
- Protecting PGP Universal Server with Ignition Keys
- Backing Up and Restoring System and User Data
- Updating PGP Universal Server Software
- Setting Network Interfaces
- Clustering your PGP Universal Servers

PGP™ Universal Server
Administrator's Guide
3.2
The software described in this book is furnished under a license agreement and may be used only in accordance with the terms of the agreement.
Version 3.2.1. Last updated: April 2012.
Legal Notice
Copyright (c) 2012 Symantec Corporation. All rights reserved.
Symantec, the Symantec Logo, PGP, Pretty Good Privacy, and the PGP logo are trademarks or registered trademarks of Symantec Corporation or its
affiliates in the U.S. and other countries. Other names may be trademarks of their respective owners.
The product described in this document is distributed under licenses restricting its use, copying, distribution, and decompilation/reverse engineering.
No part of this document may be reproduced in any form by any means without prior written authorization of Symantec Corporation and its licensors, if
any.
THE DOCUMENTATION IS PROVIDED"AS IS"AND ALL EXPRESS OR IMPLIED CONDITIONS, REPRESENTATIONS AND WARRANTIES, INCLUDING
ANY IMPLIED WARRANTY OF MERCHANTABILITY, FITNESS FOR A PARTICULAR PURPOSE OR NON-INFRINGEMENT, ARE DISCLAIMED, EXCEPT
TO THE EXTENT THAT SUCH DISCLAIMERS ARE HELD TO BE LEGALLY INVALID. SYMANTEC CORPORATION SHALL NOT BE LIABLE FOR
INCIDENTAL OR CONSEQUENTIAL DAMAGES IN CONNECTION WITH THE FURNISHING, PERFORMANCE, OR USE OF THIS DOCUMENTATION.
THE INFORMATION CONTAINED IN THIS DOCUMENTATION IS SUBJECT TO CHANGE WITHOUT NOTICE.
The Licensed Software and Documentation are deemed to be commercial computer software as defined in FAR 12.212 and subject to restricted rights
as defined in FAR Section 52.227-19 "Commercial Computer Software - Restricted Rights" and DFARS 227.7202, et seq. “Commercial Computer
Software and Commercial Computer Software Documentation”, as applicable, and any successor regulations. Any use, modification, reproduction
release, performance, display or disclosure of the Licensed Software and Documentation by the U.S. Government shall be solely in accordance with
the terms of this Agreement.
Symantec Corporation
350 Ellis Street
Mountain View, CA 94043
Symantec Home Page (http://www.symantec.com)
Printed in the United States of America.
10 9 8 7 6 5 4 3 2 1
1
Contents
Introduction
What is PGP Universal Server? 1
PGP Universal Server Product Family 2
Who Should Read This Guide 2
Common Criteria Environments 2
Improvements in this Version of PGP Universal Server 2
Using the PGP Universal Server with the Command Line 4
Symbols 4
Getting Assistance 5
Getting product information 5
Technical Support 5
Contacting Technical Support 6
Licensing and registration 6
Customer service 6
Support agreement resources 7
The Big Picture 9
Important Terms 9
PGP Products 9
PGP Universal Server Concepts 10
PGP Universal Server Features 11
PGP Universal Server User Types 12
Installation Overview 13
About Integration with Symantec Protection Center 18
Before You Integrate with Protection Center 18
About Open Ports 21
TCP Ports 21
UDP Ports 22
About Naming your PGP Universal Server 23
How to Name Your PGP Universal Server 23
Naming Methods 24
Understanding the Administrative Interface 25
System Requirements 25
Logging In 25
The System Overview Page 26
Managing Alerts 27
Logging In For the First Time 28
Administrative Interface Map 28
Icons 29

ii Contents
Licensing Your Software 35
Overview 35
Licensing a PGP Universal Server 35
License Authorization 35
Licensing the Mail Proxy Feature 35
Licensing PGP Desktop 36
Operating in Learn Mode 37
Purpose of Learn Mode 37
Checking the Logs 38
Managing Learn Mode 38
Managed Domains 39
About Managed Domains 39
Adding Managed Domains 40
Deleting Managed Domains 40
Understanding Keys 41
Choosing a Key Mode For Key Management 41
Changing Key Modes 43
How PGP Universal Server Uses Certificate Revocation Lists 44
Key Reconstruction Blocks 44
Managed Key Permissions 45
Managing Organization Keys 47
About Organization Keys 47
Organization Key 47
Inspecting the Organization Key 48
Regenerating the Organization Key 48
Importing an Organization Key 49
Organization Certificate 50
Inspecting the Organization Certificate 50
Exporting the Organization Certificate 51
Deleting the Organization Certificate 51
Generating the Organization Certificate 51
Importing the Organization Certificate 52
Renewing the Organization Certificate 52
Additional Decryption Key (ADK) 53
Importing the ADK 54
Inspecting the ADK 54
Deleting the ADK 54
External User Root Key 55
Generating the External User Root Key 55
Importing the External User Root Key 55
Deleting the External User Root Key 56

iii Contents
External User Root Certificate 56
Generating the External User Root Certificate 56
Importing the External User Root Certificate 57
Deleting the External User Root Certificate 57
Verified Directory Key 58
Importing the Verified Directory Key 58
Inspecting the Verified Directory Key 58
Deleting the Verified Directory Key 59
Administering Managed Keys 61
Viewing Managed Keys 61
Managed Key Information 62
Email Addresses 64
Subkeys 64
Certificates 65
Permissions 65
Attributes 66
Symmetric Key Series 66
Symmetric Keys 68
Custom Data Objects 69
Exporting Consumer Keys 70
Exporting the Managed Key of an Internal User 70
Exporting the Managed Key of an External User 71
Exporting PGP Verified Directory User Keys 71
Exporting the Managed Key of a Managed Device 71
Deleting Consumer Keys 72
Deleting the Managed Key of an Internal User 72
Deleting the Managed Key of an External User 72
Deleting the Key of a PGP Verified Directory User 73
Deleting the Managed Key of a Managed Device 73
Approving Pending Keys 73
Revoking Managed Keys 74
Managing Trusted Keys and Certificates 77
Overview 77
Trusted Keys 77
Trusted Certificates 77
Adding a Trusted Key or Certificate 78
Inspecting and Changing Trusted Key Properties 78
Deleting Trusted Keys and Certificates 79
Searching for Trusted Keys and Certificates 79
Managing Group Keys 81
Overview 81
Establishing Default Group Key Settings 81
Adding a Group Key to an Existing Group 82
Creating a New Group with a Group Key 82
Removing a Group Key from a Group 83
Deleting a Group Key 83

iv Contents
Revoking a Group Key 84
Exporting a Group Key 84
Setting Mail Policy 85
Overview 85
How Policy Chains Work 85
Mail Policy and Dictionaries 86
Mail Policy and Key Searches 87
Mail Policy and Cached Keys 87
Understanding the Pre-Installed Policy Chains 88
How Upgrading and Updating Affect Mail Policy Settings 89
Mail Policy Outside the Mailflow 89
Using the Rule Interface 90
The Conditions Card 90
The Actions Card 92
Building Valid Chains and Rules 92
Using Valid Processing Order 93
Creating Valid Groups 94
Creating a Valid Rule 95
Managing Policy Chains 96
Mail Policy Best Practices 96
Restoring Mail Policy to Default Settings 96
Editing Policy Chain Settings 96
Adding Policy Chains 97
Deleting Policy Chains 98
Exporting Policy Chains 98
Printing Policy Chains 99
Managing Rules 99
Adding Rules to Policy Chains 99
Deleting Rules from Policy Chains 99
Enabling and Disabling Rules 100
Changing the Processing Order of the Rules 100
Adding Key Searches 100
Choosing Condition Statements, Conditions, and Actions 101
Condition Statements 101
Conditions 102
Actions 106
Working with Common Access Cards 119
Applying Key Not Found Settings to External Users 121
Overview 121
Bounce the Message 121
PDF Messenger 122
PDF Messenger Secure Reply 122
Working with Passphrases 123
Certified Delivery with PDF Messenger 123
Send Unencrypted 124
Smart Trailer 124
PGP Universal Web Messenger 126
Changing Policy Settings 127
Changing User Delivery Method Preference 127

v Contents
Using Dictionaries with Policy 129
Overview 129
Default Dictionaries 130
Editing Default Dictionaries 131
User-Defined Dictionaries 132
Adding a User-Defined Dictionary 132
Editing a User-Defined Dictionary 133
Deleting a Dictionary 134
Exporting a Dictionary 134
Searching the Dictionaries 134
Keyservers, SMTP Archive Servers, and Mail Policy 137
Overview 137
Keyservers 137
Adding or Editing a Keyserver 138
Deleting a Keyserver 140
SMTP Servers 140
Adding or Editing an Archive Server 140
Deleting an Archive Server 141
Managing Keys in the Key Cache 143
Overview 143
Changing Cached Key Timeout 143
Purging Keys from the Cache 143
Trusting Cached Keys 144
Viewing Cached Keys 144
Searching the Key Cache 145
Configuring Mail Proxies 147
Overview 147
PGP Universal Server and Mail Proxies 147
Mail Proxies in an Internal Placement 148
Mail Proxies in a Gateway Placement 149
Changes in Proxy Settings from PGP Universal Server 2.0 to 2.5 and later 150
Mail Proxies Page 151
Creating New or Editing Existing Proxies 151
Creating or Editing a POP/IMAP Proxy 151
Creating or Editing an Outbound SMTP Proxy 153
Creating or Editing an Inbound SMTP Proxy 155
Creating or Editing a Unified SMTP Proxy 156
Email in the Mail Queue 159
Overview 159
Deleting Messages from the Mail Queue 159
vi Contents
Specifying Mail Routes 161
Overview 161
Managing Mail Routes 162
Adding a Mail Route 162
Editing a Mail Route 162
Deleting a Mail Route 163
Customizing System Message Templates 165
Overview 165
Templates and Message Size 165
PDF Messenger Templates 166
PGP Universal Web Messenger Templates 166
Editing a Message Template 167
Managing Groups 169
Understanding Groups 169
Sorting Consumers into Groups 169
Everyone Group 170
Excluded Group 170
Policy Group Order 170
Migrate Groups from PGP Universal Server 2.12 SP4 171
Setting Policy Group Order 171
Creating a New Group 171
Deleting a Group 172
Viewing Group Members 172
Manually Adding Group Members 172
Manually Removing Members from a Group 173
Group Permissions 174
Adding Group Permissions 174
Deleting Group Permissions 174
Setting Group Membership 175
Searching Groups 176
Creating Group Client Installations 177
How Group Policy is Assigned to PGP Desktop Installers 177
When to Bind a Client Installation 178
Creating PGP Desktop Installers 179
Managing Devices 183
Managed Devices 183
Adding and Deleting Managed Devices 184
Adding Managed Devices to Groups 184
Managed Device Information 186
Deleting Devices from PGP Universal Server 189
Deleting Managed Devices from Groups 190
WDE Devices (Computers and Disks) 191
WDE Computers 191
WDE Disks 192

Contents vii
Searching for Devices 194
Administering Consumer Policy 197
Understanding Consumer Policy 197
Managing Consumer Policies 197
Adding a Consumer Policy 197
Editing a Consumer Policy 198
Deleting a Consumer Policy 199
Making Sure Users Create Strong Passphrases 199
Understanding Entropy 200
Enabling or Disabling Encrypted Email 200
Using the Windows Preinstallation Environment 201
X.509 Certificate Management in Lotus Notes Environments 201
Trusting Certificates Created by PGP Universal Server 202
Setting the Lotus Notes Key Settings in PGP Universal Server 203
Technical Deployment Information 204
Offline Policy 205
Using a Policy ADK 206
Out of Mail Stream Support 206
Enrolling Users through Silent Enrollment 208
Silent Enrollment with Windows 208
Silent Enrollment with Mac OS X 208
PGP Whole Disk Encryption Administration 209
PGP Whole Disk Encryption on Mac OS X with FileVault 209
How Does Single Sign-On Work? 209
Enabling Single Sign-On 210
Managing Clients Remotely Using a PGP WDE Administrator Active Directory Group 211
Managing Clients Locally Using the PGP WDE Administrator Key 212
Setting Policy for Clients 215
Client and PGP Universal Server Version Compatibility 215
Serving PGP Admin 8 Preferences 216
Establishing PGP Desktop Settings for Your PGP Desktop Clients 217
PGP Desktop Feature License Settings 218
Enabling PGP Desktop Client Features in Consumer Policies 218
Controlling PGP Desktop Components 219
PGP Portable 220
PGP Mobile 221
PGP NetShare 221
How the PGP NetShare Policy Settings Work Together 221
Multi-user environments and managing PGP NetShare 222
Backing Up PGP NetShare-Protected Files 222
Using Directory Synchronization to Manage Consumers 225
How PGP Universal Server Uses Directory Synchronization 225
Base DN and Bind DN 226
Consumer Matching Rules 227
Understanding User Enrollment Methods 227
Before Creating a Client Installer 228

viii Contents
Email Enrollment 229
Directory Enrollment 231
Certificate Enrollment 232
Enabling Directory Synchronization 234
Adding or Editing an LDAP Directory 234
The LDAP Servers Tab 235
The Base Distinguished Name Tab 236
The Consumer Matching Rules Tab 236
Testing the LDAP Connection 237
Using Sample Records to Configure LDAP Settings 237
Deleting an LDAP Directory 237
Setting LDAP Directory Order 238
Directory Synchronization Settings 238
Managing User Accounts 241
Understanding User Account Types 241
Viewing User Accounts 241
User Management Tasks 241
Setting User Authentication 241
Editing User Attributes 242
Adding Users to Groups 242
Editing User Permissions 242
Deleting Users 243
Searching for Users 243
Viewing User Log Entries 244
Changing Display Names and Usernames 244
Exporting a User’s X.509 Certificate 245
Revoking a User's X.509 Certificate 245
Managing User Keys 246
Managing Internal User Accounts 246
Importing Internal User Keys Manually 247
Creating New Internal User Accounts 247
Exporting PGP Whole Disk Encryption Login Failure Data 248
Internal User Settings 248
Managing External User Accounts 252
Importing External Users 252
Exporting Delivery Receipts 253
External User Settings 254
Offering X.509 Certificates to External Users 255
Managing Verified Directory User Accounts 256
Importing Verified Directory Users 257
PGP Verified Directory User Settings 257
Recovering Encrypted Data in an Enterprise Environment 259
Using Key Reconstruction 259
Recovering Encryption Key Material without Key Reconstruction 260
Encryption Key Recovery of CKM Keys 260
Encryption Key Recovery of GKM Keys 260
Encryption Key Recovery of SCKM Keys 260
Encryption Key Recovery of SKM Keys 261
Using an Additional Decryption Key for Data Recovery 262

ix Contents
PGP Universal Satellite 263
Overview 263
Technical Information 263
Distributing the PGP Universal Satellite Software 264
Configuration 264
Key Mode 264
PGP Universal Satellite Configurations 265
Switching Key Modes 268
Policy and Key or Certificate Retrieval 268
Retrieving Lost Policies 268
Retrieving Lost Keys or Certificates 269
PGP Universal Satellite for Mac OS X 271
Overview 271
System Requirements 271
Obtaining the Installer 271
Installation 272
Updates 272
Files 272
PGP Universal Satellite for Windows 275
Overview 275
System Requirements 275
Obtaining the Installer 275
Installation 276
Updates 276
Files 277
MAPI Support 277
External MAPI Configuration 277
Lotus Notes Support 278
External Lotus Notes Configuration 278
Configuring PGP Universal Web Messenger 281
Overview 281
PGP Universal Web Messenger and Clustering 282
External Authentication 282
Customizing PGP Universal Web Messenger 284
Adding a New Template 284
Troubleshooting Customization 289
Changing the Active Template 291
Deleting a Template 291
Editing a Template 292
Downloading Template Files 292
Restoring to Factory Defaults 292
Configuring the PGP Universal Web Messenger Service 292
Starting and Stopping PGP Universal Web Messenger 293
Selecting the PGP Universal Web Messenger Network Interface 293

x Contents
Setting Up External Authentication 295
Creating Settings for PGP Universal Web Messenger User Accounts 296
Setting Message Replication in a Cluster 297
Configuring the Integrated Keyserver 299
Overview 299
Starting and Stopping the Keyserver Service 299
Configuring the Keyserver Service 299
Configuring the PGP Verified Directory 301
Overview 301
Starting and Stopping the PGP Verified Directory 302
Configuring the PGP Verified Directory 302
Managing the Certificate Revocation List Service 305
Overview 305
Starting and Stopping the CRL Service 305
Editing CRL Service Settings 306
Configuring Universal Services Protocol 307
Starting and Stopping USP 307
Adding USP Interfaces 307
Introducing PGP Remote Disable and Destroy 1
About PGP Remote Disable and Destroy 1
Components of PGP RDD 1
How PGP RDD Works 1
System Graphs 3
Overview 3
CPU Usage 3
Message Activity 3
Whole Disk Encryption 4
System Logs 5
Overview 5
Filtering the Log View 6
Searching the Log Files 6
Exporting a Log File 7
Enabling External Logging 7

xi Contents
Configuring SNMP Monitoring 9
Overview 9
Starting and Stopping SNMP Monitoring 10
Configuring the SNMP Service 10
Downloading the Custom MIB File 11
Viewing Server and License Settings and Shutting Down Services 13
Overview 13
Server Information 13
Setting the Time 13
Licensing a PGP Universal Server 14
Downloading the Release Notes 14
Shutting Down and Restarting the PGP Universal Server Software Services 15
Shutting Down and Restarting the PGP Universal Server Hardware 15
Managing Administrator Accounts 17
Overview 17
Administrator Roles 17
Administrator Authentication 19
Creating a New Administrator 19
Importing SSH v2 Keys 20
Deleting Administrators 20
Inspecting and Changing the Settings of an Administrator 21
Configuring RSA SecurID Authentication 22
Resetting SecurID PINs 23
Daily Status Email 24
Protecting PGP Universal Server with Ignition Keys 25
Overview 25
Ignition Keys and Clustering 26
Preparing Hardware Tokens to be Ignition Keys 26
Configuring a Hardware Token Ignition Key 28
Configuring a Soft-Ignition Passphrase Ignition Key 28
Deleting Ignition Keys 29
Backing Up and Restoring System and User Data 31
Overview 31
Creating Backups 31
Scheduling Backups 32
Performing On-Demand Backups 32
Configuring the Backup Location 32
Restoring From a Backup 33
Restoring On-Demand 34
Restoring Configuration 34
Restoring from a Different Version 35

xii Contents
Updating PGP Universal Server Software 37
Overview 37
Inspecting Update Packages 38
Setting Network Interfaces 39
Understanding the Network Settings 39
Changing Interface Settings 40
Adding Interface Settings 40
Deleting Interface Settings 40
Editing Global Network Settings 41
Assigning a Certificate 41
Working with Certificates 41
Importing an Existing Certificate 42
Generating a Certificate Signing Request (CSR) 42
Adding a Pending Certificate 43
Inspecting a Certificate 44
Exporting a Certificate 44
Deleting a Certificate 44
Clustering your PGP Universal Servers 45
Overview 45
Cluster Status 46
Creating a Cluster 47
Deleting Cluster Members 49
Clustering and PGP Universal Web Messenger 50
Managing Settings for Cluster Members 50
Changing Network Settings in Clusters 51
About Clustering Diagnostics 51
Monitoring Data Replication in a Cluster 52
Index 55

1 Introduction
This Administrator’s Guide describes both the PGP™ Universal Server and Client
software. It tells you how to get them up and running on your network, how to
configure them, and how to maintain them. This section provides a high-level overview
of PGP Universal Server.
What is PGP Universal Server?
PGP Universal Server is a console that manages the applications that provide email,
disk, and network file encryption. PGP Universal Server with PGP Universal Gateway
Email provides secure messaging by transparently protecting your enterprise messages
with little or no user interaction. The PGP Universal Server replaces PGP Keyserver
with a built-in keyserver, and PGP Admin with PGP Desktop configuration and
deployment capabilities.
PGP Universal Server also does the following:
Automatically creates and maintains a Self-Managing Security Architecture
(SMSA) by monitoring authenticated users and their email traffic.
Allows you to send protected messages to addresses that are not part of the SMSA.
Automatically encrypts, decrypts, signs, and verifies messages.
Provides strong security through policies you control.
PGP Universal Satellite, a client-side feature of PGP Universal Server, does the
following:
Extends security for email messages to the computer of the email user.
Allows external users to become part of the SMSA.
If allowed by an administrator, gives end users the option to create and manage
their keys on their computers.
PGP Desktop, a client product, is created and managed through PGP Universal Server
policy and does the following:
Creates PGP keypairs.
Manages user keypairs.
Stores the public keys of others.
Encrypts user email and instant messaging (IM).
Encrypts entire, or partial, hard drives.
Enables secure file sharing with others over a network.

2 Introduction
PGP Universal Server Product Family
PGP Universal Server Product Family
PGP Universal Server functions as a management console for a variety of encryption
solutions. You can purchase any of the PGP Desktop applications or bundles and use
PGP Universal Server to create and manage client installations. You can also purchase a
license that enables PGP Universal Gateway Email to encrypt email in the mailstream.
The PGP Universal Server can manage any combination of the following PGP
encryption applications:
PGP Universal Gateway Email provides automatic email encryption in the
gateway, based on centralized mail policy.
This product requires administration by the PGP Universal Server.
PGP Desktop Email provides encryption at the desktop for mail, files, and AOL
Instant Messenger traffic.
This product can be managed by the PGP Universal Server.
PGP Whole Disk Encryption provides encryption at the desktop for an entire disk.
This product can be managed by the PGP Universal Server.
PGP NetShare provides transparent file encryption and sharing among desktops.
This product can be managed by the PGP Universal Server.
Who Should Read This Guide
This Administrator’s Guide is for the person or persons who implement and maintain
your organization’s PGP Universal Server environment. These are the PGP Universal
Server administrators.
This guide is also intended for anyone else who wants to learn about how PGP Universal
Server works.
Common Criteria Environments
To be Common Criteria compliant, see the best practices in PGP Universal Server 2.9
Common Criteria Supplemental. These best practices supersede recommendations made
elsewhere in this and other documentation.
Improvements in this Version of PGP Universal Server
PGP Universal Server 3.2.1 introduces the following new and improved features:

3 Introduction
Improvements in this Version of PGP Universal Server
This release provides support for VMware VMotion HA Configurations. PGP
Universal Server with VMware VMotion allows virtual machines on failed ESX
server hosts to restart on surviving ESX hosts.
This release contains improvements in the backup process which provides a faster
way to take and restore backups. Users also now have the capability of specifying
encryption and compression with each backup.
Improvements made to streamline the migration process.
PGP Universal Web Messenger users are now notified when their accounts are
about to expire.
PGP Universal Web Messenger has added functionality to prevent a Cross Sites
Request Forge attacks. PGP Universal Server already provides functionality to
prevent CSRF attacks.
The default mail policy includes the following changes:
New default mail policy no longer uses opportunistic encryption. Email is
secured only if the sender specifies (such as by selecting the Encrypt button
in the email client or by marking the email as "Sensitive").
New default mail policy attempts to encrypt the mail if the subject line
contains “PDF”, and should be delivered as a secure PDF message if the key is
not found and PGP Universal Web Messenger/PDF options are enabled.
“Excluded Signed”, and “Excluded Unsigned” rules are removed as they are
now part of opportunistic encryption.
Secure Reply option for PDF Messenger is enabled by default.
PGP NetShare can be integrated with Symantec Data Loss Prevention to provide
automatic encryption of files without end-user intervention. A Data Loss
Prevention administrator defines policies and rules that define the parameters for
identifying sensitive files and provide credentials for the encryption. The
integration is accomplished using an endpoint client-side plug-in. Files under
consideration for sensitive content can be data in motion (DIM) or data at rest
(DAR). For more information, see the PGP NetShare Flex Response Plug-In for Data
Loss Prevention Implementation Guide.
PGP Universal Server 3.2.0 introduces the following new and improved features:
X.509 certificates are available to your external users through the PGP Universal
Web Messenger interface. External users download the certificates, add them to
their mail clients, and use them to communicate securely with users in your
managed domain.
The PGP Universal Server user interface and all end user documentation have
been rebranded to include the Symantec logo and colors. The product name
remains the same.
We improved performance and page load times for many parts of the interface.
You can now allow your external users to securely reply to PDF Messenger
messages.
You can now monitor the how well data is being replicated throughout your
cluster members.
After you migrate to PGP Universal Server 3.2.1, you can verify whether your
backup/restore or PUP update was successful. `
You can now require users to authenticate at the PGP BootGuard screen with their
user name, domain, and passphrase.

4 Introduction
Using the PGP Universal Server with the Command Line
Symantec Patch Distribution Center now provides all software updates, which
replaces PGP update servers. Automatic updates through the PGP update servers
are no longer available.
PGP Universal Server is now integrated with Symantec Protection Center, which
offers a single point of administration and helps you manage PGP Universal
Server and other security products.
PGP Universal Server now supports group keys, which allows you to protect
shared files and folders in PGP NetShare. Group keys allow you to easily add or
remove group members without affecting the PGP NetShare metadata associated
with the protected files and folders.
You can now allow users, who use certificates or smart cards to log in to Microsoft
Windows, to enroll in PGP Desktop using those certificates.
Using the PGP Universal Server with the Command Line
You can use the PGP Universal Server command line for read-only access to, for
example, view settings, services, logs, processes, disk space, query the database, and so
on.
Note: If you modify your configuration using the command line, and you do not
follow these procedures, your PGP Support agreement is void.
Changes to the PGP Universal Server using command line must be:
Authorized in writing by PGP Support.
Implemented by PGP's partner, reseller, or internal employee who is certified in
the PGP Advanced Administration and Deployment Training.
Summarized and documented in a text file in /var/lib/ovid/customization
on the PGP Universal Server.
Changes made through the command line may not persist through reboots and may
become incompatible in a future release. When troubleshooting new issues, PGP
Support can require you to revert custom configurations on the PGP Universal Server
to a default state.
Symbols
Notes, Cautions, and Warnings are used in the following ways.
Note: Notes are extra, but important, information. A Note calls your attention to
important aspects of the product. You can use the product better if you read the
Notes.
Caution: Cautions indicate the possibility of loss of data or a minor security breach. A
Caution tells you about a situation where problems can occur unless precautions are
taken. Pay attention to Cautions.

5 Introduction
Getting Assistance
Warning: Warnings indicate the possibility of significant data loss or a major security
breach. A Warning means serious problems will occur unless you take the
appropriate action. Please take Warnings very seriously.
Getting Assistance
For additional resources, see these sections.
Getting product information
The following documents and online help are companions to the PGP Universal Server
Administrator’s Guide. This guide occasionally refers to information that can be found
in one or more of these sources:
Online help is installed and is available in the PGP Universal Server product.
PGP Universal Server Installation Guide—Describes how to install the PGP
Universal Server.
PGP Universal Server Upgrade Guide—Describes the process of upgrading your
PGP Universal Server.
PGP Universal Mail Policy Diagram—Provides a graphical representation of how
email is processed through mail policy. You can access this document via the PGP
Universal Server online help.
You can also access all the documentation by clicking the online help icon in the
upper-right corner of the PGP Universal Server screen.
PGP Universal Satellite for Windows and Mac OS X includes online help.
PGP Universal Server and PGP Satellite release notes are also provided, which may
have last-minute information not found in the product documentation.
Technical Support
Symantec Technical Support maintains support centers globally. Technical Support’s
primary role is to respond to specific queries about product features and functionality.
The Technical Support group also creates content for our online Knowledge Base. The
Technical Support group works collaboratively with the other functional areas within
Symantec to answer your questions in a timely fashion. For example, the Technical
Support group works with Product Engineering and Symantec Security Response to
provide alerting services and virus definition updates.
Symantec’s support offerings include the following:
A range of support options that give you the flexibility to select the right amount
of service for any size organization
Telephone and/or Web-based support that provides rapid response and
up-to-the-minute information
Upgrade assurance that delivers software upgrades

6 Introduction
Getting Assistance
Global support purchased on a regional business hours or 24 hours a day, 7 days a
week basis
Premium service offerings that include Account Management Services
For information about Symantec’s support offerings, you can visit our Web site at the
following URL:
www.symantec.com/business/support/
All support services will be delivered in accordance with your support agreement and
the then-current enterprise technical support policy.
Contacting Technical Support
Customers with a current support agreement may access Technical Support
information at the following URL:
www.symantec.com/business/support/
Before contacting Technical Support, make sure you have satisfied the system
requirements that are listed in your product documentation. Also, you should be at the
computer on which the problem occurred, in case it is necessary to replicate the
problem.
When you contact Technical Support, please have the following information available:
Product release level
Hardware information
Available memory, disk space, and NIC information
Operating system
Version and patch level
Network topology
Router, gateway, and IP address information
Problem description:
Error messages and log files
Troubleshooting that was performed before contacting Symantec
Recent software configuration changes and network changes
Licensing and registration
If your Symantec product requires registration or a license key, access our technical
support Web page at the following URL:
www.symantec.com/business/support/
Customer service
Customer service information is available at the following URL:
www.symantec.com/business/support/

7 Introduction
Getting Assistance
Customer Service is available to assist with non-technical questions, such as the
following types of issues:
Questions regarding product licensing or serialization
Product registration updates, such as address or name changes
General product information (features, language availability, local dealers)
Latest information about product updates and upgrades
Information about upgrade assurance and support contracts
Information about the Symantec Buying Programs
Advice about Symantec's technical support options
Nontechnical presales questions
Issues that are related to CD-ROMs or manuals
Support agreement resources
If you want to contact Symantec regarding an existing support agreement, please
contact the support agreement administration team for your region as follows:
Asia-Pacific and Japan customercare_apac@symantec.com
Europe, Middle-East, Africa semea@symantec.com
North America, Latin America supportsolutions@symantec.com

2 The Big Picture
This chapter describes some important terms and concepts and gives you a high-level
overview of the things you need to do to set up and maintain your PGP Universal Server
environment.
Important Terms
The following sections define important terms you will encounter throughout the PGP
Universal Server and this documentation.
PGP Products
PGP Universal Server: A device you add to your network that provides secure
messaging with little or no user interaction. The PGP Universal Server
automatically creates and maintains a security architecture by monitoring
authenticated users and their email traffic. You can also send protected messages
to addresses that are not part of the security architecture.
PGP Global Directory: A free, public keyserver hosted by Symantec
Corporation. The PGP Global Directory provides quick and easy access to the
universe of PGP keys. It uses next-generation keyserver technology that
queries the email address on a key (to verify that the owner of the email
address wants their key posted) and lets users manage their own keys. Using
the PGP Global Directory significantly enhances your chances of finding a
valid public key of someone to whom you want to send secured messages.
For external users without encryption keys, PGP Universal Server offers multiple
secure delivery options, leveraging third-party software that is already installed
on typical computer systems, such as a web browser or Adobe Acrobat Reader. For
email recipients who do not have an encryption solution, you can use of of the
following secure delivery options from PGP Universal Server:
PGP Universal Satellite: The PGP Universal Satellite software resides on the
computer of the email user. It allows email to be encrypted end to end, all the
way to and from the desktop (for both internal and external users). Using
PGP Universal Satellite is one of the ways for external users to participate in
the SMSA. It also allows users the option of controlling their keys on their
local computers (if allowed by the administrator).
PGP Universal Web Messenger: The PGP Universal Web Messenger service
allows an external user to securely read a message from an internal user
before the external user has a relationship with the SMSA. If PGP Universal
Web Messenger is available via mail policy for a user and the recipient’s key
cannot be found, the message is stored on the PGP Universal Server and an
unprotected message is sent to the recipient. The unprotected message
includes a link to the original message, held on the PGP Universal Server.
The recipient must create a passphrase, and then can access his encrypted
messages stored on PGP Universal Server.

10 The Big Picture
Important Terms
PDF Messenger: PDF Messenger enables sending encrypted PDF messages to
external users who do not have a relationship with the SMSA. In the normal
mode, as with PGP Universal Web Messenger, the user receives a message
with a link to the encrypted message location and uses a PGP Universal Web
Messenger passphrase to access the message. PDF Messenger also provides
Certified Delivery, which encrypts the message to a one-time passphrase,
and creates and logs a delivery receipt when the user retrieves the
passphrase.
PGP Desktop: A client software tool that uses cryptography to protect your data
against unauthorized access. PGP Desktop is available for Mac OS X and Windows.
PGP Whole Disk Encryption: Whole Disk Encryption is a feature of PGP
Desktop that encrypts your entire hard drive or partition (on Windows
systems), including your boot record, thus protecting all your files when you
are not using them.
PGP NetShare: A feature of PGP Desktop for Windows with which you can
securely and transparently share files and folders among selected
individuals. PGP NetShare users can protect their files and folders simply by
placing them within a folder that is designated as protected.
PGP Virtual Disk: PGP Virtual Disk volumes are a feature of PGP Desktop
that let you use part of your hard drive space as an encrypted virtual disk.
You can protect a PGP Virtual Disk volume with a key or a passphrase. You
can also create additional users for a volume, so that people you authorize
can also access the volume.
PGP Zip: A feature of PGP Desktop that lets you put any combination of files
and folders into a single encrypted, compressed package for convenient
transport or backup. You can encrypt a PGP Zip archive to a PGP key or to a
passphrase.
PGP Portable: A separately-licensed feature that enables you to send encrypted
files to users who do not have PGP Desktop software, and to transport files
securely to systems that do not or cannot have PGP software installed.
PGP Universal Server Concepts
keys.<domain> convention: PGP Universal Server automatically looks for valid
public keys for email recipients at a special hostname, if no valid public key is
found locally to secure a message. This hostname is keys.<domain> (where
<domain> is the email domain of the recipient). For example, Example
Corporation’s externally visible PGP Universal Server is named
keys.example.com.
Symantec Corporation strongly recommends you name your externally visible
PGP Universal Server according to this convention because it allows other PGP
Universal Servers to easily find valid public keys for email recipients in your
domain.
For more information, see Naming your PGP Universal Server (see "About Naming
your PGP Universal Server" on page 23).
Security Architecture: Behind the scenes, the PGP Universal Server creates and
manages its own security architecture for the users whose email domain it is
securing. Because the security architecture is created and managed automatically,
we call this a self-managing security architecture (SMSA).

11 The Big Picture
Important Terms
PGP Universal Server Features
Administrative Interface: Each PGP Universal Server is controlled via a
Web-based administrative interface. The administrative interface gives you
control over PGP Universal Server. While many settings are initially established
using the web-based Setup Assistant, all settings of a PGP Universal Server can be
controlled via the administrative interface.
Backup and Restore: Because full backups of the data stored on your PGP
Universal Server are critical in a natural disaster or other unanticipated loss of
data or hardware, you can schedule automatic backups of your PGP Universal
Server data or manually perform a backup.
You can fully restore a PGP Universal Server from a backup. In the event of a
minor problem, you can restore the PGP Universal Server to any saved backup. In
the event that a PGP Universal Server is no longer usable, you can restore its data
from a backup onto a new PGP Universal Server during initial setup of the new
PGP Universal Server using the Setup Assistant. All backups are encrypted to the
Organization Key and can be stored securely off the PGP Universal Server.
Cluster: When you have two or more PGP Universal Servers in your network, you
configure them to synchronize with each other; this is called a “cluster.”
Dictionary: Dictionaries are lists of terms to be matched. The dictionaries work
with mail policy to allow you to define content lists that can trigger rules.
Directory Synchronization: If you have LDAP directories in your organization,
your PGP Universal Server can be synchronized with the directories. The PGP
Universal Server automatically imports user information from the directories
when users send and receive email; it also creates internal user accounts for them,
including adding and using X.509 certificates if they are contained in the LDAP
directories.
Ignition Keys: You can protect the contents of a PGP Universal Server, even if the
hardware is stolen, by requiring the use of a hardware token or a software
passphrase, or both, on start.
Keyserver: Each PGP Universal Server includes an integrated keyserver populated
with the public keys of your internal users. When an external user sends a
message to an internal user, the external PGP Universal Server goes to the
keyserver to find the public key of the recipient to use to secure the message. The
PGP Universal Server administrator can enable or disable the service, and control
access to it via the administrative interface.
Learn Mode: When you finish configuring a PGP Universal Server using the Setup
Assistant, it begins in Learn Mode, where the PGP Universal Server sends
messages through mail policy without taking any action on the messages, and does
not encrypt or sign any messages.
Learn Mode gives the PGP Universal Server a chance to build its SMSA (creating
keys for authenticated users, for example) so that when when Learn Mode is
turned off, the PGP Universal Server can immediately begin securing messages. It
is also an excellent way for administrators to learn about the product.
You should check the logs of the PGP Universal Server while it is in Learn Mode to
see what it would be doing to email traffic if it were live on your network. You can
make changes to the PGP Universal Server’s policies while it is in Learn Mode
until things are working as expected.

12 The Big Picture
Important Terms
Mail Policy: The PGP Universal Server processes email messages based on the
policies you establish. Mail policy applies to inbound and outbound email
processed by both PGP Universal Server and client software. Mail policy consists
of multiple policy chains, comprised of sequential mail processing rules.
Organization Certificate: You must create or obtain an Organization Certificate to
enable S/MIME support by PGP Universal Server. The Organization Certificate
signs all X.509 certificates the server creates.
Organization Key: The Setup Assistant automatically creates an Organization Key
(actually a keypair) when it configures a PGP Universal Server. The Organization
Key is used to sign all PGP keys the PGP Universal Server creates and to encrypt
PGP Universal Server backups.
Caution: It is extremely important to back up your Organization Key: all keys the
PGP Universal Server creates are signed by the Organization Key, and all
backups are encrypted to the Organization Key. If you lose your Organization
Key and have not backed it up, the signatures on those keys are meaningless and
you cannot restore from backups encrypted to the Organization Key.
PGP Verified Directory: The PGP Verified Directory supplements the internal
keyserver by letting internal and external users manage the publishing of their
own public keys. The PGP Verified Directory also serves as a replacement for the
PGP Keyserver product. The PGP Verified Directory uses next-generation
keyserver technology to ensure that the keys in the directory can be trusted.
Server Placement: A PGP Universal Server can be placed in one of two locations in
your network to process email.
With an internal placement, the PGP Universal Server logically sits between your
email users and your mail server. It encrypts and signs outgoing SMTP email and
decrypts and verifies incoming mail being picked up by email clients using POP or
IMAP. Email stored on your mail server is stored secured (encrypted).
With a gateway placement, the PGP Universal Server logically sits between your
mail server and the Internet. It encrypts and signs outgoing SMTP email and
decrypts and verifies incoming SMTP email. Email stored on your mail server is
stored unsecured.
For more information, see Configuring Mail Proxies (on page 147) and the PGP
Universal Server Installation Guide.
Setup Assistant: When you attempt to log in for the first time to the
administrative interface of a PGP Universal Server, the Setup Assistant takes you
through the configuration of that PGP Universal Server.
Group Key: A server-managed keypair shared by a group of users. A Group Key is
assigned to a group based on membership in an Active Directory security group.
This allows membership in the Active Directory security group to be modified
without affecting the metadata associated with the protected data. To create a
Group Key, the Directory Synchronization feature must be enabled and
synchronized with an Active Directory database.
PGP Universal Server User Types
Administrators: Any user who manages the PGP Universal Server and its security
configuration from inside the internal network.

13 The Big Picture
Installation Overview
Only administrators are allowed to access the administrative interface that
controls PGP Universal Server. A PGP Universal Server supports multiple
administrators, each of which can be assigned a different authority: from
read-only access to full control over every feature and function.
Consumers: Internal, external, and Verified Directory users, and devices.
External Users: External users are email users from other domains (domains
not being managed by your PGP Universal Server) who have been added to
the SMSA.
Internal Users: Internal users are email users from the domains being
managed by your PGP Universal Server.
PGP Universal Server allows you to manage PGP Desktop deployments to your
internal users. The administrator can control which PGP Desktop features are
automatically implemented at install, and establish and update security policy
for PGP Desktop users that those users cannot override (except on the side of
being more secure).
PGP Verified Directory Users: Internal and external users who have
submitted their public keys to the PGP Verified Directory, a Web-accessible
keyserver.
Devices: Managed devices, WDE computers, and WDE disks. Managed
devices are arbitrary objects whose keys are managed by PGP Universal
Server. WDE computers, and WDE disks are devices that are detected when
users enroll.
Other Email Users: Users within your organization can securely send email to
recipients outside the SMSA.
First, the PGP Universal Server attempts to find a key for the recipient. If that
fails, there are four fallback options, all controlled by mail policy: bounce the
message back to the sender (so it is not sent unencrypted), send unencrypted,
Smart Trailer, and PGP Universal Web Messenger mail.
Smart Trailer sends the message unencrypted and adds text giving the recipient
the option of joining the SMSA by installing PGP Universal Satellite, using an
existing key or certificate, or using PGP Universal Web Messenger. PGP Universal
Web Messenger lets the recipient securely read the message on a secure website; it
also gives the recipient options for handling subsequent messages from the same
domain: read the messages on a secure website using a passphrase they establish,
install PGP Universal Satellite, or add an existing key or certificate to the SMSA.
Installation Overview
The following steps are a broad overview of what it takes to plan, set up, and maintain
your PGP Universal Server environment.
Most of the steps described here are described in detail in later chapters. Steps 1 and 4
are described in the PGP Universal Server Installation Guide. Note that these steps
apply to the installation of a new, stand-alone PGP Universal Server.
If you plan to install a cluster, you must install and configure one PGP Universal Server
following the steps outlined here. Subsequent cluster members will get most of their
configuration settings from the initial server by replication.
The steps to install and configure a PGP Universal Server are as follows:

14 The Big Picture
Installation Overview
1 Plan where in your network you want to locate your PGP Universal Server(s).
Where you put PGP Universal Servers in your network, how many PGP Universal
Servers you have in your network, and other factors all have a major impact on
how you add them to your existing network.
Create a diagram of your network that includes all network components and
shows how email flows; this diagram details how adding a PGP Universal Server
impacts your network.
For more information on planning how to add PGP Universal Servers to your
existing network, see Adding the PGP Universal Server to Your Network in the
PGP Universal Server Installation Guide.
2 Perform necessary DNS changes.
Add IP addresses for your PGP Universal Servers, an alias to your keyserver,
update the MX record if necessary, add keys.<domain>, hostnames of potential
Secondary servers for a cluster, and so on.
Properly configured DNS settings (including root servers and appropriate reverse
lookup records) are required to support PGP Universal Server. Make sure both
host and pointer records are correct. IP addresses must be resolvable to
hostnames, as well as hostnames resolvable to IP addresses.
3 Prepare a hardware token Ignition Key.
If you want to add a hardware token Ignition Key during setup, install the drivers
and configure the token before you begin the PGP Universal Server setup process.
See Protecting PGP Universal Server with Ignition Keys (on page 25) for
information on how to prepare a hardware token Ignition Key.
Note: In a cluster, the Ignition Key configured on the first PGP Universal Server
in the cluster will also apply to the subsequent members of the cluster.
4 Install and configure this PGP Universal Server.
The Setup Assistant runs automatically when you first access the administrative
interface for the PGP Universal Server. The Setup Assistant is where you can set
or confirm a number of basic settings such as your network settings,
administrator password, server placement option, mail server address and so on.
The details of this process are described in Setting Up the PGP Universal Server in
the PGP Universal Server Installation Guide.
Note: If you plan to configure multiple servers as a cluster, you must configure
one server first in the normal manner, then add the additional servers as cluster
members. You can do this through the Setup Assistant when you install a server
that will join an existing cluster, or you can do this through the PGP Universal
Server administrative interface. For more information see Cluster Member
Configuration in the PGP Universal Server Installation Guide.
5 License your server.
You cannot take a PGP Universal Server out of Learn Mode or install updates until
the product is licensed. Once it is licensed, you should check for product updates
and install them if found. For more information, see Licensing Your Software (on
page 35).

15 The Big Picture
Installation Overview
If you want the PGP Universal Server to provide mail proxy services, you must
have a PGP Universal Server license with the mailstream feature enabled, and you
must check the Enable Mail Proxies check box on the System Settings page in the
PGP Universal Server administrative interface. For more information, see
Licensing Your Software (on page 35).
6 If you have a PGP key you want to use as your Organization Key with PGP
Universal Server, import it, then back it up.
Your Organization Key does two important things: it is used to sign all user keys
the PGP Universal Server creates and it is used to encrypt PGP Universal Server
backups. This key represents the identity of your organization, and is the root of
the Web-of-Trust for your users.
If your organization uses PGP Desktop and already has an Corporate Key or
Organization Key, and you want to use that key with PGP Universal Server, you
should import it as soon as you have configured your server, then create a backup
of the key.
If your organization does not have an existing key that you want to use as your
Organization Key, use the Organization Key the Setup Assistant automatically
creates with default values. For more information, see Managing Organization
Keys (on page 47).
No matter which key you use as your Organization Key, it is very important to
make a backup of the key. Since PGP Universal Server’s built-in back-up feature
always encrypts backups to this key, you need to provide a copy of your
Organization Key to restore your data.
For more information, see Organization Certificate (on page 50).
7 If you have a PGP Additional Decryption Key (ADK) that you want to use with
PGP Universal Server, add it.
An ADK is a way to recover an email message if the recipient is unable or unwilling
to do so; every message that is also encrypted to the ADK can be opened by the
holder(s) of the ADK. You cannot create an ADK with the PGP Universal Server,
but if you have an existing PGP ADK (generated by PGP Desktop, an ideal scenario
for a split key; refer to the PGP Desktop User’s Guide for more information), you
can add it to your PGP Universal Server and use it. For more information, see
Additional Decryption Key (ADK) (on page 53).
8 Create a SSL/TLS certificate or obtain a valid SSL/TLS certificate.
You can create a self-signed certificate for use with SSL/TLS traffic. Because this
certificate is self-signed, however, it might not be trusted by email or Web browser
clients. Symantec Corporation recommends that you obtain a valid SSL/TLS
certificate for each of your PGP Universal Servers from a reputable Certificate
Authority.
This is especially important for PGP Universal Servers that are accessed publicly.
Older Web browsers might reject self-signed certificates or not know how to
handle them correctly when they encounter them via PGP Universal Web
Messenger or Smart Trailer.
For more information, see Working with Certificates (on page 41).
9 Configure the Directory Synchronization feature if you want to synchronize an
LDAP directory with your PGP Universal Server.
If you have an existing LDAP server, using the Directory Synchronization feature
gives you more control over which users, keys, and certificates are added to the
PGP Universal Server.

16 The Big Picture
Installation Overview
By default, user enrollment is set to Email enrollment. If you elect to use
certificate enrollment or LDAP directory enrollment, you must have an LDAP
directory configured and Directory Synchronization enabled. You can change the
client enrollment setting from the Directory Synchronization Settings page in the
PGP Universal Server administrative interface.
For more information, see Using Directory Synchronization to Manage Consumers
(on page 225).
10 Configure PGP Desktop client features.
The PGP Desktop client basic (default) license is installed along with the PGP
Universal Server, so adding the client license as a separate step is not necessary.
However, the optional features (messaging, PGP Whole Disk Encryption, and PGP
NetShare) are disabled by default. If you have purchased a license for those
features, you must edit your client policy settings to enable them. For more
information about consumer policy settings, see "Establishing PGP Desktop
Settings for Your PGP Desktop Clients (on page 217)".
11 Add trusted keys, configure consumer policy, and establish mail policy.
All these settings are important for secure operation of PGP Universal Server. For
more information on adding trusted keys from outside the SMSA, see Managing
Trusted Keys and Certificates (on page 77). For more information about consumer
policy settings, see Administering Consumer Policy (on page 197). For information
on setting up mail policy, see Setting Mail Policy (on page 85).
Note: When setting policy for Consumers, PGP Universal Server provides an
option called Out of Mail Stream (OOMS) support. OOMS specifies how the email
gets transmitted from the client to the server when PGP Desktop cannot find a
key for the recipient and therefore cannot encrypt the message.
OOMS is disabled by default. With OOMS disabled, sensitive messages that can't
be encrypted locally are sent to PGP Universal Server "in the mail stream" like
normal email. Importantly, this email is sent in the clear (unencrypted). Mail or
Network administrators could read these messages by accessing the mail server's
storage or monitoring network traffic. However, archiving solutions, outbound
anti-virus filters, or other systems which monitor or proxy mail traffic will
process these messages normally.
You can elect to enable OOMS, which means that sensitive messages that can't be
encrypted locally are sent to PGP Universal Server "out of the mail stream." PGP
Desktop creates a separate, encrypted network connection to the PGP Universal
Server to transmit the message. However, archiving solutions, outbound
anti-virus filters, or other systems which monitor or proxy mail traffic will not
see these messages.
During your configuration of your PGP Universal Server you should determine
the appropriate settings for your requirements. This option can be set separately
for each policy group, and is set through the Consumer Policy settings. For more
details on the effects of enabling or disabling OOMS, see Out of Mail Stream
Support.
12 Install and configure additional cluster server members.

17 The Big Picture
Installation Overview
You can do this through the Setup Assistant when you install a server that will
join an existing cluster, or you can do this through the PGP Universal Server
administrative interface. Remember that you must configure one server in the
normal manner before you can add and configure additional servers as cluster
members. For more information, see Clustering your PGP Universal Servers (on
page 45).
13 Reconfigure the settings of your email clients and servers, if necessary.
Depending on how you are adding the PGP Universal Server to your network,
some setting changes might be necessary. For example, if you are using a PGP
Universal Server placed internally, the email clients must have SMTP
authentication turned on. For PGP Universal Servers placed externally, you must
configure your mail server to relay SMTP traffic to the PGP Universal Server.
14 Enable SNMP Polling and Traps.
You can configure PGP Universal Server to allow network management
applications to monitor system information for the device on which PGP Universal
Server is installed and to send system and application information to an external
destination. See Configuring SNMP Monitoring (on page 9) for more information.
15 Distribute PGP Universal Satellite and/or PGP Desktop to your internal users, if
appropriate.
If you want to provide seamless, end-to-end PGP message security without the
need for any user training, have them use PGP Universal Satellite.
Exchange/MAPI and Lotus Notes environments also require the use of PGP
Universal Satellite. PGP Desktop provides more features and user control than
PGP Universal Satellite. For more information, see PGP Universal Satellite and
Configuring PGP Desktop Installations.
16 Analyze the data from Learn Mode.
In Learn Mode, your PGP Universal Server sends messages through mail policy
without actually taking action on the messages, decrypts and verifies incoming
messages when possible, and dynamically creates a SMSA. You can see what the
PGP Universal Server would have done without Learn Mode by monitoring the
system logs.
Learn Mode lets you become familiar with how the PGP Universal Server operates
and it lets you see the effects of the policy settings you have established before the
PGP Universal Server actually goes live on your network. Naturally, you can fine
tune settings while in Learn Mode, so that the PGP Universal Server is operating
just how you want before you go live.
For more information, see Operating in Learn Mode (on page 37).
17 Adjust policies as necessary.
It might take a few tries to get everything working just the way you want. For
example, you might need to revise your mail policy.
18 Perform backups of all PGP Universal Servers before you take them out of Learn
Mode.
This gives you a baseline backup in case you need to return to a clean installation.
For more information, see Backing Up and Restoring System and User Data (on
page 31).
19 Take your PGP Universal Servers out of Learn Mode.

18 The Big Picture
About Integration with Symantec Protection Center
Once this is done, email messages are encrypted, signed, and decrypted/verified,
according to the relevant policy rules. Make sure you have licensed each of your
PGP Universal Servers; you cannot take a PGP Universal Server out of Learn Mode
until it has been licensed.
20 Monitor the system logs to make sure your PGP Universal Server environment is
operating as expected.
About Integration with Symantec Protection Center
Protection Center helps strengthen the security of your organization by providing easy
access to security metrics and simplified security management. You can log in to PGP
Universal Server and other security products from within Protection Center. This
feature allows for a single point of administration. The tasks you perform within each
product's separate console can now be performed through Protection Center.
Protection Center also aggregates security data from PGP Universal Server and other
Symantec Corporation products and combines that data into cross-product reports,
providing you with a more complete, all-in-one view of the security of your enterprise.
PGP Universal Server sends the following data to be included in aggregated reports:
Internal users
Client computers
Client computer status
Encryption status per client device
PGP Whole Disk Encryption login failure alerts, which Protection Center calls
incident events
Protection Center install agents, which in this case refers only to PGP Universal
Server itself
Before You Integrate with Protection Center
Both Protection Center and PGP Universal Server must be installed and set up before
integration and registration.
For detailed information about how to set up your Protection Center and register PGP
Universal Server, see the Protection Center documentation.
Complete the following tasks to prepare PGP Universal Server for registration with and
discovery by Protection Center.
To register PGP Universal Server on Protection Center, you need the PGP
Universal Server's IP address, as well as the username and passphrase of a
superuser administrator. All other registration information appears automatically
in the Advanced Options section of the registration interface and do not need to be
entered manually.
Best Practice: Create a superuser account to be used only for registration. This
provides stability even when other administrators leave the company.

19 The Big Picture
About Integration with Symantec Protection Center
You cannot register with Protection Center using an administrator account that
authenticates using SecurID. You must use an account with a passphrase. The
account used for registration is not related to which administrators can log in to
Protection Center. Any PGP Universal Server administrator, including SecurID
and passphrase administrators, can log in to Protection Center, if you map a new
Protection Center user account to that administrator. For more information, see
the Protection Center documentation.
Make sure that the time settings for PGP Universal Server and Protection Center
match, with less than a minute's difference. The hour and time zone settings do
not have to match, but the minute setting must be the same. If the minute settings
do not match, registration fails and an error message appears.
Register only one PGP Universal Server in a cluster. Because data is replicated
among cluster members, registering more than one cluster member results in
duplicate data sent to Protection Center. For example, if you manage 10 encrypted
devices, it will appear in Protection Center reports as if there are 20. If you have
cluster members located in the DMZ as well as inside your network, register a
cluster member within your network, not one in the DMZ, because cluster
members in the DMZ do not usually store private keys.

3 About Open Ports
This chapter provides information on the ports a PGP Universal Server has open and on
which ports it listens.
TCP Ports
Port Protocol/Service Comment
21 File Transfer Protocol (FTP) Used to transmit encrypted backup
archives to other servers. Data is sent via
passive FTP, so port 20 (FTP Data) is not
used.
22 Open Secure Shell (SSH) Used for remote shell access to the server
for low-level system administration.
25 Simple Mail Transfer
Protocol (SMTP)
Used to send mail. In a gateway placement,
the PGP Universal Server listens on port
25 for incoming and outgoing SMTP
traffic.
80 HyperText Transfer
Protocol (HTTP)
Used to allow user access to the PGP
Verified Directory. If the PGP Verified
Directory is disabled, access on this port is
automatically redirected to port 443 over
HTTPS.
Also used for Universal Services Protocal
(USP) keyserver connection.
110 Post Office Protocol (POP) Used to retrieve mail by users with POP
accounts in an internal placement. Closed
to gateway placements.
143 Internet Message Access
Protocol (IMAP)
Used to retrieve mail by users with IMAP
accounts in an internal placement. Closed
to gateway placements.
389 Lightweight Directory
Access Protocol (LDAP)
Used to allow remote hosts to look up local
users' public keys.
443 HyperText Transfer
Protocol, Secure (HTTPS)
Used for PGP Desktop and PGP Universal
Satellite policy distribution and PGP
Universal Web Messenger access.
If the Verified Directory is disabled, used
for HTTPS access.
Also used for Universal Services Protocal
(USP)over SSL for keyserver connection.
444 Simple Object Access
Protocol, Secure (SOAPS)
Used to cluster replication messages.

22 About Open Ports
UDP Ports
UDP Ports
Port Protocol/Service Comment
21 File Transfer Protocol (FTP) Used to transmit encrypted backup
archives to other servers. Data is sent via
passive FTP, so port 20 (FTP Data) is not
used.
465 Simple Mail Transfer
Protocol, Secure (SMTPS)
Used to send mail securely in internal
placements. Closed to gateway placements.
This is a non-standard port used only by
legacy mail servers. We recommend,
rather than using this port, you use
STARTTLS on port 25.
636 Lightweight Directory
Access Protocol, Secure
(LDAPS)
Used to securely allow remote hosts to
look up public keys of local users.
993 Internet Message Access
Protocol, Secure (IMAPS)
Used to retrieve mail securely by users
with IMAP accounts in internal
placements. Closed to gateway placements.
995 Post Office Protocol, Secure
(POPS)
Used to retrieve mail securely by users
with POP accounts in internal placements.
Closed to gateway placements.
9000 HyperText Transfer
Protocol, Secure (HTTPS)
Allows access to the PGP Universal Server
administrative interface.
Port Protocol/Service Comment
53 Domain Name System (DNS ) Used to look up a Fully Qualified
Domain Name (FQDN ) on the
DNS server and translate to an
IP address.
123 Network Time Protocol (NTP ) Used to synchronize the
system’s clock with a reference
time source on a different server.
161 Simple Network Management
Protocol (SNMP)
Used by network management
applications to query the health
and activities of PGP Universal
Server and the computer on
which it is installed.

4 About Naming your PGP Universal
Server
This chapter describes how and why to name your PGP Universal Server using the
keys.<domain> convention.
How to Name Your PGP Universal Server
Unless a valid public key is found locally, PGP Universal Servers automatically look for
valid public keys for email recipients by attempting to contact a keyserver at a special
hostname, keys.<domain>, where <domain> is the recipient's email domain.
For example, an internal user at example.com sends an email to
susanjones@widgetcorp.com. If no valid public key for Susan is found on the Example
PGP Universal Server, it automatically looks for a valid public key for Susan at
keys.widgetcorp.com, even if there is no domain policy for widgetcorp.com on
Example’s PGP Universal Server. Keys are found locally if they are cached, or if Susan
was an external user who explicitly supplied her key through PGP Universal Web
Messenger. If the Widgetcorp PGP Universal Server is named using the keys.<domain>
convention, the Example Corp. PGP Universal Server can find a valid public key for
susan@widgetcorp.com at keys.widgetcorp.com.
Caution: Symantec Corporation strongly recommends you name your PGP Universal
Server according to this convention, because it allows other PGP Universal Servers
to easily find valid public keys for email recipients in your domain. You must also use
this convention to name your externally visible PGP Universal Server.
If your organization uses email addresses, such as mingp@example.com and
mingp@corp.example.com, your PGP Universal Server must be reachable at
keys.example.com and keys.corp.example.com. If you have multiple PGP Universal
Servers in a cluster that are managing an email domain, only one of those PGP
Universal Servers needs to use the keys.<domain> convention.
Note: Keys that are found using the keys.<domain> convention are treated as valid
and trusted.
Keys.<domain> should be the address of a load-balancing device, which distributes
connections to your PGP Universal Server’s keyserver service. The ports that need to be
load balanced are the ports on which you are running your keyserver service, port 389
for LDAP and 636 for LDAPS. You can also name your PGP Universal Server according
to your company's required naming convention and ensure that the server has a DNS
alias of keys.<domain>.com.
If you are administering multiple email domains, you should establish the
keys.<domain> convention for each email domain. If your PGP Universal Server is
behind your corporate firewall, you must ensure that ports 389 (LDAP) and 636 (LDAPS)
are open to support the keys.<domain> convention.

24 About Naming your PGP Universal Server
Naming Methods
Naming Methods
To support the keys.<domain> convention, you can name your PGP Universal Server in
one of the following ways:
In the Setup Assistant, name your PGP Universal Server with the keys.<domain>
convention in the Host Name field on the Network Setup page.
On the Network Settings page, change the host name of your PGP Universal
Server to keys.<domain> .
Create a DNS alias to your PGP Universal Server that uses the keys.<domain>
convention that is appropriate for your DNS server configuration.

5 Understanding the Administrative
Interface
This section describes the PGP Universal Server’s Web-based administrative interface.
System Requirements
The PGP Universal Server administrative interface has been fully tested with the
following Web browsers:
Windows Internet Explorer 6 and greater
Firefox 3.6 and greater
Mac OS X Safari 5.0 and greater
Firefox 3.6 and greater
Although the administrative interface works with other Web browsers, we recommend
these browsers for maximum compatibility.
Logging In
A login name and passphrase for the administrative interface were originally
established when you configured the server using the Setup Assistant. In addition, the
original administrator may have created additional administrators, and may have
configured your PGP Universal Server to accept RSA SecurID authentication.
To log in to your server’s administrative interface
1 In a Web browser, type https:// <domain name of server>:9000/ and press Enter.
Note: If you see a Security Alert dialog box relating to the security certificate, it
means you need to replace the self-signed certificate created automatically with
a certificate from a public Certificate Authority.
The Login page appears.
2 Type the current login name in the Username field.
3 Type the current passphrase or SecurID passcode in the Passphrase field.
(If SecurID authentication is enabled, a message below the Passphrase field will
indicate that a SecurID passcode can be entered. A given administrator is
configured to use either passphrase or SecurID authentication, not both.)
4 Click the Login button or press Enter.
5 If the login credentials are accepted, the System Overview page appears.
6 If the login credentials do not match, an error is displayed. For passphrase
authentication that fails, an "Invalid Login" error appears. For SecurID
authentication, different events may occur. See the following procedure for more
information.

26 Understanding the Administrative Interface
The System Overview Page
To log in using RSA SecurID authentication
1 Follow steps 1-4 in the procedure above. If your SecurID passcode is accepted, and
no PIN reset is required, the System Overview page appears.
Note: If PGP Universal Server fails to connect with any RSA Manager server, you
will be presented with the standard "Invalid Login" message. The connection
failure will be logged in the PGP Universal Server Administration log, enabling
you to determine whether this was the cause of the login failure.
2 If the RSA server policy determines that a PIN reset is required, upon successful
login the PIN Reset dialog appears. Depending on the RSA server policy, you may
be able to have the RSA server generate a new PIN for you, or enter a new PIN
manually. When this is done, the System Overview page appears. For more details
see Resetting SecurID PINs (on page 23).
3 If the RSA server detects a problem with the token code portion of your passcode,
you are asked to re-enter your PIN plus the next code shown on your SecurID
token. Type your PIN and the next token code that appears, then click Login or
press Enter.
4 Based on your RSA server policy, you may be given several chances to
authenticate successfully using the next token code. However, eventually
continued failures will result in a failed login.
Note: Log in events are logged in the PGP Universal Server Administration log.
Successful and failed attempts, and next tokencode requests are logged, as are
problems connecting to the RSA Manager servers.
The System Overview Page
The System Overview page is the first page you see when you log in to PGP Universal
Server. You can also view it from Reporting > Overview.
The page provides a general report of system information and statistics. The
information displayed includes:
System alerts, including licensing issues and PGP Whole Disk Encryption login
failures. System alerts appear at the top of the page.
System Graphs for CPU usage, message activity, and Whole Disk Encryption. Click
the buttons to switch the graphs. Click the System Graphs heading to go to the
Reporting > Graphs page. See System Graphs (on page 3) for more information
about system graphs.
Services information, including which services are running or stopped.
Depending on the service, the entry may also include the number of users or
keys handled by the service.
Click the service name link to go to the administrative page for that service.
For a running Web Messenger service, click the URL to go to the Web
Messenger interface.

27 Understanding the Administrative Interface
Managing Alerts
For a running Verified Directory service, click the URL to go to the Verified
Directory interface to search for a key, upload your own public key, or
remove your key from the searchable directory.
System Statistics, including software version number, system uptime, total
messages processed, and number of PGP Portable Disks created. Click the
Statistics link to go to the System > General Settings page.
Mail Queue statistics show the number of email messages in the queue waiting to
be processed, if applicable, and the size of the mail queue. Click the Mail Queue
link to go to the Mail > Mail Queue status page for detailed information about the
contents of the mail queue. Estimated Policy Group Membership shows the
number of members in each consumer policy group. Click a policy group name to
go to the page for configuring that policy group.
Clustering provides status information about the cluster configuration, if this
PGP Universal Server is a member of a cluster. This display shows, for each cluster
member, its hostname or IP address, its status, its location (Internal or DMZ) and a
login icon (except for the member on which you are currently logged in). Click the
Clustering heading to go to the System > Clustering page. This display does not
appear if your PGP Universal Server is not a member of a cluster.
Click Refresh (at the top of the System Overview page) to refresh the information
shown on this page.
The Manage Alerts button takes you to the Alerts page where you can configure how
you want to be notified about WDE login failures. For more details, see Managing Alerts
(on page 27).
The Export Data button lets you export statistics for WDE Activity, WDE Login
Failures, PDF Messenger Certified Delivery Receipts, and the Mail Policy Print View
(which provides in a printable format all your mail policy chains and rules). Because the
report can take a long time to generate, you can begin running the report and have an
email notification sent to you when the report is ready to be downloaded.
Managing Alerts
The PGP Universal Server groups failed login attempts into reported login failures. This
feature is intended to make reporting about failed login attempts more useful, because
one or several failed login attempts by a PGP Whole Disk Encryption user does not
necessarily mean an attempted break-in. Use the Alerts dialog box to choose how many
failed login attempts constitutes a login failure. For example, you can specify that an
alert should be triggered after 3 failed login attempts. If 6 failed attempts occur, 2 login
failure alerts appear.
Alerts about PGP Whole Disk Encryption login failures appear on the System Overview
page and in the Daily Status Email. Alerts for devices belonging to specific users appear
on the user's Internal Users dialog box.
Alerts are also sent when a user is locked out of a system because he or she exceeded
the number of allowable login failures set on the Disk Encryption tab of Consumer
Policy.
To specify how you want to be notified of PGP Whole Disk Encryption login failures
1 From the System Overview page, click Manage Alerts.
The Alerts dialog box appears.
28 Understanding the Administrative Interface
Logging In For the First Time
2 Specify how many consecutive failed login attempts a single device must report
before the administrator is notified.
3 Choose how long you want login failure alerts to be displayed on the System
Overview page, the Daily Status Email, and the Internal Users page, in hours or
days.
4 Specify how long you want to keep login failure records in the database, in days.
Logging In For the First Time
The first time you log in to the PGP Universal Server, a welcome dialog box appears.
The welcome dialog box provides access to documentation. You can choose to have the
welcome dialog box appear every time you log in.
What’s New—Lists the new features in PGP Universal Server 3.2.
Mail Policy Diagram—Provides a graphical representation of how email is
processed through mail policy.
PGP Universal Upgrade Guide—Provides instructions on how to migrate PGP
Keyserver data, how to upgrade your PGP Universal Server, and how version 2.0.6
settings migrate into the mail policy environment.
You can also access all the documentation by clicking the online help icon in the upper
right corner of the PGP Universal Server page.
Administrative Interface Map
The administrative interface is organized as follows:
Sections Pages
Reporting Overview
Graphs
Logs
Consumers Groups
Users
Devices
Consumer Policy
Managed Domains
Directory Synchronization
Keys Managed Keys
Trusted Keys

29 Understanding the Administrative Interface
Icons
Organization Keys
Ignition Keys
Keyservers
Key Cache
Mail Mail Policy
Dictionaries
Archive Servers
Proxies
Mail Queue
Mail Routes
Message Templates
Services Web Messenger
Keyserver
SNMP
Verified Directory
Certificate Revocation
USP
PGP RDD
System General Settings
Administrators
Backups
Updates
Network
Clustering
Icons
The administrative interface uses the following icons.
Type Icon Description
Actions Add
Remove
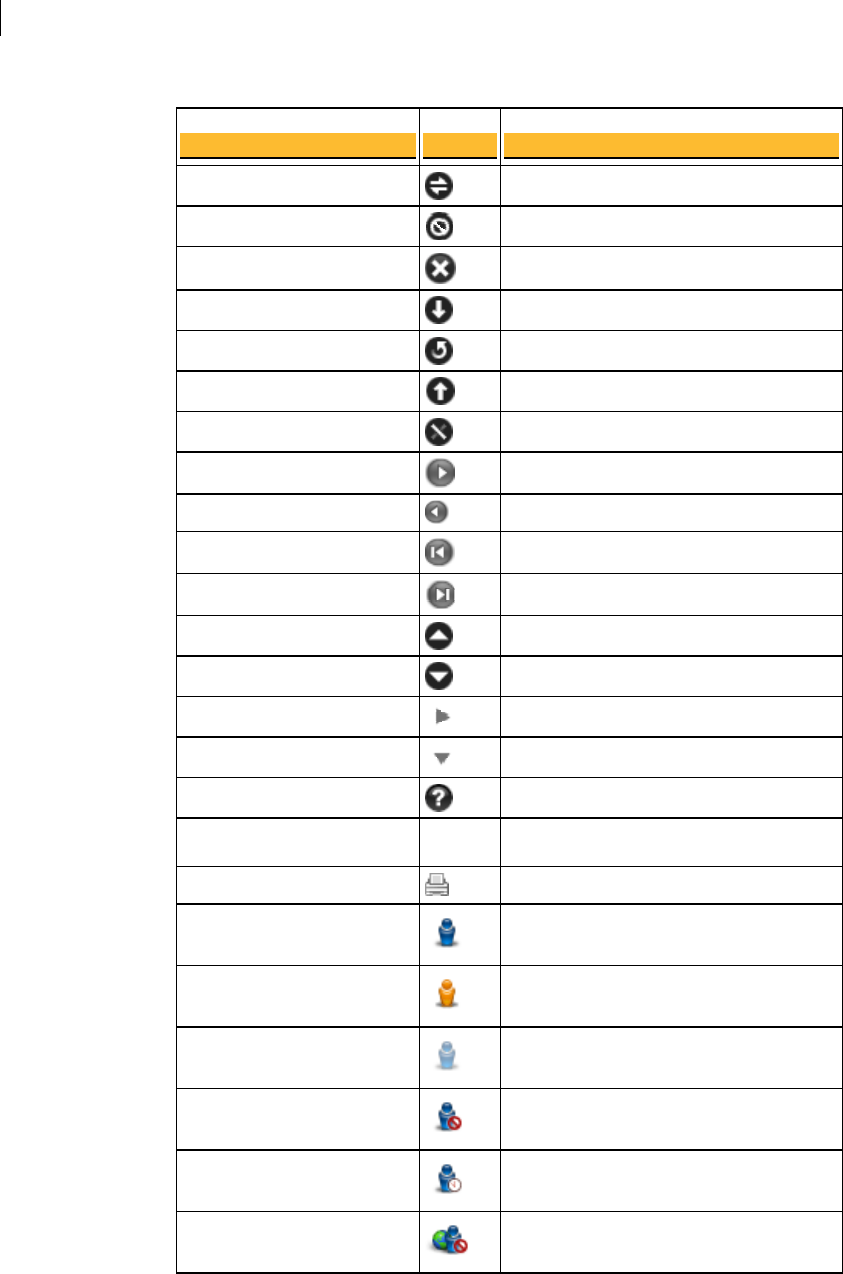
30 Understanding the Administrative Interface
Icons
Type Icon Description
Connect
Delete
Clear Search
Install/Export
Reinstall/Regenerate
Restore
Revoke
Forward
Back
First
Last
Move priority up
Move priority down
Closed Action
Opened Action
Help
Print
Users Internal user
Administrative user
Excluded user
Internal user, revoked
Expired internal user
External user, revoked
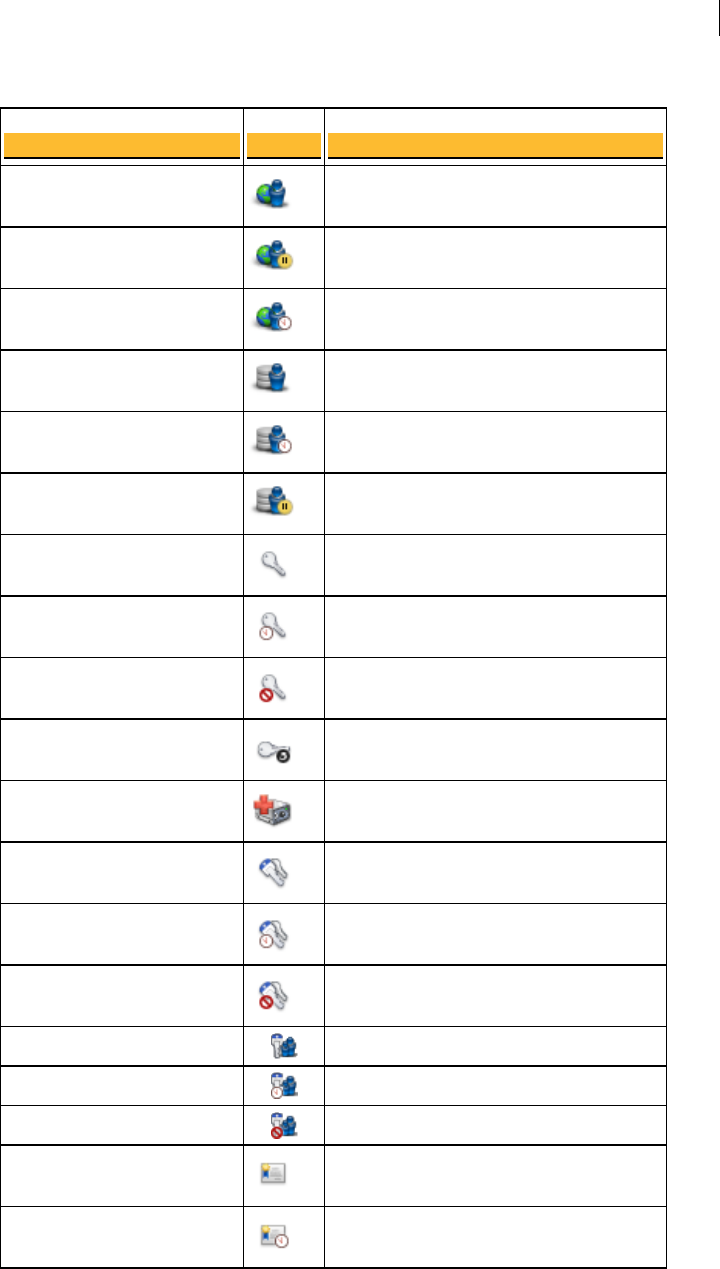
31 Understanding the Administrative Interface
Icons
Type Icon Description
External user
External user, pending
Expired external user
Directory user
Expired directory user
Directory user, pending
Keys and Certificates Key
Key, expired
Key, revoked
Key reconstruction
Whole Disk Recovery Token
Keypair
Keypair, expired
Keypair, revoked
Group key
Group key, expired
Group key, revoked
Certificate
Expired certificate
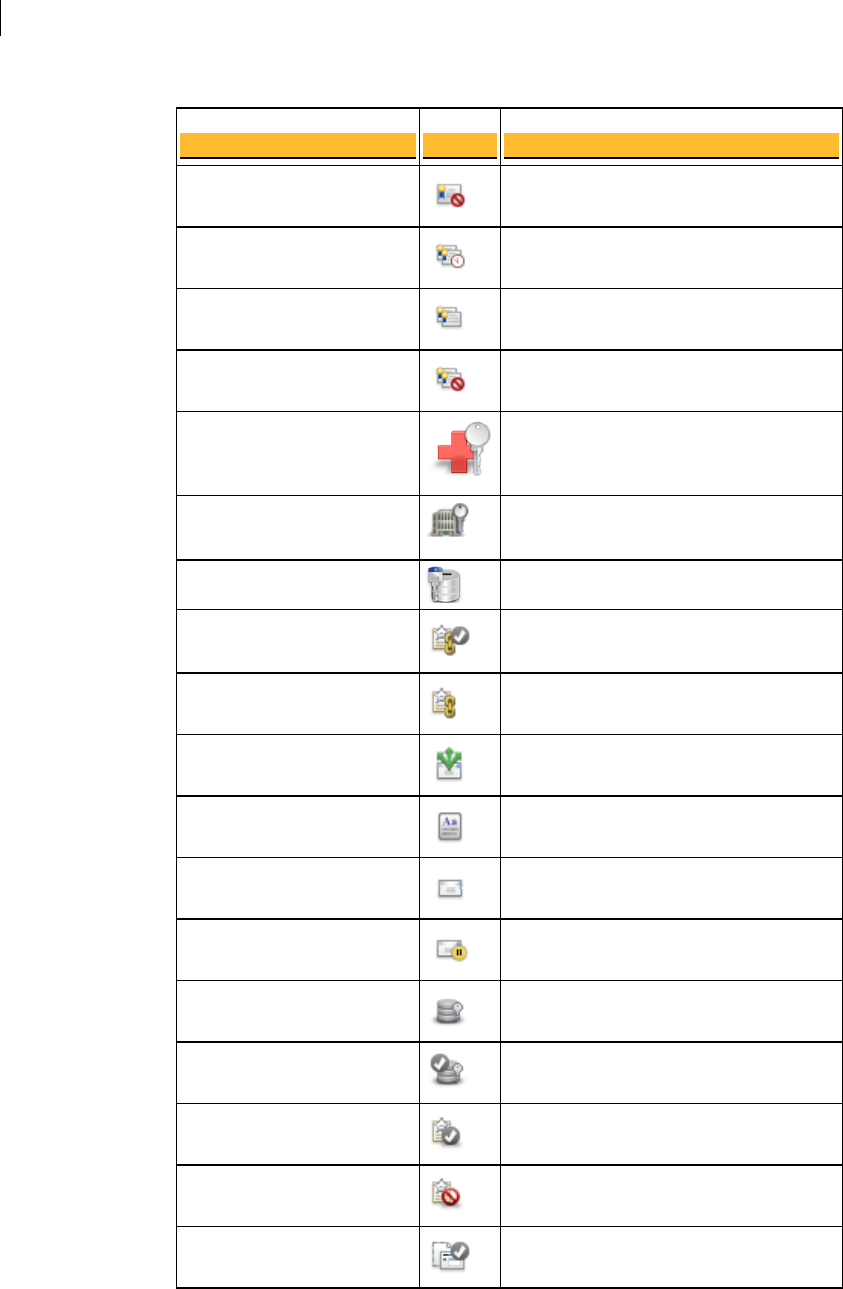
32 Understanding the Administrative Interface
Icons
Type Icon Description
Revoked certificate
Expired certificate pair
Certificate pair
Revoked certificate pair
ADK (Additional Decryption Key)
Organization Key
Verified Directory Key
Mail Policy Default policy chain
Policy chain
Policy rule
Dictionary term
Excluded address
` Pending excluded address
Keyserver
Default keyserver
User Policy Default policy
Excluded policy
Web Messenger Default template
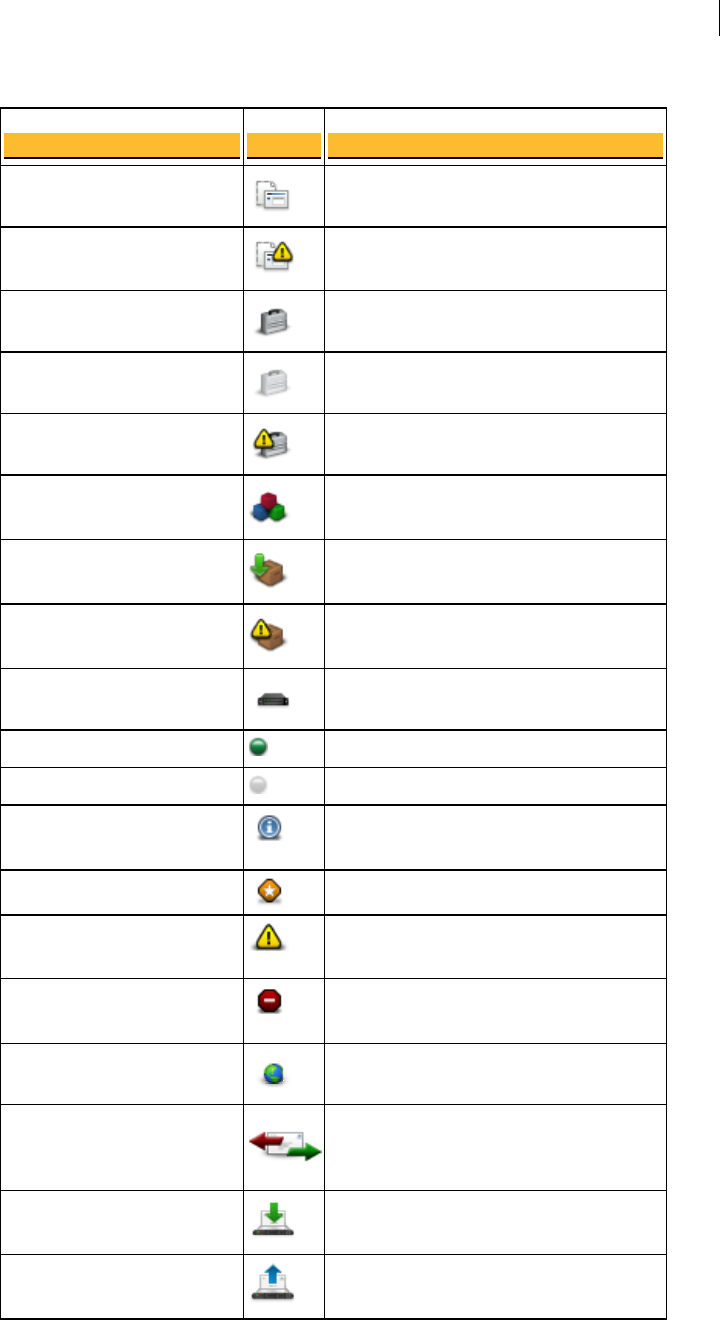
33 Understanding the Administrative Interface
Icons
Type Icon Description
Customized template
Broken template
Backup Backup successful
Backup pending
Backup failed
Update Successful install
Update ready to be installed
Failed install
Clustering Cluster
Active cluster
Inactive cluster
Logs Info
Notice
Warning
Error
Miscellaneous Domain
Mail proxy (SMTP, POP, IMAP)
Inbound mailserver
Outbound mailserver

34 Understanding the Administrative Interface
Icons
Type Icon Description
SMTP server
Mail route
Network interface
Learn mode
Access control enabled

6 Licensing Your Software
This section describes how to license your PGP Universal Server.
Overview
Your PGP Universal Server must have a valid license to be taken out of Learn Mode. In
other words, without a valid license, your PGP Universal Server will never encrypt or
sign any email messages.
If you licensed your PGP Universal Server using the Setup Assistant, you do not have to
license it again. If you did not, then you can license it at any time afterwards using the
administrative interface.
The PGP Universal Server can provide security for email messaging by inserting itself
into the flow of email traffic in your network, intercepting, or proxying, that traffic, and
processing it (encrypt, sign, decrypt, verify) based on the applicable policies.
The email proxying feature available on the PGP Universal Server can only be used if
you have the PGP Universal Gateway Email license.
Licensing a PGP Universal Server
If you did not install your license when you set up your PGP Universal Server during
the Setup Assistant, you can add a license from the System > General Settings page.
For instructions, see Licensing a PGP Universal Server (on page 14).
License Authorization
When you enter your license information, whether in the Setup Assistant or from the
System > General Settings page, the PGP Universal Server automatically authorizes the
license number. You do not need an internet connection.
Licensing the Mail Proxy Feature
You must have a PGP Universal Gateway Email license or you cannot use the Mail
Proxies feature on the administrative interface. In addition, the Enable Mail Proxies
check box on the System Settings page must be checked. If you installed your license
during system setup (through the Setup Assistant) and checked the Enable Mail
Proxies check box at that time, the check box ont he System Settings page will be
checked.

36 Licensing Your Software
Licensing PGP Desktop
You can verify that your license includes the Mail Proxies feature on the System
Settings page
For information about the Mail Proxies feature, see Configuring Mail Proxies (on page
147).(from the System > General Settings tab).
Licensing PGP Desktop
In PGP Universal Server version 3.2.1 and later, managed PGP Desktop client licenses
are built in to the server; you no longer need to add the desktop license as a separate
step.
However, you must still purchase a license to use the PGP Desktop features such as PGP
Whole Disk Encryption, messaging, and PGP NetShare. These separately-licensed
features are disabled by default. Based on your license, you must configure each
consumer policy to enable the PGP Desktop features for which you have a license.
For more information, see Establishing PGP Desktop Settings for Your PGP Desktop
Clients (on page 217).

7 Operating in Learn Mode
When you finish configuring a PGP Universal Server using the Setup Assistant, it
begins running in Learn Mode.
In Learn Mode, messages are processed through mail policy, but none of the actions
from the policy are performed. Messages are neither encrypted nor signed. This
functions as a rehearsal, so that you can learn how policies would affect email traffic if
implemented. While running in Learn Mode, the PGP Universal Server also creates keys
for authenticated users so that when Learn Mode is turned off, the server can secure
messages immediately.
After messages go through mail policy, PGP Universal Server decrypts and verifies
incoming messages for which there are local internal or external user keys. Outgoing
messages are sent unencrypted. In Learn Mode, non-RFC compliant email is sent
unprocessed and in the clear. Turn Learn Mode off to process messages through the
mail policy exception chain.
In Learn Mode, the PGP Universal Server:
Creates user accounts with user keys, in accordance with Consumer Policy.
Decrypts messages using internal and external keys stored on the server, but does
not search for keys externally.
Does not encrypt or sign messages.
Will not apply mail policy to messages, and will not take any Key Not Found action
on messages.
Note: Your PGP Universal Server must be licensed before you can take it out of Learn
Mode.
Purpose of Learn Mode
Learn Mode allows you to:
View (by examining the logs) how policies would affect email traffic if
implemented.
Build the SMSA (creating keys for authenticated users, for example) so that when
the server goes live—when Learn Mode is turned off—the server can secure
messages immediately.
Identify mailing lists your users send messages to and add their addresses to the
dictionaries of Excluded Email Addresses. Most likely, users won't send encrypted
messages to a mailing list.
PGP Universal Server decrypts and verifies incoming email while operating in
Learn Mode.
PGP Universal Server still automatically detects mailing lists when Learn Mode is
off, but unless the addresses were retrieved via the Directory Synchronization
feature, they require approval from the PGP Universal Server administrator to be
added to the list of excluded email addresses. For more information, see Using
Dictionaries with Policy (on page 129).

38 Operating in Learn Mode
Checking the Logs
Mailing lists are identified per RFC 2919, List-Id: A Structured Field and
Namespace for the Identification of Mailing Lists, as well as by using default
exclusion rules.
Checking the Logs
The effects of your policies can be checked while Learn Mode is on, even though the
server is not actually encrypting or signing messages.
To check the server’s logs
1 Access the administrative interface for the server.
The administrative interface appears.
2 Click Reporting, then Logs.
The System Logs page appears.
3 Check the logs to see what effect your policies are having on email traffic.
Managing Learn Mode
The PGP Universal Server is put into Learn Mode by the Setup Assistant. If your server
is in Learn Mode, you see a yellow icon, the Change Mode button, in the upper-right
corner of your browser page.
To turn off Learn Mode
1 Click the Change Mode button in the upper-right corner of the page.
The Mail Processing Settings dialog box appears.
2 Deselect Operate in Learn Mode.
3 Click Save.
Learn Mode is turned off.
To turn on Learn Mode
1 Click the Change Mode button in the upper-right corner of the page.
The Mail Processing Settings dialog box appears.
2 Select Operate in Learn Mode.
3 Click Save.
Learn Mode is turned on.

8 Managed Domains
This section describes how to create and manage the internal domains for which your
PGP Universal Server protects email messages.
About Managed Domains
The Managed Domains page gives you control over the domains for which the PGP
Universal Server is handling email.
Email users from domains being managed by your server are called “internal users.”
Conversely, email users from domains not being managed by your server but who are
part of the SMSA are called “external users.”
For example, if your company is “Example Corporation,” you can have the domain
“example.com” and your employees would have email addresses such as
“jsmith@example.com.”
If this were the case, you would want to establish “example.com” as a domain to be
managed by your server. When you install your PGP Universal Server you have the
opportunity to add a managed domain in the Setup Assistant. If you do not set it up at
that time, you can use the Managed Domains page to add it. You can also add additional
managed domains from the Managed Domains page, if you have users with addresses in
multiple domains that you want to be considered internal users.
Managed domains automatically include sub-domains, so in the example above, users
such as “mingp@corp.example.com” would also be considered internal users.
Multi-level domain structures as used by some countries are also acceptable: for
example, the domain “example.co.uk.”
The Managed Domains page accepts Internet DNS domain names and Domino domains.
You must have an Internet DNS domain name, and if you have Notes users, you must
also include the Domino domain name. WINS names (for example, \\EXAMPLE) do not
belong here.
Usually, you specify your Internet domain during installation through the Setup
Assistant. If your PGP Universal Server is also managing a Domino server, you must
add your Domino domain name manually through the Managed Domains page.
For example, if you have an Internet domain "example.com" and a Domino domain
"ExDomino," you would add example.com as the managed domain during setup, for
SMTP addressing. You would then add ExDomino as an additional managed domain, for
Domino addressing.
Mail to and from your managed domains is processed according to your mail policy.
You can also create mail policy rules specifically for your managed domains. See the
chapter Setting Mail Policy (on page 85) for more information on creating mail policies.
Managed domains entered on the Managed Domains page populate the Managed
Domains dictionary. The dynamic Managed Domains dictionary automatically includes
subdomains. See Using Dictionaries with Policy (on page 129) for more information on
dictionaries.

40 Managed Domains
Adding Managed Domains
Adding Managed Domains
To add a domain to the list of managed domains
1 Click Add Managed Domain.
The Add Managed Domain dialog box appears.
2 Type a domain name in the Domain field.
Do not type WINS names (for example, \\EXAMPLE) here. Type only Internet DNS
domain names or Domino domain names.
3 Click Save.
Deleting Managed Domains
If you delete a managed domain, all the user IDs within that domain remain in the
system. Users can still encrypt and sign messages with their keys.
To remove a domain name already on the list of managed domains
1 Click the icon in the Delete column of the domain you want to remove from the
list.
A confirmation dialog box appears.
2 Click OK.
The confirmation dialog box disappears and the selected domain name is removed
from the list of managed domains.

9 Understanding Keys
This chapter introduces some of the concepts related to how Consumer keys are
managed. It introduces the concept of key modes, which are used to control whether
internal and external users can manage their own keys or whether keys should be
managed by PGP Universal Server. It also discusses the use of Certificate Revocation
Lists and key reconstruction blocks.
Choosing a Key Mode For Key Management
When you create PGP Universal Satellite and PGP Desktop installers, you can choose
whether you want internal and external users to be able to manage their own keys, or
whether keys should be managed by the PGP Universal Server. End-to-end email
processing functions refer to encryption, decryption,and signing performed at the
client, rather than on the PGP Universal Server.
PGP PGP Universal Gateway Keys Managed By
NetShare Email Functions End-to-end Email Server
Support Processing Functions
Encrypt Decrypt Sign Encrypt Decrypt Sign
Client Key
Mode
(CKM)
Yes No No No Yes Yes Yes No
Guarded
Key Mode
(GKM)
Yes No No No Yes Yes Yes Private keys stored
passphrase-protected
Server Key
Mode
(SKM)
Yes Yes Yes Yes Yes Yes Yes Yes
Server
Client Key
Mode
(SCKM)
Yes Yes Yes No Yes Yes Yes Public and private
encryption subkeys stored on
client and PGP Universal
Server, private signing
subkeys stored only on client
Server Key Mode (SKM)—The PGP Universal Server generates and manages user
keys.

42 Understanding Keys
Choosing a Key Mode For Key Management
Users cannot manage their own keys.
PGP Universal Server administrators have access to private keys.
If a user has a client installation, the user’s keys are downloaded to the client
at each use.
SKM can also be used without client installations; if there is no client
installation, you must use SKM.
The client stores the private key encrypted to a random passphrase, so users
can read email offline.
In PGP Universal Gateway Email environments, existing users with SKM key
mode keys who install PGP Desktop for the first time will be prompted
automatically to re-enroll and create a CKM, GKM, or SCKM key.
Client Key Mode (CKM)—Users use client software to generate and manage their
own keys.
PGP Universal Server administrators do not have access to private keys.
CKM user email is secure on the mail server.
CKM users are responsible for backing up their keys; if they lose their private
keys, there is no way to retrieve them.
Users who want to be able to read their email offline and unconnected to
PGP Universal Server must use CKM.
PGP NetShare supports CKM; it requires that users control their own keys.
PGP Universal Gateway Email does not support CKM.
Guarded Key Mode (GKM)—Users generate and manage their own keys, and store
their passphrase-protected private keys on the server.
GKM is similar to CKM, except that PGP Universal Server stores protected
copies of private keys.
PGP NetShare supports GKM; it requires that users control their own keys.
PGP Universal Gateway Email does not support GKM.
Server Client Key Mode (SCKM)—Keys are generated on the client. Private
encryption subkeys are stored on both the client and PGP Universal Server, and
private signing subkeys are stored only on the client.
SCKM allows for separate signing and encryption subkeys, comparable to
X.509 signing and encryption keys.
The public and private encryption subkey is on the server, but by default
encryption is not performed on the server.
The public-only signing subkey is on the server. PGP Universal Server
cannot sign email for the user.
Mail processing must take place on the client side to use the SCKM signing
subkey. If you want to use PGP Universal Gateway Email with SCKM keys,
you must be using PGP Universal Server 2.5 or later. PGP Universal Gateway
Email allows email encryption and decryption with SCKM keys, but email
will not be signed.
SCKM is compatible with smart cards, but encryption keys are not generated
on the token. Copy the keys onto the token after generation.

43 Understanding Keys
Choosing a Key Mode For Key Management
If an SCKM user resets their key, the entire SCKM key is revoked, including
all subkeys, and remains on the PGP Universal Server as a non-primary key
for the user. This non-primary key can still be used for decryption, and
remain on the PGP Universal Server until manually removed by the
administrator.
SCKM is not supported by legacy PGP Desktop installations before version
9.0.
PGP NetShare supports SCKM; it requires that users control their own keys.
Which key management option you choose depends on what your users need and which
client application they use. Server Key Mode is generally appropriate for PGP Universal
Satellite users. Client Key Mode is more appropriate for PGP Desktop users. If your
security policy requires that a user’s signing key is only in the possession of the user,
but the user’s encryption key must be archived, SCKM is the correct choice.
Changing Key Modes
If you allow PGP Desktop users to change their options and allow user-initiated key
generation, users can switch key modes.
If the user’s policy has changed to permit user-managed keys, then the user is
automatically prompted to create a new key, and no further action is necessary.
However, if the user’s policy has always permitted user key management, and the user
wants to switch key modes, the user should follow this procedure.
To change key mode
1 Open PGP Desktop and select the PGP Messaging service whose key mode you
want to determine.
The account properties and security policies for the selected service appear.
2 Click Key Mode.
The PGP Universal Key Mode page appears, describing your current key
management mode.
3 Click Reset Key.
The PGP Key Setup Assistant appears.
4 Read the text, then click Next.
The Key Management Selection page appears.
5 Select the desired key mode.
Depending on how yourPGP Universal Server administrator configured your copy
of PGP Desktop, some key modes might not be available.
6 Click Next.
The Key Source Selection screen appears.
7 Choose one of the following:
New Key. You are prompted to create a new PGP key, which is used to
protect your messaging.
PGP Desktop Key. You are prompted to specify an existing PGP key to use to
protect your messaging.

44 Understanding Keys
How PGP Universal Server Uses Certificate Revocation Lists
Import Key. You are prompted to import a PGP key, which is used to protect
your messaging.
8 Make the desired selection, then click Next.
9 If you selected New Key:
a Type a passphrase for the key, then click Next.
b When the key is generated, click Next.
c Click Finish.
10 If you selected PGP Desktop Key:
a Select the key from the local keyring that you want to use, then click
Next.
b Click Finish.
11 If you selected Import Key:
a Locate the file that holds the PGP key you want to import (it must
contain a private key), then click Next.
b Click Finish.
How PGP Universal Server Uses Certificate Revocation
Lists
A certificate revocation list (CRL) is a list of certificates that have been revoked before
their scheduled expiration date. The PGP Universal Server retrieves CRLs for
certificates from CRL Distribution Points (DP).
The PGP Universal Server checks the CRL DPs automatically before encrypting a
message to a certificate, including certificates for internal and external users, as well as
certificates in the cache. The server also checks the CRL DPs before importing any
internal or external user certificate. It does not check before importing Trusted
Certificates, or before connecting to servers with SSL certificates.
The PGP Universal Server checks the revocation status of just the recipient's
certificate. It does not check the revocation status of the other certificates in the
signing chain.
Once retrieved, certificate revocation status is stored on the parent certificate, so the
Trusted Certificate for each user certificate stores the list of all the associated revoked
certificates. Once the CRL is stored on the Trusted Certificate, the PGP Universal Server
runs future CRL checks based on the “next update” date for that list.
Key Reconstruction Blocks
Key reconstruction blocks allow users to retrieve their private keys if they forget their
passphrases.

45 Understanding Keys
Managed Key Permissions
Key reconstruction blocks contain several user-defined questions and the user's private
key, which is encrypted with the answers to those questions.
PGP Universal Server stores these questions and answers so that users can get back
their private keys in case they lose their passphrases. For example, if a user writes five
questions and answers, they can be asked three (or more) of the questions to
reconstruct their private key.
If an internal PGP Desktop user has uploaded a key reconstruction block to the PGP
Universal Server, you can delete it. You might want to delete a key reconstruction block
if you have already deleted or revoked the associated key and you do not want the key
to be recoverable. If you delete the key reconstruction block, it is no longer stored on
the PGP Universal Server, although it is possible that the user also has a copy.
Note: Keys created on smart cards and tokens are not compatible with PGP Desktop's
key reconstruction feature.
See Recovering Encrypted Data in an Enterprise Environment (on page 259) for
information on other methods of data recovery.
Managed Key Permissions
Key permissions determine what actions consumers (users or managed devices) can
perform upon managed keys. Key permissions are set in three ways:
At the group level: permissions can be set that determine how group members can
interact with managed keys. Permissions set for a group are inherited by all
members of the group.
At the consumer level: individual consumers may be granted permissions. These
permissions will exists in addition to the permissions the consumer inherits from
the groups of which it is a member.
At the managed key level: a managed key can have permissions that specify what
actions consumers or groups can take upon it. These are set individually for a
managed key.
Permissions are positive (they allow actions) and are additive: the actions enabled for a
consumer relative to a managed key are combination of the permissions allowed by the
consumer's group membership, plus permissions allowed for the consumer, plus
permissions allowed by the key.
There are no deny permissions.

10 Managing Organization Keys
This section describes the various keys and certificates you can configure and use with
your PGP Universal Server.
About Organization Keys
There are multiple keys and certificates you can use with your PGP Universal Server:
Organization Key. Used to sign all user keys the PGP Universal Server creates and
to encrypt server backups.
Organization Certificate. Used to generate user S/MIME certificates in an
S/MIME environment.
External User Root Key. Provides the key material used to generate the External
User Root Certificate.
External User Root Certificate. Used to generate X. 509 S/MIME certificates for
download by external users.
Additional Decryption Key (ADK). Used to reconstruct messages if the recipient
is unable or unwilling to do so. Every message encrypted to an external recipient
by an internal user is also encrypted to the ADK, allowing the PGP Universal
Server administrator to decrypt any message sent by internal users, if required to
do so by regulations or security policy.
Verified Directory Key. Used to sign keys submitted to the PGP Verified Directory
by external users.
The Organization Keys page provides access to all of these.
All of these keys should be created on an internal cluster member only, not on a
member located in the DMZ.
Organization Key
Your Organization Key is used to sign all user keys the PGP Universal Server creates
and to encrypt server backups. The Organization Key is what was referred to as the
Corporate Key in the old PGP Keyserver environment.
Warning: You must make a backup of your Organization Key, in case of a problem
with the server. That way, you can restore your server from a backup using the
backup Organization Key.
Each PGP Universal Server is pre-configured with a unique Organization Key generated
by the Setup Assistant. If you would like to use different settings for this key, you can
regenerate the key with the settings you prefer. This should only be done prior to live
deployment of the server or creation of user keys by the server.
The Organization Key automatically renews itself one day before its expiration date. It
renews with all the same settings.

48 Managing Organization Keys
Organization Key
If you have multiple PGP Universal Servers in a cluster, the Organization Key is
synchronized.
An Organization Key’s identification is based on the name of the managed domain for
which the key was created. Organization Keys by convention have one ID per managed
domain so that they can be easily found via a directory lookup.
The Organization Key information includes the Public Keyserver URL, as specified on
the Services > Keyserver page. Anytime the Public Keyserver URL changes, that
information on the Organization Key changes immediately.
Inspecting the Organization Key
To inspect the properties of an Organization Key
1 Click the name of the Organization Key.
The Organization Key Info dialog box appears.
2 Inspect the properties of the Organization Key.
3 To export either just the public key portion of the Organization Key or the entire
keypair, click the Export button and save the file to the desired location. Optional:
You can protect your Organization Key with a passphrase when you export it.
When you export the Organization Key you also get the Organization Certificate.
You can use PGP Desktop to extract the Organization Certificate from the
Organization Key.
4 Click OK.
If you are going to regenerate your Organization Key, you should use a fairly high
bit size, such as 2048. However, if you are going to be using X.509 certificates and
S/MIME, be aware that many clients only support up to 1024 bits; thus you may
want to use 1024 bits for maximum compatibility with S/MIME. All clients can be
expected to support at least 4096 bits.
Regenerating the Organization Key
Warning: Changing the Organization Key makes all previous backups undecryptable
and all validity signatures on the keys of internal users are unverifiable until they
are automatically renewed. Only change the Organization Key if you fully understand
the consequences of this action.
Caution: Changing the Organization Key deletes Ignition Keys. If you have hard or
soft token Ignition Keys configured, regenerating the Organization Key deletes them.
Without an Ignition Key, PGP Universal Web Messenger messages are not stored
encrypted.
Note: The Organization Key signs all Trusted Keys and Certificates. If you regenerate
the Organization Key, the signature on the Trusted Keys and Certificates becomes
invalid. You must re-import all Trusted Keys and Certificates to have them signed by
the new Organization Certificate. For more information, see Managing Trusted Keys
and Certificates (on page 77).

49 Managing Organization Keys
Organization Key
To regenerate an Organization Key
1 Click Regenerate in the Action column of the Organization Key whose properties
you want to change.
2 The following warning dialog box appears:
Regenerating the Organization Key will cause problems with existing key
signatures and backups. Any existing Ignition Keys and Organization Certificate
will also be removed. Are you sure you want to proceed?
3 Click OK.
The Organization Key Generation dialog box appears.
4 Make the desired changes to the properties of the Organization Key.
5 Click Generate.
Importing an Organization Key
You also have the option of importing an existing PKCS #12 key and using that as your
Organization Key.
Caution: Importing an Organization Key deletes Ignition Keys. If you have hard or
soft token Ignition Keys configured, importing an Organization Key deletes them.
Deleting the Ignition Key stops PGP Universal Web Messenger from being stored
encrypted
To import an Organization Key
1 Click the icon in the Import column of the Organization Key row.
2 The following warning dialog box appears:
Importing a new Organization Key will cause the current key (and Organization
Certificate, if any) to be deleted, and will cause problems with existing key
signatures and backups. Any existing Ignition Keys will also be removed. Are you
sure you want to proceed?
3 Click OK.
The Import Organization Key dialog box appears.
4 Do one of the following:
If you want to import a key that has been saved as a file, click Browse to
locate the file of the key you want to import.
If you want to import a key by cutting and pasting, copy the key you want to
be your Organization Key to the Clipboard and paste it into the Key Block
box.
5 Type the passphrase for the key, if required.
6 Click Import.
The Organization Key you imported appears in the Organization Key row.

50 Managing Organization Keys
Organization Certificate
Organization Certificate
An Organization Certificate is required for S/MIME support. You can only have one
Organization Certificate attached to your Organization Key. You cannot restore from a
backup with more than one Organization Certificate associated with your Organization
Key.
The PGP Universal Server will automatically generate certificates as well as keys for
new internal consumers created after you import or generate an Organization
Certificate. All internal consumers receive a certificate added to their keys within a
certain amount of time, between 24 hours to two weeks. However, certificates issued by
the old Organization Certificate remains on users’ keys until the certificate expires.
PGP Universal Server also creates separate signing and encryption certificates for
imported SKM and SCKM internal keys, based on the appropriate subkey. PGP
Universal Server creates single signing and encryption certificates for imported CKM
and GKM keys, based on the user's topkey.
You have several options for dealing with Organization Certificates. You can:
Create a self-signed Organization Certificate. Unfortunately, a self-signed
Organization Certificate will not be universally recognized, so Symantec
Corporation recommends using a certificate from a reputable Certificate Authority
(CA). Self-signed X.509 Organization Certificates are version 3.
Create a Certificate Signing Request for a certificate authorized by an existing CA.
When you receive the certificate back from the CA as a file, you will need to import
that file.
Import an existing certificate to use as your Organization Certificate. Imported
X.509 certificates must be version 3.
To enable S/MIME support, the certificate of the issuing Root CA, and all other
certificates in the chain between the Root CA and the Organization Certificate, are on
the list of trusted keys and certificates on the Trusted Keys and Certificates page.
A self-signed Organization Certificate has the same expiration date as the Organization
Key, unless the Organization Key is set never to expire. If the Organization Key never
expires, the Organization Certificate expires 10 years from the date you generate it. You
must regenerate the Organization Certificate before it expires and distribute the new
Certificate to anyone who uses your old Organization Certificate as a trusted root CA.
This certificate is also required if you want PGP Universal Server to generate X.509
certificates for external users. External users can download and use X.509 certificates
from the PGP Universal Web Messenger interface to communicate securely with users
inside your managed domain. For more information, see Offering X.509 Certificates to
External Users (on page 255).
Inspecting the Organization Certificate
To inspect the settings of an Organization Certificate
1 Click the name of the Organization Certificate.
The Organization Certificate Info dialog box appears.
2 Inspect the settings of the Organization Certificate.

51 Managing Organization Keys
Organization Certificate
3 Click OK.
Exporting the Organization Certificate
To export an Organization Certificate to a file
1 Click on the Organization Certificate.
The Organization Certificate Info dialog box appears.
2 Click Export.
The Export Certificate dialog box appears.
3 Do one of the following:
To export just the public key portion of the certificate, select Export Public
Key.
To export the public and private key portions of the certificate, select Export
Keypair and type a passphrase to protect the private key once it is exported.
The resulting file is in PKCS #12 format.
4 Click Export.
5 At the prompt that appears, click Save.
6 Specify a name and location to save the file, then click Save.
The Organization Certificate Info dialog box appears.
7 Click OK.
Deleting the Organization Certificate
To delete an Organization Certificate
1 Click the Delete icon in the Action column of the Organization Certificate.
A confirmation dialog box appears.
2 Click OK.
The Organization Certificate is deleted.
Generating the Organization Certificate
To create a Certificate Signing Request (CSR)
1 Click the icon in the Action column of the Organization Certificate row.
The Generate Organization Certificate dialog box appears.
2 Type a name for the certificate in the Common Name field.

52 Managing Organization Keys
Organization Certificate
3 Type an email address in the Contact Email field.
4 Type your organization’s name in the Organization Name field.
5 Type your organization’s unit designation in the Organization Unit field.
6 Type a city or locality, as appropriate, in the City/Locality field.
7 Type a state or province, as appropriate, in the Province/State field.
8 Type a country in the Country field.
9 If you want to generate a self-signed certificate, click Generate Self-signed. PGP
Universal Server generates a certificate. To generate a Certificate Signing Request
(CSR) instead, proceed to the next step.
10 Click the Generate CSR button.
The CSR dialog box appears, showing the certificate signing request (CSR).
11 Copy the entire contents of the CSR dialog box to a file, then click OK.
12 Paste the CSR into the appropriate field on your third-party CA interface.
The CA sends the certificate back to you when it has approved it.
13 When you receive the certificate from the CA, use the Import feature to import it
as your Organization Certificate.
Importing the Organization Certificate
To import a certificate to be your Organization Certificate
1 Click the icon in the Import column of the Organization Certificate row.
The Import Organization Certificate dialog box appears.
2 Copy the certificate you want to be your Organization Certificate.
3 Paste the text into the Certificate Block box.
4 Click Save.
The Organization Certificate you imported appears in the Organization Certificate
row.
Renewing the Organization Certificate
Start the renewal process for an Organization Certificate issued by a certificate
authority before it expires by generating a new Certificate Signing Request. This is not
necessary for self-signed certificates.
To renew an Organization Certificate
1 Click the Add icon in the Action column of the Organization Certificate row.
The Generate Organization Certificate dialog box appears.
2 Type a name for the certificate in the Common Name field.
3 Type an email address in the Contact Email field.

53 Managing Organization Keys
Additional Decryption Key (ADK)
4 Type your organization’s name in the Organization Name field.
5 Type your organization’s unit designation in the Organization Unit field.
6 Type a city or locality, as appropriate, in the City/Locality field.
7 Type a state or province, as appropriate, in the Province/State field.
8 Type a country in the Country field.
9 Click the Generate CSR button.
The CSR dialog box appears, showing the certificate signing request (CSR).
10 Copy the entire contents of the CSR dialog box to a file, then click OK.
11 Paste the CSR into the appropriate field on your third-party CA interface.
The CA sends the certificate back to you when it has approved it.
12 When you receive the certificate from the CA, delete the existing Organization
Certificate and import the new one.
Additional Decryption Key (ADK)
An Additional Decryption Key (ADK) is a way to retrieve an email message or other
encrypted data if the recipient is unable or unwilling to do so and if required by
regulation or security policy. Every message sent by an internal user is also encrypted
to the ADK. Messages encrypted to the ADK can be opened by the recipient and/or by
the holder(s) of the ADK. The ADK is also added to disks encrypted with PGP Whole
Disk Encryption.
If you have an Additional Decryption Key uploaded, all outbound email is encrypted to
it when mail policy is applied. This setting appears in the Send (encrypted/signed) action
and the setting cannot be disabled. For more information, see the chapter "Setting Mail
Policy."
You can create an ADK with PGP Desktop, then add it to your PGP Universal Server and
use it.
You can also add an ADK to a consumer policy. Clients with a policy with an ADK have
all messages and other data encrypted to the policy-specific ADK as well as to the
Organization ADK.
Note: S/MIME messages are not encrypted to the ADK.
If you use an ADK, PGP Universal Server adds the ADK to all new keys that it generates
and all outbound email messages are automatically encrypted to it.
If you are going to use an ADK on your PGP Universal Server, you should import it prior
to generating any user keys. You should also try to avoid changing to a different ADK
later on, because doing so results in some keys being associated with the old ADK and
some with the new ADK. If you add or change an ADK, it is only associated with the
keys of new users. Existing users do not get that ADK added to their key.
Only PGP keys can be used as ADKs, and a key with a certificate cannot be used as an
ADK.
For information on using an ADK in a split key scenario, see the PGP Desktop User’s
Guide.

54 Managing Organization Keys
Additional Decryption Key (ADK)
Importing the ADK
To import an ADK to your PGP Universal Server
1 Copy the key of the ADK you are adding to the Clipboard using PGP Desktop.
2 Click the Add icon in the Action column of the Additional Decryption Key row.
The Add Additional Decryption Key dialog box appears.
3 Paste the key of the ADK into the Import Key Block box, or browse to find and
import a key.
4 Click Import.
The ADK you added appears in the Additional Decryption Key row.
Inspecting the ADK
To inspect the properties of an ADK
1 Click the name of the ADK.
The Additional Decryption Key Info dialog box appears.
2 Inspect the properties of the ADK.
3 To export the ADK, click Export and save the file to the desired location.
4 Click OK.
Deleting the ADK
To delete an ADK
Note: All keys generated while the ADK was present continue to reference the ADK
even after you delete the ADK. The change applies only to keys that are generated
after the ADK is deleted.
1 Click the delete icon in the Action column of the ADK.
A confirmation dialog box appears.
2 Click OK.
The ADK is deleted.

55 Managing Organization Keys
External User Root Key
External User Root Key
The External User Root Key provides the key material used to generate the External
User Root Certificate. The External User Root Key and Certificate allow external users
to generate and download X.509 certificates through the PGP Universal Web Messenger
interface to use to securely communicate with users inside your managed domain. For
more information, see Offering X.509 Certificates to External Users (on page 255).
Create this key on an internal cluster member only, not on a member located in the
DMZ.
Generating the External User Root Key
To generate an External User Root Key
1 Click the Generate icon in the Action column of the External User Root Key.
The External User Root Key Generation dialog box appears.
2 Select the size, allowed ciphers, and key expiration period for the key.
3 Click Generate.
Importing the External User Root Key
To import an External User Root Key
1 Click the icon in the Import column of the External User Root Key row.
The Import Organization Key dialog box appears.
2 Do one of the following:
If you want to import a key that has been saved as a file, click Browse to
locate the file of the key you want to import.
If you want to import a key by cutting and pasting, copy the key you want to
be your Organization Key to the Clipboard and paste it into the Key Block
box.
3 Type the passphrase for the key, if required.
4 Click Import.
The External User Root Key you imported appears in the External User Root Key
row.

56 Managing Organization Keys
External User Root Certificate
Deleting the External User Root Key
If you delete the External User Root Key, external users with X.509 certificates
generated by PGP Universal Server will no longer be able to communicate securely with
internal users.
To delete an External User Root Key
1 Click the Delete icon in the Action column of the External User Root Key.
A confirmation dialog box appears.
2 Click OK.
The key is deleted.
External User Root Certificate
The External User Root Certificate generates and signs external user X.509 certificates.
External users can generate and download X.509 certificates through the PGP Universal
Web Messenger interface to use to securely communicate with users inside your
managed domain.
To deliver X.509 certificates to external users, you must have an Organization
Certificate, an External User Root Key, and an External User Root Certificate.
The Organization Certificate and the External User Root Certificate must not expire
before the external user certificates expire. If either expires before the user certificate
does, external users will no longer be able to communicate securely with internal users.
The External User Root Certificate inherits trust from the Organization Certificate.
This mean most internal users automatically trust external user certificates because
they are signed by the External User Root Certificate. Only internal users with
standalone policies do not trust external user certificates, because those PGP Desktop
installations cannot access the External User Root Certificate.
For more information on delivering certificates to external users, see Offering X.509
Certificates to External Users (on page 255).
Create this certificate on an internal cluster member only, not on a member located in
the DMZ.
Generating the External User Root Certificate
To create a Self-Signed Certificate or a Certificate Signing Request (CSR)
1 Click the icon in the Action column of the External User Root Certificate row.
The Generate X509 Certificate dialog box appears.
2 Type a name for the certificate in the Common Name field.
3 Type an email address in the Contact Email field.
4 Type your organization’s name in the Organization Name field.

57 Managing Organization Keys
External User Root Certificate
5 Type your organization’s unit designation in the Organization Unit field.
6 Type a city or locality, as appropriate, in the City/Locality field.
7 Type a state or province, as appropriate, in the Province/State field.
8 Type a country in the Country field.
9 If you want to generate a self-signed certificate, click Generate Self-signed. PGP
Universal Server generates a certificate. To generate a Certificate Signing Request
(CSR) instead, proceed to the next step.
10 Click the Generate CSR button.
The CSR dialog box appears, showing the certificate signing request (CSR).
11 Copy the entire contents of the CSR dialog box to a file, then click OK.
12 Paste the CSR into the appropriate field on your third-party CA interface.
The CA sends the certificate back to you when it has approved it.
13 When you receive the certificate from the CA, use the Import feature to import it
as your External User Root Certificate.
Importing the External User Root Certificate
To import a certificate to be your External User Root Certificate
1 Click the icon in the Import column of the External User Root Certificate row.
The Add Certificate to Key dialog box appears.
2 Copy the certificate you want to be your External User Root Certificate.
3 Paste the text into the Certificate Block box.
4 Click Save.
The External User Root Certificate you imported appears in the External User
Root Certificate row.
Deleting the External User Root Certificate
If you delete the External User Root Certificate, external users with X.509 certificates
generated by PGP Universal Server will no longer be able to communicate securely with
internal users.
To delete an External User Root Certificate
1 Click the Delete icon in the Action column of the External User Root Certificate.
A confirmation dialog box appears.
2 Click OK.
The certificate is deleted.

58 Managing Organization Keys
Verified Directory Key
Verified Directory Key
The Verified Directory Key is the signing key for PGP Verified Directory users outside
your managed domain. It must consist of both private and public keys. Once you choose
the setting to allow internal and external users to submit their keys through the PGP
Verified Directory, you must upload a Verified Directory Key. Users cannot submit their
keys to PGP Verified Directory until you have added the Verified Directory Key. For
more information, see Configuring the PGP Verified Directory (on page 302).
If you have multiple PGP Universal Servers in a cluster, the Verified Directory Keys are
synchronized.
Importing the Verified Directory Key
To import a Verified Directory Key to your PGP Universal Server
1 Copy the key of the Verified Directory Key you are adding to the Clipboard using
PGP Desktop.
2 Click the Add icon in the Action column of the Verified Directory Key row.
The Add Verified Directory Key dialog box appears.
3 Paste the key of the Verified Directory Key into the Import Key Block box, or
browse to find and import a key.
4 Type the private key Passphrase.
5 Click Import.
The Verified Directory Key you added appears in the Verified Directory Key row.
Inspecting the Verified Directory Key
To inspect the properties of the Verified Directory Key
1 Click the name of the Verified Directory Key.
The Verified Directory Key Info dialog box appears.
2 Inspect the properties of the Verified Directory Key.
3 To export the Verified Directory Key, click Export.
To export just the public key portion of the Verified Directory Key, select
Export Public Key.
To export the public and private key portions of the key, select Export
Keypair and type a passphrase to protect the private key once it is exported.
4 Click OK.

59 Managing Organization Keys
Verified Directory Key
Deleting the Verified Directory Key
To delete the Verified Directory Key
1 Click the delete icon in the Action column of the Verified Directory Key.
A confirmation dialog box appears.
2 Click OK.

11 Administering Managed Keys
PGP Key Management Server (KMS) is new technology that centralizes the
management of multiple kinds of encryption keys for your organization onto a single
server, thus allowing multiple applications in your enterprise to operate against the
same set of keys.
To accommodate this new PGP KMS technology, new terms and concepts are being used
to describe how PGP applications understand keys, users, and servers, and the
relationships between them.
With PGP KMS, a Consumer is an identity associated with a person or a device. A
consumer can be a User, generally identified with a person. A user has a key, can
encrypt things, send and receive email, and so on. One person can have more than one
user identity (for example, they could be the holder of a corporate ADK as one identity
and a PGP Desktop user as a second identity, each identity having a different PGP
keypair).A consumer can also be a Managed Device, such as a web server that handles
credit cards or a bank's automated teller machine. Each consumer has a Managed Key,
which is a keypair managed by PGP KMS for the consumer.
A Managed Key is a PGP keypair with some additional information. A managed key can
be used to encrypt, decrypt, sign, and verify. It is also known as a Managed Asymmetric
Key, or MAK, in the USP API and in PGP Command Line. A managed key may or may
not have associated symmetric keys, symmetric key series, or custom data objects.
Symmetric Keys (also known as Managed Encryption Keys, or MEKs) are always
associated with a managed key. A symmetric key can be used to encrypt and decrypt; it
cannot sign or verify. Any number of symmetric keys can be associated with a managed
key. Symmetric keys can have a Validity Period, allowing them to be valid for a
specified period. At the end of the specified period, the symmetric key expires and a
new symmetric key can be automatically created. The old symmetric key is retained in
an expired state and kept, to decrypt older data if necessary.
A Symmetric Key Series (or MEK series) is series of symmetric keys, each one of which
is automatically created, is valid for the duration of its Validity Period, and then expires
and is replaced by a new symmetric key. Consumers using a symmetric key series can
be automatically notified of a new symmetric key so that they can synchronize to the
series and thus use the correct symmetric key at the correct time. In other cases, no
notification is needed; when you encrypt against the symmetric key series, the active
symmetric key is used automatically.
Custom Data Objects are encrypted data objects stored on a PGP KMS and associated
with a managed key. It is just like a regular encrypted file except it is stored on a PGP
KMS. Custom data objects are also known as Managed Secure Data, or MSDs).
Symmetric Keys and Custom Data Objects can be created, edited, searched for and
deleted by external applications using the USP APIs, or through PGP Command Line
commands. They can be viewed through the PGP Universal Server administrative
interface, but cannot be created or modified by a PGP Universal Server administrator.
Viewing Managed Keys
Managed keys can be associated with several types of consumers: internal, external,
and verified directory users, and managed devices for which keys have been imported.

62 Administering Managed Keys
Managed Key Information
There are a number of paths available to view managed keys.
For a User, you can access the Managed Key Information page by clicking the Key
ID from the Managed Key section of the user's User Information page.
For a Managed Device, you can access the Managed Key Information page by
clicking the Key ID from the Managed Key section of the Managed Device
Information page.
The organization key and Verified Directory signing keys are also managed keys, but
are discussed in Managing Organization Keys (on page 47).
To view all managed keys
1 Go to the Keys > Managed Keys page.
This displays the list of all managed keys in the PGP Universal Server database.
The Managed Keys Display shows the following information about the keys:
Key ID: click this to view Managed Key Information for this managed key.
Name: the display name and email address of the user, or the display name of the
managed device.
Key Mode: the key mode type (SKM, CKM, GKM, SCKM)
Key Size and type: key size in bits and the key type (RSA or DH/DSS)
Created: date the key was created.
Expires: date the key will expire (or never if it does not expire
Status: the status of the key (valid, revoked, expired).
Recovery: whether a key reconstruction block has been uploaded
Owner: the owner of the key. For Users, the user is the owner of his/her keys.
Using the icons under the Actions area you can:
Revoke the key
Export the key
Delete the key.
Managed Key Information
The Managed Key Information page shows detailed information about a managed key.
To view detailed information about a specific managed key
1 Click the Key ID of the managed key from any of the following pages:
From the Managed Keys page
From the Managed Key section of a User Information page
From the Managed Key section of a Device Information page The Managed Key
Information page appears for the key you selected.

63
1
Administering Managed Keys
Managed Key Information
From this page you can view detailed information about the key. You can also add or
change information about the device.
To changed the display name of the key
1 Click Edit Names... and type a new display name for the key.
2 Click Save to save the change or Cancel to close the dialog without making the
change.
To change the owner of the key
Click Edit Owner....
This takes you to the Edit Owner page where you can change the owner of this
managed key.
Note: Keys associated with email addresses cannot have their owner modified.
The Edit Owner... key will be disabled in this case.
2 Click Save to save the change or Cancel to close the dialog without making the
change.
To revoke the managed key of an SKM key
1 Click Revoke.
A confirmation dialog box appears.
2 Click OK.
The key is revoked.
To Export the managed key
1 Click Export.
If only the public key is available, the text of the key downloads to your system.
If both the public and the private key are available, the Export Key dialog box
appears.
2 Select Export Public Key to export just the public key portion of the keypair.
3 Select Export Keypair to export the entire keypair, the public key and the private
key portions.
4 If you want to protect the exported key file with a passphrase, type it in the
Passphrase field.
If a private key already has an attached passphrase, it is already protected and
there is no need to type another passphrase. When you export the keypair, you
receive a file containing an unencrypted public key and an encrypted private key.
5 Click Export.
The key is exported.

64 Administering Managed Keys
Managed Key Information
To delete the managed key
1 Click Delete.
A confirmation dialog box appears.
2 Click OK.
The key of is deleted.
Note: When you delete an internal user’s key, the private key material is deleted,
which means messages are no longer decryptable. If you want to retain the private
key material, you can revoke the key instead of deleting it.
To view Symmetric Key Series and the symmetric keys associated with this managed key
Click Symmetric Key Series... to display the Symmetric Key Series associated with
this managed key.
This button is only enabled for managed keys that have associated Symmetric keys.
Symmetric keys, also known as Managed Encryption Keys, or MEKs, can be used to
encrypt or decrypt; it cannot sign or verify.
These keys can only be created by external applications using the USP API or PGP
Command Line. For more information about Symmetric Key Series and Symmetric
Keys, see Symmetric Key Series (on page 66).
To view Custom Data Objects associated with this managed key
Click Custom Data Objects... to display the list of custom data objects associated
with this managed key.
This button is only enabled for managed keys that have associated data objects. These
objects can only be created by external applications using the USP API. For more
information about Custom Data Objects, see Custom Data Objects (on page 69).
Email Addresses
To view the Email Addresses associated with this key
Expand the Email Addresses section of the Managed Key Information page. This
displays the list of email addresses associated with this managed key.
If this is the managed key of a managed device, no email address will be present.
Subkeys
To view the subkeys associated with this managed key
Expand the Subkeys section of the Managed Key Information page.
This displays any subkeys associated with this managed key.

65 Administering Managed Keys
Managed Key Information
For each subkey, this section shows the Key ID, the usage flags that are set for the
key, the key size (in bits) and key type (RSA or DH/DSS), the date the key was
create, the date it expires (or Never if it does not expire) and the key status (Valid
or Expired).
Certificates
To view the certificates associated with this managed key
Expand the Certificates section of the Managed Key Information page.
This displays any certificates that are associated with this managed key.
For each certificate, this section shows Common Name to which the certificate was
issued, the date the certificate was created (meaning when it was imported into
PGP Universal Server), the date on which it expires,and the usage flags that are set
for the certificate.
The Actions section at the end of the row provides icons for revoking, exporting,
and deleting the certificate. You can revoke a certificate attached to any key type if
the certificate was generated by PGP Universal Server. Revoked certificates are
added to the CRL.
Permissions
Managed Key permissions are similar to the permissions that can be granted to a
Consumer or Group, with an important exception: while group and consumer
permissions define the actions a consumer or group member can perform, a Managed
Key permission defines what actions others (Groups or Consumers) can perform upon
the Managed Key.
For example, a Consumer may be given a permission such as:
Can read public key of Managed Key Joe Smith <jsmith@example.com>
while a Managed Key may have a permission such as:
Group Marketing can delete
meaning that any Consumer that is a member of the group Marketing can delete this
key.
To view, set, or delete Permissions for this key
1 Expand the Permissions section of the Managed Key Information page.
If permissions have been added specifically for this device, the permission settings
are listed in this area.
If a listed permission involves a named consumer or a group, you can click the
name to see details about the consumer or group.
2 To add, edit, or delete permissions, click View and Edit Permissions....
The Permissions page for this key appears.
To remove a permission, click the Delete icon.

66 Administering Managed Keys
Symmetric Key Series
To remove multiple permissions, check the boxes next to the permissions
you want to delete and select Delete Selected from the Options menu. To
remove all permissions, select Delete All from the Options menu.
3 To search for a specific permission, type the relevant string into the Search field at
the top right of the dialog box, and click the search icon.
The permissions list will be filtered to display only permissions that match the
search criterion.
4 To add, remove or modify permissions, click Add Permissions...
5 Use the drop-down menus to create a new permission.
6 Click the Add icon to create as many permissions as necessary. Use the Remove
icon to remove individual permission.
Attributes
To view, add, or delete Attributes for this key
1 Expand the Attributes section of the Key Information page.
If attributes have been added, the attribute/value pairs are listed in this area.
Attributes are arbitrary name/value pairs. Outside applications can make requests
related to attributes through the USP API or using PGP Command Line commands.
2 To add, delete, or modify attributes for this device, click Edit Attributes....
3 To add attributes, type the attribute name and its value in the fields provided.
To add additional attributes, click the Add icon.
4 To change an attribute name or its value, just retype the information in the field.
5 To remove an attribute, click the Remove icon.
Symmetric Key Series
A KMS license is required to access Symmetric Key Series and Symmetric Keys.
Symmetric keys (also known as Managed Encryption Keys, or MEKs) can be used,
through the USP API or the PGP Command Line commands, to encrypt and decrypt
data. A symmetric key typically has a limited life span, with a specific validity period
that determines how long the key remains valid. At the end of the validity period, the
current key expires and is replaced by a new symmetric key.
The Symmetric Key Series is the set of the current plus expired keys, maintained by
PGP Universal Server. The currently valid key is used to encrypt content during its
validity period, and to decrypt content encrypted during this validity period. The
expired keys are maintained in order to decrypt content that was encrypted in the past;
PGP Universal Server determines which key to use for decryption based on the date the
content was encrypted.
To view the symmetric key series associated with this managed key
1 Go to the Keys > Managed Keys page.

67 Administering Managed Keys
Symmetric Key Series
This displays the list of all managed keys in the PGP Universal Server database.
2 Click the Key ID of the managed key.
The Managed Key Information page appears for the key you selected.
3 Click the Symmetric Key Series... button to display a list of Symmetric Key Series
owned by this managed key.
The information shown in this list includes the key series display name, the
validity period, the date at which the key will expire (or never); the date when it
will next be renewed (or never); and the number of symmetric keys in this series.
4 To delete one or more key series, click the delete icon in the key series row, or
check one or more rows and select Delete Selected from the Options menu, or
select the Delete All option.
5 To export one or more keys, check one or more rows and select Export Selected
from the Options menu, or select the Delete All option.
6 Click the key series name to view the list of symmetric keys that are included in
the series.
To view an individual symmetric key series
1 From the Managed Key Information page, click the Symmetric Key Series...
button to display the list of Symmetric Key Series owned by this managed key.
2 Click a key series name to view the list of symmetric keys that are included in that
series.
The Symmetric Key Series Information page appears.
On this page you can see the same basic information about the key series as was
shown in the Symmetric Key Series list. You can also view and set attributes and
permissions for the key, and force a rekey of the series.
3 To view or set attributes for this key series, expand the Attributes section of the
Symmetric Key Series Information page. This shows any attribute/value pairs
defined for this key series.
To add an attribute or to modify existing ones, click Edit Attributes...
4 To view the permissions for this key series, expand the Permissions section of the
Symmetric Key Series Information page. This shows any permissions allowed for
this key.
To add or delete permissions, click View and Edit Permissions....
The Permissions page for this key appears. You can delete permissions by
clicking the delete icon next to a permission.
You can add a new permission by clicking Add Permissions..., which takes you
to a page where you can add permissions.
5 To view the individual Symmetric Keys within this series, click Symmetric Keys....
For details of the pages that show the Symmetric Keys, see Symmetric Keys (on
page 68).
To force replacement of the current valid key
1 Click Force Rekey.

68 Administering Managed Keys
Symmetric Keys
This lets you replace the current valid symmetric key, regardless of its validity
period or when it is due to expire. The current valid symmetric key is marked
expired, and a new symmetric key is created as the valid key.
Symmetric Keys
Individual Symmetric Keys are contained within a Symmetric Key Series, which is itself
associated with a specific managed key. To view the set of individual Symmetric Keys,
you must navigate through the Symmetric Key Series display.
To view the set of Symmetric Keys in a series
1 From the Managed Key Information page, click the Symmetric Key Series...
button to display the list of Symmetric Key Series owned by this managed key.
2 Click a key series name to view the list of symmetric keys that are included in that
series.
The Symmetric Key Series Information page appears.
3 Click the Symmetric Keys... button to display the list of Symmetric Keys in the
selected key series.
From this list, you can see each Key ID, along with the Validity dates (start and end
dates) for each key.
The key icon at the left of each Key ID indicates whether the key is expired or valid
- normally only the last key in the list will be valid, the others will be expired.
4 To delete an individual Symmetric Key, click the Delete icon. You can also delete
multiple keys by clicking check boxes and selecting Delete Selected from the
Options menu, or by selecting the Delete All option.
5 To export one or more individual Symmetric Keys, click their check boxes and
select Export Selected from the Options menu. You can export all the keys by
selecting the Export All option.
To view the details of an individual Symmetric Key
1 From the list of symmetric keys, click the individual key ID to display the
Symmetric Key Information page.
This shows the key UUID, the date it was created, and its validity start and end
dates.
2 To view or set attributes for this key, expand the Attributes section of the
Symmetric Key Information page. This shows any attribute/value pairs defined for
this key series.
Note: Attributes of symmetric keys cannot be added or modified through the PGP
Universal Server administrative interface. They can only be manipulated using
PGP Command Line commands or through the USP API.
3 To view the data in this key, click Show Data. This displays the data in a text
field. The administrator can copy the contents for use elsewhere.
Click Hide Data to hide the data display.

69 Administering Managed Keys
Custom Data Objects
Custom Data Objects
A KMS license is required to access Custom Data Objects (also known as Managed
Secure Data, or MSDs).
Custom Data Objects are always associated with (owned by) a Managed Key. They can be
used to store arbitrary data objects securely in the PGP Universal Server database. They
are created and manipulated using the USP API or PGP Command Line commands.
Custom Data Objects can be viewed through the PGP Universal Server administrative
interface. The administrator can also add and edit attributes and permissions for a
Custom Data Object.
To view a list of the Custom Data Objects associated with a managed key
1 From the Managed Key Information page, click the Custom Data Objects... button
to display the list of Custom Data Objects owned by this managed key.
For each object in the list, this page shows its name, its size (in kbytes), and its
MIME type.
PGP Universal Server supports the MIME types for image files, plain text, rich
text, and PDF.
2 To delete an individual Custom Data Object, click the Delete icon next to the
object. You can also delete multiple objects by clicking the appropriate check boxes
and selecting Delete Selected from the Options menu, or by selecting the Delete
All option.
3 To view an individual Custom Data Object, click the object ID.
To view the details of an individual Symmetric Key
1 From the list of symmetric keys, click the individual key ID to display the
Symmetric Key Information page.
This shows the key UUID, the date it was created, and its validity start and end
dates.
2 To view or set attributes for this Custom Data Object, expand the Attributes
section of the Custom Data Object Information page. This shows any
attribute/value pairs defined for this key series.
To add an attribute or to modify existing ones, click Edit Attributes... For
details on adding or editing attributes, see Attributes (Managed Keys) (see
"Attributes" on page 66).
3 To view the permissions for this key series, expand the Permissions section of the
Custom Data Object Information page. This shows any permissions allowed for
this object.
To add or delete permissions, click View and Edit Permissions....

70 Administering Managed Keys
Exporting Consumer Keys
The Permissions page for this object appears. You can delete permissions by
clicking the Delete icon next to a permission.
4 You can add a new permission by clicking Add Permissions..., which takes you to a
page where you can add permissions. For details on adding or editing permissions,
see Permissions (Managed Keys) (see "Permissions" on page 65).
5 To view the data in this Custom Data Object as plain text, click Show Data.
If the MIME type of the object is one that PGP Universal Server recognizes, it
attempts to display the data using the appropriate application in a separate
browser window or tab. If it does not recognize the MIME type, it displays the data
in a text field.
Click Hide Data to hide the data display.
Exporting Consumer Keys
The following sections describe how to export keys for users and managed devices.
Exporting the Managed Key of an Internal User
If the user’s key data is stored in Server Key Mode, you can export both public and
private key information. If the private key is stored protected by the user’s passphrase,
you cannot export it unencrypted. If the key data is in Client Key Mode, the private key
is not stored on the server and cannot be exported.
To export the managed key of an internal user
1 From the Consumers > Users page, click the check box for the internal user whose
key you want to export.
2 From the Options menu, select Export Keys for Selected.
If only the public key is available, the text of the key downloads to your local
system.
If both the public and the private key are available, the Export Key dialog box
appears, allowing you to choose to export only the public key, or both public and
private portions of the key.
3 Select Export Public Key to export just the public key portion of the keypair.
4 Select Export Keypair to export the entire keypair, the public key and the private
key portions.
5 If you want to protect the exported key file with a passphrase, type it in the
Passphrase field.
If a private key already has an attached passphrase, it is already protected and
there is no need to type another passphrase at this time. When you export the
keypair, you receive a file containing an unencrypted public key and an encrypted
private key.
6 Click Export.
The key is exported to your local system.

71 Administering Managed Keys
Exporting Consumer Keys
Exporting the Managed Key of an External User
To export the managed key of an external user
1 From the Consumers > Users page, click the check box for the external user whose
key you want to export.
2 From the Options menu, select Export Keys for Selected.
If only the public key is available, the text of the key downloads to your system.
If both the public and the private key are available, the Export Key dialog box
appears.
3 Select Export Public Key to export just the public key portion of the keypair.
4 Select Export Keypair to export the entire keypair, the public key and the private
key portions.
5 If you want to protect the exported key file with a passphrase, type it in the
Passphrase field.
If a private key already has an attached passphrase, it is already protected and
there is no need to type another passphrase. When you export the keypair, you
receive a file containing an unencrypted public key and an encrypted private key.
6 Click Export.
The key is exported.
Exporting PGP Verified Directory User Keys
To export the key of directory users
1 From the Consumers > Users page,select the check box for the users whose key
you want to export.
2 From the Options menu, select Export Keys for Selected.
The text of the keys downloads to your local system.
Exporting the Managed Key of a Managed Device
To export the managed key of an external user
1 From the Consumers > Devices page, select the check box for the managed device
whose key you want to export.
The Managed Device Information page for the device appears.
2 From the Managed Keys tab, click the Export icon in the Actions column of the
managed key you want to delete.
If only the public key is available, the text of the key downloads to your system.

72 Administering Managed Keys
Deleting Consumer Keys
If both the public and the private key are available, the Export Key dialog box
appears.
3 Select Export Public Key to export just the public key portion of the keypair.
4 Select Export Keypair to export the entire keypair, the public key and the private
key portions.
5 If you want to protect the exported key file with a passphrase, type it in the
Passphrase field.
If a private key already has an attached passphrase, it is already protected and
there is no need to type another passphrase. When you export the keypair, you
receive a file containing an unencrypted public key and an encrypted private key.
6 Click Export.
The key is exported.
Deleting Consumer Keys
The following sections describe how to delete keys for users and managed devices.
Deleting the Managed Key of an Internal User
If you delete a user’s key, the private key material is gone, which means messages are
no longer decryptable. If you want to retain the private key material, you can revoke the
key instead of deleting it. For more information see Revoking Managed Keys (on page
74).
To delete the managed key of an internal user
1 Select the user you want from the Internal Users page.
The Internal User Information dialog box appears.
2 From the Managed Keys tab, click the Delete icon in the Actions column of the
managed key you want to delete.
A confirmation dialog box appears.
3 Click OK.
The key of the internal user is deleted.
Deleting the Managed Key of an External User
To delete the managed key of an external user
1 Select the user you want from the External Users page.
The External User Information dialog box appears.

73 Administering Managed Keys
Approving Pending Keys
2 From the Managed Keys tab, click the Delete icon for the managed key you want to
delete.
A confirmation dialog box appears.
3 Click OK.
The key of the external user is deleted.
Deleting the Key of a PGP Verified Directory User
To delete the key of a PGP Verified Directory user
1 Select the user you want from the Verified Directory Users page.
The Directory User Information dialog box appears.
2 From the Managed Keys tab, click the Delete icon for the managed key you want to
delete.
A confirmation dialog box appears.
3 Click OK.
The key of the PGP Verified Directory user is deleted.
Deleting the Managed Key of a Managed Device
To delete the key of a managed device
1 Select the managed device you want from the All Devices or Managed Devices
page.
The Managed Device Information dialog box appears.
2 From the Managed Keys tab, click the Delete icon for the managed key you want to
delete.
A confirmation dialog box appears.
3 Click OK.
The key of the managed device is deleted.
Approving Pending Keys
Internal Users
In addition to automatically creating a key for your email users or manually adding
internal users, you can allow internal users to submit their own keys through the PGP
Verified Directory. Allowing user key submission is useful for internal users who
already have keys, such as existing PGP Desktop users who of course would have their
own PGP key. If the user already has a PGP key, and the new key is approved, the new
key replaces the old key.

74 Administering Managed Keys
Revoking Managed Keys
PGP Desktop users upload their public keys through the PGP Verified Directory
interface at the interface and port you configure on the Verified Directory page. They
can also upload keys through the PGP Desktop "Send To" function.
On the Verified Directory page, you can specify how you want these user-submitted
keys approved. If you have set the PGP Verified Directory to require either a
confirmation email from the user or to require you, the administrator, to manually
approve the key, the user’s PGP key status is marked pending. See Configuring the PGP
Verified Directory (on page 302) for information on the PGP Verified Directory.
To manually approve the key submission
1 From the Internal Users page, click the plus sign icon to approve the key.
2 Click the minus sign icon to deny the submitted key.
3 Click the delete icon to delete the user.
Directory users
If you have set the PGP Verified Directory to require either a confirmation email from
the user or to require you, the administrator, to manually approve the key, the user’s
PGP key status are pending.
To manually approve the key submission, choose one of the following
1 To approve a single user key, click the plus sign icon in the Options column to
approve the key.
2 Click the minus sign icon to deny the submitted key.
3 Click the delete icon to delete the user.
Or
1 To approve multiple user keys, click the check box at the far right end of the row
of each of the directory user key you want to approve.
2 Select Approve Selected or Approve All from the Options menu.
Revoking Managed Keys
Revoking a key removes the Organization Key signature from the key. Only keys for
which the PGP Universal Server has the private key can be revoked; that is, only the
keys of SKM users can be revoked. The Revoke button is disabled for all other keys.
If you revoke an internal user's managed key, it continues being published via the LDAP
server, but appears marked as a revoked key, and it appears on the Certificate
Revocation Lists.
Once you revoke a key, you cannot un-revoke it.
Note: Revoking a key is safer than deleting a user because the private key material is
preserved, which means that decryption continues to work.

75 Administering Managed Keys
Revoking Managed Keys
To revoke the managed key of an internal user
1 Select the user you want from the Internal Users page.
The Internal User Information dialog box appears.
2 From the Managed Keys tab, click the Revoke icon next to the key you want to
Revoke.
Note: If the key is not an SKM key, the Revoke icon is disabled.
A confirmation dialog box appears.
3 Click OK.
The internal user’s key is revoked.
To revoke the managed key of a managed device
1 Select the managed device you want from the All Devices or Managed Devices
page.
The Managed Device Information dialog box appears.
2 From the Managed Keys tab, click the Revoke icon next to the key you want to
revoke.
A confirmation dialog box appears.
3 Click OK.
The internal user’s key is revoked.

12 Managing Trusted Keys and
Certificates
This section describes how trusted keys and certificates are used with your PGP
Universal Server. You can find the list of trusted keys at Organization > Trusted Keys.
Overview
The Trusted Keys and Certificates page lists keys and certificates that are not part of
the SMSA created by PGP Universal Server but which nevertheless you do trust.
Trusted Keys
In those cases where your PGP Universal Server cannot find a public key for a
particular user on any of the keyservers you have defined as trusted, it also searches
the default directories. If it finds a key in one of the default directories, it trusts (and
therefore can use) that key only if it has been signed by one of the keys in the trusted
keys list.
For example, if your company’s law firm uses a PGP Corporate Signing Key (CSK), you
can add this key as a trusted key. Then, if someone in your firm wants to send a
message to someone at the law firm and the PGP Universal Server finds that person’s
key, signed by the law firm’s CSK, in a default directory, then that key can be used by
the server to securely send the message to the recipient at the law firm.
Trusted Certificates
PGP Universal Server can use S/MIME only if it has the root certificates from the CAs
available to verify the client certificates. These CAs can be in your company or they can
be an outside-managed CA, such as VeriSign.
To enable S/MIME support, the certificate of the issuing Root CA, and all other
certificates in the chain between the Root CA and the Organization Certificate, are on
the list of trusted keys and certificates on the Trusted Keys and Certificates page.
PGP Universal Server comes with information on many public CAs already installed on
the Trusted Keys and Certificates page. Only in-house CAs or new public CAs that issue
user certificates need to be manually imported. You can inspect, export (save on your
computer), or delete the root certificates at any time.
Trusted Certificates can be in any of the following formats: .cer, .crt, .pem and .p7b.

78 Managing Trusted Keys and Certificates
Adding a Trusted Key or Certificate
Adding a Trusted Key or Certificate
To add a trusted key or certificate
1 On the Trusted Keys and Certificates page, click Add Trusted Key.
The Add Trusted Key dialog box appears.
2 Do one of the following:
To import a trusted key saved in a file, click Browse and choose the file on
your system that contains the trusted key or certificate you want to add.
To import a key in key block format, paste the key block of the trusted key or
certificate into the Import Key Block box (you need to copy the text of the
trusted key or certificate first to paste it).
3 If desired, select any of the following:
Trust key for verifying mail encryption keys. Enable this option to trust the
key or certificate added to verify signatures on keys from default keyservers.
Trust key for verifying SSL/TLS certificates (only valid if importing X.509
certificate). Enable this option to trust the X.509 certificate added to verify
SSL/TLS certificates presented from remote SMTP/POP/IMAP mail servers.
Trust key for verifying keyserver client certificates (only valid if importing
X.509 certificate). Enable this option to trust the X.509 certificate added to
verify keyserver client authentication certificates.
4 Click Save.
Note: SSL v1.0 certificates are not supported.
Inspecting and Changing Trusted Key Properties
To inspect or change the properties of a trusted key or certificate
1 Click on the User ID (the name) of the trusted key or certificate whose properties
you want to inspect in the list of trusted keys and certificates.
The Trusted Key Info dialog box appears.
2 Inspect the properties of the trusted key or certificate you selected. You can click
more to see all the certificate data, which appears in a pop-up dialog box.
3 To export the trusted key, click Export and save the file to the desired location.
4 To change the properties of the trusted key or certificate, select any of the
following:
Trust key for verifying mail encryption keys. Enable this option to trust the
key or certificate added to verify signatures on keys from default keyservers.

79 Managing Trusted Keys and Certificates
Deleting Trusted Keys and Certificates
Trust key for verifying SSL/TLS certificates. Enable this option to trust the
X.509 certificate added to verify SSL/TLS certificates presented from remote
SMTP/POP/IMAP mail servers.
Trust key for verifying keyserver client certificates. Enable this option to
trust the X.509 certificate added to verify keyserver client authentication
certificates.
5 Click Save.
Deleting Trusted Keys and Certificates
To delete a trusted key or certificate
1 Click the delete icon in the row of the trusted key or certificate you want to delete.
A confirmation dialog box appears.
2 Click OK.
The trusted key or certificate you specified is removed from the list.
Searching for Trusted Keys and Certificates
To find keys and certificates using search, enter the criteria for which you want to
search, and click Search. A list of keys and certificates that fit the criteria you specified
appears.

13 Managing Group Keys
This section describes how group keys are used with PGP Universal Server. You can
find the list of group keys at Keys > Managed Keys. Group keys have "(Group)"
appended to their name.
Overview
A group key is a PGP Universal Server-managed keypair shared by a group of users. A
group key is assigned to a PGP Universal Server group. A group key can be assigned to
one group only; a group can have only one active group group key assigned to it (a
group can have multiple revoked group keys).
Note: In version 3.2 of PGP Universal Server, group keys can only be used with PGP
NetShare.
Group keys can be assigned to any PGP Universal Server group. To use the Generate
AD Group Keys wizard to create a group, however, requires the Directory
Synchronization feature to be enabled and synchronized with an Active Directory
database.
Membership in a group can be modified without affecting the metadata associated with
the data protected by the group key. For groups that are based on membership in an
Active Directory security group, membership in the AD security group can also be
modified without affecting the metadata.
The users of a group key must be in a PGP Universal Server-managed environment;
group keys are not supported in standalone environments.
Once created, normal key lifecycle events (creating, editing, revoking, deleting, logging,
and so on) for group keys are managed by the PGP Universal Server.
Group keys are fully compatible with additional decryption keys (ADKs).
Caution: The Distinguished Name (DN) of an Active Directory security group
associated with a group key should not be changed after creation. This could lead to
loss of access to the private portion of the group key. Additionally, the "memberOf"
attribute for members of a group with an associated group key should be set to the
same value as the Distinguished Name (DN) of the group.
Establishing Default Group Key Settings
To establish default settings for your group keys
1 Navigate to the Consumers > Groups screen, then click the Group Key Settings
button.
2 Select the appropriate Key Generation settings.

82 Managing Group Keys
Adding a Group Key to an Existing Group
3 Click Save.
Note: If you change the default group key settings, the new settings apply only to
group keys created after you make the changes; the settings of existing group keys
are not affected.
Adding a Group Key to an Existing Group
To add a group key to an existing group
1 Go to the Consumers > Groups page. The Keys column shows a group key icon for
those groups that already have a group key assigned.
2 Click on the name of the group to which you want to add a group key.
3 In the Keys row, click View.
4 Click Add Group Keys to add a group key to this group.
5 Click Generate to create a new group key or Import to import an existing keypair
as the group key.
When you click Generate, a new group key will be created using the current
default settings for a group key.
When you click Import, the Import Key page appears. Select a key file or paste a
key block, enter the passphrase of the private key, then click Import.
6 Click Save to add the key to the group.
Caution: A group can only have one active group key. If you add a group key to a
group that already has a group key assigned, the existing group key will be
overwritten by the group key you are adding.
Creating a New Group with a Group Key
To create a new group with a group key
1 On the Groups page, click Add Group. The Groups Settings: Add Group page
appears.
2 On the General subtab, type in a Group Name and Description.
3 To apply a consumer policy to members of this group, select Apply Consumer
Policy to members of this group, and choose a consumer policy from the
drop-down menu.
4 To add a group key to this group, click Generate to create a new group key or
Import to import an existing keypair as the group key.
When you click Generate, a new group key will be created using the current
default settings for a group key.

83 Managing Group Keys
Removing a Group Key from a Group
When you click Import, the Import Key page appears. Select a key file or paste a
key block, enter the passphrase of the private key, then click Import.
5 On the Membership subtab, enable Match Consumers Via Directory
Synchronization.
6 For LDAP Directory, select the appropriate LDAP directory from the drop-down
menu.
7 Select If all of the following apply, then enter "memberOf" without the quotes in
the Attribute field. In the Value field, check Regular Expression, then enter the
Distinguished Name (DN) of the appropriate Active Directory security group.
8 Click Save to create the group.
Note: To quickly create a new group from an Active Directory security group with an
automatically generated group key, go to Keys > Managed Keys, click on the
Generate AD Group Keys button, and follow the on-screen instructions.
Removing a Group Key from a Group
To remove a group key from a group
1 Go to the Consumers > Groups page. The Keys column shows a keypair icon for
those groups that already have a group key assigned.
2 Click on the name of the group from which you want to delete the group key.
3 In the Keys row, click View.
4 In the Key ID column, click on the key ID of the group key you want to delete.
5 Click Delete.
6 When the confirmation dialog appears, click OK.
7 To confirm that the group key was deleted from the group, go to the Consumers >
Groups page. The Keys column will no longer show a keypair icon for the group
from which you deleted the group key.
Deleting a Group Key
To delete a group key
1 Go to Keys > Managed Keys. In the listing of managed keys, group keys have their
own icon and their names have "(Group)" without the quotes appended to the end
of their name.
2 Click on the key ID of the group key you wish to delete.
3 On the information screen for the group key, click Delete.
4 When the confirmation dialog appears, click OK.

84 Managing Group Keys
Revoking a Group Key
Caution: Do not delete a group key that is currently assigned to a group unless you
are adding a new group key to the group.
Revoking a Group Key
To revoke a group key
1 Go to Keys > Managed Keys. In the listing of managed keys, group keys have their
own icon and their names have "(Group)" without the quotes appended to the end
of their name.
2 In the Actions column of the group key you wish to revoke, click the Revoke icon.
3 When the confirmation dialog appears, click OK.
Caution: Do not revoke a group key that is currently assigned to a group unless you
are adding a new group key to the group.
Exporting a Group Key
To export a group key
1 Go to Keys > Managed Keys. In the listing of managed keys, group keys have their
own icon and their names have "(Group)" without the quotes appended to the end
of their name.
2 In the Actions column of the group key you wish to export, click the Export icon.
3 On the Export Key dialog, choose to export just the public key or the entire
keypair. Enter a passphrase and confirm it if you wish to protect the keypair file.
Click Export.
4 Save the file to your local system.

14
Setting Mail Policy
This section describes mail policy, which determines how a PGP Universal Server
handles email messages.
Policies are enforced on the PGP Universal Server with PGP Gateway Email, and at the
desktop with PGP Desktop Email. Even if your PGP Universal Server is not proxying
and encrypting email in the mailstream, it is important to create secure mail policy,
because PGP Desktop Email receives and enforces policy information from PGP
Universal Server.
PGP Whole Disk Encryption and PGP NetShare are not affected by mail policy settings.
If your PGP Universal Server is only managing these features, mail policy is not
required.
PGP Universal Web Messenger functionality is not available for use with a
non-mailstream license.
Overview
The PGP Universal Server processes email messages based on the policies you establish.
Mail policy applies to inbound and outbound email for both PGP Universal Server
traffic and email processed by client software. Mail policy consists of multiple policy
chains, comprised of sequential mail processing rules, which appear on the Mail Policy
page.
The Mail Policy page lets you change the settings of the default mail policy chains, and
add and edit policy chains and rules. It allows you detailed granular control of all
aspects of mail processing.
If your PGP Universal Server is in gateway placement and your users do not have client
software installed, then mail policy is applied only to messages sent to recipients
outside the managed domain. Messages sent from internal users to internal users do
not pass through the PGP Universal Server, so the policy is not applied.
If your mail policy requires Smart Trailer and/or PGP Universal Web Messenger
service, you must enable the PGP Universal Web Messenger service. For more
information, see Configuring PGP Universal Web Messenger (on page 281).
For information on how mail policy settings appear to external users, and how external
users interact with Smart Trailer and PGP Universal Web Messenger, see Applying Key
Not Found Settings to External Users (on page 121).
If you upgrade from PGP Universal Server 2.0.x, your policy settings are automatically
replicated in the new mail policy. For more information, see Migrating Settings from
Version 2.0.x.
How Policy Chains Work
Mail policy refers to the entire set of chains and rules as a whole. Individual policy
chains process different kinds of email; for example, inbound or outbound mail. Each
rule in a policy chain is one step in processing a message.

86 Setting Mail Policy
Overview
Policy chains determine how messages are processed. Chains are made up of
sequences of rules. A message can pass through more than one policy chain during
processing.
Rule Applicability specifies where the policy chain's rules are applied to a
message. Rules can be evaluated and enforced on the PGP Universal Server, on the
client, or on both client and server. Policy chains can also be created that will run
on a PGP Mobile client or standalone on a PGP Desktop client, without requiring
server interaction. A Policy chain's rule applicability determines what conditions
and actions can be used to create the policy rules.
Rules consist of sets of conditions and actions. Messages pass through the rules in
a chain in order until the message comes to a rule that applies. If the conditions
for the rule are met by a message, the rule takes effect. If the conditions of a rule
are not met by a message, the message is passed to the next rule in the chain.
Conditions are the set of requirements a message must meet to trigger a rule. If a
message meets the conditions, the associated actions are performed on the
message. For a list of possible conditions, see Conditions (on page 102).
Groups are sets of one or more conditions, linked together by statements about
the Conditions. For example, a rule can have a group of conditions that are all
required to be true for the rule to be triggered. For a list of possible condition
statements, see Condition Statements (on page 101).
Condition statements link together conditions into groups, and specify how
conditions should be matched. For example, if you have more than one condition
in a rule, you can specify that the rule is triggered if all conditions are matched, or
you can specify that the rule is triggered if only one of the conditions is matched.
Actions are performed on messages when rule conditions apply. Actions applied
to a message can include encryption or simply passing the message along to
another policy chain. For a list of possible actions, see Actions (on page 106).
Mail Policy and Dictionaries
Dictionaries are lists of terms to be matched. Dictionaries work with mail policy to
allow you to define content lists that can trigger rules or fulfill the conditions of a rule
to trigger actions. For example, dictionaries can contain addresses you want excluded
from processing, key words such as “confidential,” or user names for internal users
whose messages need special handling.
A policy rule can have a dictionary associated with it as part of a condition. If a message
meets the condition, PGP Universal Server processes the message according the rule’s
actions. For example, one of the default Outbound rules is called Excluded Signed. The
condition for that rule is “If any of the following are true: Recipient address is in
dictionary Excluded Addresses: Sign.” This means the rule applies to any message in
which the recipient address matches a term in the dictionary. If that condition is met,
the action for the rule is triggered. The action is to sign and send the message with no
further processing.
For information on using conditions with dictionaries, see Choosing Condition
Statements, Conditions, and Actions (on page 101).
Consider whether the use of a dictionary in your rule is appropriate. There are several
different ways to create a rule condition that contains terms to be matched. Sometimes
you want to add a single term or pattern directly in the condition itself. Sometimes you
need to use a dictionary instead. If you want your condition to look for matches to
multiple terms, it is more appropriate to create a dictionary.

87 Setting Mail Policy
Overview
For example, if you want to create a rule that applies only to email going to specific
recipient domains, you can create a rule that will match to an individual domain: select
the condition "Recipient Domain," the modifier "is" and provide the domain as the value
to be matched.
However, if you want the rule to apply to email going to many different recipient
domains, use a dictionary. From the Mail > Dictionaries page, create a dictionary
listing all domain names as matchable literal terms. When you create the rule on the
policy chain, you would select the condition "Recipient Domain," and the modifier "is in
dictionary." You can then select that dictionary from a drop-down menu.
For instructions on creating dictionaries, see Using Dictionaries with Policy (on page
129).
Mail Policy and Key Searches
External domains sometimes have publicly accessible keyservers containing users’
public keys (in a PGP keyserver or an X.509 directory).
Mail policy contains rules that require a message be signed or encrypted to a recipient’s
key. The PGP Universal Server always looks in its own databases for keys in the
Internal Users, External Users, and Key Cache lists. If the PGP Universal Server does
not have a copy of a particular key, the policy can specify searching external sources for
the key.
For more information, see Keyservers, SMTP Servers, and Mail Policy (see "Keyservers,
SMTP Archive Servers, and Mail Policy" on page 137). For instructions, see Adding Key
Searches (on page 100).
Mail Policy and Cached Keys
Public keys for remote users are automatically cached on the PGP Universal Server on
the Keys > Key Cache page. Whenever the PGP Universal Server can harvest a key from
the mailflow, the key is stored in the key cache. As long as the key is in the key cache, it
can be used to encrypt future email, without requiring a key search.
Whenever email processing requires a remote user key, the PGP Universal Server can
automatically search for remote user keys in the cache for any keyserver that you have
added to the rule. If you add a keyserver to a rule’s Key Search tab, all cached keys from
that server are available. If you delete a keyserver from a rule, the rule can no longer
use the cached keys from that keyserver to encrypt mail.
For more information on cached keys, see Managing Keys in the Key Cache (on page
143). For more information, see Keyservers, SMTP Servers, and Mail Policy (see
"Keyservers, SMTP Archive Servers, and Mail Policy" on page 137).

88 Setting Mail Policy
Understanding the Pre-Installed Policy Chains
Understanding the Pre-Installed Policy Chains
This section describes the pre-installed policy chains for a new, non-migrated, PGP
Universal Server installation. The pre-installed policy chains provide the PGP Universal
Server and PGP Desktop with rules for processing email. You can edit any of these
policy chains, but you should make sure that you understand each of the processing
functions the chains provide before you change them. This section provides an
overview of each pre-installed chain, but you should examine the chains as installed on
the PGP Universal Server for more details.
Default: This is the starting point for the mail policy. This chain specifies how to
evaluate all messages and route them to the next appropriate policy chain for
processing. All messages start processing here, and are routed to the Inbound or
Outbound chains. Because this is the root policy chain for the entire mail policy, it
cannot be deleted. The rules in this chain apply to messages processed by both
PGP Universal Server and PGP Desktop.
Default: Legacy Client: This policy chain provides mail policy support for 9.0.x
legacy client software. This policy chain cannot be deleted. For more information,
see the PGP Universal Server Upgrade Guide.
Default: Standalone: This is the default mail policy chain that is downloaded to
PGP Desktop clients that are members of a policy group with a Mail Policy setting
of Standalone or Offline: Standalone. Once downloaded, Standalone mail policy is
enforced on the client without reference to PGP Universal Server. For more
information, see Offline Policy (on page 205).This policy chain cannot be deleted.
The default behavior is to block messages when a key is not found.
Default: Mobile: This is the default mail policy chain for PGP Mobile clients. It is
enforced on the PGP Mobile client. This policy chain cannot be deleted. The
default behavior is to block messages when a key is not found.
Exception: When the PGP Universal Server receives a badly formed message, mail
policy evaluation fails. This chain specifies how to handle messages that cannot be
processed. This chain cannot be deleted.
Messages reach the exception chain in two ways:
An error occurrs during message processing, and processing cannot
continue. The message is sent to the Exception Chain.
The message is so badly malformed that normal message processing cannot
begin. Message processing begins on the Exception Chain.
If the message cannot be processed normally, the PGP Universal Server has
limited data about the message to use to determine how to handle the message.
The only conditions supported on the Exception Chain are: Application, Service
type, Connected user has authenticated, IP Address of local connector (server
only), Port of local connector (server only). The default condition is to handle the
message based on service type. Possible actions are: bounce, pass through without
processing, or drop the message. The default is to pass the message through.
Inbound: This policy chain describes how to process inbound messages to users
inside the managed domains. It decrypts and delivers messages to the user. This is
the final chain in processing inbound email. Messages are routed to this chain by
the Default chain. The rules in this chain apply to messages processed by the PGP
Universal Server.

89 Setting Mail Policy
How Upgrading and Updating Affect Mail Policy Settings
Outbound: This policy chain contains processing rules for email to external users.
It expands mailing lists and signs messages. Email flagged as sensitive or marked
with "PDF," or flagged with the encrypt button is passed along to the Outbound:
Secure Message chain for further processing. All other messages pass through
unencrypted. The rules in this chain apply to messages processed by both PGP
Universal Server and PGP Desktop.
Outbound: Secure Message: This policy chain contains the processing rules for
emails that originate from internal users to external users. It delivers messages to
external users who choose PGP Universal Web Messenger and PDF Messenger.
Emails that are not processed according to these rules are passed to the Outbound:
Secure With Key Only policy chain. The rules in this chain apply to messages
processed by both PGP Universal Server and PGP Desktop.
Outbound: Secure With Key Only: This policy chain contains the processing rules
for emails that originated from internal users and must be secured using only the
key. The rules in this chain apply to messages processed by both PGP Universal
Server and PGP Desktop. If the key is not found, the message bounces.
How Upgrading and Updating Affect Mail Policy Settings
When you upgrade to the latest version of PGP Universal Server, different things
happen to mail policy depends on the upgrade method you choose.
Update: If you update using a .pup update package, your current mail policy
chains do not change. Any new chains or rules are not applied. If you later use the
mail policy Restore To Factory Defaults feature, the newer version of the mail
policy chains is installed.
Fresh Installation: If you upgrade to the latest version by backing up your existing
data, doing a fresh installation on a new computer, and then restoring the backed
up data to the new installation, the old mail policy overwrites the new version. If
you want to use the new mail policy rules, you must recreate them manually. See
the Mail Policy Diagram to understand what the default rules are and which
conditions and actions to use to recreate them.
For more information on upgrading and migration, as well as how to recreate some mail
policy rules after restoring data, see the PGP Universal Server Upgrade Guide.
Mail Policy Outside the Mailflow
If your PGP Universal Server is outside the mailflow on your network, mail policy
cannot be enforced at the network level. However, you can enforce mail policy through
client software. PGP Desktop installations bound to your PGP Universal Server receive
client policy information from that PGP Universal Server. Any policy chain marked as
applicable to PGP Desktop client software is enforced by the installed client application.
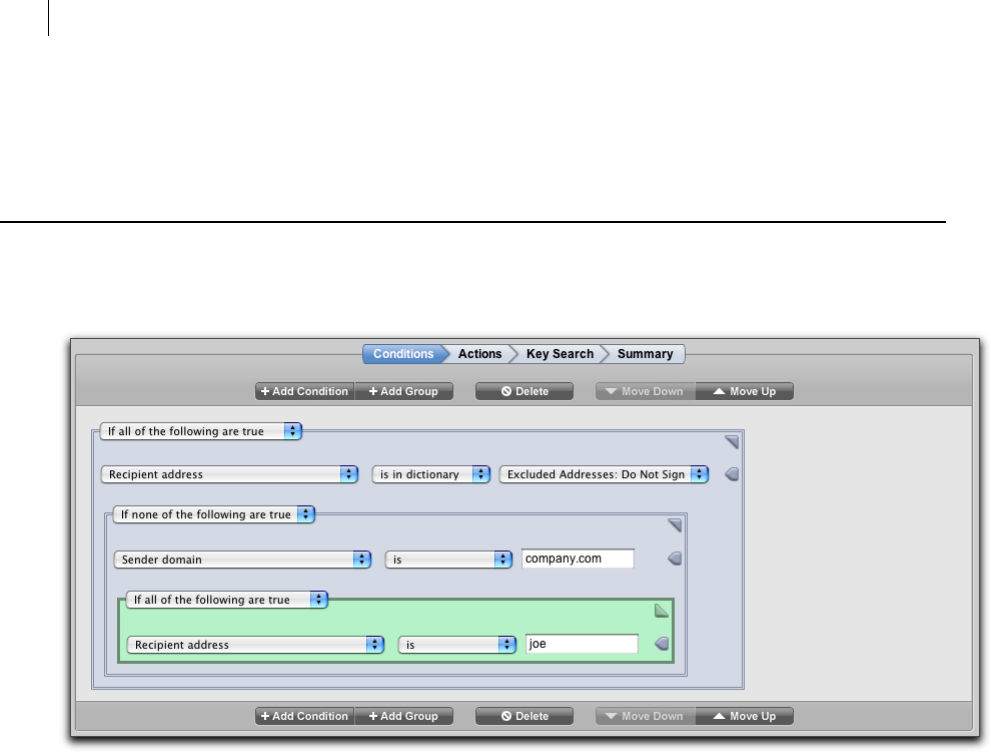
90 Setting Mail Policy
Using the Rule Interface
For more information on creating PGP Desktop installations bound to your PGP
Universal Server, see Creating PGP Desktop Installers (on page 179).
Using the Rule Interface
The rule interface has a set of arrows and buttons to help you arrange conditions and
actions. When you add a rule, the rule interface displays the Conditions page first.
1 Once you have finished creating conditions, click the Actions arrow button to
open the Actions card and add actions to the rule. See The Actions Card (on page
92).
2 Next, click the Key Search arrow button to add searchable keyservers to the rule,
if necessary. See Adding Key Searches (on page 100) for more information on key
searches.
3 To see a summary of the entire rule, click the Summary arrow button.
The Conditions Card
This section describes how to use the interface to create, add, or delete rule groups and
conditions for your rules. For more information, see Building Valid Chains and Rules
(on page 92).
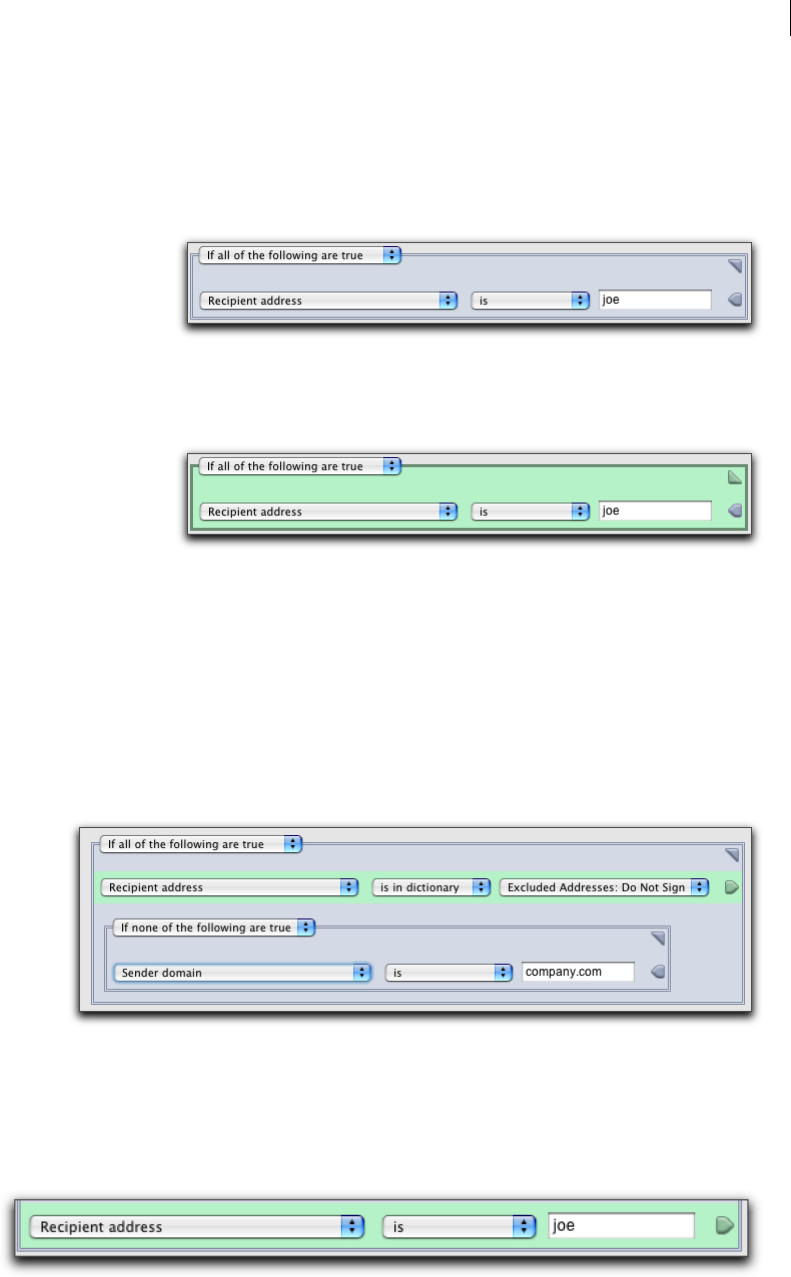
91 Setting Mail Policy
Using the Rule Interface
Selecting Groups
In an unselected group, the rule group box is blue-gray, and the triangle in the upper
right corner points away from the condition.
You cannot add conditions to a rule group until you select the group. To select the
group, click the triangle in the upper right corner. The selected group turns green and
the triangle points toward the condition. You can now delete the group or add more
conditions or groups.
Adding Groups or Conditions
To add a condition or rule group to the selected group, click the Add Condition or Add
Group button.
If you click the Add Group button, another group appears nested inside the group you
originally selected. In the example below, for the condition to be matched and the rule
triggered, the recipient address must be in the Excluded Addresses: Do Not Sign
dictionary, and the Sender Domain must not be company.com.
You can nest up to 10 levels of groups or conditions.
Selecting Conditions
To select a condition, click the arrow at the end of the condition. When the condition is
selected, the arrow points away from the condition and the condition background is
green. You cannot delete a condition until you select it.

92 Setting Mail Policy
Building Valid Chains and Rules
Deleting Groups or Conditions
To delete a group or condition, select that group or condition and click Delete.
There must be at least one condition in a rule. If there is only one condition in a rule,
you cannot delete it.
Reordering Groups or Conditions
You can change the order of conditions and groups. To change order, select the
condition or group and click the Move Up or Move Down button.
The Actions Card
This section describes how to use the interface to add, delete, and reorder rule actions.
Adding or Deleting Actions
To add or delete an action in a rule, click the Add or Delete icons to the right of the
action.
Reordering Actions
The order in which actions appear in the rule is important. Actions that finish
processing must come at the end of a list of actions in a rule. For example, in a list of
actions, the Send copy to alternate archive server action must come before the Deliver
message action in a list.
To change the order of actions in a rule, renumber the action you want to move. All
actions automatically reorder.
Building Valid Chains and Rules
Carefully plan and diagram the entire set of chains and rules before you begin creating
mail policy on the PGP Universal Server. Once you have created your mail policy, test it
before you implement it in your network. The PGP Universal Server does not prevent
you from creating chains that contradict each other or invalid rules. There are many
things to think about when creating policy chains and rules.
When you create a policy chain, organize the policy chains and rules in the correct
order.
Make sure you understand how to use condition settings, conditions, and actions
to create valid rules.
Ensure every email type that needs special processing is covered by a rule that
applies; for example, confidential email or email to specific recipients. For a list of
possible rule conditions, see Conditions (on page 102).
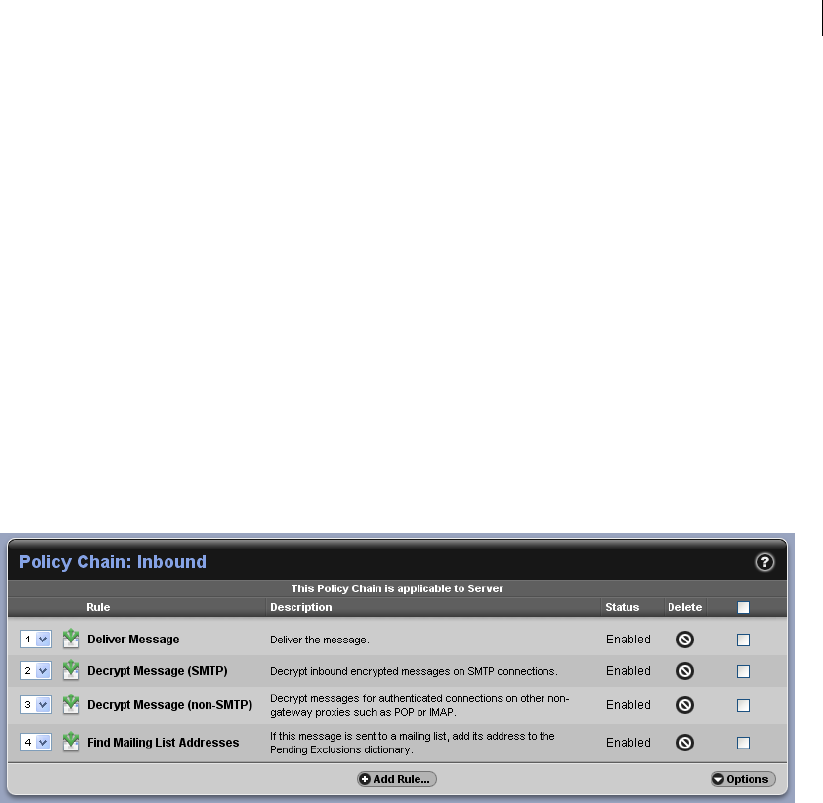
93 Setting Mail Policy
Building Valid Chains and Rules
Do not allow email to drop through the end of your policy chains. Make sure that
for every message that passes through mail policy, there is a rule with an action
that finishes processing by sending, delivering, bouncing, or dropping the email.
For a list of actions that finish processing, see Actions (on page 106).
Using Valid Processing Order
Within a chain, some rules process email, then pass the email along to other actions or
rules for further processing; for example, Decrypt Message. Other rules end email
processing; for example, Deliver Message. When constructing a rule or chain of rules,
make sure that actions that finish email processing come after the actions that allow
continued processing.
The sample policy chain below is an example of invalid processing order. The Deliver
Message rule is before the Decrypt Message rules, so that the mail is delivered before the
message is decrypted. This means that PGP Universal Server cannot decrypt the
messages before delivering them to the recipient.
Within a rule, processing order is important to actions as well. Make sure that actions
that finish processing come after actions that continue processing.
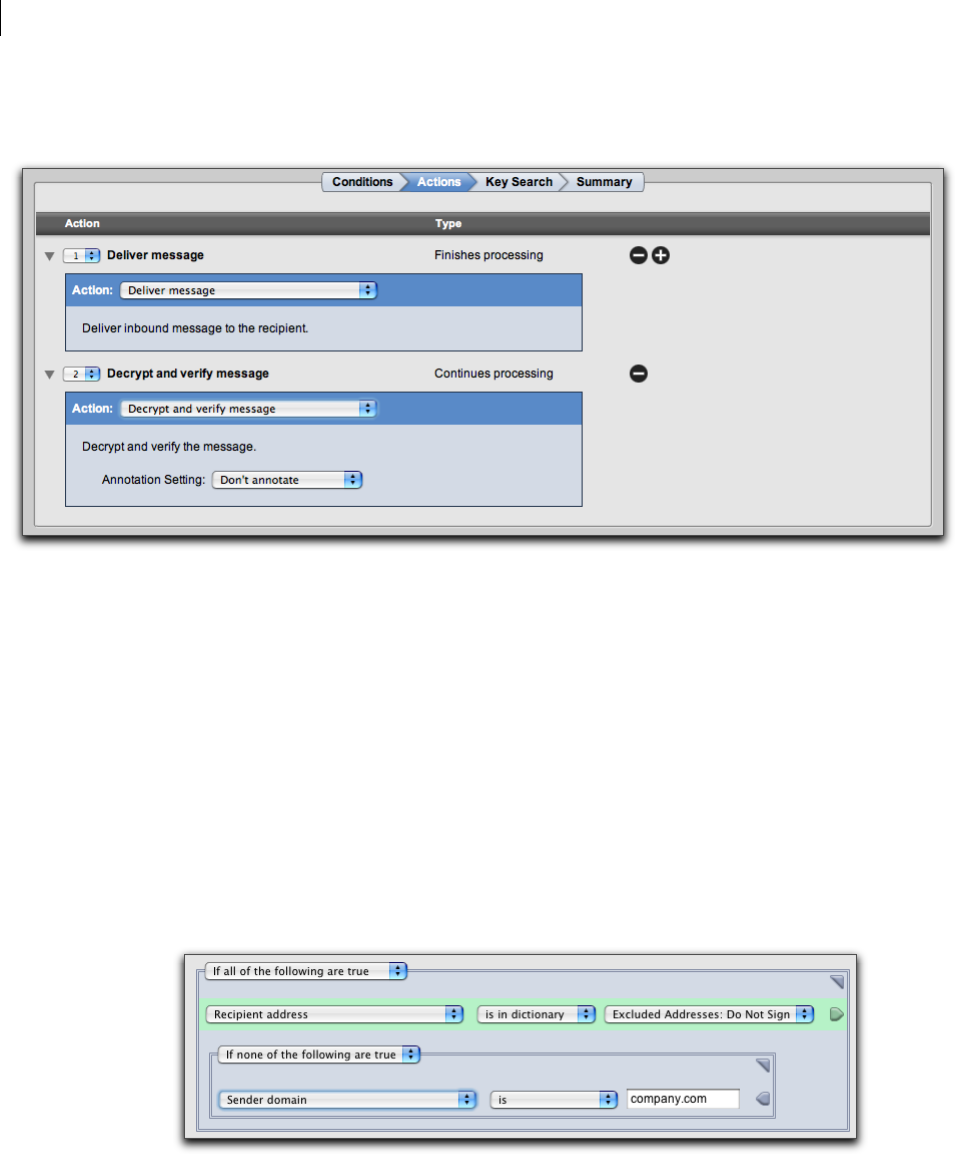
94 Setting Mail Policy
Building Valid Chains and Rules
In the example below, Deliver message is processed before Decrypt and verify message,
so messages would be sent out without being decrypted.
Creating Valid Groups
It is important to pay attention to how your condition settings work, especially if you
have nested groups.
In the example below, the first condition setting states everything it applies to must be
true. For the condition to be matched and the rule triggered, the first condition
statement must be true, and the nested conditional group must also be true.
The first condition setting applies to the condition statement about the recipient
address, and to the nested group, both of which must be true. The second condition
setting applies to the condition statement within the nested group about the sender
domain, which must not be true.
In other words, for the condition to be matched it must be true that the recipient
address is in the Excluded Addresses: Do Not Sign dictionary, and it must be true that
the Sender Domain is not company.com.
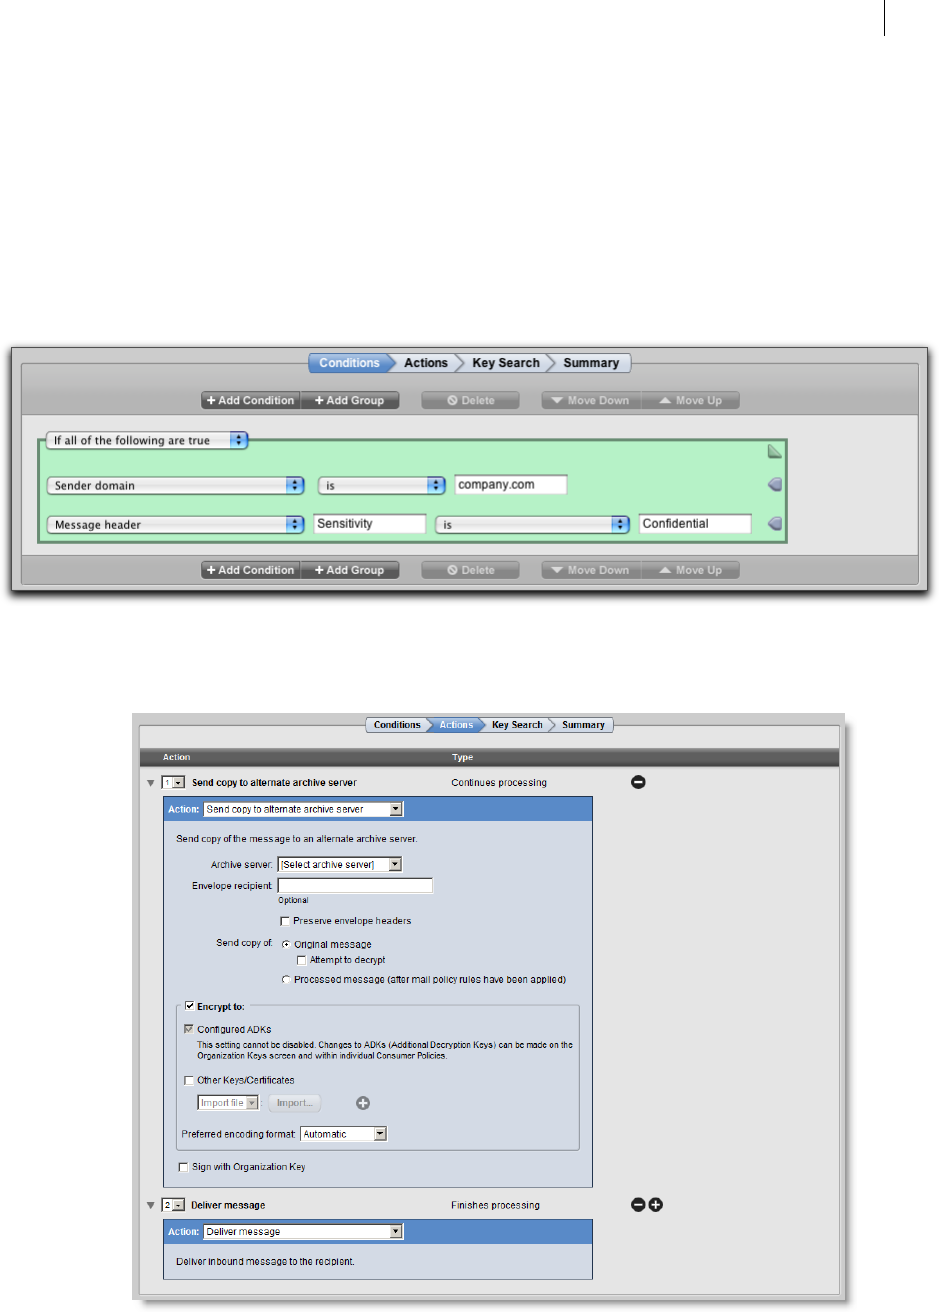
95 Setting Mail Policy
Building Valid Chains and Rules
Creating a Valid Rule
The following example shows how to create a valid rule. This sample rule applies to any
email with a Sensitivity header sent to anyone in a specific domain.
The condition setting requires that all conditions be true to trigger the action. The first
condition that must be true is that the email must be from senders in the company.com
domain. The second condition that must be true is that the message header called
Sensitivity must be the key word Confidential.
The rule action first sends a copy of the message to an archive server. The second
action delivers the message. Notice that the action that finishes processing is last. If the
action Deliver message comes first, the rule Send copy to alternate archive server cannot
be performed.

96 Setting Mail Policy
Managing Policy Chains
Managing Policy Chains
Use these procedures to edit policy chain settings, add, delete, export, import, and print
policy chains.
Mail Policy Best Practices
Managing mail policy through the web interface is the recommended method.
It is possible to export mail policy as an XML file, edit chains and rules directly in XML,
then import the edited file back into the PGP Universal Server. However, there is a
higher risk of error using this method. You can edit mail policy directly in XML if you
have a large number of changes to make at once, for example if you are migrating PGP
Universal Server 2.0.6 proxy settings from multiple upgraded clustered Secondaries.
Contact PGP Support for help if you intend to edit mail policy in XML.
Restoring Mail Policy to Default Settings
You can reset the entire Mail Policy page. This deletes all the changes you have made to
the mail policy and restores all the mail policy settings that were originally installed on
the server.
To reset the mail policy, click Restore the Factory Defaults.
Editing Policy Chain Settings
To edit the name of a policy chain
1 Click the name of the chain you want to edit.
The Policy Chain page appears.
2 Click Edit Policy Chain Settings.
The Edit Policy Chain dialog box appears.
3 Type a new name for the policy chain, if necessary.
4 Click Save.
Note: Once you have created a policy chain, you cannot change its Rule Applicability,
because the rule conditions in the policy chain may not be valid under a different
applicability setting. To change the rule applicability, you must delete the policy
chain and recreate it.

97 Setting Mail Policy
Managing Policy Chains
Adding Policy Chains
To create a new policy chain
1 Do one of the following:
Click the Add Policy Chain button.
From the Options list, select Import Policy Chains.
The Add Policy Chain dialog box appears.
1 To create a new chain, select Create New Policy Chain.
2 Type in the name for the new chain.
3 Choose the application where the rules for the policy chain will apply. This setting
specifies where the policy will be enforced, and determines what conditions and
actions are available when creating rules for the policy chain. For example, the
Standalone setting allows a limited set of conditions to be used in creating rules, as
the resulting policy chain must be able to be evaluated on a PGP Desktop client
that does not have PGP Universal Server connectivity. The Server and Client
setting provides a larger set of conditions.
A policy chain can have rules that can be interpreted and enforced on both a
PGP Desktop client and the PGP Universal Server.
A policy chain can contain only rules that can be interpreted and enforced on
the PGP Universal Server.
A policy chain can contain only rules that can be interpreted and enforced on
the PGP Desktop client.
A policy chain with Standalone rule applicability can contain only rules that
can be interpreted and enforced on a PGP Desktop client independently of
the PGP Universal Server, without PGP Universal Server connectivity.
A policy chain with Mobile rule applicability can contain only rules that can
be enforced on a PGP Mobile client.
4 Click Save.
You can also import a new policy chain from a file. Import policy chain files in XML
format, or in a ZIP file containing multiple XML files.
To import a policy chain
1 Click the Add Policy Chain button, or select Import Policy Chains from the
Options list.
The Add Policy Chain dialog box appears.
2 Select Import Policy Chain File, and click Choose File.
3 Browse to select the file you want to import.
4 Click Import.
If the policy you want to import has the same name as a policy already in your
chain, the Import Policy Chain Conflict dialog box appears.
5 Choose whether to Ignore or Replace:

98 Setting Mail Policy
Managing Policy Chains
Choose Ignore to skip importing policies with duplicate names.
Choose Replace to overwrite the existing policies with names the same as
the chains you are importing.
Deleting Policy Chains
Caution: The Default, Default: Legacy Clients, Default: Standalone, Default: Mobile,
and Exception policy chains cannot be deleted, but you can delete or edit the rules
within. The Default chains provide a necessary starting point in the mail policy for
all message processing. If you delete or change the rules in the Default chains, it can
make your mail policy invalid and prevent your messages from being processed.
To delete policy chains
Do one of the following:
To delete one policy chain:
a Click the Delete icon of the policy chain you want to delete.
A confirmation dialog box appears.
b Click OK.
The policy chain is removed from the mail policy list.
To delete multiple policy chains:
a Click the check box at the far right end of the row of each of the policy
chain you want to delete.
b Select Delete Selected from the Options menu at the bottom right
corner, or Delete All to remove all policy chains.
A confirmation dialog box appears.
c Click OK.
The policy chains are removed from the mail policy list.
Exporting Policy Chains
To export a policy chain
1 Select the check box at the far end of the row for each chain you want to export.
2 From the Options list, select Export Selected.
3 To export all dictionaries associated with the rules in the chain, click the Include
all associated dictionaries check box.
Click Export.
The policy chain you chose is exported to your desktop as an XML file. If you
exported more than one policy chain, the XML files are inside a ZIP file.

99 Setting Mail Policy
Managing Rules
Printing Policy Chains
To create a printable version of your policy chain, including all rules
1 Select the check box at the far end of the row for each chain you want to print.
2 From the Options list, select Print View for Selected. To print the entire mail
policy, select Print View for All.
A printable version of the mail policy appears.
3 Click the Print link at the top of the page.
Managing Rules
Use these procedures to add, delete, enable, and disable rules within policy chains.
Adding Rules to Policy Chains
To add a rule
1 Select the Policy Chain to which you want to add a rule.
The Policy Chain page appears.
2 Click Add Rule.
The Add Rule page appears.
3 Type in a name and description for the rule. The description should provide an
explanation for what the rule does.
4 Add conditions, actions, and keyserver locations, as needed.
For information on using the rule interface, see Using the Rule Interface (on page
90). For information on designing a valid rule, see How Policy Chains Work (on
page 85).
Deleting Rules from Policy Chains
To delete a rule
Do one of the following.
To delete a specified rule:
a Select the policy chain from which you want to delete a rule.
The Policy Chain page appears.
b Click the Delete icon of the rule you want to delete.

100 Setting Mail Policy
Adding Key Searches
A confirmation dialog box appears.
c Click OK.
The rule is removed from the policy chain.
To delete multiple rules:
a Select the check box at the far right end of the row of each of the rule
you want to delete.
b From the Options list, select Delete Selected, or Delete All to remove
all rules.
A confirmation dialog box appears.
c Click OK.
The rules are removed from the policy chain.
Enabling and Disabling Rules
An enabled rule is a rule that is turned on and being used to process email on the policy
chain. A disabled rule is not deleted, but is not currently in use to process email through
the policy chain.
Caution: If you disable a rule in the policy chain, email might be processed
incorrectly. Depending on how you have designed your policy chain, disabling rules
can cause email to be sent unintentionally unencrypted, or to fall through the policy
chain and not be sent at all.
To enable or disable rules
1 Select the check box at the far right end of the row of each of the rule you want to
enable or disable.
2 Select Toggle Status for Selected from the Options menu at the bottom right
corner, or Toggle Status for All to enable or disable all rules.
A confirmation dialog box appears.
3 Click OK.
The rules enabled or disabled.
Changing the Processing Order of the Rules
To change the order in which rules are processed, renumber the rule you want to move.
All the rules reorder automatically.
Adding Key Searches
The PGP Universal Server always looks in its own databases for keys. If the PGP
Universal Server does not have a copy of a particular key, a rule can require searching
external sources for the key.

101 Setting Mail Policy
Choosing Condition Statements, Conditions, and Actions
To enable external key searches for a rule
1 Click the Key Search arrow button.
2 Select Search for keys in additional locations.
3 Select a keyserver from the drop-down menu.
4 To add more keyservers to the rule, click the Add icon next to the server name.
5 If you have added more than one specified directory in the policy, you can choose
the order in which the added directories are searched for keys. Renumber a
directory to give it a higher search priority.
You can also add searchable keyservers to the PGP Universal Server list from this page.
To add a new searchable keyserver to the rule:
1 Select Add new keyserver... from the drop-down menu.
The Add Keyserver dialog box appears.
2 Type the information for the keyserver you want to add. See Adding or Editing a
Keyserver (on page 138) for more information on this dialog box.
The keyserver information you add also appears on the Keys > Keyservers page.
Choosing Condition Statements, Conditions, and Actions
Policies are based on condition statements, conditions, and actions.
Condition Statements
Condition statements link conditions together into groups, and specify how conditions
should be matched. For example, if you have more than one condition in a rule, you can
specify that the rule is triggered if all the conditions are matched, or you can specify
that the rule is triggered if just one of the conditions is matched.
Statement Description
If all of the following are true Every condition and group nested under this
statement must be true.
If any of the following are true Any of the conditions and groups nested under
this statement can be true for the statement to be
true, but at least one must be true.
If none of the following are true None of the conditions and groups nested under
this statement can be true. Use this statement to
exclude certain email from being processed by
the rule.
The condition is always true There are no conditions allowed under this
statement. This statement ensures that this rule
action is performed on every email processed by
the rule.
102 Setting Mail Policy
Choosing Condition Statements, Conditions, and Actions
Conditions
Conditions are the set of requirements a message must meet to trigger a rule.
Some conditions require matches to terms found in the email headers or body. Terms
can be numbers, words, regular expressions, or in dictionaries or user policies. The
condition modifier indicates how the term should be matched.
Modifier Description
Is The term can only match against the exact characters
specified in the condition. There is one and only one
possible match. Not case-sensitive.
Matches pattern The term in the email must match against a regular
expression. See the online help for more information on
using regular expressions. Not case-sensitive.
Contains The term must match against the exact characters
specified in the condition, but the characters specified can
occur anywhere within the term. Not case-sensitive.
Begins with The term must match against the exact characters
specified in the condition, and the characters specified
must occur at the beginning of the term. Not
case-sensitive.
Ends with The term must match against the exact characters
specified in the condition, and the characters specified
must occur at the end of the term. Not case-sensitive.
Is in dictionary The term must match against the content of a specified
dictionary. Not case-sensitive.
Is a subdomain of The email domain matches if it is a subdomain of the
specified domain. Not case-sensitive.
Is greater than The term matches if it is greater than the value specified.
Is less than The term matches if it is less than the value specified.
Is greater than or equal to The term matches if it is greater than or equal to the value
specified.
Is less than or equal to The term matches if it is less than or equal to the value
specified.
Fewer than The term matches if it is fewer than the number specified.
Greater than The term matches if it is greater than the number
specified.
Not all conditions are available for all rules. The policy chain's rule applicability setting
determines whether a condition can be used in a rule. For example, policy chains whose
rule applicability is Standalone or Mobile have restricted choices for rule conditions. In
the following table, the column labeled Applicable indicates the rule applicability
settings under which a condition can be used. For more information on Rule
Applicability see How Policy Chains Work (on page 85) and Adding Policy Chains (on
page 97).

103 Setting Mail Policy
Choosing Condition Statements, Conditions, and Actions
Condition Applicability Modifiers Matches Details
Recipient All is, contains, begins email address, partial email —
address with, ends with, address, regular expression,
matches pattern, is dictionary name
in dictionary
Recipient All is, contains, begins domain name, partial —
domain with, ends with, domain name, regular
matches pattern, is expression, dictionary
in dictionary, is a name
subdomain of
Recipient Client and Server, is user policies, dictionary
consumer policy Client Only, Server names
Only
When you choose to apply this
condition to a specific consumer
policy, select the policy you want from
the drop-down menu. If there is more
than one policy with the same name, it
only lists the policy name once. For
example, you have two Default user
policies. You might need to create
another condition specifying whether
you want to apply the rule to internal
or external users. If you have multiple
consumer policies with similar names,
be sure you are selecting the correct
policy.
Recipient
address is
mailing list
Client and Server,
Client Only, Server
Only
— user policies Used with the Expand mailing list and
restart processing Action (Details on
Actions (on page 110)).
Recipient key
mode
Client and Server,
Client Only, Server
Only
— SKM, CKM, GKM, SCKM —
External user
recipient
delivery
preference
Client and Server,
Client Only, Server
Only
— PGP Universal Web
Messenger, Smart Trailer,
PGP Desktop/PGP
Universal Satellite, PDF
Messenger
For external recipients only.
Sender address All is, contains, begins
with, ends with,
matches pattern, is
in dictionary
exact or partial email
address, regular expression,
dictionary name
—
Sender domain All is, contains, begins
with, ends with,
matches pattern, is
in dictionary, is a
subdomain of
exact or partial domain,
regular expression,
dictionary name
—

104 Setting Mail Policy
Choosing Condition Statements, Conditions, and Actions
Condition Applicability Modifiers Matches Details
Message Server Only is not encoded, is message encryption format This condition is available only for
encoding format OpenPGP, is server-applicable rules.
S/MIME, is
partitioned
Sender Client and Server, is, is in dictionary user policies, dictionary
consumer policy Client Only, Server name
Only
When you choose to apply this
condition to a specific consumer
policy, select the policy you want from
the drop-down menu. If there is more
than one policy with the same name, it
only lists the policy name once. For
example, you have two Default user
policies. You might need to create
another condition specifying whether
you want to apply the rule to internal
or external users. If you have multiple
consumer policies with similar names,
be sure you are selecting the correct
policy.
Sender key mode
Message header
Client and Server,
Client Only, Server
Only
All
—
is, contains, begins
with, ends with,
matches pattern
SKM, CKM, GKM, SCKM
message header type (e.g.,
To, From); exact or partial
content of message header,
or regular expression
—
Matches on the content of a message
header. You can use regular
expressions with the matches pattern
modifier to express the content of the
message header.
Message subject
Message body
All
All
is, contains, begins
with, ends with,
matches pattern
is, contains, begins
with, ends with,
matches pattern
exact or partial content of
message subject, or regular
expression
exact or partial content of
message body, or regular
expression
Matches on the content of the message
subject. For example, [Important],
[AAA], or [Confidential]. You can
use regular expressions with the
matches pattern modifier.
Matches on the content of the message
body. You can use regular expressions
with the matches pattern modifier.
Message size All is, is greater than, size in KB —
is less than

105 Setting Mail Policy
Choosing Condition Statements, Conditions, and Actions
Condition Applicability Modifiers Matches Details
Any part of the
message is
Server Only — to any key, to key ID, to
ADK, to key in dictionary
This condition is available only for
server-applicable rules.
encrypted
The key typed in the condition must
match the key or subkey used for
message encryption. This is either the
encryption key (for v4 keys) or the
topkey (for v3 keys). If you type a v4
topkey into the condition, it does not
match the encryption subkey found in
the message.
All of the Client and Server, — to any key, to key ID, to
message is Server Only ADK, to key in dictionary
encrypted
This condition is available for
server-applicable rules. It is also
applicable to client-applicable rules for
SMTP, POP, and IMAP only. It is not
applicable to Lotus Notes and MAPI.
The key typed in the condition must
match the key or subkey used for
message encryption. This is either the
encryption key (for v4 keys) or the
topkey (for v3 keys). If you type a v4
topkey into the condition, it does not
match the encryption subkey found in
the message.
Any part of the
message is
signed
Server Only — — This condition is available only for
server-applicable rules.
Message has an
attachment
whose name
All is, contains, begins
with, ends with,
matches pattern
exact or partial content of
message attachment name,
or regular expression
You can block messages with this
condition by matching it with an action
to bounce or drop matching messages.
Message has an
attachment
whose type
All is, contains, begins
with, ends with,
matches pattern
exact or partial content of
message type name, or
regular expression
You can block messages with this
condition by matching it with an action
to bounce or drop matching messages.
Message is from
mailing list
Server Only — — This condition is available only for
server-applicable rules.
Mailing list user
count is
Client and Server,
Client Only, Server
Only
fewer than, greater
than
number of members in list Default value is 30 users. Expand
mailing list and restart processing
Action (Details on Actions (on page
110)).
Application All — is internal PGP
Desktop/PGP Universal
Satellite, is external PGP
Desktop/PGP Universal
Satellite, is PGP Universal
Server
Matches on where the message is being
processed. Mobile and standalone
clients match Internal PGP
Desktop/PGP Universal Satellite
Service type All — is SMTP Inbound, is SMTP —
Outbound, is POP, is IMAP,
106 Setting Mail Policy
Choosing Condition Statements, Conditions, and Actions
Condition Applicability Modifiers Matches Details
is Microsoft Outlook
(MAPI), is Lotus Notes, is
PGP Universal Web
Messenger, is RIM
Blackberry
Client version Client Only,
Standalone, Mobile
is, is greater than,
is less than, is
greater than or
equal to, is less
than or equal to
2.7/9.7 —
Connected user
has
authenticated
Client and Server,
Client Only, Server
Only
— — If the PGP Universal Server is in
gateway placement, authentication
from internal users is not possible
because the user is authenticating to
the mail server, not directly to the PGP
Universal Server.
IP address of
local connector
Client and Server,
Client Only, Server
Only
is, contains, begins
with, ends with,
matches pattern, is
in dictionary
exact or partial IP address,
regular expression,
dictionary name
—
Port of local
connector
Client and Server,
Client Only, Server
Only
is, is greater than,
is less than
port number —
Actions
Actions are performed on messages when rule conditions apply. Some actions process
email, then pass the email along to other actions or rules for further processing; for
example, Add log entry. Other actions end email processing; for example, Drop message.
When constructing a rule or chain of rules, make sure that actions that finish email
processing come after the actions that allow continued processing.
Not all actions are available for all rules. Which actions are available depends on the
rule applicability setting of the rule’s policy chain. The Rule Applicability column in the
table below indicates the types of policy chains where a given action can be used. For
more information, see Adding Policy Chains (on page 97).
Action Applicability Type Options Result
Send (encrypted/ All Finishes See Send (encrypted/signed) Sends the email encrypted to
signed) processing Action (on page 110) for specified key(s).
information on how to
configure this action.

107 Setting Mail Policy
Choosing Condition Statements, Conditions, and Actions
Action Applicability Type Options Result
Send via Web
Messenger
Server and Client,
Server Only, Client
Only
Finishes
processing
— Recipients receive a message
(not the original email message)
that directs them to a website
where they have options for
accessing the original message
securely.
This option is not available when
message processing is on the
client unless Out Of Mail Stream
support (OOMS) is enabled on
the Messaging & Keys tab of
Consumer Policy.
Send clear
(unencrypted and
unsigned)
All Finishes
processing
— Sends the email unencrypted
and unsigned.

108 Setting Mail Policy
Choosing Condition Statements, Conditions, and Actions
Action Applicability Type Options Result
Send via PDF Server and Client, Finishes Encrypt body text and all Sends the email as a secured
Messenger Server Only, Client processing attachments checkbox. PDF.
Only The email is sent to the
recipient as a PDF file,
secured to the recipient's
Web Messenger passphrase.
The body text of the original
email is used as the body text
Converts the text of the email to
PDF and secures it using the
recipient's PGP Universal Web
Messenger passphrase. Message
attachments can also be secured.
of the secured PDF file. All See Send via PDF Messenger
attachments to the original Action (see "Encrypt Body Text
email are attached to the and all Attachments" on page
secured PDF. 114) for details on how the types
Require Certified
Delivery checkbox. Creates
of attachments interact with this
checkbox.
and logs a delivery receipt This option is not available when
when the recipient obtains message processing is on the
the password to obtain the client unless Out Of Mail Stream
message. support (OOMS) is enabled on
We recommend that you
select the Require user
the Messaging & Keys tab of
Consumer Policy.
authentication for
Certified Delivery
checkbox in the PDF
Messenger Options panel
on the General tab before
you allow senders to use
certified delivery. If you
allow certified delivery
before you select the
checkbox, external recipients
will have a passphrase that
can be used only for Secure
Reply and not for the other
PDF Messenger options.
Add Secure Reply link
checkbox. The message and
PDF attachment contain a
link the recipient can use to
reply to all members of the
email thread. The reply is
delivered through PGP
Universal Web Messenger.
Send copy to Server Only Continues Select or add an archive Sends a copy of the email
alternate archive processing server. Choose to send content (encrypted or
server original or mail unencrypted) to an archive
policy-processed message. server for archiving. For more
Choose whether to encrypt. information, see Send copy to
alternate archive server Action
(on page 117).
109 Setting Mail Policy
Choosing Condition Statements, Conditions, and Actions
Action Applicability Type Options Result
Deliver message Server and Client,
Server Only, Client
Only
Finishes
processing
— Delivers inbound email to
recipient.
Decrypt and verify
message
Server and Client,
Server Only, Client
Only
Finishes
processing
See Decrypt and verify
message Action (on page 116)
for information on how to
configure this action.
Decrypts and verifies email and
annotates email with
information about verification
results.
Bounce message All Finishes
processing
— Returns email to the sender.
Drop message Server Only Finishes
processing
— Drops email.
Inbound IMAP and POP mail
cannot be dropped. Instead,
users receive the email with the
message text replaced by the
information in the Blocked
Message Content template. For
more information, see
Customizing System Message
Templates (on page 165).
Add to dictionary Server Only Continues
processing
Add sender, recipient, or
mailing list address to
chosen dictionary.
Adds data found in email to a
selected dictionary. For more
information, see Add to
dictionary Action (on page 119).
Expand mailing list
and restart
processing
Server and Client,
Server Only, Client
Only
Continues
processing
— See Expand mailing list and
restart processing Action (on
page 116) for information on this
action.
Add log entry Server and Client,
Server Only, Client
Only
Continues
processing
Type in the log entry you
want to appear.
The specified entry appears in
the Mail log when this rule is
applied to a message. Client rules
create log entries on the client,
server rules create log entries on
the server.
Add message header Server and Client,
Server Only, Client
Only
Continues
processing
Type in a name and a value
for your custom message
header. Choose if you want
your message header to
replace existing message
headers with the same name.
Flags messages for further
processing in the mail policy
chain or elsewhere in the mail
stream.
This action applies to server and
SMTP client rules. Not supported
for MAPI and Lotus Notes
clients.
Go to chain Server and Client,
Server Only, Client
Only
Continues
processing
Select a policy chain to
which to pass the email.
Sends message on to any other
chain in the mail policy for
further processing.

110 Setting Mail Policy
Choosing Condition Statements, Conditions, and Actions
Details on Actions
The following sections provide additional detail on selected Actions.
Send (encrypted/signed) Action (on page 110)
Send via PDF Messenger Action (see "Encrypt Body Text and all Attachments" on
page 114)
Decrypt and verify message Action (on page 116)
Expand mailing list and restart processing Action (on page 116)
Send copy to alternate archive server Action (on page 117)
Add to dictionary Action (on page 119)
Send (encrypted/signed) Action
This action attempts to encrypt, sign the message, and send it. You can specify which
key(s) to use to encrypt the email and what happens if a suitable key is not found.
Note: Not all Key Not Found options are possible for all rules. In client-based rules,
select the PGP Universal Web Messenger or Smart Trailer actions in response to a
Key Not Found condition only if you enable Out Of Mail Stream (OOMS) support in
Consumer Policy. If you select one of these options, and OOMS support is disabled,
email is sent in unencrypted and unsigned.
If the sender or recipient uses signing and encryption subkeys, the encryption behavior
for this action can be affected. If your policy requires messages to be encrypted and
signed, the necessary keys must be available.
The message is not sent if one of the following occurs:
The recipient’s encryption subkey is not available.
The policy requires that the email be encrypted and signed to the sender’s key, and
the sender’s encryption key is unavailable.
However, if the policy requires that the email be encrypted and signed to the sender’s
key, but the sender’s signing key is unavailable, the message is sent encrypted and
unsigned.
For more information about how external users receive email when no suitable key is
found, and how those users interact with Smart Trailer and PGP Universal Web
Messenger, see Applying Key Not Found Settings to External Users (on page 121).
To create the Send (encrypted/signed) action
1 In the Action section of a rule, select Send (encrypted/signed) from the
drop-down menu.
2 Select the Recipient’s Key checkbox to encrypt the email to the recipient’s key.
3 Determine whether you want to require a verified key.
If you select this checkbox, and the root certificate is not in the Trusted Key list,
the certificates of external users is not trusted.
4 Choose whether to require an end-to-end key.

111
5
Setting Mail Policy
Choosing Condition Statements, Conditions, and Actions
An end-to-end key is owned by the individual recipient. For example, a CKM or
GKM key is an end-to-end key, but an SKM key is not. An SCKM key is end-to-end
for signing but not for encryption.
Select one of the following options when a suitable key or certificate cannot be
found:
Bounce: The email message is returned to the sender if a key for the
recipient cannot be found.
Send clear (signed): The email is sent to the recipient unencrypted but
signed if a suitable encryption key cannot be found.
Send clear (unsigned): The email is sent to the recipient unencrypted and
unsigned if a suitable encryption key cannot be found.
PDF Messenger: If the original email did not have unencrypted PDF
attachments, a PDF file is created and secured to the recipient's Web
Messenger passphrase. The body text of the original email is the body text of
the secured PDF file, and attachments from the original email are attached to
the secured PDF and are accessible after the PDF has been successfully opened.
The secured PDF is added as the attachment to the template-based PDF
Messenger message.
If the original email contains at least one attached unencrypted PDF file, all
unencrypted PDF attachments are encrypted to the recipient's Web Messenger
passphrase, but the other attachments are sent unencrypted. The original
email is sent (unencrypted), with the previously unencrypted PDF attachments
now encrypted. Existing PGP Universal Web Messenger users receive the email
as a PDF Messenger message. New users receive a message (but not the original
email) that directs them to a website where they create a passphrase to access
their email in PDF Messenger format.
PDF Messenger Secure Reply: This feature is identical to PDF Messenger,
except for the Secure Reply link. This link appears in the encrypted email and
the PDF attachment, unless the encrypted PDF attachment was created from
an unencrypted PDF attachment in the original email.
Best Practice: If you want to offer Secure Reply, you should also also choose
Encrypt All.
PDF Messenger Encrypt All: The email is sent to the recipient as an
encrypted PDF file, secured to the recipient's Web Messenger passphrase.
The body text of the original email is used as the body text of the secured
PDF file. All attachments to the original email are attached to the secured
PDF. The secured PDF is then added as the sole attachment to the PDF
Messenger message, which is based on a template.
Existing PGP Universal Web Messenger users receive the email as a PDF
Messenger message. New users receive a message (but not the original
message) that directs them to a website where they create a passphrase to
access their message in PDF Messenger format.
PDF Messenger Encrypt All, Secure Reply: There is one encrypted PDF
attachment in the final email. The contents of the encrypted PDF file include
all the contents of the original unencrypted email. Because this option
includes Secure Reply, there are two secure reply links; one in the PDF file
as a button, and the other as a link in the email received by the external user.

112 Setting Mail Policy
Choosing Condition Statements, Conditions, and Actions
PDF Messenger Certified Delivery: An email is sent to the recipient with a
Read Me First.html file and a secured PDF file of the email message. Users
must open the .html file to retrieve the one-time random passphrase to
which the PDF file is encrypted. The body text of the original email is the
body text of the secured PDF file, and attachments from the original email
are attached to the secured PDF. This secured PDF is the only attachment to
the template-based PDF Messenger message.
The original email is sent (unencrypted), with the previously unencrypted PDF
attachments are now encrypted. Existing PGP Universal Web Messenger users
receive the email as a PDF Messenger message. If the Require user
authentication for Certified Delivery checkbox is selected, new users must
create a passphrase to access their message in PDF Messenger format.
Note: Whether the user is required to authenticate to access the passcode for the
PDF is set in the Web Messenger section of Consumer Policy.
PDF Messenger Certified Delivery, Secure Reply: An email is sent to the
recipient with a Read Me First.html file and a PDF file of the email message.
Users must open the .html file to retrieve the one-time random passphrase
to which the PDF file is encrypted. In your consumer policy, you must select
the Require User authentication for Certified Delivery checkbox. If you
leave this checkbox deselected, users with a passphrase cannot log in.
Certified Delivery messages are always encrypted to a one-time random
passphrase, so that you know when recipients read their message.
Note: If users do not set up a passphrase, they cannot reply securely.
PDF Messenger Certified Delivery, Encrypt All: The email is sent to the
recipient as a PDF file and is secured to the recipient's Web Messenger
passphrase. The content of the original email is used as the body text of the
secured PDF file, and the attachments from the original email are attached to
the secured PDF. The secured PDF is added as an attachment to the PDF
Messenger message, which is based on a template.
When mail policy requires that a PDF Messenger message, existing PGP
Universal Web Messenger users receive the email as a PDF Messenger
message. New users receive a message (not the original message) that directs
them to a website where they must create a passphrase to access the
message in PDF Messenger format.
When the recipient opens the Read Me First.html file to retrieve the
passphrase, the PGP Universal Server creates and logs a delivery receipt.
PDF Messenger Certified Delivery, Encrypt All, Secure Reply: Identical to
PDF Messenger Certified Delivery, Encrypt All but with a Secure Reply
link.
Smart Trailer: The email is sent to the recipient unencrypted with a trailer
that explains how to get mail from the sender in a secure manner. Not
available for client policy or non-mailstream installations.
Web Messenger: The recipient is sent a message (but not the original email
message) that directs them to a website where they have options for
accessing the original message securely. Not available for client policy or
non-mailstream installations.
6 Select the Sender’s Key check box to encrypt the email to the sender’s key. This
can help in retrieving the email message.

113 Setting Mail Policy
Choosing Condition Statements, Conditions, and Actions
7 If you have uploaded Additional Decryption Keys (ADKs), all applicable outbound
email is encrypted to these keys. All outbound mail is encrypted to the
Organization ADK, and Consumer Policy ADKs are used to encrypt the outbound
mail of a consumer to whom the policy applies. This setting cannot be disabled.
8 Select the Other Keys/Certificates checkbox to encrypt the message to another
key or certificate.
You can click Add or Delete to add or remove additional keys, but you should add
keys and certificates that can be used for encryption.
Select Key ID and type in the key ID of the key to which you want to encrypt.
Only internal user keys can be found using the key ID. To encrypt to any
other key, select Import file and import the key.
Select Import file and click the Import button to import a key to which you
want to encrypt.
9 Select the Sign check box if you want the email to be signed.
10 In the Preferred encoding format menu, select your preferred format for signed
messages.
The preferred encoding format was called preferred signing format in PGP
Universal Server 2.0.x. This format is important when email is sent signed but not
encrypted. Because the email format cannot be set automatically based on the type
of key to which the email is encrypted, when the recipient’s key is not available, it
is up to the PGP Universal Server administrator to decide which format the users
at each domain can handle.
Select the Preferred encoding format based on the following:
Automatic enables PGP Universal Server to choose the most appropriate
encoding format by considering the original format of the message and the
preferred-encoding packet of the keys or certificates to which the email is
being encrypted.
PGP Partitioned is a mail encoding format that works with non-MIME mail
clients, such as Microsoft® Outlook.
The sender has only a PGP key.
Senders must use PGP/MIME as the signing format. If you select S/MIME, the
selection reverts to PGP/MIME. Keys generated by PGP Universal Server have
preferred encoding set to PGP/MIME.
The sender has only an X.509 certificate.
Senders must use S/MIME as the signing format. If you select PGP/MIME, the
selection reverts to S/MIME.
The sender has a PGP key and an X.509 certificate.
In this case, you need to select between PGP/MIME and S/MIME, based on the
recipients' ability to decrypt messages. If they can read PGP key signatures,
choose PGP/MIME, but if they can read X.509 certificate signatures, choose
S/MIME. You might need to make this choice based on your best guess of what
type of encryption system used by recipients.
Send via PDF Messenger Action
When you select to send a message using the Send via PDF Messenger action, select one
(or all) of these options:
114 Setting Mail Policy
Choosing Condition Statements, Conditions, and Actions
Encrypt body text and all attachments, which encrypts the email body and the
attachments as a secure PDF file. For more information, see Encrypt Body Text and
all Attachments (on page 114).
Require Certified Delivery, which creates a delivery receipt that is logged when
the recipient opens the message.
Add Secure Reply link, which adds a link to the delivered email and PDF
attachment and allows the recipient to reply to the email using Web Messenger.
PDF Messenger is not available when message processing is on the client unless Out Of
Mail Stream support (OOMS) is enabled on the Messaging & Keys tab of Consumer
Policy.
Encrypt Body Text and all Attachments
Recipients receive PDF Messenger messages delivered to their mail servers. How such
messages and their attachments are secured depend on whether the "Encrypt body text
and all attachments" check box is selected and whether the original message has any
unencrypted PDFs attached to it.
The following table describes the effects of the check box depending on the type of
attachments included in the message:
This table provides detailed information on this option.
Attachment
Type
With Checkbox
Selected With Checkbox Deselected
No attachments Converts plain text email to
PDF and encrypts it to the
PGP Universal Web
Messenger passphrase.
Attaches the secured PDF to
a template-based message
which is sent to the intended
recipient.
Converts plain text email to PDF and
encrypts it to the PGP Universal
Web Messenger passphrase.
Attaches the secured PDF to a
template-based message which is
sent to the intended recipient.
Only non-PDF
attachments
Converts plain text email to
PDF and encrypts it to the
PGP Universal Web
Messenger passphrase.
Attaches the attachments of
the original email to the
secured PDF. (These
attachments are secured and
available after the PDF is
decrypted.)
Attaches the secured PDF to
a template-based message
which is sent to the intended
recipient.
Converts plain text email to PDF nd
encrypts it to the PGP Universal
Web Messenger passphrase.
Attaches non-PDF attachments of
the original email to the secured
PDF. (These can only be read by first
opening the new secured PDF.)
Attaches the secured PDF to a
template-based message which is
sent to the intended recipient.
Only unencrypted
PDF attachments
Converts plain text email to
PDF format and encrypts to
the PGP Universal Web
Messenger passphrase.
Attaches all attachments of
the original email to the
secured PDF. (These
attachments are secured and
available after the PDF is
decrypted.)
Attaches the secured PDF to
Encrypts these PDF attachments to
the recipient's Web Messenger
passphrase and replaces the original
attachments with the encrypted
versions.
Does not convert the message body
to a PDF or secure it in any way.
Sends the original message with the
encrypted versions of the PDF
attachments to the intended

115 Setting Mail Policy
Choosing Condition Statements, Conditions, and Actions
Attachment
Type
With Checkbox
Selected With Checkbox Deselected
a template-based message recipient.
which is sent to the intended
recipient.
Only already
encrypted PDF
attachments
Converts plain text email to
PDF format and encrypts to
the PGP Universal Web
Converts plain text email to PDF
format and encrypts to the PGP
Universal Web Messenger
Messenger passphrase. passphrase.
Attaches all attachments of Attaches the already-encrypted PDF
the original email to the attachments of the original email to
secured PDF. (These the new secured PDF. (The
attachments are secured and attachments can only be read by
available after the PDF is first opening the new secured PDF.)
decrypted.) Attaches the secured PDF to a
Attaches the secured PDF to template-based message which is
a template-based message sent to the intended recipient.
which is sent to the intended
recipient.
Some encrypted Converts plain text email to
PDF attachments, PDF and encrypts it to
some non-encrypted thePGP Universal Web
PDF attachments Messenger passphrase.
Attaches the attachments of
the original email to the
secured PDF. (These
attachments are secured and
available after the PDF is
decrypted.)
Attaches the secured PDF to
a template-based message
which is sent to the intended
recipient.
Leaves encrypted PDF attachments
alone.
Encrypts the unencrypted PDF
attachments to the recipient's Web
Messenger passphrase and replaces
the original attachments with the
encrypted versions.
Does not convert the message body
to a PDF or secure it in any way.
Sends the original message with
encrypted versions of all
unencrypted PDF attachments to the
intended recipient.
Some unencrypted Converts plain text email to
PDF attachments, PDF and encrypts it to the
some non-PDF PGP Universal Web
attachments Messenger passphrase.
Attaches the attachments
from the original email to
the secured PDF. (These
attachments are secured and
available after the PDF is
decrypted.)
Attaches the secured PDF to
a template-based message
which is sent to the intended
recipient.
PGP Universal Server:
Leaves non-PDF attachments alone.
Encrypts the unencrypted PDF
attachments to the recipient's Web
Messenger passphrase and replaces
the original attachments with the
encrypted versions.
Does not convert the message body
to a PDF or secure it in any way.
Sends the original message with
encrypted versions of all
unencrypted PDF attachments and
original versions of the non-PDF
attachments to the intended
recipient.

116 Setting Mail Policy
Choosing Condition Statements, Conditions, and Actions
Attachment
Type
With Checkbox
Selected With Checkbox Deselected
Some unencrypted
PDF attachments,
some encrypted PDF
attachments, and
some non-PDF
attachments
Converts plain text email to
PDF and encrypts it to the
PGP Universal Web
Messenger passphrase.
Attaches the attachments
from the original email to
the secured PDF. (These
attachments are secured and
available after the PDF is
decrypted.)
Attaches the secured PDF to
a template-based message,
which is sent to the intended
recipient.
Leaves encrypted PDF attachments
alone.
Leaves non-PDF attachments alone.
Encrypts the unencrypted PDF
attachments to the recipient's Web
Messenger passphrase and replaces
the original attachments with the
encrypted versions.
Does not convert the message body
to a PDF or secure it.
Sends the original message with
encrypted versions of unencrypted
PDF attachments, original versions
of the non-PDF attachments, and
encrypted PDF attachments to the
intended recipient.
Decrypt and verify message Action
This action decrypts and verifies email and annotates email with information about
verification results.
To create the Decrypt and verify message action
1 In the Action section of a rule, select Decrypt and verify message from the
drop-down menu.
2 From the Annotation Setting drop-down menu, select how you want the email to
be annotated.
Don’t annotate: Leaves the email as it was sent and does not include
information on verification.
Annotate failures only: Annotates the email only if verification failed.
Annotate detailed info: Provides full annotation for all email and all
attachments.
Smart annotation: If everything in a message is signed by the same
individual, the message has a single annotation. If the message has multiple
signatures, then the email receives detailed annotation information.
Expand mailing list and restart processing Action
This action takes any Active Directory-based mailing list in the recipient message
header and expands it, replacing the mailing list address in the header with all the
mailing list member email addresses. The action then returns the email to the Default
policy chain and reruns mail policy on the message, processing it with the expanded
addresses.

117 Setting Mail Policy
Choosing Condition Statements, Conditions, and Actions
In the factory-set mail policy, the rule containing this action is on the Outbound chain
and is called Expand mailing lists.
This functionality is important if not all members of a mailing list should have email
processed in the same way. For example, you have an Active Directory mailing list
called execs@example.com. The mailing list has 3 members, two of whom are
executives and one of whom is an administration assistant. Your mail policy specifies
that all email received by executives must be encrypted, but email received by the
administration assistant should not be encrypted.
If the mailing list is not expanded, the executives receive mailing-list email
unencrypted. The Expand mailing lists rule means that mail policy is applied to the
individual members of a list, not to the list as a whole.
The action is triggered by matching the condition Recipient address is mailing list. It is
important to limit the size of the mailing list to which you apply the action by also
using the condition Mailing list user count is fewer than <n>. The default limit for the
condition is 30 users, although you can edit the value. Limiting the rule to smaller lists
is important because the more recipients addressed in the email, the longer it takes to
process and send the message.
If it is necessary to encrypt email to a very large mailing list, use this procedure:
1 Create a new key and distribute it to all the members of the specific mailing list to
which you want to send encrypted email.
2 Create a rule on the Outbound policy chain, and place it before the Expand Mailing
Lists rule.
3 In the new rule, create the condition
If all of the following are true:
Recipient address is mailing list
so that it is matched by email addressed to the mailing list.
4 In the rule, create a Send (encrypted/signed) action.
Select Other Keys/Certificates, and import the mailing list key for encryption.
Send copy to alternate archive server Action
This action sends a copy of the email, either encrypted or unencrypted, to an archive
server. The message can be archived in its original form (optionally after decryption) or
it can be archived after mail policy rules have been applied. However, for PDF
Messenger or PGP Universal Web Messenger messages, only the actual message is
archived -- the message invitation is not archived.
The message copy can be encrypted to one or more keys or certificates, and also can be
signed with the organization key.
This action is available only for policy chains with Server Only applicability.
To create the Send copy to alternate archive server action
1 In the Action section of a server rule, select Send copy to alternate archive server
from the drop-down menu.
2 Select the alternate SMTP archive server from the Archive server drop-down
menu.

118 Setting Mail Policy
Choosing Condition Statements, Conditions, and Actions
You can configure an archive server (without leaving the Rule configuration
process) by selecting Add new archive server... from the drop-down menu. This
displays the Add Archive Server dialog. When you have configured the new
archive server, you are returned to the Rule Action configuration process, and the
new server is available in the drop-down menu.
3 You have the option of specifying an envelope recipient on the archive server. If
you do not specify an envelope recipient, it is the same as the envelope recipient of
the original message.
4 Check the Preserve envelope headers option to include all the original SMTP
envelope recipients (all addresses specified with "RCPT TO") in an
"X-PGP-Envelope-Recipients" header, included with the archived message.
5 For the Send copy of option, specify whether to send the message as it was
originally received, or after processing by other policy actions.
Further, if the message is encrypted, you can check the Attempt to decrypt before
sending check box. The PGP Universal Server will attempt to decrypt the message
using the ADK (if it exists) and internal user keys. If the message cannot be
decrypted, the encrypted message is archived, and a warning level log message is
placed in the proxy log. This option is only applicable when archiving the original
message.
6 Check Encrypt to: to encrypt the message before sending to the archive server. If
an ADK is configured, archival messages are encrypted to the ADK (this cannot be
disabled). If no ADK is configured, you must specify at least one key or certificate
to be used for the encryption.
7 Check Other Keys/Certificates to encrypt the message to any other key or
certificate. You can add or remove more keys by clicking the Add or Delete icons.
Only add keys and certificates that can be used for encryption.
Select Key ID and type in the key ID of the key you want to encrypt to. Only
internal user keys can be found through the key ID. To encrypt to any other
key, select Import file and import the key.
Select Import file and click the Import button to import a key to encrypt to.
8 From the Preferred encoding format menu, choose your preferred format for
encrypted messages:
Automatic enables PGP Universal Server to choose the most appropriate
encoding format, taking into account the original format of the message, as
well as the preferred-encoding packet of the keys or certificates to which the
email is being encrypted.
PGP Partitioned is the standard PGP format.
PGP/MIME can be used as a signing format when the sender has only a PGP
key.
S/MIME can be used as a signing format when the sender has only an X.509
certificate.
These options are the same as the equivalent options in the Send
(encrypted/signed) action. For additional information see the discussion of that
action earlier in this section.
9 Click Sign with Organization Key to sign archival messages with the Organization
key.

119 Setting Mail Policy
Working with Common Access Cards
Add to dictionary Action
This action adds an email address found in the message to one of the dictionaries
available for use with mail policy. The address can be the email sender address, the
recipient address, or the address of a mailing list. You can select the dictionary from the
existing set of dictionaries available for use with mail policy (any of the predefined
Excluded Addresses dictionaries or user-defined dictionaries).
In order to add multiple addresses to a dictionary, you can use multiple Add to
dictionary actions.
To create the Add to dictionary action
1 In the Action section of a server rule, select Add to dictionary from the drop-down
menu.
2 Select the type of address to add from the drop-down menu.
3 Select the dictionary to which the address is to be added from the drop-down
menu of dictionaries.
Working with Common Access Cards
Common Access Cards (CAC) are a type of smart card used by the Department of
Defense and compatible with PGP Desktop. CACs contain multiple X.509 certificates;
one is used to encrypt messages and another is used for signing.
Because PGP Universal Server normally works with only one primary key per user, you
must take extra steps to make it possible for your internal PGP Desktop users to use
CACs.
To ensure that CACs work with the PGP Universal Server, make sure that the server can
access the directory containing the CAC user certificates. You must add the CAC
Directory to the Key Search page of every rule in mail policy that specifies a key search.
To access the CAC user certificates
1 For every rule in mail policy that requires a key search, click Key Search to add
the user certificate directory to the rule. See Adding Key Searches (on page 100) for
information on adding a keyserver search to a rule.
2 Since the directory contains X.509 certificates, choose directory type X.509
Directory LDAP or LDAPS.
3 All the certificates on the CACs have been signed by some root Certificate
Authority. Add the root signing certificate to the Trusted Keys list. See Managing
Trusted Keys and Certificates (on page 77) for more information.

15
Applying Key Not Found Settings to
External Users
This section describes your options for dealing with users who are outside of the
Self-Managing Security Architecture (SMSA) each PGP Universal Server creates and
maintains. This chapter explains how Key Not Found mail policy settings appear to
external users, and how external users interact with Smart Trailer and PGP Universal
Web Messenger. See the chapter "Setting Mail Policy" for more information about
working with these settings in mail policy.
This feature is an important part of creating mail policy, and is used by server and
desktop email processes.
Overview
Your PGP Universal Server automatically creates and maintains an SMSA by
monitoring authenticated users and their email traffic.
However, there are always email users who are outside the SMSA but to whom you still
want to send protected email: for example, the law firm your company uses; email to
and from the attorneys includes sensitive information and should probably be
encrypted.
Policy options for users outside the SMSA are established on the Mail Policy page of the
administrative interface. These options are controlled through the Key Not Found
settings of the Send (encrypted/signed) action. See Details on Actions (on page 110) for
more information.
You have a number of policy options you can establish for mail sent to recipients
currently outside the SMSA (that is, users for whom the PGP Universal Server cannot
find a trusted key). You can:
bounce the message back to the sender.
send the message unencrypted and signed, or unencrypted and unsigned.
send the message through PDF Messenger, with our without Secure Reply.
require a delivery receipt when recipients open a PDF Messenger message,
through Certified Delivery.
add a Smart Trailer.
offer PGP Universal Web Messenger through Smart Trailer text.
All options are described in subsequent sections.
Bounce the Message
The message is returned to the sender, undelivered, because it could not be sent
encrypted. This is the high-security approach; it requires encryption to a trusted key or
the message is not sent.
If there was more than one recipient, and some messages could be sent encrypted but
some could not, only the messages that could not be sent encrypted are bounced.

122 Applying Key Not Found Settings to External Users
Overview
The bounced message appear to be from an account called
“pgpuniversal-admin@manageddomain” (pgpuniversal-admin@example.com, for
example). Unless you create it, this account does not actually exist on the mail server. If
you think your users might respond to the bounce message (to ask why the message
bounced, for example), you can create this account on the mail server.
PDF Messenger
If a PDF Messenger recipient does not have an existing PGP Universal Web Messenger
account, the recipient receives a message generated by PGP Universal Server
requesting that the recipient create a passphrase. After the recipient creates the
passphrase, the PDF Messenger message is delivered.
When the recipient opens the PDF Messenger message, a password dialog box appears
in Adobe Acrobat. The recipient types his Web Messenger passphrase, and the PDF
opens.
Existing PGP Universal Web Messenger users who receive a PDF Messenger message
for the first time receive a notification email requiring confirmation of the passphrase.
PGP Universal Web Messenger user passphrases created before 2.7 are stored hashed,
rather than encrypted to the Ignition Key. Confirming the passphrase allows it to be
encrypted to the Ignition Key.
You can store copies of messages sent through PDF Messenger on the PGP Universal
Server, and allow recipients to access them through PGP Universal Web Messenger.
Messages read through PGP Universal Web Messenger are displayed in their original
format, not converted to secured PDF format. From Consumer Policy, select the policy
you want to change, choose PGP Universal Web Messenger and enable Retain sent PDF
Messenger messages on the PGP Universal Server and make them available to
recipients through Web Messenger.
Encrypted PDF files work best in Adobe Acrobat 7.0 or later. Attachments that do not
have an extension on Adobe's list cannot be opened using Adobe Acrobat 8.0. Mac
Preview does not support the secured PDF format.
This option is not available when message processing is on the client unless Out Of Mail
Stream support (OOMS) is enabled on the Messaging & Keys tab of Consumer Policy.
PDF Messenger Secure Reply
PDF Messenger Secure Reply allows your external users to securely receive, reply, and
forward encrypted emails. To use PDF Messenger Secure Reply, you must select the
Add Secure Reply link in the Send via PDF Messenger action. For more information on
actions, see Details on Actions (on page 110). On the General tab of the Web Messenger
page, if you select Retain sent PDF Messenger messages on the PGP Universal Server
and make them available to recipients through Web Messenger, you can set that the
number of days after which the metadata for the Secure Reply link is deleted. The
default is 90 days. For more information on additional Web Messenger settings, see PGP
Universal Web Messenger Settings.
If the checkbox is selected, the Secure Reply action includes the original email text as
any other email program does when you click Reply. Emails are forwarded and stored
on the recipient’s system, and there is no key management or public key infrastructure
for external users. If external recipients are offline, they can still access and print the
messages.
This option is not available when message processing is on the client unless Out Of Mail
Stream support (OOMS) is enabled on the Messaging & Keys tab of Consumer Policy.

123 Applying Key Not Found Settings to External Users
Working with Passphrases
If you forward a certified delivery messages, unless you require a login, these
messages can be read by new recipients. For more information on certified delivery,
see Certified Delivery with PDF Messenger (on page 123).
You cannot add attachments with these file extensions:
• ZIP
• EXE
• BAT
• VBS
• DLL
• JS
Working with Passphrases
External recipients must remember their passphrases to read their encrypted PDF
messages. If they change their passphrase, older PDF messages are encrypted to the
previous passphrase. Messages received after the passphrase was changed are
encrypted to the new passphrase. You can have one passphrase to access encrypted
PDF messages and a different passphrase to use the Secure Reply link.
Note: If the external recipients forget their passphrase, they cannot open their
encrypted PDF messages.
You cannot enforce the use of the Secure Reply link by a policy, only by the action of
the external recipient.
They can do one of the following:
• Click on the link
• Click Reply in their email client
• Log in to Web Messenger to compose a new message
Certified Delivery with PDF Messenger
PDF Messenger with Certified Delivery creates and logs a delivery receipt when the
recipient obtains the passphrase, or opens the message initially in Web Messenger.
Certified Delivery messages are converted to secured PDF format, and must be opened
with a passphrase. The original message is converted to PDF in the same way as the
regular PDF Messenger feature.
The recipient email contains two attachments: the message PDF and an HTML link
called Read Me First.html. The recipient retrieves the PDF Messenger passphrase by
clicking the readmefirst.html link.

124 Applying Key Not Found Settings to External Users
Working with Passphrases
The PGP Universal Server creates and logs the delivery receipt when the recipient
obtains the passphrase (or accesses the message via Web Messenger). You can
download all delivery receipt logs from the External Users page. To specify how long
the PGP Universal Server stores delivery receipts, see Configuring the PGP Universal
Web Messenger Service (on page 292).
There are two ways to generate a passphrase:
User authentication not required: When the recipient clicks the readmefirst.html
link, a web page appears with a randomly generated single-use passphrase. The
user copies and pastes that passphrase into the PDF Messenger passphrase field to
open the PDF. Each passphrase is used only once, and all previously used
passphrases are stored. This secure method does not require the user to create a
login credential.
User authentication required: If you require login authentication, the recipient
must create a PGP Universal Web Messenger passphrase and log in using it to
obtain the single-use passphrase that opens the PDF Messenger message. When
the recipient clicks the readmefirst.html link, a PGP Universal Web Messenger
passphrase creation page appears. When the user creates a passphrase, a web page
appears with a randomly generated single-use passphrase. The user copies and
pastes that passphrase into the PDF Messenger passphrase field to open the PDF.
To require that certain external user groups use login authentication to open a
Certified Delivery message, from Consumer Policy, select the policy you want to
change, choose PGP Universal Web Messenger and enable Require user
authentication for Certified Delivery.
This option is not available when message processing is on the client unless Out Of Mail
Stream support (OOMS) is enabled on the Messaging & Keys tab of Consumer Policy.
Send Unencrypted
The message is sent to the recipient unencrypted. This is a low-security option. You can
specify that the email be unsigned, or signed by the sender’s key.
Smart Trailer
The message is sent unencrypted with a Smart Trailer added. The Smart Trailer is text
that explains that the message would be encrypted if the recipient were a member of
the SMSA.
This option is not available when message processing is on the client unless Out Of Mail
Stream support (OOMS) is enabled on the Messaging & Keys tab of Consumer Policy.
The Smart Trailer also includes a link to a location on the PGP Universal Server where
recipients can set a passphrase and choose how they would like to receive future
messages from senders in the same domain. In other words, it gives them ways to
become part of the SMSA.
When the recipient follows the link, a Security Confirmation page appears.
The user then receive another email with a new link. When the user follows the link, the
Passphrase page appears.
The user types a passphrase that allow them to securely retrieve all future messages.
Then the user clicks Continue.
The Future Message Delivery Options page appears.

125 Applying Key Not Found Settings to External Users
Working with Passphrases
The options on the Future Message Delivery Options page depend on the applicable
mail policy. Possible choices are:
PGP Universal Web Messenger: The recipient gets access to a Web browser-based
email reader called PGP Universal Web Messenger mail. This is available only if
PGP Universal Server is in the mailstream.
If the recipient chooses this option, they can also choose to have all outgoing
messages they compose in PGP Universal Web Messenger saved to a “Sent Mail”
folder.
PGP Universal Satellite: The recipient downloads PGP Universal Satellite,
becoming a part of the SMSA. If the recipient selects this option, they are
prompted to download PGP Universal Satellite. For more information, see PGP
Universal Satellite (on page 263).
If downloading PGP Universal Satellite is prohibited by policy, this option does not
appear.
PGP Desktop or S/MIME: If recipients are already PGP Desktop users or have
X.509 certificates for S/MIME environments, they can provide their keys or
certificates; future email messages to them are encrypted with the key or
certificate they provide, making them part of the SMSA.
If they select this option, they are prompted to provide the public portion of their
key or certificate in a file (.asc format for PGP keys, .pem or .crt formats for X.509
certificates, p7b or .p7c formats for PKCS #7, or .p12 or .pfx formats for PKCS #12
certificates) or they can copy and paste their PGP key.
Users providing a PKCS#12 certificate that has a passphrase need to type that
passphrase in the Passphrase field.
Future email messages from the same domain are encrypted using their key or
certificate.
External users who choose this option and provide their key can opt later to switch
to receiving mail through PGP Universal Web Messenger. For more information,
see Changing User Delivery Method Preference (on page 127).
After providing their PGP Desktop public key or S/MIME certificate, a page
appears describing additional steps needed to use the PGP Desktop key or
certificate to decrypt, verify, and encrypt messages:
If a PGP Desktop public key was provided, then they need to add this PGP
Universal Server as a keyserver in PGP Desktop and download and import to their
PGP Desktop keyring the Organization Key of the domain they are sending
messages to and receiving messages from.
If an S/MIME certificate was provided, then they need to download the
Organization Certificate and install it into their email client (Outlook or Outlook
Express, for example) as a trusted root certificate.
PDF Messenger: The recipient can choose to have all future email delivered as
PDF Messenger messages. Plain text email is converted to PDF format and
encrypted to the passphrase. The PDF is attached to a message generated by the
PGP Universal Server. If the email already has a PDF attachment, the PDF is
encrypted to the recipient's passphrase, and the message body is not converted.
Recipients can use the PGP Universal Web Messenger interface to change their
passphrase and view archived statements.
Regular Email: The recipient can choose to receive all future email messages
unencrypted from senders in the same domain.

126 Applying Key Not Found Settings to External Users
Working with Passphrases
If a user selects Regular Mail, it does not necessarily mean that the user receives
unencrypted email. This option only allows users to express their preference to
receive regular mail when possible. Mail policy can override this choice. For
example, if the Key Not Found setting for a Send (encrypted/signed) action is PGP
Universal Web Messenger, email to a recipient without suitable keys is delivered
through PGP Universal Web Messenger, despite the user’s delivery preference.
PGP Universal Web Messenger
PGP Universal Web Messenger mail gives recipients a way to securely read messages
sent to them.
Note: For PGP Universal Web Messenger mail to work, the PGP Universal Server
must be accessible from outside the network. One way to do this is to put the server
in a DMZ. The PGP Universal Web Messenger port must be accessible from outside
the network for external users to access the PGP Universal Web Messenger interface
and the synchronization port for PGP Universal Satellite.
Instead of sending the original message to the recipient, PGP Universal Web Messenger
leaves the message on the PGP Universal Server and sends the recipient a different
message.
Note: Email messages sent to PGP Universal Web Messenger users must be smaller
than 50MB. Attachments to email replies created in PGP Universal Web Messenger
are limited to approximately 15MB per attachment. Also, users cannot send or
receive any message that would put them over their message storage Quota.
The PGP Universal Server stores both mail received and mail sent by PGP Universal
Web Messenger users. The user’s Quota is the memory allotted for PGP Universal Web
Messenger mail storage. You can specify how big the Quota is for each external user.
For more information, see External User Settings (on page 254).
If you customized the PGP Universal Web Messenger user interface, the images of the
interface shown might not match what your users see.
Subsequent email messages from the same domain contain a link to that message in
PGP Universal Web Messenger mail. Following the link brings up the message. The
Inbox button to the left of the message page provides access to their secure inbox.
Buttons to the left of the messages let users access their inbox, compose new messages,
and view sent messages (if policy allows sent messages to be saved). Icons across the
top of the user interface enable users to access their settings (they can change their
delivery options or their passphrase), view help, and log out.
The Inbox can be accessed at any time; the PGP Universal Web Messenger mail user
simply points their Web browser to the URL provided in the first PGP Universal Web
Messenger email, then types their passphrase when prompted.
PGP Universal Web Messenger allows its users to send reply email to any user in your
managed domains, as well as to anyone outside the managed domains but originally
carbon-copied in the message, but users cannot add new external recipients to the
reply.
This option is not available when message processing is on the client unless Out Of Mail
Stream support (OOMS) is enabled on the Messaging & Keys tab of Consumer Policy.

127 Applying Key Not Found Settings to External Users
Changing Policy Settings
Changing Policy Settings
Changing your mail policy can change how current PGP Universal Web Messenger
users receive future messages. See the chapter "Setting Mail Policy" for more
information.
If your mail policy is currently set to allow PGP Universal Web Messenger accounts,
changing that setting affects PGP Universal Web Messenger users differently
depending on how you change the setting.
Change your policy to Smart Trailer without PGP Universal Web Messenger.
Current PGP Universal Web Messenger users can remain so. They can still read all
their old messages in PGP Universal Web Messenger and all their new messages
are also presented through PGP Universal Web Messenger, in spite of the policy
change. As long as the user has even one PGP Universal Web Messenger message,
the user still sees the PGP Universal Web Messenger option the first time they log
in, even if they do not log in for the first time until after the policy changes. Users
who do not already have any PGP Universal Web Messenger messages are treated
according to policy, and are not be offered PGP Universal Web Messenger as an
option.
Change your policy from PGP Universal Web Messenger to Bounce/Send
clear/PDF Messenger. Treatment of all new messages follow that policy. Current
PGP Universal Web Messenger users can still view their old messages, but no new
ones are added to any user’s account.
Changing User Delivery Method Preference
External PGP Desktop users who choose to provide their key can opt later to switch to
receiving mail through PGP Universal Web Messenger.
1 The user must log in to PGP Universal Web Messenger using their email address
and passphrase.
2 On the Secure Messaging Settings page, the user should change how to receive
future email by selecting Regular Mail.
3 The user should log out.
The next time an internal user sends email to this external user, the external user
receives another PGP Universal Web Messenger invitation.
4 The user should click the link in the email and log in to PGP Universal Web
Messenger using their email and passphrase.
5 On the Secure Messaging Settings page, the user should select PGP Universal Web
Messenger.
All future email from internal users are delivered to this external user through
PGP Universal Web Messenger.

16 Using Dictionaries with Policy
This section describes dictionaries, which are lists of matchable terms that allow the
PGP Universal Server to process messages according to mail policy rules. The
Dictionaries page is under the Mail tab.
This feature is available with PGP Universal Gateway Email and PGP Desktop Email.
Overview
Dictionaries are lists of terms to be matched. Dictionaries work with mail policy to
allow you to define content lists that can trigger rules or fulfill the conditions of a rule
to trigger actions. For example, Dictionaries can contain addresses you want excluded
from processing, key words such as “confidential,” or user names for internal users
whose messages need special handling.
A policy rule can have a dictionary associated with it as a condition. If a message meets
the condition, the PGP Universal Server processes the message according the rule’s
action. For example, one of the default Outbound rules is called Excluded Signed. The
condition for that rule is “If any of the following are true: Recipient address is in
dictionary Excluded Addresses: Sign.” This means the rule applies to any message in
which the recipient address matches a term in the dictionary. If that condition is met,
the action for the rule is triggered. The action is to sign and send the message with no
further processing.
For more information on mail policy conditions and actions, see the chapter "Setting
Mail Policy".
Dictionaries are also used to match consumers to the correct group. Create a dictionary
containing a terms to match; for example, a list of user names, then create a group with
a membership made up of consumers with names in that dictionary. For more
information, see Sorting Consumers into Groups (on page 169).
The Dictionaries page lets you add and edit Dictionaries. There are 4 default
dictionaries, and you can also create your own.
There are two types of dictionaries:
Static dictionaries are editable lists of literal or pattern strings. All except one of
the dictionaries are static.
Dynamic dictionaries are not editable but are maintained by the PGP Universal
Server. Information in the dictionary comes from data elsewhere on the PGP
Universal Server rather than added directly to the dictionary by hand. There is
one dynamic dictionary, the Managed Domains dictionary.
There are two types of entries in a dictionary:
Literals are dictionary entries that can only match against the exact characters in
the entry. There is one and only one possible match. For example, if the dictionary
entry is “jsmith@example.com”, then a message matches the entry only if it
contains “jsmith@example.com”. Similar strings, for example,
“smith@example.com”, do not match.

130 Using Dictionaries with Policy
Default Dictionaries
Patterns are dictionary entries that match against characters in messages that
satisfy the pattern. For example, the pattern “j.*@example.com” requires a match
for the letter "j", then any number of other characters, then the sequence
"@example.com", it matches "jsmith@example.com" and "jgreen@example.com".
Use regular expression syntax to create patterns. For more information on using
regular expressions in building mail policy, see the PGP Universal Server online
help.
Default Dictionaries
There are four default dictionaries that exist on the server as installed. You cannot
delete these dictionaries.
Excluded Addresses: Sign: The addresses in this dictionary do not receive
normally encrypted messages; messages to these addresses are signed. These
addresses are generally mailing lists. For more information, see Editing Default
Dictionaries (on page 131).
The list of “sign” default excluded addresses includes:
.*-announce@.*
.*-bugs@.*
.*-devel@.*
.*-digest@.*
.*-docs@.*
.*-help@.*
.*-list@.*
.*-news@.*
.*-users@.*
This dictionary corresponds to the default Outbound rule Excluded Signed in
versions of PGP Universal Server before 3.2.1. The rule applies to any message in
which the recipient address matches a term in this dictionary. If that condition is
met, the action for the rule is triggered. The action is send the message signed but
not encrypted. In PGP Universal Server 3.2.1 and newer, this rule is no longer
required because the default mail policy behavior is to send non-sensitive
messages unencrypted.
Excluded Addresses: Do Not Sign: The addresses in this dictionary receive
unsigned and unencrypted email. These addresses are generally mailing lists. For
more information, see Editing Default Dictionaries (on page 131).
PGP Universal Server includes default exclusion rules that handle email addresses
common to mailing lists. You do not need to add these to the Excluded Email
Addresses list.
The list of “do not sign” default excluded addresses includes:
.*-bounces@.*
.*-report@.*
.*-request@.*
.*-subscribe@.*

131 Using Dictionaries with Policy
Default Dictionaries
.*-unsubscribe@.*
This dictionary corresponds to the default Outbound rule Excluded Unsigned in
versions of PGP Universal Server before 3.2.1. The rule applies to any message in
which the recipient address matches a term in this dictionary. If that condition is
met, the action for the rule is triggered. The action is to send the message
unsigned and not encrypted. In PGP Universal Server 3.2.1 and newer, this rule is
no longer required because the default mail policy behavior is to send
non-sensitive messages unencrypted.
Excluded Addresses: Pending: If your PGP Universal Server proxies email,
possible excluded addresses are detected and added to this dictionary
automatically. You can approve addresses on this list to add them to either
Excluded Addresses: Sign or Excluded Addresses: Do Not Sign. For more
information, see Approving Pending Excluded Addresses (on page 132).
While in Learn Mode, the PGP Universal Server will automatically detect and add
to the Excluded Email Addresses dictionary those mailing lists that use
standards-based header identification.
When Learn Mode is turned off, the PGP Universal Server still automatically
detects mailing lists, but it adds them to the Excluded Addresses: Pending
dictionary. The PGP Universal Server administrator must approve the mailing
lists before messages to it are excluded.
The PGP Universal Server detects mailing lists per RFC 2919, “List-Id: A
Structured Field and Namespace for the Identification of Mailing Lists,” as well as
by using default exclusion rules.
If you are using the Directory Synchronization feature, mailing lists found in the
directory are automatically added without requiring approval when using
directories that support proper identification of mailing lists, such as Active
Directory with Exchange Server.
If a mailing list is not in the Excluded Addresses: Pending dictionary, it possibly
was not detected or did not use standards-based header identification.
If a mailing list is not automatically detected and added to the Excluded
Addresses: Pending dictionary, you can easily add it directly to either of the
Excluded Addresses dictionaries manually. For more information, see Editing
Default Dictionaries (on page 131).
Managed Domains: You cannot edit this dictionary from the Dictionaries page. If
you want to add or delete a managed domain, use the Consumers > Managed
Domains tab. For more information on adding Managed Domains, see Managed
Domains (on page 39).
The dynamic managed domains dictionary automatically includes subdomains. To
exclude or include specific subdomains in a rule, create a dictionary listing those
domains and reference it in the rule’s conditions.
Editing Default Dictionaries
You can edit, but not delete, a default dictionary.
Editing Excluded Addresses Dictionaries
1 From the Mail > Dictionaries tab, click Excluded Addresses: Sign or Excluded
Addresses: Do Not Sign.

132 Using Dictionaries with Policy
User-Defined Dictionaries
The View Dictionary page appears.
2 To delete terms from the dictionary, click the icon in the Delete column of the
term you want to delete, or select check boxes for multiple exclusions, and choose
Delete Selected from the Options list.
A confirmation dialog box appears.
3 Click OK.
4 To add to the contents of the dictionary, click Add Exclusions.
The Edit Dictionary dialog box appears.
5 Select from the menu whether you are adding plain text terms, an XML file, or a
ZIP file.
6 Type in or paste a list of terms, each separated on its own line, or choose Import
File and select a file to import.
7 Specify whether the terms are Patterns or Literals.
8 Choose whether to append the new terms to the current contents of the dictionary
or to replace the existing terms with the new terms.
9 Click Import.
Approving Pending Excluded Addresses
When you approve a pending excluded address, it moves to the Excluded Addresses:
Sign dictionary.
1 From the Mail > Dictionaries tab, click the Excluded Addresses: Pending
dictionary.
The View Dictionary page appears.
2 To approve excluded addresses, select the check boxes of the addresses you want
to approve, and choose Approve Selected from the Options menu.
A confirmation dialog box appears.
3 Click OK.
User-Defined Dictionaries
You can add dictionaries to use with specific policy rules.
Adding a User-Defined Dictionary
To add a user-defined dictionary
1 At the bottom of the Dictionaries page, click Add Dictionary.
The Add Dictionary dialog box appears.

133 Using Dictionaries with Policy
User-Defined Dictionaries
2 Select from the list whether you are adding plain text terms, an XML file, or a ZIP
file.
3 Add a Dictionary Name and Description. For example, you can add a dictionary
named Managers and the description might be “Messages from these users must
always be encrypted and signed.”
4 Type in or paste a list of terms, each separated on its own line, or choose Import
Text File and select a file to import.
5 Specify whether the terms are Patterns or Literals.
6 Click Import.
Editing a User-Defined Dictionary
To edit a user-defined dictionary
1 Click the name of the domain in the Name column.
The View Dictionary page appears.
2 To remove terms from the dictionary, click the icon in the Delete column of the
term you want to delete.
A confirmation dialog box appears.
3 Click OK.
4 Click Add Terms to add to the contents of the dictionary.
The Edit Dictionary dialog box appears.
5 Select from the drop-down menu whether you are adding plain text terms, and
XML file, or a ZIP file.
6 Type in or paste a list of terms, each separated on its own line, or choose Import
Text File and select a file to import.
7 Specify whether the terms are Patterns or Literals.
8 Choose whether to append the new terms to the current contents of the dictionary
or to replace the existing terms with the new terms.
9 Click Import.
10 Click the Dictionary Settings button to change the name or description of the
dictionary.
Caution: If you change the name of a dictionary, any rule that refers to the
original dictionary name become invalid.
The Dictionary Settings dialog box appears.
11 Choose the appropriate setting, then click Save.

134 Using Dictionaries with Policy
Exporting a Dictionary
Deleting a Dictionary
Use this procedure to delete dictionaries. You cannot delete the default dictionaries.
Caution: If you do not want a rule to use a particular dictionary, you can simply
remove it from that rule’s conditions. If you delete a dictionary from the Dictionaries
page, it is no longer available for any rule in your mail policy and can make your
rules invalid. Any consumer group using the deleted dictionary to match consumers
to the group will no longer be able to use the dictionary to determine group
membership.
To delete a dictionary
1 Click the icon in the Delete column of the dictionary you want to delete.
A confirmation dialog box appears.
2 Click OK.
The dictionary you specified is deleted.
Exporting a Dictionary
To export a dictionary
1 Select the check box at the far end of the row for each dictionary you want to
export.
2 From the Options menu, select Export Selected.
The dictionary you chose is exported to your desktop as an XML file. If you
exported more than one dictionary, the XML files are inside a ZIP file called
dictionaries.zip.
Searching the Dictionaries
You can search dictionaries in 2 different ways.
Search for exclusion/term allows you to find a term in the dictionary. This
substring search returns entries that exactly match the characters you type into
the search box. For example, if you have dictionary entries “jsmith@example.com”
(literal) and “j.*@example.com” (pattern), and you search for “@example”, both
entries would be returned.

135 Using Dictionaries with Policy
Searching the Dictionaries
Evaluate expression allows you to determine whether any term in the dictionary
matches a certain string. You can use this as a trial of the dictionary as it would
act in a rule condition. Type a test string that you know should match a dictionary
entry to see if the string would trigger the action in the rule. The results of the
evaluation are the matches for the test string. For example, if you have dictionary
entries “jsmith@example.com” (literal) and “j.*@example.com” (pattern), and you
evaluate the expression “jsmith”, neither entry is returned. If you evaluate
“jsmith@example.com”, both entries are returned. If you evaluate the expression
“jgreen@example.com”, only the pattern “j.*@example.com” is returned.
To search dictionaries
1 From the Mail > Dictionaries page, click the name of the dictionary you want to
search.
2 Select Search for exclusion/Search for term or Evaluate expression from the
drop-down menu.
3 Type the term you want to find or evaluate.
4 Click Go.
A list of terms that fit the criteria you specified appears.
To clear the search, click the cancel button to the right of the search field.

17 Keyservers, SMTP Archive Servers, and
Mail Policy
This section describes how to add keyserver and SMTP archive server information to
the PGP Universal Server. Policy rules can then refer to those servers to enforce your
mail policy.
These features are available with PGP Universal Gateway Email and PGP Desktop
Email.
Overview
PGP Universal Server allows you to add and manage information about servers outside
your network. There are two types of external servers you can manage in this way;
Keyservers and SMTP servers used for archiving email. Policy rules can specify the
keyservers listed on this tab for recipient key searches, as required by mail policy. The
Archive servers you add are used by policy rules to archive messages, as required by
mail policy.
Keyservers can be added from the Keys > Keyservers tab.
SMTP archive servers can be added from the Mail > Archive Servers tab.
Keyservers
Mail policy contains rules that require a message be signed or encrypted to a recipient’s
key. The PGP Universal Server always looks in its own databases for keys in the
Internal Users, External Users, and Key Cache lists. If the PGP Universal Server does
not have a copy of a particular key, the policy can specify searching external sources for
the key. The Keyservers page (accessed from the Keys > Keyservers tab) allows you to
add and edit information for those external keyservers.
For information on using keyservers with policy rules, see the chapter "Setting Mail
Policy."
The keyservers on the Keyservers page are divided into two groups:
All keyservers available to be searched for recipient keys are listed under All
Keyservers. You can use the Key Search tab of the Add Rule or Edit Rule page to
select which keyservers a mail policy rule searches.
Keyservers in the default set are referred to when legacy client software verifies
signatures. If PGP Desktop or PGP Universal Satellite requests a key, the PGP
Universal Server searches the default keyservers for the correct key, based on the
key ID in the email. Legacy client software includes PGP Desktop 9.0.x and PGP
Universal Satellite 2.0.x.
You can specify the order in which default keyservers are searched by numbering the
keyservers in the order you want them searched.

138 Keyservers, SMTP Archive Servers, and Mail Policy
Keyservers
The PGP Universal Server has one pre-selected Default Keyserver, the PGP Global
Directory at ldap://keyserver.pgp.com:389. The PGP Global Directory is a free, publicly
available keyserver hosted by PGP Corporation that lets PGP users find the public keys
of other PGP users with whom they want to exchange secure messages. It provides
quick and easy access to the universe of PGP keys. If your policy requires it, you can
keep the PGP Global Directory from being searched for keys by removing it from the
policy rules’ Key Lookup lists. For more information on Key Lookup, see the chapter
"Setting Mail Policy."
The PGP Universal Server has one other preinstalled keyserver. This keyserver’s
hostname appears on the Keyservers page as keys.$ADDRESS_DOMAIN. If you add this
keyserver to the Key Search tab for a rule, PGP Universal Server searches for a
keyserver at the domain in the recipient’s email. For example, if the rule states that a
message sent to jsmith@company.com must be encrypted, and the recipient’s key is not
already stored on the PGP Universal Server, the PGP Universal Server can search for
the key in a keyserver called keys.company.com. Keys found in this type of keyserver
are used for encrypting messages.
You can add more searchable keyservers to the Keyservers page. Keyservers can be PGP
keyservers or X.509 directories.
You can also add new locations to search for keys directly from a mail policy rule’s Key
Search tab. Servers entered this way automatically appear on the Keys > Keyservers
page.
Note: PGP Universal Server does not support HTTP keyservers. Key queries to HTTP
keyservers are unsuccessful.
Adding or Editing a Keyserver
If you know of a keyserver or directory outside your own network that can contain keys
belonging to people receiving mail from inside your network, you can add that
keyserver to the list of searchable keyservers. The PGP Universal Server searches the
specified keyserver for recipient keys or certificates, if mail policy rules containing that
keyserver apply to the message being sent.
This procedure covers adding and editing keyservers.
To add or edit a keyserver
1 Click Add Keyserver on the Keyservers page or click the name of the keyserver
you want to edit.
The Add (or Edit) Keyserver dialog box appears.
2 If you choose, type a description of the keyserver into the Description field. The
description appears in the Key Search area of rules in your mail policy, to help you
choose keyservers for each mail policy rule.
Note: External applications that call into the PGP Universal Server use the
keyserver description (as defined in the Description field) to identify the
keyservers to use for external key searches. As a result, changing the description
of an existing keyserver may prevent those applications from finding keys.
Applications that call into the PGP Universal Server may include PGP Command
Line and custom applications that use the PGP Universal Services Protocol API.
3 Select the keyserver type and method of access from the Type drop-down menu:

139 Keyservers, SMTP Archive Servers, and Mail Policy
Keyservers
PGP Keyserver LDAP: Select this option to connect to a PGP Keyserver via
LDAP. The default port is 389.
PGP Keyserver LDAPS: Select this option to connect to a PGP Keyserver via
LDAPS (LDAP over SSL). The default port is 636.
PGP Universal Services Protocol: Select this to connect to a keyserver using
the USP protocol. The default port is 80.
PGP Universal Services Protocol (SSL): Select this to connect to a keyserver
using the USP protocol via SSL. The default port is 443.
X.509 Directory LDAP: Select this option to connect to an LDAP directory to
search for X.509 certificates. The default port is 389.
X.509 Directory LDAPS: Select this option to connect to an LDAPS directory
to search for X.509 certificates. The default port is 636.
PGP Global Directory LDAP: Select this option to connect to the PGP Global
Directory via LDAP. The default port is 389. The host is
ldap://keyserver.pgp.com.
PGP Global Directory LDAPS: Select this option to connect to the PGP
Global Directory via LDAPS. The default port is 636. The host is
ldaps://keyserver.pgp.com.
4 Type a hostname or IP address in the Hostname field.
5 If you want to change the default port, type the desired port number in the Port
field.
6 Type a base distinguished name (base DN) in the Base DN field, if appropriate.
7 If you selected a keyserver that uses the LDAPS protocol, you can specify a client
certificate to be used to authenticate when the PGP Universal Server queries the
directory. Click the Add icon next to Client Certificate to import a certificate or
generate a CSR or self-signed certificate using the New Keyserver Client
Certificate dialog box.
a To add an existing certificate, click Import, select the certificate file or
paste in the certificate block, and type an optional passphrase.
b To generate a self-signed certificate or CSR, type the appropriate
information into the New Keyserver Client Certificate dialog box and
click either Generate Self-signed or Generate CSR.
8 Select Trust keys from this keyserver implicitly to automatically trust all keys
from this keyserver.
9 Select Include this keyserver in the default set to add the keyserver to the default
set for client software signature verification requests.
10 On the Add Keyserver dialog box, click Save.
The new keyserver is added to the searchable keyservers list on the Keyservers
page.

140 Keyservers, SMTP Archive Servers, and Mail Policy
SMTP Servers
Deleting a Keyserver
Caution: If you do not want a rule to search a particular keyserver, you can simply
remove it from that rule’s Key Lookup. If you delete a keyserver from the Servers
page, it is no longer available for any rule in your mail policy and can make your
rules invalid.
To delete a keyserver
1 Click the Delete icon to the right of the name of the keyserver you want to delete.
A confirmation dialog box appears.
2 Click OK.
The keyserver you specified is deleted.
SMTP Servers
Archive Servers are used by policy rules to archive messages, as required by mail policy.
When you create a rule with the action Send copy to alternate archive server, the PGP
Universal Server sends a copy of the message to the archive server specified in the rule.
See the chapter Setting Mail Policy (on page 85) for more information on how archive
servers work with policy rules.
Adding or Editing an Archive Server
To add or edit an archive server
1 Go the the Mail > Archive Servers tab.
2 Click Add Archive Server... on the Archive Servers page or click the hostname of
the archive server you want to edit. The Add Archive Server dialog box appears.
3 Type a hostname or IP address in the Hostname field.
4 If you want to change the default port, type the desired port number in the Port
field.
5 Select the security type from the Security menu:
STARTTLS Attempt: Allows the security of the connection to be upgraded to
TLS via negotiation when communications begin. The SMTP server must
support STARTTLS for the upgrade to occur.
STARTTLS Disable: STARTTLS is not allowed for this connection.
STARTTLS Require: Requires that the connection be secured by TLS. Only
select this option if you are confident that the SMTP server supports
upgrading the security to STARTTLS.
SSL: Uses SSL to protect the connection between the archive server and the
PGP Universal Server.

141 Keyservers, SMTP Archive Servers, and Mail Policy
SMTP Servers
6 Type a username into the Username field if you chose a secure SMTP connection.
7 Type a passphrase into the Passphrase field for the secure SMTP connection.
8 On the Add Archive Server dialog box, click Save.
The Archive Server page reappears with the new server entry added.
Deleting an Archive Server
Caution: If you do not want a rule to archive messages to an archive server, you can
simply remove the server from the rule. If you delete a server from the Archive
Servers page, it is no longer available for any rule in your mail policy and can make
your rules invalid.
To delete an archive server
1 Click the Delete icon to the right of the name of the archive server you want to
delete.
A confirmation dialog box appears.
2 Click OK.
The archive server you specified is deleted.

18 Managing Keys in the Key Cache
This section describes the key cache, which stores public keys on the PGP Universal
Server.
This feature is available with PGP Universal Gateway Email and PGP Desktop Email.
Overview
Public keys for remote users are automatically cached on the PGP Universal Server, and
can be viewed on the Keys > Key Cache page. Whenever the PGP Universal Server can
harvest a key from the mailflow or finds a recipient key on an external keyserver, the
key is stored in the key cache. As long as the key is in the key cache, it can be used to
encrypt future email, without requiring a key search.
Keys found on external keyservers stay in the cache for a time period you specify. After
the specified time period, the keys are purged. Keys found in the mailflow automatically
time out after 6 months.
If you have clustered PGP Universal Servers, there are duplicate keys in the cache,
because keys cached from the mailflow are replicated across the cluster and the same
key might already be cached on more than one cluster member. PGP Universal Server
does not share keys found on external keyservers between cluster members.
Bound PGP Desktop installations harvest S/MIME certificates from messages and send
those certificates, and all certificates in the chain, to the PGP Universal Server key
cache.
Changing Cached Key Timeout
To change the cache settings
1 On the Keys > Key Cache page, click the Cache Settings button.
The Cache Settings dialog box appears.
2 Type the desired number in the Public key cache timeout field, then select Hours
or Days, as appropriate.
3 Click Save to save changes to the scheduled cache timeout period.
The Key Cache page reappears.
Purging Keys from the Cache
Purging the cache is useful, for instance, if you are aware that a key has been updated
and you want to force the PGP Universal Server to retrieve the latest copy before the
cache expires.

144 Managing Keys in the Key Cache
Changing Cached Key Timeout
To purge keys from the cache
1 Do one of the following:
To purge a single key manually, click the purge icon next to the key you want
removed.
To purge multiple public keys and certificates currently in the cache, select
the check box at the far right end of the row of each of the keys you want to
purge.
2 Select Purge Selected from the Options menu or select Purge All to purge all the
keys in the cache.
A confirmation dialog box appears.
3 Click OK.
Trusting Cached Keys
To mark as trusted the public keys and certificates currently in the cache
1 Select the check box at the far right end of the row of each of the keys you trust.
2 Select Trust Selected from the Options menu.
3 The newly trusted key is added to the list of external users on the Users > External
Users page.
Viewing Cached Keys
To view information about each key in the cache, and either purge the key or mark it
trusted
1 From the Keys > Key Cache page, click the ID of the key you want.
The Key Information dialog box appears. The dialog box shows the Key ID, the
User ID, when the key was created, when the key expires, when the key was
cached, where the key was found (on a keyserver or in the mailflow), and when the
key will be purged, as well as a list of email addresses associated with that key.
2 Click the Trust Key button to trust this key. The key is added to the list of external
users.
3 Click the Purge Key Now button to purge this key from the cache.
4 Click OK to save changes and close the dialog box.

145 Managing Keys in the Key Cache
Searching the Key Cache
Searching the Key Cache
To find a cached key using a simple search, enter the criteria for which you want to
search, and click the Search button. A list of users that fit the criteria you specified
appears.
To search using advanced criteria
1 On the Key Cache page, click the Advanced icon.
The User Search dialog box appears.
2 Specify your criteria:
In the drop-down menu on the left, select search criteria from: Key ID,
Primary Email, Key Cached, or Source.
In the middle drop-down menu, select how to limit the search, for example:
contains, does not contain, is on, is before.
In the text box on the right, enter or select the criteria you want to search
for.
If you want to use more search criteria, click the plus sign icon and enter the
appropriate criteria. Returned results match all the search criteria you enter.
3 Click Search.
A list of keys that fit the criteria you specified appears.
To clear the search, click the cancel button to the left of the search field.

19 Configuring Mail Proxies
This section describes the mail proxies that a PGP Universal Server uses to determine
how to handle incoming and outgoing mail traffic.
This feature is available with PGP Universal Gateway Email.
Note: You must be using a PGP Universal Gateway Email license, and the Enable
Mail Proxies check box on the System > General Settings page must be checked, or
you cannot use the Mail Proxies feature on the administrative interface. If your
license has not been typed, server-side mail proxy functionality is disabled. You
cannot add or edit proxies. If you upgraded from a previous version of PGP Universal
Server and your new license does not include PGP Universal Gateway Email, your
mail is no longer being proxied.
Overview
Mail proxies control how your PGP Universal Server handles the email traffic in your
environment: where it comes into the PGP Universal Server, how the server knows
where the traffic came from, and where it is going, so that it can be processed correctly.
PGP Universal Server accepts up to 30 proxy connections per second.
The Mail Proxies page lets you create new POP, IMAP, and SMTP proxies, and edit
existing proxies to match your security requirements. You also have control over Learn
Mode.
PGP Universal Server and Mail Proxies
A PGP Universal Server provides security for email messaging by inserting itself into
the flow of email traffic in your network, intercepting, or proxying, that traffic, and
processing it (encrypt, sign, decrypt, verify) based on the applicable policies.
The chapter "Setting Mail Policy" discussed how email is processed and protected by
PGP Universal Server. This chapter focuses on correctly setting up how your PGP
Universal Server proxies email traffic in your network. A PGP Universal Server cannot
protect your email messages unless proxying is set up correctly.
Proxying means “to act on behalf of.” The PGP Universal Server intercepts email traffic
before it gets to the intended destination, accepting the traffic on behalf of the intended
destination for a brief period while it processes it (based on applicable mail policy), then
forwarding it onto the intended destination when it is done. Connections are proxied in
real time, meaning PGP Universal Server does not typically take possession of messages
for any longer than necessary to apply policies.

148 Configuring Mail Proxies
PGP Universal Server and Mail Proxies
An example of how this works in a real network would be using PGP Universal Server in
an internal placement. The mail server supports the POP protocol, which email users
use to retrieve their email messages from the mail server. Before the PGP Universal
Server was installed in an internal placement, email users retrieved their email, using
POP, by connecting directly from their email client to the mail server. Now that there is
a PGP Universal Server in an internal placement, when email users want to retrieve
their email using POP, they should connect from their mail client directly to the PGP
Universal Server. The PGP Universal Server then creates its own connection directly to
the mail server, and proxies the POP request between the two connections. While doing
this, the PGP Universal Server processes the mail according to policy.
At PGP Universal Server installation, the Setup Assistant requires you to specify
whether you want an internal placement or a gateway placement. The Setup Assistant
combines this information with the information you provide about your network and
your mail server, and the Setup Assistant configures your mail proxies for you.
Mail Proxies in an Internal Placement
For an internal placement, the Setup Assistant creates three mail proxies: one POP and
one IMAP (the protocols used to retrieve messages from a mail server) and one SMTP (a
protocol for sending mail messages). Because the POP and IMAP proxies are both used
for retrieving mail, they are referred to together as POP/IMAP throughout the
documentation.
For example, a simplified look at the configuration:
1 Email users
2 PGP Universal Server
3 Mail server
The POP/IMAP proxy listens for incoming mail traffic on ports 110 and 143,
respectively, on a virtual interface configured on the PGP Universal Server; this
interface/port combination is called the local connector. The connection between the
user trying to retrieve their email and the local connector can optionally be secured
and/or restricted by the connecting IP address, if desired. At least one local connector is
required for a mail proxy; however, you can have as many as you want, as long as they
use different interface/port combinations.
The POP/IMAP proxy also has a proxy peer—the device to which the PGP Universal
Server sends the email traffic after it has processed it. The proxy peer for the
POP/IMAP proxy is the mail server from which the email users are retrieving their
email messages.
The initial SMTP proxy created by the Setup Assistant is an Outbound type (SMTP
proxies can be Outbound only, Inbound only, or Unified, which combines the settings
for Inbound and Outbound into a single proxy); Outbound means the email traffic
originates from the local network (and often heads out to the Internet).
The Outbound SMTP proxy also has one or more local connectors, the interface/port
combination on which the PGP Universal Server listens for and accepts email traffic. As
with the POP/IMAP proxy, the local connectors can optionally use secured connections
and/or restrict access by IP address.
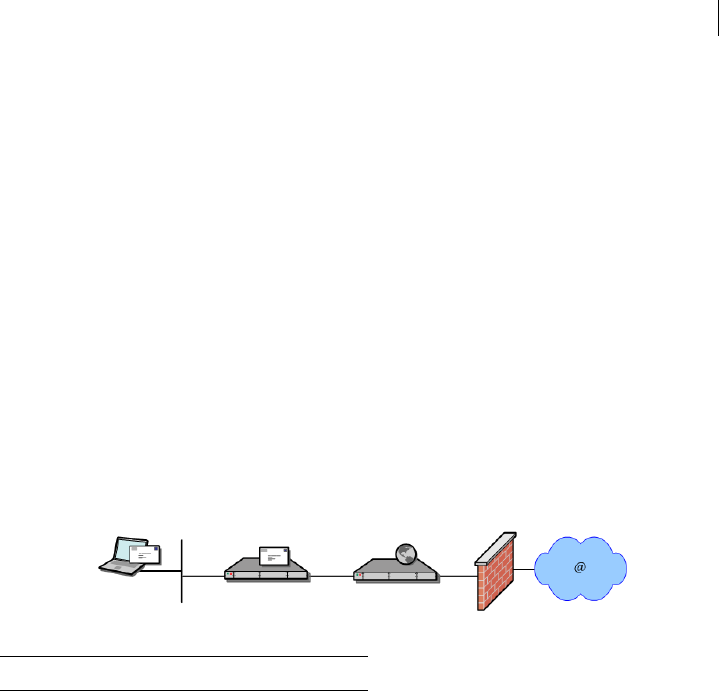
149 Configuring Mail Proxies
PGP Universal Server and Mail Proxies
The Outbound SMTP proxy also has a proxy peer, the device to which outbound email
traffic is sent after processing by the PGP Universal Server. By default, this is the mail
server that outgoing mail messages would have been sent to if the PGP Universal Server
had not been inserted into the flow of email traffic; it is called the recipient mail server.
To summarize, when you use the Setup Assistant to configure a PGP Universal Server
in an internal placement (between your email users and their local mail server), the
Setup Assistant configures the PGP Universal Server with a POP proxy and an IMAP
proxy to process email messages the local email users are retrieving and an Outbound
SMTP proxy for messages the local email users are sending.
Mail Proxies in a Gateway Placement
When you use the Setup Assistant to configure a PGP Universal Server in a gateway
placement (the PGP Universal Server is between your network’s outward-facing mail
server and the Internet), the Setup Assistant creates the proxies differently. In a
gateway placement, the Setup Assistant creates a single, Unified SMTP proxy.
For example, a simplified look at the configuration:
1 Email users
2 Mail server
3 PGP Universal Server
The default local connector, the interface/port combination on which PGP Universal
Server listens for email traffic, is interface 1 and port 25. To enhance security, add a
second local connector that uses port 465 (SMTPS) with SSL security, for example. And
you can also restrict access by IP address, as is possible for any local connector.
Whichever combinations of local connectors you use, these local connectors are where
email traffic is coming in, whether inbound from the Internet or outbound from your
network’s outward-facing mail server.
Because this is the Unified SMTP proxy, and thus handles both incoming mail traffic
from the Internet and outgoing mail traffic from your network’s outward-facing mail
server, the Unified SMTP proxy has two proxy peers, two destinations to which email
traffic is sent. Which one is used depends on where each connection is coming from.
To deal with two destinations, the proxy peer for the Unified SMTP proxy has two
sections: Outbound Mail and Inbound Mail. The Outbound Mail section handles mail
traffic coming from your outward-facing mail server on its way to the Internet then to
its destination. The Inbound Mail section handles mail traffic coming in from the
Internet on its way to your outward-facing mail server.
The Outbound Mail section lists Designated Source IPs. If the PGP Universal Server
receives a connection from an IP address on this Designated Source IPs list, it knows
that the email traffic is from your outward-facing mail server(s) on its way to the
Internet and processes it accordingly.

150 Configuring Mail Proxies
Changes in Proxy Settings from PGP Universal Server 2.0 to 2.5 and later
The Outbound Mail section of the Unified SMTP proxy also lets you choose between
sending outgoing email traffic that has been processed by the PGP Universal Server
directly to the recipient mail server (the default) or to a different device (a SMTP relay)
that you specify by hostname and port. You can also specify security settings for the
connection to this device.
The Inbound Mail section of the Unified SMTP proxy handles email traffic coming in
from the Internet. Because it is listening on the same local connector as the Outbound
Mail section, how does the Inbound Mail section know what is inbound mail traffic and
what is not? The opposite way the Outbound section does: any connection from an IP
address that does not appear in the Designated Source IPs list is considered Inbound
mail from the Internet and is processed accordingly.
The Inbound Mail section of the Unified SMTP proxy includes one mailserver field; this
is where you specify the connection details for your outward-facing mail server. The
PGP Universal Server then sends inbound mail traffic there as it proxies it. You specify
the host, port, and type of security for the connection.
Warning: In almost all cases, one of the IP addresses in the Designated Source IPs
listed in the Outbound Mail section should be the IP address of the mailserver host
configured in the Inbound Mail section. In both cases, this is your network’s
outward-facing mail server. Typical organizations that have only one mail server
only have one entry on the Designated Source IPs list, and this entry is also the same
mail server the Inbound mail traffic is going to. This is how the Setup Assistant
initially configures the Unified SMTP proxy (note these both refer to the same mail
server; one referenced by IP address, the other by hostname).
To summarize, when you use the Setup Assistant to configure a PGP Universal Server
in gateway placement (between the outward-facing mail server and the Internet), the
Setup Assistant creates and configures one Unified SMTP proxy that proxies both
inbound and outbound mail traffic between your mail server and the Internet.
Changes in Proxy Settings from PGP Universal Server 2.0
to 2.5 and later
Some of the settings that in previous versions of PGP Universal Server were controlled
through the Mail Proxies page are now managed on the Mail Policy page. You can now
manage the following settings through mail policy rules:
Decrypt Upon Receipt
Apply Mail Policy for Authenticated Connections
Always Encrypt Internal Mail
When you migrate from PGP Universal Server 2.0 to version 2.5 and later, your
previous settings are also automatically migrated. Policy rules reflect your previous
choices. However, if you had multiple SMTP proxies, or if you have clustered PGP
Universal Servers, you need to recreate some of your settings manually.
To learn more about how your previous settings are now reflected in mail policy, or to
learn how to recreate your settings if necessary, see the PGP Universal Server Upgrade
Guide. For more information, see the chapter "Setting Mail Policy."

151 Configuring Mail Proxies
Mail Proxies Page
Mail Proxies Page
The Mail Proxies page:
Displays the proxies that are configured on this PGP Universal Server, lets you
manage existing proxies, and lets you create new ones.
Lets you control the mail processing settings.
The Mail Proxies page lists the proxies currently configured on a PGP Universal Server.
It shows the protocol of the proxy, the assigned interface, the local port, and the remote
host and port; it also lets you delete proxies.
Depending on your environment, the proxies created for a PGP Universal Server using
the Setup Assistant might be adequate. On the other hand, you might need to add or
edit a proxy on the Mail Proxies page.
Creating New or Editing Existing Proxies
You can add or edit three types of proxies:
POP. The POP protocol is available only for internal placements. The POP protocol
is used by email clients to retrieve email messages from a mail server.
IMAP. The IMAP protocol is also available only for internal placements. The IMAP
protocol is also used by email clients to retrieve email messages from a mail
server.
SMTP. The SMTP protocol is available for internal or gateway placements. With
an internal placement, you can only create or edit an Outbound SMTP proxy. With
an gateway placement, you can create or edit an Outbound, Inbound, or Unified
SMTP Proxy.
Creating or Editing a POP/IMAP Proxy
The POP and IMAP proxies support email traffic where your internal email users are
retrieving their messages from their local mail server. Because the PGP Universal
Server is sitting between the email users and their mail servers, a POP and/or IMAP
proxy must exist to proxy that traffic.
Note: POP and IMAP proxies are only needed if your PGP Universal Server is placed
internally, between your email users and their local mail server. They are not needed
if your PGP Universal Server is in a gateway placement.
This procedure applies to both POP and IMAP proxies. Differences are noted in the text.
To create or edit a POP/IMAP proxy
1 If you are editing an existing POP or IMAP proxy, click on the name of the proxy
you want to edit in the Proxy column on the Mail Proxies page.

152 Configuring Mail Proxies
Creating New or Editing Existing Proxies
The Edit Mail Proxy page appears.
2 Or, if you are creating a new POP or IMAP proxy, click Add Proxy on the Mail
Proxies page and select POP or IMAP, as appropriate, from the Protocol menu.
The Add Mail Proxy: POP or IMAP page appears.
3 In the Connector 1 field, in the Local Connector section, select the interface for
the local connector for this proxy from the drop-down menu.
The interfaces available are those configured on the Network Settings page
(System > Network). If you want more interfaces to be available for your proxies,
you need to configure them on the Network Settings page. See Setting Network
Interfaces (on page 39) for more information.
4 In the Port field, select the appropriate port.
The default for POP is 110; the default for IMAP is 143. The default for POPS
(secure POP) is 995; the default for IMAPS (secure IMAP) is 993.
The port number automatically changes based on your selection from the Security
menu.
5 In the Security menu, select from:
STARTTLS Allow. Allows the security of the connection to be upgraded to
TLS via negotiation when communications begin. The email client must
support STARTTLS for the upgrade to occur.
STARTTLS Disable. STARTTLS is not allowed for this connection.
STARTTLS Require. Requires that the connection is secured by TLS. Only
select this option if you are confident that all email clients connecting to
this local connector support upgrading the security to STARTTLS.
SSL. Uses SSL to protect the connection between the email client and the
PGP Universal Server.
6 Click the Restrict Access button to enhance the security of this local connector by
restricting access by IP address.
7 On the Access Control for Connector dialog box, put a check in the Enable Access
Control for Connector check box.
8 Select Hostname/IP or IP Range.
In the Hostname/IP field, type a hostname or IP address, then click Add.
What you type here appears in the Block or Allow field below. If you type a
hostname such as example.com, the name resolves to an IP address.
In the IP Range fields, type starting and ending IP addresses for an IP
address range, then click Add. What you type here appears in the Block or
Allow field below.
In the Block or Allow field, select Block these addresses or Allow only these
addresses, as appropriate, for the IP addresses or ranges in the box below.
To remove an IP address or range from the box, select it then click Remove.
Click Save when you have configured the appropriate access control restrictions.
The Access Control for Connector dialog box disappears.
9 In the Mailserver field, in the Proxy Peer section, type the mail server from which
the email clients are attempting to retrieve their messages.

153 Configuring Mail Proxies
Creating New or Editing Existing Proxies
This is the mail server from which the email clients would be retrieving their
messages directly if the PGP Universal Server were not between them in the flow
of email traffic.
10 In the Port field, select the appropriate port.
The default for POP is 110; the default for IMAP is 143. The default for POPS
(secure POP) is 995; the default for IMAPS (secure IMAP) is 993.
The port number automatically changes based on your selection from the Security
menu.
11 In the Security menu, select between:
STARTTLS Attempt. Allows the security of the connection to be upgraded to
TLS via negotiation when communications begin. The mail server must
support STARTTLS for the upgrade to occur.
STARTTLS Disable. STARTTLS is not allowed for this connection.
STARTTLS Require. Requires that the connection be secured by TLS. Only
select this option if you are confident that the mail server connecting to this
local connector supports upgrading the security to STARTTLS.
SSL. Uses SSL to protect the connection between the PGP Universal Server
and the mail server.
12 Click Save.
Creating or Editing an Outbound SMTP Proxy
An Outbound SMTP proxy can be configured for either an internal placement of your
PGP Universal Server or a gateway placement.
In an internal placement, the Outbound SMTP proxy proxies messages being sent by
your internal email users to the local mail server for delivery to the intended recipient.
In an gateway placement, the Outbound SMTP proxy proxies messages being sent by
your outward-facing mail server to the Internet on the way to the intended recipient.
To create or edit an Outbound SMTP proxy
1 If you are editing an existing Outbound SMTP proxy, click on the name of the
proxy you want to edit in the Proxy column on the Mail Proxies page.
The Edit Mail Proxy page appears.
2 If you are creating a new Outbound SMTP proxy, click Add Proxy on the Mail
Proxies page, select SMTP from the Protocol menu, then select Outbound from
the SMTP Proxy Type in the Proxy Peer section.
The Add Mail Proxy: SMTP page appears.
3 In the Connector 1 field, in the Local Connector section, select the interface for
the local connector for this proxy from the drop-down menu.
The interfaces available are those configured on the Network Settings page
(System > Network). If you want more interfaces to be available for your proxies,
you need to configure them on the Network Settings page.
4 In the Port field, select the appropriate port.

154 Configuring Mail Proxies
Creating New or Editing Existing Proxies
The default port for SMTP is 25. The default for SMTPS (secure SMTP) is 465.
The port number automatically changes based on your selection from the Security
menu.
5 In the Security menu, select between:
SSL. Uses SSL to protect the connection between the email client and the
PGP Universal Server.
STARTTLS Allow. Allows the security of the connection to be upgraded to
TLS via negotiation when communications begin. The email client must
support STARTTLS for the upgrade to occur.
STARTTLS Disable. STARTTLS is not allowed for this connection.
STARTTLS Require. Requires that the connection be secured by TLS. Only
select this option if you are confident that all email clients connecting to this
local connector support upgrading the security to STARTTLS.
6 Click the Restrict Access button to enhance the security of this local connector by
restricting access by IP address.
7 On the Access Control for Connector dialog box, put a check in the Enable Access
Control for Connector check box.
8 Select Hostname/IP or IP Range.
In the Hostname/IP field, type a hostname or IP address, then click Add.
What you type here appears in the Block or Allow field below. If you type a
hostname such as example.com, the name resolves to an IP address.
In the IP Range fields, type starting and ending IP addresses for an IP
address range, then click Add. What you type here appears in the Block or
Allow field below.
In the Block or Allow field, select Block these addresses or Allow only these
addresses, as appropriate, for the IP addresses or ranges in the box below.
To remove an IP address or range from the box, select it then click Remove.
Click Save when you have configured the appropriate access control restrictions.
The Access Control for Connector dialog box disappears.
9 In the Proxy Peer section, choose between:
Send mail directly to recipient mailserver. When selected, the outgoing
email messages coming from your internal email users are sent to the
recipient mail server after processing by the PGP Universal Server per the
appropriate policies.
Proxy mail to SMTP server. When selected, the outgoing email messages
from your internal email users are sent to the device you specify after
processing by the PGP Universal Server per the appropriate policies.
10 If you selected Proxy mail to SMTP server, in the Hostname field, type the
hostname or IP address of the device you want outgoing email messages to be sent
to after processing by the PGP Universal Server.
In the Port field, select the appropriate port. The default port for SMTP is 25. The
default for SMTPS (secure SMTP) is 465. The port number automatically changes
based on your selection from the Security menu.
In the Security menu, select between SSL, STARTTLS Attempt, STARTTLS
Disable, and STARTTLS Require. These are the same options available for the
Security menu in the Local Connector section.

155 Configuring Mail Proxies
Creating New or Editing Existing Proxies
11 Click Save.
Creating or Editing an Inbound SMTP Proxy
The Inbound SMTP proxy processes mail traffic coming into your network from the
Internet. An Inbound SMTP proxy can be configured only for a PGP Universal Server in
a gateway placement.
To create or edit an Inbound SMTP proxy
1 If you are editing an existing Inbound SMTP proxy, click on the name of the proxy
you want to edit in the Proxy column on the Mail Proxies page.
The Edit Mail Proxy page appears.
2 If you are creating a new Inbound SMTP proxy, click Add Proxy on the Mail
Proxies page, select SMTP from the Protocol menu, then select Inbound from the
SMTP Proxy Type in the Proxy Peer section.
The Add Mail Proxy: SMTP page appears.
3 In the Connector 1 field, in the Local Connector section, select the interface for
the local connector for this proxy from the drop-down menu.
The interfaces available are those configured on the Network Settings page
(System > Network). If you want more interfaces to be available for your proxies,
you need to configure them on the Network Settings page.
4 In the Port field, select the appropriate port.
The default port for SMTP is 25; the default for SMTPS (secure SMTP) is 465.
The port number automatically changes based on your selection from the Security
menu.
5 In the Security menu, select between:
STARTTLS Allow. Allows the security of the connection to be upgraded to
TLS via negotiation when communications begin. The external MTA must
support STARTTLS for the upgrade to occur.
STARTTLS Disable. STARTTLS is not allowed for this connection.
STARTTLS Require. Requires that the connection be secured by TLS. Only
select this option if you are confident that all the devices connecting to this
local connector support upgrading the security to STARTTLS.
SSL. Uses SSL to protect the connection between the external MTA sending
and the PGP Universal Server.
6 Click the Restrict Access button to enhance the security of this local connector by
restricting access by IP address.
7 On the Access Control for Connector dialog box, put a check in the Enable Access
Control for Connector check box.
8 Select Hostname/IP or IP Range.
In the Hostname/IP field, type a hostname or IP address, then click Add.
What you type here appears in the Block or Allow field below. If you type a
hostname such as example.com, the name resolves to an IP address.

156 Configuring Mail Proxies
Creating New or Editing Existing Proxies
In the IP Range fields, type starting and ending IP addresses for an IP
address range, then click Add. What you type here appears in the Block or
Allow field below.
In the Block or Allow field, select Block these addresses or Allow only these
addresses, as appropriate, for the IP addresses or ranges in the box below.
To remove an IP address or range from the box, select it then click Remove.
Click Save when you have configured the appropriate access control restrictions.
The Access Control for Connector dialog box disappears.
9 In the Mailserver field, in the Proxy Peer section, in the Hostname field, type the
hostname or IP address of the device you want incoming email messages to be sent
to after processing by the PGP Universal Server.
Under most circumstances, this should be your outward-facing mail server.
In the Port field, select the appropriate port. The default port for SMTP is 25; the
default for SMTPS (secure SMTP) is 465. The port number automatically changes
based on your selection from the Security menu.
In the Security menu, select between SSL, STARTTLS Attempt, STARTTLS
Disable, and STARTTLS Require. These are the same options available for the
Security menu in the Local Connector section.
10 Click Save.
Creating or Editing a Unified SMTP Proxy
The Unified SMTP proxy is a single proxy that includes the properties of both the
Inbound SMTP proxy and the Outbound SMTP proxy. In fact, you can individually
configure one Inbound and one Outbound SMTP proxy and achieve the same result as
with the Unified SMTP proxy.
The Unified SMTP proxy can only be configured for a PGP Universal Server in gateway
placement.
With the Unified SMTP proxy, all mail traffic arrives on the same local connectors. This
means that you do not need a second IP address for your PGP Universal Server, which
you would need if you created separate Inbound and Outbound SMTP proxies.
It also means you need to configure the Unified SMTP proxy so that it can distinguish
between inbound and outbound mail traffic, because all mail traffic is arriving on the
same local connectors.
You do this by creating a Designated Source IPs list, a list of IP addresses which by
definition are sending outbound mail traffic to the PGP Universal Server. Traffic from
all other IP addresses are, by definition, inbound from the Internet.
Put a different way, on the Unified SMTP proxy you put the IP addresses of your trusted
internal mail servers on the Designated Source IPs list, because these are the only
devices that should be sending outbound email traffic to the PGP Universal Server in
gateway placement.
The PGP Universal Server checks the source IP addresses of all incoming mail traffic on
its local connectors and decides the traffic fits one of these two categories:

157 Configuring Mail Proxies
Creating New or Editing Existing Proxies
The mail traffic is coming from an IP address on the Designated Source IPs list.
This traffic is thus outbound traffic coming from an internal mail server, and is
processed as such. Messages are encrypted and/or signed, per the applicable
policy, but not decrypted or verified.
The mail traffic is coming from an IP address not on the Designated Source IPs list.
This traffic is thus inbound traffic coming from the Internet, and is processed as
such. Messages are decrypted and verified, but not encrypted or signed.
To create or edit a Unified SMTP proxy
1 If you are editing an existing Unified SMTP proxy, click on the name of the proxy
you want to edit in the Proxy column on the Mail Proxies page.
The Edit Mail Proxy page appears.
2 If you are creating a new Unified SMTP proxy, click Add Proxy on the Mail Proxies
page, select SMTP from the Protocol menu, then select Unified from the SMTP
Proxy Type in the Proxy Peer section.
The Add Mail Proxy: SMTP page appears.
3 In the Connector 1 field, in the Local Connector section, select the interface for
the local connector for this proxy from the drop-down menu.
The interfaces available are those configured on the Network Settings page
(System > Network). If you want more interfaces to be available for your proxies,
you need to configure them on the Network Settings page.
4 In the Port field, select the appropriate port.
The default port for SMTP is 25; the default for SMTPS (secure SMTP) is 465.
The port number automatically changes based on your selection from the Security
menu.
5 In the Security menu, select between:
STARTTLS Allow. Allows the security of the connection to be upgraded to
TLS via negotiation when communications begin. The external MTA must
support STARTTLS for the upgrade to occur. The default port is 25.
STARTTLS Disable. STARTTLS is not allowed for this connection. The
default port is 25.
STARTTLS Require. Requires that the connection be secured by TLS. Only
select this option if you are confident that all devices connecting to this local
connector support upgrading the security to STARTTLS. The default port is
25.
SSL. Uses SSL to protect the connection between the external MTA and the
PGP Universal Server. The default port is 465.
6 Click the Restrict Access button to enhance the security of this local connector by
restricting access by IP address.
7 On the Access Control for Connector dialog box, put a check in the Enable Access
Control for Connector check box.
8 Select Hostname/IP or IP Range.
In the Hostname/IP field, type a hostname or IP address, then click Add.
What you type here appears in the Block or Allow field below. If you type a
hostname such as example.com, the name will be resolved to an IP address.

158 Configuring Mail Proxies
Creating New or Editing Existing Proxies
In the IP Range fields, type starting and ending IP addresses for an IP
address range, then click Add. What you type appears in the Block or Allow
field below.
In the Block or Allow field, select Block these addresses or Allow only these
addresses, as appropriate, for the IP addresses or ranges in the box below.
To remove an IP address or range from the box, select it then click Remove.
Click Save when you have configured the appropriate access control restrictions.
The Access Control for Connector dialog box disappears.
9 In the Designated Source IPs list, add the internal mail server(s) that sends mail
traffic to the PGP Universal Server that is outbound for the Internet.
To add the IP address of a mail server, click the plus sign icon, type the IP address,
then click Save.
The Unified SMTP proxy considers all mail traffic coming from IP addresses on
this list to be outbound for the Internet, and processes it accordingly.
10 Choose between:
Send mail directly to recipient mailserver. When selected, the outgoing
email messages coming from your internal email users will be sent to the
recipient mail server after processing by the PGP Universal Server per the
appropriate policies.
Send all outbound mail to relay. When selected, the outgoing email
messages from your internal email users will be sent to the device you
specify after processing by the PGP Universal Server per the appropriate
policies.
11 If you selected Send all outbound mail to relay, in the Hostname field, type the
hostname or IP address of the device you want outgoing email messages to be sent
to after processing by the PGP Universal Server.
In the Port field, select the appropriate port. The default port for SMTP is 25. The
default for secure SMTP is 465. The port number automatically changes based on
your selection from the Security menu.
In the Security menu, select between SSL, STARTTLS Attempt, STARTTLS
Disable, and STARTTLS Require. These are the same options available for the
Security menu in the Local Connector section.
12 In the Mailserver field, for Hostname, type the hostname or IP address of the
device you want incoming email messages to be sent to after processing by the
PGP Universal Server.
Under most circumstances, this should be your outward-facing mail server.
In the Port field, select the appropriate port. The default port for SMTP is 25; the
default for SMTPS (secure SMTP) is 465. The port number automatically changes
based on your selection from the Security menu.
In the Security menu, select between SSL, STARTTLS Attempt, STARTTLS
Disable, and STARTTLS Require. These are the same options available for the
Security menu in the Local Connector section.
13 Click Save.

20 Email in the Mail Queue
This section describes the Mail Queue feature.
You can configure Mail Queues from the Mail > Mail Queue page.
This feature is available with PGP Universal Gateway Email.
Overview
The Mail Queue page lists email messages that are waiting to be sent by the PGP
Universal Server. The list is often empty, even on medium-load servers.
When there are messages in the list, the following information is shown about each
queued message: the email address of the sender, the email address of the recipient, the
reason the message is in the queue, when the server received the message, and its size.
If the reason is too long to display in full, it is truncated. Click on or roll your cursor
over the shortened reason to see the complete text.
There are several reasons why an email message would appear on the list:
While looking for a key for the recipient of a message, a keyserver did not respond.
Only keyserver failures for $ADDRESS_DOMAIN keyservers do not cause a
message to be queued.
A problem with the network or the recipient mail server is preventing the PGP
Universal Server from sending messages (a network outage might be the issue).
While the PGP Universal Server waits for the mail server to respond, it queues up
outgoing messages.
The message recipient’s email address does not exist. If the message is not
immediately deliverable, the PGP Universal Server places it in the Mail Queue and
continues trying to send it. The message times out and disappears from the queue
after 4 days (96 hours).
You can wait for the messages to be sent or you can delete them from the queue.
Note: If a message is addressed to multiple recipients, and the keys for some of the
recipients cannot be found immediately, PGP Universal Server breaks the message
into multiple messages and only queues the messages for those recipients whose
key(s) were not found.
Deleting Messages from the Mail Queue
When there are messages in the list, the Mail Queue page lists each one on its own row.
You can delete one, some, or all messages from the list:
To delete individual email messages from the queue, click on the icon in the Delete
column of the message you want to delete. The message is deleted.

160 Email in the Mail Queue
Deleting Messages from the Mail Queue
To delete some of the email messages from the queue, click the check boxes for the
messages you want to delete, then select Delete Selected from the Options menu.
To delete all email messages in the queue at one time, select Delete All from the
Options menu. The messages are deleted.
Note: PGP Universal Server does not notify the sender of a deleted message of the
deletion.
For information about what messages have been handled by the PGP Universal Server,
see System Logs (on page 5).

21 Specifying Mail Routes
This section describes how to use mail routes with your PGP Universal Server.
Mail routes apply to all email processed by PGP Universal Gateway Email. For PGP
Desktop Email, mail routes apply only to messages generated by PGP Universal Server
and sent to internal users.
Warning: Creating static Mail Routes is an advanced feature that should only be used
if you have a specific reason to override the default mail routing behavior of a PGP
Universal Server. Incorrect configuration can cause mail loops or other delivery
problems.
Overview
Mail routing is used to establish static mail routes that override the DNS MX-record
lookup normally used when determining where to route mail. In certain instances, this
can provide a more efficient route, bypassing the “loop” through DMZ and the firewall.
For example, if you set static routes, email for internal users can be forwarded from the
PGP Universal Server directly to the internal mail server. Mail traffic for certain
destinations can also be routed over leased lines instead of the Internet.
Typically, PGP Universal Server proxies SMTP connections to specific hosts defined by
the administrator. These proxied connections do not involve mail routing, and thus are
not affected by any configured static mail routes. However, in certain instances, PGP
Universal Server transmits messages directly — in these instances, any configured
static mail routes applies.
Examples of such instances are:
When messages are being retransmitted from the mail queue.
For PGP Universal Server–generated messages: Daily Status Email, PGP Universal
Web Messenger notifications, bounce notifications, and so on.
When the outbound SMTP proxy is configured to “Send mail directly to recipient
mailserver.”
When no static mail routes are configured, the Mail Routes page displays the text “Your
mail is being routed normally.”
The PGP Universal Server can automatically create or adjust static mail routes when
you add or remove managed domains or when you change the server’s placement
within your network. For example, if the PGP Universal Server is externally placed, the
Setup Assistant automatically adds a mail route based on the managed domain and mail
server information you enter. You should make sure that the mail route is correct,
because it is not always possible for the PGP Universal Server to determine the correct
rules for your network.

162 Specifying Mail Routes
Managing Mail Routes
Use a wildcard static mail route when using PGP Universal Web Messenger and an
external relay. Your network firewall can block outgoing PGP Universal Web Messenger
messages when the messages are sent directly to the recipient domain. The wildcard
forces all outbound email to be routed to the next hop or specified MTA, which has
permission from the firewall to send email through. To create a wildcard mail route, use
the character * instead of specifying a route with a domain and hostname/IP.
Managing Mail Routes
You can add a new mail route, change route priority, edit an existing mail route, or
delete a mail route. You can only create one mail route per domain.
Adding a Mail Route
To add a static mail route
1 Click Add Mail Route.
The Add New Mail Route dialog box appears.
2 In the Domain Name field, type the domain name of the email that is to be
statically routed.
For example, if you want all email bound for example.com to be routed to a device
other than the MX-listed mailservers for example.com, you would type
"example.com." You can also use the wildcard character "*".
3 In the Hostname/IP field, type the hostname or IP address of the device to which
mail should be routed.
For example, "mail.example.com" or "10.1.1.30."
There is no requirement that the device you specify in the Hostname/IP field be a
device in the domain you specified in the Domain Name field.
4 Click Save.
The new static mail route is added.
Editing a Mail Route
To edit a static mail route
1 Click on the static route you want to edit.
The Edit Mail Route dialog box appears.
2 Type the desired changes for the domain name and the IP address of the host.
3 Click OK.
The information about the host is changed.

163 Specifying Mail Routes
Managing Mail Routes
Deleting a Mail Route
To delete a static mail route
1 Click the icon in the Delete column of the static route you want to delete.
A confirmation dialog box appears.
2 Click OK.
The static route you specified is removed from the list.

22
Customizing System Message
Templates
This section describes message templates, which allow you to modify the content of
predefined messages sent out by your PGP Universal Server in various circumstances.
For example, you can edit the content of messages sent out when email bounces, or
when notifying PGP Universal Web Messenger users of new email.
These messages are available for PGP Universal Gateway Email and PGP Desktop Email.
Overview
Message templates let you modify the contents of the predefined messages sent out by
the PGP Universal Server in various circumstances; for example, you can edit the
wording of the Smart Trailer.
You can customize each message template to add any content that is important for your
specific situation.
Most message templates include one or more template variables. These variables
always begin with a $, such as $URL. These variables convert directly into RFC 822
headers with appropriate text when the message is sent. Some variables are optional,
others are required. Be very careful when editing templates; the PGP Universal Server
does not send messages based on a template with incorrect or 822-unsupported
variables.
Changing the format of the template can also cause it to fail. If you change or remove
the blank line between the email headers and the message body, a template is no longer
considered by the system to be well-formed, and the template fails.
The list of permitted variables for each template along with a description of each is
provided on the dialog box itself. You can also restore a message to the factory default
setting, if necessary.
You should always test template changes to confirm that the template is still correctly
formatted. You should make sure, for example, that the mail built from the template
was successfully received by the proper recipients and that it contained the proper
information and/or links. Test the template by forcing the circumstance that causes the
edited template to be used. The test message should be sent to an external account that
you can access immediately so you can quickly validate the results.
The Message Templates page shows the list of message templates, and which PGP
Universal Server function each template supports.
Caution: The messages template character set is UTF-8. Do not change the character
set, or messages based on the templates are unreadable.
Templates and Message Size
There are two ways email senders are notified if they send messages too large to be
received by PGP Universal Web Messenger users.

166 Customizing System Message Templates
Overview
If the email is smaller than the recipient’s quota but would exceed the quota when
added to the rest of the email stored for that user, the sender receives a message based
on the template Quota Exceeded for Web Messenger Recipient (Delivered to Sender).
The original email is not delivered to the PGP Universal Web Messenger user.
If the email is larger than the recipient’s quota, or if the message is larger than 50MB
total, the sender receives a message based on the template Message Bounced - Message
Too Large. The original email is not delivered to the PGP Universal Web Messenger
user.
PDF Messenger Templates
New PDF Messenger recipients can receive one of several message notifications,
depending on the type of user they are. For more information, see PDF Messenger (on
page 122).
New PDF Messenger Message Notification. Messages based on this template are
sent to recipients who are PGP Universal Web Messenger users with passphrases.
This is the standard message recipients see when the entire original message is
converted to a secure PDF message.
Establish PDF Messenger Passphrase. Messages based on this template are sent
to recipients who are existing PGP Universal Web Messenger users but do not
have an un-hashed passphrase on record. This could be because they only received
statements with PDF Messenger Certified Delivery and were never previously
asked to create a passphrase.
New User Email - Establish PDF Messenger Passphrase. Messages based on this
template are sent to new recipients who have never received a PDF Messenger
statement and have never established a PGP Universal Web Messenger account.
New PDF Messenger Message Notification + Secure Reply. A message based on
this template is sent to existing PGP Universal Web Messenger users with
instructions on how to open the email. They must click the Secure Reply link to
send a secure reply. In addition to opening and replying to emails, users can also
change their passphrase or delivery options.
New Certified Delivery Message Notification + Secure Reply. A message based on
this template is sent to the recipient instructing them to read the attached Read
Me First.html file. They can then open the email using a PDF reader, send a secure
reply with or without acknowledging receipt of the message, or access their PGP
Universal Web Messenger Inbox.
New Certified Delivery Message Notification. A message based on this template
is sent to the recipient instructing them to read the attached Read Me First.html
file. They can then open the email using a PDF reader.
Secure Reply Trailer. A message based on this template is sent to the recipient
instructing them to click the Secure Reply link to reply to the email. Recipients
can also change their PGP Universal Web Messenger passphrase or delivery
options.
PGP Universal Web Messenger Templates
New and existing PGP Universal Web Messenger recipients receive one of several
message notifications, depending on what type of user they are.

167 Customizing System Message Templates
Editing a Message Template
New Message Notification. Messages based on this template notify recipients that
they have received a new PGP Universal Web Messenger message.
New User Email - Establish Passphrase. This template creates a message used
when sending a PGP Universal Web Messenger invitation to an external user
imported into the External Users page on the PGP Universal Server. Recipients
must create a passphrase to retrieve future PGP Universal Web Messenger
messages.
New User Email - Out-of-band Passphrase. A message based on this template
states that the recipient has a waiting PGP Universal Server Secured Message. The
recipient must contact the sender for the passphrase used to log in to PGP
Universal Web Messenger. The sender is prompted to create a passphrase by a
message based on the Out-of-band Passphrase (Delivered to sender) template.
Expiration Warning Message. This template creates a message that is sent by the
PGP Universal Server server to external users as a reminder that their PGP
Universal Web Messenger accounts are about to expire.
The expiration message is sent is seven days before the account expires, and the
maximum number of reminders that can be sent out each day is 10,000. Only one
account expiration reminder is sent for each user per expiration. When users
receive the expiration messages, users must click on the link in the email message
to log in to their PGP Universal Web Messenger accounts.
The following daily events are logged:
• The number of expiration reminders to be processed.
• The number of successful or failed expiration reminders.
Editing a Message Template
To edit a message template
1 Click on the description of the template you want to edit.
The appropriate Edit Message Template dialog box appears.
2 Make the desired changes to the template.
Caution: The messages template character set is UTF-8. Do not change the
character set, or messages based on the templates are unreadable.
3 To revert to the default content (both text and variables) of a message template,
click Revert to Default Message.
4 Click Save.

23
Managing Groups
This chapter describes how consumers are sorted into groups.
Understanding Groups
A group is a set of users and managed devices that match specified criteria. You can
sort consumers into groups manually, by user type, or by matching consumer attributes
to domains, dictionary entries or through LDAP values.
There are two groups installed on the PGP Universal Server: Everyone and Excluded.
You can also create custom groups.
Consumer policy and permissions are applied to consumers depending on to which
groups they belong. You can assign a consumer policy to a group, but it is not required.
Consumers can belong to multiple groups.
Because consumers can belong to more than one group, you can set the priority order of
the list of groups that reference consumer policy. Consumers receive policy based on
the highest ranking group to which the consumer belongs. The Everyone group is
always last in priority and the Excluded group is always first.
Sorting Consumers into Groups
Consumers can be sorted by the following methods:
LDAP rules. Specify sets of attributes and values that the consumer must match
to be a member of the group.
Dictionary matching. You can require that consumers match criteria specified in
a dictionary to be a member of the group. For example, you can create a dictionary
of usernames or email addresses, and any consumer with a matching username or
email address is a member of the group. For more information on using
dictionaries, see Using Dictionaries with Policy (on page 129).
Domain matching. You can require that users must have email addresses from a
specified domain.
Consumer type. Specify that members of the group must be internal users,
external users, Verified Directory users, and/or managed devices.
Assigned manually. You can add users and devices to the group manually. Devices
can only be sorted into groups manually, not through matching.
You can sort by any or all of these methods. You can specify multiple required matches.
For more information on how to sort consumers into groups, see Setting Group
Membership (on page 175).

170 Managing Groups
Policy Group Order
Everyone Group
The Everyone group is the default group. All non-excluded consumers are members of
the Everyone group. If consumers belong to no other group, than the consumer policy
assigned to the Everyone group applies. If a consumer belongs to any other group, the
other group's consumer policy applies. By default, the Everyone group receives the
Default consumer policy, but you can specify a different policy. For more information
on consumer policy, see Understanding Consumer Policy (on page 197).
You cannot delete this group, but you can change settings at any time.
Excluded Group
Excluded consumers are consumers you do not want to include as part of any group.
They do not have keys managed by the PGP Universal Server. They do not receive client
installations. The Excluded consumer policy applies. For more information on
consumer policy, see Understanding Consumer Policy (on page 197).
You can edit the settings of the Excluded group, but you cannot delete the group.
You can exclude consumers through Directory Synchronization, or through matching
to domain, dictionary, or type. You cannot manually add consumers to the Excluded
group.
If some of your consumers are sorted into the Excluded group using Directory
Synchronization, and you later disable Directory Synchronization, those consumers
become members of the Everyone group.
You can also exclude users by adding their email addresses to either of the default
exclusions dictionaries. If a user’s email address appears on the Excluded Addresses:
Sign or the Excluded Addresses: Do Not Sign dictionaries, that user is a member of the
Excluded group. This is true even if none of the mail policy rules use the default
exclusions dictionaries. Excluding users this way does not require Directory
Synchronization. For more information, see Using Dictionaries with Policy (on page
129).
Excluding Users by Default
In previous versions of PGP Universal Server, you could use the Exclude non-matching
users by default feature to specify that all users who do not match the criteria for any
other policy are treated as excluded users, instead of assigning those users to the
default policy. You can replicate this function by opening the Group Settings page for
the Everyone group and applying the consumer policy Excluded.
Policy Group Order
Because consumers can belong to more than one group, you can set the priority order of
the list of groups that reference consumer policy. Consumers receive policy based on
the highest ranking group to which the consumer belongs. The Everyone group is
always last in priority and the Excluded group is always first.
Group permissions are also enforced using this setting.

171 Managing Groups
Creating a New Group
Migrate Groups from PGP Universal Server 2.12 SP4
Caution: After migrating from a previous version of PGP Universal Server, you must
ensure that the groups are in the correct priority order. If groups are incorrectly
prioritized, users will not receive the correct policy settings.
In PGP Universal Server versions 2.12 SP4, if a user can be matched to more than one
user policy, the user received the policy with the name that was first in alphabetical
order. Administrators could not change this ordering. In PGP Universal Server 3.2.1,
because users can belong to more than one group, you must make sure that the policies
are ranked correctly.
Setting Policy Group Order
Use the numbers in the order drop-down menus to reorder the groups. This function is
only available if you have at least one custom group.
To set the policy group order
1 Select a number from the drop-down menu for each group. The number indicates
the order in which you want group policies applied.
Groups reorder based on your number selections.
2 Continue selecting numbers until the groups are in the correct policy priority
order.
Creating a New Group
1 On the Groups page, click Add Group.
The Groups Settings: Add Group page appears.
2 On the General subtab, type in a Group Name and Description.
3 To apply a consumer policy to members of this group, select Apply Consumer
Policy to members of this group, and choose a consumer policy from the
drop-down menu.
4 On the Membership subtab, specify how you want to sort users into this group and
what criteria you want users to match. For more information, see Setting Group
Membership (on page 175).
5 Click Save.

172 Managing Groups
Deleting a Group
Deleting a Group
You can only delete groups created by an administrator. The Excluded and Everyone
groups cannot be deleted. Because consumers receive policy based on the highest
ranking group to which the consumer belongs, members of a deleted group receive
policy based on the next highest ranking group to which they belong. If they are not
members of any other ranked group, they receive policy settings of the Everyone group.
To delete a group
1 Click the Delete icon of the group you want to remove.
A confirmation dialog box appears.
2 Click OK.
The group is deleted.
Viewing Group Members
You cannot view lists of members for the pre-installed groups Everyone and Excluded,
but you can see lists of users for groups you create.
To view a list of group members
1 Select the group whose members you want to see.
The Group Details page appears.
2 Click View to select which type of group member you want to see. You can choose:
Users. Users added to the group by the administrator.
Managed Devices. Devices added to the group by the administrator.
Matched Consumers. Users and devices added to the group because of
matched domain, dictionary, consumer type, or directory criteria.
Manually Adding Group Members
Consumers are often sorted into groups based on matched criteria, but you can also
manually add users or devices to the group.
For more information on using matching to sort consumers into groups, see Setting
Group Membership (on page 175).
To add consumers to a group
1 Select the group to which you want to add members.

173 Managing Groups
Manually Removing Members from a Group
The Group Details page appears.
2 Click the View button for the Users or Managed Devices member type.
The group member page appears.
3 Click Add Users or Add Managed Devices.
4 The Add to Group dialog appears.
5 Type the name of the user or device you want to add.
6 Click Save.
7 The consumer is added to the group.
You can also add individual consumers to the group from that consumer's User
Information or Managed Device Information page. For more information, see Adding
Users to Groups (on page 242) or Adding Managed Devices to Groups (on page 184).
Manually Removing Members from a Group
You can manually remove members from any custom group, but you cannot remove
members from the Excluded or Everyone groups. You also cannot remove group
members if they are in the group because they matched a domain, dictionary, or
directory.
To remove one consumer from a group
1 Select the group from which you want to remove members.
The Group Details page appears.
2 Click the View button for the Users or Managed Devices member type.
The group member page appears.
3 Click the Remove icon of the consumer you want to remove.
A confirmation dialog box appears.
4 Click OK.
The consumer is removed from the group.
To remove multiple consumers from the group
1 Select the group from which you want to remove members.
The Group Details page appears.
2 Click the View button for the Users or Managed Devices member type.
3 The group member page appears.
4 Select the check box at the far right end of the row of each of the consumers you
want to remove.
5 Select Remove Selected From Group or Remove All From Group from the
Options menu at the bottom right corner.
A confirmation dialog box appears.

174 Managing Groups
Group Permissions
6 Click OK.
The consumers are removed from the group.
Group Permissions
Permissions allow members of a group to perform actions on objects. In other words,
you can give all members of a group permission to delete managed keys, or create
custom data objects, or many other actions. You can give permission to group members
to act on a single object, or every object of a certain type; for example, to create all
symmetric key series or one particular symmetric key series.
Managed keys, symmetric key series, and custom data objects have owners, and object
owners have complete permission to act on what they own. There is one exception: SKM
key owners cannot delete or modify their OpenPGP keys, because they do not have
access to their private keys. Also, owners cannot move ownership of objects they own to
any other consumer.
Excluded consumers have read-only permissions for things they own but cannot change
anything. They also have any read-only permissions granted to Everyone group
members. Read-only permissions include the ability to read a public key, read a key
pair, decrypt with a key, and verify with a key.
All non-excluded consumers are members of the Everyone group, and can also be
members of more than one group. Group members have the permissions of all groups of
which they are members.
Adding Group Permissions
To add group permissions
1 Select the group to which you want to add permissions.
The Group Details page appears.
2 Click View for permissions.
The group permissions page appears.
3 Click Add Permissions.
The Add Permissions dialog appears.
4 Use the drop-down menus to create a new permission.
5 Click the Add icon to create as many permissions as necessary.
6 Click Save.
Deleting Group Permissions
To delete a single group permission
1 Select the group from which you want to delete permissions.

175 Managing Groups
Setting Group Membership
The Group Details page appears.
2 Click View for permissions.
The Permissions page appears.
3 Click the Delete icon of the permission you want to remove.
A confirmation dialog box appears.
4 Click OK.
The permission is removed from the group.
To delete multiple group permissions
1 Select the group from which you want to delete permissions.
The Group Details page appears.
2 Click View for permissions.
3 The Permissions page appears.
4 Select the check box at the far right end of the row of each of the permissions you
want to remove.
5 Select Delete Selected or Delete All from the Options menu at the bottom right
corner.
A confirmation dialog box appears.
6 Click OK.
7 The permissions are removed from the group.
Setting Group Membership
You can control how users and devices are sorted into groups. You can sort consumers
into groups by user type, or by matching consumer attributes to domains, dictionary
entries or through LDAP values. Consumers must match your requirements to become
members of the group.
To set group membership requirements
1 From the Groups page, select the group you want to edit.
The Group Details page appears.
2 Click Group Settings.
The Group Settings page appears.
3 If necessary, click the Membership subtab.
4 Enable Match Consumers by Domain, Dictionary, or Type to sort consumers into
the group by matching the specified criteria. You can use this in conjunction with
LDAP directory matching.
5 From the drop-down menu, select the criteria you want to match. Add as many
criteria as necessary.

176 Managing Groups
Searching Groups
6 Enable Match Consumers Via Directory Synchronization to sort consumers into
the group by matching LDAP directory values. Directory Synchronization must be
enabled. You can use this in conjunction domain, dictionary, and type matching.
7 For All LDAP Directories, use attribute and value pairs that are common to all the
LDAP directories to which the PGP Universal Server refers. Leave this empty if
you do not want to use attributes associated with global LDAP directories. Choose
whether you want all or any of the attribute and value pairs to be true and apply to
the consumer to make the consumer a member of the group.
When you set a group to match disabled users in Active Directory and specify
matching any of the following, PGP Universal Server matches all disabled users in
the directory and ignores specified LDAP attribute/value pairs for that group. If
you want to match disabled users and also attribute/value pairs, specify matching
all of the following.
8 For any LDAP Directory, use attribute and value pairs that are specific to the LDAP
directory you choose. Add as many directories as needed. Choose whether you
want all or any of the attribute and value pairs to be true and apply to the
consumer to make the consumer a member of the group.
9 Enable Match disabled Active Directory users to add users disabled in Active
Directory to the group. Matching Active Directory-disabled users receive the same
policy and permissions as all other group members.
You can also add consumers to a group manually. For more information, see Manually
Adding Group Members (on page 172).
Searching Groups
To do a simple search
1 On the Consumers > Groups page, select the group you want to search.
The Group Details page appears.
2 Click View to open the list of consumers or permissions you want to search.
3 Type the criteria for which you want to search, and click the Search icon. A list of
consumers or permissions that fit the criteria you specified appears.
To search using advanced criteria
1 On the Consumers > Groups page, select the group you want to search.
The Group Details page appears.
2 Click View to open the list of consumers you want to search. You cannot perform
an advanced search for permissions.
3 Click the advanced icon.
The Search dialog box appears.
4 Specify your criteria. Available search criteria depends on which users are listed.
5 If you want to use more search criteria, click the plus sign icon and enter the
appropriate criteria. Returned results match all the search criteria you enter.

177 Managing Groups
Creating Group Client Installations
6 Click Search.
A list of consumers that fit the criteria you specified appears.
To clear the search, click the cancel button to the left of the search field.
Creating Group Client Installations
You can create and download a customized client installation for distribution to a
group.
Consumer policy controls the client software configuration. For more information on
setting consumer policy for a group, see Administering Consumer Policy (on page 197).
Before you create a client installer, you must understand how consumers enroll.
Enrollment is the binding of a computer with client software installed to a PGP
Universal Server. After a client is bound it receives feature policy information from the
PGP Universal Server; for example, encryption keys, email policy, PGP NetShare, or
PGP Whole Disk Encryption administration. For more information on how to plan for
consumer enrollment, see Understanding User Enrollment Methods (on page 227).
How Group Policy is Assigned to PGP Desktop Installers
Create PGP Desktop deployments from the Consumers > Groups section of the PGP
Universal Server administrative interface.
Create PGP Desktop installers for consumers with one of three available policy settings:
No policy settings. Create a PGP Desktop installer with no policy settings, which
means that the PGP Universal Server administrator has no way to control how
users use PGP Desktop on their systems.
Auto-detect Policy Group. PGP Desktop coordinates with the PGP Universal
Server to identify the correct policy group for the consumer. Sort consumers into
groups by user type, or by matching consumer attributes to domains, dictionary
entries or through LDAP values. Based on these attributes, the appropriate policy
is applied. If you later create a new group and the user’s attributes match that
group, the policy for the consumer switches to the policy for that new group. If
you have not created any custom groups, the consumer policy for the default
Everyone group applies.
Preset policy. Select a consumer policy to apply to the installer you are creating.
All users who get this installer are bound to the selected policy. If you change the
settings of the policy later, those settings that are not implemented at installation
(such as creating a PGP Virtual Disk volume) are modified for the PGP Desktop
users who are bound to this policy. If you have not created any custom consumer
policies, the default policy is the only user policy you can apply to the installer.
Note: If you are using Directory Sync to apply policy, do not use Preset Group Policy.
Directory Sync will always override the Preset Group Policy.
Note: You must have a PGP Desktop license to create customized PGP Desktop
installers. You can use the same license for all your policies, but unless you clone
your user settings from a policy that already has license information entered, you
need to type the license information into each policy individually.

178 Managing Groups
Creating Group Client Installations
Note: Changes you make to download policies automatically update. If you make
changes to the Key Setup section of a policy, those changes only affect new users.
Existing user keys do not change.
Note: PGP Corporation supports backward compatibility for clients only. For
example, you cannot upgrade or install a PGP Desktop 9.9 client bound to PGP
Universal Server 2.0.x. You must upgrade your PGP Universal Server to support PGP
Desktop 9.9 bound clients. PGP Universal Server 2.5 and later does offer limited
support to 9.0.x clients.
When to Bind a Client Installation
To send and receive protected email, PGP Desktop must be able to access a mail server
to send and receive mail and a PGP Universal Server to get keys and policies.
In many cases, PGP Desktop determines how to communicate with the appropriate mail
server and PGP Universal Server automatically. There are two scenarios where it
cannot do this automatically, however. In these cases, this information must be
provided to it.
Note: Do not to bind a mail server to a PGP Universal Server except for the two cases
described below. If you do, the PGP Desktop user cannot send or receive email.
Because the mail server binding setting default is a wildcard *, which binds to any
mail server, you might need to remove the default to ensure that there is no bound
mail server.
The two cases are:
Internal MAPI or Lotus Notes client running PGP Desktop: In a Microsoft
Exchange or Domino Server environment, the PGP Universal Server is prohibited
from being between the internal email client and the Exchange or Domino Server
in the logical flow of data. In this situation, the PGP Desktop can automatically
determine its mail server (the Exchange or Domino Server), but it cannot
automatically determine its PGP Universal Server; that information must be
provided to it.
MAPI and Lotus Notes email clients are only supported in the Windows version of
PGP Desktop.
Internal PGP Desktop user accessing a PGP Universal Server externally: Same
problem with this configuration. By definition, the PGP Universal Server is
between the mail server and the Internet, thus making it impossible for the PGP
Desktop to automatically determine its PGP Universal Server. It must be told
which PGP Universal Server to use.
Caution: If PGP Desktop is installed in either of the two cases described above and
the mail server is not bound to a PGP Universal Server, and the end user then sends
an email message outside of their email domain, the PGP Universal Server creates
Server Key Mode keys for that user. The user does not have the option of other key
modes (if allowed by policy). The user also cannot retrieve keys or policies until the
mail server is bound to a PGP Universal Server in a PGP Desktop policy.
There are two ways of “binding” a mail server and a PGP Universal Server in a PGP
Desktop policy: pre-binding and manual binding.
Manual binding: PGP Desktop is first installed on the system of the end user, then
create a policy on the client that includes the appropriate mail server and PGP
Universal Server.

179 Managing Groups
Creating Group Client Installations
Pre-binding: Configure the PGP Desktop installer with the information needed to
create the binding; the client is already bound to the mail server and PGP
Universal Server when it is installed. To pre-bind a client, follow the instructions
on creating client installers.
Creating PGP Desktop Installers
The procedure for creating PGP Desktop installers for your consumers is different
depending on how you want group policy applied to client installation.
Creating an Installer with No Policy Settings
To create a PGP Desktop installer with no associated consumer policy
1 On the Groups page, click Download Client.
The Download PGP Clients page appears.
2 In the Client field, select PGP Desktop.
3 In the Platform field, select Mac OS X, Linux 32-bit or Linux 64-bit (RHEL 6.2,
6.1, 5.3, 5.2; Ubuntu 11.04, 11.10, 9.04, 8.04), Windows 32-bit, or Windows 64-bit
as appropriate.
4 From the Language drop-down menu, select the language you want the client
installation to use.
5 Make sure the Customize check box is deselected.
6 Click Download.
The PGP Desktop installer is created and downloaded to your system.
7 Distribute the PGP Desktop installer to your users and have them install it on their
systems.
Creating an Installer with Auto-Detect Policy Group
Before you begin, create the custom consumer policies you want to be linked to your
PGP Desktop users. If you do not create any custom consumer policies, then your PGP
Desktop users automatically receive whatever policy is associated with the Everyone
group, most likely the Default consumer policy. Configure the settings on the PGP
Desktop page appropriately for these custom consumer policies. For more information,
see Administering Consumer Policy (on page 197).
To create a PGP Desktop installer with auto-detect policy
1 On the Groups page, click Download Client.
The Download PGP Clients page appears.
2 In the Client field, select PGP Desktop.
3 In the Platform field, select Mac OS X, Linux 32-bit or Linux 64-bit (RHEL 5.3,
RHEL 5.2, Ubuntu 8.04, Ubuntu 9.04), Windows 32-bit, or Windows 64-bit as
appropriate.

180 Managing Groups
Creating Group Client Installations
4 From the Language drop-down menu, select the language you want the client
installation to use.
5 Make sure the Customize check box is selected.
6 Select Auto-detect Policy.
7 In the PGP Universal Server field, type the PGP Universal Server you want the
application to interact with.
The PGP Universal Server you are using to create the installer is listed by default.
8 In the Mail Server Binding field, type the name of the mail server you want bound
to that PGP Universal Server. You must type this information unless your users
read mail directly from this PGP Universal Server via POP or IMAP. Customized
client installations will not work without mail server binding.
The * wildcard character is the default setting; the client will bind automatically to
any mail server. Mail policy will be enforced for any mail server to which the client
connects. You can also use the wildcard as follows: *, *.example.com, and
example.*.com.
For more information about what mail configurations require you to change the
binding to other than the default settings, see Binding (see "When to Bind a Client
Installation" on page 178).
If you are creating a binding for an internal MAPI email client, you must use the
WINS name of the Exchange Server.
If you are creating a binding for an internal Lotus Notes email client, you must use
the fully qualified domain name of the Domino server.
9 Click Download.
The PGP Desktop installer is created and downloaded to your system.
10 Distribute the PGP Desktop installer to your users and have them install it on their
systems.
Once installed, PGP Desktop coordinates with the PGP Universal Server and links
to the most appropriate user policy. This linkage is based on how closely the
settings for the particular user in the LDAP directory match the settings of the
available user policies.
If an administrator later adds a more appropriate policy, the affected PGP Desktop
users automatically become linked to the new, more appropriate policy.
Creating an Installer with Preset Policy
Before you begin, create the custom consumer policies you want to be linked to your
PGP Desktop users. If you do not create any custom consumer policies, then your PGP
Desktop users automatically receive whatever policy is associated with the Everyone
group, most likely the Default consumer policy. Configure the settings on the PGP
Desktop page appropriately for these custom consumer policies. For more information,
see Administering Consumer Policy (on page 197).
To create a PGP Desktop installer with preset policy
1 On the Groups page, click Download Client.
The Download PGP Clients page appears.
2 In the Client field, select PGP Desktop.

181 Managing Groups
Creating Group Client Installations
3 In the Platform field, select Mac OS X, Linux 32-bit or Linux 64-bit (RHEL 5.3,
RHEL 5.2, Ubuntu 8.04, Ubuntu 9.04), Windows 32-bit, or Windows 64-bit as
appropriate.
4 From the Language drop-down menu, select the language you want the client
installation to use.
5 Make sure the Customize check box is selected.
6 Select Preset Policy, then select the policy you want your PGP Desktop users to be
linked to from the drop-down menu.
If you have not created any custom user policies, then the only entry in the
drop-down menu is Default.
7 You can also select to embed policy and license information into the installer to
force the clients to be disconnected from the PGP Universal Server. Choose Embed
policy and license information to force disconnected clients. In this case, there is
no connection between the client and the PGP Universal Server. The client never
receives any updated policy information from the PGP Universal Server, even if
the policy is updated on the server side. Policy information normally downloaded
during installation is instead embedded in the installer itself. The Organization
Key and ADK are not included in embedded policies. This option is useful for PGP
Whole Disk Encryption-only deployments, which cannot connect again to the PGP
Universal Server. Remember that if a PGP Whole Disk Encryption deployment
never connects to the PGP Universal Server, you cannot use Whole Disk Recovery
Tokens. The option is not recommended for other PGP Desktop deployments.
Caution: Use this option carefully; most product features do not work in this
mode.
8 In the PGP Universal Server field, type the PGP Universal Server you want the
application to interact with.
The PGP Universal Server you are using to create the installer is listed by default.
9 In the Mail Server Binding field, type the name of the mail server you want bound
to that PGP Universal Server. You must type this information unless your users
read mail directly from this PGP Universal Server via POP or IMAP. Customized
client installations do not work without mail server binding.
The * wildcard character is the default setting; the client will bind automatically to
any mail server. Mail policy is enforced for any mail server to which the client
connects. You can also use the wildcard as follows: *, *.example.com, and
example.*.com.
For more information about what mail configurations require you to change the
binding to other than the default settings, see Binding (see "When to Bind a Client
Installation" on page 178).
If you are creating a binding for an internal MAPI email client, you must use the
WINS name of the Exchange Server.
If you are creating a binding for an internal Lotus Notes email client, you must use
the fully qualified domain name of the Domino server.
10 Click Download.
The PGP Desktop installer is created and downloaded to your system.
11 Distribute the PGP Desktop installer to your users and have them install it on their
systems.

182 Managing Groups
Creating Group Client Installations
Once installed, PGP Desktop coordinates with the PGP Universal Server to retrieve
the settings from the linked consumer policy. This link cannot be changed once
PGP Desktop is installed.
If the linked policy is deleted, the link reverts to the Default policy.

24 Managing Devices
In the PGP Universal Server, Consumers can include not only Users (the owners of
email addresses) but also devices such as the computers and disks that are running
under PGP Whole Disk Encryption through the PGP Desktop client, if those features
have been purchased and licensed for use with PGP Universal Server. In addition, you
can add arbitrary devices as Managed Devices to the PGP Universal Server database.
If you have PGP Desktop clients with WDE, whenever a user enrolls, PGP Universal
Server also obtains information about the computer and disks associated with the user.
As an administrator you can then view information about disk encryption status, login
failures, and authorized users. If the device has a key reconstruction block associated
with it, you can also view that from the device information display.
You can add managed devices manually through the administrative interface, or
through the USP API or PGP Command Line commands.
WDE Disks and WDE Computers cannot be added manually. They are discovered
when a user enrolls.
For a managed device that you have added manually, you can add an authentication key
(public key) or password, assign it to be a member of a group, set arbitrary attributes,
and set permissions for the device.
External applications can make requests of PGP Universal Server concerning these
managed devices using the USP API or PGP Command Line commands.
To view the devices being managed by PGP Universal Server
1 Go to Consumers > Devices. The All Devices page appears.
This shows all the devices (managed devices, WDE Disks, WDE Computers) in the
PGP Universal Server database.
For each device, the shows the name of the device, its type, whether
authentication is configured for the device, and the date and time of the last
interaction the PGP Universal Server had with the device.
2 To view only devices of a specific type, click the appropriate tab (Managed Devices,
WDE Computers, WDE Disks). The list is filtered to show only devices of the
selected type. Depending on the type of device, different information is displayed.
3 To view detailed information about a device, click the device name. This displays
the Device Information page for the device.
Managed Devices
Managed Devices are arbitrary "devices" added manually to the PGP Universal Server
database so the the PGP Universal Server can manage them and their related
components, such as keys, attributes, and permissions. A Managed Device can be a
device such as a web server that handles credit cards or a bank's automated teller
machine.

184 Managing Devices
Managed Devices
For a managed device, you can add an authentication key (public key) or password,
assign the device to be a member of a group, set arbitrary attributes, and set
permissions for the device.
External applications can make requests of PGP Universal Server concerning these
managed devices using the USP API or PGP Command Line commands.
To view the Managed Devices in the PGP Universal Server database
1 Go to Consumers > Devices. The All Devices page appears.
2 Click the Managed Devices tab. This filters the list so that only Managed Devices
(not WDE Disks or WDE Computers) are listed.
For each managed device, the list shows the name of the device, whether
authentication is configured for the device, its effective policy group (Everyone by
default), and the date and time of the last interaction the PGP Universal Server
had with the device.
Adding and Deleting Managed Devices
To manually add a Managed Device to the PGP Universal Server database:
1 From the Consumers > Devices page, under either the All Devices list or the
Managed Devices list, click Add Managed Device....
2 Type a name for the device in the Display Name field.
3 Optionally, type a passphrase in the Passphrase field, and type it again to confirm
it in the Confirm field.
4 Click Add to add the device to the database.
The Add Managed Device dialog stays open so you can add another managed
device.
To delete Managed Device
1 From the Consumers > Devices page, find the device on either the All Devices list
or the Managed Devices list
2 Click the Delete icon in the row for the device you want to delete.
3 To delete multiple devices, click the check boxes for the rows you want to delete
and select Delete Selected from the Options menu. Use the Delete All option from
the Options menu to delete all managed devices.
Adding Managed Devices to Groups
Sorting devices into groups enables you to use policy to manage the certificates on the
devices.
Managed Devices can be sorted into groups manually or by matching to the consumer
type. You cannot use directory, domain, or dictionary matching to sort devices into
groups.

185 Managing Devices
Managed Devices
Note: Only managed devices can be added as members of a group. WDE Computers
and WDE Disks cannot be members of a group.
You can manually assign a managed device to a group in one of two ways:
From the Managed Device Information page for a specific device, you can add the
device to one or more groups (in addition to the Everyone group).
From a group information page, you can add managed devices to the group.
Managed Device added manually appear under the Managed Devices section on the
group information page.
Devices added automatically through matching to a consumer type appear under the
Matched Consumers section on the group information page.
Note: A managed device can be a member of multiple groups, but an individual
managed device can appear only once in a specific group. In other words, if a
managed device is added to a group through consumer type matching, you cannot
add it manually. If a managed device has been added manually, and you subsequently
turn on consumer matching, only managed devices that are not already group
members will be added as matched consumers.
To manually add a Device to a group from the Managed Device Information page
1 From the Consumers > Devices page, under either the All Devices list or the
Managed Devices list, click the name of the Managed Device you want to add to a
group. The Managed Device Information page for the device appears.
2 Display the Groups list to see the current group memberships for this device.
Managed devices are always members of the Everyone group.
3 To add the device to an individual group, click Add to Group... to display the Add
Devices to Group dialog.
4 In the Name field, type the name of the group to which the device should be added,
and click Save. The group appears in the Groups list for the device.
To manually add a device to a group from the Group Information page:
1 From the Groups page, click the name of the group to which you want to add a
device. The group information page for the selected group appears.
2 Click View... under the Managed Devices section to display the managed devices
added to the group by an administrator.
Note: Managed Devices that are added automatically through Consumer
Matching appear in the Matched Consumers section, and do not appear in the
Managed Devices section.
3 Click Add Managed Devices... to display the Add Devices to Group dialog.
4 In the Name field, type the name of the device you want to add. The device must
already exist in the database (and appear in the Managed Devices list under
Consumers > Devices).
5 Click Save. The device appears in the Managed Devices list for the group.

186 Managing Devices
Managed Devices
Adding Managed Devices automatically through Consumer Matching
1 From the Groups page, click the name of the group to which you want to add a
device. The group information page for the selected group appears.
2 Click Group Settings... to display the Group Settings page for the group.
3 Go to the Membership tab, and check Match Consumers by Domain, Dictionary,
or Type.
4 From the drop-down menu for Consumer is, select Managed Device, then Save.
Managed Devices that are already in the PGP Universal Serverdatabase are added
to this group. As new managed devices are added to PGP Universal Server they are
automatically also added to the group.
Managed Device Information
To view detailed information about a specific managed device
1 From the Consumers > Devices page, under either the All Devices list or the
Managed Devices list, click the name of the managed device you want to see.
2 The Managed Device Information page appears for the device you selected.
From this page you can view some basic information about the device. You can also add
or change information about the device.
To view logs for this device
Click View Log Entries. This displays the Administration log entries for this
device.
To changed the device display name
1 Click Edit Names... and type a new display name for the device.
2 Click Save to save the change or Cancel to close the dialog without making the
change.
Authentication Information
To view or add authentication credentials for the device
1 Expand the Authentication section of the Managed Device Information page.
If a public key has been imported for the device, the key ID is displayed.
To view the public key information, click the key ID link.
To delete the key, click the delete icon.
If a passphrase has been added, the status Assigned appears.

187 Managing Devices
Managed Devices
To change the passphrase click Change....
To delete the passphrase, click the delete icon.
2 To add a Public Key, click Import... to display the Update Public Key page.
Provide the name of a file where the key has been saved, or copy and paste
the key block.
Click Import to import the key.
3 To add a passphrase:
Click Create... and type (and confirm) the passphrase in the fields provided.
Attributes
To view, add, or delete Attributes
1 Expand the Attributes section of the Managed Device Information page.
If attributes have been added, the attribute/value pairs are listed in this area.
Attributes are arbitrary name/value pairs. Outside applications can make requests
related to attributes through the USP API or through PGP COmmand Line.
2 To add, delete, or modify attributes for this device, click Edit Attributes....
3 To add attributes, type the attribute name and its value in the fields provided.
To add additional attributes, click the Add icon.
4 To change an attribute name or its value, just retype the information in the field.
5 To remove an attribute, click the Remove icon.
Groups
To add or view Group membership for this device
1 Expand the Groups section of the Managed Device Information page.
This shows all the groups to which the managed device has been added. The group
at the top of the list is the Effective Group -- the group whose policies apply to this
managed device. The effective group is always the most recent group to which the
device was added
Managed Devices are always members of the Everyone group by default.
2 To view a group of which the device is a member, click the group name.
3 To go the the Consumers > Groups page to view all groups, click All Groups....
4 To add the managed device to a group, click Add to Group...
The Add Device to Group dialog appears.

188 Managing Devices
Managed Devices
5 Type the name of the group to which the device should be added, and click Save.
See Adding Managed Devices to Groups (on page 184) for more information.
6 To remove a device from a group, you must go the the Group information page and
do it from there. For instructions see Deleting Managed Devices from Groups (on
page 190).
Permissions
To view, set, or delete Permissions for this device
1 Expand the Permissions section of the Managed Device Information page.
If permissions have been added specifically for this device, the permission settings
are listed in this area. The device also inherits permissions based on its group
membership.
If a listed permission involves a managed key, you can click the key ID to see
details about the managed key.
2 To add, edit, or delete permissions, click View and Edit Permissions....
The Permissions page for this device appears.
To remove a permission, click the Delete icon.
To remove multiple permissions, check the boxes next to the permissions
you want to delete and select Delete Selected from the Options menu. To
remove all permissions, select Delete All from the Options menu.
3 To search for a specific permission, type the relevant string into the Search field at
the top right of the dialog box, and click the search icon.
The permissions list will be filtered to display only permissions that match the
search criterion.
4 To add, remove or modify permissions, click Add Permissions...
5 Use the drop-down menus to create a new permission.
6 Click the Add icon to create as many permissions as necessary. Use the Remove
icon to remove individual permission. You can also modify existing permissions.
Managed Keys
To view the Managed Keys for this device
1 Expand the Managed Keys section of the Managed Device Information page.
If there are managed keys for this device, they are listed in this area.

189 Managing Devices
Deleting Devices from PGP Universal Server
Information provided about the keys includes the key mode (SKM, CKM etc.), what
key usage flags are set on the key, the key size and encryption type, the date it was
created and when it will expire, its status (Valid, Revoked, Expired), and whether
key reconstruction is enabled. (If a key reconstruction block has been uploaded, a
delete icon is also provided to enable deleting the key reconstruction block to
prevent a user from recreating the key.)
Subkeys are also displayed.
2 You can revoke, export, or delete the managed key using the icons at the end of the
row.
3 To view key details, click the Key ID to display the Managed Key Information page
for this key.
Deleting Devices from PGP Universal Server
Warning: You cannot delete Intel Anti-Theft-activated computers from the Devices
list. Before you delete an AT Activated device, you must deactivate and decrypt the
computer.
You can delete any of the three types of devices -- managed devices,WDE Disks and
WDE computers. Deleting a managed device removes it from any groups to which it has
been assigned, as well as deleting it from the PGP Universal Server database. Any
configuration information (authentication, attributes, permissions) is also deleted. To
delete a device from a group without removing it from the database, see Deleting
Managed Devices from Groups (on page 190).
To delete a single device from PGP Universal Server
1 From the Consumers > Devices page, find the device on either the All Devices list
or the list based on the type of device.
2 Click the Delete icon in the row for the device you want to delete.
To delete multiple devices from the PGP Universal Server
1 From the Consumers > Devices page, display either the All Devices list or the list
based on the type of device.
2 Click the check boxes for the rows you want to delete and select Delete Selected
from the Options menu.
3 To delete all devices in the list, use the Delete All option from the Options menu
to delete all managed devices.

190 Managing Devices
Deleting Managed Devices from Groups
Deleting Managed Devices from Groups
You can manually remove Managed Devices from any custom group, but you cannot
remove them from the Everyone group. You also cannot manually remove Managed
Devices if they are in the group due to matching the consumer type.
To remove one Managed Device from a group
1 Select the group from which you want to remove the device.
The Group Details page appears.
2 Click the View button for the Managed Devices member type.
The group member page appears.
3 Click the Remove icon of the device you want to remove.
A confirmation dialog box appears.
4 Click OK.
The Managed Device is removed from the group.
To remove multiple Managed Devices from the group
1 Select the group from which you want to remove managed devices.
The Group Details page appears.
2 Click the View button for the Managed Devices member type.
3 The group member page appears.
4 Select the check box at the far right end of the row of each of the managed devices
you want to remove.
5 Select Remove Selected From Group or Remove All From Group from the
Options menu at the bottom right corner.
A confirmation dialog box appears.
6 Click OK.
The managed devices are removed from the group.
If managed devices were added to a group based on matching the consumer type, you
cannot remove them individually. However, if you remove the consumer matching
setting in the Group Settings dialog, all matched managed devices are automatically
removed from the group.
To remove all Managed Devices from the matched consumers list for a group
1 Select the group from which you want to remove the device.
The Group Details page appears.
2 Click Group Settings... to display the Group Settings page for the group.
3 Go to the Membership tab, and under the Match Consumers by Domain,
Dictionary, or Type, remove the row that specifies Consumer is Managed Device.

191 Managing Devices
WDE Devices (Computers and Disks)
4 Click Save.
All managed devices in the Matched Consumers list are removed.
WDE Devices (Computers and Disks)
If you have PGP Desktop clients with WDE, whenever a user enrolls, PGP Universal
Server also obtains information about the computer and disks associated with the user.
As an administrator you can then view information about disk encryption status, login
failures, and authorized users for these devices.
External applications can make requests of PGP Universal Server concerning these
managed devices using the USP API or PGP Command Line.
WDE Computers
To view the WDE Computers in the PGP Universal Server database
1 Go to Consumers > Devices. The All Devices page appears.
2 Click the WDE Computers tab. This filters the list so that only WDE Computers
are listed.
For each WDE computer, the list shows: the name of the device, the number of
partitions on its disks, the operating system, the version of the PGP Desktop
client, the encryption status of the partitions, the number of Login Failures seen,
whether the boot drive has a Whole Disk Recovery Token associated with it, the
number of authorized users associated with this computer, and the date of the last
interaction PGP Universal Server had with this device.
Note: Some information, for example the device name and MAC address, appears
only after PGP Desktop sends log information to PGP Universal Server for the
first time. Thus, depending on the logging interval, there may be a delay before
all the information is available.
3 To view the details for this computer, click the device name.
4 To delete multiple computers, check the boxes for the computers you want to
delete and select Delete Selected from the Options menu. To delete all computers,
select Delete All from the Options menu.
5 To export WDE Login Failure information, either check selected computers and
select Export WDE Login Failures for Selected from the Options menu, or select
Export WDE Login Failures for All.
6 To export all WDE Activity for the listed computers, select Export All WDE
Activity from the Options menu.
WDE Computer Information
The WDE Computer Information page shows details about the selected computer.

192 Managing Devices
WDE Devices (Computers and Disks)
To view logs for this device
Click View Log Entries. This displays the Administration log entries for this
device.
To view the Whole Disk Recovery Token (WDRT) for this device
Click View WDRT.... This displays information about the WDRT for this device.
For more information about the WDRT, see Using Whole Disk Recovery Tokens (on
page 250).
This button is not available if the disk is not a boot disk, or if it does not have a
WDRT.
To view the Disk Encryption status for this device
1 Expand the Disk Encryption section of the WDE Computer Information page.
This shows the disks associated with this device, and their encryption status.
2 To view detailed information about the disk, click the Disk ID. This takes you to
the appropriate WDE Disk Information dialog.
To view the Disk Login Failures detected for this device
1 Expand the Disk Login Failures section of the WDE Computer Information page.
This section lists login failures alerts for encrypted devices, and allows you to
clear them.
Login failure alerts also appear on the System Overview page. You can configure
the System Overview failure alerts display using the Managing Alerts (on page 27)
dialog box from the System Overview page.
2 To clear the login failures alerts list, click Clear Login Failure Alerts.
To view the Authorized Users associated with this device
1 Expand the Authorized Users section of the WDE Computer Information page.
This section lists the authorized users associated with this computer.
2 To view detailed information about a user, click the user name. This takes you to
the appropriate Internal User Information page.
WDE Disks
To view the WDE Disks in the PGP Universal Server database
1 Go to Consumers > Devices. The All Devices page appears.
2 Click the WDE Disks tab. This filters the list so that only WDE Disks are listed.

193 Managing Devices
WDE Devices (Computers and Disks)
For each WDE disk, the list shows: the name of the device, the type of disk, the
number of the partition, the operating system, the version of the PGP Desktop
client, the encryption status of the partition, the number of Login Failures seen,
whether the boot drive has a Whole Disk Recovery Token associated with it, the
number of authorized users associated with this disk, and the date of the last
interaction PGP Universal Server had with this device.
3 To view the details for this computer, click the device name.
4 To delete a disk from the database, click the Delete icon.
5 To delete multiple disks, check the boxes for the disks you want to delete and
select Delete Selected from the Options menu. To delete all disks, select Delete
All from the Options menu.
6 To export WDE Login Failure information, either check selected disks and select
Export WDE Login Failures for Selected from the Options menu, or select Export
WDE Login Failures for All.
7 To export all WDE Activity for the listed devices, select Export All WDE Activity
from the Options menu.
WDE Disk Information
The WDE Computer Information page shows details about the selected computer.
To view logs for this device
Click View Log Entries. This displays the Administration log entries for this
device.
To view the Whole Disk Recovery Token (WDRT) for this device
Click View WDRT.... This displays information about the WDRT for this device.
For more information about the WDRT, see Using Whole Disk Recovery Tokens (on
page 250).
This button is not available if the disk is not a boot disk, or if it does not have a
WDRT.
To view the Disk Login Failures detected for this device
1 Expand the Disk Login Failures section of the WDE Disk Information page.
This section lists login failures alerts for encrypted devices, and allows you to
clear them.
Login failure alerts also appear on the System Overview page. You can configure
the System Overview failure alerts display using the Managing Alerts (on page 27)
dialog box from the System Overview page.
2 To clear the login failures alerts list, click Clear Login Failure Alerts.
To view the Authorized Users associated with this device
1 Expand the Authorized Users section of the WDE Disk Information page.
194 Managing Devices
Searching for Devices
This section lists the authorized users associated with this disk.
2 To view detailed information about a user, click the user name. This takes you to
the appropriate Internal User Information page.
Searching for Devices
You can search for devices using a plain string match or through an Advanced Search
dialog box.
To perform a simple string match search
1 In Search computers, type a search string.
2 Click Search.
The devices that match your search criteria are displayed.
To perform an advanced search
1 Click Advanced search.
The relevant search dialog box appears.
2 Select a search type from the drop-down menu and type or select your search
criteria.
3 To search using multiple criteria, click + and type the appropriate criteria.
4 Click Search.
The devices that match your search criteria are displayed.
The following table lists the search criteria for the device.
Note: Not all criteria are available for all types of devices.
Search Criteria Search Limiters
Name All or part of a device's name.
Type The type of device (selected from a drop-down menu):
Managed Device, WDE Disk, WDE Computer, or
Unknown.
Last Seen Date or time of the last device activity.
WDE Status The encryption status of the target disks:
Unencrypted, Decryption Paused, Decryption Started,
Encryption Completed, Encryption Paused,
Encryption Started.
Client OS The operating system managing the disk.
Client The version and build of the PGP Desktop client
managing the disk.
Partition ID The ID of the partition.

195 Managing Devices
Searching for Devices
Search Criteria Search Limiters
Recovery Whether Recovery is enabled (True) or not (False).

25
Administering Consumer Policy
This chapter describes how to create consumer policy, including key generation and
management, client updates, and PGP Universal Web Messenger.
The chapter also explains how certain consumer policy settings change the behavior of
client installations, and when and how those settings should be used.
For information on how to set consumer policy specifically for client software features,
see Setting Policy for Clients (on page 215).
Understanding Consumer Policy
Use consumer policies to create client installations and control how they behave. For
more information on specific consumer policy settings, see the online help and
Managing Consumer Policies (on page 197).
Consumer policy is applied to consumers depending on group membership and policy
group order. For more information on groups and consumer policy, see Managing
Groups (on page 169).
There are two consumer policies installed on the PGP Universal Server: Default and
Excluded.
Default policy. All non-excluded consumers are members of the Everyone group.
By default, the Everyone group receives the Default policy, but you can assign any
other custom consumer policy to the group. You can also assign the Default policy
to any custom group. You can edit Default policy settings.
Excluded policy. All Excluded consumers receive the Excluded policy, but you can
also assign the Excluded policy to any custom group. You cannot edit Excluded
policy settings.
You can also create custom consumer policies.
Managing Consumer Policies
You can add, edit or delete consumer policies.
Adding a Consumer Policy
To create a new consumer policy
1 On the Consumer Policy page, click Add Policy.
The Add Consumer Policy dialog box appears.
2 In the Clone From menu, select the existing policy with the settings you would like
to use as a starting point for a new policy.

198 Administering Consumer Policy
Managing Consumer Policies
If this is the first new consumer policy to be created, the menu has only one entry,
Default, the external users default policy.
3 In the Policy Name field, type a name for the policy you are creating.
4 Click Save.
5 Edit the new policy settings as appropriate.
Editing a Consumer Policy
You cannot edit the Excluded consumer policy.
Note: The settings you establish for PGP Desktop can be affected by the licenses
used, features you enable or disable, or by changes made to the client installer after
it is created.
To edit a consumer policy
1 On the Consumer Policy page, select the policy you want to change.
The Consumer Policy Options page appears.
2 For each of the following policy sections, make the necessary changes. For details
on the feature settings for each section, see the online help.
General. Click Edit... to make changes related to client software updates, to
configure a proxy server, import an ADK for this policy, or edit XML
preferences.
Keys. Click Edit... to select key types and sizes, key modes, certificate
generation settings, and passphrase specifications. These settings apply to
keys and certificates generated for use with any of the PGP encryption
products, including PGP Universal Satellite. See Choosing a Key Mode For Key
Management (on page 41) for more information on selecting key modes.
PGP Desktop. The section provides the following configuration settings:
Desktop.... Configuration settings for PGP Desktop as well as PGP
NetShare, PGP Virtual Disk, PGP Whole Disk Encryption, and other
options.
Mobile.... Configuration options for PGP Mobile users.
Client Licensing.... This shows the information about your client
license for both version 9.0 and 9.5+ PGP Desktop clients. PGP Desktop
client licenses are included by default in PGP Universal Server version
3.1 and later. If you upgraded from a previous PGP Universal Server
release, your existing PGP Desktop license is shown; you have the
option to use the default license instead.
The license information is integrated in the PGP Desktop client installers.
Note that in a new PGP Universal Server installation with the default client
license, all licensable features are disabled; you must explicitly configure
your consumer policy to enable the features for which you have purchased
a license.

199 Administering Consumer Policy
Making Sure Users Create Strong Passphrases
PGP Universal Web Messenger. Click Edit... to configure options for
enabling external users to join the SMSA. Based on consumer policy settings,
recipients are offered different ways to join the SMSA; for example, PGP
Universal Satellite or PGP Universal Web Messenger. See Applying Key Not
Found Settings to External Users (on page 121) for information on how
external users interact with Smart Trailer and PGP Universal Web
Messenger.
3 To change the name or description of the policy, click Edit Policy Name....
4 To delete all changes you have made to this policy (in any of the policy sections)
and restore it to the default settings, click Restore to Factory Defaults.
Deleting a Consumer Policy
You cannot delete the Default and Excluded consumer policies.
To delete a consumer policy
1 To delete a consumer policy, click the Delete icon for the policy you want to
remove.
A confirmation dialog box appears.
2 Click OK to continue.
Making Sure Users Create Strong Passphrases
When you create internal and external user policies, you can make sure users create
strong passphrases by setting the Enforce minimum passphrase quality feature. The
feature allows you to choose a passphrase quality of 25%, 50%, 65%, 75%, 80%, 85%,
90%, or 100%.
When an internal or external user creates a passphrase, the Passphrase Quality bar
appears. The length of the bar indicates the strength of the user's passphrase. The
passphrase quality percentage you choose determines the minimum length of the user's
Passphrase Quality bar. If you choose a 50% passphrase quality, the Passphrase Quality
bar must be at least 50% of its full length.
The Passphrase Quality bar compares the amount of entropy, or randomness, in the
passphrase the user enters against a true 128-bit random string (the same amount of
entropy in an AES128 key). This is called 128 bits of entropy. Entropy is a measure of
the difficulty in determining a password or key.
If the passphrase the user creates fills up approximately half the Passphrase Quality
bar, then that passphrase has approximately 64 bits of entropy. If the passphrase fills
the Passphrase Quality bar, then that passphrase has approximately 128 bits of
entropy.
To make sure user passphrases have approximately 64 bits of entropy, select a
minimum passphrase quality of 50%, which is half the total length of the Passphrase
Quality bar.

200 Administering Consumer Policy
Enabling or Disabling Encrypted Email
For information on how to set the Enforce minimum passphrase quality feature, see
Editing a Consumer Policy (on page 198).
Understanding Entropy
How strong is 128 bits of entropy? In the late 1990s, specialized "DES cracker"
computers were built that could recover a DES key in a few hours by trying all possible
key values.
If you could build a computer that could recover a DES key in one second (the computer
would have to be able to try 255 keys per second), it would take that computer
approximately 149 trillion (thousand billion) years to crack one 128-bit AES key.
The entropy of a particular character measured by the number of possible choices. The
more characters there are to choose from when picking a particular character, the more
entropy is assigned to the chosen character. For example, if you must create a numeric
PIN, you can only choose from the numbers zero through nine; a total of 10 characters.
This is a small pool, so the entropy for a chosen character is low.
When an internal or external user chooses a passphrase, there are many more choices.
The user has three pools of characters to choose from: uppercase and lowercase letters
(52 characters), numbers zero through nine (10 characters), and the punctuation
characters on a standard keyboard (32 characters). When the user enters a character,
the software determines the entropy value for that character based on the set of
characters it comes from, and applies that value to the Passphrase Quality bar.
Enabling or Disabling Encrypted Email
On the Options page in your consumer policy, the Allow users to receive encrypted mail
checkbox determines whether any PGP email messaging software can encrypt email to
the primary keys that belong to users who follow the consumer policy.
If the checkbox is selected, any PGP email messaging software can encrypt mail to that
user.
If it is deselected, and PGP software tries to encrypt mail to the user’s key, the key not
found (KNF) action in your mail granular policy is triggered, as if the email recipient
had never had a key. The key can be found and only used for other purposes, for
example by PGP NetShare, but not email encryption.
Note: When you migrate to PGP Universal Server 3.2, the default setting is the same
as the one for PGP Desktop Email Messaging. Users who upgrade to PGP Universal
Server 3.2 need to verify that the setting is appropriate for them. For a new
installation of PGP Universal Server 3.2, you must verify that the Allow users to
receive encrypted mail checkbox is selected to reflect the encryption needs of the
affected policy group.
To enable or disable encrypted emails:
1 Select Consumer > Consumer Policy.
2 Click Default.
3 In the Keys panel, click Edit.
4 Click the Options tab.

201 Administering Consumer Policy
Using the Windows Preinstallation Environment
5 Do one of the following:
To allow encrypted email, select the Allow users to receive encrypted mail
checkbox.
To prevent encrypted email, deselect the Allow users to receive encrypted
mail checkbox.
6 Click Save.
Using the Windows Preinstallation Environment
Creating a customized Windows Preinstallation (PE) CD/UFD (USB Flash Drive)
provides a bootable recovery tool that can be used for rescue purposes. For example,
you can use the DOS commands to copy, edit, backup and delete files.
Also use Windows PE to upgrade a PGP WDE-encrypted computer to Windows Vista.
To obtain the PGP WDE drivers and tools, go to the Symantec Knowledgebase
(http://www.symantec.com/business/support/index?page=home) and search for
TECH149060, “Windows Preinstallation Environment & BartPE Tools.” Also included in
this knowledgebase article is a technical note you can download that contains all of the
instructions in this section.
X.509 Certificate Management in Lotus Notes
Environments
Note: This section applies only if you have both a PGP Universal Server enterprise
encryption platform managing PGP Desktop clients and a Lotus Notes/Domino
environment.
You can populate your Lotus Notes Domino X.509 certificate store with X.509
certificates created by and managed by your PGP Universal Server through the PGP
Universal Server Encryption Platform. This includes deploying the private portion of
the certificate into the user's Lotus Notes ID file and the public portion into the
organization’s Domino Directory.
This feature is disabled by default.
This feature allows you to take advantage of the management capabilities of your PGP
Universal Server and to maintain cryptographic compatibility in places where PGP
Universal Server cannot otherwise play a role.
For example:
If a user or administrator selects “encrypt incoming mail” on the user's Domino
person document, any mail encrypted by the server can be decrypted by PGP
Desktop when the user opens the message. All secure-messaging features provided
by PGP Desktop can be used, including notifications and logging.
The Lotus Notes full-text indexer can index PGP-encrypted content;
MIME-formatted mail becomes searchable, but Lotus Notes Rich Text mail does
not.

202 Administering Consumer Policy
X.509 Certificate Management in Lotus Notes Environments
External or internal users who are not using client software can still find the X.509
certificates deployed by Lotus Notes-based PGP Desktop users and send
S/MIME-encrypted mail to those users. The PGP Universal Server-managed X.509
certificates proliferate into the Notes/Domino X.509 certificate stores so that all
Notes/Domino services can make native use of them.
Note: Further integration with the Lotus Domino X.509 environment, including
participation in the Domino Certificate Authority (CA) server process, is not included
in this feature. Certificates deployed by PGP Desktop are not included in the Domino
Issued Certificate List (ICL) or its internal Certificate Revocation List (CRL).
Trusting Certificates Created by PGP Universal Server
To populate your Domino Directory with X.509 certificates created by PGP Universal
Server, you must configure the Domino Directory to trust the X.509 certificates, then
establish how the X.509 certificates are pushed to the Lotus Notes/Domino
environment.
Note: By taking the following steps, you are extending explicit trust of X.509
certificates that are created and managed by PGP Universal Server into your Lotus
Notes/Domino environment.
To configure the Domino Directory to trust the X.509 certificates
Export the root public and passphrase-protected private X.509 Organization
Certificate from the PGP Universal Server to a PKCS12 file.
Import the PKCS12 file into the Domino Directory.
Configure the Domino Directory to trust the X.509 certificates.
Establish how X.509 certificates are pushed to the Lotus Notes/Domino
environment.
To export the root X.509 Organization Certificate from the PGP Universal Server to a
PKCS12 file
1 On the PGP Universal Server, from Keys >Organization Keys, open the
Organization Certificate.
2 Click Export.
3 From the Export Certificate dialog box, select Export Keypair.
4 Type a passphrase.
5 Click Export to export the root public and passphrase-protected private X.509
certificate from the PGP Universal Server to a PKCS12 file.
To import the PKCS12 file into your Domino Directory:
1 On the Domino Directory Administration Client, select Configuration.
2 Open the Certificates part of the directory tree.
3 From the Certificates part of the directory tree, select Certificates.
4 From the Action menu, select Import Internet Certificates.

203 Administering Consumer Policy
X.509 Certificate Management in Lotus Notes Environments
The Specify File dialog box appears.
5 Browse to select the PKCS12 certificate, then click Open.
6 Type the certificate passphrase in the Enter Password dialog box.
The Import Internet Certificate dialog box appears.
7 Click Accept All. The certificate is imported.
To configure the Domino Directory to cross-certify (trust) the X.509 certificates:
1 On the Domino Directory Administration Client, select Configuration.
2 Open the Certificates part of the directory tree.
3 From the Certificates part of the directory tree, select Certificates.
4 From Internet Certificates, find and double-click the imported certificate.
The certificate opens.
5 From the Actions menu, select Create Cross Certificate.
The Create Cross Certificate dialog box appears.
6 Select the certificate and click OK.
7 From the Issue Cross Certificate dialog box, click Server and select the server
where the certificate should be stored, then click OK.
8 Click Certifier, choose the appropriate Notes/Domino certifying ID file (or use the
Domino CA Process if it is in use), and click OK.
9 Choose the subject name and expiration date for the certificate.
10 Click Cross Certify. The imported root certificate is cross-certified (trusted).
To establish how X.509 certificates should be pushed to the Lotus Notes/Domino
environment:
1 On the PGP Universal Server, from Consumers > Consumer Policy, select the
consumer policy you want to modify.
2 Click Desktop....
3 Click Messaging & Keys and choose the correct Lotus Notes settings. For
information on how to select the appropriate settings, see Setting the Lotus Notes
Key Settings in PGP Universal Server (on page 203).
Setting the Lotus Notes Key Settings in PGP Universal Server
There are two options in PGP Universal Server that control how PGP Universal Server
X.509 certificates are used in the Lotus Notes/Domino environment.
These options are:

204 Administering Consumer Policy
X.509 Certificate Management in Lotus Notes Environments
Use PGP certificates instead of Lotus Notes certificates. This option adds the
users’ PGP X.509 certificate into the Lotus Notes/Domino credential store if and
only if the user has an active X.509 certificate not generated by PGP Universal
Server. Lotus Notes users do not receive an X.509 certificate by default; instead,
the user or administrator must provide one.
Once enabled, the PGP X.509 certificate becomes the users’ active certificate in
Lotus Notes; the Lotus Notes certificate is suppressed. Lotus Notes users without
client software can find PGP Universal Server-generated X.509 certificates in the
Domino Directory and use them to encrypt mail.
This setting allows the organization to eliminate certificate confusion by making
the PGP-generated certificate primary and any other certificates secondary. The
setting prevents message verification failure, which occurs when a recipient
without PGP Desktop client software opens an S/MIME message signed by a
sender who does use PGP Desktop. The sender’s signing certificate is generated by
PGP Desktop, but the recipient directory lookup in the Domino Directory fails to
find a match.
Add PGP certificates to Lotus Notes if no certificate exists. If you enable this
setting in addition to the Use PGP certificates instead of Lotus Notes certificates
setting, this setting inserts the PGP X.509 certificates into the Lotus Notes
certificate directory, overlaying and overriding any X.509 certificates already
there. Every Lotus Notes-based PGP Desktop client automatically inserts its PGP
X.509 certificate into the Lotus Notes/Domino environment.
Prefer Notes native encoding over PGP encoding - Sign and Encrypt or Encrypt
only
If the recipient is an internal Notes user, this setting allows PGP Desktop to
encrypt mail messages using Notes native encryption as the primary encryption
method. Regardless of whether keys are found, if the Notes native encryption
option is selected, this setting enables Notes native encryption to attempt
encrypting messages first. If the recipient is not a Notes user, PGP Desktop uses
PGP encoding.
Prefer Notes native encoding over PGP encoding - Sign Only
If the Notes native encryption option is selected, and the PGP result is Sign Only,
this setting passes the Signature action to Notes. Notes will attempt to sign the
message using Notes native signing. When this option is selected, PGP Desktop
does not sign the mail message at all.
Technical Deployment Information
Before you use PGP-generated certificates with your Domino server, you must prepare
your email environment. To prevent an inconsistent state, there are steps you must
take before any change to the Lotus Notes/Domino certificate store is committed.
The steps are:
1 Make sure the user has Author or Editor access to her “person document” in the
Domino Directory on her home server. This enables PGP Desktop and certificate
settings to be shared.
If the Domino directory template has been installed unmodified, give users
Author access.
If the Domino directory template has been installed with modifications,
Author access might not be sufficient. If Author access does not allow PGP
Desktop and certificates settings to be shared, give users Editor access.

205 Administering Consumer Policy
Offline Policy
2 If the public certificate to be deployed is not found in the person document, add
the certificate and mark it as the default encryption certificate.
3 If the public certificate is not found in the user’s Notes ID file (keyring), add the
associated private key and the certificate to the ID file, marking it as the default
signing certificate for Internet mail.
Furthermore, PGP Desktop maintains any certificates deployed, updating them when
they expire, for instance, and PGP Universal Server issues replacements. No certificates
are ever deleted from the Lotus Notes/Domino certificate store by PGP Desktop, as
legacy certificates must be preserved to decrypt or verify content previously encrypted
to or signed by those certificates.
Offline Policy
Offline policy allows administrators to control how PGP Desktop processes messages
when it can access the mail server but not PGP Universal Server. Each consumer policy
can specify different offline policy behavior. PGP Desktop uses offline policy instead of
local policy to process messages.
In Mail Policy (Mail > Mail Policy), the default offline policy messaging rules are laid
out in the Default: Standalone policy chain. You can also create customized standalone
rule chains. Standalone chains can only contain conditions and actions PGP Desktop
can perform without PGP Universal Server. For example, you cannot have dictionary
searches in a standalone chain.
You can also specify that PGP Desktop should always use the standalone mail policy
whether PGP Universal Server is available or not.
These settings control offline policy behavior:
From Consumer Policy > Policy Options > PGP Desktop > Messaging and Keys:
Mail Policy. Specifies how PGP Desktop processes messages when it can access
the mail server but not PGP Universal Server. Select one of the following options.
Standalone: PGP Desktop always enforces the selected Standalone mail
policy locally, regardless of whether PGP Universal Server is reachable. The
client only contacts PGP Universal Server for policy updates and to upload
logs. If you also disable policy updates and uploading logs, the client will
never contact PGP Universal Server again after enrollment.
Offline: Standalone: PGP Desktop enforces the selected Standalone mail
policy locally whenever PGP Universal Server is unreachable. PGP Desktop
follows normal mail policy when it can reach PGP Universal Server.
Offline: Block: If PGP Universal Server is unreachable, PGP Desktop queues
or blocks outgoing messages. PGP Desktop follows normal mail policy when
it can reach PGP Universal Server.
Offline: Send Clear: If PGP Universal Server is unreachable, PGP Desktop
sends outgoing messages in the clear, with user confirmation. PGP Desktop
follows normal mail policy when it can reach PGP Universal Server.
If client fails to download policy for X days/hours/minutes. Specifies how PGP
Desktop processes messages when it has not been able to download policy for the
specified period of time.
Block outbound message. Blocks outgoing messages after the specified
period of time.

206 Administering Consumer Policy
Using a Policy ADK
Apply last downloaded policy. PGP Desktop continues to use the last policy
settings downloaded. Choose this option if you turn off the setting Download
policy updates from PGP Universal Server, because otherwise PGP Desktop
will permanently block all outgoing messages after the specified time period.
From Consumer Policy > Policy Options > PGP Desktop > General:
Send client logs to PGP Universal Server every X days/hours/minutes. Specifies
how often PGP Desktop contacts PGP Universal Server to send client logs. If you
turn off this setting, PGP Desktop will never upload client logs.
Download policy updates from PGP Universal Server every X
days/hours/minutes. Specifies how often PGP Desktop should attempt to
download policy. If you deselect this, PGP Desktop will never contact PGP
Universal Server to get new policy. If you turn off this setting, select Apply last
downloaded policy from the setting If client fails to download policy, or PGP
Desktop will permanently block all outgoing messages after the specified time
period.
Using a Policy ADK
You can import an Additional Decryption Key for a Consumer Policy from the
Consumers > Consumer Policy > Consumer Policy Options > General page. The
consumer policy ADK is a public key used to encrypt resources owned by any consumer
in a group that uses the policy.
For more information on ADKs, see Additional Decryption Key (ADK) (on page 53) and
Using an Additional Decryption Key for Data Recovery (on page 262).
Out of Mail Stream Support
PGP Desktop encrypts email locally when it can find a key for the recipient. If it cannot
find a key, it sends the message to the PGP Universal Server for further processing. Out
Of Mail Stream support (OOMS) specifies how the email gets transmitted from the
client to the server.
Out Of Mail Stream support is disabled by default.
During installation, you should consider the following information to determine the
appropriate setting for your requirements.
OOMS Disabled
With OOMS disabled, sensitive messages that can't be encrypted locally are sent to PGP
Universal Server "in the mail stream." In other words, these messages are sent from the
mail client, through the mail server, and then to the PGP Universal Server just like
normal email.
Importantly, this email is sent in the clear (unencrypted). Mail or Network
administrators could read these messages by accessing the mail server's storage or
monitoring network traffic. These messages in the sender's Sent folder may also remain
unencrypted.

207 Administering Consumer Policy
Out of Mail Stream Support
However, archiving solutions, outbound anti-virus filters, or other systems which
monitor or proxy mail traffic will process these messages normally.
OOMS Enabled
With OOMS enabled, sensitive messages that can't be encrypted locally are sent to PGP
Universal Server "out of the mail stream." PGP Desktop creates a separate, encrypted
network connection to the PGP Universal Server to transmit the message.
Technically, this email is sent via an SSL connection over port 443 (similar to accessing
secure web sites on the Internet). Messages will not be delivered if SSL traffic between
the client and the server over port 443 is not available.
Because OOMS sends sensitive messages over an encrypted connection, they are
protected from interception or monitoring by mail or network administrators.
Additionally, outbound messages in the sender's Sent folder will be encrypted to the
sender's key.
However, archiving solutions, outbound anti-virus filters, or other systems which monitor
or proxy mail traffic will not see these messages. For example, email archive systems
may not capture these messages unless they also archive the contents of senders' Sent
folders.
Notes/Domino Outlook/Exchange
OOMS OOMS OOMS OOMS
Enabled Disabled Enabled Disabled
Sensitive
External Email
sent via
SSL/port 443 Mail stream SSL/port 443 Mail stream
Encrypted in
transit from PGP
Desktop to PGP
Universal Server
Encrypted Clear Encrypted Clear
Sent items folder Encrypted Encrypted Encrypted Clear
Archiving system
impact
Invisible None
(archived
email will be
unencrypted
)
Invisible None (archived
email will be
unencrypted)
To enable or disable OOMS
1 From the Consumers > Consumer Policy page, select the policy you want to
modify.
2 Click Edit... in the PGP Desktop section.
3 Select the Messaging & Keys tab.
4 Check or uncheck the Enable Out of Mail Stream support (OOMS) option
5 Save the policy.

208 Administering Consumer Policy
Enrolling Users through Silent Enrollment
This setting will now take effect for Users who are members of Groups that use this
policy.
Enrolling Users through Silent Enrollment
PGP Desktop silent enrollment reduces the number of screens your users must navigate
during enrollment. Only essential Setup Assistant screens appear during enrollment.
Silent enrollment suppresses non-essential screens and uses default settings.
Enrollment with SKM is completely silent.
Using smart cards means that enrollment is not completely silent. Users are prompted
to enter their smart card PINs during enrollment.
Set silent enrollment for a PGP Desktop installer by selecting the Enable Silent
Enrollment option on the General subtab of the PGP Desktop section.
Silent enrollment requires the use of the LDAP Directory Synchronization feature.
For information on configuring silent enrollment, go to the Symantec Knowledgebase
(http://www.symantec.com/business/support/index?page=home) and search for:
HOWTO59479 "HOW TO: Enable Invisible Silent Enrollment for PGP Desktop Clients".
Silent Enrollment with Windows
When you create a PGP Desktop installer for Windows with silent enrollment enabled,
the Allow/Deny/Require encryption of disks to existing Windows Single Sign-On
password option (on the Disk Encryption subtab of the PGP Desktop section) is ignored
if set to Deny. Windows users log in to Windows and PGP Whole Disk Encryption using
a single sign-on password.
Silent Enrollment with Mac OS X
When you create a PGP Desktop installer for Mac OS X with silent enrollment enabled,
and you require that the boot disk automatically be encrypted at enrollment,
enrollment is no longer completely silent. Users must provide credentials before before
disk encryption begins.
To require that the boot disk automatically be encrypted at enrollment, set
Automatically encrypt boot disk upon installation on the Disk Encryption subtab of
the PGP Desktop section.

209 Administering Consumer Policy
PGP Whole Disk Encryption Administration
PGP Whole Disk Encryption Administration
PGP Whole Disk Encryption includes the Single Sign-On (SSO) feature. It synchronizes
the PGP Whole Disk Encryption authentication with the one required by Microsoft
Windows when a user boots a computer. Once a disk or boot partition is encrypted, the
next time the user starts the system, the PGP WDE BootGuard screen appears
immediately upon startup. Logging in at this point also logs the user into the Windows
session. The users does not have to log in twice.
The SSO feature is enabled through the Allow/Force/Deny encryption of disks to
existing Windows Single Sign-On password option on the Disk Encryption subtab of
the PGP Desktop Settings for any consumer policy.
If you select Force, users with this policy are forced to choose the SSO feature when
they initially protect a boot partition or an entire disk using PGP Whole Disk
Encryption. If you select Allow, users can choose to use the SSO feature.
PGP Whole Disk Encryption on Mac OS X with FileVault
There are no conflicts with FileVault on Mac OS X systems. If a system has only a single
user, using FileVault would be redundant by double-encrypting the user's Home folder.
However, if a system has multiple users, you can use FileVault also to ensure privacy of
data for each user's Home folder from the other users of the system.
How Does Single Sign-On Work?
Microsoft Windows has a few methods available by which other companies can
customize the Windows login experience. One method is the Graphical Identification
and Authentication (GINA) dynamic-link library (DLL), the pluggable part of WinLogon,
which third parties can replace to customize login functionality or the login user
interface. GINA can be used to create, for example, biometric login methods, or smart
card logins.
The PGP Whole Disk Encryption Single Sign-On (SSO) feature does not use GINA, as
there are certain compatibility issues with GINA. For example, it is possible to have
multiple, conflicting GINAs on the same system. Instead, SSO uses another method, the
Windows Automatic Login feature. PGP Desktop uses your configured authentication
information to create, dynamically, specific registry entries when you attempt to log in.
Your Windows password is never stored in the registry, nor in any form on the
disk—neither encrypted, nor as cleartext.
Implementation details differ between the various versions of Microsoft Windows, but
user interaction with the feature is the same, regardless of Windows platform.
The SSO feature is not compatible with other GINAs. You might encounter some issues
if you attempt to use SSO in conjunction with another GINA.

210 Administering Consumer Policy
PGP Whole Disk Encryption Administration
Multiple Users and Single Sign-On
You can configure up to 120 multiple users on one system for Single Sign-On. Symantec
Corporation, however, recommends limiting the number of Single Sign-On users to the
fewest possible persons who must share the system. While technically feasible to do so,
a large number of users sharing a single, encrypted computer is not a secure solution,
and Symantec Corporation discourages this practice.
Note that the Single Sign-On feature is passphrase-only; you cannot utilize Single
Sign-On with users’ keys, nor is the feature compatible with smart cards or tokens.
Local Users
If a computer is not a part of a domain, PGP Whole Disk Encryption automatically
disables certain User Access features, including “Use Welcome Screen” and “Fast User
Switching” (which relies on the welcome screen), such that it then makes the
CTRL+ALT+DEL available.
These features are automatically disabled when computers are part of a domain.
Enabling Single Sign-On
Your license must include PGP Whole Disk Encryption.
The user must have PGP Whole Disk Encryption installed.
Select Force or Allow for the consumer policy setting Allow/Force/Deny
encryption of disks to existing Windows Single Sign-On password.
Note: If you change the Single Sign-On setting on a group policy or re-assign a
user to a new policy with a different setting, the change is not reflected on the
user's end. Users continue to sign in once or more than once, based on the
original Single Sign-On setting for their group.
To set up the Single Sign-On feature through the user’s PGP Whole Disk Encryption
installation
1 Click the PGP Disk control box, then select Encrypt Whole Disk.
2 Select the disk or partition that you would like to encrypt, and choose the PGP
Whole Disk Encryption options that you would like, if any.
3 In the User Access section, select New Passphrase User.
4 Select Use Windows Password, then click Next.
5 Type your Windows login password, then click Finish.
PGP Whole Disk Encryption verifies that your name is correct across the domain,
and that the Windows password is correct. PGP Whole Disk Encryption also
checks your password to make sure that it contains only allowable characters. If
your password does contain any such characters, you are not allowed to continue.
6 Click Encrypt, then click OK.

211 Administering Consumer Policy
PGP Whole Disk Encryption Administration
Changing the User's Passphrase
For PGP Whole Disk Encryption Single Sign-On to work properly, the user must change
the password for Single-Sign On using the Change Password… feature in the Windows
Security dialog box, which you access by pressing CTRL+ALT+DEL.
To change the user passphrase
1 Press CTRL+ALT+DEL.
2 Type the old password.
3 Type and confirm the new password.
4 Click OK.
Single Sign-On automatically and transparently synchronizes with this new password.
The user can use the new password immediately, in the next login attempt.
If you change the password in any other manner—via Domain Controller, the Windows
Control Panel, via the system administrator, or from another system, the next login
attempt on the PGP BootGuard screen fails. The user must then supply the old Windows
password. Successful login on the PGP BootGuard screen using the old Windows
password then brings up the Windows Login username/password screen. The user must
then log in successfully using the new Windows password, at which time PGP WDE
synchronizes with the new password.
Supported Characters and Keysets
PGP WDE Single Sign-On supports alphanumeric, punctuation characters, spaces, and
standard meta-characters. TABs and control characters are not supported.
The following characters are supported:
abcdefghijklmnopqrstuvwxyz
ABCDEFGHIJKLMNOPQRSTUVWXYZ
0123456789
` ! @ # $ % ^ & * ( ) _ + = { } : ; [ ] ' " < > , . ? / -
Managing Clients Remotely Using a PGP WDE Administrator Active Directory Group
To access users' systems remotely to perform system changes to the PGP Whole Disk
Encryption configuration, create an Active Directory group. Members of this group
can access PGP Whole Disk Encryption installations through the -admin-authorization
command line option, using their current remote login capability.
Any member of the WDE-ADMIN Active Directory group can remotely access a system
to add or remove users from PGP WDE, encrypt or decrypt a drive, and so on, using the
PGP Whole Disk Encryption command-line tool. These administrative functions can be
performed without having to request the user's passphrase.
Using Active Directory, create a new Administrator Group called WDE-ADMIN. Add
members to this group who are authorized to remotely access users' systems to perform
PGP WDE maintenance tasks. WDE-ADMIN is a security group, not a distribution
group.

212 Administering Consumer Policy
PGP Whole Disk Encryption Administration
The encrypted drive and Active Directory must both be running for you to use this
function.
Creating an Active Directory group for WDE-ADMIN allows you to:
Log in remotely to perform PGP WDE maintenance tasks (using the pgpwde
command line).
Use SMS or other tools to perform PGP WDE maintenance.
Use pgpwde to perform Active Directory authentication to ensure only authorized
administrators can access users' systems. (Note that the system must be connected
to the network and Active Directory must be running.)
For more information on using a WDE-ADMIN administrator group, see the PGP Whole
Disk Encryption Command Line for Windows User's Guide.
Managing Clients Locally Using the PGP WDE Administrator Key
If you need to perform maintenance or other tasks on a user's system, use the PGP
Whole Disk Encryption administrator key without having to request the user's
passphrase. Use the PGP Whole Disk Encryption administrator key to log in to a user's
system at the PGP WDE BootGuard screen using two-factor authentication (with a
smart card or token). Once you have logged in at the Bootguard, you can then log in to
the user's system using your domain administrator user name and password.
The benefits of using two-factor authentication to access a user's system are:
Each administrator has a unique token that allows access to systems encrypted
with PGP Whole Disk Encryption.
Because both the smart card or token and a PIN are required to access the system,
security is maintained if the smart card or token is lost or stolen.
If an administrator leaves the company, the PGP Universal Server administrator
can change the key in PGP Universal Server for that group, and all clients are
updated automatically. Clients are updated at PGP Desktop tray startup and every
24 hours.
Note: If you have systems that have been encrypted with PGP WDE, you do not need
to re-encrypt those disks to add the PGP WDE administrator key. The key is pushed
down to the clients during the next policy update.
Supported Smart Cards and Tokens
The following smart cards and tokens can be used for the PGP WDE administrator key:
Aladdin eToken 64K, 2048 bit RSA-capable
Aladdin eToken PRO USB Key 32K, 2048 bit RSA capable
Aladdin eToken PRO without 2048 bit capability (older smart cards)
Athena ASEKey Crypto USB Token
Athena ASECard Crypto Smart Card No other tokens are supported. To create a PGP
WDE administrator Key
1 Create a key (for example, AdminSales) using PGP Desktop. For more information
on creating a key, see PGP Desktop User's Guide .

213 Administering Consumer Policy
PGP Whole Disk Encryption Administration
Do not specify a preferred keyserver for this key. If you do specify a keyserver on
the key, you need to upload and publish the key to the specified keyserver.
2 Configure the key in a PGP Universal Server internal user group policy, if
necessary, so that only systems in that group can be accessed using the PGP WDE
administrator key. If you want all PGP Whole Disk Encryption installations to be
accessible through the same key, upload the same key to all internal user groups.
For information on adding the key to an consumer policy, see the online help for
the Disk Encryption subtab of the PGP Desktop section of consumer policy.
3 Copy the key to a smart card or token using PGP Desktop.
The same key can be copied to multiple tokens. Each token should have its own
unique PIN.
To use a PGP WDE administrator Key
1 Insert the smart card into one of the USB ports.
2 Start the system to be accessed.
3 At the PGP BootGuard screen, type the PIN, and then press CTRL + ENTER.
4 At the Windows login dialog box, after the system has booted, type your
administrator user name and password to access the system.
5 Perform the tasks needed on the system, and shut down the system.

26 Setting Policy for Clients
This chapter describes how to use policy settings to build client installations for
consumers. Client installations are PGP client applications such as PGP NetShare, PGP
Portable, PGP Mobile, and PGP Desktop.
For more general information on setting consumer policy, see Administering Consumer
Policy (on page 197).
Client and PGP Universal Server Version Compatibility
Symantec Corporation supports backward compatibility for clients only. PGP Universal
Server 3.2.1 supports managing policy of these versions (and subsequent maintenance
releases of each) of PGP Desktop:
9.5.3
9.6.1
9.6.2
9.6.3
9.7.1
9.8.2
9.9.0
9.9.1
9.10.0
9.10.1
9.12.0
10.0.0
10.0.1
10.0.2
10.1.0
10.2.0
10.2.1
Note: Limited backward compatibility support means that legacy features, such as
enrollment, policy download, logging and reporting are supported, but legacy clients
cannot access the latest client features in Consumer Policy.
We recommend that you upgrade your PGP Universal Server and your clients, so
that they are eventually on the same release. For the most current information on
which client versions are supported, see the Knowledge Base.

216 Setting Policy for Clients
Client and PGP Universal Server Version Compatibility
PGP Universal Server 3.2.1 supports managing policy of these versions (and subsequent
maintenance releases of each) of PGP Universal Satellite:
2.5.3
2.6.3
2.7.1
2.8.2
2.9.0
2.10
2.12
3.0
3.0.1
3.1.0
3.2.0
3.2.1
Note: Policy options for features that do not exist in supported legacy versions are
ignored by those installations.
PGP Universal Server 3.2.1 provides limited management support (without policy) back
to PGP Desktop version 9.0 and PGP Universal Satellite version 2.0.
Serving PGP Admin 8 Preferences
You can import and store Administrative Preferences from PGP Admin 8.x clients in an
LDAP directory associated with your new PGP Universal Server. This allows you to
retain preferences for PGP Desktop 8.x users, and still replace the old PGP Keyserver.
PGP Admin preferences do not affect PGP Desktop 9.x clients. The preferences are only
stored for the benefit of users running previous versions of PGP Desktop.
You can use LDAP or LDAPS. If you choose LDAPS, make sure you have enabled LDAPS
keyserver service on the new PGP Universal Server.
Read-only and Service Control Only PGP Universal Server administrators do not have
write access to the LDAP servers, so they cannot import PGP Admin preferences.
1 Install and set up your new PGP Universal Server.
2 Open PGP Admin on your PGP administrative computer.
3 From Administrative Options > Updates, change the previous LDAP Server URL
(for example, ldap://<oldkeyservername>) to the LDAP server URL you are using
with your PGP Universal Server.
The LDAP server URL format must be ldap://<newservername>/o=Prefs or
ldaps://<newservername>/o=Prefs.
The bind DN must be cn=<username>,o=Prefs.
The username is the username of the PGP Universal Server administrator, and the
passphrase is that user’s PGP Universal Server passphrase. An example of the new
LDAP server URL format would be ldap://keys.example.com,o=Prefs, which
replaces ldap://oldkeyserver.example.com.

217 Setting Policy for Clients
Establishing PGP Desktop Settings for Your PGP Desktop Clients
4 Click OK. The PGP Admin screen appears.
5 Click Update Server Configuration. The login screen for your new LDAP server
appears. Log in with the username and passphrase specified in step 3.
The current PGP Admin settings file is uploaded to the new LDAP server.
PGP Desktop 8 clients download the preferences from the old server at
ldap://<oldkeyserver>. Those preferences contain the new LDAP URL.
When your PGP Desktop 8 clients next poll for preference updates, they download them
from the new LDAP URL at ldap://<newservername>/o=Prefs.
Once your users have all started receiving preferences from the new PGP Universal
Server, you can remove your old PGP Keyserver from service.
Establishing PGP Desktop Settings for Your PGP Desktop
Clients
There are multiple ways for you to control what your users can do with PGP Desktop
when it is installed on their systems:
License settings: The traditional method of controlling what your users can do
with PGP Desktop is for your organization to purchase licenses that support the
features you want. So if you want your users to whole disk encrypt their drives,
you purchase licenses that include support for PGP Whole Disk Encryption. You
must then enable the PGP Whole Disk Encryption feature within your consumer
policies.
For more information about feature licenses, see PGP Desktop Feature License
Settings (on page 218).
Feature settings: Once your organization purchases the appropriate licenses,
establish settings for each feature that support your organization’s security
policies. The default license is installed by default along with the PGP Universal
Server. If you have purchased a license that includes PGP Whole Disk
Encryption, for example, you must enable the PGP Whole Disk Encryption feature.
When Whole Disk Encryption is enabled within a consumer policy, you can control
other aspects of the feature, such as whether or not removable USB disks inserted
on your users’ systems must be encrypted. For more information, see Enabling
PGP Desktop Client Features in Consumer Policies (on page 218).
Feature control: Another way to control what your users can do with PGP Desktop
is by controlling not just the settings for a feature but the feature itself. So if your
organization has licenses for all employees that support PGP Shredder, for
example, but you have a subset of employees that do not need this feature, you can
create a client installer just for this subset of users that does not contain the PGP
Shredder feature. Feature control is available for all major features of PGP
Desktop. Features that are disabled do not appear in the PGP Desktop user
interface. For more information, see Editing a Consumer Policy (on page 198).
218 Setting Policy for Clients
Establishing PGP Desktop Settings for Your PGP Desktop Clients
Component control: You can also control what your users can do with PGP
Desktop by editing the MSI client installer file to disable PGP Desktop
components. If your organization does not use Lotus Notes or Groupwise for
messaging, for example, disable these components to limit any potential
compatibility issues. This is accomplished by using Microsoft’s msiexec
application to disable components after the client installer file is created. To
enable a component that has been disabled requires a reinstallation of PGP
Desktop with the component enabled. Components that are disabled do not appear
in the PGP Desktop user interface. For more information, see Controlling PGP
Desktop Components (on page 219).
PGP Desktop Feature License Settings
The following features are available depending on what PGP Desktop license you
purchased:
The column headings indicate the name of the PGP Desktop products you can purchase.
The row labels indicate the product features that are licensed for each product.
PGP Desktop PGP Whole PGP PGP Desktop PGP PGP
Email Disk NetShare Professional Desktop Desktop
Encryption Storage Corporate
PGP Desktop Email Yes No No Yes No Yes
PGP Whole Disk
Encryption
No Yes No Yes Yes Yes
PGP NetShare No No Yes No Yes Yes
PGP Virtual Disk Yes Yes Yes Yes Yes Yes
PGP Keys Yes Yes Yes Yes Yes Yes
PGP Shredder Yes Yes Yes Yes Yes Yes
PGP Zip Yes Yes Yes Yes Yes Yes
PGP Portable is licensed through PGP Universal Server, not PGP Desktop.
PGP Mobile clients are licensed separately.
Enabling PGP Desktop Client Features in Consumer Policies
The basic license for PGP Desktop is installed along with the PGP Universal Server, but
the optional features (email messaging, PGP Whole Disk Encryption, PGP NetShare) are
disabled. If you have purchased a license for one or more of these features, you must
enable those features in your consumer policies.
To enable PGP Desktop client features in a consumer policy
1 On the Consumer Policy page, select the policy you want to change.

219 Setting Policy for Clients
Establishing PGP Desktop Settings for Your PGP Desktop Clients
Note: If you plan to use multiple consumer policies, but want to enable the same
PGP Desktop features for all of them, edit the policy you will use as the basis for
cloning the additional policies.
The Consumer Policy Options page appears.
2 Click Desktop... in the PGP Desktop area.
3 Select and enable options based on the features in the PGP Desktop license you
have purchased:
If your license includes Email Messaging, select the Messaging & Keys tab,
and check the Email Messaging check box. You can then set specific policy
settings for how clients handle email.
If your license includes PGP Whole Disk Encryption, select the Disk
Encryption tab, and check the PGP Whole Disk Encryption check box. Once
selected, the default settings are enabled. You can then select and modify the
relevant settings.
If your license includes PGP NetShare, select the Netshare tab, and check the
PGP Netshare for Windows check box. Once selected, the default settings
are enabled. You can then select and modify the relevant settings.
For details of the features included with the various client licenses, refer to the
table in PGP Desktop Feature License Settings (on page 218).
4 Save these policy changes to enable the selected features.
Controlling PGP Desktop Components
One of the ways you can control what your users can do with PGP Desktop is by
disabling specific PGP Desktop components. This is accomplished by using software to
distribute your client installers that has the ability to specify switches to the
msiexec.exe command line utility.
Disabling a PGP Desktop component means it does not appear in the PGP Desktop user
interface, and it ensures that there are no compatibility issues with the operating
system or third-party products.
Upgrades, including automatic upgrades, honor the disabling of PGP Desktop
components and do not reenable disabled components unless the MSI file has been
specifically edited to reenable the disabled component.
The following PGP Desktop components can be disabled:
MAPI: Means MAPI messaging is disabled.
Notes: Means Notes messaging is disabled.
LSP: Means the IM encryption feature and POP, SMTP, and IMAP messaging is
disabled.
SSO: Means the PGP WDE Single Sign-On feature is disabled.
WDE: Means the PGP Whole Disk Encryption feature is disabled.
NetShare: Means the PGP NetShare feature is disabled.
Groupwise: Means Groupwise messaging is disabled.

220 Setting Policy for Clients
PGP Portable
Memory lock: Means the memory locking feature (which keeps sensitive data from
leaving volatile memory) is disabled. Disabling the memory lock means you can
disable all kernel-level items, if desired. It should generally not be disabled unless
you have a specific reason to do so.
Virtual Disk: Means the PGP Virtual Disk feature is disabled.
The syntax to disable PGP Desktop components is:
> msiexec /I pgpdesktop.msi PGP_INSTALL_[component]=0 Where [component]
is the PGP Desktop component you want to disable:
MAPI
NOTES
LSP
SSO
WDE
NETSHARE
GROUPWISE
MEMLCK
VDISK
You can disable multiple PGP Desktop components using a single command. For
example:
> msiexec /I pgpdesktop.msi PGP_INSTALL_MAPI=0
PGP_INSTALL_NOTES=0 PGP_INSTALL_LSP=0
To reenable a PGP Desktop component that was disabled requires a reinstallation with
the disabled component specifically reenabled. For example:
> msiexec /I pgpdesktop.msi PGP_INSTALL_MAPI=1
Note: If you disable the MAPI, Notes, and LSP components, clients cannot enroll
through email. Email enrollment does not work with the email proxies disabled.
PGP Portable
PGP Desktop users use PGP Portable to distribute encrypted files to users who do not
have PGP Desktop software, and to transport files securely to other systems that do not
or cannot have PGP Desktop installed, for example through a USB device. A device
containing PGP Portable-encrypted files also provides encryption and decryption
functionality, and does not require any other encryption software.
PGP Portable provides:
Portability of secured documents
Ease of distribution of secured documents
PGP Portable is licensed through the PGP Universal Server. PGP Portable is available to
PGP Desktop users if your PGP Universal Server license includes PGP Portable.
You can see how many PGP Portable disks have been created on the System Settings,
Reporting Overview, Consumer Policy Options, and Daily Status Email

221 Setting Policy for Clients
PGP Mobile
For information on enabling or disabling PGP Portable through the PGP Desktop
settings, see Editing a Consumer Policy (on page 198) or the online help.
For information on how to create and use PGP Portable disks, see PGP Portable Quick
Start Guide.
PGP Mobile
PGP Mobile enables enterprises to extend market-leading PGP® encryption security
solutions for laptops and desktops to Windows Mobile devices, allowing users to
encrypt emails, files, and entire storage volumes.
You can use PGP Universal Server to manage mail and consumer policy for PGP Mobile.
You can edit the Default: Mobile mail policy chain from Mail > Mail Policy, and update
the PGP Mobile consumer policies from Consumers > Consumer Policy. However, you
cannot create the initial PGP Mobile installer from PGP Universal Server. For
information on creating and configuring a PGP Mobile installation, see the PGP Mobile
Administrator's Guide.
PGP NetShare
How the PGP NetShare Policy Settings Work Together
To understand how the PGP NetShare policy settings work together, this example
demonstrates how these settings work together.
Assuming that:
The folder whitelist contains %USERHOME%\Audit.
The application-based encryption list contains excel.exe.
The decryption bypass list contains FTP.
The network share (H:\Finance_Q4 folder) is encrypted to UserA, UserB, and
UserC.
Then, when UserA:
Saves a standalone Excel file, the file is encrypted to UserA only.
Saves an Excel file to the Audit folder, the file is encrypted to UserA only.
Saves an Excel file to the H:\Finance_Q4 network share, the file is encrypted to
UserA, UserB, and UserC.
Transfers the standalone file (from the first bullet) via FTP to the a corporate
server, the file retains the encryption to UserA only.
Emails the file from within Excel, the file is not encrypted as a result of any PGP
NetShare policy settings. The file is encrypted to according to mail policy settings.

222 Setting Policy for Clients
PGP NetShare
Multi-user environments and managing PGP NetShare
PGP NetShare, and management of it, is now supported in multi-user environments.
These environments were not supported in past releases because they only isolate
sessions at the user level, resulting in undesired behavior when taking some typical
actions. For example, disabling PGP NetShare affected all users, and more importantly,
decrypted data would be available to all users. Now, user sessions are isolated at the
driver-level on the client systems, ensuring the desired behavior of all PGP NetShare
functionality.
Multi-user environment requirements
Not all multi-user environments are supported. PGP NetShare support is limited to
several environments and server operating systems.
Supported multi-user environments:
Microsoft Terminal Services
Fast User Switching (this is a subset of Terminal Services)
Citrix Presentation Server 4.x Server operating systems supported for multi-user
environments:
Windows Server 2003, all editions
Windows Server 2003 R2, all editions
Windows Server 2008, all editions Note: Both 32-bit and 64-bit versions of platforms
are supported.
Backing Up PGP NetShare-Protected Files
You can back up files and folders that have been protected by PGP NetShare. Whether
you are using PGP NetShare in a PGP Universal Server managed environment or not
determines how the files are handled during the backup process.
Backing up files with an unmanaged client
When an unmanaged (standalone) client backs up protected files and folders, the
protected files are decrypted transparently during backup and are stored in the clear on
the backup media. Restoring them to their original encryption will encrypt them again
transparently.
Backing up files with a PGP Universal Server-managed client
When a managed client is used to back up of protected files and folders, how the
encryption is handled depends on if the backup application is set as an application
bypass by the PGP Universal Server administrator.
If the backup application is part of the decryption bypass list, the protected files
stay encrypted on the backup media after backup. Restoring them to their original
location keeps them encrypted.

223 Setting Policy for Clients
PGP NetShare
If the backup application is not part of the decryption bypass list, then it is similar
to backing up files with an unmanaged client. In this case, the protected files are
decrypted transparently during backup and are stored in the clear on the backup
media. Restoring them to their original encryption will encrypt them again
transparently.
Note: Symantec Corporation recommends that you do not mix the different scenarios
between backing up data and restoring data. For example, if you are using an
unmanaged client to back up the files, an unmanaged client should restore the files.

27 Using Directory Synchronization to
Manage Consumers
This section describes the Directory Synchronization feature, which lets you
synchronize LDAP directories with your PGP Universal Server. Directory
Synchronization allows you use LDAP directories to enroll clients as internal user
consumers, and to assign a consumer to a specific consumer group based on the
consumer's presence in a specified LDAP directory, or based on matching directory
attributes you specify.
You can configure PGP Universal Server to search multiple LDAP directories, specify
which directories should be searched based on matching the consumer's email address
to predefined patterns, and specify how to handle a consumer that cannot be found in a
directory.
For more information on using LDAP directories to sort consumers into groups, see
Managing Groups (on page 169).
PGP Universal Server supports LDAPv2, LDAPv3, and LDAPS. You can use any of a
number of directories with PGP Universal Server, although directories that more
closely conform to the OpenLDAP or X.500 standards work best.
How PGP Universal Server Uses Directory Synchronization
Enabling Directory Synchronization lets you do multiple things:
Use the LDAP directory to help create and enroll internal users.
Include only specified consumers from the directories, allowing them to be added
to the PGP Universal Server as internal users or as managed devices, and
excluding consumers that do not match the criteria.
Prevent specified consumers found in the directories from becoming members of
any group except the Excluded group.
Match certain consumers, based on their attributes in the specified directories,
with a consumer policy group you create.
Directory Synchronization occurs when the local user (a user in a managed domain)
sends or receives an email message. When a local user sends or receives a message, the
PGP Universal Server checks to see if the sender is known to it. If not, it checks one or
more LDAP directories (assuming Directory Synchronization is enabled) to see if an
entry for the sender is present.
Note: Changes made to an LDAP directory can take up to 10 minutes to take effect in
PGP Universal Server.
If the user is found in an LDAP directory (or the portion of it you specify), the PGP
Universal Server adds that person to a group. You also have options to narrow the
scope of the searching to certain parts of the directory (see Adding or Editing an LDAP
Directory (on page 234) and The Base Distinguished Name Tab (on page 236)) or to
consumers with certain attributes (see Setting Group Membership (on page 175)).

226 Using Directory Synchronization to Manage Consumers
How PGP Universal Server Uses Directory Synchronization
When users are added to PGP Universal Server from a directory via Directory
Synchronization, their names, email addresses, and existing X.509 certificates (used to
secure S/MIME email messages) are imported. If certificates are not found, PGP
Universal Server generates PGP keys (and certificates, if configured for certificates) for
these users.
Note: To import an X.509 certificate (RSA only) found on an LDAP directory, that
certificate must have been issued by a trusted certificate. To ensure this happens, be
sure the certificate of the issuing Root CA, and all other certificates in the chain
between the Root CA and the X.509 certificate, are on the list of trusted keys and
certificates on the Trusted Keys and Certificates page (Keys > Trusted Keys) and is
trusted for verifying mail encryption keys. If it is not, import the certificate of the
issuing Root CA that issued the user certificate to the list as soon as you enable
Directory Synchronization. For instructions, see Managing Trusted Keys and
Certificates (on page 77).
Certificates that include an email address that is not in a domain being managed by the
PGP Universal Server are not added to the internal user account created. Expired,
revoked, weak certificates (less than 1024-bit encryption), and certificates with greater
than 4096-bit encryption are also not imported via Directory Synchronization.
When Directory Synchronization is enabled, for a user to be correctly added to PGP
Universal Server, the “mail” attribute must be present in the directory and they must
match the information PGP Universal Server has about them. The “uid” attribute must
also be present, unless the directory is a Microsoft Active Directory, which requires the
“sAMAccountName” attribute. For example, if PGP Universal Server discovers a user
with a login name of “ming” and an email address of “mingp@example.com,” that user
must have attributes “uid=ming” and “mail=mingp@example.com” in the directory. If
these attributes do not match or are empty, the user is not added correctly. For a list of
attributes, see Directory Attributes (on page 232).
The X.509 certificates stored in LDAP directories contain only public keys, so these
users are imported into PGP Universal Server as Client Key Mode (CKM) users, which
means that the PGP Universal Server does not have the private key for these users.
Base DN and Bind DN
The Directory Synchronization feature makes use of two types of Distinguished Names
when communicating with an LDAP directory.
Bind DN
The Bind Distinguished Name (DN) is used to initially bind (or log in) to the directory
server.
The Bind DN entry, if included, must match a user entry in the directory. This user
represents the PGP Universal Server to the LDAP directory, allowing PGP Universal
Server to log in to the directory and retrieve information. Supply the passphrase for
this user, if appropriate.
Note: A bind DN is optional. If no Bind DN is provided, anonymous binding will be
used, if the directory allows it.
Bind DN entries usually look as follows in an Active Directory environment:
CN=LDAP user,CN=users,DC=<yourcompany_name>,
DC=<yourcompany_domain>

227 Using Directory Synchronization to Manage Consumers
Understanding User Enrollment Methods
(CN=LDAP user,CN=users,DC=acmecorp, DC=net, for example)
Following is a sample Directory Synchronization configuration for an Exchange Server
for a fictitious company called Acme Corporation:
Host: mail.acmecorp.net
Bind DN: CN=LDAP Search, CN=Users, DC=acmecorp, DC=net
Base DN: Leave blank
Here the “LDAP Search” user is a username created explicitly to allow the PGP
Universal Server access to the directory. Its passphrase would be typed in the next
field.
Base DN
A Base Distinguished Name (DN) specifies the location in the directory tree where
directory lookups will start. You can have multiple Base DNs on one server. When you
enter a Base DN value, you narrow the search for users and certificates to that specific
portion of the directory.
Base DN entries usually look as follows in an Active Directory environment:
CN=users,DC=<yourcompany_name>,DC=<yourcompany_domain>
(CN=users, DC=acmecorp, DC=net, for example)
PGP Universal Server can automatically determine the Base DN to use if your
LDAP directory supports the RFC 2252 namingContexts attribute. If it does not
support this attribute, manually type the Base DNs to search. You can also specify
the order in which Base DNs are searched.
Consumer Matching Rules
Consumer matching rules let you specify the set of consumers that are expected to be
found in a given LDAP directory. For example, if you have several managed domains, or
a managed domain with subdomains that each have their own LDAP directories, you
can use the matching rules to specify which LDAP directory to search for a given email
address.
For details about how consumer matching rules are used, see Adding or Editing an LDAP
Directory (on page 234), and specifically The Consumer Matching Rules Tab (on page
236).
Understanding User Enrollment Methods
Enrollment is the binding of a computer with client software installed to a PGP
Universal Server. After a client is bound it receives feature policy information from the
PGP Universal Server; for example, encryption keys, email policy, PGP NetShare, or
PGP Whole Disk Encryption administration.
There are two ways to enroll client software:
Email enrollment. This is the default method; if you do not select Enroll clients
using directory authentication for Directory Synchronization, users enroll
through email.

228 Using Directory Synchronization to Manage Consumers
Understanding User Enrollment Methods
This method is available to all client installations, including PGP Whole Disk
Encryption-only installations, as long as there is an email account on the installed
computer. Email enrollment is possible even if the PGP Universal Server does not
perform email encryption or is out of the mailflow. Email enrollment only requires
that the PGP Universal Server be able to send an SMTP message to the client’s
mail server.
For more information, see Email Enrollment (on page 229).
LDAP directory enrollment. If you select Enroll clients using directory
authentication for Directory Synchronization, you allow clients to enroll with
LDAP.
LDAP enrollment requires certain attributes in the directory to bind the client to
the PGP Universal Server. For more information on necessary attributes, see
Directory Attributes (on page 232).
When you allow clients to enroll with LDAP, you can specify whether the users can
enroll using a certificate. Use Certificate Enrollment to enroll users who already
log on to Windows with existing smart cards/certificates. These users do not know
their Windows passwords, so they cannot use LDAP enrollment alone to enroll. If
you select this option, enrollment defaults to LDAP enrollment for any user
without a certificate or smart card.
Certificate enrollment requires that the LDAP server must already be set up to
work with PGP Universal Server. Users are found using the sAMAccountName
attribute.
Add the certificate’s issuing root CA to the PGP Universal Server Trusted Key list.
If client computers are also encrypted, smart cards must be compatible with PGP
WDE.
You can change the client enrollment setting for Directory Synchronization from the
Directory Synchronization Settings page, accessed by clicking the Settings... button at
the bottom of the Consumers > Directory Synchronization page. For more details
about global Directory Synchronization settings, see Directory Synchronization Settings
(on page 238).
For more information on enrolling clients using directory synchronization, see
Directory Enrollment (on page 231).
Before Creating a Client Installer
Perform the following tasks before you create a PGP Desktop installer. These tasks
apply to both email and LDAP enrollment.
1 Make sure that port 443 is open between the client computer and the PGP
Universal Server. Clients use this port to retrieve policy information and
encryption keys from the PGP Universal Server. Enrollment fails if port 443 is
unavailable.
2 If the client must connect through a proxy server, from the applicable consumer
policy, click General, select Use an HTTPS Proxy Server for client
communications, and type in the hostname and port for the HTTPS proxy server.
3 Type a valid PGP Desktop license. From Consumers > Consumer Policy, choose
the policy for which you want to add a license. For more information on licensing
your software, see Administering Consumer Policy (on page 197).

229 Using Directory Synchronization to Manage Consumers
Understanding User Enrollment Methods
4 Ensure that the domain you use for email appears as a managed domain on the
Consumers > Managed Domains page. This is necessary even if you are not using
PGP Universal Server or PGP Desktop Email to process email. If your email
domain does not appear on the Managed Domains page, add the domain. For more
information, see Managed Domains (on page 39).
5 Make sure you have DNS properly configured. Properly configured DNS settings
(including root servers and appropriate reverse lookup records) are required to
support PGP Universal Server. Make sure both host and pointer records are
correct. IP addresses must be resolvable to hostnames, as well as hostnames
resolvable to IP addresses.
6 If you use the Override default keyring locations option, PGP Desktop still
requires temporary access to the My Documents folder on the user's system. If
your IT policy restricts access to users' My Documents folder, please be sure to
temporarily enable access when users are installing PGP Desktop.
7 If you are reinstalling PGP Desktop from a previous failed attempt, delete the
folder under C:\Documents and Settings\<username>\Application
Data\PGP Corporation. This deletes the preferences file and allows you to start
with new settings.
Email Enrollment
This method is available to all client installations, including PGP NetShare-only and
PGP Whole Disk Encryption-only installations, as long as there is an email account on
the installed computer. Email enrollment is possible even if the PGP Universal Server
does not perform email encryption or is out of the mailflow. Email enrollment only
requires that the PGP Universal Server be able to send an SMTP message to the mail
server.
If your email protocol cannot be proxied, then you cannot use email enrollment, but
must choose LDAP enrollment instead. POP, IMAP, Lotus Notes, and MAPI protocols
can all be proxied. Novell GroupWise cannot be proxied and does not allow email
enrollment.
If you do not select Enroll clients using directory authentication on the Directory
Synchronization Settings dialog box when you enable Directory Synchronization,
clients enroll through email.
There are two parts to client installation and enrollment:
On the PGP Universal Server, you create a client installer. Tasks include: adding
mail routes, checking port and SMTP settings, enabling Directory
Synchronization, creating consumer groups and policies, and customizing and
downloading the client installer.
On the client computer, you install the client software. Tasks include: uploading
the installer file, installing the client software, and following the enrollment
wizard.
To create a client installer for email enrollment
1 From Mail > Mail Routes on your PGP Universal Server, create a mail route that
sends mail for your domain to the hostname of your mailserver. For more
information on adding mail routes, see Specifying Mail Routes (on page 161).

230 Using Directory Synchronization to Manage Consumers
Understanding User Enrollment Methods
2 Make sure port 25 is open between your PGP Universal Server and your mail
server.
3 Make sure your mail server accepts SMTP. Some mail servers, for example Domino
servers, are not set to accept SMTP by default.
4 If you want to use directory synchronization to assign consumers to user policies,
enable Directory Synchronization. From Consumers > Directory
Synchronization, select Settings. Do not select Enroll clients using directory
authentication. For more information, see Enabling Directory Synchronization (on
page 234).
5 From Consumers > Consumer Policy, create consumer policies. For more
information, see Administering Consumer Policy (on page 197).
6 From Consumers > Groups, create consumer groups and assign consumer
policies. For more information, see Managing Groups (on page 169).
7 Create a client installer. From Consumers > Groups, select Download Client.
8 Click Customize, and add the settings you want for the installer.
Make sure to add your mail server name to the Mail Server Binding field. You can
use wildcards. Mail Server Binding is necessary for email enrollment because it
tells the client where to send enrollment email. This setting is also particularly
important when PGP Universal Server is proxying email, because it specifies the
mail server for which policies are being locally enforced. When the client
computer sends email using the specified mail server, policy from the PGP
Universal Server is enforced.
For more information on creating a client installer, Creating Group Client
Installations (on page 177).
9 Click Download to download the installer.
If your Microsoft Internet Explorer security settings do not allow downloads, to
override the security setting, click Download while you press and hold the CTRL
button on your keyboard.
To install and enroll a client through email enrollment
1 Upload the installer file to the client computer.
2 Install PGP Desktop by double-clicking the installer file.
3 Follow the on-screen instructions to install.
4 Restart the client computer when instructed.
The PGP Desktop Setup Assistant appears. Follow the instructions to enroll.
5 Type the user’s email address.
6 Run the email client and check for new email.
7 The user should receive an enrollment email from the PGP Universal Server. Open
the email to use the enrollment cookie embedded in the email.
Note: If the user does not receive an enrollment email, make sure the email
domain matches a managed domain, and make sure the correct ports are open.
8 From the Enrollment Assistant, continue with enrollment by following the
instructions.

231 Using Directory Synchronization to Manage Consumers
Understanding User Enrollment Methods
Directory Enrollment
If you select Enroll clients using directory authentication when you enable Directory
Synchronization, you allow clients to enroll with LDAP. If you do not select this setting,
clients enroll through email.
To use LDAP enrollment your directory schema must contain certain attributes. For
more information, see Directory Attributes (on page 232).
There are two parts to client installation and enrollment:
On the PGP Universal Server, you create a client installer. Tasks include: enabling
Directory Synchronization, creating user policies, and customizing and
downloading the client installer.
On the client computer, you install the client software. Tasks include: uploading
the installer file, installing the client software, and following the enrollment
wizard.
To create a client installer for directory enrollment
1 Enable Directory Synchronization on the PGP Universal Server. From Consumers
> Directory Synchronization, click Enable.
2 Add LDAP directories. For more information, see Enabling Directory
Synchronization (on page 234).
3 From Consumers > Directory Synchronization, click Settings. Select Enroll
clients using directory authentication.
4 Click Save.
5 From Consumers > Consumer Policy, create consumer policies. For more
information, see Administering Consumer Policy (on page 197).
6 From Consumers > Groups, create consumer groups and assign consumer
policies. For more information, see Managing Groups (on page 169).
7 Create a client installer. From Consumers > Groups, select Download Client.
8 Click Customize, and add the settings you want for the installer.
Make sure to add your mail server name to the Mail Server Binding field. You can
use wildcards. This setting is particularly important when PGP Universal Server is
proxying email, because it specifies the mail server for which policies are being
locally enforced. When the client computer sends email using the specified mail
server, policy from the PGP Universal Server is enforced.
For more information on creating a client installer, see Creating Group Client
Installations (on page 177).
9 Click Download to download the installer.
If your Microsoft Internet Explorer security settings do not allow downloads, to
override the security setting, click Download while you press and hold the CTRL
button on your keyboard.
To install and enroll a client through directory enrollment
1 Upload the installer file to the client computer.
2 Install PGP Desktop by double-clicking the installer file.

232 Using Directory Synchronization to Manage Consumers
Understanding User Enrollment Methods
3 Follow the on-screen instructions to install.
4 Restart the client computer when instructed.
The PGP Desktop Setup Assistant appears. Follow the instructions to enroll.
5 Type your network login username and password when prompted.
6 Click Next, and continue with enrollment.
Note: If enrollment fails, make sure that the attributes, especially the email address,
are present in the directory and are populated with data.
Directory Attributes
Below is a list of required and optional attributes your LDAP directory must have for
LDAP enrollment.
Because you specify what type of LDAP directory you use, PGP Universal Server queries
user information using only the necessary attributes, providing faster results when
querying user information.
Note: Microsoft Windows 2000, 2003, 2008 Active Directory with Exchange Server
have all required attributes. Other Directory Server and Email Server combinations
might not have the necessary attributes.
Required attributes:
uid or sAMAccountName. These attributes are interchangeable. Microsoft Active
Directory uses sAMAccountName. All other LDAP directories use uid.
DN. This attribute exists if the user exists in the directory.
mail or proxyAddresses. These attributes are interchangeable. Every user must
have an email address for the attribute mail.
cn. This attribute matches what PGP Universal Server refers to as Display Name.
Each user must have a password defined in the directory. This security feature prevents
enrollment unless the user can authenticate with a username and password.
Optional attributes:
userCertificate. This attribute allows PGP Universal Server to find user X.509
S/MIME public certificates.
Attributes used to assign users to Internal User Policies.
Certificate Enrollment
If you select Enroll clients using directory authentication, you can also choose
whether users can enroll using smart cards or certificates. Use certificate enrollment to
enroll users who already log on to Windows with existing smart cards/certificates. For
more information on how to use your LDAP server for client enrollment, see Directory
Enrollment (on page 231).
There are two parts to client installation and enrollment:
On the PGP Universal Server, you create a client installer. Tasks include: enabling
Directory Synchronization, specifying whether users enroll using certificates,
creating user policies, and customizing and downloading the client installer.

233 Using Directory Synchronization to Manage Consumers
Understanding User Enrollment Methods
On the client computer, you install the client software. Tasks include: uploading
the installer file, installing the client software, and following the enrollment
wizard.
To create a client installer for certificate enrollment
1 Enable Directory Synchronization on the PGP Universal Server. From Consumers
> Directory Synchronization, click Enable.
2 Add LDAP directories. For more information, see Enabling Directory
Synchronization (on page 234).
3 From Consumers > Directory Synchronization, click Settings. Select Enroll
clients using directory authentication.
4 From the drop-down menu, select Allow, Deny, or Force certificate enrollment.
5 Click Save.
6 From Consumers > Consumer Policy, create consumer policies. For more
information, see Administering Consumer Policy (on page 197).
7 From Consumers > Groups, create consumer groups and assign consumer
policies. For more information, see Managing Groups (on page 169).
8 Create a client installer. From Consumers > Groups, select Download Client.
9 Click Customize, and add the settings you want for the installer.
Make sure to add your mail server name to the Mail Server Binding field. You can
use wildcards. This setting is particularly important when PGP Universal Server is
proxying email, because it specifies the mail server for which policies are being
locally enforced. When the client computer sends email using the specified mail
server, policy from the PGP Universal Server is enforced.
For more information on creating a client installer, see Creating Group Client
Installations (on page 177).
10 Click Download to download the installer.
If your Microsoft Internet Explorer security settings do not allow downloads, to
override the security setting, click Download while you press and hold the CTRL
button on your keyboard.
To install and enroll a client through certificate enrollment
1 Upload the installer file to the client computer.
2 Install PGP Desktop by double-clicking the installer file.
3 Follow the on-screen instructions to install.
4 Restart the client computer when instructed.
The PGP Desktop Setup Assistant appears. Follow the instructions to enroll. You
will not be prompted to enter a username and password, but you may be required
to enter information about your certificate or smart card.
Note: If enrollment fails, make sure that the attributes, especially the email address,
are present in the directory and are populated with data.

234 Using Directory Synchronization to Manage Consumers
Enabling Directory Synchronization
Enabling Directory Synchronization
The Directory Synchronization page enables you to add and configure LDAP
directories, and to enable and disable the Directory Synchronization function. Enabling
Directory Synchronization is necessary to allow PGP Desktop LDAP enrollment.
Disabling Directory Synchronization deactivates LDAP enrollment.
To enable Directory Synchronization
1 Go to Consumers > Directory Synchronization in the administrative interface.
The Directory Synchronization page appears.
2 Click Enable.
You can enable Directory Synchronization before you add and configure your LDAP
directories, or you can leave the feature disabled until you have completed and tested
your LDAP directory configurations.
Once the Directory Synchronization is enabled, the enable button changes to Disable.
The LDAP Directories section
If you have added LDAP directories, they appear listed in the LDAP Directories list at
the lower part of the page.
For each directory, this display shows the directory name, and the number of servers
that are part of the directory.
Click on a directory name to edit the directory.
Adding or Editing an LDAP Directory
A single LDAP Directory can have multiple servers associated with it. PGP Universal
Server treats all the associated servers as a single directory.
You can specify multiple Base DNs to be used as the basis for directory searches.
To Add an LDAP directory
1 Go to Consumers > Directory Synchronization in the administrative interface.
2 Click Add LDAP Directory...
The Add LDAP Directory page appears.
3 Type a name for the directory in the Name field.
4 From the Type drop-down menu, select the type of directory: choose Active
Directory, OpenLDAP (RFC 1274), Lotus Domino, or SunOne. Active Directory is
the default setting.

235 Using Directory Synchronization to Manage Consumers
Adding or Editing an LDAP Directory
Microsoft Active Directory uses the sAMAccountName attribute for user
information. OpenLDAP-based directories use the attribute uid for user
information. PGP Universal Server queries user information using only the
necessary attributes, providing faster results when querying user information.
5 In the Bind DN field, type the Distinguished Name of a valid user that exists in the
LDAP directory. PGP Universal Server will use this as the user name to bind (log
in) to the LDAP directory. This DN must match the name of an existing user in the
directory. Binding determines the permission granted for the duration of a
connection.
6 In the Passphrase field, type the passphrase to use for authentication to the DN.
Note: If you want to bind to the LDAP directory anonymously, leave these fields
blank. If no DN is provided, PGP Universal Server will attempt to bind
anonymously.
7 Go the the LDAP Servers tab and add at least one LDAP server. See The LDAP
Servers Tab (on page 235) for further details.
8 Go to the Base Distinguished Names tab to specify any Base DNs you want to use
as the basis for searches within this directory. See The Base Distinguished Name
Tab (on page 236) for further details.
9 Go to the Consumer Matching Rules tab if you want to set rules for which email
addresses should be searched for in this LDAP directory. For further details see
The Consumer Matching Rules Tab (on page 236).
To Edit an LDAP Directory
1 Click the directory name in the LDAP Directories list under Consumers >
Directory Synchronization.
The Edit LDAP Directory page appears.
From this page you can change the directory name, its type, add or remove
servers, change the Base DN settings and the consumer matching rules.
The LDAP Servers Tab
Under the LDAP Servers tab, you can add one or more LDAP servers to be associated
with this LDAP directory.
1 Type the fully qualified domain name or IP address of the LDAP directory server in
the Hostname field.
2 Type the port number in the Port field. Typically, port 389 is used for LDAP or and
636 for LDAPS.
3 From the Protocol menu, select LDAP or LDAPS.
4 Specify the search priority for each server. If you have more than one LDAP
server, assign the priority with which you want the servers searched. More than
one server can have the same priority number; PGP Universal Server load balances
between servers with the same priority. You can use the priority setting to make
sure PGP Universal Server always searches the local LDAP server first.

236 Using Directory Synchronization to Manage Consumers
Adding or Editing an LDAP Directory
There are two ways to assign priority. You can number each server in the order
you want them searched, simply using 1,2,3, etc., or you can assign priority as a
reflection of the cost of connecting the PGP Universal Server to the LDAP server.
The connection cost can be ping time or any other measure you want, and you can
use any number you want to reflect cost. PGP Universal Server always contacts
the LDAP server with the lowest cost first.
Note: Priority settings are not replicated across a cluster. However, if you change
any setting on this page other than the priority setting, the other cluster
members lose their priority settings. You must reset the priority for all LDAP
servers on the other cluster members.
5 To test whether PGP Universal Server can successfully connect to the server using
the credentials you have provided (hostname, port, Bind DN and passphrase) click
the Test Connection button associated with this server. For additional
information, see Testing the LDAP Connection (on page 237).
6 To add another server to this LDAP directory, click the Add icon at the end of the
row.
The order of servers is not significant.
To remove a server, click the associated Remove icon.
The Base Distinguished Name Tab
Select this tab to specify one or more base DNs to use with searches of this directory.
1 If desired, type a value in the Base DN field; this narrows the search for users and
certificates to that portion of the directory. This is an optional field. For more
information about the Base DN and Bind DN fields, see Base DN and Bind DN (on
page 226).
2 To add another Base DN, click the Add icon at the end of the row.
3 To remove a Base DN, click the Remove icon.
4 The order in which the Base DNs are used for5 lookup is indicated by the number
in the drop-down menu at the left of the row. To reorder the Base DNs, select a
different number from the drop-down menu. The rules renumber immediately.
5 Click the Browse Base DNs... button to display a list of the DNs configured on this
LDAP directory. You can use this list to determine the valid DNs you can use for
your searches on this LDAP Directlry.
The Consumer Matching Rules Tab
Use the Consumer Matching Rules tab to specify patterns to match again the
enrollment user name. If an enrollment username matches this pattern, PGP Universal
Server will query this LDAP directory. If the username does not match the pattern, this
directory will not be searched.
1 Type the string to be used as a match in the Pattern: field.
2 To add another string, click the Add icon.
3 To remove a string, click the Remove icon.
Pattern strings can take the form of a regular expression. For example, you might use
.*.example.com to search the LDAP directory only for users in the example.com domain.

237 Using Directory Synchronization to Manage Consumers
Deleting an LDAP Directory
Testing the LDAP Connection
You can test the connection to the LDAP server from the Directory Synchronization
page without having to log out of PGP Universal Server. The PGP Universal Server
validates the information you typed into the fields, then uses that information to
connect to the LDAP server. The host, port, Bind DN, and passphrase are required for
this test.
To test the LDAP server connection
1 Go to Consumers > Directory Synchronization in the administrative interface.
2 Click Add LDAP Directory..., then go to the LDAP Servers tab.
3 Click Test Connection for the server you want to test.
A box appears with a pass or failure message.
Using Sample Records to Configure LDAP Settings
PGP Universal Server provides a way to test your LDAP configuration and lookup
settings.
The View Sample Records... button attempts to perform a lookup using the credentials
and search settings you have provided (Bind DN, configured servers, base DNs and
consumer matching rules) and returns the first five results it finds. You can use these to
determine if your search will return the results you expect based on your search
criteria.
For example, the five returned results should all be relative to your specified base DN or
set of base DNs, and should be appropriate matches for your consumer matching rules.
If no results are returned it may mean you are not searching the correct directory, or
that your base DN or matching rules are incorrect.
Deleting an LDAP Directory
To Delete an LDAP Directory
1 Go to Consumers > Directory Synchronization in the administrative interface.
2 Click the Delete icon next to the directory you want to delete.
You can remove a server from the directory without deleting the directory through the
Edit LDAP Directory page. Click the directory name to open the Edit LDAP DIrectory
page.

238 Using Directory Synchronization to Manage Consumers
Setting LDAP Directory Order
Setting LDAP Directory Order
The order that LDAP directories appear in the directory list determines the order in
which they are searched. You can configure PGP Universal Server to search for users in
multiple LDAP directories and specify which directory to search first. If the first
directory is unavailable, PGP Universal Server does not automatically search the next
directory in your list. PGP Universal Server only searches the next LDAP directory if
the user was not found in the first LDAP directory.
To change the order of LDAP directories
1 In the administrative interface, select Consumers > Directory Synchronization.
2 From the drop-down menu that is next to the directory whose position you want to
change, select the number that represents the directory's new position in the list.
The directory list is reordered immediately based on your change.
Note: You can choose whether you want the directory search order to be
replicated across your cluster. For more information, see Directory
Synchronization Settings (on page 238).
Directory Synchronization Settings
You can configure several aspects of how Directory Synchronization behaves. These are
global settings.
To configure Directory Synchronization Settings
1 Go to Consumers > Directory Synchronization in the administrative interface.
2 Select Settings....
The Directory Synchronization Settings dialog appears.
3 To change the Mailing List Cache Timeout value, type the number of minutes
entries should remain in the cache. The mailing list cache stores information
about the users in a mailing list, captured when mail policy expands a mailing list
and sends the processed message to the users on the list. The default is 30
minutes.
4 To enable PGP Desktop user enrollment authentication through Directory
Synchronization instead of through email, check the Enroll clients using
directory authentication option. This is unchecked by default, so that email
enrollment is the default behavior.
User enrollment through LDAP allows you to deploy standalone PGP Whole Disk
Encryption to users without requiring email processing.
For more information, see Understanding User Enrollment Methods (on page 227).

239 Using Directory Synchronization to Manage Consumers
Directory Synchronization Settings
5 Check the Enable LDAP Referrals option to allow PGP Universal Server to query
referred LDAP directories when searching for user information. If this option is
not selected, users who cannot be found in the named directory will be disabled,
even if the LDAP directory has responded with a referral to user information that
exists in another directory.
Allowing PGP Universal Server to search referred directories can result in lengthy
search times. This is unchecked by default.
6 Select Replicate LDAP Directory search order across all cluster members to
have all cluster members search LDAP directories in the same order. This is
enabled by default. If you deselect this option, LDAP directories are still replicated
across the cluster, but each cluster member can search them in a different order.
For example, you can specify that each cluster member first search a local LDAP
directory.
7 To change the behavior of Directory Synchronization when a user cannot be
matched to a specific LDAP directory based on any consumer matching rules,
select an option from the drop-down menu of choices. Your choices are:
Look for the consumer in all ordered LDAP Directories: If the consumer
cannot be matched to a specific directory, then search all LDAP Directories
specified for this PGP Universal Server, in priority order. (You can define the
order that directories are searched on the Directory Synchronization page.)
Only look for the consumer in the first ordered LDAP Directory: If the
consumer cannot be matched to a specific directory, then search only the
first (highest priority) LDAP Directory specified for this PGP Universal
Server. If not found in the first ordered directory, the consumer is rejected.
Reject the consumer: If the consumer cannot be matched to a specific
directory based on the consumer matching rules, reject the consumer.

28 Managing User Accounts
This section describes how to manage the user accounts on your PGP Universal Server.
Understanding User Account Types
Three types of users can have accounts on PGP Universal Server. All users share some
common features, and their accounts require some of the same management tasks.
Each user type also has unique features and management functions.
Internal users. Email users from managed domains. Internal users are created
automatically by your PGP Universal Server when those internal users interact
with the mail server, for example, when PGP Desktop users enroll with this PGP
Universal Server. You can also add internal users manually.
External users. Email users outside of managed domains but who are part of the
SMSA. External users can run PGP Universal Satellite or PGP Desktop, or they can
interact with the PGP Universal Server through PGP Universal Web Messenger.
Verified Directory users. Users outside of your domain who submit and manage
their keys stored on PGP Universal Server through the PGP Verified Directory.
Viewing User Accounts
You can look at user accounts on the Consumers > Users page. Buttons at the top of the
page allow you to view all users, or only internal, external, or Verified Directory users.
User Management Tasks
You can manage user accounts from the Consumers > All Users page, or from each
individual user information page. All users share some common features, and their
accounts require some of the same management tasks.
Setting User Authentication
You can add additional keys and passphrase information for internal and external
users.
Authentication for internal users:
Passphrase: This passphrase functions as an alternate means of authentication
for internal users. PGP Universal Server only stores this passphrase. PGP
Desktop users cannot use this passphrase to enroll. However, the passphrase can
be used with PGP Command Line and through external products that use the PGP
USP API.

242 Managing User Accounts
User Management Tasks
Public Key: This key functions as an alternate means of authenticate for users.
PGP Universal Server only stores this key; it does not replace the signing and
encryption key and is not used for those functions. However, the key can be used
as an authentication credential with PGP Command Line and through external
products that use the PGP USP API.
Authentication for external users:
Passphrase: You can add or edit the PGP Universal Web Messenger passphrase for
external user accounts. This option is not available if the user authenticates to
an external authentication server.
Public Key: This key functions as an alternate means of authenticate for users.
PGP Universal Server only stores this key; it does not replace the signing and
encryption key and is not used for those functions. However, the key can be used
as an authentication credential with PGP Command Line and through external
products that use the PGP USP API. This option is not available if the user
authenticates to an external authentication server.
Editing User Attributes
Store important non-key data about users by adding user attributes. Attributes are
attribute/value pairs that provide metadata about a user, device, or key. The attribute
value can be a text string or numeric.
For example, add information about how the user fits into the organization by creating
the attribute "department," and then adding a text string value with the name of the
user's department. An attribute identifying make and model can be added to a managed
device.
Adding Users to Groups
You can add users to groups from the User Information page.
To add a user to a group
1 From Consumers > Users, click the user who you want to manage.
The User Information page appears.
2 From the Groups section, click Add to Group.
You can also add users to a group from the Consumers > Groups page. For information
on users and groups, see Managing Groups (on page 169).
Editing User Permissions
Permissions are actions that a group or consumer is allowed to perform on keys,
consumers, or data objects. These are permissions specific to the user, not permissions
inherited from a group. To edit this user's permissions, click View and Edit
Permissions.
For more information on permissions and how users inherit permissions through group
membership, see Group Permissions (on page 174).

243 Managing User Accounts
User Management Tasks
Deleting Users
Caution: Deleting a user is permanent. If you delete a user, all private key material is
lost with no way to get it back. Anything encrypted only to those keys is not
recoverable. If you store private key material and there is any chance that user’s
private key might be needed again, revoke the user’s key instead of deleting the user.
See Revoking PGP Keys (see "Revoking Managed Keys" on page 74).
Warning: You cannot delete users with Intel Anti-Theft-activated computers from the
Users list. When you delete users, all user records are lost. The next time the
computer tries to rendezvous with PGP Universal Server, authentication fails and
the computer locks. You will not be able to recover the laptop without the PGP RDD
recovery passphrase, which is also deleted with the user records, unless you
previously exported it. Before you delete an AT Activated user or device, you must
deactivate and decrypt the computer.
To delete one user
1 Click the Delete icon of the user you want to delete.
A confirmation dialog box appears.
2 Click OK.
The user is deleted.
To delete multiple users
1 Select the check box at the far right end of the row of each of the users you want to
delete.
2 Select Delete Selected or Delete All from the Options menu at the bottom right
corner.
A confirmation dialog box appears.
3 Click OK.
The users are deleted.
Searching for Users
To find an user using a simple search, type the criteria for which you want to search,
and click the Search icon. A list of users that fit the criteria you specified appears. You
can also search using more specific criteria.
To search using advanced criteria
1 On the Consumers > Users page, click the advanced icon.
The User Search dialog box appears.
2 Specify your criteria. Available search criteria depends on which users are listed.
3 If you want to use more search criteria, click the plus sign icon and enter the
appropriate criteria. Returned results match all the search criteria you enter.
4 Click Search.

244 Managing User Accounts
User Management Tasks
A list of users that fit the criteria you specified appears. Search results only
contain users with Published or Pending Delete keys. Searches do not return
information for users with keys waiting for confirmation.
To clear the search, click the cancel button to the left of the search field.
Viewing User Log Entries
You can search for system logs for any user directly from that user's User Information
page.
To view user logs
1 Select the user you want from the All Users, Internal Users, External Users, or
Verified Directory Users page.
The User Information page appears.
2 Click View Log Entries.
The System Logs page appears with search results for the user you chose. Results
are from the Mail logs only.
For more information, see System Logs (on page 5).
Changing Display Names and Usernames
You can change or add usernames or display names associated with a user’s account.
To edit usernames and display names
1 Click on the name of the user whose information you want to edit.
The User Information page appears.
2 To change the user name displayed in the Users list, click Edit Names.
The Edit Names dialog box appears.
3 Type the display name you want to use. Display names containing the symbol @
are not valid unless the display name is typed within quotation marks; for
example, “joe@example.com” is valid.
4 If this is an internal user, you can also type in one or more usernames. Click the
Add icon to add more usernames. Usernames must be unique and not shared with
any other user.
5 Click Save.

245 Managing User Accounts
User Management Tasks
Exporting a User’s X.509 Certificate
To export the X.509 certificate of a user
1 Select the user you want from the All Users page.
The User Information page appears.
2 From the Email Addresses section, click the Export icon to export the certificate
associated with that email address.
If only the public key is attached to the certificate, the text of the certificate
downloads to your system.
If both the public and the private key are attached to the certificate, the Export
Certificate dialog box appears, allowing you to choose to export only the public
key, or both public and private portions of the key.
3 Select Export Public Key to export just the public key portion of the certificate.
4 Select Export Keypair to export the entire certificate.
5 If you want to protect the exported certificate file with a passphrase, type it in the
Passphrase field.
If the X.509 certificate is already protected by a passphrase, you cannot export the
private portion. You export only a PEM file containing the public certificate.
6 Click Export.
The X.509 certificate is exported.
Revoking a User's X.509 Certificate
If you revoke a user's certificate, it is removed from the user's key, and it appears on the
Certificate Revocation Lists.
The certificate can be used to decrypt messages, but cannot be used to encrypt or sign.
Once you revoke a certificate, you cannot un-revoke it.
To revoke the certificate of a user
1 Select the user you want from the All Users page.
The User Information page appears.
2 From the Email Addresses section, click the Revoke icon next to the certificate you
want to revoke.
A confirmation dialog box appears.
3 Click OK.
The user’s certificate is revoked.

246 Managing User Accounts
Managing Internal User Accounts
Managing User Keys
You can manage an individual user's keys directly from the User Information page. The
Managed Keys section of the page lists the key ID, what key usage flags are set on the
key, key size, creation date, expiration date, reconstruction block status, key status, and
actions you can take for PGP keys associated with the selected user. You can delete
internal users’ key reconstruction blocks uploaded to the PGP Universal Server. For
more information, see Deleting a PGP Desktop Key Reconstruction Block (on page 249). If
the internal user has an associated PGP key, you can export or delete the key. If the
user’s key is in SKM, you can also revoke it. Pending keys can be exported, but you
cannot revoke or delete them.
If you delete a user’s key, the private key material is gone, which means messages are
no longer decryptable.
To manage user keys
1 From Consumers > Users, click the user who you want to manage.
The User Information page appears.
2 From the Managed Keys section, click the icon for the action you want to take.
You can also manage user keys from the Keys > Managed Keys page. For information
on managed keys, see Administering Managed Keys (on page 61).
Managing Internal User Accounts
The list on the Internal Users page (Consumers > All Users > Internal Users) shows all
internal users that are part of the SMSA created by the PGP Universal Server. It lists
their Name, Primary Email Address, the policy group to which the user belongs, how
many keys the user has, the last time they sent or received a message, device
encryption information, whole disk recovery tokens, and it lets you delete a user.
Sometimes a user is listed on the Internal Users page with no email address shown.
This happens when the user account was created automatically by the PGP Universal
Server when the user accessed email over a POP or IMAP connection, but the PGP
Universal Server does not know what email address is associated with that user. As
soon as that user sends email over SMTP, the PGP Universal Server adds the rest of the
user information to the record.
You can also manually add the keys of PGP Desktop users to the list, search for an
internal user, and approve keys submitted by internal users.
When user keys are created, they automatically contain information on the preferred
keyserver URL, as specified on the Services > Keyserver page. If the Public URL for the
preferred keyserver changes, the information updates on the key the next time the
Organization Key signature on the user key renews.

247 Managing User Accounts
Managing Internal User Accounts
Importing Internal User Keys Manually
In addition to automatically creating a key for your email users, the PGP Universal
Server also lets you manually add internal users. This option is useful for internal users
who already have keys, such as existing PGP Desktop users who of course would have
their own PGP key, or existing S/MIME users from a previous PKI in your organization.
The PGP Universal Server checks the Certificate Revocation List Distribution Points
automatically before importing any internal user certificate. See Certificate Revocation
Lists (see "How PGP Universal Server Uses Certificate Revocation Lists" on page 44) for
more information.
There are some important things to know before you import the key of an internal user:
You can only import users with email addresses in a domain being managed by the
PGP Universal Server.
You can import more than one key at a time (if appropriate, of course). Paste the
keys into the Key Block box one after the other or put them together in one file.
If users manage their private keys on their own computers, called Client Key Mode
(CKM), then paste in only their public keys.
To have the PGP Universal Server manage both the private key and the public key
for the user, called Server Key Mode (SKM), paste in a keypair that was created
with no passphrase.
If the user wants to manage their private key on their own computer, but wants to
keep a copy of their private key on the server in encrypted format, called Guarded
Key Mode (GKM), paste in a keypair that was created with a passphrase.
If the user wants to store their private encryption key on both their own computer
and on the PGP Universal Server, but wants to store their private signing key only
on their own computer, called Server Client Key Mode (SCKM), paste in the SCKM
keypair.
To manually import internal user keys
1 From Consumers > Users > Internal Users, click Add Internal Users.
The Import Internal Users dialog box appears.
2 Enter key material.
3 If you importing a private key, type in the passphrase.
4 Click Import.
The key data is imported.
If you are importing a PGP Keyserver file, all keys belonging to internal users are
imported, and all other key information is discarded.
Creating New Internal User Accounts
You can create internal users without keys.

248 Managing User Accounts
Managing Internal User Accounts
To manually create internal users without keys
1 Click Add Internal Users.
The Import Internal Users dialog box appears.
2 Click Manual Creation.
The Create Internal Users dialog box appears.
3 Enter user information.
4 Click Add.
Exporting PGP Whole Disk Encryption Login Failure Data
You can download just PGP Whole Disk Encryption login failure data to view offline.
The data covers login failures for all internal users. For more information on login
failures, see Managing Alerts (on page 27).
To export login failure data
1 From the Internal Users page, from the Options menu, select Export WDE Login
Failures For All.
2 If you want to export the data for only some users, select the users you want and
select Export WDE Login Failures For Selected.
The file WDE_Failures.CSV is exported.
3 To view login failure data for a single user, click the user you want to view.
Internal User Settings
To inspect the settings of an internal user, click on the name of the user whose
information you want to inspect. The Internal User Information page appears.
The top section of this dialog box displays the Username, Display Name, when the user
account was created, status, last use, WDE status, UUID, and what policy group applies
for the selected internal user.
Status reflects a user’s key status. Key status for CKM and SKM users is always
Published because those keys are published to your LDAP directory. If a user submits
their keys using the PGP Verified Directory interface, the key status indicates where the
key is in the PGP Verified Directory process. For more information, see Configuring the
PGP Verified Directory (on page 302).
The UUID is the unique identifier assigned to this user within the PGP Universal Server
database. The username and all other user information is associated with this UUID.
The Attributes section lists the attributes that apply to the user. To add or change
attributes, click Edit Attributes.
The Groups section lists to which group the user belongs. To add the user to a
different group, click Add to Group. To see a list of groups, click All Groups.
The Permissions section lists permissions for this user. To edit this user's
permissions, click View and Edit Permissions.

249 Managing User Accounts
Managing Internal User Accounts
The Managed Keys section lists the key ID and mode, what key usage flags are set
on the key, key size, creation date, expiration time, status, reconstruction block
status, pending keys, and actions you can take for PGP keys associated with the
selected internal user. For example, you can delete internal users’ key
reconstruction blocks uploaded to the PGP Universal Server. For more
information, see Deleting a PGP Desktop Key Reconstruction Block (on page 249). If
the internal user has an associated PGP key, you can export or delete the key. If
the user’s key is in SKM, you can also revoke it. Pending keys can be exported, but
you cannot revoke or delete them.
The Email Addresses section lists the email addresses associated with the selected
internal user, any certificates attached to their email addresses, and anything you
can do in regards to their certificates. The tab also shows any included X.509
certificate. For more information, see Exporting a User’s X.509 Certificate (on page
245).
The Whole Disk Encryption section lists encrypted device data. Information is
grouped by computer, then by disk ID, common device name, then by partition.
You can also see any whole disk recovery tokens associated with encrypted
devices, their status, and actions you can take. For more information, see Viewing
PGP Whole Disk Encryption Status (on page 251). For more information about
whole disk recovery tokens, see Using Whole Disk Recovery Tokens (on page 250).
The WDE Login Failures section lists login failures alerts for encrypted devices,
and allows you to clear them. Specify how long you want login failure alerts to be
listed using the Managing Alerts (on page 27) dialog box on the System Overview
page.
Deleting a PGP Desktop Key Reconstruction Block
If an internal PGP Desktop user has uploaded a key reconstruction block to the PGP
Universal Server, you can delete it. You can delete a key reconstruction block if you
have already deleted or revoked the associated key and you do not want the key to be
recoverable. If you delete the key reconstruction block, the PGP Universal Server no
longer stores it, although the user may also have a copy. See Key Reconstruction Blocks
(on page 44) for more information.
To delete a key reconstruction block
1 Select the user you want from the Internal Users page.
The Internal User Information page appears.
2 From the Managed Keys tab, click the Delete icon in the Reconstruction column.
A confirmation dialog box appears.
3 Click OK.
The key reconstruction block is deleted.

250 Managing User Accounts
Managing Internal User Accounts
Using Whole Disk Recovery Tokens
Whole disk recovery tokens are associated with encrypted devices, not single
computers or single users. A single computer can be associated with multiple encrypted
devices. If multiple users have accounts on the same device, they share the same whole
disk recovery token. Whatever you do with the token affects all users sharing that
device. Each encrypted device has only one whole disk recovery token, which unlocks
all the encrypted disks on that device.
The WDRT column of the Whole Disk Encryption section of the Internal User
Information dialog box lists any whole disk recovery tokens the internal user has.
Whole disk recovery token strings are case-sensitive and contain both letters and
numerals. Because it can be difficult to tell the difference between certain letters and
numerals, whole disk recovery tokens use letter and numeral equivalencies. You can
type either letter or numeral when you use a whole disk recovery token, and the token
string are still accepted. The following are interchangeable:
Capital letter B and numeral eight (8)
Capital letter O and numeral zero (0)
Capital letter I and numeral one (1)
Capital letter S and numeral five (5)
To recover a whole disk
1 Select the user you want from the Internal Users page.
The Internal User Information page appears.
2 From the Whole Disk Encryption tab, click the View icon in the WDRT column.
The recovery token string appears.
3 Provide this information to the user, who uses it to recover the disk.
Once the token is used, it is presented as a “broken” or opened token, and a new
token is automatically generated by PGP Desktop and synchronized with the PGP
Universal Server as soon as the user logs in and the PGP Universal Server is
contacted. The new token then re-appears as unviewed or valid.
Deleting Whole Disk Recovery Tokens
Caution: You can delete any whole disk recovery token. If you delete a WDRT that has
not been used to recover a disk, the PGP Whole Disk Encryption client is not
prompted to create and send another token. The disk cannot be recovered. Search
the log files to make sure the token you want to delete has been used.
To delete a whole disk recovery token
1 Select the user you want from the Internal Users page.
The Internal User Information page appears.
2 From the Whole Disk Encryption tab, click the View icon in the WDRT column.
The recovery token string appears.

251 Managing User Accounts
Managing Internal User Accounts
3 Click Delete WDRT.
A confirmation dialog box appears.
4 Click OK to continue and delete the WDRT.
Viewing PGP Whole Disk Encryption Status
The Whole Disk Encryption section of the Internal User Information page lists
encrypted disk data. Information is grouped by computer, then by disk, then by
partition. You can also see any whole disk recovery tokens associated with encrypted
disk, their status, and actions you can take. For more information, see Using Whole Disk
Recovery Tokens (on page 250).
The Whole Disk Encryption tab displays the following information:
Computer: The name of the computer associated with the encrypted disk. A single
computer can have multiple associated encrypted disk.
Disk ID: The ID for the encrypted disk. A single encrypted disk can have multiple
encrypted partitions.
Common Name: The type of disk encrypted; for example, the brand and model.
Partition: The encrypted disk partition.
Size: The size of the encrypted disk.
Type: Whether the disk is fixed or removable.
Last Seen: Date of the most recent event occurring on the disk.
Status: Encryption status of the internal user's entire system (not just an
encryptable drive on the system), including encrypting and decrypting, as well as
login failures.
Note: The PGP Universal Server does not display encrypted disk status on the
Internal User Information page for PGP Desktop prior to 9.7, and instead
displays the "Unknown" status for all such devices. To see encrypted device
status, you must upgrade the client to 9.7 or later.
The status can be:
No encrypted disks
Unencrypted
Encrypting
Partially encrypted (one drive is encrypted, one or more other drives on the
system are not encrypted)
Fixed encrypted
Encrypted
Decrypting
Error
Client: The version number of the PGP Whole Disk Encryption client software
used to encrypt the all devices associated with a computer.

252 Managing User Accounts
Managing External User Accounts
WDRT: Whole disk recovery tokens. Click the whole disk recovery token icon to
see details.
1 For details on all the encrypted devices associated with a computer, click the name
of the computer.
The WDE Computer Information dialog box appears. The dialog box shows all
encrypted devices, as well as login failures for each encrypted partition.
2 Click OK to close the dialog box.
3 To clear the list of login failures, click Clear Login Failure Alerts. For more
information on login failures, see Managing Alerts (on page 27).
Managing External User Accounts
The External Users page (Consumers > All USers > External Users) shows accounts for
users outside your domain. Importing external users allows your internal users to easily
send encrypted messages to them, because external users’ public keys are stored
locally. This is similar to adding external domains and directories to the PGP Universal
Server, except that you are adding information about specific individuals rather than
domains. PGP Universal Server stores the key material for external users, rather than
having to look for it on an external keyserver directory.
The PGP Universal Server checks the Certificate Revocation List Distribution Points
automatically before importing any external user certificate. For more information, see
Certificate Revocation Lists (see "How PGP Universal Server Uses Certificate Revocation
Lists" on page 44).
The External Users page lists all external users your PGP Universal Server knows. It
lists their Email Address, Name, User Type, what policy group the user belongs to,
number of keys associated with the user, how much of the Web Messenger quota is in
use, date and time stamp of the last use, and lets you delete the user or export their
keys.
You can also change the default account settings your server uses when it creates a new
external user or search for an external user.
If you would prefer your external users to manage their own keys stored on the PGP
Universal Server, rather than you importing and managing their keys yourself, you can
allow them to submit keys to the PGP Verified Directory. For more information, see
Managing PGP Verified Directory User Accounts.
You can also specify whether PGP Universal Web Messenger user passwords
authenticate locally or to an external authentication server.
Importing External Users
If PGP Universal Web Messenger is enabled, you can add external users by sending
them email invitations to establish a passphrase, and to choose a method to receive
secure email, including the option to submit their public keys.

253 Managing User Accounts
Managing External User Accounts
To manually import one or more external users using their email addresses
1 On the External Users page, click Add External Users.
The Add External Users dialog box appears.
2 In the Email addresses field, type the email addresses of the external users you
are adding. Separate email addresses with commas, semi-colons, or on new lines.
3 Click Save. The added users then receive an invitation email.
If you have an external user’s public key, you can import it directly into the PGP
Universal Server, so that your internal users can immediately begin sending encrypted
email to that user. If PGP Universal Web Messenger is not enabled, you can add
external users by manually importing user keys.
To manually import one or more external users by importing their keys
1 On the External Users page, click Add External Users.
The Add External Users dialog box appears.
2 Click Import keys.
On the Import External Users dialog box, import your external users by choosing
their key file or pasting their key block. Type a passphrase if necessary.
3 Click Import.
The key data is imported.
If you are importing a PGP Keyserver file, all keys belonging to external users are
imported, and all other key information is discarded.
Exporting Delivery Receipts
External users can receive messages through PDF Messenger with Certified Delivery.
For more information, see Certified Delivery with PDF Messenger (on page 123).
The PGP Universal Server creates and logs the delivery receipt when the recipient
obtains the passphrase required to open the PDF. A delivery receipt is also created and
logged if the user initially opens a PDF Messenger message through Web Messenger
(depends on Consumer Policy settings). To specify how long the PGP Universal Server
stores delivery receipts, see Configuring the PGP Universal Web Messenger Service (on
page 292).
To download delivery receipts
1 To export receipts for all users, from the Options menu, select Export Delivery
Receipts For All.
OR
2 Select the check boxes for the users whose delivery receipts you want to export.
3 From the Options menu, select Export Delivery Receipts For Selected.
DeliveryReceipts.csv is exported. The delivery receipt file contains the following
information:
Delivery status of the message

254 Managing User Accounts
Managing External User Accounts
Message subject
Sender and recipient
Sent and receipt dates
External User Settings
From the Users > External Users page, click on the name of the user whose information
you want to inspect. The External User Information page appears.
The top section of this dialog box shows the Display Name, when the user account was
created, the policy group the user belongs to, where the user's Web Messenger data is
stored, last use, user type, Web Messenger quota, the user's UUID, and quota usage for
the selected external user.
The user’s Quota is the storage space allotted for PGP Universal Web Messenger mail
storage. All mail messages received, sent, and saved are counted.
The Web Messenger Server is where the user’s PGP Universal Web Messenger data is
stored. In a cluster, Web Messenger data can be stored on more than one cluster
member.
The User Type describes the external user's encryption method, for example, Web
Messenger, PDF, or S/MIME.
The UUID is the unique identifier assigned to this user within the PGP Universal Server
database. The username and all other user information is associated with this UUID.
Usage refers to how much of the user’s Quota has already been used.
The Authentication section allows you to upload an authentication key and to add
or change the user's PGP Universal Web Messenger passphrase. You can also
control whether a PGP Universal Web Messenger user's password is authenticated
to the PGP Universal Server or to an external directory, if there is an external
directory configured.
The Attributes section lists the attributes that apply to the user. To add or change
attributes, click Edit Attributes.
The Groups section lists to which group the user belongs. To add the user to a
different group, click Add to Group. To see a list of groups, click All Groups.
The Permissions section lists permissions for this user. To edit this user's
permissions, click View and Edit Permissions.
The Managed Keys section lists the key ID, key usage, key size, creation date,
expiration time, status, reconstruction block status, and actions you can take for
PGP keys associated with the selected directory user. You can revoke, export or
delete the key.
The Email Addresses section lists the email address associated with the selected
external user.

255 Managing User Accounts
Offering X.509 Certificates to External Users
Changing the Passphrase of an External User
To change the passphrase of an external user
1 On the External User Information page, from the Authentication section, click
Change Passphrase. This option is not available if the user authenticates to an
external authentication server.
The Change Passphrase dialog box appears.
2 In the New Passphrase field, type the new passphrase. The passphrase must be at
least 6 characters long.
3 In the Confirm New Passphrase field, type the new passphrase again, exactly as
you typed it in the New Passphrase field.
4 Click Save.
The passphrase is changed.
Unlocking PGP Universal Web Messenger Accounts
After a specified number of failed login attempts to PGP Universal Web Messenger, the
user account locks and the user is shut out of the system. When users are shut out, they
receive an email message notifying them that they have been locked out. The email
message provides a URL to allow the user to log back in again. This ensures that only
the correct recipient of a message can log back in after multiple failed login attempts. If
a user is locked out and fails to respond to the email, the administrator can unlock the
account manually.
For more information on specifying the number of times a user can attempt to log in
before the account is locked, see Configuring the PGP Universal Web Messenger Service
(on page 292).
To unlock a PGP Universal Web Messenger account
On the External User Information page, click Unlock Account.
Offering X.509 Certificates to External Users
You can offer X.509 certificates to your external users through the PGP Universal Web
Messenger interface. External users who choose this option download the certificates,
add them to their mail clients, and use them to communicate securely with users inside
your managed domain. PGP Universal Server stores the certificates and uses them to
encrypt messages from internal to external users. The messages are forwarded to the
recipient mail clients; they are not stored in PGP Universal Web Messenger. External
users' mail clients decrypt the messages. External users must choose to encrypt and
sign replies to internal users; there is no way to enforce secure replies.
Before external users can generate and download X.509 certificates, the following
requirements must be met.

256 Managing User Accounts
Managing Verified Directory User Accounts
PGP Universal Server must have an Organization Certificate, External User Root
Certificate, and External User Root Key. For more information, see Managing
Organization Keys (on page 47).
External users must have access to internal user X.509 certificates. Without
certificate access, external users cannot securely reply to messages from internal
users. External users can access certificates via LDAP if their mail clients are
LDAP-enabled. PGP Universal Server can function as a keyserver to provide
internal user certificates to external users whose mail clients are not
LDAP-enabled. If an external user's mail client cannot connect to an LDAP
keyserver, the internal user can send their public key directly to the external user.
The PGP Universal Server license must include gateway email.
PGP Universal Web Messenger must be enabled. For more information, see
Configuring PGP Universal Web Messenger (on page 281).
You must set up a consumer policy for PGP Universal Web Messenger that offers
certificates to external users. Enable the Generate and download digital ID/ X.509
Certificate for S/MIME option and select certificate generation settings in the
PGP Universal Web Messenger section of consumer policy. For more information
on creating consumer policies, see Administering Consumer Policy (on page 197).
For information on PGP Universal Web Messenger policy settings, see the online
help.
External user certificates are not offered as a Key Not Found option. If PGP Universal
Web Messenger is available as a Key Not Found setting, you can add the option to make
certificates available to users as a message delivery choice through PGP Universal Web
Messenger consumer policy. Only the external user can choose to download and use a
certificate; you cannot manually assign that delivery type to a user.
When a user selects this delivery type, they are prompted to download the certificate,
install it on the mail client, send a test message through PGP Universal Web Messenger,
and confirm success. PGP Universal Server does not verify that the user successfully
set up certificate delivery. If any part of the process fails, the external user continues to
receive messages through PGP Universal Web Messenger. Every time the user receives
another message, they are prompted to either try again to download the certificate or
choose a different delivery type.
If the user changes delivery types, the user's certificate remains stored on PGP
Universal Server. However, to renew or re-download the certificate, the user must
temporarily switch back to the X.509 download delivery type. If the user uploads a
different certificate to PGP Universal Server, the first certificate is not deleted.
Managing Verified Directory User Accounts
Internal and external users can submit their keys to the PGP Verified Directory. The
PGP Verified Directory gives you the option of hosting a Web-accessible keyserver for
the public keys of your internal or external users. Storing external user keys through
the PGP Verified Directory allows directory users to manage their keys themselves
through the PGP Verified Directory interface, without requiring them to establish PGP
Universal Web Messenger accounts.
You must add a Verified Directory Key to the PGP Universal Server before you import
keys or allow users outside your managed domain to submit keys. The Verified
Directory Key is the signing key for PGP Verified Directory users outside your managed
domain. (Internal PGP Verified Directory user keys are signed by your Organization
Key.)

257 Managing User Accounts
Managing Verified Directory User Accounts
For more information on the Verified Directory Key, see Managing Organization Keys
(on page 47).
For information on enabling users outside your managed domain to use the PGP
Verified Directory, see Configuring the PGP Verified Directory (on page 301).
If you would prefer to manage external user keys, or you would like external users to
use PGP Universal Web Messenger, see Managing External User Accounts (on page 252).
You can manage Verified Directory users through Consumers > Users > Verified
Directory Users.
Importing Verified Directory Users
While you can allow directory users to submit their own keys through the PGP Verified
Directory interface, you can also import their keys manually, and still allow the users to
manage their own keys.
1 On the Verified Directory Users page, click Add Verified Directory Users.
The Import Verified Directory Users dialog box appears.
2 On the Import Verified Directory Users dialog box, import directory users by
choosing their key file or pasting their key block.
3 Choose how the user keys should be verified:
Default. Applies the vetting method you selected on the Verified Directory
service page.
Implicitly. The keys are by default trusted.
Via Email. The directory user receives an email message and must respond.
Manually. The PGP Universal Server administrator manually approves or
disapproves the directory user keys.
4 Click Import.
The key data is imported.
PGP Verified Directory User Settings
From the Consumers > Users > Verified Directory Users page, click on the name of the
user whose information you want to inspect. The Verified Directory User Information
page appears.
The top section of this page shows the Display Name, when the user account was
created, last use, the policy group the user belongs to, the user's UUID, and status of the
user’s key. The key status indicates where the key is in the PGP Verified Directory
process: Pending Confirmation, Published, or Delete Pending.
The UUID is the unique identifier assigned to this user within the PGP Universal Server
database. The username and all other user information is associated with this UUID.
The Attributes section lists the attributes that apply to the directory user. To add
or change attributes, click Edit Attributes.
The Groups section lists to which group the user belongs. To add the user to a
different group, click Add to Group. To see a list of groups, click All Groups.

258 Managing User Accounts
Managing Verified Directory User Accounts
The Permissions section lists permissions for this user. To edit this user's
permissions, click View and Edit Permissions.
The Managed Keys section lists the key ID, key usage, key size, creation date,
expiration time, status, reconstruction block status, and actions you can take for
PGP keys associated with the selected directory user. You can approve, deny,
revoke, export or delete the key. Pending keys can be exported, but you cannot
delete them.
The Email Addresses section lists the email address associated with the selected
directory user.

29 Recovering Encrypted Data in an
Enterprise Environment
PGP Desktop together with PGP Universal Server securely encrypts data and email.
When enterprise-critical data is encrypted, the ability to recover data is necessary.
How can data be recovered if an employee loses an encryption key, or forgets the
key passphrase?
How can data be recovered if it was encrypted for an employee, and the employee
is unable or unwilling to perform the decryption?
When the original encryption key is not available, there are four methods to ensure the
enterprise can still access protected data:
Key reconstruction.
Recovery of the encryption key material.
Decryption of the encrypted data using an special data recovery key, known as an
Additional Decryption Key (ADK).
Using administrator keys and groups to recover encrypted data. For more
information, see Managing Clients Remotely Using a PGP WDE Administrator
Active Directory Group (on page 211) and Managing Clients Locally Using the PGP
WDE Administrator Key (on page 212).
PGP Desktop, in conjunction with PGP Universal Server, supports four different key
modes. Key modes affect which solutions are available for key reconstruction or
recovery. The ADK is suitable for use with all key modes.
Choose the most appropriate solution for your enterprise data security needs.
Using Key Reconstruction
Enabling key reconstruction ensures that users can reconstruct their PGP keys. For
more information on enabling key reconstruction, see Configuring PGP Desktop
Installations.
If you enable this option, when the user generates their key, a window appears
requiring the user to enter five questions and five corresponding answers. Answers
must contain at least six characters, which helps prevent attacks against the key
reconstruction material.
Key reconstruction is useful if the user loses their key material, or forgets their key
passphrase. To use key reconstruction, the user selects “Reconstruct Key” from the PGP
Desktop Keys menu. The user is then prompted to answer the key reconstruction
questions; if they answer three of the five questions correctly, their key is
reconstructed and they can type a new passphrase for the key.
Key reconstruction is not suitable for enterprise data recovery, since only the user
knows the answers to the reconstruction questions.
Key reconstruction is only applicable for CKM, GKM, and SCKM keys. For more
information on key modes, see Understanding Keys (on page 41).

260 Recovering Encrypted Data in an Enterprise Environment
Recovering Encryption Key Material without Key Reconstruction
Recovering Encryption Key Material without Key
Reconstruction
In some circumstances, key material can be recovered from PGP Universal Server
without utilizing key reconstruction. It is sometimes possible to continue to use the key
normally, but it may be necessary to generate a new key to be used going forward.
PGP Desktop, in conjunction with PGP Universal Server, supports four different key
modes. The key mode affects how key recovery is performed.
For more information on key modes, see Setting Internal User Policy.
Encryption Key Recovery of CKM Keys
CKM keys are created and managed by users. CKM keys are fully compatible with key
reconstruction, but the encryption key material cannot be recovered in any other way.
If reconstruction is not available, and the key material is lost or the passphrase is
forgotten, the user needs to generate a new CKM key, and begin using that key. Any
data recovery must then be accomplished with a data recovery key. For more
information, see Recovering Encryption Key Material without Key Reconstruction (on
page 260).
Encryption Key Recovery of GKM Keys
Because the PGP Universal Server stores a copy of a GKM key, a user can download a
new copy whenever needed. If the user loses their key (due, for example, to a hard disk
failure or theft of the computer), they can download the backed-up copy of their key
from PGP Universal Server, and continue to use it as before.
The GKM key stored by PGP Universal Server is encrypted using the user's passphrase.
If the user has forgotten the passphrase, or is not available to provide the passphrase, it
is not possible to recover the encryption key. Any data recovery must be accomplished
with a data recovery key. For more information, see Using an Additional Decryption Key
for Data Recovery (on page 262).
Encryption Key Recovery of SCKM Keys
SCKM keys are generated and managed by users. However, the PGP Universal Server
stores a passphraseless, unencrypted copy of the encryption key.
If a user has forgotten their passphrase or has lost their SCKM key material, the user
needs to generate and use a new SCKM key.
Because PGP Universal Server keeps a copy of the old SCKM encryption key, you can
use this key to decrypt data and email.

261 Recovering Encrypted Data in an Enterprise Environment
Recovering Encryption Key Material without Key Reconstruction
User Recovery of the Encryption Key for Email Decryption
When a user attempts to decrypt an email message encrypted to an old SCKM key, PGP
Desktop automatically downloads a copy of this key and stores it locally. This is
transparent to the user, but does require that the user have connectivity to PGP
Universal Server; the key is not stored permanently by the client.
This method of key recovery is only suitable for decrypting old email. Data cannot be
decrypted with the key downloaded from PGP Universal Server.
User Recovery of the Encryption Key for Data Decryption
If a PGP Desktop user needs to recover data encrypted to their old SCKM key, or needs
to decrypt email while disconnected from the PGP Universal Server, they must have a
local copy of the old SCKM key in their keyring.
The encryption key can be recovered by the PGP Universal Server administrator, by
following the following steps:
1 Export the old SCKM key from PGP Universal Server. Since the user has generated
a new SCKM key, the old key should be considered revoked.
2 Import the old key into PGP Desktop.
3 Remove the signing subkey.
4 Change the key passphrase, and provide a strong passphrase.
5 Send to the user an email message containing the key.
6 Send the passphrase to the user. You can send the passphrase in an email
message, because the email should be encrypted to the user's new SCKM key.
7 The user imports the key into their keyring, and changes the passphrase.
At this point the user has a copy of the encryption key locally, and can use it off-line to
decrypt both email and data.
Enterprise Recovery of the Encryption Key for Email or Data Decryption
If an enterprise needs to decrypt email or data encrypted for a user, they can recover
the encryption key using the User Recovery of the Encryption Key for Data Decryption
(on page 261) procedure. However, instead of sending the key to the user, the
administrator uses the key with the administrator’s own installation of PGP Desktop.
Encryption Key Recovery of SKM Keys
SKM keys are always stored on PGP Universal Server, and have no passphrase.
The PGP Universal Server administrator can export any user's SKM key and use it to
decrypt messages encrypted for that user. SKM users do not need a key recovery
process, because their keys are provided automatically by PGP Universal Server as
needed for decrypting email.
SKM keys cannot be used for data encryption. Encryption key recovery of SKM keys is
only required when email must be decrypted.

262 Recovering Encrypted Data in an Enterprise Environment
Using an Additional Decryption Key for Data Recovery
Using an Additional Decryption Key for Data Recovery
The ADK (Additional Decryption Key) is only available in PGP Universal Server
managed environments. The ADK provides a solution for enterprise data recovery that
works with any user key mode. An ADK can be used to decrypt encrypted data and
messages if an end user is unable or unwilling to do so.
An ADK is a normal PGP key created in PGP Desktop and uploaded to the PGP Universal
Server. The ADK can be a split key, which requires multiple administrators to come
together to reconstitute the key and use it for decryption. For more information on
creating keys, see the PGP Desktop User’s Guide.
When configured for use in a PGP Universal Server managed environment, all email is
encrypted to the ADK as well as the email recipient’s keys. The ADK is added as an
authorized recipient when a PGP Zip file is created. When a PGP NetShare folder is
created, the ADK is added as an authorized user key. In this manner, encrypted email
messages and data encrypted by a user can be decrypted by an administrator in
possession of the ADK. The ADK can be used to recover data from encrypted disks,
because it is also added to disks encrypted with PGP Whole Disk Encryption.
Because the ADK is created the same way as any other key, the holder of the ADK can
use it for email and data decryption, using the same method as for any other key in
their possession. The holder of the ADK can decrypt any encrypted message, decrypt
PGP Zip files, recover data from encrypted disks, and access PGP NetShare protected
files.
For more information on adding an ADK to the PGP Universal Server, see Managing
Organization Keys (on page 47). You can also add an ADK to a specific consumer policy;
for more information, see Using a Policy ADK (on page 206)

30
PGP Universal Satellite
This section describes PGP Universal Satellite.
PGP Universal Satellite is available for both Windows and Mac OS X systems. This
chapter describes those aspects of PGP Universal Satellite that are common to both.
For information about the Windows version, see PGP Universal Satellite for Windows
(on page 275). For information specific to the Mac OS X version, see PGP Universal
Satellite for Mac OS X (on page 271).
Overview
PGP Universal Satellite:
Provides security for messages all the way to the computers of external users
(email users external to an organization’s PGP Universal Server).
Allows external users to become part of the Self-Managing Security Architecture
(SMSA) and to use their favorite email client for sending and receiving PGP
Universal Server messages.
Gives external users the option to create and manage their keys on their own
computer, if allowed by the PGP Universal Server administrator.
Caution: PGP Universal Satellite cannot be installed on a system with PGP Desktop
9.0 or later. Beginning with PGP Desktop 9.0, PGP Universal Satellite functionality is
built into PGP Desktop.
PGP Universal Satellite installation requires no input from the person installing it.
Once installed, PGP Universal Satellite gets its policy settings from a PGP Universal
Server. PGP Universal Satellite does not do anything to outbound email without a
policy from a PGP Universal Server.
PGP Universal Satellite proxies SMTP traffic when the user sends email messages and
POP and IMAP traffic when they retrieve email messages from their mail server.
PGP Universal Satellite also manages all sending and receiving of email via the MAPI
protocol in an Exchange Server environment and via the Lotus Notes email client in a
Domino Server environment.
Note: Connectivity to the PGP Universal Server on port 443 (HTTPS) is required.
Technical Information
Before the PGP Universal Satellite software is installed on the email user’s computer,
their email client communicates with its associated mail server using SMTP to send
email and POP or IMAP to retrieve email.

264 PGP Universal Satellite
Distributing the PGP Universal Satellite Software
When installed, PGP Universal Satellite inserts itself into this process. It monitors the
email traffic of the user and proxies their SMTP and POP or IMAP traffic, adding
security (encrypting, decrypting, verifying, and signing) according to the policies it
receives from its associated PGP Universal Server. It also gets policies and exchanges
keys with the server over a link secured via SOAP/TLS.
Distributing the PGP Universal Satellite Software
PGP Universal Server provides an executable for deploying and upgrading PGP
Universal Satellite to your external users.
Configuration
PGP Universal Satellite is installed on the computer of an external user, someone who
is outside of the email domain being managed by a PGP Universal Server. PGP
Universal Satellite obtains its policies from a PGP Universal Server in the managed
domain. This is the same PGP Universal Server that sent the Smart Trailer or PGP
Universal Web Messenger message.
It does not matter if the PGP Universal Server in the managed domain is placed
internally or externally, as long as it is accessible to the external PGP Universal
Satellite via HTTPS on port 443.
To configure PGP Universal Satellite to adds security to email traffic, you must decide
which key modes the user can choose.
Key Mode
PGP Universal Satellite also works differently depending on the key mode associated
with an applicable policy (one installation of PGP Universal Satellite can potentially
have multiple key modes, one for each policy):
In Client Key Mode (CKM), all cryptography is performed by the computer on
which PGP Universal Satellite is installed. The private key stays on the computer;
the computer also handles all private key management.
In Guarded Key Mode (GKM), is the same as CKM, with one difference: an
encrypted copy of the private key is stored on the PGP Universal Server
(encrypted to the user’s passphrase). The PGP Universal Server administrator
cannot use the stored private key in GKM. GKM is useful if a key is accidentally
deleted or if the user needs to access the key and policy from a different computer:
the PGP Universal Server provides the private key when needed. The user must
use the same passphrase for the key from any system where this mobile key is
used.

265 PGP Universal Satellite
Configuration
In Server Key Mode (SKM), all cryptography is performed by the computer on
which PGP Universal Satellite is installed (with the exception of key generation);
the PGP Universal Server temporarily sends the private key to PGP Universal
Satellite via SOAP/TLS. The private key is stored only on the PGP Universal
Server, and the PGP Universal Server handles all private key management. With
SKM, the PGP Universal Server administrator has complete access to the private
key material and can thus access all messages encrypted by the PGP Universal
Satellite user.
Caution: If you are in an S/MIME environment and require ADK-like key recovery
capabilities, you must operate S/MIME in SKM.
In Server Client Key Mode (SCKM), all cryptography is performed by the
computer on which PGP Universal Satellite is installed. Additionally, an
unencrypted copy of the encryption subkey is stored on the PGP Universal Server,
while the signing subkey is held only on the computer on which PGP Universal
Satellite is installed. All other key management is also handled by the user’s
computer. This mode ensures compliance with laws and corporate policies that
require that signing keys not leave the control of the user while making sure that
encryption keys are stored in case of emergency. SCKM requires a key with a
separate signing subkey, which can be created for a new key with PGP Desktop or
PGP Universal Satellite 9.5 or later or added to an older PGP key using PGP
Desktop 9.5 or later.
PGP Universal Satellite users can select from any allowed mode.
PGP Universal Satellite Configurations
These two concepts together — the deployment mode and the key mode — gives us three
possible configurations for PGP Universal Satellite:
External user, Server Key Mode (called External SKM)
External user, Client Key Mode (called External CKM)
External user, Server-Client Key Mode (called External SCKM)
For the purposes of understanding PGP Universal Satellite configurations, CKM and
GKM work the same way.
All PGP Universal Satellite configurations are described below.

266 PGP Universal Satellite
Configuration
External SKM
In External SKM, the email user joins the SMSA via a Smart Trailer or PGP Universal
Web Messenger message. When they respond to the message, they must establish a
passphrase to secure future messages. Next, they choose a method of delivery for future
messages from the managed email domain: PGP Universal Web Messenger, PGP
Universal Satellite, or using an existing PGP Desktop key. For an external user:
1 Email server of external user
2 PGP Universal Server (public and private keys)
3 Keys and policies
4 PGP Universal Satellite
5 Email client
When they select the PGP Universal Satellite option, the PGP Universal Satellite
installer downloads to their computer. After installation, PGP Universal Satellite
automatically contacts the PGP Universal Server that sent the Smart Trailer or PGP
Universal Web Messenger message and downloads its policies. The PGP Universal
Server creates and manages the key for this user.
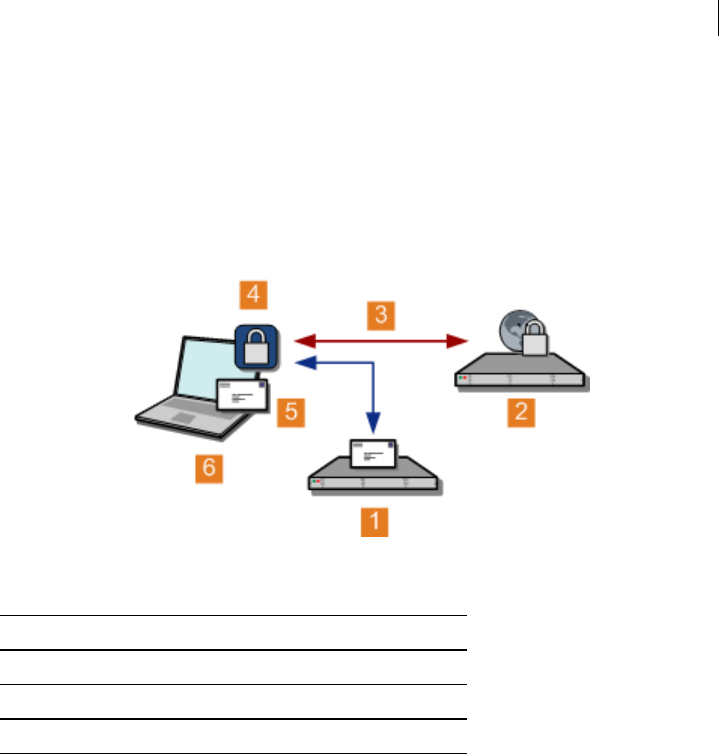
267 PGP Universal Satellite
Configuration
External CKM
External CKM users go through the same process as External SKM users except that
instead of the PGP Universal Server automatically creating and managing a key for
them, the PGP Universal Satellite Key Setup Assistant gives the users options: first to
choose an allowed key mode, then to specify the key to use.
1 Email server of external user
2 PGP Universal Server (public key)
3 Public key and policies
4 PGP Universal Satellite
5 Email client
6 Private key
The private key stays on the email user’s computer and is not sent to the PGP Universal
Server. A technical exception to this rule is the ability to synchronize the key with the
PGP Universal Server (Guarded Key Mode), which stores an encrypted,
passphrase-protected version of the private key on the PGP Universal Server; the key is
sent to the PGP Universal Server, but it is encrypted and passphrase-protected, so the
PGP Universal Server cannot do anything with it. The advantage to Guarded Key Mode
is that the encrypted private key remains available to the user as they move between
computers or between home and work, for example.
External SCKM
External SCKM users also joins the SMSA via a Smart Trailer or PGP Universal Web
Messenger message. Once PGP Universal Satellite is installed and the user selects the
SCKM option, their encryption subkey is copied to their PGP Universal Server, allowing
encrypted messages to be decrypted if the user is unwilling or unable to decrypt them.
SCKM requires a key with a separate signing subkey, which can be created for a new key
with PGP Desktop 9.5 or later or added to an older key using PGP Desktop 9.5 or later.

268 PGP Universal Satellite
Policy and Key or Certificate Retrieval
Switching Key Modes
To switch key modes
1 In PGP Universal Satellite, click Clear.
The next time PGP Universal Satellite needs the key of the user, the Key Setup
Assistant appears.
2 The PGP Universal Satellite user chooses an allowed key mode, then selects a key
source, if applicable.
When the Key Setup Assistant is complete, the key mode has been switched.
Policy and Key or Certificate Retrieval
PGP Universal Server includes built-in support to help PGP Universal Satellite users
retrieve lost policies and keys or certificates.
A policy might be lost if it is accidentally removed or if the computer hosting the policy
stops working. A key or certificate might be lost because it has been cleared from a
policy or the computer hosting the key or certificate stops working. A “lost” policy or
key/certificate is one that once existed but that is no longer available.
If both a policy and a key/certificate are no longer available (if the computer hosting
them stops working, for example), then the policy should be retrieved first, followed by
the key/certificate.
Retrieving Lost Policies
This section explains how to retrieve a lost policy in External Deployment Mode as well
as how to retrieve the PGP Universal Satellite software and the policy.
The PGP Universal Satellite software is installed on the computer of an external user, a
user who is not in an email domain being managed by a PGP Universal Server. PGP
Universal Satellite gets its policies from the PGP Universal Server from which it
received the PGP Universal Satellite software via a Smart Trailer or PGP Universal Web
Messenger message.
Need Policy Only
An external PGP Universal Satellite user who has lost their policy but still has the PGP
Universal Satellite software installed needs to retrieve the lost policy from the PGP
Universal Server.

269 PGP Universal Satellite
Policy and Key or Certificate Retrieval
To retrieve a lost policy
Log in to the PGP Universal Server that you originally got PGP Universal Satellite
from by pointing your Web browser at https://keys.domain .com (where
domain.com is the domain you originally got PGP Universal Satellite from), type
your passphrase, re-select PGP Universal Satellite as your delivery option, and
click Choose Option. The ActiveX control determines that you already have PGP
Universal Satellite installed but do not have a policy, so it downloads your policy
for you.
Access the PGP Universal Satellite user interface, create a new external policy (use
the URL and email address that were part of the lost policy), then click Retrieve
Policy. The lost policy is retrieved from the server.
Need PGP Universal Satellite Software and Policy
A, external PGP Universal Satellite user who has lost both their PGP Universal Satellite
software and their policy needs to both reinstall the PGP Universal Satellite software
and retrieve the lost policy.
To reinstall PGP Universal Satellite software and retrieve a lost policy without the
original PGP Universal Satellite installer
1 Open a Web browser and access the Web interface of the PGP Universal Server
from which you received the original PGP Universal Satellite installer.
Use the URL https://keys. <domain>.
2 Log in to the PGP Universal Server using the passphrase that was established
when you first downloaded the PGP Universal Satellite software.
3 Re-select PGP Universal Satellite as your delivery option and click Choose
Option.
The ActiveX control determines that you do not have PGP Universal Satellite
installed nor do you have a policy, so it downloads and installs both PGP Universal
Satellite and your policy for you.
Retrieving Lost Keys or Certificates
The method of retrieving a lost key or certificate depends on the key mode of the user.
Note: This section covers only retrieving lost keys/certificates. If you also need to
retrieve the PGP Universal Satellite software and/or a policy, see Retrieving Lost
Policies (on page 268). When the PGP Universal Satellite software and policy are in
place, return to this section for key/certificate retrieval instructions.
SKM
In SKM, the private key/certificate is stored only on the server, and the server handles
all private key management.
If a key/certificate is lost from a policy in SKM, because it resides on the server and not
on the computer hosting the PGP Universal Satellite software, it is automatically
retrieved the next time an email message is sent or received. No action is required by
the user to retrieve the key/certificate.

270 PGP Universal Satellite
Policy and Key or Certificate Retrieval
CKM and GKM
In CKM, the private key/certificate stays on the user’s computer; it is only transmitted
to the PGP Universal Server if the user chooses to store it there encrypted, which is
GKM.
If a key or certificate is lost from a policy in CKM, PGP Universal Satellite attempts to
locate the key/certificate the next time it is needed. If the user synchronizes their
key/certificate with the server (GKM), the key/certificate is retrieved.
If PGP Universal Satellite cannot locate the key/certificate, or if the key/certificate has
been manually cleared from the policy, PGP Universal Satellite displays the Key
Wizard, which gives the user the option of importing the key/certificate from an
exported file or reinitializing the account.
To import a private key/certificate from an exported file
1 On the Key Source Selection page, select Import Key and click Next.
2 Locate and select the ASC file that includes the appropriate key or certificate, then
click Import.
The key is retrieved.
If a private key/certificate is permanently unretrievable, you should reinitialize the
account so that the user does not continue to receive messages they cannot decrypt.
Another reason you might want to reinitialize an account is if the private
key/certificate has been compromised.
To reinitialize an account where the key has been lost
1 On the Key Source Selection page, select Reinitialize Account and click Next.
You are prompted for a key or certificate for the new account.
2 Select from create a new key/certificate, create a managed key/certificate (that is,
Server Key Mode), or import a different, previously exported key or certificate.
Make your selection and click Next.
The account is reinitialized.
To reinitialize an account where the key has been compromised, have the user click the
Clear button. This clears the compromised key from the account. When PGP Universal
Satellite next needs the key, the Key Setup Assistant appears and asks the PGP
Universal Satellite user to set up a new key.

31 PGP Universal Satellite for Mac OS X
This section describes those aspects of the PGP Universal Satellite software that are
specific to the Mac OS X version.
For information about PGP Universal Satellite, see PGP Universal Satellite (on page
263). For information specific to the Windows version, see PGP Universal Satellite for
Windows (on page 275).
Overview
PGP Universal Satellite for Mac OS X proxies SMTP traffic when the user is sending
email messages and POP and IMAP traffic when the user is retrieving email messages
from their mail server.
It should work without problems with any Internet-standards-based email client that
runs on Mac OS X 10.4 or later.
For the most current system requirements, see the PGP Universal Satellite for Mac OS X
Release Notes.
Note: PGP Universal Satellite requires a PGP Universal Server; it provides no
functionality at all without a policy from an associated PGP Universal Server.
System Requirements
Please see the most current PGP Universal Satellite for Mac OS X Release Notes for
minimum system requirements for PGP Universal Satellite for Mac OS X.
Obtaining the Installer
External users (email users external to an organization’s PGP Universal Server) get
access to the PGP Universal Satellite installer via a link in an email message from an
internal user that includes a Smart Trailer or when they retrieve a message sent using
PGP Universal Web Messenger mail. For more information, see Applying Key Not Found
Settings to External Users (on page 121). After installation, PGP Universal Satellite
automatically downloads its policies from the appropriate PGP Universal Server.

272 PGP Universal Satellite for Mac OS X
Installation
Installation
Caution: PGP Universal Satellite for Mac OS X cannot be installed on a system with
PGP Desktop. If you currently have PGP Desktop on your system, do not install PGP
Universal Satellite for Mac OS X. If you are using a version of PGP Desktop prior to
9.0, you should upgrade. If you are using 9.0 or later of PGP Desktop, you can
configure PGP Desktop to do everything PGP Universal Satellite for Mac OS X does
for you. See your administrator for more information.
To install PGP Universal Satellite for Mac OS X
1 Download the PGP Universal Satellite for Mac OS X installation file to the
computer.
The file that is downloaded is pgpuniversal.tar.gz. Most Mac OS X systems
should automatically extract the actual installer, PGP Universal Server.pkg.
If this does not happen automatically, you can extract the installer using Stuffit
Expander or with Terminal using the command:
tar -xzf pgpuniversal.tar.gz.
2 Quit any open programs.
3 Double-click the installer (PGP Universal Server.pkg).
4 Follow the on-screen instructions.
Updates
When the PGP Universal Server with which PGP Universal Satellite communicates
receives an updated version of the PGP Universal Satellite software, it notifies PGP
Universal Satellite of this the next time they communicate.
The PGP Universal Server Automatic Update screen displays automatically on the
computer on which PGP Universal Satellite is installed.
Once the installer is downloaded, it can be installed in the same manner as described in
Installation (on page 272).
Files
PGP Universal Satellite both installs files onto the user’s system and creates files when
it is used.
The following files are installed onto the user’s system during installation:
/Library/Application Support/PGP/pgpdivert
/Library/Application Support/PGP/pgpipfwtool.pl

273 PGP Universal Satellite for Mac OS X
Files
/Applications/PGP Universal Server.app
The following files are created when the user runs PGP Universal Satellite for Mac OS
X:
~/Library/Preferences/com.pgp.universal.plist
~/Documents/PGP Universal Server/PGP Public Keyring.pkr
~/Documents/PGP Universal Server/PGP Private Keyring.skr
~/Library/Logs/PGP/PGPEngine*.log
Note: If your users are managing their own keys, it is recommended that they back
up their keyring files (PGP Public Keyring.pkr and PGP Private Keyring.skr).
32 PGP Universal Satellite for Windows
This section describes those aspects of the PGP Universal Satellite software that are
specific to the Windows version.
For information about PGP Universal Satellite, see PGP Universal Satellite (on page
263). For information specific to the Mac OS X version, see PGP Universal Satellite for
Mac OS X (on page 271).
Overview
PGP Universal Satellite for Windows proxies SMTP traffic when the user is sending
email messages and POP and IMAP traffic when the user is retrieving email messages
from their mail server. It also supports MAPI traffic in an Exchange Server
environment and Lotus Notes email client (versions 5.x and above) traffic in a Domino
Server environment.
It should work without problems with any Internet-standards-based email client that
runs on Windows, with email clients that support MAPI, and with Lotus Notes email
clients.
Versions of Novell GroupWise earlier than 6.5 might not work properly due to a lack of
support for standard mail protocols.
For the most current system requirements, see the PGP Universal Satellite for Windows
Release Notes.
Note: PGP Universal Satellite requires a PGP Universal Server; it provides no
functionality at all without a policy from an associated PGP Universal Server.
System Requirements
Please see the most current PGP Universal Satellite for Windows Release Notes for
minimum system requirements for PGP Universal Satellite for Windows.
Obtaining the Installer
Email users who are already part of the Self-Managing Security Architecture (SMSA)
should get the PGP Universal Satellite installer from their PGP Universal Server
administrator (the PGP Universal Satellite installer is included on the PGP Universal
Server CD and can be downloaded from the PGP Universal Server administrative
interface). After installation, PGP Universal Satellite communicates with the local PGP
Universal Server to get its policies.

276 PGP Universal Satellite for Windows
Installation
Email users outside the SMSA get access to the PGP Universal Satellite installer via a
link in an email message from an internal user that includes a Smart Trailer or when
they retrieve a message sent using PGP Universal Web Messenger mail. For more
information, see Applying Key Not Found Settings to External Users (on page 121).
External PGP Universal Satellite for Windows users also are sent an ActiveX® control
that assists them with both installing and updating their PGP Universal Satellite
software. The ActiveX control is clearly labeled as being from PGP Corporation.
In these cases, PGP Universal Satellite downloads its policies from the appropriate PGP
Universal Server.
Installation
Caution: PGP Universal Satellite for Windows cannot be installed on a system with
PGP Desktop. If you currently have PGP Desktop on your system, do not install PGP
Universal Satellite for Windows. If you are using a version of PGP Desktop prior to
9.0, you should upgrade. If you are using 9.0 or later of PGP Desktop, you can
configure PGP Desktop to do everything PGP Universal Satellite for Windows does
for you. See your administrator for more information.
External users need to download an ActiveX component and approve it to be installed
and allowed to run.
To install PGP Universal Satellite for Windows for external users
1 As part of interacting with a PGP Universal Server via a Smart Trailer or PGP
Universal Web Messenger message, the Future Message Delivery Options screen
appears.
2 Select PGP Universal Satellite and click Choose Option.
The PGP Universal Satellite ActiveX control asks for permission to install and run.
3 Click Yes.
4 Agree to the End User License Agreement.
You are prompted for permission to download the installer.
5 Click Yes.
PGP Universal Satellite begins installing.
6 When the install is complete, click Continue.
The system prompts you to restart your computer.
7 Follow the instructions to create your key.
Once a key is generated, the policy is downloaded from PGP Universal Server.
Updates
When PGP Universal Satellite communicates with a PGP Universal Server that is
running a newer version, PGP Universal Satellite can update its software.
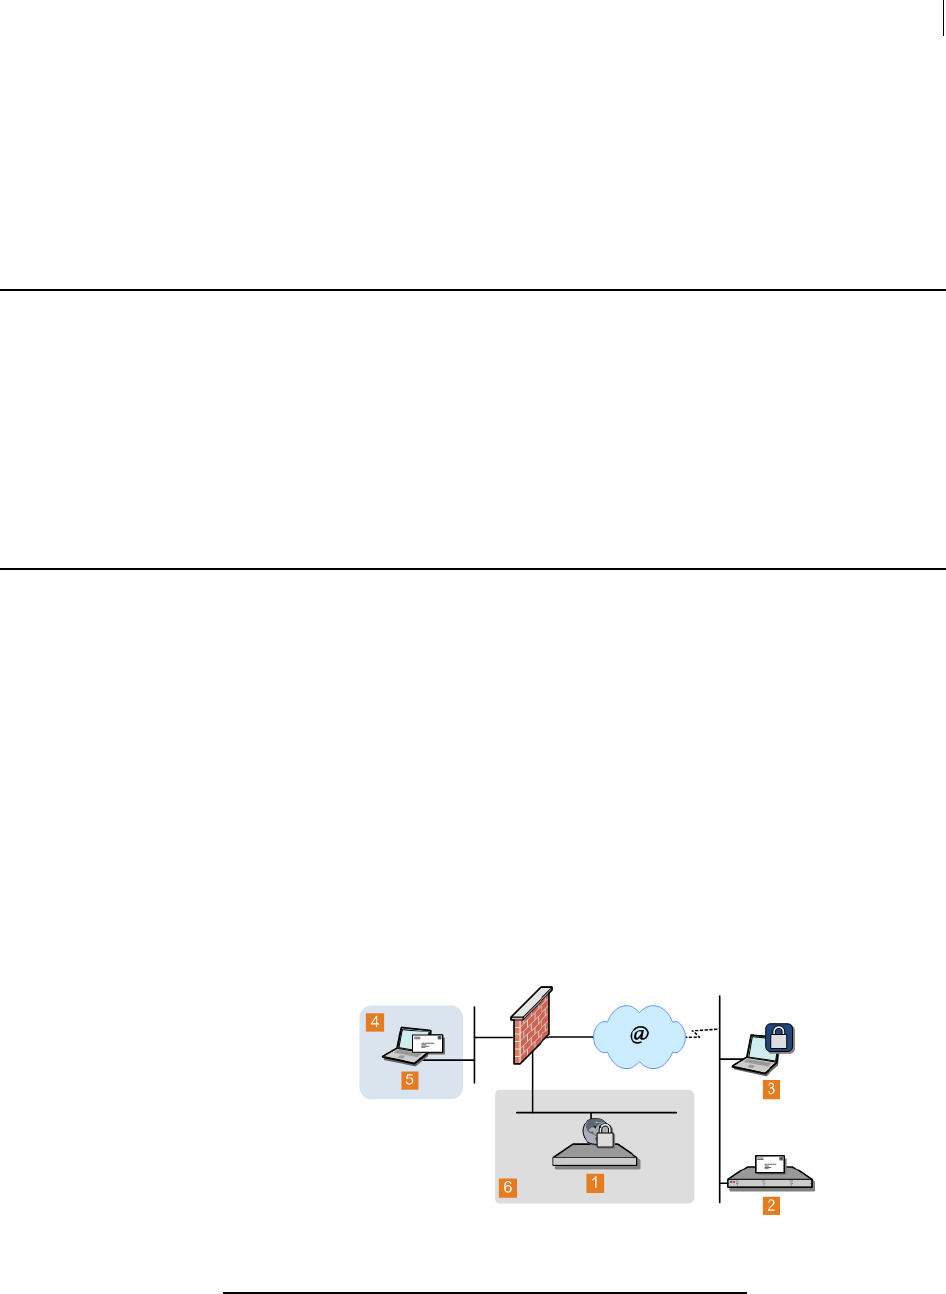
277 PGP Universal Satellite for Windows
Files
The PGP Universal Server Automatic Update screen displays automatically on the
computer on which PGP Universal Satellite is installed.
Click Install to begin the installation.
Click Remind Me Later to be reminded in 18 hours.
Files
The files that are created and/or used by PGP Universal Satellite are stored on the
user’s computer at:
C:\Documents and Settings\<username>\Application Data\PGP
Corporation\PGP Universal
If your users are managing their own keys, it is recommended that they back up their
keyring files (secring.skr and pubring.pkr).
MAPI Support
MAPI (Messaging Application Programming Interface), a messaging architecture and a
client interface used in Microsoft Exchange Server environments, is supported in PGP
Universal Satellite for Windows.
MAPI support in PGP Universal Satellite for Windows means you get both PGP message
security all the way to your users’ computers and the other features that MAPI makes
available.
External MAPI Configuration
For external email users using PGP Universal Satellite, MAPI is no different than using
POP or IMAP.
The external PGP Universal Satellite gets its policies from a PGP Universal Server in
the managed domain. This is the same PGP Universal Server that sent the Smart Trailer
or PGP Universal Web Messenger message.
1 PGP Universal Server
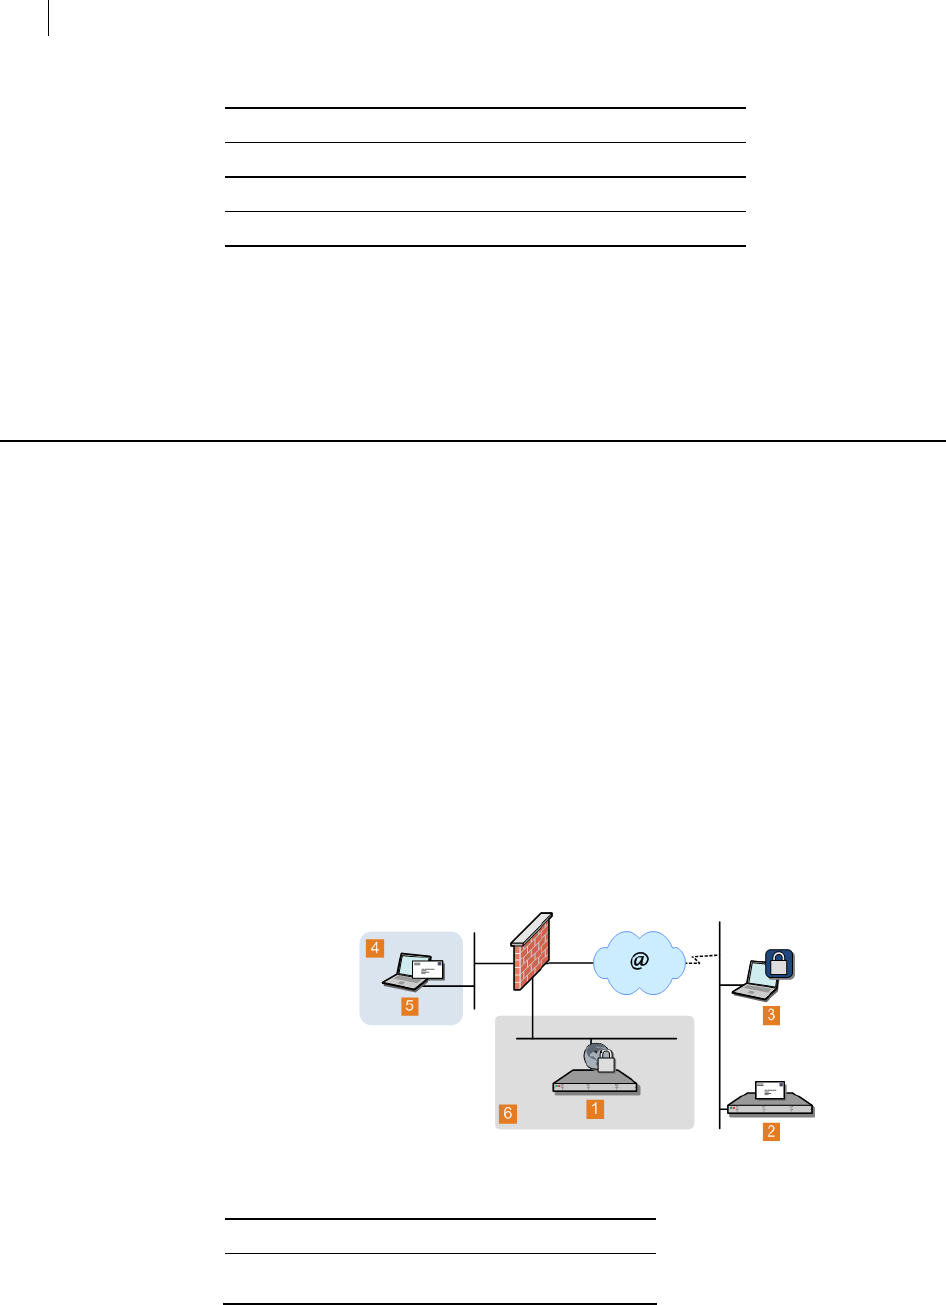
278 PGP Universal Satellite for Windows
Lotus Notes Support
2 Exchange Server
3 External MAPI user (with PGP Universal Satellite)
4 Example Corp. internal network
5 Example Corp. email user
6 Example Corp. DMZ
It does not matter if the PGP Universal Server in the managed domain is in Internal or
Gateway Mode as long as it is accessible to the external PGP Universal Satellite via
HTTPS on the well-known port 443.
Lotus Notes Support
Lotus Notes is a groupware application that supports messaging, calendaring, and
scheduling capabilities. The Lotus Notes email client is supported in PGP Universal
Satellite for Windows.
(Support for Lotus Notes email clients is not included in PGP Universal Satellite for Mac
OS X.)
Support for Lotus Notes email clients in PGP Universal Satellite for Windows means
you get both PGP message security all the way to your users’ computers and the other
features that Lotus Notes makes available.
External Lotus Notes Configuration
For external email users, using a Lotus Notes email client is no different than using a
POP or IMAP email client.
The external PGP Universal Satellite gets its policies from a PGP Universal Server in
the managed domain. This is the same PGP Universal Server that sent the Smart Trailer
or PGP Universal Web Messenger message.
1 PGP Universal Server
2 Domino server
3 External Lotus Notes user (with PGP Universal
Satellite)

6
PGP Universal Satellite for Windows
Lotus Notes Support
279
4 Example Corp. internal network
5 Example Corp. email user
Example Corp. DMZ
It does not matter if the PGP Universal Server in the managed domain is in Internal or
Gateway Mode, as long as it is accessible to the external PGP Universal Satellite via
HTTPS on the well-known port 443.

33 Configuring PGP Universal Web
Messenger
This section describes how to configure the PGP Universal Web Messenger service.
PGP Universal Web Messenger functionality is available for use with PGP Universal
Gateway Email and PGP Desktop Email, if PGP Universal Server is in the mailstream.
For information about using PGP Universal Web Messenger, see Applying Key Not
Found Settings to External Users (on page 121) .
Overview
The Web Messenger Configuration page lets you enable, configure, and customize the
PGP Universal Web Messenger service.
The PGP Universal Web Messenger service allows an external user to securely read a
message from an internal user before the external user has a relationship with the
SMSA.
If PGP Universal Web Messenger is available via mail policy for a user and the
recipient’s key cannot be found, the message is stored on the PGP Universal Server and
an unprotected message is sent to the recipient. The unprotected message includes a
link that sets up an SSL-protected connection to the original message, waiting on the
PGP Universal Server.
When they go to read their messages, recipients are given several options for how
future messages from the same PGP Universal Server are handled:
Continue to use PGP Universal Web Messenger.
Receive messages as PDF Messenger messages.
Install PGP Universal Satellite, if the policy permits.
Encrypt messages using an existing PGP Desktop key or an S/MIME certificate
that the external user provides.
If the PGP Universal Web Messenger service is not enabled, messages bounce when
processed by policy rules that use PGP Universal Web Messenger as the key not found
setting. You must also enable the PGP Universal Web Messenger service if your policy
rules use Smart Trailer, even if you are not also using the PGP Universal Web
Messenger service for external users.
If users continue to use PGP Universal Web Messenger to read and send messages, the
PGP Universal Server stores both mail received and, if the user chooses, mail sent by
the users. The user’s Quota is the disk space allotted for PGP Universal Web Messenger
mail storage. You can set the size of the Quota. There is also a 20MB limit to the total
encoded message size of email sent to PGP Universal Web Messenger users, and a limit
of approximately 15MB per uploaded attachment (after encoding) in email replies
created in PGP Universal Web Messenger. Users cannot send or receive any message
that would put them over their message storage Quota or exceed 50MB.
PGP Universal Web Messenger sessions time out after 15 minutes of user inactivity.
After the session times out, the user is required to log in again.

282 Configuring PGP Universal Web Messenger
Overview
If you protect your PGP Universal Server with an ignition key, PGP Universal Web
Messenger passphrases and messages are stored encrypted. When existing PGP
Universal Web Messenger users log in for the first time after installation of PGP
Universal 2.7 or later, they receive a notification email requiring confirmation of the
passphrase. PGP Universal Web Messenger user passphrases created before 2.7 are
stored hashed, rather than encrypted to the Ignition Key. Confirming the passphrase
allows it to be encrypted to the Ignition Key. For more information, see Protecting PGP
Universal Server with Ignition Keys (on page 25).
PGP Universal Web Messenger supports browser languages English, German, Japanese,
French, and Spanish. You can use customization to add any other language.
PGP Universal Web Messenger and Clustering
If the PGP Universal Web Messenger service is running on a PGP Universal Server that
is a member of a cluster, you can choose whether PGP Universal Web Messenger data is
replicated to other cluster members that are running the Web Messenger service. There
are three options for replication of Web Messenger data:
You can have Web Messenger data replicated to all PGP Universal Servers in the
cluster that are running the Web Messenger service.
You can have Web Messenger data replicated to a subset of the eligible servers in a
cluster. (Only servers running Web Messenger are eligible to host Web Messenger
data).
For example, if you have four servers in a cluster running the Web Messenger
service, you can elect to have Web Messenger data replicated only to two of the
four servers, to reduce the amount of resources required for storage of Web
Messenger data.
You can elect not to replicate Web Messenger data at all.
For more information on clustering, see Clustering your PGP Universal Servers (on page
45).
External Authentication
External users can enroll and log in using passwords stored on an existing
authentication server, or using passphrases stored on the PGP Universal Server.
External authentication enables compliance for PGP Universal Web Messenger
passwords with corporate password policies.
Administrators can specify an external authentication server.
Supported standard authorization types:
LDAP
RADIUS
If you use RADIUS, the username must be the user's email address. If the username is
not the user's email address, contact PGP Support. Contact PGP Support to use
anything other than RADIUS or LDAP.
PGP Universal Server stores PGP Universal Web Messenger passphrases locally and in
cleartext. At enrollment, users who authenticate locally create a passphrase, and that
passphrase is stored locally.

283 Configuring PGP Universal Web Messenger
Overview
Users who authenticate externally have their passwords authenticated against the
externally configured server. At enrollment, external authentication users do not
create a passphrase. Users log in using existing passwords, and the external
authentication server verifies the passwords. PGP Universal Server stores the
passwords locally and in cleartext. Storing cleartext passwords is necessary because
PDF Messenger requires access to cleartext to encrypt messages. Although passwords
are stored locally, user passwords continue to authenticate externally.
Note: Use an Ignition Key with the PGP Universal Server to store PGP Universal Web
Messenger passphrases encrypted instead of in cleartext.
Users added after you enable external authentication have passwords authenticated
externally. Existing users continue to authenticate locally. You can convert all existing
users to external authentication. You can also convert an individual existing user to
external authentication through the user's External User account. If you convert a user
from local to external authentication, the locally stored passphrase is overwritten with
the external password on PGP Universal Server
If PGP Universal Server loses the connection to the authentication server while
authenticating a user password, the PGP Universal Web Messenger user will not be able
to log in.
If you turn off external authentication, all users are authenticated to the locally stored
passwords, even if individual user accounts are set to external authentication.
Smart Trailer cannot be used with external authentication enabled.
For more information on how to set up external authentication, see Setting Up External
Authentication (on page 295).
Options for External Authentication for User Accounts
Options for which external users authenticate to an external server:
New users only. Enable external authentication. All users added after enabling
this option authenticate to an external server.
All new and existing users. Enable external authentication and select Convert all
existing External Users with local authentication to external authentication. All
existing users and all users added after enabling this option authenticate to an
external server.
Most but not all users. Enable external authentication. Select Convert all existing
External Users with local authentication to external authentication and then
open individual external user accounts and reset them to authenticate locally.
Few users. Enable external authentication. Open individual external user accounts
and set them to authenticate externally. New users are all set to authenticate
externally. You can change this for any individual account.
Note: If PGP Universal Server Web Messenger is selected as the only delivery
method, external users can create a passphrase and log into their Web Messenger
Inbox without first having to select Web Messenger as the delivery option.

284 Configuring PGP Universal Web Messenger
Customizing PGP Universal Web Messenger
Customizing PGP Universal Web Messenger
You can customize the appearance of PGP Universal Web Messenger to match your
corporate style by creating customized templates to control look and feel. Choose from
among the templates you create which one you want to be the active template. Some
customization options require knowledge of HTML. You can either edit the HTML
yourself, or have a designer provide you with what you need. The default template is
the standard, and cannot be edited or deleted.
There are three levels of customization:
Simple Customization: Your company's name and customized introductory text
appear on the login page. Change the color theme. Upload and display your
company's logo. You do not need to know how to edit HTML to use this option.
Advanced Customization: Your company's name and customized introductory
text appear on the login page. Change the appearance of the header, footer, and
left side of the PGP Universal Web Messenger interface using HTML and CSS.
Upload new images and edit existing ones. You can cut and paste HTML created
for you, or modify the HTML directly.
Complete Customization: Your company's name and customized introductory text
appear on the login page. Download the HTML, CSS, JavaScript, and Image files,
edit them offline, then upload them. This option gives you the most control over
the appearance of the interface, including adding more supported languages.
Complete customization requires expertise in using HTML.
Templates are synchronized across the cluster, but can only be edited on the Primary.
Note: Make sure you finish customizing PGP Universal Web Messenger before
performing tasks such as updating the system time.
Note: If PGP Universal Web Messenger is selected as the only delivery method,
external users can create a passphrase and log into their PGP Universal Web
Messenger Inbox without first having to select PGP Universal Web Messenger as the
delivery option.
Adding a New Template
1 Click Add Template.
The Web Messenger Customization dialog box appears.
2 Read the Customization Agreement and click I Agree.
The Customization Option page appears.
3 Choose one of the three customization options, and click Next.

285 Configuring PGP Universal Web Messenger
Customizing PGP Universal Web Messenger
Using Simple Customization
To create a simple template
1 Select Simple Customization from the Customization Option page, and click Next.
2 Type in a name for the template.
3 Type in your company name, if you want it to appear on the Secure Messaging
Settings page.
4 Type in a login title. This appears at the top of the login page.
5 Type in a login message, if you have information you want users to read on the
login page.
6 Click Next.
7 Select a theme color: blue, green, red, or yellow, for the PGP Universal Web
Messenger display.
8 Click Next.
9 If you want to display a custom logo, for example your company logo, click Choose
File and browse to find an image file to use as a logo. You can use a .gif, .jpg., or
.png file. If you do not choose a graphic, the default PGP Universal Web Messenger
logo appears.
10 Click Next.
11 Your template is complete. Click Close Window.
Note: Make sure you finish customizing PGP Universal Web Messenger before
performing tasks such as updating the system time.
Customizing the Logo
Customizing the logo is part of the simple customization process. To perform simple
customization, such as changing the color theme or adding a custom logo, you do not
need to know how to edit the HTM file.
To select a custom logo, browse to and select the image file to use as the logo displayed
to users on the PGP Universal Web Messenger pages. You can use a .gif, .jpg, or .png
file. If you do not choose a graphic, the most recently uploaded custom logo displays.
If no custom logo has been uploaded, the default Web Messenger logo is used.
To create a simple template to customize the logo
1 Select Simple Customization from the Customization Option page, and click Next.
2 Type in a name for the template.
3 Type in your company name, if you want it to appear on the Secure Messaging
Settings page.
4 Type in a login title. This appears at the top of the login page.
5 Type in a login message, if you have information you want users to read on the
login page.

286 Configuring PGP Universal Web Messenger
Customizing PGP Universal Web Messenger
6 Click Next.
7 Select a theme color: blue, green, red, or yellow, for the PGP Universal Web
Messenger display.
8 Click Next.
9 If you want to display a custom logo, for example your company logo, click Choose
File and browse to find an image file to use as a logo. You can use a .gif, .jpg., or
.png file. If you do not choose a graphic, the default PGP Universal Web Messenger
logo displays.
10 Click Next.
11 Your template is complete. Click Close Window.
Using Advanced Customization
To create an advanced template
1 Select Advanced Customization from the Customization Option page, and click
Next.
2 Download both the default image template files and the image source file. While it
is not required that you edit using the .psd file, it is much faster and easier.
Default Web Messenger Template Images: Contains the complete set of
images used by the PGP Universal Web Messenger interface. The
downloaded file is called WebMessengerImages.zip.
Adobe Photoshop/ImageReady Image Source File: Contains Adobe
Photoshop-editable versions of all the files in the WebMessengerImages.zip
file. The .psd format file allows you to edit the default images, export them to
.gif format, then upload them back to the Web Messenger Customization
page. The downloaded file is called
PGP-Universal-Web-Messenger-Image-Source.zip. Use this file to edit the
images, then save your edits as .gif files.
a Download both the PGP Universal Web Messenger and Adobe
Photoshop/ImageReady .zip files.
b Extract the contents of the .zip files and save them to your desktop.
c Edit the images in the image source .psd file. If you edit the images
through the .psd file, the final graphics quality is better, you can
control transparency and anti-aliasing, and the final images are
correctly named and sized. For more information, see the Adobe
Photoshop/ImageReady documentation.
d Save each edited image as a .gif file, using "Save as optimized" in Adobe
ImageReady.
e Copy the .gif files into the WebMessengerImages/images directory on
your desktop.
f Compress the WebMessengerImagesdirectory into a .zip file. You can
rename the .zip file, but the directory structure must not change.
9
Configuring PGP Universal Web Messenger 287
Customizing PGP Universal Web Messenger
g When you are finished, upload the .zip file containing the edited
images. You can upload new files, but all files from the original .zip
must be uploaded, even if you did not edit them.
3 Click Next.
4 Type in a name for the template.
5 Type in your company name, if you want it to appear on the Secure Messaging
Settings page.
6 Type in a login title. This appears at the top of the login page.
7 Type in a login message, if you have information you want users to read on the
login page.
8 Click Next.
The Custom Content page appears. If you have HTML ready, paste it into the
appropriate content box. Otherwise, edit the CSS and HTML for the Header, Left
Side, and Footer.
Header Edit the HTML here to change the appearance of the top part of the interface. If you plan
to upload new image files to replace the default .gif files, make sure to change the .gif file
names to match the new file names.
Left Side Edit the HTML here to change the appearance of the interface to the left of the page,
underneath the Compose, Inbox, and Sent buttons. You can edit this section to display
images you upload or reference CSS you add to the CSS file. For example, you can add
links to a Privacy Policy or Terms of Service.
Footer Edit the HTML here to change the appearance of the bottom part of the interface. For
example, you can add text in addition to the copyright information already present.
CSS Edit the CSS to change the overall appearance of the interface, including font usage,
spacing, error display, and button appearance and behavior. If you plan to upload new
image files to replace the default .gif files, make sure to change the .gif file names to
match the new file names.
Click Next. The Upload New Files page appears.
Use this page to upload edited files.
a If you want to edit image files offline, and upload them to this template
at a later time, you can upload the default WebMessengerImages.zip
file without making any changes, and click Next. The template is saved.
After you have edited your image files, re-open the template and
upload them.
b Or, if you are ready to upload edited image files, click Choose File and
browse to select the .zip file and click Next. PGP Universal Server
validates the file you uploaded. This can take a few minutes.
Uploaded files with the same names as existing image files overwrite the
existing files. If you added other new images, files with new names are added.
You can only upload a .zip file, and the .zip file must contain all images in the
set, not just the images you edited.
If the uploaded files contain errors, a File Validation Error page appears. For more
information, see Troubleshooting Customization (on page 289).
If the uploaded files contain no errors, a page appears notifying you that the
customization files have been successfully uploaded and validated.

288 Configuring PGP Universal Web Messenger
Customizing PGP Universal Web Messenger
10 Your template is complete. Click Close Window.
Note: Make sure you finish customizing PGP Universal Web Messenger before
performing tasks such as updating the system time.
Using Complete Customization
To create a complete template
1 Select Complete Customization from the Customization Option screen, and click
Next.
2 Download both the image file and the template files for offline editing. You need
both files for offline editing of graphics and HTML.
All Default Web Messenger Template Files: This is all default PGP Universal
Web Messenger HTML, CSS, JavaScript, localization, and image files. You can
edit each individual file that makes up the PGP Universal Web Messenger
interface, then upload them again. Editing these files requires knowledge of
HTML. Comments describing the HTML have been added to the files to make
editing easier. The downloaded file is called WebMessengerWeb.zip.
Adobe Photoshop/ImageReady Image Source File: The .psd format file allows
you to edit the default images, export them to .gif format, then upload them
back to the Web Messenger Customization screen. You cannot upload the
source file itself. The downloaded file is called
PGP-Universal-Web-Messenger-Image-Source.zip.
For more information on editing the image files, see Using Advanced
Customization (on page 286).
3 Click Next.
4 Type in a name for the template.
5 Type in your company name, if you want it to appear on the Secure Messaging
Settings screen.
6 Type in a login title to appear at the top of the login screen.
7 Type in a login message, if you have information you want users to read on the
login screen.
8 Click Next.
9 The Upload New Files page appears.
10 Use this screen to upload edited files.
a If you want to edit image and HTML files offline, and upload them to
this template at a later time, you can upload the default .zip file
without making any changes, and click Next. The template is saved.
After you have edited your files, re-open the template and upload them.
b Or, if you are ready to upload edited files, click Choose File and browse
to select the .zip file and click Next. PGP Universal Server validates the
file you uploaded. The Validating Files page appears. Validation can
take a few minutes.

289 Configuring PGP Universal Web Messenger
Customizing PGP Universal Web Messenger
Uploaded files with the same names as existing files overwrite the existing
files. Files with new names are added. You can only upload a .zip file, and the
.zip file must contain all files in the set, not just the ones you edited.
If the uploaded files contain errors, a File Validation Error screen appears. For
more information, see Troubleshooting Customization (on page 289).
If the uploaded files contain no errors, a screen appears notifying you that the
customization files have been successfully uploaded and validated.
11 Your template is complete. Click Close Window.
Note: Make sure you finish customizing PGP Universal Web Messenger before
performing tasks such as updating the system time.
Troubleshooting Customization
You cannot make active a broken template.
Best Practices
Before you upload HTML and images for a customized template:
Test the appearance of your files: You can test the appearance of your edited files
and graphics by opening them within your web browser. You cannot test the
functionality of the new template within the PGP Universal Server.
Use the correct version of HTML: Use HTML 4.01 Transitional or earlier. Newer
versions of HTML are not compatible.
Upgrades and Templates
PGP Universal Server upgrades can cause templates to break. After upgrade, the
Overview page that appears at login displays a warning if the active template is broken.
The Daily Status Email also provides a warning if the active template is broken. If the
active template is broken, the default template becomes active. The Services > Web
Messenger page displays information about all broken templates.
Fixing Templates in Error States
Templates in error states appear in red on the Web Messenger page. Error states can be
caused by malformed or missing files discovered during the upload validation phase, or
because an upgrade to PGP Universal Server caused a template to break. Click to open
the broken template. The validation page appears. You can view the validation errors,
export the validation error logs, and upload new files from this page.
Template Validation Errors
Advanced and complete custom templates allow you to edit the images and/or HTML
files used by PGP Universal Web Messenger. After you upload your files, there are two
levels of validation: file validation and tag validation.

290 Configuring PGP Universal Web Messenger
Customizing PGP Universal Web Messenger
File Validation
During advanced customization file upload, the zipped image file is validated to make
sure all required files are present. During complete customization, the zipped file is
validated to make sure all required image, HTML, and other files are present and
located in the correct directory. When you download the default file set, all necessary
files are present. The same files must be present, although edited, during upload. You
can add more files, but you cannot remove any.
File validation runs before tag validation. If the template fails file validation and you
make corrections, the template can still fail validation at the tag validation stage.
To correct invalid files
If validation fails, the File Validation Error page appears. The File Validation Error page
shows a list of missing or misplaced files.
1 Click Export Validation Error Log to export and view the error log offline. The
error log is exported as a text file.
2 Click Cancel to save the template in the error state.
3 Repair the invalid files on your own computer desktop, using the exported error
log as a reference.
You can download the default set of files and use them as a reference when
replacing and re-organizing missing and incorrectly located customized files.
4 When you are ready to upload the corrected files, click the template.
The template opens to the validation page.
5 Click Upload New File to upload the .zip files.
The files are validated.
Tag Validation
During complete customization file upload, the zipped file is validated to make sure all
required files are present. A compiler converts the HTML pages to an internal format,
then validation makes sure that all required HTML tags and tag attributes are present
in the HTML and are correctly positioned in relation to each other.
Validation checks that specific code necessary to PGP Universal Web Messenger
functionality has not been modified, moved, or deleted. Tag attributes that mark
specific locations on each page, such as ID attributes, are particularly important.
If your files failed validation compare the default set of files with your edited versions
to find the errors listed in the validation error log.
Make sure that you have not deleted any HTML tags, IDs, and other elements that
use the "Required" attribute. HTML tags necessary to PGP Universal Web
Messenger functionality are marked with the Required attribute, so if you delete a
tag that was marked as Required, validation fails and an error message appears. If
the Required attribute is "true," the tag is required.
Example:
<h2 id="loginWelcome" required="true">
Look for incorrectly nested HTML tags, attributes, and other elements. Make sure
you have not moved or deleted elements containing the "Within" attribute. The
content of the attribute is the element in which it should be nested.
Example:

291 Configuring PGP Universal Web Messenger
Customizing PGP Universal Web Messenger
<tr id="trTemplateRow" required="true" within="taInbox">
<td class="first" width="20"><input id="deletecheck box"
required="true" within="trTemplateRow" type="check box"
name="deletedMessages" value="runtime_replace"
onclick="highlightRow(this);"></td>
To correct invalid files
If validation fails, the Tag Validation Error page appears. The Tag Validation Error
page shows a list of missing or misplaced files.
1 Click Export Validation Error Log to export and view the error log offline. The
error log is exported as a text file.
2 Click Cancel to save the template in the error state.
3 Repair the invalid files on your own computer desktop, use the exported error log
as a reference.
You can download the default set of files and use them as a reference when
replacing and re-organizing missing and incorrectly located customized files and
repairing the HTML.
4 When you are ready to upload the corrected files, click the template.
The template opens to the validation page.
5 Click Upload New File to upload the .zip files.
The files are validated.
Changing the Active Template
To change the active template displayed to users
1 From the Active column, select the template you want to make active.
A confirmation dialog box appears.
2 Click OK.
Users see the template you choose when they log in to PGP Universal Web
Messenger.
Deleting a Template
To delete a template
1 Click the delete icon in the Actions column of the template you want to delete. You
cannot delete the default template or the active template. Make a different
template active before deletion.
A confirmation dialog box appears.
2 Click OK.
The template you specified is deleted.

292 Configuring PGP Universal Web Messenger
Configuring the PGP Universal Web Messenger Service
Editing a Template
You can edit the settings for any non-active template, change the HTML, and upload
new files. You cannot edit the active template or the default template. For more
information on how to change template settings, see Adding a New Template (on page
284).
If you want to change the customized image or template files for a template, click the
download icon in the Actions column.
To edit a template
To edit a template, click the name of the template. The Web Messenger Customization
dialog box for that template appears.
You cannot edit a template while it is active. If you want to edit the current active
template, you must first make another template active.
Downloading Template Files
To download all files
To download the files for a specific advanced or complete customized template,
click the download icon in the Actions column of the template. You receive all the
current files belonging to the template, including any customized files.
You can edit the files after download, then upload them for use with the template.
To download the default set of files, begin creating a new advanced or complete
customized template, download the default files, then click Cancel to stop
template creation.
Restoring to Factory Defaults
Restoring to factory defaults deletes all custom templates and activates the Default
template.
To restore factory defaults
1 Click Restore To Factory Defaults.
A confirmation dialog box appears.
2 Click OK to continue.
Configuring the PGP Universal Web Messenger Service
The following sections provide details on configuring the PGP Universal Web
Messenger service for this PGP Universal Server.

293 Configuring PGP Universal Web Messenger
Configuring the PGP Universal Web Messenger Service
You can enable or disable the service; you can also pause the service temporarily.
For details see Starting and Stopping PGP Universal Web Messenger (on page 293).
You can configure the URL used by external users to log into the PGP Universal
Web Messenger service. You can also configure one or more interfaces that PGP
Universal Server will use to listen for Web Messenger traffic. Further, you can
restrict access to those interfaces, if necessary. For details, see Selecting the PGP
Universal Web Messenger Network Interface (on page 293)
You can configure how external users are authenticated for PGP Universal Web
Messenger access: either using a passphrase stored locally (on the PGP Universal
Server or through an external authentication service. See Setting Up External
Authentication (on page 295) for details.
You can configure options for external users, such as whether messages should be
encrypted to the Ignition Key, how much storage is available per user, how long an
account can be inactive before it expires, how long messages are retained, and a
number of other settings. For details, see Creating Settings for PGP Universal Web
Messenger User Accounts (on page 296).
If your PGP Universal Server is a member of a cluster, you can configured how
replication of Web Messenger data is replicated. See Setting Message Replication in
a Cluster (on page 297) for further details.
Note: If PGP Universal Server Web Messenger is selected as the only delivery
method, external users can create a passphrase and log into their Web Messenger
Inbox without first having to select Web Messenger as the delivery option.
Starting and Stopping PGP Universal Web Messenger
To enable the PGP Universal Web Messenger service
1 On the Services > Web Messenger page, click the Enable button to enable the
service.
2 To disable the PGP Universal Web Messenger service, click the Disable button on
the Web Messenger page.
3 To suspend the PGP Universal Web Messenger service, click the Pause button.
Users see a message that the service is unavailable. Click Resume to continue the
service.
Selecting the PGP Universal Web Messenger Network Interface
To select network interfaces
1 On the Services > Web Messenger page, click Edit.
The Edit Web Messenger page appears.
2 Select the Interface tab to specify where external users log in to the PGP
Universal Web Messenger service.
3 In the Public URL field, type a PGP Universal Web Messenger hostname. This is
the hostname used in Smart Trailer and PGP Universal Web Messenger links.

294 Configuring PGP Universal Web Messenger
Configuring the PGP Universal Web Messenger Service
If the keyserver is behind a load balancer, this name can be different from the PGP
Universal Server’s network name. Once you specify a custom value for the PGP
Universal Web Messenger’s hostname here, it remains there permanently even if
the actual hostname changes later.
4 In the Interface field, select the network interface on which the PGP Universal
Server should listen for PGP Universal Web Messenger traffic. Restrict access to
all interfaces by following the procedure described in Restricting Access to the
Connectors (on page 294).
5 In the Port field, keep the default or type an appropriate port number.
If you change the port (from the default 443 to any other value), then be sure
to change the public URL to include that port (for example,
https://keys.example.com:500).
6 To remove the requirement that connections to PGP Universal Web Messenger be
over SSL, remove the check in the SSL check box. SSL should be enabled for at
least one connector.
7 Click the plus sign icon to add another interface, and select the appropriate
interface, port, and SSL information.
8 Click Save.
9 The PGP Universal Server restarts, which takes a few seconds.
Restricting Access to the Connectors
To restrict access to connectors
For all interfaces, you have the option of restricting the source of incoming PGP
Universal Web Messenger HTTP or HTTPS requests to one or more specific IP
addresses. Access restriction applies to all PGP Universal Web Messenger connectors.
1 Click Restrict Access to establish access control for the connections on the Access
Control for Connector dialog box:
2 Select Enable Access Control for Connector to enable access control.
3 Select Hostname/IP or IP Range from the menu.
If you selected Hostname/IP, type a hostname or IP address, then click Add.
What you type here appears in the Block or Allow field below. If you type a
hostname such as example.com, the name resolves to an IP address.
If you selected IP Range, type starting and ending IP addresses for an IP
address range, then click Add. What you type here appears in the Block or
Allow field below.
4 In the Block or Allow field, select Block these addresses or Allow only these
addresses, as appropriate, for the IP addresses or ranges in the box below.
To remove an IP address or range from the box, select it, and then click Remove.
5 Click Save to close the Access Control for Connector dialog box. The changes you
made apply to all PGP Universal Web Messenger interfaces.
The PGP Universal Server restarts, which takes a few seconds.

295 Configuring PGP Universal Web Messenger
Configuring the PGP Universal Web Messenger Service
Setting Up External Authentication
To set up external authentication
1 On the Services > Web Messenger page, click Edit.
The Edit Web Messenger page appears.
2 Select the External Authentication tab.
3 Select Enable External Authentication.
4 From the Protocol menu, select LDAP or Radius.
5 Provide the required information to connect to your external authentication
server.
LDAP. Specify Hostname, Port, SSL, Base DN, Bind DN, Bind DN Passphrase,
Username Attribute, and Mail Attribute.
RADIUS. Specify Hostname, Account Port, Authentication Port, and Secret.
6 Click Convert all existing External Users with local authentication to external
authentication to authenticate all existing users externally. For more information
on converting users, see Options for External Authentication for User Accounts (on
page 283).
Note: If Protector for Mail Encryption Web Messenger is selected as the only
delivery method, external users can create a passphrase and log into their Web
Messenger Inbox without first having to select Web Messenger as the delivery
option.
7 Click Save.
The PGP Universal Server restarts, which takes a few seconds.
Testing the External Authentication Configuration
To test the external authentication configuration
1 Type in the email address and passphrase of a user in the external authentication
server.
2 Click Test Connection.
PGP Universal Server attempts to contact and authenticate to the external
authentication server using the configuration.
A message appears at the top of the page, indicating whether the test succeeded or
failed. If the test succeeded, the configuration is valid. If the test failed, there are
errors in the configuration.

296 Configuring PGP Universal Web Messenger
Configuring the PGP Universal Web Messenger Service
Creating Settings for PGP Universal Web Messenger User Accounts
To set up PGP Universal Web Messenger user accounts
1 On the Services > Web Messenger page, click the Edit button.
The Edit Web Messenger page appears.
2 Select the Options tab to create settings for PGP Universal Web Messenger
external user accounts.
3 Select Encrypt stored messages to Ignition Keys to encrypt all stored PGP
Universal Web Messenger messages to your Ignition Key(s). This option is not
available if you have not created any Ignition Keys. See Protecting PGP Universal
Server with Ignition Keys (on page 25) for more information.
If this option is currently enabled and you disable it by deselecting the check box,
all encrypted stored messages are decrypted.
4 Select Allow users to reset their passphrase by email if you want external users
to be able to reset their PGP Universal Web Messenger passphrases by email.
5 In the Inactivity Expiration field, specify how long a PGP Universal Web
Messenger account can be inactive before it expires.
Before the account expires, PGP Universal Server sends a message to the user
requesting that the user log in to keep the account active. When the account
inactivity time-out is reached, the account is deleted—including any keys, email, or
settings associated with the account.
6 In the Storage Quota field, type the desired per-user storage quota for PGP
Universal Web Messenger user accounts in megabytes (MB) or gigabytes (GB).
7 From the Maximum Login Attempts menu, select how many times the user can
attempt to log in before being shut out of the system. The default is to allow
unlimited login attempts. When users are shut out, they see an error message in
the PGP Universal Web Messenger interface, then receive an email message
notifying them that they have been locked out. The email message provides a URL
to allow the user to log back in again. This ensures that only the correct recipient
of a message can log back in after multiple failed login attempts. If a user is locked
out and fails to respond to the email, the administrator can unlock the account
manually from the External User account page. For more information, see
Unlocking PGP Universal Web Messenger Accounts (on page 255).
8 If this PGP Universal Server is a member of a cluster, the Message Replication
settings let you configure whether and how Web Messenger data (user account
information and message) are replicated to other cluster members. For details on
these settings, see Setting Message Replication in a Cluster (on page 297). These
settings are not available if this PGP Universal Server is not a member of a cluster.
9 From the Message Expiration menu, select when you want user messages to
expire, from 1 day to 5 years, or never. When a message expires, it is deleted from
the user’s account.
10 From the Delivery Receipt Expiration menu, select when you want Certified
Delivery receipts to expire and be deleted, from 1 day to 5 years, or never. For
more information on Certified Delivery, see Certified Delivery with PDF Messenger
(on page 123).
11 Click Save.

297 Configuring PGP Universal Web Messenger
Configuring the PGP Universal Web Messenger Service
The PGP Universal Server restarts, which takes a few seconds.
Setting Message Replication in a Cluster
To configure Web Messenger data replication in a cluster
1 On the Services>Web Messenger page, click the Edit button.
The Edit Web Messenger page appears.
2 Select the Options tab to configurePGP Universal Web Messenger data replication
for this cluster member.
3 Under the Message Replication section, select the replication option you want for
this PGP Universal Server:
Select All to have Web Messenger data replicated from this PGP Universal
Server to all eligible cluster members. Cluster members that are not running
the PGP Universal Web Messenger service cannot host Web Messenger data.
To replicate Web Messenger data to a subset of eligible cluster members,
select Replicate messages on X servers in the cluster, and select the number
of servers from the drop-down menu. This will cause data to be replicated
only the the number of servers you indicate. For example, if there are four
servers in a cluster that are running the Web Messenger service, you could
elect to have each PGP Universal Servers Web Messenger data replicated to
only two of the other four eligible servers. This can reduce the amount of
resources and overhead needed for replicating Web Messenger data.
If there are only two members in a cluster, then this selection is not available.
Select Off to indicate that Web Messenger data should not be replicated. If
you select this option, you will need to confirm this choice.

34 Configuring the Integrated Keyserver
This section describes the Keyserver service, which is integrated into every PGP
Universal Server and holds the public keys of internal users.
You can configure Keyserver options from the Services > Keyserver page.
Overview
Every PGP Universal Server includes an integrated keyserver that is populated with the
public keys of your internal users. When an internal user sends a message to another
internal user, the PGP Universal Server goes to the keyserver to find the public key of
the recipient to secure the message.
Depending on how your network is configured, the PGP Universal Servers of other
organizations can also contact your keyserver to look for public keys. External users’
PGP Desktop applications can do the same.
The keyserver is always on if the service is enabled, but PGP Universal Server
administrators can control access to it via the Keyserver page. You can block or allow
access to the keyserver by specified IPs and hostnames.
If you have the PGP Verified Directory activated, the keyserver receives vetted
user-submitted keys from the PGP Verified Directory. See Configuring the PGP Verified
Directory (on page 302).
Starting and Stopping the Keyserver Service
To enable the Keyserver service
1 Go to Services > Keyserver. On the Keyserver page, click Enable to enable the
service.
2 To disable the Keyserver service, click Disable on the Keyserver page.
Configuring the Keyserver Service
You can allow access to the keyserver through non-SSL/TLS service, SSL/TLS service,
or both.
To configure the Keyserver service:
1 From the Services > Keyserver page, click Edit.
The Edit Keyserver page appears.

300 Configuring the Integrated Keyserver
Configuring the Keyserver Service
2 In the Public URL field, type the keyserver’s network name. If the keyserver is
behind a load balancer, this name can be different from the PGP Universal
Server’s network name.
Anytime the Public Keyserver URL changes, that information on the Organization
Key changes immediately. On user keys, the URL information updates the next
time the Organization Key signature is renewed.
3 In the Interface field, select the appropriate interface for the Keyserver from the
drop-down menu.
4 In the Port field, type a port number for the Keyserver to listen on or keep the
default setting. The default port for the first interface connector is port 389. The
SSL default is port 636.
5 Put a check in the SSL check box to require that connections to the Keyserver be
over SSL.
6 Put a check in the Require SSL Client Authentication check box to require that
client connections be SSL-authenticated.
7 Click the plus sign icon to add another network interface, and select the
appropriate interface, port, and SSL information.
8 Click Save to save changes and return to the Keyserver page.
9 For each interface you enabled, you have the option of clicking Restrict Access
and establishing access control for the connection on the Access Control for
Connector dialog box:
10 Put a checkmark next to Enable Access Control for Connector to enable access
control, and select Hostname/IP or IP Range:
In the Hostname/IP field, type a hostname or IP address, then click Add.
What you type here appears in the Block or Allow field below. If you type a
hostname such as example.com, the name resolves to an IP address.
In the IP Range fields, type starting and ending IP addresses for an IP
address range, then click Add. What you type here appears in the Block or
Allow field below.
In the Block or Allow field, select Block these addresses or Allow only these
addresses, as appropriate, for the IP addresses or ranges in the box below.
To remove an IP address or range from the box, select it then click Remove.
11 Click Save to close the Access Control for Connector dialog box.

35 Configuring the PGP Verified Directory
This section describes how to configure the PGP Verified Directory feature to enable
users to submit their keys.
You can configure PGP Verified Directory options from the Services > Verified
Directory page.
Overview
The PGP Verified Directory gives you the option of hosting a Web-accessible keyserver
for the public keys of your internal or external users. This feature is optional; you do
not have to enable it. You can choose whether to allow your internal users or external
users, or both, to submit their keys.
The PGP Verified Directory feature allows users running older client software not
directly supported by PGP Universal Server to submit their keys.
The PGP Verified Directory uses next-generation keyserver technology that lets users
manage their own keys, including submitting and removing them. These features are
not available on keyservers with older keyserver technology.
These advanced features simplify managing user keys and ensure that the keys in the
directory can be trusted.
Specifically, the PGP Verified Directory sends verification messages to the email
addresses on keys submitted to it. If the key owner responds to the verification message
with permission to add the key, then the key is added to the directory. This approach
keeps the PGP Verified Directory free of useless keys and protects users’ privacy by
foiling the upload of bogus keys that use their email addresses.
Published user keys are signed by another key. Keys submitted by internal users are
signed by the Organization Key attached to the PGP Universal Server; keys submitted
by external users (also called directory users) are signed by the Verified Directory Key.
You must add a Verified Directory Key to the PGP Universal Server before you allow
users outside your managed domain to submit keys. See Managing Organization Keys
(on page 47) for more information on the Verified Directory Key.
The signature on the submitted key expires on a timetable you set. Every time the key
signature expires, the key must be renewed based on the selected vetting method. For
example, using the email vetting method, the user receives an email asking them to
re-confirm that the email and key still belong to them. If the user responds to the
verification email, the posted key is renewed. If the user does not respond, the key is
removed from the PGP Verified Directory.
Additionally, the PGP Verified Directory lets the owner of a key remove it from the
directory, even if the passphrase has been lost. This prevents the buildup of unusable
keys; with older keyserver technology, once a key was posted, it was there forever
unless the keyserver administrator manually removed it. However, removing a user’s
key removes all key-related material for that user. Whole Disk Recovery Tokens and
other important user data are lost.
Finally, the PGP Verified Directory lets users search the directory through a web
interface for the public keys of persons to whom they want to send secured messages.

302 Configuring the PGP Verified Directory
Starting and Stopping the PGP Verified Directory
Once the PGP Verified Directory accepts an uploaded key, the verified key material is
shared with the keyserver, to be used in encrypting messages.
Starting and Stopping the PGP Verified Directory
To enable the PGP Verified Directory service
1 On the Services > Verified Directory page, click Enable to enable the service.
2 To disable the PGP Verified Directory service, click Disable on the Verified
Directory page.
3 To suspend the PGP Verified Directory service, click Pause. Users see a message
that the service is unavailable. Click Resume to continue the service.
Configuring the PGP Verified Directory
To configure the PGP Verified Directory service
1 On the Services > Verified Directory page, click the Edit button.
The Edit Verified Directory page appears.
2 Click the Interface tab to specify how users access the directory.
3 In the Public URL field, type the PGP Verified Directory’s network name.
Directory users access the PGP Verified Directory using this URL. The default URL
is the hostname of the server, and the default port is port 80. You can change the
URL, depending on your network configuration. By default, SSL is turned off. If
the PGP Verified Directory runs on an interface with SSL, use HTTPS, and not
HTTP, for the public URL. If the port you choose is not the default, add the number
to the end of the URL; for example, https:// <publicURL>:9999.
4 In the Interface field, select the appropriate interface for the PGP Verified
Directory from the drop-down menu.
5 In the Port field, type a port number for the PGP Verified Directory to listen on or
keep the default setting.
The above two fields are the interface and port on which the PGP Verified
Directory is established.
6 Put a check in the SSL check box to require that connections to the PGP Verified
Directory be over SSL.
7 Click the plus sign icon to the right of the Edit field to add another network
interface, and select the appropriate interface, port, and SSL information.
8 Click the Options tab to specify key and user interaction settings.
9 Establish user key submission criteria:

303 Configuring the PGP Verified Directory
Configuring the PGP Verified Directory
Allow Submission. When checked, users can submit their public keys to the
PGP Verified Directory. When unchecked, they cannot. You can choose
whether internal or directory users can submit their keys. Internal users are
inside your managed domain; directory users are users outside your
managed domain.
Vetting Method. Choose a method for determining whether or not the owner
of a submitted key agrees to it being posted in the PGP Verified Directory.
Implicit means anyone who submits a key is by default trusted. Manual means
the PGP Universal Server administrator must manually approve or disapprove
all submitted keys (the default). Email means an email message is sent and
must be responded to. See Approving Pending Keys (on page 73) in the Internal
Users chapter for information about manually approving internal user
submitted keys. See Managing PGP Verified Directory User Accounts for
information on approving submitted external user keys.
10 In the Re-email Timeout field, type a timeout value for resending email. The
default is 24 hours. If for some reason a user’s key is submitted multiple times, the
timeout value specifies how often the user receives the vetting email in response.
The default of 24 hours means that users only receive the email once every 24
hours.
11 In the Email Token Timeout field, type the timeout value for the expiration of the
email token. The default is 336 hours (14 days).
12 In the Signature Expiration field, type the expiration time for the Organization
Key’s signature. The default is 6 months.
When signature expiration time period is reached, the user’s key is automatically
re-verified using the selected vetting method.
13 In the Max Search Results field, type the maximum number of results users
receive for a web-based search. The default number of results returned for
web-based searches is 25.
14 In the Customized Sender Address field, type the email address you want all PGP
Verified Directory-generated email to appear to be from. Every email users receive
from the PGP Verified Directory has this address in the email "From" line. The
customized sender address prevents your PGP Universal Server’s hostname from
appearing in the "From" line.
Note: You do not need to create an email account to correspond to the email
address you choose, because users should only interact with the PGP Verified
Directory through the PGP Verified Directory interface, or through the
information you provide in the Administrator Contact Message. However, if you
want users to be able to reply to verification email using this address, you can
create an email account using this email address. If you do not create an email
account, reply email sent to the customized sender address bounces.
15 Click Save.
The settings you established are saved.

36 Managing the Certificate Revocation
List Service
This section describes the Certificate Revocation List (CRL) service, which
automatically generates and publishes a CRL, adds certificates to the CRL when their
key is revoked, and lets you download the CRL via HTTP or LDAP. The PGP Universal
Server CRL service is RFC 3280-compliant.
PGP Universal Server also checks the CRLs it gets from other CRL Distribution Points
before encrypting a message to a certificate (see Certificate Revocation Lists (see "How
PGP Universal Server Uses Certificate Revocation Lists" on page 44) for more
information).
You configure the CRL service from the Services > Certificate Revocation page.
Overview
PGP Universal Server includes a CRL service that, when enabled (the default setting),
monitors the status of keys and their associated certificates. When a key is revoked, the
corresponding certificate is automatically added to the CRL.
There are two ways for a key to be revoked, causing the certificate to be added to the
CRL:
The key is manually revoked by a PGP Universal Server administrator (see
Revoking the PGP Key of an Internal User (see "Revoking Managed Keys" on page
74)).
If a new key is imported for an existing internal user, the old key is automatically
revoked.
The only way to revoke a certificate is to revoke the corresponding key.
The CRLs created by PGP Universal Server are valid for a configurable number of days;
the default is 7 days.
Starting and Stopping the CRL Service
To enable or disable the CRL service
1 On the Services > Certificate Revocation page, click Enable to enable the service
if it is not running.
2 To disable the CRL service if it is running, click Disable on the Certificate
Revocation page.

306 Managing the Certificate Revocation List Service
Editing CRL Service Settings
Editing CRL Service Settings
To edit settings for the CRL service
1 On the Services > Certificate Revocation page, click the Edit button.
The Edit Certification Revocation page appears.
2 In the URLs field, type the URLs you want to be stamped into the CRL DP when the
PGP Universal Server creates a certificate for a key.
Type one URL per line.
Note: To use the default CRL DP location, enter only the protocol and hostname
of the URL (for example, https:// examplehostname:port) and the rest of
the path is stored correctly in generated certificates (for example,
https://examplehostname:port/crl/RevokedCertificates.crl).
To use a custom CRL DP location, you must enter the complete URL. Custom CRL
DP locations are not modified in anyway.
3 In the Regeneration field, type the number of days for which a CRL is valid.
The default is 7 days. When the threshold is reached, a new CRL is generated.
4 In the Interfaces fields, type an interface and port you want stamped into the CRL
DP for accessing the CRL via HTTP.
You must configure one interface for each HTTP URL you type in the URLs field.
You can create additional interface/port combinations by clicking the plus-sign
icon and typing the appropriate information.
The interfaces you configure have no effect on accessing the CRL via LDAP.
5 Click Save.
The settings you established are saved.
37 Configuring Universal Services
Protocol
The Universal Services Protocol (USP) provides communication between external
services and the PGP Key Management Service (KMS). USP enables key management
and policy services to clients and other external services.
USP is used for communication between PGP Universal Server and PGP Desktop client
and PGP Universal Satellite, and for communication with keyservers for key lookup.
Starting and Stopping USP
The Universal Services Protocol page lets you enable or disable the Universal Services
Protocol.
This protocol is enabled by default.
Warning: Disabling USP could cause PGP Desktop communications and key lookups
to fail.
To disable the Universal Services Protocol
1 Go to System > USP in the administrative interface.
The Universal Services Protocol page appears.
2 Click Disable.
To enable the Universal Services Protocol
1 Go to System > USP in the administrative interface.
The Universal Services Protocol page appears.
2 Click Enable.
Adding USP Interfaces
USP is initially configured with a single interface, on port 443 using SSL, for
communication with PGP client software. You can add additional interfaces to allow
communication over other ports or via HTTP rather than HTTPS (SSL).
To add an interface for USP
1 Go to System > USP in the administrative interface.
The Universal Services Protocol page appears.
2 Click Edit....

308 Configuring Universal Services Protocol
Adding USP Interfaces
The Edit Universal Services Protocol page appears.
3 Click the Add icon to create a new row.
4 Select an interface from the drop-down menu.
5 Type the port number you want to use.
6 Uncheck the SSL box if you do not want to use SSL.
7 Click Save to save your changes.
8 To remove a row from the table, click the Remove icon.
You cannot remove the interface if it is the only one configured.

38 Introducing PGP Remote Disable and
Destroy
About PGP Remote Disable and Destroy
PGP Remote Disable and Destroy from Symantec(TM) powered by Intel(R) Anti-Theft
Technology (PGP RDD) provides a security solution for lost, stolen, or decommissioned
computers.
PGP RDD solves the need to keep data secure in mobile environments and comply with
increasingly stringent regulations in data security and privacy using the latest Intel AT
technology. PGP RDD offers corporate users the option to activate PGP Universal
Server's security service and manage hardware-based, client-side intelligence to secure
the notebook and/or data if a notebook is lost or stolen. If the client system is lost or
stolen, you can remotely disable client systems or disable access to data and securely
decommission client systems.
Components of PGP RDD
The following items are part of the overall PGP RDD installation:
PGP Universal Server. The administrative server used to manage client systems.
Intel Content License Server (ICLS). The ICLS permit licensing server is the
activation site at Intel where client installations are tracked.
Managed PGP Desktop client system with PGP Whole Disk Encryption installed.
Once PGP RDD policies are applied and the system is encrypted, the client system
then becomes PGP RDD-enabled.
How PGP RDD Works
You deploy PGP RDD to clients you have specified in PGP Universal Server as part of a
particular consumer group. For that consumer group, you create a policy that enables
PGP RDD with Intel Anti-Theft Technology. You then create a PGP Desktop client
installer that uses the policy.
A user installs the PGP Desktop client and enrolls with the PGP Universal Server using
the method you choose. The client computer is then encrypted with PGP Whole Disk
Encryption. During this process, the client receives the policy from PGP Universal
Server that enables PGP RDD. PGP RDD in turn activates the Intel Anti-Theft
Technology on that client, and the encrypted client moves to a state known as “AT
Activated.” This is the normal operating state for a PGP RDD-enabled client. This state
is transparent to the user. The client system operates normally and is protected.

2 Introducing PGP Remote Disable and Destroy
How PGP RDD Works
PGP Universal Server then monitors PGP RDD-enabled clients through regular periodic
contact between server and client. This contact refreshes the theft status of the
computer and is known as a rendezvous. A successful rendezvous indicates to the
server that a client is online and controlled by the authorized user.
After a missed rendezvous, a timer begins counting down to disable the system. If the
client fails to rendezvous successfully before the timer expires, the client is
automatically flagged on the server as “Stolen.” The client is locked down until the user
or administrator unlocks the system and returns it to an “AT Activated” state.
Security for the system is local. The computer is disabled when the timers expire. This
thwarts a common strategy employed in laptop theft to avoid putting the computer
online. Security is also hardware-based, preventing use of the system even if its hard
drive is replaced.
For more information on configuring and deploying PGP RDD, go to the Symantec
Knowledgebase (http://www.symantec.com/business/support/index?page=home) and
search for DOC4975, "PGP Remote Disable & Destroy Configuration Guide".

39 System Graphs
This section describes system graphs, a feature that graphically displays information
about your PGP Universal Server.
Overview
Select Reporting > Graphs to view the graph page. There are three system graphs:
CPU usage (Last 24 hours)
Message activity
Whole Disk Encryption
Click Refresh (at the top of the System Graphs page) to refresh the information in the
graphs.
CPU Usage
The CPU Usage graph displays information about the CPU usage of the hardware
hosting your PGP Universal Server in the last 24 hours. The following categories are
shown:
Nice. Shows CPU usage by processes running at a lower priority than any other
processes; it is mostly used for low-importance background tasks and rarely shows
much activity on PGP Universal Servers. Nice processes only run when the CPU is
not running any other task.
System. Shows CPU usage by the PGP Universal Server software.
User. Shows CPU usage by PGP Universal Server users.
Message Activity
The Message Activity graph shows the number of messages the PGP Universal Server
encrypted, decrypted, and processed for the specified time period.
Available time periods are the previous 30 days, previous 6 months, and previous year.

4 System Graphs
Whole Disk Encryption
Whole Disk Encryption
The Whole Disk Encryption chart shows the number of fixed devices with PGP Whole
Disk Encryption in the following states:
Encrypted
Decrypted
Encrypting
Decrypting
Encryption Paused
Decryption Paused
Unknown
In error states
From this page, you can export a CSV report on all PGP Whole Disk Encryption activity
data for each encrypted device, on the system; a system with multiple drives that can be
encrypted will have multiple rows in the report. The fields on the report are:
User name
Primary email address
Last access by user
MAC address
Domain
IP address
PGP Desktop version
Device ID and type
Partition ID
Device status
The device status field displays numeric codes for the PGP WDE status of the
device. These codes include:
0 – Unknown status
1 – Encrypting
2 – Encryption paused
3 – Encrypted
4 – Decrypting
5 – Decryption paused
6 – Not encrypted

40 System Logs
This section tells you about the PGP Universal Server system logs.
Overview
The System Logs page lists and time stamps each action a PGP Universal Server takes.
Analysis of the logs can help you determine how your configuration of the server and
the policies you have established are affecting your email.
The list shows the most recent events at the top.
The list can be filtered by what actions were logged, date the action occurred, time the
action occurred, and type of message (Information, Warnings, Notices, and Errors). You
can filter on the following types of actions:
Administration logs are audit logs of configuration changes made through the
administration console interface.
Backup logs provide information about events such as data and configuration
restoration, and automatic and manual backups.
Client logs display messages about connections made from client software. For
example, PGP Whole Disk Encryption event notices include device detection, disk
encryption or decryption, device status changes, errors during events, and WDRT
use or creation.
Cluster logs include messages about cluster join events and data replication
notices.
Data Layer logs provide information on the data layer service, which is part of the
system that sits between the PGP Universal Server database and the rest of the
code.
Groups logs provide information on the group manager service.
Ignition Key logs record events such as adding and removing ignition keys and
using ignition keys to unlock the server.
Mail logs record mail proxy activities such as PGP Universal Server finding
recipient keys, IMAP connections, and the starting and stopping of mail services.
Postfix logs display events associated with sending mail messages.
RDD logs provide information about events associated with the PGP RDD feature,
including viewing the hardware recovery passphrase.
Update logs provide information about software-update specific actions.
Verified Directory logs include information about events such as user submission
of keys and key-verification email.
Web Messenger logs display events such as users logging in and out of the service
and messages being sent.
You can also search the log and save a copy of the log as a text file at any time.

6 System Logs
Filtering the Log View
Filtering the Log View
You can filter the log view based on multiple criteria.
To filter the view of the system log
1 Select Reporting > Logs.
2 Click the current Log selection and select the appropriate logged action from the
drop-down menu.
The list of log entries re-displays, showing only those entries for the appropriate
action for the selected date.
3 To change the type of entries shown in the list, select the Display type you want to
see. The list immediately re-displays to show entries of the display type you have
selected, as well as any entries of greater (more severe) types.
You can select from from the following Display types:
Information shows informative log entries (events of low importance) as
well as error, warning, and notification log entries.
Notice shows notification log entries (important events such as starting and
stopping processes) as well as warning and error log entries.
Warnings shows warning log entries, indicating possible problems, in
addition to error log entries.
Errors shows error log entries, for example, serious and non-fatal errors.
For example, if you select the Warnings display type, the resulting list will also
show any error entries that match the current Log selection. It will not show
Information or Notice entries.
The list of log entries re-displays each time you choose a Log or Display filter.
4 To change the dates and times displayed, select 1 page, 1 hour, 6 hours, and so on,
from the menu on the right. You can move between time periods one at a time by
clicking the arrows.
Searching the Log Files
Searches are not case–sensitive.
Note: To use regular expressions to search for log messages, escape the regular
expression meta characters (such as parentheses, periods, square brackets, etc.) with
a backslash. For example, to use the regular expression .*pgp.*, type
\.\*pgp\.\* into the Search field.
To perform a simple search in the list of log entries for a particular word or phrase
1 Type the word or phrase in the Search field.

7 System Logs
Exporting a Log File
2 Check Regular expressions, as appropriate.
3 Choose any of the Log and Display types.
4 Click Search.
The list of log entries re-displays to show logs containing the word or phrase for
which you searched.
To perform an advanced search based on days of the week, or dates and times
1 Click advanced.
2 Type a word or phrase in the Search field, if necessary.
3 Check Regular expressions, as appropriate.
4 Choose any of the Log and Display types.
5 Enter the dates and times of the logs you want to view.
6 Click Search.
The list of log entries shows those entries time stamped at the times you specified
for the selected dates.
Exporting a Log File
You can save a log file, or a record of log messages, to examine offline. The log file is a
text file, so you can open it with any text editor.
To export log files
Click the Export Log button to save a log file for the log you are currently viewing.
You can also download just PGP Whole Disk Encryption login failure data to view
offline.
To export login failure data
On the Users/Internal tab, from the Options menu, select Export WDE Login Failures
For All.
The file WDE_Failures.CSV is exported.
Enabling External Logging
Log Settings lets you enable external system logging, which means you can send all log
messages to an existing remote syslog server for central log gathering. Keeping logs for
all systems in one location can help with log analysis.

8 System Logs
Enabling External Logging
When external syslog is enabled, the logs for the following PGP Universal Server
services are sent to the syslog server: administration, software updates, clustering,
backups, Web Messenger, Verified Directory, Postfix, client logs, and mail. The logs of
some generic services, such as cron (the system task scheduler), are sent as well.
To configure the log settings
1 Click on the Settings button.
The Log Settings dialog box appears.
2 Put a checkmark next to Enable External Syslog.
3 Choose the desired Protocol to use to send the logs (UDP or TCP) from the
drop-down menu.
The default protocol and port values are the most common values; they should be
used unless you are certain you must use different values.
4 Specify the Hostname to which to send them.
5 Type the desired Port number or use the default.
6 Click Save.

41 Configuring SNMP Monitoring
This chapter describes how to configure PGP Universal Server to allow network
management applications to monitor system information for the device on which PGP
Universal Server is installed, and to send system and application information to an
external destination.
You can configure SNMP options from the Services > SNMP page.
Overview
SNMP enables a network management application to monitor the health and activity of
the PGP Universal Server software and the computer on which it is installed. The
network management application can poll the PGP Universal Server on a regular basis
to extract information. Polling means that the network management application
periodically queries the PGP Universal Server to get the desired status information, and
SNMP is the protocol it uses.
You can configure all polling settings, including polling cycles, on the network
management application. You can poll the following system information, as part of the
standard MIB:
The number of instances of certain running processes
System memory usage
Disk usage
System load information
You can also download custom MIBs that allow you to poll for messaging statistics,
including the number of messages:
Processed that day
Encrypted and/or signed that day
Decrypted that day
Processed total
Encrypted and/or signed total
Decrypted total
Currently in the mail queue
You can also set up the PGP Universal Server to use SNMP to send out trap information
to one or more specified hosts or IP addresses. Traps are triggers set off by certain
network events. You can configure the SNMP service to send out an alert every time
these events occur:
The number of certain processes drops to zero
The available swap space drops too low
A disk has less than 20% free space
The 1-minute system load average rises above 4.0

10 Configuring SNMP Monitoring
Starting and Stopping SNMP Monitoring
The 5-minute system load average rises above 1.0
The 15-minute system load average rises above 1.0
Starting and Stopping SNMP Monitoring
To enable the SNMP service
On the Services > SNMP page, click the Enable button to enable the service.
To disable the SNMP service, click the Disable button on the SNMP page.
Configuring the SNMP Service
To configure the SNMP service
1 From the SNMP page, click the Edit button.
The Edit SNMP page appears.
2 In the Interface field, select the interface on which you want to allow SNMP
polling of the PGP Universal Server.
You cannot specify a port because the standard port for SNMP traffic is always
port 161.
3 In the Community field, type the community name, also called the community
string. The community name acts as a password, allowing the network
management application to poll the PGP Universal Server. Use the same
community name in your SNMP browser.
4 In the SNMP Traps Recipient field, type the IP or hostname you want to receive
SNMP trap data.
5 Click the plus sign icon next to the Recipient field to add another recipient. There
is no limit to the number of IPs you can add.
6 Click Save to save changes and return to the SNMP page.
7 You have the option of clicking Restrict Access and establishing access control for
the connection on the Access Control for Connector dialog box:
8 Put a checkmark next to Enable Access Control for Connector to enable access
control and select Hostname/IP or IP Range:
In the Hostname/IP field, type a hostname or IP address, then click Add.
What you type here appears in the Allow only these addresses field below. If
you type a hostname such as example.com, the name resolves to an IP
address.
In the IP Range fields, type starting and ending IP addresses for an IP
address range, then click Add. What you type here appears in the Allow only
these addresses field below.
To remove an IP address or range from the box, select it and click Remove.

11 Configuring SNMP Monitoring
Downloading the Custom MIB File
9 Click Save to close the Access Control for Connector dialog box.
Downloading the Custom MIB File
PGP Corporation provides a custom MIB extension to allow you to poll for PGP
Universal Server-specific information. The MIB files are called
PGP-UNIVERSAL-MIB.mib and PGP-SMI.mib. The root Object ID (OID) for the PGP
Universal Server custom MIB set is .1.3.6.1.4.1.17766.1.1.1, which is
.iso(1).org(3).dod(6).internet(1).private(4).enterprises(1).pgp(17766).products(1).pgpuni
versal(1).messaging(1).
To download the custom MIB files
1 From the Services > SNMP page, click Download PGP Universal ServerMIBs.
2 Save the zipped file mibs.zip to your desktop.
The MIB files download to your desktop.
3 Unzip mibs.zip, and extract the files PGP-UNIVERSAL-MIB.mib and PGP-SMI.mib.
4 Depending on which SNMP browser you are using, you might need to compile the
MIBs before you can add them to the browser. The MIB files are formatted as text
and can be converted to a database form before they can be used. Consult the
documentation for your SNMP browser.
5 Import the MIBs to your SNMP browser.

42 Viewing Server and License Settings
and Shutting Down Services
This section discusses the tasks you can perform on the System General Settings page.
Overview
From the System Settings page found at System > General Settings, you can:
View Server information such as the server host name, currently installed
software version, and information about your PGP Universal Server license
Install or update your PGP Universal Server license
Stop and restart system services
Reboot the PGP Universal Server
Shut down the PGP Universal Server
Server Information
The Server Information section displays the version of the server currently installed
and any important information or cautions that apply (a system update ready to be
installed, for example). It also includes links to the release notes for the current release,
and to the software update page if you have downloaded an update to your PGP
Universal Server but not yet installed it.
If you have a valid PGP Universal Server license installed, this section also shows
information about the license: the licensee information, number of licensed users, and
the features included with the license, and whether you have mail proxies enabled, if
your license includes PGP Universal Gateway Email. If the license includes PGP
Portable, it shows the number of PGP Portable disks created.
The Enable Mail Proxies check box must be checked in order to configure and use mail
proxies.
If you installed a PGP Universal Server license with the Setup Assistant, and it
included PGP Universal Gateway Email, this check box should appear already
checked. (You can uncheck it to disable the mail proxying feature.)
If your license does not include PGP Universal Gateway Email then the check box
is disabled.
If you install a new license that included PGP Universal Gateway Email you must
check this box in order to configure and use mail proxying.
Setting the Time
You need to set the time for your PGP Universal Server so that it knows what time it is;
this is especially important for time-based operations such as scheduled backups.

14 Viewing Server and License Settings and Shutting Down Services
Server Information
To set the time
1 Click Set Time.
The Set System Time dialog box appears.
2 Select the appropriate time zone from the Time Zone menu.
3 Select your preferred time and date formats.
4 Select either Set Time Manually, then set the correct time or Use NTP Server and
use the default NTP server or specify a different one.
5 Click Save.
Licensing a PGP Universal Server
To enter, change, or view licensing information for this PGP Universal Server
1 Click License....
The Enter License Information dialog box appears.
2 In the Licensee Name field, type the name of the person who owns the license.
Note: If you have already used your license number for authorization, you must
type your name and organization exactly the way you did the first time. If you
are unable to authorize your software successfully and you have ruled out
problems with your network connection, please contact PGP Support
(www.pgp.com/support/).
3 In the Licensee Organization field, type the name of the organization that owns
the license.
4 In the Licensee Email field, type the email address of the person who owns the
license.
5 In the License Number field, type the license number for this server.
6 Click Save.
If the authorization is successful, the System Settings page appears with the
license information filled in.
If your license includes PGP Universal Gateway Email, the Enable Mail Proxies check
box will be shown and enabled. You must check this box in order to configure mail
proxies.
If you installed your license with the Setup Assistant, and it includes PGP Universal
Gateway Email, the Enable Mail Proxies check box should appear already checked.
Downloading the Release Notes
To download the Release Notes, click Release Notes in the Server Information section.
The Release Notes for your version of the software appears.

15 Viewing Server and License Settings and Shutting Down Services
Shutting Down and Restarting the PGP Universal Server Software Services
Shutting Down and Restarting the PGP Universal Server
Software Services
Services lets you shut down and restart the software services provided by PGP
Universal Server; the hardware and the administrative interface are not affected.
Restarting restarts any stopped services and reloads any running services; the server
does not accept connections until the restart is complete. Stopping services shuts down
all services until they are restarted; the server does not accept connections during this
time.
Services include:
PGP Universal Web Messenger
Keyserver
PGP Verified Directory
Mail proxies
Clustering communication
Client software communication
To restart services when services are running, click Restart Services.
The server software is restarted. An confirmation message appears at the top of the
page when the restart is complete.
To stop all services, click Stop All Services.
All software services are stopped. An confirmation message appears at the top of the
page when the services are stopped.
To start all services when the services are stopped, click Start All Services.
All software services start. A confirmation message appears when the services are
started.
Shutting Down and Restarting the PGP Universal Server
Hardware
Server Power lets you restart or shut down the hardware on which your PGP Universal
Server is running. Restarting stops all server functionality until the automatic restart is
complete. Shut down stops all server functionality until the server is manually
restarted.
To restart the PGP Universal Server, click Restart.
The PGP Universal Server restarts.
To shut down the PGP Universal Server, click Shut Down.
The PGP Universal Server shuts down.
You must manually restart the server to restore operation.

43 Managing Administrator Accounts
This section describes how to create administrators for your PGP Universal Server.
You can configure Administrator options from the System > Administrators page.
Overview
You can have as many administrators as you want for each PGP Universal Server, and
those administrators can be configured in any of six roles, each role having a fixed set
of privileges attached to it.
PGP Universal Server supports two types of authentication for administrators;
standard passphrase authentication, or RSA SecurID authentication, verifying
administrator credentials against RSA Authentication Manager servers.
During the Setup Assistant, one administrator must be created. This administrator is
automatically created with the highest privileges, called SuperUser, and uses
passphrase authentication. Other administrators, created by the first SuperUser
administrator, can also be SuperUser administrators or they can have fewer privileges.
If RSA SecurID authentication is enabled, they can be configured to use SecurID
Passcode authentication, or standard passphrase authentication.
Once administrators are configured, they can log in and have access to only those
functions they are entitled to based on their role. Administrators who do not have all
privileges can see everything in the administrative interface, but those functions they
cannot affect are disabled.
Any administrator can receive a daily status email sent from the PGP Universal Server.
You can also have the PGP Universal Server send a status email at any time.
On the Administrators page, you can create a new administrator, delete one or more
administrators, sort the configured administrators listed on the Administrators page,
view the settings of configured administrators, change their authentication type (if RSA
SecurID authentication is enabled), change their passphrases, and upload or remove the
SSH v2 keys of SuperUser administrators.
Administrator Roles
The following preconfigured administrator roles are in PGP Universal Server:
Role Has Permission To:
Read-only Administrator View settings and logs
WDRT-only Administrator View settings and logs
Access and read Whole Disk Recovery Tokens
Service Control Only View settings and logs
Start and stop software and hardware services but not
configure them

18 Managing Administrator Accounts
Overview
Role Has Permission To:
Basic Administrator View settings and logs
Control and configure services
Access and read Whole Disk Recovery Tokens
Configure system settings
Install updates
Restore backups
Manage policies
Manage users (excluding adding/deleting users) and their
public keys
Vet users
Full Administrator View settings and logs
Control and configure services
Access and read Whole Disk Recovery Tokens
Configure system settings
Install updates
Restore backups
Manage policies
Manage users (including adding/deleting users) and their
public keys
Vet users
Configure clustering
Export user private keys
Manage organization, trusted, ignition, and Additional
Decryption Keys (ADKs)
Update consumer policies
Manage groups and group permissions
SuperUser View settings and logs
Control and configure services
Access and read Whole Disk Recovery Tokens
Configure system settings
Install updates
Restore backups
Manage messaging policies
Manage users and their public keys
Vet users
Configure clustering
Export user private keys
Manage organization, trusted, ignition, and ADKs
Access the PGP Universal Server via SSH
Create and manage other administrators
Update consumer policies
Manage groups and group permissions

19 Managing Administrator Accounts
Creating a New Administrator
Administrator Authentication
The PGP Universal Server supports two types of authentication for administrators:
standard passphrase authentication, and RSA SecurID passcode authentication.
The SecurID authentication feature allows PGP Universal Server to be configured to
verify authentication credentials against RSA Authentication Manager servers. Once
enabled, SuperUser administrators can individually set themselves and other
administrators to login to PGP Universal Server using SecurID Passcode
Authentication.
The SecurID feature must be configured and enabled before administrators can be
configured to use SecurID authentication.
A SecurID passcode consists of a PIN (optional) plus Tokencode. The PIN is
optional, and is under the control of the RSA Authentication server, based on the
policy in force on that server.
At least one SuperUser administrator must use standard passphrase
authentication, to ensure that the PGP Universal Server Administration interface
will never become inaccessible because the RSA Authentication servers cannot be
reached.
Administrators can use either passphrase authentication or SecurID
authentication, but not both. An administrator's passphrase is immediately
deleted from the PGP Universal Server database when that administrator is set to
use SecurID authentication.
If an Administrator's login method is changed from SecurID to Passphrase, a new
passphrase must be entered, and will be enforced and stored in the database.
Creating a New Administrator
To add a new administrator
1 From the System > Administrators page, click Add Administrator.
The Administrator Settings dialog box appears.
2 In the Login Name field, type a login name for the new administrator. If you are
using SecurID authentication, make sure the login name exactly matches this
administrator's username in the RSA server, or this user will not be able to
authenticate successfully.
3 If SecurID authentication is enabled, an Authentication field with a drop-down
menu is shown.
Select Passphrase to use a passphrase for authentication. The fields to enter a
passphrase will appear below.
Select SecurID to use RSA SecurID authentication.
If RSA SecurID authentication is not enabled, the Authentication field does not
appear on this page.

20 Managing Administrator Accounts
Importing SSH v2 Keys
4 If you are using Passphrase authentication, fields to enter and confirm the
administrator passphrase are shown. These fields are not displayed if this
administrator will use SecurID authentication.
In the Passphrase field, type a passphrase for this administrator.
In the Confirm field, type the same passphrase again.
5 In the Email field, type the email address of the new administrator.
6 Select Daily Status Email if you want the new administrator to receive a daily
status email for your system.
7 From the Role list, select the role for the new administrator.
8 The privileges for the selected role appear.
9 Click Save.
The new administrator is added.
Importing SSH v2 Keys
SuperUser administrators have the option of adding their SSH v2 key to the PGP
Universal Server. The SSH v2 key acts as an authentication token and allows SuperUser
administrators to access the command line of the PGP Universal Server by logging in
with the username root.
Caution: Accessing the PGP Universal Server command line in this way can void
portions of your PGP Support agreement. Contact PGP Support for more
information.
To import an SSH v2 key
1 Click the plus icon at the end of the SSHv2 Key field on the Administrator Settings
dialog box.
The Update SSH Public Key dialog box appears.
2 Import the SSH v2 key file either by selecting a key file via the Import Key File
field, or by pasting the SSH v2 public key block into the Import Key Block box.
3 Click Import.
The SSH key is imported.
Deleting Administrators
To delete one administrator
1 From the System > Administrators page, click the icon in the Delete column of
the administrator you want to delete. Administrators cannot delete themselves.
A confirmation dialog box appears.
2 Click OK.

21 Managing Administrator Accounts
Inspecting and Changing the Settings of an Administrator
The name of the deleted administrator is removed from the list.
If SecurID authentication is enabled, you cannot delete the administrator who is the
single remaining administrator using standard passphrase authentication.
To delete multiple administrators
1 Specify the administrators you want to delete by selecting the appropriate check
boxes on the far right side of each administrator’s name.
2 Select Delete Selected from the Options menu on the bottom right corner of the
Administrators page.
3 To delete all administrators, select Delete All from the Options menu.
A confirmation dialog box appears.
4 Click OK.
The selected administrators are deleted from the list.
If SecurID administration is enabled, PGP Universal Server will not delete the last
remaining administrator who is using standard passphrase authentication.
Inspecting and Changing the Settings of an Administrator
To inspect or change the settings of a configured administrator
1 On the Administrators page, click the name of the administrator whose settings
you want to view.
The Administrator Settings dialog box appears.
2 You can type a new email address, activate the daily status email, send an
immediate status email, add an SSH v2 key if you have SuperUser status, or
change the passphrase. You can also change other administrators’ roles, but you
cannot change your own role. If SecurID authentication is enabled, you can change
the administrator's authentication type.
3 To change your own passphrase, click Change Passphrase, type the current
passphrase, type a new passphrase, confirm the new passphrase, then click Save.
The Change Passphrase button does not appear if you are configured to use
SecurID authentication.
4 To change another administrator’s passphrase, click Reset Passphrase, type and
confirm the new passphrase, and click Save. The Reset Passphrase button does
not appear if the administrator is configured to use SecurID authentication.
5 To change the authentication type (this requires SecurID to be enabled), select
either Passphrase or SecurID from the Authentication drop-down menu.
If you change from Passphrase to SecurID, the Passphrase fields disappear.
If you change from SecurID to Passphrase, the Passphrase fields appear, and
you must enter and confirm a new passphrase.
Note: The Authentication menu is not available if this administrator is the only
one using passphrase authentication. There must always be at least one
administrator who authenticates using a passphrase.

22 Managing Administrator Accounts
Configuring RSA SecurID Authentication
6 Click Save.
The Administrator Settings dialog box disappears.
If you have change the authentication type to SecurID, an alert pops up stating
that SecurID credentials must be used at the next login.
Configuring RSA SecurID Authentication
To use RSA SecurID authentication, one or more RSA Authentication Manager servers
must be configured prior to configuring SecurID on the PGP Universal Server.
The PGP Universal Server IP address must be added as an agent to each RSA
Authentication server.
The RSA server configuration file (sdconf.rec) must be exported from the RSA
server or cluster, and placed where it can be uploaded to the PGP Universal Server.
To enable SecurID Authentication
1 From the Administrators page, click the SecurID Authentication... button to
display the SecurID Authentication page.
2 Click Upload... to display the Upload Configuration File dialog, and browse to the
location of the sdconf.rec file.
3 Click Upload to upload the file.
An alert appears indicating that the server is restarting.
4 When the server has restarted, log in, and return to the Systems > Administrators
page.
5 Click SecurID Authentication... again to return to the SecurID Authentication
page.
The SecurID Authentication Enable button is now available. An icon and the file
name are displayed, along with a Delete icon, an Upload... button, and a Test
Connection button.
6 To enable SecurID Authentication, click Enable.
To verify connectivity with the RSA Authentication server
You can test the connection to ensure that the PGP Universal Server can successfully
contact the RSA Authentication Manager servers present in the RSA configuration file.
SecurID does not need to be enabled on the PGP Universal Server, but you must have
successfully uploaded the sdconf.rec file and restarted the server. It is recommended
that you test the connection before you enable SecurID authentication.
1 From the Administrators page click SecurID Authentication....
2 Click Test Connection. A message appears indicating whether this was successful
or it failed. The test will fail only if none of the servers in the configuration file can
be reached.
NOTE: The Test Connection function tests to ensure that at least one RSA server is
reachable. It cannot be used to test an individual user ID.

23 Managing Administrator Accounts
Resetting SecurID PINs
To update the SecurID configuration file
You can update the sdconf.rec file at any time without disabling SecurID
authentication.
1 From the Administrators page click SecurID Authentication....
2 Click Upload..., browse to the location of the sdconf.rec file, and upload it. The
server will restart. SecurID authentication is still enabled.
To disable SecurID authentication
1 For any administrator that is using SecurID authentication, go to Administrator
Settings and set their Authentication type to Passphrase. You cannot disable
SecurID authentication if an administrator is using it as their authentication
method.
2 Go to the SecurID Authentication page and click Disable to disable SecurID
authentication.
3 To delete the sdconf.rec file, click the Delete icon.
Resetting SecurID PINs
If PINs are required as part of the SecurID passcode, the RSA server can flag an account
as needing a PIN reset. When this occurs, the affected administrator is able to log in to
the PGP Universal Server administrator interface using his current credentials, but is
immediately presented with the Reset SecurID PIN dialog.
The RSA server administration policy determines whether and when a PIN must be
reset, and also determines the method(s) available to reset the PIN. One method is to
request that the RSA server generate the PIN. The other method is to allow the PGP
Universal Server administrator to manually enter a new PIN that conforms to the RSA
server policy for PINs.
1 Select the method for generating the new PIN.
Select Automatically Generate to have the RSA server generate the PIN. The
new PIN is displayed in the confirmation box.
Select Create Manually and type and confirm the new PIN to generate a PIN
Of your choice. A pin can be between 4 and 8 letters and digits.
To create a valid PIN, you must know the policy set in the RSA server for
choosing a new PIN (e.g. numeric only, alphanumeric, or no PIN).
Note: If only one method is allowed by your RSA server policy, then only one
choice will appear.
2 Click Continue to generate the PIN. A confirmation dialog is displayed. If you had
the PIN generated automatically, it is displayed here. If you entered one manually,
it is not shown here.
Note: A PGP Universal Server administrator cannot initiate a PIN reset, or flag an
account for reset. The PIN is entirely under the control of the RSA server and its
administrators.

24 Managing Administrator Accounts
Daily Status Email
Daily Status Email
Any administrator can receive a daily or immediate status email.
To send an administrator the daily status email, from the Administrator Settings dialog
box select Send Daily Status Email. To send a status report now, Send Status Now.
The status email provides information about the following:
Software version number.
Length of time the PGP Universal Server has been running.
Warnings. For example, that there is a software update available.
Data backup failures.
Security. For example, failed administration login attempts and excessive PGP
Universal Web Messenger login failures.
Statistics. For example, messages processed, encrypted, decrypted, in queue, and
pending email address exclusions.
License information.
Organization Certificate status.
Disk and CPU usage.
PGP Whole Disk Encryption login failures.

44 Protecting PGP Universal Server with
Ignition Keys
This section describes the Ignition Key feature, which protects your PGP Universal
Server in the event an unauthorized person gains physical control of the hardware.
Overview
Ignition Keys protect the data on your PGP Universal Server (your Organization Key,
internal and external user keys in SKM mode, and optionally PGP Universal Web
Messenger messages) in case an unauthorized person gains physical control of your
PGP Universal Server.
The Ignition Keys page shows the current status of the PGP Universal Server at the top
of the page: for example, Server is unlocked. It also lists all Ignition Keys currently
configured on the PGP Universal Server. If there are no Ignition Keys configured, There
are currently no ignition keys appears.
There are two types of Ignition Keys:
Hardware Token. When you insert a PKCS#11 token in the PGP Universal Server,
the PGP Universal Server detects it and allows you to use it as an Ignition Key. The
token must contain a single key, which must be protected by a PIN. You can cache
the token’s PIN so that you do not need to type the PIN at restart, just have the
token present.
Soft-Ignition Passphrase. A passphrase you specify protects the PGP Universal
Server.
If the PGP Universal Server is protected by an ignition key, the following information is
stored encrypted on the server:
PGP Universal Web Messenger passphrases. (If you do not have an Ignition Key,
PGP Universal Web Messenger passphrases are stored in the clear.)
PGP Universal Web Messenger messages, if you choose it. Enable this option on
the Services > Web Messenger page. See Configuring PGP Universal Web
Messenger (on page 281) for more information.
Internal and external user private (SKM) keys.
Whole Disk Recovery Tokens.
Organization key, public and private.
Cluster shared secrets.
Using the Ignition Key feature, you can provide several levels of protection for the
hardware hosting your PGP Universal Server:
No ignition key protection.
Soft-ignition key with passphrase-only protection (no hardware token).
Hardware ignition key with PIN cached.
Hardware ignition key with PIN uncached.

26 Protecting PGP Universal Server with Ignition Keys
Preparing Hardware Tokens to be Ignition Keys
You can create as many Ignition Keys as you like; any combination of hardware token
keys and soft-ignition passphrase keys. If you have multiple administrators, for
example, you might want to create separate Ignition Keys for each administrator.
If you add or remove an Ignition Key, the database begins encrypting or decrypting
immediately. Additional Ignition Keys cannot be added or removed while the database
is encrypting or decrypting.
If you configure one or more Ignition Keys, but they are not available when the PGP
Universal Server is restarted, the Organization Key can be used to unlock the server.
During normal operation, the PGP Universal Server is unlocked; it automatically locks
on restart if you have ignition keys enabled. You can manually lock a PGP Universal
Server only by rebooting it; you cannot use the administrative interface to lock it.
You can unlock a PGP Universal Server in any of the following ways:
By inserting a hardware token Ignition Key with a cached PIN. In this case, the
PGP Universal Server unlocks automatically.
By inserting a hardware token Ignition Key with an uncached PIN, then supplying
the PIN.
By supplying a configured soft-ignition passphrase.
Caution: Changing the Organization Key deletes Ignition Keys. If you have hard or
soft token Ignition Keys configured, regenerating the Organization Key deletes them.
Ignition Keys and Clustering
Ignition Keys are synchronized throughout the cluster; any Ignition Key can be used to
unlock any PGP Universal Server in the cluster. However, each PGP Universal Server in
the cluster must be unlocked independently on startup.
The cluster page shows which cluster members are locked.
Preparing Hardware Tokens to be Ignition Keys
Before you can add a hardware token Ignition Key, you must prepare the token.
Currently only the Athena ASEKey USB token (both 1024-bit and 2048-bit versions) can
be used as a hardware Ignition Key.
To use an Athena token as a hardware Ignition Key token with PGP Universal Server,
the Athena token must have a PGP keypair on it. The only way to get a PGP keypair
onto an Athena ASEKey token is using PGP Desktop.
The token must have one keypair and a PIN to be an Ignition Key.
To put a PGP keypair onto an Athena ASEKey token
1 Obtain an Athena ASEKey USB token that has been set up and properly initialized.
This is the only token that can be used as an Ignition Key with PGP Universal
Server 2.9 or later.
Install PGP Desktop 9.9 or later for Windows on a Windows system (if you do not
already have a Windows system with PGP Desktop installed).

27 Protecting PGP Universal Server with Ignition Keys
Preparing Hardware Tokens to be Ignition Keys
2 Install the Athena driver software 4.17 on the Windows system.
The driver software is available from Athena Smartcard Solutions
(www.athena-scs.com). The file name is ASECardCryptoToolkit417.msi (or
64-bit ASECardCryptoToolkit417x64.msi); it includes the ASEKey drivers
and the PKCS#11 library.
3 When PGP Desktop for Windows 9.9 or later and the Athena driver software are
installed, open PGP Desktop.
4 Insert the Athena ASEKey token in an available USB port on the Windows system.
You have two options for getting a PGP keypair onto your Athena ASEKey token:
Create a new PGP keypair directly on the token.
Use the Send To shortcut menu to copy an existing PGP keypair to the token.
5 To create a new PGP keypair on your Athena ASEKey token, select File > New PGP
Key. When the PGP Key Generation Assistant appears, select Generate Key on
Token, and then click Next.
6 On the Name and Email Assignment page, type a name and an email address (if
you plan on using this PGP keypair only as an Ignition Key for PGP Universal
Server, you can leave the Primary Email field empty; no email address on a keypair
means no messages are encrypted to the key nor can it be uploaded to the PGP
Global Directory. You are asked if you want to continue without an email address;
click Yes.). Click Next.
7 On the Passphrase Assignment page, type the PIN of your Athena ASEKey token
(which becomes the passphrase for the keypair); the default for Athena tokens is
eight 1s (11111111). Click Next.
8 PGP Desktop generates the key on the token. When complete, click Next.
9 On the PGP Global Directory Assistant page, click Skip so the public key is not sent
to the PGP Global Directory. When PGP Desktop reappears, click the Smart Card
Keys item in the PGP Keys Control box; the PGP keypair you just created should
appear on the right.
10 To copy an existing PGP keypair to your Athena ASEKey token, click the All Keys
item in the PGP Keys Control box. Right-click the keypair you want to send to the
token (it must be a 1024-bit or 2048-bit RSA keypair, not just a public key). Make
sure there is only one keypair in the token.
11 In the shortcut menu, select Send To > Smart Card (if Smart Card is grayed out,
the selected key does not meet the requirements to be on the token).
A warning message explains that the passphrase for the selected keypair is
changing to the PIN of the token; click OK.
12 Type the current passphrase for the selected keypair, then click OK.
13 Type the PIN of the Athena ASEKey token, then click OK.
The keypair is copied to the token.
14 As the default PIN for Athena tokens is publicly known, you need to change it
immediately.
The Athena ASEKey token now has a PGP keypair on it. It can be used as a
hardware Ignition Key with a PGP Universal Server.

28 Protecting PGP Universal Server with Ignition Keys
Configuring a Hardware Token Ignition Key
Configuring a Hardware Token Ignition Key
To add a hardware token Ignition Key
1 On the Ignition Keys page, click Add Ignition Key.
The Add Ignition Key dialog box box appears.
2 Insert the hardware token you want to use. The system reads the token’s
manufacturer and serial number.
3 In the Ignition Key Name field, type a name for the Ignition Key you are creating.
4 Select Hardware Token.
5 If you want to store the token’s PIN on the PGP Universal Server so that you do
not need to type it on restart, enable Cache PIN and type the PIN for the token you
are using.
Caching the token’s PIN can save time when you are restarting the PGP Universal
Server, but it also lowers security.
If you leave the token in the server and cache the PIN, the server unlocks
automatically at restart, for example in the event of a power failure. This option is
useful if the box is installed in a remote location, because you do not have to go
there to type the PIN. However, this option compromises the security of using an
Ignition Key.
6 Click Save.
The Ignition Keys page appears; the Ignition Key you just created appears on the
list.
Configuring a Soft-Ignition Passphrase Ignition Key
To add a soft-ignition passphrase Ignition Key
1 On the Ignition Keys page, click Add Ignition Key.
The Add Ignition Key dialog box appears.
2 In the Ignition Key Name field, type a name for the Ignition Key you are creating.
Soft-Ignition Passphrase is already selected.
3 In the Passphrase field, type a passphrase for this Ignition Key.
4 In the Confirm field, type the same passphrase again.
5 Click Save.
The Add Ignition Key dialog box disappears; the Ignition Key you just created
appears on the list.

29 Protecting PGP Universal Server with Ignition Keys
Deleting Ignition Keys
Deleting Ignition Keys
If you no longer need a specific Ignition Key, you can delete it.
To delete an Ignition Key
1 Click the icon in the Delete column of the Ignition Key you want to delete.
A confirmation dialog box appears, asking if you are sure you want to delete this
Ignition Key.
2 Click OK.
The Ignition Key is deleted.
Deleting the Ignition Key means all formerly protected data is no longer protected.

45 Backing Up and Restoring System and
User Data
This section describes PGP Universal Server’s backup and restore capabilities.
You can configure Backup options from the System > Backups page.
Overview
Your data is important. To help make sure that it does not get lost, PGP Universal
Server supports backing up your data in two ways: scheduled backups and on-demand
backups.
Backup files can be stored on the PGP Universal Server, or they can be automatically
sent via FTP or SCP to a location you specify. If your remote host is temporarily
unavailable, the backup file is stored on the PGP Universal Server until the host
becomes available. Make sure that you get the backup file from the host in binary
format, not ASCII.
Backups include all information necessary to restore the PGP Universal Server to its
exact condition when the backup was created, including proxy and policy settings, as
well as keys and user information. Symantec Corporation recommends making periodic
backups of all PGP Universal Servers. Each backup is a full backup.
The System Backups list shows both pending backups (if scheduled) and existing
backups.
PGP Universal Server also supports multiple ways of restoring data from a backup.
Caution: It is not possible to upload backups of 2GB or larger through the PGP
Universal Server web interface. Contact PGP Support for help restoring your data.
Caution: You cannot use FTP to back up large amounts of data. The backup will fail. If
you have 3 GB or more to back up, do not use FTP.
Creating Backups
PGP Universal Server supports two kinds of backups:
Scheduled backups. You set up a schedule so that backups of your data are made
automatically.
On-demand backups. You create a backup immediately.
Note: If a backup attempt fails, hover your mouse over the View Details link in the
Status column of the Backups page to see the error message for the failure.

32 Backing Up and Restoring System and User Data
Configuring the Backup Location
Scheduling Backups
To schedule automatic backups
1 On the System > System Backups page of the administrative interface, click
Backup Schedule.
The Backup Schedule dialog box appears.
2 Click Enable Scheduled Backups.
3 Select the boxes under the names of the days of the week you want backups
performed.
4 Specify a time for the backups to begin in the Start backups at field.
5 Click Save.
Performing On-Demand Backups
To create a backup right now, on the System > System Backups page of the
administrative interface, click Backup Now.
A backup of your data is performed immediately. When the backup is complete, it
displays in the Backups list.
Configuring the Backup Location
By default, backups are saved to the local disk on the PGP Universal Server. You can
specify another location to save backup files to instead. Backup files are then
automatically sent to that location via FTP or SCP.
If you change your backup location, you cannot restore from backups stored on the old
location, even though the backup files still appear listed on the System Backups page.
Caution: You cannot use FTP to back up large amounts of data. The backup will fail. If
you have 3 GB or more to back up, do not use FTP.
To configure the backup location
1 On the System > System Backups page of the administrative interface, click
Backup Location.
The Backup Location dialog box appears.
2 Choose Save backups on this PGP Universal Server, or to have backups saved to a
remote location, select Save backups to a remote location.
3 Select FTP, SCP Password Authentication, or SCP Keypair Authentication.
4 Type the backup location hostname in the Hostname field.

33 Backing Up and Restoring System and User Data
Restoring From a Backup
5 Type the port number in the Port field. The default FTP port is 21. The default SCP
port is 22.
6 Specify a Directory to which to save the backup. The default backup directory is
the FTP or SCP home directory for the username you choose.
7 Type a valid login name for the location you are saving the backup to in the
Username field.
8 Type a valid passphrase for the login name you specified in the Passphrase field.
9 If you chose SCP Keypair Authentication, import an SSHv2 Key by clicking the
Add icon. The Update SSH Key dialog box appears.
a If you do not have an SSH keypair, choose Generate and Import New
Key. Select the appropriate key size and type.
b If you already have an SSH keypair, choose Import Key File, import
your keypair, and type a passphrase.
c Click Import. The Update SSH Key dialog box disappears and the
keypair appears in the Backup Location dialog box.
10 Type a name for your backup files into the Backup Name field.
11 Specify if you want to Encrypt backups to the Organization Key. Backing up data
is much faster if you do not encrypt and compress the backup file, but your backup
files will be less secure and require more disk space.
12 Specify if you want to Enable file compression. Backup files are saved in binary
format normally, which is compressed, but you can choose this option to compress
the file further.
13 Specify how many backups you want to save at a time. Once you have saved that
number of backups, the newest backup overwrites the oldest backup file.
14 Click Save.
The Backup Location dialog box disappears.
You can download your SSH keypair and place the public part of the key onto another
server to use to validate logins on that server.
Restoring From a Backup
PGP Universal Server supports three ways of restoring data from an existing backup
file:
On-demand restore, where you restore a server that is up and running to the data
saved in an existing backup file. This is useful if data has been lost or corrupted
but the PGP Universal Server is still up and running.
Configuration restore, where you use the data in an existing backup file to
configure a replacement PGP Universal Server. This is useful when you need to
replace a PGP Universal Server because it is no longer functional.
Specific-version restore, where you have a backup created by a version of the PGP
Universal Server software and you need to restore that backup using a PGP
Universal Server running that same version.

34 Backing Up and Restoring System and User Data
Restoring From a Backup
Caution: You should not attempt to restore a backup taken on one system to a
different system (unless that system is intended as a replacement for the original
system). The network parameters from the original (backed-up) system will be
restored to the target system, which may cause IP address conflicts or other
problems. Contact PGP Support for help if you need to do this.
Restoring On-Demand
There are two ways to restore server data from a backup.
On the System Backups page, click the icon in the Restore column of the backup
from which you want to restore.
If you have a backup file on your system that is not on the list of backups but from
which you would like to restore, click Upload Backup, locate the backup file, and
then click Restore. The PGP Universal Server is restored from the backup file you
specified.
Caution: It is not possible to upload backups of 2GB or larger through the PGP
Universal Server web interface. Contact PGP Support for help restoring your data.
The PGP Universal Server is restored to the state when the backup was performed.
Restoring Configuration
You can do a configuration restore when you are configuring a new PGP Universal
Server or when you are re-installing PGP Universal Server.
Remember that you must have stored the backup in a location other than the PGP
Universal Server itself, if you want to restore the data after upgrading.
Begin by connecting to the new PGP Universal Server for the first time, which brings up
the Setup Assistant, as described in Setting Up the PGP Universal Server Restoring
from a backup restores everything configured, including proxy and policy settings, as
well as keys and user information. If you want to upgrade from a previous version and
restore your configuration, see the PGP Universal Server Upgrade Guide or the PGP
Universal Server Release Notes for your product version.
Note: If the PGP Universal Server software you are using for your configuration
restore is a different version than was used to make the backup file from which you
are restoring, you might have problems performing the restore. If this is the case, see
Restoring from a Different Version (on page 35). Older versions may not be able to be
restored directly on the most recent version of the PGP Universal Server.
To restore backed-up data during the initial configuration of a server
1 Access the Setup Assistant for the new server.
2 On the Welcome page, read the text, then click the Forward button.
The End User License Agreement page appears.
3 Read the text, click the I Agree button at the end, then click the Forward button.
The Setup Type page appears.
4 Select Restore, then click the Forward button.

35 Backing Up and Restoring System and User Data
Restoring From a Backup
The Import Organization Key page appears.
5 Copy your Organization Key and paste it into the box or import a file containing
the key, then click the Forward button.
The Upload Current Backup File page appears.
6 Click Choose File, select the backup file from which you want to restore, then click
OK.
When installation is complete, the Network Configuration Changed page appears
and the server restarts automatically.
You are redirected to the PGP Universal Server administrative interface.
The server is configured with the settings from the backup file you selected.
Restoring from a Different Version
Restoring from a backup might not work if the PGP Universal Server software you are
using to perform the restore is a different version than was used to make the backup
file.
Note: You can only restore backed-up data from version 2.7 or later. For information
on upgrading and restoring data, see the Release Notes for your product version.
If a version mismatch is preventing you from restoring directly from a backup, a
specific-version restore lets you restore from the backup file.
Remember that you must have stored the backup in a location other than the PGP
Universal Server itself, if you want to restore the data after reinstalling the software.
To perform a specific-version restore
1 Reinstall the PGP Universal Server software using the original CD or download
file.
2 Use the software update feature to update the PGP Universal Server software to
the same version as was used to create the backup file. For more information, see
Updating PGP Universal Server Software (on page 37).
3 On the System Backups page, click the icon in the Restore column of the backup
from which you want to restore.
If the backup file from which you want to restore is not on the list of backups, click
Upload Backup, locate the backup file, then click Restore. The PGP Universal
Server is restored from the backup file.

46 Updating PGP Universal Server
Software
This section describes how to manage software updates for your PGP Universal Server.
Caution: Test software updates on staging servers before implementing them in large
live production environments. This allows you to easily return to a previous version
if you run into problems.
Overview
The Software Updates page lets you control how and when updates to PGP Universal
Servers and PGP Universal Satellite are handled.
You do not need to backup and restore your data to perform an update. Backing up and
restoring your data is only necessary for major software upgrades, which are installed
using a DVD instead of the Software Updates page.
Symantec Corporation makes updates available periodically to provide support for new
security patches or new software releases by other vendors. Updates for PGP Universal
Satellite are also available this way. (New versions of PGP Universal Satellite install
over the existing version.)
Note: You cannot update the software of a PGP Universal Server unless it has been
licensed.
The file format for PGP Universal Server updates is .pup.
The list on the Software Updates page shows all updates available and not yet installed
for your PGP Universal Server. Updates have to be installed in the appropriate order, so
only the update that should be installed next has its install icon active (all other
updates have their install icon disabled).
The list shows the name of the update, the version, the size, the date of the last action
for that update, and the Install icon.
After the update installs, all users logged in during the update must log back in to the
server. All mail connections shut down during the installation, so any mail sent to the
PGP Universal Server during the short update period is rejected, and the mail client or
other sender resends the message.
Updates to the PGP Universal Server software are not propagated among cluster
members; all PGP Universal Servers in a cluster must update their own software.
Note: All members of a cluster use the same version and build of the PGP Universal
Server software. If you update the software of one member of a cluster, you must
update the software of all others as well. If you need to update to a new version from
a previous version, see the PGP Universal Server Upgrade Guide.

38 Updating PGP Universal Server Software
Inspecting Update Packages
Inspecting Update Packages
Click the name of the update you want to inspect. When the Update Information dialog
box appears, you can read the information about the update. Click OK to close the
dialog box.
If an update is available, you can obtain it from the <cn_long> web site and save it on
your hard drive.
The Upload Update Packages link lets you retrieve update packages saved on your hard
drive. You can upload the package, then install it as you would any other update
package.
1 Click Upload Update Packages to upload an update package from your hard drive.
The Upload Update dialog box appears.
2 Browse to find the file you want, then click Upload.
The update package appears on the list.
The Install icon lets you manually install an update. You must install them in the
order in which they were received, if you are installing more than one.
3 Click the icon in the Install column to manually install an update.
The text in the Date of Last Action column says “Currently Installing” while the
install is in progress.
After the update installs, log back into the server.
For more information on how to verify the success of your update, see the PGP
Universal Server Upgrade Guide.

47 Setting Network Interfaces
This section tells you about network settings and how to modify them. It also describes
certificates and tells you how to work with them.
Understanding the Network Settings
The Network Settings page lets you view and change the settings for the interfaces the
PGP Universal Server is using to connect to your network.
You can have more than one network interface. Each interface must have its own IP
address.
At installation and setup, PGP Universal Server attempts to fill in as much network
information as possible, so values for IP address, MAC ID, MTU, subnet mask, and other
settings may already appear when you open this page. By default the link speed is
determined by auto-negotiation. The default MTU is 1500.
Interface number. Numbered sequentially from the highest existing interface
number.
Physical adapter. The physical network cards on your hardware.
MAC ID. Specify the MAC address associated with each network interface. PGP
Universal Server prevents you from setting an invalid or broadcast MAC address.
You can use the same MAC address for all virtual interfaces associated with a
network adapter. You cannot use the same MAC address for different adapters.
Link Speed. Speed and duplex values together make up the link speed. PGP
Universal Server determines which combinations of speed and duplex are
appropriate for the hardware, and offers only those as options. You can also
choose auto-negotiation, where the network interface determines the appropriate
speed and duplex setting, but that does not always result in the best link speed.
MTU (Maximum Transmission Unit). Set this value to make the most efficient use
of the network. You can specify any valid MTU. Values lower than 500 can cause
inefficient network usage. MTU values of 64 or lower make the network adapter
unusable.
Interfaces belonging to the same physical adapter share the same link speed and MTU
value.
Changing the IP address, MAC ID, or MTU disconnects current network connections.
Changing network interface IP addresses and MAC IDs disconnects all current SSH
connections.
MAC ID, MTU, and Link Speed are not applicable to PGP Universal Server hosted on
VMWare. The ESX server controls the network settings.
You can also use the Network Settings page to manage the certificates your PGP
Universal Server uses.
If you want to change the network settings of any Primary or Secondary cluster
member, break up the cluster first, change the settings, and reestablish the cluster. See
Clustering and PGP Universal Web Messenger for information on clusters and network
settings.

40 Setting Network Interfaces
Changing Interface Settings
Changing Interface Settings
To change the settings of an interface
1 Select the interface whose settings you want to change from the Edit menu.
2 Establish the appropriate settings for the Physical Adapter (the physical network
cards on your hardware), MAC ID, Link Speed, MTU, IP Address, and Subnet
Mask fields.
3 Click Save.
Adding Interface Settings
To add an interface
1 Click the Add icon.
A new interface number appears in the Edit field; it is numbered sequentially from
the highest existing interface number.
2 Establish the appropriate settings for the Physical Adapter, MAC ID, Link Speed,
MTU, IP Address, and Subnet Mask fields.
3 Click Save.
The new interface is added.
Deleting Interface Settings
To delete an interface
1 Click the Delete icon to the right of the Edit field.
A confirmation dialog box appears.
Caution: You might need to reassign services assigned to the interface you are
trying to delete before you can delete the interface. A message appears, listing
which services need to be reassigned.
2 Click OK.

41 Setting Network Interfaces
Editing Global Network Settings
Editing Global Network Settings
Your PGP Universal Server needs to have a hostname and needs to know about domain
name servers (DNS) it can use. These were configured when you first accessed your
server using the Setup Assistant; existing settings can be changed here.
To edit the global network settings
1 In the Hostname field, type a fully qualified domain name for the server
(keys.example.com, for example).
2 In the DNS Servers box, remove the IP address of an existing DNS server or add
the IP address of a new DNS server.
3 In the Gateway box, type the IP for the network gateway.
4 Click Save.
Assigning a Certificate
When you assign a certificate to an interface, any service bound to that interface
automatically uses the certificate for SSL/TLS traffic.
To assign a certificate to an interface
1 In the Assigned Certificate section of the Network Settings page, click the
drop-down menu.
The SSL/TLS certificates that can be assigned to the interface shown at the top of
the Network Settings page appear.
2 Select the appropriate certificate, then click Save.
The certificate you selected is assigned to the interface.
For information about adding certificates to the list, see Working with Certificates
(on page 41).
Working with Certificates
To see the Certificates page, navigate to the Network Settings page (System > Network
in the administrative interface) and click the Certificates button in the lower left
corner of the page.
The Certificates page lets you view existing certificates, import existing certificates,
and generate self-signed certificates and new certificate signing requests.

42 Setting Network Interfaces
Working with Certificates
The Setup Assistant automatically creates a self-signed certificate for use with SSL/TLS
traffic. Because this certificate is self-signed, it might not be trusted by email or Web
browser clients. Specific behavior in response to this self-signed certificate depends on
the specific email or web browser client and its security settings.
Note: Symantec Corporation recommends you obtain a valid SSL/TLS certificate for
each of your servers from a reputable Certificate Authority. Not doing so causes
incompatibilities with some email clients and Web browsers.
You can also use pre-existing keys and certificates for SSL/TLS traffic (you must import
them first so that they appear on the Certificate page, then you can assign them using
the Certificate Assignment page).
Most commonly, these keys and certificates are used in conjunction with Apache Web
servers to provide secure communications between Web browsers and Web servers.
Importing an Existing Certificate
If you have an existing certificate you would like to assign to an interface, you must
import it first.
To import a certificate
1 Click Add Certificate on the Certificates page.
The New SSL/TLS Certificate dialog box appears.
2 Click Import.
The Import SSL/TLS Certificate dialog box appears.
3 Select Import Certificate File and use the Choose File button to locate the file of
the PKCS #12 certificate.
If you have a native Apache-style SSL/TLS certificate, you can paste both the
public and private portions of the certificate into the Import Certificate Block box
in any order.
4 If the certificate you are importing has a passphrase, type it in the Passphrase
field.
5 Click Import.
The Import SSL/TLS Certificate dialog box disappears. The certificate you just
added appears on the Certificate page. It can now be assigned to an interface.
Generating a Certificate Signing Request (CSR)
Services that the PGP Universal Server runs that use the SSL protocol require a
server-side SSL/TLS certificate, which includes the DNS name for the IP address on
which the service is running. To issue a certificate, the Certificate Authority needs
information found in a certificate signing request (CSR).
To generate a certificate signing request (CSR)
1 Click Add Certificate on the Certificates page.
The New SSL/TLS Certificate dialog box appears.

43 Setting Network Interfaces
Working with Certificates
2 Type the PGP Universal Server domain name in the Hostname field.
3 In the Key Type field, the only supported option is RSA.
4 In the Key Size field, select 1024, 1536, or 2048 from the drop-down menu.
5 In the Expiration field, select 6 months, 1 year, 2 years, 3 years, or 5 years from
the drop-down menu.
6 Type an email address in the Contact Email field.
7 Type your organization’s name in the Organization Name field.
8 Type your organization’s unit designation in the Organization Unit field.
9 Type a city or locality, as appropriate, in the City/Locality field.
10 Type a state or province, as appropriate, in the Province/State field. Do not
abbreviate the state or province name. For example, type “California,” not “CA.”
11 Type a country in the Country field.
12 To generate a self-signed certificate that you can use right away, click Generate
Self-signed after you have typed all the values; a new, self-signed certificate is
created, which you can then assign to an interface. Skip the rest of this procedure
because it does not apply.
13 To generate a certificate signing request (CSR), click Generate CSR. If you choose
this option, the certificate appears on the Certificate page labeled “Pending.”
When the certificate has been validated and returned by the Certificate Authority
(CA), add the certificate.
The New SSL/TLS Certificate dialog box disappears. The certificate signing
request (CSR) is created with the settings you specified.
The CSR dialog box appears, showing the certificate signing request (CSR).
14 Copy the contents of the CSR dialog box to a file, then click OK.
15 Submit this file to your CA.
The CA approves and sends the certificate back to you.
16 When the certificate signing request (CSR) has been approved, go to the
Certificates page, and add the certificate using the Import icon in the row for the
pending certificate (for details, see Adding a Pending Certificate (on page 43)).
Then assign the certificate to an interface using the Certificate Assignment page.
Adding a Pending Certificate
When you send a certificate signing request (CSR), the certificate appears on the
Certificate page listed as pending. When the certificate signing request (CSR) is
approved, add the pending certificate so that it can be assigned to an interface.
To add a pending certificate
1 Click the plus sign icon in the Import column of the pending certificate you are
adding.
The Add Certificate to Key dialog box appears.
2 Paste the validated certificate file that was sent to you by the CA into the
Certificate Block box.

44 Setting Network Interfaces
Working with Certificates
3 Click Save.
The Add Certificate to Key dialog box disappears. The certificate is ready for
inspection and can be assigned to an interface.
Inspecting a Certificate
To inspect the settings of a certificate
1 Click the name of the certificate whose settings you want to inspect.
The Certificate Info dialog box appears.
2 Inspect the information about the certificate you selected. You can click more to
see all the certificate data, which appears in a pop-up dialog box.
3 Click OK.
The Certificate Info dialog box disappears.
Exporting a Certificate
To export a certificate to a PKCS #12 file
1 Click the name of the certificate you want to export.
The Certificate Info dialog box appears.
2 Click Export.
The Export Key dialog box appears.
3 To export the certificate with just the public key, select Export.
4 To export the certificate with the private key, select Export Keypair and type a
passphrase to protect the exported key file, then click Export.
5 Specify a location you want to save the file to, then click Save.
The certificate is saved to a PKCS #12 file.
Deleting a Certificate
To delete a certificate
1 Click the Delete icon of the certificate you want to delete.
A confirmation dialog box appears.
2 Click OK.
The confirmation dialog box disappears. The certificate is deleted.

48 Clustering your PGP Universal Servers
Clustering allows multiple PGP Universal Servers in an organization to synchronize
with each other.
Overview
When you have two or more PGP Universal Servers operating in your organization, you
can configure them to synchronize with each other; this arrangement is called a
“cluster.” The benefits of clustering include lower overhead (spreading the system load
between the PGP Universal Servers in the cluster means greater throughput) and the
ability for email services to continue working even if one of the servers in the cluster
goes down.
Servers in a cluster can all keep data replicated from the other servers in the cluster:
users, keys, managed domains, and policies. For those servers running PGP Universal
Web Messenger they can also replicate Web Messenger data.
Cluster members interact with each other as peers. Every server in a cluster can serve
all types of requests, and any server can initiate persistent changes.
For the most part, cluster members all share the same database and configuration
information -- changes on one are replicated to all the other cluster members. However,
not all configuration settings are global, and it is possible to configure a cluster such
that not all servers in the cluster provide all services.
The following settings and data are considered global and are replicated to all servers in
the cluster:
Consumers (internal and external users, devices, and their public keys and
properties)
Group configurations, the group's public key, and consumer policies
Managed domains and mail settings (policies, dictionaries, archive servers,
message templates)
Directory synchronization settings
Organization keys and certificates
Ignition keys
Trusted keys
Configured keyservers
Web Messenger data, if replication is enabled and if the target server has a valid
license
Learn Mode
PGP Verified Directory data (though the service can be enabled or disabled on
individual servers).
The following settings are not replicated:
Server TLS/SSL certs

46 Clustering your PGP Universal Servers
Cluster Status
Mail routes
Mail proxies
As the administrator, you have some degree of control over what data is replicated to
which cluster members:
You can allow or prevent the private keys of internal users and groups from being
replicated to individual servers.
You can configure the Web Messenger service to run only on a subset of cluster
members, which limits Web Messenger data replication to only those servers
running Web Messenger. Further, you can configure Web Messenger data
replication so that it is replicated only to a subset of the eligible cluster members.
For example, if you have a cluster of four servers, three of which run Web
Messenger, you can configure Web Messenger replication so that each user's
mailbox is replicated to only one or two of the three eligible servers.
You can choose to set the order in which each cluster member searches LDAP
directories, or specify that all cluster members use the same search order.
Cluster members may reside either inside or outside an organization's inner firewall --
members outside the firewall are considered to reside in the DMZ. Cluster members in
the DMZ cannot initiate contact with systems on the internal network; therefore, in
order to add a cluster member that resides in the DMZ, a server on the internal network
must be configured first, and can then initiate a join, acting as the "sponsoring" server
for the server in the DMZ.
Cluster Status
On the System Overview page, you can determine the cluster status of a PGP Universal
Server, and detailed status is available on the Clustering page. For more details on the
clustering status available from the System Overview, see The System Overview Page
(on page 26). The Clustering page shows a list of the IP addresses or hostnames and
properties of all the servers in the cluster, including the server in which you are logged.
On the Clustering page, the following status information is available for each cluster
member:
If the server is not a member of a cluster, no member hostnames or IP addresses
appear on the clustering page, and the message This server is not participating in a
cluster. appears.
Is a member of a cluster, the cluster members are grouped based on their location:
Internal members
DMZ members
Internal members are cluster members that are located in the organization's
firewall, and DMZ members are located outside the firewall.
Hostname or IP address, the data replication rate, whether it stores private keys,
and which services it provides.
Logging in to other clusters by clicking Login column for the cluster member into
which you want to log in.
This opens an additional tab (or browser window) for the other member's
administrative interface. If you logged in to PGP Universal Server through
Symantec Protection Center, this feature is unavailable.

47 Clustering your PGP Universal Servers
Creating a Cluster
Pending, which appears on the PGP Universal Server you are trying to add after
you issue an Add Cluster Member request for another server.
Since your server is the sponsoring PGP Universal Server, you must click Contact
to initiate the join and replication of cluster data. When the contact has been
initiated, the status changes to Replicating. When data replication has finished,
this status is replaced by the replication rate for that server.
Unreachable, which appears in the Replication Rate column, means that the
other cluster member could not be reached from this cluster member. Reasons
why it could not be reached include a networking issue or that the other server is
down temporarily.
Creating a Cluster
You can create a cluster once you have a PGP Universal Server installed and running on
your network.
To create and add members to a cluster, you must:
1 Perform an Add Cluster Member operation from initial PGP Universal Server (the
sponsor) administrative interface. This adds the IP address or hostname of the
prospective cluster member to the list of pending cluster members.
2 Complete a Join request on the PGP Universal Server being added (the joining
server), which can be done in one of the following ways:
The joining server can be installed as a cluster member through the Setup
Assistant and specifying the sponsor server as the cluster it will be joining.
If the joining server is already installed, it can send a Join Cluster request
from its administrative interface.
3 From the sponsoring server, initiate contact with the joining server to start the
configuration and replication process.
The first time you do an Add Cluster Member request, a cluster is created that includes
both the sponsor and joining servers. Once the cluster exists, with at least two
members, any cluster member can act as a sponsor for a new cluster member.
To create a new cluster or to sponsor a cluster member
1 On the sponsoring PGP Universal Server, select System > Clustering.
2 Click Add Cluster Member.
3 Specify the hostname or IP address of the PGP Universal Server that is to be added
(the joining server).
4 If private keys should be replicated to the joining server, leave Host private keys
for Internal Users and Groups selected. If your private keys should not be
replicated to this server, you can deselect this checkbox after you select This
server is located in the DMZ.
If the Host private keys for Internal Users and Groups checkbox is selected, keys
are replicated as follows:
External user keys (public and private) generated on this node are replicated
to your internal and DMZ nodes.

48 Clustering your PGP Universal Servers
Creating a Cluster
Internal user public keys are replicated between internal nodes and between
your internal nodes to your DMZ nodes.
Internal user private keys are only replicated between your internal nodes.
DMZ nodes never host private keys.
Internal user keys (public and private) are not replicated from your DMZ
nodes to your internal nodes.
As a best practice, you should deselect Host private keys for Internal Users and
Consumer Groups if the node you are adding is located in the DMZ.
5 If the joining server is located in your corporate DMZ, select This server is located
in the DMZ.
6 Click Save.
Both your current server (the PGP Universal Server you are logged in to) and the
server you are adding appear on the Clustering page. A Contact button appears in
the entry for the joining server, which is designated as Pending.
7 After the joining server initiates its join request (see the next section) and is
waiting for contact, click Contact in the row for the joining server. This attempts
to contact the joining server and initiate the replication process.
The Contact function assumes that the joining server has already requested to join the
cluster, specifying the IP address or hostname of the server from which you did the Add
Cluster Member request (the sponsoring server).
Note: For the sponsoring server to successfully contact the joining server, the
hostname and IP address of the joining server must be resolvable via DNS. If not, the
sponsoring server will not be able to contact the joiner, and the join will not
succeed. If your cluster members do not have DNS resolvable hostnames, contact
Symantec Corporation Technical Support for help.
To join a stand alone PGP Universal Server to a cluster
If the joining server is already configured as a stand-alone PGP Universal Server, you
can generate the Join Cluster request from it's administrative interface:
1 On the joining PGP Universal Server, select System > Clustering in the
administrative interface.
Note: You can log in to the joining server's administrative interface by clicking
Login on the Clustering page.
2 Click Join Cluster.
After a warning, the joining server is put into a wait state until contact is initiated
from the sponsor server. You can cancel the join process by clicking Cancel.
3 When the sponsoring host has initiated contact, a replication status notice
appears with a progress bar that shows the progress of the data replication
process.
Settings from the sponsoring server are replicated to the joining server. If the
joining server was configured differently from the sponsoring server, except for
network settings, mail routes and proxies, and the server certificate, the
configuration is replaced by the sponsoring server's configuration.

49 Clustering your PGP Universal Servers
Deleting Cluster Members
Warning: After the join process starts, whether the process fails or succeeds, all data
is erased.
To join a server that has not yet been installed or configured
1 After installing the software, connect to the administrative interface to initiate the
Setup Assistant.
2 For the Setup Type, select Cluster Member.
3 Proceed through the initial Setup Assistant.
4 On the Join Cluster page, type the hostname or IP address of the sponsoring
cluster member.
This is the PGP Universal Server from which the Add Member request was
performed. After confirmation and a server reboot, the joining server is in a wait
state until contact is initiated from the sponsor server. You can cancel the join
process by clicking Cancel.
Note: You must wait until the Waiting dialog box appears before you initiate
contact from the sponsoring server.
5 After the sponsoring host has initiated contact, monitor the progress bar in the a
replication status notice.
6 When the replication has completed, log in to the cluster member's administrative
interface.
7 Configure the appropriate mail routes and mail proxies:
For the mail route, select Mail > Mail Routes and click Add Mail Route.
For detailed instructions, see Specifying Mail Routes (on page 161).
For the mail proxy, select Mail > Mail Proxies and click Add Proxy.
For detailed instructions, see Configuring Mail Proxies (on page 147).
Deleting Cluster Members
You can remove individual cluster members from a cluster without dismantling the
entire cluster (assuming the cluster consists of more than two members).
To delete a cluster member
1 Go to System > Clustering in the administrative interface of any of the cluster
members.
2 Click the Delete icon next to the cluster member you want to delete.
The cluster member is removed from the cluster list, and will operate as a single
server.
If there are only two nodes in a cluster, deleting either node dismantles the
cluster.

50 Clustering your PGP Universal Servers
Clustering and PGP Universal Web Messenger
Note: If you delete a node from a cluster while another cluster member is not
available, the deletion information is not communicated to the cluster member that
was unavailable. When the unavailable member comes back up, it will attempt to
communicate to the deleted member. To resolve this, log in to the out-of-sync
member, go to its System > Clustering page, and delete the member that is no longer
part of the cluster.
Clustering and PGP Universal Web Messenger
If you have multiple PGP Universal Servers configured as a cluster, you can choose how
PGP Universal Web Messenger messages are replicated between cluster members that
are running the Web Messenger service. There are three options for replication of Web
Messenger data:
You can have Web Messenger data replicated to all PGP Universal Servers that are
running the Web Messenger service.
You can have Web Messenger data replicated to a subset of the eligible servers in a
cluster. (Only servers running Web Messenger are eligible to host Web Messenger
data). For example, if you have four servers in a cluster running the Web
Messenger service, you can elect to have Web Messenger data replicated only to
two of the four servers, to reduce the amount of resources required for storage of
Web Messenger data.
You can elect not to replicate Web Messenger data at all. This is also known as
"home" server mode. In this mode each Web Messenger user can access his
messages only from the specific PGP Universal Server where his account resides.
You can configure Web Messenger data replication through the Options tab on the Edit
Web Messenger page (accessed from Services > Web Messenger > Edit...). The
replication settings for Web Messenger are global and affect all PGP Universal Servers
in the cluster that run PGP Universal Web Messenger.
PGP Universal Web Messenger data is not replicated to cluster members that are not
running the Web Messenger service.
For more information on configuring PGP Universal Web Messenger see Configuring
PGP Universal Web Messenger (on page 281).
Managing Settings for Cluster Members
Setting up a cluster is intended to spread the system load and provide a certain level of
data redundancy. Cluster members interact with each other as peers, and every server
in a cluster can serve all types of requests and initiate persistent changes. You
configure a cluster so that not all servers in the cluster provide all services. For
example, you can configure a cluster so that only selected servers store private keys or
store Web Messenger data.
Each server in the cluster can independently control selected functions:
Services, including enabling or disabling the following on a cluster member:
PGP Universal Web Messenger
keyserver functionality

51 Clustering your PGP Universal Servers
Changing Network Settings in Clusters
SNMP polling and traps
PGP Verified Directory
If PGP Universal Web Messenger or the keyserver functions are enabled, these
services will participate in the data replication functions of the cluster, as
determined by your clustering configuration.
Licensing
Each server must have a valid license.
Network settings
Backup and restore
Purging the key cache
PGP Verified Directory User key vetting, which can be enabled or disabled for each
cluster member.
The directory is shared and replicated.
Mail processing
Each cluster member must have its mail routes and proxies configured
individually. If the PGP Universal Server has been installed as a cluster member
through the Setup Assistant, this configuration must be done after the installation
is complete. However, the managed domains are global.
Many other functions are affected by the PGP Universal Server's membership in the
cluster. When a PGP Universal Server joins a cluster, data and configuration settings
are replicated to the joining server from the sponsoring server, and the changes
through the administrative interface on a cluster member affect all cluster members.
Changing Network Settings in Clusters
Changing the network settings of a cluster member prevents the servers from
communicating with each other.
To change network settings:
1 Remove the server from the cluster.
2 Change the network settings.
This causes the server to reboot.
3 Re-join the server to the cluster.
For more information on network settings, see Setting Network Interfaces (on page 39).
About Clustering Diagnostics
Clustering Diagnostics allows you to monitor data replication on the cluster members
in your cluster. For more information on clusters, see Clustering your PGP Universal
Servers (on page 45).

52 Clustering your PGP Universal Servers
About Clustering Diagnostics
Regularly monitor the data replication rates in your cluster to ensure that these rates
remain in synch between the cluster members. If the difference between the change IDs
is minimal, your cluster members are in synch. Symantec recommends that you set a
daily schedule to regularly monitor your cluster.
Note: To get your servers back in synch, contact Tech Support.
Data replication rates comprise the following information:
Change IDs
Change IDs represent the rate of replication between servers. When cluster
members synchronize their database against each other’s data, each cluster
member assigns a change ID to a group of new data before replicating them to
another cluster member. The difference between the change IDs increase or
decrease over time, so regular monitoring is important. Large differences in
change IDs means your servers are out of synch. Regular monitoring ensures that
you can get servers back in synch quickly.
Group IDs
Group IDs represent different groups of replicated data. Information from the
databases is not replicated in one large batch but in chunks. Each type of
replicated data is assigned a different group ID.
The group IDs are:
Keys, which are replicated to all servers.
Private keys can only be replicated between internal cluster members. For
more information, see step 4 in Creating a Cluster (on page 47).
Consumer Data, which are replicated to all servers without restrictions.
Web Messenger on <server-name>, which is data that is accessible through a
specific Web Messenger server and is replicated in one of the following ways:
High availability (HA), where data is replicated to all cluster members.
Selected replication, where the server determines to which cluster
members data is replicated.
Home server, where data is replicated only to the current server.
Each cluster member that has Web Messenger enabled appears as a separate row, but
Web Messenger may not appear on all cluster members. This is because the server
determines on which member Web Messenger is displayed.
Monitoring Data Replication in a Cluster
Before monitoring the replication rates for cluster members you want to compare, you
must log into a Universal Servers in a separate Web browser window for each cluster
member.. For example, if you have three cluster members, but you want to check the
replication rates of two cluster members, you must log into two instances of Universal
Server.
1 In each Web browser window, select System > Clustering.
2 On the Clustering page, in the Replication Status column, click the magnifying
glass icon for the cluster member from which the data originates.

53 Clustering your PGP Universal Servers
About Clustering Diagnostics
The Clustering Replication Status dialog box appears. The group IDs and change
IDs that represent the rate of replication for data to this cluster member are
displayed.
3 Repeat step 2 for each of the other browser windows.
4 In the Clustering Replication Status dialog boxes, compare the replication rates
from the member where the data originated to each of other the other cluster
members.
Here is an example that explains how Clustering Diagnostics works:
You have the following cluster members in a cluster:
Cluster member A
Cluster member B
Cluster member C
You want to compare the replication rate of data from cluster member A to cluster
members B and C.
To compare replication rates:
1 Open three Web browser windows.
2 Do the following in each browser window:
a Log into an instance of Universal Server.
b Select System > Clustering.
c In cluster member A, under the Replication Status column, click the
magnifying glass icon in member A for member A.
d Repeat steps b and c for the other two cluster members.
The Replication Status dialog box appears in each browser window.
e Read the message at the top of the dialog box.
In the dialog box for cluster member A, it should read:
You are looking at replication data on Cluster member A with data originating
from Cluster member A.
For cluster member B and cluster member C, the message should read:
You are looking at replication data on Cluster member B (or C) with data
originating from Cluster member A.
This means that for cluster members B and C, you are looking at the rate that data is
being replicated from cluster member A.
If the difference between the change IDs for cluster member A and cluster member B is
small, it means that the servers are in synch. However, if the differences between the
change IDs for cluster member A and cluster member C are large, it means that your
servers are not in synch. If the difference between change IDs does not decrease over
time, contact Technical Support.
Note: Symantec recommends that you set a daily schedule to regularly monitor your
cluster members.
Index
A
Additional Decryption Key (ADK)
and S/MIME messages • 53
defined • 53
deleting • 54
importing • 54
inspecting • 54
administrative interface
browser requirements • 25
defined • 11
icons • 29
logging in • 25
map of • 28
administrators
changing passphrases • 21
changing settings • 21
creating a new administrator • 19
deleting • 20
described • 17
importing SSH v2 keys • 20
inspecting settings • 21
Athena ASEKey • 26
B
backups
compressing and encrypting backup files • 32
defined • 11, 31
FTP • 32
location • 32
on demand • 32
restoring • 33
restoring from other software versions • 35
restoring on demand • 34
scheduling • 32
SCP • 32
best practices
mail policy • 96
bouncing messages • 121
browser requirements • 25
C
CAC • 119
certificate enrollment • 232
certificate request
generating a self-signed Organization Cert • 51
generating for SSL/TLS • 42
generating Organization Certificate Signin • 51
regenerating the Organization Key • 48
Certificate Revocation Lists • 44, 305
certificates
adding trusted certificates • 78
Additional Decryption Key (ADK) • 53
assigning to interfaces for SSL/TLS • 41
certificate, revoking internal user • 245
changing trusted certificate properties • 78
deleting the ADK • 54
deleting the Organization Certificate • 51
deleting the Verified Directory Key • 59
deleting trusted certificates • 79
exporting the Organization Certificate • 51
exporting the Organization Key • 48
External User Root Certificate • 56
External User Root Key • 55
for external users • 55, 56, 255
generating a self-signed Organization Certificate
• 51
generating Certificate Signing Request • 51
importing the ADK • 54
importing the Organization Certificate • 52
importing the Organization Key • 49
importing the Verified Directory Key • 58
importing, SSL/TLS • 42
inspecting the ADK • 54
inspecting the Organization Certificate • 50
inspecting the Organization Key • 48
inspecting the Verified Directory Key • 58
inspecting trusted certificates • 78
Organization Certificate • 50
Organization Key • 47
regenerating the Organization Key • 48
renweing the Organization Certificate • 52
searching trusted certificates • 79
trusted certificates • 77
trusted keys • 77
X.509, exporting internal users • 245
X.509, generating for external users • 255
client installations
binding to mail server • 178
MAPI • 178
Client Key Mode (CKM) • 41, 264
Clustering diagnostics, overview • 51, 52
clusters
and PGP Universal Web Messenger • 282
defined • 11
Ignition Key • 26
key cache • 143
network settings • 39, 51
Verified Directory Key • 58
command line access • 4, 20
Common Access Card. See CAC. • 119
D
default
keyservers • 137
dictionaries
adding • 132
defaults • 130
deleting • 134
dynamic • 129
editing • 133
evaluating expressions • 134
excluded addresses • 130
exporting • 134
literal entries • 129
mail policy • 86, 129
managed domains • 39, 130
overview • 129
pattern entries • 129
pending excluded addresses • 130, 132
searching • 134
static • 129
testing • 134
directory synchronization
described • 11
user group policies • 225
disabling services • 305, 15
Domino Directory • 201
E
email enrollment • 227
enabling services • 305, 15
encrypted email, enabling or disabling • 200
email, enabling encrypted • 200
enrollment
certificate • 232
email • 227
LDAP • 227
excluded addresses • 130, 132
excluded users
default policy • 170
dictionaries • 175
external users
adding new policies • 197
changing passphrases • 255
defined • 12, 252
deleting • 243
deleting keys of • 72
editing policies • 198
exporting PGP key of • 71
importing • 252
importing PGP Keyserver data • 252
inspecting settings • 254
joining SMSA • 124, 126
Key Not Found settings • 121
mail policy • 121
outside SMSA • 121
PDF Messenger Secure Reply • 122
PGP Verified Directory • 256, 301, 302
searching for • 243
self-managing security architecture (SMSA) • 121,
252
submitted keys, understanding • 301
viewing log entries • 244
X.509 certificate, generating • 255
F
FTP backup location • 32
G
gateway placement
defined • 11
mail policy • 85
proxies • 149
generating certificate signing request for SSL/TLS •
42
granular policy. See mail policy • 85
group keys, in PGP NetShare • 81
creating a new group • 82
managing • 83
groups
add group • 171
Adding consumers to groups • 172, 184, 242
apply consumer policy to group • 171
applying policy to groups • 170
create group PGP Desktop installer • 177
Everyone group • 170
excluded group • 170
group permissions • 174
remove consumers from groups • 173
searching for consumers • 176
set group membership • 175
Guarded Key Mode (GKM) • 41, 264
H
High Availability Mode • 282
I
icons • 29
Ignition Keys

57 Clustering your PGP Universal Servers
About Clustering Diagnostics
clusters • 26
deleting • 29
described • 25
encrypting stored PGP Universal Web Messenger
messages • 292, 25
hardware token, configuring • 28
preparing hardware token to be Ignition Key • 26
soft-ignition passphrase, configuring • 28
inspecting software updates • 38
interface settings
adding • 40
changing • 40
deleting • 40
internal placement
defined • 11
proxies • 148
internal users
adding users • 247, 301
creating PGP Desktop installers • 179
defined • 12
deleting • 243
deleting key reconstruction block • 249
deleting keys • 72
enrollment • 227
exporting PGP keys • 70
exporting X.509 certificate • 245
importing PGP Keyserver data • 246, 247
inspecting settings • 248
keyserver • 299
pending • 73, 246
PGP Desktop installations • 177
PGP Verified Directory • 73, 301, 302
revoking keys • 74
searching for • 243
submitted keys, approving • 73
submitted keys, understanding • 301
viewing log entries • 244
Whole Disk Recovery Tokens • 250
K
key cache
changing settings • 143
cluster • 143
mail policy • 87
mailflow key harvesting • 143
overview • 87, 143
PGP Desktop and S/MIME certificates • 143
purging the cache • 143
searching • 145
trusting keys • 144
viewing keys • 144
key mode • 264
changing key modes • 43, 268
choosing a key mode • 41
Client Key Mode (CKM) • 41, 264
Guarded Key Mode (GKM) • 41, 264
Server Client Key Mode (SCKM) • 41, 264
Server Key Mode (SKM) • 41, 264
Key Reconstruction Block
deleting • 249
described • 44
smart cards and tokens • 44
key recovery • 264
keys
adding trusted keys • 78
changing trusted key properties • 78
deleting trusted keys • 79
inspecting trusted keys • 78
internal users, deleting • 72
internal users, exporting • 70
key cache • 87, 143
preferred keyserver • 246, 299
searching trusted keys • 79
trusted keys • 77
keys.domain convention • 10
keyserver • 15
access control • 299
adding • 138
and PGP Verified Directory • 299, 301
configuring • 299
default keyservers • 137
deleting • 140
disabling service • 299
editing • 138
enabling service • 299, 15
internal user keys • 299
mail policy • 87, 100, 137
network configuration • 299
non-SSL/TLS service • 299
PGP Global Directory • 137
Public URL • 299
SSL/TLS service • 299
L
LDAP connection
testing • 237
LDAP enrollment • 227
Learn Mode
checking logs • 38
license requirement • 35
purpose of • 11, 37, 38
turning off • 38
turning on • 38
licensing
authorization • 35
described • 35
Learn Mode • 35
mail proxies • 35
PGP Universal Server • 35, 14
logging in • 25
Login screen • 25
Lotus Notes • 178, 201
Lotus Notes email client • 278
Lotus Notes full-text indexer • 201
M
mail policy
actions • 85, 106
actions card • 92
adding a keyserver • 87, 100
adding chains • 97
best practices • 96
chains • 85
changing keyserver search order • 100
changing policy settings • 127
condition statements • 85
conditions • 85, 102
conditions card • 90
default policy • 88
deleting chains • 98
described • 85
dictionaries • 86, 129
disabling rules • 100
editing chain settings • 96
enabling rules • 100
enforcing client policy • 88, 89, 179
exporting chains • 98
external users • 121
gateway placement • 85
groups • 85
internal users • 85
key cache • 87
Key Not Found settings • 121
key searches • 87, 100
keyservers • 137
managed domains • 39
managing policy chains • 96
migrating clusters • 150
outside of mailflow • 89
pre-installed policy • 88
printing chains • 99
reproducing proxy settings • 150
restore to default settings • 96
rule interface • 90
rules • 85
rules, valid processing order • 93
SMTP servers • 140
supporting legacy clients • 88
upgrading previous versions
recreating mail policy rules • 89
valid groups • 94
valid rules • 95
mail proxy
see proxies • 147
mail routes
adding • 162
automatic • 161
deleting • 163
editing • 162
purpose of • 161
malicious files, blocking • 102
managed domains
adding a domain • 40
deleting a domain • 40
described • 39
dictionaries • 39, 130
Gateway placement • 39
mail policy • 39
message templates
described • 165
editing • 167
PGP Universal Web Messenger message size • 165
messages
bouncing • 121
sending unencrypted • 124
MIBs, see SNMP • 11
migration
mail policy • 150
proxy settings • 150
N
Network Settings
adding interface settings • 40
changing in clusters • 39, 51
changing interface settings • 40
deleting interface settings • 40
editing global network settings • 41
O
Organization Certificate
defined • 50
deleting • 51
described • 11
expiration • 50
exporting • 51
generating Certificate Signing Reques • 51
generating self-signed • 51
importing • 52
inspecting • 50
renewing • 52
S/MIME encryption • 50
Organization Key
clusters • 47
defined • 47
described • 11, 47
exporting • 48
importing • 49
inspecting • 48
Public URL • 47, 299
regenerating • 48
P
permissions

59 Clustering your PGP Universal Servers
About Clustering Diagnostics
device permissions • 186 authenticating passwords to an external server •
group permissions • 174 282
user permissions • 242 changing mail policy settings • 127
PGP Admin configuring • 124
migrating preferences • 216 configuring the service • 292
PGP Desktop customizing • 284, 292
caching S/MIME certificates • 143 defined • 12
creating installers • 179 disabling service • 292, 15
licensed features • 35 enabling service • 292, 15
licensed options • 218 encrypting stored messages to Ignition Key • 292,
supporting legacy clients • 88 25
user group policies • 169, 177, 197 external users • 281
PGP Global Directory • 137 handling malformed messages • 88
PGP Keyserver migration locked accounts • 255, 292
external user keys • 252 message size limit • 165, 281
internal user keys • 246 network configuration • 126
PGP Admin preferences • 216 PDF Messenger • 122, 198
PGP NetShare SMSA • 281
group keys, using in • 81, 82, 83 storage quota • 165, 281
licensed features • 35 using • 126
licensed options • 218 PGP Verified Directory
PGP Portable and keyserver • 299, 301
number of disks created • 13 configuring • 302
PGP Universal Satellite • 178, 263 described • 301
configurations • 264 disabling service • 302, 15
described • 9, 263 enabling service • 302, 15
External CKM • 267 external user keys • 256
External SCKM • 267 external users • 256, 301, 302
External SKM • 266 internal users • 302
key mode • 264 limiting access • 302
supporting legacy clients • 88 Verified Directory Key • 58, 256, 301
technical information • 263 PGP Verified Directory users
PGP Universal Server deleting • 243
changes in 2.7 • 2 deleting PGP keys of • 73
concepts • 9 importing • 257
described • 1, 9 searching for • 243
downloading Release Notes • 14 viewing log entries • 244
product family • 2 PGP Whole Disk Encryption
PGP Universal Web Messenger administrator • 17
advanced centralized event logging • 27, 248, 3
licensed features • 35
licensed options • 218
Single Sign-On • 209
PKCS12 • 202
POP/IMAP proxy
internal placement • 148
ports • 21, 22
proxies
configuration • 151
gateway placement • 149
internal placement • 148
overview • 147
POP/IMAP, internal placement • 148
setting migration • 150
SMTP proxy, gateway placement • 149
SMTP, internal placement • 148
Public URL:adding, for keyserver
Public URL:on Organization Key
Public URL:on user keys
Public URL:on Organization Key
Public URL:on user keys
R
Release Notes • 14
reporting
described • 25
system data • 25
restoring
configuration during setup • 34
from backup • 33
from other software versions • 35
on demand • 34
root access • 20
S
S/MIME • 264
key recovery • 264
SCP backup location • 32
search
dictionaries • 134
groups • 176
internal users • 243
key cache • 145
PGP Verified Directory users • 71
system logs • 6
trusted keys and certificates • 79
self-managing security architecture (SMSA)
defined • 10
external users • 121, 252
sending messages unencrypted • 124
Server Client Key Mode (SCKM) • 41, 264
server hardware
restarting • 15
shutting down • 15
Server Key Mode (SKM) • 41, 264
server placement • 11
Setup Assistant
purpose of • 11
restoring from a server backup • 34
self-signed SSL/TLS certificate • 41
Single Sign-On • 209
smart card
CAC • 119
Ignition Key • 26
importing X.509 certificates • 198
Key Reconstruction Block • 44
key storage • 198
Athena ASEKey token • 26
Smart Trailer
configuring • 124
defined • 12
SMTP proxy
gateway placement • 149
internal placement • 148
SMTP server
adding • 140
deleting • 141
editing • 140
SMTP servers
mail policy • 140
SNMP
configuring trap service • 10
disabling service • 10, 15
downloading custom MIB file • 11
enabling polling • 10
enabling service • 10, 15
pollable data • 9
trap events • 9
software services
restarting • 15
shutting down • 15
software updates
inspecting • 38
SSL/TLS certificates
assigning to interfaces • 41
generating certificate signing request • 42
importing • 42
Setup Assistant, generating self-signed • 41
status email
daily • 24
immediate • 24
Symantec Protection Center • 18
system data
overview • 25
system graphs
CPU usage • 3
described • 3
message activity • 3
Whole Disk Encryption (system graphs) • 4
system logs
display types • 6
enabling remote syslog • 7
events logged • 5
exporting log files • 7
filtering the log view • 6
message types • 6
searching • 6
System Settings
downloading Release Notes • 14
Key Cache • 143
PGP Universal • 13
server power • 15
software services • 15
time • 13
T
TCP ports, open • 21
time, setting • 13
token
Key Reconstruction Block • 44
trusted keys and certificates

61 Clustering your PGP Universal Servers
About Clustering Diagnostics
adding • 78
deleting • 79
inspecting and changing properti • 78
inspecting properties • 78
searching • 79
U
UDP ports, open • 22
updating software
upgrading
user group policies
see software updates • 37
recreating mail policy rules • 89
replicate Excluded user setting • 170
add consumers to groups • 171
adding external user policies • 197
creating PGP Desktop installer • 177
directory synchronization • 225
editing external user policies • 198
V
Verified Directory Key
clusters • 58
deleting • 59
importing • 58
inspecting • 58
W
Whole Disk Recovery Tokens
administrator • 17
using • 250
X
X.509 certificates • 201
importing • 225
