ETI Solid State Lighting 90600120 Motion Sensor User Manual
Elec-Tech International Co., Ltd. Motion Sensor
User manual
THANK YOU
We appreciate the trust and confidence you have placed in Commercial Electric through the purchase of this motion
sensor module. We strive to continually create quality products designed to enhance your home. Visit us online to see
our full line of products available for your home improvement needs. Thank you for choosing Commercial Electric!
Warranty
WHAT IS COVERED
The manufacturer warrants this product to be free from defects in materials and workmanship for
a period of five (5) years from date of purchase. This warranty applies only to the original consumer
purchaser and only to products used in normal use and service. If this product is found to be defective,
the manufacturer’s only obligation, and your exclusive remedy, is the repair or replacement of the
product at the manufacturer’s discretion, provided that the product has not been damaged through
misuse, abuse, accident, modifications, alterations, neglect, or mishandling.
WHAT IS NOT COVERED
This warranty shall not apply to any product that is found to have been improperly installed, set-up, or
used in any way not in accordance with the instructions supplied with the product. This warranty shall
not apply to a failure of the product as a result of an accident, misuse, abuse, negligence, alteration,
faulty installation, or any other failure not relating to faulty material or workmanship. This warranty
shall not apply to the finish on any portion of the product, such as surface and/or weathering, as this is
considered normal wear and tear.
The manufacturer does not warrant and specifically disclaims any warranty, whether express or
implied, of fitness for a particular purpose, other than the warranty contained herein. The manufacturer
specifically disclaims any liability and shall not be liable for any consequential or incidental loss or
damage, including but not limited to any labor / expense costs involved in the replacement or repair of
said product.
Contact the Customer Service Team at 1-877-527-0313 or visit www.HomeDepot.com.
Questions, problems, missing parts? Before returning to the store,
call Commercial Electric Customer Service
8 a.m. - 7 p.m., EST, Monday - Friday, 9 a.m. - 6 p.m., EST, Saturday
1-877-527-0313
HOMEDEPOT.COM
USE AND CARE GUIDE
MOTION SENSOR MODULE
Item #1000000000
Model #90600120
Care and Cleaning
CAUTION: Before attempting to clean the sensor, disconnect the power to the fixture by turning the breaker
off or removing the fuse from the fuse box.
Clean the sensor with a soft, dry cloth.
Do not use cleaners with chemicals, solvents, or harsh abrasives.
Do not use liquid cleaner on the sensor.
Pre-Installation
Before beginning assembly, installation or operation of the product, make sure all parts are present.
Compare parts with the package contents list. If any part is missing or damaged, do not attempt to
assemble, install or operate the product. Contact customer service for replacement parts.
NOTE: Keep your receipt and these instructions for proof of purchase.
If you are unfamiliar with electrical installations, we recommend you contact a qualified electrician to do
the installation.
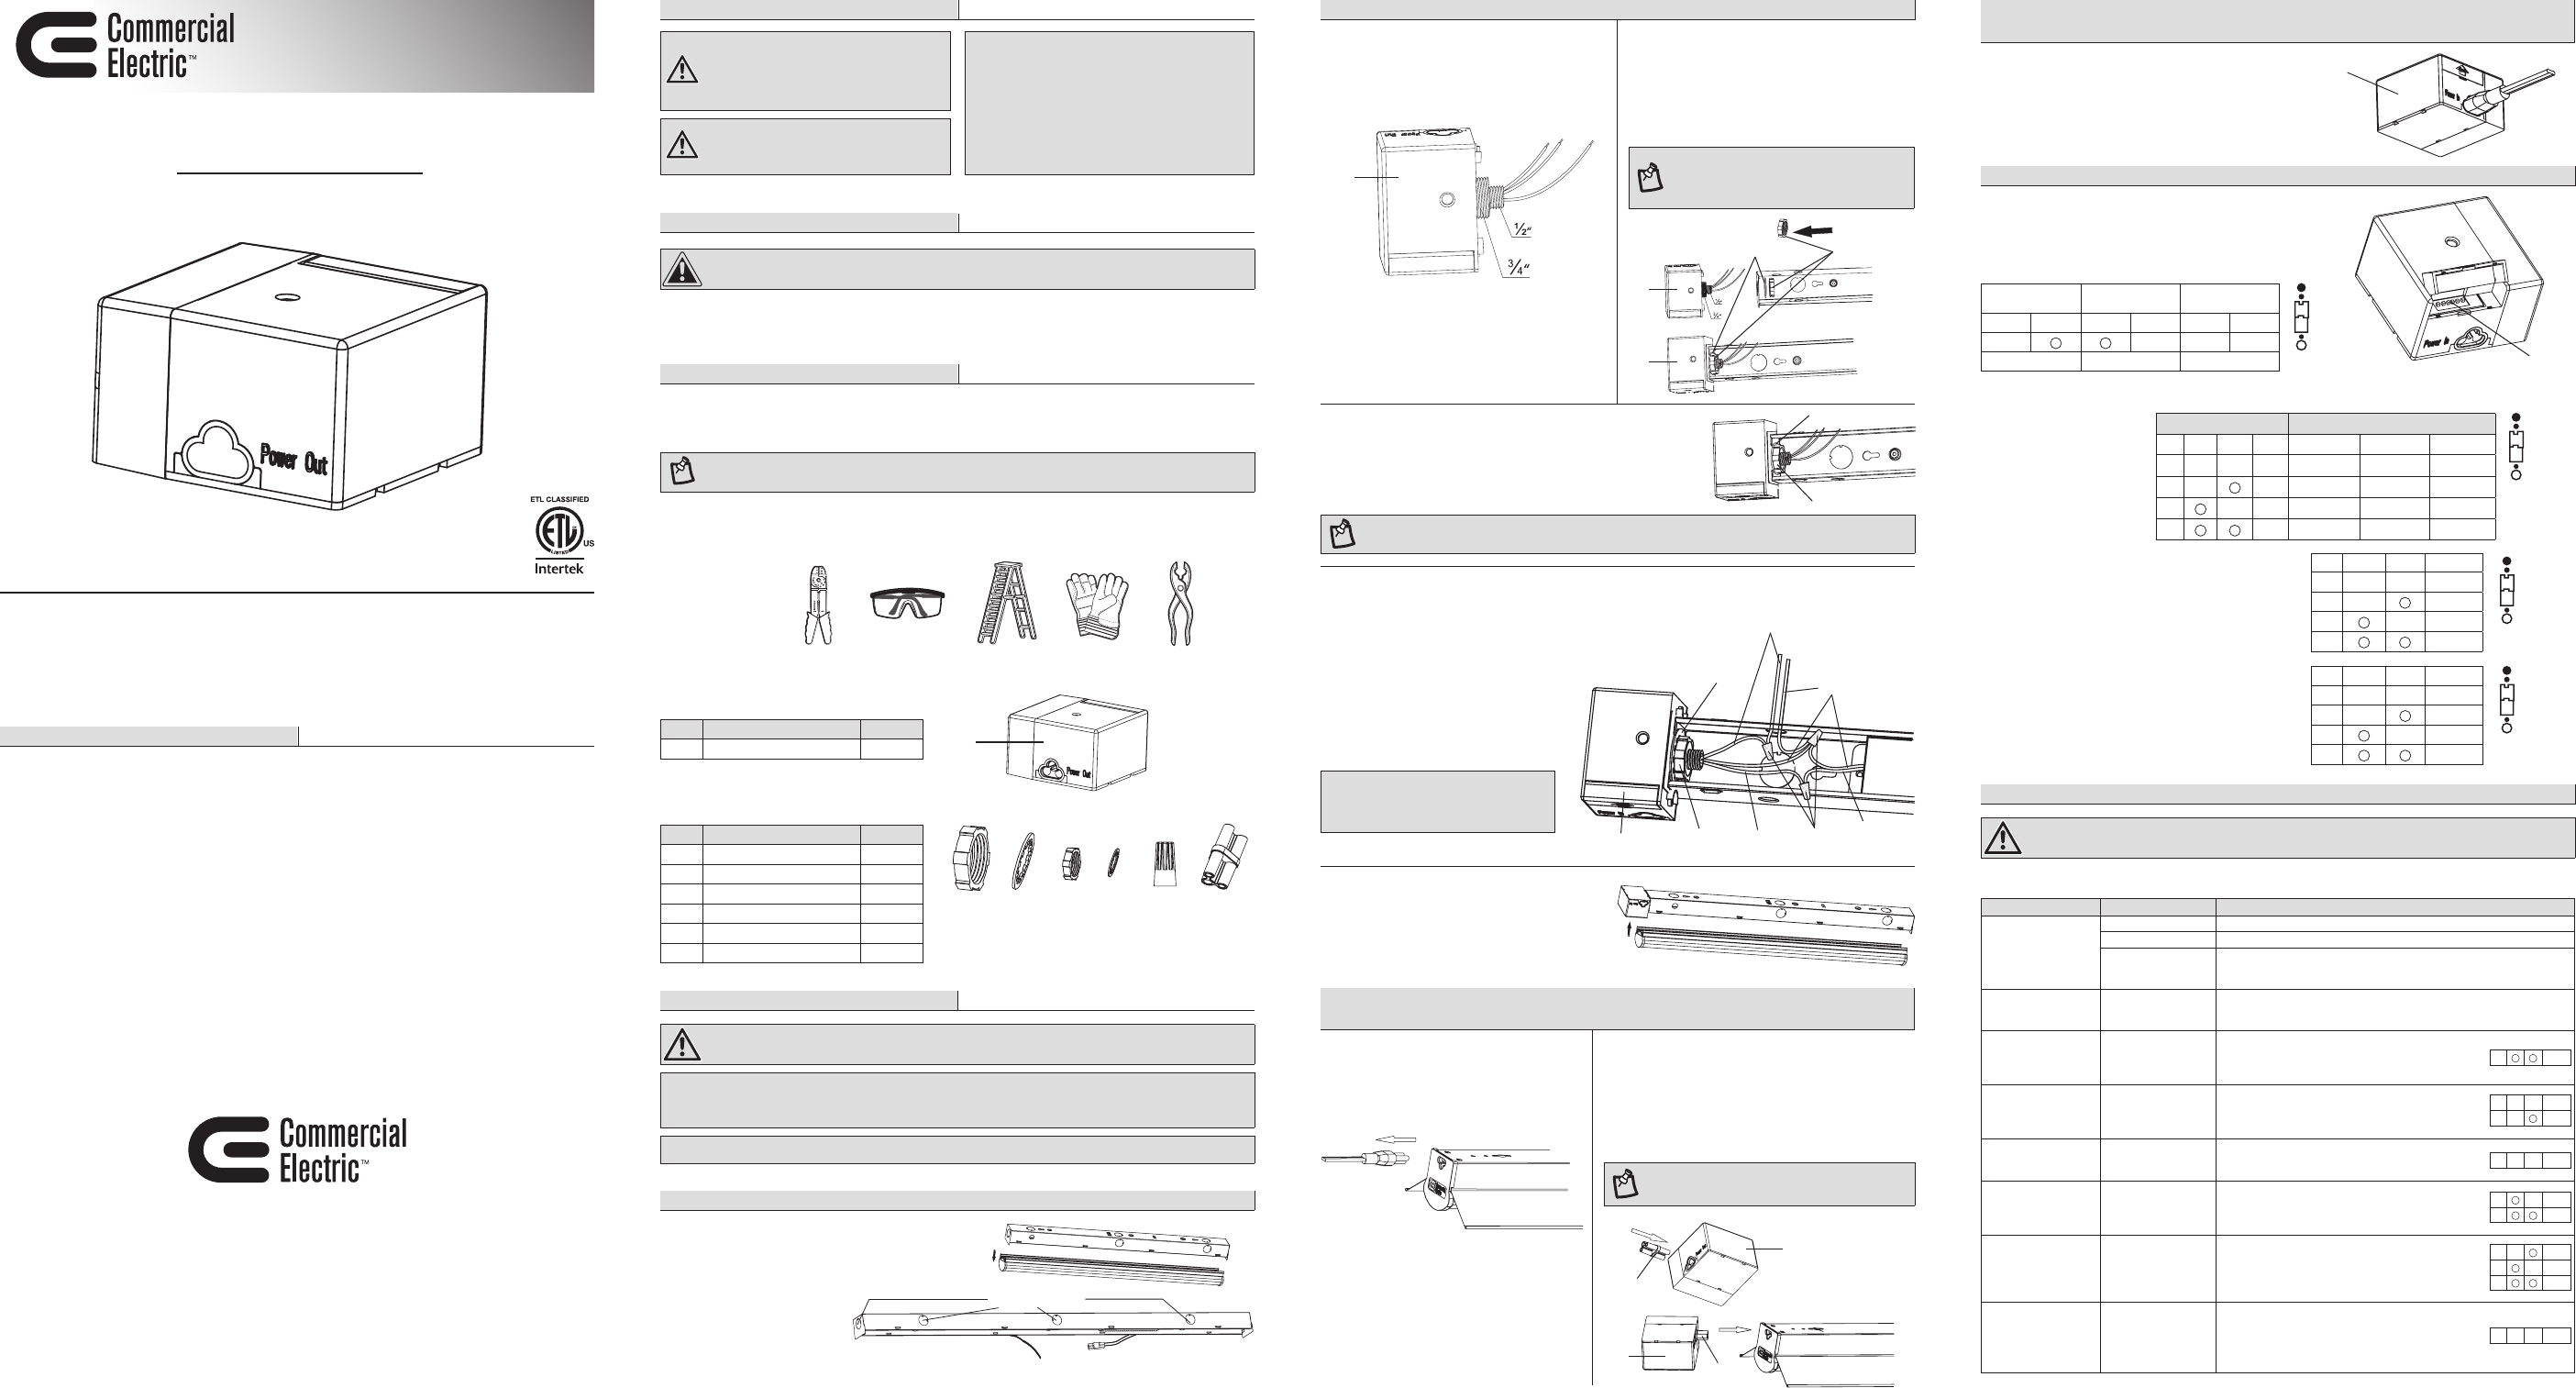
TOOLS REQUIRED
PACKAGE CONTENTS
Part Description Quantity
A Motion Sensor Module 1
HARDWARE INCLUDED
Part Description Quantity
AA Locknut (3/4 in.) 1
BB Lock Washer (3/4 in.) 1
CC Locknut (1/2 in.) 1
DD Lock Washer (1/2 in.) 1
EE Wire Connectors 3
FF Male to Male Connector 1
Installation
WARNING: RISK OF ELECTRIC SHOCK. Ensure the electricity to the wires you are working on is shut off.
Either remove the fuse or turn off the circuit breaker before beginning assembly or installation.
NOTICE: This motion sensor module works with direct hard wired LED and fluorescent light fixtures as well as
with selected Commercial Electric linkable plug-in LED light fixtures. Visit HomeDepot.com for a list of compatible
Commercial Electric linkable plug-in fixtures.
NOTICE: The motion sensor can be used for fixtures installed up to 18 feet high.
1Preparing the fixture
Remove the diffuser/lens to allow access to the
fixture wiring.
Remove the knockout
where you wish to mount
the sensor module.
Installing for Use with Direct Wired Fixtures
2Determining the knockout size
Choose the appropriate knockout size for
your fixture, either 3/4” or 1/2”, and use only
the locknut and lock washer for that size.
4Connecting the sensor module to the fixture
Insert the threaded end of the sensor module (A) completely
into the selected knockout hole and through the lock washer
(BB/DD). Then tighten the locknut (AA/CC) securely onto the
threaded end of the sensor module (A).
NOTE: For a firm fit, gently use pliers to tighten the locknut (AA/CC).
3Feeding the wires
Feed the electrical connection wires from
the sensor module (A) through the selected
knockout hole and then through the lock
washer (BB/DD) followed by the locknut
(AA/CC).
NOTE: The lock washer (BB or DD) and
locknut (AA or CC) should be on the inside of
the fixture wall with the wires coming through
the center of each.
5Making the electrical connections
Connect the hot (black) wire from the sensor (A) to the black
wire from the electrical box.
Connect the neutral (white) wire from the sensor (A) to the
white wire from the fixture and the white wire from the
electrical box.
Connect the secondary live wire
(red) from the sensor (A) to the live
wire (black) from the fixture.
Cover the three wire connections
using the wire connectors (EE).
NOTICE: The green wire from the fixture
should continue to be connected to the
grounding wire from the electrical box.
6Attaching the diffuser to the housing
Replace the diffuser/lens on the light fixture.
Restore power to the electrical box.
Turn on the light switch to activate the
fixture.
Installing for use with selected Commercial Electric linkable
plug-in LED light fixtures
1Preparing the fixture
Unplug the power cord from the
electrical outlet and from the light
fixture.
2Connecting the sensor module to the
fixture
Insert the small male-to-male connector (FF) to
the Power Out side of the sensor module (A).
Push the other end of the male-to-male
connector (FF) into the Power end of the fixture.
Make sure both connections fit securely.
NOTE: The sensor module (A) notes which end is
Power In and which is Power Out.
3Turning on the power
Insert the power cord firmly into the Power In end of
the sensor module (A).
Plug the power cord into the electrical outlet.
Turn on the light fixture.
Adjusting the Motion Sensor
Safety Information
WARNING: Carefully read and understand the
information given in this manual before beginning the
assembly and installation. Failure to do so could lead
to electric shock, fire, or other injuries which could be
hazardous or even fatal.
WARNING: Ensure the electricity to the wires you
are working on is shut off. Either remove the fuse or
turn off the circuit breaker.
FCC ID:XZH-90600120
NOTICE: This device complies with Part 15 of the FCC
Rules. Operation is subject to the following two conditions:
(1) This device may not cause harmful interference, and (2)
this device must accept any interference received, including
interference that may cause undesired operation.
CAUTION: Changes / modifications not approved by the
responsible party could void the user’s authority to operate
the equipment.
Wire Strippers Safety Goggles Ladder Gloves Pliers
Installing for Use with Direct Wired Fixtures (continued)
Troubleshooting
WARNING: Before doing any work on the motion sensor module, disconnect power to the light fixture.
Minor problems often can be fixed without the help of an electrician.
Installing for use with selected Commercial Electric linkable
plug-in LED light fixtures (continued)
AA
A
EE FF
Detection area
The motion detection
area can be adjusted
by selecting the
combination of settings
on the DIP switches
for the desired motion
detection area.
Detection Area Coverage By Install Height
DIP 1 DIP 2 10 ft. Ceiling 9 ft. Ceiling 8 ft. Ceiling
In n 100% 43 ft. x 10 ft. 40 ft. x 9 ft. 39 ft. x 8 ft.
II n75% 36 ft. x 10 ft. 34 ft. x 9 ft. 33 ft. x 8 ft.
III n50% 26 ft. x 10 ft. 23 ft. x 9 ft. 23 ft. x 8 ft.
IV 10% 7 ft. x 10 ft. 7 ft. x 9 ft. 7 ft. x 8 ft.
DIP 3 DIP 4
In n 5 sec.
II n90 sec.
III n5 min.
IV 15 min.
DIP 5 DIP 6
In n Disable
II n50 lux.
III n10 lux.
IV 2 lux.
I - 100%
II - 75%
III - 50%
IV - 10%
I - 5 sec.
II - 90 sec.
III - 5 min.
IV - 15 min.
I - Disable
II - 50 lux.
III - 10 lux.
IV - 2 lux.
Motion Sensor
Detection Area Hold-time Daylight Sensor
Light Level
DIP 1 DIP 2 DIP 3 DIP 4 DIP 5 DIP 6
nnnn
75% 5 minutes Disabled
The sensor comes from the factory with the following settings:
Detection Area: 75%
Hold Time: 5 Minutes
Daylight Sensor: Photocell Disabled
To adjust the settings, simply move the DIP switches to the settings you prefer.
Hold-time
Hold-time is the time period the light will remain
on after the person has left the detected area.
The amount of time the light remains on can be
adjusted by selecting the combination of settings
on the DIP switches for the desired hold-time.
Daylight sensor
The daylight threshold can be adjusted by
selecting the combination of settings on the DIP
switches to determine the level of darkness when
the light will turn on automatically.
Problem Possible Cause Solution
The fixture will not light. The power is off. Ensure the power supply and circuit breaker are both in the on position.
There is a bad connection. Check to ensure proper wire connections are made. Contact a qualified electrician.
The motion sensor module
is mounted higher than
18 ft.
Mount the fixture with the motion sensor module at 18 ft. or lower.
The fuse blows or the
circuit breaker trips when
the light is turned on.
The wires are crossed
or the power wire is
grounding out.
Check the wire connections.
Contact a qualified electrician or call Commercial Electric customer service
1-877-527-0313.
The light is not staying on
long enough after the last
motion is detected.
The hold-time setting
needs to be adjusted. Factory setting is a 5 minute hold time. To increase the time
period the light remains on, please refer to the Adjusting the
Motion Sensor section of the instruction manual to adjust the
4th dip switch to the preferred setting.
The light is staying on too
long after the last motion is
detected.
The hold-time setting
needs to be adjusted. Factory setting is a 5 minute hold time. To decrease the time
period the light remains on, please refer to the Adjusting the
Motion Sensor section of the instruction manual to adjust the
3rd and 4th dip switches to the preferred setting.
The motion sensor is not
detecting motion in a large
enough area.
The motion sensor needs
to be adjusted. To increase the motion detection area, please refer to the
Adjusting the Motion Sensor section of the instruction manual
to adjust the 1st and 2nd dip switches to the preferred setting.
The motion sensor is
detecting motion in too
large an area.
The motion sensor needs
to be adjusted. To decrease the motion detection area, please refer to the
Adjusting the Motion Sensor section of the instruction manual
to adjust the 1st and 2nd dip switches to the preferred setting.
The motion sensor is
detecting motion during
daylight hours and turning
the light on when I do not
need it on.
The daylight sensor needs
to be adjusted. Ensure the 5th and 6th dip switches are set to detect light at
the 50 lux, 10 lux or 2 lux settings. Please refer to the Adjusting
the Motion Sensor section of the instruction manual to adjust
the 5th and 6th dip switches to the preferred setting.
The motion sensor is not
detecting motion and
turning the light on during
daylight hours when I
need it to.
The daylight sensor needs
to be adjusted. Ensure the 5th and 6th dip switches are set at “disable”. This
will allow the light to turn on when motion is detected at any
light level. Please refer to the Adjusting the Motion Sensor
section of the instruction manual to adjust the 5th and 6th dip
switches to the preferred setting.
BB CC DD
Knockout holes
FF
A
AA/CC
AA/CC
IV 15 min.
In n 5 sec.
II n90 sec.
In n 100%
In n Disable
II n50 lux.
III n10 lux.
IV 2 lux.
III n50%
IV 10%
A
FCC ID: XZH-9050102016
A
BB/DD
A
DIP Switches
A
BB/DD
FF
A
A
Black
BB/DD
AA/CC Red EE
White
Black
GRACIAS
Apreciamos la confianza que ha puesto en Commercial Electric a través de la compra de este módulo detector de
movimiento. Nos esforzamos por crear constantemente productos diseñados para realzar su hogar. Visítenos en línea
para ver uestra gama completa de productos disponibles para sus necesidades al momento de hacer mejoras en su
hogar. ¡Muchas gracias por elegir a Commercial Electric!
Garantía
CUBRE
El fabricante garantiza que este aparato de iluminación no tendrá defectos en los materiales o en
la mano de obra por un periodo de cinco (5) años desde la fecha de compra. Esta garantía se aplica
sólo al comprador consumidor original y sólo a los productos que se utilizan y reciben servicio en
forma normal. Si se encuentra que este producto tiene defectos, la única obligación del fabricante, y
su exclusiva solución, es reparar o reemplazar el producto a su entera discreción, siempre y cuando
el producto no se haya dañado debido al mal uso, abuso, accidente, modificaciones, alteraciones,
negligencias o mal manejo del mismo.
NO CUBRE
Esta garantía no se aplica a ningún producto que se ha instalado incorrectamente, ajustado o utilizado
en una forma que no concuerde con las instrucciones suministradas junto con el producto. Esta garantía
no se aplicará a fallas del producto como resultado de un accidente, uso incorrecto, abuso, negligencia,
alteración, instalación defectuosa, o ninguna otra falla no relacionada con el material o mano de
obra defectuosa. Esta garantía no se aplica a la terminación en una parte del producto, tales como la
superficie o la acción de los elementos, ya que esto se considera desgaste normal.
El fabricante no garantiza y no acepta responsabilidad, ya sea, expresa o implícita de la idoneidad
para un fin particular, a excepción de la garantía contenida en el presente. El fabricante niega
específicamente responsabilidad y no será responsable por daños o pérdidas indirectas o
consecuenciales, e incluye pero no se limita a los costos de mano de obra, gastos relacionados en el
reemplazo o reparación de dicho producto.
Comuníquese con el equipo de Servicio al Cliente al 1-877-527-0313 o visite www.HomeDepot.com
¿Preguntas, problemas, piezas faltantes? Antes de devolver el producto a la tienda,
llame al Centro de Atención al Cliente de Commercial Electric en el horario de
8 a.m. – 7 p.m., Hora del Este de EE.UU., de lunes a viernes.
9 a.m. – 6 p.m., Hora del Este de EE.UU., sábados.
1-877-527-0313
HOMEDEPOT.COM
GUÍA DE USO Y CUIDADO
MÓDULO DETECTOR DE MOVIMIENTO
Artículo # 1000000000
Modelo # 90600120
Cuidado y limpieza
PRECAUCIÓN: Antes de limpiar el aparato, desconecte el suministro eléctrico hacia este apagando el
cortacircuitos o extrayendo el fusible de la caja de fusibles.
Limpie el detector con un paño suave y seco.
No utilice limpiadores con productos químicos, solventes o abrasivos.
No use producto de limpieza líquido sobre el detector.
Previo a la instalacíon
Antes de comenzar el armado, instalación u operación del producto, asegúrese de que tiene todas las
piezas. Compare las piezas con la lista de contenido. Si alguna de las piezas faltara o estuviera dañada,
no proceda a armar, instalar u operar el producto. Comuníquese con el servicio al cliente para consultar
por las piezas de reemplazo.
NOTA: Guarde el recibo de compra y estas instrucciones como prueba de compra.
Si no está familiarizado con las instalaciones eléctricas, le recomendamos que haga que un electricista
calificado se ocupe de la instalación.
HERRAMIENTAS NECESARIAS
CONTENIDO DEL PAQUETE
Pieza Descripción Cantidad
A Módulo detector de movimiento 1
MATERIALES INCLUIDOS
Pieza Descripción Cantidad
AA Contratuerca (3/4 pulg.) 1
BB Arandela de presión (3/4 pulg.) 1
CC Contratuerca (1/2 pulg.) 1
DD Arandela de presión (1/2 pulg.) 1
EE Conectores de cable 3
FF Conector macho a macho 1
Instalación
ADVERTENCIA: RIESGO DE DESCARGA ELÉCTRICA. Asegúrese de cortar el suministro eléctrico en los cables
con los que trabajará. O bien sacar el fusible o desconectar el disyuntor antes de empezar el montaje o instalación.
AVISO: Este módulo detector de movimiento funciona con lámparas LED y fluorescente con cableado permanente,
como también con lámparas LED enchufables y conectables Commercial Electric selectas. Visite HomeDepot.com
para obtener una lista de lámparas enchufables y conectables Commercial Electric compatibles.
AVISO: El detector de movimiento puede ser utilizado en lámparas hasta una altura de 5,5 m.
1Preparación de lámparas
Retire difusor/lente para permitir acceso al
cableado de la lámpara.
Retirer tapa desprendible
donde se desee montar
el módulo detector
Instalación para uso con lámparas con cableado permanente
2Determine el tamaño de la tapa
desprendible
Elige el tamaño de tapa desprendible
adecuado para su lámpara, ya sea de 3/4” o
1/2”, y use solo la contratuerca y la arandela
para ese tamaño.
4Conectar el módulo detector a la lámpara
Inserte completamente la punta roscada del módulo
detector (A) en el agujero de la tapa desprendible
seleccionado y a través de la arandela (BB/DD). Entonces
aprete fuerte la contratuerca (AA/CC) a la punta roscada del
módulo detector (A).
NOTA: Para que quede bien fuerte, user alicates para apretar la contratuerca (AA/CC).
3Echar cable
Eche cables eléctricos para el módulo
detector (A) a través del agujero de tapa
seleccionado y luego a través de la arandela
(BB/DD) seguido por la contratuerca (AA/CC).
NOTA: La arandela (BB o DD) y contratuerca
(AA o CC) deben quedar en el interior de la
lámpara con los cables entrando por el centro
de cada uno.
5Hacer las conexiones eléctricas
Conecte el cable fase (negro) del detector (A) al cable negro de
la caja eléctrica.
Conecte el cable neutro (blanco) del detector (A) con el cable
blanco de la lámpara y el cable blanco de la caja elèctrica.
Conecte el cable secundario bajo
tensión (rojo) del detector (A) con
el cable bajo tensión (negro) de la
lámpara.
Cubre las tres conexiones de cable
usando los conectores de cable
(EE).
AVISO: El cable verde de la lámpara
debe seguir conectado al cable de tierra
de la caja eléctrica.
6Acoplar difusor a caja
Volve a colocar el difusor/lente a la lámpara.
Reconecte suministro eléctrico.
Prende luz con interruptor para activar la
lámpara.
Instalación para uso con lámparas LED enchufables y conectables
Commercial Electric
1Preparar el accesorio
Desenchufe el cable eléctrico del
enchufe eléctrico y de la lámpara.
2Conectar el módulo detector a la lámpara
Inserte el pequeño conector macho a macho
(FF) al lado de salida de corriente del módulo
detector (A).
Empuje la otra punta del conector macho a
macho (FF) en el extremo de entrada de corriente
de la lámpara.
Asegurarse que ambas conexiones están
perfectamente encajadas.
NOTA: El módulo detector (A) indica cual es el
extremo de la entrada de corriente y cual la salida
de corriente.
3Prender la corriente
Inserte el cable eléctrico en el extremo de entrada de
corriente del módulo detector (A).
Enchufe el cable eléctrico en el enchufe eléctrico.
Prende la lámpara.
Ajustar el detector de movimiento
Informacíon sobre seguridad
ADVERTENCIA: Lea cuidadosamente y
comprenda la información incluida en este manual
antes de comenzar el armado e instalación. No
hacerlo puede provocar descarga eléctrica, incendio,
u otras lesiones que pueden ser graves or mortales.
ADVERTENCIA: Asegúrese de cortar el suministro
eléctrico en los cables con los que trabajará. Extraiga
los fusibles o apague el cortacircuitos.
FCC ID:XZH-90600120
AVISO: Este aparato cumple con Parte 15 del reglamento
FCC. Funcionamiento está sujeto a dos condiciones: (1)
Este aparato puede no causar interferencia perjudicial,
y (2) este aparato debe aceptar cualquier interferencia
recibida, incluyendo la interferencia que pueda causar un
funcionamiento no deseado.
ADVERTENCIA: Los cambios o modificaciones que no
estén expresamente aprobados por la parte responsable del
cumplimiento anulan la autoridad del usuario de operar el
equipo.
Alicates pelacables Gafas de seguridad Escalera Guantes Pliers
Instalación para uso con lámparas con cableado permanente (continuación)
Solución de problemas
ADVERTENCIA: Antes de realizar cualquier trabajo en la lámpara, desconecte la electricidad que la
alimenta.
Los problemas menores pueden arreglarse sin ayuda de un electricista.
Instalación para uso con lámparas LED enchufables y conectables
Commercial Electric (continuación)
AA
A
EE FF
Área de detección
El área de detección
de movimiento
puede ajustarse
seleccionando la
combinación de
configuraciones en los
interruptores DIP.
Área de detección Cobertura por altura de instalación
DIP 1 DIP 2
Cielorraso de
10 pies Cielorraso de
9 pies Cielorraso de
8 pies
In n 100%
43 pies x 10 pies 40 pies x 9 pies 39 pies x 8 pies
II n75%
36 pies x 10 pies 34 pies x 9 pies 33 pies x 8 pies
III n50%
26 pies x 10 pies 23 pies x 9 pies 23 pies x 8 pies
IV 10%
7 pies x 10 pies 7 pies x 9 pies 7 pies x 8 pies
DIP 3 DIP 4
In n 5 sec.
II n90 sec.
III n5 min.
IV 15 min.
DIP 5 DIP 6
In n
Desactivado
II n50 lux.
III n10 lux.
IV 2 lux.
I - 100%
II - 75%
III - 50%
IV - 10%
I - 5 sec.
II - 90 sec.
III - 5 min.
IV - 15 min.
I - Desactivado
II - 50 lux.
III - 10 lux.
IV - 2 lux.
Área de
detección del
sensor de
movimiento
Tiempo de
encendido
Nivel de luz del
sensor durante
el día
DIP 1 DIP 2 DIP 3 DIP 4 DIP 5 DIP 6
nnnn
75% 5 minutos Desactivado
El detector viene de fábrica con la siguiente configuración:
Área de detección: 75%
Tiempo de encendido: 5 minutos
Sensor de día: Fotocelda desactivada
Para ajustar la configuración, mueva los conmutadores DIP a su configuración preferida.
Tiempo de encendido
El tiempo de encendido es el periodo que la
luz permanece encendida después de que la
persona deja el área de detección. El periodo
que la luz permanece encendida puede ajustarse
seleccionando la combinación de opciones en el
interruptor DIP por el tiempo deseado.
Sensor de día
El límite de día puede ajustarse seleccionando la
combinación de opciones en los interruptores DIP
para determinar el nivel de oscuridad cuando la
luz se enciende automáticamente.
Problema Posible causa Medida correctiva
La lámpara no enciende. El suministro eléctrico
está cortado. Asegurarse que el suministro eléctrico y el disyuntor estan ambos en la posición “on”.
Mal conexión de cables. Revise para asegurarse de que se hayan conectado los cables de forma correcta. Comuníquese
con un electricista calificado.
El módulo detector de
movimiento se monta por
encima de 5,5 m.
Monte la lámpara con el módulo detector de movimiento a 5,5 m, o más abajo.
El fusible se quema o salta
el cortacircuitos cuando se
enciende la lámpara.
Los cables están cruzados
o el cable de suministro
eléctrico no está puesto a
tierra.
Verique las conexiones de los cables.
Comuníquese con un electricista calificado o llame al Centro de Atención al Cliente de
Commercial Electric 1-877-527-0313.
La luz no permanece
encendida el tiempo suficiente
después de la detección del
último movimiento.
Debe ajustarse la
configuración del tiempo
de encendido.
La configuración de fábrica es de un tiempo de encendido de 5 minutos.
Para aumentar el tiempo que la luz permanece encendida, consulte la
sección de ajustar el detector de movimiento del manual de instrucciones
para ajustar el 4° interruptor dip a su configuración preferida.
La luz permanece encendida
demasiado tiempo después de
la detección del último
movimiento.
Debe ajustarse la
configuración del tiempo
de encendido.
La configuración de fábrica es de un tiempo de encendido de 5 minutos.
Para reducir el tiempo que la luz permanece encendida, consulte la
sección de ajustar el detector de movimiento del manual de instrucciones
para ajustar el 3° y 4° conmutadores DIP a su configuración preferida.
El sensor no detecta
movimiento en una superficie
lo suficientemente grande.
Debe ajustarse el sensor
de movimiento. Para aumentar la superficie de detección de movimiento, consulte la
sección de ajustar el detector de movimiento del manual de instrucciones
para ajustar el 1° y 2° conmutadores DIP a su configuración preferida.
El sensor detecta movimiento
en una superficie demasiado
grande.
Debe ajustarse el sensor
de movimiento. Para reducir la superficie de detección de movimiento, consulte la sección
de ajustar el detector de movimiento del manual de instrucciones para
ajustar el 1° y 2° conmutadores DIP a su configuración preferida.
El sensor detecta movimiento
durante las horas del día y la
luz se enciende cuando no la
necesito.
Debe ajustarse el sensor
de luz de día. Asegúrese de que los interruptores 5to. y 6to. están configurados para
detectar luz a 50 lux, 10 lux o 2 lux. Consulte la sección de ajustar el
detector de movimiento del manual de instrucciones para ajustar el 5° y
6° conmutadores DIP a su configuración preferida.
El sensor no detecta
movimiento y la luz se
enciende cuando no la
necesito.
Debe ajustarse el sensor
de luz de día. Asegúrese de que los interruptores 5to. y 6to. están configurados en
“desactivado”. Esto permitirá que se encienda la luz cuando se detecta
movimiento en cualquier nivel de luz. Consulte la sección de ajustar el
detector de movimiento del manual de instrucciones para ajustar el 5° y
6° conmutadores DIP a su configuración preferida.
BB CC DD
Agujeros tapa desprendible
FF
A
AA/CC
AA/CC
IV 15 min.
In n 5 sec.
II n90 sec.
In n 100%
In n
Desactivado
II n50 lux.
III n10 lux.
IV 2 lux.
III n50%
IV 10%
A
FCC ID: XZH-9050102016
ABB/DD
A
Interruptores DIP
A
BB/DD
FF
A
A
Negro
BB/DD
AA/CC Rojo EE
Blanco
Negro
This device complies with Industry Canada’s licence-exempt RSSs. Operation is subject to the
following two conditions:
(1) This device may not cause interference; and
(2) This device must accept any interference, including interference that may cause undesired
operation of the device.
Cet appareil est conforme aux CNR exemptes de licence d'Industrie Canada . Son fonctionnement
est soumis aux deux conditions suivantes :
( 1 ) Ce dispositif ne peut causer d'interférences ; et
( 2 ) Ce dispositif doit accepter toute interférence , y compris les interférences qui peuvent causer
un mauvais fonctionnement de l'appareil.