Equinox Payments 010164-005A Point of Sale Device User Manual Exhibits hypercom cdpd
Equinox Payments LLC Point of Sale Device Exhibits hypercom cdpd
Contents
- 1. manual
- 2. updated users manual
manual

January 2000 APREL Project No.: HYPB-SMARTICE-CDPD-3365
Consulting
*
Research
*
Training
*
Certification
Testing Since 1981
Exhibit 9
SmartICE/CDPD
Point of Sale Device
Hypercom
FCC ID: NVA010164-005A
User’s Manual

SmartICE
Hardware and Installation Manual
Version 1.0
January 26, 2000
draft

Corporate Telephone 602.504.5000
Corporate Fax 602.866.5380
Corporate Website www.hypercom.com
Copyright 2000 by Hypercom Corporation.
Produced in the United States of America.
Hypercom Corporation
2851 West Kathleen Road
Phoenix, Arizona 85053
USA
Hypercom Corporation 2000. All rights reserved.
Hypercom and the Hyprcom logo are registered trademarks of Hypercom Corporation.
Hypercom has attempted throughout this publication to distinguish proprietary trademarks from descriptive terms by
following the capitalization style used by the manufacturer.
This document is proprietary to Hypercom Corporation and is intended solely for use by Hypercom customers. This
publication may not be reproduced or distributed for any purpose without the written permission of Hypercom
Corporation.
NOTICE
Hypercom Corporation reserves the right to make changes to the publication at any time and without notice. The
information furnished in this publication by Hypercom Corporation is believed to be accurate and reliable; however,
Hypercom Corporation assumes no responsibility for its use. Any error in identifying or reflecting any proprietary marks
or notices is inadvertent and unintentional.
This document applies to the
SmartICE Series Terminals.

FCC PART 15 REQUIREMENTS NOTICE
§ · This device must not be installed on coin-operated telephone lines or party lines.
· This device (equipment) complies with the requirements in Part 15 of FCC Rules for a Class B
computing device. Operation of this device (equipment) is subject to the following two conditions:
- This device (equipment) may not cause harmful interference, and
- This device must accept any interference received, including interference that may cause
undesired operation.
· If this device (equipment) is used in a residential area, it may cause unacceptable interference to
radio and TV reception requiring the operator to take whatever steps necessary to correct the
interference.
· Repair work on this device (equipment) must by done by Hypercom Corporation or an authorized
repair station.

940264-001 Hypercom Corporation v
Table of Contents
Introduction
Document Organization. . . . . . . . . . . . . . . . . . . . . . . . . . . . . . . . . . . . . . . . . . . . . . . . . . . . . . . . . . . . . . . . . . . . . xiii
Document Conventions . . . . . . . . . . . . . . . . . . . . . . . . . . . . . . . . . . . . . . . . . . . . . . . . . . . . . . . . . . . . . . . . . . . . . . . . . . xiii
Notes. . . . . . . . . . . . . . . . . . . . . . . . . . . . . . . . . . . . . . . . . . . . . . . . . . . . . . . . . . . . . . . . . . . . . . . . . . . . . . . . xiii
Component Names. . . . . . . . . . . . . . . . . . . . . . . . . . . . . . . . . . . . . . . . . . . . . . . . . . . . . . . . . . . . . . . . . . . . . . . . . . . . . xiii
Procedures. . . . . . . . . . . . . . . . . . . . . . . . . . . . . . . . . . . . . . . . . . . . . . . . . . . . . . . . . . . . . . . . . . . . . . . . . . . .xiv
Warning and Caution Messages . . . . . . . . . . . . . . . . . . . . . . . . . . . . . . . . . . . . . . . . . . . . . . . . . . . . . . . . . . . . . . . . . . xiv
Chapter 1 Equipment Information
Terminal Information. . . . . . . . . . . . . . . . . . . . . . . . . . . . . . . . . . . . . . . . . . . . . . . . . . . . . . . . . . . . . . . . . . . . . . . .1-1
Features. . . . . . . . . . . . . . . . . . . . . . . . . . . . . . . . . . . . . . . . . . . . . . . . . . . . . . . . . . . . . . . . . . . . . . . . . . . . . . . . . . . 1-2
Terminal Connection Ports . . . . . . . . . . . . . . . . . . . . . . . . . . . . . . . . . . . . . . . . . . . . . . . . . . . . . . . . . . . . . . . . . . . . 1-3
LAN Port . . . . . . . . . . . . . . . . . . . . . . . . . . . . . . . . . . . . . . . . . . . . . . . . . . . . . . . . . . . . . . . . . . . . . . . . . . . . 1-3
PIN Pad Port . . . . . . . . . . . . . . . . . . . . . . . . . . . . . . . . . . . . . . . . . . . . . . . . . . . . . . . . . . . . . . . . . . . . . . . . . 1-3
Power Port. . . . . . . . . . . . . . . . . . . . . . . . . . . . . . . . . . . . . . . . . . . . . . . . . . . . . . . . . . . . . . . . . . . . . . . . . . . . 1-3
Contrast Control Dial . . . . . . . . . . . . . . . . . . . . . . . . . . . . . . . . . . . . . . . . . . . . . . . . . . . . . . . . . . . . . . . . . . . . . . . . . . . . 1-3
Terminal Modem. . . . . . . . . . . . . . . . . . . . . . . . . . . . . . . . . . . . . . . . . . . . . . . . . . . . . . . . . . . . . . . . . . . . . . . . . . 1-3
Terminal Radio. . . . . . . . . . . . . . . . . . . . . . . . . . . . . . . . . . . . . . . . . . . . . . . . . . . . . . . . . . . . . . . . . . . . . . . . . . . . . 1-3
Terminal Power Adaptors. . . . . . . . . . . . . . . . . . . . . . . . . . . . . . . . . . . . . . . . . . . . . . . . . . . . . . . . . . . . . . . . . . . 1-3
Transactions and Functions . . . . . . . . . . . . . . . . . . . . . . . . . . . . . . . . . . . . . . . . . . . . . . . . . . . . . . . . . . . . . . . . . . . . 1-4
Terminal Initialization . . . . . . . . . . . . . . . . . . . . . . . . . . . . . . . . . . . . . . . . . . . . . . . . . . . . . . . . . . . . . . . . . . .1-4
Terminal Diagnostics . . . . . . . . . . . . . . . . . . . . . . . . . . . . . . . . . . . . . . . . . . . . . . . . . . . . . . . . . . . . . . . . . . .1-4
Application Program Changes . . . . . . . . . . . . . . . . . . . . . . . . . . . . . . . . . . . . . . . . . . . . . . . . . . . . . . . . . . . . . . . . . . .1-4
Financial Integrity . . . . . . . . . . . . . . . . . . . . . . . . . . . . . . . . . . . . . . . . . . . . . . . . . . . . . . . . . . . . . . . . . . . . . . . . . 1-5
Fast Response Times . . . . . . . . . . . . . . . . . . . . . . . . . . . . . . . . . . . . . . . . . . . . . . . . . . . . . . . . . . . . . . . . . . . . . . 1-5
Reduced Communications Costs. . . . . . . . . . . . . . . . . . . . . . . . . . . . . . . . . . . . . . . . . . . . . . . . . . . . . . . . . . . . . . . . . . . 1-5
Networking Efficiency . . . . . . . . . . . . . . . . . . . . . . . . . . . . . . . . . . . . . . . . . . . . . . . . . . . . . . . . . . . . . . . . . . . . . . . 1-6
Term-Master . . . . . . . . . . . . . . . . . . . . . . . . . . . . . . . . . . . . . . . . . . . . . . . . . . . . . . . . . . . . . . . . . . . . . . . . . . . . .1-6

vi SmartICE Hardware and Installation Manual 940264-001
Chapter 2 Equipment Installation
Installing the SmartICE Terminal . . . . . . . . . . . . . . . . . . . . . . . . . . . . . . . . . . . . . . . . . . . . . . . . . . . . . . . . . . . . . . . . . . . . . 2-1
Turning on the Terminal. . . . . . . . . . . . . . . . . . . . . . . . . . . . . . . . . . . . . . . . . . . . . . . . . . . . . . . . . . . . . . . . . . . 2-3
Installing the SmartICE Paper Roll. . . . . . . . .. . . . . . . . . . . . . . . . . . . . . . . . . . . . . . . . . . . . . . . . . . . . . . . . . 2-4
Installing an External PIN Pad . . . . . . . . . . . . . . . . . . . . . . . . . . . . . . . . . . . . . . . . . . . . . . . . . . . . . . . . . . . . 2-4
Accessing the Battery Pack . . . . . . . . . . . . . . . . . . . . . . . . . . . . . . . . . . . . . . . . . . . . . . . . . . . . . . . . . . . . . . 2-5
Adjusting the Display Contrast. . . . . . . . . . . . . . . . . . . . . . . . . . . . . . . . . . . . . . . . . . . . . . . . . . . . . . . . . . . . . . . 2-6

940264-001 Hypercom Corporation vii

940264-001 Hypercom Corporation ix
List of Figures
Chapter 1 Equipment Information
SmartICE terminal . . . . . . . . . . . . . . . . . . . . . . . . . . . . . . . . . . . . . . . . . . . . . . . . . . . . . . . . . . . . . .1-2
Chapter 2 Equipment Installation
SmartICE under panel connections. . . . . . . . . . . . . . . . . . . . . . . . . . . . . . . . . . . . . . . . . . . . . . . . . .2-2
SmartICE side view . . . . . . . . . . . . . . . . . . . . . . . . . . . . . . . . . . . . . . . . . . . . . . . . . . . . . . . . . . . . .2-6

940264-001 Hypercom Corporation xiii
Introduction
This manual,
SmartICE Hardware and Installation Manual
, is a comprehensive guide to working
with the Hypercom SmartICE Terminal.
Document Organization
This book is designed to provide you with information relevant to Hypercom equipment. This
book is divided into two chapters:
Chapter 1 Equipment Information: describes the SmartICE terminal in detail
Chapter 2 Equipment Installation: describes how to install the SmartICE terminal
Document Conventions
This manual contains the following special terms and style conventions.
Notes
Notes are indented for emphasis, as follows:
NOTE: A note contains neutral or positive information supplementing the main text. It is often
information that applies only to special cases.
Component Names
This manual uses special bold text formatting to highlight terminal key names and field
description names, as follows:
Manually enter the card account number and press Enter.
The Surcharge field option increments the total purchase amount by the value set in Term-Master.
Introduction
xiv SmartICE Hardware and Installation Manual 940264-001
Procedures
Procedures: Numbered procedures have a special graphic appearing in the margin of the text.
The words
Step-by-Step
also appear in bold at the beginning of the procedure. An example of
procedure formatting follows.
Step-by-Step
To perform a procedure:
1. Follow the steps outlined in the procedure.
2. Each procedure has at least two steps.
Warning and Caution Messages
When you see a Warning message or Caution message, read it promptly and carefully before
proceeding further. The format of these messages is shown in the following examples.
WARNING
Warnings provide information that is essential to the safety of the user, the equipment, or both. Failure
to do as instructed may result in physical damage.
CAUTION
A caution advises users that a negative result such as a loss of data may occur if they do not follow the
instructions provided.

CHAPTER 1
Equipment Information
This chapter provides an overview of the Hypercom SmartICE terminal. Included are the
features and benefits of the devise.
Terminal Information
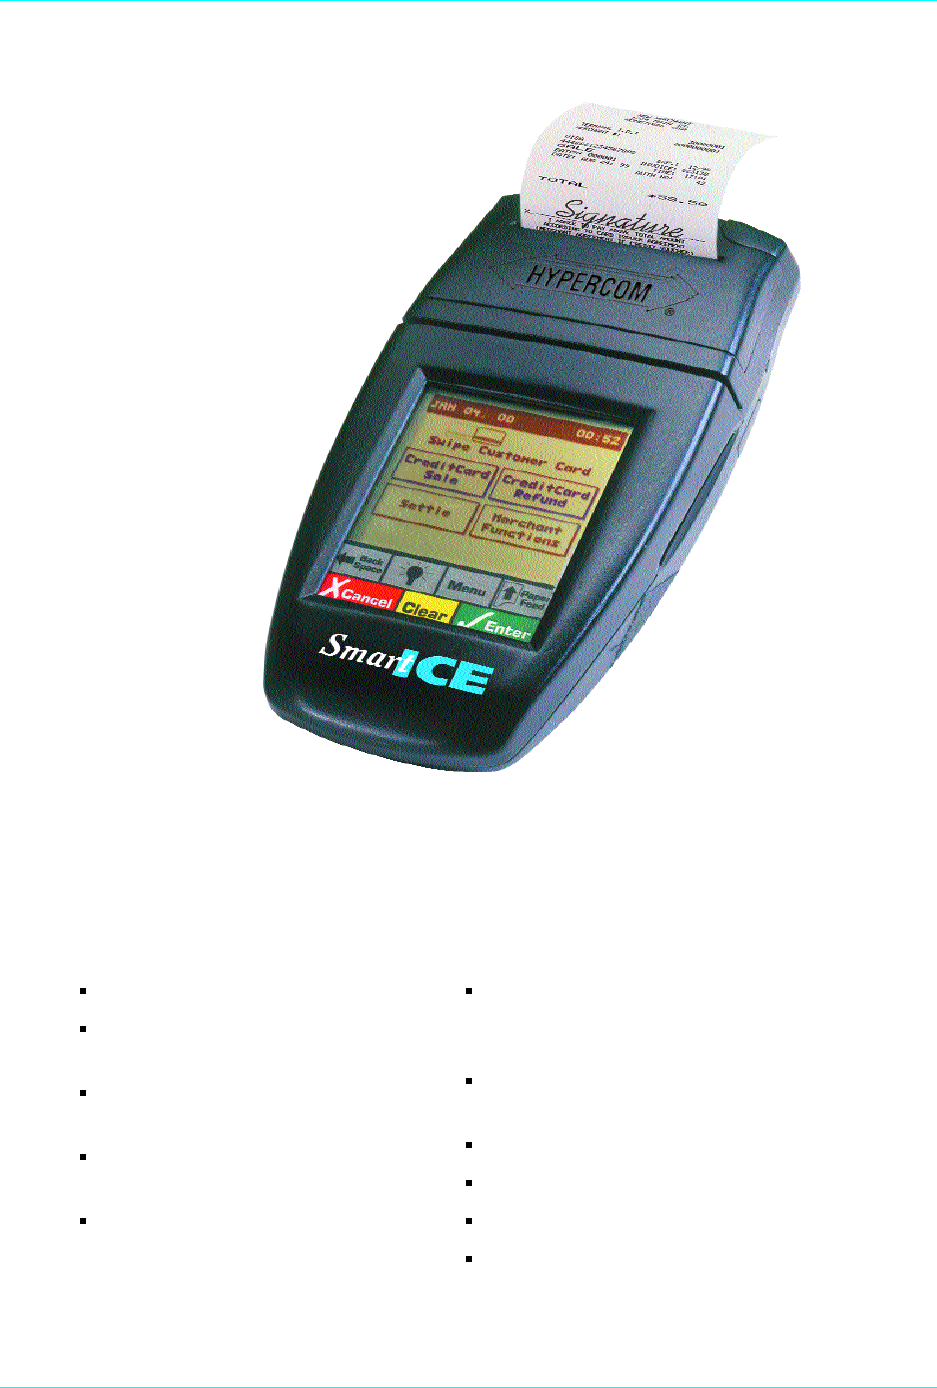
The Hypercom SmartICE terminal is a fully functional terminal that supports draft capture, check
verification and guarantee, authorization, and debit.
When communication with the host is interrupted, the terminals support offline transaction
capture. These transactions are then communicated to the host before settlement each day.
At settlement time, all terminal totals are matched with host totals. In the rare instance of
non-matching totals, automatic batch uploading allows accurate matching of terminal and host
transaction details, and provides rapid automated arbitration and balancing.
Settlement functions are either password protected for manual activation or are handled
automatically at a time pre-set to meet merchant needs.
The SmartICE terminal provides application-level statistical and diagnostic information to the
host at the end of each settlement period. This information enables the network operator or
processor to be actively involved in maintenance and service.
For software maintenance, the Hypercom SmartICE terminal uses application downloading from
the Hypercom PC-based Term-Master, terminal-to-terminal loading (fast loading), or loading
from the processing host.
The Hypercom Term-Master software manages the SmartICE terminal. Term-Master is a PC
application that can store, retrieve, update, and transmit a custom configuration for any terminal
in a customer terminal population. Term-Master also handles terminal software loading using an
optional dial-up request, remote diagnostics, and retrieval of terminal operation statistics.
For initial configuration, the user enters terminal-specific information using Term-Master before
the terminal goes online for full initialization of operating parameters from the processing host.
Chapter 1
1-2 SmartICE Hardware and Installation Manual 940264-001
Figure 1-1. SmartICE terminal
Features
Integrated thermal printer
256K and 512K memory,
optional 1 MB available
Integrated PIN and signature
capture pads
Optional dial, LAN, or leased-
line operation
Optional smart card support
High-contrast 160 x 160 FSTN
display with integrated 12-bit
resolution
Full track 1 & 2 simultaneous card
reader
Multi-host application support
Multi-tasking operating system
Electronic receipt capture
On-screen advertising available

Equipment Information
940264-001 Hypercom Corporation 1-3
Terminal Connection Ports
The following is a description of the ports on the SmartICE terminal.
LAN Port
The RS485 LAN port allows up to 16 terminals to be installed in environments using the
Hypercom MiniNAC-II, NAC-1A, or NAC-6A LAN controller.
PIN Pad Port
The PIN pad port supports a range of PIN pads including Hypercom Models S7, S7-C, and S8.
PIN encryption is according to ANSI X 9.8. The capability to generate ANSI X 9.9 Message
Authentication Code (MAC) is optional. The PIN pad port supports multiple master and working
keys.
Power Port
The power port supports two types of Hypercom power packs. The Linear power pack is used
within the United States of America. The Switcher power pack is used outside of the United
States.
Contrast Control Dial
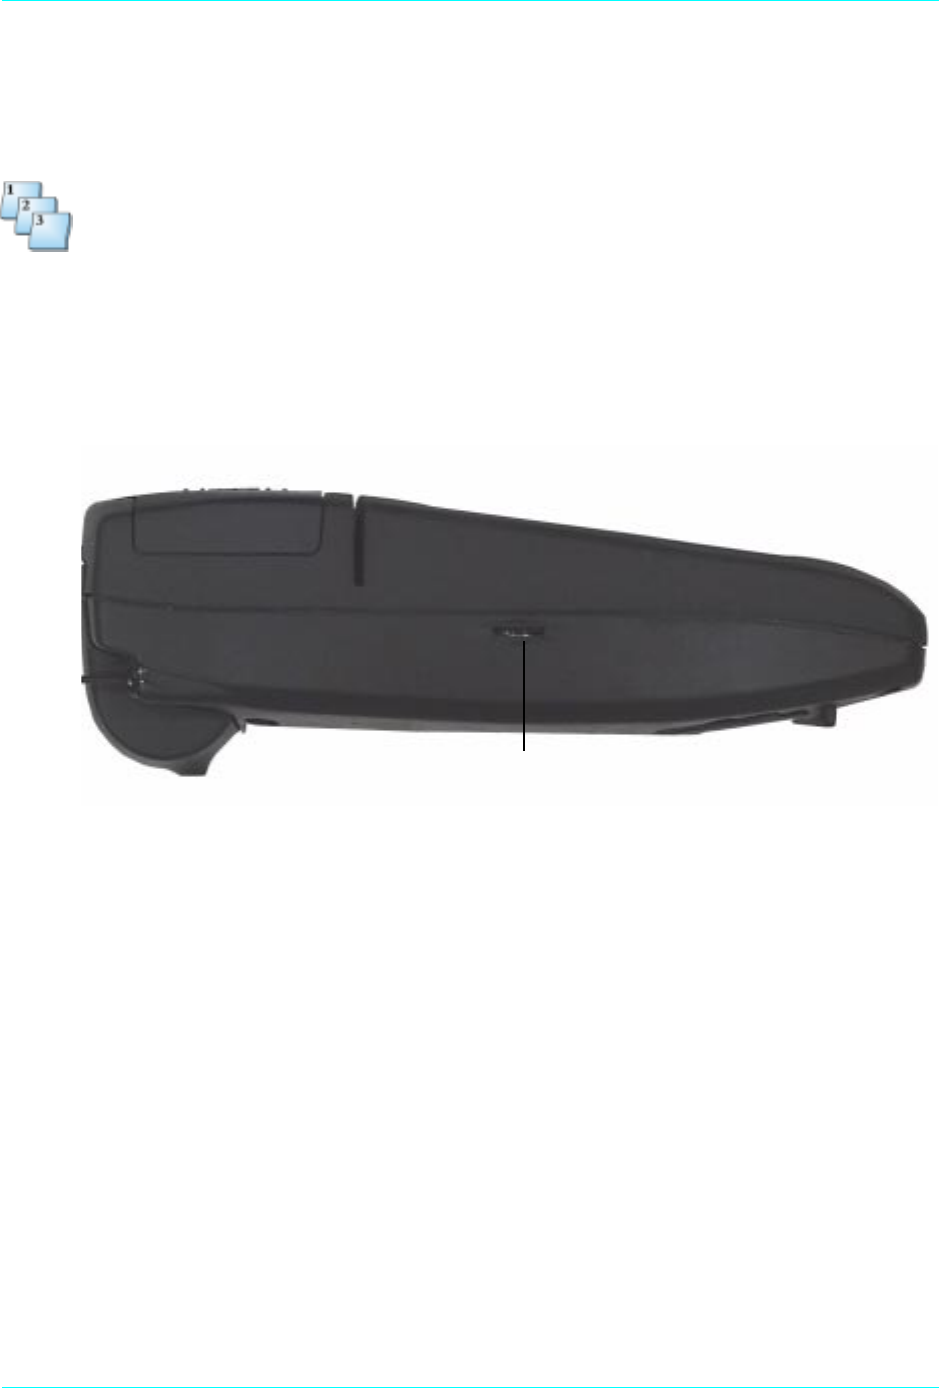
Rotating the Contrast Control Dial, located on the left side of the terminal, changes the contrast
of the display screen.
Terminal Modem
The optional internal modem, the FastPOS 9600, is compatible with the Bell 212A modem and
the CCITT V.22 interface and provides for Asynchronous or Synchronous operation at 9600 bps.
The optional modem is suitable for both dial and leased-line operation.
Terminal Radio
The SmartICE supports four radios types: CDPD (cellular digital packet data), Mobitex, GSM,
and the 900 MHz.
Terminal Power Adaptors
Hypercom offers two types of terminal power adaptors: The Linear power adaptor is used within
the United Stated of America. The Switcher power adaptor is used internationally.

Chapter 1
1-4 SmartICE Hardware and Installation Manual 940264-001
Transactions and Functions
The SmartICE terminal supports the full transaction set required for authorization, draft capture,
debit, check verification and guarantee, proprietary cards, and mail and phone.
Term-Master supports automated terminal configuration, terminal interrogation, automated
program changes, and merchant installation.
Terminal Initialization
Automated Terminal Configuration is downloaded from the host or from the Hypercom Term-
Master application. Term-Master terminal profiles are downloaded through terminal initialization
to meet the specific requirements of merchant categories such as restaurants (tips), retail,
supermarkets, and the hospitality industry.
Terminal Diagnostics
Term-Master supports terminal interrogation and the reporting of status and statistics such as
response time measurements, communication errors, re-dials, card-read errors, and password
review.
Application Program Changes
Program changes are automated and downloaded through either a host-resident process or
Term-Master.

Equipment Information
940264-001 Hypercom Corporation 1-5
Features
Financial Integrity
The SmartICE terminal generates automatic reversals to achieve total financial transaction
integrity. These reversals ensure that communications and processing errors do not result in lost
transactions, duplicate processing, or the failure of terminals to balance. The SmartICE
terminals also enable simple terminal balancing and settlement, while eliminating network
overloads caused by end-of-day batch transfers.
Fast Response Times
The fast response time of the SmartICE terminal is the direct result of the efficient SDLC
protocol, which permits pre-dialing and message compression. At a speed of 9600 bps, EFT
messages of 150 characters are transmitted in 0.8 seconds, increasing throughput four to ten
times over traditional 300 bps Asynchronous terminals.
Reduced Communications Costs
The SmartICE terminals reduce transaction costs by taking advantage of recent advances in
communications and networking technology. Using an optional modem, the savings are
generated through short dial-up online times, local area networking, and concentration using the
Hypercom regional Network Access Controllers (NACs), reducing long distance costs and
improving network economics. These terminals actively interface through the Hypercom NACs
with SNA, X.25, and BISYNC networks already in place.

Chapter 1
1-6 SmartICE Hardware and Installation Manual 940264-001
Networking Efficiency
The SmartICE terminals are totally compatible with the Hypercom family of Network Access
Controllers (NACs), providing end-to-end network optimization and concentration to keep
communication costs low.
Term-Master
The SmartICE terminals support parameter and software downloading. Parameter downloading
does not affect merchant totals due to the sophisticated architecture of the terminal. Term-
Master collects Management Information System (MIS) statistics and can be interrogated online
for speedy problem resolution. The PC-based Term-Master package supports software
download requests from terminals even when the PC is unattended, ensuring terminal software
is automatically kept up to date.
Using an optional modem, a merchant can install the SmartICE terminal through the menu-
driven procedure that identifies the telephone line profile (tone or pulse, PABX access code),
prompts for the telephone numbers for initialization and network management, and prompts for a
unique terminal identification number with optional check digit.

CHAPTER 2
Equipment Installation
This chapter describes how to install the SmartICE terminal.
Installing the SmartICE Terminal
This chapter describes how to install the SmartICE terminal and port locations.
Chapter 2
2-2 SmartICE Hardware and Installation Manual 940264-001
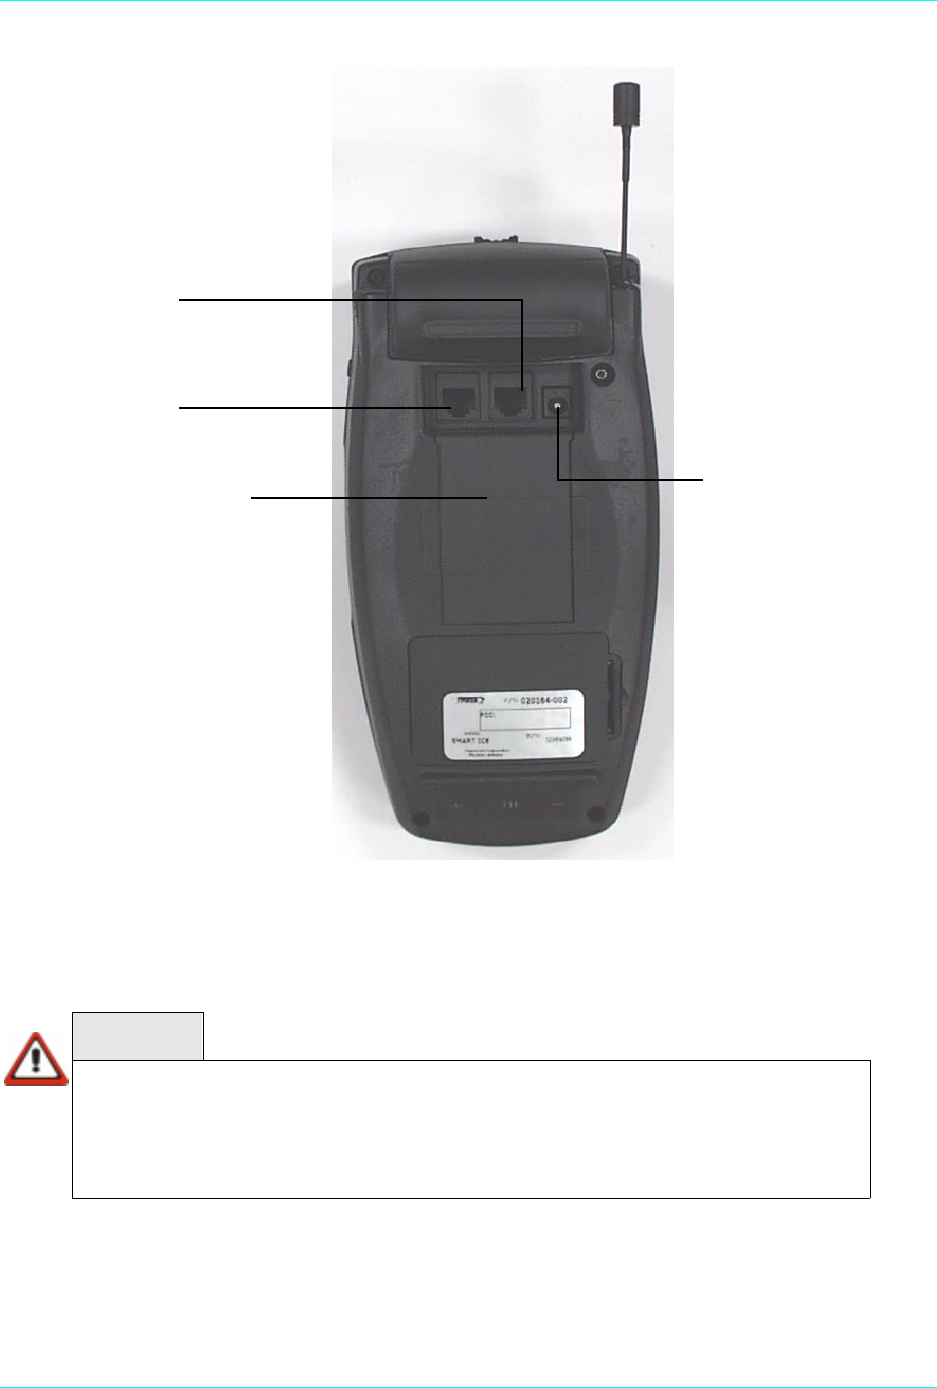
The SmartICE under panel connectors include power, PIN, and line ports.
Figure 2-1. SmartICE under panel connectors
WARNING
When using the Mobitex and CDPD version, the user must ensure that the device is not
positioned in such a way as to put the side of the terminal near the antenna and above the credit
card slot less than 3cm (1 1/8”) from any part of the body for a period of six minutes or more.
Not complying with this waring may expose the user or customer to levels of elecrtomagnetic
radiation exceeding the FCC guidelines.
PIN port
Line port
Battery pack panel Power port

Equipment Installation
940264-001 Hypercom Corporation 2-3
Turning On the Terminal
The SmartICE terminal operates using a +12 Vdc power cable in conjunction with a 110-Volt
grounded power receptacle.
Step-by-Step
To turn on the smartICE terminal:
1. Connect the +12 Vdc power cable from the AC adapter to the terminal power socket labeled
PWR
.
2. Plug the adapter into a 110-Volt grounded power receptacle. Be sure the connector is firmly
seated. When the power is connected successfully, the terminal beeps twice and then
performs a self-test and diagnostic routine.
WARNING
Do not use an adapter, a power extender adapter, a power extender cable, or an AC outlet that
does not have a ground connection.
Do not disassemble the AC adapter. Only qualified service personnel should service the adapter.
The AC adapter was designed for indoor use only. Do not expose to rain or snow.
Do not immerse in fluid.
The reliability of electronic equipment is significantly reduced whenever it is powered from an
underground outlet. A low-power AC adapter connects power to the terminal. Connect only one
terminal to the AC adapter.

Chapter 2
2-4 SmartICE Hardware and Installation Manual 940264-001
Installing the SmartICE Paper Roll
The SmartICE uses a paper roll for receipt printing.
Step-by-Step
To install the SmartICE paper roll:
1. Open the paper bucket cover and remove the paper roll.
2. Place the paper roll in the bucket so the paper feeds from under the roll, not over the top,
and has a straight-line path into the printer paper-feed mechanism.
3. Feed the paper evenly into the paper feed slot at the rear of the SmartICE terminal.
4. When the paper appears, close the paper bucket cover. The printer is now ready to print
receipts.
Installing an External PIN Pad
The SmartICE supports an external PIN pad.
Step-by-Step
To install an external PIN pad on the SmartICE terminal:
1. Insert the PIN pad connector into the opening marked
PIN
on the under panel of the
SmartICE terminal. The use of a different cable might result in improper operation.
2. Ensure that the PIN pad cable latches are firmly locked into the jack on the SmartICE
terminal.

Equipment Installation
940264-001 Hypercom Corporation 2-5
Accessing the Battery Pack
The SmartICE uses a lithium battery pack.
Step-by-Step
To access the battery pack on the SmartICE terminal:
1. Place your finger on the top portion of the Battery Pack access panel.
NOTE:See Figure 2-1.
2. Slide the access panel down.
3. Remove the battery pack.
Chapter 2
2-6 SmartICE Hardware and Installation Manual 940264-001
Adjusting the Display Contrast
The SmartICE uses a contrast control dial to adjust the display.
Step-by-Step
To adjust the contrast on the SmartICE terminal:
1. Place your finger on the Contrast Control Dial.
NOTE:See Figure 2-2.
2. Slide the access clockwise to darken or counter-clockwise to lighten the contrast.
Figure 2-2. SmartICE side view
Contrast Control Dial

We Welcome Your Comments
Please fax this page with your comments to Hypercom Corporation at 602.504.4990
Document Number: 940264-001
1. In one word, how would you describe this guide? _________________________________________
2. How do you use this guide?
I read it from beginning to end.
I read only the sections that relate to my immediate needs.
I read only the sections that relate to my job.
3. When you need to find information in this guide, where is the first place you usually look?
Table of contents
Index
Search through the pages until I find what I am looking for
4. How easily can you find information in this guide?
1 Not easily 2 3 4 5 Very easily
5. How clear is the information in this guide?
1 Not clear 2 3 4 5 Very clear
6. When you try the instructions described in this guide, how easily can you follow them?
1 Not easily 2 3 4 5 Very easily
7. How well did you understand the product before reading this guide?
1 Not well 2 3 4 5 Very well
8. How well did you understand the product after reading this guide?
1 Not well 2 3 4 5 Very well
9. The best aspect of this guide is _____________________________________________________.
10. The least useful aspect of this guide is________________________________________________.
Additional comments:

Hypercom
Document Number 940264-001
SmartICE Hardware and Installation Manual, Version 1.0
Printed in the USA