Firetide 1000R-1 Long Range Wireless LAN PC Card User Manual
Firetide Inc. Long Range Wireless LAN PC Card
Firetide >
User Manual

Installation and User Guide
HotPoint 1000R Outdoor Wireless Mesh Router
wireless instant networks™

Installation and User Guide
Page 2

HotPoint 1000R Outdoor Wireless Mesh Router
Page 3
Installation and User Guide
HotPoint 1000R Outdoor Wireless Mesh Router
Copyright Notice
© 2003-2004 Firetide, Inc. All rights reserved.
Trademarks
Firetide, the Firetide logo, Wireless Instant Networks, HotPoint are trademarks of Firetide, Inc. All other
trademarks are the property of their respective owners.
FCC Class B Notice
This device complies with Part 15 of the FCC Rules. Operation is subject to the following two conditions:
1. This device may not cause harmful interference.
2. This device must accept any interference received, including interference that may cause undesired
operation.
Note
This equipment has been tested and found to comply with the limits for a Class B digital device, pursuant to
Part 15 of the FCC Rules. These limits are designed to provide reasonable protection against harmful
interference in a residential installation. This equipment generates, uses and can radiate radio frequency
energy and, if not installed and used in accordance with the instructions, may cause harmful interference to
radio communications. However, there is no guarantee that interference will not occur in a particular
installation. If this equipment does cause harmful interference to radio or television reception, which can be
determined by turning the equipment off and on, the user is encouraged to try to correct the interference by
one or more of the following measures:
• Reorient or relocate the receiving antenna.
• Increase the separation between the equipment and receiver.
• Connect the equipment into an outlet on a circuit different from that to which the receiver is connected.
• Consult the dealer or an experienced radio/television technician for help.
Modifications
Any modifications made to this device that are not approved by Firetide, Inc. may void the authority granted
to the user by the FCC to operate this equipment.
FCC Radiation Exposure Statement
The antenna used for this transmitter must be installed to provide a separation distance of at least 20 cm
from all persons and must not be co-located or operating in conjunction with any other antenna or
transmitter. OEM Integrators, end-users and installers must be provided with antenna installation
instructions and transmitter operating conditions for satisfying RF exposure compliance.

Installation and User Guide
Page 4
Table of Contents
Firetide™ HotPoint™ 1000R Outdoor Wireless Mesh Router ........................................................5
Firetide Wireless Instant Network.....................................................................................................6
What is a Firetide Mesh Network?....................................................................................................6
Building a Firetide Mesh Network.....................................................................................................7
HotPoint 1000R Installation ..............................................................................................................9
HotPoint Manager™ Software........................................................................................................17
Troubleshooting and Support Information ......................................................................................20
Restoring Default Settings..............................................................................................................21
HotPoint Accessories .....................................................................................................................22
Specifications..................................................................................................................................23
FreeBSD Copyright ........................................................................................................................25
Installation and User Guide
Page 6
Firetide™ HotPoint™ 1000R Outdoor Wireless Mesh Router
The Firetide HotPoint 1000R outdoor wireless mesh router brings all of
the benefits of Firetide’s instant mesh networking to outdoor and long
range applications. With its extended operating range and NEMA 4
certified enclosure, this rugged version of Firetide’s HotPoint wireless
mesh router enables mesh networks to operate in outdoor environments
and to span great distances for both rural and metro applications. The
HotPoint 1000R provides two weatherproof Ethernet ports for
provisioning Ethernet instantly without the need for a wired backhaul.
Eliminating the wired backhaul enables the installation of outdoor
networking equipment—such as weatherized access points, computers,
and surveillance cameras-virtually anywhere at a fraction of the time and
cost associated with installing wired outdoor solutions.
Firetide mesh networks provide a reliable, flexible, and scalable
alternative to standard LAN cabling. Because they form automatically
without wires, Firetide mesh networks do not require elaborate site
surveys or physical modifications to buildings and landscaping. Outdoor
network installation costs will drop dramatically because time-consuming
trenching and cable pulling between buildings is no longer needed.
Provisioning is also easy and fast because special drivers, setup,
interfaces, and configurations are not required for equipment to connect
to a Firetide instant mesh network.
Firetide HotPoint 1000R Outdoor Wireless Mesh Router
HotPoint 1000R Outdoor Wireless Mesh Router
Page 7
Firetide Wireless Instant Network
Firetide developed the Wireless Instant Network, based on the HotPoint Wireless Mesh Router, to
enable faster, easier and more affordable network deployment. Firetide’s patented mesh
networking technology makes it possible to survey, plan and deploy an entire network in less than
one day rather than weeks. The Firetide network is also portable. Your entire network can be
relocated simply by taking your HotPoint routers with you to your new location.
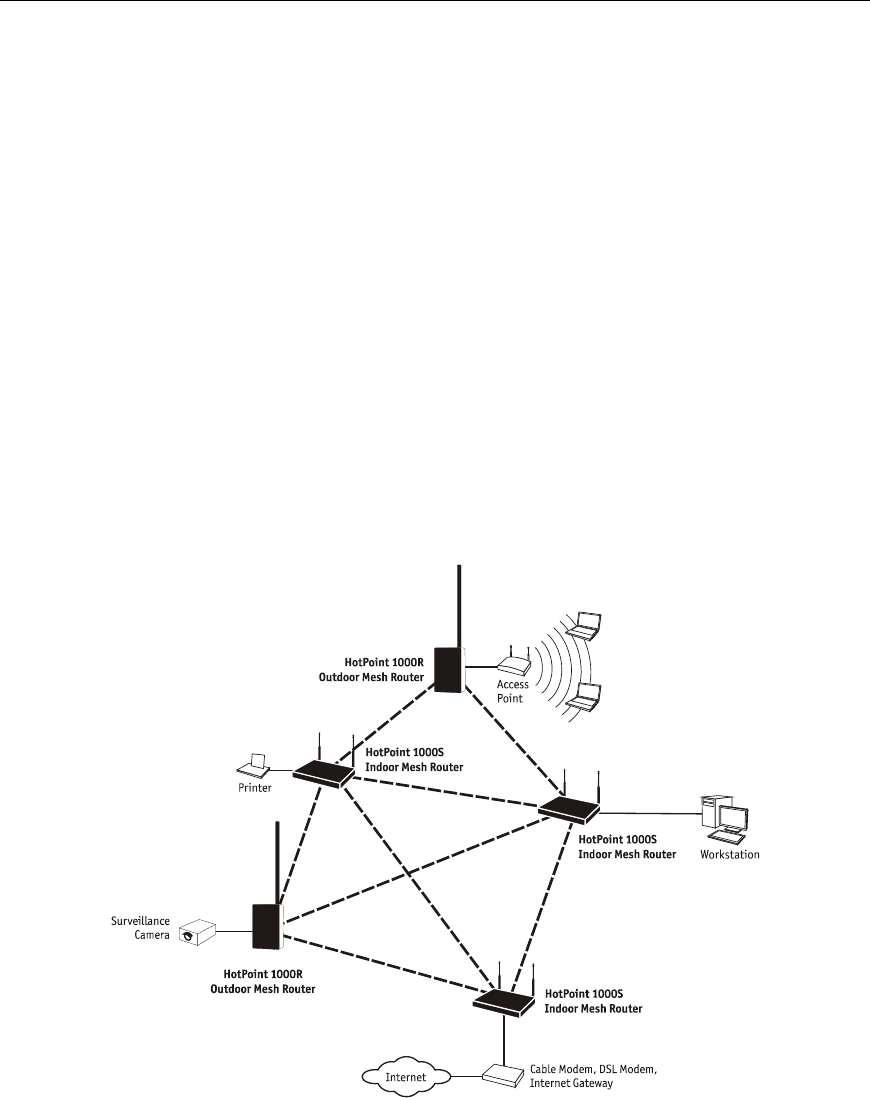
What is a Firetide Mesh Network?
Firetide mesh networks feature a self-configuring, self-healing, multi-hop topology. Because of
these inherent self-organizing properties, a mesh network requires no manual configuration.
Thus, creating a new network or adding or relocating network equipment is as easy as powering
up new nodes. The network automatically discovers the new nodes and integrates them into the
mesh.
A big advantage of a mesh network is its robustness and ability to heal itself. If a node is
disconnected, congested, or fails to operate, neighboring nodes are notified, and data is routed
around it. There is no need for a network engineer to intervene, troubleshoot, and cure the
problem.
Firetide Mesh Network with Indoor and Outdoor Wireless Mesh Routers
Mesh networking can be compared to the Internet, where data can be rerouted on other paths if
one path becomes disabled or congested. Losing a node or two or a link won’t bring down the
entire mesh network. Unlike other WLAN technologies, a mesh network’s reliability and scalability
can actually improve by adding more nodes and enriching the density of the mesh. More
redundant paths means the network in aggregate can handle far more data traffic, and is
therefore quite scalable. Mesh networks are ideal whenever the network must be reliable,

Installation and User Guide
Page 8
scalable, and flexible. They are very portable and can adapt well to many different physical
environments.
Building a Firetide Mesh Network
Installing, expanding, or even relocating a Firetide Mesh network is easy and fast. Simply place a
HotPoint router wherever you need an Ethernet port and connect it to an AC power source. As
long as the HotPoint router is within operating range of other HotPoint routers, you can connect
and operate your network devices immediately. Although network planning is often not required
for basic installations, adhering to a few simple guidelines will help ensure that your network
performs reliably and gives you the full benefi ts and performance that mesh networking has to
offer.
Important! Use the Correct RJ-45 Ethernet Cable
The type of Ethernet cable to use depends on what you connect to the HotPoint router. End
devices such as video cameras and access points require crossover cables. Multi-user devices
such as hubs and switches as well as most cable and DSL modems require straight-through
(non-crossover) cables. Devices with auto-sensing MDI/MDIX ports can use either crossover or
straight-through cables. Both cable types with weatherproof connectors are available from your
Firetide dealer. See Accessories on page 22 for available cables.
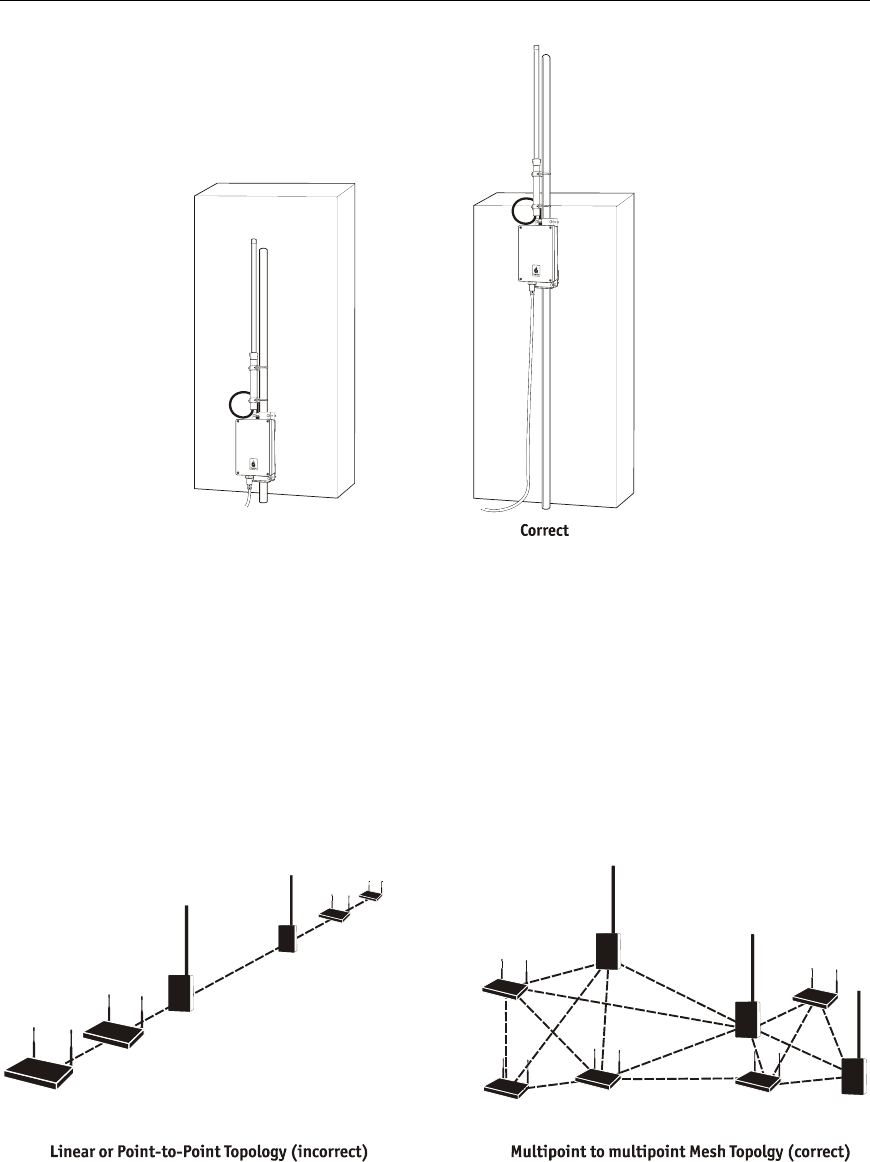
Understand HotPoint Antenna Patterns
HotPoint 1000R outdoor mesh routers have omni directional antennas that radiate in a broad
circular pattern perpendicular to the antenna shaft. For optimum coverage, orient the antennas in
your mesh network vertically (perpendicular to the ground).
Line-of-Sight Improves Operating Distance
Although HotPoint wireless mesh routers can communicate between walls and buildings, you can
increase the working distance of your outdoor mesh router by avoiding obstacles made of dense
materials such as concrete and metal. Positioning the HotPoint 1000R units so the space
between them provides an unobstructed, line-of-sight view, will greatly increase the effective
range and reliability of transmission. They should be located high enough to prevent interruption
from passing motor vehicles or pedestrians.
HotPoint 1000R Outdoor Wireless Mesh Router
Page 9
For best results, position the HotPoint 1000R antenna above obstructions.
Create a Mesh Topology for Maximum Performance and Reliability
Unlike simple point-to-point bridging, Firetide provides true mesh networking with flexible and
redundant paths. This improves overall performance, allows the network to be extended over long
distances, and reduces the chance of single point failures. To fully benefit from the self-forming
and self-healing properties of the mesh, place each HotPoint router within direct range of two or
more HotPoint routers. Also, do not install your HotPoint network in a linear, point-to-point
configuration. The Firetide network protocol is optimized for two- and three-dimensional
topologies including vertical connections between multiple floors in a building.
Linear vs. Mesh Topology
Use the HotPoint Manager Software

Installation and User Guide
Page 10
Although this software is not required for installing or operating your network, the HotPoint
Manager software provides an easy way to monitor and manage the mesh and your HotPoint
routers. Because wireless connections between HotPoint routers are invisible, this software lets
you “see” which units are within direct range of each other. HotPoint Manager also provides
additional security and optional configuration features. You can download the software from the
Firetide web site. See page 16 for information on downloading and installing HotPoint Manager.
HotPoint 1000R Outdoor Wireless Mesh Router
Page 11
HotPoint 1000R Installation
Be sure to read and understand all installation instructions and safety instructions before
proceeding with the installation.
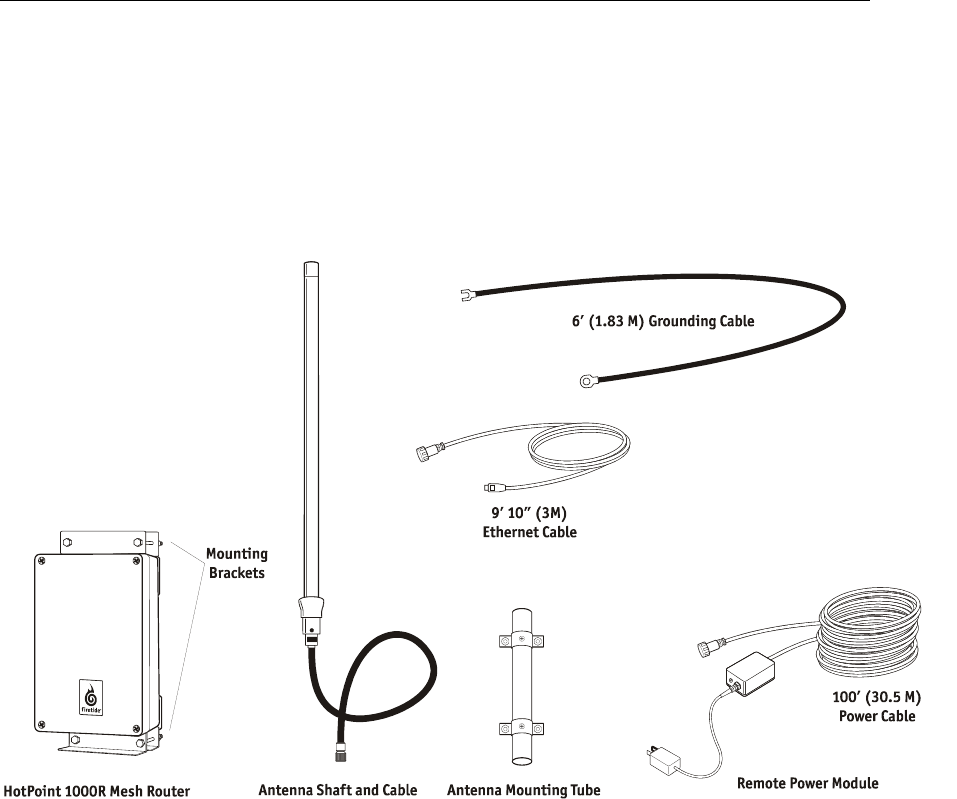
Unpacking
The HotPoint 1000R Outdoor Wireless Mesh Router package contains the following items. If you
are missing any of these items, contact your Firetide reseller.
HotPoint 1000R Wireless Outdoor Mesh Router Components
Mesh Router
• HotPoint 1000R Outdoor Mesh Router with NEMA 4x enclosure with two weatherproof
connector caps.
Antenna
• Hi Gain antenna with coaxial cable attached
• Antenna wall/pole mounting tube.
Remote power module
• 100’ (30.5 M) Remote power cable with indoor power adapter.
Mounting Brackets
• Wall/pole mounting brackets for HotPoint 1000R enclosure
External Grounding Cable
• 6’, #10AWG, stranded ground wire with ring/fork attachment connectors.
External Ethernet Cable

Installation and User Guide
Page 12
• 3 meter, shielded, straight-through, one-side watertight, one-side non-watertight, RJ-45 to
RJ-45 CAT 5e Ethernet patchcord with black cable jacket suitable for industrial
applications/low smoke, zero halogen.
Ethernet Crossover Cable
• 1meter, RJ-45 to RJ-45, Ethernet patch cord for restoring default settings.
Documentation
• End user license agreement (EULA)
• Warranty and registration card
• Installation and User Guide (this document)

HotPoint 1000R Outdoor Wireless Mesh Router
Page 13
WARNING! IMPORTANT SAFETY PRECAUTIONS
The HotPoint 1000R outdoor wireless mesh router must be installed by a qualified
professional such as a licensed electrician. Failure to install this equipment properly may
result in equipment damage and personal injury or death.
Carefully observe these instructions and any special instructions that are included with the
equipment you are installing. Look over the site before beginning any installation, and anticipate
possible hazards, especially these:
CONTACTING POWER LINES CAN BE LETHAL.
Do not install the HotPoint 1000R outdoor mesh router where possible contact with power lines
can be made. Antennas, masts, towers, guy wires or cables may lean or fall and contact these
lines. People may be injured or killed if they are touching or holding any part of equipment when it
contacts electric lines. Make sure there is NO possibility that equipment or personnel can come in
contact directly or indirectly with power lines.
ASSUME ALL OVERHEAD LINES ARE POWER LINES!
The horizontal distance from a tower, mast or antenna to the nearest power line should be at
least twice the total length of the mast/antenna combination. This will ensure that the mast will not
contact power if it falls either during or after installation.
TO AVOID FALLING, USE SAFE PROCEDURES WHEN WORKING AT HEIGHTS ABOVE
GROUND.
• Select equipment locations that will allow safe and simple installation.
• Don’t work alone. A friend or co-worker can save your life if an accident happens.
• Use approved non-conducting ladders and other safety equipment. Make sure all equipment is
in good repair.
• If a tower or mast begins falling, don’t attempt to catch it. Stand back and let it fall.
• If anything such as a wire or mast does come in contact with a power line, DON’T TOUCH IT
OR ATTEMPT TO MOVE IT. Instead, save your life by calling the power company.
• Don’t attempt to erect antennas or towers on windy days.
MAKE SURE ALL TOWERS AND MASTS ARE SECURELY GROUNDED, AND ELECTRICAL
CABLES CONNECTED TO ANTENNAS HAVE LIGHTNING ARRESTORS. This will help prevent
fire damage or human injury in case of lightning, static build-up, or short circuit within equipment
connected to the antenna. The HotPoint 1000R has an external ground connector and built in
lightning protection. Be sure that any other equipment connected to the HotPoint 1000R also has
the same level of protection.
• The base of the antenna mast or tower must be connected directly to the building protective
ground or to one or more approved grounding rods, using 10AWG ground wire and corrosion-
resistant connectors.
• Refer to the National Electrical Code for grounding details.
IF A PERSON COMES IN CONTACT WITH ELECTRICAL POWER, AND CANNOT MOVE:
• DON’T TOUCH THAT PERSON, OR YOU MAY BE ELECTROCUTED.
• Use a non-conductive dry board, stick or rope to push or drag them so they no longer are in
contact with electrical power.
• Once they are no longer contacting electrical power, administer CPR if you are certified, and
request emergency medical aid immediately.
Installation and User Guide
Page 14
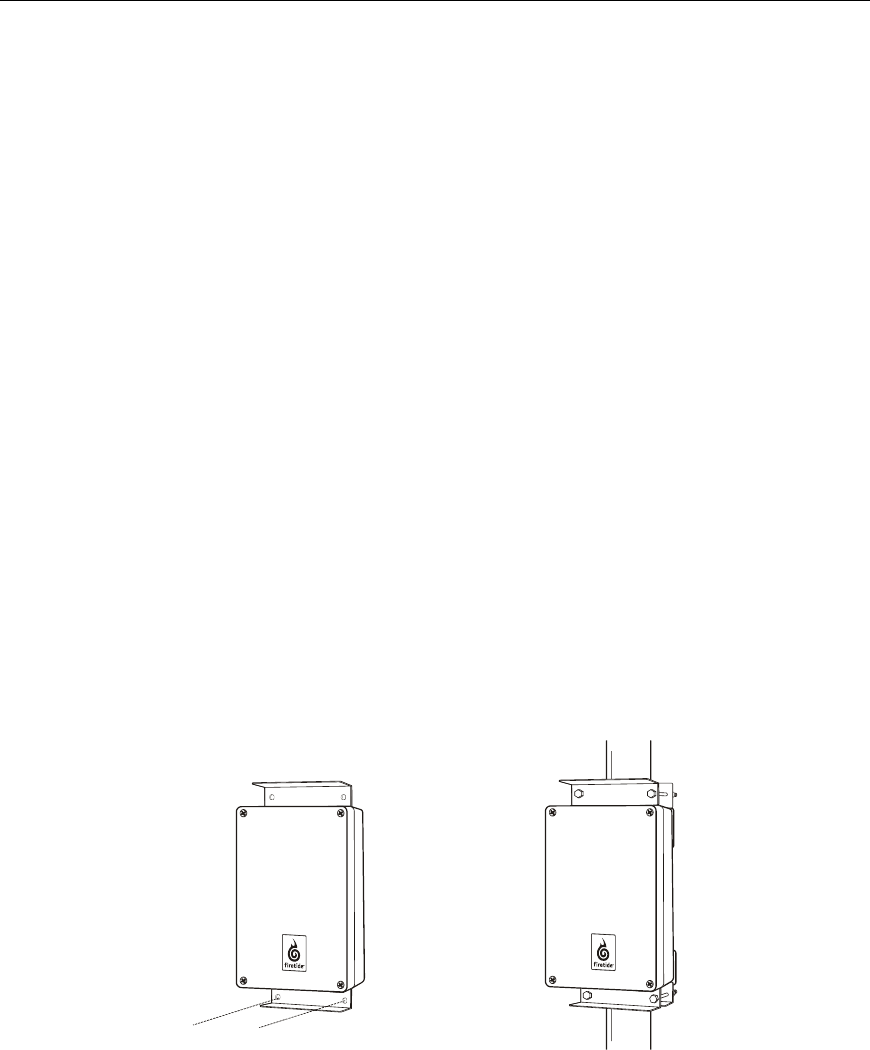
Mounting the Enclosure
The HotPoint 1000R enclosure should be mounted securely to a wall or a pole approximately 2”
(51 mm) in diameter.
Mounting Guidelines
• For best results, the mounting location should enable maximum performance of the antenna
and any attached devices such as access points or cameras. Whenever possible, provide
clear line-of-sight access for the antenna. You can test various locations by mounting the unit
to a portable stand until you can determine the ideal location for permanent mounting.
• The location must allow for a solid connection to earth ground. Be sure the earth ground wire
or strap does not obstruct access to the enclosure.
• The unit must be within 100’ (30 M) of an indoor AC outlet for power. Note: AC power is not
required if the HotPoint 1000R will receive power via PoE (power over Ethernet) from an
attached peripheral device. Note: If power is provided to the Hotpoint 1000R via a PoE
carrying Ethernet connector, use the sealing cap from the Ethernet connector to cover the
power input connector.
• Avoid areas with heavy vehicle and foot traffic. Do not install near rain gutters and
downspouts or areas subject to flooding.
Wall Mounting
1. Attach the angled mounting brackets to the rear of the enclosure as shown.
2. Use four screws to attach the enclosure securely to the wall. Use appropriate anchors when
attaching to masonry or other materials
Pole Mounting
1. Attached the angled mounting bracket to the rear of the enclosure as shown.
2. Position the unit against the pole and clamp it securely in place using the rear “U” brackets
and four bolts provided.
Wall and Pole Mounting

HotPoint 1000R Outdoor Wireless Mesh Router
Page 15
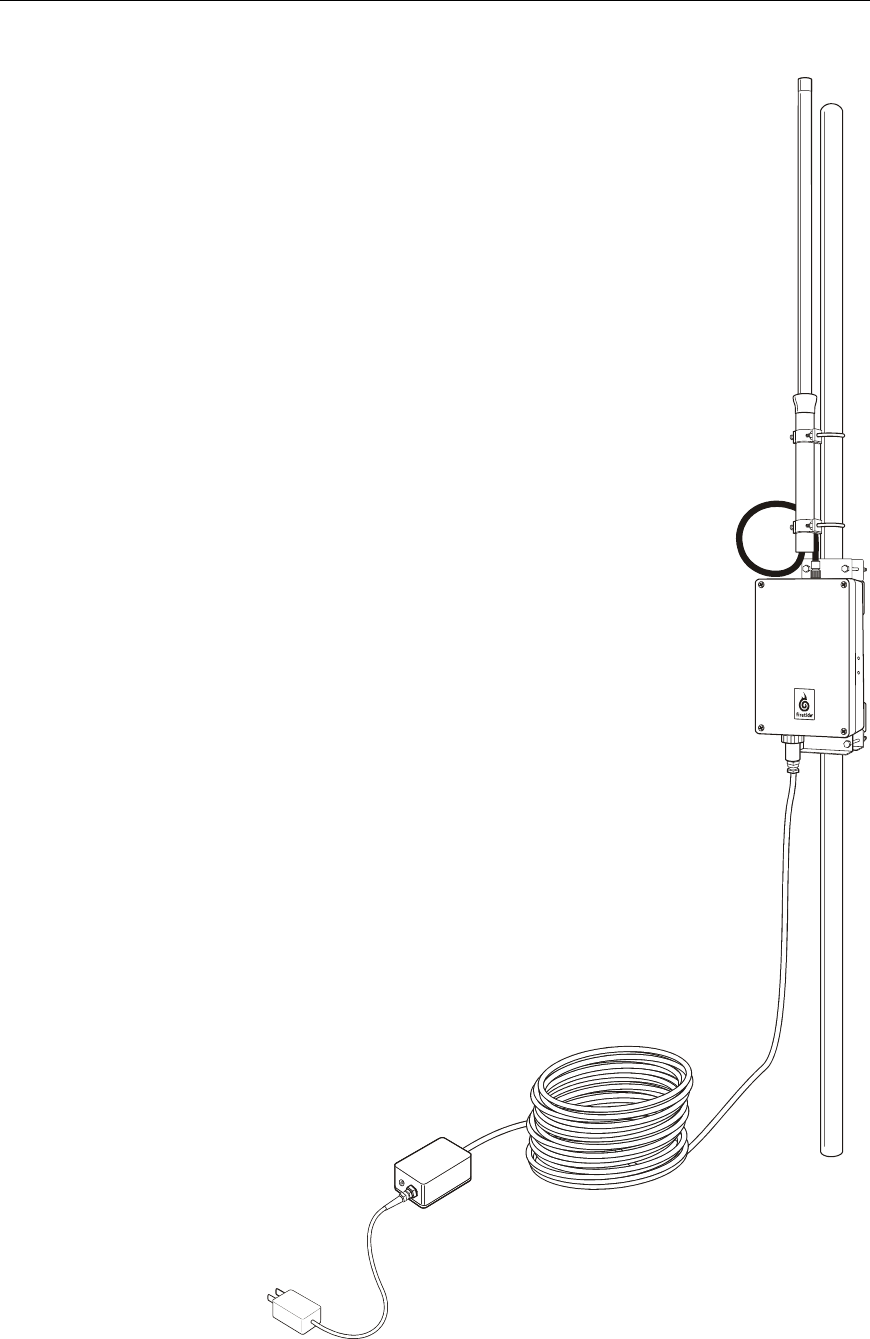
Mounting the Antenna
The antenna consists of an antenna shaft with an attached coaxial cable and a mounting tube.
Remove the set screw that secures the antenna shaft to the tube and separate the two
components
Note: The antenna used for this transmitter must be installed to provide a separation distance of
at least 20 cm from all persons and must not be co-located or operating in conjunction with any
other antenna or transmitter. OEM Integrators, end users and installers must be provided with
antenna installation instructions and transmitter operating conditions for satisfying RF exposure
compliance.
Wall Mounting
1. Position the mounting tube vertically above or to the side of the HotPoint 1000R enclosure to
permit easy attachment of the coaxial antenna to the connector at the top of the enclosure.
2. Use four screws to attach the mounting tube securely to the wall. Use appropriate anchors
when attaching to masonry or other materials
3. Replace the antenna shaft by first threading the coaxial cable through the tube and then
securing the shaft to the tube using the set screw.
4. Connect the end of the coaxial cable to the antenna connector at the top of the HotPoint
1000R enclosure.
Pole Mounting
1. Position the mounting tube on the pole above the HotPoint 1000R enclosure. Be sure allow
spacing for easy attachment of the coaxial antenna to the connector at the top of the
enclosure.
2. Clamp the tube securely to the pole using the two “U” bolts provided.
3. Replace the antenna shaft by first threading the coaxial cable through the tube and then
securing the shaft to the tube using the set screw.
4. Connect the end of the coaxial cable to the antenna connector at the top of the HotPoint
1000R enclosure.
HotPoint 1000R Antenna
Installation and User Guide
Page 16
Connecting to Earth Ground
• Warning! The HotPoint 1000R must be properly connected
to earth ground. Failure to do so may result in equipment
damage, injury or death. The product warranty does not
cover damages resulting in part or in whole from improper
grounding.
The HotPoint 1000R outdoor mesh router has an external,
threaded grounding post at the base of the enclosure. After
mounting the unit securely, secure the ground wire lug to the
theaded post using the two nuts supplied with the post. Connect
the other end of the ground wire to an existing earth ground point
or a grounding rod.
HotPoint 1000R Connectors

HotPoint 1000R Outdoor Wireless Mesh Router
Page 17
Power Connections
There are two options for supplying power to the HotPoint 1000R outdoor mesh router.
Option 1. Remote Power Module
The remote power module provides power to the HotPoint 1000R enclosure from an indoor AC
outlet. You can also plug an optional power over Ethernet (PoE) injector into the module to power
a peripheral device connected to the second (rightmost connector) HotPoint 1000R Ethernet port.
• Caution! The Remote Power Module AC adapter is for indoor use only.
1. Feed the 100’ (30 M) power cable from the indoor AC outlet location to the HotPoint 1000R
enclosure. The connectors at each end are wired identically. If necessary, you can remove
the connectors with a small screwdriver to enable feeding the cable through conduit or small
openings.
Important! When reattaching the connectors, be sure to connect each of the four conductors to
the correct terminal. Incorrect wiring may result in equipment failure and possible damage.
2. Remove the protective cap from the power connector on the HotPoint 1000R enclosure and
attach the power cable connector. Tighten the connector to ensure a watertight seal.
3. Attach the connector at the other end of the cable to the indoor remote power module.
4. Plug the AC adapter into the indoor AC outlet.
5. If you are using a PoE injector, plug it into the auxiliary power connector on the remote power
module and connect the injector to an indoor AC power source.
Option 2. Power over Ethernet (PoE) from a Peripheral Device
The HotPoint 1000R can also receive power from a peripheral device such as an access point or
camera. This device must be able to supply PoE and must be attached to center (middle
connector) Ethernet port on the HotPoint 1000R.

Installation and User Guide
Page 18
Ethernet Ports
The HotPoint 1000R outdoor mesh router has two weatherproof Ethernet ports to provide
Ethernet connectivity to outdoor peripheral devices such as access points or surveillance
cameras. Use of these ports is optional.
Power over Ethernet (PoE)
Ethernet port 1 (center connector) supports PoE for powering the HotPoint 1000R outdoor mesh
router from a peripheral device attached to this connector.
Ethernet port 2 (right connector) supports PoE for powering a peripheral device attached to this
connector.
Connecting Peripheral Devices
1. Remove the protective cap from the Ethernet port you want to use and plug in the Ethernet
cable. Tighten the cable connector to ensure a watertight seal.
2. Attach the other end of the Ethernet cable to the peripheral device.

HotPoint 1000R Outdoor Wireless Mesh Router
Page 19
HotPoint Manager™ Software
The HotPoint Manager software provides a convenient, browser-based interface for monitoring all
of the HotPoint routers on your mesh network. HotPoint Manager is a Java-based application
compatible with most Internet browsers and platforms including Windows, Macintosh, UNIX, and
Linux. Registered users can download the HotPoint Manager software and user documentation
from the Firetide web site (www.firetide.com).
Downloading and Installation Instructions
1. Go to the Firetide web site www.firetide.com
2. Select Downloads from the Support Menu
3. Read the instructions provided and download the appropriate version of the software and
documentation. You may be asked to log in or to register before being permitted to download.
4. Install the software on your workstation as directed in the instructions for your operating
system.
Connecting to the Mesh Network
1. Be sure all of your HotPoint routers are installed and powered.
2. Connect your workstation’s network adapter directly to any one of the Hot Point routers using
an Ethernet crossover cable. For safety and convenience, connect the workstation to a HotPoint
1000S wireless mesh router that is on the same mesh as your HotPoint 1000R outdoor mesh
router(s). This will enable you to manage the mesh while you are indoors.
3. Turn on your workstation and configure your TCP/IP settings as described on the following
page or by using the instructions provided for your operating system.
Connecting a workstation running HotPoint Manager software

Installation and User Guide
Page 20
For Windows XP
1. Click on the Start button.
2. Click on the Control Panel icon.
3. Double-click on the Network Connections icon.
4. Double-click on the Local Area Connection icon for the network adapter used to connect to the
Firetide mesh network.
5. Select Internet Protocol (TCP/IP) and click on the Properties button.
6. Select “Use the following IP address” and enter the following information:
• IP address: 192.168.224.200
• Subnet mask: 255.255.255.0
7. Click OK to finish.
8. Restart your computer and proceed to “Getting Started with HotPoint Manager.”
For Windows 2000
1. Click on the Start button.
2. Click on Settings and select Control Panel.
3. Double-click on the Network and Dial-up Connections icon.
4. Double-click on the Local Area Connection icon for the network adapter that is connected to
the Firetide mesh network.
5. Select Internet Protocol (TCP/IP) and click on the Properties button.
6. Select “Use the following IP address” and enter the following information:
• IP address: 192.168.224.200
• Subnet mask: 255.255.255.0
7. Click OK to finish.
8. Restart your computer and proceed to
“Getting Started with HotPoint Manager.”
For Other Operating Systems and Platforms
Please refer to the HotPoint Manager User Guide (available for registered customers at
www.firetide.com) for information and setup instructions.
Getting Started with HotPoint Manager
Use the following procedure to determine if your HotPoint Manager software is installed and
running properly. For complete information on HotPoint manager features and more detailed
instructions on its operation, download the latest HotPoint Manager User Guide available at
www.firetide.com/support.
Note: Steps 1 and 2 are for launching HotPoint Manager under Windows. Your operating system
may have a different procedure for launching applications.
1. From the Windows Desktop click on the Start button
2. Click on All Programs and select HotPoint Manager. The Login screen will appear.
3. Enter the following information to log into the mesh network
• Username: admin
• Password: admin
• Mesh IP address: 192.168.224.100
4. Click on Login to start
5. Wait for your computer to connect to the mesh. This may take a few seconds to several
minutes.
6. You should see the screen shown on the following page with a list of all of the HotPoint units
on the mesh.
Note: If this screen does not appear, or some of your HotPoint mesh routers appear to be
missing from the list, refer to the troubleshooting section of the HotPoint Manager User Guide.

HotPoint 1000R Outdoor Wireless Mesh Router
Page 21
Troubleshooting and Support Information
As a Firetide customer you are entitled to receive free support services on our web site and from
your authorized Firetide dealer.
Troubleshooting
The best way to troubleshoot individual HotPoint routers and your entire Firetide mesh network is
to use the HotPoint Manager software. With HotPoint Manager you will be able to view mesh
activity, customize your network configurations and change the default settings on your HotPoint
routers. This software is available from the Firetide web site. See page 17 for downloading and
installation instructions.
Register with us now to Access our Support Web Site
Registering as a customer on our web site entitles you to free information and materials to help
you get the most from your Firetide mesh network. Visit www.firetide.com/support for
information on becoming a registered customer and for access to our support materials.
Dealer Provided Technical Support and Warranty Services
If you need additional technical assistance that is not available on our web site, please don’t
hesitate to contact your Firetide dealer directly. All authorized Firetide dealers are trained and
authorized to provide technical support and warranty services for our products and have qualified
technical staff available to help you build and maintain your Firetide mesh network.
Product Returns
Please contact your Firetide dealer for instructions on returning defective or damaged products
for repair or replacement. Do not return products to Firetide, Inc.
Sales Support
If you need additional HotPoint wireless mesh routers or accessories, please contact your Firetide
dealer directly. If you do not know your dealer’s name, simply email sales@firetide.com and we
will send you the dealer information you need. To help us provide the best service possible, be
sure to include your phone number, address and the serial numbers of the HotPoint routers at
your location.
Installation and User Guide
Page 22
Restoring Default Settings
You can change or restore the default settings for your HotPoint router using the HotPoint
Manager software. You can also use the following procedure to restore the factory default
settings without HotPoint Manager.
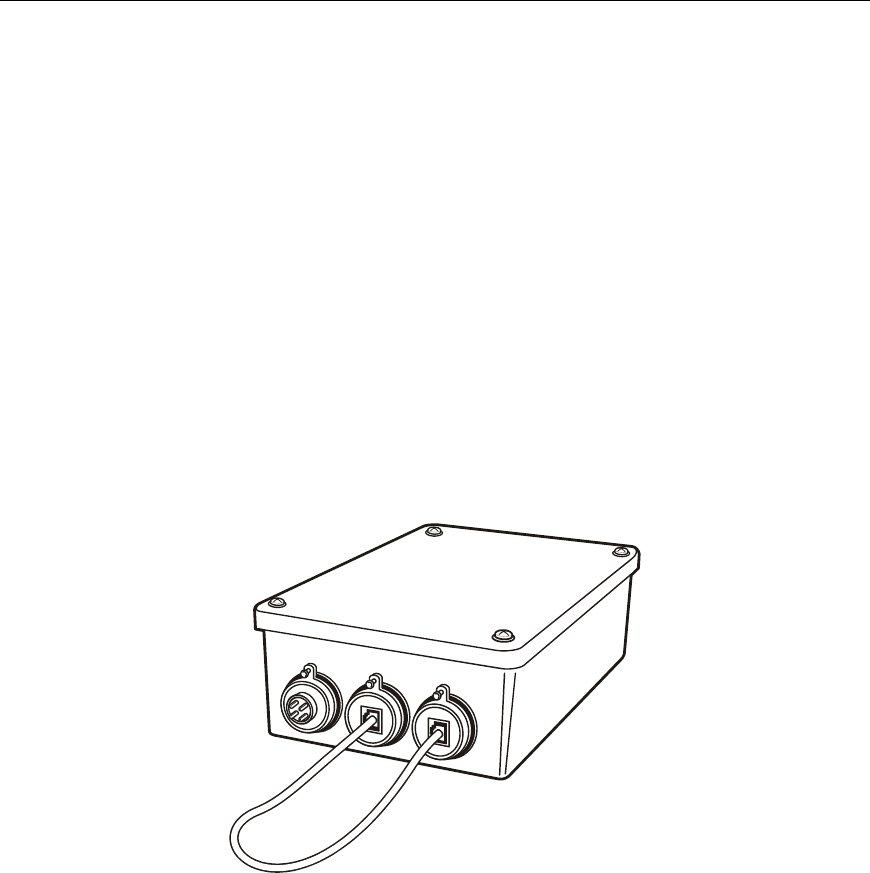
1. Connect an Ethernet crossover cable between both Ethernet ports.
2. Plug in the HotPoint power adapter and wait for red “fault” LED to turn on and then off.
3. Unplug the HotPoint power adapter and disconnect the crossover cable. The default settings
are now restored.
HotPoint Factory Default Settings
AES Encryption: Disabled
WEP Encryption: Disabled
Mesh IP address: 192.168.224.100
Ethernet ports: All ports enabled
HotPoint Manager username: admin
HotPoint Manager password: admin
Connect a crossover cable between Ethernet ports to reset.

HotPoint 1000R Outdoor Wireless Mesh Router
Page 23
HotPoint Accessories
Consult your Firetide dealer or the Products section of www.firetide.com for a current list of
available accessories. Accessories, components and additional HotPoint wireless mesh routers
are available directly from your Firetide dealer.

Installation and User Guide
Page 24
Specifications
Model
HotPoint 1000R Outdoor Wireless Mesh
Router
Protocol
Topology Broadcast based on Reverse-Path
Forwarding (TBRPF)
Encryption
AES, RSA certificates; Wireless: WEP
Radio range (open environment)
Up to 2 miles (3.22 km)
Wireless interface
• IEEE 802.1lb compliant (backhaul)
• Radio Tx Power: 200mW
• Modulation: DSSS
• Data Rates: 11, 5.5, 2, 1 Mbps
• 8.5dB, 50 Ohm omni-directional antenna
Network ports
Two weatherized, autosensing 10/100
Ethernet ports
Lightning protection
(1kV/5KA with replaceable isolation cell)
Dimensions (enclosure)
6.5” x 10” x 3.25” (16.51 cm 25.4 cm x 8.25
cm)
Dimensions (with mount and antenna)
7” x 45” x 4.5” (17.78 cm x 114.3 cm x 11.43
cm)
Antenna
32” (81.28 cm) with mount
Weight (enclosure only)
4 lb (1.81 kg)
Power
• 120 VAC, 60 Hz
• 802.3af Power over Ethernet
• 10 W power consumption
Regulatory Agency Certifications
• FCC CFR47 Part 15, Class B
• FCC CFR47 Part 15, Class B
• OET-65C,
Environmental specifications
• Operating temperature: -20 C to +55 C
• Storage temperature: -40 C to 80 C
• Humidity (non-condensing) 10% to 90%
• Weather rating: NEMA 4x weatherproof
• Wind shear: 100 mph (161 kph)
Warranty
One year (limited)
Package Contents
• HotPoint 1000R outdoor wireless mesh
router
• Remote power module with AC power
adapter
• Wall and pole mounting brackets
• 8.5 dBi antenna with mouting bracket
• Installation and User’s Guide
• Warranty card
• Registration card
• End User License Agreement card.

HotPoint 1000R Outdoor Wireless Mesh Router
Page 25
FreeBSD Copyright
All of the documentation and software included in the 4.4BSD and 4.4BSD-Lite Releases is
copyrighted by The Regents of the University of California.
Copyright 1979, 1980, 1983, 1986, 1988, 1989, 1991, 1992, 1993, 1994. The Regents of the
University of California. All rights reserved.
Redistribution and use in source and binary forms, with or without modifi cation, are permitted
provided that the following conditions are met:
1. Redistributions of source code must retain the above copyright notice, this list of conditions and
the following disclaimer.
2. Redistributions in binary form must reproduce the above copyright notice, this list of conditions
and the following disclaimer in the documentation and/or other materials provided with the
distribution.
3. All advertising materials mentioning features or use of this software must display the following
acknowledgement: This product includes software developed by the University of California,
Berkeley and its contributors.
4. Neither the name of the University nor the names of its contributors may be used to endorse or
promote products derived from this software without specifi c prior written permission.
THIS SOFTWARE IS PROVIDED BY THE REGENTS AND CONTRIBUTORS “AS IS” AND ANY
EXPRESS OR IMPLIED WARRANTIES, INCLUDING, BUT NOT LIMITED TO, THE IMPLIED
WARRANTIES OF MERCHANTABILITY AND FITNESS FOR A PARTICULAR PURPOSE ARE
DISCLAIMED. IN NO EVENT SHALL THE REGENTS OR CONTRIBUTORS BE LIABLE FOR
ANY DIRECT, INDIRECT, INCIDENTAL, SPECIAL, EXEMPLARY, OR CONSEQUENTIAL
DAMAGES (INCLUDING, BUT NOT LIMITED TO, PROCUREMENT OF SUBSTITUTE GOODS
OR SERVICES; LOSS OF USE, DATA, OR PROFITS; OR BUSINESS INTERRUPTION)
HOWEVER CAUSED AND ON ANY THEORY OF LIABILITY, WHETHER IN CONTRACT,
STRICT LIABILITY, OR TORT (INCLUDING NEGLIGENCE OR OTHERWISE) ARISING IN ANY
WAY OUT OF THE USE OF THIS SOFTWARE, EVEN IF ADVISED OF THE POSSIBILITY OF
SUCH DAMAGE.
NOTE: The copyright of UC Berkeley’s Berkeley Software Distribution (“BSD”) source has been
updated. The copyright addendum may be found at
ftp://ftp.cs.berkeley.edu/pub/4bsd/README.Impt.License.Change and is included below.
July 22, 1999 To All Licensees, Distributors of Any Version of BSD:
As you know, certain of the Berkeley Software Distribution (“BSD”) source code files require that
further distributions of products containing all or portions of the software, acknowledge within their
advertising materials that such products contain software developed by UC Berkeley and its
contributors. Specifically, the provision reads:
3. All advertising materials mentioning features or use of this software must display the following
acknowledgement: “This product includes software developed by the University of California,
Berkeley and its contributors.”
Effective immediately, licensees and distributors are no longer required to include the
acknowledgement within advertising materials. Accordingly, the foregoing paragraph of those
BSD Unix fi les containing it is hereby deleted in its entirety.
William Hoskins, Director, Office of Technology Licensing, University of California, Berkeley

Installation and User Guide
Page 26
This product may also incorporate source code copyrighted by the following FreeBSD
Developers:
Shunsuke Akiyama, Jose M. Alcaide, Doug Ambrisko, Will Andrews, Eric Anholt, Mathieu Arnold, Sergey
Babkin, Daniel Baker, John Baldwin, Duncan Barclay, Mike Barcroft, Doug Barton, Anton Berezin, Pierre
Beyssac, Andrzej Bialecki, John Birrell, Neil Blakey- Milner, Martin Blapp, Torsten Blum, Maxim Bolotin,
Hartmut Brandt, Oliver Braun, Jonathan M. Bresler, Christian Brüffer, Wilko Bulte, Jake Burkholder, Donald
Burr, Adrian Chadd, Hye-Shik Chang, David W. Chapman Jr., Philippe Charnier, Jonathan Chen, Luoqi
Chen, Andrey A. Chernov, Sean Chittenden, Kenjiro Cho, Junho Choi, Crist J. Clark, Joe Marcus Clarke, Nik
Clayton, Archie Cobbs, Chris Costello, Alan L. Cox, Martin Cracauer, David E. Cross, Chad David, Ceri
Davies, Brooks Davis, Brian S. Dean, John W. DeBoskey, Prafulla S. Deuskar, Matthew N. Dodd, Dima
Dorfman, Ian Dowse, Robert Drehmel, Garance A Drosehn, Frank Durda IV, Tor Egge, Oliver Eikemeier,
Daniel Eischen, Eivind Eklund, Julian Elischer, Ralf S. Engelschall, Udo Erdelhoff, Ruslan Ermilov, Stefan
Esser, Bruce Evans, Sean Eric Fagan, Chris D. Faulhaber, Brian F. Feldman, Bill Fenner, Mário Sérgio
Fujikawa Ferreira, Tony Finch, Marc Fonvieille, Marc G. Fournier, Lars Fredriksen, Pete Fritchman, Dirk
Frömberg, Satsuki Fujishima, Shigeyuki Fukushima, Bill Fumerola, Atsushi Furuta, Andrew Gallatin, Patrick
S. Gardella, Thomas Gellekum, Justin T. Gibbs, Brandon Gillespie, Sebastien Gioria, Daichi Goto, Cameron
Grant, Edwin Groothuis, John-Mark Gurney, Ernst de Haan, Hiroyuki Hanai, Roger Hardiman, Michael Haro,
Daniel Harris, John Hay, Sheldon Hearn, Mike Heffner, Martin Heinen, Guy Helmer, Maxime Henrion,
Christoph Herrmann, Nick Hibma, Seiichirou Hiraoka, Tatsumi Hosokawa, Michael L. Hostbaek, Olivier
Houchard, James Housley, Jeffrey Hsu, Howard F. Hu, Jordan K. Hubbard, Tom Hukins, Matthew Hunt,
Mitsuru Iwasaki, Matthew Jacob, Jing-Tang Keith Jang, Gary Jennejohn, Trevor Johnson, Alexander
Kabaev, Poul-Henning Kamp, Thomas-Henning von Kamptz, Coleman Kane, Johan Karlsson, Josef
Karthauser, Takenori Kato, Sean Kelly, Kris Kennaway, Giorgos Keramidas, Tim Kientzle, Max Khon,
Kazuhiko Kiriyama, Andreas Klemm, Katsushi Kobayashi, Lars Koeller, Sergei Kolobov, Motoyuki Konno,
Maxim Konovalov, Joseph Koshy, Hideyuki Kurashina, Jun Kuriyama, Clement Laforet, Alexander Langer,
Erwin Lansing, Nate Lawson, Jeremy Lea, Chern Lee, Yen-Ming Lee, Sam Leffl er, Stéphane Legrand,
Oliver Lehmann, Alexander Leidinger, Jonathan Lemon, Don “Truck” Lewis, Greg Lewis, Patrick Li, Ying-
Chieh Liao, Clive Lin, Mark Linimon, Tilman Linneweh, Kevin Lo, Scott Long, Ade Lovett, Michael W. Lucas,
Pav Lucistnik, Scott Mace, Bruce A. Mah, Mike Makonnen, Juli Mallett, David Malone, Nobutaka Mantani,
Makoto Matsushita, Stephen McKay, Kirk McKusick, Eric Melville, Kenneth D. Merry, Dirk Meyer, Hellmuth
Michaelis, Yoshiro Sanpei Mihira, Bosko Milekic, Jonathan Mini, Yoshio Mita, Scott Mitchell, Noriaki
Mitsunaga, Jim Mock, Marcel Moolenaar, Eric Moore, Akio Morita, Dan Moschuk, Thomas Möstl, Mark
Murray, Akinori Musha, Yukihiro Nakai, Masafumi Nakane, Maho Nakata, Yoichi Nakayama, Alexander
Nedotsukov, Simon L. Nielsen, Anders Nordby, Robert Nordier, Michael Nottebrock, David O’Brien, Daniel
O’Callaghan, Tetsurou Okazaki, Jimmy Olgeni, Atsushi Onoe, Andre Oppermann, Sergey A. Osokin, Hiten
Pandya, Bill Paul, Mark Peek, Peter Pentchev, Denis Peplin, Alfred Perlstein, Wes Peters, Gerald Pfeifer,
John Polstra, Boris Popov, Kirill Ponomarew, Randy Pratt, Steve Price, Mike Pritchard, Mark Pulford,
Thomas Quinot, Darren Reed, George C. A. Reid, Michael Reifenberger, Andrew R. Reiter, Tom Rhodes,
Benno Rice, Paul Richards, Luigi Rizzo, Tim J. Robbins, Jeff Roberson, Ollivier Robert, Chuck Robey,
Jesus Rodriguez, Guido van Rooij, Gerard Roudier, Dima Ruban, Paul Saab, Sada Kenji, Hiroki Sato, Nick
Sayer, Søren Schmidt, Wolfram Schneider, Cy Schubert, David Schultz, Jens Schweikhardt, Lev
Serebryakov, Gregory Neil Shapiro, Arun Sharma, Takeshi Shibagaki, Norikatsu Shigemura, Takuya
Shiozaki, Hidetoshi Shimokawa, Vanilla I. Shu, Christopher Shumway, Mike Silbersack, Bruce M. Simpson,
Shafeeq Sinnamohideen, Dmitry Sivachenko, Jesper Skriver, Sergey Skvortsov, Ville Skyttä, Ken Smith,
Michael Smith, Ben Smithurst, Dag-Erling C. Smørgrav, Maxim Sobolev, Daniel C. Sobral, Brian Somers,
Nicolas Souchu, Diomidis D. Spinellis, Murray Stokely, Munechika Sumikawa, Gregory Sutter, Suzuki
Shinsuke, Bill Swingle, Yoshihiro Takahashi, Seigo Tanimura, Satoshi Taoka, Mikhail Teterin, Gordon
Tetlow, Yar Tikhiy, Chris Timmons, Hajimu Umemoto, Semen Ustimenko, Rajesh Vaidheeswarran, Tim
Vanderhoek, Valentino Vaschetto, Jacques Vidrine, Jayanth Vijayaraghavan, Johann Visagie, Rebecca
Visger, Bernd Walter, Takanori Watanabe, Adam Weinberger, Christian Weisgerber, Assar Westerlund,
Doug White, Nate Williams, Garrett Wollman, Michael C. Wu, Jörg Wunsch, Kelly Yancey, Jennifer Yang,
Maksim Yevmenkin, Kazutaka Yokota, Andrey Zakhvatov, Dave Zarzycki, Alexey Zelkin, Jean-Marc
Zucconi.