General Dynamics Itronix IX-GUBTC41MTH IX-GUBTC41MTH User Manual 1
General Dynamics Itronix Corporation IX-GUBTC41MTH 1
Contents
- 1. User Manual 1
- 2. User Manual 2
- 3. RAdio specific safety information
User Manual 1

Getting Started
Congratulations on your purchase of the Duo-Touch II Tablet PC! Your new Duo-Touch II features the most innovative advances in
portable computing technology. It combines state-of-the-art ergonomics, patented RF technology, and a rugged , durable architecture to
provide you with a Tablet PC that is compact, powerful, and easy to use virtually anywhere.
Designed for a wide range of business productivity applications, the Duo-Touch II is an ideal choice for mobile workers who are on the go
throughout the day. It offers flexibility, durability and dependability along with ruggedness and portability to make it quick and easy to
transport to any work location, indoors, outdoors, or in your vehicle.
This online document, Duo-Touch II Help, contains all the information you need to set up and use your new Tablet PC. For information on
printing, searching, navigating or using Duo-Touch II Help, see How to Use This Help System. To optimize readability, we recommend
you view this document in landscape orientation. If you have suggestions for how we may improve this document, please e-mail
technical.publications@gd-itronix.com.
Unpacking Your System
After opening the package, carefully inspect the contents. Contact your dealer if any items are missing or appear
damaged. The shipping carton should contain a Duo-Touch II Tablet PC with the following features and parts:
Standard Parts
Standard Features
Optional Features
Optional Accessories
Where to Look For Information
About Your Duo-Touch II Tablet PC
Pa
g
e 1 of 57Duo-Touch II Hel
p
2/28/2008file://C:\Documents and Settin
g
s\harwoodm\Local Settin
g
s\Tem
p
\~hh5E31.htm

About Windows XP
About Windows Vista
Precautions
You can use your computer under a wide range of environmental conditions. However, to ensure long use and
continued high performance, consider the following factors when setting up your computer:
zFollow all warnings and instructions noted in this documentation, including the notification section
zFollow all warnings and instructions noted in Windows Help and Support, found on the Start Menu
zThe first time you use your computer, we recommend that you carefully read the section on Power
Management to familiarize yourself with basic battery information and ensure optimum performance
zWARNING! There is danger of explosion if the battery is incorrectly replaced. Replace only with the same
or equivalent type recommended by the manufacturer. Dispose of used batteries according to the
manufacturer's instructions
zCAUTION Internal components of the Duo-Touch II will be damaged if exposed to contaminants when doors are open on the
computer. Shield the unit from all contaminants such as liquids, rain, snow, and dust
zUnplug the computer from the power outlet before cleaning. Use a damp cloth for cleaning. Do not use
aerosols, solvents, or strong detergents
zSome vents and openings in the computer case are for ventilation purposes. Do not block or cover these
openings or the system could overheat
zThere is a label on the bottom of the Duo-Touch II containing information on the power requirements of this
system. These requirements must be followed. If you are unsure of your local power supply, consult your
dealer or local power company
zDo not step on or place anything on the power cord
zIf you use the computer with an extension cord, ensure that the total ampere ratings of all the devices sharing
the extension do not exceed the rating of the extension cord or the rating of the wall outlet
zUnless instructed, never push foreign objects into the computer through any of the slots or openings.
Dangerous voltages are present, which could cause electric shock, fire, or damage sensitive components
zFor best results, use a power strip with a built-in surge protector. Do not use inferior extension cords as this
may result in damage to your computer
zDo not operate the Duo-Touch II at temperatures above 140°F (60°C) or below -4°F (-20C)
zDo not store the Duo-Touch II at temperatures above 167°F (75°C) or below -67°F (-55°C)
The First Time...
Using your computer for the first time involves:
zConnectin
g
the AC Ada
p
te
r
Pa
g
e 2 of 57Duo-Touch II Hel
p
2/28/2008file://C:\Documents and Settin
g
s\harwoodm\Local Settin
g
s\Tem
p
\~hh5E31.htm

zTurning the Duo-Touch II On
zCalibrating the Display
More Basics
The next section, Getting Familiar with Your Computer, contains basic information you need to efficiently use your
Duo-Touch II.
Startup Problems
If your computer does not start properly, try these solutions:
zConnect the AC adapter to charge the battery if it is not charged.
NOTE The Power Status LED should be solid blue and the Power LED on the AC adapter should be lit if the
AC adapter is connected and functioning properly. Additionally, one of the power icons should appear in the
task tray.
zIf the AC adapter is connected, make sure the electrical outlet you are using works.
zCheck to make sure the battery is installed and charging properly.
zIf the battery does not begin charging, remove the battery, connect the AC adapter, and turn on the computer
by pressing the power button ; then reinstall the battery. The Battery Status LED is orange while the battery is
charging.
The Troubleshooting section lists additional solutions you can try.
Best Practices for the Duo-Touch II
This section provides Duo-Touch II with recommended practices intended to maximize the service life of the equipment and provide
resolution to common issues. For more detailed discussions of care, maintenance and troubleshooting, see the sections below:
zOperating with Battery Power
zCustomizing Your BIOS Settings
zMaintenance and Storage
zTroubleshooting
General Daily Operations
1. Missing Case Feet, Port Covers and Doors: Inspect for broken, loose or missing parts and fasteners.
a. Items such as missing case feet can present alignment and fit issues when the Duo-Touch II is used in a
vehicle dock. A loose fit condition can subject the Duo-Touch II to excessive vibration and shock from
daily driving conditions.
b. Missing port covers or doors create contaminant entry points which may lead to system failure.
c. Re
p
lacement
p
ort covers, doors, and case feet are available as field kits. contact
y
our su
pp
ort
Pa
g
e 3 of 57Duo-Touch II Hel
p
2/28/2008file://C:\Documents and Settin
g
s\harwoodm\Local Settin
g
s\Tem
p
\~hh5E31.htm

representative for order requests.
2. Screen Cleaning: The Duo-Touch II display, with proper usage and cleaning, will last for the anticipated field
life of the product (3 to 5 years) without significant degradation in view ability or function.
a. For mild cleaning tasks use the micro-fiber cleaning cloth provided with your unit. Tougher
contaminates such as oily fingerprints may require light dampening with clean water, and will be
effective for most contaminants without damaging the screen surface. This method should always be
tried before stronger solutions are considered.
b. For tougher cleaning tasks, a mixture of Isopropyl Alcohol and Water (50/50) used with the cleaning
cloth is effective and will not damage the Touch Screen surface.
c. Never use paper products such as paper towels or wipes to clean the display surface. Paper products are
abrasive and act much like fine sandpaper causing irreversible damage to the screen surface and anti-
glare hard coat.
d. Both replacement Display Cleaning Cloths and approved Display Cleaning solution are available as
Field Kits. Contact your support representative for order requests.
3. Screen Overlay Use: A screen overlay is recommended for environments with high contaminant potential.
a. A Screen overlay provides protection from damage caused by use of foreign objects or surface
contaminants, and maximizes the useful life of the screen surface.
b. Worn, scratched, or otherwise damaged screen overlays can be replaced.
c. Contaminants on the screen overlay surface should be removed by following the same cleaning methods
noted above.
d. The screen overlay has a negligible impact on overall display brightness/viewability and provides
enhanced screen clarity while maximizing the screen surface useful life.
e. Screen Overlays are available as Field Kits. Contact your Support Representative for order requests.
4. Use of the Touch Screen Stylus: If your Duo-Touch II has the optional integrated Touch Screen use the
included stylus. Foreign objects such as ball point pens or hand tools should never be used for Touch Screen
input; they will cause damage to the screen surface.
a. A clean finger tip can be used for Touch Screen input with out damaging the screen surface. Fingertip
use may introduce contaminants to the Touch Screen surface and increase periodic screen cleaning
requirements.
b. Replacement Styli are available as Field Kits. Contact your Support Representative for order requests.
NOTE: Available Field Kits and can be ordered through the iCare Servenet Portal, or by contacting the Client Care
Center (CCC) at 800-638-9270, option 2. Access to the iCare Servenet Portal requires a User Name and Password.
Portal access will be setup upon request.
5. Ensure that the computer is operated and stored within its specified temperature range.
1. Operating Temperature -4° F to 140° F (-20° C to 60° C)
2. Stora
g
e Tem
p
erature -67° F to 167° F
(
-55° C to 75° C
)
Pa
g
e 4 of 57Duo-Touch II Hel
p
2/28/2008file://C:\Documents and Settin
g
s\harwoodm\Local Settin
g
s\Tem
p
\~hh5E31.htm

6. Conserve battery charge when possible to maximize battery life during daily use.
1. Partial discharge/charge cycles are preferred compared to draining the battery completely and
recharging.
7. Avoid prolonged exposure to temperature extremes.
1. Cold temperature extremes may result in reduced available energy from the battery. This energy is
recoverable as the battery warms to a nominal temperature of 68° F (20°C).
2. Prolonged exposure to high temperatures can result in a permanent reduction in available energy from
the battery.
3. Battery charging is disabled below 32° F (0°C) and above 113° F (45°C) to protect the lithium ion cells
in the battery.
8. Power Down: Exit all applications, and shutdown or reboot at the end of each work day. If the computer is
left powered overnight, ensure that all applications are closed and perform a restart prior to beginning daily
operations.
1. This practice ensures that all applications (and system resources used by those applications) are
reinitialized each work day.
2. Unless an application is specifically designed for 24/7 operation, a daily practice of restarting (resetting)
an application can minimize the potential for a wide variety of operational anomalies often perceived as
a hardware failure.
9. Use of the Duo-Touch II in a Vehicle Dock:
1. Never attempt to operate the Duo-Touch II or read the display while driving. This is extremely
distracting and may increase potential for accidents.
Tips for New Owners
zRead the Troubleshooting section for common questions and answers about the Duo-Touch II
zTake the Windows tutorials
For Windows XP, select "Get Going with Tablet PC" from the Start Menu.
For Windows Vista, select Start, Welcome Center, Tablet PC Pen Training.
zTake responsibility for backup
Back up files often. Users who need to manage large amounts of data may wish to use backup devices such as
a ZIP drive.
zDon't leave passwords anywhere on your Tablet PC or carrying case
zBe careful when placing your Tablet PC on an airport security conveyor belt
In most airports, security conveyor belts are safe for computers. If you are not sure, ask the security staff. You
should keep a close eye on your computer.
zTape your business card to the Tablet PC and accessories
In the workplace, Tablet PCs and accessories may often look exactly alike, leading to equipment mix ups.
Prevent such mix u
p
s b
y
p
lacin
g
y
our name on
y
our e
q
ui
p
ment.
Pa
g
e 5 of 57Duo-Touch II Hel
p
2/28/2008file://C:\Documents and Settin
g
s\harwoodm\Local Settin
g
s\Tem
p
\~hh5E31.htm

zUse a lock
For added security, consider purchasing a Kensington lock to secure the Tablet PC to a desk or table.
zDevelop ergonomic work habits
The science of ergonomics studies the relationship between health and a suitable work environment. For more
information on ergonomics, contact your nearest computer bookstore, or local library. The Internet also has
information on this and other related subjects.
NOTE Using a computer for extended periods of time with a poor workstation setup or incorrect work habits
can cause health problems.
Power Management
1. Power Management Applications: The use of Windows Power Management or Duo-Touch II Power Saver
(if equipped) applications is recommended to provide maximum battery run time and prolong battery service
life. Default settings allow the Duo-Touch II to enter a Standby/Suspend state after a set period of inactivity.
Extending or Disabling the Standby/Suspend time-out period will increase power consumption and reduce
operational time on battery power.
The Duo-Touch II will resume/wake from Standby by pressing the Power Button.
2. Display backlight power settings: Extending or disabling the display backlight time-out period increases
power consumption and reduces operational time on battery power. The display backlight will resume power
with keyboard or cursor activity.
3. Shutdown: Shutdown the Duo-Touch II when it will not be used for extended periods to conserve battery
power. Depending on the configuration of the Duo-Touch II there are specific considerations:
1. Basic Configuration – No PC Card devices, RF Modems or external device connections. When using a
basic configuration unit, there are no special considerations for power management.
2. Integrated RF Devices – Disable integrated or user installed RF devices when not in use as they can
consume battery power unnecessarily
3. Externally connected devices – Some externally connected devices may be powered by the Duo-Touch
II. It is best to exit any application utilizing these devices prior to powering off. Restarting the
application should reinitialize the device. Externally connected devices or peripherals using Duo-Touch
II battery power may result in reduced battery run times.
File Management
Backups: It is good practice to backup essential data and files periodically. Any data or files stored in volatile
memory (RAM) can be lost in the event of a hard reset or unexpected shutdown. Contacts, tasks, calendar, email,
and documents should be safeguarded against loss.
Battery Charging
1. Charge the battery at room temperature (approximately 68° F [20° C]) for best results. Charge acceptance
is optimum at this temperature and requires the least amount of time to fully recharge. At room temperature
the Duo-Touch II batter
y
re
q
uires a
pp
roximatel
y
three
(
3
)
hours to rechar
g
e from a full
y
dischar
g
ed state.
Pa
g
e 6 of 57Duo-Touch II Hel
p
2/28/2008file://C:\Documents and Settin
g
s\harwoodm\Local Settin
g
s\Tem
p
\~hh5E31.htm

2. Charge the Duo-Touch II Battery at the end of each work day:
c. Exit all applications and power off.
d. Connect to external power; Verify External Power LED.
e. Verify charge indicator LED.
3. At the beginning of each work day:
a. Check for battery charge status (Recommend Fully Charged)
4. During each work day:
a. Connect AC Charger, Vehicle Dock, or Vehicle Power Adapter whenever possible.
b. Verify charging indicator LED.
Storage
1. Storing the Duo-Touch II for five (5) days or less
a. Install the battery pack and connect the Duo-Touch II to external power and allow the battery pack to
fully charge. The charging LED will be solid orange while charging and green when battery charging
is complete.
b. Shut down the Duo-Touch II and store in a cool, dry location.
2. Storing the Duo-Touch II for longer than five (5) days.
a. Lithium Ion batteries can be permanently damaged if the Duo-Touch II is stored for extended periods
requiring battery replacement.
b. If the computer will be stored for more than 5 days, backup files and data, fully charge the battery, and
then discharge it to 40% and remove the battery.
c. The Duo-Touch II and battery should be stored in a cool, dry location.
3. When storing Li-Ion battery packs for extended periods, consider these factors
a. Fully charged Li-Ion battery packs deteriorate faster than partly discharged ones. For ideal storage,
charge the packs to 100% and then discharge them to a 40% charge before storage.
b. Do not allow stored Li-Ion packs to discharge completely, as this may permanently damage them.
Stored packs should be recharged to 40% capacity every six (6) months.
c. Storing packs at temperatures near 0°C (45°F) slows down self-discharge and battery aging; packs that
are stored for a long period should be kept at low temperatures where practical.
NOTE Store batteries as close as practical to 0°C (45°F) without allowing the batteries to freeze or reach 0°C
(32°F).
d. If you store battery packs at normal ambient temperatures, use the following charge policy to maintain
b
atter
y
p
ack condition:
Pa
g
e 7 of 57Duo-Touch II Hel
p
2/28/2008file://C:\Documents and Settin
g
s\harwoodm\Local Settin
g
s\Tem
p
\~hh5E31.htm

i. Store batteries within the temperature range of 15°C to 30°C (59°F to 86°F).
ii. Charge installed packs every 5 days to maintain their charge capacity.
iii. Charge uninstalled packs every six (6) months to 100%, then discharge to 40% and return to
storage.
Troubleshooting
These are basic troubleshooting tips. For more complete help with troubleshooting, see the Troubleshooting section
at the end of this Help file.
1. Battery Power – Battery does not charge
2. Battery Power – Short run time
3. Lock-ups
a. Determine if the Digitizer, Touchscreen, or keypad inputs are recognized.
b. Attempt to close any programs that are not responding (press the Security key, Task Manager).
c. If Task Manager does not list any suspect programs/applications, perform a reboot.
d. Restart applications and try the specific operation again.
e. If the Shut down Menu does not respond, press and hold the power button for approximately 10 seconds
to perform a forced shutdown. Note: Any unsaved data will be lost when using this shutdown method.
4. RF Communications
a. If coverage is historically good at this location, check the signal strength. Reposition the computer
slightly to increase signal strength. Wait approximately five (5) minutes. Determine if there is RF
activity. Applications provided with RF devices generally provide diagnostic capability.
b. If not resolved, exit all applications, restart the applications, and try RF communications again.
c. If not resolved, connect external power and perform a restart.
d. Restart applications and try RF communications again.
5. Additional Information is Available
a. The Duo-Touch II Getting Started Guide included with the original shipment packaging.
b. The Duo-Touch II factory installed Windows image includes a resident help file with a link on the
desktop; alternately Help can be accessed via the following path: Start -> All Programs -> Mobile
Computer Tools.
c. Please contact your Support Representative for any additional questions.
Getting Familiar with your Tablet PC
Pa
g
e 8 of 57Duo-Touch II Hel
p
2/28/2008file://C:\Documents and Settin
g
s\harwoodm\Local Settin
g
s\Tem
p
\~hh5E31.htm
The Duo-Touch II is a rugged , weather-sealed Tablet PC built for the demanding environment of the mobile
worker. This computer is a superior work tool for collecting, managing, and communicating information in the field.
This section describes the external and internal features of your Duo-Touch II Tablet PC. This document uses the
landscape view as the default orientation.
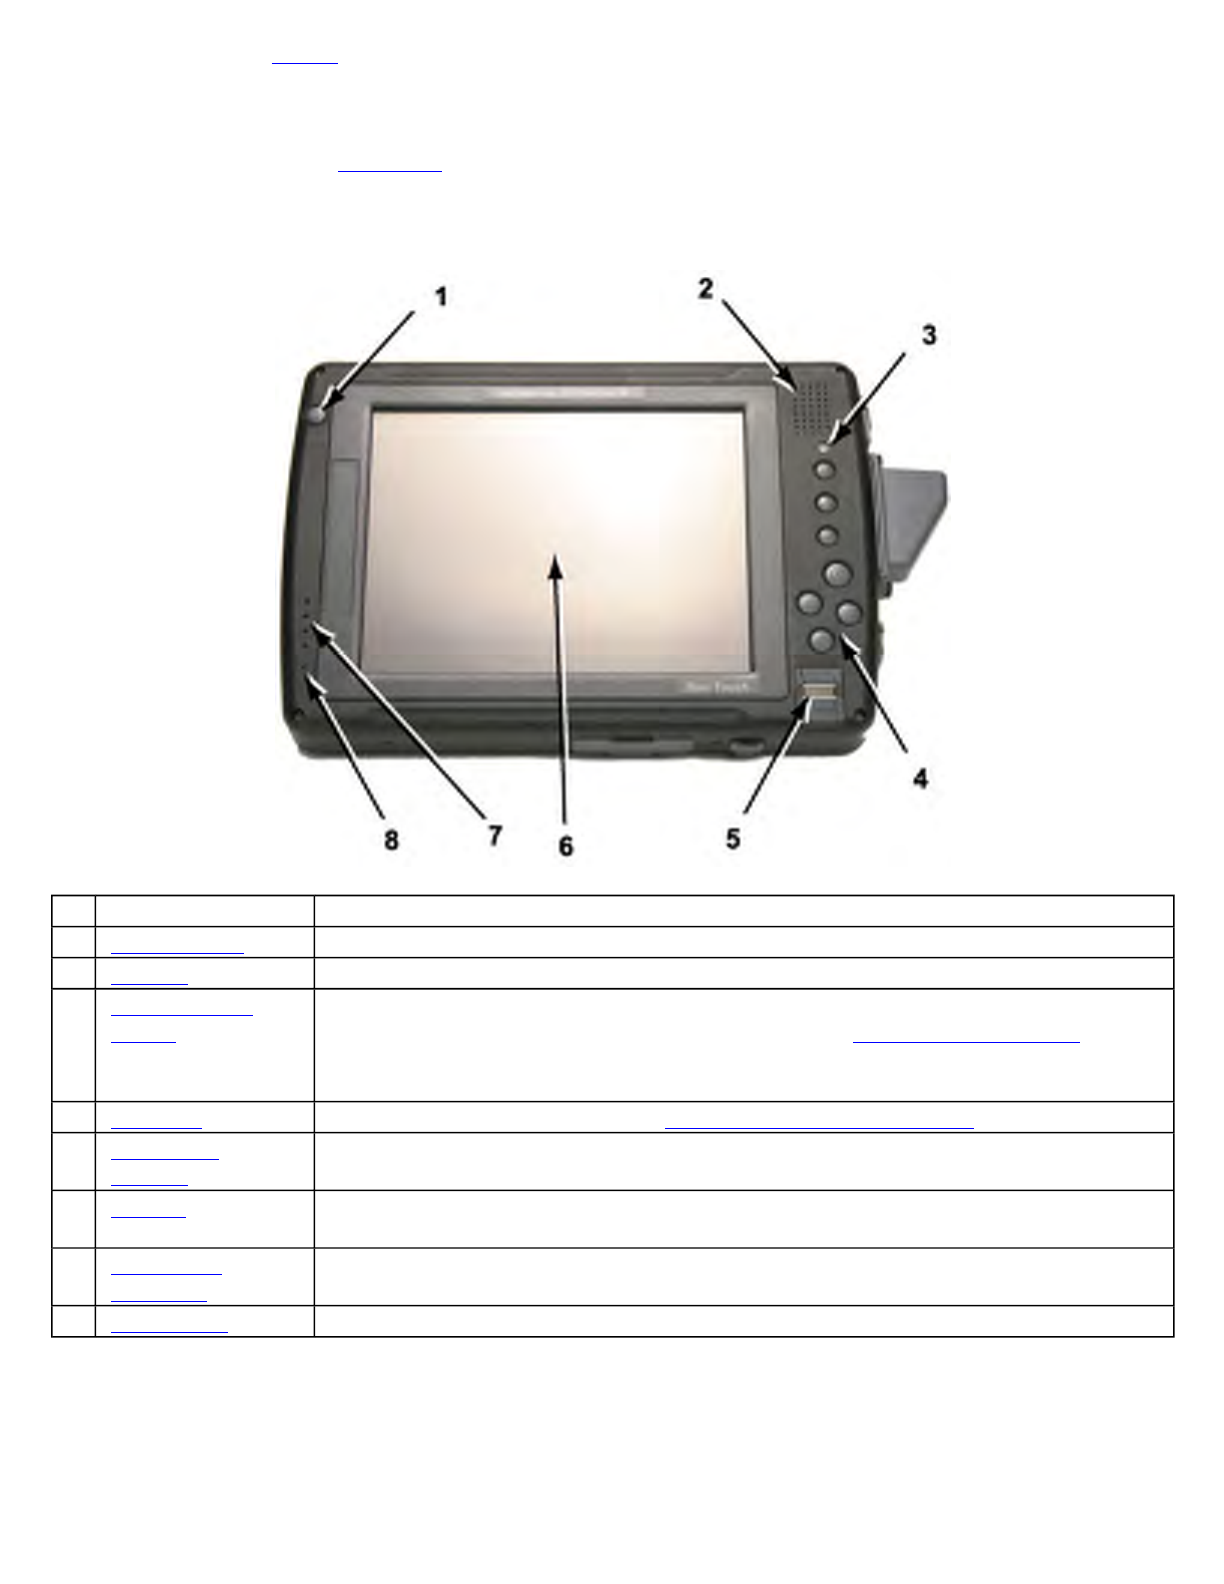
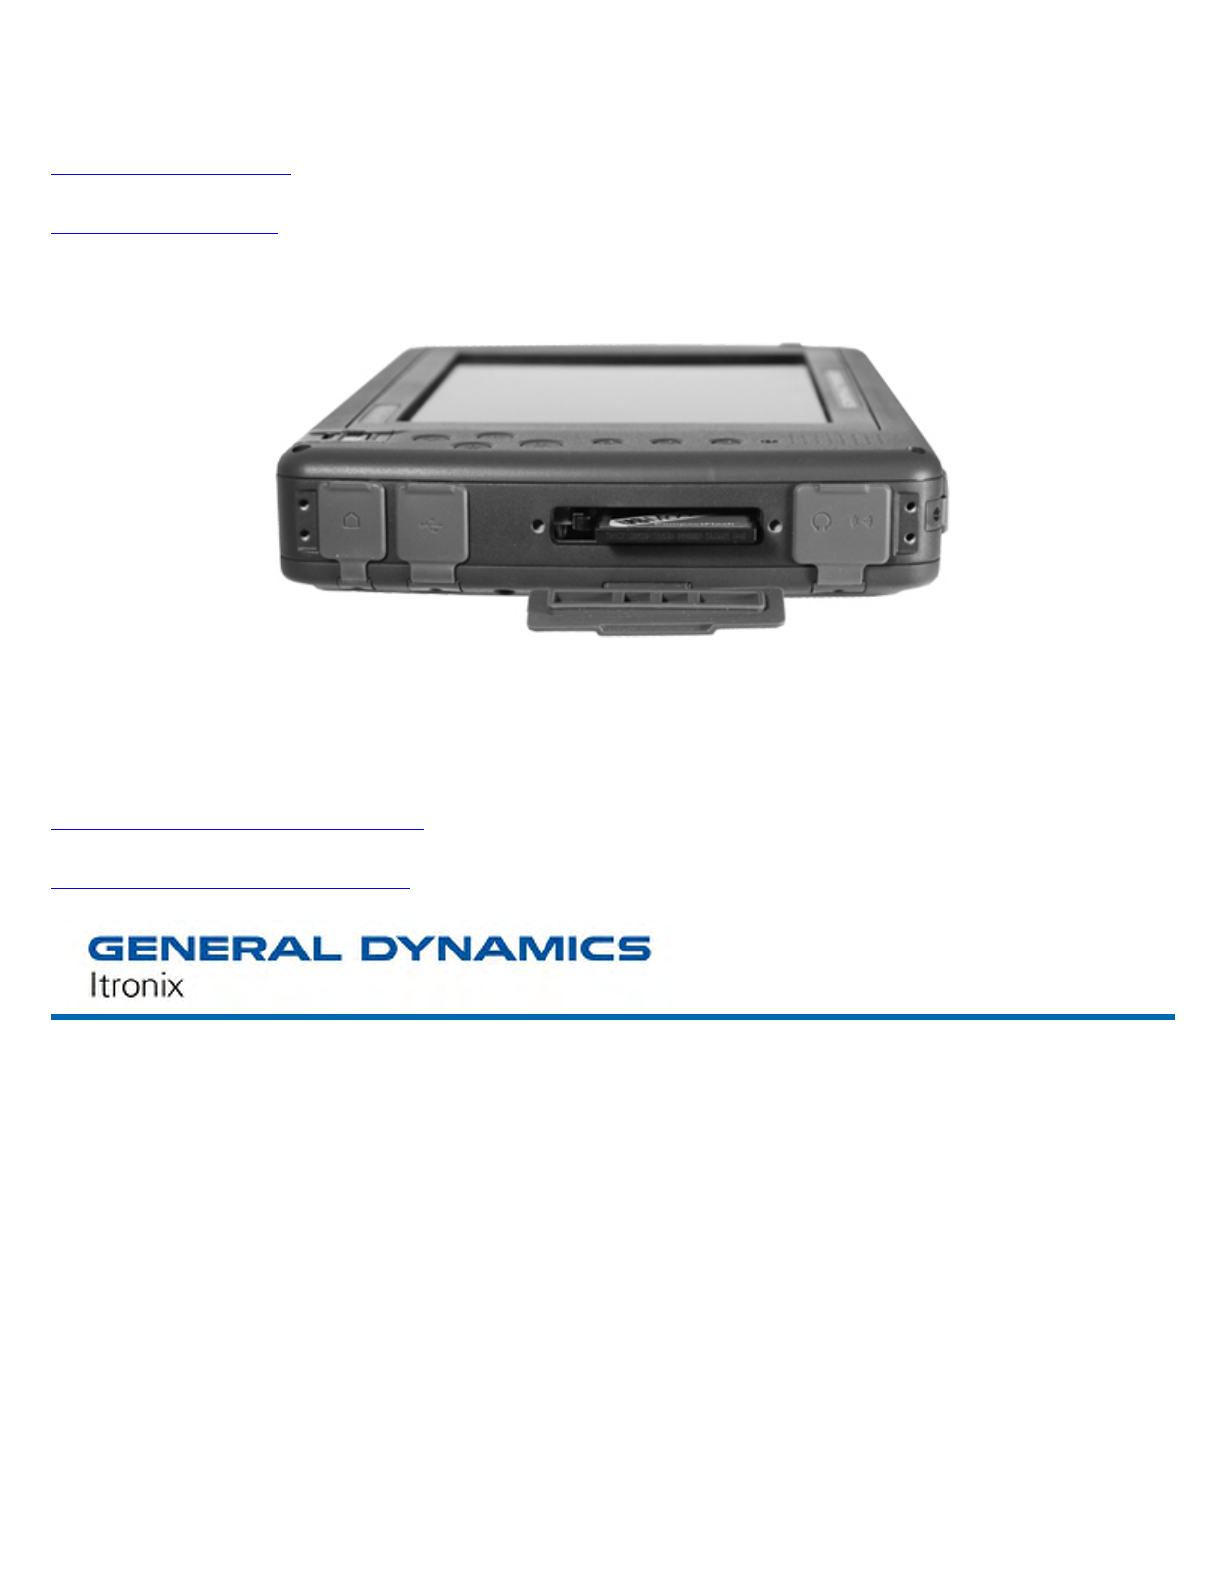
Front View
Right Side View
# Feature Description
1 Power Button Press this button to turn the unit on or off or to hibernate
2 Speaker Use the integrated speaker for audio output
3
Ambient Light
Sensor
When enabled, the Ambient Light Sensor adjusts the display backlight in response to
ambient light conditions. It is disabled by default. See Display and Pen Basics for
more information.
4 Hot Keys Speeds common functions such as changing the display orientation
5 Fingerprint
Scanner Optional Fingerprint Scanner for additional security.
6 Display 8.4" TFT SVGA Outdoor Transmissive Display with Digitizer Control Panel and
optional Touch Screen
7 LED Status
Indicators The LEDs light up when a particular function of the computer is active
8 Microphone Use the sealed, integrated microphone for audio input
Pa
g
e 9 of 57Duo-Touch II Hel
p
2/28/2008file://C:\Documents and Settin
g
s\harwoodm\Local Settin
g
s\Tem
p
\~hh5E31.htm
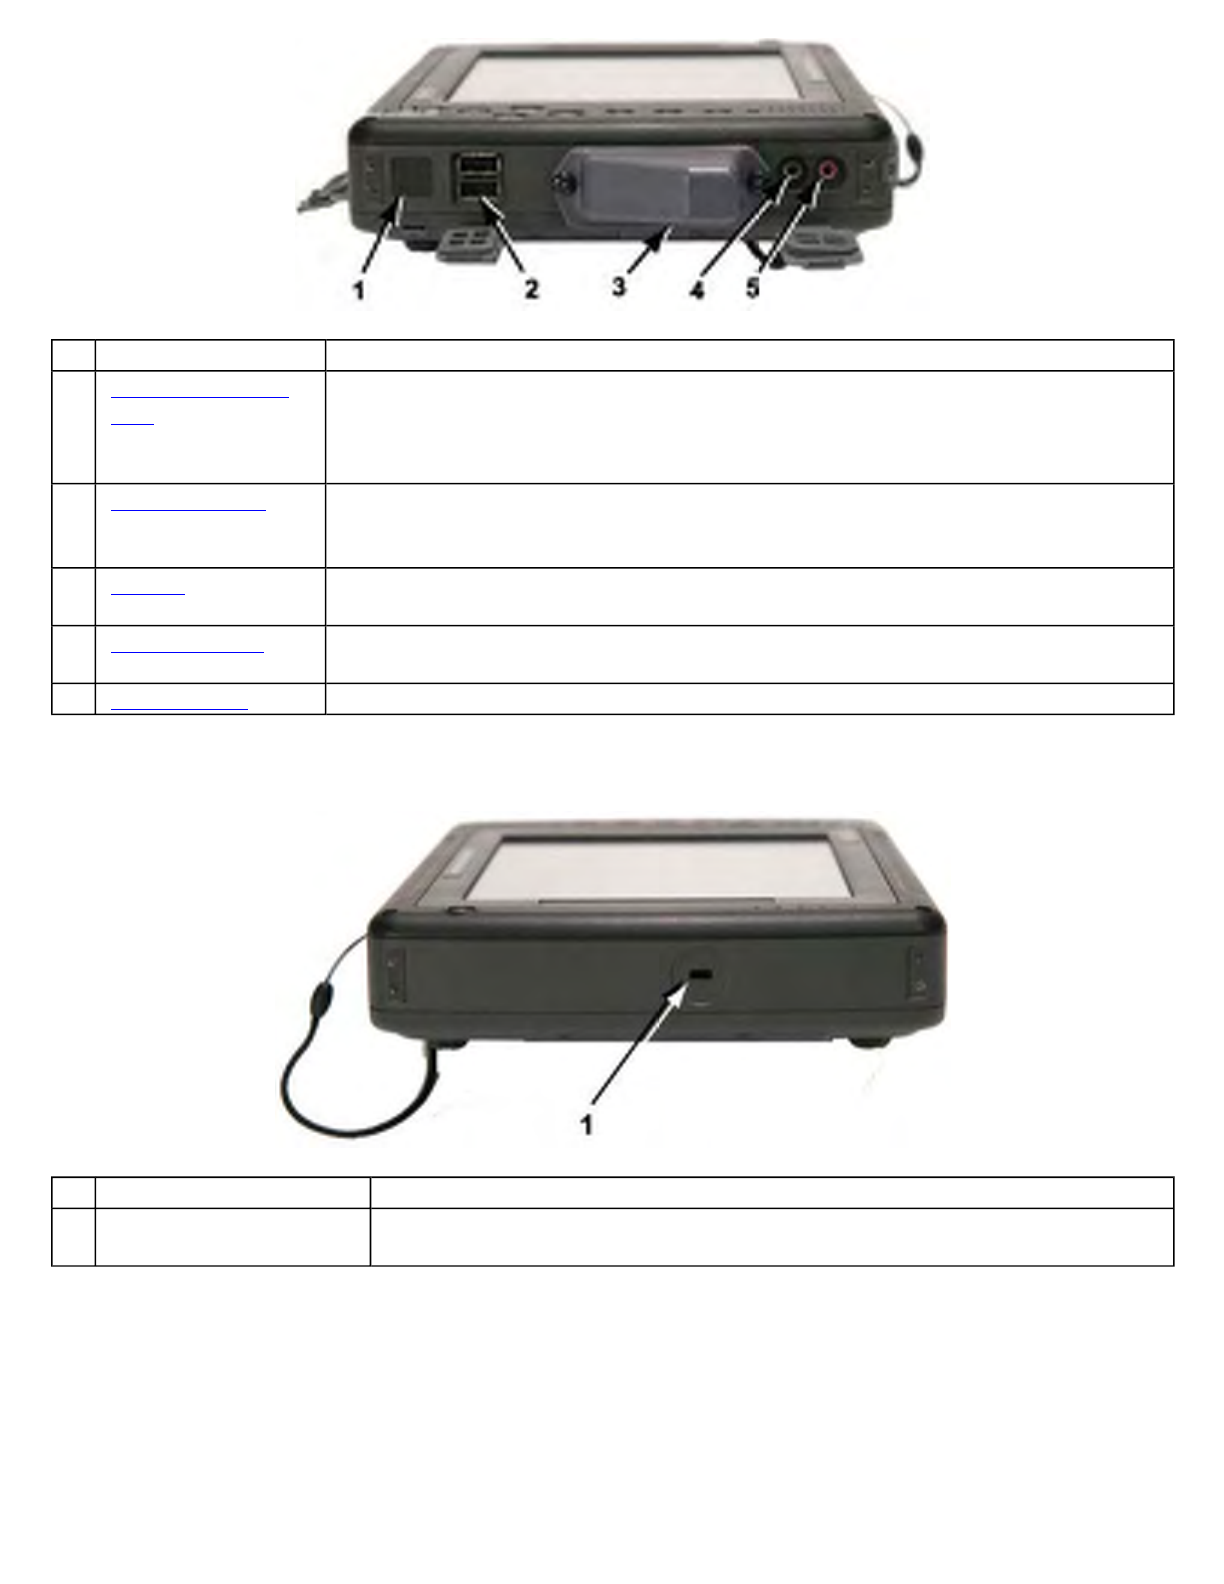
Left Side View
Top Edge View
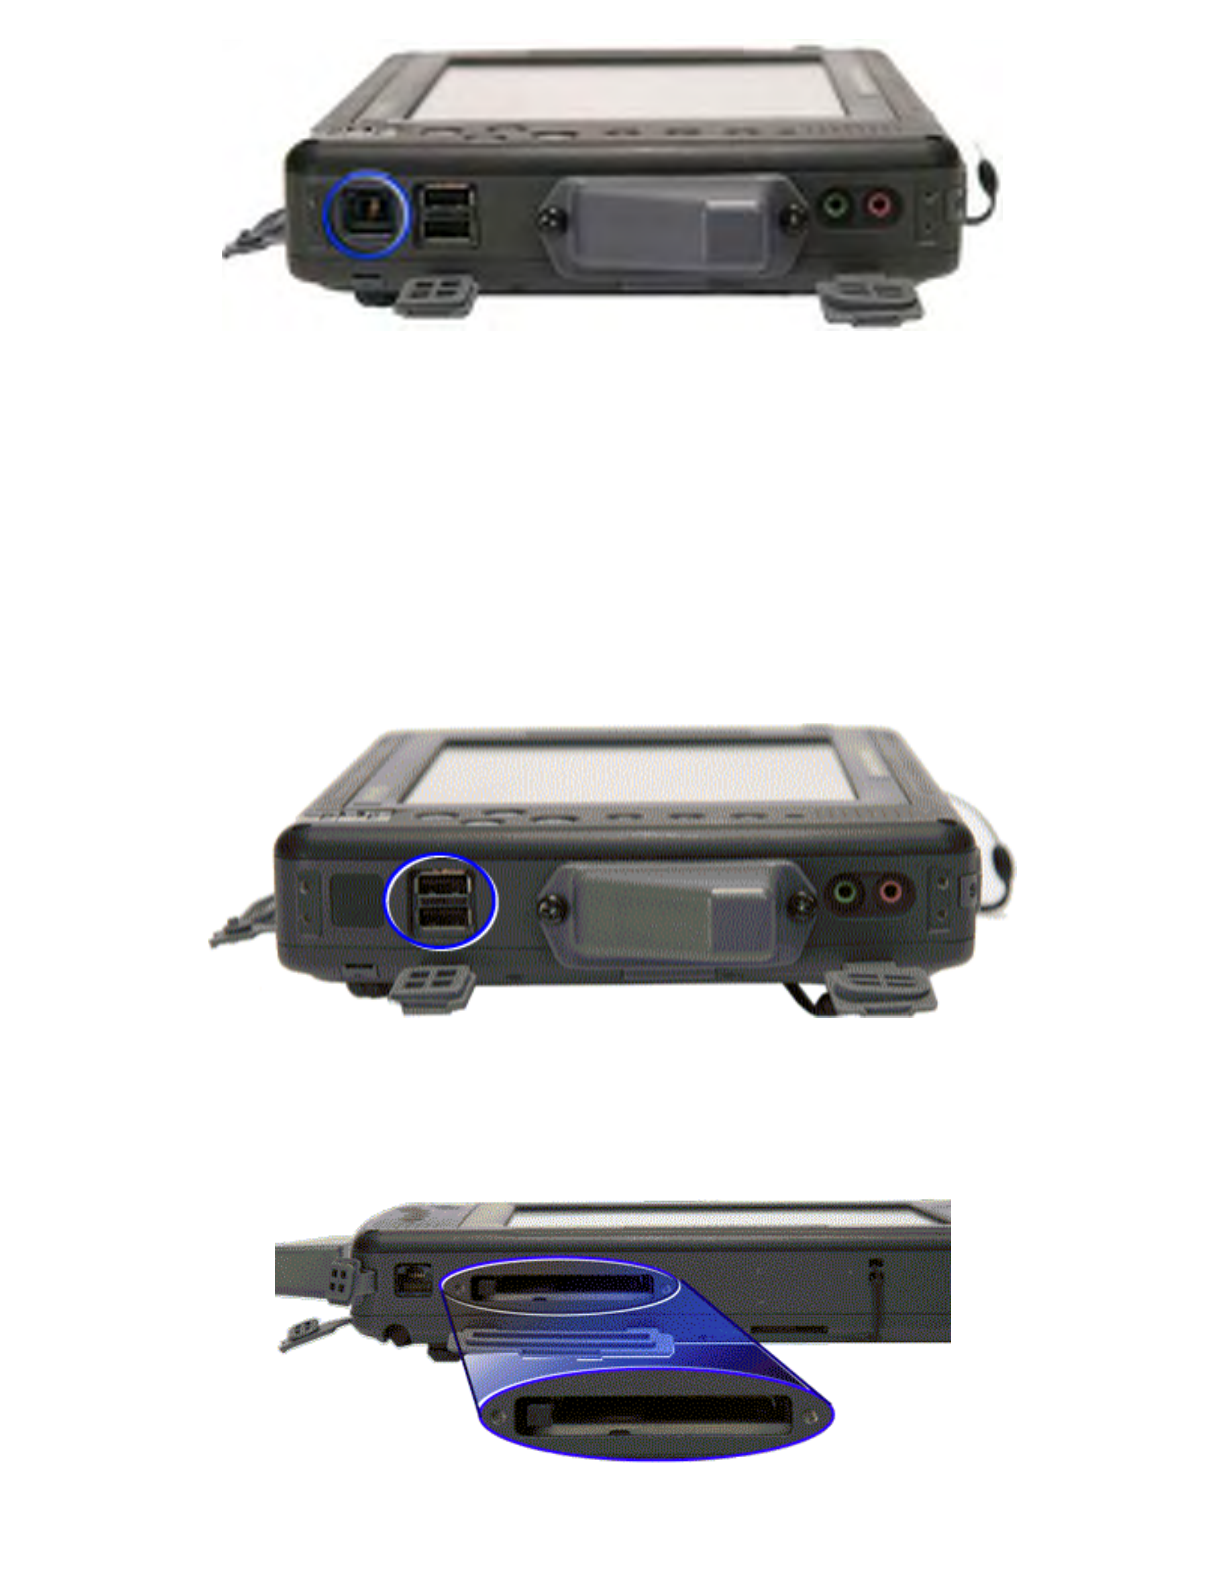
# Feature Description
1 Fax/modem RJ-11
Jack
The fax/modem can transmit data using the 56 Kbps V.90 or V.92 protocol, and
send and receive faxes at 14.4 Kbps.
2 2 USB 2.0 ports The Universal Serial Bus (USB) enables you to attach keyboards, a mouse, scanners,
printers and other USB devices. USB devices can be chained together on a single
cable.
3 CF Slot Housing for (optional) GPS electronics and antenna or CF Slot for Compact Flash
Cards and devices.
4 Audio-Out Jack Connect external speakers or a stereo headset to this jack to listen to multimedia
(mono only).
5 Audio-In Jack Connect a microphone to this jack to record audio.
# Feature Description
1 Security Slot Your computer has a Security Slot that can be used with a standard laptop
locking device, such as a Kensington Lock.
Pa
g
e 10 of 57Duo-Touch II Hel
p
2/28/2008file://C:\Documents and Settin
g
s\harwoodm\Local Settin
g
s\Tem
p
\~hh5E31.htm
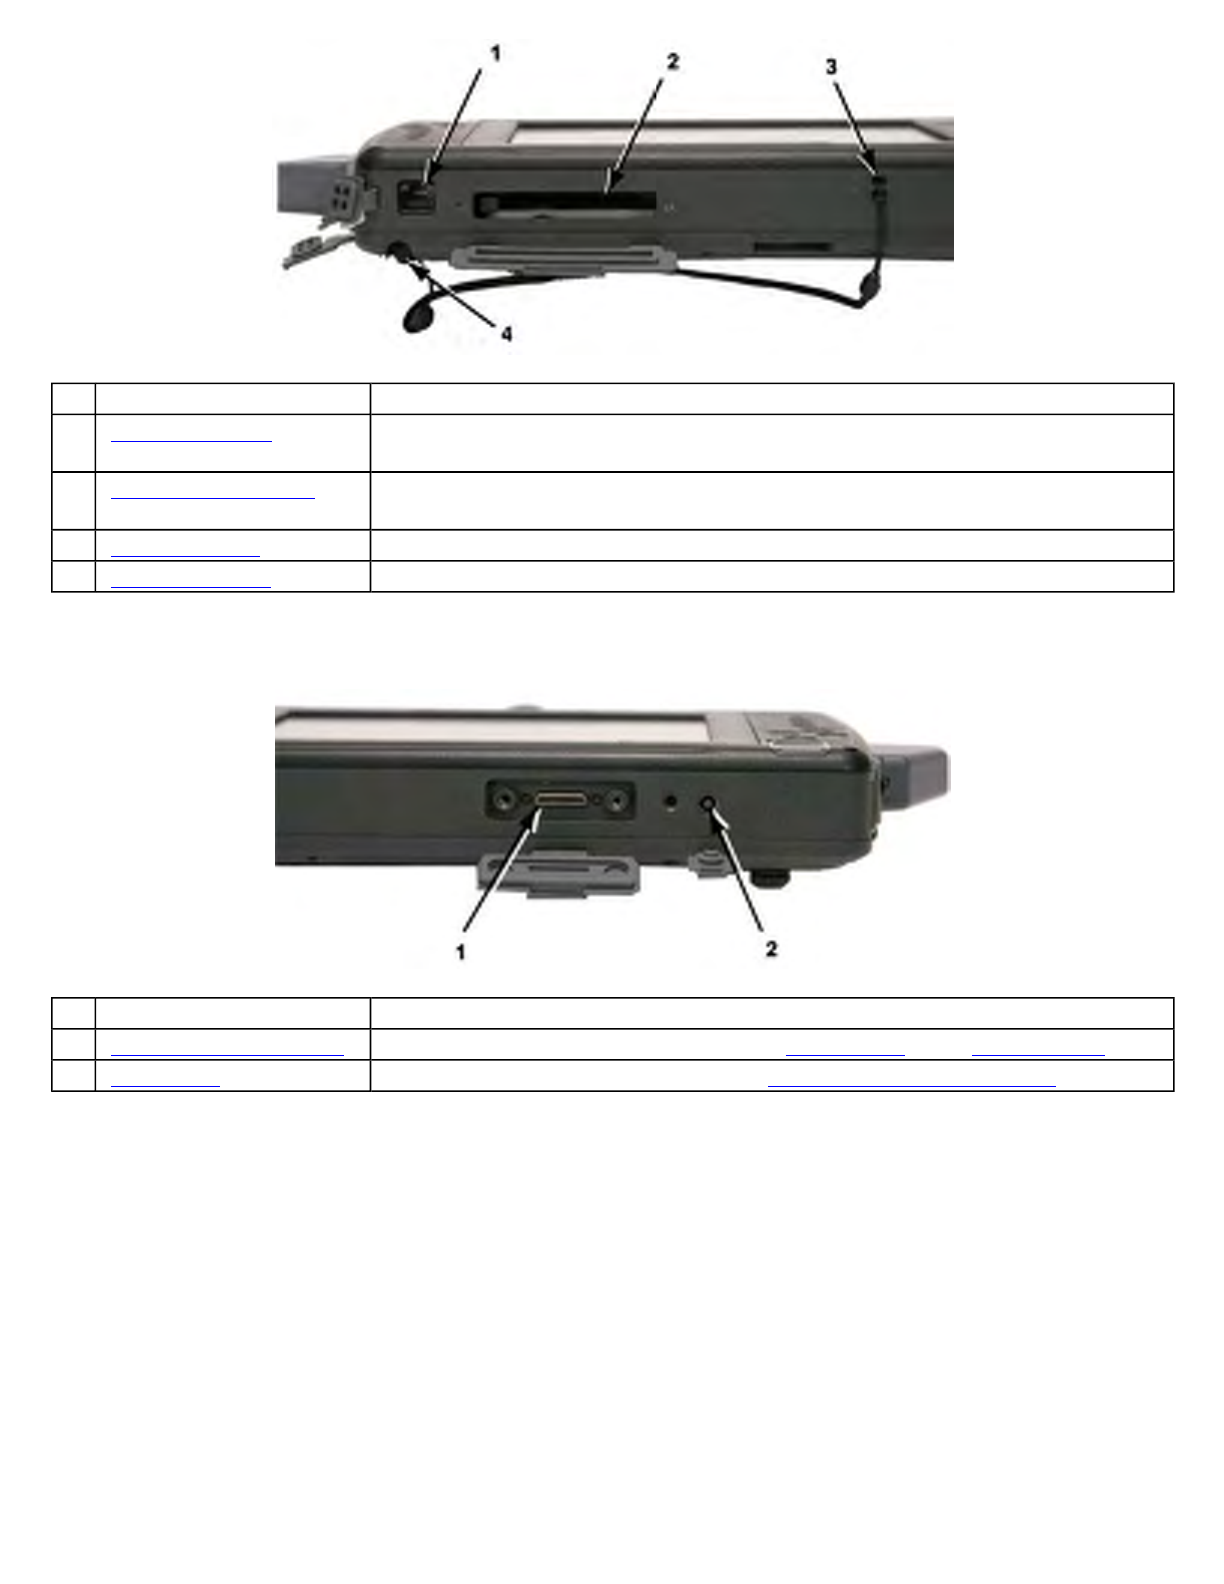
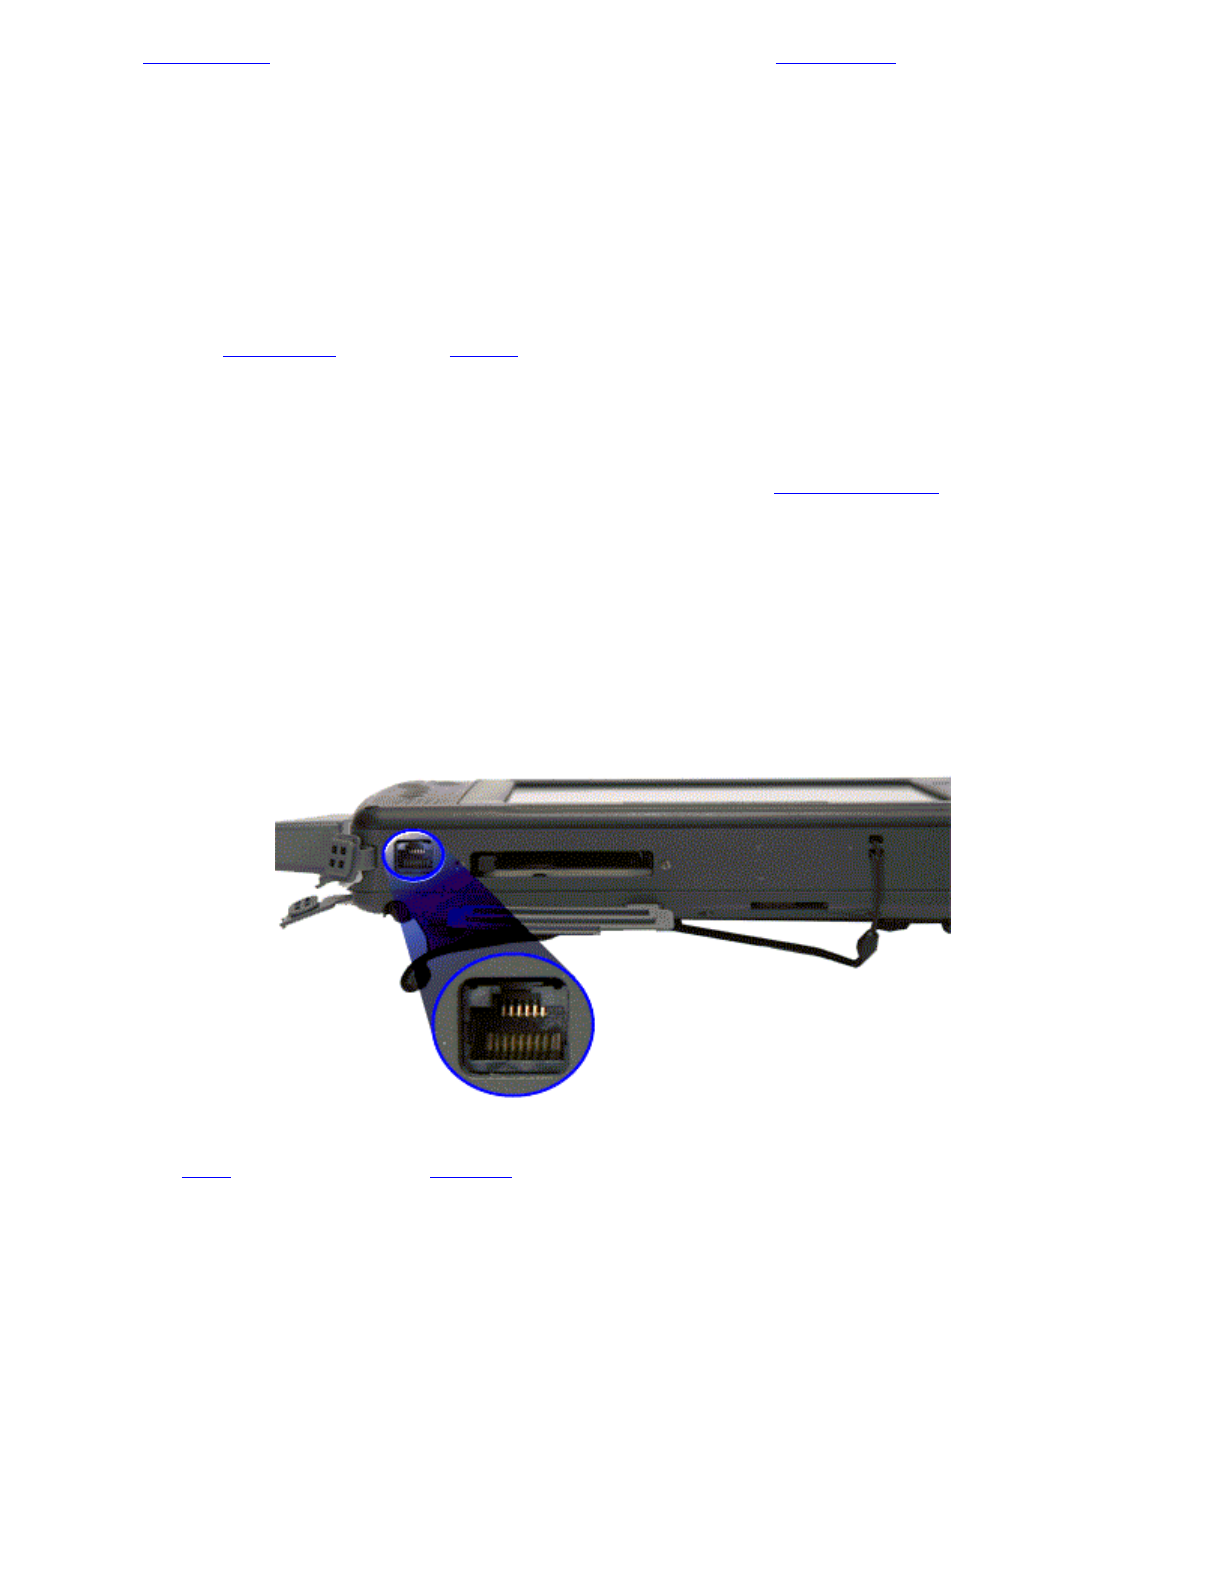
Bottom Edge View
Back View
# Feature Description
1 LAN RJ-45 Jack With an Ethernet LAN (Local Area Network) you can make LAN connections
without installing PC Cards. Connection speed is 10/100/1000 Mbps.
2 Type II PC Card Slot The PC Card Slot supports 32 bit Card Bus 2.1 interface as well as Zoom Video
when in landscape orientation. You can use this slot with PC Card Radios.
3 Pen Tether Slot Thread your pen tether through this slot.
4 Pen Storage Slot Store the pen / stylus here when not using it.
# Feature Description
1 Multi-IO Extension Slot Use this Multi-IO extension slot with the Desk Mount or the Vehicle Dock.
2 DC-in Jack Power the Tablet PC by connecting the AC adapter or vehicle adapter.
Pa
g
e 11 of 57Duo-Touch II Hel
p
2/28/2008file://C:\Documents and Settin
g
s\harwoodm\Local Settin
g
s\Tem
p
\~hh5E31.htm
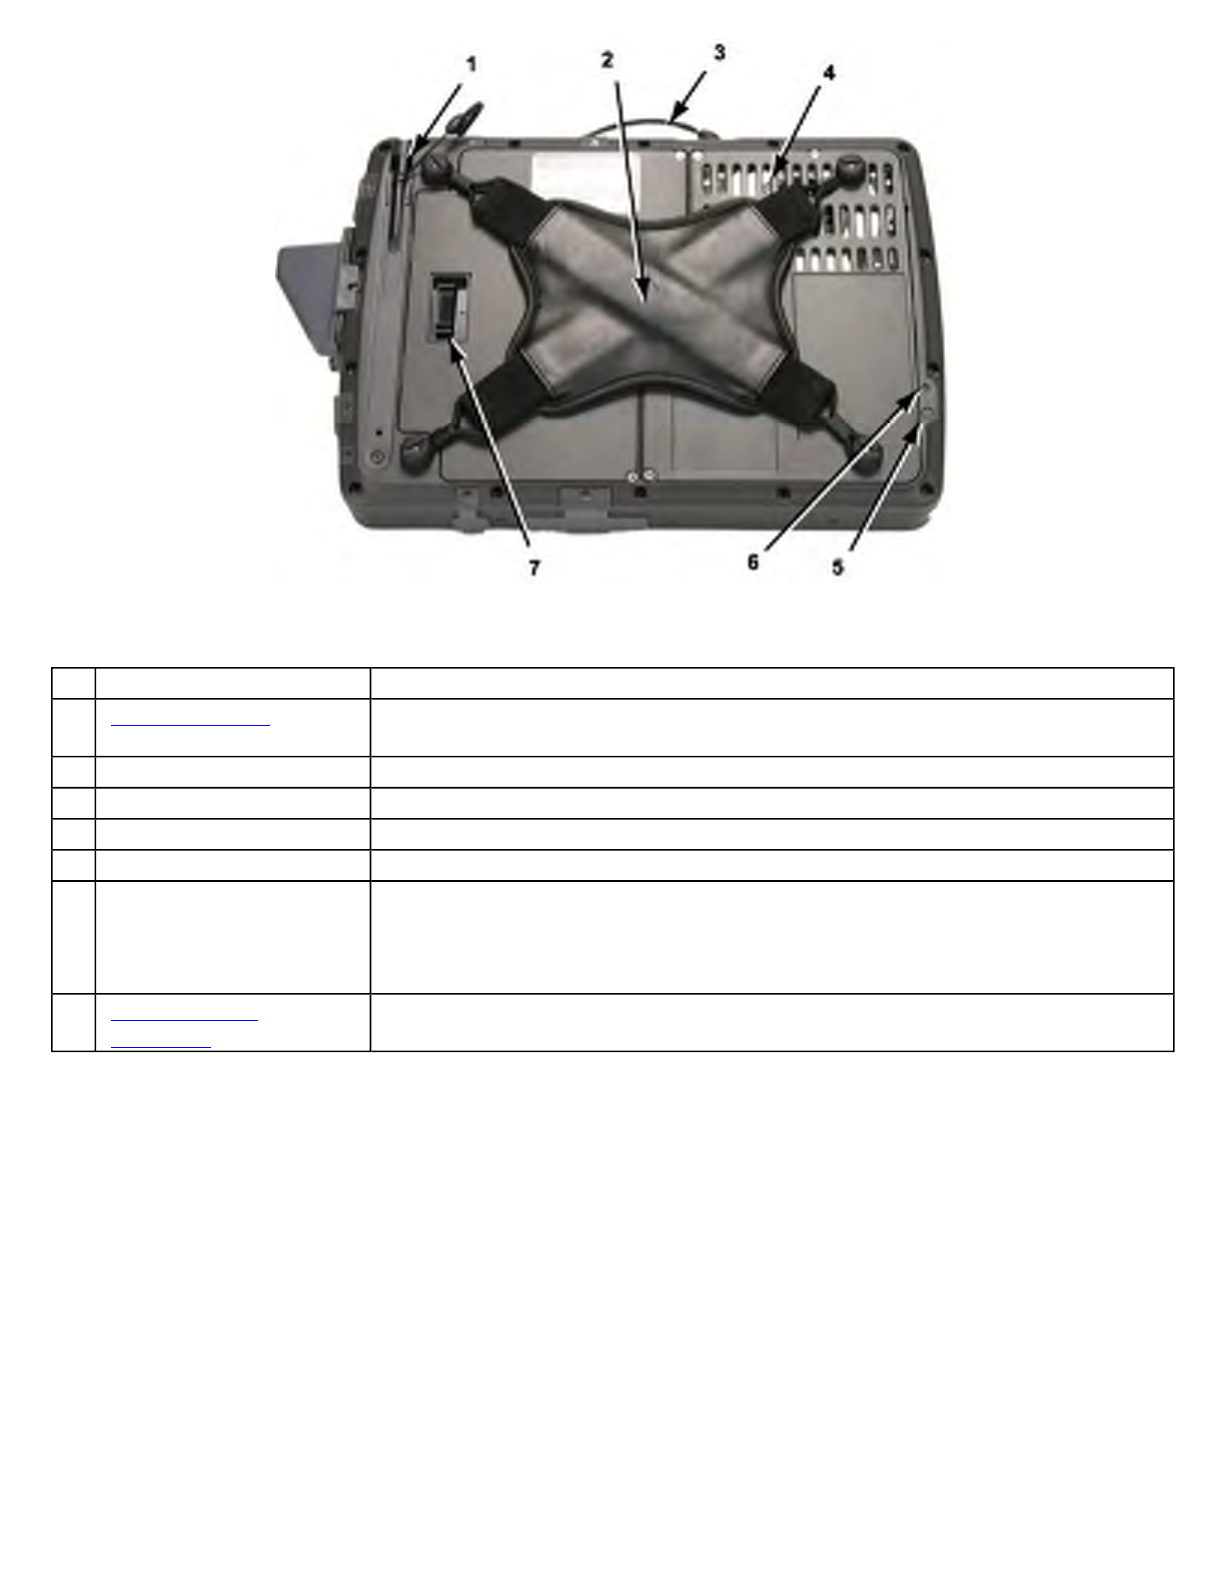
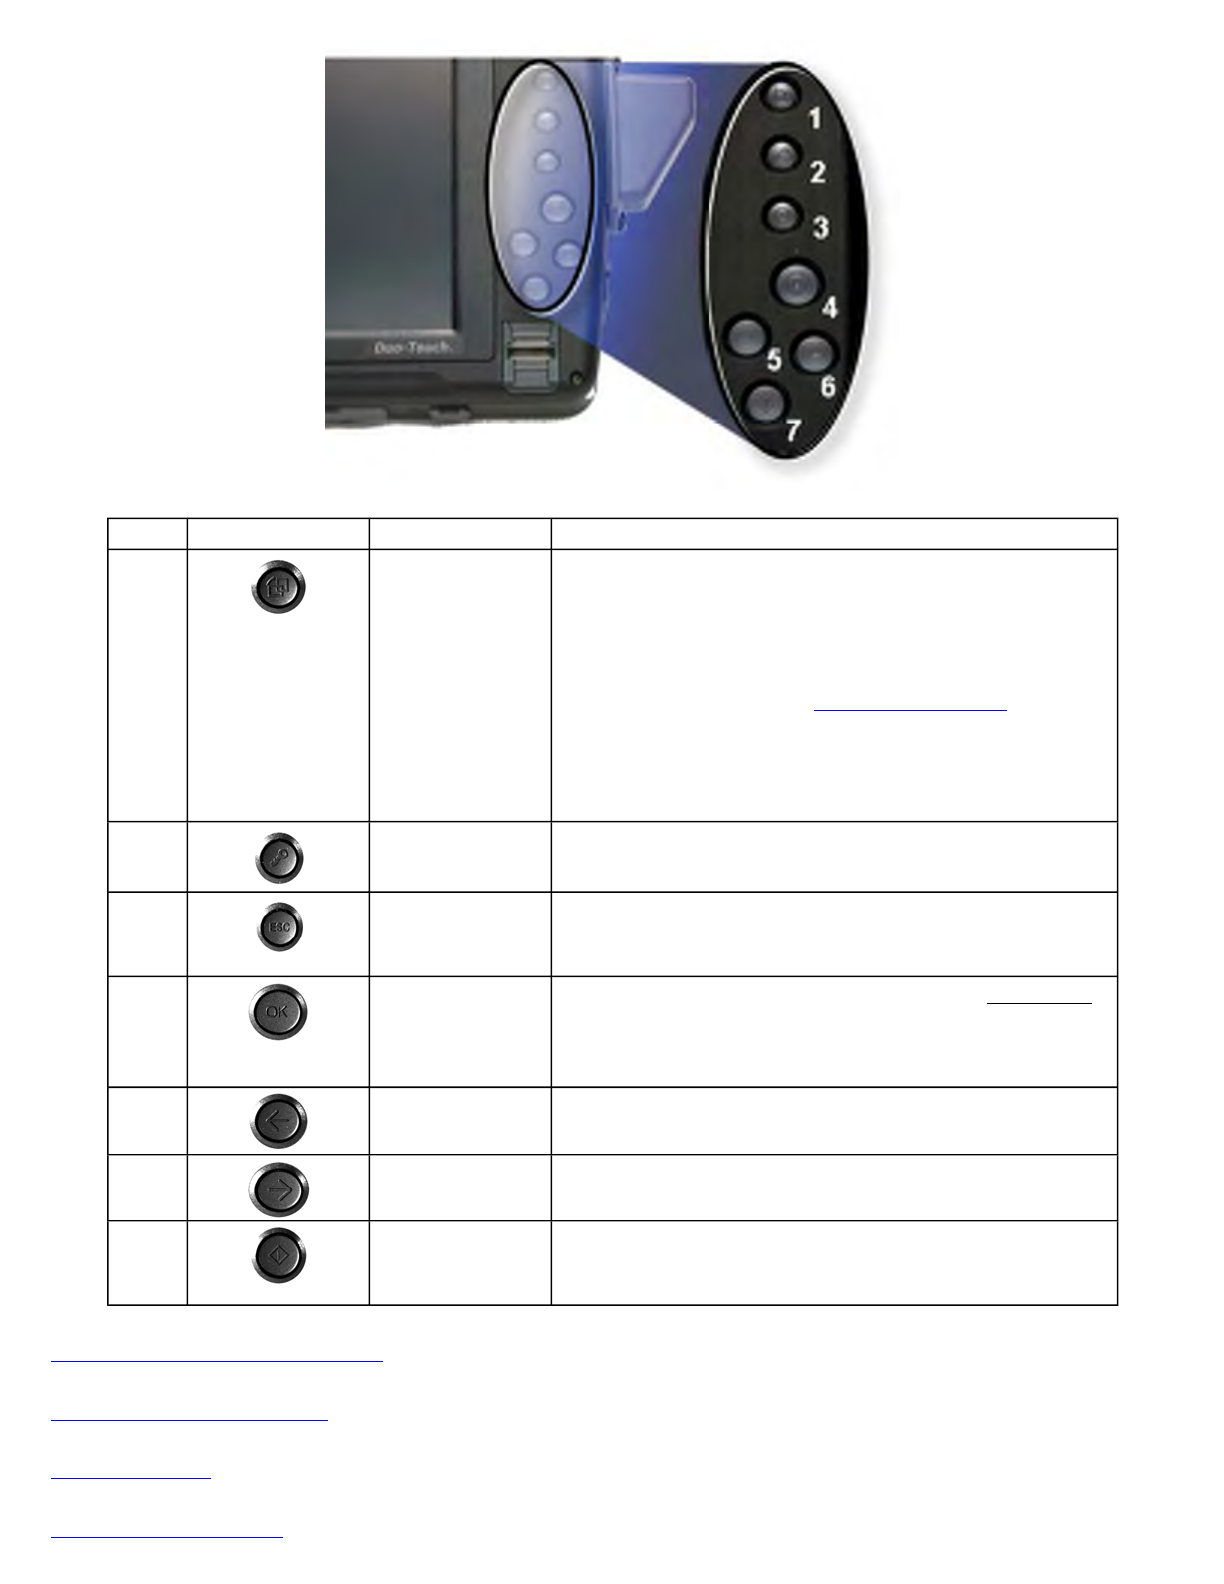
Buttons and Hot Keys
The Duo-Touch II has seven Hot Keys to speed common functions. Additionally, it has a Power Button, an RF
On/Off Button, and a Master Reset Key.
Hover the mouse over each number on the picture to see a description
# Feature Description
1 Pen / Stylus Slot Use the pen provided with your Tablet PC to navigate and input on the touch
panel display. Store it in the slot when not using it.
2 Hand Strap Allows Duo-Touch II to be held with one hand (optional device).
3 Pen Tether Attach a pen tether to the tether slot to keep the pen with the Tablet PC.
4 Thermal Grate Covers the fan. Do not cover this grate while using the Duo-Touch II.
5 RF ON/OFF Button This button enables/disables WLAN , WWAN, Bluetooth, and GPS radios.
6
Master Reset Key Use the stylus tip in this hole to perform a hard reset of your Duo-Touch II. You
will then need to press the power button to restart the computer.
CAUTION Any unsaved files or data will be lost during a hard reset.
7 Second Battery
Connector Attach a second, external battery to this connector to extend battery life.
Pa
g
e 12 of 57Duo-Touch II Hel
p
2/28/2008file://C:\Documents and Settin
g
s\harwoodm\Local Settin
g
s\Tem
p
\~hh5E31.htm
FN + Hot Key Combinations
Programming Hot Keys
Power Button
RF ON/OFF Button
# Icon Hot Key Description
1
Rotate Key
Use this key to switch between portrait and landscape
orientation on the display. It rotates the screen in 90°
increments. You can also program it to execute a
specific function.
NOTE You will need to calibrate the display for each
orientation and choose a primary orientation.
Some applications may not display as well in portrait
orientation. For example, you may need to scroll right
to view all the contents on the page.
2
Security Key Press this key like you would press Ctrl+Alt+Del on a
desktop computer.
3
Escape Key Press this key to go back or escape to the previous
context or window. You can also program it to execute
a specific function.
4
OK/Enter Key Press this key just like you would press the Enter Key
on a desktop computer. For example, use this key to
execute a command, implement an action, navigate
deeper or move forward through content.
5
Line Up Key Press this key to move the cursor up one line. You can
also program it to execute a specific function.
6
Line Down
Key Press this key to move the cursor down one line. You
can also program it to execute a specific function.
7
Function Key
(Fn) Press this key in combination with another key to
perform more functions. See the standard key
combinations listed below.
Pa
g
e 13 of 57Duo-Touch II Hel
p
2/28/2008file://C:\Documents and Settin
g
s\harwoodm\Local Settin
g
s\Tem
p
\~hh5E31.htm
Master Reset Key
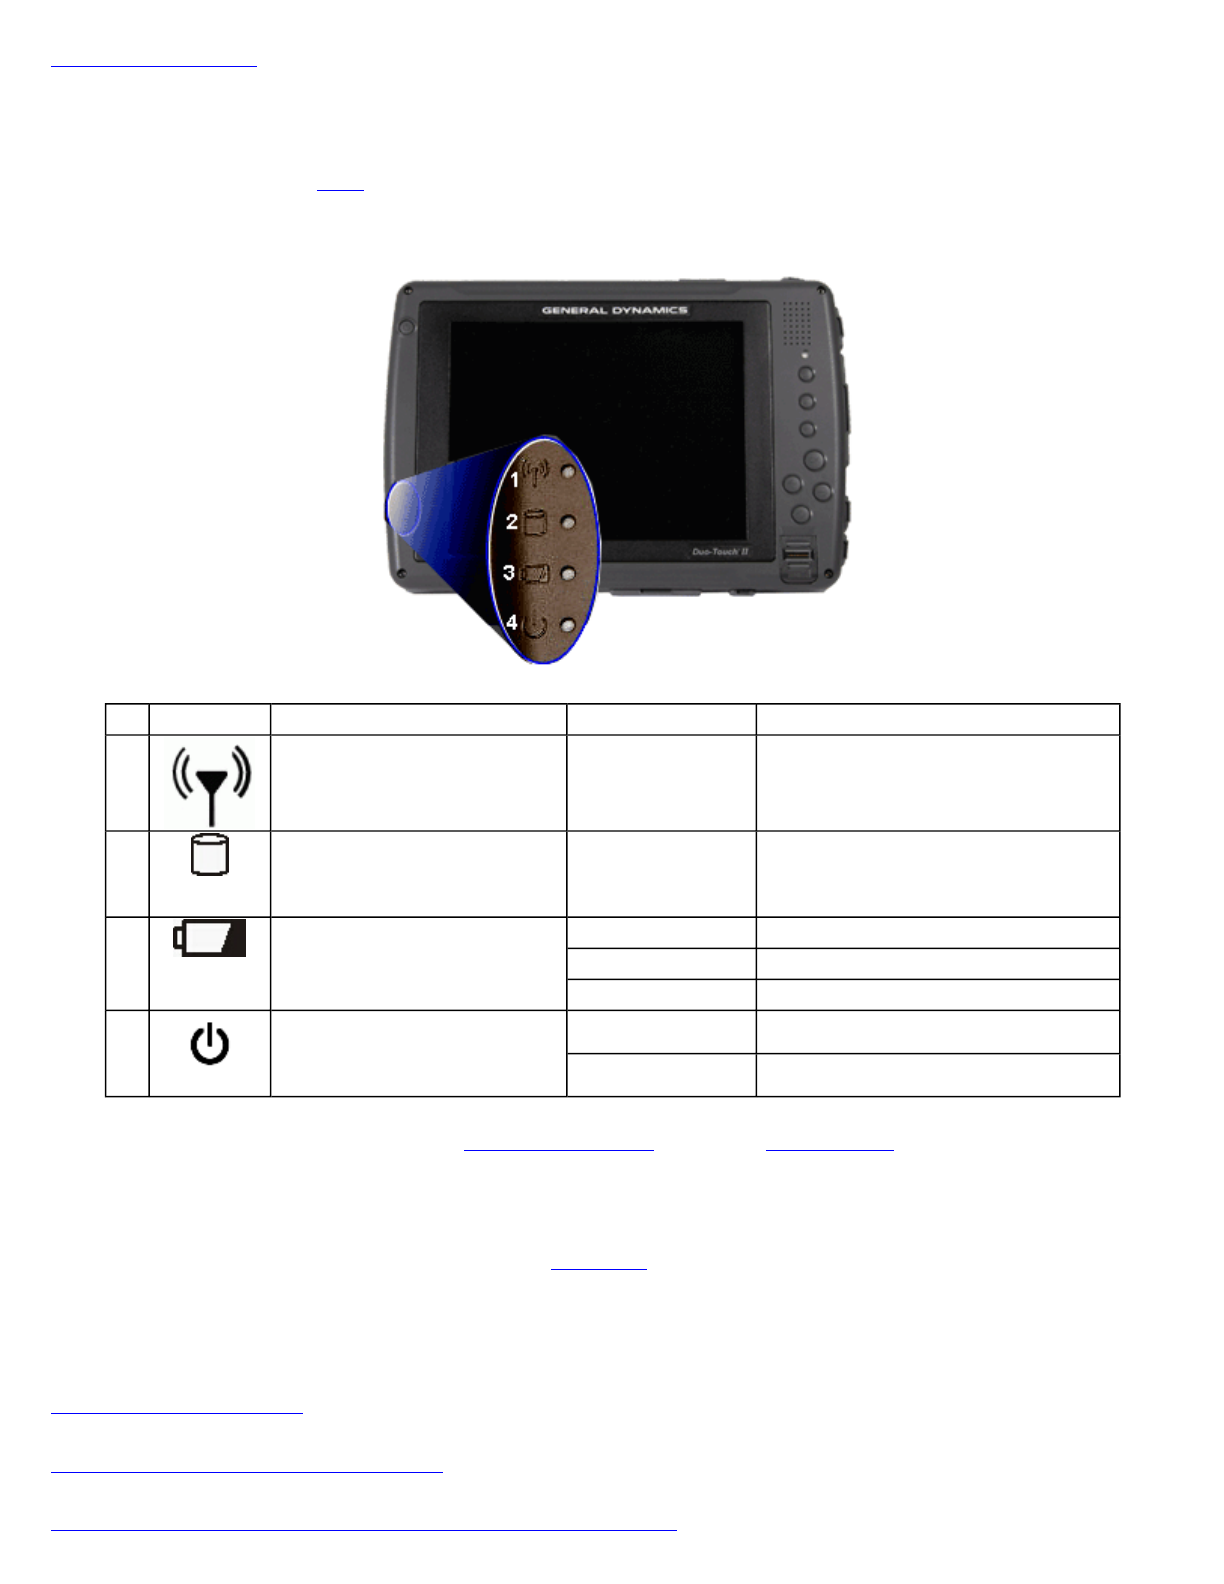
LED Status Indicators
The Duo-Touch II has four LED status indicators located left of the display when the unit is in landscape
orientation. The LEDs light up when a particular function of the computer is active. LED numbers are from top to
bottom when the Tablet PC is in landscape orientation.
NOTE LEDs can be disabled by using the BIOS Setup Utility to activate Stealth Mode.
Display and Pen Basics
Your Duo-Touch II has an 8.4" TFT SVGA outdoor viewable DynaVue™ (patent-pending) transmissive display with digitizer control
panel and touch screen. It is an active matrix color display with integrated graphics capabilities that provides excellent readability both
indoors and outdoors.
Using the Pen / Stylus
Changing the Display Orientation
Switchin
g
Between Di
g
itizer and Touch Screen Modes
# Icon LED Light Description
1
Wireless Radio Status LED
Solid Blue Integrated radio(s) are powered on
2 HDD Status LED
Blinking Green Accessing the Hard Disk Drive
3 Battery Status LED
Green Fully Charged
Orange Charging
Red Battery capacity is less than 10%
4
Power Status LED
Solid Blue Unit is turned on
Blinking Blue Unit is suspended
Pa
g
e 14 of 57Duo-Touch II Hel
p
2/28/2008file://C:\Documents and Settin
g
s\harwoodm\Local Settin
g
s\Tem
p
\~hh5E31.htm
Calibrating the Display
Ambient Light Sensor
Adjusting Screen Brightness
See Maintenance and Storage for information on how to clean the display.
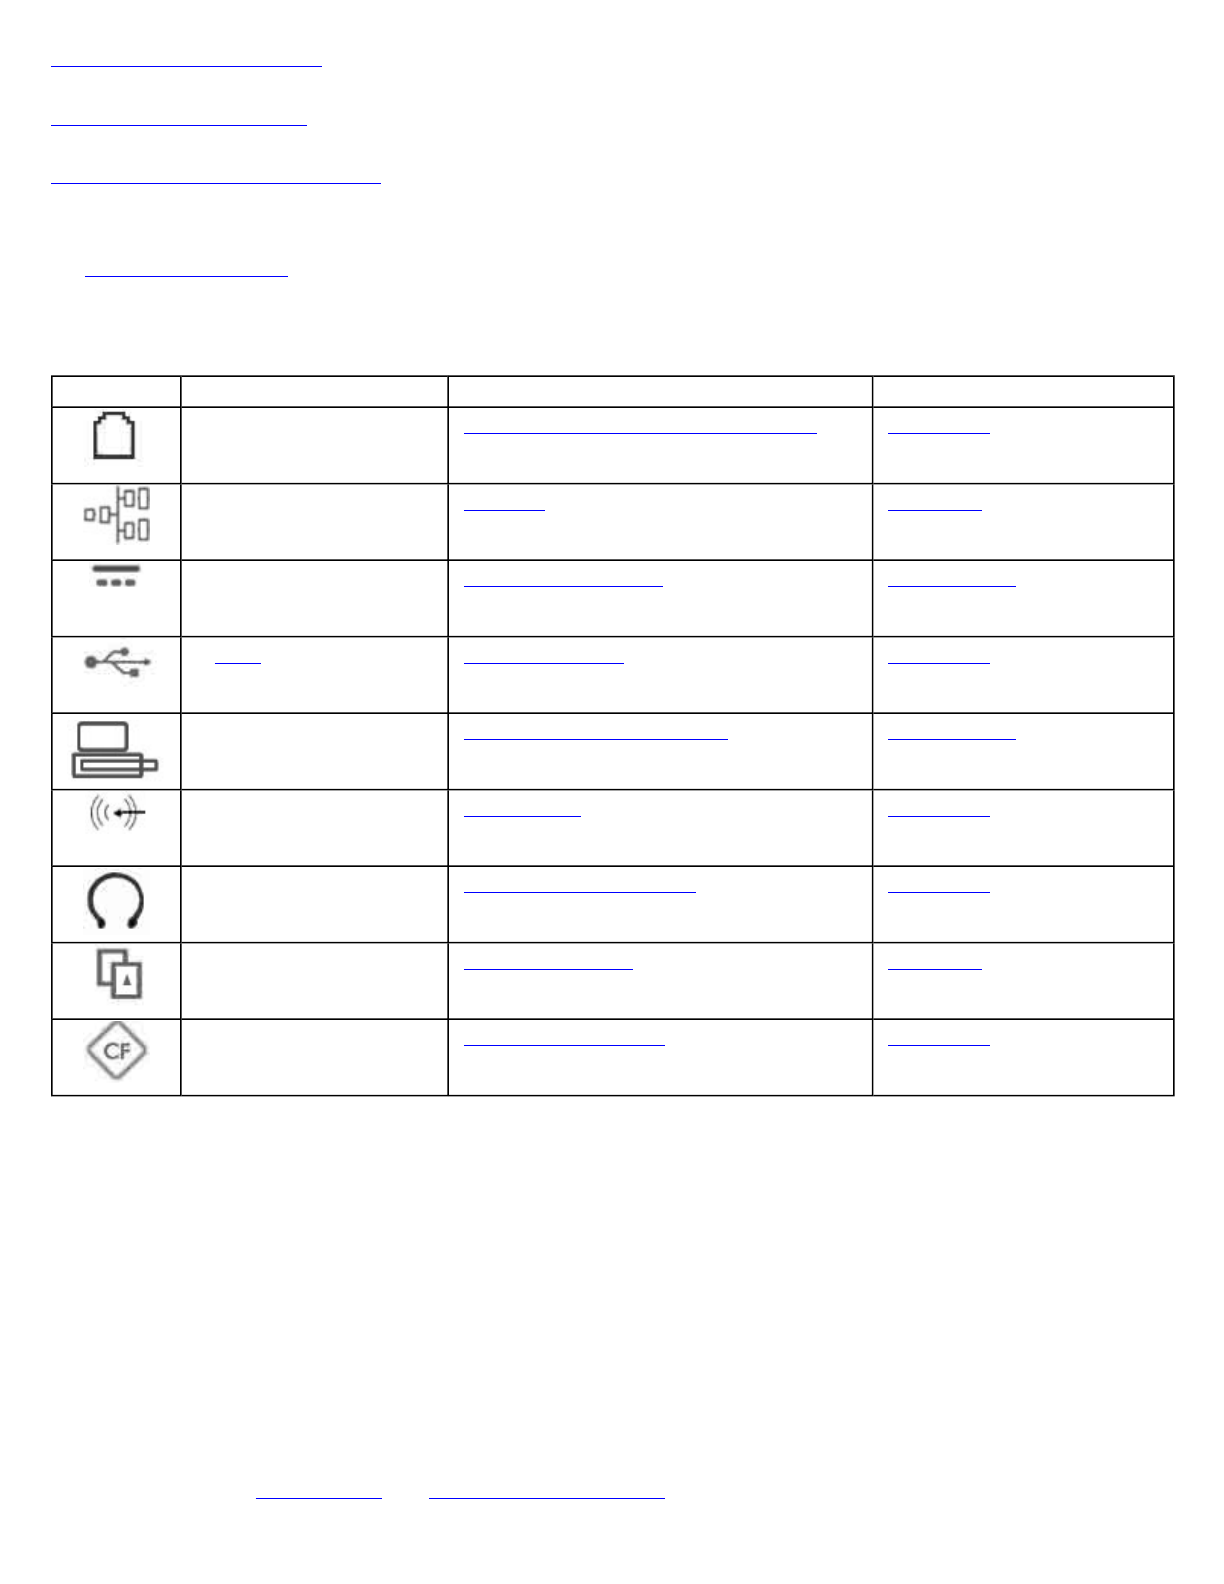
Ports and Connectors
Disk Drives
Your Duo-Touch II comes with several components for reading and writing (recording) information.
The Hard Disk Drive (HDD)
The hard disk drive provides high-capacity storage and fast access. The operating system and most programs are
stored here. Your Duo-Touch II identifies the hard disk drive as drive C:. Your hard disk drive may include an
optional hard drive heater to allow operation in certain environments. There is also a Solid State Hard Drive option.
Card Slots
You can also use the PC Card Slot and Com
p
actFlash Card Slot for additional data stora
g
e.
Icon Ports and Connectors Connection Location
RJ-11 Phone line/modem (internet and fax) Right Side
RJ-45 Ethernet Top Edge
DC-in AC Adapter (power) Bottom Edge
2 USB 2.0 USB Peripherals such as a mouse or
printer Right Side
Multi-I/O Extension
Slot Vehicle Dock, Desk Mount Bottom Edge
Audio In Microphone Right Side
Audio Out Speakers or headphones Right Side
PC Card Slot Type II PC Cards Top Edge
CompactFlash Slot CompactFlash Cards Right Side
Pa
g
e 15 of 57Duo-Touch II Hel
p
2/28/2008file://C:\Documents and Settin
g
s\harwoodm\Local Settin
g
s\Tem
p
\~hh5E31.htm

Optional External Drives
The Duo-Touch II has three USB external drive options that may be connected to the Tablet USB ports. You do not
have to power down the Tablet PC to connect any of these drives because they are "hot pluggable."
zUSB Floppy Disk Drive (FDD): The floppy disk drive provides a convenient way of storing and transferring
small files. It uses standard 3.5-inch, 1.44 MB disks.
zUSB CD-ROM Drive: The CD-ROM drive can be used to read data from CDs, including audio or video
CDs.
zUSB DVD / CD-RW: The DVD / CD-RW drive is a read/write drive. It can be used to write data to a
recordable CD. It can also read data from DVDs and CDs, including audio or video disks.
NOTE The Duo-Touch II identifies the drive with the letter following the highest partition letter. For example, if
your highest drive partition is drive E:, the DVD/CD-RW or CD-ROM will be assigned to drive F:. However, the
floppy drive will always get assigned to drive A: or B:.
Precautions for Handling DVDs and CDs
Keep these precautions in mind when handling DVDs and CDs.
zAlways hold the disk by the edges; avoid touching the surface of the disk
zUse a clean, dry, cloth to remove dust, smudges, or fingerprints. Wipe from the center outward
zDo not write on the surface of the disk
zExtremes in temperature may damage disks. Store disks in a cool dry place
zDo not use benzene, thinners, or cleaners with detergent to clean DVDs or CDs. Only use cleaning kits
designed for DVDs or CDs
zDo not bend or drop the disks
zDo not place objects on top of disks
zDo not expose to direct sunlight for long periods
Computer Security
Your computer includes several different security features to help prevent theft and protect data. These include a
security slot, multiple levels of password protection, an optional fingerprint scanner, and stealth mode.
Security Slot
A security slot located on the left side of the computer lets you
connect a Kensington compatible computer security lock. You
can connect the computer to an immovable object to prevent
theft. Insert the lock into the notch and turn the key to secure the
lock. Some keyless models are also available. See the
documentation that comes with your lock for more information.
Passwords
Pa
g
e 16 of 57Duo-Touch II Hel
p
2/28/2008file://C:\Documents and Settin
g
s\harwoodm\Local Settin
g
s\Tem
p
\~hh5E31.htm

Passwords protect your computer from unauthorized access. When set, no one can access the computer without
entering the correct password.
There are three types of passwords you can set:
zSupervisor Password secures your computer against unauthorized entry to critical parameters in the BIOS
Utility
zUser Password secures your computer against unauthorized use, and allows limited access to the BIOS
Utility
zHard Disk Password protects your data by preventing unauthorized access to your hard disk, even if the hard
disk is physically removed from the computer and installed in another computer
NOTE Do not forget your Setup and Hard Disk password! If you forget your password, please get in touch with
your dealer or an authorized service center.
Fingerprint Scanner (Optional)
The optional swipe style fingerprint scanner can be used for all standard security
uses. The optional fingerprint scanner provides a greater level of security and
convenience for your Duo-Touch II and your private data. Use the fingerprint
scanner instead of passwords for the following:
zLogging in to your Tablet PC
zLogging into secure websites or when opening password protected
applications
zProviding encryption security for individual files
Fingerprint Scanner Software
Before using the fingerprint scanner, you must first install compatible software. There are various software packages
available.
CAUTION Before installing any third party software, ensure it is approved for use with your Tablet PC.
NOTE When accessing some secure websites, you may need to specify you are using the scanner instead of a
p
assword. Refer to the fingerprint scanner software documentation for setup instructions.
Stealth Mode
Your computer has a Stealth Mode feature for users who may need to use it where light or sound could be dangerous
or disruptive, such as military personnel. Enabling Stealth Mode allows you to disable sound and light features such
as system beeps, the fan, and the display backlight. Refer to the BIOS Setup Utility section to configure the Stealth
Mode feature.
Trusted Platform Module (TPM)
The TPM can be enabled or disabled in the System BIOS utility under the Advanced, Trusted Computing section.
TPM provides a platform root of trust which uniquely identifies a particular platform and provides various crypto
ca
p
abilities includin
g
hardware-
p
rotected stora
g
e. See the TPM vendor's hel
p
files for more information.
Pa
g
e 17 of 57Duo-Touch II Hel
p
2/28/2008file://C:\Documents and Settin
g
s\harwoodm\Local Settin
g
s\Tem
p
\~hh5E31.htm
Making Connections
Your Duo-Touch II is equipped with a full array of ports and connectors, including standard input/output (I/O) ports
for quickly and easily adding peripherals such as a USB printer. Refer to documentation included with individual
devices for details on connecting these devices to your computer. Along with the standard ports found on most
computers, your computer also includes modem and LAN ports for advanced communications technology.
CAUTION: Keep port doors closed when not in use. Internal components of the Duo-Touch II will be damaged if
exposed to contaminants. When dust covers, the PC card door, or the bottom access panel are open on the computer,
shield the unit from all contaminants such as liquids, rain, snow, and dust.
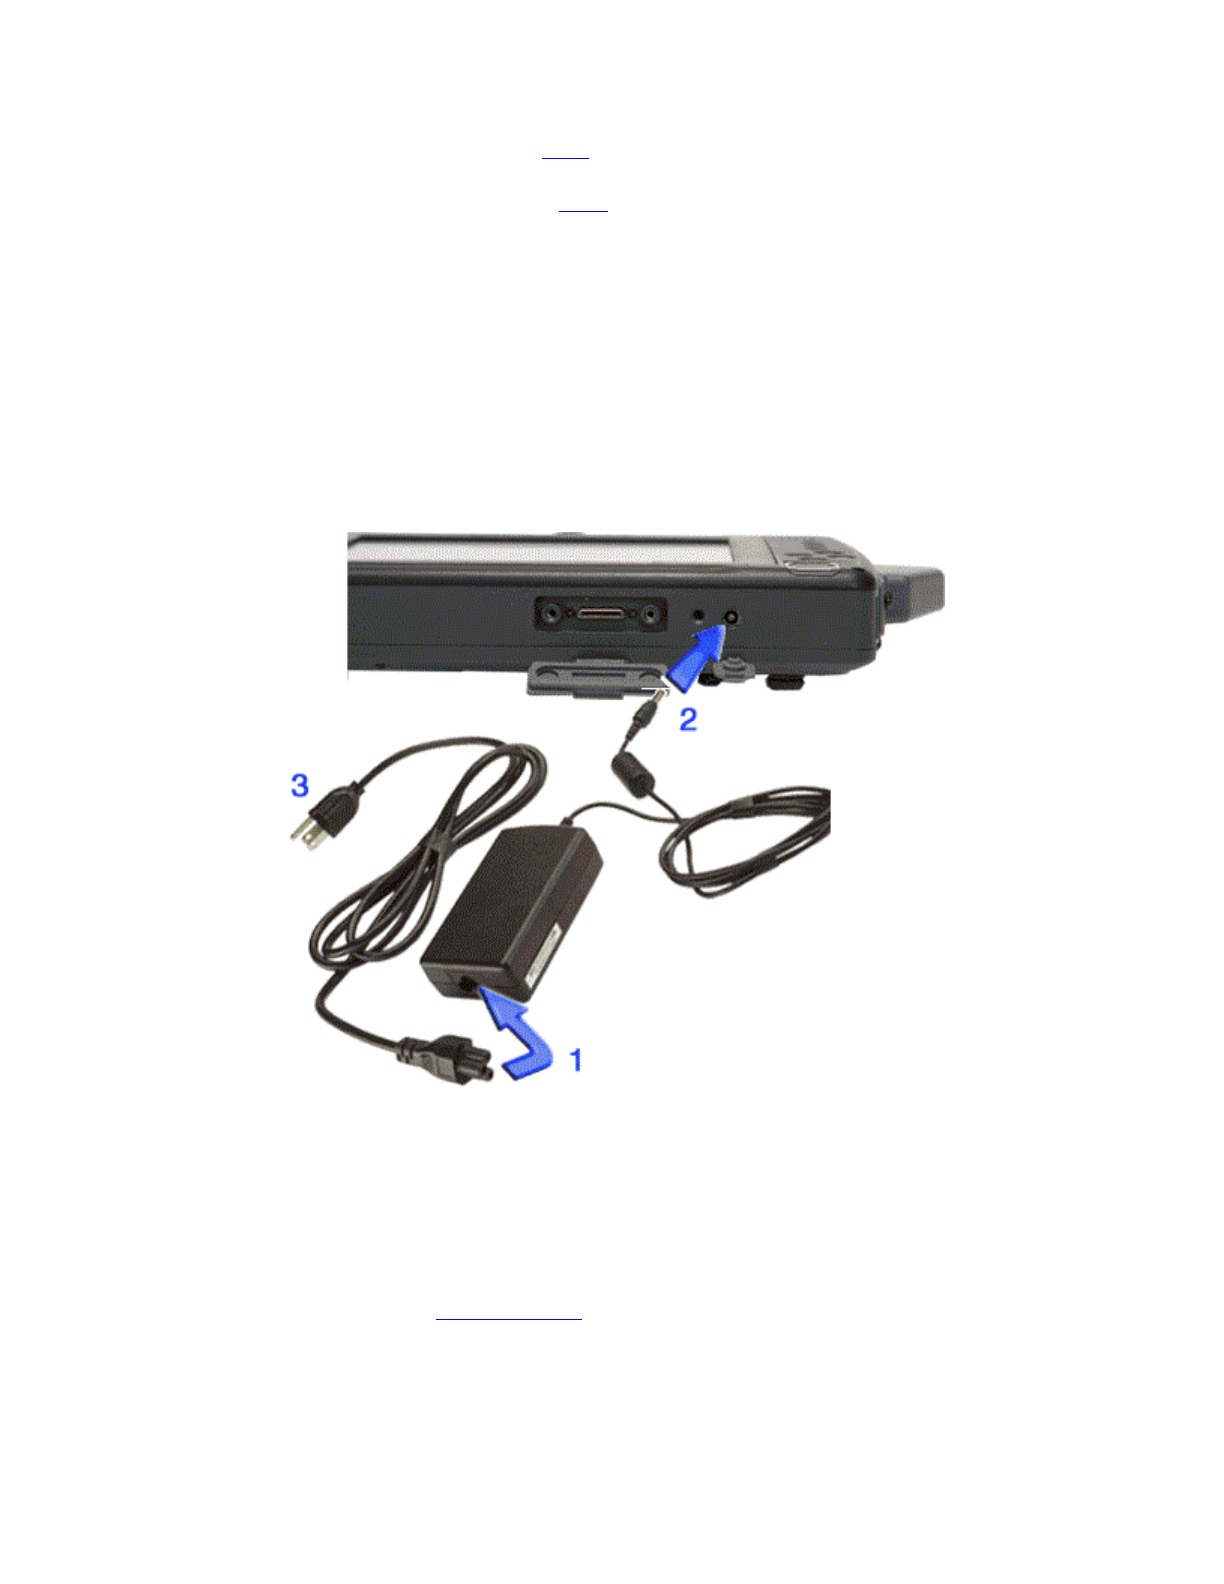
Attaching Power
You can operate the computer while the battery is charging on external power or on battery power.
Attaching the AC Adapter
1. Connect the supplied AC adapter power cord to the AC adapter.
2. Connect the AC adapter to the DC power port on your computer.
3. Connect the AC adapter power cord to an AC outlet.
Alternately, you can attach the optional vehicle adapter.
Turning the Duo-Touch II On and Off
To turn on the com
p
uter
Pa
g
e 18 of 57Duo-Touch II Hel
p
2/28/2008file://C:\Documents and Settin
g
s\harwoodm\Local Settin
g
s\Tem
p
\~hh5E31.htm
Press the power button once, and then give the system time to respond. The Power LED should illuminate and the
unit should boot into Windows.
To turn off the computer
For Windows XP:
From the Start menu, select Turn Off Computer, then select Turn Off.
For Windows Vista:
Select the Start button , select the Arrow button, then select Shut Down.
NOTE If you need to leave the system for a short time, or if you want to conserve battery power, you can put
the computer into hibernation mode by pressing the power button. See Managing Power for additional
information.
CAUTION Shutting down the computer improperly could result in lost or corrupted data.
Ethernet
The Ethernet LAN (RJ-45 Jack) on the top edge of the computer enables you to make LAN connections without
installing PC cards. Connection speed is 10/100/1000 Mbps.
Internet and Fax
Pa
g
e 19 of 57Duo-Touch II Hel
p
2/28/2008file://C:\Documents and Settin
g
s\harwoodm\Local Settin
g
s\Tem
p
\~hh5E31.htm
The fax/modem RJ-11 jack can transmit data using the 56 Kbps V.90 or V.92 protocol, and send and receive faxes at
14.4 Kbps. In some countries, local regulations may not permit the use of the fax/modem designed for this system.
In this case, you may use a PCMCIA modem.
CAUTION Plug your modem into an analog telephone jack only. Most homes use analog lines. Do not use digital
lines, such as PBX and ISDN systems found in many offices. Digital lines may damage your modem. If you are
unsure as to the type of port you have to plug into, contact your building superintendent. Simple detection and
p
rotection devices are also available at most computer stores and should be used to protect the Duo-Touch II.
NOTE Port access to connect the modem is disabled for the Australian market.
Attaching USB Devices
The two Universal Serial Bus (USB) 2.0 ports enable you to attach USB devices such as keyboards, a mouse,
scanners, and printers.
Using PC Cards
The Duo-Touch II has a T
yp
e II PC Card Slot located on the to
p
side of the com
p
uter. It su
pp
orts 32 bit Card Bus
Pa
g
e 20 of 57Duo-Touch II Hel
p
2/28/2008file://C:\Documents and Settin
g
s\harwoodm\Local Settin
g
s\Tem
p
\~hh5E31.htm
2.1 interface as well as Zoom Video when in landscape orientation. You can use this slot to interface between your
Duo-Touch II and a variety of communications devices, such as network adapters, SCSI adapters, fax/modems, and
PC Card Radios. It can also provide additional data storage capacity.
Installing a PC Card
Ejecting a PC Card
Using CompactFlash Cards
Your Duo-Touch II can use Type 1 CompactFlash Cards for secure data storage. If you store any user-installed
application programs and associated data on CompactFlash, these programs and data will not be lost after a hard
reset. Files stored on CompactFlash Cards can be created, deleted, moved and amended in exactly the same manner
as files stored in memory. The CompactFlash slot is also used to house the optional GPS radio and antenna.
Installing a CompactFlash Card
Ejecting a CompactFlash Card
Audio
Your Duo-Touch II has inte
g
rated audio as well as audio
j
acks so
y
ou can connect external audio com
p
onents
Duo-Touch® II Help
Pa
g
e 21 of 57Duo-Touch II Hel
p
2/28/2008file://C:\Documents and Settin
g
s\harwoodm\Local Settin
g
s\Tem
p
\~hh5E31.htm
Changing the volume
zUse the volume function keys: Fn + ESC = Volume Up; Fn + OK= Volume Down, or
zOpen the Windows volume control program by Double-tapping the speaker icon in the taskbar .
Attaching to the Desk Mount or Vehicle Dock
Use the Multi-IO extension slot to connect the Desk Mount or the Vehicle Dock or custom external devices.
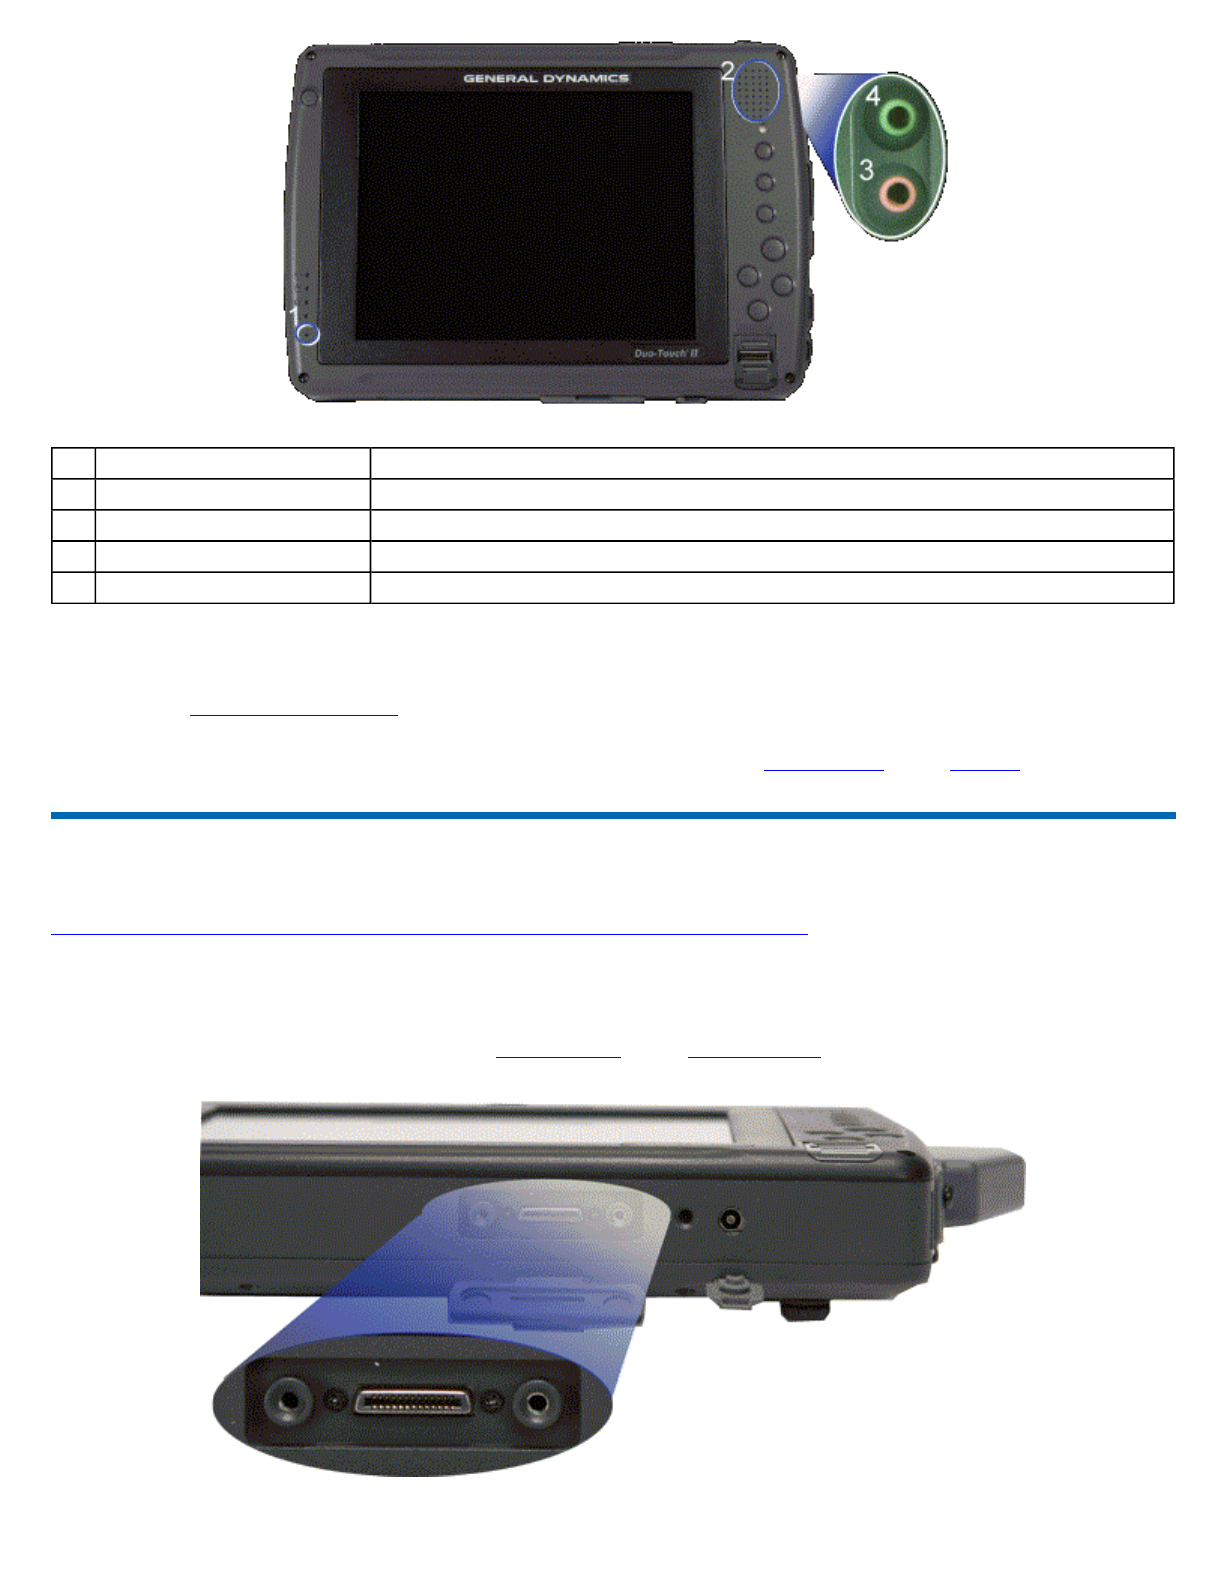
# Feature Description
1 Microphone Integrated microphone for audio input
2 Speaker Integrated speaker for audio output
3 Audio-out jack Connect external speakers or a stereo headset
4 Audio-in jack Connect an external microphone for audio recording
72_0135_002
2007 November 14
Co
py
ri
g
ht © 2007 General D
y
namics Itronix Cor
p
oration. All ri
g
hts reserved.
Pa
g
e 22 of 57Duo-Touch II Hel
p
2/28/2008file://C:\Documents and Settin
g
s\harwoodm\Local Settin
g
s\Tem
p
\~hh5E31.htm
Wireless Communication
The Duo-Touch II has superior wireless capabilities. Depending on your configuration, it supports up to four
optional wireless radio technologies: PC card wireless technologies; Bluetooth, Wireless LAN (WLAN), and GPS.
Each Duo-Touch II comes standard with three antennas for wireless communication; two WLAN and one
Bluetooth. GPS and PC Card radio antenna are optional accessories.
Use only the supplied or an approved antenna(s). Unauthorized antennas, modifications, or attachments could impair
data quality, damage the cord, or result in violation of FCC regulations.
Your Duo-Touch II has an RF ON/OFF button on the back. This can be used to turn off Bluetooth and disable
WLAN, WWAN, and GPS radios. The radios can also be enabled or disabled in the BIOS on the Advanced tab,
Extended Configuration. For a more detailed look at wireless communications, click here.
Bluetooth Radio (optional)
The Duo-Touch II includes an integrated Class 1 Bluetooth option. Its maximum range is about 100 meters.
Turning the power to the Bluetooth and GPS radios on or off and
enabling/disabling the WLAN
1. Turn your Tablet PC over so you are looking at the back of the unit.
2. Press the radio on/off button.
Read About Bluetooth
WLAN Radio (optional)
The Duo-Touch II has an integrated 802.11 A/G/N WLAN radio option. Its typical range is 100 to 300 meters in
open spaces and 30 to 100 meters indoors. Internal antennas are provided for the WLAN radio.
Turning the power to the Bluetooth and GPS radios on or off and
enabling/disabling WLAN radios
1. Turn your Tablet PC over so you are looking at the back of the unit..
2. Press the RF ON/OFF button.
Read About WLAN
Read About In-Building WLANs
Read About Building-to-Building WLANs
Read About Combination WLANs
GPS (optional)
Pa
g
e 23 of 57Duo-Touch II Hel
p
2/28/2008file://C:\Documents and Settin
g
s\harwoodm\Local Settin
g
s\Tem
p
\~hh5E31.htm

About GPS
The Global Positioning System (GPS) is a worldwide radio-navigation system formed from a constellation of
satellites and their ground stations. GPS uses these satellites as reference points to calculate positions accurate
within 10 meters.
Improving Radio Coverage
Wireless connectivity between radio-equipped portable terminals and host computers is unique and maintaining this
wireless connectivity over a wide area is fundamental to the usefulness of the network. As such, the scope and
reliability of radio coverage is a primary concern. Therefore, one of the most important features of the wireless
network is the degree of radio coverage provided. Coverage is influenced by terrain, buildings or a crowded room.
There are many things that can be done to improve coverage depending on location.
In any location
1. Performance can vary significantly at different times of the day.
2. Weather can affect performance.
On the street
1. Try all sides of a building to see which side provides the strongest radio signal.
2. Move from under trees. Pine needles absorb radio signals more than leaves.
3. Move away from overhead electrical wires.
4. Radio signals reflect off other buildings. Even in the signal shadow, the signal could be reflected back by
another building.
5. Try not to hold the unit. If possible, place it in vehicle, on a cabinet or desk.
6. If holding the unit, turn the unit in 90-degree increments to avoid shielding it with your body.
7. The signal is 1 - 2 feet across; therefore, moving several feet in any direction may give different results.
Inside a building
NOTE GPS is not intended for use in buildings
1. Move toward windows.
2. Signals do not penetrate ground, therefore, there will probably be no signal in basements.
3. Reflective coatings on windows reflect radio signals. Try the side of the building that is least likely to have
coated windows.
4. Closed metal blinds can reflect radio signals.
5. Dropped ceilings sometimes hide an accumulation of electrical cable.
Electroma
g
netic Interference
(
EMI
)
Pa
g
e 24 of 57Duo-Touch II Hel
p
2/28/2008file://C:\Documents and Settin
g
s\harwoodm\Local Settin
g
s\Tem
p
\~hh5E31.htm

1. Electromagnetic Interference (EMI) is generated by switching circuitry closets or Un-interruptable Power
Source (UPS) systems found near computer rooms and can block the radio signal.
2. Look for significant sources of electromagnetic radiation. The problem may emanate from a source between
location and the radio base station.
When to use landline communication
If the tips above do not improve radio signal strength, switch to landline communication. Switching to landline
communication is faster than searching for and trying to improve the radio signal.
PC Card Radios
Your Duo-Touch II supports the following PC Card radio technologies:
• EDGE/HSDPA/HSUPA
• 1x E-V-DO Rev 0, Rev A
User accessible PCMCIA bay for PC Card radios*
It is the responsibility of the customer to verify that all appropriate agency approvals
have been met with the regard of there radio. General Dynamics-Itronix make no
performance representations, warranties or guarantees, either express or implied,
oral or written, with respect to the customer installed radio.
Operating with Battery Power
The Duo-Touch II uses Dynamic Power Management ( DPM ) so you can reduce the amount of energy used,
especially during periods of inactivity. It is powered by a smart Li-ION battery pack. A CMOS coin battery
maintains the Real Time Clock and CMOS memory. There is also an optional second external battery pack that
effectively doubles your battery powered runtime.
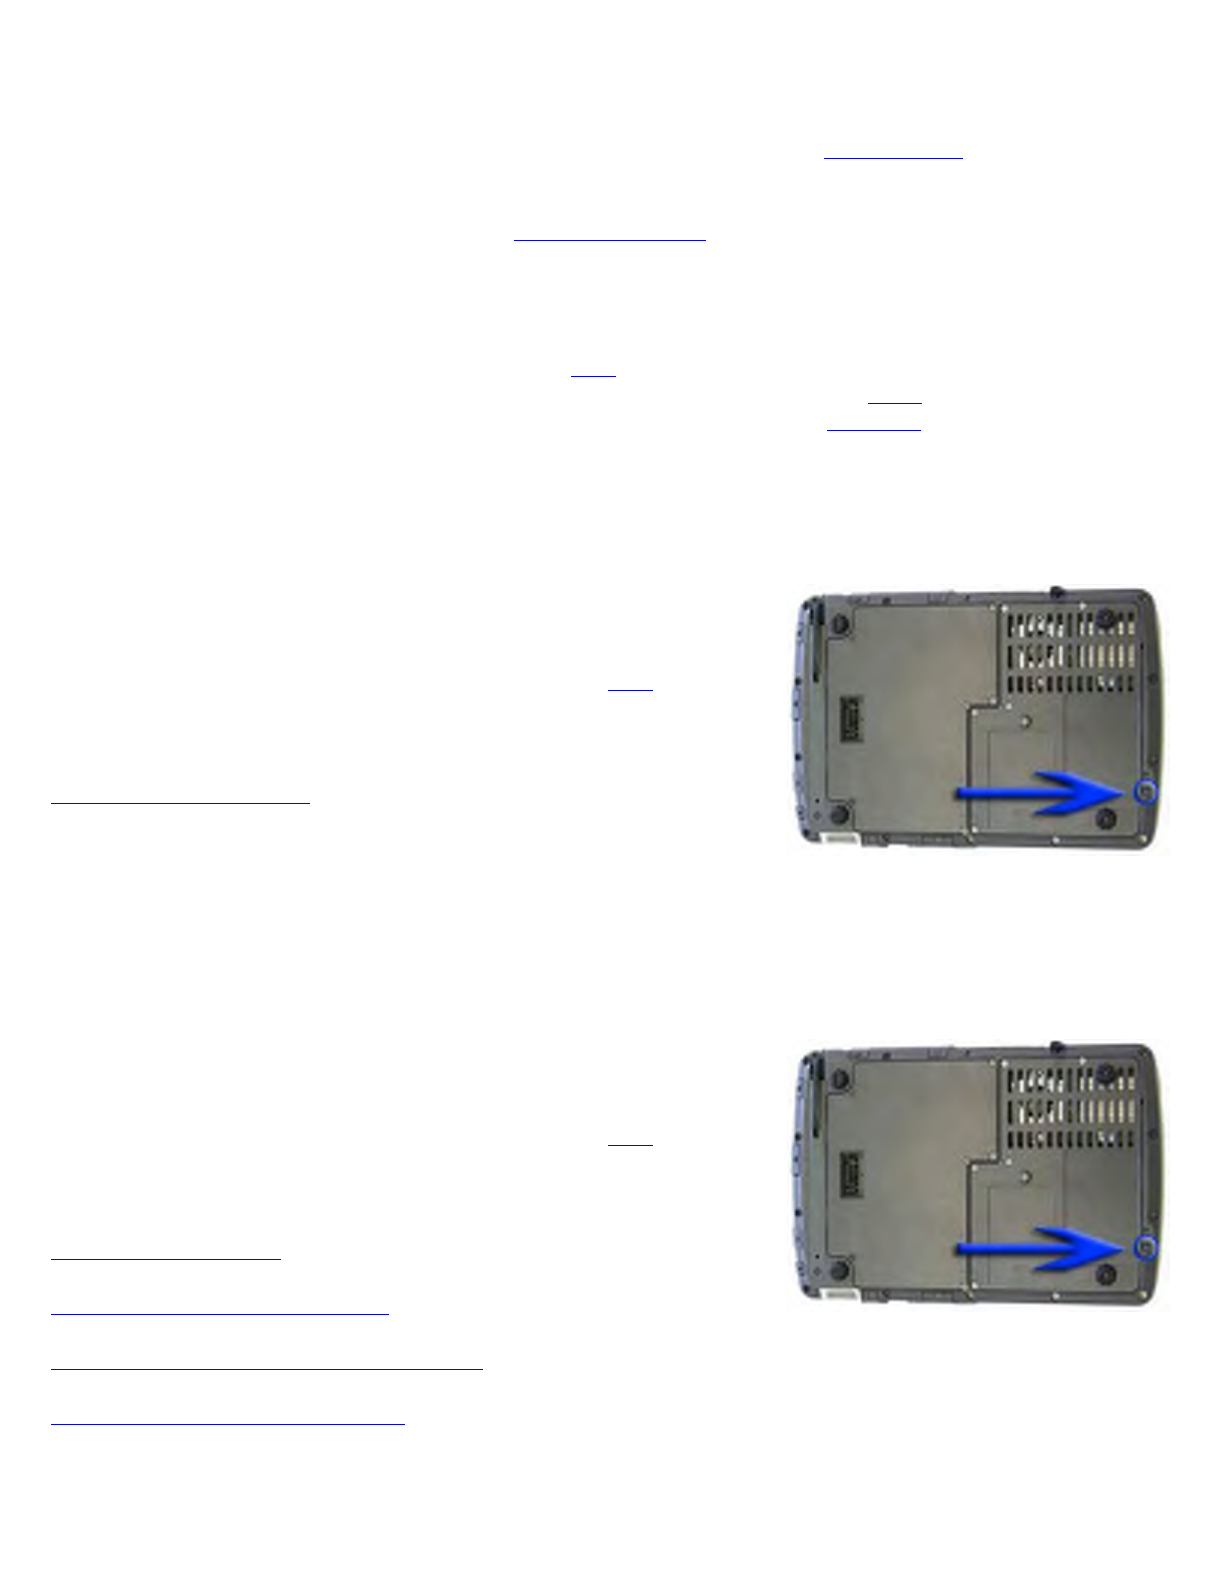
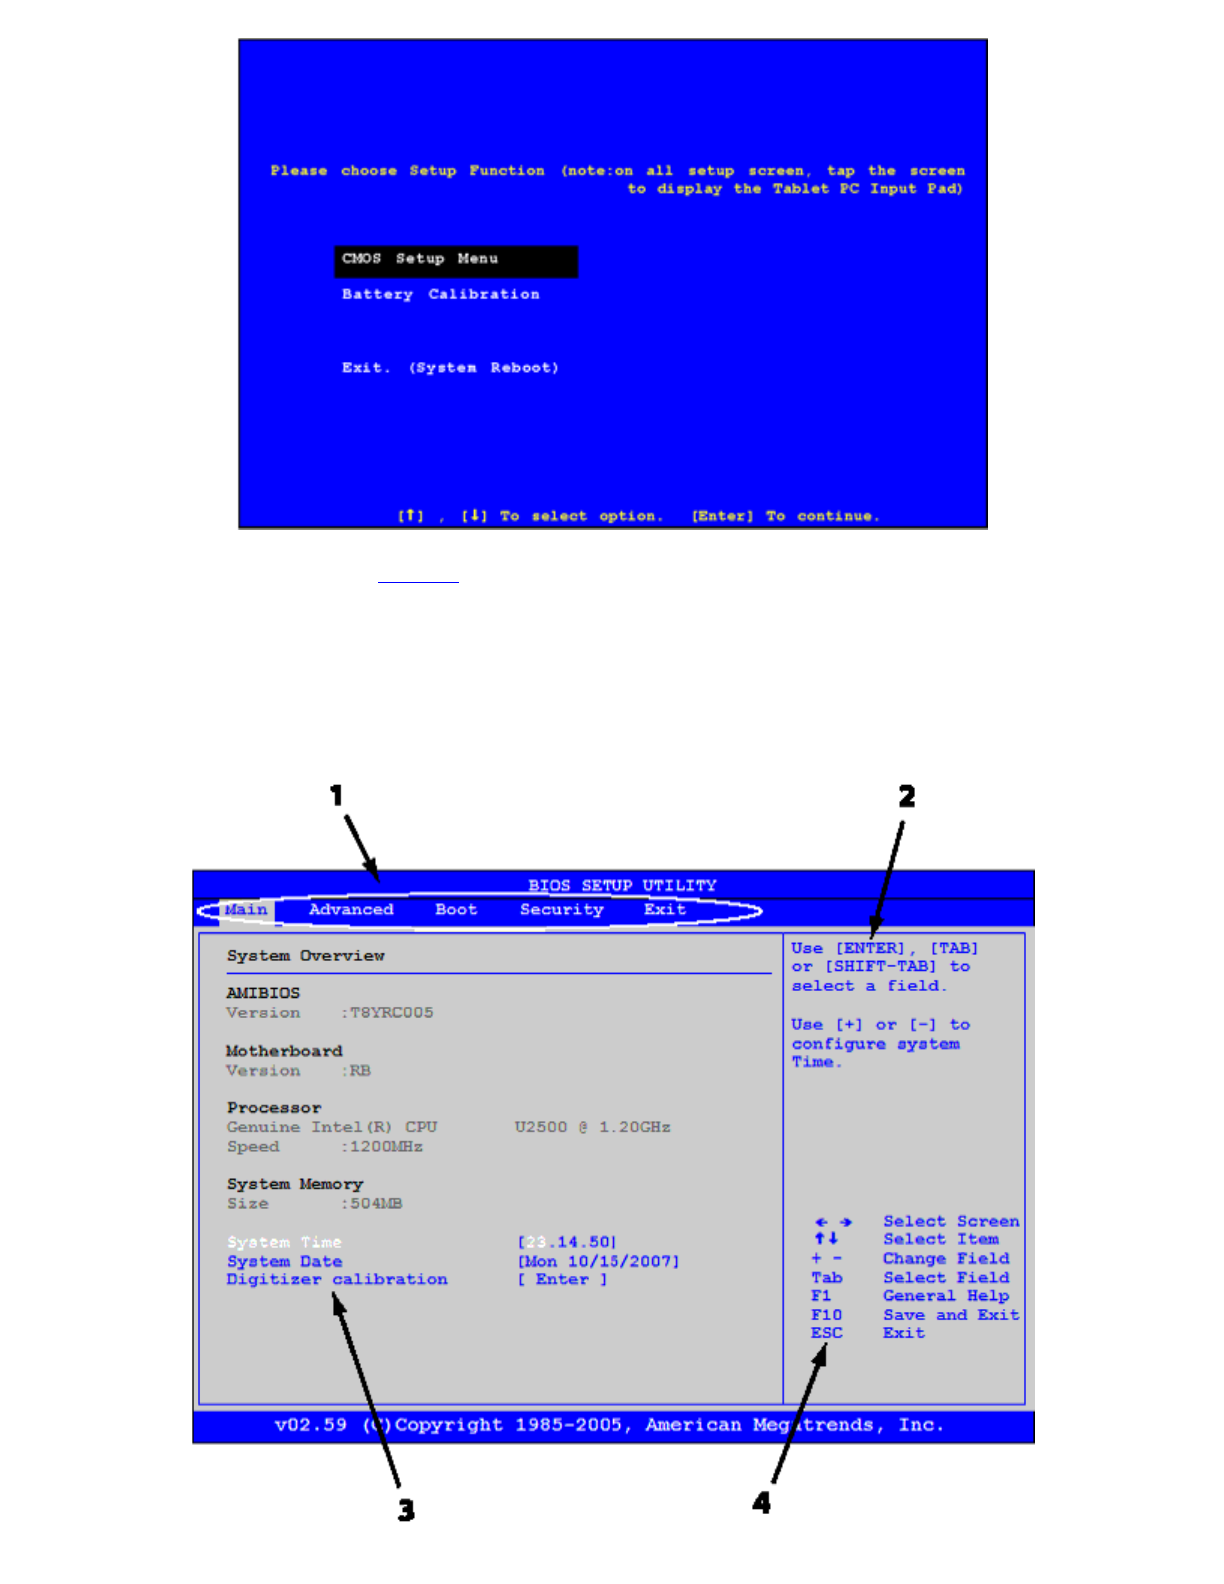
Battery Installation and Replacement
Over time, the battery’s capacity gradually decreases. We recommend that you replace your battery when you notice
that it begins to store significantly less charge. Change the main battery pack as follows (you may want to print this
topic for reference).
CAUTION The Duo-Touch II battery and unit are only weather sealed when the battery is properly installed and
the battery door is closed. Shelter the computer when you install or replace the battery. To prevent damage when
the unit is in use, keep the battery door closed with all screws in place and secured tightly.
Installin
g
the Batter
y
Pa
g
e 25 of 57Duo-Touch II Hel
p
2/28/2008file://C:\Documents and Settin
g
s\harwoodm\Local Settin
g
s\Tem
p
\~hh5E31.htm

Replacing the Real Time Clock Battery
Battery Calibration
The battery calibration process fully charges, discharges, and recharges the battery. This allows the Windows
battery gas gauge to accurately monitor battery status.
It is recommended you calibrate your battery:
zthe first time you use it
zafter it has been stored for awhile
zif the gas gauge has become inaccurate.
zfor optimum performance, we recommend calibrating the battery and optional secondary battery every three
months
You can calibrate your main battery or optional second external battery from the BIOS Setup Utility. You can also
calibrate the main battery from within Windows.
Windows Level Battery Calibration
BIOS Level Battery Calibration
Battery Calibration takes from 10 to 16 hours, depending on how much power the battery already contains. You can
speed up calibration by starting with a fully charged battery.
NOTE External power is required for battery calibration.
Battery Charging
When you use the AC adapter to connect your Duo-Touch II to a power outlet, the internal battery automatically
begins to recharge. While the battery is charging, the Battery Status LED turns orange after 6-12 seconds and stays
solid orange until the battery is fully charged. When the battery is fully charged, the LED will turn green.
If your computer is turned off, a fully discharged battery takes about 3 hours to recharge. If your computer is turned
on and is not in suspend mode , it takes about 3-5 hours to recharge the battery. Refer to the following table:
NOTE A fully charged Li-Ion battery can run the Tablet PC for approximately 3 hours of normal use. (According
to Battery Mark benchmark tests.) Use of external devices, such as the wireless radio, cause increased battery
consumption.
If a second external battery is attached to your Duo-Touch II, this battery will begin charging once the main battery
is fully charged.
Using the Battery
Charging Discharging
System On 3-5 hours 3 hours
System Off (Suspend to RAM
and Suspend to Disk) 3 hours _
Pa
g
e 26 of 57Duo-Touch II Hel
p
2/28/2008file://C:\Documents and Settin
g
s\harwoodm\Local Settin
g
s\Tem
p
\~hh5E31.htm

About the Battery
The battery is a Lithium-Ion "smart" battery. It contains a temperature sensor and a memory device that stores
information about the battery, such as how much charge is left and how many times it has been recharged. The
p
arameters for the "management" of the battery are also kept in the battery's memory. The life expectancy will
depend strongly on the care of the battery, the individual usage pattern and the Duo-Touch II's specific
configuration. Generally, a battery pack is good for 300 - 500 charge/discharge cycles during its useful life (70% of
original capacity).
CAUTION Shutdown the computer and remove from external power before removing the battery to prevent
p
otential loss of data.
The battery pack is most efficient at room temperature. However, its efficiency fails as the temperature varies from
that range. The chart below shows approximate capacity values with respect to temperatures.
To prevent damage, the charge circuitry is turned off for temperatures that are too high (above approximately 115°F
or 46°C) or too low (below approximately 32°F or 0°C). Your Duo-Touch II is equipped with a fan to remove heat
from the processor.
CAUTION The Thermal Grate gets warm during use of the Duo-Touch II. Do not block the flow of air to the
Thermal Grate.
NOTE A "cold-soaked" battery has an even lower capacity and may not power a unit.
Monitoring Battery Power
There are two ways to monitor how much power the battery has left:
1. Hover your pen over the battery icon in the taskbar to check your battery power status. The status will show
as a pop-up.
2. Alternately, select Start, Control Panel. If you are in Category View, select Performance and Maintenance,
and then select Power Options. If you are in Classic View, select Power Options and then tap the Power
Meter tab to see how much battery power remains.
NOTE If you do not see the battery icon, enable it in Start, Control Panel, Power Options. Choose the Advanced
tab and select "Always show icon on the taskbar."
Low Battery Alarms
CAUTION When battery power is low, the alarm beeps or displays a warning on your screen. Take immediate
action, such as saving files or connecting to the AC adapter , or data may be lost.
When the computer alerts you that the battery is low, immediately do one of the following:
1. Connect the AC
p
ower ada
p
te
r
Temperature Capacity
-10°C 50%
0°C 80%
20°C 100%
45°C 100%
55°C 80%
Pa
g
e 27 of 57Duo-Touch II Hel
p
2/28/2008file://C:\Documents and Settin
g
s\harwoodm\Local Settin
g
s\Tem
p
\~hh5E31.htm

2. Save your work and then select Shut Down from the Start menu
3. Turn off the computer and replace the discharged battery with a charged battery (See Battery Charging).
NOTE Do not restart the computer until you have connected to an AC adapter or replaced the discharged battery
with a charged battery.
Refer to Battery Tips for more information about how you can conserve battery power. Refer to Managing Power
for information about how you can setup your computer to effectively manage power for your unique use patterns.
Managing Power
Your computer has power management capability so you can reduce the amount of energy used, especially during
p
eriods of inactivity. Effective use of power management options can greatly conserve and extend your battery life.
The power management unit monitors system activity, such as the hard drive, keyboard, mouse, or any devices
attached to a port. If it does not detect activity for a period of time, the computer stops some or all of these devices
in order to conserve energy.
Your computer employs a power management scheme that supports ACPI (Advanced Configuration and Power
Interface), allowing for maximum power conservation and maximum performance at the same time. Windows
handles all power-saving chores for your computer.
For more information search for Power Options in Microsoft (R) Help and Support.
Low-Power States
Your computer can enter three different low-power states to conserve power: Standby/Sleep, Hibernate and
Power Off. These states can be entered manually or after a period of inactivity.
Standby/Sleep
Most devices in the system are powered off, but the contents of system memory are retained. Standby/Sleep is
sometimes referred to as Suspend to RAM. When the computer returns from standby mode, the desktop appears
with the same files and programs open as when the computer was suspended. Resume time is very quick.
Hibernate
Hibernate, or Suspend to Disk, is similar to Standby, except that the current state of the computer is copied to the
hard disk in a special file. After this occurs, all devices in the computer are turned off. When the computer returns
from hibernation, the desktop appears with the same files and programs open as when the computer was suspended.
Hibernation saves more power than Standby, but takes slightly longer to resume.
Power Off
All applications are closed and the system is shutdown.
Entering Low-Power States
From the Start Menu, select Shut Down to display a dialog that allows you to manually enter low-power
states.
Pa
g
e 28 of 57Duo-Touch II Hel
p
2/28/2008file://C:\Documents and Settin
g
s\harwoodm\Local Settin
g
s\Tem
p
\~hh5E31.htm

Battery Tips
Tip 1. Avoid excessive heat and cold
zYour battery will last longer during the day if it is used, charged and stored between 50°F and 86°F (10°C and
30°C).
zCharge the battery nightly where the temperature will remain around 68°F (20°C). Your battery may not last
as long through the day if you charge it at higher or lower temperatures.
zAllow unrestricted airflow while the computer is connected to external power. Make sure that the fan inlet and
outlet are unobstructed.
zAvoid exposing batteries to hot or cold temperatures for long periods.
How your battery behaves in warm conditions
How your battery behaves in cold conditions
Tip 2. Prevent wasted power
zManually turn off or suspend your computer whenever you are not using it.
zReduce the screen brightness. Decrease brightness by pushing Fn + Rotate . Increase it by pushing Fn +
Security .
zUse the AC adapter or vehicle adapter whenever possible.
zSelect either the Portable/Laptop or Max Battery power scheme. Both of these power schemes help to
conserve battery power. Max Battery provides the most battery conservation by always keeping the
processing speed lower. However, this may affect your application performance. Portable/Laptop
automatically adjusts the processing speed as required by your applications.
zWhen running on battery power, make sure your system suspends automatically after a few minutes of
inactivity. PC Cards, radios, custom applications, or modified system settings may affect this.
zRemove PC Cards and unplug peripherals when you are not using them. They may draw power from the
system even when not in use.
zAvoid operating the fax/modem, or audio and video applications when using battery power. Operating a
fax/modem, video, or audio equipment increases the computer’s power requirements.
zDon't use screen savers as they draw excessive current, especially “3D” screen savers.
zAvoid or minimize using applications that keep the CPU busy a large percentage of the time. The following
will help you determine if your system is running such applications:
Identifying power wasting programs
What to do if applications are keeping the CPU busy
Tip 3. Calibrate your battery
zOver time, the accurac
y
of the Windows batter
y
g
as
g
au
g
e ma
y
be affected b
y
re
p
eated char
g
in
g
and
Pa
g
e 29 of 57Duo-Touch II Hel
p
2/28/2008file://C:\Documents and Settin
g
s\harwoodm\Local Settin
g
s\Tem
p
\~hh5E31.htm

discharging of the battery. Calibrating the battery every three or four months helps to keep the gas gauge
accurate. For information on calibrating the battery, refer to Battery Calibration.
Tip 4. Get a good charge
zYour computer will charge more quickly if it is turned off or suspended.
zIn warmer or cooler temperatures, your battery can take much longer to fully charge.
zIf your battery is charged in a cold (less than 41°F/5°C) or very warm (greater than 122°F/50°C) environment,
it is possible that the Battery Charge LED will indicate that the charge has stopped; however, this does not
necessarily mean that your battery is fully charged.
Tip 5. Prevent data loss
Follow these guidelines to prevent data loss when removing your battery or storing your computer:
zYou will lose data if you remove the battery while the computer is operating or suspended. To prevent this,
shutdown your computer or put it into hibernate (suspend-to-disk) mode before removing your battery.
zIf you plan to store your computer for more than a few days, shutdown your computer. Remove the battery
before storing the computer.
Tip 6. Clean terminals
zDirty terminals can be a cause of charging problems. Clean battery terminals with a cotton swab dipped in
isopropyl alcohol. Make sure that the alcohol has evaporated before reinstalling the battery.
Tip 7. Storing batteries
zStore the battery within the recommended temperature range: 10°C to 30°C (50°F to 86°F).
zUnused or stored batteries can lose power over time. When you install a battery that has not been used for
awhile, connect external power to the computer and fully charge your battery.
zBattery calibration may increase the capacity of a battery stored for a period of time. For information on
calibrating the battery, refer to Battery Calibration.
zIt is recommended that the battery is recharged every six months while in storage.
Using the BIOS Setup Utility
The BIOS Setup Utility allows you to configure your computer’s basic settings. When you turn your computer on,
the system reads this information to initialize the hardware so that it will operate correctly. You can use the BIOS
Setup Utility to change your computer’s start-up configuration. For example, you can change your system's security
routine.
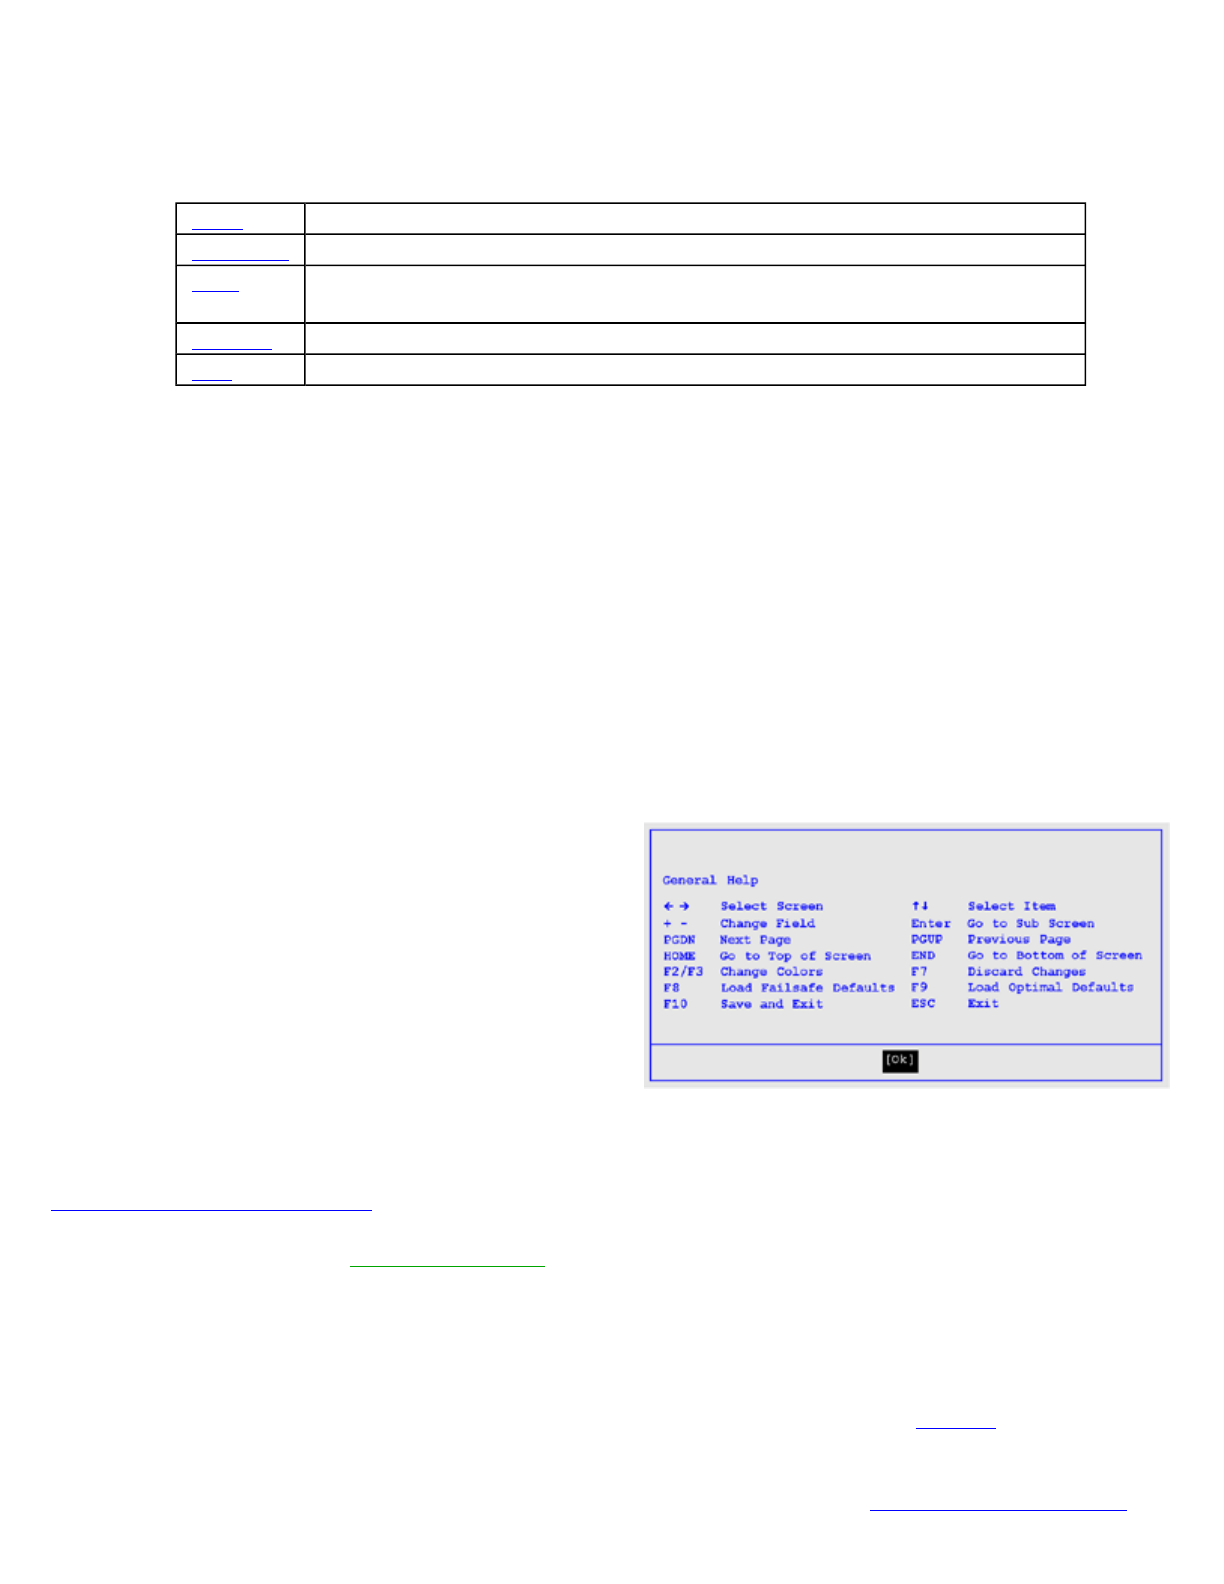
Starting the BIOS Setup Utility
You can only start the Setup Utility shortly after the computer has been turned on. When you see the message "Press
Enter button to enter SETUP" display at the bottom of the screen, press the OK/Enter key .
You will then see the followin
g
screen:
Pa
g
e 30 of 57Duo-Touch II Hel
p
2/28/2008file://C:\Documents and Settin
g
s\harwoodm\Local Settin
g
s\Tem
p
\~hh5E31.htm
Use your Line Up or Line Down hot keys to highlight "CMOS Setup Menu" and press the OK/ Enter key. The
system will start the Setup Utility and display the main menu of the utility.
CAUTION Incorrect settings can cause your system to malfunction. To correct mistakes, return to Setup and
restore the Setup Defaults by going to the Exit Menu and selecting "Load Optimal Defaults".
Navigation and Help
Pa
g
e 31 of 57Duo-Touch II Hel
p
2/28/2008file://C:\Documents and Settin
g
s\harwoodm\Local Settin
g
s\Tem
p
\~hh5E31.htm
The Menu Bar
The Setup Utility has five menu options in the Menu Bar (1) at the top of the window. To navigate between the
screens you must tap on the screen with the pen/stylus to see the Tablet PC Input Pad and use the arrow keys or
attach a USB keyboard.
The Field and General Help Windows
The Field Help Window (2) is on the right side of each menu. It displays the help text for the currently selected
field. This text updates as you move the cursor from field to field.
The Field List (3) is on the lower left side of the BIOS Setup Utility screen. It displays the actual field titles and
entry fields for the BIOS settings.
The Navigation Menu (4) is on the lower left side of the BIOS Setup Utility screen. It displays the navigation keys
used with an external keyboard.
NOTE The Field Help Window refers to keys that are only available via an external USB keyboard. If you do not
have an external keyboard attached to your Duo-Touch II, use the Setup Utility's Tablet PC Input Pad described
below:
The General Help Window describes the Tablet PC Input
Pad keys and their functions. You can access it by selecting
F1on the Tablet PC Input Pad. However, the following keys
are not available during Setup unless you have an external
USB keyboard attached to the Tablet PC:
HOME
F2/F3
F8
END
Tablet PC Input Pad
The Setup Utility has a unique Tablet PC Input Pad that appears when you hover over or tap your pen anywhere on
the screen. Use the Tablet PC Input Pad to navigate between setup screens, between fields on each screen and to
make any field changes. To avoid making unintentional field changes, we recommend you do not open the panel
from the bottom right side of your screen. Instead, tap anywhere on the left side of the display.
To navigate between the five menu screens, tap the left or right arrows on the input pad. To toggle through the
fields, tap the up and down arrows. Alternately, you can use the Line Up and Line Down hot keys to toggle through
the fields. Press the OK/Enter key to view a list of options for each field.
If you need to input characters, tap FnA on the Tablet PC Input Pad to expand it to a larger Tablet PC Input Pad that
includes characters. Press FnA a
g
ain to return to the small in
p
ut
p
ad.
Main Use for basic system configuration
Advanced Use to set the advanced features
Boot Use to select the sequence of boot devices that are searched to load an
operating system.
Security Use to set user and supervisor passwords
Exit Use to exit the current Setup session
Pa
g
e 32 of 57Duo-Touch II Hel
p
2/28/2008file://C:\Documents and Settin
g
s\harwoodm\Local Settin
g
s\Tem
p
\~hh5E31.htm
NOTE The Tablet PC Input Pad disappears after a few seconds of inactivity and when you change screens.
The Main Menu
The Advanced Menu
Field Setting Function
AMIBIOS for information
only Version
Motherboard for information
only Version
Processor for information
only Type and Speed
System
Memory for information
only Size
System Time HH:MM:SS Configure system time
System Date MM/DD/YYYY Configure system date
Digitizer
Calibration Opens the
Digitizer
Calibration Utility
Begins the digitizer calibration. Once you have
calibrated the display, the computer will restart.
Pa
g
e 33 of 57Duo-Touch II Hel
p
2/28/2008file://C:\Documents and Settin
g
s\harwoodm\Local Settin
g
s\Tem
p
\~hh5E31.htm
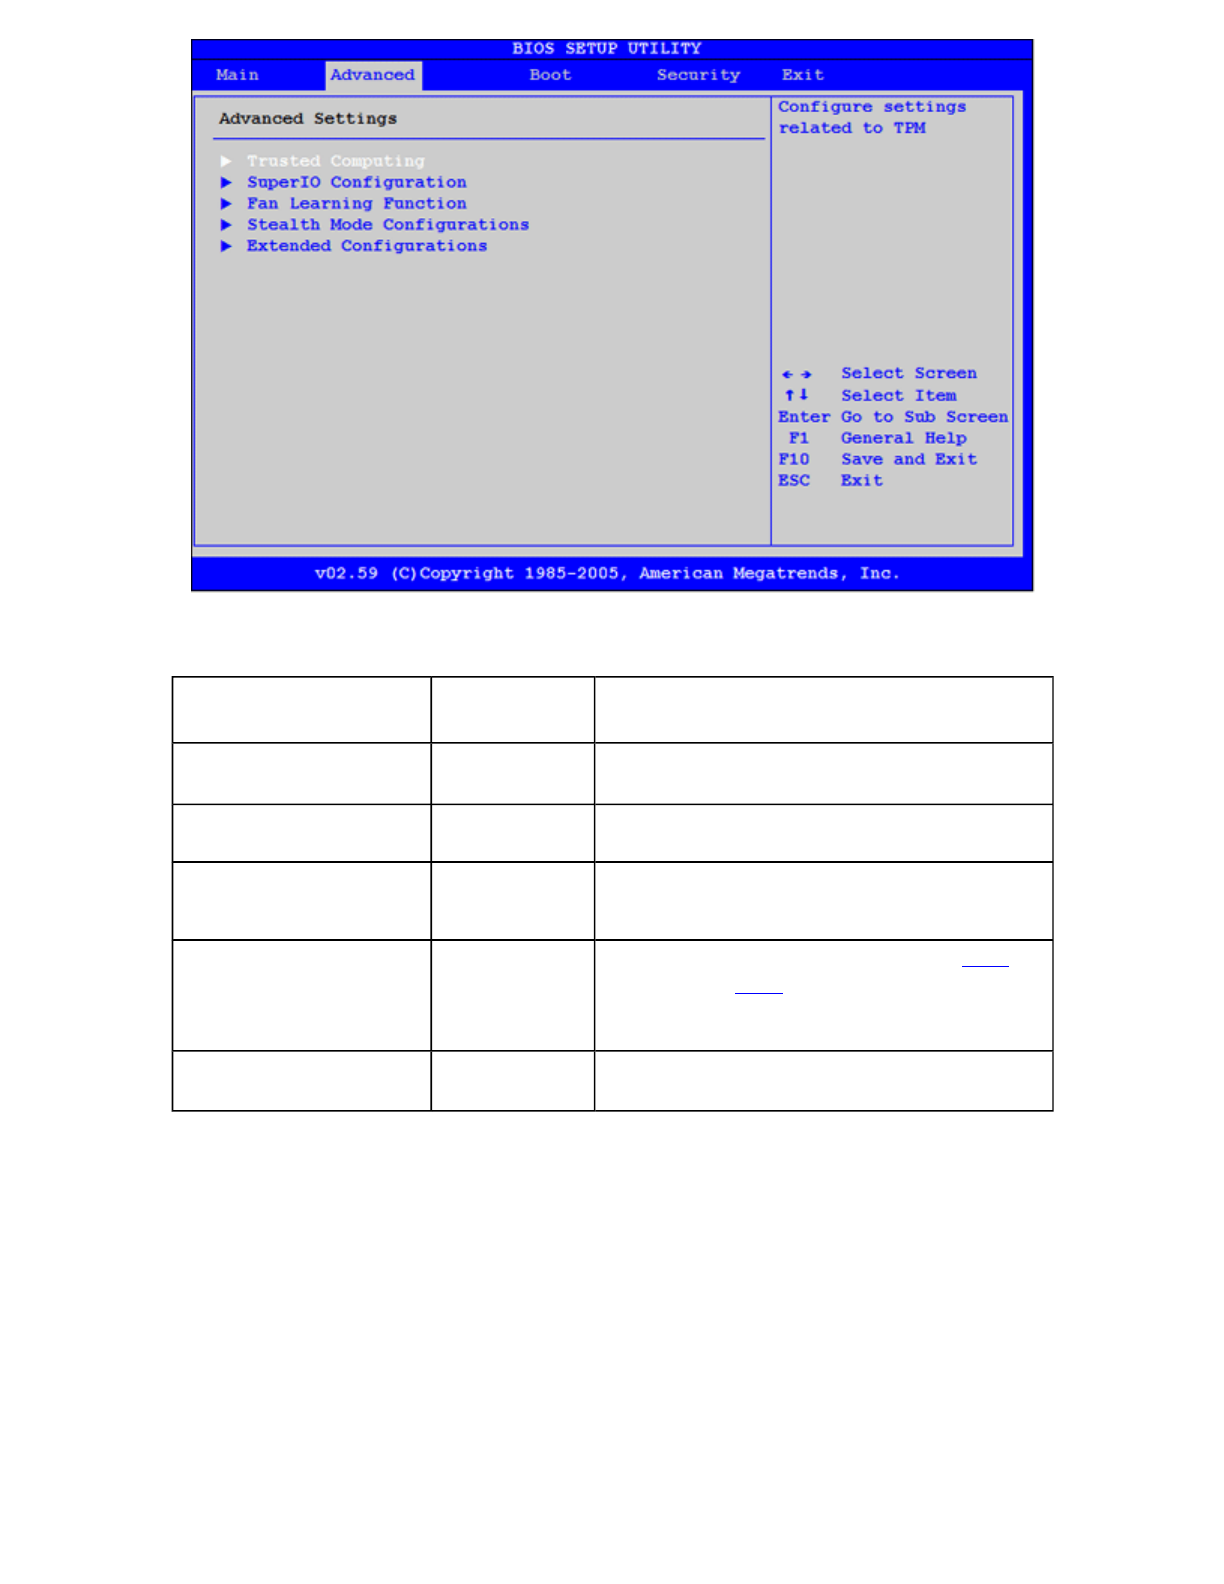
Trusted Com
p
utin
g
Field Setting Function
Trusted Computing Sub-Menu Configure settings related to TPM
SuperIO Configuration Sub-Menu Configure I/O port interrupt and IRQ
settings
Fan Learning Function Sub-Menu Fan Learning Function will take 2 minutes
to finish procedure
Stealth Mode
Configurations Sub-Menu Depending on Stealth Mode setting, LED ,
FAN Beeps, LCD Brightness, Audio and
Wireless devices will keep silent when you
need
Extended
Configuration Sub-Menu Other special function settings including
low battery beep, radio wakeup, etc ...
Pa
g
e 34 of 57Duo-Touch II Hel
p
2/28/2008file://C:\Documents and Settin
g
s\harwoodm\Local Settin
g
s\Tem
p
\~hh5E31.htm
Su
p
erIO Confi
g
uration
Field Setting Function
TCG/TPM Support Yes
No
Enable/Disable TPM TCG (TPM 1.1/1.2)
support in BIOS
Execute TPM Command Don't
Change
Disabled
Enabled
Enable (Activate) / Disable (Deactivate) / Don't
change (leave settings in last configuration)
Enable (Activate) / Disable (Deactivate)
Command to TPM
TPM Enable/Disable
Status Disabled This displays the current status of the TPM
TPM Owner Status Unowned This displays the current Ownership status of the
TPM
Pa
g
e 35 of 57Duo-Touch II Hel
p
2/28/2008file://C:\Documents and Settin
g
s\harwoodm\Local Settin
g
s\Tem
p
\~hh5E31.htm
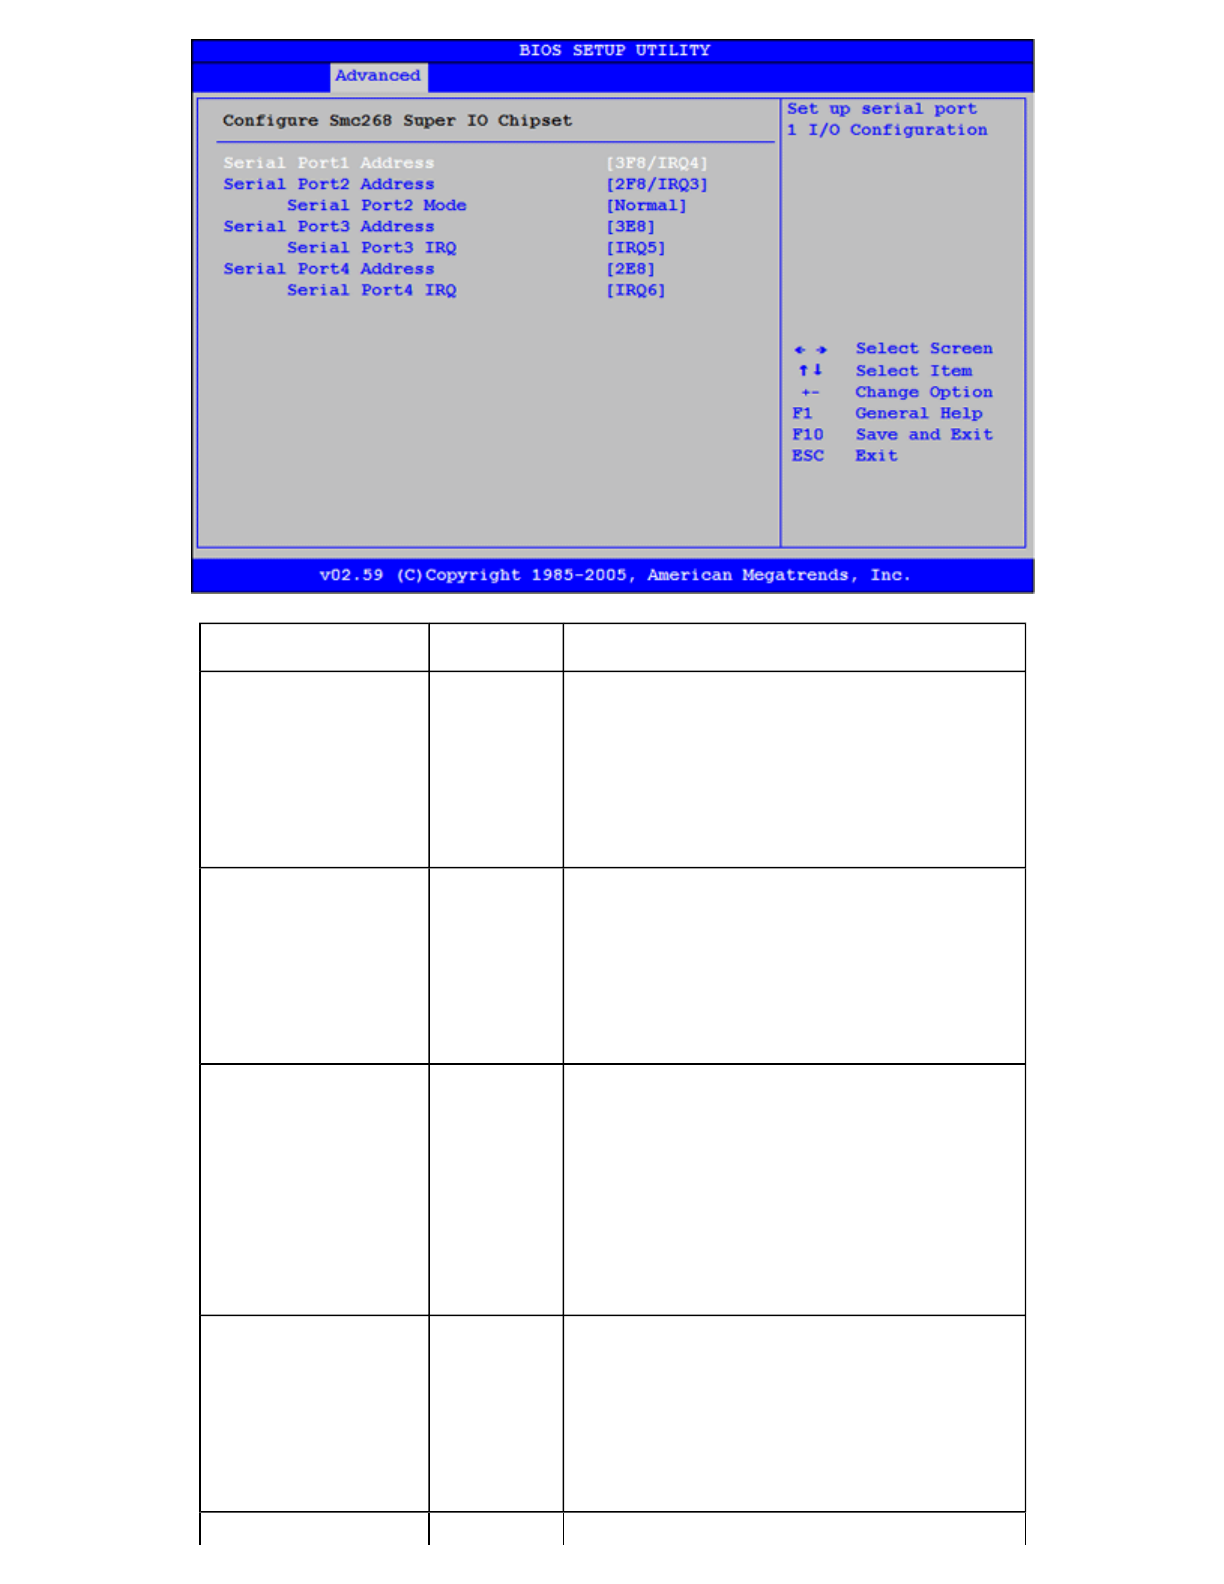
Field Setting Function
Serial Port1
Address Disabled
3F8/IRQ4
3E8/IRQ4
2E8/IRQ3
Select serial port 1 interrupts and IRQ
settings
Serial Port2
Address Disabled
2F8/IRQ3
3E8/IRQ4
2E8/IRQ3
Select serial port 2 interrupts and IRQ
settings
Serial Port3
Address Disabled
3F8
2F8
3E8
2E8
Sets address for serial port 3
Serial Port3 IRQ IRQ4
IRQ5
IRQ10
IRQ11
Sets IRQ for serial port 3
Serial Port4 Disabled Sets address for serial port 4
Pa
g
e 36 of 57Duo-Touch II Hel
p
2/28/2008file://C:\Documents and Settin
g
s\harwoodm\Local Settin
g
s\Tem
p
\~hh5E31.htm
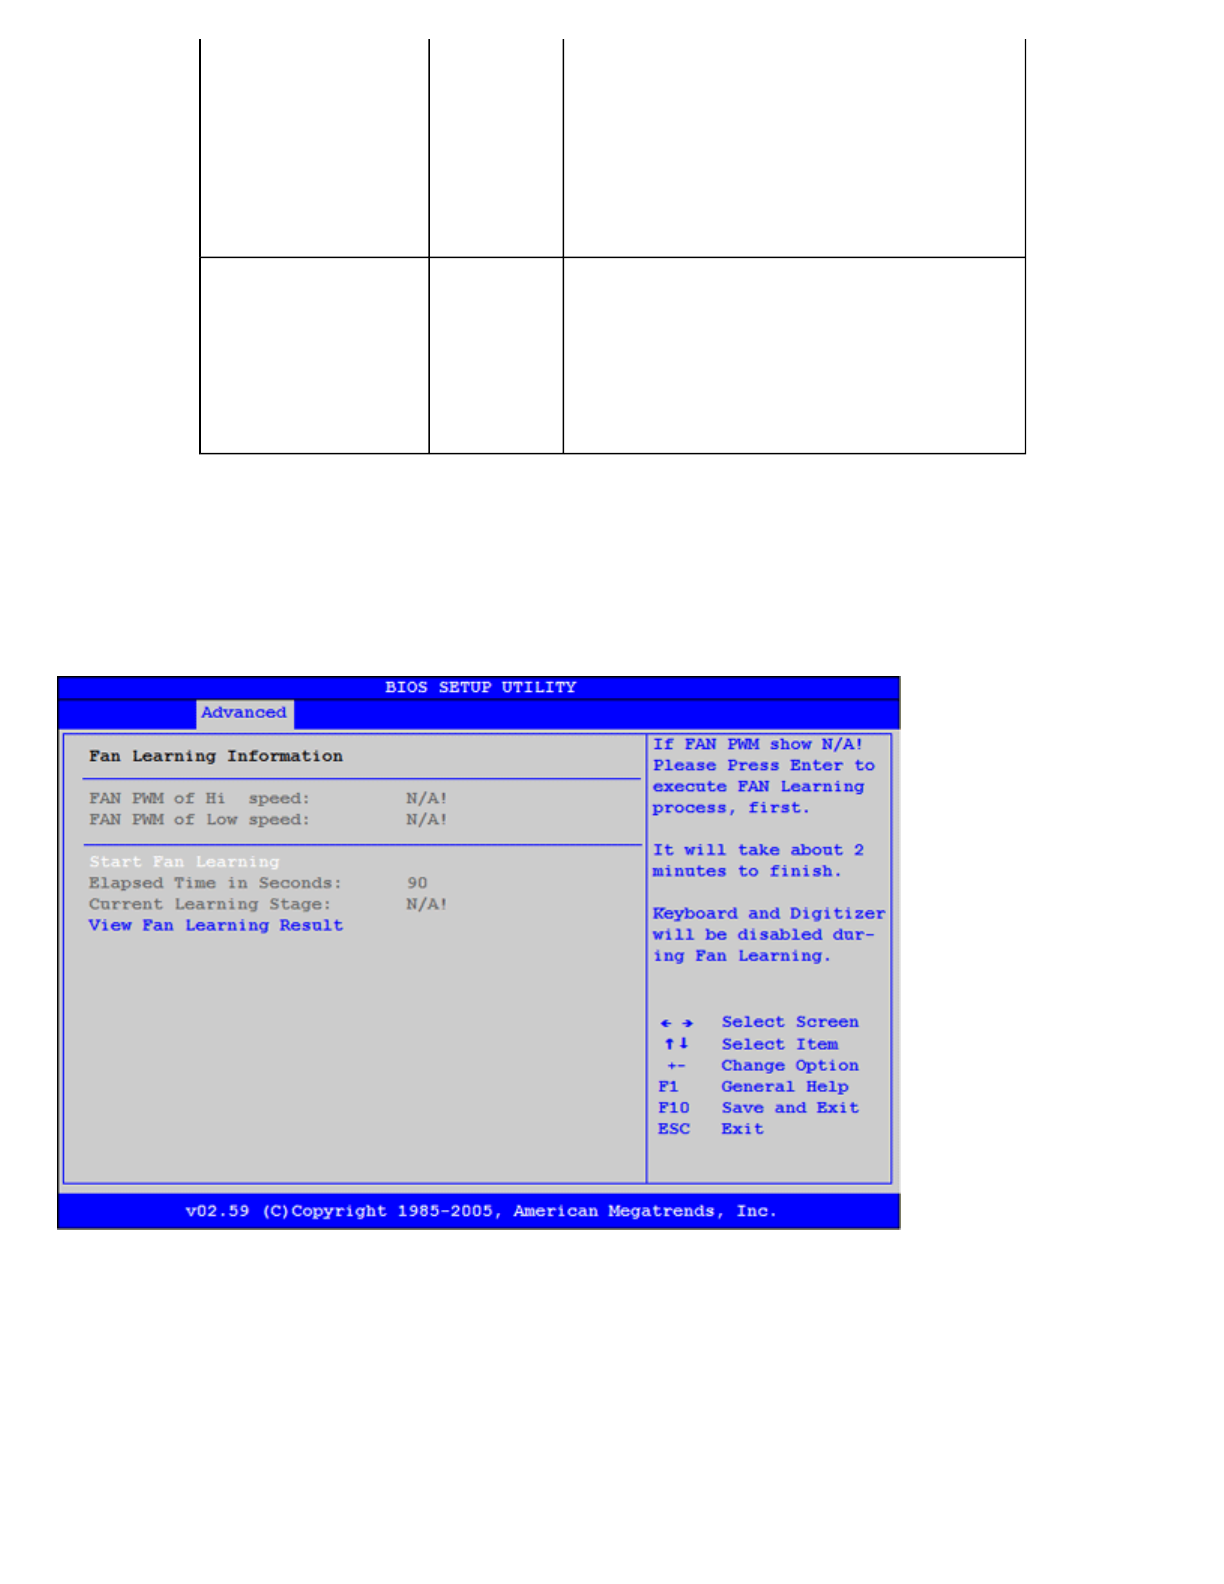
Fan Learning Function
The purpose of the Fan Learning Function is to calibrate the fan’s performance. The fan’s throughput will be
decreased over time and the Fan Learning Function adjusts the fan’s efficiency allowing the fan to operate properly.
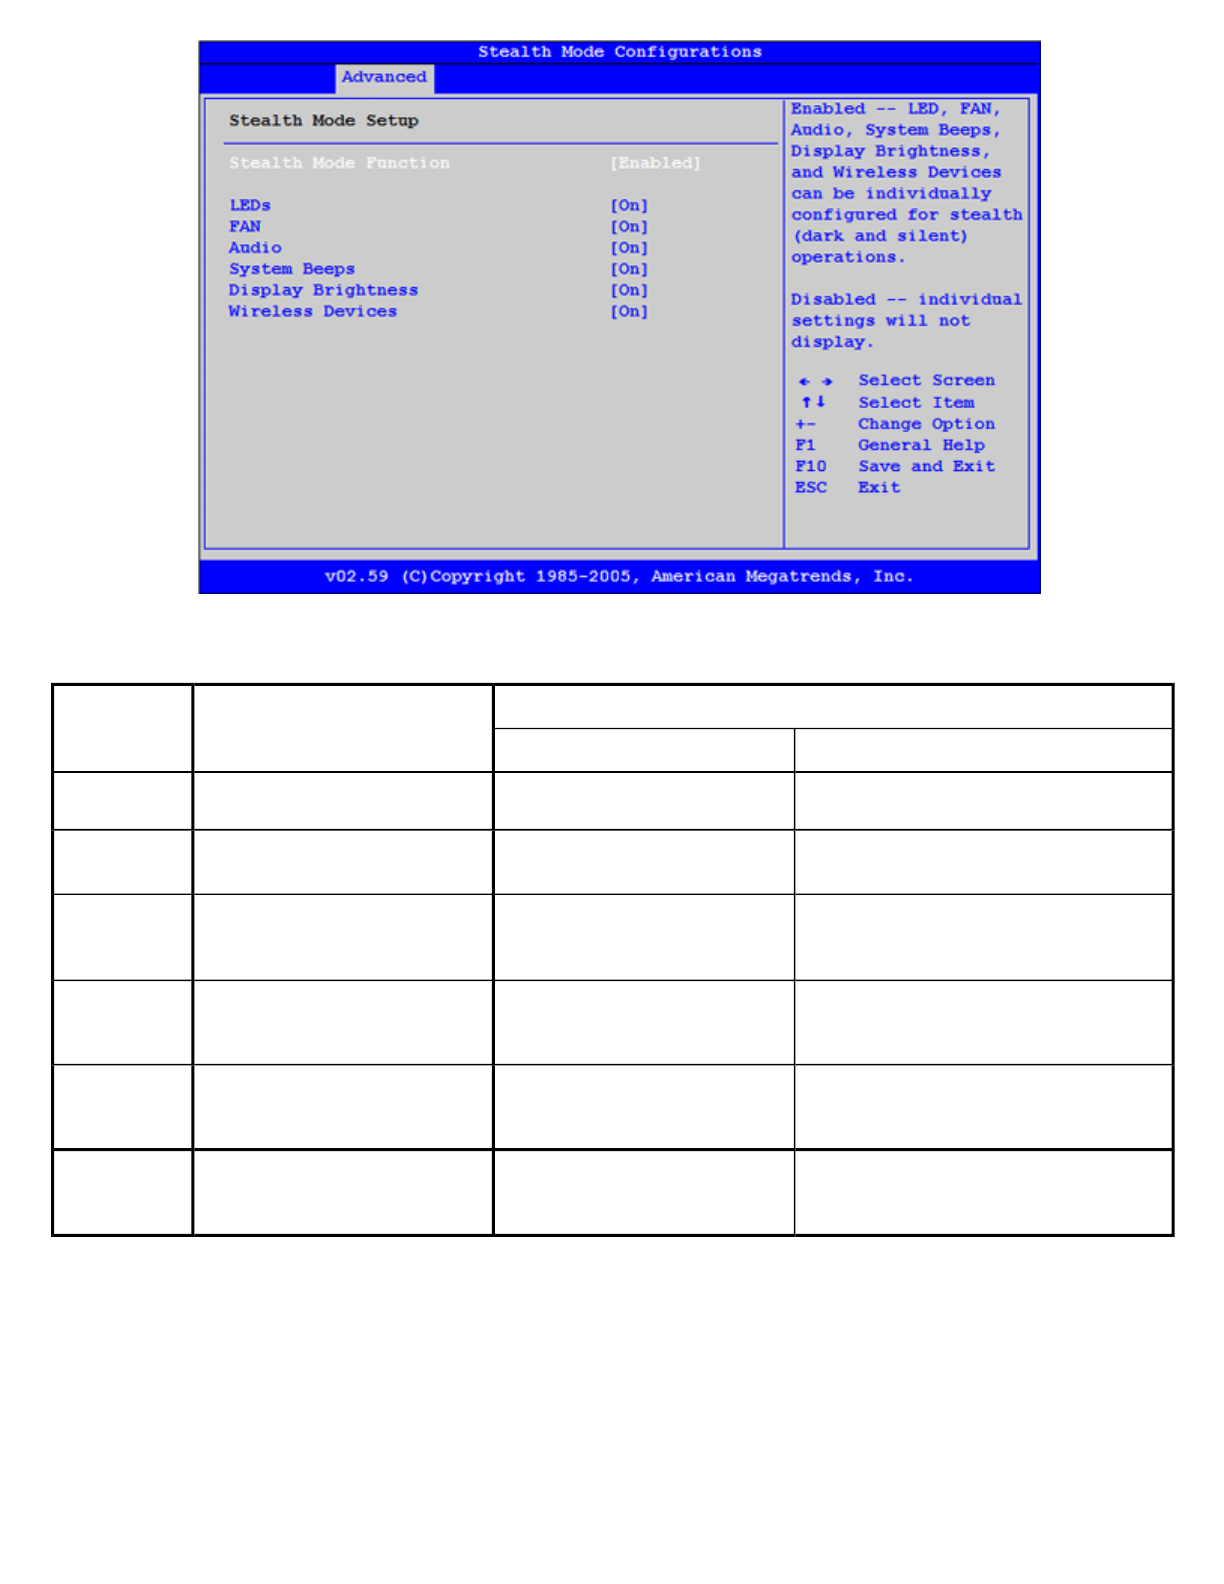
Stealth Mode Setup
The Duo-Touch II has stealth mode capability so it can be used in an environment where sound and light could be
dangerous to the user.
If stealth mode is set to “Disabled", the LEDs, Fan, system beeps, audio, display brightness, and wireless devices
o
p
erate normall
y
. If stealth mode is enabled,
y
ou can individuall
y
set each o
p
tion to "on" or "off."
Address 3F8
2F8
3E8
2E8
Serial Port4 IRQ IRQ3
IRQ6
IRQ10
IRQ11
Sets IRQ for serial port 4
Pa
g
e 37 of 57Duo-Touch II Hel
p
2/28/2008file://C:\Documents and Settin
g
s\harwoodm\Local Settin
g
s\Tem
p
\~hh5E31.htm
Extended Confi
g
uration
Option Stealth Mode Function
Disabled Stealth Mode Function Enabled
On Off
LEDs LEDs function as normal On -- all LEDs function
normally Off -- LEDs remain un-lit
Fan Fan functions as normal On -- fan functions
normally Off -- FAN does not run (beware
of overheating the unit)
Audio
Audio functions as normal.
(The default volume level
is set to mid range.)
On -- Audio volume levels
are maintained when unit
powers up
Off -- Audio volume is set to zero
when unit powers up
System
Beeps Beeps are heard during
POST. On -- System beeps
(battery low, no boot
device)
Off -- System beeps are disabled
Display
Brightness The default brightness level
is mid range. On -- brightness levels are
maintained when unit
powers up
Off -- brightness levels set to zero
when unit powers up
Wireless
Devices Wireless devices function
as normal. On -- all wireless devices
are turned on when unit
powers up
Off -- all wireless devices are
turned off when unit powers up
Pa
g
e 38 of 57Duo-Touch II Hel
p
2/28/2008file://C:\Documents and Settin
g
s\harwoodm\Local Settin
g
s\Tem
p
\~hh5E31.htm
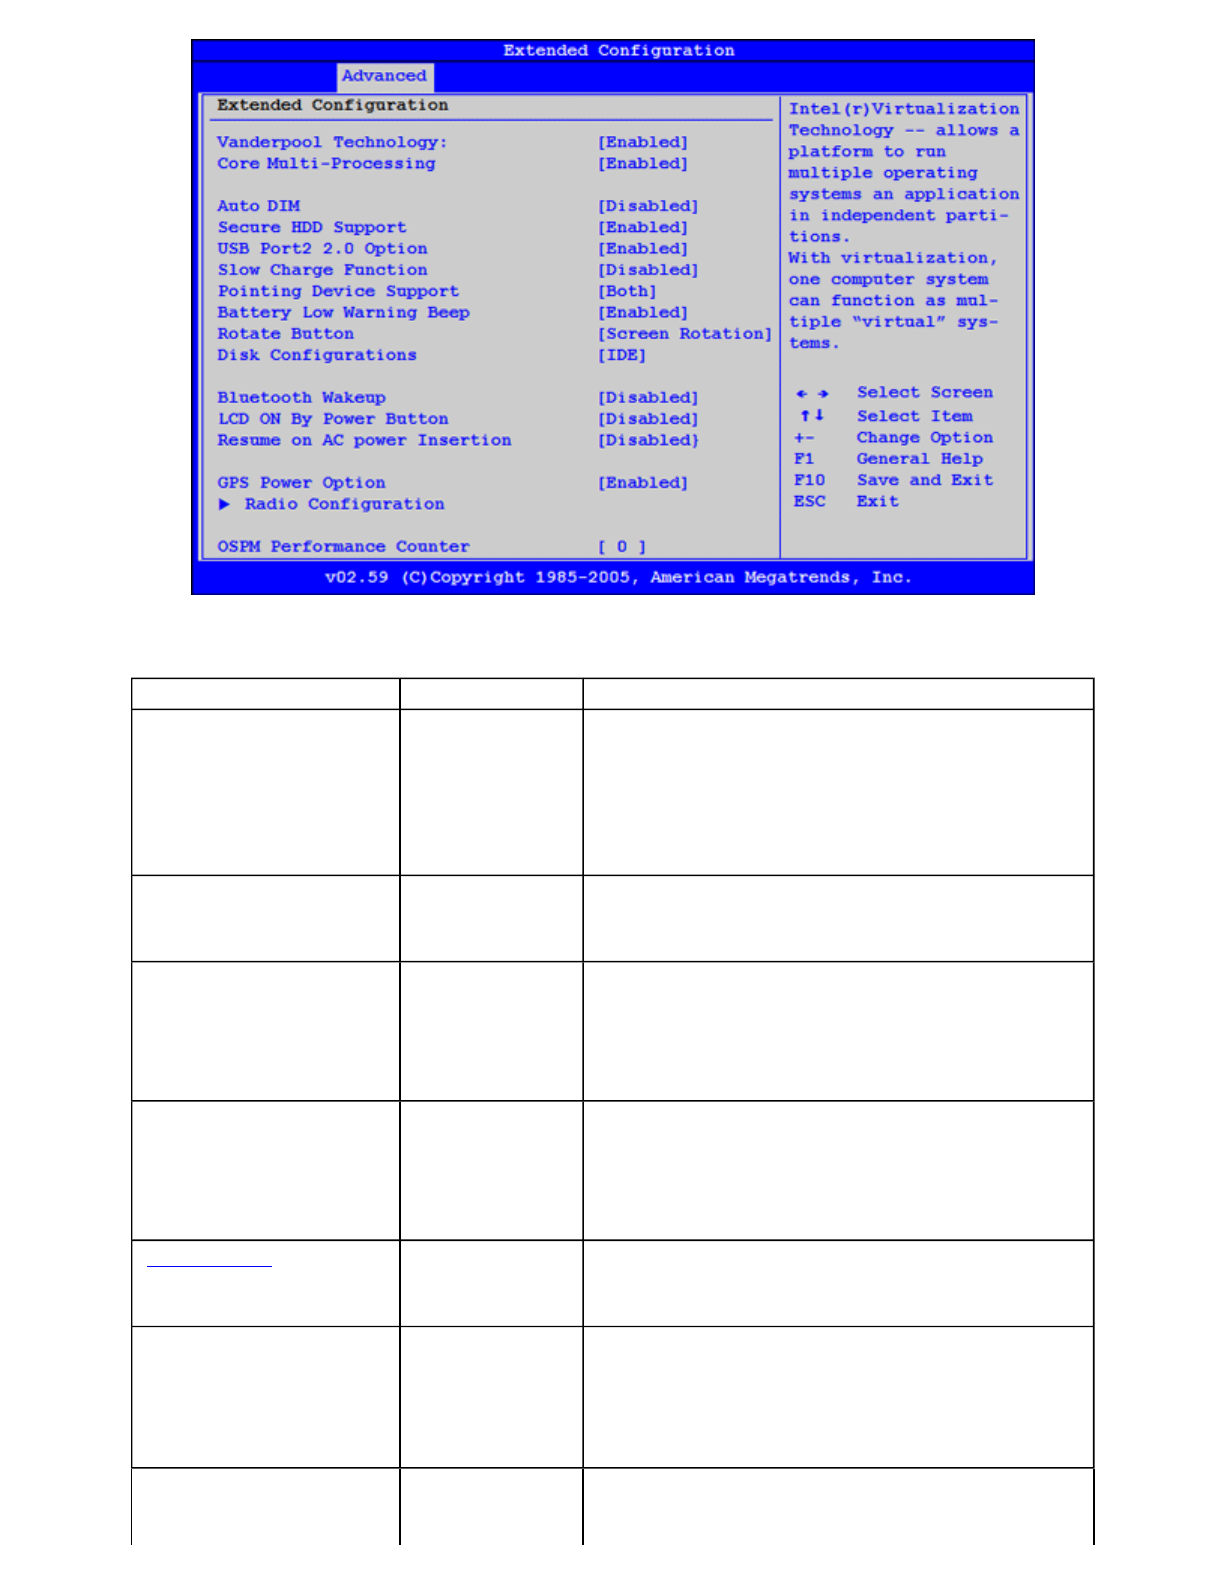
Field Setting Function
Vanderpool Technology Enabled
Disabled
Intel (r) Virtualization Technology -- allows a
platform to run multiple operating systems an
application in independent partitions.
With virtualization, one computer system can
function as multiple “virtual” systems.
Core Multi-Processing Enabled
Disabled
Enabled -- Use multi-processing core
Disabled -- Use only one processor core
Auto DIM Disabled
Enabled Enabled -- Display will dim slightly when on
battery power.
Disabled -- Display brightness will not dim
when on battery power.
USB Port2 2.0 Option Enabled
Disabled
Enabled = bottom/backside USB port is USB
2.0
Disabled = bottom/backside USB port is USB
1.1
Slow Charge Function Disabled
Enabled Enabled -- Slow charge function is enabled
Disabled -- Battery charges at normal rate
Pointing Device
Support Both
Digitizer
Touch Panel
Both -- Use both touch panel and digitizer
Digitizer -- Use digitizer only
Touch Panel -- Use touch panel only
Battery Low Warning
Beep Enabled Enabled -- System will sound 3 beeps every 10
seconds if battery charge drops below 7%
Pa
g
e 39 of 57Duo-Touch II Hel
p
2/28/2008file://C:\Documents and Settin
g
s\harwoodm\Local Settin
g
s\Tem
p
\~hh5E31.htm

Radio Confi
g
uration
Disabled Disabled -- System will not beep if battery low
Rotate Button Screen
Rotation
Backlight
Toggle
Screen Rotation -- Pressing Rotate button will
rotate screen.
Backlight Toggle -- Pressing Rotate Button will
toggle the backlight on and off.
Disk Configurations IDE
AHCI
IDE Combined -- Standard IDE Configuration
Mode
AHCI Mode -- Advanced Configuration Mode
for SATA drive
Bluetooth Wakeup Disabled
Enabled Enabled -- System will awake up from standby
if a Bluetooth signal is detected
Disabled -- System will not awake up from
standby if a Bluetooth signal is detected
LCD ON By Power
Button Disabled
Enabled Enabled -- If display is set in OS to turn off, it
will turn back on with power button during
runtime.
Disabled -- Display will not turn on with power
button during runtime; pressing button will cause
the unit to hibernate.
Resume on AC power
Insertion Disabled
Enabled Enabled -- System will wake from standby or
hibernation state when AC power is inserted.
Disabled -- System will not wakeup when AC
power is inserted. Power button will cause unit to
hibernate if pressed.
GPS Power Option Disabled
Enabled Turn on/off GPS
Radio Configuration Sub-Menu
Radio function settings, including Bluetooth and
Wireless LAN
OSPM Performance
Counter 0
1
Select the following timers for OS power
management to be used:
1 = OS uses ACPI Power Management Timer
0 = Allow OS to use either ACPI Management
Timer or Internal Processor Clock
Pa
g
e 40 of 57Duo-Touch II Hel
p
2/28/2008file://C:\Documents and Settin
g
s\harwoodm\Local Settin
g
s\Tem
p
\~hh5E31.htm
The Boot Menu
Field Setting Function
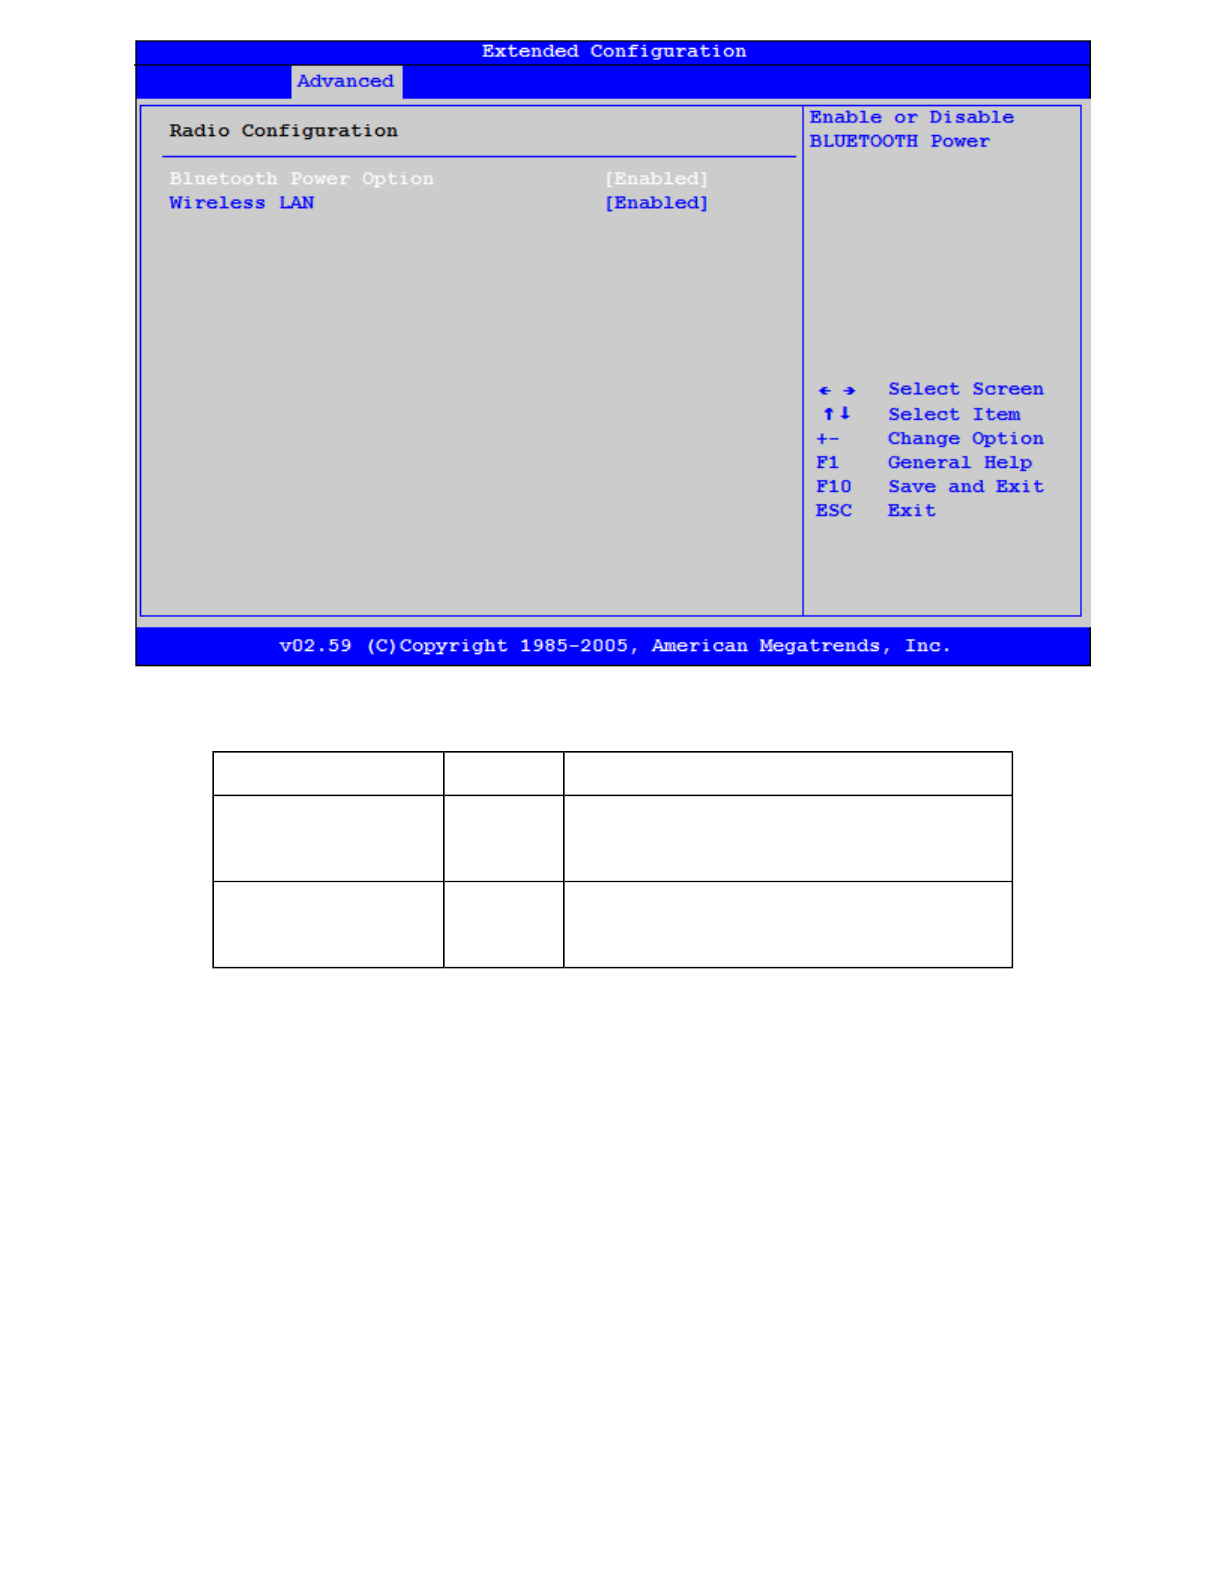
Bluetooth Power
Option Enabled
Disabled
Enable or disable Bluetooth power
Wireless LAN Enabled
Disabled
Enable or disable Wireless LAN
Pa
g
e 41 of 57Duo-Touch II Hel
p
2/28/2008file://C:\Documents and Settin
g
s\harwoodm\Local Settin
g
s\Tem
p
\~hh5E31.htm
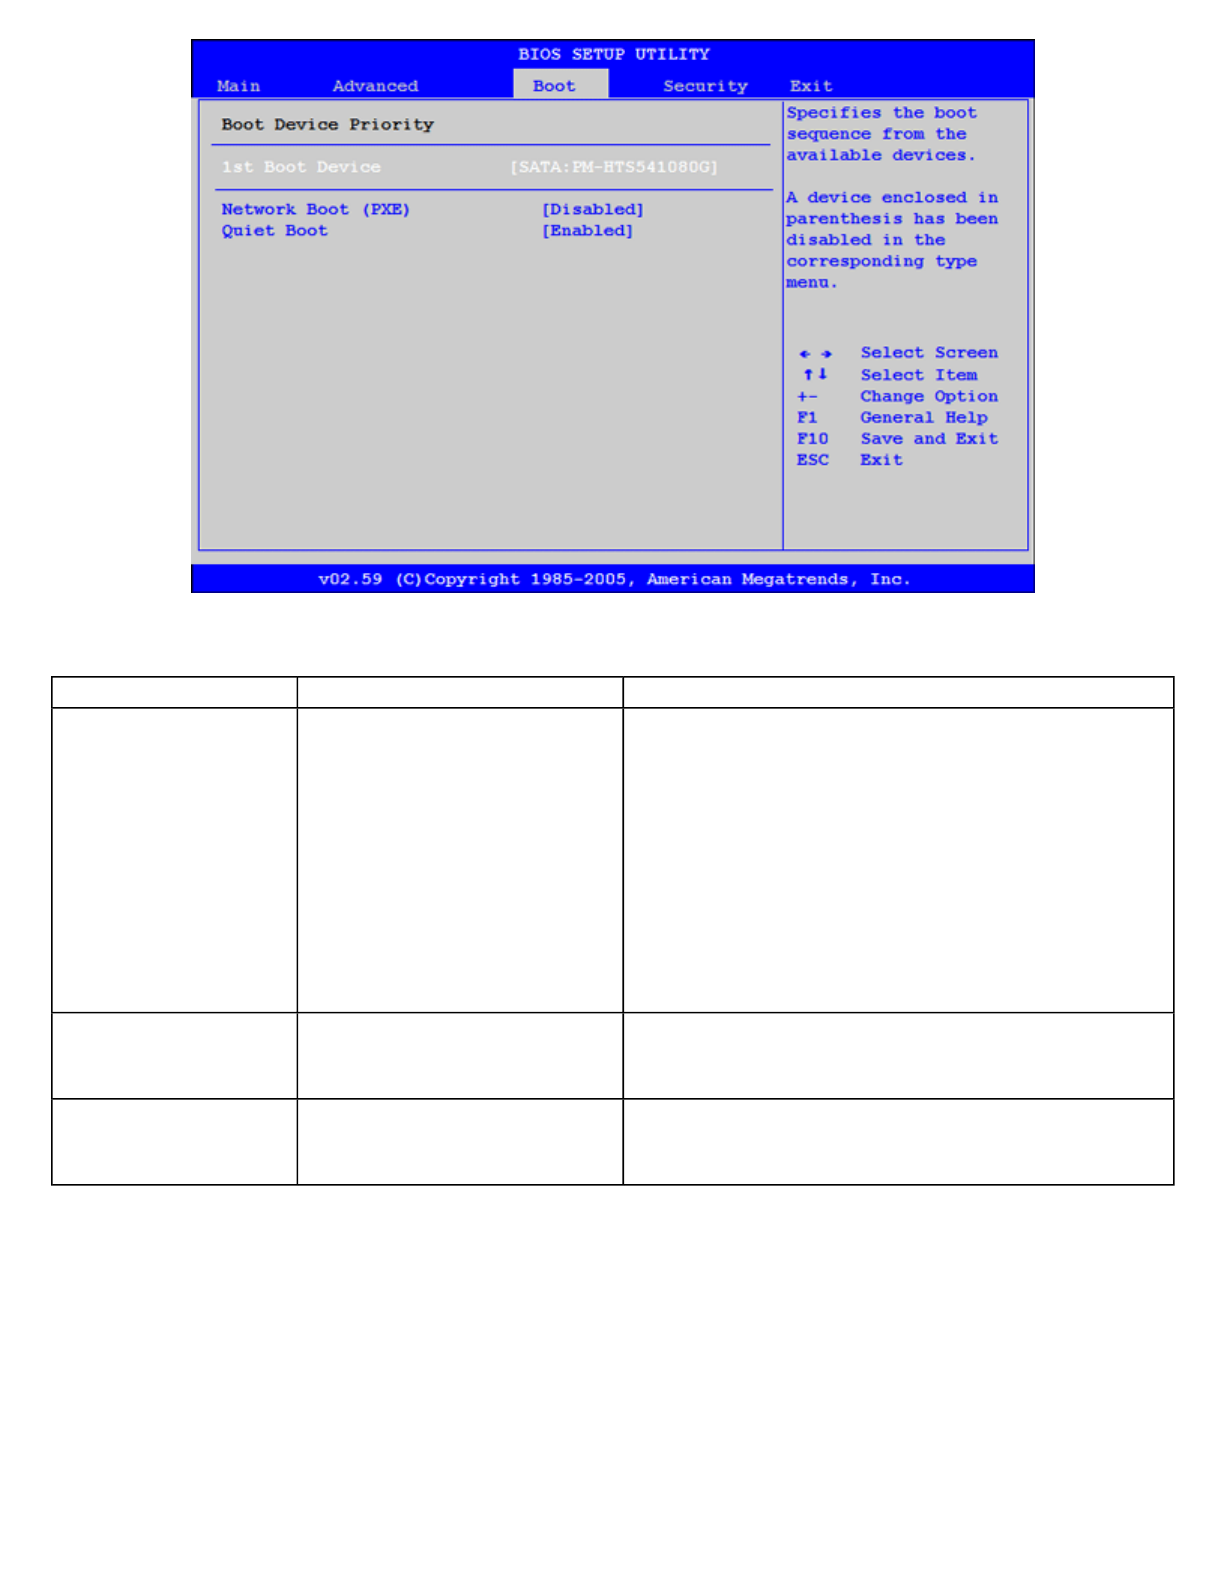
The Security Menu
Field Setting Function
1st Boot Device
(multiple devices may
be displayed)
Removable Dev.
CD/DVD
HDD: SATA:PM-
HTS541080G
Network:Realtek Boot Agent
USB Device
Disabled
Specifies the boot sequence from the available
devices. A device enclosed in parenthesis has been
enabled in the corresponding type menu.
Removable Devices = FDD
CDROM = CDROM
Realtek Boot Agent = Ethernet boot
(NOTE: There are a variety of boot devices
available, only currently installed options are
displayed)
Network Boot (PXE) Enabled
Disabled
If Enabled boot from the network becomes available.
Quiet Boot Enabled
Disabled
If Disabled: Displays normal POST messages. If
Enabled: Displays OEM Logo instead of POST
messages.
Pa
g
e 42 of 57Duo-Touch II Hel
p
2/28/2008file://C:\Documents and Settin
g
s\harwoodm\Local Settin
g
s\Tem
p
\~hh5E31.htm
The Exit Menu
Field Setting Function
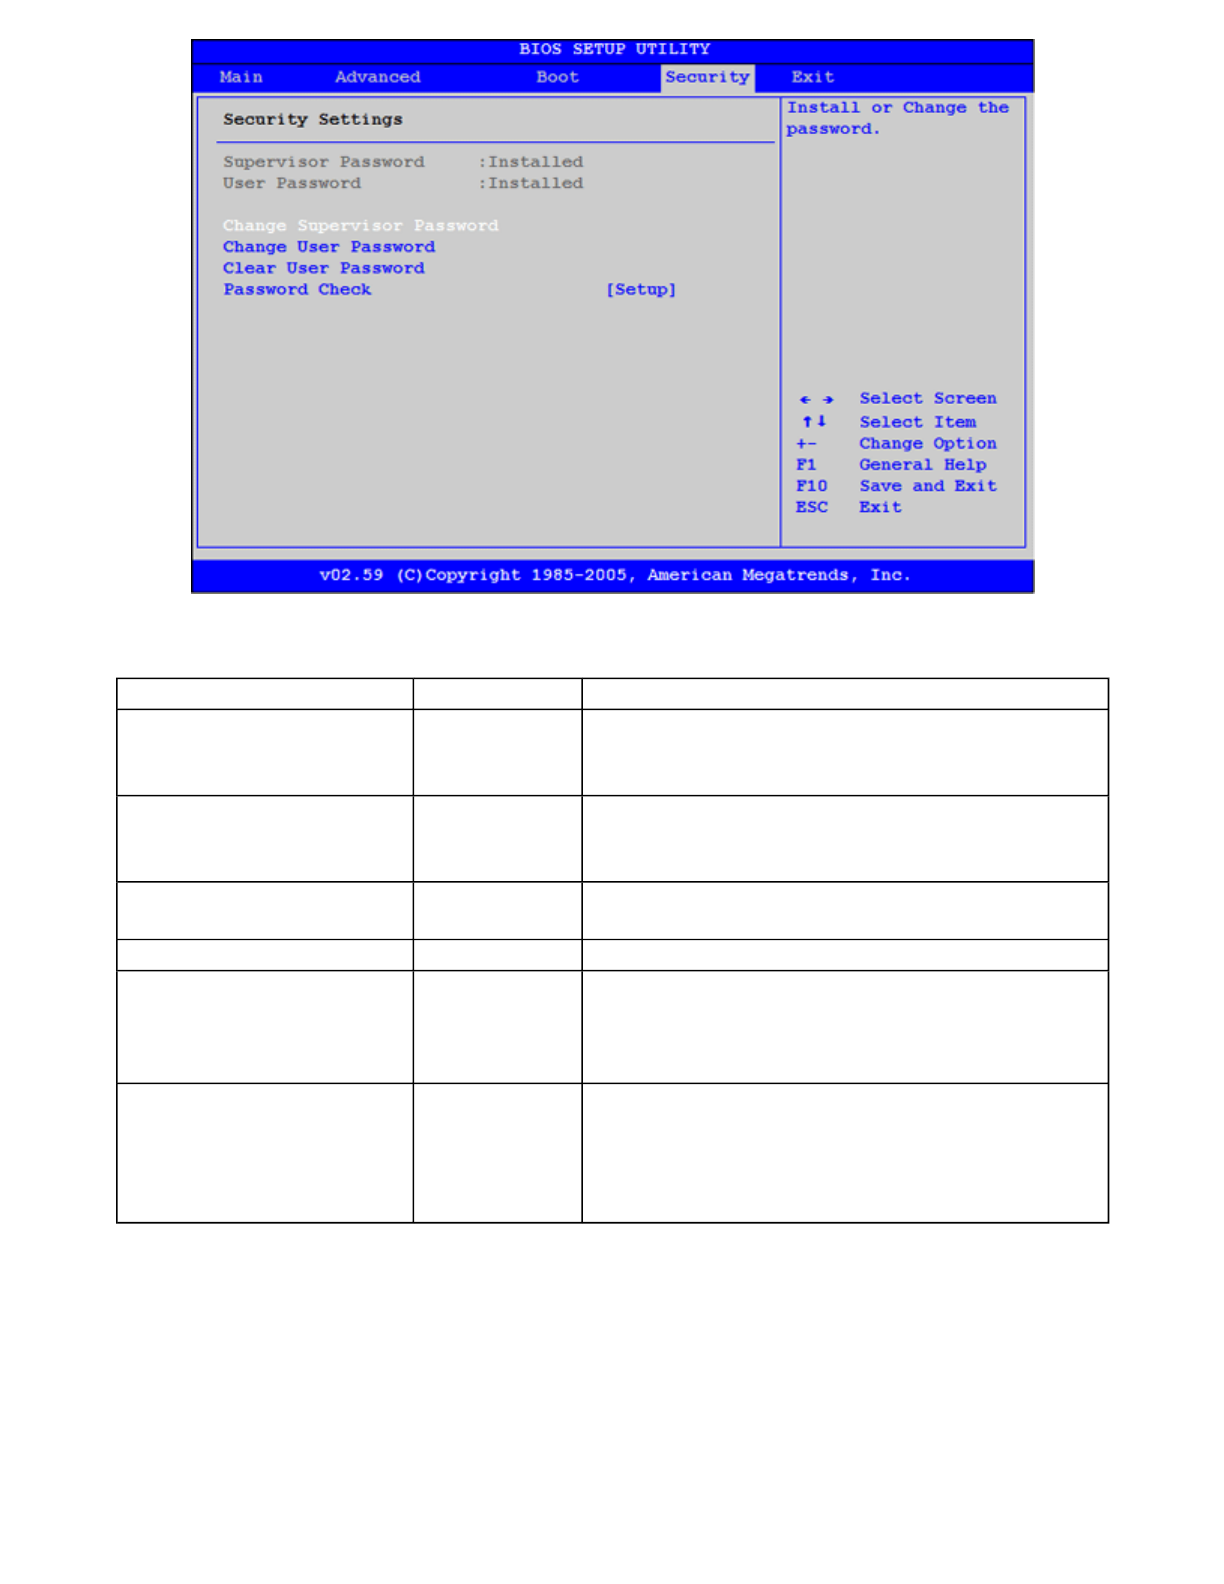
Supervisor Password Installed
Not Installed
Information Only
User Password Installed
Not Installed
Information Only
Change Supervisor
Password N/A Install or Change the password
Change User Password N/A Install or Change the password
Clear User Password N/A Clears/Removes the User Password
(NOTE: This option only displays if a User
Password has been installed)
Password Check Setup
Always
Determines when a password is required by the
system.
(NOTE: This option only displays if password(s)
are installed)
Pa
g
e 43 of 57Duo-Touch II Hel
p
2/28/2008file://C:\Documents and Settin
g
s\harwoodm\Local Settin
g
s\Tem
p
\~hh5E31.htm
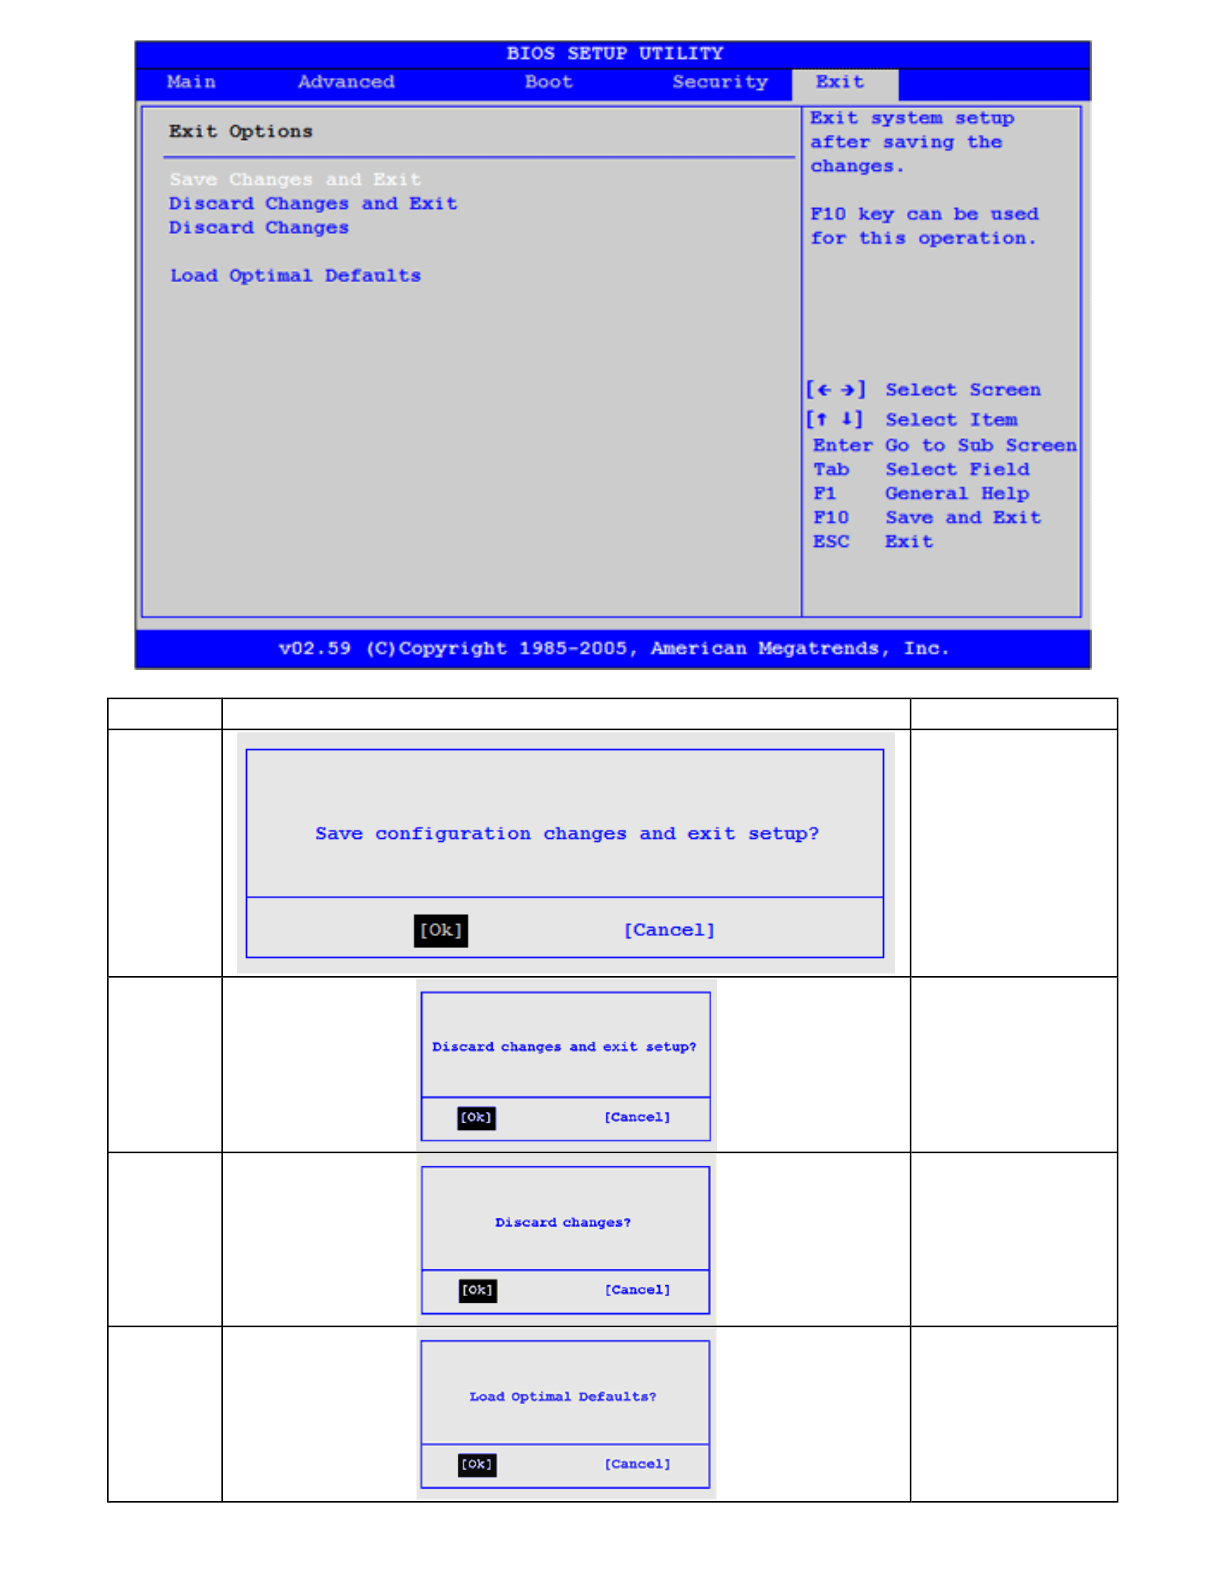
Field Screen Function
Save
Changes
and Exit
Exit system setup
after saving the
changes. F10 key
can be used for
this operation
Discard
Changes
and Exit
Exit system setup
without saving
any changes. Esc
key can be used
for this operation.
Discard
Changes Discards changes
done so far to any
of the setup
questions. F7 key
can be used for
this operation.
Load
Optimal
Defaults
Load Optimal
Default values for
all the setup
questions. F9 key
can be used for
this operation.
Pa
g
e 44 of 57Duo-Touch II Hel
p
2/28/2008file://C:\Documents and Settin
g
s\harwoodm\Local Settin
g
s\Tem
p
\~hh5E31.htm

Maintenance and Storage
The Duo-Touch II is rugged and weather resistant. Handle it with the normal care required by any sophisticated
electronic equipment, and the computer will provide reliable service even under harsh field conditions.
Follow the guidelines in this section to care for your unit.
Battery Maintenance and Storage
Maintaining Batteries
Follow these guidelines to maintain performance of Lithium-Ion (Li-on) batteries.
• Avoid exposing batteries to extremely hot or cold temperatures for long periods. To prevent possible damage
to the battery, the Duo-Touch II does not allow the battery to charge if the internal temperature of the battery
gets too low (< 5°C or < 41°F) or too high (> 50°C or > 122°F).
• Charge the battery nightly where the temperature will remain around 20°C (68°F).
• Re-calibrate your battery every three months or when your battery performance degrades.
Storing Batteries
• Store the battery within the recommended temperature range: 10°C to 30°C (50°F to 86°F).
• Unused or stored batteries can lose power over time. When you install a battery that has not been used for
awhile, connect external power to the computer and charge the battery.
• After storage, battery calibration may increase its capacity.
Tablet PC Maintenance and Storage
Maintaining Your Tablet PC
Follow these guidelines to help maintain the condition and performance of your computer.
zTurn off the computer when you are not using it.
zCharge the batteries daily or whenever their capacity is low.
zOperate the computer within the recommended temperature ranges of -20°C to +60°C (-4°F to +140°F).
Care and Cleaning
Physical Inspection Periodically inspect the computer and accessories for wear, damage, loose or missing parts.
Identifying and correcting potential problems early can help reduce the need to return the unit for service.
Outside Case Like all tools, the outside of the computer will get dirty with use. The case is made of painted
Magnesium and polycarbonate blend (plastic) doors and covers. These areas can be cleaned with a solution of one
p
art mild cleanser and one part water. Do not use ammonia, abrasive cleaners, or bleach as this may damage the
unit. To clean the outside case, follow the procedure below.
1. Disconnect external
p
owe
r
and turn off the com
p
uter.
Pa
g
e 45 of 57Duo-Touch II Hel
p
2/28/2008file://C:\Documents and Settin
g
s\harwoodm\Local Settin
g
s\Tem
p
\~hh5E31.htm

2. Using a soft, dry cloth (do not use paper products because they can scratch the surface, add a small amount of
cleaning solution to the cloth and clean the computer case.
3. Wipe off any excess liquid with a soft cloth.
Display Periodically inspect the display to make sure the brightness function is operating properly and that all
p
ixels are operational. To clean the display assembly, use the same cleaning solution and procedure described earlier
for the outside case. In some cases, you can use a small amount of isopropyl alcohol to remove streaks or smears.
Use a soft, clean cloth to clean the display. Do not use paper products because they can scratch the screen. A
Display Cleaning Kit is available.
External Power Connector The external power connector may sometimes be exposed to moisture and/or
contamination causing an unreliable connection to the external power source.
Clean the connector using a cotton swab dipped in isopropyl alcohol.
RJ-11/ RJ-45 / USB Connectors Make sure these connectors are operating properly. During normal use, the
connector pins can get dirty or become broken, bent, or pushed out of place. Clean the connector with a cotton swab
dipped in isopropyl alcohol.
I/O Ports Make sure the audio and Multi-IO ports are operating properly. Periodically inspect the ports for damage
or contamination, and make sure their covers are attached and closed when not in use. The I/O covers can be
replaced without returning the unit for service. Contact your local support person for more information.
PC Card Door and Connector Whenever possible, make sure this door is closed and latched properly. When the
PC Card door is closed, it provides a watertight seal for the PC Card socket. Shield the area from all contaminants
such as liquids, rain, snow, and dust when the door is open.
Make sure the PC Card connector is operating properly by reading from or writing to a PC Card.
Storing Your Computer
If you plan to store the computer, please follow the storage guidelines listed below.
zFiles and data should be saved before storing the computer.
zContact your organization’s help desk about the procedure for backing up files or data.
zExit all applications and use the appropriate procedure to exit from your operating system.
zTurn off the computer by going to the Start menu and selecting Shutdown.
zRemove the battery from the unit and store it in a dry place.
zStore the computer within the recommended temperature ranges of -55°C to +75°C (-67°F to +167°F).
zIf you use PC cards, refer to the manufacturer’s instructions you received with the card for storage and care
information.
Backup and Recovery
Data Backu
p
Pa
g
e 46 of 57Duo-Touch II Hel
p
2/28/2008file://C:\Documents and Settin
g
s\harwoodm\Local Settin
g
s\Tem
p
\~hh5E31.htm

There are several methods to backup your data. It is best to regularly use all the methods below to ensure the
greatest data integrity, provide the fastest recovery options, and minimize downtime.
After you have installed all your applications and have your computer configured as desired, create a backup of
drive C: using the Hard Disk Backup and Recovery Utility. Then, use the Windows Backup Utility on a frequent
basis to backup your daily data. It is recommended that you schedule the Windows Backup Utility to run
automatically.
Save Important System Information (WinXP only)
By default, your computer is set up to automatically save certain critical information, such as the registry, on a
regular basis. This information is saved as a Restore Point. You can also create Restore Points manually by using
the System Restore utility. Select Start, All Programs, Accessories, System Tools, System Restore. Then, follow the
instructions on the Wizard.
Backup your Files
You can backup files in case they are accidentally erased or corrupted.
F
or Windows X
P
: Select Start, All Programs, Accessories, System Tools, Backup. You can schedule backups to run
automatically on a regular basis. To set this up, talk to your help desk or IT department.
F
or Windows Vista: Click the Start button, open the Control Panel, and select Backup Your Computer under
System and Maintenance.
Backup Drive C:
You can make an exact copy of drive C: and save the backup image on the Recovery Partition of your hard disk
(usually drive D:). In the future, you can restore drive C: to its previous state should it become corrupted. To make a
backup copy of drive C:, use the Hard Disk Backup and Recovery Utility. Select Start, All Programs, Mobile
Computer Tools, Hard Disk Backup and Recovery. You will be prompted for additional information.
NOTE The Hard Disk Backup and Recovery Utility is only available on computers configured with a Recovery
Partition.
Data Recovery
There are several methods to restore your data. It is best to start with the least destructive and fastest recovery
options.
Try this first: Restore System Information (WinXP only)
If you are having problems with your system, restore system information to an earlier state, or Restore Point. To
restore to an earlier state, select Start, All Programs, Accessories, System Tools, System Restore. Then, follow the
instructions on the Wizard.
Try this next: Restore a Backup
You can restore files and folders that you have backed up using the Windows Backup Utility. See instructions
below:
F
or Windows XP: Select Start, All Programs, Accessories, System Tools, Backup.
F
or Windows Vista: Click the Start button, open the Control Panel, and select Backup Your Computer under
S
y
stem and Maintenance. This will brin
g
y
ou to the Backu
p
and Restore Center where
y
ou can restore files and
Pa
g
e 47 of 57Duo-Touch II Hel
p
2/28/2008file://C:\Documents and Settin
g
s\harwoodm\Local Settin
g
s\Tem
p
\~hh5E31.htm

folders.
Try this last: Restore Entire Contents of Drive C:
If none of the above steps restore your disk image to a stable state, you may need to restore your disk to its original
factory image or an image you saved using the Hard Disk Backup and Recovery Utility. Restoring a previously
saved disk image overwrites the entire contents of drive C:. Before running this process, save your data to another
location, such as a USB flash drive.
F
or Windows XP: Select Start, All Programs, Mobile Computer Tools, Hard Disk Backup and Recovery. You will
be prompted for additional information.
F
or Windows Vista: Click the Start button, open the Control Panel, and select Backup Your Computer under
System and Maintenance. This will bring you to the Backup and Restore Center. From here, you can restore your
entire computer from a Windows Complete PC Backup and Restore Image. Click on Restore Computer to begin the
p
rocess.
NOTE The Hard Disk Backup and Recovery Utility is only available on computers configured with a Recovery
Partition. If it is not available, you will either need to contact your company's help desk about obtaining a Recovery
CD or return your unit for service.
Optional Equipment and Accessories
The Duo-Touch II has several equipment and accessory options to further enhance your mobile computing
experience.
A complete list of optional peripherals and accessories is listed on the General Dynamics Itronix Website.
CAUTION When purchasing any additional accessories, purchase only those accessories that are approved for use
with your Tablet PC. Some accessories are proprietary items and can be obtained through your system vendor. If
you use items that are not approved for use with this Tablet PC, you may cause it to malfunction, or to emit or
receive electromagnetic radiation in excess of local regulations. For non-proprietary accessories such as PC Cards or
p
rinters, ensure that the accessory functions properly with your computer before making the purchase. Your system
vendor may be able to recommend reliable brands and models.
Second Battery
For longer battery life, you can attach an optional second, external battery to the connector on the back of the Tablet
PC. The external battery connector is sealed against the Tablet case.
Attaching a Second Battery
1. Remove the two left feet (1) on the back of the unit.
2. Line u
p
the second batter
y
connector
(
2
)
with the connector on the external batter
y
.
Pa
g
e 48 of 57Duo-Touch II Hel
p
2/28/2008file://C:\Documents and Settin
g
s\harwoodm\Local Settin
g
s\Tem
p
\~hh5E31.htm
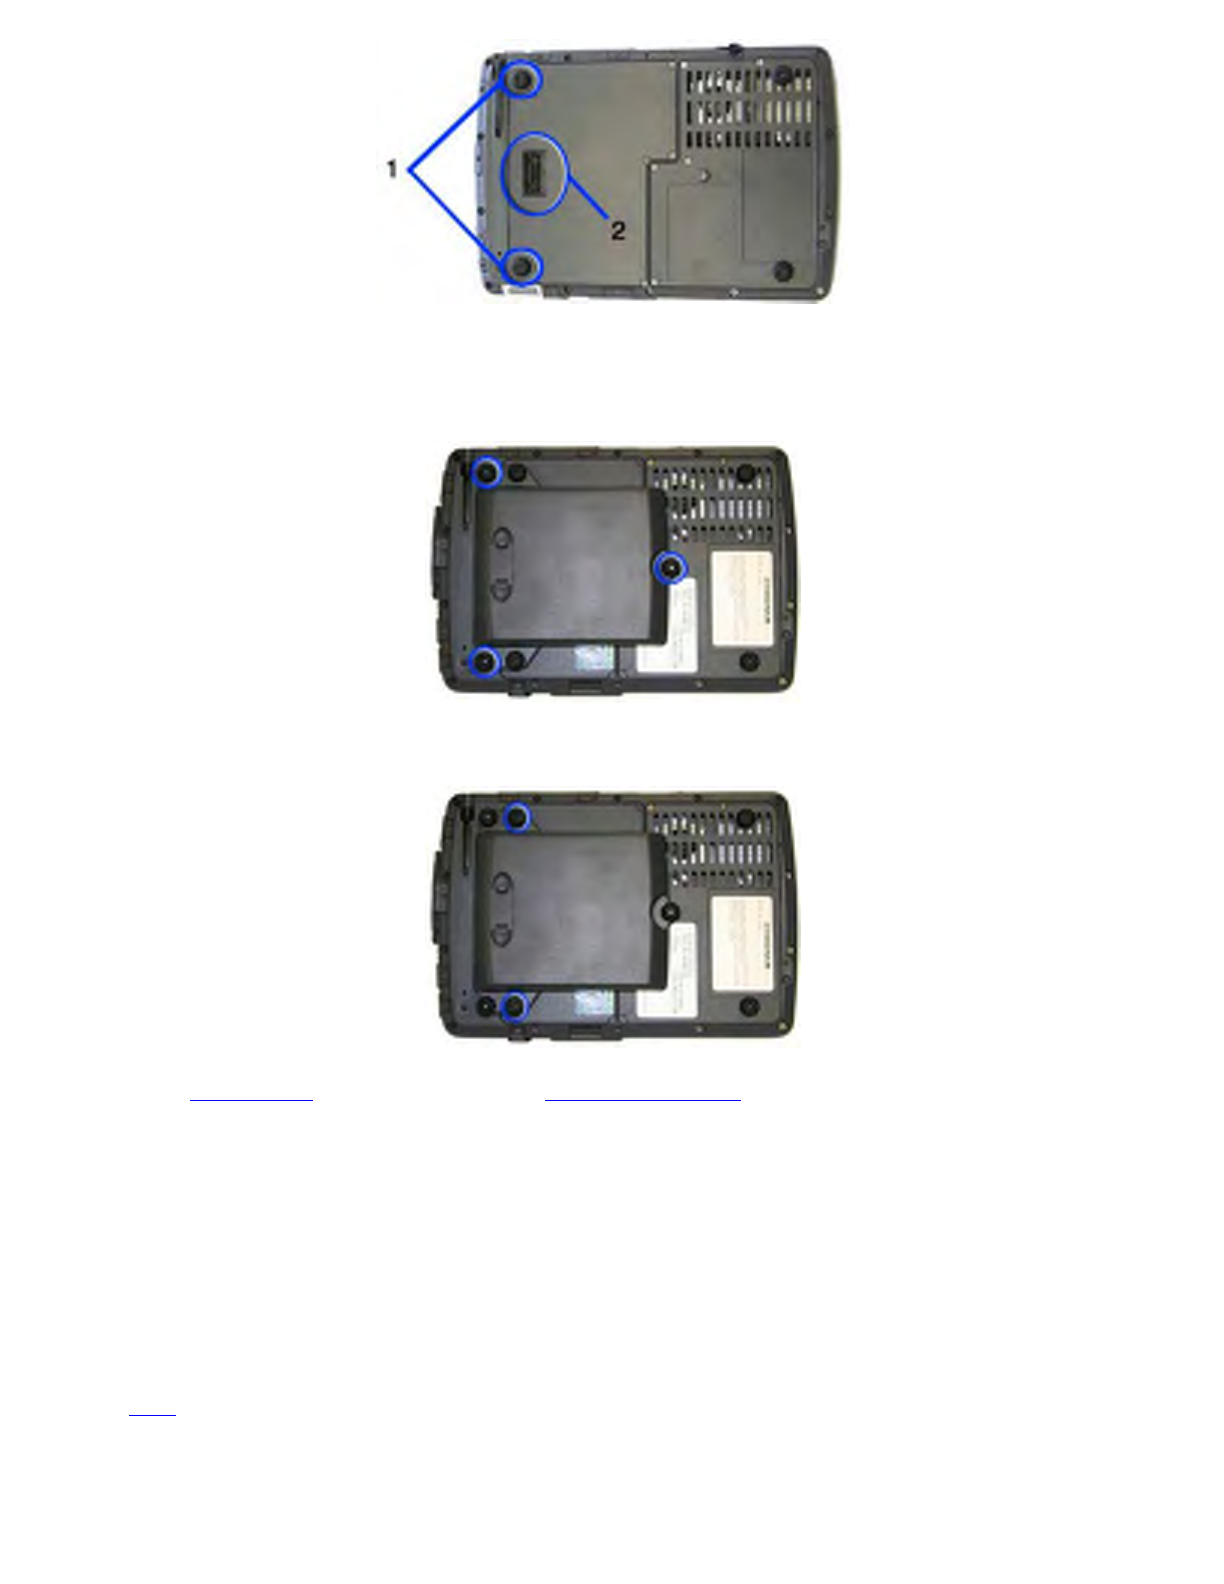
3. Press until battery is firmly seated.
4. Tighten the three screws to secure the battery in place.
5. Screw the feet into the battery for safekeeping.
6. Use the Setup Utility Calibration program to Calibrate the battery.
Desk Mount
The Duo-Touch II 's desk mount enables you to experience desktop functionality with your Duo-Touch II. The desk
mount includes the following ports:
zStand holder connector (this is the unit interface)
zDC in
z2 USB 2.0 ports
z15-pin CRT port for an external monitor
zExtra batter
y
char
g
e
r
Pa
g
e 49 of 57Duo-Touch II Hel
p
2/28/2008file://C:\Documents and Settin
g
s\harwoodm\Local Settin
g
s\Tem
p
\~hh5E31.htm
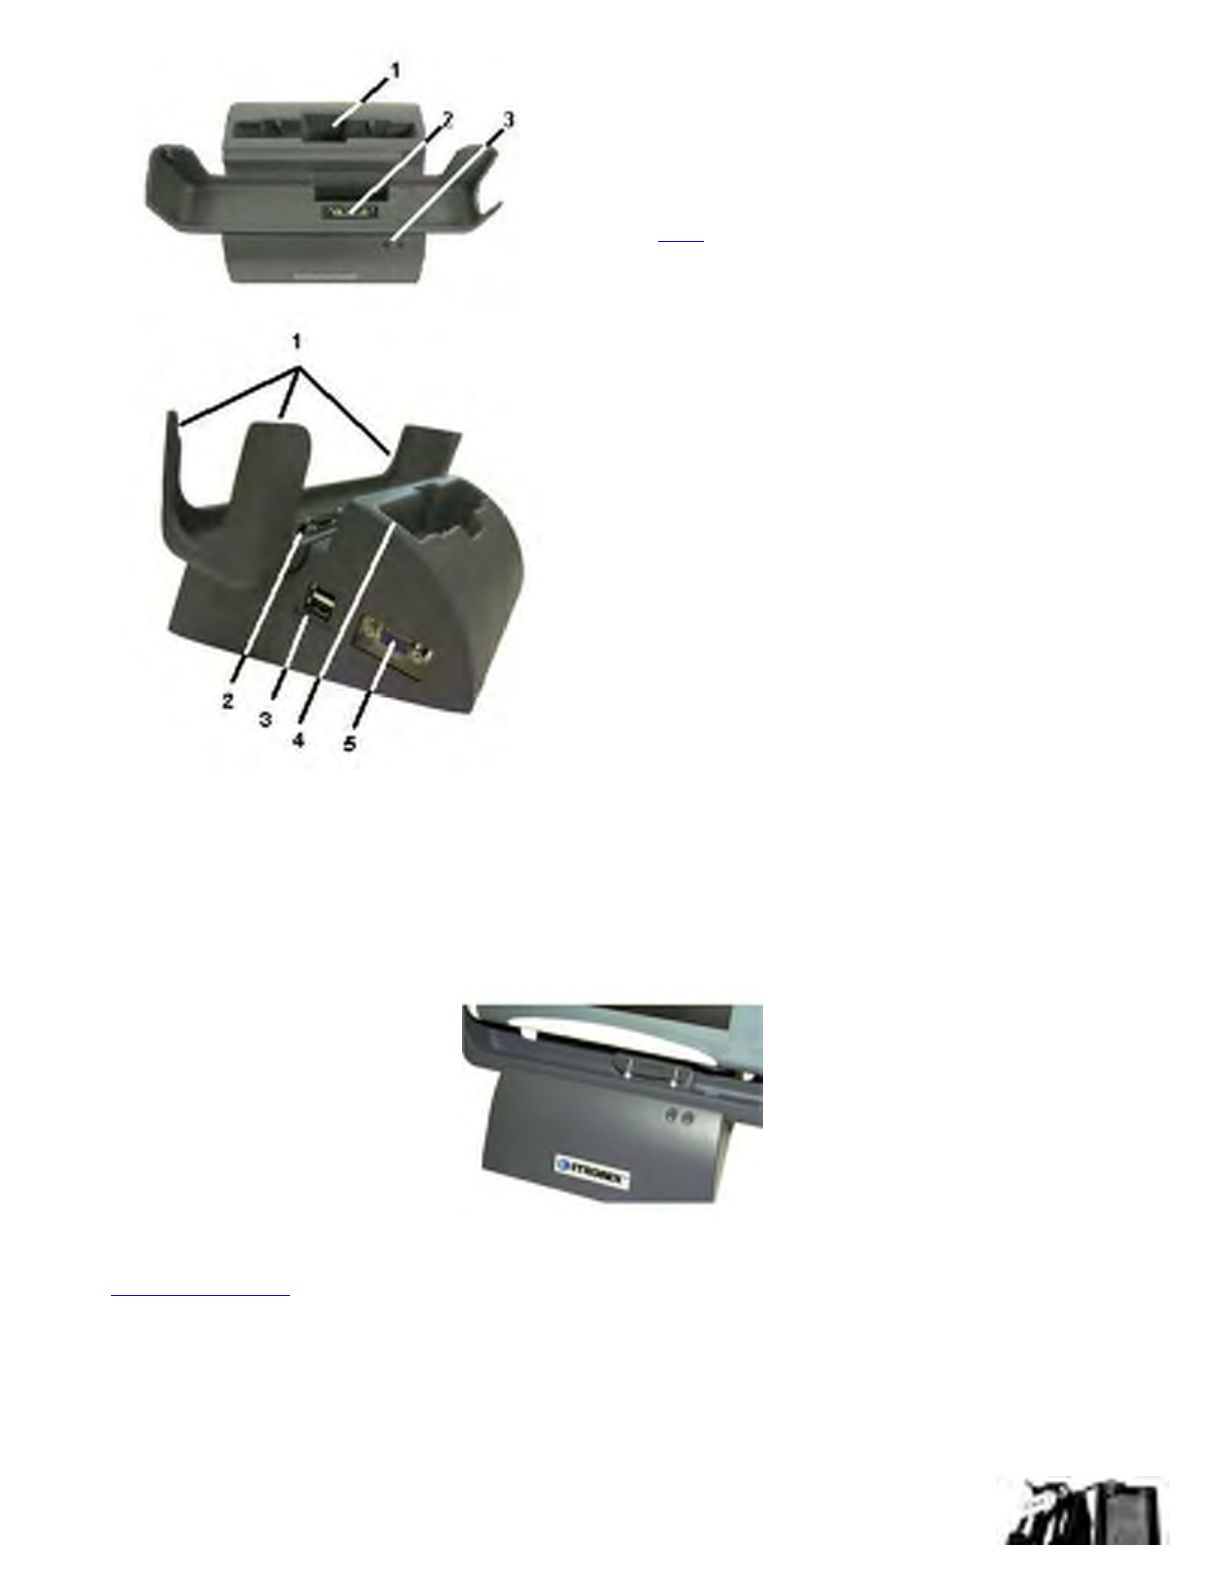
To use the desk mount:
1. Ensure the port cover on the extension slot is open and the port cover for the AC power is closed.
2. Line up the bottom of the unit with the guides and press down while feeding the rubberized IO port cover
through the opening provided.
3. Apply external power to the desk mount. The LED in the front of the desk mount will light along with the
Power Status LED on the Duo-Touch II.
The desk mount includes a slot so you can simultaneously charge the main battery and an additional battery.
NOTE Power must be applied to the dock for the ports to function.
Vehicle Adapter
The Vehicle Ada
p
ter is an o
p
tional device that su
pp
lies
p
ower from the vehicle batter
y
to o
p
erate
1. Extra Battery Charging Slot
2. Stand Holder Connector (unit interface)
3. LED
1. Guides
2. Stand Holder Connector (unit interface)
3. 2 USB 2.0 ports
4. Extra Battery Charging Slot
5. 15-pin CRT port for External Monitor
Pa
g
e 50 of 57Duo-Touch II Hel
p
2/28/2008file://C:\Documents and Settin
g
s\harwoodm\Local Settin
g
s\Tem
p
\~hh5E31.htm

the computer and charge the battery installed in the unit. It typically connects to the vehicle battery using the
cigarette lighter socket.
To prevent possible damage to the battery, the system will not allow the battery to charge at extreme temperatures.
Be aware of the following charging characteristics, especially if the computer is left unattended in a closed vehicle.
zIf the temperature is <20°C the battery will take longer to charge.
zIf the temperature is <5°C (<41°F) the battery will not charge
zIf the temperature is >50°C (>122°F) the battery will not charge
NOTE The Vehicle Adapter is not designed for long-term fixed use.
CAUTION Do not pinch or crush the vehicle adapter cables.
To connect the vehicle adapter
1. Insert the Vehicle Adapter’s power cord into the power port (DC-in jack) on the bottom side of the computer.
2. Insert the cigarette lighter adapter into the vehicle’s cigarette lighter socket, turning it slightly to make a good
connection.
The Power Status LED illuminates to indicate that current is reaching the unit. When you connect the vehicle
adapter, it automatically begins charging the computer’s battery. At moderate temperatures, around 21°C (70ºF), the
battery will be fully charged in approximately 3-5 hours. However, under extremely cold or hot temperatures, or if
the system is on, it will take longer to charge the battery (up to 16 hours).
Vehicle Dock
The optional vehicle docks allow for the functionality of a desk mount in your vehicle. It can charge your unit's
battery as well as an attached expansion battery. The dock features two USB ports, two serial ports, and an external
monitor/CRT connector. It also includes a locking mechanism to secure your Tablet PC.
Different vehicle docks provide for various requirements. Contact your Sales Representative for additional
information.
Memory Upgrade
Pa
g
e 51 of 57Duo-Touch II Hel
p
2/28/2008file://C:\Documents and Settin
g
s\harwoodm\Local Settin
g
s\Tem
p
\~hh5E31.htm

Adding memory allows the computer to operate faster, handle more tasks simultaneously, and work more efficiently
with large files. Users who increase memory demands by adding additional programs may notice slower operating
speeds. Adding memory offsets this slowdown. The Tablet PC includes a memory card slot for adding additional
memory.
Calculate memory size by adding the size of the memory module to the existing built-in memory. For example: 128
MB (module) + 128 MB (built-in memory) = 256 MB Total. The maximum memory configuration is 1.2 GB.
Inserting a Memory Card
If you add memory to your Duo-Touch II, it will automatically detect the change in RAM capacity when it restarts.
You can verify RAM capacity has changed in the BIOS Setup Utility or in Windows:
1. Setup: Press the OK/Enter key during boot-up. Then select CMOS Setup menu. This screen shows the
amount of system memory.
2. For Windows XP: Right click (tap and hold) on My Computer and select properties. The bottom of the
System Properties, General tab lists the memory detected by Windows.
3. For Windows Vista: Right click on Computer and select Properties to open the System Screen. This will
show the memory that is detected by Windows.
CAUTION Only use memory cards approved for use in your Tablet PC. Failure to do so may void your
warranty.
Surge Protection
A large number of computer and high technology equipment damage is directly related to AC power and telephone
line problems. These problems can include surges, spikes, noise, interference, and weather-related problems, which
in turn can cause glitches, hang-ups, crashes, performance slow downs, and down time with computer equipment.
The market is flooded with hundreds of AC power line surge suppressors advertising high performance surge
p
rotection; only a few of them actually provide adequate protection.
This section provides guidelines for selecting a quality surge suppressor to be used with your Duo-Touch II, and it
helps identify a few sources for products with acceptable performance.
Selecting the Right Surge Protection
Consider the level of quality you need when selecting a surge suppressor. This depends on factors such as surge
environment, the type of equipment to be protected, and the quality of the electrical wiring and service.
Surge Environment
Type of Equipment to be Protected
Quality of Electrical Wiring and Service
Equipment Selection
Troubleshooting
Pa
g
e 52 of 57Duo-Touch II Hel
p
2/28/2008file://C:\Documents and Settin
g
s\harwoodm\Local Settin
g
s\Tem
p
\~hh5E31.htm

This section is designed to help you determine and fix problems you might encounter while operating the Duo-
Touch II. Try the following steps in order:
1. First, look through the categories in this section for a solution.
2. If you do not find a solution for your problem here, try one of the resources listed below under "For More
Help."
3. If you are having a problem with a computer application , use the online help that comes with the application
to find a solution.
4. If you still cannot resolve your problem, contact the help desk at your organization.
For More Help
zWindows Help is already installed on your system. To access this information, select Start, Help and
Support.
zTake the Windows Tutorials. Select Start, Get Going with Tablet PC.
zThird-party Windows manuals are available from your local bookstore.
Applications
• My application locks up, acts strangely, or produces a General Protection Fault (GPF) error
• Communications programs don’t seem to work or they lock Windows
• When I rotate the display to portrait orientation my application does not work or does not display correctly
Batteries
• The battery does not charge
• The batteries take much longer than seven hours to charge
• The batteries don’t last very long
• The gas gauge isn’t full after charging the battery
• The gas gauge reads “full,” but the charging indicator light is still lit
• My battery seems to have less and less capacity
Hard Disk
• The hard disk will not spin up so the computer can’t boot up
• I can’t save files because the disk is full
• Disk Read Erro
r
Pa
g
e 53 of 57Duo-Touch II Hel
p
2/28/2008file://C:\Documents and Settin
g
s\harwoodm\Local Settin
g
s\Tem
p
\~hh5E31.htm

• Hard disk recovery
Landline Modems
• The modem doesn’t work
• The modem doesn’t dial a number
• The modem dials and receives an answer but does not establish a connection
• Communications programs such as HyperTerminal don’t seem to work or they lock Windows
• The modem dials and the answering modem generates tone, but our modem does not begin the training sequence
to establish a connection
Miscellaneous
• The computer shuts off unexpectedly
• The speaker volume is too high or too low
• The computer won’t turn on
• The computer won’t turn off
• The computer enters suspend mode too quickly
• The computer doesn’t automatically suspend
• The system date and time are incorrect
• I receive an “out of memory” error message
• Holding down the Power button to reset the computer doesn’t always work
PC Cards
• I can’t remove the PC card
• Disk Read Error
• The system does not recognize the PC Card CD-ROM when it is inserted into the PC Card socket
• The computer locks up when I remove the PC card
Pen / Display
• When I try to use the pen on my display, nothing happens
• The dis
p
la
y
war
p
s or
p
illows in hi
g
h humidit
y
Pa
g
e 54 of 57Duo-Touch II Hel
p
2/28/2008file://C:\Documents and Settin
g
s\harwoodm\Local Settin
g
s\Tem
p
\~hh5E31.htm

• The touch screen doesn't respond after a suspend
• I cannot change the orientation
• The display performance is slow
• I can’t read the display
• The underlined, inverse, and hypertext characters are difficult to read on the screen
• I can’t see the cursor while using the DOS editor
• The display appears to have random pixels darkened after scrolling
• I changed my display resolution, but I see no difference on the screen
• The display cuts off the right side of the application or page in portrait mode
FAQs
• How do I calibrate the pen/display?
• How do I change the main battery?
• How do I adjust the speaker volume?
• How do I clean the display screen?
• How do I change the display screen's brightness?
• How do I change the display orientation?
• How do I switch between Digitizer and Touch Screen modes?
• How long will the battery last?
• How do I optimize the Duo-Touch II for left handed use?
Service and Support
We are committed to providing you, our client, with the products and support services necessary for success in your
enterprise.
Client Care Center
The Client Care Center strives to consistently provide world-class service and continually make improvements
thanks to valuable input and ideas from our customer base.
Product Support - Downloads
Get the software u
p
dates
y
ou need to kee
p
y
our confi
g
uration current.
Pa
g
e 55 of 57Duo-Touch II Hel
p
2/28/2008file://C:\Documents and Settin
g
s\harwoodm\Local Settin
g
s\Tem
p
\~hh5E31.htm

Client Care Center (CCC)
General Dynamics Itronix Client Care Center – The CCC is an internal central point for telephone warranty support
for all GD-Itronix products. Our Technical Service Representatives know your product and provide input and
support for problem resolution.
One call to the convenient Client Care Center number (800-638-9270, Opt 2) allows a single entry point of access to
meet all your needs. You may also use the new web portal at www.gd-itronix.com/CCC. The CCC receives calls
from 5am-5pm Pacific Time, Monday through Friday except weekends or holidays.
Technical Service Representatives provide the following support services:
• Product troubleshooting
• RMA origination for service return
• RMA status check on product service
• Check status Warranty/Service Kit orders
• Coordinate requests for product upgrades
• Radio registration
• icareServeNet registration and training
icareServeNet, the General Dynamics Itronix web portal, provides 24x7 access to create RMA’s, check the status of
Service Requests, search the knowledgebase. This service is provided as part of GD-Itronix’ standard product
warranty, but does require registration for user-id and password.
GD-Itronix offers service uplift programs for clients who wish to expand their support coverage beyond the basic
warranty. Coverage and details of these programs are available on line at www.gd-itronix.com
Product Support - Downloads
It's easy to get the software updates you need to keep your configuration current and get the most from your product.
Simply go to the General Dynamics Itronix Website, then from the menu on the left, click on Products, and choose
Tablet PCs. Downloads are listed by model (Duo-Touch II) and product number (IX350).
Documentation Feedback
We strive to create accurate, convenient and highly useful product documentation for all our products. With this in
mind, we'd like to hear from you and encourage your feedback. If you have comments or suggestions about our
online Help or other product documentation, click here.
Please include the followin
g
information when submittin
g
feedback:
Duo-Touch® II Help
Pa
g
e 56 of 57Duo-Touch II Hel
p
2/28/2008file://C:\Documents and Settin
g
s\harwoodm\Local Settin
g
s\Tem
p
\~hh5E31.htm

zProduct name
zPlace and date of purchase
zName of online Help or other document
zTopic title (for online Help) or page number
zLocalized document language (such as English, French, German, Spanish)
zType of feedback (for example, need for clarification, grammatical errors, incorrect information)
zYour su
gg
estion for how to im
p
rove the document
Pa
g
e 57 of 57Duo-Touch II Hel
p
2/28/2008file://C:\Documents and Settin
g
s\harwoodm\Local Settin
g
s\Tem
p
\~hh5E31.htm