Giant Telecom OL2430 2.4GHz 40 Channel Analog Modulation Cordless Phone User Manual manual
Giant Telecom Limited 2.4GHz 40 Channel Analog Modulation Cordless Phone manual
Contents
- 1. User Manual
- 2. FCC Information
User Manual

Giant -309 Operation Manual (2.4GHz Cordless + CID)
Revision 1
Page 1 of 22
IMPORTANT SAFETY INSTRUCTIONS
When using your telephone equipment, basic safety precautions should always be followed to reduce
the risk of fire, electric shock and injury to persons, including the following:
1. Do not use this product near water, for example, near a bath tub, wash bowl, kitchen sink or
laundry tub, in a wet basement or near a swimming pool.
2. Avoid using a telephone (other than a cordless type) during an electrical storm. There may be a
remote risk of electric shock from lightning.
3. Do not use the telephone to report a gas leak in the vicinity of the leak.
4. Use only the power cord and batteries indicated in this manual. Do not dispose of batteries in a fire.
They may explode. Check with local codes for possible special disposal instructions.
CAUTION
RISK OF EXPLOSION IF BATTERY IS REPLACED BY AN INCORRECT TYPE. DISPOSE OF
USED BATTERIES ACCORDING TO THE INSTRUCTIONS.
SAVE THESE INSTRUCTIONS

Giant -309 Operation Manual (2.4GHz Cordless + CID)
Revision 1
Page 2 of 22
MAIN FEATURES
OLYMPIA OL2430 CORDLESS PHONE FEATURES :
1. 2.4GHz 40 channels auto scanning operation
2. Manual channel selection
3. 65536 Random combinations of security code
4. Last number re-dial (32 digits max.)
5. Power saving in standby mode. ( handset )
6. Page in base unit to locate the handset ( short and long page )
7. Temporary touch tone (pulse to tone dialing)
8. Tone / Pulse dialing mode selection in handset
9. Ringer ON /OFF selection in handset
10. Mixed mode dialing (auto insert of 4 sec. pause when mode change from Pulse to Tone)
11. 10 indirect memories store in handset (16-digits / phone no.)
12. Chained memory dialing of 32 digits max.
13. Flash key for call waiting and call transfer 600ms.
14. Handset LED for paging, ringing and on cradle (Enabled by setup menu)
15. Receiver volume control by software (Three level default at middle level)
16. Pause key ( pause time is 4 seconds )
17. Low battery warning tone
18. Handset ringing
19. Back-lighted LCD
20. Auto Standby feature
21. Auto Answer connection
22. Any key answer
23. Direct number dial out
24. Memory direct dial out
25. Direct redial
26. Redial & CID transfer to in-direct memory ( 16 digits long )
Auto Standby Allows the user to hang up by simply returning the handset to the base.
Auto Answer
Allows the user to answer a call by just removing the handset from the base so the user don’t have to waste
time pushing buttons. The ‘Talk” key will be disabled for 5 seconds to avoid accidental hang up. This
feature is activated while ringing and disable 5 seconds after the ring.
CALLER ID FEATURES :
1 Type I + Type II (call waiting)
2 64 name and number caller ID
3 3-line display
4 back-lit LCD (on handset)
5 Total call counter
6 New call LED indicator in handset
7 Repeat call indication (LCD icon)
8 3-language operation (English, Spanish & French)
9 Scroll review of CID records
10 Selective-erase / Erase-all function
11 Real time clock (date & time)
12 Private/ out-of-area indication
13 LCD contrast control 6 levels, default at 3.
14 Call back (CID dial back)

Giant -309 Operation Manual (2.4GHz Cordless + CID)
Revision 1
Page 3 of 22
15 Battery low indication (‘Battery Low’ text display on the 3rd line )
CORDLESS OPERATION
Channel frequencies
CH. BASE TX H/S TX CH. BASE TX HS/TX
1 2401000000 2473500000 21 2403000000 2475500000
2 2401100000 2473600000 22 2403100000 2475600000
3 2401200000 2473700000 23 2403200000 2475700000
4 2401300000 2473800000 24 2403300000 2475800000
5 2401400000 2473900000 25 2403400000 2475900000
6 2401500000 2474000000 26 2403500000 2476000000
7 2401600000 2474100000 27 2403600000 2476100000
8 2401700000 2474200000 28 2403700000 2476200000
9 2401800000 2474300000 29 2403800000 2476300000
10 2401900000 2474400000 30 2403900000 2476400000
11 2402000000 2474500000 31 2404000000 2476500000
12 2402100000 2474600000 32 2404100000 2476600000
13 2402200000 2474700000 33 2404200000 2476700000
14 2402300000 2474800000 34 2404300000 2476800000
15 2402400000 2474900000 35 2404400000 2476900000
16 2402500000 2475000000 36 2404500000 2477000000
17 2402600000 2475100000 37 2404600000 2477100000
18 2402700000 2475200000 38 2404700000 2477200000
19 2402800000 2475300000 39 2404800000 2477300000
20 2402900000 2475400000 40 2404900000 2477400000

Giant -309 Operation Manual (2.4GHz Cordless + CID)
Revision 1
Page 4 of 22
1. Power Up
1.1. After power up, the handset should place on the cradle of the base unit for setting a new
security code for communication
1.2. Each time when the handset place on the cradle of the base unit, the base unit will generate
and transmit a new security code to the handset unit through the RF Link.(The both unit will
use the 1st channel for the security code transfer operation)
1.3. The completion of a successful security code transfer operation will be indicated by a flash
of the in use LED on the base unit and a beep sound generated by handset.
1.4. In case, the Transfer operation cannot be successful, please try again.
2. Answering Call
2.1. The incoming call is signaled by a ringing sound from the handset’s buzzer and by the
blinking of the base In use/Charge LED. At the same time ‘RINGING’ will be shown in the
display. The handset LED will be turned on during ringing
2.2. When the handset on the cradle, simply pick up the handset unit from the cradle of the base
to talk. The “TALK” button will be disabled for 5 seconds.
2.3. When the handset is away from the base unit, press the “TALK” button on the handset unit.
The handset will transmit the “talk on” command to base unit to establish the RF connection
with in use/charge LED turns on after connection is successful.
2.4. If the communication Link cannot establish within 8 seconds, three error beeps tone will be
heard from the handset to indicate communication is failed.
3. Make a call
3.1. Each new call must begin by pressing the “TALK” button in the handset and it will scanning
for a clear channel for communication. At the same time, ‘TALK’ will be shown on LCD
display. The handset will transmit the “talk on” command to the base unit to establish the
RF communication after connection is successful.
3.2. If the communication Link cannot establish within 8 seconds, there error beeps tone will be
heard from the handset to indicate the communication is failed.

Giant -309 Operation Manual (2.4GHz Cordless + CID)
Revision 1
Page 5 of 22
4. Terminate a call
4.1. To terminate a call, either by pressing the “TALK” button, the handset will emit a beep
indicating call is terminated successfully.
4.2. By placing the handset on the cradle, call is terminated and ‘Security code set up’ procedure
will be performed.
4.3. Handset will emit a error beep if it cannot receive ‘talk off ACK’ from the base unit. In this
case, put the handset back to the base cradle to make sure base unit is going ON HOOK.
5. Short Paging (to locate the Handset)
5.1. Press the PAGE button of the base unit. The ‘PAGING’ will be shown on the LCD display
and output 3 short beeps then followed by 1 second pause, followed by 3 short beeps. The handset LED
will be turned on during paging.
6. Long Paging (to find the handset)
6.1. Press the PAGE button of the base unit. The ‘PAGING’ will be shown on the LCD display
and output beep. If you hold the button for 5sec, the beep will be extended to 60sec. The
handset LED will be turned on during paging.
6.2. Press any key on handset to stop paging.
7. Selecting system language
7.1. Two cases you enter the system setup mode.
1) The handset is first time use or no any system data after power up.
2) Press and hold the ‘memory’ key for about 2sec in stand-by.
7.2. Setup mode begins with language selection. The device offers 3 languages, namely English,
French and Spanish. Press “#” or “*” button to choose the desired language and then press
the “MEMO” key to confirm. After confirmation, it will enter Setting local area code
S E T L A N G U A G E

Giant -309 Operation Manual (2.4GHz Cordless + CID)
Revision 1
Page 6 of 22
8. Setting local area code
8.1. You need enter 3 digits from number pad. Three digits will be shift to left one by one, after
you enter one digit.
E.g. [Press “1”, display “ 001”] à [Press “2”, display “012”] à [Press “3”, display “123”]
8.2. Press “MEMO” key to confirm. After confirmation, it will enter Tone/Pulse setting.
9. Setting Tone/Pulse
9.1. It will display current T/P setting first
9.2. Press “#” or “*” button to set the desired setting, and the display will update to current
setting also, ”SET T/P? T”à” SET T/P? P”à”SET T/P? T”……..
9.3. Press “MEMO” key to confirm. After confirmation, It will enter ringer setting.
10. Setting RINGER ON/OFF
10.1. It will display current RINGER ON/OFF setting first
10.2. Press “#” or “*” button to set the desired setting, and the display will update to current setting
also, ”RINGER ON”à” RINGER OFF”à”RINGGER ON”……..
10.3. Press “MEMO” key to confirm. After confirmation, It will enter LED setting.
0 0 0
A R E A C O D E ?
S E T T / P ? T
R I N G E R O N
Giant -309 Operation Manual (2.4GHz Cordless + CID)
Revision 1
Page 7 of 22
11. Setting handset LED ON/OFF/CON
11.1. It will display current “LED ON/OFF/CON” setting first.
11.2. Press “#” or “*” button to set the desired setting, and the display will update to current setting
also, ”LED ON”à” LED OFF”à”LED CON”à ”LED ON”……..to control the handset
LED.
11.3. Press “MEMO” key to confirm. After confirmation, It will enter display contrast setting.
12. Setting display contrast
12.1. Two cases you can enter contrast setting.
1) From system setup mode.
2) Press “FLASH” button in stand-by.
12.2. Press “#” or “*” button to set the desired contrast.
12.3. Press “MEMO” key to confirm. After confirmation, display returns to standby.
* Press ‘CHANNEL’ button to return to stand-by.
13. CALLER ID OPERATION
Display :
C O N T R A S T 5 6
12-character text line (dot matrix) 12-digit number line (7-segment)
1 2 3 4 5 6 7 8 9 0 1 2
ttA B C D E F G H I J K L uu
NEW
CALL
88
RPT
18:88
PM
AM
1 8/8 8
New-Call /
Call counter
Repeated-call
indicator
New
voice-mess
age
Clock
Clock ticker
Date
NEW CALL
INDICATOR
VIP
L E D O N

Giant -309 Operation Manual (2.4GHz Cordless + CID)
Revision 1
Page 8 of 22
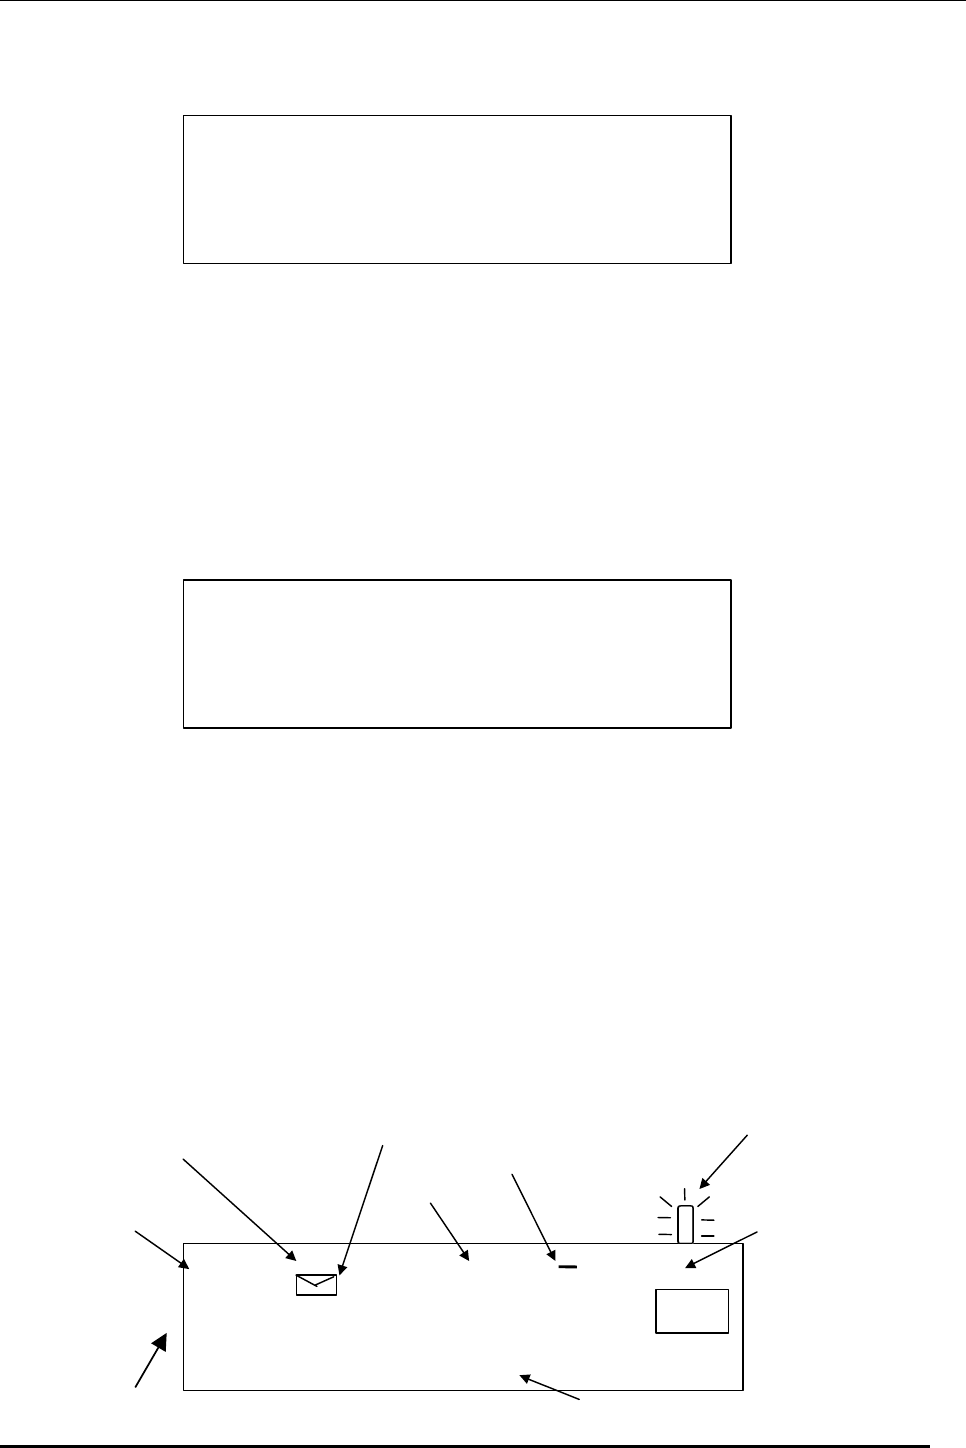
Display Descriptions Remarks
12-character text line
For display of callers’ name, system prompts (CID
and phone), call timer, dial number. Dot-matrix
(5 x 5 )
12-digit number line 1, Display caller’s number (CID), or
2, Display dialed digits (phone). 7-segment
New-call / Call counter Shows the amount of calls / new calls in standby
mode
Example: to show # of old calls: CALL 18
to show # of new calls: NEW CALL 9
(The numbers are displayed at the left hand side of
the 12-digit number line)
CID only
Repeated-call icon
Lights on to indicate that the displayed call arrived
more than once. CID only
Clock 1, Shows the real time clock (AM/PM format), or,
2, the time stamp of a CID record.
Clock ticker Blinks when real time clock is being displayed.
(Frequency: 0.5sec. On / 0.5 sec. Off)
Date 1, Shows the date (month/date format), or,
2, the date stamp of a CID record.
CID related button Descriptions Remarks
“DEL” 13) Erase a single CID record in CID
browser.
2) Erase all CID records in stand-by.
“#” 1) Scroll-down CID records.
“*” 1) Scroll-up CID records.
“Calls” 1) Redial CID number in CID browser.
NEWCALL indicator - to indicate that there are unread/new calls stored in memory. The duty cycle
of the NEWCALL indicator is 60ms on / 2950ms off (500ms on / 2950ms off per CCL request).
Note1: All display illustrations in the document will be in English. However, the actual appearances of the screens will vary according
to the language selection during start-up (English, French or Spanish).
Note2: If the unit receives more than 64 calls, the oldest CID information will be erased except VIP calls.
13.1. RECEIVING CALLS
13.1.1. When Caller ID is activated, the Telephone Company sends the caller’s telephone
number (and name, if available) and the call’s date and time between the first and
second rings. The device receives and displays this information for each call and
updates the display with the current date and time. The NEWCALL indicator will be
flashed.

Giant -309 Operation Manual (2.4GHz Cordless + CID)
Revision 1
Page 9 of 22
13.1.2. The display also indicates if caller information is not available or if the sender
intentionally blocks the number.
13.1.3. After 20 seconds, the display will return to standby mode and shows “NEW CALL
XX” where XX is the number of unread calls. NEW CALL LED indicator blinks until
the user retrieves all new messages.
Note: If the received CID number is 10 digit long and the first three digits match with the area code
set by user, the LCD shows the last 7 digits only (area code will be omitted).
13.2. REVIEWING NEW CALLS
13.2.1. In stand-by mode, NEW LED flashing, pressing “*” or “#” button, the LCD
displays the last new call information.
13.2.2. Repeatedly press “*” or “#” button to review all new call information in the order of
receiving until the LCD displays “END NEW CALL” and the NEW LED off.
CALL
E
D
L
L
C
A
W
E
N
N
N O C A L L E R I D
NEW
CALL
1
10:00
PM
1 0/3 0
CALL
NEW
CALL
S
I
H
N
J
H
T
O
M
2
10:00
AM
1 1/0 1
9
8
7
--
6
5
4
--
3
NEW CALL
2
1
CALL
NEW
CALL
S
I
H
N
J
H
T
O
M
0
9
8
7
--
6
5
3
4
--
1
10:00
PM
1 0/3 0
1
2
C I D B L O C K E D
NEW
CALL
1
10:00
PM
1 0/3 0

Giant -309 Operation Manual (2.4GHz Cordless + CID)
Revision 1
Page 10 of 22
13.2.3. If the received call information is same as any of the existing new calls, the ‘RPT’
icon will be on to indicate REPEAT CALL. The most recently arrived CID will be
saved attached with a new date / time stamp. The previously arrived record will be
deleted. After you review this call, the ‘RPT’ icon will be off.
13.2.4. If not review over all new calls, after 20 seconds the Time of Day will display and
the new call counter will show the total number of new calls including those already
reviewed.
* Press ‘CHANNEL’ button to return to stand-by.
* No press any button for 20 seconds, it will return stand-by mode.
13.3. REVIEWING OLD CALLS
13.3.1. In stand-by mode, press “*” or “#” button to review old call information from the
oldest to the newest (“*” button) or from the newest to oldest (“#” button).
13.3.2. When finish reviewing all calls, the “-END-” is displayed.
13.3.3. If there is no calls, the display shows “-NO CALLS-”
* Press ‘CHANNEL’ button to return to stand-by.
* No press any button for 20 seconds, it will return stand-by mode.
CALL
--
S
L
A
L
O
N
--
C
CALL
NEW
CALL
5
10:00
PM
1 0/3 0
CALL
CALL
S
I
H
N
J
H
T
O
M
0
9
8
7
--
6
5
3
4
--
1
10:00
PM
1 0/3 0
1
2
CALL
D
--
E
--
N

Giant -309 Operation Manual (2.4GHz Cordless + CID)
Revision 1
Page 11 of 22
13.4. DELETE INDIVIDUAL CALL
13.4.1. When you review the call information, you can delete it from the display.Press “#”
or “*” button until the call record you want to delete.
13.4.2. Press “Del” button, the LCD display “Erase ?”.
13.4.3. Press “Del” button again to confirm deletion.
13.4.4. If the deleted message is last one, it will go back to stand-by mode. (It won’t go
back to standby, it will display the last record after the deletion instead)
13.4.5. VIP call can’t be deleted.
* Press any button to cancel the deletion.
* No press any button for 20 seconds, it will return stand-by mode.
13.5. DELETE ALL CALL
13.5.1. If the new call information has been reviewed, it can erase all call records. If there
are any new calls in call list, Erase All will not work.
13.5.2. Press and hold “Del” button for 2 seconds in stand-by mode. The LCD displays
“ERASE ALL? ”.
13.5.3. Press “Del” button again to confirm deletion, and back to stand-by mode.
* Press ‘CHANNEL’ button to return to stand-by.
* Press any button to cancel the deletion.
* No press any button for 20 seconds, it will return stand-by mode.
13.6. SET VIP CALLS
The user can create VIP call records. When a VIP call is received, 4 beeps will be heard after the
CALL
CALL
S
I
H
N
J
H
T
O
M
0
9
8
7
--
6
5
3
4
--
1
10:00
PM
1 0/3 0
1
2
CALL
CALL
?
L
L
A
S
A
R
E
E
10
11:00
AM
1 1/0 3
CALL
S
I
H
N
J
H
T
O
M
0
9
8
7
--
6
5
3
4
--
1
10:00
PM
1 0/3 0
1
2

Giant -309 Operation Manual (2.4GHz Cordless + CID)
Revision 1
Page 12 of 22
ring, and VIP icon will be on.
13.6.1. Press “#” or “*” button to select the caller to which you want to assign a VIP.
13.6.2. Press and hold “Calls” button for 2 seconds , the VIP icon is on.
13.6.3. Press and hold “Calls” button for 2 seconds , the VIP icon will disappear as VIP
call.
* Press ‘CHANNEL’ button to return to stand-by.
* No press any button for 20 seconds, it will return stand-by mode.
13.7. Caller ID REDIAL
The unit allows you to redial a phone number stored in the Caller ID memory. If the local area
code was programmed, only the 7 digit number will be displayed and dialed. If the area code is
different than the one you have programmed, the full 10 digit number is displayed and a “1”
will automatically be added to the dialing sequence. To skip the digit “1” , press “Calls” button
twice within 2 second to begin dialing out number.
13.7.1. Press “#” or “*” button to select the Caller to which you want to dial.
13.7.2. Press “Calls” button once. The display will show ‘DIALING…’.
13.7.3. After 2 second delay, the unit will enter TALK-ON mode automatically. Dialed
digits shift to the display from right to left-hand side as line seize.
13.7.4. Re-dialing 7- and 10-digit numbers ( CID )
13.7.4.1. Note that if a CID number to be dialed is 10 digits long, an access code ‘1’
will be automatically inserted before the 1st digit by press “call” button once. The
insertion of such access code can nevertheless be suppressed by activating
CID-redial function differently, i.e. by press & release “Calls” button twice within
2 seconds.
D I A L I N G. . .
4 5 6 7 8 9 0
1 1 2 3 4 5 6 7 8 9 0

Giant -309 Operation Manual (2.4GHz Cordless + CID)
Revision 1
Page 13 of 22
13.7.4.2. If a 10 digits long CID number (123-456-7890), the first 3 digits of the
number matches local area code, the area code will be skipped and only the last 7
digits will be dialed out in the re-dialing.
13.7.4.3. It is also possible to insert an access code ‘1’ in front of 7-digit numbers.
Press and release CID “Calls” button twice within 2 seconds to do so.
* Press ‘CHANNEL’ button to return to stand-by.
* No press any button for 20 seconds, it will return stand-by mode.
13.8. Save CID to indirect memory
13.8.1. Press “#” or “*” button to select the Caller ID number that you want to save.
13.8.2. Press “MEMO” button to show “LOCATION ? X”.
Note: only number can be saved to indirect memory.
13.8.3. Press “MEMO” button to confirm saving Caller ID number to indirect memory.
The unit will assign a free memory for CID ID number. The display will show
‘LOCATION? X’, you can press “MEMO” button to confirm saving CID number to
assign memory or press digit button to select a memory location to saving. The display
show “ MEMx STORED’.
* Press ‘CHANNEL’ button to return to stand-by.
4 5 6 7 8 9 0
1 4 5 6 7 8 9 0
L O C A T I O N ? X
M E M X S T O R E D

Giant -309 Operation Manual (2.4GHz Cordless + CID)
Revision 1
Page 14 of 22
* No press any button for 20 seconds, it will return stand-by mode.
14. Visual message function
When Visual message function is activated, the Telephone Company sends the Visual message
information out accordingly. The device receives and displays this information for each Visual
message.
14.1. After received Visual message ON, New voice-message Icon will be turned on.
14.2. After received Visual message OFF, New voice-message Icon will be turned off.
15. Indirect Memories (MEMO…MEM9)
15.1. Memory browser
15.1.1. Enter memory browser mode by pressing “MEMO” button. The display will show
‘MEM 0’.
15.1.2. Press “#” or “*” button to select indirect memory to which you want to see.
15.1.3. Press “MEMO” button to return stand-by mode.
15.2. Memory editor
15.2.1. Enter memory browser by pressing “MEMO” button. Press “#” or “*” button to
select memory to which you want to edit.
M E M 0
M E M 2
CALL
NEW
CALL
5
10:00
PM
1 0/3 0
CALL
NEW
CALL
5
10:00
PM
1 0/3 0

Giant -309 Operation Manual (2.4GHz Cordless + CID)
Revision 1
Page 15 of 22
15.2.2. You enter number, the display will shift entered digits from right to left-hand side
until the number reach to 16 digits. If the number is larger than 16 digits, error tone will
be generated.
Eg. Enter the digit 0
Enter the digit 9
Enter the digits 01234567899990
0
M E M 2
0 9
M E M 2

Giant -309 Operation Manual (2.4GHz Cordless + CID)
Revision 1
Page 16 of 22
15.2.3. Press “Del” button to delete the last entered digit. The display will shift entered
digits from left to right-hand side.
15.2.4. Press “Flash” button to clear all entered digits.
15.2.5. Press “MEMO” button to save entered number. The display will show
‘LOCATION? X’.
15.2.6. Press “ MEMO” button to confirm saving number to MEM2 or you press digit
button to save number to other indirect memory. The display will show ‘MEMx
STORED’ for 2 seconds.
15.3. Delete individual memory
15.3.1. Enter memory browser by pressing “MEMO” button. Press “#” or “*” button to
select memory to which you want to delete.
15.3.2. Press “Del” button to delete the memory. The display will show ‘ERASE ?’.
15.3.3. Press “Del” button to confirm delete the memory or press any key to cancel.
15.4. Dial indirect memory ( TALK OFF )
15.4.1. Enter memory browser by pressing “MEMO” button. Press “#” or “*” button to
select memory to which you want to redial.
15.4.2. Press “Calls” button. The unit will enter TALK-ON mode automatically. The
number will scroll across the screen from right to left-hand side as it is dialed.
ll Press ‘CHANNEL’ button to return to stand-by.
2 3 4 5 6 7 8 9 9 9 9 0
M E M 2 0 1
L O C A T I O N ? X
E R A S E ?

Giant -309 Operation Manual (2.4GHz Cordless + CID)
Revision 1
Page 17 of 22
ll No press any button for 20 seconds, it will return stand-by mode.
15.5. Dial indirect memory ( TALK ON )
15.5.1. Press “TALK” button to enter TALK-ON mode. The display will show ‘TALK
0:00’.
15.5.2. First, you press “MEMO” button. Second, you press digit button to dial memory.
The display will scroll across the screen from right to left-hand side as it is dialed. If
memory is empty, error tone will be generated. You need repeat this step to dial
memory.
16. Direct number dialing ( TALK OFF )
16.1. You enter number in the stand-by mode same as memory editor. The maximum digits is 24.Eg.
Enter number 0:
Enter number 9:
Enter number 012345678999990
16.2. Press “Del” button to delete last entered digit. If all digits are deleted, it will return to
stand-by.
CALL
T
L
0
0
0
:
K
A
10:00
PM
1 0/3 0
CALL
0
10:00
PM
1 0/3 0
CALL
9
0
10:00
PM
1 0/3 0
CALL
2
1
0
0
9
9
9
9
9
8
5
7
6
10:00
PM
1 0/3 0
3
4

Giant -309 Operation Manual (2.4GHz Cordless + CID)
Revision 1
Page 18 of 22
16.3. Press “Flash” button to clear all entered digits and it will return to stand-by.
16.4. Press “Calls” button, The unit will enter TALK-ON mode automatically. The number will
scroll across the screen from right to left-hand side as it is dialed.
16.5. Direct number saves to indirect memory -
Press “MEMO” button to save last 16 digits of direct number to indirect memory. The unit
will assign a free memory. The display will show ‘LOCATION? X’, you can press
“MEMO” button to confirm saving redial number or press digit button to select a memory
location to saving. The display show “ MEMx STORED’.
ll No press any button for 20 seconds, it will return stand-by mode.
17. Direct re-dial ( TALK OFF )
17.1. Press “Redial” button in stand-by mode. The display will show redial number. If redial number
is larger than 24 digits, the display will show last 24 digits.
17.2. Press digit button to enter new digit to redial number.
17.3. Press “Del” button to delete last entered digit. If all digits are deleted, it will return to stand-by.
17.4. Press “Flash” button to clear all entered digits and it will return to stand-by.
17.5. Press “Calls” button, The unit will enter TALK-ON mode automatically. The number will
scroll across the screen from right to left-hand side as it is dialed.
17.6. Redial number saves to indirect memory –
Press “MEMO” button to save last 16 digits of redial number to indirect memory. The unit will
assign a free memory. The display will show ‘LOCATION? X’, you can press “MEMO” button
to confirm saving redial number or press digit button to select a memory location to saving.
The display show “ MEMx STORED’.
ll No press any button for 20 seconds, it will return stand-by mode.
18. Dialing digits
Digits which can be dialed out are : 0,1,2,3,4,5,6,7,8,9,*,#,PAUSE.
- ‘#’ will be displayed as ‘ ’ in line2, ‘#’ in line3
CALL
2
1
0
0
9
0
9
9
9
9
9
8
5
7
6
10:00
PM
1 0/3 0
3
4

Giant -309 Operation Manual (2.4GHz Cordless + CID)
Revision 1
Page 19 of 22
- ‘*’ will be displayed as ‘’ in line2, ‘*’ in line3
- PAUSE will be displayed as ‘P’, when PAUSE is encountered during dialing, a pause of
4 seconds will be generated.
19. Call timer
19.1. The call timer comes up automatically at the line seizes on TALK ON mode and shows on the
3rd line of the display. After 10 seconds the call timer will appear as dialing activities finishing.
19.2. The call timer counts up to 999 minutes and 59 seconds. After that, the timer will show ‘0:00’.
19.3. When handset goes back to TALK-OFF, the call timer will remain on the display for 5
seconds.
20. Battery/Voltage low detection
20.1. Battery detection will perform all the time except during charge mode.
20.2. If battery low condition is detected, then the handset will enter into battery low condition. The
buzzer will beep for 10 seconds interval i.e. 400ms ON, 10sec OFF . Handset will change to
‘Halt’ mode immediately and keeps beeping with no timeout. When the handset is in TALK
mode, it will change to ‘Halt’ mode immediately and keeps beeping after TALK OFF. The
display will show ‘BATTERY LOW’.
20.3. If battery low condition is restored, the handset will back to normal mode again.
CALL
T
L
1
0
0
:
K
A
10:00
PM
1 0/3 0
CALL
B
T
W
L
O
Y
R
E
T
A
10:00
PM
1 0/3 0

Giant -309 Operation Manual (2.4GHz Cordless + CID)
Revision 1
Page 20 of 22
21. Mute
21.1. Press and hold “Mute” button to mute audio in TALK ON mode.
22. Changing Volume
User can adjust the volume levels (3 levels) in talk mode. Pressing “Del” key to increase or “Calls”
key to decrease the receiver volume. Volume level doesn’t return to default value when the handset
goes back to standby mode.
23. Handset LED
If the handset LED is set to ON, the handset LED will be turned on for one minute when the handset
is on cradle. If the handset LED is set to CON, the handset LED will be turned ON continuous except
in talk mode.
FCC REGULATIONS
WARNING: Changes or modifications to this unit not expressly approved by the party responsible
for compliance could void the user’s authority to operate the equipment.
NOTE: This equipment has been tested and complies with the limits pursuant to Part 15 of the FCC
rules. These limits are designed to provide reasonable protection against harmful interference in a
residential installation. This equipment generates, uses and can radiate radio frequency energy and, if
not installed and used in accordance with the instructions, may cause harmful interference to radio
communications.
However, there is no guarantee that interference will not occur in a particular installation. If this
equipment does cause harmful interference to radio or television reception, which can be determined
by turning the equipment off and on, the user is encouraged to try to correct the interference by one or
more of the following measures:
•• Reorient or relocate the receiving antenna;
•• Increase the separation between the equipment and the receiver;
•• Connect the equipment into an outlet on a circuit different from that to which the receiver
is needed.
•• Consult the dealer or an experienced radio/TV technician for help.
FCC ID: RAQOL2430
This device complies with Part 15 of the FCC Rules.
Operation is subject to the following two conditions:
(1) this device may not cause harmful interference, and
(2) this device must accept any interference received, including interference that may cause
undesired operation.
Privacy of communications may not be ensured when using this phone.

Giant -309 Operation Manual (2.4GHz Cordless + CID)
Revision 1
Page 21 of 22
Consumer Information:
This equipment complies with Part 68 of the FCC rules and the requirements adopted by the
ACTA. On the back of this equipment is a label that contains, among other information, a product
identifier in the format US:DDKW900BOL2430. If requested, this number must be provided to the
telephone company.
An applicable certification jacks Universal Service Order Codes (USOC) for the equipment is
provided (i.e., RJ11C) in the packaging with each piece of approved terminal equipment.
A plug and jack used to connect this equipment to the premises wiring and telephone network must
comply with the applicable FCC Part 68 rules and requirements adopted by the ACTA. A
compliant telephone cord and modular plug is provided with this product. It is designed to be
connected to a compatible modular jack that is also compliant. See installation instructions for
details.
The REN is used to determine the number of devices that may be connected to a telephone line.
Excessive RENs on a telephone line may result in the devices not ringing in response to an incoming
call. In most but not all areas, the sum of RENs should not exceed five (5.0). To be certain of the
number of devices that may be connected to a line, as determined by the total RENs, contact the
local telephone company. The REN for this product is part of the product identifier that has the format
US:DDKW900BOL2430. The digits represented by 00 are the REN without a decimal point (e.g., 03
is a REN of 0.3). The REN is separately shown on the label too.
If this equipment OL2430 causes harm to the telephone network, the telephone company will
notify you in advance that temporary discontinuance of service may be required. But if advance
notice isn't practical, the telephone company will notify the customer as soon as possible. Also, you
will be advised of your right to file a complaint with the FCC if you believe it is necessary.
The telephone company may make changes in its facilities, equipment, operations or procedures that
could affect the operation of the equipment. If this happens the telephone company will provide
advance notice in order for you to make necessary modifications to maintain uninterrupted service.
Please follow instructions for repairing if any (e.g. battery replacement section); otherwise do not
alternate or repair any parts of device except specified.
Connection to party line service is subject to state tariffs. Contact the state public utility commission,
public service commission or corporation commission for information.
This equipment is hearing aid compatible.
NOTICE:
1) If your home has specially wired alarm equipment connected to the telephone line,
ensure the installation of this OL2430 does not disable your alarm equipment. If you have
questions about what will disable alarm equipment, consult your telephone company or a
qualified installer.
2) According to telephone company reports, AC electrical surges, typically resulting from
lightning strikes, are very destructive to telephone equipment connected to AC power sources.
To minimize damage from these types of surges, a surge arrestor is recommended.
Should you experience trouble with this equipment, please contact US Returns Center, Wave

Giant -309 Operation Manual (2.4GHz Cordless + CID)
Revision 1
Page 22 of 22
Industries, with the below information for warranty information. If the equipment is causing harm
to the telephone network, the telephone company may request that you disconnect the equipment
until the problem is resolved.
QUESTIONS??????? OUR HELP LINE IS
1-866-537-0384
TRANSLATION TABLE
ENGLISH SPANISH FRENCH Max.
length
1. Out of Area NO CALLER ID FUERA AREA HORS ZONE 12
2. Private Call CID BLOCKED LLAM PRIVADA APPEL PRIVE 12
3. End -- END -- -- FIN -- -- FIN -- 12
4. End of new call END NEW CALL FIN LLAM NVA FIN D’APPEL 12
5. Erase? ERASE ? BORRAR ? EFFACE ? 12
6. Erase all ? ERASE ALL ? BORRAR TODO? EFFACE TOUS? 12
7. Error -- ERROR -- -- ERROR -- -- ERREUR -- 12
8. No Calls -NO CALLS- NO LLAMADAS AUCUN APPELS 12
9. Dialing DIALING ... MARCANDO NUMEROTATION 12
10. Set language SET LANGUAGE --- --- 12
11. Set Area Code AREA CODE ? COD AREA ? INDICATIF ? 12
12. Contrast CONTRAST tu CONTRASTE tu
CONTRASTE tu
12
13. Battery low BATTERY LOW BATERIA BAJA BAT FAIBLE 12
14. Enter location LOCATION ? INTROD LUGAR ENTRER SITUA 12
15. Memory 3 (*)
stored MEM3 STORED MEM3 GUARD MEM3 GARDE 12
16. PAGING PAGING LOCALIZAR PRE’VENIR 12
17. RINGING RINGING TIMBRAR SONNER 12
18. TALK TALK HABLAR PARLER 6
19. SET T/P? P SET T/P? P ? ? ?
20. SET T/P? T SET T/P? T ? ? ?
21. RINGER ON RINGER ON ? ? ?
22. RINGER OFF RINGER OFF ? ? ?
23. LED ON LED ON ? ? ?
24. LED OFF LED CON ? ? ?
25. LED OFF LED OFF ? ? ?