Grandstream Networks PD722 DECT Cordless HD Handset User Manual
Grandstream Networks, Inc. DECT Cordless HD Handset
UserManual.wiki
>
Grandstream Networks
>
PD722 User Manual
User Manual
Navigation menu
Upload a User Manual
Namespaces
Wiki Guide
HTML
PDF
Info
Views
User Manual
Discussion / Help
Navigation


![P a g e | 32 DP752/DP722/DP730 User Guide Version 1.0.5.9 • Disable Busy Tone Enable/Disable Busy Tone. If set to enabled, busy tone will not be played. (Default is Disabled). • Disable CW Tone Enable/Disable CW Tone. If set to enabled, Call Waiting Tone will not be played. (Default is Disabled). • Onhook Backlight Enable/Disable Onhook Backlight. If enabled, pressing key on idle screen will switch off LCD screen. (Default is Disabled) • Cradle Backlight Enable/Disable/Dim Cradle Backlight. If enabled, LCD will remain backlit when the handset is placed on-cradle/charging. If set to “Dim”, LCD brightness will be reduced when the handset is placed on-cradle/charging. (Default is Disabled) • SIP Account Display Select which SIP Account information will be displayed on the screen. ▪ Name Only: Display SIP Account Name only. (Default) ▪ ID Only: Display SIP User ID only. ▪ None: No account information will be displayed. Shortcut • Customizing keys functions : Configure Left Softkey function in idle. Function can be set as Menu, History, Contacts, Line or PTT. Default is Menu. : Configure Right Softkey function. Function can be set as History, Contacts, Line or PTT Default is Contacts. : Configure Arrow UP Key function. Default is Outgoing Calls (Call History). : Configure Arrow DOWN key function. Default is Accepted Calls (Call History). : Configure Arrow LEFT key function. Default is Ringer Volume Down. : Configure Arrow RIGHT key function. Default is Ringer Volume Up. Select key and press OK button to configure function. Following functions are available for arrow keys: 1. Disabled, 2. Menu, 3: Missed Calls, 4: Accepted Calls, 5: Outgoing Calls, 6: History, 7: Contacts, 8: Status, 9: Line, 10: Voice Mail, 11: Ringer Volume Up, 12: Ringer Volume Down, 13: Audio Volume Up, 14: Audio Volume Down. • Speed Dial Assign contact numbers as speed dial. Select a key [2], [3], [4], [5], [6], [7], [8] or [9] and press OK button. Select “Edit”](https://usermanual.wiki/Grandstream-Networks/PD722/User-Guide-4098327-Page-33.png)
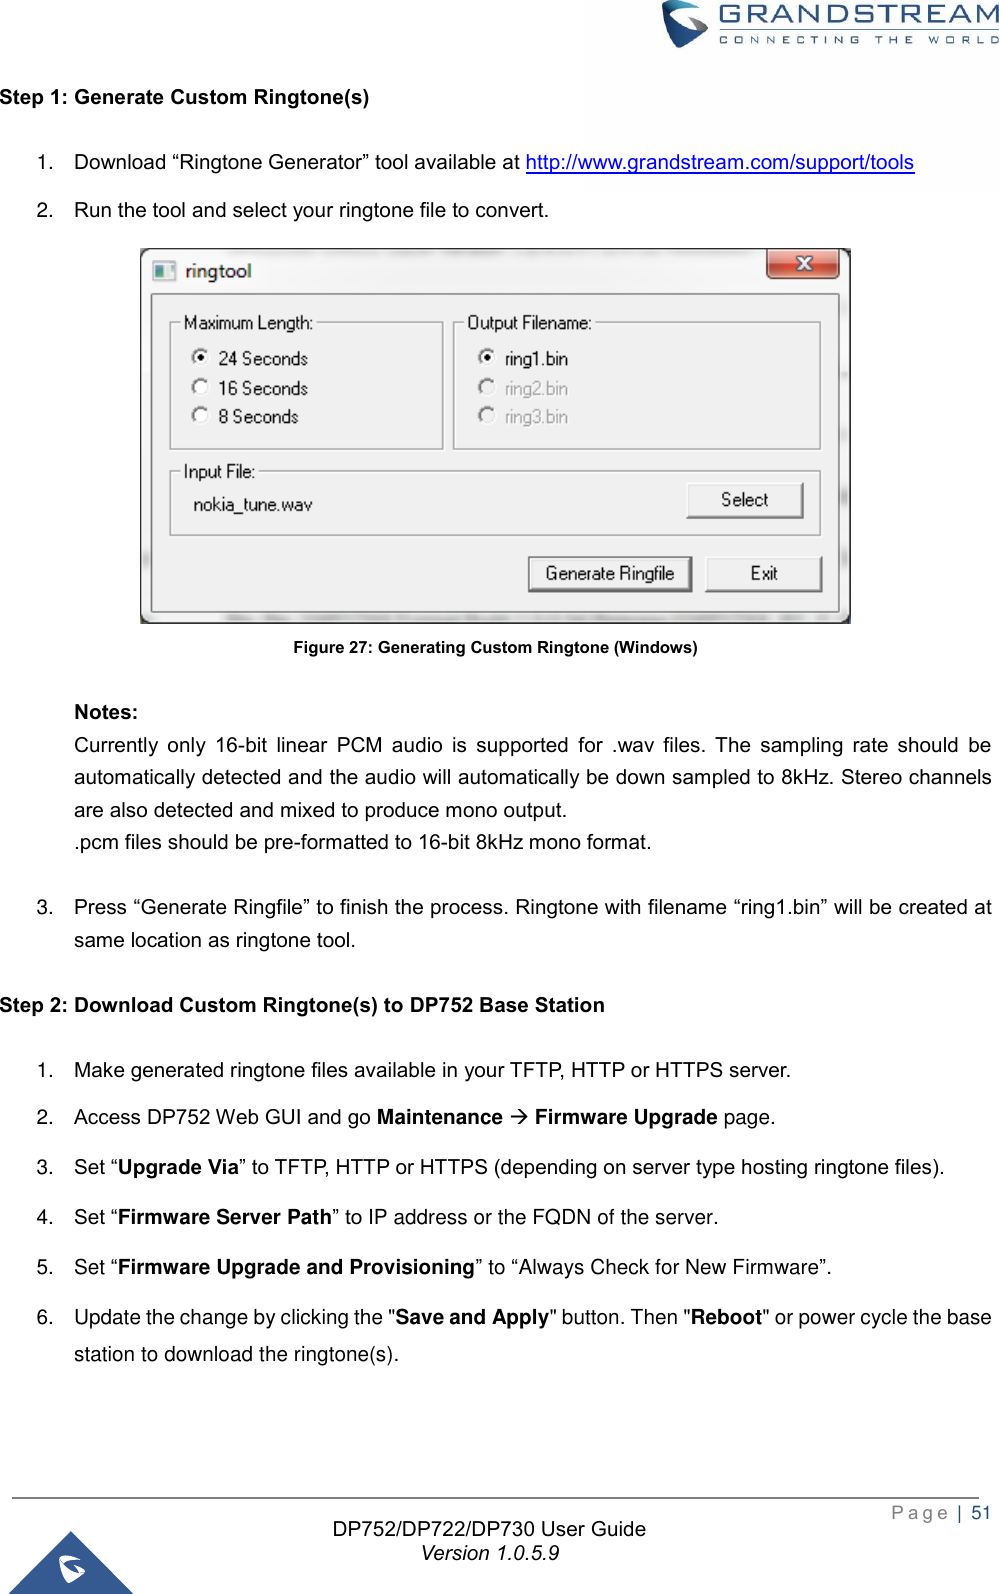
![P a g e | 50 DP752/DP722/DP730 User Guide Version 1.0.5.9 Advisory Tones Advisory tones are acoustic signals, which inform you of different actions and states on your handsets. The following advisory tones can be configured independently of each other: ▪ Keypad tone: it’s played when a user presses any key of the keypad (even during calls). ▪ Confirmation: it’s played when a user saves settings or places the handsets in the charger cradle. ▪ Low battery: it’s played if the capacity of the batteries is low or the handsets requires charging. To configure the advisory tones 1. Press Menu (left softkey or the selection key) to bring up operation menu. 2. Use arrow keys to reach Settings . 3. Navigate to select Audio → Advisory tones, and choose which tone you want to change it. 4. Press the left and right arrow keys to either enable or disable the desired tones. 5. Press “Save” (left softkey) to confirm, and a message prompt will be displayed to confirm that the new settings has been successfully saved. Figure 26: Advisory Tone Ringtones Customization DP752/730/722 allow users to use custom ringtones. Custom ringtones will be stored on DP752 base station and only selected custom ringtone will be downloaded to specific DP722/DP730 handsets. DP752 base station supports up to 10 custom ringtones. Custom ringtone should be generated using GS Ringtone Tool and named ring[1-10].bin (example: ring1.bin , ring6.bin). To use custom ringtones, follow below steps:](https://usermanual.wiki/Grandstream-Networks/PD722/User-Guide-4098327-Page-51.png)