Grandway Technology MD20XYSERIES Digital Automatic Blood Pressure Monitor User Manual MD2020 Manual Lab
Grandway Technology (Shenzhen) Limited Digital Automatic Blood Pressure Monitor MD2020 Manual Lab
User Manual
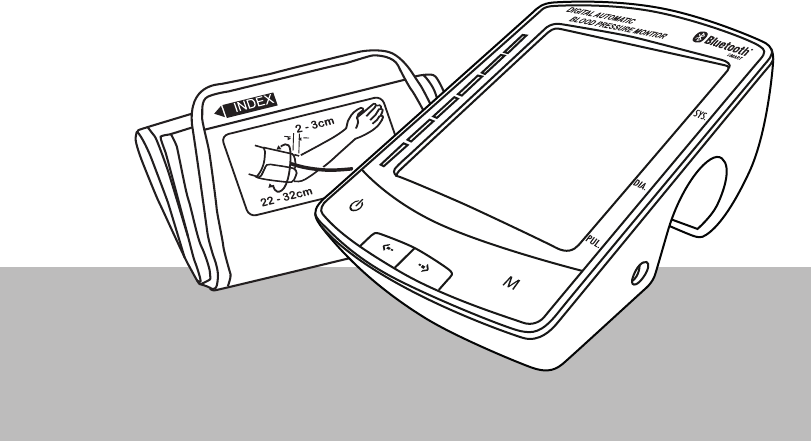
DIGITAL AUTOMATIC
BLOOD PRESSURE MONITOR
USER MANUAL
MODEL : MD2020/MD2030/MD2060/MD2070/
MD2021/MD2031/MD2061/MD2071/MD2080

INTRODUCTION
Thank you for purchasing this Blood Pressure Meter. This fully automatic instrument measures blood pressure and pulse rate promptly and
easily. This device is intended for the non-invasive measurement of systolic and diastolic arterial blood pressure and pulse rate in adults
(age 15 and above).
Please read this manual thoroughly before use. Contact your physician if you have any query about your blood pressure.
This device conforms to the European Directive 93/42 EEC for Medical Products. This is made evident by the CE mark of conformity
accompanied by the reference number of the designated authority.
This device complies with EN1060 standard relating to non-invasive blood pressure monitors Part 1/1995 : General requirements and Part
3/1997 : Additional requirements for electromechanical blood pressure measuring systems.
This completely automatic instrument quickly measures your blood pressure and pulse rate and displays on a large digital panel. This unit
uses the oscillometric method of blood pressure measurement. This means the monitor detects your blood's movement through your
brachial artery and converts the movements into a digital reading. An oscillometric monitor does not need a stethoscope so the monitor is
simple to use. The cuff fills with air the push of a button and automatically deflates when the measurement is complete.
The arm cuff has been treated as Applied Part (clause 3.8 in IEC 60601-1:2005)
PRECAUTIONS
• This device will detect the atmospheric pressure first after power on each time, so atmospheric pressure is not a factor at this monitor.
• Precision components are used in the construction of this device. Extremes in temperature, humidity, direct sunlight, shock or
dust should be avoided.
• To share the cuff, it need to disinfect by UV light before using and user should cover the LCD screen of the device from the UV light.
• If no UV light for disinfection, a mild soap and water (and drying afterwards) to be used for cleaning the surface of the cuff before using.
Make sure that no liquid enters into the bladder inside the cuff.
• Avoid folding the cuff or storing the hose tightly twisted for long periods, as such treatment may shorten the life of the components.
• The device and cuff are not water-resistant. Prevent rain, sweat and water from soiling the device and cuff.
• Measurements may be distorted if the device is used close to a television, microwave oven, cellular telephone, X-ray or other
devices with strong electrical fields.
• Used equipment, parts and batteries are not treated as ordinary household waste, and must be disposed of according to the
applicable local regulations.
Do not use the equipment where flammable gas (such as anesthetic gas, oxygen or hydrogen) or
flammable liquid (such as alcohol) are present.
User should not make any clinical decision based on the device’s results alone, unless he/she consults with a medical doctor.
• WARNING: No use-serviceable parts inside, before servicing to authorized representation or manufacturer!
• WARNING: No modification of this equipment is allowed
MAINTENANCE
Do not open the device. It uses delicate electrical components and an intricate air unit that could be damaged. If you cannot fix the problem
using the troubleshooting instructions, request service from your dealer.
The device was designed and manufactured for a long service life. However it is generally recommended to have the monitor inspected
every 2 years, to ensure proper functioning and accuracy. Please contact your dealer for maintenance.
Avoid dropping the device. If the device is dropped, especially on a hard surface, and the user suspects damage, please contact your
dealer for inspection. 1
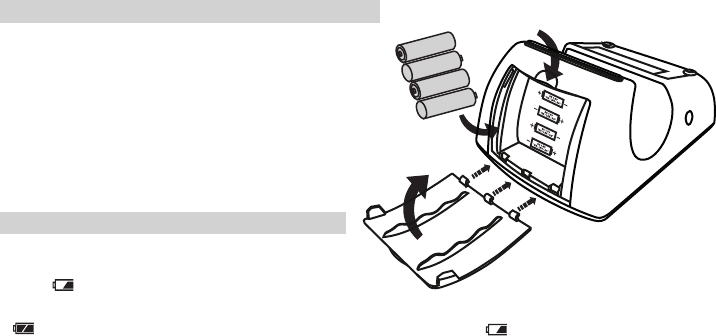
INSTALL / CHANGE BATTERIES
1. Pull out the battery cover on the back side of
the unit as directed.
2. Battery door will pop up instantly. Remove
the used batteries and insert new ones as
shown. Make sure the polarities (+) and (-)
are correct.
3. Push battery cover down to close it.
4. Use only R6P, LR6 or AA alkaline batteries,
do not use rechargeable batteries.
5. Only same type batteries are allowed to use
together.
CAUTION
• Insert the batteries as shown in the battery compartment.
If not, the device will not work or even be damaged.
• When [ ] blinks and "E6" appears in the display, replace all
batteries with new ones. Do not mix old and new batteries.
It may shorten the battery life, or cause the device to malfunction.
• [ ] appears when batteries are new. When battery power becames weak, [ ] and "E6" will
appear on display.
• Battery life varies with the ambient temperature and may be shorter at low temperature.
• Remove the batteries if the device is not to be used for a long time. Batteries may leak and cause a
malfunction.
• If the battery leaks:
- Do not allow the leaking fluid to come in contact with skin or clothing. If already in contact, flush the affected
are immediately with clean water and seek medical advice.
- Do not allow the leaking fluid to come in contact with eyes. If already in contact, DO NOT rub; rinse with clean
water immediately and seek medical advice.
- Take extra precautions to keep a leaking battery away from fire as there is a danger of ignition or explosion.
To open:
Pull out from here
To close:
Insert the battery cover to
the 3 lock first, and then push
down to close it
2
USE OPTIONAL AC ADAPTOR (Accessory item sold separately)
1. When optional AC adaptor should comply with the requirement of
IEC 60601-1:2005. Furthermore all configurations shall comply with
the requirements for medical electrical systems (see IEC 60601-1-1
or clause 16 of the 3Ed. of IEC 60601-1, respectively). Anybody
connecting additional equipment to medical electrical equipment
configures a medical system and is therefore responsible that the
system complies with the requirements for medical electrical
systems. Attention is drawn to the fact that local laws take priority
over the above mentioned requirements. If in doubt, consult your
local representative or the technical service department.
2. When using AC power, use only the exclusive AC adapter
that can be purchased from authorized dealers
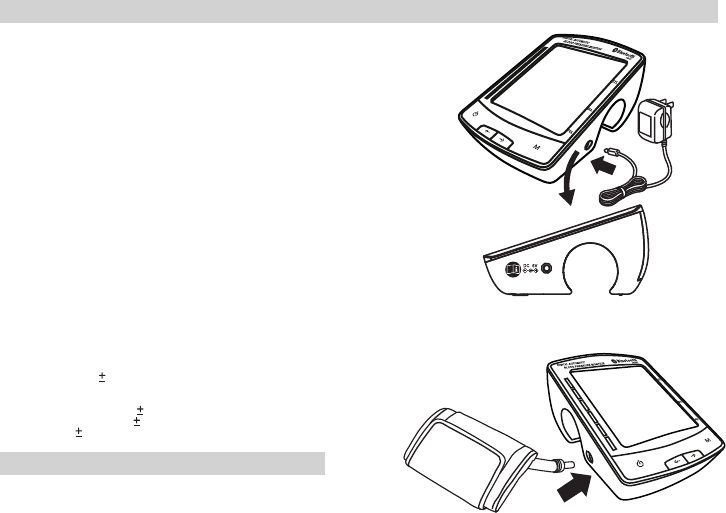
3. Insert the AC adapter cord into the jack on the right
side of the monitor.
4. Insert the AC adapter plug into the outlet.
5. To remove the AC adapter, disconnect the adapter plug from the
AC outlet first and then disconnect the cord from the monitor's jack.
To avoid possible damage to the monitor, use only the exclusive
AC adapter specified by authorized dealers. Other adapters may
vary in output voltage and polarities.
Note: The monitor is designed not to draw power from the batteries
when the AC adapter is in use.
Note: When optional AC adaptor used, such adaptor and the device consist a medical electrical system,
and when need to isolate from supply mains, please pull out the plug of AC adaptor from outlets.
Adapter technical features: (For Europe only: comply with the requirement of IEC 60601-1:2005)
Input voltage: US: 110VAC/60Hz ; Europe: 230VAC/50Hz
Output voltage: 6V 5%
Max. output current: At least 600 mA
Output plug polarity: <+> inner
External diameter: 5.5mm 0.1mm
Internal diameter: 2.1mm 0.1mm
Length: 11mm 0.3mm
CONNECT THE AIR HOSE
Insert the air connector plug into the air socket firmly.
3
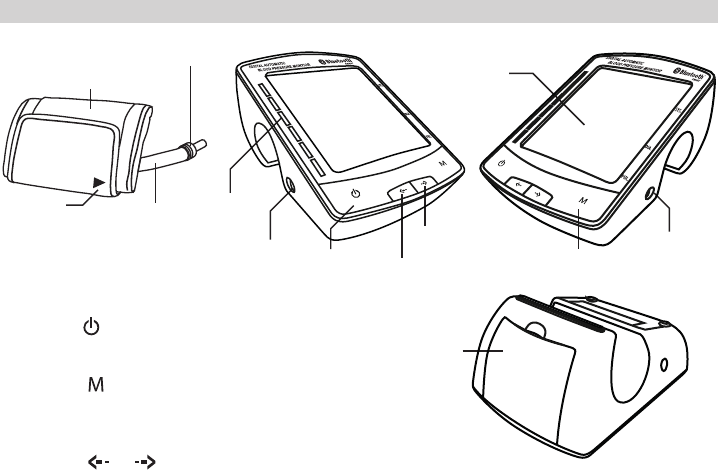
PART IDENTIFICATION
Button Operations
• Go to sleep mode
Press button.
• Recalling average data
Press button.
• Select between different users
(User 1 / User 2 / User 3 / User 4)
Press or button
Air socket Start / Stop
Button Increase
Button
Decrease
Button
Memory
Button
Air Connector Plug
WHO
Indicator
Index Mark
Arm Cuff
Air Hose
Display
Battery Door
DC Jack
4
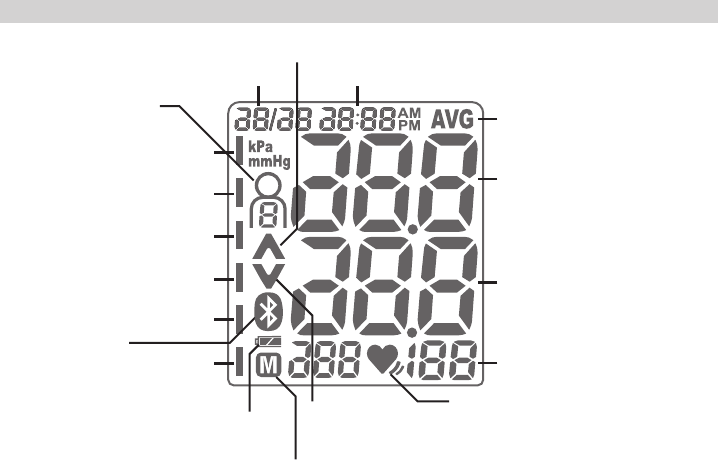
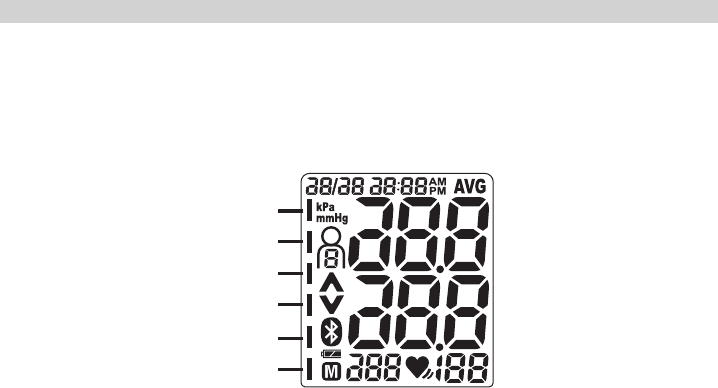
DISPLAY READINGS
5
Date Time
Pressurizing
USER
Releasing Air
Average of
Previous
Measurement
Memory
Bluetooth
Battery
Indicator
Pulse Rate
Diastolic Pressure
Systolic Pressure
Irregular Heartbeat Indicator
Severe Hypertension
Moderate Hypertension
Mild Hypertension
High Normal
Normal
Optimal
BEFORE MEASURE YOUR BLOOD PRESSURE
• Sit down in a comfortable position. Place the arm to be
used for the measurement on a table or other support
so that the center of the cuff with be at the same height
as your heart.
• Relax for about five or ten minutes before taking a
measurement. If you are excited or depressed by
emotional stress, the measurement will reflect this
pulse reading will usually be faster than normal.
• Your blood pressure varies constantly, depending on
what you are doing and what you have eaten. What
you drink can have a very strong and rapid effect on
your blood pressure.
• This device bases its measurements on the heartbeat.
If you have a very weak or irregular heartbeat, the
device may have difficulty determining your blood
pressure.
• Should the device detect a condition that is abnormal,
it will stop the measurement and display an error
symbol.
• This instrument is intended for use by adults only.
Consult with your physician before using this device
on a child. A child should not use this device
unattended.
6
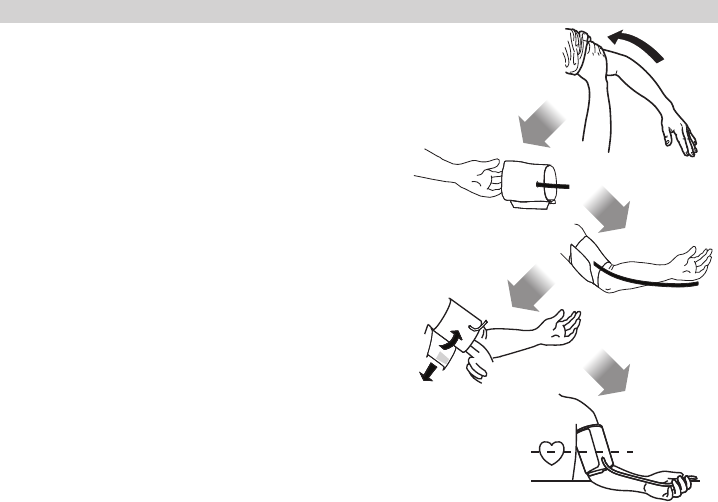
TO APPLY ARM CUFF
1.If the cuff is assembled correctly, the sewn hook material will be on the outside of the cuff loop and
the metal D-ring will not touch your skin.
2.Pass the end of the cuff furthest from the tubing through the metal D-ring to form a loop. The smooth
cloth should be on the inside of the cuff loop.
3.Put your left arm through the cuff loop. The bottom of the cuff should be approximately 1/2 inch above
the elbow. The white artery marker on the cuff should lie over the brachial artery on the inside of the arm.
Tube should run down center of arm even with the middle finger.
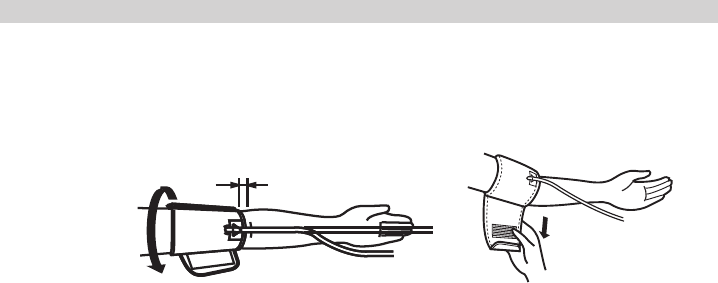
4.Pull the cuff so that the top and bottom edges are tightened evenly around your arm.
5.When the cuff is positioned correctly, press the sewn hook material firmly against the pile side of
the cuff.
6.Make certain the cuff fits snugly around your arm. The cuff should make good contact with your skin.
7.Sit in a chair with your feet flat on the floor and place your arm on a table so that the cuff is at the
same level as your heart.
8.Relax your arm and turn your palm upward.
9.Be sure there are no kinks in the air tubing.
NOTE: If the circumference around your arm is greater than 32 cm, you will need to use a large adult
size cuff. The large adult cuff is an accessory item and it is sold separately.
ATTENTION: Do not use cuff other than the original cuffs contained in this kit!
1/2 inch
7

TO SET CLOCK
Press and hold [ ] button to enter clock setting mode
1. "Year” will blink on display automatically
2. Press / button to select year
3. Press [ ] button to confirm and "Month" will blink
4. Press / button to select month
5. Press [ ] button to confirm and "Day" will blink
6. Press / button to select day
7. Press [ ] button to confirm and "Hour" will blink
8. Press / button to adjust to desired hour
9. Press [ ] button to confirm and "Minute" will blink
10. Press / button to adjust to desired minute
11. Press [ ] button to confirm and settings are done
8
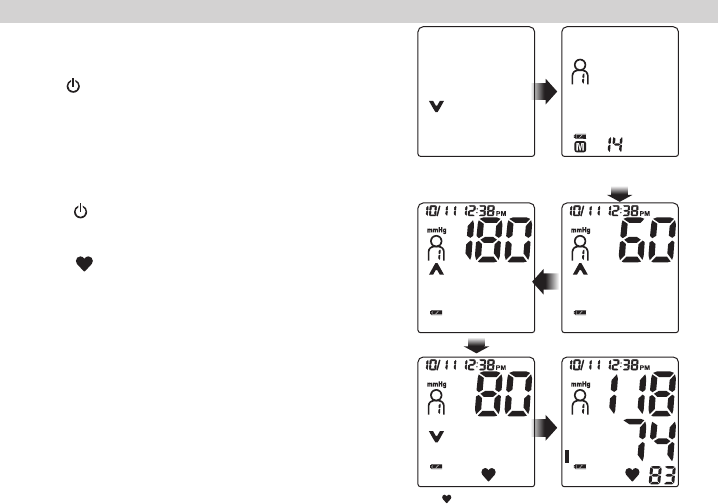
TO MEASURE YOUR BLOOD PRESSURE
1. Place the cuff on the arm (preferably the left arm).
Sit quietly during measurement.
2. Press [ ] button to start. The deflation icon and
measurement record number is displayed briefly. Then
the cuff starts to inflate. It is normal for the cuff to feel
very tight. The inflaction number is displayed during
measurement.
Note: If you wish to stop inflation at any time, press
the [ ] button again.
3. When inflation is complete, deflation starts automatically
and the [ ] blinks, indicating that the measurement is
in progress. Once the pulse is detected, the mark
flashes with each pulse beat.
4. When the measurement is complete, the systolic
and diastolic pressure readings and pulse rate are
displayed and stored. The cuff exhausts the remaining
air and deflates completely.
9
Deflation for start measuring Record number and
User ID are displayed
Inflation in progress
Measurement result shown
[ ] icon blinks
WHO CLASSIFICATION INDICATOR
Each of the six segments of the bar indicator corresponds to the WHO blood pressure classification.
WHO Classification Indicator:
10
Severe Hypertension
Moderate Hypertension
Mild Hypertension
High Normal
Normal
Optimal

Pressure Bar Indicator
The indicator monitors the progress of pressure during measurement.
11
Pressurizing Releasing Air
Inflation in progress
Inflation complete Measurement in progress
TO USE THE MEMORY FUNCTION
This monitor has a memory capable of storing 240 sets of readings for each user. Every time you
complete the measurement, the monitor automatically stores blood pressure and pulse rate.
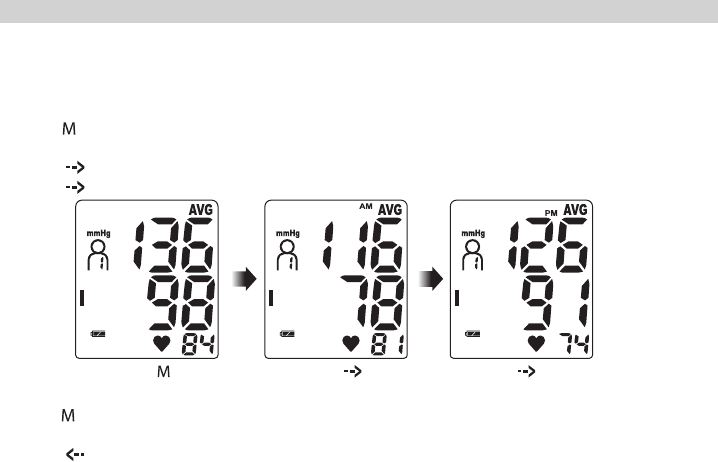
Recalling the average data
• Press [ ] button to enter the memory mode, the average blood pressure on last 3 measurements
is displayed.
• Press [ ] to view average data for AM period
• Press [ ] one more time to view average data for PM period
Recalling the previous measurement record
• Press [ ] button to enter the memory mode, the average blood pressure on last 3 measurements
is displayed.
• Press [ ] to view the previous measuremnt record
12
Press [ ] Press [ ] Press [ ] again
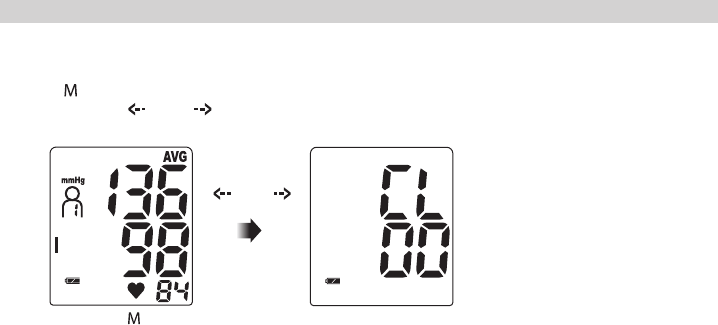
DELETING ALL DATA STORED IN MEMORY
Deleting all data stored in memory
• Press [ ] to go into average data display.
• Press and hold [ ] and [ ] for 2 seconds to delete all memory records.
13
All memories cleared
Press [ ]
Press and hold
[ ] and [ ]
at the same time
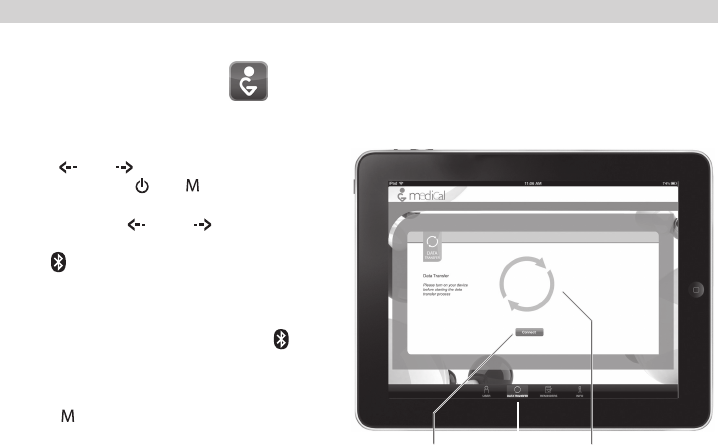
BLUETOOTH CONNECTION
This monitor works with iPod touch, iPhone or iPad by Bluetooth connection. Please install
application (APP) - BPM Smart to your devices from the App Store before you start.
Transfer data from your monitor to your smartphone or tablet devices
• Press any key to start up the monitor.
Press [ ] or [ ] to select the target user
profile and press [ ] or [ ] to confirm your
selection.
• Press and hold [ ] and [ ] buttons to turn
on the bluetooth connection. The bluetooth
icon [ ] is flashing.
• Launch the app. and go to the data transfer
section. Press the “Connect” button. The data
transfer icon is rotating.
• When connected, the bluetooth icon [ ] on the
monitor will stop flashing. The data transfer icon
in the app. will stop rotating and change to
blue.
• Press [ ] button on the monitor to send data
to the app. and the data transfer icon is rotating
while the app. is receiving data.
• Once the data transfer icon is stop rotating, the
date transfer process is finished. 14
Data Transfer Data Transfer IconConnect Button

WHAT IS AN IRREGULAR HEARTBEAT?
This blood pressure monitor provides a blood pressure and pulse rate measurement even when an
irregular heartbeat occurs. An irregular heartbeat is defined as a heartbeat that varies by 25% from the
average of all heartbeats during the blood pressure measurement. It is important that you are relaxed,
remain still and do not talk during measurements.
Note: We recommend contacting your physician if you see this [ ] indicator frequently.
ABOUT BLOOD PRESSURE
What Is Blood Pressure?
Blood pressure is the force exerted by blood against the walls of the arteries. Systolic pressure occurs
when the heart contracts. Diastolic pressure occurs when the heart expands. Blood pressure is
measured in millimeters of mercury (mmHg). One’s natural blood pressure is represented by the
fundamental pressure, which is measured first thing in the morning while one is still at rest and before
eating.
What Is Hypertension And How Is It Controlled?
Hypertension, an abnormally high arterial blood pressure, if left unattended, can cause many health
problems including stroke and heart attack. Hypertension can be controlled by altering one’s lifestyle,
avoiding stress, and with medication under a doctor’s supervision. To prevent hypertension or to keep it
under control:
• Do not smoke
• Exercise regularly
• Reduce salt and fat intake
• Have regular physical checkups
• Maintain proper weight
15

Why Measure Blood Pressure At Home?
Blood pressure measured at a clinic or doctor’s office may cause apprehension and can produce an
elevated reading, 25 to 30 mmHg higher than that measured at home. Home measurement reduces
the effects of outside influences on blood pressure readings, supplements the doctor’s readings and
provides a more accurate, complete blood pressure history.
WHO Blood Pressure Classification
Standards to assess high blood pressure, without regard to age, have been established by the World
Health Organization (WHO), as shown in the chart below.
Reference Material: Journal of Hypertension 1999, Vol 17 No.2
mmHg
110
105
100
95
90
85
80
Diastolic blood pressure
120 130 140 150 160 170 180
Systolic blood pressure mmHg
Grade 3 hypertension (severe)
Grade 2 hypertension (moderate)
Grade 1 hypertension (mild)
High-normal
Normal
Optimal
16

TROUBLE SHOOTING
Nothing appears in
the display, even
when the power is
turned on
Batteries are drained Replace all batteries with new ones
Battery polarities are not in
the correct position
Re-install the batteries with their
negative and positive ends matching
their indicated in the battery
compartment
Loose in plug or contact with
outlet (IF AC adaptor is used)
Check the wiring to make sure plug
& outlet are properly secured
ERROR code 1
(E1)
appears
The cuff position is not
fastened properly
Fasten the cuff correctly
The cuff position is not correct Sit comfortably and still. Ensure that
the cuff is the same level as the heart
ERROR code 2
(E2)
appears
You moved your arm or body
during measurement
Make sure you remain very still and
quiet during the measurement
17

TROUBLE SHOOTING
ERROR code 3
(E3)
appears
The unit does not measure
Check whether tube connection of
the cuff is secured to the unit
properly
ERROR code 4
(E4)
appears
The cuff may not be applied
If you have a very weak or irregular
heart beat, the device may have
difficultly in determining your blood
pressure
There is a measuring Error Sit comfortably and still. Fasten the
cuff again carefully
ERROR code 5
(E5)
appears
Cuff over inflated The measurement range is over
300 mmHg. It is recommended to
see doctor as soon as possible.
The monitor keeps
reinflating
Circuit locked Remove and reinsert the batteries
and then proceed to take
measurement again.
ERROR code 6
(E6)
appears
Low battery The battery power is too low to
function. Replace the batteries with
new ones.
18
SPECIFICATION
Display : LCD Display
Measurement Range : Pressure : 30-250 mmHg
Pulse : 40-180 beats/minute
Accuracy : Pressure : +/-3 mmHg or 2% of the reading
Pulse : +/-5% of reading
Measurement Method : Non-invasive, Oscillometric method
Power Source : 4 x"AA" Alkaline batteries, Optional AC Adaptor (6V@600mA)
Operating Temperature / Humidity : 10˚C to 40˚C, 30-85% RH maximum
Storage Temperature / Humidity : -20˚C to 60˚C, 10-95% RH maximum
Operation, storage and : 700hPa to 1060hPa
transport atmospheric pressure
Outer Dimensions : Approx. 110 x 154 x 77mm
Arm Circumference : (22-32cm)
Accessories : Cuff, Instruction Manual, Storage Pouch, Batteries, AC Adaptor(Optional)
Classification : Application part Type BF
Key to symbols : Application part Type BF
: Class II equipment symbol
Protection against harmful ingress of water or particulate matter : IPX0
Operation mode : Continuous
: Attention, Consult ACCOMPANYING DOCUMENTS.
NOTE : These specifications are subject to change without notice.
19
SPECIFICATION
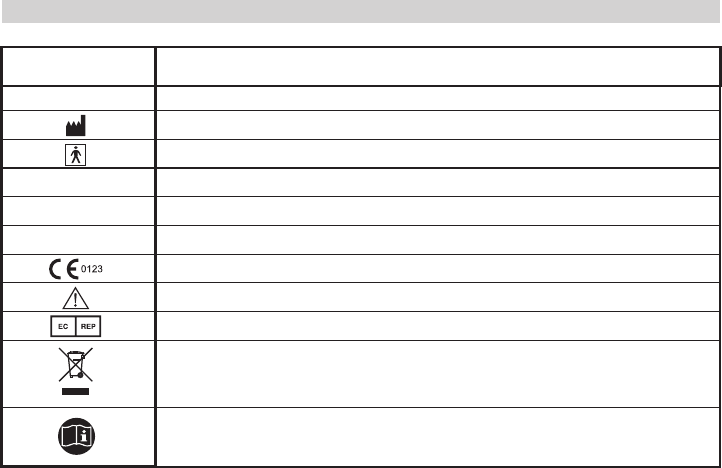
Symbols Function / Meaning
SN Serial Number
Manufacturer
Type BF: Device, cuff and tubing are designed to provide special protection against electrical shocks.
SYS Systolic Blood Pressure in mmHg
DIA Diastolic Blood Pressure in mmHg
PUL Pulse
EC Directive Medical Device Label
Caution
Authorized Representative in the European Community
WEEE Label
Refer to instruction manual / booklet
20
Appendix I
The Sphygmomanometer (MD2020/MD2030/MD2060/MD2070/MD2021/MD2031/MD2061/MD2071/MD2080)
is intended for use in the electromagnetic environment specified below. The customer of the user of the
Sphygmomanometer (MD2020/MD2030/MD2060/MD2070/MD2021/MD2031/MD2061/MD2071/MD2080)
should assure that it is used in such an environment.
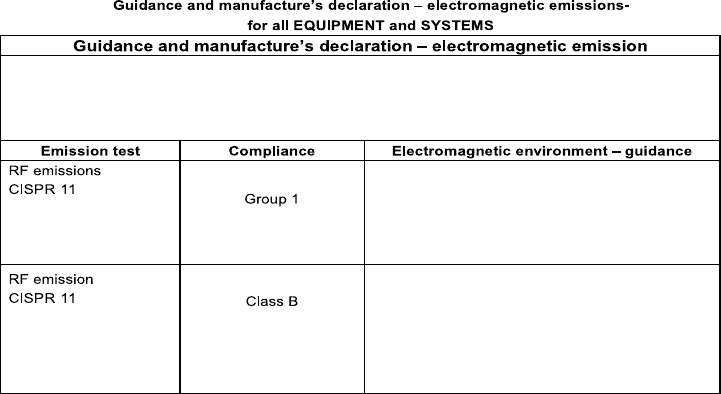
The Sphygmomanometer
(MD2020/MD2030/MD2060/MD2070/MD2021/
MD2031/MD2061/MD2071/MD2080) uses RF energy
only for its internal function. Therefore, its RF
emissions are very low and are not likely to cause any
interference in nearby electronic equipment.
The Sphygmomanometer
(MD2020/MD2030/MD2060/MD2070/MD2021/
MD2031/MD2061/MD2071/MD2080) is suitable for
use in all establishments, including domestic
establishments and those directly connected to the
public low-voltage power supply network that supplies
buildings used for domestic purposes.
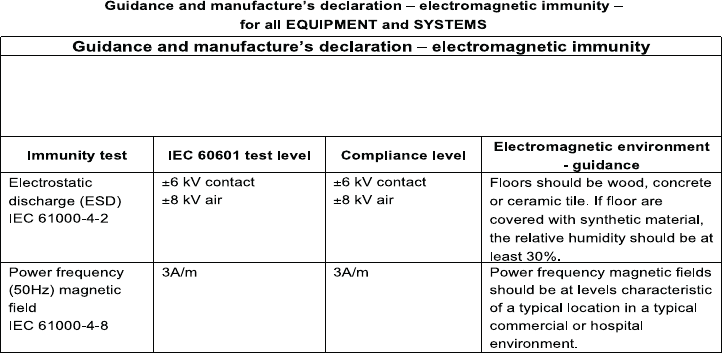
The Sphygmomanometer (MD2020/MD2030/MD2060/MD2070/MD2021/MD2031/MD2061/MD2071/MD2080)
is intended for use in the electromagnetic environment specified below. The customer of the user of
Sphygmomanometer (MD2020/MD2030/MD2060/MD2070/MD2021/MD2031/MD2061/MD2071/MD2080)
should assure that it is used in such an environment.
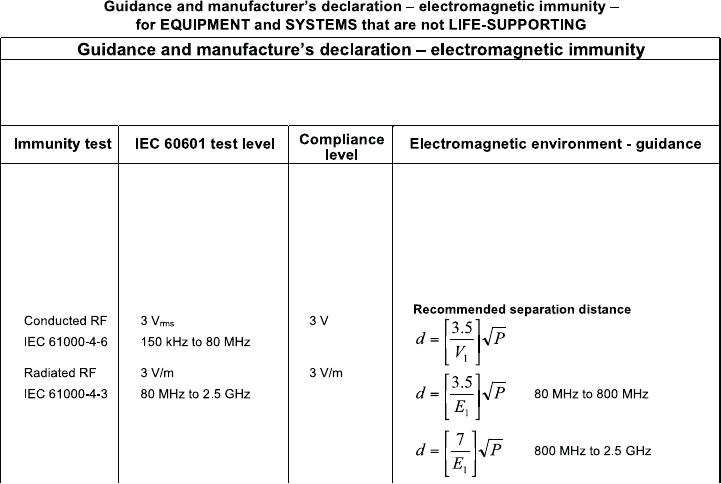
Appendix II
The Sphygmomanometer (MD2020/MD2030/MD2060/MD2070/MD2021/MD2031/MD2061/MD2071/MD2080)
is intended for use in the electromagnetic environment specified below. The customer of the user of
Sphygmomanometer (MD2020/MD2030/MD2060/MD2070/MD2021/MD2031/MD2061/MD2071/MD2080)
should assure that it is used in such an environment.
Portable and mobile RF communications
equipment should be used no closer to any part
of the Sphygmomanometer
(MD2020/MD2030/MD2060/MD2070/MD2021/
MD2031/MD2061/MD2071/MD2080) including
cables, than the recommended separation
distance calculated from the equation applicable
to the frequency of the transmitter.
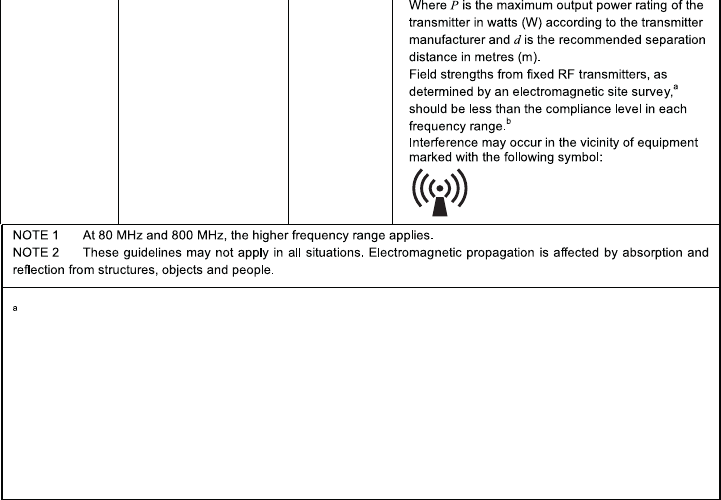
Field strengths from fixed transmitters, such as base stations for radio (cellular/cordless) telephones
and land mobile radios, amateur radio, AM and FM radio broadcast and TV broadcast cannot be predicted
theoretically with accuracy. To assess the electromagnetic environment due to fixed RF transmitters, an
electromagnetic site survey should be considered. If the measured field strength in the location in which the
Sphygmomanometer (MD2020/MD2030/MD2060/MD2070/MD2021/MD2031/MD2061/MD2071/MD2080) is
used exceeds the applicable RF compliance level above, the Sphygmomanometer
(MD2020/MD2030/MD2060/MD2070/MD2021/MD2031/MD2061/MD2071/MD2080) should be observed to
verify normal operation. If abnormal performance is observed, additional measures may be necessary, such
as reorienting or relocating the Sphygmomanometer
(MD2020/MD2030/MD2060/MD2070/MD2021/MD2031/MD2061/MD2071/MD2080) b Over the
frequency range 150kHz to 80 MHz, field strengths should be less than 3 V/m.
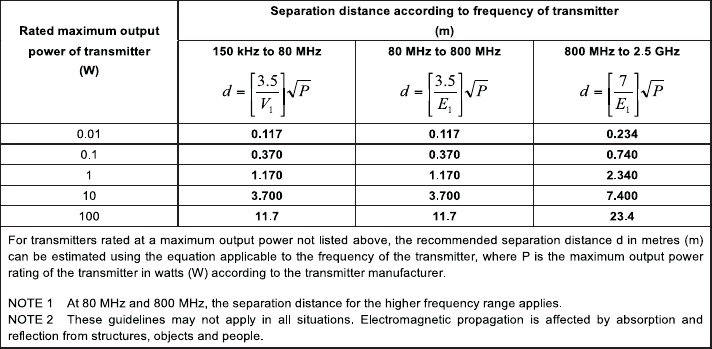
Appendix III
Recommended separation distances between
portable and mobile RF communications equipment and the
Sphygmomanometer (MD2020/MD2030/MD2060/MD2070/MD2021/MD2031/MD2061/MD2071/MD2080)
The Sphygmomanometer (MD2020/MD2030/MD2060/MD2070/MD2021/MD2031/MD2061/MD2071/MD2080)
is intended for use in an electromagnetic environment in which radiated RF disturbances are controlled. The
customer or the user of the Sphygmomanometer
(MD2020/MD2030/MD2060/MD2070/MD2021/MD2031/MD2061/MD2071/MD2080) can help prevent
electromagnetic interference by maintaining a minimum distance between portable and mobile RF
communications equipment (transmitters) and the Sphygmomanometer
(MD2020/MD2030/MD2060/MD2070/MD2021/MD2031/MD2061/MD2071/MD2080) as recommended below,
according to the maximum output power of the communications equipment.
NOTE: This equipment has been tested and found to comply with the limits for a Class B
digital device, pursuant to part 15 of the FCC Rules. These limits are designed to provide
reasonable protection against harmful interference in a residential installation. This
equipment generates uses and can radiate radio frequency energy and, if not installed and
used in accordance with the instructions, may cause harmful interference to radio
communications. However, there is no guarantee that interference will not occur in a
particular installation. If this equipment does cause harmful interference to radio or
television reception, which can be determined by turning the equipment off and on, the user
is encouraged to try to correct the interference by one or more of the following measures:
- Reorient or relocate the receiving atenna.
- Increase the separation between the equipment and receiver.
- Connect the equipment into an outlet on a circuit different from that to which the receiver
is connected.
- Consult the dealer or an experienced technician for help.
CAUTION: To comply with the limits of the Class B digital device, pursuant to Part 15 of the
FCC Rules, this device is comply with Class B limits. All peripherals must be shielded and
grounded. Operation with non-certified peripherals or non-shielded cables may results in
interference to radio or reception.
MODIFICATION: Any changes or modifications not expressly approved by the grantee of
this device could void the user's authority to operate the device.
Appendix IV
- This device may not cause harmful interference.
- This device must accept any interference received, including interference that
may cause undesired operation.
Indication for Use
Digital Automatic Blood Pressure Monitor BPM20 Series is for use by medical professional or home
user. The BPM20 Series is intended to measure the systolic and diastolic blood pressure, and pulse
rate of an individual (age>=16) by using a non-invasive technique, in which an inflatable cuff is
wrapped around the upper arm of an individual.
Appendix V

MADE IN CHINA
P/N: 83-M2020-SEN00A-R #0905A
PEMS# E3F5-DC75
Includes:
• Digital Automatic Blood Pressure Monitor
• Arm Cuff ( 8-1/2"-12-1/2" / 22-32cm )
• Illustrated User Guide
Customer Support:
For questions / comments regarding the Blood
Pressure Monitor, you may contact manufacturer.
Shanghai International Trading Corp. GmbH (Hamburg)
Eiffestrasse 80, 20537 Hamburg, Germany.
Grandway Technology (Shenzhen) Limited,
Block 6 and 7, Zhu Keng Industrial Zone,
Ping Shan, Long Gang District, Shenzhen,
Guang Dong, P.R.C.
Symbol for the marking of electrical and electronics devices according to Directive 2002/96/EC.
The device, accessories and the packaging have to be disposed of waste correctly at the end of the usage.
Please follow Local Ordinances or Regulations for disposal.
0123