HEADWATERS BST-100 BLUETOOTH SOUND THERAPY User Manual
HEADWATERS INC. BLUETOOTH SOUND THERAPY Users Manual
Contents
- 1. Users Manual
- 2. user manual
Users Manual

Confidential
Sound Oasis Bluetooth Speaker System BST-100
Revision: R1.0 Product Specification
Issue Date: June 05, 2013
Prepared By: Rudy Vandenbelt
Revision Modification Tracking:
1.0 - Initial Release

June 05, 2013
1. Standards:
1.1. The unit must meet the specific requirements listed below as compared to documentation provided and/or
identified and approved samples. Documentation shall include any and all correspondence with Headwaters
(USA) Inc., Headwaters Research & Development (Canada) Inc. regarding product specification and/or details.
2. Product Design & Details:
2.1. The unit shape details and finish must meet the approved standards as documented in the Industrial Design
specifications. The final version of the Industrial Design specifications shall be mutually agreed upon by The
MANUFACTURER and HEADWATERS in writing prior to the start of tooling and production.
2.2. Any deviation from the Industrial Design specifications shall require the written approval of Headwaters or its
designated agent(s) prior to the implementation of the design. Headwaters shall not unreasonably withhold
such approvals. Generally such changes will be related directly to mechanical design and /or manufacturability
requirements.
2.3. All plastics shall be of the specified colors and shall not obviously deviate from the median of any sample. The
plastic colors will be specified using supplied samples OR the PANTONETM color specification system.
Headwaters will provide actual plastic color samples where possible and appropriate. The color of all molded
parts shall be pre-approved by Headwaters prior to production. (The MANUFACTURER will supply plastic color
proof sample for approvals when required.)
2.4. Headwaters will provide custom artwork for pad / hot stamp printing and product information tool inserts for
specific customer requirements. A change of artwork and product color will require a minimum order of 2500
units (one time order) and 1500 pcs. (recurring orders.) Headwaters will incur film and set up charges for any
changes in artwork or printing method.
2.5. The rights to the product Industrial Design and all related details shall remain the sole and exclusive property of
Headwaters Research & Development (Canada) Inc. Use of the design or any of its specific elements requires
the written authorization of Headwaters.
June 05, 2013
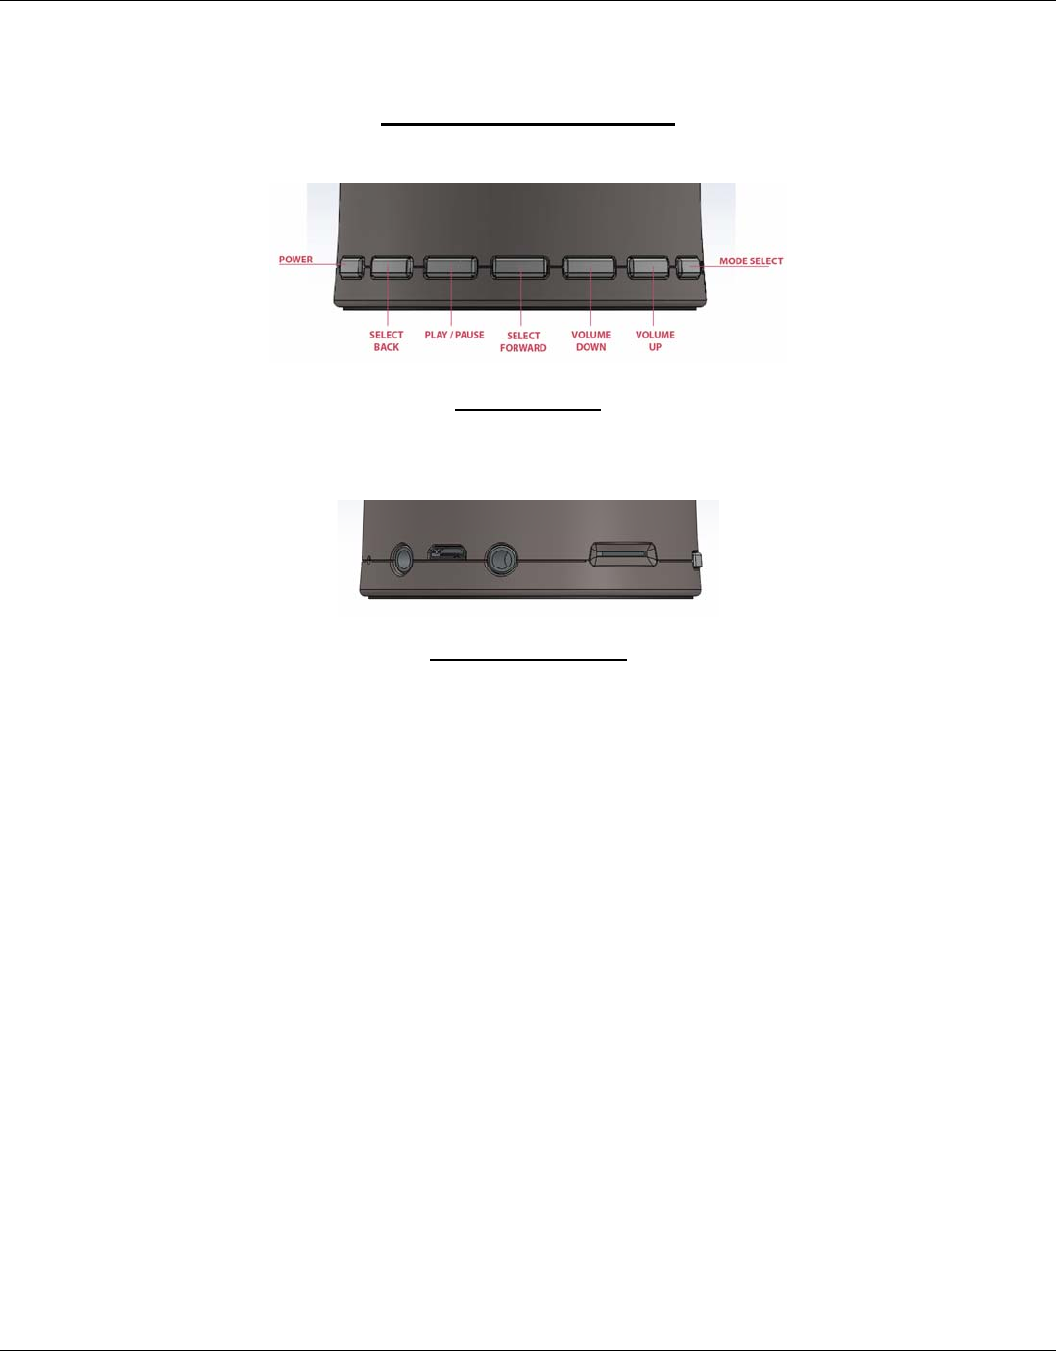
Figure 4.1 BST-100 Views
FRONT VIEW
Buttons L to R: Power – Select Back – Play/Pause – Select Forward – Vol. Down – Vol. Up – Mode Select
LEFT REAR VIEW
L to R: Headphone out – Micro USB – Audio Signal Input – Micro SD Card Slot

June 05, 2013
RIGHT REAR VIEW
L to R: Mode LED Bluetooth (Blue) – Mode LED SD Card (Amber) – Mode LED USB / Charging (Red) – Microphone

June 05, 2013
5. FUNCTIONS
5.1. Operating Modes
5.1.1. BLUETOOTH – Playback from external device.
5.1.2. SD CARD – Playback from SD Card
5.1.3. USB INPUT – Playback from device via. USB (PC Speaker mode)
5.2. Auxiliary Input & Battery Charging
5.2.1. Auxiliary Input will have a mechanical switched over-ride of ALL other inputs to the amplifier circuit. The unit
can be in ANY mode when the auxiliary input is being used.
5.2.1.1. LED mode status light does not change when AUX input is plugged in(当输入线插入时,LED 不
会变颜色)
5.2.2. Charging of the battery will happen in any mode when a powered USB cord is plugged into the device.
5.3. Bluetooth Confirmation
5.3.1. Standard IC confirmation tone on Bluetooth connect.
5.3.2. Bluetooth Name on device = “Sound Oasis”
5.4. Start-Up (FACTORY) Default Settings
5.4.1. All sound output is off.
5.4.2. Volume Level = 1/3 of total range
5.4.3. SD Card installed
5.4.4. Battery Fully Charged
5.5. Initial Setup
5.5.1. Initial Startup: Plug in USB power cable and charge the battery.
5.5.2. Unit is OFF.
5.5.3. Battery is charging

June 05, 2013
6. OPERATION
6.1. On – Off
6.1.1 Press and hold (1 sec.) [On-Off] to turn the unit on. (standard IC power function) (按住 ON/OFF 键开关)
6.1.1. BLUETOOTH Mode is the default. The device will automatically connect to Bluetooth (solid blue LED) OR
Bluetooth LED will flash and audio connect prompt signal will activate.(默认是蓝牙模式)
6.1.2. Press and hold (1 sec.) [On-Off] to turn the unit off. (standard IC power function)
6.2 Mode Function
6.2.1 Default = Bluetooth Mode
6.2.2 From any mode setting press [MODE] to select the next mode.
6.2.2.1 Sequence - Bluetooth (default) [MODE] SD Card [MODE] USB [MODE] Bluetooth ….
- Bluetooth LED = Blue Color
- SD Card LED = Amber Color
- USB LED = Red Color. (same as charging)
6.3 Adjust Volume
6.3.1 Default volume setting = 1/3 total.
6.3.2 Press once [VOL DN] or [VOL UP] to reduce or increase volume one increment.
6.3.3 Press and hold [VOL DN] or [VOL UP] to reduce or increase volume continuously. (rate same as current
sample ~ 3 steps per second.)
6.3.4 Minimum volume = barely audible in quiet room
6.3.5 Max volume per sample provided.
6.4 Playback
• Same as sample provided.
END OF OPERATIONAL DESCRIPTION

Federal Communications Commission (FCC) Statement
This device complies with part 15 of the FCC Rules. Operation is subject to the following two
conditions: (1) This device may not cause harmful interference, and (2) this device must
accept any interference received, including interference that may cause undesired operation.
Note: This equipment has been tested and found to comply with the limits for a Class B digital
device, pursuant to part 15 of the FCC Rules. These limits are designed to provide reasonable
protection against harmful interference in a residential installation. This equipment generates,
uses and can radiate radio frequency energy and, if not installed and used in accordance with
the instructions, may cause harmful interference to radio communications. However, there is
no guarantee that interference will not occur in a particular installation. If this equipment does
cause harmful interference to radio or television reception, which can be determined by turning
the equipment off and on, the user is encouraged to try to correct the interference by one or
more of the following measures:
●Reorient or relocate the receiving antenna.
●Increase the separation between the equipment and receiver.
●Connect the equipment into an outlet on a circuit different from that to which the receiver is
connected.
●Consult the dealer or an experienced radio/TV technician for help.
Warning: Changes or modifications made to this device not expressly approved by
HEADWATERS INC. may void the FCC authorization to operate this device.
Note: The manufacturer is not responsible for any radio or tv interference caused by
unauthorized modifications to this equipment. Such modifications could void the user’s
authority to operate the equipment.