HON HAI PRECISION IND ABALONE200 Cellular Phone User Manual Revised
HON HAI Precision Ind. Co., Ltd. Cellular Phone Users Manual Revised
UserManual.wiki
>
HON HAI PRECISION IND
>
ABALONE200 User Manual
Users Manual Revised
Navigation menu
Upload a User Manual
Namespaces
Wiki Guide
HTML
PDF
Info
Views
User Manual
Discussion / Help
Navigation

![8 3.1.2. Power off Steps Description Press and hold end key The power off animation shows and the phone is power off. 3.2. Making calls Function Steps Description Making a call 1. Enter the phone number in idle mode. Press clear key or [Delete] to delete the last character. Press and hold to delete all characters. 2. Press send key to call the number. 3. Press or key to end the call. You can also end the call by closing the flip. When the ear piece is connected, closing the flip will not end a call. You can press and hold the button on the ear piece to answer or end a call. Last number redial In idle mode, press twice continuously Dial a number from call record Search the desired number from “Call Records” and press key to call. Dial a number from Phonebook 1. In idle mode, press key to access phonebook. 2. Select [Search] to find the desired record by name or position and then press key to call. International calls 1. Press and hold key for international prefix (+ character). 2. Enter the country code, area code, and the phone number.](https://usermanual.wiki/HON-HAI-PRECISION-IND/ABALONE200/User-Guide-425656-Page-8.png)
![9 3. Press key to call the number. GSM emergency call Key in ‘112’ then press key. Notice: This phone, like any wireless phone, operates using radio signals, wireless and landline networks as well as user-programmed functions, which cannot guarantee connection in all conditions. Therefore, you should never rely solely on any wireless phone for essential communications (medical emergencies, for example). 3.3. Answering a call There are three methods of answering a call according to the settings. Function Steps Description Press send key to answer Press key to answer the incoming call. Press key to reject the call. When somebody is calling you, the phone shows the caller’s information. Press any key to answer Press any key except and key to answer the incoming call. Press or key to reject the call. When somebody is calling you, the phone shows the caller’s information. Open the flip to answer Open the flip to answer the incoming call. Notice: 1. If you have set call divert in [Network Service], the call will be forward to the number you set. In any situation, you can press or key to answer the call. Press or key to reject it. 3.4. Handling two or more calls You can answer an incoming call or make another call during a call. You can also build a conference call. Function Steps Description Answering an incoming call during a call 1. During a call, press key to answer an incoming call. The first call is put on hold and the new call becomes active. 2. Press key to reject the incoming](https://usermanual.wiki/HON-HAI-PRECISION-IND/ABALONE200/User-Guide-425656-Page-9.png)
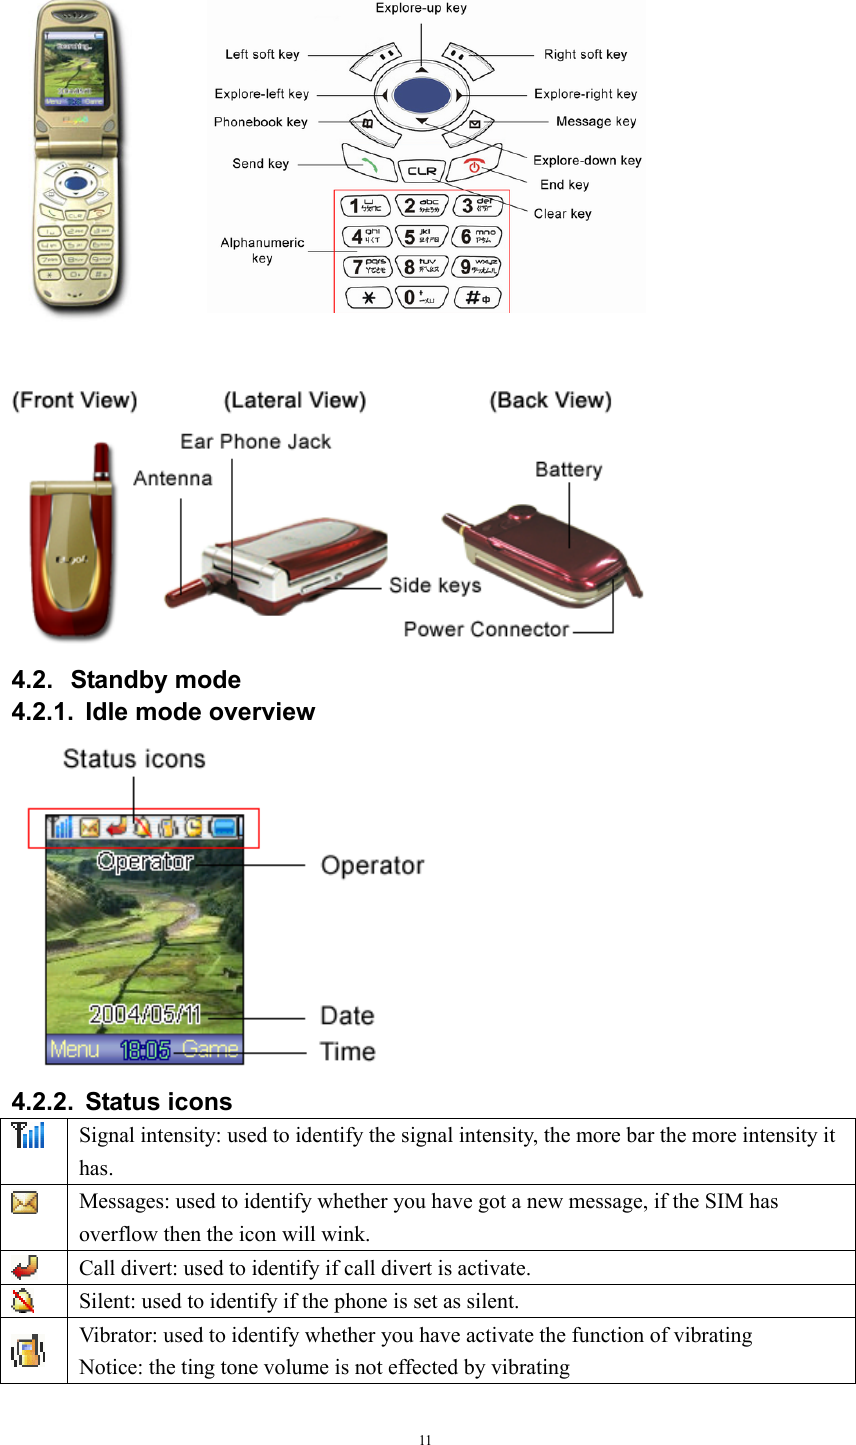
![10 call. Making another call during a call 1. During a call, press number keys to key in the outgoing call numbers or press key to select from phonebook. 2. Press key to make the new call and the first call is put on hold. Swap calls 1. Press key for in call option list. Select [Swap] to switch between the active and held call. 2. Press key to end the selected call. Build a conference call 1. To build a conference call, you must have an active call and a held call. 2. Press key and select [Start Conference]. 3. To add a new participant to the call, put the conference call on hold. Connect a new call and then select [Add To Conference] from option list. To speak privately to a specific party 1. Select a party in the list by pressing up and down key. 2. Select [Private Call] in option list. Other calling parties in the conference call are put on hold. 3. You can press [End] to end this call or select [Add To Conference] to rejoin to the conference call. To end the call for specific party 1. Select a party in the list by pressing up and down key. 2. Select [End Selected Call] in option list. End conference call 1. Select any party of the conference call. 2. Press or key to end the conference call for all parties. Notice: Conference call is a network service that allows you to make a conference call with a maximum of six participants, including yourself. Please contact your service provider for this service. 4. Introduction 4.1. Phone overview](https://usermanual.wiki/HON-HAI-PRECISION-IND/ABALONE200/User-Guide-425656-Page-10.png)


![14 5. Introduction of menu 5.1. Messages In idle mode, select Menu->Message or press key to enter Message. You can save maximum 30 messages in on the handset for Draft and Outbox. 5.1.1. Inbox function description 1()Delete Delete the focused message. 2()Reply reply message to the sender 3()Forward Forward a receiving message. After editing the message, press [Option] to send, save or give it up. 【Send】:send the message 【Group Send】:send the message to the existing group 【Save】:save the message to the Draft 【Cancel】:abandon the editing message 4()Extract Number Extract the number of sender and the number in the messages. Press [Option] to save or call the number 【Save】:save this number into Phonebook 【Call Number】:call this number 5()Call Number call the sender 5.1.2. Write Message You can edit maximum 160 characters in a message. Press this function to send and store messages. Press [Select] to enter the edit interface. The input method including, Abc The first letter is written in upper case and other letters are written in lower case ABC Upper case input mode abc Lower case input mode 123 Number input mode Press key to switch the input mode. Press key to show the symbols. Select the symbols by using explore key and press [Select] to confirm. Press to delete one character, long press to clear all the characters on the screen.](https://usermanual.wiki/HON-HAI-PRECISION-IND/ABALONE200/User-Guide-425656-Page-14.png)
![15 Functions in [Option] are, function description 1()Send Send the message 2()Group Send send the message to the existing group (3)Save save the message to the Draft (4)Cancel abandon the editing message 5.1.3. Draft Enter to show the saved message list. Press key to select the focused message. Functions including, 1()Delete: delete the selected message. 2()Send: send the message 5.1.4. Outbox Enter to show the sent message list. Press key to select the focused message. Functions including, 1()Delete: delete the focused message. 2()Forward: Forward the focused message. 5.1.5. Group Setting You can store a group list for group sending. Step1 Press [Select] to enter the edit mode. Input the phone number or press key to select from Phonebook. Step2 Press [Save] to save and back to list screen. Press key to delete the focused list. 5.1.6. Memory Status Display SIM card and handset storage space. The display format is, saved records / total records available 5.1.7. Delete All Delete all records on SIM card and handset. After selecting this function, a dialog “Delete All?” shows. Press [OK] to delete all the messages, press [Back] to give up this operation. 5.1.8. Settings 1()Service Center: Edit or save the service center number. This number can be offered by network supplier. 2()Validity Period: If the recipient cannot be reached within the validity period, the message will be removed from the message center. Options includes [1 hour], [12 hours], [24 hours], and [1 week]. 3()Status Report: After sending messages, it will report whether it has been successful, Press [On] to open this function, [Off] to close this function. 5.1.9. Broadcast This service is used to receive information of weather report, traffic information, hospital, taxi information, etc. You can contact with network service to get more information. Please contact your service provider for more information.](https://usermanual.wiki/HON-HAI-PRECISION-IND/ABALONE200/User-Guide-425656-Page-15.png)
![16 1()Receiving Setting On:open the cell broadcast function Off:close the cell broadcast function 2()Read Broadcast:Check all the received cell broadcast message 3()Add Channel:Add a new cell broadcast channel 4()Channel List:List all the cell broadcast channel, press [Delete] to delete the focused channel Note: This service is not support for all networks. More information please contacts your service provider. 5.1.10. Voice Mail 1()Dial Voice Mail:Dial the voicemail number to get the message. 2()Set Voice Mail:set the voicemail number. 5.2. Phonebook In idle mode, press “menu” to enter main menu. Using explore key and hint to select “Phonebook”. You can also press key to enter Phonebook. The handset phonebook can store 200 names and phone numbers. 5.2.1. Search 1()By Name:search records by your entering name 2()By Position:search records by position. The position of handset records starts from 1 to 200. SIM card position starts from 201. 5.2.2. New Entry Using explore key and then press [Select] to enter New Entry. 1()Save To SIM:add a new entry on SIM card. 2()Save To Phone:add a new entry on handset. Step1 Press [Select] to enter edit mode. Key in the phone number and press [OK] to save record. Or press [Delete] to modify the entry. Step2 Key in the name and press [OK]. A confirm dialog shows if the record is successfully saved. 5.2.3. Copy All SIM To Phone:Copy all SIM card records to your phone. Phone To SIM:Copy all phone records to SIM card. 5.2.4. Delete All SIM Card:Delete all SIM card records. Phone:Delete all phone records.](https://usermanual.wiki/HON-HAI-PRECISION-IND/ABALONE200/User-Guide-425656-Page-16.png)
![17 5.2.5. Memory Status The using state will be shown in number: the used capacity/ total capacity. 5.2.6. My Number Select to set your own phone number. Select [Check] to view your phone number. Select [Add] to edit it. 5.3. Call Record This item can show the records of all the outgoing calls, missed calls and received calls. 5.3.1. Missed Calls This item shows the last recently 10 answered number. 1. You can press [up] or [down] key to browse. 2. Press [option] key ,then press [Select] key to activate this functions. function description Call Number Dial the missed call number. Store Number store the number in the SIM card or phone. Send Message send message to this number. Details show the number and the name (if stored before) also the time and the date of the call Delete delete the number from Missed Calls. Delete all delete all the number from Missed Calls. 5.3.2. Received Calls This item shows the last recently 10 received number. Functions are as [Missed Calls]. 5.3.3. Dialed Calls This item shows the last recently 10 dialed number. Functions are as [Missed Calls]. 5.3.4. Call Timers This function shows the duration of your incoming and outgoing calls. 1()Last Call:check the last call duration 2()All Incoming:check total duration of all incoming calls 3()All Outgoing:check total duration of all outgoing calls 5.3.5. Call Cost Show the total fee of all the calls. The network server will provide fee inquiry, and you can inquiry the fee of last call and all calls. 1()Last charge: enquire the fee of last call.](https://usermanual.wiki/HON-HAI-PRECISION-IND/ABALONE200/User-Guide-425656-Page-17.png)
![18 2()Total charges: total fee of all the calls. 3()Rate: look for or set a unit of time and currency. PIN2 is required. 4()Limit:inquiry or set the maximum fee. You should enter PIN2 number if you want use this function. View:check the cost limit. Change:change the cost limit and activate this function. PIN2 is required. Cancel:cancel this function. PIN2 is required. 5()Reset Charge: delete cost records, it require PIN2. Notice! Not all the SIM card has this function. 5.3.6. Clear Records 1()Missed Calls:Clear all missed call records. 2()Received Calls:Clear all received call records. 3()Dialed Calls:Clear all dialed call records. 4()Clear All:Clear all call records. 5.4. Network Service This option contains some Network Services. 5.4.1. Call Divert This option can divert the incoming calls to the target phone. It needs to set the number of the target phone in advance. 1()When No Service This option can set the diverting of no reaching. It can divert the incoming calls to the designated phone when the phone is powered off or not connecting to network. Press [Select] and select operations: Voice, Fax and Data. Each operation provides three functions: Check Status, Set Divert and Cancel Divert Please press [select] to activate it. Check Status:View the current settings status of the diverting. Set Divert:Set the diverting. Cancel Divert:Cancel the diverting. 2()When Busy This option can set the busy diverting. When the phone is in busy it can divert the incoming calls to the target phone. Its submenu is the same as When No Service. 3()When No Answer If this item is selected, the call will be diverted to the target phone when it is ignored. Its submenu is the same as When No Service. 4()All Calls Divert all incoming calls to the target phone. Its submenu is the same as When No Service.](https://usermanual.wiki/HON-HAI-PRECISION-IND/ABALONE200/User-Guide-425656-Page-18.png)
![19 5()Cancel All The diverting of all incoming calls is cancelled. 5.4.2. Call Barring Forbid the outgoing or incoming calls. Please input password before operating this function. (The password is provided by network supplier.) 1()Outgoing Calls:Restrict the outgoing callings. There are three function options. Press [Select] to activate. Check Status: View the current status of the restriction of the calls. Set Bar:Set the restriction of the calls. Cancel:Cancel the restriction of the calls. 2()Internat. Calls:Restrict the international callings. Its second rank menu is the same as Outgoing Calls. 3()Internat. But Home:Restrict the international callings except it those directed to the home PLMN country. Its submenu is the same as Outgoing Calls. 4()Incoming Calls:Restrict the incoming callings. Its submenu is the same as Outgoing Calls. 5()When Roaming:Restrict the roaming service. Its submenu is the same as Outgoing Calls. 6()Cancel All Barring:Cancel all of the restriction of incoming and outgoing calls. 7()Change Password:Change the restriction password. 5.4.3. Call Waiting Open or close the function of the incoming calls waiting. If it is active, you will be notified when the phone is busy but another new incoming call. If it is deactivated, you will not be notified. 1()Check Status:View the current status of this option. 2()Active:Activate this function. 3()Cancel: Disable this function. 5.4.4. Network Selection This option can select the method of searching network. There are two modes, Automatic and Manual. And the default is automatic. 1()Automatic: Select this item to search network automatically. 2()Manual: Select this item to choose the network manually. 5.4.5. Band Mode This option can select the band. There are five options: Automatic, 900&1800, 900, 1800, 1900. Usually select Automatic. 5.4.6. Hide Number Set this function to hide your phone number when calling. (Network support is required) 1()On:Activate this function and hide the your phone number. 2()Off:Turn off this function. Your phone number will be sent. 5.5. Accessories](https://usermanual.wiki/HON-HAI-PRECISION-IND/ABALONE200/User-Guide-425656-Page-19.png)
![20 Some applications are provided in this menu. 5.5.1. Game This phone offers you three games to play: Saving Egg, Helicopter, and Shrewmouse. Choose the desired game and then select [Help] to see how to play the game. 1()Game Options New Game: Start a new game. Continue: Resume a paused game. Help: Instruction of the game. 2()Tones On: Turn on game tones. Off: Turn off game tones. 5.5.2. Calculator Select this item to calculate. It includes plus, minus, multiply and divide. 5.5.3. Calendar This function helps you to edit and read the reminder. Use explore key to select date and then press [Select] to show the user saved reminder and options. 1()New:Add a new reminder on the selected date. 2()Delete All:Delete all reminders. 3()Saved Reminders:Read the selected reminder and do the edit or delete single record. 5.5.4. Alarm You can set three sets of alarms. Use explore up and down key to select the record and press [Select] to set the alarm. 1()Repeat:Press explore right to select the repeat period. Options includes Daily, Week Day, and Once. 2()Time:Press explore right to set alarm time. The time format is 24 hours. 3()Date:Set this item if you select Once. Press explore right to set the date and press [OK] after finished. 4()On/Off:Press explore right to turn on/off this alarm. Press [Save] after finishing the settings. Select [Cancel All Alarms] to clear all alarm settings. 5.5.5. SIM Toolkit (STK) Your SIM card may provide additional services that called SIM Toolkit (STK). This menu is only displayed if this is support by your SIM card. The name and the contents of this menu depend entirely on the service available. For more information please contact your service provider. 5.6. Phone Settings](https://usermanual.wiki/HON-HAI-PRECISION-IND/ABALONE200/User-Guide-425656-Page-20.png)
![21 This option is used to set your phone. 5.6.1. Language This option can select language. Press [Select] to activate. 5.6.2. Tones This phone provides 40 poly ring tone. It includes four options: Ring Tone, SMS Tone, Alarm Tone, and Keypad Tone. 1()Ring Tone:Set the ring tone and the volume of the incoming calls. Move the cursor by Up/Down-key and press [Select] to choose. 2()SMS Tone:Set the ring tone and the volume of the incoming SMS. 3()Alarm Tone:Set the ring tone and the volume of the alarm clock. 4()Keypad Tone:Set the tone of key press. The phone offers 2 sets normal keypad tone and 4 sets special ones. Use up and down key to select the preferred keypad tone. 5.6.3. Vibrating Select [On] to set the phone vibrating when incoming calls, receiving SMS or alarming. Select [Off] to turn off vibrating. Notice:Vibrating is independent with the silent. 5.6.4. Display function description (1) Wallpaper There are three display method, No Wallpaper, Slide Wallpaper, and Fixed Wallpaper. 1. No Wallpaper:wallpaper displayed as blank。 2. Slide Wallpaper:change wallpaper for every three seconds. Fixed Wallpaper:Select a wallpaper from the list. (2) Backlight Timer You can set backlight always on, off, or switch off after a period of inactivity (10, 20, 30, 60 seconds). (3) Backlight Level Use up and down key to adjust the backlight brightness. Press [Select] to confirm. (4) Battery Level Check the current battery capability. 5.6.5. Clock 1()Date Setting:Set the current date (dd/mm/yy, for example, 23/07/2003). 2()Time Setting:Set the current time (hh/min, for example, 08/58). 3()Time Format:Set the format of time. There are two choices: 24 hour and 12 hour. 12-Hours: for example, 1:00 PM (PM 1:00) 24-Hours: for example, 13:00 (PM 1:00). 5.6.6. Call Setting](https://usermanual.wiki/HON-HAI-PRECISION-IND/ABALONE200/User-Guide-425656-Page-21.png)
![22 1()Answering Mode:This function can set the answering method. Normal Answer:Press answer key to answer the incoming call. Anykey Answer:Press any key except end key to answer the incoming call. Flip Answer:Open the flip to answer the incoming call. 2()Auto Redial:If this function is activated, the phone will redial automatically after a delay when it can’t reach the target phone. 3()Incall Timer:Set whether you need to be noticed calling time during calling. 5.6.7. Security 1()Enable PIN Activate:Need to input the PIN while power on. Cancel:Select this item not to activate. 2()Change PIN: change PIN code. 3()Change PIN2:This function needs SIM card support. For more information please contact your service provider. (4)Handset Code:Phone data will be protected by handset code. The default handset code is “0000”. You can use this function to change it. (5)Fixed Dialing:When this function is activate, only the set numbers can be called out. Users can enter phonebook to edit the fixed dialing list. Select [Cancel] to close this function. This function needs SIM card support. PIN2 is required to change the setting. 5.6.8. Restore Factory Select this option to revert the initial status which manufacturer destined. Handset code is required.](https://usermanual.wiki/HON-HAI-PRECISION-IND/ABALONE200/User-Guide-425656-Page-22.png)