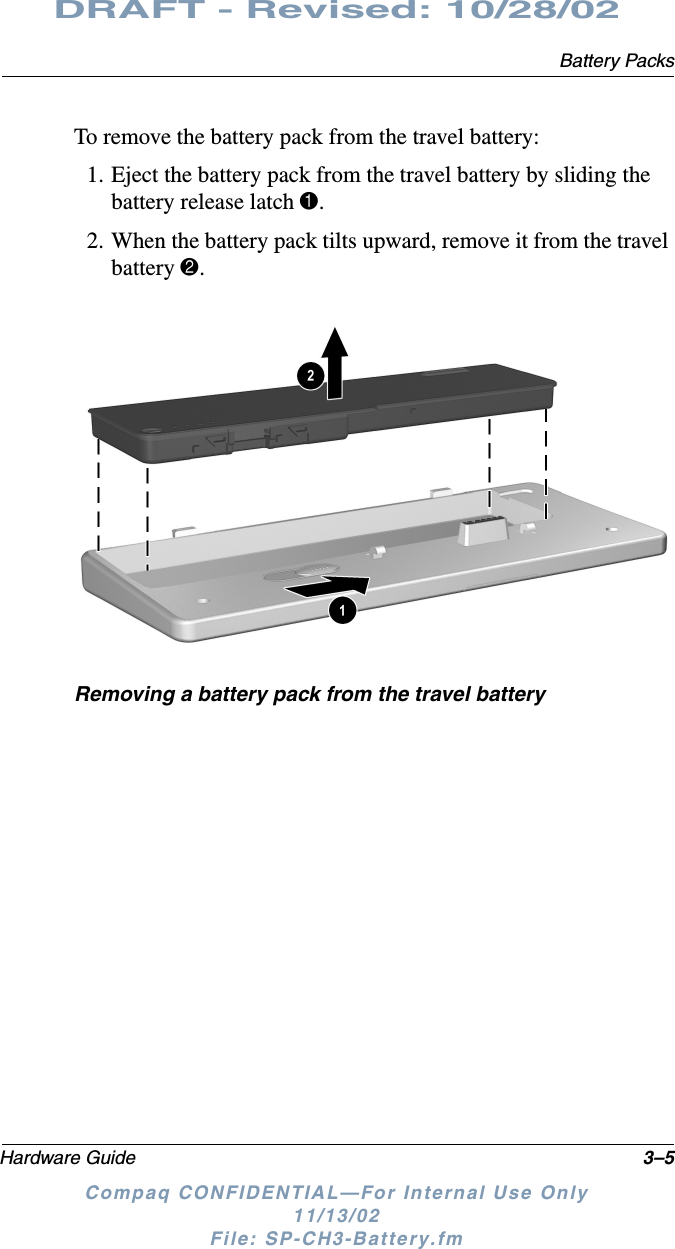
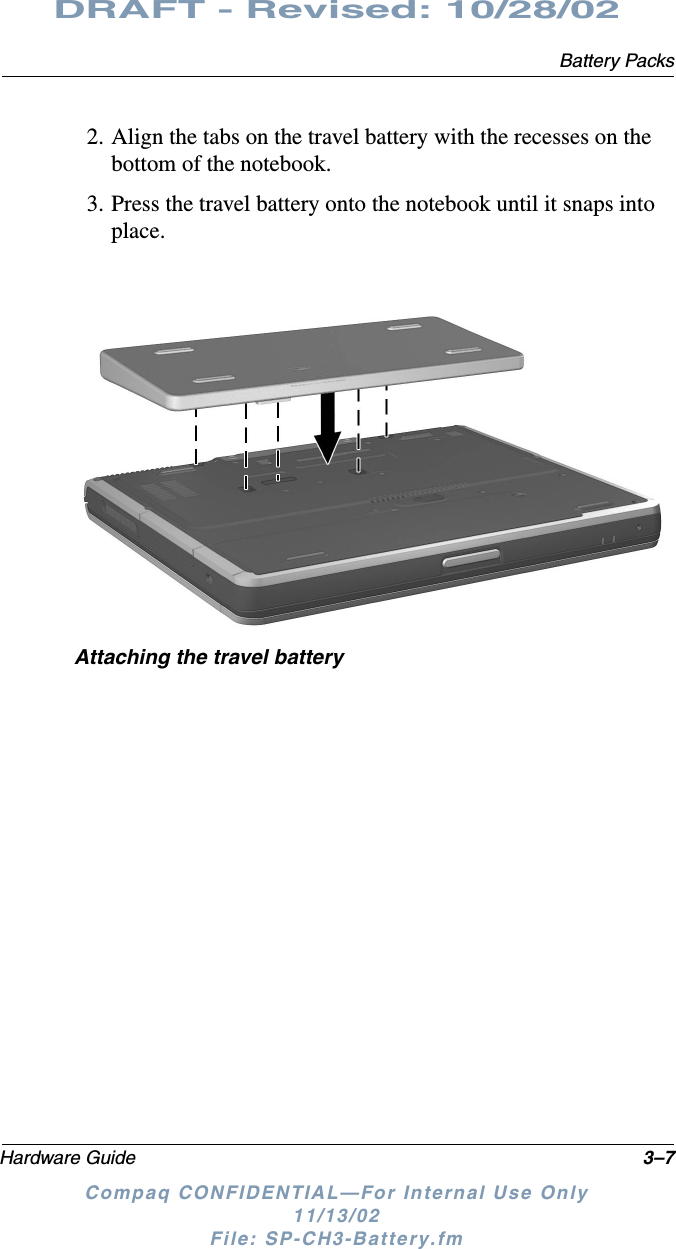
HON HAI PRECISION IND J07H06902 Notebook Computer With 802.11 b/g Module User Manual 309971 001

HON HAI Precision Ind. Co., Ltd. Notebook Computer With 802.11 b/g Module 309971 001

Contents

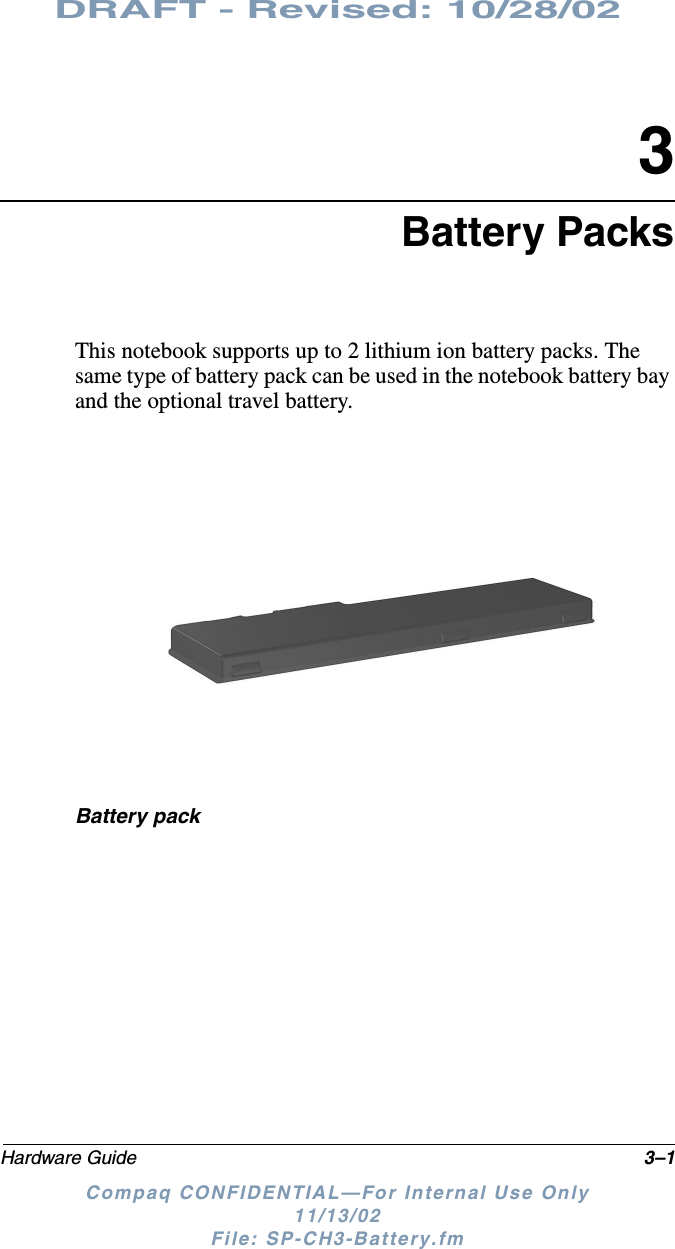
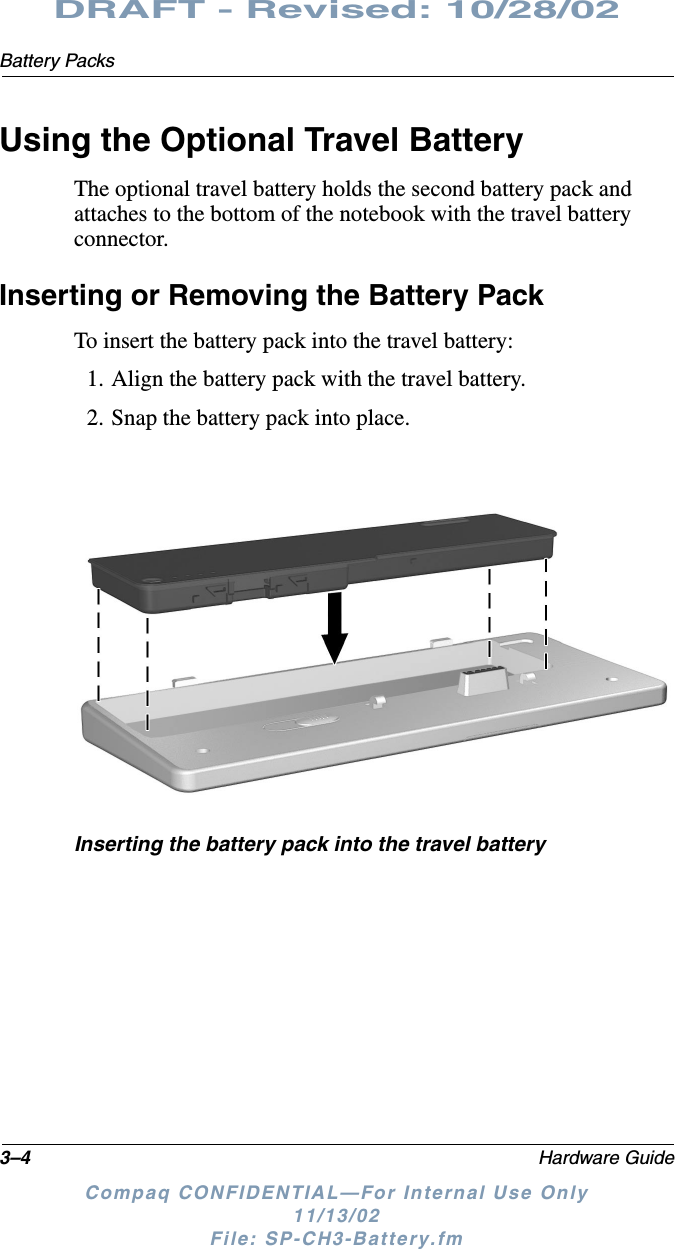
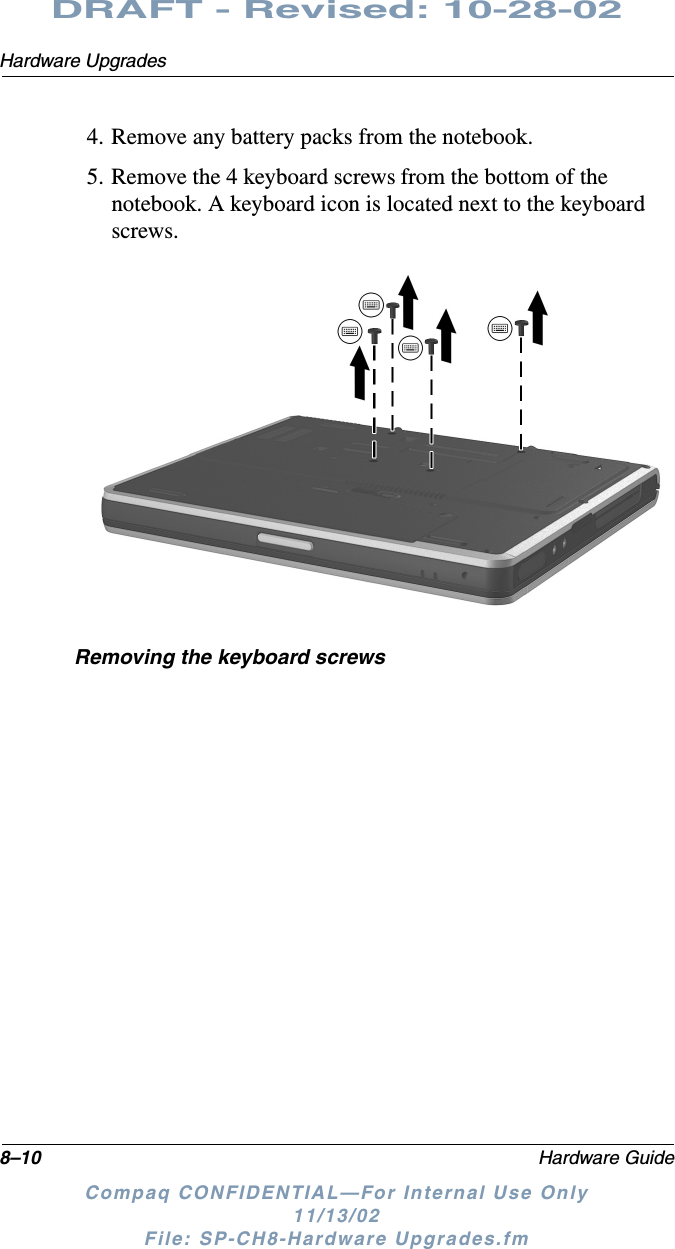
Notebook user manual

DRAFT - Revised: 11-17-02Compaq CONFIDENTIAL—For Internal Use Only11/12/02 File: Sapphire-Intro.fmbHardware GuideSapphireDocument Part Number: 309971-001April 2003[Abstract goes here, or delete this line.]
DRAFT - Revised: 11-17-02Compaq CONFIDENTIAL—For Internal Use Only11/12/02 File: Sapphire-Intro.fm© 2003 HPHP noticeHardware GuideFirst Edition February 2003Document Part Number: 309971-001
DRAFT - Revised: 10-28-02Hardware Guide iiiCompaq CONFIDENTIAL—For Internal Use Only11/13/02 File: 309971-001TOC.fmContents1 Notebook FeaturesContents of the Packing Box . . . . . . . . . . . . . . . . . . . . . .  1–1Notebook Features . . . . . . . . . . . . . . . . . . . . . . . . . . . . . .  1–2Pointing Device Components  . . . . . . . . . . . . . . . . . .  1–2Top Components . . . . . . . . . . . . . . . . . . . . . . . . . . . .  1–3Left Side Components . . . . . . . . . . . . . . . . . . . . . . . .  1–5Right Side Components. . . . . . . . . . . . . . . . . . . . . . .  1–6Front View Components . . . . . . . . . . . . . . . . . . . . . .  1–7Rear Panel Components. . . . . . . . . . . . . . . . . . . . . . .  1–8Bottom Components . . . . . . . . . . . . . . . . . . . . . . . . .  1–9Lights. . . . . . . . . . . . . . . . . . . . . . . . . . . . . . . . . . . .  1–102 Pointing Devices and KeyboardUsing a Pointing Device. . . . . . . . . . . . . . . . . . . . . . . . . .  2–1Using the Pointing Stick . . . . . . . . . . . . . . . . . . . . . .  2–2Using the TouchPad. . . . . . . . . . . . . . . . . . . . . . . . . .  2–3Using an External Mouse  . . . . . . . . . . . . . . . . . . . . .  2–3Setting Pointing Device Preferences . . . . . . . . . . . . .  2–4Using Hotkeys and Shortcut Keys . . . . . . . . . . . . . . . . . .  2–5Fn and Function Keys . . . . . . . . . . . . . . . . . . . . . . . .  2–5Hotkey and Shortcut Key Quick Reference  . . . . . . .  2–6Display Help (Fn+F1) . . . . . . . . . . . . . . . . . . . . . . . .  2–6Initiate Standby (Fn+F3) . . . . . . . . . . . . . . . . . . . . . .  2–7Switching Display and Image (Fn+F4) . . . . . . . . . . .  2–7Initiating Quick Controls (Fn+F6). . . . . . . . . . . . . . .  2–8Viewing Battery Charge Information (Fn+F8) . . . . .  2–8Adjusting the Screen Brightness (Fn+F9 and Fn+F10) . . . . . . . . . . . . . . . . . . . . . . . . . . . . . . . . . . .  2–8
iv Hardware GuideDRAFT - Revised: 10-28-02Compaq CONFIDENTIAL—For Internal Use Only11/13/02 File: 309971-001TOC.fmDisplaying System Information (Fn+Esc). . . . . . . . .  2–8Using Hotkeys and Shortcut Keys with External Keyboards . . . . . . . . . . . . . . . . . . . . . . . . . .  2–9Using Quick Launch Buttons. . . . . . . . . . . . . . . . . . . . .  2–10Keypads . . . . . . . . . . . . . . . . . . . . . . . . . . . . . . . . . . . . .  2–11Using the Internal Keypad. . . . . . . . . . . . . . . . . . . .  2–11Using an External Keypad. . . . . . . . . . . . . . . . . . . .  2–133 Battery PacksInserting or Removing the Primary Battery Pack  . . . . . .  3–2Using the Optional Travel Battery . . . . . . . . . . . . . . . . . .  3–4Inserting or Removing the Battery Pack . . . . . . . . . .  3–4Attaching or Detaching the Travel Battery and the Notebook . . . . . . . . . . . . . . . . . . . . . . . . . . . . . . .  3–6Charging a Battery Pack. . . . . . . . . . . . . . . . . . . . . . . . . .  3–9Monitoring the Charge of a Battery Pack  . . . . . . . . . . .  3–11Displaying Charge Information on the Screen  . . . .  3–12Displaying Charge Information on a Battery Pack. . . . . . . . . . . . . . . . . . . . . . . . . . . . . . .  3–13Managing Low-Battery Conditions . . . . . . . . . . . . . . . .  3–14Identifying Low-Battery Conditions . . . . . . . . . . . .  3–14Resolving Low-Battery Conditions. . . . . . . . . . . . .  3–15Calibrating a Battery Pack . . . . . . . . . . . . . . . . . . . . . . .  3–16When to Calibrate . . . . . . . . . . . . . . . . . . . . . . . . . .  3–16How to Calibrate . . . . . . . . . . . . . . . . . . . . . . . . . . .  3–17Conserving Battery Power . . . . . . . . . . . . . . . . . . . . . . .  3–19Conserving Power as You Work . . . . . . . . . . . . . . .  3–19Selecting Power Conservation Settings. . . . . . . . . .  3–20Storing a Battery Pack . . . . . . . . . . . . . . . . . . . . . . . . . .  3–21Disposing of a Used Battery Pack . . . . . . . . . . . . . . . . .  3–22Finding More Power Information  . . . . . . . . . . . . . . . . .  3–22
Hardware Guide vDRAFT - Revised: 10-28-02Compaq CONFIDENTIAL—For Internal Use Only11/13/02 File: 309971-001TOC.fm4 Hard DriveCaring for Drives . . . . . . . . . . . . . . . . . . . . . . . . . . . . . . .  4–1Hard Drive Activity Light . . . . . . . . . . . . . . . . . . . . . . . .  4–2Replacing the Primary Hard Drive. . . . . . . . . . . . . . . . . .  4–25 Audio and VideoUsing Audio Features. . . . . . . . . . . . . . . . . . . . . . . . . . . .  5–1Adjusting Volume . . . . . . . . . . . . . . . . . . . . . . . . . . .  5–2Using the Audio Line-In Jack . . . . . . . . . . . . . . . . . .  5–3Using the Audio Line-Out Jack. . . . . . . . . . . . . . . . .  5–3Using Video Features. . . . . . . . . . . . . . . . . . . . . . . . . . . .  5–3Connecting a Device to the S-Video-Out Jack . . . . .  5–4Changing the Video Mode. . . . . . . . . . . . . . . . . . . . .  5–56 Communication DevicesConnecting a Modem Cable. . . . . . . . . . . . . . . . . . . . . . .  6–1Using the RJ-11 Cable. . . . . . . . . . . . . . . . . . . . . . . .  6–3Using a Country-Specific Adapter Cable  . . . . . . . . .  6–4Connecting a Network Cable . . . . . . . . . . . . . . . . . . . . . .  6–5Linking to an Infrared Device . . . . . . . . . . . . . . . . . . . . .  6–6Setting Up an Infrared Transmission. . . . . . . . . . . . .  6–7Using Standby with Infrared . . . . . . . . . . . . . . . . . . .  6–8Using Wireless LAN . . . . . . . . . . . . . . . . . . . . . . . . . . . .  6–87 External DevicesConnecting a Monitor or Projector  . . . . . . . . . . . . . . . . .  7–1Using a USB Device  . . . . . . . . . . . . . . . . . . . . . . . . . . . .  7–2Using a USB Device . . . . . . . . . . . . . . . . . . . . . . . . .  7–3Enabling USB Legacy Support . . . . . . . . . . . . . . . . .  7–3Using an Optional External MultiBay . . . . . . . . . . . . . . .  7–4Connecting an Optional Cable Lock . . . . . . . . . . . . . . . .  7–5
vi Hardware GuideDRAFT - Revised: 10-28-02Compaq CONFIDENTIAL—For Internal Use Only11/13/02 File: 309971-001TOC.fm8 Hardware UpgradesUsing PC Cards . . . . . . . . . . . . . . . . . . . . . . . . . . . . . . . .  8–1Inserting a PC Card . . . . . . . . . . . . . . . . . . . . . . . . . .  8–2Removing a PC Card . . . . . . . . . . . . . . . . . . . . . . . . .  8–2Using SD Cards . . . . . . . . . . . . . . . . . . . . . . . . . . . . . . . .  8–4Inserting an SD Card . . . . . . . . . . . . . . . . . . . . . . . . .  8–4Removing an SD Card. . . . . . . . . . . . . . . . . . . . . . . .  8–5Adding and Upgrading Memory Boards . . . . . . . . . . . . .  8–6Adding a Memory Expansion Board. . . . . . . . . . . . .  8–6Upgrading the Memory Board in the Primary Memory Slot. . . . . . . . . . . . . . . . . . . . . . . . . . . . . . . . . . . . . . .  8–9Increasing RAM . . . . . . . . . . . . . . . . . . . . . . . . . . . . . . .  8–14A SpecificationsNotebook Dimensions . . . . . . . . . . . . . . . . . . . . . . . . . . .  9–1Operating Environment . . . . . . . . . . . . . . . . . . . . . . . . . .  9–1Rated Input Power . . . . . . . . . . . . . . . . . . . . . . . . . . . . . .  9–2Modem Specifications . . . . . . . . . . . . . . . . . . . . . . . . . . .  9–2B Regulatory NoticesRegulatory Notices. . . . . . . . . . . . . . . . . . . . . . . . . . . . .  10–1Wireless Notices. . . . . . . . . . . . . . . . . . . . . . . . . . . . . . .  10–1Electrostatic Discharge. . . . . . . . . . . . . . . . . . . . . . . . . .  10–2Index
DRAFT - Revised:10-28-02Hardware Guide 1–1Compaq CONFIDENTIAL—For Internal Use Only11/13/02 File: SP-CH1-Notebook Features.fm1Notebook FeaturesContents of the Packing BoxContents of the Packing BoxItem Component DescriptionThis is place-holder
1–2 Hardware GuideNotebook FeaturesDRAFT - Revised:10-28-02Compaq CONFIDENTIAL—For Internal Use Only11/13/02 File: SP-CH1-Notebook Features.fmNotebook FeaturesPointing Device ComponentsPointing Device ComponentsItem Component Description1Pointing stick Moves the pointer and selects or activates items on the screen.2Left and right TouchPad buttonsFunction like the left and right buttons on an external mouse.3TouchPad Moves the pointer and selects or activates items on the screen. Can be set to perform other mouse functions, such as scrolling, selecting, and double-clicking.4Left and right pointing stick buttonsFunction like the left and right buttons on an external mouse.
Notebook FeaturesHardware Guide 1–3DRAFT - Revised:10-28-02Compaq CONFIDENTIAL—For Internal Use Only11/13/02 File: SP-CH1-Notebook Features.fmTop ComponentsTop ComponentsItem Component Description1Quick Launch buttons (6) Enable you to access common functions with a single keystroke.2Power/standby button When the notebook is*:■Off, press and release to turn on the notebook.■On, press and release to initiate Standby.■In Standby, press and release to exit Standby.■In Hibernation, press and release to exit Hibernation.If the system has stopped responding and Windows shut down procedures cannot be used, press and hold for 5 seconds to turn off the notebook.
1–4 Hardware GuideNotebook FeaturesDRAFT - Revised:10-28-02Compaq CONFIDENTIAL—For Internal Use Only11/13/02 File: SP-CH1-Notebook Features.fm3Function keys Execute frequently used system functions when pressed in combination with the Fn key.4Applications key Displays shortcut menu for items beneath the pointer.5Display release latch recessSecures the display when it is closed.6Microsoft logo key Displays the Windows Start menu.7Fn key Executes frequently used system functions when pressed in combination with another key.Not shownPrimary memory compartment (not shown, located under the keyboard)Contains the primary memory slot.* This table describes default settings. For information about changing the functions of the power button and about using Standby and Hibernation, refer on this CD to the Software Guide, “Power” chapter.Top Components (Continued)Item Component Description
Notebook FeaturesHardware Guide 1–5DRAFT - Revised:10-28-02Compaq CONFIDENTIAL—For Internal Use Only11/13/02 File: SP-CH1-Notebook Features.fmLeft Side ComponentsLeft Side ComponentsItem Component Description1Infrared port Links another IrDA-compliant device for wireless communication.2PC Card eject button Ejects an optional PC Card from the PC Card slot.3PC Card slot Supports optional Type I or Type II 32-bit (CardBus) or 16-bit PC Cards.4Secure Digital (SD) slot Accepts SD memory cards to increase the memory capacity of the notebook.5Audio line-in jack Connects an optional single-sound channel microphone.6Audio line-out jack Connects optional, powered stereo speakers, headphones, headset, or television audio.7Speaker Produces stereo sound.
1–6 Hardware GuideNotebook FeaturesDRAFT - Revised:10-28-02Compaq CONFIDENTIAL—For Internal Use Only11/13/02 File: SP-CH1-Notebook Features.fmRight Side ComponentsRight Side ComponentsItem Component Description1Security cable slot Attaches an optional security cable to the notebook.2Hard drive bay Holds the primary hard drive.3Exhaust vent Enables airflow to cool internal components.ÄTo prevent overheating, do not obstruct vents. Using the notebook on a soft surface, such as a pillow, blanket, rug, or thick clothing may block airflow.
Notebook FeaturesHardware Guide 1–7DRAFT - Revised:10-28-02Compaq CONFIDENTIAL—For Internal Use Only11/13/02 File: SP-CH1-Notebook Features.fmFront View ComponentsFront View ComponentsItem Component Description1Antenna (2) Send and receive internal wireless Local Area Network (LAN) signals.2Microphone Inputs single-channel sound.3Display release latch Opens the notebook.
1–8 Hardware GuideNotebook FeaturesDRAFT - Revised:10-28-02Compaq CONFIDENTIAL—For Internal Use Only11/13/02 File: SP-CH1-Notebook Features.fmRear Panel ComponentsRear Panel ComponentsItem Component Description1S-video out jack Connects an optional S-video device, such as a television, VCR, camcorder, overhead projector, or video capture card.2External monitor connector Connects an optional external monitor or overhead projector.3USB connector Connects USB devices.4USB with power connector Connects powered USB devices.5DC power connector Connects an AC Adapter or an optional Automobile Power Adapter/Charger, Aircraft Power Adapter, or DC cable.6RJ-45 jack Connects a network cable.
Notebook FeaturesHardware Guide 1–9DRAFT - Revised:10-28-02Compaq CONFIDENTIAL—For Internal Use Only11/13/02 File: SP-CH1-Notebook Features.fmBottom Components7RJ-11 jack Connects a modem cable.8Rear panel connector cover Closes to cover the connectors. This cover can be removed by removing the screws that secure it to the notebook.Rear Panel Components (Continued)Item Component DescriptionBottom ComponentsItem Component Description1Travel battery connector Connects the optional travel battery bay. The travel battery connector has a plastic cover that must be opened before connecting the travel battery bay.2Docking connector Connects the notebook to an optional Port Replicator.
1–10 Hardware GuideNotebook FeaturesDRAFT - Revised:10-28-02Compaq CONFIDENTIAL—For Internal Use Only11/13/02 File: SP-CH1-Notebook Features.fmLights3Mini PCI compartment Contains the mini PCI wireless card.4Intake vents Enables airflow to cool internal components.ÄTo prevent overheating, do not obstruct vents. Using the notebook on a soft surface, such as a pillow, blanket, rug, or thick clothing may block airflow.5Battery release latch Releases the primary battery pack from the battery bay.6Battery bay Holds the primary battery pack.7Memory expansion compartmentContains 1 memory expansion slot for optional memory expansion boards.Bottom Components (Continued)Item Component Description
Notebook FeaturesHardware Guide 1–11DRAFT - Revised:10-28-02Compaq CONFIDENTIAL—For Internal Use Only11/13/02 File: SP-CH1-Notebook Features.fmLightsItem Component Description1Caps lock On: Caps lock is on.2Scroll lock On: Scroll lock is on.3Num lock On: Num lock is on or the embedded numeric keypad is enabled.4Hard drive activity On: The hard drive is being accessed. 5Power/standby On: Power is turned on. Blinking: Notebook is in Standby.✎The power/standby light also blinks when a battery pack, which is the only available power source, reaches a critical low-battery condition while Hibernation is disabled.6Battery On: A battery pack is charging.Blinking: A battery pack, which is the only available power source, has reached a low-battery condition.7Wireless on/off On: The notebook is connected to a wireless LAN.Blinking: Information is being transmitted.Off: The notebook is not connected to a wireless LAN.
DRAFT - Revised: 10-28-02Hardware Guide 2–1Compaq CONFIDENTIAL—For Internal Use Only11/13/02 File: SP-CH2-Keyboard.fm2Pointing Devices and KeyboardUsing a Pointing DeviceBy default, the pointing stick and TouchPad components can be used interchangeably.Pointing device components
2–2 Hardware GuidePointing Devices and KeyboardDRAFT - Revised: 10-28-02Compaq CONFIDENTIAL—For Internal Use Only11/13/02 File: SP-CH2-Keyboard.fmUsing the Pointing StickTo move the pointer, press the pointing stick in the direction you want to move the pointer. Use the left and right pointing stick buttons as you would the left and right buttons on an external mouse.To change the pointing stick cap:1. Turn off the notebook.2. Gently pull off the used pointing stick cap.3. Push a replacement cap, included with the notebook, into place.Pointing Device ComponentsItem Component Description1Pointing stick Moves the pointer and selects or activates items on the screen.2Left and right pointing stick buttonFunctions like the left and right buttons on an external mouse.3TouchPad Moves the pointer and selects or activates items on the screen. Can be set to perform other mouse functions, such as scrolling, selecting, and double-clicking.4Left and right TouchPad buttonsFunctions like the left and right buttons on an external mouse.
Pointing Devices and KeyboardHardware Guide 2–3DRAFT - Revised: 10-28-02Compaq CONFIDENTIAL—For Internal Use Only11/13/02 File: SP-CH2-Keyboard.fmReplacing the pointing stick capUsing the TouchPadTo move the pointer, slide your finger across the TouchPad surface in the direction you want to move the pointer. Use the left and right TouchPad buttons as you would the left and right buttons on an external mouse.Using an External MouseAn external USB mouse can be connected to the notebook using one of the USB connectors on the back panel. An external PS/2 or USB mouse can be connected to the system using the connectors on an optional Port Replicator.
2–4 Hardware GuidePointing Devices and KeyboardDRAFT - Revised: 10-28-02Compaq CONFIDENTIAL—For Internal Use Only11/13/02 File: SP-CH2-Keyboard.fmSetting Pointing Device PreferencesMouse Properties in Windows enables you to change custom settings for pointing devices, including:■Enabling or disabling a pointing device.■TouchPad tapping, which enables you to tap the TouchPad once to select an object or twice to double-click an object.■Edge motion, which enables you to continue to scroll even though your finger has reached the edge of the TouchPad.■Palm Check, which helps prevent moving the pointer unintentionally if your palms contact the TouchPad as you type.Other features, such as mouse speed preferences and mouse trails, are also found in the Mouse Properties windows.To access Mouse Properties:■In Windows 2000 Professional, select Start > Settings > control Panel > Mouse icon.■In Windows XP Professional, select Start > Control Panel > printers and Other Hardware > mouse icon.■In Windows XP Home, select Start > Control Panel > printers and Other Hardware > mouse icon.
Pointing Devices and KeyboardHardware Guide 2–5DRAFT - Revised: 10-28-02Compaq CONFIDENTIAL—For Internal Use Only11/13/02 File: SP-CH2-Keyboard.fmUsing Hotkeys and Shortcut KeysHotkeys and shortcut keys, which are preset combinations of the Fn key and another key, execute frequently used system functions.Fn and Function KeysFn and function keys■A hotkey is a combination of the Fn key and one of the function keys. The icons on the function keys represent the hotkey functions available on your notebook.■A shortcut key is a combination of the Fn key and a key other than a function key.Item Component1Fn key2Function keys
2–6 Hardware GuidePointing Devices and KeyboardDRAFT - Revised: 10-28-02Compaq CONFIDENTIAL—For Internal Use Only11/13/02 File: SP-CH2-Keyboard.fmHotkey and Shortcut Key Quick ReferenceDisplay Help (Fn+F1)The Fn+F1 hotkeys display help and support information. For more information on help and support, refer to the Worldwide Telephone Numbers booklet.FunctionKey Combination to Activate FunctionKey Combination to Deactivate FunctionDisplay help Fn+F1 Fn+F1Initiate Standby Fn+F3 Power/standby buttonSwitch display and imageFn+F4 Fn+F4Initiate Quick Controls Fn+F6 Enter Power-on passwordView battery charge informationFn+F8 Fn+F8Adjust the screen brightness to a lower levelFn+F9 N/AAdjust the screen brightness to a higher levelFn+F10 N/ADisplay system informationFn+esc Fn+esc
Pointing Devices and KeyboardHardware Guide 2–7DRAFT - Revised: 10-28-02Compaq CONFIDENTIAL—For Internal Use Only11/13/02 File: SP-CH2-Keyboard.fmInitiate Standby (Fn+F3)The Fn+F3 hotkeys are set at the factory to initiate Standby.■When the notebook is on, press the Fn+F3 hotkeys to initiate Standby. When Standby is initiated, your work is saved in random access memory (RAM), the screen is cleared, and power is conserved. While the notebook is in Standby, the power/standby light blinks.■To exit Standby, briefly press the power/standby button.The function of the Fn+F3 hotkeys, called the “sleep button” in Windows, can be changed. For example, the Fn+F3 hotkeys can be set to initiate Hibernation instead of Standby. For more information about Standby, Hibernation, and changing the function of the Fn+F3 hotkeys, refer on this CD to the Software Guide, “Power” section.Switching Display and Image (Fn+F4)The Fn+F4 hotkeys switch the image between the display and an external display device connected to the notebook. Pressing Fn+F4 switches the image among the notebook display, the external display device, and a simultaneous display on the notebook and the external device.The following video transmission types are supported by the Fn+F4 hotkeys:■LCD (notebook display)■External VGA (most external monitors and projectors)■S-video (televisions, camcorders, VCRs, and video capture cards with S-video-in jacks)
2–8 Hardware GuidePointing Devices and KeyboardDRAFT - Revised: 10-28-02Compaq CONFIDENTIAL—For Internal Use Only11/13/02 File: SP-CH2-Keyboard.fmInitiating Quick Controls (Fn+F6)Quick Control security features disable the keyboard and pointing device and clear the display. Before you can use the Quick Controls, you must set a power-on password and select Quick Control preferences. For more information, refer on this CD to the Software Guide, “Security” chapter.To initiate Quick Controls manually, press Fn+F6. To exit Quick Controls, enter your Windows password.Viewing Battery Charge Information (Fn+F8)Press Fn+F8 to display charge information for all installed battery packs. The display indicates which battery packs are charging and reports the amount of charge remaining in each battery pack. Battery pack locations are indicated by number:■Location 1 is the primary battery pack.■Location 2 is the travel battery pack.Adjusting the Screen Brightness (Fn+F9 and Fn+F10)Pressing the Fn+F9 and the Fn+F10 hotkeys respectively increases and decreases the display brightness among several levels of brightness. Press Fn+F9 to lower the brightness level, and press Fn+F10 to increase the brightness level. Holding down the hotkeys changes the brightness level incrementally.Displaying System Information (Fn+Esc)Press Fn+esc to display information about system hardware components and software version numbers. Press Fn+esc a second time to remove the system information from the screen.
Pointing Devices and KeyboardHardware Guide 2–9DRAFT - Revised: 10-28-02Compaq CONFIDENTIAL—For Internal Use Only11/13/02 File: SP-CH2-Keyboard.fm✎The system BIOS date is the version number of the system ROM. The BIOS date may display in a decimal format, for example, 10/19/2002 A.07.Using Hotkeys and Shortcut Keys with External KeyboardsThe following hotkeys and shortcut keys can be used as described with external keyboards:■Fn+esc■Fn+F8■Fn+F6To use hotkeys or shortcut keys on an external keyboard, press the scroll lock key twice, then the other key of the hotkey combination. For example, to use the Fn+F8 hotkeys, press scroll lock+scroll lock+F8. Hotkeys and shortcut keys may not function on an external keyboard connected through a USB connector if Quick Launch Buttons software is not loaded. You can download the appropriate software and drivers for your system at www.hp.com. For more information on software updates, refer on this CD to the Software Guide, “Software Updates and Restorations” chapter. For more information about Quick Launch buttons, refer to “Using Quick Launch Buttons” later in this chapter.
2–10 Hardware GuidePointing Devices and KeyboardDRAFT - Revised: 10-28-02Compaq CONFIDENTIAL—For Internal Use Only11/13/02 File: SP-CH2-Keyboard.fmUsing Quick Launch ButtonsThe 6 Quick Launch buttons enable you to access common functions with a single keystroke.Quick Launch buttonsItem Component Description1Wireless On/Off button Turns the wireless Local Area Network (LAN) on and off.2Presentation Mode buttonSets the notebook to presentation mode, which opens a user-defined application, folder, file, or Web site. The image simultaneously displays on the notebook screen and an external device connected to they external monitor connector or S-video-out jack on the rear panel or to connectors on an optional Port Replicator.3Internet button Launches Internet Explorer.
Pointing Devices and KeyboardHardware Guide 2–11DRAFT - Revised: 10-28-02Compaq CONFIDENTIAL—For Internal Use Only11/13/02 File: SP-CH2-Keyboard.fmKeypadsThe notebook has an internal numeric keypad and supports an optional external numeric keypad or an optional external keyboard that includes a numeric keypad.Using the Internal KeypadThe 15 keys of the embedded numeric keypad can be used like the keys on an external keypad. When the internal keypad is turned on, each key on the internal keypad performs the functions indicated by the icon in the upper right corner of the key.4Mute button Mutes and restores the system volume.5Volume - button Decreases the system volume level. To mute or restore volume, press both volume buttons at the same time.6Volume + button Increases the system volume level. To mute or restore volume, press both volume buttons at the same time.Item Component Description
2–12 Hardware GuidePointing Devices and KeyboardDRAFT - Revised: 10-28-02Compaq CONFIDENTIAL—For Internal Use Only11/13/02 File: SP-CH2-Keyboard.fmEmbedded numeric keypad componentsEnabling and Disabling the Internal KeypadPress Fn+num lk to enable the embedded numeric keypad. The num lock light turns on. Press Fn+num lk again to return the keys to their standard keyboard functions.✎The numeric keypad cannot be enabled while an optional external keypad is connected an optional Port Replicator or if an optional external keyboard is attached to the notebook or an optional Port Replicator.Item Component1num lock light2num lock key3Numeric keypad keys4Fn key
Pointing Devices and KeyboardHardware Guide 2–13DRAFT - Revised: 10-28-02Compaq CONFIDENTIAL—For Internal Use Only11/13/02 File: SP-CH2-Keyboard.fmSwitching Key Functions on the Internal KeypadYou can temporarily switch the functions of keys on the internal keypad between their standard keyboard functions and their keypad functions by using the Fn key or the Fn+shift key combination.■To change the functions of a keypad key to keypad functions while the keypad is off, press and hold the Fn key while pressing the keypad key.■To use the keypad keys temporarily as standard keys while the keypad is on:❏Press and hold the Fn key to type in lowercase.❏Press and hold Fn+shift to type in uppercase.Using an External KeypadMost keys on most external keypads function differently when num lock mode is on than when num lock mode is off. For example:■When num lock mode is on, most keypad keys type numbers.■When num lock mode is off, most keypad keys function like arrow, page up, or page down keys.When num lock mode on an external keypad is turned on, the num lock light on the notebook turns on. When the num lock mode on external keypad is turned off, the num lock light on the notebook turns off.If the external keypad is connected, the internal keypad cannot be turned on. Enabling or Disabling Num Lock Mode as You WorkTo turn num lock on or off on an external keypad as you work, press the num lk key on the external keypad, not on the notebook.
2–14 Hardware GuidePointing Devices and KeyboardDRAFT - Revised: 10-28-02Compaq CONFIDENTIAL—For Internal Use Only11/13/02 File: SP-CH2-Keyboard.fmEnabling or Disabling the Numeric Keypad at StartupTo set the notebook to startup with a connected external keypad in num lock mode, set your preference in Computer Setup. For more information about using Computer Setup, refer on this CD to the Software Guide, “Setup and Diagnostic Utilities” section.To set the notebook to start up with the external keypad enabled:1. Turn on or restart the notebook.2. Press F10 while the F10 = ROM Based Setup message is displayed in the lower left corner of the screen.❏To change the language, press F2.❏For navigation instructions, press F1.3. Select Advanced > Device Options, then press enter.4. Select or clear the Num Lock State at Boot field:❏To start up an external keypad with num lock mode turned on, select the field.❏To start up an external keypad with num lock mode turned off, clear the field.5. Press F10.6. To save your preference and exit Computer Setup, select File > Save Changes and Exit, then follow the instructions on the screen.Your preference is set as you exit Computer Setup and is in effect when the notebook restarts.
DRAFT - Revised: 10/28/02Hardware Guide 3–1Compaq CONFIDENTIAL—For Internal Use Only11/13/02 File: SP-CH3-Battery.fm3Battery PacksThis notebook supports up to 2 lithium ion battery packs. The same type of battery pack can be used in the notebook battery bay and the optional travel battery.Battery pack
3–2 Hardware GuideBattery PacksDRAFT - Revised: 10/28/02Compaq CONFIDENTIAL—For Internal Use Only11/13/02 File: SP-CH3-Battery.fmInserting or Removing the Primary Battery PackThe notebook battery bay holds the primary battery pack.ÄCAUTION: To prevent the loss of information when removing a battery pack, when it is the only power source available to the system, initiate Hibernation or shut down the notebook before removing the battery pack.To insert the primary battery pack:1. Align the battery pack with the notebook battery bay.2. Snap the battery pack into place.Inserting the primary battery pack3. Turn the notebook over and open the display. If the notebook is in Hibernation, press the power/standby button to resume operation.
Battery PacksHardware Guide 3–3DRAFT - Revised: 10/28/02Compaq CONFIDENTIAL—For Internal Use Only11/13/02 File: SP-CH3-Battery.fmTo remove the primary battery pack:1. Close the display and turn the notebook bottom-side up.2. Slide the battery release latch 1.3. After the battery pack tilts upward, remove it from the battery bay 2.Removing the primary battery pack
3–4 Hardware GuideBattery PacksDRAFT - Revised: 10/28/02Compaq CONFIDENTIAL—For Internal Use Only11/13/02 File: SP-CH3-Battery.fmUsing the Optional Travel BatteryThe optional travel battery holds the second battery pack and attaches to the bottom of the notebook with the travel battery connector.Inserting or Removing the Battery Pack To insert the battery pack into the travel battery:1. Align the battery pack with the travel battery.2. Snap the battery pack into place.Inserting the battery pack into the travel battery
Battery PacksHardware Guide 3–5DRAFT - Revised: 10/28/02Compaq CONFIDENTIAL—For Internal Use Only11/13/02 File: SP-CH3-Battery.fmTo remove the battery pack from the travel battery:1. Eject the battery pack from the travel battery by sliding the battery release latch 1.2. When the battery pack tilts upward, remove it from the travel battery 2.Removing a battery pack from the travel battery
3–6 Hardware GuideBattery PacksDRAFT - Revised: 10/28/02Compaq CONFIDENTIAL—For Internal Use Only11/13/02 File: SP-CH3-Battery.fmAttaching or Detaching the Travel Battery and the NotebookTo attach the optional travel battery:1. Open the travel battery connector on the bottom of the notebook by sliding the cover.Opening the travel battery connector
Battery PacksHardware Guide 3–7DRAFT - Revised: 10/28/02Compaq CONFIDENTIAL—For Internal Use Only11/13/02 File: SP-CH3-Battery.fm2. Align the tabs on the travel battery with the recesses on the bottom of the notebook.3. Press the travel battery onto the notebook until it snaps into place.Attaching the travel battery
3–8 Hardware GuideBattery PacksDRAFT - Revised: 10/28/02Compaq CONFIDENTIAL—For Internal Use Only11/13/02 File: SP-CH3-Battery.fm4. Lock the travel battery onto the notebook by sliding the locking switch.Locking the travel battery onto the notebook
Battery PacksHardware Guide 3–9DRAFT - Revised: 10/28/02Compaq CONFIDENTIAL—For Internal Use Only11/13/02 File: SP-CH3-Battery.fmTo detach the travel battery from the notebook:1. Unlock the travel battery from the notebook by sliding the locking switch 1.2. Press the release latch 2.3. Lift the travel battery up and away from the notebook 3.Detaching the travel battery from the notebookCharging a Battery PackMultiple battery packs in the system charge and discharge in a preset sequence determined by location:■Charge sequence:1. Notebook battery bay2. Travel battery■Discharge sequence:1. Travel battery2. Notebook battery bay
3–10 Hardware GuideBattery PacksDRAFT - Revised: 10/28/02Compaq CONFIDENTIAL—For Internal Use Only11/13/02 File: SP-CH3-Battery.fmThe primary battery pack charges when it is inserted into the notebook and the notebook is connected to external power. External power can be supplied through an AC Adapter, the optional Advanced Port Replicator, or an optional Automobile Power Adapter/Charger. The battery pack in the travel battery charges when it is attached to the notebook and the notebook is connected to external power. External power can be supplied through an AC Adapter or an optional Automobile Power Adapter/Charger. Because the travel battery covers the docking connector, the travel battery can not be used or charged with the advanced port replicator.Battery packs can also be charged in the optional Universal Charger. The optional Aircraft Power Adapter can be used to run the notebook, but cannot be used to charge a battery pack. While the battery pack is charging, the battery light on the notebook is on. The light turns off when the battery pack is fully charged.Battery light
Battery PacksHardware Guide 3–11DRAFT - Revised: 10/28/02Compaq CONFIDENTIAL—For Internal Use Only11/13/02 File: SP-CH3-Battery.fmTo charge the primary battery pack:1. Insert the battery pack into the notebook.2. Connect the notebook to AC power. (The battery light turns on.)3. Leave the notebook connected to AC power until the battery light turns off, signaling that the battery pack is fully charged.To charge the battery pack in the travel battery:1. Insert the battery pack into the travel battery.2. Attach the travel battery to the notebook.3. Connect the notebook to AC power. (The battery light turns on.)4. Leave the notebook connected to AC power until the battery light turns off, signaling that the battery pack is fully charged.Monitoring the Charge of a Battery PackTo increase the accuracy of all battery charge displays:■Allow a battery pack to discharge to less than 10 percent of a full charge through normal use before charging it.■When you charge a battery pack, charge it fully.■If a battery pack has not been used for one month or more, calibrate the battery pack instead of simply charging it. For calibration instructions, refer to “Calibrating a Battery Pack” later in this chapter.
3–12 Hardware GuideBattery PacksDRAFT - Revised: 10/28/02Compaq CONFIDENTIAL—For Internal Use Only11/13/02 File: SP-CH3-Battery.fmDisplaying Charge Information on the ScreenTo display battery charge information on the screen, use the Power meter feature of the operating system: ■Select Start > Control Panel > Performance and Maintenance icon > Power Options icon > Power Meter tab.or■Select the Power meter icon in the system tray.To display the Power meter icon in the system tray:1. Select Start > Control Panel > Performance and Maintenance icon > Power Options icon > Advanced tab.2. Select the Always Show Icon On The Taskbar check box.3. Select the OK button.Most charge displays report battery status in both percent and time:■The percent indicates the amount of charge remaining in the battery pack.■The time indicates the approximate running time remaining on the battery pack if the battery pack continues to provide power at the current level. For example, the time remaining will decrease if you start playing a DVD and will increase if you stop playing a DVD.Most charge displays identify battery packs by location:■Location 1 is the notebook battery bay.■Location 2 is the travel battery.In some displays, a lightening bolt icon may be displayed beside a battery pack location. This icon indicates that the battery pack is being charged.
Battery PacksHardware Guide 3–13DRAFT - Revised: 10/28/02Compaq CONFIDENTIAL—For Internal Use Only11/13/02 File: SP-CH3-Battery.fmDisplaying Charge Information on a Battery PackThe battery Quick Check feature enables you to check the battery pack charge information. You do not have to remove a battery pack from the notebook battery bay or the travel battery to check the charge information; however, you must detach the travel battery from the notebook to check the charge of the travel bay battery pack.To display the percentage of a full charge remaining on a battery pack, press the Quick Check button 1 on the battery pack. The Quick Check lights 2 on the battery pack indicate the charge remaining, as shown in the table below.Battery pack Quick Check button and lights
3–14 Hardware GuideBattery PacksDRAFT - Revised: 10/28/02Compaq CONFIDENTIAL—For Internal Use Only11/13/02 File: SP-CH3-Battery.fmManaging Low-Battery ConditionsSome low-battery condition alerts and system responses can be changed in the Power Options Properties window of the operating system. The information in this chapter describes the alerts and system responses set at the factory. For information about setting preferences in the Power Options Properties window, refer on this CD to the Software Guide, “Power” chapter, “Setting Power Preferences” section.Identifying Low-Battery ConditionsThe notebook has alerts for 2 types of low-battery conditions: a low-battery condition and a critical low-battery condition.Low-Battery ConditionWhen a battery pack that is the only power source available reaches a low-battery condition (10 percent of a full charge), the battery light flashes.Critical Low-Battery ConditionIf a low-battery condition is not resolved, the notebook enters a critical low-battery condition (one percent of a full charge). In a critical low-battery condition:Battery Pack Quick Check IndicationsIndication Percent of a Full Charge Remaining4 lights on 76 to 100%3 lights on 51 to75%2 lights on 26 to 50%1 light on 11 to 25%1 light blinking 1 to 10%
Battery PacksHardware Guide 3–15DRAFT - Revised: 10/28/02Compaq CONFIDENTIAL—For Internal Use Only11/13/02 File: SP-CH3-Battery.fm■If Hibernation is enabled and the notebook is on or in Standby, the notebook initiates Hibernation.■If Hibernation is disabled and the notebook is on or in Standby, the notebook remains in Standby until there is no power, then shuts down and loses your unsaved work.For more information about Hibernation and Standby, refer on this CD to the Software Guide, “Power” chapter.Resolving Low-Battery ConditionsÄCAUTION: If the notebook has reached a critical low-battery condition and has initiated Hibernation, do not press the power/standby button until Hibernation is complete. Hibernation is complete when the power/standby light turns off.When a Charged Battery Pack is AvailableTurn off the notebook or initiate Hibernation, insert a charged battery pack, then turn on the notebook.When External Power Is AvailableSelect one of the following options:■Connect the AC Adapter.■Plug an optional Automobile Power Adapter/Charger into the notebook and into a vehicle cigarette lighter receptacle.
3–16 Hardware GuideBattery PacksDRAFT - Revised: 10/28/02Compaq CONFIDENTIAL—For Internal Use Only11/13/02 File: SP-CH3-Battery.fm■Plug an optional Aircraft Power Adapter into the notebook and into the in-seat power supply available on some commercial aircraft. (The optional Aircraft Power Adapter can run the notebook but cannot charge a battery pack.)■Dock the notebook in an optional Port Replicator.When No Power Source Is AvailableSelect one of the following options:■Initiate Hibernation.■Save your work and shut down the notebook.When the Notebook Cannot Exit HibernationIf the notebook lacks the power to exit Hibernation:1. Insert a charged battery pack or connect external power.2. Exit Hibernation by briefly pressing the power/standby button.Calibrating a Battery PackTo manually calibrate a battery pack, follow the instructions in the following sections. To initiate an unattended calibration in an optional Universal Charger, follow the instructions included with the device.When to CalibrateCalibrate an in-use battery pack whenever battery status displays seem inaccurate or whenever the battery pack has not been used for one month or more. It should not be necessary to calibrate any battery pack, even if it is heavily used, more than once a month. It is not necessary to calibrate a new battery pack before first use.
Battery PacksHardware Guide 3–17DRAFT - Revised: 10/28/02Compaq CONFIDENTIAL—For Internal Use Only11/13/02 File: SP-CH3-Battery.fmHow to CalibrateCalibration requires 3 steps:1. Fully charge the battery pack.2. Fully discharge the battery pack.3. Fully recharge the battery pack.Charging the Battery PackYou can charge the battery pack while the notebook is on or off, but the battery pack charges faster while the notebook is off.Fully charge the battery pack according to the “Charging a Battery Pack” section earlier in this chapter. Be sure the battery light turns off, signaling that the battery is fully charged.Discharging the Battery PackThe notebook must remain on while the battery pack is being discharged. The battery pack discharges whether you are using the notebook, but discharges faster while the notebook is in use.If you plan to leave the notebook unattended during the discharge, save your work before beginning the discharge procedure. If you use the notebook occasionally during the discharge procedure and have set energy-saving timeouts, expect the following performance from your system during the discharge process:■The monitor will not turn off automatically.■Hard drive speed will not decrease automatically while the notebook is idle.■System-initiated Standby will not occur.■System-initiated Hibernation will not occur until the battery has discharged to a critical low-battery condition.
3–18 Hardware GuideBattery PacksDRAFT - Revised: 10/28/02Compaq CONFIDENTIAL—For Internal Use Only11/13/02 File: SP-CH3-Battery.fmTo fully discharge a battery pack:1. When the battery light turns off indicating that the battery pack is fully charged, select Start > Control Panel > Performance and Maintenance icon > power Options icon > Power Schemes tab.2. Make a note of the 2 settings in the Plugged In column and the 2 settings in the Running On Batteries column so that you can reset them after the calibration.3. Change the settings in both columns to Never.4. Select the OK button.5. Disconnect the notebook from AC power, but do not turn off the notebook.6. Run the notebook on battery power until the battery pack is fully discharged. (The battery light begins to flash when the battery pack has discharged to a low-battery condition. When the battery pack is fully discharged, the notebook initiates Hibernation and the power/standby light turns off.)Recharging the Battery Pack1. Connect the notebook to external AC power, then leave the notebook connected to external power until the battery pack is fully recharged. (The battery light turns off).You can use the notebook while the battery pack is recharging, but the battery pack charges faster if the notebook is off.2. If the notebook is off, turn it on when the battery pack is fully charged and the battery light turns off.3. Select Start > control Panel > performance and Maintenance icon > Power Options icon > Power Schemes tab.
Battery PacksHardware Guide 3–19DRAFT - Revised: 10/28/02Compaq CONFIDENTIAL—For Internal Use Only11/13/02 File: SP-CH3-Battery.fm4. Referring to the settings you made note of earlier, change the settings for the 2 options in the Plugged In column and the 2 options in the Running On Batteries column.5. Select the OK button.Conserving Battery PowerUsing the battery conservation procedures and settings described below extends the time that a battery pack can run the notebook from a single charge.Conserving Power as You WorkTo conserve power as you use the notebook:■Turn off wireless and local area network (LAN) connections and exit modem applications when you are not using them.■Disconnect external devices you are not using that are not connected to an external power source.■Stop or remove a PC Card or SD card that you are not using.■Use the Fn+F9 and Fn+F10 hotkeys to quickly lower and raise screen brightness as you need it.■Use optional powered speakers instead of the internal speakers, or use the volume buttons to quickly raise and lower system volume as needed.■Turn off a device connected to the S-video connector by using the Fn+F4 hotkeys or by turning off support for the device in Windows.■Run the notebook on external power while formatting a diskette.■If you leave your work, initiate Standby or Hibernation or shut down the notebook.
3–20 Hardware GuideBattery PacksDRAFT - Revised: 10/28/02Compaq CONFIDENTIAL—For Internal Use Only11/13/02 File: SP-CH3-Battery.fmSelecting Power Conservation SettingsTo set the notebook to conserve power:■Select a short wait for the screen saver and select a screen saver with minimal graphics and motion. To access screen saver settings by selecting Start > Control Panel > Appearance and Themes > Display icon > Screen Saver tab.■Follow the instructions on this CD in the Software Guide, “Power” section, to:❏In the operating system, select a Power Scheme with low power-use settings.❏In SpeedStep, select the Battery Optimized mode or Maximum Battery Mode (Windows XP Professional only).
Battery PacksHardware Guide 3–21DRAFT - Revised: 10/28/02Compaq CONFIDENTIAL—For Internal Use Only11/13/02 File: SP-CH3-Battery.fmStoring a Battery PackIf a notebook will be unused and unplugged for more than 2 weeks, remove and store the battery pack.ÄCAUTION: To prevent damage to a battery pack, do not expose it to high temperatures for an extended time.High temperatures accelerate the self-discharge rate of a stored battery pack. To prolong the charge of a stored battery pack, store it in a cool, dry place within the following temperature ranges.Battery Storage Temperature RangesStorage Time Temperature Range °F Temperature Range °CLess than 1 month32°–122° 0°–50°No more than 3 months32°–104° 0°–40°Unlimited 32°–86° 0°–30°
3–22 Hardware GuideBattery PacksDRAFT - Revised: 10/28/02Compaq CONFIDENTIAL—For Internal Use Only11/13/02 File: SP-CH3-Battery.fmDisposing of a Used Battery PackÅWARNING: There is a risk of fire and chemical burn if a battery pack is handled improperly. Do not disassemble, crush, or puncture a battery pack or short the contacts on a battery pack. Do not expose a battery pack to temperatures higher than 60°C (140°F) or dispose of a battery pack in water or fire.When a battery pack has reached the end of its useful life, do not dispose of it in general household waste. For more information about battery pack precautions and disposal and the complete text of governmental agency notices, refer on this CD to the Regulatory and Safety Notices guide.Finding More Power InformationFor more information about using Standby and Hibernation, conserving power, setting power preferences, and using other power management features, refer on this CD to the Software Guide, “Power” chapter.
DRAFT - Revised: 10-28-02Hardware Guide 4–1Compaq CONFIDENTIAL—For Internal Use Only11/13/02 File: SP-CH4-Hard Drives.fm4Hard DriveCaring for DrivesHard drives are fragile notebook components that must be handled with care. Please read carefully the general caution notices provided below. Caution notices specific to individual procedures are provided throughout this chapter with the procedures to which they apply.ÄCAUTION: To prevent loss of work or damage to the notebook or a drive:■Handle the drive carefully. ■Do not drop the drive.■Excessive force can damage drive connectors. When you insert the drive, use only enough pressure to seat the drive.■Do not spray the drive with a cleaner or other liquid or expose it to extreme temperatures.■Do not remove the primary hard drive (the hard drive in the hard drive bay) except for repair or replacement.■Avoid exposing a hard drive to devices with a magnetic field, such as airport walk-through metal detectors and security wands.■If you mail the drive, ship it in packaging that protects it from shock, vibration, temperature, and humidity. Label the package “FRAGILE.”ÄCAUTION: Prevent electrostatic damage to the notebook or a drive:■Discharge yourself from static electricity before handling a drive by touching a grounded metal object.■Avoid touching the connectors on a drive. For more information about preventing electrostatic damage, refer on this CD to the Regulatory and Safety Notices.
4–2 Hardware GuideHard DriveDRAFT - Revised: 10-28-02Compaq CONFIDENTIAL—For Internal Use Only11/13/02 File: SP-CH4-Hard Drives.fm✎Airport security devices that check carry-on luggage placed on a conveyor belt use X-rays instead of magnetism and do not damage hard drives.Hard Drive Activity LightThe hard drive activity light turns on when the hard drive is being accessed.Hard drive activity lightReplacing the Primary Hard DriveThe hard drive in the hard drive bay is the primary hard drive.ÄCAUTION: To prevent system lockup and loss of information:■Shut down the notebook before removing the hard drive from the hard drive bay. Do not remove the hard drive while the notebook is on, in Standby, or Hibernation.■If you are not sure whether the notebook is in Hibernation, turn on the notebook and then shut it down.
Hard DriveHardware Guide 4–3DRAFT - Revised: 10-28-02Compaq CONFIDENTIAL—For Internal Use Only11/13/02 File: SP-CH4-Hard Drives.fmTo replace the primary hard drive:1. Save your work.2. Shut down the notebook and close the display.3. Turn the notebook bottom-side up.4. Remove the hard drive retaining screw.Removing the hard drive retaining screw
4–4 Hardware GuideHard DriveDRAFT - Revised: 10-28-02Compaq CONFIDENTIAL—For Internal Use Only11/13/02 File: SP-CH4-Hard Drives.fm5. Remove the hard drive bezel.Removing the hard drive bezel
Hard DriveHardware Guide 4–5DRAFT - Revised: 10-28-02Compaq CONFIDENTIAL—For Internal Use Only11/13/02 File: SP-CH4-Hard Drives.fm6. Pull the drive out of the bay.Removing the hard drive from the hard drive bay
4–6 Hardware GuideHard DriveDRAFT - Revised: 10-28-02Compaq CONFIDENTIAL—For Internal Use Only11/13/02 File: SP-CH4-Hard Drives.fm7. Insert a hard drive by sliding the hard drive into the bay until the drive is seated.Inserting the hard drive into the hard drive bay
Hard DriveHardware Guide 4–7DRAFT - Revised: 10-28-02Compaq CONFIDENTIAL—For Internal Use Only11/13/02 File: SP-CH4-Hard Drives.fm8. Replace the hard drive bezel.Replacing the hard drive bezel
4–8 Hardware GuideHard DriveDRAFT - Revised: 10-28-02Compaq CONFIDENTIAL—For Internal Use Only11/13/02 File: SP-CH4-Hard Drives.fm9. Reinsert the hard drive retaining screw. (If you removed but did not replace a hard drive, put the retaining screw in a safe place.)Replacing the hard drive retaining screw
DRAFT - Revised: 10-28-02Hardware Guide 5–1Compaq CONFIDENTIAL—For Internal Use Only11/13/02 File: SP-CH5-Audio and Video.fm5Audio and VideoUsing Audio FeaturesThe notebook provides the following audio components:Audio componentsAudio ComponentsItem Component Description1Mute button Mutes system volume.2Volume buttons (2) Adjust the system volume.3Audio line-in jack Connects an optional single-sound channel microphone.
5–2 Hardware GuideAudio and VideoDRAFT - Revised: 10-28-02Compaq CONFIDENTIAL—For Internal Use Only11/13/02 File: SP-CH5-Audio and Video.fmAdjusting VolumeTo adjust the volume, use any of the following controls:■Notebook volume buttons❏To mute or restore volume, press the Quick Launch mute button. You can also mute or restore volume by pressing the volume - and volume + buttons simultaneously.❏To decrease the volume, press the left button.❏To decrease the volume, press the right button.■Windows Volume Control window✎Volume can also be adjusted within some applications.4Audio line-out jack Connects optional, powered stereo speakers, headphones, headset, or television audio.5Speaker Produces stereo sound.6Microphone Inputs single-channel sound.Audio Components (Continued)Item Component Description
Audio and VideoHardware Guide 5–3DRAFT - Revised: 10-28-02Compaq CONFIDENTIAL—For Internal Use Only11/13/02 File: SP-CH5-Audio and Video.fmUsing the Audio Line-In JackWhen an external microphone is connected to the notebook, the notebook microphone is disabled.When connecting a microphone to the audio line-in jack, use a single-sound channel (monaural) microphone with a 3.5-mm plug. A monaural electret condenser microphone is recommended. Other types of microphones are not fully functional with the notebook:■If you connect a stereo microphone, left channel sound will record on both channels.■If you connect a dynamic microphone, the recommended sensitivity may not be achieved.Using the Audio Line-Out JackÅWARNING: To reduce the risk of personal injury, adjust the volume before putting on headphones or a headset.ÄCAUTION: To prevent possible damage to an external device, do not plug a single-sound channel (monaural) connector into the audio line-out jack.When connecting a device to the audio line-out jack, use only a 3.5-mm stereo plug. for best sound quality, use 24-ohm to 32-ohm headphones.When an external audio device is connected to the audio-out jack, the notebook stereo speaker is disabled.Using Video FeaturesThe notebook features an S-video-out jack. An S-video cable attaches the notebook to an optional S-video device, such as a television, VCR, camcorder, overhead projector, or video capture
5–4 Hardware GuideAudio and VideoDRAFT - Revised: 10-28-02Compaq CONFIDENTIAL—For Internal Use Only11/13/02 File: SP-CH5-Audio and Video.fmcard. The notebook supports one S-video device connected to the S-video-out jack while simultaneously supporting an image on the notebook display and on any other supported external display.To transmit video signals through the S-video-out jack, you need an S-video cable available from most electronic retailers. If you are combining audio and video functions, such as playing a movie from a DVD in an optional MultiBay to a television, you also need a standard audio cable available from most electronics retailers.Connecting a Device to the S-Video-Out JackTo connect a video device to the S-video-out jack:1. Plug either end of the S-video cable into the S-video-out jack on the notebook 1.2. Connect the other end of the cable to the video device as instructed in the documentation included with the device 2.Connecting a device to the S-video-out jack
Audio and VideoHardware Guide 5–5DRAFT - Revised: 10-28-02Compaq CONFIDENTIAL—For Internal Use Only11/13/02 File: SP-CH5-Audio and Video.fm✎If the S-video-out jack on the notebook is not accessible while the notebook is docked, you can connect the device to the S-video-out jack on the optional Port Replicator.Changing the Video ModeThe default color television standard mode of the notebook is NTSC. Color television standard modes vary even within regions. However, NTSC is common in North America; PAL is common is Europe, China, Africa, and the Middle East; NTSC-J is common in Japan; and PAL-M is common in Brazil. Other South and Central American regions may use NTSC, PAL, or PAL-M.To change the color television standard mode from NTSC:1. Turn on or restart the notebook.2. Press F10 while the F10 = ROM Based Setup message is displayed in the lower left corner of the screen.❏To change the language, press F2.❏For navigation instructions, press F1.3. Select Advanced > Device Options, then press enter.4. Enter your preference, then press F10.5. To save your preference and exit Computer Setup, select File > Save Changes and Exit, then follow the instructions on the screen.
DRAFT - Revised: 10-28-02Hardware Guide 6–1Compaq CONFIDENTIAL—For Internal Use Only11/13/02 File: SP-CH6-Communication Devices.fm6Communication DevicesConnecting a Modem CableA modem cable, which has a 6-pin RJ-11 connector at each end, must be connected to an analog telephone line. Jacks for digital PBX systems may resemble analog telephone jacks, but are not compatible with the modem.ÅWARNING: Connecting the notebook to a digital line can permanently damage the modem. Immediately disconnect your modem cable if accidentally connected to a digital line.
6–2 Hardware GuideCommunication DevicesDRAFT - Revised: 10-28-02Compaq CONFIDENTIAL—For Internal Use Only11/13/02 File: SP-CH6-Communication Devices.fmIf the modem cable contains noise suppression circuitry, which prevents interference from TV and radio reception, orient the circuitry end of the cable toward the notebook.RJ-11 modem cable with noise suppression circuitry
Communication DevicesHardware Guide 6–3DRAFT - Revised: 10-28-02Compaq CONFIDENTIAL—For Internal Use Only11/13/02 File: SP-CH6-Communication Devices.fmUsing the RJ-11 CableTo connect an RJ-11 modem cable:1. Plug the modem cable into the RJ-11 jack on the notebook 1.ÅWARNING: To reduce the risk of electrical shock, fire, or damage to the equipment, do not plug a telephone cable into the RJ-45 network jack.2. Plug the modem cable into the RJ-11 telephone jack 2.Connecting the RJ-11 modem cableFor more information about using the modem or about using AT commands and dial modifiers, refer on this CD to the Modem and Networking guide or the Modem Command Guidelines (Advanced Users Only) guide.
6–4 Hardware GuideCommunication DevicesDRAFT - Revised: 10-28-02Compaq CONFIDENTIAL—For Internal Use Only11/13/02 File: SP-CH6-Communication Devices.fmUsing a Country-Specific Adapter CableTelephone jacks vary by country. To use the modem and the RJ-11 cable outside the country in which you purchased the notebook, you must obtain a country-specific modem adapter. Refer on this CD to the Modem and Networking guide for more details about using your notebook internationally.To connect the modem to an analog telephone line that does not have an RJ-11 telephone jack:1. Plug the modem cable into the RJ-11 jack on the notebook 1.ÅWARNING: To reduce the risk of electrical shock, fire, or damage to the equipment, do not plug a telephone cable into the RJ-45 network jack.2. Plug the country-specific modem adapter into the telephone jack 2.3. Plug the modem cable into the country-specific modem adapter.Connecting a modem cable using a modem adapter
Communication DevicesHardware Guide 6–5DRAFT - Revised: 10-28-02Compaq CONFIDENTIAL—For Internal Use Only11/13/02 File: SP-CH6-Communication Devices.fmConnecting a Network CableA network cable has an 8-pin RJ-45 connector at each end. If the network cable contains noise suppression circuitry, which prevents interference from TV and radio reception, orient the circuitry end of the cable toward the notebook.RJ-45 network cable with noise suppression circuitry
6–6 Hardware GuideCommunication DevicesDRAFT - Revised: 10-28-02Compaq CONFIDENTIAL—For Internal Use Only11/13/02 File: SP-CH6-Communication Devices.fmTo connect the network cable:1. Plug the network cable into the RJ-45 jack on the notebook 1.2. Plug the other end of the cable into a network jack 2.Connecting a network cable3. Start or restart the notebook.4. Connect to the network.Linking to an Infrared DeviceThe notebook is IrDA-compliant—4 megabits per second (Mbps) standard—and can communicate with another infrared-equipped device that is also IrDA-compliant.
Communication DevicesHardware Guide 6–7DRAFT - Revised: 10-28-02Compaq CONFIDENTIAL—For Internal Use Only11/13/02 File: SP-CH6-Communication Devices.fmInfrared signals are sent through an invisible beam of infrared light and require an unobstructed line of sight path.Linking to an infrared deviceThe infrared port supports both low speed connections of up to 115 kilobits per second (Kbps) and high speed connections of up to 4 Mbps. Infrared performance may vary depending on the performance of infrared peripherals, distance between infrared devices, and applications used.Setting Up an Infrared TransmissionFor information about using infrared software, refer to your operating system Help file.To set up infrared devices for optimal transmission:■Prepare the infrared ports on both devices for transmission.■Position the devices so that their infrared ports face one another at a distance no greater than 1 meter (3.3 feet).■Position the ports so that they face one another directly. Because the maximum capture angle is 30 degrees, the ports must be aligned no more than 15 degrees off-center.
6–8 Hardware GuideCommunication DevicesDRAFT - Revised: 10-28-02Compaq CONFIDENTIAL—For Internal Use Only11/13/02 File: SP-CH6-Communication Devices.fm■Shield the ports from direct sunlight, flashing incandescent light, and energy-saving fluorescent light.■Be sure that no signals from remote control or other wireless devices, such as headphones or audio devices, aim at a port.■During the transmission, do not move either device and do not allow objects or movement to disrupt the beam.Using Standby with InfraredStandby is not compatible with infrared transmission. If the notebook is in Standby, an infrared transmission cannot be initiated. If Standby is initiated during an infrared transmission, the transmission stops. To resume from Standby, press the power/standby button. The transmission resumes when the notebook resumes from Standby. However, any program that was using the infrared transmission when Standby was initiated may not continue at the point it was stopped. For example, if a program was printing when Standby was initiated, the program resumes transmission after the notebook resumes, but the print job may not resume.Using Wireless LANThe notebook provides internal wireless LAN supported through the mini PCI board. For more information on using your internal wireless LAN, refer on this CD to the Software Guide, “Wireless LAN Software” chapter or to the wireless mini PCI card documentation that ships with the notebook.
DRAFT - Revised: 10-28-02Hardware Guide 7–1Compaq CONFIDENTIAL—For Internal Use Only11/7/02 File: SP-CH7-External Devices.fm7External DevicesThe jacks and connectors described in this guide support the standard external devices that specify them. ■For information about which jack or connector to use, refer to the documentation included with the device. ■For information about installing or loading any software, such as drivers, required by the device, refer to the documentation included with the device.To connect a standard external device to the notebook:1. Turn off the notebook.2. If you are connecting a powered device, turn off the device.3. Connect the device to the connector on the notebook.4. If you are connecting a powered device, plug the device power cord into a grounded electrical outlet.5. Turn on the device.6. Turn on the notebook.To disconnect a standard external device from the notebook, turn off the device, then disconnect the device from the notebook.Connecting a Monitor or ProjectorTo connect an external monitor or projector to the notebook, insert the monitor cable into the external monitor connector on the back of the notebook.
7–2 Hardware GuideExternal DevicesDRAFT - Revised: 10-28-02Compaq CONFIDENTIAL—For Internal Use Only11/7/02 File: SP-CH7-External Devices.fm✎If a properly connected external monitor or projector does not display an image, try pressing the Fn+F4 hotkeys to switch the image to the monitor.Using a USB DeviceUniversal serial bus (USB) is a hardware interface that can be used to connect external devices, such as a USB keyboard, mouse, drive, printer, scanner, or hub, to the notebook. The notebook has a USB connector 1 and a USB connector with power 2. The USB connectors support USB 2.0 and USB 1.1 devices.USB connectors on the rear panelUSB hubs can be connected to a USB connector on the notebook or a Port Replicator or to other USB devices. Hubs support varying numbers of USB devices and are used to increase the number of USB devices in the system. Powered hubs must be connected to external power. Unpowered hubs must be connected either to a USB connector on the notebook or to a port on a powered hub.
External DevicesHardware Guide 7–3DRAFT - Revised: 10-28-02Compaq CONFIDENTIAL—For Internal Use Only11/7/02 File: SP-CH7-External Devices.fmUsing a USB DeviceA USB device functions in the same way as a comparable non-USB device, with one exception. By default, USB devices do not function unless an operating system that supports USB is loaded.Some USB devices may require additional support software, which is usually included with the device. For more information and software installation instructions, refer to the documentation included with the device.Enabling USB Legacy SupportTo use a USB keyboard, mouse, or hub connected to a USB connector on the notebook during startup or in a non-Windows application or utility, enable USB legacy support.To enable USB legacy support:1. Turn on or restart the notebook.2. Press F10 while the F10 = ROM Based Setup message is displayed in the lower left corner of the screen.❏To change the language, press F2.❏For navigation instructions, press F1.3. Select Advanced menu > Device Options.4. Select Enable USB legacy support.5. To save your preference and exit Computer Setup, select File > Save Changes and Exit, then follow the instructions on the screen.
7–4 Hardware GuideExternal DevicesDRAFT - Revised: 10-28-02Compaq CONFIDENTIAL—For Internal Use Only11/7/02 File: SP-CH7-External Devices.fmUsing an Optional External MultiBayAn external MultiBay connects to the notebook using the USB with power connector. For more information about the external MultiBay, refer to the documentation that is included with the device.Connecting an external MultiBay
External DevicesHardware Guide 7–5DRAFT - Revised: 10-28-02Compaq CONFIDENTIAL—For Internal Use Only11/7/02 File: SP-CH7-External Devices.fmConnecting an Optional Cable LockTo install a security cable:1. Loop the security cable around a secured object.2. Pull the security cable lock through the cable loop and insert the cable 1 into the security cable slot on the notebook.3. If the cable has a key 2, use it to lock and unlock the cable.Connecting a security cable
DRAFT - Revised: 10-28-02Hardware Guide 8–1Compaq CONFIDENTIAL—For Internal Use Only11/13/02 File: SP-CH8-Hardware Upgrades.fm8Hardware UpgradesTo order hardware or learn more about upgrades and accessories, visit the HP Web site at http://www.hp.com or contact an authorized dealer, reseller, or service provider. For information about obtaining and installing software updates and upgrades, refer on this CD to the Software Guide, “Software Updates and Restorations” chapter.Using PC CardsA PC Card is a credit card-sized accessory designed to conform to the standard specifications of the Personal Computer Memory Card International Association (PCMCIA). The notebook supports both 32-bit CardBus and 16-bit PC Cards, and it supports Type I and Type II cards. Zoomed video PC Cards are not supported.ÄCAUTION: If you install all of the software or any of the enablers provided by a PC Card manufacturer, you may not be able to use other PC Cards. If you are instructed by the documentation included with your PC Card to install device drivers:■Install only the device drivers for your operating system.■Do not install other software, such as card services, socket services, or enablers, that may also be supplied by the PC Card manufacturer.
8–2 Hardware GuideHardware UpgradesDRAFT - Revised: 10-28-02Compaq CONFIDENTIAL—For Internal Use Only11/13/02 File: SP-CH8-Hardware Upgrades.fmInserting a PC CardÄCAUTION: To prevent damage to the connectors:■Use minimal pressure when inserting a PC Card into a PC Card slot.■Do not move or transport the notebook while a PC Card is inserted.To insert a PC Card:1. Hold the PC Card label-side up with the connector facing the notebook.2. Gently push the card into the slot until the card is seated.Inserting a PC Card into the PC Card slotRemoving a PC CardÄCAUTION: To prevent loss of work or system lockup, stop the PC Card before removing it.
Hardware UpgradesHardware Guide 8–3DRAFT - Revised: 10-28-02Compaq CONFIDENTIAL—For Internal Use Only11/13/02 File: SP-CH8-Hardware Upgrades.fmTo remove a PC Card:1. Stop the PC Card:❏In Windows 2000 Professional, select the Unplug or Eject icon in the task bar, then stop the card you plan to remove. (When the card can be safely removed, a message is displayed.)❏In Windows XP Professional, select the Sfely Remove Hardware icon in the taskbar, then select the PC Card. (To display the Safely Remove Hardware icon, select Show Hidden Icons in the taskbar.)2. Press the PC Card eject button 1.3. Gently pull out the card 2.Removing a PC Card✎An inserted PC Card uses power even when not in use. To conserve power, stop or remove a PC Card when you are not using it.
8–4 Hardware GuideHardware UpgradesDRAFT - Revised: 10-28-02Compaq CONFIDENTIAL—For Internal Use Only11/13/02 File: SP-CH8-Hardware Upgrades.fmUsing SD CardsSecure Digital (SD) cards are postage stamp-sized accessories that increase the memory capacity of your notebook.Inserting an SD CardÄCAUTION: To prevent damage to the connectors:■Use minimal pressure when inserting an SD card into an SD card slot.■Do not move or transport the notebook while an SD card is inserted.To insert an SD card:1. Insert the SD card into the SD slot.2. Push the card firmly into the slot until it clicks into place.Inserting an SD card into the SD slot
Hardware UpgradesHardware Guide 8–5DRAFT - Revised: 10-28-02Compaq CONFIDENTIAL—For Internal Use Only11/13/02 File: SP-CH8-Hardware Upgrades.fmRemoving an SD CardÄCAUTION: To prevent loss of work or system lockup, stop the SD card before removing it.To remove an SD card:1. Close all files and applications using the SD card.2. Stop the SD card.❏In Windows 2000 Professional, select the Unplug or Eject icon in the task bar, then stop the card you plan to remove. (When the card can be safely removed, a message is displayed.)❏In Windows XP, select the Safely Remove Hardware icon in the taskbar, then select the PC Card. (To display the Safely Remove Hardware icon, select Show Hidden Icons in the taskbar.)3. Gently press in on the SD card to unlock it 1.4. Pull the SD card from the slot 2.Ejecting an SD card from the SD slot
8–6 Hardware GuideHardware UpgradesDRAFT - Revised: 10-28-02Compaq CONFIDENTIAL—For Internal Use Only11/13/02 File: SP-CH8-Hardware Upgrades.fmAdding and Upgrading Memory BoardsÅWARNING: The memory compartments are the only user-accessible internal compartments on the notebook. All other areas that require a tool to access should be opened only by an authorized service provider.ÅWARNING: Failure to unplug the power cord and remove all battery packs before installing a memory expansion board can damage the equipment and expose you to the risk of electrical shock.ÄCAUTION: Electrostatic discharge (ESD) can damage electronic components. Before beginning any procedure, ensure that you are discharged of static electyricity by touching a grounded metal object. For more information, refer on this CD to the Regulatory and Safety Notices guide.The notebook has 2 memory slots. The primary memory slot is located under the keyboard. The primary memory slot is populated at the factory. The memory expansion slot is located on the bottom of the notebook. The memory capacity of the notebook can be upgraded first by adding a memory board to the expansion slot and then by upgrading the memory board in the primary memory slot.Adding a Memory Expansion BoardTo add a memory expansion board:1. Shut down the notebook. (If you are not sure whether the notebook is off or in Hibernation, turn the notebook on by pressing the power/standby button. Then shut down the notebook through the operating system.)2. Disconnect all external devices connected to the notebook.3. Disconnect the power cord.
Hardware UpgradesHardware Guide 8–7DRAFT - Revised: 10-28-02Compaq CONFIDENTIAL—For Internal Use Only11/13/02 File: SP-CH8-Hardware Upgrades.fm4. Turn the notebook bottom-side up.5. Remove any battery packs from the notebook.6. Remove the screw from the memory expansion slot cover 1.7. Remove the memory expansion slot cover 2.Removing the expansion slot cover
8–8 Hardware GuideHardware UpgradesDRAFT - Revised: 10-28-02Compaq CONFIDENTIAL—For Internal Use Only11/13/02 File: SP-CH8-Hardware Upgrades.fm8. Insert the memory expansion board:a. Align the keyed (notched) edge of the board with the keyed area in the expansion slot 1.b. Press the board into the slot from a 45-degree angle until it is seated, then push the board downward until the retention clips snap into place 2.Inserting a memory expansion board
Hardware UpgradesHardware Guide 8–9DRAFT - Revised: 10-28-02Compaq CONFIDENTIAL—For Internal Use Only11/13/02 File: SP-CH8-Hardware Upgrades.fm9. Replace the expansion slot cover over the expansion board compartment 1.10. Replace the expansion slot cover screw 2.11. Replace the battery packs.12. Reconnect AC power and external devices.13. Restart the notebook.Upgrading the Memory Board in the Primary Memory SlotTo upgrad the memory board in the primary memory slot:1. Shut down the notebook. (If you are not sure whether the notebook is off or in Hibernation, turn the notebook on by pressing the power/standby button. Then shut down the notebook through the operating system.)2. Disconnect all external devices connected to the notebook.3. Disconnect the power cord.
8–10 Hardware GuideHardware UpgradesDRAFT - Revised: 10-28-02Compaq CONFIDENTIAL—For Internal Use Only11/13/02 File: SP-CH8-Hardware Upgrades.fm4. Remove any battery packs from the notebook.5. Remove the 4 keyboard screws from the bottom of the notebook. A keyboard icon is located next to the keyboard screws.Removing the keyboard screws
Hardware UpgradesHardware Guide 8–11DRAFT - Revised: 10-28-02Compaq CONFIDENTIAL—For Internal Use Only11/13/02 File: SP-CH8-Hardware Upgrades.fm6. Using a fingernail or small flat tool, remove the Quick Launch button bezel located above the keyboard.Removing the Easy Access button bezel7. Remove the keyboard.Removing the keyboard
8–12 Hardware GuideHardware UpgradesDRAFT - Revised: 10-28-02Compaq CONFIDENTIAL—For Internal Use Only11/13/02 File: SP-CH8-Hardware Upgrades.fm8. Remove the existing memory board:a. Pull away the retention clips on each side of the board 1. (The board tilts upward.)b. Lift the edge of the memory expansion board, then gently pull it out of the slot 2.Removing the existing memory board✎To protect a memory board after it has been removed, place it in an static-safe container.
Hardware UpgradesHardware Guide 8–13DRAFT - Revised: 10-28-02Compaq CONFIDENTIAL—For Internal Use Only11/13/02 File: SP-CH8-Hardware Upgrades.fm9. Insert the upgraded memory board:a. Align the keyed (notched) edge of the board with the keyed area in the expansion slot 1.b. Press the board into the slot from a 45-degree angle until it is seated, then push the board downward until the retention clips snap into place 2.Inserting the upgraded memory board10. Replace the keyboard.11. Replace the Quick Launch button bezel.12. Replace the keyboard screws located on the bottom of the notebook.13. Replace the battery packs.14. Reconnect AC power and external devices.15. Restart the notebook.
8–14 Hardware GuideHardware UpgradesDRAFT - Revised: 10-28-02Compaq CONFIDENTIAL—For Internal Use Only11/13/02 File: SP-CH8-Hardware Upgrades.fmIncreasing RAMYou can increase the random access memory (RAM) of the notebook with optional PC Cards or memory expansion boards. When RAM increases, the operating system increases the hard drive space reserved for the hibernation file.If you experience problems with Hibernation after increasing RAM, verify that your hard drive has enough free space for the larger hibernation file.■To display the amount of RAM in the system:❏In Windows 2000 Professional, select Start > Settings Control Panel > System > General tab.❏In Windows XP, select Start > Control Panel > Performance and Maintenance > System > General tab.■To display the amount of free space on your hard drive:Double-click the My Computer icon on the desktop, then select your hard drive. Information about the space on the drive is displayed in a status bar at the bottom of the window.■To display the amount of space required by the hibernation file:❏In Windows 2000 Professional, select Start > Settings > Control Panel > Compaq Power > Hibernation tab.❏In Windows XP, select Start > Control Panel > Performance and Maintenance > Power Options icon > Hibernate tab.
DRAFT - Revised: 11-17-02Hardware Guide A–1Compaq CONFIDENTIAL—For Internal Use Only11/13/02 File: SP-APPA-Specs.fmASpecificationsNotebook DimensionsOperating EnvironmentDimension Metric U.S.Height 2.79 cm 1.1 in.Width 27.94 cm 11 in.Depth 23.37 cm 9.2 in.Factor Metric U.S.TemperatureOperating 10° to 35° C 50° to 95° FNonoperating –10° to 60° C 14° to 140° FRelative humidity (noncondensing)Operating 10 to 90% 10 to 90%Nonoperating 5 to 95% 5 to 90%Maximum altitude (unpressurized)Operating 3,048 m 10,000 ftNonoperating 9,144 m 30,000 ft
A–2 Hardware GuideSpecificationsDRAFT - Revised: 11-17-02Compaq CONFIDENTIAL—For Internal Use Only11/13/02 File: SP-APPA-Specs.fmRated Input PowerModem SpecificationsInput Power RatingOperating voltage 100–120/220–240 VAC RMSOperating current 1.6/0.8 A RMSOperating frequency range 50–60 Hz ACWhen powered by a DC source 18.5V MAX✎This product is designed for IT power systems in Norway with phase-tophase voltage not exceeding 240 Vrms.Factor SpecificationTemperatureOperating 0° to 75° C (32° to 167° F)Storage –40° to 75° C (–40° to 167° F)Relative humidity (noncondensing)Operating –10 to 90%Nonoperating –5 to 95% @ 39° C (–5 to 95% @ 102° F)Interfaces Communications connectorStandard RJ-11 connectorTelephone, central office networkInternal DAAPower Requirements+3.3 volts ±5%, +5 volts ±5%
DRAFT - Revised: 11-17-02Hardware Guide B–1Compaq CONFIDENTIAL—For Internal Use Only11/13/02 File: SP-APPB-Regulatory.fmBRegulatory NoticesThis notebook has been tested and found to comply with limits for a Class B digital device. Regulatory NoticesFor additional governmental agency information, refer on this CD to Regulatory and Safety Notices.Wireless NoticesIn some situations or environments, the use of wireless devices may be restricted by the proprietor of the building or responsible representatives of the organization. Such restrictions may apply when:■Using the wireless equipment on airplanes, or■The risk of interference to other devices or services is perceived as harmful.If you are uncertain of the policy that applies on the use of wireless equipment in a specific organization or environment (such as airports), you are encouraged to ask for authorization to use this device prior to turning on the equipment.
B–2 Hardware GuideRegulatory NoticesDRAFT - Revised: 11-17-02Compaq CONFIDENTIAL—For Internal Use Only11/13/02 File: SP-APPB-Regulatory.fmÅWARNING: Exposure to Radio Frequency RadiationThe radiated output power of this device is far below the FCC radio frequency exposure limits. Nevertheless, the device should be used in such a manner that the potential for human contact during normal operation is minimized. In order to avoid the possibility of exceeding the FCC radio frequency exposure limits, human proximity to the antenna should not be less than 20 cm (8 inches) during normal operation.Electrostatic DischargeA discharge of static electricity from fingers or other electrostatic conductors may damage electronic components. Before handling electrostatic-sensitive components, discharge static electricity. For more information on electrostatic discharge, refer on this CD to Regulatory and Safety Notices.
IndexManual Title Variable Index–1DRAFT - Revised: mm/dd/yyCompaq CONFIDENTIAL—For Internal Use Only11/13/02 File: 309971-001IX.fmIndexAAC Adapter 1–8Aircraft Power Adapter (optional) 1–8airflow 1–6, 1–10altitude specifications 9–1, 9–2analog vs. digital telephone lines 6–2applications key 1–4audioadjusting volume 5–2components 5–1line-in jack 5–1, 5–3line-out jack 5–2, 5–3audio devicesmicrophone 5–2microphone jack 1–5speaker 1–5, 5–2Automobile Power Adapter/Charger (optional) 1–8Bbatterylow-battery condition 1–11release latch 1–10travel battery connector 1–10battery baylocation 1–10battery light 3–10battery llight 1–11battery packscalibrating 3–16charging 3–9displaying charge information 3–12low-battery conditions 3–14monitoring charge 3–11primary, inserting 3–2primary, removing 3–2, 3–3Quick Check 3–13travel (optional) 3–4travel, inserting 3–4travel, removing 3–5type 3–1baybattery 1–10hard drive 1–6, 4–2buttonsEasy Access 1–3Internet 2–10
Index–2 Manual Title VariableIndexDRAFT - Revised: mm/dd/yyCompaq CONFIDENTIAL—For Internal Use Only11/13/02 File: 309971-001IX.fmmute 2–11, 5–1, 5–2PC Card, eject 1–5pointing stick 1–2, 2–2power/standby 1–3Presentation Mode 2–10TouchPad 1–2, 2–2volume - 2–11, 5–1volume + 2–11, 5–1wireless 2–10Ccalibrating battery packs 3–16Caps lock light 1–11connectordocking 1–9connectorsDC power 1–8external monitor 1–8travel battery 1–10USB 1–8contents of packing box 1–1country-specific modem adapter 6–4DDC power connector 1–8digital vs. analog telephone lines 6–1display release latch 1–7displaying battery pack charge information 3–12dockingconnector 1–9drivescaring for 4–1hard drive activity light 4–2inserting 4–6removing 4–3EEasy Access buttons 5–2functions 2–10location 1–3embedded numeric keypad 1–11exhaust vent 1–6expansion board 8–6external devices (optional), connecting 7–1external monitor, connecting 7–1external mouse 2–3external MultiBay (optional) 7–4Ffeatures, notebook 1–2Fn key 2–5location 1–4function keys 1–4Hhard driveactivity light 1–11bay 1–6bezel 4–4, 4–7caring for 4–1displaying amount of free space on 8–14displaying amount of space required by Hibernation file 8–14hard drive activity light 4–2primary 4–2
IndexManual Title Variable Index–3DRAFT - Revised: mm/dd/yyCompaq CONFIDENTIAL—For Internal Use Only11/13/02 File: 309971-001IX.fmremoving 4–3replacing 4–2, 4–6retaining screw 4–3, 4–8space on, required for Hibernation file 8–14viewing amount of free space on 8–14headphones, headset (optional) 1–5help and support 2–6Hibernationfile, space requirements of 8–14hotkeyquick reference 2–6hotkeysdefined 2–5hotkeys commandsadjusting screen brightness 2–8initiate Standby 2–7initiating quick controls 2–8switching display and image 2–7system information 2–8viewing battery charge information 2–8hubs, USB 7–2humidity specifications 9–1, 9–2Iinfraredcapabilities 6–6connection speeds 6–7port 1–5transmissions 6–7using Standby with 6–8Internet button 2–10Jjackaudio line-out 1–5audio-line in 1–5S-video 1–8jacksaudio line-in 5–1, 5–3audio line-out 5–2audio line-out jack 5–3Kkeyboard, external (optional)entering hotkeys and shortcut keys commands from 2–9keysMicrosoft logo 1–4Llights 1–11battery 1–11, 3–10caps lock 1–11hard drive activity 1–11, 4–2num lock 1–11power/standby 1–11scroll lock 1–11wireless on/off 1–11low-battery conditions 3–14Mmemorydisplaying amount of 8–14
Index–4 Manual Title VariableIndexDRAFT - Revised: mm/dd/yyCompaq CONFIDENTIAL—For Internal Use Only11/13/02 File: 309971-001IX.fmexpansion compartment 1–10memory expansion board 8–6slots, location 1–4upgrading 8–6, 8–9microphone 5–2internal 1–7, 5–2microphone jack 1–5, 5–1, 5–3Microsoft logo key 1–4mini PCIcompartment 1–10wireless card 1–9modemcable 6–1, 6–3connecting 6–1, 6–3country-specific, adapter 6–4monitorexternal, connector 1–8monitor, connecting external 7–1Mouse Properties utility 2–4mouse, external 2–3MultiBay (optional) 7–4mute button 2–11, 5–1, 5–2Nnetworkcable 6–5connecting to 6–6noise suppression circuitry 6–2, 6–5notebook features 1–2Num lock light 1–11numeric keypad, embedded 1–11Oopening the notebook 1–7operating environment specfications 9–1, 9–2PPC Cardeject buttons 1–5slots 1–5PC Cardsinserting 8–2removing 8–3types 8–1pointing devicescomponents 1–2, 2–2external mouse 2–3pointing stick 1–2, 2–1preferences 2–4TouchPad 1–2, 2–1pointing stickbuttons 1–2, 2–2location 1–2using 2–2portinfrared 1–5, 6–6powerconnector 1–8conservation settings 3–20conserving battery 3–19power/standbylight 1–11power/standby button 1–3Presentation Mode button 2–10
IndexManual Title Variable Index–5DRAFT - Revised: mm/dd/yyCompaq CONFIDENTIAL—For Internal Use Only11/13/02 File: 309971-001IX.fmprojector, connecting 7–1QQuick Check 3–13RRAM (random access memory) 8–14release latch 1–4RJ-11 jackconnecting 6–1, 6–3Sscroll lock key 2–9Scroll lock light 1–11SD cardsinserting 8–4removing 8–5security cableconnecting 7–5slot 1–6shortcut keydefined 2–5quick reference 2–6sleep button (Windows) 2–7Sleep. See Standbysoftwaremodem 3–19SpeedStep (Windows 2000 Professional) 3–20speaker 1–5, 5–2SpeedStep (Windows 2000 Professional) 3–20Standbyexiting 2–7initiating 2–7S-video 5–4jack 1–8Ttemperatureoperating 9–1, 9–2TouchPadbuttons 1–2, 2–2location 1–2using 2–3travel batteryattaching 3–6battery packs 3–4detaching 3–9traveling with the notebookoperating environment specifications 9–1, 9–2UUSBconnecting 7–2connectors 1–8devices, using 7–3enabling legacy support 7–3external devices 7–2hubs 7–2mouse 2–3utilities. See softwareVventsintake 1–10videofeatures 5–3mode 5–5volumevolume - button 2–11
Index–6 Manual Title VariableIndexDRAFT - Revised: mm/dd/yyCompaq CONFIDENTIAL—For Internal Use Only11/13/02 File: 309971-001IX.fmvolume + button 2–11volume - button 5–1volume + button 5–1volume, adjusting 5–2Wwirelessantenna 1–7button 2–10infrared 6–6infrared port 1–5LAN 6–8mini PCI compartment 1–10on/off light 1–11

Navigation menu