Hisense Electric LCDF0063 Part15 Subpart B-LED LCD TV User Manual W9HLCDF0063 1
Hisense Electric Co., Ltd. Part15 Subpart B-LED LCD TV W9HLCDF0063 1
Contents
- 1. W9HLCDF0063_User Manual 1
- 2. W9HLCDF0063_User Manual 2
- 3. W9HLCDF0063_User Manual 3
- 4. W9HLCDF0063_User Manual 4
- 5. W9HLCDF0063_User Manual 5
W9HLCDF0063_User Manual 1

ES-G155266-1

Help SHARP improve the environment by reducing paper waste.
For detailed instructions and feature descriptions, access the full User Manual online.
Model LC-75N8000U
Quick Start Guide
4K Smart TV
© 2015, 2016 Hisense Company Ltd. All Rights Reserved.
All material in this Quick Start Guide is the property of Hisense Company Ltd. and its subsidiaries, and is protected under US and
International copyright and/or other intellectual property laws. Reproduction or transmission of the materials, in whole or in part, in any
manner, electronic, print, or otherwise, without the prior written consent of Hisense Company Ltd., is a violation of Hisense Company Ltd.
rights under the aforementioned laws.
No part of this publication may be stored, reproduced, transmitted or distributed, in whole or in part, in any manner, electronic or
otherwise, whether or not for a charge or other or no consideration, without the prior written permission of Hisense Company Ltd.
Requests for permission to store, reproduce, transmit or distribute materials may be made in writing to the following address:
USA: Hisense USA Corporation
PO Box 3289
Suwanee, GA 30024
CANADA: Hisense Canada Co., Ltd,
405 Britannia Rd E., Suite 11
Mississauga, Ontario,L4Z 3E6
MEXICO: Hisense Mexico S de RL de CV
Boulevard Miguel de Cervantes Saavedra No. 301, Torre Norte, Piso 2,
Colonia Ampliación Granada, C.P. 11520, en México Distrito Federal.
“Sharp™”, “Aquos™”, “Quattron™” and any and all other Sharp product names, logo’s, slogans or marks are registered trademarks
owned exclusively by Sharp Corporation.
"Hisense™", and any and all other Hisense product names, logo’s, slogans or marks are registered trademarks and intellectual property
rights of Hisense Company Ltd. and its subsidiaries.
This product is sold to you under one or more license agreements between Sharp Corporation and Hisense International (Hong Kong)
America Investment Co. Ltd. All other trademarks are the property of their respective holders.

1
4K Smart TV: An unforgettable entertainment experience
Multiple Connection Methods
• Built-in wireless connection
0.3 BSU 1 dna srotcennoC 0.2 BSU 2( srotcennoC BSU 3 •
Connector)
• 4 HDMI Connectors (2 HDMI 1.4 Connectors and 2 HDMI 2.0
Connectors)
• 1 LAN (Ethernet) port
High-Quality Picture and Sound
• Vibrant contrast and brightness to display images
accurately
• dbx-tv® Award-winning sound
• 4K technology that supports 4K online streaming, 4K USB
content, HDMI 2.0 devices and much more to maximize
your entertainment experience
Smart LED TV with Popular Features
• Ultra-fast access to launch Netflix®
• Numerous built-in social media, gaming and movie apps
• Thousands of movie titles and streaming content to view
• 4K Media Player and Receiver
• App Store and Web Browser
• Many other cool features
Easy Setup Menu and Simple Design
• Short and easy-to-follow first-time setup menu
• 75" class screen with a simple user interface (UI) design to
navigate
• Descriptive features to help make your selections
• AquoMotionTM
2
Register Your TV!
Congratulations on the purchase of your new SHARP 4K Smart TV! This Quick Start Guide will walk you through a few
easy steps to set up your TV. For detailed instructions, access the User Manual on the support pages listed below.
Because we value your business, we want to keep you in the know of 'all things SHARP'. Using your mobile phone, scan the Registration
page QR code to register your TV. Depending on the make and model of your phone, you may need to download a QR code scanning
app.
Country Customer Care Center SHARP Support Page REGISTER YOUR TV
U.S.A • Phone: 1-888-935-8880
• Hours of Operation:
Monday - Friday: 9 AM to 9 PM EST
Saturday - Sunday: 9 AM to 6 PM EST
• Service Email: support@sharptvusa.com
http:// www.sharptvusa.com
/support
www.sharptvusa.com/
support/productreg.asp
No need to register
CANADA • Phone: 1-855-271-6271
• Hours of Operation:
Monday - Friday: 8 AM to 8 PM EST
• Service Email: Canadasupport@sharp-canada.ca
http://www.sharp-canada.
ca/support/
MEXICO • Phone: 01-800-999-7277
• Hours of Operation: Monday-Friday 09:00-18:00
• Service Email: servicio@SHARPTV.com.mx
http://www.SHARPTV.com.
mx/support/
http://www.SHARPTV.
com.mx/support/product
Reg.asp
Disclaimer: This Quick Start Guide is intended as a general guideline to help you set up your SHARP TV. Images
throughout this document are for illustrative purposes only and may differ from the actual product.

3
PACKAGED CONTENTS
Your package in which you purchased your new TV contains the following items:
● TV ● QuickStartGuide(thisdocument)
● PowerCord ● 4Support
● 16screws(M3×8) ● ImportantSafetyInformationandWarrantyCard
● RemoteControl ● 1setofAAAbatteries
IMPORTANT:
To prevent accidentally discarding items that came with your TV, be sure to check ALL of the foam in the carton box.
· Please check foam for accessories before discarding.
· Veuillez vérifier la mousse pour qu'il n'y ait pas d'accessoires avant de la jeter.
· Antes de desechar la espuma, asegúrese de retirar todos los accesorios.
Required tools and devices
● Wirelessrouter(notincluded)forInternetconnectivity
● Phillipsscrewdriver(notincluded)tosecuretheTVstand
● HDMIandothertypesofcables(notincluded)toconnectexternaldevicestotheTV
● Wallmountbracket(notincluded)ifyouprefertomounttheTVtothewall
4
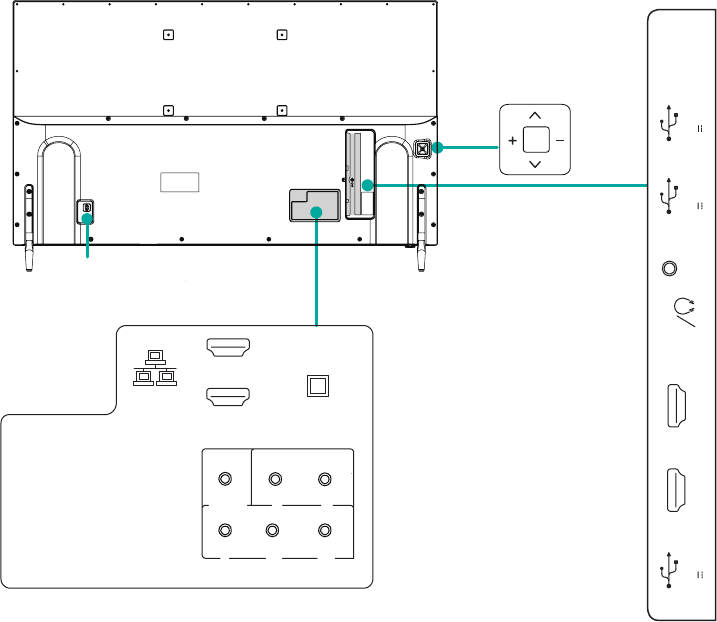
BUTTONS AND PORTS ON THE TV
Back View of the TV
TV Side Vi
ew
TV Bottom View
OK
ANT/CABLE
USB 2
SERVICE
AUDIO
OUT
HDMI 1(4K@30Hz)
MHL(DC 5V 900mA)
HDMI 2(4K@30Hz)
USB 1
DC 5V 0.5A(MAX)
USB 3
DC 5V 1A(MAX)
ARC
DC 5V 0.5A(MAX)
HDMI 3(4K@60Hz)
HDMI 4(4K@60Hz)
AV IN
COMPONENT IN
VIDEO L
YPBPR
R
DIGITAL
AUDIO OUT
LAN
Power input
5
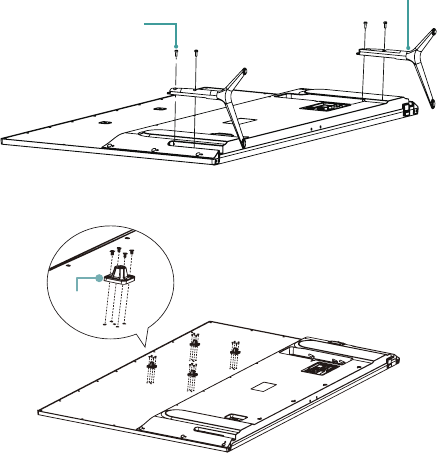
STEP 1. Attach the TV Stand or Wall Mount Bracket
Attach the TV Stand
Follow the illustrations and instructions below to complete the installation steps:
1.CarefullyplaceyourTVfacedownonasoft,atsurfacetopreventdamagetotheTVorscratchingtothescreen.
2. Remove the TV base stand.
screw
base stand
3. Take out the cover sheet on the wall or ceiling mounting position of the TV set. Fasten the mounting support on the mounting position
with the screws in the accessory bag.
support
M3 × 8
NOTES: Other mounting support and screws with different specications may cause damage to TV.
Product images are only for reference, actual product may vary in appearance.
6
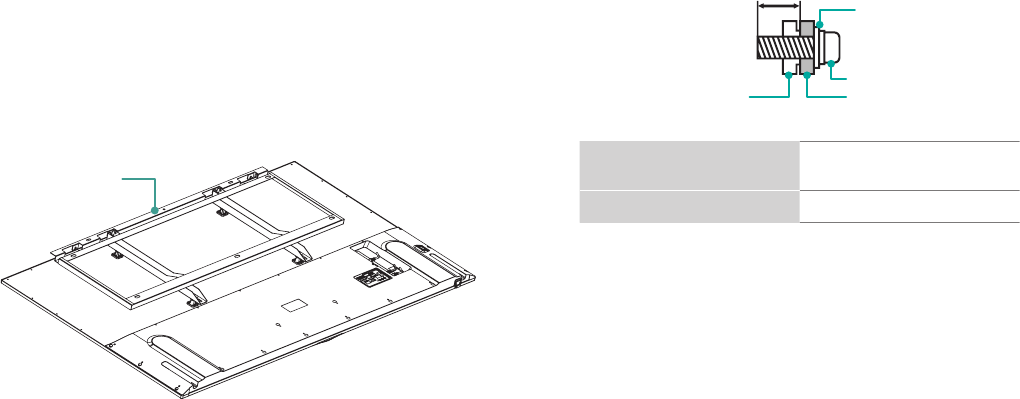
Attach the Wall Mount Bracket (not included)
Before you begin the third-party manufacturer instructions, be
sure to do the following things:
1.Place the TV face down on a clean, safe and cushioned surface.
2.Remove the TV stand if you already attached it.
3.Place the spacers (not included) in the corresponding bracket
holes.
(not provided)
Bracket
CAUTION:
• When you attach the mount, be sure to use the spacers
(provided by the third-party manufacturer) between the TV
and the bracket.
• To prevent internal damage to the TV and ensure it is
mounted securely, be sure to use xing screws (not
provided) that are 9.5 - 11.5 mm in length when measured
from the attaching surface of the mounting hook.
FollowinstructionsprovidedwiththeWallmountbracket.
●Tocompletetheinstallation,pleasecontactthewall-mount
manufacturer or the retailer from which you purchased the TV.
●Theselectedscrewsare9.5-11.5mminlengthwhen
measured from the attaching surface of the rear cover. The
diameter and length of the screws differ depending on the
Wallmountbracketmodel.
NOTE: The diameter and length of the screws differ
depending on the wall mount bracket model.
Rear cover of the TV Spacer
Screw
Wall mount bracket
9.5 - 11.5 mm
Wall mount hole pattern
VESA (mm) 600 × 400
Wall mount screw size (mm) M6
7
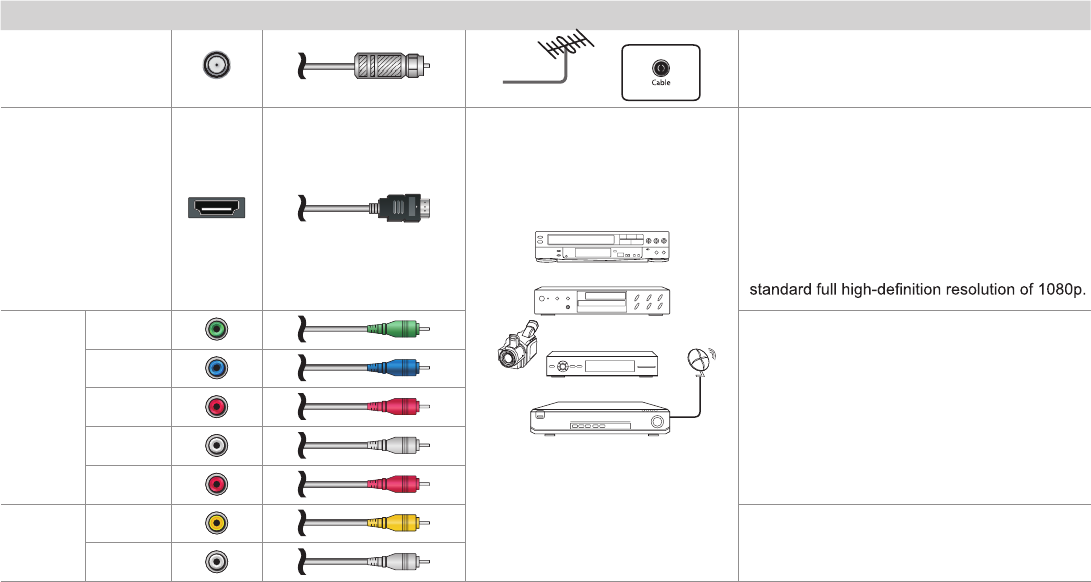
STEP 2. Connect devices to your TV
Check to ensure that you have selected the right cables for the ports and that they are connected securely. Loose connections can affect
the quality of the picture image and color.
TV label Port Cable External Equipment Brief Description
ANT/CABLE
Antenna
VHF/UHF Antenna
ANT OUT
Connect an outdoor VHF/UHF antenna.
HDMI
DVD Player/Recorder
Set-top Box
Satellite Receiver
Satellite
antenna
cable
VCR
Video
Camera
This 4K TV has two different software versions
of HDMI ports to connect HDMI-enabled
devices. The two high-powered HDMI version
2.0(HDMI 3, HDMI 4) inputs enable you to
connect 4K Ultra-HD external devices that
require more bandwidth to transmit to the TV
screen. For example, if you have an X-box or
Blu-ray player that supports the 2.0 standard.
The two HDMI version 1.4 inputs are great for
any of your external devices that support a
COMPO-
NENT IN
YGreen
Connect a component video cable and left-right
audio cables from an external AV device.
PBBlue
PRRed
LWhite
RRed
AV IN
VIDEO Yellow Connect a composite video cable and left-right
audio cables from an external AV device.
LWhite
8
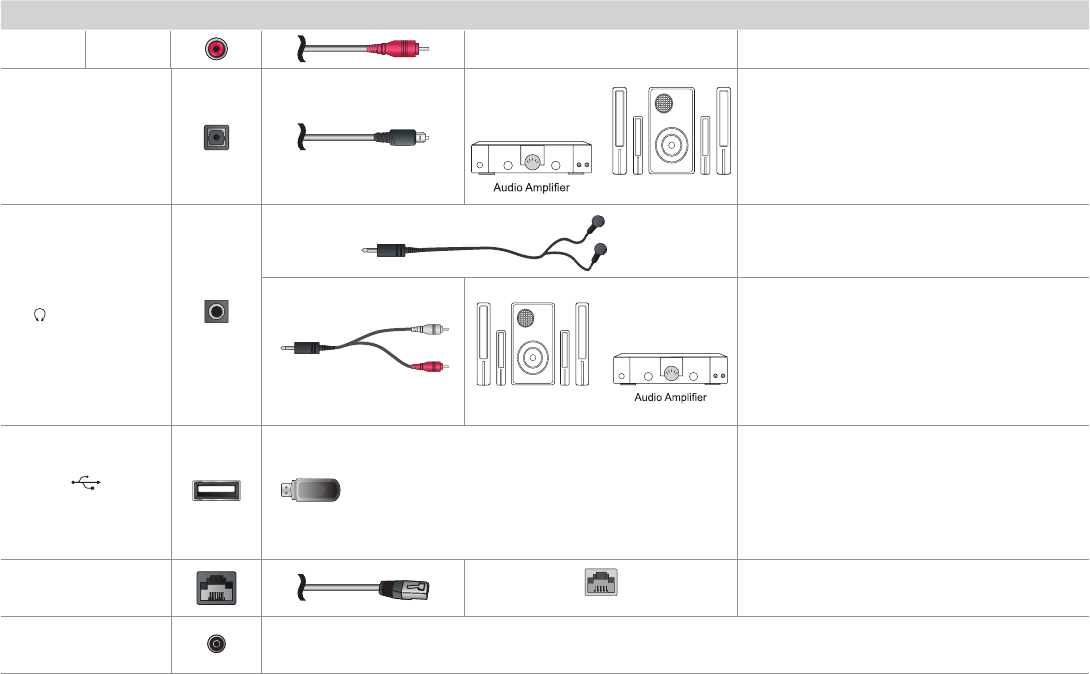
AV IN R Red
TV label Port Cable External Equipment Brief Description
DIGITAL AUDIO OUT
Speaker
Connect an optical cable from an external
digital audio system.
AUDIO OUT
Connect headphones to hear audio from the
TV.
Connect an audio adapter (not provided) from
an external analog audio system.
USB
Connect a USB 3.0 device to transfer photos,
music and movies to your TV at a rate that's 10
times faster than the USB 2.0 port
NOTE: You can still plug a USB 2.0 device into
a USB 3.0 port; however, the rate of speed will
not be as fast. USB 3.0 devices are also back-
wards compatible with USB 2.0 ports.
LAN
LAN
Connect an Ethernet cable to access a network
or the Internet. The TV also has a wireless
connectivity feature.
SERVICE This port is not available for you to connect an external device. It can only be used by our factory for testing
purposes.
White
Red
Speaker
9
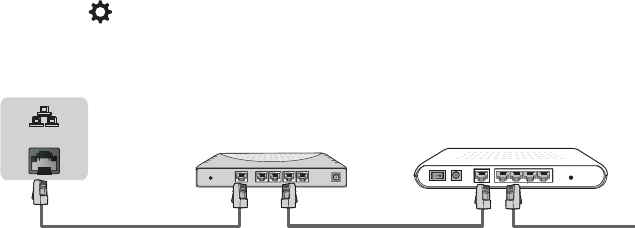
STEP 3. Establish a network connection
1.Press the button on the remote control and then press > to enter the Settings menu.
2.Select Network→Network Conguration.
TV JACK
Modem CableLAN CableLAN Cable
External Modem
(ADSL / VDSL / Cable TV)
IP Sharer (Router)
(with DHCP server)
LAN
Establish a wired network connection
Automatically obtain an IP address
1.Select Ethernet. The TV will automatically obtain an IP address and connect to the network.
NOTE: The default option of IP Setting Mode is DHCP.
2.If the connection fails then "Disconnected" will display for the Ethernet status. Retry or select Manual to input the information again.
Manually enter the IP address
1.Select Manual.
2.Enter the IP Address, Subnet Mask, Default Gateway, Preferred DNS and Alternative DNS in the menu. Next, select Connect.
10
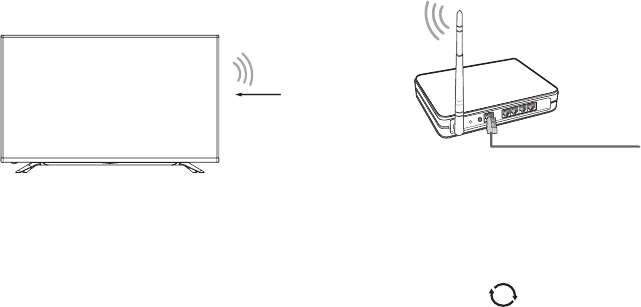
Establish a wireless network connection
Wireless router with DHCP
LAN Cable
Wireless LAN Adapter
built-in TV set
The TV can directly receive network signals via wireless router
1.Select Wireless. The list of networks will be displayed in Available Networks automatically.
2.Select a wireless network from the list, input password and select Connect.
3.If the network connection does not appear in the list, select to refresh the list or select + to manually enter SSID and Security mode
selection, select Add.
Close the network connection
Select Off. The network connection will close.
11
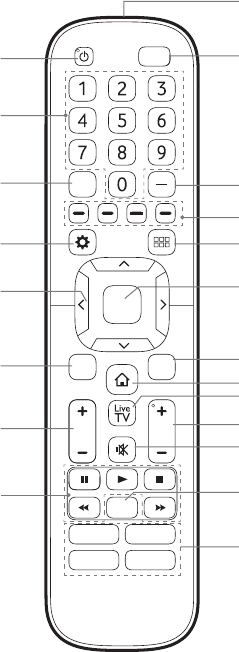
Buttons on your TV remote
SLEEP
VOLCH
OK
CC
BACK EXIT
INPUT
Infrared transmitter
Power on / off
Enter Channels / input numbers
Media content control function buttons
Dash button
Select a digital sub-channel
D-pad (up/down/left/right
navigation buttons)
Volume (up/down)
Adjust Sleep timer setting
The 'Gear' button for the Quick setup menu
Return to the previous place in the menu or app
Live TV
Change TV input source
All Apps
Confirmation button
Channel (up/down)
Mute and restore sound
Exit the application
Turn Closed Caption On/Off
Special function buttons
Quick access buttons to apps
Display the Home screen
APP
APPAPP
APP

12
STEP 4. Begin using your remote
1. Slide the back cover to open the battery compartment of the remote
control
Insert the batteriesGently push and slide Gently push and slide
2. Insert two AAA size batteries. Make sure to match the (+) and (-)
ends of the batteries with the (+) and ( - ) ends indicated in the
battery compartment.
3. Replace the battery compartment cover.
Important Information about the remote and batteries:
• Discard batteries in a designated disposal area. Do not throw
them into a re.
• Remove old batteries immediately to prevent them from leaking
into the battery compartment.
• If you do not intend to use the remote control for a long time,
then remove the batteries.
• Battery chemicals can cause a rash. If the batteries leak, clean
the battery compartment with a cloth. If chemicals touch your
skin then wash it immediately.
• Do not mix old and new batteries.
• Do not mix alkaline, standard (carbon-zinc) or rechargeable
(NiCd, NiMH, etc.) batteries.
• Do not continue using the remote if it gets warm or hot.
Call our Support Center immediately on the SHARP
support website.
Remote Control Range Information
●Theremotecontrolcanworkatadistanceofupto26feetin
front of the TV set.
●Itcanworkata30degreehorizontalorverticalangle.
Program Your Universal Cable or Satellite
Remote Control to Operate Your New SHARP
Television (only for USA)
If you would like to program your other household remote
controls to your new SHARP television,please refer to the User
Manual supplied by your Cable or Satellite provider. It should
include instructions on how to program their remote to your
television.
A list of SHARP codes for the most common Cable and Satellite
providers are listed below. Use the SHARP code that is
associated with your Cable or Satellite provider (if applicable).
DIRECTV......0178, 10178, 10019, 10748, 11314, 11660, 11710,
11780, 12049, 10171, 11204, 11326, 11517, 11564, 11641,
11963, 12002, 12183
Time Warner Cable......386, 0178, 10178, 400, 450, 461, 456,
0748, 1463, 0463, 10463
13
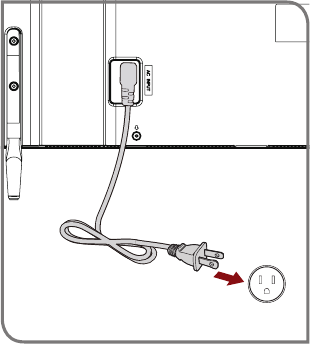
STEP 5. Power on the TV
Plug the power cord into a wall outlet.
Wall Outlet
Power Cord
Comcast......0178, 10178, 10463, 11463, 10748, 11314, 11660,
10171, 11204, 11326, 11517, 11641, 11780, 11785, 11892, 11963,
12002
Cox Communications......0178, 10178, 1326, 1463
Dish Network......505, 627, 538, 720, 659
If the SHARP code associated with your Cable or Satellite provider
is not listed, does not work or you cannot locate the instructions to
program your remote, call your local Cable or Satellite provider's
customer service center.
If your Cable or Satellite provider does not have a SHARP code
available, please contact us at one of the phone numbers on Page 2.
Using Your Cable Set-top Box or Satellite Receiver
Remote as a ‘Universal’ Remote
If you prefer to use your Cable Set-top Box or Satellite Receiver
Remote as a ‘Universal Remote’, then visit the Support page to view
a list of the codes.
14
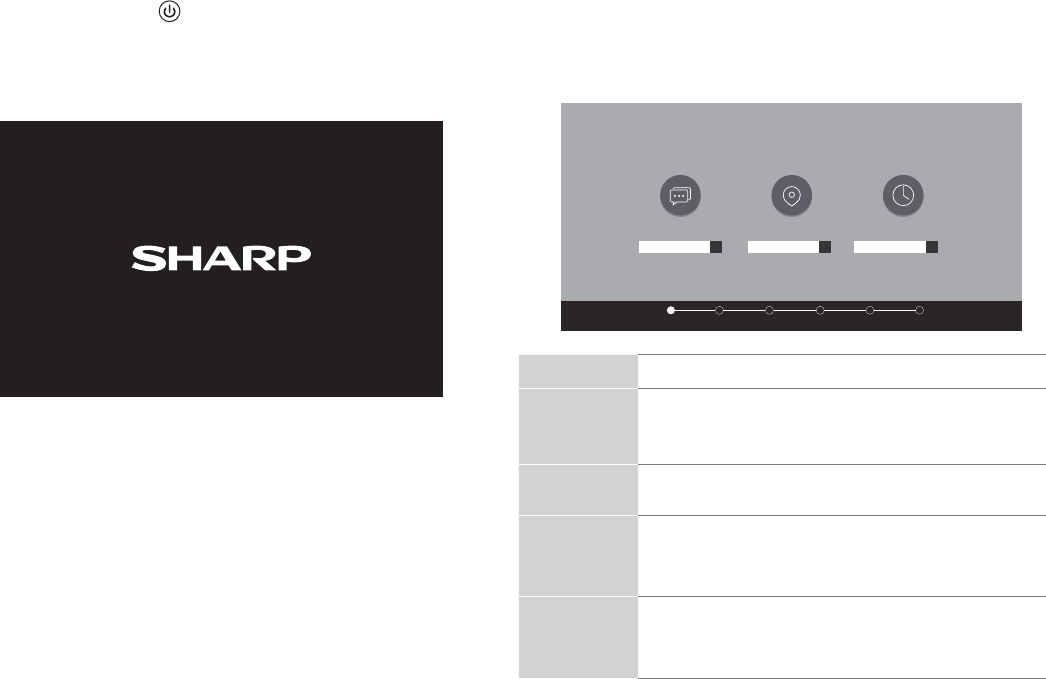
Press the Power button on the remote to turn on the TV. A
splash screen that shows the SHARP logo appears. Next, the
First-Time Setup Menu begins by prompting you to choose your
Language, Country, and Time Zone.
STEP 6. Complete the rst-time setup menu
After the splash screen that shows the SHARP logo appears, begin
therst-timesetupmenu.
Screen Task
LANGUAGE
AND
LOCATION
• UsingtheD-padarrowsofyourremote,choose
your
Language, Country and Time Zone. Next,
navigate to the Forward arrow and press OK.
TERMS OF
SERVICE
• PressOK to select Accept all.Whenyou’redone
navigate to the Forward arrow and press OK.
TV USAGE
MODE
•SelectHome (which appears by default).
Next,navigate to the Forward arrow and press OK.
•Note: ‘Store mode’ should only be selected by
Retailers who plan to demonstrate the TV.
NETWORK
CONNECTION
•IfyourTVdoesnotautomaticallydetectanEthernet
connection, then select WiFi.Whenyou’redone,
select your network from the list that displays and
move to the next screen.
LANGUAGE AND LOCATION
Language
Language Country Time Zone
TermsMode Network Input Done
+ + +
English United States Select

15
STEP 7. Begin to enjoy your TV
Your Smart TV is easy to use and brag-worthy!
Nowthatyou’vecompletedtherst-timesetupmenu,theHome
screen is your starting point for navigating the TV. Gone are
the days where your TV only provides one way for you to be
entertained. This showpiece provides you the convenience
of watching a program on a live channel, accessing Video on
Demand to watch a movie and many other entertainment options.
Using your remote, press the Home button to begin enjoying your
TV.
Disclaimer: Subscriptions or other payments may be required to access content through some applications. Some or all of the included
or downloaded application services in this Sharp, Aquos or Quattron device may not function depending on the Internet connection,
local limitations of included applications or other reasons outside of the Licensor's or Manufacturers control. ALL LICENSORS AND THE
MANUFACTURER EXPRESSLY DISCLAIM RESPONSIBILITY FOR ANY APPLICATION SERVICE FROM FUNCTIONING AT ANY
TIME, FOR CONTENT IN ANY APPLICATION SERVICE, FOR DISRUPTIONS OF SERVICE, LOCAL OR REGIONAL LIMITATIONS,
WARRANTIES OF TITLE, NO INFRINGEMENT, AND FOR IMPLIED WARRANTIES OF MERCHANTABILITY OR FITNESS FOR
A PARTICULAR PURPOSE. By purchasing this device, you accept such Disclaimer without any claim on any Licensor and/or the
Manufacturer at any time and in any territory.
Screen Task
LIVE TV
INPUT
SOURCE
Select how you receive your TV channels. Choose
from one of the following sources below and then move
to the next screen.
•TV
• AV
•COMPONENT
•HDMI
TIP: You only need to scan for channels if your TV is
connected to an Antenna.
CONGRATULATIONS! Your TV is now ready to use.
Press the OKconrmationbuttononyourremoteifyouarene
with the selections that appear on the screen. Otherwise, navigate
to the back arrow on the screen to change your selection.

16
PRODUCT SPECIFICATIONS
Disclaimer: All product, product specications, and data are subject to change without notice to improve reliability, function, design or
otherwise.
Model Name LC-75N8000U
Dimension
(W×H×D)
WithoutStand 66×37.9×2.2inches
(1676×962×56mm)
WithStand 66×40.7×12.8inches
(1676×1034×326mm)
Weight WithoutStand 106.3 lbs (48.2 kg)
WithStand 108.5 lbs (49.2 kg)
Active Screen Size (Diagonal) 75 inches
Screen Resolution 3840×2160
Audio Power 15W+15W
Power consumption 230W
Power Supply 120 V ~ 60 Hz
Performance and Compliance
Certications HDMI, VESA, Dolby Digital Plus, FCC, dbx-tv® Total Technology
Picture Quality HDR Processing, AquoMotion and Revelation Upscaler
Audio technologies Supports dolby digital and dbx-tv®
Connectivity Built-inWirelessfeature(2x2dualband)
Key Apps Netix,Vudu,YouTube,AmazonInstantVideo,PandoraandOperaApp(SomeappsonlyforUSA)
Ports 4 HDMI ports, 3 USB ports, LAN port for Ethernet, 1 Digital Audio Output, 1 RF Input, 1 Earphone Audio Output, 1
RCA Composite Video Input , 1 left/right Audio Input for Composite, 1 RCA Component Video Input
Other features Smart TV, Dynamic contrast Picture, VESA standard wall mount support, Webbrowser,ParentalControlandClosed
Caption
17
QUICK PROBLEM-SOLVING TIPS
WhenyouexperienceanissuewithyourTV,turnitoffandonagain.Ifthisdoesnotresolvetheproblem,thenrefertothetipsbelow.If
the problem is still not resolved, then contact us at one of the phone numbers on Page 2.
ISSUES POSSIBLE SOLUTIONS
No sound or picture
• CheckifthepowercordispluggedintoapoweredACoutlet.
•Pressthe Power button on the remote control to activate the unit from 'Standby' mode.
• ChecktoseeiftheLEDlightisonornot.Ifitis,thentheTVisreceivingpower.
I have connected an external
source to my TV and I get no
picture and/or sound.
•CheckforthecorrectoutputconnectionontheexternalsourceandforthecorrectinputconnectionontheTV.
•Makesureyouhavemadethecorrectselectionfortheinputmodefortheincomingsignal.
WhenIturnonmyTV,thereisa
delay for a few seconds before the
picture appears. Is this normal?
•Yes,thisisnormal.TheTVisinitializingandsearchingforprevioussettinginformation.
The picture is normal but there is
no sound
•Checkthevolumesettings.
•Checkif'Mute'modeissettoOn.
Sound but no picture or black and
white picture
•Ifthepictureisblackandwhite,unplugtheTVfromtheACoutletandreplugitafter60seconds.
•CheckthattheColorissetto50orhigher.
•TrydifferentTVchannels.
The sound and/or picture is
distorted or appears wavy
•AnelectricappliancemaybeaffectingtheTV.Turnoffanyappliancesthatarenearbyandmoveitfartheraway
from the TV.
•InsertthepowerplugoftheTVsetintoanotherpoweroutlet.
The sound and picture is blurry or
cuts out
•Ifusinganexternalantenna,checkthedirection,positionandconnectionoftheantenna.
•Adjustthedirectionofyourantennaorresetornetunethechannel.
A horizontal or vertical stripe
appears on the picture and/or the
picture is shaking
•Checkifthereisanapplianceorelectrictoolnearbythatiscausinginterference.

18
The plastic cabinet makes a
"clicking" type of sound
•The'click'soundcanoccurwhenthetemperatureofthetelevisionchanges.Thischangecausesthetelevision
cabinet to expand or contract, which makes the sound. This is normal and the TV is OK.
The remote control does not work
•ConrmthatTVstillhaspowerandisoperational.
•Changethebatteriesintheremotecontrol.
•Checkifthebatteriesarecorrectlyinstalled.
Need more help?
Additional help is available online at support links on Page 2. You will nd answers to frequently asked questions,
downloadable rmware and more.

19
Certication and Compliance
FCC Notice
This device has been tested and found to comply with the limits
for a Class B digital device pursuant to Part 15 of the FCC Rules.
These limits are designed to provide reasonable protection
against harmful interference in a residential installation. This
device generates, uses, and can radiate radio frequency energy
and, if not installed and used in accordance with the instructions,
may cause harmful interference to radio communications.
However, there is no guarantee that interference will not
occur in a particular installation. If this device does cause
harmful interference to radio or television reception, which can
be determined by turning the device off and on, the user is
encouraged to try to correct the interference by one or more of the
following measures:
●Reorientorrelocatethereceivingantenna.
●Increasetheseparationbetweenthedeviceandreceiver.
●Connectthedeviceintoanoutletonacircuitdifferentfromthat
to which the receiver is connected.
●Consultthedealeroranexperiencedradio/TVtechnicianfor
help.
NOTE: The manufacturer is not responsible for any radio or
TV interference caused by unauthorized modications
to this equipment. Such modications could void the
user’s authority to operate the equipment.
TheWi-FiModulecomplieswithFCCradiationexposurelimits
set forth for an uncontrolled environment. This device should be
installed and operated with a minimum distance of 20 centimeters
between the radiator and your body.
Manufactured under license from Dolby Laboratories. Dolby, Dolby
Audio, and
the double-D symbol are trademarks of Dolby Laboratories.
The terms HDMI and HDMI High-Definition Multimedia Interface,
and the HDMI Logo are trademarks or registered trademarks
of HDMI Licensing LLC in the United States and other countries.
This TV includes dbx-tv Technology
. dbx-tv is a trademark
or registered trademark of THAT Corporation.
©2015. All rights reserved. SHARP and the SHARP
logo are registered
trademarks of SHARP. Other brand and product names are registered
trademarks of their respective owners.