HUIZHOU FORYOU GENERAL ELECTRONICS M608 Marine Audio User Manual
HUIZHOU FORYOU GENERAL ELECTRONICS CO.,LTD. Marine Audio
UserManual.wiki
>
HUIZHOU FORYOU GENERAL ELECTRONICS
>
M608 User Manual
User Manual
Navigation menu
Upload a User Manual
Namespaces
Wiki Guide
HTML
PDF
Info
Views
User Manual
Discussion / Help
Navigation
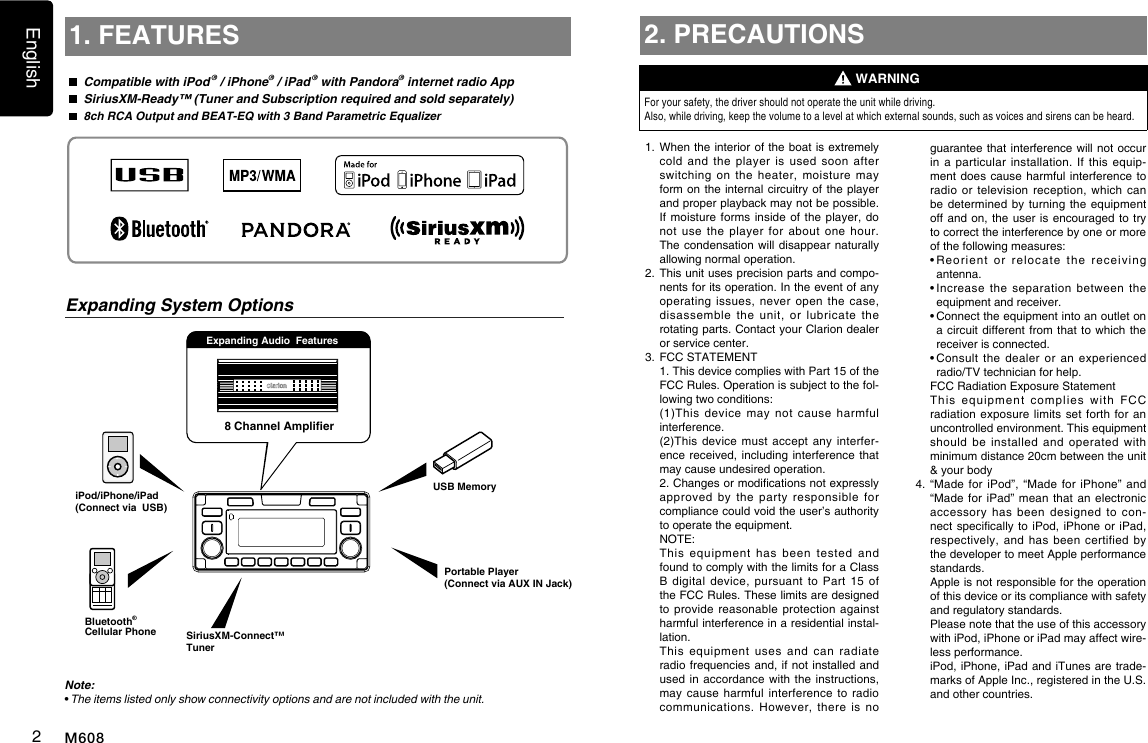
![English4M6083. CONTROLSOperational PanelNames of Buttons[ / SRC ] Button• Toggles the audio sources• Power on / Power off (long press)[BND] Button• RADIO mode – Select tuner band• USB mode – Top play[ ] Button• Audio adjustments (Short Press)• Zone link (long press)[VOLUME] Knob• Adjust volume level[SCAN] Button• RADIO mode –Preset scan / Auto store (long press)[MENU] Button• USB mode – Search function• iPod mode – iPod menu• Pandora mode – Station select• SiriusXM mode – Instant Replay• In menu/le list – Back• Tuner mode - No function• AUX mode - No function • Adjust mode (long press)[ENT] button• Clock menu (Short Press)• DISP off (long press)[ / ] Buttons• RADIO mode – Manual tuning / Auto search (long press)• USB/iPod mode – Previous / next track – Fast Forward / Fast Backward (long press)• Pandora mode – Skip track ( )• SiriusXM mode – Channel Up/Down[SCAN]Remote Sensor[ SRC][ BND ][ ][VOLUME][1 - 5] Buttons [SUB][MUTE][MENU][ENT][ , ][UP/DOWN][UP/DOWN] Knob• Radio mode - Tune• USB mode - Select folder/le• Pandora mode – Select search mode/station• SiriusXM Radio mode – Select category / (Operates on Category and Channel modes)[MUTE] button• Mute the volume output (short press)• Display change (long press)[1 - 5] Buttons• [1] Button: Repeat play / Preset station 1 / Preset station memory 1 (long press) / Pandora mode – Bookmark track• [2] Button: Random play / Preset station 2 / Preset station memory 2 (long press) / Pandora mode - Bookmark artist • [3] Button: Play/Pause / Preset station 3 / Preset station memory 3 (long press) Note: When in “Replay” feature will Play/Pause • [4] Button: Previous folder / Preset station 4 / Preset station memory 4 (long press) / Pandora mode - Thumbs down • [5] Button: Next folder / Preset station 5 / Preset station memory 5 (long press) / Pandora mode - Thumbs up[SUB] Button• Subwoofer menu (Short Press)• SiriusXM mode – Direct select (long press)](https://usermanual.wiki/HUIZHOU-FORYOU-GENERAL-ELECTRONICS/M608/User-Guide-3685339-Page-5.png)
![English5M608Remote Control (RCX001: Sold separately)[ , ][ ][DISP][ISR][RDM][RPT][ , ][MUTE][SCN/PS/AS][SRC / ] [BAND/TOP]Notes for use of Optional RCX001 Remote Control1. Aim the remote control at the remote sensor on the unit.2. Remove the battery from the remote control or insert a battery insulator if the remote is not going to be used for a month or longer.3. DO NOT store the remote control under direct sunlight or in high temperature envi-ronment, or it may not function properly.4. Use “button shaped” lithium battery “CR2025” (3V) only.5. DO NOT subject battery to recharge, disas-semble, heat or dispose in re or water.6. Insert the battery in proper direction according to the (+) and (-) polarities.7. Store the battery in a place where children cannot reach to avoid the risk of accident.Inserting the Battery1. Slide remote control unit’s rear cover in the direction shown.2. Insert battery (CR2025) into insertion guides with printed side (+) up.3. Press battery into compartment as shown.4. Replace and slide cover until it clicks into place.Insertion guide[SRC / ] Button• Toggles the audio sources• Power on / Power off (long press)[ , ] Buttons• Radio mode - Manual Tune up or down / Seek Tune up or down (long press)• Previous / next track• SiriusXM mode - Channel up or down / Rapid Channel Browsing (long press)• Pandora mode – Skip[SCN/PS/AS] Button• Scan play / Preset scan• Auto memory store (long press)• Pandora mode – Thumbs down• SiriusXM mode– Channel scan (in current category) / Preset scan (long press)[BAND/TOP] Button• USB mode – Top play• RADIO mode – Select tuner band• SiriusXM mode – Select tuner band / Cat-egory Browsing mode (long press)[ , ] Buttons• Volume up / down[ ] Button• Play / Pause[ISR] Button• No function[DISP] Button• Display switch[RDM] Button• Random play• Pandora mode – Thumbs up[RPT] Button• Repeat play• Pandora mode – Bookmark track / Book-mark Artist (long press)[MUTE] Button• Mutes the volume](https://usermanual.wiki/HUIZHOU-FORYOU-GENERAL-ELECTRONICS/M608/User-Guide-3685339-Page-6.png)
![English6M608Optional Wired Remote Control Unit OperationsZone ControlOptional Clarion wired remote control functions.Note:If the remote control is connected to the unit while powered on, please restart and/or reset the unit to introduce the wired remote control to the system.[ /SOURCE] Button• Press the [ /SOURCE] button to turn the power on and press and hold it (1 sec.) to turn the power off.• Each time the [ /SOURCE] button is pressed, the mode switches.Note:• Iftheaboveequipmentisnotconnected,cor-respondingmodecannotbeselected.[ENTER] Button• RADIO mode – No function• USB mode – No function• iPod mode – Conrm (in Menu mode)• AUX mode – No function• Pandora mode – No function• SiriusXM mode – Conrm (in Menu mode)[ ], [ ] Buttons• Press the [ ] button to increase the volume.• Press the [ ] button to decrease the volume.[ ], [ ] Buttons• RADIO mode – Station up-down / Seek up - down (long press)• USB mode – Previous - next track / Fast forward-reverse (long press) • iPod mode – Previous - next track / Fast forward-reverse (long press) • AUX mode – No function• Pandora mode – skip track ( )• SiriusXM mode – Channel up - down / Rapid tune up-down – (Long press) / Move cursor (direct mode) / Channel up - down in current category (Category mode)CAUTIONLower the volume level before powering the source unit off. The source unit stores the last volume setting.WARNINGEXPOSING THE UNIT TO WATER WITH THE FRONT PANEL OPEN WILL CAUSE DAMAGE OR UNIT MALFUNC-TION!Optional Wired Remote Control Unit Operations[ ], [ ] Buttons• RADIO mode – Preset station up / down• USB mode – No function• iPod mode – Navigate (in Menu mode)• AUX mode – No function• Pandora mode – No function [MENU/BAND] Button• Each time the button is pressed, the band switches in the following order: Radio: FM1 -> FM2 -> FM3 -> AM -> WB..... SiriusXM: SXM1 -> SXM2 -> SXM3 -> SXM1.....• Press and hold the button to enter the Cat-egory Browsing mode. (in SiriusXM mode)• Press and hold the button to enter the iPod menu. (in iPod mode)When power on rst time, you need to select the audio configuration type: rotate the [UP/DOWN] knob to select “STANDARD”, “MULTI ZONE” or “TOWER”, and press [ENT] button to conrm. If “STANDARD” mode is selected, all the zones will be congured together. If “MULTI ZONE” is selected, the zones can be congured sepa-rately. If “TOWER” is selected, the zones will be split into zone 1 and zone 2 (tower).To reset the audio configuration type, please access system setup mode.[ ] Button• RADIO mode – Mute ON-OFF• USB mode – Play-Pause• iPod mode – Play-Pause• AUX mode – Mute ON-OFF• Pandora mode – Play-Pause• SiriusXM mode – Mute ON/OFF in Live mode Play/Pause in Instant Replay mode IR-Receiver• Receiver for optional IR remote control unit. (Operating range: 30° in all directions)ZONE LINK (MULTI ZONE/TOWER mode)1. Long press the [ ] button.2. Press the [ ] or [ ] button to select the ZONE number. Rotate the [UP/DOWN] knob to select “YES” or “NO”.3. Press the [ENT] button to conrm.[MENU/BAND][ENTER][ [ /SOURCE]][ ], [ ][ ][ ][ ], [ ]IR-Receiver](https://usermanual.wiki/HUIZHOU-FORYOU-GENERAL-ELECTRONICS/M608/User-Guide-3685339-Page-7.png)
![English7M6084. OPERATIONSBasic OperationsNote:• Refer to the diagrams in “3. CONTROLS” when reading this chapter.CAUTIONListening to the unit at or near maximum volume level can be harmful to your hearing.Power On / OffNote:• Start the engine before using this unit.• Be careful about using this unit for a long time without running the engine. If you drain the battery too far, you may not be able to start the engine and this can reduce the service life of the battery.1. Start the engine. The power button / knob illumination on the unit will light up.Engine ON position2. Press the [ SRC] button on the front panel or remote control to turn on the power under standby mode. The unit goes back to the last status after power on.3. Press and hold the [ SRC] button on the front panel or the remote control to turn off the power.MutePress the [MUTE] button on the front panel or remote control to mute the volume from the unit.Note:Doing the operation above again or adjusting volume will release muting.Volume AdjustmentSTANDARD: Rotate the [VOLUME] knob on the front panel or press the [ ] or [ ] button on the remote control.MULTI ZONE: In Volume adjustment mode, press the [ ] or [ ] button to select ZONE number, then rotate the [VOLUME] knob to adjust.TOWER: In linked mode, rotate [VOLUME] knob on the front panel or press the [ ] or [ ] button on the remote control. In non-linked while in volume adjustment press the [] or [ ] button to select Zone 1 or Tower, then rotate the [VOLUME] knob to adjust.The adjustable range of volume is 0 to 40.CAUTIONWhile driving, keep the volume level at which external sounds can still be heard.Changing SourcesPress the [ SRC] button to change the operation mode. Changing the DisplayLong press the [MUTE] button on the front panel or press [DISP] on the remote control to switch the display information from clock, station infor-mation (radio mode), or track information (USB mode).System SetupAUX SENS (AUX mode)Rotate the [UP/DOWN] knob to choose AUX Input sensitivity LOW, MID or HIGH in AUX mode.PARENTAL (SiriusXM mode)Change parental password. Default code is “0000”.LOCK CH (SiriusXM mode)Lock the current channelUNLOCK ALL CH (SiriusXM mode)Unlock all parental locked channels.SELECTThe “SELECT” menu is intended to auto-matically pair with a stored mobile device. This unit can store a maximum of three mobile devices. The mobile devices will be stored in the order they are paired to the unit. If you wish to add a different device than those already paired, you will need to delete the unwanted mobile device from the “DELETE” menu. DELETE 1. Press the [ENT] button.2. Rotate the [UP/DOWN] knob to choose the paired mobile phone name from the pairing list.3. Press the [ENT] button.to conrm.DISCON (BT mode)Disconnect currently connected mobile phone.1. Press the [ENT] button, mobile phone displays are currently connected.2. Press the [ENT] button to disconnect.AUTO CON: ON/OFF1. Rotate the [UP/DOWN] knob to choose AUTO CONNECTION ON or OFF. ON: When detect the phone paired before, the unit will reconnect to it auto-matically.Changing Adjustment Settings1. Press and hold [MENU] button to switch to system setup mode.2. Press the [ ] or [ ] button to select the “item name”.3. Rotate the [UP/DOWN] knob to select the “desired setting value”. * For some options, you should press the [ENT] button to adjust the setting value.4. After completing the setting adjustment, press the [MENU] button to return to the previous mode.CLOCK1. Press the [ENT] button.2. Press the [ ] or [ ] button to select the hour or the minute.3. Rotate the [UP/DOWN] knob to set the correct time. * The clock is displayed in 12-hour format by default.4. Press the [ENT] button to store the time into memory.Note:• Theclockcanonlybesetwhiletheunitison.Ifyoudrain or removetheboat’sbatteryortakeout this unit,theclockwillreset.Whilesettingthe clock, ifanotherbuttonoroperationis selected, theclocksetmodeiscanceled.AUDIO MODE1. Rotate the [UP/DOWN] knob to select STANDARD, MULTI ZONE or TOWER.2. Press the [ENT] button to conrm.DX/LO (RADIO mode)Rotate the [UP/DOWN] knob to choose radio local or distant at RADIO mode.• LO: Only stations with strong signal can be received.• DX: Stations with strong and weak signals can be received.](https://usermanual.wiki/HUIZHOU-FORYOU-GENERAL-ELECTRONICS/M608/User-Guide-3685339-Page-8.png)
![English8M608System Setup Audio SetupPIN CODE 1. Press the [ENT] button.2. Rotate the [UP/DOWN] knob and press [ ] or [ ] button to choose a 4-digit password. 3. Press the [ENT] button.to conrm. The PIN CODE default setting is “ 0000 ”.SCREEN SAVER: ON/OFF1. Rotate the [UP/DOWN] knob to choose screen saver ON or OFF. ON: The screen saver will appear on the LCD screen after 30 seconds of non-use.SCROLL: ON/OFF1. Rotate the [UP/DOWN] knob to choose scroll ON or OFF. For track information that is longer than the display panel: When SCROLL is ON, the LCD will scroll the ID3 TAG information across the dis-play, e.g.: TRACK -> FOLDER -> FILE -> ALBUM -> TITLE -> ARTIST -> TRACK ->... When SCROLL is OFF, the LCD will dis-play one of the ID3 TAG information, the default is TRACK, but user can adjust it to other ID3 TAG information by long pressing [MUTE] button.PANDORA: ON/OFF1. Rotate the [UP/DOWN] knob to choose Pandora ON or OFF. Select OFF if the Pandora application has not been installed on your iPod, iPhone, or iPad.DIMMER: ON/OFF1. Rotate the [UP/DOWN] knob to choose dimmer ON or OFF.• ON: LCD dimmer is active when the marker lights on the boat are turned ON.• OFF: LCD always maximum brightness regardless of the boat’s marker lights.BEEP: ON/OFF1. Rotate the [UP/DOWN] knob to choose button beep sound ON or OFF.12/24HOUR1. Rotate the [UP/DOWN] knob to choose time format: 12 HOUR or 24 HOUR.REGION 1. Rotate the [UP/DOWN] knob to choose a Radio Tuner Region from Europe/America/Asia/Australia.FACTORY RESET1. Rotate the [UP/DOWN] knob to choose YES or NO. 2. YES: Press the [ENT] button to show “CONFIRM”. 3. Rotate the [UP/DOWN] knob to choose YES or NO. 4. YES: Pressing the [ENT] button will reset the unit.STANDARD 1. Press the [ ] button to enter sound effect setting mode. First press shows current BEAT EQ setting. Rotate the [UP/DOWN] knob to change BEAT EQ in this order: EQ OFF -> POP -> CLASSIC -> JAZZ -> CUSTOM. On CUSTOM setting mode, press the [ENT] button. Then press [ ] or [ ] button to select BAS, MID, or TRE Gain, rotate the [UP/DOWN] knob to select a value: (-6) - (+6), press [ENT] button to conrm.2. After pressing the [ ] button, press [ ] or [ ] button to select USER preset including: SUBWOOFER VOL -> SUBWOOFER LPF -> SUBWOOFER PHASE -> LOUDNESS -> BALANCE -> FADER -> FRONT/REAR HPF, rotate the [UP/DOWN] knob to select a value.MULTI ZONE1. Press the [ ] button to enter sound effect setting mode. First press shows current BEAT EQ setting. Rotate the [UP/DOWN] knob to change BEAT EQ in this order: EQ OFF -> POP -> CLASSIC -> JAZZ -> CUSTOM. On CUSTOM setting mode, press the [ENT] button. Then press [ ] or [ ] button to select BAS, MID, or TRE Gain, rotate the [UP/DOWN] knob to select a value: (-6) - (+6), press [ENT] button to conrm.2. After pressing the [ ] button, press ] or [ ] button to select ZONE 1/2/3/4 EQ -> BALANCE -> HPF. Rotate the [UP/DOWN] knob to select a value. TOWER 1. Press the [ ] button to enter sound effect setting mode. First press shows current BEAT EQ setting. Rotate the [UP/DOWN] knob to change BEAT EQ in this order: EQ OFF -> POP -> CLASSIC -> JAZZ -> CUSTOM. On CUSTOM setting mode, press the [ENT] button. Then press [ ] or [ ] button to select BAS, MID, or TRE Gain, rotate the [UP/DOWN] knob to select a value: (-6) - (+6), press [ENT] button to conrm. 2. After pressing the [ ] button, press [ ] or [ ] button to select USER preset including: SUBWOOFER VOL -> SUBWOOFER LPF -> SUBWOOFER PHASE -> LOUDNESS -> BALANCE -> FADER -> FRONT/REAR HPF, rotate the [UP/DOWN] knob to select a value. SUBWOOFER1. Press [SUB] to enter subwoofer adjust mode.2. Rotate the [UP/DOWN] knob to adjust the volume level from -6 to +6.](https://usermanual.wiki/HUIZHOU-FORYOU-GENERAL-ELECTRONICS/M608/User-Guide-3685339-Page-9.png)
![English9M608Selecting Tuner ModePress [ SRC] button once or more to enter TUNER mode.Selecting a Radio BandPress the [ BND ] button on the panel or [BAND] on the remote control to select one radio band among FM1, FM2, FM3, AM, WB.Manual TuningDuring manual tuning, the frequency will be changed in steps.Press the [ ] or [ ] button on the panel to tune in a lower / higher station.Press the [ ] or [ ] button on the remote control to select preset stations.Auto TuningPress and hold the [ ] or [ ] button to seek a lower / higher station.To stop searching, repeat the operation above or press other buttons having radio functions.Note:When a station is received, searching stops and the station is played.Preset ScanPreset Scan receives the stations stored in preset memory in order. This function is useful when searching for a desired station in memory.1. Press the [SCAN] button on the panel or [SCN/PS/AS] on the remote control.2. When a desired station is tuned in, press the button again to continue receiving that station.Note: Be careful not to press and hold the [SCAN] button for 1 second or longer, otherwise the auto store function will begin and the unit starts storing stations.Tuner OperationsAuto StoreThe unit stores the strongest stations found in the entire Band.Press and hold the [SCAN] button (1 sec.) to start automatic station search.To stop auto store, press other buttons having radio functions.Notes:1. After auto store, the previous stored stations will be overwritten.2. The unit has 5 bands, such as FM1, FM2, FM3, AM and WB. Each band can store 5 stations, M608 can store 25 stations in total.Manual StoreWhen a desired radio station has been detected, press and hold number button 1 - 6 to store it in the memory.Recalling a Stored StationPress one numeric button among 1 - 6 on the panel to select the corresponding stored station.Local SeekingWhen LOCAL seeking is ON, only those radio stations with strong radio signal will be received.To select LOCAL function, press and hold the [ MENU ] button on the front panel, then press [ ] button repeatedly until DX/LO displays on the screen, and rotate the [UP/DOWN] knob to select Local or Distant mode.Note:The number of radio stations that can be received will decrease when Local mode is ON.SiriusXM Satellite Radio OperationsOnly SiriusXM® brings you more of what you love to listen to, all in one place. Get over 140 channels, including commercial-free music plus the best sports, news, talk, comedy and entertainment. Welcome to the world of satellite radio. A SiriusXM Tuner and Subscription are required. For more information, visit www.siriusxm.com. Displaying the Radio IDBefore you listen to satellite radio, you must subscribe to the service using the SiriusXM Radio ID number. 1. Press [ SRC] button to activate SiriusXM mode.2. Press [ ] or [ ] to select channel “0”. The unit displays Radio ID. Note: Unit does not display “0CH” when you tune to channel “0”.Activating your SiriusXM Subscrip-tionAfter installing your SiriusXM-Connect Tuner and antenna, power on your headunit and select SiriusXM mode. You should be able to hear the SiriusXM preview channel on Channel 1. If you cannot hear the preview channel, please check the installation instruc-tions to make sure your SiriusXM Connect tuner is properly installed.Once you can hear the Preview channel, tune to Channel 0 to nd the Radio ID of your tuner. In addition, the Radio ID is located on the bottom of the SiriusXM Connect Boat Tuner and its packaging. You will need this number to activate your subscription. Write the number down for reference. Note: The SiriusXM Radio ID does not include the letters I, O, S or F.In the USA, you can activate online or by calling SiriusXM Listener Care:• Visit www.siriusxm.com/activatenow • Call SiriusXM Listener Care at 1-866-635-8634For Canadian Subscriptions, please contact: • Visit www.siriusxm.ca/activatexm • Call SiriusXM Customer Care at 1-888-539-7474 As part of the activation process, the Siri-usXM satellites will send an activation mes-sage to your tuner. When your radio detects that the tuner has received the activation message, your radio will display: “Subscrip-tion Updated”. Once subscribed, you can tune to channels in your subscription plan. Note, the activation process usually takes 10 to 15 minutes, but may take up to an hour. Your radio will need to be powered on and receiving the SiriusXM signal to receive the activation message.Storing Channel Presets1. Press [ BND ] button to select the desired band you want to store the preset in. There are 3 Satellite Radio Preset bands. Each press of [ BND ] button changes the band: SXM1 -> SXM2 -> SXM3 -> SXM12. Tune to the desired channel and then press and hold one of the preset buttons (1 - 6), to store the channel. 3. Repeat the procedure to store up to 5 other channels on the same band.Note:• A total of 18 channels can be stored in the preset memory, 6 channels for each band (SXM1, SXM2 and SXM3).Tuning Channels using Presets1. Press [ BND ] button to select the desired band of presets you wish to access.2. Press the preset button (1 - 6) that has your desired Satellite Radio channel stored in memory.Category Browsing1. Press and hold [ BND ] button to activate the Category Browsing mode.](https://usermanual.wiki/HUIZHOU-FORYOU-GENERAL-ELECTRONICS/M608/User-Guide-3685339-Page-10.png)
![English10 M608SiriusXM Satellite Radio Operationspress [ ] to scroll to “LOCK CH”, press [ENT] button to conrm. Input password as explained in step 1 and then press [ENT] button to set the locked channel. You will be asked to input password. Enter pass-word and “LOCK” will be displayed if it is successful.3. For unlocking the locked channel, tune to the channel you wish to unlock, press and hold [MENU] and press [ ] to select “UNLOCKCH”. Enter the password to unlock the channel.4. To access the locked channels, select a channel by “DIRECT SELECT”. Press [MENU] and select “DIRECT SELECT” by pressing the [ENT] button. Input the desired locked channel (you need to input 3 digits) and enter the pass-word, then you can tune into that locked channel.This Unit Supports MP3/WMA File Playback Note:• Ifyouplaya WMA filewithactiveDRM(DigitalRightsManagement),therewillbenoaudio.To disable DRM (Digital Rights Management) When using Windows Media Player 9/10/11, click on Tool -> Options -> Copy Music tab, then under Copy settings, unclick the Check box for Copy protect music. Then, recon-struct les.Personally constructed WMA les are used at your own responsibility.Precautions when creating MP3/WMA leUsable sampling rates and bit rates1. MP3: Sampling rate 8 kHz-48 kHz, Bit rate 8 kbps-320 kbps / VBR 2. WMA: Bit rate 8 kbps-320 kbpsFile extensions1. Always add a file extension “.MP3”, “.WMA” to MP3, WMA le by using single byte letters. If you add a file extension other than specified or forget to add the le extension, the le cannot be played.2. Files without MP3/WMA data will not play. The les will not play if you attempt to play les without MP3/WMA data.* When VBR les are played, the displayed play time may differ from the actual play location.1. Insert a USB device into the rear of the unit USB cable. When connecting a USB device, the unit will read the les automatically.2. To remove the USB device, you should rst select another source or turn off the power, in order to avoid damaging the USB device. Then you can remove the USB device safely.USB OperationsSiriusXM Satellite Radio Operations2. Rotate the [UP/DOWN] knob to select desired category.3. Press [ ] or [ ] to select desired channel within the selected Category. You can see channel name, channel number, artist, title or content by long pressing [MUTE].4. Press [ENT] to tune to selected channel.Note:If no operation is performed for 10 seconds, the Category Browsing mode is canceled.Preset ScanPreset scan receives the channels stored in preset memory in order. This function is useful when searching for a desired channel in memory.1. Press and hold the [SCAN] button.2. When a desired channel is tuned in, press the [SCAN] button again to select that channel.Category ScanThis function is useful when scanning for a desired channel within a specic category.1. Press the [BND] button on the panel. Selectable options CHN/CAT will appear.2. Short Press [SCAN] button to begin channel scan.3. When the desired channel is playing, press the [SCAN] button again to select that channel.Note:• Be careful not to press and hold the [SCAN] button for 1 second or longer, otherwise the preset scan function will begin and the unit starts scanning presets.Instant Replay1. In SiriusXM mode, press [MENU] button to enter INSTANT REPLAY mode.2. Press [ ] or [ ] button to skip back or forward.3. Press and hold [ ] or [ ] button to rewind (REW) or fast forward (FF).4. Press the [ 4 ] button on the panel or [ ] on the remote control for play/pause.5. Press [MENU] or [ BND ] button to exit.Changing the DisplayText information, such as the channel name, artist name/feature, song/program title and content is available with each SiriusXM channel. The unit can display this text informa-tion as explained below.1. In SiriusXM mode, long press [MUTE] button. Each time you long press this button, the display changes as shown below. Band/Channel number/channel name -> Artist Name -> Song Title -> Content Info -> Category Name -> Clock -> Band/Channel number/channel name* If there is no text information, nothing will be displayed.Parental Lock / UnlockThe SiriusXM Parental Control feature allows you to control access to channels that you con-sider inappropriate for younger listeners.When enabled, the Parental Control feature requires you to enter a password to tune into the locked channels. Information on setting up the password, setting up the channels to be locked, and the method to access the locked channels is described below.1. To set up the password, press and hold [MENU] then release [MENU] and press [ ] to scroll to “PARENTAL PASS-WORD”. Press [ENT] button to change password. Enter old password, then enter new password. To enter pass-word, rotate [UP/DOWN] knob to choose the numbers (0-9) and press [ ] or [ ] to enter the next number in the password. Once all 4 numbers are entered, press [ENT] button to confirm password. Note: Default password is “0000”.2. To set up the channels to be locked, tune to the channel you wish to lock. Press and hold [MENU] then release [MENU] and](https://usermanual.wiki/HUIZHOU-FORYOU-GENERAL-ELECTRONICS/M608/User-Guide-3685339-Page-11.png)
![English11M608* When MP3/WMA files are played, there will be a small gap of no sound between tracks.Logical format (File system)1. The folder name and file name can be displayed as the title during MP3/WMA play but the title must be within 32 single byte alphabetical letters and numerals (including an extension).2. Do not afx a name to a le inside a folder having the same name.Number of les or folders1. Up to 999 files can be recognized per folder. Up to 99 folders can be recognized. Up to 3000 les can be played.2. Some noise may occur depending on the type of encoder software used while recording.Pausing Playback1. Press the [ 3 ] button to pause playback. “PAUSE” appears in the display.2. To resume playback, press the [ 3 ] button again.Selecting a TrackTrack-up1. Press the [ ] button to skip ahead to the beginning of the next track.2. Each time you press the [ ] button, the track advances ahead to the beginning of the next track.Track-down1. Press the [ ] button to go back to the beginning of the current track.2. Press the [ ] button twice to go back to the beginning of the previous track.Fast-forward/Fast-reverseFast-forwardPress and hold the [ ] button.USB Operations USB OperationsFast-reversePress and hold the [ ] button.* USB devices containing a large amount of audio files can take several moments to begin the search and increase the delay between tracks. Additionally, some errors may occur during playback.Folder SelectThis function allows you to select a folder containing MP3/WMA les and start playing from the rst track in the folder.1. Press the [ 4 ] or [ 5 ] button. Press the [ 5 ] button to move to the next folder. Press the [ 4 ] button to move to the previous folder.2. To select a track, press the [ ] or [ ] button.Search Function1. Press the [ MENU ] button to enter FOLDER SEARCH mode. 2. Turn the [UP/DOWN] knob to select a folder.3. Press the [ENT] button to enter the le list search mode. The track list appears in the display.4. Turn the [UP/DOWN] knob to select a track.5. Press the [ENT] button to play.* When playing back MP3/WMA file, this function is performed in the current folder.Top FunctionThe top function resets to the first track of the storage. Press [ 3 ] button to play the rst track (track No. 1).* In case of MP3/WMA, the rst track of the current folder will be played.Other Playback FunctionsScan playThis function allows you to locate and play the rst 10 seconds of all the tracks.Press the [ SCAN ] button to perform scan play.iPod, iPhone & iPad OperationsDevice ConnectionConnect an iPod, iPhone or iPad to the USB connector via lightening cable for iPod/iPhone/iPad.When connecting a device, the unit will read the les automatically. The track information displays on the screen once playback starts.MENUPress [ MENU ] button, rotate the [UP/DOWN] knob to select from PLAYLIST / ARTIST / ALBUM / GENRE / SONGS / COM-POSERS / AUDIO BOOK / PODCASTS, press the [ENT] button to conrm. Play/PausePress the [ 3 ] button on the panel or [ ] on the remote control for play/pause.Repeat PlayThis function allows you to play the current track repeatedly or play all tracks in your iPod/iPhone /iPad repeatedly.1. Press the [ 1 ] button until “REPEAT ONE” appears on the LCD to perform repeat the current song playing.2. Press the [ 1 ] button until “REPEAT ALL” appears on the LCD to perform repeat play all songs.3. Press [ 1 ] button repeatedly until “REPEAT OFF” appears on the LCD to cancel repeat playback. Random PlayThis function allows you to play all tracks recorded on your iPod/iPhone/iPad in a random order.1. Press the [ 2 ] button once or more until “RANDOM ON” appears on the LCD to perform random play.2. Press [ 2 ] button repeatedly until “RANDOM OFF” appears on the LCD to cancel random playback. Repeat playThis function allows you to play the current track, tracks currently being played in the folder, or all the tracks repeatedly.1. Press the [ 1 ] button once or more until “REPEAT ONE” appears on the display to perform repeat play, and “ ” segment lights on. 2. Press [ 1 ] button repeatedly until “REPEAT FOLD” appears on the display for folder repeat play, 3. Press [ 1 ] button repeatedly until “REPEAT ALL” appears on the display for all tracks repeat play.4. Press [ 1 ] button repeatedly until “REPEAT OFF” appears on the display to cancel repeat playback, and “ ” seg-ment goes off. Random playThis function allows you to play all tracks in a random order.Press the [ 2 ] button to perform random play, and “ ” segment lights on.](https://usermanual.wiki/HUIZHOU-FORYOU-GENERAL-ELECTRONICS/M608/User-Guide-3685339-Page-12.png)
![English12 M608The built-in Bluetooth in this unit allows you to wireless transmit music from most Bluetooth enabled devices. Notes:• Do no leave device in direct sunlight or exposed to high temperatures. Extreme heat can cause distortion and discoloration which may result in a malfunction. • Some Bluetooth enabled devices may not function properly with this unit.• Clarion cannot guarantee the compatibility of all mobile device together with unit.BT Pairing1. Turn on Bluetooth function of your mobile device.2. Enter mobile device’s Bluetooth setup menu.3. Search for new Bluetooth devices.4. Select M608 from the pairing list on the mobile device.5. Enter “0000” as the password if necessary (The password default setting is “ 0000 ”).6. After pairing successfully, “BT AUDIO” will appear on the LCD for 1 second. 7. Press [ SRC] button to select “BT AUDIO”.8. The unit can connect up to three devices.* During pairing, depending on type of mobile device, a six digit PIN code will be shown on both the source unit’s display and the mobile device. In this case, please make sure that you have the same PIN code on both devices, and then conrm on the mobile device. Bluetooth Audio Streaming Operations What is Bluetooth audio streaming (A2DP)?Audio streaming is a technique for transfer-ring audio data such that it can be processed as a steady and continuous stream. Users can stream music from their external audio player to their boat stereo wirelessly and listen to the tracks through the boat’s speakers. Bluetooth OperationsCAUTIONPlease avoid operating your connected mobile phone while audio streaming, as this may cause noise interference on the song playback.Depending on your mobile phone, audio streaming may or may not resume after a telephone interruption. This unit will always return to Radio mode if audio streaming is disconnected.Note:Be sure to read the chapter “Pairing” before proceeding.Play/Pause a Track1. Press the [3] button or [ ] button on the remote control to pause audio playback.2. To resume audio playback, push the [3] button or [ ] button on the remote con-trol again.Selecting a TrackTrack-up1. Press the [ ] button to move to the beginning of the next track.2. Each time the [ ] button is pressed, playback proceeds to another track in the advancing direction.Track-down1. Press the [ ] button to move to the beginning of the previous track.2. Each time the [ ] button is pressed, playback proceeds to previous track in the reverse direction.Note:Playing order will depend on Bluetooth audio player. When the [ ] button is pressed, some A2DP devices will restart the current track depending on the duration of playback.During music streaming playback, “A2DP” will be shown on the display. Information iPod Menu Alphabetical SearchThis function searches the subfolders for desired alphabetical letters.1. Press the [MENU] button to select the iPod menu mode.2. Rotate the [UP/DOWN] knob to switch between categories. PLAYLIST, ARTIST, ALBUM, GENRE, SONGS, COMPOSERS, AUDIO BOOK, PODCASTS.3. Press the [ENT] button. (The contents of the category are displayed.)4. Rotate the [UP/DOWN] knob to select the desired letter to search.5. Press the [ENT] button to conrm.Listening to Pandora ®You can stream Pandora internet radio by connecting an iPod/iPhone/iPad that has the Pandora mobile application already installed.To start streaming, connect the iPod/iPhone/iPad with Pandora already launched.In Pandora mode, when the unit displays “PLEASE LAUNCH PANDORA APPLICA-TION ON MOBILE DEVICE”, please launch the Pandora Application by operating the iPod/iPhone/iPad connected.1. Press the [ SRC] button to enter the Pan-dora mode.Selecting a station from listPress the [MENU] button and select “BY DATE” or “BY NAME” by rotating the [UP/DOWN] knob and press the [ENT] button.• BY DATE: Listed in date created.• BY NAME: Listed in an alphabetical orderGo to next station or previous station (in alphabetical order)Rotate the [UP/DOWN] knob on the panel counter-clockwise to go to previous station.Rotate the [UP/DOWN] knob on the panel clockwise or press the [BAND/TOP] button on the remote control to go to next station.Thumbs up/downThumbs up: Press the [ 5 ] button on the panel or the [RPT] button on the remote control for thumbs up. Giving a track the thumbs up will tell Pandora to play more tracks like that one. Thumbs down: Press the [ 4 ] button on the panel or the [SCN] button on the remote control for thumbs down. Giving a track the thumbs down will skip to the next track (subject to skip limit), and Pandora will remember not to play that track on the sta-tion again.Notes:• You can personalize your stations by “thumbs up” or “thumbs down”.• If you give a track the thumbs down after the skip limit has been exceeded, your feedback will be saved but the current track will continue to play.BOOKMARK trackShort-press the [1] button to Bookmark cur-rent track. BOOKMARK artistShort-press the [2] button to Bookmark cur-rent artist. SkipPress the [ ] button on the panel or on the remote control for the next tracks in station.Note:• Pandora limits the number of skips allowed on their service. If you attempt to skip tracks beyond the limit, “SKIP LIMIT” is displayed.Play/PausePress the [ 3 ] button on the panel or [ ] on the remote control for play/pause.iPod, iPhone & iPad Operations](https://usermanual.wiki/HUIZHOU-FORYOU-GENERAL-ELECTRONICS/M608/User-Guide-3685339-Page-13.png)
![English13M608The rear RCA AUX terminals of this system is provided to allow playback of sounds and music from external devices connected to this unit.Press [ SRC] button on the panel to select “AUX 1” or “AUX 2”.AUX Input Sensitivity SettingSelect the following settings to set the sensitivity level of the sound from an external device con-nected to this system, that are difcult to hear, even after adjusting the volume. * The factory default setting is “MID”.1. Long press the [MENU] button.2. Press the [ ] button until “AUX SENSE” appears in the display.3. Rotate the [UP/DOWN] knob to select “HIGH”, “MID” or “LOW”.Note:• WhenAUXmodeisselected,AUXINsensi-tivitycanbeset.By this function, you can play the music in your Android phone through the car device.1. Open the MTP function of your mobile phone.2. Connect the mobile phone to the car device via a USB cable.3. The unit will play the music in the mobile phone automatically.AUX OperationsMTP OperationsBluetooth Operationsabout tracks (e.g. the elapsed playtime, song title, etc.) cannot be displayed on this unit. When an A2DP device is disconnected, “NO DEVICE” will be shown on the display and the unit will return to previously selected audio source. Some Bluetooth audio players may not have play/pause synchronized with this unit. Please make sure both device and main unit are in the same play/pause status in BT MUSIC mode.ID3 DisplayDuring music streaming playback, for music information that is longer than the display panel:When SCROLL is ON, the LCD will display ID3 TAG information, e.g: TITLE -> ARTIST -> ALBUM ..When SCROLL is OFF, the LCD will display one of the ID3 TAG information, the default is TRACK, but user can adjust it to other ID3 TAG information by long pressing the [MUTE] button.](https://usermanual.wiki/HUIZHOU-FORYOU-GENERAL-ELECTRONICS/M608/User-Guide-3685339-Page-14.png)