HYUNDAI MOBIS AVN600CMFL Car audio bluetooth User Manual AVN 600CMFL ATT E Manaul
Hyundai MOBIS Co., Ltd. Car audio bluetooth AVN 600CMFL ATT E Manaul
UserManual.wiki
>
HYUNDAI MOBIS
>
AVN600CMFL User Manual
User Manual
Navigation menu
Upload a User Manual
Namespaces
Wiki Guide
HTML
PDF
Info
Views
User Manual
Discussion / Help
Navigation
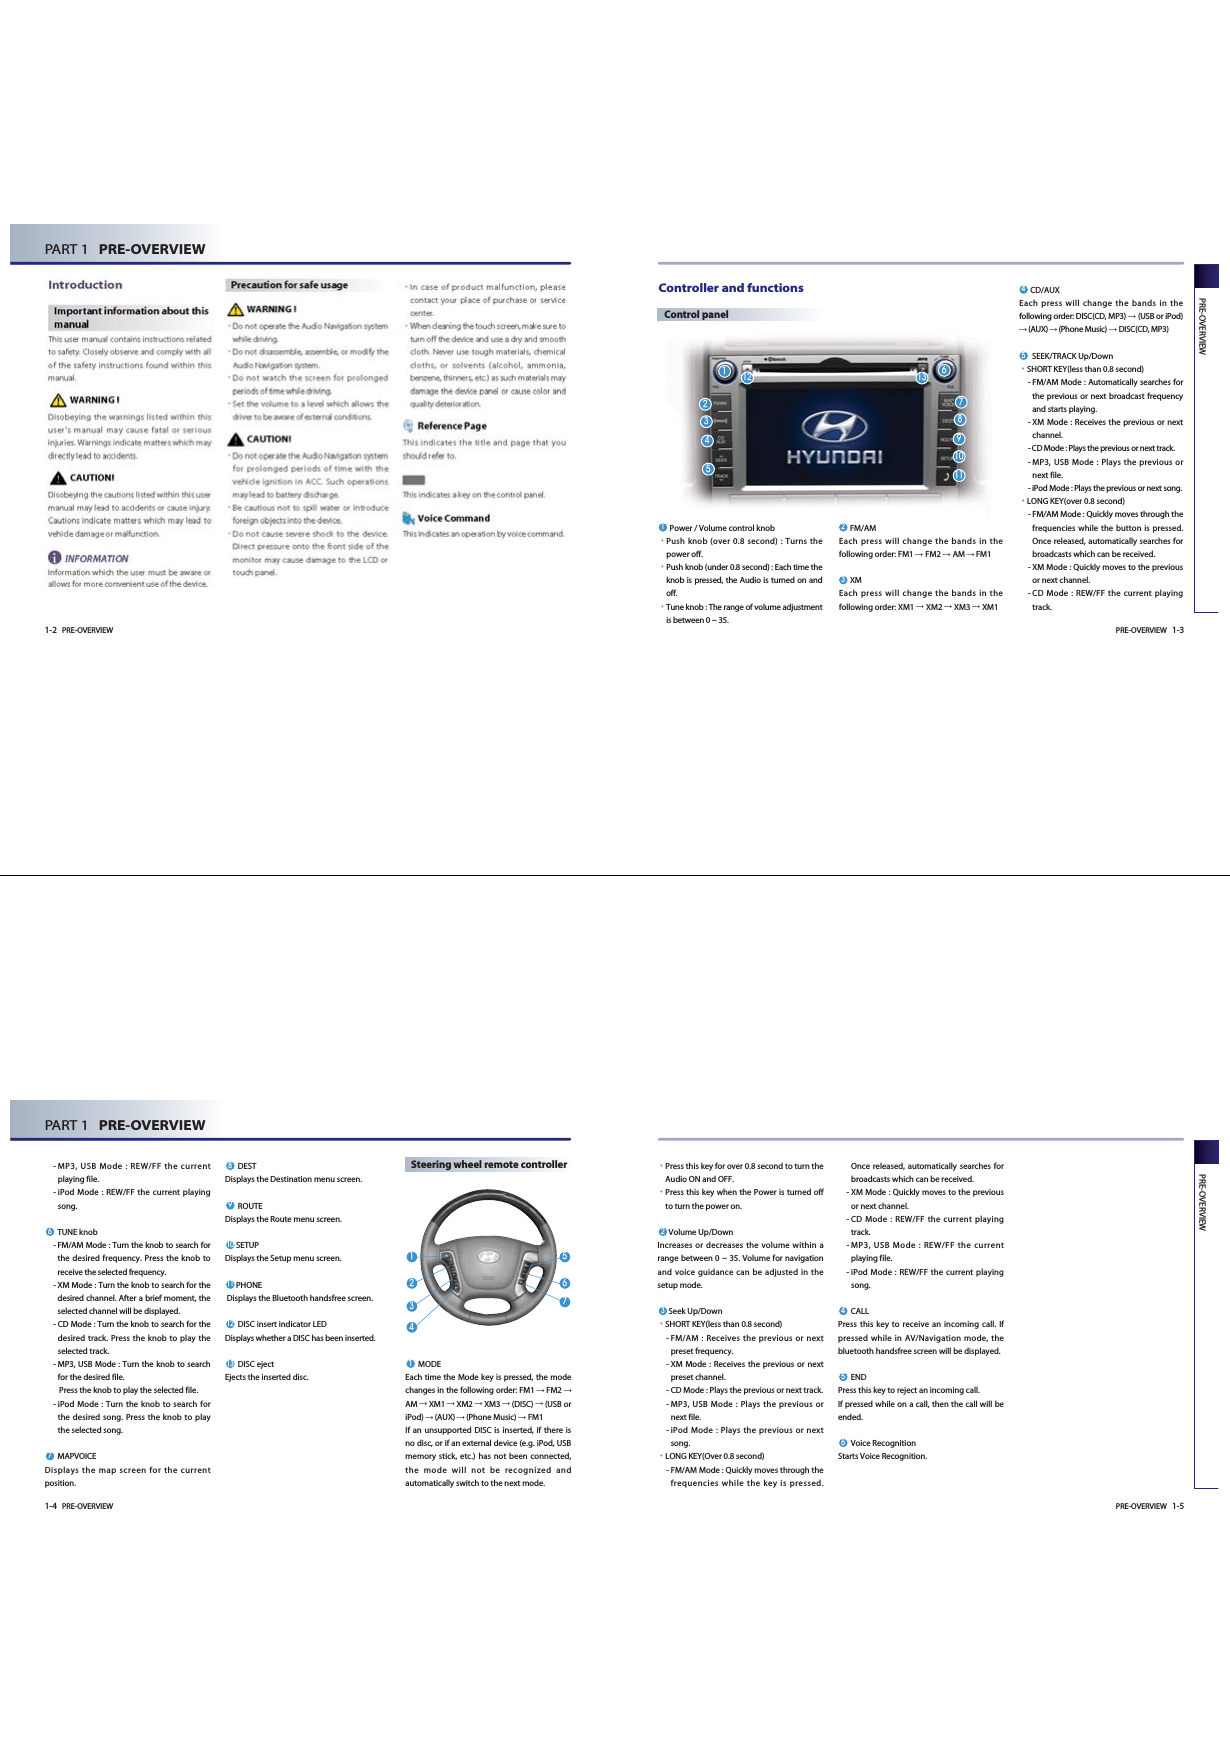
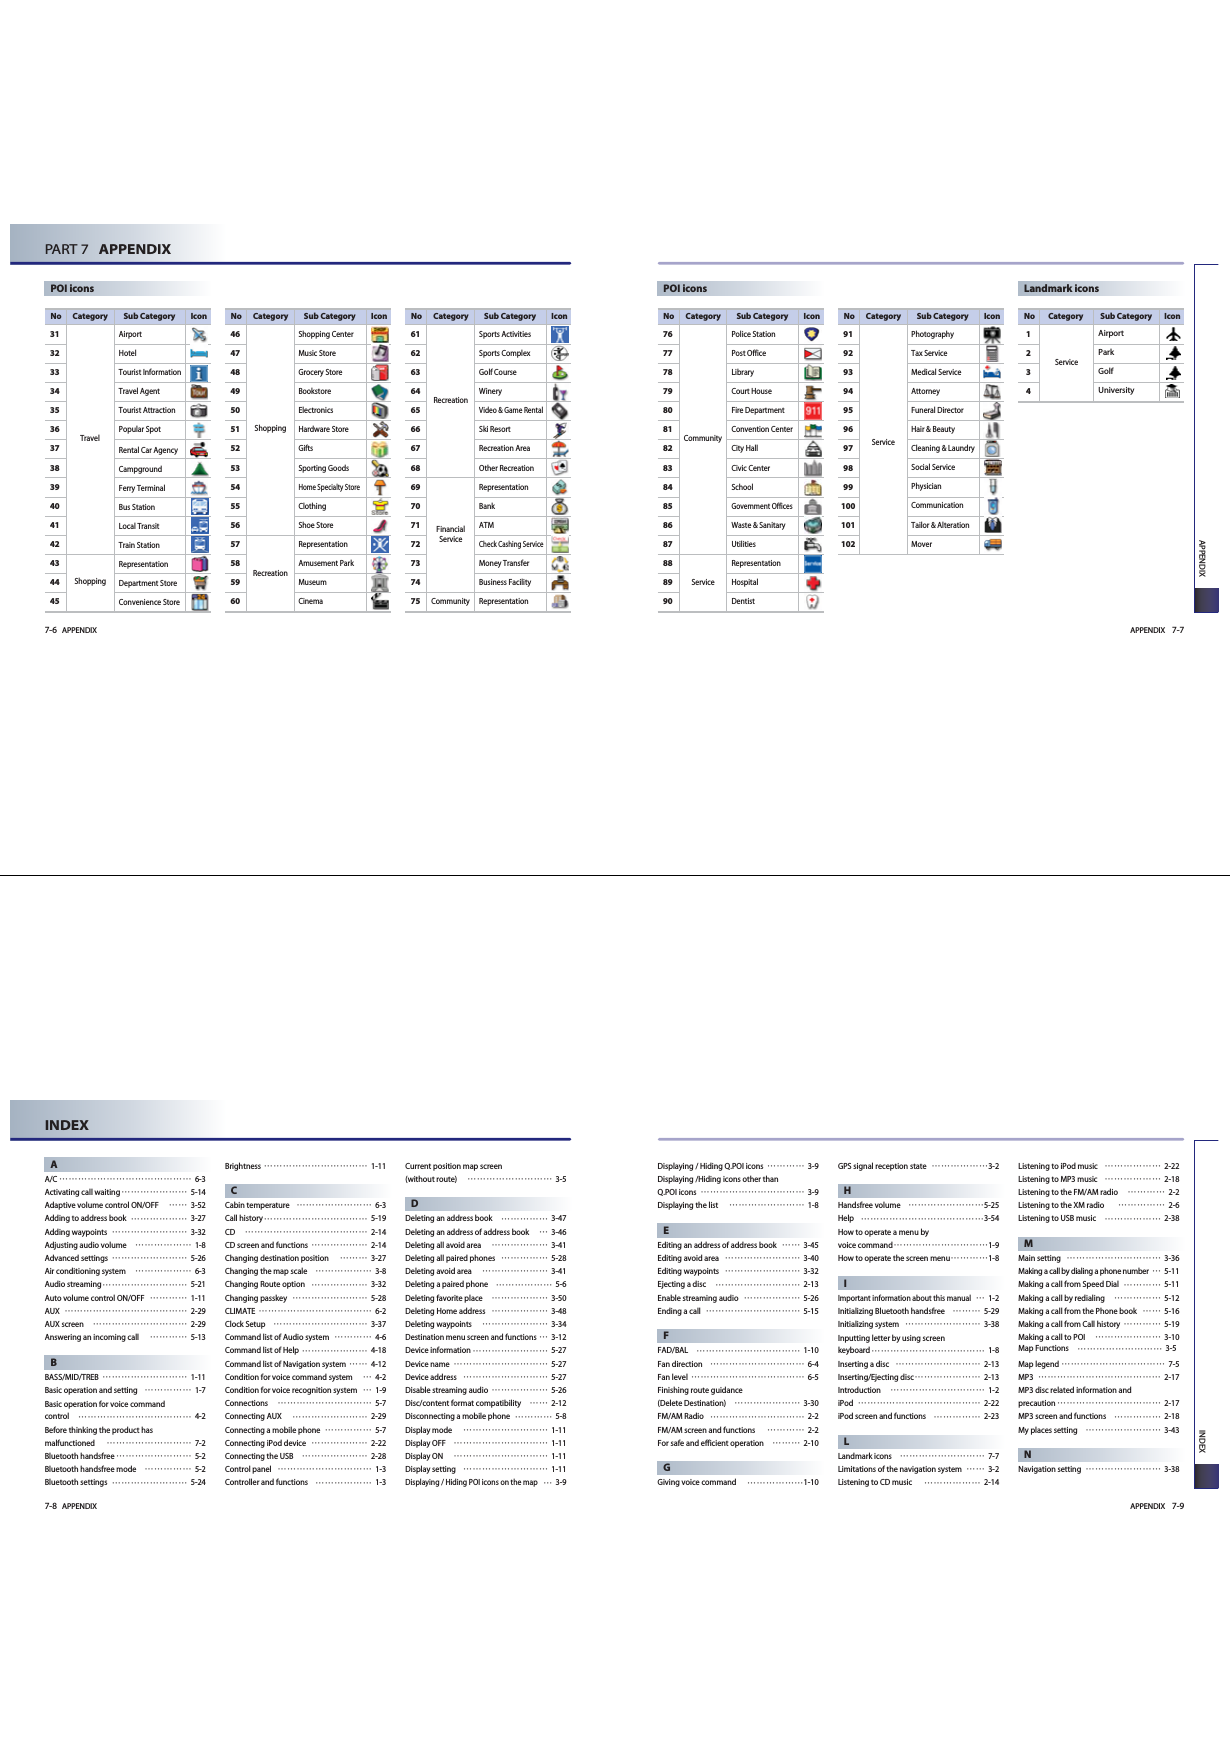
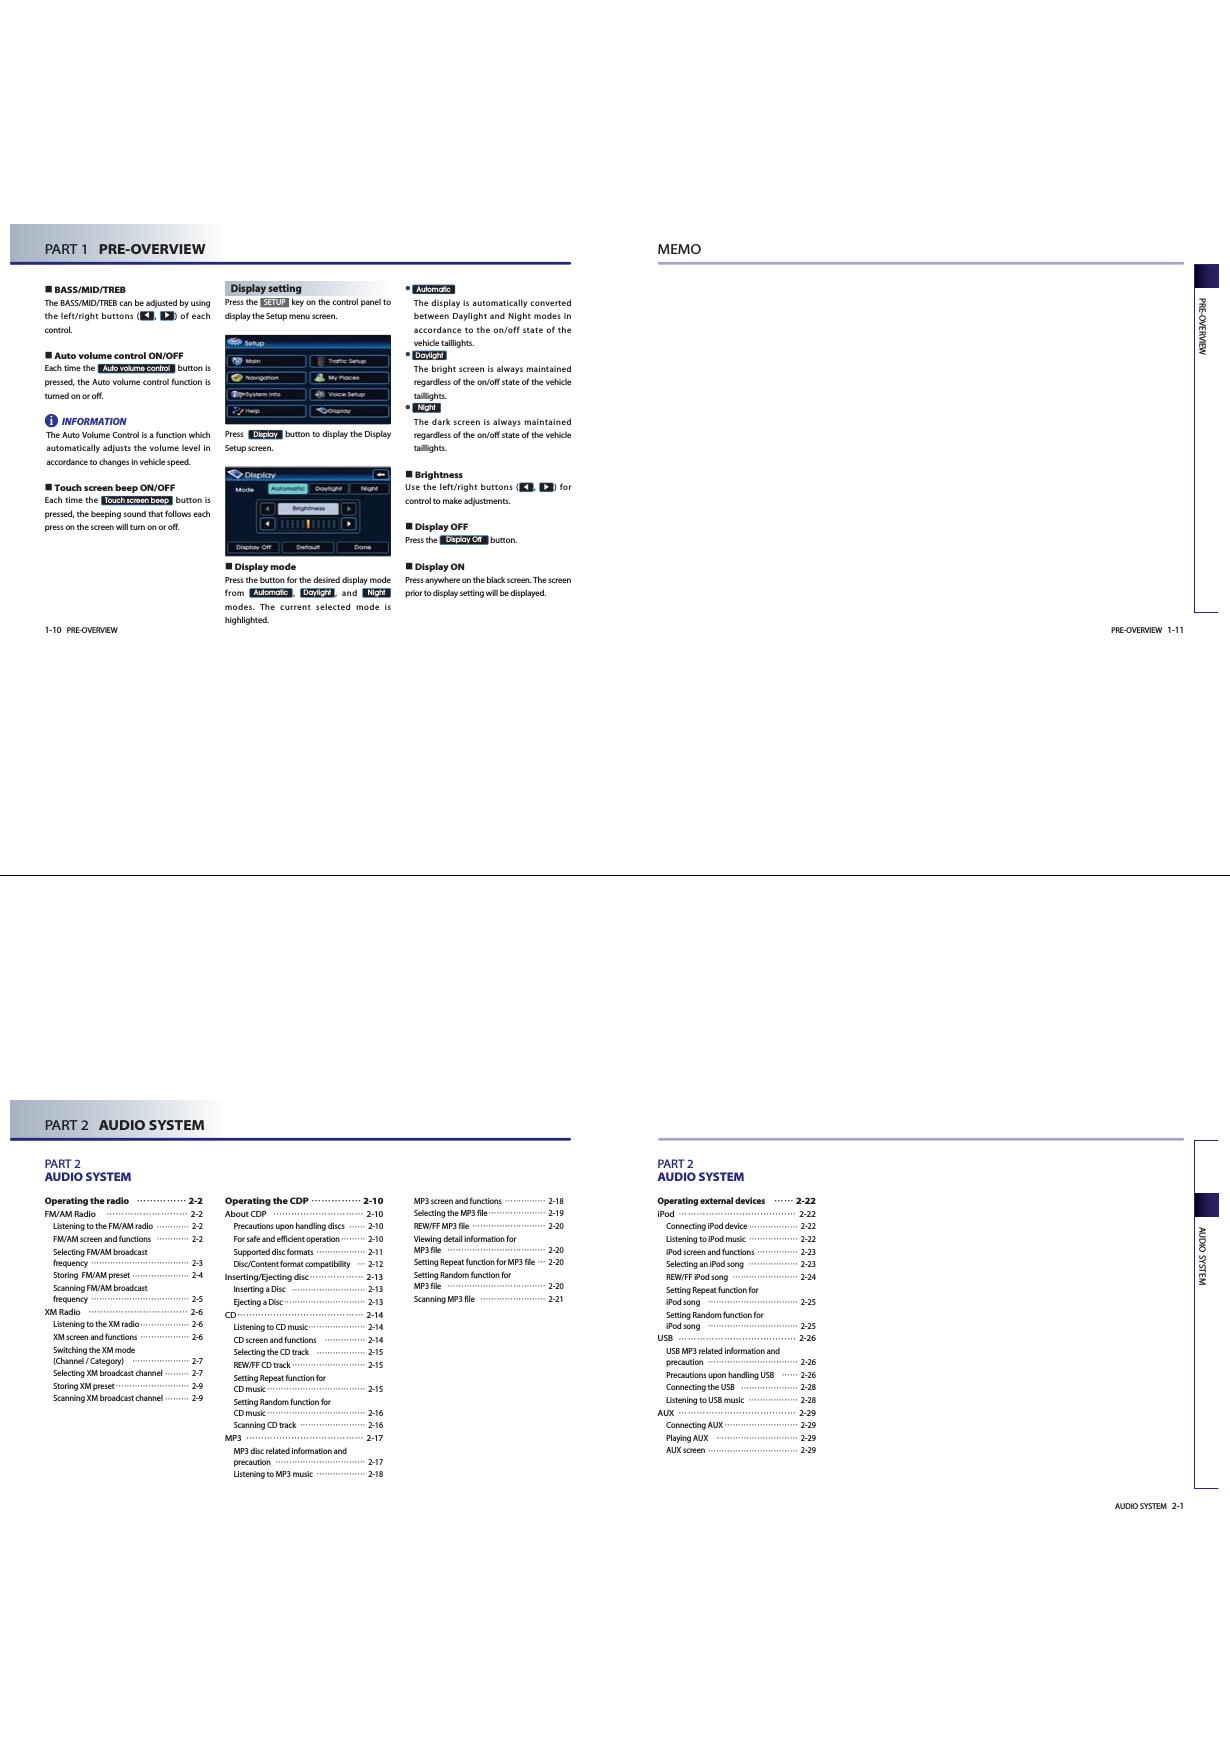
![PRE-OVERVIEW 1-7PRE-OVERVIEW1-6 PRE-OVERVIEWPART 1 PRE-OVERVIEWBasic operation and setting Turning the Power ONTurn the ignition key onto ACC or ON. If thesystem power had been on when theignition was turned off, the system will turnback on automatically. If the system power had been off when theignition was turned off, the system willremain off. In this case, press theknob to turn on the systempower.System Power ONINFORMATIONAs system booting starts from the point thedoor lock is unlocked, the device maycomplete booting before the ACC is turnedon or the knob is pressed.Consequently, the booting screen may not bedisplayed upon initially turning on the systempower.Once system booting is complete, the mostrecent operated mode will be displayed.For example, turning on the system willdisplay FM1 radio mode if the last operatedmode prior to turning off the system hadbeen FM1 radio mode.Turning the Power OFFIf the knob is pressed for over 0.8second, a beep will sound and the systempower will be turned off. Turning the Audio ON/OFFPress the knob for under 0.8second with the system power on to turn theAudio on and off. Voice Command1. Press the key on the steering wheelremote controller.2. After the beep sound, say a command."AV On""AV Off"INFORMATIONConducting the following operations whilethe AUDIO is off will automatically turn on theAudio system. Pressing the AV related keys ( ,, ). Inserting a DISC or connecting an externaldevice.CD/AUXFM/AMPWR/VOLPWR/VOLPWR/VOLPWR/VOLiiAdjusting audio volumeTurn the knob in clockwisedirection to increase the volume and counter-clockwise to decrease the volume. INFORMATIONThe range of volume adjustment isbetween 0 ~ 35. Adjustments to the volume cannot bemade while the AUDIO is turned off. How to operate the screen menu Operating typical screen menuIf a menu button on the screen is pressed,the corresponding function will beginoperation.The same menu button may performdifferent functions depending on the lengthof time the button is pressed (under 0.8seconds or over 0.8 second). For more information, refer to the specificfunction within this user manual.The current operated button will behighlighted upon display. Buttons which cannot be operated underthe current conditions will be displayed indisabled state. Pressing a disabled buttonwill not perform any operation. Inputting letter by using screenkeyboard: Displays the English alphabet keypad.: Displays the French alphabet keypad.(if available): Displays the number and symbolkeypad.: Deletes the previously inputted letter.Pressing for over 0.8 second will deleteall content. : The input is completed.: Restores to previous screen. Theinputted text will not be saved. Displaying the list: Even if input is not complete, thecurrent matching items from thedatabase will be displayed. INFORMATIONThe number at the upper-right side of thescreen displays the number of currentmatches.ListDoneDelete0 - 9ABCPWR/VOLiiPRE-OVERVIEW 1-9PRE-OVERVIEW1-8 PRE-OVERVIEWPART 1 PRE-OVERVIEWSelecting an item in a list: Moves to the next page or previouspage.: The button will be displayed ifthe text is too long to be displayedin one button. Press the button to move the cursor tothe end of the text. Press the button tomove the cursor to the front of the text. Sorting items from listSelect the desired sorting method toreorganize the list in accordance to theselected method. How to operate menu by voicecommandConditions for voice recognitionsystemMost of the functions within the AV andNavigation system can be operated by voice.Please follow the instructions below foroptimal voice recognition performance. Close all windows and the sunroof. Thevoice recognition can be improved when ina quiet environment. Press the voice recognition button and saythe desired voice command after the soundof the beep. The microphone is positioned above thedriver so that voice commands can be saidwhile maintaining a proper posture. Pronounce the voice commands naturallyand clearly as if in normal conversation. Giving voice commandPress the key on the steering wheelremote controller. A voice command window will be displayedon the lower side of the screen followed by a"Command please" system voice comment. Once the icon changes into the icon on the pop-up screen with a beepsound, say the desired voice command. [Voice command list], page 4-6.[Searching a destination by voicecommand], page 4-19.INFORMATIONPress the key shortly to input the desiredvoice command. The system voice instructioncomment will immediately terminate. Whenthe icon changes into the icon with abeep sound, it is possible to input voicecommands.Sound settingPress the button on the main screenof each AV mode (FM/AM, XM, CD, MP3, USB,iPod) to display the Sound setting screen. FAD/BALThe position of the sound can be adjusted byusing the up-down and left-right ( , ,, ) buttons on the left side of thescreen.Press the button to position thesound in the center of the vehicle. DefaultSoundi](https://usermanual.wiki/HYUNDAI-MOBIS/AVN600CMFL/User-Guide-1136535-Page-5.png)
![Operating the radio FM/AM RadioListening to the FM/AM radioPress the key on the controlpanel. The FM/AM radio band of the mostrecent listened station will be displayed. Press the key to change thedesired radio band. Each press willchange the bands in the following order:FM1FM2AMFM1Select the desired broadcast frequency. [Selecting FM/AM broadcast frequency],page 2-3.Voice Command1. Press the key on the steering wheelremote controller.2. After the beep sound, say a command." Radio""(Radio) AM""(Radio) FM""(Radio) FM <1 or 2>""AM Frequency <530 to 1710>""FM Frequency <87.5 to 107.9>""AM Preset <1 to 6>""FM <1 or 2> Preset <1 to 6>"FM/AM screen and functionsMode display : Displays the FM1/FM2/AM modes. SEEK/SCAN/PRESET SCAN/AUTO PRESETindicator : If SEEK/SCAN/PRESET SCAN/AUTO PRESET is operating, the switch isdisplayed.FM/AMFM/AMAUDIO SYSTEM 2-3AUDIO SYSTEM2-2 AUDIO SYSTEM PART 2 AUDIO SYSTEMSTEREO indicator : If the currentfrequency is a stereo broadcast, theindicator is displayed.Program Service name: Displays theprogram service name if data is beingbroadcast.Frequency: Displays the current playingfrequency.Program type name: Displays theprogram type name if data is beingbroadcast.Radio Text: Displays the radio textinformation if data is being broadcast.Frequency Bar : Displays the position ofthe current frequency within the totalfrequency range.buttons : The desired frequencycan be preset and selected. [Storing FM/AM preset], page 2-4.ON/OFF button : Turns theRadio Text information on and off. INFORMATIONIf the is on OFF state, text will not bedisplayed even if there is text beingtransmitted from the broadcast station.If the is on ON state, the frequencybar will not be displayed. Even if the in on ON state, text may not be displayed if textis not being received from the broadcaststation.button : Searches the 6frequencies with the most superiorreception and automatically stores aspreset buttons in corresponding order.[Storing FM/AM preset], page 2-4.button : Scans all frequenciesor just the preset frequencies for 5seconds each. [Scanning FM/AMbroadcast frequency], page 2-5.button : Adjusts the FAD/BAL,BASS/MID/TREB controls.[Sound setting], page 1-10.Selecting FM/AM broadcast frequencyThere are 3 ways to select the broadcastfrequency - (a) selecting through preset, (b)selecting through SEEK, (c) selectingthrough manual search.(a) Selecting a frequency through presetPress the preset button of the desiredbroadcast frequency. INFORMATIONPress the or keys on thesteering wheel remote controller shortly. Thepreset frequencies of the current band will beselected in order.There are 6 preset frequencies each forFM1, FM2, and AM modes. [Storing FM/AM preset], page 2-4.Voice Command1. Press the key on the steering wheelremote controller.2. After the beep sound, say a command."Preset <1 to 6>""Preset Up""Preset Down"TRACKSEEKSoundScanAutopresetR-TextR-TextR-TextR-TextPresetii AUDIO SYSTEM 2-5AUDIO SYSTEM2-4 AUDIO SYSTEM PART 2 AUDIO SYSTEMScanning FM/AM broadcastfrequencyPress the button. SCAN (less than 0.8 second) :Scans all frequencies and plays onlyfrequencies with superior reception for 5seconds each. Voice Command1. Press the key on the steering wheelremote controller.2. After the beep sound, say a command."Scan"PRESET SCAN (over 0.8 second): Scans the 6 frequencies stored as presetfrequencies in the current band for 5seconds each.Voice Command1. Press the key on the steering wheelremote controller.2. After the beep sound, say a command."Preset Scan"Press the button again tocontinue listening to a frequency. Thescan will be terminated and the currentfrequency will continue to be played.INFORMATIONWhen scanning has completed an entirerevolution, the scan function will terminateautomatically and the previous playedfrequency will be restored.ScanScan(b) Selecting a Broadcast frequencythrough SEEKPress the orkeys on thecontrol panel for less than 0.8 second. Once the SEEK function is operating (SEEKindicator blinking), the next or previousbroadcast frequency with superior receptionwill be searched automatically.INFORMATIONPress the or keys on thecontrol panel or steering wheel remotecontroller for more than 0.8 second toquickly move to the nearest desiredfrequency. Once the button is released, thenext frequency with superior reception willbe searched automatically.If the SEEK function is operating, pressingthe or keys on thecontrol panel again will terminate SEEKoperation and select the current frequency. Voice Command1. Press the key on the steering wheelremote controller.2. After the beep sound, say a command."Seek Up""Seek Down"(c) Selecting a broadcast frequency throughmanual search Turn the knob on the control panel inclockwise or counter-clockwise direction.Each click on the knob will increase ordecrease the frequency by 1 step (FM: 0.2MHz, AM: 10 kHz). Storing FM/AM presetThere are 2 ways to store preset frequencies -(a) storing manually and (b) auto store. (a) Storing manuallySelect the desired frequency.[Selecting FM/AM broadcast frequency],page 2-3.Press the preset button to store for over0.8 second. The frequency will becomestored along with a beep sound. INFORMATIONSix preset frequencies each for FM1/ FM2/AMmodes can be stored using the aboveinstructions.(b) Auto StoreAfter selecting the desired band, press thebutton. The 6 frequencies withthe most superior reception will be stored aspreset buttons in corresponding order.INFORMATIONIf the button is pressed againwhile operating Auto Store, then the AutoStore operation will be terminated and thepreviously played frequency will be restored.Voice Command1. Press the key on the steering wheelremote controller.2. After the beep sound, say a command."Auto preset"Auto presetAuto presetTUNETUNETRACKSEEKTRACKSEEKTRACKSEEKiiii](https://usermanual.wiki/HYUNDAI-MOBIS/AVN600CMFL/User-Guide-1136535-Page-7.png)
![AUDIO SYSTEM 2-7AUDIO SYSTEM2-6 AUDIO SYSTEM PART 2 AUDIO SYSTEMbutton : selects the channel bydirectly inputting the channel number.[Selecting XM broadcast channel],page 2-7.button : scans all frequencies orjust the preset channels for 5 secondseach.[Scanning XM broadcast channel],page 2-9.button : adjusts the FAD/BAL,BASS/MID/TREB controls. [Sound setting], page 1-10.Switching the XM mode (Channel /Category)Each time the button is pressed,the mode will switch between channelmode and category mode. Use the tune knob to change categoriesand press the tune knob change to selectedcategory.Selecting XM broadcast channelThere are 5 ways to select a broadcastchannel - (a) selecting through preset, (b)selecting with channel Up/Down, (c)Selecting a channel through manual search,(d) selecting through channel/ category list,(e) selecting by directly inputting thechannel number.(a) Selecting a channel through presetPress the preset button of the desiredchannel.INFORMATIONPress the or keys on thesteering wheel remote controller for lessthan 0.8 second. The preset channels of thecurrent band will be selected in order. There are 6 preset channels each for XM1,XM2, and XM3.[Storing XM preset], page 2-9.Voice Command1. Press the key on the steering wheelremote controller.2. After the beep sound, say a command."Preset <1 to 6>""Preset Up""Preset Down"(b) Selecting with Channel Up/DownPress the orkeys on thecontrol panel for less than 0.8 second.The previous or next channel will be selected. INFORMATIONIf in Channel mode, the channel is selectedfrom all channels. If in Category mode, thefirst channel of each category is selected. Press the or keys on thecontrol panel or steering wheel remotecontroller for more than 0.8 second toquickly move to the nearest desiredchannel. Once the button is released, thecurrent channel will be selected.TRACKSEEKTRACKSEEKTRACKSEEKModeSoundScanSearchXM radioListening to the XM radioPress the key on the control panel.The XM radio band screen of the mostrecent listened station will be displayed. Press the key to change thedesired radio band. Each press willchange the bands in the following order:XM1 XM2 XM3 XM1Select the desired broadcast channel. [Selecting XM broadcast channel], page2-7.Voice Command1. Press the key on the steering wheelremote controller.2. After the beep sound, say a command."XM""XM <1 or 2 or 3>""XM Channel <0 to 255>""XM <1 or 2 or 3> Preset <1 to 6>"XM screen and functionsMode display : displays the XM1/XM2/XM3 modes. SCAN/PRESET SCAN indicator : ifSCAN/PRESET SCAN is operating, theswitch is displayed. Channel number : displays the currentplaying channel.Channel mode indicator : displays thechannel mode in orange. Category mode indicator : displays thecategory mode in orange. Channel name : displays the channelname.NAME : displays the artist and otherrelated information.Title name : displays the title name.Category name : displays the categoryname.buttons : the desired channelcan be preset and selected. [StoringXM preset], page 2-9.buttons : switches betweenchannel mode and category mode.[Switching the XM mode], page 2-7.button : displays the channel orcategory list. [Selecting XM broadcastchannel], page 2-7.ListModePreseti i AUDIO SYSTEM 2-9AUDIO SYSTEM2-8 AUDIO SYSTEM PART 2 AUDIO SYSTEMInput desired channel number, and pressthe button. The previous screenwill be restored and the selected channelwill begin playing.INFORMATIONTo prevent inputting a channel which exceedsthe channel range, numbers which cannot beinputted are set to disabled state.Voice Command1. Press the button on the steering wheelremote controller.2. After the beep sound, say a command."Channel<0 to 255>"Storing XM presetSelect the desired channel. [SelectingXM broadcast channel], page 2-7.Press the preset button for over 0.8second. The frequency will be savedalong with beep sound. INFORMATIONSix preset frequencies each for XM1/ XM2/XM3 modes can be stored using the aboveinstructions.Scanning XM broadcast channelPress the button. SCAN (under 0.8 second): Scans allchannels for 5 seconds each if in channelmode. If in category mode, scans allchannels within the current category for 5seconds each. Voice Command1. Press the button on the steering wheelremote controller.2. After the beep sound, say a command."Scan"PRESET SCAN (over 0.8 second): Scans the6 preset channels within the current bandfor 5 seconds each. Voice Command1. Press the key on the steering wheelremote controller.2. After the beep sound, say a command."Preset Scan"Press the button again tocontinue playing the channel. The scanwill be terminated and the currentchannel will continue to be played. INFORMATIONWhen scanning has completed an entirerevolution, the scan function is automaticallyterminated and the previous played channelwill be restored. Channel 0 is the radio ID and containsinformation required for XM Activation. ScanScanOKVoice Command1. Press the key on the steering wheelremote controller.2. After the beep sound, say a command."Channel Up""Channel Down"(c) Selecting a channel through manualsearchTurn the key in clockwise or counter-clockwise direction to display the previousor next channel information. After a briefmoment, the selected channel will bedisplayed.INFORMATIONIf in channel mode, the channel is selectedfrom all channels. If in category mode, the firstchannel of each category is selected.(Category search)(d) Selecting channel through channel/category list Press the button.If in category mode, the all category listscreen will be displayed. Select the desired category button todisplay the channel list screen for thecorresponding category. If in channel mode, the all channels listscreen will be displayed.Select the desired channel button. Theprevious screen will be restored and theselected channel will begin playing.Voice Command1. Press the key on the steering wheelremote controller.2. After the beep sound, say a command."Category Search"(e) Selecting channel by directly inputtingthe channel number Press the button. The channelinput screen will be displayed.SearchListTUNEiiii](https://usermanual.wiki/HYUNDAI-MOBIS/AVN600CMFL/User-Guide-1136535-Page-8.png)
![AUDIO SYSTEM 2-15AUDIO SYSTEM2-14 AUDIO SYSTEM PART 2 AUDIO SYSTEMSelecting the CD trackThere are 2 ways to select a CD Track - (a)selecting through Track Up/Down, (b)selecting through searching Track.(a) Selecting through Track Up / DownPress the orkeys on thecontrol panel or steering wheel remotecontroller for less than 0.8 second. The nextor previous track will begin playing. INFORMATIONIf the key on the control panel orsteering wheel remote controller is pressedshortly while the track has played for morethan 3 seconds, the start of the current trackwill begin playing. If the track has beenplaying for less than 2 seconds, the start ofthe previous track will begin playing. Voice Command1. Press the button on the steering wheelremote controller.2. After the beep sound, say a command."Next Track""Previous Track"(b) Selecting track through search Turn the knob on the controlpanel in clockwise or counter-clockwisedirection. Each click on the knobwill display the information of the next orprevious track. The current playing trackwill continue to be played. Press the knob at the desired track.The searched track will begin playing. REW/FF CD trackPress and hold the orkeys on the control panel or steering wheelremote controller for over 0.8 second. The track will play 20 times faster whileholding the button and return to normalplay when the button is released. Setting Repeat function for CDmusicPress the button. Each press willchange the function in the following order:REPEATREPEAT OFFREPEAT* REPEAT : repeats the current playing track. Voice Command1. Press the key on the steering wheelremote controller.2. After the beep sound, say a command."Repeat Track"Say "Repeat File" or "Repeat Folder" againor say "Normal Play" in order to terminatethe set RepeatRepeatTRACKSEEKTUNETUNETUNETRACKTRACKSEEKCDListening to CD musicInsert the CD or press the keyon the control panel if the CD is alreadyinserted.Select the desired track. [Selecting theCD track], page 2-15.Voice Command1. Press the button on the steering wheelremote controller.2. After the beep sound, say a command."DISC""CD""CD Track <1 to 665>"CD screen and functionsMode display : displays that the currentmode is CD mode.REPEAT/RANDOM/SCAN indicator : ifREPEAT/RANDOM/SCAN is operating,the switch is displayed. Track number : displays the tracknumber.Play Time : displays the play time.Title name : display the title name.Artist name : display the artist name.buttons : repeat the currentplaying track. [Setting Repeat function for CD music],page 2-15.button : plays the tracks on thedisc in random order.[Setting Random function for CDmusic], page 2-16.button : scans all tracks on thedisc for 10 seconds each. [Scanning CD track], page 2-16.button : adjusts the FAD/BAL,BAS, MID, TRE controls. [Sound setting], page 1-10.SoundScanRandomRepeatCD/AUXi AUDIO SYSTEM 2-17AUDIO SYSTEM2-16 AUDIO SYSTEM PART 2 AUDIO SYSTEMMP3MP3 disc related information andprecautionInformationThe MP3 file standards supported by thedevice are as follows. Acceptable standard: MPEG1 AUDIOLAYER 3Acceptable sampling frequency: 32, 44.1,48 (KHz)Acceptable bit rate: 32, 40, 48, 56, 64, 80,96, 112, 128, 160, 192, 224, 256, 320(Kbps)Recommended bit rate & referencesampling frequency: 96,128, 192 Kbpsfixed bit rate /44.1KHzID3 tag This device supports ID3v1.0, ID3v1.1,ID3v2.2, ID3v2.3, and ID3v2.4 ID3 tags.Supported media The MP3 media supported by the deviceare CD-ROM and USB.Supported media formats This device supports ISO9660 LEVEL1 andLEVEL2. Detailed specification is as below.Maximum directory layers: 8 layersMaximum folder length: 64 Bytes, filename length: 64 BytesSupported characters for folder name/ filename: Alphanumeric characters, Koreanstandard character set 2350 characters,Simplified Chinese 4888 charactersMaximum number of folders which canbe stored onto one disc: 256 folders(including ROOT directory)Maximum number of files which can bestored onto one disc: 512 files Precautions upon burning MP3 files The use of ISO 9660 LEVEL 2 JOLIETformat is recommended when burningMP3 files. Burning in other formats mayabnormally display the file names.It is possible to display up to 32 charactersfor file and folder names in case ofUNICODE, and up to 64 characters in case ofASCII. Although the full length of the filename can be displayed by using the scrollfunction, the full length of folder namesmay not be displayed as the scroll functiondoes not operate when displaying foldernames.PrecautionPlease use a MP3 bit rate which is less than128 kbps. The sound quality cannot beguaranteed for MP3s exceeding 128kbps. Setting Random function for CDmusicPress the button. Each press willchange the function in the following order:RANDOM RANDOM OFF RANDOM* RANDOM : plays all tracks in the disc inrandom order.Voice Command1. Press the key on the steering wheelremote controller.2. After the beep sound, say a command."Random"Say "Random" or "Random Folder" again orsay "Normal Play" in order to terminate theset Random function.Scanning CD trackPress the button. Each press willchange the function in the followingorder: SCAN SCAN OFF SCAN.* SCAN : scans all tracks in the disc for 9seconds each. Voice Command1. Press the key on the steering wheelremote controller.2. After the beep sound, say a command. "Scan"Say "Normal Play" in order to terminate theset Scan function.Press the button again to continuelistening to the track. The scan will beterminated and the current track willcontinue to be played.INFORMATIONWhen scanning has completed an entirerevolution, the scan function is automaticallyterminated and the previous played track willbe restored. ScanScanRandomi](https://usermanual.wiki/HYUNDAI-MOBIS/AVN600CMFL/User-Guide-1136535-Page-10.png)
![AUDIO SYSTEM 2-19AUDIO SYSTEM2-18 AUDIO SYSTEM PART 2 AUDIO SYSTEMSelecting the MP3 fileThere are 3 ways to select an MP3 file - (a)selecting through file up/down, (b)selecting through searching files, (c)selecting through MP3 list.(a) Selecting through File Up / DownPress the orkeys on thecontrol panel or steering wheel remotecontroller for less than 0.8second. The next orprevious file will begin playing.INFORMATIONIf the key on the control panel orsteering wheel remote controller is pressedshortly while the song has played for morethan 3 seconds, the start of the current songwill begin playing. If the song has beenplaying for less than 2 seconds, the start ofthe previous song will begin playing. Voice Command1. Press the key on the steering wheelremote controller.2. After the beep sound, say a command."Next File""Previous File""Next Folder""Previous Folder"(b) Selecting through search Turn the knob on the controlpanel in clockwise or counter-clockwisedirection. Each click on the knobwill display the information of the next orprevious file. The current playing file willcontinue to be played. INFORMATIONIf the operation of the Tune knob is too rapid,there may be a delay in displaying the fileinformation.Press the knob at the desired file.The searched file will begin playing. (c) Selecting through MP3 List Press the button. The file list ofthe folder for the current playing file willbe displayed. INFORMATIONIf many songs and folders are recorded onto aDISC, file loading time may be longer andcause the play list to be improperly displayedor song search through TUNE operation tooperate improperly. In such cases, wait until fileloading is complete and try again.Press the desired menu to return to themain screen and play the selected file. ListTUNETUNETUNETRACKTRACKSEEKListening to MP3 musicInsert the MP3 disc or press the key on the control panel if the MP3 disc isalready inserted.Select the desired file. [Selecting theMP3 file], page 2-19.Voice Command1. Press the key on the steering wheelremote controller.2. After the beep sound, say a command."DISC""CD""MP3"MP3 screen and functionsMode display : displays that the currentmode is MP3 disc mode. (MP3 files onDVD discs are not supported.)REPEAT/RANDOM/SCAN indicator : ifREPEAT/RANDOM/SCAN is operating,the switch is displayed.Play Time : displays the play time.Folder name : displays the folder name.File name : displays the file name. button : displays or hidesthe detailed file information for thecurrent playing file. [Viewing detail information for MP3file], page 2-20.button : displays the MP3folders and file lists for the disc.[Selecting the MP3 file], page 2-19.button : repeats the currentplaying folder or file. [Setting repeat function for MP3 file],page 2-20.button : plays all files on thedisc or folder in random order. [Setting random function for MP3file], page 2-20.button : scans all files on thedisc or folder for 10 seconds each. [Scanning MP3 file], page 2-21.button : adjusts the FAD/BAL,BASS/MID/TREB controls. [Sound setting], page 1-10.SoundScanRandomRepeatListInfo ON/OFFCD/AUXiii AUDIO SYSTEM 2-21AUDIO SYSTEM2-20 AUDIO SYSTEM PART 2 AUDIO SYSTEMScanning MP3 filePress the button. Each press will change the function in thefollowing order : Scan Folder Scan Scan Off Scan* Folder Scan : plays all files in the currentfolder for 10 seconds each. * Scan: scans all files in the disc for 10seconds each.Voice Command1. Press the key on the steering wheelremote controller.2. After the beep sound, say a command."Scan""Folder Scan"Say "Normal Play" in order to terminate theset Scan function.Press the button again tocontinue listening to the file. The scanwill be terminated and the current filewill continue to be played.INFORMATIONWhen scanning has completed an entirerevolution, the scan function is automaticallyterminated and the previously played file willbe restored. ScanScanREW/FF MP3 filePress and hold the orkeys on the control panel or steering wheelremote controller for over 0.8 second. The file will play 20 times faster whileholding the button and return to normalplay when the button is released.Viewing detail information forMP3 filePress the button. The detailedinformation (Title, Artist, Album, Genre)for the current playing MP3 will bedisplayed.Press the button. The detailedinformation will be turned off.Setting Repeat function for MP3 filePress the button. Each press will change the function in thefollowing order: Repeat Folder Repeat Repeat Off Repeat* Repeat : repeats the current playing file. * Folder Repeat : repeats the files in thecurrent folder.Voice Command1. Press the key on the steering wheelremote controller.2. After the beep sound, say a command."Repeat File""Repeat Folder"Say "Repeat File" or "Repeat Folder" againor say "Normal Play" in order to terminatethe set Repeat function.Setting Random function for MP3filePress the button. Each press changes the setting as follows :RandomFolder Random Random OffRandom* Folder Random : plays the files in thecurrent folder in random order. * Random : plays all files in the disc in randomorder.Voice Command1. Press the key on the steering wheelremote controller.2. After the beep sound, say a command."Random""Random Folder"Say "Random" or "Random Folder" again orsay "Normal Play" in order to terminate theset Random function.RandomRepeatInfo OFFInfo ONTRACKSEEKi](https://usermanual.wiki/HYUNDAI-MOBIS/AVN600CMFL/User-Guide-1136535-Page-11.png)
![AUDIO SYSTEM 2-23AUDIO SYSTEM2-22 AUDIO SYSTEM PART 2 AUDIO SYSTEMOperating external devices iPodiPod is a registered trademark ofApple Inc.Connecting iPod deviceConnect the iPod device as shown in thepicture.The identification of the iPod device, batteryrecharge, and other functions provided bythe iPod device can be normally supportedonly by using a separately sold iPodconnector cable. If the USB cable provided upon purchasingthe iPod for charging is used as theconnector cable, the device will berecognized as a USB and may not properlyoperate or display all of the displayinformation.Supported iPod devices : Classic 4th/5th/6th,Mini 1st/2nd, NANO 1st/2nd/3rd/4thand Touch1st/2ndGenerations.If iPod mode cannot be entered due toidentification error, no track, incompatibleprotocol version, or other reasons, a pop-upmessage will be displayed for 5 seconds andreturn automatically to the previous mode.If the message continues even afterreconnecting the iPod, check to see if thereare any problems with the iPod device.CAUTION!If a playing iPod is connected to the audiosystem, a high-pitched tone may occur forapproximately 1-2 seconds. Please turn the iPod device to pause/stopprior to connecting it to the vehicle. INFORMATIONAn iPod cable assembly can be purchased atyour local Hyundai dealer.Listening to iPod musicConnect the iPod or press thekey on the control panel if the iPod isalready connected.INFORMATIONEven if the iPod is connected, message maybe displayed if an error has occurred. In such acase, reconnect the iPod. Select the desired song. [Selecting an iPod song], page 2-23.CD/AUXiiVoice Command1. Press the key on the steering wheelremote controller.2. After the beep sound, say a command."iPod"iPod screen and functionsMode display : displays that the currentmode is iPod mode.REPEAT/RANDOM indicator : if REPEAT/RANDOM is operating, the switch isdisplayed.Title name : displays the title name ofthe playing file. Play Time : displays the play time. Artist name : displays the artist name ofthe playing file. Album name : displays the album nameof the playing file.button : converts to the searchmenu screen. [Selecting an iPod song], page 2-23.buttons : repeats the currentplaying song. [Setting repeat function for iPodsong], page 2-25.button : plays all songs in thecurrent playing list in random order orrandomly in album unit. [Setting random function for iPodsong], page 2-25.button : adjusts the FAD/BAL,BASS/MID/TREB controls.[Sound setting], page 1-10.Selecting an iPod songThere are 3 ways to select songs from theiPod device - (a) selecting song throughUp/Down, (b) selecting song throughsequential search, (c) selecting songthrough menu.(a) Selecting song through Up / DownPress the or button onthe for less than 0.8 second. The next orprevious song will begin playing. INFORMATIONIf the key on the control panel orsteering wheel remote controller is pressedshortly while the track has played for morethan 3 seconds, the start of the current songwill begin playing. If the track has beenplaying for less than 2 seconds, the start ofthe previous song will begin playing. TRACKTRACKSEEKSoundRandomRepeatMenui AUDIO SYSTEM 2-25AUDIO SYSTEM2-24 AUDIO SYSTEM PART 2 AUDIO SYSTEMVoice Command1. Press the key on the steering wheelremote controller.2. After the beep sound, say a command."Next Song""Previous Song"(b) Selecting song through search Turn the knob on the controlpanel in clockwise or counter-clockwisedirection.Operate the key dial to display theprevious or next channel information. Aftera brief moment, the selected channel willbe displayed. INFORMATIONIf the operation of the knob is toorapid, there may be a delay in displaying thesong information.(c) Selecting song through MenuPress the button. The iPod menuscreen will be displayed. Press the button for the desired searchmethod.INFORMATIONIf the search mode is accessed while playing asong, the most recent searched step will bedisplayed. The search steps upon initialconnection are listed below. Press the desired song button to returnto the main screen and play the selectedsong.REW/FF iPod songPress and hold the or keys on the control panel or steering wheelremote controller for over 0.8 second. Thesong will be play faster while holding thebutton and return to normal play when thebutton is released. TRACKSEEKMenuTUNETUNETUNEiiSetting Repeat function for iPodsongPress the button. Each press willchange the function in the following order : Repeat Repeat Off Repeat* Repeat : repeats the current playing song. Voice Command1. Press the key on the steering wheelremote controller.2. After the beep sound, say a command."Repeat Song"Say "Normal Play" in order to terminate theset Repeat function.Setting Random function for iPodsongPress the button. Each press willchange the function in the following order :RandomAlbum Random Random OffRandom* Album Random : plays the songs in thecurrent playing list randomly in Albumunits.* Random : plays all files in the currentplaying list in random order.Voice Command1. Press the key on the steering wheelremote controller.2. After the beep sound, say a command."Random""Random Album"Say "Random" or "Random Album" again orsay "Normal Play" in order to terminate theset RandomRandomRepeat1 Step 2 Step 3 Step 4 StepPlaylist Playlist SongGenre Genre Artist Album SongArtist Artist Album SongComposer composer Album SongAlbum Album SongAudiobooks SongSongs SongPodcasts Program EpisodeSongSongEpisodeSongSongSong](https://usermanual.wiki/HYUNDAI-MOBIS/AVN600CMFL/User-Guide-1136535-Page-12.png)
![AUDIO SYSTEM 2-27AUDIO SYSTEM2-26 AUDIO SYSTEM PART 2 AUDIO SYSTEMUSBUSB MP3 related information andprecautionInformationThe MP3 file standards supported by thedevice are as follows. Acceptable standard: MPEG1 AUDIOLAYER 3Acceptable sampling frequency: 32, 44.1,48 (kHz)Acceptable bit rate : 32, 40, 48, 56, 64, 80,96, 112, 128, 160, 192, 224, 256, 320(kbps)Recommended bit rate & referencesampling frequency: 96,128, 192 kbpsfixed bit rate /44.1kHzID3 tagThis device supports ID3v1.0, ID3v1.1,ID3v2.2, ID3v2.3, and ID3v2.4 ID3 tags.Supported mediaThe MP3 media supported by the deviceare CD-ROM and USB.Supported media formats This device supports ISO9660 LEVEL1 andLEVEL2. Detailed specification is as below.Maximum directory layers: 20 layersMaximum length of folder name/filename: 250BytesSupported characters for folder name/ filename: Alphanumeric characters, Koreanstandard character set 2350 characters,Simplified Chinese 4888 charactersMaximum number of folders which canbe stored onto one USB: 2000 folders(including ROOT directory)Maximum number of files which can bestored onto one USB: 6000 files Precautions upon formatting USB &downloading MP3 files The device only supports FAT type USBfile system. The device will not play USBmedia content if the USB is NTFS type. PrecautionPlease use an MP3 bit rate which is less than192Kbps and a fixed bit rate. The sound quality cannot be guaranteed forMP3s exceeding 192Kbps and operation ofspecific functions (limited to FF/REWfunctions) may be abnormal with variablebit rates.Precautions upon handling USBWhen using the external USB device, makesure to keep the device disconnected andconnect only some time after turning on thevehicle ignition. The USB device may bedamaged if the USB device alreadyconnected when the ignition is turned on.(USB device is not an electronic automotivecomponent)The external USB device may not operateif the USB device already connected whenvehicle ignition is turned on or off. The device will not operate when playinga format which is not MP3 or WMA fileformats.Only MP3 files with compression ratesbetween 8Kbps~320Kbps are supported.Only WMA files with compression ratesbetween 8Kbps~320Kbps are supported. Be cautious of static electricity whenconnecting/disconnecting the externalUSB device. Encoded MP3 Players will not berecognized when connected as theexternal device. When connecting an external USB device,the device may not be properly recognizethe USB when the USB is in some states.When formatting the external USB device,the device may not be properly recognizea Byte/Sector selection other than512Byte or 2048Byte. The device will only recognize USBdevices formatted in FAT 12/16/32.Some USB devices may not operateproperly because of compatibility issues.Verify that the external device issupported by the device before startinguse.Avoid contact between the USBconnector with bodily parts and foreignsubstances.Repeatedly connecting/disconnecting theUSB in a short period of time may causedamage to the device. When disconnecting the USB, anabnormal sound may occur occasionally.Abruptly disconnecting the external USBdevice while the USB is operating maycause the device to be damaged or functionabnormally.Make sure to disconnect the USB deviceonly after the audio power is turned off orwhen the audio is operating in a differentmode.The amount of time required to recognizethe external USB device may differdepending on the type, size, or fileformats stored on the USB. Suchdifferences in the required time are notindications of malfunction. Please wait the period of time required torecognize the device.The device supports only USB devicesused to play music files. Do not use the USB I/F to charge batteriesor USB accessories which generate heat.Such acts may lead to deterioratedperformance or damage to the device. The device may not recognize the USBdevice if separately purchased USB hubsand extension cables are being used.Connect the USB directly to themultimedia terminal of the vehicle.In the case of high capacity USB devices,there are instances where the logicaldrives are partitioned for userconvenience. In this case, only the USBmusic in the top-level logical drive will bepossible to play. When using partitioned drives, save thesongs desired to play on the device onlyin the top-level logical drive. In addition, certain USB devices areconfigured with a separate drive used toinstall application programs and songsfrom such drives may not be possible toplay for the reasons as described above.AUDIO SYSTEM 2-29AUDIO SYSTEMThe device may not support normaloperation if MP3 Players, cellular phones,digital cameras, or other electronicdevices (USB devices not recognized asportable disk drives) are connected to thedevice.The device may not support normaloperation when using a USB memorytype besides the Metal Cover Type USBMemory.The device may not support normaloperation when using formats such asHDD Type, CF, or SD Memory. The device will not support files locked byDRM (Digital Rights Management).The device many not support normaloperation if the proper connection withthe USB memory fails due to vibrationscaused by the vehicle. (i-stick type, etc.)Please avoid using USB memory productswhich can be used as key chains or cellularphone accessories as they could causedamage to the USB jack. Please make certain only to use plug typeconnector products as shown below.Connecting the USBConnect the USB as shown in the picture. Listening to USB musicConnect a USB or press the keyon the control panel if the USB is alreadyconnected.Select the desired file. [Selecting theMP3 file], page 2-19.Voice Command1. Press the key on the steering wheelremote controller.2. After the beep sound, say a command."USB"INFORMATIONThe USB screen and operation method is thesame with MP3 mode. Please refer to the MP3mode section for more information. CD/AUX2-28 AUDIO SYSTEM PART 2 AUDIO SYSTEMPlug Type ConnectorAUXConnecting AUXConnect the external Audio player asshown in the picture.INFORMATIONConnect only by using AUX terminals. Playing AUXConnect an AUX or press the keyon the control panel if the AUX is alreadyconnected.Voice Command1. Press the key on the steering wheelremote controller.2. After the beep sound, say a command."Line In"AUX screenAudio AUX screenCD/AUXiiExternal Device](https://usermanual.wiki/HYUNDAI-MOBIS/AVN600CMFL/User-Guide-1136535-Page-13.png)
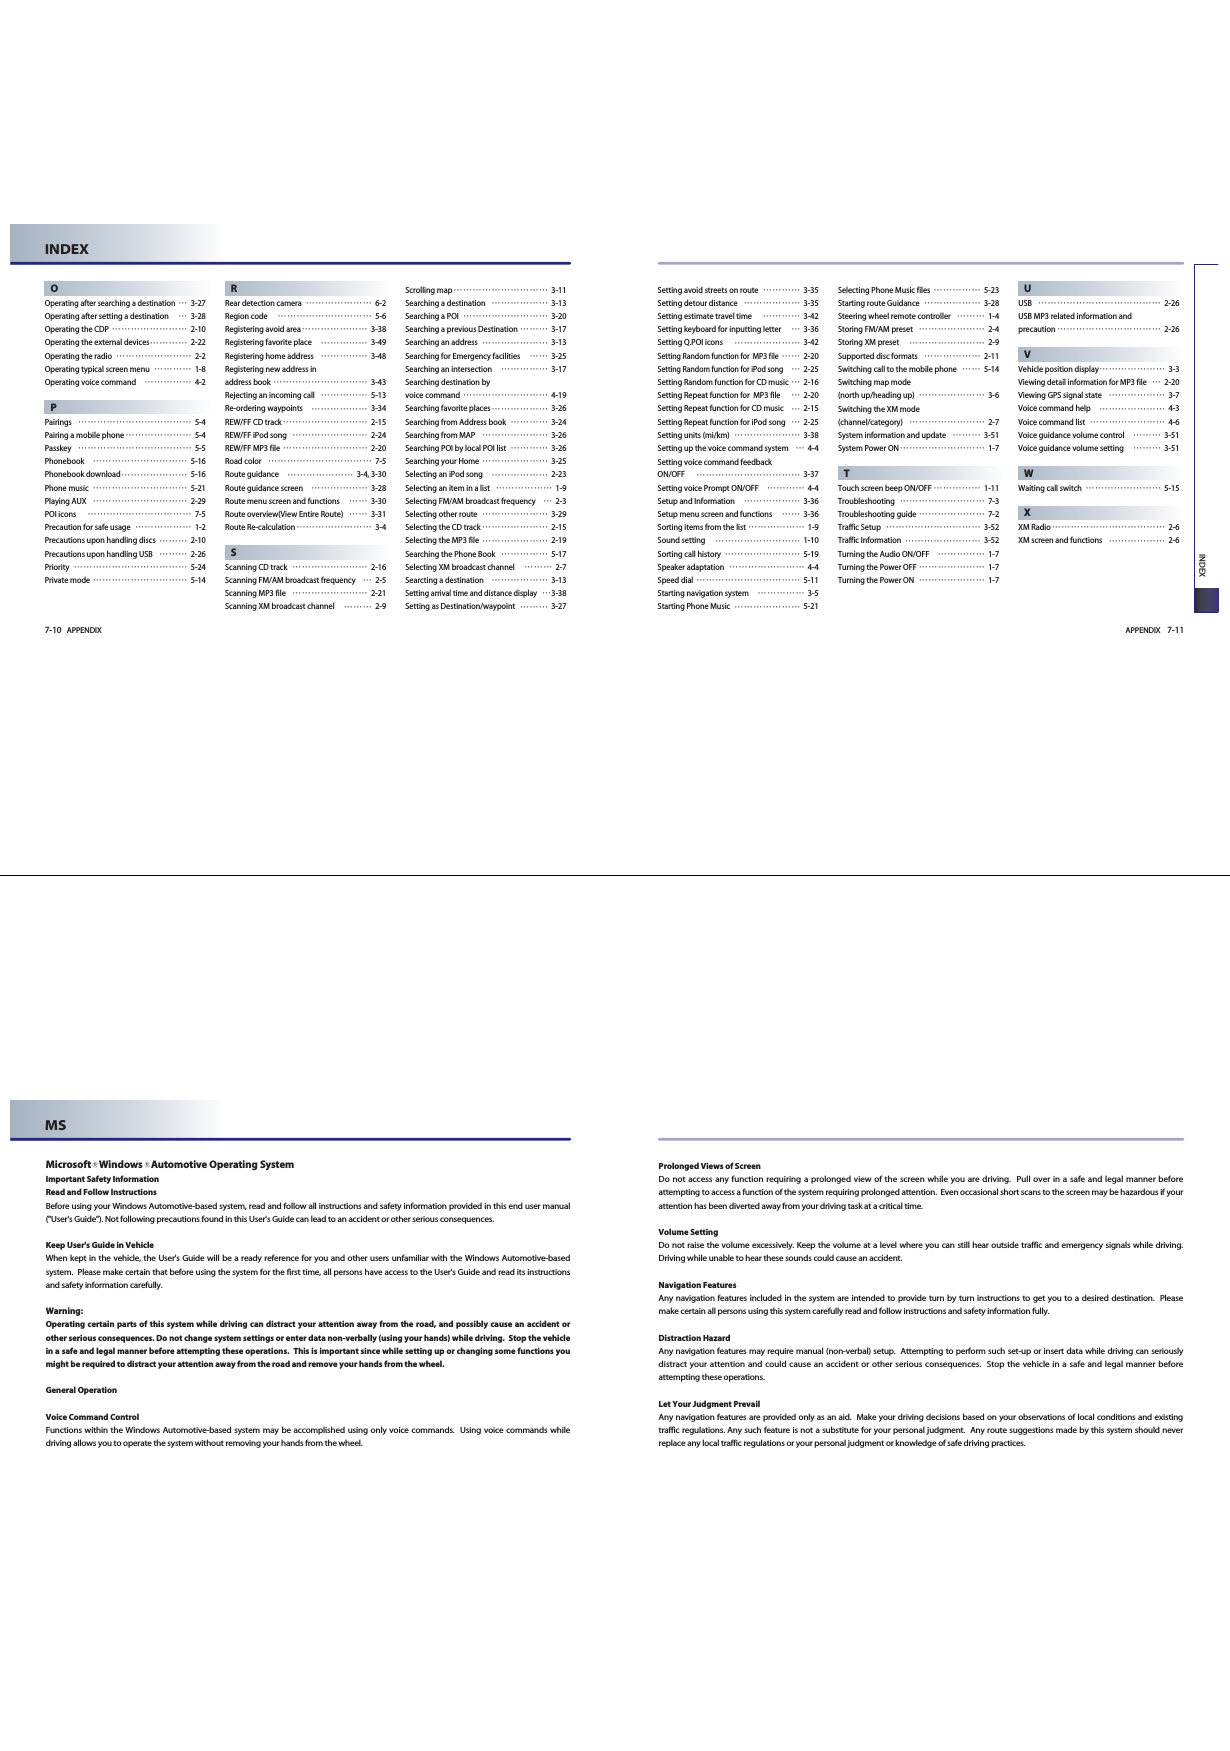
![NAVIGATION SYSTEM 3-5NAVIGATION SYSTEMRoute GuidanceSuitable route guidance may not occurcaused by search conditions or thedriving position. Guidance to go straight may be givenwhile driving on a straight road. Guidance may not be given even whenhaving turned at an intersection.There are certain intersections in whichguidance may not occur. A route guidance signaling for a U-Turnin a No U-Turn location may occur. A route guidance signaling entrance intoa no enter zone may occur (No enterzone, road under construction, etc.). Guidance may be given to a positionremoved from the actual destination ifroads to reach the actual destination donot exist or are too narrow.Faulty voice guidance may be given ifthe vehicle breaks from the designatedroute (ex: if a turn is made at anintersection while the navigationprovided guidance to go straight). Map Data may be missing or incorrectcausing route guidance to not be given.Route Re-calculationThe following phenomena may occurafter conducting route recalculation.Guidance may be given to a positiondiffering from the current position whenturning at an intersection.Route Recalculation may take a longerperiod of time when driving under highspeeds.A route guidance signaling for a U-Turnin a No U-Turn location may occur. A route guidance signaling entrance into ano enter zone may occur (No enter zone,road under construction, etc). Guidance may be given to a positionremoved from the actual destination ifroads to reach the actual destination donot exist or are too narrow.Faulty voice guidance may be given ifthe vehicle breaks from the designatedroute (ex: if a turn is made at anintersection while the navigationprovided guidance to go straight)3-4 NAVIGATION SYSTEMPART 3 NAVIGATION SYSTEMStarting navigation system Press the Navigation mode key ( ,, , ). The Caution screenwill always be displayed when first enteringinto Navigation mode. Read the contents ofthe caution screen carefully and press thebutton.Map Functions Current position map screen(without route)Press the key on the controlpanel to display the map of current positionand the neighboring area.GPS signal state indicator : Displays thestate of GPS signal reception.[Viewing GPS signal state], page 3-7. Map scale level indicator : Displays thecurrent map scale.[Changing the map scale], page 3-8.Landmark icons : Landmark icons aredisplayed on the map when the mapscale level is set to under 300 ft (100mdepending on map data)[Appendix : Landmark icons], page 8-11.POI icons : POI icons are displayed onthe map when the map scale level is setto under 0.5 mi (800m).[Appendix : POI icons], page 8-8.Current vehicle position icon : Displaysthe current position of the vehicle.MAPVOICEAgreeSETUPROUTEDESTMAPVOICE NAVIGATION SYSTEM 3-7NAVIGATION SYSTEMViewing GPS signal state The state of GPS signal reception isdisplayed as shown below.GPS (active) : GPS reception is satisfactory.GPS (inactive) : GPS reception is unsatisfactory.[System information and update], page3-51.INFORMATIONGPS (Global Position System) : GPS is asystem developed and operated by theUnited States which determines the currentlocation of the user (longitude, latitude, etc.)by generally using 4 or more satellites. Thissystem is used with related GPS information,various sensors, road map data, and othernavigation related information.GPS information may not operate under thefollowing conditions. - When buildings, tunnels, or otherobstructions block satellite signals.- When materials are placed above the GPSantenna and block satellite signals.- When the satellite does not transmitsignals (signal transmission is controlledby the satellite control center in theUnited States and may not transmit whenunder repair, modification, etc). - When a digital cellular phone (1.5GHz) isplaced near the GPS antenna.This system uses GPS information, varioussensors, road map data, and other relatedinformation to display the current position.Errors may occur if the satellite istransmitting inaccurate signals or if whichcan only two or less satellite signals can bereceived.Errors which occur in such conditionscannot be corrected.3-6 NAVIGATION SYSTEMPART 3 NAVIGATION SYSTEMNorth Up / Heading Up switch :Displays the current map mode and themap mode can be switched betweenNorth Up and Heading Up. [Switching map mode], page 3-6.POI : Displays or hides the POI icon onthe map.[Displaying/Hiding POI icons on themap], page 3-9.Map scale : Increases or decreases themap scale. [Changing the map scale], page 3-8.Switching map mode (North Up /Heading Up)Each time the compass button is pressed,the screen will switch in the order shownbelow.Heading Up North Up Heading UpINFORMATIONAll map screens (map screen after settingdestination & whole route display screen)except the current position screen will alwaysbe displayed in North Up mode. North Up : displays the map always facingthe North direction regardless of thedirection which the vehicle is traveling. The vehicle icon is displayed in the centerposition of the map. Heading Up : displays the map alwaysfacing the direction which the vehicle istraveling. The vehicle icon is displayed inthe lower center position of the map.Voice Command1. Press the key on the steering wheelremote controller.2. After the beep sound, say a command."North Up""Heading Up"ii](https://usermanual.wiki/HYUNDAI-MOBIS/AVN600CMFL/User-Guide-1136535-Page-15.png)
![NAVIGATION SYSTEM 3-9NAVIGATION SYSTEM3-8 NAVIGATION SYSTEMPART 3 NAVIGATION SYSTEMChanging the map scalePress the or button. The map scalewill be increased or decreased by one level. INFORMATIONEach time the orbutton is pressed,the scale bar will be displayed. The scale can be changed by directly pressingthe scale level on the scale bar. The green color on the scale bar indicates thecurrent scale level while the orange colorindicates the selected scale level.Press the orbutton for over 0.8second. The scale will continuously change. If the scale range limit is reached, the orbutton will be disabled. The map scale range is between 1 and 14:10,240,000 ~ 1 : 5,000. iLevel Actual distancemi / ft km / m1 150 ft 50 m2 300 ft 100 m3 700 ft 200 m4 0.25 mi 400 m5 0.5 mi 800 m6 1 mi 1.6 km7 2 mi 3.2 km8 4 mi 6.4 km9 8 mi 12 km10 16 mi 25 km11 32 mi 50 km12 64 mi 100 km13 130 mi 200 km14 250 mi 400 kmVoice Command1. Press the key on the steering wheelremote controller.2. After the beep sound, say a command."Zoom In""Zoom Out""Zoom Maximum""Zoom Minimum""Zoom level <1 to 14>""Zoom <actual distance>"" (ex. Zoom 700ft)"Displaying / Hiding POI icons onthe mapDisplaying/Hiding Q.POI iconsPress the button. Related menu buttons will be displayedat the bottom of the screen. INFORMATIONThe Q.POI icons are set to - Gas Station,- Parking, - Hotel, - Golf Course,- Bank, - Fast Food (6 icons) by default.This setting can be changed in SETUP. [Setting Q.POI icons], page 3-42.Press the icon buttons to display or hide.To turn off all POI icons displayed on themap, press the button. INFORMATIONThe current displayed POI icons arehighlighted while the icons not beingdisplayed are shown as normal buttons.If there are no POI icons being displayed,the button will be disabled. POI icons are displayed when the scale isunder 0.5 mi (800m). Displaying / Hiding icons otherthan Q.POI iconsPress the button. Related menu buttons will be displayedat the bottom of the screen. Press the button. INFORMATIONQ.POI stands for Quick POI and refers to thefunction which turns POI icon display on or offon the map. OthersPOIALL OFFALL OFFPOIiiiNAVIGATION SYSTEM 3-11NAVIGATION SYSTEM3-10 NAVIGATION SYSTEMPART 3 NAVIGATION SYSTEM(a) by category listPress the desired main category button. Select the desired sub category menu todisplay or hide (Multiple selections arepossible).Press the selected menu again to cancelthe selection. If the button is pressed, theselected menus will be displayed orhidden on the map screen. Voice Command1. Press the key on the steering wheelremote controller.2. After the beep sound, say a command."Show <POI name>" (ex. Show ATM)"Hide <POI name>" (ex. Hide ATM)"Hide All"Making a call to POI After searching a POI, the POI phonenumber information can be used to make acall to the POI facility. Use the various search methods, such asthe map scroll function, Q.POI searchfunction, and destination search functionto search for a POI.Press the button.Show Icon(s)Bluetooth is used to make a call to thePOI facility.Once the call is ended, the map isrestored to the current vehicle location. INFORMATIONMaking a call is not possible if there is notelephone information for a POI or if there isno mobile phone connected throughBluetooth.For more information of mobile phoneauthentication through Bluetooth ordetailed information on conducting search,refer to [Pairing and connecting aBluetooth phone], page 5-4.Scrolling map Press the map area on the map screen. The selected point will be centered on thescreen and the scroll mark will be displayed.Information about the marked point andstraight line distance from the currentposition will be displayed at the top of thescreen.INFORMATIONIf a map area on the map screen is pressed,the map will continuously scroll in thecorresponding direction until the pressing isreleased.ii](https://usermanual.wiki/HYUNDAI-MOBIS/AVN600CMFL/User-Guide-1136535-Page-16.png)
![NAVIGATION SYSTEM 3-13NAVIGATION SYSTEM3-12 NAVIGATION SYSTEMPART 3 NAVIGATION SYSTEMSetting a destination Destination menu screen andfunctionsPress the key on the control panel todisplay the destination menu screen. Address : sets the destination throughaddress search. [Searching an Address], page 3-13.Previous Dest : sets the destinationthrough the previous destination list. [Searching a Previous Destination],page 3-17 .Intersection : sets the destinationthrough intersection search. [Searching an Intersection], page 3-17.POI Search : sets the destination throughPOI Category search. [Searching a POI], page 3-20 .Address Book : sets the destinationthrough address book search. [Searching from Address book], page3-24 .Emergency : sets the destinationthrough emergency facilities search. [Searching for Emergency facilities],page 3-25 .HOME : sets the stored HOME as thedestination.[Searching your Home], page 3-25 .Favorite place ~ : sets thedestination with one of the storedfavorite places. [Searching favorite places], page 3-26 .51DEST Searching a Destination Searching an AddressThere are 2 ways to set the destinationthrough address search-(a) by street, (b) bycity.Press the key.Press the button.Press the button to change thestate.Input the State name and press thebutton.If the number of matches with the inputis less than 4 results, then the state listscreen will be displayed automatically. If the number of matches is only oneresult, then the state will automatically bechanged without having to manuallyselect the state. Select the desired state from the list tochange the state.(a) by streetPress the button.StreetListStateAddressDEST3-14 NAVIGATION SYSTEMPART 3 NAVIGATION SYSTEMNAVIGATION SYSTEM 3-15NAVIGATION SYSTEMInput the House number and Press thebutton to complete. If the House number is not recognized,press the button. In this case, the range of house numberswill be displayed during the last step.Input the Street name and press thebutton.If the number of matches with the inputis less than 4 results, then the street listscreen will be displayed automatically. If the desired street from the list isselected, the corresponding position willbe displayed on the map. INFORMATIONIf more than 30 cities exist with the selectedstreet, then the city input screen will bedisplayed. If less than 30 cities exist, then thecity selection screen will be displayed.Input the city name and press thebutton to complete. If the number of matches with the inputis less than 4 results, then the list screenwill be displayed automatically. Select the desired city from the list. ListListSkipDoneiThis screen will be displayed if the Housenumber had not been inputted duringstepand more than 2 house numbersranges exist. Select the desired House number range. This screen will be displayed if the Housenumber had not been inputted duringstepand only one house numbersrange exists.Input the House number and press thebutton to complete. The corresponding position will bedisplayed on the map. (b) by cityPress the button.Input the city name and press and pressthe button. If the number of matches with the inputis less than 4 results, then the city listscreen will be displayed automatically. Select the desired city from the list. ListCityDone](https://usermanual.wiki/HYUNDAI-MOBIS/AVN600CMFL/User-Guide-1136535-Page-17.png)
![NAVIGATION SYSTEM 3-17NAVIGATION SYSTEM3-16 NAVIGATION SYSTEMPART 3 NAVIGATION SYSTEMInput the house number and press thebutton to complete. If the House number is not recognized,press the button. In this case, the range of house numberswill be displayed during the last step.Input the Street name and press thebutton to complete. If the number of matches with the input isless than 4 results, then the street listscreen will be displayed automatically. Select the desired street from the list andthe corresponding position will bedisplayed on the map. This screen will be displayed if the Housenumber had not been inputted duringstepand more than 2 House numberranges exist. Select the desired House number range.This screen will be displayed if the Housenumber had not been inputted duringstepand only one House numberrange exists. Select the house number range and Pressthe button to complete. The corresponding position will bedisplayed on the map.Voice Command1. Press the key on the steering wheelremote controller.2. After the beep sound, say a command."Find address" [Find address], page 4-20.DoneListSkipDoneSearching a Previous DestinationPress the key.Press the button.Select the desired previous destination.The corresponding position will bedisplayed on the map. Voice Command1. Press the key on the steering wheelremote controller.2. After the beep sound, say a command."Previous destination"[Previous destination], page 4-25."Previous start point"[Previous start point], page 4-26.Searching an Intersection There are two ways to set the destinationthrough intersection search-(a) by street, (b)by city. Press the key.Press the button.Press the button to change thestate.Input the state name and press thebutton. If the number of matcheswith the input is less than 4 results, thenthe state list screen will be displayedautomatically.If the number of matches is only oneresult, then the state will automatically bechanged without having to manuallyselect the state.Select the desired state from the list tochange the state. ListStateIntersectionDESTPrevious DestDESTNAVIGATION SYSTEM 3-19NAVIGATION SYSTEM(a) by streetPress the button.Input the name of the 1st street andpress the button. If the number of matches with the inputis less than 4 results, then the street listscreen will be displayed automatically. Select the desired 1st street from the list. Input the name of the 2nd street andpress the button. If the number of matches with the inputis less than 4 results, then the street listscreen will be displayed automatically. Select the desired 2nd street menu fromthe list. The corresponding position willbe displayed on the map. If the selected 2nd street is within morethan 2 cities, then the city list screen willbe displayed. Select the desired city menu from the list.The corresponding position will bedisplayed on the map. ListListStreet3-18 NAVIGATION SYSTEMPART 3 NAVIGATION SYSTEM(b) by cityPress the button.Input the city name and press thebutton.If the number of matches with the inputis less than 4 results, then the city listscreen will be displayed automatically. Select the desired city name.Input the name of the 1st street andpress the button. If the number of matches with the inputis less than 4 results, then the street listscreen will be displayed automatically. Select the desired 1st street menu fromthe list. Input the name of the 2nd street andpress the button. If the number of matches with the inputis less than 4 results, then the street listscreen will be displayed automatically. ListListListCity](https://usermanual.wiki/HYUNDAI-MOBIS/AVN600CMFL/User-Guide-1136535-Page-18.png)
![NAVIGATION SYSTEM 3-21NAVIGATION SYSTEMSelect the desired 2nd street menu fromthe list. The corresponding position will bedisplayed on the map. If the selected 2nd street is within morethan 2 cities, then the city list screen willbe displayed. Select the desired city menu from the list.The corresponding position will bedisplayed on the map.Searching a POI There are 3 ways to set the destinationthrough POI search - (a) by category, (b) byname, (c) by phone number. Press the key.Press the button.Press the button.Input the state name and press thebutton. If the number of matcheswith the input is less than 4 results, thenthe state list screen will be displayedautomatically. If there is only onematching result, then the state willautomatically be changed without havingto manually select the state.Select the desired state from the list tochange the state.ListStatePOI SearchDEST3-20 NAVIGATION SYSTEMPART 3 NAVIGATION SYSTEM(a) By category Searches for facilities nearby the currentposition or from the city center.Press the button.Press the button tosearch for facilities nearby the currentposition, or press the button to search for facilities in the nearcity center. (a-1) Near current position Searches for facilities within a 30 mi (45km)radius of the current position. Press the desired main category menu. Voice Command1. Press the key on the steering wheelremote controller.2. After the beep sound, say a command."Find nearest POI"[Find nearest POI], page 4-21.Press the desired sub category menu. Select the desired menu button. The corresponding position will bedisplayed on the map. Near city centerNear current positionCategoryNAVIGATION SYSTEM 3-23NAVIGATION SYSTEM3-22 NAVIGATION SYSTEMPART 3 NAVIGATION SYSTEM(a-2) Near city center Searches for facilities from the city center. Input the city name and press thebutton.If the number of matches with the inputis less than 4 results, then the city listscreen will be displayed automatically. Press the desired city menu. Press the desired main category. Press the desired sub category.Select the desired menu button. The corresponding position will bedisplayed on the map. INFORMATIONThe distance on each POI item button refersto the distance from the city center.Listi(b) By namePress the button.Input the name of the POI and press thebutton.If the number of matches with the inputis less than 4 results, then the facilities listscreen will be displayed automatically. Select the desired POI menu. The corresponding position will bedisplayed on the map. INFORMATIONWhen necessary, the search conditions forthe city and category can be changed bypressing the button. Changing City Press the button.Input the city name and press the button.Select the desired city name.Changing CategoryPress the button.Select the desired main category menu. Select the desired sub category menu. (c) By phone numberPress the button.Phone #CategoryListCityAdvancedListNamei](https://usermanual.wiki/HYUNDAI-MOBIS/AVN600CMFL/User-Guide-1136535-Page-19.png)
![NAVIGATION SYSTEM 3-25NAVIGATION SYSTEM3-24 NAVIGATION SYSTEMPART 3 NAVIGATION SYSTEMInput the phone number and Press thebutton to complete. The corresponding position will bedisplayed on the map. Voice Command1. Press the key on the steering wheelremote controller.2. After the beep sound, say a command."Destination POI by Phone Number"[Destination POI by phone number],page 4-23.Searching from Address bookPress the key.Press the button.Select the desired address book (user)menu.INFORMATIONThis system provides 5 address books. Eachaddresses book can hold up to 200 entries.Select the desired address name fromthe list. The corresponding position will bedisplayed on the map. [Registering new address in addressbook], page 3-43.Voice Command1. Press the key on the steering wheelremote controller.2. After the beep sound, say a command."Destination by address book"[Destination by address book], page 4-25.Address bookDESTDoneiSearching for Emergency facilitiesPress the key.Press the button.Select the desired facility category. Select the desired facility. The corresponding position will bedisplayed on the map. Voice Command1. Press the key on the steering wheelremote controller.2. After the beep sound, say a command."Find emergency <Category>"[Find emergency <Category>], page 4-24.Searching your HomePress the key.Press the button. The Home position will be displayed onthe map. INFORMATIONIf the Home address is not registered, then thebutton will be displayed. [Registering home address], page 3-48.Voice Command1. Press the key on the steering wheelremote controller.2. After the beep sound, say a command."Go home"[Go home], page 4-26.HOMEHOMEDESTEmergencyDESTiNAVIGATION SYSTEM 3-27NAVIGATION SYSTEMOperating after searching adestination Changing destination position : Changes the position of the destination byscrolling the map. [Scrolling map], page 3-11.Setting as Destination / waypoint :Sets the position as the destination orwaypoint.Voice Command1. Press the key on the steering wheelremote controller.2. After the beep sound, say a command."Start guidance" (Sets the position of the scroll mark as thedestination and begins route guidance.)Adding to address book : Saves the position in the address book. [Registering new address in addressbook], page 3-43. Voice Command1. Press the key on the steering wheelremote controller.2. After the beep sound, say a command."Store Marked Location to <text tag>"3-26 NAVIGATION SYSTEMPART 3 NAVIGATION SYSTEMSearching favorite placesPress the key.Select the desired button from ~ .The corresponding position will bedisplayed on the map. INFORMATIONIf the address of the Favorite place is notregistered, then the ~ buttonswithout registered addresses will be disabled.[Registering favorite place], page 3-49.Voice Command1. Press the key on the steering wheelremote controller.2. After the beep sound, say a command."Destination by memory point <1 to 5>"[Destination by memory point <1 to 5>],page 4-26.Searching from MAP Position the scroll mark at the destinationby scrolling the map on the map screen. Searching POI by local POI listPress the button on the mapscreen.Press the button.Press the button.Select the desired POI menu. The corresponding position will bedisplayed on the map. Voice Command1. Press the key on the steering wheelremote controller.2. After the beep sound, say a command."Find nearest <POI name>"[Find nearest <POI name>], page 4-21.Local POI listsOthersPOI5151DESTi](https://usermanual.wiki/HYUNDAI-MOBIS/AVN600CMFL/User-Guide-1136535-Page-20.png)
![NAVIGATION SYSTEM 3-29NAVIGATION SYSTEM3-28 NAVIGATION SYSTEMPART 3 NAVIGATION SYSTEMOperating after setting adestination Starting Route Guidance Press the button. RouteGuidance will start. Route simulationIf the button is pressedand held for over 0.8 second, then theroute simulation will start. If the key on the control panel ispressed during route simulation, thenroute simulation will be terminated.Voice Command1. Press the key on the steering wheelremote controller.2. After the beep sound, say a command."Time to destination" "Distance to destination"Route guidance screenSymbol guidance mode : If the button is pressed, then the followingroute guidance screen will be displayed. Turn-List mode : If the button ispressed, then the following routeguidance screen will be displayed. MAPStart GuidanceStart GuidanceHighway mode : If the button ispressed, then the following routeguidance screen will be displayed.Intersection zoom mode : This routeguidance screen is automatically displayedduring guidance at an intersection. Once guidance at the intersection iscomplete, the screen will automaticallydisappear and the previous guidancescreen will be restored. Highway junction mode : This routeguidance screen is automaticallydisplayed during guidance at highwayjunctions.Once guidance at a highway junction iscomplete, this screen will automaticallydisappear and the previous guidancescreen will be restored. Selecting other routePress the button. Other routes can be selected by pressingthe or buttons. OthersNAVIGATION SYSTEM 3-31NAVIGATION SYSTEM3-30 NAVIGATION SYSTEMPART 3 NAVIGATION SYSTEMRoute guidance Route menu screen and functionsPress the key on the control panel. The ROUTE menu screen will be displayed. Cancel Route: Deletes destination,waypoints and terminates routeguidance.[Finishing route guidance], page 3-30 .Route Overview: Displays the entireroute and route detailed.[Route overview], page 3-31 .Route Option: The route option can bechanged.[Changing Route option], page 3-32 .Edit Waypoint: Waypoints can beadded/deleted and the order can bechanged.[Editing waypoints], page 3-32 .Detour: Searches detour routes. [Setting detour distance], page 3-35 .Avoid Streets: Searches routes whichavoid the selected streets. [Setting avoid streets on route], page3-35.Finishing route guidance (DeleteDestination)Press the key.Press the button. Press the button. The destination and waypoints aredeleted and the route guidance isterminated.[Finishing route guidance], page 3-30 .YesCancel RouteROUTEROUTE Voice Command1. Press the key on the steering wheelremote controller.2. After the beep sound, say a command."Cancel route"(Terminates route guidance and deletes theset destination and waypoints.)Route overview (View Entire Route)Press the key.Press the button.Press the button.INFORMATIONIf the button is pressed,route guidance screen is displayed.The detailed route information can beviewed.Return to GuidanceTurn by turnRoute OverviewROUTEi](https://usermanual.wiki/HYUNDAI-MOBIS/AVN600CMFL/User-Guide-1136535-Page-21.png)
![NAVIGATION SYSTEM 3-33NAVIGATION SYSTEM3-32 NAVIGATION SYSTEMPART 3 NAVIGATION SYSTEMChanging Route optionPress the key.Press the button.Press the button for the desired routeguidance method. Guidance will be restarted afterrecalculating the route with the selectedguidance method. Voice Command1. Press the key on the steering wheelremote controller.2. After the beep sound, say a command."Replan recommended route""Replan shortest route""Replan minimize freeway route""Replan minimize toll road route"Editing waypointsAdding waypointsThere are 2 ways to add waypoints - (a)searching for POI nearest to the route, (b)using advanced search.Press the key.Press the button.Press the button.Press to add new waypointEdit WaypointROUTERoute OptionROUTE(a) Searching POI lists near route Press the button. Select the desired category. Select the desired sub category from list. Select the desired POI from the list. The corresponding position will bedisplayed on the map. Press the button. Press the button to complete. Guidance will restart after recalculatingthe route. DoneAdd as WaypointNear POI lists on RouteNAVIGATION SYSTEM 3-35NAVIGATION SYSTEM3-34 NAVIGATION SYSTEMPART 3 NAVIGATION SYSTEM(b) Using advanced Search The method for searching waypoints throughthe button is the samemethod as searching destination.[Searching a Destination], page 3-13.Deleting waypointsPress the key.Press the button.Select the waypoint and press thebutton.Press the button.After deleting, press the button tocomplete.Guidance will be restart after recalculatingthe route. Re-ordering waypointsPress the key.Press the button.Select the desired waypoint and use the, buttons to changethe order. Once re-ordering is complete, press thebutton to complete. Guidance will restart after recalculatingthe route. DoneMOVEMOVEEdit waypointROUTEDoneYesDeleteEdit waypointROUTEAdvanced(more)Setting detour distancePress the key.Press the button.Select the desired detour range.Guidance will restart after recalculatingthe detour route. Voice Command1. Press the key on the steering wheelremote controller.2. After the beep sound, say a command."Detour <1 or 2 or 5 or 10> miles""Detour <1 or 2 or 5 or 10> kilometers"Setting avoid streets on routePress the key.Press the button.Select the desired streets to avoid( avoid, allow) and press the button to complete. Guidance will restarted after recalculatingthe route to avoid the selected streets. DoneAvoid streetsROUTEDetourROUTE](https://usermanual.wiki/HYUNDAI-MOBIS/AVN600CMFL/User-Guide-1136535-Page-22.png)
![NAVIGATION SYSTEM 3-37NAVIGATION SYSTEM3-36 NAVIGATION SYSTEMPART 3 NAVIGATION SYSTEMSetup and Information Setup menu screen and functionsPress the key on the control panelto display the setup menu screen.Main button : changes to the inputkeyboard type, voice command feedbackON/OFF settings and system initializationcan be made. [Main setting], page 3-36 .Traffic Setup : sets whether to displaytraffic information on map, whether toprovide upcoming traffic information voiceguidance, and whether to display thedetour route popup showing upcomingtraffic information. Navigation button : navigation relatedsettings can be set. [Navigation setting], page 3-38 .My Places button : the Address book,Home address, Favorite places, Previousdestination can be edited.[My places setting], page 3-43 .System Info button : the system versioninformation can be viewed and systemupgrades can be conducted. [System information and update],page 3-51 .Voice Setup button : adjusts theNavigation guidance volume. [Voice guidance volume setting],page 3-51 .Help button : the help contents can beviewed. [Help], page 3-54 .Display button : adjusts the displaysetting. [Display setting], page 1-11 .Main settingPress the key.Press the button.Select the desired changes and press thebutton to complete. Setting keyboard for inputtingletterPress the desired keyboard type button.The selection will be highlighted. DoneMainSETUPSETUP Setting voice command feedbackON/OFFPress the desired setting button.Setting LanguagePress the button.Press the desired language. Press the button to complete. Initializing systemPress the button.Press the menu desired for initialization. Press the button. YesFactory defaultDoneChangeNAVIGATION SYSTEM 3-39NAVIGATION SYSTEMIf the Avoid area needs to be renamed,press the button. Rename the Avoid area and Press thebutton to complete. Each time the button is pressed, thefunction will switch between avoid ( )orallow( ). Press the button to complete thesetting.DoneAvoidDoneRename3-38 NAVIGATION SYSTEMPART 3 NAVIGATION SYSTEMNavigation settingPress the key.Press the button.Select the desired changes and press thebutton to complete.Setting units (mile/ km)Select the desired distance unit. Setting arrival time and distancedisplaySelect the desired setting button. Registering avoid areaPress the button.Press the button.Set the start position of the avoid areaand press the button. Set the end position of the avoid areaand press the button.Press the button to complete.DoneNEXTNEXTAdd new avoid areaAvoid AreaDoneNavigationSETUP](https://usermanual.wiki/HYUNDAI-MOBIS/AVN600CMFL/User-Guide-1136535-Page-23.png)
![Deleting avoid areaPress the button.Press the button.Select the button to delete. Press the button. Press the button.Deleting all avoid areasPress the button.Press the button.Press the button.YesDelete all avoid areaAvoid areaYesDeleteAvoid areaEdit avoid areaAvoid areaNAVIGATION SYSTEM 3-41NAVIGATION SYSTEMEditing avoid areaPress the button.Press the button.Select the Avoid area button to edit.If the Avoid area needs to be renamed,press the button.Rename the Avoid area and press thebutton to complete.Each time the button is pressed,the function will switch between avoid( )or allow( ). Press the button once editing iscomplete.DoneAvoidDoneRenameEdit avoid areaAvoid Area3-40 NAVIGATION SYSTEMPART 3 NAVIGATION SYSTEMNAVIGATION SYSTEM 3-43NAVIGATION SYSTEM3-42 NAVIGATION SYSTEMPART 3 NAVIGATION SYSTEMSetting Q.POI iconsPress the button.Select the desired menu. Select the desired category. Select the desired sub category. Press the button to complete.INFORMATIONQ.POI stands for Quick POI and refers to thefunction which turns POI icon display on or offon the map. Setting estimate travel timePress the button. Press the or button on theResidential, Main street, and Freewaycontrols to adjust the speed. Press the button to set thespeeds to the default settings.Press the button to complete thesetting.DoneDefaultTravel TimeDoneEdit Q.POIiMy places settingRegistering new address inaddress bookThere are 3 ways to register a new addressin the address book - (a) by DEST menu, (b)by registering address in address book, (c)from map scroll. (a) by DEST menuPress the key.Search through the desired method. The search process is the same as themethod for destination search.[Searching a destination], page 3-13.Press the button.Press the desired address book (user)button.Input the name and telephone informationand press the button to complete.[Editing an address of address book],page 3-45.(b) by registering in the address book Press the key.Press the button.Press the button.Press the desired address book (user)button.Address bookMy PlacesSETUPDoneAdd to Address BookDEST](https://usermanual.wiki/HYUNDAI-MOBIS/AVN600CMFL/User-Guide-1136535-Page-24.png)
![NAVIGATION SYSTEM 3-45NAVIGATION SYSTEM3-44 NAVIGATION SYSTEMPART 3 NAVIGATION SYSTEMPress the button.Press the button to search theaddress.[Searching an address], page 3-13.INFORMATIONPress the button to inputthe address of the current position. Input the name and telephone informationand press the button to complete.[Editing an address of address book],page 3-45.(c) from map scrollIn the map screen, scroll the map to thedesired position. Press the button.Press the desired address book (user)button.Input the name and telephone informationand press the button to complete.[Editing an address of address book],page 3-45.DoneAdd to Address BookDoneStore current positionAddressNew AddressiEditing an address of addressbookPress the key.Press the button.Press the button.Select the desired address book (user)button .Select the desired address to edit. Press the button to input theaddress name.Input the address name and press thebutton to complete.Press the button to search theaddress. The process is the same as themethod for searching an address.[Searching an Address] , page 3-13.INFORMATIONPress the button to inputthe address of the current position.Store current positionAddressDoneNameAddress bookMy placesSETUPiNAVIGATION SYSTEM 3-47NAVIGATION SYSTEM3-46 NAVIGATION SYSTEMPART 3 NAVIGATION SYSTEMPress the button to input thephone number.Input the phone number and press thebutton to complete.Press the button to complete.Deleting an address of addressbookPress the key.Press the button.Press the button.Select the desired address book (user)button.Select the desired address button todelete.Press the button.DeleteAddress bookMy placesSETUPDoneDonePhonePress the button.Deleting an address bookPress the key.Press the button.Press the button.Press the desired address book (user)button.Press the button. Press the button.YesDelete allAddress bookMy placesSETUPYes](https://usermanual.wiki/HYUNDAI-MOBIS/AVN600CMFL/User-Guide-1136535-Page-25.png)
![NAVIGATION SYSTEM 3-49NAVIGATION SYSTEM3-48 NAVIGATION SYSTEMPART 3 NAVIGATION SYSTEMRegistering home addressPress the key.Press the button.Press the button.Press the button. INFORMATIONPress the button toregister the current position as Home.Search the address. The process is the same method assearching an address.[Searching an Address], page 3-13.Press the button to complete.Deleting home addressPress the key.Press the button.Press the button.Press the button.DeleteHome AddressMy placesSETUPDoneStore current positionSearch AddressHome AddressMy placesSETUPiPress the button.Registering favorite placePress the key.Press the button.Press the button.Press the number of the Favorite Place toregister.Press the button.INFORMATIONPress the button toregister the current position as a Favorite place. Search the address. The process is the same as the methodfor searching an address.[Searching an Address], page 3-13.Store current positionSearch addressFavorite PlacesMy placesSETUPYesiNAVIGATION SYSTEM 3-51NAVIGATION SYSTEM3-50 NAVIGATION SYSTEMPART 3 NAVIGATION SYSTEM](https://usermanual.wiki/HYUNDAI-MOBIS/AVN600CMFL/User-Guide-1136535-Page-26.png)
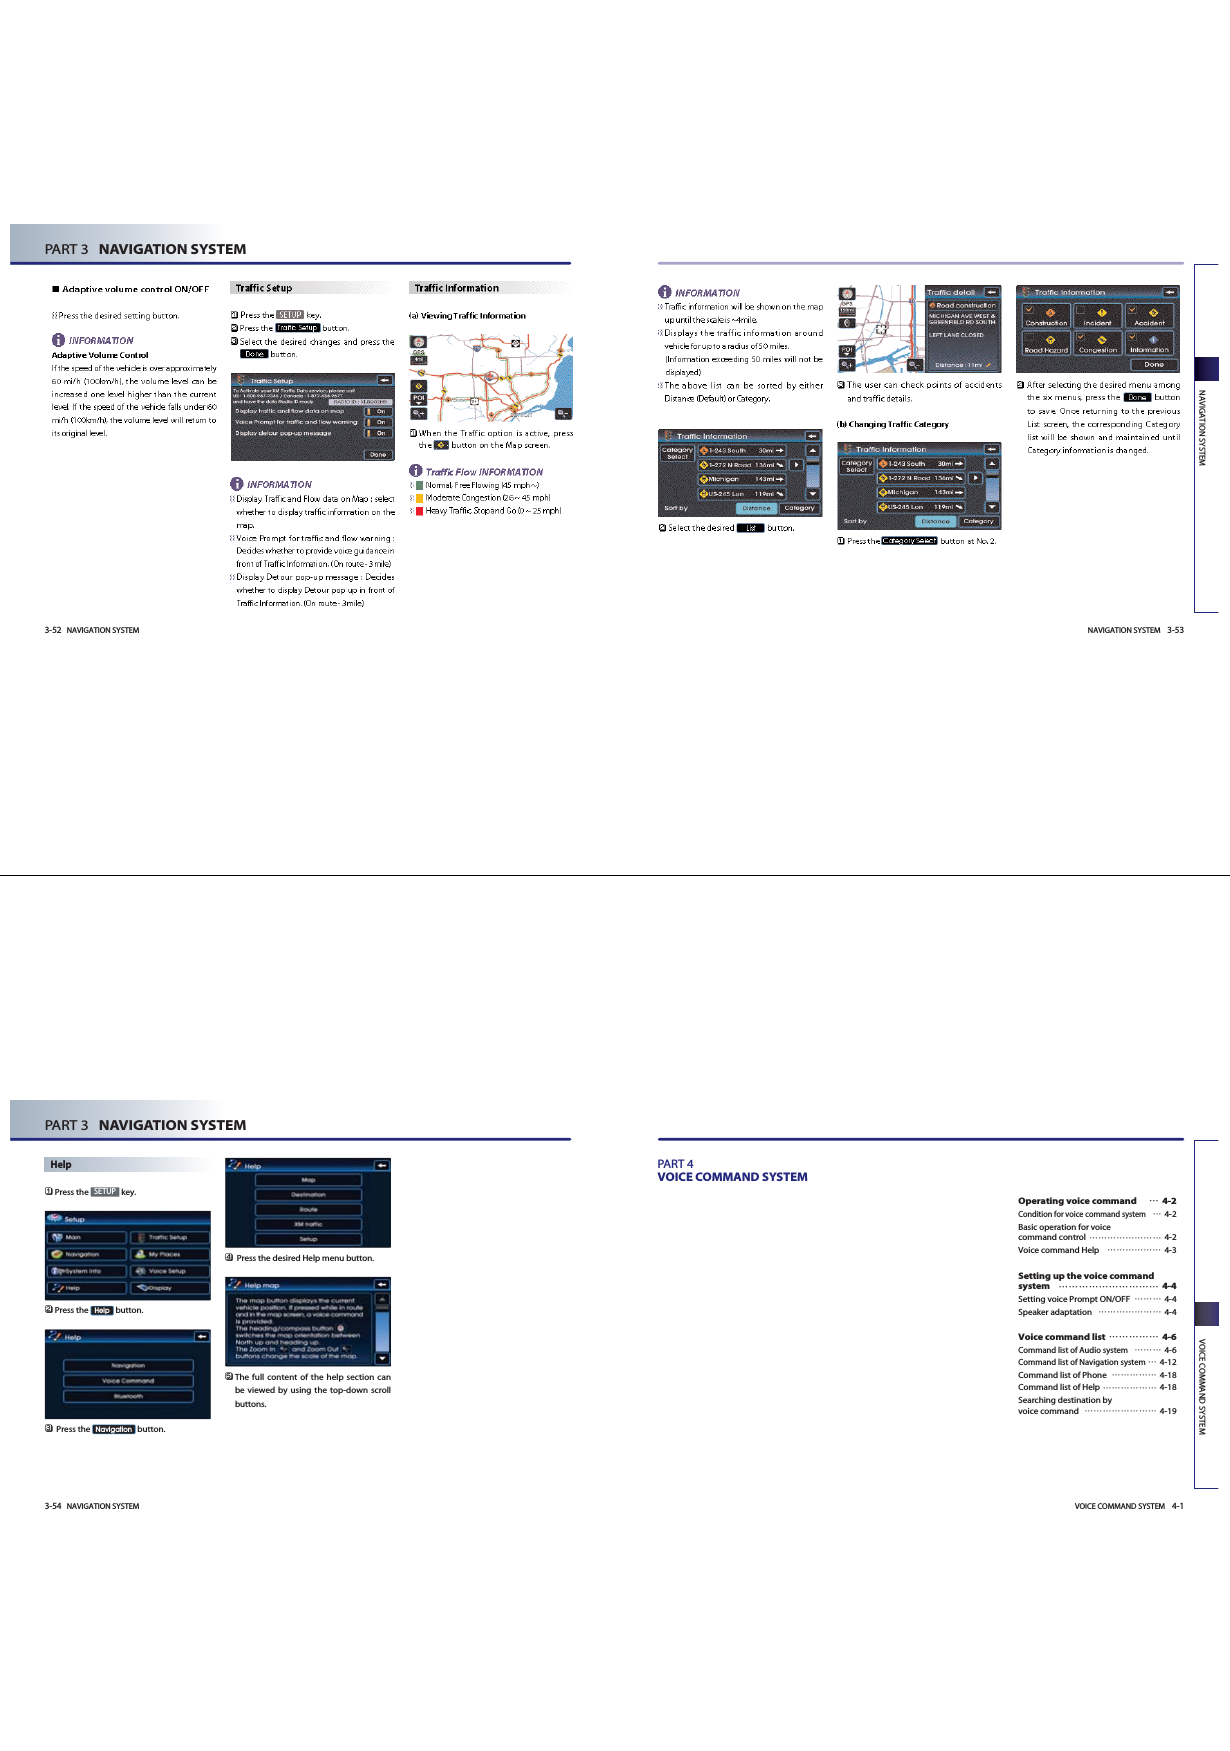
![VOICE COMMAND SYSTEM 4-3VOICE COMMAND SYSTEM4-2 VOICE COMMAND SYSTEMPART 4 VOICE COMMAND SYSTEMThe inputted command is fed back to thescreen and voice system. If the commandwas not recognized properly, say "Back". INFORMATIONThe commands which can currently beinputted are displayed on the screen inyellow.To terminate the voice recognition system,either say "cancel" or press the for over0.8 second. Be aware that during the operation of thevoice recognition system, pressing the hardkeys or the screen will terminate the voicerecognition system. Voice command HelpPress the key on the steering wheelremote controller. A voice commandwindow will be displayed on the lowerside of the screen followed by a"Command please" system voicecomment.INFORMATIONThe System voice comment "CommandPlease" will not be provided when the Voiceprompt is turned OFF. Once the icon changes into the icon on the pop-up screen with a beepsound, say "Help". If the proper Helpmenu is already known, voicecommands, such as "destination help"can be inputted directly. INFORMATIONThe "help" command can be used even whilevoice recognition dialogue is operating. Atsuch time, help instructions appropriate tothe state of the dialogue will be provided. Say the name of the desired menu. (ex : "Destination help")Say the desired voice command.PART 4 VOICE COMMAND SYSTEMOperating voice command Condition for voice commandsystemMost of the functions within the AV andNavigation system can be operated byvoice. Please follow the followinginstructions for optimal voice recognitionperformance.Close all windows and the sunroof. Theperformance of the voice recognition canbe improved if the environment of the carinterior is quiet. Press the voice recognition button andsay the desired voice command after thesound of the beep.The microphone is positioned above thedriver so that voice commands can bespoken while maintaining a properposture.Pronounce the voice commands naturallyand clearly as if in a normal conversation. Basic operation for voicecommand controlPress the key on the steering wheelremote controller. A voice commandwindow will be displayed on the lowerside of the screen followed by a"Command please" system voicecomment.INFORMATIONThe System voice comment "CommandPlease" will not be provided when the Voiceprompt is turned OFF. Once the icon changes into the icon on the pop-up screen with a beepsound, say the desired voice command(ex : previous destination)[Voice command list], page 4-6.[Searching destination by voice command],page 4-19.If the exact command is not known, use the"Help" command to view the commands listin detail. INFORMATIONPress the shortly to input a voicecommand from among the system voicecomments. The system voice instructioncomment will immediately terminate. Whenthe icon changes into the icon with abeep sound, input the desired voice command. iiiiiVOICE COMMAND SYSTEM 4-5VOICE COMMAND SYSTEM4-4 VOICE COMMAND SYSTEMPART 4 VOICE COMMAND SYSTEMOnce the icon changes into the icon on the pop-up screen with a beepsound, say "Yes".Listen and repeat the 20 commands(approximate) as instructed by thedevice.Reset Speaker adaptation: Returns toprevious state prior to applying Speakeradaptation.Press the key on the steering wheelremote controller.Once the icon changes into the icon on the pop-up screen with a beepsound, say "Reset Speaker adaptation".Setting up the voicecommand system Setting voice Prompt ON/OFFVoice prompt ON : All system prompts areprovided.Voice prompt OFF : Most of the systemprompts are not provided. Press the key on the steering wheelremote controller. Once the icon changes into the icon on the pop-up screen with a beepsound, say "Voice setup." The "voiceprompt on" or "voice prompt off" can bedirectly inputted if the current state isalready known. Once the icon changes into the icon onthe pop-up screen with a beep sound,say "Voice Prompt on".INFORMATIONIn the Voice Setup Help screen, the commandspossible for input within the current mode aredisplayed. For example, if the Voice prompt iscurrently in Off state, then the command Voiceprompt ON will be displayed on the screen. Speaker adaptationPress the key on the steering wheelremote controller.Once the icon changes into the icon on the pop-up screen with a beepsound, say "Voice setup." Or the "Speakeradaptation" command can be directlyinputted.Once the icon changes into the icon on the pop-up screen with a beepsound, say "Speaker adaptation".i](https://usermanual.wiki/HYUNDAI-MOBIS/AVN600CMFL/User-Guide-1136535-Page-28.png)
![VOICE COMMAND SYSTEM 4-11VOICE COMMAND SYSTEM4-10 VOICE COMMAND SYSTEMPART 4 VOICE COMMAND SYSTEMUSB iPodCommand OperationUSB If the USB has been connected to the device, plays the MP3 files within the USB. Next file Plays the next file. Previous file Plays the previous file. Next folder Plays the first chapter of the next folder. Previous folder Plays the first chapter of the previous folder. Scan Scans all files within the USB.Folder Scan Plays all songs in the folder in which the current playing file is located for 10 seconds each.Repeat File Repeats the current playing file. Repeat Folder Repeats all songs within the current playing folder. Random Plays all files within the MP3 DISC in random order.Random Folder Plays all files within the current playing folder in random order.Normal play Turns off the Scan, Repeat, and Random functions.Command OperationiPod Plays the songs within the iPod if the iPod has been connected to the device. Next song Plays the next song. Previous song Plays the previous song. Repeat song Repeats the current playing song. Random Plays all songs within the iPod in random order. Random Album Plays all songs within the current playing album in random order.Normal play Turns off the Repeat and Random functions.OthersCommand OperationLine in Plays the unit connected with the AUX terminal.Audio on Turns on the Audio/Video. Audio off Turns off the Audio/Video.VOICE COMMAND SYSTEM 4-13VOICE COMMAND SYSTEM4-12 VOICE COMMAND SYSTEMPART 4 VOICE COMMAND SYSTEMMapCommand OperationMap Current location Displays the current position of the vehicle.Zoom In Decreases the map zoom by one level. Zoom Out Increases the map zoom by one level. Zoom minimum Displays the map screen in the minimum zoom level. Zoom maximum Displays the map screen in the maximum zoom level. Zoom level <1 to 14> Displays the map in the zoom level selected from the 14 levels. Zoom <scale factor> Displays the map in the corresponding zoom.150 feet / 50 meters300 feet /100 meters700 feet / 200 meters0.25 miles / 400 meters0.5 miles / 800 meters1 mile / 1.6 kilometers2 miles / 3.2 kilometers4 miles / 6.4 kilometers8 miles / 12 kilometersCommand list of Navigation systemNavigation commands will operate only agreeing to the terms and conditions for the Navigation system. Command Operation16 miles / 25 kilometers32 miles / 50 kilometers64 miles / 100 kilometers130 miles / 200 kilometers250 miles / 400 kilometers(ex.Zoom 0.25 miles, zoom 400 meters)North up Displays the map in North Up mode. Heading up Displays the map in Heading Up mode. Show <POI name> (ex. Show ATM) Displays the selected POI categories. [POI Category list], page 4-17.Hide <POI name> (ex. Hide ATM) Hides the selected POI categories. [POI Category list], page 4-17.Hide all Hides all POI categories. Daylight mode Converts the map display into daylight mode. Night mode Converts the map display into night mode. Auto mode Converts the map display is between daylight/night modes automatically.](https://usermanual.wiki/HYUNDAI-MOBIS/AVN600CMFL/User-Guide-1136535-Page-30.png)
![VOICE COMMAND SYSTEM 4-15VOICE COMMAND SYSTEM4-14 VOICE COMMAND SYSTEMPART 4 VOICE COMMAND SYSTEMDestinationCommand OperationFind address Sets the destination through address search for route guidance.Find nearest POISets a POI near the current position as the destination for route guidance through POI category search.Find nearest <POI name> Sets a POI near the current position as the destination by directly inputting the POI name forroute guidance. [POI Category list], page 4-17.Destination POI by phone number Sets the destination by searching the phone number of the facility.Find Emergency <Category> Searches for an emergency facility which is nearby the current position and sets it as thedestination for route guidance. Emergency facilities are police stations, hospitals, anddealerships.Destination by address book Sets one of the list of previously registered addresses in the address book for the user as thedestination.Previous destination Sets one of the previous destination as the current destination.Previous start point Sets the previous start point as the current destination.Go home Sets the previously registered home address as the destination for route guidance. Destination by memory point <1 to 5> Sets a previously registered memory point as the destination for route guidance.(ex. Find Emergency Hospital)RouteCommand OperationCancel route Deletes the designated destination and terminates the route guidance.Repeat voice guidance Repeats the route guidance. Detour <1 or 2 or 5 or 10> miles Searches detour routes within a <1|2|5|10> mile radius. Detour <1 or 2 or 5 or 10> kilometers Searches detour routes within a <1|2|5|10> kilometer radius. Replan recommended route Recalculates the route with the recommended route. Replan shortest route Recalculates the route with the shortest route. Replan minimize freeway route Recalculates the route with the minimize freeway route. Replan minimize toll road route Recalculates the route with the minimize toll route. Distance to destination Reports the remaining distance until destination by voice. Time to destination Reports the remaining time until destination by voice.View route If the destination has been set, displays the whole route screen until the destination. Start guidance Sets the scroll mark displayed on the map as the destination and starts route guidance.VOICE COMMAND SYSTEM 4-17VOICE COMMAND SYSTEM4-16 VOICE COMMAND SYSTEMPART 4 VOICE COMMAND SYSTEMOthersCommand OperationVoice guidance on Turns the Voice Guidance On. Voice guidance off Turns the Voice Guidance Off.Voice guidance louder Increases the Voice Guidance volume by 1 level. Voice guidance softer Increase the Voice Guidance volume by 1 level. Store marked location to <text tag> Registers the selected location into the selected Address book. (ex. Store marked location to user 1)POI Category listAll restaurantsFast Food restaurantAmerican restaurantFrench restaurantItalian restaurantContinental restaurantMexican restaurantJapanese restaurantChinese restaurantKorean restaurantVegetarian Food restaurantSeafood restaurantLatin American restaurantAsian restaurantAfrican restaurantCoffee Shop Other restaurantsAll automotiveGas StationParkingAuto serviceRoad AssistanceHyundai DealershipAutomobile DealershipAuto PartsRest AreaCar WashMotorcycle DealershipAll Travel AirportHotelTourist InformationTravel AgentTourist AttractionCity CnterRental Car AgencyCampgroundFerry TerminalBus StationLocal TransitTrain StationAll ShoppingDepartment StoreConvenience StoreShopping CenterMusic StoreGrocery StoreBookstoreHardware StoreGifts shopSporting Goods storeHome Specialty StoreClothing shopShoe StorePharmacyAll Recreation Amusement ParkMuseumCinemaSports ActivitiesSports ComplexGolf CourseWineryVideo & Game RentalSki ResortRecreation AreaOther RecreationAll Financial ServiceBankATMCheck Cashing ServiceMoney TransferBusiness FacilityAll CommunityPolice StationPost OfficeLibraryCourt HouseFire DepartmentConvention CenterCity HallCivic CenterSchoolGovernment OfficesWaste & SanitaryUtilitiesAll ServicesHospitalDentistPhotographyTax ServiceMedical ServiceAttorneyFuneral DirectorHair & BeautyCleaning & LaundrySocial ServicePhysicianCommunication servicesTailor AlterationMover services](https://usermanual.wiki/HYUNDAI-MOBIS/AVN600CMFL/User-Guide-1136535-Page-31.png)
![BLUETOOTH HANDSFREE 5-5BLUETOOTH HANDSFREEWhen pairing the car handsfree from themobile phone, a passkey input windowwill become displayed on the mobilephone screen. Input the passkey set withinthe car system into the mobile phoneinput window. (The factory state passkey is0000.) As shown in the figure, once thepasskey becomes successfully inputted,the Bluetooth connection between the carsystem and mobile phone will start.Once Bluetooth connection is successful,the name of the connected mobile phonewill become displayed on the PHONEscreen and Bluetooth handsfree functionswill operate.INFORMATIONSome functions may not be supported dueto limited Bluetooth compatibility betweenthe car system and mobile phone. ii5-4 BLUETOOTH HANDSFREEPART 5 BLUETOOTH HANDSFREEPairing and connecting aBluetooth phonePairing a mobile phonePress the button on the PHONEscreen.Press the button on the Settingsscreen.The list of currently paired phones will bedisplayed. Press the button topair a new mobile phone.INFORMATIONFor safety reasons, pairing a Bluetoothphone is not possible when the vehicle is inmotion.Park the vehicle in a safe location to pair anew phone. It is possible to pair up to fivemobile phones. In order to pair a newphone when there are already five mobilephones paired, you must first delete one ofthe previously paired phones.From the Bluetooth device list within themobile phone, add the car handsfree. The default name of the car system isSantafe..For more information on registeringBluetooth devices from the mobile phone,please refer to the mobile phone user'smanual.INFORMATIONWhile conducting a Bluetooth device searchfrom the mobile phone, operating toanother screen will prevent the carhandsfree from being found in the mobilephone. Always conduct searches forBluetooth devices with the SearchBluetooth device screen displayed.Add toPairingsSettingsiBLUETOOTH HANDSFREE 5-7BLUETOOTH HANDSFREE5-6 BLUETOOTH HANDSFREEPART 5 BLUETOOTH HANDSFREEDeleting a paired phonePress the button on the PHONEscreen.Press the button on the Settingsscreen.The list of currently paired phones will bedisplayed. Select the phone you wish todelete from the list and press the button.A pop-up asking whether you wish todelete the paired phone will be displayed. Press the button to delete thepaired phone and the button tocancel.CAUTION!A mobile phone cannot be deleted if it iscurrently connected to the car system. To delete the phone, first disconnect themobile phone and try again.NoYesDeletePairingsSettingsConnecting a mobile phonePress the button on the PHONEscreen.Press the button on theSettings screen. The list of currently paired phones will bedisplayed. Select the phone you wish toconnect from the list and press thebutton.INFORMATIONWhen there are no paired phones, pair themobile phone through [Settings>Pairings>Add to]. For more information on pairingmobile phones, refer to the user's manual[Pairing and Connecting a Bluetooth phone >Pairing a mobile phone]. The Bluetooth connection between the carsystem and mobile phone will start.Once Bluetooth connection is successful,the name of the connected mobile phonewill become displayed on the PHONEscreen and Bluetooth handsfree functionswill operate.ConnectConnectionsSettingsi](https://usermanual.wiki/HYUNDAI-MOBIS/AVN600CMFL/User-Guide-1136535-Page-35.png)
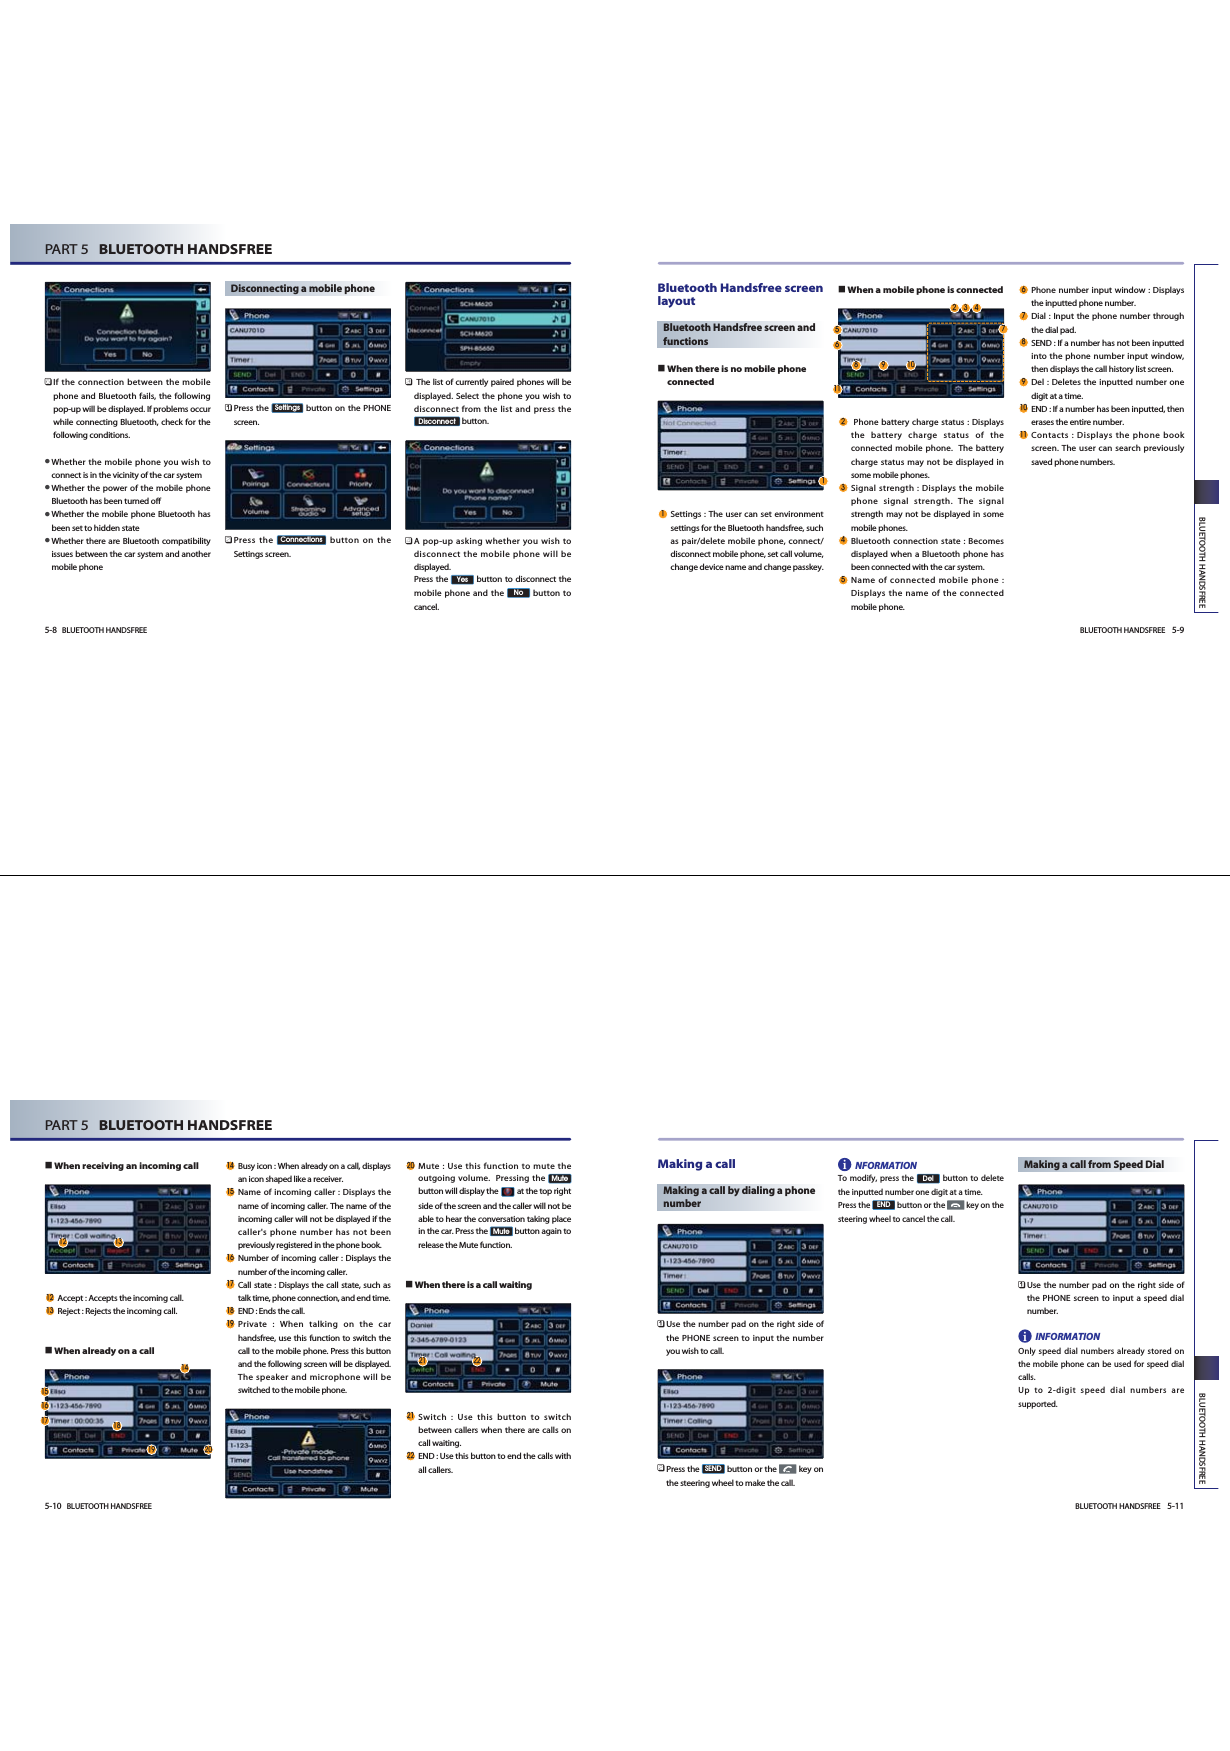
![BLUETOOTH HANDSFREE 5-13BLUETOOTH HANDSFREE5-12 BLUETOOTH HANDSFREEPART 5 BLUETOOTH HANDSFREEPress the button or the key onthe steering wheel to make the call.INFORMATIONFor 2-digit speed dial numbers, press andhold the 2nd digit to make a call to the speeddial number.Making a call by redialingPress and hold (over 0.8 second) the button on the PHONE screen or the key on the steering wheel.INFORMATIONRedialing is not possible when there is no callhistory or the call history list is beingdownloaded from the mobile phone. Whenthere is no call history list, the buttonwill be inactive.The recently called number is redialed.INFORMATIONIt is not possible to display the AV mode andSettings screen when on a phone call. Onlythe call volume and Navigation (MAP, DEST,ROUTE) screens can be operated. SENDSENDSENDAnswering a callAnswering an incoming call The following screen will be displayedwhen you receive an incoming call.To answer the incoming call, press thebutton or the key on thesteering wheel.Rejecting an incomingThe following screen will be displayedwhen you receive an incoming call.To reject the incoming call, press thebutton or the key on thesteering wheel. The incoming call will berejected.INFORMATIONUpon receiving a call, the [Reject] functionmay not be supported in some mobilephones.RejectAcceptiiiiBLUETOOTH HANDSFREE 5-15BLUETOOTH HANDSFREE5-14 BLUETOOTH HANDSFREEPART 5 BLUETOOTH HANDSFREEOperating menus during acallSwitching call to the mobilephoneIf you wish to switch the call to the mobilephone while talking on the car handsfree,press the button or press andhold (over 0.8 second) the key on thesteering wheel.As shown, the call will be switched to themobile phone.INFORMATIONIf you wish to switch the call to the carhandsfree while talking on the mobile phone,press the button or press andhold (over 0.8 second) the key on thesteering wheel. The call will be switched tothe car handsfree.Activating Call waitingIf another person calls while already on acall, the following screen will be displayed. Press the button or the keyon the steering wheel to receive theincoming call by switching to the newcaller.AcceptUse handsfreePrivateTo switch again to the other caller, pressthe button or the key on thesteering wheel. The other call will bereceived and the previous call will switchback to call waiting. INFORMATIONPress the button or the key onthe steering wheel to end the current call andcall waiting.Ending a callTo end a call, press the button orthe key on the steering wheel.The call will be ended.EndEndSwitchii](https://usermanual.wiki/HYUNDAI-MOBIS/AVN600CMFL/User-Guide-1136535-Page-37.png)
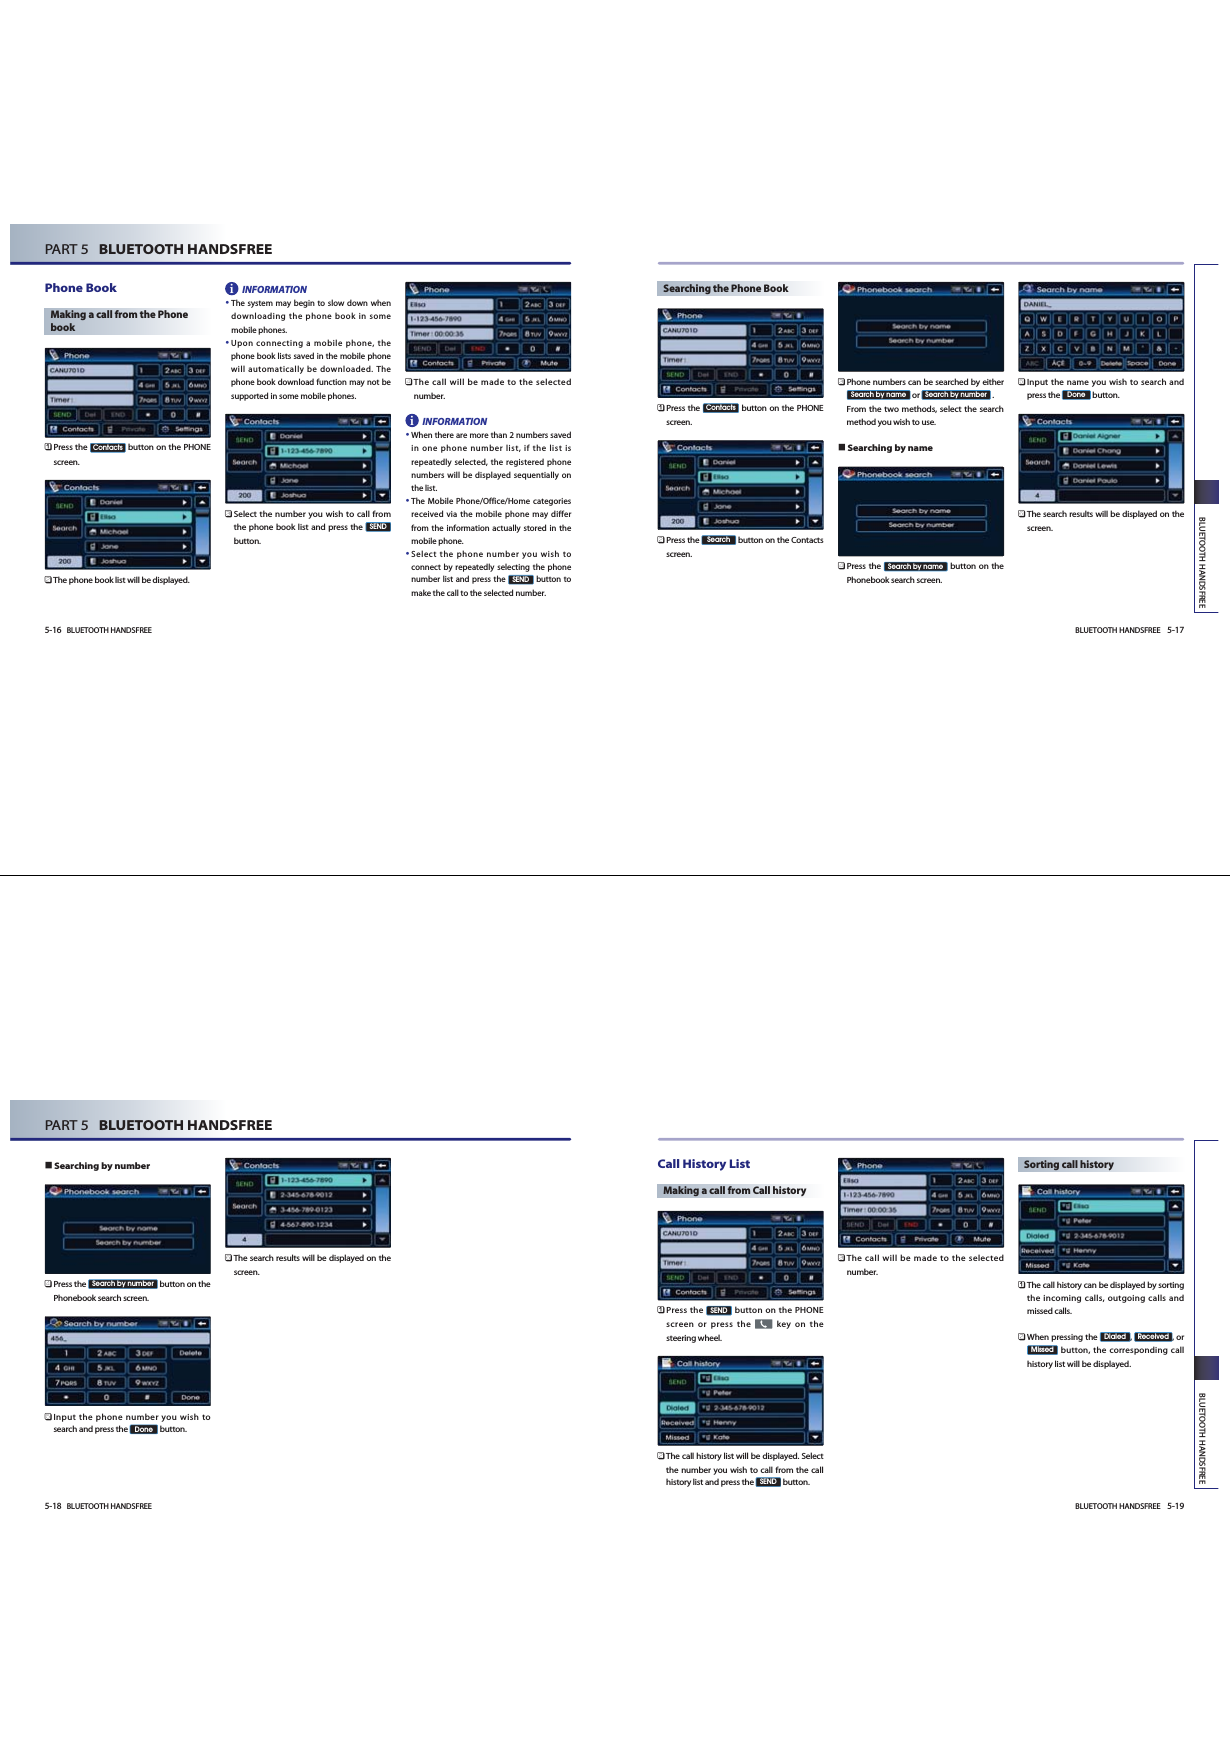
![BLUETOOTH HANDSFREE 5-21BLUETOOTH HANDSFREE5-20 BLUETOOTH HANDSFREEPART 5 BLUETOOTH HANDSFREEDialed number Received numberMissed numberINFORMATIONIf there are no entries saved in the ,, or lists, the correspondingbutton will be inactive. Up to 20 entries canbe saved in each list. MissedReceivedDialedPhone MusicBefore playing Phone musicMusic saved in the mobile phone can beplayed in the car through Bluetooth audiostreaming.Phone music can be played only when aBluetooth phone has been connected. Toplay phone music, connect the Bluetoothphone to the car system. For moreinformation on connecting Bluetooth, pleaserefer to the user's manual [Pairing andConnecting a Bluetooth phone]. If the Bluetooth is disconnected while playingphone music, the music will be discontinued. The audio streaming function may not besupported in some mobile phones. Only one function can be used at a timebetween the Bluetooth handsfree or Phonemusic function. For example, if you convert to the Bluetoothhandsfree while playing Phone music, themusic will be discontinued. Playing music from the car is not possiblewhen there are no music files stored in themobile phone. Starting Phone MusicRepeatedly press the key on thefront panel or the key on thesteering wheel to enter Phone musicmode.MDOECD/AUXiBLUETOOTH HANDSFREE 5-23BLUETOOTH HANDSFREE5-22 BLUETOOTH HANDSFREEPART 5 BLUETOOTH HANDSFREEINFORMATIONEach press of the key on the frontpanel will change the function in the order ofDISC USB or iPod AUX Phone Music DISC .Each press of the key on the steeringwheel will change the audio mode in theorder of FM1 FM2 AM XM1 XM2 XM3 DISC USB or iPod AUX PhoneMusic FM1.It is not possible to enter Phone music mode ifthe mobile phone is not connected or if theaudio streaming setting within Bluetoothhandsfree settings has been set to [Disablestreaming audio]. For more information on audio streamingsetting, please refer to the users manual[Bluetooth settings > Setting Audio streaming].The Phone music screen is displayed. INFORMATIONWhile music saved in the mobile phone willautomatically begin playing after convertingto the Phone music screen, this music playerfunction may not be supported in somemobile phones. If music does not begin playing even afterconverting to the Phone music screen, trystarting the music directly from the mobilephone.Phone music screen layoutInformation Bar : displays information forthe currently playing song.File Down button : plays the previoussong.Play/Pause button : Plays/pauses thesong.File Up button : plays the next song.Sound button : sets the FAD/BAL andBAS/MID/TRE.MODECD/AUXSelecting Phone music filesPress the , buttons on thePhone music screen or the ,keys on the system. The previous or next song will be playedeach time the button or key is pressed.INFORMATIONThe file selection function may not besupported in some mobile phones. TRACKSEEKii i](https://usermanual.wiki/HYUNDAI-MOBIS/AVN600CMFL/User-Guide-1136535-Page-39.png)
![BLUETOOTH HANDSFREE 5-25BLUETOOTH HANDSFREE5-24 BLUETOOTH HANDSFREEPART 5 BLUETOOTH HANDSFREEBluetooth settingsPairing and connecting a mobilephoneFor more information on pairing andconnecting a mobile phone, please refer to[Pairing and Connecting a Bluetooth phone]. Setting mobile phone autoconnect priorityINFORMATIONAfter turning on the car ignition and thesystem is booted up, the Bluetooth connectionbetween the car system and mobile phone isautomatically made. The Bluetooth connection will be conductedin the order of mobile phone priority. The auto connect priority will be supportedonly for previously paired mobile phones. Press the button on the PHONEscreen.Press the button on the Settingsscreen.The paired mobile phone list and themobile phone connection priority will bedisplayed.When wishing to change the priority order,select the mobile phone from the list anduse the , buttons to change itspriority.Press the button to save thechanged mobile phone priority.DonePrioritySettingsSetting Handsfree volume Press the button on the PHONEscreen.Press the button on the Settingsscreen.INFORMATIONThe Bluetooth handsfree volume can beadjusted only when a mobile phone has beenconnected.The cannot be set if no mobilephone has been connected. Use the , buttons to set thedesired volume on the Phone volumescreen. Press the button to save. INFORMATIONWhile on a call, turning the knob tothe left/right or pressing the key onthe steering wheel will also adjust the callvolume.If the call volume is set too high, the loudincoming call bell may cause a traffic accident. VOLPOWERDoneVolumeVolumeSettingsiiiBLUETOOTH HANDSFREE 5-27BLUETOOTH HANDSFREE5-26 BLUETOOTH HANDSFREEPART 5 BLUETOOTH HANDSFREESetting Audio streamingPress the button on the PHONEscreen.Press the button on theSettings screen. Streaming audio setting is selected.INFORMATIONEnable streaming audio: Repeatedly press thekey or the key to enterPhone music mode. Phone music can beplayed through Bluetooth audio streaming. Disable streaming audio: Even if the key or the key is repeatedly pressed,will not enter Phone music mode. Phonemusic through Bluetooth audio streaming isnot supported. Advanced settingsBluetooth advanced settings can bechanged. Enter advanced settings throughthe following way.Press the button on the PHONEscreen.Press the button on theSettings screen. Advanced setupSettingsMODECD/AUXMODECD/AUXStreaming audioSettingsINFORMATIONFor safety reasons, operation of Advancesetup is not possible when the vehicle is inmotion. Please park in a safe place to makechanges to Advanced setup.The Advance setup screen will bedisplayed. In Advance setup, the followingfour settings can be made. Searching and modifying mydevice propertiesPress the button on theAdvance setup screen. Displays the Device information such asthe name and address of the car system. To modify the device name, press thebutton.Use the key pad to input the Device nameyou wish to modify. After inputting is complete, press thebutton to save. DoneChange nameDevice informationii](https://usermanual.wiki/HYUNDAI-MOBIS/AVN600CMFL/User-Guide-1136535-Page-40.png)
![BLUETOOTH HANDSFREE 5-29BLUETOOTH HANDSFREE5-28 BLUETOOTH HANDSFREEPART 5 BLUETOOTH HANDSFREEChanging passkeyPress the button on theAdvance setup screen.Once the Change passkey screen isdisplayed, input the desired passkey andpress the button. INFORMATIONThe passkey is a 4-digit authentication codeused for a Bluetooth connection between themobile phone and car system. The defaultpasskey is set to 0000.Deleting all paired phonesPress the buttonon the Advance setup screen.A pop-up asking whether you wish todelete all paired phone will be displayed.Press the button to delete all pairedphones and the button to cancel. If button is pressed, all currentlypaired phones will be deleted.YesNoYesDelete all paired phonesDoneChange passkeyInitializing Bluetooth handsfreePress the button onthe Advance setup screen.A pop-up asking whether you wish toinitialize the Bluetooth handsfree will bedisplayed.Press the button to initialize theBluetooth handsfree system and the button to cancel.INFORMATIONUpon initializing the Bluetooth handsfree, theentire paired phone list will be deleted and allBluetooth related settings will be restored tofactory state.If is pressed, the Bluetooth handsfreesettings will be initialized. YesNoYesRestore factory settingsi iBLUETOOTH HANDSFREE 5-31BLUETOOTH HANDSFREE5-30 BLUETOOTH HANDSFREEPART 5 BLUETOOTH HANDSFREEImportant information About pairing mobile phonesI cannot search for mobile phonesthrough the car system. What is thecause?Check to see whether the mobile phoneyou wish to connect supports Bluetoothfunction. If your mobile phone supportsBluetooth, check to see that whether theBluetooth settings in the mobile phonehave been set to hidden state or if theBluetooth power has been turned off. Ifthe device has been set to hidden,release the hidden state and if theBluetooth power has been turned off,turn the power ON and try searchingagain.What is the difference between pairing amobile phone and connecting a mobilephone?Through a two-way passkey betweenthe car system and mobile phones, up to5 mobile phones can be paired with thecar system. The paired mobile phone willremain paired with the car system untilthe user deletes it manually. In addition, the call history lists andphone number books saved in eachmobile phone will also be maintaineduntil the paired phone is deleted. Formore information on pairing mobilephones, please refer to the manual[Pairing and Connecting a Bluetoothphone > Pairing a mobile phone]. Connect a mobile phone to Bluetoothby selecting the desired mobile phonefrom the paired phones. Within the carsystem, only one Bluetooth phone canbe connected at one time. For moreinformation, please refer to the manual[Pairing and Connecting a Bluetoothphone > Pairing a mobile phone]. What is a Passkey?A passkey is an authentication code usedfor two-way authentication of the carsystem and the mobile phone. Only 4-digit numbers can be used aspasskeys. Passkeys are registered onlyonce when pairing the phone numberfor the first time. The factory-set passkeyis 0000. About making/answering phonecallsHow can I answer a call?When you receive an incoming call,press the key on the steering wheelor the button on the PHONEscreen to answer. To reject the incomingcall, press the key on the steeringwheel or the button on thePHONE screen. What should I do if I am talking on theHandsfree but wish to switch the call tothe mobile phone?To switch the call to the mobile phone,press the button on the PHONEscreen or press and hold (over 0.8second) the key on the steeringwheel. If you wish to switch the call backto the car handsfree, press thebutton on the PHONEscreen or press and hold (over 0.8second) the key on the steeringwheel.About Bluetooth deviceenvironment What is the range for Bluetooth wirelessconnection?The wireless connection range is within10 meters.How many mobile phones can be paired? It is possible to pair up to five phoneswith the car system.What is the reason why the call qualitydeteriorates?First, check to see the signal strength ofthe mobile phone. The call quality maydeteriorate when the signal strength islow. Call quality may also deteriorate ifmetal objects, such as drink cans, areplaced near the mobile phone.Use handsfreePrivateRejectAcceptQ.A.A.A.Q. Q.A.Q.A.Q.A.Q.A.Q.A.Q.](https://usermanual.wiki/HYUNDAI-MOBIS/AVN600CMFL/User-Guide-1136535-Page-41.png)
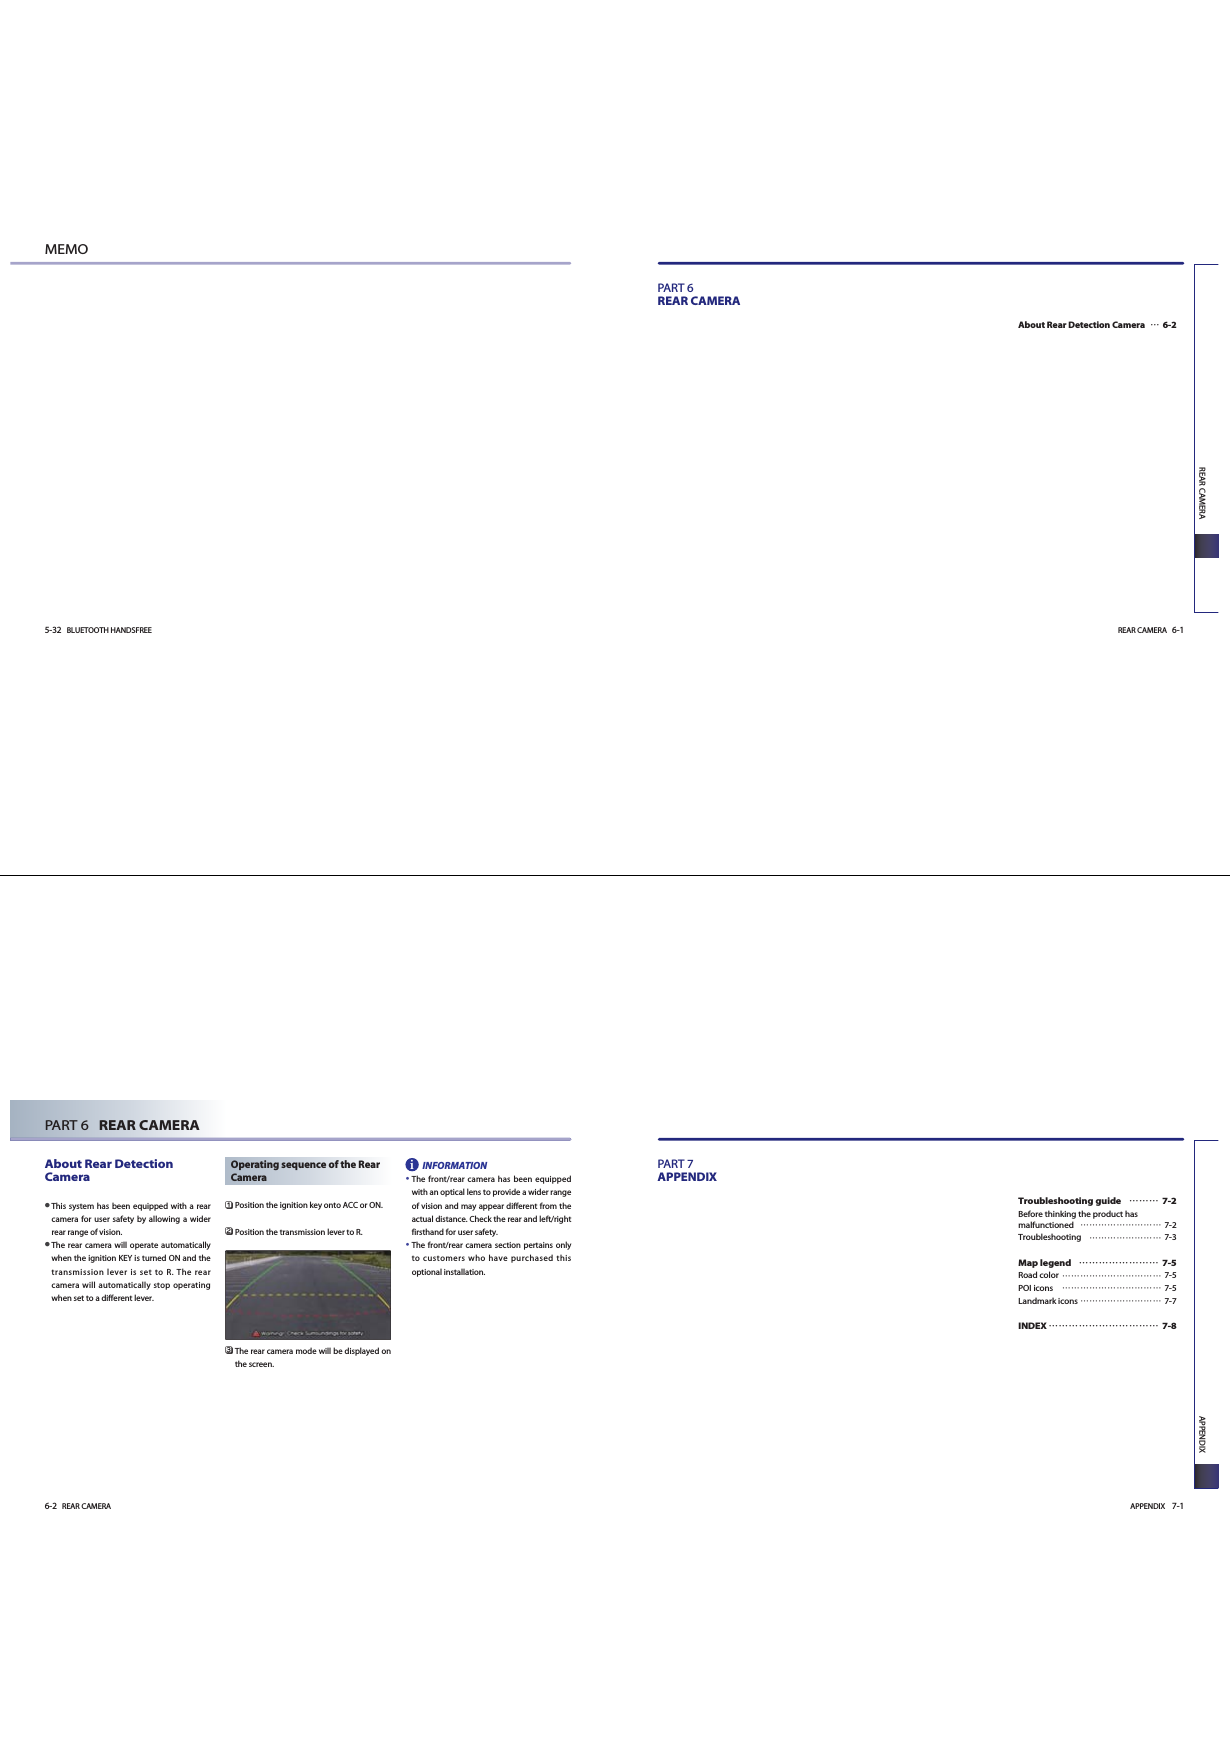
![APPENDIX 7-3APPENDIX7-2 APPENDIXPART 7 APPENDIXTroubleshooting guideBefore thinking the product has malfunctioned Errors which occur during the operation or installation of the device may be mistaken as a malfunction of the actual device. If you are having problems with the device, try the suggestions listed below. If the problems persist, contact your point of purchase or the nearest service center. FunctionBecause the LCD is manufactured with technology requiring high point density, a pixel deficiency orlighting may occur within 0.01% of total pixels.Has the Switch for the vehicle been turned to [ACC] or [ON]?Has the SYSTEM been turned OFF? Has the volume been set to a low level?Has the volume been set on mute?The display looking somewhat darker after prolonged periods of use is a normal phenomenon withLCD panels. It is not a malfunction.If the screen is very dark, contact your point of purchase or the nearest service center.Is the position of FAL/BAL sound controls or volume adjusted to only one side?Is the audio and video connector jacks fully inserted into the AUX terminal? Is the external device connected with a standard connector cable? Some map data may be missing or incorrect. The TTS(Text To Speech) engine speaks the street name based off of the phonetic spelling. This will continuously be update with the map database.ProblemThere are small red, blue, or green dotson the screenThe sound or image is not workingThe video is being displayed but sound is not workingWhen the power is turned on, thecorners of the screen are darkSound is working from only onespeakerSound and video does not work in AUXmodeThe external device is not working The road is missing The road name is spoken incorrectlyTroubleshootingPossible CauseThe fuse is disconnected. SolutionReplace with a suitable fuse. If the fuse is disconnected again, pleasecontact your point of purchase or service center.ProblemThe power does notturn on.Device is not properly connected. Check to see that the device has been properly connected. The XM mode is in category. Press the mode button to change to channel mode.The DISC has not been inserted or has beeninserted upside down. Insert the disc properly so that the sides are facing the correctdirection.The DISC has been contaminated. The vehicle battery is low. A disc which is not supported by the devicehas been inserted. Wipe dirt and other foreign substances from the DISC.Charge the battery. If the problem persists, please contact your point ofpurchase or service center. Insert a disc which is supported for play by the device. The CD does not play. XM only goes throughone categoryThe brightness level has been set to thelowest level.Adjust the brightness to a higher level. The video does notwork.The volume level is set the lowest level. The connector is not properly connected. The device is currently fast-forwarding,rewinding, scanning, or playing in slowmode.Adjust the volume level. Check the connection state. The sound will not work when the device is fast-forwarding,rewinding, scanning, or playing in slow mode. The sound does notwork.APPENDIX 7-5APPENDIX7-4 APPENDIXPART 7 APPENDIXPossible CauseThe DISC is dirty or scratched. Vibration is occurring from the position inwhich the conversion switch has been installed. The color and tone quality of the image is low. SolutionWipe off water or dirt from the DISC. Do not use a disc which hasbeen scratched. The sound may be short-circuited and the image distorted if thedevice begins to vibrate. The device will return to normaloperation once the vibration has stopped. Aging of the video display and deterioration in performancemay cause certain quality degradations. ProblemThe sound or videoquality is low. The iPod is notrecognized even thoughit has been connected. There are no titles which can be played. The iPod firmware version has not beenproperly updated. The iPod device does not recognize downloads. Use iTunes to download and save MP3 files into the iPod. Use iTunes to update the firmware version and reconnect theiPod with the device. Reset the iPod and reconnect with the device. The USB does not work. USB memory is damaged. USB memory has been contaminated. A separately purchased USB HUB is being used.A USB extension cable is being used. A USB which is not a Metal Cover Type USBMemory is being used. A HDD type, CF, SD Memory is being used. There are no music files which can be played. Please use after formatting the USB into FAT 12/16/32 format.Remove any foreign substances on the contact surface of theUSB memory and multimedia terminal. Directly connect the USB memory with the multimedia terminal onthe vehicle. Directly connect the USB memory with the multimedia terminal onthe vehicle.Use a standard USB Memory. Use a standard USB Memory. Only MP3,WMA file formats are supported. Please use only thesupported music file formats. Map legend Road colorColorDay Road TypeFreewayArterialCountyCollectorLocalUnpaved localFerryColorNight Road TypeFreewayArterialCountyCollectorLocalUnpaved localFerryPOI iconsNo Category Sub Category Icon123456789101112131415RepresentationFast FoodAmericanFrenchItalianContinentalMexicanJapaneseChineseKoreanVegetarian FoodSeafoodLatin AmericanAsianAfricanRestaurantsNo Category Sub Category Icon161718192021222324252627282930RestaurantsAutomotiveTravelCoffee ShopOthersRepresentationGas StationParkingAuto serviceRoad AssistanceHyundai DealershipKia DealershipAutomobile DealershipAuto PartsRest AreaCar WashMotorcycle DealeshipRepresentation](https://usermanual.wiki/HYUNDAI-MOBIS/AVN600CMFL/User-Guide-1136535-Page-43.png)