HYUNDAI MOBIS PA715AMLSB Car Audio Bluetooth User Manual K AM USA 081210
Hyundai MOBIS Co., Ltd. Car Audio Bluetooth K AM USA 081210
UserManual.wiki
>
HYUNDAI MOBIS
>
PA715AMLSB User Manual
User Manual
Navigation menu
Upload a User Manual
Namespaces
Wiki Guide
HTML
PDF
Info
Views
User Manual
Discussion / Help
Navigation

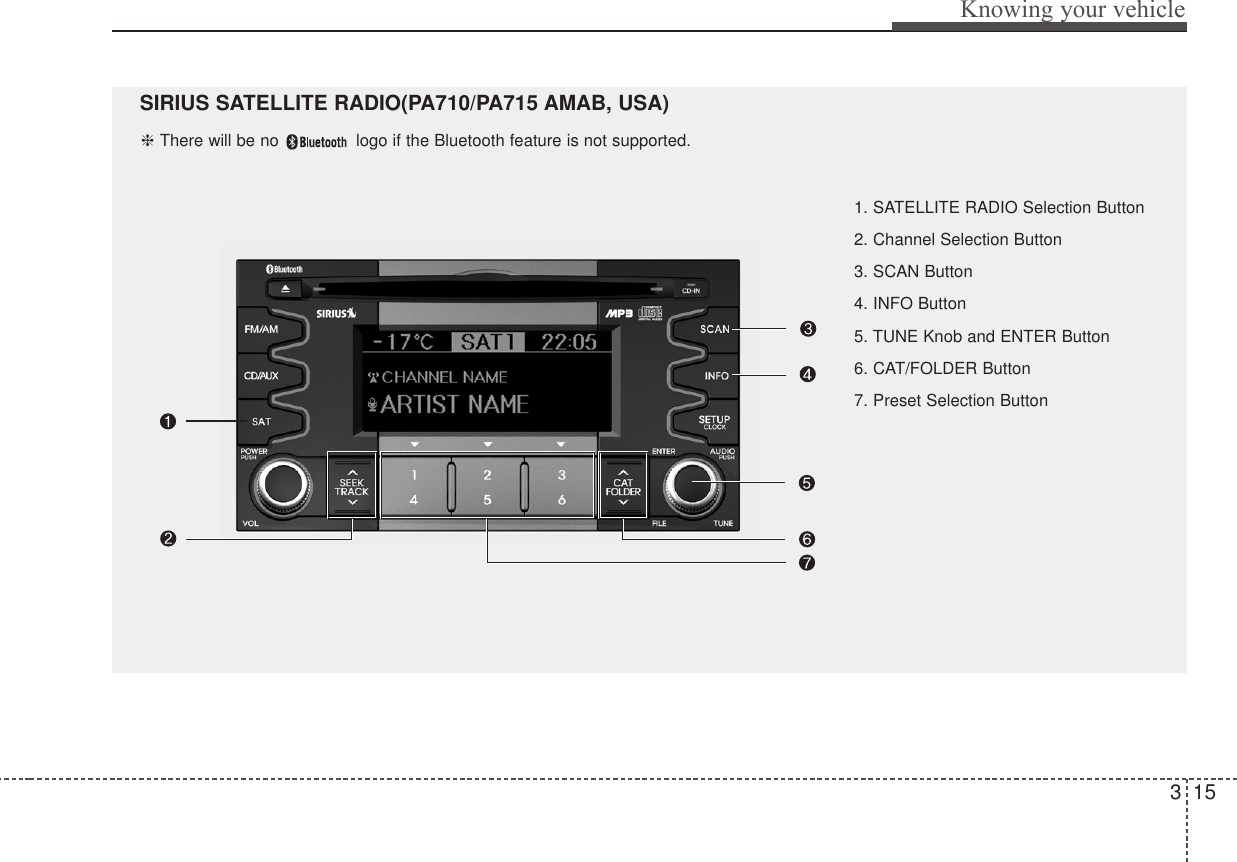
![Knowing your vehicle231. FM/AM Selection ButtonTurns to FM or AM mode, and toggles inthe order of FM1 ➟ FM2 ➟ AM ➟ FM1...when the button is pressed each time.2. CD/AUX Selection ButtonIf there is a CD in the CDP DECK it turnsto CD mode. If a device is connected toAUX, then it toggles in the order of CD ➟AUX ➟CD... when the button is pressedeach time. (It will not turn to AUX if thereis no auxiliary device connected.) 3. Power ON/OFF Button &Volume Control KnobTurns on/off the set when the IGNITIONSWITCH is on ACC or ON. If the buttonis turned to the right, it increases the vol-ume and left, decreases the volume.4. Automatic Channel SelectionButton• When the [SEEK ] button is pressed,it reduces the band frequency by200kHz to automatically select a chan-nel. Stops at the previous frequency ifno channel is found.• When the [SEEK ] button is pressed,it increases the band frequency by200kHz to automatically select a chan-nel. Stops at the previous frequency if nochannel is found.5. SCAN ButtonIf this button is pressed, the frequencieswill become increased and receive thecorresponding broadcasts. This functionwill play the frequencies for 5 seconds(SIRIUS MODE:10 seconds) each andfind other broadcasts as the frequencyincreases. Press the button again whendesiring to continue listening to the cur-rently playing broadcast.6. SETUP Button & Clock ControlButtonPress this button to turn to the SIRIUSoption and the other adjustment mode. If no action is taken for 5 seconds afterpressing the button, it will return to theplay mode. (After entering SETUP mode,move between items using the left, rightand PUSH functions of the [TUNE]knob.) ■ PA710 AMAB is an internal AMPMODEL with Bluetooth feature. The setup changes in the order ofCLOCK ↔ SAT ↔ SCROLL ↔ P.BASS↔ RETURN ↔ TEMP ↔PHONE ↔SDVC ↔ CLOCK...■ PA710 AMA is an internal AMP MODELwithout Bluetooth feature. The setup changes in the order ofCLOCK ↔ SAT ↔ SCROLL ↔ P.BASS↔ TEMP ↔ SDVC ↔ CLOCK...■ PA715 AMAB is an external AMPMODEL with Bluetooth feature. The setup changes in the order ofCLOCK ↔ SAT ↔ SCROLL ↔ TEMP ↔PHONE ↔ SDVC ↔ CLOCK...■ PA715 AMA is an external AMP MODELwithout Bluetooth feature.The setup changes in the order ofCLOCK ↔ SAT ↔ SCROLL ↔ RETURN↔ TEMP ↔ SDVC ↔ CLOCK...](https://usermanual.wiki/HYUNDAI-MOBIS/PA715AMLSB/User-Guide-1114492-Page-3.png)
![33Knowing your vehicle• Adjusting the Clock Press the [SETUP] button. Use the vol-ume controller to adjust the clock in thefollowing order: CLOCK ➟ENTER ➟hour or minute. Adjust the hour and press the [ENTER]button to set. Use the same method toadjust the minute and press the [ENTER]button to complete and exit from clockadjustment mode. Pressing the [SETUP] button while inPOWER OFF screen will allow the userto make immediately adjustments to theclock.• SCROLLThis function is used to display charac-ters longer than the LCD text display andcan be turned ON/OFF through the vol-ume controller.• RETURNThis function displays the previousMODE screen.• TEMPThis function is used to change the tem-perature display setting.• SDVCThis function automatically adjusts thevolume level according to the speed ofthe vehicle and can be turned ON/OFFthrough the volume controller.• POWER BASS(P.BASS)Based on psychoacoustic technology, thistechnology overcomes BASS limitationswhich may occur due to the limited num-ber and size of speakers to offer dynamicBASS sound quality. It is possible toadjust in 3 levels of LOW/MID/HIGH.OFF ➟LOW ➟MID ➟HIGHModes: CD/FM/AUX/IPOD/USB (exclud-ing AM Mode)7. TUNE Knob & Sound QualityControl KnobRotate the knob clockwise by one notchto increase frequency by 200kHz fromcurrent frequency.Rotate the knob counterclockwise by onenotch to decrease frequency by 200kHzfrom current frequency.• Pressing the button changes the BASS,MIDDLE, TREBLE, FADER and BAL-ANCE TUNE mode. The mode selectedis shown on the display. After selectingeach mode, rotate the Audio controlknob clockwise or counterclockwise. (Sound Quality Control will operate in FM,AM, CD, AUX, USB, iPod and SATmodes.)• BASS ControlTo increase the BASS, rotate the knobclockwise, while to decrease the BASS,rotate the knob counterclockwise.• MIDDLE ControlTo increase the MIDDLE, rotate the knobclockwise, while to decrease the MID-DLE, rotate the knob counterclockwise.• TREBLE ControlTo increase the TREBLE, rotate the knobclockwise, while to decrease the TRE-BLE, rotate the knob counterclockwise.• FADER ControlTurn the control knob clockwise toemphasize rear speaker sound(frontspeaker sound will be attenuated). Whenthe control knob is turned counterclock-wise, front speaker sound will be empha-sized(rear speaker sound will be attenu-ated).](https://usermanual.wiki/HYUNDAI-MOBIS/PA715AMLSB/User-Guide-1114492-Page-4.png)
![Knowing your vehicle43• BALANCE ControlRotate the knob clockwise to emphasizeright speaker sound(left speaker soundwill be attenuated). When the controlknob is turned counter clockwise, leftspeaker sound will be emphasized(rightspeaker sound will be attenuated).8. Preset ButtonPush [1]~[6] buttons less than 0.8 secondto play the channel saved in each button.Push Preset button for 0.8 second orlonger to save current channel to therespective button with a beep.](https://usermanual.wiki/HYUNDAI-MOBIS/PA715AMLSB/User-Guide-1114492-Page-5.png)
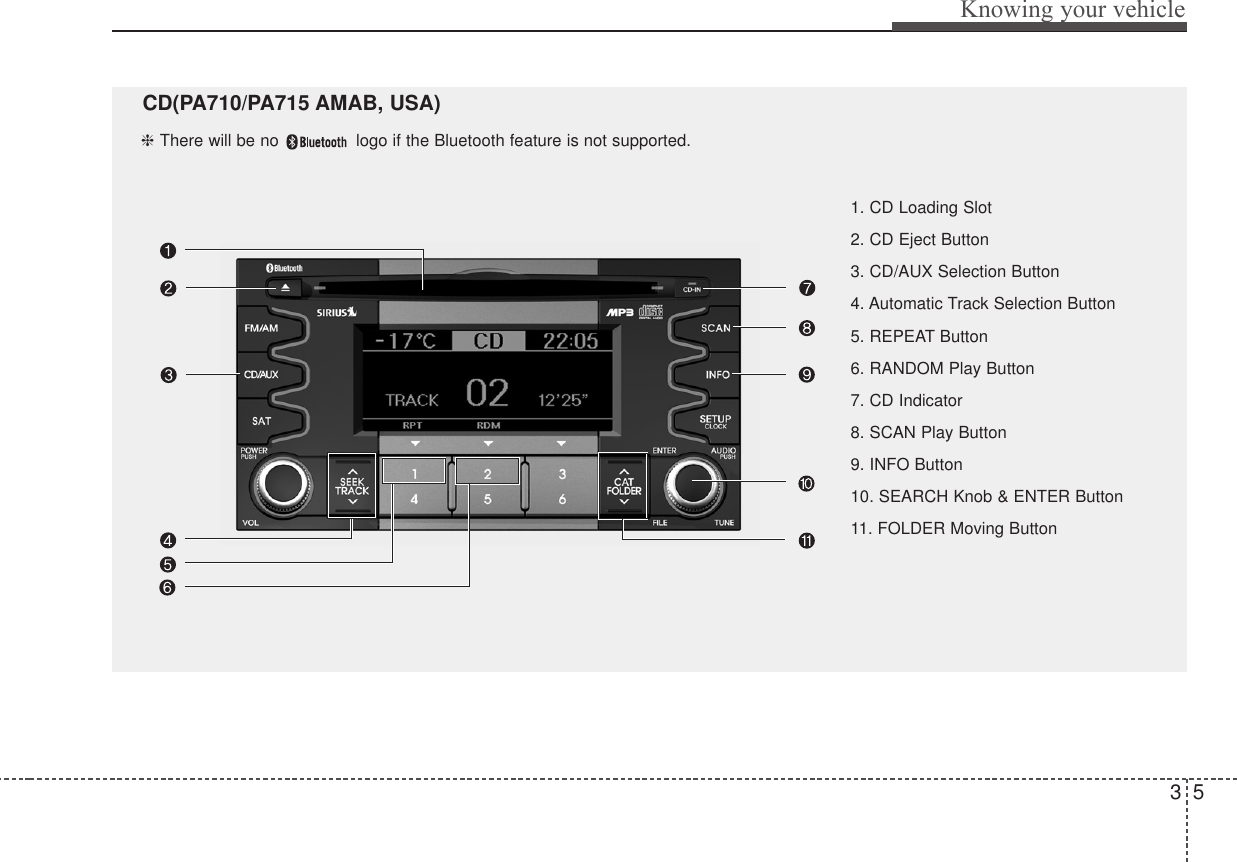
![Knowing your vehicle631. CD Loading SlotPlease face printed side upward and gen-tly push in. When the ignition switch is onACC or ON and power is off, power isautomatically turned on if the CD is loaded.This CDP supports only 12cm CD. If VCDor Data CD are loaded, a "Reading Error"message will be displayed and the CD willbe ejected.2. CD Eject ButtonPush button to eject the CD duringCD playback. This button is enabledwhen ignition switch is off.3. CD/AUX Selection Button• If an auxiliary device is connected, itswitches to AUX mode from the othermode to play the sounds from the aux-iliary player. • If the CD is loaded, turns to CD mode,and if a device is connected to AUXthen it toggles in the order of CD ➟AUX➟CD... when the button is pressedeach time.(It will not turn to AUX if theauxiliary device is not connected.) • If there is no CD or auxiliary device,then it displays the message "NoMedia" for 3 seconds and returns to theprevious mode.4. Automatic Track SelectionButton• Press [TRACK ] button for less than0.8 second to play from the beginningof current song. • Press [TRACK ] button for less than0.8 second and press again within 1seconds to play the previous song.• Continue to press down the [TRACK ]button to initiate reverse direction highspeed sound search of current song.• Press [TRACK ] button for less than0.8 second to play the next song.• Continue to press down the [TRACK ]button to initiate high speed soundsearch of current song.5. REPEAT ButtonRepeats current song when the button ispressed for less than 0.8 second.Repeats the entire DISC when the buttonis pressed for 0.8 second or longer.(In the case of MP3, the Repeat functionwill operate only within folder.)6. RANDOM Play ButtonPress this button for less than 0.8 secondto activate ‘RDM’ mode and longer than0.8 second to activate ‘A.RDM’ mode.• RDM : Only files/tracks in a folder/discare played back in a random sequence.• A.RDM(MP3/WMA Only) : All files in adisc are played back in the randomsequence.7. CD Indicator When car ignition switch is ACC or ONand if the CD is loaded, this indicator islighted. If the CD is ejected, the light isturned off.8. SCAN Play ButtonScans first 10 seconds of each song inthe DISC. To cancel the mode, press thebutton once again.9. INFO ButtonDisplays the information of the currentCD TRACK(FILE) in the order shownbelow each time the button is pressed.• CDDA : Disc Title ➟ Disc Artist ➟TrackTitle ➟ Track Artist ➟Total Track...](https://usermanual.wiki/HYUNDAI-MOBIS/PA715AMLSB/User-Guide-1114492-Page-7.png)
![37Knowing your vehicle• MP3/WMA : File Name ➟ Title ➟Artist ➟Album ➟ Folder Name ➟Total File...(not displayed if the information is notavailable on the DISC.)10. SEARCH Knob & ENTERButtonRotate the knob clockwise to display thesongs after the currently played song.Rotate the knob counterclockwise to dis-play the songs before the currentlyplayed song. Press the button to skip andplay the selected song. 11. FOLDER Moving Button• Press [FOLDER ] button to movechild folder of the current folder and dis-play the first song in the folder. PressTUNE/ ENTER knob to move to thefolder displayed. It will play the firstsong in the folder.• Press [FOLDER ] button to moveparent folder and display the first songin the folder. Press TUNE/ENTER knobto move to the folder displayed.](https://usermanual.wiki/HYUNDAI-MOBIS/PA715AMLSB/User-Guide-1114492-Page-8.png)
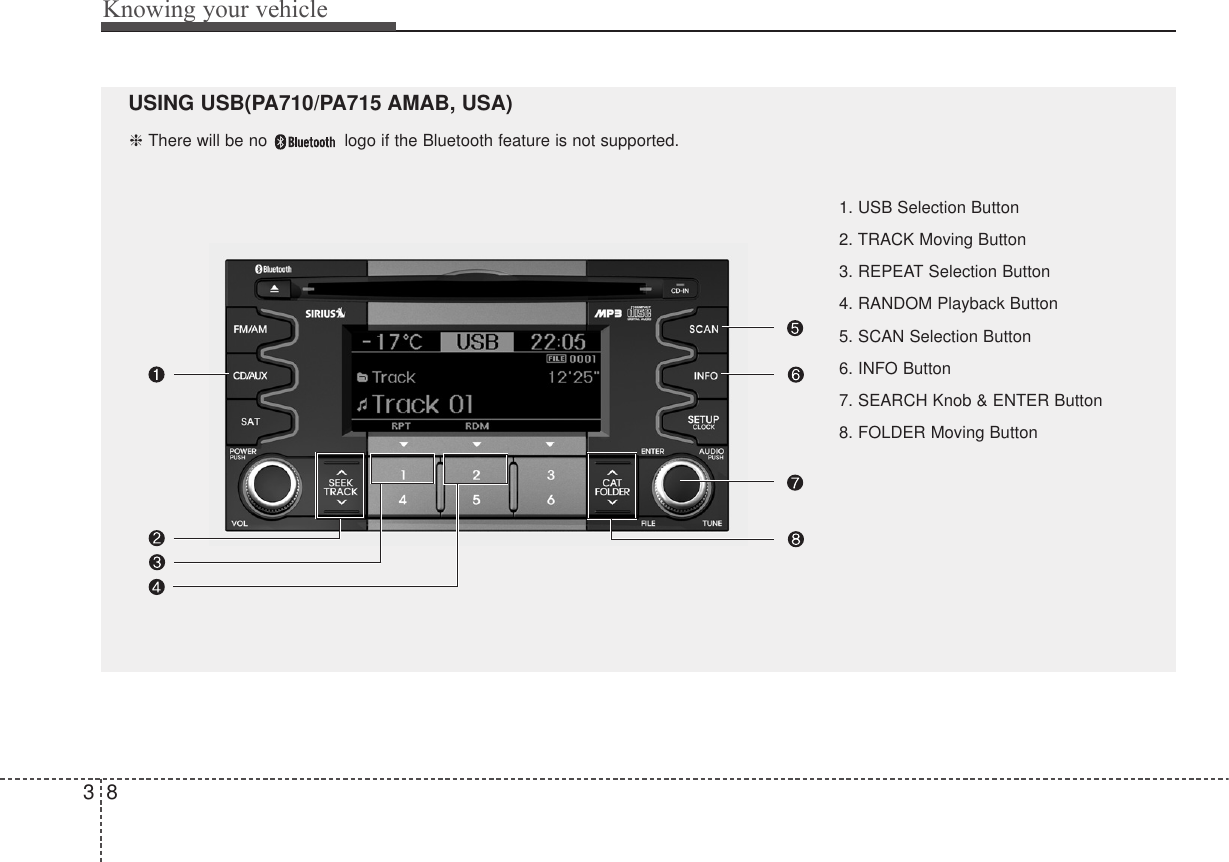
![39Knowing your vehicle1. USB Selection ButtonIf USB is connected, it switches to theUSB mode from the other mode to playthe song files stored in the USB. If no CDand auxiliary device is not connected, itdisplays "NO Media" for 3 seconds andreturns to the previous mode.2. TRACK Moving Button• Press the [TRACK ] button for lessthan 0.8 second to play from the begin-ning of the song currently played. Press the button for less than 0.8 secondand press it again within 1 seconds tomove to and play the previous track. Press the button for 0.8 second orlonger to play the song in reverse direc-tion in fast speed.• Press the [TRACK ] button for lessthan 0.8 second to move to the nexttrack. Press the button for 0.8 secondor longer to play the song in forwarddirection in fast speed.3. REPEAT ButtonPress this button for less than 0.8 secondto activate 'RPT' mode and longer than0.8 second to activate ' ' mode.• RPT : Only thr current file is repeatedlyplayed back. • : All files in a folder are repeat-edly played back.4. RANDOM Playback ButtonPress this button for less than 0.8 secondto activate 'RDM' mode and longer than0.8 second to activate 'A.RDM' mode. • RDM : All files in a folder are playedback in random sequence.• A.RDM : All files in a USB memory areplayed back in random sequence.5. SCAN Selection ButtonScan 10 seconds of each song in the USBdevice.Press the button once again to cancelscanning.6. INFO ButtonDisplays the information of the currentlyplayed file in the order of File Name ➟Title ➟ Artist ➟ Album ➟ Folder ➟ TotalFile ➟Normal Display ➟ File Name ➟…(Displays no information if the file has nosong information.)7. SEARCH Knob & ENTERButtonRotate the knob clockwise to display thesongs after the currently played song.Rotate the knob counterclockwise to dis-play the songs before the currentlyplayed song. Press the button to skip and play theselected song. 8. FOLDER Moving Button• Press [FOLDER ] button to movechild folder of the current folder and dis-play the first song in the folder. PressTUNE/ENTER knob to move to thefolder displayed. It will play the firstsong in the folder.• Press [FOLDER ] button to moveparent folder and display the first songin the folder. Press TUNE/ENTER knobto move to the folder displayed.](https://usermanual.wiki/HYUNDAI-MOBIS/PA715AMLSB/User-Guide-1114492-Page-10.png)
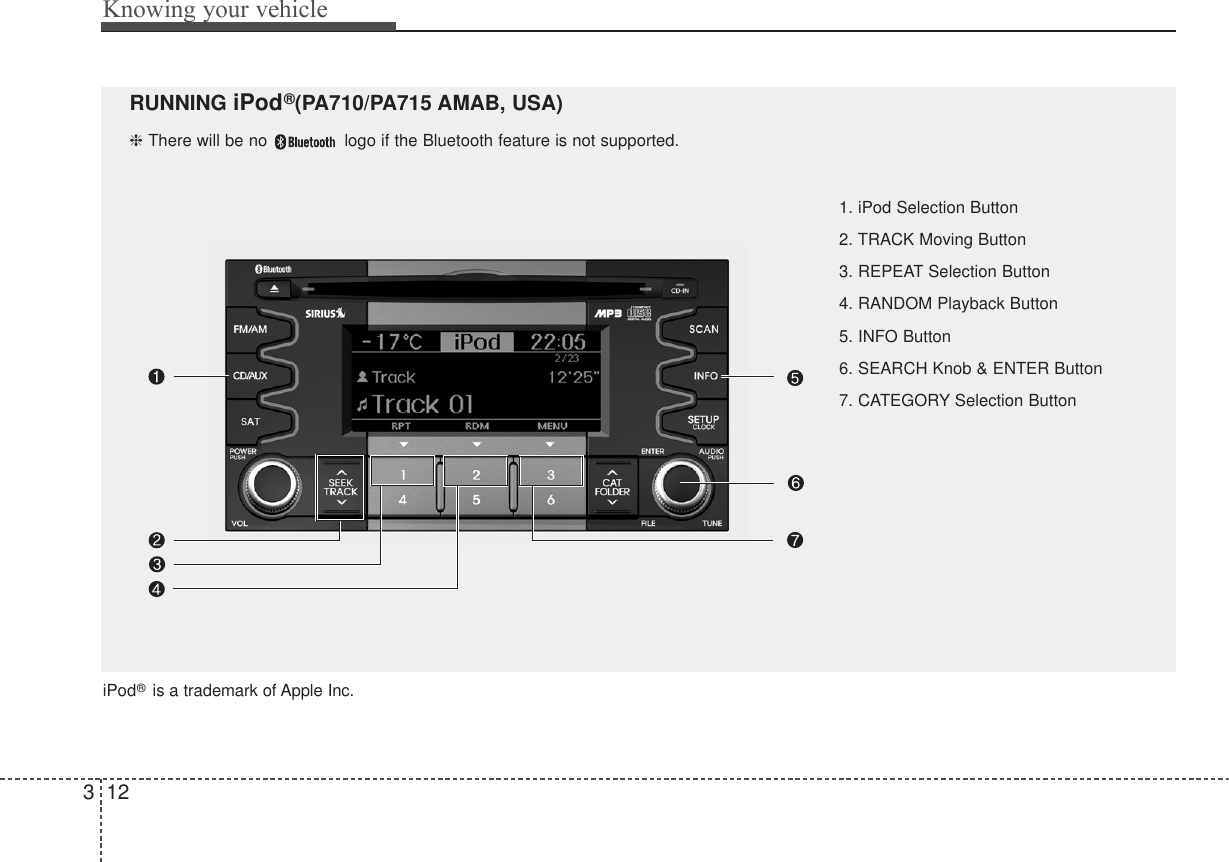
![313Knowing your vehicle1. iPod Selection ButtonIf iPod is connected, it switches to theiPod mode from the current mode to playthe song files stored in the iPod. If thereis no iPod connected, it displays "NoMedia" for 3 seconds and returns to theprevious mode.2. TRACK Moving Button• Press the [TRACK ] button for lessthan 0.8 second to play from the begin-ning of the song currently played. Press the button for less than 0.8 secondand press it again within 1 seconds tomove to and play the previous track.Press the button for 0.8 second orlonger to play the song in reverse direc-tion in fast speed.• Press the [TRACK ] button for lessthan 0.8 second to move to the nexttrack. Press the button for 0.8 second orlonger to play the song in forward direc-tion in fast speed.3. REPEAT ButtonRepeats the song currently played.4. RANDOM Playback ButtonPress the button for less than 0.8 secondto start or stop the random playback ofthe songs within the current category.Press the button for longer than 0.8 sec-ond to randomly play all songs in theentire album of the iPod.Press the button once again to cancel themode.5. INFO ButtonDisplays the information of the file cur-rently played in the order of Title ➟ Artist➟ Album ➟… (Displays no information ifthe file has no song information.)6. SEARCH Knob & ENTERButtonWhen you rotate the knob clockwise, itwill display the songs (category) next tothe song currently played (category inthe same level).Also, when you rotate the knob counter-clockwise, it will display the songs (cate-gory) before the song currently played(category in the same level).To listen to the song displayed in thesong category, press the button to skip toand play the selected song.7. CATEGORY Selection ButtonMoves to the upper category from cur-rently played category of the iPod. To move to (play) the category (song)displayed, press TUNE/ENTER knob.You will be able to search through thelower category of the selected category.The order of iPod’s category is Playlist,Albums, Artists, Genres, songs, com-posers.](https://usermanual.wiki/HYUNDAI-MOBIS/PA715AMLSB/User-Guide-1114492-Page-14.png)
![Knowing your vehicle163How to Use SIRIUS SatelliteRadioYour Kia vehicle is equipped with 3 monthscomplimentary period of SIRIUS SatelliteRadio so you have access to over 130channels of music, information, and enter-tainment programming.ActivationIn order to extend or reactivate your sub-scription to SIRIUS Satellite Radio, youwill need to contact SIRIUS CustomerCare at 888-539-7474. Have your 12digit SID (Sirius IdentificationNumber)/ESN (Electronic Serial Number)ready. To retrieve the SID/ESN, turn onthe radio, press the [SAT] button and tuneto channel zero. Please note that thevehicle will need to be turned on, in Siriusmode, and have an unobstructed view ofthe sky in order for the radio to receivethe activation signal.1. SATELLITE RADIO SelectionButton(SIRIUS Satellite Radio)Press the [SAT] button to switch to SIR-IUS Satellite Radio. It cycles through thedifferent bands as noted below. SAT1 ➟ SAT2 ➟ SAT3 ➟ SAT1 ➟...2. Channel Selection Button• Press [TRACK ] or [SEEK ] but-ton for less than 0.8 second to selectprevious or next channel.• Press [TRACK ] or [SEEK ] but-ton for 0.8 or longer to continuouslymove to previous or next channel.• If "CATEGORY" Icon is displayed at thetop of the screen, channel up/down isdone through the channels within cur-rent category.3. SCAN Button • When the button is pressed, it automat-ically scans the radio stations upwards.• The SCAN feature steps through eachchannel, starting from the initial chan-nel for ten seconds.• Press the [SCAN] button again to stopthe scan feature and to listen to the cur-rently selected channel.• If "CATEGORY" Icon is displayed at thetop of the screen, channel changing isdone through the channels in currentcategory.4. INFO Selection ButtonDisplays the information of the channelcurrently played by in the order of Artist/Song title ➟Category/Channel name ➟Composer(if available) ➟ Artist/Song title ➟Category/Channel name ➟... (ART/TITLESelection)Displays the information of the channelcurrently played by in the order ofCategory/Channel name ➟ Artist/Songtitle ➟Composer(if available) ➟ Category/Channel name ➟ Artist/Song title ➟...(CAT/CH Selection) (If there is no infor-mation of COMPOSER NAME, it returnsto main display.)5. TUNE Knob and ENTER ButtonWhile listening to SIRIUS broadcast,rotate this knob to the right or left tosearch other channels while listening tocurrent channels and push this knob toselect what you want to listen to.(Turn to the right to search higher chan-nels and left lower channels)](https://usermanual.wiki/HYUNDAI-MOBIS/PA715AMLSB/User-Guide-1114492-Page-17.png)
![317Knowing your vehicle6. CAT/FOLDER Button • Press [CAT ] or [FOLDER ] buttonto enter the Category List Mode, it dis-plays category items and highlights thecategory that currently tuned channelbelongs to.• On Category List Mode, press thesebuttons to navigate category list.• Press [ENTER] button to select the low-est channel in highlighted category.• If channel is selected by selecting cate-gory "CATEGORY" Icon is displayed atthe top of the screen.7. Preset Selection Button• Push [1]~[6] buttons less than 0.8 sec-ond to play the channel saved in eachbutton.• Hold down the [PRESET] button for 0.8second or longer to save current chan-nel. An audible beep will play to confirmthe preset is stored. ✽Troubleshooting1. Antenna Error If this message is displayed, the anten-na or antenna cable is broken orunplugged. Please consult with yourKia dealership. 2. Acquiring Signal If this message is displayed, it meansthat the antenna is covered and thatthe SIRIUS Satellite Radio signal isnot available. Ensure the antenna isuncovered and has a clear view of thesky.](https://usermanual.wiki/HYUNDAI-MOBIS/PA715AMLSB/User-Guide-1114492-Page-18.png)
![Knowing your vehicle203• Changing PriorityThe connection priority for registeredphones can be changed.1. Press the button. 2. Say "Set Up".3. Say "Change Priority".4. Say the name of the contact or thenumber of the contact.5. Say "Yes".•Turning Bluetooth on / offBluetooth function can be switched ON/OFF. initial status : Bluetooth ON1. Press the button. 2. Say "Set Up".3. Say "Bluetooth off".4. Say "Yes".• Turning Bluetooth on1. Press the send or button.2. Say "yes".3. The Bluetooth will be turned on.■ Phone Book• Adding EntryPhone numbers and voice tags can beregistered. Entries registered in the phonecan also be transferred.• Adding Entry by Voice1. Press the button.2. Say "phonebook".3. Say "add entry".4. Say "by voice".5. Say the name of the contact.6. Say "yes".7. Say the phone number.8. Say "store".9. Say "Home", "Office", "Mobile", "Other"or "default".10. Say "Yes" to store an additional loca-tion for this contact.• Adding Entry by phone1. Press the button.2. Say "phonebook".3. Say "add entry".4. Say "by phone".5. Say "yes".6. Transfer procedures may vary depend-ing on the cellular phone.✽NOTICEThe system can recognize single digitsfrom zero to nine. Numbers that are tenor greater are not recognized.To speed up input, it is a good idea togroup all digits into a continuous string. However, you can enter each digit indi-vidually or group digits together in pre-ferred string lengths.The display corresponding to each oper-ation appears on the screen as follows:Input operation1. say: "Nine, nine, five"Display: "995"2. say: "Seven, three, four"Display: "995734"• Changing NameThe registered names can be changed.1. Press the button.2. Say "phonebook".3. Say "Change name".4. Say the name of the phonebook [voicetag].5. Say "yes".6. Say the name of the phonebook to bechanged.](https://usermanual.wiki/HYUNDAI-MOBIS/PA715AMLSB/User-Guide-1114492-Page-21.png)
![323Knowing your vehicle■ Key matrixNo.ClassPaired H/PEmpty Disconnected1SHORTLONGSHORTSHORTLONG[10sec]LONG[10sec]Normal modeBT SETUP menuIncoming Call Outgoing Call Active Call 2nd CallNot Paired Not Connecting --Accept CallConnected-2nd call1st Call:waiting2nd Call:active2nd Call2nd Call:waiting1st Call:activeKEY------Transfer call:secret callEnd CallVR MODE CancelVR MODE CancelVR MODE CancelVR MODE Cancel Reject Call End Call End Call-ActiveChangelanguage-ActiveSpeakerAdaptation(Only English)ChangelanguageActiveChangelanguageActive-SpeakerAdaptation(Only English)Changelanguage-----------23](https://usermanual.wiki/HYUNDAI-MOBIS/PA715AMLSB/User-Guide-1114492-Page-24.png)