HYUNDAI MOBIS PA960CM Car Audio Bluetooth User Manual PA960CM ATT E Manaul
Hyundai MOBIS Co., Ltd. Car Audio Bluetooth PA960CM ATT E Manaul
UserManual.wiki
>
HYUNDAI MOBIS
>
PA960CM User Manual
Users Manual
Navigation menu
Upload a User Manual
Namespaces
Wiki Guide
HTML
PDF
Info
Views
User Manual
Discussion / Help
Navigation

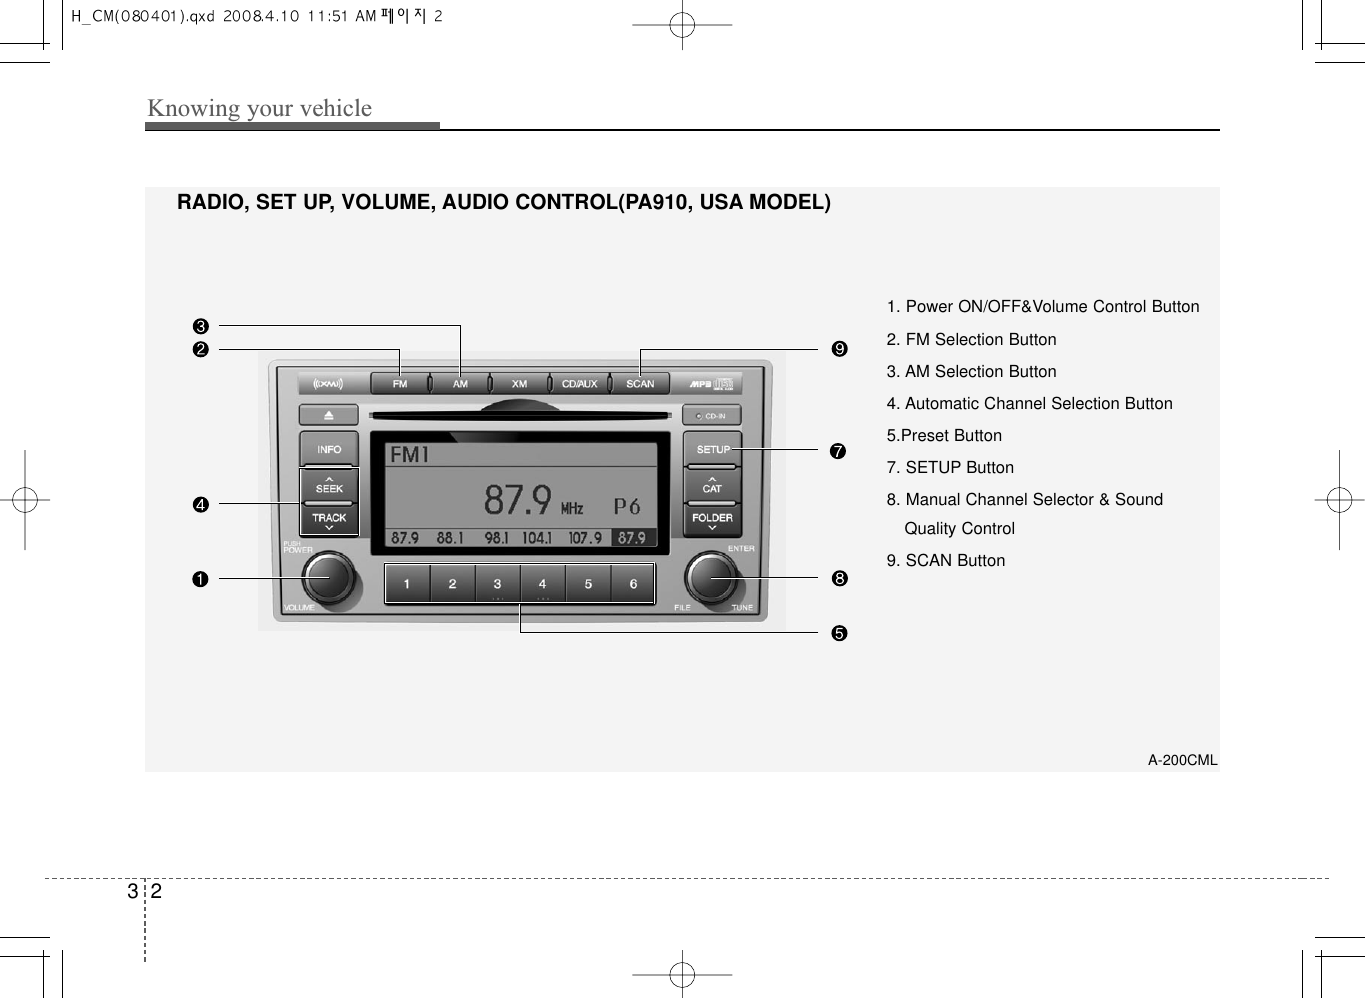

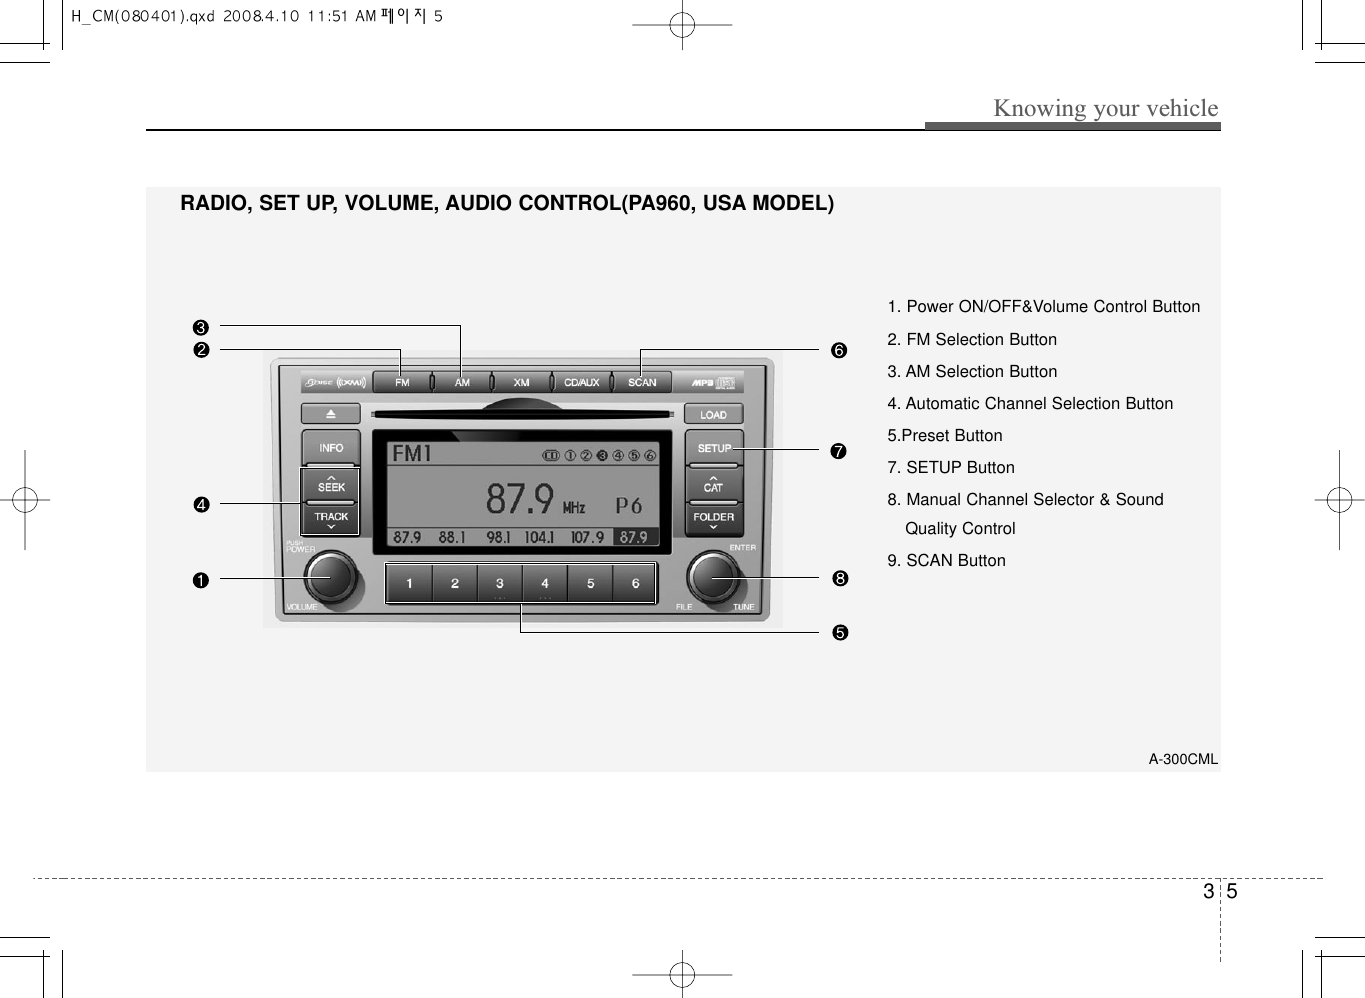
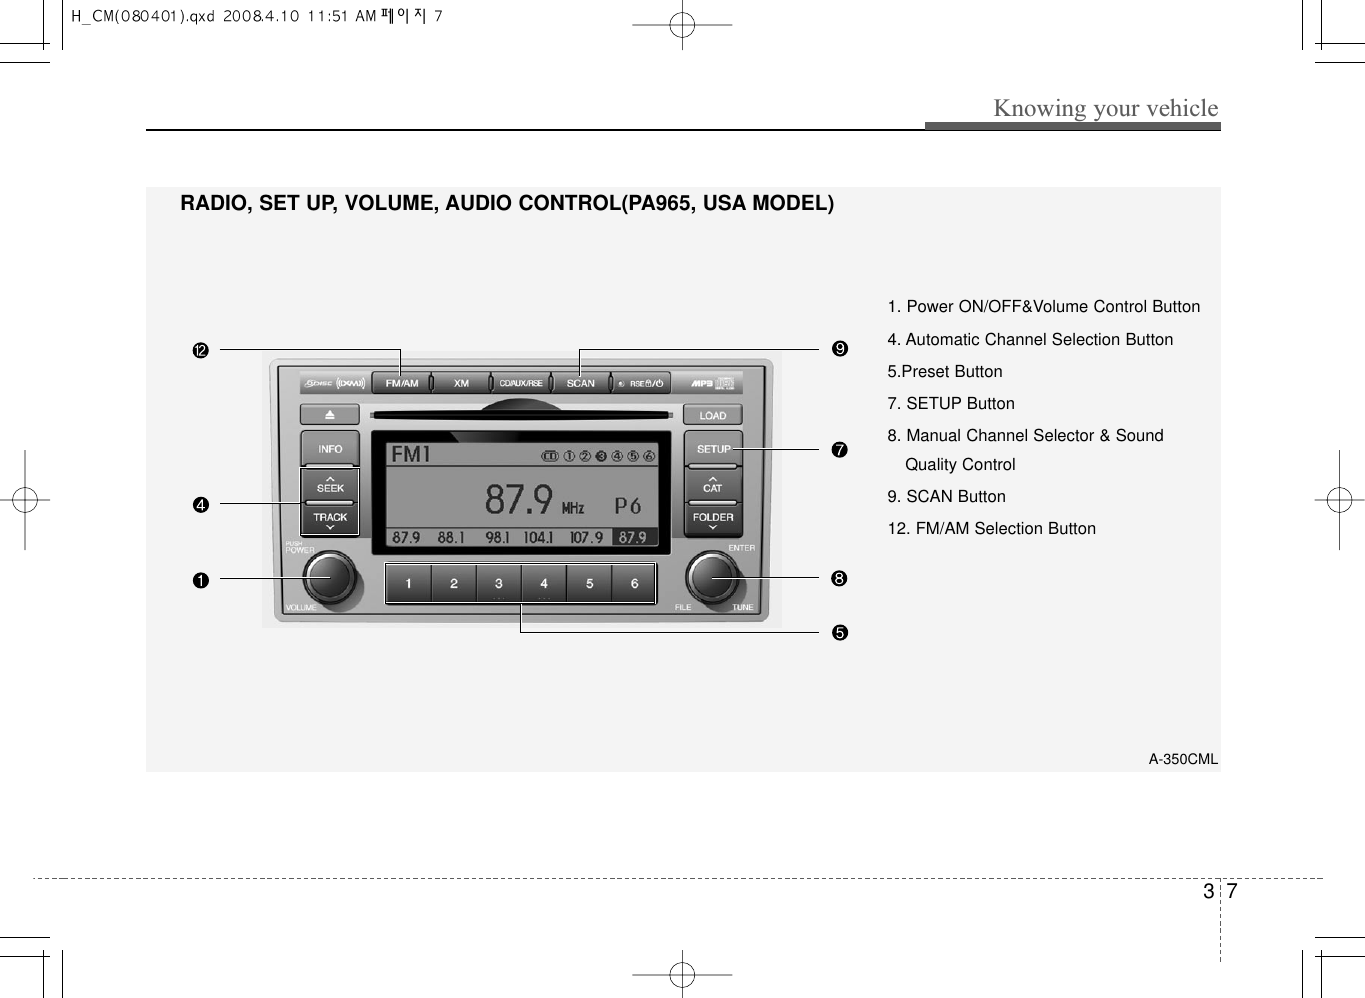
![1. Power ON/OFF&VolumeControl ButtonTurns on/off the set when the IGNITIONSWITH is on ACC or ON. If the button isturned to the right, it increases the vol-ume and left,decreases the volume.2. FM Selection ButtonTurns to FM mode and toggles FM1andFM2 when the button is pressed eachtime.3. AM Selection ButtonPressing the [AM] button selects the AMband. AM Mode is displayed on the LCD.4. Automatic Channel SelectionButton• When the [SEEK ] button is pressed,it increases the band frequency to auto-matically select channel. Stops at theprevious frequency if no channel isfound.• When the [TRACK ] button is press-ed, it reduces the band frequency toautomatically select channel. Stops atthe previous frequency if no channel isfound.5. Preset ButtonPush [1]~[6] buttons less than 0.8 sec-ond to play the channel saved in eachbutton. Push Preset button for 0.8 sec-ond or longer to save current channel tothe respective button with a beep.6. AST(AUTO STORE Button)When the button is pressed, it automati-cally selects and saves channels withhigh reception rate to PRESET buttons[1]~[6] and plays the channel saved inPRESET1. If no channel is saved afterAST, it will play the previous channel.7. SETUP Button• GENERAL MODELPress this button to turn to the TEXTSCROLL adjustment mode. If no actionis taken for 5 seconds after pressing thebutton, it will return to the play mode.(After entering SETUPmode, PUSHfunctions of the TUNE button to adjustTEXT SCROLL.)• USA MODEL(PA710S ONLY)Press this button to turn to the XMoption,TEXT SCROLL and adjustmentmode. If no action is taken for 5 secondsafter pressing the button, it will return totheplay mode.(After entering SETUPmode, move between items using theleft, right and PUSH functions of theTUNE button.) The setup item changesfrom TEXT SCROLL➟XM...• USA MODELPress this button to turn to the XMoption,TEXT SCROLL, SURROUND andadjustment mode. If no action is taken for 5seconds after pressing the button, it willreturn to theplay mode.(After enteringSETUP mode, move between items usingthe left, right and PUSH functions of theTUNE button.) The setup item changesfrom TEXT SCROLL➟SURROUND➟XM...Knowing your vehicle83](https://usermanual.wiki/HYUNDAI-MOBIS/PA960CM/User-Guide-1125436-Page-9.png)
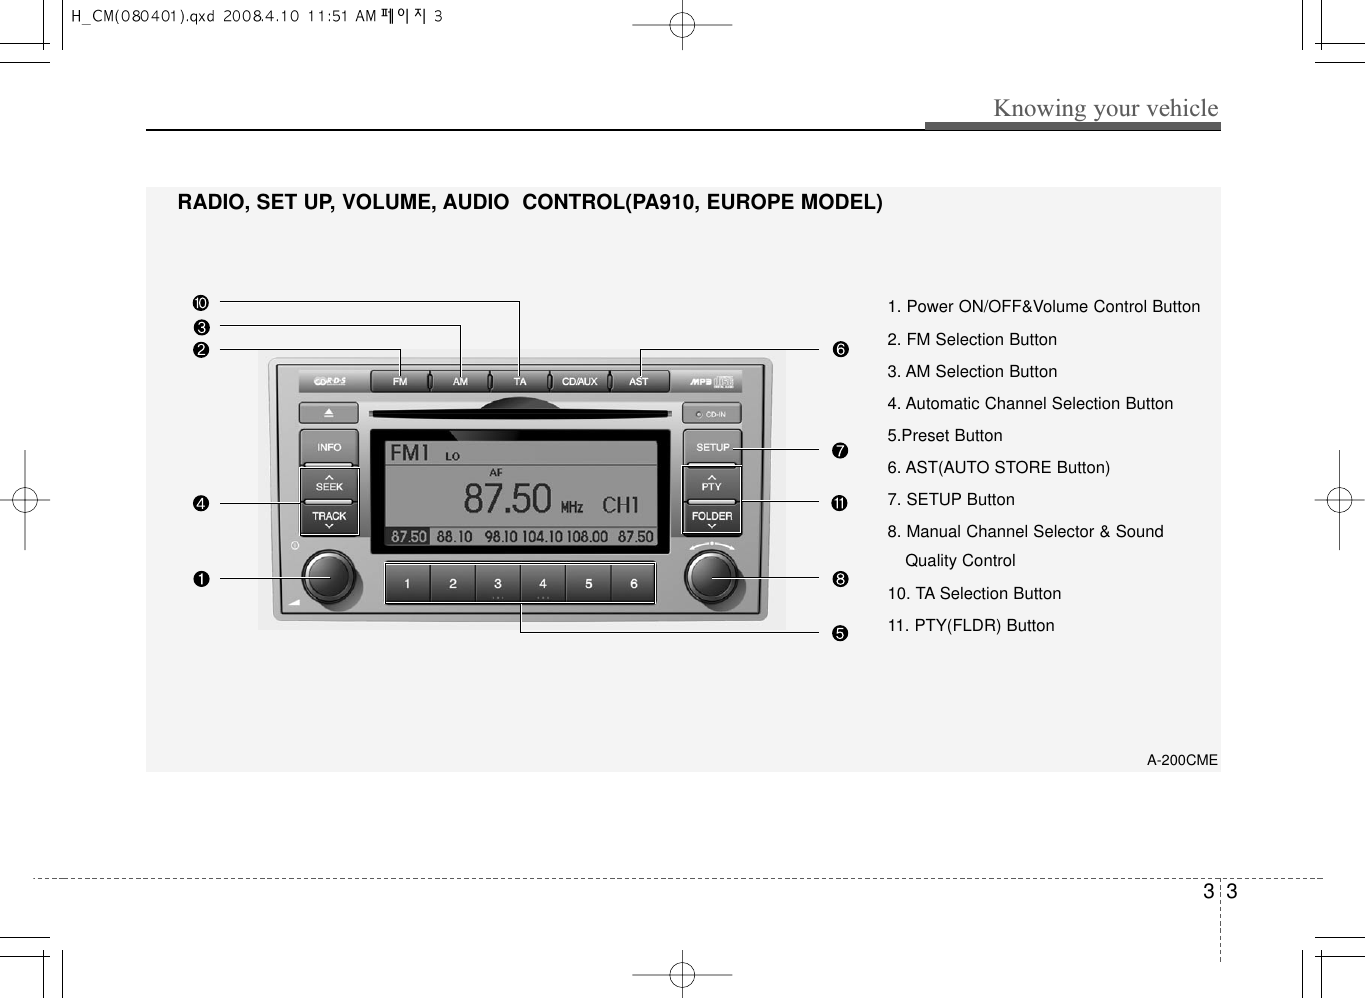
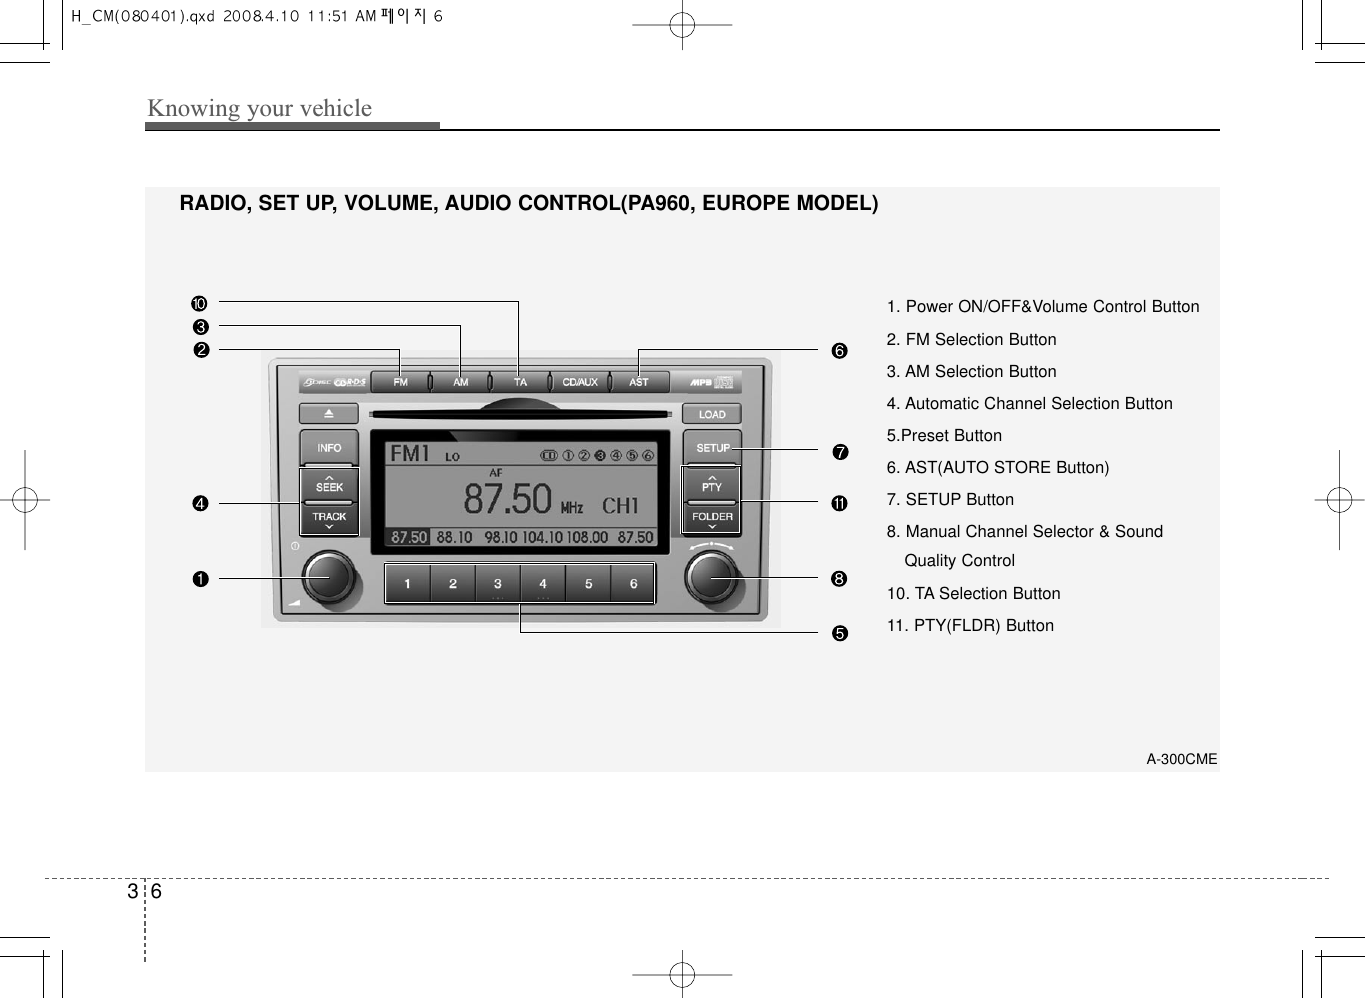
![39Knowing your vehicle• EUROPE MODELPress this button to turn to the RDSoption, TEXT SCROLL adjustment mode.If no action is taken for 5 seconds afterpressing the button, it will return to theplay mode.(After entering SETUP mode,move between items using the left, rightand PUSH functions of the TUNE button.)The setup item changes from TEXTSCROLL➟AF➟RDSNEWS➟REGION➟TA VOL8. Manual Channel Selector &Sound Quality ControlTurn this control while listening to a radiochannel to manually adjust frequency.Turn clockwise to increase frequency andcounterclockwise to reduce frequency.Pressing the button changes the BASS,MIDDLE, TREBLE, FADER and BAL-ANCE TUNE mode. The mode selectedis shown on the display. After selectingeach mode, rotate the Audio control knobclockwise or counterclockwise. BASS ControlTo increase the BASS, rotate the knobclockwise, while to decrease the BASS,rotate the knob counterclockwise.MIDDLE ControlTo increase the MIDDLE, rotate the knobclockwise, while to decrease the MID-DLE, rotate the knob counterclockwise.TREBLE ControlTo increase the TREBLE, rotate the knobclockwise, while to decrease the TRE-BLE, rotate the knob counterclockwise.FADER ControlTurn the control knob clockwise toemphasize rear speaker sound(frontspeaker sound will be attenuated). Whenthe control knob is turned counterclock-wise, front speaker sound will be empha-sized(rear speaker sound will be attenu-ated).BALANCE ControlRotate the knob clockwise to emphasizeright speaker sound(left speaker soundwill be attenuated). When the controlknob is turned counter clockwise, leftspeaker sound will be emphasized(rightspeaker sound will be attenuated).9. SCAN ButtonIf this button is pressed, the frequencieswill become increased and receive thecorresponding broadcasts. This functionwill play the frequencies for 5 seconds(XM MODE:10 seconds) each and findother broadcasts as the frequencyincreases. Press the button again whendesiring to continue listening to the cur-rently playing broadcast.10. TA Selection ButtonIn FM, CD, AUX mode, turns on/off thereception of TA channels of RDS.11. PTY(FLDR) Button• Moves [FOLDER ] Button whensearching PTY in RDS BroadcastingProgram Type selection.• Moves [PTY ] button when search-ing PTY in RDS Broadcasting ProgramType selection.12. FM/AM Selection ButtonTurns to FM or AM mode, and toggles inthe order of FM1➟FM2➟AM➟FM1... whenthe button is pressed each time.](https://usermanual.wiki/HYUNDAI-MOBIS/PA960CM/User-Guide-1125436-Page-10.png)


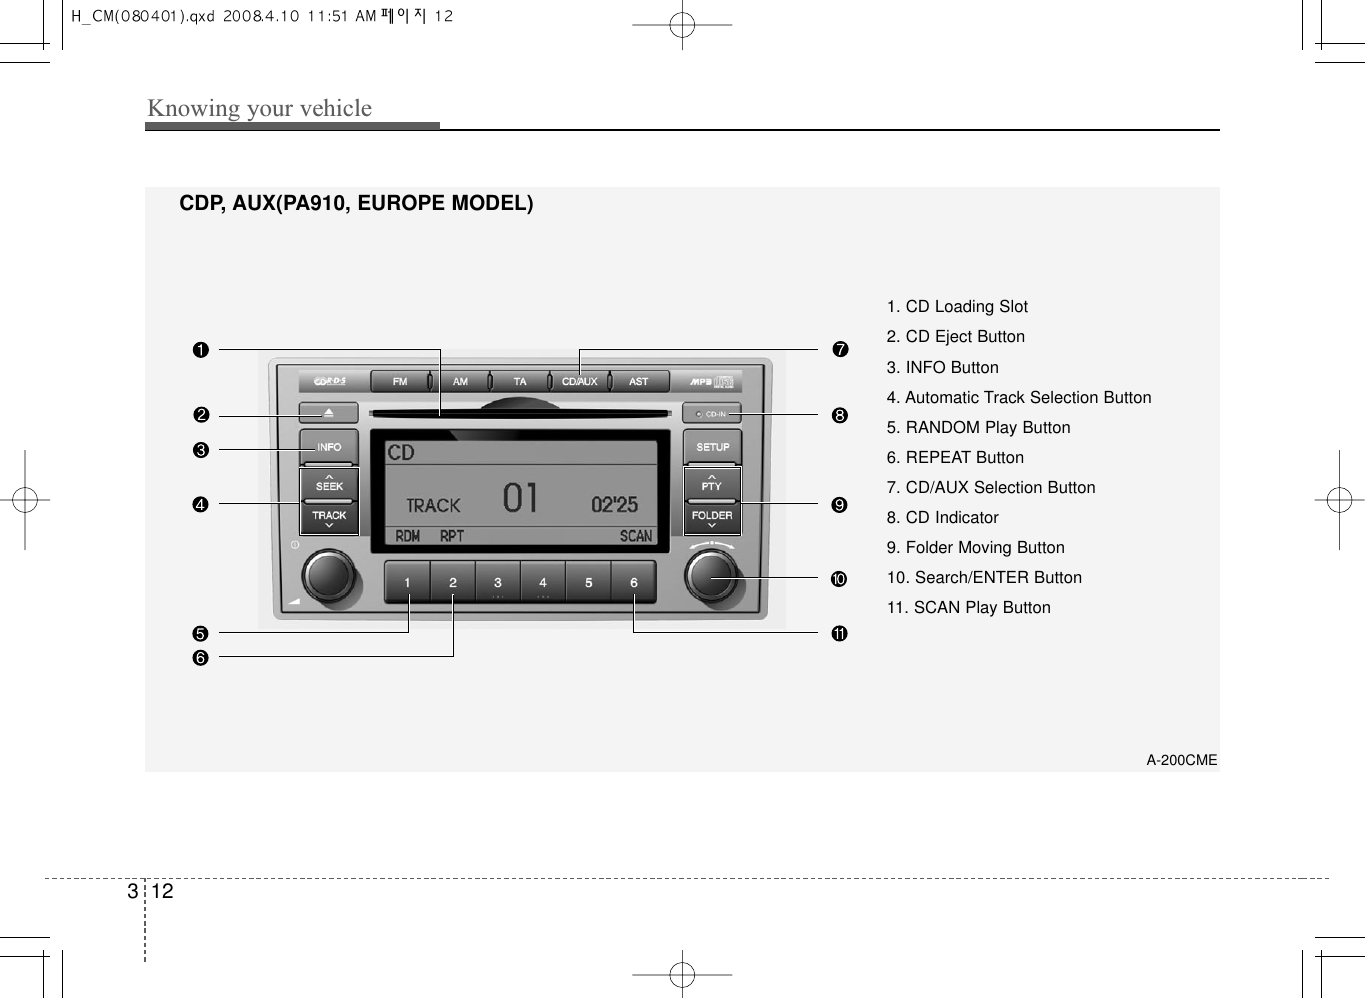
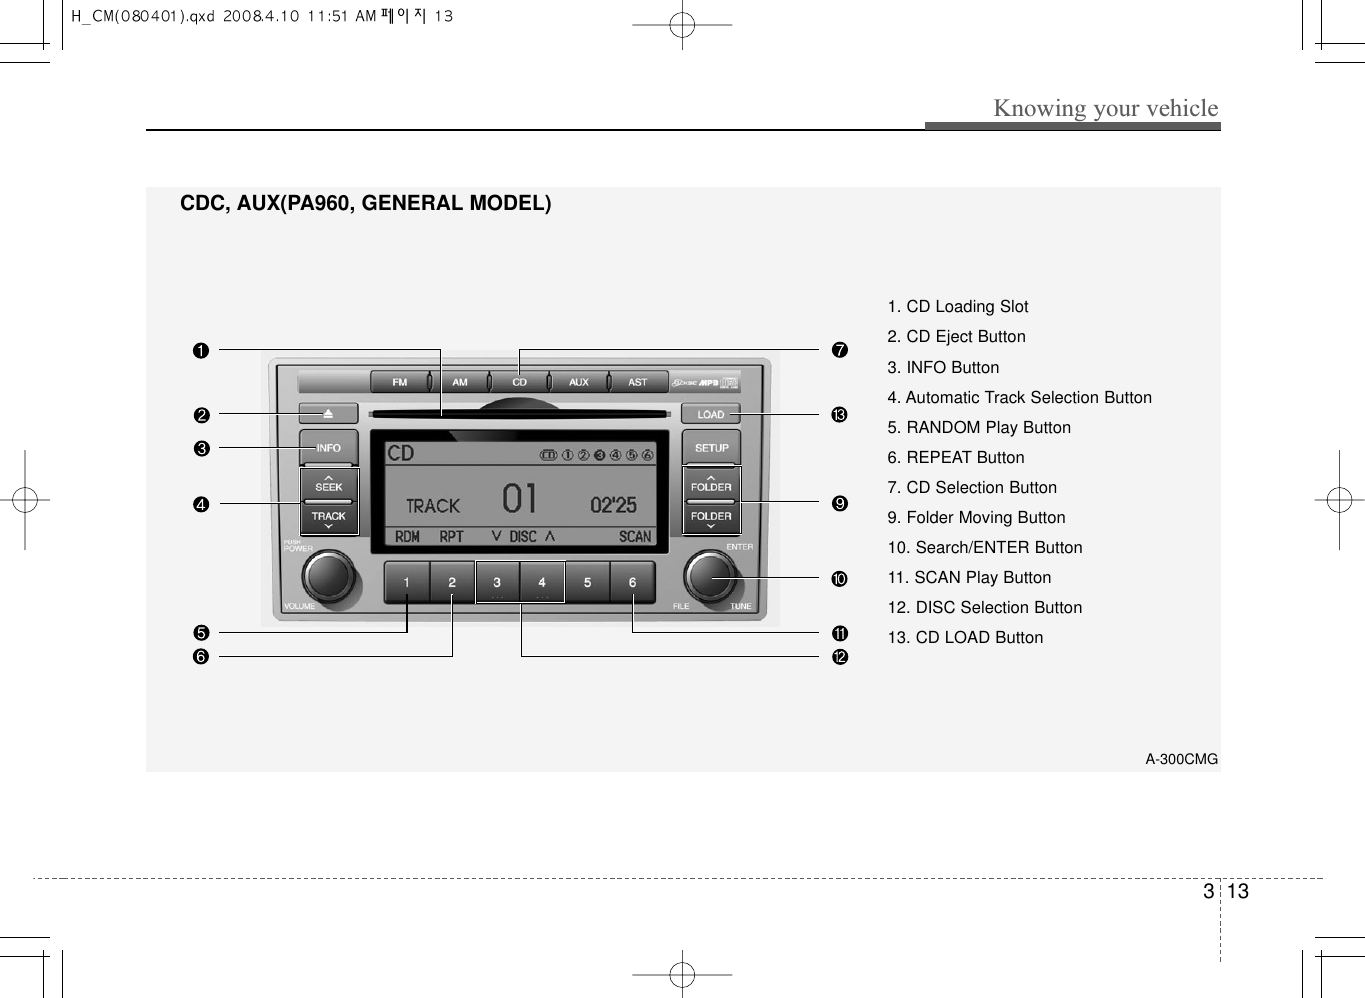
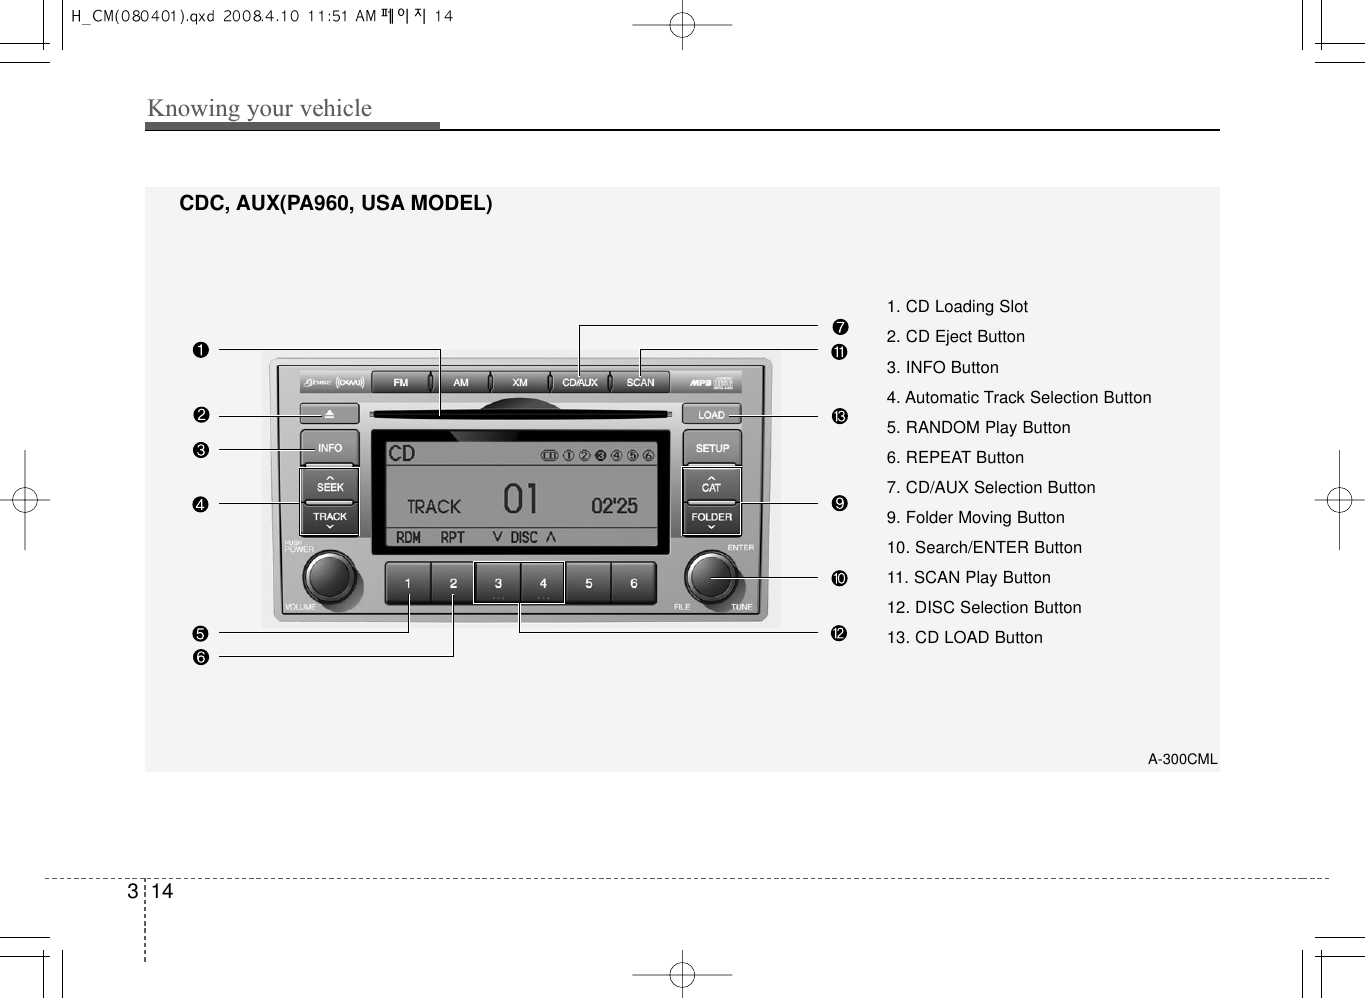
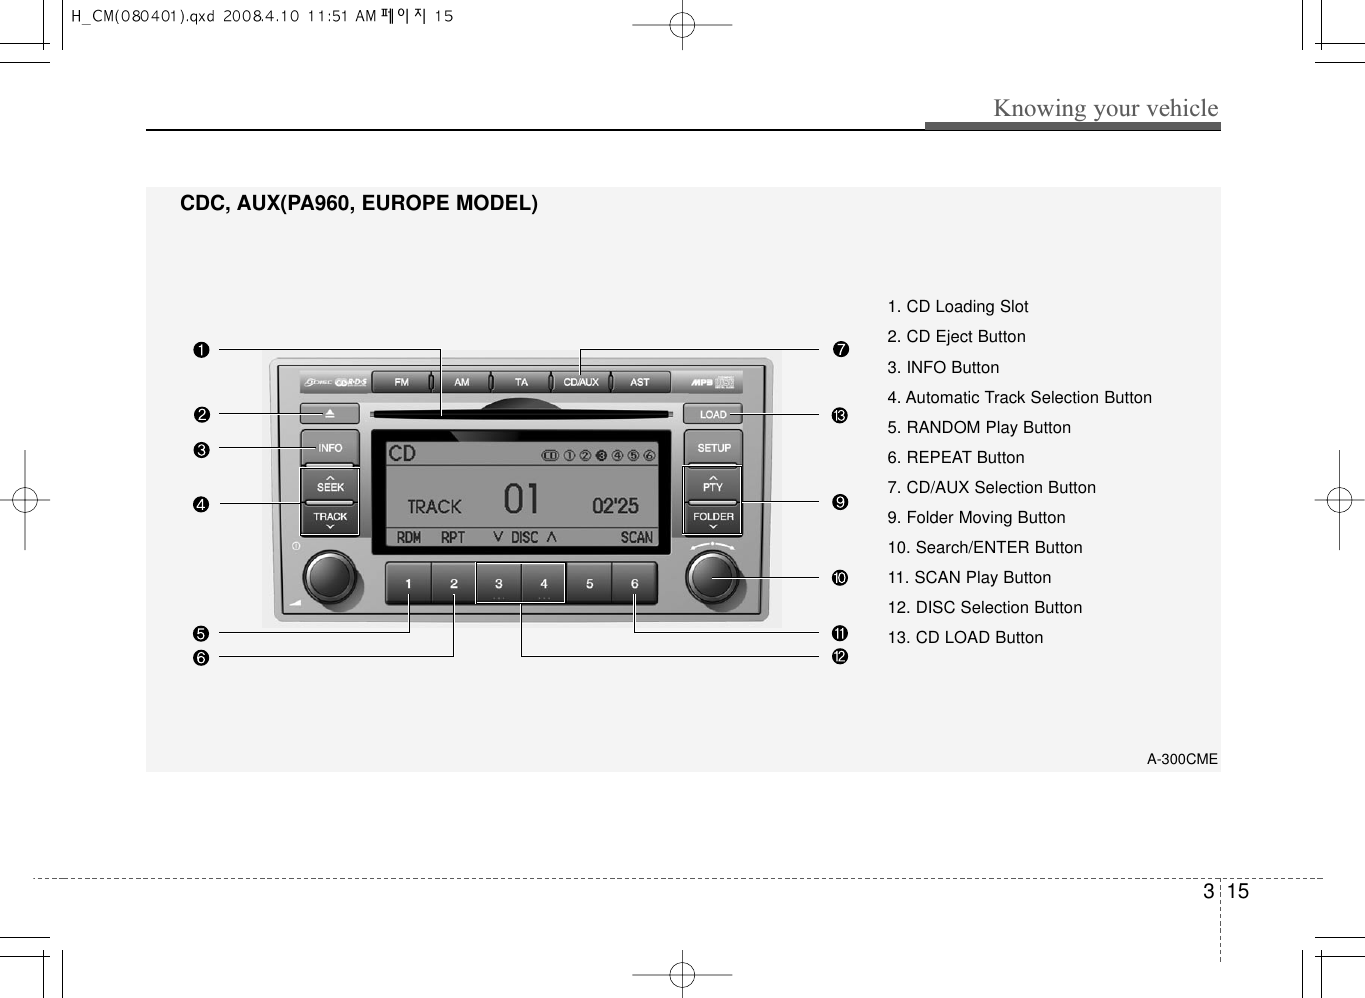

![317Knowing your vehicle1. CD Loading SlotPlease face printed side upward and gen-tly push in. When the ignition switch is onACC or ON and power is off, power isautomatically turned on if the CD is loaded.This CDP supports only 12cm CD. If VCD,Data CD are loaded, "Reading Error" mes-sage will appear and CD will be ejected.2. CD Eject ButtonPush button for less than 0.8 secondsto eject the CD during CD playback. Thisbutton is enabled when ignition switch isoff.• ALL EJECT(CDC Only)Press this button for more than 0.8 sec-onds to eject all discs inside the deck inrespective order.3. INFO ButtonDisplays the information of the currentCD TRACK(FILE) as below when thebutton is pressed each time.• CDDA : DISC TITLE ➟DISC ARTIST➟TRACK TITLE➟TRACK ARTIST➟TOTAL TRACK...• MP3/WMA : FILE NAME➟TITLE➟ARTIST➟ALBUME➟FOLDER NAME➟TOTAL FILE... (not displayed if the infor-mation is not available on the DISC.)4. Automatic Track SelectionButton• Push [TRACK ] button for less than0.8 second to play from the beginningof current song.Z• Push [TRACK ] button for less than0.8 second and press again within 1seconds to play the previous song.• Push [TRACK ] button for 0.8 orlonger to initiate reverse direction highspeed sound search of current song.• Push [SEEK ] button for less than0.8 second to play the next song.• Push [SEEK ] button for 0.8 orlonger to initiate high speed soundsearch of current song.5. RANDOM Play ButtonPress this button for less than 0.8 secondto activate ‘RDM’ mode and more than0.8 seconds to activate ‘ALL RDM’ mode.• RDM : Only files/tracks in a folder/discare played back in a random sequence.• ALL RDM(MP3/WMA Only) : All files ina disc are played back in the randomsequence.6. REPEAT ButtonPress this button for less than 0.8 secondto activate ‘RPT’ mode and more than0.8 seconds to activate ‘FLD RPT’ mode.• RPT : Only a track(file) is repeatedlyplayed back.• FLD RPT(MP3/WMA Only) : Only filesin a folder are repeatedly played back.7. CD or CD/AUX or CD/AUX/RSESelection Button• CD Selection ButtonIf the CD is loaded, turns to CD mode. Ifno CD, it displays "NO Disc" for 3 sec-onds and returns to th previous mode.](https://usermanual.wiki/HYUNDAI-MOBIS/PA960CM/User-Guide-1125436-Page-18.png)
![Knowing your vehicle183• CD/AUX Selection ButtonIf the auxiliary device is connected, itswitches to the AUX mode from the othermode to play the sound from the auxiliaryplayer. If the CD is loaded, turns to CDmode, and if a device is connected toAUX then it toggles. CD➟AUX➟CD...when the button is pressed each time.(Itwill not turn to AUX if the auxiliary deviceis not connected) If no CD and auxiliarydevice is not connected, it displays "NOMedia" for 3 seconds and returns to theprevious mode.• CD/AUX/RSE Selection ButtonIf the auxiliary device is connected, itswitches to the AUX mode from the othermode to play the sound from the auxiliaryplayer. If the CD is loaded, turns to CDmode, and if a device is connected toAUX and there is a CD in the RSE then ittoggles. CD➟AUX➟RSE➟CD... when thebutton is pressed each time.(It will notturn to AUX and RSE if the auxiliarydevice is not connected and there is noCD in the RSE) If no CD and auxiliarydevice is not connected, it displays "NOMedia" for 3 seconds and returns to theprevious mode.8. CD Indicator(CDP Only)When car ignition switch is ACC or ONand if the CD is loaded, this indicator islighted. If the CD is ejected the light isturned off.9. Folder Moving Button• Moves [FOLDER ] button child fold-er of the current folder and displays thefirst song in the folder. Press TUNE/ENTER knob to move to the folder dis-played. It will play the first song in thefolder.• Moves [CAT ], [PTY ], [FOLDER ] button parent folder anddisplays the first song in the folder.Press TUNE/ENTER knob to move tothe folder displayed.10. Search/ENTER ButtonTurn this button clockwise to display thesongs next to the currently played song.Turn the button counterclockwise to dis-play the songs before the currentlyplayed song. Press the button to skip andplay the selected song.11. SCAN Play ButtonPlays first 10 seconds of each song inthe DISC. To cancel the mode, press thebutton once again.12. DISC Selection Button• [DISC ] Change Button Changesdisc to the previous disc.• [DISC ] Change Button Changesdisc to the next disc.13. CD LOAD ButtonPush [LOAD] button to load CDs to avail-able CDC deck (from 1~6). Push [LOAD]button for more than 2 seconds to loadinto all available decks. The last CD willplay. 10 seconds idle status will disableloading process.14. AUX Selection ButtonIf the auxiliary device is connected, itturns to AUX mode from the other modeto play the sound from the auxiliary play-er. If no auxiliary device is connected, itdisplays "NO Media" for 3 seconds andreturns to the previous mode.](https://usermanual.wiki/HYUNDAI-MOBIS/PA960CM/User-Guide-1125436-Page-19.png)

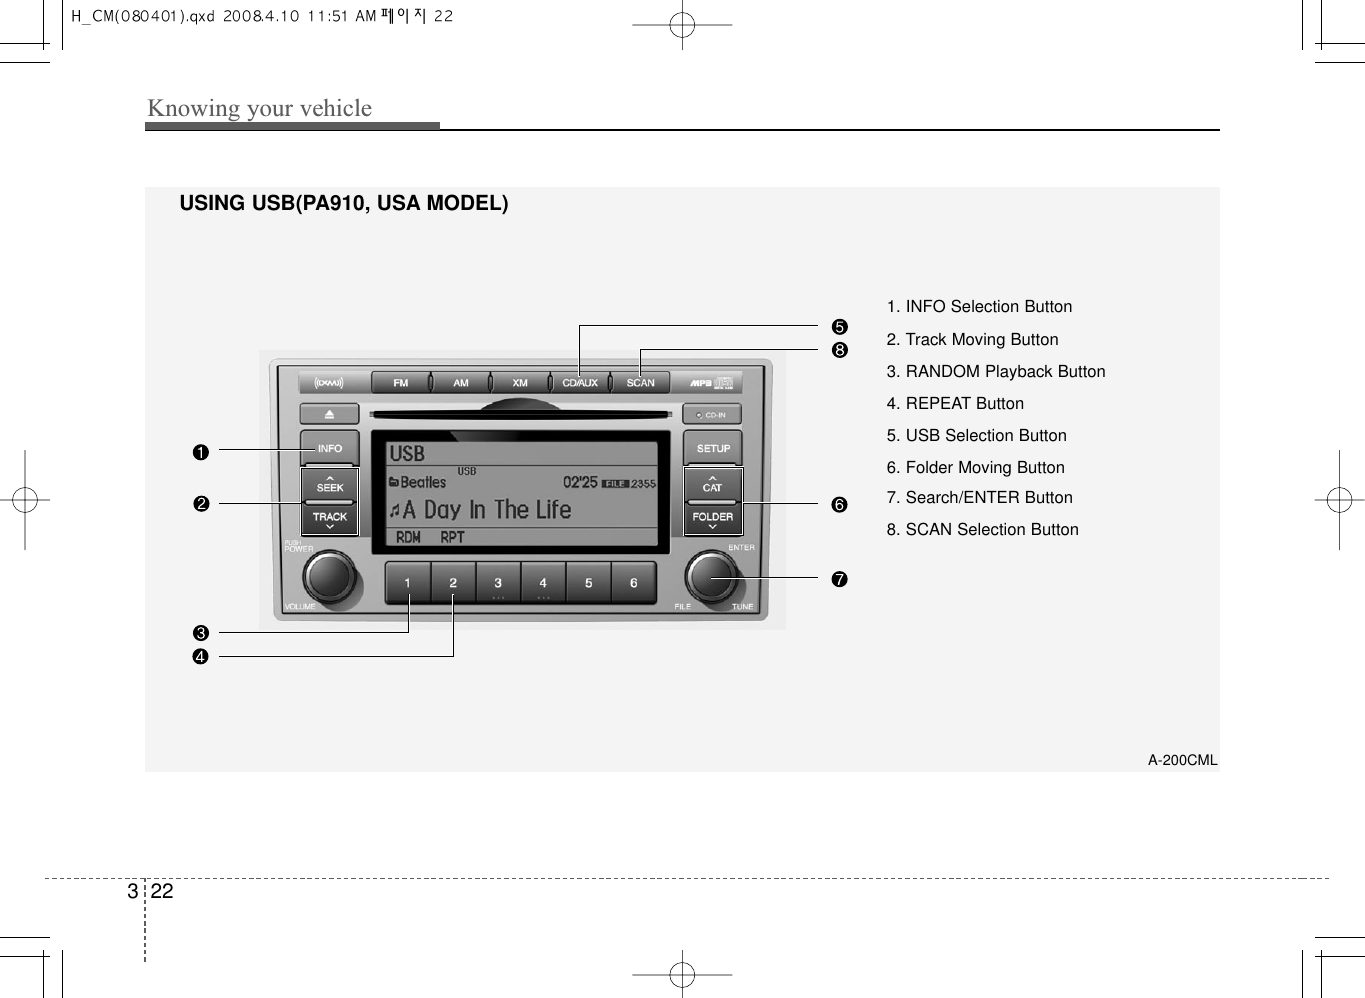
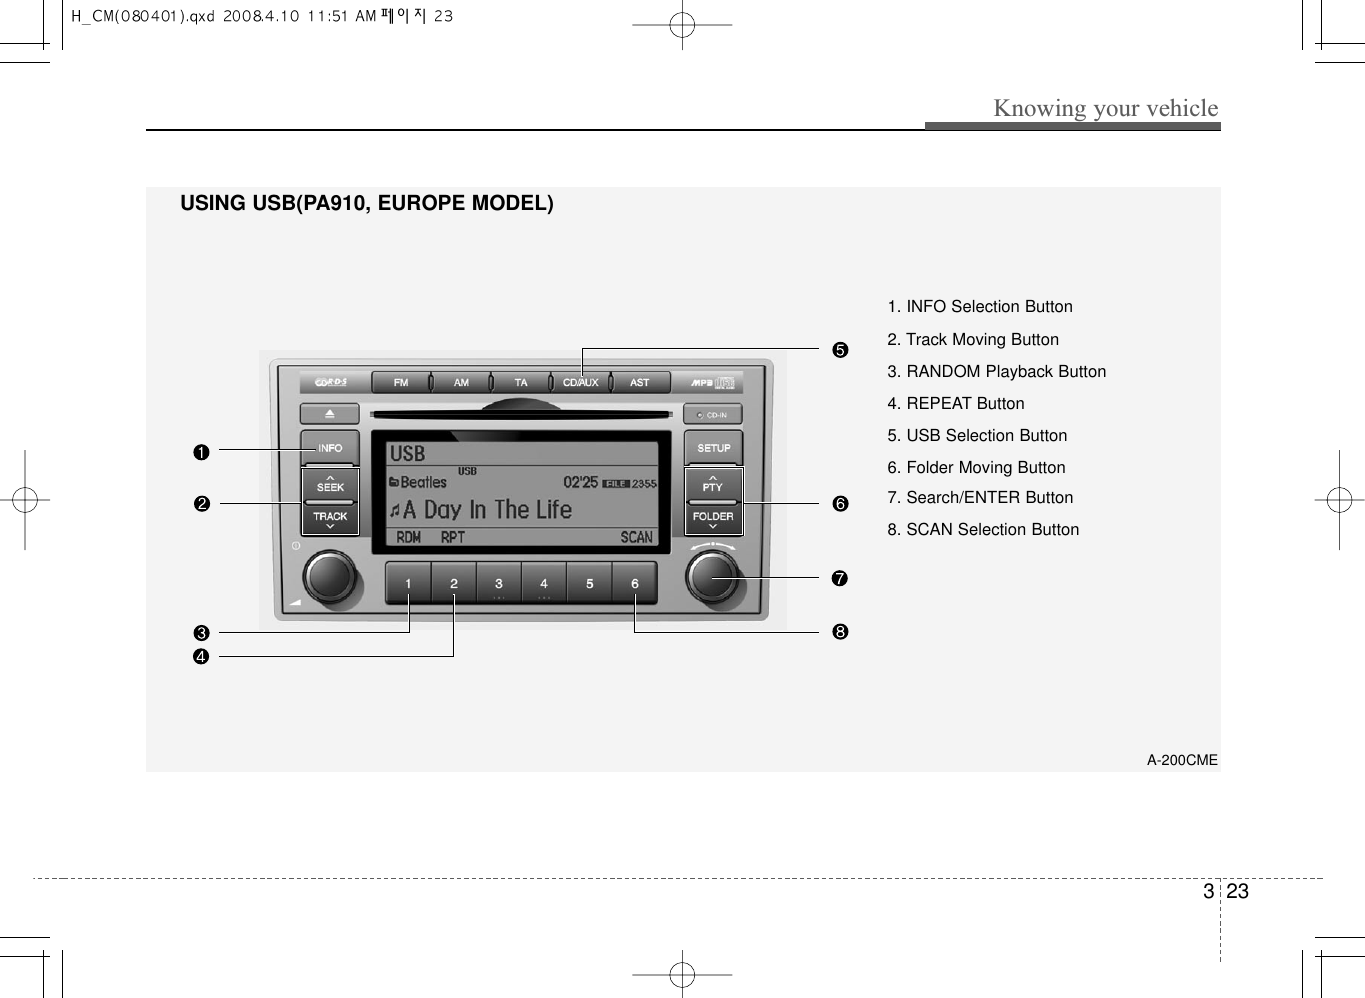
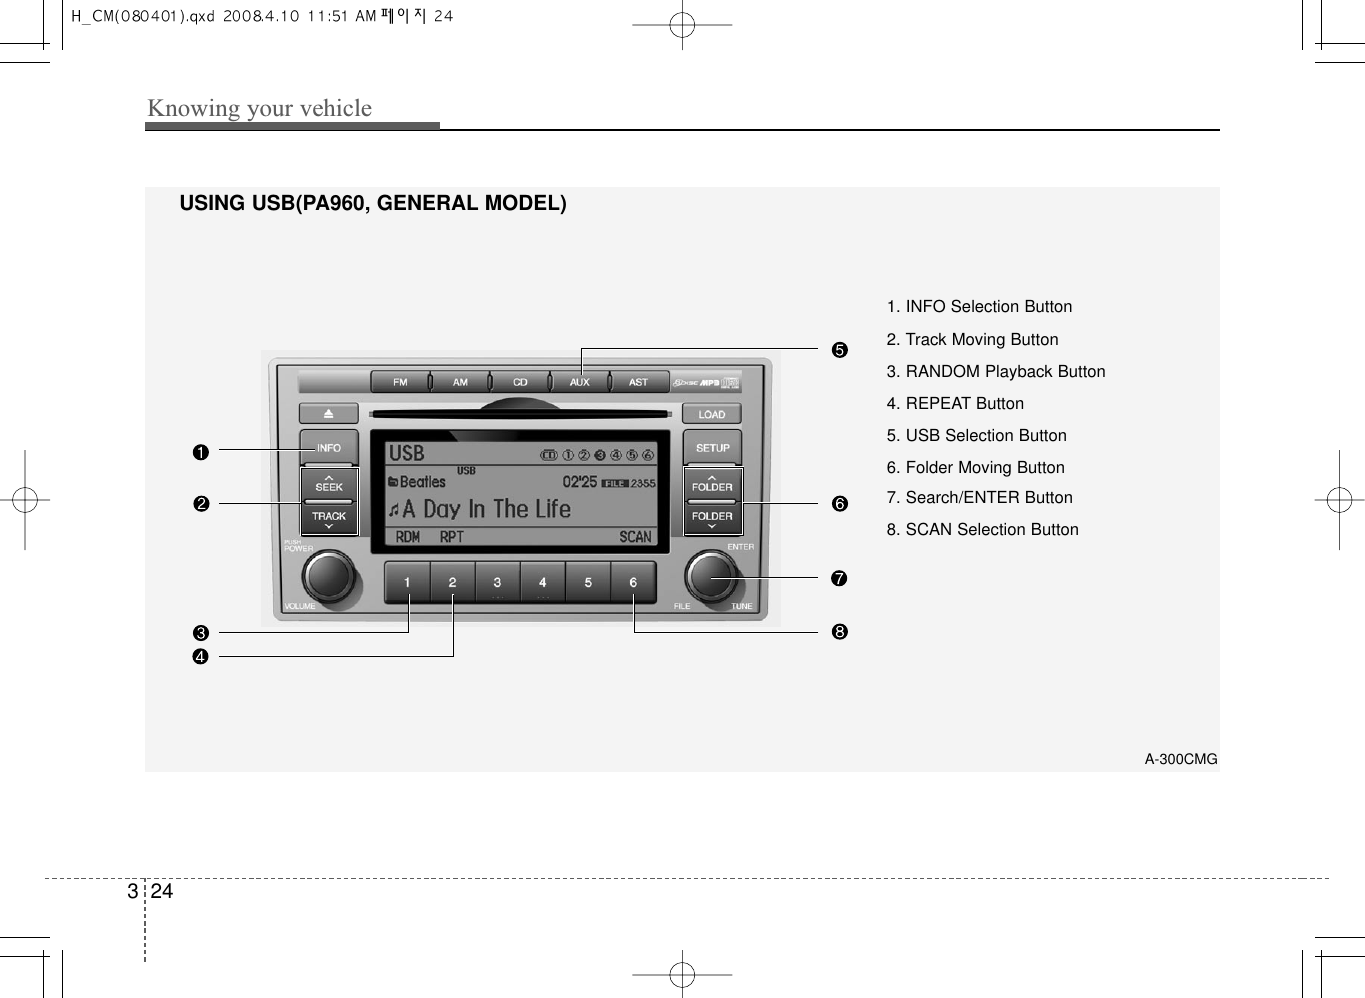


![Knowing your vehicle2831. INFO Selection ButtonDisplays the information of the file cur-rently played in the order of FILE NAME➟TITLE➟ARTIST➟ALBUM➟FOLDER➟TOTAL FILE➟NORMAL DISPLAY➟FILENAME➟... (Displays no information if thefile has no song information.)2. Track Moving Button• Press the [TRACK ] button for lessthan 0.8 second to play from the begin-ning of the song currently played.Press the button for less than 0.8 sec-ond and press it again within 1 sec-onds to move and play the previoustrack. Press the button for 0.8 secondor longer to play the song in reversedirection in fast speed.• Press the [SEEK ] button for lessthan 0.8 second to move to the next-track. Press the button for 0.8 secondor longer to play the song in forwarddirection in fast speed.3. RANDOM Playback ButtonPress this button for less than 0.8 sec-onds to activate 'RDM' mode and morethan 0.8 seconds to activate 'ALL RDM'mode. • RDM : Only files in a folder are playedback in a random sequence.• ALL RDM : All files in a USB memoryare played back in the randomsequence.4. REPEAT ButtonPress this button for less than 0.8 sec-onds to activate 'RPT' mode and morethan 0.8 seconds to activate 'FLD RPT'mode.• RPT : Only a file is repeatedly playedback. • FLD RPT : Only files in a folder arerepeatedly played back.5. USB Selection ButtonIf USB is connected, it switches to theUSB mode from the other mode to playthe song files stored in the USB. If no CDand auxiliary device is not connected, itdisplays "NO Media" for 3 seconds andreturns to the previous mode.6. Folder Moving Button• Moves [FOLDER ] button child folderof the current folder and displays the firstsong in the folder. Press TUNE/ ENTERknob to move to the folder displayed. Itwill play the first song in the folder.• Moves [CAT ] button parent folderand displays the first song in the folder.Press TUNE/ENTER knob to move tothe folder displayed7. Search/ENTER ButtonTurn this button clockwise to display thesongs next to the currently played song.Turn the button counterclockwise to dis-play the songs before the currentlyplayed song. Press the button to skip andplay the selected song. 8. SCAN Selection ButtonPlays 10 seconds of each song in theUSB device. Press the button once againto cancel scanning.](https://usermanual.wiki/HYUNDAI-MOBIS/PA960CM/User-Guide-1125436-Page-29.png)
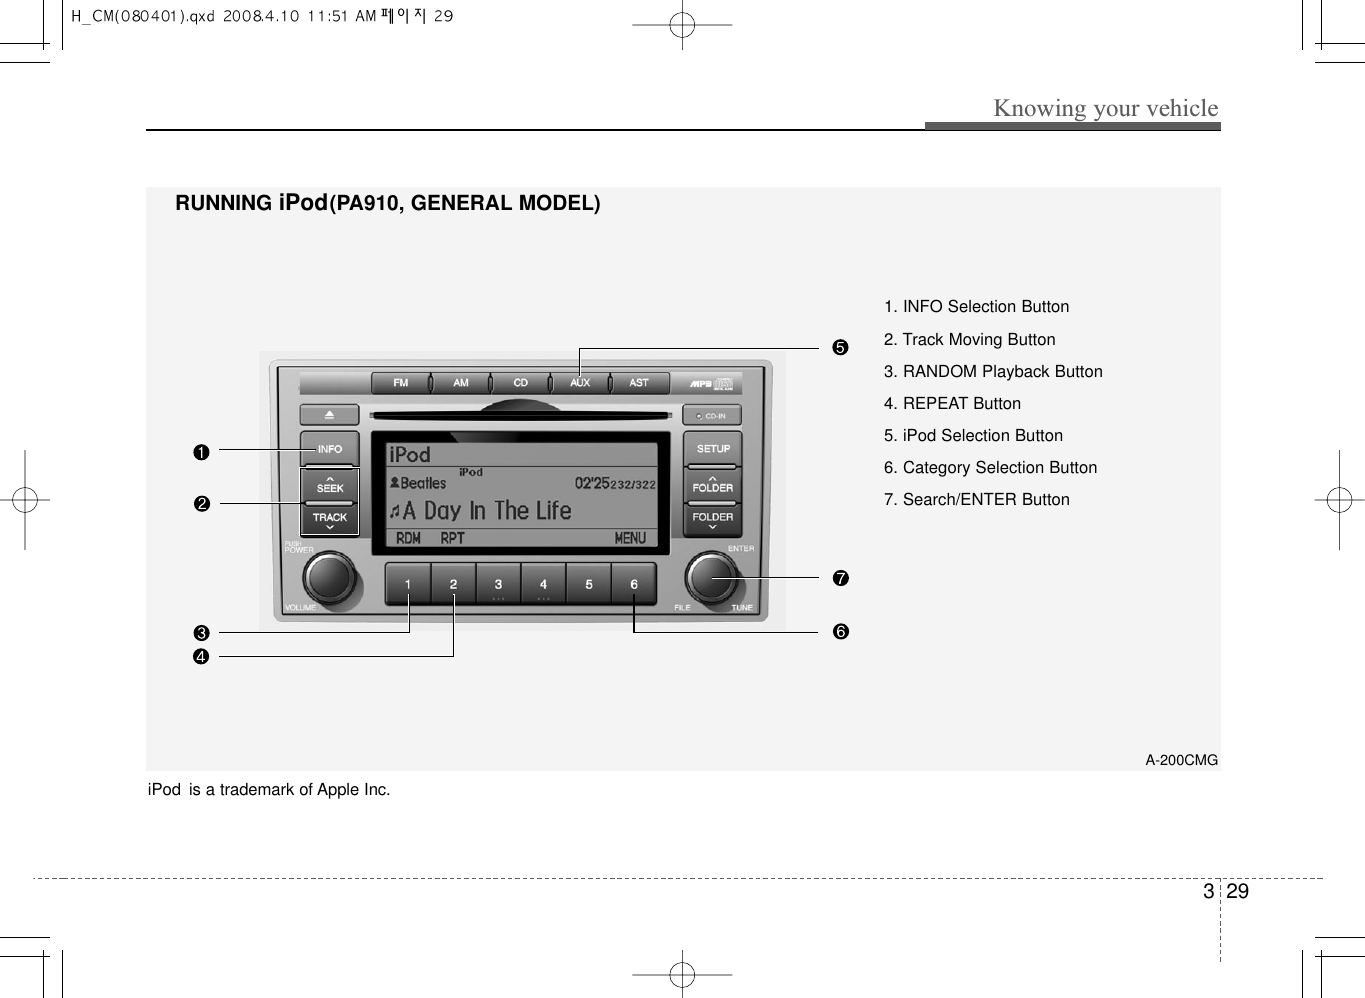
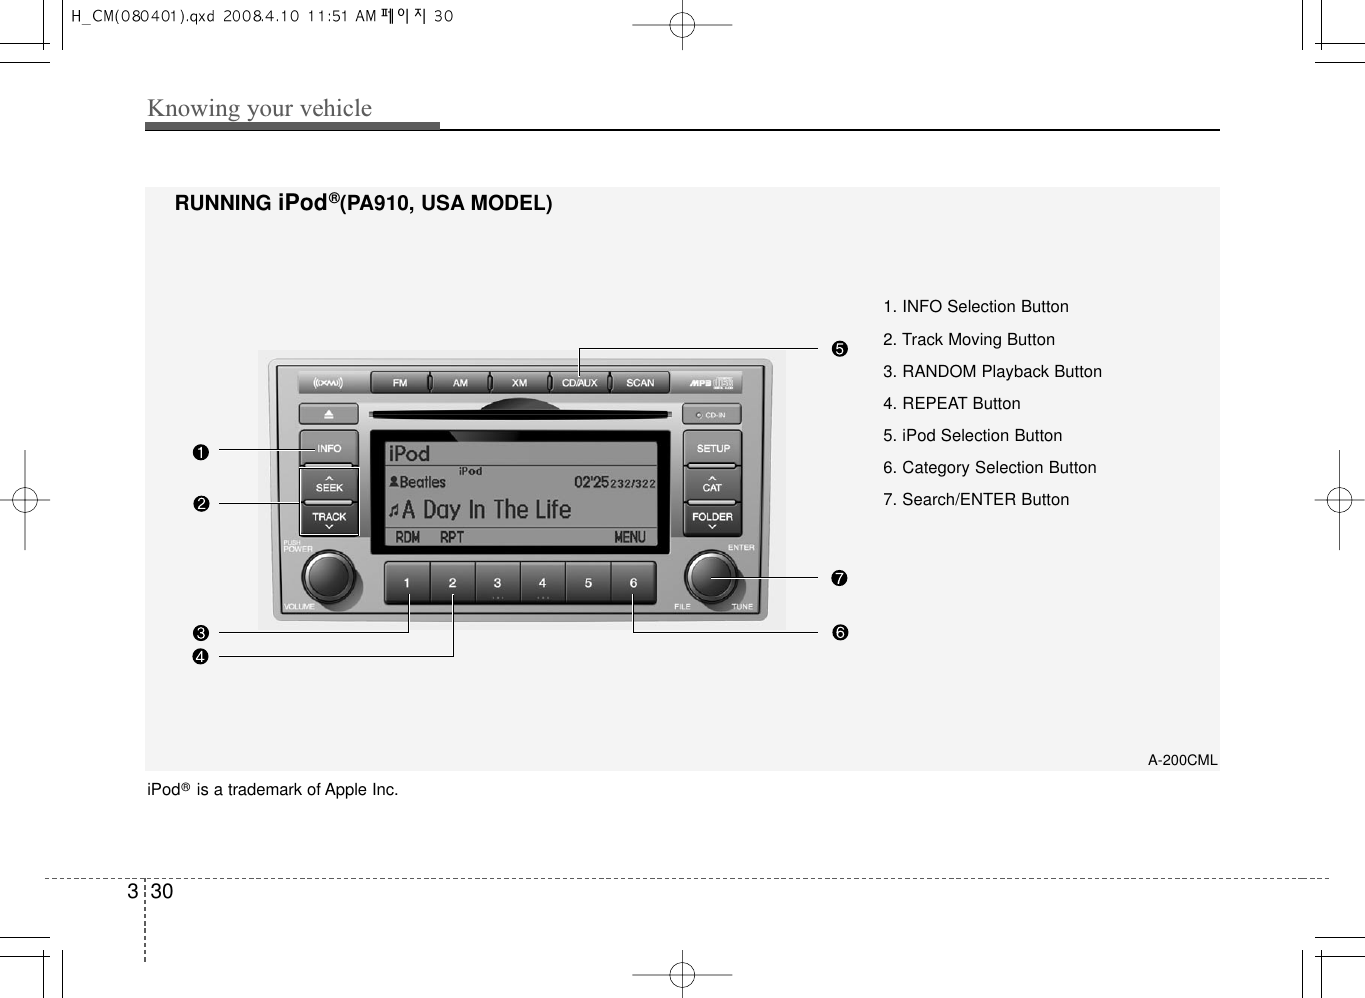

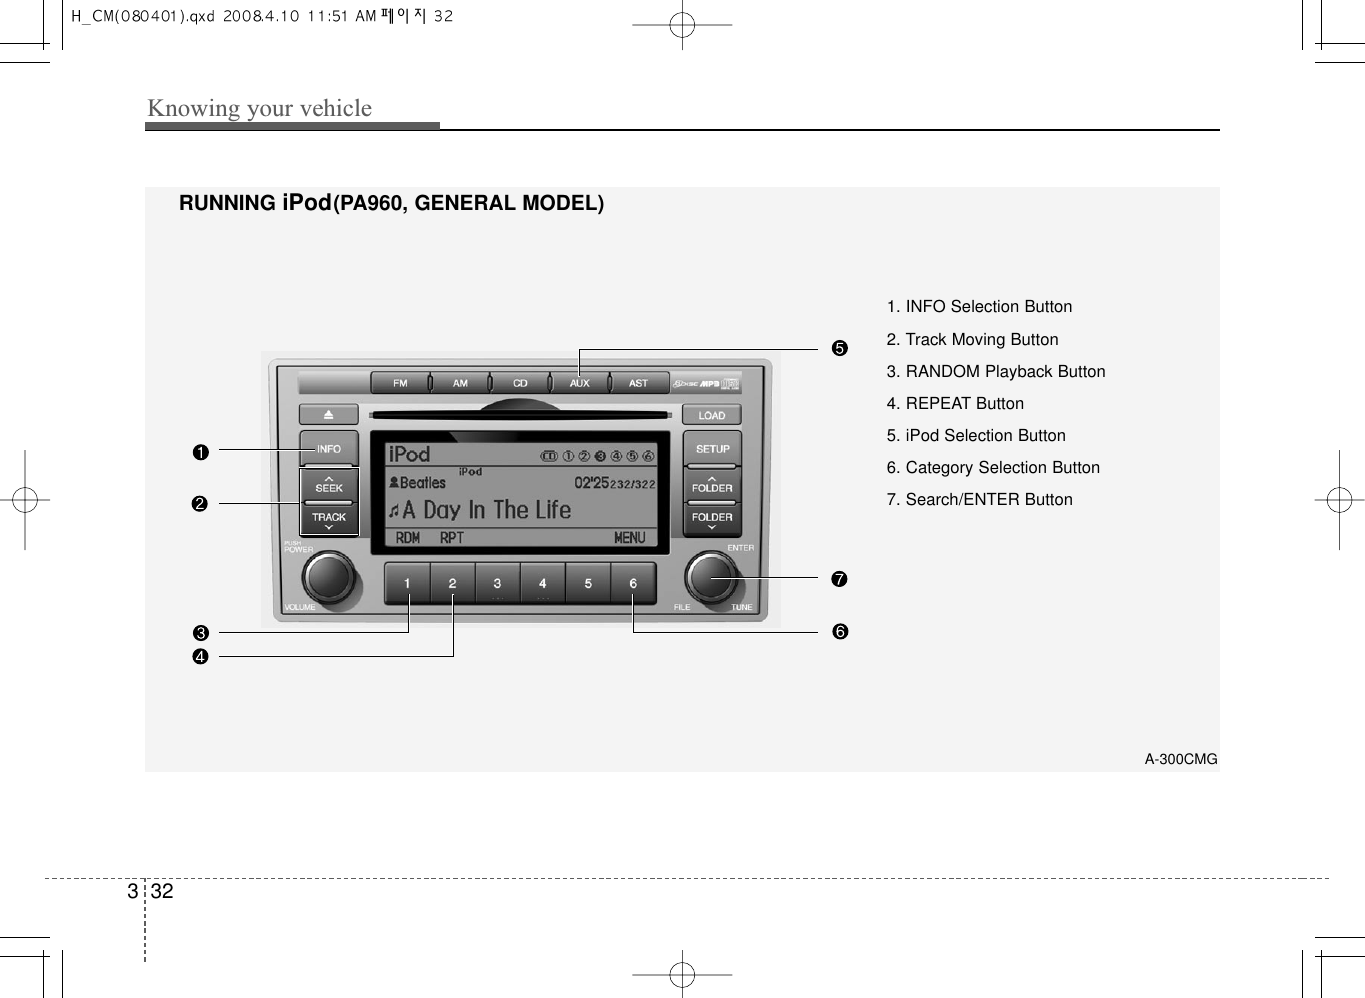


![Knowing your vehicle363In case the iPod exclusive cable is con-nected to the multiple terminal inside theconsol on the right hand side of the dri-ver's seat. When the iPod is connected,the 'iPod' icon will be displayed on thetop left corner of the display screen.1. INFO Selection ButtonDisplays the information of the file cur-rently played in the order of TITLE➟ARTIST➟ALBUM➟NORMAL DISPLAY➟TITLE➟... (Displays no information if thefile has no song information.)2. Track Moving Button• Press the [SEEK ] button for lessthan 0.8 second to play from the begin-ning of the song currently played.Press the button for less than 0.8 sec-ond and press it again within 1 sec-onds to move and play the previoustrack. Press the button for 0.8 secondor longer to play the song in reversedirection in fast speed.• Press the [TRACK ] button for lessthan 0.8 second to move to the nexttrack. Press the button for 0.8 secondor longer to play the song in forwarddirection in fast speed.3. RANDOM Playback ButtonPress the button for less than 0.8 secondto activate or deactivate the randomplayback of the songs within the currentcategory. Press the button for longerthan 0.8 second to randomly play allsongs in the entire album of the iPod.Press the button once again to cancelthe mode.4. REPEAT ButtonRepeats the song currently played.5. iPod Selection ButtonIf iPod is connected, it switches to theiPod mode from the CD mode to play thesong files stored in the iPod. If no CDand auxiliary device is not connected, itdisplays "NO Media" for 3 seconds andreturns to the previous mode.6. Category Selection ButtonMoves to the upper category from cur-rentlyplayed category of the iPod. Tomove to(play) the category(song) dis-played, MENU(preset6) You will be ableto search through the lower category ofthe selected category. The order of iPod'scategory is SONG, ALBUMES, ARTISTS,GENRES, and iPod.7. Search/ENTER ButtonWhen you turn the button clockwise, itwill display the songs(category) next tothe song currently played(category in thesame level). Also, when you turn the but-ton counterclockwise, it will display thesongs(category) before the song current-ly played(category in the same level). If you want to listen to the song displayedin the song category, press the button,then it will skip to the selected song andplay.](https://usermanual.wiki/HYUNDAI-MOBIS/PA960CM/User-Guide-1125436-Page-37.png)
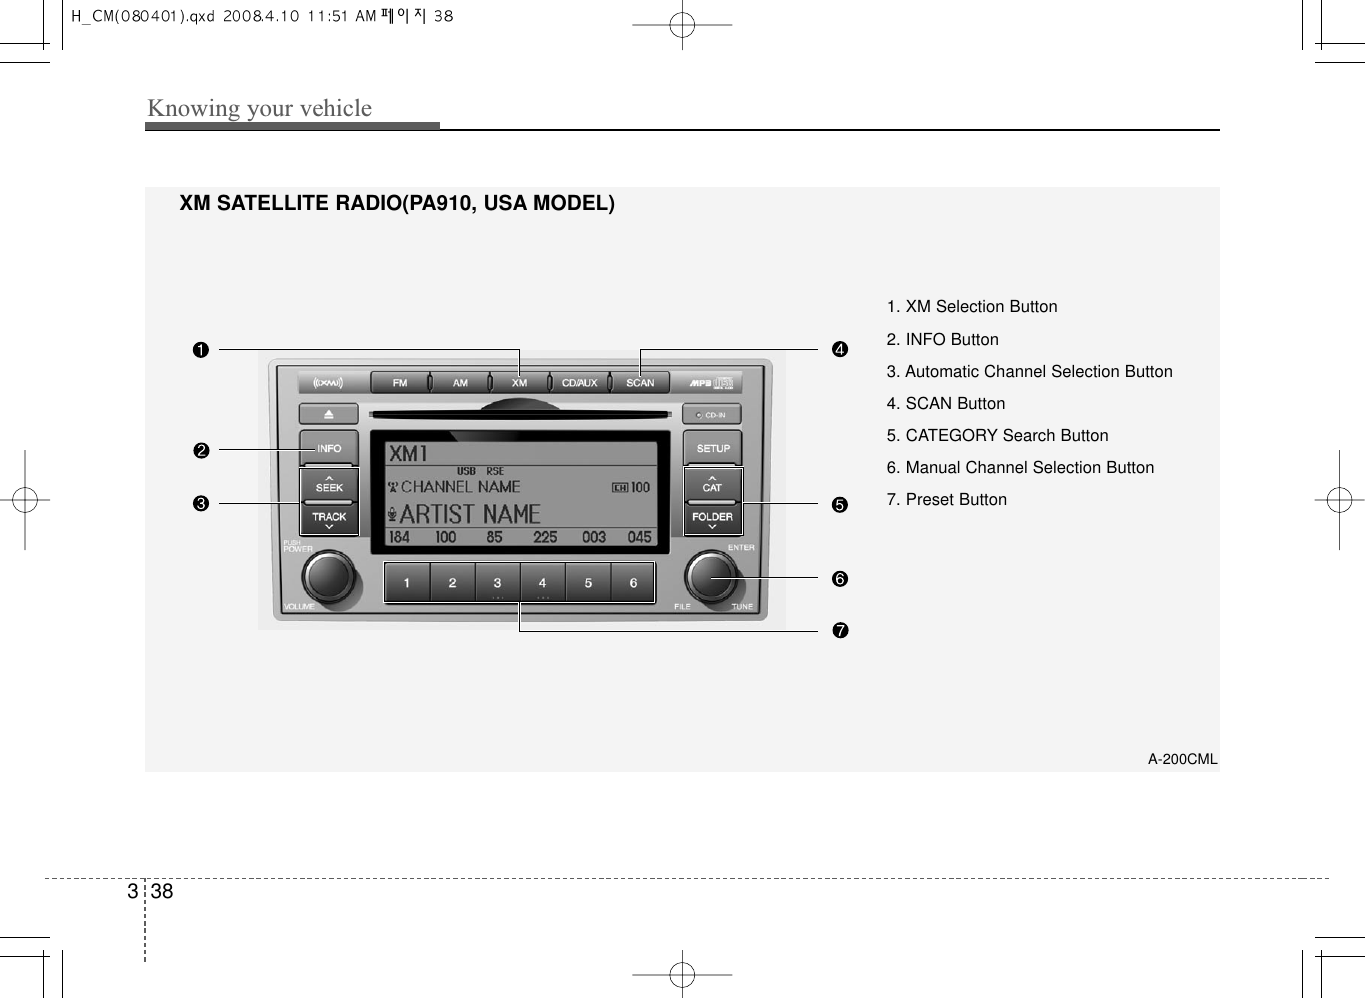
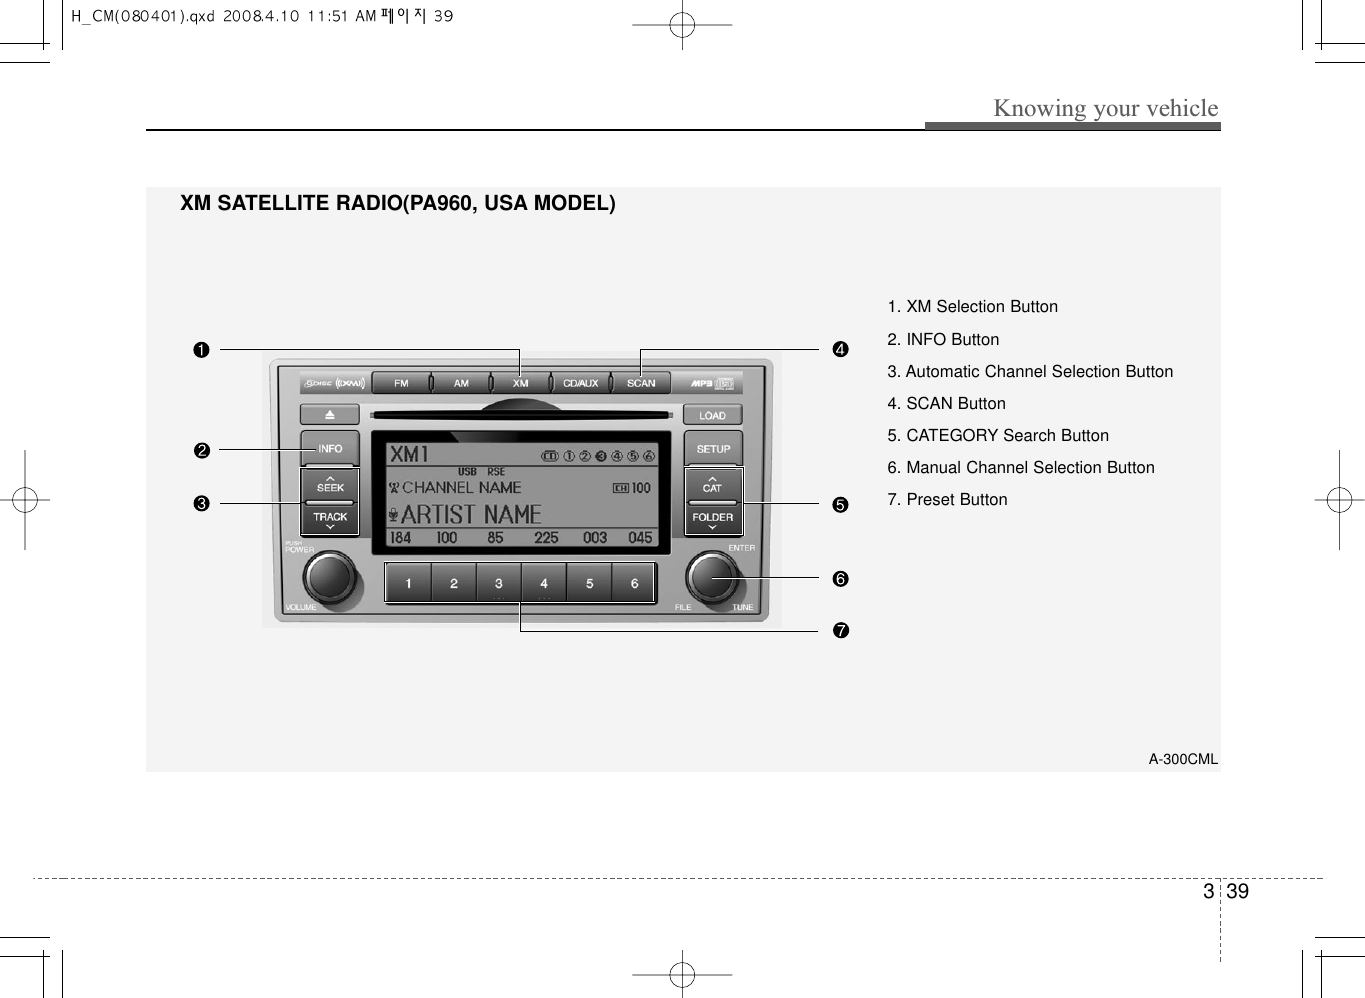
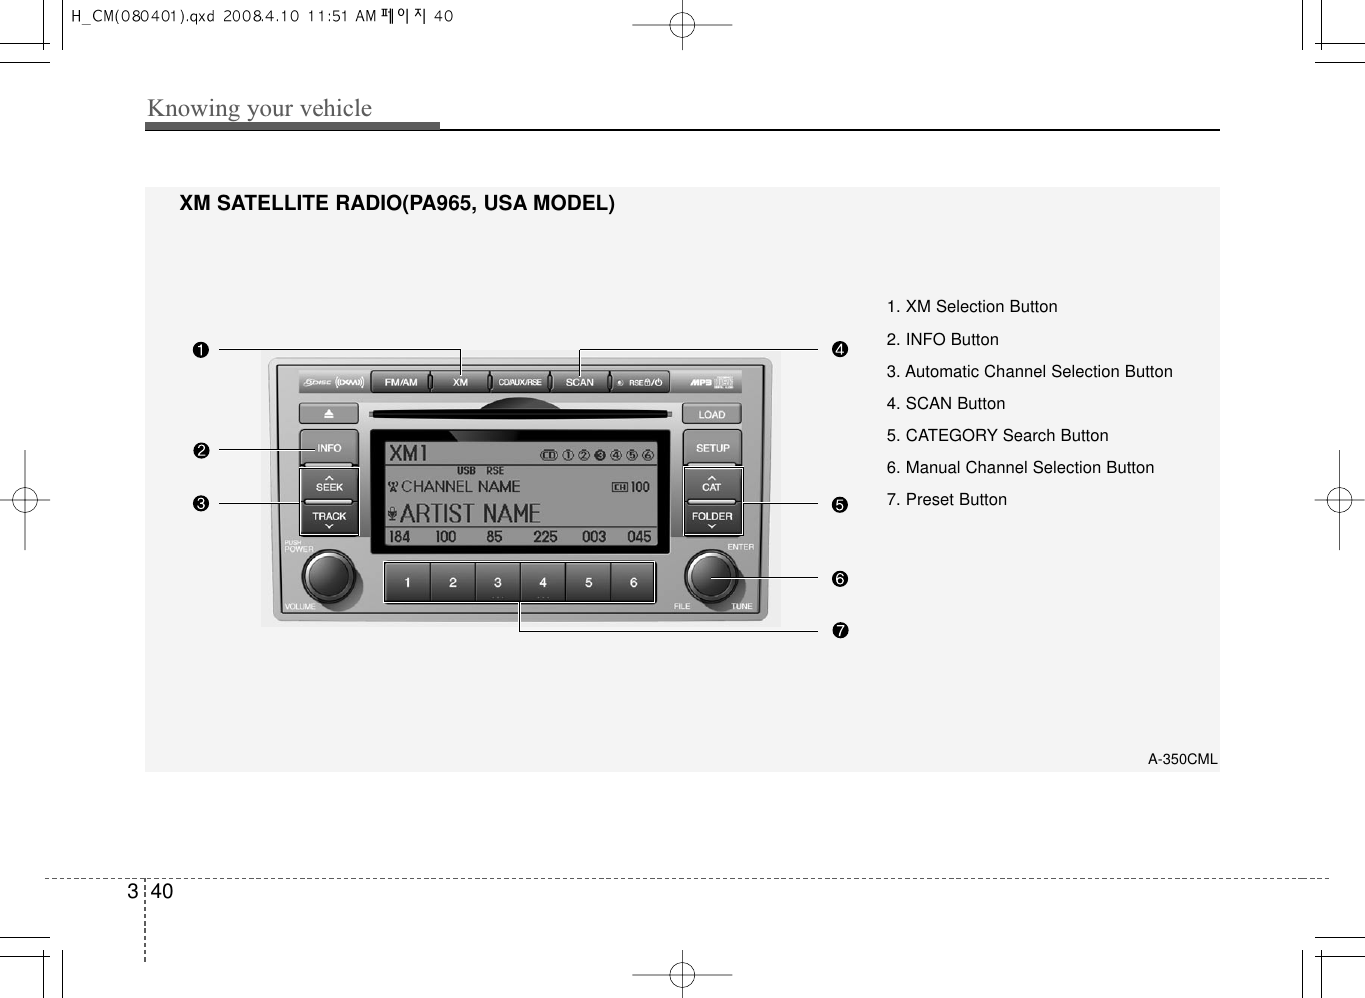
![341Knowing your vehicle1. XM Selection ButtonTurns to XM Satellite Radio Mode. XMmode toggles in order to XM1➟XM2➟XM3➟XM1... when the button is pressedeach time.2. INFO ButtonDisplays the information of the currentchannel in the order of Artist/Song title➟Category/Channel name➟Current PlayChannel➟Artist/Song title➟Category/Channel name... when the button ispressed each time. If can not display thewhole text information, rotate the tunebutton to see the next page.3. Automatic Channel SelectionButton• Push [TRACK ] button for less than0.8 second to select previous channel.• Push [TRACK ] button for 0.8 sec-ond or longer to continuously move toprevious channel.• Push [SEEK ] button for less than0.8 second to select next channel.• Push [SEEK ] button for 0.8 secondor longer to contiuously move to nextchannel.• Radio ID : Seek or Tune to XM channel0 to display the Radio ID.4. SCAN ButtonPress to hear a brief sampling of allchannel. To cancel the scan mode, pressthe button once again.5. CATEGORY Search Button• Push [FOLDER ] button to searchprevious category.• Push [CAT ] button to search nextcategory. To listen to the displayed cat-egory, press the TUNE/SETUP button.To scan channel in displayed category,press the scan button. To search chan-nel in displayed category, press seekbuttons or turn the tune button clock-wise/counterclockwise.(CATEGORYicon is will be turned on in Categorymode)6. Manual Channel SelectionButtonWhile listening to XM broadcast, rotatethis control to the right or left to searchother channels while listening to currentchannel. (Turn to the right to searchhigh-er channels and left, lower channels)7. Preset ButtonPush [1]~[6] buttons less than 0.8 sec-ond to play the channel saved in eachbutton. Push Preset button for 0.8 sec-ond or longer to save current channel tothe respective button with a beep.](https://usermanual.wiki/HYUNDAI-MOBIS/PA960CM/User-Guide-1125436-Page-42.png)
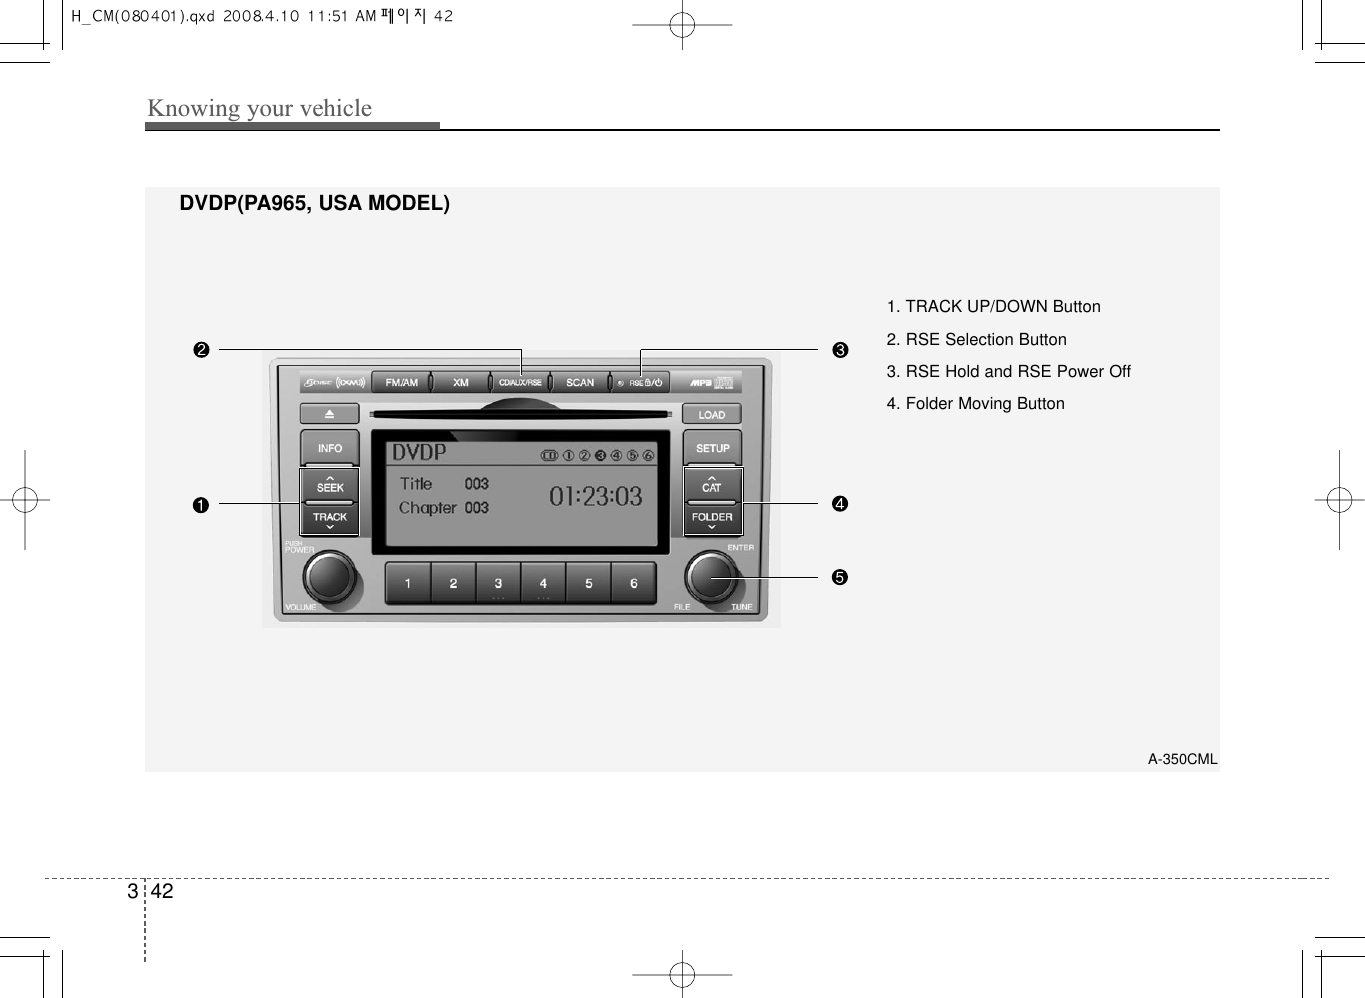
![343Knowing your vehicleIn case RSE is loaded DVD disc andconnected auxiliary device at RSE unitthat is located the rear seat.1. TRACK UP/DOWN Button• Press [TRACK ] button to play fromthe beginning of current track.• Press [TRACK ] button for pressagain within 3 seconds to play the pre-vious track.• Press [SEEK ] button for less than0.8 second to play the next track.2. RSE Selection ButtonWhen you press this button, the systemwill switch to RSE mode and you will beable to listen to the source played in theRSE unit. (If RSE unit has no disc, cannot select)3. RSE Hold and RSE Power OffIf you press and hold this button for lessthan 0.8 second, the LED of the buttonwill light and RSE unit will be locked. Ifyou press and hold this button for morethan 0.8 second, RSE unit will be turnedoff with a beep and [RSE] will disappearfrom LCD.4. Folder Moving Button• Press [FOLDER ] button to play theprevious track.• Press [CAT ] button to play the nexttrack.CAUTION IN USING RSE DEVICEWhen listening to the CD on theH/UNIT in RSE, the mode cannot beconverted to USB on the H/UNIT andwill be displayed on the LCD.](https://usermanual.wiki/HYUNDAI-MOBIS/PA960CM/User-Guide-1125436-Page-44.png)
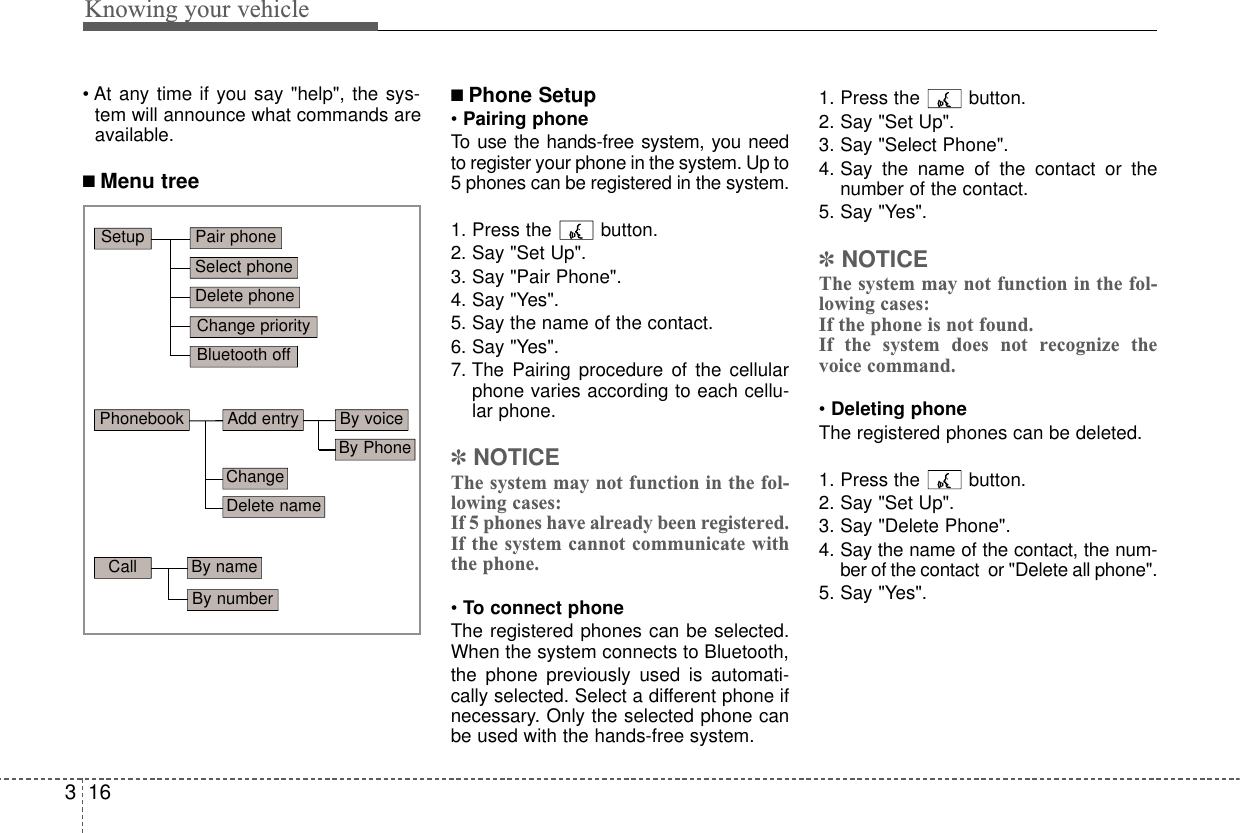
![317Knowing your vehicle• Changing PriorityThe connection priority for registeredphones can be changed.1. Press the button. 2. Say "Set Up".3. Say "Change Priority".4. Say the name of the contact or thenumber of the contact.5. Say "Yes".•Turning Bluetooth on / offBluetooth function can be switched ON/OFF. initial status : Bluetooth ON1. Press the button. 2. Say "Set Up".3. Say "Bluetooth off".4. Say "Yes".• Turning Bluetooth on1. Press the send or button.2. Say "yes".3. The Bluetooth will be turned on.■ Phone Book• Adding EntryPhone numbers and voice tags can beregistered. Entries registered in the phonecan also be transferred.• Adding Entry by Voice1. Press the button.2. Say "phonebook".3. Say "add entry".4. Say "by voice".5. Say the name of the contact.6. Say "yes".7. Say the phone number.8. Say "store".9. Say "Home", "Office", "Mobile", "Other"or "default".10. Say "Yes" to store an additional loca-tion for this contact.• Adding Entry by phone1. Press the button.2. Say "phonebook".3. Say "add entry".4. Say "by phone".5. Say "yes".6. Transfer procedures may vary depend-ing on the cellular phone.✽NOTICEThe system can recognize single digitsfrom zero to nine. Numbers that are tenor greater are not recognized.To speed up input, it is a good idea togroup all digits into a continuous string. However, you can enter each digit indi-vidually or group digits together in pre-ferred string lengths.The display corresponding to each oper-ation appears on the screen as follows:Input operation1. say: "Nine, nine, five"Display: "995"2. say: "Seven, three, four"Display: "995734"• Changing NameThe registered names can be changed.1. Press the button.2. Say "phonebook".3. Say "Change name".4. Say the name of the phonebook [voicetag].5. Say "yes".6. Say the name of the phonebook to bechanged.](https://usermanual.wiki/HYUNDAI-MOBIS/PA960CM/User-Guide-1125436-Page-47.png)
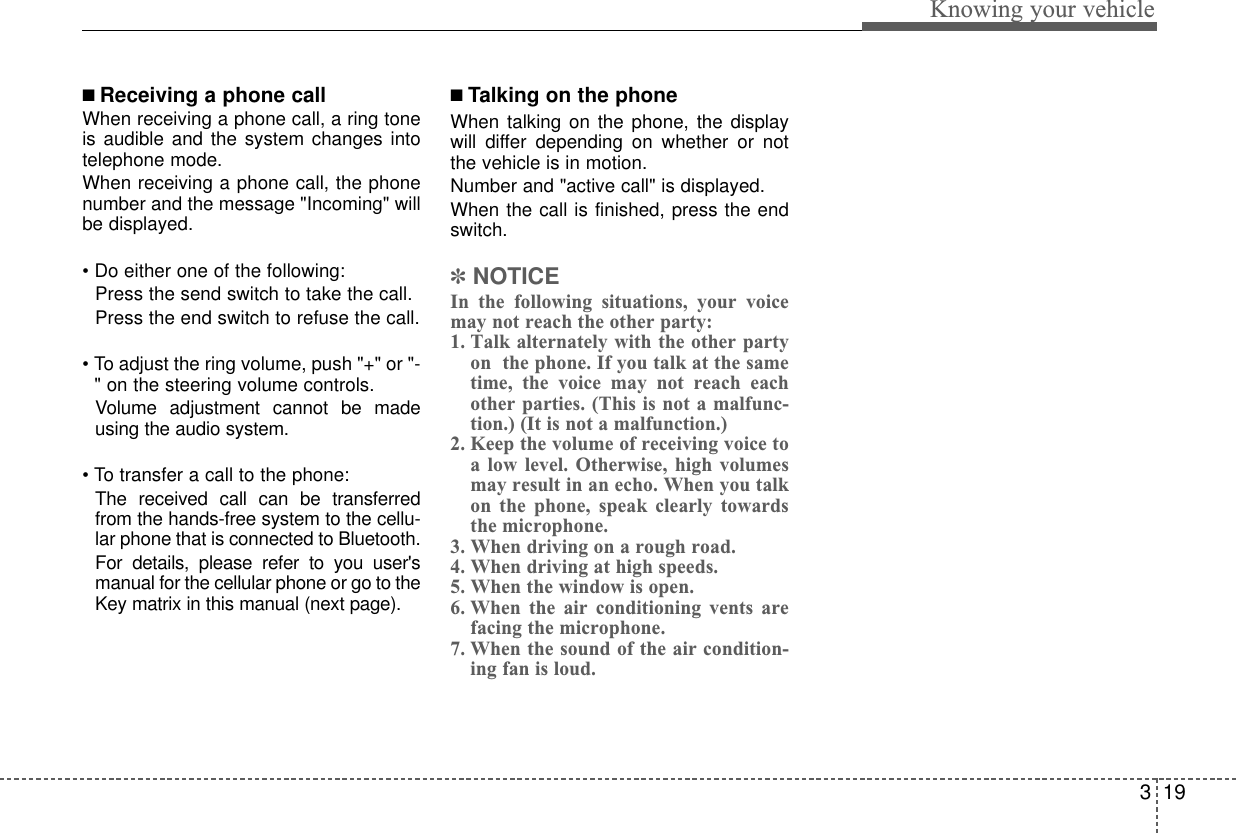
![Knowing your vehicle203■ Key matrixNo.ClassPaired H/PEmpty Disconnected1SHORTLONGSHORTSHORTLONG[10sec]LONG[10sec]Normal modeBT SETUP menuIncoming Call Outgoing Call Active Call 2nd CallNot Paired Not Connecting --Accept CallConnected-2nd call1st Call:waiting2nd Call:active2nd Call2nd Call:waiting1st Call:activeKEY------Transfer call:secret callEnd CallVR MODE CancelVR MODE CancelVR MODE CancelVR MODE Cancel Reject Call End Call End Call-ActiveChangelanguage-ActiveSpeakerAdaptation(Only English)ChangelanguageActiveChangelanguageActive-SpeakerAdaptation(Only English)Changelanguage-----------23](https://usermanual.wiki/HYUNDAI-MOBIS/PA960CM/User-Guide-1125436-Page-50.png)