HYUNDAI MOBIS PA960HMLSDB Car audio bluetooth User Manual HM09 usa 4c audio 151
Hyundai MOBIS Co., Ltd. Car audio bluetooth HM09 usa 4c audio 151
UserManual.wiki
>
HYUNDAI MOBIS
>
PA960HMLSDB User Manual
User manual
Navigation menu
Upload a User Manual
Namespaces
Wiki Guide
HTML
PDF
Info
Views
User Manual
Discussion / Help
Navigation

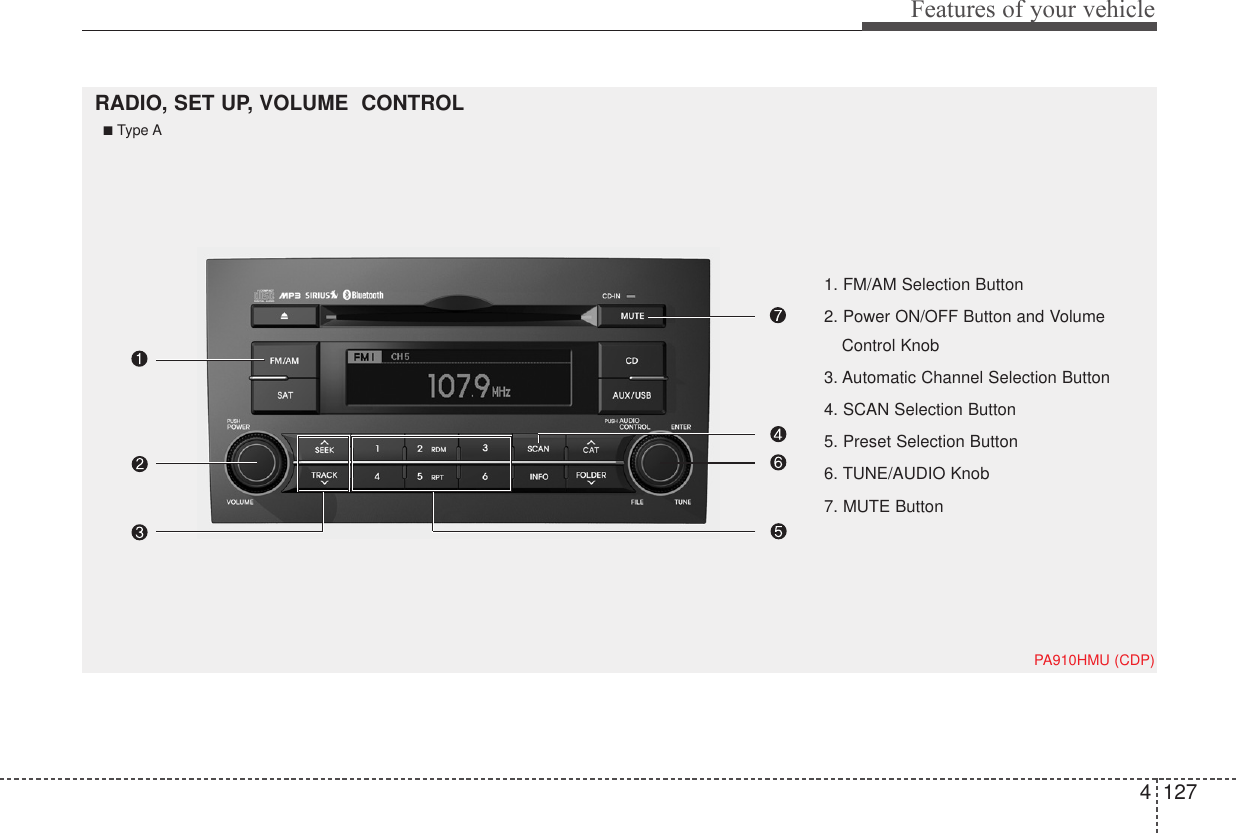
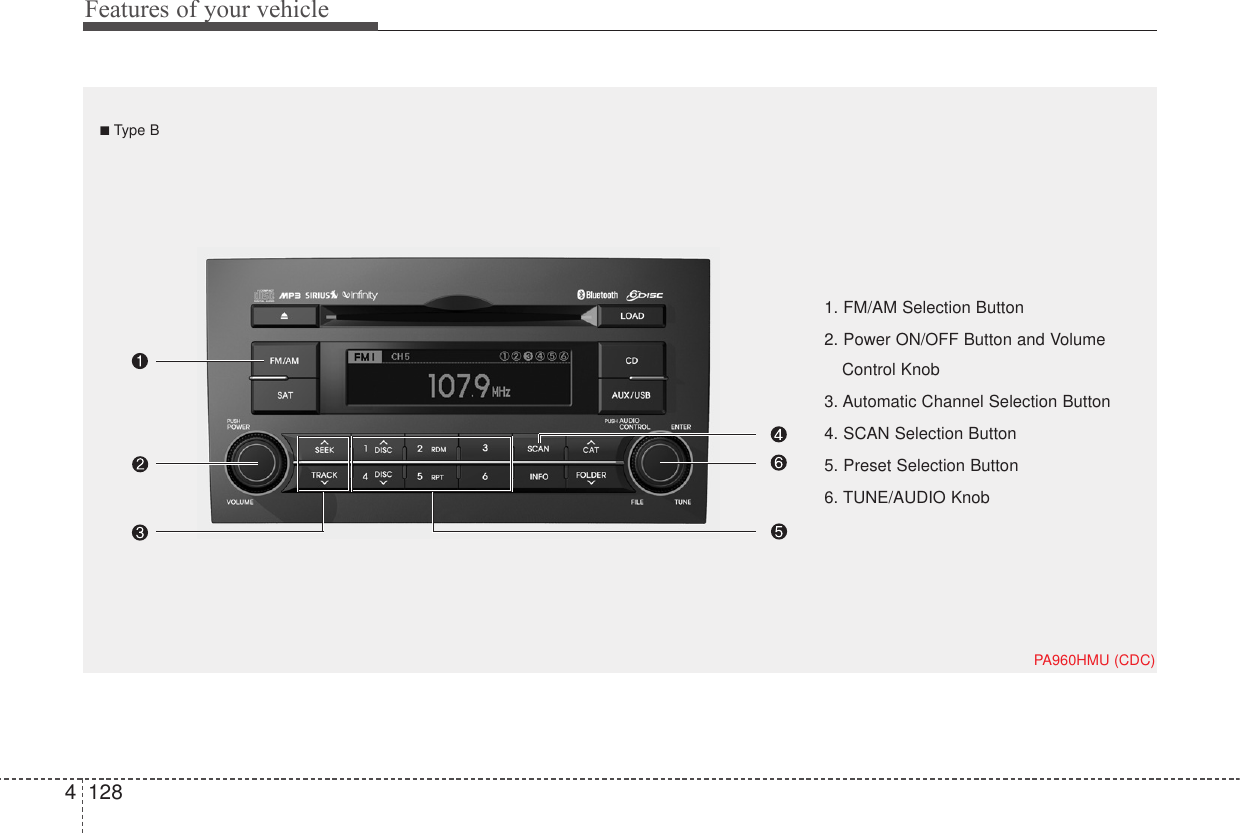
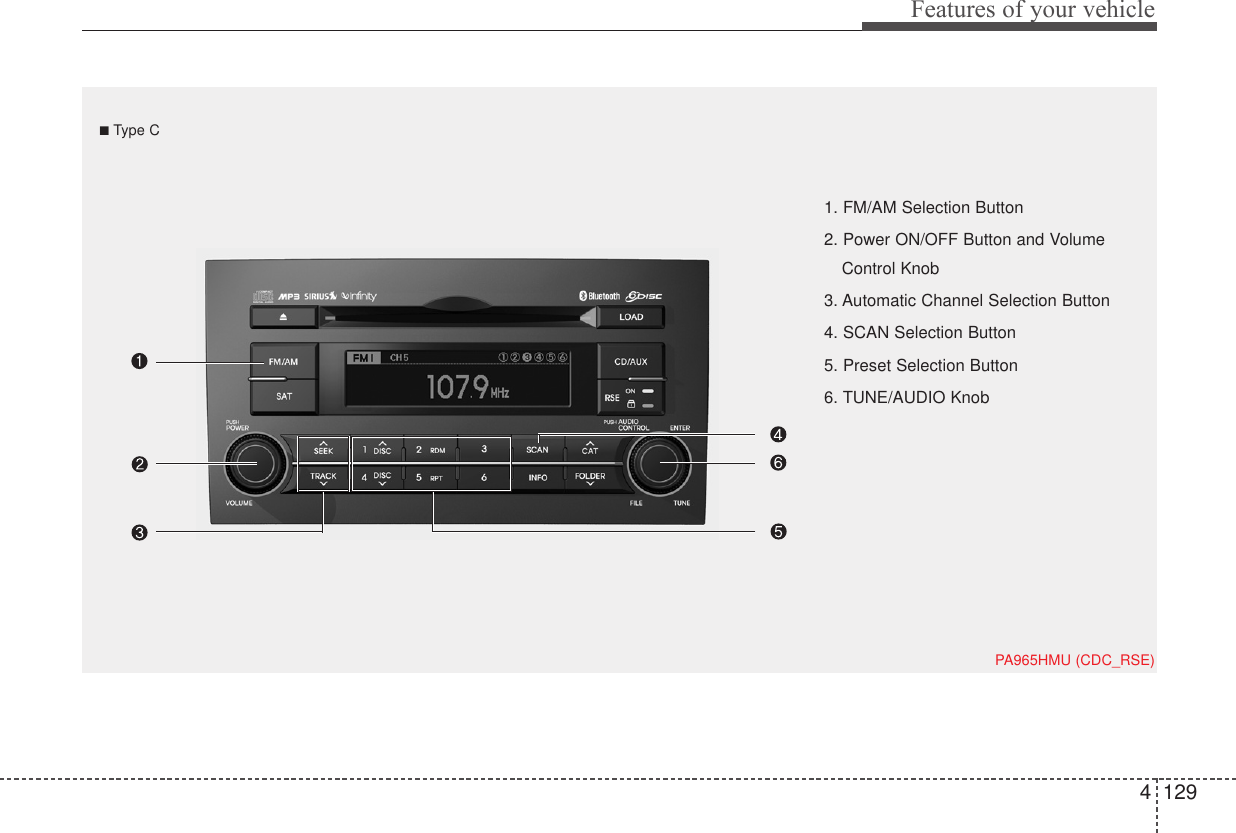
![Features of your vehicle1304How to Activate RADIO, SET UP, VOLUME Control1. FM/AM Selection Button The FM/AM button toggles between FMand AM. Listed below are the paths asthe system switches from FM to AM andback to FM.• FM/AM : FM1➟FM2➟AM➟FM1...• FM : FM1➟FM2➟FM1...2. Power ON/OFF Button &Volume Control Knob• Turns the audio system on/off whenthe ignition switch is on ACC or ON.• If the knob is turned clockwise/counter-clockwise, the volume will increase/decrease.3. Automatic Channel SelectionButton• When the [TRACK ] is pressed, itwill automatically tune to the next lowerstation. • When the [SEEK ] is pressed, it willautomatically tune to the next higherstation.4. SCAN Selection Button• When the button is pressed, it auto-matically scans the radio stationsupwards.• The SCAN feature steps through eachstation, starting from the initial station,for ten seconds.• Press the [SCAN] button again to stopthe scan feature and to listen to thecurrently selected channel.5. Preset Selection Button• Press [1]~[6] buttons less than 0.8 sec-ond to play the station saved in eachbutton.• Press [1]~[6] button more than 0.8 sec-ond or longer to save the current sta-tion to the respective button with abeep.6. TUNE/AUDIO KnobIf the knob is turned clockwise/counter-clockwise, the frequency will increase/decrease.(AM 10kHz, FM 200kHz)■Audio Setup MODE Press and Rotate [AUDIO] repeatedly tochoose the desired mode. Each press changes the mode as below :(Hierarchy 4 (AUTO VOLUME CON-TROL) mode is only selected in the CDP.)• Hierarchy 1• Hierarchy 2](https://usermanual.wiki/HYUNDAI-MOBIS/PA960HMLSDB/User-Guide-1113458-Page-10.png)
![4 131Features of your vehicle❈For example: To Adjusting SIRIUSDISPLAY• Press [AUDIO] to activate SETUPmode, then Hierarchy 1 is selected.• Rotate [AUDIO], to select the SAT con-trol mode.• Rotate [AUDIO] to select the SIRIUSDisplay mode.• If [AUDIO] is not pressed/rotated for 5seconds after adjusting, the displayautomatically returns to normal mode.- Another adjusting mode can be usedfor same operation. 7. MUTE Button(CDP ONLY)Press [MUTE] to stop the sound and"MUTE" is displayed on the LCD.](https://usermanual.wiki/HYUNDAI-MOBIS/PA960HMLSDB/User-Guide-1113458-Page-11.png)
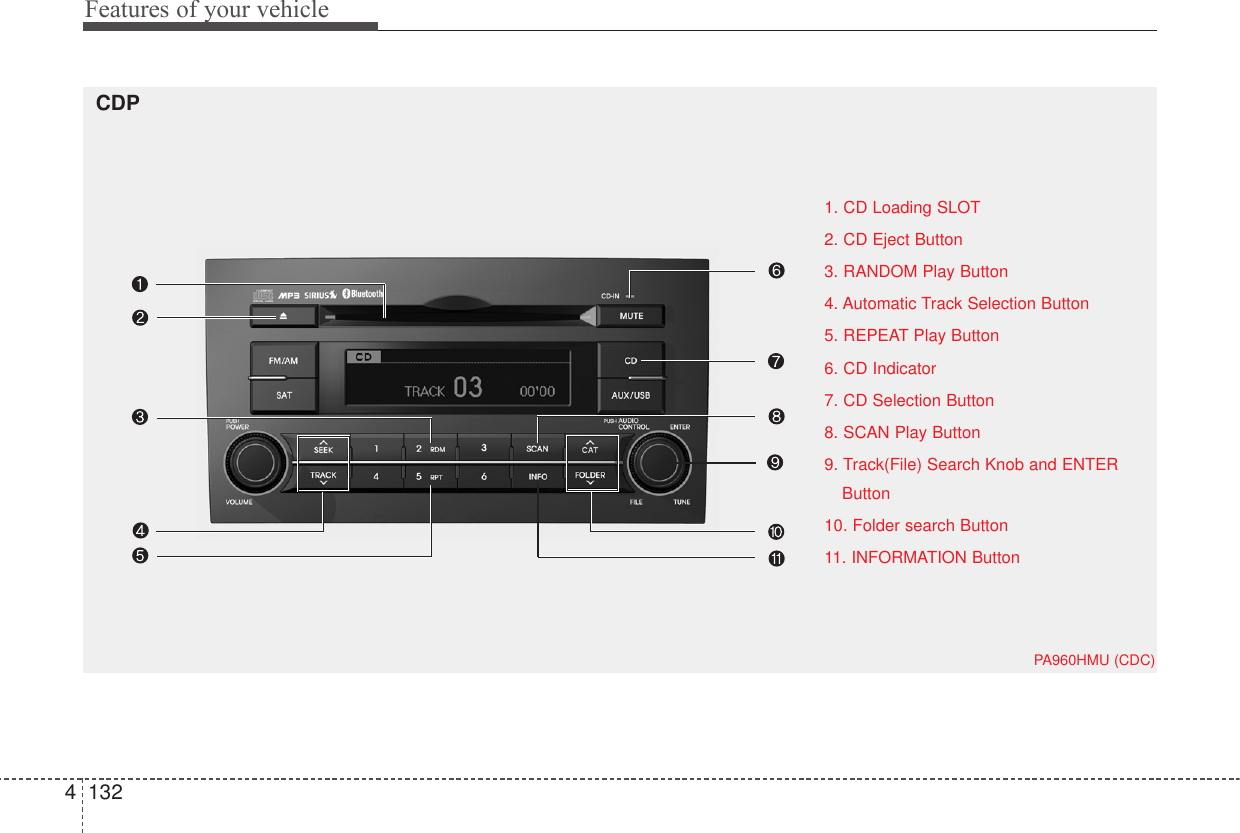
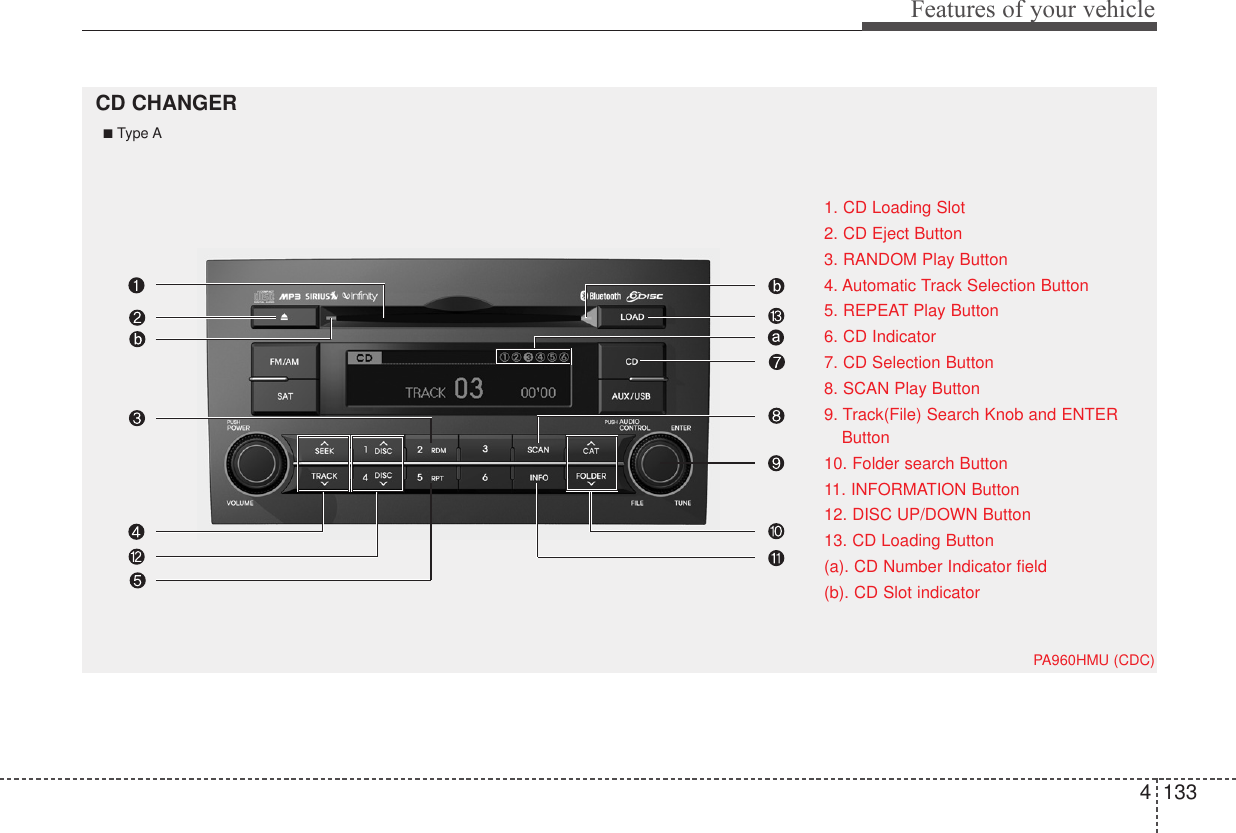
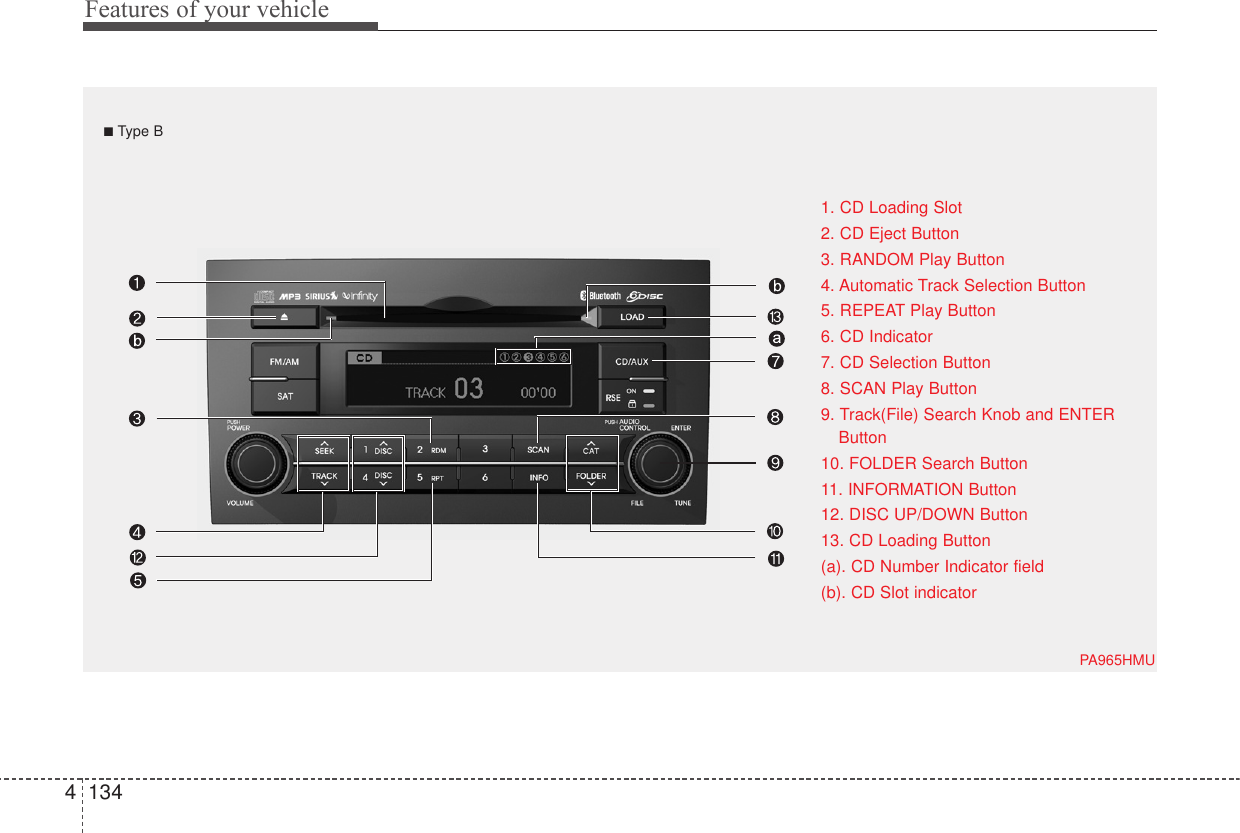
![4 135Features of your vehicleHow to Activate CDP/CD CHANGER1. CD Loading Slot• Please place the CD with the printedside upward, and then gently push in. • CDP models support both 8cm and 12cm CDs.• CDC models support only 12 cm CD.• If VCD, Data CD, DVD are loaded,"MEDIA ERROR" message will appearand the CD will eject. 2. CD Eject Button• Press this button to eject the CD duringCD playback.• If there is no CD in the deck, "NODISC" will be displayed for 5 secondsand returns to the previous mode.❈ ALL EJECT(CDC ONLY)Press this button for more than 0.8second to eject all discs inside thedecks in the respective order.3. RANDOM Play ButtonPress this button for less than 0.8 secondto activate 'RDM' mode and more than0.8 second to activate 'ALL RDM' mode.• RDM : Only files/tracks in a folder/discare played in random sequence.• ALL RDM (MP3/WMA Only) : All files/tracks in a folder/disc are played inrandom sequence.4. Automatic Track Selection Button• Press [TRACK ] to return to thebeginning of the current track(file).Press again within 1 seconds to returnto the previous track(file).• Press and hold [TRACK ] to initiaterewind search.• Press [SEEK ] for less than 0.8 sec-ond to advance the next track(file).• Press and hold [SEEK ] to initiatefast forward search.CAUTION Don’t insert a CD, if CD indicator isilluminated in the CDP.](https://usermanual.wiki/HYUNDAI-MOBIS/PA960HMLSDB/User-Guide-1113458-Page-15.png)
![Features of your vehicle13645. REPEAT Play ButtonPress this button for less than 0.8 secondto activate 'RPT' mode and more than 0.8second to activate 'FLD RPT' mode.• RPT : Only a track(file) is playedrepeatedly.• FLD RPT(MP3/WMA Only) : Only filesin a folder are played repeatedly.6. CD Indicator(CDP ONLY)When the ignition switch is in the ACC orON position and if the CD is loaded, thisindicator is illuminated.7. CD Selection Button• If the CD is loaded, turns to CD mode.• If there is no Disc in the deck, it dis-plays "NO DISC" for 5 seconds andreturns to the previous mode. 8. SCAN Selection ButtonPlays back the first 10 seconds of eachsong in the CD. 9. Track(File) Search Knob andENTER Button• Turn this knob clockwise to display theTrack NO(File name) after the currentsong.• Turn this button counterclockwise todisplay the Track NO(File Name)before the current song.• To select the displayed song, press thebutton.10. FOLDER Search Button • Folder name/File name(the first song inthe folder) is moved up or down fromthe currently playing folder. • To select the displayed folder, pressENTER(NO.10) button.11. INFORMATION ButtonDisplays the information of the currentCD TRACK(FILE) as below when the but-ton is pressed each time. • CDDA : Disc Title➟Disc Artist➟Track Title➟Track Artist➟Total Track... (not displayed ifthe information is not available on the DISC)• MP3/WMA : File Name➟Title➟Artist➟Album➟Folder Name➟Total File...12. DISC UP/DOWN Button(CDC ONLY)Disc is moved up or down from the cur-rently playing disc. 13. CD Loading Button(CDC ONLY)How to load a CD• Press [LOAD] for less than 0.8 second.• An empty slot is selected and the CDnumber indicator(a) blinks on the LCD. • After "WAIT" is displayed for a moment,"INSERT DISC(1~6)" is diplayed andthe CD slot indicator(b) blinks.• Insert a CD while the slot indicatorblinks.How to load CDs(ALL Load)• Press [LOAD] for more than 0.8 sec-ond.• An empty slot is selected and the CDnumber indicator(a) blinks on the LCD. CAUTION • Insert a CD only while "InsertDisc(1~6)" is displayed and theslot indicator blinks.• Don't insert two CDs for one oper-ation.](https://usermanual.wiki/HYUNDAI-MOBIS/PA960HMLSDB/User-Guide-1113458-Page-16.png)
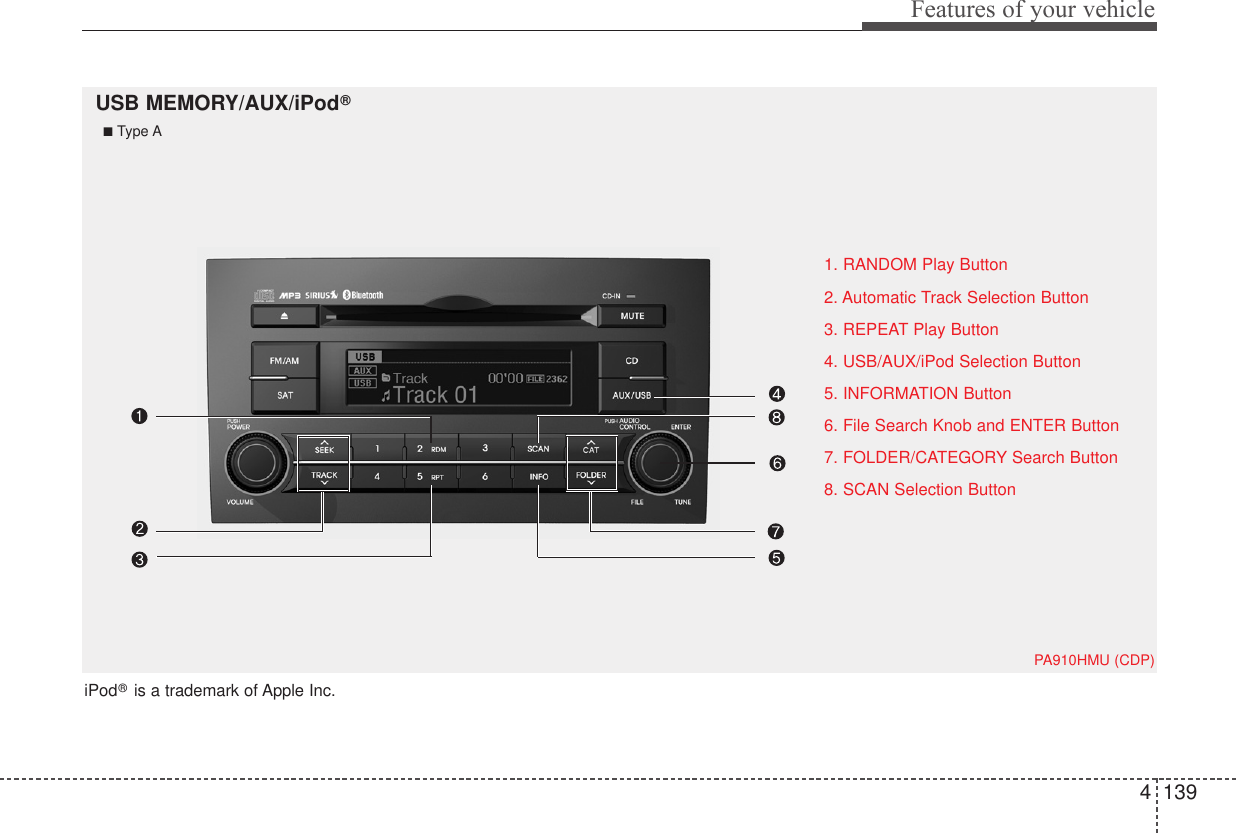
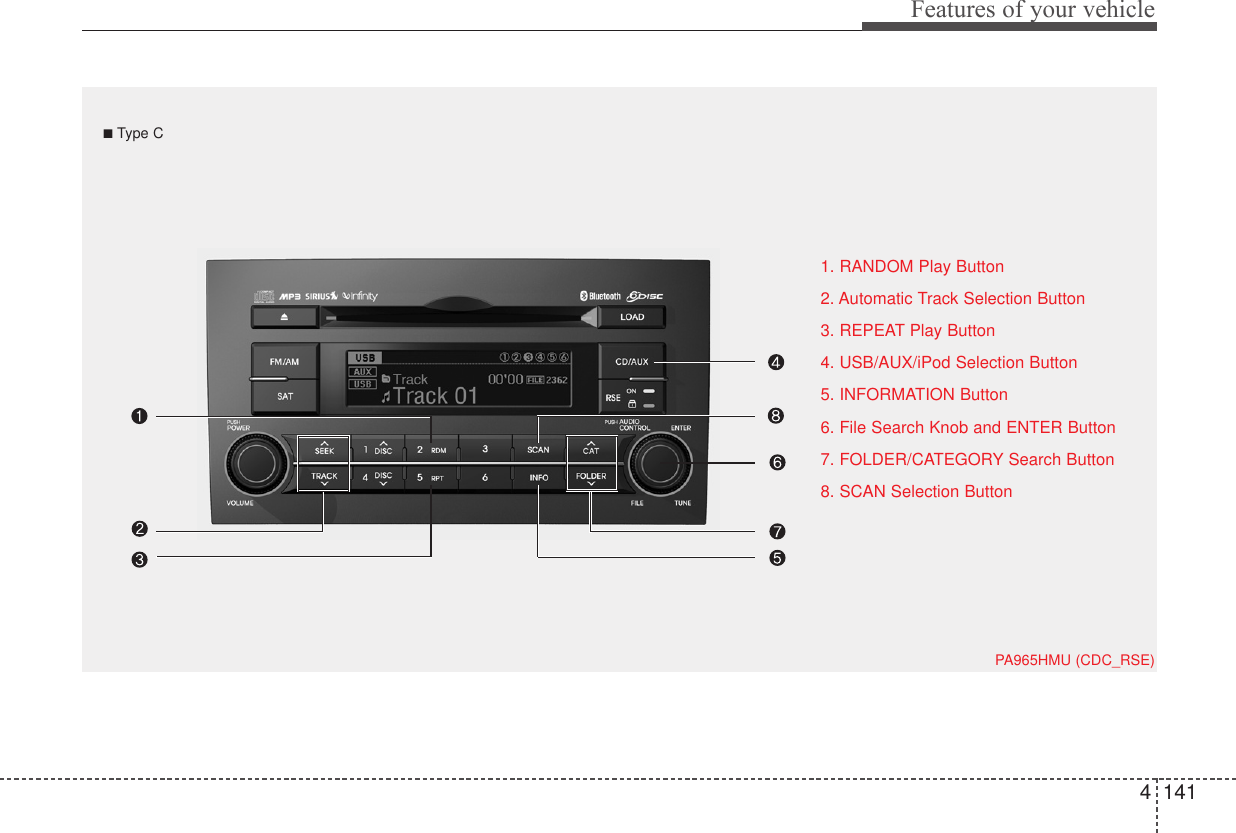
![Features of your vehicle1424How to Activate USB MEMORY1. RANDOM Play ButtonPress this button for less than 0.8 secondto activate 'RDM' mode and more than0.8 second to activate 'ALL RDM' mode.• RDM : Only files in a folder are playedback in random sequence. • ALL RDM : All files in a USB memory areplayed back in random sequence.2. Automatic Track Selection Button• Press [TRACK ] to return to thebeginning of the current file. Press again within 1 second to returnthe previous file.• Press and hold [TRACK ] to initiaterewind search.• Press [SEEK ] for less than 0.8 sec-ond to advance the next file.• Press and hold [SEEK ] to initiatefast forward search.3. REPEAT Play ButtonPress this button for less than 0.8 secondto activate 'RPT' mode and more than0.8 second to activate 'FLD RPT' mode.• RPT : Only a file is played repeatedly.• FLD RPT : Only files in a folder areplayed repeatedly.4. USB/AUX Selection Button• If auxiliary device/USB/ is connected, itturns to USB/AUX mode and togglesas below when the button is pressedeach time.AUX/USB : AUX➟USB➟AUX.......• If no auxiliary device and USB is con-nected, it displays "No Media" for 5seconds and returns to the previousmode.5. INFORMATION ButtonDisplays the information of the currentCD TRACK(FILE) as below when thebutton is pressed each time. File Name➟Title➟Artist➟Album➟Folder Name➟Total File...(not dis-played if the file has no song)6. File Search Knob and ENTERButton• Turn this knob clockwise to display Filename after the current song. • Turn this knob counterclockwise to dis-play File Name before the currentsong.• To select the displayed song, press thebutton.7. FOLDER Search Button • Folder name/File name(the first songin the folder) is moved up or down fromcurrently playing folder. • To select the displayed folder, pressENTER(NO.6) button.9. SCAN Play Button Plays back the first 10 seconds of eachsong in the USB memory.](https://usermanual.wiki/HYUNDAI-MOBIS/PA960HMLSDB/User-Guide-1113458-Page-22.png)
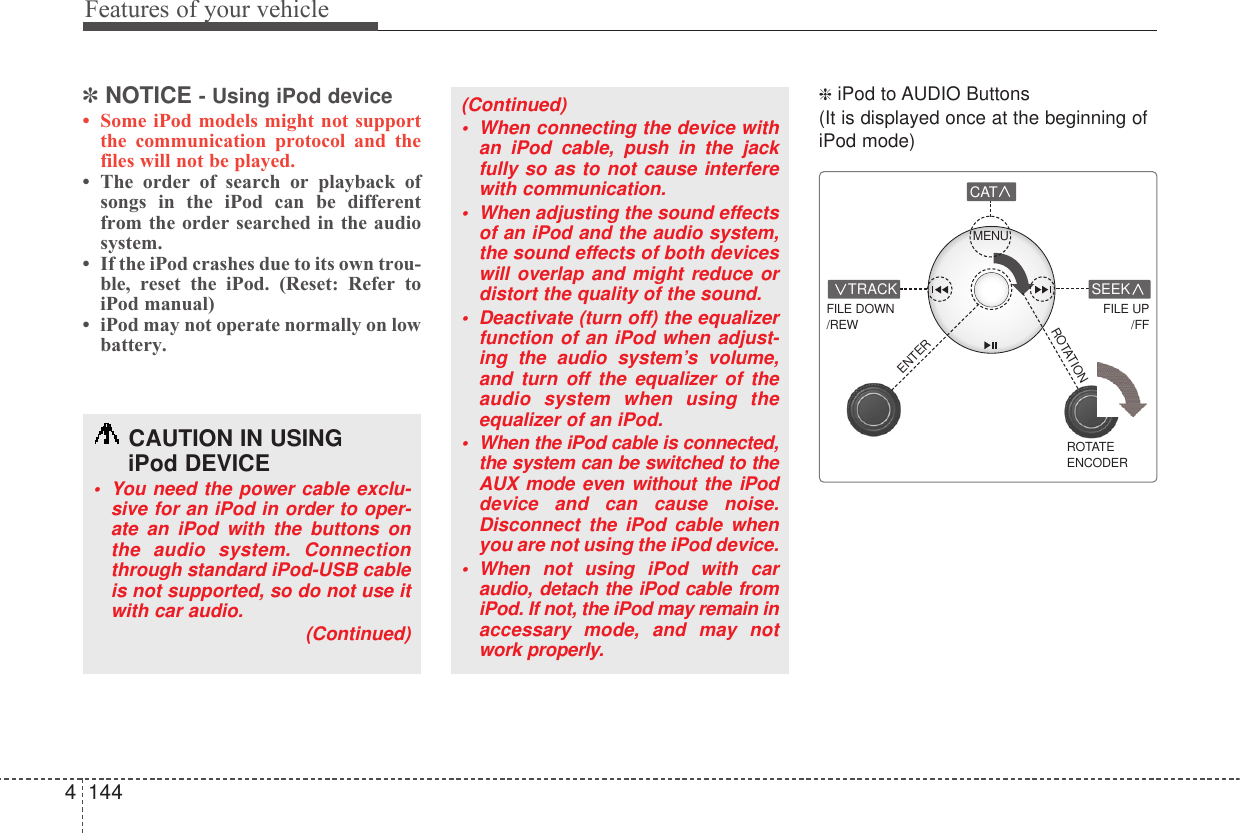
![4 143Features of your vehicleHierarchy 1 Hierarchy 2 Hierarchy 3 Hierarchy 4 Hierarchy 5Playlist Playlists Songs - -Artist Artists Albums Songs -Album Albums Songs - -Song Songs - - -Genre Genres Artists Albums SongsComposer Composers Albums Songs -How to Activate iPod Device1. RANDOM Play ButtonPress this button for less than 0.8 secondto activate ' ' mode and more than 0.8second to activate ''mode.•'': All songs in the current categoryare played in random.•'': An album in the iPod is selectedin random and is played in the order ofthe songs in the album.2. Automatic Track Selection Button• Press [TRACK ] to return to thebeginning of the current file.Press again within 1 second to returnthe previous file.• Press and hold [TRACK ] to initiaterewind search.• Press [SEEK ] for less than 0.8 sec-ond to advance to the next file.• Press and hold [SEEK ] to initiatefast forward search.3. REPEAT Play ButtonA single song is played repeatedly.4. iPod Selection Button If iPod is connected, it turns to iPod mode.5. INFORMATION ButtonDisplays the information of the file cur-rently played as below when the button ispressed each time. Title➟Artist➟Album...■Searching for a desired Song/TitleUsing search mode's individual hierar-chy, you can narrow down your searchas shown in the table below.❈ For example : Searching byComposers• Press [FOLDER ] or turn [ENTER]to activate the Menu Select mode.• Turn [ENTER] to select the Compo-sers, and press ENTER.• Turn [ENTER] to select the Albums,and press ENTER.• Turn [ENTER] to select the Song, andpress ENTER. The selected song isplayed.- In the search mode, pressing[FOLDER ] will return to the previ-ous mode.- Other search modes scan be adjustedas above. Although, the hierarchy dif-fers.](https://usermanual.wiki/HYUNDAI-MOBIS/PA960HMLSDB/User-Guide-1113458-Page-23.png)
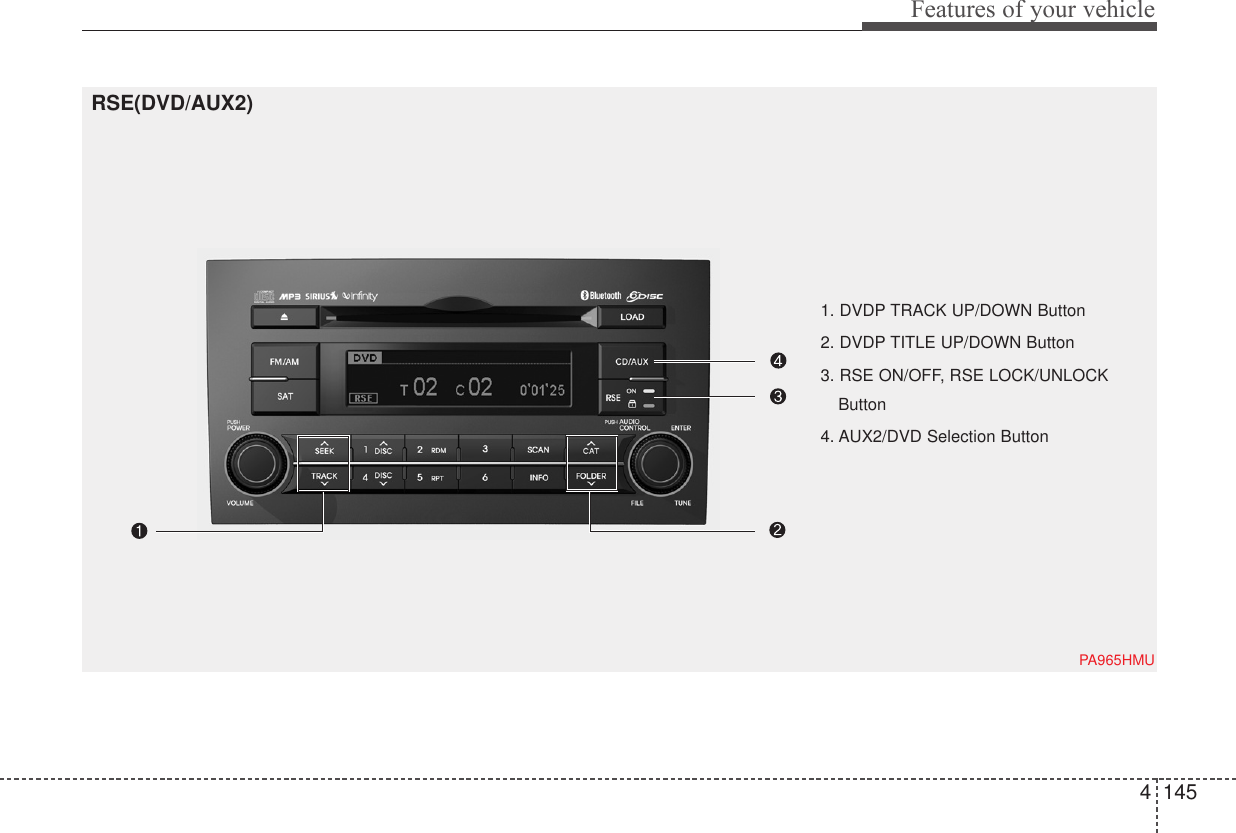
![Features of your vehicle1464Using the Rear SeatEntertainment (RSE)1. DVD Chapter Selection Button• Press [TRACK ] button to play fromthe beginning of current track.• Press [TRACK ] button again within3 seconds to play the previous track.• Press [SEEK ] button for less than0.8 second to play the next track.2.DVD Title Selection Button• Press [FOLDER ] button to play theprevious track.• Press [CAT ] button to play the nexttrack.3. RSE ON/OFF, LOCK/UNLOCKButtonWhen the RSE ON/OFF, LOCK/UNLOCKbutton is pushed for less than 0.8 sec-ond, the red color LED of the button willlight and RSE unit will be locked. If youpush button for more than 0.8 second,the green color LED of the button willlight and RSE unit will turn on and [RSE]will appear on the LCD.4. DVD/AUX2 Selection ButtonIn the event there is a DVD inserted andan auxiliary device is connected to theRSE system, pressing the DVD/AUX2button will switch between DVD andAUX2 modes.](https://usermanual.wiki/HYUNDAI-MOBIS/PA960HMLSDB/User-Guide-1113458-Page-26.png)
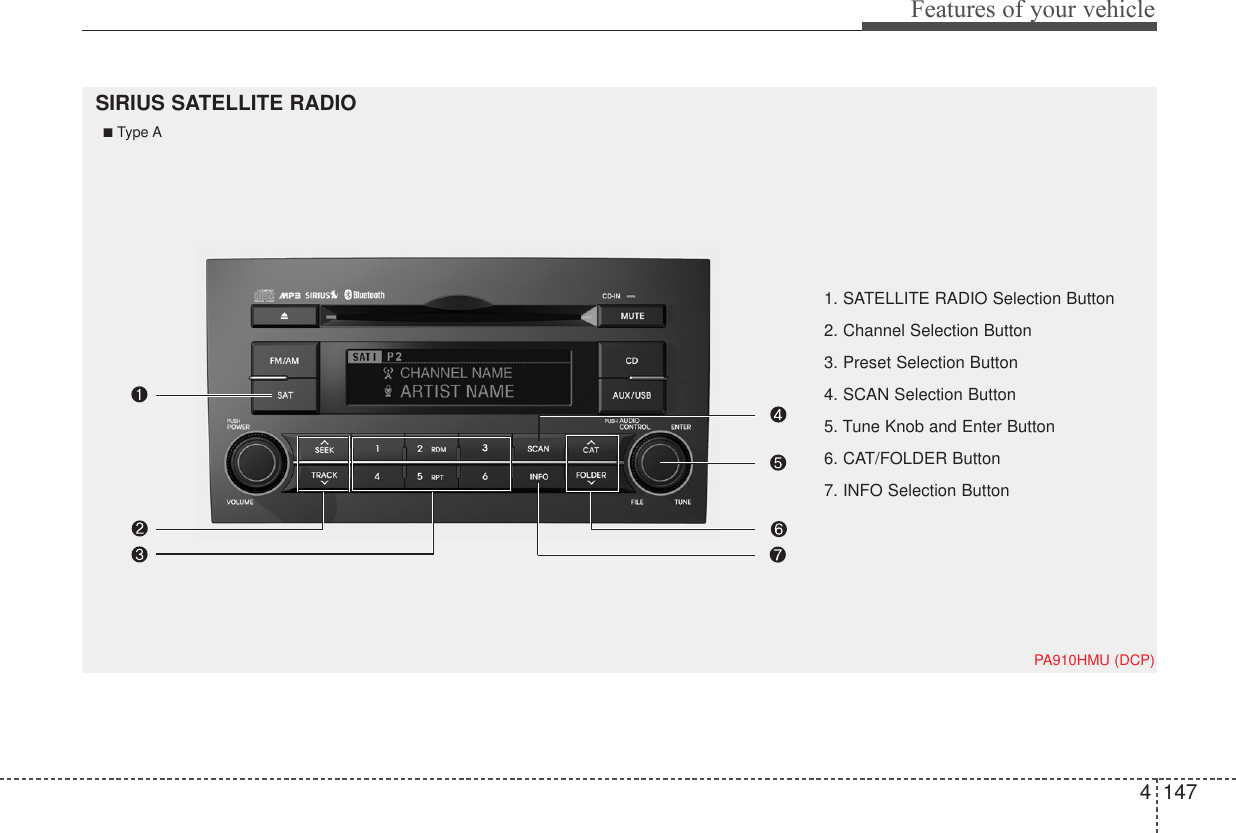
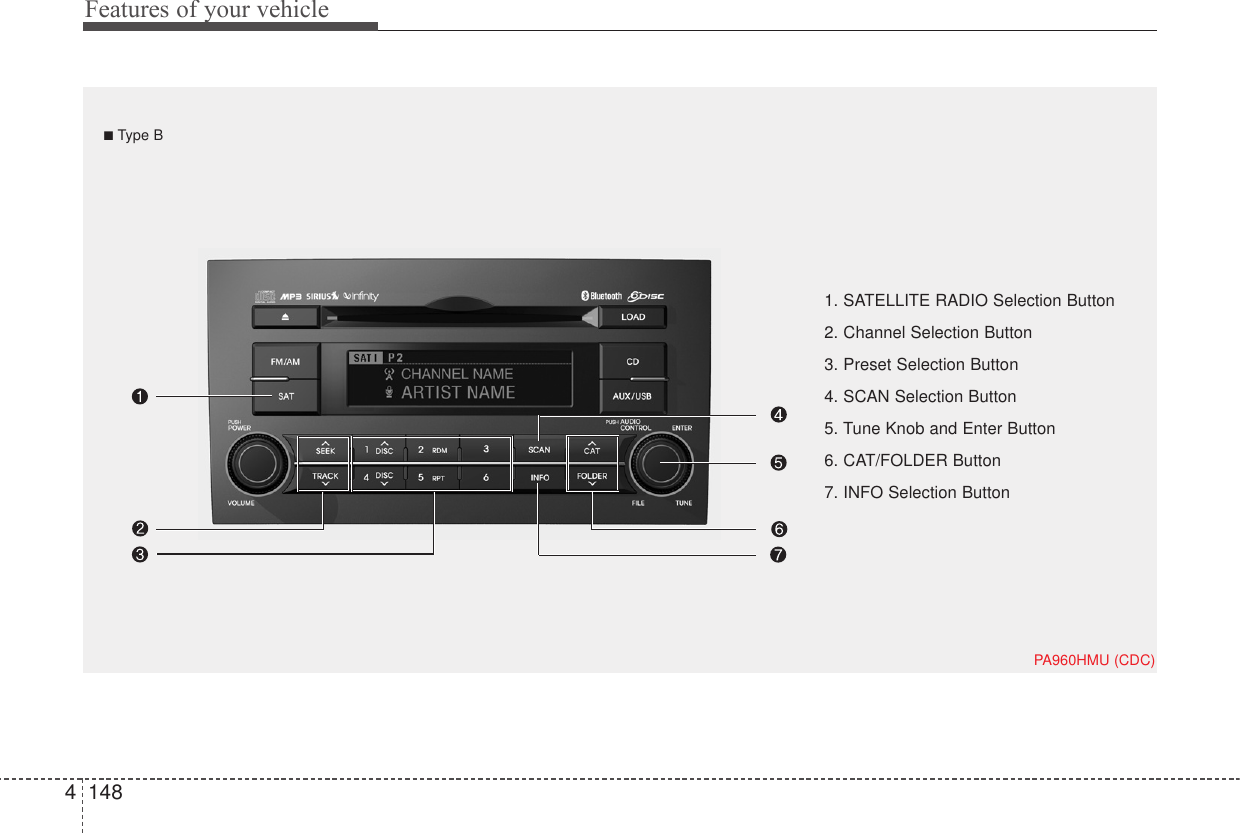
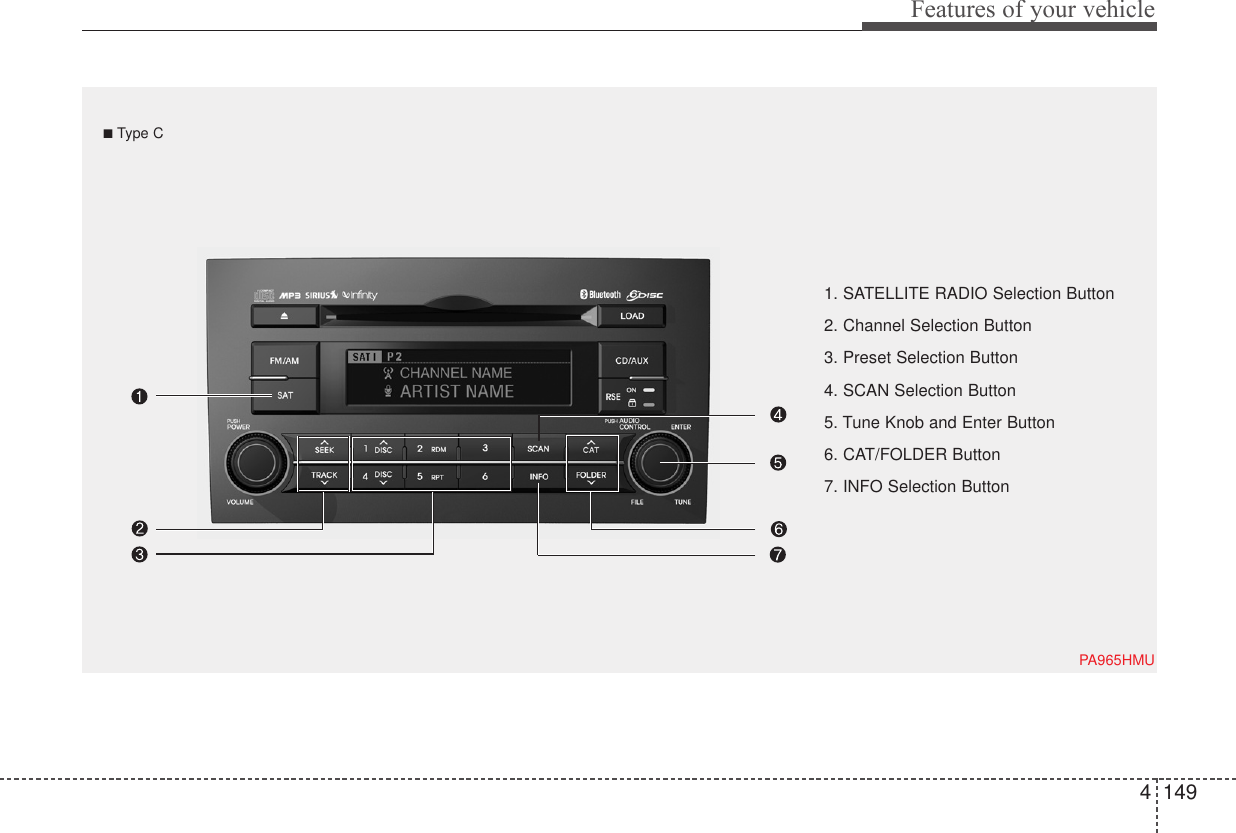
![Features of your vehicle1504How to Use SIRIUS SatelliteRadioYour Kia vehicle is equipped with 3months complimentary period of SIRIUSSatellite Radio so you have access toover 130 channels of music, information,and entertainment programming.ActivationIn order to extend or reactivate your sub-scription to SIRIUS Satellite Radio, youwill need to contact SIRIUS CustomerCare at 888-539-7474. Have your 12digit SID (Sirius IdentificationNumber)/ESN (Electronic SerialNumber) ready. To retrieve the SID/ESN,turn on the radio, press the [SAT] button,and tune to channel zero. Please notethat the vehicle will need to be turned on,in Sirius mode, and have an unobstruct-ed view of the sky in order for the radio toreceive the activation signal.1. SATELLITE RADIO SelectionButton(SIRIUS Satellite Radio)Press the [SAT] button to switch to SIR-IUS Satellite Radio. It cycles through thedifferent bands as noted below.SAT1➟SAT2➟SAT3➟SAT1➟...2. Channel Selection Button• Press [TRACK ] or [SEEK ] but-ton for less than 0.8 second to selectprevious or next channel.• Press [TRACK ] or [SEEK ] but-ton for 0.8 second or longer to continu-ously move to previous or next chan-nel.• if "CATEGORY" Icon is displayed atthe top of the screen, channel up/downis done through the channels withincurrent category.3. Preset Selection Button• Press [1]~[6] buttons less than 0.8 sec-ond to play the channel saved in eachbutton.• Press [1]~[6] button for 0.8 second orlonger to save current channel to therespective button with a beep.4. SCAN Selection Button • When the [SCAN] button is pressed, itautomatically scans the radio stationsupwards.• The SCAN feature steps through everychannel, starting from the initial chan-nel, for ten seconds.• Press the [SCAN] button again to stopthe scan feature and to listen to thecurrently selected channel.• if "CATEGORY" Icon is displayed atthe top of the screen, channel chang-ing is done through the channels with-in current category.5. Tune Knob and Enter Button• Rotate clockwise to increase the chan-nel number or to scroll down the cate-gory list.• Rotate counterclockwise to decreasethe channel number or to scroll up thecategory list.• Press this button to make selection ofchannels or items.](https://usermanual.wiki/HYUNDAI-MOBIS/PA960HMLSDB/User-Guide-1113458-Page-30.png)
![4 151Features of your vehicle6. CAT/FOLDER Button• Press [CAT ] or [FOLDER ] but-ton to enter the Category List Mode.The display will indicate the categoryitems, highlight the category that thecurrent channel belongs to.• In the Category List Mode, press thesebuttons to navigate category list.• Press [ENTER] Button to select thelowest channel in highlighted category.• If channel is selected by selecting cat-egory "CATEGORY" Icon is displayedat the top of the screen.7. INFO Selection ButtonDisplays the information of the currentchannel as below when the button ispressed each time.• When default display is CAT/CHCategory/Channel➟Artist/Title➟Composer (if available)➟ Category/Channel ➟...• When default display is ART/TITLEArtist/Title➟Category/Channel➟Composer(if available)➟Artist/Title➟...✽Troubleshooting1. Antenna ErrorIf this message is displayed, the anten-na or antenna cable is broken orunplugged. Please consult with yourKia dealership. 2. Acquiring SignalIf this message is displayed, it meansthat the antenna is covered and thatthe SIRIUS Satellite Radio signal isnot available. Ensure the antenna isuncovered and has a clear view of thesky.](https://usermanual.wiki/HYUNDAI-MOBIS/PA960HMLSDB/User-Guide-1113458-Page-31.png)
![Features of your vehicle1544• Changing PriorityThe connection priority for registeredphones can be changed.1. Press the button. 2. Say "Set Up".3. Say "Change Priority".4. Say the name of the contact or thenumber of the contact.5. Say "Yes".•Turning Bluetooth on / offBluetooth function can be switched ON/OFF. initial status : Bluetooth ON1. Press the button. 2. Say "Set Up".3. Say "Bluetooth off".4. Say "Yes".• Turning Bluetooth on1. Press the send or button.2. Say "yes".3. The Bluetooth will be turned on.■ Phone Book• Adding EntryPhone numbers and voice tags can beregistered. Entries registered in the phonecan also be transferred.• Adding Entry by Voice1. Press the button.2. Say "phonebook".3. Say "add entry".4. Say "by voice".5. Say the name of the contact.6. Say "yes".7. Say the phone number.8. Say "store".9. Say "Home", "Office", "Mobile", "Other"or "default".10. Say "Yes" to store an additional loca-tion for this contact.• Adding Entry by phone1. Press the button.2. Say "phonebook".3. Say "add entry".4. Say "by phone".5. Say "yes".6. Transfer procedures may vary depend-ing on the cellular phone.✽NOTICEThe system can recognize single digitsfrom zero to nine. Numbers that are tenor greater are not recognized.To speed up input, it is a good idea togroup all digits into a continuous string. However, you can enter each digit indi-vidually or group digits together in pre-ferred string lengths.The display corresponding to each oper-ation appears on the screen as follows:Input operation1. say: "Nine, nine, five"Display: "995"2. say: "Seven, three, four"Display: "995734"• Changing NameThe registered names can be changed.1. Press the button.2. Say "phonebook".3. Say "Change name".4. Say the name of the phonebook [voicetag].5. Say "yes".6. Say the name of the phonebook to bechanged.](https://usermanual.wiki/HYUNDAI-MOBIS/PA960HMLSDB/User-Guide-1113458-Page-34.png)
![4 157Features of your vehicle■ Key matrixNo.ClassPaired H/PEmpty Disconnected1SHORTLONGSHORTSHORTLONG[10sec]LONG[10sec]Normal modeBT SETUP menuIncoming Call Outgoing Call Active Call 2nd CallNot Paired Not Connecting --Accept CallConnected-2nd call1st Call:waiting2nd Call:active2nd Call2nd Call:waiting1st Call:activeKEY------Transfer call:secret callEnd CallVR MODE CancelVR MODE CancelVR MODE CancelVR MODE Cancel Reject Call End Call End Call-ActiveChangelanguage-ActiveSpeakerAdaptation(Only English)ChangelanguageActiveChangelanguageActive-SpeakerAdaptation(Only English)Changelanguage-----------23](https://usermanual.wiki/HYUNDAI-MOBIS/PA960HMLSDB/User-Guide-1113458-Page-37.png)