Innovative Technology Electronics VM100B ACRYLIC TURNTABLE W/TRUE WIRELESS 40W FLOATING SPEAKERS User Manual 1

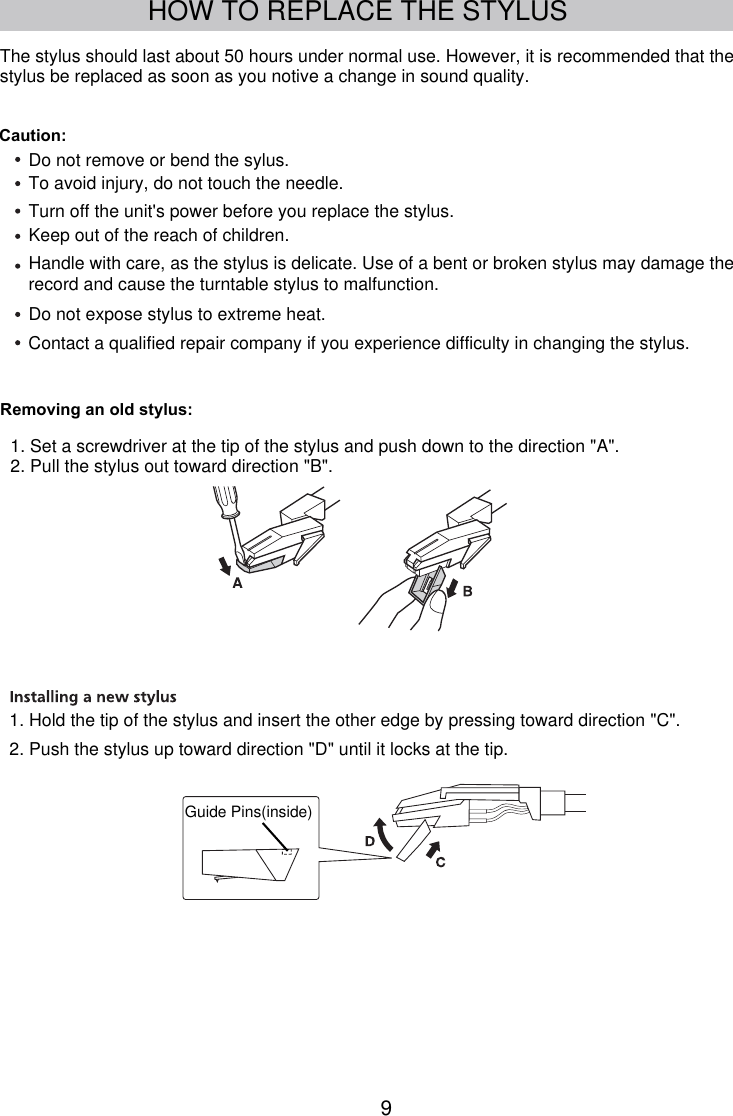
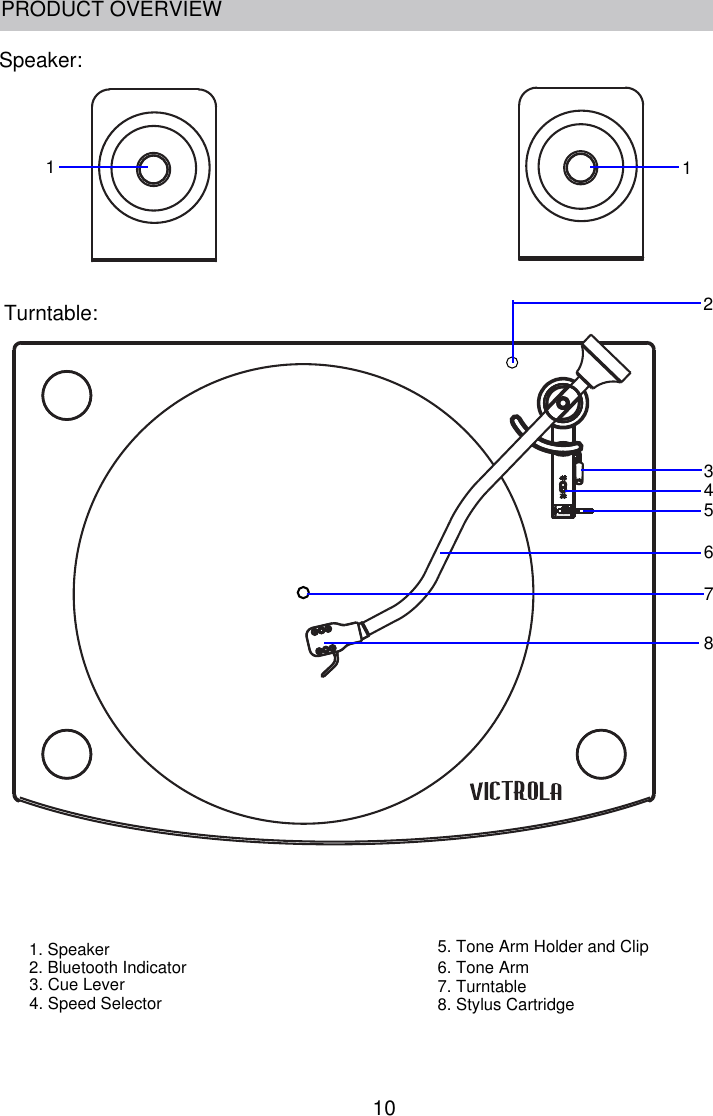
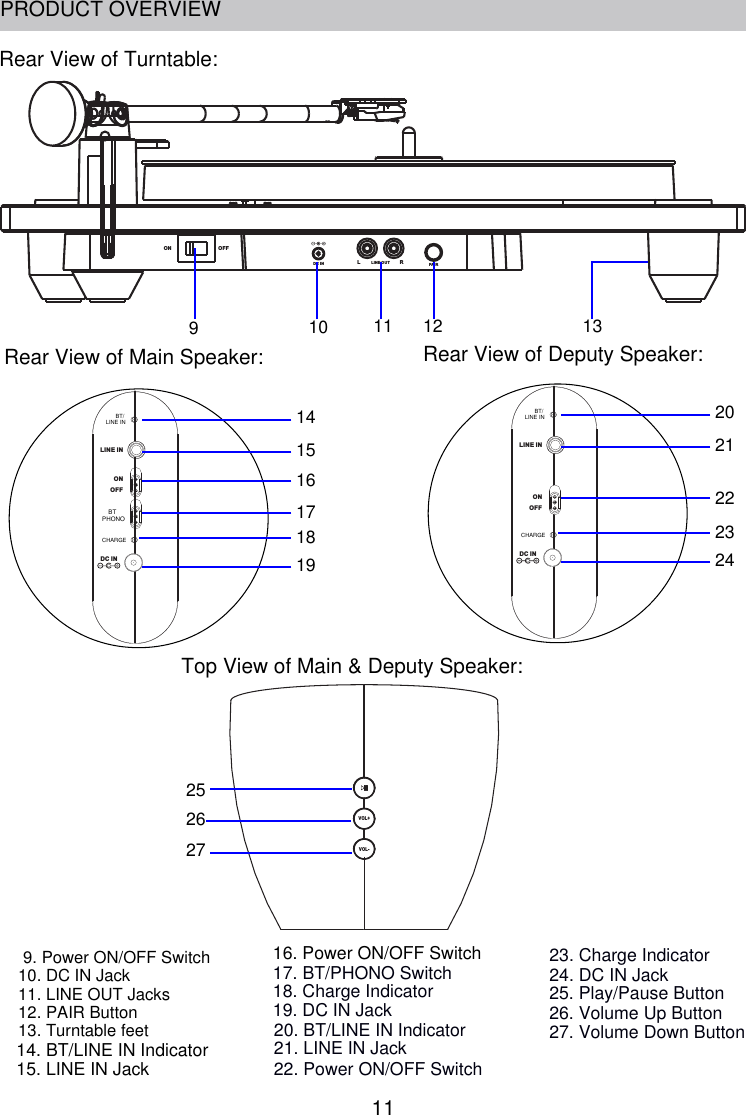
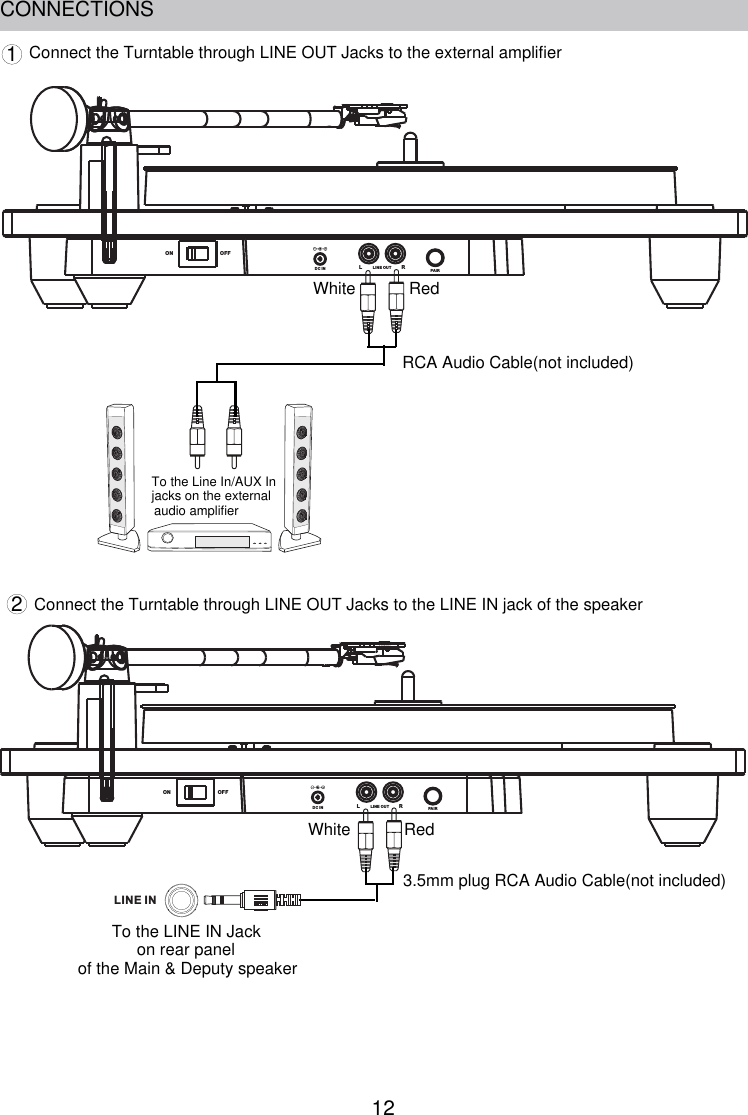
INNOVATIVE TECHNOLOGY ELECTRONICS LLC ACRYLIC TURNTABLE W/TRUE WIRELESS 40W FLOATING SPEAKERS 1

Users Manual

MODEL:VM-100BACRILIC TURNTABLE  WITH WIRELESS SPEAKERSPLEASE READ CAREFULLY BEFORE OPERATING THIS EQUIPMENTKEEP IT IN A SAFE PLACE FOR FUTURE REFERENCE
2DANGEROUS VOLTAGE: The lighting flash with arrowhead symbolwithin an equilateral triangle is intended to alert the user to thepresence of uninsulated “dangerous voltage” within the product’senclosure that may be of sufficient magnitude to constitute a risk of electric shockto persons.ATTENTION:The exclamation pointwithinan equilateral triangle is intendedto alert theuserto the presenceof important operating and maintenance(servicing) instructions in the literature accompanying the appliance.WARNING:TO PREVENT FIRE OR SHOCK HAZARD, DO NOT EXPOSETHIS UNIT TO RAIN OR MOISTURE.WARNING: USE UNDER SUPERVISION OF AN ADULT DUE TO LONGCORD This unit has a long cord that can be easily tripped on or pulled on,causing injury.Please make sure it is arranged so that it will not drape over atabletop, etc. Where it can be pulled on by children or tripped over accidentally.CAUTION: TO REDUCE THE ELECTRIC SHOCK, DO NOT REMOVE THECOVER (OR BACK). NO USER SERVICEABLE PART INSIDE, REFERSERVICING TOQUALIFIED SERVICE PERSONNEL.RISK OF ELECTRIC SHOCKO NOT OPENCAUTIONDFCC NOTICE:This equipment has been tested and found to comply with the limits for a ClassB digital device, pursuant to Part 15 of the FCC Rules. These limits aredesigned to provide reasonable protection against harmful interference in aresidential installation. This equipment generates, uses and can radiate radiofrequency energy and, if not installed and used in accordance with theinstructions, may cause harmful interference to radio communications.However, there is no guarantee that interference will not occur in a particularinstallation. If this equipment does cause harmful interference to radio ortelevision reception, which can be determined by turning the equipment off andon, the user is encouraged to try to correct the interference by one or more ofthe following measures:Reorient or relocate the receiving antenna.Increase the separation between the equipment and receiver.Connect the equipment into an outlet on a circuit different from that towhich the receiver is connected.Consult the dealer or an experienced radio/TV technician for help.
3Before using the unit, be sure to read all operating instruction carefully, pleasenote that these are general precautions and may not pertain to your unit. Forexample, this unit may not have the capability to be connected to an outdoorantenna.(1) Read these instructionsAll the safety and operating instructions should be read before theappliance is operated.(2) Keep these instructionsThe safety and operating instructions should be kept for future reference.(3) Heed all warningsAll warnings on the appliance and in the operating instructions should beadhered to.(4) Follow all instructionsAll operation and use instructions should be followed.(5) Do not use this apparatus near waterThe appliance should not be used near water; for example, near a bathtub, washbowl, kitchen sink, laundry tub, in a wet basement, or near aswimming pool.FCC STATEMENT:This device complies with part 15 of the FCC Rules. Operation is subject to thefollowing two conditions:(1) This device may not cause harmful interference, and(2) This device must accept any interference received, including interferencethat maycause undesired operation.FCC Radiation Exposure Statement:  This equipment complies with FCC radiation exposure limits set forth for an uncontrolled environment .This transmitter must not be co-located or operating in conjunction with any other antenna or transmitter.ISEDC Radiation Exposure Statement:This equipment complies with ISEDC RF radiation exposure limits set forth for an uncontrolled environment. This transmitter must not be co-located or operating in conjunction with any other antenna or transmitter.Cet appareil estconforme aux limitesd'exposition de rayonnement RF ISEDC établiespour un environnement non contrôlé.  Cetémetteur ne doit pas être co-implanté oufonctionner en conjonction avec toute autreantenne ou transmetteur This device complies with ISEDC licence-exempt RSS standard(s). Operation is subjectto the following two conditions:(1) this device may not cause interference, and(2) this device must accept any interference, including interference that may causeof the device. undesired operationFCC WARNING:To assure continued operation, follow the attached installation instructions anduse only shield cables when connecting to other devices. Changes ormodifications not expressly approved by the party responsible for compliancecould void the user's authority to operate the equipment .
4(6) Clean only with dry clothThe appliance should be cleaned only as recommended by themanufacturer.(7) Do not block any ventilation openings.Install in accordance with themanufacturer’s instructions.Slots and openings in the cabinet and in the back or bottom are providedfor ventilation, to ensure reliable operation of the product and to protect itfrom overheating. These openings must not be blocked or covered. Theopenings should never be blocked by placing the product on a bed, sofa,rug, or similar surface. This product should never be placed near or over aradiator or heat source. This product should not be placed in a built-ininstallation, such as a bookcase or rack unless proper ventilation isprovided or the manufacturer’s instructions have been adhered to.(8) Do not install near any heat sources such as radiators, heat registers,stoves, or other apparatus (including amplifiers) that produce heat.(9) Do not defeat the safety purpose of the polarized or grounding-typeplug. A polarized plug has two blades with one wider than the other.A grounding type plug has two blades and a third grounding prong.The wide or the third prong is provided for your safety. If theprovided plug does not fit into your outlet, consult an electrician forreplacement of the obsolete outlet.(10) Prod ct the power cord from being walked on or pinched particularlyat plugs, convenience receptacles, and the point where they exitfrom the apparatus.(11) Only use attachments / accessories specified by the manufacturer.(12) Use only with a cart, stand, tripod, bracket, or tablspecified by the manufacturer, or sold with thapparatus. When a cart is used, use caution wheneemoving the cart/apparatus combination to avoid injury from tip-over.An appliance and cart combination should be moved with care. Quick stop,excessive force and uneven surfaces may cause the appliance and cartcombination to overturn.(13) Unplug this apparatus during lightning storms or when unused forlong periods of time.To protect your product from a lightning storm, or when it is left unattendedand unused for long periods of time, unplug it from the wall outlet anddisconnect the antenna or cable system. This will prevent damage to theproduct due to lightning and power-line surges.(14) Refer all servicing to qualified service personnel. Servicing isrequired when the apparatus has been damaged in any way, such aspower-supply cord or plug is damaged, liquid has been spilled orobjects have fallen into the apparatus, the apparatus has beenexposed to rain or moisture, does not operate normally, or has beendropped.te
5(15) Power sourceThis product should be operated only from the type of power sourceindicated on the marking label. If you are not sure of the type of powersupply to your home, consult your appliance dealer or local powercompany. For products intended to operate from battery power, or othersource, refer to the operation instructions.(16) Power linesAn outside antenna system should not be located in the vicinity ofoverhead power lines or other electric light or power circuits, or where itcan fall into such power lines or circuits. When installing an outsideantenna system, extreme care should be taken to keep from touchingsuch power lines or circuits as contact with them might be fatal.(17) OverloadingDo not overload wall outlets and extension cords as this can result in arisk of fire or electric shock.(18) Object and liquid entryNever push objects of any kind into the product through openings as theymay touch dangerous voltage points or short out parts that could result infire or electric shock. Never spill or spray any type of liquid on the product.(19) Outdoor antenna groundingIf an outside antenna is connected to the product, be sure the antennasystem is grounded so as to provide some protection against voltagesurges and built up static charges. Section 810 of the National ElectricCode ANSI/ NFPA 70 provides information with respect to propergrounding of the mast and supporting structure, grounding of the lead- inwire to an antenna discharge product, size of grounding conductors,location of antenna- discharge product, connection to groundingelectrodes and requirements for the grounding electrodes.(20) ServiceDo not attempt to service this product yourself as opening or removingcovers may expose you to dangerous voltage or other hazards. Refer allservicing to qualified service personnel.
6(21) Replacement partsWhen replacement parts are required, be sure the service technician usesreplacement parts specified by the manufacturer or those that have thesame characteristics as the original parts. Unauthorized substitutions mayresult in fire or electric shock or other hazards.(22) Safety checkUpon completion of any service or repairs to this product, ask the servicetechnician to perform safety checks to determine that the product is inproper operating condition.(23) Wall or ceiling mountingThe product should be mounted to a wall or ceiling only as recommendedby the manufacturer.(24) Damage requiring serviceUnplug this product from the wall outlet and refer service to qualifiedservice personnel under the following conditions.a) When the power- supply cord or plug is damaged.b) If liquid has been spilled or objects have fallen into the product.c) If the product has been exposed to rain or water.d) If the product does not operate normally by following the operatinginstructions. Adjust only those controls that are covered by theoperating instructions, as an adjustment of other controls may result indamage and will require extensive work by a qualified technician torestore the product to its normal operation.e) If the product has been dropped or the cabinet has been damaged.f ) When the product exhibits a distinct change in performance- thisindicates a need for service.(25) Note to CATV system installerThis reminder is provided to call the CATV system installer' s attention toArticle 820- 40 of the NEC that provides guidelines for proper groundingand, in particular, specifies that the cable ground shall be connected to thegrounding system of the building, as close to the point of cable entry aspractical.NOTE: Refer all servicing to qualified service personnel. Servicing isrequired when the unit has been damaged in any way such as thefollowing: the power-supply cord or plug has been damaged, liquid hasbeen spilled into unit, the unit has been exposed to rain or moisture, theunit has been dropped or the unit does not operate normally.
7BEFORE USING THE UNITAs the unit may become warm during operation, always leaveThe voltage supplied to the unit should match the voltage as printed on  the  rear panel. If you  are  in any  doubt  regarding this matter, consult an electrician.Choose  the  installation  location  of  your  unit  carefully.  Avoid placing it in direct sunlight or close to a source of heat. Also avoid locations subject to vibrations and excessive dust, heat,cold or moisture.Do not place the unit on an amplifier/receiver.Do not open the cabinet as this might result in damage to the circuitry or electrical shock. If a foreign object should get into the unit, contact your dealer or service company.When removing the power plug from the wall outlet, alwaysTo  keep  the  laser  pickup  clean,  do  not  touch  it,  and  always close the disc tray.Do not attempt to clean the unit with chemical solvents  asKeep this manual in a safe place for future reference.DO NOT MOVE THE UNIT DURING PLAYBACKDuring playback, the disc rotates at high speed. Do NOT lift or move the unit during playback. Doing so may damage thedisc or the unit.WHEN MOVING THIS UNITWhen changing the unit’s location or packing the unit formoving, be sure to remove the record or disc. Moving thisunit with the  record  or disc loaded may  result  in damage to this unit. If the unit is to be packed and moved  a  greatdistance, it is also advisable to tighten the turntable transport locking screw.sufficient space around the unit for ventilation.pull directly on the plug, never yank the cord.this might damage the finish. Use a clean, dry cloth.
8Do not expose records to direct sunlight or high humidity and  the record.Do not store your records in the trunk of your car. TheStore records in an aera with a stable temperature and low humidity.Should the record become dirty, gently wipe the surface in a To avoid dust and scratches, keep records in their sleeves and jackets when not in use.Store records upright on their edges. Records stored horizontally will eventually bend and warp.Keep your records away from dust. Keep them in a cool, dry place.Do not touch the record's grooves. Only handle records by thefrom even clean hands can leave a residue on the recordsurface that will gradually deteriorate the quality of your record.temperature.  Long exposure to high temperatures will warptemperature in a closed trunk can ruin your collection.circular motion, using a soft anti-static cloth.edges or the lable. Make sure your hands are clean. Skin oilsedgelabel grooveHANDLING RECORDS
9HOW TO REPLACE THE STYLUSGuide Pins(inside)The stylus should last about 50 hours under normal use. However, it is recommended that the stylus be replaced as soon as you notive a change in sound quality.Caution:Do not remove or bend the sylus.To avoid injury, do not touch the needle.Turn off the unit's power before you replace the stylus.Keep out of the reach of children.record and cause the turntable stylus to malfunction.Do not expose stylus to extreme heat.Handle with care, as the stylus is delicate. Use of a bent or broken stylus may damage the Contact a qualified repair company if you experience difficulty in changing the stylus.1. Set a screwdriver at the tip of the stylus and push down to the direction "A".2. Pull the stylus out toward direction "B".1. Hold the tip of the stylus and insert the other edge by pressing toward direction "C".2. Push the stylus up toward direction "D" until it locks at the tip.Removing an old stylus:
10PRODUCT OVERVIEW1234567811. Speaker2. Bluetooth Indicator3. Cue Lever4. Speed Selector5. Tone Arm Holder and Clip6. Tone Arm7. Turntable8. Stylus Cartridge Speaker:Turntable:
11DC IN LIN E OUTLRPAIRON O FFLI NE I NONDC I NOF FVOL -VOL +BT/LINE INCHARGE910 11 12 131415161819252627Rear View of Turntable:PRODUCT OVERVIEWRear View of Main Speaker:Top View of Main & Deputy Speaker:9. Power ON/OFF Switch10. DC IN Jack11. LINE OUT Jacks12. PAIR Button13. Turntable feet14. BT/LINE IN Indicator15. LINE IN Jack16. Power ON/OFF Switch18. Charge Indicator19. DC IN Jack 25. Play/Pause Button26. Volume Up Button27. Volume Down ButtonLI NE I NONDC I NOF FBT/LINE INCHARGE2021222324Rear View of Deputy Speaker:BTPHONO 1720. BT/LINE IN Indicator21. LINE IN Jack22. Power ON/OFF Switch23. Charge Indicator24. DC IN Jack17. BT/PHONO Switch
12CONNECTIONS1DC IN LIN E OUTLRPAIRON O FFTo the Line In/AUX In jacks on the external audio amplifier RCA Audio Cable(not included)Connect the Turntable through LINE OUT Jacks to the external amplifier2Connect the Turntable through LINE OUT Jacks to the LINE IN jack of the speakerDC IN LIN E OUTLRPAIRON O FF3.5mm plug RCA Audio Cable(not included)LINE INWhite RedWhite Redof the Main & Deputy speakerTo the LINE IN Jack on rear panel
13CHARGING AND CONNECTIONSDC IN LIN E OUTLRPAIRON O FFMethod 2: Insert the AC/DC Adapter plug into the DC Cable Splitter, plug one end of DC Cable Splitter into the DC IN Jack of the Turntable, then plug another end of the AC/DC Adapterinto the AC Walloutlet.Recharging the Main & Deputy Speakers:into the AC Walloutlet.Insert the AC/DC Adapter plug into the DC Cable Splitter, plug each end of DC Cable Splitter into the DC IN Jack of both speakers, then plug another end of the AC/DC AdapterDuring recharging, the CHARGE Indicator will light up, Powering the Turntable:Method 1: Insert one end of the AC/DC adapter plug into the DC IN Jack of the Turntable, plug  another end of the AC/DC Adapter into the AC Walloutlet.after fully charged, the CHARGE Indicator will turn off.AC/DC Adapter DC Cable SplitterInserted into the DC Cable Splitter
14LINE IN AND LINE OUTMobile Phone (Such like MP3 Player; cell phones;  iPod/iPad ... etc)MP31. Connect one end of the audio connection cable to the Phones jack; Line out jack or AUX out jack on the external audio player.2. Connect the other end to the LINE IN jack of the Speaker as the illustrated below:LINE IN:3. Power on the speaker. 4. Plays the music on the connected external audio player as usual.LINE OUT:1. Connect one end of the RCA audio connection cable to the Line IN jacks or LINE IN jacks on  2. Connect the other end of the cable to the LINE OUT  jacks on the rear of turntable as the illustrated on right.To the Line In/AUX In jacks on the external audio amplifier 4. Power on the external audio amplifier and set it toLINE IN mode to play the music.3. Power on the unit and play music as usual.LINE INRear View of the Main or Deputy SpeakerLI N E OUTLRWhite RedLine In Cable( included)RCA Cable (not included)the LINE IN Cable into the LINE IN Jack of the main unit, it will enter into LINE IN mode automatically, the LINE IN Indictor will turn RED.NOTE: When both of the Main speaker and deputy speaker are paired with each other,  only insert  the external audio amplifier.The Deputy speaker will enter line in mode if the LINE IN cable inserted during paired with the Main Speaker .LINE IN
15LISTENING TO A RECORDBefore operation, detach the  stylus guard ( white plastic cover ) by3. Slide the BT/PHONO switch to PHONO mode. Place a record on the center spindle. Note: If you are playing a 45 RPM Single (small size record), place the  45 RPM adapter to the center spindle  then place the record on it.5. Unlock the Tone Arm from the holder as the illustrated below:Clip6. Raise the Cue Lever to raising the Tone Arm then move it to the top of the desired location7. When finished playing, move the Tone Arm back to Holder.  of the record. Release the Lever to put the Tone Arm onto the record. It will start playing.  Release the Cue Lever then lock the Tone Arm on the Holder.Cue Leverpulling it straight off the front of  the cartridge.NOTE:Note: Do not insert the LINE IN Cable into the LINE IN jack of the Main speaker.NOTE: Press the PAIR button to pair with the two speakers if connection is unsuccessful.1. Switch on the two speakers first, wait both speaker paird with each other, the Indicator on main speaker will flash when connected. turntable will be paired to the two speakers automatically, and the  bluetooth indicator on turntable will flash, after a few seconds, the2. Switch on the turntable, bluetooth indicator on turntable will stay lit.4. Slide the Speed selector to 33 or 45 to match the play speed of the record.with the turntable.Press and hold the      button on main speaker to disconnect the connectionPlease restart both speakers and the Turntable if all of them are not responding.
16LISTENING THROUGH BLUETOOTH3. Activate the bluetooth function on your external device, and try searching, the pairing name will appear on the pairing name list. Select it and register in your player.4. After successful connection, the main speaker will send a tone.5. Play the music as usual.Note: When the LINE IN Cable inserted in, it will be LIEN IN mode automatically.During playing:Press VOL+ or VOL - button to adjust the volume.Press the        button to switch between pause and playing."VM-100"Press and hold the      button on main speaker to disconnect the connection with externalOPERATION WITH TWO SPEAKERSOPERATION WITH SINGLE SPEAKER2. Activate the bluetooth function on your external device, and try searching, the pairing name will appear on the pairing name list. Select it and register in your player.3. After successful connection, the bluetooth indicator will stay lit.4. Play the music as usual.During playing:Press VOL+ or VOL - button to adjust the volume.Press the        button to switch between pause and playing."VM-100"5. Press and hold the         button on speaker to disconnect the current connection withexternal blutooth device.Note: When the LINE IN Cable inserted, it will be LIEN IN mode automatically.The unit can be automatically connected with the last paired device after first time pairing.bluetooth device.1. Switch on the two speakers. (the bluetooth indicator will stay lit on deputy speaker).2. Slide the BT/PHONO switch to BT position, the bluetooth indicator will blink, they will paird with each other automatically,  the bluetooth indicator blinks on main speaker after successful connection1. Switch on main speaker or deputy speaker, (if using main speaker, slide the BT/PHONO switch to BT position)the bluetooth indicator will blink.6. The main speaker will automatically connect with the last paired device after first time pairing.Please restart both speakers and the Turntable if all of them are not responding.
17TROUBLESHOOTINGIf you experience any problems with the unit, please take a moment to look through and see if you cansolve the problem yourself before calling for help.NO POWERCheck the connection to AC power source. Check and make sure the AC power source is not a switchedoutlet and if it is, the switch is turned on. Make sure there is power to the AC outlet by plugging anotheritem such as a lamp or fan.NO SOUNDAdjust the volume.NOISY SOUNDThe unit is too close to a TV set or similar appliances. Relocate the unit further away from them, or turn theother appliances off.RECORD PLAYER (can not play)●Detach the stylus guard.(The stylus guard is a white plastic cover that protects the stylus during transportation.Failing to remove this guard will not allow the needle to contact the grooves of the record and no soundwill be heard!)●If the stylus is worn-out, change the stylus.SOUND SKIPS●Place the unit on a stable surface to avoid vibration and shock. Make sure the unit is level both frontto back and side to side.●Clean the surface of the record.●Don’t use scratched, damaged or warped records.BEAWARE OF CONDENSATIONWhen the unit(or a record ) is moved from a cold to warm place, or used after a sudden temperaturechange, there is the danger of condensation, vapor in the air could condense on the internal mechanism,making correct operation erratic or impossible. To prevent this, or if this occurs, leave the unit turned onfor one or two hours. The unit will stabilize at the temperature of its surroundings.MAI TAINENCEAlways keep the turntable clean.If the surface of the unit gets dirty, wipe with a soft cloth or use a diluted mild liquid soap.Be sure to remove any excess liquid completely. Do not use thinner, benzine or alcohol as they may damagesurface of the unit. Allow the surface of the unit. Allow the surface of the unit to dry completely before using.N
Speaker built-in battery.............................................................................................7.4V, 2000mAhPower requirement....................................................................................DC9V         2ASpeaker output power..................................................................................................2X10W(RMS)Bluetooth working range..........................................................................................................32feetTurntable speed.........................................................................................................33 rpm, 45rpm1 X Instruction Manual1 X AC/DC AdapterAccessories:Design and specifications are subject to change without notice.1 X DC Cable SplitterSpeaker recharge time...............................................................................................about 2-3 hourSPECIFICATIONSSpeaker running time...........................................................................about 4 hour(at 50%volume)181 X Line In Cable

Navigation menu