Idexx Laboratories 98-08705 Wireless Radiography Trigger Unit User Manual Exhibit D Users Manual per 2 1033 b3
Idexx Laboratories, Inc. Wireless Radiography Trigger Unit Exhibit D Users Manual per 2 1033 b3
Exhibit D Users Manual per 2 1033 b3

IDEXX EquiView
Digital Radiography System
Operator’s Guide
®
Proprietary Rights Notice
Information in this document is subject to change without notice. Companies, names and data used
in examples are fictitious unless otherwise noted. No part of this document may be reproduced or
transmitted in any form or by any means, electronic, mechanical, or otherwise, for any purpose,
without the express written permission of IDEXX Laboratories. IDEXX may have patents or pending
patent applications, trademarks, copyrights, or other intellectual or industrial property rights covering
this document or subject matter in this document. The furnishing of this document does not give a
license to these property rights except as expressly provided in any written license agreement from
IDEXX Laboratories or an affiliate.
© 2007 IDEXX Laboratories, Inc. All rights reserved. For veterinary use only. • 06-14899-00
EquiView and Practice what’s possible are trademarks or registered trademarks of IDEXX
Laboratories, Inc. in the United States and/or other countries. Microsoft and Windows are registered
trademarks of Microsoft Corporation. All other product and company names and logos are
trademarks of their respective holders.
Contents
Getting Started ............................................................................................................................1
Overview ................................................................................................................................................1
Components ..........................................................................................................................................1
Safety ...........................................................................................................................................2
Electrical Safety ....................................................................................................................................2
Mechanical Safety .................................................................................................................................2
Setting Up the EquiView® Digital Radiography System ............................................................3
Initial Installation ...................................................................................................................................3
Taking Images..............................................................................................................................6
Selecting an Existing Record ...............................................................................................................6
Adding a New Record ...........................................................................................................................6
Setting Up an Exam ...............................................................................................................................7
Taking Xrays ..........................................................................................................................................8
Skipping an Image ..............................................................................................................................10
Reshooting an Image ..........................................................................................................................10
Taking Additional Images....................................................................................................................10
Reviewing Images ...............................................................................................................................11
Viewing Images .........................................................................................................................12
Manipulating Images .................................................................................................................14
Dynamic Views ...................................................................................................................................14
Printing Images .........................................................................................................................17
Printer Settings....................................................................................................................................17
Preview Mode ......................................................................................................................................17
Exporting Images and Creating CDs ........................................................................................18
Exporting Images ................................................................................................................................18
Creating a Patient CD..........................................................................................................................18
Viewing the Patient CD Images ..........................................................................................................19
System Backup ..........................................................................................................................20
Troubleshooting ........................................................................................................................21
Cleaning and Maintenance .......................................................................................................22
Cleaning ...............................................................................................................................................22
Disinfecting ..........................................................................................................................................22
Maintenance ........................................................................................................................................22
Inspections ..........................................................................................................................................23
Transportation and Storage ......................................................................................................24
Optional Accessories ................................................................................................................25
Technical Specifications ...........................................................................................................26
Dimensions ..........................................................................................................................................26
Electrical Data .....................................................................................................................................26
Environmental Conditions ..................................................................................................................26
Computer Specifications ....................................................................................................................27
Appendix A—List of Shortcuts .................................................................................................28
Appendix B—Technique Chart..................................................................................................29
IDEXX EquiView® Digital Radiography System Operator’s Guide 1
Getting Started
Overview
The IDEXX EquiView® Digital Radiography System is a high-resolution digital X-ray system that
generates X-ray images without films and chemistry. The digital X-ray plate is exposed by a diagnostic
X-ray apparatus and the X rays are then directly converted into electrical signals. These signals are
read by the X-ray generator and then converted into images by the EquiView software and displayed
on the monitor.
The images created by the EquiView software allow you to view both bone and soft tissue structures
in one image with one single exposure. You can easily view and enhance relevant areas and
structures for diagnosis. In addition, areas of an image can be enlarged up to three times without
significant pixelization.
Because of the high quality of the monitor, the
IDEXX EquiView Digital
Radiography System
is suitable for mobile application as a digital X-ray computer as well as for
diagnostic purposes.
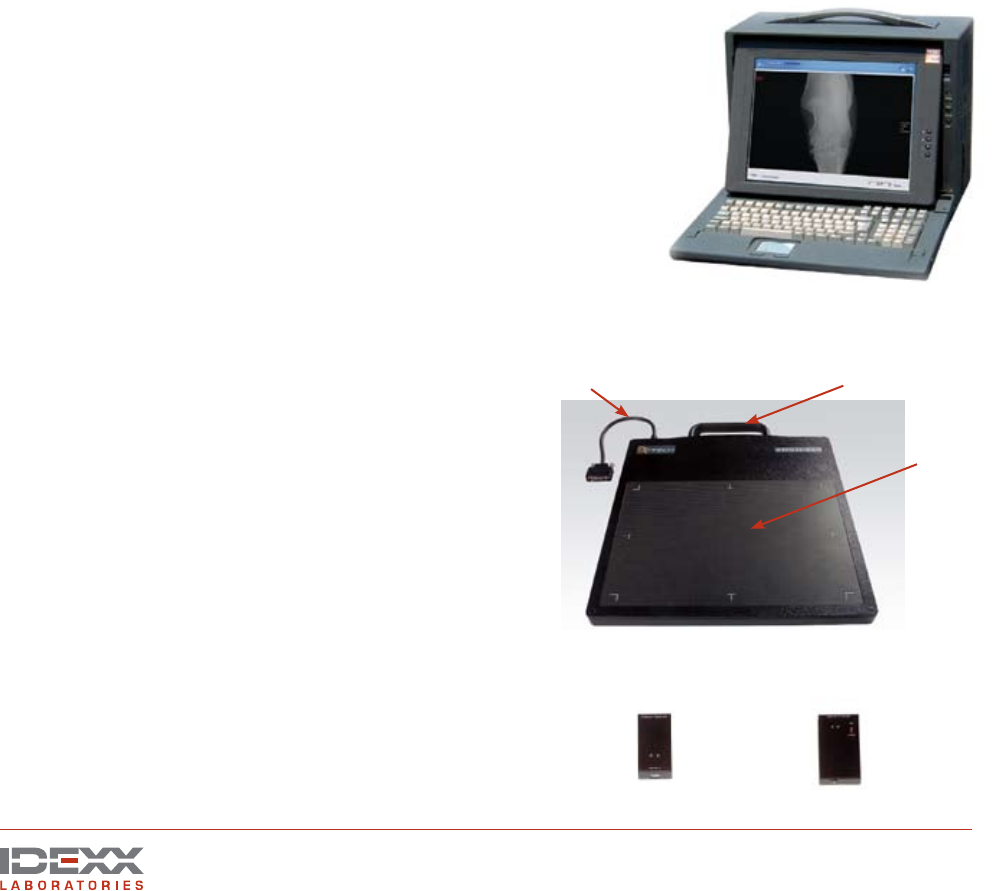
Components
The basic components for the IDEXX EquiView Digital Radiography System consist of a computer,
a digital X-ray plate, two switch boxes, a trigger, and a remote control. These components form a
compact system for taking, processing, and archiving digital X-ray images.
Computer
The portable, Microsoft® Windows®-compatible computer
runs the
EquiView software, which
lets you view, manage, and
archive the image files created from the digital X-ray plate.
Digital X-ray Plate
The digital X-ray plate is an ultracompact, portable plate
for use in place of a regular film cassette, and can be used
with any X-ray source generally available
(portable sources
should have a high-frequency, full-wave rectification
(e.g., Gierth 80 HF ultralight)
.
The plate generates digital X-ray images without
using X-ray film or foil. The X rays are converted
directly into an image and displayed on the
computer. The direct conversion of the X rays into
electrical signals without the use of a scintillator
absorbs less energy, thereby reducing blurring.
As a result, the various structures are better
differentiated so that images are sharper and
provide greater detail.
The plate’s active imaging
surface is 20 x 25 cm (8 in x 10 in).
Switch Boxes
The switch box is the interface between your
X-ray generator and the IDEXX EquiView Digital
Radiography System computer. There are two
switch boxes—one for the manual trigger setup
and one for the remote control setup. Be sure
you are using the correct switch box for your
desired setup.
Computer and monitor
Carrying
handle
Cable
Active
imaging
surface
Digital X-ray plate
Manual trigger switch box Remote control switch box

2 IDEXX EquiView® Digital Radiography System Operator’s Guide
Safety
This operator’s guide is an integral part of the EquiView Digital Radiography System. Keep it close
to the system for ready reference. Observance of the instructions contained herein is a precondition
for the use of the system for the intended purpose and for its correct operation. The system may be
operated only by personnel who have the necessary knowledge and have been instructed in its use.
Operator safety and trouble-free operation of the system are only ensured if use is made of original
equipment parts. Moreover, only those accessories may be used that are specified herein or that
have been expressly approved and released by IDEXX. IDEXX cannot guarantee the safety or proper
functioning of this system if parts or accessories are used that are not supplied by IDEXX. All claims
for damages, caused by the use of parts and accessories not supplied by IDEXX, are excluded.
The safety features of the EquiView Digital Radiography System are only ensured if the following
points are adhered to:
• You may not use the system if it has any electrical or mechanical defects. This applies in
particular to display, warning, and alarm equipment.
• If you want to connect the device to other devices, components, or assemblies, other than
those described in the Accessories section, and if a hazard-free combination with these
devices, components, or assemblies cannot be deduced from the technical data, you must
consult the respective manufacturer to ensure that the safety of the patient, the operating
personnel, and the environment are not affected by this intended combination.
• IDEXX is responsible for the safety features of its products only if servicing, maintenance and
modifications have been carried out by IDEXX or by a person expressly authorized for this
purpose by IDEXX.
• Like all technical devices, the EquiView Digital Radiography System needs proper operation,
regular maintenance, and care as described in the Maintenance section.
• If you use the system incorrectly or if you neglect to carry out proper maintenance, IDEXX
cannot be held responsible for resulting errors, damage, or injuries.
• Safety circuits may neither be removed nor modified.
• You are only allowed to remove or open parts of the case as instructed to do so within this
operator’s guide.
Electrical Safety
• You must not operate this device in potentially explosive atmospheres.
• Cleaning agents, disinfectants, flammable anesthetic material, skin cleaners, oxygen and
some coupling agents, even when used on the patients, can form explosive gas mixtures.
DO NOT OPERATE THE DEVICE UNDER THESE CONDITIONS!
Mechanical Safety
• Ensure that the patient is suitably restrained in accordance with accepted standards for
administration of treatment.
• This is a portable, mobile device. Carry it carefully.
IDEXX EquiView® Digital Radiography System Operator’s Guide 3
Setting Up the IDEXX EquiView® Digital Radiography System
Ensure that all components are present. Keep the packing materials in a dry place in case you need
them later.
CAUTION: The room temperature must not drop below 5°C (40°F) and must not rise above 35°C
(95°F). There is a risk that the active layer of the digital X-ray plate can be destroyed.
CAUTION: When the EquiView Digital Radiography System is taken out of a cold environment and
put into a warm room, condensation may form. In this case, the equipment must not be connected
to an electrical source because there is a risk of damage. Wait until the EquiView Digital Radiography
System has warmed up to the ambient temperature and condensation has completely dried. This
may take several hours.
The initial installation may only be carried out by suitably qualified personnel.
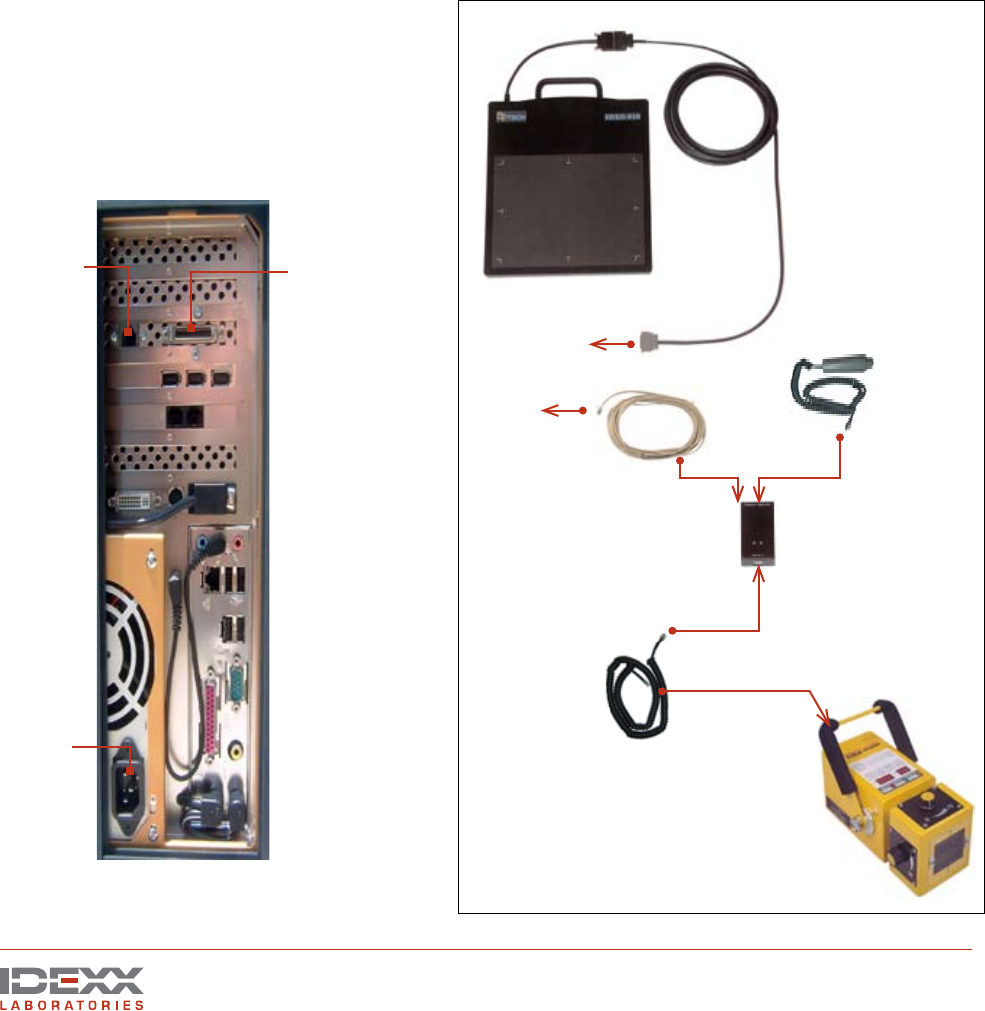
Initial Installation
You can configure your EquiView Digital
Radiography System to use a manual
trigger or a remote control to take X rays.
Decide which configuration you prefer
before beginning the initial installation.
Computer connections for the manual trigger
Connect
the digital
X-ray plate
data cable
here
Connect
the
trigger
cable
here
Connect
the power
cord here
Digital
X-ray plate
to computer
video card
Data
cable
Switch box for
manual trigger
Component connections for the manual trigger
to
computer
to X-ray generator
X-ray cable
Trigger
Trigger cable
4 IDEXX EquiView® Digital Radiography System Operator’s Guide
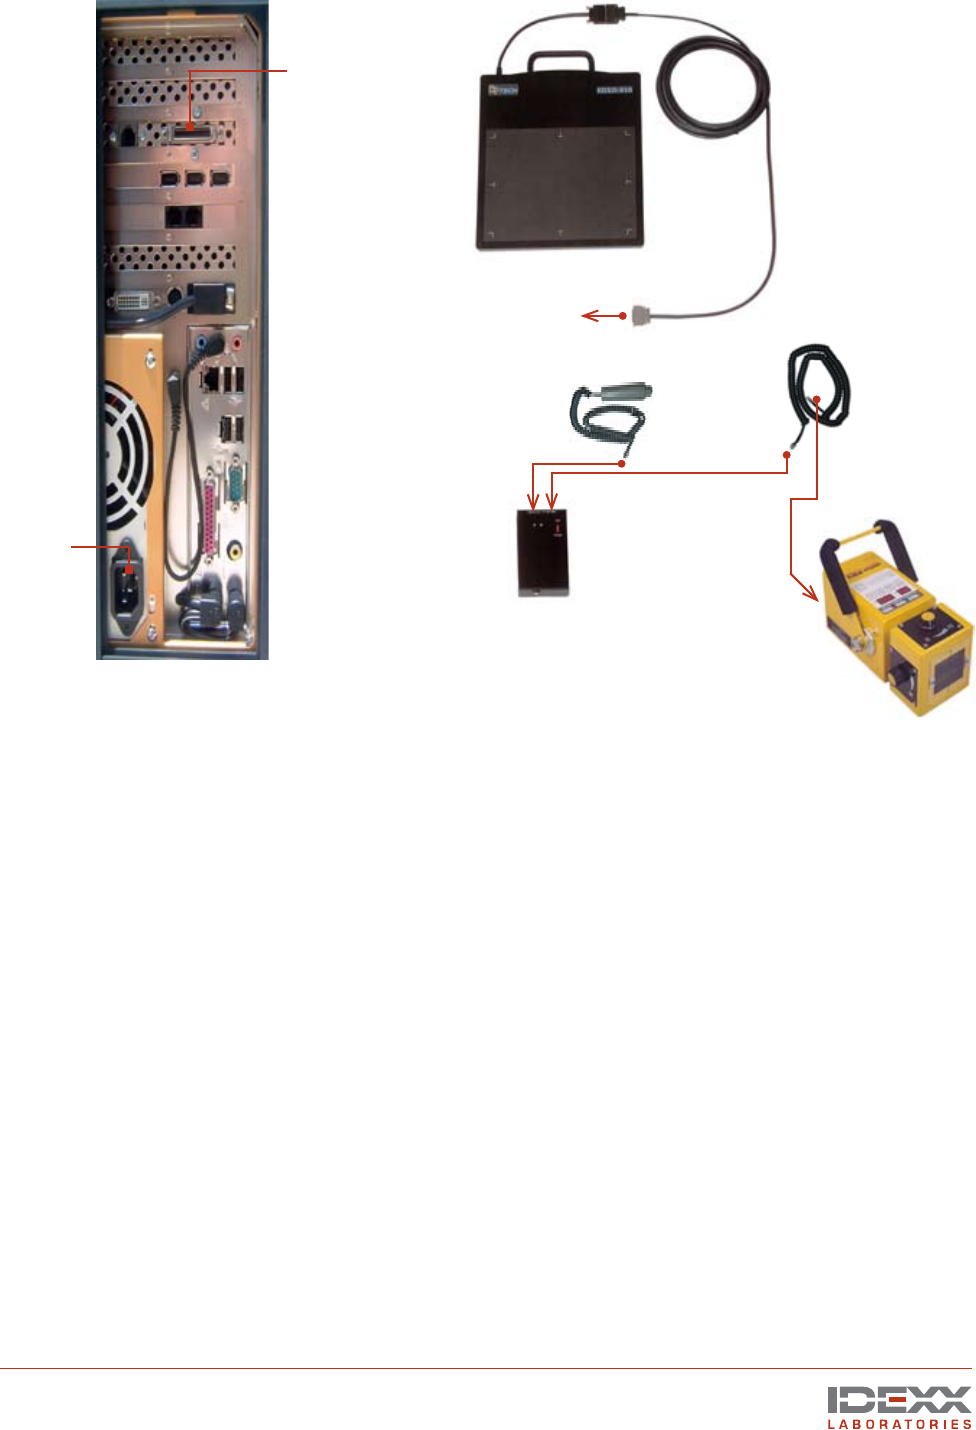
Connecting the Components
1. Connect the digital X-ray plate to the computer’s video card with the data cable provided.
NOTE: Use only the data cable provided with the EquiView Digital Radiography System.
2.
Connect your X-ray generator to the switch box’s “X-ray gen” socket with the X-ray cable.
NOTE: There are two switch boxes—one for the manual trigger configuration and one for the
remote control configuration. Be sure you are using the correct switch box for your desired
configuration.
3. Connect the trigger to the switch box’s “Hand s/w” socket.
4. For the manual trigger configuration, use the trigger cable to connect the switch box’s
“detector” socket to the computer.
5. Turn the switch box to the “on” position.
6. Connect the power cord to the computer and then to an appropriate electrical source, and
turn on the computer.
TIP: When using extension cords for your X-ray generator, make sure you use heavy duty,
large-core diameter cords because this will reduce the losses that long power cords incur.
These losses significantly affect the output of X-ray generators. Ideally, always use the
shortest cord possible for the X-ray generator.
Component connections for the remote control
Switch box for
remote control
Digital
X-ray plate
to computer video card
Trigger
to X-ray generator
X-ray cable
Data
cable
Computer connections for the remote control
Connect
the digital
X-ray plate
data cable
here
Connect
the power
cord here
IDEXX EquiView® Digital Radiography System Operator’s Guide 5
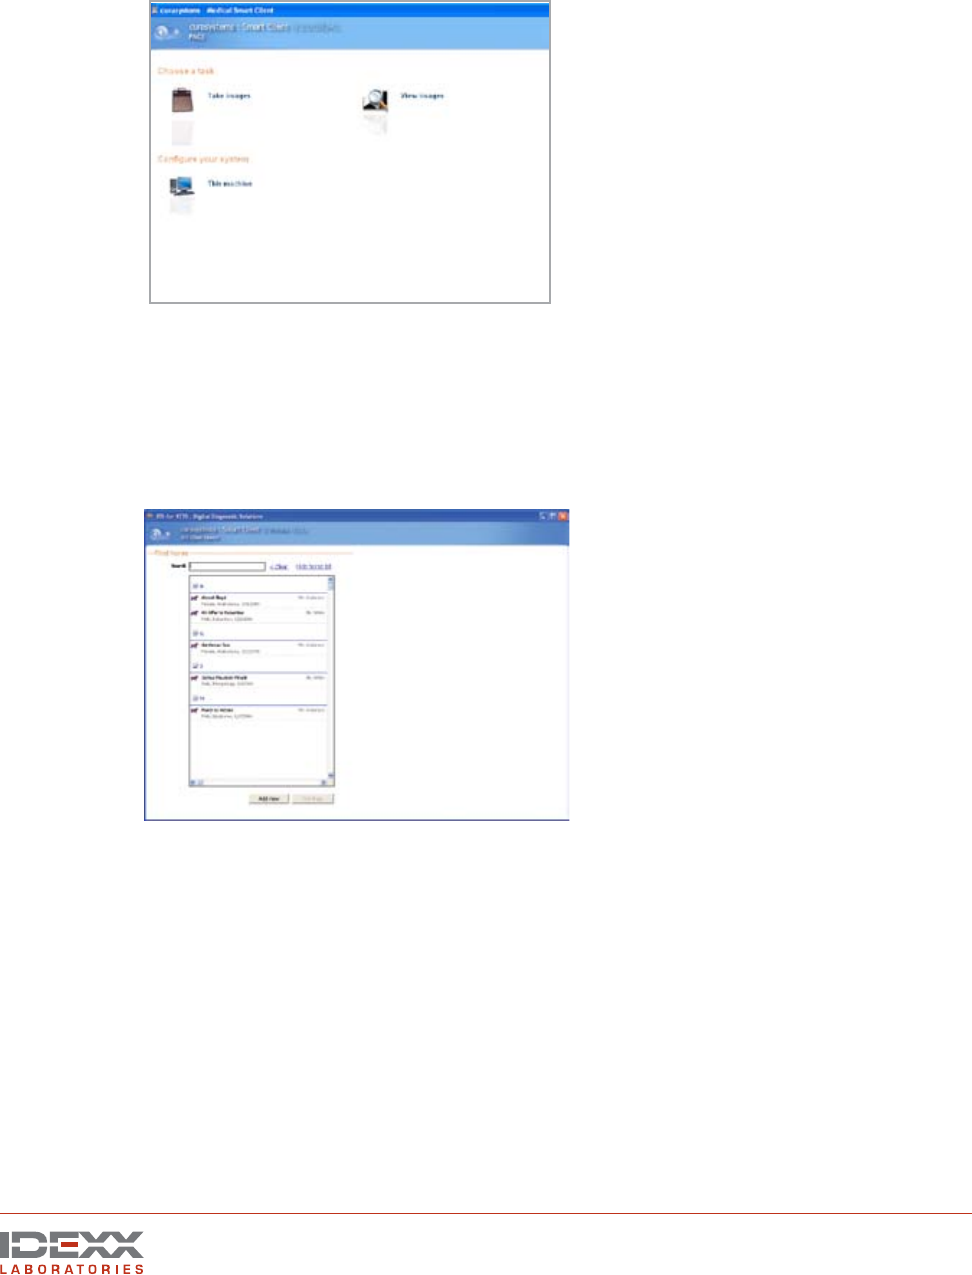
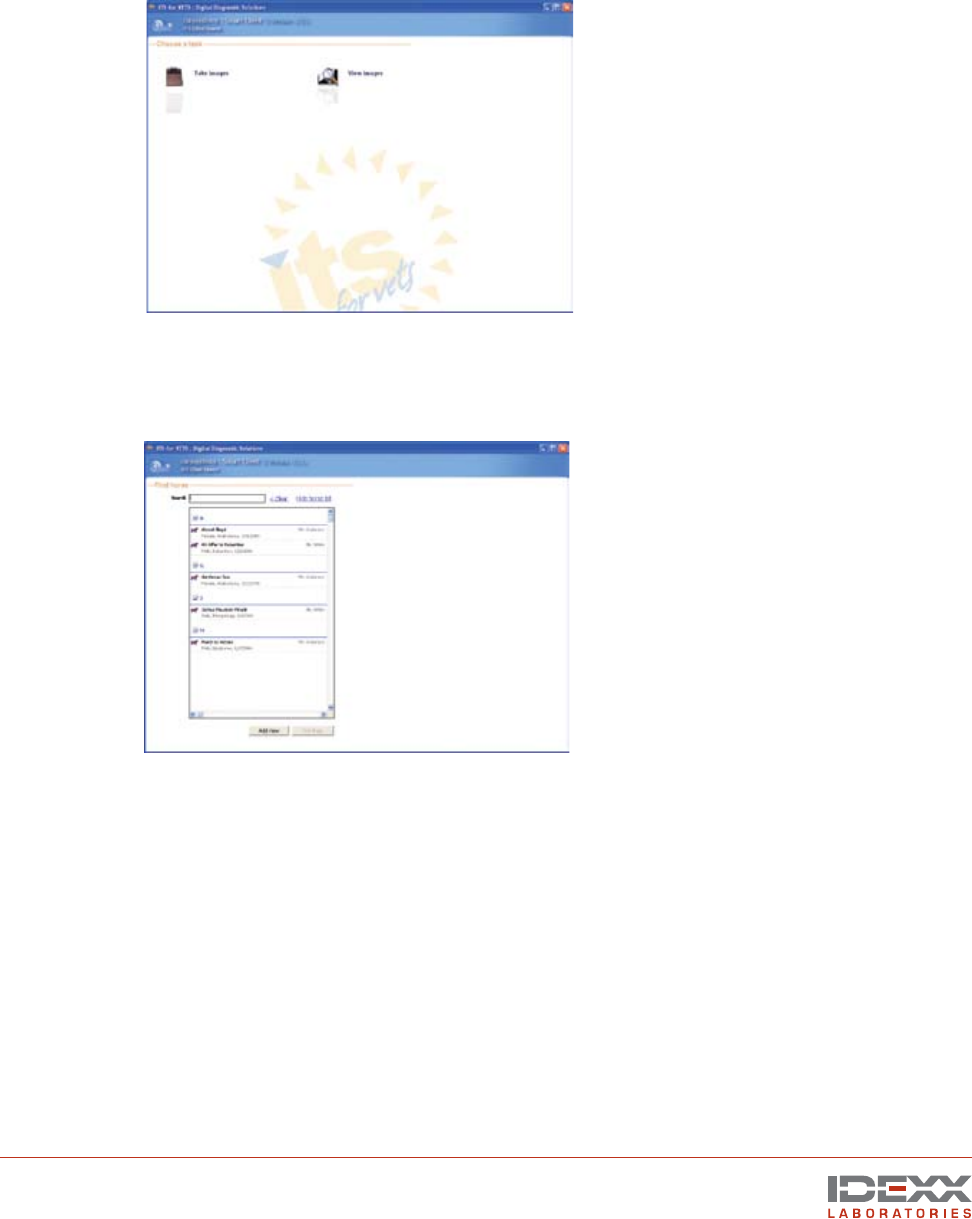
Using the Software
1. Open the IDEXX EquiView Digital Radiography software by double-clicking the desktop icon.
2. In the dialog box that appears, enter your user ID and the registration key for the software
(indicated on the software disc).
3. On the initial screen of the software, there are two options.
The Take Images option lets you select or add a patient and then take X rays.
The View Images option lets you review stored images, create a patient CD, export images,
or print images.
4. To begin, click Take Images. The Find Horse screen appears. The information you enter
here will appear on the X-ray images and on the patient CDs.
Initial screen
Find Horse screen
6 IDEXX EquiView® Digital Radiography System Operator’s Guide
Taking Images
When taking images, you need to either select an existing patient from the EquiView Digital
Radiography System database or add a new record.
Selecting an Existing Record
1. Click the Take Images option on the Choose a Task screen.
When the Find Horse screen appears, the first 100 horses in the database are listed. To
find a horse, type the first few characters of the horse’s name in the Search box. The list
populates with horses’ names that match those characters.
NOTE: The software can be configured so that horse names are not displayed until a
specified number of characters have been typed.
2. When you locate the desired horse record, click the name and then click the Continue
button to display the Set Up Exam screen.
Adding a New Record
The patient’s record displays all the information that is entered when you add a new record. If some
fields are left blank or unknown, they will also display as blank or unknown in the software and on
the patient CD.
1. If the patient’s record does not already exist, click the Take Images option on the Choose a
Task screen and then click the Add New button at the bottom of the Find Horse screen. The
Enter New Horse screen appears to the right of the Find Horse screen.
Choose a Task screen
Find Horse screen

IDEXX EquiView® Digital Radiography System Operator’s Guide 7
NOTE: To avoid duplicate records, always check to see if the Owner/Trainer already exists
before entering a new Owner/Trainer.
TIP: To confirm an entry and move to the next field, use the Tab key.
2. Below the Owner/Trainer field, scroll through the list to find the owner/trainer. If the owner/
trainer is not listed, type his or her name into this field. This is a required field.
3. Enter the horse’s identification number in the Horse ID field. This is an optional field and
your clinic may not use it.
4. Enter the name of the horse in the Horse Name field. Avoid using special characters such as
&, \, #, and /. This is a required field.
5. In the Owner ID field, enter the owner’s ID if your clinic uses one. This is an optional field.
NOTE: This field can also be configured for other uses, such as project or stable name.
6. Select the horse’s gender from the Gender drop-down list. This is an optional field.
7. Select the horse’s breed from the Breed drop-down list. You can also type the first few letters
of the breed to quickly access a particular breed in the list. This is an optional field; you can
accept the default value, Unknown.
8. In the Age field, enter the horse’s age, or use the up or down arrows to select the age. This
is an optional field.
NOTE: Entering the age and then pressing the Tab key will default the birthdate setting to
1/1/XXXX.
9. Enter the horse’s date of birth in the Birthdate field. This is an optional field.
10. After entering all the patient’s data, click the Add Horse button at the bottom of the screen to
display the Set Up Exam screen.
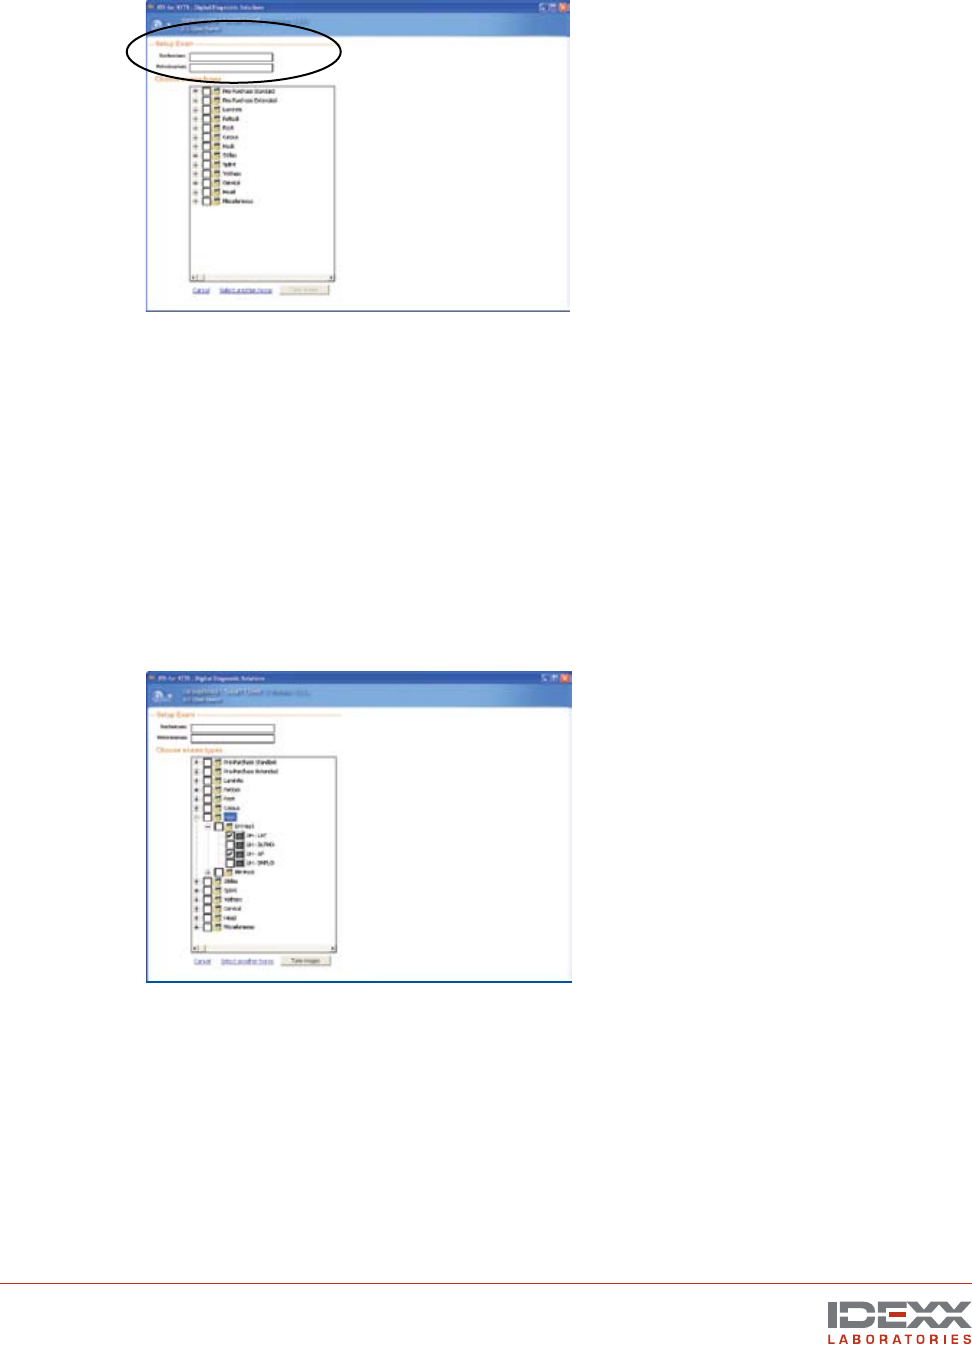
Setting Up an Exam
After selecting an existing record or adding a new record, the Set Up Exam screen appears.
1. In the Technician field, enter the name of the X-ray technician. This information is stored with
the exam series, and is an optional field.
NOTE: Each image file stores and displays information, such as:
• Horse name • Date and time of exam
• Owner name • Specific exam information
• Hospital name
2. Enter the name of the veterinarian in the Veterinarian field. This information is stored with
the exam series, and is an optional field.
3. In the Choose Exam Types section, select the exams you want to perform. You can choose
images/views from several different exam.
Enter New Horse screen
8 IDEXX EquiView® Digital Radiography System Operator’s Guide
Click the plus (+) sign to expand the exams and display the sub-exams and specific views.
Click the individual images needed, or click the box next to the main exam heading to
choose all items within that heading.
NOTE: In addition to taking these images, you can choose to either cancel the selection and
start over again, or select another horse.
4. Click the Take Images button at the bottom of the screen to open the Take Images screen
and begin to take X rays.
Taking X rays
The EquiView Digital Radiography System has a very large dynamic range, which means that careful
technique setting is no longer a necessity, with certain exceptions. The most likely error that can
occur is underexposure, in which only a part of the dynamic range of the digital X-ray plate is used.
In this case, especially bony structures appear significantly less structured and there is a risk of
losing important information about these areas.
Special X-ray Views
• Thick body parts: AP Stifle, Neck, and Spinous Processes. These thick body parts are
at the limit of penetration for the small handheld generators. However, the EquiView Digital
Radiography System is still able to produce good quality images provided some important
points are kept in mind.
Thick body parts produce a large amount of scatter, which tends to fog the image. Due to the
high dynamic range of the EquiView
Digital Radiography System
, the image is very sensitive
to scatter. This means in practice that there is a limit on thick body parts where increasing mAs
Set Up Exam screen
Choose Exam Types screen

IDEXX EquiView® Digital Radiography System Operator’s Guide 9
becomes limiting and does not improve image quality after a certain level.
TIP: Moving the X-ray source closer to the body part, which increases the effective kVp, may
have a better impact on the image than simply continuing to increase mAs.
• Equine foot: The equine foot is another body part that produces a great deal of scatter. To
produce good images of the navicular bone, similar techniques to the above may be helpful.
A grid is always helpful for images where a grid can be easily used, in respect of maintaining
the geometric requirements. In addition, lead shielding of unwanted parts of the image can
be helpful.
To expose the plate:
1. Place the digital X-ray plate into your X-ray equipment’s holder for film cassettes or in another
suitable position. The plate’s active imaging surface must face the radiation source.
2. Select suitable settings on your X-ray equipment for exposure time and accelerating voltage.
WARNING: National regulations for dealing with X-ray radiation and the operation of X-ray
devices applies. Do not exceed the applicable national standards for the radiation doses.
Pay particular attention to the safety of the personnel in the vicinity of the X-ray equipment.
TIP: Use high kV and low exposure time. Dose increases proportionally with the kV, but to
second order with time.
TIP: Using old generators that do not have full-wave rectification and have exposure times
over 0.2 seconds is not ideal. If you have been using a good quality X-ray generator in the
past, setting kVp at 80 and mAs at 1.8 is ideal for most exams.
TIP: Most X-ray generators have a milliamperage of 15 mA, so the time factor would be set to
0.12 seconds: 15 mA x 0.12 s = 1.8 mAs. For large structures, 80 kVp and an mAs-product
of 15 mA x 0.25 s = 3.75 mAs can be used.
3. Ensure that the desired structures are located between the X-ray source and the digital X-ray
plate. The plate must be aligned vertically to the direction of incidence of the X-ray beams.
The film-focal distance (FFD) should be in the range of 55–60 cm (21.6"–23.6").
TIP: The X-ray generator should be placed closely to the region of interest.
TIP: Movement artifact is usually a combination of movement of the X-ray source, the horse
and the plate itself.
4. Press and hold the exposure switch halfway down until you hear the beep indicating that the
plate is ready for an exposure. This prepares the generator and plate, and can take up to 4
seconds. In addition to the beep, the light on the plate turns from green to red, and a blue
progress bar appears at the bottom of the computer screen and moves halfway across.
Take Images screen (X-ray mode)
Image area Borderline

10 IDEXX EquiView® Digital Radiography System Operator’s Guide
5. After any of these signals, fully press the switch to take the image. The computer beeps, the
blue progress bar continues across the computer screen, and the light on the plate changes
from red to green.
6. The processed image appears on the monitor within 12–15 seconds. The next image can be
taken after 5–8 seconds, when the 20-second cycle time of the plate has elapsed.
Skipping an Image
The EquiView software looks for the first unchecked check box in the Examination section and
associates the image to be taken with that view. You can skip image views (if necessary or desired)
by selecting the check box next to that particular image.
Reshooting an Image
To reshoot an image, click the view name (it turns blue), then right-click and select Reshoot Image.
This deletes the original image, and the software prompts you to confirm the deletion.
NOTE: If you have opted to reshoot an image and then decided to skip it until later, the image view
name will remain highlighted in gray and the Done button will be disabled until that view is reshot.
Taking Additional Images
To take multiple images of the same view, deselect the check box in front of the image name after the
Take Image screen
Better picture of a stifle due to reduced distance between the
X-ray generator and the region of interest

IDEXX EquiView® Digital Radiography System Operator’s Guide 11
first image is processed and shoot again.
NOTE: If you take multiple images of a particular view, you can only review the last image taken
while in the Take X-Ray mode. However, you can display all of the images for the particular view
when you are in the View Images mode.
Reviewing Images
You can double-click any image view name with a selected check box to review that particular image.
NOTE: To view the next image taken, deselect the check box of the image you just viewed. The next
image you took appears in that spot.
12 IDEXX EquiView® Digital Radiography System Operator’s Guide
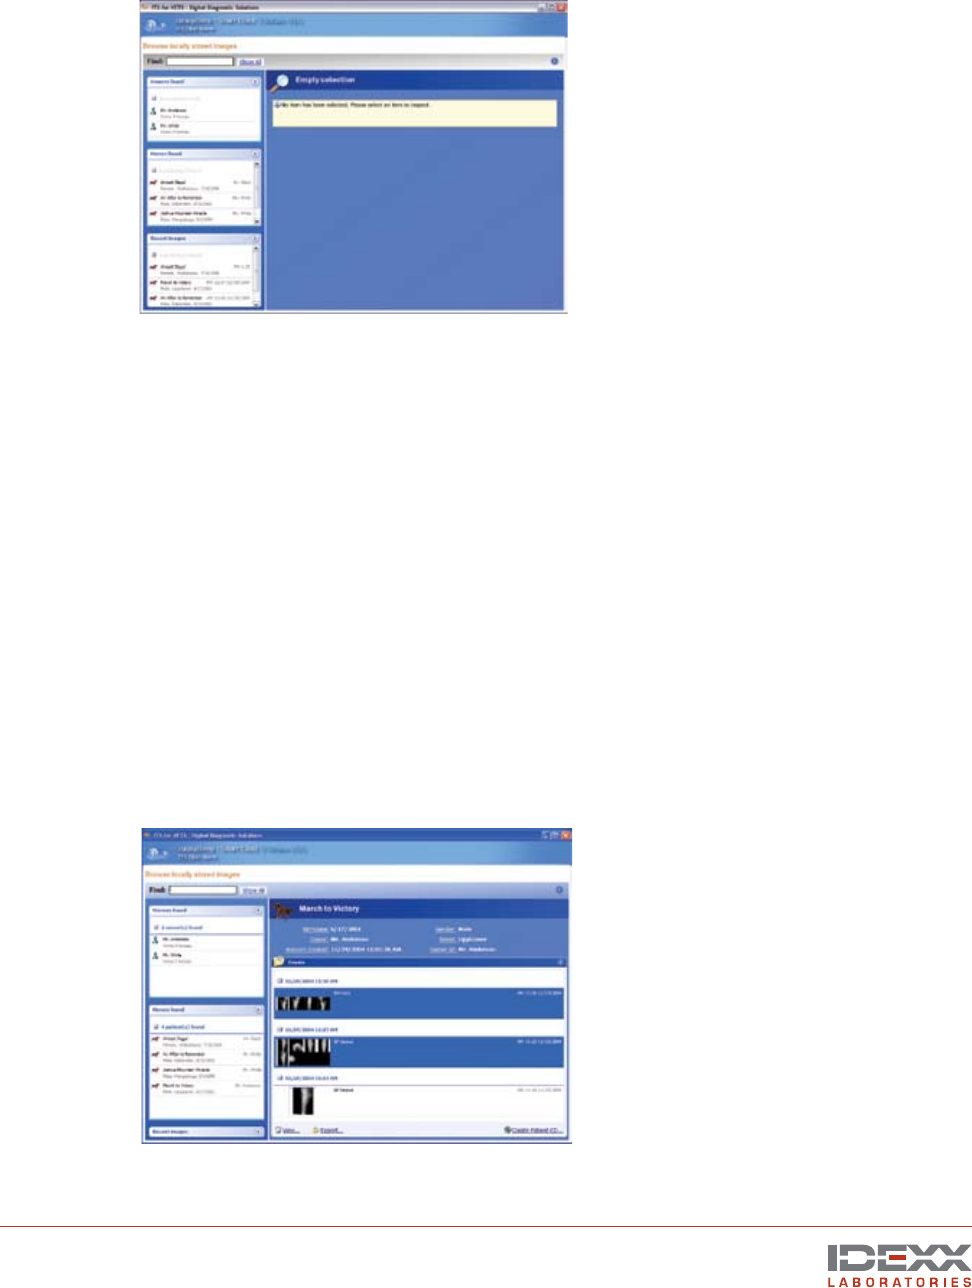
Viewing Images
After you click Done to save the images that you took, the Choose a Task screen displays. Click
View Images to open the Browse Locally Stored Images screen where all owners and horses are
displayed alphabetically.
NOTE: You can set a filter value in the configuration file if you prefer that no information is displayed
on the Browse Locally Stored Images screen.
There are four ways to search for images:
• Find—Type the first few letters of the horse’s or owner’s name into the Find text box. The
matching results display in their corresponding sections.
• Search by Owner—Click the owner’s name in the Owners Found section. This displays all
horses for that owner in the Horses Found section. To view the images of a particular horse,
right-click the horse’s name in the Horses Found section.
• Search by Horse—Click the horse’s name in the Horses Found section. This displays the
horse’s record on the right side of the screen.
Search by Recent Images—Click the horse listed in the Recent Images section, which
shows all horses that have been x-rayed recently. The most recent patients are listed first.
To view images:
1. After you have selected a horse and its information appears on the right of the screen, select
an image series to view.
Browse Locally Stored Images screen
Select an image series to view
IDEXX EquiView® Digital Radiography System Operator’s Guide 13
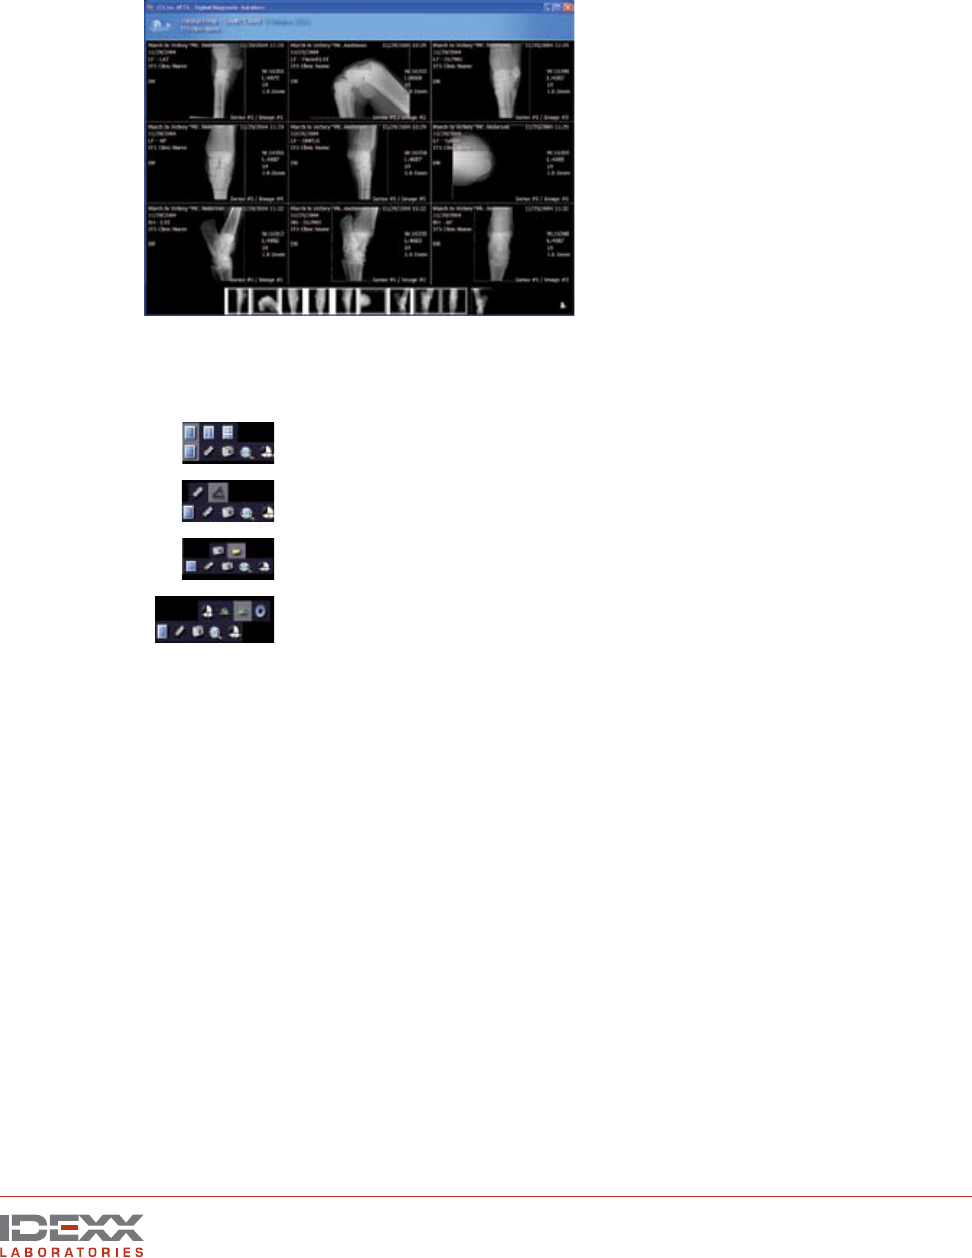
NOTE: To view more than one series, press and hold the CTRL key and select the series you
want to view.
2. Double-click the series, or click the series and then click the View link at the bottom of the
screen.
3. The Review Images screen displays the first nine images of the selected exams. Use the
navigation bar at the bottom to select individual views.
TIP: At the lower left corner of each image is a toolbar with the following tools:
View single and multiple images
Measure distances and angles
Snapshot images and save individual images to a user-defined location
Window and Level multiple images at one time. Rotate images
TIP: In the lower left corner of the Review Images screen, there is a small printer icon for
printing.
NOTE: To exit this screen, click the blue Back button; the View Images screen appears.
Review Images screen (9 images at one time)

14 IDEXX EquiView® Digital Radiography System Operator’s Guide
Manipulating Images
The IDEXX EquiView® software allows for certain settings to be adjusted to change the appearance
of the “first view.” The first view is the image that appears on-screen after these automatic
settings are applied. You can then manually change window and level settings and apply other
functions, such as edge enhancement when looking for a stress fracture. During installation, your
IDEXX representative will adjust the appearance of the first view to suit your preference and the
performance of your X-ray generator.
After the image is taken, you have a full range of tools to use to manipulate the image. Images
already taken are automatically stored and sequentially numbered in accordance with the
presettings made by you. You can take all relevant images, and then optimize the settings for the
images and make the diagnosis.
Dynamic Views
The mathematical treatment of the raw data from the plate is a very complex combination of
functions known as an algorithm. IDEXX has developed an algorithm that shows some soft-tissue
features while still allowing you to view dense bone detail. This is one of the features that makes the
EquiView Digital Radiography System unique.
Window and Level Adjustments
The Window function is a representation of the amount of image data viewed at one time
(contrast). The Level function is a measure of the relative luminance of the pixels within the
window (brightness). The Window and Level functions adjust the contrast and brightness as a
secondary function to the primary purpose of making various structures in an image visible on
the screen.
Window and Level both have a numeric value that is displayed in the middle of the right
border of the active viewing window.
The same picture using different parameters in the software to
show the bone structures
X ray of a hock showing clear soft tissue structures

IDEXX EquiView® Digital Radiography System Operator’s Guide 15
If you “window” and “level” a typical image, you can view individual hairs on a limb while still being
able to “window” back to dense subchondral bone detail. With film, this is generally very difficult,
and it is standard practice to take two different exposures to identify subchondral bone features of
the distal condyles of MCIII and a second lower-energy setting to identify any possible osteophyte
or enthesiophyte formation around the joint. The dynamic range of the digital X-ray plate and the
EquiView software allow all these details to be seen in one image.
To adjust the Window, click and drag the cursor:
• Left to right to increase the Window
• Right to left to decrease the Window
To adjust the Level, click and drag the cursor:
• Bottom to top to increase the Level
• Top to bottom to decrease the Level
Window and Level default values
Window adjustment—increased for high contrast Level adjustment—increased for brightness
X ray of a hock
TIP: Drag the cursor
diagonally to adjust
the Window and the
Level simultaneously.

16 IDEXX EquiView® Digital Radiography System Operator’s Guide
Level and Strength Adjustments
You can apply different algorithms to the image by adjusting the numbers in the Image Manipulation
dialog box.
Level—Adjusting the Level between and 1 and 4 flattens or deepens the image.
Strength—Adjusting the Strength between 0 and 100 softens or sharpens the image.
Zoom, Rotate and Move Adjustments
Zoom—To zoom in on an image, press and hold the Z key on the keyboard and then scroll with the
mouse. Or, right-click and scroll up.
Rotate—To rotate an image counterclockwise, press and hold the A key on the keyboard. To rotate
the image clockwise, press and hold the S key on the keyboard.
Move—To move an image, press and hold the M key on the keyboard and scroll in the direction you
want to move the image.
Image Manipulation
dialog box
TIP: Click Original to return the
image to its original state after
you have applied different Level
and Strength adjustments.
Level/Strength settings 1/70 (Default = 3/85) Level/Strength settings 4/100 (Default = 3/85)
Zoomed, rotated and moved image
IDEXX EquiView® Digital Radiography System Operator’s Guide 17
Printing Images
Printer Settings
If you have already installed a printer, when you click the printer icon, the Printer Settings dialog box
opens.
1. Choose the layout you want for your printed image series.
NOTE: For optimal printing, we recommend printing the images in Landscape, as this allows
the image to fill most of the paper size.
2. Select the printer and choose the paper size.
3. Click Print.
NOTE: The EquiView Digital Radiography System currently prints only FULL series of images, rather
than individual images. To print individual images, use the Snapshot tool from the Review Images
toolbar, paste the image into a graphics program and print from there.
Preview Mode
You can preview the images. Click Print when ready.
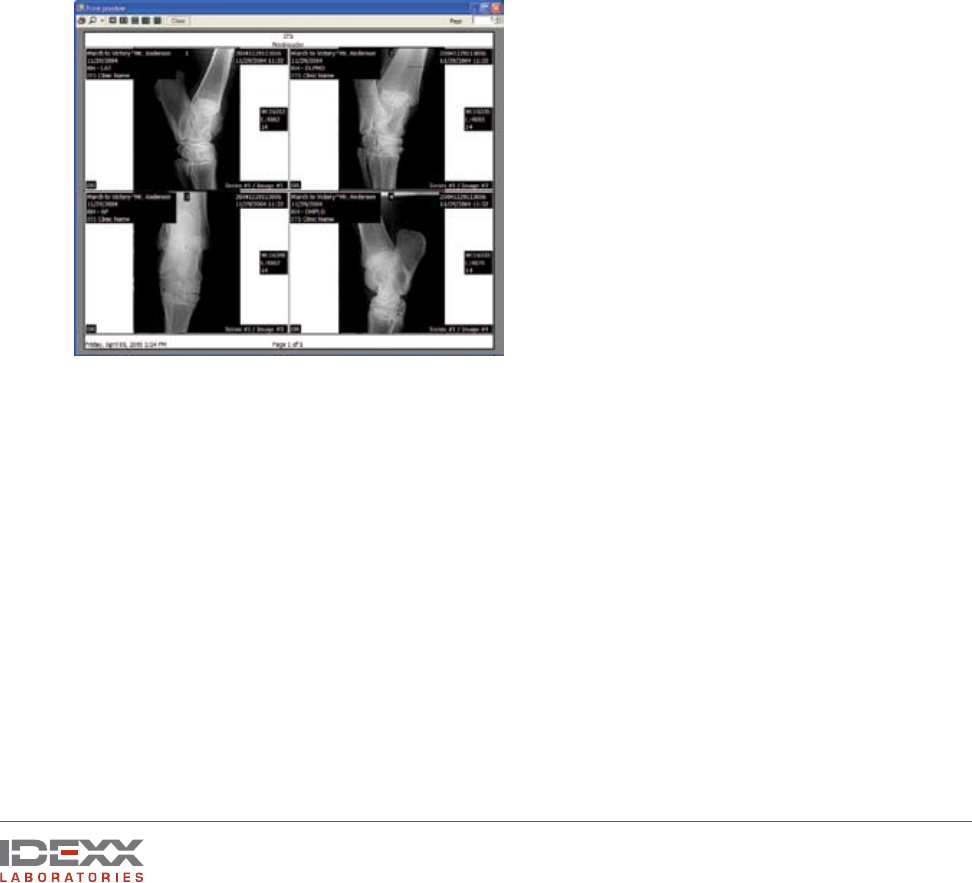
Print Preview

18 IDEXX EquiView® Digital Radiography System Operator’s Guide
Exporting Images and Creating CDs
The IDEXX EquiView® Digital Radiography System lets you select an image series to export or save
to a CD.
Exporting Images
To export images:
1. From the Browse locally stored images screen, select the image series you want to export.
To select multiple series, press and hold the CTRL key while selecting.
2. Click the Export link at the bottom of the screen to open the Export Images dialog box.
3. Choose JPEG, DICOM, RAW, or any combination of the three types of images, to indicate
how you want the images to be exported.
4. Select the location where you want to save the exported images.
NOTE: The default location for exported images is the Images to Export folder located on
your desktop. The images that you exported are saved in a subdirectory of the exam name
as “the horse’s name_date_time of exam.”
Creating a Patient CD
To create a patient CD:
1. Click the Create Patient CD link at the bottom right of the Browse locally stored images
screen. The CD Drive (D:) screen appears.
2. In the CD writing tasks section, click the Write these files to CD link.
3. Follow the on-screen instructions (accept the default values) to create your patient CD.
Export Images dialog box
Write these files to CD link

IDEXX EquiView® Digital Radiography System Operator’s Guide 19
Viewing the Patient CD Images
Insert your patient CD into the CD drive. The patient information appears. Follow the viewing
instructions on the patient CD.
NOTE: Because the viewer is running off the CD, it may take a little while to open the image.
NOTE: IDEXX recommends that the viewer for the patient CDs not be installed directly onto any
computers.
NOTE: The default view format is JPEG, but you can view the images as DICOM images by selecting
the check box in front of the series name and clicking the View DICOM images button. To view the
DICOM files, you must have the Microsoft.NET Framework 1.1 software (or later) installed on your
computer. If the software is not already installed, follow the instructions below.
To install the Microsoft.NET Framework software:
1. The patient CD is equipped with the .NET Framework software and will run the installer when
you choose to view DICOM images. Select Authorize this script from the drop-down list.
2. If the .NET Framework software is not installed, you will be asked to install it. Click Yes. The
.NET Framework setup screen appears and begins extracting the necessary files.
3. The license agreement appears. Select I agree and click Install. The .NET Framework
software installation begins. A message appears when installation is complete.
Because your EquiView Digital Radiography System is protected with the industry standard in virus
protection software, you may get a “Malicious script detected” warning when you choose to view
DICOM images from the patient CD.

20 IDEXX EquiView® Digital Radiography System Operator’s Guide
System Backup
Your IDEXX EquiView® Digital Radiography System has been preloaded and configured to back up
onto an external hard drive.
To back up the EquiView Digital Radiography System:
1. Connect the external hard drive to the EquiView Digital Radiography System computer and
to a power outlet if necessary.
2. Disable the Norton Antivirus software by right-clicking the Norton Antivirus icon and
selecting Disable Auto-Protect. You will be asked to choose a duration; select Until system
restart.
3. Stop the SQL Server Service by right-clicking the SQL Server icon and selecting
MSSQLServer - Stop. When you are asked to confirm your decision, click Yes.
4. On the front of the hard drive, press the blue button. The program, Retrospect 6, starts
scanning your computer.
At the end of the backup process you may see a short “execution error” list. This is normal
as not all resident applications can be shut down. The Retrospect software will close when it
is finished, signifying the successful completion of the backup.
NOTE: Do not run any programs while the backup is running.

IDEXX EquiView® Digital Radiography System Operator’s Guide 21
Troubleshooting
This table identifies possible problems and procedures to fix them:
Problem Potential cause Troubleshooting procedure
EquiView Digital
Radiography System
does not turn on
• No power
• Faulty power switch on
the computer
• Check the power cord, plugs, and sockets
• Check the fuses
• Contact a service technician
Computer does not
identify the digital
X-ray plate
• No cable connection
between the plate and
the computer
• Software not started
• Check the cable connection from the plate
to the computer and, if necessary, make the
connection
• Start the EquiView software and wait until the
connection has been made
Starting the EquiView
software produces
“Error initializing
device. Could not
connect to Meteor II
CL hardware...”
• This message
indicates that the
EquiView software
cannot communicate
with the Matrox video
card.
• Make sure the plate cable is correctly
connected to the computer. Try to run the
EquiView software
again.
• If the same message appears, try the
following:
Choose Start> System> Hardware and then
click Device Manager. You should see a list of
devices, including the Matrox Meteor II. The
associated icon should be green with no other
symbols. Click the icon and click Properties.
The device should be enabled. If the device is
disabled, click Enable. If this does not solve the
problem, try restarting the computer by turning
it off and waiting a few minutes before restarting.
If you still get the error, contact IDEXX Technical
Support.
The EquiView
software opens but
new X rays do not
appear or an image
with a broad white
region appears.
• Error in
synchronization or
error in connection to
trigger synchronization
unit.
• Check synchronization. Is the trigger
synchronization unit connected correctly?
Check all connections, and check and/or
replace batteries.
Image is
underexposed or
overexposed.
• Wrong exposure
factors
• Presets for first view
images not optimal
• Check that exposure factors on your X-ray
source are set correctly. For example, 80
kVp and an mAs of 1.8 (0.12 seconds on the
MinXray) should give a good image of most
leg joints in the horse.
• It is possible to adjust the presets in
the system that will globally change the
appearance of the first view images (the
view portrayed on-screen before any manual
manipulation takes place). Your system was
adjusted for your preference at installation. If
your images are not diagnostic in the first view,
contact IDEXX Technical Support.
NOTE: Error messages without titles generally emanate from the Microsoft Windows® XP® operating
system software. Contact IDEXX Technical Support for assistance.

22 IDEXX EquiView® Digital Radiography System Operator’s Guide
Cleaning and Maintenance
Cleaning
Plastic surfaces must be cleaned only with a soap solution. If you use other agents (e.g., those
with a high alcohol content), the plastic will be damaged. Do not use corrosive, solvent, or abrasive
cleaning or polishing agents.
To clean:
• Turn off the power switch and disconnect the power cord before cleaning the device.
• Make sure that water or other fluids do not get inside the device.
• Painted parts and aluminum surfaces should be wiped only with a damp cloth and a mild
cleaning agent, and then wiped with a dry cloth.
• Wipe chrome parts with a dry cloth only.
Disinfecting
CAUTION: The EquiView Digital Radiography System must not be subject to a bath disinfection,
sterilized in an autoclave, or put into another device for sterilization. The EquiView Digital
Radiography System can be wiped with a disinfectant. Suitable disinfectants are listed below.
The method of disinfection applied must correspond to the applicable legal regulations and
guidelines on disinfecting and explosion protection. Do not use corrosive, solvent, or gaseous
disinfectants. If you use disinfectants that form an explosive gas mixture, they must evaporate first
before turning on the device again.
• Turn off the power before disinfecting the device.
• All parts of the device, including accessories and connecting cables, must be given only a
wiping disinfection.
• A spray disinfectant must not be used because it can enter the device.
If you use a room disinfectant atomizer, you must turn off the EquiView Digital Radiography System
and remove it from the area in which the spray disinfection is to be used. You can give the EquiView
Digital Radiography System a wiping disinfection in this case.
Maintenance
Maintenance consists of checks that the operator can perform and service performed by IDEXX
within the scope of service contracts or by service order or by persons expressly authorized by
IDEXX to perform such tasks.
Like all technical devices, the EquiView Digital Radiography System requires:
• Correct operation
• Regular inspection by the operator
• Regular maintenance and servicing
These measures help you maintain the working order and the operational reliability of your device.
As the operator of the device, you must abide by the regulations for prevention of accidents and the
local medical product law, as well as other regulations.
IDEXX EquiView® Digital Radiography System Operator’s Guide 23
Inspections
Safety inspections
To avoid malfunctions and to ensure personnel, patient, and device safety, IDEXX recommends
biannual inspections of the device.
These inspections are part of the preventative maintenance tasks
within the scope of IDEXX Laboratories, Inc. service contracts.
They include:
• Visual inspection for completeness and noticeable damage and defects as well as
contamination, parts sticking together, and wear that reduces safety
• Inspection of the necessary monitoring, safety, display, and annunciation devices
• Measurement of the safety-relevant output parameters
• Further special technical inspections for the respective product corresponding to the
generally recognized state of the art
• Further necessary inspections according to manufacturer’s details
NOTE: The maintenance and inspections must only be carried out by trained specialists.
Operator inspections
The operator needs to check the device for obvious defects (see table). If functional defects or other
deviations from the normal operating conditions occur, the operator must turn off the equipment and
inform IDEXX Technical Support. The equipment can only be used again after repair. Operation with
defective components can lead to an increased safety risk.
Interval Scope Method
Daily Damaged parts, inscriptions, warning signs Inspection
Daily All cables and connections (damage, breaks) Inspection
Daily Water leaks, unusual noises Inspection
Servicing
Servicing of the EquiView Digital Radiography Systems may only be carried out by personnel
authorized by IDEXX. The correct setting of the electromechanical and electronic components affects
the function, the image quality, the electrical safety, and the radiation exposure of patients and
medical personnel.
IDEXX recommends:
• Carry out the inspections indicated in the above table on a regular basis.
• Have the device serviced at least once a year by IDEXX. Devices used very often may need
to be serviced more frequently.
A service contract with IDEXX helps you preserve the value and safety of your device. All necessary
servicing, including safety inspections for preventative hazard protection, is performed at regular
intervals. IDEXX coordinates service intervals with you, depending on the service level you elect.
Please refer to our extended maintenance agreement terms for a complete description.
Repair
Defective components that influence the device’s safety must be replaced by original spare parts.
24 IDEXX EquiView® Digital Radiography System Operator’s Guide
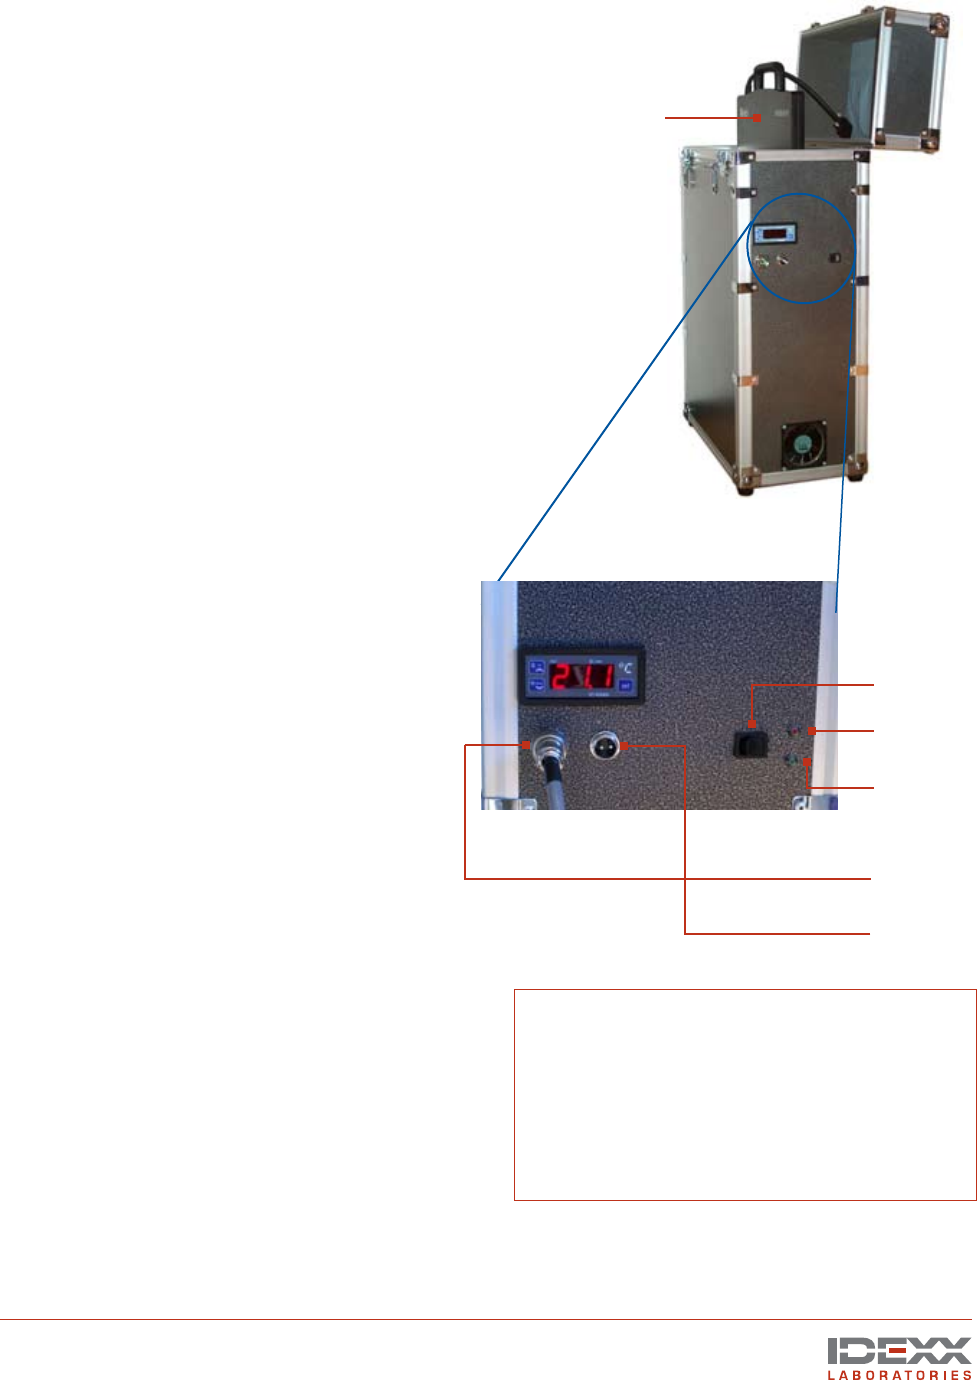
Transportation and Storage
The active imaging surface of the digital
X-ray plate is sensitive to temperature. To
ensure safe transportation and storage
of the digital X-ray plate, always transport
and store the plate in the supplied
case. Connect the digital X-ray plate to
a power supply (Connector 1) or to the
12-volt electrical system (Connector 2)
of your vehicle as shown in the diagram,
and turn on the temperature control.
This ensures that the plate is always
transported and stored in the optimum
temperature range.
CAUTION: At temperatures below 5°C
(40°F) or above 35°C (95°F), changes to
the surface can occur. At temperatures
above 40°C (104°F), depending on time
and temperature, irreversible changes
will take place.
If the ambient temperature rises above
27°C (80°F) or falls below 10°C (50°F),
make sure the case is connected to
a main power supply or to the 12-volt
electrical system of your vehicle and
is turned on. The plate can be used in
the extreme temperatures as long as it
is placed into the case between taking
shots.
A combined heating and cooling
element (Peltier element) is installed
in the transport case, and insulation
ensures that the temperature within
the case changes very slowly. The red
LED indicates temperatures below 15°C
(60°F) and the temperature control
module has automatically turned on
the heating. The green LED indicates
temperatures above 35°C (95°F) and
the cooling is active. If the temperature
range is above 15°C (60°F) or below
35°C (95°F), none of the LEDs light up;
the temperature in the case is within
the allowable temperature range and is
displayed on the temperature control
module. When heating or cooling is active,
the temperature control module will keep
heating or cooling until a temperature of
25°C (77°F) is reached in the case.
IMPORTANT: Transport and store the digital
X-ray plate only at temperatures of 5°–35°C (40°–
95°F). Transportation, operation, and storage
at temperatures exceeding this temperature
range may permanently damage the digital X-ray
plate. Damage to the plate due to inappropriate
temperatures is not covered by warranty.
digital x-ray plate
Transport case with
temperature control
On/Off switch
Indicator LED
“Heating”
Indicator LED
“Cooling”
Connector 1,
110-230V AC
Connector 2,
12V DC
IDEXX EquiView® Digital Radiography System Operator’s Guide 25
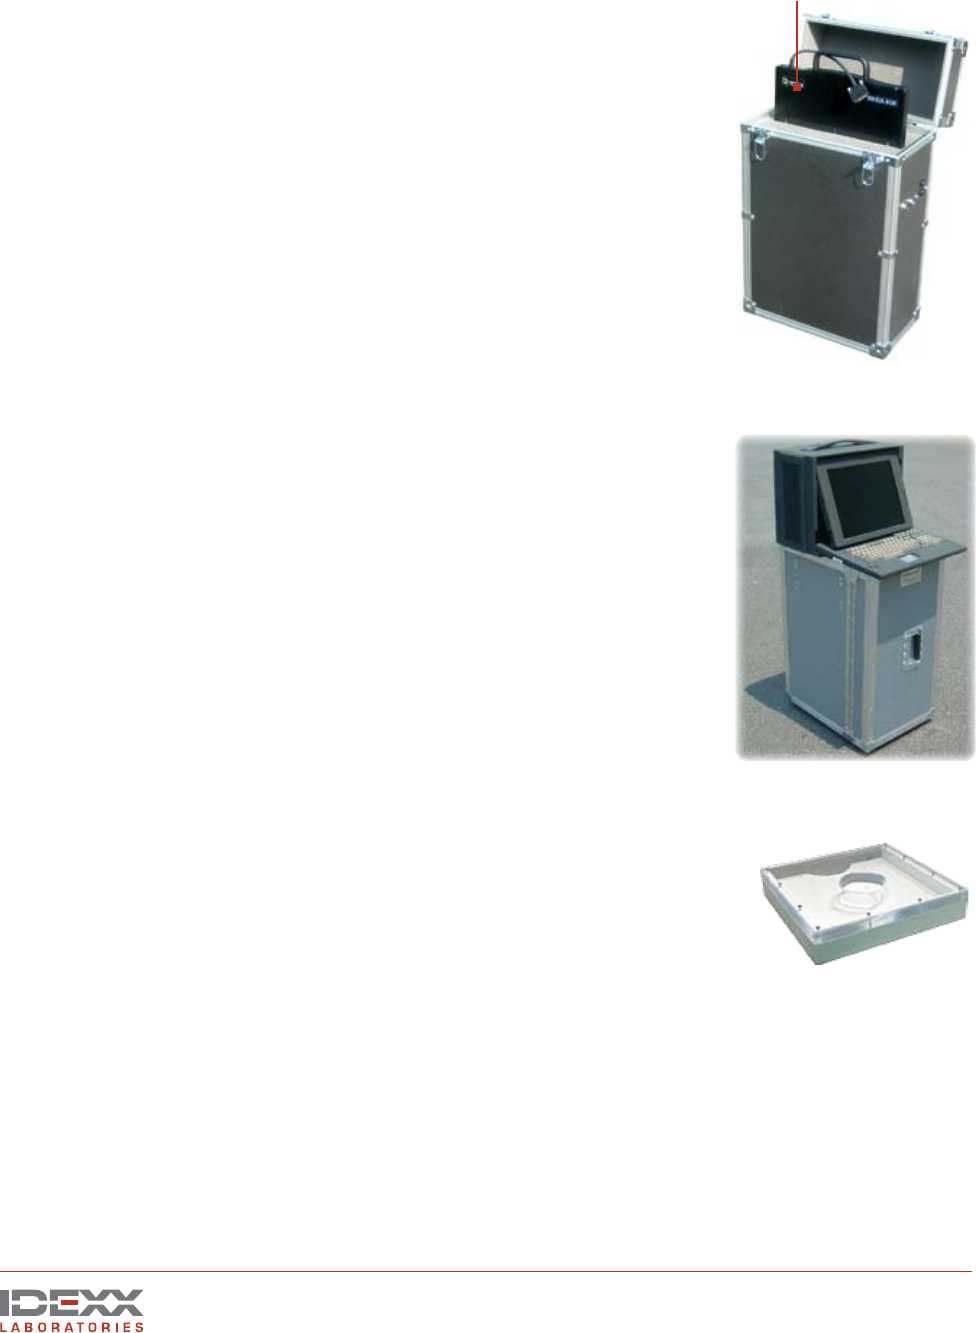
Optional Accessories
Transport case and X-ray plate
Only the supplied case with built-in temperature control may
be used for transporting and storing the digital X-ray plate. The
Peltier element built into the case maintains the temperature
inside the case reliably below 35°C, even in the event of external
temperatures around 45°C. The case containing the digital
X-ray plate must not be exposed to direct sunlight or kept inside
a vehicle in direct sunlight. The case must be supplied with power
using only the cable provided. The case can be connected to
a main power supply (110V–230V on socket 1) or to a 12-volt
vehicle electrical system (socket 2).
NOTE: After connecting the power supply, it is absolutely
necessary that the temperature control of the case be switched
on using the switch and the case closed. This ensures that the
valuable plate has a long service life.
UPS (Uninterruptible Power Supply)
The UPS ensures smooth operation of the EquiView Digital
Radiography System even if the power supply fails. Images not
yet stored are not lost.
Travel Bag
Travel bag for transporting of the EquiView Digital Radiography
System during journeys.
Optional equipment
• Toe blocks
• Tunnels
• Specialized items for holding the plates under a horse’s
foot and positioning the foot. Using this holder, you can
place the digital X-ray plate under the hoof and position
the hoof in a suitable manner.
Transport case with temperature
control for digital X-ray plate
digital x-ray plate
Transport case with computer on top
Tunnel for positioning the digital
X-ray plate under the hoof

26 IDEXX EquiView® Digital Radiography System Operator’s Guide
Technical Specifications
Type of device: Device for digital X-ray exposure, picture manipulation, and archive system
Dimensions
Computer dimensions
Height: 36 cm (14.2")
Depth: 26 cm (10.2")
Width: 41.5 cm (16.3")
Weight: 14.9 kg (~ 32.9 lb)
Location: mobile, portable unit
Digital X-ray plate dimensions
Length: 37.7 cm (14.84")
Width: 32.7 cm (12.9")
Height: 2.2 cm (0.9")
Weight: ~ 3.2 kg (~ 7 lb)
Location: mobile, portable unit
Active area: 20 cm x 25 cm (8" x 10")
Electrical Data
Computer
Power supply: 100V–240V AC ±10% 50/60 Hz
Plate case
Power supply: 100V–240V AC ±10% 50/60 Hz,
75 Wh power consumption or 12V DC using the car jack
3 Amps power required
NOTE: Do not leave the plate case in the car for more than 12 hours; the car battery might go low.
Environmental Conditions
Transportation and storage
Ambient temperature: 5°C to 35°C (40°F to 95°F)
Relative air humidity: 10% to 98% (noncondensing)
Air pressure: 500 hPa to 1060 hPa
Dimensions of the digital X-ray plate
32.7 cm
(12.9") 37.7 cm
(14.84")
2.2 cm
(0.9")
Dimensions of the computer
41.5 cm
(16.3")
26 cm
(10.2")
36 cm
(14.2")

IDEXX EquiView® Digital Radiography System Operator’s Guide 27
Operation
Ambient temperature: 5°C to 35°C (40°F to 95°F)
Relative air humidity: 10% to 75% (noncondensing)
Air pressure: 700 hPa to 1060 hPa
NOTE: The EquiView Digital Radiography System must not be operated in conditions under
which condensation can form in the device. Operate the device only under the above-mentioned
environmental conditions.
Computer Specifications
• CPU: Intel® Pentium® 4 processor, 2.4 GHz, 512 KB cache, 400 MHz system bus
• Memory: SDRAM: 1024 MB
• Video card: Matrox Meteor II CL frame grabber card
• Hard disk: 2 x 180 GB (total 360 GB), 7200 rpm EIDE UATA
• Drive: Sony DVD-RW/CD-RW combo drive
• Monitor: 15.1" 1024 x 768 TFT monitor
• 8–24 port Ethernet switch
• Cat6 Ethernet card
• Operating system: Microsoft® Windows® XP Professional

28 IDEXX EquiView® Digital Radiography System Operator’s Guide
Appendix A—List of Shortcuts
Press the indicated key and move your finger on the trackpad to:
M Move the image across the screen
Z Zoom the image
Press one of the following keys to:
A Rotate the image 90° counterclockwise
S Rotate the image 90° clockwise
Using a mouse, the following functions are available:
Window and Level—Click and hold, and then move your finger left to right and up and
down on the trackpad to adjust the settings for window and level, respectively.
Zoom—Right-click and hold, and then move your finger up and down on the trackpad to
zoom the picture in or out.
Move—Click and hold the mouse wheel. Move the mouse left to right and up and down to
move the picture in the indicated direction.
You can use the following shortcuts to undo specific changes:
Undo Window and Level—Double-click to undo these changes.
Undo Zoom—Double-click the right mouse button to undo these changes.
Undo Move—Double-click the right mouse button to undo these changes.

IDEXX EquiView® Digital Radiography System Operator’s Guide 29
Appendix B—Technique Chart
These settings were applied using a MinXray 80/15 Ultralight on a 1,100-pound quarter horse.
View kVp sec mAs
Film/Focus
Distance
P3
Lateral 66 0.1 1.5 20"
PD 66 0.12 1.8 20"
Navicular
Lateral 66 0.12 1.8 20"
60° 70 0.3 4.5 12"–16"
Fetlock
Lat/Obl 66 0.1 1.5 20"–24"
DP 66 0.12 1.8 20"–24"
Carpus
All views 66 0.1 1.5 20"–24"
Skyline 68 0.14 2.1 12"–16"
Tarsus
Lat/Obl 70 0.1 1.5 20"–24"
DP 70 0.12 1.8 20"–24"
Stifle
Lat/Obl 70 0.2 3 20"–24"
CC 70 0.4 6 close as possible
Neck
C1–3 70 0.2 3 20"–24"
C4ff 70 0.3 4.5 20"–24"
Whithers 70 0.3 4.5 18"–24"
NOTE: Higher kVp settings do not always produce a better image. If you are not satisfied with the
penetration or the contrast, try increasing the time (sec), and thereby the dose (mAs).
NOTE: Generally, the image is improved when the film/focus distance is smaller.

One IDEXX Drive
Westbrook, Maine 04092 USA
06-14899-00