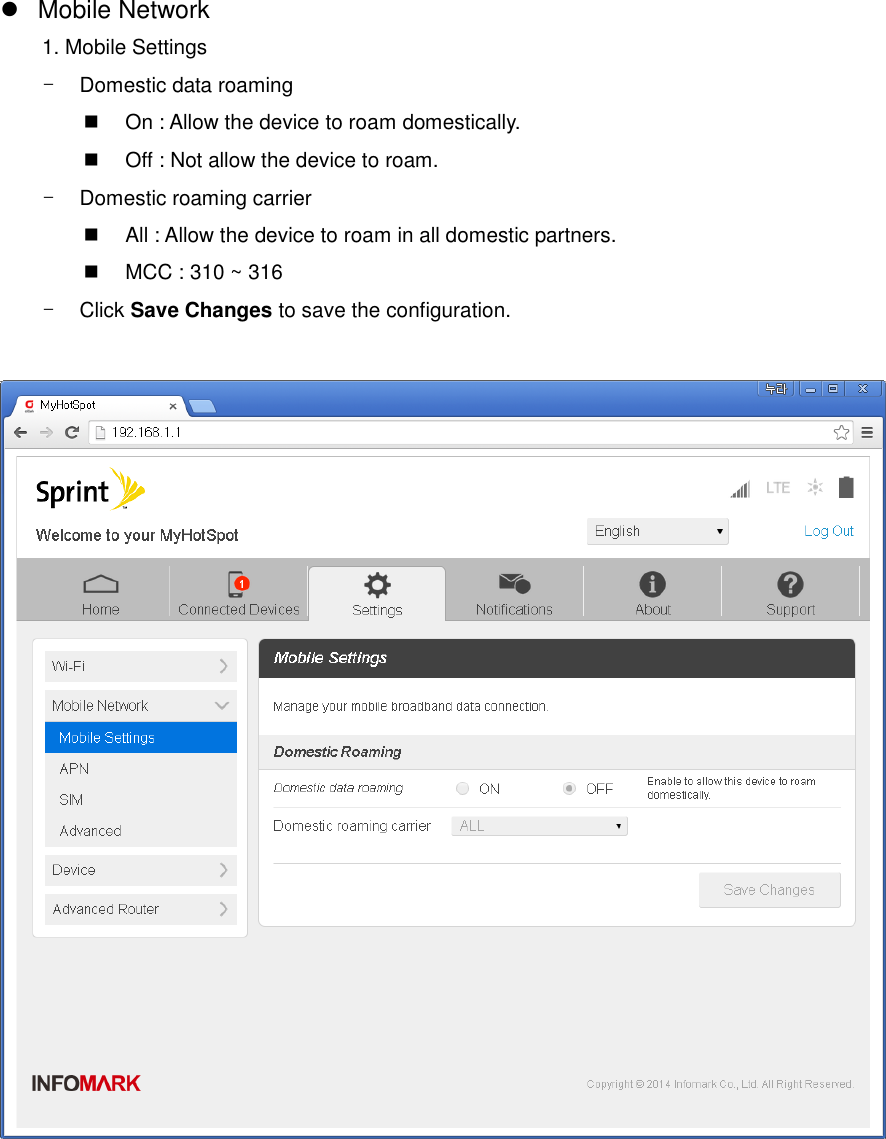
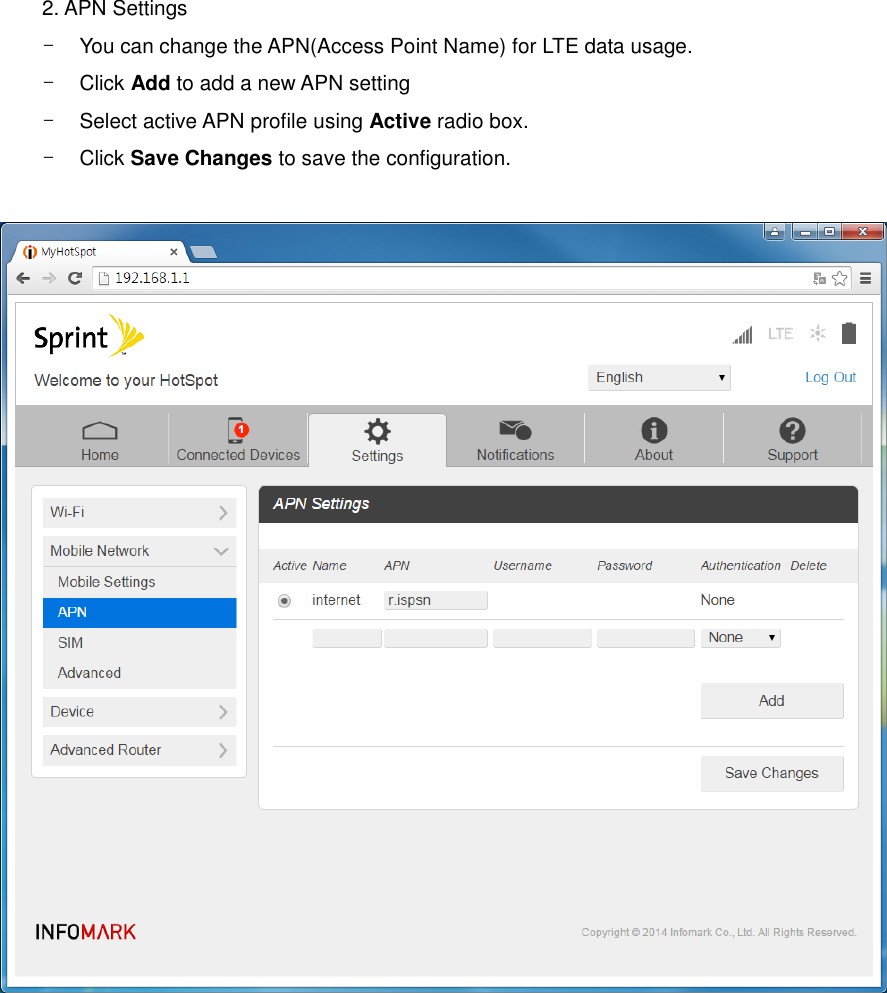
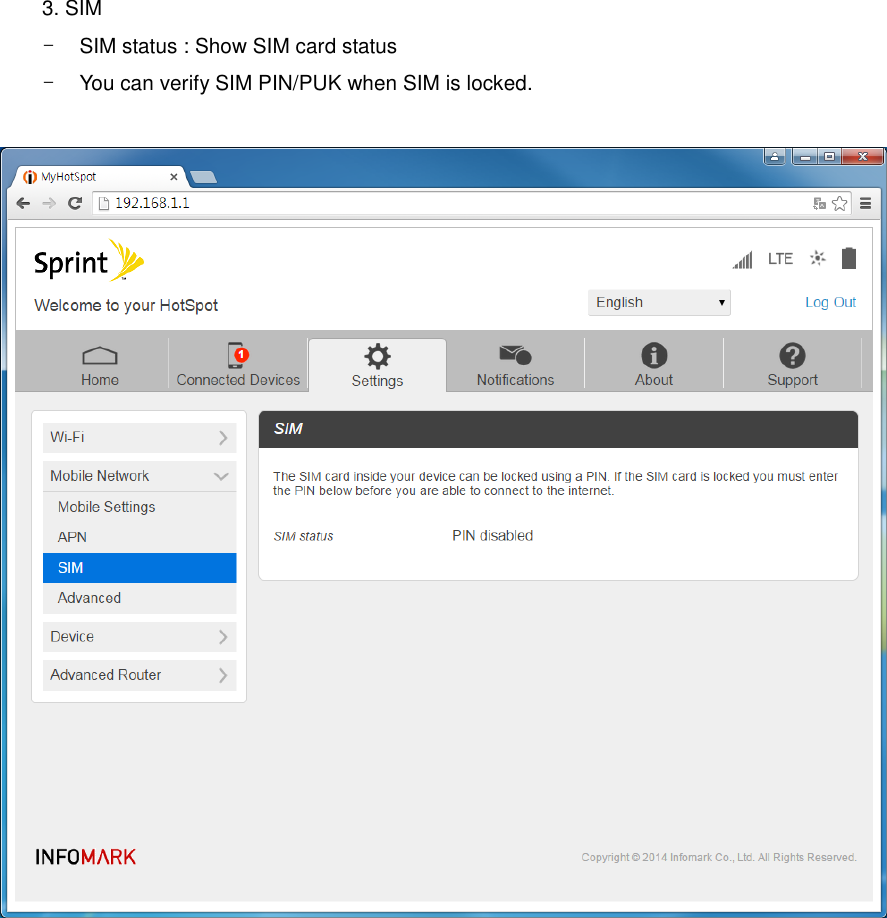
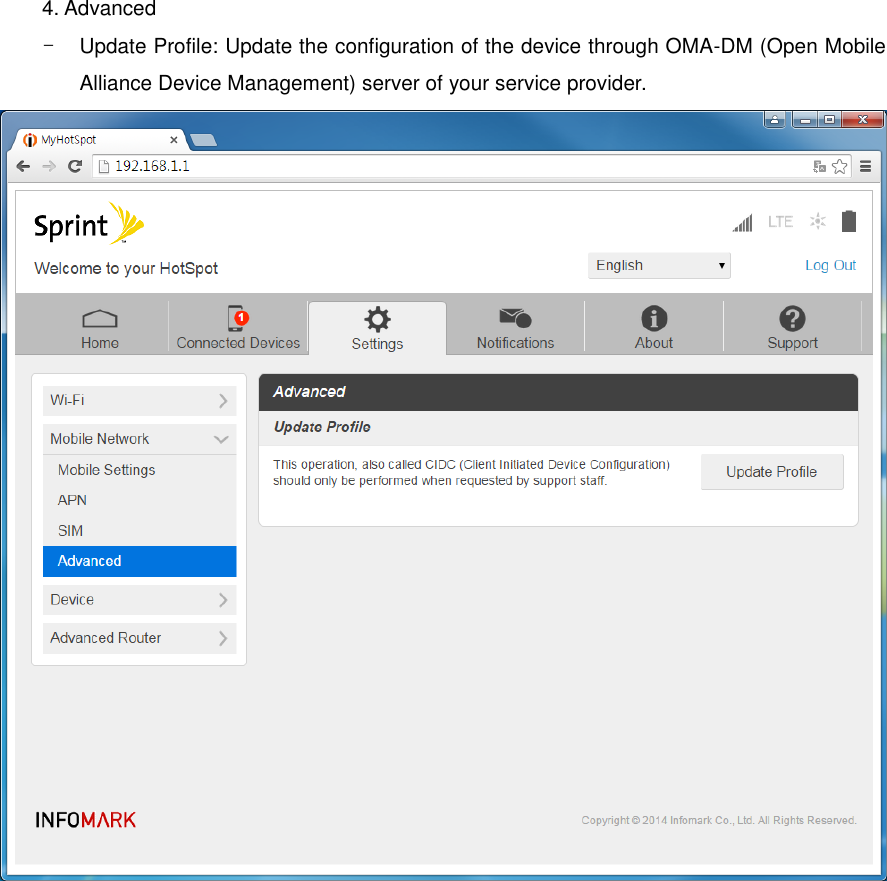
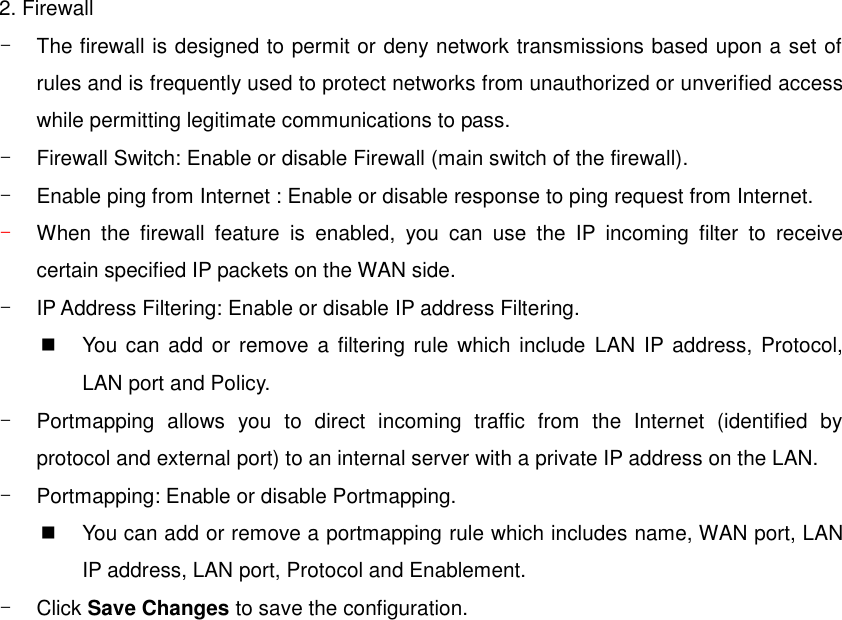
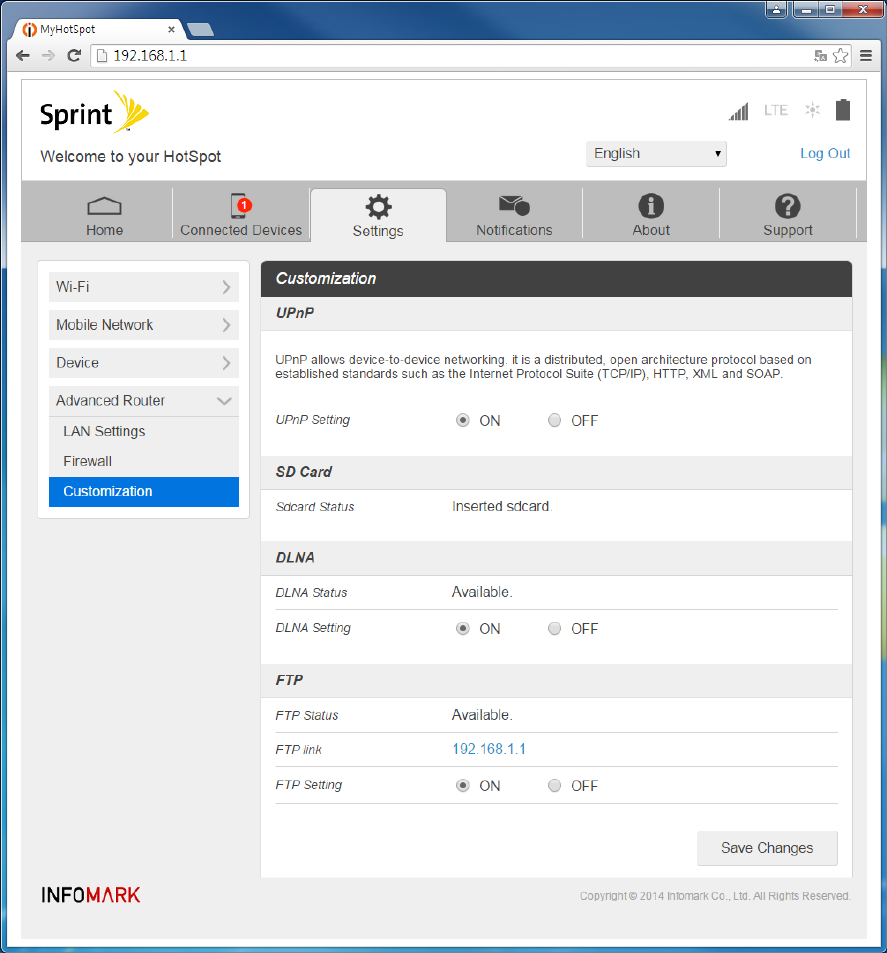
INFOMARK IML-C4300W Mobile Router User Manual for iPhone 4

Infomark Co., Ltd. Mobile Router for iPhone 4

Users Manual

MyHotspot User Manual (Draft version - 2015.04.01)   Model: IML-C4300W   INFOMARK
Contents 1. Getting Started ........................................................................................................................................ 4 1.1) Your Device ........................................................................................................................................... 4 1.2) Package Contents ............................................................................................................................... 5 1.3) System Requirements ....................................................................................................................... 6 1.4) Setting Up Service .............................................................................................................................. 6 2. Device Information ................................................................................................................................ 7 2.1) Introduction........................................................................................................................................... 7 2.2) How to use ............................................................................................................................................ 7 2.3) LED .......................................................................................................................................................... 10 3. Web Management ............................................................................................................................... 12 3.1) How to Connect to Web Management Page ...................................................................... 12 3.2) Web Management Page Menu .................................................................................................. 14 3.2.1) Home .................................................................................................................................................. 15 3.2.2) Connected Devices ....................................................................................................................... 16 3.2.3) Settings .............................................................................................................................................. 18
3.2.4) Notifications .................................................................................................................................... 38 3.2.5) About .................................................................................................................................................. 39 3.2.6) Support .............................................................................................................................................. 40 4. Frequently Asked Questions ............................................................................................................ 41 5. Technical Specification ....................................................................................................................... 42 5.1) Radio Frequency specification .................................................................................................... 42 5.2) Electrical and Mechanical specification .................................................................................. 42 6. Safety Information ............................................................................................................................... 43 6.1) Important Notice .............................................................................................................................. 43 6.2) Safety and Hazards .......................................................................................................................... 43 6.3) Proper Battery Use and Disposal .............................................................................................. 44 6.4) For Your Safety .................................................................................................................................. 44 7. Regulatory Notice ................................................................................................................................ 45 8. Warranty Information ......................................................................................................................... 47 8.1) TBD ......................................................................................................................................................... 47
1.  Getting  Started The following topics give you all the information you need to set up your device. 1.1)  Your  Device  1.  Power button 2.  Micro USB cable for charging external devices 3.  Charger LED (indicates external charging status) 4.  Micro USB port   5.  LED indicators (Wi-Fi, Network, Power) 6.  Reset button 7.  Nano SIM Card Slot/Micro SD Card Slot 8.  Battery  ※  "6, 7, 8" is under the back cover .
1.2)  Package  Contents                       1. MyHotspot                           2. Wall charger [5V/1A]           3. Micro USB cable                                                4. Quick Guide  ※  Failure  to  use  approved  accessories  provided  by  manufacturer  could  result  in  poor performance, electric shock, fire, injury or damage to MyHotspot or other property.
1.3)  System  Requirements The following items are required to use your MyHotspot.       One or more WiFi enabled devices which support Wi-Fi (IEEE 802.11b/g/n)   Web browser. The following browsers are supported:   ®  (version 7.0 or higher)    oogle Chrome™ (version 2.0.172.28 or higher)   ®  (version 4.0 or higher)      If you will be connecting your device through USB:    or Mac OS®  X (version 10.5 or higher)   SB 2.0 slot 1.4)  Setting  Up  Service 1. Setting Up MyHotspot -  Remove the back cover. -  Insert the SIM card if not already installed. -  Install the battery. -  Install the back cover onto MyHotspot. -  Press Power button on the side of the MyHotspot for about three seconds to turn the device on. -  Make a Wi-Fi connection from your PC or Smartphone to the device.   Default Wi-Fi SSID is "IML-C4300Wa- xxxxxx".   "xxxxxx" is the lower 6 Hex value of the Wi-Fi MAC Address.   Default Wi-Fi Key is "yyyyyyyy".     "yyyyyyyy" is the Serial number(8 Digit) of the MyHotspot.  2. Activate Your Device -  Power up your device -  Make  a  connection  to  Web  management  page  (please  refer  to  Section  3.3)  How  to Connect to Web Management Page ) -  Click 'Start Activation' on the Notification pop-up.
2.  Device  Information 2.1)  Introduction MyHotspot provide LTE service over Wi-Fi AP and up to 10 clients can connect at the same time. ※  Main Wi-Fi support up to 9 clients at the same time. To use 10 clients, Guest Wi-Fi should be enabled. Please check the instructions in "Wi-Fi basic settings" .  2.2)  How  to  use     The operation / battery charging time LTE MyHotspot can be charged over wall charger or Micro USB Cable suppler provided.   No Description Approximate Time 1 Full  Charging  time (Power off) Over Micro USB cable. 5h 18m Over wall charger  5h 12m 2 Operation time Battery is full charged  7h 45m 3 Stand by time Power On and full charged battery  8h 20m 4 Hibernation Hibernation Mode  1000h ※  Above  times  may  vary  with  the  number  of  users,  operating  environment  and  signal conditions.    Power Power can be supplied through a USB cable or internal battery.    Power On/OFF 1. Power On   Push power button (more than 2 seconds) and release when PWR, Network LED is turned on with Red color. 2. Power Off Push power button (more than 8 seconds) and release when  Network LED is Blinking with Blue color.     Hibernation Mode
1. Wakeup   Push  power  button  (more  than  2  seconds)  and  release  when  Power  LED  turns  Yellow, Network LED turns Green color. 2. Hibernation Entry Push  power  button  (between  2~8  seconds)  and  release  when  Power  LED  is  Blinking  with Yellow color. ※ Wi-Fi and LTE Network cannot be used in Hibernation Mode.     Device Reset   If the device is unstable or responds erratically, push the Reset Button for 1 sec to reset the device.  Reset  Button  is  located  under  the  back  cover.  Remove  the  back  cover  to  find  the Reset Button.    Device Factory Reset Factory default settings can be restored when the device is turned on.   Push power button for 15 seconds and release when Network LED is blinking with Blue color. Wi-Fi LED turns Red. The configuration settings of the device will be reset and restored to the factory default values. After Factory Reset, device will perform power on reset and reboot.     Nano SIM Nano SIM card is used for LTE service.   SIM Card slot is located under back cover. First remove back cover and then insert Nano SIM Card. There are two card slots, upper slot is for micro SD card and the lower one for nano SIM. Before inserting SIM Card, check the card orientation. Circuit side should face down.
   Micro SD Card You can use the storage function by installing a micro SD card. When you connect the device to a PC via USB cable after you insert a micro SD card, it is recognized as a removable disk on your PC.   You  can  also  use  the  media  server  (DLNA)  and  file  transfer  server  (FTP)  functions  by downloading  related programs  and apps on  your PC  or Smartphone. Some popular  Media Streaming apps are BubbleUPnP for Android devices and Gizmoot for iOS devices. And some popular apps for FTP include File Manager and AndFTP for both Android and iOS devices.   The micro SD Card Slot is located under back cover, first remove back cover and then insert micro SD Card into the upper slot. Before insert micro SD Card, check the orientation of the card.
2.3)  LED    Status LED Information MyHotspot support 4 status LED( Wi-Fi, Network, Battery, External changing )                                 1. Wi-Fi Status LED           2. Network Status LED           3. Battery Status LED           4. External charging status LED       Wi-Fi status   Wi-Fi status is shown on Wi-Fi LED. Wi-Fi On with Wi-Fi clients LTE Network : Green (Solid) Wi-Fi On without Wi-Fi clients LTE Network : Green (Blinking) Wi-Fi Off LED Off
  Network Status LTE signal level is shown on Network LED. No SIM Card Purple (Blinking) SIM Initial Fail or SIM Lock Yellow (Blinking) Connecting / Out of zone   Red (Blinking) Low level Red (Solid) Middle level Yellow (Solid) High level Green (Solid)    Battery Status Battery status is shown on PWR LED. 20~ 0% Red (Solid)   50~20% Yellow (Solid) 100~50% Green (Solid) When charging with wall charger or USB cable Red (Solid) When battery is fully charged Green (Solid )    Factory reset LED status Wi-Fi LED Green (Solid) Network LED Blue (Blinking)    Firmware updating LED status Network LED Blue (Blinking) ※  After downloading the update file, firmware update will start next booting.    External Charging status LED External Charging cable is in Use Red (Solid) External Charging cable is Not in Use LED Off
3.  Web  Management 3.1)  How  to  Connect  to  Web  Management  Page   Connect to Web management page over PC 1. Connect PC to the device using Wi-Fi. -  Default Wi-Fi SSID is "IML-C4300Wa- xxxxxx".   "xxxxxx" is lower 6 Hex. Value of Wi-Fi MAC Address. -  Default Wi-Fi Key is "yyyyyyyy".     "yyyyyyyy" is Serial number(8 Digit). 2. Start Web browser on PC -  Use web browser to connect Web management page -  Type Address http://192.168.1.1  3. Log In -  Click Log In on main page to log in web management page.   -  Enter the user  password (password by default) in the log in  window, and  then click Log In.
3.2)  Web  Management  Page  Menu     Web management page Display 1.  Network  Status:  Display  Signal  Level(7  bars)  ,  Current  Network(LTE)  and  Usage Indicator(star shape) 2. Battery Status: Display Battery Status and Charging status. 3. Language Setting: English(default)/Spanish 4. Main Menu. 5. Sub Menu & Status information. 6. Detailed information.        2 4 5 6 1 3
3.2.1)  Home   Show connection information of LTE and Wi-Fi AP and data usage of the device. 1. CONNECTION -  Network Status : Connected / Not Connected / Connecting / Disconnecting -  Network : Show type of connected mobile network (LTE) -  Time Connected : Show elapsed time after mobile network connection -  Data Used: Show amount of data after mobile network connection. -  Connect Button: You can connect to or disconnect from mobile network. -  Main Wi-Fi : Show status of Main Wi-Fi and clients -  Guest Wi-Fi : Show status of Guest Wi-Fi and clients 2. Data Usage -  Current Session : Show amount of data used in current session -  This Month: Show amount of data used in this month.
3.2.2)  Connected  Devices 1. Connected Devices -  Show connected clients through Main Wi-Fi, Guest Wi-Fi and USB Tethered device -  You can find the number of clients and the name or MAC address of each client. You can change the name of the client by clicking Edit.
2. Access Permissions -  Show Access permission for clients in Main Wi-Fi and Guest Wi-Fi. -  Access  Status:  You  can  change  the access  permission for  clients in  Main Wi-Fi and Guest Wi-Fi   'Allow all devices to access with password' - All the clients with correct password can access the device.   'Allow only users on Permitted list' - Only the clients in Permitted list can access the device. -  Add Device : You can add or remove clients to Permitted list -  Click Save Changes to save the configuration.
3.2.3)  Settings  Wi-Fi 1. Wi-Fi Basic Settings -  Set Basic configuration of Main and Guest Wi-Fi. -  Multi SSID: Enable or disable the Guest Wi-Fi. -  Multi SSID isolation: Enable or disable the access between clients of Main Wi-Fi and Guest Wi-Fi. -  Allow Guest Wi-Fi users to access the web interface: Enable or disable the web access from Guest Wi-Fi. - Wi-Fi Name: Set the SSID of Wi-Fi. Tip:  An  SSID  (Service  Set  Identifier)  is  a  unique  identifier  that  distinguishes  one hotspot  from  another.  Wireless  devices  use  the  SSID  to  establish  and  maintain wireless connectivity. You  should make the  SSID unique  and change  it on  a regular basis for optimal security - Wi-Fi Password: Set the password for accessing the Wi-Fi hotspot. ※  Note: The password cannot contain special characters. -  Authentication Method     WPA/WPA2 PSK : Wi-Fi devices that use either WPA or WPA2 can connect to the MyHotspot. Supported by most Wi-Fi devices.   WPA2-PSK: This is a stronger, newer security standard that is limited to newer Wi-Fi devices.   None: No security is used (no password is required to access the Wi-Fi network); this setting is not recommended. Anyone may access  your device and use your Internet connection. -  Encryption Method     Auto:  Wi-Fi  devices  that  use  either  TKIP  or  AES-CCMP  can  connect  to  the MyHotspot. Supported by most Wi-Fi devices.   TKIP: This is an encryption standard that is supported by most Wi-Fi devices.   AES-CCMP: This is a stronger, newer encryption standard that is limited to newer Wi-Fi devices. -  Privacy Separator: Enable or disable the privacy separator function. -  SSID Stealth     On: Prohibit the SSID from being broadcast.   Off: Enable the SSID to be broadcast. -  Maximum  Connections:  Set the  number  limit of Wi-Fi clients that can  connect to  the
device. You can change the number limit of Main Wi-Fi and Guest Wi-Fi using arrow button. - Wi-Fi Settings Reset - Restore all Wi-Fi settings to the default values. -  Click Save Changes to save the configuration.
2. Wi-Fi Advanced Settings -  Set Advanced configuration of Wi-Fi. -  Country: Set the country. - Wi-Fi Mode     2.4GHz 20MHz : Set the frequency to 2.4GHz and bandwidth to 20MHz   2.4GHz  40MHz  :  Set  the  frequency  to  2.4GHz  and  bandwidth  to  40MHz  if available   5GHz 20MHz : Set the frequency to 5GHz and bandwidth to 20MHz   5GHz 40MHz : Set the frequency to 5GHz and bandwidth to 40MHz if available - Wi-Fi Channel     Auto : Device automatically determine the Wi-Fi channel to use   You can also select Wi-Fi channel manually.   2.4GHz : ch. 1~11   5GHz : ch. 36/40/44/48/149/153/157/161 -  Tx Power : Set the transmit power of Wi-Fi     Long/Medium/Short: Long means higher power and Short means lower power. -  Click Save Changes to save the configuration.
  Mobile Network 1. Mobile Settings -  Domestic data roaming   On : Allow the device to roam domestically.   Off : Not allow the device to roam. -  Domestic roaming carrier     All : Allow the device to roam in all domestic partners.   MCC : 310 ~ 316 -  Click Save Changes to save the configuration.
2. APN Settings -  You can change the APN(Access Point Name) for LTE data usage. -  Click Add to add a new APN setting -  Select active APN profile using Active radio box. -  Click Save Changes to save the configuration.
3. SIM -  SIM status : Show SIM card status -  You can verify SIM PIN/PUK when SIM is locked.
4. Advanced -  Update Profile: Update the configuration of the device through OMA-DM (Open Mobile Alliance Device Management) server of your service provider.
 Device 1. Preference -  Sleep Mode can set how soon the device goes into power management mode when no Wi-Fi clients are connected to it. -  Time out on battery - Set the time-before-sleep when device is on battery power. -  Time  out  on  AC  -  Set  the  time-before-sleep  when  is  connected  to  the  AC  adaptor through the USB cable. -  Time out on USB - Set the time-before-sleep when device is connected to a computer through the USB cable. -  Click Save Changes to save the configuration.
2. Web Interface -  Display Password: Show or Hide the password while changing the password. -  Change Password: Change the password of device's Web management page. -  Click Save Changes to save the configuration.
3. Software Update -  Show Software Information and perform software update. -  Auto Update : Enable or Disable automatic firmware update from remote server. -  Firmware : Show the version for the software and last date of update check. -  Last Update : Show the information about current software. -  Update History : Show software update history. -  Update Firmware - Update the firmware of the device through OMA-DM server of your service provider. -  Manual Update: You can update the firmware using a file stored in PC. Choose the file using Choose File and click Manual Update to proceed with manual firmware update.
4. Backup and Restore -  Backup and Restore device settings -  Download backup: Click Backup Now to save the system configuration parameters in the path you desired. -  Restore  from  backup:  Click  Choose file  to  select  a  file  saved  previously to  restore. Then click Restore Now to proceed with restoring. -  Restore  device  to  factory  defaults:  Click  Restore  factory  defaults  to  reset  to  the factory default settings.
5. Connection History -  Show Data Connection History. -  Each  record  shows  the  profile  name,  start  time,  end  time,  duration,  upload  and download traffic volume. -  Click Clear History to clear all the connection history.
6. System Logs -  Show System Logs -  Each record shows the system events, such as connect, disconnect and other system events. -  Enable Logs : Enable or disable logging system events -  Click Clear logs to clear current logs. -  Click Download logs to save logs into a PC. -  Click Save Changes to save the configuration.
 Advanced Router 1. LAN Settings -  Set Advanced LAN parameters such as IP, DHCP, DNS. -  IP address: Set the IP address of the device. -  Subnet mask: Set the subnet mask of the device. -  VPN pass-through: Enable or Disable the VPN pass-through function. -  DHCP Server: Enable or Disable DHCP server function. When DHCP server is enabled, the  device  provides  the  TCP/IP  configuration  automatically  for  the  LNA  clients  that support  DHCP  client  capability.  If  DHCP  server  is  disabled,  each  client  must  be configured manually. -  DHCP IP range: Set the range of IP address pool assigned to DHCP clients. -  DHCP lease time: Set the lease time of the IP address.   -  DNS manual mode: You can set the address of DNS manually when it is on -  Click Save Changes to save the configuration.
2. Firewall -  The firewall is designed to permit or deny network transmissions based upon a set of rules and is frequently used to protect networks from unauthorized or unverified access while permitting legitimate communications to pass. -  Firewall Switch: Enable or disable Firewall (main switch of the firewall). -  Enable ping from Internet : Enable or disable response to ping request from Internet. - When  the  firewall  feature  is  enabled,  you  can  use  the  IP  incoming  filter  to  receive certain specified IP packets on the WAN side. -  IP Address Filtering: Enable or disable IP address Filtering.   You can  add or  remove  a filtering  rule which include  LAN  IP address, Protocol, LAN port and Policy. -  Portmapping  allows  you  to  direct  incoming  traffic  from  the  Internet  (identified  by protocol and external port) to an internal server with a private IP address on the LAN. -  Portmapping: Enable or disable Portmapping.   You can add or remove a portmapping rule which includes name, WAN port, LAN IP address, LAN port, Protocol and Enablement. -  Click Save Changes to save the configuration.
3. Customization -  UPnP  (Universal  Plug  and  Play)  is  a  set  of  networking  protocols  that  allow  UPnP devices on a network to detect each other and connect with each other seamlessly and automatically,  and  establish  functional  network  services  for  data  sharing, communication,  and  entertainment.  Simply,  UPnP  allows  automatic  discovery  and configuration of devices attached to your LAN. -  UPnP setting : Enable or disable the UPnP function. -  SD Card : Show status of SD card. -  DLNA is an industry-wide standard for  sharing multimedia data over  a local network. DLNA server enables you stream Video and Audio in sdcard to DLNA compliant clients. -  DLNA Status : Show DLNA server status. -  DLAN Setting : Enable or disable DLNA server. -  FTP Status : Show FTP server status. -  FTP link : Show a link of FTP server browsers can open. -  FTP Setting : Enable or Disable FTP server. -  Click Save Changes to save the configuration. ※  Account  information  for  FTP  -  ID  :  “user”  and  Password  :  same  as  Web  password (“password” by default)
3.2.4)  Notifications Show Notifications on the device.
3.2.5)  About Show information about the device.
3.2.6)  Support Show device Support Information.
4.  Frequently  Asked  Questions   How can I tell the device is working after power up? 1. Check LEDs on the front side. Below is for normal operation.  Wi-Fi Status LED - Green (solid or blink)   Network Status LED - Green, Yellow or Red (solid)   Battery Status LED - Green, Yellow or Red (solid) 2. If the device does not power up, please charge it first and try again. 3. If the device does not power up after charging, please contact customer service.    How can I tell I'm connected to LTE? 1. Check Network Status LED on the front side. If it’s connected to LTE, it will show either solid green or yellow. If it shows solid red, it means LTE service is not available. 2. Check your notebook or Smartphone to verify if internet service is available. 3. Check Web Management page if it is connected to the LTE Network   How do I connect to Wi-Fi? 1. Windows XP : Control panel -> Network Connection -> View Available Wireless Networks -> check IML-C4300W and connect 2. Windows  Vista  /Windows  7  :  Control  panel  ->  Network  and  Internet  ->  View  network status and tasks -> Connect to a network -> check IML-C4300W and connect 3. Windows 8 : Settings -> select wireless icon -> check IML-C4300W and connect 4. Smartphones : Settings -> Wi-Fi -> check IML-C4300W and connect   What do I do if I forget the Main or Guest Wi-Fi password? Check "Device factory Reset" on the manual   What do I do if I forget the Administrator password?   Check "Device factory Reset" on the manual
5.  Technical  Specification   5.1)  Radio  Frequency  specification LTE Standard : LTE Rel9 Cat4   Frequency Band :   - B25 (FDD) : 1850-1915 MHz - B26 (FDD): 814-849 MHz   - B41 (TDD): 2496-2690 MHz Air Interface : Internal Antenna Max output power : 23dBm Wi-Fi Standard : IEEE802.11 a/b/g/n   Frequency :   - 2.4GHz : 2412 ~ 2462MHz - 5GHz : 5180MHz ~ 5240MHz, 5745MHz ~ 5825MHz Air Interface : Internal Antenna   Bandwidth : HT20/HT40 MIMO : 2TX2RX support (Default 1T1R) SSID : Multiple-SSID support(2 SSID)  5.2)  Electrical  and  Mechanical  specification Operating Voltage Internal Battery - Nor. 3.8V (min 3.3V/max 4.35V) Battery (Li-Ion) 3.8V / 2,420mAh Wall charger 5V/1A Dimension   104.0 x 59.0 x 11.5mm Weight 87g
6.  Safety  Information   Read important safety information about your device. 6.1)  Important  Notice Due to the nature of wireless communications, transmission and reception of data can never be guaranteed.  Data  may  be  delayed,  corrupted  (i.e.,  have  errors)  or  be  totally  lost.  Although significant  delays or  losses  of  data  are  rare  when  wireless  devices  such  as  the  INFOMARK MyHotspot are used in a normal manner with a well-constructed network, your device should not be used in situations where failure to transmit or receive data could result in damage of any kind to the user or any other party, including but not limited to personal injury, death, or loss of property. INFOMARK accepts no responsibility for damages of any kind resulting from delays or errors in data transmitted or received using your device, or for failure of your device to transmit or receive such data.  6.2)  Safety  and  Hazards Do not operate your device under the following conditions.   ●  In areas where blasting is in progress   ●  Where explosive atmospheres may be present   ●  Near medical equipment   ●  Near life support equipment, or any equipment that may be susceptible to any form of radio interference.  In such areas, your device MUST BE POWERED OFF. Your device can transmit signals that could interfere with this equipment.   Do not operate your device in any aircraft, whether the aircraft is on the ground or in flight. In aircraft,  your  device  MUST  BE  POWERED  OFF.  When  operating,  your  device  can  transmit signals that could interfere with various onboard systems.   ※  Note: Some airlines may permit the use of cellular phones while the aircraft is on the ground and the door is open. Your device may be used at this time.   The driver or operator of any vehicle should not operate the device while in control of a vehicle. Doing so will detract from the driver or operator’s control and operation of that vehicle. In some jurisdictions, operating such communications devices while in control of a vehicle is an offense.
6.3)  Proper  Battery  Use  and  Disposal   Follow these guidelines to ensure safe and responsible battery use. ● Do not open, disassemble, puncture, crush, bend, or shred.   ● Do not expose to water or other liquids, fire, explosion, or other hazards.   ●  Use the battery only in the INFOMARK MyHotspot.   ● If using with a charger, use only the AC charger supplied with your device.   ● Do not short circuit the battery.   ●  When replacing a battery, use the same model of battery that was supplied with your device.   ●  Follow local regulations when disposing of a used battery.   ●  Avoid dropping your device or the battery. If dropped and you suspect damage, take it to a service center for inspection.   ※  Note: Improper battery use may result in a fire, explosion, or other hazard.  6.4)  For  Your  Safety Follow the precautions below for your safety.   Keep away from high humidity.   Use in clean place.   Place on a stable platform to avoid dropping.  Don’t keep around electromagnetic waves.  Don’t place on heavy things.  Don’t expose to direct sunlight.  Don’t throw to avoid breakage.  Don’t place on hot object.   Keep away from pets and children.   Keep away from water.  Don’t hold power adaptor with wet hands.   Avoid extreme temperatures.  Don’t dispose of your phone in fire.
7.  Regulatory  Notice   This section contains regulatory information for your device.   The  design  of  the  INFOMARK  MyHotspot  complies  with  U.S.  Federal  Communications Commission  (FCC)  guidelines  respecting  safety  levels  of  radio  frequency  (RF)  exposure  for mobile devices, which in turn are consistent with the following safety standards previously set by U.S. and international standards bodies:   ●  ANSI / IEEE C95.1-1999, IEEE Standard for Safety Levels with Respect to Human Exposure to Radio Frequency Electromagnetic Fields, 3kHz to 300 GHz   ●  National  Council  on  Radiation  Protection  and  Measurements  (NCRP)  Report  86,  1986, Biological Effects and Exposure Criteria for Radio Frequency Electromagnetic Fields   ●  International Commission on Non-Ionizing Radiation Protection (ICNIRP) 1998, Guidelines for  limiting exposure to  time-varying electric, magnetic,  and electromagnetic  fields (up to  300 GHz)  FCC ID: YCO-IML-C4300W RF  Exposure  -  The  INFOMARK  MyHotspot  has  been  tested  for  compliance  with  FCC  RF exposure limits in a portable configuration. At least 1.0 cm of separation distance between the INFOMARK MyHotspot and the user’s body must be maintained at all times. This device must not be  used  with  any other  antenna or  transmitter that has  not  been  approved  to operate in conjunction with this device.   WARNING (EMI) - United States FCC Information - This equipment has been tested and found to comply with the limits for a Class B computing device peripheral, pursuant to Part 15 of the FCC  rules.  These  limits  are  designed  to  provide  reasonable  protection  against  harmful interference in a residential installation.   This equipment generates, uses, and can radiate radio frequency energy and, if not installed and  used  in  accordance  with  the  instructions,  may  cause  harmful  interference  to  radio communications. However, there is no guarantee that interference will not occur in a particular installation.   If this equipment does cause harmful interference to radio or television reception, which can be determined by turning the  equipment off and on, the user  is encouraged to  try to correct the interference by one or more of the following measures:   ●  Reorient or relocate the receiving antenna.   ●  Increase the separation between the equipment and receiver.   ●  Connect the equipment into an outlet on a circuit different from that to which the receiver is connected.
●  Consult the dealer or an experienced radio/TV technician for help.    CAUTION: Any changes or modifications not expressly approved by INFOMARK could void the user’s authority to operate the equipment.   This device complies with Parts 15, 24, and 27 of the FCC Rules. Operation is subject to the following two conditions: (1) This device may not cause harmful interference, and (2) this device must  accept  any  interference  received,  including  interference  that  may  cause  undesired operation.   Use only the supplied  antenna. Use  of unauthorized antennas,  or modifications,  could impair call quality, damage the phone, void your warranty, or result in a violation of FCC regulations. Do not use the phone with a damaged antenna. A damaged antenna in contact with the skin could cause a singe. Contact your local dealer for an antenna replacement.
8.  Warranty  Information   8.1)  TBD

Navigation menu