Inkel WD-1 Network AV adapter (WiFi) User Manual Part 1
Inkel Corporation Network AV adapter (WiFi) Part 1
Inkel >
Contents
- 1. User Manual Part 1
- 2. User Manual Part 2
User Manual Part 1

WD-1
NETWORK AV ADAPTER
ADAPTATEUR AV RÉSEAU
ADAPTADOR AV CON CONEXIÓN DE RED
OPERATING INSTRUCTIONS
GUIDE D’UTILISATION
INSTRUCCIONES DE FUNCIONAMIENTO

2
Safety Information
READ THIS BEFORE OPERATING YOUR UNIT
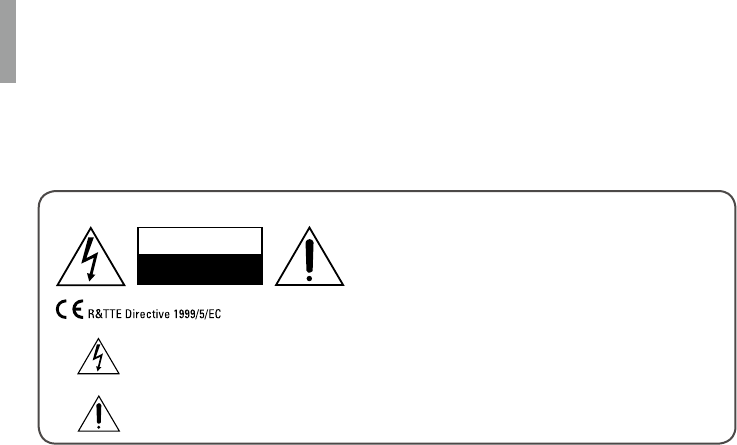
CAUTION
TO REDUCE THE RISK OF ELECTRIC SHOCK,
DO NOT REMOVE FRONT OR BACK COVER.
NO USER-SERVICEABLE PARTS INSIDE.
REFER SERVICING TO QUALIFIED SERVICE
PERSONNEL.
CAUTION
RISK OF ELECTRIC SHOCK
DO NOT OPEN
This symbol indicates the presence of uninsulated “dangerous voltage” within the product’s
enclosure that may be of sufcient magnitude to constitute a risk of electric shock.
This symbol indicates important operating and maintenance (servicing) instructions in the
literature accompanying the appliance.
WARNING: TO REDUCE THE RISK OF FIRE OR ELECTRIC SHOCK, DO NOT EXPOSE
THIS APPLIANCE TO RAIN OR MOISTURE.
CAUTION
•Leave space around the unit for sufcient
ventilation.
•Avoid installation in extremely hot or cold
locations, or in an area that is exposed to
direct sunlight or heating equipment.
•Keep the unit free from moisture, water, and
dust.
•Do not let foreign objects in the unit.
•Keep the ventilation openings clear of items,
such as newspapers, linens, or curtains.
•Keep open ame from candles or other
sources away from the unit.
•Observe the local regulations regarding
disposal of packaging materials, exhausted
batteries and old equipment.
•Do not expose the unit to dripping or
splashing, or place objects lled with liquids
such as vases.
•Do not let insecticides, benzene, or thinner
come in contact with the unit.
•Never disassemble or modify the unit in any
way.
Notes on the AC power cord and the wall
outlet
•The unit remains connected to AC power
as long as it is plugged into the wall outlet,
even if the unit has been turned off.
•To completely disconnect this product from
AC power, disconnect the plug from the wall
socket outlet.
•When setting up this product, make sure
that the AC outlet you are using is easily
accessible.
•Disconnect the plug from the wall outlet
when not using the unit for long periods of
time.
FCC Notice
This equipment has been tested and found
to comply with the limits for a Class B digital
device, pursuant to Part 15 of the FCC
Rules. These limits are designed to provide
reasonable protection against harmful
interference in a residential installation.
This equipment generates, uses and can
radiate radio frequency energy and, if not
installed and used in accordance with the
instructions, may cause harmful interference
to radio communications. However, there is
no guarantee that interference will not occur
in a particular installation. If this equipment
does cause harmful interference to radio or
television reception, which can be determined
by turning the equipment off and on, the user is
encouraged to try to correct the interference by
one or more of the following measures:

Safety Information
English
3
Reorient or relocate the receiving antenna.
Increase the separation between the equipment
and the receiver.
Connect the equipment to an outlet on a circuit
different from that to which the receiver is
connected.
Consult the dealer or an experienced radio/TV
technician for help.
This device complies with part 15 of the
FCC Rules. Operation is subject to the
following two conditions:
(a) This device may not cause harmful
interference, and
(b) This device must accept any
interference received, including
interference that may cause undesired
operation.
(FCC Part 15.21) Caution: changes or
modications not expressly approved by the
party responsible for compliance could void the
user’s authority to operate the equipment.
For Canadian customers:
This Class B digital apparatus complies with
Canadian ICES-003.
FCC Radiation Exposure Statement:
This equipment complies with FCC radiation
exposure limits set forth for an uncontrolled
environment. This equipment should be
installed and operated with a minimum distance
of 20 cm between the radiator and your body.
This transmitter must not be co-located or
operated in conjunction with any other antenna
or transmitter.
Important Safety Instructions
1 Read these instructions.
2 Keep these instructions.
3 Heed all warnings.
4 Follow all instructions.
5 Do not use this apparatus near water.
6 Clean only with dry cloth.
7 Do not block any ventilation openings.
Install in accordance with the
manufacturer’s instructions.
8 Do not install near any heat sources such
as radiators, heat registers, stoves, or
other apparatus (including ampliers) that
produce heat.
9 Do not defeat the safety purpose of
the polarized or grounding-type plug. A
polarized plug has two blades with one
wider than the other. A grounding type
plug has two blades and a third grounding
prong. The wide blade or the third prong
is provided for your safety. If the provided
plug does not t into your outlet, consult an
electrician for replacement of the obsolete
outlet.
10 Protect the power cord from being walked
on or pinched particularly at plugs,
convenience receptacles, and the point
where they exit from the apparatus.
11 Only use attachments/accessories
specied by the manufacturer.
12 Use only with the cart, stand,
tripod, bracket, or table
specied by the manufacturer,
or sold with the apparatus.
When a cart is used, use
caution when moving the cart/apparatus
combination to avoid injury from tip-over.
13 Unplug this apparatus during lightning
storms or when unused for long periods of
time.
14 Refer all servicing to qualied service
personnel. Servicing is required when
the apparatus has been damaged in any
way, such as power-supply cord or plug
is damaged, liquid has been spilled or
objects have fallen into the apparatus, the
apparatus has been exposed to rain or
moisture, does not operate normally, or has
been dropped.
Product Name: Network AV ADAPTER
Model Number: WD-1
Responsible Party Name:
ETRON CORPORATION
Address:
6120 Valley View Buena Park, Ca. 90620
Phone: 1-714-739-2000
URL: http://www.sherwoodamerica.com

4
Table of Contents
2 SAFETY INFORMATION
5 GETTING STARTED
5 What's Included
6 Installing the Remote Control Battery
6 Operating the range of the Remote
Control
7 Parts Description
9 MAKING CONNECTIONS
9 Connecting HDMI Components
10 Connecting Digital Audio Components
10 Connecting to a Network
11 Connecting Power
12 OPERATING YOUR DEVICE
12 Turning on Your Unit
12 Setting the Network Standby Control
12 Setting the Network Setup
14 Listening to Internet Radio
15 Listening to Music from the Media Server
16 Using the Sherwood Remote Application
21 Updating the Firmware
23 TROUBLESHOOTING
24 ADDITIONAL INFORMATION
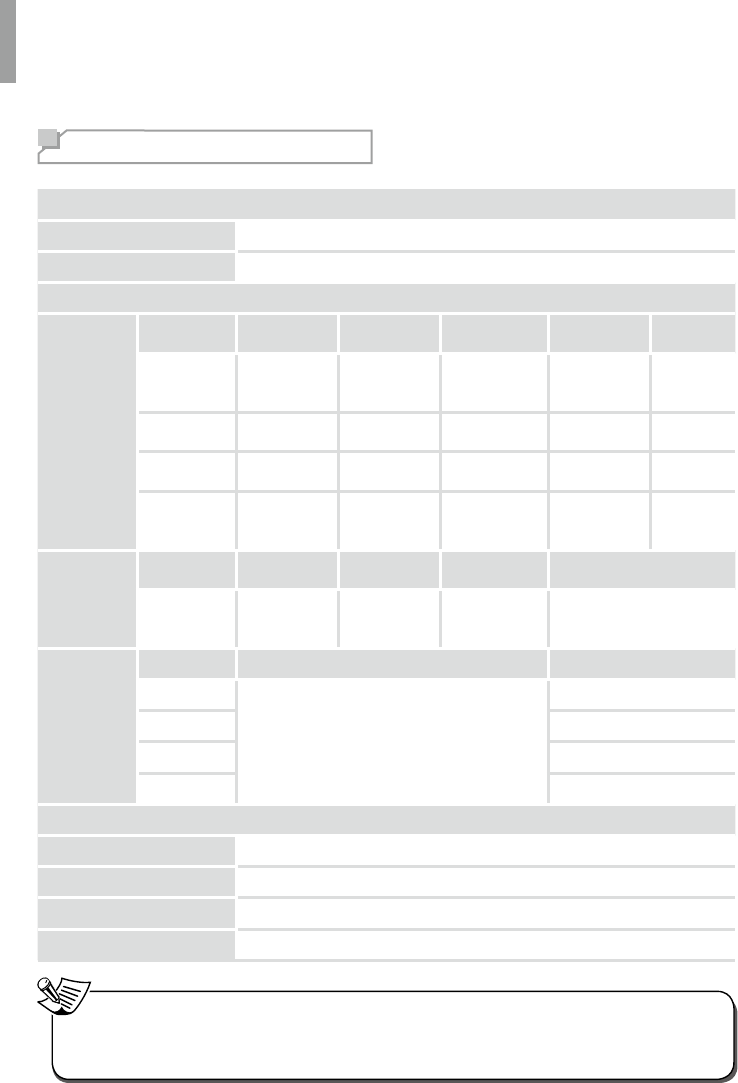
24 Specications
25 TRADEMARKS AND LICENSES
5
English
Getting Started
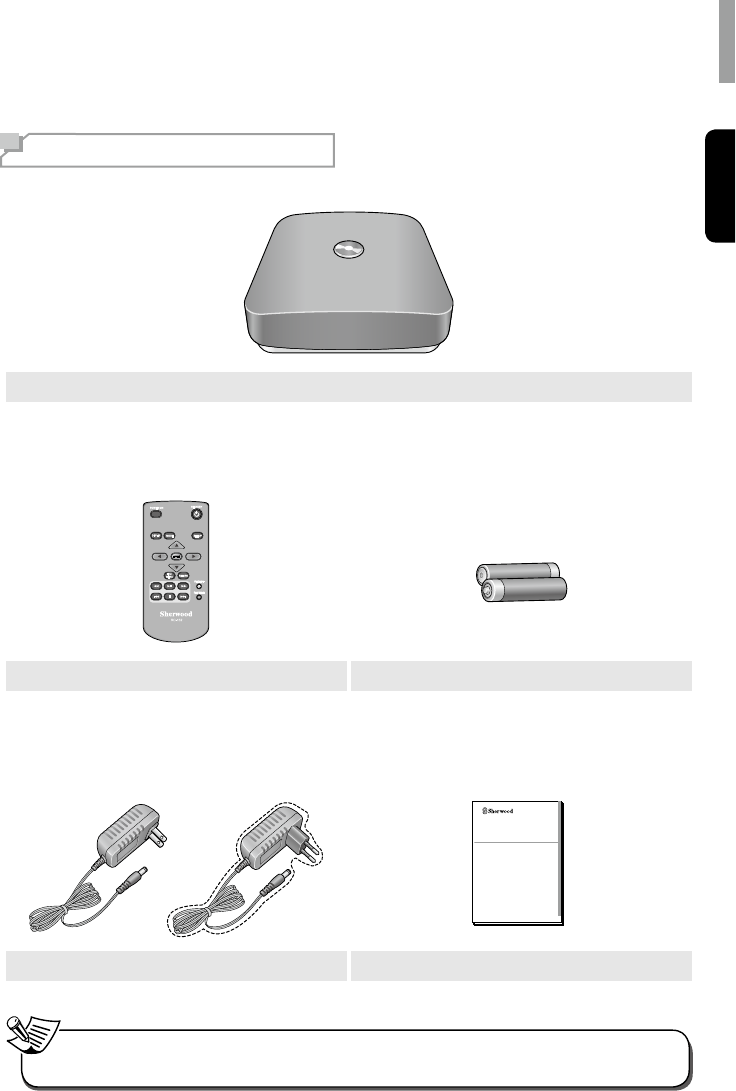
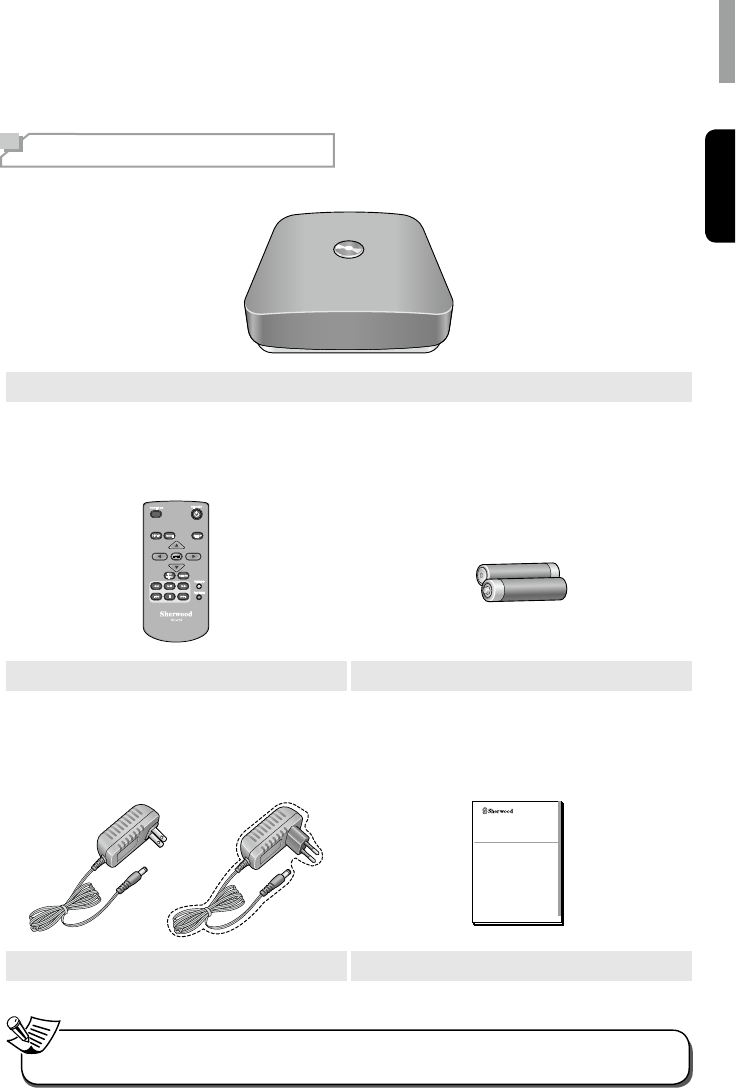
What's Included
Main unit
Remote control (1 ea) Battery “AAA” size, 1.5V (2 ea)
WD-1
NETWORK AV ADAPTER
OPERATING INSTRUCTIONS
Power adapter (1 ea) User manual (1 ea)
•The items supplied with your unit are subject to change without prior notice.
Note

WD-1 NETWORK AV ADAPTER
6
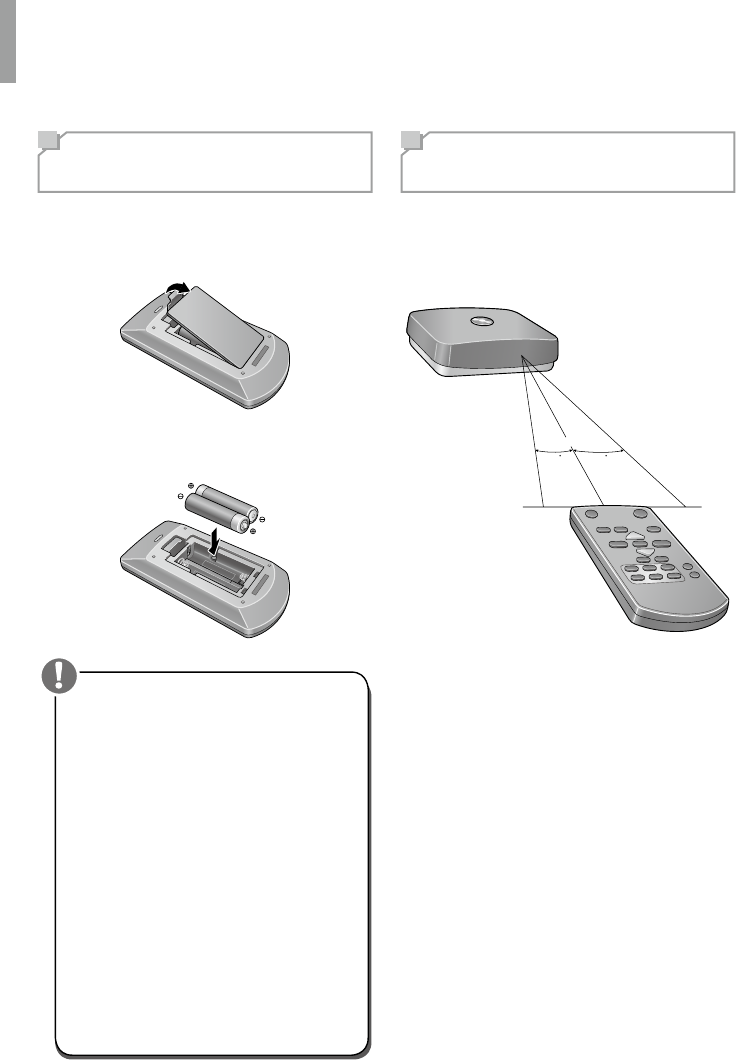
Installing the Remote
Control Battery
1Remove the battery cover.
2Insert two AAA size batteries with the
polarity matched properly.
•Always use alkaline batteries, and do not
use the rechargeable batteries (Ni-Cd
type).
•If the batteries run out, remove the old
batteries and replace them with new ones
within several minutes.
•If the batteries are removed or have been
exhausted for a longer period of time,
memorized contents will be cleared. In
this case, you should memorize them
again.
•If the battery is placed incorrectly, it can
cause explosion.
•Remove the battery if the remote control
is not used for a long period of time.
•Do not leave the product in a hot or
humid place.
•Do not handle and store the battery with
metallic tools.
Caution
Operating the range of
the Remote Control
Use the remote control within a range of
about 7 meters (23 feet) and angles of up
to 30 degrees aiming at the remote control
sensor.
30 30
7m

Getting Started
English
7
English
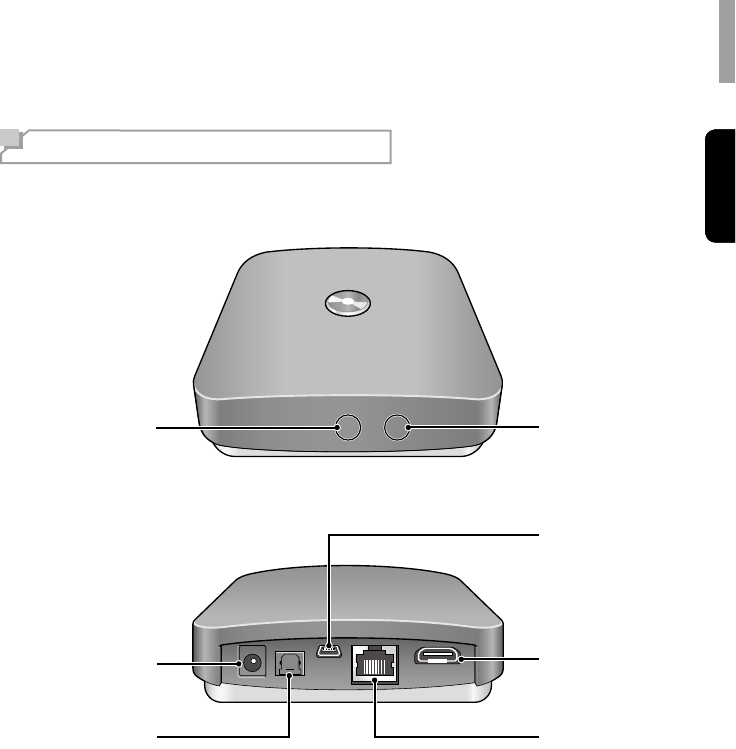
Parts Description
Front and Rear Panel
2
1
3
7
5
6
4
1
Status LED
2
Power Connector
3
OPTICAL OUT Connector
4
LAN/ETHERNET Connector
5
HDMI Connector
6
USB Connector (For Upgrade only)
7
IR Sensor
WD-1 NETWORK AV ADAPTER
8
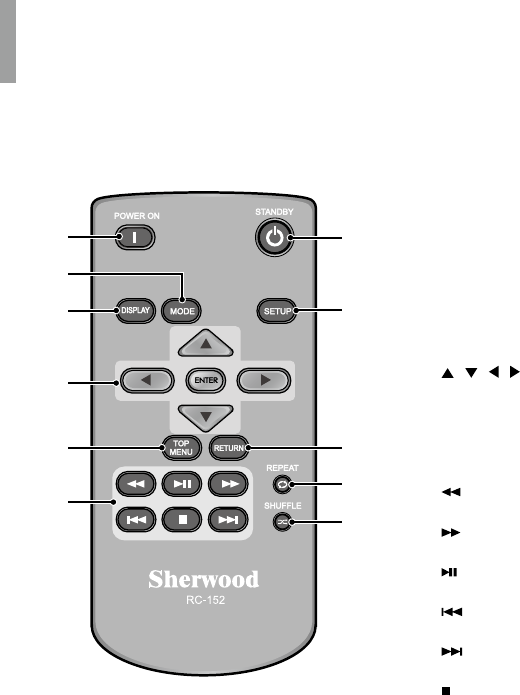
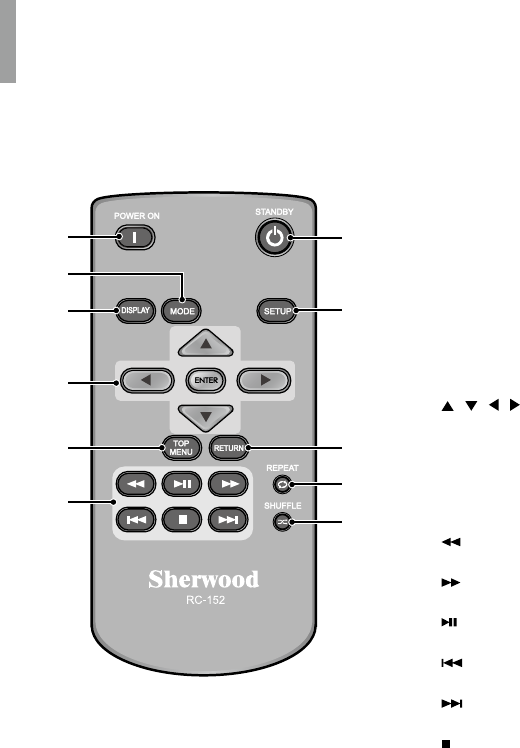
Remote Control
1
3
2
11
10
9
8
7
6
5
4
1
POWER ON
Turn on the main unit.
2
MODE
Adjust the screen resolution. (Original/Full)
3
DISPLAY
•When playing audio or video les, turns on
or off the progress bar.
•When viewing photos, turns on or off the
slideshow transition time display.
4
/ / / / ENTER
•Navigate through the menus.
•Conrm a setting option or menu.
5
TOP MENU
Move to the top menu for each media or
service.
6
Fast-reverse the current le.
Fast-forward the current le.
Play or pause playback.
Select the previous le.
Select the next le.
Stop playback.
7
SHUFFLE
Activate the random playback.
8
REPEAT
Activate the repeat function.
9
RETURN
Return to the previous menu.
10
SETUP
Enter or exit the system setup menu.
11
STANDBY
Turn off the main unit to the normal standby
mode.
9
English
Making Connections
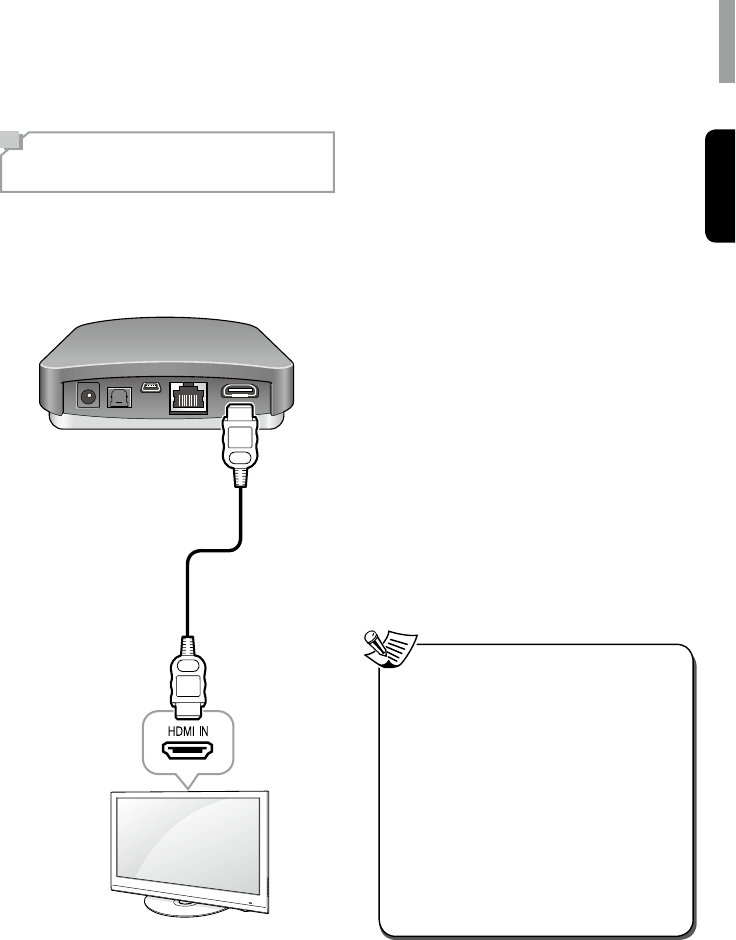
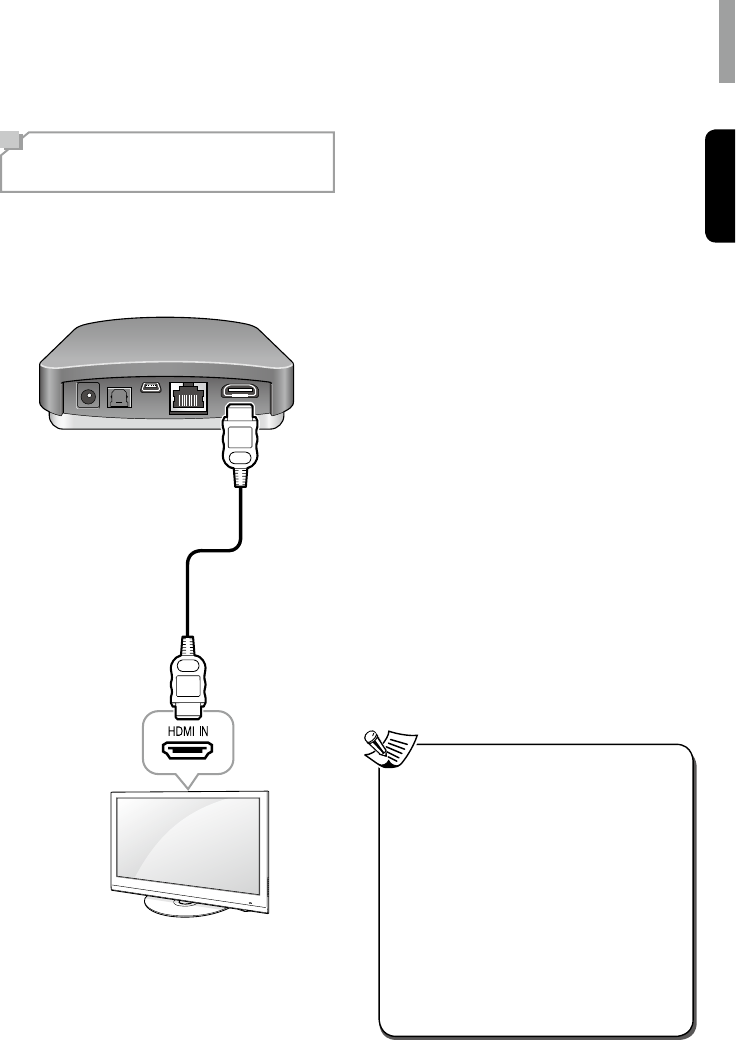
Connecting HDMI
Components
With HDMI, you can easily enjoy high
quality sounds and images. The main unit
plays audio from HDMI compatible products
while also passing on the video signal to a
HDMI-connected TV.
About HDMI
HDMI (High Denition Multimedia Interface)
supports both audio and video on a single
digital connection for use with DVD players,
DTV, set-top boxes, and other AV devices.
HDMI was developed to provide the
technologies of High Bandwidth Digital Content
Protection (HDCP) as well as Digital Visual
Interface (DVI) in one specication. HDCP is
used to protect the digital content transmitted
and received by DVI-compliant displays.
HDMI has the capability to support standard,
enhanced, or high-denition video plus
standard to multi-channel surround-sound
audio. HDMI features include uncompressed
digital video, a bandwidth of up to 2.2 gigabytes
per second (with HDTV signals), one connector
(instead of several cables and connectors), and
communication between the AV source and AV
devices such as DTVs.
This main unit is also compatible with the
DeepColor and x.v.Color feature (x.v.Color is
trademarks of Sony Corporation.).
•Check the setup of the connected
component if an image is poor or there is
no sound from a component connected
via the HDMI cable.
•Audio signals (sampling frequency,
bit length, etc.) transmitted from an
HDMI jack may be suppressed by the
connected component.
•When the connected component is not
compatible with copyright protection
technology (HDCP), the image and the
sound from the HDMI TV OUT jack may
be distorted or may be not output. In
this case, check the specication of the
connected component.
Note
WD-1 NETWORK AV ADAPTER
10
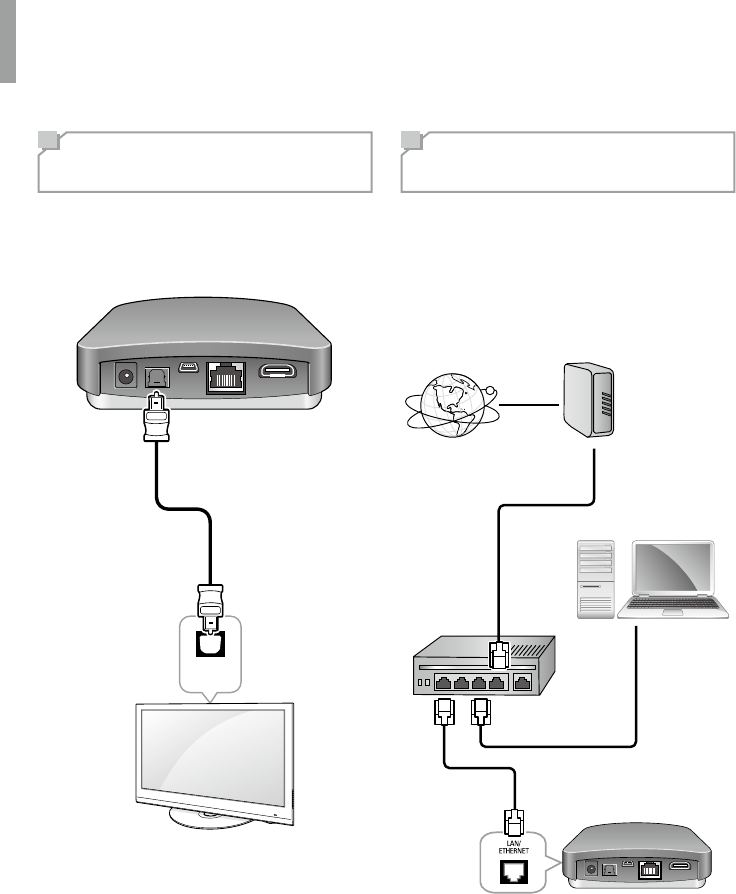
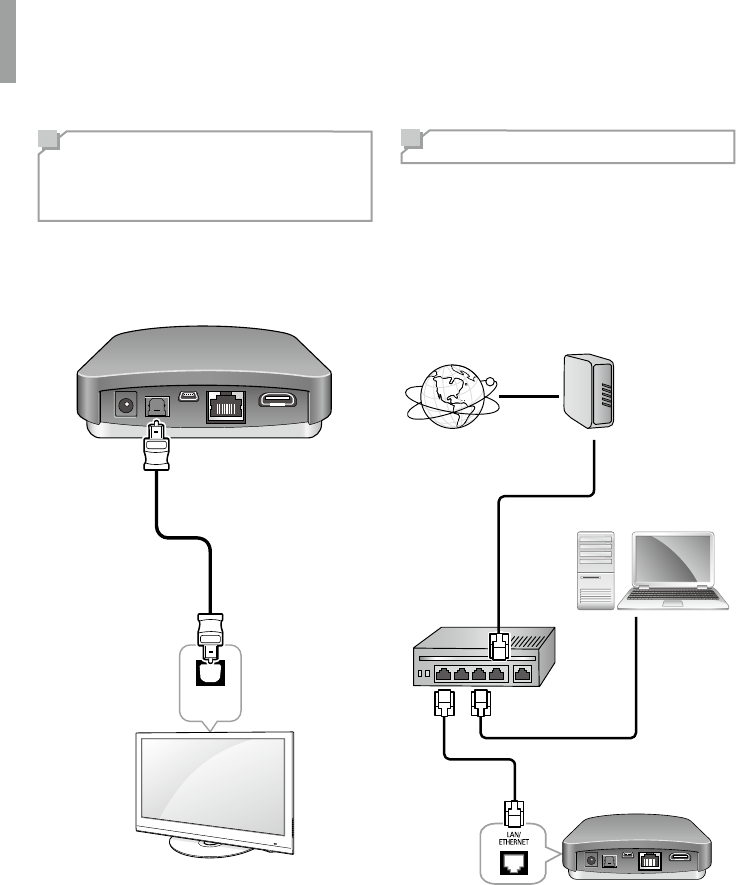
Connecting Digital
Audio Components
You can connect components equipped with an
optical input jack. Then, the main unit transmits
the digital audio signal to the connected
external device.
OPTICAL
IN
Connecting to a
Network
If you have an internet connection, you can
connect the main unit to the internet as well as
using a wireless or a wired LAN connection.
The following illustration is a conguration
example of a home network with the main unit
and a server. It is recommended to connect the
server to the router with a wired connection.
Internet
Modem
PC
Router
To WAN side
LAN port/Ethernet
connector
To LAN port
Main Unit
To LAN port
Making Connections
English
11
•After making a broadband internet
connection, you should set the
communication settings. For details, see
“Setting the Network Setup” on page 12.
•When using a broadband internet
connection, a contract with an internet
service provider is required. For more
information, contact local internet service
provider.
•Since the connected equipment and
connection method may differ depending
on your internet environment, refer to the
operating instructions of the equipment.
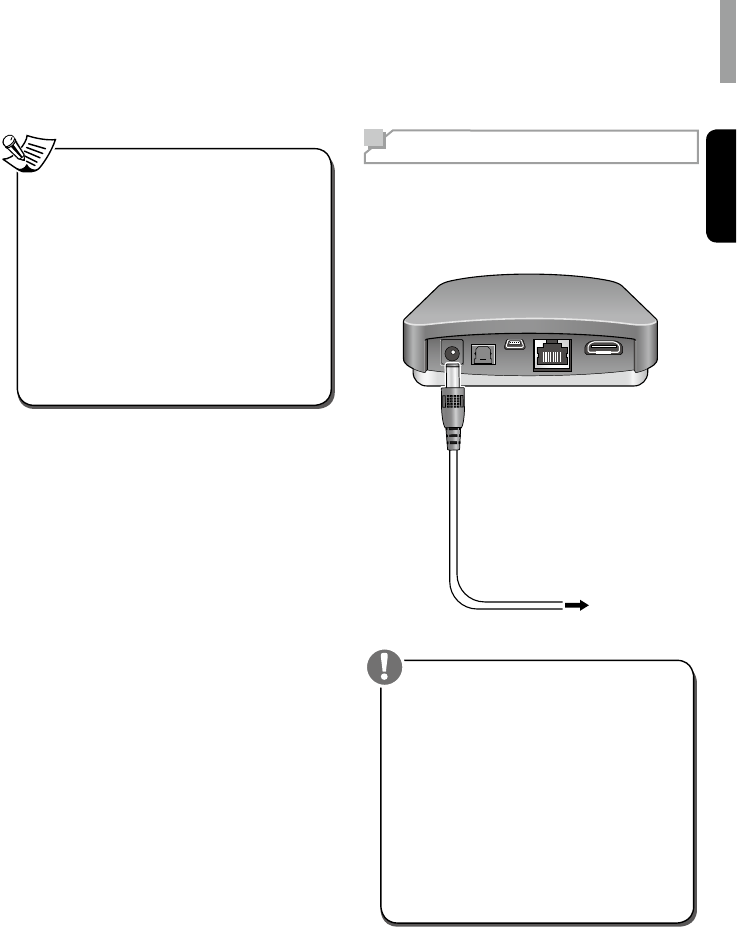
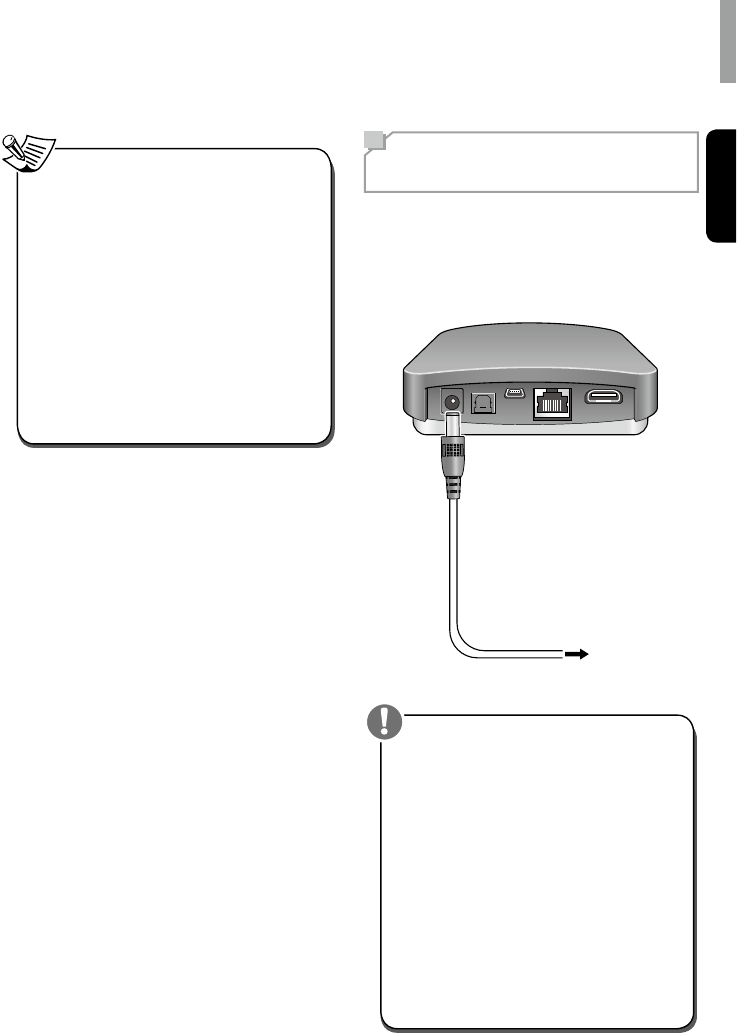
Note Connecting Power
Make sure to plug in after you have connected
all your components to the main unit. Plug the
supplied AC input cord into the AC inlet and
then into the wall AC outlet.
To the Wall Outlet
•The supplied AC adapter is designed
exclusively for use with this unit. Do not
attempt to use it with any device for which
was not expressly designed, since res
or shocks may occur.
•Handle the power cord by the plug part.
Do not pull out the plug by tugging the
cord, and never touch the power cord
when your hands are wet, as this could
cause a short circuit or electric shock.
•The main unit should be disconnected
by removing the main plug from the wall
outlet when not in regular use for a long
period of time.
Caution
12
Operating Your Device
Turning on Your Unit
1Turn on the main unit by pressing
POWER ON.
2Turn off the standby mode by pressing
STANDBY.
Setting the Network
Standby Control
1Press and hold SETUP for more than 3
seconds.
When the Network Standby Control is
turned on, the status LED on the front
panel ashes two times.
2To turn off the Network Standby Control,
press and hold SETUP for more than
3 seconds again.
When the Network Standby Control is
turned off, the status LED on the front
panel ashes three times.
•When the Network Standby Control is
turned on, the power consumption may
increase.
Note
Setting the Network
Setup
To listen to Internet radio stations or music les
stored on your computer via a wired or wireless
network, you should congure network settings
rst.
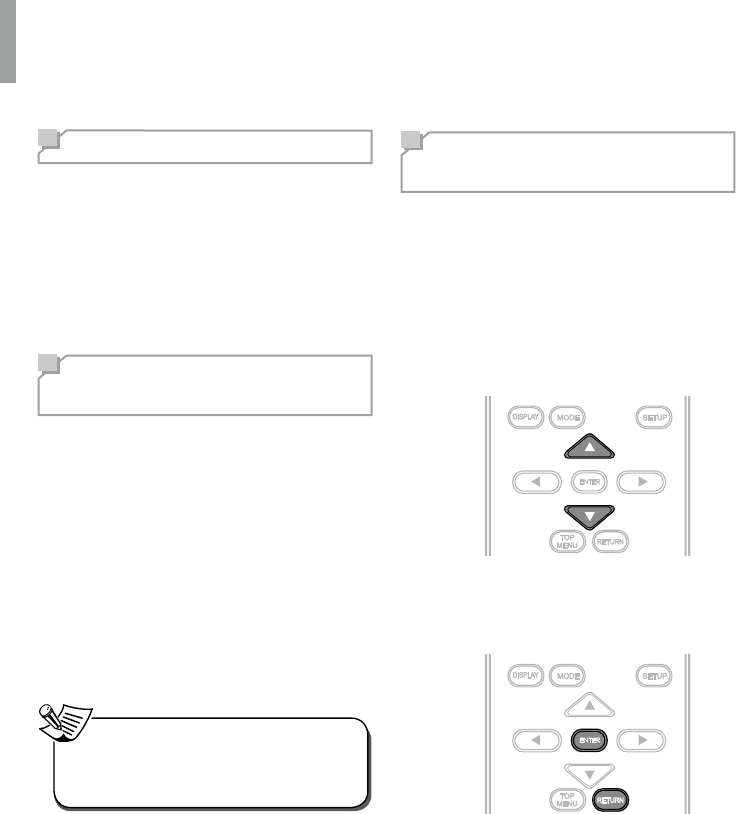
1Press SETUP.
2Press or to navigate up or down the
menu.
3Press ENTER to conrm the desired
menu. Press RETURN to move to the
previous menu.
Operating Your Device
English
13
Network Settings Overview
Main Menu Sub Menu Go to
Page
NETWORK
CONNECT
Direct
AV Set
Soft AP
hotspot 13
Wi-Fi direct 13
Wired
Ethernet 13
Ethernet
Conguration 13
OTHER
AP Name 14
Resolution 14
Display size 14
Factory Setting 14
INFORMATION
Network Information 14
Passcode Information 14
Setting the Direct Wireless Network
Connection
You can connect the main unit with a mobile
device wirelessly through Soft AP hotspot or
Wi-Fi direct.
Soft AP hotspot
When you enable Soft AP hotspot, you can
use the main unit as a wireless access point. It
provides internet access to network devices.
Wi-Fi direct
Wi-Fi Direct is a standard that allows Wi-Fi
devices to connect to the main unit without the
need for a wireless access point. When you
enable Wi-Fi Direct, you can directly transfer
data between Wi-Fi direct devices and the
main unit without the need for full setup.
Setting the Wired Network
Connection
Before you setup the connection, check
that the LAN cable is connected to the LAN/
ETHERNET connector properly and securely.
For details, see “Connecting to a Network”
on page 10.
Ethernet
You can enable and set the Ethernet
connection automatically on the main unit.
Ethernet Conguration
You can set the Ethernet connection settings
manually.
Menu item Description
Ethernet
Device Inputs an Ethernet device name.
Connection
Type Sets the connection type as DHCP or
Static IP.
IP Address Inputs IP Address.
Netmask Inputs subnet mask when the DHCP
function is disabled.
DNS
address Inputs DNS address when the DHCP
function is disabled.
Default
Router Inputs Default Router when the
DHCP function is disabled.
•When you set DHCP as a connection
type, you do not need to set the IP
Address, Netmask, or DNS address etc.
•When you set Static IP as a connection
type, you should set the network
connection manually by entering the
IP Address, etc. In this case, some
knowledge of networks is required. If you
do not understand internet connections,
contact your internet service provider.
Note
WD-1 NETWORK AV ADAPTER
14
Setting Other Network Options
Menu item Description
AP Name Views and changes the name of the
unit displayed on the network.
Resolution Sets the resolution of the video
output.
Display size Adjusts the screen display size
manually.
Factory
Setting Resets all the settings to the factory
default.
Viewing the Network Information
Network Information
You can view the detailed information of a
connected network.
Passcode Information
You can view and change the passcode of the
main unit. When you use the main unit for the
rst time, you should input this passcode when
you enable Soft AP hotspot and try to connect
the mobile device to the main unit.
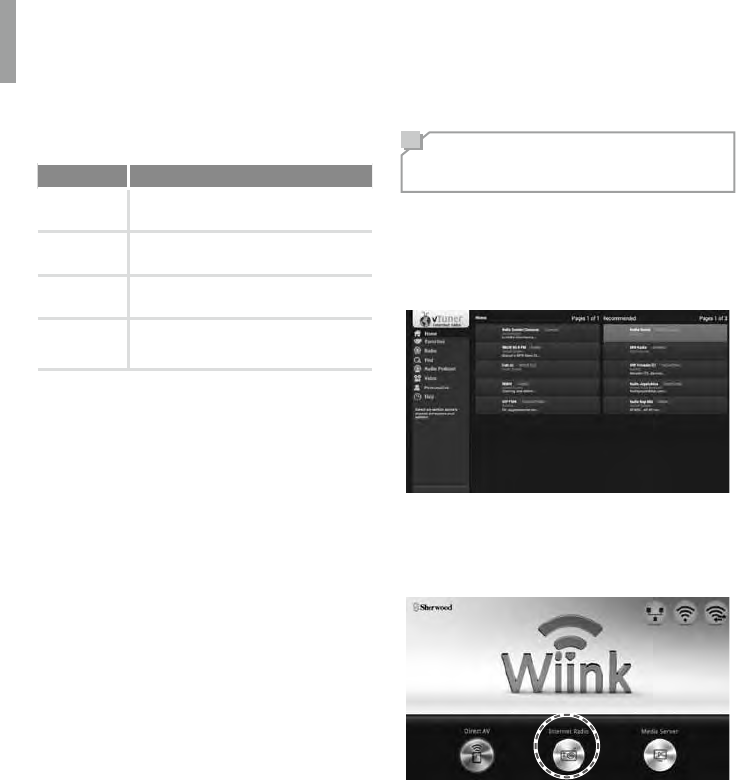
Listening to Internet
Radio
You can listen to Internet radio broadcasts
provided by vTuner. You can control the
internet radio with the menu displayed on the
TV screen.
1When the image is displayed as below,
select Internet Radio on the screen, and
then press ENTER on the remote control.
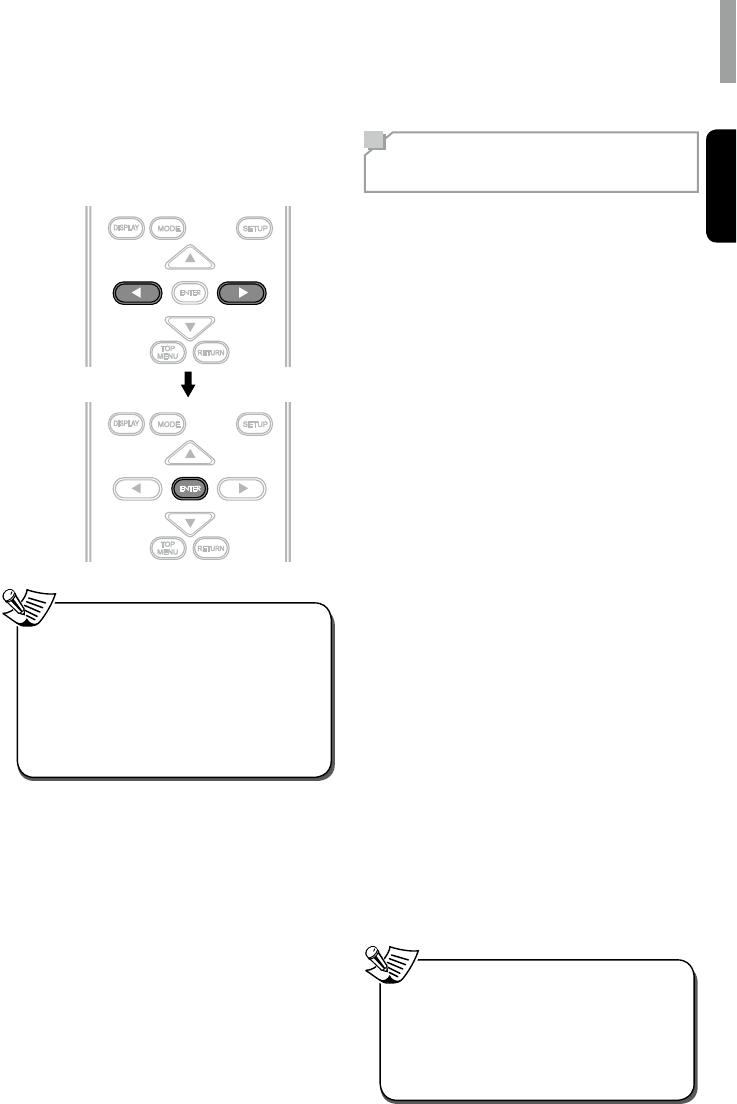
Operating Your Device
English
15
2Select the desired category by pressing
or , and then press ENTER on the
remote control.
•To use this function, the unit should
be connected to the internet. Refer
to “Setting the Network Setup” on
page 12 for details.
•The service may be discontinued without
notice.
•You may not be able to receive some
internet radio stations.
Note
Listening to Music from
the Media Server
You can play music les stored on a computer
(media server) connected to this unit via a
wired or wireless network. You can share the
music les easily by using Windows Media
Player 11 or later versions.
Conguring the Windows Media
Player
On Windows Media Player 11 version
1Run the Windows Media Player 11
version on your computer.
2Click the “Library” tab in the menu bar,
and then select “Media Sharing”.
3In the “Media Sharing” dialog box, select
the “Share my media” check box, and
then click “OK”.
4Select this unit in the list of devices, and
then click “Allow”.
5Click “OK” to close the dialog box.
On Windows Media Player 12 version
1Run the Windows Media Player 12
version on your computer.
2Click “Stream” at the top of the player.
3Click “Turn on media streaming” when it
appears in the next window.
4Select “Local Network” next to Show
devices on if it is not already selected.
5Click “OK” to close the dialog box.
•Windows Media Player 11 and 12
versions can be downloaded for free from
the Microsoft web site.
•If the rewall restricts access, Windows
Media Player 11 and 12 cannot be
congured.
Note
WD-1 NETWORK AV ADAPTER
16
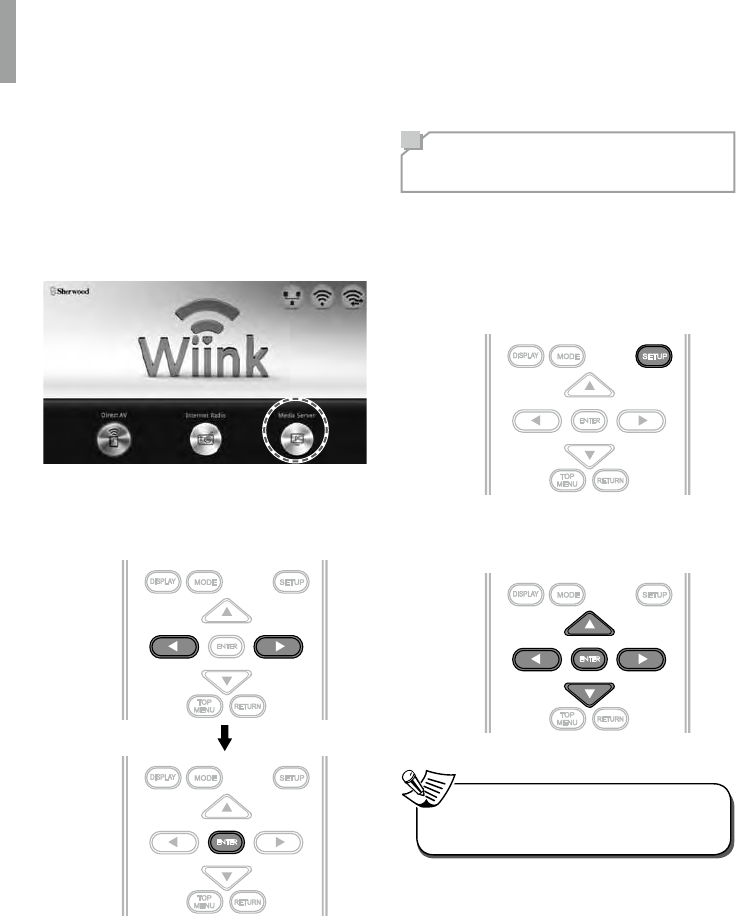
Listening to Music from the Media
Server
1Start your computer.
2Select Media Server on the screen, and
then press ENTER on the remote control.
3Select the desired category by pressing
, , and then press ENTER on the
remote control.
4Repeat step 3 above until the desired
music le is selected.
Using the Sherwood
Remote Application
Preparing for the Application
Setting the Network on the Main Unit
1Press SETUP on the remote control.
2Tap Hotspot & Wi-Fi Direct > Soft Wi-Fi
hotspot or Wi-Fi direct.
•Wi-Fi hotspot is enabled as a default
connection setting.
Note
Operating Your Device
English
17
Installing the Application on Your
Phone
1Visit Play Store on your Android
Smartphone.
Or visit App Store on your iPhone.
2Search for Sherwood Remote.
3Download and install the application on
your phone.
4Open the application.
5Tap Select Product and WD-1.
Connecting Your Phone with the Main
Unit
•On an Android phone
1Go to Wireless & networks settings in
your Android smartphone.
2Enable Wi-Fi direct or Portable Wi-Fi
hotspot.
•When you connect your phone with
the main unit using a Wi-Fi hotspot,
you should enter the password
(1234567890) for the main unit
connection.
3Go to Wi-Fi settings to select and tap
WD-1 and Connect.
•When Ethernet is not connected to
the main unit, you cannot use Wi-Fi
connection even though Wi-Fi hotspot is
enabled on your phone.
Note
•On an iPhone
1Go to Wi-Fi hotspot settings to select and
tap WD-1.
Using the Application
The Sherwood Remote application helps you
to control the main unit remotely by allowing
you to use Wiink.
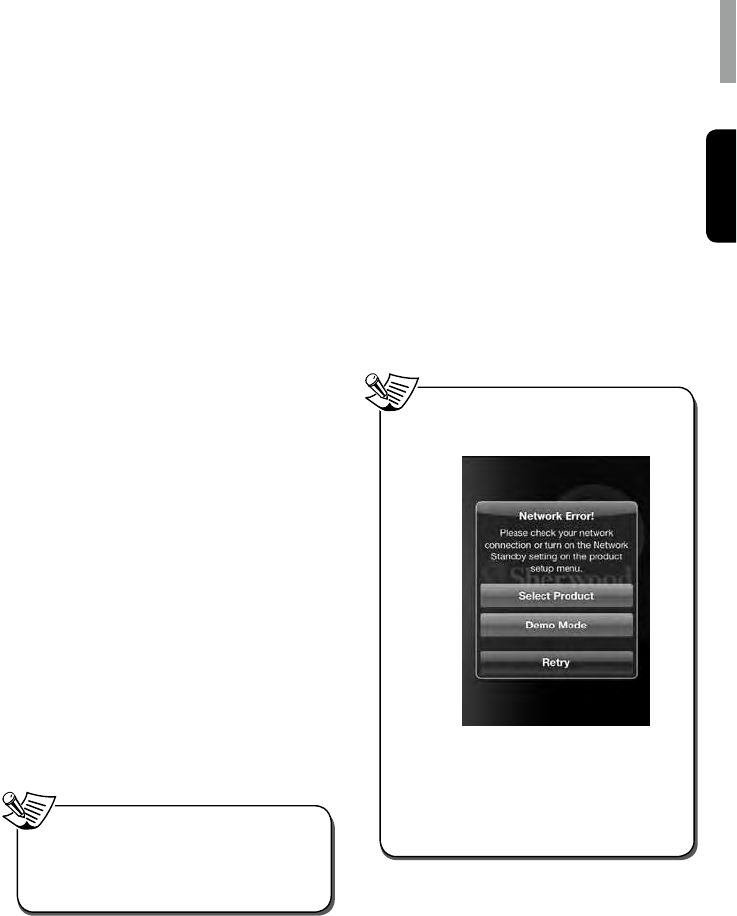
1Open the Sherwood Remote application.
2When the product search window is
activated, select and tap WD-1. Then,
you can use your smartphone as a
remote control for the main unit.
•When a network error occurs, the
following screen will pop up.
•Select Product: Check your smartphone
network connection, and select the main
unit again.
•Demo Mode: Use the application in
Demo Mode.
•Retry: Try to open the application again.
Note
WD-1 NETWORK AV ADAPTER
18
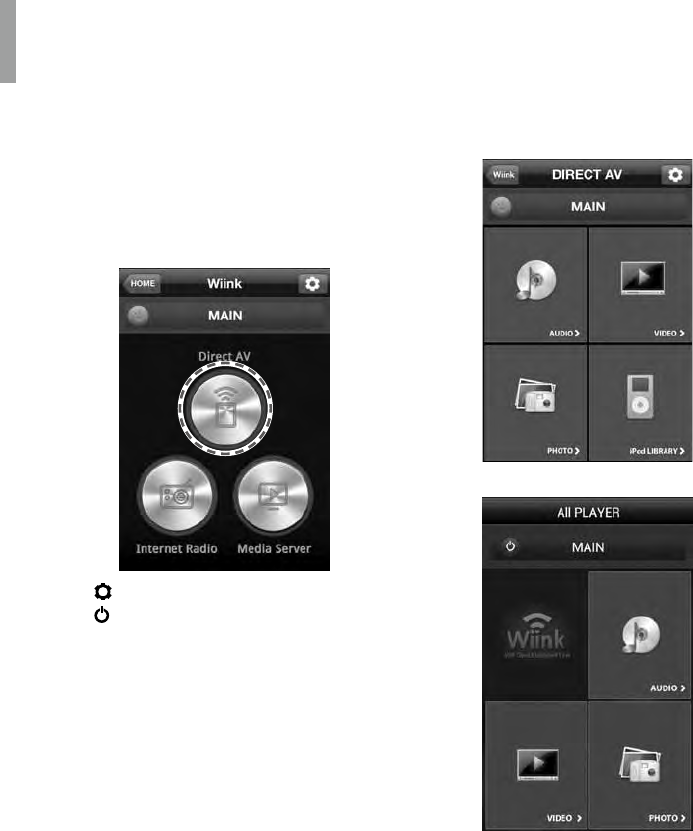
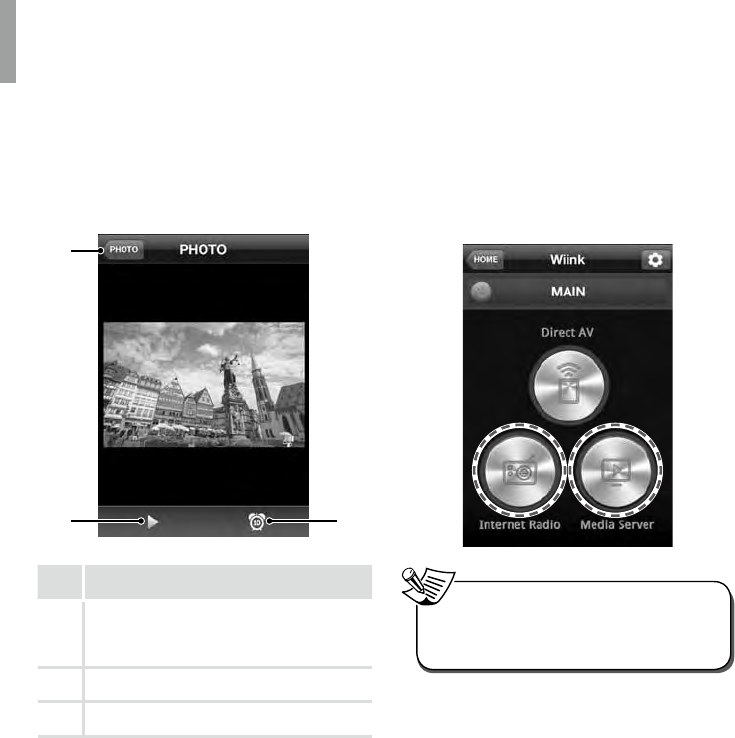
Using Direct AV
On Direct AV, you can listen to songs, watch
videos, and view photos stored on your Android
phone or iPhone.
1Tap Direct AV.
•: Adjust the settings.
•: Turn on or off the main unit.
(To activate the function, you should
turn on the Network Standby Control.
Then, the power consumption may
increase. Refer to “Setting the
Network Standby Control” on
page 12 for details.)
2Tap Audio to listen to the songs stored
on your phone.
Tap Video to watch video stored on your
phone.
Tap Photo to view photos stored on your
phone.
•iOS
•Android
Operating Your Device
English
19
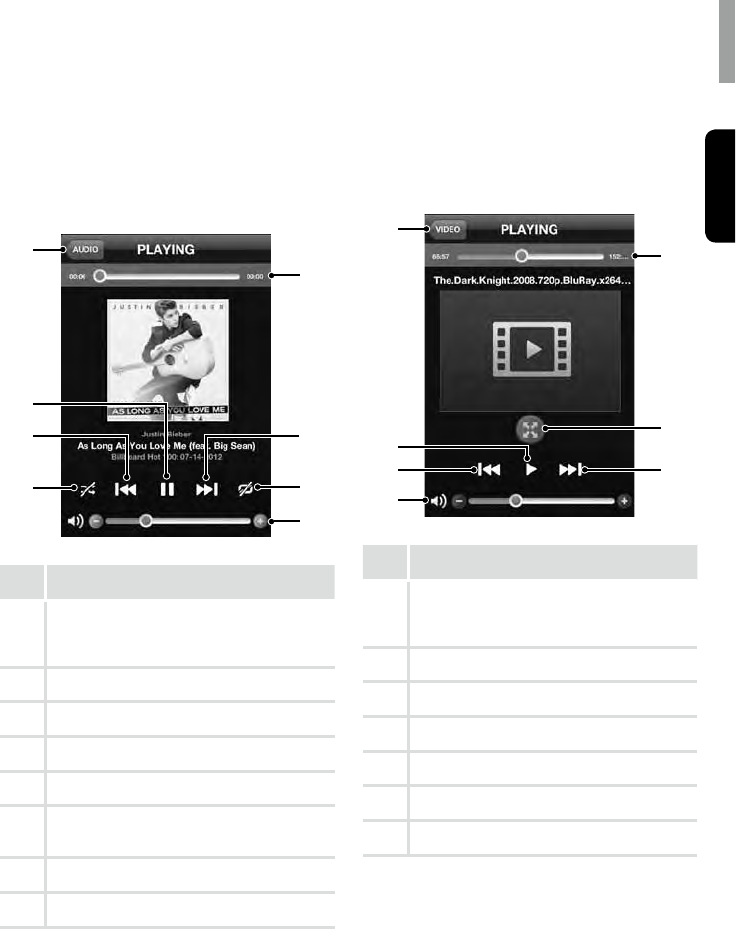
Listening to Songs on Your
Smartphone
You can select a song on the song list and play
it over the main unit.
1
4
2
3
8
5
6
7
No. Description
1
Move to the previous menu
•This menu is not displayed on Android
smartphone.
2
Play or pause a song
3
Play a previous song
4
Set shufe function
5
Volume control bar
6
Set the repeat function
(Repeat for all song or one song.)
7
Play the next song
8
Progress bar
Watching Videos on Your Smartphone
You can select a video on the video le list and
enjoy it on the main unit.
1
4
3
2
7
5
6
No. Description
1
Move to the previous menu
•This menu is not displayed on the
Android smartphone.
2
Play or pause a video
3
Move to a previous video
4
Volume control bar
5
Move to the next video
6
Control display size
7
Progress bar
WD-1 NETWORK AV ADAPTER
20
Viewing Photos on Your Smartphone
You can view photos as a slideshow and set
the slideshow transition time at Off, 5s, 10s,
20s, 30s.
1
2 3
No. Description
1
Move to the previous menu
•This menu is not displayed on the
Android smartphone.
2
Start the photo slideshow
3
Set the slideshow transition time
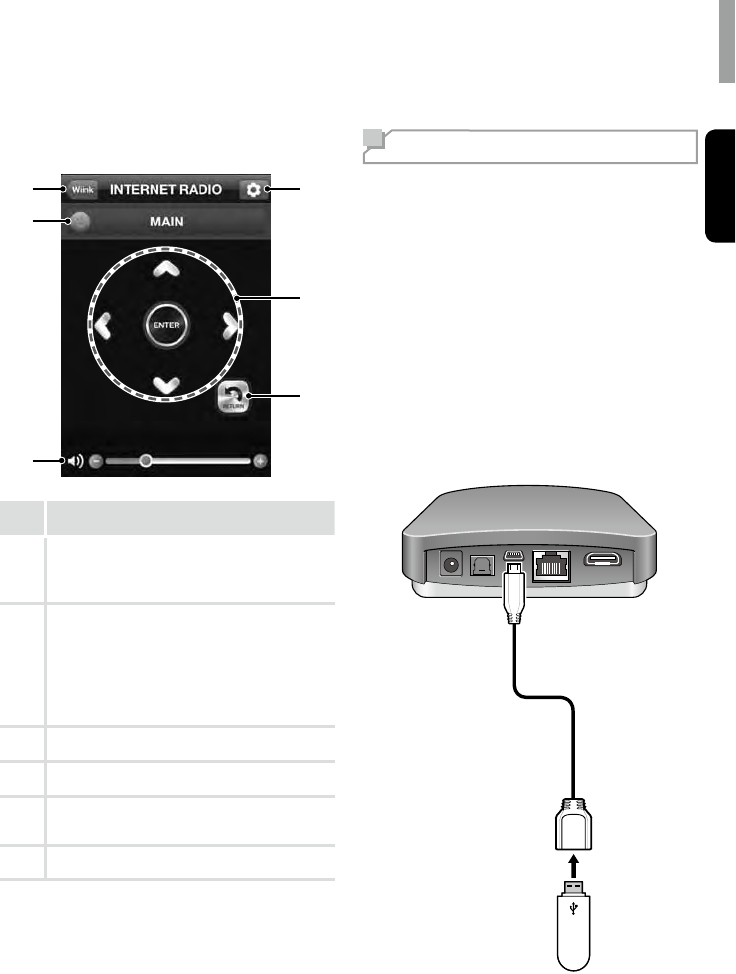
Using Internet Radio and Media Server
You can use your smartphone as a remote
controller for Internet Radio and Media Server.
1Tap Internet Radio or Media Server.
•This function may not be available
depending on types or functions of a
smartphone or network connection.
Note
Operating Your Device
English
21
Overview of the Main Screen
1
2
3
4
6
5
No. Description
1
Move to the Wiink main menu
•This menu is not displayed on the
Android smartphone.
2
Turn off the main unit.
(To activate the function, you should turn
on the Network Standby Control. Then, the
power consumption may increase. Refer to
“Setting the Network Standby Control”
on page 12 for details.)
3
Volume control bar
4
Return to the previous menu
5
Select or conrms a broadcast in Internet
Radio and Media server
6
Move to the settings menu
Updating the Firmware
New rmware that provides additional features
or product improvements will be released as
needed. Updates can be downloaded from our
website: www.sherwoodamerica.com.
After downloading the rmware to a USB
device, you can update the main unit by
connecting the USB device with a USB OTG
cable(faster than USB 2.0) and doing the
following procedures.
For details, refer to the information supplied
with updates. Do not perform this procedure
unless rmware update is necessary. Also,
make sure you read the information supplied
with updates before updating the rmware.
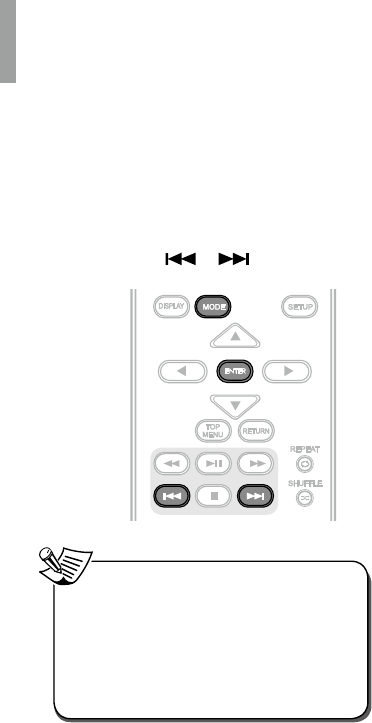
WD-1 NETWORK AV ADAPTER
22
1Connect the USB connector of the
main unit to the device which stores
the rmware.
2Press the buttons in the following
order.
MODE ENTER
•When the main unit does not turn on
automatically after updating, you should
turn on the unit manually.
•Make sure not to turn off the main unit,
disconnect the USB cable or perform
any operation on the main unit while the
updating operation is in progress.
Note
23
English
Troubleshooting
If you experience any of the following difculties while using the main unit, use this troubleshooting
guide to help remedy the problem before requesting servicing. Should any problem persist, consult
your nearest authorized dealer or authorized independent company.
If the unit does not operate normally due to external inuence such as static electricity, disconnect
the power plug from the outlet and insert again to return to normal operating conditions.
GENERAL
Problem Remedy
The power does not turn on.
•Disconnect the power plug from the outlet, and connect again.
The main unit suddenly turns off.
•After about a minute (you won’t be able to turn the main unit on
during this time), turn the main unit back on. If the message persists,
call an authorized independent service company.
No sound is heard after a
function is selected.
•Make sure the component is connected correctly.
(See “Making Connections” on page 9.)
Can’t operate the remote control.
•Replace the batteries. (See page 6.)
•Operate within 7 m, and 30° of the remote sensor.
•Remove any obstacles, or operate from another position.
•Avoid exposing the remote sensor on the front panel to direct light.
NETWORK CONNECTION
Symptom Remedy
The main unit cannot connect
to the WPS via a wireless LAN
connection.
•You cannot connect to a network using WPS when your access point
is set to WEP. Set up your network after searching the access point
using the access point scan.
The main unit cannot connect to
the network.
•Check the network status.
•When the main unit is connected through a wireless network, move
the main unit and the wireless LAN router/access point closer to each
other and do the setup again.
•Check the settings of the wireless LAN router/access point and do
the setup again. For details on the settings of the devices, refer to the
operating instructions of the devices.
•Make sure that you use a wireless LAN router/access point.
•Wireless networks are inuenced by electromagnetic radiation
emitted by microwave ovens and other devices. Move the main unit
away from these devices.
Cannot select the Network
Settings menu.
•Wait for a few moments after you have turned on the main unit, and
then select the Network Settings menu again.
24
Additional Information
Specications
Input/Output
HDMI Output 1
Audio Output Optical x1 (Digital)
Supported Codecs
Audio
Codec Type Sampling
rate (kHz)
Bitrate (max in
Kbps) Channel Container
MP3 MP3 up to 48 kHz
CBR/VBR
from 8 kbps to
320 kbps
mono, stereo *.mp3
WMA WMA, WMV up to 48 kHz up to
192 kbps mono, stereo *.wma,
*.wmv
WAVE LPCM,
m-law, a-law
at 8, 16 and
44.1 kHz - mono, stereo *.wav
AC3
Dolby Digital
5.1ch for
video
Up to 48 kHz 32 kbps -
640 kbps 1 - 5.1 ch -
Video
Codec Frame rate
(max) Bitrate (max) Resolution
(max) Container
H.264
(MPEG4
AVC)
up to 24 fps -
30 fps
up to
16 Mbps
up to Full-HD
(1920 x 1080) *.avi, *.mp4, *.mkv, *.mov
Photo
Codec Resolution (max) Container
JPEG
up to 8192 x 8192
*.jpg, *.jpeg
PNG *.png
GIF *.gif
BMP *.bmp
General Specications
Power supply AC100-240V, 50/60Hz (DC 5V)
Power consumption <0.5 W (standby), AC 5 W (DC 5 W)
Dimensions (W x H x D) 4.33" X 4.33" X1.26" (110 mm X 110 mm X 32 mm)
Weight 0.595 lb (270 g)
•Design and specications are subject to change without notice for improvements.
•The specications for the supported codes are the maximum values and may differ depending on
playback status or playback les.
Note

25
English
HDMI
HDMI, the HDMI Logo, and High-Denition Multimedia Interface are trademarks or registered
trademarks of HDMI Licensing LLC in the United States and other countries.
Dolby Digital
Dolby and the double-D symbol are trademarks of Dolby Laboratories.
Wi-Fi
The Wi-Fi CERTIFIED Logo is a certication mark of the Wi-Fi Alliance.
Trademarks and Licenses
26
Informations de sécurité
À LIRE AVANT D'UTILISER L'APPAREIL
ATTENTION
AFIN DE REDUIRE LES RISQUES DE CHOC
ELECTRIQUE, N'ENLEVEZ PAS LE PANNEAU
ARRIERE. AUCUNE PIÈCE À L'INTÉRIEUR NE PEUT
ÊTRE RÉPARÉE PAR L'UTILISATEUR. EN CAS
DE PROBLÈME, S'ADRESSER À UN PERSONNEL
TECHNIQUE QUALIFIÉ.
ATTENTION
RISQUES D'ELECTROCUTION
NE PAS OUVRIR
Ce symbole sert à avertir l'utilisateur de la présence dans le boîtier de l'appareil de tensions
dangereuses non isolées d'une magnitude pouvant constituer un risque d'électrocution.
Ce symbole indique que la documentation fournie avec l'appareil contient des instructions
d'utilisation et d'entretien importantes.
AVERTISSEMENT :
POUR REDUIRE TOUT RISQUE D'INCENDIE OU DE CHOC ELECTRIQUE,
NE PAS EXPOSER CET APPAREIL A LA PLUIE OU A L'HUMIDITE.
ATTENTION
•Laissez de l'espace autour de l'appareil pour en
assurer une ventilation sufsante.
•Evitez d'installer l'appareil dans des endroits
trop chauds ou trop froids ou dans une zone
exposée directement au soleil ou à un dispositif de
chauffage.
•Protégez l'appareil de l'humidité, de l'eau et de la
poussière.
•Ne faites pas tomber de corps étrangers dans
l'appareil.
•N'obstruez pas les ouvertures de ventilation par
des journaux, rideaux, linge etc.
•Eloignez toute amme nue, telle que bougie, ou
autres sources de chaleur de l'appareil.
•Respectez les réglementations locales concernant
la mise au rebut des emballages, piles/batteries
usagées et anciens équipements.
•N'exposez pas l'appareil au ruissellement ou à
la projection d'eau et évitez de poser dessus des
objets remplis de liquides, tels que des vases.
•Ne pas mettre l'appareil en contact avec des
insecticides, du benzène ou des diluants.
•Ne démontez pas et ne modiez pas l'appareil de
quelle que manière que ce soit.
Remarques concernant le câble d'alimentation
et la prise murale
•L'appareil reste sous tension tant qu'il est branché
à une prise murale, même s'il a été éteint.
•Il faut le débrancher l'appareil de la prise secteur
pour le déconnecter complètement du secteur.
•Lors de la mise en place de l'appareil, veillez à ce
que la prise secteur soit facilement accessible.
•Débranchez la che de la prise murale si vous
n'avez pas l'intention d'utiliser l'appareil pendant
longtemps.
Notice de la FCC
Cet équipement a été testé et déclaré conforme avec
les limites des appareils numériques de classe B,
conformément à la section 15 de la réglementation
de la FCC. Ces limites sont dénies pour fournir
une protection raisonnable contre les interférences
nuisibles dans une installation résidentielle. Cet
équipement génère, utilise et émet de l'énergie de
fréquences radio et peut, en cas d'installation ou
d'utilisation non conforme aux instructions, engendrer
des interférences nuisibles aux communications radio.
Rien ne permet de garantir que ces interférences
se produiront à un moment quelconque. Si cet
équipement cause des interférences nuisibles à
la réception radio ou télévisée, ce qui peut être
déterminé en éteignant et rallumant l'équipement,
l'utilisateur peut tenter d’éliminer ces interférences
au moyen de l'une ou de plusieurs des mesures
suivantes :
Réorienter ou déplacer l'antenne de réception.
Augmenter la distance séparant l'équipement et le
récepteur.
Informations de sécurité
Français
27
Brancher l'équipement dans une prise de courant d'un
circuit différent de celui sur lequel le récepteur est
branché.
Consulter le revendeur ou un technicien radio/
télévision qualié pour toute assistance.
Cet appareil est conforme à la section 15 de la
réglementation de la FCC. Le fonctionnement
est soumis aux deux conditions suivantes :
(a) Cet appareil ne doit pas causer des
interférences nuisibles, et
(b) Cet appareil doit accepter toute autre
interférence reçue, y compris les
interférences susceptibles d'entraîner un
fonctionnement indésirable.
(FCC Part 15.21) Attention : Tout changement et toute
modication non expressément approuvée par la
partie responsable de la conformité pourrait annuler
l'autorisation accordée à l'utilisateur d'utiliser cet
appareil.
Pour les clients canadiens :
Cet appareil numérique de classe B est conforme à la
norme ICES-003 du Canada.
Déclaration FCC relative à l'exposition
aux radiations :
Cet équipement est conforme avec les limites
d'exposition aux radiations prévues par la
réglementation FCC pour un environnement non
contrôlé. Cet équipement doit être installé et utilisé
en respectant une distance minimale de 20 cm entre
l’émetteur et votre corps.
Cet émetteur ne doit pas être situé à proximité ou
fonctionner avec une autre antenne ou émetteur.
Mesures de sécurité
importantes
1 Veuillez lire les présentes instructions avant
utilisation.
2 Conservez ces instructions.
3 Respectez tous les avertissements.
4 Suivez toutes les instructions.
5 N’utilisez pas cet appareil à proximité de l’eau.
6 Nettoyez uniquement avec un chiffon sec.
7 Ne bloquez aucune fente d'aération. Installez
conformément aux consignes du fabricant.
8 Ne pas installer près de sources de chaleur
telles que radiateurs, registres de chaleur,
cuisinières ou tout autre appareil (y compris des
amplicateurs) qui produit de la chaleur.
9 N’essayez pas de contourner la sécurité de la
prise polarisée ou de terre. Une che de courant
polarisée comporte deux lames dont l'une
est plus large que l’autre. Une che de terre
comporte deux lames et une troisième broche
de mise à la terre. La lame large ou la broche
de mise à la terre est prévue pour votre sécurité.
Si vous ne parvenez pas à insérer entièrement
la prise dans une prise de courant, contactez
votre électricien an qu’il remplace votre prise de
courant obsolète.
10 Evitez que le cordon soit piétiné ou pincé, surtout
au niveau des ches, prises de courant et au
point de sa sortie de l'appareil.
11 Utilisez uniquement des pièces/accessoires
recommandés par le fabricant.
12 Utilisez seulement un chariot,
socle, tripode, support ou table
recommandé par le fabricant ou
vendu avec l’appareil. Lorsque
vous utilisez un chariot, soyez prudent lorsque
vous déplacez l'ensemble chariot/appareil pour
éviter les blessures en cas de chute.
13 Débranchez l'appareil durant les orages ou en
cas d'inutilisation prolongée.
14 Conez toute réparation à un personnel de
réparation qualié. Une réparation s'impose si
l'appareil a subi d'une manière ou d'une autre un
dommage tels que cordon ou che d'alimentation
endommagée, liquide renversé ou objet tombé
à l'intérieur de l'appareil, si cet appareil a été
exposé à la pluie ou à l’humidité, ne fonctionne
pas normalement ou s’il est tombé.
Nom du produit : ADAPTATEUR AV réseau
Numéro de modèle : WD-1
Nom de la partie responsable :
ETRON CORPORATION
Adresse :
6120 Valley View Buena Park, Ca. 90620
Téléphone : 1-714-739-2000
URL: http://www.sherwoodamerica.com

28
Table des matières
26 INFORMATIONS DE SÉCURITÉ
29 MISE EN ROUTE
29 Contenu de l'emballage
30 Installation des piles de la télécommande
30 Portée de la télécommande
31 Description des composants
33 ETABLISSEMENT DES
CONNEXIONS
33 Connexion de sources HDMI
34 Raccordement d’appareils audio
numérique
34 Connexion au réseau
35 Branchement au courant
36 UTILISATION DE L'APPAREIL
36 Allumer l'appareil
36 Réglage de l’état de veille réseau
36 Conguration réseau
38 Ecouter la radio Internet
39 Ecouter de la musique à partir d'un Media
Server (serveur multimédia)
40 Utilisation de l'application Sherwood
Remote
45 Mise à jour du micrologiciel
47 DÉPANNAGE
48 INFORMATIONS
SUPPLÉMENTAIRES
48 Spécications
49 Marques et licences
29
Français
Mise en route
Contenu de l'emballage
Unité principal
Télécommande (1 ea) Piles « AAA » 1,5V (2 ea)
WD-1
NETWORK AV ADAPTER
OPERATING INSTRUCTIONS
Adaptateur secteur (1 ea) Guide d'utilisation (1 ea)
•Les articles livrés avec votre appareil sont susceptibles de modication sans préavis.
Remarque
WD-1 ADAPTATEUR AV RÉSEAU
30
Installation des piles
de la télécommande
1Enlevez le couvercle du compartiment
des piles.
2Insérez deux piles AAA en respectant les
polarités.
•Utilisez toujours des piles alcalines.
N'utilisez jamais de piles rechargeables
(de type Ni-Cd).
•Lorsque les piles sont usées, les
remplacer immédiatement par de
nouvelles piles.
•Si les piles sont enlevées ou usées
depuis longtemps, le contenu de la
mémoire sera effacé. Dans ce cas,
il vous faudra effectuer une nouvelle
conguration.
•Des piles non installées correctement
peuvent provoquer une explosion.
•Retirez les piles si vous n'allez pas
utiliser la télécommande pendant une
longue durée.
•Ne laissez pas l'appareil dans un endroit
chaud ou humide.
•Ne pas manipuler et stocker les piles
avec des objets métalliques.
Attention
Portée de la
télécommande
Utilisez la télécommande dans un rayon
d'environ 7 mètres et à un angle de 30 degrés
maximum en la dirigeant vers le capteur de la
télécommande.
30 30
7m
Mise en route
Français
31
Français
Description des composants
Panneau avant et arrière
2
1
3
7
5
6
4
1
Voyant d'état
2
Prise d'alimentation
3
Prise de sortie optique
4
Prise LAN/ETHERNET
5
Prise HDMI
6
Prise USB
(pour mise à jour du logiciel uniquement)
7
Capteur infrarouge
WD-1 ADAPTATEUR AV RÉSEAU
32
Télécommande
1
3
2
11
10
9
8
7
6
5
4
1
MISE EN MARCHE
Allume l'unité principale.
2
MODE
Réglage de la résolution de l’écran
(Original/Total)
3
AFFICHAGE
•Active/désactive la barre de progression lors
de lecture de chiers audio ou vidéo.
•Active/désactive l'afchage de l’intervalle
de transition diaporama lors de l'afchage
photos.
4
/ / / / ENTER
•Permet de naviguer dans les menus.
•Permet de conrmer une option de réglage
ou menu.
5
Menu principal
Afche le menu principal de chaque support ou
service.
6
Retour rapide dans le chier en cours.
Avance rapide dans le chier en cours
Permet de lancer ou suspendre la lecture.
Permet de sélectionner le chier précédent.
Permet de sélectionner le chier suivant.
Pour arrêter la lecture.
7
SHUFFLE
Active la lecture aléatoire
8
REPEAT
Pour activer la fonction de répétition
9
RETOUR
Pour retourner au menu précédent.
10
CONFIGURATION
Permet d’accéder ou de quitter le menu
conguration.
11
STANDBY
Eteindre l'unité principale et la faire passer en
mode veille.
33
Français
Etablissement des connexions
Connexion de sources
HDMI
HDMI vous permet de bénécier de sons et
d'images de haute qualité. L'unité principale
peut lire l'audio à partir d'appareils compatibles
HDMI tout en passant le signal vidéo sur un
téléviseur HDMI connecté.
À propos de HDMI
HDMI (High Denition Multimedia Interface)
(Interface multimédia haute dénition) est une
interface prenant en charge les signaux audio
et vidéo sur une seule connexion numérique,
utilisable avec les lecteurs DVD, téléviseurs
numériques, boîtiers décodeurs et autres
appareils Audio/Vidéo. HDMI combine les
technologies HDCP (High Bandwidth Digital
Content Protection) et DVI (Digital Visual
Interface). HDCP est utilisé pour protéger les
contenus numériques transmis et reçus par
des écrans compatibles DVI.
HDMI peut supporter la vidéo standard,
améliorée ou haute dénition et l'audio
standard surround-sound multicanal. Les
avantages de HDMI comptent entre autre la
vidéo numérique non compressée, une large
bande passante allant jusqu'à 2,2 gigaoctets
par seconde (avec les signaux TVHD), un
seul connecteur (au lieu de plusieurs câbles
et connecteurs) et la communication entre une
source et des appareils Audio/Vidéo tels que
les téléviseurs numériques.
La présente unité principale est également
compatible avec les fonctionnalités DeepColor
et x.v.Color (x.v.Color est une marque de Sony
Corporation).
•Vériez la conguration du composant
connecté si l'image est mauvaise ou
si l'audio n'est pas reproduite via un
composant connecté par un câble HDMI.
•Les signaux audio (fréquence
d'échantillonnage, longueur de bits, etc.)
transmis par une prise HDMI peuvent être
anéantis par le composant connecté.
•Lorsque le composant connecté n'est pas
conforme à la technologie de protection
du droit d'auteur (HDCP), l'image et le
son provenant de la prise HDMI TV OUT
peuvent être déformés ou inexistants.
Dans ce cas, vériez les caractéristiques
du composant connecté.
Remarque
WD-1 ADAPTATEUR AV RÉSEAU
34
Raccordement
d’appareils audio
numérique
Vous pouvez raccorder des appareils équipés
d'une prise de sortie optique. L'unité principale
transmet le signal audio numérique aux
appareils externes raccordés.
OPTICAL
IN
Connexion au réseau
Si vous disposez d'une connexion Internet,
vous pouvez connecter l'unité principale à
Internet, sans l ou de manière câblée.
L'illustration suivante donne un exemple de
conguration d'un réseau local avec l'unité
principale et un serveur. Il est recommandé
de connecter le serveur au routeur via une
connexion câblée.
Internet
Modem
PC
Routeur
Vers le côté WAN
port LAN/Ethernet
connecteur
Vers le port LAN
Unité principale
Vers le port LAN
Etablissement des connexions
Français
35
•Une fois une connexion Internet large
bande est établie, vous devez régler les
paramètres de communication. Pour plus
de détails, voir «Congurationréseau»
à la page 36.
•Lorsque vous utilisez une connexion
Internet large bande, cela suppose que
vous ayez souscrit à un abonnement
auprès d'un fournisseur de services
Internet. Pour plus d'informations, contactez
le fournisseur de services Internet local.
•Reportez-vous à la notice d'utilisation de
l'équipement car la méthode de connexion
de l'équipement peut varier en fonction de
l'environnement Internet.
Remarque Branchement au
courant
Ne branchez l’alimentation qu'après avoir
connecté tous vos appareils à l'unité principale.
Branchez le câble électrique fourni dans la
prise d'alimentation de l'appareil et dans une
prise secteur murale.
Vers une prise secteur
•L'adaptateur secteur fourni est conçu
exclusivement pour une utilisation avec
cet appareil. Ne l'utilisez pas avec un
autre appareil auquel il n'a pas été
explicitement conçu ; des incendies
ou des chocs électriques peuvent se
produire.
•Manipulez le cordon d'alimentation par
sa che. Ne retirez pas la che en tirant
sur le câble d’alimentation et ne touchez
jamais le câble avec les mains mouillées ;
un court-circuit ou un choc électrique
peuvent se produire.
•L'unité principale doit être débranchée
du courant lorsqu'elle n'est pas utilisée
régulièrement ou ne va pas être utilisée
pendant une longue période.
Attention